

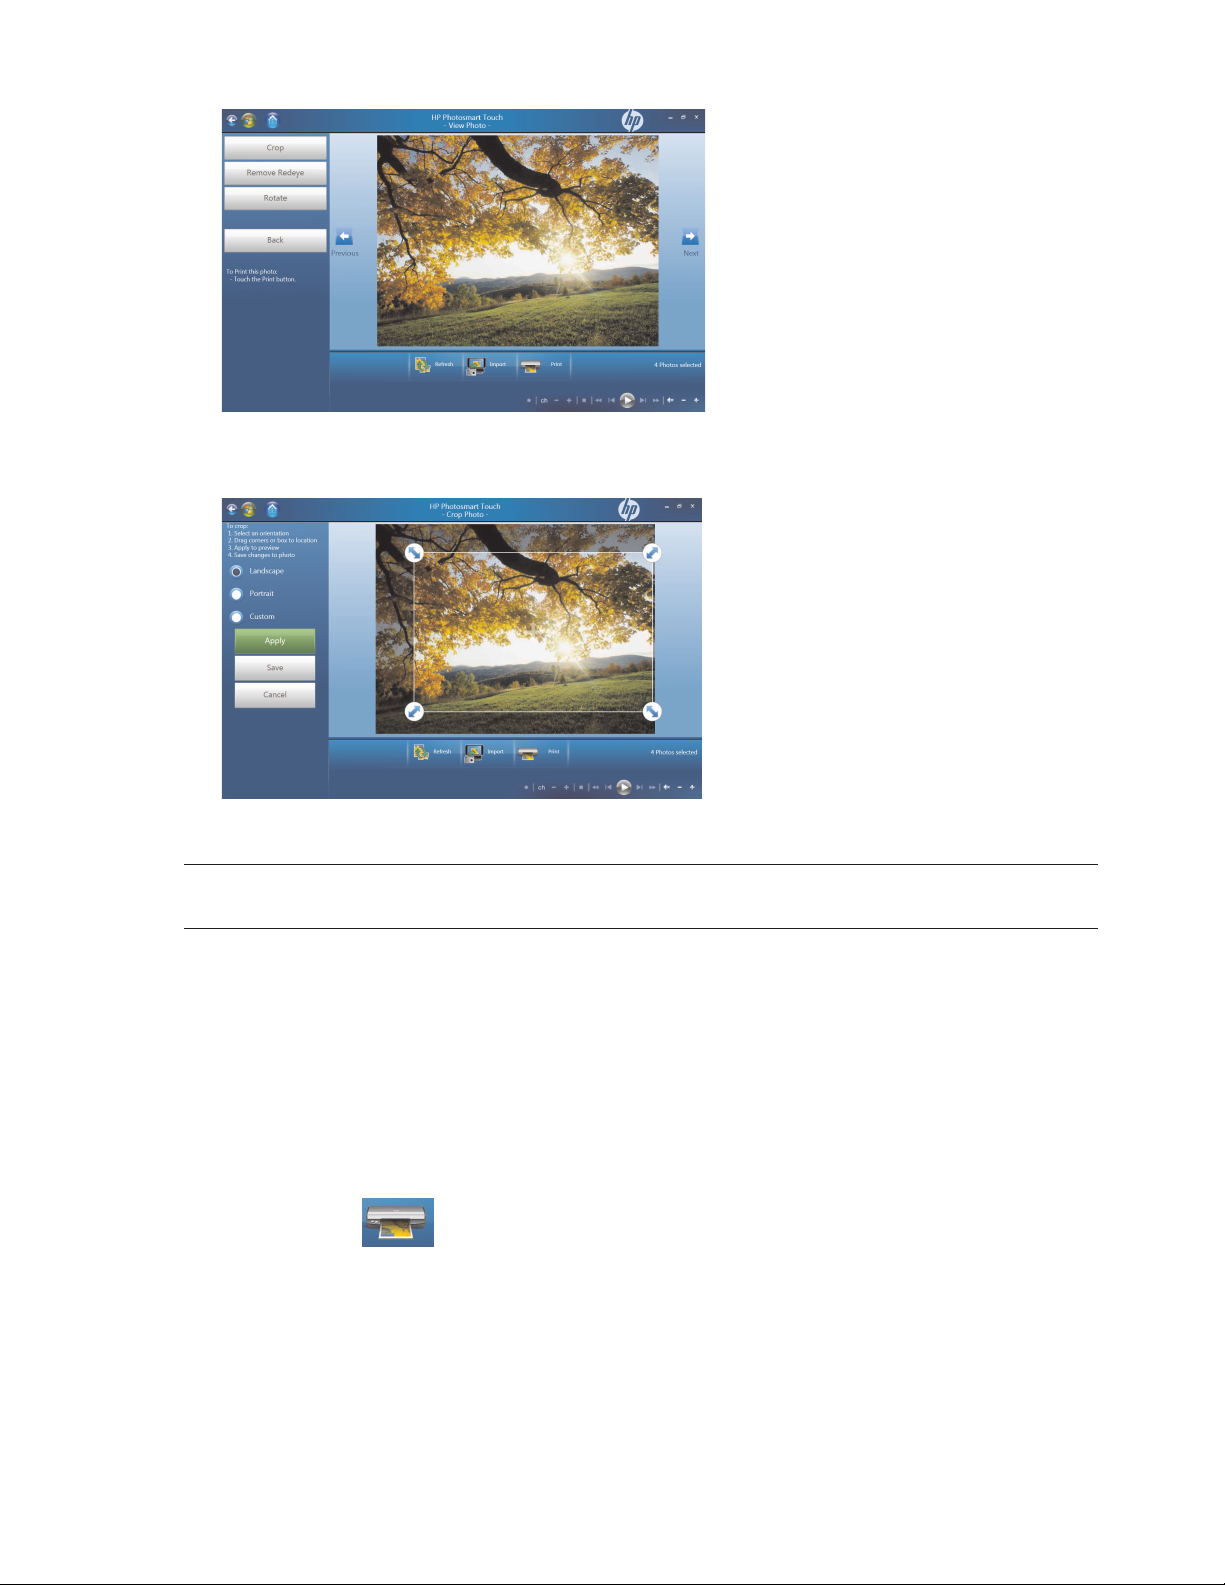
3 Select the editing option, such as Crop.
4 Select your cropping option of Landscape, Portrait, or Custom, press and drag the cropping
arrows until you have the cropped image you want, and then select Apply.
5 Press Done.
NOTE: You may need to refresh the window to view your edited picture in your HP Photosmart Touch
folders.
Printing pictures in HP Photosmart Touch
You need to connect your printer and install any printer software before you can print from
HP Photosmart Touch.
1 Open HP Photosmart Touch.
2 Select the photo you want to print by clicking the bottom-left corner. A check mark is displayed when a
photo is selected.
3 Press the Print icon at the bottom of the window.
Using the HP TouchSmart PC 37
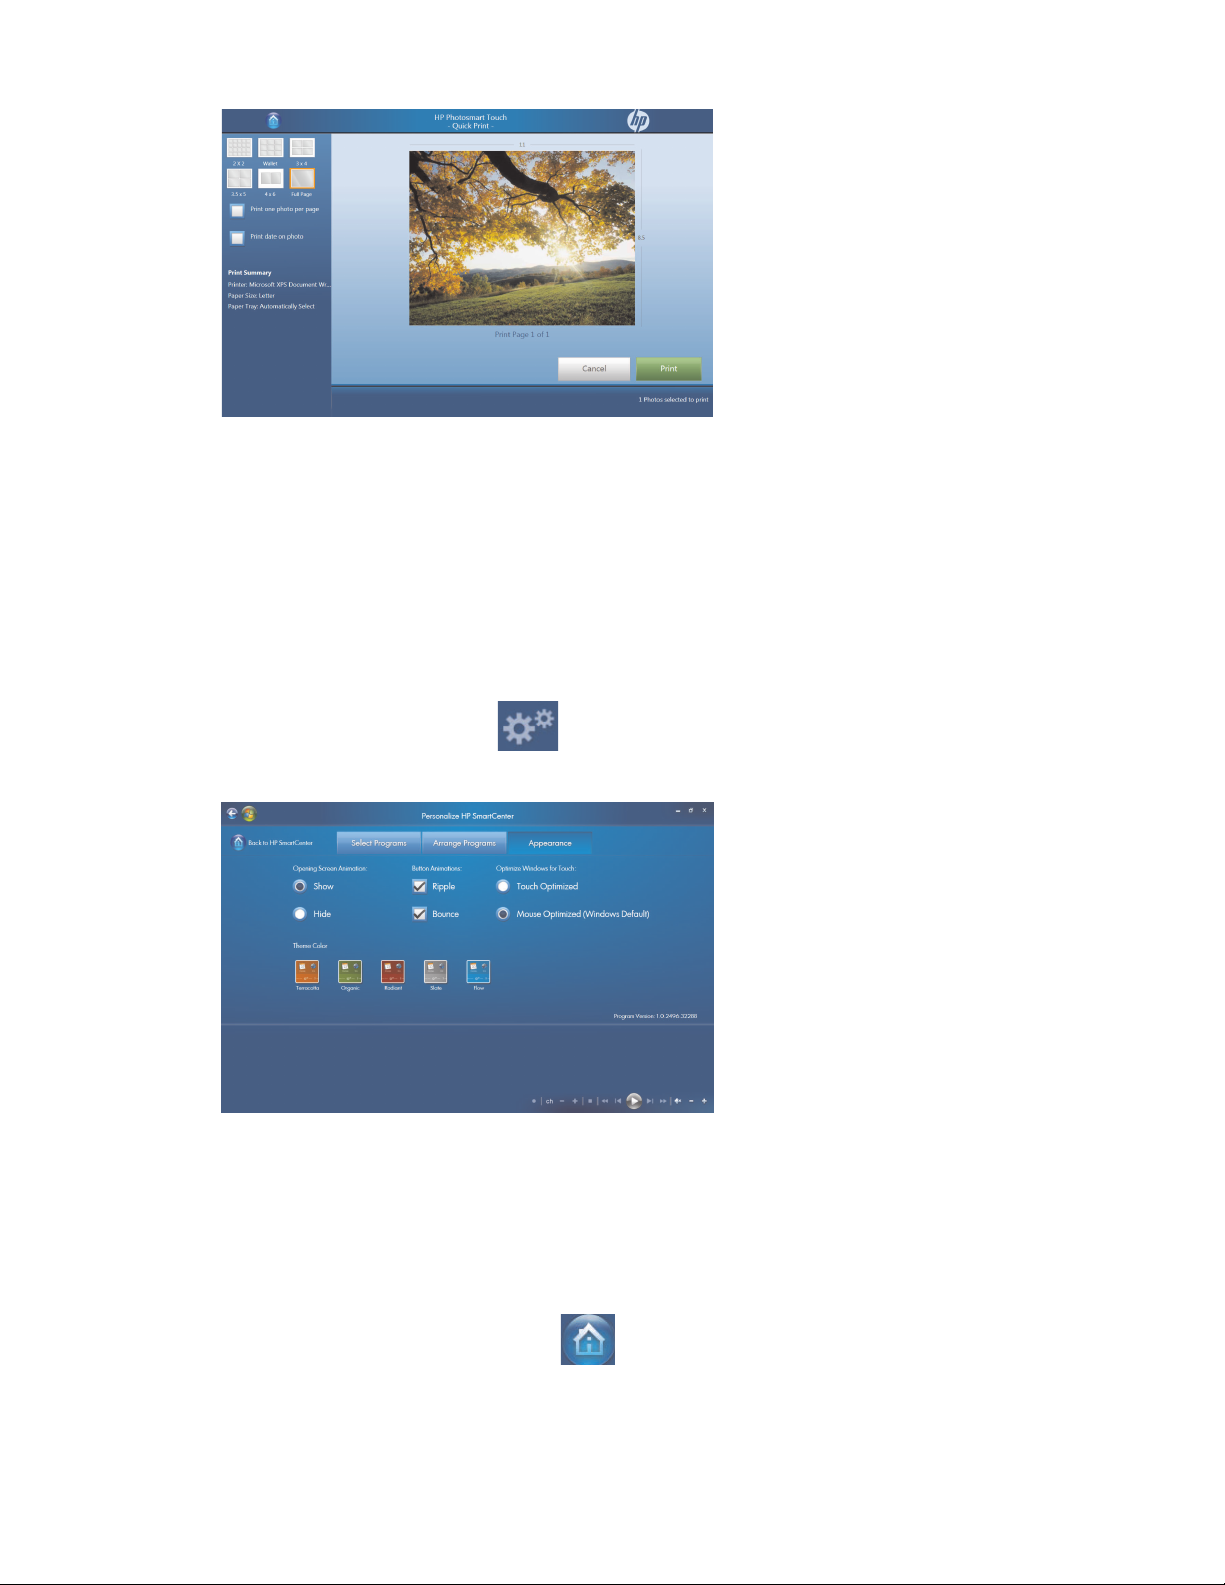
4 Select your print options, and then press Print.
5 Follow any onscreen printing instructions.
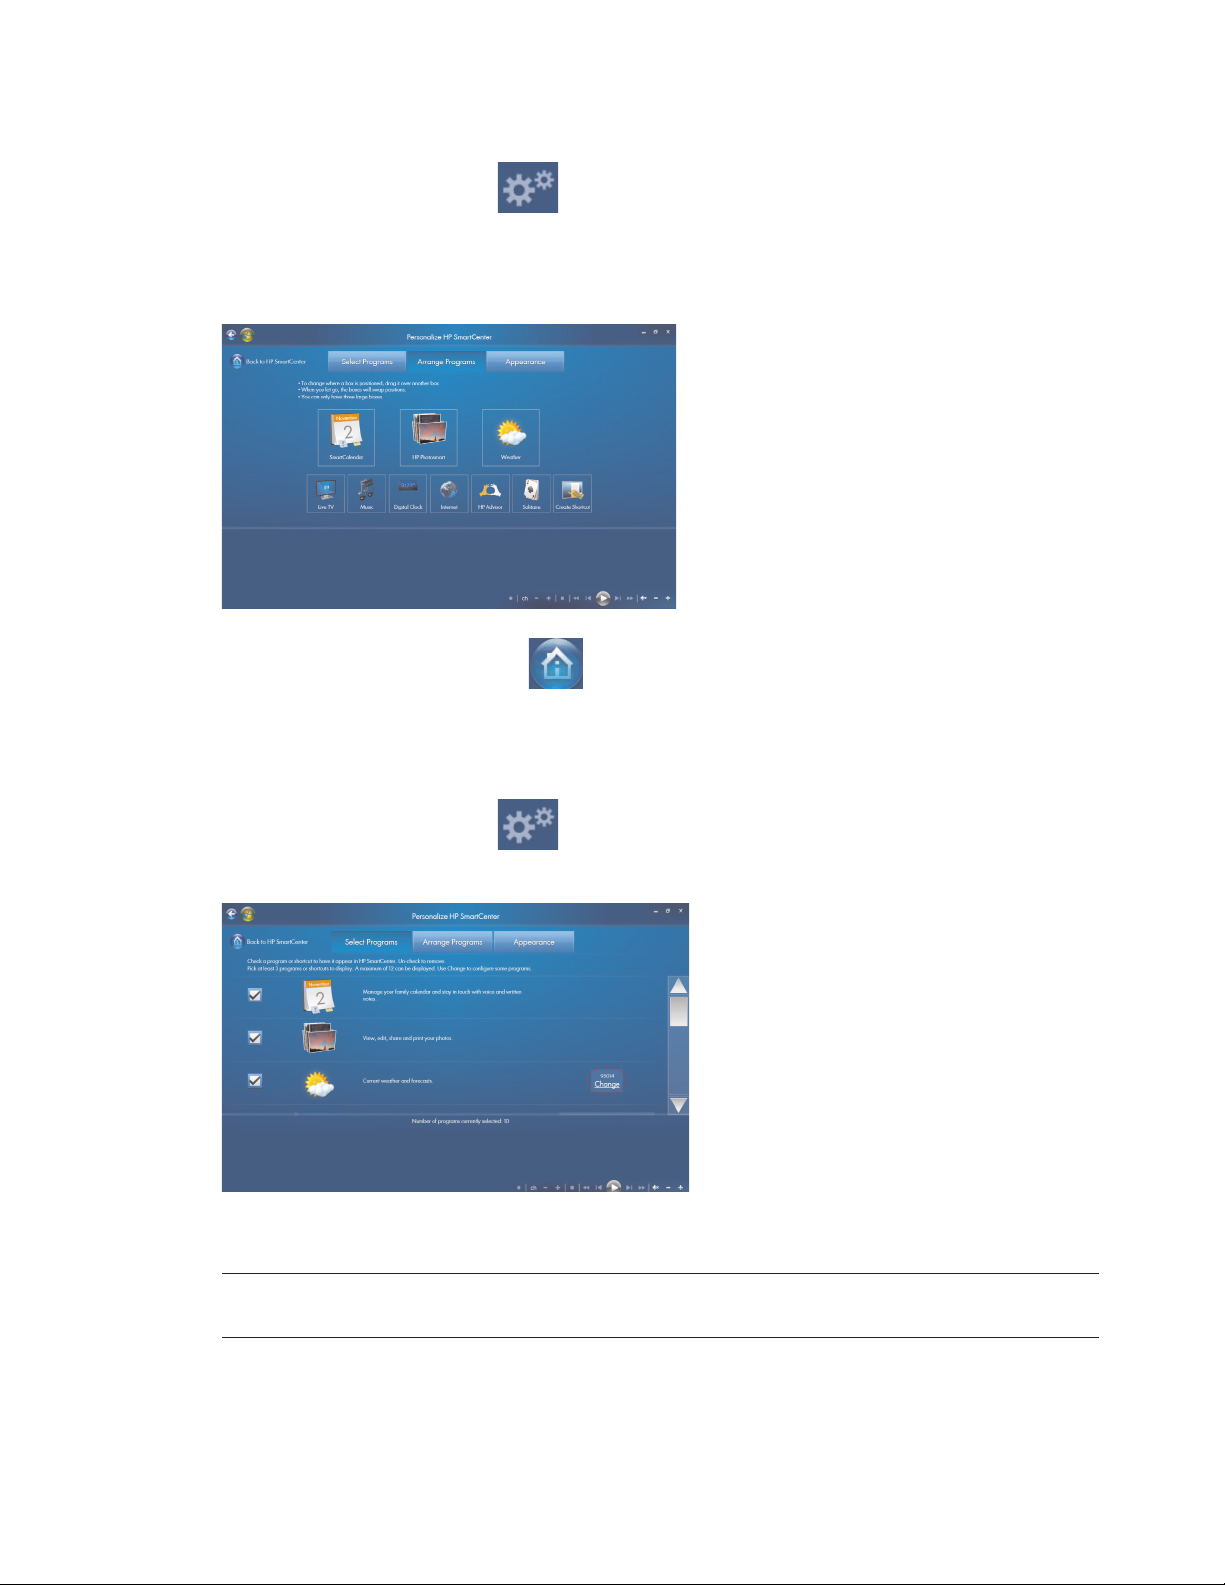
Other HP SmartCenter Features
Personalizing your HP SmartCenter page
To change the look of your HP SmartCenter page:
1 Open the HP SmartCenter page.
2 Press or click the Personalize icon.
3 Select the Appearance tab.
4 Select your HP SmartCenter page settings:
Under Opening Screen Animation, select Show or Hide.
Under Button Annimation, check or uncheck Ripple or Bounce.
Under Optimize Windows for Touch, select Touch Optimized or Mouse Optimized.
Under Theme Color, select a color.
5 Press the Back to HP SmartCenter icon when you are finished.
38 HP TouchSmart PC User Guide
Changing what you can launch from HP SmartCenter
1 Open the HP SmartCenter page.
2 Press or click the Personalize icon.
3 Select the Arrange Programs tab.
4 Click and drag the shortcut icon you want to move over another shortcut icon. When you let go, the
shortcuts change position on your HP SmartCenter page.
5 Press Back to HP SmartCenter when you are finished.
Adding or removing a Web shortcut on the HP SmartCenter page
1 Open the HP SmartCenter page.
2 Press or click the Personalize icon.
3 Select the Select Programs tab.
4 Select the shortcuts you want to appear by placing or removing the check mark next to each item
listed. Use the scroll bar on the right side of the screen to view all of the shortcut items.
NOTE: Up to twelve and a minimum of three shortcut icons appear on the HP SmartCenter page at
one time.
Using the HP TouchSmart PC 39

5 To create a new shortcut, place a check mark next to Create a shortcut for your favorite program or
web site, and then press Create Shortcut Change on the right side of the screen.
6 Select Web Page.
7 In the address field, press the touch keyboard icon to enter the Web address by touch, or you can use
your physical keyboard to enter the address.
8 Enter your shortcut name.
9 Select an icon for your Web page shortcut.
10 Press OK.
11 Press Back to HP SmartCenter when you are finished.
Adding or removing a program shortcut on the HP SmartCenter page
1 Open the HP SmartCenter page.
2 Press or click the Personalize icon.
3 Press the Select Programs tab.
4 Select the shortcuts you want to appear or remove by placing or removing the check mark next to each
item listed.
NOTE: You can have up to twelve and a minimum of three shortcut icons at one time.
5 To create a new shortcuts, press Create Shortcut Change.
6 Press Program.
7 Press Browse to locate a program you want to create a shortcut for, select it, and then press OK.
8 Press Back to HP SmartCenter when you are finished.
40 HP TouchSmart PC User Guide

Using the touch screen to access Windows Media
Center
You can enjoy your favorite music, TV programs, slideshows, and movies by using Windows Media
Center. All of the menus in Windows Media Center are accessible through touch as well as your remote
control, keyboard, and mouse. It is your choice.
To open Windows Media Center from the Start menu just press the Windows Start Button on the
taskbar, and then press Windows Media Center.
To open Windows Media Center from the HP SmartCenter just open HP SmartCenter and press
the Windows Media Center icon.
To open HP SmartCenter:
1 Press the Windows Start Button on the taskbar.
2 Press All Programs.
3 Scroll down the Start menu, and then press HP.
4 Press HP TouchSmart Programs.
5 Press HP SmartCenter.
For more information about using Windows Media Center, refer to the Getting Started guide.
Some of the things you can do in Windows Media Center are:
Use the included remote control or touch screen to quickly and easily access your music, TV programs,
movies, and radio.
Watch TV programs and movies.
Browse and listen to your music collection.
Play DVDs and videos.
Listen to FM and Internet radio.
Create music CDs and DVDs of your recorded TV programs.
Opening HP SmartCenter from Windows Media Center
1 Click the Windows Start Button on the taskbar.
2 Click Windows Media Center.
3 From the Windows Media Center menu, scroll to HP TouchSmart Programs, and then select
HP SmartCenter, HP SmartCalendar, or HP Photosmart Touch.
Using the HP TouchSmart PC 41
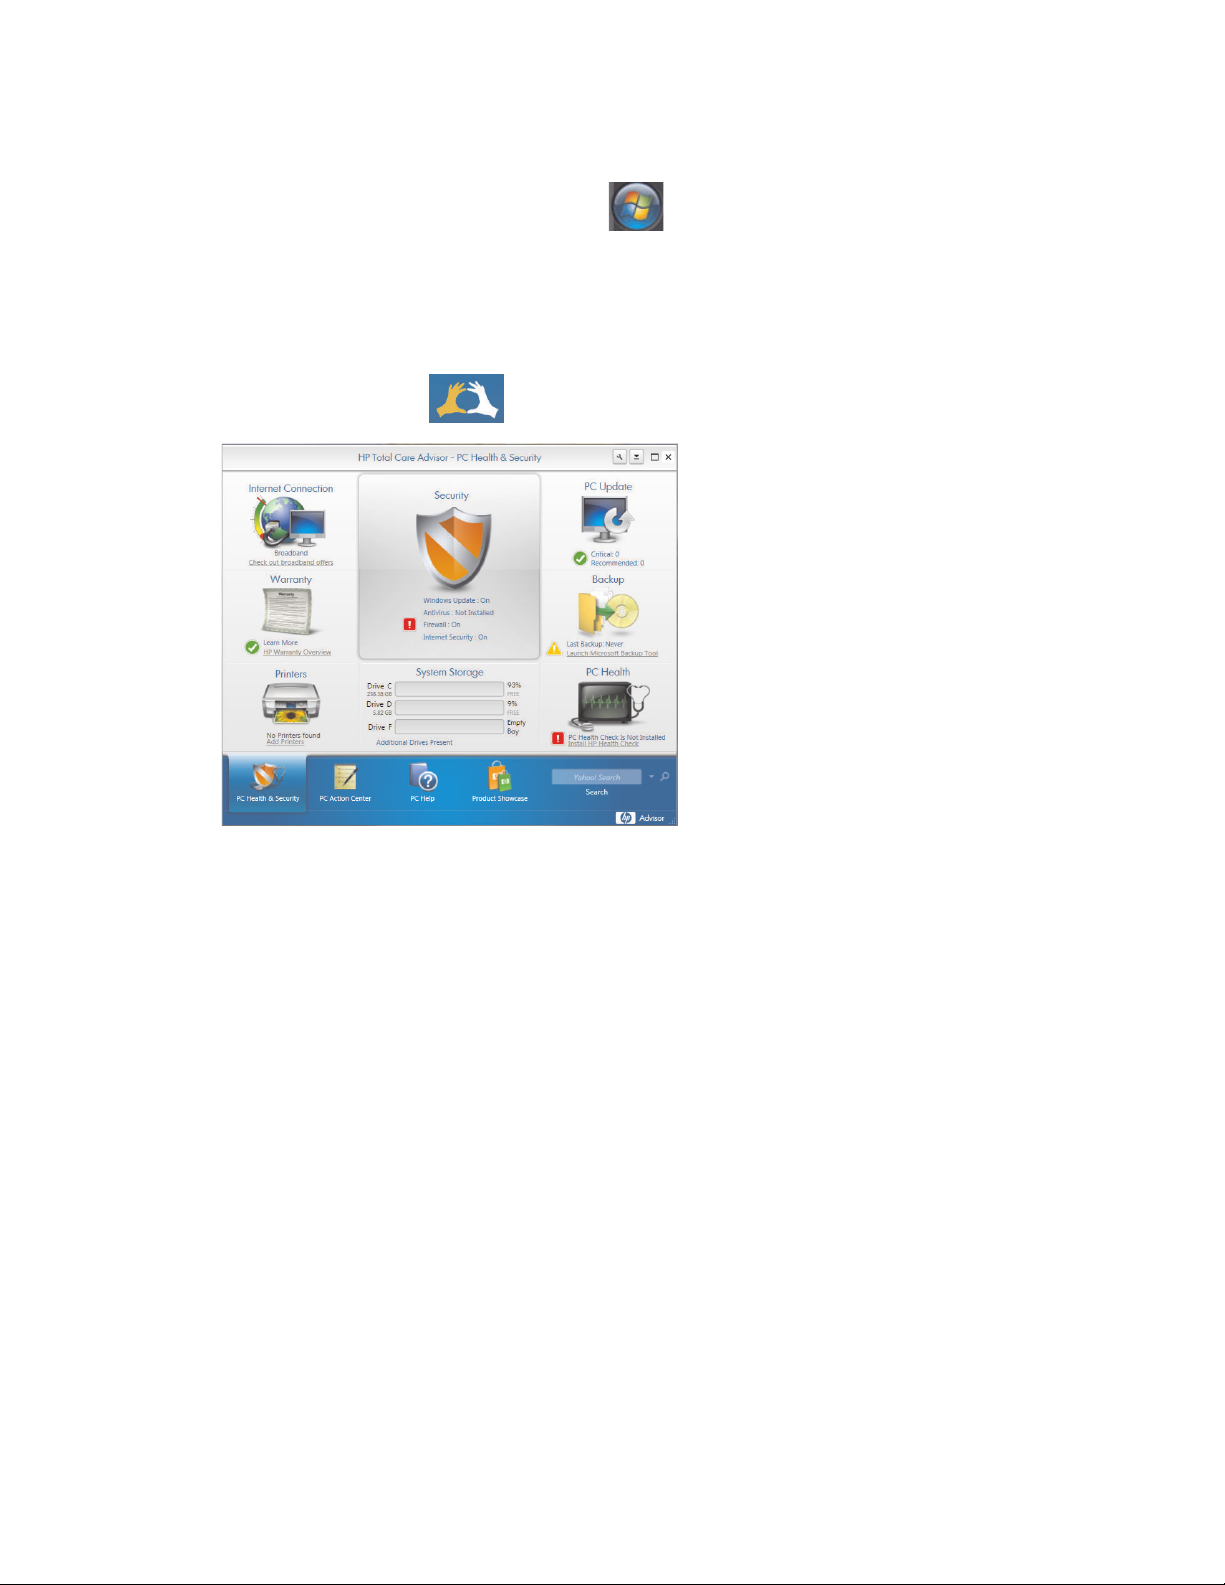
Access PC updates, PC health and security information, and more with
HP Advisor
HP Advisor is available in North America only.
1 Press or click the Windows Start Button on the taskbar.
2 Click HP Total Care Advisor.
Or
Press or click All Programs, scroll down the Start menu, and then press or click HP. Press or click
HP TouchSmart Programs. Press or click HP SmartCenter.
3 Click the HP Advisor icon.
4 From here you can:
View security information such as Windows Auto Update and Virus Protection.
Get PC updates.
Connect to the Internet and view Internet Service Provider offers.
View HP warranty information.
View connected printers and add a printer.
Launch Microsoft Backup Tool.
Access PC health and security information.
Access PC help tools.
Access PC Action Center, where you can get critical PC alerts, tips, and tricks regarding keeping
your PC in good working order.
42 HP TouchSmart PC User Guide
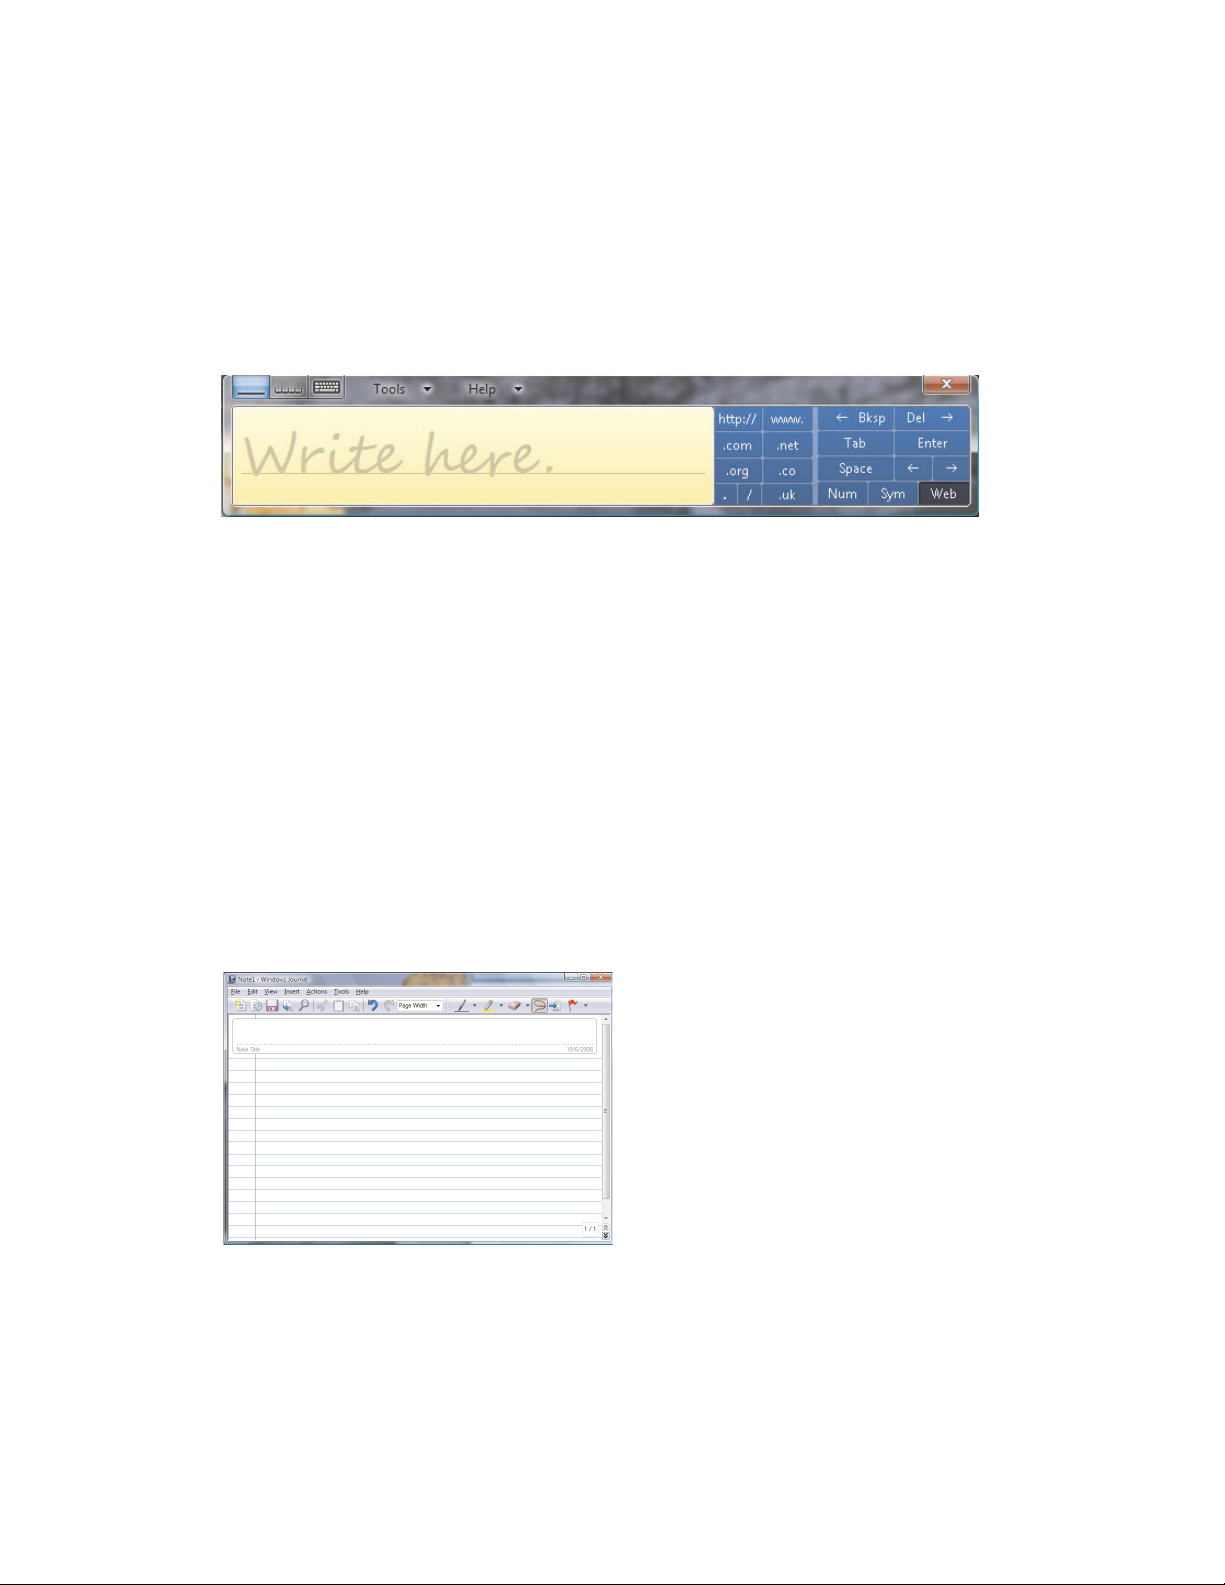
Using Tablet PC software to enter text
with the touch screen
Use Microsoft Tablet PC to enter text in any software program or Internet text field without using the
keyboard. You can use the stylus or your touch to enter text on the touch screen by using the onscreen
keyboard. Use the writing pad or the character pad to convert your handwriting into typed text, or use the
onscreen keyboard to enter characters.
To open the Tablet PC Input Panel:
1 Press the Windows Start Button on the taskbar.
2 Press All Programs, Accessories, Tablet PC, and then Tablet PC Input Panel.
3 To move or dock the window to the side of your screen, just press the close button.
4 To move it back to the middle of the desktop, just touch and press it.
5 Use your stylus or your touch to write a note. You can also use the tools in the Windows toolbar to
customize your note
Using Windows Journal software to create hand-written
notes and drawings
Use Windows Journal to write or draw using your stylus on the touch screen. You can save your
handwriting in a note, convert the writing to type-written text, or just leave your handwriting or drawing as
ink in a note. You can also insert pictures into your notes.
To open the Windows Journal:
1 Press the Windows Start Button on the taskbar.
2 Press All Programs, Accessories, Tablet PC, and then Windows Journal.
3 Use your stylus or your touch to write a note or draw a picture. You can also use the tools in the
Windows Journal toolbar to customize your note.
4 To save your note, press the File menu and press Save.
Using the HP TouchSmart PC 43

44 HP TouchSmart PC User Guide

Upgrading the HP TouchSmart PC
Safety Information
This product has not been evaluated for connection to an “IT” power system (an AC distribution system with
no direct connection to the earth, according to IEC 60950).
WARNING: Please read “Additional Safety Information” in the Limited Warranty and Support
Guide before installing and connecting your system to the electrical power system.
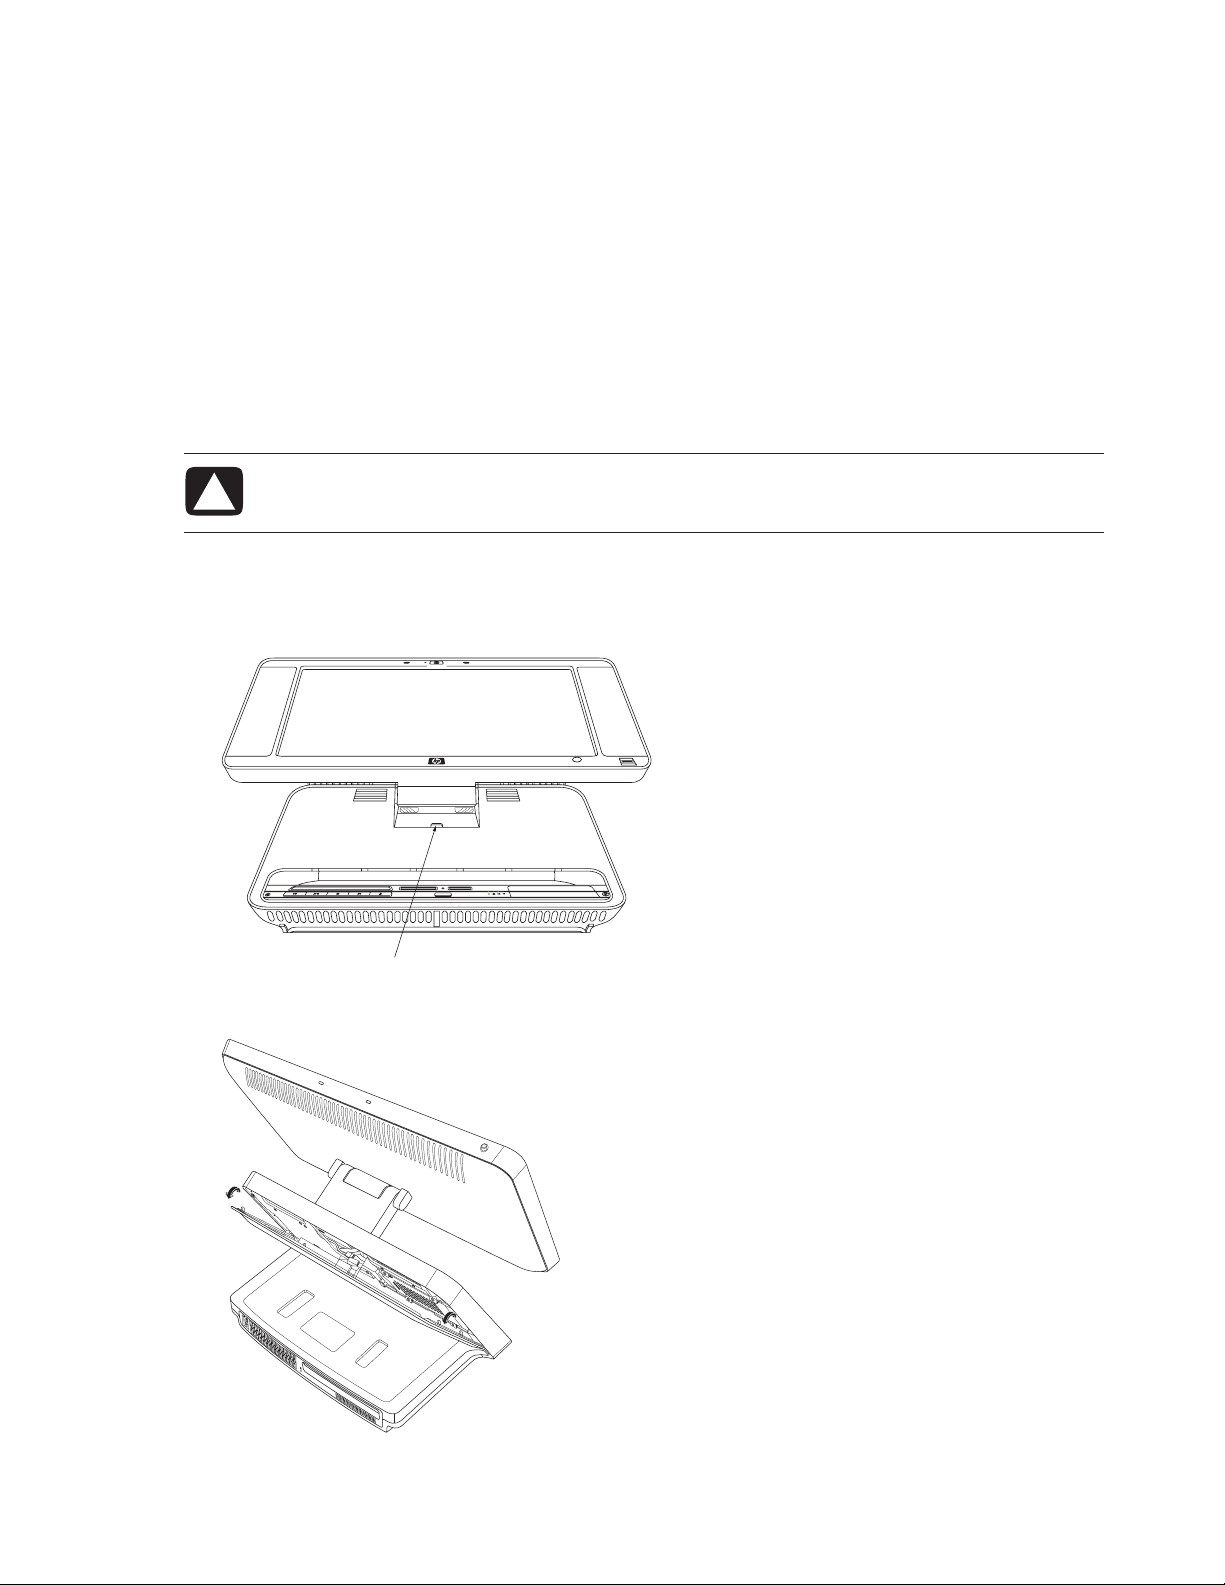
Opening and Closing the HP TouchSmart PC
Vertical cover
Rear cover
Preparing the HP TouchSmart PC
Before you upgrade any component in your HP TouchSmart PC, you need to prepare the HP TouchSmart
PC so that you can safely handle it and the components.
Read the following items before attempting to upgrade or service the HP TouchSmart PC.
1 These procedures assume familiarity with the general terminology associated with personal computers
and with the safety practices and regulatory compliance required for using and modifying electronic
equipment.
2 Write down and save the system model and serial numbers, all installed options, and other
information about the system. It’s easier to consult this information than to open and examine the
computer.
Upgrading the HP TouchSmart PC 45

3 It is recommended that you use an antistatic wrist strap and a conductive foam pad when working on
the system.
WARNING: Always disconnect the HP TouchSmart PC from the power source before removing
the rear or vertical cover of the HP TouchSmart PC. Failure to do so before you open the
HP TouchSmart PC or do any procedures can result in personal injury or equipment damage.
Before opening the HP TouchSmart PC
To avoid injury and equipment damage, always follow this procedure in this order before opening the
HP TouchSmart PC.
1 Remove any media (CD, DVD, memory cards, USB devices, external hard disk drives) from the
HP TouchSmart PC.
2 Click the Windows Start Button, and then click Shut Down.
CAUTION: To reduce the risk of personal injury from electrical shock or hot surfaces,
disconnect the power cord from the wall outlet, and allow the internal system components to
cool before touching.
3 Disconnect the power cord from the electrical outlet and then from the HP TouchSmart PC.
4 Disconnect all other attached cables from the rear of the HP TouchSmart PC.
5 Disconnect all external devices.
CAUTION: Static electricity can damage the electronic components of the HP TouchSmart PC or
optional equipment. Ensure that you are discharged of static electricity by briefly touching a
grounded metal object.
After closing the HP TouchSmart PC
To avoid injury and equipment damage, always follow this procedure in this order after closing the
HP TouchSmart PC.
1 Reconnect the power cord.
WARNING: To reduce the risk of electrical shock, fire, or damage to the equipment, do not
plug telecommunications or telephone connectors into the network interface card (NIC)
(labeled as LAN).
2 Reconnect all other cables.
3 Reconnect external devices.
4 Turn on the HP TouchSmart PC and all peripherals such as the monitor.
46 HP TouchSmart PC User Guide

Removing the rear cover
This procedure is necessary when removing and upgrading memory.
1 See “Opening and Closing the HP TouchSmart PC” on page 45.
2 Remove the two screws that secure the rear cover to the HP TouchSmart PC chassis. Keep the screws
for later.
+
-
3 Pull the rear cover back about 1/2 in (1.27 cm) (A). If necessary, gently push down on the cover while
pulling back.
4 Lift the rear cover and remove from the chassis (B).
WARN I N G : B eware of sharp edges inside the chassis.
Upgrading the HP TouchSmart PC 47
Replacing the rear cover
1 Place the rear cover in the proper position on the chassis and about 1/2 in (1.27 cm) back from the
vertical cover.
2 Slide the rear cover toward the front of the chassis until the rear of the cover is flush with the rear I/O
area of the chassis.
3 Ensure that the holes for the screws align with the holes in the chassis, and then replace the two
screws.
Removing the vertical cover
This procedure is necessary when removing or replacing the hard disk drive.
1 See “Opening and Closing the HP TouchSmart PC” on page 45.
CAUTION: To reduce the risk of personal injury from electrical shock or hot surfaces, disconnect
the power cord from the wall outlet, and allow the internal system components to cool before
touching.
2 If necessary, raise the display (monitor) until the pocket behind the monitor is accessible.
3 While holding the back of the vertical cover, push and hold down the lever on the front of the vertical
cover. This lever is located in a pocket behind the display (monitor) portion of the HP TouchSmart PC.
Lever
4 While holding down the lever, pull the vertical cover up and remove from the chassis.
48 HP TouchSmart PC User Guide

Replacing the vertical cover
1 Align and insert the hooks on the vertical cover into the holes on the back of the chassis.
2 Reach behind the display, and hold down the lever on the vertical cover while sliding the vertical cover
down and into place on the back of the vertical chassis.
Adding Memory
Your HP TouchSmart PC comes with random access memory (RAM), which temporarily stores data and
instructions on your HP TouchSmart PC. The HP TouchSmart PC ships with two memory modules, but you
can replace the existing memory modules with higher-capacity ones.
The motherboard contains sockets for SO-DIMMs (small outline dual in-line memory modules).
To determine which type and speed of memory module your HP TouchSmart PC uses, and for specific
memory module information and specifications, go the Web site listed in your Limited Warranty and
Support Guide, and click the Support link.
WARNING: Using the wrong type of memory module could damage the system.
Removing a memory module
1 Complete the procedures to prepare the HP TouchSmart PC and to remove the rear cover. See
“Opening and Closing the HP TouchSmart PC” on page 45.
2 Remove the cable from the DVD drive.
DVD drive
Tab
3 Lift the tab at the left side of the DVD drive and slide the drive straight back.
DVD drive cable
4 Move the DVD drive cable away from the memory module beneath it.
CAUTION: When handling a memory module, be careful not to touch any of the contacts.
Doing so may damage the module.
Upgrading the HP TouchSmart PC 49

WARNING: Do not pull the memory module out of the socket. Use the latches of the retaining
clips to remove the module.
5 Push the two latches of the retaining clips away from the memory module. The memory module pops
up at an angle.
Latches
Latches
Memory module
6 Lift the memory module from the memory socket. Note the location of the key slot on the
connector edge.
Installing a memory module
Upgrade the memory in your HP TouchSmart PC with memory of the same type and speed as the memory
originally installed in your HP TouchSmart PC. The two memory modules must be identical in type, speed,
and capacity.
CAUTION: When handling a memory module, be careful not to touch any of the contacts.
Doing so may damage the module.
1 With the DVD cable moved out of the way, align the memory module with the socket, so the key slot on
the connector edge is same as the module removed.
NOTE: The sockets are keyed. If the module slot does not match the socket, turn the memory
module over.
2 Slide the memory module into the socket at the same angle it was removed.
3 Push the outer edge of the memory module down until the retaining clip latches catch.
4 Move the DVD cable out of the way and insert the DVD drive. Slide the drive in until the tab catches.
5 Reconnect the DVD drive cable.
6 Complete the procedures to replace the rear cover, and close the HP TouchSmart PC. See “Opening
and Closing the HP TouchSmart PC” on page 45.
NOTE: If a blank screen is displayed after replacing or adding a memory module, the memory is
installed incorrectly or it is the wrong type of memory. Remove and reinstall the memory module.
50 HP TouchSmart PC User Guide

Removing and Replacing the Hard Disk Drive
You can replace or upgrade the hard disk drive.
The hard disk drive is a Serial ATA (advanced technology attachment) drive, which uses a narrow
data cable.
CAUTION: Back up your personal files on the hard disk drive to an external storage
device, such as a CD, before removing the hard disk drive. Failure to do so may result in
data loss. After replacing the hard disk drive, you need to run System Recovery using
recovery discs to load the factory-installed files. See the user documentation that came
with your HP TouchSmart PC for details about the recovery procedure.
Removing the hard disk drive
1 Complete the procedures to prepare the HP TouchSmart PC to remove the vertical cover. See
“Opening and Closing the HP TouchSmart PC” on page 45.
2 Loosen the two bottom screws on the hard disk drive cage three turns.
Screw (remove)Screw (remove)
Powe r
cable
Data
cable
Screw (loosen 3 turns)
Screw (loosen 3 turns)
3 Remove the two top screws from the hard disk drive cage.
4 Lift the cage up off the two bottom screws and out of the chassis.
5 Disconnect the power and data cables from the back of the drive. Squeeze the latch on the SATA
connector to remove the data cable.
6 Remove the four screws from the cage, and lift the sides of the hard disk drive from the cage.
Screws
Upgrading the HP TouchSmart PC 51

Replacing the hard disk drive
1 Complete the procedures to remove the hard disk drive, if necessary. See “Removing the hard disk
drive” on page 51.
2 Place the hard disk drive into the cage and insert the four screws.
Screws
3 Connect the power and data cables to the hard disk drive.
4 Place the hard disk drive cage over the two bottom screws and into the chassis.
Screw (insert)Screw (insert)
Powe r
cable
Data
cable
Screw (tighten)
Screw (tighten)
5 Insert the two top screws and tighten the two bottom screws.
6 Complete the procedures to replace the vertical cover and close the HP TouchSmart PC. See “Opening
and Closing the HP TouchSmart PC” on page 45.
52 HP TouchSmart PC User Guide

Locating Information About Your Computer
This section is an index to information about your
computer. The information is located in this guide and
other guides that have been included with your
computer.
HP TouchSmart PC User Guide (this guide), a
printed guide with specific information about the
HP TouchSmart PC product. References are listed
as black page numbers UG-#.
Getting Started guide, included on your
computer is an onscreen guide, provides
information about using your HP computer, the
Microsoft Windows Vista operating system, the
Windows Media Center, and some of the
hardware and the software programs included
with the computer. References are coded as
green page numbers: GS-#.
Limited Warranty and Support guide, a
printed guide, provides information about your
computer warranty and how to obtain support.
References are listed as blue page
numbers: WS-#.
Troubleshooting and Maintenance Guide,
a printed guide, provides information about tasks
you can perform to ensure the trouble-free
operation of your computer and to ease the
recovery of important information on your
computer should problems arise in the future. It
also contains a series of tables that describe
solutions you can try to resolve problems that may
occur when you install and use your computer.
References are listed as red page numbers: TM-#.
Viewing the Getting Started guide, or
more information
The Getting Started guide is an onscreen guide.
Onscreen guides are available in the User Guides
folder on your computer.
1 Click the Windows Start Button
on the taskbar.
2 Click All Programs.
3 Click User Guides.
4 Click the guide name, such as Getting Started,
to view the guide.
Finding more information on the Web
You can find copies of your guides and information for
your computer by using the Internet to access the
Support Web site.
1 Go to http://www.hp.com/support in your
Web browser.
2 Select your country/region and language.
3 Click Support and Drivers.
4 Click See support and troubleshooting
information, enter the model number of your
computer, and then click Search .
5 Click Manuals.
6 Locate the manual you want, and then do one of
the following:
TM
How to locate information
Locate information by looking in the entries under the
main task or subject.
For example, to locate a figure showing where the
DVD slot is on the computer, look under D for the term
DVD, then look for a listing from the User Guide such
as drive slot,
UG-3.
Click the title to display the file in Adobe
Acrobat Reader (which you can download
from the Manuals page if it is not currently
installed on your computer).
Right-click the title, click Save Target As,
specify a location on your computer where
you want to save the file, rename the file
(retaining the .pdf extension), and then
click Save.
NOTE: Only Getting Started guide references are
included in the index at this time.
Locating Information About Your Computer 53

A
activity lights UG- 2
adding
CD tracks to the music library GS- 92
music files to the music library
from the hard disk drive GS- 91
antivirus, installing program
Audio Troubleshooting, TM- 8
autoscroll
GS- 28
GS- 16
B
batteries UG- 16
installing in remote control 35
keyboard and mouse UGremote control UG- 16
type for remote control GS-35
bay
HP Pocket Media Drive UG-
Bluetooth devices UG- 17
burning
audio and data disc GS-120–GS-125
CDs, DVDs GS-119–GS-123
button
computer on/standby UGHP SmartCenter UG- 2
buttons
channel, volume, and mute UGDVD control UG- 2
media control or playback GS-24
Off, See turning off PC GS-10
remote control GS-32
buttons, keyboard
customizing GS-25
11
6
2
3
C
calendar
using HP SmartCalendar UGviewing UG- 30
camera
using built-in Web camera UGWeb camera with indicator UG- 1
card reader, memory GS-61
carpal tunnel syndrome GS-5
CD and DVD Drive Troubleshooting, TM- 9–10
CDs
creating a music CD in Music GS-101, GS-102
erasing rewritable GS-120
playing in Music GS-96, GS-98
change the speed of the cursor GS-29
channel buttons UG-
3
29
24
cleaning UG- 23
computer
connecting the IR emitter UGturning on UG- 8
Computer Playback GS-149
connecting
FM antenna UGheadphones UG- 2
printer UG- 15
remote IR emitter cable UG- 14
to the Internet UG- 18
TV signal UG- 13
connectors UG- 5
audio/video UG- 3
country/region codes GS-111
cursor speed GS-29
customizing keyboard buttons GS-25
13
14
D
Declaration of Conformity, WS- 9
desktop
switching from Media Center
digital camera, using HP Photosmart Touch UG- 34
digital images GS-129
working with UG- 34
digital picture GS-61, GS-129
digital video
camera capture
using HP Photosmart Touch UG- 34
discs
drive compatibility
erasing rewritable GS-120
features and compatibility GS-58
Disk Cleanup, TM- 2
Disk Defragmenter, TM- 3
Display (monitor) Troubleshooting, TM- 11
dock
printer UG-
documentation, onscreen GS-1
Drivers, update, TM- 22
DV camera capture
DVD
drive slot UGindicator light UG- 2
DVD movies
changing
audio settings
language GS-113
playing
in Media Center
DVD Play, features GS-46
GS-142
GS-57
5
GS-142
2
GS-116
GS-112
GS-80
54 HP TouchSmart PC User Guide

E
End-User License Agreement, WS- 6–8
erasing rewritable discs
error messages
Channel information is currently not available
common recording errors GS-173
Download Incomplete GS-159
Image cannot be displayed GS-133
Low Disk Space GS-168, GS-170
No data available GS-159
Search is unavailable because there is no guide
information
The current lineup and/or location selected for the guide
is not supported
The guide information is either missing or
corrupt
GS-159
errors
reducing recording speed
Ethernet UG- 18
event
deleting an event from HP SmartCalendar UG-
scheduling in HP SmartCalendar UG- 30
GS-120
GS-159
GS-159
GS-159
GS-121
32
F
file type
music
GS-93, GS-140
picture GS-133, GS-139
video GS-137, GS-139
FireWire (IEEE 1394) GS-142, GS-143
FM Radio GS-104
FM Antenna In GS-106
FM Tuner In GS-104
Preset Radio Stations GS-106, GS-107, GS-108
Radio Online GS-109
radio tuner input GS-104
TV Signal GS-105
FM radio, see radio
G
games
finding UG-
Guide, see Television Program Guide
25
H
Hard Disk Drive Troubleshooting, TM- 12
Hard Disk Drive upgrade UG-
Hardware Installation Troubleshooting, TM- 12–13
Hardware Limited Warranty, WS- 2–6
headphones UG-
Help and Support GS-2
HP Advisor
access PC updates, security information UG-
accessing UG- 25
features UG- 42
2
51
42
HP Media Drive
inserting a drive
HP Personal Media Drive GS-67
activity and power lights GS-68
automatic on and off feature GS-68
disconnecting the drive GS-72
location and drive letter GS-70
HP Photosmart Essential GS-46
HP Photosmart Touch
creating your picture library UGopening UG- 34
using UG- 25, 34, 35
HP Pocket Media Drive GS-67
bay UG- 6
using UG- 6
HP printer Y-cable UG- 5
HP SmartCalendar
adding user accounts UGcreating voice notes UG- 33
deleting an event UG- 32
using UG- 25, 29
HP SmartCenter
accessing the two-day weather forecast UGadding or removing Web site shortcut UG- 39
changing location of shortcuts UG- 39
changing time setting UG- 28
customizing UG- 38
getting help UG- 25
opening UG- 26, 29, 41
scheduling an event UG- 30
what is, using UG- 24
HP SmartCenter button UG- 2
using to open HP SmartCenter UG- 26
HP Total Care Advisor GS-17
HP TouchSmart PC screen
cleaning UG-
GS-68
35
32
23
I
indicators
activity lights UG-
Internet
access UGconnecting UG- 18
Internet Access Troubleshooting, TM- 14–15
Internet security
IR emitter
connecting UG-
2
25
GS-7, GS-8, GS-103
14
27
Locating Information About Your Computer 55

K
Kensington lock slot UG- 5
keyboard
customizing buttons
keys UG- 9
replace batteries UG- 11
setting up UG- 8
shortcuts GS-25
special buttons UG- 9
types of buttons GS-19
UK keyboard differences UG- 9
using UG- 9, GS-19
Keyboard and Mouse Troubleshooting, TM- 16–17
GS-25
L
LAN UG- 17, 18
local area network (LAN) UG- 17
lock
Kensington UG-
5
M
magicSpot GS-145
manual sync, keyboard and mouse UG- 12
Media Center
menu bars
navigating GS-80
opening with remote control GS-34
playing DVDs GS-112
resizing window GS-80
using with another program open GS-80
what you can do
in Music
in Radio GS-104
media control buttons UG- 2
memory card, formatting GS-65
memory card reader UG- 34, GS- 129
card types UG- 2, GS-61
in-use light GS-65
troubleshooting GS-66
using GS-61
memory, upgrade UG- 49
microphone
using UGmicrophone array UG- 1
mouse
autoscroll
cursor speed GS-29
panning GS-28
replace batteries UG- 11
setting up UG- 8
storing UG- 1
switching button functions GS-29
using UG- 11
GS-80
GS-89
24
GS-28
Music GS-89
browse, listen UG- 25
copying music to CD GS-101, GS-102
creating a queue list GS-97
deleting music from the Music library GS-93
finding and playing an album GS-98
playing a song GS-96
playing an album GS-96, GS-98
playing music GS-94
playing with Windows Media Player
GS-111, GS-116
supported file types GS-93
music library
adding CD tracks
creating GS-91
mute button UG- 3, GS-24
muvee autoProducer
adding a title and credits
adding music GS-141
adding pictures GS-141, GS-144
adding video GS-141, GS-143
allowing music to repeat GS-146
allowing video and pictures to repeat GS-146
basic steps to create a movie GS-139
changing settings GS-146
copying a movie to disc GS-150
features GS-47
getting started GS-141
getting video from a camera GS-141
making a movie GS-147
previewing a movie GS-148
rotating images clockwise GS-145
selecting style GS-145
setting the duration of video GS-146
upgrading GS-151
using the magicMoments feature GS-144
GS-92
GS-141
N
network
wireless UG-
Norton Internet Security
configuring
registering GS-44
note
deleting notes in HP SmartCalendar UGediting in HP SmartCalendar UG- 33
moving notes to calendar UG- 33
2
GS-44
O
Off button, See turning off PC GS-10
On/Standby button UG- 2
Operating Specifications, WS- 10
optical drive quick reference
optimizing for touch or mouse UG- 21
Optimization setting GS-76, GS-87
GS-59
33
56 HP TouchSmart PC User Guide

P
panning with the mouse GS-28
passwords
creating
PC
connecting the IR emitter UG-
Help & Tools GS-2
turning off GS-10
Performance Troubleshooting, TM- 18–19
photos
transferring to PC UGphoto slot UG- 2
pictures GS-129
copying pictures to CD GS-136
editing GS-133
editing in HP Photosmart Touch UG- 36
image not displayed GS-133
printing UG- 37, GS-133
rotating GS-135
selecting in HP Photosmart Touch UG- 36
types of files it can display GS-133
viewing a slide show with music GS-132
Pictures and Videos GS-129
pictures, turning captions on or off GS-131
pictures, viewing GS-131
pictures, viewing pictures as a slide show GS-132
playing
digital music files
digital videos GS-137
DVDs in Media Center GS-112
music CDs in Media Center GS-94
songs in Music GS-96
playing music CDs GS-110, GS-117
playing songs
Buy Music option
Visualize option GS-98
playlist
creating in Music
pointer device
using the stylus UGpower
surge protection UGpower cord
connecting UG-
Power Troubleshooting, TM- 17–18
printer
connecting UGprinter dock UG- 5
Program Guide, see Television Program Guide
GS-15
14
34
GS-94
GS-98
GS-100
23
7
7
15
Q
queue list
creating in Music
GS-97
R
radio
connecting antenna to PC
getting reception GS-104
organizing radio station presets GS-107
Radio window GS-104
organizing pre-set radio stations GS-107
playing FM stations GS-104
playing radio in Media Center GS-104
recording radio programs GS-107
RAM, see Memory UG- 49
RealPlayer, features GS-46
Recommended Maintenance Schedule, TM- 5–6
recorded TV
recording
options
radio programs GS-107
TV programs GS-164
recording TV
standby mode
recording TV programs
manually
single program or series, canceling GS-164
when two are scheduled for the same time GS-165
recording TV shows
making sure a program is being recorded
using the guide GS-165
Recovery Discs, Creating, TM- 25–26
Regulatory and Safety Information, WS- 10–13
remote control
buttons
On/Standby (sleep) button UG- 16
range GS-34
type of battery to use GS-35
sensor UG- 16
sensor window UG- 1
using GS-34
using with HP SmartCenter UG- 26
using in TV + Movies GS-156
remote control UG- 1, 16
remote sensor GS-35
using GS-34
repetitive strain injury (RSI),
see Safety & Comfort Guide GS-5
Return to HP SmartCenter button
using UG-
rewritable discs, erasing GS-120
router installation UG- 18
Roxio Creator
erasing discs
GS-172
GS-165
how to stop recording GS-164
GS-82
GS-166
GS-32
26
GS-120
GS-104
GS-164
Locating Information About Your Computer 57

S
Safety & Comfort Guide GS-5
safety warnings GS-5
screen UG- 1
scrolling with the mouse GS-28
search
pictures in HP Photosmart Touch UG-
searching for programs GS-163
setting up
keyboard and mouse UG-
settings
for sound
general GS-86
Internet connections GS-86
remote control and remote sensor GS-35
set-top box
IR emitter cable for UG-
Shared Video folder GS-136
shortcuts
keyboard
shutting down PC GS-10
sleep mode button GS-22
slide show
displaying information about pictures
viewing pictures GS-132
viewing with music GS-132
Software and Driver Reinstallation, TM- 24
software programs
DVDPlay
Windows Movie Maker GS-48
sorting TV programs
by category
by date GS-172
by name GS-172
speakers UG- 1
Start menu
Media Center
stylus UG- 1
using UG- 23
Support
messages
Support Information, WS- 14–15
Support Phone Numbers, WS- 14
surge protection UG-
SVCD GS-150
switching mouse button functions GS-29
sync
keyboard and mouse, manually UG-
System Recovery, TM- 25–29
System Restore, TM- 23
GS-86
GS-25
GS-46
GS-172
GS-78
GS-2
7
8
14
36
GS-132
12
T
Tablet PC
using to enter text with the touch screen UG-
Television Program Guide
no data available
recording TV programs GS-165
searching for TV programs GS-163
setting up a download method GS-160
using the More information button GS-159
viewing GS-159
touch screen UG- 21, 23
creating notes in HP TouchSmart Calendar UG- 32
selecting UG- 21
using Tablet PC software UG- 43
using Windows Journal UG- 43
touch screen UG- 1
troubleshooting
remote sensor
turning off PC GS-10
turning on the computer UG- 8
TV
adding missing channels to the guide
advanced recording options GS-165
editing channels in the guide GS-162
input connectors UG- 4
manually downloading the guide GS-160, GS-161
playback, time shifting GS-156
playing recorded TV programs GS-172, GS-173
recording icons GS-164
recording TV from the guide GS-165
recording TV manually GS-166
recording TV programs GS-164
removing channels from the guide GS-162
searching for TV programs GS-163
searching for TV programs by category GS-164
sorting programs GS-172
Television Program Guide errors GS-159
time shifting GS-156
using digital video recorder while watching GS-156
using the remote control GS-156
watching GS-154
watching TV programs GS-155
TV + Movies GS-153
tweak muvee GS-148
GS-159
GS-35
43
GS-162
U
update, Windows Vista GS-14
updates from Compaq Connections, using GS-2
updates from HP Connections, using GS-2
updating, system GS-14
upgrade UG- 45
user accounts
adding in HP SmartCalendar UG-
creating GS-15
32
58 HP TouchSmart PC User Guide

V
VCD GS-150
playing with Windows Media Player GS-117
video capture
live
GS-142
recorded video GS-142
video chat
setting up UG-
video editing
getting started with muvee autoProducer
video movies
transferring
transferring and recording GS-138
Video Troubleshooting, TM- 11
GS-136
videos
creating a CD or DVD GS-138
playing GS-136
playing digital videos GS-137
transferring videos GS-138
visualization settings GS-95
voice messages
creating UG-
volume
controls
volume buttons UG- 3
24
GS-141
GS-138
33
GS-24
W
weather
changing location of the two-day forecast UG-
checking local weather in HP SmartCenter UG- 27
weather forecast
accessing UGWeb camera
using UG-
25
24
27
Web camera and indicator UG- 1
Web Streaming GS-149
Windows Journal
using UG-
Windows Media Center
opening UG-
play videos GS-136
playing videos GS-136
using the touch screen to access UG- 41
viewing your pictures GS-131
watch live TV UG- 25
what you can do
Windows Media Player
play DVDs
play music CDs GS-111
playing video CDs GS-117
setting as default player GS-93
types of files GS-93
Windows Movie Maker, features GS-48
Windows Vista update GS-14
wired network UG- 18
wireless network UG- 2, UG- 19
working in comfort GS-5
43
25
in TV + Movies
GS-116
GS-153
Y
Y-cable, HP printer UG- 5, UG- 15
59 HP TouchSmart PC User Guide

Part number: 5991-7301
 Loading...