

Page 1
AIR3
iPod Speaker with ASUS Internet Radio
User Manual
Page 2

Contents
Contents ......................................................................2
Notices ..........................................................................................................4
Notes for this manual ..............................................................................5
Welcome ......................................................................6
Package contents ......................................................................................6
Overview ......................................................................................................7
Features .................................................................................................7
Specifications .............................................................................................8
Getting to know your AIR3 ........................................9
Front view .................................................................................................... 9
Rear view ....................................................................................................10
Top view .....................................................................................................12
Using the remote control .....................................................................14
Turning on the device ...........................................................................16
Main menu ................................................................................................17
Language selection ................................................................................17
Text entry ...................................................................................................18
Connecting to an iPod ..............................................19
Playing iPod media files ........................................................................19
Listening to the radio ...............................................20
Searching for a radio station ...............................................................20
Searching by global rankings ......................................................20
Searching by genre ..........................................................................21
Searching by country/location ....................................................21
Searching by station name ...........................................................22
Connecting to a station ........................................................................23
Adding a station to My Favorite ........................................................23
Adding a currently played radio station ..................................23
Page 3

Adding a radio station from the list ...........................................24
Adding a manually entered station ...........................................24
Managing My Favorite ..........................................................................25
Other settings ...........................................................26
Configuration ...........................................................................................26
Network ...............................................................................................26
Clock .....................................................................................................26
Alarm ....................................................................................................26
Language ............................................................................................27
Dimmer ................................................................................................27
Sleep Timer .........................................................................................28
Buffer ....................................................................................................28
Weather................................................................................................28
Version Update ..................................................................................28
Reset .....................................................................................................29
Weather forecast .....................................................................................30
Standby mode display ....................................................................30
Information Center ..........................................................................30
UPnP playback ..........................................................31
Troubleshooting .......................................................33
Page 4

AIR3
Notices
Federal Communications Commission Interference
Statement
This equipment has been tested and found to comply with the limits
for a Class B digital device, pursuant to Part 15 of the FCC Rules.
These limits are designed to provide reasonable protection against
harmful interference in a residential installation. This equipment
generates, uses and can radiate radio frequency energy and, if not
installed and used in accordance with manufacturer’s instructions,
may cause harmful interference to radio communications. However,
there is no guarantee that interference will not occur in a particular
installation. If this equipment does cause harmful interference to
radio or television reception, which can be determined by turning
the equipment off and on, the user is encouraged to try to correct
the interference by one or more of the following measures:
• Reorient or relocate the receiving antenna.
• Increase the separation between the equipment and receiver.
• Connect the equipment to an outlet on a circuit different from
that to which the receiver is connected.
• Consult the dealer or an experienced radio/TV technician for
help.
This device complies with Part 15 of the FCC Rules. Operation is
subject to the following two conditions:
• This device may not cause harmful interference, and
• This device must accept any interference received including
interference that may cause undesired operation.
FCC Caution:
Any changes or modifications not expressly approved by the party
responsible for compliance could void the user’s authority to
operate this equipment.
AIR34
Page 5

AIR3
FCC Radiation Exposure Statement
This equipment complies with FCC radiation exposure limits set
forth for an uncontrolled environment. This equipment should beThis equipment should be
installed and operated with a minimum distance of 20cm between
the radiator and your body. This transmitter must not be co-located
or operated in conjunction with any other antenna or transmitter.
IEEE 802.11b or 802.11g operation of this product in the U.S.A. is
firmware-limited to channels 1 through 11.
Industry Canada Statement
Operation is subject to the following two conditions:
• This device may not cause interference andThis device may not cause interference and
•
This device must accept any interference, including interference
that may cause undesired operation of the device.
Radiation Exposure Statement
This equipment complies with IC radiation exposure limits set
forth for an uncontrolled environment. This equipment should beThis equipment should be
installed and operated with a minimum distance of 20cm between
the radiator and your body.
Notes for this manual
To ensure that you perform certain tasks properly, take note of the
following symbols used throughout this manual.
WARNING: Vital information that you MUST follow to prevent
injury to yourself.
IMPORTANT: Instructions that you MUST follow to complete a
task.
TIP: Tips and useful information that help you complete a task.
NOTE: Additional information for special situations.
AIR3 5
Page 6
AIR3
Welcome
PREVIOUS
PLAY/PAUSE NEXT
R
R
Rock Solid Heart Touching
User Manual
Network Setup
Guide
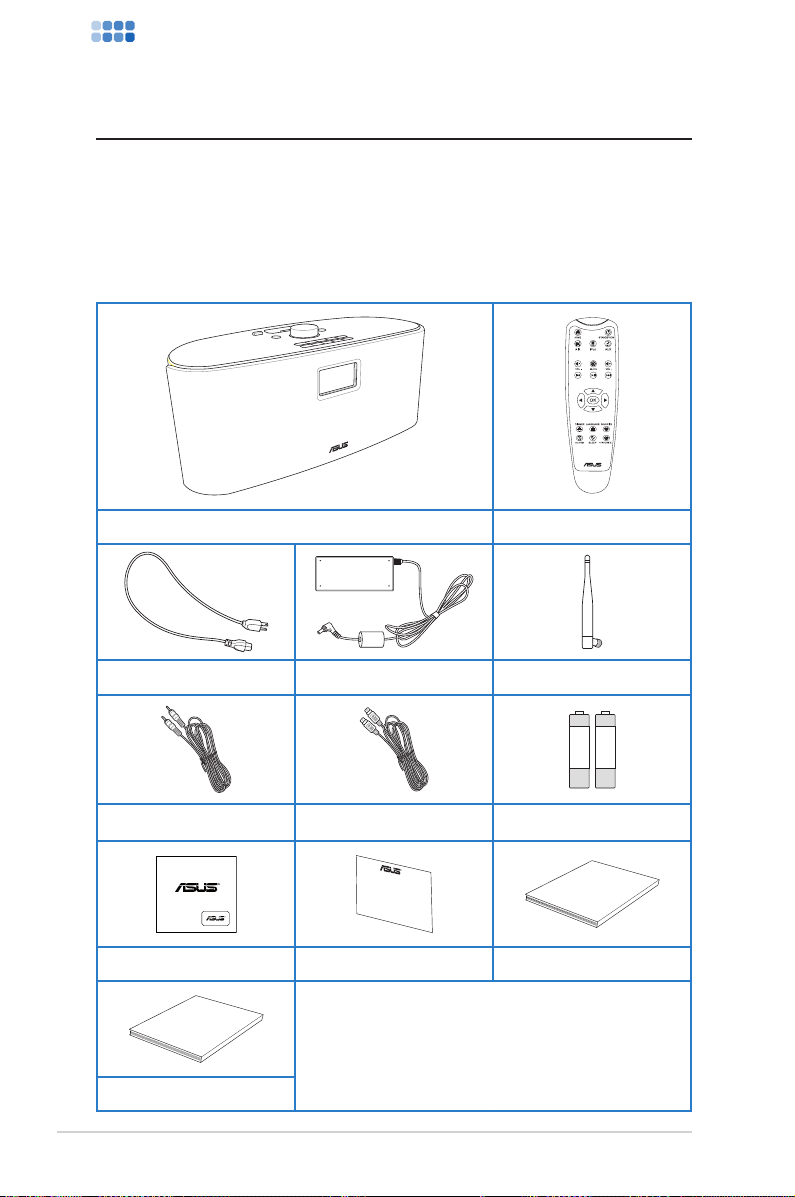
Congratulations on your purchase of AIR3. The following
illustrations are the package contents of your new AIR3. Note that
the package does not include an iPod.
Package contents
AIR3 Remote control
Power cord AC power adpater Wireless antenna
AIR36
3.5mm jack audio cable S-Video cable AAA battery x2
Cleaning cloth Warranty card User Manual
*The illustrations are for reference only. Actual
product specifications may vary.
Network Setup Guide
Page 7

AIR3
Overview
AIR3 is both an iPod docking station and an Internet Radio that
enriches your audiovisual life. You can play your iPod music through
the AIR3 speakers. When connected to a display, AIR3 allows you to
view your iPod videos or image files. AIR3 also provides easy access
to a wide selection of radio stations on the Internet. Before enjoying
your ASUS Internet Radio, ensure that you have access to a wired/
wireless network.
Features
• iPod docking with high quality stereo speakers
• Aux In from other audio devices
• Video Out from iPod
• Stand-alone device
• Wireless/wired connection
• More than 10,000 worldwide radio stations with rankings
• Playing music from your PC through UPnP protocol
• 250 favorite radio stations
• Nap alarm clock
• Weather forecast and financial information
AIR3 7
Page 8

AIR3
Specications
Connectivity
Date rates
Wireless LAN security
Audio format decoder
SNR >90dB earphone
Display
I/O ports
Speakers
AC power adapter
Remote control 22 keys
Dimension 400 (L) ×170 (W ) ×170 (H) mm
Weight 3.5 Kg (device only)
ADSL/Cable
Modem bandwidth
(recommended)
Wireless LAN 802.11b/g
Wired 10/100M Ethernet
54 Mbits (WLAN)
10/100 Mbits (Ethernet)
64/128-bit WEP
WPA/WPA2
MP3/WMA
16Kbps–320Kbps
128 × 64 FSTN graphics display
Blue color with white LED
Headphone jack (Φ 3.5mm)
Aux In (Φ 3.5mm)
Ethernet (RJ45)
DC power jack
Video out (RCA jack)
S-Video (DIN jack)
1” Tweeter 3 Watt/5 Ohm x 2
3.5” Woofer 15 Watt/4 Ohm x 2
Input: AC 100–240V (50–60Hz)
Output: DC 20V/2A
1M bps at least
AIR38
Page 9
AIR3
Getting to know your AIR3
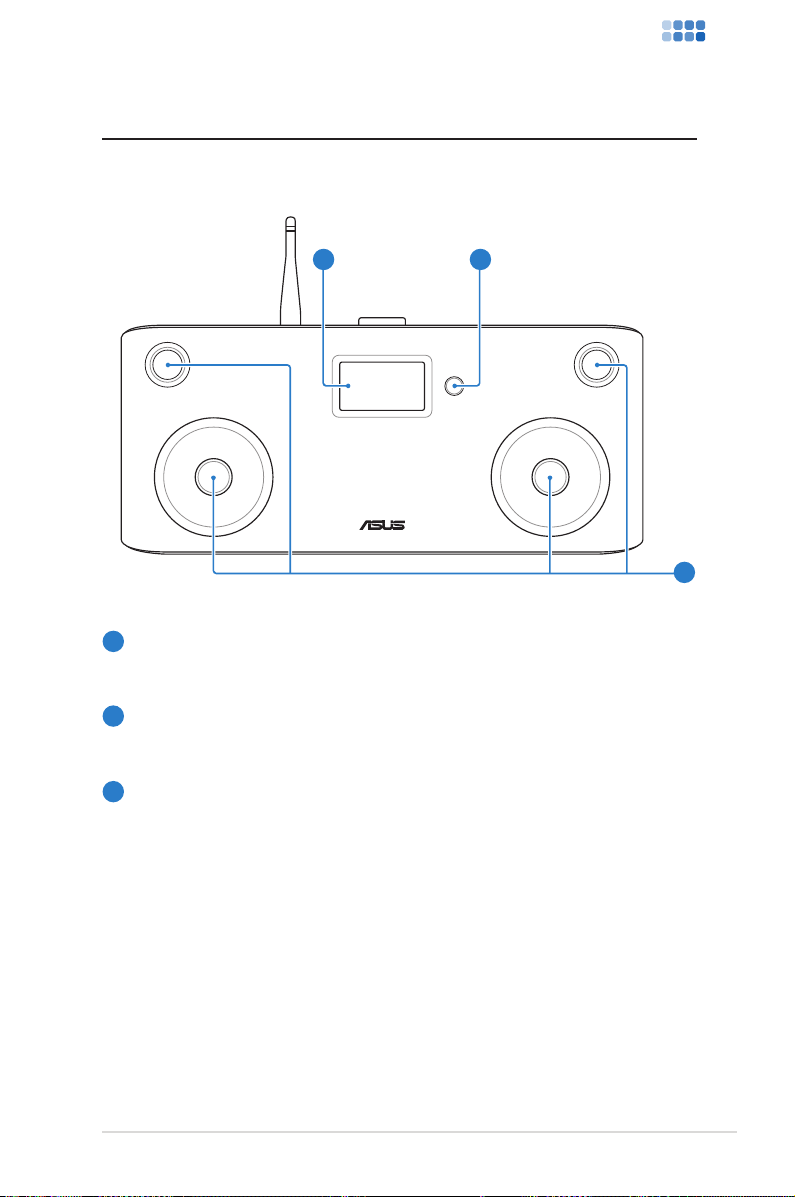
Front view
1
LCD display
1
2
3
The LCD display, with adjustable backlight, shows user interface.
2
IR receiver
The IR receiver receives commands from the remote control.
3
Speakers
The built-in speakers deliver high-quality audio output. You may
remove the front net cover to see the speakers.
AIR3 9
Page 10
AIR3
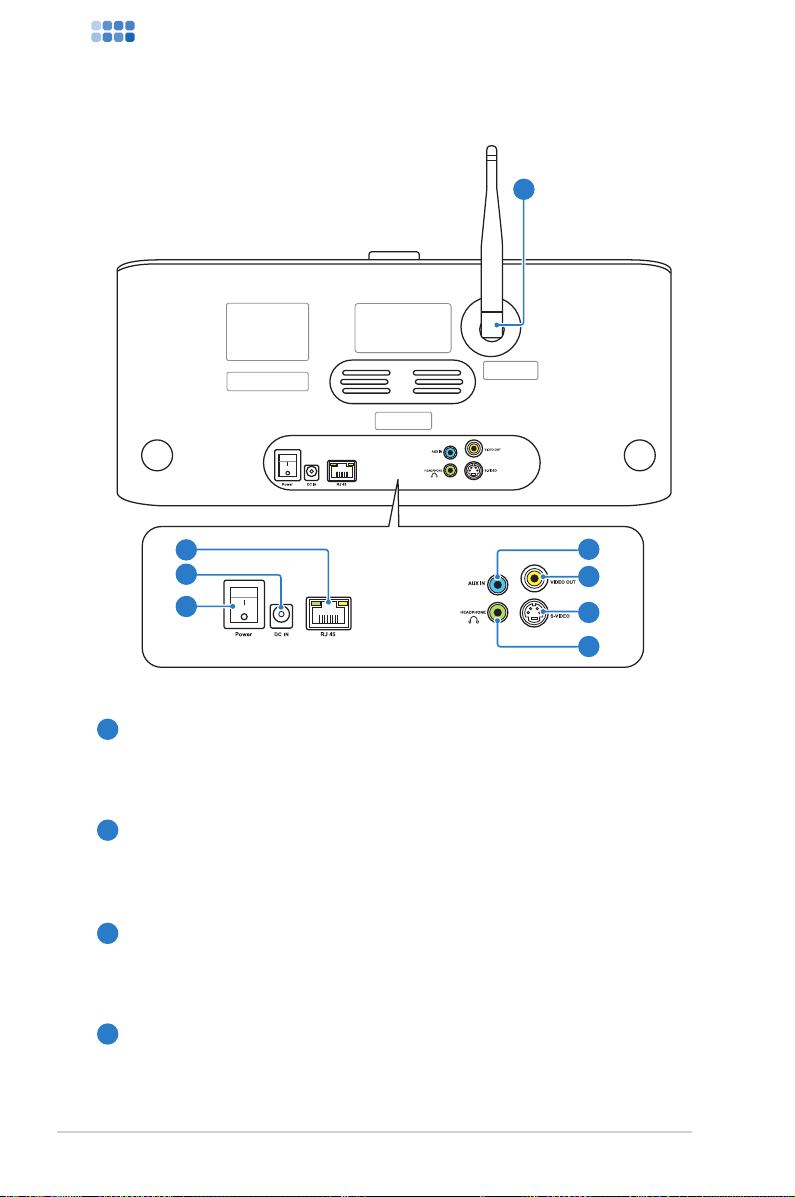
Rear view
3
10
9
8
3
Wireless antenna
4
5
6
7
Install the supplied antenna and set it to a vertical position to the supplied antenna and set it to a vertical position to
ensure best reception of wireless signal.
4
AUX IN jack
To use the device solely as speakers, connect the supplied
3.5mm jack audio cable to this jack from a playback device.
5
VIDEO OUT jack
To connect the device to a display, plug a composite cable
(yellow) into this jack.
6
S-VIDEO jack
To connect the device to a display, plug the supplied S-Video
cable into this jack.
AIR310
Page 11

AIR3
7
HEADPHONE jack
The stereo headphone jack (Φ 3.5mm) is used to connect the
device’s audio out signal to amplified speakers or headphones.
Using this jack automatically disables the built-in speakers.
8
Power switch
The power switch allows powering ON and OFF the device.
9
DC 20V power jack
The supplied power adapter converts AC power to DC power
for use with this jack. Power supplied through this jack supplies
power to the device. To prevent damage to the device, always
use the supplied power adapter.
The power adapter may become warm or hot when in use. Do not
cover the adapter and keep it away from your body.
10
RJ 45 LAN port
The eight-pin RJ-45 LAN port supports a standard Ethernet
cable for connection to a local network.
AIR3 11
Page 12

AIR3
Top view
1
6
5
8 9
7 10 11
1213141516
2
3
4
When the button
LED lights are off,
press any button to
turn on the lights.
When the LEDs are
on, pressing a button
performs the action.
1
iPod connector
The iPod connector allows connecting to an iPod to play iPod
music. By connecting the device to a display, videos or image
files stored in an iPod can be viewed. The device is switched to
iPod mode automatically as soon as an iPod is connected.
AIR312
Page 13

AIR3
2
Standby/On buttonStandby/On button
Press to switch the device between standby and on mode.Press to switch the device between standby and on mode.
3
Right button
Press to confirm your selection of an option and go to the
submenu. Press to go to the next field when entering text.
4
Volume knob
Rotate to adjust volume,select text, or scroll up/down throughRotate to adjust volume, select text, or scroll up/down through
menu options. Press to confirm your selection of a menu option.
5
Left button
Press to go to the previous menu. Press to go to the previous
field when entering text.
6
BASS button
Press to turn on/off the built-in speaker bass effects.Press to turn on/off the built-in speaker bass effects.
7
Home button
Press to return to the main menu.Press to return to the main menu.
8
Previous track button
Press to go to the previous track.Press to go to the previous track.
9
Play/Pause button
Press to play iPod music/videos/image files or pause a playback.Press to play iPod music/videos/image files or pause a playback.
10
Next track button
Press to go to the next track.Press to go to the next track.
11
Dimmer button
Press to select a backlight mode.Press to select a backlight mode.
12
Sleep button
Press to select a preset amount of time after which the devicePress to select a preset amount of time after which the device
shuts off.
13
AUX mode button
Press to switch the device to AUX mode when it is used solely asPress to switch the device to AUX mode when it is used solely asused solely as
speakers. Press this button after connecting a playback device.. Press this button after connecting a playback device.
AIR3 13
Page 14

AIR3
PREVIOUS
PLAY/PAUSE NEXT
14
iPod mode button
Press to switch the device to iPod mode.The device isPress to switch the device to iPod mode. The device is
automatically switched to this mode when you connect an iPod.
15
AIR mode button
Press to switch the device to Internet Radio mode.Press to switch the device to Internet Radio mode.
16
Favorite button
Press to display a list of your favorite radio stations.Press to display a list of your favorite radio stations.
Using the remote control
Refer to the table on the next page for the remote control buttons
and their functions.
AIR314
Page 15

AIR3
Icon Name Function
Standby/On
Press to switch the device between
standby and on mode.
Home Press to return to the main menu.
AIR mode Press to switch to Internet Radio mode.
iPod mode Press to switch to iPod mode.
AUX mode Press to switch to AUX mode.
Volume- Press to decrease the output volume.
Mute Press to mute the audio output.
Volume+ Press to increase the output volume.
Previous track Press to go to the previous track.
Play/Pause
Press to play iPod music/videos/image
files or pause a playback.
Next track Press to go to the next track.
Up
Down
Press to scroll up through menu items.
Press to select text.
Press to scroll down through menu items.
Press to select text.
Press to go to the previous menu.
Left
Press to go to the previous field when
entering text.
Press to confirm your selection of an
Right
option and go to the submenu.
Press to go to the next field when
entering text.
OK
Press to confirm your selection of a menu
option.
(continued on the next page)
AIR3 15
Page 16

AIR3
Icon Name Function
Dimmer Press to select a backlight mode.
Language Press to select a menu language.
Favorite Press to display your favorites list.
Alarm Press to turn on/off the alarm clock.
Sleep
+Favorite
Press to select a preset amount of time
after which the device shuts off.
Press to store the currently played radio
station to your favorites list.
Turning on the device
Connect the supplied AC adapter to the DC IN power jack on the
rear panel (1 2 3), and then press the power switch to turn on
the device (4). The display lights up to show the ASUS logo, and
then the main menu appears.
4
2
3
1
AIR316
Page 17

AIR3
Main menu
PREVIOUS
PLAY/PAUSE NEXT
Network
status
Menu
options
12:00PM
Internet Radio
Media Center/UPnP
iPod
1/6 >>
The main menu contains six options and the
first option is highlighted
Time
Press the
Right button
to display the
submenu
Pressing the button on the top panel or on the remote control
does not turn the device on.
Language selection
ASUS Internet Radio supports multiple languages for the menu
options.
To change the language:
Press the Language button on the
remote control to select the language
you use (the fastest way).
OR
1. From the main menu, rotate the volume knob to highlight
Configuration and then press the knob to enter the submenu.
2. Select Language in the same way.
3. Rotate the volume knob to highlight the language you use and
then press the knob to apply.
The selected language applies to the device menus and system
messages only. The station names shown vary according to station
locations.
AIR3 17
Page 18

AIR3
Text entry
PLAY/PAUSE NEXT
To enter your WEP/WPA key or IP address, add a radio station
address, and set time and date, do the following:
1. Press the Up/Down button or rotate
the volume knob to select a character
from the following table:
Letters A a B b C c…Z z
Symbols $ % & # _ ^ ~ ` “ ‘, . : ; ? ! * - + @ < = > { ¦ } [ \ ] ( / )
Numbers 0 1 2 3 4 5 6 7 8 9
Delete ( ): Select and press the Left/Right button
Other
The characters appear in a circular order. What is next to “space” is
the uppercase A.
2. Press the Right button ( or ) to proceed to the next. Press
OK ( ) or the volume knob when done.
to delete text on the left.
Space: Select to add a space.
AIR318
Page 19

AIR3
Connecting to an iPod
PREVIOUS
PLAY/PAUSE NEXT
Playing iPod media les
After you connect your iPod to AIR3, AIR3 is switched to iPod mode
automatically and is ready to play iPod music, videos, or image files.
Pressing the iPod mode button on the top panel ( ) or on the
remote ( ) also switches the device to this mode from the other
modes. You can use the AIR3 remote to control your iPod.
To view videos or image files stored in your iPod, connect AIR3 to a
display. The following two connections are available:
• VIDEO OUT: Plug one end of a composite cable (yellow) into this
jack on the rear panel and the other end to a display.
• S-VIDEO: Plug one end of the supplied S-Video cable into this
jack on the rear panel and the other end to a display.
AIR3 19
Page 20

AIR3
Listening to the radio
Searching for a radio station
AIR3 has an up-to-date, well-classified list of online radio stations
worldwide. Not every Internet radio station has a corresponding
traditional radio station. Some of them broadcast via the Internet
only. You can search for a station by global rankings, music genre,
or location. You can also go through the stations categorized in
alphabetical order.
Searching by global rankings
1. From the main menu, select Internet Radio > Radio Station/
Music > Global Top 20, and a list of top 20 radio stations
worldwide displays.
2. Press the Up/Down button to highlight a station and press
Enter to connect to the station.
Network
Press the
Left button
to go to the
previous
AIR320
status
menu
*When you highlight a station from the list, vertical bars appear
at the bottom left corner of the display to indicate the accessibility
to the station. Three bars suggest the highest accessibility.
12:00PM
Top01: XXXXXXXX
Top02: XXXXXX
Top03: XXXX
<< 1/20 >>
Accessibility*
1st of all 20 items
Press the Enter
button to
connect to the
station
Press the
Right button
to display the
submenu
Page 21

AIR3
Searching by genre
1. From the main menu, select Internet Radio > Radio
Station/Music > Genre, and a list of music genres displays in
alphabetical order.
2. Press the Up/Down button to highlight a genre. For example, if
you want to listen to jazz music:
12:00PM
Industrial
Jazz
Jazz Rock
<< 34/78 >>
3. Press the Right button to display all the jazz stations available,
with the top 10 listed first. Highlight a station and press Enter to
connect to the station.
Searching by country/location
1. From the main menu, select Internet Radio > Radio Station/
Music >Country/Location, and a list of geographical regions
displays in alphabetical order.
12:00PM
Africa
Asia
Europe
<< 1/8 >>
The list includes: Africa, Asia, Europe, Latin America, Middle East,
North America, Oceania/Pacific, and Internet Only.
AIR3 21
Page 22

AIR3
2. Select a geographical region and then select a country in the
region. A list of stations located in the country displays.
3. Highlight a station and press Enter to connect to the station.
• For countries that have a huge number of radio stations, the
stations are sub-classified by name initial alphabetically.
• If you select a language other than English, you will see the
name of the country where that language is spoken in the
Radio Station/Music menu. Highlight the country name and
press Enter to display the stations located in this country.
Searching by station name
1. From the main menu, select Internet Radio > Service > Search
Radio Station.
2. The stations are divided into 10 categories by their name initial:
0-9, A-C, D-F, G-I, J-L, M-O, P-R, S-U, V-Z, and Other. Select a
category and a list of stations displays.
Station names formed by characters other than Roman alphabet
are in the Other group.
3. Select any of the stations again to display more stations. The
stations are listed alphabetically according to the first two
letters of their names.
4. Highlight a station and press Enter to connect to the station.
AIR322
Page 23

AIR3
Connecting to a station
If your AIR3 is successfully connected to a station, the display is as
follows:
Network status
Data
information
Buffer length**
12:00PM
All That Jazz Radio
WMA 32 kbps/Jazz
Playing…
Station name
Connection
status*
< 11/92
• *The connection status may change from “Connecting” to
“Buffering” to “Playing.” Press Enter to stop playing and go back
to the previous menu.
• **Refer to page 28 for details about setting the buffer.
• If you shift to the main menu while connecting to a station, a
countdown timer will appear at the bottom right corner of the
display. After a lapse of 10 seconds, the system automatically
shifts back to the station being played.
Adding a station to My Favorite
You can add a currently played radio station or one found on the list
to My Favorite. You can also manually enter the address of a station
and add it to your favorites list. AIR3 has a memory of 250 stations.
Adding a currently played radio station
1. Press the +Favorite button ( ) on the remote control.
2. The following icons will appear next to the network status icon
to indicate favorites status:
The station is being added to My Favorite.
The station has already been in My Favorite.
Favorites exceeds the maximum of 250.
AIR3 23
Page 24

AIR3
Adding a radio station from the list
1. Search for a station using any of the methods mentioned in the
“Searching for a radio station” section.
2. Highlight a station and press the Right button to display the
submenu as the following:
12:00PM
Add to My Favorite
Auto Scan (Down)
Auto Scan (Up)
<< 1/4
3. • Add to My Favorite: Select to add the station to your
favorites list.
• Auto Scan (Down)/(Up): Select to connect to the stations
on the list consecutively up/down from the highlighted
station. Each station will be played for 30 seconds during
which you can add it to My Favorite by pressing the
+Favorite button ( ).
• Play: Select to connect to the station.
Refer to the table on page 23 for favorites status.
Adding a manually entered station
1. From the main menu, select Internet Radio > Service > Add
New Radio Station.
2. Enter the address of a station. Refer to the “Text entry” section
on page 18 for details about entering text.
3. When finished, press Enter to add it to your favorites list. Refer
to the table on page 23 for favorites status.
AIR324
Page 25

AIR3
Managing My Favorite
AIR3 saves up to 250 stations to My Favorite so that you can have
quick access to preset stations.
To manage your favorites list:
1. Press the Favorite button ( ) on the remote control or select
Internet Radio > My Favorite from the main menu. A list of
preset stations displays.
2. Highlight a station on the list and press the Right button to
display the submenu as the following.
You can also connect to the highlighted station directly by
pressing Enter.
12:00PM
Delete
Shift Up
Shift Down
<< 1/5
3. • Delete: Select to delete the station.
• Shift Up/Down: Select to change the order of the preset
stations.
• Rename: Select to rename the station.
• Play: Select to connect to the station.
AIR3 25
Page 26

AIR3
Other settings
Conguration
Selecting Configuration from the main menu allows you to
configure the AIR3 setups including Network, Clock, Alarm,
Language, Dimmer, Sleep Timer, Buffer, Weather, Version Update,
and Reset.
Network
Refer to the Network Setup Guide for details.
Clock
The Configuration > Clock option allows you to set the time/date
and a format for displaying time. The first time you turn on the
device and connect it to the network, the display shows Greenwich
Mean Time (GMT). Set the hour according to your time zone, and
through Network Time Protocol (NTP), a clock synchronization
solution on the Internet, the device will synchronize its clock with
accuracy as long as it is connected to the network.
• Set Date and Time: Select to set the time and date. Refer to
the “Text entry” section on page 18 for details about entering
numbers.
• Set Time Format: Select between the 12Hour and 24Hour
format.
• You can check Greenwich Mean Time (GMT) under the
Information Center menu.
• Reset the hour for the device once you are in a different time
zone.
Alarm
This option allows you to turn on/off the alarm or program a nap
alarm that wakes you up in a fixed period of time. Pressing the
Alarm button ( ) on the remote control can activate/deactivate a
programmed alarm or select the alarm settings.
AIR326
Page 27

AIR3
To program an alarm:
1. Go to Configuration > Alarm > Turn On (1)/(2) or XXX
Minutes (NAP).
You can program two different alarms or set a nap alarm that will
set off after XXX minutes.
2. Select Set Alarm Time and enter values. Refer to the “Text
entry” section on page 18 for details about entering numbers.
3. Select Set Alarm Sound to choose a sound type from Beep,
Melody, Radio (the station you last listened to), and iPod (the
iPod music you last played).
4. The / /XXX icon will appear at the upper right corner of the
display to indicate that the alarm function is activated.
Ensure that the device is in standby mode at the set time, or the
alarm will not set off. When the alarm sets off, press any button to
stop it.
Language
Refer to page 17 for details about language selection.
Dimmer
The Configuration > Dimmer option allows you to adjust the
brightness of the device backlight. You can also shift the backlight
mode by pressing the Dimmer button ( ) on the remote control.
Three modes are available:
• Turn Off: Select to turn off the backlight.
• Power Saving: Select to turn down the backlight.
• Turn On: Select to turn on the backlight.
AIR3 27
Page 28

AIR3
Sleep Timer
The Configuration > Sleep Timer option allows you to select a
preset amount of time after which the device shuts off. You can also
set the sleep timer by pressing the Sleep button ( ) on the remote
control. When this function is activated, the XXX icon will appear
at the upper right corner of the display, XXX signifying the minutes
left. Six options are available: Turn Off, 15 Minutes, 30 Minutes, 60
Minutes, 90 Minutes, and 120 Minutes.
Buffer
The Configuration > Buffer option allows you to set the buffer to
hold data received for a certain amount of time. Setting a longer
buffer makes the data transfer more smoothly but takes you longer
to wait. If you are connecting to a station, there will be an icon
signifying the buffer length you set:
• 2 Seconds:
• 4 Seconds:
• 8 Seconds:
Weather
The Configuration > Weather > Standby display > Turn on
standby display option allows weather forecast to be displayed
in standby mode. You can select the Temperature unit between
Centigrade (˚C) and Fahrenheit (˚F).
Version Update
If a new firmware version comes up,
you will see this pop-up message.
Select Version Update (Yes) to
download the latest version.
If you select Version Update (No),
You can still download the latest
version later:
AIR328
12:00PM
Version Update (Yes)
Version Update (No)
< 1/2
Page 29

AIR3
1. Go to Configuration > Version Update and select the item (a
string of numbers) you are allowed to download.
• If there is no item displayed, it means your current firmwareIf there is no item displayed, it means your current firmware
version is the latest.
• The device will download the latest station list version
automatically as long as it is connected to the network. The
station list version is signified by the last four digits of the
number string.
2. Select Yes. A countdown timer displays to count from 60
seconds. Wait until the device reboots.
3. Go toGo to Configuration > Version Update to check if the version
name is different from the previous one.
Do not turn off the device while the update is proceeding.
Reset
The Configuration > Reset option allows you to reset the device to
its factory default settings. Your favorites lists and network settings
will not be erased.
AIR3 29
Page 30

AIR3
Weather forecast
Standby mode display
Information Center
AIR330
Page 31

AIR3
UPnP playback
AIR3 31
Page 32

AIR3
AIR332
Page 33

AIR3
Troubleshooting
Read the following Q&As for troubleshooting guide. If these do
not give you answers, you may contact us directly at the contact
information provided on this manual’s inside cover.
Why is it that I cannot hear anything from the speakers?
• Some stations may not have 24-hour broadcasts. You cannot hear
anything If the stations do not send out any programs.
• Either your AIR3 speakers are muted or the volume is too low.Either your AIR3 speakers are muted or the volume is too low.
Turn up the volume or press the Mute button ( ) to cancel the
muted mode. If you are using additional speakers, make sure that
the connected speaker system is powered on.
I have connected AIR3 to my playback device but there is no sound
coming out.
• Ensure that you have plugged the audio cable to the AUX IN jack
on AIR3 and have pressed the AUX mode button ( / ) to
switch the device to that mode.
• In AUX mode, neither AIR3 top panel buttons nor the remote
control works on your playback device.
Why is it that I cannot activate UPnP?
You need to connect both your PC and AIR3 to the same network.
What can I do if my AIR3 crashes?
Press the power switch on the rear panel to turn off the device, and
then switch it on again.
I have set the alarm but it did not set off.
The alarm will set off only in standby mode.
The wireless connection is not stable.
• Establish a wired connection to test if your network is reliable.
• If the wired connection is more stable than the wireless one, use
the LAN connection instead.
AIR3 33
Page 34

AIR3
Why does the list of online radio stations change?
The addresses of the Internet radio stations may vary, so ASUS
technicians update them regularly. Your AIR3 will obtain the latest
list automatically as long as it is connected to the network. Your
device functions as usual while the update is proceeding (1–2
minutes).
I have had a station in mind but it is not shown on the AIR3 station
list.
• Go to Home > Internet Radio > Service > Add New Radio
Station to enter the station address.
• Contact us at http://vip.asus.com/eservice/techserv.aspx
(recommended).
I cannot connect to certain radio stations.
The accessibility to online radio stations vary with the network
bandwidth in different countries. Failed connections may be due to
the following:
• The network bandwidth in the country you want to connect to is
narrow. We recommend an ADSL/Cable Modem bandwidth of at
least 1M bps.
• Internet congestion.
• The radio stations do not provide enough bandwidth.
• The radio stations are under repair or no longer exist.
If you still cannot connect to some radio stations, contact us at
http://vip.asus.com/eservice/techserv.aspx
AIR334
 Loading...