

Page 1

Chapter 4
This device complies with Part 15 of the FCC Rules
Operation is subject to the following two conditions:
(1)This device may not cause harmful interference, and
(2)This device must accept any interference received,
including interference that may cause undesired operation
Microsoft® Pocket Outlook
♦♦
♦ Introduction........................................................... 4-2
♦♦
♦♦
♦ Calendar ................................................................ 4-2
♦♦
Creating appointments............................................................. 4-3
Using the summary screen ...................................................... 4-4
Creating meeting requests....................................................... 4-4
♦♦
♦ Contacts ................................................................ 4-5
♦♦
Creating contacts ..................................................................... 4-6
Using the summary screen ...................................................... 4-6
Finding a contact...................................................................... 4-7
♦♦
♦ Tasks...................................................................... 4-8
♦♦
Creating tasks .......................................................................... 4-8
Using the summary screen ...................................................... 4-9
♦♦
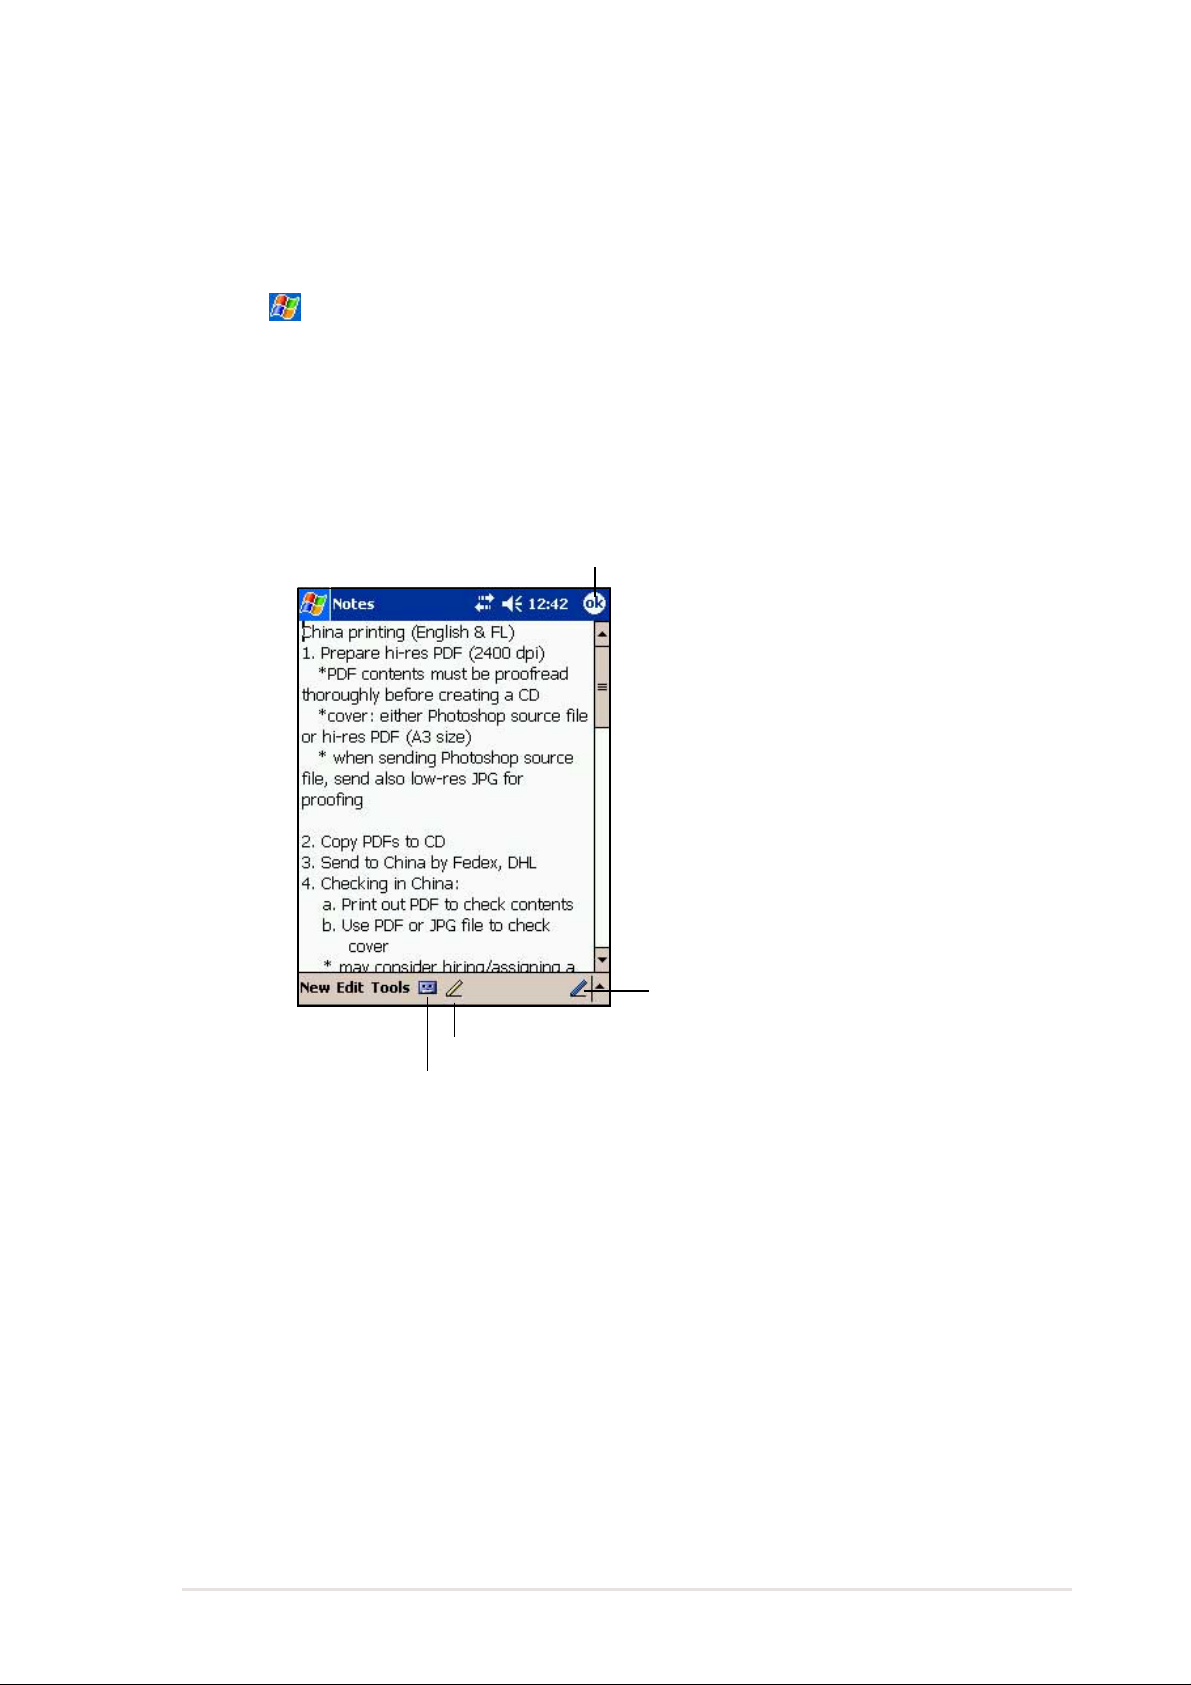
♦ Notes.................................................................... 4-10
♦♦
Creating notes.........................................................................4-11
♦♦
♦ Inbox .................................................................... 4-12
♦♦
Synchronizing e-mail messages ............................................ 4-12
Connecting directly to an e-mail server.................................. 4-13
Using the message list........................................................... 4-14
Composing messages ........................................................... 4-16
Managing e-mail messages and folders ................................ 4-17
Microsoft® Pocket Outlook
4-1
Page 2
Introduction
Microsoft® Pocket Outlook includes Calendar, Contacts, Tasks, Inbox, and
Notes. You can use these programs individually or together. For example,
e-mail address stored in Contacts can be used to address e-mail
messages in Inbox.
Using ActiveSync
or Microsoft Exchange on your desktop computer with your device. You
can also synchronize this information directly with a Microsoft Exchange
server. Each time you synchronize, ActiveSync compares the changes you
mode on your device and desktop computer or server and updates both
computers with the latest information. For information on using ActiveSync,
see ActiveSync Help on your desktop computer.
You can switch to any of the Pocket Outlook programs by tapping
®
, you can synchronize information in Microsoft Outlook
.
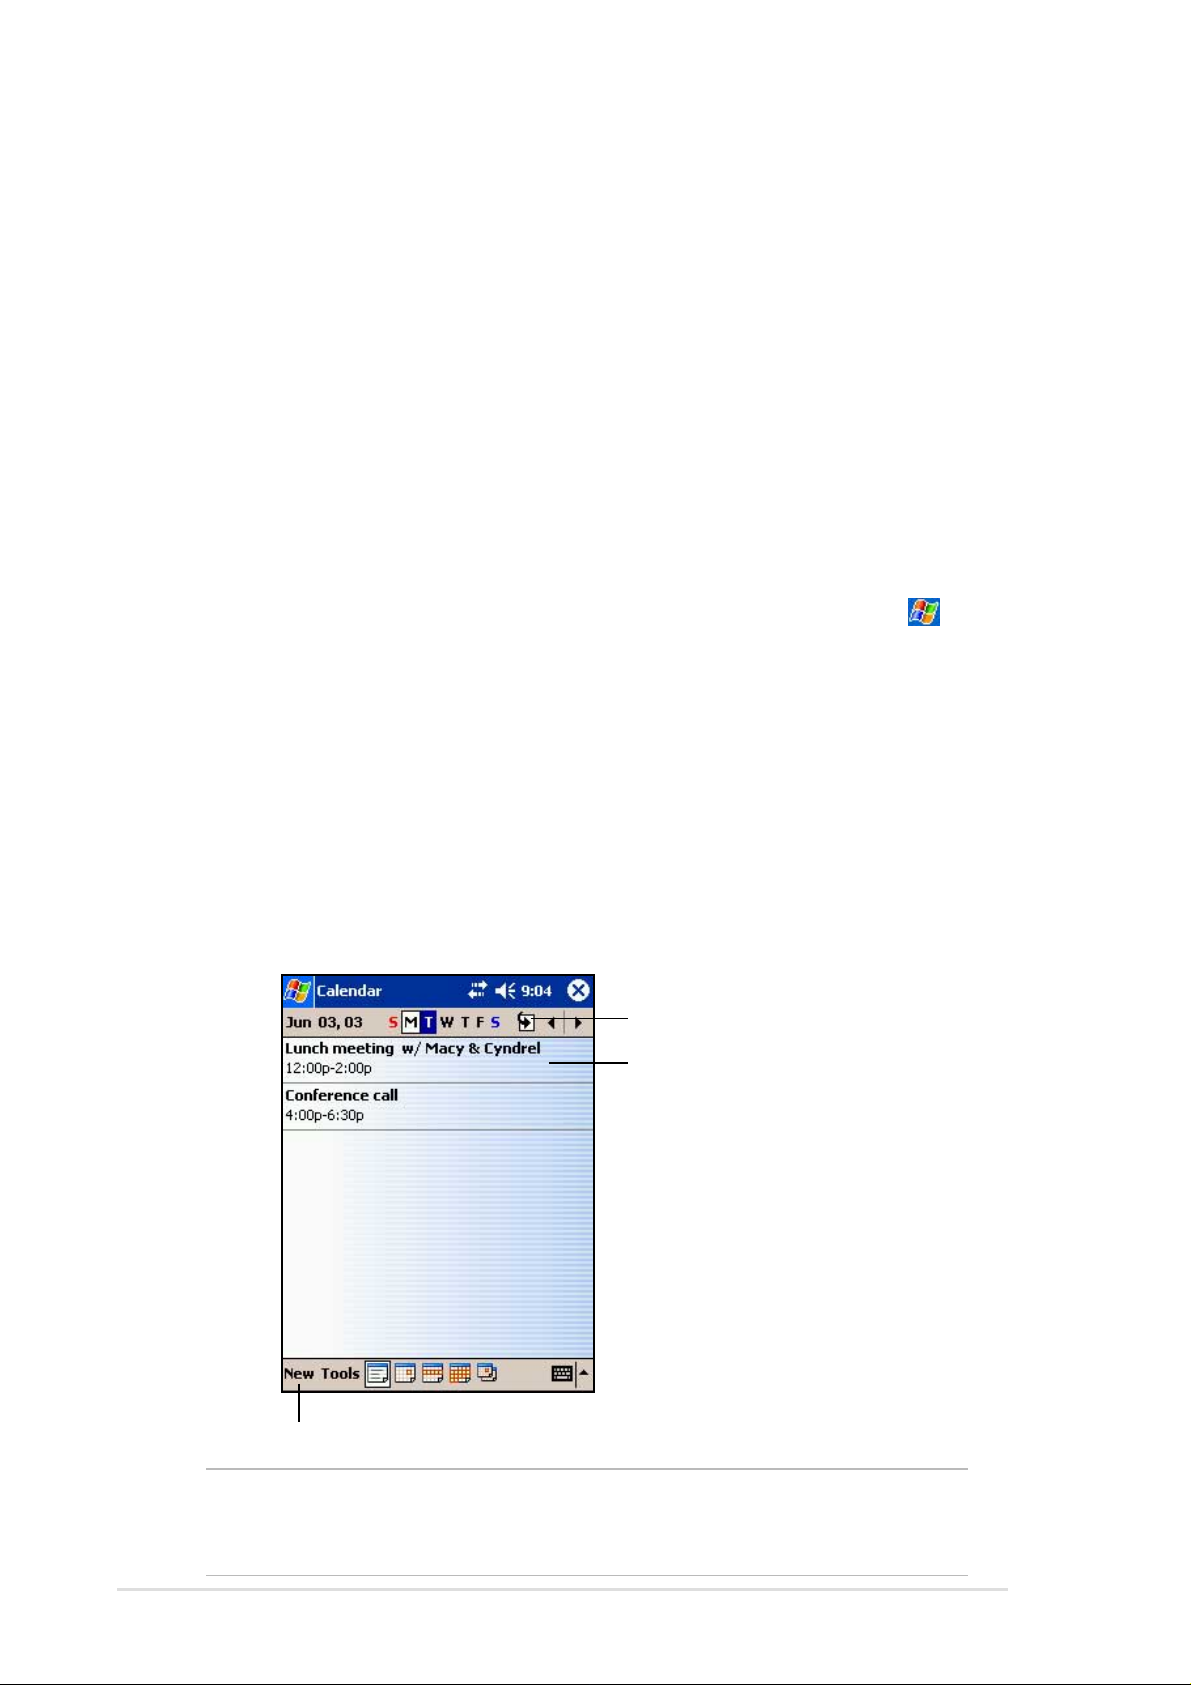
Calendar: Scheduling appointments
and meetings
Use Calendar to schedule appointments, including meetings and other
events. You can check your appointments in one of several views
(Agenda, Day, Week, Month, and Year) and easily switch views using the
View menu.
Tap to go to Today
Tap to display or edit the
appointment details
Tap to create a new appointment
NOTE You can customize the Calendar display, such as changing
the first day of the week, by tapping Options on the Tools
menu.
4-2
Chapter 4
Page 3
Creating appointments
To create an appointment:
1. If you are in Day or Week view, tap your desired date for the
appointment,
2. Tap New.
Tap to select from a predefined text
Tap to select from previously
entered locations
Tap to specify the time of appointment
Tap to specify the date of appointment
Tap to add notes to the appointment
3. Using the input panel, enter a description and a location. Tap to select
the field.
4. If needed, tap the date and time to change them.
5. Enter other desired information. You will need to hide the input panel to
see all available fields.
6. To add notes, tap the Notes tab. You can enter text, draw, or create a
recording. For more information on creating notes, see the “Notes:
Capturing thoughts and ideas” later in this chapter.
7. When done, tap OK to return to Calendar.
NOTE If you select Remind me in an appointment, your device will
remind you according to the options set in
Personal tab, Sounds and Notifications.
, Settings,
Microsoft® Pocket Outlook
4-3
Page 4
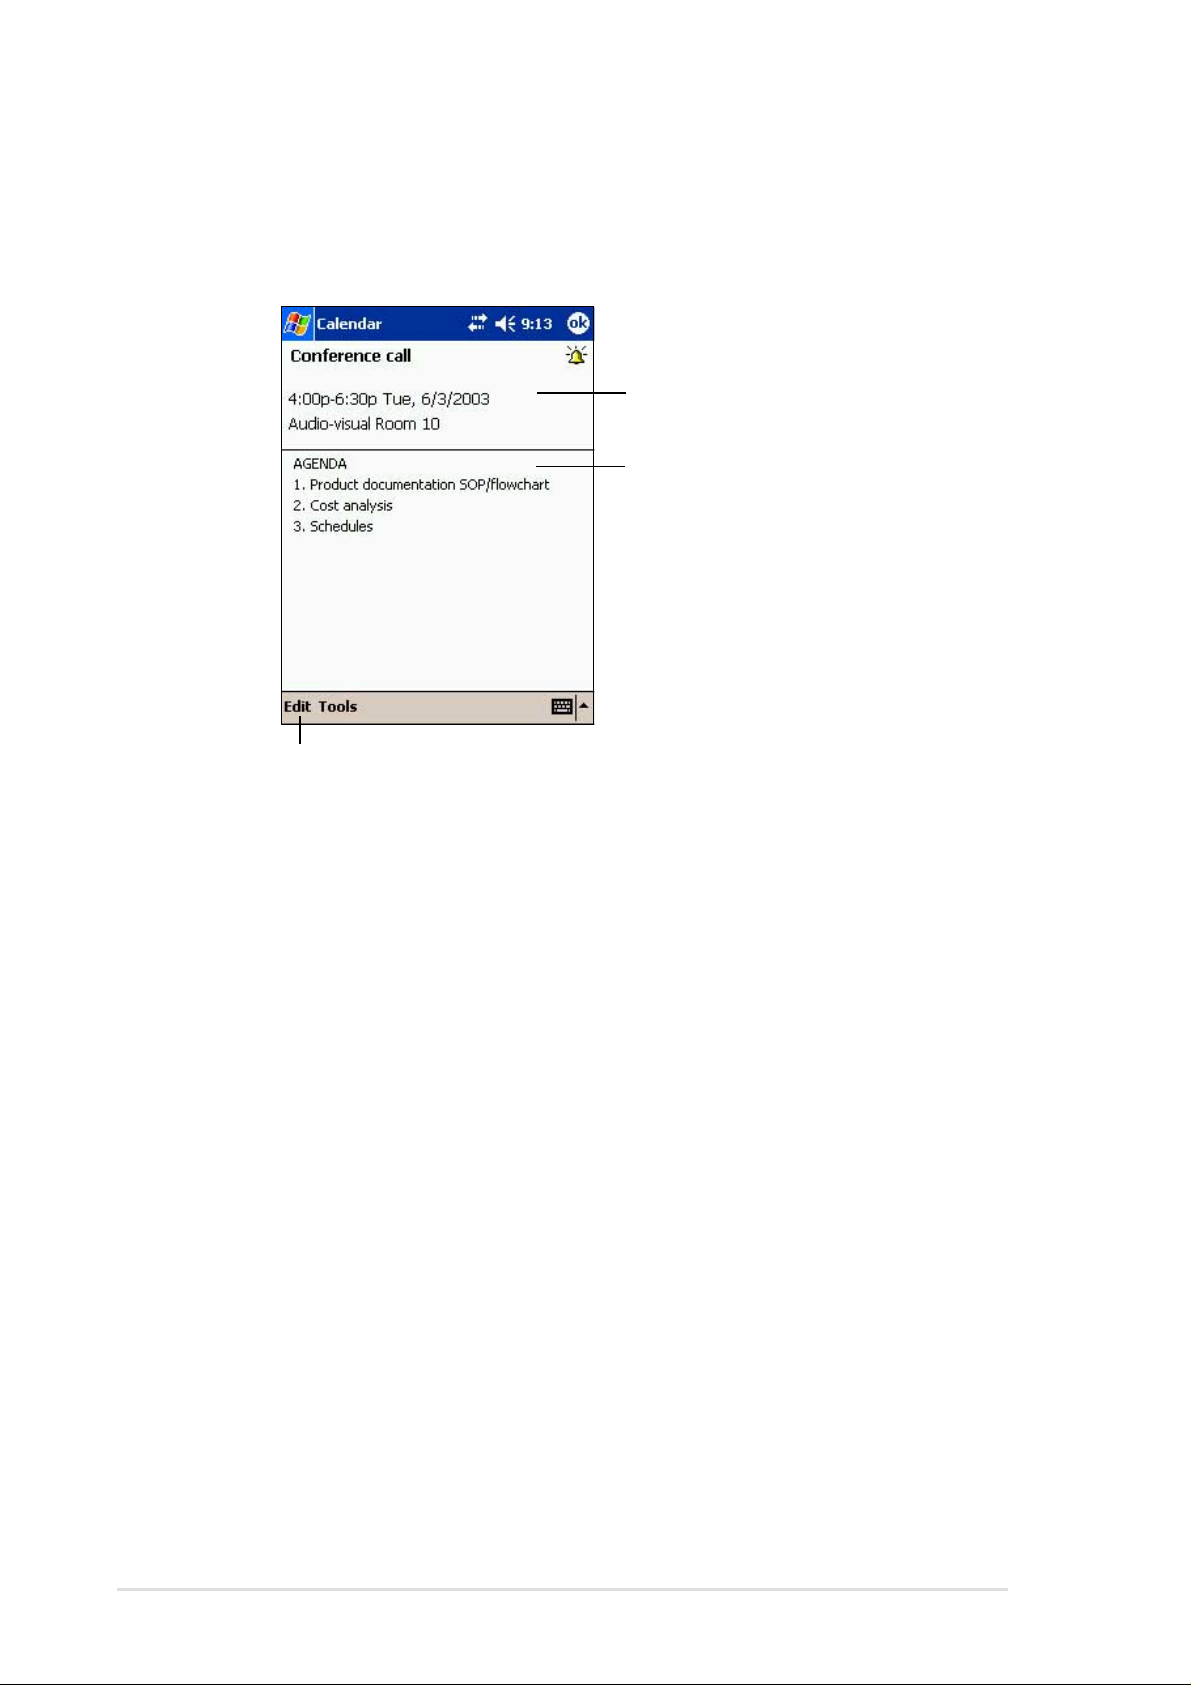
Using the summary screen
When you tap an appointment in Calendar, a summary screen appears. To
change the appointment, tap Edit.
Appointment details
Notes/additional information
on the appointment
Tap to change details of the appointment
Creating meeting requests
You can use Calendar to set up meetings with users of Outlook and
Pocket Outlook. The meeting request will be created automatically and
sent either when you synchronize Inbox or when you connect to your
e-mail server.
To create a meeting request:
1. Tap Tools then Options to indicate how you want meeting requests
sent.
2. If you send and receive e-mail messages through ActiveSync, select
ActiveSync.
To schedule a meeting:
1. Create an appointment.
2. In the appointment details, hide the input panel, then tap Attendees.
3. From the list of e-mail addresses you have entered in Contacts, select
the meeting attendees.
4-4
The meeting notice is created automatically and place in the Outbox
folder. For more information on sending and receiving meeting
requests, see Calendar Help and Inbox Help on the device.
Chapter 4
Page 5
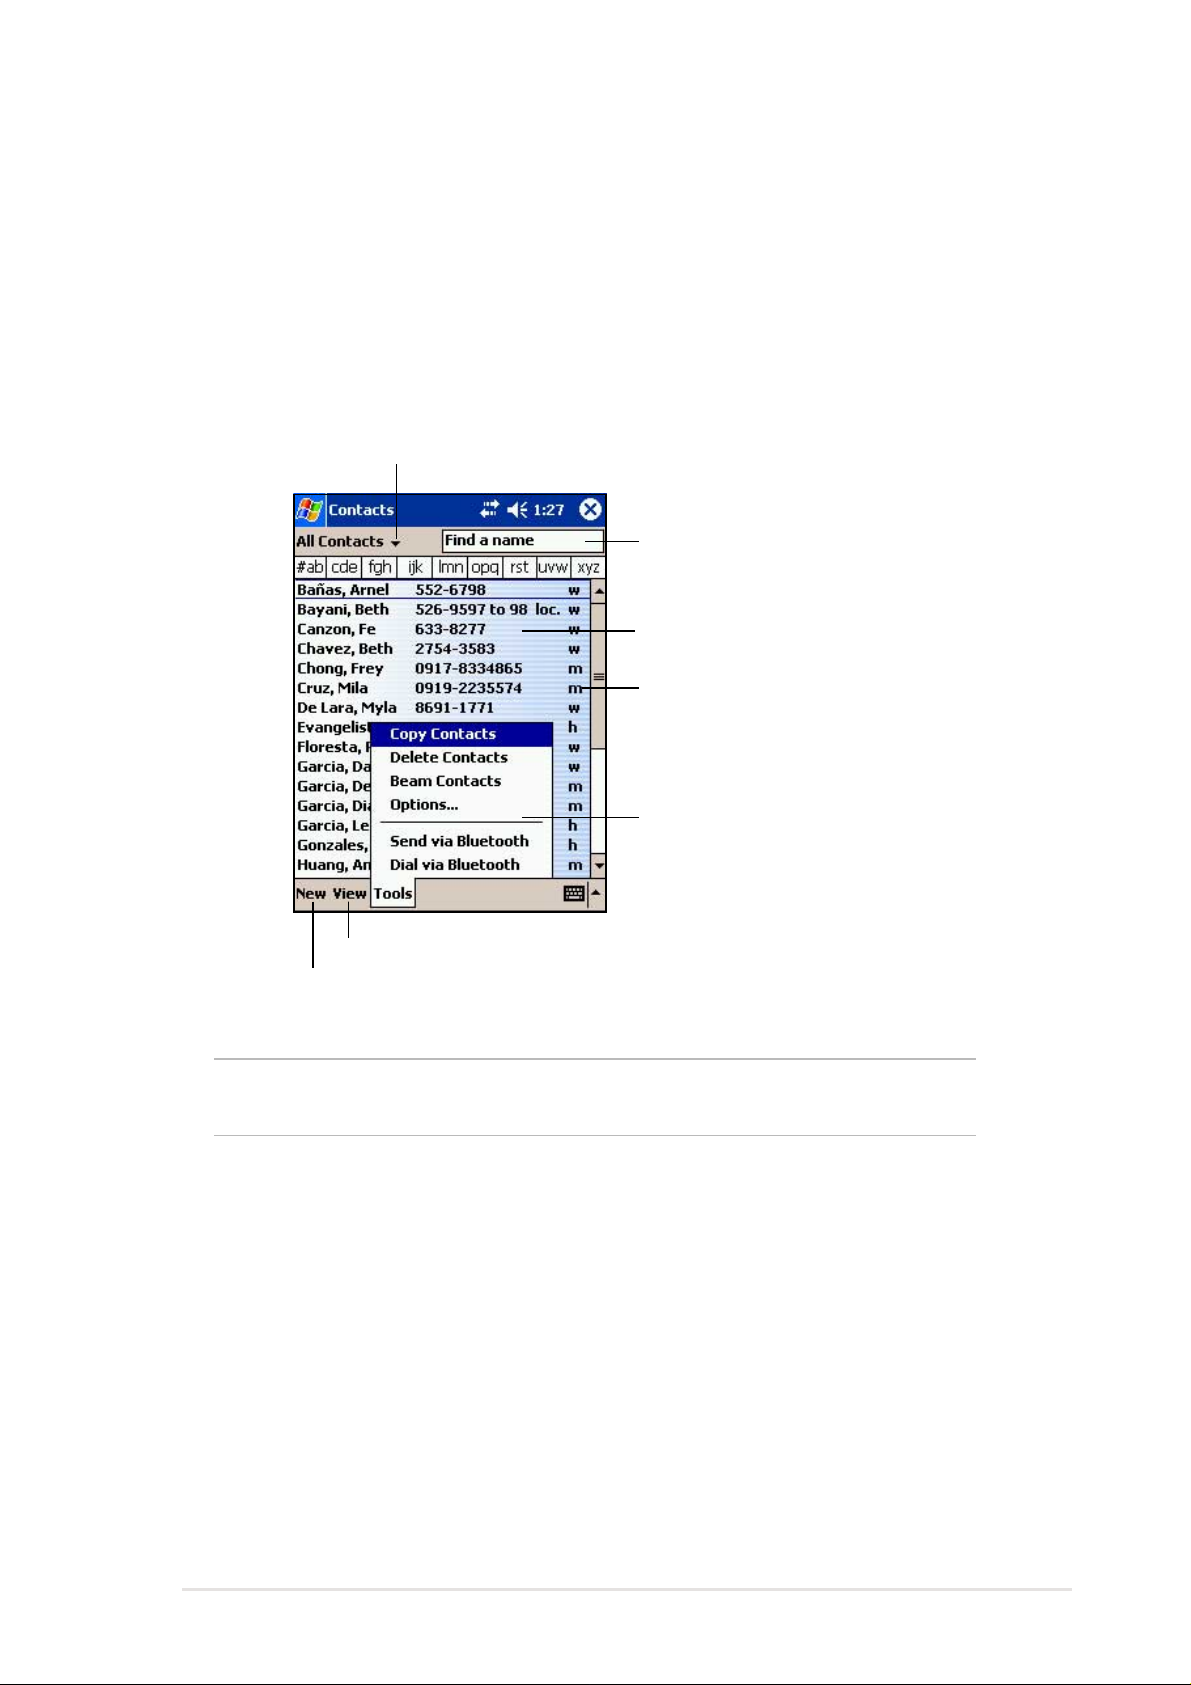
Contacts: T racking friends and
colleagues
Contacts maintains a list of your friends and colleagues so that you can
easily find the information you look for, whether you are at home or on the
road. Using the infrared port (IR) on the device, you can quickly share
Contacts information with other device users.
Tap to select the category of
contacts you want to display
Tap and enter part of a name
to quickly find it on the list
Tap to display or edit the contact details
Tap to display additional phone
numbers and email addresses
Tap an action for a selected contact
Tap to sort contacts by name or company
Tap to create a new contact
NOTE To change the way information is displayed in the list, tap
Tools then Options.
Microsoft® Pocket Outlook
4-5
Page 6
Creating contacts
To create a contact:
1. Tap , then tap Contacts.
2. Tap New to display a blank
contact form.
3. Using the input panel, enter a
name and other contact
information. You will need ot scroll
down to see all available fields.
4. To assign the contact a category,
scroll to and tap Categories, then
select a category from the list. On
the contact list, you can display
the contacts by category.
5. To add notes, tap the Notes tab. You can enter text, draw, or create a
recording. For more information on creating notes, see “Notes:
Capturing thoughts and ideas” later in this chapter.
6. Tap OK to return to the contact list when done.
Using the summary screen
Tapping a contact on the contact list displays a summary screen. To
change the contact information, tap Edit.
Contact details
4-6
Tap to display notes
Tap to change contact information
Chapter 4
Page 7
Finding a contact
There are four ways to find a contact.
1. On the contact list, enter a contact
name in the box under the
navigation bar. To show all contacts
again, clear text from the box or tap
the button to the right of the box.
2. In the contact list, tap the category
list (labeled All Contacts by
default) and select the type of
contact that you wish to display. To
show all contacts again, select All
Contacts. To view a contact not
assigned to a category, select
None.
3. To view the names fo companies
your contacts work for, in the
contact list, tap View > By
Company. The number of contacts
that work for that company will be
displayed to the right of the
company name.
1
2
4. Tap
name, select Contacts for the type,
and tap Go.
Microsoft® Pocket Outlook
, Find, enter the contact
3
4
4-7
Page 8
Tasks: Keeping a to do list
Use Tasks to keep track of what you have to do.
Tap to select the category of
tasks you want to display
Tap to select a sort
order of the task list
Indicates high priority
Tap to display or edit
the task details
Tap and hold to display a
pop-up menu of actions
Tap an action for the task
Tap to create a new task
Creating tasks
To create a task:
1. Tap , then tap Tasks.
2. Tap New to display a blank task
form.
3. Using the input panel, enter a
description.
4. Enter a start date and due date,
or enter other information by
tapping the field first. If the input
panel is open, you will need to
hide it to see all available fields.
4-8
Chapter 4
Page 9

5. To assign the task to a category, tap Categories and select a category
from the list. On the task list, you can display tasks by category.
6. To add notes, tap the Notes tab. You can enter text, draw, or create a
recording. For more information on creating notes, see “Notes:
Capturing thoughts and ideas” later in this chapter.
7. Tap OK to return to the task list when done.
TIP To quickly create a task with
only a subject, tap Entry Bar on
the Tools menu. Tap Tap here
to add a new task and enter
your task information.
Using the summary screen
Tapping a task on the task list displays a summary screen. To change the
task details, tap Edit.
Task details
Tap to show or hide the task details
Notes/additional information on the task
Tap to change the task details
Microsoft® Pocket Outlook
4-9
Page 10
Notes: Capturing thoughts and
ideas
Quickly capture thoughts, reminders, ideas, and phone numbers with
Notes. You can create a written note or a recording. You can also include a
recording in a note. If a note is open when you create the recording, it will
be included in the note as an icon. If the note is displayed, it will be
created as a stand-alone recording.
Tap to change the sort order of the list
Tap to open a note or play a recording
Tap and hold to display a
pop-up menu of actions
Tap an action for the item
Tap to record
Tap to show or hide the recording toolbar
Tap to create a new note or recording
You may change the default Notes options including the writing mode,
template, file storage, and record button action.
To change the Notes options:
1. Tap , then tap Notes.
2. Tap Tools, then Options... to
display the options screen.
3. Make your desired changes.
4. Click OK.
4-10
Chapter 4
Page 11
Creating notes
To create a note:
1. Tap , then tap Notes.
2. Tap New to display a blank note.
3. Create your note by writing, drawing, typing, or recording. For more
information about using the input panel, writing and drawing on the
screen, and creating recordings, see Chapter 2.
Tap to save the note and
return to the Notes list
Tap to show or hide
the input panel
Tap to write on the screen
Tap to add a recording to the note
Microsoft® Pocket Outlook
4-11
Page 12

Inbox: Sending and receiving e-mail
messages
Use Inbox to send and receive e-mail messages in one of these ways:
• Synchronize e-mail messages with Microsoft Exchange of or Microsoft
Outlook on your desktop computer
• Send and receive e-mail messages by connecting directly to an e-mail
server through an Internet service provider (ISP) or a network
Synchronizing e-mail messages
E-mail messages can be synchronized as part of the general
synchronization process. You will need to enable Inbox synchronization in
ActiveSync. For more information on enabling Inbox synchronization, see
ActiveSync Help on your desktop computer.
During synchronization:
• Messages are copied from the mail folders of Exchange or Outlook on
your desktop computer to the ActiveSync folder in Inbox on your device.
By default, you will receive messages from the past three days only, the
first 100 lines of each message, and file attachments of less than 100KB
in size.
• E-mail messages in the Outbox folder on your device are transferred to
Exchange or Outlook, then send from those programs.
• E-mail messages in subfolder must be selected in ActiveSync on your
desktop computer in order to be transferred.
NOTE You can also synchronize e-mail messages with your desktop
computer from a remote location. For more information, see
Chapter 7.
4-12
Chapter 4
Page 13

Connecting directly to an e-mail server
In addition to synchronizing e-mail messages with your desktop computer,
you can send and receive e-mail messages by connecting to an e-mail
server using a modem or network card connected to your device. You
need to set up a remote connection to a network or an ISP, and a
connection to your e-mail server. For more information, see Chapter 7.
When you connect to the e-mail server, new messages are downloaded to
the device Inbox folder, messages in the device Outbox folders are sent,
and messages that have been deleted on the e-mail server are removed
from the device Inbox folder.
Messages that you receive directly from an e-mail server are linked to your
e-mail server rather than your desktop computer. When you delete a
message on your device, it is also deleted from the e-mail server the next
time you connect based on the settings you selected in ActiveSync.
You can work online or offline. When working online, you read and
respond to messages while connected to the e-mail server. Messages are
sent as soon as you tap Send, which saves space in your device.
When working offline, once you have downloaded new message headers
or partial messages, you can disconnect from the e-mail server and decide
which messages to download completely. The next time you connect,
Inbox downloads the complete messages you have marked for retrieval
and sends the messages you have composed.
Microsoft® Pocket Outlook
4-13
Page 14
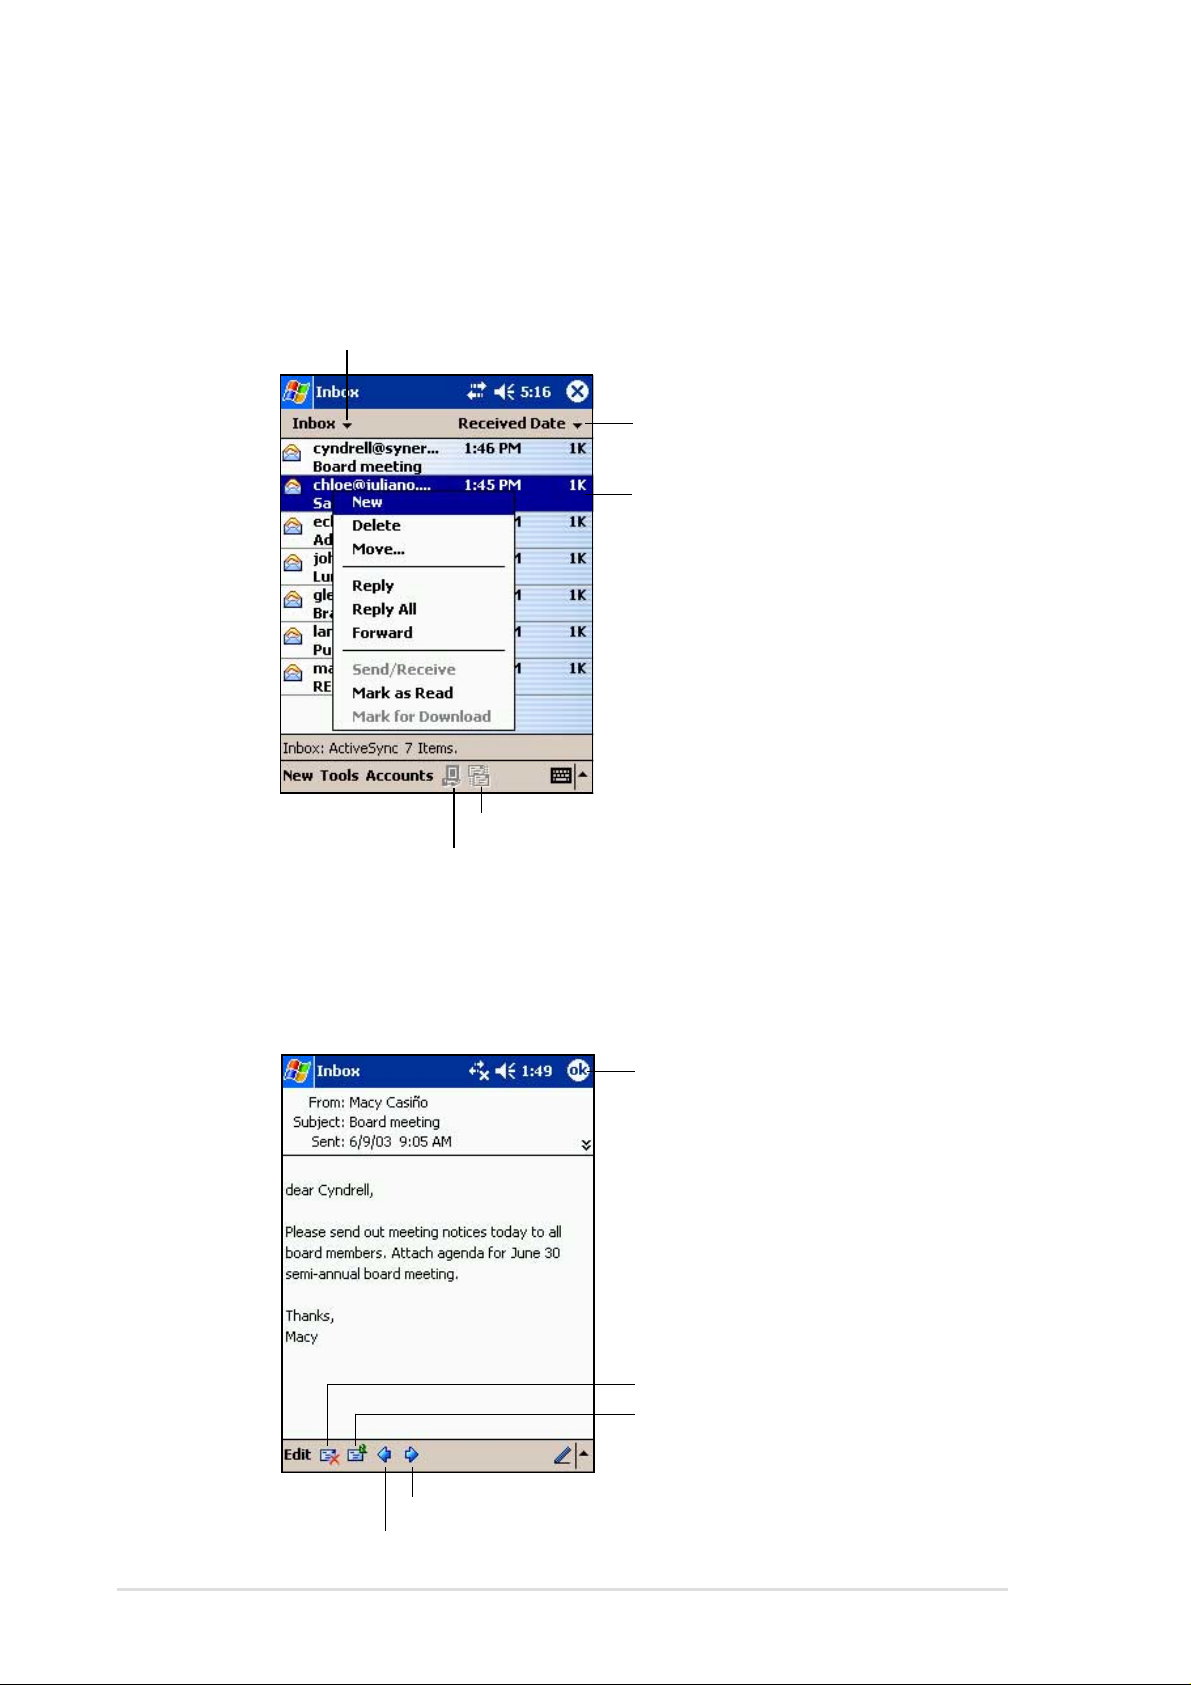
Using the message list
The messages you receive are displayed in the message list. By default,
the most recently received messages are displayed first in the list.
Tap to select the service, and the
folder that you wish to display
Tap to select the sort order
for the messages
Tap and hold to display a
pop-up menu of actions
Tap to connect, and to send/receive e-mail
Tap to connect to the selected service
When you receive a message, tap it to open. Unread messages are
displayed boldface.
Tap to return to the message list
Tap to delete this message
Tap to reply to or forward this message
4-14
Tap to view the next message
Tap to view the previous message
Chapter 4
Page 15

When you connect to your e-mail server or synchronize with your desktop
computer, by default, you will receive messages from the last five days
only, the first 100 lines of each new messages, and file attachments of less
than 100KB in size. The original messages remain on the e-mail server or
your desktop computer.
You can mark the messages that you want to retrieve in full during your
next synchronization or e-mail server connection. In the message list, tap
and hold the message that you want to retrieve. On the pop-up menu, tap
Mark for Download. The icons in the Inbox message list give you visual
indications of message status.
You can specify your downloading preferences when you set up the
service or select your synchronization options. You can change them at
any time.
• Change options for Inbox synchronization using ActiveSync options. For
more information, see ActiveSync Help on your desktop computer.
• Change options for direct e-mail server connections in Inbox on your
device. Tap Tools then Options. On the Service tab, tap the service that
you wish to change. Tap and hold the service and select Delete to
remove a service.
Microsoft® Pocket Outlook
4-15
Page 16
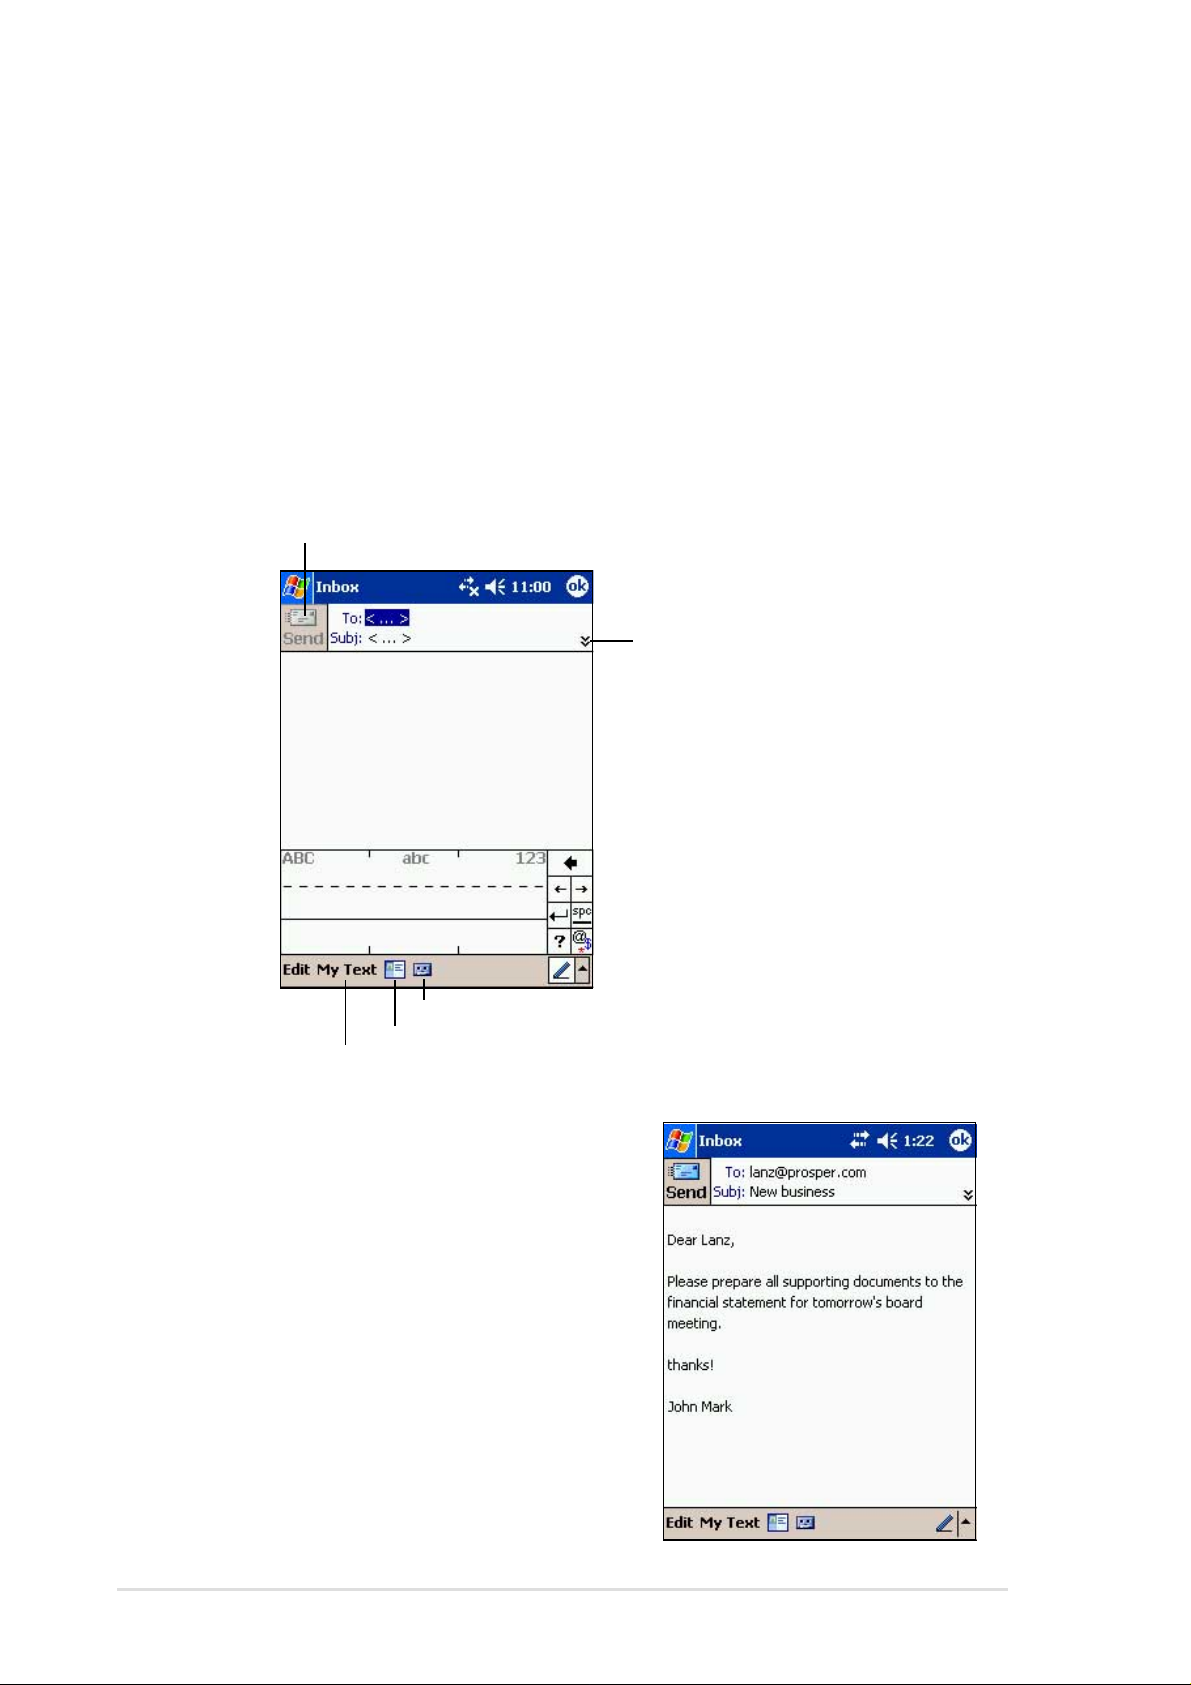
Composing messages
To compose a message:
1. Tap New.
2. In the To field, enter an e-mail or SMS address of one or more
recipients, separating them with a semicolon, or select a name from
the Contacts list by tapping the Address Book button. All e-mail
addresses entered in the e-mail fields in Contacts appear in the
Address Book.
Tap to send the message
Tap to show or hide the
complete message header
Tap to show or hide the recording toolbar
Tap to display the e-mail address book
Tap to select a preset message
3. Compose your message. To enter
preset or frequently used
messages, tap My Text and
select a message.
4. Tap Send when you have finished
the message. If you are working
offline, the message is moved to
the Outbox folder and will be sent
the next time you connect.
4-16
Chapter 4
Page 17

Managing e-mail messages and folders
The behavior of the folders you create depends on whether you are using
ActiveSync, SMS, POP3, or IMAP4.
• If you use ActiveSync, e-mail messages in the Inbox folder in Outlook will
automatically be sunchronized with your device. You can select to
synchronize additional folders by designating them for ActiveSync. The
folders you create and the messages you move will then be mirrored on
the server . For example, if you move two messages from the Inbox folder
to a folder named Family, and you have designated Family for
synchronization, the server creates a copy of the Family folder and
copies the messages into that folder. You can then read messages while
away from your desktop computer.
• If you use SMS, messages are stored in the Inbox folder .
• If you use POP3 and you move e-mail messages to a folder you created,
the link is broken between the messages on the device and their copies
on the mail server . The next time you connect, the mail server will see
that the messages are missing from the device Inbox and delete them
from the server. This prevents you from having duplicate copies of a
message, but it also means that you will no longer have access to
messages that you move to folders created from anywhere except the
device.
• If you use IMAP4, the folders you create and the e-mail messages you
move are mirrored on the server. Therefore, messages are available to
you anytime you connect to your mail server, whether it is from your
device or desktop computer. This synchronization of folders occurs
whenever you connect to your mail server, create new folders, or
rename/delete folders when connected.
Microsoft® Pocket Outlook
4-17
Page 18

4-18
Chapter 4
Page 19

Chapter 5
Companion programs
♦♦
♦ Pocket Word.......................................................... 5-2
♦♦
Creating Pocket Word documents ........................................... 5-2
Saving Pocket Word documents.............................................. 5-3
Opening an existing Pocket Word document........................... 5-5
Modes of entering information ................................................. 5-6
♦♦
♦ Pocket Excel ......................................................... 5-9
♦♦
Creating Pocket Excel documents ......................................... 5-10
Saving Pocket Excel documents............................................ 5-10
Securing your Excel document .............................................. 5-12
Tips for working in Pocket Excel ............................................ 5-13
♦♦
♦ MSN Messenger.................................................. 5-14
♦♦
Signing up .............................................................................. 5-15
Working with contacts ............................................................ 5-16
Chatting with contacts............................................................ 5-17
♦♦
♦ Windows Media Player for Pocket PC .............. 5-18
♦♦
♦♦
♦ Microsoft Reader ................................................ 5-19
♦♦
Getting books on your device ................................................ 5-20
Using the Library.................................................................... 5-20
Reading a book...................................................................... 5-21
Using Reader features ........................................................... 5-22
Removing a book ................................................................... 5-22
Companion programs
5-1
Page 20
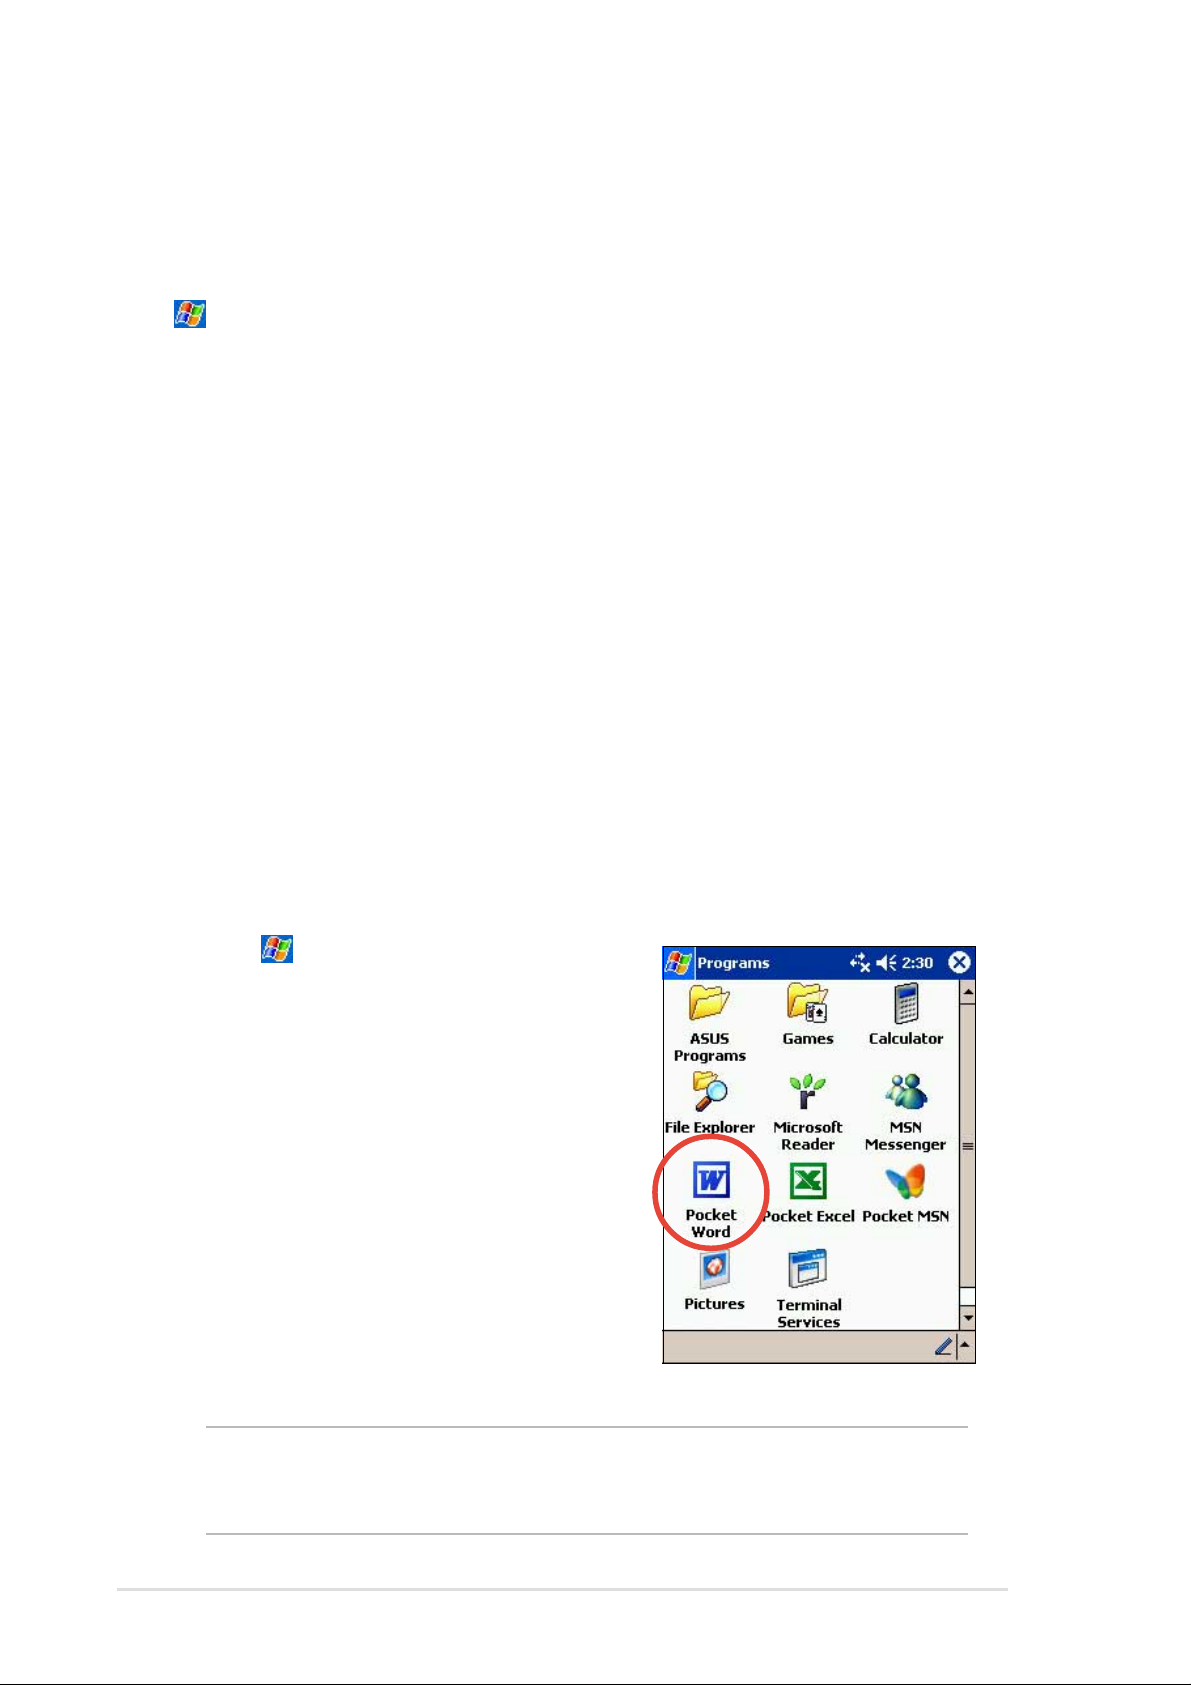
The companion programs consist of Microsoft
Pocket Excel, MSN Messenger, Windows Media™ Player for Pocket PC,
and Microsoft® Reader .
To switch to a companion program on your device, tap Programs on the
menu, then tap the program that you wish to open.
®
Pocket Word, Microsoft
®
Pocket Word
Pocket Word works with Microsoft Word on your desktop computer to give
you easy access to copies of your documents. You can create new
documents on your device, or you can copy documents from your desktop
computer to your device. Synchronize documents between your desktop
computer and your device so that you have the most up-to-date content in
both locations.
Use Pocket Word to create documents, such as letters, meeting minutes,
or trip reports.
Creating Pocket Word documents
To create a new Word document:
1. Tap , tap Programs, tap
Pocket Word to launch the
application.
If you have existing Microsoft
Word or Pocket Word documents
in your device, a list of the
documents appears.
5-2
NOTE If you selected a template for new documents in the Options
dialog box, that template appears with the appropriate text
and formatting already provided.
Chapter 5
Page 21
2. Tap New to display a blank document.
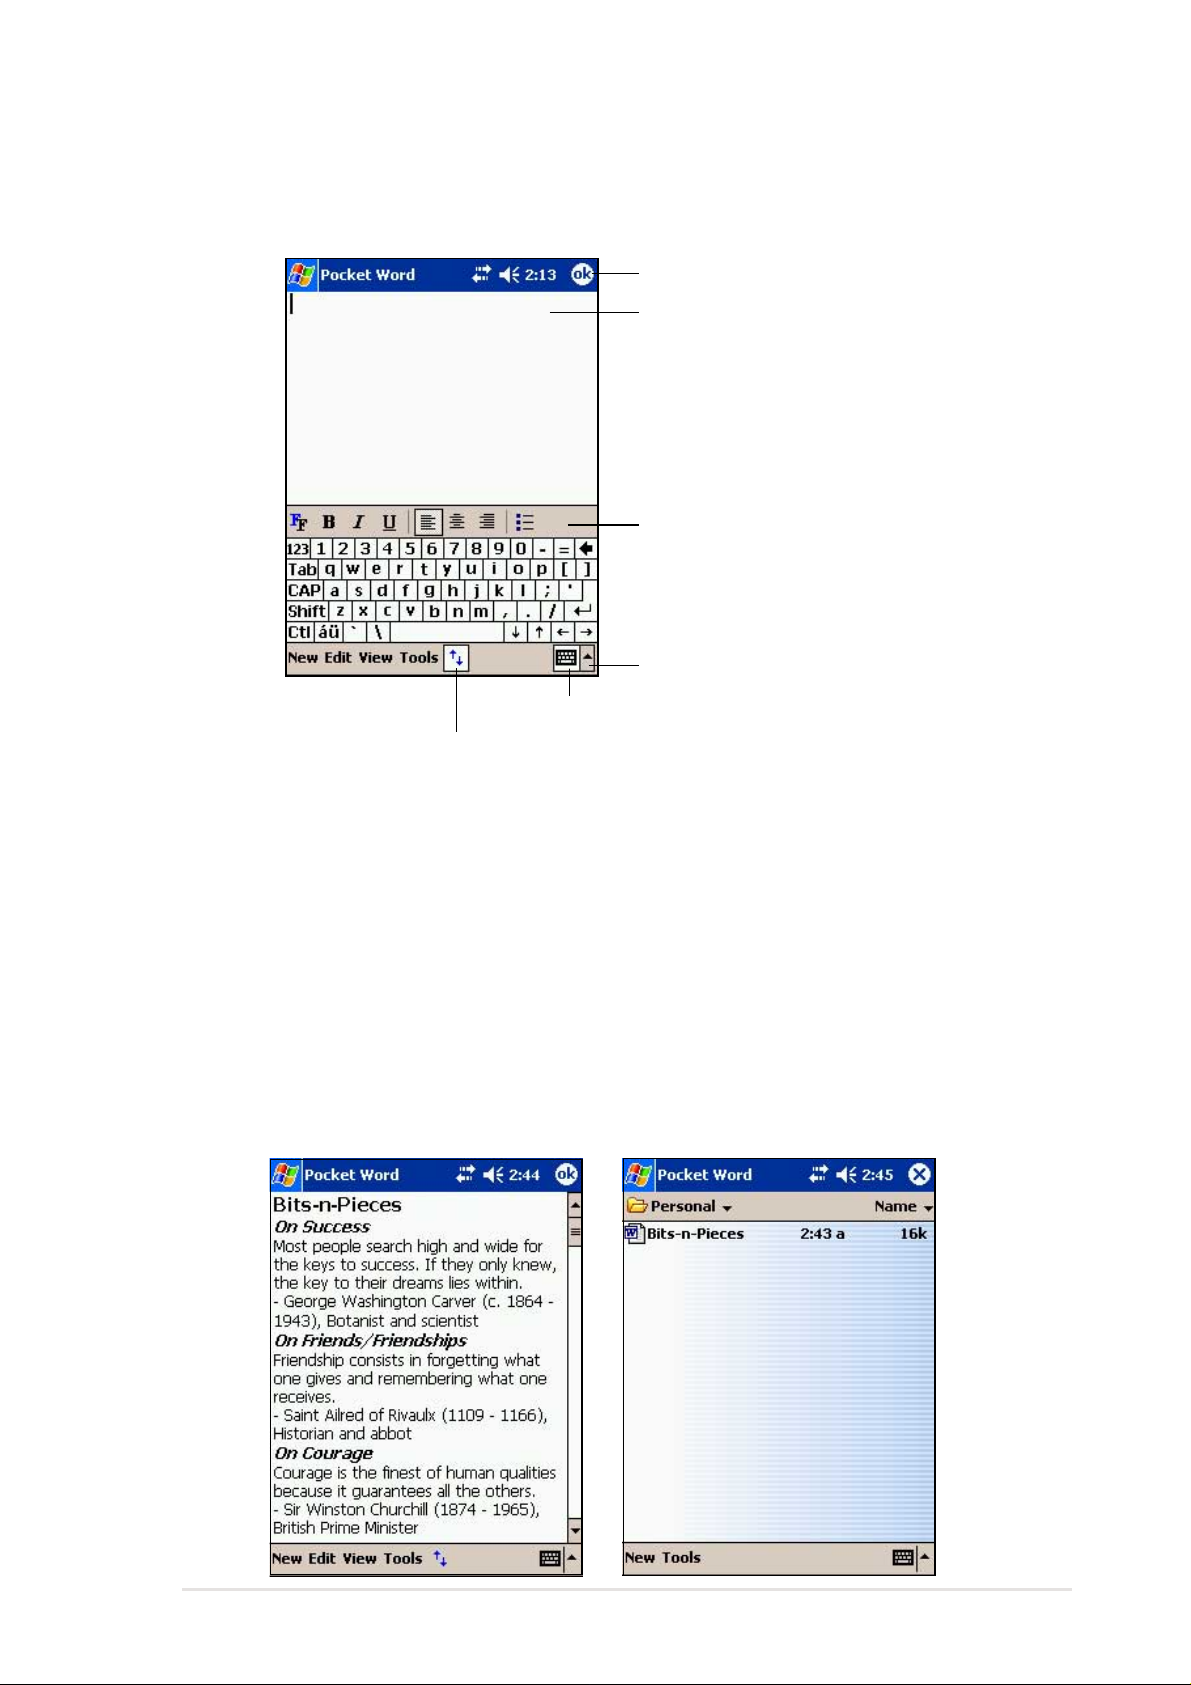
3. Use any of the tools in the input panel to type your text.
Tap to save and close your document
Type your text here
Formatting toolbar
Tap to select an input method
Tap to show or hide the input panel
Tap to show or hide the formatting toolbar
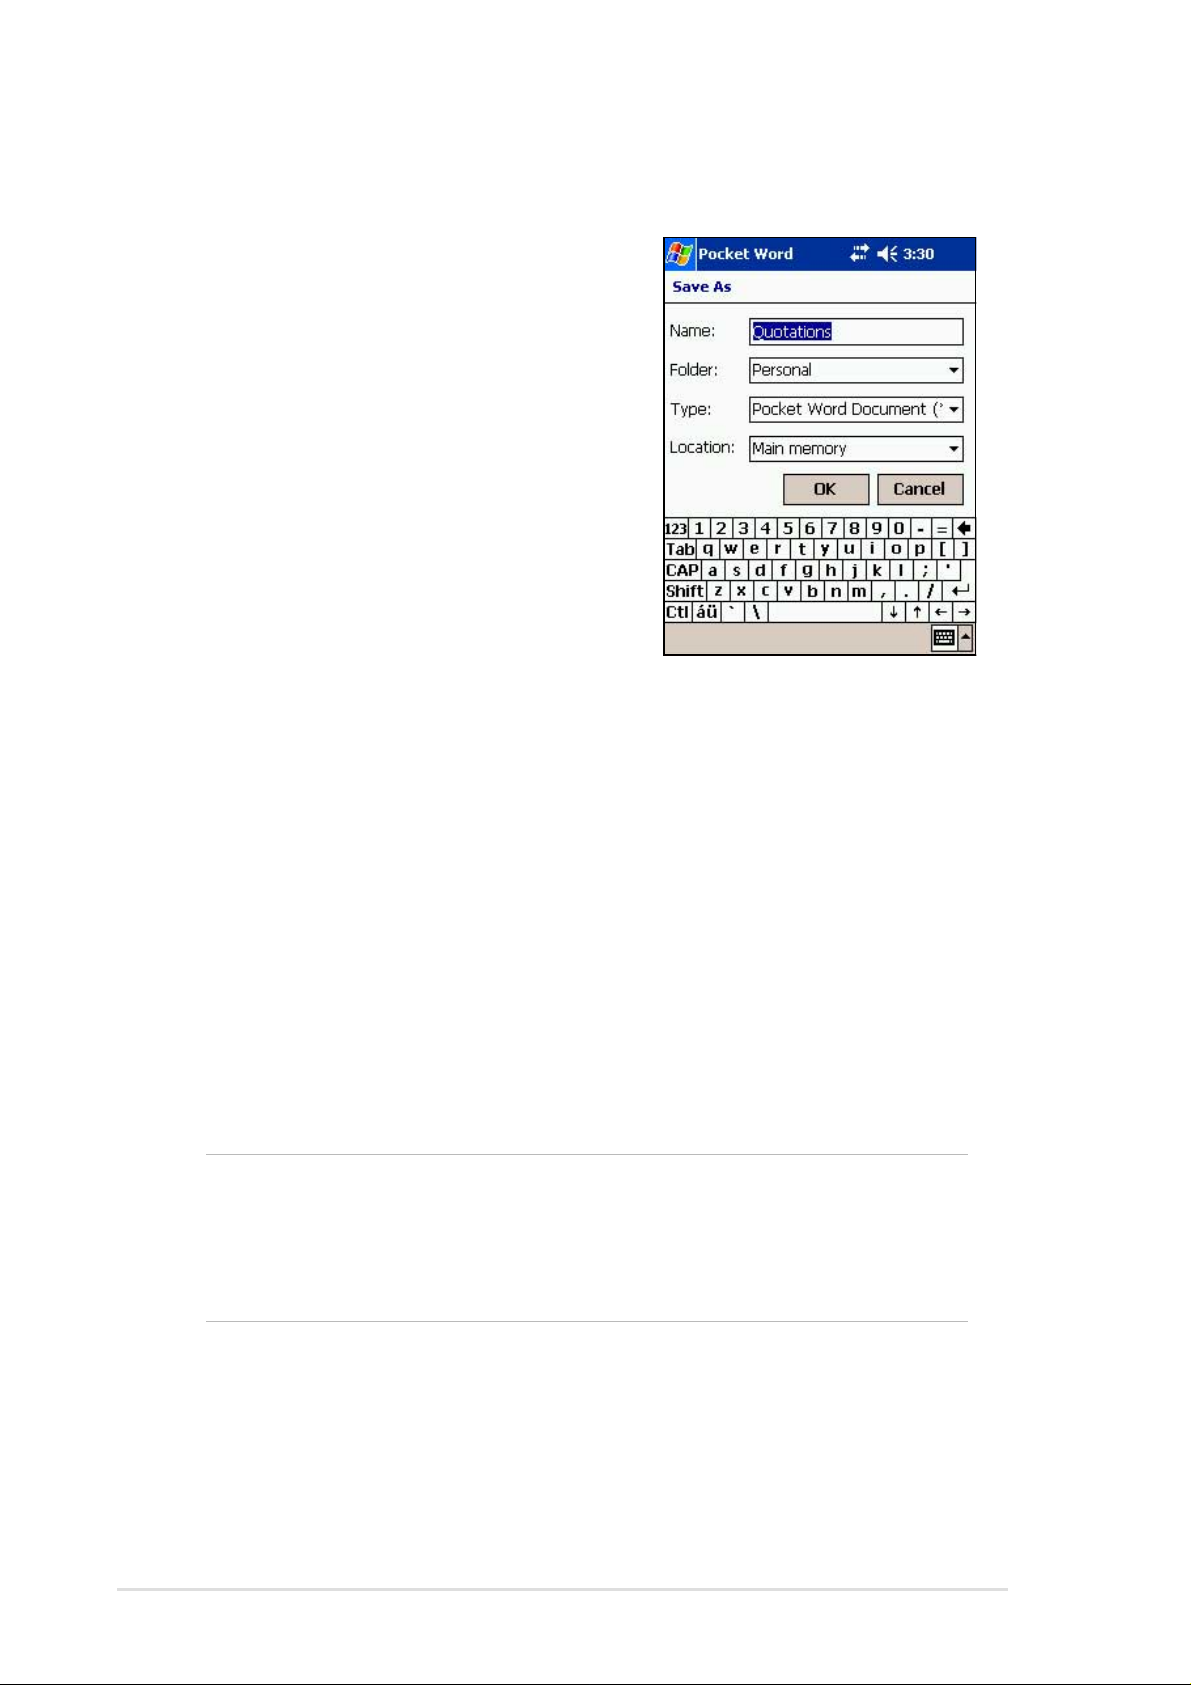
Saving Pocket Word documents
To save a Pocket Word document:
When you have finished editing your document, tap OK.
The document is saved using the first line as file name if you did not
specify a file name. For example, if your first line in the document has
the words Bits-n-Pieces, these words appear in your Word documents
list.
Companion programs
5-3
Page 22
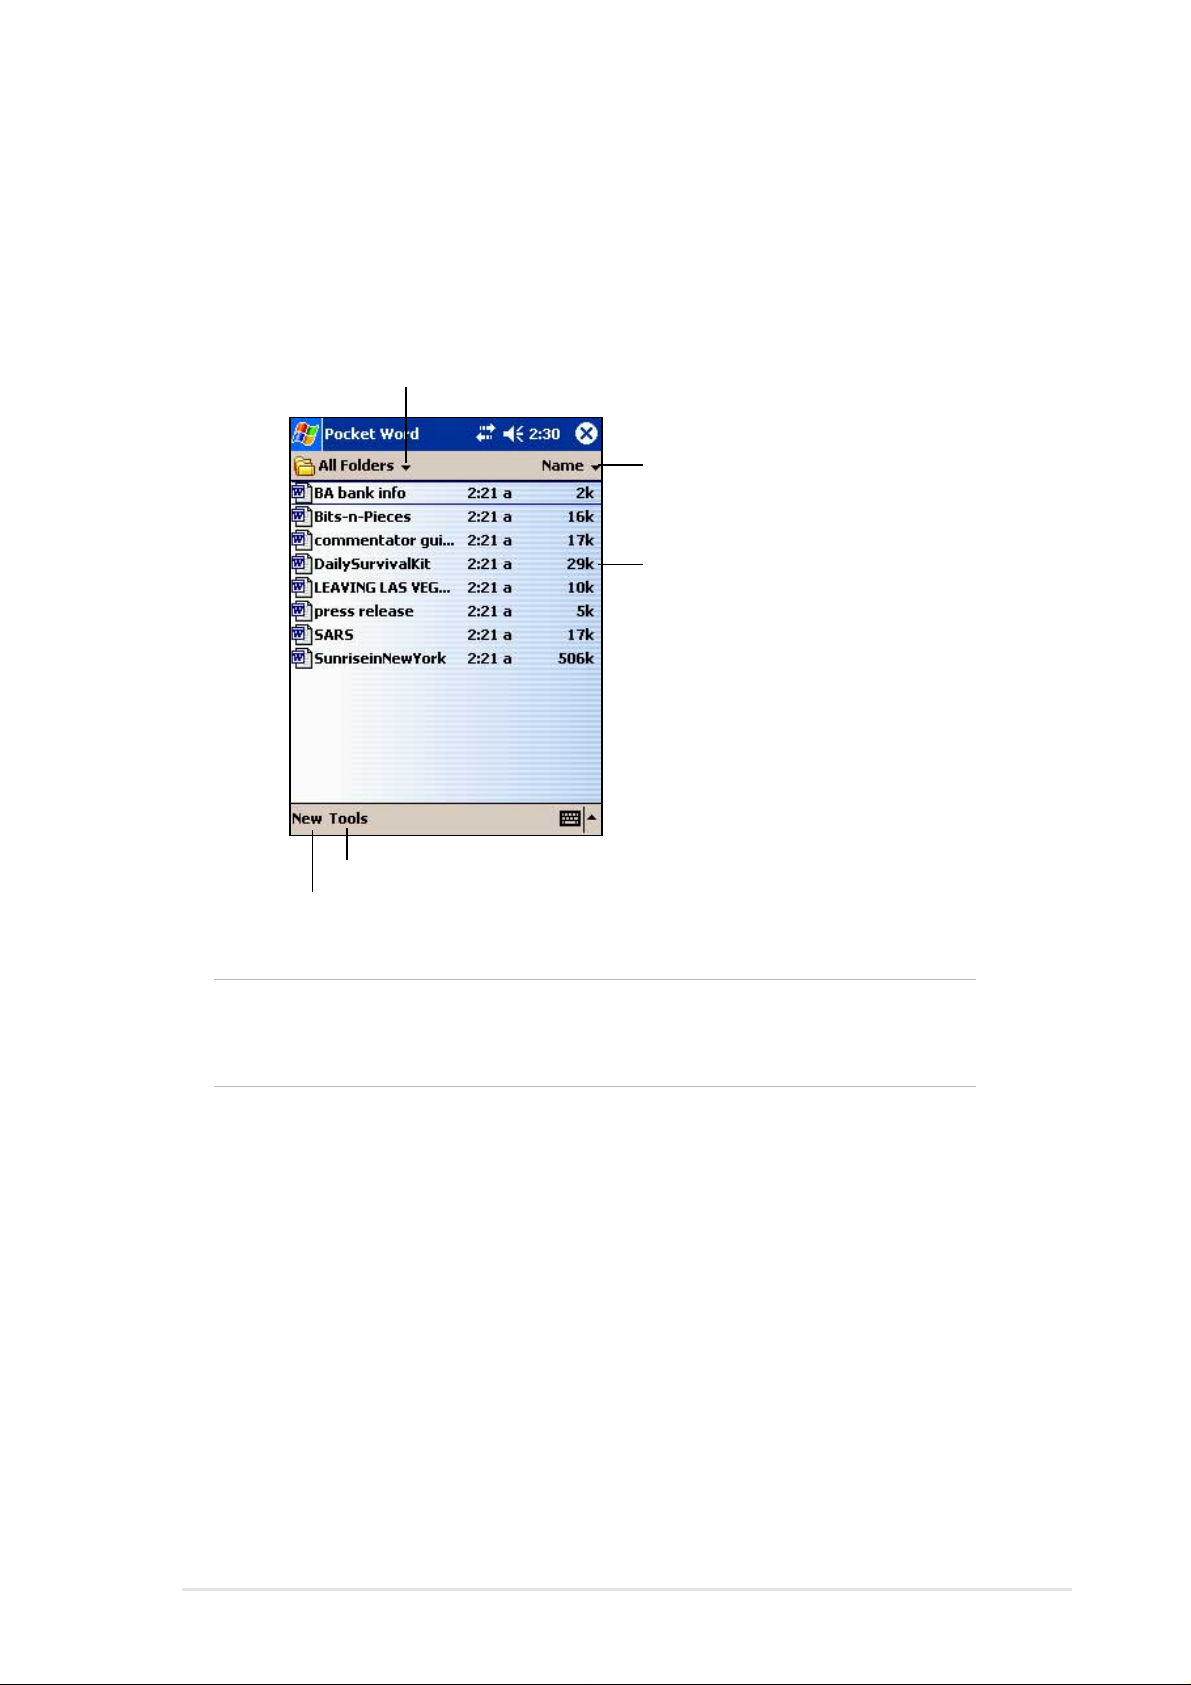
To specify save options:
1. With the document open, tap
Tools.
2. From the pop-up menu, tap Save
Document As... to display the
Save As screen.
3. Change the file name by simply
typing a new one in the Name
field.
4. Tap the down arrow in the Folder
field to select a folder where you
wish to place the file.
5. Tap the down arrow in the Type field to select a file format.
You can save the document you create or edit in a variety of formats:
• Word (.doc)
• Pocket Word (.psw)
• Rich Text Format (.rtf)
• Plain Text (.txt)
6. Tap the down arrow in the Location field to indicate the location of
your saved file, either in the main memory of your device, or in a
storage card, if available.
7. Tap OK when done.
NOTE If you do not wish to change the document format, but would
like to change the file name, folder, and location of your
document, simply tap Edit from the command bar, then tap
Rename/Move... from the pop-up menu to make your
changes.
5-4
Chapter 5
Page 23
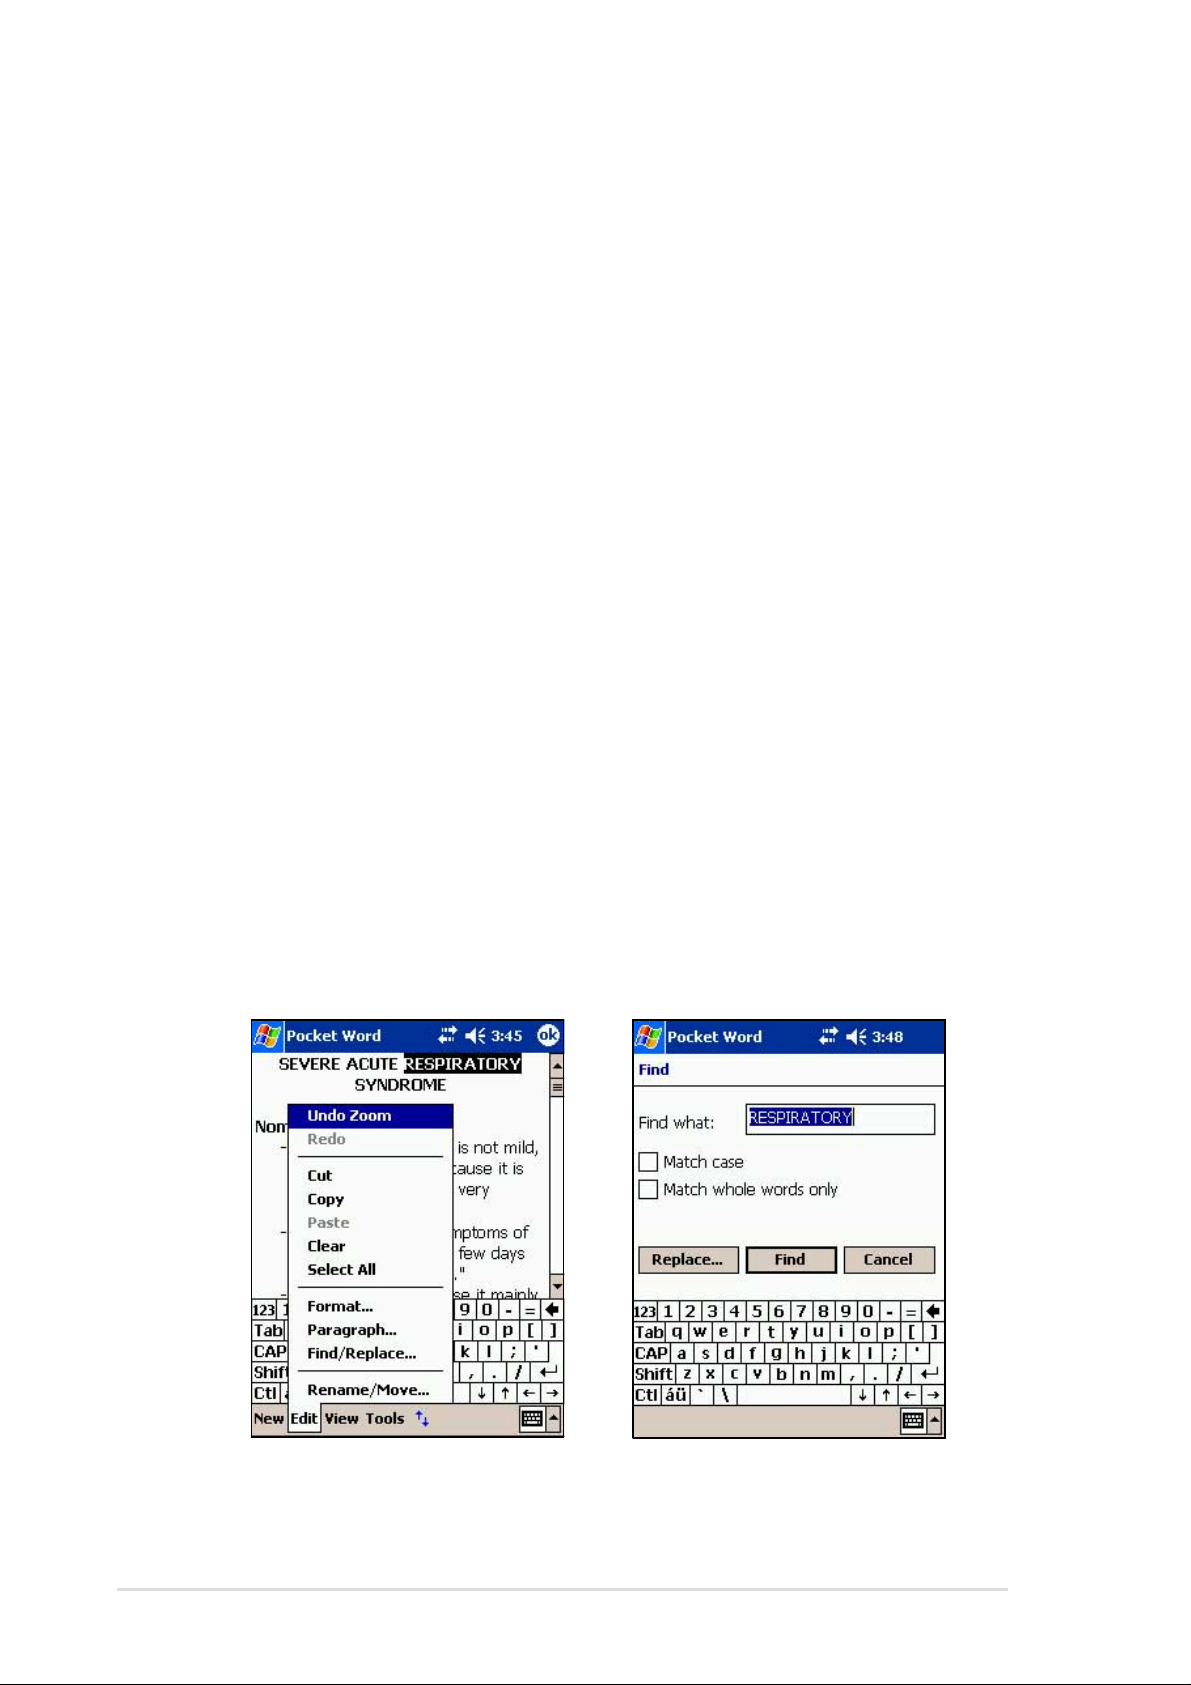
Opening an existing Pocket Word document
Pocket Word contains a list of the files stored on your device. Tap a file in
the list to open. To delete, make copies of, and send files, tap and hold a
file in the list, then select the appropriate action on the pop-up menu.
Tap to select the folder you want to display
Tap to change the sort order of the list
Tap to open a document
Tap to change document settings
Tap to create a new document
NOTE You can open only one Pocket Word document at a time;
when you open a second document, you will be asked to
save the first.
Companion programs
5-5
Page 24
Modes of entering information
You can enter information in Pocket Word in one of four modes (typing,
writing, drawing, or recording), which are displayed on the View menu.
Each mode has its own toolbar that you can show or hide by tapping the
Show/Hide Toolbar button on the command bar.
If you are opening a Word document created on a desktop computer,
select Wrap to Window on the View menu so that you can see the entire
document.
To change the zoom magnification:
1. Tap View, then tap Zoom.
2. Select your desired percentage.
Select a higher percentage to enter text and lower one to see more of
your document.
Typing Mode
Using the input panel, enter typed text into the document. For more
information on entering typed text, see Chapter 2.
To format existing text and to edit text, first select the text. You can select
text as you do in a Word document, using your stylus instead of the mouse
to drag through the text you want to select. You can search a document to
find text by tapping Edit and Find/Replace.
5-6
Chapter 5
Page 25
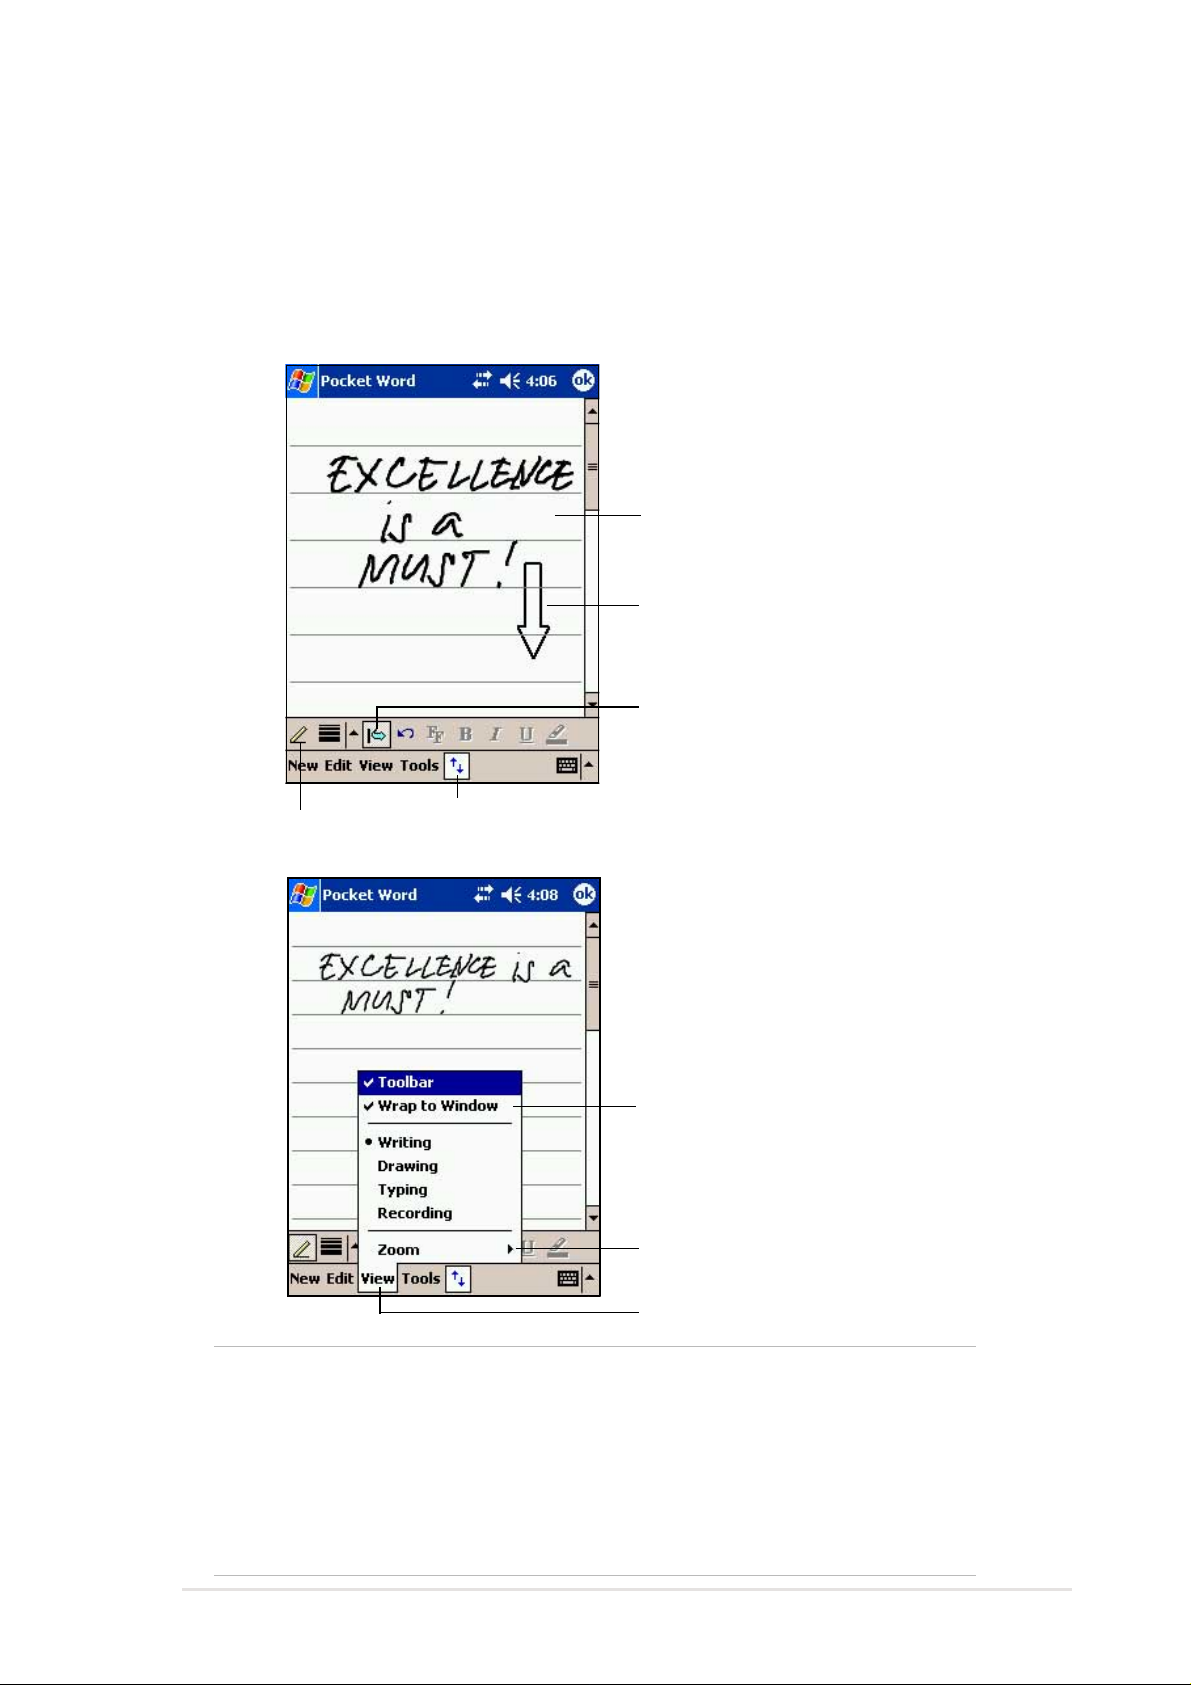
Writing mode
In writing mode, use your stylus to write directly on the screen. Ruled lines
are displayed as a guide, and the zoom magnification is greater than in
typing mode to allow you to write more easily. For more information on
writing and selecting writing, see Chapter 2.
Write your text here
With the Space button selected,
drag to insert space. An arrow
appears showing the space
direction direction and size.
Space button
Pen button
Tap to show or hide the writing/formatting toolbar
Tap to wrap text to screen
Tap to display zoom percentages
Tap to display the menu
NOTE If you cross three ruled lines in a single stylus stroke, the
writing becomes a drawing, and can be edited and
manipulated as described in the next section.
Written words are converted to graphics (metafiles) when a
Pocket Word document is converted to a Word document on
your desktop computer.
Companion programs
5-7
Page 26
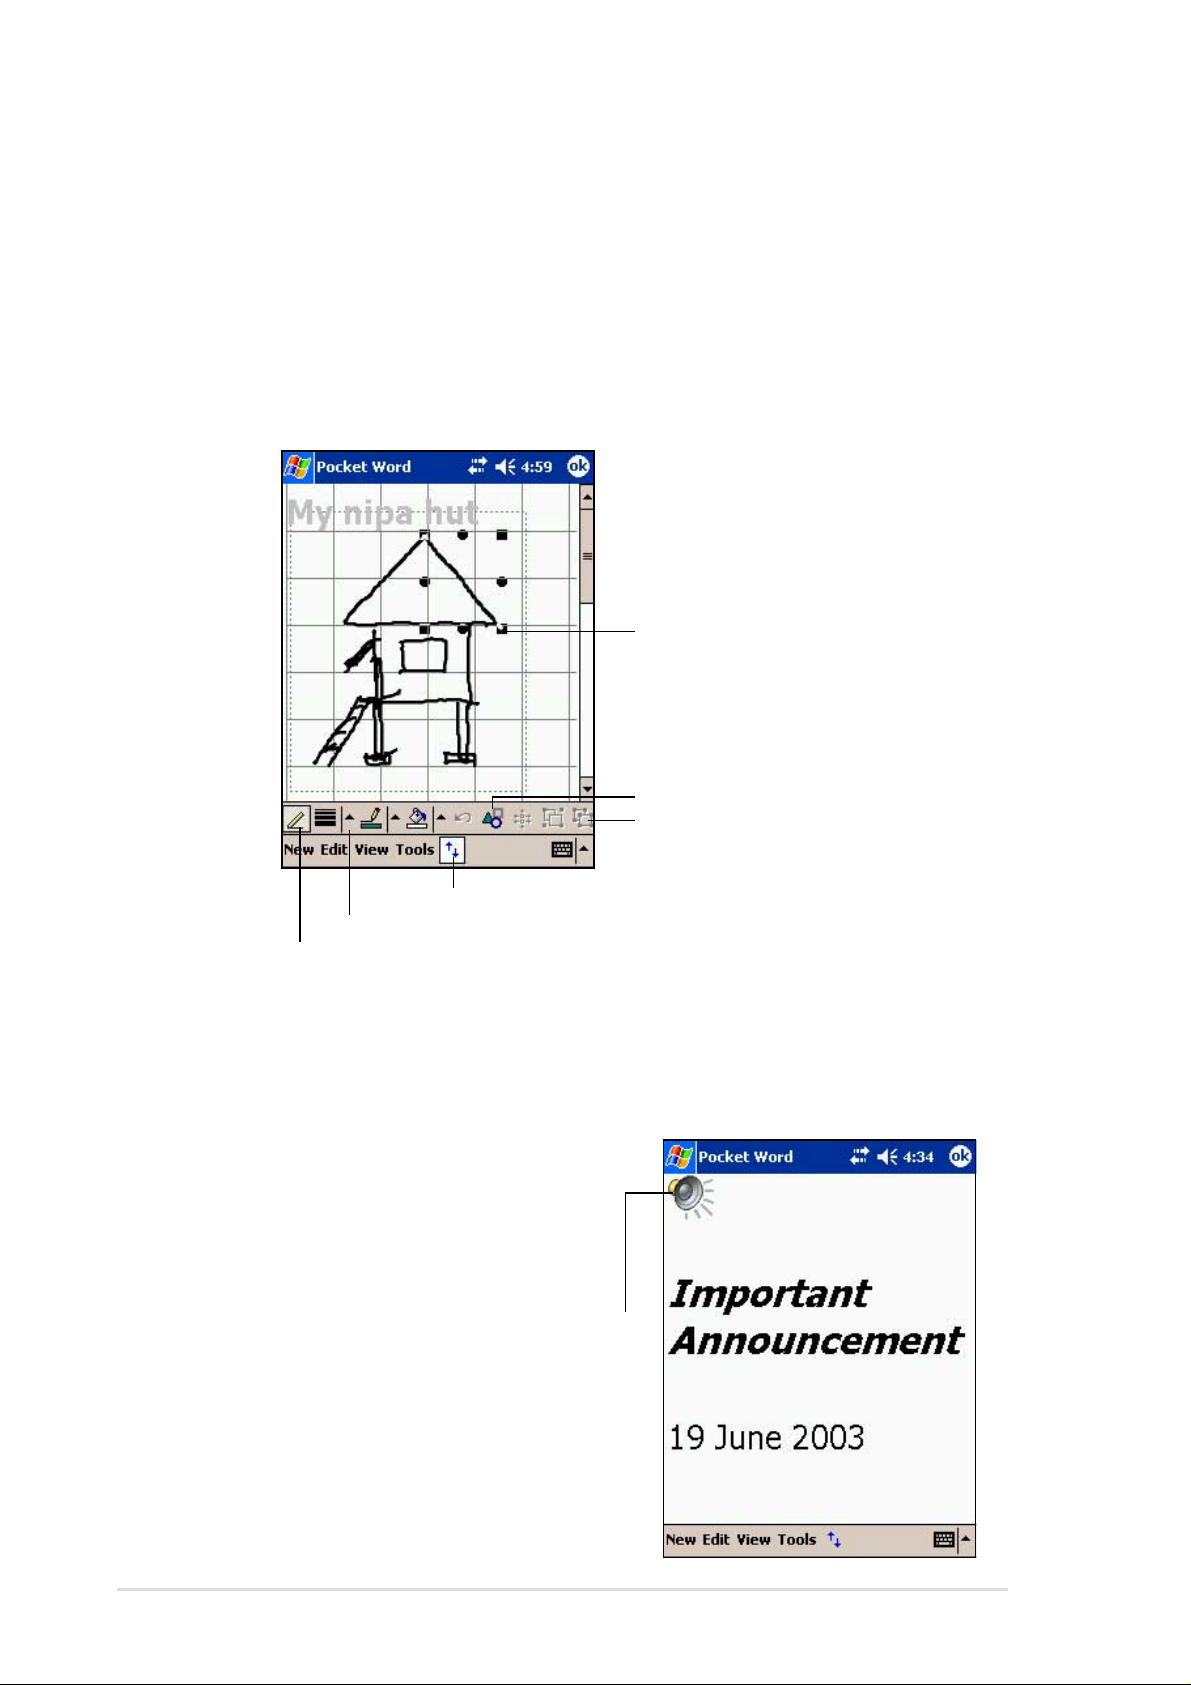
Drawing mode
In drawing mode, use your stylus to draw on the screen. Gridlines appear
as a guide. When you lift your stylus off the screen after ther first stroke,
you will see a drawing box indicating the boundaries of the drawing. Every
subsequent stroke within or touching the drawing box becomes part of the
drawing. For more information on drawing and selecting drawings, see
Chapter 2.
Resize an object by dragging
the selection handles
Tap to show or hide the drawing toolbar
Tap an arrow to display the options
Pen button
Recording mode
In recording mode, embed a
recording into your document.
Recordings are saved as .wav files.
For more information on recording,
see Chapter 2.
Embedded recording
Tap to select the formatting options
Drawing toolbar
5-8
Chapter 5
Page 27
Pocket Excel
Pocket Excel works with Microsoft Excel on your desktop computer to give
you easy access to copies of your workbooks. You can create new
workbooks on your device, or you can copy workbooks from your desktop
computer to your device. Synchronize workbooks between your desktop
computer and your device so that you have the most up-to-date contents
in both locations.
Use Pocket Excel to create workbooks, such as expense reports and
mileage logs.
Pocket Excel contains a list of the files stored on your device. Tap a file in
the list to open. To delete, make copies of, and send files, tap and hold a
file in the list, then select the appropriate action on the pop-up menu.
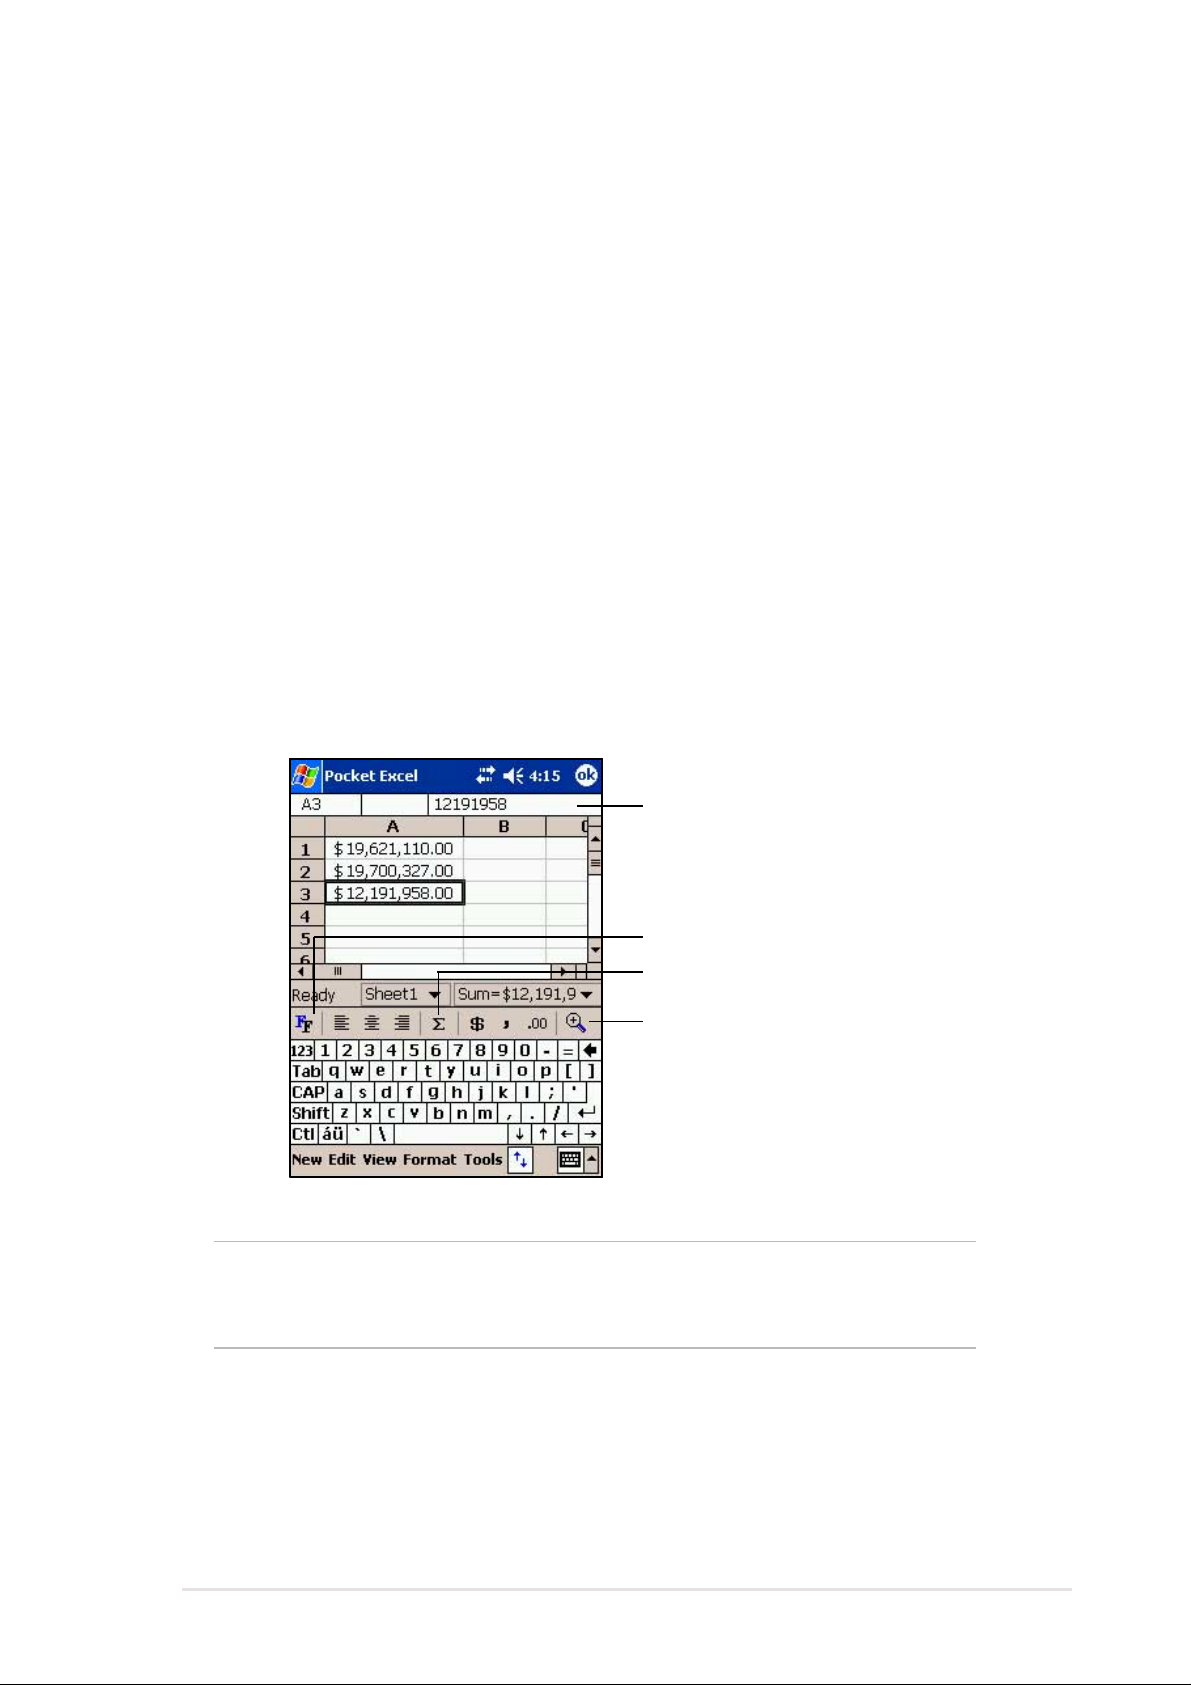
Pocket Excel provides fundamental spreadsheet tools, such as formulas,
functions, sorting, and filtering. To display the toolbar, tap View, then tap
Toolbar.
Cell contents appear here as you
type, or when you select the cell
Format button
AutoSum button
Zoom button
NOTE You can open only one Pocket Excel document at a time;
when you open a second document, you will be asked to
save the first.
Companion programs
5-9
Page 28
Creating Pocket Excel documents
To create a new Excel document:
1. Tap
Pocket Excel.
2. Tap New to display a blank
document.
If you selected a template for new
documents in the Options dialog
box, that template appears with
the appropriate text and
formatting already provided.
, tap Programs, tap
Saving Pocket Excel documents
To save an Excel document:
When you have finished editing your document, tap OK.
By default, your document is saved as Book1 as file name. You can
change the file name to one that is more descriptive of your document.
See next section for saving options.
5-10
Chapter 5
Page 29

To specify save options:
1. With the document open, tap
Tools.
2. From the pop-up menu, tap Save
Workbook As... to display the
Save As screen.
3. Change the file name by simply
typing a new one in the Name
field.
4. Tap the down arrow in the Folder
field to select a folder where you
wish to place the file.
5. Tap the down arrow in the Type field to select a file format.
You can save the document you create or edit in a variety of formats:
• Pocket Excel (.pxl)
• Excel (.xls)
6. Tap the down arrow in the Location field to indicate the location of
your saved file, either in the main memory of your device, or in a
storage card, if available.
7. Tap OK when done.
NOTE If you do not wish to save your workbook to a different format,
but would like to change the file name, folder, and location of
your document, simply tap Edit from the command bar, then
tap Rename/Move... from the pop-up menu to make your
changes.
Companion programs
5-11
Page 30
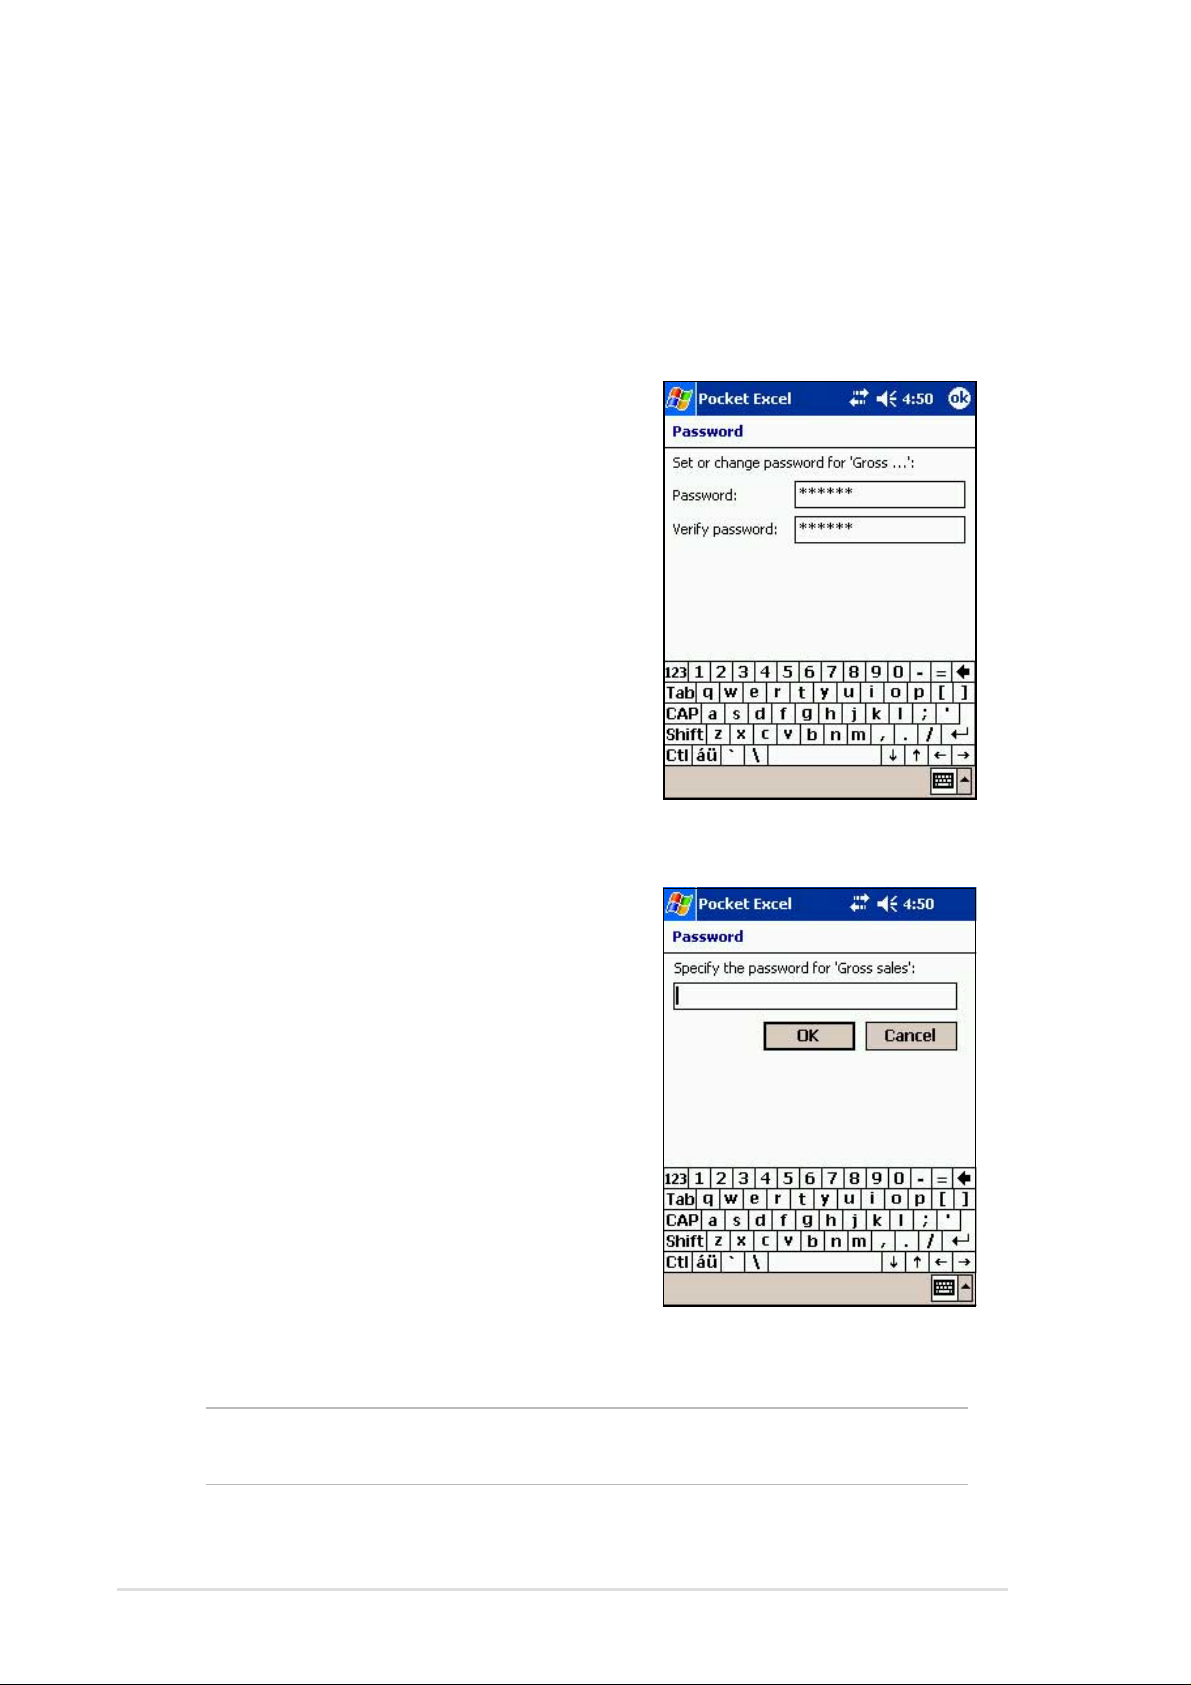
Securing your Excel document
If your workbook contains sensitive or confidental information, you can
protect it with a password.
To set a password for your workbook:
1. Open the workbook.
2. Tap Edit from the command bar,
then tap Password... to display
the password setting screen.
3. Type a password in the
Password field.
4. Re-type the password in the
Verify Password field.
5. Tap OK when done.
If you have set a password for your
workbook, a password screen
appears asking you to type your
password whenever you try to open
the workbook.
Type your password, then tap OK. If
you type in a wrong password, a
message appears telling you so.
NOTE DO NOT forget your password! You can not open your
workbook unless you type in the correct password.
5-12
Chapter 5
Page 31

Tips for working in Pocket Excel
Take note of the following when working in large worksheets in Pocket
Excel:
• View in full-screen mode to see as much of your worksheet as
possible. Tap View, then tap Full Screen. To exit full-screen mode, tap
Restore.
• Show and hide window elements. Tap View, then tap the elements to
show or hide.
• Freeze panes on a worksheet. First select the cell where you want to
freeze panes. Tap View, then tap Freeze Panes. You might want to
freeze the top and leftmost panes in a worksheet to keep row and
column labels visible as you scroll through a sheet.
• Split panes to view different areas of a large worksheet. Tap View, then
tap Split. Drag the split bar to where you want it. To remove the split, tap
View, then tap Remove Split.
• Show and hide rows and columns. To hide a row or column, select a
cell in the row or column that you want to hide. Tap Format, then tap
Row or Column, and tap Hide. To show a hidden row or column, tap
Tools, then tap Go To, and type a reference that is in the hidden row or
column. Tap Format, then tap Row or Column, and tap Unhide.
For more information on using Pocket Excel, tap
, then tap Help.
Companion programs
5-13
Page 32

MSN Messenger
MSN Messenger on your device is an instant messaging program that
allows you to:
• See who is online
• Send and receive instant messages
• Have instant message conversations with groups of contacts
To use MSN Messenger:
You must have a Microsoft Passport™ account or a Microsoft
Exchange e-mail account.
You must have a Passport to use the MSN Messenger Service. If you
have a Hotmail
have obtained either a Microsoft Passport or Microsoft Exchange account,
you are ready to set up your account.
®
or MSN account, you already have a passport. Once you
Sign up for a Microsoft Passport account at http://www.passport.com.
Get a free Microsoft Hotmail e-mail address at http://www.hotmail.com.
To launch MSN Messenger:
1. Tap , then tap Programs.
2. Tap MSN Messenger.
5-14
Chapter 5
Page 33

Signing up
To sign in to MSN Mesenger service:
1. Tap Tools then tap Sign in... from
the menu.
OR
Simply tap the Tap here to sign
in area.
2. In the sign-in screen, enter your
e-mail address and password.
Tap Sign In.
NOTE If you already use MSN Messenger on your desktop
computer, your contacts will show up on your device without
being added again.
Companion programs
5-15
Page 34

Working with contacts
The MSN Messenger window shows all of your messenger contacts at a
glance, divided into Online and Not Online categories. From this view,
while connected, you can chat, send an e-mail, block the contact from
chatting with you, or delete contacts from your list using the pop-up menu.
To see others online without being seen, tap My Status in the Tools menu
and select Appear Offline.
If you block a contact, you will appear offline but will remain on the blocked
contact’s list. To unblock a contact, tap and hold the contact, then tap
Unblock on the pop-up menu.
5-16
Chapter 5
Page 35

Chatting with contacts
Tap a contact name to open a chat window. Enter your message in the text
entry area at the bottom of the screen, or tap My Text to enter a preset
message, then tap Send. To invite another contact to a multi-user chat, tap
Invite in the Tools menu, then tap the contact that you want to invite.
NOTE To switch back to the main window without closing a chat, tap
the Contacts button. To go back to your chat window, tap
Chats and select the person whom you were chatting with.
To know if the contact you are chatting with is responding, look for the
message under the text entry area. For more information on using MSN
Messenger, tap
, then tap Help.
Companion programs
5-17
Page 36

Windows Media Player for Pocket PC
Use Microsoft® Windows Media Player for Pocket PC to play digital audio
and video files that are stored on your device or on a network. To switch to
Windows Media Player for Pocket PC, tap
, tap Programs, then tap
Windows Media.
Indicates the progress
of the current track
Slide to adjust volume
Tap to mute sound
Tap to play the next track
Tap to play the previous track
Tap to stop
Tap to play or pause
Use Microsoft Windows Media Player on your desktop computer to copy
digital audio and video to your Pocket PC. You can play Windows Media
and MP3 files on your Pocket PC.
For more information on using Windows Media Player for Pocket PC, tap
, then tap Help.
5-18
Chapter 5
Page 37

Microsoft Reader
Use Microsoft Reader to read eBooks on your device. Download books to
your desktop computer from your favorite eBook web site. Then, use
ActiveSync to copy the book files to your activated device. The books
appear in the Reader Library.
Each book consists of a cover page, an optional table of contents, and the
pages of the book. You can:
• Page through the book using the Up/Down control on your device, or by
tapping the page number on each page.
• Annotate the book with highlighting, bookmarks, notes, and drawings.
• Search for text and look up definitions for words.
The Guidebook contains all the information that you need to use the
software. To open the Guidebook, tap Help on the Reader command bar.
Or, on a book page, tap and hold on the book title, then tap Help on the
pop-up menu.
To launch Microsoft Reader:
1. Tap , then tap Programs.
2. Tap Microsoft Reader.
Companion programs
5-19
Page 38

Getting books on your device
You can download book files from the Web. Just visit your favorite eBook
retailer and follow the instructions to download the book files.
Sample books and a dictionary ar also included in the MSReader folder in
the Extras folder on the Pocker PC Companion CD.
Use ActiveSync to download the files from your desktop computer to your
activated device as described in the Read Me file in the MSReader folder.
Using the Library
The Library is your Reader home page. It displays a list of all books stored
on your device or storage card.
To open the library:
1. On the Reader command bar, tap Library.
2. On a book page, tap the book title, then tap Library on the pop-up
menu.
To open a book, tap its title on the Library list.
Tap to scroll through
the Library list
Tap to select
a sort order
Tap to search books
by author or title
Tap to navigate to
other parts of the
Reader
A list of books you
have stored appears
here
5-20
Chapter 5
Page 39

Reading a book
Each book consists of a cover page, and optional table of contents, and
the pages of the book. Navigation options are listed in the bottom portion
of the cover page.
The first time you open a book, you will probably want to go to the first
page or to the table of contents, if there is one. Subsequently, whenever
you open a book, you will be automatically taken to the last page read.
In addition to the text, each book page includes a page number and the
book title.
You can also page through a book using the Up/Down control on your
device.
Companion programs
5-21
Page 40

Using Reader features
Reading a book electronically gives you several options not available with
paper books. These options are available from any book page.
Select text by dragging across the text on the page. Then, tap an option on
the pop-up menu, as described below.
• Search for Text. Find text in a book by tapping Find on the pop-up
menu. Enter the word you want to search for, and tap the desired Find
option. Reader highlights found text on the page. To close Find, tap
outside the box. To return to your original page, tap the title then tap
Return on the pop-up menu.
• Copy Text. You can copy text form books that support this feature into
any program that accepts text. On a book page, select the text that you
want to copy. Then, tap Copy Text on the pop-up menu. The text can be
pasted into the program of your choice.
• Bookmarks. When you add a bookmark to a book, a color-coded
bookmark icon appears on the right margin. You can add multiple
bookmarks to a book. Then, from anywhere in the book, tap the
bookmark icon to go to the bookmarked page.
• Highlights. When you highlight text, it appears with a colored
background.
• Notes. When you attach a note to text, you enter the text in a note pad
that appears on top of the book page. A Note icon appears on the left
margin. To show or hide the note, tap the icon.
• Drawings. When you add a drawing, a Drawing icon appears on the
bottom-left corner of the page, and drawing tools appear across the
bottom of the page. Draw by dragging your stylus.
NOTE To see a list of a book’s annotations, including bookmarks,
highlights, text notes, and drawings, tap Annotations Index
on the book’s cover page. You can tap an entry in the list to
go to the annotated page.
Removing a book
When you finish reading a book, you can delete it to conserve space on
your device. If a copy of the book is stored on your desktop computer, you
can download it again at any time.
To remove a book from your device, tap and hold the title in the Library list,
then tap Delete on the pop-up menu.
5-22
Chapter 5
Page 41

Chapter 6
Pocket Internet Explorer
♦♦
♦ Introduction........................................................... 6-2
♦♦
♦♦
♦ Using Pocket Internet Explorer ........................... 6-2
♦♦
Changing View settings...................................................... 6-3
Browsing the Internet ......................................................... 6-3
♦♦
♦ AvantGo Channels................................................ 6-4
♦♦
♦♦
♦ Mobile Favorites folder ........................................ 6-5
♦♦
Favorite links ...................................................................... 6-5
Mobile Favorites ................................................................. 6-5
Viewing mobile favorites and channels .............................. 6-7
Adding/Deleting mobile favorites and folders ..................... 6-8
Pocket Internet Explorer
6-1
Page 42

Introduction
Use Microsoft Pocket Internet Explorer to view Web or WAP pages in any
of these ways.
• During synchronization with your desktop computer, download your
favorite links and mobile favorites that are stored in the Mobile Favorites
sub-folder in the Internet Explorer on the desktop computer.
• Connect to an Internet service provider (ISP) or network and browse the
Web. To do this, you need to create the connection first. See Chapter 7
for information on creating a connection.
When connected to an ISP or network, you can also download files and
programs from the Internet or intranet.
Using Pocket Internet Explorer
You can use Pocket Internet Explorer to browse mobile favorites and
channels that have been downloaded to your device without connecting to
the Internet. You can also connect to the Internet through an ISP or a
network connection to browse the Web.
To launch Pocket Internet Explorer:
1. Tap , then Internet Explorer
to display the Pocket MSN
services.
New Pocket MSN services
Tap to go back to previous page
Tap to stop/refresh
6-2
Tap to go to Pocket Internet Explorer home
Tap to launch Favorites
Chapter 6
Page 43

2. Tap the Home button to display
the Pocket Internet Explorer
welcome screen with links to
some useful Web sites.
3. Tap any of the Web site buttons to
go to a specific site.
Changing View settings
To change View settings:
1. Tap View to display a pop-up
menu.
2. Tap Fit to Screen to see all the
screen items at the same time.
3. Tap Address Bar to display the
Web site address bar.
4. Tap and hold Text Size to display
another pop-up menu with a text
size selection. Select your desired
text size for the screen.
Browsing the Internet
To browse the Internet:
1. Set up a connection to your ISP or corporate network using
Connections. See Chapter 7 for details.
2. Do one of the following to connect and start browsing:
• Tap the Favorites button, then tap the favorite that you wish to view.
• Tap View, then Address Bar. Enter the Web address that you want
to visit then tap Go.
Pocket Internet Explorer
6-3
Page 44

A vantGo Channels
AvantGo is a free interactive service that gives you access to personalized
content and thousands of popular Web sites. You subscribe to AvantGo
channels directly from your device. Then, synchronize your device and
desktop computer, or connect to the Internet to download the content.
For more information, visit the AvantGo web site at http://avantgo.com/
To activate AvantGo:
1. In the ActiveSync window on your
desktop computer, click Options.
2. In the Sync Options tab, check
the box beside the AvantGo item.
Click OK.
ActiveSync automatically updates
the settings and synchronizes
with your device.
NOTE Make sure that your computer is connected to the Internet.
3. When synchronization is
complete, the AvantGo home
page appears on your device.
To launch AvantGo:
1. In Pocket Internet Explorer on
your device, tap the Favorites
button to display your list of
favorites.
2. Tap the AvantGo Channels link
to go directly to the AvantGo
home page and see a few of the
most popular channels.
To add or remove channels:
Tap the Add or Remove link.
6-4
Chapter 6
Page 45

Mobile Favorites folder
Only items items stored in the Mobile Favorites sub-folder in the Favorites
folder in the Internet Explorer on your desktop computer will be
synchronized with your device. This folder was created automatically when
you installed ActiveSync.
Favorite links
During synchronization, the list of favorite links in the Mobile Favorites
folder on your desktop computer is synchronized with Pocket Internet
Explorer on your device. Both computers are updated with changes made
to either list each time you synchronize. Unless you mark the favorite link
as a mobile favorite, only the link will be downloaded to your device, and
you will need to connect to your ISP or network to view the content. For
more information on synchronization, see ActiveSync Help on the desktop
computer.
Mobile Favorites
If you are using Microsoft Internet Explorer 5.0 or later on your desktop
computer, you can download mobile favorites to your device.
Synchronizing mobile favorites downloads Web content to your device so
that you can view pages while you are disconnected from your ISP and
desktop computer.
Use the Internet Explorer plug-in installed with ActiveSync to create mobile
favorites quickly.
Pocket Internet Explorer
6-5
Page 46

To create a mobile favorite:
1. In Internet Explorer on your desktop
computer, click Tools then Create
Mobile Favorite.
2. To change the link name, enter a new
name in the Name box.
3. Select your desired update schedule
in Update. This is optional.
4. Click OK. Internet Explorer downloads
the latest version of the page to your
desktop computer.
5. If you want to download the pages that
are linked to the mobile favorite you
just created, in Internet Explorer on the
desktop computer, right-click the
mobile favorite, then click Properties.
In the Download tab, specify the
number of links deep you want to
download. To conserve device
memory, go only one level deep.
6. Synchronize your device and your
desktop computer. Mobile favorites that
are stored in the Mobile Favorites in
Internet Explorer are downloaded to
your device.
NOTE If you did not specify an update schedule in step 3, you will
need to manually download content to keep the information
updated on your desktop computer and device. Before
synchronizing with your device, in Internet Explorer on your
desktop computer, click Tools then Synchronize. You will
see the last time content was downloaded to the desktop
computer, and you can manually download content if needed.
You can add a button to the Internet Explorer toolbar for
creating mobile favorites. In Internet Explorer on your desktop
computer , click View, Toolbars, and Customize.
6-6
Chapter 6
Page 47

Saving device memory
Mobile favorites take up storage memory on your device. To minimize the
amount of memory used:
• In the settings for the Favorites information type in ActiveSync options,
turn off pictures and sounds, or stop some mobile favorites from being
downloaded to the device. For more information, see ActiveSync Help.
• Limit the number of downloaded linked pages. In Interner Explorer on
your desktop computer, right-click the mobile favorite you want to
change, then click Properties. In the Download tab, specify 0 or 1 for
the number of linked pages you want to download.
Viewing mobile favorites and channels
To view mobile favorites and channels:
1. Tap to display your list of favorites.
Tap the favorite that
you wish to view
Tap to add or delete a
folder or favorite link
2. Tap a Favorites page that you wish to view.
You will see the page that was downloaded the last time you
synchronized with your desktop computer. If the page is not on your
device, the favorite is dimmed. You need to synchronize with your
desktop computer again to download the page to your device, or
connect to the Internet to view the page.
Pocket Internet Explorer
6-7
Page 48

Adding/Deleting mobile favorites and folders
To add a favorite:
1. Tap to display your list of
favorites.
2. Tap the Add/Delete button to
display the Favorites screen.
3. Tap the Add... button to show the
Add Favorite screen.
4. Type a name for the favorite that
you wish to add in the Name field.
5. Type in the URL address in the
Address (URL) field.
6. Select a folder to place the
favorite from the Create in: box.
7. Tap Add to return to the Favorites
screen, which now shows the
favorite that you added.
To delete a favorite:
1. Tap to display your list of
favorites.
2. Tap the Add/Delete button to
display the Favorites screen.
3. Select the favorite that you wish
to delete, then tap Delete.
4. When prompted to permanently
delete the favorite, tap Yes.
6-8
Chapter 6
Page 49

To add a folder:
1. Tap to display your list of
favorites.
2. Tap the Add/Delete button to
display the Favorites screen.
3. Tap the New Folder button.
4. Type a name for the folder that
you wish to create.
5. Tap Add to return to the Favorites
screen, which now shows the
folder that you added.
To delete a folder:
1. Tap to display your list of
favorites.
2. Tap the Add/Delete button to
display the Favorites screen.
3. Select the folder that you wish to
delete, then tap Delete.
4. When prompted to permanently
delete the folder, tap Yes.
Pocket Internet Explorer
6-9
Page 50

6-10
Chapter 6
Page 51

Chapter 7
Get connected
♦♦
♦ Introduction........................................................... 7-2
♦♦
♦♦
♦ Connect to the Internet ........................................ 7-2
♦♦
♦♦
♦ Connect to Work................................................... 7-3
♦♦
♦♦
♦ Set up connections .............................................. 7-3
♦♦
Modem connections................................................................. 7-3
VPN server connections .......................................................... 7-4
Proxy server settings ............................................................... 7-4
Network card connections........................................................ 7-5
Wireless network connections ................................................. 7-6
Enter settings information ........................................................ 7-6
Configure authentication settings............................................. 7-7
Change connection settings name........................................... 7-7
♦♦
♦ End a connection.................................................. 7-8
♦♦
♦♦
♦ Set up a WAP gateway ......................................... 7-8
♦♦
♦♦
♦ Use dialing rules................................................... 7-9
♦♦
♦♦
♦ Infrared (IR) connection ..................................... 7-10
♦♦
Sending information ................................................................7-11
Receiving information .............................................................7-11
Get connected
7-1
Page 52

Introduction
You can set up connections to the Internet and corporate network at work
in order to do such activities as browse the Internet or intranet, send and
receive e-mail and instant messages, and synchronize information using
ActiveSync.
Connections can be made using a modem, wireless network, or
network (Ethernet) card. A modem connection can be used to set up
connections with an external modem, or through your mobile phone
network using a cellular line.
Your device has two groups of connection settings: My ISP and My Work
Network. My ISP settings are used to connect to the Internet, and My
Work Network settings can be used to connect to any private network,
such as a corporate network you use at work. Simply fill in the settings and
get ready to start connecting. For more information, see the sections
“Connect to the Internet” or “Connect to Work.”
You may also establish connection to another device with infrared (IR) or
Bluetooth features. For more information, see sections “Infrared (IR)
connection” or “Bluetooth connection.”
Connect to the Internet
To connect to the Internet:
1. Obtain the following information from your ISP: ISP server phone
number, user name, and password.
2. Tap
3. In My ISP, tap Add a new modem connection.
4. Create a modem connection. For more information, see section “Set
up modem connections.”
5. To start the connection, begin using the desired program. For example,
switch to Pocket Internet Explorer and browse a Web page. Your
device automatically connects.
NOTE To set up a network card or wireless network connection to
> Settings > Connections tab > Connections.
your ISP, add a new connection under My Work Network.
7-2
Chapter 7
Page 53

Connect to Work
1. Obtain the following information from your network administrator:
server phone number, user name, and password.
2. Tap
3. In My Work Network, set up either a modem, network card, wireless
network, or VPN server connection. Refer to the section “Set up
connections” for the procedure.
4. To start the connection, start using a desired program. For example,
switch to Pocket Internet Explorer and browse to a Web page. Your
device automatically starts connecting.
> Settings > Connections tab > Connections.
Set up connections
Modem connections
To set up a modem connection:
Obtain the following information from your ISP or network administrator:
telephone number , user name, password, domain name, and TCP/IP
settings.
If your device does not have access to a mobile phone network, insert a
modem card.
1. Tap > Settings > Connections tab > Connections.
2. To create a new connection, in either My ISP or My Work Network,
tap Add a new modem connection, then follow the instructions in the
New Connection wizard.
3. To view additional information for any screen in the wizard or while
changing settings, tap
NOTE To change modem connection settings in either My ISP or My
Work Network, tap Manage existing connections. Select
the desired modem connection, tap Settings, and follow the
instructions on the screen.
.
Get connected
7-3
Page 54

VPN server connections
A VPN connection helps you to securely connect to servers, such as a
corporate network, via the Internet. Ask your network administrator for your
user name, password, domain name, TCP/IP settings, and host name or
IP address of the VPN server.
To set up a VPN server connection:
1. Tap > Settings > Connections tab > Connections.
2. To create a new VPN server connection, in My Work Network, tap Add
a new VPN server connection, then follow the screen instructions.
3. To view additional information for any screen in the wizard or while
changing settings, tap
NOTE To change existing settings, in My Work Network, tap
Manage existing connections > VPN tab. Select your
desired VPN connection, tap Settings, then follow the
instructions on the screen.
.
Proxy server settings
If you are connected to your ISP or private network during synchronization,
your mobile device should download the proper proxy settings from your
PC. If these settings are not on your PC or need to be changed, ask your
ISP or network administrator for the proxy server name, server type, port,
type of Socks protocol used, and your user name and password.
To change proxy server settings:
1. Tap > Settings > Connections tab.
2. To create a new connection, in My Work Network, tap Add a new
proxy server.
3. To change proxy server settings, in My Work Network, tap Edit my
proxy server. Select the desired proxy server, and tap Settings.
4. Select This network connects to the Internet and This network uses a
proxy server to connect to the Internet.
5. In the Proxy server box, enter the proxy server name.
6. To change such settings as port number or proxy server type, tap
Advanced and change desired settings.
7-4
Chapter 7
Page 55

Network card connections
Use a network (Ethernet) card to connect directly to a network. Once
connected, you can view the Internet or intranet, or download e-mail. You
do not need to create a new connection on your device. For more
information, see your network administrator. Make sure to purchase and
configure a network card that is compatible with your device.
To set up a network card:
1. Obtain the following information from your network administrator: user
name, password, and domain name.
2. Insert the network card into your device.
3. The first time you insert the card, Network Settings appears
automatically so that you can configure the network card. If it does not
appear, or to change settings later, tap > Settings > Connections
tab > Connections > Advanced tab > Network Card.
4. If you need to enter specific server information, tap the appropriate
adapter, and then tap Properties. Most networks use DHCP, so you
should not have to change these settings unless your network
administrator instructs you to do so.
5. If necessary, connect the network card to the network by using a
network cable. For information, refer to the documentation that came
with your network card.
6. To start a connection, insert the network card, and begin using a
desired program. For example, switch to Pocket Internet Explorer
and browse a Web page. Your device automatically starts connecting.
If you use your network card with two networks, such as a private
network at work and one at home for the Internet, you need to change
the network to which the network card connects.
NOTE You may need proxy server and VPN connection settings.
For more information, see your network administrator.
Get connected
7-5
Page 56

Wireless network connections
Networks that you have already configured are preferred networks and are
listed in Wireless networks. You can select to connect to only preferred
networks or have your device search for and connect to any available
network whether it is preferred or not.
To set up a wireless network:
1. Tap > Settings > Connections tab > Connections > Network
Card > Wireless tab.
2. To change network settings, in Wireless networks, tap a network. If
you do not see a desired network, tap Add new and follow the
instructions on the screen.
3. From Networks to access, select All available, Only access points,
or Only computer-to-computer depending on the type of network(s)
you connect to.
4. To connect only to networks you have already configured, clear
Automatically connect to non-preferred networks.
NOTE If you select to automatically connect to non-preferred
networks, your device detects any new networks and provide
you the opportunity to configure them.
Enter settings information
A wireless network can be added either when the network is detected, or
manually by entering settings information.
To enter new settings:
1. To manually enter information, tap > Settings > Connections tab
> Connections > Network Card > Wireless tab. Then, tap Add new.
If the network was detected, step one is not necessary.
2. In the General tab, enter a network name. If the network was detected,
the network name is automatically entered and can't be changed.
3. From Connects to, select what your network connects to, Work or the
Internet.
4. To connect to an ad-hoc connection, select This is a device-to-
computer (ad-hoc) connection.
7-6
Chapter 7
Page 57

Configure authentication settings
A wireless network can be added either when the network is detected, or
manually by entering settings information. To determine if authentication
information is needed, see your network administrator.
To configure authentication settings:
1. To manually enter information, tap > Settings > Connections tab
> Connections > Network Card > Wireless tab.
2. Tap Add new. If the network was detected, step one and two are not
necessary.
3. To use data encryption, tap Data encryption (WEP enabled).
4. To use Shared Key authentication, tap Network Authentication
(shared mode). You need a network key.
5. To automatically use a network key, tap The key is provided for me
automatically. Otherwise, enter the network key.
6. For increased security, select Use IEEE 802.1x network access
control, then select the appropriate EAP type.
Change connection settings name
Your mobile device is already set up with two sets of connection settings:
My ISP and My Work Network. You can change the name of these
settings to something more familiar. For example, if you put all of your
corporate settings under My Work Network, you can change the name
from My Work Network to your company name.
To change a connection name:
1. Tap > Settings > Connections tab > Connections.
2. Under My ISP or My Work Network, tap Manage existing
connections.
3. Tap the General tab.
4. Enter a name for the settings.
Get connected
7-7
Page 58

End a connection
• When connected via modem or VPN, tap on the navigation bar,
then tap Disconnect.
• When connected via cable or cradle, detach your device from the cable
or cradle.
• When connected via Infrared, move the device away from the other
computer or device.
• When connected via a network (Ethernet) card, remove the card from
your device.
• When connected via a wireless network, switch off the connection.
Set up a W AP gateway
To access WAP sites through Pocket Internet Explorer, configure your
device to use a WAP gateway. Use the following steps to create a new set
of connections to the Internet with WAP gateway settings.
NOTE Some device models do not support the WAP sites viewing
feature.
1. Get the following information from your ISP: ISP server phone number,
user name, and password. Also, contact your mobile phone service
provider and ask for your WAP gateway server name and port number.
2. Tap
3. Tap Edit my proxy server. If a proxy server has not been set up, tap Set
up my proxy server.
4. In Programs that automatically connect to the Internet should
connect using, tap New and enter a name for the ISP connection.
5. On the Proxy Settings tab, select This network connects to the
Internet and This network uses a proxy server to connect to the
Internet.
6. If necessary, in the Proxy server box, enter the proxy server name.
7. Tap Advanced.
> Settings > Connections tab > Connections > Tasks tab.
8. In the WAP box, enter the WAP gateway server name. Under Port,
enter the port number. The most common WAP port number is 9201.
7-8
Chapter 7
Page 59

9. Create a modem connection. See section “Set up connections.”
If necessary, set dialing rules. See section “Use dialing rules.”
10.If your device does not have a connection to a mobile phone network,
insert a modem card.
Use dialing rules
Additional numbers may need to be dialed depending on your given
location when connecting. For example, if you want to dial from work, a 9
prefix must often be dialed, or an area code is needed.
To avoid creating a new modem connection for each situation, set dialing
rules for the locations from which you connect often. Three dialing
locations, Home, Mobile, and Work, have been created for you, and you
can create more. If a connection cannot be made, your device gives you
an opportunity to change the dialing location.
1. Tap
tab.
2. Tap Select Location.
3. Tap Use dialing rules.
4. Select a location.
• Home - Dials the number as a local call without a 9 prefix.
• Work - Dials the number as local call with the 9 prefix.
NOTE To create a new location, tap New and follow the directions
> Settings > Connections tab > Connections > Advanced
on the screen. To view additional information at any time,
tap .
Get connected
7-9
Page 60

Infrared (IR) connection
By default, your device detects incoming infrared (IR) beams and prompts
you to accept them. If you do not want your device to detect or receive
beans, clear the Receive all incoming beams check box.
To set the Beam options:
1. Tap , then Settings.
2. Tap the Connections tab.
3. Tap the Beam icon to display the
Settings screen.
4. Make your desired change and tap OK.
5. To receive an infrared beam from this screen, tap the link at the
bottom. Your device automtically looks for another device using
infrared.
7-10
Chapter 7
Page 61

Sending information
To send information:
1. Switch to the program where you
created the item that you want to
send, and locate that item in the
list.
2. Align the IR ports so that they are
unobstructed and within a close
range.
3. Tap and hold the item, then tap
Beam File... on the pop-up menu.
NOTE You can also send items, but not folders, from File Explorer.
Tap and hold the item that you want to send, then tap Beam
File on the pop-up menu.
Receiving information
To receive information:
1. Align the IR ports so that they are unobstructed and within a close
range.
2. Have the owner of the other device send the information to you. Your
device automatically receive the information.
Get connected
7-11
Page 62

7-12
Chapter 7
Page 63

Chapter 8
®
Bluetooth
♦♦
♦ Introducing Bluetooth
♦♦
Bluetooth for Windows CE (BTW-CE) ..................................... 8-2
Bluetooth icon .......................................................................... 8-2
♦♦
♦ Bluetooth settings ................................................ 8-3
♦♦
General .................................................................................... 8-3
Accessibility ............................................................................. 8-3
File Transfer ............................................................................. 8-4
Information Exchange .............................................................. 8-4
Serial Port ................................................................................ 8-4
Personal Network Server ......................................................... 8-5
Audio Gateway......................................................................... 8-5
About........................................................................................ 8-5
♦♦
♦ Bluetooth Manager ............................................... 8-6
♦♦
®
................................................................
8-2
Bluetooth connection wizard .................................................... 8-7
Business Card Exchange......................................................... 8-8
♦♦
♦ Remote device services....................................... 8-9
♦♦
Wireless serial port .................................................................. 8-9
Dial-up networking ................................................................. 8-10
Bluetooth file explorer .............................................................8-11
Send via Bluetooth................................................................. 8-14
Dial via Bluetooth ................................................................... 8-15
Bluetooth Personal Area Network .......................................... 8-16
Bluetooth
®
8-1
Page 64

Introducing Bluetooth
®
Bluetooth is a short-range wireless communications technology. Devices
with Bluetooth capabilities can exchange information over a distance of
about 10 meters (30 feet) without requiring a physical connection.
Unlike infrared, you don’t need to line up the devices to beam information
with Bluetooth. The devices only need to be within a range of about 10
meters. You can even beam information to a device in a different room, as
long as it is within the specififed range.
Bluetooth® for Windows® CE (BTW-CE)
BTW-CE is the solution to smoothly integrate the Bluetooth technology into
devices that use the Pocket PC operating system.
The Bluetooth technology allows your Pocket PC to:
• Locate other Bluetooth devices within the vicinity
• Discover the services that those devices offer
• Connect to, use, and disconnect from those services
• Enable or disable individual services
• Use security features including authentication, authorization, and
encryption
Bluetooth icon
The Bluetooth icon is located on the lower
right corner of the Today screen.
When Bluetooth is enabled (turned ON),
the icon is blue
on the left side of the device blinks blue.
When Bluetooth is disabled (turned OFF),
the icon is grayed with a red X on its lower
right corner
, and the Bluetooth LED
.
Tapping the icon displays a menu that
allows you to:
• turn Bluetooth on or off
• launch the Bluetooth Manager
• change the Bluetooth Settings
8-2
Bluetooth icon
Chapter 8
Page 65

Bluetooth settings
To configure the Bluetooth settings:
1. Tap from the lower right corner of
the Today screen to display the
Bluetooth menu.
2. Tap Bluetooth Settings.
3. Tap one of the tabs at the bottom of
the Settings screen to make your
desired changes.
General
Allows you to:
• select the user profile
• see the Bluetooth status (ON/OFF)
• turn Bluetooth ON or OFF
• tap a link to the Bluetooth Manager
Accessibility
Allows you to:
• set the device name
• see the Bluetooth Device Address
(BDA)
• select the remote devices you wish to
connect
• set whether to allow remote devices to
see your device
Bluetooth
®
8-3
Page 66

File Transfer
Allows you to customize the settings for
file transfers, and set the highest level
directory on your device that remote
devices can access.
Refer to section “Remote device
services” for more information.
Information Exchange
Allows you to customize the service
settings, and set the default business
card.
Serial Port
Allows you to customize the service
settings, and display the serial port
addresses. The port address
assignments cannot be changed.
Refer to section “Remote device
services” for more information.
8-4
Chapter 8
Page 67

Personal Network Server
Allows you to customize the service
settings for your personal network
server.
Refer to section “Remote device
services” for more information.
Audio Gateway
Allows you to customize the service
settings for the Audio Gateway.
About
Displays the Bluetooth™ for Windows
CE (BTW-CE) information including the
release version, copyright notice,
website address, technical support
email, and the Advanced button. The
Advanced buttons contains the version
information about the individual software
modules that make up BTW-CE.
The information on this screen is not
configurable.
Bluetooth
®
®
8-5
Page 68

Bluetooth Manager
The Bluetooth Manager allows you to create, manage, and use Bluetooth
to connect to remote devices.
To launch the Bluetooth Manager:
Tap , then tap the Bluetooth Manager
from the Start menu.
The My Shortcuts screen displays a list of pre-configured connections, if
any. Tap New > Connect to connect to other devices via Bluetooth.
The Active Connections screen displays the active incoming and outgoing
connections.
8-6
Tap to set Business Card exchange options
Tap to launch the Bluetooth connection wizard
Tap to set view options
Tap to add or remove paired devices
Tap to make a new connection
Chapter 8
Page 69

Bluetooth connection wizard
The Bluetooth connection wizard helps you set up connections with
remote Bluetooth devices.
To launch the Bluetooth connection wizard:
1. Tap from the Bluetooth Manager
command bar. The Bluetooth
Connection Wizard screen appears.
2. Select a type of connection that you
wish set up. Tap Next.
Tap Cancel if you do not wish to
continue the connection process.
NOTE Refer to the device online help for other information on
Bluetooth.
Bluetooth
®
8-7
Page 70

Business Card Exchange
The Business Card Exchange function allows you to:
• send your business card to a remote device
• receive a business card from a remote device
• exchange business cards with one or more remote devices
To launch the Business Card Exchange screen:
1. Tap from the Bluetooth Manager
command bar.
2. Select the action that you wish to
make.
NOTE From this screen, tap the link Select the business card to
go to the Information Exchange settings.
8-8
Chapter 8
Page 71

Remote device services
Wireless serial port
Using a Bluetooth serial port is equivalent to using a physical cable serial
port connection between two devices. As with a physical connection, you
have to configure the application that will use the serial port.
To configure the Bluetooth Serial Port:
1. Tap from the lower right corner
of the Today screen to display the
Bluetooth menu.
2. Tap Bluetooth Settings, then the
Serial Port tab.
3. Note the assigned Outbound
COM Port 6 and configure the
application that will use the
Bluetooth serial port to send data
to this port.
NOTE Refer to the application’s documentation for more information
about configuring your application’s Outbound COM port.
4. From the Bluetooth Manager My Shortcuts screen, open the Bluetooth
Serial Port connection to the remote device.
5. Send/receive data from the application.
Bluetooth
®
8-9
Page 72

Dial-up networking
The Dial-up Networking feature allows you to connect to a rmeote
computer through a phone line. Once connected, you can browse the
Internet, check/read emails, etc.
NOTE The remote Bluetooth device that will provide the Dial-up
Networking service should have access to a telephone
system, either a hard-wired or a cellular connection, and
capable of answering a call.
Devices that may provide a Dial-up Networking service:
• Bluetooth-enabled cellular telephones
• Bluetooth-enabled desktop computers attached to a telephone system
• Bluetooth modems
To use Dial-up Networking:
1. Create a connection to the device that will provide telephone access.
See the section “Bluetooth connection wizard” on page 8-7.
2. Tap
3. In My Shortcuts screen, tap and hold the Dial-up Networking
Connection shortcut, then select Connect from the pop-up menu.
4. On the first Bluetooth: Dial-up Connection screen, double-tap New
Connection... OR select New Connection then tap OK.
5. Key-in the following informatin on the second Bluetooth: Dial-up
Connection screen:
• Name for a connection
• Country code (if dialing outside the default country setting)
• Area code (if dialing outside the default area code setting)
• Phone number to be dialed
6. Tap OK.
7. Enter the required information on the succeeding screens to complete
the connection process.
, then the Bluetooth Manager from the Start menu.
8. When the connection is active, open a web browser from the device.
8-10
Chapter 8
Page 73

Bluetooth file explorer
The Bluetooth File Explorer appears automatically after a file transfer
connection is established.
This service feature allows you to do the following operations:
• Navigate the directory structure of the remote device
• View the files and folders on the remote device
• Create new folders on the remote device
• Send files to, and copy or get files from the remote device
• Delete files from the remote device
NOTE The file operations on the remote device are limited to the
configured FTP root directory and sub-directories of the
remote device.
The Bluetooth File Explorer also allows you to set a folder in your device
for receiving inbound files. You may configure this folder for each of your
connection shortcuts. See the section “To set a local folder” on page 8-13.
Bluetooth File Explorer menus
File Send a File...
Create a Folder
Get
Delete
Tools
Set Local Folder
Refresh
To change the remote device folder:
1. To move down in the directory structure of the remote device, tap the
New Folder from the main window of Bluetooth File Explorer.
2. To move up in the directory structure of the remote device, tap the
down-arrow to the right of the currently selected folder and select the
New Folder from the drop-down list.
Bluetooth
®
8-11
Page 74

To create a folder on the remote device:
1. Select the folder in which you wish to place the new folder.
2. From the File menu, tap Create a Folder.
3. Enter a name for the new folder while the default name New Folder is
highlighted.
To send a file to the remote device:
1. From the File menu, tap Send a File... to display the Open screen.
The Open screen includes the following:
Folder - tap the down-arrow and select the folder that contains the file
you wish to send
Type - default and only option is “All Files (*.*)
A list of files in the selected folder - tap a file that you wish to send
Cancel button - abort the Send a File... operation
2. Tap your desired operation.
The file that you selected is automatically sent when tapped, after
which the Bluetooth File Explorer re-appears.
To get a file from the remote device:
1. Select the folder containing the file.
2. Tap the file that you wish to get or copy.
3. From the File menu, tap Get.
OR
Tap and hold the desired file and select Get from the pop-up menu.
The file is copied to the local folder listed in the Local Folder field at the
bottom of the screen.
To delete a file from the remote device:
1. Tap the file that you wish to delete.
2. From the File menu, tap Delete.
3. Tap OK in the confirmation dialog box.
OR
Tap and hold the desired file and select Delete from the po-up menu.
8-12
Chapter 8
Page 75

To set a local folder for incoming files:
1. From the Tools menu, tap Set Local Folder.
2. Use the drop-down menu at the top of the screen to go to your desired
folder.
3. Tap OK to return to the main screen of Bluetooth File Explorer. You will
see the Local Folder field is updated to reflect the new folder selection.
NOTE The Local Folder information is associated with the currently
open shortcut and is saved with the active profile. You can
separately configure your Local Folder for each connection
shortcut.
To refresh the list of displayed files and folders on the remote device,
simply tap Refresh from the Tools menu.
Bluetooth
®
8-13
Page 76

Send via Bluetooth
You can conveniently send your Pocket Outlook contacts, calendar items,
and tasks individually or collectively to the remote device via Bluetooth.
To send data via Bluetooth:
1. Tap , then either Contacts,
Calendar, or Tasks.
2. Highlight an item that you wish to
send to the remote device.
3. Tap and hold the item, then tap
Send via Bluetooth from the
pop-up menu.
OR
Tap Tools from the command bar,
then select Send via Bluetooth.
4. On the Select a Bluetooth Device
screen, tap the name of the
destination, then tap OK.
8-14
Chapter 8
Page 77

Dial via Bluetooth
The Dial via Bluetooth option allows you to select a contact from the
Pocket Outlook contacts list, and have your paired cell phone dial the
contact’s phone number. If a contact has more than one phone number,
select the number that you wish to dial. You may also modify a phone
number before you dial.
To dial via Bluetooth:
1. From the Pocket Outlook Contacts screen, tap and hold a contact and
select Dial via Bluetooth.
2. If your device is paired with more than one cell phone, or if a phone is
not yet selected, tap the phone icon next to Select a phone, and
choose the phone that you wish to use.
3. Select the number that you wish to dial, then tap Dial Number.
4. To modify the number, tap Edit Number and make your desired
changes. Tap OK to return to the previous screen.
NOTE If you modify a phone number, a dialog box appears with an
option to save or to discard the modification.
5. Tap Dial Number.
After the number is sent to the cell phone, the connection on the
device is closed.
After the cell phone completes the dialing process, you can use the
use the phone the normal way.
Bluetooth
®
8-15
Page 78

Bluetooth Personal Area Network
A Bluetooth personal area network is a private, temporary, ad-hoc network
of up to eight (8) devices. A Bluetooth personal area network allows you to
easily exchange information that normally requires a TCP/IP network.
Most chat utilities, multi-player games, etc. are fully functional in a
Bluetooth personal area network environment.
Bluetooth private area networks are subject to the same security settings
(service availability, authorization, authentication, and encryption) that
govern other Bluetooth communications.
One Bluetooth device must be the host of the personal area network.
Other Bluetooth devices join the network as clients. The host can accept
and reject clients on an individual basis.
To set up a Bluetooth personal area network:
1. From the Bluetooth Manager,
select New>Connect> Join a
personal network. Tap Next.
2. On the wizard screen, select Host
a personal network, then tap
Next.
3. Add remote devices to the
Bluetooth personal network, if
desired.
a. Tap the Add button and select
the device that you wish to
add.
b. Add other devices, if desired.
There can be up to eight
devices, including the host.
4. After adding devices, tap OK to
complete the setup and close the
wizard.
NOTE Adding devices is optional. You do not have to add devices to
the personal network while configuring the host. You can let
other devices join the personal network later.
8-16
Chapter 8
Page 79

To join a personal network:
1. From the Bluetooth Manager,
select New>Connect>Join a
personal network. Tap Next.
2. On the wizard screen, select Join
a personal network, then tap
Next. The Bluetooth browser
appears.
3. Select the host of the personal
network, then tap Next to
establish a connection to the
personal area network.
If you are asked to enter the IP
network settings, select Use
server-assigned IP address,
then tap OK.
Bluetooth
®
8-17
Page 80

8-18
Chapter 8
Page 81

Chapter 9
Wireless LAN
♦♦
♦ Accessing Wireless LAN ..................................... 9-2
♦♦
♦♦
♦ Using Wireless LAN ............................................. 9-2
♦♦
Turning on Wireless LAN ......................................................... 9-2
Configuring Wireless Networks................................................ 9-3
♦♦
♦ Wireless LAN configuration ................................ 9-4
♦♦
IP Address Configuration ......................................................... 9-5
Wireless LAN Card Status ....................................................... 9-5
Site Survey............................................................................... 9-7
Profile Configuration ................................................................ 9-8
Statistics................................................................................. 9-10
Power Management................................................................9-11
About.......................................................................................9-11
♦♦
♦ WiFiME................................................................. 9-12
♦♦
Pop-up menu ......................................................................... 9-12
WiFiME task bar icons ........................................................... 9-13
Wireless LAN
9-1
Page 82

Accessing Wireless LAN
The Wireless LAN icon on your Today screen allows you easy access to
the Wi-Fi (Wireless Fidelity) feature on your device. Tapping the icon
displays a menu that allows you to:
• turn Wireless LAN on or off
• show the Wireless LAN info
• change the ASUS Settings
NOTE You may not use Bluetooth® and
Wireless LAN simultaneously. If
Bluetooth is turned on, the
Wireless LAN menu is grayed
out. You need to turn off
Bluetooth before you can turn on
Wireless LAN.
Using Wireless LAN
Turning on Wireless LAN
To turn on Wireless LAN:
1. Tap the icon on the command bar.
2. Tap the option Wireless LAN ON. The
system automatically scans for all the
available wireless networks.
Wireless LAN icon
9-2
Chapter 9
Page 83

3. From the list of detected wireless
networks, select a wireless network to
which you wish to connect your
device.
4. Select either The Internet or Work for
the network to connect your device.
5. Tap Connect.
Configuring Wireless Networks
To configure a wireless network:
1. After selecting a network to connect
your device, tap Settings instead of
Connect.
2. Make your desired changes to the
available networks on the list.
3. Tap OK when done.
Wireless LAN
9-3
Page 84

To configure a network adapter:
1. Tap the Network Adapters tab.
2. Make your desired changes to the
available adapters on the list.
3. Tap OK when done.
Wireless LAN configuration
Display the Wireless LAN information
screens by tapping the
selecting Wireless LAN Info from the
menu.
icon, and
9-4
Chapter 9
Page 85

IP Address Configuration
This page shows the IP address details
and allows you to renew the IP address
when DHCP is used.
Pressing the Renew button forces the
Pocket PC device to refresh its serverassigned IP address. The process may
take several seconds while the system
updates the IP information.
Wireless LAN Card Status
This page includes fields that display the current state and link information
of your Wi-Fi device, and allows you to re-scan the available Access
Points (AP) when necessary by tapping the Rescan button.
The Rescan button allows you to search for all available access points
ad-hoc networks in the profile. If your link quality or signal strength is poor,
you can use re-scanning to push the radio off a weak AP and search for a
better link with another AP. The re-scanning process may take a while.
State
This field shows the Wi-Fi connection status.
• Connected - the station is associated with
one wireless LAN device. This status also
indicates the MAC address of the device.
• Scanning - the station is attempting to
authenticate and associate with the
specified access point.
• Disconnected - a previous link existed but
no beacon was received. The connection
to the adapter is terminated.
• Disabled - the Wi-Fi device radio is turned
off.
• Not available - cannot obtain the Wi-Fi status; requires turning Wi-Fi on.
• Unknown - the Wi-Fi device is in an unknown state.
Wireless LAN
9-5
Page 86

The following table describes the WEP status icons that you may see on
your screen while on the Wireless LAN Card Status screen.
Icon WEP status
none WEP disabled, no encryption
WEP disabled but encryption is required.
This status requires you to input the correct network key.
WEP enabled, data is correctly encrypted/decrypted.
WEP enabled but failed to enrypt/decrypt data.
This status requires you to input the correct network key.
Ad-hoc mode, WEP disabled.
Ad-hoc mode, WEP enabled.
ESSID
This field shows the Extended Service Set Indenfier (ESSID) to which the
wireless device is connected. The text on this field is usually an
unreadable alphanumeric string.
BSSID
This field shows the Basic Service Set ID (BSSID) to which the wireless
device is connected. In ESS mode, this is the MAC address of the access
point to which your device is connected.
Current Channel
This field shows the radio channel that the Wi-Fi device is currently using.
Data Rate
This field shows the data rate that the Wi-Fi device is currently using.
Link Quality
This field shows the signal quality level between the Wi-Fi device and the
access point to which the device is currently connected.
Signal Strength
This field shows the signal strength level between the Wi-Fi device and the
access point to which the device is currently connected.
9-6
Chapter 9
Page 87

Site Survey
This page allows you to search for
available wireless networks near your
device. Tap the Search button to scan all
available wireless networks and display
the results on your screen.
ESSID
This column shows the Extended Service
Set Indenfier (ESSID) of the wireless
network found in the search.
BSSID
This column shows the Media Access
Control (MAC) address of the access point, or the Basic Service Set ID
(BSSID) in an ad-hoc mode.
CH
This column shows the channel used by the wireless device.
Signal
This column shows the Received Signal Strength Indication (RSSI)
transmitted by each wireless network. This information is helpful in
determining which network you wish to associate your device. This signal
is normally represented by a dBm value.
To associate with one of the detected wireless networks:
1. Tap-and-hold on a wireless network entry, then tap Connect on the
pop-up menu.
NOTE Another way to connect is by tapping twice on the entry.
2. If the wireless network that you selected is on the profile, your device
will try to connect to the wireless network automatically without asking
you for additional information. Otherwise, input the required
information.
3. After you have entered the required information, tap OK. The wireless
network is then added to the profile, and your device will try to connect
to it.
Wireless LAN
9-7
Page 88

The following table describes the status icons that you may see on your
screen while on the Site Survey screen.
Icon Status
Access Point (AP)
Access Point with WEP enabled
Access Point currently connected
Access Point with WEP enabled currently connected
Ad-hoc network
Ad-hoc network with WEP enabled
Ad-hoc network currently connected
Ad-hoc network with WEP enabled currently connected
Profile Configuration
This page shows the detailed information
hidden behind the wireless management
mechanism of Pocket PC 2003, and
allows you to change the profile settings
of a selected wireless network.
The profile-based mechanism built-in the
Pocket PC 2003 conveniently allows your
device to connect to or switch between
several wireless networks using the
pre-configured profile settings, while
activating, roaming, or re-scanning the
Wi-Fi device.
The Refresh button allows you to keep the profile list up-to-date. When
you tap this button, the profile setting is immediately read from the system
and displayed on the screen.
CAUTION If you made changed the profile settings, make sure to save
the changes before tapping the Refresh button.
9-8
Chapter 9
Page 89

ESSID
This column shows the Extended Service Set Indenfier (ESSID) used in
the profile entry.
Connects to
This column shows which network your device is connected, Work or the
Internet.
Pop-up menu items
Item Action
Move Moves the selected entry to a specified location
Edit Edits the selected entry. A profile edit window appears
and allows you to modify the settings for the entry.
Delete Deletes the selected entry from the profile.
Add New Profile Adds a new entry to the profile. A profile window appears
and lets you add and input the settings for the new entry.
Apply Change Applies all the changes you made and saves them to
the profile in system. Make sure to perform this action
after you have made your desired changes.
NOTE While configuring your settings in the Profile Configuration
page, you may also see icons that indicate the connection
status of your device. Refer to the table on page 9-8 for the
description of the icons.
To edit a wireless network profile:
1. Tap-and-hold on a wireless network
item and select the Edit option from
the pop-up menu, or simply tap twice
on the target entry to launch the Edit
menu.
2. Make your desired changes.
3. Tap OK when done.
Wireless LAN
9-9
Page 90

Statistics
This page displays the statistics of your
Wi-Fi device.
Tx Packets
This field shows both the current and
accumulated packets the Wi-Fi device has
transmitted.
Tx Bytes
This field shows both the current and
accumulated bytes the Wi-Fi device has
transmitted.
Times of Retry
This field shows the accumulated number of packets that were
successfully transmitted after retries.
Discard
This field shows the accumulated number of discarded transmit requests.
Rx Packets
This field shows both the current and accumulated packets the Wi-Fi
device has received.
Rx Bytes
This field shows both the current and accumulated bytes the Wi-Fi device
has received.
Decrypt Error
This field shows the total number of received packets that failed to decrypt.
FCS Error
This field shows the total number of received packets with incorrect CRC
value.
9-10
Chapter 9
Page 91

Power Management
This page displays the statistics of your
Wi-Fi device.
Enable Power Saving
Check this box to enable the power
saving mode on the Wi-Fi device. Disable
(uncheck) this feature for better system
performance.
Automatically turn off Wi-Fi
• if not connected for
When this box is checked, your Wi-Fi
device automatically turns off if it
cannot connect to any wireless network after a specified time period.
• if not used for
When this box is checked, your Wi-Fi device automatically turns off if it
does not transmit or receive any data for a specified time period. This
feature saves system power especially when you are browsing on the
Internet reading web page contents rather then downloading data.
About
This page displays the Wi-Fi utility and
driver version information of your Wi-Fi
device.
For updated product information, technical
support, and downloads, visit the ASUS
web site at http://www.asus.com.
Wireless LAN
9-11
Page 92

WiFiME
WiFiME is a program built-in your Pocket PC device that makes wireless
networking even more convenient. This program allows you to turn on the
Wireless LAN (Wi-Fi) feature on your device, and continuously monitor
your wireless link status through the indicator icon on the task bar. The
WiFiME pop-up menu provides you quick and easy access to the Wi-Fi
configuration (WiFiCfg) utility if you wish to configure the wireless LAN
settings, or view configuration information.
To turn on Wireless LAN and launch the WiFiME program:
1. Tap >Programs >ASUS
Programs.
2. Tap the WiFiME icon .
Pop-up menu
To display the WiFiME pop-up menu,
simply tap the WiFiME indicator
the task bar.
Wireless Info
This item shows the Wireless page of the
WiFiCfg.
Site Survey
This item shows the Site Survey page of
WiFiCfg.
Profile Info
This item shows the Profile page of WiFiCfg.
on
9-12
Chapter 9
Page 93

IP Info
This item shows the IP Address Configuration page of WiFiCfg.
Rescan
This item prompts the Wi-Fi device to re-scan (search for) all available
access points (AP) or ad-hoc networks in the profile.
Radio off
This item turns off the radio of the Wi-Fi device.
About
This item shows the Wi-Fi utility and driver version information of your
Wi-Fi device.
Hide WiFiME
This item gives you an option to temporarily remove the WiFiME icon from
the task bar.
WiFiME task bar icons
The following describes the WiFiME indicator icons that you may see on
the task bar.
Icon Link Quality WEP Decryption result
Excellent Disabled —
Good Disabled —
Fair Disabled —
Poor Disabled —
Excellent Enabled Correct
Good Enabled Correct
Fair Enabled Correct
Poor Enabled Correct
Excellent Enabled Fail
Good Enabled Fail
Wireless LAN
Fair Enabled Fail
Poor Enabled Fail
Not linked ——
Ad-hoc network ——
9-13
Page 94

9-14
Chapter 9
Page 95

Appendix
Notices
♦♦
♦ Federal Communications Commission
♦♦
Statement ..............................................................A-2
♦♦
♦ Canadian Department of Communications
♦♦
Statement ..............................................................A-2
♦♦
♦ UL Safety Notices .................................................A-3
♦♦
Notices
A-1
Page 96

Federal Communications Commission Statement
This device complies with Part 15 of the FCC Rules. Operation is subject to the following two
conditions:
1) This device may not cause harmful interference, and
2) This device must accept any interference received, including interference that may cause
undesired operation.
This device and its antenna must not be co-located or operating in conjunction with any other
antenna or transmitter.
This equipment has been tested and found to comply with the limits for a Class B digital
device, pursuant to Part 15 of the FCC Rules. These limits are designed to provide reasonable
protection against harmful interference in a residential installation. This equipment generates,
uses and can radiate radio frequency energy and, if not installed and used in accordance with
manufacturer’s instructions, may cause harmful interference to radio communications.
However, there is no guarantee that interference will not occur in a particular installation. If this
equipment does cause harmful interference to radio or television reception, which can be
determined by turning the equipment off and on, the user is encouraged to try to correct the
interference by one or more of the following measures:
• Reorient or relocate the receiving antenna.
• Increase the separation between the equipment and receiver.
• Connect the equipment to an outlet on a circuit different from that to which the receiver is
connected.
• Consult the dealer or an experienced radio/TV technician for help.
WARNING! The use of shielded cables for connection of the monitor to the
graphics card is required to assure compliance with FCC regulations.
Changes or modifications to this unit not expressly approved by the
party responsible for compliance could void the user’s authority to
operate this equipment.
Canadian Department of Communications Statement
This digital apparatus does not exceed the Class B limits for radio noise emissions from digital
apparatus set out in the Radio Interference Regulations of the Canadian Department of
Communications.
This class B digital apparatus complies with Canadian ICES-003.
A-2
Appendix
Page 97

UL Safety Notices
Required for UL 1459 covering telecommunications (telephone) equipment intended to be
electrically connected to a telecommunication network that has an operating voltage to ground that
does not exceed 200V peak, 300V peak-to-peak, and 105V rms, and installed or used in
accordance with the National Electrical Code (NFP A 70).
When using the Pocket PC, basic safety precautions should always be followed to reduce the risk
of fire, electric shock, and injury to persons, including the following:
• Do not use the Pocket PC near water, for example, near a bath tub, wash bowl, kitchen sink
or laundry tub, in a wet basement or near a swimming pool.
• Do not use the Pocket PC during an electrical storm. There may be a remote risk of electric
shock from lightning.
• Do not use the Pocket PC in the vicinity of a gas leak.
Required for UL 1642 covering primary (nonrechargeable) and secondary (rechargeable) lithium
batteries for use as power sources in products. These batteries contain metallic lithium, or a lithium
alloy , or a lithium ion, and may consist of a single electrochemical cell or two or more cells
connected in series, parallel, or both, that convert chemical energy into electrical energy by an
irreversible or reversible chemical reaction.
• Do not dispose the Pocket PC battery pack in a fire, as they may explode. Check with local
codes for possible special disposal instructions to reduce the risk of injury to persons due to fire
or explosion.
• Do not use power adapters or batteries from other devices to reduce the risk of injury to
persons due to fire or explosion. Use only UL certified power adapters or batteries supplied by
the manufacturer or authorized retailers.
Replaceable batteries
If an equipment is provided with a replaceable batterym and if replacement by an incorrect type
could result in an explosion (e.g. with some lithium batteries), the following applies:
– if the battery is placed in an OPERA T OR ACCESS AREA, there shall be a marking close
to the battery or a statement in both the operating and the servicing instructions;
– if the battery is placed elsewhere in the equipmen, there shall be a marking close to the
battery or a statement in the servicing instructions.
The marking or statement shall include the following or similar text:
RISK OF EXPLOSION IF BATTERY IS REPLACED
BY AN INCORRECT TYPE.
DISPOSE OF USED BATTERIES ACCORDING
Compliance is checked by inspection.
CAUTION
THE INSTRUCTIONS
Operator access with a tool
If a TOOL is necessary to gain access to an OPERATOR ACCESS AREA, either all other
compartments within that area containing a hazard shall be inaccessible to the OPERA T OR by the
use of the same TOOL, or such compartments shall be marked to discourage OPERATOR access.
An acceptable marking for an electric shock hazard is (ISO 3864, No. 5036)
Equipment for restricted access locations
For equipment intended only for installation in a RESTRICTED ACCESS LOCATION, the
instalation instructions shall contain a statement to this effect.
Notices
A-3
Page 98

A-4
Appendix
 Loading...