

Page 1

SYNCHRONISING INFORMATION
5
3 Press Menu (right softkey) and
select Add Server Source.
4 Enter the server address.
5 Check the This server requires an
encrypted (SSL) connection box if
your server uses an encrypted
connection. In most cases, this box
should be checked.
6 Press Next (right softkey).
7 Enter the username and password you
use to access your corporate mail
server, and enter the Exchange server
domain.
NOTE You can’t see your password as you
enter it, so be careful. Be sure Caps Lock
and Option Lock are not on unless you
need them. For info on how to enter
characters, see Entering lowercase and
uppercase letters and Entering numbers,
punctuation, and symbols.
TIP
The Exchange server settings are casesensitive. Be sure to enter uppercase and
lowercase letters properly.
8 Check the Save password box.
TIP
If you found out from your system
administrator that it is not OK to store your
password, don’t check the Save password
box; you must synchronise manually (see
Initiating a wireless sync manually
TIP
If you check this box and later change your
Exchange password, you need to repeat the
steps in this procedure and enter the new
password. You cannot synchronise wirelessly
until you update the password.
).
CHAPTER
SETTING UP WIRELESS SYNCHRONISATION
75
Page 2
SYNCHRONISING INFORMATION
5
CHAPTER
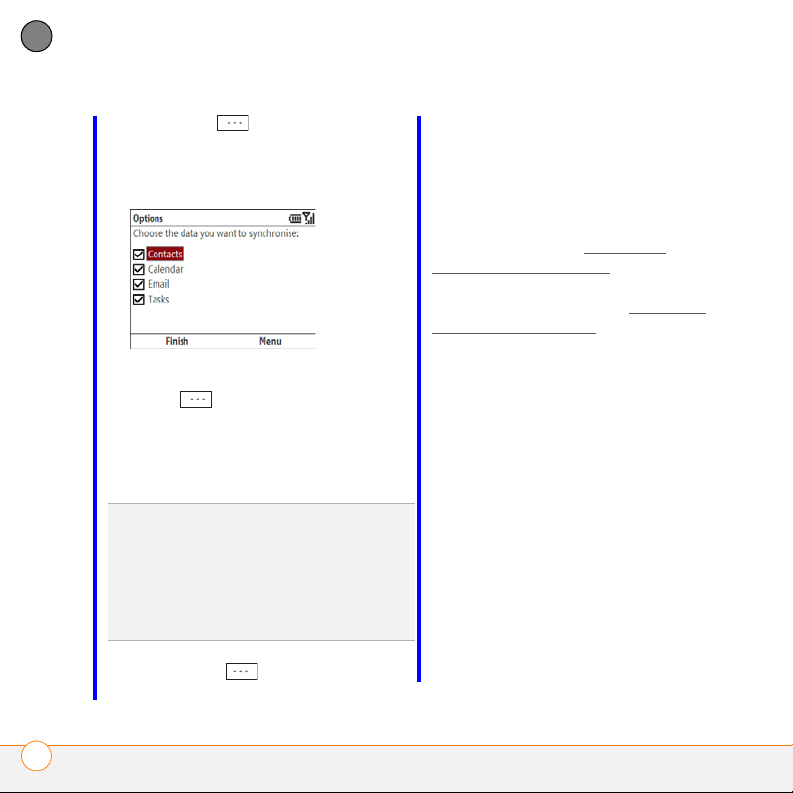
9 Press Next (right softkey) and
check the boxes for the types of
information you want to synchronise
with the Exchange server.
server begins automatically. A status
bar appears onscreen indicating sync
progress.
You can set a schedule for synchronisation
to take place anytime info is updated on
either your smartphone or the server or at
certain intervals (see Setting the
synchronisation schedule), or allow
synchronisation to take place only when
you initiate it manually (see Initiating a
wireless sync manually).
10 (Optional) Highlight an item, press
Menu (right softkey), and then
select Settings to change the
synchronisation settings for that type
of information. Settings are not
available for all items.
Setting the synchronisation schedule
You can set a synchronisation schedule in
either of the following situations:
If you use Microsoft Exchange Server
2007 or Microsoft Exchange Server 2003
with Service Pack 2: By default, wireless
sync takes place anytime info is updated
TIP
To automatically download more of an
incoming email message than the default
setting, select E-mail in step 10 and select a
higher number from the Download size limit
list. If you don’t increase this setting, you can
manually download the rest of the message at
your convenience.
on either your smartphone or the server
using Direct Push Technology. To save
battery life, however, you can set
synchronisation to take place at intervals
that you specify.
If you use Microsoft Exchange Server
2003 that is not upgraded to Service
11 Press Finish (left softkey).
Pack 2: By default, wireless sync does not
Synchronisation with your Exchange
SETTING UP WIRELESS SYNCHRONISATION
76
Page 3
SYNCHRONISING INFORMATION
5
take place automatically. Set a
synchronisation schedule to have sync
take place either anytime info is updated
on your smartphone or the server, or at
certain intervals.
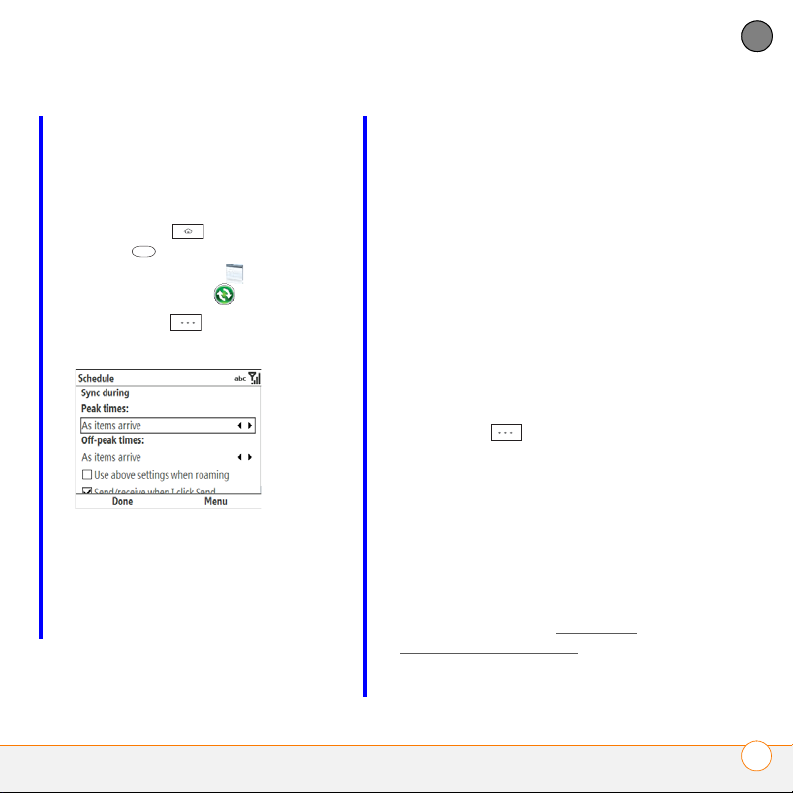
1 Press Home , and then press
Centre .
2 Select Applications , and then
select ActiveSync .
3 Press Menu (right softkey) and
select Schedule.
4 Set any of the following options:
Peak times: Sets the frequency for
high-traffic time periods such as when
you are at work or when email volume
is high.
Off-peak times: Sets the frequency for
low-traffic time periods such as late at
night.
Use above settings when roaming:
Sets the frequency while you are
roaming outside your network
operator’s network. You should keep
this box checked to ensure that
wireless sync works properly.
Send/receive when I click Send: Sets
whether items are sent as soon as you
select Send in the Inbox application,
or whether they are held until the next
synchronisation.
5 Press Done (left softkey).
Initiating a wireless sync manually
If you want to control exactly when a
wireless sync takes place, or if it is not OK
to store your corporate email password on
your smartphone, you can initiate sync
manually.
1 To set up manual sync, follow the
preceding procedure, Setting the
synchronisation schedule. In the Peak
times and Off-peak times lists, select
Manual.
CHAPTER
SETTING UP WIRELESS SYNCHRONISATION
77
Page 4
SYNCHRONISING INFORMATION
5
CHAPTER
2 To initiate a manual sync, press
Home , and then press
Centre .
3 Select Applications , and then
select ActiveSync .
4 Press Sync (left softkey).
Setting up your
have a backed-up and up-to-date copy of
important info.
Before you can synchronise, you need to
install your desktop sync software and
connect the USB sync cable to your
computer. Even if you already have
desktop sync software installed on your
computer, you must install the software
that came with your smartphone on the
Windows Mobile Getting Started CD.
computer for
synchronisation
Even if you are synchronising email,
contacts, calendar events, and tasks
directly with Exchange Server 2003 or
2007, we recommend that you install the
desktop sync software from the Windows
Mobile Getting Started CD so that you can
sync your smartphone directly with your
computer. Why? Using the desktop sync
software enables you to synchronise
additional info such as pictures, videos,
music files, Microsoft Office files, and
notes, so you can create and work on files
on your smartphone and then sync
changes to your computer, where you then
System requirements
Your computer must meet the following
minimum system requirements:
• Windows XP Service Pack 2 or
Windows Vista (later versions may also
be supported)
• 32MB of available memory (RAM)
• 170MB of free hard disk space
• CD drive
• Available USB port
• USB sync cable (included with your
smartphone)
• Adobe Flash Player (required to run the
installation program)
SETTING UP YOUR COMPUTER FOR SYNCHRONISATION
78
Page 5
SYNCHRONISING INFORMATION
5
TIP
If you do not have Adobe Flash Player on
your computer, you can download it for free
from a
dobe.com.
Installing ActiveSync desktop software:
Windows XP
If you have a Windows XP computer, the
desktop sync software is called ActiveSync
desktop software. The Windows Mobile
Getting Started CD recognises that you
have a Windows XP computer and
automatically directs you to install
ActiveSync desktop software. On your
smartphone, the sync application is called
ActiveSync.
BEFORE YOU BEGIN If you are installing
the software on a computer at work, make
sure your company allows you to install
new software. Contact your company’s
IT department for help.
1 Close any applications that are currently
running on your computer, including
those running in the background. Your
computer must have all its resources
available to install the software.
2 Insert the Windows Mobile Getting
Started CD into the CD drive on your
computer.
3 Follow the installation instructions that
appear on both your computer and your
smartphone.
During installation, you connect your
smartphone to your computer and sync
for the first time. Be sure to watch
what’s happening on both your
computer and your smartphone. For
more info, see C
onnecting your
smartphone to your computer and
Synchronisa
TIP
During software installation, you can
select an option to synchronise email,
contacts, calendar events, and tasks directly
with Microsoft Exchange Server 2003 or
2007. If you choose this option, you are
prompted to enter your mail server address
and domain name and your Exchange server
account username and password.
tion.
Installing Windows Mobile Device Center:
Windows Vista
If you have a Windows Vista computer, the
desktop sync software is called Windows
CHAPTER
SETTING UP YOUR COMPUTER FOR SYNCHRONISATION
79
Page 6
SYNCHRONISING INFORMATION
5
CHAPTER
Mobile Device Center. The Windows
Mobile Getting Started CD recognises that
you have a Windows Vista computer and
automatically directs you to install
Windows Mobile Device Center. On your
smartphone, the sync application is called
ActiveSync.
BEFORE YOU BEGIN If you are installing
the software on a computer at work, make
sure your company allows you to install
new software—for example, that you have
Administrator privileges. Contact your
company’s IT department for help.
7 Make sure the Windows Mobile
Device Center box is checked, and click
Install.
8 Follow the installation instructions that
appear on both your computer and your
smartphone.
During installation, you connect your
smartphone to your computer and sync
for the first time. Be sure to watch
what’s happening on both your
computer and your smartphone. For
more info, see C
onnecting your
smartphone to your computer and
Synchronisa
tion.
1 Close any applications that are currently
running on your computer, including
those running in the background. Your
computer must have all its resources
available to install the software.
2 Insert the Windows Mobile Getting
Started CD into the CD drive on your
computer.
3 If prompted, click RunStart.exe.
4 Click Continue.
5 Select your language and click Next.
6 Select Setup and Installation.
Using the desktop sync software
After you install the desktop sync
software, synchronisation happens
automatically anytime you connect your
smartphone to your computer, as
described in the next section. You can also
open the desktop sync software window
on your computer to perform the following
tasks:
• Install applications from your computer
to your smartphone (see Installing
applications from your computer) or to
an expansion card inserted into the
SETTING UP YOUR COMPUTER FOR SYNCHRONISATION
80
Page 7
SYNCHRONISING INFORMATION
5
expansion card slot on your smartphone
(see Installing applications onto an
expansion card)
• Change which applications synchronise
• In ActiveSync desktop software on a
Windows XP computer, enter settings
to synchronise wirelessly with
Microsoft Exchange Server 2003 or
2007
DID YOU KNOW
applications synchronise (see C
applications sync) and enter settings to
synchronise wirelessly (see Setting up
wireless synchronisation) in the ActiveSync
app on your smartphone. Whether you enter
changes on your smartphone or on your
computer, the changes are transferred to the
other location the next time you synchronise.
?
You can also change which
hanging which
To open the desktop sync software, do
one of the following:
Windows XP: To open the ActiveSync
desktop software window, double-click the
ActiveSync icon in the taskbar in the
lower-right corner of your computer
screen.
TIP
If the ActiveSync icon does not appear in
the taskbar, go to Start, navigate to
Programs, and then select Microsoft
ActiveSync to open the ActiveSync window.
TIP
You can enter a setting to have the
ActiveSync window open automatically when
you connect your computer and your
smartphone. In the ActiveSync window,
select File > Connection Settings, and then
check the Open ActiveSync when my
device connects box.
Windows Vista: To open Windows Mobile
Device Center, click Start > All Programs
> Windows Mobile Device Center.
Desktop software installation also creates
a folder for your smartphone on your
computer. When your smartphone is
connected to your computer, opening My
Computer or Windows Explorer (Windows
XP) or Computer (Windows Vista) displays
an icon representing your smartphone.
Double-clicking this icon displays folders
containing items you synchronised, such
as music files, pictures, and videos.
CHAPTER
SETTING UP YOUR COMPUTER FOR SYNCHRONISATION
81
Page 8
SYNCHRONISING INFORMATION
5
CHAPTER
Connecting your smartphone to your
computer
NOTE If you’re transferring info from a
previous Windows Mobile
a Palm OS
®
device, you can learn more
®
device or from
about how to move content, such as
pictures, music, and files, to your
smartphone by going to go.palm.com/
treo500v.
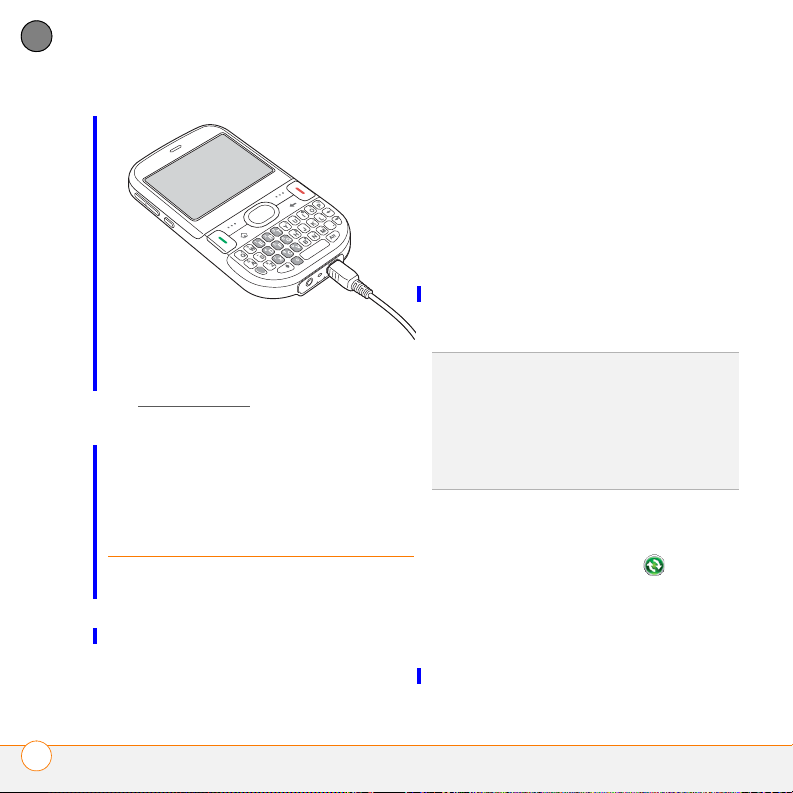
1 Prepare the AC charger by connecting
the adapter that fits the wall outlet
you’re going to use.
sockets to the left on the bottom of the
smartphone.
5 Connect the charger cable to the
remaining socket on the bottom of your
smartphone.
TIP
To charge your smartphone, connect the
AC charger to the connector on the bottom of
the smartphone. Your smartphone also
charges when it is connected to your
computer using the sync cable.
DID YOU KNOW
indicator light that glows when the charger is
connected to a power source.
?
The AC charger contains an
2 Plug the AC charger into a wall outlet.
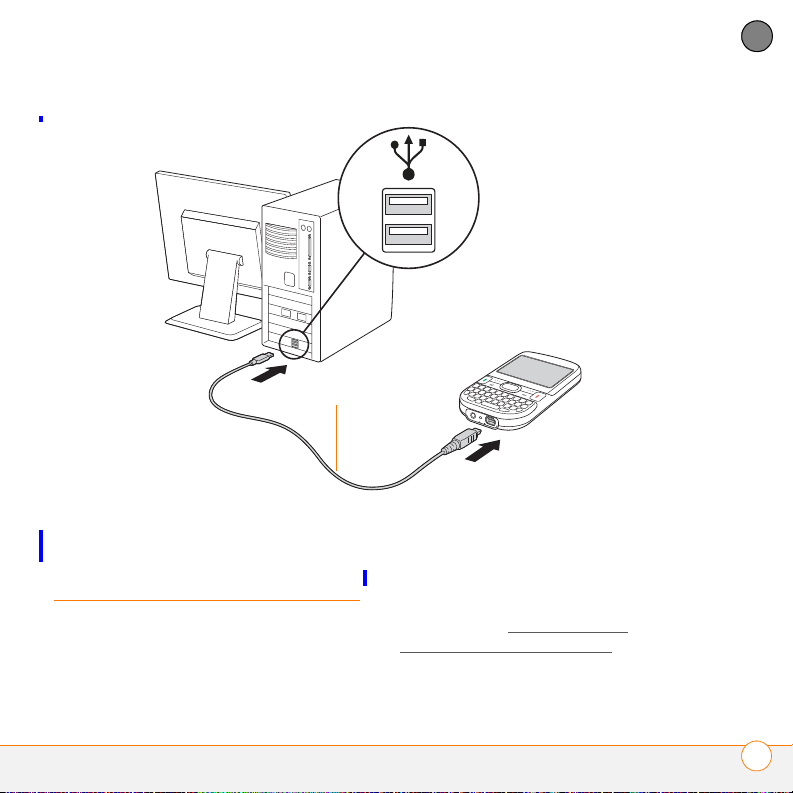
3 Plug the USB sync cable into an
available USB port or into a powered
USB hub on your computer.
TIP
For best performance, plug your sync
cable directly into a USB port on your
computer. If your computer has USB ports on
both the front and back, we suggest using the
back port. If you use a USB hub, make sure it’s
a powered hub.
4 Connect the sync cable to your
smartphone by inserting it into the two
SETTING UP YOUR COMPUTER FOR SYNCHRONISATION
82
Page 9
SYNCHRONISING INFORMATION
USB sync
cable
5
CHAPTER
Synchronising using
the sync cable
Every time you connect your smartphone
to your computer, the desktop sync
software automatically turns on and
checks whether changes you made on the
computer or on the smartphone need to be
synchronised.
• Connect your smartphone to your
computer (see C
smartphone to your computer).
SYNCHRONISING USING THE SYNC CABLE
onnecting your
83
Page 10
SYNCHRONISING INFORMATION
5
CHAPTER
BEFORE YOU BEGIN Do the following:
• Make sure your computer is equipped
with Bluetooth wireless technology.
• If you have not already done so, install
the ActiveSync Plug-in for Bluetooth
wireless technology from the Windows
Mobile Getting Started CD. The plug-in
is installed on your computer and is
needed to synchronise over a Bluetooth
connection with your smartphone.
TIP
If you have any problems synchronising,
see Synchronisa
tion for troubleshooting
suggestions.
Other ways to
synchronise
To install the plug-in for Bluetooth
technology, insert the Windows Mobile
Getting Started CD into your computer’s CD
drive, and select Add Programs (Windows
XP) or Bonus Software (Windows Vista).
Select the plug-in option and follow the
onscreen instructions.
1 Do one of the following:
Windows XP: On your computer,
right-click the ActiveSync icon in
Synchronising over a Bluetooth
connection
You can synchronise your computer and
smartphone using Bluetooth wireless
technology.
the taskbar in the lower-right corner of
the screen, and select Connection
Settings.
Windows Vista: Click Start > All
Programs > Windows Mobile Device
OTHER WAYS TO SYNCHRONISE
84
Page 11
SYNCHRONISING INFORMATION
5
Center. Select Connect without
setting up your device, and then
select Connection settings.
2 Check the Allow connections for one
of the following box, and then select
Bluetooth.
3 On your smartphone, press
Home , and then press
Start (left softkey).
4 Navigate to the My Settings content
list and press All Settings (right
softkey).
5 Select Connections, and then select
Bluetooth.
6 Press Menu (right softkey) and
select Turn On Bluetooth if it is not
already on.
7 Press Home , and then press
Centre .
8 Select Applications , and then
select ActiveSync .
9 Press Menu (right softkey) and
select Connect via Bluetooth.
10 If this is the first time you’re making a
Bluetooth connection to this computer,
follow the onscreen prompts to set up a
Bluetooth partnership with this
computer. See C
onnecting to devices
with Bluetooth® wireless technology for
more information on partnerships.
11 Select Sync.
12 When synchronisation has finished,
press Menu (right softkey) and
select Disconnect Bluetooth.
Synchronising with multiple computers
You can set up your smartphone to
synchronise with up to two computers as
well as with Exchange Server 2003 or
2007. When synchronising with multiple
computers, the items that you synchronise
appear on all the computers.
For example, if you set up to sync your
smartphone with two computers named
C1 and C2, when you sync Contacts and
Calendar on your smartphone with both
computers, you get the following results:
• The contacts and calendar
appointments that were on C1 are now
also on C2.
• The contacts and calendar
appointments that were on C2 are now
also on C1.
CHAPTER
OTHER WAYS TO SYNCHRONISE
85
Page 12
SYNCHRONISING INFORMATION
5
CHAPTER
• The contacts and calendar
appointments from both computers are
on your smartphone.
NOTE Microsoft
®
Office Outlook® E-mail
can synchronise with only one computer.
Setting
synchronisation
options
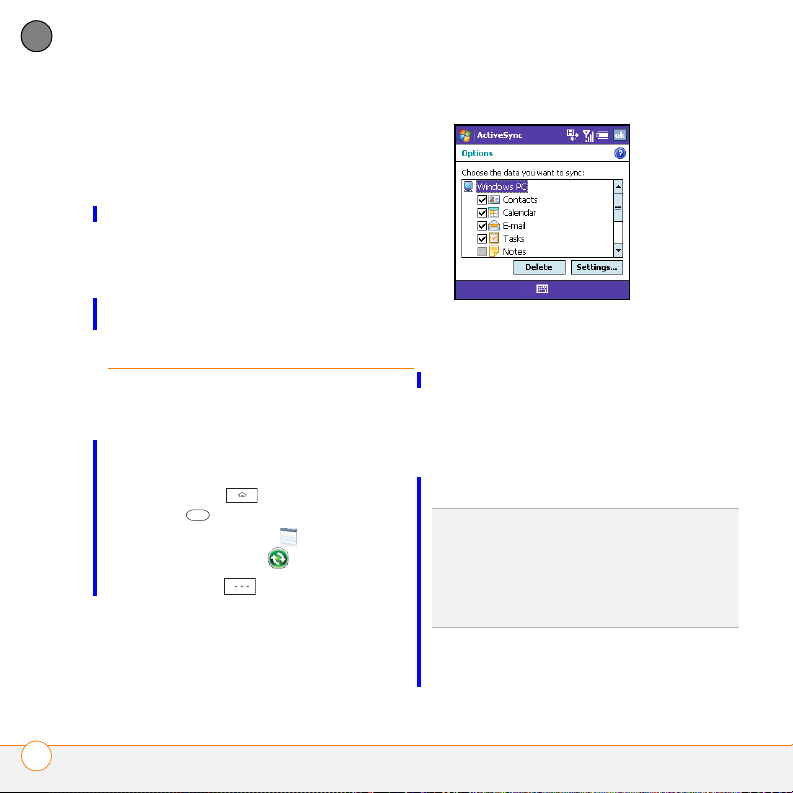
Changing which applications sync
You must select sync options if you want
to synchronise notes, pictures, and other
types of files.
1 Press Home , and then press
Centre .
2 Select Applications , and then
select ActiveSync .
3 Press Menu (right softkey) and
select Options.
4 Do any of the following:
• Check the box next to any items you
want to synchronise. If you cannot
check a box, you might have to
uncheck a box for the same
information type elsewhere in the list.
• Uncheck the box next to any items
you want to stop synchronising.
TIP
To end the sync relationship between your
smartphone and a computer so that items are
no longer synchronised with that computer,
highlight the computer name on the Options
screen, press Menu (right action key), and
then select Delete.
• Highlight an item and then select
Settings to customise the
SETTING SYNCHRONISATION OPTIONS
86
Page 13
SYNCHRONISING INFORMATION
5
settings for that item. Settings are not
available for all items.
TIP
For detailed information on synchronising
Word documents, Excel spreadsheets, and
PowerPoint presentations, see Synchronisi
your Microsoft Office files. For detailed
information on synchronising pictures, videos,
and music files, see Synchronisi
files.
ng your media
ng
Stopping synchronisation
If you ever need to manually stop
synchronisation, follow these steps:
1 Press Home , and then press
Centre .
2 Select Applications , and then
select ActiveSync .
3 Press Stop (left softkey).
CHAPTER
SETTING SYNCHRONISATION OPTIONS
87
Page 14

SYNCHRONISING INFORMATION
5
CHAPTER
SETTING SYNCHRONISATION OPTIONS
88
Page 15

CHAPTER
Your email
6
You already know how efficient email is for staying in touch.
Now your Palm
®
Tre o™ 500v smartphone brings you a new
level of convenience: email on the go. Enjoy the ease and
speed of communicating with friends, family, and colleagues
anywhere you can access your network operator’s data
network.
You can send photos to your friends and family, or create
Microsoft Word or Excel files and send them to your
colleagues. You can also receive attachments to view and edit
at your convenience.
Benefits
• Receive photos, sound files, Word
and Excel files, and more
• Attach and send files of almost any
type
• Save messages from your
computer to view at a convenient
time
Page 16

In this chapter
Setting up email . . . . . . . . . . . . . . . . . . . . . . . . . . . . . . . . . . . . . . . . 91
Sending and receiving messages . . . . . . . . . . . . . . . . . . . . . . . . . . 100
Working with email messages. . . . . . . . . . . . . . . . . . . . . . . . . . . . . 103
Working with meeting invitations . . . . . . . . . . . . . . . . . . . . . . . . . . 112
Page 17
YOUR EMAIL
6
Setting up email
personal email service, which you can use
to access one or more email accounts,
already installed. You can also use other
BEFORE YOU BEGIN
• Before you use your smartphone to
send or receive messages, consult your
network operator for pricing and
availability of email services and data
rate plans.
• Make sure your phone is on and you’re
inside a coverage area before you send
or receive messages.
applications on your smartphone to access
the many kinds of email you may use:
corporate, ISP, and web-based (like Gmail
and Yahoo! Mail). Before you can send and
receive email on your smartphone, you
need to decide which type of email
account you want to access. The setup
process is different for each email account
type, so it is very important that you select
the correct type.
Entering settings for an email account
Depending on your network operator, your
smartphone may come with the MyMail
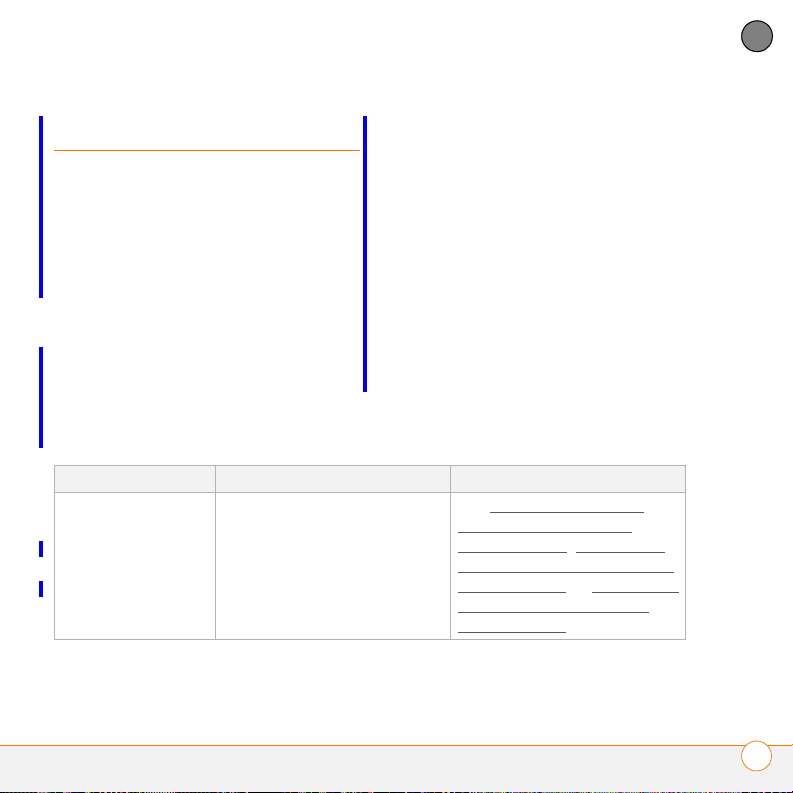
Email account type Type of email you can access How to set up
POP/IMAP You can obtain email from an
ISP or Internet email account
such as EarthLink, or from a
small business or corporate
Internet email account.
See Setting up a personal
email account using the
MyMail service, Setting up a
POP/IMAP account: Common
email providers, or Setting up a
POP/IMAP account: Other
email providers.
CHAPTER
SETTING UP EMAIL
91
Page 18
6
YOUR EMAIL
CHAPTER
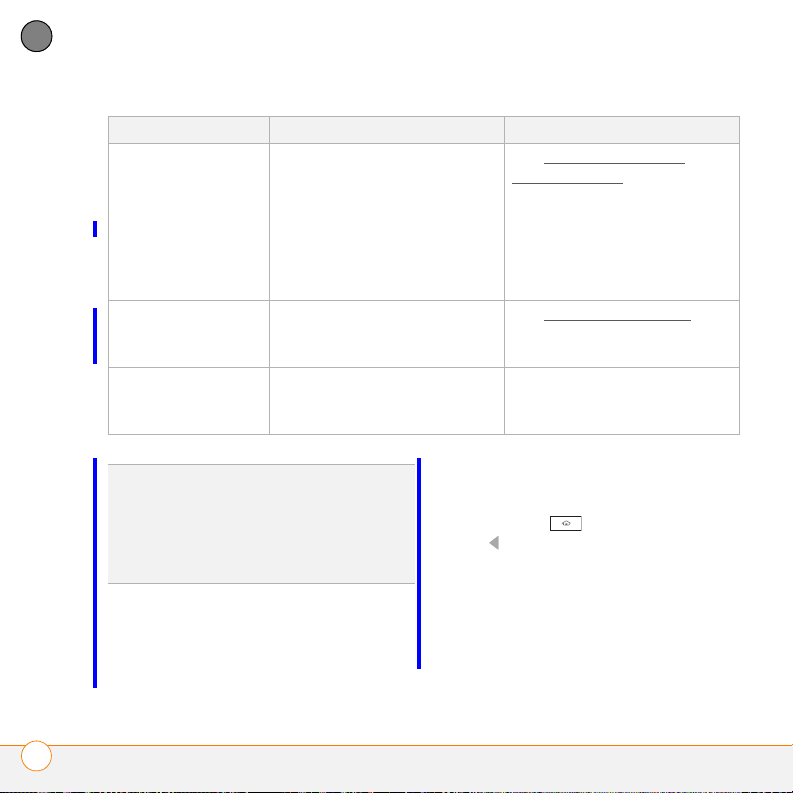
Email account type Type of email you can access How to set up
Microsoft Exchange
server
You can retrieve corporate
email using a Microsoft
Exchange server. You can
access email wirelessly if your
company is using Microsoft
Exchange ActiveSync
®
.
See Setting up wireless
synchronisation.
You may need to check with
your IT organisation to ensure
that Exchange ActiveSync
supported and to obtain the
®
is
configuration settings.
Hotmail You can use Windows Live to
See Using Windows Live
access mail from your
web-based Hotmail account
Free web-based
email
You can access mail from
Yahoo! and other free
web-based systems.
TIP
Some web-based email providers such as
Yahoo! and Gmail allow you to configure your
email account so that you can access it from
the email application on your smartphone
instead of from the web browser. Check the
provider’s website for information.
Check with your network operator for
availability.
1 Press Home , and then press
Access the email website
directly using your
smartphone’s web browser.
Left to open the Message Centre
content list
2 Select MyMail.
Setting up a personal email account using
the MyMail service
BEFORE YOU BEGIN The MyMail service
3 Select the Welcome to Vodafone! Set
up your MyMail account message.
4 Select the link within the message.
is not supported by all Vodafone operators.
SETTING UP EMAIL
92
Page 19

YOUR EMAIL
6
5 If prompted, press Ye s (left
softkey) to go the web page.
6 Follow the instructions for setting up
your MyMail email account.
Setting up a POP/IMAP account:
Common email providers
Follow this procedure if you have a
common email provider such as AOL,
EarthLink, or Yahoo!. If you are setting up
the Inbox application to work with your
corporate email account, or you have a
less-common email provider, see S
etting
up a POP/IMAP account: Other email
providers.
BEFORE YOU BEGIN Ask your email
provider or system administrator for your
account username and password if you
don’t know them.
1 Press Home , and then press
Centre .
2 Select Messaging <ICON>, and then
select New Email Account.
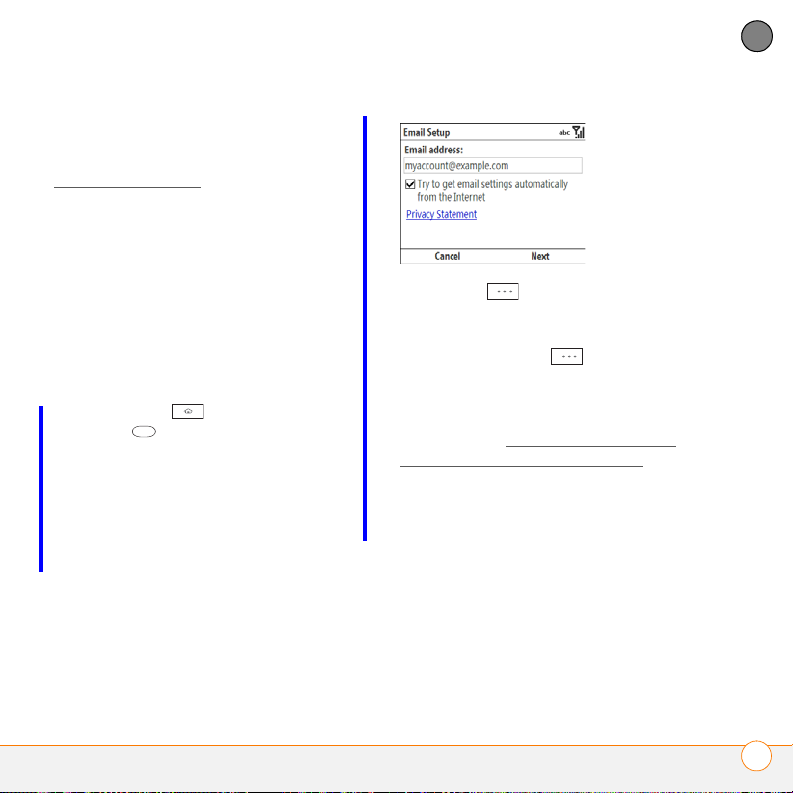
3 Enter the email address that you want
to set up. Check the box to have the
setup process get your account settings
from the Internet.
4 Press Next (right softkey).
5 If the setup process finds your account
settings, press Next (right
softkey).
If the setup process does not find your
account settings, go to S
etting up a
POP/IMAP account: Other email
providers and continue with step 6 of
that procedure.
6 Enter your name and, if you want,
change your account display name to
something meaningful. For example, if
this is your work email account, you can
change the display name to “Work” or
your company’s name.
CHAPTER
SETTING UP EMAIL
93
Page 20

6
CHAPTER
YOUR EMAIL
7 Press Next (right softkey).
8 Enter your account username and
9 If you want your password entered
10 Press Next (right softkey).
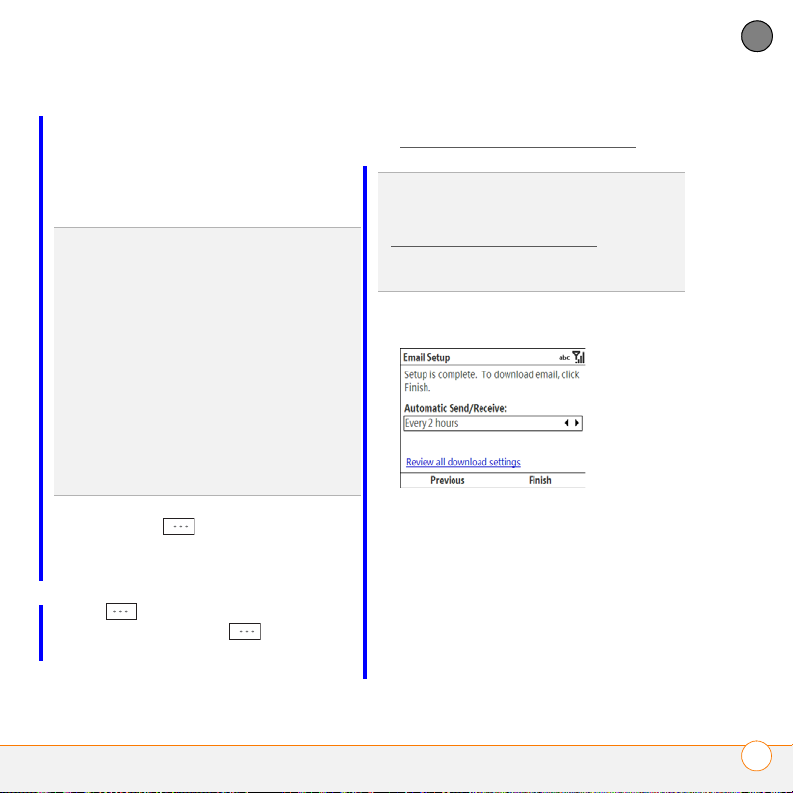
11 (Optional) Select either of the following:
SETTING UP EMAIL
94
password.
automatically, check the Save
password box. If you want to enter
your password each time you access
this account, do not check this box.
DID YOU KNOW
box makes it easier to check your email,
because you don’t have to enter your
password each time. Leaving the box
unchecked keeps your email more secure,
because no one can download messages
without entering your password.
?
Checking the Save password
Automatic Send/Receive: Change the
time interval for automatically
downloading email, from every 5
minutes to once a day. If you do not
want to automatically download
messages, select Manually.
Review all download options: Select
this option to change download
settings; see C
hanging email download
settings for information.
12 Press Finish (right softkey). If
prompted, select OK to download
messages for this account now.
Setting up a POP/IMAP account: Other
email providers
You can set up an account to send and
receive email messages using an email
account that you have with an Internet
Page 21
YOUR EMAIL
6
service provider (ISP), an email account
that you access using a VPN server
connection (such as a work account; see
C
onnecting to a VPN), or any other IMAP
or POP email account.
BEFORE YOU BEGIN Work with your
email provider or system administrator to
gather the following info:
• Account type (POP3 or IMAP)
• Mail server name for receiving mail
• Your username and password
• Any special security requirements
1 Press Home , and then press
Centre .
2 Select Messaging <ICON>, and then
select New Email Account.
3 Enter the email address that you want
to set up. Check the box if you want the
setup process to try to get your account
settings from the Internet.
4 Press Next (right softkey).
5 If you did not check the box in step 4 or
the setup process does not find account
settings, press Next (right
softkey).
If you did check the box and the account
setup process finds your account
settings, go to S
etting up a POP/IMAP
account: Common email providers and
continue with step 6 of that procedure.
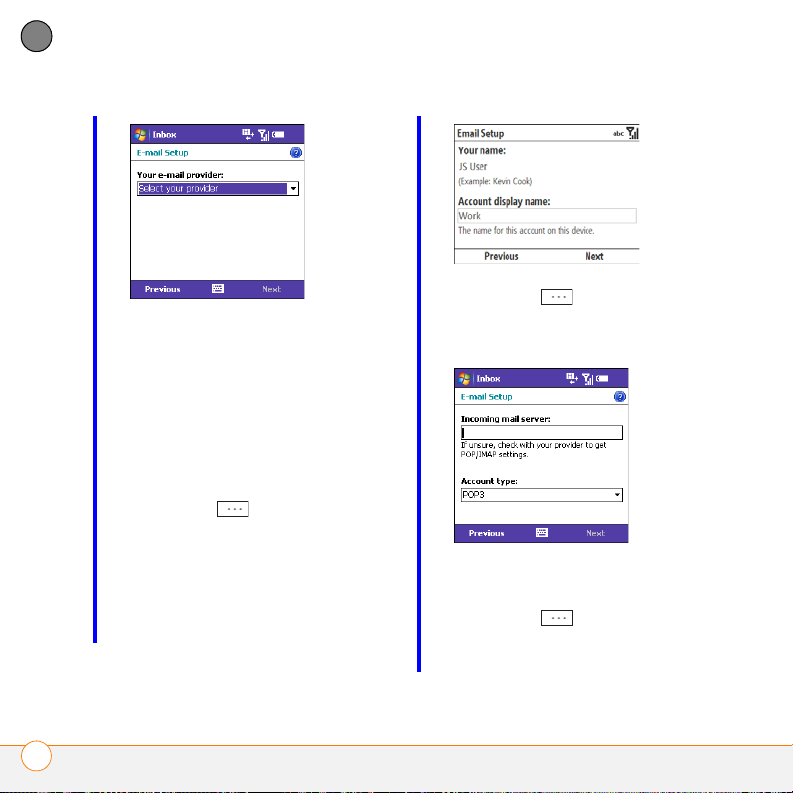
6 If prompted, select either of the
following as your email provider:
CHAPTER
SETTING UP EMAIL
95
Page 22
6
CHAPTER
YOUR EMAIL
Internet email: Select this option if you
access email from any type of email
account except a corporate account that
uses an Exchange mail server.
Exchange server: Select this option if
you access email from a corporate
email account using an Exchange
server.
7 Press Next (right softkey).
8 Enter your name and, if you want,
change your account display name to
something meaningful. For example, if
this is your work email account, you can
change the display name to “Work” or
your company’s name.
9 Press Next (right softkey).
10 Enter the name of the incoming mail
server.
11 Select the Account type list, and then
select POP3 or IMAP.
12 Press Next (right softkey).
13 Enter your account username and
password.
SETTING UP EMAIL
96
Page 23
YOUR EMAIL
6
14 If you want your password entered
automatically, check the Save
password box. If you want to enter
your password each time you access
this account, do not check this box.
DID YOU KNOW
box makes it easier to check your email,
because you don’t have to enter your
password each time. Leaving the box
unchecked keeps your email more secure,
because no one can download messages
without entering your password.
TIP
For a corporate email account, ask your
system administrator if it is OK to store your
corporate email password on your
smartphone (for increased security, you may
need to enter your password each time you
access your email). If it is not OK, don’t check
the Save password box.
?
Checking the Save password
15 Press Next (right softkey).
16 If you receive an alert that your network
operator has already customised the
outgoing mail server settings, press
OK (left softkey to close the alert,
and then press Next (right
softkey) on the outgoing mail server
settings screen. Do not enter or change
anything on the screen.
If you do not receive an alert, go to
Entering outgoing server settings
TIP
If you do not receive an alert, and if your
incoming mail requires SSL, you set that
option with the outgoing server settings. See
Entering outgoing server settings
the Require SSL for Incoming email box on
the Advanced Server Settings screen.
.
and check
17 (Optional) Select either of the following:
Automatic Send/Receive: Change the
time interval for automatically
downloading email, from every 5
minutes to once a day. If you do not
want to automatically download
messages, select Manually.
Review all download options: Select
this option to change download
CHAPTER
SETTING UP EMAIL
97
Page 24

6
YOUR EMAIL
CHAPTER
settings; see Changing email download
settings for information.
18 Press Finish (right softkey). If
prompted, select OK to download
messages for this account now.
TIP
To delete an email account or to edit
account settings—for example, if you need to
change the name of the outgoing mail
server—press Home, press Centre on the
5-way, and then press Messaging. To delete
an account, highlight the account you want,
press Menu (right action key), and then select
Delete. (To delete an Outlook Email account,
use the ActiveSync application.) To edit an
account, highlight the account you want,
press Menu (right action key), and then select
Settings. Go through the screens to change
the settings you want to edit.
Entering outgoing server settings
If, during account setup, you do not receive
an alert saying that your network operator
has set the outgoing mail options, you
need to manually enter these settings.
BEFORE YOU BEGIN Work with your
email provider or system administrator to
gather the following info:
• Mail server name for sending mail
• Any special security requirements
1 On the screen for entering outgoing
mail settings, select the correct settings
for the following:
Outgoing (SMTP) mail server: Enter
the server name.
Outgoing server requires
authentication: Check the box if your
outgoing mail server requires
authentication.
Use the same user name and
password for sending email: Check
SETTING UP EMAIL
98
Page 25

YOUR EMAIL
6
the box if the server requires you to use
your account username and password
when sending email.
2 Select Advanced Server Settings, and
then select the correct settings for
either of the following:
Require SSL for Incoming email:
Check the box if your account requires
SSL for incoming messages.
Require SSL for Outgoing email:
Check the box if your account requires
SSL for outgoing messages.
Network connection: Select the type
of connection to use for sending and
receiving email.
3 Select Done (left softkey). On the
outgoing mail server screen, press
Next (right softkey).
4 (Optional) Select either of the following:
Automatic Send/Receive: Change the
time interval for automatically
downloading email, from every 5
minutes to once a day. If you do not
want to automatically download
messages, select Manually.
Review all download options: Select
this option to change download
settings; see C
hanging email download
settings for information.
5 Press Finish (right softkey). If
prompted, select OK to download
messages for this account now.
CHAPTER
SETTING UP EMAIL
99
Page 26

6
YOUR EMAIL
CHAPTER
Sending and
receiving messages
Selecting which email account to use
If you set up more than one email account
on your smartphone (see Setting u
you can select the account you want to use
to view or send messages in one of three
ways:
• Press Home , and then press
Left to open the Message Centre
content list. Select the account you
want.
• By default, when you press
Home , press Centre . and
then select Messaging <ICON>, a list
of all of your email accounts appears.
Select the account you want.
• If you turn off the option to display the
list of accounts (see Customisi
email settings), when you open the
p email),
ng your
TIP
Also press Left to switch to a different
account after you are finished working in the
first account you selected.
Creating and sending an email message
1 Press Home , and then press
Left to open the Message Centre
content list
2 Highlight the email account you want.
3 Press New (left softkey).
4 Enter the recipient’s email address.
Here are some shortcuts:
• If the recipient’s name and email
address are in your Contacts list,
press Menu (right softkey),
select Add Recipient, and then select
the recipient from the list.
• If the recipient’s name is in an online
address book, you can find the name
and add it. See the User Guide on the
Windows Mobile Getting Started CD
for information.
Messaging application, the last account
you were using is displayed. Press Left
to cycle through your accounts until
the name of the account you want
appears in the title bar.
SENDING AND RECEIVING MESSAGES
100
Page 27

YOUR EMAIL
6
DID YOU KNOW
you can enter one or more letters of the
contact’s first and last names, separated by a
space.
TIP
To address a message to multiple
recipients, separate the addresses by
pressing Enter or entering a semicolon (;).
?
When addressing a message,
5 Select Subject and enter a title for the
message.
6 Press Down to go to the body of the
message. Enter your message, or press
Menu (right softkey), select My
Text, and then select a predefined
phrase you want to insert.
7 (Optional) To attach an item to the
message, press Menu (right
softkey) and select Insert. Select the
type of item you want to attach, and
then select the file or record a voice
note.
TIP
You can send an email message with a file
attached from directly within other
applications on your smartphone; see S
email messages from within another
application.
ending
8 (Optional) Press Menu (right
softkey) and select Message Options.
Select the Priority list, select a priority
setting for the message, and then press
Done (left softkey).
9 Press Send (left softkey).
TIP
To save memory on your smartphone, turn
off the option to save sent messages in the
Saved folder. In the Inbox, press Menu (right
softkey) and select Too l s > Options. Select
Sending, and then uncheck the Save copies
of sent items box.
Receiving email messages
How you receive email messages depends
on the type of account you are using and
how you synchronise:
CHAPTER
SENDING AND RECEIVING MESSAGES
101
Page 28

6
YOUR EMAIL
CHAPTER
• If you synchronise wirelessly with your
Exchange server using Microsoft
Exchange ActiveSync, new email
messages are sent to your smartphone
when they appear on the server,
according to the schedule you set up
(see Setting the synchronisation
schedule), or when you manually initiate
a sync (see Initiating a wireless sync
manually.
TIP
If you sync email with Microsoft Exchange
Server 2003 or 2007, you can synchronise
messages in subfolders you create. In the
account Inbox, press Menu (right softkey) and
select Tools > Manage Folders. Folders
containing subfolders display a +. Select the +
to view the subfolders. Check the box to the
left of any subfolder you want to sync.
TIP
If you synchronise email with Microsoft
Exchange Server 2007, and you receive a
message containing a link to a document on
SharePoint or an internal file server, you can
view the document by selecting the link.
• If you use desktop sync software to
synchronise your smartphone with your
computer, messages in Outlook on your
computer are transferred to your
computer and your smartphone (see
C
onnecting your smartphone to your
computer).
• For all other types of accounts,
including ISP accounts and accounts
you access using a VPN server
connection (typically a work account;
see C
onnecting to a VPN), message
retrieval depends on the option you
chose from the Automatic Send/
Receive list during account setup (see
S
etting up a POP/IMAP account:
Common email providers or Setting up
a POP/IMAP account: Other email
providers), as follows:
If you chose a time interval: Your
smartphone automatically checks for
and downloads new messages
according to that interval.
If you chose Manually: Follow these
steps to send and receive messages:
1 Press Home , and then press
Left to open the Message Centre
content list
2 Select the email account containing the
messages you want to view.
smartphone when you connect your
SENDING AND RECEIVING MESSAGES
102
Page 29
YOUR EMAIL
6
3 Press Menu (right softkey) and
select Send/Receive to synchronise
your smartphone with your email
server.
TIP
Partially downloaded messages appear in
the message list with a partial envelope icon
to the left of the subject. To view the full
message, either press Menu (right softkey)
and select Download Message, or open the
message and select Get the rest of this
message.
DID YOU KNOW
as HTML with the HTML formatting intact.
?
You can view messages sent
Receiving attachments
1 Scroll to and select the attachment
name (below the subject). This marks it
for download.
2 Synchronise the email account that
contains the message as described in
the previous sections.
3 Scroll to and select the attachment
name (below the subject).
4 Press Open (left softkey).
DID YOU KNOW
attachments in a number of different formats,
including PDF. PDF file attachments open in
PDF Viewer on your smartphone (see PDF
Viewer).
TIP
You can save an attachment to an
expansion card inserted into your
smartphone. On the Attachment Options
screen, press Menu (right action key) and
select Save As. Select the Location list, and
then select Storage Card.
?
You can receive and open
Working with email
messages
Adding a contact from an email message
You can add a contact name or email
address to your Contacts list directly from
the To, cc, or bcc field of an email
message. You can select the name or
address from either an outgoing or an
incoming message, and you can either
create a new contact or add the
information to an existing contact.
CHAPTER
WORKING WITH EMAIL MESSAGES
103
Page 30

6
YOUR EMAIL
CHAPTER
1 In an open message, highlight the name
or address of the contact you want to
add.
2 Press Centre .
3 Press Save (left softkey).
4 Select <New Contact> to create a new
contact entry for this name or address,
or select an existing contact to add the
name or address to that entry.
your organisation’s online address book or
Global Address List (GAL). To access a
GAL, make sure you are accessing either
Exchange Server 2007 or Exchange Server
2003 upgraded to Service Pack 2. This
feature is useful only if you know the exact
name as it appears in the directory.
DID YOU KNOW
Address List to find a contact. In Contacts,
press Menu (right softkey) and select
Company Directory. When sending a
meeting request, select Attendees, press
Menu (right softkey) and select Company
Directory.
?
You can use the Global
1 In a new message, select To .
2 Press Menu (right softkey) and
select Add Recipient.
3 Select New <Company Directory>.
5 Enter or edit the contact information.
6 Press Save (left softkey).
4 Enter the contact name as it appears in
the directory and press Find (left
softkey). You must spell the contact
Using an online address book
name correctly.
You can access contact information, such
as an email address or phone number, from
WORKING WITH EMAIL MESSAGES
104
Page 31

YOUR EMAIL
6
TIP
When you sync with Outlook on your
computer, disable your online address books
to avoid errors. Press Menu (right softkey) and
select Tools > Options. Select Address,
select each online address book, and then
uncheck the Check name against this server
box. Be sure to turn this option back on if you
synchronise other email accounts.
Finding messages
You can find messages containing a
specific word or phrase. The find feature
searches names, email addresses, and
subject lines.
1 Press Home , and then press
Left to open the Message Centre
content list
2 Select the account you want.
3 Begin typing the word or phrase you
want to find. The list display changes to
show only those messages containing
the letters you have entered.
4 Continue entering letters to narrow the
display until the message you want
appears.
DID YOU KNOW
Microsoft Outlook 2007, you can also find
messages stored on your mail server.
?
If you synchronise with
Replying to a message
1 Open the message to which you want
to reply.
2 Press Reply (left softkey).
3 Address the message and enter any
text you want to add.
4 (Optional) Select Edit sender’s
message to edit the original sender’s
message text that you include in your
reply.
5 Press Send (left softkey).
DID YOU KNOW
as HTML, the reply is sent in HTML also.
?
If you reply to a message sent
Forwarding a message
1 Highlight or open the message you
want to forward.
2 Press Menu (right softkey) and
select Reply > Forward.
3 Address the message and enter any
text you want to add.
CHAPTER
WORKING WITH EMAIL MESSAGES
105
Page 32

6
YOUR EMAIL
CHAPTER
4 (Optional) Select Edit sender’s
message to edit the original sender’s
message text that you include in your
forwarded message.
5 Press Send (left softkey).
Press and
hold...
To...
0 View all email shortcuts
1 Reply to the sender of a
message and all other
Deleting messages
You can delete a message you are reading,
or you can delete a message from the
message list.
To delete a message you are reading:
• Press Menu (right softkey) and
select Delete.
To delete messages from the message list:
1 Highlight the message you want to
delete.
2 Press Delete (left softkey).
3 Select Ye s to confirm the deletion.
Using email shortcuts
You can perform common email tasks by
pressing and holding certain keys on the
2 Reply to the sender only
3 Mark a message read or
4 Flag a message as high
5 Move a message between
6 Forward a message
7 Delete a message
8 Fully download a partially
9 Synchronise your
addressees
unread
priority
folders
downloaded message
smartphone with the server
to get and send new
messages
keyboard. Open the message you want,
and then press and hold any of the
following:
WORKING WITH EMAIL MESSAGES
106
Page 33

YOUR EMAIL
6
Adding a signature to your messages
You can use a different signature with each
email account.
1 Press Home , and then press
Left to open the Message Centre
content list
2 Select any email account.
3 Press Menu (right softkey) and
select To o l s > Options.
4 Select Signatures.
5 Select the account for which you want
to create a signature.
6 Check the Use signature with this
account box to add this signature to
new messages you create with this
account.
7 (Optional) Check the Include when
replying and forwarding box to add
this signature to messages you reply to
or forward with this account.
8 Select Enter a signature here and
enter the signature text you want to
use.
9 Press Done (left softkey).
Customising your email settings
When you customise settings for an email
account, the options you choose apply to
that account only.
1 Press Home , and then press
Left to open the Message Centre
content list
2 Select the account you want.
3 Press Menu (right softkey) and
select To o l s > Options.
4 Select Display and set any of the
following options:
CHAPTER
WORKING WITH EMAIL MESSAGES
107
Page 34

6
YOUR EMAIL
CHAPTER
5 Select Sending and set either of the
following options:
Show date and time in the message
list: Sets whether the date and time a
message is received is included in the
message list.
Sort messages by: The first list
specifies the criteria by which
messages are sorted in the message
list. The second list sets whether the
sort order is ascending (A-Z or most
recent to oldest) or descending (Z-A or
oldest to most recent).
After deleting or moving a message:
Specifies what you want to see after
you delete or move an email message
you are reading: the message list, the
next message, or the previous
message.
WORKING WITH EMAIL MESSAGES
108
Page 35

YOUR EMAIL
6
Include copy of original message
when replying to email: Indicates
whether the body of a message you
received appears in your response to
that message.
Save copies of sent items: Indicates
whether messages you send are stored
in the Sent folder.
6 Select Security and check the Warn
before navigating to a URL or file link
that is not on my device box if you
want to receive a warning message
before you open a URL or file link that is
not on your smartphone.
7 Select Other and set either of the
following options:
Display account picker when opening
Messaging: Specifies whether a list of
your email accounts appears when you
open the Messaging application,
allowing you to select the one you want
to use. If the box is unchecked, the
Inbox application opens to the last
account you used.
TIP
If the Display account picker when
opening Inbox box is unchecked, repeatedly
press Left on the 5-way after you open the
Messaging application to cycle through your
accounts.
Warn when deleting messages in the
message list: Specifies whether a
confirmation message appears when
CHAPTER
WORKING WITH EMAIL MESSAGES
109
Page 36

6
YOUR EMAIL
CHAPTER
you delete one or more messages from
the message list.
8 Press Done (left softkey).
Changing email download settings
You can customise the download options
for each email account that you have with
an Internet service provider (ISP) or that
you access using a VPN server connection
(typically a work account).
NOTE To change options for a Microsoft
Office Outlook email account, Press
Home , press Centre , select
Applications , and then select
ActiveSync . Press Menu (right
softkey) and select Options.
1 Press Home , and then press
Left to open the Message Centre
content list
2 Select the email account you want.
3 Press Menu (right softkey) and
select To o l s > Options.
4 Select Account Settings.
5 Press Next (right softkey) until the
following screen is displayed.
6 Select either of the following:
Automatic Send/Receive: Specifies
the time interval for automatically
downloading email, from every 5
minutes to once a day. If you do not
want to automatically download
messages, select Manually.
Download messages: Specifies the
number of days’ worth of email to be
retrieved for each automatic or manual
retrieval.
TIP
To save memory, limit the number of
emails that are downloaded to your
smartphone by selecting a larger time interval
for automatically downloading messages or a
smaller time interval for how many days’
worth of messages are downloaded.
WORKING WITH EMAIL MESSAGES
110
Page 37

YOUR EMAIL
6
7 Select Advanced Settings, and then
select any of the following:
Send/receive when I click Send:
Specifies whether you can manually
send and receive messages, in addition
to automatically downloading them.
Use automatic send/receive schedule
when roaming: Specifies whether
automatic downloading takes place
when you are roaming. This may result
in higher connection charges than
downloading while in your home
network.
When deleting messages: Specifies
whether messages should be deleted
from the mail server when you delete
them on your smartphone, or whether
messages you delete on your
smartphone should remain on the
server.
8 Press Done (left softkey).
9 Press Next (right softkey).
10 Select either of the following:
Message format: Select the format for
sending and receiving messages. If you
select HTML, messages sent to you as
HTML are received with their formatting
intact. If you select Plain Text, all
messages are received as plain text.
DID YOU KNOW
text are always received as plain text, even if
you select HTML.
?
Messages sent to you as plain
CHAPTER
WORKING WITH EMAIL MESSAGES
111
Page 38

6
YOUR EMAIL
CHAPTER
Message download limit: Select the
size of an incoming message that is
automatically downloaded. For any
message that exceeds this size, you
must manually download the rest of the
message. Selecting a higher limit
means more of your messages will be
fully downloaded, but message retrieval
might take longer. You can also choose
to download message headers only,
regardless of size.
11 Press Finish (right softkey).
Working with
meeting invitations
You can receive meeting invitations on
your smartphone in the same way that you
receive email messages.
NOTE You can create meeting invitations
on your smartphone; see S
meeting request.
Here are the key features of meeting
invitations:
ending a
• Meeting invitations appear on your
smartphone in the Inbox application, not
in the Calendar application.
• From within the Inbox application, you
can accept, decline, or tentatively
accept a meeting invitation.
• If you accept an invitation, the meeting
shows up as an appointment in the
Calendar application.
• You can reply to and forward meeting
invitations in the same way as email
messages.
1 Press Home , and then press
Left to open the Message Centre
content list
2 Select the account you want.
3 Select a meeting invitation to open it.
Meeting invitations are displayed with
this icon: .
4 To accept the invitation, press
Accept (left softkey), select
whether to edit (include comments
with) your response, and then select
OK (left softkey).
To decline or tentatively accept the
invitation, press Menu (right
WORKING WITH MEETING INVITATIONS
112
Page 39

YOUR EMAIL
6
softkey) and select Decline or
Te n t a t i v e .
TIP
If you receive an updated meeting
invitation, you can again choose to accept,
decline, or tentatively accept. If you receive a
meeting cancellation, you don’t need to do
anything.
Sending email
messages from
within another
application
You can send files such as pictures, videos,
and ringtones as attachments to email
messages (see Creating and sending an
email message).
You can send certain files as attachments
from within the application where the file is
created or stored. For example, if you take
a picture with the built-in camera on your
smartphone, you can select an option to
send the picture as an attachment to an
email message. You can also use this
feature with videos and sound files. For
details, see the chapter on the specific
application.
Using a Palm® Foleo™
mobile companion
with your
smartphone
The Palm® Foleo™ mobile companion is
designed to work as a companion to your
CHAPTER
SENDING EMAIL MESSAGES FROM WITHIN ANOTHER APPLICATION
113
Page 40

6
YOUR EMAIL
CHAPTER
smartphone. The mobile companion
enables you to take advantage of its
ten-inch screen and full-size keyboard to
manage your email and browse the web.
You establish a Bluetooth
®
wireless
connection between your smartphone and
your mobile companion; then, by means of
that connection, you sync the email
messages that are currently in the Mobile
Outlook email accounts on your phone.
You can then manage your email on your
mobile companion.
The mobile companion also includes
applications that let you view email
attachments of some common file types:
Word and Excel
®
files, PDFs, and common
digital photo file formats (JPG, GIF, PNG).
The Bluetooth connection between your
smartphone and your mobile companion
also enables you to access the Internet (for
this, you’ll need to check your
smartphone’s service plan to see if it
includes dial-up networking). The mobile
companion also lets you connect to the
Internet through a Wi-Fi connection.
For more information, go to the page for
the Foleo mobile companion on palm.com
.
USING A PALM
114
®
FOLEO™ MOBILE COMPANION WITH YOUR SMARTPHONE
Page 41

CHAPTER
Your text and multimedia
messages
7
If you need to get a short message to a friend or a coworker
fast, send a text message from your Palm
smartphone to their mobile phone or email address.
If you need more than text to express yourself, use multimedia
messaging to give your message extra impact by adding a
photo, video, or sound file.
Benefits
• Enjoy quick communication
• Use text messaging to chat with
friends
• Be as simple or as creative as you
want
®
Tre o™ 500v
Page 42

In this chapter
Sending and receiving messages . . . . . . . . . . . . . . . . . . . . . . . . . . 117
Customising your message settings . . . . . . . . . . . . . . . . . . . . . . . . 124
Page 43

YOUR TEXT AND MULTIMEDIA MESSAGES
7
Sending and
receiving messages
You can use your smartphone to send and
receive brief text messages (SMS) and
multimedia messages (MMS). Before you
send or receive messages, consult your
network operator for pricing and availability
of text and multimedia messaging
services.
NOTE The network settings for text and
multimedia messaging are preset by the
network operator associated with the SIM
card included with your smartphone. If you
use a different SIM card associated with a
different network operator, you need to
manually enter network settings to use
messaging services. See XXX for
instructions.
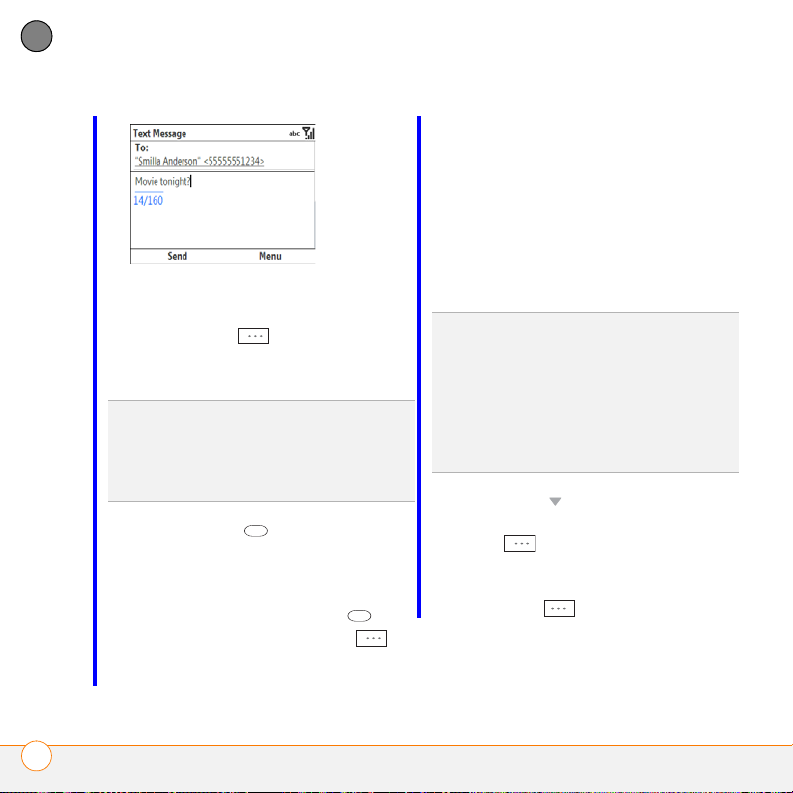
Creating and sending a text message
Each text message can have up to 160
characters. You can send a message of
more than 160 characters, but the
message will automatically be split into
several messages. If you send a text
message to an email address, the email
address is deducted from the
160-character count.
DID YOU KNOW
messages even while you are on a phone call.
This is easiest when using a hands-free
headset or the speakerphone.
BEFORE YOU BEGIN Make sure that your
?
You can send and receive text
phone is on and that you’re inside a
coverage area (see Turning your phone on
1 Press Home , and then press
Left to open the Message Centre
content list
2 Highlight Text Message.
3 Press New (left softkey).
4 Enter the recipient’s name, mobile
phone number, or email address. Here
are some shortcuts:
CHAPTER
).
SENDING AND RECEIVING MESSAGES
117
Page 44
YOUR TEXT AND MULTIMEDIA MESSAGES
7
CHAPTER
name, and then select either the
phone number or the email address.
For more information, see the User
Guide on the Windows Mobile
Getting Started CD.
• If the recipient’s name and mobile
number are not in your Contacts list,
enter the full mobile number or email
• If the recipient’s name and email
address are in your Contacts list,
press Menu (right softkey),
select Add Recipient, and then select
the recipient from the list.
TIP
You can also send a text message to a
contact whose record contains a mobile
phone number by looking up the contact and
selecting the option to send a message to the
contact.
• Press Centre to view a list of
recently used addresses, and select
the recipient from the list.
• If the recipient’s name is in an online
address book, press Centre ,
address.
TIP
To address a message to multiple
recipients, separate the addresses by
pressing Enter or entering a semicolon (;). You
can send a message to up to 20 addresses.
TIP
To send a message to a different number
for a contact, select the contact in the To field,
and then edit the number that appears in the
box below the contact number.
5 Press Down to go to the body of the
message. Enter your message, or press
Menu (right softkey), select My
Text, and then select a predefined
phrase you want to insert.
6 Press Send (left softkey).
enter the name, press Menu
(right softkey), and then select
Company Directory. Select the
SENDING AND RECEIVING MESSAGES
118
Page 45

YOUR TEXT AND MULTIMEDIA MESSAGES
7
Setting text message delivery options
You can set options for individual text
messages you send.
DID YOU KNOW
preferences that apply to all incoming and
outgoing messages (see Customisi
message settings). If you set options for an
individual message, those options override
your general preferences for that message
only.
?
You can set general
ng your
1 On the message compose screen,
press Menu (right softkey).
2 Select Message Options.
3 Check the Request message delivery
notification box to receive confirmation
that the message has been delivered.
4 Press Done (left softkey).
Creating and sending a multimedia
message
Multimedia messages consist of pictures,
videos, text, and sounds presented as one
or more slides. You can include any of the
following items:
Ringtones
• MIDI
Sound clips
• AMR
• QCELP
Pictures
• JPEG
• GIF
• WBMP
Videos
• 3GPP
• 3GPP2
• MPEG4
Outgoing multimedia messages can be up
to 300KB by default, but your network
operator may have a different maximum
message size.
CHAPTER
SENDING AND RECEIVING MESSAGES
119
Page 46

YOUR TEXT AND MULTIMEDIA MESSAGES
7
CHAPTER
BEFORE YOU BEGIN Make sure that your
phone is on and that you’re inside a
coverage area (see Turning your phone on
1 Press Home , and then press
Left to open the Message Centre
content list
2 Highlight MMS.
3 Press New (left softkey)
• Press Centre to view a list of
recently used addresses, and select
).
the recipient from the list.
• If the recipient’s name is in an online
address book, press Centre ,
enter the name, press Menu
(right softkey), and then select
Company Directory. Select the
name, and then select either the
phone number or the email address.
For more information, see the User
Guide on the Windows Mobile
Getting Started CD.
• If the recipient’s name and mobile
number are not in your Contacts list,
enter the full mobile number or email
address.
4 Enter the recipient’s mobile phone
number or email address. Here are
some shortcuts:
• If the recipient’s name and email
address are in your Contacts list,
press Menu (right softkey),
select Add Recipient, and then select
the recipient from the list.
TIP
With the cursor in the To field, press Up
on the 5-way to view the Bcc and Cc address
fields.
5 Select Subject and enter a title for the
message.
6 Select one or more of the following:
Insert Picture/Video: Enables you to
insert a picture. You can take a new
SENDING AND RECEIVING MESSAGES
120
Page 47

YOUR TEXT AND MULTIMEDIA MESSAGES
7
picture with the built-in camera or insert
an existing picture.
Insert Audio: Enables you to record a
message, such as a voice caption for a
picture, or insert an existing sound, such
as a ringtone. You can add one sound
per slide; to send more than one sound
in a message, add another slide to your
message.
TIP
You can add both a picture and a sound
clip to the same slide in a message. To add a
sound to a picture, select the picture
thumbnail and select Insert Audio. To add a
picture to a sound, select the sound icon, and
then select Insert Picture/Video.
7 (Optional) Select Insert Text and enter a
text caption or message for the slide
you inserted.
8 (Optional) Press Menu (right
softkey), select Slides > Insert, and
repeat steps 5 and 6 to add another
slide in this message.
DID YOU KNOW
to a message, you can set the length of time
each slide is displayed. Press Menu (right
softkey) and select Slides > Duration.
?
If you add more than one slide
9 (Optional) To add a vCard (contact file)
or vCalendar (calendar event file) to a
message, press Menu (right
softkey) and select Insert > vCard or
Insert > vCalendar.
10 Press Send (left softkey).
Setting multimedia message delivery
options
You can set options for individual
multimedia messages you send.
DID YOU KNOW
preferences that apply to all incoming and
outgoing messages (see Customisi
message settings). If you set options for an
individual message, those options override
your general preferences for that message
only.
?
You can set general
ng your
1 On the message compose screen,
press Menu (right softkey).
2 Select Options > Send Options.
CHAPTER
SENDING AND RECEIVING MESSAGES
121
Page 48

YOUR TEXT AND MULTIMEDIA MESSAGES
7
CHAPTER
3 Select any of the following options:
TIP
To change the background color of
outgoing multimedia messages, on the
message compose screen, press Menu (right
action key) and select Options > Background
Color. Select the color you want, and then
press Select (left action key).
Receiving text and multimedia messages
When your phone is on and you are in a
wireless coverage area, a notification
appears anytime you receive a new text or
Priority: Indicates the priority for this
message.
Delivery/Read Report: Indicates
whether you want to receive
confirmation that the message has
been delivered or has been read.
Hide Sender: Specifies that you do not
want your phone number included with
the message identifying you as the
sender.
4 Press Done (left softkey).
multimedia message. You can open the
message directly from the notification, or
you can open the message later in the
Messaging applications.
1 Do one of the following to open the
message:
• If a notification appears onscreen,
press Centre to open the
message.
• If yo want to view the message later,
press Home , and then press
Left to open the Message Centre
content list. Select Text Message or
MMS, and then select the message
you want to view.
SENDING AND RECEIVING MESSAGES
122
Page 49

YOUR TEXT AND MULTIMEDIA MESSAGES
7
2 If prompted, press Download
(left softkey) to download the full
message.
3 Do any of the following:
Pause or resume playback
(multimedia message only):
Select Pause (left softkey). To
resume playback, select Play (left
softkey).
Save the item that is playing
(multimedia message only): Press
Menu (right softkey) and
select Save.
Reply to the message: Press Menu
(right softkey) and select Reply >
Reply or Reply > Reply All.
NOTE If the message is a text message or
a multimedia message containing a single
picture with no audio, select Reply
(left softkey) to reply to the message.
Forward the message: Press Menu
(right softkey) and select Reply >
Forward.
Add the sender’s information to your
Contacts list: Select the sender’s
phone number or email address and
press Ye s (left action key) when asked
if you want to create a new contact for
the sender. Select <New Contact> to
create a new contact entry for this
name or address, or select an existing
contact to add the name or address to
that entry. Enter or edit the contact
information, and then press Save
(left softkey
DID YOU KNOW
message containing multiple slides, you can
press Right on the 5-way to move to the next
slide, or press Left on the 5-way to move to
the previous slide.
?
When viewing a multimedia
4 Press Done (left softkey).
CHAPTER
SENDING AND RECEIVING MESSAGES
123
Page 50

YOUR TEXT AND MULTIMEDIA MESSAGES
7
CHAPTER
Using links in messages
When you receive a text message that
contains a telephone number, email
Customising your
message settings
address, or URL, you can dial the number,
send an email message, or go to the web
page immediately. Your smartphone
automatically opens the appropriate
application from the link.
1 Open a message in the Inbox or another
folder.
2 Select the phone number, email
address, or URL (appears as underlined
blue text).
Deleting a message
1 Go to the Inbox or other folder
containing the message you want to
Many of the settings that apply to email
accounts also apply to text and multimedia
messaging accounts. For instructions on
customising these settings, see
Customisi
ng your email settings.
You can customise additional settings for
multimedia messages specifically.
DID YOU KNOW
individual message (see Setting text message
delivery options and Setting multimedia
message delivery options) override the
general preferences you set for all messages.
?
Options you select for an
delete.
2 Highlight the message.
3 Press Delete (left softkey).
4 Select Ye s to confirm the deletion.
1 Press Home , and then press
Left to open the Message Centre
content list
2 Select MMS.
3 Press Menu (right softkey) and
select MMS Settings.
CUSTOMISING YOUR MESSAGE SETTINGS
124
Page 51

YOUR TEXT AND MULTIMEDIA MESSAGES
7
4 Select MMSC Settings and set any of
the following options:
I get an error message when
I select this option, so need
help with what content goes
here
5 Select Send Options and set any of the
following options:
CHAPTER
Priority: Indicates the priority for this
message.
Validity Period: Indicates how long
messages remain available to be sent if
the recipient’s phone or email address
is not available when you originally send
the message. For example, if your
messages generally contain information
that will not be useful to recipients after
an hour, you can set the validity for one
hour. Select Maximum to allow
messages to remain available for the
maximum period of time permitted by
your network operator.
Deferred Delivery: Indicates whether
you want message delivery to be
deferred for the period of time you
specify.
CUSTOMISING YOUR MESSAGE SETTINGS
125
Page 52

YOUR TEXT AND MULTIMEDIA MESSAGES
7
CHAPTER
Message Type: Specifies the type of
messages you are sending.
Message Size: Sets the maximum
message size you can send. Do not
change the size unless instructed by
your network operator.
Delivery/Read Report: Indicates
whether you want to receive
confirmation that the message has
been delivered or has been read.
Hide Sender: Specifies that you do not
want your phone number included with
the message identifying you as the
sender.
Reply Charging/Charging: Specifies
whether to apply reply charging to the
entire message, to the message text
only, or not at all.
Not sure what reply charging
means? Do we need to
explain it?
6 Select Receive Options and set any of
the following options:
Home Reception: Indicates whether
multimedia messages are downloaded
automatically or whether you receive a
prompt to download multimedia
messages when you are inside your
home network.
Roaming Reception: Indicates
whether multimedia messages are
downloaded automatically or whether
you receive a prompt to download
multimedia messages when you are
roaming outside of your home network.
Allowed Message Types: Specifies
which types of messages you allow to
be downloaded to your smartphone.
CUSTOMISING YOUR MESSAGE SETTINGS
126
Page 53

YOUR TEXT AND MULTIMEDIA MESSAGES
7
Reject Anonymous Message:
Specifies that messages whose sender
is hidden should not be downloaded to
your smartphone.
7 Select General Options and select the
number of times your smartphone
should attempt to send or receive a
message before an error message is
displayed.
TIP
Select About on the MMS Settings
screen to view detailed information about the
multimedia messaging software.
TIP
You can restore the default settings for
any of the options in this procedure by
pressing Menu (right softkey) and selecting
Reset to Default.
8 Press Done (left softkey).
Using Windows Live
Windows Live is a set of services that
combines online search features, email,
and instant messaging:
Live Search: Enables you to search for text
on the web directly from your smartphone.
Windows Live Mail: The next generation
of the Hotmail web-based email
application. Windows Live Mail offers more
storage, greater message security, and
easier filing of messages.
Windows Live Messenger: Enables you to
see who’s online and exchange instant
messages (IM). Make calls to phones and
computers (including video calls) and
exchange pictures and other files.
Using Live Search
1 Press Home , and then press
Start (left softkey).
2 Navigate to the Windows Live content
list and select Live Search.
CHAPTER
USING WINDOWS LIVE
127
Page 54

YOUR TEXT AND MULTIMEDIA MESSAGES
7
CHAPTER
3 In the search bar at the top of the
screen, enter the text you want to find.
4 Press Centre .
5 Select the item you want from the
search results. If the item you want
does not appear, select Refine to
change the text you enter, or select
More to see more results.
4 The first time you sign into Windows
Setting up Windows Live Mail
BEFORE YOU BEGIN You must have an
existing Hotmail account to use Windows
Live Mail. If you do not have an account,
use the web browser on your smartphone
to go to www.hotmail.com
, and follow the
Live, press Accept (left softkey).
5 Enter your Hotmail email address and
password. Leave the Save password
box checked if you want to have your
password entered automatically.
steps to set up an account.
1 Press Home , and then press
Start (left softkey).
2 Navigate to the Windows Live content
list and select Live Mail.
3 Select Sign in to Windows Live.
6 Press Next (left softkey).
7 Check the Live Search bar box to have
the Live Search bar appear on your
Today screen. Check the Windows Live
services box to have Windows Live
USING WINDOWS LIVE
128
Page 55

YOUR TEXT AND MULTIMEDIA MESSAGES
7
Email and Windows Live Messenger
appear on your Home screen.
8 Press Next (left softkey).
9 Select which application information—
contacts, Windows Live Messenger,
and/or email—you want to synchronise
between the Windows Live mail server
and Windows Live on your smartphone.
For the applications you choose, any
information that appears in your
Hotmail/Windows Live account on the
web—for example, your email
messages and contact list—appears in
Windows Live on your smartphone
when you synchronise.
NOTE If you synchronise email, your
Windows Live email account also appears
in the Inbox application. If you synchronise
contacts, your Windows Live contacts also
appear in the Contacts application.
10 Press Next (left softkey).
11 Press Done (left softkey). Your
Windows Live main page is displayed.
Using Windows Live Mail
BEFORE YOU BEGIN Make sure that your
phone is on and that you’re inside a
coverage area (see Turning your phone on
1 Press Home , and then press
Start (left softkey).
2 Navigate to the Windows Live content
list and select Live Mail.
3 To synchronise email, contact, and/or
Windows Live Messenger information,
do the following:
• Press Right or Left until Sync is
highlighted.
• Press Centre . Information is
synchronised for any of the three
applications you selected during
setup.
4 To read your email, do the following:
CHAPTER
).
USING WINDOWS LIVE
129
Page 56

YOUR TEXT AND MULTIMEDIA MESSAGES
7
CHAPTER
• On your Windows Live main page,
select Mail.
• The Messaging application opens,
displaying your Windows Live mail.
You can view, send, and work with
www.hotmail.com
, and follow the
steps to set up an account.
• Make sure that your phone is on and
that you’re inside a coverage area (see
Turning your phone on
).
messages in your Windows Live
account in the same way as with
messages for any other account.
TIP
You can set an option to have messages
pushed to Windows Live Mail on your
smartphone as they arrive on the server.
Open Windows Live, press Menu (right
softkey), select Options, select Home screen
options, and then select the option to
download messages as they arrive.
1 Press Home , and then press
Start (left softkey).
2 Navigate to the Windows Live content
list and select Live Messenger.
3 Press Sign in (left softkey).
4 If you have not already set up a
Windows Live Mail account (see Setting
up Windows Live Mail), the first time
you sign into Windows Live Messenger,
press Accept (left softkey).
Using Windows Live Messenger
BEFORE YOU BEGIN
• You must have an existing Hotmail
account to use Windows Live
Messenger. If you do not have an
account, use the web browser on your
5 If prompted, enter your Hotmail email
address and password.
6 To send an instant message to a contact
who is online, highlight the contact
name and press Send IM (left
softkey).
smartphone to go to
USING WINDOWS LIVE
130
Page 57

YOUR TEXT AND MULTIMEDIA MESSAGES
Text entry
bar
7
TIP
If the contact you want is offline, send an
email message instead. Highlight the contact
name and press Send e-mail (left softkey).
Enter a subject and body text for the email
message, and then press Send (left softkey).
7 Do one of the following:
• Highlight the text entry bar and enter
your message text.
• Press Voice clip (left softkey)
and record a voice note by speaking
clearly with your smartphone held up
facing you.
8 (Optional) To add an emoticon to your
message, press Menu (right
softkey), select Add emoticon, and
then select the emoticon you want.
9 (Optional) To send a picture or other file,
press Menu (right softkey), select
Send, and then select the type of file
you want to send. Capture or select the
picture or other file you want.
10 Press Send (left softkey).
11 (Optional) To exchange messages with
more than one person, press
Menu (right softkey) and select
Options > Add participant. Select the
participant you want to add.
12 To end the messaging session, press
Menu (right softkey) and select
End conversation. If you are
exchanging messages with more than
one person, select End all
conversations to stop all the sessions
at once.
CHAPTER
USING WINDOWS LIVE
131
Page 58

YOUR TEXT AND MULTIMEDIA MESSAGES
7
CHAPTER
TIP
From the Messenger contacts list screen,
press Menu (right softkey) and select options
to add, block, or remove a contact; change
your status to “Busy,” “Away,” and so on; add
a display picture or personal message; and
more.
USING WINDOWS LIVE
132
Page 59

CHAPTER
Your connections to the web
and wireless devices
You use the web for so many things: finding driving directions,
getting news, buying gifts, checking web-based email. Now,
with your network operator’s network and your Palm
500v smartphone’s built-in web browser, you can take the web
with you almost anywhere you go.
The built-in Bluetooth
helps you easily set up wireless connections to a number of
devices, so you can enjoy the convenience of cable-free
connectivity. You can also use your smartphone to connect your
computer to the Internet and to share contacts or your favourite
photos with other people.
Benefits
• Carry the web with you
• Store web pages for offline
viewing
®
wireless technology on your smartphone
• Connect to Bluetooth headsets
and car kits
• Connect your computer to the
Internet through your smartphone
®
Tre o™
8
Page 60

In this chapter
Browsing the web . . . . . . . . . . . . . . . . . . . . . . . . . . . . . . . . . . . . . . 135
Connecting to devices with Bluetooth
Using your device as a wireless modem . . . . . . . . . . . . . . . . . . . . . 145
®
wireless technology. . . . . . 140
Page 61

YOUR CONNECTIONS TO THE WEB AND WIRELESS DEVICES
8
Browsing the web
Internet Explorer Mobile provides quick and
easy access to web pages. You can view
most sites on your smartphone that you
can view on your computer, including
those with security and advanced features,
such as JavaScript and frames.
Internet Explorer Mobile supports
JavaScript, Secure Sockets Layer (SSL),
and cookies, but does not support plug-ins
(Flash, Shockwave, VBScript, WML script,
and so on) or Java applets.
DID YOU KNOW
128-bit SSL strong encryption enable you to
browse secure sites, such as online shopping,
banking, and email. Remember, some secure
sites also require a specific browser and may
not work with Internet Explorer Mobile. Ask
the organisation for an alternate access point
that is compatible with Internet Explorer
Mobile.
BEFORE YOU BEGIN Do the following:
• Be sure to subscribe to data services
from your network operator. This is
necessary for browsing the web.
?
The Security certificates and
• Make sure your phone is on and that
you’re inside a coverage area (see
Turning your phone on
).
By default, Internet Explorer Mobile scales
web page content to fit your smartphone
screen so that you can view most of the
information without scrolling left or right.
Opening the Vodafone live! website
The Vodafone live! website gives you
access to features such as ringtones,
music downloads, and news. Additional
fees may apply; contact your network
operator for more information.
• Press Home , and then press
live (right softkey).
Opening other web pages
1 Press Home , and then press
Start (left softkey).
2 Navigate to the live! content list and
select Enter URL.
3 Enter the URL for the web page you
want to visit.
4 Press Go (left softkey).
CHAPTER
BROWSING THE WEB
135
Page 62

YOUR CONNECTIONS TO THE WEB AND WIRELESS DEVICES
8
CHAPTER
screen with the web page. To exit full
screen mode, press (right
softkey).
Show Pictures: Shows or hides
pictures on web pages. Hiding pictures
speeds up the time it takes to load
pages.
5 Press Menu (right softkey), select
View, and then select one of the
following:
One Column: Arranges web pages into
one column that is as wide as the
screen, so that you don’t have to scroll
horizontally.
Fit To Screen: Maintains a layout similar
to what you see on a desktop computer,
but it makes items smaller and arranges
the content so that you can see most of
it without scrolling horizontally.
Desktop: Keeps the same layout and
size as on a desktop computer, which
requires both horizontal and vertical
scrolling.
Full Screen: Hides the status and
navigation areas and fills the entire
6 Here are some tips on viewing web
pages and moving around in them:
• To view the previous page, press
Back (left softkey) or
Backspace .
• To refresh the page with the latest
content from the Internet, press
Menu (right softkey) and select
Refresh.
• To scroll through the page in One
Column View or Default View, press
Up or Down . In Desktop View,
press Up , Down , Left , or
Right to scroll in all directions.
• To follow a link to another web page
press Up or Down to highlight
the link, and then press Centre to
go to the selected page.
• To send email from a web page,
select the address link. You need to
BROWSING THE WEB
136
Page 63

YOUR CONNECTIONS TO THE WEB AND WIRELESS DEVICES
8
configure an email application on your
smartphone before you can use this
feature (see Your email
• To adjust the size of the text on web
).
pages, press Menu (right
softkey), select View > Text Size,
and then select the size you want.
• To view a web page’s properties,
press Menu (right softkey) and
select To o l s > Properties.
• To view each item in a list, select the
list and scroll using Up or
Down .
• In a list, press Left or Right to
cycle between items, and then press
Centre to accept the change.
• In a form, such as a browser search
field, press Centre to interact
with the form, and then press Centre
to stop interacting with the form.
7 Press Back to close Internet
Explorer Mobile.
TIP
To send a link, press Menu (right softkey)
and select Tools > Send Link. Select the
option you want to use to send the link: SMS
(text message), MMS (multimedia message),
Windows Live (if you have set up Windows
Live on your smartphone), or an email
account.
Creating a favourite
Favourites let you bookmark a web page
so that you can instantly access it without
entering the web address.
BEFORE YOU BEGIN Create the folders
where you want to store your favourites
first. After you create a favourite, you can’t
move it to another folder (see Organisi
ng
your favourites).
1 Go to the page you want to mark as
a favourite.
2 Press Menu (right softkey) and
select Add to Favourites.
CHAPTER
BROWSING THE WEB
137
Page 64

YOUR CONNECTIONS TO THE WEB AND WIRELESS DEVICES
8
CHAPTER
Organising your favourites
You can create folders to organise your
favourites. For example, you can store
travel links in one folder, stock links in
another, and business links in a third folder.
1 Press Home , and then press
live! (right softkey).
3 (Optional) Select Name and enter a
different description.
4 (Optional) Select Folder, and then
select the folder where you want to
create the favourite.
2 Press Favourites (left softkey).
3 Press Menu (right softkey) and
select Add Folder.
4 Enter the folder name.
5 Press Add (left softkey).
5 Select Add (left softkey).
Downloading files and images from a
TIP
To delete a favourite or folder, press
Menu and select Favourites. Highlight the
item you want to delete, press Menu (right
softkey), and then select Delete. Press Ye s
(left softkey) to confirm the deletion.
web page
You can download files that are usable on
your smartphone, such as new
applications, MIDI ringtones, or pictures.
1 Go to the page that contains the link to
Viewing a favourite
1 Press Home , and then press
live! (right softkey).
2 Press Favourites (left softkey).
3 Select the page you want to view in the
list.
the file you want to download.
2 Select the link to download the file.
3 Select Name and enter a new name for
the file.
4 Select the Folder list, and then select
the folder where you want to save the
file.
BROWSING THE WEB
138
Page 65

YOUR CONNECTIONS TO THE WEB AND WIRELESS DEVICES
8
5 Select the Location list, and then select
where you want to store the file: Main
memory or Storage card.
6 Press Done (left softkey).
Returning to recently viewed pages
The History list stores the addresses of the
pages you visited recently.
1 Press Menu (right softkey) and
select History.
2 Select the web page you want to view.
Customising your Internet Explorer
Mobile settings
1 Press Menu (right softkey) and
select To o l s > Options.
2 Select General and set any of the
following options. Press Done
(left softkey) when you have finished.
CHAPTER
Play sounds: Specifies whether your
smartphone plays any sounds
associated with a web page.
Warn when changing to an
unsecured page: Sets whether a
message appears when you switch
from a secure page to one that is not
secure.
Allow cookies: Sets whether your
smartphone accepts cookies (small files
containing info about your identity and
preferences). The page sends the file
and stores it on your smartphone.
Encoding: Sets the character set for
the web pages you view.
BROWSING THE WEB
139
Page 66

YOUR CONNECTIONS TO THE WEB AND WIRELESS DEVICES
8
CHAPTER
Warn when page content is blocked
by security settings: Sets whether a
message appears when you attempt to
open a page that does not meet the
security standards associated with your
smartphone.
Select Connections and set either of the
following options. Press Done (left
softkey) when you have finished.
Automatically detect settings:
Select network:
3 Select Memory, highlight any of the
three options, and press Clear
(right softkey) to delete the selected
files. Press Done (left softkey)
when you have finished.
Save links to pages visited in the
past: Sets how many days of activity
the History list stores.
Clear History: Empties the History list.
Delete Files: Removes web files that
you previously viewed synchronised
with your computer.
4 Press Done (left softkey).
Connecting to
devices with
Bluetooth
®
wireless technology
With the built-in Bluetooth® wireless
technology on your smartphone, you can
connect to a number of Bluetooth devices
such as a headset or hands-free car kit, as
well as to other phones, handhelds, or
piconets. When you connect to another
device, you create a partnership (also
referred to by terms such as trusted pair,
trusted device, or pairing) with that device.
CONNECTING TO DEVICES WITH BLUETOOTH
140
®
WIRELESS TECHNOLOGY
Page 67

YOUR CONNECTIONS TO THE WEB AND WIRELESS DEVICES
8
KEY TERM
Partnership Two devices—for
example, your smartphone and a hands-free
device—that can connect because each
device finds the same passkey on the other
device. After you form a partnership with a
device, you don’t need to enter a passkey to
connect with that device again. Partnership is
also known as paired relationship, pairing,
trusted device, and trusted pair.
If your computer is enabled with Bluetooth
wireless technology, you can also
synchronise wirelessly or use your phone
as a wireless modem.
You can create a list of Bluetooth devices
that you trust to communicate with your
smartphone. When communicating with
trusted devices, your smartphone skips the
discovery process and creates a secure link
as long as the device is within range.
Bluetooth range is up to
9 meters
in ideal
conditions. Performance and range are
affected by physical obstacles, radio
interference from nearby electronic
equipment, and other factors.
When you configure a headset (see
Connecting to a Bluetooth
®
hands-free
device), the headset is automatically added
to your trusted device list. Follow the steps
in this section to add other devices, such
as your computer, to your trusted device
list.
DID YOU KNOW
establishing a Bluetooth connection. If the
battery level is low, you can’t make a
Bluetooth connection.
TIP
Bluetooth printer. To print a file, open the file,
press Menu (right softkey), and then select
Print via Bluetooth in any application that
supports this feature.
?
Check your battery level before
You can set up a connection to a nearby
Entering basic Bluetooth settings
1 Press Home , and then press
Start (left softkey).
2 Navigate to the My Settings content
list, highlight Bluetooth, and then press
Tu r n On (left softkey).
3 If you want to allow Bluetooth devices
that are not on your Trusted Device list
to request a connection with your
device, select Bluetooth, press
Menu (right softkey), and select
Turn On Visibility, Your device
remains accessible to other devices
CHAPTER
CONNECTING TO DEVICES WITH BLUETOOTH
®
WIRELESS TECHNOLOGY
141
Page 68

YOUR CONNECTIONS TO THE WEB AND WIRELESS DEVICES
8
CHAPTER
until you press Menu (right
softkey) and select Turn Off Visibility.
The Bluetooth status icon
The Bluetooth icon on your Today screen
indicates the status of the Bluetooth
feature:
Bluetooth on.
Call in progress with a Bluetooth
4 Wait for your smartphone to search for
devices and to display the device list.
headset or car kit.
Music files are playing through a
Bluetooth headset.
Requesting a connection with another
Bluetooth device
1 Press Home , and then press
Start (left softkey).
2 Navigate to the My Settings content
list, highlight Bluetooth, and then press
Tu r n On (left softkey).
3 Select Bluetooth, and then select Add
new device.
5 Select the device with which you want
to connect, and press Next (right
softkey).
6 Enter an alphanumeric passkey
between 1 and 16 characters long and
press Next (right softkey).
IMPORTANT Some hands-free devices
have a predefined passkey. If your device
has a predefined passkey, you can find it in
CONNECTING TO DEVICES WITH BLUETOOTH
142
®
WIRELESS TECHNOLOGY
Page 69

YOUR CONNECTIONS TO THE WEB AND WIRELESS DEVICES
8
the documentation for that device. Other
devices provide a screen where you enter
a passkey that you make up. In either case,
you must use the same passkey on both
your smartphone and the other device. We
recommend that where possible, you
make up a passkey of 16 alphanumeric
characters (letters and numerals only) to
improve the security of your smartphone.
The longer the passkey, the more difficult
it is for the passkey to be deciphered.
7 If the passkey is not built-in, enter the
same passkey on the other Bluetooth
device, and then press OK (right
softkey).
8 Enter a new display name if desired,
and then press Next (left
softkey).
9 Press Done (left softkey).
You can now communicate with this device
whenever it is within range and the
Bluetooth feature on your smartphone is
turned on. The range varies greatly
depending on environmental factors. The
maximum is about 9 meters.
TIP
To delete the established partnership with
a device, go to the Bluetooth Devices screen
and highlight the connection you want to
remove. Press Menu (right softkey) and
select Delete. Press Ye s (left softkey) to
confirm the deletion. The deleted device can
no longer automatically connect with your
smartphone.
Accepting a connection from another
Bluetooth device
BEFORE YOU BEGIN To prepare your
smartphone to be able to accept a
connection from a requesting device, enter
the basic Bluetooth settings as described
in Entering basic Bluetooth setting
s.
1 Press Home , and then press
Start (left softkey).
2 Navigate to the My Settings content
list, highlight Bluetooth, and then press
Tu r n On (left softkey).
3 If you have already set up a partnership
with the transmitting device, your
smartphone is ready to receive the info.
If you haven’t set up a connection,
select Bluetooth, press Menu
CHAPTER
CONNECTING TO DEVICES WITH BLUETOOTH
®
WIRELESS TECHNOLOGY
143
Page 70

YOUR CONNECTIONS TO THE WEB AND WIRELESS DEVICES
8
CHAPTER
(right softkey), and select Turn O n
Visibility to let the device find your
smartphone and request a connection.
4 When prompted to add this device,
select Ye s .
5 Enter the same passkey on your
smartphone and on the Bluetooth
device.
6 (Optional) To give the partnership a
more meaningful name, select Display
Name and enter a new name.
7 Press Done (left softkey).
8 When your smartphone is receiving
info, a notification tells you that a
transmission is in progress. To stop the
transmission, press Cancel (right
softkey). To close the notification, press
Hide (left softkey).
Entering advanced Bluetooth settings
You can use Bluetooth profiles to enter
settings for transferring images, connect to
a Bluetooth printer, and more.
1 Press Home , and then press
Start (left softkey).
2 Navigate to the My Settings content
list and press All Settings (right
softkey).
3 Select Bluetooth Profiles.
4 Select any of the following options:
File Transfer: Enables you to specify
where to store files you receive through
a Bluetooth connection. You can also
select whether your smartphone
prompts for server authorisation
credentials.
Images: Enables you to specify where
to store images you receive through a
Bluetooth connection. You can also
select whether your smartphone
prompts for server authorisation
credentials, whether to open images
automatically once the transfer has
finished, and whether to request a
thumbnail image of transmitted images.
Security: Specifies a time interval after
which your smartphone reverts from
visible to hidden status.
Printer: Enables you to manage print
jobs with Bluetooth printers. If you
select this option, you can do the
following:
CONNECTING TO DEVICES WITH BLUETOOTH
144
®
WIRELESS TECHNOLOGY
Page 71

YOUR CONNECTIONS TO THE WEB AND WIRELESS DEVICES
8
• If you have formed a connection with
a Bluetooth printer but the printer is
not displayed on the Printer screen,
press Menu (right softkey) and
select Refresh.
• To view current print jobs, press
Menu (right softkey) and select
Status. To cancel a print job, on the
Print Manager screen, press
Menu (right softkey) and select
Cancel Jobs.
Identification: Lets you enter a name
for your smartphone and select whether
to use this as the Bluetooth device
name.
5 After entering each setting you want,
press Done (left softkey).
Using your device as
a wireless modem
Internet Connection Sharing (ICS) is the
feature that converts your smartphone into
a modem so that you can access the
Internet from your computer.
You can set up Internet Connection Sharing
in one of two ways:
• Connect your smartphone to your
computer using the USB sync cable.
• If your computer is enabled with
Bluetooth wireless technology, you can
set up your smartphone as a wireless
modem using the built-in Bluetooth
technology.
Setting up a USB Internet Connection
Sharing connection
1 Press Home , and then press
Centre .
2 Select Applications , and then
select Internet Sharing .
3 Select the PC Connection list, and then
select USB.
4 Press Connect (left softkey).
5 On your computer, open your web
browser to confirm that you can
connect to the Internet.
CHAPTER
USING YOUR DEVICE AS A WIRELESS MODEM
145
Page 72

YOUR CONNECTIONS TO THE WEB AND WIRELESS DEVICES
8
CHAPTER
Creating a Bluetooth Internet Connection
Sharing connection
BEFORE YOU BEGIN
• Make sure your smartphone is visible
(see Entering basic Bluetooth setting
• Create a partnership between your
s).
smartphone and your computer. We
recommend that you initiate the
partnership from your smartphone (see
R
equesting a connection with another
Bluetooth device).
1 On your computer, double-click the icon
to open the Bluetooth connections
window. Check the documentation
included with your computer for
instructions.
2 Select the option to view devices within
range.
3 You should see an icon representing
your smartphone. Double-click this icon
to make sure that “Network Access
Point” or something similar appears in
the list of Bluetooth services.
TIP
Don’t see your smartphone icon or the list
of services? Check the documentation
included with your computer, or contact your
computer manufacturer for help. Different
computer models use different terminology
for the Bluetooth connection features.
4 On your smartphone, press
Home , and then press
Centre .
5 Select Applications , and then
select Internet Sharing .
6 Select the PC Connection list, and then
select Bluetooth PAN.
NOTE Keep the default setting on the
Network Connection list.
7 Press Connect (left softkey) and
follow the wizard to set up Internet
Sharing.
8 On your computer, follow the steps to
accept or enable a Bluetooth PAN
connection with your smartphone.
Check the documentation included with
your computer for instructions.
9 After you have connected, on your
computer, open your web browser to
USING YOUR DEVICE AS A WIRELESS MODEM
146
Page 73

YOUR CONNECTIONS TO THE WEB AND WIRELESS DEVICES
8
confirm that you can connect to the
Internet.
CHAPTER
USING YOUR DEVICE AS A WIRELESS MODEM
147
Page 74

YOUR CONNECTIONS TO THE WEB AND WIRELESS DEVICES
8
CHAPTER
USING YOUR DEVICE AS A WIRELESS MODEM
148
Page 75

CHAPTER
Your photos, videos, and
music
Do you have a wallet bulging with photos of friends, family,
pets, and your most recent vacation?
Are you tired of carrying both your MP3 player and your phone?
Yo u r P a l m
can keep your favourite photos right on your smartphone—
videos, too. And there's no need to carry an expensive MP3
player, because you can play music on your smartphone.
Simply transfer songs onto your smartphone or an expansion
card (sold separately) and then listen through your stereo
headphones.
Benefits
• Never be far from your favourite
people, places, and songs
• Arrange your photos, videos, and
songs
®
Tre o™ 500v smartphone solves both problems. You
• Avoid having to use a separate
photo viewer, MP3, CD, or
mini-disc player
9
Page 76

In this chapter
Camera. . . . . . . . . . . . . . . . . . . . . . . . . . . . . . . . . . . . . . . . . . . . . . . 152
Pictures & Videos. . . . . . . . . . . . . . . . . . . . . . . . . . . . . . . . . . . . . . . 157
Windows Media Player Mobile . . . . . . . . . . . . . . . . . . . . . . . . . . . . 162
Page 77

YOUR PHOTOS, VIDEOS, AND MUSIC
9
Synchronising your
media files
You can synchronise pictures, videos, and
music files between your smartphone and
your computer so that changes you make
show up on both your computer and your
smartphone. To synchronise media files,
you must first choose Media as one of your
synchronisation options on your
smartphone; see C
applications sync.
The procedure for synchronising media
files is different for computers running
Windows XP and computers running
Windows Vista.
Synchronising media files: Windows XP
BEFORE YOU BEGIN You must install
ActiveSync
from a link on the Windows Getting
Started Disc (see Installing
desktop software: Windows XP), and
select the option to synchronise media
(see C
hanging which applications sync).
hanging which
®
desktop software, available
ActiveSync
When you synchronise your smartphone,
your pictures and videos are synchronised
between your smartphone and your
desktop computer. On your computer, you
can view the pictures and videos, and you
can also send them to friends using your
desktop email application.
To find all synchronised pictures and
videos on your computer, look in
C:\Documents and
Settings\<Username>\My
Documents\Treo My Documents.
You use Windows Media Player to
synchronise music files; see T
media files to your smartphone.
Synchronising media files: Windows
Vista
BEFORE YOU BEGIN You must install
Windows Mobile Device Center, available
from a link on the Windows Getting
Started Disc (see Installing
Mobile Device Center: Windows Vista),
and select the option to synchronise media
(see C
hanging which applications sync).
On a computer running Windows Vista,
you use Windows Media Player to
ransferring
Windows
CHAPTER
SYNCHRONISING YOUR MEDIA FILE S
151
Page 78
YOUR PHOTOS, VIDEOS, AND MUSIC
9
CHAPTER
synchronise all types of media files—
pictures, videos, and music files—that are
on your computer to your smartphone. See
T
ransferring media files to your
smartphone.
To synchronise pictures and videos from
your smartphone to your computer, follow
these steps:
1 Connect your smartphone to your
computer with the USB sync cable.
2 On your computer, click Start > All
Programs > Windows Mobile Device
Center.
3 Select Connect without setting up
your device.
4 Select Pictures, Music and Video.
5 Select X new pictures/video clips are
available for import.
All new or changed pictures and videos on
your smartphone are synchronised to your
computer.
Camera
Your smartphone comes with an
easy-to-use, built-in, 2-megapixel camera
with 2.5x digital zoom. You can use the
camera to take and view pictures and
videos and send them to your friends and
family. To add a personal touch to your
smartphone, use your pictures as your
Home screen background and as caller ID
images.
You can receive and view pictures and
videos, and send pictures and videos as
attachments or multimedia messages (see
Pictures & Videos
contact (see A
also move pictures and videos to a
computer by synchronising your
smartphone with your computer.
Taking a picture
By default, pictures are stored in the My
Pictures folder on your smartphone. If you
want to store your pictures on an
expansion card, you can change where
pictures are stored (see Customisi
Camera settings). For information on
). Or add a picture to a
dding a contact). You can
ng your
152
CAMERA
Page 79

YOUR PHOTOS, VIDEOS, AND MUSIC
9
accessing your pictures on your computer,
see Synchronisi
ng media files: Windows
XP.
DID YOU KNOW
stored in 16-bit colour, JPG format. Resolution
settings range from a low end of 96 x 72
pixels to a high end of 1600 x 1200 pixels. You
can change the default setting. See
Customisi
?
Pictures are captured and
ng your Camera settings for details.
1 Press Home , and then press
Start (left softkey).
2 Navigate to the Recent Photos content
list and press All Photos (right
softkey).
3 Press Camera (left softkey).
TIP
If you see a camcorder icon below the
preview image, video mode is on. To turn on
the still camera, press Menu (right softkey)
and select Still.
4 Adjust the position of your smartphone
until you see the subject you want to
photograph on the screen.
5 (Optional) Adjust any of the following:
Zoom: Press Up to zoom in or
Down to zoom out.
Brightness: Press Menu (right
softkey) and select Brightness to
change the image brightness.
Resolution: Press Menu (right
softkey) and select Resolution to
change the image quality.
6 (Optional) Set a five-second timer: Press
Menu (right softkey) and select
Mode > Timer.
7 Press Centre to capture the picture
or start the timer.
CHAPTER
CAMERA
153
Page 80

YOUR PHOTOS, VIDEOS, AND MUSIC
9
CHAPTER
8 Hold your smartphone still until the
picture renders, and then do one of the
following:
• Press Camera (left softkey) to
take another picture.
• Press Back and then press
Thumbnails (left softkey) to
return to Thumbnail View.
DID YOU KNOW
inactivity when previewing an image, the
camera goes into standby mode. Press any
key to return to the image preview.
?
After three minutes of
Taking pictures in burst mode
Burst mode takes five pictures in quick
succession, with one button press.
1 Press Home , and then press
Start (left softkey).
2 Navigate to the Recent Photos content
list and press All Photos (right
softkey).
3 Press Camera (left softkey).
4 Press Menu (right softkey) and
select Mode > Burst.
5 Press Centre .
Recording a video
Videos can be any length, provided you
have enough storage space available. By
default, videos are stored in the My
Pictures folder on your smartphone. If you
want to store your videos on an expansion
card, see Customisi
ng your Camera
settings to change where videos are
stored. For information on accessing your
videos on your computer, see
Synchronisi
DID YOU KNOW
stored in MP4 format. Video resolution ranges
from 176 x 144 pixels to 320 x 240 pixels. You
can change the resolution setting by pressing
Menu (right softkey) and selecting Quality.
ng media files: Windows XP.
?
Videos are captured and
1 Press Home , and then press
Start (left softkey).
2 Navigate to the Recent Photos content
list and press All Photos (right
softkey).
3 Press Camera (left softkey).
4 Press Menu (right softkey) and
select Video.
5 Adjust the position of your smartphone
until you see the subject you want to
154
CAMERA
 Loading...