

Page 1
VH242/VH222 Series
LCD Monitor
User Guide
E4240 V1
October 2008
Page 2

Table of contents
Notices ......................................................................................................... iii
Safety information ...................................................................................... iv
Care & Cleaning .......................................................................................... v
Chapter 2: Setup
2.1
Adjusting the monitor ..................................................................
2-1
2.2
Detaching the arm/stand (for VESA wall mount).......................
2-2
Chapter 1: Product introduction
1.1 Welcome! .................................................................................... 1-1
1.2 Package contents ......................................................................... 1-1
1.3 Assembling the monitor base ..................................................... 1-2
1.5 Monitor introduction .................................................................... 1-4
1.5.1 Front of the LCD monitor ................................................ 1-4
1.5.2 Rear of the LCD monitor ................................................ 1-7
Chapter 3: General Instruction
3.1 OSD (On-Screen Display) menu ................................................ 3-1
3.1.1 How to recongure .......................................................... 3-1
3.1.2 OSD Function Introduction .............................................. 3-1
3.2 Specications summary .............................................................. 3-4
3.3 Troubleshooting (FAQ) ................................................................ 3-6
3.4 Supported operating modes ....................................................... 3-7
3.5
HDMI Supported Primary Timings
Copyright © 2008 ASUSTeK COMPUTER INC. All Rights Reserved.
No part of this manual, including the products and software described in it, may be reproduced, transmitted,
transcribed, stored in a retrieval system, or translated into any language in any form or by any means,
except documentation kept by the purchaser for backup purposes, without the express written permission
of ASUSTeK COMPUTER INC. (“ASUS”).
Product warranty or service will not be extended if: (1) the product is repaired, modied or altered, unless
such repair, modication of alteration is authorized in writing by ASUS; or (2) the serial number of the
product is defaced or missing.
ASUS PROVIDES THIS MANUAL “AS IS” WITHOUT WARRANTY OF ANY KIND, EITHER EXPRESS
OR IMPLIED, INCLUDING BUT NOT LIMITED TO THE IMPLIED WARRANTIES OR CONDITIONS OF
MERCHANTABILITY OR FITNESS FOR A PARTICULAR PURPOSE. IN NO EVENT SHALL ASUS, ITS
DIRECTORS, OFFICERS, EMPLOYEES OR AGENTS BE LIABLE FOR ANY INDIRECT, SPECIAL,
INCIDENTAL, OR CONSEQUENTIAL DAMAGES (INCLUDING DAMAGES FOR LOSS OF PROFITS,
LOSS OF BUSINESS, LOSS OF USE OR DATA, INTERRUPTION OF BUSINESS AND THE LIKE),
EVEN IF ASUS HAS BEEN ADVISED OF THE POSSIBILITY OF SUCH DAMAGES ARISING FROM ANY
DEFECT OR ERROR IN THIS MANUAL OR PRODUCT.
SPECIFICATIONS AND INFORMATION CONTAINED IN THIS MANUAL ARE FURNISHED FOR
INFORMATIONAL USE ONLY, AND ARE SUBJECT TO CHANGE AT ANY TIME WITHOUT NOTICE, AND
SHOULD NOT BE CONSTRUED AS A COMMITMENT BY ASUS. ASUS ASSUMES NO RESPONSIBILITY
OR LIABILITY FOR ANY ERRORS OR INACCURACIES THAT MAY APPEAR IN THIS MANUAL,
INCLUDING THE PRODUCTS AND SOFTWARE DESCRIBED IN IT.
Products and corporate names appearing in this manual may or may not be registered trademarks or
copyrights of their respective companies, and are used only for identication or explanation and to the
owners’ benet, without intent to infringe.
........................................... 3-8
ii
Page 3

Notices
Federal Communications Commission Statement
This device complies with Part 15 of the FCC Rules. Operation is subject to the
following two conditions:
• This device may not cause harmful interference, and
• This device must accept any interference received including interference that
may cause undesired operation.
Th is equipment ha s been tested and f ound to compl y with the limi ts f or a
Class B digital device, pursuant to Part 15 of the FCC Rules. These limits are
designed to provide reasonable protection against harmful interference in a
residential installation. This equipment generates, uses and can radiate radio
frequency energy and, if not installed and used in accordance with manufacturer’
s instructions, may cause harmful interference to radio communications. However,
there is no guarantee that interference will not occur in a particular installation. If
this equipment does cause harmful interference to radio or television reception,
which can be determi ned by tu rning the equipm ent off a nd on, th e user is
encouraged to try to correct the interference by one or more of the following
measures:
• Reorient or relocate the receiving antenna.
• Increase the separation between the equipment and receiver.
• Connect the equipment to an outlet on a circuit different from that to which the
receiver is connected.
• Consult the dealer or an experienced radio/TV technician for help.
As an Energy Star® Partner, our company has determined that this product meets
the Energy Star® guidelines for energy efciency.
Canadian Department of Communications Statement
This digital apparatus does not exceed the Class B limits for radio noise emissions
from digital apparatus set out in the Radio Interference Regulations of the
Canadian Department of Communications.
This class B digital apparatus complies with Canadian ICES-003.
iii
Page 4

Safety information
• Before setting up the monitor, carefully read all the documentation that came
with the package.
• To prevent re or shock hazard, never expose the monitor to rain or moisture.
• Never try to open the monitor cabinet. The dangerous high voltages inside the
monitor may result in serious physical injury.
• If the power supply is broken, do not try to x it by yourself. Contact a qualied
service technician or your retailer.
• Before using the product, make sure all cables are correctly connected and the
power cables are not damaged. If you detect any damage, contact your dealer
immediately.
• Sl ot s an d openings on the back or top of th e ca bi net are provided for
ventilation. Do not block these slots. Never place this product near or over a
radiator or heat source unless proper ventilation is provided.
• The monitor should be operated only from the type of power source indicated
on the label. If you are not sure of the type of power supply to your home,
consult your dealer or local power company.
• Use the appropriate power plug which complies with your local power standard.
• Do not overload power strips and extention cords. Overloading can result in re
or electric shock.
• Avoid dust, humidity, and temperature extremes. Do not place the monitor in
any area where it may become wet. Place the monitor on a stable surface.
• Unplug the unit during a lightning storm or if it will not be used for a long period
of time. This will protect the monitor from damage due to power surges.
• Never push objects or spill liquid of any kind into the slots on the monitor
cabinet.
• To ensure satisfactory operation, use the monitor only with UL listed computers
which have appropriate congured receptacles marked between 100-240V AC.
• If you encounter technical problems with the monitor, contact a qualied service
technician or your retailer.
iv
Page 5
Care & Cleaning
• Before you lift or reposition your monitor, it is better to disconnect the cables
and power cord. Follow the correct lifting techniques when positioning the
monitor. When lifting or carrying the monitor, grasp the edges of the monitor.
Do not lift the display by the stand or the cord.
• Cleaning. Turn your monitor off and unplug the power cord. Clean the monitor
surface with a lint-free, non-abrasive cloth. Stubborn stains may be removed
with a cloth dampened with mild cleaner.
• Avoid using a cleaner containing alcohol or acetone. Use a cleaner intended
for use with the LCD. Never spray cleaner directly on the screen, as it may drip
inside the monitor and cause an electric shock.
The following symptoms are normal with the monitor:
• The screen may icker during the initial use due to the nature of the uorescent
light. Turn off the Power Switch and turn it on again to make sure that the
icker disappears.
• You may find slightly uneven brightness on the screen depending on the
desktop pattern you use.
• When the same image is displayed for hours, an afterimage of the previous
screen may remain after switching the image. The screen will recover slowly or
you can turn off the Power Switch for hours.
• When the screen becomes black or ashes, or cannot work anymore, contact
your dealer or service center to x it. Do not repair the screen by yourself!
Conventions used in this guide
WARNI NG: Informa tion to pre vent injury t o yoursel f when trying t o
complete a task.
CAUTION: Information to prevent damage to the components when trying
to complete a task.
IMPORTANT: Information that you MUST follow to complete a task.
NOTE: Tips and additional information to aid in completing a task.
v
Page 6

Where to nd more information
Refer to the following sources for additional information and for product and
software updates.
1. ASUS websites
The ASUS websites worldw ide pro vide up dated information on ASUS
hardware and software products. Refer to
2. Optional documentation
Your product package may include optional documentation, such as warranty
card, that may have been added by your dealer. These documents are not
part of the standard package.
http://www.asus.com
vi
Page 7
1.1 Welcome!
Thank you for purchasing the ASUS
The latest widescreen LCD monitor from ASUS provides a crisper, broader, and
brighter display, plus a host of features that enhance your viewing experience.
With these features, you can enjoy the convenience and delightful visual
experience that the VH242/VH222 Series brings you!
®
VH242/VH222 Series LCD monitor!
1.2 Package contents
Check your VH242/VH222 Series LCD package for the following items:
LCD monitor
Monitor base
Support CD
Quick Start Guide
Power cord
VGA cable
DVI cable (Only for some models)
Audio cable
(Only for some models)
If any of th e above i te ms is dam ag ed or m is sing, c on tact your ret ai ler
immediately.
ASUS LCD Monitor VH242/VH222 Series
1-1
Page 8
1.3 Assembling the monitor base
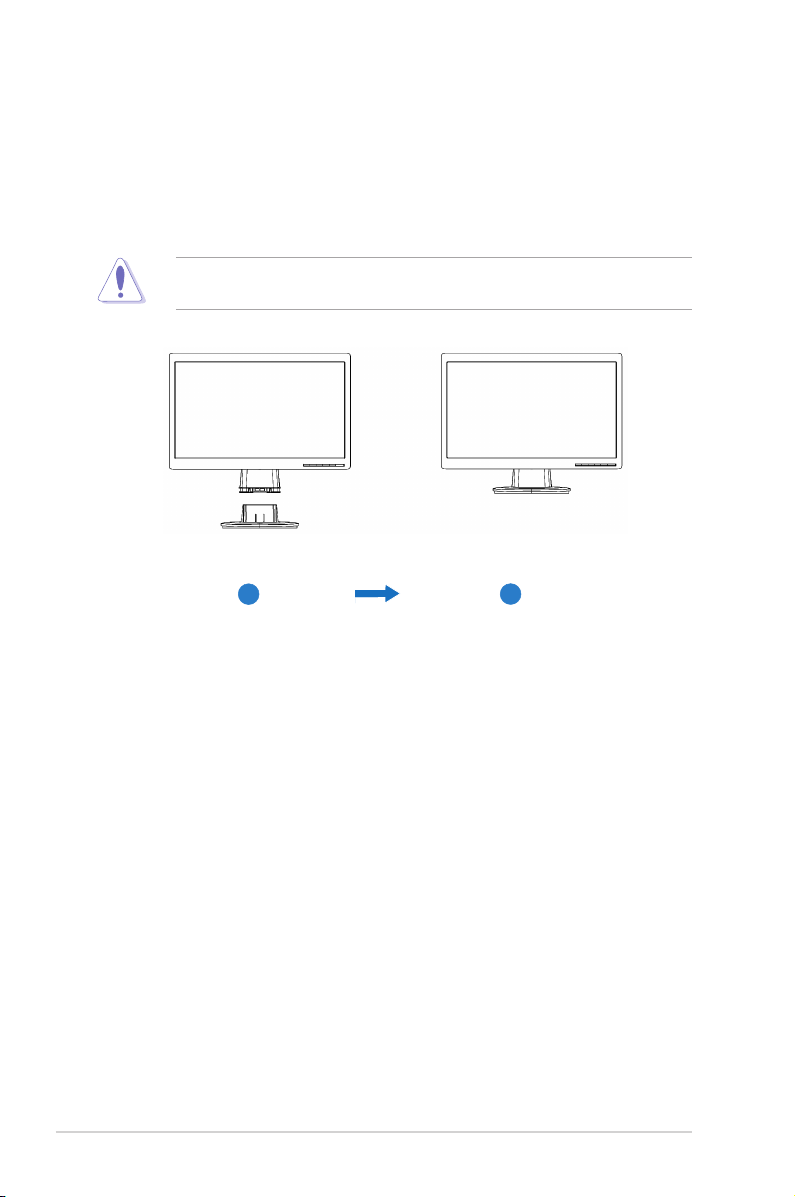
To assemble the monitor base:
1. Connect the base with the monitor. A click indicates that the base has been
connected successfully.
2. Adjust the monitor to the angle that is most comfortable for you.
We recommend that you cover the table surface with soft cloth to prevent
damage to the monitor.
1
1-2 Chapter 1: Product introduction
2
Page 9
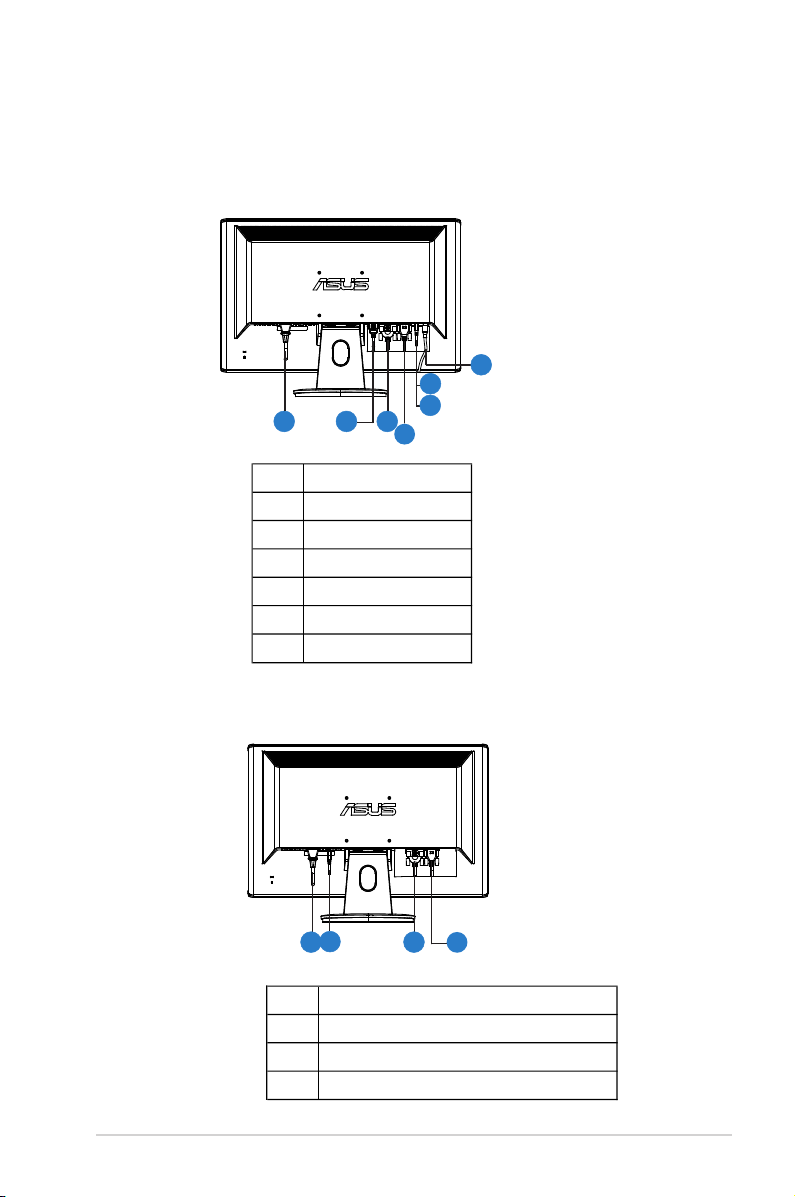
1.4 Connect cables
Connect cables which you need
1.4.1 VH242H/VH222H
1
1
2
3
4
5
6
7
2
AC-IN port
HDMI-IN port
DVI port
VGA port
Line - in Port
Earphone - out Port
SPDIF Out
7
5
6
3
4
.2 VH242T/VH242S/VH242D/VH222T/VH222S/VH222D
1.4
2
1
AC-IN port
1
2
Line - in Port
DVI port
3
VGA port
4
(Only for some models)
4
3
(Only for some models)
ASUS LCD Monitor VH242/VH222 Series
1-3
Page 10
1.5 Monitor introduction
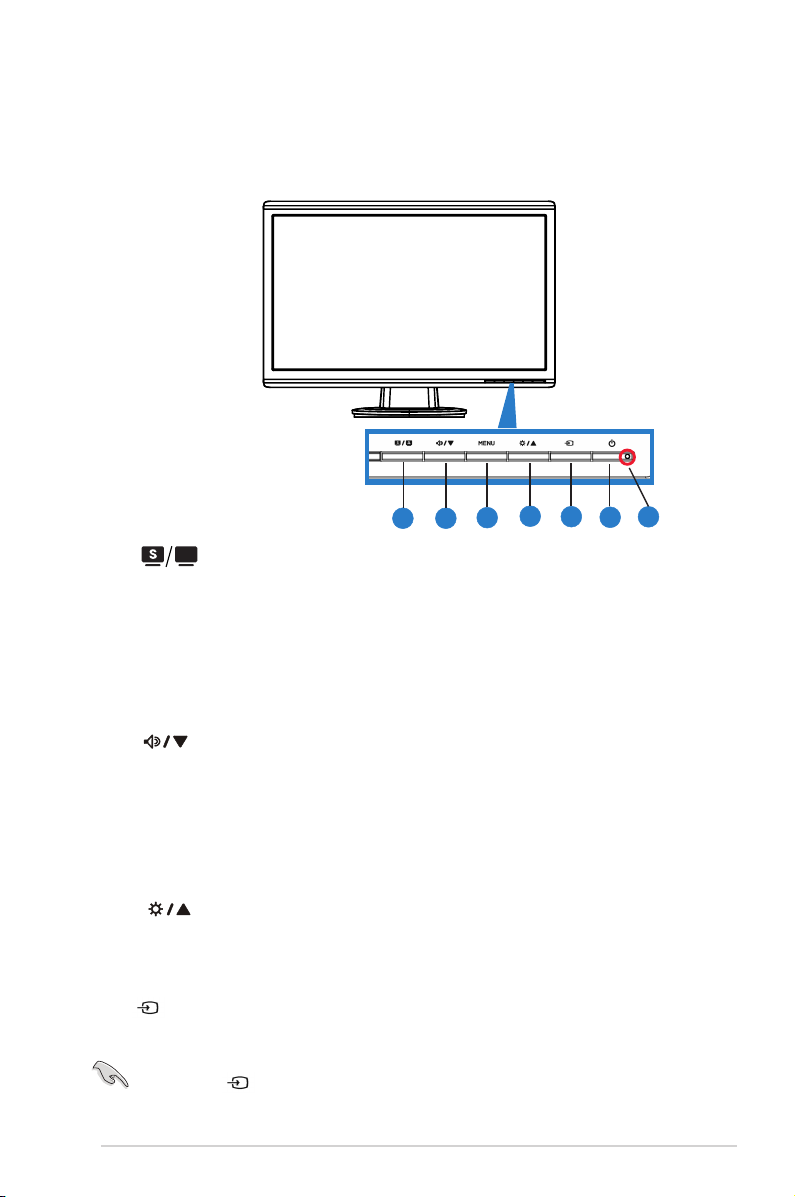
1.5.1 Front of the LCD monitor
1.5.1.1 VH242H/VH242T/VH222H/VH222T
1 2
3
4
5
7
6
1. button:
A
• Automatically adjust the image to its optimized position, clock, and phase
by long pressing this button for 2-4 seconds (for VGA mode only).
• Use this hotkey to switch from five video preset modes (Game
Mode, Night View Mode, Scenery Mode, Standard Mode, Theater Mode)
with SPLENDID™ Video Enhancement Technology.
• Exit the OSD menu or go back to the previous menu as the OSD
menu is active.
2. Button:
• Press this button to decrease the value of the function selected
or move to the next fuction.
• This is also a hotkey for Volume adjustment.
3. MENU Button:
• Press this button to enter/select the icon (function) highlighted
while the OSD menu is activated.
4. Button:
• Press this button to increase the value of the function selected
or move to the previous fuction.
• This is also a hotkey for Brightness adjustment.
5. Input Select Button
Use this hotkey to switch from VGA,DVI,HDMI input signal.
(for some models)
Press (Input Select Button) to display HDMI signals after
you connect cable with monitor.(for VH242H and VH222H)
1-4 Chapter 1: Product introduction
Page 11
.
6
Power button
• Press this button to turn the monitor on/off.
7. Power indicator
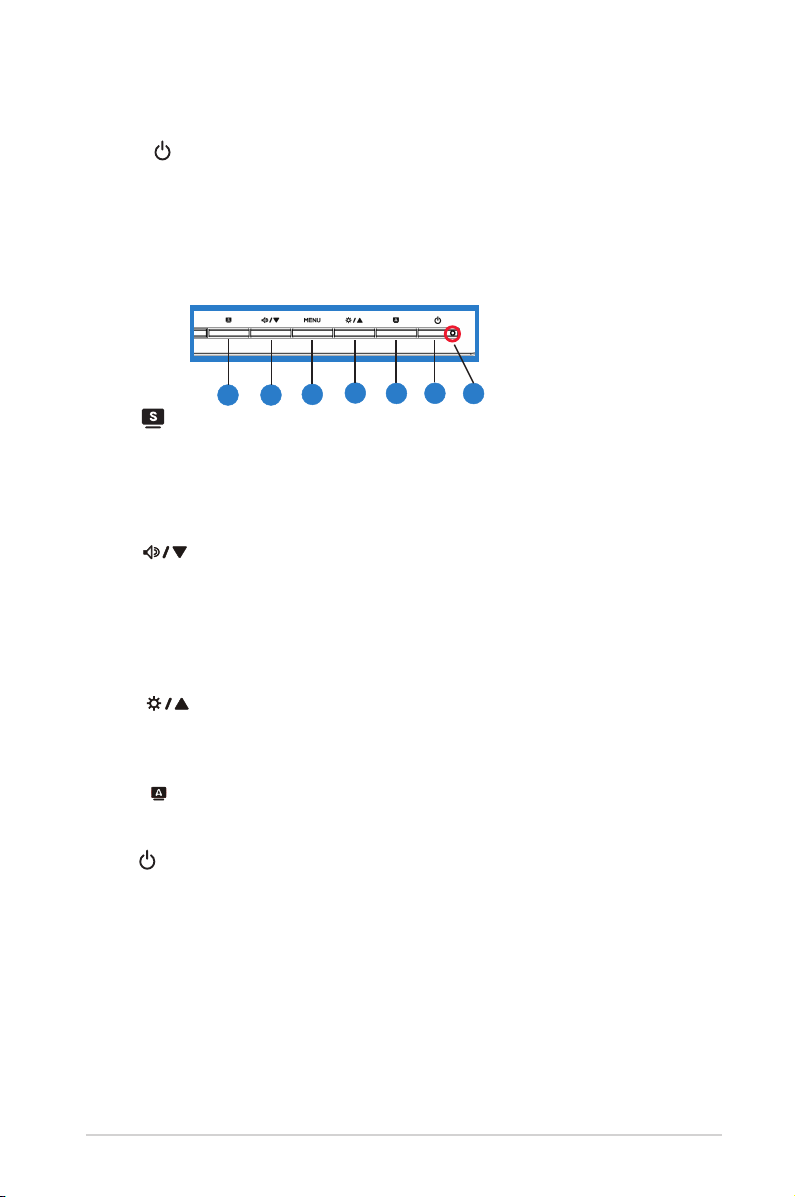
1.5.1.2 VH242S/VH222S
1 2
4
3
6
5
7
1. button:
• Use this hotkey to switch from five video preset modes (Game
Mode, Night View Mode, Scenery Mode, Standard Mode, Theater Mode)
with SPLENDID™ Video Enhancement Technology.
• Exit the OSD menu or go back to the previous menu as the OSD
menu is active.
2. Button:
• Press this button to decrease the value of the function selected
or move to the next fuction.
• This is also a hotkey for Volume adjustment.
3. MENU Button:
• Press this button to enter/select the icon (function) highlighted
while the OSD menu is activated.
4. Button:
• Press this button to increase the value of the function selected
or move to the previous fuction.
• This is also a hotkey for Brightness adjustment.
5.
button:
• Automatically adjust the image to its optimized position, clock, and phase
by long pressing this button (for VGA mode only).
6.
Power button
• Press this button to turn the monitor on/off.
7. Power indicator
ASUS LCD Monitor VH242/VH222 Series
1-5
Page 12
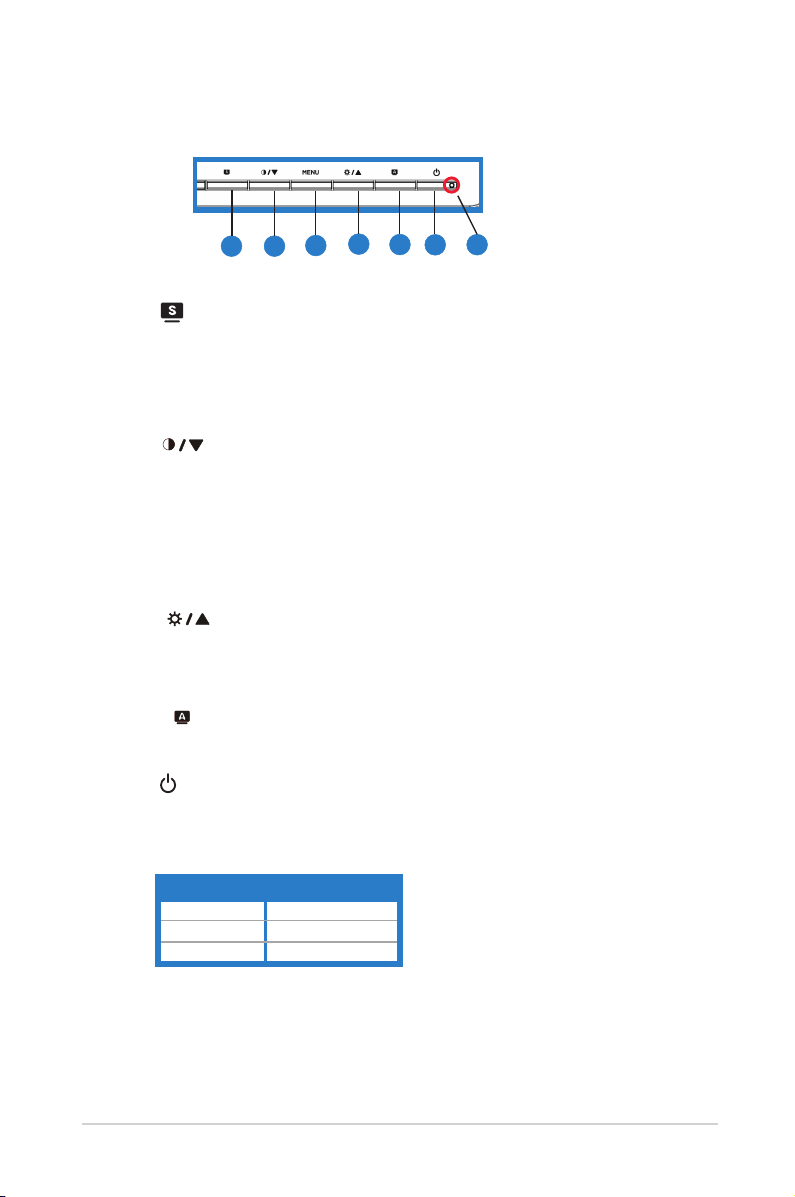
1.5.1.3 VH242D/VH222D
4
1 2
1.
• Use this hotkey to switch from five video preset modes (Game
button:
3
6
5
7
Mode, Night View Mode, Scenery Mode, Standard Mode, Theater Mode)
with SPLENDID™ Video Enhancement Technology.
• Exit the OSD menu or go back to the previous menu as the OSD
menu is active.
2. Button:
• Press this button to decrease the value of the function selected
or move to the next fuction.
This is also a hotkey for Contrast Ratio adjustment.
•
3. MENU Button:
• Press this button to enter/select the icon (function) highlighted
while the OSD menu is activated.
4. Button:
• Press this button to increase the value of the function selected
or move to the previous fuction.
This is also a hotkey for Brightness adjustment.
•
5.
button:
Automatically adjust the image to its optimized position, clock, and phase
•
by long pressing this button (for VGA mode only).
6.
• Press this button to turn the monitor on/off.
Power button
7
7. Power indicator
Status Description
Blue ON
Amber Standby mode
OFF OFF
1-6 Chapter 1: Product introduction
Page 13
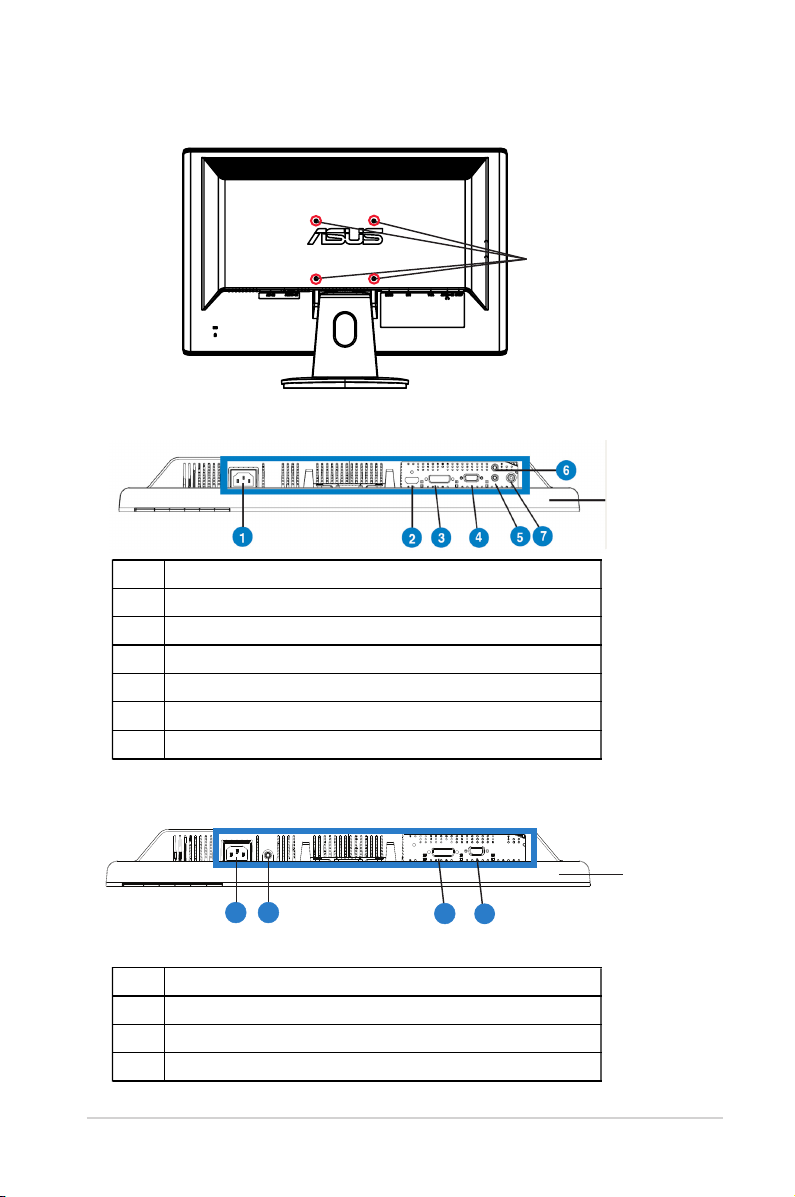
1.5.2 Rear of the LCD monitor
1.5.2.1 VH242H/VH222H
AC-IN port
1
2
HDMI-IN port
DVI port
3
VGA port
4
Line - in Port
5
Earphone - out Port
6
7
SPDIF Out
Screw holes for
VESA Wall Mount
Rear connectors
1.5.2.2 VH242T/VH242S/VH242D/VH222T/VH222S/VH222D
2
1
AC-IN port
1
2
Line - in Port
DVI port
3
VGA port
4
ASUS LCD Monitor VH242/VH222 Series
(Only for some models)
(Only for some models)
4
3
Rear connectors
1-7
Page 14
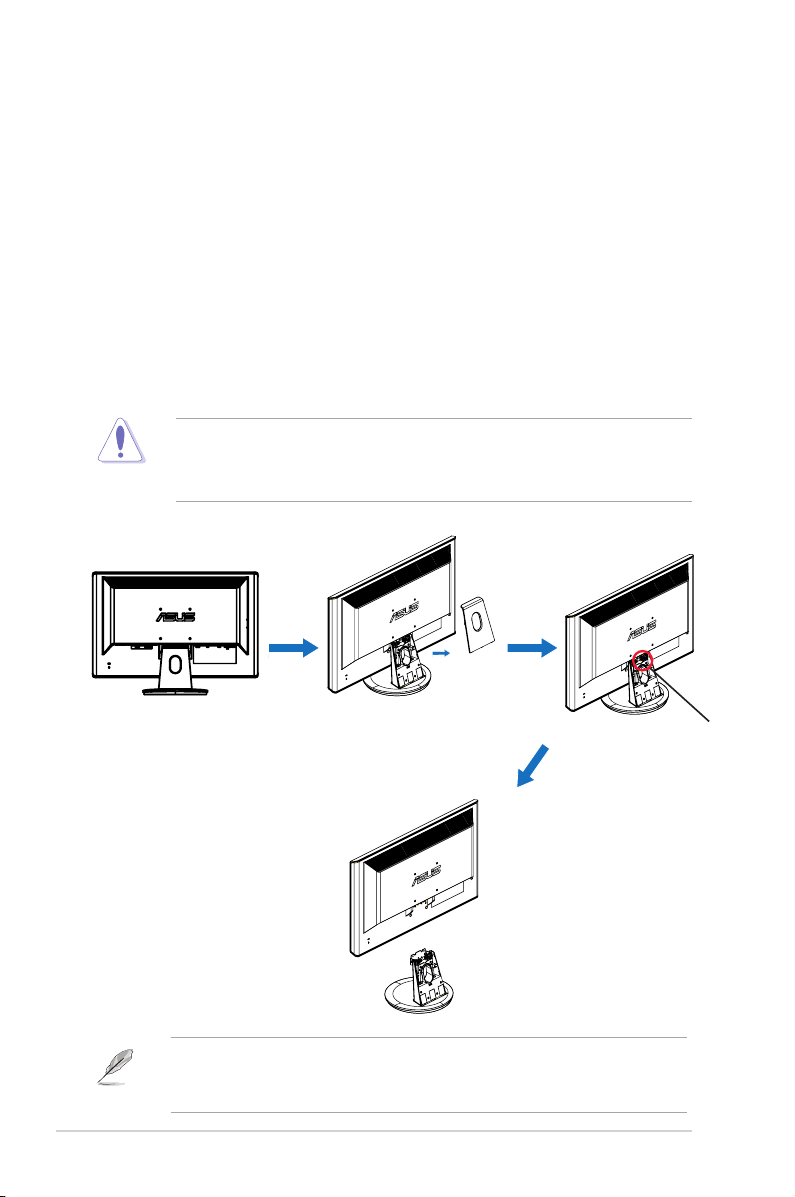
2.1 Detaching the arm/stand
(for VESA wall mount)
The detachable stand of the VH242/VH222 Series LCD monitor is specially designed for
VESA wall mount.
To detach the arm/stand:
1. Remove the arm cover.
2. Have the front of the monitor face down on a table.
3. Use a screwdriver to remove the three screws on the stand of the monitor as
the below drawing shows.
4. Detach the arm from the monitor.
• We recommend that you cover the table surface with soft cloth to prevent
damage to the monitor.
• Hold the stand of the monitor when you remove the screws.
The VESA wall mount kit (100 mm x 100 mm) is purchased separately.
For use only with UL Listed Wall Mount Bracket with minimum weight/load 5.8Kg
(Screw size: 4mm x 12 mm)
ASUS LCD Monitor VH242/VH222 Series
3 screws
2-1
Page 15
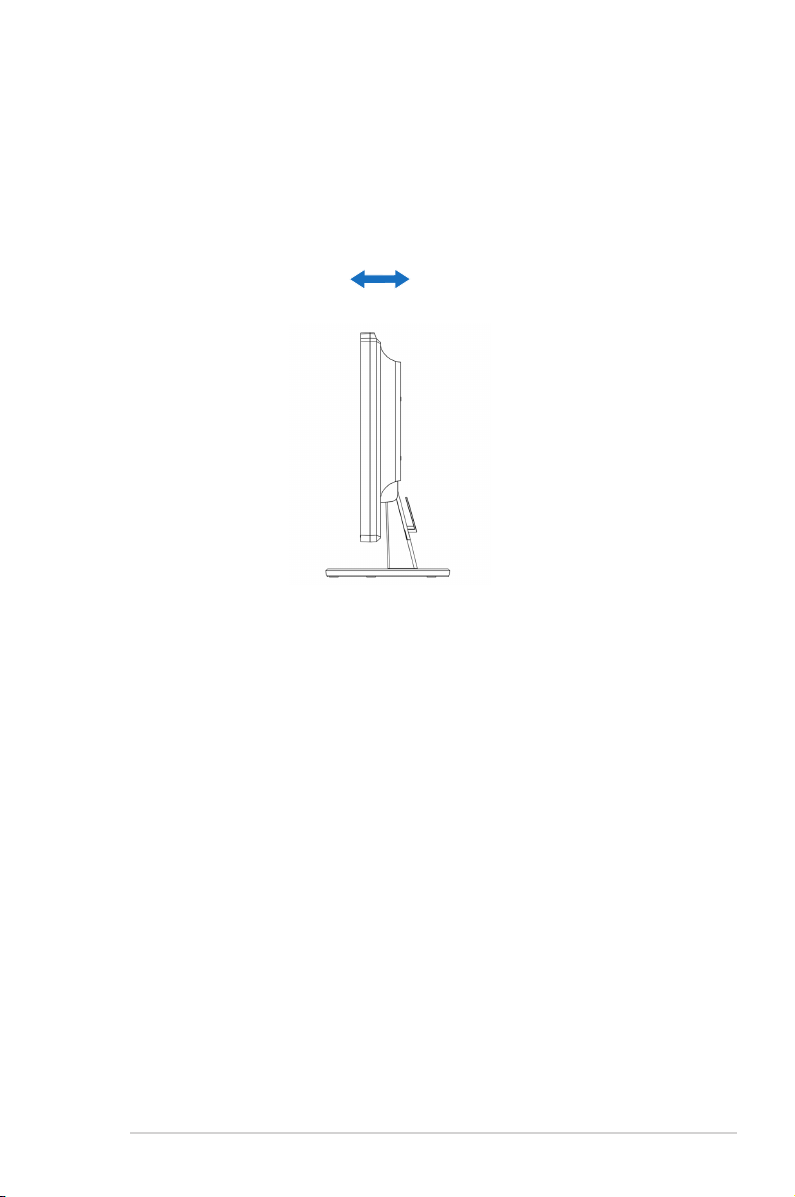
2.2 Adjusting the monitor
• For optimal viewing, we recommend that you look at the full face of the monitor,
then adjust the monitor to the angle that is most comfortable for you.
• Hold the stand to prevent the monitor from falling when you change its angle.
• You can adjust the monitor’s angle from -5º to 20º.
-5º~20º
2-2 Chapter 2: Setup
Page 16
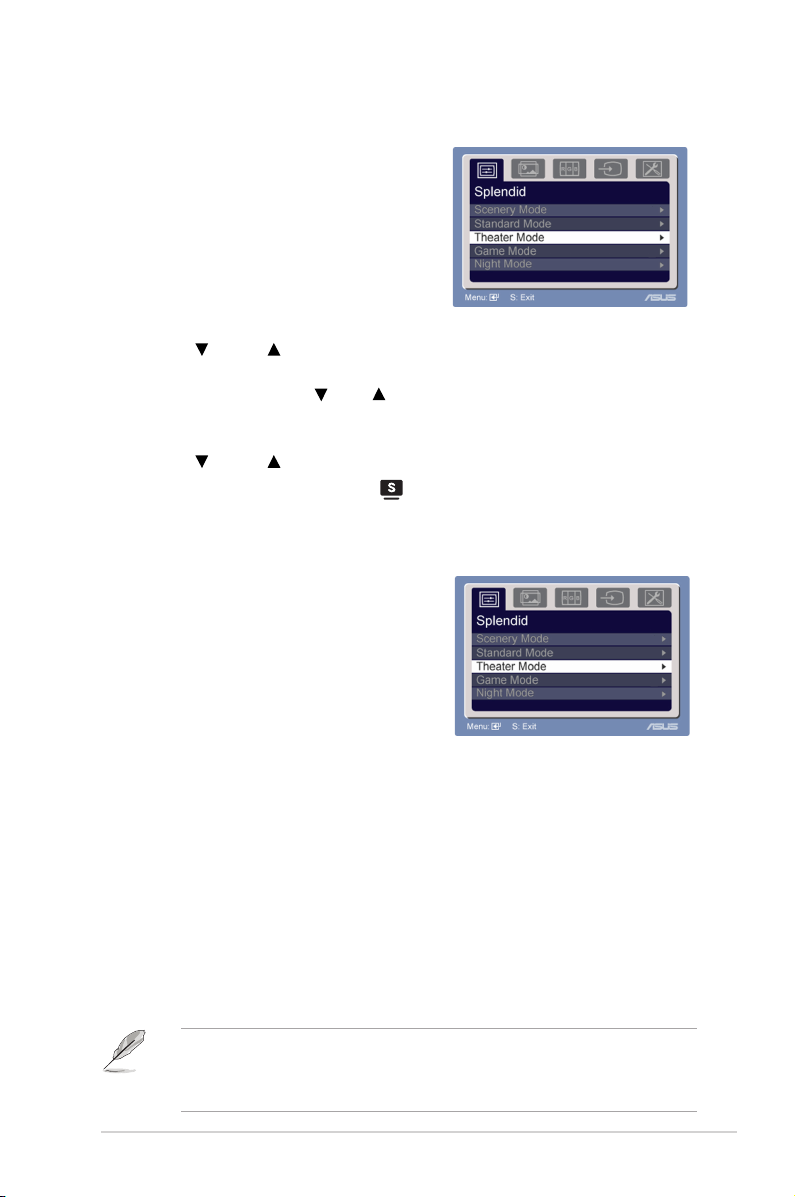
3.1 OSD (On-Screen Display) menu
3.1.1 Howtorecongure
1. Press the MENU button to activate
the OSD menu.
2. Press and to navigate through the functions. Highlight and activate
the desired function by pressing the MENU button. If the function selected
has a sub-menu, press and again to navigate through the sub-menu
functions. Highlight and activate the desired sub-menu function by pressing
the MENU button.
3. Press and to change the settings of the selected function.
4. To exit the OSD menu, press the button. Repeat step 2 and step 3 to
adjust any other function.
3.1.2 OSDFunctionIntroduction
1. Spendid
This function contains five
sub-functions you can select
for your preference. Each mode has the
Reset selection, allowing you to maintain
your setting or return to the preset mode.
•
SceneryMode
: best choice for scenery photo display with SPLENDID™
Video Enhancement.
•
StandardMode
: best choice for document editing with SPLENDID™
Video Enhancement.
•
TheaterMode
: best choice for movie with SPLENDID™ Video
Enhancement.
•
GameMode
: best choice for game playing with SPLENDID™ Video
Enhancement.
•
NightViewMode
: best choice for dark-scene game or movie with
SPLENDID™ Video Enhancement.
• In the Standard Mode, the
user-configurable.
• In the other modes, the
ASUS LCD Monitor VH242/VH222 Series
Satuation
sRGB
and
function is not user-configurable.
functions are not
ASCR
3-1
Page 17
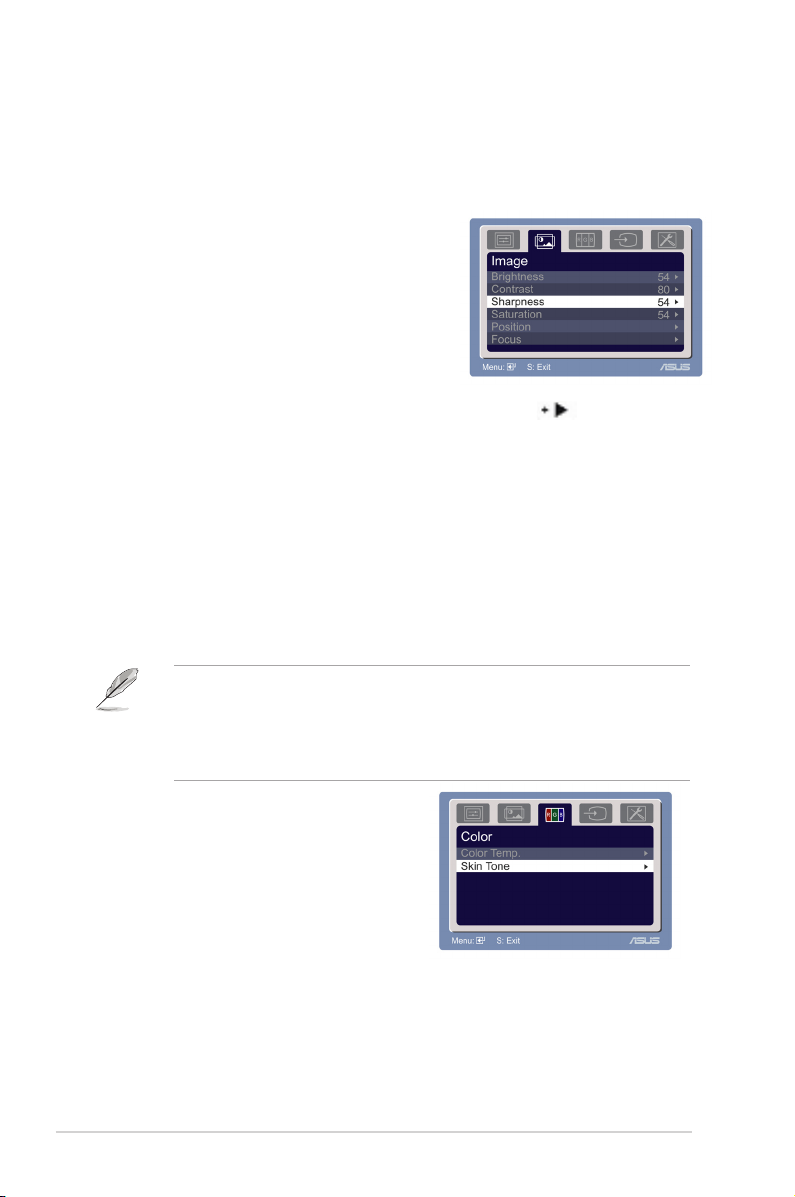
2. Image
You can adjust brightness, contrast,
sharpness, saturation,position (VGA
only), and focus (VGA only) from
this main function.
• Brightness: the adjusting range is from 0 to 100.
is a hotkey to
activate this function.
• Contrast: the adjusting range is from 0 to 100.
• Sharpness: the adjusting range is from 0 to 100.
• Saturation: the adjusting range is from 0 to 100.
• Position: adjusts the horizontal postition (H-Position) and the vertical
position (V-Position) of the image. The adjusting range is from 0 to 100.
• Focus: reduces Horizonal-line noise and Vertical-line noise of the image
by adjusting (Phase) and (Clock) separately. The adjusting range is from
0 to 100.
• Phase adjusts the phase of the pixel clock signal. With a wrong phase
adjustment, the screen shows horizontal disturbances.
• Clock (pixel frequency) controls the number of pixels scanned by one
horizontal sweep. If the frequency is not correct, the screen shows vertical
stripes and the image is not proportional.
3. Color
Select the image color you like
from this function.
3-2 Chapter 3: General Instruction
Page 18
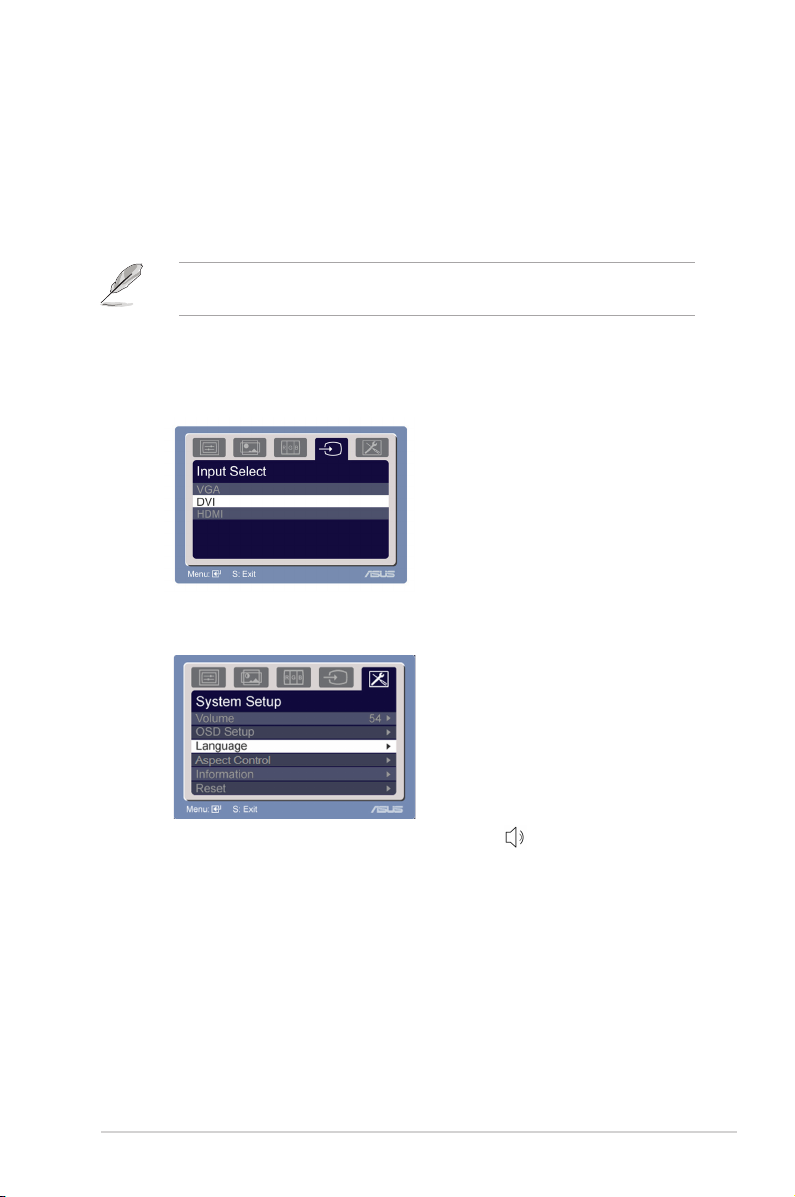
4. InputSelect
• Color Temp.: contains five color modes including Cool, Normal,
Warm, sRGB, and User mode.
• Skin Tone: contains three color modes including Reddish, Natural,
and Yellowish.
In the User mode, colors of R (Red), G (Green), and B (Bluee) are userconfigurable; the adjusting range is from 0-100.
In this function, you can select VGA,DVI,HDMI input source.
(Only for some models)
A
5. SystemSetup
Allow you to adjust the system.
• Volume: the adjusting range is from 0 to 100. is a hotkey to activate
this function.
• OSD Setup: adjusts the horizontal postition (H-Position) and
the vertical position (V-Position) of the OSD. The adjusting range is
from 0 to 100. In the OSD Timeout selection, you can adjust the
OSD timeout from 10 to 120.
• Language: there are ten languages for your selection,
including English, German, Italian, French, Dutch, Spanish, Russian,
Traditional Chinese, Simplified Chinese, Japanese, and Korean.
• Aspect Controls: adjusts the aspect ratio to “Full” or “4:3”.
(for some models)
• Information: shows the monitor information.
• Reset: “Yes” allows you to revert to the preset mode.
ASUS LCD Monitor VH242/VH222 Series
3-3
Page 19
3-4 Chapter 3: General Instruction
3.2
V
V
V
V
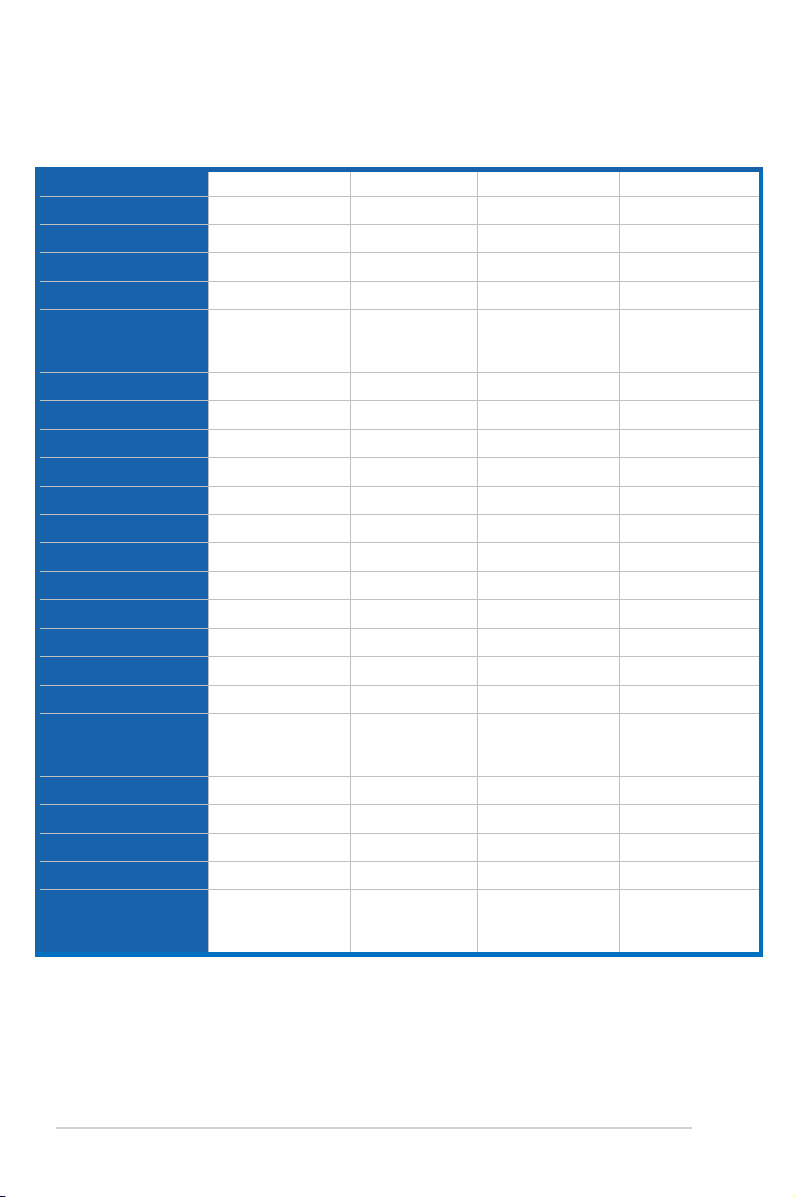
Specications summary
Model
PanelSize
TrueResolution
Brightness(Max.)
IntrisincContrastRatio
ViewingAngle(CR=10)
ColorSaturation(NTSC)
DisplayColors
ResponseTime
SatelliteSpeaker
HDMIinput
DVIinput
D‐Subinput
AudioLine‐in
EarphoneOutput
SPIDIFoutput
PowerON
Tilt
VESAWallMounting
Phys.Dimension
BoxDimension(WxHxD)
NetWeight(Esti.)
GrossWeight(Esti.)
VoltageRating
H242H
23.6"W 23.6"W 23.6"W 23.6"W
1920x1080 1920x1080 1920x1080 1920x1080
≧300cd/㎡ ≧300cd/㎡ ≧300cd/㎡ ≧300cd/㎡
≧1000:1 ≧1000:1 ≧1000:1 ≧1000:1
≧160°(V),
≧170°(H)
72% 72% 72% 72%
16.7 M 16.7 M 16.7 M 16.7 M
5ms (Tr+Tf) 5ms (Tr+Tf) 5ms (Tr+Tf) 5ms (Tr+Tf)
2W x 2 stereo 2W x 2 stereo 2W x 2 stereo -
HDMI - - -
DVI DVI - -
Yes Yes Yes Yes
Yes Yes Yes -
Yes - - -
Yes - - -
50W 50W 50W 50W
+20° ~ -5° +20° ~ -5° +20° ~ -5° +20° ~ -5°
Yes
(100mmx100mm)
562.04x220x416.02
638x171x491
5.8 5.6 5.4 5.2
8.2 8.0 7.8 7.6
AC:100~240V
(Built-in)
H242T
≧160°(V),
≧170°(H)
Yes
(100mmx100mm)
562.04x220x416.02
638x171x491
AC:100~240V
(Built-in)
H242S
≧160°(V),
≧170°(H)
Yes
(100mmx100mm)
562.04x220x416.02
638x171x491
AC:100~240V
(Built-in)
H242D
≧160°(V),
≧170°(H)
Yes
(100mmx100mm)
562.04x220x416.02
638x171x491
AC:100~240V
(Built-in)
Page 20
Model
V
V
V
V
A
H222H
H222T
H222S
H222D
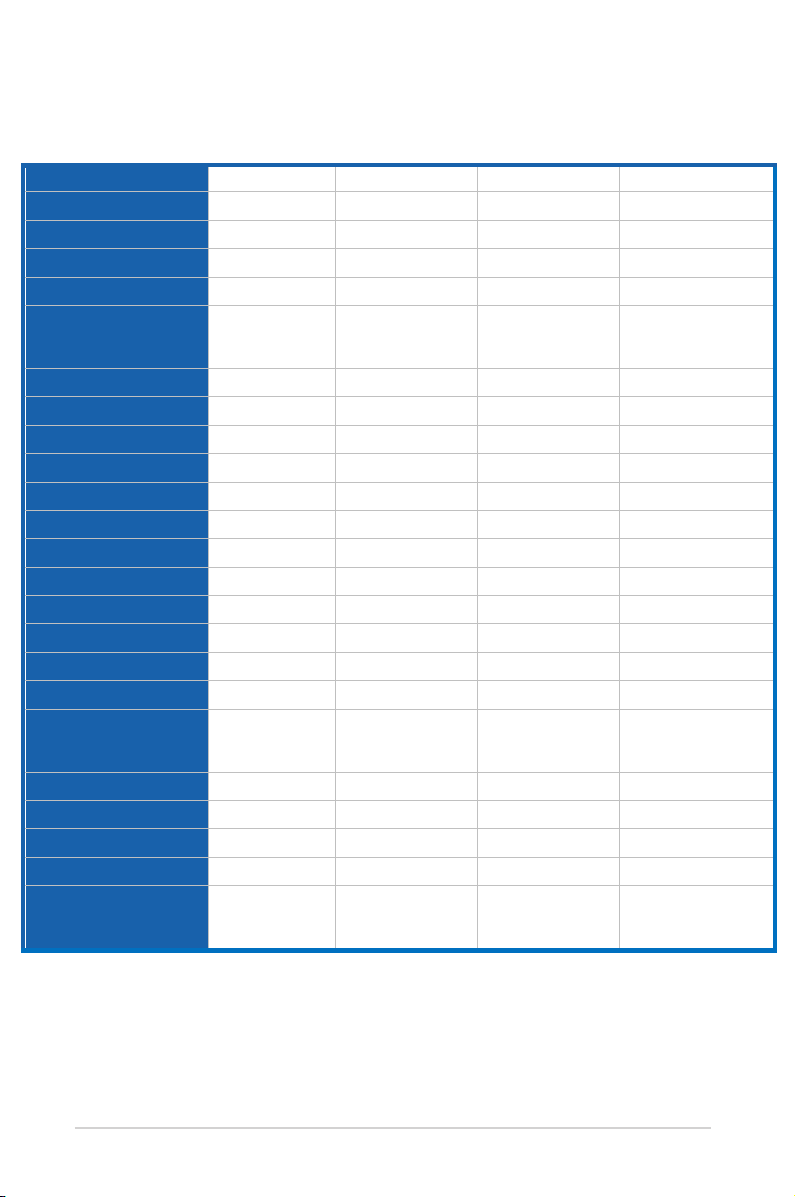
Panel Size 21.5"W 21.5"W 21.5"W 21.5"W
True Resolution 1920x1080 1920x1080 1920x1080 1920x1080
Brightness (Max.)
Intrisinc Contrast Ratio
Viewing Angle (CR=10)
≧300cd/㎡ ≧300cd/㎡ ≧300cd/㎡ ≧300cd/㎡
≧1000:1 ≧1000:1 ≧1000:1 ≧1000:1
≧160°(V), ≧
170°(H)
≧160°(V), ≧
170°(H)
≧160°(V), ≧
170°(H)
≧160°(V), ≧
170°(H)
Color Saturation (NTSC) 72% 72% 72% 72%
Display Colors 16.7 M 16.7 M 16.7 M 16.7 M
Response Time 5ms (Tr+Tf) 5ms (Tr+Tf) 5ms (Tr+Tf) 5ms (Tr+Tf)
Satellite Speaker 2W x 2 stereo 2W x 2 stereo 2W x 2 stereo -
HDMI input
HDMI - - -
DVI input DVI DVI - -
D-Sub input Yes Yes Yes Yes
udio Line-in Yes Yes Yes -
Earphone Output Yes - - -
SPIDIF output Yes - - -
Power ON
45W 45W 45W 45W
Tilt +20° ~ -5° +20° ~ -5° +20° ~ -5° +20° ~ -5°
VESA Wall Mounting
Yes
(100mmx100mm)
Phys. Dimension 515x220x330.5
Box Dimension (WxHxD) 588x452x162
Yes
(100mmx100mm)
515x220x330.5
588x452x162
Yes
(100mmx100mm)
515x220x330.5
588x452x162
Yes
(100mmx100mm)
515x220x330.5
588x452x162
Net Weight (Esti.) 4.9 4.7 4.5 4.3
Gross Weight (Esti.) 7.4 7.2 7.0 6.8
Voltage Rating
AC:100~240V
(Built-in)
AC:100~240V
(Built-in)
AC:100~240V
(Built-in)
AC:100~240V
(Built-in)
*Specicationsaresubjecttochangewithoutnotice.
3-5ASUS LCD Monitor VH242/VH222 Series
Page 21
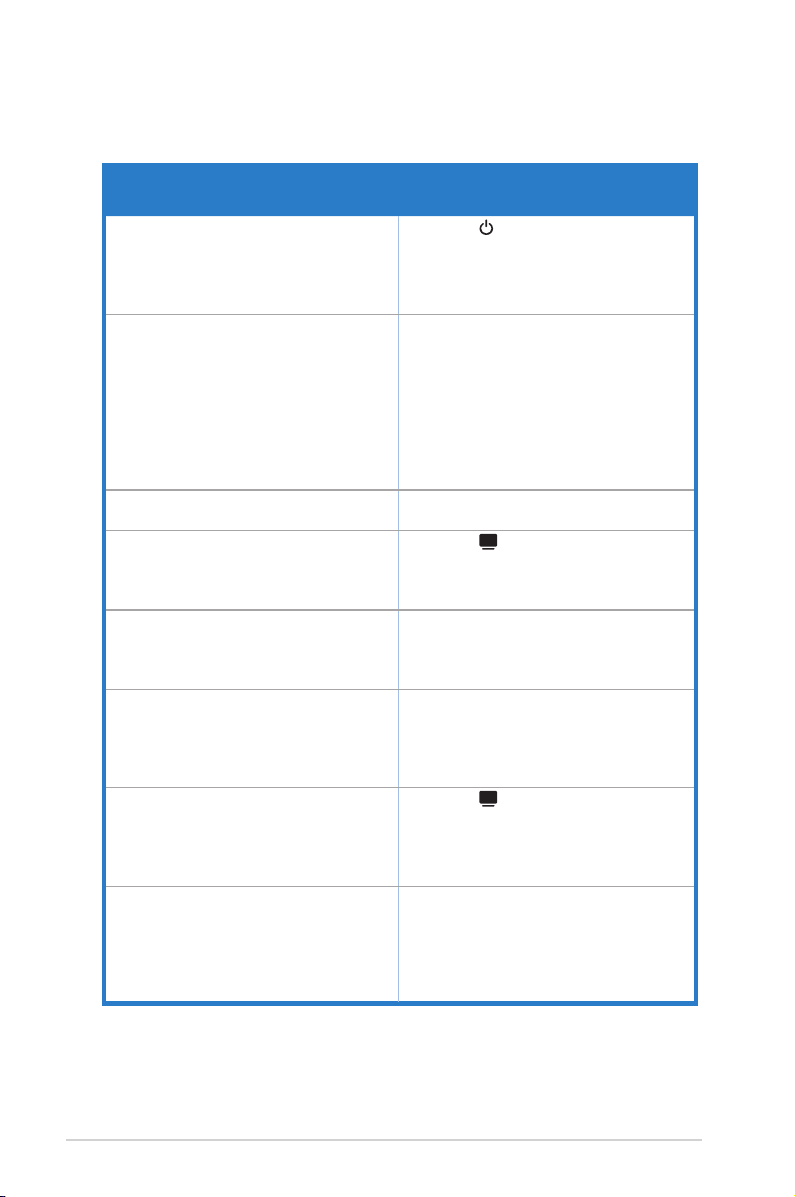
3.3 Troubleshooting (FAQ)
Problem PossibleSolution
Power LED is not ON • Press the button to check if the monitor
The power LED lights amber and there is no
screen image
Screen image is too light or dark • Adjust the Contrast and Brightness settings
Screen image is not centered or sized
properly
Screen image bounces or a wave pattern is
present in the image
Screen image has color defects (white does
not look white)
Screen image is blurry or fuzzy • Press the button for two seconds to
No sound or sound is low • Ensure that the audio cable is properly
is in the ON mode.
• Check if the power cord is properly
connected to the monitor and the power
outlet.
• Check if the monitor and the computer are
in the ON mode.
• Make sure the signal cable is properly
connected the monitor and the computer.
• Inspect the signal cable and make sure
none of the pins are bent.
• Connect the computer with another
available monitor to check if the computer
is properly working.
via OSD.
• Press the button for two seconds to
automatically adjust the image.
• Adjust the H-Position or V-Position settings
via OSD.
• Make sure the signal cable is properly
connected to the monitor and the computer.
• Move electrical devices that may cause
electrical interference.
• Inspect the signal cable and make sure that
none of the pins are bent.
• Perform Reset via OSD.
• Adjust the R/G/B color settings or select the
Color Temperature via OSD.
automatically adjust the image (for VGA
mode only).
• Adjust the Phase and Clock settings via
OSD.
connected to the monitor and the computer
• Adjust the volume settings of both your
monitor and computer.
• Ensure that the computer sound card driver
is properly installed and activated.
A
A
3-6 Chapter 3: General Instruction
Page 22
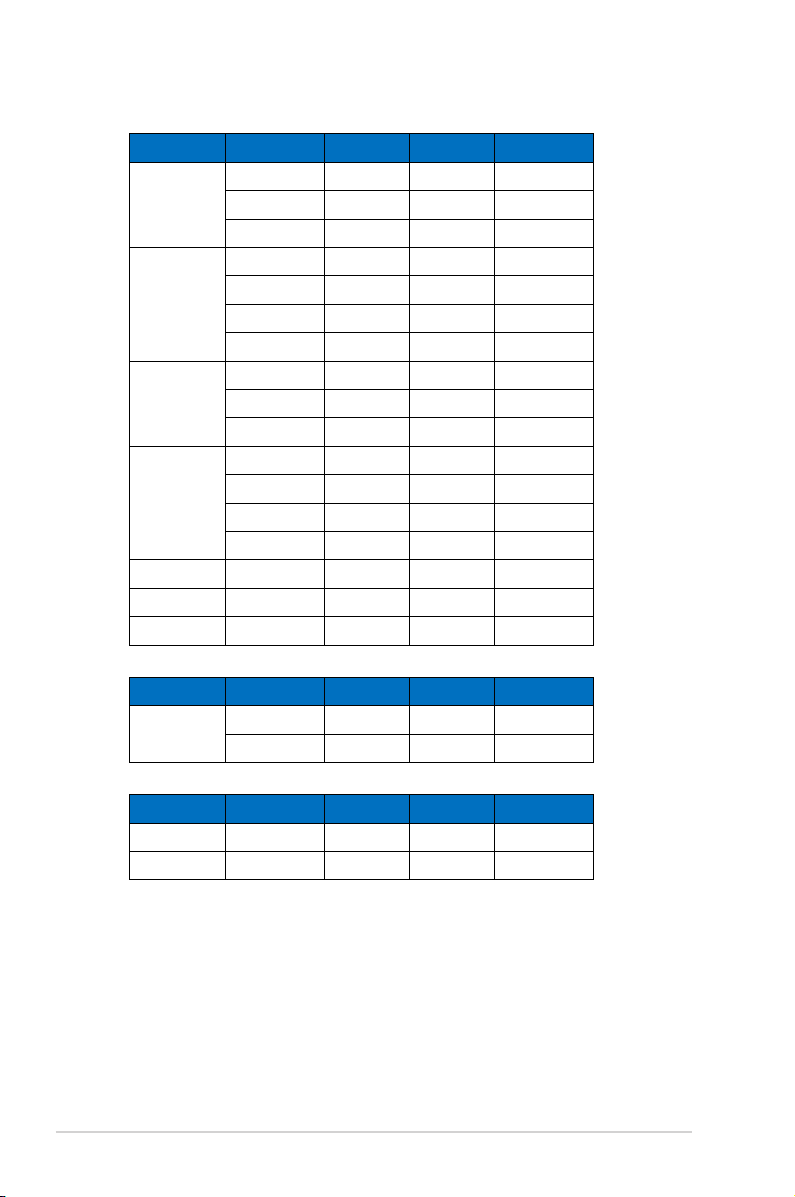
3.4
VH242/VH222 PC Supported Timing List
VESAModes,Fact oryPresetTimings
Mode Resolution H(KHz) V(Hz) Pixel(MHz)
VGA 640x480 31.469 60 25.175
640x480 37.861 72 31.5
640x480 37.5 75 31.5
SVGA 800x600 35.156 56 36
800x600 37.879 60 40
800x600 48.077 72 50
800x600 46.875 75 49.5
XGA
SXGA 1152x864 67.5 75 108
WXGA+ 1440x900 55.935 59 106.5
WSXGA+ 1680x1050 65.29 60 146.25
1080P 1920x1080 67.5 60 148.5
IBMModes
Mode Resolution H(KHz) V(Hz) Pixel(MHz)
DOS 640x350 31.469 70 25.175
MACModes
Mode Resolution H(KHz) V(Hz) Pixel(MHz)
VGA 640x480 35 67 30.24
SVGA 832x624 49.725 75 57.2832
1024x768 48.363 60 65
1024x768 56.476 70 75
1024x768 60.023 75 78.75
1280x960 60 60 108
1280x1024 63.981 60 108
1280x1024 79.976 75 135
720x400 31.469 70 28.322
3-7 Chapter 3: General Instruction
Page 23
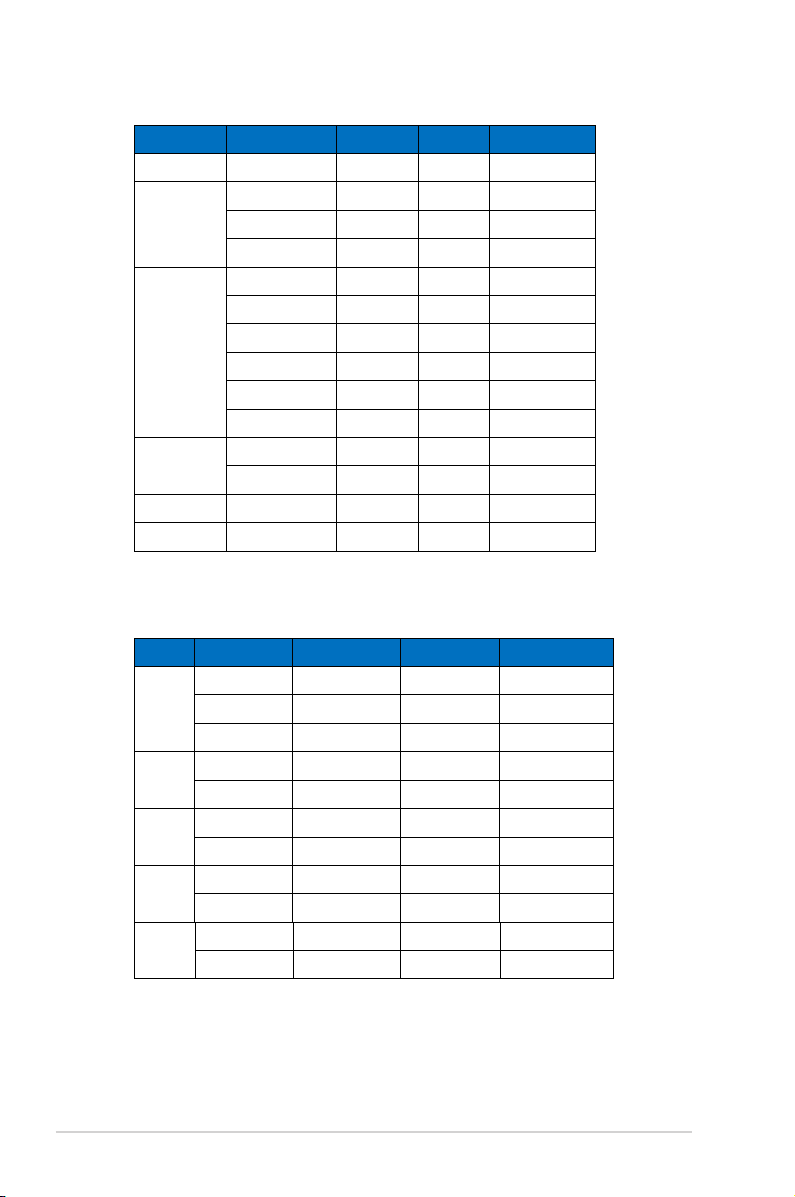
VESAModes ,User Available Timings
Mode Resolution H(KHz) V(Hz) Pixel(MHz)
720P
WXGA
WXGA+
WSXGA+
1080P
848x480 31.02 60 33.75
1280x720 44.444 60 64
1280x720 44.772 60 74.5
1280x720 56.456 75 95.75
1280x768 47.396 60 68.25
1280x768 47.776 60 79.5
1280x768 60.289 75 102.25
1280x800 49.306 60 71
1280x800 49.702 60 83.5
1280x800 62.795 75 106.5
1440x900 55.469 60 88.75
1440x900 70.635 75 136.75
1680x1050 64.674 60 119
1920x1080 66.587 60 138.5
VH242H/VH222H HDMI
Mode Resolution H(KHz) V(Hz) Pixel(MHz)
480P
576P
720P
1080i
1080P 1920x1080P
*Modesnotlistedintheabovetablesmaynotbesupported.Foroptimalresolution,werecommend
thatyouchooseamodelistedintheabovetables
3-8
640x480P 31.469/31.5 59.94/60 25.175/25.2
720x480P 31.469 / 31.5 59.94 / 60 27 /27.027
720x480P 31.469 / 31.5 59.94 / 60 27 /27.027
720x576P 31.25 50 27
720x576P 31.25 50 27
1280x720P 37.5 50 74.25
1280x720P 44.955/45 59.94/60 74.176/74.25
1920x1080i 28.125 50 74.25
1920x1080i 33.716/33.75 59.94/60 74.176/74.25
56.25
1920x1080P 67.433/67.5 59.94/60 148.352/148.5
Supported Primary Timings
50
148.5
Chapter 3: General Instruction
 Loading...