

Page 1
SDRW-08D2S-U • SDRW-08D6S-U
External Slim Optical Drive
Quick Installation Guide
In 36 Languages
English
繁體中文
簡体中文
български
Česky
Dansk
Deutsch
Model / нормативная модель : SDRW-08D2S-U
V 6.5 Published June 2018
Copyright © 2018 ASUSTeK Computer Inc. All Rights Reserved.
15060-34310500
Ελληνικά
Español
Eesti
Suomi
Français
Magyar
Bahasa Indonesia
Italiano
日本語
Қазақ
한국어
Lietuvių
Latviski
Bahasa Malaysia
Nederlands
Norsk
Polski
Português
Română
Русский
Slovensky
Slovenščina
Svenska
ไทย
Türkçe
(Kurulum Kılavuzu)
Tiếng Việt
Українська
ﻱﺏﺭﻉ
یﺱﺭﺍﻑ
Page 2
Safety Information
Using the device
• Do not place damaged discs inside the device. A damaged disc may break while in
use and damage the device.
• Use of any controls, adjustments, or procedures other than those specified in this
manual may result to hazardous radiation exposure.
• Do not attempt to disassemble the drive.
• Do not move the device from a cold to a warm or hot environment. Drastic change
in temperature is harmful to the device.
• Before moving or uninstalling the drive, remove any disc in it.
• Prevent liquids or any metal from getting into the device, If this situation occurs,
contact your retailer for help.
• Do not use any evaporating solvents to clean the device. If you accidentally
sprayed any solvent on the device, use a clean cloth to wipe it. You may also use a
neutral cleaner to dilute the solvent to easily wipe it from the device.
• Do not turn off the computer while the device is in reading or writing mode.
• Do not place discs into the device immediately if they came from a cold environment, especially during cold seasons. Wait until the discs have reached room
temperature.
CD-ROM Drive Safety Warning
CLASS 1 LASER PRODUCT
Sicherheitsinformationen
Gerät nutzen
• Legen Sie keine beschädigten Medien in das Gerät ein. Ein defektes Medium kann
bei der Benutzung brechen und das Gerät beschädigen.
• Die Nutzung von Reglern, Einstellungen und Verfahren, die nicht in dieser
Anleitung angegeben sind, kann zu gefährlicher Strahlenbelastung führen.
• Versuchen Sie nicht, das Laufwerk zu demontieren.
• Bringen Sie das Gerät nicht von einem kalten an einen warmen oder heißen Ort.
Drastische Temperaturunterschiede sind schädlich für das Gerät.
• Entnehmen Sie jegliche Medien, bevor Sie das Laufwerk transportieren oder
ausbauen.
• Achten Sie darauf, dass keine Flüssigkeiten oder Metallteile in das Gerät gelangen;
falls dies dennoch passiert, wenden Sie sich an Ihren Händler.
• Verwenden Sie zur Reinigung des Gerätes keine verdunstenden Lösungsmittel.
Falls Sie versehentlich Lösungsmittel auf das Gerät sprühen, wischen Sie es mit
einem sauberen Tuch ab. Sie können das Lösungsmittel auch mit einem neutralen
Reiniger verdünnen und so leichter vom Gerät entfernen.
• Schalten Sie den Computer nicht ab, während sich das Gerät im Lese- oder
Schreibmodus befindet.
• Legen Sie Medien nicht sofort ein, wenn sie aus einer kalten Umgebung kommen,
insbesondere während der kalten Jahreszeit. Warten Sie, bis das Medium
Zimmertemperatur erreicht hat.
CD-ROM-Laufwerk – Sicherheitswarnung
Laserprodukt der Klasse 1
Page 3
Australia Statement Notice
From 1 January 2012 updated warranties apply to all ASUS products, consistent with the
Australian Consumer Law. For the latest product warranty details please visit
http://support.asus.com. Our goods come with guarantees that cannot be excluded under the
Australian Consumer Law. You are entitled to a replacement or refund for a major failure and
compensation for any other reasonably foreseeable loss or damage. You are also entitled to
have the goods repaired or replaced if the goods fail to be of acceptable quality and the
failure does not amount to a major failure. If you require assistance please call ASUS
Customer Service 1300 2787 88 or visit us at http://support.asus.com.
India RoHS
This product complies with the "India E-Waste (Management) Rules, 2016” and prohibits use
of lead, mercury, hexavalent chromium, polybrominated biphenyls (PBBs) and polybrominated
diphenyl ethers (PBDEs) in concentrations exceeding 0.1% by weight in homogenous
materials and 0.01% by weight in homogenous materials for cadmium, except for the
exemptions listed in ScheduleIIof the Rule.
REACH
Complying with the REACH (Registration, Evaluation, Authorisation, and Restriction
of Chemicals) regulatory framework, we published the chemical substances in our
products at ASUS REACH website at http://csr.asus.com/english/REACH.htm.
Die rechtliche Rahmenbedingungen für REACH (Registration, Evaluation, Authorisation, and Restriction of Chemicals) erfüllend, veröffentlichen wir die chemischen
Substanzen in unseren Produkten auf unserer ASUS REACH-Webseite unter
http://csr.asus.com/english/REACH.htm.
ASUS COMPUTER GmbH
HARKORT STR. 21-23,40880
RATINGEN, GERMANY
ASUSTeK Computer Inc.
4F. No.150, Li-Te RD, PEITOU,
TAIPEI,TAIWAN
安全資訊
使用裝置
• 請勿將損壞的碟片放入光碟機,可能會造成碟片破碎或裝置損毀。
• 進行控制、調整或執行非本手冊指定的程序可能會導致危險的輻射外洩。
• 請勿試圖拆解光碟機。
• 請勿將裝置從寒冷環境移到溫暖或炎熱的環境。溫度的驟變可能會損毀裝置。
• 在移動或移除裝置之前,請先取出裝置內的碟片。
• 防止液體或任何金屬進入裝置。若發生此種情況,請連絡您的經銷商尋求幫助。
• 請勿使用任何揮發性溶劑來清潔裝置。若您不小心將任何此類溶劑濺到裝置上,請使用乾淨的布將
其擦除。您也可以使用中性清潔劑將溶劑稀釋,接著從裝置上擦除。
• 請勿將冰冷的碟片立即放入裝置內,特別是在寒冷的季節。等待碟片溫度達到室溫時再進行操作。
• 請在 0°C ~ 40°C 溫度的環境中使用本裝置。
• 產品中文名稱:外接式薄型燒錄機。
• 產品型號:SDRW-08D2S-U。
• 產品規格: 5V, 2.0A。
• 第1 類雷射產品。
Page 4
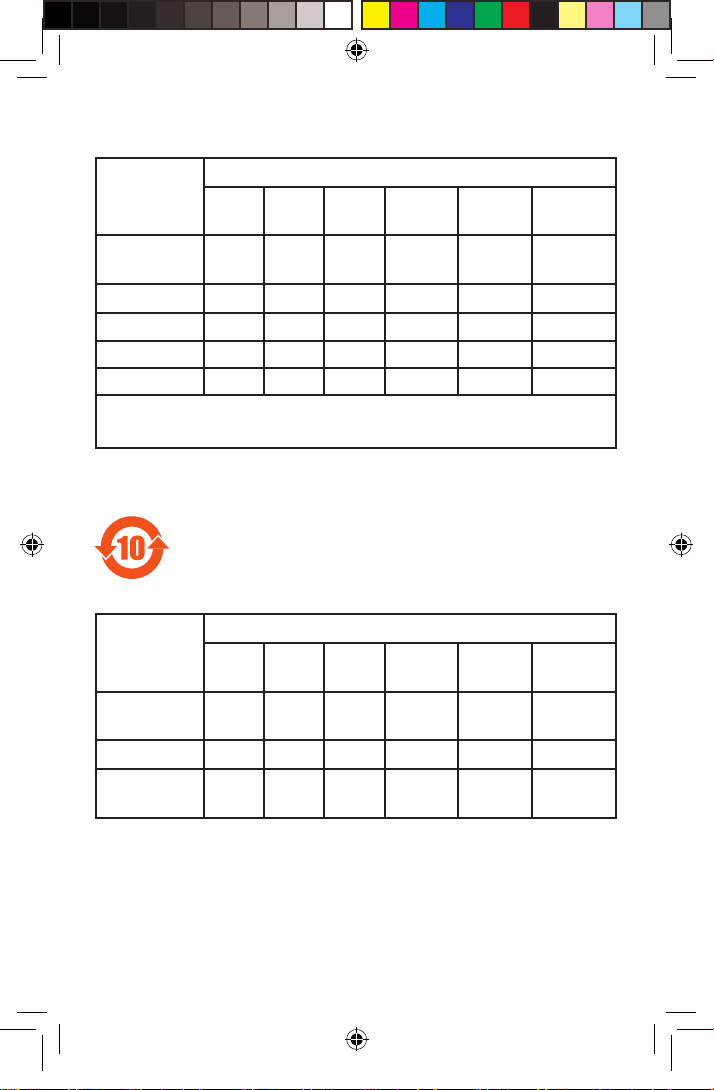
「產品之限用物質含有情況」之相關資訊,請參考下表:
限用物質及其化學符號
單元
印刷電路板
及電子組件
外殼
讀寫頭
主軸馬達
其他及其配件
備考1. “○”係指該項限用物質之百分比含量未超出百分比含量基準值。
備考2. “
鉛(Pb) 汞(Hg) 鎘(Cd)
- ○ ○ ○ ○ ○
○ ○ ○ ○ ○ ○
- ○ ○ ○ ○ ○
- ○ ○ ○ ○ ○
- ○ ○ ○ ○ ○
-
”係指該項限用物質為排除項目。
电子电器产品有害物质限制使用标识要求:图中之数字为产品之环保使
用期限。仅指电子电器产品中含有的有害物质不致发生外泄或突变从而
对环境造成污染或对人身、财产造成严重损害的期限。
六價鉻
+6
(Cr
)
多溴聯苯
(PBB)
多溴二苯醚
(PBDE)
有害物质名称及含量说明标示:
有害物质
部件名称
印刷电路板及
其电子组件
外壳
外部信号连接
头及线材
本表格依据SJ/T 11364的规定编制。
○:表示该有害物质在该部件所有均质材料中的含量均在GB/T 26572规定的限量要
求以下。
X: 表示该有害物质至少在该部件的某一均质材料中的含量超出GB/T 26572 规定的
限量要求,然该部件仍符合欧盟指令2011/65/EU的规范。
备注:此产品所标示之环保使用期限,系指在一般正常使用状况下。
铅(Pb) 汞(Hg) 镉(Cd)
× ○ ○ ○ ○ ○
○ ○ ○ ○ ○ ○
× ○ ○ ○ ○ ○
六价铬
(Cr(VI))
多溴联苯
(PBB)
多溴二苯醚
A(PBDE)
Page 5
Compliance Statement of Innovation, Science and
Economic Development Canada (ISED)
This device complies with Innovation, Science, and Economic Development Canada licence
exempt RSS standard(s). Operation is subject to the following two conditions: (1) this device
may not cause interference, and (2) this device must accept any interference, including
interference that may cause undesired operation of the device.
CAN ICES-3(B)/NMB-3(B)
Déclaration de conformité de Innovation, Sciences et
Développement économique Canada (ISED)
Le présent appareil est conforme aux CNR d’Innovation, Sciences et Développement
économique Canada applicables aux appareils radio exempts de licence. L’exploitation est
autorisée aux deux conditions suivantes : (1) l’appareil ne doit pas produire de brouillage, et
(2) l’utilisateur de l’appareil doit accepter tout brouillage radioélectrique subi, même si le
brouillage est susceptible d’en compromettre le fonctionnement.
CAN ICES-3(B)/NMB-3(B)
Takeback Services
ASUS recycling and takeback programs come from our commitment to the highest standards
for protecting our environment. We believe in providing solutions for our customers to be able
to responsibly recycle our products, batteries and other components as well as the
packaging materials. Please go to http://csr.asus.com/english/Takeback.htm for detail
recycling information in different region.
AEEE Yönetmeliğine Uygundur.
B급 기기
이 기기는 가정용(B급) 전자파적합기기로서 주로 가정에서 사용하는 것을 목적으로 하며,
모든 지역에서 사용할 수 있습니다.
Package Contents
Quick Install GuideSoftwareUSB Y CableOptical Drive
Page 6
ONOFF
ONOFF
ONOFF
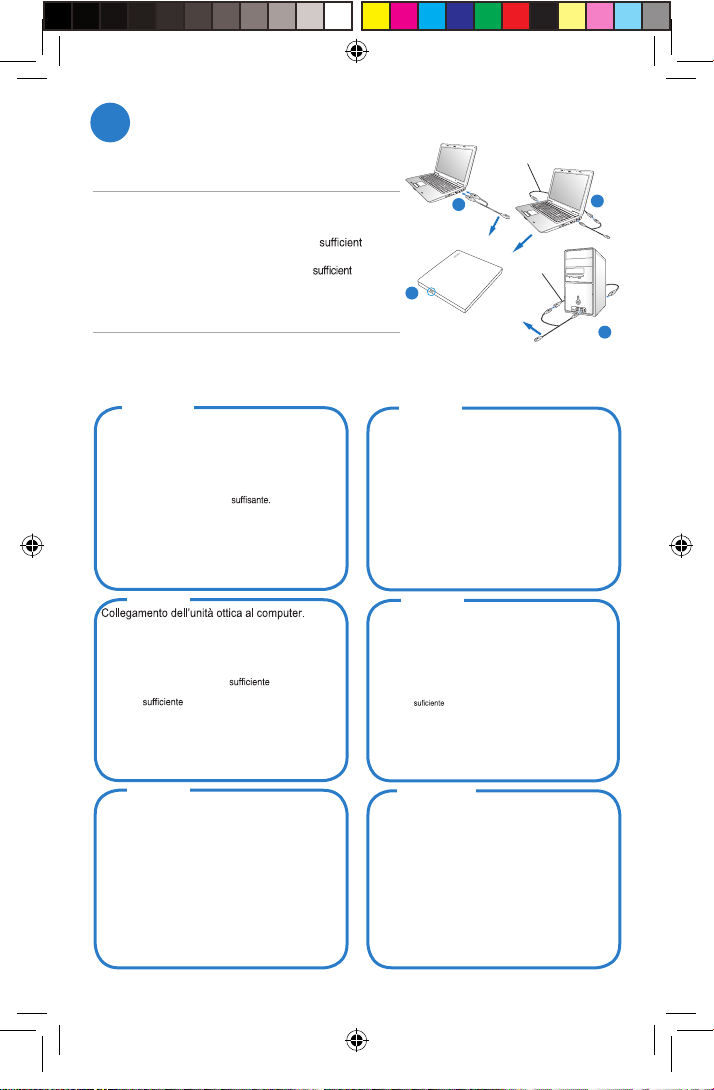
Connect the optical drive to your computer.
1
A. Connect the bundled USB Y cable to your
computer.
NOTES:The bundled USB Y cable comes with two
USB connectors and one mini-USB connector. We
recommend that you connect both USB connectors
to two USB ports on your computer for
power supply (see A1).
• For some computers that cannot provide
you may need an extension cable (see A2).
• The extension cable is purchased separately.
• We DO NOT guarantee the performance of the
optical drive connected using a USB hub.
B. Connect the mini-USB connector of the
bundled USB Y cable to the mini-USB port
of the optical drive (see B).
Français Deutsch
Connectez le lecteur optique à votre
ordinateur.
A. Connectez le câble USB Y sur l’un des ports USB de
votre ordinateur.
REMARQUES:
• Il est recommandé de connecter les deux extrémités du
câble USB Y, livré avec le lecteur optique, à votre ordinateur
pour garantir une alimentation
• Pour les modèles d’ordinateurs ne pouvant pas fournir l’
alimentation adéquate, utilisez un câble d’extension (Voir A2).
• Le câble d’extension est vendu séparément.
• Nous ne garantissons pas les performances du lecteur
optique lorsque ce dernier est connecté à un hub USB.
B. Connectez l’extrémité mini-USB du câble USB Y au port
mini-USB du lecteur optique (Voir B).
Italiano Español
Collegamento dell’unità ottica al computer.
A. Collegare il cavo USB a Y al computer.
NOTE:
• Il cavo USB a Y dotato di due connettori USB e un
connettore mini USB. Si raccomanda di collegare
entrambi i connettori USB a due porte USB de computer
per avere una alimentazione (vedere A1).
• Per alcuni computer che non riescono ad erogare una
quantit di energia elettrica, potrebbe rendersi
necessario utilizzare un cavo di prolunga (vedere A2).
• Il cavo di prolunga deve essere acquistato
separatamente.
• NON si garantiscono le prestazioni dell’unità ottica, se
collegata utilizzando un hub USB.
B. Collegare il connettore mini USB del cavo USB a Y in
dotazione alla porta mini USB dell’unità ottica (vedere B).
Русский Български
Подключение оптического привода к компьютеру.
A. Подключите поставляемый USB Y кабель к вашему
компьютеру.
Примечания:
• Поставляемый USB Y кабель имеет два обычных USB разъема
и один мини-USB разъем. Дл я обеспечения достаточного
питания рекомендуется подключить оба USB разъема
поставляемого USB Y кабеля к вашей системе. (рис A1).
• Если нет разъемов, находящихся рядом, вы може те
использовать USB удлинитель (рис A2).
• USB удлинитель приобретае тся отдельно.
• ASUS не гарантирует производит ельность опти
привода, подклю ченного через USB хаб.
B. Подключи те мини-USB разъем поставляемого USB Y кабеля к
мини-USB разъему оптического привода (рис B).
(Voir A1).
ческого
USB Extension cable
A1
power,
B
Verbinden des optischen Laufwerks mit Ihren
Computer.
A. Schließen Sie das mitgelieferte USB Y-Kabel an Ihren
Computer an.
HINWEISE:
• Das mitgelieferte USB Y-Kabel ist mit zwei USB-Steckern und einem
Mini-USB-Stecker ausgerüstet. Wir empfehlen Ihnen, dass Sie beide
USB-Stecker in die USB-Anschlüsse Ihres Computers stecken, um eine
ausreichende Stromversorgung zu gewährleisten (siehe A1).
• Für Computer, die keine ausreichende Leistung zur Verfügung stellen
können, benötigen Sie ein Verlängerungskabel (siehe A2).
• Das Verlängerungskabel muss extra gekauft werden.
• Wir garantieren die Leistung des optischen Laufwerks NICHT, wenn es über
einen USB-Hub angeschlossen wurde.
B. Stecken sie den Mini-USB-Stecker des mitgelieferten
USB Y-Kabels in den Mini-USB-Anschluss des optischen
Laufwerks (siehe B).
Conecte la unidad óptica a su equipo.
A. Conecte el cable USB en Y suministrado a su equipo.
NOTAS:
• El cable USB en Y suministrado está equipado con dos conectores
USB y un conector mini-USB. Recomendamos conectar ambos
conectores USB a dos puertos USB de su equipo para alcanzar el
nivel de alimentación necesario (consulte el punto A1).
• Es posible que algunos equipos no sean capaces de suministrar la
energía y deba utilizar un cable prolongador (consulte el
punto A2).
• El cable prolongador se adquiere por separado.
• NO garantizamos el rendimiento de la unidad óptica conectada a
través de un concentrador USB.
B. Conecte el conector mini-USB del cable USB en Y
suministrado al puerto mini-USB de la unidad óptica
(consulte el punto B).
Свържете оптичното устройство с компютъра.
A. Свържете USB Y кабела от комплекта към Вашия компютър.
ЗАБЕЛЕЖКИ:
• USB Y кабелът от комплек та има два USB конектора и
един mini-USB конект ор. Препоръчваме Ви да свържете и
двата USB конектора към два USB порта на компютъра за
достатъчно захранване (вижте А1).
• За компютри, които не могат да осигурят достатъчно
енергия, се н уждаете от удължител (вижте А2).
• Удължителят трябва да бъде закупен отделно.
• НЕ гарантираме производителността на оптичното
устройство свързано посредством USB хъб.
B. Свърже те mini-USB конектора на USB Y кабела от комплекта
към mini-USB порта на оптичното устройство (вижте Б).
A2
USB Extension cable
A2
Page 7
Čeština
Připojte optickou jednotku k počítači.
A. Připojte dodaný kabel USB Y k počítači.
POZNÁMKY:
• Dodaný kabel USB Y je opatřen dvěma konektory USB a
jedním konektorem mini-USB. Pro zajištění dostatečného
napájení doporučujeme připojit oba konektory USB ke
dvěma portům USB v počítači (viz A1).
• U některých počítačů, které nemohou poskytnout
dostatečné napájení, bude pravděpodobně třeba použít
prodlužovací kabel (viz A2).
• Prodlužovací kabel je třeba zakoupit samostatně.
• NEZARUČUJEME funkčnost optické jednotky připojené
prostřednictvím rozbočovače USB.
B. Připojte konektor mini-USB dodaného kabelu USB Y k
portu mini-USB optické jednotky (viz B).
Nederlands
Sluit het optische station aan op uw computer.
A. Sluit de bijgeleverde USB-Y-kabel aan op uw computer.
OPMERKINGEN:
• De bijgeleverde USB-Y-kabel bevat twee USB-aansluitingen en één
mini-USB-aansluiting. Wij raden u aan beide USB-aansluitingen aan
te sluiten op de twee USB-poorten op uw computer voor voldoende
stroomtoevoer (zie A1).
• Voor sommige computers die niet voldoende stroom kunnen leveren,
kunt u mogelijk een verlengkabel nodig hebben (zie A2).
• De verlengkabel moet afzonderlijk worden aangeschaft.
• Wij bieden GEEN garantie voor de prestaties van het optische station
dat is aangesloten via een USB-hub.
B. Sluit de mini-USB-aansluiting van de bijgeleverde
USB-Y-kabel aan op de mini-USB-poort van het optische
station (zie B).
Suomi
Liitä optinen asema tietokoneeseesi.
A. Liitä niputettu USB Y–kaapeli tietokoneeseesi.
HUOMAUTUKSIA:
• Niputettu USB Y–kaapeli tulee kahden USB-liittimen
ja yhden mini-USB-liittimen kanssa. Suosittelemme,
että liität molemmat USB-liittimet kahteen USB-porttiin
tietokoneessasi riittävää virtalähdettä varten (katso A1).
• Joitakin tietokoneita varten, jotka eivät voi tarjota
riittävästi virtaa, saatat tarvita jatkokaapelin (katso A2).
• Jatkokaapeli on ostettu erikseen.
• EMME TAKAA suorituskykyä optiselle asemalle, joka on
liitetty USB-keskintä (hub) käyttäen.
B. Liitä niputetun USB Y–kaapelin mini-USB-liitin optisen
aseman mini-USB-porttiin (katso B).
Magyar
Az optikai meghajtót csatlakoztassa a
számítógéphez.
A. A mellékelt USB kábelt csatlakoztassa a számítógéphez.
MEGJEGYZÉS:
• A mellékelt USB Y kábel 2 USB csatlakozóval és egy
mini-USB csatlakozóval rendelkezik. Azt ajánljuk, hogy
a megfelelő áramellátás érdekében mind a két USB
csatlakozót csatlakoztassa a számítógéphez (lásd A1).
• Néhány számítógép nem biztosít elegendő áramellátást,
ezért szüksége lehet egy hosszabbító kábelre (lásd A2).
• A hosszabbító kábelt külön kell megvásárolni.
• NEM garantáljuk az optikai meghajtó teljesítményét, ha
USB hub-hoz csatlakoztatva használja.
B. A mellékelt USB Y kábel mini-USB csatlakozóját
csatlakoztassa az optikai meghajtó mini-USB port-jához
(lásd B).
Dansk
Forbind det optiske drev til computeren.
A. Forbind det medfølgende USB Y kabel til computeren.
BEMÆRKINGER:
• Det medfølgende USB Y kabel leveres med to USB
stik og et mini-USB stik.For at opnå tilstrækkelig effekt,
anbefaler vi, at du forbinder begge USB stik til to USB
porte på din computer (se A1).
• Til nogle computere, som ikke har tilstrækkelig effekt,
kan du behøve et forlængerkabel (se A2).
• Forlængerkablet anskaffes separat.
• Vi garanterer IKKE for det optiske drevs ydelse, hvis det
er forbundet til en USB stikdåse.
B. Forbind det medfølgende USB Y kabels mini-USB stik til
det optiske drevs mini-USB port (se B).
Eesti
Ühendage optiline seade arvutiga.
A. Ühendage seadmega kaasnenud USB Y kaabel arvutiga.
MÄRKUSED:
• Seadmega kaasnenud USB Y kaabel on varustatud
kahe USB konnektoriga ja ühe mini-USB konnektoriga.
Soovitame piisava toite tagamiseks ühendada mõlemad
USB konnektorid arvuti kahe USB pordiga (vt A1).
• Võimalik, et mõne arvuti puhul, mis ei suuda tagada
piisavat toidet, tuleb kasutada pikendusjuhet (vt A2).
• Pikendusjuhe tuleb osta eraldi.
• Me EI garanteeri USB jaoturisse ühendatud optilise
seadme toimivust.
B. Ühendage seadmega kaasnenud USB Y kaabel optilise
seadme mini-USB konnektorisse (vt B).
Ελληνικά
Συνδέστε την οπτική μονάδα στον υπολογιστή σας.
A. Συνδέστε το καλώδιο USB Y στον υπολογιστή σας.
ΣΗΜΕΙΩΣΕΙΣ:
Το καλώδιο USB Y που συμπεριλαμβάνεται παραδίδεται με δύο
•
ακροδέκτες USB και έναν ακροδέκτη mini-USB. Συνιστάται να
συνδέσετε και τους δύο ακροδέκτες USB σε δύο θύρες USB
στον υπολογιστή σας για σωστή τροφοδοσία ρεύματος (δείτε
A1).
• Για μερικούς υπολογιστές οι οποίοι δεν μπορούν να παρέχουν
επαρκή τροφοδοσία ρεύματος, ενδέχεται να χρειαστείτε ένα
καλώδιο επέκτασης (δείτε Α2).
• Το καλώδιο επέκτασης πωλείται ξεχωριστά.
ΔΕΝ παρέχουμε εγγύηση για την απόδοση οπτικής μονάδας
•
B. Συνδέστε τον ακροδέκτη mini-USB του παρεχόμενου
που συνδέεται μέσω διανομέα (hub) USB.
κάλωδίου USB Y στη θύρα mini-USB της οπτικής μονάδας
(δείτε B).
Bahasa Indonesia
Menyambungkan optical drive pada komputer.
A. Sambungkan kabel USB Y yang disertakan pada komputer.
PERHATIAN:
• Kabel USB Y yang disertakan, dilengkapi dengan
dua konektor USB dan satu konektor mini-USB. Kami
menyarankan Anda menyambungkan kedua konektor
USB dengan dua port USB pada komputer untuk
mendapatkan pasokan daya yang cukup (lihat A1).
• Pada komputer yang tidak bisa memberikan daya yang
cukup, mungkin memerlukan kabel perpanjangan (lihat
A2).
• Kabel perpanjangan ini dibeli secara terpisah.
• Kami TIDAK menjamin kinerja optical drive yang
tersambung menggunakan hub USB.
B. Sambungkan konektor mini-USB dari kabel USB Y yang
disertakan pada port mini-USB optical drive (lihat B).
Page 8

Latviski
Pievienojiet optisko draivu jūsu datoram.
A. Savienojiet komplekta USB Y kabeli ar jūsu datoru.
PIEZĪMES:
• Komplekta USB Y kabelim ir divi USB savienotāji un
viens mini-USB savienotājs. Lai nodrošinātu pietiekošu
barošanu, mēs iesakām savienot abus USB savienotājus
ar diviem USB portiem jūsu datorā (skatiet A1).
• Dažiem datoriem, kuri nevar nodrošināt pietiekamu
barošanu, ir nepieciešams pagarināšanas kabelis
(skatiet A2).
• Pagarināšanas kabelis ir jāiegādājas atsevišķi.
• Mēs NEGARANTĒJAM optiska draiva darbību, ja tas ir
savienots, izmantojot USB kopnes centrmezglu.
B. Savienojiet komplekta USB Y kabeļa mini-USB
savienotāju ar optiskā draiva mini-USB portu (skatiet B).
Bahasa Malaysia
Sambungkan pemacu optik pada komputer anda.
A. Sambungkan kabel USB Y terberkas pada komputer anda.
NOTA:
• Kabel USB Y terberkas datang bersama-sama dengan
dua penyambung USB dan satu penyambung USB
mini. Kami mencadangkan agar anda menyambungkan
kedua-dua penyambung USB ke kedua-dua port USB
pada komputer anda untuk mendapatkan bekalan kuasa
yang secukupnya (lihat A1).
• Bagi sesetengah komputer yang tidak dapat
menyalurkan bekalan yang secukupnya, anda mungkin
memerlukan kabel pemanjangan (lihat A2).
• Kabel pemanjangan dibeli secara berasingan.
• Kami TIDAK menjamin prestasi pemacu optik yang
disambung menggunakan hab USB.
B. Sambungkan penyambung USB mini kabel USB Y ke
port USB mini pemacu optik (lihat B).
Polski
Podłączenie napędu optycznego do komputera.
A. Podłącz dostarczony kabel USB Y do komputera.
UWAGI:
• Dostarczony kabel USB Y posiada dwa złącza USB i jedno
złącze mini-USB. Dla zapewnienia odpowiedniego zasilania
(patrz A1) zaleca się, aby podłączyć obydwa złącza USB
do dwóch portów USB w komputerze.
• Niektóre komputery, które nie zapewniają odpowiedniego
zasilania, wymagają przedlużacza (patrz A2).
• Przedłużacz jest kupowany oddzielnie.
• NIE gwarantujemy wysokiej wydajności napędu optycznego
podłączonego z wykorzystaniem huba USB.
B. Podłacz złącze mini-USB dostarczonego kabla USB Y do
portu mini-USB pionowego napędu (patrz B).
Română
Conectarea drive-ului optic la computerul dvs.
A. Conectaţi legătura cablului USB Y la computerul dvs.
NOTE:
• Legătura de cablu USB Y vine livrat cu două conectoare
USB şi un mini-USB conector. Recomandăm să
conectaţi ambele conectoare USB la cele două porturi
USB ale computerului pentru o alimentare cu curent
(vezi A1).
• Pentru anumite computere ce nu pot asigura
curent, aţi putea avea nevoie de un cablu prelungitor
(vezi A2).
• Cablul prelungitor este achiziţionat separat.
• NU garantăm performanţa în funcţionarea drive-lui optic
conectat folosind un hub USB.
B. Conectaţi conectorul mini-USB a legăturii cablului USB Y
la portul mini-USB a drive-lui optic (vezi B).
Lietuvių
Prijunkite optinį diską prie kompiuterio.
A. Prie kompiuterio prijunkite pridedamą USB Y laidą.
PASTABOS :
• Pridedamas USB Y laidas turi dvi USB jungtis ir vieną
mini USB jungtį. Pakankamam maitinimo tiekimui
užtikrinti rekomenduojame prijungti abi USB jungtis prie
dviejų kompiuterio USB prievadų (žr. A1).
• Kai kuriems kompiuteriams, kurie negali užtikrinti
pakankamo maitinimo, gali reikėti prailginančio laido (žr.
A2).
• Prailginantis laidas perkamas atskirai.
• Mes NEGARANTUOJAME dėl optinio disko, prijungto
per USB šakotuvą, veikimo.
B. USB Y laido mini USB jungtį prijunkite prie optinio
įrenginio mini USB prievado (žr. B).
Norsk
Koble den optiske stasjonen til PC-en.
A. Koble den medfølgende USB Y-kabelen til PC-en.
MERK:
• Den medfølgende USB Y-kabelen har to USB-koblinger
og én mini USB-kobling. Vi anbefaler at du kobler begge
USB-koblinger til to USB-porter på PC-en for å få nok
strøm (se A1).
• For noen PC-er som ikke kan gi nok strøm er det mulig
at du trenger en forlenger-kabel (se A2).
• Forlengerkabelen kan kjøpes separat.
• Vi garanterer IKKE yteevnen til den optiske stasjonen
hvis du bruker en USB-hub.
B. Koble mini USB-koblingen til den medfølgende USB
Y-kabelen til mini USB-porten på den optiske stasjonen
(se B).
Português
Ligue a unidade óptica ao computador.
A. Ligue o cabo fornecido USB Y ao seu computador.
NOTAS:
• O cabo USB Y fornecido possui dois conectores USB e um
conector mini-USB. Recomendamos que ligue ambos os
conectores USB a duas portas USB no seu computador
para fornecer energia
• Para computadores que não consigam fornecer energia
poderá precisar de um cabo de extensão (ver
A2).
• O cabo de extensão é adquirido separadamente.
• NÃO garantimos o desempenho da unidade óptica
quando ligada a um concentrador USB.
B. Ligue o conector mini-USB do cabo USB Y fornecido à
porta mini-USB da unidade óptica (ver B).
(ver A1).
Slovensky
Pripojte optickú mechaniku ku svojmu počítaču.
A. Pripojte dodávaný USB Y kábel k počítaču.
POZNÁMKY:
• Dodávaný USB Y kábel obsahuje dva USB konektory a
jeden mini USB konektor. Pred dosiahnutie dostatočného
napájania (pozrite si A1) vám odporúčame obidva USB
konektory pripojiť k dvom USB portom počítača.
• V prípade niektorých počítačov, ktoré nedokážu
poskytovať patričné napájanie možno bude potrebné
použiť predlžovací kábel (pozrite si A2).
• Predlžovací kábel sa predáva samostatne.
• NEGARANTUJEME vám výkon optickej mechaniky
pripojenej pomocou USB rozbočovača.
B. Mini USB konektor dodávaného USB Y kábla pripojte k
mini USB portu optickej mechaniky (pozrite si B).
Page 9

Povežite optični gonilnik z računalnikom.
A. Povežite priložen USB Y kabel z vašim računalnikom.
OPOMBE:
• Priložen USB Y kabel je opremljen z dvema
USB-priključkoma in enim mini USB priključkom.
Priporočamo, da priključite oba USB priključka v dvoje
USB vrat na vašem računalniku, da zagotovite potrebno
napajanje (glej A1).
• Pri nekaterih računalnikih, ki ne morejo zagotoviti
zadostnega napajanja, bo potreben podaljšek (glej A2).
• Podaljšek je potrebno naročiti posebej.
• Kvaliteta delovanja optičnih gonilnikov, ki so priključeni
preko USB razdelilnikov, NI ZAJAMČENA.
B. Priključite mini USB priključek dostavljenega USB Y
kabla v mini USB vrata na optičnem gonilniku (glej B).
ไทย
ณุค
A. ณุคงอข์รอตเวิพมอคบักา้ขเ BSU Y ลิบเคเยาสอ่ตมอ่ืชเ
:ุตหเยามห
• BSU อ่ตว้ัขบักมอ้รพาม BSU Y ลิบเคเยาส ินิมอ่ตว้ัขะลแนัอ 2
USB อพงยีพเ่ีทนางงัลพยา่จรากอ่ ืพเณุคงอข์รอตเวิพมอคนบต์รอพ 2
• สำา อพงยีพเ้ดไนางงัลพยา่จถรามาส่มไ่ีทงอ่ืรคเงาบ์รอตเวิพมอคบัรห
• กาหงา่ตกยแมอ่ืชเอ่ตลิบเคเยาสอ้ืซงอ้ต
• บัฮ้ชใยดโอ่ตมอ่ืชเ่ีท์ฟรดไลัคิตปอองอขะนถรรมสงึถนักะรปบัร่มไารเ
USB
B. BSU Y ลิบเคเยาสงอข BSU ินิมอ่ตว้ัขอ่ตมอ่ืชเ
ำนะนแารเ นา้ด 1 BSU า ต์รอพบักา้ขเู่คง้ัท BSU อ่ตว้ัขอ่ตมอ่ืชเณุค้หใ
)1A ูด(
ำจจาอณุค า )2A ูด( มอ่ืชเอ่ตลิบเคเยาส้ชใงอ้ตน็ปเ
งอข์รอตเวิพมอคบักา้ขเ์ฟรดไลัคิตปอออ่ตมอ่ืชเ
)B ูด( ณุคงอข์ฟรดไลัคิตปอองอข BSU ินิมต์รอพบักา้ขเ
Українська
Підключіть оптичний дисковод до комп’ютера.
A. Підключіть багатожильний кабель USB Y до комп’ютера.
ПРИМІТКИ:
• Багатожильний кабель USB Y оснащений двома
сполучува чами USB та одним сполучувачем міні-USB.
Рекомендуємо підключити обидва сполучувача USB
до двох портів USB на комп’ютері для достатнього
постачання живлення (див. А1).
• Для деяких комп’ют ерів, де живлення недос татньо, може
знадобитис я кабель розширення (див. А2).
• Кабель розширення купу ється окремо.
• Ми НЕ ГАРАНТУЄМО робочі характерис тики опти чного
дисководу , підключеного за допомогою USB-хабу.
B. Підключіт ь міні-USB сполучувач багатожильного кабелю
USB Y до порту міні-USB оптичного дисководу (див. В).
簡体中文
将光驱连接到您的电脑。
A. 将附赠的 USB Y 数据线连接到您的电脑。
注意:
• 的赠:附 USB Y 数据线拥有两个 USB 接头与一个
mini-USB 接头。建议您将两个 USB 接头同时连
接到电脑的两个 USB 接口,以获取足够的电力
供应(参见 A1)。
• 某些電腦無法提供足夠電力,則您可能需要一根
延长线(参见 A2)。
• BSU 延长线需要另行购买。
• 用使您若 USB hub 进行连接,则我们无法保证
光驱的性能。
B. USB Y 数据线的将附赠 mini-USB 接头连接到光驱
上的 mini-USB 接口(参见 B)。
SvenskaSlovenščina
Anslut den optiska enheten till din dator.
A. Anslut den förpackade USB Y-kabeln till din dator.
NOTERA:
• Den förpackade USB Y-kabeln levereras med två USB-
kontakter och en mini-USB-kontakt. Vi rekommenderar
att du ansluter båda USB-kontakterna till två USB portar
på din dator för tillräcklig strömförsörjning (se A1).
• För vissa datorer som inte kan tillhandahålla tillräckligt
med energi kan du behöva en förlängningskabel (se A2).
• Förlängningskabeln köps separat.
• Vi garanterar INTE prestandan hos den optiska enheten
som ansluts via en USB-hubb.
B. Anslut mini-USB-kontakten med den sampackade USB
Y-kabeln med mini-USB-porten på den optiska enheten
(se B).
Türkçe
Optik sürücüyü bilgisayarınıza bağlayın.
A. Birlikte verilen USB Y kablosunu bilgisayarınıza bağlayın.
NOT:
• Birlikte verilen USB Y kablosunda iki adet USB
konektörü ve bir adet mini-USB konektörü bulunur.
Yeterli güç kaynağı için her iki USB konektörüde
bilgisayarınızdaki iki USB bağlantı noktasınada
bağlamanızı öneririz (A1'e bakınız).
• Yeterli güç sağlayamayan bazı bilgisayarlar için, bir
uzatma kablosuna ihtiyaç duyabilirsiniz (A2'ye bakınız).
• Uzatma kablosu ayrıca piyasadan satın alınır.
• Bir USB hub kullanarak bağlanan optik sürücünün
performansına yönelik garanti VERMEMEKTEYİZ.
B. Birlikte verilen USB Y kablosunun mini USB konektörünü
optik sürücünün mini-USB bağlantı noktasına bağlayın
(B'ye bakınız).
繁體中文
將光碟機連接到您的電腦。
A. 將附贈的 USB Y 排線連接到您的電腦。
注意:
• 的贈附 USB Y 排線擁有兩個 USB 接頭與一個
mini-USB 接頭。建議您將兩個 USB 接頭同時連
接到電腦的兩個 USB 連接埠,以獲取足夠的電
力供應(參見 A1)。
• 條一要需能可您則,力電夠足供提法無腦電些某
延長線(參見 A2)。
• BSU 延長線需要另行購買。
• 用使您若 USB hub 進行連接,則我們無法保證光
碟機的效能。
B. 贈附將 USB Y 排線之 mini-USB 接頭連接到光碟機
上的 mini-USB 連接埠(參見 B)。
日本語
光学ドライブをコンピュータに接続する
A. 付属のUSB Yケーブルをお使いのコンピュータに接続します。
注:
• 付属のUSB YケーブルにはUSBコネクタが2つとミニ
USBコネクタが1つ付いています。電源の供給を安定させ
るため、両方のUSBコネクタをコンピュータのUSBポートに
接続することをお勧めします。(A1参照)
• コンピュータによっては十分な電源を供給できない場合が
あります。その場合は、 延長ケーブルをご使用ください。(
A2参照)
• 延長ケーブルは別売りとなっております。
• USBハブを使用して接続した場合、光学ドライブのパフォー
マンスは保証致しません。
B. 付属のUSB YケーブルのミニUSBコネクタを、光学ドライブ
のミニUSBポートに接続します。(B参照)
Page 10

한국어
컴퓨터에 광드라이버를 연결합니다.
A. 컴퓨터에 USB Y케이블을 연결합니다.
주의:
• 번들 된 USB Y 케이블은 2개의 USB 커넥터와 1개의
mini-USB 커넥터로 구성되어 있습니다.
충분한 전원공급을 위하여 컴퓨터의 2개 USB 포트에
USB 커넥터 양쪽을 모두 연결할 것을 권장합니다. (
A1 참고 )
• 몇 컴퓨터가 안정적인 전원을 공급하지 못 하는 경우,
확장케이블이 필요할 수 있습니다. ( A2 참고 )
• 확장 케이블은 별매 입니다.
• USB 허브를 사용하여 연결 할 경우 광드라이브의
성능을 보장하지 않습니다.
B. USB Y 케이블의 mini-USB 커넥터를 광드라이브의 mini-
USB포트에 연결합니다.( B 참고 )
Tiếng Việt
Kết nối ổ đĩa quang với máy tính.
A. Cắm cáp USB Y kết hợp vào máy tính.
GHI CHÚ:
• Cáp USB Y kết hợp đi kèm với hai đầu cắm USB và một
đầu cắm USB mini. Chúng tôi đề nghị bạn cắm cả hai
đầu cắm USB vào hai cổng USB trên máy tính để được
cung cấp nguồn điện đầy đủ (xem hình A1).
• Đối với một số máy tính vốn không thể cung cấp đủ
nguồn điện, bạn có thể cần dùng đến cáp mở rộng (xem
hình A2).
• Bạn phải mua riêng cáp mở rộng.
• Chúng tôi KHÔNG đảm bảo về tính hiệu quả của ổ đĩa
quang được kết nối qua cổng USB.
B. Cắm đầu cắm USB mini của cáp USB Y kết hợp vào cổng
USB mini của ổ đĩa quang (xem hình B).
Қазақ
Оптикалық жетекті компьютерге қосу.
A. Бірге берілетін USB Y кабелін компьютерге жалғаңыз.
ЕСКЕРТПЕЛЕР:
• Бірге берілетін USB Y кабелінде екі USB қосқышы мен
бір мини-USB қосқышы болады. Қуат жеткілікті түрде
берілуі үшін компьютерге USB қосқыштардың екеуін
де қосуды абзал санаймыз (А1 қараңыз).
• Жеткілікті түрде қуат беруге қабілеті жоқ кейбір
компьютерлермен қолданғанда ұзартқыш кабель
қажет болуы мүмкін (А2 қараңыз).
• Ұзартқыш кабелін бөлек сатып алу керек.
• USB хабы арқылы қосылған оптикалық жетектің
жұмыс істеуіне кепілдік бере АЛМАЙМЫЗ.
B. Бірге берілетін USB Y кабелінің мини-USB қосқышын
оптикалық жетектің мини-USB портына жалғаңыз (В
қараңыз).
Page 11

Ensure that your system detects the external
2
optical drive.
A. From your Windows® desktop, right-click My Compu ter,
then click Properties > Hardware > Device Manager .
B. Click
before DVD/CD-ROM drives to unfold the list.
When the external optical drive is detected, the name of
the external optical drive appears in the list.
ASUS SDRW-08D2S-U USB Device
Français Deutsch
Assurez-vous que le système détecte le
lecteur optique externe.
A. Dans le bureau de Windows®, faites un clic droit sur
Poste de travail , puis cliquez sur Propriétés > Matériel
> Gestionnaire de périphériques .
B. Cliquez sur
pour la liste. Si le lecteur optique externe a été
détecté, son nom doit apparaître dans la liste.
Italiano Español
esterna.
A. Dal desktop di Windows®, fare clic con il tasto destro
su My Computer (Computer) , quindi fare clic su
Properties (Proprietà) > Hardware > Device Manager
(Gestione periferiche).
B. Fare clic su
visualizzare l’elenco. Quando viene rilevata l’unità ottica, il
nome dell’unità ottica esterna viene visualizzato nell’elenco.
Русский Български
Убедитесь, что система обнаружила внешний
оптический привод.
A. На рабочем столе Windows® нажмите правой кнопкой
мыши My Computer, затем выберите Properties >
Hardware > Device Manager.
B. Нажмите
появления списка. Когда внешний привод обнаружен,
его имя появится в списке.
Čeština Dansk
Zkontrolujte, zda počítač rozpozná externí
optickou jednotku.
A. Na pracovní ploše operačního systému Windows®
klepněte pravým tlačítkem myši na položku My
Computer (Tento počítač) a potom na Properties
(Vlastnosti) > Hardware > Device Manager (Správce
zařízení).
B. Klepnutím na před jednotkami DVD/CD-
ROM zobrazte seznam. Když je externí optická jednotka
rozpoznána, je v seznamu uveden její název.
au niveau des lecteurs DVD/CD-ROM
davanti alle unità DVD/CD-ROM per
перед DVD/CD-ROM приводами для
Vergewissern Sie sich, dass Ihr System das
externe optische Laufwerk erkennt.
A. Rechtsklicken Sie auf dem Windows®-Bildschirm auf
Arbeitsplatz und klicken Sie dann auf Eigenschhaften >
Hardware > Gerätemanager.
B. Klicken Sie auf das
um die Liste anzuzeigen. Wenn das externe optische
Laufwerk erkannt wurde, erscheint der Name des externen
optischen Laufwerks in der Liste.
Asegúrese de que su sistema detecta la
unidad óptica externa.
A. Desde su escritorio de Windows®, haga clic con el
B. Haga clic en el símbolo
Уверете се, че системата е открила външното
оптично устройство.
A. От работния плот на Windows®, натиснете с десния бутон
B. Натиснете
Kontroller, at systemet genkender det
eksterne, optiske drev.
A. På Windows® desktop, rskrivebordet, højreklik på
B. Klik på
vor den DVD/CD-ROM-Laufwerken,
botón secundario en My Computer (Mi PC) y después
en Properties (Propiedades) > Hardware > Device
Manager (Administrador de dispositivos).
unidades de DVD / CD-ROM para desplegar la lista.
Una vez detectada la unidad óptica externa, aparecerá
en la lista el nombre de la unidad óptica.
на мишката My Computer (Моят компютър), след което
Properties (Свойства) > Hardware (Хардуер) > Device
Manager (Диспечер на хардуерни устройства).
отворите списъка. Когато бъде открито външно оптично
устройство, името на външния оптичен диск ще се появи
в списъка.
My Computer (Denne computer) , og klik derefter
på Properties (Egenskaber) > Hardware > Device
Manager (Enhedsstyrer).
Når det eksterne, optiske drev er genkendt, ses drevets
navn på listen.
situado junto a las
пред DVD/CD-ROM устройствата, за да
foran DVD/CD-ROM drev for at se listen.
Page 12

Nederlands
Controleer of uw systeem het externe
optische station kan detecteren.
A. Klik op het bureaublad van Windows® met de
rechtermuisknop op My Computer (D eze computer) ,
en klik vervolgens op Properties (Eigenschappen) >
Hardware > Device Manager (Apparaatbeheer) .
B. Klik op
Varmista, että järjestelmäsi havaitsee ulkoisen
optisen aseman.
A. Napsauta hiiren oikealla painikkeella Windows
-työpöydältä, My Computer (Oma tietokone) , sen
jälkeen napsauta Properties (Ominaisuudet) >
Hardware (Laitteisto) > Device Manager (Laitehallinta).
B. Napsauta
purkamiseksi. Kun ulkoinen optinen asema on havaittu,
ulkoisen optisen aseman nimi tulee näkyviin luettelossa.
Győződjön meg arról, hogy a rendszer
automatikusan érzékeli a külső optikai meghajtót.
A. A Windows® asztalon az egér jobb oldali gombjával
kattintson a My Computer (Sajátgép) ikonra, majd
kattintson a Properties (Tulajdonságok) > Hardware >
Device Manager (Eszközkezelő).
B. Kattintson a
Ha a rendszer érzékeli a külső optikai meghajtót, a külső
optikai meghajtó neve megjelenik a listában.
voor de dvd/cd-romstations om de lijst
uit te vouwen. Wanneer het externe optische station
is gedetecteerd, verschijnt de naam van het externe
optische station in de lijst.
Suomi
®
ennen DVD/CD-ROM -asemia luettelon
Magyar Bahasa Indonesia
jelre a DVD/CD-ROM meghajtók előtt.
Latviski
Pārliecinieties, ka jūsu sistēma detektē ārējo
optisko draivu.
A. Jūsu Windows® darbvirsmā noklikšķiniet ar labo klikšķi uz
Mans dators (My Computer) un pēc tam noklikšķiniet
uz Īpašības (Properties) > Aparatūra (Hardware) >
Ierīces pārvaldnieks (Device Manager).
B. Noklikšķiniet uz , lai DVD / CD-ROM draivs atver
sarakstu. Kad ārējais optiskais draivs ir atklāts, sarakstā
parādīsies ārējā optiskā draiva nosaukums.
Veenduge, et teie süsteem tuvastab välise
optilise seadme.
A. Windows® 'i töölaual paremklõpsake ikooni My Computer
(Minu arvuti) , seejärel valige Properties (Atribuudid)
> Hardware (Riistvara) > Device Manager (Seadme
haldur) .
B. Klõpsake ikooni
avada. Kui väline optiline seade on tuvastatud, siis ilmub
selle nimi loendisse.
Ελληνικά
Σιγουρευτείτε ότι το σύστημά σας μπορεί να
ανιχνεύσει την εξωτερική οπτική μονάδα.
A. Από την επιφάνεια εργασίας των Windows®, κάντε δεξί κλικ
στο My Computer (Ο Υπολογιστής μου), και κάντε κλικ
στο Properties (Ιδιότητες) > Hardware (Υλικό) > Device
Manager (Διαχείριση Συσκευών).
B. Κάντε κλικ στο
οδηγούς DVD/CD-ROM για να ανοίξει η λίστα. Όταν
ανιχνευτεί η εξωτερική οπτική μονάδα, εμφανίζεται στη
λίστα το όνομα της εξωτερικής μονάδας οδήγησης.
Memastikan sistem mendeteksi external optical
drive (penggerak optik eksternal).
A. Dari desktop Windows®, klik-kanan My Computer
(Komputerku) , kemudian klik Properties (Properti)
> Hardware (Perangkat Keras) > Device Manager
(Manajer Piranti).
B. Klik sebelum drive DVD/CD-ROM membuka daftar.
Saat external optical drive terdeteksi, namanya akan
muncul dalam daftar.
Įsitikinkite, kad sistema atpažįsta išorinį optinį
diską.
A. „Windows®“ darbalaukyje, dešiniu klavišu spustelėkite
Mano kompiuteris (My Computer) , tada spragtelėkite
Ypatybės (Properties) > Techninė įranga (Hardware) >
Įtaisų tvarkytuvė (Device Manager).
B. Kad sąrašas išsiskleistų, spustelėkite prieš DVD / CD-
ROM įrenginius esantį . Kai išorinis optinis diskas
atpažįstamas, sąraše atsiranda išorinio optinio disko
pavadinimas.
Bahasa Malaysia Norsk
Pastikan bahawa sistem anda mengesan
pemacu optik luaran.
A. Untuk desktop Windows® anda, klik kanan My Computer,
kemudian klik Properties > Hardware > Device
Manager.
sebelum pemacu DVD/CD-ROM untuk
B. Klik
membuka senarai. Apabila pemacu optik luaran dikesan,
nama pemacu optik luaran muncul dalam senarai.
Kontroller at systemet oppdager den eksterne
optiske stasjonen.
A. Fra Windows® desktop høyreklikk My Computer
(Min Computer) , klikk så Properties (Egenskaper)
> Hardware (Maskinvare) > Device Manager
(Enhetsbehandling) .
B. Klikk på
listen. Når den eksterne optiske stasjonen er oppdaget vil
navnet på den eksterne optiske stasjonen komme frem på
listen.
Eesti
Lietuvių
DVD/CD-ROM draivi ees, et loendit
που βρίσκεται μπροστά από τους
foran DVD/CD-ROM-stasjoner for å få opp
Page 13

Polski
Upewnij się, że posiadany system wykrywa
zewnętrzny napęd optyczny.
A. Na pulpicie Windows®, kliknij prawym przyciskiem
My Computer (Mój komputer) , a następnie kliknij
Properties (Właściwości) > Hardware (Urządzenia)>
Device Manager (Menedżer urządzeń) .
B. Kliknij
rozwinięcia listy. Po wybraniu zewnętrznego napędu
optycznego, na liście pokaże się nazwa zewnętrznego
napędu optycznego.
Română Slovensky
Asiguraţi-vă că sistemul dvs detectează drive-ul
optic extern.
A. Din desktopul dvs Windows®, efectuaţi click dreapta pe
right My Computer (Computerul meu) , apoi click pe
Properties (Proprietăţi) > Hardware > Device Manager
(Administrare dispozitiv).
înainte ca drive-ul DVD/CD-ROM să
B. Click
desfăşoare lista. Atunci când drive-ul optic extern este
detectat, numele drive-ului optic extern apare în listă.
Prepričajte se, da je vaš operacijski sistem
zaznal zunanji optični gonilnik.
A. Na vašem Windows® namizju, z desnim gumbom kliknite
My Computer (Moj računalnik) , nato kliknite Properties
(Lastnosti) > Hardware (Strojna oprema) > Device
Manager (Upravitelj naprav).
B. Kliknite predenj DVD/CD-ROM gonilnik prikaže
seznam. Ko je zunanji optični gonilnik zaznan, se na
seznamu pojavi ime zunanjega optičnega gonilnika.
ไทย
A. swodniW ปอท์กสดเกาจ
B. กิลค MOR-DC/DVD ์ฟรดไนอ่ก
przed napędami DVD/CD-ROM w celu
กอนยาภ์ฟรดไ
®
่ีทาวขกิลค , My Computer
)นัฉงอข์รอตเวิพมอค( กิลคน้ันกาจ , Properties
)์ณรกปุอรากดัจวัต( reganaM
รากยารนใฏการปะจกอนยาภ์ฟรดไลัคิตปอองอขอ่ืช
unidade óptica.
A. A partir do ambiente de trabalho do Windows® , clique com
B. Clique no sinal
Presvedčte sa, že systém zistil externú optickú
mechaniku.
A. V rámci pracovnej plochy Windows® pravým tlačidlom
B. Kliknite na
ลัคิตปออบพจวรตณุคงอขบบะรา่วจใ่นแ้หใูดจวรต
eciveD > )์รวแด์ราฮ( erawdraH > )ิตับมสณุค(
กอนยาภ์ฟรดไลัคิตปออบพจวรตบบะรอ่ืมเ รากยารยาจะรกอ่ืพเ
Українська
Переконайтеся, що система визначає зовнішній
оптичний дисковод.
A. З робочого столу Windows® правою кнопкою миші
клацніть по My Computer (Мій комп’ютер), потім клацніть
по Properties (Властивості) > Hardware (Апаратне
забезпечення) > Device Manager (Менеджер пристрою).
B. Клацніть по
розкрити список. Коли визначено зовнішній оптичний
дисковод, назва зовнішнього оптичного дисковода
з’являється у списку.
перед дисками DVD/CD-ROM, щоб
Português
o botão direito em My Computer (O meu computador) ,
depois clique em Properties (Propriedades) > Hardware
> Device Manager (Gestor de dispositivos).
ROM para expandir a lista. Quando a unidade óptica externa
for detectada, será exibido o nome da unidade na lista.
antes das Unidades de DVD/CD-
kliknite na My Computer (Môj počítač) ; následne kliknite
na Properties (Vlastnosti) > Hardware (Hardvér) >
Device Manager (Správca zariadení).
otvoríte zoznam. Po zistení externej optickej mechaniky
sa názov externej optickej mechaniky objaví v zozname.
Se till att ditt system upptäcker den externa
optiska enheten.
A. Från Windows® skrivbord högerklicka på My Computer
(Den här datorn) , klicka sedan på Properties
(Egenskaper) > Hardware (Hårdvara) > Device
Manager (Enhetshanteraren).
B. Klicka på före DVD/CD-ROM enheterna för att
veckla ut listan. När den externa optiska enheten är
upptäckt kommer namnet på den externa optiska enheten
att visas i listan.
pred mechanikami DVD/CD-ROM, čím
SvenskaSlovenščina
Türkçe
Sisteminizin harici optik sürücüyü
algıladığından emin olun.
A. Windows® masaüstünüzden, My Computer
(Bilgisayarım) 'a sağ tıklayın ve daha sonra Properties
(Özellikler) > Hardware (Donanım) > Device Manager
(Aygıt Yöneticisine) tıklayın.
B. DVD/CD-ROM sürücüleri listeyi açmadan önce
tıklayın. Harici optik sürücü algılandığında, harici optik
sürücünün adı listede belirir.
繁體中文
請確認您的系統已偵測到外接光碟機。
A. 從 Windows 桌面,右鍵點選 我的電腦,
接著點選 內容 > 硬體 > 裝置管理員。
B. 選點 DVD/CD-ROM
展開清單。當偵測到外接光碟機裝置時,
此外接光碟機的名稱將顯示在清單中。
光碟機前面的
以
Page 14

簡体中文
请确认您的系统已侦测到外接光驱。
A. 从 Wind ows 桌面,右键点选“我的电
脑“ , 接着点选 属性 > 硬件 > 设备管理
器。
B. 选点 DVD/CD-ROM 驱动器前面的
展开列表。当侦测到外接光驱设备时,此外
接光驱的名称将显示在列表中。
한국어
시스템이 외장 광드라이브를 인식했는지
확인합니다.
A. 좌측하단의 시작을 클릭하고 제어판 ->
시스템 -> 장치관리자를 클릭 합니다.
B. DVD/CD-ROM 드라이브 앞의
클릭합니다. 외장 광드라이를 인식할 때, 외장
광드라이브의 모델명이 리스트에 나타납니다.
를
Tiếng Việt
Đảm bảo hệ thống của bạn nhận dạng được ổ
đĩa quang ngoại vi.
A. Từ màn hình nền Windows®, click phải My Computer
(Máy tính của tôi) rồi click Properties (Thuộc tính)
> Hardware (Phần cứng) > Device Manager (Quản
lý thiết bị).
B. Click dấu
ở phía trước các ổ đĩa DVD/CD để hiển thị
danh sách. Khi đã nhận dạng ổ đĩa quang ngoại vi, tên
của ổ đĩa này sẽ hiển thị trên danh sách.
日本語
光学ドライブがシステムで検出されるかを確認する
A. Windows® デスクトップから「マイ コンピュータ」を右
クリックし、「プロパティ」→「ハードウェア」→「デ
バイス マネージャ」の順に開きます。
以
(右の写真は英語版です)
B. DVD/CD-ROMドライブの左にある マークをクリッ
クし、リストを展開します。光学ドライブが検出されて
いれば、光学ドライブの名前がリストに表示されます。
Қазақ
Жүйе сыртқы оптикалық жетекті
анықтайтынына көз жеткізу.
A. Windows® жұмыс үстелінде My Computer (Менің
компьютерім) тармағын тінтуірдің оң жақ
түймешігімен басып, Properties (Сипаттар) >
Hardware (Жабдық) > Device Manager (Құралдар
басқарушысы) тармағын таңдаңыз.
B. Тізімді жаю үшін DVD/CD-ROM жетектерінің алдындағы
таңбасын басыңыз. Сыртқы оптикалық жетек
анықталған кезде, тізімде оның атауы көрсетіледі.
Page 15

Safely remove the external optical drive.
3
The external optical drive supports Plug & Play. Follow the steps below to safely remove the
drive.
A.From the task bar of your computer, click the Safely Remove Hardware icon (
).
B.When a message Safely remove USB Mass Storage Device pops up, click the message.
C.When a message The device can now be safely removed from the computer pops up,
disconnect the USB Y cable from your computer.
NOTE: DO NOT disconnect the USB Y cable when the system is booting up or the LED indicator of the external
optical drive is
Français
Retirer le lecteur optique en toute sécurité.
Le lecteur optique externe supporte la norme Plug & Play. Suivez
les étapes ci-dessous pour retirer le lecteur en toute sécurité.
A. Dans la zone de cliquez sur l’icône (
B. Lorsque le message Retirer le périphérique en toute
sécurité apparaît, cliquez sur le message.
C. Lorsque le message Le matériel peut être retiré en
toute sécurité apparaît, déconnectez le câble USB Y
de votre ordinateur.
REMARQUE: NE déconnectez PAS le câble USB Y lors du
démarrage du système ou lorsque le voyant DEL du lecteur
optique clignote.
Italiano Español
Rimuovere in modo sicuro l’unità ottica esterna.
L’unità ottica esterna supporta la funzionalità Plug&Play.
Per rimuovere in modo sicuro l’unità seguire le istruzioni
riportate di seguito.
A. Dalla barra delle attività del computer, fare clic sull’icona
Rimozione sicura dell’hardware ( ).
B. Quando viene visualizzato il messaggio Rimozione
sicura dispositivo di archiviazione di massa USB ,
fare clic sul messaggio.
C. Quando viene visualizzato il messaggio È ora possibile
rimuovere il dispositivo da computer in modo sicuro ,
scollegare il cavo USB a Y dal computer.
NOTA: NON scollegare il cavo USB a Y durante l’avvio del
sistema o se l’indicatore LED dell’unità ottica esterna lampeggia.
).
Русский Български
Безопасное отключение внешнего оптического
привода.
Внешний оптический привод поддерживает Plug & Play. Для
отключения устройства выполните следующие инструкции:
A. В панели задач вашего компьютера нажмите иконку
Safely Remove Hardware (
B. При появлении сообщения Safely remove USB Mass
Storage Device нажмите на это сообщение.
C. Когда появится сообщение The device can now be safely
removed from the computer отключите USB Y кабель от
компьютера.
Примечание: Никогда не отключайте USB Y при загрузке
системы или мигании индикатора на внешнем оптическом
приводе.
).
Deutsch
Externes optisches Laufwerk sicher entfernen.
Das externe optische Laufwerk unterstützt Plug & Play. Folgen
Sie den Schritten, um das Laufwerk sicher zu entfernen.
A. Klicken Sie in der Taskleiste auf das Symbol USB Mass
Storage Device - Laufwerk (E:) entfernen ( ).
B. Wenn die Nachricht Hardware sicher entfernen
erscheint, klicken Sie auf die Nachricht.
C. Wenn eine Nachricht Hardware kann jetzt entfernt
werden erscheint, ziehen Sie das USB Y-Kabel aus
Ihren Computer.
HINWEIS: Ziehen Sie das USB Y-Kabel nicht aus Ihren
Computer heraus, wenn das System hochgefahren wird
oder die LED-Anzeige des externen optischen Laufwerks
blinkt.
Extraer la unidad óptica externa con seguridad.
La unidad óptica externa es compatible con Plug & Play. Siga los
pasos siguientes para extraer la unidad con seguridad.
A. Desde la barra de tareas de su equipo, haga clic en el
icono Quitar hardware de forma segura ( ).
B. Cuando aparezca el mensaje Quitar dispositivo de
almacenamiento masivo USB de forma segura , haga clic
en él.
C. Si aparece el mensaje Ahora se puede quitar el
dispositivo de forma segura del equipo , desconecte el
cable USB en Y del equipo.
NOTA: NO desconecte el cable USB en Y si el sistema se está
iniciando o el indicador LED de la unidad óptica externa está
parpadeando.
Безопасно премахване на външното оптично
устройство.
Външното оптично устройство поддържа Plug & Play.
Следвайте стъпките по-долу, за да премахнете устройството.
A. От лентата със задачи на Вашия компютър, натиснете
иконата Безопасно премахване на хардуер (
B. Когато се отвори съобщението Безопасно премахване
на USB устройство за съхранение на данни натиснете
съобщението.
C. Когато се появи съобщение Сега това устройство
може безопасно да бъде отстранено от компютъра,
изключете USB Y кабела от компютъра.
ЗАБЕЛЕЖКА: НЕ
се зарежда или индик аторът на външното оптично устройство
мига.
изваждайте
USB Y кабеладока систематато
).
Page 16

Čeština
Bezpečně odeberte externí optickou jednotku.
Tato externí optická jednotka podporuje technologii Plug & Play.
Podle následujících pokynů bezpečně odeberte jednotku.
A. Na hlavním panelu počítače klepněte na ikonu Bezpečné
odebrání hardwaru (
B. Po zobrazení zprávy Bezpečně odebrat velkokapacitní
paměťové zařízení klepněte na tuto zprávu.
C. Po zobrazení zprávy Nyní lze zařízení bezpečně odebrat z
počítače odpojte kabel USB Y od počítače.
POZNÁMKA: NEODPOJUJTE kabel USB Y, když se systém
restartuje nebo když bliká indikátor LED externí optické jednotky.
).
Dansk
Du kan nu fjerne det optiske drev.
Det eksterne, optiske drev understøtter “plug and play”. Fjern
drevet på følgende måde.
A. På computerens jobbjælke, klik på Fjern Hardware
B. Når meddelelsen Fjern USB masselagerenhed dukker op,
C. Når en meddelelse Drevet kan nu fjernes fra computeren
BEMÆRK: Fjern IKKE USB Y kablet, mens systemet genstarter
eller, hvis det eksterne drevs LED indikatorlampe blinker.
).
ikonen (
klik på meddelelsen.
dukker op, fjern USB Y kablet fra computeren.
Nederlands
Het externe optische station veilig verwijderen.
Het externe optische station ondersteunt Plug & Play. Volg de
onderstaande stappen om het station veilig te verwijderen.
A. Klik in de taakbalk van uw computer op het pictogram
Hardware veilig verwijderen (
B. Wanneer het bericht USB-massaopslagapparaat veilig
verwijderen verschijnt, klik dan op dit bericht.
C. Wanneer het bericht Het apparaat kan nu veilig worden
verwijderd van de computer verschijnt, koppelt u de USBY-kabel los van uw computer.
OPMERKING: Koppel de USB-Y-kabel NIET los terwijl het
systeem wordt opgestart of terwijl de LED van het externe
optische station knippert.
Suomi
Poista ulkoinen optinen asema.
Ulkoinen optinen asema tukee Plug & Play -ominaisuutta.
Noudata alla olevia vaiheita aseman turvallista poistamista
varten.
A. Napsauta tietokoneesi tehtäväpalkissa Laitteiston
turvallinen poistaminen -kuvaketta ( ).
B. Kun viesti USB-massamuistilaitteen turvallinen
poistaminen ponnahtaa esiin, napsauta viestiä.
C. Kun viesti Laite voidaan nyt poistaa turvallisesti
tietokoneesta ponnahtaa esiin, irrota USB Y–kaapeli
tietokoneestasi.
HUOMAA: ÄLÄ irrota USB Y –kaapelia, kun järjestelmä on
käynnistymässä tai ulkoisen optisen aseman LED-ilmaisin
vilkkuu.
Magyar
Távolítsa el biztonságosan a külső optikai meghajtót.
A külső optikai meghajtó támogatja a Plug & Play (csatold
és játszik) funkciót. A meghajtó biztonságos eltávolítása
érdekében kövesse a következő utasításokat:
A. A számítógép Windows tálcáján kattintson a hardver
biztonságos eltávolítása ikonra (
B. Amikor megjelenik a USB adattároló eszköz
bizt onságos eltávolítása felirat, kattintson az üzenetre.
C. Amikor megjelenik a Az eszköz biztonságosan
eltávolítható üzenet, húzza ki az USB Y kábelt a
számítógépből.
MEGJEGYZÉS: NE húzza ki az USB Y kábelt, amikor a rendszer
elindul vagy a külső optikai meghajtó LED kijelzője villog.
).
).
Eesti
Eemaldage väline optiline seade.
Välisel optilisel seadmel on funktsiooni Plug & Play toetus.
Optilise seadme eemaldamiseks järgige alltoodud samme.
A. Arvuti tööriistaribal klõpsake ikooni Riistvara turvaline
eemaldamine (
B. Kui hüpikaknas ilmub teade USB massmäluseadme
turvaline eemaldamine , siis klõpsake teadet.
C. Kui hüpikaknas ilmub teade Seadme saab nüüd
turvaliselt arvutist eemaldada , siis ühendage USB Y
kaabel arvutist lahti.
MÄRKUS: ÄRGE lahutage USB Y kaablit, kui süsteem
taaskäivitub või kui välise optilise seadme LED indikaator
vilgub.
).
Ελληνικά
Αφαιρέστε με ασφάλεια την εξωτερική οπτική
μονάδα.
Η εξωτερική οπτική μονάδα υποστηρίζει τη λειτουργία Τοποθέτησηςκαι-Άμεσης-Λειτουργίας (Plug & Play). Ακολουθήστε τα παρακάτω
βήματα για να αφαιρέσετε με ασφάλεια τη μονάδα οδήγησης.
A. Από τη γραμμή λε ιτουργιών του υπολογιστή σας, κάντε κλικ στο
εικονίδιο Ασφαλής Αφαίρεση Υλικού (
B. Όταν εμφανιστεί τ ο μήνυμα Ασφαλής αφαίρεση συσκευής
αποθήκευσης USB, κάντε κλικ στο μήνυμα.
C. Όταν εμφανιστεί τ ο μήνυμα Μπορείτε τώρα να αφαιρέσετε με
ασφάλεια τη συσκευή από τον υπολογιστή , αποσυνδέστε το
καλώδιο USB Y από τον υπολογιστή σας.
ΣΗΜΕΙΩΣΗ: ΜΗΝ αποσυνδέετε το καλώδιο USB Y όταν το σύστημα
κάνει επανεκκίνηση ή όταν η λυχνία ένδειξης LED της εξωτερικής
οπτικής μονάδας αναβοσβήνει.
).
Bahasa Indonesia
Melepaskan external optical drive dengan aman.
External optical drive mendukung Plug & Play (Pasang &
Main). Ikuti langkah-langkah berikut untuk melepaskan drive
dengan aman.
A. Dari task bar (batang tugas) komputer, klik ikon
Lepaskan Perangkat Keras dengan hati-hati ( ).
B. Ketika pesan Lepaskan Alat Penyimpan Mass USB
dengan aman muncul, klik pesan tersebut.
C. Ketika pesan Alat ini bisa dilepaskan dari komputer
dengan aman muncul, lepaskan kabel USB Y dari
komputer.
PERHATIAN: JANGAN melepaskan kabel USB Y ketika
sistem sedang dinyalakan atau indikator LED external
optical drive berkedip-kedip.
Page 17

Latviski
Droša ārējā optiskā draiva noņemšana.
Ārējais optiskais draivs atbalsta Plug & Play tehnoloģiju.
Draiva drošai noņemšanai, izpildiet sekojošos soļus.
A. Jūsu datora uzdevumu joslā noklikšķiniet uz ikonas
Droši noņemt aparatūru (
B. Kad uznirst ziņa USB zibatmiņas droša noņemšana,
noklikšķiniet uz šīs ziņas.
C. Kad uznirst ziņa Ierīci tagad var droši noņemt no
datora , atvienojiet USB Y kabeli no datora.
PIEZĪME: NEATVIENOJIET USB Y kabeli, ja sistēma sāknē
vai ārējā optiskā draiva LED rādītājs mirgo.
Bahasa Malaysia
Keluarkan pemacu optik luaran dengan selamat.
Pemacu optik luaran menyokong Plag & Main. Ikut langkah
di bawah untuk mengeluarkan pemacu dengan selamat.
A. Daripada bar tugas komputer anda, klik ikon Safely
Remove Hardware (
B. Apabila mesej Safely remove USB Mass Storage
Device pop timbul, klik mesej tersebut.
C. Apabila mesej The device can now be safely
removed from the computer pop timbul, keluarkan
kabel USB Y dari komputer anda.
NOTA: JANGAN keluarkan kabel USB Y apabila sistem
sedang but atau penunjuk LED pemacu optik luaran
berkelip.
Polski
Bezpiecznie odłącz zewnętrzny napęd optyczny
Zewnętrzny napęd optyczny obsługuje Plug & Play. Wykonaj
podane poniżej czynności w celu bezpiecznego odłączenia
napędu.
A. Na pasku zadań komputera, kliknij ikonę Bezpieczne
usuwanie sprzętu ( ).
B. Po wyświetleniu komunikatu Bezpieczne usuwanie
urządzenia pamięci masowej USB , kliknij komunikat.
C. Po wyświetleniu komunikatu Sprzęt można teraz
bezpiecznie odłączyć od komputera , odłącz kabel USB
Y od komputera.
UWAGA: NIE należy odłączać kabla USB Y podczas
uruchamiania lub, gdy miga wskaźnik LED zewnętrznego
napędu optycznego.
).
).
Išorinio optinio disko saugus šalinimas.
Išorinis optinis diskas palaiko „Plug & Play“. Norėdami
saugiai pašalinti įrenginį, sekite žemiau aprašytus žingsnius.
A. Kompiuterio užduočių juostoje spustelėkite piktogramą „
B. Kai pasirodys pranešimas Saugiai pašalinti USB
C. Kai atsiranda pranešimas Dabar įrenginį galima
PASTABA: NEATJUNKITE USB Y laido kai sistema
kraunasi arba mirksi išorinio optinio disko šviestukas.
Trygg fjerning av den eksterne optiske stasjonen.
Den eksterne optiske stasjonen støtter Plug & Play. Følg
trinnene nedenfor for trygt å fjerne stasjone.
A. Fra PC-ens oppgavelinje kan du klikke på trygg fjerning
B. Når meldingen Trygg fjerning av USB-
C. Når meldingen Enheten kan nå trygt fjernes fra PC-en
MERK: IKKE koble fra USB Y-kabelen når systemet starter opp
eller LED-indikatoren til den eksterne optiske stasjonen blinker.
Remover a unidade óptica externa com segurança.
A unidade óptica externa suporta Plug & Play. Siga os passos
indicados abaixo para remover a unidade com segurança.
A. A partir da barra de tarefas do seu computador, clique no
B. Quando for exibida a mensagem Remover Dispositivo
C. Quando for exibida a mensagem O dispositivo pode
NOTA: NÃO desligue o cabo USB Y quando o sistema
estiver a arrancar ou quando o indicador LED da unidade
óptica externa estiver a piscar.
Română Slovensky
Îndepărtarea în siguranţă a drive-ului optic extern.
Drive-ul optic extern suportă aplicaţia Plug & Play
(Conectează & Redă). Urmaţi paşii de mai jos pentru a
îndepărta în siguranţă drive-ul.
A. Din bara dvs de sarcină a computerului dvs, click pe
icoana Îndep ărtează în siguranţă hardware-ul (
B. Atunci când mesajul Îndepărtează în siguranţă
Dispozitivul de stocare în masă USB apare, click pe
mesaj.
C. Atunci când mesajul
îndepărtat de la computer apare, deconectaţi cablul
USB Y de la computerul dvs.
NOTĂ: NU deconectaţi cablul USB Y atunci când sistemul
porneşte sau când LED-ul indicator al drive-lui optic extern
pâlpâie.
Bezpečné odinštalovanie externej optickej mechaniky.
Externá optická mechanika podporuje funkciu Plug & Play.
Aby ste mechaniku bezpečne odinštalovali, postupujte
podľa dolu uvedených krokov.
A. V rámci panela nástrojov svojho počítača kliknite na
).
B. Po zobrazení hlásenia Bezpečne odinštalovať
C. Po zobrazení hlásenia Zariadenie možno teraz
POZNÁMKA: NEODPÁJAJTE USB Y kábel počas
bootovania systému alebo pokiaľ LED indikátor externej
mechaniky bliká.
Lietuvių
Saugiai pašalinti techninę įrangą“ (
talpiosios atminties įrenginį , jį spragtelėkite.
saugiai pašalinti iš kompiuterio , nuo kompiuterio
atjunkite USB Y laidą.
).
Norsk
av maskinvare-ikonet ( ).
masselagringsenhet kommer opp kan du klikke på
meldingen.
kommer opp kan du frakoble USB Y-kabelen fra PC-en.
Português
ícone Remover o hardware com segurança (
de armazenamento de massa USB , clique na
mensagem.
agora ser removido com segurança do sistema ,
desligue o cabo USB Y do seu computador.
ikonu Bezpečné odstránenie hardvéru ( ).
zariadenie veľkokapacitnej pamäte s podporou USB
kliknite na toto hlásenie.
bezpečne odpojiť od počítača , odpojte USB Y kábel
od počítača.
).
Page 18

Pazljivo odstranite zunanji optični gonilnik.
Zunanji optični gonilnik podpira Plug & Play sistem. Pri
odstranitvi gonilnika, upoštevajte spodaj opisana navodila.
A. Od opravilne vrstice na vašem računalniku kliknite ikono
Varno odstranite napravo ( ).
B. Ko se prikaže sporočilo Varno odstranite USB
napravo za masovno shranjevanje kliknite
sporočilo.
C. Ko se prikaže sporočilo Naprava se sedaj lahko varno
odstrani od računalnika izklučite USB Y kabel iz
vašega računalnika.
OPOMBA: NE ODSTRANITE USB Y kabla, ko se sistem
zaganja ali, ko svetleča dioda na zunanjem optičnem
gonilniku utripa.
ไทย
ทำา ยัภดอลปงา่ยอ์ฟรดไดอถอ่ืพเงา่ลนา้ดนอตน้ัขมาต
A. นอคอไกิลค ,ณุคงอข์รอตเวิพมอคงอข์ราบ์กสาทกาจ
B. มาวคอ้ขอ่ืมเ ยัภดอลปงา่ยอ BSU ลูมอ้ขบ็กเ์ณรกปุอดอถ
C. มาวคอ้ขอ่ืมเ กาจ้ีน์ณรกปุอดอถถรามาส้ีนะณข
:ุตหเยามห ำกบบะร่ีทะณขนใ BSU Y ลิบเคเยาสดอถา่ยอ า ตูบงัล
ยัภดอลปงา่ยอ์รวแด์ราฮดอถ (
มาวคอ้ข่ีทกิลค้หใ ,น้ึขฏการป
ยัภดอลปงา่ยอ้ดไ์รอตเวิพมอค ลิบเคเยาสดอถ้หใ ,น้ึขฏการป
ณุคงอข์รอตเวิพมอคกาจ BSU Y
DEL ะนาถสงดสแฟไอืรห ำกกอนยาภ์ฟรดไลัคิตปอองอข า บิรพะกงัล
na
ยัภดอลปงา่ยอกอนยาภ์ฟรดไลัคิตปออดอถ
์ยลพเ & กัลพบบะรนุนสบันสกอนยาภ์ฟรดไลัคิตปออ
)
Українська
Безпечно зніміть зовнішній оптичний
дисковод.
Зовнішній оптичний дисковод підтримує «Вмикай і працюй!».
Виконайте наступні кроки, щоб безпечно зняти дисковод.
A. На панелі задач на комп' ютері клацніть по піктограмі
Безпечно зняти апаратне забезпечення (
B. Коли вискакує повідомлення Безпечно знімі ть
пристрій масового зберігання USB, клацніть по ньому.
C. Коли вискакує повідомлення Тепер можна безпечно
зняти пристрій з комп’ютера , від’єднайте кабель USB Y
від комп’ютера.
ПРИМІТКА: НЕ від’єднуйте кабель USB Y, коли система
здійснює первинне завантаження або коли спалахує
світлодіодний індикатор зовнішнього оптичного дисковода.
).
簡体中文
安全从系统移除光驱。
外接光驱支持即插即用功能。请依照以下步骤移除
光驱。
A. 从电脑的任务栏中,点选安全删除硬件图标( )。
B. 当出现“ 安全删除 USB Mass Storage Device”信
息时,点选该信息。
C. BSU“现出当 Mass Storage Device 设备现在可安全
地从系统移除“信息时,将 USB Y 数据线从电脑上
移除。
注意:当系统正在启动或外接光驱的 LED 指示灯正
在闪烁时,请勿移除 USB Y 数据线。
SvenskaSlovenščina
Säker borttagning av den externa optiska
enheten.
Den externa optiska enheten stödjer plug-and-play. Följ
stegen nedan för att säkert ta bort enheten.
A. Från aktivitetsfältet på datorn klickar du på ikonen
“Säker borttagning av hårdvara” (
B. När ett meddelande Säker borttagning av USB
masslagringsenhet poppar upp, klicka på meddelandet.
C. När meddelandet Enheten kan nu säkert tas bort från
datorn poppar upp kopplar du bort USB Y-kabeln från datorn.
NOTERA: Koppla INTE bort USB Y-kabeln när systemet
startar eller LED indikatorn på den externa optiska enheten
blinkar.
Türkçe
Harici optik sürücüyü güvenli bir şekilde kaldırın.
Harici optik sürücü Tak & Çal'ı desteklemektedir. Sürücüyü
güvenli bir şekilde kaldırmak için aşağıdaki adımları takip
edin.
A. Bilgisayarınızın görev çubuğundan, Donanımı Güvenle
Kaldır simgesini ( ).
B. USB Yığın Depolama Aygıtını Güvenle Kaldır iletisi
ekrana geldiğinde, iletiye tıklayın.
C. Bu aygıt şimdi güvenle bilgisayardan kaldırılabilir
iletisi ekrana geldiğinde, USB Y kablosunu bilgisayardan
çıkarın.
NOT: Sistem ön yükleme yaparken veya harici optik
sürücünün LED göstergesi yanıp sönerken USB Y
kablosunun bağlantısını KESMEYİN.
繁體中文
安全從系統移除光碟機。
外接光碟機支援隨插即用功能。請依照以下步驟移
除光碟機。
A. 從電腦的工作列中,點選安全移除硬體圖示(
B. 現出當 安全移除 USB Mass Storage Device 訊息時,
點選該訊息。
C. 現出當 USB Mass Storage Device 裝置現在可安全地從
系統移除 訊息時,將 USB Y 排線從電腦上移除。
注意:當系統正在啟動或外接光碟機的 LED 指示燈
正在閃爍時,請勿移除 USB Y 排線。
日本語
光学ドライブを安全に取り外す
光学ドライブはPlug & Play をサポートしています。取り外
す際は次の手順で取り外します。
A. コンピュータのタスクバーから、 アイコン をクリ
ックします。
B. 「Safely remove USB Mass Storage Device 」のメッセ
ージが表示されたら、メッセージをクリックします。
C. 「The device can now be safely removed from the
computer」 のメッセージが表示されますので、USB Y
ケーブルをコンピュータから取り外します。
注: システムの起動中、または光学ドライブのLEDインジ
ケータが点滅しているときは、USB Yケーブルを取り外さ
ないでください。
).
)。
Page 19

한국어
안전하게 외장 광드라이버를 제거합니다.
외장 광드라이버는 Plug & Play 를 지원합니다. 안전하게
장치를 제거하기 위해 아래의 단계를 따라 주십시오.
A. 컴퓨터 작업표시줄에서 “하드웨어 안전하게 제거”
아이콘을 클릭합니다.
B. “USB 대용량저장소 장치”라는 메시지를 클릭하십시오.
C. “이제 시스템에서 USB 대용량 저장 장치를 안전하게
제거할 수 있습니다”라는 메시지를 확인, 컴퓨터에서
USB Y 케이블을 제거하십시오.
주의: 시스템이 시작 중이거나 외장 광드라이버의 LED가
깜빡이는 동안 USB Y 케이블을 제거하지 마십시오.
Tiếng Việt
Tháo an toàn ổ đĩa quang ngoại vi.
Ổ đĩa quang ngoại vi hỗ trợ chuẩn Plug & Play (Cắm vào là
chạy). Thực hiện theo các bước bên dưới để tháo an toàn ổ
đĩa.
A. A. Từ thanh tác vụ trên máy tính, click vào biểu tượng
Safely Remove Hardware (Tháo phần cứng an toàn) (
).
B. Khi thông báo Safely remove USB Mass Storage
Device (Tháo an toàn thiết bị lưu trữ khối USB)
hiển thị, hãy click vào thông báo đó.
C. Khi thông báo The device can now be safely
removed from the computer (Hiện có thể tháo
thiết bị an toàn khỏi máy tính) hiển thị, hãy rút cáp
USB Y khỏi máy tính.
LƯU Ý: KHÔNG ĐƯỢC rút cáp USB Y khi hệ thống đang
khởi động hoặc đèn báo LED của ổ đĩa quang ngoại vi đang
nhấp nháy.
Қазақ
Сыртқы оптикалық жетекті қауіпсіз түрде
ажырату.
Сыртқы оптикалық жетек Plug & Play мүмкіндігін
қолдайды. Жетекті қауіпсіз түрде ажырату үшін
төмендегі қадамдарды орындаңыз.
A. Компьютердің тапсырмалар жолағында жабдықты
қауіпсіз түрде ажырату белгішесін ( ) басыңыз.( ).
B. Safely remove USB Mass Storage Device (USB
жад құрылғысын қауіпсіз түрде ажырату)
хабарламасы көрсетілген кезде, оны басыңыз.
C. The device can now be safely removed from the
computer (Құрылғыны енді компьютерден
қауіпсіз түрде ажыратуға болады) хабарламасы
көрсетілгенде USB Y кабелін компьютерден
ағытыңыз.
ЕСКЕРТПЕ: Жүйе іске қосылып жатқанда немесе
сыртқы оптикалық жетектің ЖД шамы жыпылықтап
тұрған кезде USB Y кабелін АҒЫТПАҢЫЗ.
Page 20

Troubleshooting
If your computer cannot detect the external optical drive, follow the steps below:
1. Shut down your computer.
2. Check if the USB Y cable is connected properly. See Step 1 Connect the optical drive to
your computer for details.
3. Turn on your computer.
NOTE: For more technical service, contact your retailer or the ASUS Technical Support.
Français
Dépannage
Si votre ordinateur ne parviens pas à détecter le
lecteur optique externe, suivez les instructions
suivantes :
1. Arrêtez votre ordinateur.
2. que le câble USB Y est correctement connecté.
Voir 1 Connectez le lecteur optique à votre
ordinateur pour de plus amples détails.
3. Allumez votre ordinateur.
REMARQUE: Pour toute assistance, contactez votre
revendeur ou le service après vente d’ASUS.
Italiano Español
Risoluzione dei problemi
Se il computer non rileva l’unità ottica esterna, seguire
le istruzioni riportate di seguito:
1. Spegnere il computer.
2. Controllare che il cavo USB a Y sia collegato
correttamente. Si veda il punto 1 Collegamento
dell’unità ottica al computer per avere magiori
informazioni.
3. Accendere il computer.
NOTA: Per avere maggiore assistenza tecnica, rivolgersi al
rivenditore o al supporto tecnico ASUS.
Русский Български
Устранение неисправностей
Если ваш компьютер не может обнаружить внешний
оптический привод, выполните следующие действия:
1. Выключите компьютер.
2. Проверьте правильность подключения USB Y кабеля.
Подробную информацию смотрите в разделе 1
Подключение оптического привода к компьютеру.
3. Включите компьютер.
Примечание: Для дополнительного технического
обслуживания обратитесь к вашему продавцу или в
техподдержку ASUS.
Čeština
Odstraňování problémů
Pokud počítač nemůže rozpoznat externí optickou
jednotku, postupujte podle následujících kroků:
1. Vypněte počítač.
2. Zkontrolujte, zda je kabel USB Y řádně připojen.
Podrobnosti viz Krok 1 Připojte optickou jednotku k
počítači .
3. Zapněte počítač.
POZNÁMKA: Potřebujete-li další technickou pomoc, obraťte
se na prodejce nebo na odbornou pomoc společnosti ASUS.
Deutsch
Fehlerbehebung
Wenn Ihr Computer das externe optische Laufwerk
nicht erkennt, folgen Sie bitte den nachstehenden
Schritten:
1. Schalten Sie Ihren Computer aus.
2. Überprüfen Sie, ob das USB Y-Kabel richtig verbunden
ist. Siehe Schritt 1 Verbinden des optischen
Laufwerks mit Ihren Computer für Details.
3. Schalten Sie Ihren Computer ein.
HINWEIS: Für mehr technische Unterstützung kontaktieren
Sie bitte Ihren Händler oder den ASUS Kundendienst.
Resolución de problemas
Si su equipo no detecta la unidad óptica externa, siga
los pasos siguientes:
1. Apague su equipo.
2. Compruebe si el cable USB en Y está conectado
correctamente. Consulte el Paso 1 Conecte la unidad
óptica a su equipo si desea obtener más información.
3. Encienda su equipo.
NOTA: Si desea recibir asistencia técnica, póngase en
contacto con su distribuidor o con el Departamento de
asistencia técnica de ASUS.
Отстраняване на проблеми
Ако Вашият компютър открие външно оптично устройство,
следвайте стъпките по-долу:
1. Изключете компютъра.
2. Проверетедали USB Y кабелът е свързан правилно. Вижте
стъпка 1 Свързване на оптичното устройство към
Вашия компютър за повече информация.
3. Включете компютъра си.
ЗАБЕЛЕЖКА: За техническо обслужване, свържете се
с Вашия търговски представител или с техническата
поддръжка на ASUS.
Dansk
Hvis computeren ikke kan genkende det eksterne,
optiske drev, skal du gøre som følger:
1. Sluk for computeren.
2. Tjek, om USB Y kablet er korrekt tilsluttet. Se Trin
1 Forbind det optiske drev til din computer for
yderligere oplysninger.
3. Tænd for computeren.
BEMÆRK: For yderligere teknisk service, kontakt din
forhandler eller ASUS Teknisk Hjælp.
Page 21

Nederlands
Probleemoplossing
Volg de onderstaande stappen als uw computer het
externe optische station niet kan detecteren:
1. Schakel uw computer uit.
2. Controleer of de USB-Y-kabel correct is aangesloten.
Zie Stap 1 Het optische station aansluiten op uw
computer voor details.
3. Schakel uw computer in.
OPMERKING: neem contact op met uw leverancier of
met de technische ondersteuning van ASUS voor meer
technische ondersteuning.
Suomi
Vianetsintä
Jos tietokoneesi ei voi havaita ulkoista optista asemaa,
seuraa alla olevia vaiheita:
1. Sammuta tietokone.
2. Tarkasta, onko USB Y–kaapeli liitetty oikein. Katso Vaihe
1 Liitä optinen asema tietokoneeseesi yksityiskohtia
varten.
3. Laita tietokone päälle.
HUOMAA: Saadaksesi lisää teknistä palvelua ota yhteys
myyjääsi tai ASUS-yhtiön tekniseen tukeen.
Eesti
Tõrkeotsing
Kui arvuti ei suuda välist optilist seadet tuvastada, siis järgige
alltoodud samme:
1. Sulgege arvuti.
2. Kontrollige, kas USB Y kaabel on korralikult ühendatud.
Üksikasju vt sammust 1 Ühendage optiline seade
arvutiga .
3. Lülitage arvuti sisse.
MÄRKUS: Täiendavaks tehniliseks teeninduseks võtke
ühendust ASUS'e tehnilise toega.
Ελληνικά
Αντιμετώπιση Προβλημάτων
Αν ο υπολογιστής σας δεν μπορεί να ανιχνεύσει την εξωτερική
οπτική μονάδα, ακολουθήστε τα παρακάτω βήματα:
1. Κλείσ τε τον υπολογιστή σας.
2. Ελέγξτε αν το καλώδιο USB Y είναι σωστά συνδεδεμένο.
Δείτε το Βήμα 1 Σύνδ εση της οπτικής μονάδας στον
υπολογιστή για λεπτομέρειες.
3. Ενεργοπ οιήστε τον υπολογιστή σας.
ΣΗΜΕΙΩΣΗ: Για περισσότερη τεχνική υποστήριξη,
επικοινωνήστε με το κατάστημα λιανικής πώλησης ή την Τεχνική
Υποστήριξη της ASUS.
Magyar
Hibaelhárítás
Amennyiben a rendszer nem érzékeli automatikusan a külső
optikai meghajtót, kövesse a következő utasításokat:
1. Kapcsolja ki a számítógépet.
2. Ellenőrizze, hogy az USB Y kábel megfelelően csatlakozzon
a számítógéphez. A részletekért lásd a Az optikai
meghajtót csatlakoztassa a számítógéphez 1. pontját.
3. Kapcsolja be a számítógépet.
MEGJEGYZÉS: Bővebb technikai információért keresse fel a
forgalmazót vagy az ASUS Terméktámogató Részlegét.
Latviski
Traucējummeklēšana
Ja jūsu dators nevar atklāt ārējo optisko draivu, tad izpildiet
sekojošos soļus:
1. Izslēdziet jūsu datoru.
2. Pārbaudiet, vai USB Y kabelis ir pareizi savienots. Sīkākai
informācijai, skatiet soli 1 Pievienojiet optisko draivu jūsu
datoram .
3. Ieslēdziet jūsu datoru.
PIEZĪME: Tehniskā servisa pakalpojumiem sazinieties ar jūsu
izplatītāju vai ar ASUS tehnisko atbalstu.
Bahasa Malaysia
Menyelesaikan masalah
Jika komputer anda tidak dapat mengesan pemacu optik
luaran, ikut langkah di bawah:
1. Matikan komputer anda.
2. Periksa sama ada kabel USB Y disambungkan dengan
baik. Lihat Langkah 1 Sambungkan pemacu optik pada
komputer anda untuk mendapatkan maklumat.
3. Hidupkan komputer anda.
NOTA: Untuk mendapatkan perkhidmatan teknikal, hubungi
peruncit anda atau Sokongan Teknikal ASUS.
Bahasa Indonesia
Pemecahan Masalah
Jika komputer tidak mendeteksi external optical drive, ikuti
langkah-langkah berikut:
1. Matikan komputer.
2. Periksa apakah kabel USB Y tersambung dengan benar.
Lihat Langkah 1 Sambungkan penggerak optik ke
komputer untuk lebih jelasnya.
3. Matikan komputer.
PERHATIAN: Untuk layanan teknis, hubungi penjual atau
Dukungan Teknis ASUS.
Lietuvių
Trikčių šalinimas
Jeigu kompiuteris neatpažįsta išorinio optinio disko, sekite
žemiau aprašytus žingsnius:
1. Išjunkite kompiuterį.
2. Patikrinkite ar tinkamai prijungtas USB Y laidas.
Detalesnės informacijos ieškokite 1 žingsnyje Prijunkite
optinį diską prie kompiuterio .
3. Įjunkite kompiuterį.
PASTABA: Jei reikia daugiau techninės pagalbos,
susisiekite su pardavėju arba ASUS techniniu aptarnavimu.
Norsk
Feilsøking
Hvis PC-en ikke kan oppdage den eksterne optiske stasjonen
kan du følge trinnene nedenfor:
1. Slå av PC-en.
2. Kontroller om USB Y-kabelen er riktig tilkoblet. Se trinn
1 Koble den optiske stasjonen til PC-en for
opplysninger.
3. Slå på PC-en.
MERK: For mer teknisk service kan du kontakt forhandleren
eller teknisk støtte hos ASUS.
Page 22

Polski
Rozwiązywanie problemów
Jeśli komputer nie wykrywa zewnętrznego napędu
optycznego, wykonaj podane poniżej czynności:
1. Wyłącz komputer.
2. Sprawdź, czy jest prawidłowo podlączony kabel USB
Y. Szczegółowe informacje znajdują się w czynności 1
Podłączanie napędu optycznego do komputera .
3. Włącz komputer.
UWAGA: W celu uzyskania dalszych informacji technicznych,
skontaktuj się ze sprzedawcą lub z pomocą techniczną ASUS.
Română Slovensky
Remedierea defecţiunilor
Dacă computerul dvs nu poate detecta drive-ul optic extern,
urmaţi paşii de mai jos:
1. Închideţi computerul.
2. dacă este corespunzător conectat cablul USB
Y. Vezi Pasul 1 Conectează drive-ul optic la computer
pentru detalii.
3. Porniţi computerul.
NOTĂ: Pentru detalii service mai tehnice, contactaţi
vânzătorul sau Asistenţa Tehnică ASUS.
Iskanje in odstranjevanje motenj
Če vaš računalnik ne more zaznati zunanjega optičnega
gonilnika, sledite naslednjemu postopku:
1. Izključite vaš računalnik.
2. Preverite, da je vaš USB Y kabel pravilno priključen.
Glej korak 1 Povežite optični gonilnik z računalnikom
za več podrobnosti.
3. Zaženite vaš računalnik.
OPOMBA: Za izdatnejšo tehnično podporo kontaktirajte
vašega prodajalca ali ASUS tehnično podporo.
Resolução de problemas
Se o seu computador não detectar a unidade óptica, siga os
passos indicados abaixo:
1. Desligue o computador.
2. se o cabo USB Y está correctamente ligado.
3. Ligue o computador.
NOTA: Para serviço mais técnico, contacte o seu vendedor
ou o Suporte técnico ASUS.
Riešenie problémov
Pokiaľ váš počítač nedokáže zistiť externú optickú
mechaniku, postupujte podľa dolu uvedených krokov:
1. Vypnite počítač.
2. Skontrolujte správnosť pripojenia USB Y kábla.
3. Zapnite počítač.
POZNÁMKA: Ďalšiu technickú pomoc získate u predajcu
alebo technickej podpory spoločnosti ASUS.
Felsökning
Om din dator inte kan hitta den externa optiska enheten följ
stegen nedan:
1. Stäng av datorn.
2. Kontrollera om USB Y-kabeln är ordentligt ansluten. Se
3. Slå på datorn.
Notera: För mer teknisk service kontakta din återförsäljare
eller ASUS tekniska support.
ไทย
Sorun Giderme
Bilgisayarınız harici optik sürücüyü algılamıyorsa, aşağıdaki
adımları takip edin:
1. Bilgisayarınızı kapatın.
2. USB Y kablosunun doğru şekilde bağlanıp
ณุคงอข์รอตเวิพมอคบักา้ขเ์ฟรดไลัคิตปอออ่ตมอ่ืชเ
3. Bilgisayarınızı açın.
NOT: Daha fazla teknik yardım için, satıcınız veya ASUS
งอขคินคทเนา้ดนุนสบันสยา่ฝอืรห ณุคงอขกีลปา้คนา้รอ่ตดิต้หใ
Teknik Destek ile temasa geçin.
1. ณุคงอข์รอตเวิพมอคดิป
2. มสะามหเงา่ยอู่ยออ่ตมอ่ืชเ BSU Y ลิบเคเยาสา่วูดจวรต
3. ณุคงอข์รอตเวิพมอคดิปเ
ASUS
สำา 1 ่ีทน้ัขูด้หใ ดยีอเะลยารบัรห
:ุตหเยามห สำา มิตเม่ิพเคินคทเนา้ดรากิรบบัรห
าหญัปขไ้กแราก
:งา่ลนา้ดนอตน้ัขมาติตับิฏป้หใ
กอนยาภ์ฟรดไลัคิตปออบพ่มไจวรต์รอตเวิพมอคา้ถ
Português
Consulte o Passo 1 Ligue a unidade óptica ao
computador para obter mais detalhes.
Podrobnosti nájdete v kroku 1 Pripojenie optickej
mechaniky k počítaču .
SvenskaSlovenščina
Steg 1 Anslut den optiska enheten till din dator för
detaljer.
Türkçe
bağlanmadığını kontrol edin. Ayrıntılar için Optik
Sürücüyü Bilgisayarınıza Bağlayın Aşama 1'ye
bakınız.
Українська
Усунення несправностей
Якщо комп’ютер не здатний визначити зовнішній оптичний
дисковод, виконайте наступні кроки:
1. Вимкніть сист ему комп’ютера.
2. Перевірте, чи правильно підк лючений кабель USB
Y. Подробиці див. у Кроці 1 Підклю чіть оптичний
дисковод до комп’ютера .
3. Вимкніть комп’ю тер.
ПРИМІТКА: Щоб отримати більш специфічне технічне
обслуговування, зверніться до розповсюджувача або
технічної підтримки ASUS.
繁體中文
疑難排解
若您的電腦無法偵測到外接光碟機,請執行以下步驟:
1. 關閉您的電腦。
2. 查檢 USB Y 排線是否連接正確。詳細內容請參考步
驟 1 「將光碟機連接到您的電腦」。
3. 開啟電腦。
注意:更多技術服務,請連絡您的經銷商或華碩
技術支援。
Page 23

简体中文
疑难排解
若您的电脑无法侦测到外接光驱,请执行以下步骤:
1. 关闭您的电脑。
2. 查检 USB Y 数据线是否连接正确。详细内容请参考
步骤 1 「将光驱连接到您的电脑」 。
3. 开启电脑。
注意:更多技术服务,请联络您的经销商或华硕
技术支持。
한국어
고장 수리
컴퓨터가 외장 광드라이브를 인식하지 못할 경우, 아래
단계를 따라 하십시오.
1. 컴퓨터를 종료합니다.
2. USB Y 케이블이 정확이 연결되었는지 확인하고,
“스텝 1. 컴퓨터에 광드라이버를 연결합니다 .” 를
참고하십시오.
3. 컴퓨터를 켜십시오.
주의: 추가 기술지원은 판매점 또는 ASUS 기술지원으로
문의하십시오.
Tiếng Việt
Khắc phục sự cố
Nếu máy tính không thể nhận dạng ổ đĩa quang ngoại vi,
hãy thực hiện các bước dưới đây:
1. Tắt máy tính.
2. Kiểm tra xem cáp USB Y đã được kết nối đúng cách hay
chưa. Xem Bước 1 Kết nối ổ đĩa quang với máy tính
để biết thêm chi tiết.
3. Bật máy tính.
LƯU Ý: Để được hỗ trợ thêm về dịch vụ kỹ thuật, hãy liên
hệ với cửa hàng bán sản phẩm hoặc Bộ phận hỗ trợ kỹ
thuật của ASUS.
日本語
トラブルシューティング
お使いのコンピュータで光学ドライブが検出されない場合
は、次の手順で問題を解決してください。
1. コンピュータをシャットダウンします。
2. USB Yケーブルが正しく接続されていることを確認しま
す。詳細はステップ1の「 光学ドライブをコンピュータ
に接続する 」をご参照ください。
3. コンピュータの電源をONにします。
注:問題が解決しない場合など、技術的なサポートサービ
スをご利用される場合は、販売店またはASUSのサポートセ
ンターにご相談ください。
Қазақ
Ақаулықтарды жою
Компьютер сыртқы оптикалық жетекті анықтай алмаса,
төмендегі қадамдарды орындаңыз:
1. Компьютерді өшіріңіз.
2. USB Y кабелі дұрыс жалғанын тексеріңіз. Мәлімет алу
үшін «
Оптикалық жетекті компьютерге қосу
атты 1-қадамды қараңыз.
3. Компьютерді қосыңыз.
ЕСКЕРТПЕ: Қосымша техникалық қызмет алу үшін
сатушыға немесе ASUS компаниясының техникалық
қолдау қызметіне хабарласыңыз.
»
 Loading...