

Page 1

Stylus Headset
Quick Start Guide
Page 2

E7303
First Edition
March 2012
Copyright © 2012 ASUSTek Computers, Inc.
All Rights Reserved.
No part of this manual, including the products and software described in it,
may be reproduced, transmitted, transcribed, stored in a retrieval system,
or translated into any language in any form or by any means, except
documentation kept by the purchaser for backup purposes, without the
express written permission of ASUS Telecom (“ASUS”).
Product warranty or service will not be extended if: (1) the product is repaired,
modied or altered, unless such repair, modication of alteration is authorized
in writing by ASUS; or (2) the serial number of the product is defaced or
missing.
ASUS PROVIDES THIS MANUAL “AS IS” WITHOUT WARRANTY OF ANY
KIND, EITHER EXPRESS OR IMPLIED, INCLUDING BUT NOT LIMITED TO
THE IMPLIED WARRANTIES OR CONDITIONS OF MERCHANTABILITY
OR FITNESS FOR A PARTICULAR PURPOSE. IN NO EVENT SHALL ASUS,
ITS DIRECTORS, OFFICERS, EMPLOYEES OR AGENTS BE LIABLE FOR
ANY INDIRECT, SPECIAL, INCIDENTAL, OR CONSEQUENTIAL DAMAGES
(INCLUDING DAMAGES FOR LOSS OF PROFITS, LOSS OF BUSINESS,
LOSS OF USE OR DATA, INTERRUPTION OF BUSINESS AND THE LIKE),
EVEN IF ASUS HAS BEEN ADVISED OF THE POSSIBILITY OF SUCH
DAMAGES ARISING FROM ANY DEFECT OR ERROR IN THIS MANUAL
OR PRODUCT.
SPECIFICATIONS AND INFORMATION CONTAINED IN THIS MANUAL
ARE FURNISHED FOR INFORMATIONAL USE ONLY, AND ARE SUBJECT
TO CHANGE AT ANY TIME WITHOUT NOTICE, AND SHOULD NOT
BE CONSTRUED AS A COMMITMENT BY ASUS. ASUS ASSUMES NO
RESPONSIBILITY OR LIABILITY FOR ANY ERRORS OR INACCURACIES
THAT MAY APPEAR IN THIS MANUAL, INCLUDING THE PRODUCTS AND
SOFTWARE DESCRIBED IN IT.
Products and corporate names appearing in this manual may or may not be
registered trademarks or copyrights of their respective companies, and are
used only for identication or explanation and to the owners’ benet, without
intent to infringe.
Page 3
Thank you for purchasing another cool ASUS product!
Before you start, ensure that you have read all the safety
information and operating instructions in the Important
Notices bundled with your PadFone to prevent in�ury orbundled with your PadFone to prevent in�ury orto prevent in�ury or
damage to your device.
NOTE: This bundled Quick Start Guide is for reference only and is
sub�ect to change without prior notice. For the latest updates and
detailed information, please visit www.asus.com
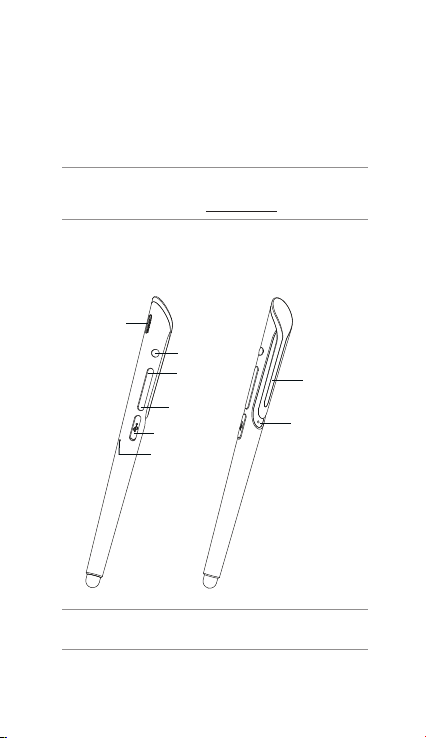
Getting to know your PadFone Stylus
Headset
Receiver
Multi-function
button
Volume up (+)
Volume down (-)
Micro USB port
Microphone
NOTE: * Refer to the table on the next page for the descriptions of
the LED colors.
Pen clip
LED (red/blue
light)*
Page 4

LED Color Description / Status
Solid blue Fully charged
Slow blue pulse Power on, paired and
Quick blue ash Incoming call or while taking
Solid red Charging mode
Red ash Power on and not in pairing
Quick red and
blue ash
connected
a call
mode
Establishing the pairing mode
15060-07F00000
Page 5

Charging your PadFone Stylus Headset
We strongly recommend that you charge the battery fully
before turning your device on.
To charge your PadFone Stylus Headset:
1. Connect the power plug into the USB charger. Ensure
that the power plug is attached securely in place.
2. Connect the USB connector into the USB charger’s
USB port.
3. Connect the micro USB connector into your PadFone
Stylus Headset.
4. Insert the power plug into a wall socket.
CAUTION! Double-check the connections and ensure that the power
plug is securely attached to the USB charger to prevent overheating
and damage to the cables, adapter, or device.
NOTES:
Use the power plug and USB charger that came with your
•
PadFone to charge your PadFone Stylus Headset.
The input voltage range between the wall outlet and the power
•
adapter is AC 100V-240V. The output voltage through the microUSB cable is DC 5V, 2A.
Page 6

Turning your PadFone Styus Headset
on or off
To turn your PadFone Stylus Headset on:
Press the multi-function button for about 2 seconds. When
you turn it on for the rst time, the LED quickly ashes red
and blue alternately to indicate that is in the pairing mode
and is discoverable by other Bluetooth devices.
To turn your PadFone Stylus Headset off:
Press the multi-function button for about 3 seconds until the
LED turns red.
Multi-function
button
LED
Page 7

Pairing and connecting devices
To pair and connect your devices:
1. Ensure that the Bluetooth function in your PadFone
Station or Bluetooth mobile device is turned on.
NOTES:
For details on turning the Bluetooth function on in your PadFone
•
Station, refer to its user manual that you can download from the
ASUS website at support.asus.com
For details on turning the Bluetooth function on in your Bluetooth
•
mobile device, refer to the documentation that came with your
Bluetooth mobile device.
Press and hold the multi-function button for 5 seconds 2.
where the LED quickly ashes red and blue alternately,
indicating that your PadFone Stylus Headset is ready
to be paired with your PadFone Station.
If the LED behaves differently, do the following:
a) Press and hold the multi-function button for 3
seconds to turn your PadFone Stylus Headset off.
b) Press and hold the multi-function button for 5
seconds to turn your PadFone Stylus Headset on
again and enter the pairing mode.
To pair your PadFone Stylus Headset with your 3.
PadFone Station, go to the All apps screen, touch
Stylus Headset and follow the onscreen instructions
to complete the pairing process.
NOTE:
For details on pairing your Bluetooth mobile device with another
device, refer to the documentation that came with your Bluetooth
mobile device.
Page 8

Making calls
To make a call:
1. Ensure that the devices are paired and connected.
2. From your PadFone Station, touch on the Home
Screen or go to the All apps screen.
3. From your contacts list, touch the number you wish to
call.
4. Touch to dial.
5. Use your PadFone Stylus Headset to talk to the person
on the other line.
Press the volume button to ad�ust the volume.
6. Press the multi-function button on your PadFone Stylus
Headset or touch on your PadFone Station
to end the call.
Answering calls
To answer a call:
1. Ensure that the devices are paired and connected.paired and connected.
2. Press the multi-function button to answer the call. Your
PadFone Stylus Headset vibrates and the LED quickly
ashes blue to indicate that you have an incoming call.
3. Talk on your PadFone Stylus Headset as you would on
your PadFone or mobile device.
Press the volume button to ad�ust the volume.
4. Press the multi-function button to end the call. Your
PadFone Stylus Headset vibrates to indicate that the
call has ended.
NOTES:
For clearer audio, keep the pen clip oriented towards the
•
PadFone Station.
Do not bend or damage the pen clip. Refrain from touching the
•
pen clip wihle talking on your PadFone Stylus Headset to avoid
any signal interference.
 Loading...