How it Works
Log In / Sign Up
Buy Points
How it Works
FAQ
Contact Us
Questions and Suggestions
Users
ASUS
Loading...
R
RO8355
RO8435
RO8492
RO8496
RO8509
RO8517
RO8619
RO8661
RO8713
RO8770
RO8798
RO8803
RO8828
RO8923
RO8994
2
ro9024
RO9028
RO9036
RO9042
ro9052
RO9054
RO9105
RO9159
RO9188
RO9364
RO9396
RO9399
ro9510
RO9526
RO9537
RO9541
RO9564
RO9651
RO9655
RO9813
ROG Aura
ROG Azoth Extreme
ROG Balteus
2
ROG Balteus QI
3
ROG Capture GT6 AiMesh Router TriBand AX10000 (WiFi 6) Hvid
ROG Capture GT6 AiMesh Router TriBand AX10000 (WiFi 6) Sort
ROG Centurion
2
ROG Cerberus USB
ROG Cetra II
ROG Cetra II Core
ROG Cetra True Wireless SpeedNova, Dokanałowe, ANC
ROG CG8565
2
ROG CG8890
2
ROG Chakram
ROG Chakram Core
Rog Chariot
ROG Chariot Core
ROG Chariot X
ROG Chariot X Core SL301CW
ROG Chariot X Core SL301CW Szary
ROG Chariot X Szary
ROG Claymore Core
ROG Crosshair VI Extreme
2
ROG Crosshair VI Hero
2
ROG Crosshair VII Hero
2
ROG CROSSHAIR VII HERO (WI-FI)
ROG Crosshair VIII Dark Hero
ROG Crosshair VIII Formula
2
ROG Crosshair VIII Hero
2
ROG Crosshair VIII Impact
ROG CROSSHAIR X670E HERO, AMD X670, AM5 ATX
ROG Delta
ROG Delta Core
ROG Delta S Animate
ROG Dominus extreme
2
ROG Falchion Ace HFX
ROG Flow X13 GV301RE-LI024W
ROG Flow X16 GV601RW-M5048W
ROG Flow X16 GV601VI-NL008W
ROG Flow Z13 GZ301ZC-LD009W
ROG Flow Z13 GZ301ZE-LD183W
ROG Front Base
ROG Fusion II 300
ROG Fusion II 500
ROG G11CD-K-RU011T
ROG G20CB-CZ025T
ROG G20CB-CZ034T
ROG G46VW
ROG G703GI-E5181T
ROG GL502VY-FY023T
ROG GL503GE-EN173T
ROG GL503GE-EN250T
ROG GL703GE-GC168T
ROG GL703GM-E5187T
ROG GL703GM-E5209T
ROG GL703GM-E5211
ROG GL703GM-E5211T
ROG GL703GM-EE225
ROG GL703GM-EE231
ROG GL703GS-E5053T
ROG GL703GS-E5058T
ROG GL703GS-E5062T
ROG GL703VM-BA226
ROG GL753VD-GC525T
ROG Gladius 2 Core
Loading...
Loading...
Nothing found
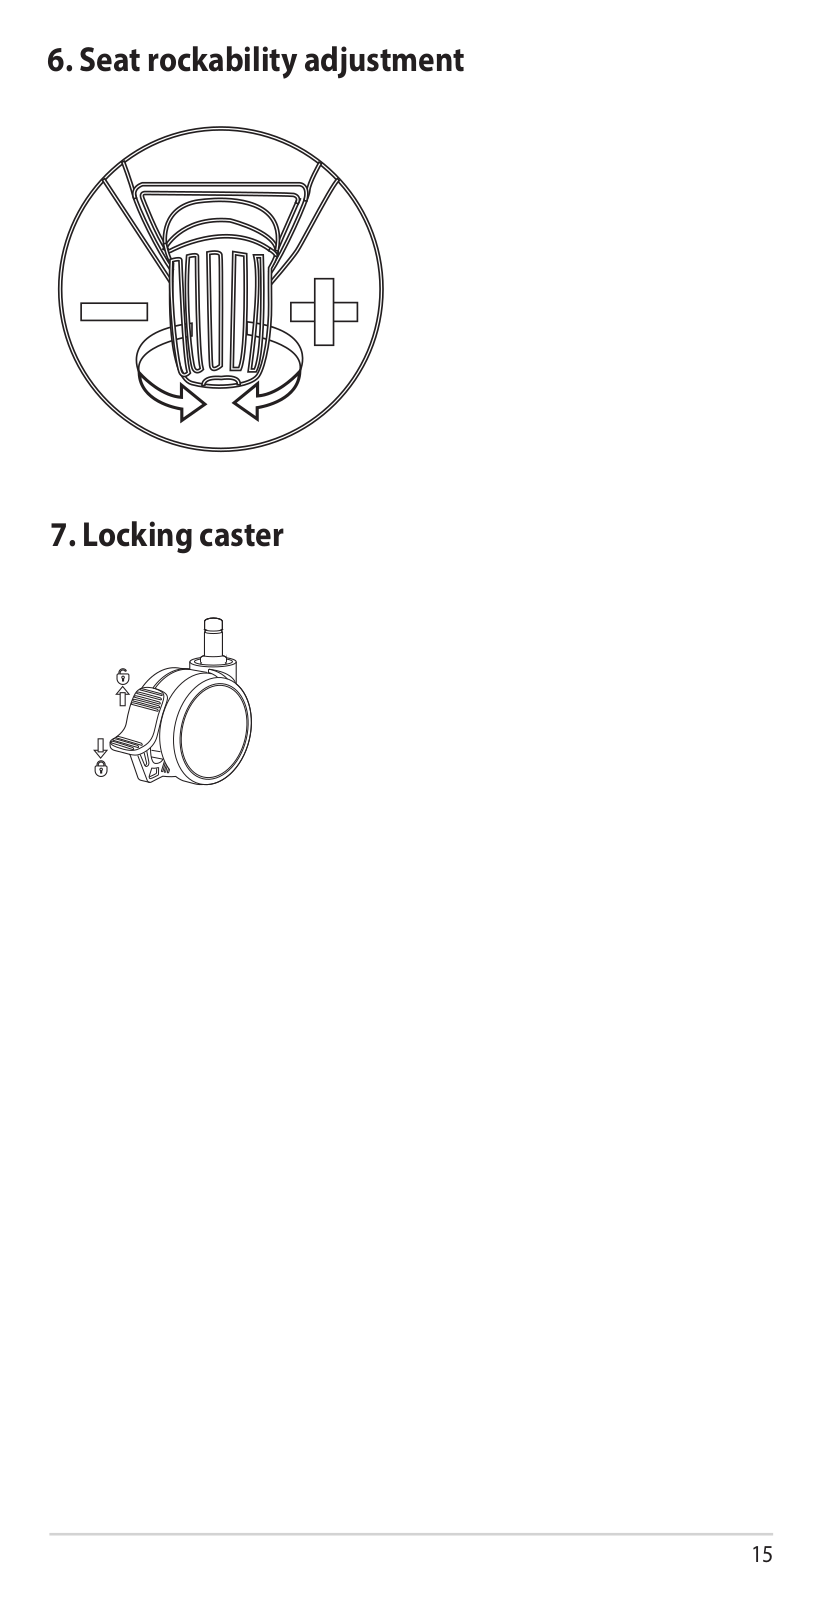
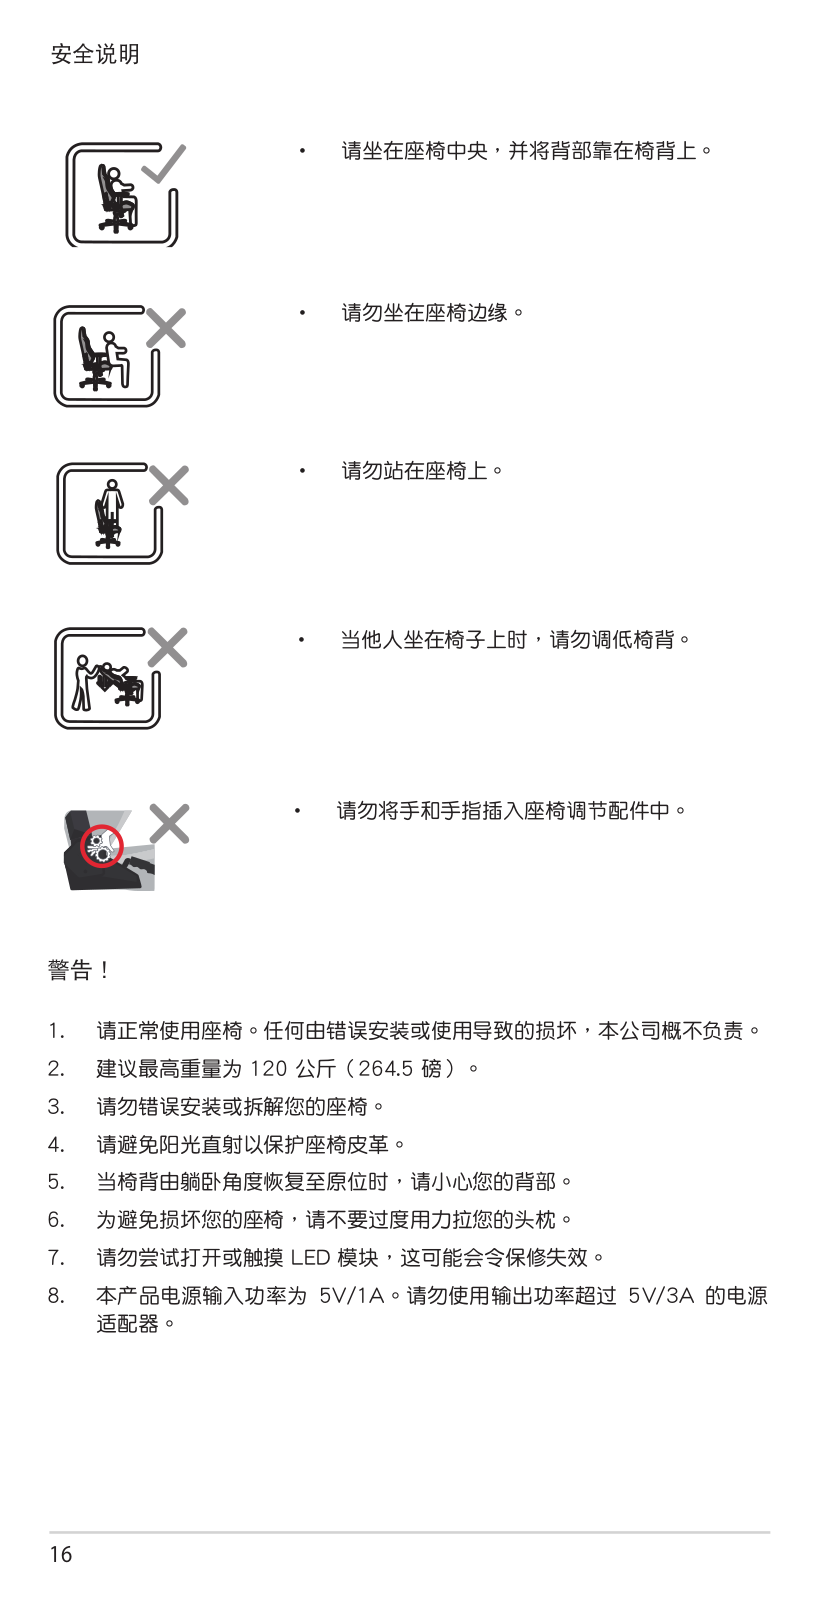
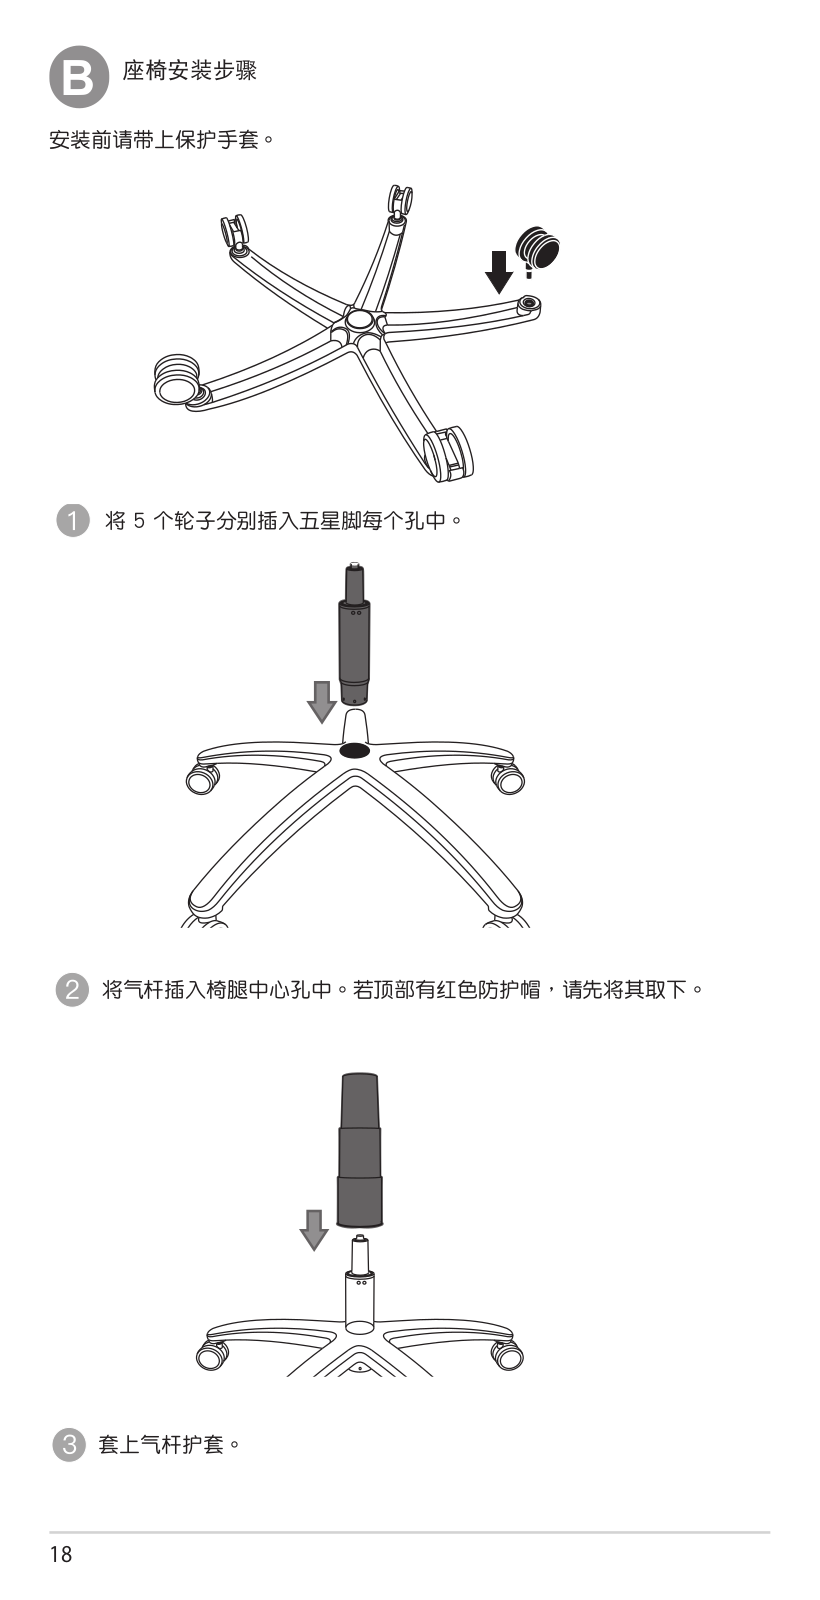
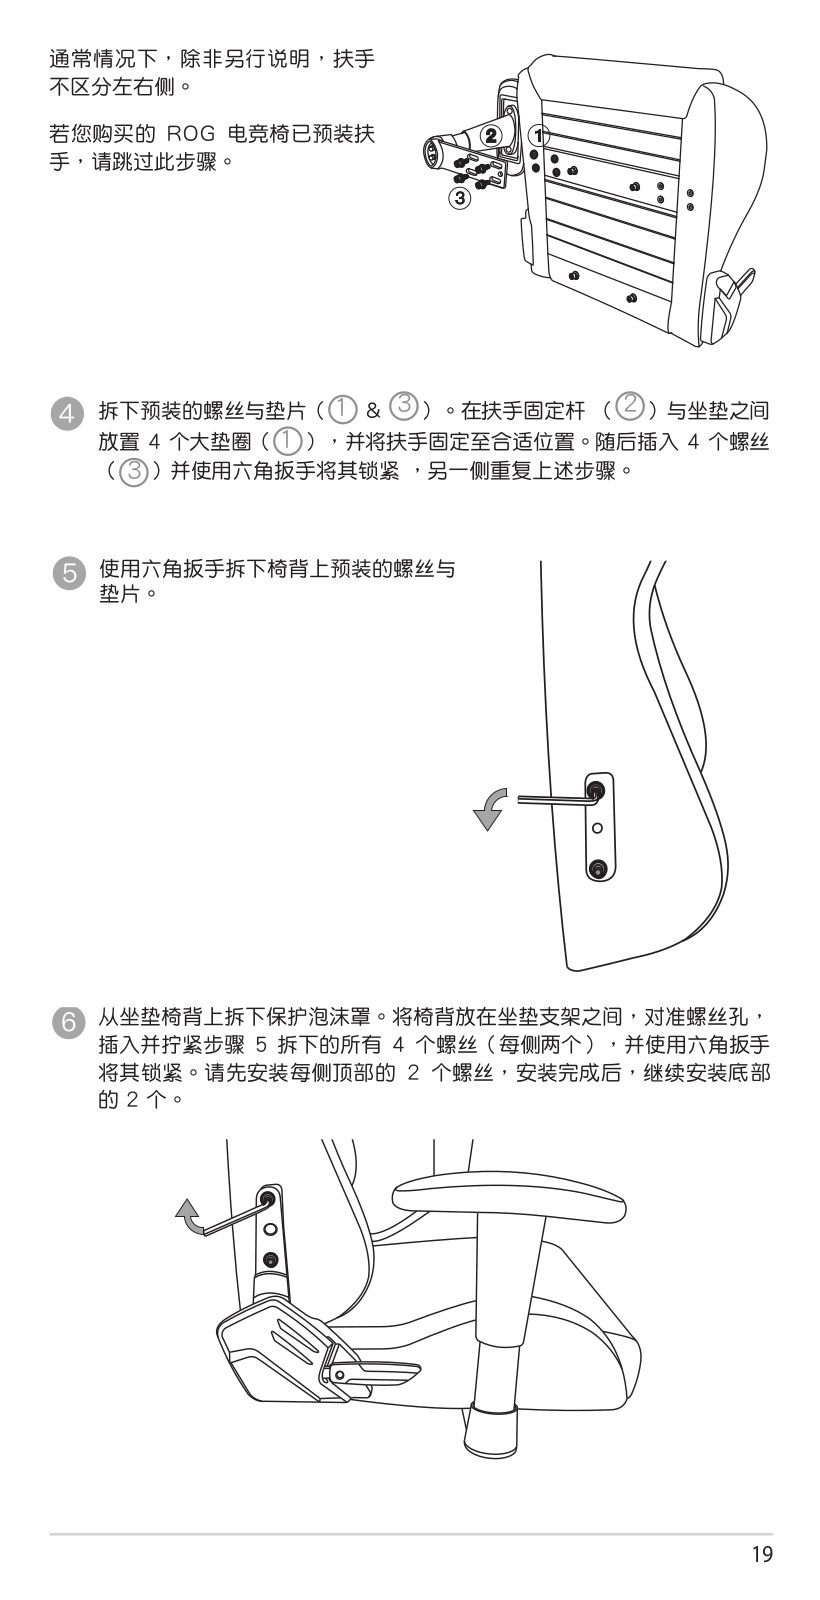
Rog Chariot
User Manual [ru]
279 pgs
59.34 Mb
0
Table of contents
Loading...
ASUS Rog Chariot User Manual [ru]
...
ASUS User Manual [ru]
Download
Specifications and Main Features
Frequently Asked Questions
User Manual
Download
Loading...
+
hidden pages
Unhide
You need points to download manuals.
1 point = 1 manual.
You can buy points or you can get point for every manual you upload.
Buy points
Upload your manuals
 Loading...