

Asus R300GOLD-GIFT BOX User Manual

R300
Portable Navigation Device
User
Manual
Quick
Start Guide
E3402

2
E3402
First Edition
September 2007
Copyright © 2007 ASUSTeK COMPUTER INC. All Rights Reserved.
No part of this manual, including the products and software described in it, may be reproduced, transmitted,
transcribed, stored in a retrieval system, or translated into any language in any form or by any means, except
documentation kept by the purchaser for backup purposes, without the express written permission of ASUSTeK
COMPUTER INC. (“ASUS”).
Product warranty or service will not be extended if: (1) the product is repaired, modied or altered,
unless such repair, modication of alteration is authorized in writing by ASUS; or (2) the serial number of
the product is defaced or missing.
ASUS PROVIDES THIS MANUAL “AS IS” WITHOUT WARRANTY OF ANY KIND, EITHER EXPRESS
OR IMPLIED, INCLUDING BUT NOT LIMITED TO THE IMPLIED WARRANTIES OR CONDITIONS OF
MERCHANTABILITY OR FITNESS FOR A PARTICULAR PURPOSE. IN NO EVENT SHALL ASUS, ITS
DIRECTORS, OFFICERS, EMPLOYEES OR AGENTS BE LIABLE FOR ANY INDIRECT, SPECIAL,
INCIDENTAL, OR CONSEQUENTIAL DAMAGES (INCLUDING DAMAGES FOR LOSS OF PROFITS, LOSS
OF BUSINESS, LOSS OF USE OR DATA, INTERRUPTION OF BUSINESS AND THE LIKE), EVEN IF ASUS
HAS BEEN ADVISED OF THE POSSIBILITY OF SUCH DAMAGES ARISING FROM ANY DEFECT OR
ERROR IN THIS MANUAL OR PRODUCT.
SPECIFICATIONS AND INFORMATION CONTAINED IN THIS MANUAL ARE FURNISHED FOR
INFORMATIONAL USE ONLY, AND ARE SUBJECT TO CHANGE AT ANY TIME WITHOUT NOTICE, AND
SHOULD NOT BE CONSTRUED AS A COMMITMENT BY ASUS. ASUS ASSUMES NO RESPONSIBILITY
OR LIABILITY FOR ANY ERRORS OR INACCURACIES THAT MAY APPEAR IN THIS MANUAL, INCLUDING
THE PRODUCTS AND SOFTWARE DESCRIBED IN IT.
Products and corporate names appearing in this manual may or may not be registered trademarks or
copyrights of their respective companies, and are used only for identication or explanation and to the owners’
benet, without intent to infringe.

3
GPS navigational software for ASUS R300
UK English
August, 2007 (1.0)
Copyright note
The product and the information contained herein may be changed at any time without prior notication.
This manual nor any parts thereof may not be reproduced or transmitted in any form either electronically
or mechanically, including photocopying and recording, without the express written consent of ASUSTek
Computer Inc..
Whereis® map data is © 2007 Telstra Corporation Limited and its licensors
Data Source © 2007 Tele Atlas N.V.
Austria: © BEV, GZ 1368/2003
Denmark: © DAV
France: © IGN France
Great Britain: Ordnance Survey data with permission of Her Majesty’s Stationery Ofce
© Crown Copyright
Italy: © Geonext/DeAgostini
Northern Ireland: © Ordnance Survey of Northern Ireland
Norway: © Norwegian Mapping Authority, Public Roads Administration / Mapsolutions
Switzerland: © Swisstopo
The Netherlands: Topograsche ondergrond
Copyright © dienst voor het kadaster en de openbare registers, Apeldorn
All rights reserved.

4
Safety Notices
Before using the device, carefully read the safety information below. When using the device, always
follow the safety precautions to avoid any accident, personal injury or property damage due to improper
operating.
- Congurethedevicesettingsbeforedriving.Donotcongureitwhiledriving.
- Thenavigationmaynotbealwaysinaccordancewiththeactuallocationsandit’sforyour
referenceonly.
- Themapmaynotbeexactthesamewiththeactuallocationsandit’sforyourreferenceonly.
- Itistheuser’sresponsibilitytoobservesafedrivingpracticeandthelocallawsofdriving.
- Avoidingexposingthedevicetohightemperatureforlongtime.Mountthedeviceinacool
dryplacewhenitisnotinuse.
- Whileparking,keepthesatellitenavigationfunctionenabledtoensurethesatellitesearching
accuracy.
- Donotopenorremovetheinternalcomponentsbyyourselforbyunauthorizedengineers.
ASUSisnotresponsibleforanydevicedamagecausedbytheabovesituations.
- Avoidpressurethatmaydamagetheinternalcomponents.
- Usequaliedbatteryonly.
- Protectthedisplayfromscratch.Usengersorastylustowriteonthescreen.
- Donotapplyanychemicalwhencleaningthedisplay
- Mountthedeviceinadryplaceandavoidenvironmentswhereitmaygetwet.
- Removethechargerandpoweroffthedevicebeforecleaningit.
- Shutthemainpoweronthebottomofthedeviceandcontactyourtechnicalsupportstaff
immediatelyinthefollowingsituations:
- powercableisdamaged,
- coverpanelsbreak,and
- thedeviceisexposedtowaterorrain
5
CAUTION
! Use only batteries listed in user-instruction.
! Risk of explosion if battery is replaced by an incorrect type. Dispose of used batteries
according to the instructions.
! All function about GPS or the similar are not intended to be used for location of persons,
especially for “life-safety” and “non-life-safety” applications.
Package contents
Note: The Standard items table is for your reference only. Package content may change
without notice.
Standarditems
-ASUS R300
device
-Car Holder
-Car charger
-Support CD
containing full
manual and map
-Quick Start Guide
-Micro SD Card
-Warranty Card
-USB Cable
Optionalaccessories
ExternalAntenna BicycleMount TMCmodule Earphone
6
Product specications
OS Microsoft®Windows®CE.Net5.0Coreversion
CPU SAMSUNG400MhzProcessor
Dimensions 101x81.5x13.8mm;140g
Battery 1300mAh,rechargeableLi-ionbattery(Swappable)
Display 3.5inchTFTTouch-screen,65KColor,320x240
Pixels(QVGA)
GPS SiRFSTARIIIGPSchipsetwithinternalantenna
Memory Buildin64MBRAM,128MBFlashROM
Connectivity USB1.1,Bluetooth2.0(withHandsfreefunction)
ExpansionSlot MicroSDCardSlot(upto4GB)
Audio SupportMP3andWMAformat
Communication -Phone:Answer/makephonecallthroughBT
Entertainment -Videoplayer:play/suspend/forward/backward/next/
previous,Fullscreenplay,PlayLister
-MP3Player:play/suspend/forward/backward/next/
previous,PlayLister
-PhotoViewer:Slideshowreview
Other 1.Lightsensor2.OptionalTMCmodule(dependson
TMCserviceavailability)3.FMTavailabilitydependson
validityindifferentcountries

7
Table of Contents
Legal statements ............................................................................... 2
Safety notice ..................................................................................... 4
Package Contents ............................................................................. 5
Product specications ....................................................................... 6
Chapter 1 Getting to know your R300 12
1.1 Layout features ...................................................................13
1.2 Charging the battery ...........................................................16
1.3 Turn on the device .............................................................. 18
1.4 Main menu ...........................................................................19
1.5 Adjust the basic Settings ...................................................20
1.6 Installing the car kit ............................................................25
Chapter 2 Navigation System 27
2.1 Getting started with Asus GO ............................................28
2.1.1 Simple and Advanced modes .......................................... 30
2.1.2 Hardware buttons ............................................................. 32
2.1.3 Buttons and other controls on the screens ...................... 32

8
2.1.4 Using the map .................................................................. 32
2.1.5 Using keyboards .............................................................. 36
2.1.6 Asus GO concepts ........................................................... 37
2.2 Navigating with Asus GO ...................................................42
2.2.1 Selecting the destination of a simple route ...................... 42
2.2.2 Creating a multi-point route .............................................. 54
2.2.3 Watching the simulation of a route ................................... 55
2.2.4 Pausing the active route .................................................. 56
2.2.5 Deleting the active route .................................................. 56
2.2.6 Using track logs ............................................................... 56
2.2.7 Saving a route .................................................................. 57
2.2.8 Loading a saved route ..................................................... 58
2.3 Reference book (Advanced mode) ....................................59
2.3.1 Map .................................................................................. 60
2.3.2 Find menu ........................................................................ 63

9
2.4 Glossary ..............................................................................68
2.5 End user licence agreement ..............................................71
Chapter 3 Multi-media features 72
3.1 Music Player ........................................................................73
Launch the Music player ................................................................. 73
Playlist ......................................................................................... 74
Play music ....................................................................................... 75
3.2 Photo Viewer .......................................................................76
Launch the Photo Viewer ................................................................ 76
View photos ..................................................................................... 77
Display a photo ............................................................................... 78
3.3 Video Player ........................................................................79
Launch the Video Player ................................................................. 79
Playlist ......................................................................................... 80

10
Note: the screens, procedures and specications in this manual may not be exactly the
same with those of your device, please take them as reference only.
Playing a video ................................................................................ 81
Chapter 4 Phone features 82
4.1 Phone menu ................................................................................... 83
4.2 Bluetooth Settings ......................................................................... 84
4.3 Connecting R300 to your cellphone ............................................ 85
4.4 Making and receiveing phone calls ............................................. 87
ASUS Contact information 89

11
Getting to know
your R300
Chapter
1
12
ASUS R300 is a professional portable navigation device (PND) which provides reliable
navigation and positioning function. R300 also provide you with phone and multi-media
functions.
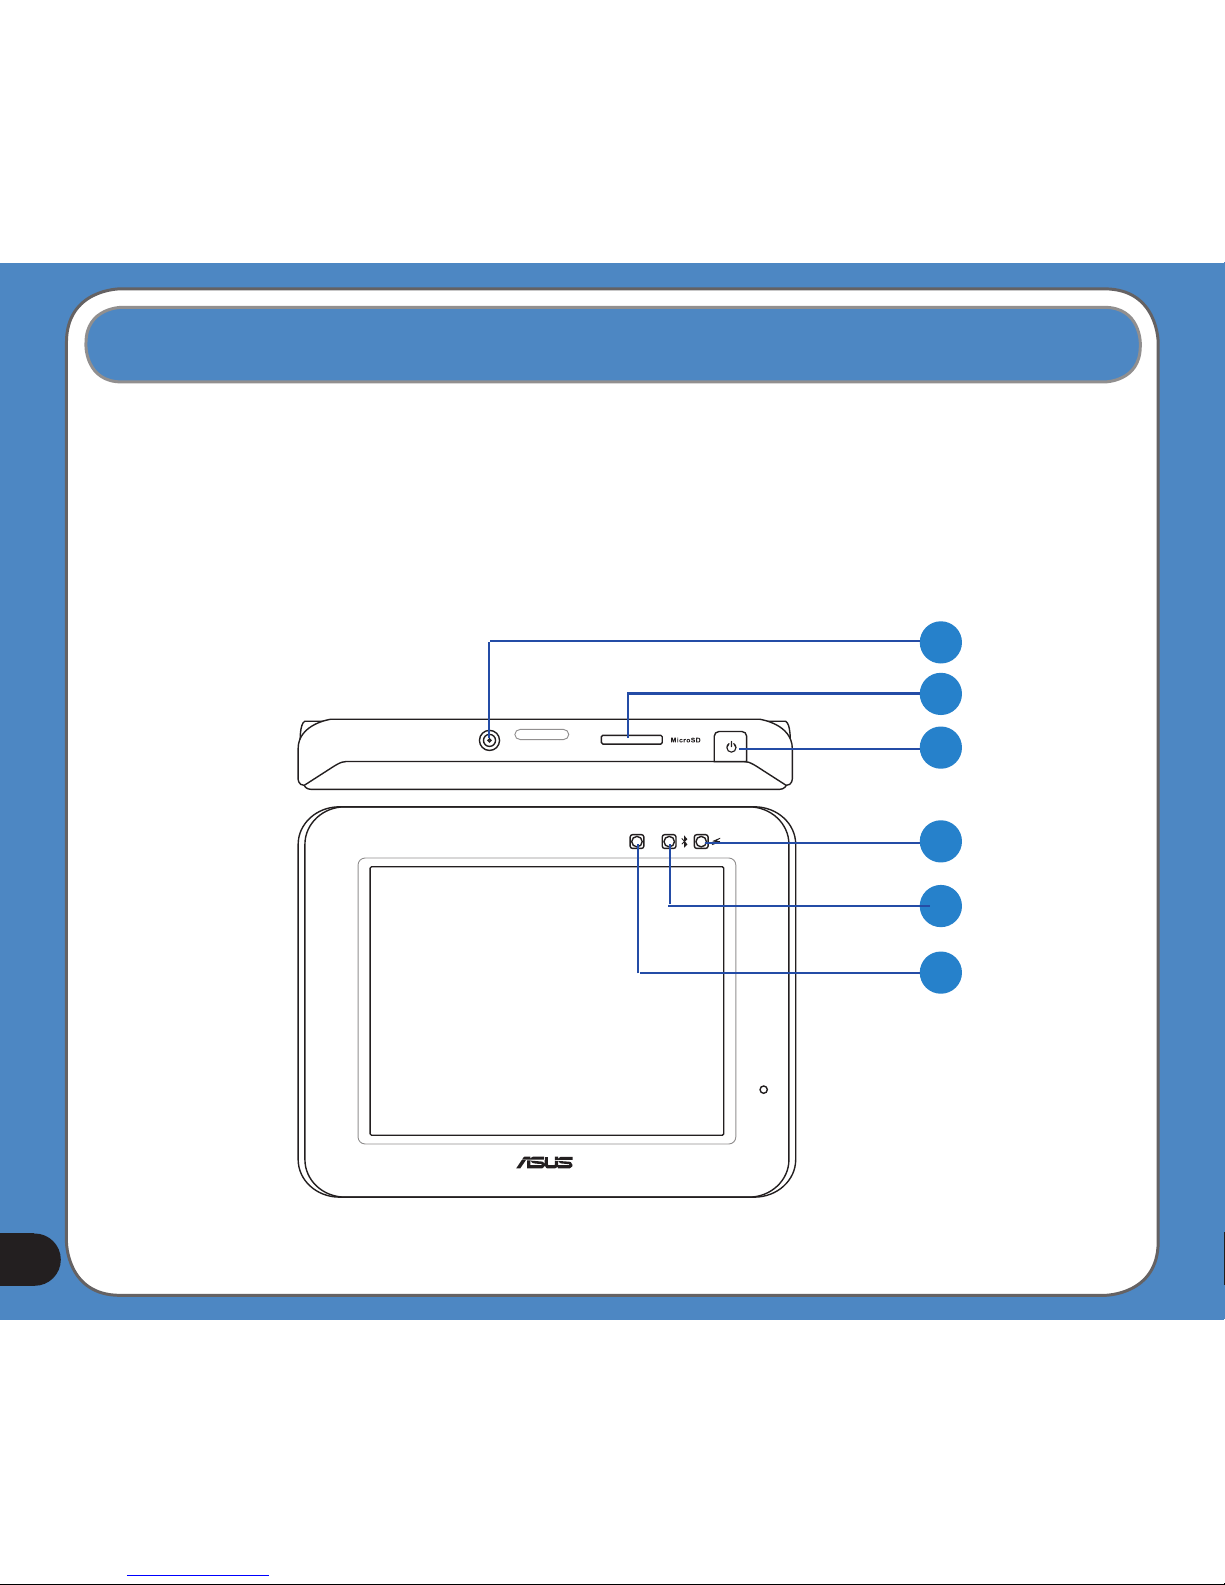
Front and top features
1.1 Layout features
1
2
3
4
5
6
13
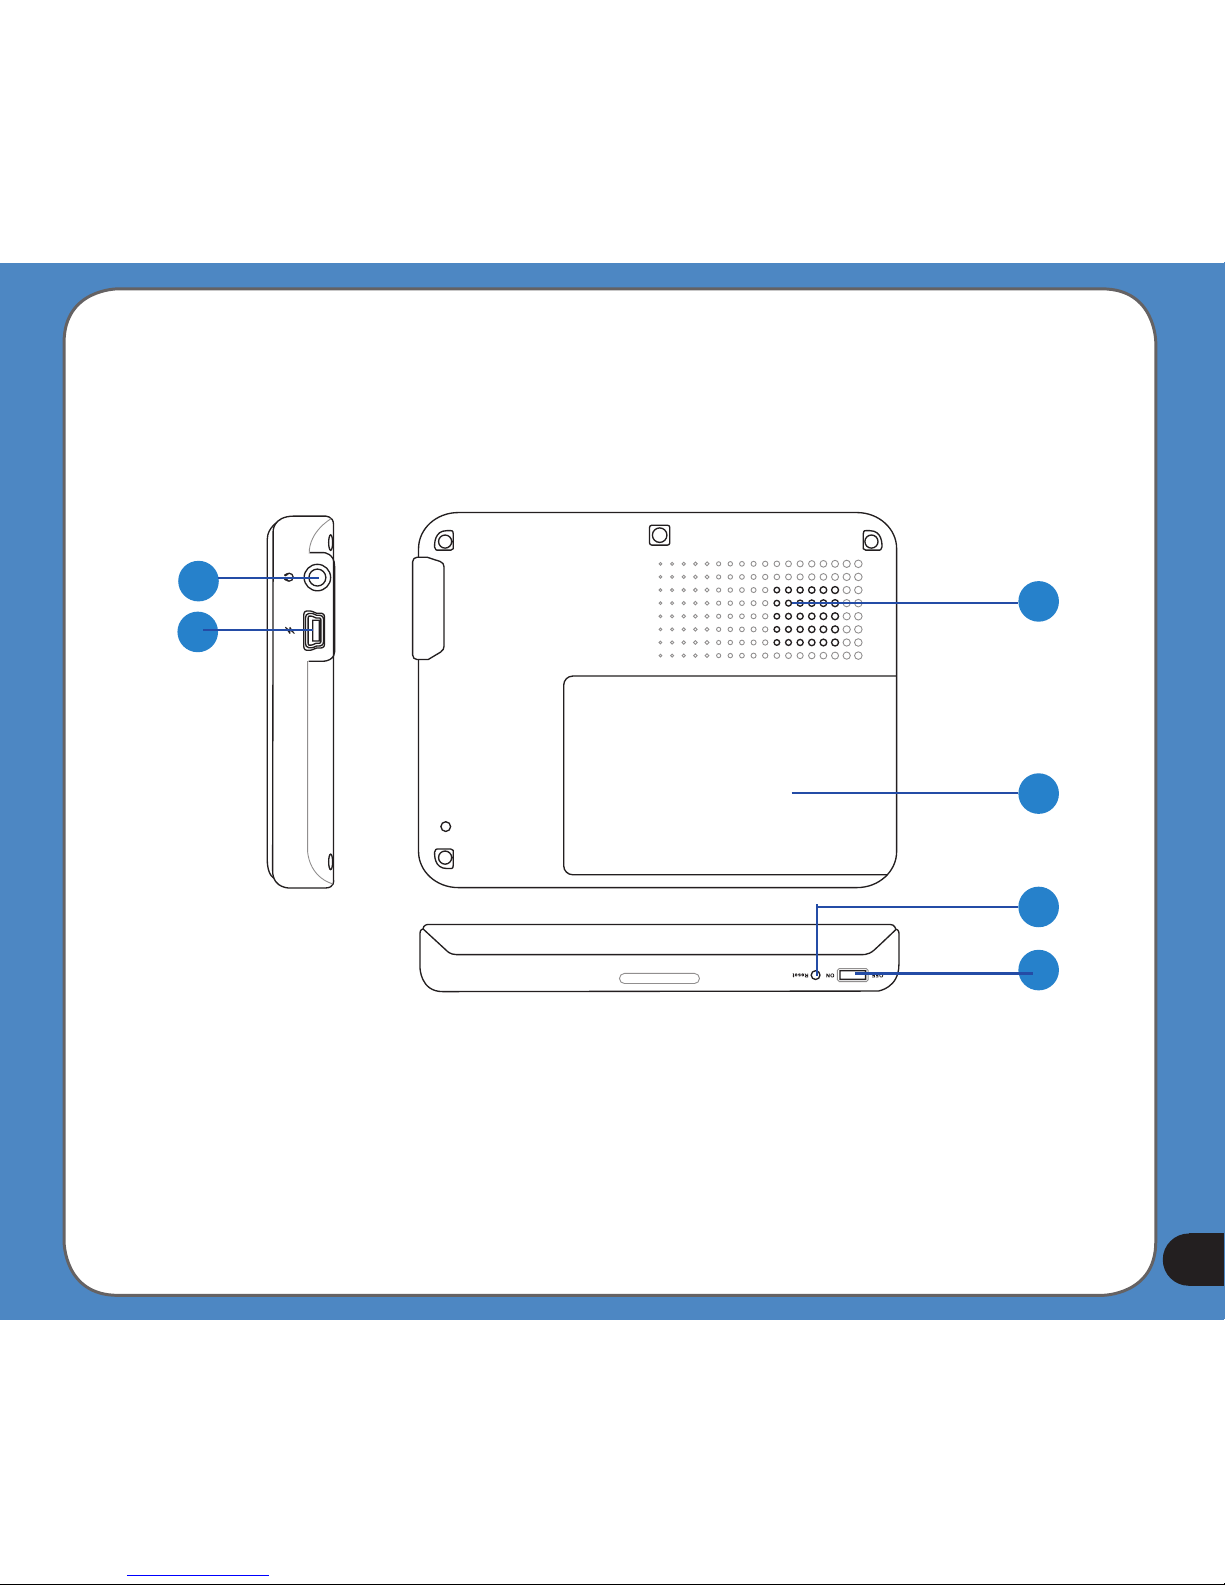
Rear and side features
7
8
9
11
12
10
14
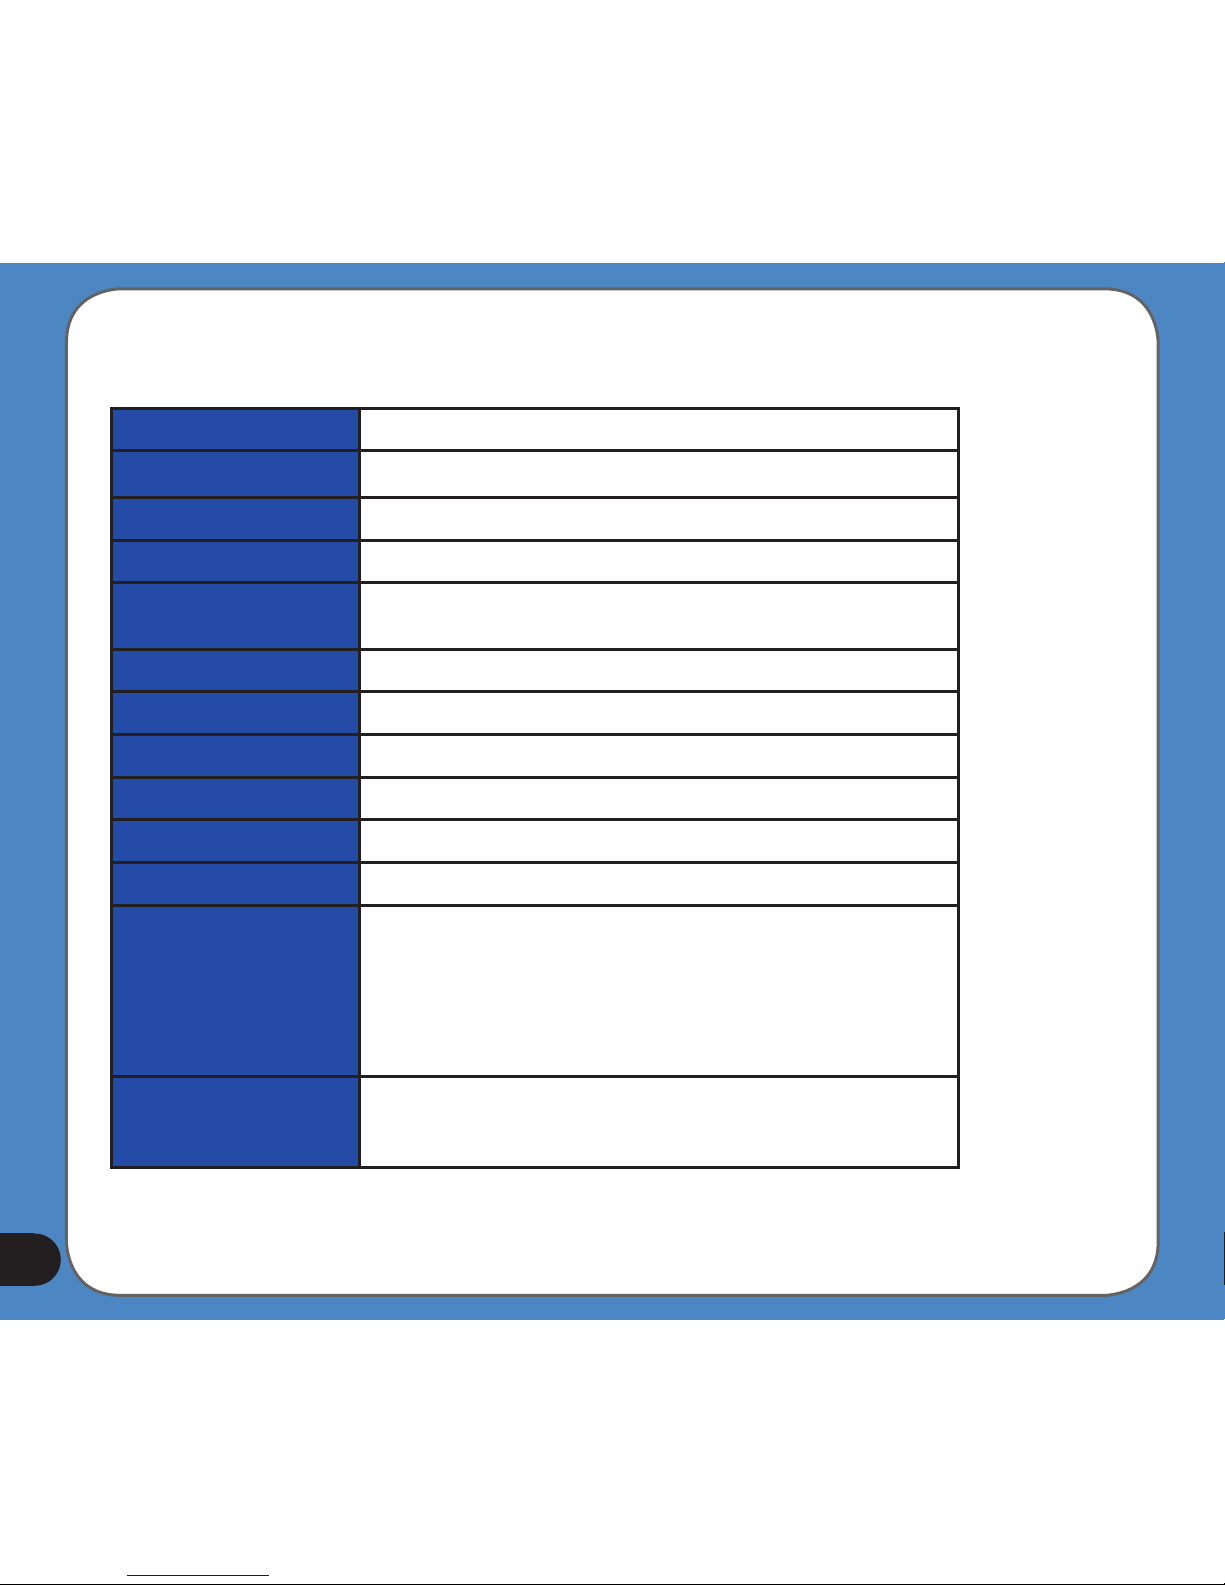
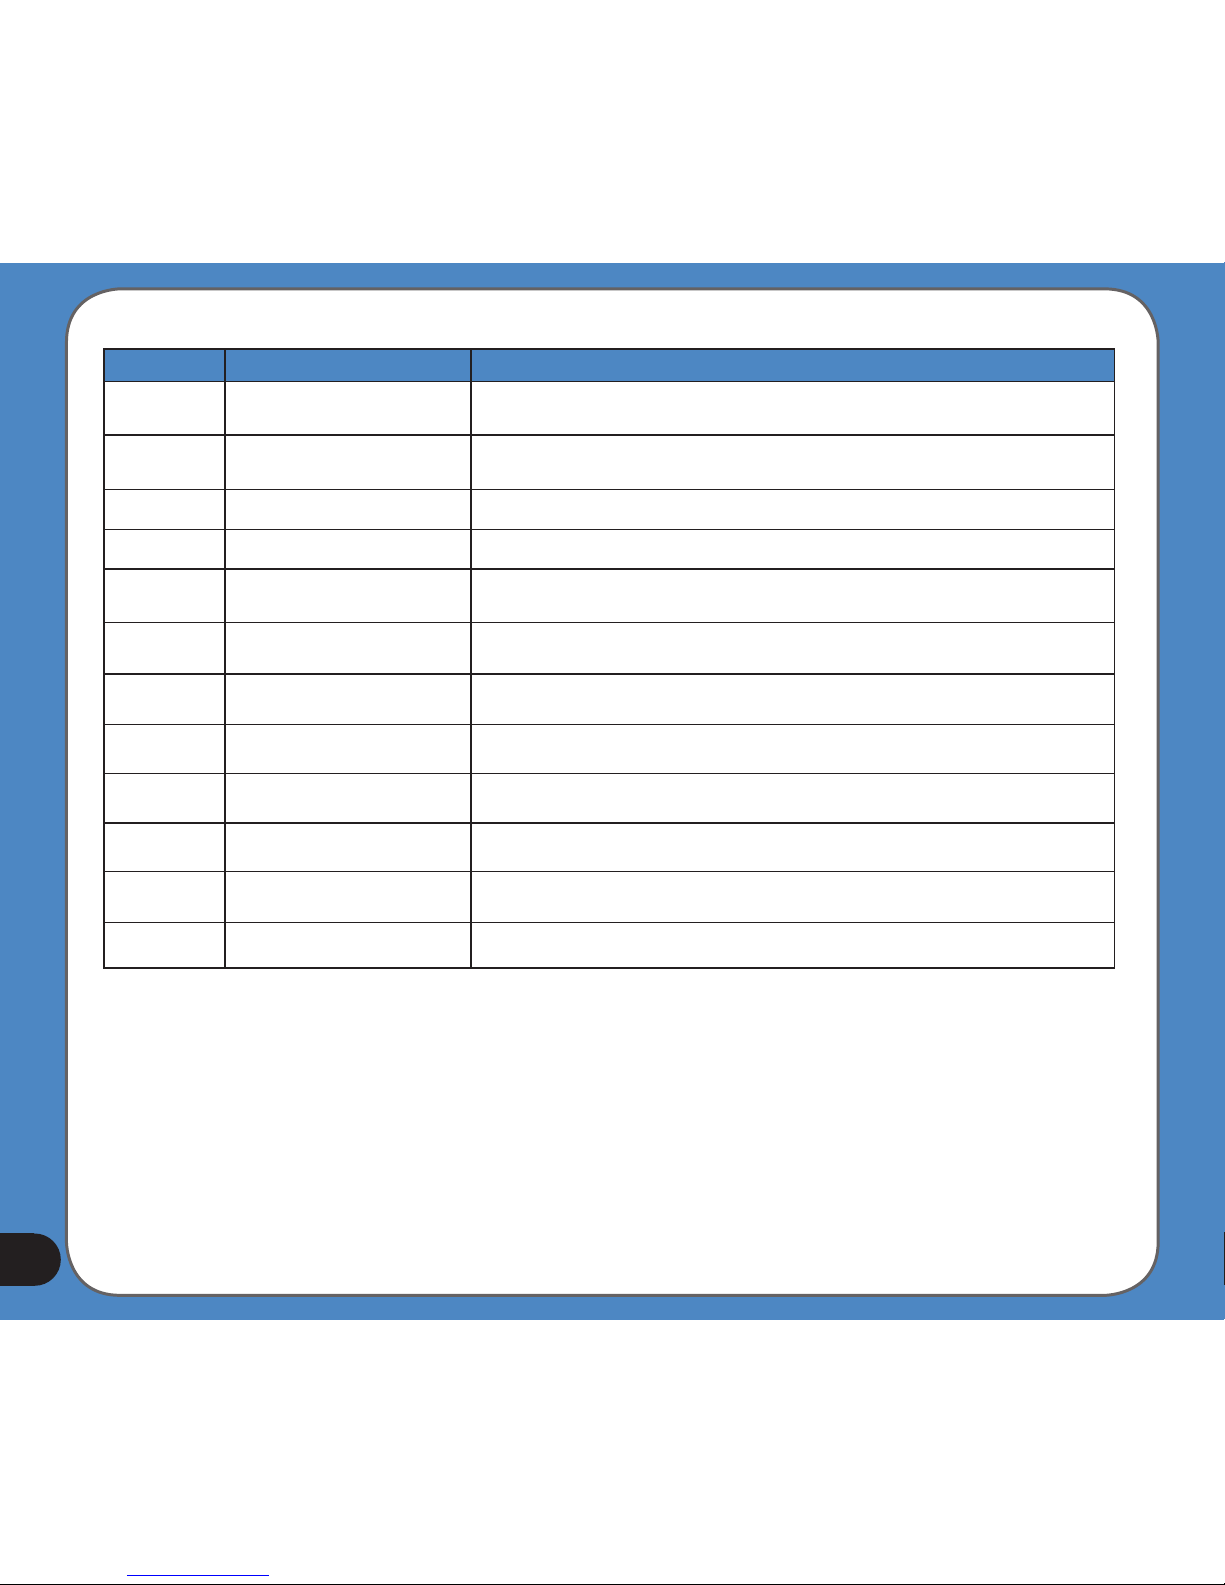
Number Item Description
1
ExternalAntennaport
Connects to an external antenna for better signal performance (the external
antenna is optional)
2
MicroSDSlot
Insert the external Micro SD memory card to this slot
3
SleepModeButton
Press to turn on the device, or to enter into sleep mode
4
ChargingLED
Red- charging, Yellow- full charged
5
BluetoothLED
When function turning on, it's lighting Blue
6
LightSensor
Automatically adjusts the backlight according to the light in the environment
7
AudioJack
Use to connect headsets or two-channel speakers
8
MiniUSB
Connects to other devices through a Mini USB cable
9
Speaker
Allows you to listen to music, the navigation voice, and system warning
10
Battery
Battery cover
11
Reset
Push to perform reset function
12
Mainpowerswitch
Turns the main power on/off
15
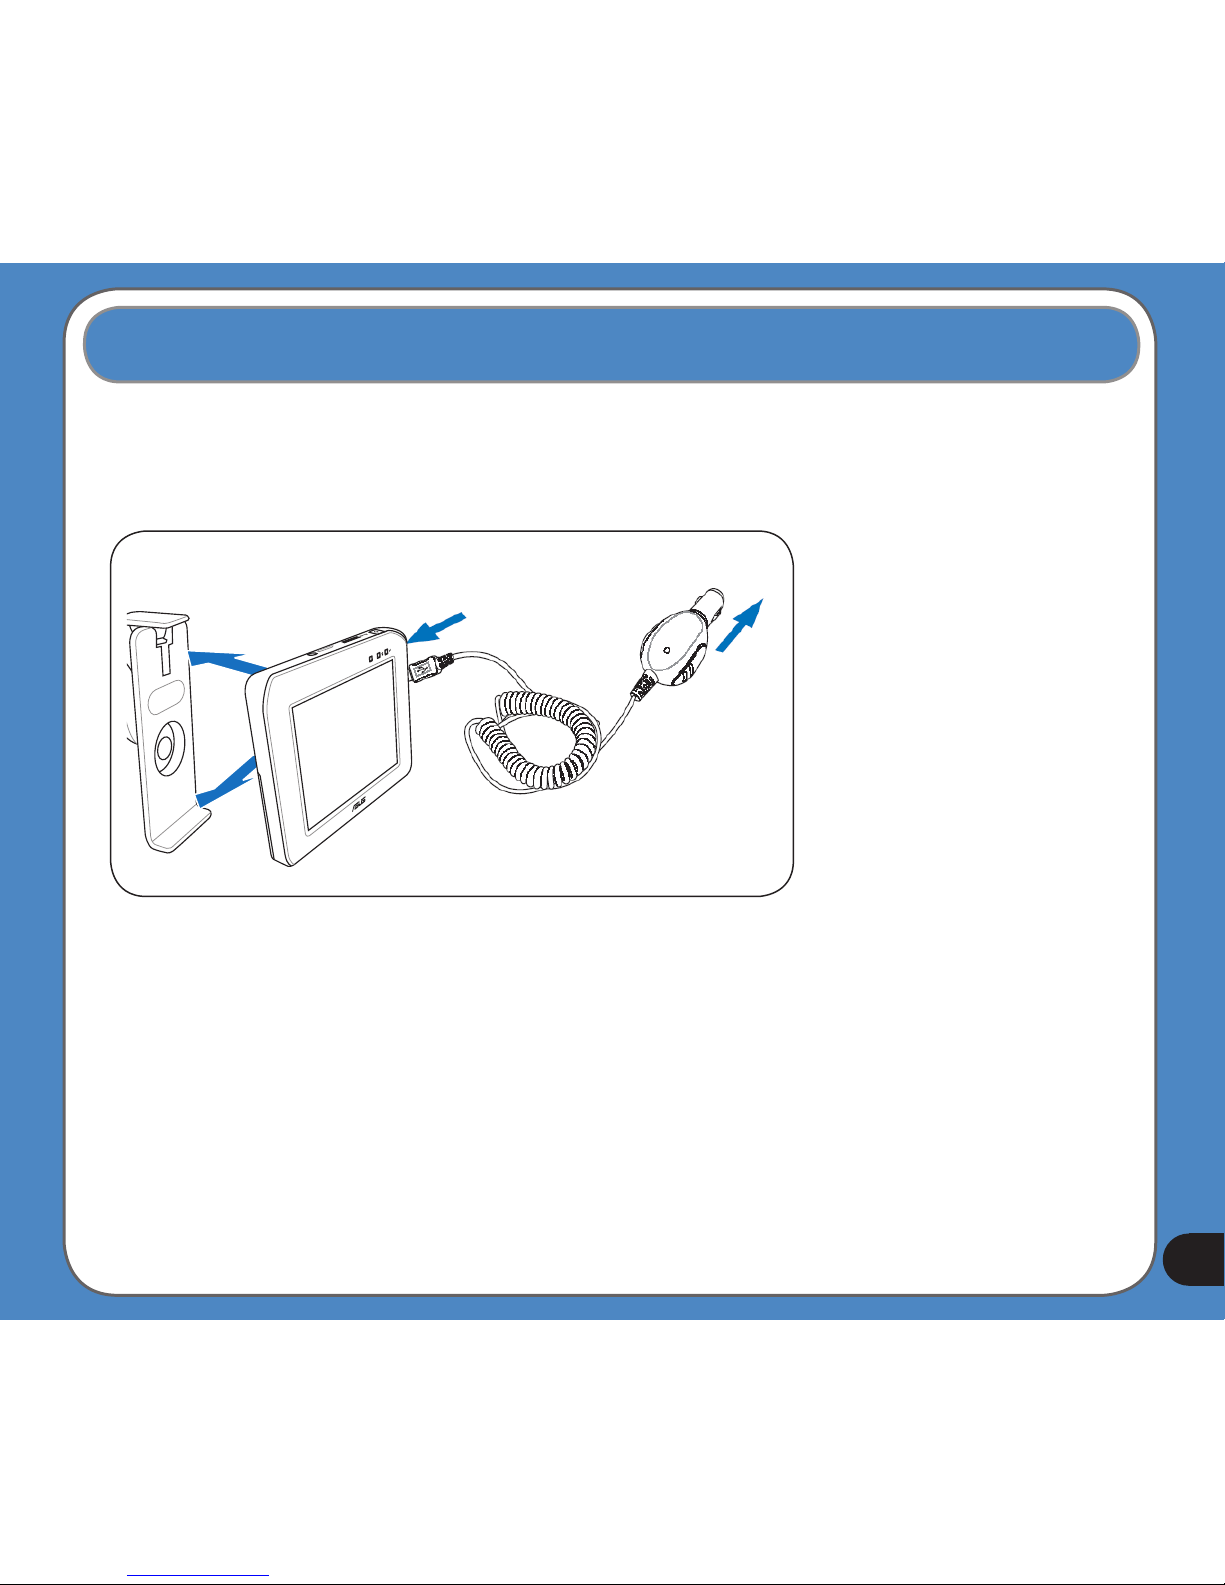
You can charge the device using a car charger kit. Plug any of these cables to the mini-USB
port on the right side of the device.
Car charger kit
NOTE:
When the Main Power
Switch is set to Off,
the device can not be
charged.
While charging, the
power LED lights up in
red. When the battery is
fully charged, the power
LED turns to yellow.
You can use the
device while charging.
However, the device
takes much less time
to be fully charged in
sleep mode.
1.2 Charging the Battery
16
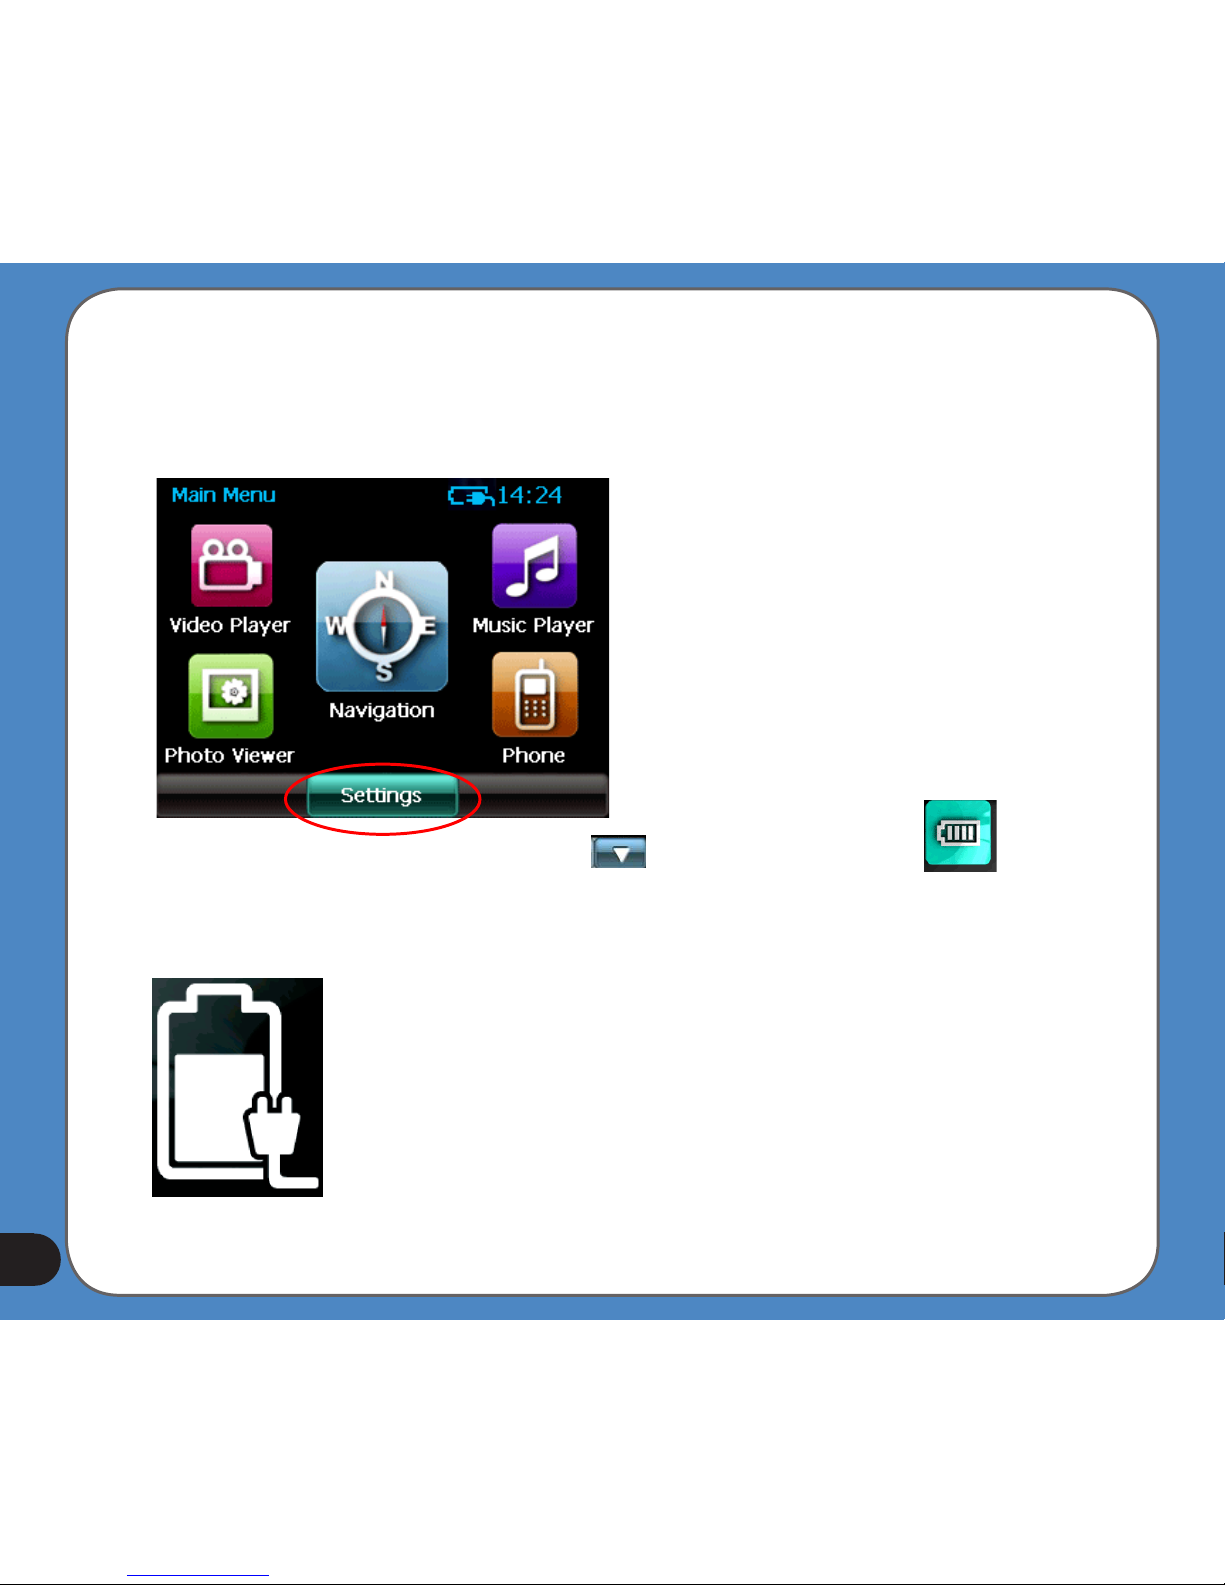
Checking battery status
To check how much battery power remains:
(1) From the main menu, tap Settings.
(2) The Sub-menu Settings appears. Tap to display Battery icon .
(3) The Battery screen appears and displays a battery icon indicating the battery power
that remains (see the gure below).
17
Note:
When the main power switch is set
to Off, the device is not able to be
charged.
If you press the Sleep Mode button
when the device is on, it enters into
sleep mode.
When the device is on, it takes
longer time for the battery to be
fully charged. When the device is in
sleep mode, the battery can be fully
charged quickly.
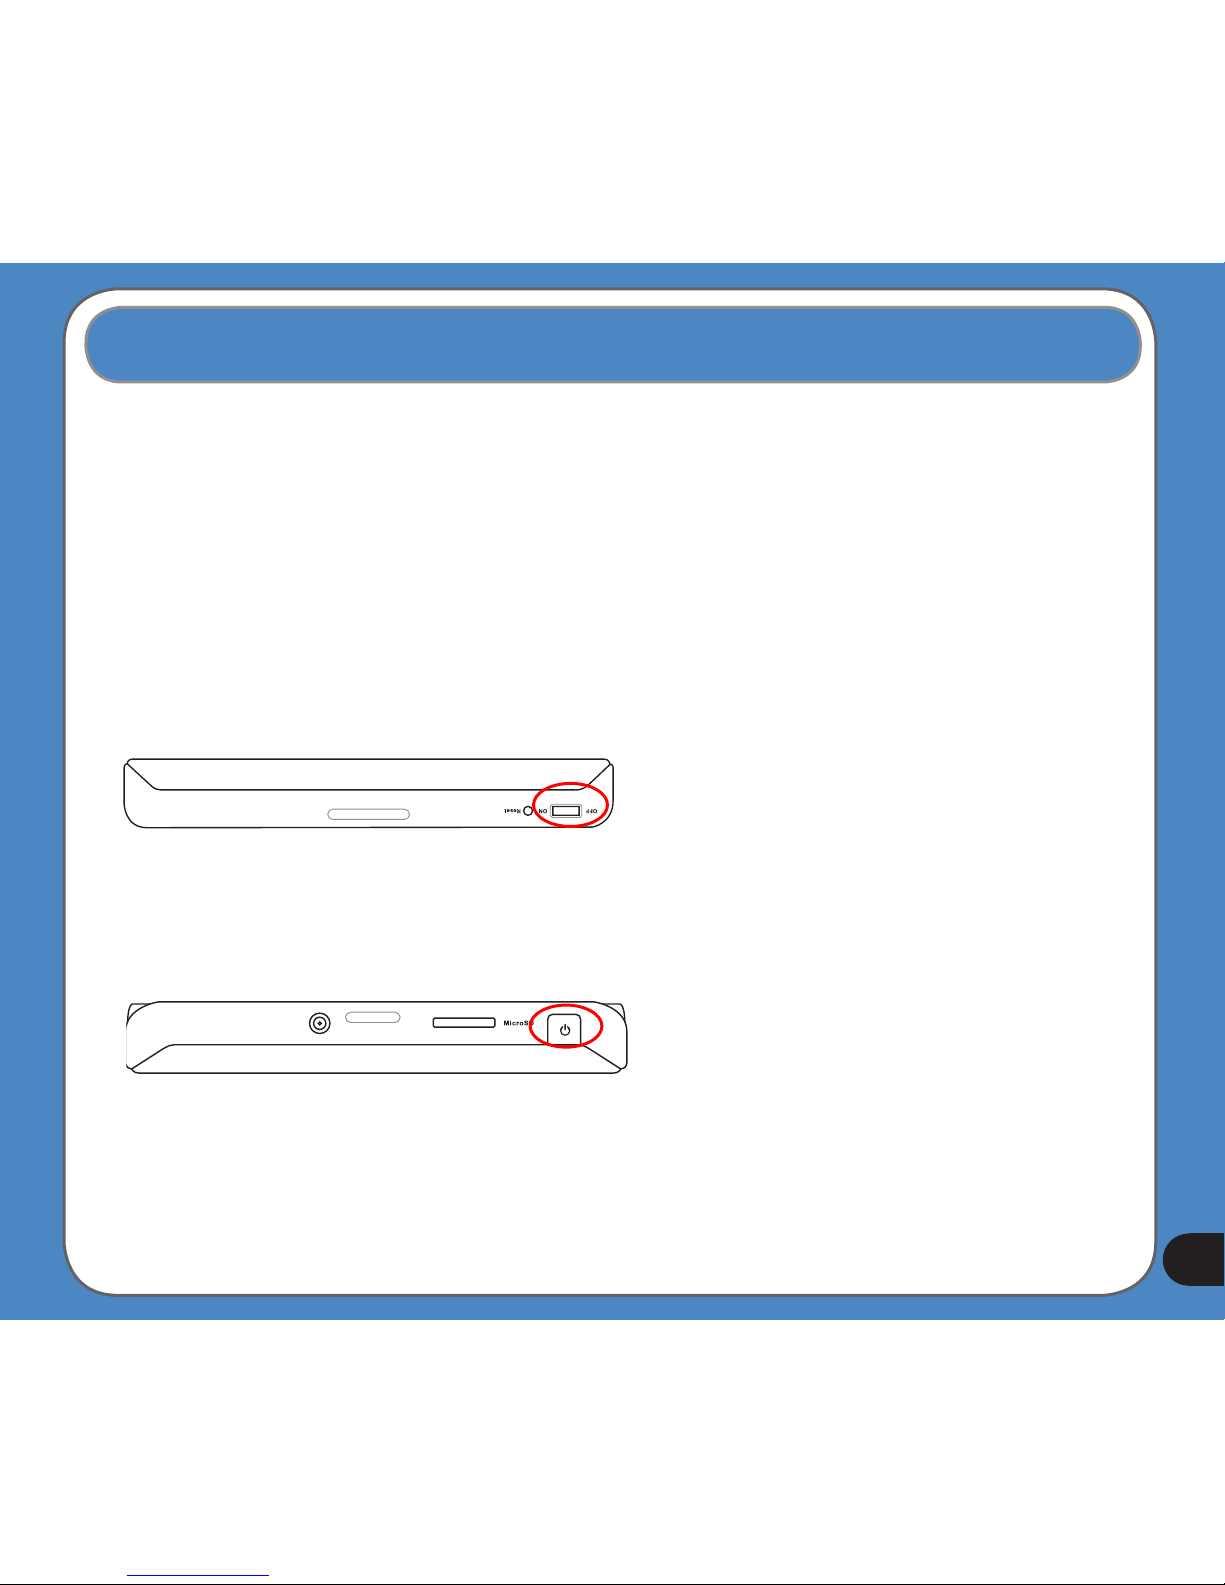
1.3 Turning on the Device
To turn on the device:
- Turn on the main power switch on the bottom of device (gure 1).
To enter/wake up from the sleep mode:
- Press the Sleep Mode Button on the top of the device (gure 2).
gure 1
gure 2
Sleep Mode Button
Main power switch

18
The following menu appears after you turn on the device. From the main menu, you can:
- Tap Navigation to enter the navigation system.
- Tap Settings to adjust the device settings.
- Tap Video Player to play videos.
- Tap Music Player to play music.
- Tap Photo Viewer to view photos.
- Tap Phone to use phone through the bluetooth connection.
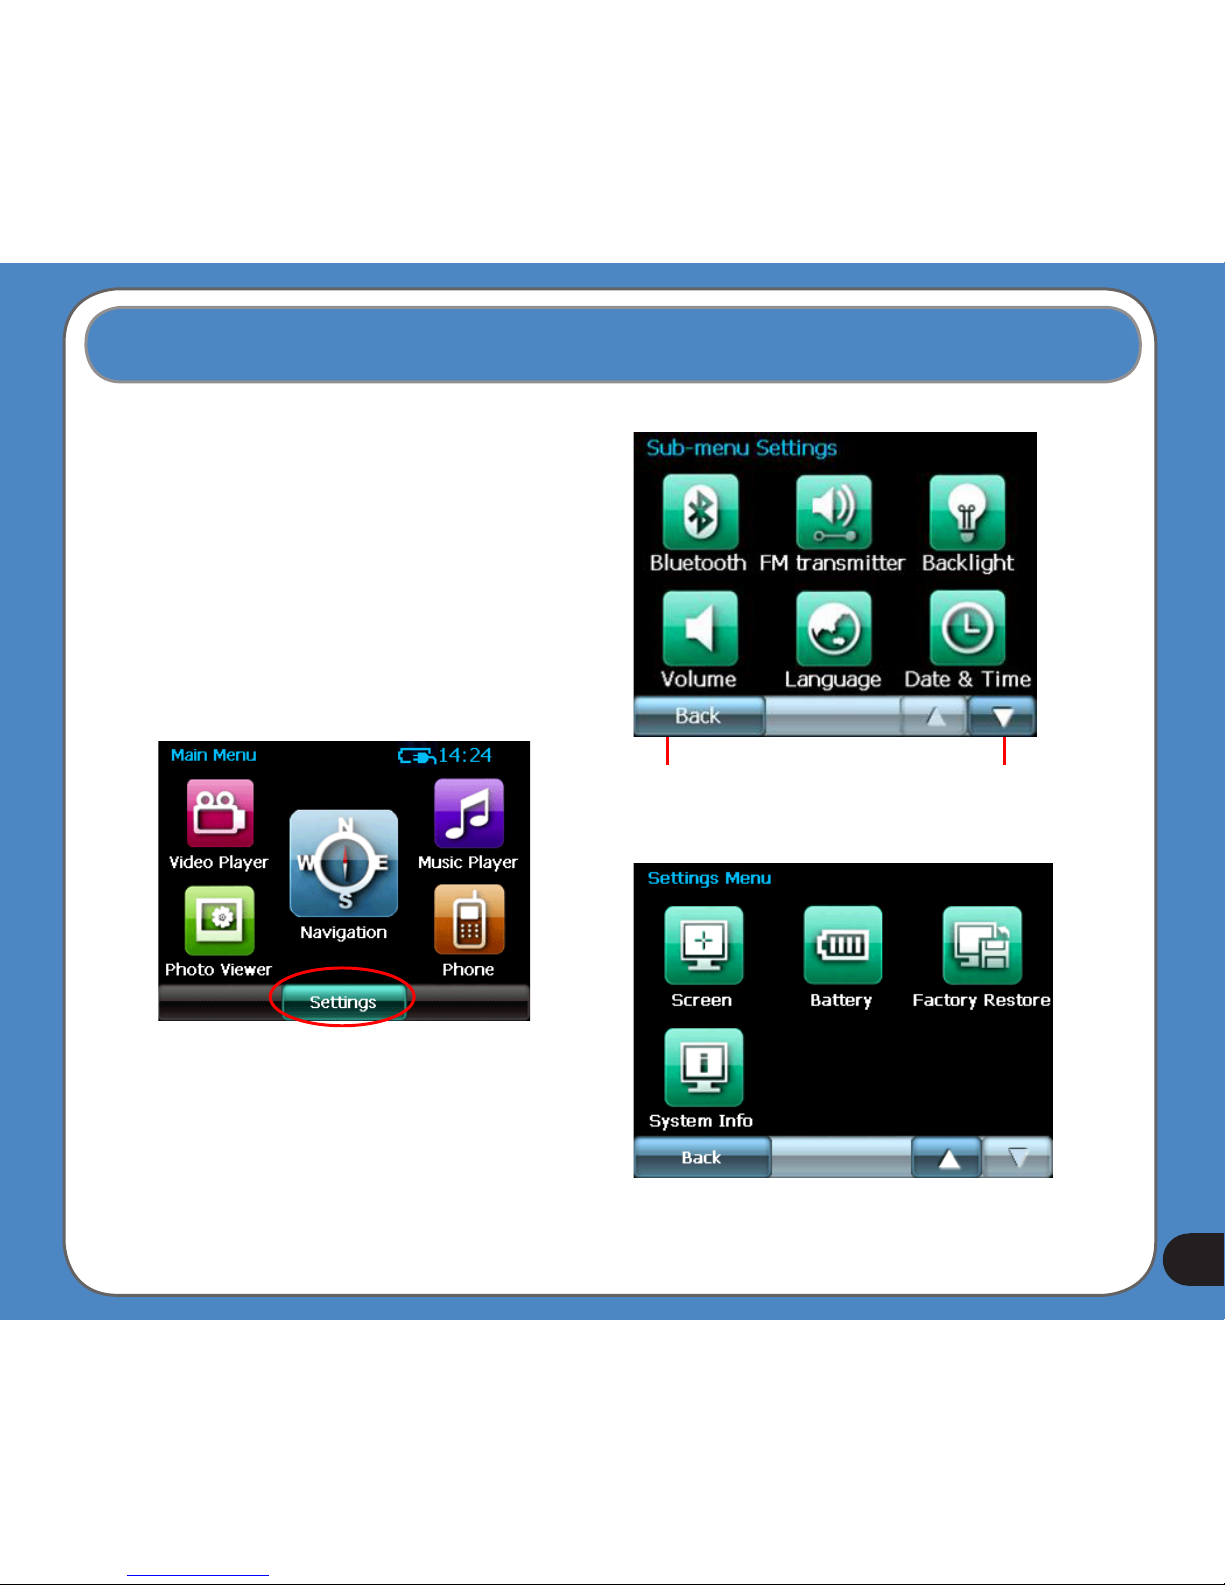
1.4 Main Menu
Note: The FM transmitter icon only appears when the FM transmitter function is enabled.
19
1.5 Adjust the basic settings
You can launch the basic settings menu
by tapping Settings on the main menu.
The settings menu allows you to adjust
language settings, backlight, Date and
time, bluetooth settings, volume, to align
screen, and to view system information.
tap to back
to the main
menu
tap to move
to the next
page
20
System Infomation
System information screen display the ROM
version, Software Version and the screen
resolution and color information.
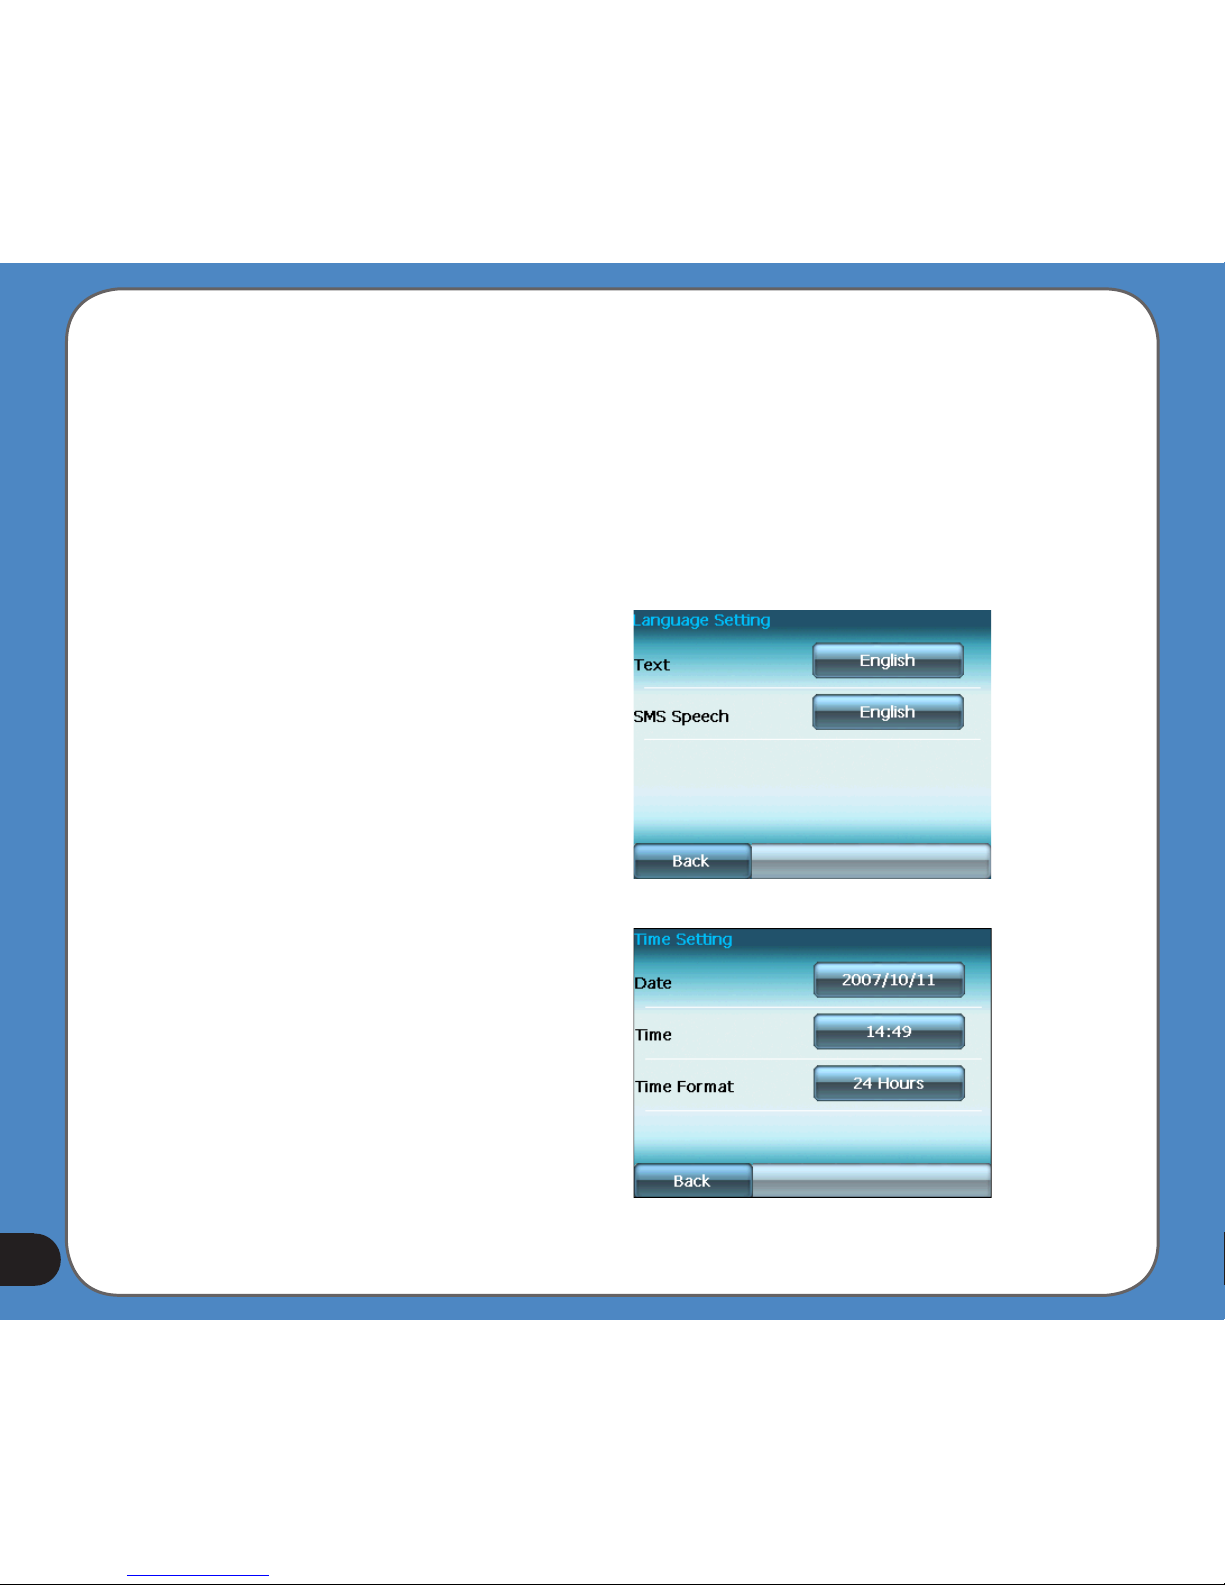
Language
You can choose the language for displaying
the text. Simply tap the bars behind the Text
to select the language.
Date and Time
To set the date and time, tap
Date and Time
from the settings menu. Tap the bars behind
Date, Time
and
Time Format
to adjust
them.
21
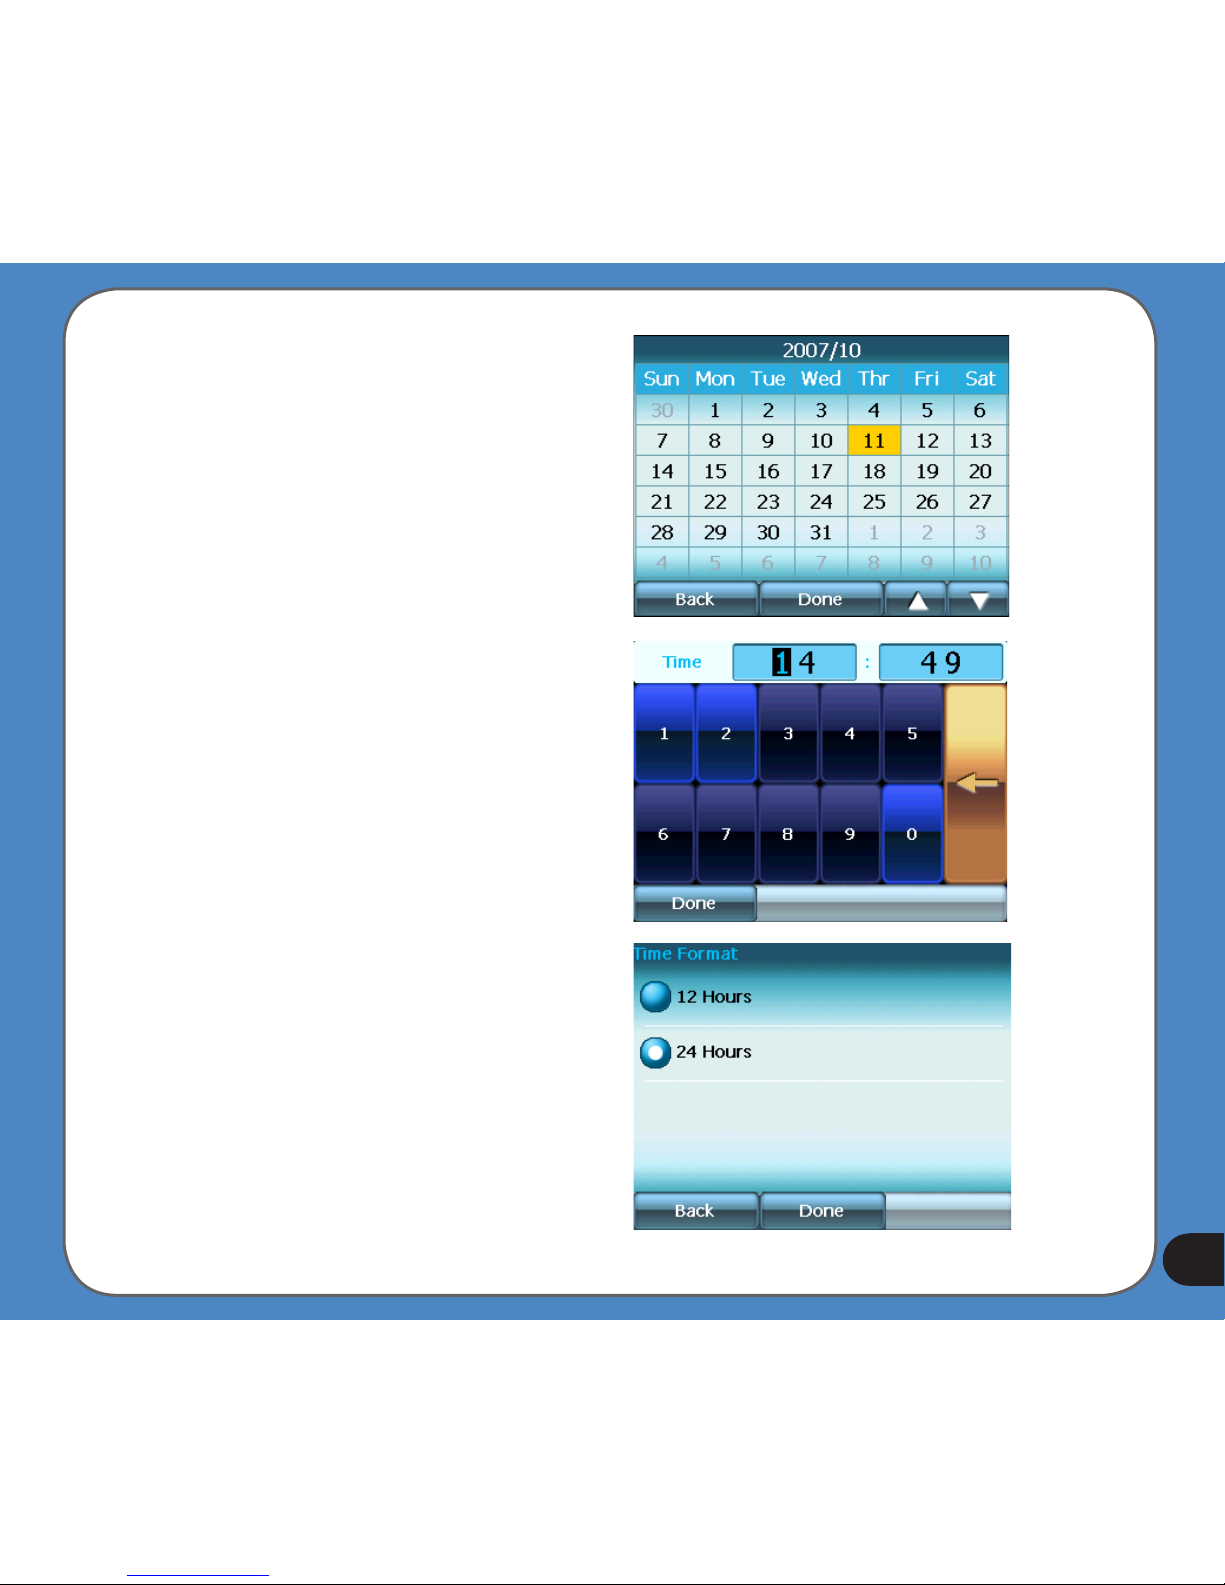
Set Date
Set time
Set time format
22
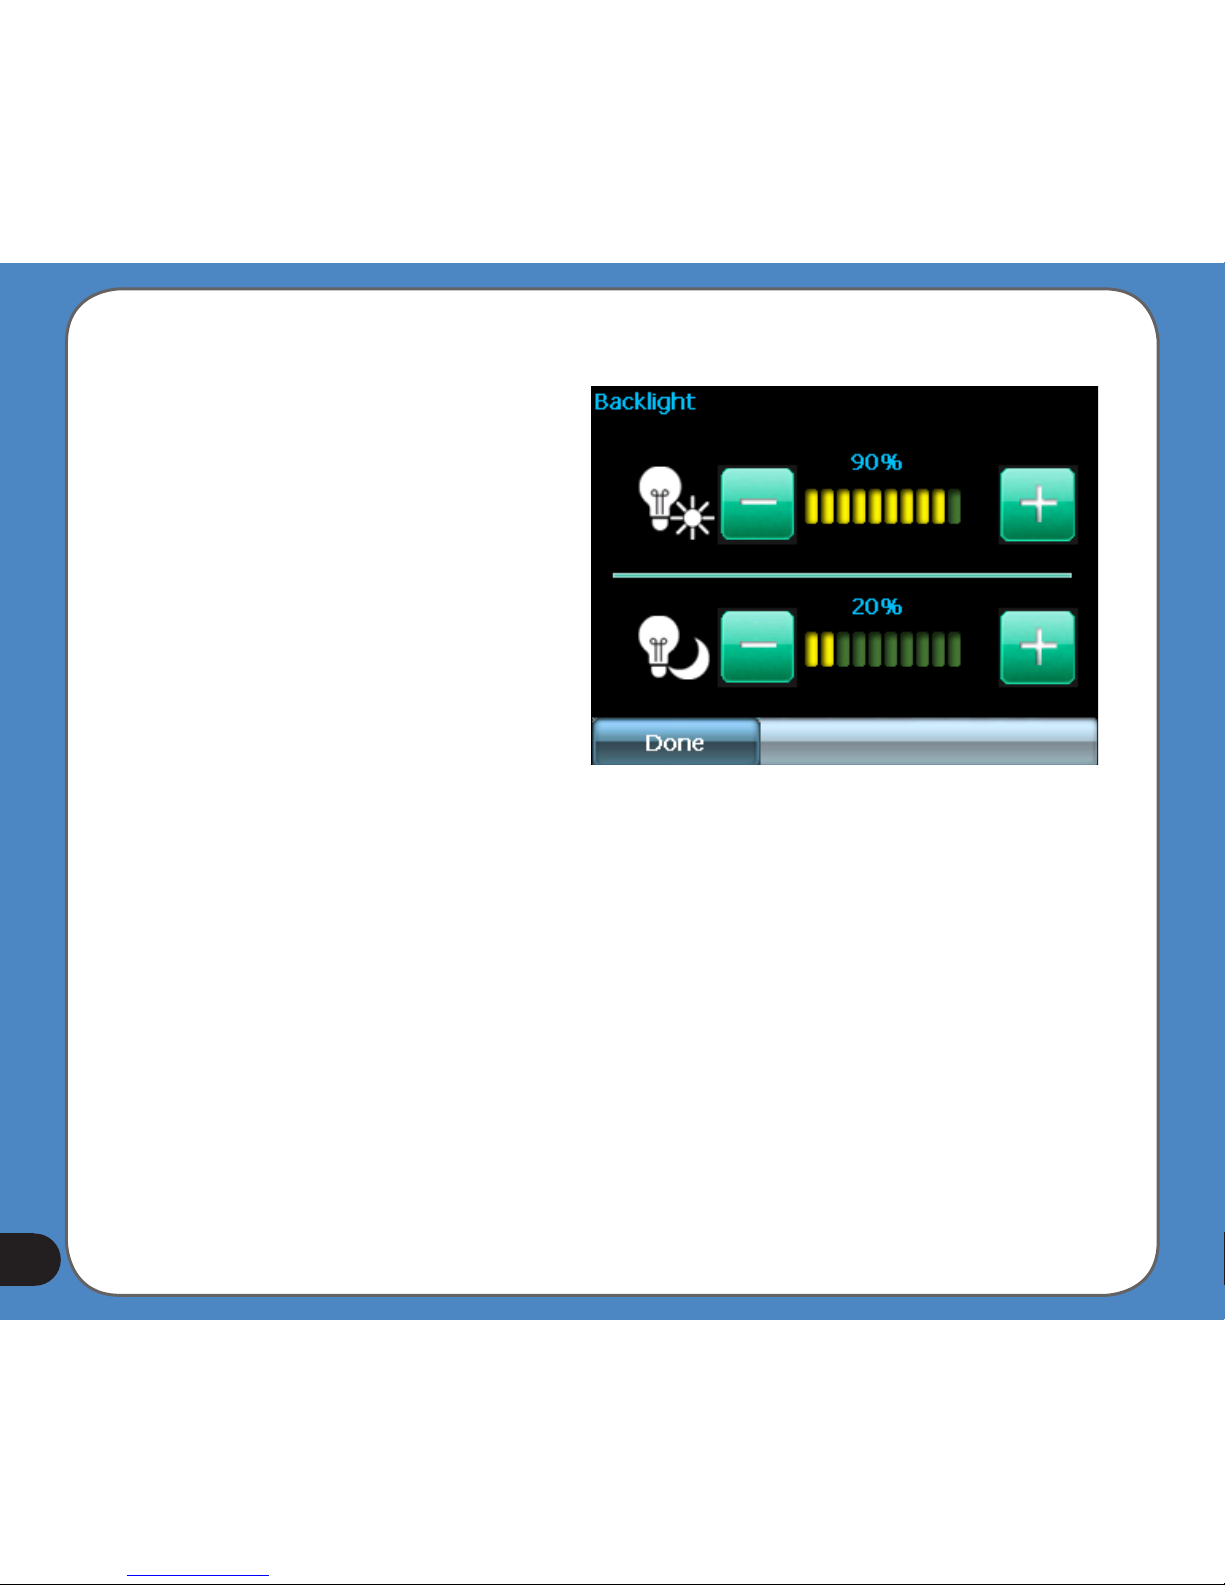
LCD brightness
Note: The device provides two LCD
brightness adjusting modes for you to
choose, one is Fix backlight brightness,
the other is Adjust by environment
brightness.
To adjust LCD brightness in Fix backlight
brightness mode, simply tap + or -.
To adjust LCD brightness in Adjustment by
environment brightness mode:
- tap the + or - behind the sun light icon
to adjust the LCD brightness in a lighter
environment
- tap the + or - behind the moon light icon
to adjust the LCD brightness in a darker
environment
23
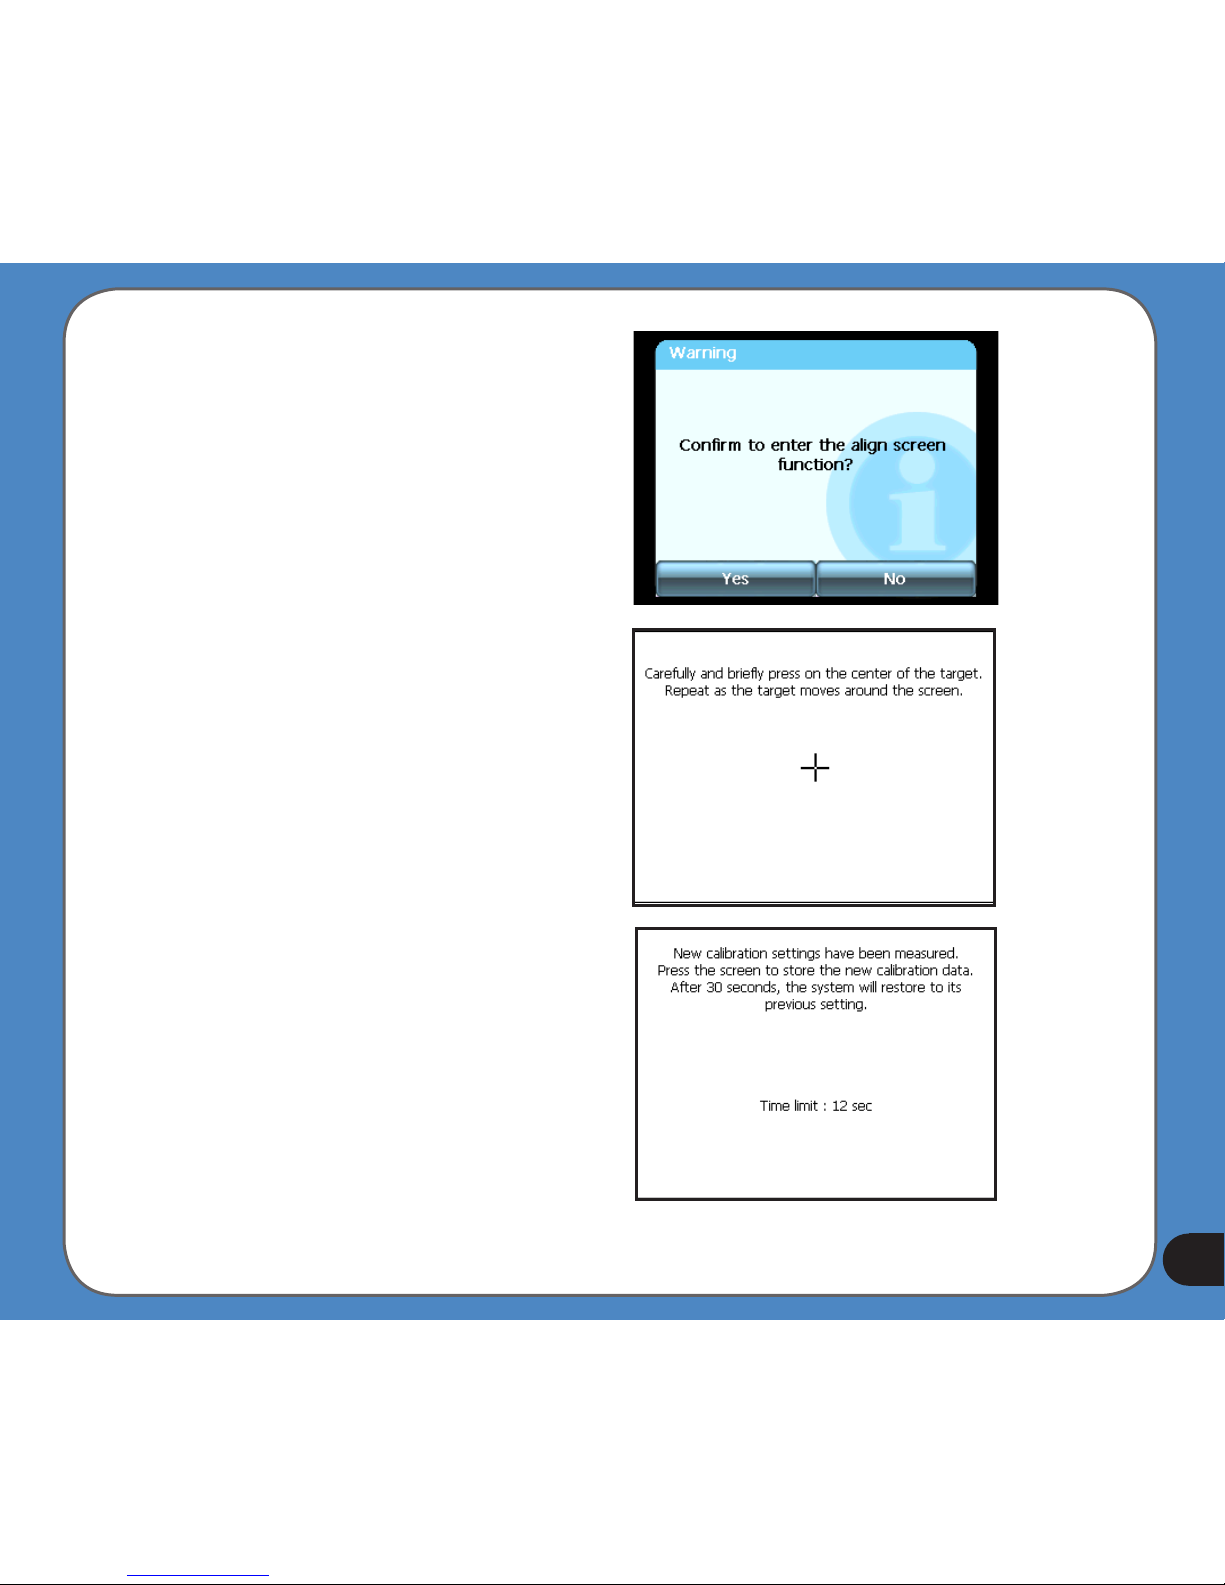
Screen calibration
Screen calibration ensures that the screen
accurately responds to the stylus.
To calibrate screen:
1. Carefully press and briey hold stylus on
the center of the target. Repeat as the target
moves to other coordinates on the screen.
2. When done, tap anywhere on the screen
for the settings to take effect; otherwise,
the new settings will be canceled after 30
seconds.
3. Tap on the screen to exit.
24
FM Transmitter
The FM transmitter allows you to transmit
navigation voice instruction and music/video
sounds to your car audio system through the
FM radio.
To use FM Transmitter function:
1. Tap FM Transmitter from the settings
menu.
2. Tap to turn on the Power and then to set
the Channel. Set the same channel as the
one on your car stereo.
The sound of R300 then can be broadcasted
and plays through your car stereo.
25
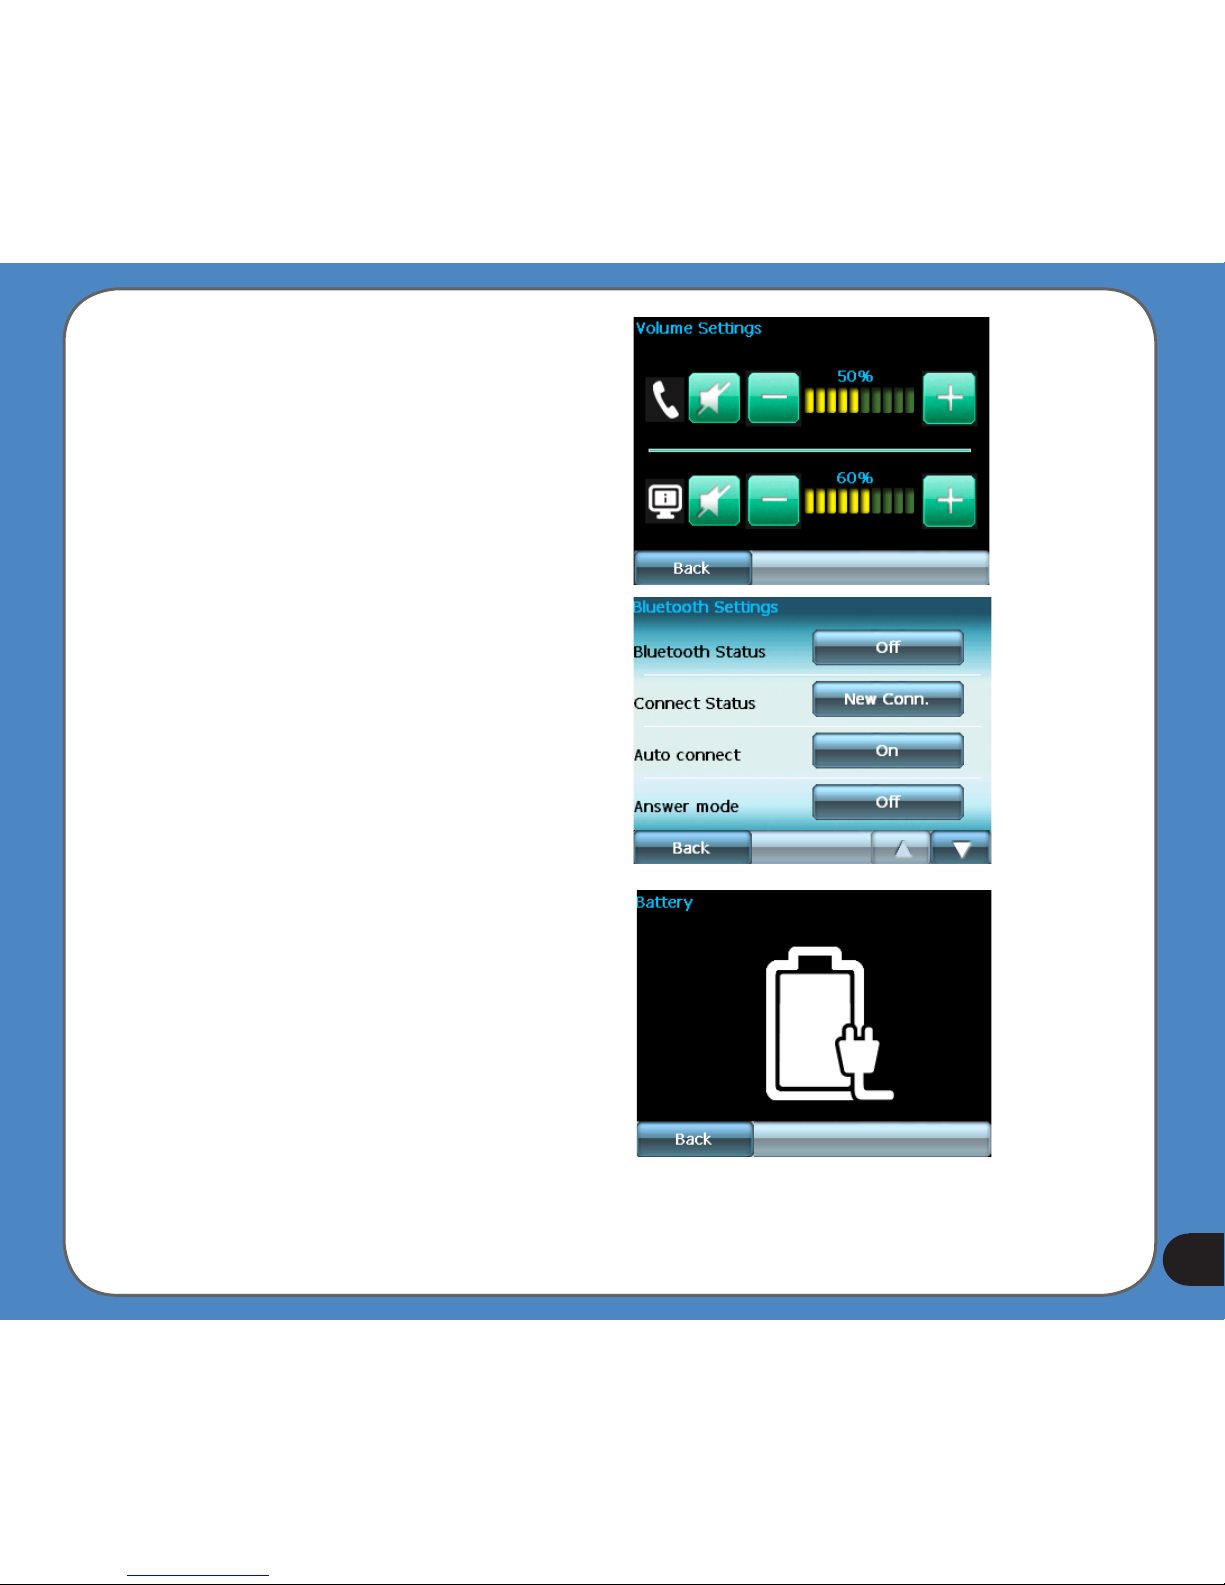
Volume
Tap
+
or
-
to adjust the volume for the
device and for the phone, or mute the device
and the phone.
Bluetooth
Enable bluetooth function to connect to a cell
phone.
Battery
Allows you to view battery status.
26
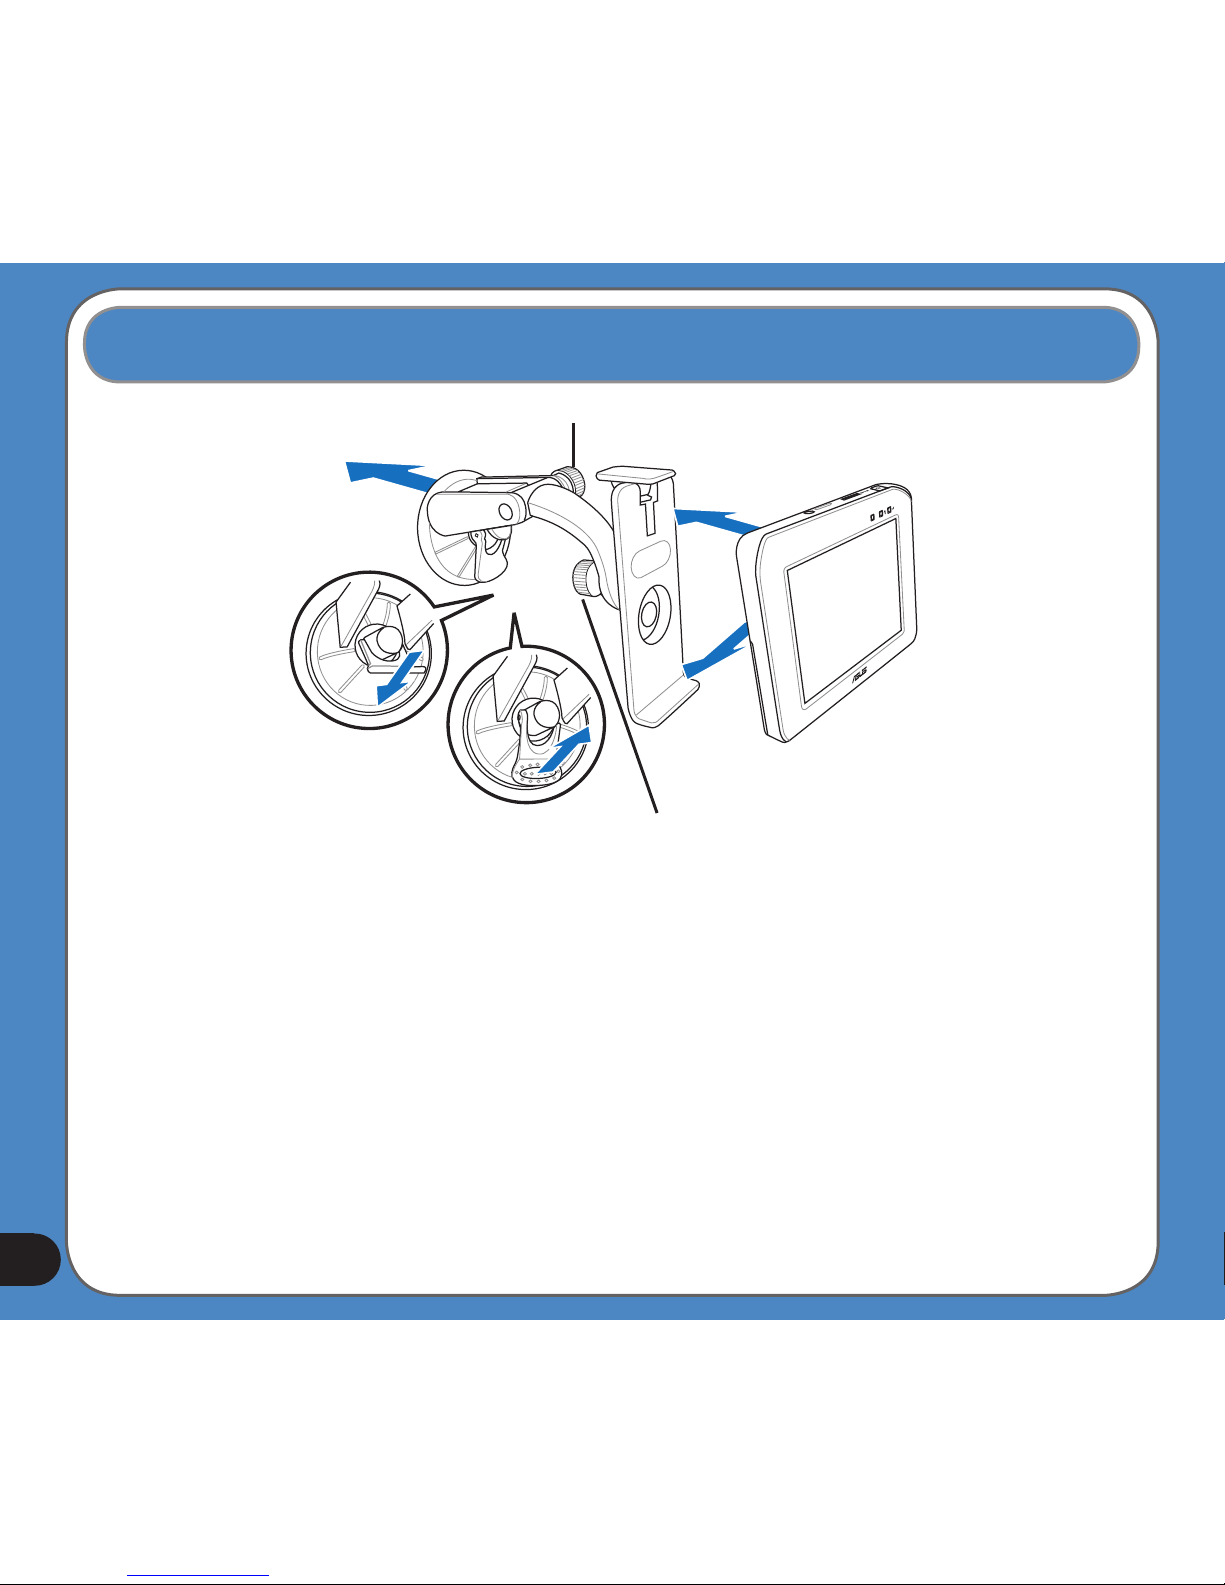
1.6 Installing the car kit
To install the car kit:
1. Attached the cupula to the windshield inside your car.
2. Press the lever to secure the cupula on the windshield surface.
Note: Rise the lever (3) to release the cupula from the windshield.
3. Adjust the angle of the gooseneck and secure it by fastening screwcap A.
4. Adjust the angle of the cradle and secure it by fastening screwcap B.
5. Carefully place and slide the device into the cradle.
screwcap A
screwcap B
1
2
3
5

27
Chapter
2
Navigation System
Note: the screens and procedures in this chapter may not be exactly the same with those of
your device, please take them as reference only.
 Loading...