

Page 1

R300
User
Manual
Quick
Start Guide
Portable Navigation Device
E3402
Page 2

E3402
First Edition
September 2007
Copyright © 2007 ASUSTeK COMPUTER INC. All Rights Reserved.
No part of this manual, including the products and software described in it, may be reproduced, transmitted,
transcribed, stored in a retrieval system, or translated into any language in any form or by any means, except
documentation kept by the purchaser for backup purposes, without the express written permission of ASUSTeK
COMPUTER INC. (“ASUS”).
Product warranty or service will not be extended if: (1) the product is repaired, modied or altered,
unless such repair, modication of alteration is authorized in writing by ASUS; or (2) the serial number of
the product is defaced or missing.
ASUS PROVIDES THIS MANUAL “AS IS” WITHOUT WARRANTY OF ANY KIND, EITHER EXPRESS
OR IMPLIED, INCLUDING BUT NOT LIMITED TO THE IMPLIED WARRANTIES OR CONDITIONS OF
MERCHANTABILITY OR FITNESS FOR A PARTICULAR PURPOSE. IN NO EVENT SHALL ASUS, ITS
DIRECTORS, OFFICERS, EMPLOYEES OR AGENTS BE LIABLE FOR ANY INDIRECT, SPECIAL,
INCIDENTAL, OR CONSEQUENTIAL DAMAGES (INCLUDING DAMAGES FOR LOSS OF PROFITS, LOSS
OF BUSINESS, LOSS OF USE OR DATA, INTERRUPTION OF BUSINESS AND THE LIKE), EVEN IF ASUS
HAS BEEN ADVISED OF THE POSSIBILITY OF SUCH DAMAGES ARISING FROM ANY DEFECT OR
ERROR IN THIS MANUAL OR PRODUCT.
SPECIFICATIONS AND INFORMATION CONTAINED IN THIS MANUAL ARE FURNISHED FOR
INFORMATIONAL USE ONLY, AND ARE SUBJECT TO CHANGE AT ANY TIME WITHOUT NOTICE, AND
SHOULD NOT BE CONSTRUED AS A COMMITMENT BY ASUS. ASUS ASSUMES NO RESPONSIBILITY
OR LIABILITY FOR ANY ERRORS OR INACCURACIES THAT MAY APPEAR IN THIS MANUAL, INCLUDING
THE PRODUCTS AND SOFTWARE DESCRIBED IN IT.
Products and corporate names appearing in this manual may or may not be registered trademarks or
copyrights of their respective companies, and are used only for identication or explanation and to the owners’
benet, without intent to infringe.
2
Page 3

GPS navigational software for ASUS R300
UK English
August, 2007 (1.0)
Copyright note
The product and the information contained herein may be changed at any time without prior notication.
This manual nor any parts thereof may not be reproduced or transmitted in any form either electronically
or mechanically, including photocopying and recording, without the express written consent of ASUSTek
Computer Inc..
Whereis® map data is © 2007 Telstra Corporation Limited and its licensors
Data Source © 2007 Tele Atlas N.V.
Austria: © BEV, GZ 1368/2003
Denmark: © DAV
France: © IGN France
Great Britain: Ordnance Survey data with permission of Her Majesty’s Stationery Ofce
© Crown Copyright
Italy: © Geonext/DeAgostini
Northern Ireland: © Ordnance Survey of Northern Ireland
Norway: © Norwegian Mapping Authority, Public Roads Administration / Mapsolutions
Switzerland: © Swisstopo
The Netherlands: Topograsche ondergrond
Copyright © dienst voor het kadaster en de openbare registers, Apeldorn
All rights reserved.
3
Page 4

Safety Notices
Before using the device, carefully read the safety information below. When using the device, always
follow the safety precautions to avoid any accident, personal injury or property damage due to improper
operating.
- Congurethedevicesettingsbeforedriving.Donotcongureitwhiledriving.
- Thenavigationmaynotbealwaysinaccordancewiththeactuallocationsandit’sforyour
referenceonly.
- Themapmaynotbeexactthesamewiththeactuallocationsandit’sforyourreferenceonly.
- Itistheuser’sresponsibilitytoobservesafedrivingpracticeandthelocallawsofdriving.
- Avoidingexposingthedevicetohightemperatureforlongtime.Mountthedeviceinacool
dryplacewhenitisnotinuse.
- Whileparking,keepthesatellitenavigationfunctionenabledtoensurethesatellitesearching
accuracy.
- Donotopenorremovetheinternalcomponentsbyyourselforbyunauthorizedengineers.
ASUSisnotresponsibleforanydevicedamagecausedbytheabovesituations.
- Avoidpressurethatmaydamagetheinternalcomponents.
- Usequaliedbatteryonly.
- Protectthedisplayfromscratch.Usengersorastylustowriteonthescreen.
- Donotapplyanychemicalwhencleaningthedisplay
- Mountthedeviceinadryplaceandavoidenvironmentswhereitmaygetwet.
- Removethechargerandpoweroffthedevicebeforecleaningit.
- Shutthemainpoweronthebottomofthedeviceandcontactyourtechnicalsupportstaff
immediatelyinthefollowingsituations:
- powercableisdamaged,
- coverpanelsbreak,and
- thedeviceisexposedtowaterorrain
4
Page 5
CAUTION
! Use only batteries listed in user-instruction.
! Risk of explosion if battery is replaced by an incorrect type. Dispose of used batteries
according to the instructions.
! All function about GPS or the similar are not intended to be used for location of persons,
especially for “life-safety” and “non-life-safety” applications.
Package contents
Standarditems
-ASUS R300
device
Optionalaccessories
ExternalAntenna BicycleMount TMCmodule Earphone
Note: The Standard items table is for your reference only. Package content may change
without notice.
-Car Holder
-Car charger
-Support CD
containing full
manual and map
-Quick Start Guide
-Micro SD Card
-Warranty Card
-USB Cable
5
Page 6
Product specications
OS Microsoft®Windows®CE.Net5.0Coreversion
CPU SAMSUNG400MhzProcessor
Dimensions 101x81.5x13.8mm;140g
Battery 1300mAh,rechargeableLi-ionbattery(Swappable)
Display 3.5inchTFTTouch-screen,65KColor,320x240
GPS SiRFSTARIIIGPSchipsetwithinternalantenna
Memory Buildin64MBRAM,128MBFlashROM
Connectivity USB1.1,Bluetooth2.0(withHandsfreefunction)
ExpansionSlot MicroSDCardSlot(upto4GB)
Audio SupportMP3andWMAformat
Communication -Phone:Answer/makephonecallthroughBT
Entertainment -Videoplayer:play/suspend/forward/backward/next/
Other 1.Lightsensor2.OptionalTMCmodule(dependson
Pixels(QVGA)
previous,Fullscreenplay,PlayLister
-MP3Player:play/suspend/forward/backward/next/
previous,PlayLister
-PhotoViewer:Slideshowreview
TMCserviceavailability)3.FMTavailabilitydependson
validityindifferentcountries
6
Page 7

Table of Contents
Legal statements ............................................................................... 2
Safety notice ..................................................................................... 4
Package Contents ............................................................................. 5
Product specications ....................................................................... 6
Chapter 1 Getting to know your R300 12
1.1 Layout features ...................................................................13
1.2 Charging the battery ...........................................................16
1.3 Turn on the device ..............................................................18
1.4 Main menu ...........................................................................19
1.5 Adjust the basic Settings ................................................... 20
1.6 Installing the car kit ............................................................25
Chapter 2 Navigation System 27
2.1 Getting started with Asus GO ............................................28
2.1.1 Simple and Advanced modes .......................................... 30
2.1.2 Hardware buttons ............................................................. 32
2.1.3 Buttons and other controls on the screens ...................... 32
7
Page 8

2.1.4 Using the map .................................................................. 32
2.1.5 Using keyboards .............................................................. 36
2.1.6 Asus GO concepts ........................................................... 37
2.2 Navigating with Asus GO ................................................... 42
2.2.1 Selecting the destination of a simple route ...................... 42
2.2.2 Creating a multi-point route .............................................. 54
2.2.3 Watching the simulation of a route ................................... 55
2.2.4 Pausing the active route .................................................. 56
2.2.5 Deleting the active route .................................................. 56
2.2.6 Using track logs ............................................................... 56
2.2.7 Saving a route .................................................................. 57
2.2.8 Loading a saved route ..................................................... 58
2.3 Reference book (Advanced mode) ....................................59
2.3.1 Map .................................................................................. 60
2.3.2 Find menu ........................................................................ 63
8
Page 9

2.4 Glossary ..............................................................................68
2.5 End user licence agreement ..............................................71
Chapter 3 Multi-media features 72
3.1 Music Player ........................................................................ 73
Launch the Music player ................................................................. 73
Playlist ......................................................................................... 74
Play music ....................................................................................... 75
3.2 Photo Viewer .......................................................................76
Launch the Photo Viewer ................................................................ 76
View photos ..................................................................................... 77
Display a photo ............................................................................... 78
3.3 Video Player ........................................................................79
Launch the Video Player ................................................................. 79
Playlist ......................................................................................... 80
9
Page 10

10
Playing a video ................................................................................ 81
Chapter 4 Phone features 82
4.1 Phone menu ................................................................................... 83
4.2 Bluetooth Settings ......................................................................... 84
4.3 Connecting R300 to your cellphone ............................................ 85
4.4 Making and receiveing phone calls ............................................. 87
ASUS Contact information 89
Note: the screens, procedures and specications in this manual may not be exactly the
same with those of your device, please take them as reference only.
Page 11
Chapter
Getting to know
your R300
1
11
Page 12
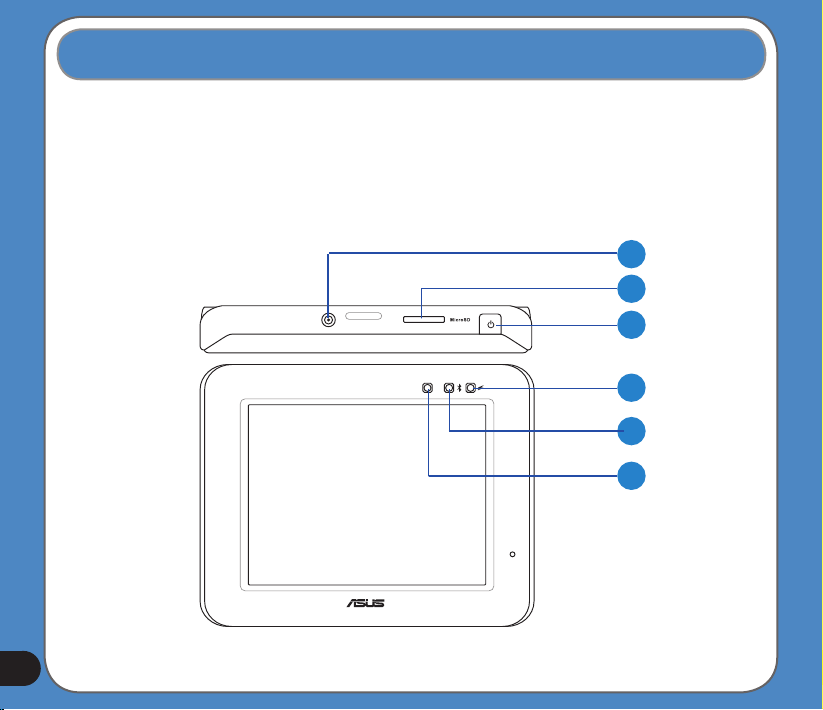
1.1 Layout features
ASUS R300 is a professional portable navigation device (PND) which provides reliable
navigation and positioning function. R300 also provide you with phone and multi-media
functions.
Front and top features
1
2
3
4
5
6
12
Page 13
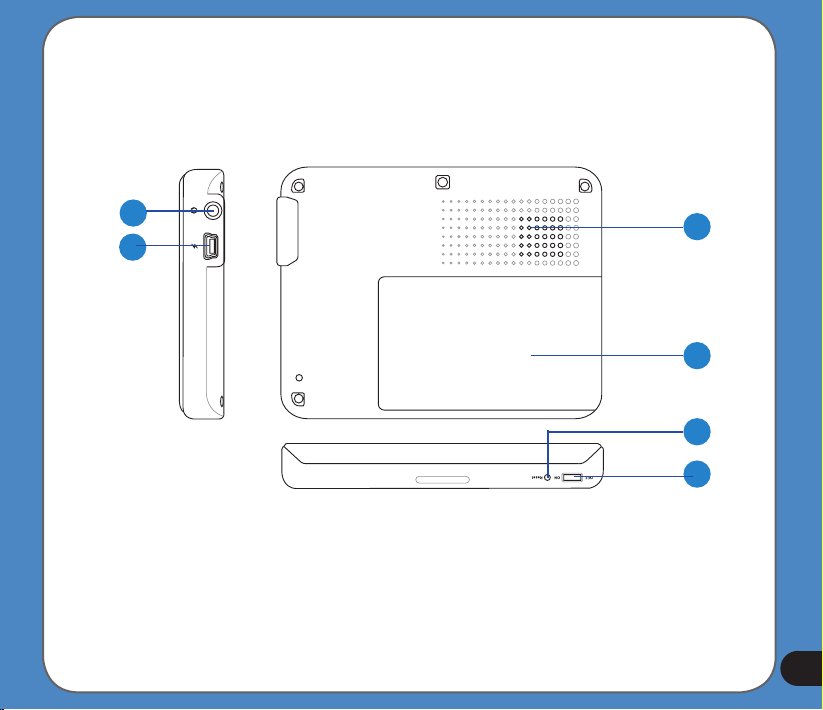
Rear and side features
7
8
9
10
11
12
13
Page 14
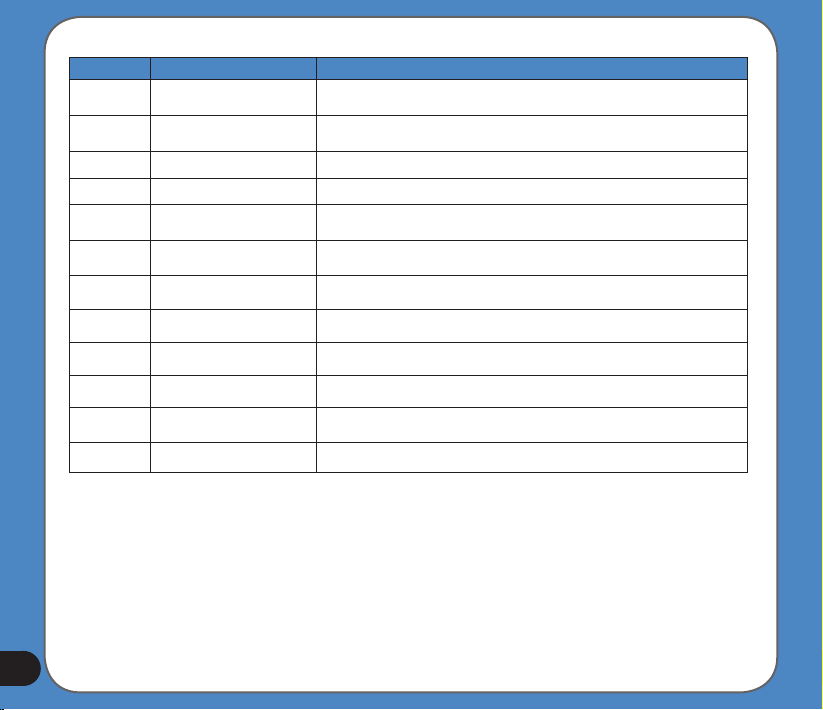
Number Item Description
Connects to an external antenna for better signal performance (the external
antenna is optional)
Insert the external Micro SD memory card to this slot
Press to turn on the device, or to enter into sleep mode
Red- charging, Yellow- full charged
When function turning on, it's lighting Blue
Automatically adjusts the backlight according to the light in the environment
Use to connect headsets or two-channel speakers
Connects to other devices through a Mini USB cable
Allows you to listen to music, the navigation voice, and system warning
Battery cover
Push to perform reset function
Turns the main power on/off
10
11
12
1
2
3
4
5
6
7
8
9
ExternalAntennaport
MicroSDSlot
SleepModeButton
ChargingLED
BluetoothLED
LightSensor
AudioJack
MiniUSB
Speaker
Battery
Reset
Mainpowerswitch
14
Page 15
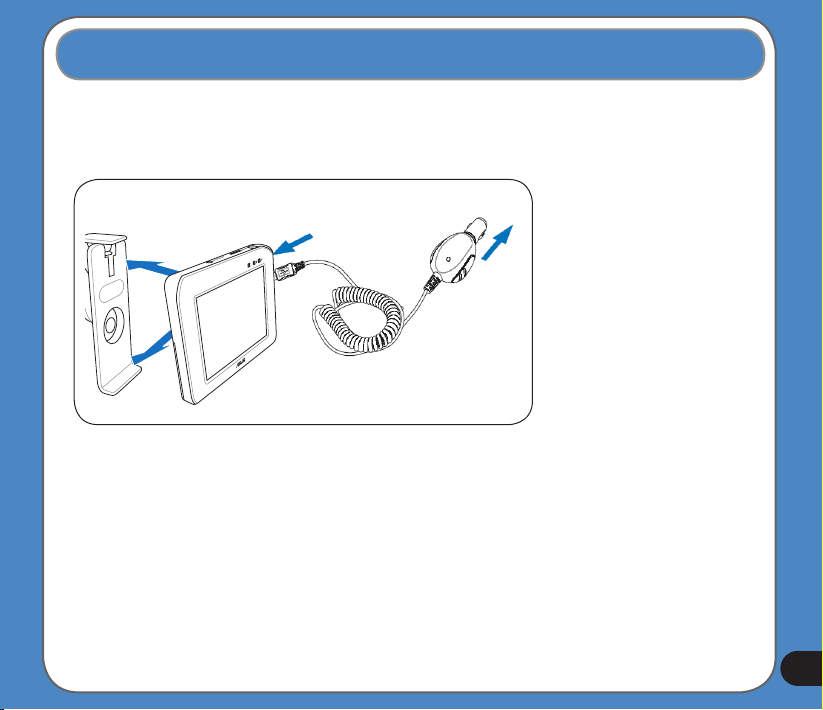
1.2 Charging the Battery
You can charge the device using a car charger kit. Plug any of these cables to the mini-USB
port on the right side of the device.
NOTE:
Car charger kit
When the Main Power
Switch is set to Off,
the device can not be
charged.
While charging, the
power LED lights up in
red. When the battery is
fully charged, the power
LED turns to yellow.
You can use the
device while charging.
However, the device
takes much less time
to be fully charged in
sleep mode.
15
Page 16

Checking battery status
To check how much battery power remains:
(1) From the main menu, tap Settings.
(2) The Sub-menu Settings appears. Tap to display Battery icon .
(3) The Battery screen appears and displays a battery icon indicating the battery power
that remains (see the gure below).
16
Page 17
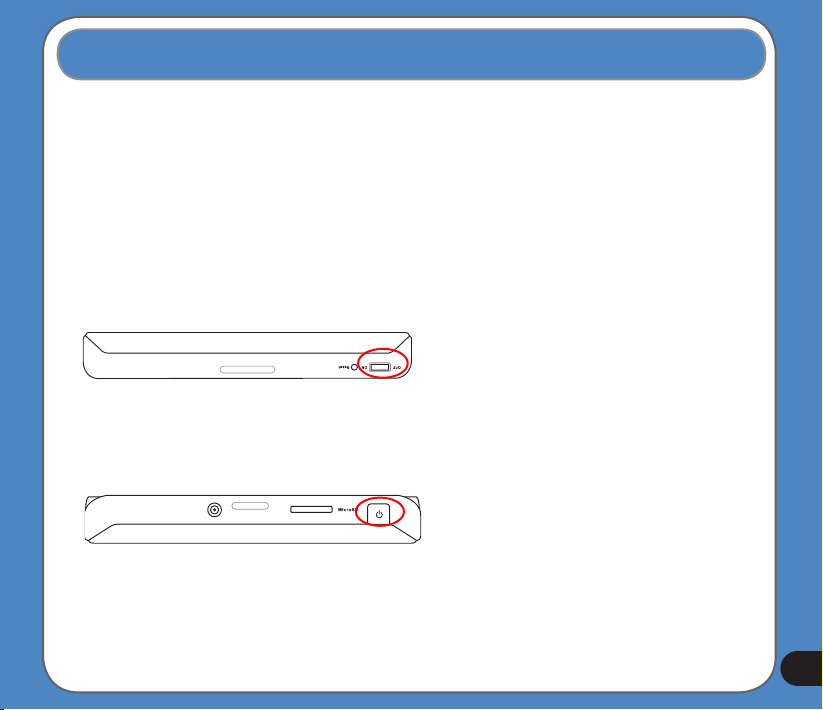
1.3 Turning on the Device
To turn on the device:
- Turn on the main power switch on the bottom of device (gure 1).
To enter/wake up from the sleep mode:
- Press the Sleep Mode Button on the top of the device (gure 2).
gure 1
gure 2
Main power switch
Sleep Mode Button
Note:
When the main power switch is set
to Off, the device is not able to be
charged.
If you press the Sleep Mode button
when the device is on, it enters into
sleep mode.
When the device is on, it takes
longer time for the battery to be
fully charged. When the device is in
sleep mode, the battery can be fully
charged quickly.
17
Page 18
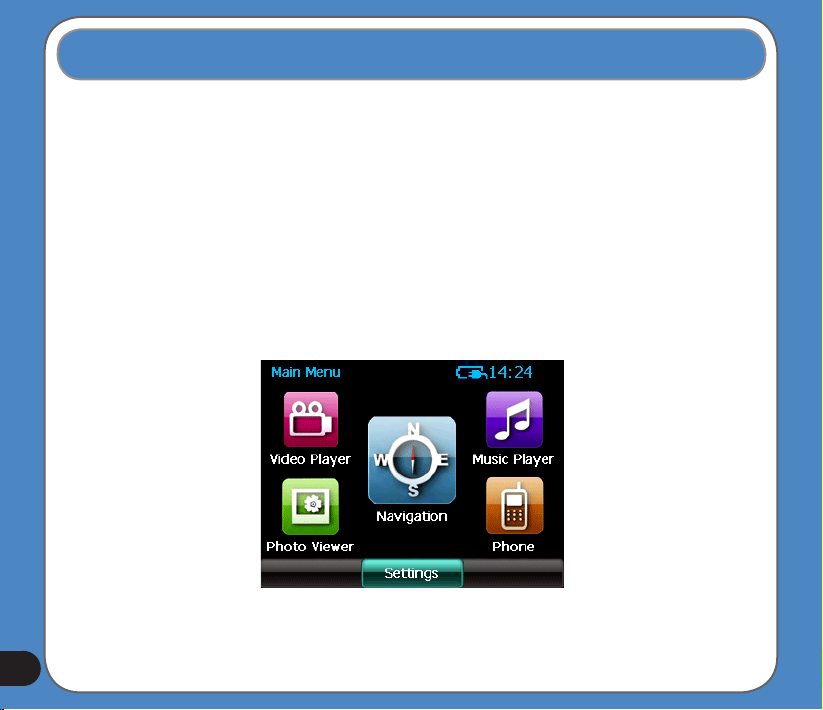
1.4 Main Menu
The following menu appears after you turn on the device. From the main menu, you can:
- Tap Navigation to enter the navigation system.
- Tap Settings to adjust the device settings.
- Tap Video Player to play videos.
- Tap Music Player to play music.
- Tap Photo Viewer to view photos.
- Tap Phone to use phone through the bluetooth connection.
Note: The FM transmitter icon only appears when the FM transmitter function is enabled.
18
Page 19
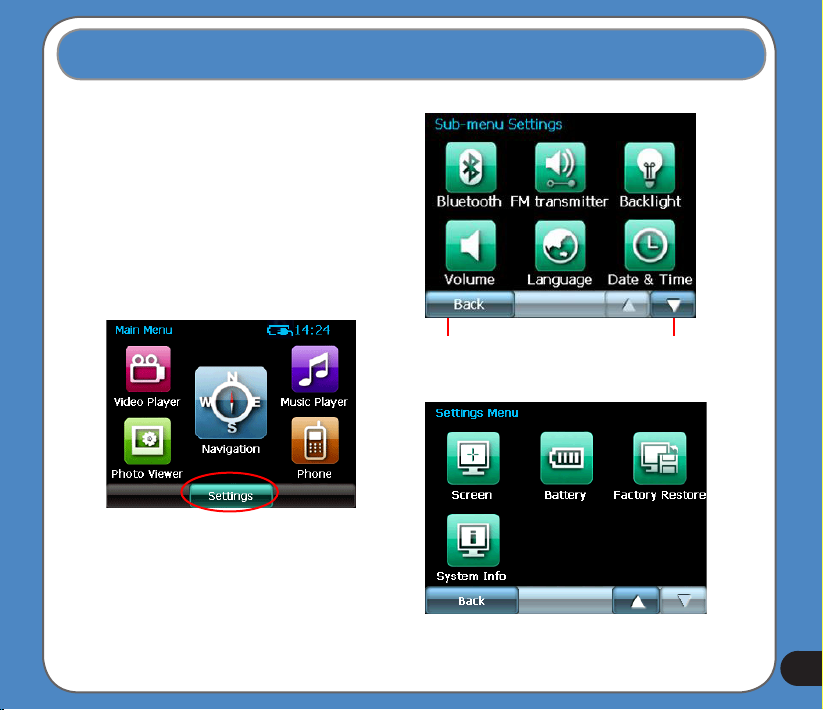
1.5 Adjust the basic settings
You can launch the basic settings menu
by tapping Settings on the main menu.
The settings menu allows you to adjust
language settings, backlight, Date and
time, bluetooth settings, volume, to align
screen, and to view system information.
tap to back
to the main
menu
tap to move
to the next
page
19
Page 20
System Infomation
System information screen display the ROM
version, Software Version and the screen
resolution and color information.
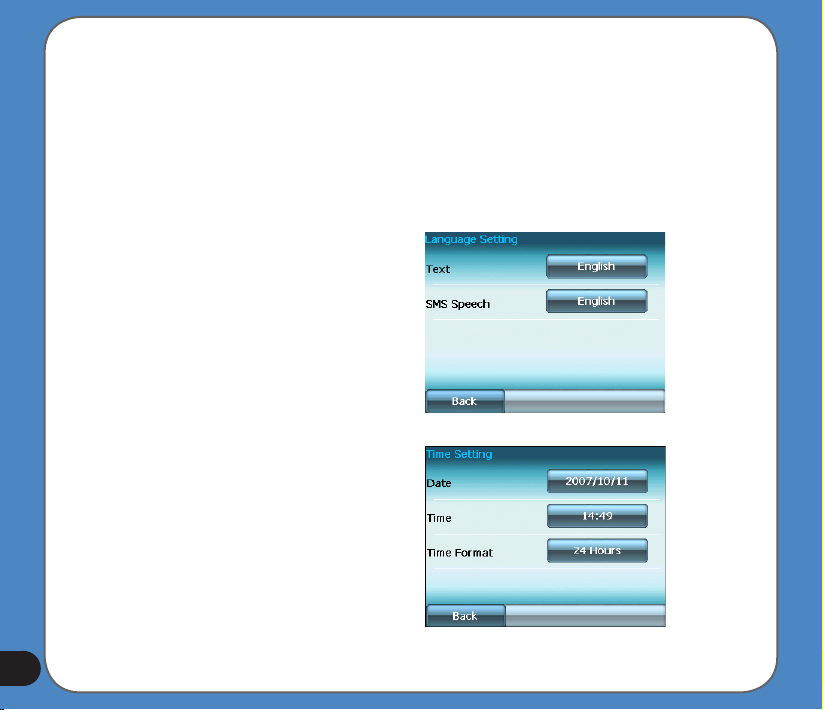
Language
You can choose the language for displaying
the text. Simply tap the bars behind the Text
to select the language.
Date and Time
To set the date and time, tap
from the settings menu. Tap the bars behind
Date, Time
them.
and
Time Format
Date and Time
to adjust
20
Page 21

Set Date
Set time
Set time format
21
Page 22

LCD brightness
Note: The device provides two LCD
brightness adjusting modes for you to
choose, one is Fix backlight brightness,
the other is Adjust by environment
brightness.
To adjust LCD brightness in Fix backlight
brightness mode, simply tap + or -.
To adjust LCD brightness in Adjustment by
environment brightness mode:
- tap the + or - behind the sun light icon
to adjust the LCD brightness in a lighter
environment
- tap the + or - behind the moon light icon
to adjust the LCD brightness in a darker
environment
22
Page 23
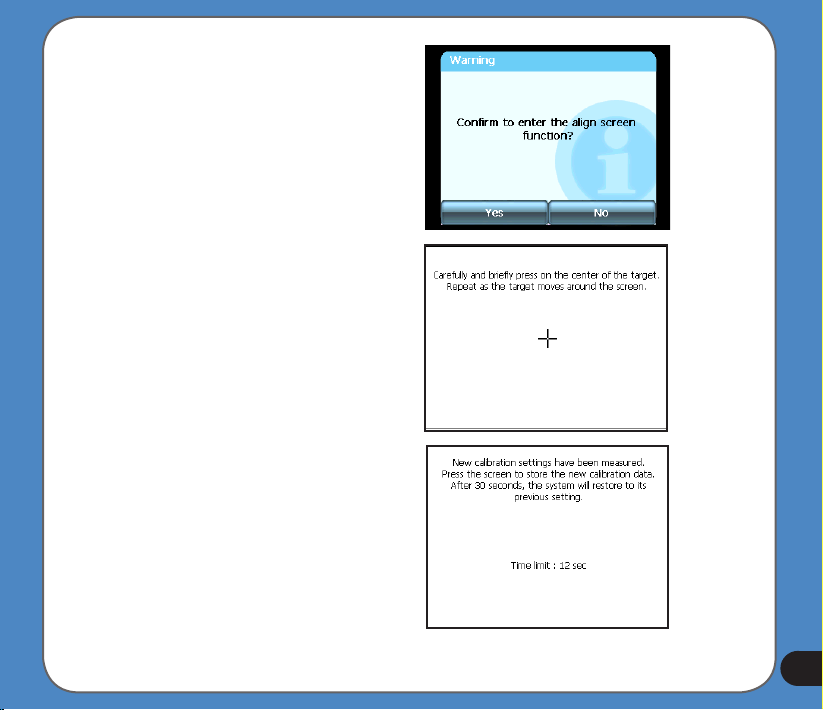
Screen calibration
Screen calibration ensures that the screen
accurately responds to the stylus.
To calibrate screen:
1. Carefully press and briey hold stylus on
the center of the target. Repeat as the target
moves to other coordinates on the screen.
2. When done, tap anywhere on the screen
for the settings to take effect; otherwise,
the new settings will be canceled after 30
seconds.
3. Tap on the screen to exit.
23
Page 24
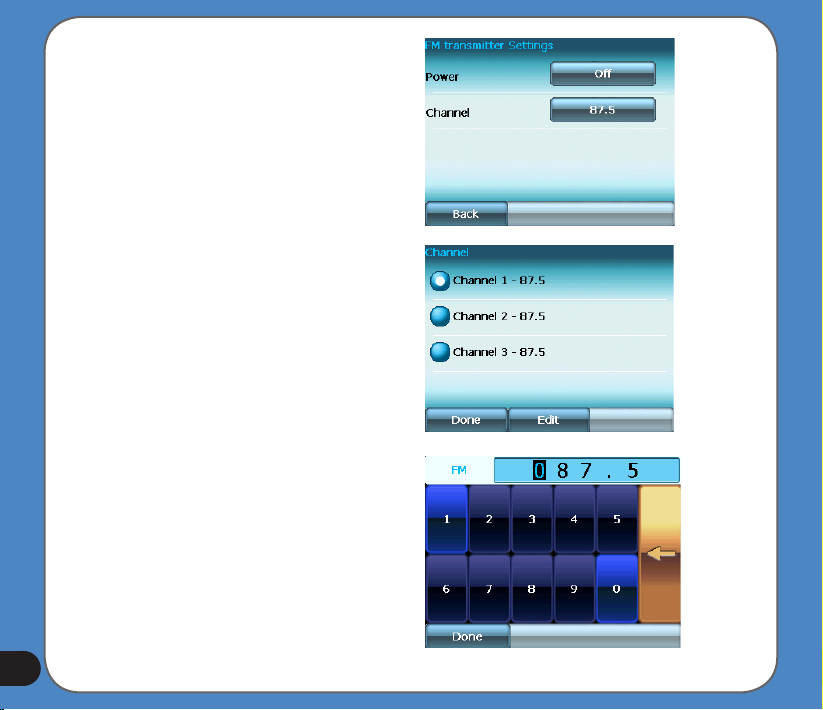
FM Transmitter
The FM transmitter allows you to transmit
navigation voice instruction and music/video
sounds to your car audio system through the
FM radio.
To use FM Transmitter function:
1. Tap FM Transmitter from the settings
menu.
2. Tap to turn on the Power and then to set
the Channel. Set the same channel as the
one on your car stereo.
The sound of R300 then can be broadcasted
and plays through your car stereo.
24
Page 25
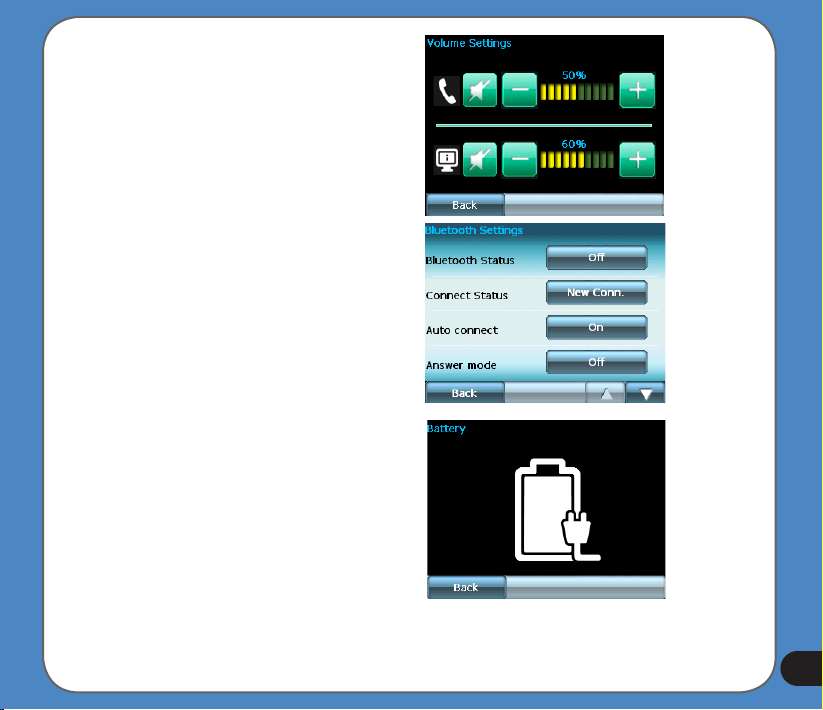
Volume
Tap
or
to adjust the volume for the
+
-
device and for the phone, or mute the device
and the phone.
Bluetooth
Enable bluetooth function to connect to a cell
phone.
Battery
Allows you to view battery status.
25
Page 26
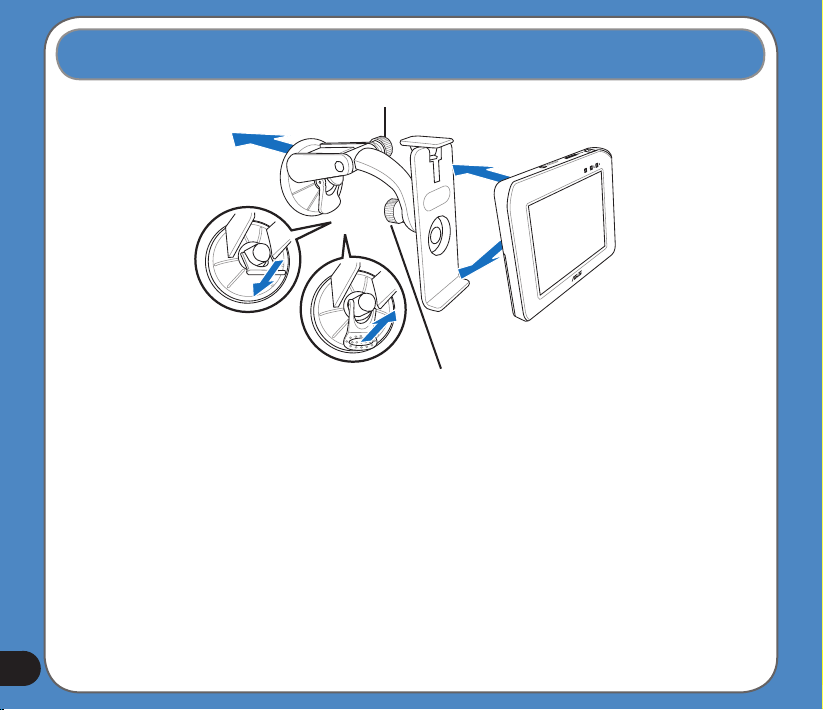
1.6 Installing the car kit
26
3
screwcap A
5
screwcap B
1
2
To install the car kit:
1. Attached the cupula to the windshield inside your car.
2. Press the lever to secure the cupula on the windshield surface.
Note: Rise the lever (3) to release the cupula from the windshield.
3. Adjust the angle of the gooseneck and secure it by fastening screwcap A.
4. Adjust the angle of the cradle and secure it by fastening screwcap B.
5. Carefully place and slide the device into the cradle.
Page 27
Chapter
Navigation System
Note: the screens and procedures in this chapter may not be exactly the same with those of
your device, please take them as reference only.
2
27
Page 28

2.1 Getting started with Asus GO
Asus GO is optimised for in-car use. You can use it easily by tapping the screen buttons and
the map with your ngertips.
Asus GO can plan routes throughout the whole installed map set; you do not need to change
maps or switch to a poorly detailed general map to navigate between map segments or
countries.
Tasks Instructions
Using a stylus You do not need a stylus to use Asus GO. Tap the buttons and the map with your
Tapping and tapping & holding
a button
Finding information about the
buttons and features of Asus GO
ngertips.
You do not need to double-tap the screen and usually you do not
need to grab the screen buttons either. A single tap is usually
enough.
You need to tap&hold a screen button only in the following cases:
• Moving the handle on a slider
• Moving the map
• Zooming, tilting or rotating the map
• Deleting several characters in the text entry eld on the
keyboards
For more information, see the relevant section.
For information about the buttons and controls, see the relevant sections.
28
Page 29

First screen of Asus GO
Asus GO starts by displaying the Navigation menu in Simple mode.
The fastest way to nd your destination and start navigating is tapping the
button:
You can select your destination the following ways (not all of them are available in Simple
mode):
• Use the selected location on the map (the Cursor).
• Enter a full address or part of an address, for example a street name without a house
number or the names of two intersecting streets.
• Enter an address with postal code. This way you do not need to select the name of the
settlement and the search for street names might be faster as well.
29
Page 30

• Use a coordinate
• Use a saved location:
• a Favourite
• a POI
• the History of previously set destinations and waypoints
Using Asus GO
First you need to decide whether to keep on using the application in Simple mode, or to switch
to Advanced mode.
2.1.1 Simple and Advanced modes
The application starts in Simple mode, but you have the possibility to choose between the two
user modes:
• Simple mode: you have easy access to the most important navigation functions and the
basic settings only
• Advanced mode: you have access to the full functionality of Asus GO.
To switch from Simple mode to Advanced mode from the startup screen (Navigation Menu),
tap .
To switch from Advanced mode to Simple mode from the startup screen (Navigation Menu),
tap .
The features and settings available in each mode are as follows:
30
Page 31

Type of action Available in Simple
mode
Navigating to a selected map point Yes Yes
Navigating to a street address Yes Yes
Navigating to an incomplete address Yes Yes
Navigating to an intersection Yes Yes
Navigating to recent destinations (History) Yes Yes
Navigating to Favorites Yes Yes
Navigating to a POI Yes Yes
Navigating to coordinates No Yes
Creating a multi-point route No Yes
Saving a map point as a Favorite destination Yes Yes
Saving a map point as a POI No Yes
Saving a map point as a location of a No Yes
Road Safety Camera
Mark a map point with a Pin No Yes
Saving the active route No Yes
Saving track logs No Yes
Visual settings Only background picture Yes
Sound settings Only master volume Yes
Route settings No Yes
Regional settings Only language selection Yes
Warnings No Yes
Advanced mode
Available in
31
Page 32

2.1.2 Hardware buttons
You can use Asus GO mostly by tapping the touch screen. The device has only one hardware
button, the Power on/off button.
You can turn on or off the device at any time. When the device is switched off, Asus GO does
not calculate your GPS position and it does not update the route or the driving instructions; it
will calculate these data when it is turned on again.
When you turn Asus GO on again, Asus GO continues navigating as soon as the GPS
receiver has determined your position.
2.1.3 Buttons and other controls on the screens
When you are using Asus GO, you usually tap buttons on the touch screen.
You only need to conrm selections or changes in Asus GO if the application needs to restart
or it has to perform a major reconguration. Otherwise, Asus GO saves your selections and
applies the new settings without conrmation steps.
2.1.4 Using the map
2.1.4.1 Checking the details of a map location
You can check the details of a location (address, coordinates, nearby POIs) by tapping the
location on the screen. The Cursor (red dot with radiating red circles) appears.
The address of the location is displayed at the bottom of the map. During navigation, this line
shows the current street and house number information.
32
Tap to open theCursor menu. Now tap to see the address, the
coordinates and the list of nearby POIs.
Page 33

2.1.4.2 Manipulating the map
You can change how the map looks:
• You can tilt it, rotate it or scale it to best suit your needs while you are creating, planning
or following a route.
• You can customise which icons and buttons are visible. You can, for example, hide the
battery status icon.
Position markers on the map:
• Current GPS position:
• Selected location (Cursor):
Action Button(s) Description
Moving the
map with
drag&drop
Zooming in
and out
No buttons No buttons You can move the map into any direction: tap and hold the map,
and move your nger to the direction into which you want to move the map.
Change how much of the map Asus GO displays on the screen. Asus GO
uses high-quality vector maps that let you see the map at various zoom levels,
always with optimised content. It always displays street names and other text
with the same font size, never upside-down, and you only see the streets and
objects that you need.
Viewing modes
Tilting up and
down
Give you the following map perspectives in Asus GO:
• classic top-down view (2D)
• perspective view (3D)
Change the vertical view angle of the map in 3D mode.
33
Page 34

Action Button(s) Description
Zoom
presets
Tilt presets Tap one of the preset buttons to set the tilt level to a predened value. These buttons
Tap one of the preset buttons to set the zoom level to a predened value. These
buttons are available in 2D mode.
are available in 3D mode.
34
Rotating
left and
right
Smart
Zoom
When GPS positioning is available, Asus GO always rotates the map so its top facesso its top faces
your direction of travel (Track-Up orientation). You can turn away from Track-Up with
these buttons.
If you enable Smart Zoom, Asus GO can automatically rotate, scale and tilt the map
and give you the optimal view:
• When you are approaching a turn, Asus GO zooms in and raises the view angle to
let you easily recognise your manoeuvre at the next junction.
• If the next turn is at a distance, Asus GO zooms out and lowers the view angle to
show you the road in front of you.
2.1.4.3 Switching between the 2D and 3D modes
You can switch between the 2D and 3D modes as follows:
With the
2D/3D
switch
buttons
Tap them to switch between the two modes.
or
The value always shows the mode the button switches to: If you are in 2D mode,you
can see the button and you needto tap it to switch to 3D mode.
Page 35

2.1.4.4 Status information on the map (GPS, battery, etc.)
The following icons show status information on the map in Asus GO:
Icon Status for More information
GPS position quality See relevant section.
Battery See relevant section.
Orientation Asus GOalways selects the suitable in 2D, 3D or
Overview modes:
• North-Up (North is always at the top of the screen)
• Track-Up (Asus GO rotates the map into the direction
where you are heading)
TMC Status of the TMC reception (see relevant page). The
symbol on the right also shows the vehicle type used for
route calculation.
2.1.4.5 Using the Cursor
You can perform the following actions with the location that you selected on the map (with
the Cursor):
• In the active route, use it as:
• the start point by replacing the current GPS position (available in Advanced mode
only)
• the destination by replacing the previous destination
35
Page 36

• a via point (intermediary waypoint) preceding the destination (available in Advanced
mode only)
• the destination while keeping the previous destination as a via point (available in
Advanced mode only)
• Save it as one of the following
• POI (available in Advanced mode only)
• Favorite
• speed camera (available in Advanced mode only)
• Road Block (available in Advanced mode only)
• Push a Pin in the map at the given location (available in Advanced mode only)
• List the POIs near it
2.1.5 Using keyboards
You only need to enter letters or numbers in Asus GO when you cannot avoid it. You can
type with your ngertips on the full-screen keyboards and you can switch between various
keyboard layouts, for example ABC, QWERTY, or numerical.
36
Switching to another keyboard type, for example
from a QWERTY
Latin keyboard to an alphabetical Latin keyboard. Asus GOremembers your last keyboard choice and offers it the
Correcting your entry on the keyboard
Entering a space, for example between a
surname and a family name or in multi-word
street names
Finalising the keyboard entry
Tasks Instructions
Tap the button.
next time you need to enter data.
Remove the unneeded character(s): tap the button.
Hold the button to delete the entire input string.
Tap the button.
Tap the button
Page 37

2.1.6 Asus GO concepts
2.1.6.1 Smart Zoom
Smart Zoom is a lot more than just a usual automatic zoom:
• While following a route calculated by Asus GO: when approaching a turn, it will zoom in
and raise the view angle to let you easily recognise your manoeuvre at the next junc-
tion. If the next turn is at a distance, it will zoom out and lower the view angle to be at
so you can see the road in front of you.
• While driving without an active route in Asus GO:Auto Zoom will zoom in if you drive
slowly and zoom out to the limit set here when you drive at high speed.
For instructions on how to enableSmart Zoom.
2.1.6.2 Current GPS position and Lock-On-Road
Asus GO uses the following position markers on the map:
• Current GPS position:
When your GPS position is available, the Asus GO icon marks your current position
with the icon on the map and points to the direction toward which you are head-
ing. If you are driving on a two-way road, appears on the side of the road on which
you are driving, that is, on the right in Germany and on the left in the U.K.
• Selected location (Cursor):
The selected map location is marked with the radiating dot on the map.
Lock-On-Road
Asus GO puts the icon on the road or to your exact GPS position that might be off the
road depending on the selection that you made for navigation preferences.
37
Page 38

• If you chose a vehicle, the icon is on the road on which you are driving.
• If you chose pedestrian, the icon is at your exact GPS position.
2.1.6.3 Selected location on the map (Cursor)
If you tap the map, the Cursor appears at the selected point on the map. Asus GO displays
the Cursor with a red dot and radiating red circles to make it visible at all zoom levels, even
when it is in the background of a 3D map view.
When the Cursor is set, tap . The Cursor menu appears and you can use the Cursor
as one of the following:
• the starting point of a route (tap )
• a via point in a route (tap )
• the destination of a route (tap if there is no active route, or tap
if a route already exists)
You can save the location of the Cursor as:
• a Favorite, tap .
• a speed camera, tap .
• a POI, tap .
38
Page 39

• a map marker Pin, tap .
2.1.6.4 Return to GPS position
When the Cursor on the map is not at your GPS position, the button is visible. Tap it to move
the displayed map segment to the GPS position.
Note
Even if you move the map while you are driving, Asus GO continues navigating if there is an active route: it plays the
voice instructions and displays the turn preview icons according to your actual GPS position.
2.1.6.5 Daylight and night colour schemes
Asus GO uses different skins (colour schemes) during the day and during the night.
• Daylight colours are similar to paper road maps.
• The night colour schemes use dark colours for large objects to keep the average
brightness of the screen low.
Asus GO offers several daytime and night colour schemes. It can also switch automatically
between the daytime and the night scheme based on the current date and GPS position a
few minutes before sunrise, when the sky has already turned bright, and a few minutes after
sunset, before it becomes dark.
2.1.6.6 Route calculation and recalculation
Asus GO calculates the route based on your preferences:
39
Page 40

40
• route calculation method
• vehicle and route types
Asus GO automatically recalculates the route if you deviate from the proposed set of steps.
2.1.6.7 Itinerary
The list of the nearest route events, the driving instructions.
When you are on the map, you can display the itinerary in one of the following ways:
• On the Cockpit screen tap the area between the Turn preview and the Travel data.
• In Advanced mode, tap the following buttons: .
2.1.6.8 Track Logs
Asus GO can log the track that you drive.
The track log is a recording of how your GPS position changed and it is independent of the
route Asus GO calculated.
2.1.6.9 Simulation
A simulation drives you through the route, following the driving instructions.
You can use it, for example, to see which bridge Asus GO planned for the route; if you do
not want to take that bridge, you can avoid it.
Page 41

2.1.6.10 Speed Cameras
A speed camera is a special POI . Asus GO is not shipped with a built-in database of speed
cameras, but you can also add more speed cameras by marking their positions on the map.
2.1.6.11 Speed limit warnings
Maps sometimes contain information about the speed limits of the road segments. This
information may not be available for your region (ask your local dealer) or may not be fully
correct for all roads in the map.
You can congure Asus GO to warn you if you exceed the current limit.
2.1.6.12 POI (Points of Interest)
A point of interest (POI) is a location that someone might nd useful or interesting. Asus
GO is delivered with thousands of POIs and you can also create your own POIs in the
application.
POI icons are quite large so you can easily recognise the symbol. The icons are also
semitransparent: they do not cover the streets and intersections behind them.
For instructions on how to add or edit a POI or a POI group, see the relevant section.
41
Page 42

2.2 Navigating with Asus GO
You can set up your route in Asus GO in several ways:
• if you need a simple route (a route with only one destination, without any intermediary
waypoints), you can select the destination and start navigating to it right away
• you can plan a multi-point route (available in Advanced mode only)
• you can also plan a route independently of your current GPS position or even without
GPS reception (available in Advanced mode only)
2.2.1 Selecting the destination of a simple route
Asus GO offers you several ways of choosing your destination and waypoints:
• Use the selected location on the map (the Cursor).
• Enter a full address or part of an address, for example a street name without a house
number or the names of two intersecting streets.
• Enter an address with postal code. This way you do not need to select the name of the
settlement and the search for street names might be faster as well.
• Use a coordinate
• Use a saved location:
• a Favourite
• a POI
• the History of previously set destinations and waypoints
Tip
If you are going to use a route later, save it before you start navigating.
42
Page 43

2.2.1.1 Selecting the Cursor as the destination
1. Find your destination on the map: move the map, tilt it, etc. as needed.
2. Tap the location that you want to select as your destination.
3. Tap to open the Cursor menu.
4. Tap the button (Advanced mode), or the
button (Simple mode).
5. The map appears with the selected point in the middle. Tap
(Simple mode) or (Advanced mode) from the Cursor menu. The
route is then automatically calculated, and you can start navigating.
Tip
If you know that you will use a destination later, save it as a POI.
2.2.1.2 Entering an address or part of an address
If you know at least a part of the address, it is the quickest way to select the destination of
the route. You can nd an address by entering:
• the exact address, including house number
• the centre of a settlement
• an intersection
• the midpoint of a street
• any of the above, starting the search with the postal code
43
Page 44

2.2.1.2.1 Entering an address
The procedure is explained starting from the Navigation menu.
1. Tap the following buttons: (Simple mode), or ,
(Advanced mode).
2. By default, Asus GO proposes the country/state and settlement where you are. If
needed, tap the button with the name of the country/state, and select a different one
from the list.
3. Change the settlement following the steps below:Change the settlement following the steps below:
Tip
To select the settlement from the list of recently used ones, tap the button.
1. Tap the button with the name of the settlement, or if you have changed the
country/state, tap .
2. Start entering the settlement name on the keyboard.
3. Get to the hit list:
• After entering a couple of characters, the hits that match the string appear in a list.
• Tap the button to open the hit list before it appears automatically.
4. Pick the settlement from the list.
44
Page 45

4. Enter the street name:
1. Tap .
2. Start entering the street name on the keyboard.
3. Get to the hit list:
• After entering a couple of characters, the hits that match the string appear in a list.
• Tap the button to open the hit list before it appears automatically.
4. Pick the street from the list.
5. Enter the house number>:
1. Tap .
2. Enter the house number on the keyboard.
3. Tap the button to nish entering the address.
6. The map appears with the selected point in the middle. Tap (Simple
mode) or (Advanced mode) from the Cursor menu. The route is then
automatically calculated, and you can start navigating.
Tip
Tap the button after a couple of letters; Asus GO lists the items that contain the character set.
45
Page 46

2.2.1.2.2 Tips on entering addresses quickly
• When you are entering the name of a settlement or a street, Asus GO only displays
those characters that appear in possible search results. The other characters are greyed
out.
• You can speed up nding an intersection:
• Search rst for the street with a less common or less usual name; fewer letters arenough to nd it.
• If one of the streets is shorter, search for that one rst. You can then nd the second
one faster.
• You can search for both the type and the name of a road. If the same word appears in
several names, for example in the name of streets, roads and avenues, you can obtain
the result faster if you enter the rst letter of the street type: For example, enter Pi A to
obtain Pine Avenue and skip all Pine Streets and Pickwick Roads.
• You can also search in postal codes. This is useful when a street name is common and it
is used in several districts of a city.
2.2.1.2.3 Selecting an intersection as the destination
The procedure is explained starting from the Navigation menu.
1. Tap the following buttons: (Simple mode), or ,
(Advanced mode).
2. By default, Asus GO proposes the country/state and settlement where you are. If
needed, tap the button with the name of the country/state, and select a different one
from the list.
3. To change the settlement:To change the settlement:
46
Page 47

Tip
To select the settlement from the list of recently used ones, tap the button.
1. Tap the button with the name of the settlement, or if you have changed the
country/state, tap .
2. Start entering the settlement name on the keyboard.
3. Get to the hit list:
• After entering a couple of characters, the hits that match the string appear in a list.
• Tap the button to open the hit list before it appears automatically.
4. Pick the settlement from the list.
4. Enter the street name:
1. Tap .
2. Start entering the street name on the keyboard.
3. Get to the hit list:
• After entering a couple of characters, the hits that match the string appear in a list.
• Tap the button to open the hit list before it appears automatically.
4. Pick the street from the list.
47
Page 48

48
5. Tap the button. Start entering the name of the intersecting street on the
keyboard.
6. Tap the other street in the list.
7. The map appears with the selected point in the middle. Tap (Simple
mode) or (Advanced mode) from the Cursor menu. The route is
then automatically calculated, and you can start navigating.
2.2.1.2.4 Selecting a city centre as the destination
The City Centre is not the geometric centre of the settlement but an arbitrary point the map
creators have chosen. In towns and villages, it is usually the most important intersection; in
larger cities, it is an important intersection.
The procedure is explained starting from the Navigation menu.
1. Tap the following buttons: (Simple mode), or ,
(Advanced mode).
2. By default, Asus GO proposes the country/state and settlement where you are. If
needed, tap the button with the name of the country/state, and select a different one
from the list.
3. To change the settlement:To change the settlement:
Tip
To select the settlement from the list of recently used ones, tap the button.
Page 49

To change the settlement:
1. Tap the button with the name of the settlement, or if you have changed the country/
state, tap .
2. Start entering the settlement name on the keyboard.
3. Get to the hit list:
• After entering a couple of characters, the hits that match the string appear in a list.
• Tap the button to open the hit list before it appears automatically.
4. Pick the settlement from the list.
4. Tap the button.
5. The map appears with the selected point in the middle. Tap
(Simple mode) or (Advanced mode) from the Cursor menu. The
route is then automatically calculated, and you can start navigating.
2.2.1.2.5 Entering an address with a postal code
1. Tap the following buttons: (Simple mode), or ,
(Advanced mode).
49
Page 50

2. By default, Asus GO proposes the country/state and settlement where you are. If
needed, tap the button with the name of the country/state, and select a different one
from the list.
3. Tap the button with the name of the settlement, and enter the postal code:
1. Start entering the code on the keyboard.
2. Get to the hit list:
• After entering a couple of numbers, the hits that are a match appear in a list.
• Tap the button to open the hit list before it appears automatically.
3. Pick the settlement from the list.
4. Enter the street name:
1. Tap .
2. Start entering the street name on the keyboard.
3. Get to the hit list:
• After entering a couple of characters, the hits that match the string appear in a list.
• Tap the button to open the hit list before it appears automatically.
4. Pick the street from the list.
5. Enter the house number>:
50
1. Tap .
Page 51

2. Enter the house number on the keyboard.
3. Tap the button to nish entering the address.
6. The map appears with the selected point in the middle. Tap (Simple
mode) or (Advanced mode) from the Cursor menu. The route is
then automatically calculated, and you can start navigating.
2.2.1.3 Selecting the destination from your Favorites
You can select as your destination a location that you have already saved as a Favorite. For
instructions on how to create a Favorite, see the relevant section.
The procedure is explained starting from the Navigation menu.
1. Tap the following buttons: (Simple mode) or ,
(Advanced mode).
2. Tap the Favourite that you want to set as your destination.
3. The map appears with the selected point in the middle. Tap
(Simple mode) or (Advanced mode) from the Cursor menu. The
route is then automatically calculated, and you can start navigating.
51
Page 52

2.2.1.4 Selecting the destination from the POIs
You can select your destination from the POIs included with Asus GO or from the ones you
have previously created. For instructions on how to create a POI, see relevant section.
The procedure is explained starting from the Navigation menu.
1. Tap the following buttons: (Simple mode), or ,
(Advanced mode).
2. Select the area around which the POIs should be searched. For information on anchors
in POI searches, see relevant section.
3. Select the POI category to narrow the search further. If you do not want to narrow the
search further, tap the button.
4. [optional] Sort the result list:
• alphabetically with the button
• by the distance from your current position with the button
5. Tap the POI.
6. The map appears with the selected point in the middle. Tap (Simple
mode) or (Advanced mode) from the Cursor menu. The route is then
automatically calculated, and you can start navigating.
52
Page 53

2.2.1.5 Selecting the destination or a waypoint from the History
The destinations that you have set earlier appear in the History.
The procedure is explained starting from the Navigation menu.
1. Tap the following buttons: (Simple mode), or ,
(Advanced mode).
2. If necessary, turn the page to see earlier destinations with the arrow buttons.
3. Tap the desired item.
4. The map appears with the selected point in the middle. Tap
(Simple mode) or (Advanced mode) from the Cursor menu. The
route is then automatically calculated, and you can start navigating.
2.2.1.6 Selecting the destination by entering its coordinates
This feature is available in Advanced mode only.
The procedure is explained starting from the Navigation menu.
1. Tap the following buttons: .
2. (optional) Tap to change the format of the displayed
coordinates.
3. Tap the latitude or longitude value to change the coordinates:
53
Page 54

1. Select the coordinate system: tap WGS84 or UTM.
2. Enter the coordinate values:
• In UTM: the latitude (N or S) and the longitude (E or W)
• In WGS84: the number and the letter of the zone, and the X Y coordinates
4. Tap the button.
5. The map appears with the selected point in the middle. Tap
(Simple mode) or (Advanced mode) from the Cursor menu. The
route is then automatically calculated, and you can start navigating.
2.2.2 Creating a multi-point route
This feature is available in Advanced mode only.
1. Multi-point routes are extended from single routes, so a route must be active rst.
2. Select another point as you did in the previous sections. This will be the additional
destination in the route.
3. The map appears with the selected point in the middle, and the Cursor menu opens
automatically.
4. Tap to open the full Cursor menu with the additional functions.
5. Now add the new point to the existing route:
54
• Tap to add the point as an intermediary destination preceding the
nal destination of the route.
Page 55

• Tap to add the point as a new nal destination demoting the previous
one to the last intermediary destination.
6. [optional] To add more points to the route, repeat the above steps as many times as
you like.
Every time a new point is added, the route is recalculated automatically, and you can start
navigating right away.
2.2.3 Watching the simulation of a route
This feature is available in Advanced mode only.The procedure is explained starting from the
Cockpit screen.
1. Tap the following buttons: , .
2. The Route menu appears. There are two ways of running the route simulation:
• Tap to run the simulation at high speed to give you a quick overview of the
route.
• Tap to run the simulation at normal speed and with voice guidance
instructions announced. This option is for demonstration purposes, or for checking dif-
cult parts of the route in advance.
3. The simulation can be aborted any time by tapping the button.
55
Page 56

2.2.4 Pausing the active route
You do not need to pause the active route: when you start driving again, Asus GO restarts
the voice instructions from your position.
2.2.5 Deleting the active route
This feature is available in Advanced mode only.The procedure is explained starting from the
Cockpit screen.
• Tap the following buttons: , , .
2.2.6 Using track logs
Asus GO can record the track (how your GPS position changed) that you drive.
Tip
You do not need to select a destination and create a route for this; you can also record your driving path while cruising.
This feature is available in Advanced mode only.
The procedure is explained starting from the Cockpit screen. Recording the travelled path
(creating a Track Log)
1. Start driving.
2. Tap the following buttons: , , .
56
3. Start the recording: tap the button.
Page 57

You return to the map and you can continue driving.
Viewing a Track Log on the map
1. Tap the following buttons: , , .
2. Tap the log and then tap the button.
Changing the colour of a Track Log
1. Tap the following buttons: , , .
2. Tap the log and then tap the button.
2.2.7 Saving a route
This feature is available in Advanced mode only.
When you save a route, Asus GO only saves the waypoints:
• If you updated your map since you rst saved the route, Asus GO calculates the driving
instructions according to the latest available map information.
• Asus GO deletes the information about the legs and waypoints that you already left
behind during navigation. If you want to save the route, that is, the waypoints, you need
to save it before Asus GO starts navigating.
Tip
If you have a simple route or if you want to save only the destination from a multipoint oute, save the destination as a
POI.
57
Page 58

Saving a multi-point route
1. Tap the following buttons: , , .
2. Enter a name for the saved route, and then tap .
2.2.8 Loading a saved route
This feature is available in Advanced mode only.The procedure is explained starting from the
Cockpit screen.
1. Tap the following buttons: , , .
2. Tap the route you wish to navigate.
3. You need to conrm whether you want to stop navigating from the current GPS position
(to use the start point of the loaded route as the start point), or keep on navigating to the
destination(s) in the route from the GPS position.
4. The map appears, the route is automatically calculated, and you can start navigating.
58
Page 59

2.3 Reference book (Advanced mode)
Asus GO starts with the Navigation menu. From there you can access the following screens:
Screen Button Description
Map
Find
My Data
Route
Settings
About
The map.
Setting the destination (for example from an address or a POI) or using the search
engine of Asus GO.
Managing user data, such as saved point (POI, Favourites, Pins), History items,
Saved Routes, and Track logs.
Managing the active route (obtain information about it, change or delete it) or plan a
route without GPS reception.
Managing the navigation settings, for example the language settings or the settings
of the map display.
This screen has no navigation feature. It merely provides information about the
maps and licenses included with your navigation system.
59
Page 60

2.3.1 Map
Asus GO is primarily intended for land navigation. That is why maps in Asus GO look similar
to paper road maps. However, Asus GO provides much more than regular paper maps: you
can customise the look and the content of the map.
The most important and most often used screen of Asus GO is the Map screen. The gures
below show what can appear on the map; usually only a couple of them are visible at the
same time.
No. Name Active? Related topics
1 Next route event Yes Tap it to hear the voice instruction again.
2 Second upcoming
manoeuvre
No -
60
Page 61

No. Name Active? Related topics
3 Simulation control Yes Watching the simulation of a route
4 Zoom in, zoom out Yes Manipulating the map view
5 Cursor (selected map
location)
6 Map view modes Yes -
7 Current speed limit No Setting the tolerance level for the speed limit warning
8 Volume control Yes
9 Tilt up, tilt down Yes Manipulating the map view
10 Rotate left, rotate right Yes Manipulating the map view
11 Current street No
12 Active route No Creating a simple route
13 Scale No -
14 Show the Panel Yes -
15 Open the Menu Yes -
16 TMC status No Listing nearby TMC events
17 Map orientation No Manipulating the map view
18 Return to GPS position Yes -
19 Battery status No Tips for saving battery life
20 GPS position quality No Viewing the GPS status information
21 Lane information No -
22 Next street No -
Yes Using the Cursor
Creating a multi-point route
Modifying the active route
Disabling TMC
61
Page 62

23 POI Yes Listing nearby POIs
Creating, changing or deleting a POI
24 TMC event Yes Listing nearby TMC events
25 Safety Camera No Creating a Safety Camera
Changing the Safety Camera warning settings
26 Road Block Yes Removing a Road Block
Updating the schedule of a Road Block
27 Track Log Yes Using Track Log
28 Point Info No Checking the details of a map location
2.3.1.2 Buttons on the map
4.1.2.1 Zooming, tilting and rotating buttons
These buttons appear when you tap the map.
Button Description Available in which map view modes
Zooms the map in/out. In all modes.
Tilts the map up/down. Only in 3D mode.
Rotates the map left/right. Only in 2D and 3D modes, not in Overview mode.
62
Page 63

2.3.1.2.2 Map view buttons
The button of the active map view is always visible on the map. Tap it to switch to another
view.
Button Name Description
2D view (top-down)
3D view (perspective)
2.3.2 Find menu
Select the destination of your route:
Button Name Description
Address If you know at least a part of the address, this is the quickest way to nd the
Favourites You can select as your destination a location that you have already saved as
POIs You can select your destination from the thousands of POIs included with
History The destinations that you have already entered in Asus GO are available in
Coordinates You can select your destination by entering its coordinates.
location.
a Favourite.
Asus GO or from the ones you have previously created.
the History list.
63
Page 64

2.3.2.1 Sound and System settings
There are several ways to ne-tune the way Asus GO sounds.
Name Description
Volume Shows the current volume settings in Asus GO:
• whether dynamic volume is on When you are driving at a high speed, the noise in the car might be
too loud and you might not be able to hear the voice instructions and warnings. If you turn on Dynamic
Volume, Asus GO increases the volume when your speed exceeds a certain limit.
• loudness of the voice instructions
• loudness of your clicks when you tap the screen
Sound Shows the current sound selections for:
• clicks when you tap the screen
• incoming phone calls from known numbers
• incoming phone calls from unknown numbers
2.3.2.2 Regional settings
Regional settings let you personalize the application to t your local needs of language and
data formats.
64
Page 65

Name Description
Program Language Selects the language of the text on the buttons and in the menus.Asus GO restarts
Voice Prole Selects the language and the prole of the voice instructions.
Distance Units Distances in Asus GO can be displayed in various international formats.
Date and Time Format Sets the format of the date and time. Asus GO might not support all of the listed
Time and Time Zone Sets the time zone. You can also make Asus GO automatically use the time zone of
when you change the language.
units in some voice guidance languages. If you select a measurement unit that
is not supported by the chosen voice guidance language, you will see a warning
message.
the GPS position.
2.3.2.3 Route
There are various settings that inuence the way routes are calculated.
4.2.3.1 Route Calculation Method
The following route planning types exist in this application:
Option Description
Fast Gives the quickest possible route if you can travel at or near the speed limit on all roads. Usually the
Short Gives a route that has the smallest total distance of all possible routes between the waypoints.
Economical Combines the benets of Fast and Short: Asus GO calculates as if it were calculating the Fast route,
Easy Results in a route with fewer turns. With this option, you can make Asus GO to take, for example, the
best selection for fast and normal cars.
Usually practical for pedestrians, cyclists or slow vehicles.
but it takes other roads to save petrol.
motorway instead of series of smaller roads or streets.
65
Page 66

2.3.2.3.2 Vehicles and Road Types used in route calculation
Route calculation can be based for the following vehicle types:
• Car
• Taxi
• Bus
• Lorry
• Emergency vehicles
• Bicycle
• Pedestrian
For each vehicle type, you can set whether Asus GO should include the following route types
when it is calculating a route:
Note
When you exclude a road type, you set only a preference. Asus GO will still include such roads in the routes when it
cannot plan a route to your destination in any other way.
For instructions on how to include or exclude these route types in the route calculation, see
table below.
66
Page 67

Type Description
Motorways You might need to avoid motorways when you are driving a slow car or you are towing
Unpaved roads Asus GO excludes unpaved roads by default: unpaved roads can be in a bad condition and
Toll roads By default Asus GO includes toll roads (pay roads where you can purchase a pass or vignette
Charge roads Charge roads are pay roads where there is a per-use charge. They can be enabled or
U turns Asus GO can exclude manoeuvres that would include a U-turn. Turning back on dual carriage
Permit needed You might need a permit or permission from the owners to use certain roads or to enter
Ferries Asus GO includes ferries in a planned route by default. However, a map does not necessarily
Cross-border
planning
another vehicle.
usually you cannot reach the speed limit on them.
to use the road for a longer period of time) in the routes. If you disable toll roads, Asus GO
plans the best toll-free route.
disabled separately from toll roads.
ways does not count as a U-turn.
is checking for your U-turn preferences. If you enable this, Asus GO avoids U-turns whenever
possible. When it reaches a waypoint, however, it might plan the rest of the route starting in the
opposite direction.
Note: Asus GO considers waypoints as stopovers when it
certain areas. Asus GO excludes these roads from the route calculation by default.
contain information about the accessibility of temporary ferries. You might also need to pay a
fare on ferries.
In some cases the route calculated according to your other navigation and route preferences
would lead through another country. If you wish to always stay within the same country, turn
this option off.
67
Page 68

2.4 Glossary
2D/3D GPS reception
The GPS receiver uses satellite signals to calculate its (your) position and need at
least four signals to give a three-dimensional position, including elevation. Because the
satellites are moving and because objects can block the signals, your GPS device might
not receive four signals. If three satellites are available, the receiver can calculate the
GPS position but the accuracy is lower and the GPS device does not give you elevation
data: only 2D reception is feasible.
In Asus GO, you can see the GPS position quality on the GPS Data Screen.
2D and 3D GPS reception have nothing to do with the 2D and 3D display modes of the
map, which are ways of showing the map on the screen independently of the quality of
the GPS reception.
Active route
The instructions used in the ongoing navigation. You can save and load routes in Asus
GO, but at most one route is active at any give time, and it is always active until you
delete it, reach your destination or you shut down Asus GO.
For information how Asus GO shows the active route on the map.
City Centre
The City Centre is not the geometric centre of the settlement but an arbitrary point
the map creators have chosen. In towns and villages, it is usually the most important
intersection; in larger cities, it is an important intersection.
68
Page 69

GPS accuracy
Several factors have an impact on the deviation between your real position and the
one given by the GPS device. For example, signal delay in the ionosphere or reecting
objects near the GPS device have a different and varying impact on how accurately the
GPS device can calculate your position.
Map
Asus GO works with digital maps which are not simply the computerised versions of
traditional paper maps. Similarly to the paper road maps, the 2D mode of digital maps
show you streets and roads. In 3D mode, you can also see the height differences, for
example valleys and mountains, or buildings.
Digital maps, however, differ from paper maps in that you can use them interactively:
you can zoom in and out (increase or decrease the scale), you can tilt them up and
down, turn them left and right. In GPS-supported navigation, digital maps facilitate
route planning.
Route
Can contain one or more via points. The last via point is the destination and the route
is cut into different legs (from one via point to another).
Scheme
Asus GO comes with different colour schemes for the map for the daylight or night use.
Schemes are custom graphic settings for the map and they can have different colours
for streets, blocks or surface waters in 2D and 3D modes, and they display shades or
shadows in different ways in 3D mode.
69
Page 70

One daytime scheme and one night-time scheme is always selected. Asus GO uses
them when it switches from day to night and back.
Speed Camera
A special POI type. Asus GO is shipped with a built-in database of xed and mobile
speed cameras but you can also mark the position of a speed camera on the map. You
can congure Asus GO to warn you when you approach a speed camera.
Waypoint
A location that a navigation application uses when it calculates a route. Asus GO
navigates you to it and the voice instructions mention that you reached it.
70
Page 71

2.5 End user licence agreement
Please do not operate, enter data into or obtain data from this product while driving.
Failure to pay proper attention to the operation of your vehicle could cause death,
injury or material damage. When using this product, please park your vehicle safely
rst and must always observe trafc regulations and safety requirements. You use this
product at your own responsibility and risk.
ASUS shall not assume any responsibility for damages arising from this product during
driving or transportation or any violation of trafc regulations or safety requirements for
any purpose.
71
Page 72

Chapter
Multimedia features
72
3
Page 73

3.1 Music Player
The device scans its memory card for MP3 and WMA audio recordings. You can create play
lists from the audio les. Songs on a play list will be played sequentially.
Launch the Music player
1. Tap Music Player from the Main Menu to open the Music Player Main Screen ( see gure
1). The Music player main screen appears.
2. Tap Playlist from the Music player main screen to display the playlist (gure 2)
gure 1
gure 2
73
Page 74

Playlist
Tap playlist to display the playlist directory. When you open the playlist, the system
searches for Mp3 and WMA les on the Micro SD card to create a playlist.
Previous page
Next page
74
Return to the
main screen
play
songs
Add
songs
song from the
Remove a
playlist
Remove all
songs from
the playlist
refresh
playlist
Page 75

Playing Music
Select a song from your playlist, tap Play to play it. The following screen appears.
circulate
(playlist)
play randomly
back to the main
menu
launch the playlist adjust the volume
75
Page 76

3.2 Photo Viewer
The Photo Viewer lets you view photos from your handheld device. This application
recognizes mpg, mpeg, mpv, mpe, asf, asx, wax, wvx, wmx les. The Photo Viewer’s main
features let you zoom in or zoom out, rotate an image, and display a series of photos through
a slide show.
Launch the Photo Viewer
You can open the Photo Viewer by tapping the Photo Viewer button on the Main menu.
76
Page 77

View photos
When you open the Photo Viewer, the screen shows the top level folders on your device, as
shown below.
page up
page down
back to the main
menu
tap to view the
photos as a
slide show
Note: When you open the photo viewer, the system searches for photos on the Micro SD card
to create a playlist.
77
Page 78

Display a photo
Tap a photo from the screen below to display the photo.
78
zoom out
back to the main
menu
tap to show the
photo’s infomation
previous next
zoom in
Note: Tap the photo to display it by full-screen. Tap the full-screen photo to back to its
previous size.
Page 79

3.3 Video Player
The Video Player lets you view videos from your handheld device. This application
recognizes wmv les.
Launching the Video Player
You can open the Photo Viewer by tapping the Video Player button as shown below. The
Video Player main menu appears.
79
Page 80

Playlist
Tap Playlist on the main menu to display the Playlist screen (see the gure below).
Note: When you open the photo viewer, the system searches for photos on the Micro SD
card to create a playlist.
Tap a video name and tap play to play it.
page up
page down
back to the main menu play a video
80
Page 81

Play a video
Tap a video from the playlist to play it. The image below shows a video is playing.
the name of the
movie
the length of the
movie
time remains
back to the main menu
launch the playlist
adjust the
volume
Note: Tap the video to play it by full-screen, tap the full-screen video to back to its previous
size.
81
Page 82

Chapter
Phone features
82
4
Page 83

4.1 Phone menu
The Phone function allows the hands-free
communication through a bluetooth connection
to your phone.
You can open the Phone by tapping the Phone
button. The Phone main menu appears as show
below.
Open SMS
call log
Open
contact
tap to display the
phone pad
Tap to back to the
main menu
83
Page 84

84
4.2 Bluetooth settings
Turning on the bluetooth
To turn on the bluetooth, tap Bluetooth Setting button from the phone main menu, then tap
Bluetooth Status, set the status to On, tap Done.
Bluetooth settings
- Bluetooth Status. You can choose to turn
on/off the bluetooth function.
- Connect Status. You can choose to
connect/disconnect R300 from a bluetooth
cellphone.
- Auto connect. You can choose to enable/
disable Auto Connect function.
- Answer mode. If you choose Answer (5
Secs), the incoming call will automatically
get through in within 5 seconds. Or, you
can choose to disable this function.
Page 85

4.3 Connecting R300 to your cellphone
To connect R300 to your cellphone:
1. Tap Dialer from the Phone Menu.
2. Tap Yes from the Connect to a
Bluetooth handset rst screen.
The screen displays the devices
3. Tap a device to select it.
Note: Some cellphones do not support the
SMS and Contact functions of R300.
85
Page 86

4. A screen appears to show a password.
Input the password to your cellphone.
5. After the R300 is paired up with your
cellphone, tap the cellphone name and
then tap Connect.
6. The following screen appears when
your R300 is successfully connected to
your cellphone. Tap Back to back to the
phone main menu.
86
Page 87

4.4 Making and Receiving Calls
Making phone calls
1. Tap Dialer from the phone main menu.
The phone-pad screen appears.
2. Input a number in the phone-number bar
and tap the green phone icon to dial.
After talk, tap the red phone icon to end
a call. You can also press Volume key to
adjust volume.
87
Page 88

Receiving calls
A screen appears as shown when there is a
incoming call. Press the green phone icon to
receive the call. Press the red icon to end the
call.
Call Log
Tap the Call Log button on the phone menu to
display the call record list. Tap a record to dial
or delete it.
88
Page 89

Contact information
ASUSTeK COMPUTER INC. (Taiwan)
Hotline: 0800-093-456 (Toll-Free call from Taiwan only)
Fax: 886-2-2895-9254
Online service: http://vip.asus.com/eservice/techserv.aspx
WWW: http://tw.asus.com
ASUSTeK COMPUTER INC. (Asia-Pacic)
Hotline: 886-2-2894-3447
Fax: 886-2-2890-7698
Online service: http://vip.asus.com/eservice/techserv.aspx
WWW: http://www.asus.com
ASUS COMPUTER GmbH (Germany/Austria)
Hotline: +49-2102-9599-10
Fax: +49-2102-9599-11
Online service: http://vip.asus.com/eservice/techserv.aspx
WWW: http://www.asus.de
ASUS COMPUTER (China)
Tel: +86-10-82667575
Online service: http://vip.asus.com.cn/eservice/techserv.aspx.
89
 Loading...