

Asus Play Media Pro User Manual
O!PLAY MEDIA PRO
User Manual
Smart TV Set Top Box
SD/MMC
USB
e7276_oplays3_contents.indb 1 4/5/12 3:31:17 PM
ii
E7276
First Edition
March 2012
Copyright © 2012 ASUSTeK COMPUTER INC. All Rights Reserved.
No part of this manual, including the products and software described in it, may be reproduced,
transmitted, transcribed, stored in a retrieval system, or translated into any language in any form or by any
means, except documentation kept by the purchaser for backup purposes, without the express written
permission of ASUSTeK COMPUTER INC. (“ASUS”).
Product warranty or service will not be extended if: (1) the product is repaired, modied or altered, unless
such repair, modication of alteration is authorized in writing by ASUS; or (2) the serial number of the
product is defaced or missing.
ASUS PROVIDES THIS MANUAL “AS IS” WITHOUT WARRANTY OF ANY KIND, EITHER EXPRESS
OR IMPLIED, INCLUDING BUT NOT LIMITED TO THE IMPLIED WARRANTIES OR CONDITIONS OF
MERCHANTABILITY OR FITNESS FOR A PARTICULAR PURPOSE. IN NO EVENT SHALL ASUS, ITS
DIRECTORS, OFFICERS, EMPLOYEES OR AGENTS BE LIABLE FOR ANY INDIRECT, SPECIAL,
INCIDENTAL, OR CONSEQUENTIAL DAMAGES (INCLUDING DAMAGES FOR LOSS OF PROFITS,
LOSS OF BUSINESS, LOSS OF USE OR DATA, INTERRUPTION OF BUSINESS AND THE LIKE),
EVEN IF ASUS HAS BEEN ADVISED OF THE POSSIBILITY OF SUCH DAMAGES ARISING FROM ANY
DEFECT OR ERROR IN THIS MANUAL OR PRODUCT.
SPECIFICATIONS AND INFORMATION CONTAINED IN THIS MANUAL ARE FURNISHED FOR
INFORMATIONAL USE ONLY, AND ARE SUBJECT TO CHANGE AT ANY TIME WITHOUT NOTICE,
AND SHOULD NOT BE CONSTRUED AS A COMMITMENT BY ASUS. ASUS ASSUMES NO
RESPONSIBILITY OR LIABILITY FOR ANY ERRORS OR INACCURACIES THAT MAY APPEAR IN THIS
MANUAL, INCLUDING THE PRODUCTS AND SOFTWARE DESCRIBED IN IT.
Products and corporate names appearing in this manual may or may not be registered trademarks or
copyrights of their respective companies, and are used only for identication or explanation and to the
owners’ benet, without intent to infringe.
e7276_oplays3_contents.indb 2 4/5/12 3:31:18 PM

iii
Contents
Contents ...................................................................................................... iii
Safety information ...................................................................................... vi
Warning labels ..................................................................................vi
Important Safety Instructions ...........................................................vii
License notice and trademark acknowledgement for Dolby Digital .... viii
License notice and trademark acknowledgement for DTS 2.0+ Digital Out™
viii
About this user guide ............................................................................... viii
How this user guide is organized .................................................... viii
Conventions used in this guide ......................................................... ix
Where to nd more information .........................................................ix
Chapter 1 1-1
Getting started 1-1
Welcome .................................................................................................... 1-1
Package contents ..................................................................................... 1-1
Specications summary .......................................................................... 1-3
Getting to know your O!PLAY MEDIA PRO ............................................ 1-4
System requirements ............................................................................... 1-4
Front panel ..................................................................................... 1-4
Rear panel ...................................................................................... 1-5
Remote control ............................................................................... 1-6
Getting your O!PLAY MEDIA PRO ready .............................................. 1-10
Connecting the power adapter ..................................................... 1-10
Connecting devices to your MEDIA PRO ..................................... 1-10
To connect devices to your MEDIA PRO: ..................................... 1-10
Setting up your O!PLAY MEDIA PRO for digital streaming .......... 1-12
Starting for the rst time ............................................................... 1-13
Chapter 2 2-1
Connecting to a network 2-1
Wired connection ...................................................................................... 2-1
Connecting to a home network ...................................................... 2-1
Connecting to your local area network (LAN) ................................ 2-3
Wireless connection ................................................................................. 2-4
Accessing les wirelessly ............................................................... 2-4
e7276_oplays3_contents.indb 3 4/5/12 3:31:18 PM

iv
Connecting to a wireless local area network (WLAN) .................... 2-5
Sharing les over the network ................................................................ 2-8
Sharing les under Windows® XP OS ............................................ 2-8
Sharing les under Windows® Vista OS ......................................... 2-9
Sharing les under Windows® 7 OS ..............................................2-11
Sharing les under Mac OS X 10.5.xx ......................................... 2-13
Sharing les under Linux OS ....................................................... 2-14
Chapter 3 3-1
Using your O!PLAY MEDIA PRO 3-1
The Home screen ...................................................................................... 3-1
Conguring the O!PLAY MEDIA PRO settings ....................................... 3-2
Playing a movie ......................................................................................... 3-3
Movie control buttons on the remote control .................................. 3-3
Playing a movie .............................................................................. 3-4
Playing music ............................................................................................ 3-5
Movie control buttons on the remote control .................................. 3-5
Playing a music le ........................................................................ 3-6
Conguring the audio playback settings ........................................ 3-7
Viewing photos ......................................................................................... 3-8
Photo control buttons on the remote control .................................. 3-8
Viewing photos ............................................................................... 3-9
Viewing photos in slideshow mode ................................................ 3-9
Setting the background music for the slideshow .......................... 3-10
Conguring the photo playback settings ...................................... 3-10
Streaming online media ......................................................................... 3-11
Online streaming from YouTube Leanback ...................................3-11
Online streaming from Facebook ................................................. 3-12
Online streaming from Acetrax ..................................................... 3-12
Online streaming from Dailymotion .............................................. 3-13
Streaming digital TV programs ............................................................. 3-13
Viewing the TV program guide ..................................................... 3-14
Conguring the digital TV program settings ................................. 3-14
Managing your les ................................................................................ 3-15
Renaming les/folders .................................................................. 3-15
e7276_oplays3_contents.indb 4 4/5/12 3:31:18 PM

v
Using O!Direct ......................................................................................... 3-15
Installing O!Direct ......................................................................... 3-15
Streaming media les via O!Direct ............................................... 3-16
Using O!MediaShare ............................................................................... 3-17
Using AutoPlay ....................................................................................... 3-18
Chapter 4 4-1
Troubleshooting 4-1
Troubleshooting ........................................................................................ 4-1
Display ........................................................................................ 4-1
Audio ........................................................................................ 4-3
USB Storage Device ...................................................................... 4-4
Remote Control .............................................................................. 4-4
Firmware Update ............................................................................ 4-4
Wired, Wi-Fi, and Internet Connection ........................................... 4-5
Operation/function failure ............................................................... 4-7
Appendices A-1
Notices .......................................................................................................A-1
REACH ........................................................................................A-1
Federal Communications Commission Statement .........................A-1
Canadian Department of Communications Statement ................... A-2
GNU General Public License ...................................................................A-2
Licensing information ..................................................................... A-2
ASUS contact information .......................................................................A-8
e7276_oplays3_contents.indb 5 4/5/12 3:31:19 PM
vi
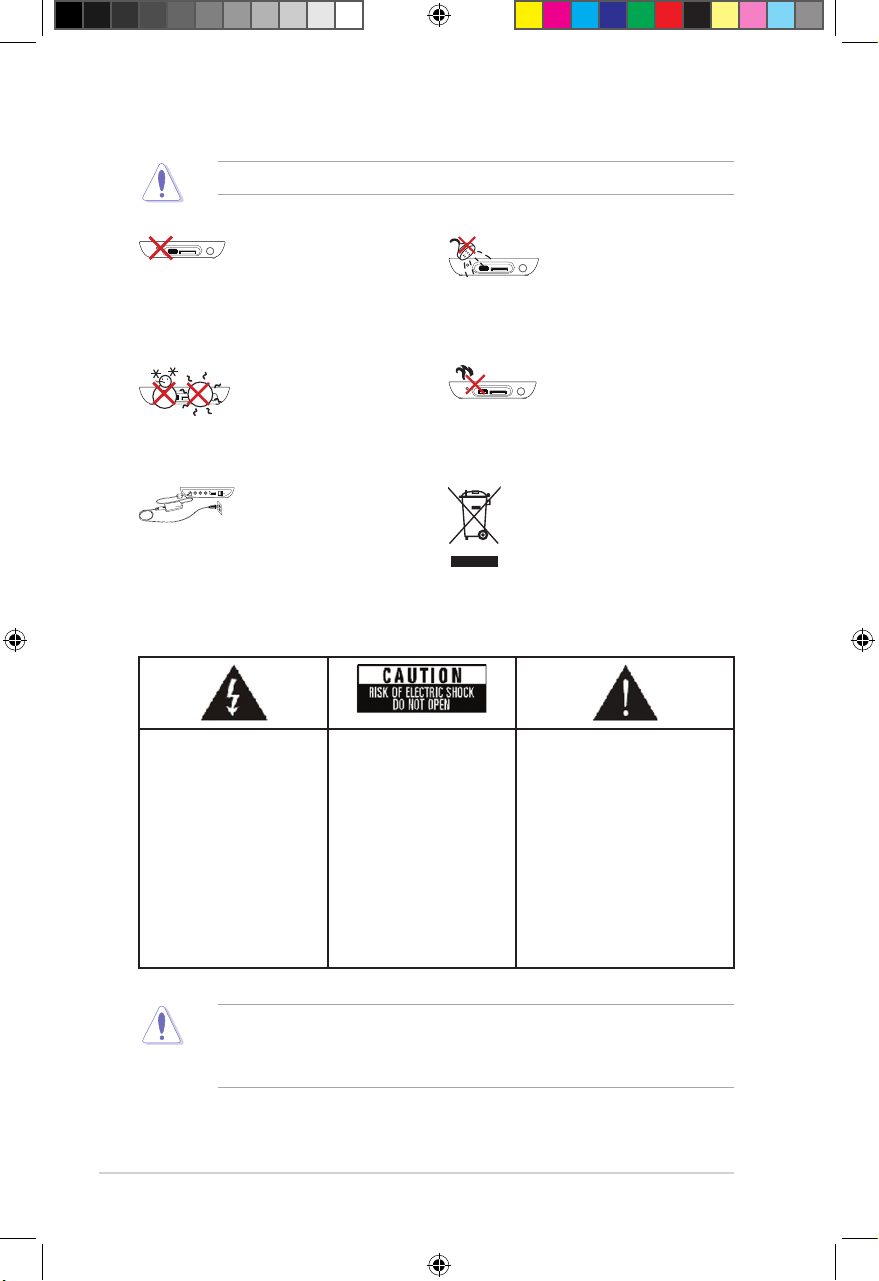
DO NOT place on uneven
surfaces. Seek service if the
casing has been damaged.
Refer all service only to
qualied service personnel.
DO NOT expose the device
to any moisture or immerse
in uids.
SAFE TEMP: This device
should only be used in
environments with ambient
temperatures between 5oC
(41oF) and 35oC (95oF).
DO NOT install near any
heat-producing devices or
sources such as radiators,
heat registers, stoves, or
ampliers.
DO NOT throw the device
in public bins. This device is
designed for proper reuse
and recycling. Check local
regulations for disposal of
electronic products.
Ensure that you plugged
the device into the correct
power input rating (12Vdc,
2A).
Safety information
• Danger of explosion if battery is incorrectly replaced. Replace only with the
same or recommended battery type.
• Dispose used batteries according to local regulations.
The lightning ash with
arrowhead symbol,
within an equilateral
triangle, is intended
to alert the user to the
presence of uninsulated
dangerous voltage within
the product’s enclosure
that may be of sufcient
magnitude to constitute
a risk of electric shock to
persons.
To reduce the risk of
electric shock, do not
remove the back cover.
No user serviceable parts
inside. Refer servicing
to qualied service
personnel.
The exclamation point within
an equilateral triangle is
intended to alert the user to
the presence of important
operating and maintenance
(servicing) instructions in the
literature accompanying the
appliance.
Use only a dry cloth to clean the device.
Warning labels
e7276_oplays3_contents.indb 6 4/5/12 3:31:21 PM
vii
Important Safety Instructions
1. Keep these instructions for reference.
2. Heed all warnings regarding usage.
3. Do not use this apparatus near water or expose the device to moisture.
4. Clean only with a dry cloth.
5. Do not block any ventilation openings. Install in accordance with the
manufacturer’s instructions.
6. Do not install near any heat sources such as radiators, heat registers, stoves,
or other apparatus (including ampliers) that produce heat.
7. Do not remove or cut off the polarized or grounding-type plug. A polarized
plug has two blades with one wider than the other. A grounding type plug has
two blades and a third grounding prong. The wide blade or the third prong
is provided for your safety. If the provided plug does not t into your outlet,
consult an electrician for replacement of the outlet.
8. Do not step on the power cord, place weight on top of the cord, or twist the
cable particularly in the area close to the plugs and the point where they exit
from the apparatus.
9. Only use attachments/accessories specied by the manufacturer.
10. Use only with the cart, stand, tripod, bracket, or table specied by the
manufacturer, or sold with the apparatus. When a cart is used,
use caution when moving the cart/apparatus combination to
avoid injury from tip-over.
11. Unplug this apparatus during lightning storms or when unused
for long periods of time.
12. Refer all servicing to qualied service personnel. Servicing is required when
the apparatus has been damaged in any way, such as when the powersupply cord or plug is damaged, liquid has been spilled, objects have fallen
into the apparatus, the apparatus has been exposed to rain or moisture, does
not operate normally, or has been dropped.
e7276_oplays3_contents.indb 7 4/5/12 3:31:22 PM
viii
License notice and trademark
acknowledgement for Dolby Digital
Manufactured under license from Dolby Laboratories. Dolby and the double-D
symbol are trademarks of Dolby Laboratories.
Manufactured under license under US Patent #s: 5,451,942; 5,956,674;
5,974,380; 5,978,762; 6,487,535 & other US and worldwide patents issued &
pending. DTS and the Symbol are registered trademarks, & DTS 2.0+ Digital Out
and the DTS logos are trademarks of DTS, Inc. Product includes software.
© DTS, Inc. All Rights Reserved.
License notice and trademark acknowledgement for
DTS 2.0+ Digital Out™
About this user guide
How this user guide is organized
• Chapter 1: Getting started
Provides basic information about your ASUS O!PLAY MEDIA PRO
• Chapter 2: Connecting to a network
Provides information on connecting your ASUS O!PLAY MEDIA PRO to a
network.
• Chapter 3: Using your O!PLAY S3 HD Media Player
Provides information on using your ASUS O!PLAY MEDIA PRO.
• Chapter 4: Troubleshooting
Provides solutions to frequently-asked questions about your ASUS O!PLAY
MEDIA PRO.
e7276_oplays3_contents.indb 8 4/5/12 3:31:23 PM
ix
DANGER/WARNING: Information to prevent injury when completing a
task.
NOTE: Tips and additional information to help you complete a task.
IMPORTANT: Instructions that you MUST follow to complete a task.
Where to nd more information
Refer to the following sources for additional information and for product and
software updates.
1. ASUS Support site
Download the latest rmware, drivers, and utilities from the ASUS Support
site at http://support.asus.com/.
2. ASUS Forum
Get the latest news and information about this product on the ASUS Forum at
http://vip.asus.com/forum/.
3. Optional documentation
Your product package may include optional documentation, such as warranty
yers, that may have been added by your dealer. These documents are not
part of the standard package.
CAUTION: Information to prevent damage to the components when
completing a task.
Conventions used in this guide
To enure that you perform certain tasks properly, take note of the following symbols
used throughout this user guide.
e7276_oplays3_contents.indb 9 4/5/12 3:31:23 PM
x
e7276_oplays3_contents.indb 10 4/5/12 3:31:23 PM
1-1
Chapter 1
Getting started
Welcome
Thank you for buying the ASUS O!PLAY MEDIA PRO!
The ASUS O!PLAY MEDIA PRO allows you to enjoy digital media les from
external USB storage devices/hard disk drives, or memory cards using your TV or
entertainment system.
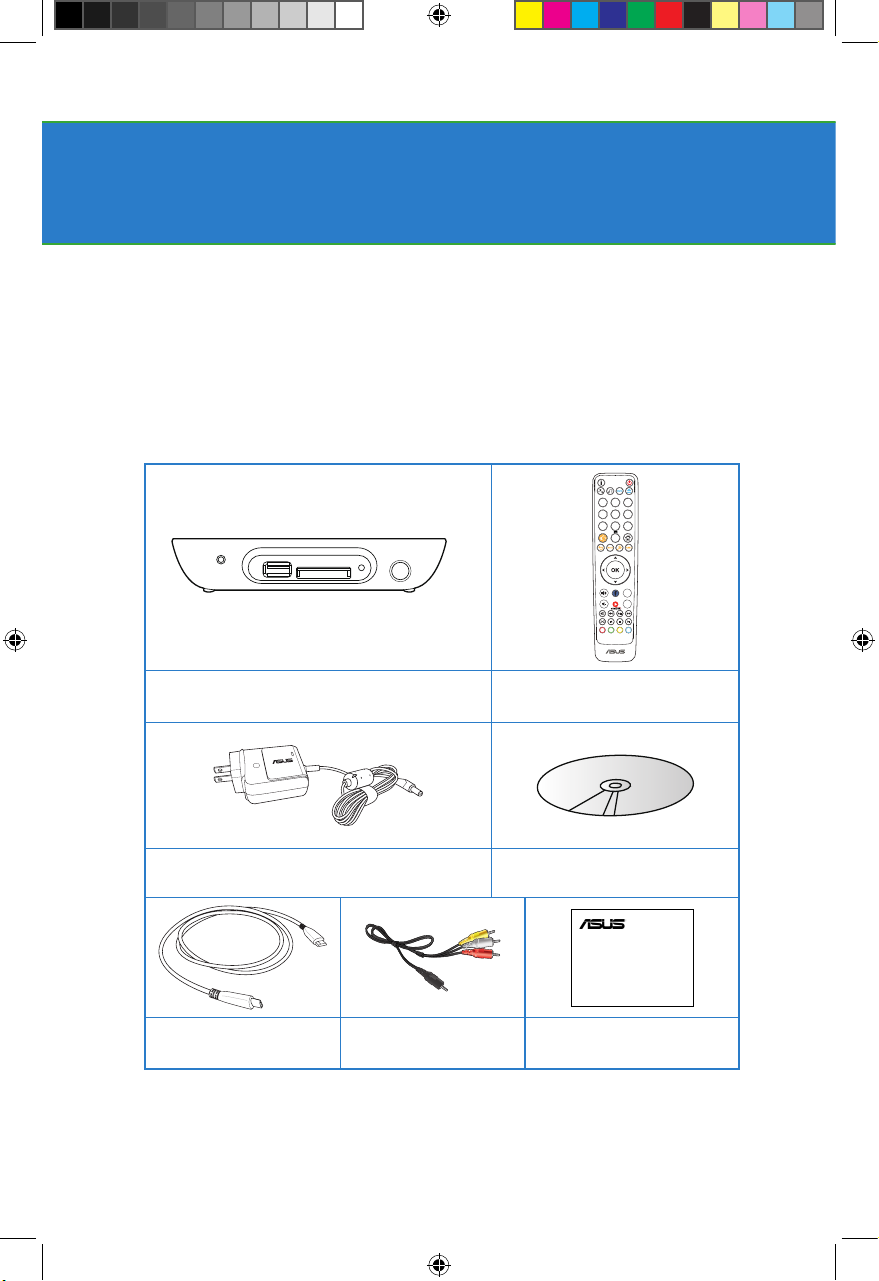
Package contents
SD/MMC
USB
1
4
7
625
9
8
0
3
. -?! ABC DEF
GHI JKL MNO
PQRS TUV
CH
DTV
EPG
R G Y B
CH
WXYZ
O!PLAY MEDIA PRO Remote control with two AAA
batteries
AC power adapter and power cord
Support CD
(User Manual/utilities)
Quick Start Guide
O!Play Mini Plus
HD Media Player
Mini-HDMI cable
Composite AV (audiovideo) cable
Quick Start Guide
e7276_oplays3_contents.indb 1 4/5/12 3:31:27 PM
Chapter 1: Getting started
1-2
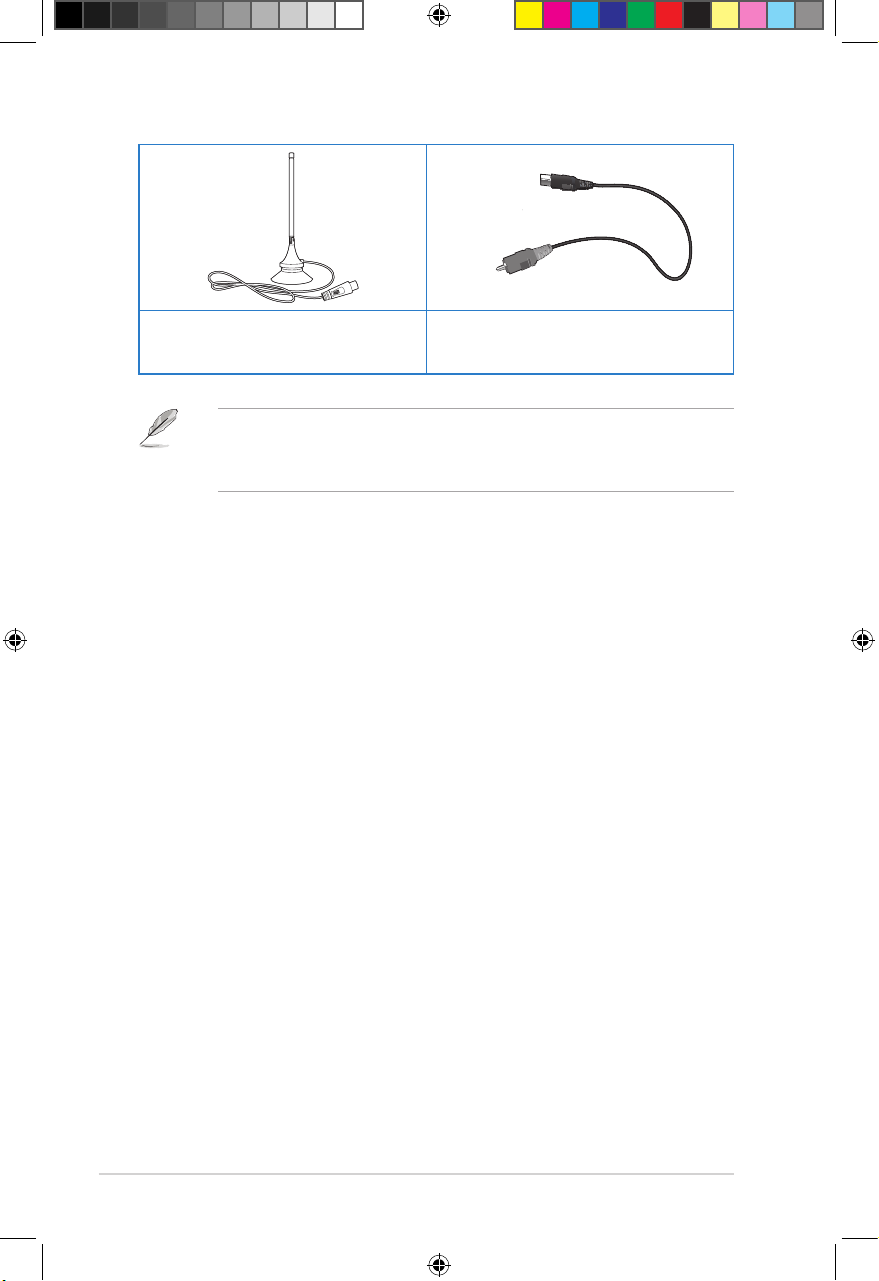
Antenna Cable (DTV)
(Optional)*
RF-in adapter
• If any of the above items is damaged or missing, contact your retailer.
• Some items may be included in the package depending on the country or
region.
e7276_oplays3_contents.indb 2 4/5/12 3:31:29 PM
ASUS O!PLAY MEDIA PRO
1-3
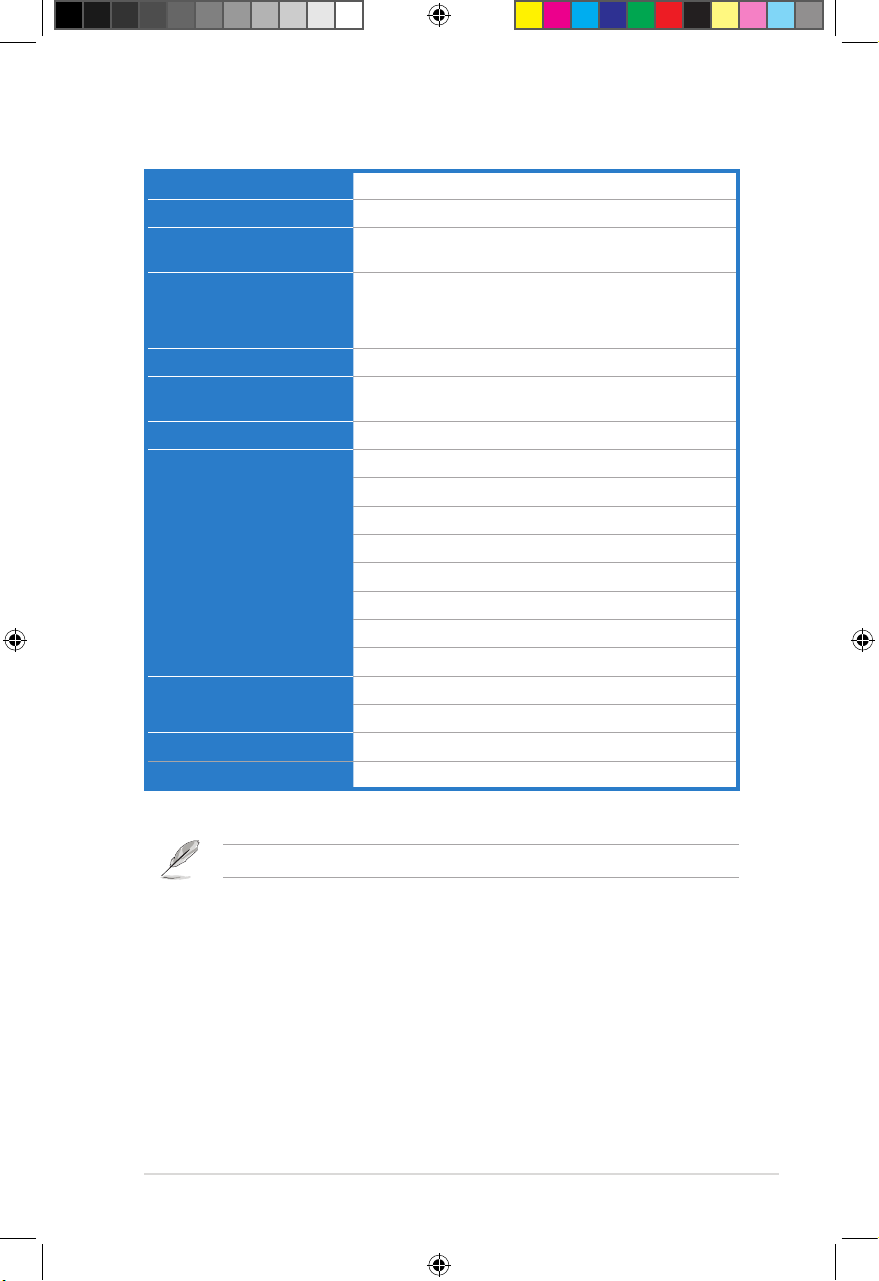
Specications summary
Specications are subject to change without notice.
Wireless Standard WiFi 802.11b/g/n
Supported video formats MPEG1/2/4, H.264, VC-1, RM/RMVB
Supported video le
extension
.mp4, .mov, .avi, .asf, .wmv, .v, .mkv, .ts, m2ts, .dat,
.mpg, .vob, .mts, .iso, .trp, .xvid
Supported audio formats MP3, WAV, AAC, OGG,FLAC, aiff, Dolby Digital AC3m,
DTS Digital Surround, Dolby Digital Plus, PCM/LPCM,
Dolby TrueHD, ID3 Tag, MS-ADPCM, LC-AAC, HE-AAC,
COOK, RA-Lossless
Supported image formats JPEG, BMP, PNG, GIF, TIFF
Supported subtitle
formats
SRT, SUB, SMI, SSA, TXT, ASS, IDX+SUB
File systems FAT16/32, NTFS, HFS/HFS+, ext3
I/O ports 1 x Power (DC-in) input
2 x USB 2.0 ports
1 x Gigabit LAN port (1000Mbps)
1 x Mini-HDMI port
1 x Analog audio/video output
1 x digital audio output (S/PDIF) port
1 x SD/MMC card slot (2 in 1)
1 x RF in port
Dimensions W x D x H: 151.85mm x 106.7mm x 29.03mm
Weight: 175g
Power input rating 12Vdc, 2A
Power Consumption 10W
e7276_oplays3_contents.indb 3 4/5/12 3:31:29 PM
Chapter 1: Getting started
1-4
Getting to know your O!PLAY MEDIA PRO
System requirements
• High-denition TV (HDTV), standard TV, or HDMI monitor
• Storage device (USB ash drive / USB HDD)
• Memory card (SD/MMC)
• Use the bundled Mini-HDMI cable to connect your MEDIA PRO to an HDTV
or HDMI monitor.
• Use the bundled composite AV cable to connect your MEDIA PRO to a
standard TV.
1
SD/MMC
USB
2 3
4
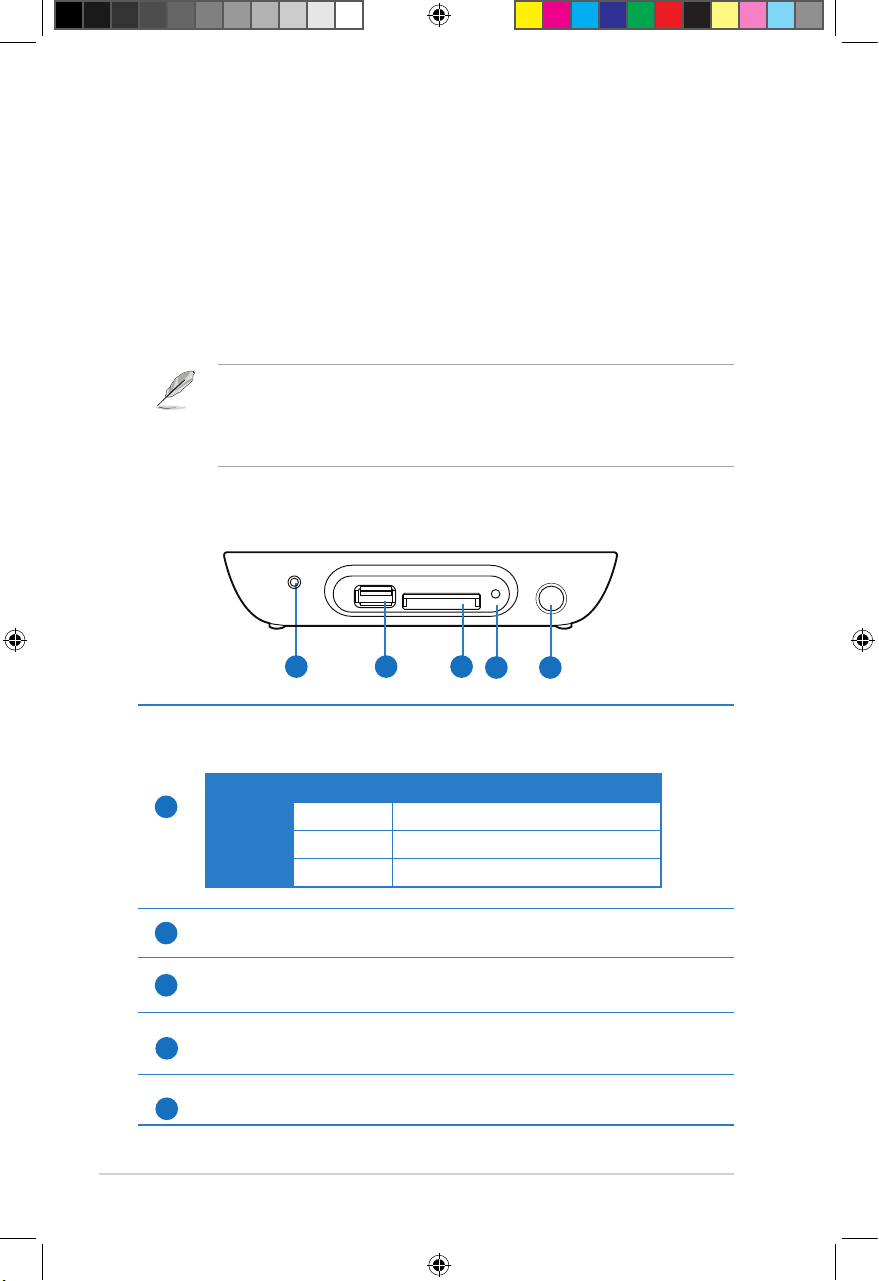
1
LED indicator
Displays the status of the MEDIA PRO.
LED Status Description
Power OFF The device is turned off.
Orange The device is in standby mode.
Blue The device is turned on.
2
USB 2.0 port
Connect a USB 2.0 device into this port.
3
SD/MMC combo card slot
Insert a SD/MMC card into this slot.
Reset Button
Use a pin or a paper clip to press this button to reset the device to its factory
default settings.
IR (Infra-red) Receiver
Allows you to control the MEDIA PRO using the IR remote control.
Front panel
5
4
5
e7276_oplays3_contents.indb 4 4/5/12 3:31:30 PM
ASUS O!PLAY MEDIA PRO
1-5
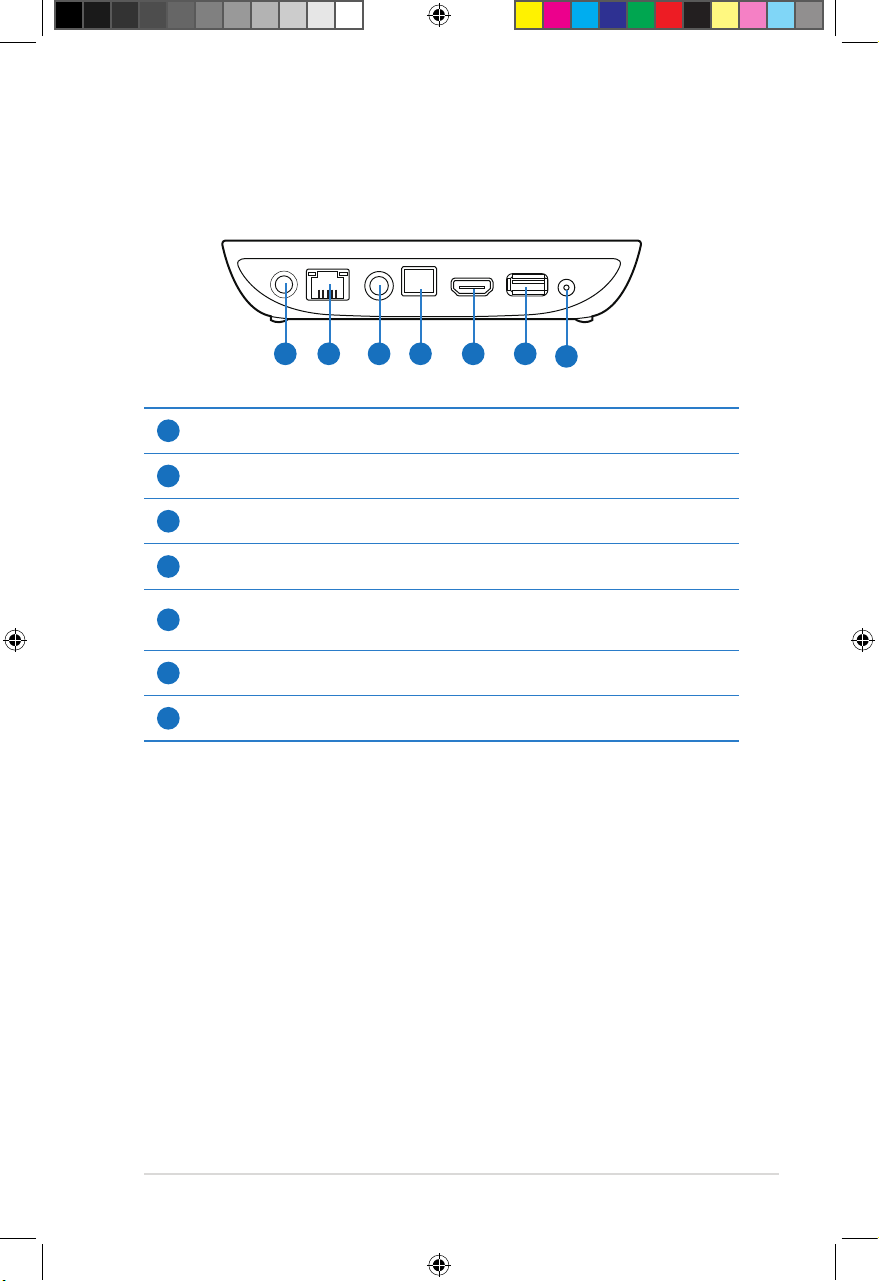
Rear panel
1
Power (DC-In) input
Insert the power adapter into this port.
2
LAN port
Connect to a Local Area Network (LAN) using an Ethernet Cable.
3
Analog Audio/Video Output
Insert a composite cable to connect to a television or other video equipment.
4
Digital Audio Output (S/PDIF)
Insert an optical cable into this port to connect to an external Hi-Fi audio system.
5
Mini-HDMI port
Insert a Mini-HDMI cable into this port to connect to a high-denition multimedia
interface (HDMI) device.
6
USB 2.0 port
Connect a USB 2.0 device into this port.
7
RF-in port (DVBT Antenna Input)
Insert the bundled RF in adapter into this port to connect the antenna cable.
DC-IN
AV/OUT AV/OUT HDMI USB
RF-IN
LAN
1 2 3 4 5 6
7
e7276_oplays3_contents.indb 5 4/5/12 3:31:30 PM
Chapter 1: Getting started
1-6
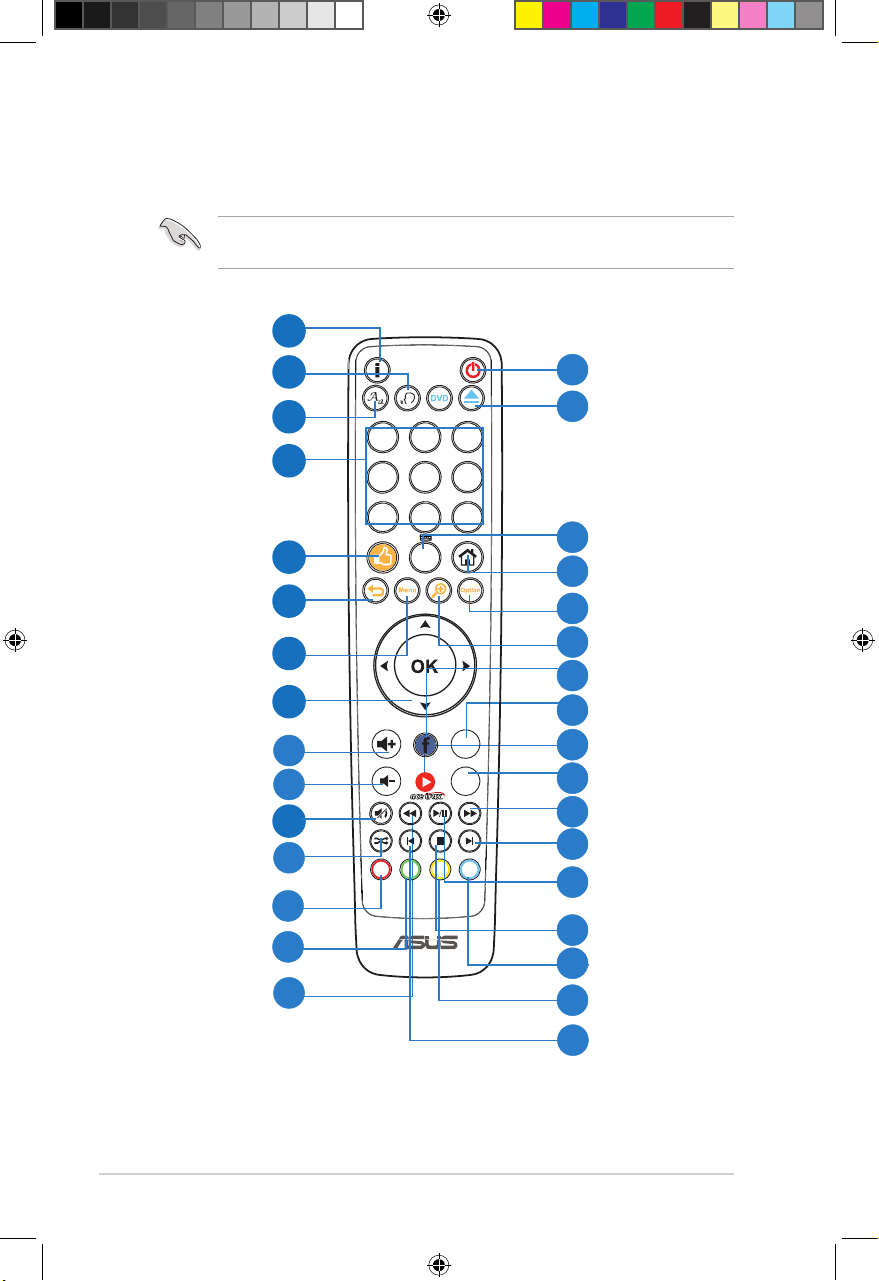
Remote control
Use the remote control to power on/off the O!PLAY MEDIA PRO, browse
through menus, and select media to play.
1
4
7
6
2
5
9
8
0
3
. -?! ABC DEF
GHI JKL MNO
PQRS TUV
CH
DTV
EPG
R G Y B
CH
WXYZ
Rewind
15
Next
Stop
Option
Forward
Play / Pause
Eject
Power on/off
Home
31
30
27
26
28
23
21
17
16
19
18
Yellow key
Blue key
DTV
Zoom In
Alphanumeric and Language
Keyboard
Navigation/
OK keys
Mute
Return
Volume up
Volume down
Music Shufe
Menu
1
2
3
4
5
6
8
7
10
13
9
14
Information
Audio
Subtitle
Number keys
Share
12
Red key
Green key
11
20
22
Facebook
24
Acetrax
25
TV Program Guide
29
Previous
32
e7276_oplays3_contents.indb 6 4/5/12 3:31:31 PM
ASUS O!PLAY MEDIA PRO
1-7
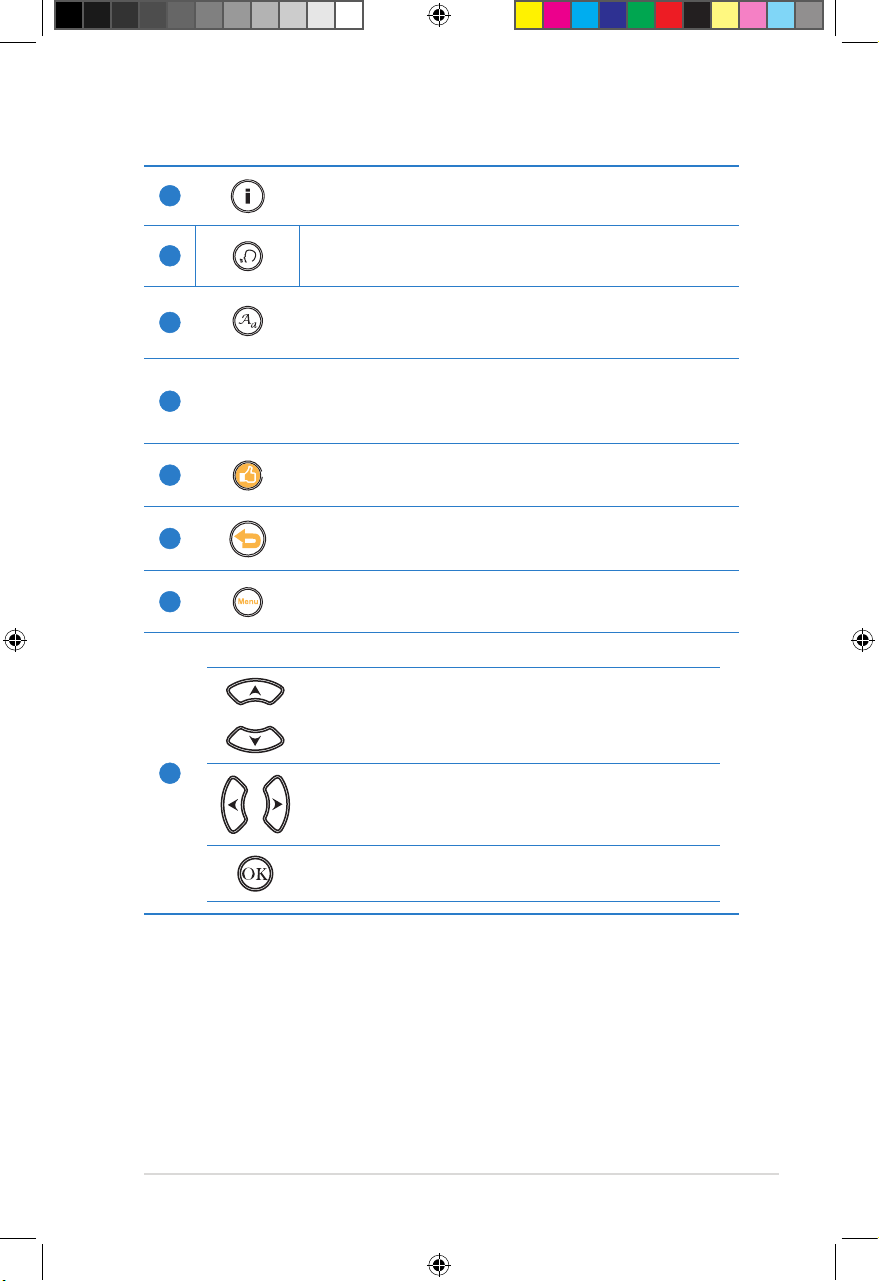
1
Information
Press to display information about the movie, video, or music.
2
Audio
Press to select an audio track located on an HDD/USB/ODD.
3
Subtitle
Press to congure subtitle settings such as location, size, time,
language and color.
4
Number Keys
Press the numbers to access your preferred TV channel.
5
Share
Press to share photos, music les, and videos to Facebook and
Youtube.
6
Return
Returns to the previous screen.
7
Menu
Press to return to the Home menu.
8
Navigation/OK keys
Press the up/down keys to move through the menu bar in a
submenu.
Press the up/down keys to decrease/increase a numerical
value.
Press the left/right keys to move through the main menus in
the Home screen.
Press the left/right keys to move through the items in a
submenu.
Press OK to conrm the selection.
e7276_oplays3_contents.indb 7 4/5/12 3:31:34 PM
Chapter 1: Getting started
1-8
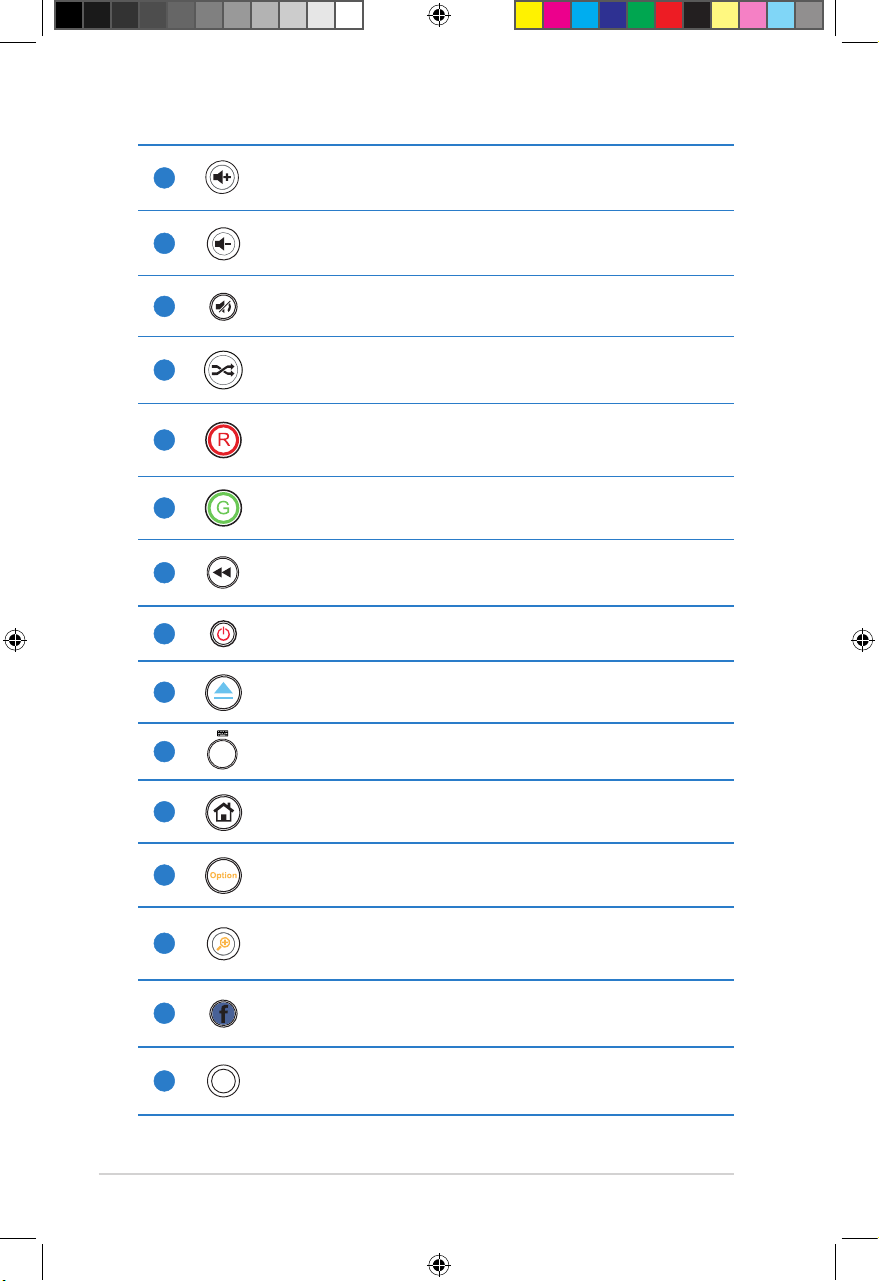
9
Volume up
Increases the volume.
10
Volume down
Decreases the volume.
11
Mute
Press to disable audio output.
12
Music Shufe
Press to group all your music les in your storage device and then play
the music les randomly.
13
Red Key
This is a function key.
14
Green Key
This is a function key.
15
Rewind
Press to rewind the playback.
16
Power On/Off
Turn the Smart TV Set Top Box on or off
17
Eject
Press to eject the disc from the external optical disk drive..
18
0
Alphanumeric and Language Keyboard
Press to change the language of the virtual keyboard.
19
Home
Press to return to the Home menu.
20
Option
Press to view and select from a function’s submenu.
21
Zoom In
Zooms in on the screen.
22
Facebook
Press to access Facebook.
23
DTV
DTV
Press to launch the DTV function.
e7276_oplays3_contents.indb 8 4/5/12 3:31:36 PM
ASUS O!PLAY MEDIA PRO
1-9
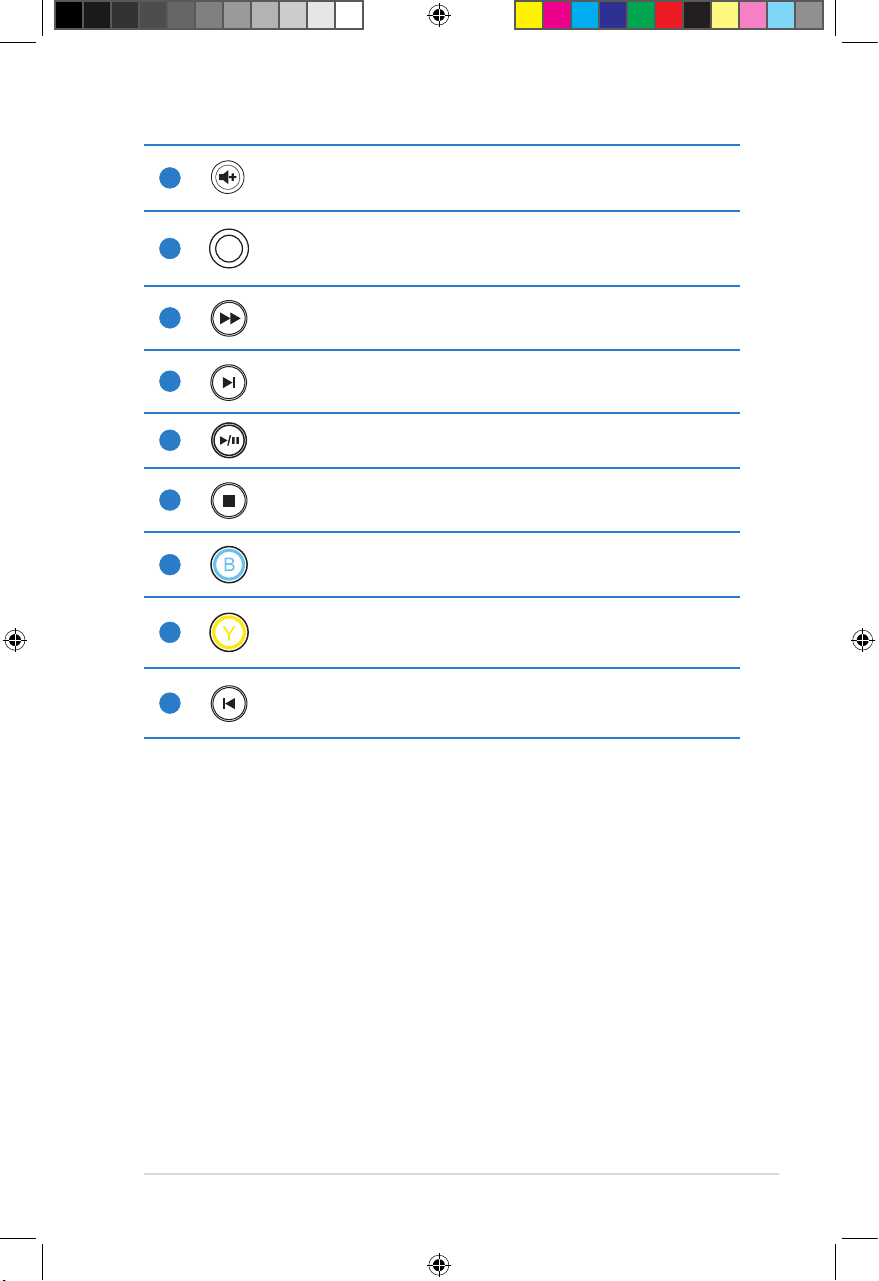
24
Acetrax
Press to access Acetrax service.
25
EPG
TV Program Guide
Press to view the Electronic TV Program Guide (EPG).
26
Forward
Press to forward the playback.
27
Next
Goes to the next media le.
28
Play / Pause
Toggles between playback and pause.
29
Stop
Press to stop the playback.
30
Blue key
This is a function key.
31
Yellow key
This is a function key
32
Previous
Returns to the previous le
e7276_oplays3_contents.indb 9 4/5/12 3:31:38 PM
Chapter 1: Getting started
1-10
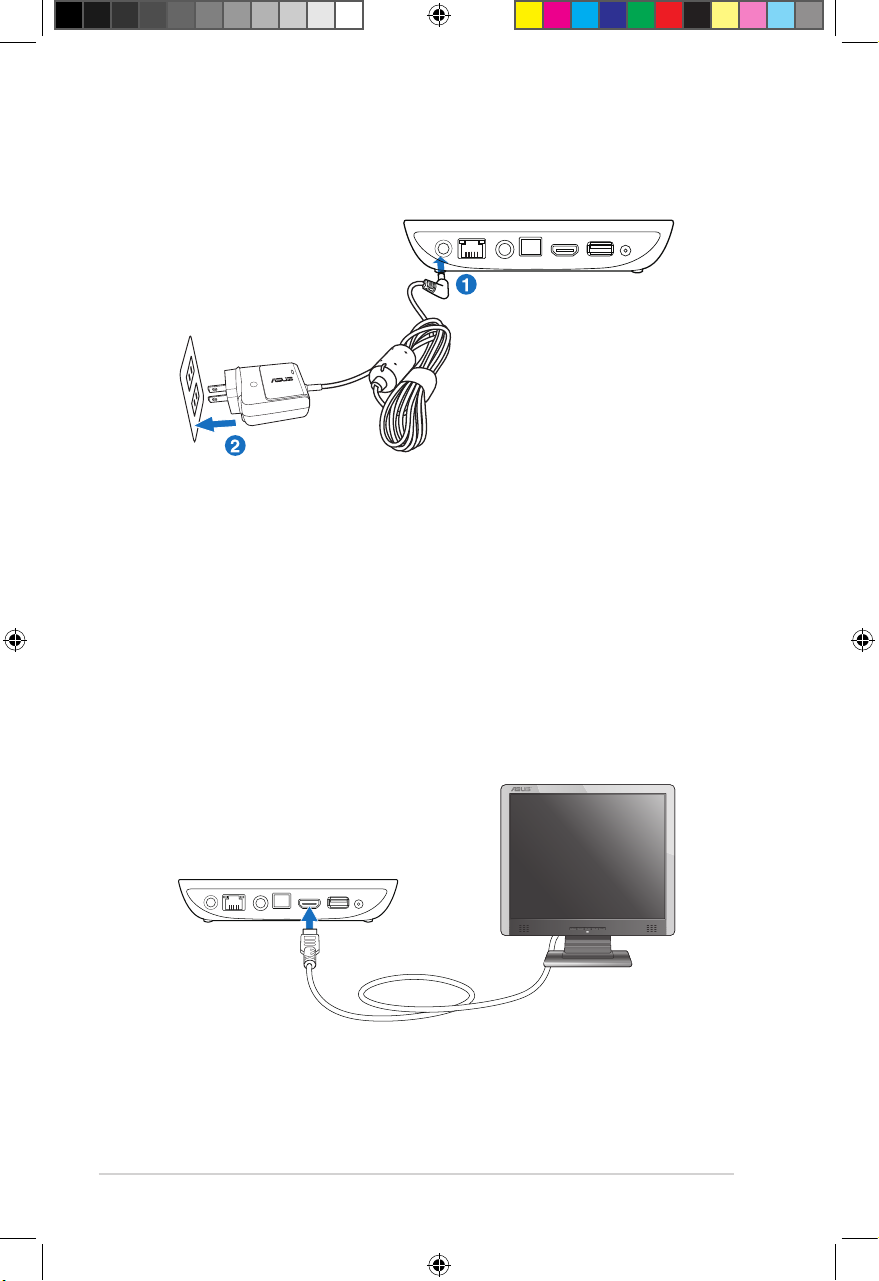
Connecting the power adapter
To connect the power adapter:
1. Connect the AC adapter to the DC-in port at the back of your MEDIA PRO.
2. Connect the AC adapter to a power source.
Connecting devices to your MEDIA PRO
To connect devices to your MEDIA PRO:
1. Do any of the following to connect a display to your MEDIA PRO:
• Use a Mini-HDMI cable to connect your MEDIA PRO to an HDTV or an
HDMI monitor.
Getting your O!PLAY MEDIA PRO ready
DC-IN
AV/OUT AV/OUT HDMI USB
RF-IN
LAN
DC-IN
AV/OUT AV/OUT HDMI USB
RF-IN
LAN
e7276_oplays3_contents.indb 10 4/5/12 3:31:40 PM
ASUS O!PLAY MEDIA PRO
1-11
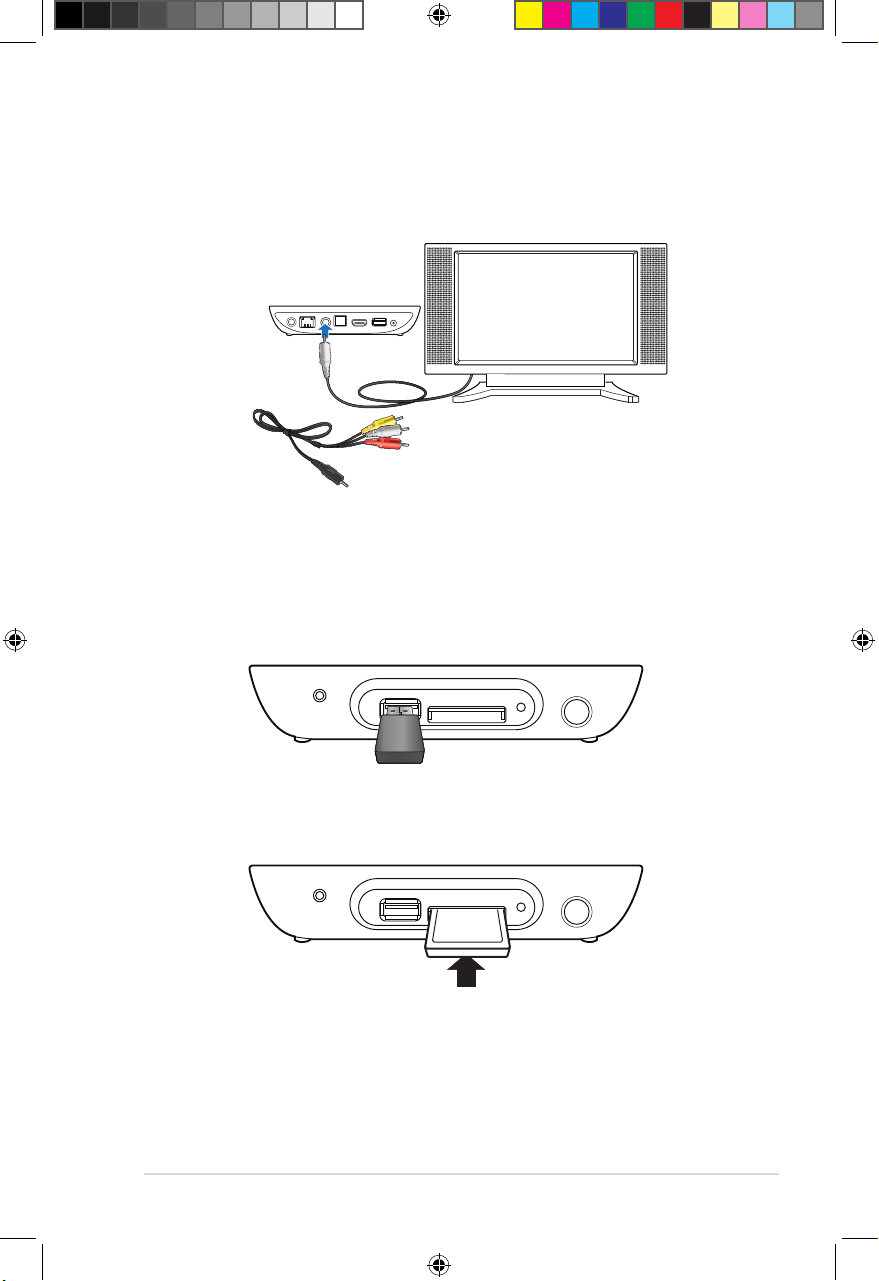
2. Do any of the following to connect a storage device or memory card to your
MEDIA PRO:
• Insert a USB storage device such as a portable hard disk drive or a USB
ash disk to the USB port at the front panel of your MEDIA PRO.
• Insert a memory card, for an example an SD or MMC card, into the card
slot in the front panel of your MEDIA PRO.
• Use the bundled composite AV cable to connect your MEDIA PRO to a
standard TV.
3. Use the S/PDIF cable to connect your audio system to your MEDIA PRO.
SD/MMC
USB
SD/MMC
USB
DC-IN
AV/OUT AV/OUT HDMI USB
RF-IN
LAN
e7276_oplays3_contents.indb 11 4/5/12 3:31:42 PM
Chapter 1: Getting started
1-12
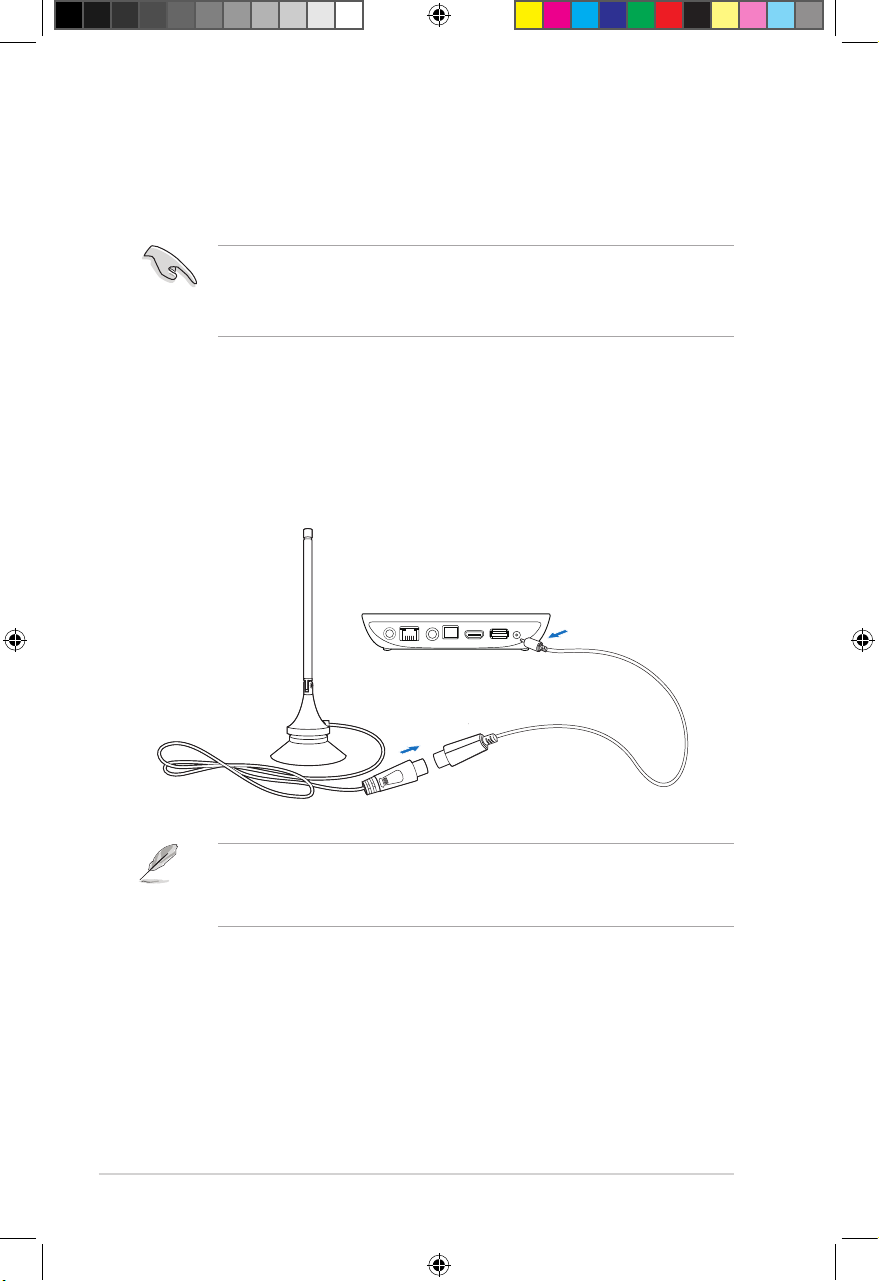
Setting up your O!PLAY MEDIA PRO for digital streaming
Your O!PLAY MEDIA PRO allows you to enjoy high-denition digital audio/video
(DVBT) streaming on your TV in .mpeg format.
To set up your O!PLAY MEDIA PRO for digital streaming:
1. Connect the bundled Mini-HDMI cable to your HDTV or a composite AV cable
to your standard TV.
2. Connect the RF-in adapter to your O!PLAY MEDIA PRO’s RF-in port and
then connect it to the antenna cable.
• For details on streaming digital TV programs, refer to the section Streaming
digital TV programs in Chapter 3.
• Please place the antenna near a window for better reception.
Before using your O!PLAY Media Pro’s digital streaming function, check with
your country’s telecommunications agency or your local TV stations if DVB-T
(Digital Video Broadcasting - Terrestrial) signals are available in your country or
region.
DC-IN
AV/OUT AV/OUT HDMI USB
RF-IN
LAN
e7276_oplays3_contents.indb 12 4/5/12 3:31:42 PM
 Loading...