

Page 1
Welcome the world in the palm of
your hands!
Page 2

E1978E1978
E1978
E1978E1978
March 2005
First edition V1
Copyright © 2005 ASUSTeK COMPUTER INC. All Rights Reserved.Copyright © 2005 ASUSTeK COMPUTER INC. All Rights Reserved.
Copyright © 2005 ASUSTeK COMPUTER INC. All Rights Reserved.
Copyright © 2005 ASUSTeK COMPUTER INC. All Rights Reserved.Copyright © 2005 ASUSTeK COMPUTER INC. All Rights Reserved.
No part of this manual, including the products and software described in it, may be
reproduced, transmitted, transcribed, stored in a retrieval system, or translated into any
language in any form or by any means, except documentation kept by the purchaser for
backup purposes, without the express written permission of ASUSTeK COMPUTER INC.
(“ASUS”).
Product warranty or service will not be extended if: (1) the product is repaired, modified or
altered, unless such repair, modification of alteration is authorized in writing by ASUS; or
(2) the serial number of the product is defaced or missing.
ASUS PROVIDES THIS MANUAL “AS IS” WITHOUT WARRANTY OF ANY KIND, EITHER EXPRESS
OR IMPLIED, INCLUDING BUT NOT LIMITED TO THE IMPLIED WARRANTIES OR CONDITIONS OF
MERCHANTABILITY OR FITNESS FOR A PARTICULAR PURPOSE. IN NO EVENT SHALL ASUS, ITS
DIRECTORS, OFFICERS, EMPLOYEES OR AGENTS BE LIABLE FOR ANY INDIRECT, SPECIAL,
INCIDENTAL, OR CONSEQUENTIAL DAMAGES (INCLUDING DAMAGES FOR LOSS OF PROFITS,
LOSS OF BUSINESS, LOSS OF USE OR DATA, INTERRUPTION OF BUSINESS AND THE LIKE), EVEN
IF ASUS HAS BEEN ADVISED OF THE POSSIBILITY OF SUCH DAMAGES ARISING FROM ANY
DEFECT OR ERROR IN THIS MANUAL OR PRODUCT.
SPECIFICATIONS AND INFORMATION CONTAINED IN THIS MANUAL ARE FURNISHED FOR
INFORMATIONAL USE ONLY, AND ARE SUBJECT TO CHANGE AT ANY TIME WITHOUT NOTICE,
AND SHOULD NOT BE CONSTRUED AS A COMMITMENT BY ASUS. ASUS ASSUMES NO
RESPONSIBILITY OR LIABILITY FOR ANY ERRORS OR INACCURACIES THAT MAY APPEAR IN THIS
MANUAL, INCLUDING THE PRODUCTS AND SOFTWARE DESCRIBED IN IT.
Products and corporate names appearing in this manual may or may not be registered
trademarks or copyrights of their respective companies, and are used only for identification or
22
2
22
explanation and to the owners’ benefit, without intent to infringe.
Page 3

Chapter summary
Chapter 1: Welcome!Chapter 1: Welcome!
Chapter 1: Welcome!
Chapter 1: Welcome!Chapter 1: Welcome!
Chapter 2: Basic phone information Chapter 2: Basic phone information
Chapter 2: Basic phone information
Chapter 2: Basic phone information Chapter 2: Basic phone information
This chapter features the basic information on the mobile phone including the phone layout,
installation of phone components, and procedures that you have to perform before using the
mobile phone.
Chapter 3: Getting started Chapter 3: Getting started
Chapter 3: Getting started
Chapter 3: Getting started Chapter 3: Getting started
This chapter provides information on the display layout, screen icons, and basic phone
operations so you can start using your mobile phone.
Chapter 4: Changing the settings Chapter 4: Changing the settings
Chapter 4: Changing the settings
Chapter 4: Changing the settings Chapter 4: Changing the settings
This chapter provides information on how to change the phone settings. It tells you how to
change and customize your call, display, ring tone, and phone security settings.
Chapter 5: Managing the phone book Chapter 5: Managing the phone book
Chapter 5: Managing the phone book
Chapter 5: Managing the phone book Chapter 5: Managing the phone book
This chapter provides information on how to save, share, and manage contact information
using the phone book.
(Pages 25 ~ 64)
(Pages 9 ~ 24)
(Pages 65 ~ 126)
(Pages 127 ~ 156)
Chapter 6: Messaging features Chapter 6: Messaging features
Chapter 6: Messaging features
Chapter 6: Messaging features Chapter 6: Messaging features
This chapter provides information on the MMS and SMS messaging features of your mobile
phone including instructions on how to send text, graphics, and audio files to other mobile
phones.
(Pages 157 ~ 196)
33
3
33
Page 4

Chapter 7: Capturing moments Chapter 7: Capturing moments
Chapter 7: Capturing moments
Chapter 7: Capturing moments Chapter 7: Capturing moments
This chapter provides information on how to capture photos and videos using the camera.
Chapter 8: Having fun Chapter 8: Having fun
Chapter 8: Having fun
Chapter 8: Having fun Chapter 8: Having fun
This chapter tells you how to play games on your mobile phone, change the ring tone
settings, and browse your captured photos and videos.
Chapter 9: Organizing your stuff Chapter 9: Organizing your stuff
Chapter 9: Organizing your stuff
Chapter 9: Organizing your stuff Chapter 9: Organizing your stuff
This chapter provides information on how to use the phone organizer for your daily activities.
Chapter 10: Managing calls and customizing manners Chapter 10: Managing calls and customizing manners
Chapter 10: Managing calls and customizing manners
Chapter 10: Managing calls and customizing manners Chapter 10: Managing calls and customizing manners
This chapter provides information on how to manage the call records and how to select or
customize the phone manner.
(Pages 229 ~ 236)
(Pages 197 ~ 228)
(Pages 237 ~ 272)
(Pages 273 ~ 294)
Chapter 11:Chapter 11:
Chapter 11:
Chapter 11:Chapter 11:
This chapter tells you how to surf the Internet using your mobile phone and how to access
value-added services offered by your phone operator.
Safety Notice Safety Notice
Safety Notice
Safety Notice Safety Notice
44
4
44
Surfing the Internet and using value added servicesSurfing the Internet and using value added services
Surfing the Internet and using value added services
Surfing the Internet and using value added servicesSurfing the Internet and using value added services
(Pages 295 ~ 306)
(Pages A-1 ~ A-2)
Page 5

Safety precautions
For your safety and to keep your phone in good operating condition, read the following tips
and reminders carefully before using your phone.
Do not use
driving, unless you use an
earphone or hands-free car kit.
Switch off the phone when you are
inside a hospital or near medical
equipment. Follow hospital rules
and regulations on using devices
that may cause interference.
Switch off the phone while in an
aircraft. Wireless devices may
cause interference in the aircraft
communication and navigation
systems.
Switch off the phone when
refuelling. Do not use the phone
near fuels or chemicals.
Always keep the phone dry and
free from dust.
your phone while
Do not use the phone where
blasting is in progress. Strictly
observe restrictions where
required.
Use the phone to call for help or
to help others during
emergencies.
Ensure that the phone is
switched off before removing
the battery or SIM card.
Refer phone servicing only to
qualified personnel.
Use only approved accessories
and batteries. Do not connect
incompatible products or
devices.
Use the phone following the
instructions in this user guide.
55
5
55
Page 6

Conventions
To make sure that you perform certain tasks properly, take note of the following
conventions used throughout this user guide.
NOTENOTE
NOTE: Tips and information to aid in completing a task.
NOTENOTE
IMPORTANTIMPORTANT
IMPORTANT: Information that you MUST follow to
IMPORTANTIMPORTANT
complete a task.
CAUTIONCAUTION
CAUTION: Information to prevent damage to the phone
CAUTIONCAUTION
when trying to complete a task.
WARNINGWARNING
WARNING: Information to prevent injury to yourself when
WARNINGWARNING
trying to complete a task.
NETWORK DEPENDENT/SUBSCRIBED FEATURENETWORK DEPENDENT/SUBSCRIBED FEATURE
NETWORK DEPENDENT/SUBSCRIBED FEATURE:
NETWORK DEPENDENT/SUBSCRIBED FEATURENETWORK DEPENDENT/SUBSCRIBED FEATURE
The phone feature is network dependent or subscribed.
66
6
66
Page 7
Welcome!
®®
®
®®
Thank you for choosing the
ASUSASUS
ASUS
ASUSASUS
J103 mobile phone J103 mobile phone
J103 mobile phone!
J103 mobile phone J103 mobile phone
This phone comes with the latest mobile technology that fits your world into your hands. The
J103 is a dual-band mobile phone with dual LCD, built-in 300K camera, MMS/SMS messaging
capability, organizer, WAP, and GPRS.
With 4 MB memory, J103 allows you to save graphics, audio, video, and text files like no other
mobile phone could match. The J103 mobile phone also comes in a light and compact design
making it a perfect partner whether you’re on or off the road.
With these and many more, J103 is sure to give you a satisfying mobile phone experience.
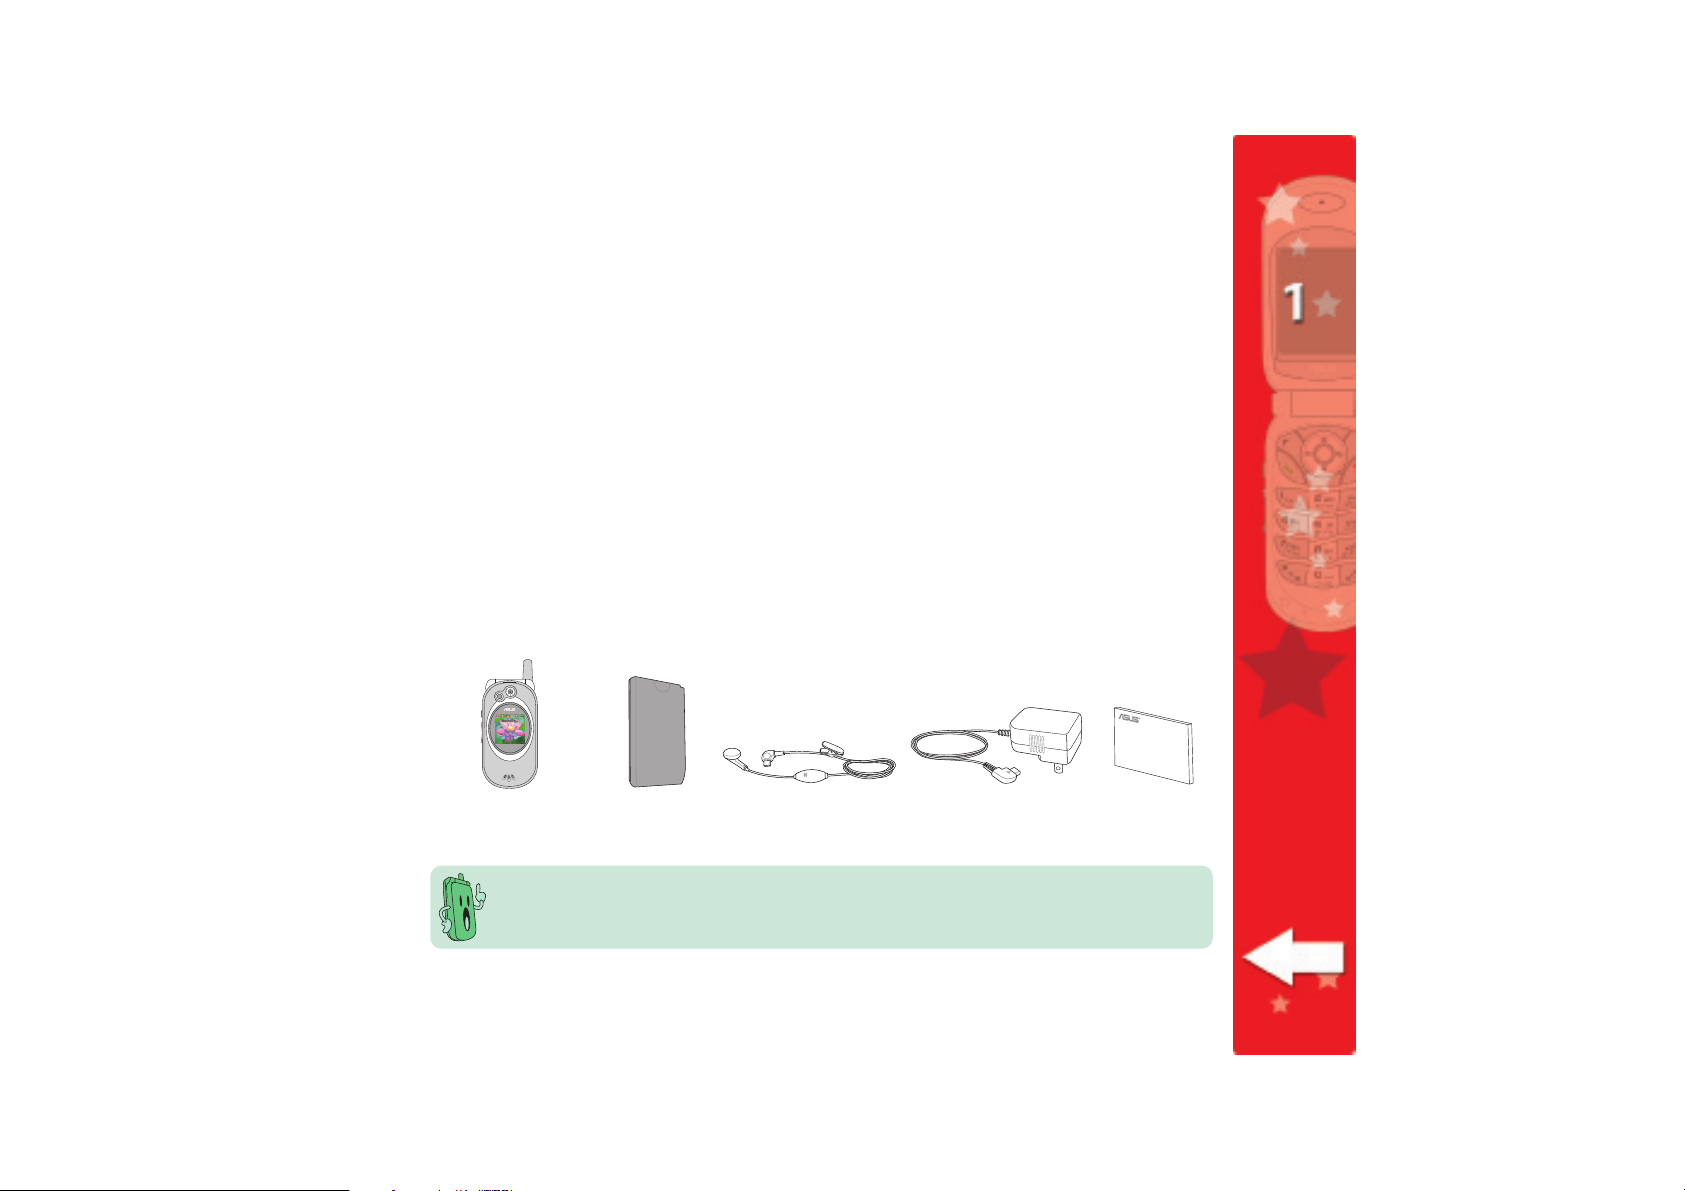
Package contents
Check your mobile phone package for the following items.
J103 mobileJ103 mobile
J103 mobile
J103 mobileJ103 mobile
phone unitphone unit
phone unit
phone unitphone unit
• Contact your retailer if any of the items is damaged or missing.
•Your phone operator may place other items that are not part of the standard mobile
phone package.
Lithium-IonLithium-Ion
Lithium-Ion
Lithium-IonLithium-Ion
batterybattery
battery
batterybattery
HeadsetHeadset
Headset
HeadsetHeadset
Battery chargerBattery charger
Battery charger
Battery chargerBattery charger
and plugand plug
and plug
and plugand plug
User GuideUser Guide
User Guide
User GuideUser Guide
77
7
77
Page 8
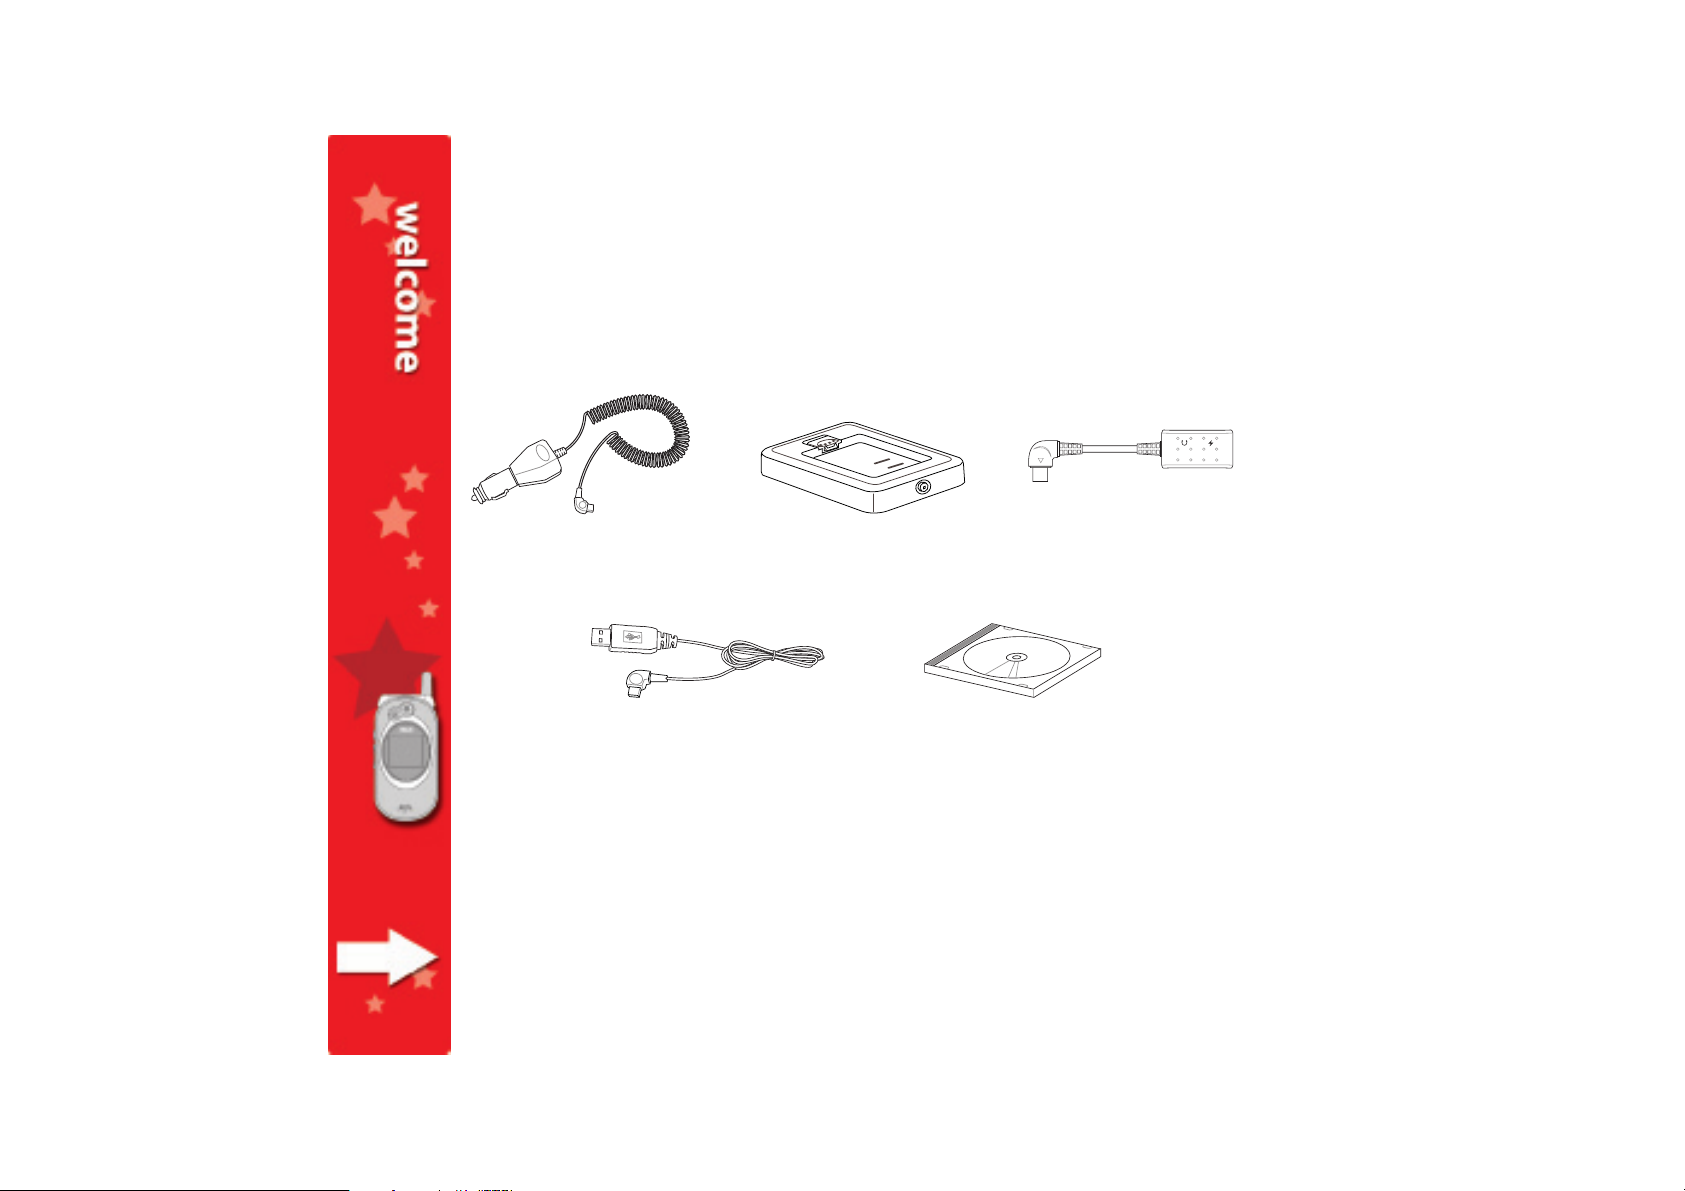
Optional accessoriesOptional accessories
Optional accessories
Optional accessoriesOptional accessories
These phone accessories are optional items and are purchased separately. Ask your phone
operator for details.
Desktop chargerDesktop charger
Desktop charger
Car chargerCar charger
Car charger
Car chargerCar charger
Desktop chargerDesktop charger
USB data transfer cableUSB data transfer cable
USB data transfer cable
USB data transfer cableUSB data transfer cable
USB sync cableUSB sync cable
USB sync cable
USB sync cableUSB sync cable
88
8
88
Support CDSupport CD
Support CD
Support CDSupport CD
Page 9
This chapter features the basic
information on the mobile phone
including the phone layout,
installation of phone components,
and procedures that you have to
perform before using the mobile
phone.
Page 10

Chapter summaryChapter summary
Chapter summary
Chapter summaryChapter summary
Phone layout ..................................................................................... 11
Function keys .................................................................................... 13
Multi-color LED indicator ................................................................... 14
Changeable faceplate ........................................................................ 15
Subscriber Identity Module (SIM) card .............................................. 16
Battery .............................................................................................. 17
Battery power levels .................................................................. 17
Installing and removing the battery ........................................... 18
Charging the battery.................................................................. 20
Signal strength .................................................................................. 22
LCD displays ...................................................................................... 22
Camera .............................................................................................. 23
Switching the phone ON or OFF ........................................................ 24
1010
10
1010
Page 11
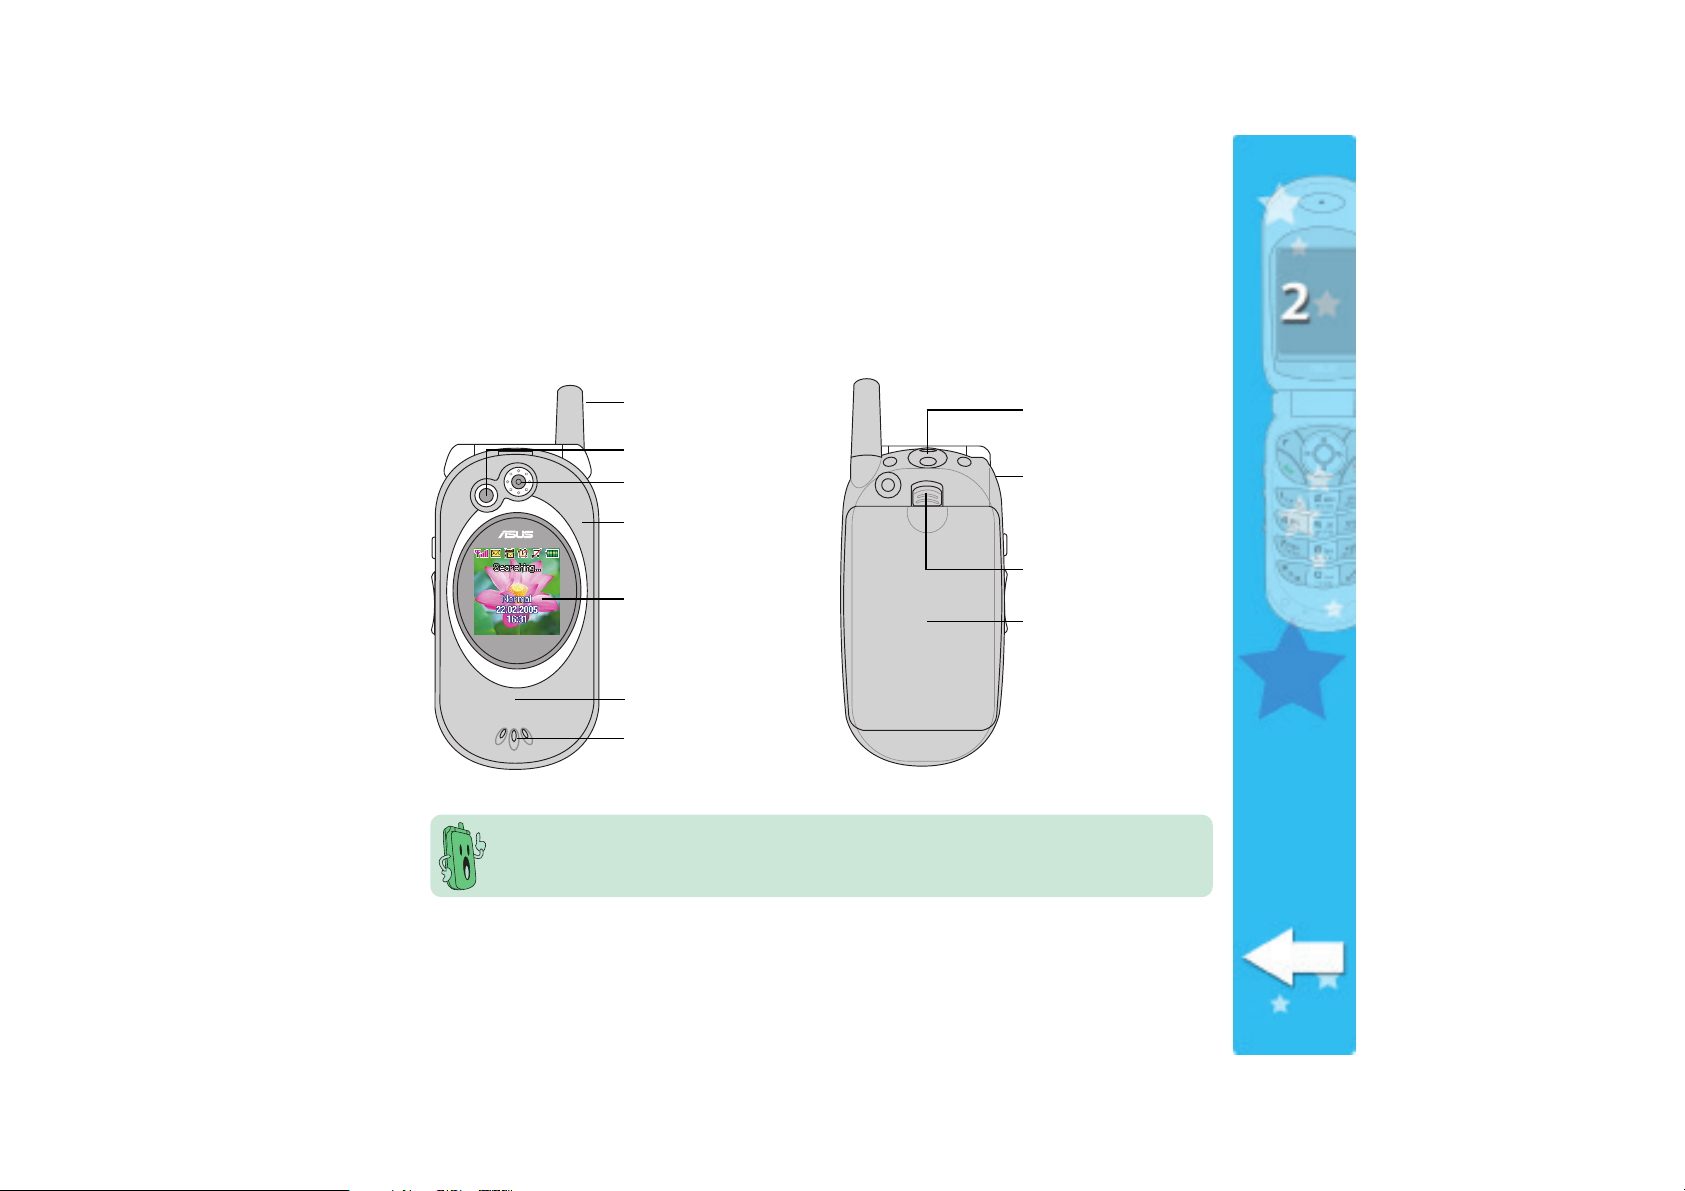
Phone layout
Front viewFront view
Front view
Front viewFront view
AntennaAntenna
Antenna
AntennaAntenna
FlashFlash
Flash
FlashFlash
CameraCamera
Camera
CameraCamera
ChangeableChangeable
Changeable
ChangeableChangeable
faceplatefaceplate
faceplate
faceplatefaceplate
External displayExternal display
External display
External displayExternal display
LED indicatorLED indicator
LED indicator
LED indicatorLED indicator
SpeakerSpeaker
Speaker
SpeakerSpeaker
* The battery comes uninstalled on the J103 mobile phone. Refer to the battery
installation section for instructions on how to install the battery.
Back viewBack view
Back view
Back viewBack view
Strap holderStrap holder
Strap holder
Strap holderStrap holder
I/O connectorI/O connector
I/O connector
I/O connectorI/O connector
covercover
cover
covercover
Battery latchBattery latch
Battery latch
Battery latchBattery latch
Battery*Battery*
Battery*
Battery*Battery*
1111
11
1111
Page 12
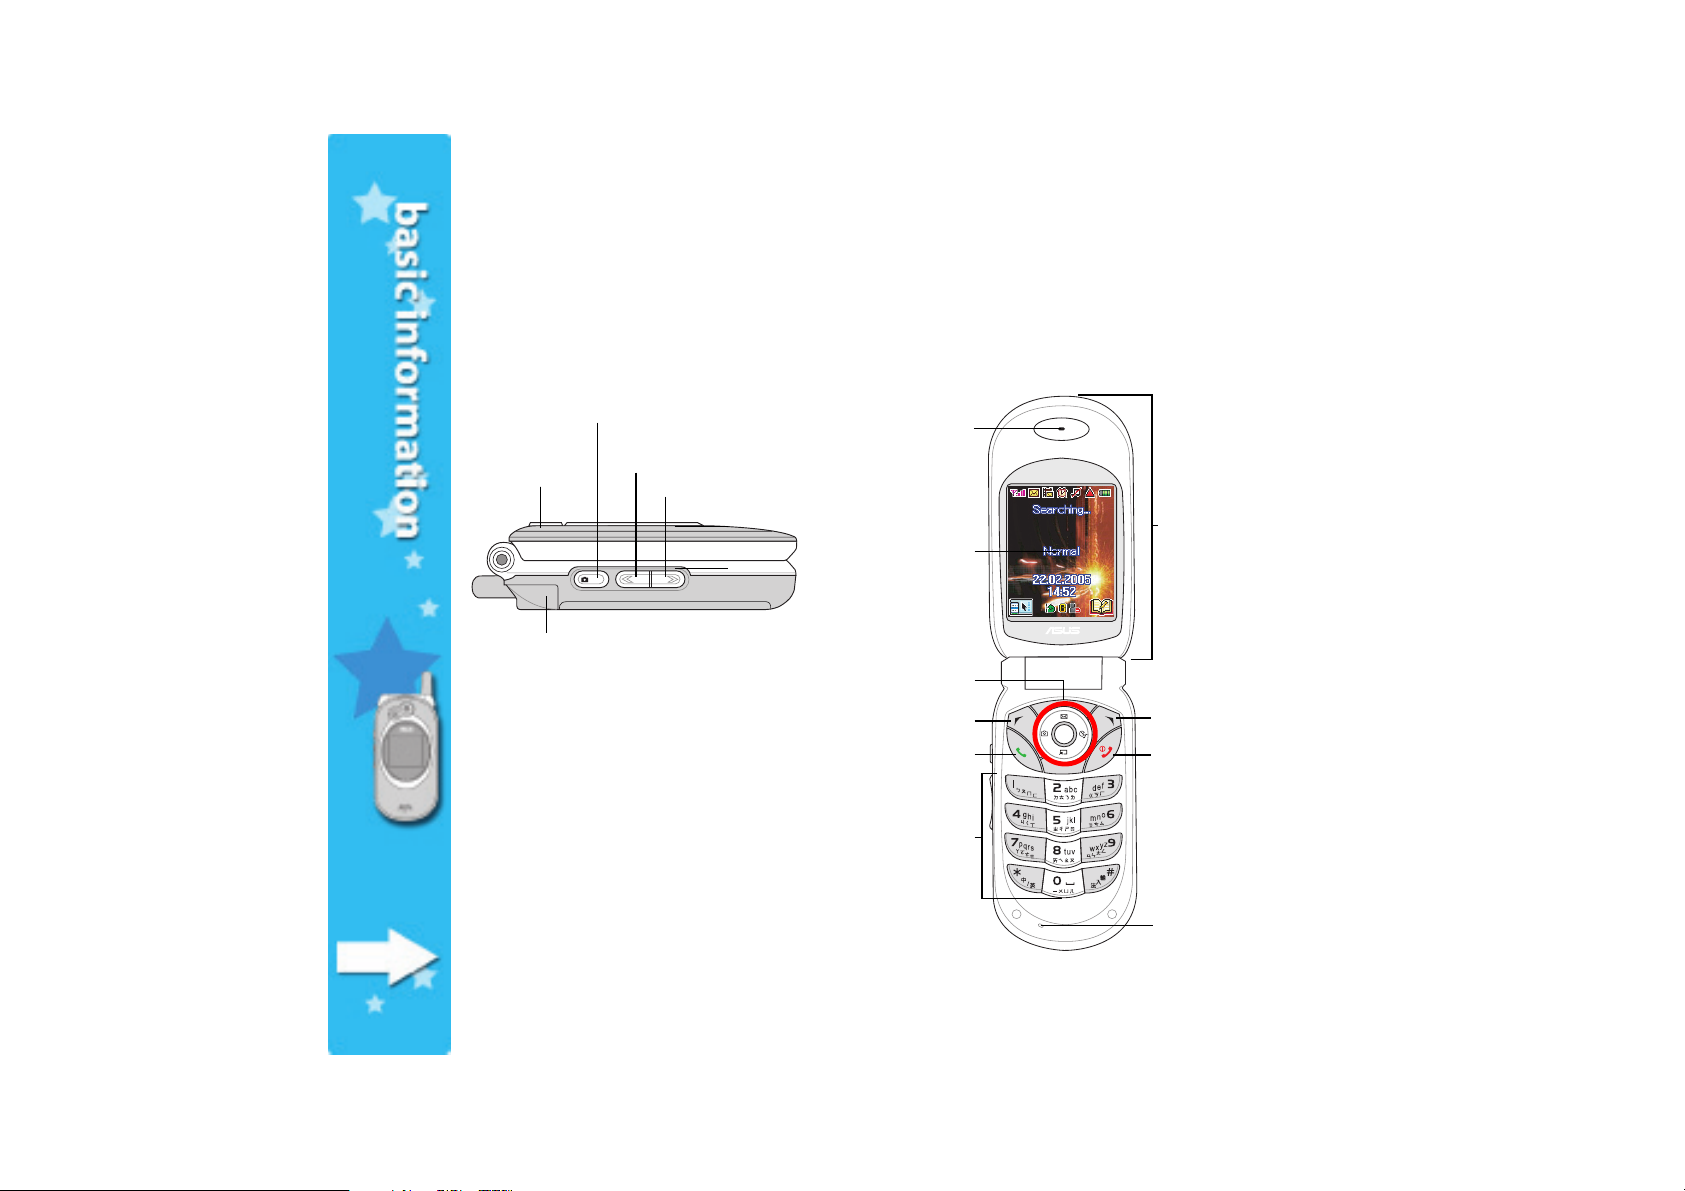
Phone layout
Side view (Left)Side view (Left)
Side view (Left)
Side view (Left)Side view (Left)
Camera/VoiceCamera/Voice
Camera/Voice
Camera/VoiceCamera/Voice
dial buttondial button
dial button
dial buttondial button
ChangeableChangeable
Changeable
ChangeableChangeable
faceplatefaceplate
faceplate
faceplatefaceplate
I/O connectorI/O connector
I/O connector
I/O connectorI/O connector
(inside the cover)(inside the cover)
(inside the cover)
(inside the cover)(inside the cover)
Volume up buttonVolume up button
Volume up button
Volume up buttonVolume up button
Volume down button Volume down button
Volume down button
Volume down button Volume down button
Front view (Open flip top)Front view (Open flip top)
Front view (Open flip top)
Front view (Open flip top)Front view (Open flip top)
EarpieceEarpiece
Earpiece
EarpieceEarpiece
Main displayMain display
Main display
Main displayMain display
Navigation/Quicklaunch keysNavigation/Quicklaunch keys
Navigation/Quicklaunch keys
Navigation/Quicklaunch keysNavigation/Quicklaunch keys
Soft key (left)Soft key (left)
Soft key (left)
Soft key (left)Soft key (left)
Call keyCall key
Call key
Call keyCall key
Alphanumeric keysAlphanumeric keys
Alphanumeric keys
Alphanumeric keysAlphanumeric keys
Flip topFlip top
Flip top
Flip topFlip top
Soft keySoft key
Soft key
Soft keySoft key
(right)(right)
(right)
(right)(right)
On/Off/EndOn/Off/End
On/Off/End
On/Off/EndOn/Off/End
callcall
keykey
call
key
callcall
keykey
1212
12
1212
MicrophoneMicrophone
Microphone
MicrophoneMicrophone
Page 13

Function keys
When the phone is in idle mode, you can press the following function keys to launch some of
the most common phone functions and features.
Displays the SMS/MMS inbox
Displays the Fun menuDisplays the Camera menu
Launches the phone menu; performs
various functions depending on the
menu level and screen display
Answers a call; displays dialed numbers
Puts the phone in active mode;
selects an option; enters data; long
press to launch WAP; shows the
wallpaper in full screen mode
Side keysSide keys
Side keys
Side keysSide keys
Displays the phone book when in idle
mode; performs various functions
depending on the menu level and
screen display
Ends a call; turns the phone ON or OFF
Displays your shortcuts
Enters numbers, alphanumeric
characters, and symbols
Press once to launch the camera. Long press to launch the voice command function.
Press this button to increase the ring tone volume.
Press this button to decrease the ring tone volume.
1313
13
1313
Page 14
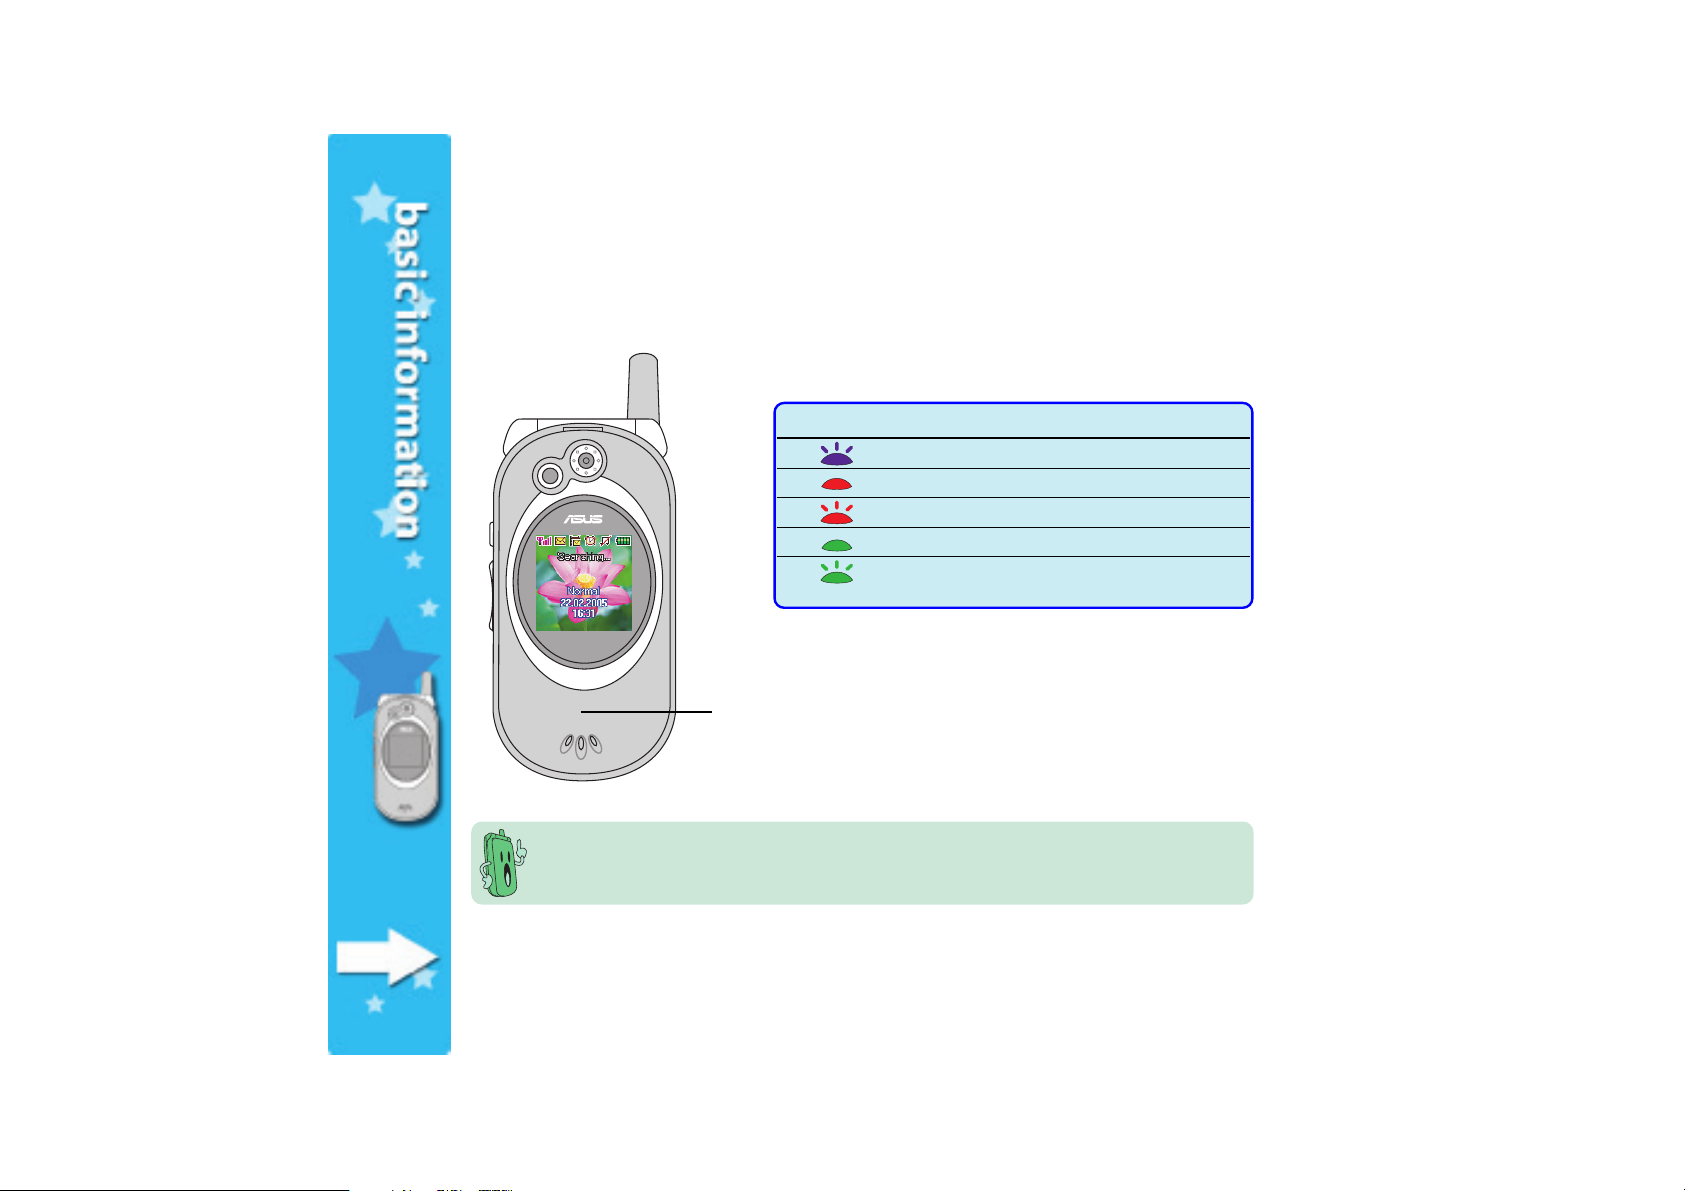
Multi-color LED indicator
The phone comes with a multi-color LED located below the external display. This LED displays
the phone, message, or call status in four different color indications.
1414
14
1414
ColorColor
Color
ColorColor
Purple (flashing) Default (Idle)
Red Battery is charging
Red (flashing) Battery low warning
Green Battery is fully charged
Green (flashing) Missed call
LED indicatorLED indicator
LED indicator
LED indicatorLED indicator
Aside from the four-color LED indicator, seven colors are available for caller
identification. You may assign a specific LED color to a phone book entry. See Chapter 9
“Organizing your stuff” for details.
StatusStatus
Status
StatusStatus
New SMS/MMS message
Page 15

Changeable faceplate
The faceplate of the phone can be easily removed and replaced with a different one without
the need for any tools.
To change the faceplate:
1. With the front of the phone facing you, wedge your
fingernail into the notch located right above the faceplate .
Carefully pull the faceplate off of the phone, and set it
aside.
2. Pick up the new faceplate and align the locking latches at
the bottom of it to the corresponding notches on the
phone.
3. Press down firmly along all sides until the faceplate snaps
into place.
Before removing the faceplate, make sure the phone is
powered off and disconnected from the charger.
11
1
11
33
3
33
22
2
22
1515
15
1515
Page 16
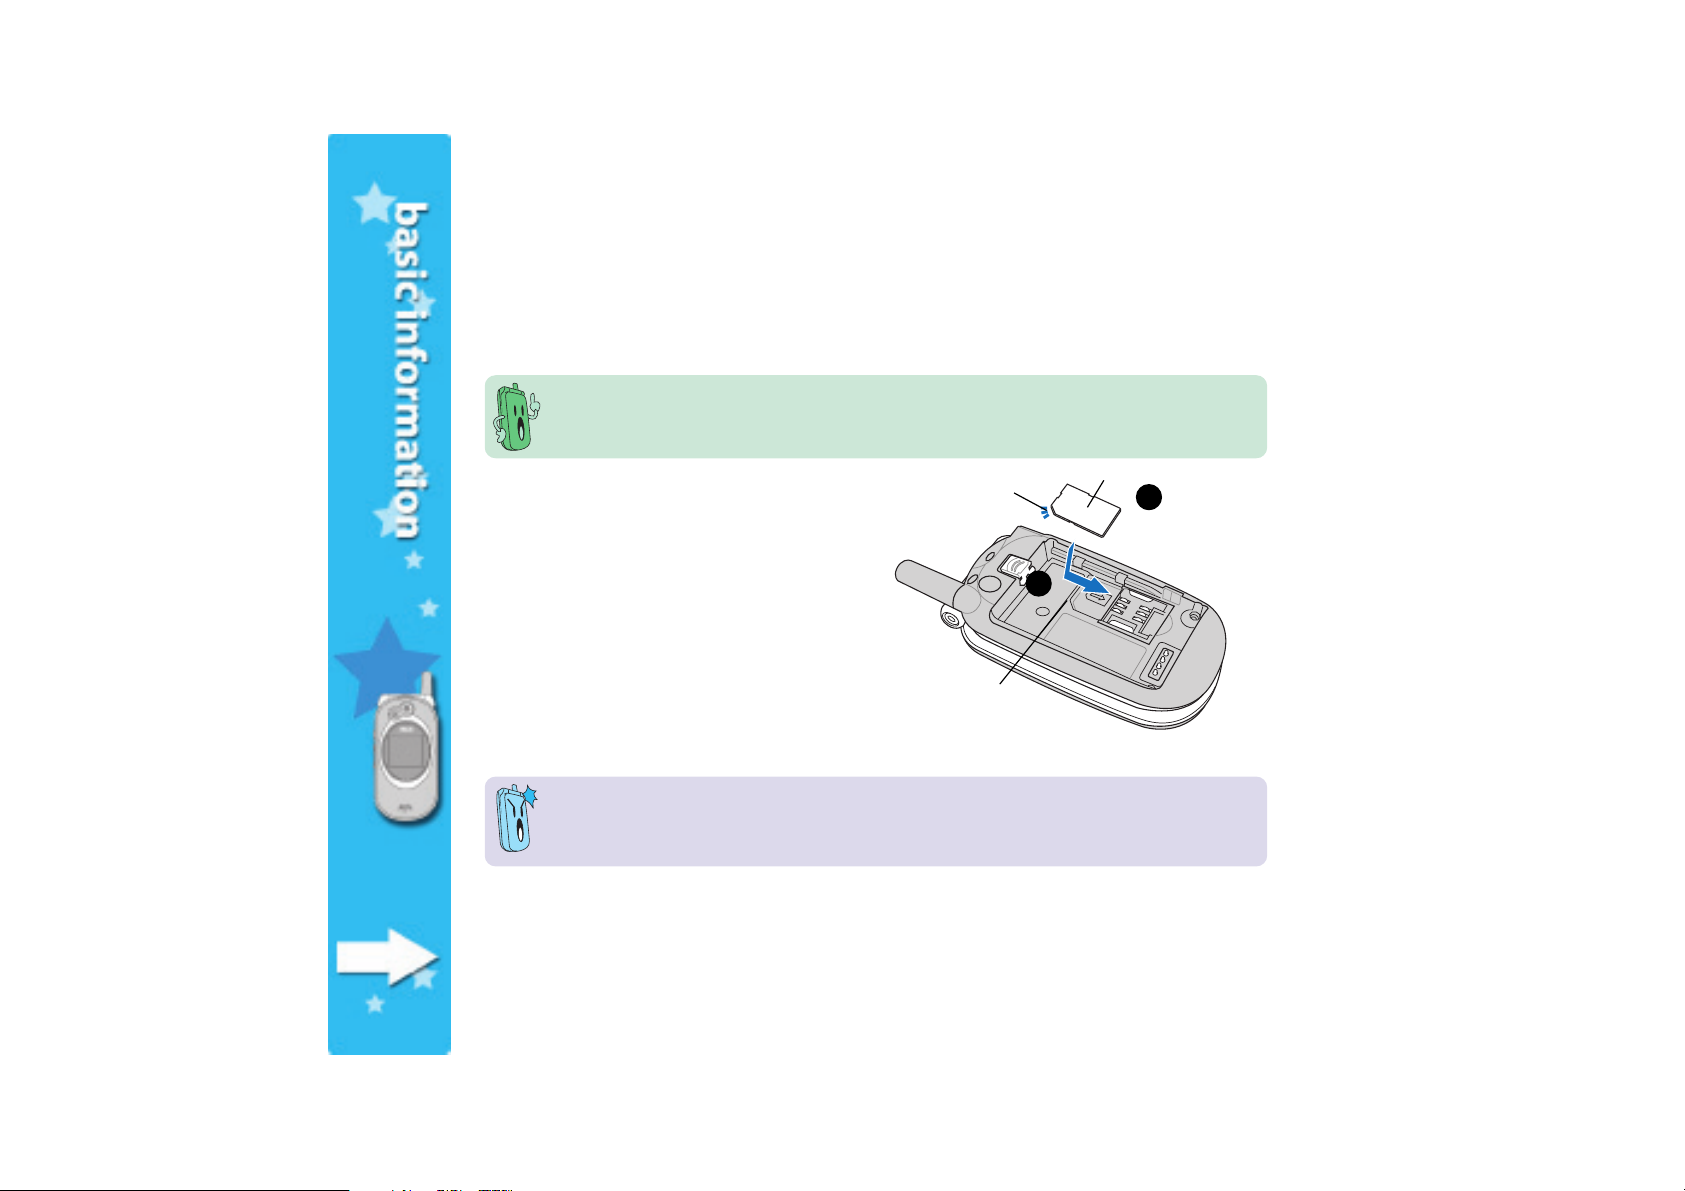
Subscriber Identity Module (SIM) card
The phone operator provides you with a Subscriber Identity Module (SIM) card that stores your
mobile phone number, phone book entries, SMS/MMS messages, graphics, etc. Install the SIM
card before you install the battery.
The SIM card usually comes embedded on a plastic card. Read the SIM card documentation
before removing the SIM card. Remove any rough edges on the SIM card before you install
it to the phone.
AA
A
AA
11
1
11
To install the SIM card:
1. Position the SIM card (A) over the SIM
card slot with the contacts (golden
connectors) face down, and the nicked
corner (B) matching the notch (C) on the
SIM card slot.
2. Carefully press, then slide the SIM card
into the slot until it fits completely.
• Keep SIM cards out of children’s reach.
• Be careful when handling, inserting, or removing a SIM card to avoid damaging its
contacts.
BB
B
BB
22
2
22
CC
C
CC
1616
16
1616
Page 17
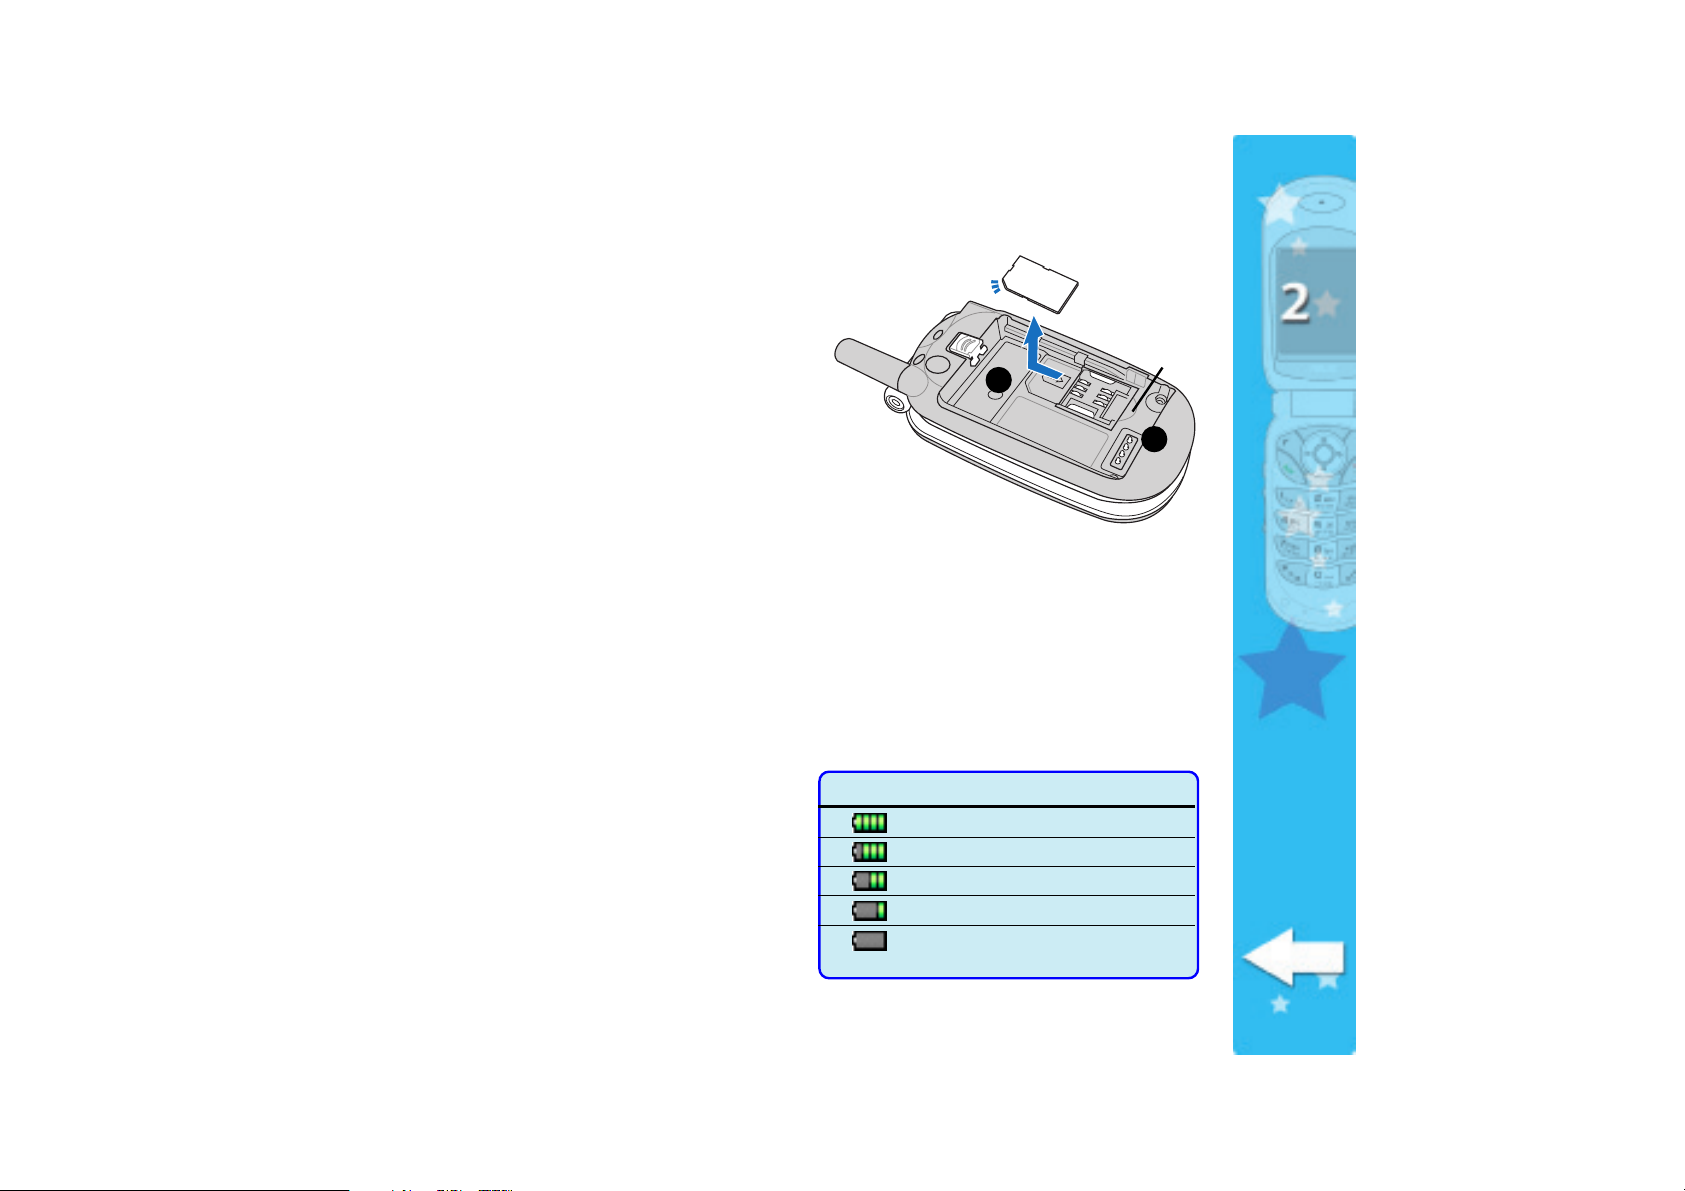
To remove or replace a SIM card:
1. When installed, remove the battery
following the instructions in the next
section.
AA
A
2. From the dent (A) on the SIM card slot, use
your fingertip to push the SIM card halfway
33
3
33
AA
out of the slot.
22
2
3. Carefully pull the SIM card out from the SIM
22
card slot. Set the SIM card aside.
4. Replace the SIM card following the
instructions in the previous section.
Battery
A rechargable Lithium-Ion battery powers your mobile phone. Make sure that the battery is
fully charged before using the phone for the first time. Initial battery charging may take
about eight (8) hours. You can charge the battery when the phone is either on or off.
A battery icon on the main and external displays indicates the battery power level. Refer to
the table below for battery icon indications.
Battery power levelsBattery power levels
Battery power levels
Battery power levelsBattery power levels
The battery icon on both displays helps you
keep track of the remaining battery power, so
you will know when to charge the battery.
Take note of the battery icon indicating the
battery power levels.
Icon IndicationIcon Indication
Icon Indication
Icon IndicationIcon Indication
Battery is 55% to 100% full
Battery is 25% to 55% full
Battery is 10% to 25% full
Battery is 0% to 10% full
Battery has low power.
Charging is needed.
1717
17
1717
Page 18
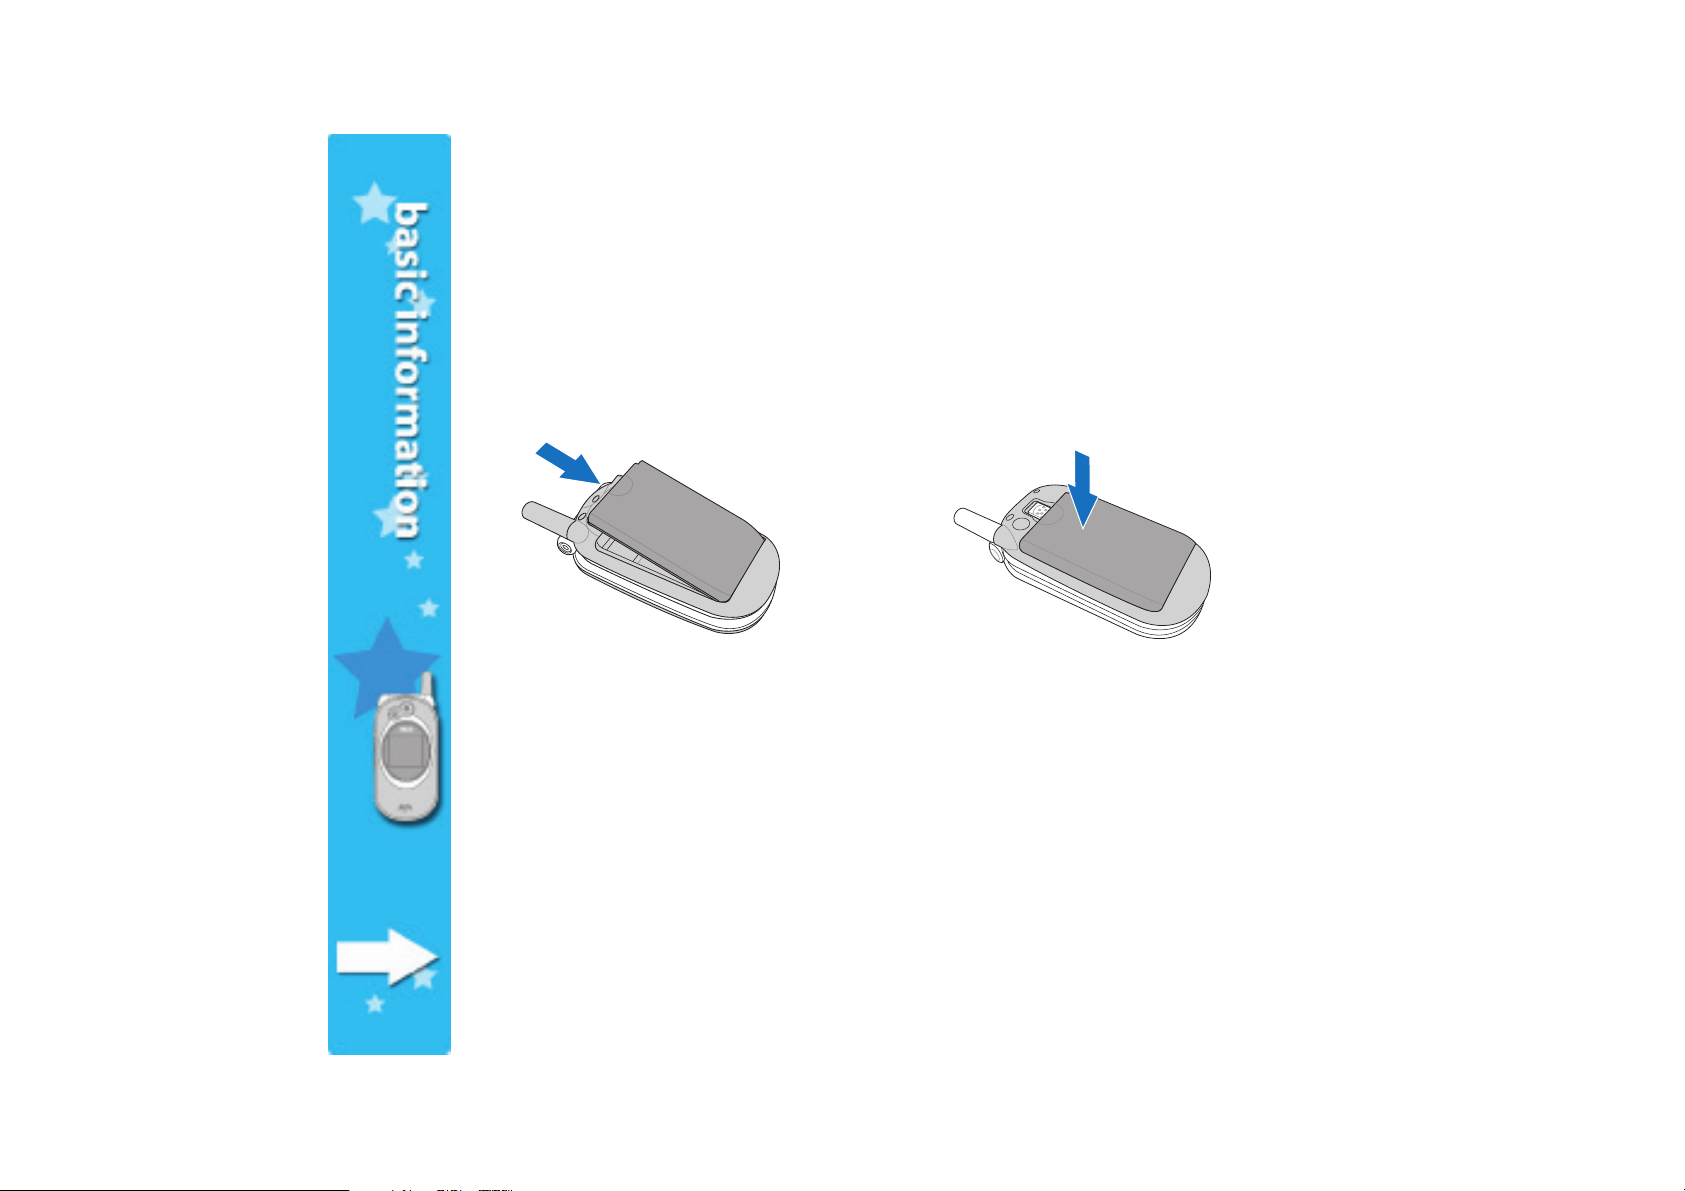
Installing and removing the batteryInstalling and removing the battery
Installing and removing the battery
Installing and removing the batteryInstalling and removing the battery
Follow these instructions to install the battery to the mobile phone.
To install the battery:
1. Insert the battery hooks to the holes on
the bottom of the battery compartment.
2. Push the battery to the direction of the
arrow until it clicks in place.
1818
18
1818
Page 19
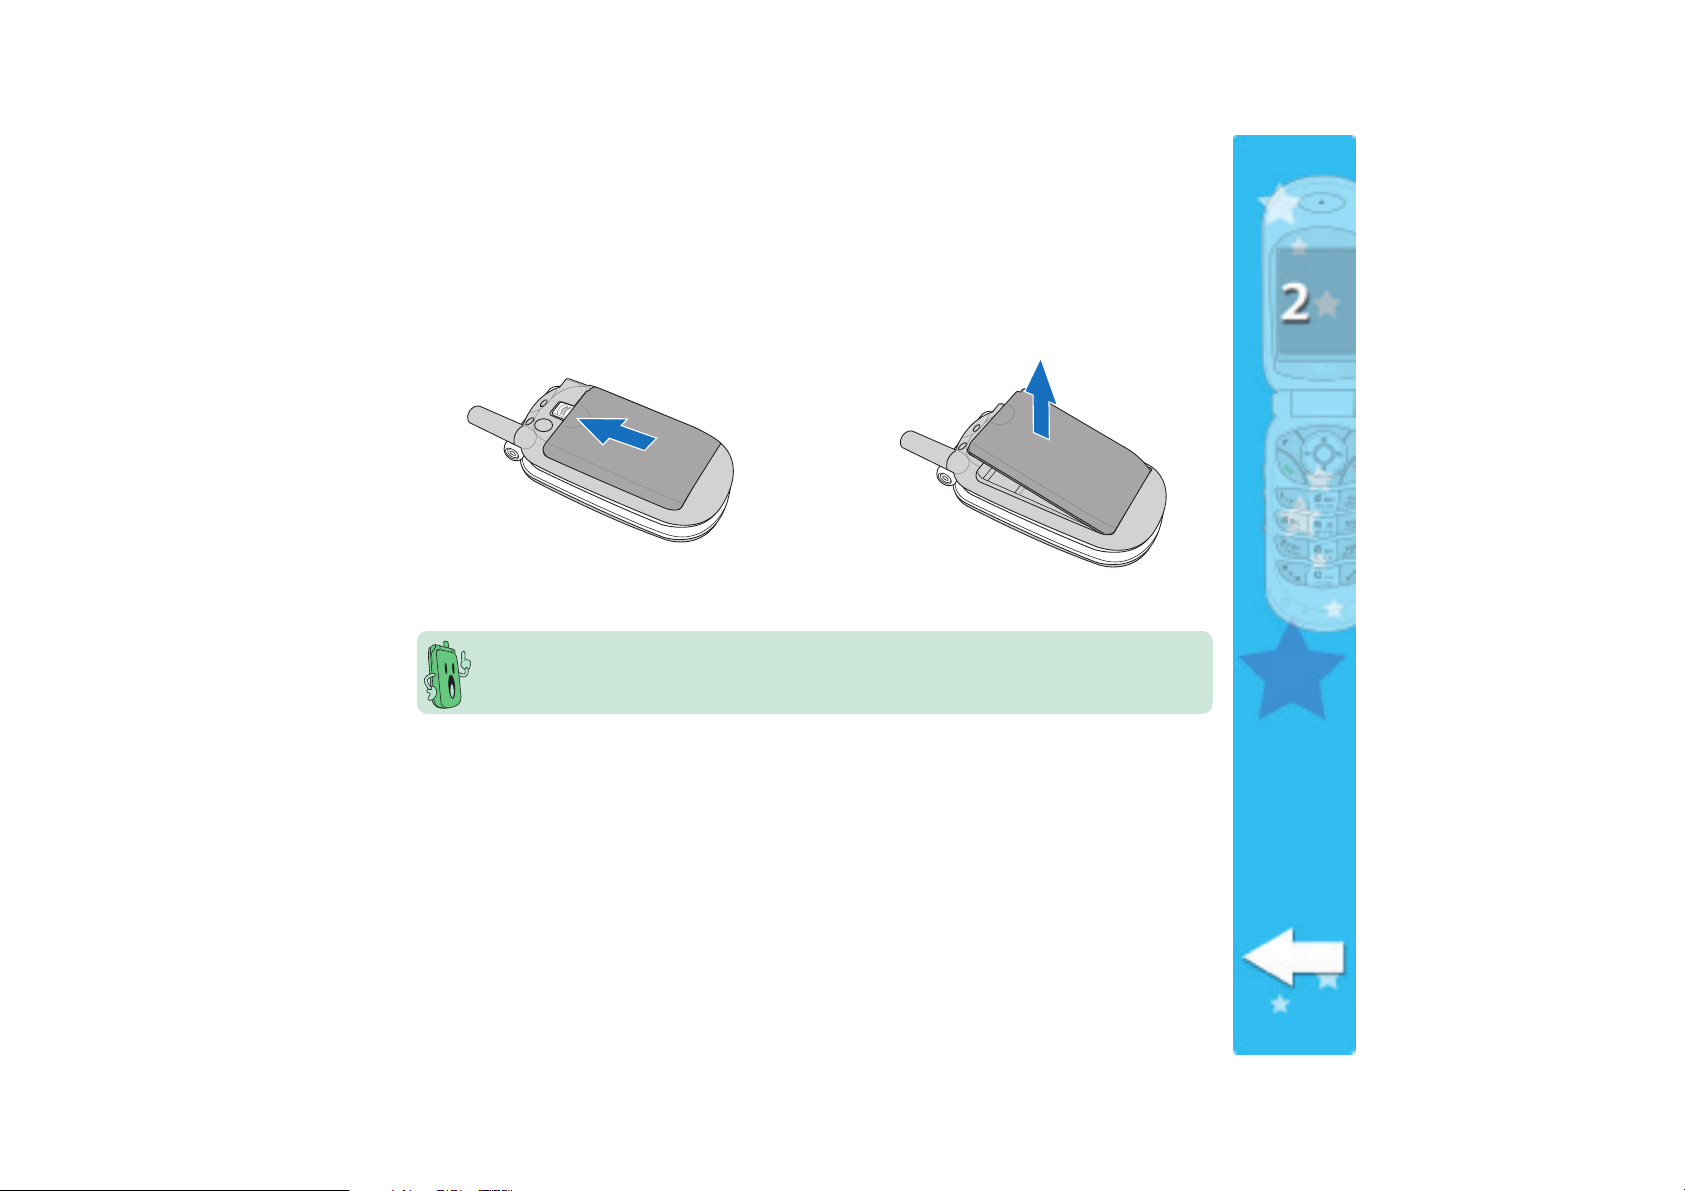
To remove the battery:
1. Push the battery latch upward until the
2. Lift the battery until it is disengaged from
battery ejects from the unit.
These illustrations are for reference only and may not exactly show the actual unit. Colors
were used for emphasis.
the battery terminals. Set the battery
aside.
1919
19
1919
Page 20
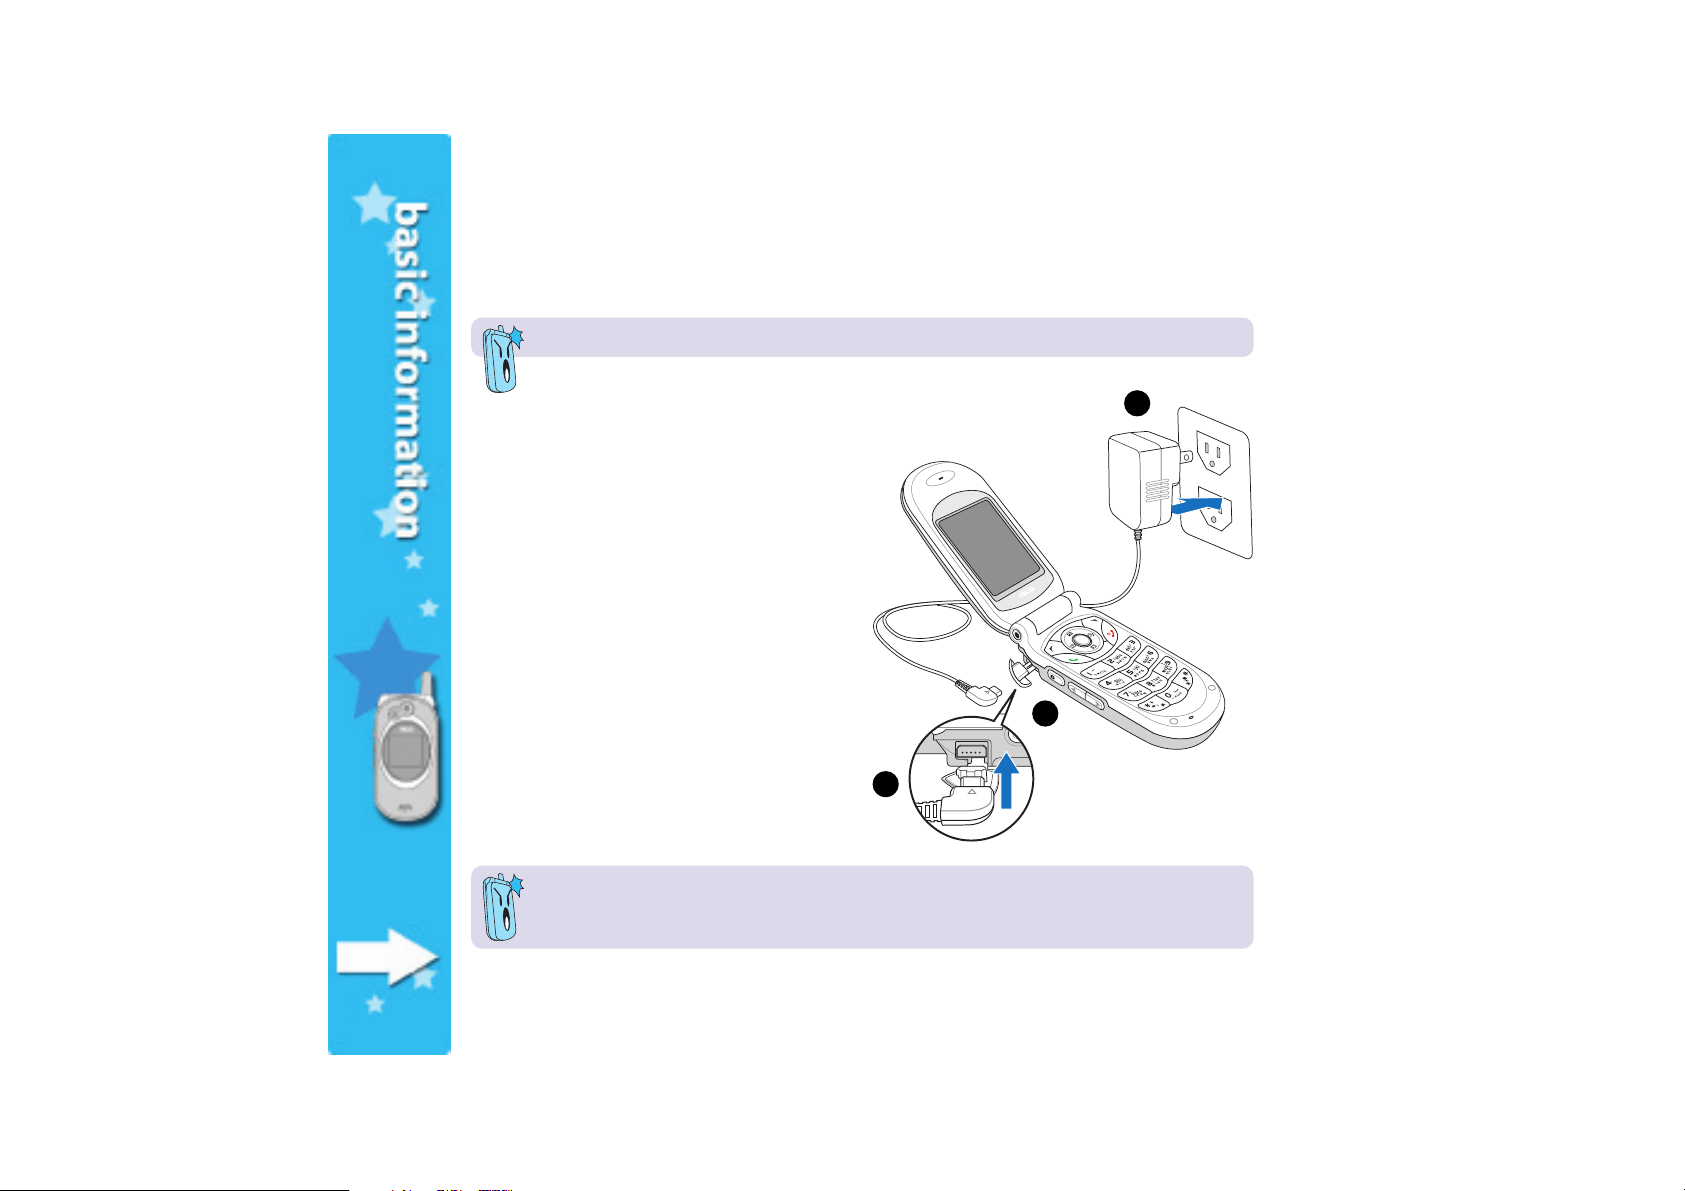
Charging the batteryCharging the battery
Charging the battery
Charging the batteryCharging the battery
Make sure that the battery is properly installed before charging.
To charge the battery:
1. Connect the charger to a power source.
2 Flip open the I/O connector cover on the
side of the phone.
3. Connect the power cable plug to the I/O
connector.
33
3
33
11
1
11
22
2
22
2020
20
2020
Disconnect the charger from the power source and the plug from the mobile phone
when charging is complete.
Page 21

When the phone is onWhen the phone is on
When the phone is on
When the phone is onWhen the phone is on
The battery icon on both external and main
displays animates to indicate that the battery
is charging. It takes about two to three hours
to fully charge the battery. A message
appears on the display to tell you that the
battery is fully charged. The battery icon now
shows four green bars.
External displayExternal display
External display
External displayExternal display
When the phone is offWhen the phone is off
When the phone is off
When the phone is offWhen the phone is off
Both displays show an animated battery icon
to indicate the battery is charging. When the
battery is fully charged, both displays show a
fully charged battery icon.
Battery is chargingBattery is charging
Battery is charging
Battery is chargingBattery is charging
Main displayMain display
Main display
Main displayMain display
Battery is fullyBattery is fully
Battery is fully
Battery is fullyBattery is fully
chargedcharged
charged
chargedcharged
2121
21
2121
Page 22
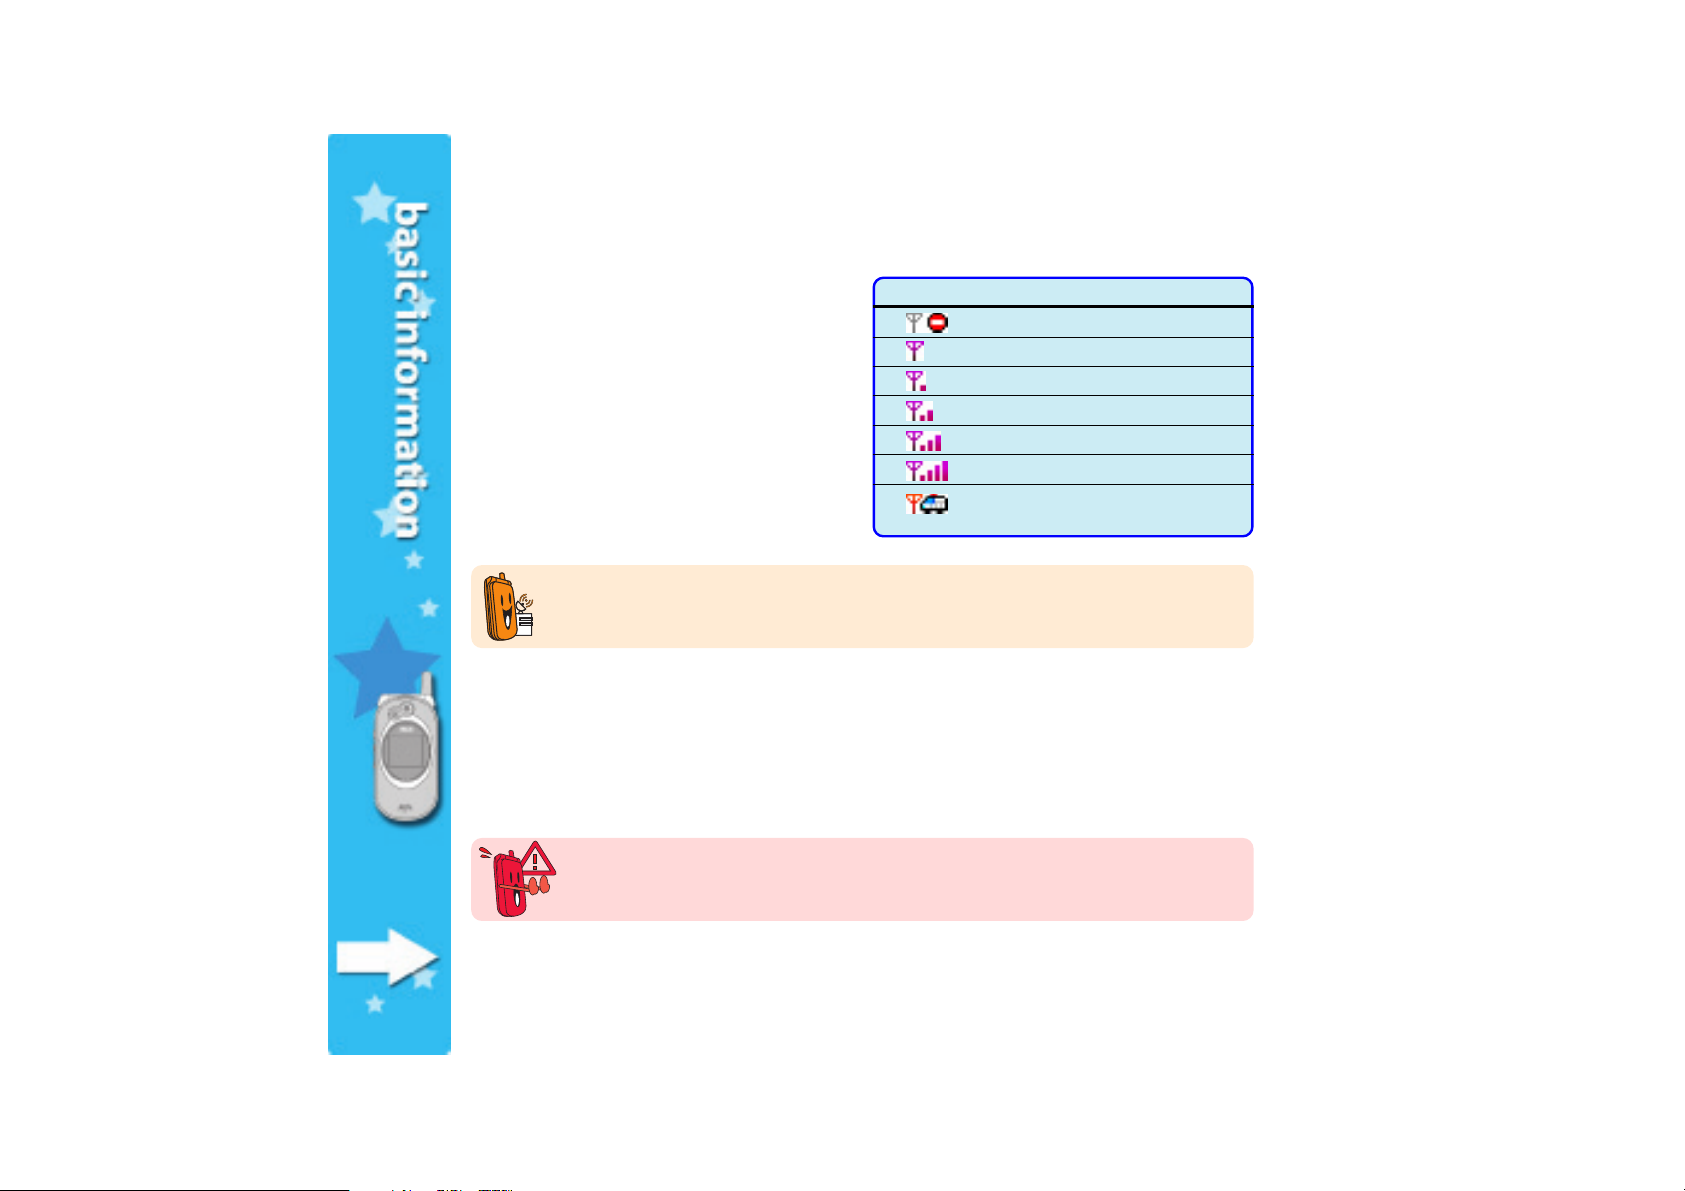
Signal strength
Your phone has an external antenna and
signal strength icon in both main and
external LCD displays to indicate the signal
level. Refer to the table for signal strength
indications.
The signal strength depends on your proximity to your phone operator signal station. Ask
assistance from your phone operator if the signal level in your location is weak or
fluctuating.
IconIcon
Icon
IconIcon
IndicationIndication
Indication
IndicationIndication
No service (dead spot)
Poor signal
Low signal
Fair signal
Good signal
Strong signal (ideal)
Emergency outgoing calls only;
No SIM card installed
LCD displays
This phone includes two LCD displays: external and main. Both displays are illuminated by a
backlight that automatically turns on or off after a certain period of time depending on your
setting. Refer to the next chapter for details on adjusting the LCD backlight.
Do not apply too much pressure on the phone to avoid damaging the LCD displays. Avoid
putting the phone in your pockets, cramped bags, and in areas where it is pressed on hard
surfaces.
2222
22
2222
Page 23
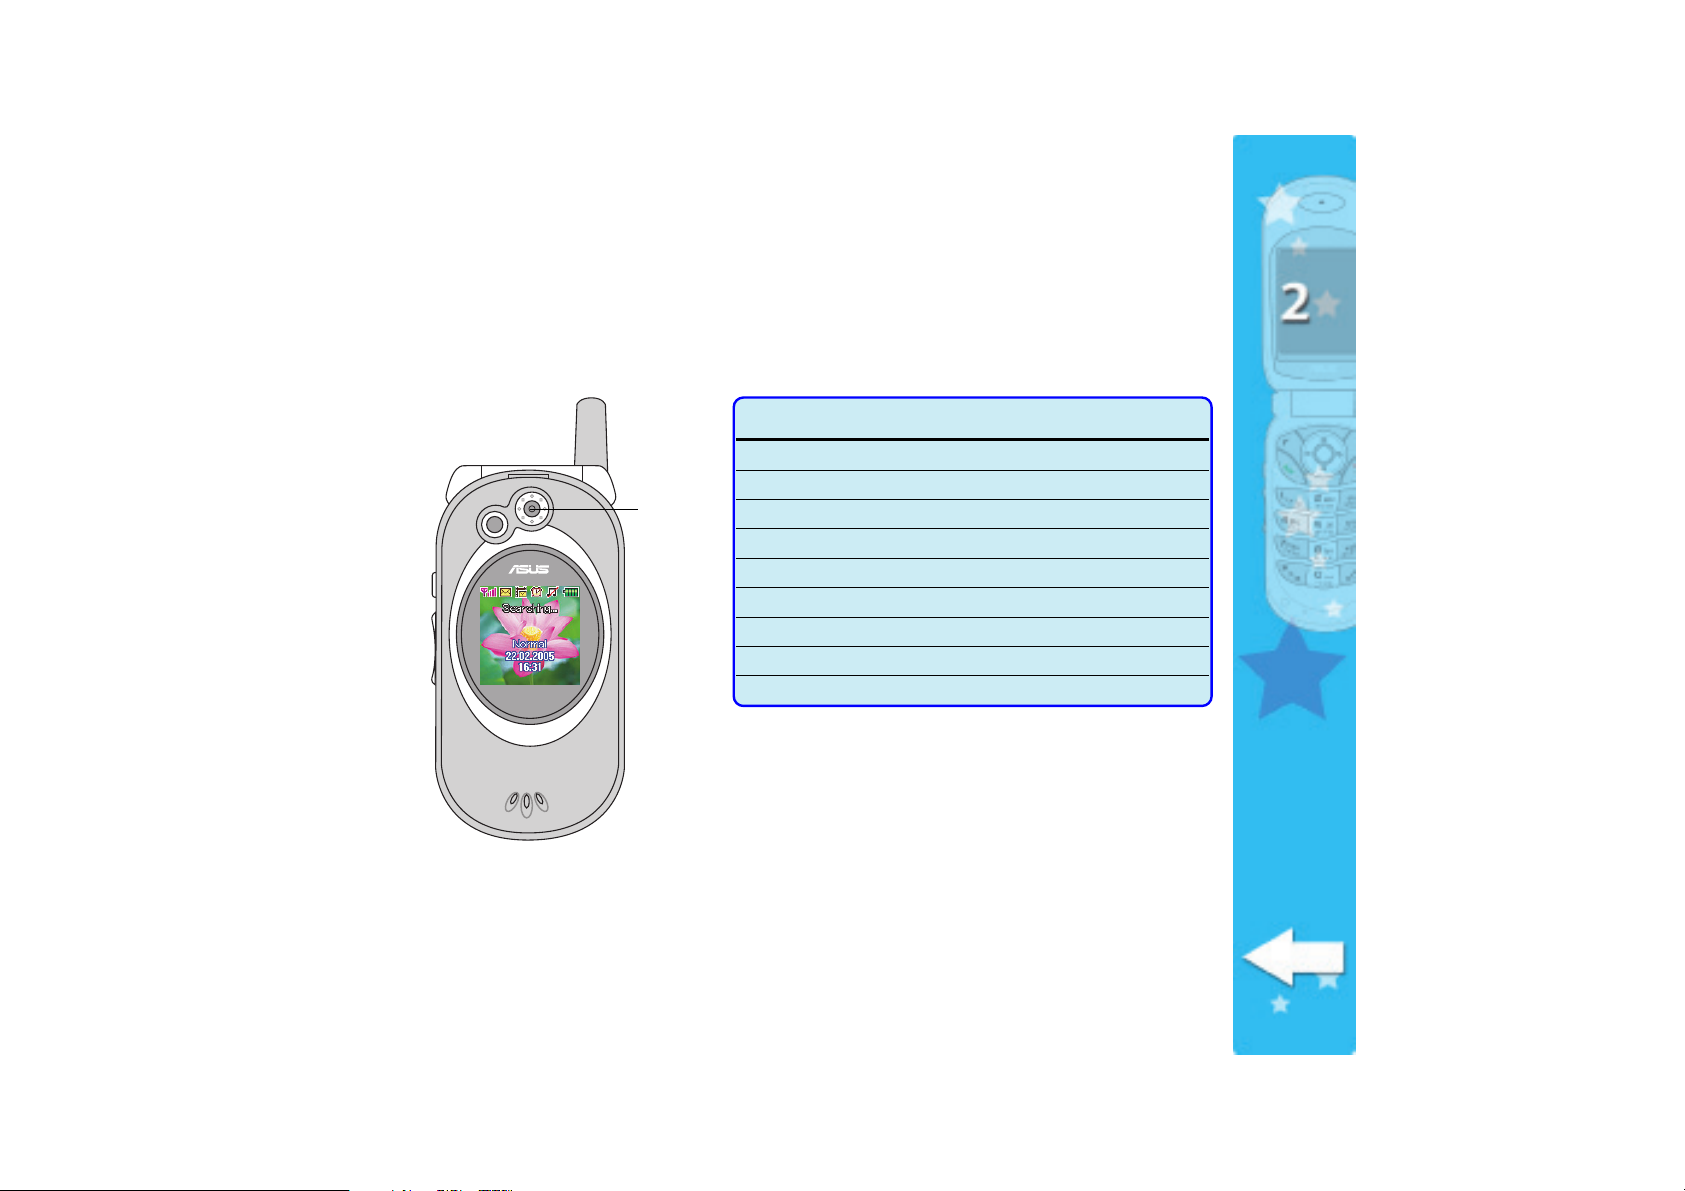
Camera
Your phone comes with a built-in camera that allows you to capture, edit, and share photos
and videos with other mobile phone, PDA, notebook, or PC users. Refer to Chapter 5 “Having
fun” for more information.
CameraCamera
Camera
CameraCamera
SpecificationSpecification
Specification
SpecificationSpecification
SensorSensor
Sensor CMOS type
SensorSensor
PixelPixel
Pixel 300K
PixelPixel
Self-captureSelf-capture
Self-capture Supported thru the external display
Self-captureSelf-capture
Preview functionPreview function
Preview function Supported
Preview functionPreview function
TimerTimer
Timer Supported
TimerTimer
Low light supportLow light support
Low light support Built-in flash
Low light supportLow light support
Digital ZoomDigital Zoom
Digital Zoom Supported
Digital ZoomDigital Zoom
Multi-captureMulti-capture
Multi-capture Supports 4, 6, 9, and 16 captures
Multi-captureMulti-capture
VideoVideo
Video 15-second AVI video
VideoVideo
DescriptionDescription
Description
DescriptionDescription
(with audio)
2323
23
2323
Page 24
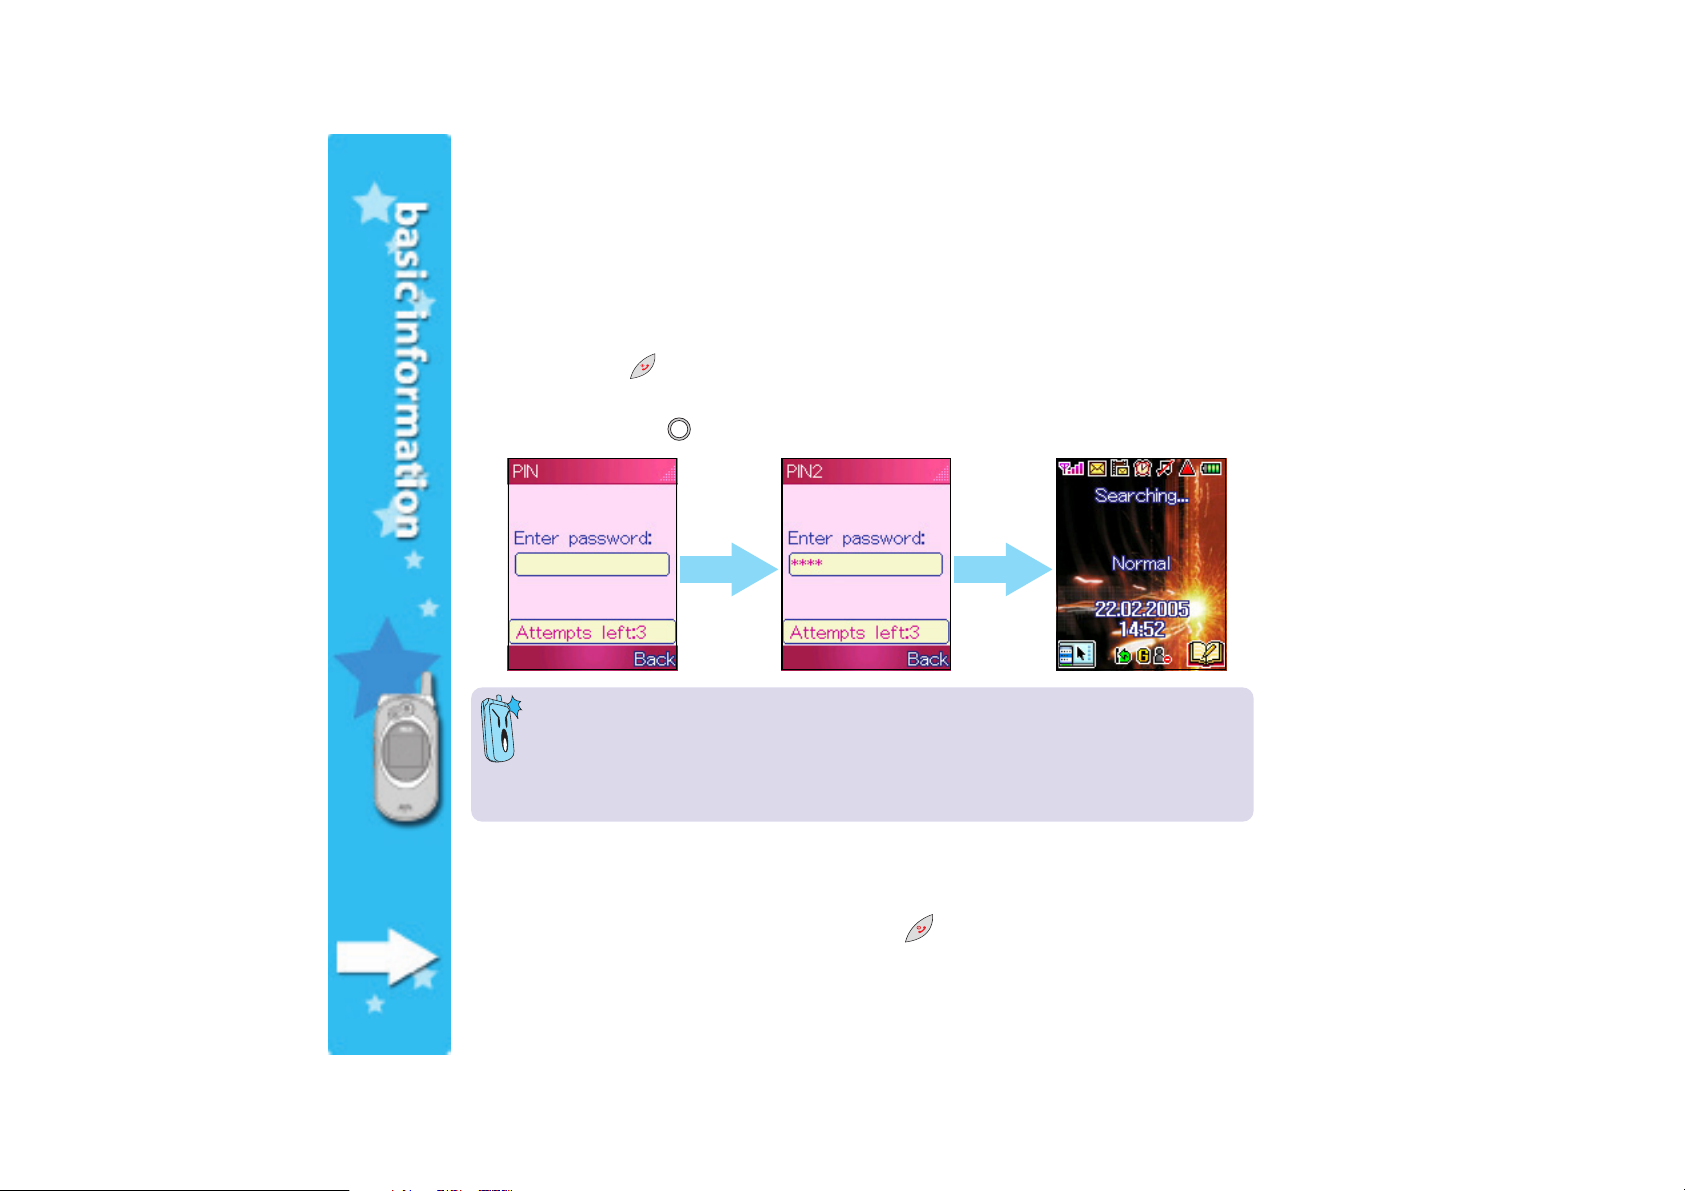
Switching the phone ON or OFF
To turn
ONON
ON the phone:
ONON
1 Open the phone flip top to access the keypad.
2. Press and hold
for a few seconds until the display turns on.
3. If you are asked for a Personal Identification Number (PIN) code, key-in the code using the
keypad, then press
• Some SIM cards come with a default PIN code. Read the SIM card documentation
before entering the PIN code.
• The phone allows you to enter the PIN code in three attempts. You must enter the
PIN Unlocking Key (PUK) if you fail to key-in the correct PIN in three attempts. The
PUK is provided by your phone operator.
To turn
OFF OFF
OFF the phone:
OFF OFF
. The main display shows the idle screen.
2424
24
2424
1. Open the phone flip top.
2. Set the phone in idle mode, then press and hold
for a few seconds until the display
turns off.
Page 25

This chapter provides information on
the display layout, screen icons, and
basic phone operations so you can
start using your mobile phone.
Page 26

Chapter summaryChapter summary
Chapter summary
Chapter summaryChapter summary
Display layout ................................................................................... 28
Other display modes .................................................................. 29
Indicator icons................................................................................... 30
Main menu ......................................................................................... 32
Navigating the main menu ......................................................... 33
Sub-menu .......................................................................................... 33
Changing initial settings .................................................................... 34
Setting the date and time.......................................................... 34
Setting the time zone ................................................................ 35
Setting the date format ............................................................. 36
Setting the time format ............................................................. 37
Selecting a language .................................................................. 38
Creating a greeting text ............................................................ 39
Basic operations ................................................................................ 40
Placing a local call ...................................................................... 40
Placing an international call ........................................................ 41
Calling a number from your phone book .................................... 42
Calling a recently dialed number ................................................ 42
Initiating a conference call ......................................................... 45
Answering a call ......................................................................... 52
2626
26
2626
Page 27

Adjusting the ring volume .......................................................... 53
Saving a phone number in the phone book ................................ 54
Entering text .............................................................................. 56
2727
27
2727
Page 28

Display layout
The phone display area has three parts when in idle mode.
Icon/Title barIcon/Title bar
Icon/Title bar
Icon/Title barIcon/Title bar
idle idle
In
idle mode, this bar shows
idle idle
the indicator icons.
2828
28
2828
In either
or
shows the name of the
current menu, sub-menu, or
function.
Soft key barSoft key bar
Soft key bar
Soft key barSoft key bar
This bar shows the current
functions of the left and
right soft keys. The soft key
functions vary depending on
the selected menu.
The soft key bar also displays the available functions of the 4-way navigation keys when in
sub-menu or function display. The arrows (left/right/up/down) appear or disappear depending
on the current sub-menu, function, or application. When a directional arrow appears, you can
press the corresponding button on the navigation key to move the cursor or selection to that
direction.
menumenu
menu,
menumenu
function function
function modes, this bar
function function
sub-menusub-menu
sub-menu,
sub-menusub-menu
Text and graphic areaText and graphic area
Text and graphic area
Text and graphic areaText and graphic area
idle idle
In
idle mode, this area
idle idle
shows the name of the
service provider, date,
time, and manner if you
choose to display them.
This are also displays
your selected wallpaper.
In either
sub-menusub-menu
sub-menu, or
sub-menusub-menu
modes, this area displays
text, graphics, or both.
menumenu
menu,
menumenu
functionfunction
function
functionfunction
Page 29
Other display modesOther display modes
Other display modes
Other display modesOther display modes
The phone display varies according to menu levels and modes.
Menu modeMenu mode
Menu mode
Menu modeMenu mode
Page loading modePage loading mode
Page loading mode
Page loading modePage loading mode
Sub-menu modeSub-menu mode
Sub-menu mode
Sub-menu modeSub-menu mode
Text input modeText input mode
Text input mode
Text input modeText input mode
Function modeFunction mode
Function mode
Function modeFunction mode
Selection modeSelection mode
Selection mode
Selection modeSelection mode
Phone book modePhone book mode
Phone book mode
Phone book modePhone book mode
Camera modeCamera mode
Camera mode
Camera modeCamera mode
2929
29
2929
Page 30

Indicator icons
The icons that appear on the displays indicate the activated phone features and alert you of
an SMS/MMS message or other useful information. The screen displays below show all the
icons in the main and external displays. Refer to the table on the next page for a description of
each icon.
3030
30
3030
Main displayMain display
Main display
Main displayMain display
(silent mode and
privilege list activated)
External displayExternal display
External display
External displayExternal display
(silent mode)
The indicator icons appear only after you have installed a SIM card and turned on the phone.
Main displayMain display
Main display
Main displayMain display
(vibrate mode and
ignore list activated)
External displayExternal display
External display
External displayExternal display
(vibrate mode)
Page 31

IconIcon
Icon
IconIcon
DescriptionDescription
Description
DescriptionDescription
IconIcon
Icon
IconIcon
DescriptionDescription
Description
DescriptionDescription
Indicates the signal strength level;
permanently positioned on the top
left corner of both displays. See
page 20 for other indications.
Appears when a new SMS message
is received; blinks if the SIM card
has reached its maximum capacity*
Appears when a new MMS message
is received
Appears when a new MMS message
is downloaded to your phone
Appears if you set an alarm
Appears if you set the phone to
silent mode
Appears if you set the ring mode
to Vibrate
Appears if your phone has an
activated roaming feature**
* The maximum SMS/MMS capacity of SIM cards vary. Refer to the SIM card documentation for details.
** Network-dependent or subscribed feature.
Indicates the battery level;
permanently positioned on the top
right corner of both displays. See
page 16 for other indications
Appears if you activated the call
forwarding feature**
Appears when you are connected
to a GPRS network**
Appears if you activate the call
filter Ignore list
Appears if you activate the call
filter Privilege list
Main menu icon; permanently
positioned on the lower left corner
of the main display
Phonebook icon; permanently
positioned on the lower right
corner of the main display
3131
31
3131
Page 32
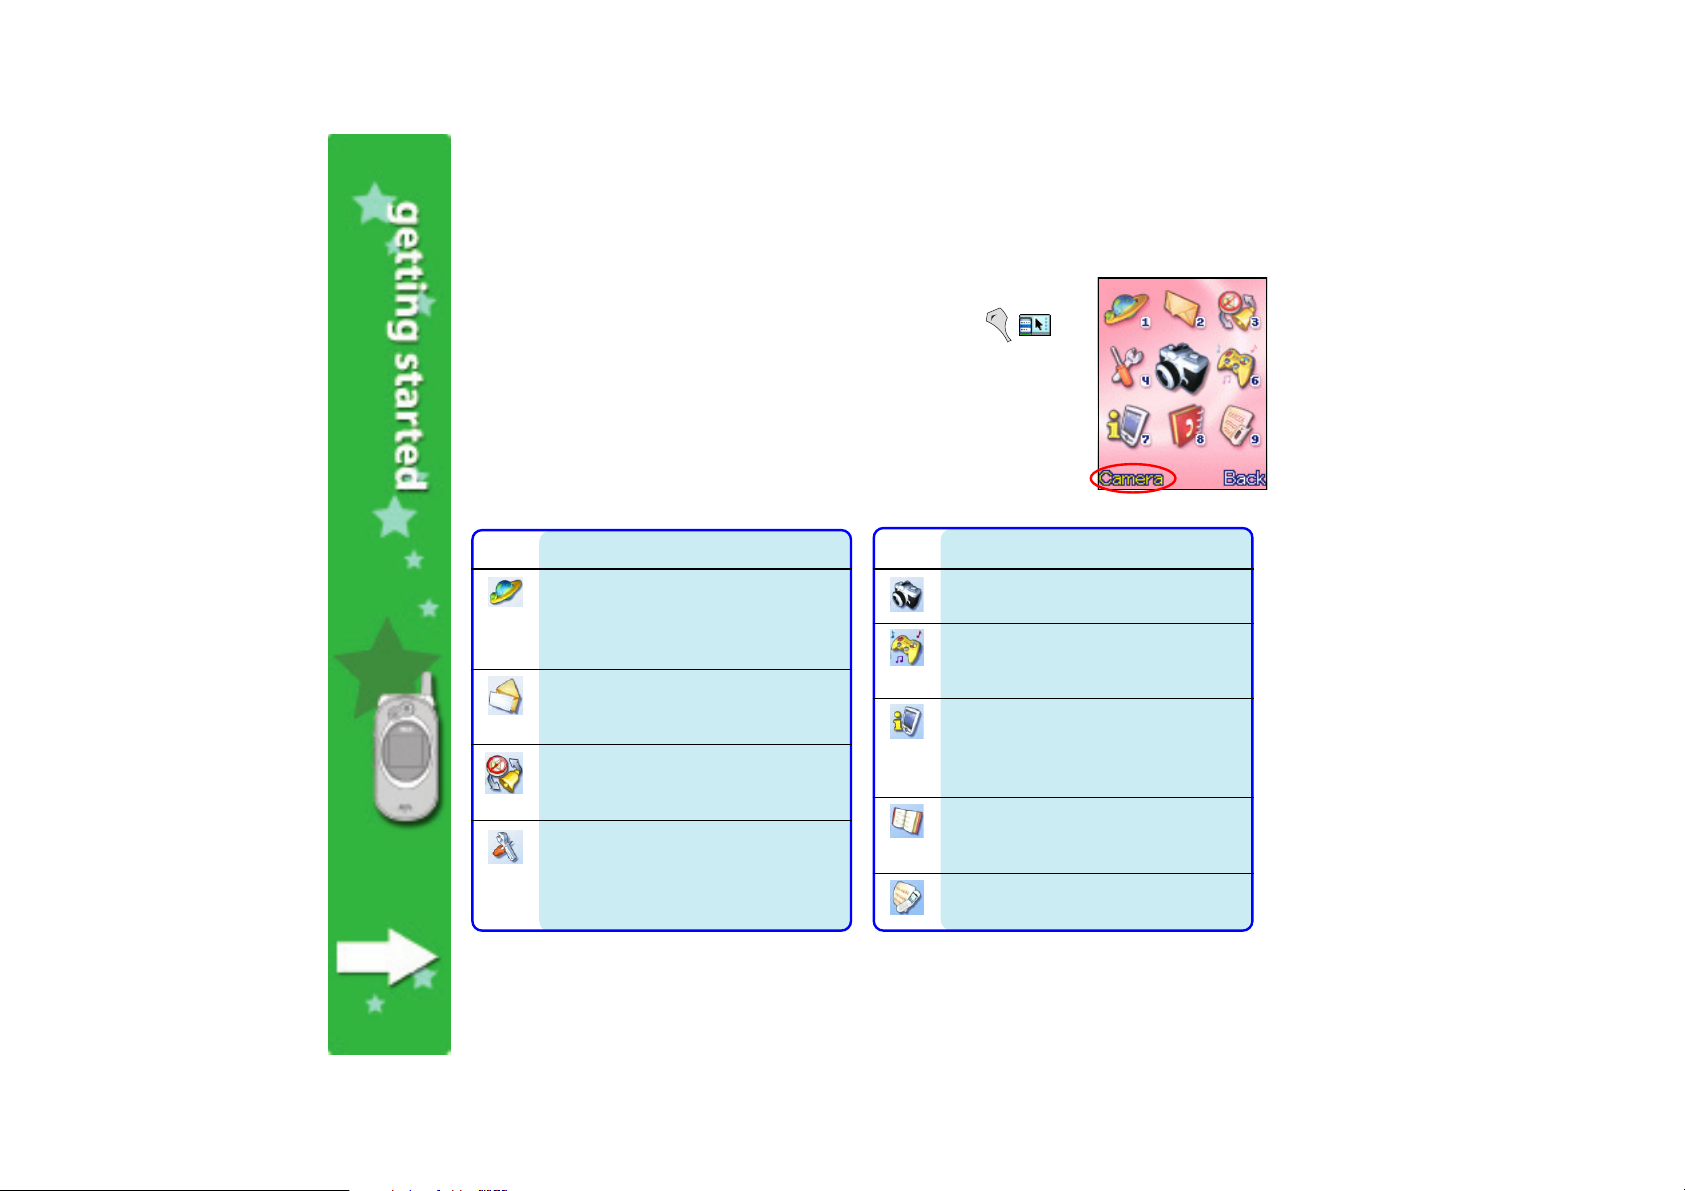
Main menu
The icons in the main menu represents all the functions and features of
your mobile phone. You can open the main menu by pressing
[ ]
when the phone is in idle mode. When selected, the menu icon animates
and the screen shows the menu description on the bottom left corner of
the display.
Refer to the table below for a brief description of the menu icons and
their functions.
IconIcon
Icon
IconIcon
NetworkNetwork
Network. Allows you to surf the
NetworkNetwork
Internet using the WAP feature of the
phone and access other services offered
by your phone operator.
MessageMessage
Message. Allows you to compose, edit,
MessageMessage
send, and manage SMS and MMS
messages to almost any mobile phone.
MannerManner
Manner. Allows you to select from five
MannerManner
preset manners or to customize the
manner ring tone, volume, etc.
SettingsSettings
Settings. Allows you to adjust the
SettingsSettings
phone ringtone, display, security,
connectivity, memory, and network
settings.
DescriptionDescription
Description
DescriptionDescription
IconIcon
Icon
IconIcon
CameraCamera
Camera. Allows you to capture, manage,
CameraCamera
and share photos and videos.
FunFun
Fun. Allows you to play Java games,
FunFun
compose ring tones, and access the
Image Gallery.
OrganizerOrganizer
Organizer. Allows you to organize
OrganizerOrganizer
your daily schedule using the Calendar,
Alarm, World Clock, Text/Voice Memo,
Currency Exchange, and other features.
PhonebookPhonebook
Phonebook. Allows you to add,
PhonebookPhonebook
organize, search contacts saved in the
phone and SIM memory.
CallsCalls
Calls. Allows you to manage missed,
CallsCalls
dialled, and answered call information.
DescriptionDescription
Description
DescriptionDescription
3232
32
3232
Page 33

Navigating the main menuNavigating the main menu
Navigating the main menu
Navigating the main menuNavigating the main menu
To navigate the main menu:
Use the navigation buttons to select a menu icon, then press
to display the menu items. For example, if you want to select
SettingsSettings
Settings, press (left) once to select, then press .
SettingsSettings
OROR
OR
OROR
Press the corresponding menu icon number on the keypad to launch
the menu. For example, if you want to select
to display the Settings menu.
SettingsSettings
Settings, press
SettingsSettings
By default, the
Camera Camera
Camera icon is selected every time you open the main menu.
Camera Camera
Sub-menu
Each main menu item has a sub-menu that lists the specific
functions of that menu. There are two ways to open the sub-menu:
• Press
open the sub-menu functions.
• Press the corresponding item number on the keypad to open the
sub-menu functions.
(up) or (down) to select an item, then press to
3333
33
3333
Page 34

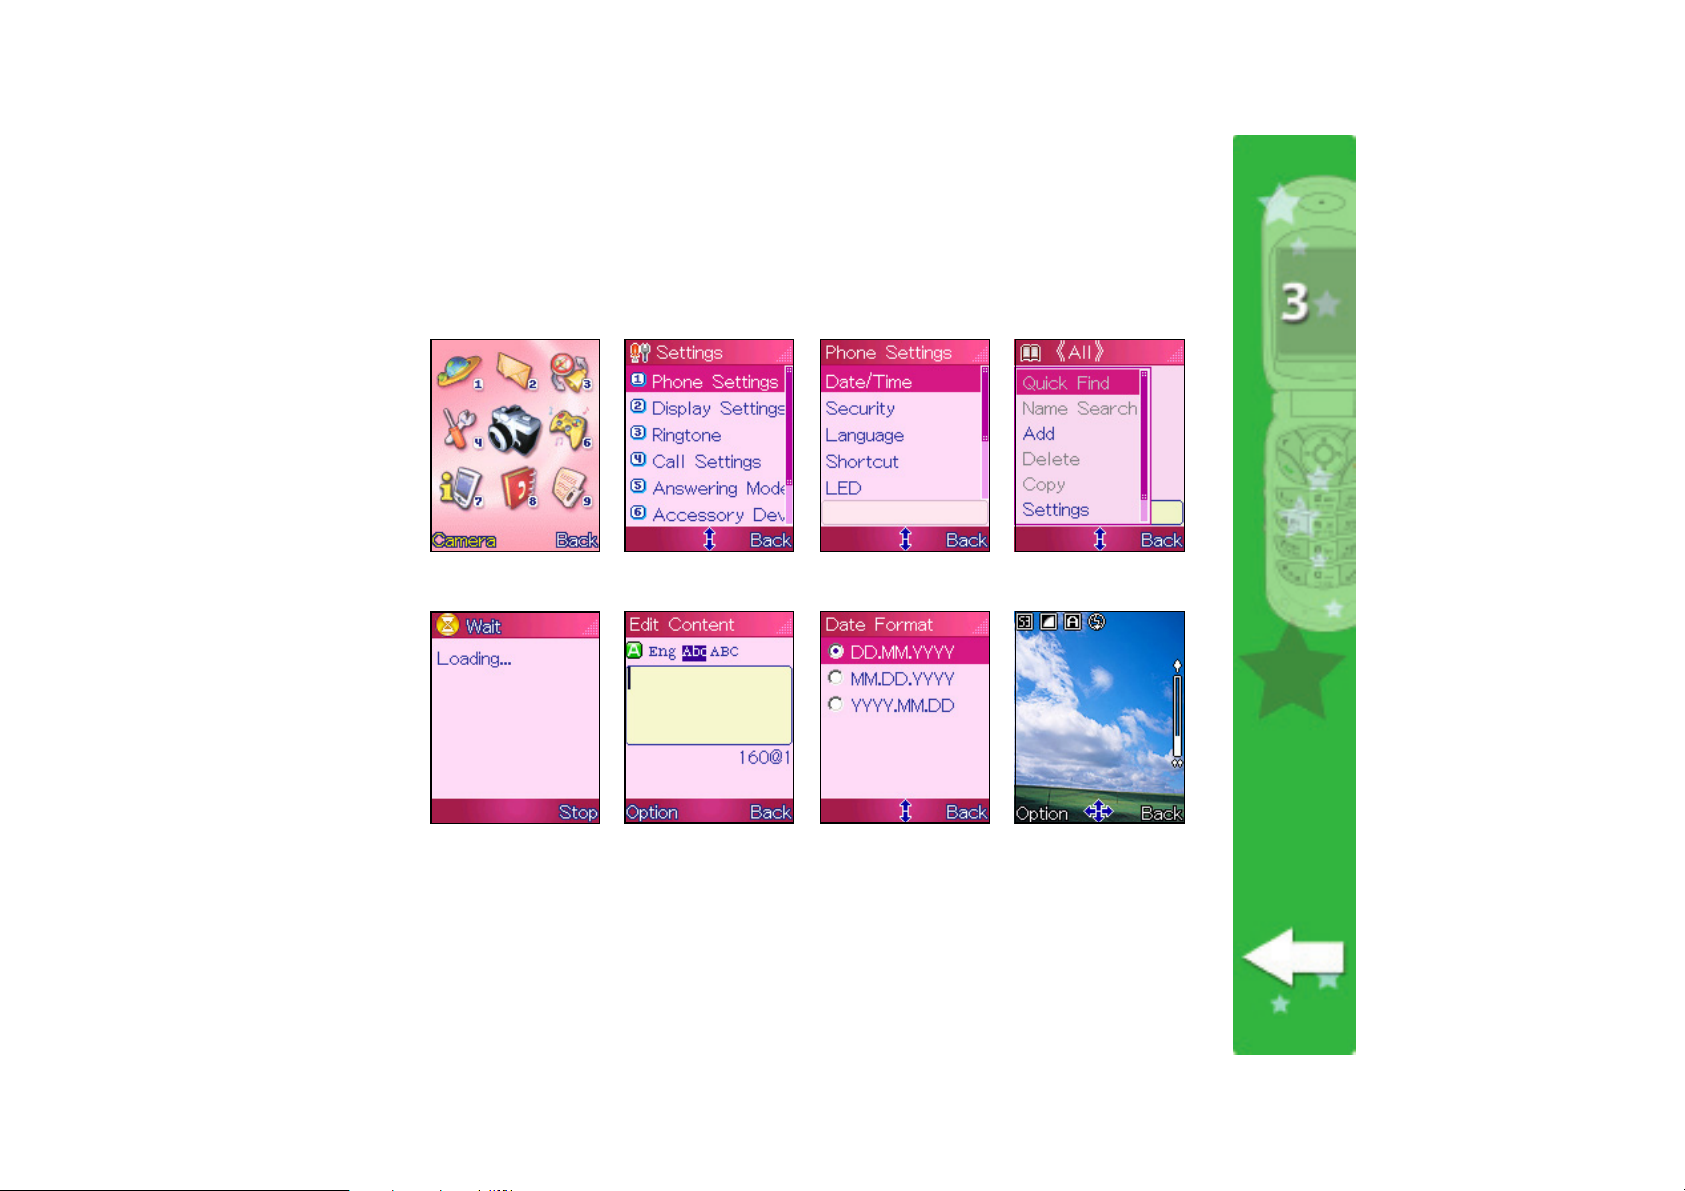
Changing initial settings
You need to change some initial phone settings such as the date, time,
time zone, and greeting text before using the phone. These initial
settings are important so you can synchronize the mobile phone and
your current location time.
Setting the date and timeSetting the date and time
Setting the date and time
Setting the date and timeSetting the date and time
To set the date and time:
3434
34
3434
1. From the
the date and time options.
2. Press
current date and time is displayed above the soft key bar.
3. If the date or time is incorrect, press
Date/Time Date/Time
Date/Time screen.
Date/Time Date/Time
4. On the date field, key-in the current date in DD.MM.YYYY format.
For example, key-in 2-8-0-9-2-0-0-4 to set the date to 28 September
2004. You can press
5. When finished setting the date, press
field.
6. On the time field, key-in the current time in HH:MM 24-hour format.
For example, key-in 1-1-3-1 to set the time to 11:31 AM.
7. When finished setting the time, press
message appears indicating that you have successfully changed the date
and time.
The display returns to the
Phone SettingsPhone Settings
Phone Settings sub-menu, select
Phone SettingsPhone Settings
(up) or (down) to select
(Back) to select and replace an incorrect entry.
Date/TimeDate/Time
Date/Time menu.
Date/TimeDate/Time
Set Date/TimeSet Date/Time
Set Date/Time.
Set Date/TimeSet Date/Time
. A
Date/Time Date/Time
Date/Time to display
Date/Time Date/Time
The
to display the
(down) to move to the time
Set successfully!Set successfully!
Set successfully!
Set successfully!Set successfully!
SetSet
Set
SetSet
Page 35

Setting the time zoneSetting the time zone
Setting the time zone
Setting the time zoneSetting the time zone
To set the time zone:
1. From the
2. From the
select
the soft key bar.
3. If the time zone is incorrect, press
Zone Zone
Zone screen.
Zone Zone
4. Press (up) or (down) to highlight the correct time zone, then
press
displayed above the soft key bar.
5. When finished setting the time zone, press
the previous menu.
Phone SettingsPhone Settings
Phone Settings sub-menu, select
Phone SettingsPhone Settings
Date/TimeDate/Time
Date/Time menu items, press
Date/TimeDate/Time
Set Time ZoneSet Time Zone
Set Time Zone.
Set Time ZoneSet Time Zone
to select.
The first item on the time zone list,
Line.
The current time zone is displayed above
to display the
The time difference of the selected time zone is
Date/TimeDate/Time
Date/Time.
Date/TimeDate/Time
(up) or (down) to
Set TimeSet Time
Set Time
Set TimeSet Time
(Back) to return to
IDLIDL
IDL, means International Date
IDLIDL
3535
35
3535
Page 36

Setting the date formatSetting the date format
Setting the date format
Setting the date formatSetting the date format
There are three available date formats you can choose from.
To set the date format:
3636
36
3636
1. From the
2. From the
select
the soft key bar.
3. To select another date format, press
Format Format
Format screen.
Format Format
4. Press
press
5. When finished, press
Phone SettingsPhone Settings
Phone Settings sub-menu, select
Phone SettingsPhone Settings
Date/TimeDate/Time
Date/Time menu items, press
Date/TimeDate/Time
Date FormatDate Format
Date Format.
Date FormatDate Format
(up) or (down) to highlight a date format, then
to select.
The default date format is displayed above
(Back) to return to the previous menu.
(up) or (down) to
to display the
Date/TimeDate/Time
Date/Time.
Date/TimeDate/Time
DateDate
Date
DateDate
Page 37

Setting the time formatSetting the time format
Setting the time format
Setting the time formatSetting the time format
You can select a 24-hour or a 12-hour time format.
To set the time format:
1. From the
2. From the
select
the soft key bar.
3. To select another time format, press
Format Format
Format screen.
Format Format
4. Press
press
5. When finished, press
Phone SettingsPhone Settings
Phone Settings sub-menu, select
Phone SettingsPhone Settings
Date/TimeDate/Time
Date/Time menu items, press
Date/TimeDate/Time
Time FormatTime Format
Time Format.
Time FormatTime Format
(up) or (down) to highlight a time format, then
to select.
The default time format is displayed above
(Back) to return to the previous menu.
(up) or (down) to
to display the
Date/TimeDate/Time
Date/Time.
Date/TimeDate/Time
TimeTime
Time
TimeTime
3737
37
3737
Page 38

Selecting a languageSelecting a language
Selecting a language
Selecting a languageSelecting a language
To select a language:
1. From the
default language is displayed on top of the soft key bar.
2. To change the language, press
3. Press
phone to use, then press
4. When finished, press
Phone SettingsPhone Settings
Phone Settings sub-menu, select
Phone SettingsPhone Settings
to display the
(up) or (down) to highlight the language you want the
to select.
(Back) to return to the previous menu.
Language. Language.
Language. The
Language. Language.
Language Language
Language screen.
Language Language
3838
38
3838
Page 39

Creating a greeting textCreating a greeting text
Creating a greeting text
Creating a greeting textCreating a greeting text
The greeting text appears in the main display every time you turn on the
phone.
To create a greeting text:
1. From the
2. Press
3. Press
key-in your greeting, then press
Set successfully!Set successfully!
A
Set successfully! message appears to indicate that you have
Set successfully!Set successfully!
successfully created the greeting text.
The display returns to the
Phone SettingsPhone Settings
Phone Settings sub-menu, select
Phone SettingsPhone Settings
to display the
or to select the desired text format, use the keypad to
The greeting text is limited to 18 characters.
Refer to the “Entering text” section on page 56 for details on how
to input text.
Greeting Text Greeting Text
Greeting Text screen.
Greeting Text Greeting Text
.
Phone Settings Phone Settings
Phone Settings menu.
Phone Settings Phone Settings
Greeting TextGreeting Text
Greeting Text.
Greeting TextGreeting Text
3939
39
3939
Page 40

Basic operations
Placing a local callPlacing a local call
Placing a local call
Placing a local callPlacing a local call
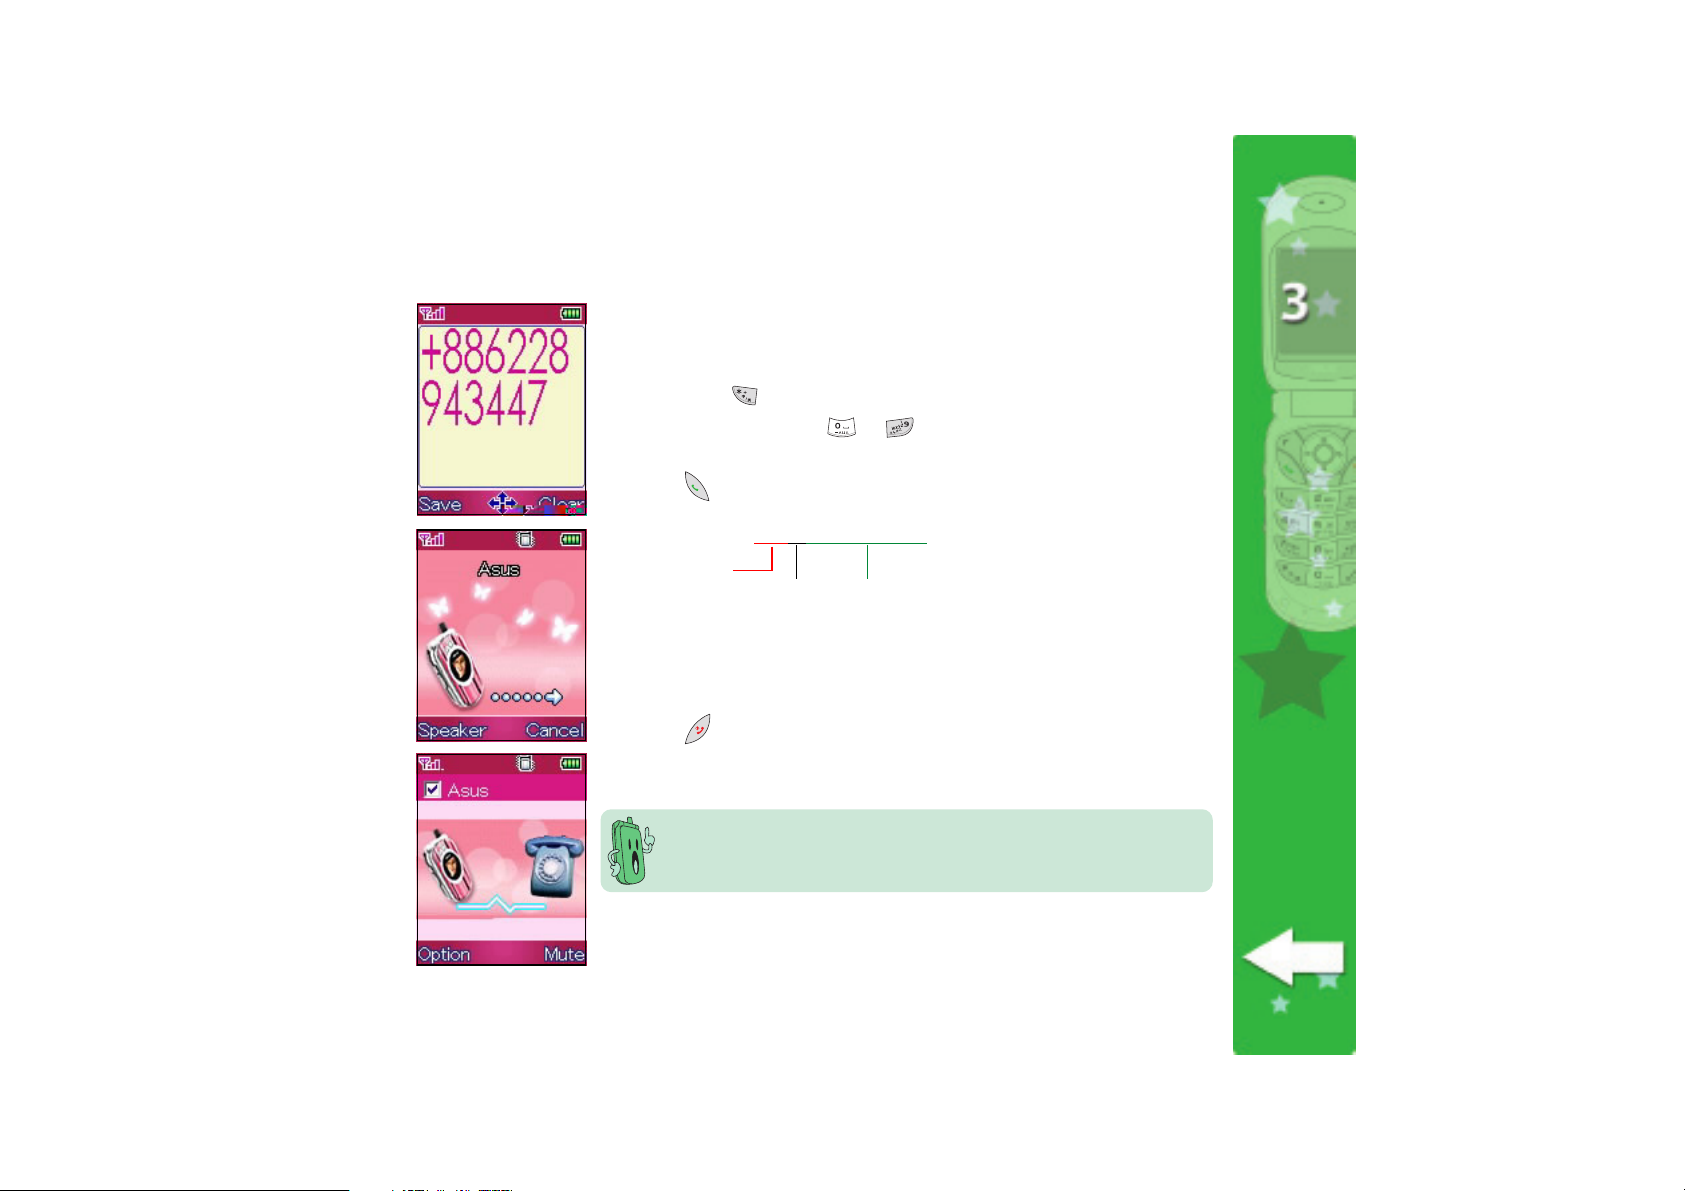
To place a local call:
1. Set the phone in idle mode.
2. Use the numeric keys [
you wish to call, then press
When available, the display shows the name and photo of the called
party. Refer to Chapter 5 “Managing the phone book” for details on
customizing contact information.
3. Talk to the called party when connected. The display shows the
name and photo of the called party, duration of the call, and audio
status (Mute/Not Mute).
to ] to key-in the number of the party
.
4040
40
4040
4. Press
briefly to display the call duration and voice recording, if any. The
phone returns to idle mode.
to terminate the call. A
Local calls are subject to tolls, fees, and/or taxes. Ask your phone
operator for the latest call charges in your location.
Call Summary Call Summary
Call Summary screen appears
Call Summary Call Summary
Page 41
Placing an international callPlacing an international call
Placing an international call
Placing an international callPlacing an international call
To place an international call:
1. Set the phone in idle mode.
2. Long press
3. Use the numeric keys [
area code, and phone number of the party you wish to call, then
press
Country codeCountry code
Country code
Country codeCountry code
4. Talk to the called party when connected. The display shows the
name and photo of the called party (when available), duration of
the call, and audio status (Mute/Not Mute).
to display the (+) sign.
to ] to key-in the country code,
.
++
6363
22
+
++
65866876586687
63
2
6586687
6363
22
65866876586687
Area codeArea code
Area code
Area codeArea code
Phone numberPhone number
Phone number
Phone numberPhone number
5. Press
appears briefly to display the call duration and voice recording, if
any. The phone returns to idle mode.
to terminate the call. A
International long distance calls are subject to tolls, fees, and/or
taxes. Ask your phone operator for the latest call charges in your
location.
Call Summary Call Summary
Call Summary screen
Call Summary Call Summary
4141
41
4141
Page 42
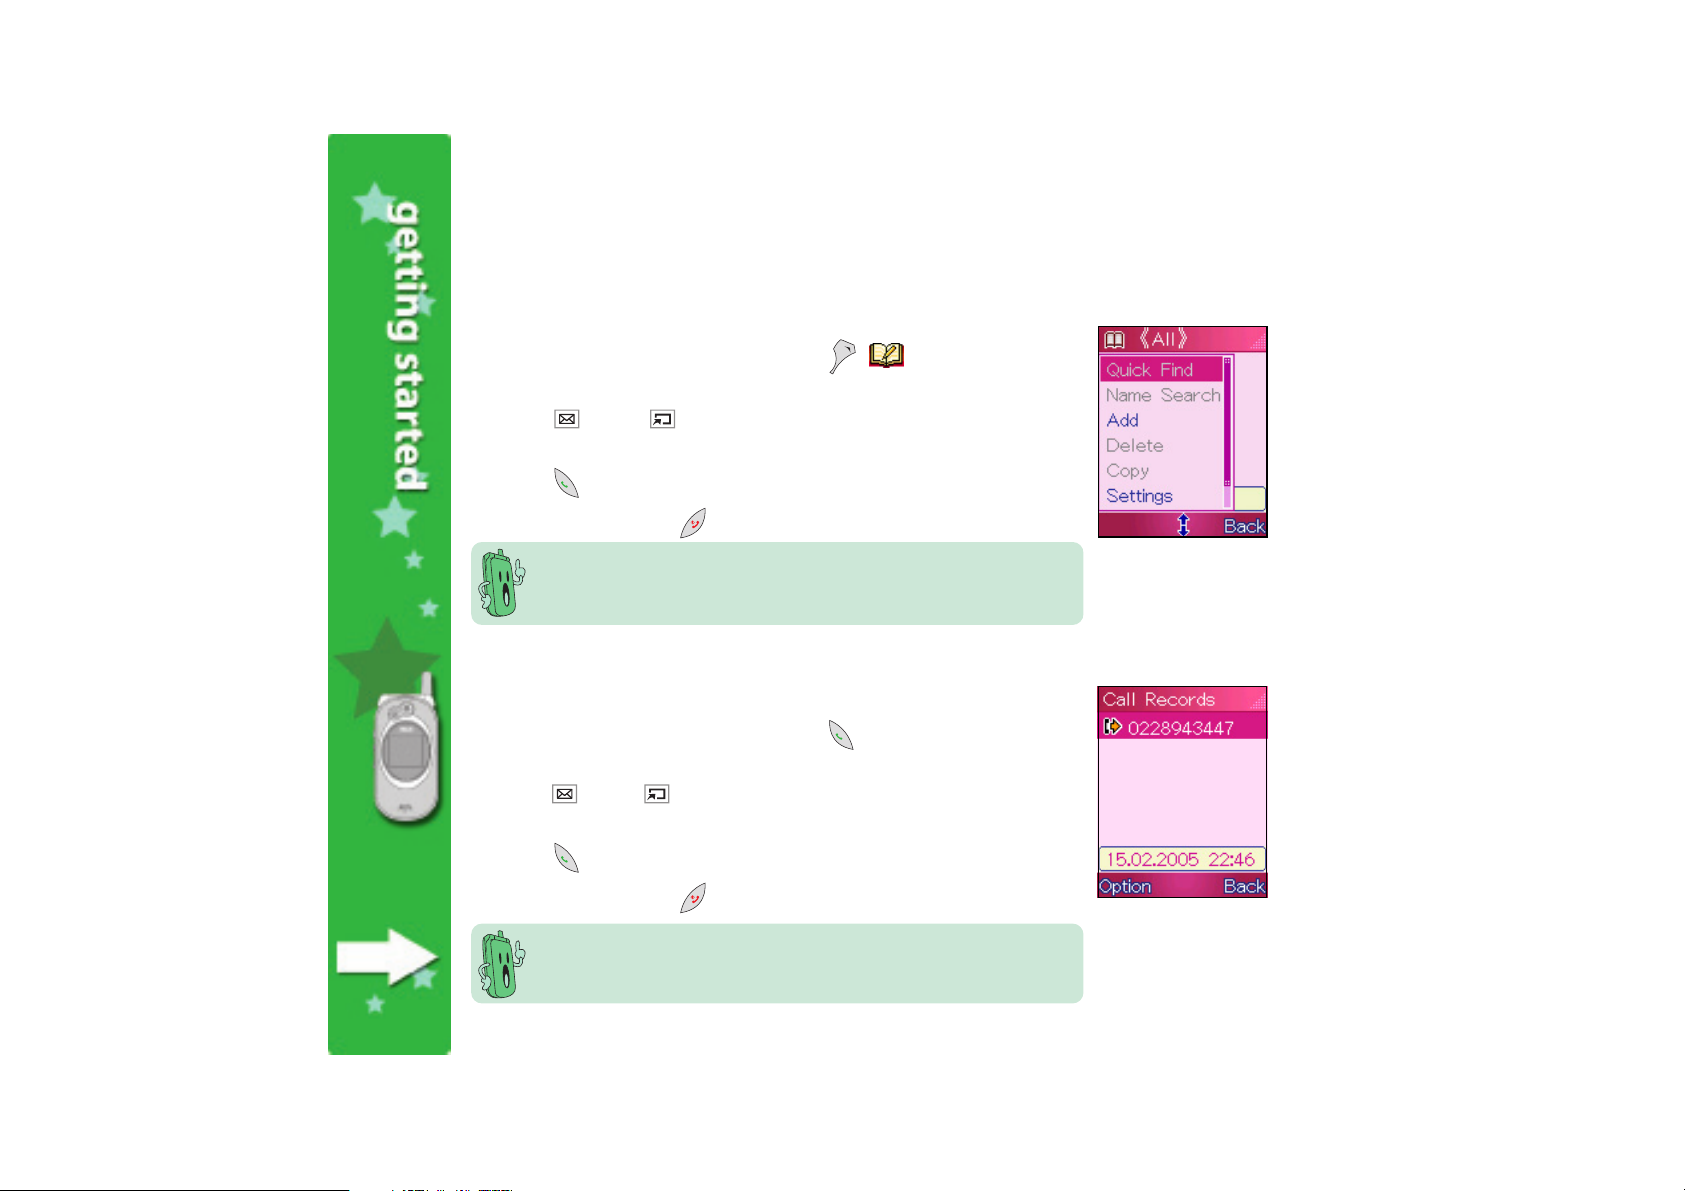
Calling a number from your phone bookCalling a number from your phone book
Calling a number from your phone book
Calling a number from your phone bookCalling a number from your phone book
To call a number from your phone book:
1. Set the phone in idle mode, then press [ ] to display the
names of contacts saved in the phone and/or SIM memory.
2. Press (up) or (down) to select the contact you wish to call.
The contact number is displayed above the soft key bar.
4242
42
4242
3. Press
4. When finished, press to terminate the call.
Calling a recently dialed numberCalling a recently dialed number
Calling a recently dialed number
Calling a recently dialed numberCalling a recently dialed number
To call a recently dialed number:
1. Set the phone in idle mode, then press
recently dialed, received, or missed calls.
2. Press
The date and time of the call record is displayed above the soft key bar.
3. Press
4. When finished, press
to place the call.
Refer to the Chapter 5 “Managing the phone book” for details on
how to create contact information in the phone book.
to display the list of
(up) or (down) to select the call record you wish to call.
to place the call.
to terminate the call.
Refer to the Chapter 10 “Managing calls and customizing manners”
for more information on saving recently dialed numbers.
Page 43
Using voice command to dial a numberUsing voice command to dial a number
Using voice command to dial a number
Using voice command to dial a numberUsing voice command to dial a number
You must save at least one voice command or voice tag before you
can use this feature. Refer to Chapter 9 “Organizing your stuff” for
details.
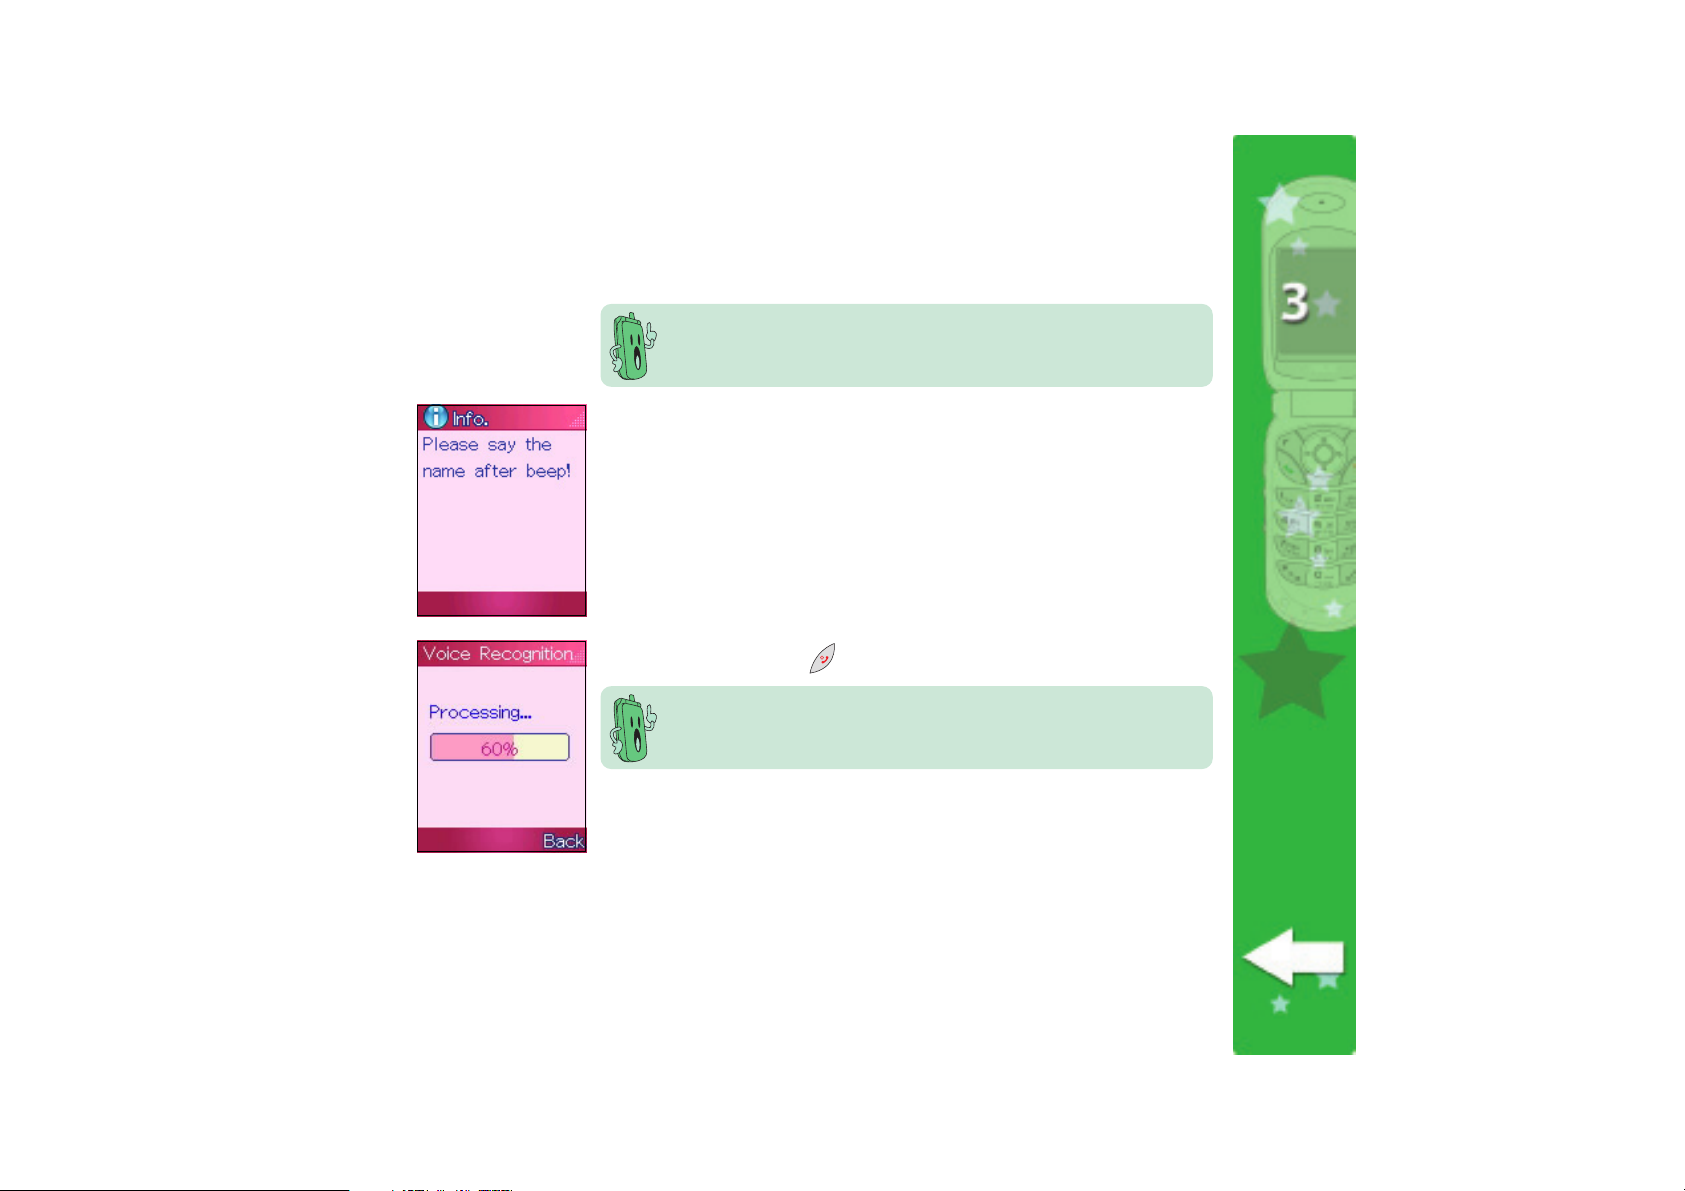
To use voice command to dial a number:
1. Set the phone in idle mode, then long press the camera button on the
left side of the phone.
2. After the beep, clearly say the name of the party you wish to call.
3. The
Voice Recognition Voice Recognition
Voice Recognition screen records and processes the voice
Voice Recognition Voice Recognition
command. If the phone recognizes the voice command, it
automatically dials the number corresponding to the command/name.
The screen displays the name of the person you are calling.
4. When finished, press
Voice RecognitionVoice Recognition
If the
Voice Recognition fails three times, the screen displays an
Voice RecognitionVoice Recognition
error message. Check if the name dialing record or the voice tag is
correct.
to terminate the call.
4343
43
4343
Page 44

Using speed dialUsing speed dial
Using speed dial
Using speed dialUsing speed dial
You should have previously assigned a phone number to one of the
speed dialing keys before using this feature. Refer to Chapter 5
“Managing the phone book” for details on speed dialing.
To use speed dialing:
1. Press an assigned speed dial key [ to ] , then press . The
phone calls the number that corresponds to the assigned speed dial
key.
2. Talk to the called party when connected. The display shows the
name and photo of the called party (when available), duration of the
call, and audio status (Mute/Not Mute).
4444
44
4444
3. Press
briefly to display the call duration and voice recording, if any.
The phone returns to idle mode.
to terminate the call. A
Call Summary Call Summary
Call Summary screen appears
Call Summary Call Summary
Page 45
Initiating a conference callInitiating a conference call
Initiating a conference call
Initiating a conference callInitiating a conference call
You can talk to two parties at the same time using the conference call feature of the mobile
phone.
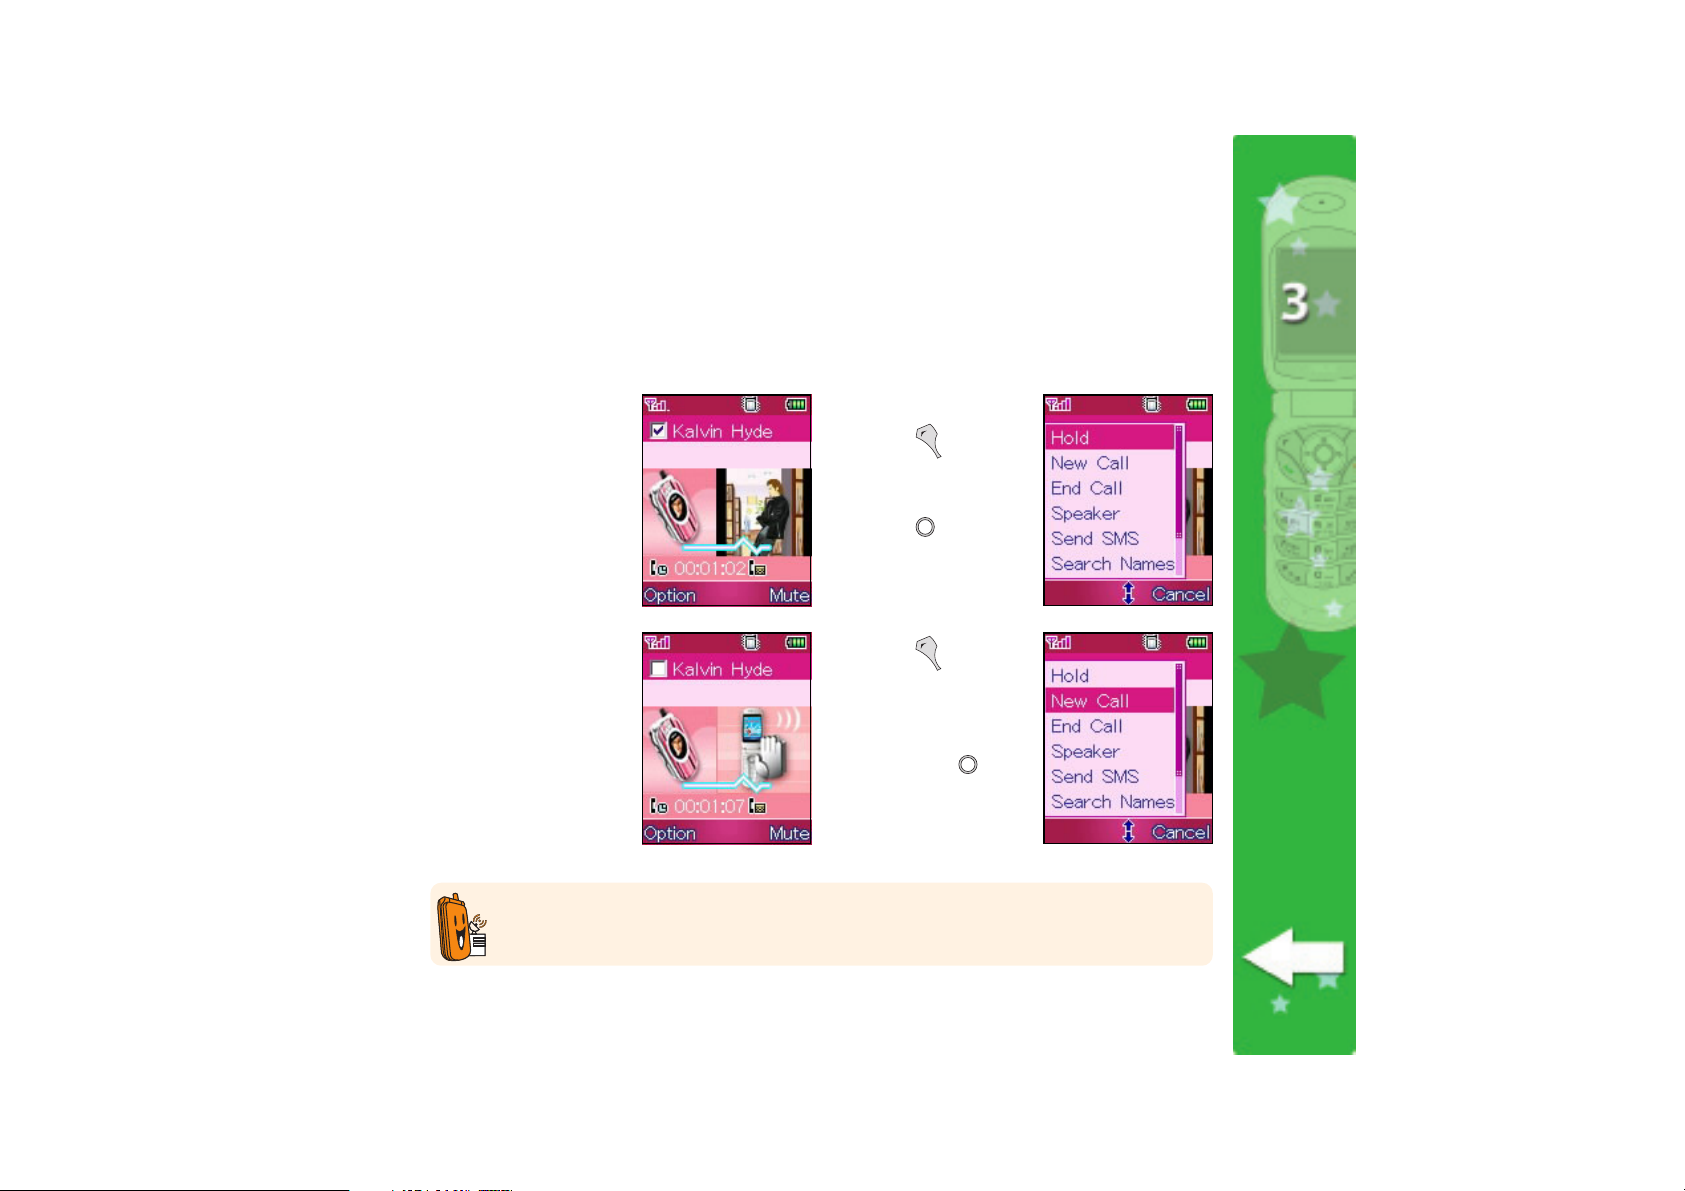
To initiate a conference call:
1. Place a call to
person A.
2. When connected
press
select
the menu, then
press
person A on hold.
(Option),
Hold Hold
Hold from
Hold Hold
to put
The display shows
this screen when a
party is placed on
hold.
You must activate the multi-party or conference call service before you can enjoy this
feature. Contact your phone operator for details on this service.
3. Press
select
Search NamesSearch Names
Search Names
Search NamesSearch Names
from the menu,
then press
call person B.
(Option),
New CallNew Call
New Call or
New CallNew Call
to
4545
45
4545
Page 46

4. Place a call to
person B using the
keypad (when you
selected
New CallNew Call
New Call),
New CallNew Call
or the phone book
(when you selected
Search NamesSearch Names
Search Names).
Search NamesSearch Names
When connected,
the display shows
person B’s name
(or number), photo
(when available),
and duration of the
call.
4646
46
4646
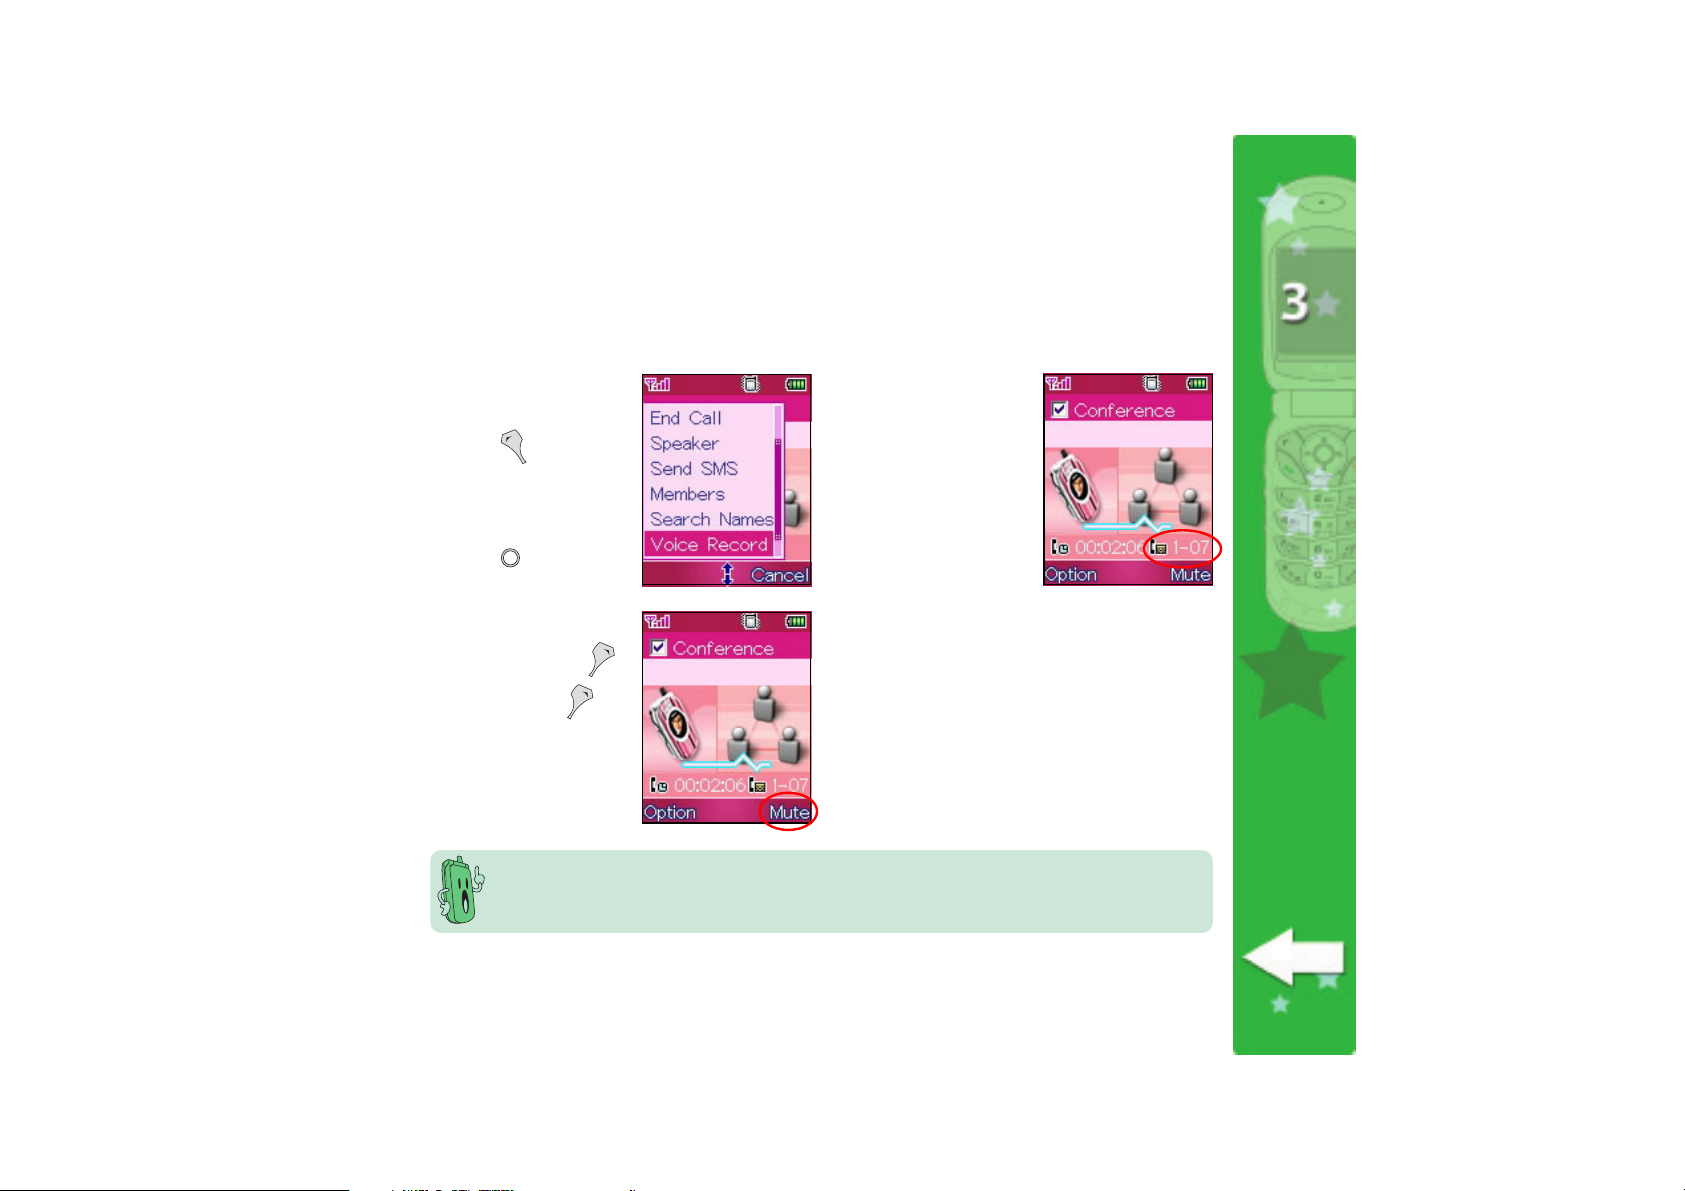
5. Press
(Option),
then select
Conference Conference
Conference from
Conference Conference
the menu.
You can now talk
simultaneously with
persons A and B.
Page 47
Recording a conference callRecording a conference call
Recording a conference call
Recording a conference callRecording a conference call
You can record the proceedings of a conference call using the voice recorder.
To record a conference call:
1. During the
conference call,
press
select
Record Record
Record from the
Record Record
menu, then
press
2. To stop or pause the
recording, press
(Mute). Press
(Unmute) to
continue recording.
(Option),
VoiceVoice
Voice
VoiceVoice
.
You can listen to voice recordings using the Voice Memo application in the
menu. Refer to Chapter 9 “Organizing your stuff” for more information.
The voice recorder
records the
conference and
displays the
recording time on
the bottom right
corner of the
display.
OrganizerOrganizer
Organizer
OrganizerOrganizer
4747
47
4747
Page 48
Talking privately to a conference call memberTalking privately to a conference call member
Talking privately to a conference call member
Talking privately to a conference call memberTalking privately to a conference call member
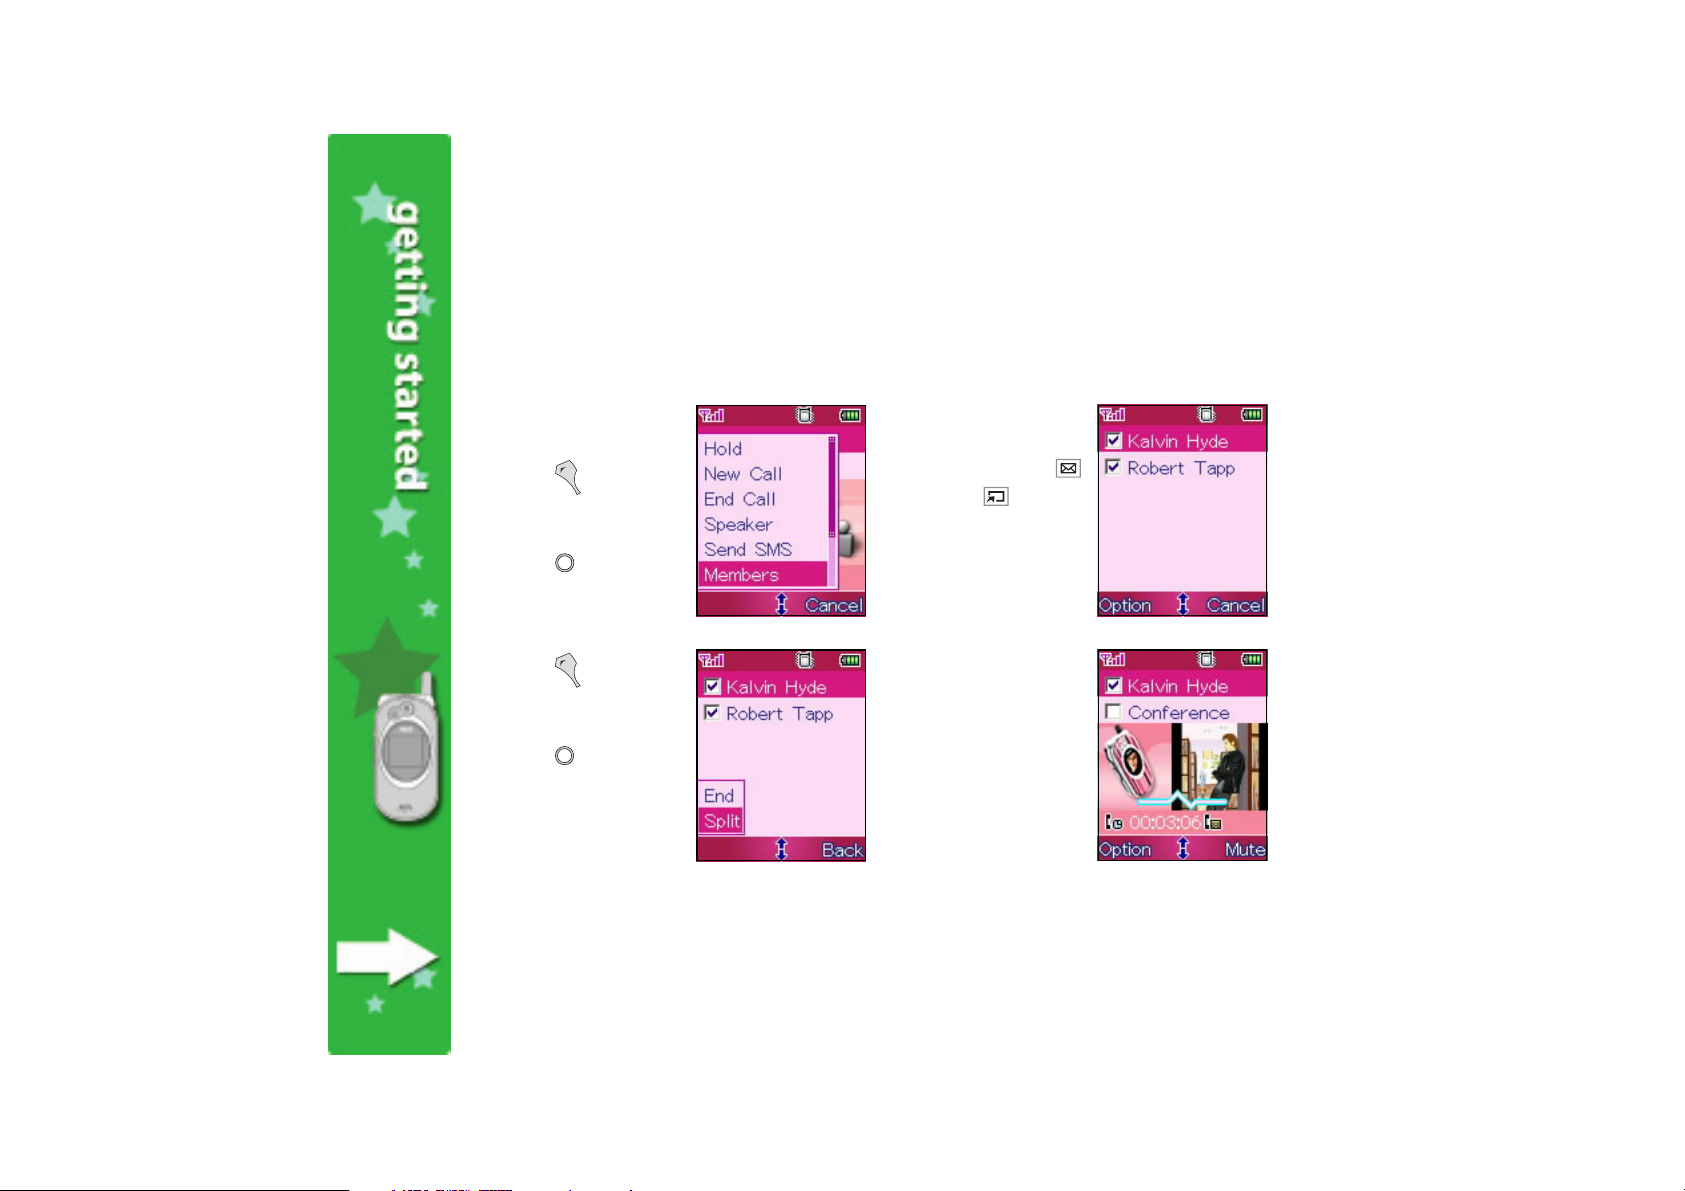
You can talk privately to a conference call member using the split feature of the call
conference function.
To talk privately to a conference call member:
4848
48
4848
1. During the
conference call,
press
select
from the menu, then
press
3. Press (Option),
select
the menu, then
press
selected member
from the conference
call.
(Option),
MembersMembers
Members
MembersMembers
.
Split Split
Split from
Split Split
to split the
2. The display shows
the conference call
members. Press
(up) or (down)
to highlight the
member you want
to privately talk.
You can now talk
to the selected
member privately
while the other
party is placed on
hold.
Page 49

To talk privately to another conference call member:
1. After you finished
talking to the first
conference call
member, press
(Option), select
Swap Swap
Swap from the
Swap Swap
menu, then
press
.
3. To resume the
conference, press
(Option), select
Conference Conference
Conference from
Conference Conference
the menu, then
press
.
2. The other
conference call
member is selected.
You can now talk to
the other member
privately while the
other party is
placed on hold.
4949
49
4949
Page 50

Terminating a conference call memberTerminating a conference call member
Terminating a conference call member
Terminating a conference call memberTerminating a conference call member
To terminate a member from a conference call:
1. During the
conference call,
press
select
from the menu, then
press
3. Press
select
menu, then press
(Option),
MembersMembers
Members
MembersMembers
.
(Option),
End End
End from the
End End
2. The display shows
the conference call
members. Press
(up) or (down)
to highlight the
member you want
to terminate from
the conference call.
You may still talk
to the remaining
.
conference call
member.
5050
50
5050
Page 51

Ending a conference callEnding a conference call
Ending a conference call
Ending a conference callEnding a conference call
To end a conference call:
During the conference call, press (Option), select
menu, then press
OROR
OR
OROR
1. During the conference call, press
the menu, then press
2. Select a member using
3. Repeat the process until all conference call members are terminated.
. The conference call is terminated.
(Option), select
to display the conference call members.
(up) or (down), then press .
End Call End Call
End Call from the
End Call End Call
Members Members
Members from
Members Members
5151
51
5151
Page 52

Answering a callAnswering a call
Answering a call
Answering a callAnswering a call
When the phone receives an incoming call, it rings, vibrates, or rings and
vibrates depending on your settings.
There are four ways to answer an incoming call.
5252
52
5252
• Open the phone flip top, then press
on the line.
• Open the phone flip top, then press
from the menu, then press
the party on the line.
• If you selected the “
Settings Settings
the
Settings menu, open the phone flip top, then press any key on
Settings Settings
the keypad. Start talking with the party on the line.
• If you selected the “
Settings Settings
Settings menu, open the phone flip top, then talk with the party
Settings Settings
on the line.
When connected, the main display shows the name or number of the
party calling, call duration, and other call options.
Press
display the call duration and voice recording, if any. The phone returns
to idle mode.
to end the call. A
Any KeyAny Key
Any Key” option as your answering mode in
Any KeyAny Key
FlipFlip
Flip” option as your answering mode in the
FlipFlip
to receive the call. Start talking with
Call Summary Call Summary
Call Summary screen appears briefly to
Call Summary Call Summary
. Start talking with the party
(Option). Select
AnswerAnswer
Answer
AnswerAnswer
Page 53

IncreaseIncrease
Increase
IncreaseIncrease
volumevolume
volume
volumevolume
DecreaseDecrease
Decrease
DecreaseDecrease
volumevolume
volume
volumevolume
Adjusting the ring volumeAdjusting the ring volume
Adjusting the ring volume
Adjusting the ring volumeAdjusting the ring volume
Your mobile phone has a convenient volume control button on the left
side that allows you to quickly increase or decrease the phone volume.
DO NOT set a loud ring tone volume in museums, hospitals, places
of worship, and other places where noise is prohibited.
To adjust the ring tone volume using the volume control buttons:
1. Open the phone flip top.
2. Press the upper volume button to increase the ring tone volume, or
the lower volume button to decrease the ring tone volume. You can
also use
(left) or (right) to adjust the volume.
3. Refer to the main display for the volume level.
• The volume control buttons function only when the phone is in
idle mode. The button does not work in any other menu levels.
• See Chapter 4 “Changing the settings” for details on the phone
volume and ring tone settings.
5353
53
5353
Page 54

Saving a phone number in the phone bookSaving a phone number in the phone book
Saving a phone number in the phone book
Saving a phone number in the phone bookSaving a phone number in the phone book
Using the keypadUsing the keypad
Using the keypad
Using the keypadUsing the keypad
To save a phone number using the keypad:
1. Key-in the phone number using the numeric keys to .
5454
54
5454
2. When done, press
3. Key-in the details of the saved number (name, address, additional
phone numbers, fax number, company phone number, etc.). You can
navigate through the details by pressing
4. When done, press (Save). Otherwise, press (Back) to cancel.
Data saved!Data saved!
A
Data saved! message appears indicating that you have
Data saved!Data saved!
successfully saved the phone number.
See Chapter 5 “Managing the phonebook” for more information on
the phone book features.
(Save). The
Add Record Add Record
Add Record screen appears
Add Record Add Record
(up) or (down).
Page 55
Using the Call RecordsUsing the Call Records
Using the Call Records
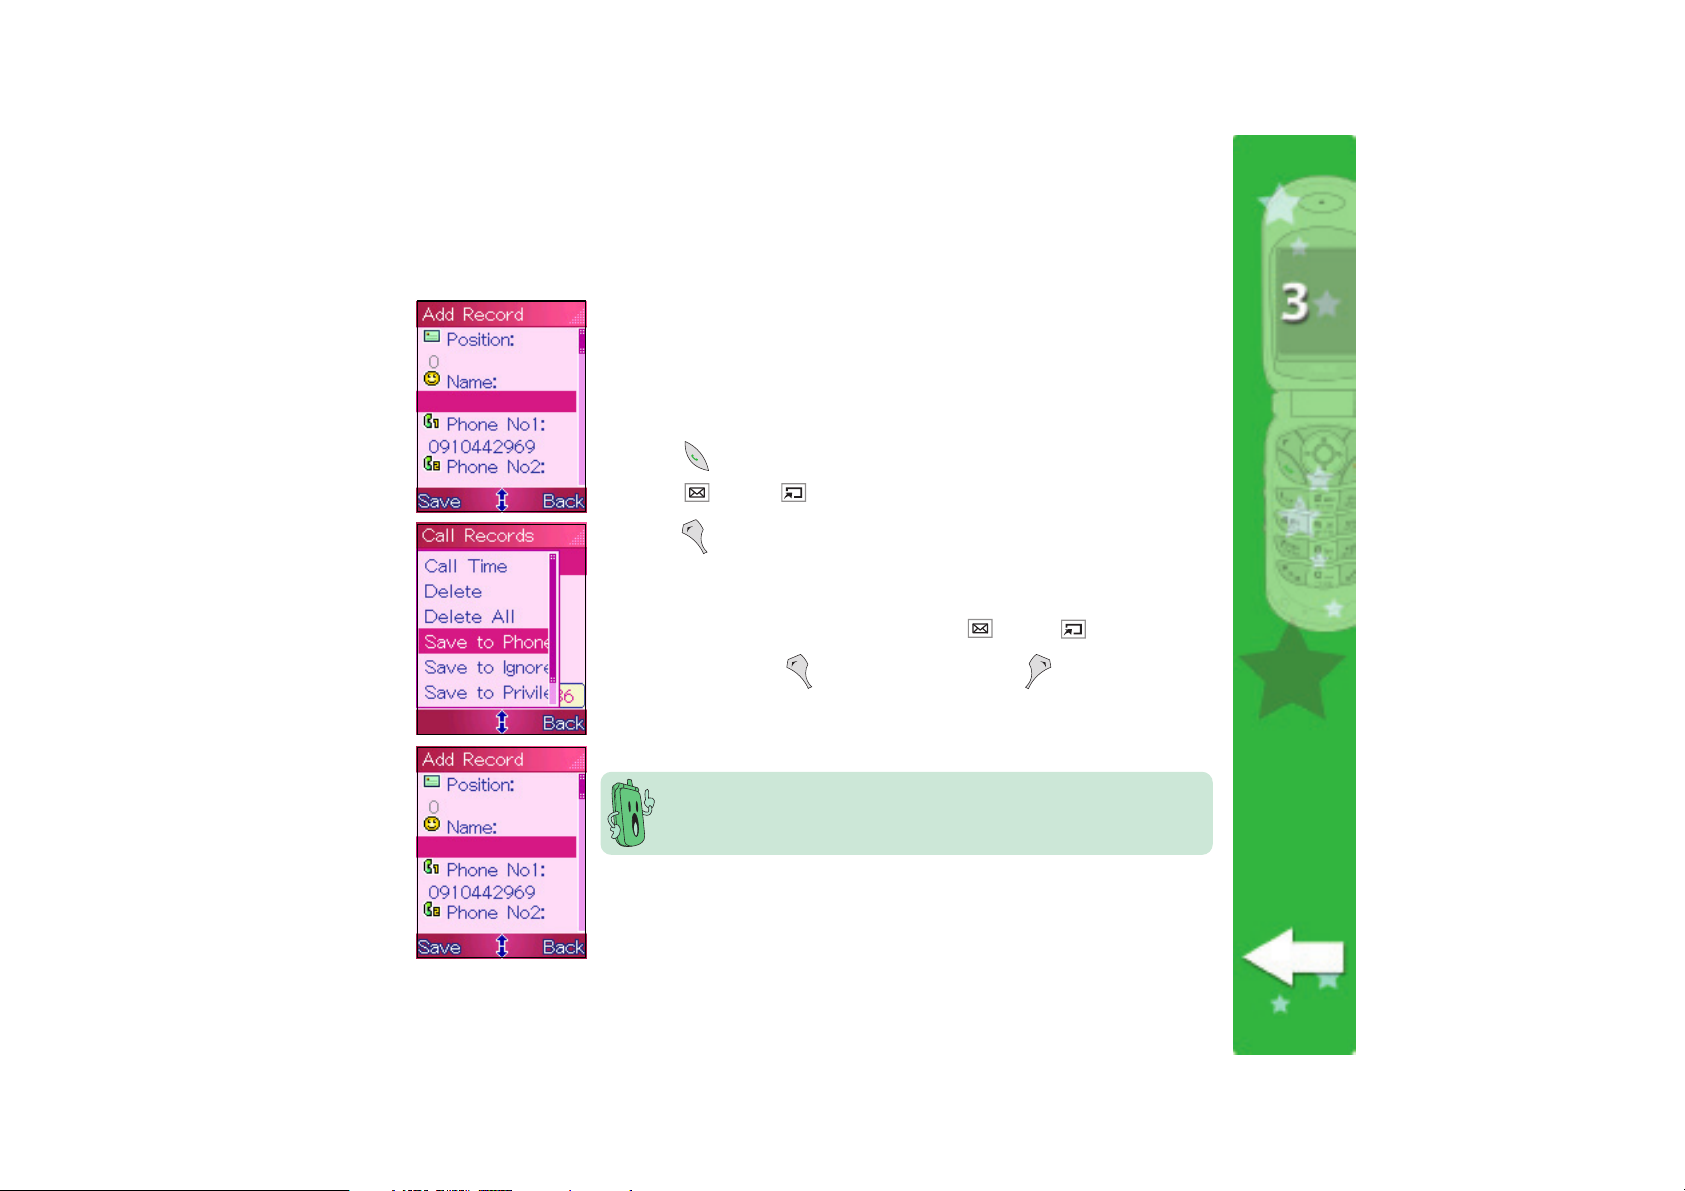
Using the Call RecordsUsing the Call Records
When you dialed a number, received or missed a call, the number called
or the calling party is automatically saved in the phone call records. You
can save the phone numbers in the call records to your phone book.
To save a dialed, received, or missed call number in the phone book:
1. Press
2. Press
3. Press
4. Key-in the details of the saved number (name, address, additional
phone numbers, fax number, company phone number, etc.). You can
navigate through the details by pressing
5. When done, press
A
successfully saved the phone number.
once to display the
(up) or (down) to select a call record entry.
(Option), then select
(Save). Otherwise, press (Back) to cancel.
Data saved!Data saved!
Data saved! message appears indicating that you have
Data saved!Data saved!
See Chapter 10 “Managing calls and customizing manners” for more
information on call records.
Call Records Call Records
Call Records screen.
Call Records Call Records
Save to Phonebook Save to Phonebook
Save to Phonebook from the menu.
Save to Phonebook Save to Phonebook
(up) or (down).
5555
55
5555
Page 56

Entering textEntering text
Entering text
Entering textEntering text
You will need to enter text to use several phone functionalities. For example, storing a name
entry in the phone book, creating a text message, or scheduling appointments in your
calendar.
5656
56
5656
The text editor has two input modes:
English mode
Predictive text (initial CAPS)
Normal text (initial CAPS)
Normal text (all CAPS)
English input modeEnglish input mode
English input mode
English input modeEnglish input mode
EnglishEnglish
English and
EnglishEnglish
Number/Symbol mode
Symbols
Numbers
Symbol input modeSymbol input mode
Symbol input mode
Symbol input modeSymbol input mode
Number/SymbolNumber/Symbol
Number/Symbol.
Number/SymbolNumber/Symbol
Page 57

Press toPress to
Press to
Press toPress to
change thechange the
change the
change thechange the
text typetext type
text type
text typetext type
Press toPress to
Press to
Press toPress to
change thechange the
change the
change thechange the
text inputtext input
text input
text inputtext input
modemode
mode
modemode
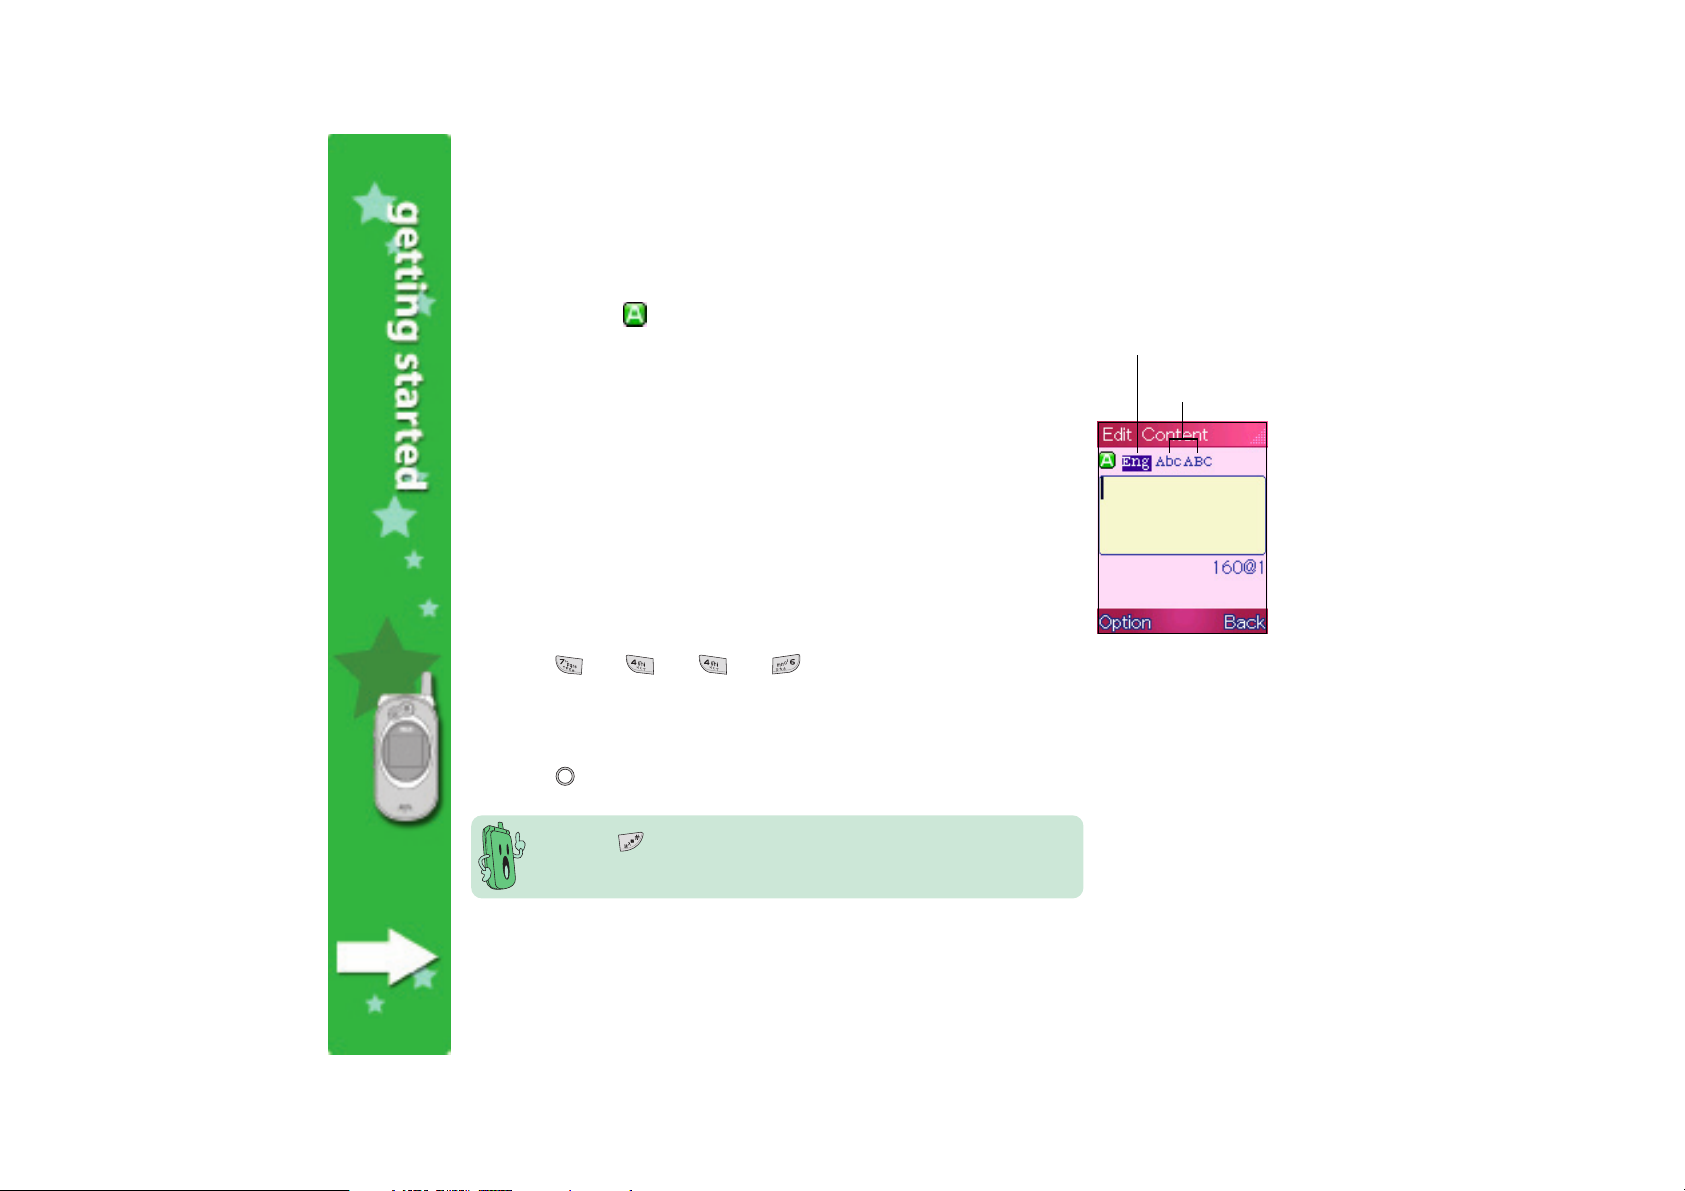
Changing text input modesChanging text input modes
Changing text input modes
Changing text input modesChanging text input modes
While in the text editing screen, press to select either one of the
text input modes. The currently selected mode is indicated by an icon,
located on the top left corner of the screen.
English text mode
Number/symbol mode
After selecting the text input mode, select the text type by
pressing
. The currently selected text type is highlighted.
The default input mode is English.
5757
57
5757
Page 58

General rules on text entryGeneral rules on text entry
General rules on text entry
General rules on text entryGeneral rules on text entry
When entering text:
• Use the alphanumeric keys to enter letters, numbers, and symbols.
• Press a key repeatedly until your desired character appears on the screen (refer to the
Character display chart for a list of letters and numbers that each key represents).
5858
58
5858
• Press
Number/Symbols .
• Press
normal text methods.
• Press
• Press the available navigation keys (indicated on the soft keys bar) to select characters
or words.
to shift between the input modes: English and
to shift between lowercase and uppercase letters, or predictive text and
then to insert a space between words.
The functions of the soft keys and the navigation keys vary on different screens.
Page 59

Character chartCharacter chart
Character chart
Character chartCharacter chart
KeyKey
Key
KeyKey
Uppercase (ABC)Uppercase (ABC)
Uppercase (ABC)
Uppercase (ABC)Uppercase (ABC)
Lowercase (abc)Lowercase (abc)
Lowercase (abc)
Lowercase (abc)Lowercase (abc)
. , ! ? 1 @ : ’ ” ( ) % & . , ! ? 1 @ : ’ ” ( ) % &
AA
BB
CC
A
AA
DD
D
DD
GG
G
GG
JJ
J
JJ
MM
M
MM
PP
P
PP
TT
T
TT
WW
W
WW
B
BB
EE
E
EE
HH
H
HH
KK
K
KK
NN
N
NN
QQ
Q
QQ
UU
U
UU
XX
X
XX
22
C
2
CC
22
FF
33
F
3
FF
33
II
44
I
4
II
44
LL
55
L
5
LL
55
OO
66
O
6
OO
66
RR
SS
R
RR
VV
V
VV
YY
Y
YY
77
S
7
SS
77
88
8
88
ZZ
99
Z
9
ZZ
99
aa
a
aa
dd
d
dd
gg
g
gg
jj
j
jj
mm
m
mm
pp
p
pp
tt
t
tt
ww
w
ww
bb
cc
b
bb
ee
e
ee
hh
h
hh
kk
k
kk
nn
n
nn
qq
q
qq
uu
u
uu
xx
x
xx
22
c
2
cc
22
ff
33
f
3
ff
33
ii
44
i
4
ii
44
ll
55
l
5
ll
55
oo
66
o
6
oo
66
rr
ss
r
rr
vv
v
vv
yy
y
yy
77
s
7
ss
77
88
8
88
zz
99
z
9
zz
99
displays other symbols
Pressing while in text input mode toggles the display to numbers/symbols input
mode. Use navigation keys to select the number or symbol, then press
returns to text input mode.
. The display
5959
59
5959
Page 60
English modeEnglish mode
English mode
English modeEnglish mode
PredictivePredictive
Predictive
The English mode features two methods of entering text, predictive
and normal. The
Predictive textPredictive text
Predictive text method allows smart key-in of
Predictive textPredictive text
English words using single keystrokes. For each key you press, the
program looks for possible word matches in the built-in dictionary, and
PredictivePredictive
text inputtext input
text input
text inputtext input
NormalNormal
Normal
NormalNormal
text inputtext input
text input
text inputtext input
displays them on the screen. Thus, you can display and enter a word
using fewer keystrokes than the
Normal textNormal text
The
Normal text method lets you key-in a character (letter, number,
Normal textNormal text
Normal textNormal text
Normal text input.
Normal textNormal text
or symbol) by pressing the assigned key once, twice, or so until your
desired character appears.
To use the predictive text method:
6060
60
6060
For example, if you want to enter the word
1. Press
(P), (H), (O), (N). Press each key once for
PHONEPHONE
PHONE.
PHONEPHONE
each letter. The word PHONE appears on the list right after pressing
(N). This method automatically adds a space after the entered word.
See next page for the screen illustrations.
2. Press
to select and enter the word.
Press to shift from predictive to normal text, and from
uppercase to lowercase letters.
Page 61
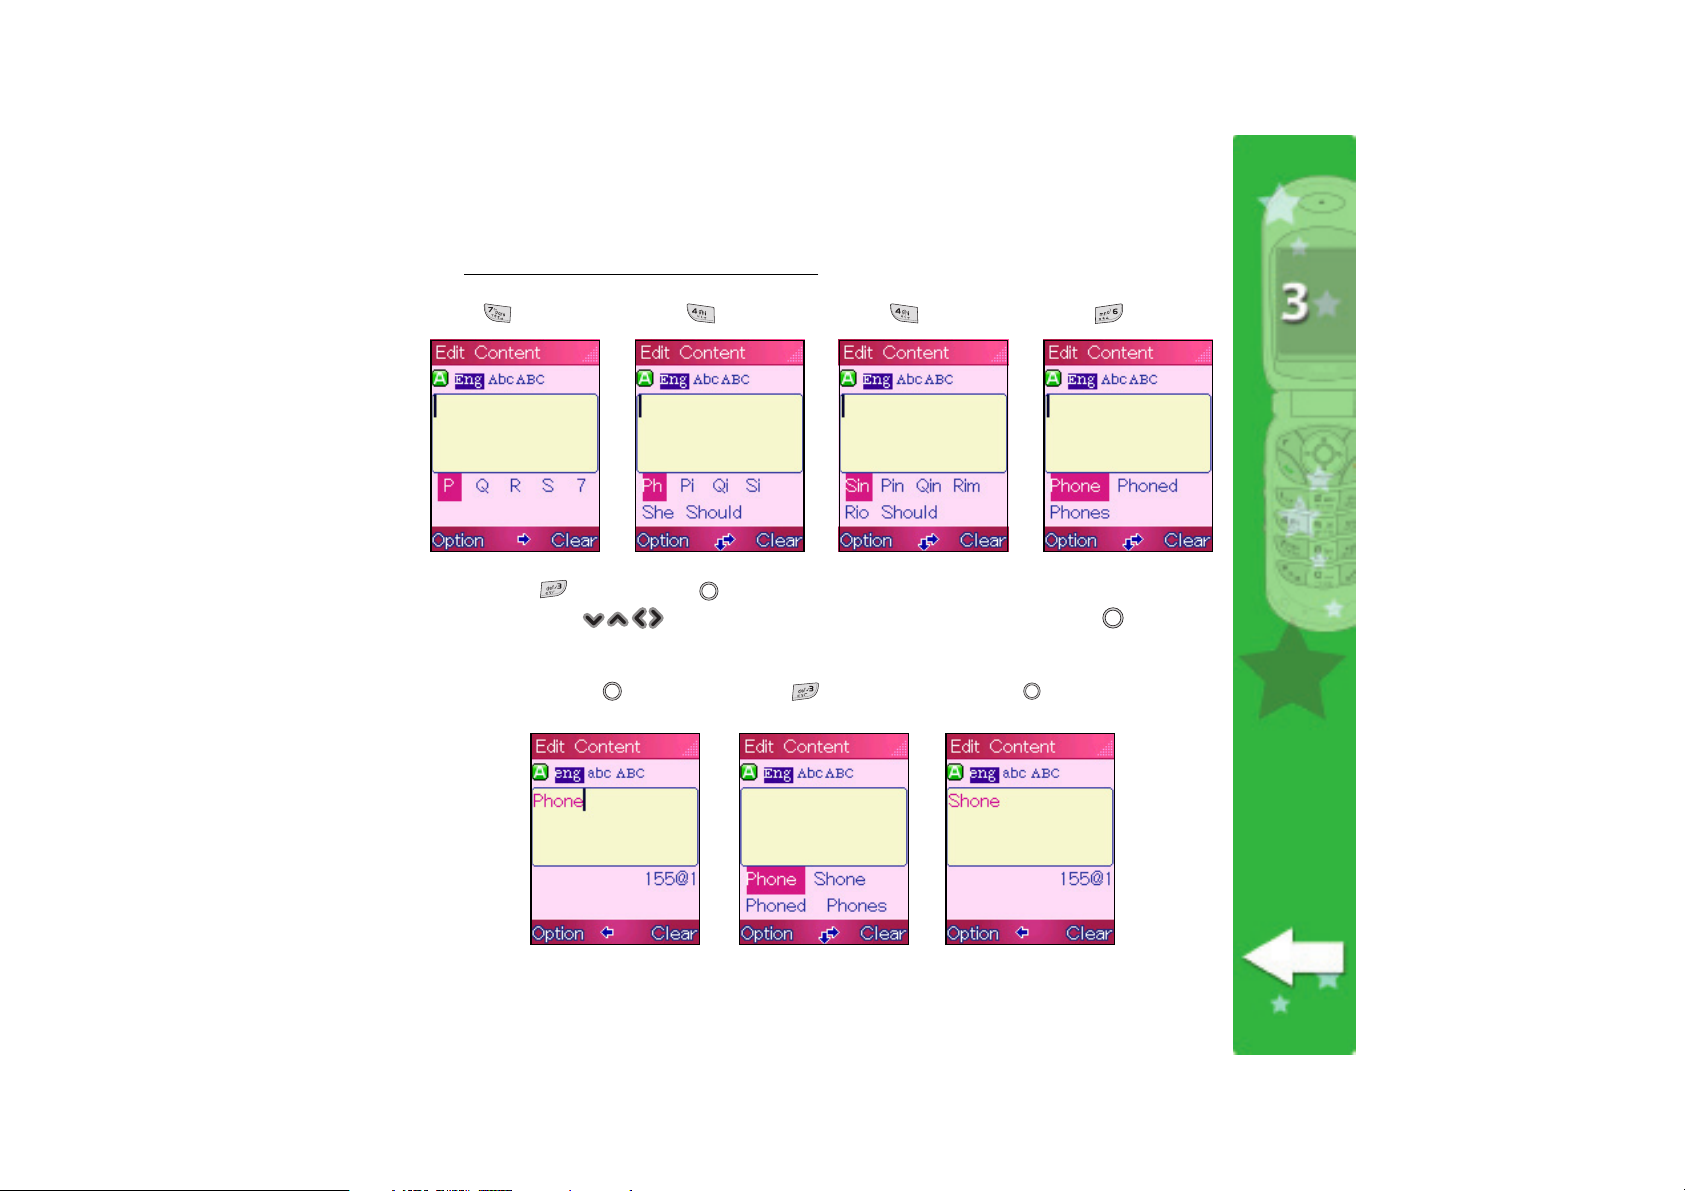
Screen displays using predictive text input
(P) (P)
(P)
(P) (P)
(H) (H)
(H)
(H) (H)
(O) (O)
(O)
(O) (O)
(N) (N)
(N)
(N) (N)
If you press (E), instead of in the above example, the word list displays a different
set of words. Use
to select another word. For example, SHONE. Press to enter
the word.
(E) (E)
(E)
(E) (E)
6161
61
6161
Page 62

To use the normal text method:
For example, if you want to enter the word phone.
1. Press
2. Press
3. Press
4. Press
once to key-in
twice to key-in
thrice to key-in
twice to key-in
5. Press twice to key-in
A character navigator appears on the top right corner of the main
display showing the character corresponding to the number of
times you press a key.
pp
p.
pp
hh
h.
hh
nn
n.
nn
ee
e.
ee
oo
o.
oo
Character navigator
6262
62
6262
Page 63
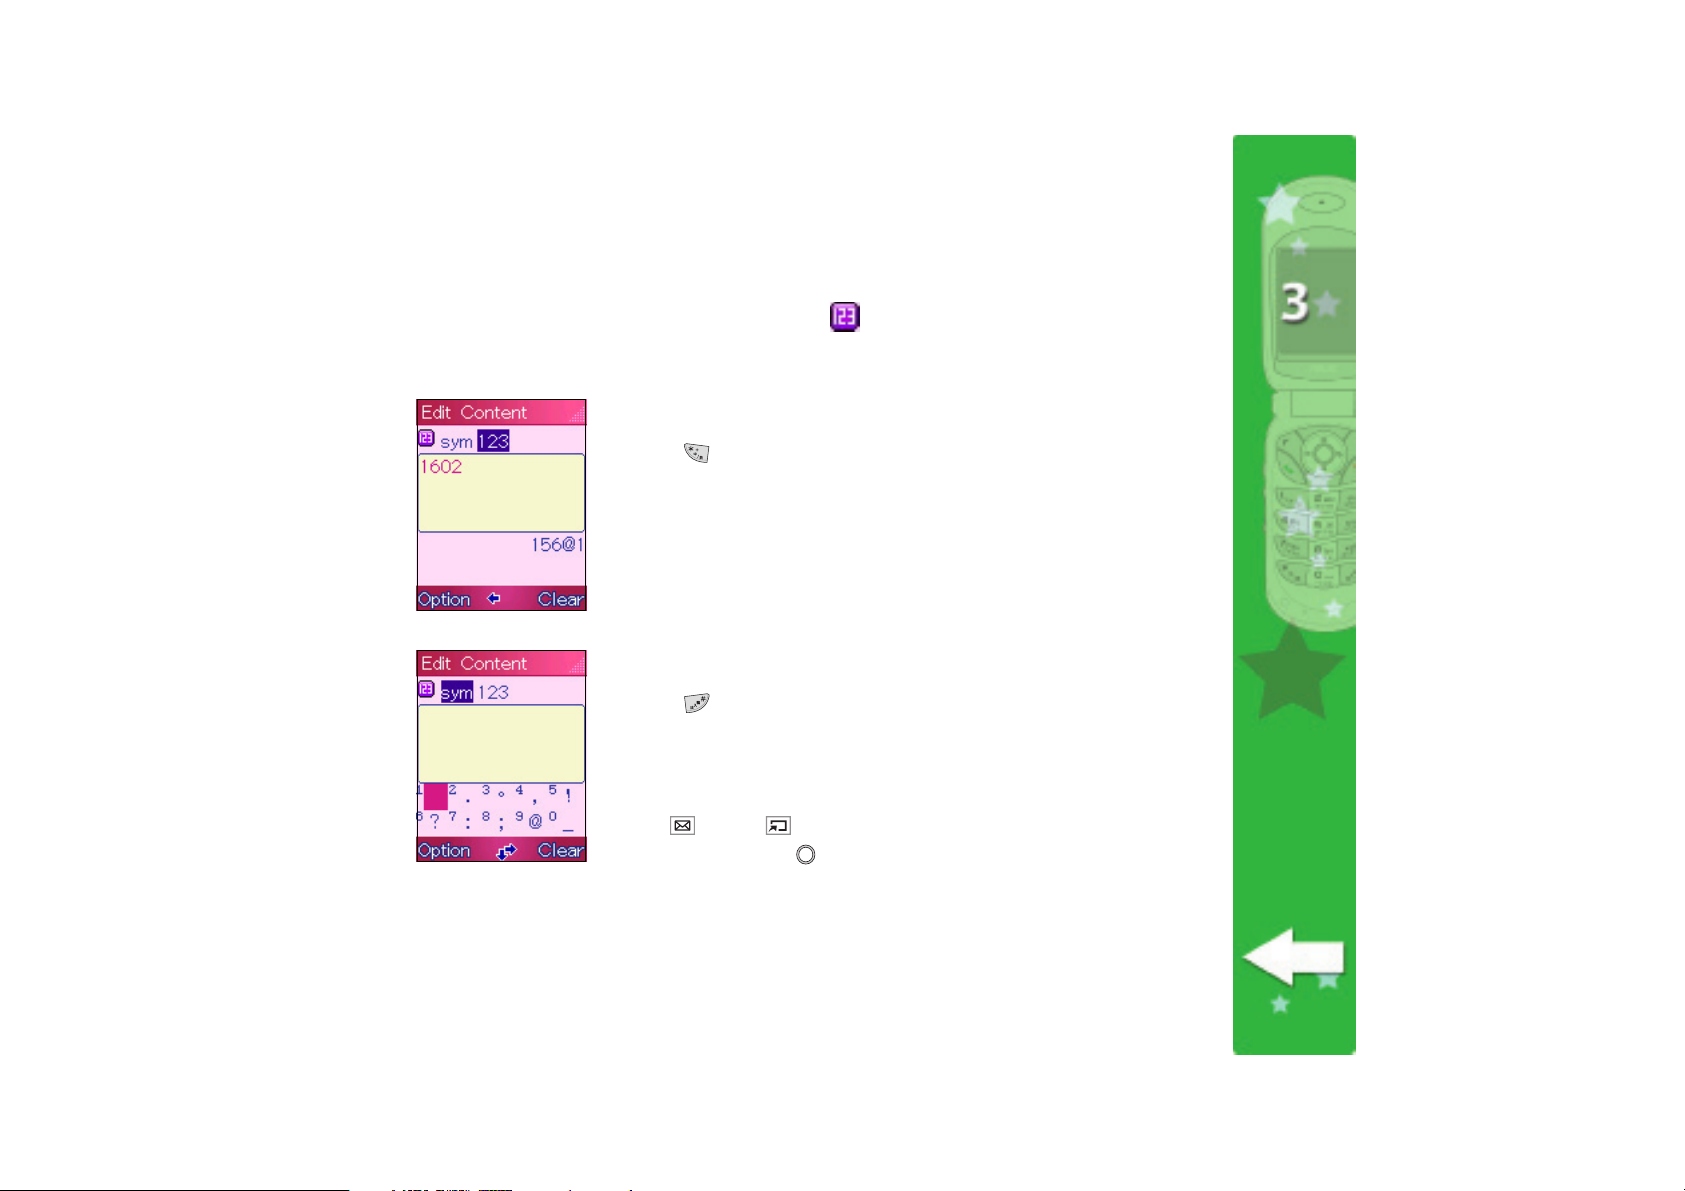
Number/Symbol modeNumber/Symbol mode
Number/Symbol mode
Number/Symbol modeNumber/Symbol mode
The Number/Symbol mode allows you to enter numbers and
symbols. Select this mode to key-in numbers and symbols within your
alphabetic text.
To enter numbers:
1. Press to select the number mode (123).
2. Press the keys that correspond to the numbers that you wish to enter.
To enter symbols:
1. Press to select the symbol mode (sym).
2. Press the number keys that correspond to the symbols that you wish
to enter.
OROR
OR
OROR
Use
symbol, then press
(up) or (down) to display other sets of symbols, select a
. See next page on how to display symbols.
6363
63
6363
Page 64

To display the available symbols:
1. Select the symbol mode (sym). The initial screen displays the first set
of symbols assigned to the number keys. See Screen 1.
2. Press
(down) twice to shift the symbols upward and display
another set. Note that the symbols initially assigned to keys 1, 2, 3,
4, and 5 disappear, and the symbols previously assigned to keys 6, 7,
8, 9, and 0 move up. Compare
Screen 1Screen 1
Screen 1 and
Screen 1Screen 1
Screen 2Screen 2
Screen 2.
Screen 2Screen 2
3. Press the key once more to display another set of symbols. See
Screens 3, 4, and 5.
Screen 1Screen 1
Screen 1
The symbol assigned to each number key changes every time you
press the
displayed on the screen, pressing the
colon (:), quotation mark (”), plus sign (+), greater than sign (>), or
dollar ($) sign. The same variation goes for the other number keys.
(down) key. For example, depending on the symbols
key enters either a space,
Screen 1Screen 1
Screen 2Screen 2
Screen 2
Screen 2Screen 2
6464
64
6464
Screen 3Screen 3
Screen 3
Screen 3Screen 3
Screen 4Screen 4
Screen 4
Screen 4Screen 4
Screen 5Screen 5
Screen 5
Screen 5Screen 5
Page 65
This chapter provides information on
how to change the phone settings.
It tells you how to change and
customize your call, display, ring
tone, and phone security settings.
Page 66

6666
66
6666
Chapter summaryChapter summary
Chapter summary
Chapter summaryChapter summary
Settings ............................................................................................ 68
Phone Settings .................................................................................. 69
Security ................................................................................ 70
Shortcuts ................................................................................ 77
LED ................................................................................ 79
My Phone Number ...................................................................... 80
Factory Settings ........................................................................ 81
Firmware Version ....................................................................... 82
Display settings ................................................................................ 83
Brightness ................................................................................ 84
Theme ................................................................................ 85
Wallpaper ................................................................................ 86
Power On/Off Animation ............................................................ 88
Main Idle Screen ......................................................................... 89
Sub Idle Screen .......................................................................... 90
Clean Wallpaper .......................................................................... 93
Backlight Timer .......................................................................... 94
Sleep Timer ................................................................................ 95
Ringtone ............................................................................................ 96
Incoming ................................................................................ 97
Key Tone ................................................................................ 98
Page 67

Composer ................................................................................ 98
Ring Mode .............................................................................. 102
Volume .............................................................................. 102
Misc Tones Switch .................................................................... 104
Power On Ringtone .................................................................. 106
Power Off Ringtone .................................................................. 106
Call Settings .................................................................................... 107
Auto Redial .............................................................................. 108
Speed Dial .............................................................................. 109
Call Waiting .............................................................................. 112
Hide My No. .............................................................................. 113
Call Barring .............................................................................. 114
Call Forwarding ......................................................................... 115
Fixed Dialing ............................................................................. 117
Money Keeper .......................................................................... 119
Call Summary ........................................................................... 122
Answering mode ............................................................................. 123
Accessory Devices .......................................................................... 124
Transmit .......................................................................................... 125
Network Selection ........................................................................... 126
6767
67
6767
Page 68

Settings
Settings Settings
The
Settings menu allows you to change and customize most of the
Settings Settings
phone settings and network configuration. With the
you can change the phone display, ring tone, call features, security, and
network options.
Settings Settings
Settings menu,
Settings Settings
6868
68
6868
To access the
1. Put the phone in idle mode, then press to display the main menu.
2. Use the navigation keys to select the
press
OROR
OR
OROR
Press
Settings Settings
The
Settings menu consists of eight menu items that you can select
Settings Settings
using
number before each menu item.
(up) or (down), or by using the keypad to press the
Settings Settings
Settings menu:
Settings Settings
to display the
to display the
Settings Settings
Settings menu.
Settings Settings
Settings Settings
Settings menu.
Settings Settings
Settings Settings
Settings icon
Settings Settings
, then
Page 69

Phone Settings
You can change the basic phone settings such as the time, date,
language, phone security, and other phone configuration using this
menu.
To access the
From the
SettingsSettings
Settings, then press
SettingsSettings
OROR
OR
OROR
Press
Phone Settings Phone Settings
The
Phone Settings menu has nine functions that you can select
Phone Settings Phone Settings
using (up) or (down).
Phone SettingsPhone Settings
Phone Settings menu:
Phone SettingsPhone Settings
Settings Settings
Settings menu, use (up) or (down) to select
Settings Settings
.
to display the
Refer to the previous chapter on how to set the date/time,
language, and greeting text. Proceed to the succeeding sections on
setting the phone security, creating shortcuts, changing the LED,
restoring defaults, and viewing the firmware version.
Phone Settings Phone Settings
Phone Settings menu.
Phone Settings Phone Settings
..
.
..
PhonePhone
Phone
PhonePhone
6969
69
6969
Page 70

SecuritySecurity
Security
SecuritySecurity
Security Security
The
Security menu allows you to activate, deactivate, or change the
Security Security
phone security settings.
7070
70
7070
Menu itemMenu item
Menu item
Menu itemMenu item
PINPIN
PIN activate, deactivate, or change your Personal
PINPIN
PIN2PIN2
PIN2 change the second PIN
PIN2PIN2
Network CodeNetwork Code
Network Code change the network code
Network CodeNetwork Code
Phone Lock CodePhone Lock Code
Phone Lock Code activate, deactivate, or change the phone lock code
Phone Lock CodePhone Lock Code
DO NOT change the security settings of your phone if not
necessary. Keep a record of your PIN, PIN2, and other security
codes in a safe place.
Allows you toAllows you to
Allows you to
Allows you toAllows you to
Identification Number (PIN)
Page 71
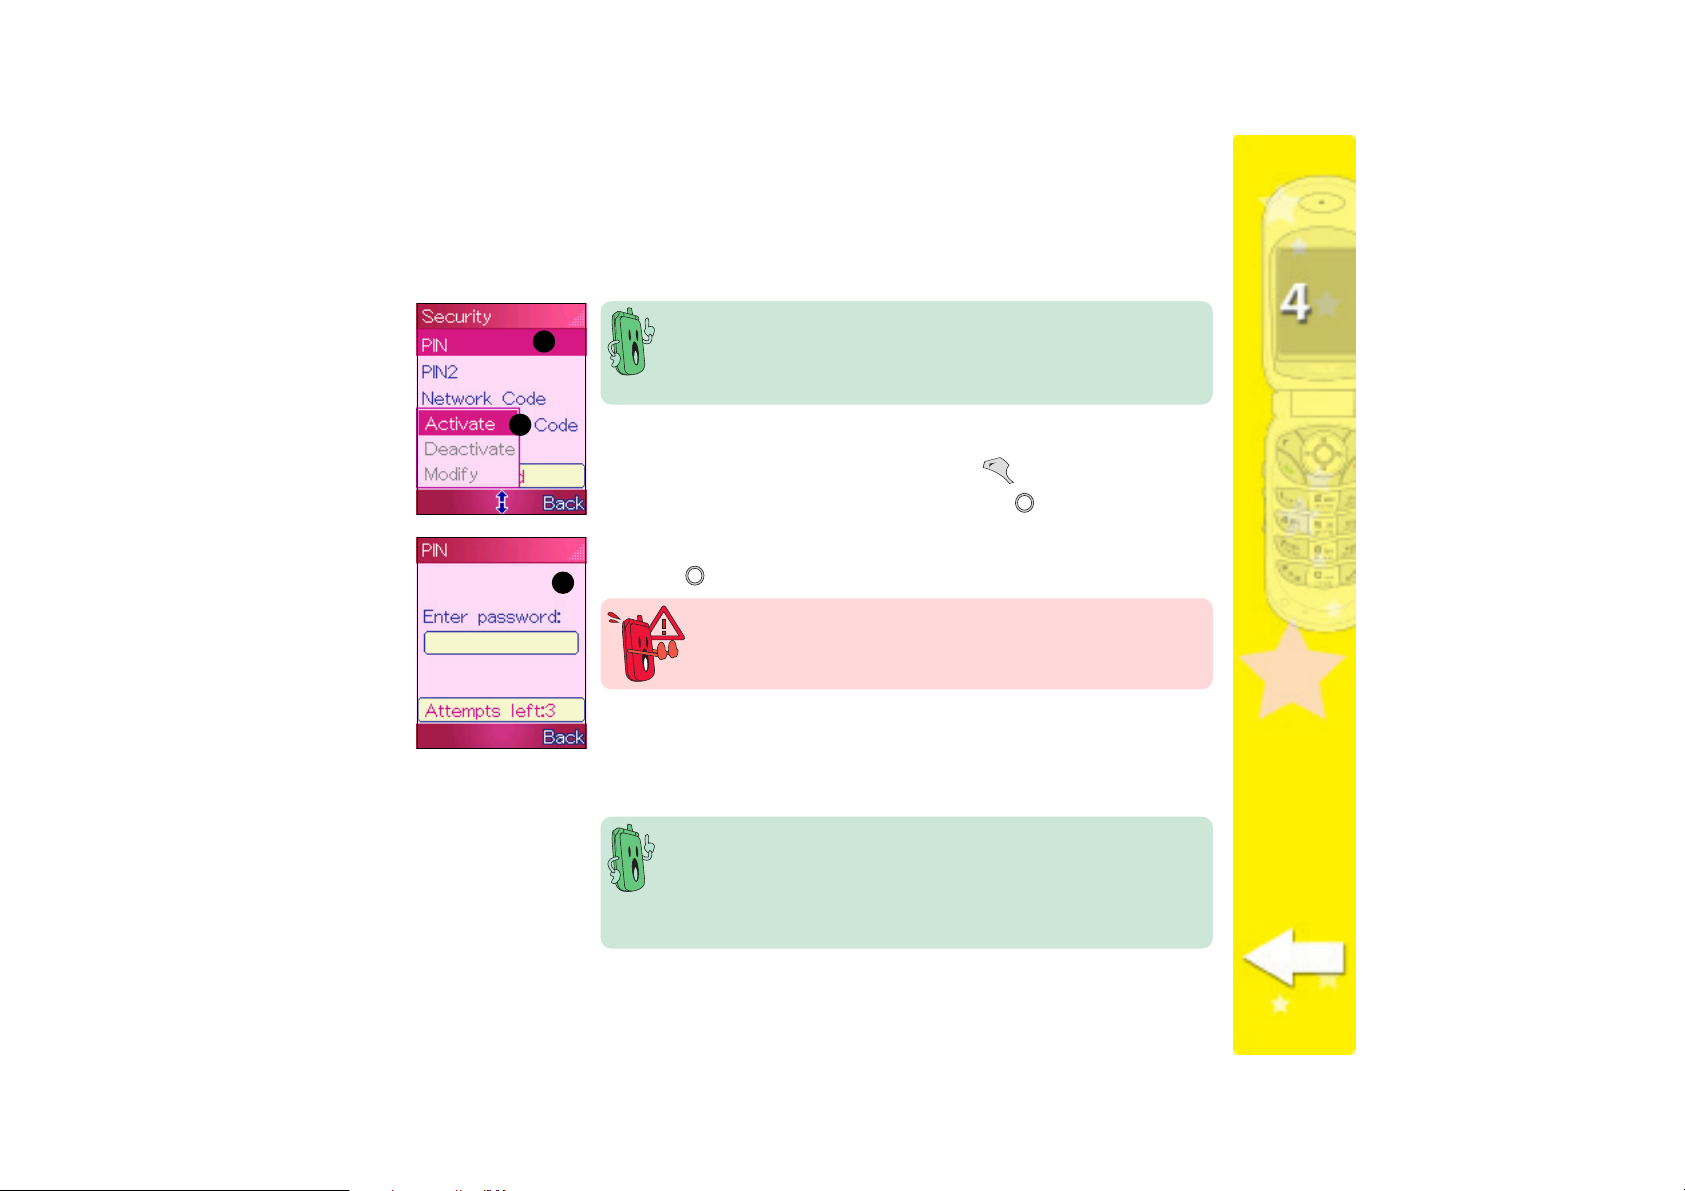
Activating your PINActivating your PIN
Activating your PIN
Activating your PINActivating your PIN
The default PIN and PIN2 codes come with the SIM card package.
11
1
11
You must key-in the default codes before you can change them.
Refer to the SIM card documentation for information on the PIN
codes and PIN Unblocking Keys (PUK).
22
2
22
To activate the PIN:
1. Highlight
2. Select
PIN PIN
PIN from the menu, then press (Option).
PIN PIN
Activate Activate
Activate from the menu, then press
Activate Activate
.
3. When prompted, key-in the PIN using the numeric keypad, then
33
3
33
press
A
.
The SIM card locks if you fail to enter the correct PIN in three
attempts. You need to enter the PIN Unlocking Key (PUK) to unlock
the SIM card.
Set successfully!Set successfully!
Set successfully! message appears on screen to indicate that
Set successfully!Set successfully!
you have successfully activated the PIN. The display returns to the
Security Security
Security menu. The PIN status on top of the soft key bar now
Security Security
ActivatedActivated
shows
Activated.
ActivatedActivated
• If you have activated the PIN, you are prompted to enter the
PIN every time you turn on the phone.
• If you have activated the PIN2, you are prompted to enter the
PIN2 before you can modify some vital phone settings such as
FDN, call costs, etc.
7171
71
7171
Page 72

Changing the PINChanging the PIN
Changing the PIN
Changing the PINChanging the PIN
To change the PIN:
7272
72
7272
1. Highlight
2. Select
PIN PIN
PIN from the menu, then press (Option).
PIN PIN
Modify Modify
Modify from the menu, then press
Modify Modify
.
3. When prompted, key-in the current PIN using the numeric keypad,
then press
4. Key-in the new PIN using the numeric keypad, then press
.
(down)
to move to the confirmation field.
5. Key-in the new PIN again using the numeric keypad, then press
Set successfully!Set successfully!
A
Set successfully! message appears on screen to indicate that
Set successfully!Set successfully!
.
you have successfully changed the PIN. The display returns to the
Security Security
Security menu.
Security Security
22
2
22
33
3
33
44
4
44
55
5
55
Page 73

Changing the PIN2Changing the PIN2
Changing the PIN2
Changing the PIN2Changing the PIN2
To change the PIN2:
11
1
11
1. Highlight
PIN2 PIN2
PIN2 from the menu, then press (Modify).
PIN2 PIN2
2. When prompted, key-in the current
then press
3. Key-in the new PIN2 using the numeric keypad, then press
22
2
22
(down) to move to the confirmation field.
.
If you are not able to enter the correct PIN in three attempts, the
SIM card locks. You need to enter the PIN Unlocking Key 2 (PUK2)
to unlock the SIM card.
4. Key-in the new PIN2 again using the numeric keypad, then press
Set successfully!Set successfully!
A
Set successfully! message appears on screen to indicate that
Set successfully!Set successfully!
PIN2PIN2
PIN2 using the numeric keypad,
PIN2PIN2
.
you have successfully changed the PIN2. The display returns to the
Security Security
Security menu.
Security Security
You can assign a PIN/PIN2 of up to eight numeric characters.
7373
73
7373
Page 74

Changing the network codeChanging the network code
Changing the network code
Changing the network codeChanging the network code
The network code is supplied by your phone operator. The network
code is required when enabling some call security features such as
call barring.
To change the network code:
1. Highlight
Network Code Network Code
Network Code from the menu, then press (Option).
Network Code Network Code
11
1
11
7474
74
7474
2. Select
Modify Modify
Modify from the menu, then press
Modify Modify
.
3. When prompted, key-in the network code provided by your phone
operator, then press
.
4. Key-in the new network code using the numeric keypad, then press
(down) to move to the confirmation field.
5. When prompted, key-in the new network code again, then press
Set successfully!Set successfully!
A
Set successfully! message appears on screen to indicate that
Set successfully!Set successfully!
.
you have successfully changed the network code. The display
returns to the
Security Security
Security menu.
Security Security
22
2
22
Page 75
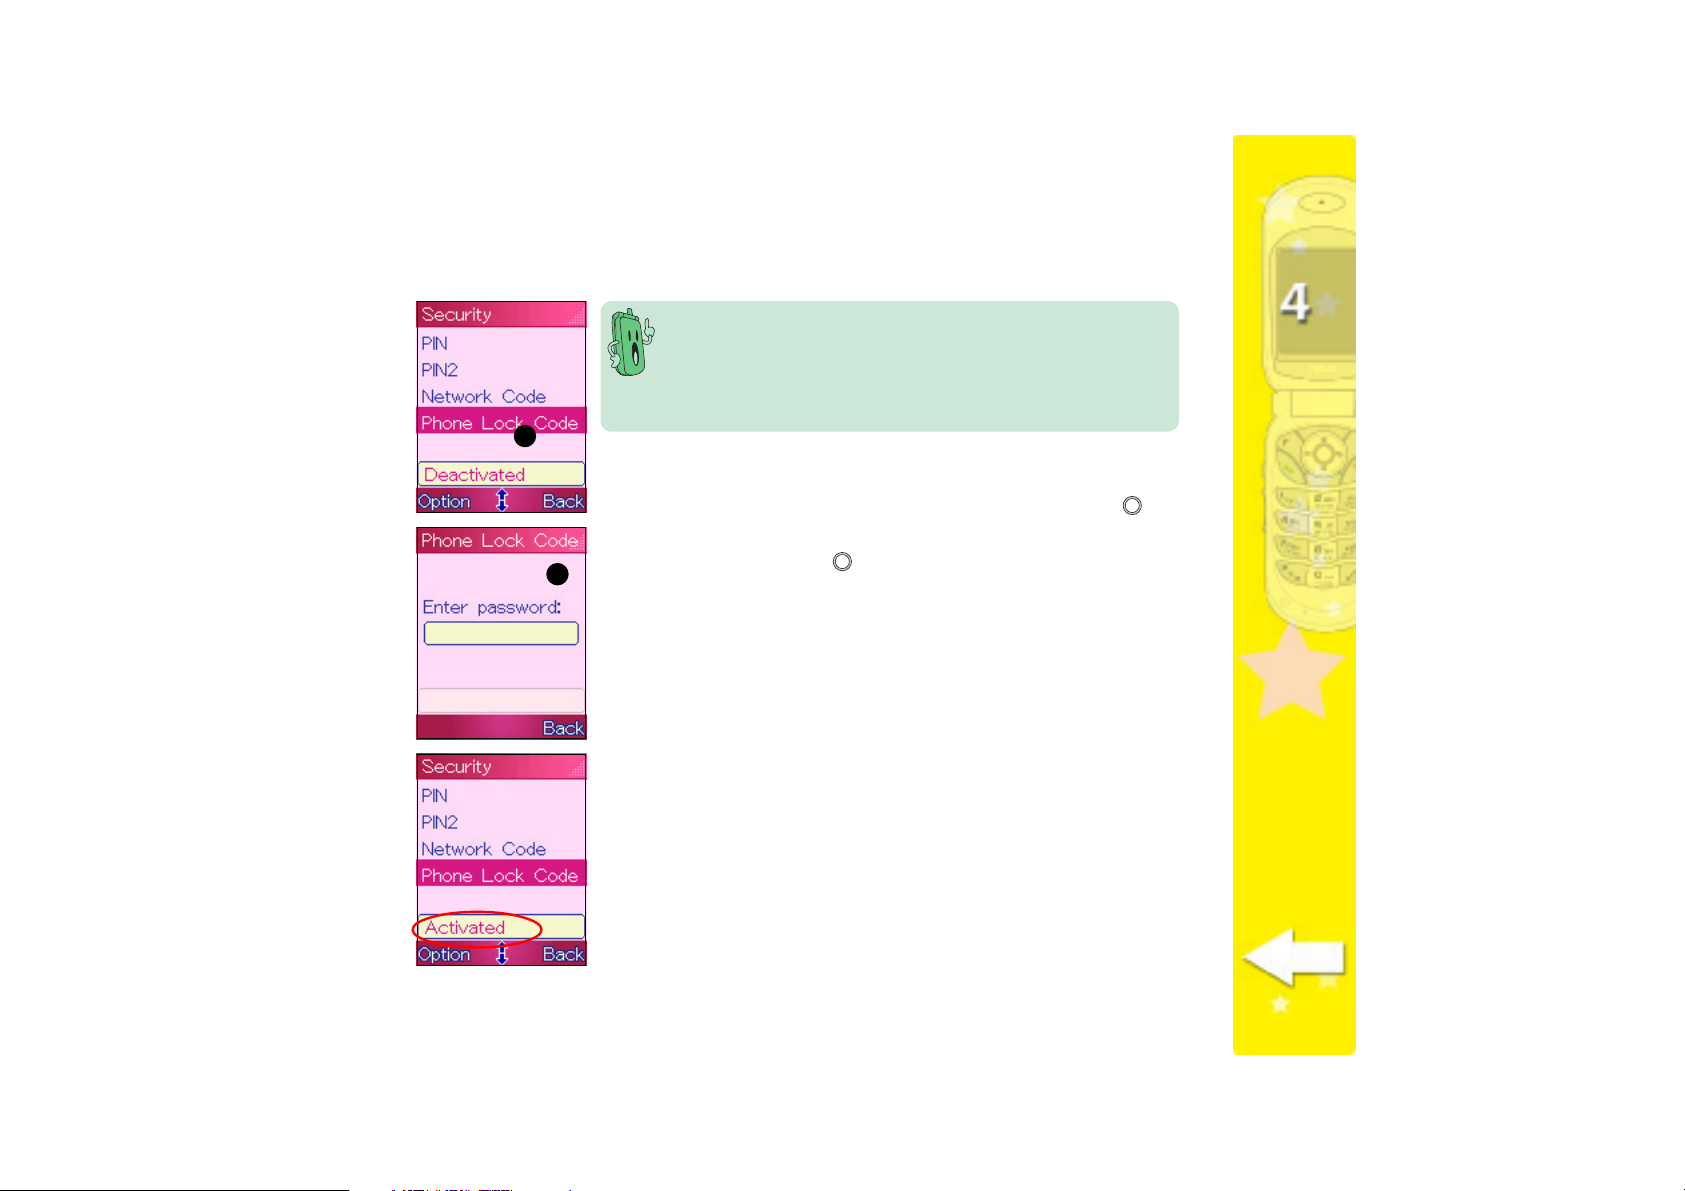
Activating the phone lock codeActivating the phone lock code
Activating the phone lock code
Activating the phone lock codeActivating the phone lock code
•You are prompted to enter the code every time you turn on
the phone.
• You can assign a phone lock code of up to eight numeric
characters.
11
1
11
• The default phone lock code is 0000.
To activate the phone lock code:
1. Highlight
Phone Lock Code Phone Lock Code
Phone Lock Code from the menu, then press
Phone Lock Code Phone Lock Code
.
2. When prompted, key-in the default phone lock code (0000) using
22
2
22
the keypad, then press
Set successfully!Set successfully!
A
Set successfully! message appears on screen to indicate that
Set successfully!Set successfully!
.
you have successfully activated the PIN. The display returns to the
Security Security
Security menu.
Security Security
The phone lock code status on top of the soft key bar now shows
ActivatedActivated
Activated.
ActivatedActivated
7575
75
7575
Page 76

Changing the phone lock codeChanging the phone lock code
Changing the phone lock code
Changing the phone lock codeChanging the phone lock code
To change the phone lock code:
1. Highlight
Phone Lock Code Phone Lock Code
Phone Lock Code from the menu, then press
Phone Lock Code Phone Lock Code
(Options).
2. Select
Modify Modify
Modify from the menu, then press
Modify Modify
.
3. When prompted, key-in the current phone lock code using the
keypad, then press
.
4. Key-in the new phone lock code using the keypad, then press
(down) to move to the confirmation field.
5. Key-in the new phone lock code again, then press
Set successfully!Set successfully!
A
Set successfully! message appears on screen to indicate that
Set successfully!Set successfully!
.
you have successfully changed the phone lock code . The display
returns to the
Security Security
Security menu.
Security Security
11
1
11
22
2
22
33
3
33
44
4
44
55
5
55
7676
76
7676
Page 77

ShortcutsShortcuts
Shortcuts
ShortcutsShortcuts
Shortcuts Shortcuts
The
Shortcuts menu allows you to create shortcuts for common phone
Shortcuts Shortcuts
features and applications. You can quickly launch the
by pressing
11
1
11
Creating shortcutsCreating shortcuts
Creating shortcuts
Creating shortcutsCreating shortcuts
To create a shortcut
when the phone is in idle mode.
Shortcuts Shortcuts
Shortcuts menu
Shortcuts Shortcuts
1. Select
2. Select an (EMPTY) shortcut, press
3. Press
22
2
22
33
3
33
4. Highlight a feature, then press
Shortcut Shortcut
Shortcut from the
Shortcut Shortcut
from the menu.
to display the Shortcut List. The Shortcut List shows all
available phone features such as SMS, MMS, Camera, etc.
functions. For example, highlight
SMS commands/functions such as SMS Inbox, SMS Outbox, Edit SMS,
etc.
44
4
44
Phone Settings Phone Settings
Phone Settings menu, then press .
Phone Settings Phone Settings
(Option), then select
to display all specific commands or
SMSSMS
SMS, then press
SMSSMS
to display all
EditEdit
Edit
EditEdit
7777
77
7777
Page 78

5. Select a command or
function from the
list, then press
ShortcutShortcut
The
Shortcut menu
ShortcutShortcut
.
55
5
55
6. Put the phone in idle
mode, then press
to display the
shortcut list.
66
6
66
shows the created
shortcut.
7. Use the keypad to press the number preceding the shortcut to launch the command or
7878
78
7878
function. Otherwise, press
Deleting shortcutsDeleting shortcuts
Deleting shortcuts
Deleting shortcutsDeleting shortcuts
(Back) to put the phone in idle mode.
To delete a shortcut:
1. Select
Shortcut Shortcut
Shortcut from the
Shortcut Shortcut
2. Highlight the shortcut you want to delete, then press
3. Select
DeleteDelete
Delete from the menu, then press
DeleteDelete
Phone Settings Phone Settings
Phone Settings menu, then press .
Phone Settings Phone Settings
(Option),.
to delete the
highlighted shortcut.
OROR
OR
OROR
Delete All Delete All
Select
Delete All from the menu, then press to delete all
Delete All Delete All
created shortcuts.
4. When prompted, press
successfully! successfully!
successfully! message appears indicating that you have deleted
successfully! successfully!
the shortcut(s). The display returns to the
(Yes) to delete the shortcut(s). A
ShortcutShortcut
Shortcut menu.
ShortcutShortcut
SetSet
Set
SetSet
33
3
33
Page 79

LEDLED
LED
LEDLED
This menu allows you to activate the LED for several phone events and
status.
Activating the LEDActivating the LED
Activating the LED
Activating the LEDActivating the LED
To activate the LED for phone events or status:
11
1
11
1. Select
LED LED
LED from the
LED LED
Phone Settings Phone Settings
Phone Settings menu, then press . The
Phone Settings Phone Settings
display shows the available phone events or status.
2. Highlight an item, then press
to activate the LED on the specified
event or status. A check appears on the box preceding the event or
22
2
22
function.
3. The LED is now activated for the phone event or status.
Refer to the table below for LED indications on phone events or
functions. Press
(Back) to return to the previous menu.
LEDLED
LED
LEDLED
MTC LED when there is an incoming call
Event LED when you have a missed call/unread SMS/MMS message
Charging LED red when the battery is charging
Low Battery red when the battery power is low
Normal LED purple to indicate that the phone is in normal condition
All event or status LED indications are activate by default. To
deactivate the LED for an event or status, highlight the item, then
press
to uncheck.
If activated, the LED flashesIf activated, the LED flashes
If activated, the LED flashes
If activated, the LED flashesIf activated, the LED flashes
7979
79
7979
Page 80
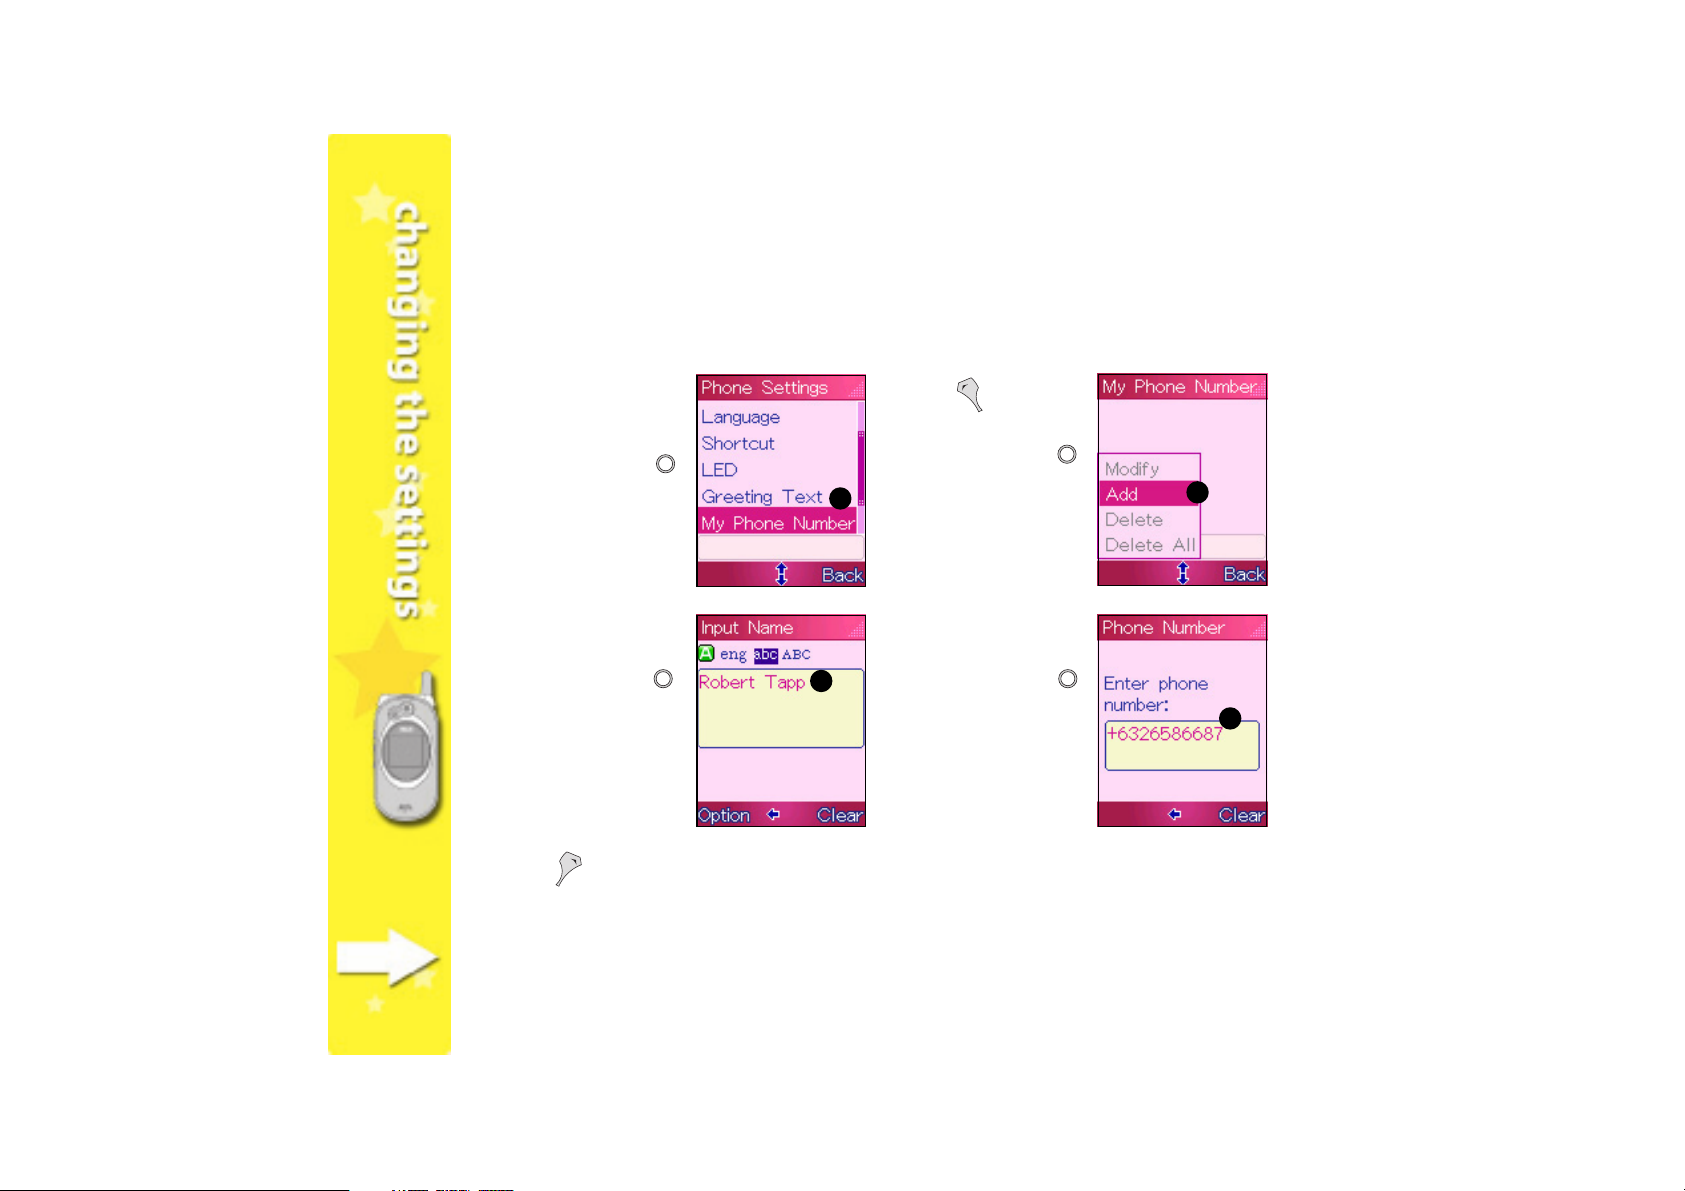
My Phone NumberMy Phone Number
My Phone Number
My Phone NumberMy Phone Number
This menu allows you to save and easily retrieve your mobile phone numbers.
To add a phone number:
1. Select
My PhoneMy Phone
My Phone
My PhoneMy Phone
Number Number
Number from the
Number Number
Phone SettingsPhone Settings
Phone Settings
Phone SettingsPhone Settings
menu, then press
.
2. Press
11
1
11
(Option),
Add Add
select
Add from the
Add Add
menu, then press
.
22
2
22
8080
80
8080
3. Key-in the contact
name using the
keypad, then press
.
4. Key-in the contact
number using the
33
3
33
keypad, then press .
The screen displays
the contact name in
the list.
5. Press (Back) to return to the previous menu.
44
4
44
Page 81
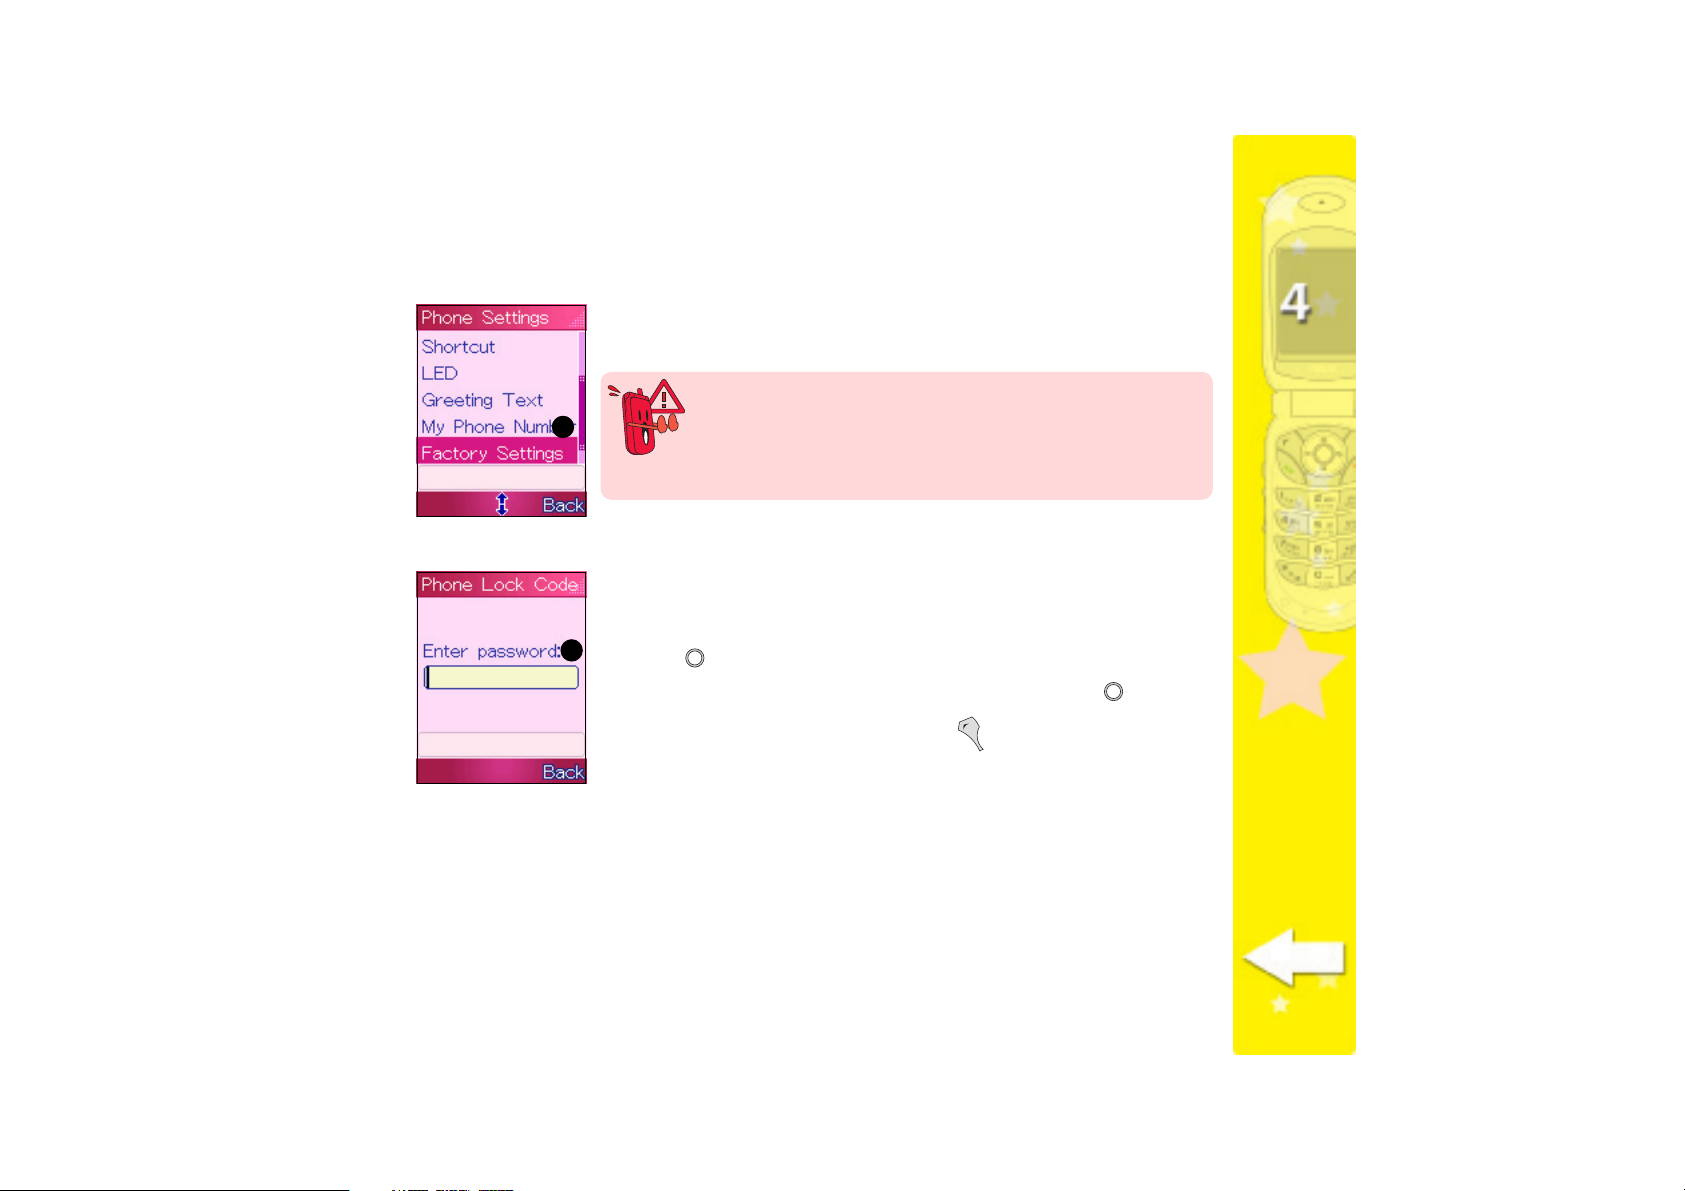
Factory SettingsFactory Settings
Factory Settings
Factory SettingsFactory Settings
Factory SettingsFactory Settings
The
Factory Settings
Factory SettingsFactory Settings
all settings to their default values.
Reverting the phone to factory settings erases all previously saved
11
1
11
Restoring the default settingsRestoring the default settings
Restoring the default settings
Restoring the default settingsRestoring the default settings
To restore the default (factory) settings:
1. Select
22
2
22
press
2. When prompted, enter the phone lock code, then press
3. A confirmation window appears. Press
successfully!successfully!
successfully! message appears to indicate that the phone has
successfully!successfully!
been restored to its original settings. The display returns to the
Phone Settings Phone Settings
Phone Settings menu.
Phone Settings Phone Settings
data in the phone memory and resets all customized settings such
as display, ring tone, and manners. Back up all your contact
information to the SIM card or to your PC (using PC transmit) before
you revert to the factory settings.
Factory Settings Factory Settings
Factory Settings from the
Factory Settings Factory Settings
.
menu allows you to reset the device and revert
Phone Settings Phone Settings
Phone Settings menu, then
Phone Settings Phone Settings
(Yes). A
SetSet
Set
SetSet
.
8181
81
8181
Page 82

Firmware VersionFirmware Version
Firmware Version
Firmware VersionFirmware Version
To view the phone firmware version:
1. Highlight
to show the firmware version on top of the soft key bar.
2. Press
Firmware Version Firmware Version
Firmware Version from the
Firmware Version Firmware Version
(Back) to return to the previous menu.
Phone Settings Phone Settings
Phone Settings menu
Phone Settings Phone Settings
11
1
11
8282
82
8282
Page 83

Display settings
Display Settings Display Settings
The
Display Settings menu allows you to change various display
Display Settings Display Settings
properties including the theme, wallpaper, animation, backlight,
brightness, and display elements.
To access the
From the
SettingsSettings
Settings, then press
SettingsSettings
OROR
OR
OROR
Press
The
to display the
Display Settings Display Settings
Display Settings has ten functions that you can select using
Display Settings Display Settings
(up) or (down).
Display Settings Display Settings
Display Settings menu:
Display Settings Display Settings
Settings Settings
Settings menu, use (up) or (down) to select
Settings Settings
.
Display Settings Display Settings
Display Settings menu.
Display Settings Display Settings
DisplayDisplay
Display
DisplayDisplay
8383
83
8383
Page 84

BrightnessBrightness
Brightness
BrightnessBrightness
Brightness Brightness
The
Brightness menu allows you to adjust the main display brightness
Brightness Brightness
level. The display brightness is set to 80% by default.
Adjusting the display brightnessAdjusting the display brightness
Adjusting the display brightness
Adjusting the display brightnessAdjusting the display brightness
To adjust the display brightness:
8484
84
8484
1. Select
2. Press
3. When finished, press
10% brightness10% brightness
10% brightness
10% brightness10% brightness
Brightness Brightness
Brightness from the
Brightness Brightness
(left) to decrease, or (right) to increase the
brightness. Compare the screens below for reference.
menu.
Display Settings Display Settings
Display Settings menu, then press .
Display Settings Display Settings
(Back) to return to the
80% brightness80% brightness
80% brightness
80% brightness80% brightness
Display SettingsDisplay Settings
Display Settings
Display SettingsDisplay Settings
100% brightness100% brightness
100% brightness
100% brightness100% brightness
Page 85

ThemeTheme
Theme
ThemeTheme
ThemeTheme
The
Theme
ThemeTheme
themes.
Selecting the color themeSelecting the color theme
Selecting the color theme
Selecting the color themeSelecting the color theme
To select the color theme for your display:
1. Select
The available color themes appear.
2. Press
3. When finished, press
menu.
menu allows you to select the display color from four preset
Theme Theme
Theme from the
Theme Theme
(up) or (down) to highlight a color theme, then press
to select. Refer to the color themes below for reference.
Display Settings Display Settings
Display Settings menu, then press .
Display Settings Display Settings
(Back) to return to the
Display SettingsDisplay Settings
Display Settings
Display SettingsDisplay Settings
SpringSpring
Spring
SpringSpring
SummerSummer
Summer
SummerSummer
FallFall
Fall
FallFall
WinterWinter
Winter
WinterWinter
8585
85
8585
Page 86

WallpaperWallpaper
Wallpaper
WallpaperWallpaper
Wallpaper Wallpaper
The
Wallpaper menu allows you to select the main and external display wallpapers from
Wallpaper Wallpaper
preset or saved photos, and set a time interval for the main wallpaper to change
automatically.
Changing the main or external display wallpaperChanging the main or external display wallpaper
Changing the main or external display wallpaper
Changing the main or external display wallpaperChanging the main or external display wallpaper
To change the main or external display wall paper:
8686
86
8686
1. Select
3. Press (up) or
WallpaperWallpaper
Wallpaper
WallpaperWallpaper
from the
Settings Settings
Settings menu,
Settings Settings
then press
display the wallpaper
menu.
(down) to highlight a
wallpaper, press
(Option), select
As As
As from the menu,
As As
then press
The screen on the
right shows the
available wallpapers
for the main display.
DisplayDisplay
Display
DisplayDisplay
to
SetSet
Set
SetSet
.
2. Highlight
Wallpaper Wallpaper
Wallpaper or
Wallpaper Wallpaper
WallpaperWallpaper
Wallpaper, then
WallpaperWallpaper
press to view
available display
wallpapers.
The screen on the
right shows the
available wallpapers
for the external
display.
MainMain
Main
MainMain
SubSub
Sub
SubSub
Page 87

Setting the wallpaper timerSetting the wallpaper timer
Setting the wallpaper timer
Setting the wallpaper timerSetting the wallpaper timer
You can set the main display wallpaper to automatically change at a specified time interval.
To adjust the wallpaper timer:
1. Select
3. Highlight the wallpaper timer you wish to use, then press to select.
WallpaperWallpaper
Wallpaper
WallpaperWallpaper
from the
Settings Settings
Settings menu,
Settings Settings
then press
display the
WallpaperWallpaper
Wallpaper menu.
WallpaperWallpaper
DisplayDisplay
Display
DisplayDisplay
to
2. Highlight
TimerTimer
Timer, then press
TimerTimer
to display the
wallpaper timer
options.
WallpaperWallpaper
Wallpaper
WallpaperWallpaper
8787
87
8787
Page 88

Power On/Off AnimationPower On/Off Animation
Power On/Off Animation
Power On/Off AnimationPower On/Off Animation
Power On/Off Animation Power On/Off Animation
The
Power On/Off Animation menu allows you to select the animation everytime you
Power On/Off Animation Power On/Off Animation
turn the phone on or off. The animation is shown only on the main display.
Changing the power on or off animationChanging the power on or off animation
Changing the power on or off animation
Changing the power on or off animationChanging the power on or off animation
To change the power on or off animation:
1. Select
Power On/Power On/
Power On/
Power On/Power On/
Off Anim.Off Anim.
Off Anim. from the
Off Anim.Off Anim.
Display SettingsDisplay Settings
Display Settings
Display SettingsDisplay Settings
menu, then press
to display the
available power
on/off animation(s).
2. Press
(down) to highlight
an animation.
(up) or
8888
88
8888
3. Press
select
the menu, then
press
5. A
set. The display returns to the animation list. Press
settings menu.
(Option),
Set As Set As
Set As from
Set As Set As
.
Set successfully! Set successfully!
Set successfully! message appears to indicate that the power on or off animation is
Set successfully! Set successfully!
4. Select
Power OnPower On
Power On
Power OnPower On
Anim. Anim.
Anim. to display the
Anim. Anim.
animation every time
you turn on the phone.
Power OffPower Off
Select
Power Off
Power OffPower Off
Anim. Anim.
Anim. to display the
Anim. Anim.
animation every time
you turn off the phone.
(Back) to return to the Display
Page 89

Main Idle ScreenMain Idle Screen
Main Idle Screen
Main Idle ScreenMain Idle Screen
Main Idle Screen Main Idle Screen
The
Main Idle Screen menu allows you to show or hide the items
Main Idle Screen Main Idle Screen
appearing on the main display when the phone is in idle mode. Refer to
the screen below for the location of these items.
OperatorOperator
Operator
OperatorOperator
MannerManner
Manner
MannerManner
DateDate
Date
TimeTime
Time
TimeTime
To show or hide the main idle screen items:
11
1
11
DateDate
1. Select
2. Press
Main Idle Screen Main Idle Screen
Main Idle Screen from the
Main Idle Screen Main Idle Screen
press
to display a list of main idle screen items.
(up) or (down) to highlight an item, then press to
check or uncheck. Checked items appear on the main display when
22
2
22
the phone is in idle mode.
3. When finished, press
menu.
Display Settings Display Settings
Display Settings menu, then
Display Settings Display Settings
(Back) to return to the
Display SettingsDisplay Settings
Display Settings
Display SettingsDisplay Settings
8989
89
8989
Page 90

Sub Idle ScreenSub Idle Screen
Sub Idle Screen
Sub Idle ScreenSub Idle Screen
Sub Idle Screen Sub Idle Screen
The
Sub Idle Screen menu allows you to select the screen for the
Sub Idle Screen Sub Idle Screen
external display when the phone is in idle mode.
To select the external display screen:
1. Select
press
2. Press
Sub Idle Screen Sub Idle Screen
Sub Idle Screen from the
Sub Idle Screen Sub Idle Screen
to display a list of external display screens.
(up) or (down) to highlight an item, then press to
Display Settings Display Settings
Display Settings menu, then
Display Settings Display Settings
select.
11
1
11
9090
90
9090
3. When you selected
4. Press
(up) or (down) to highlight an item, then press to
NormalNormal
Normal,
NormalNormal
press
(Set).
check or uncheck. Checked items appear on the external display
when the phone is in idle mode.
5. Press
(Back) to return to the previous menu.
33
3
33
44
4
44
55
5
55
Page 91

To display the business clock on the external display:
1. From the
Screen Screen
Screen menu,
Screen Screen
highlight
ClockClock
Clock, then press
ClockClock
Sub IdleSub Idle
Sub Idle
Sub IdleSub Idle
BusinessBusiness
Business
BusinessBusiness
to select.
3. Use the (up) or
(down) button
to select the local
clock, then press
(Option).
2. Press
4. Select
33
3
33
(Set) to
display the local
clock and the visiting
clock.
22
2
22
Set as LocalSet as Local
Set as Local
Set as LocalSet as Local
from the menu, then
SetSet
. A
press
Successfully!Successfully!
Successfully!
Successfully!Successfully!
Set
SetSet
message appears to
indicate that the local
clock synchronized
with the local time
you specified using
Date/TimeDate/Time
the
Date/Time
Date/TimeDate/Time
menu.
9191
91
9191
Page 92
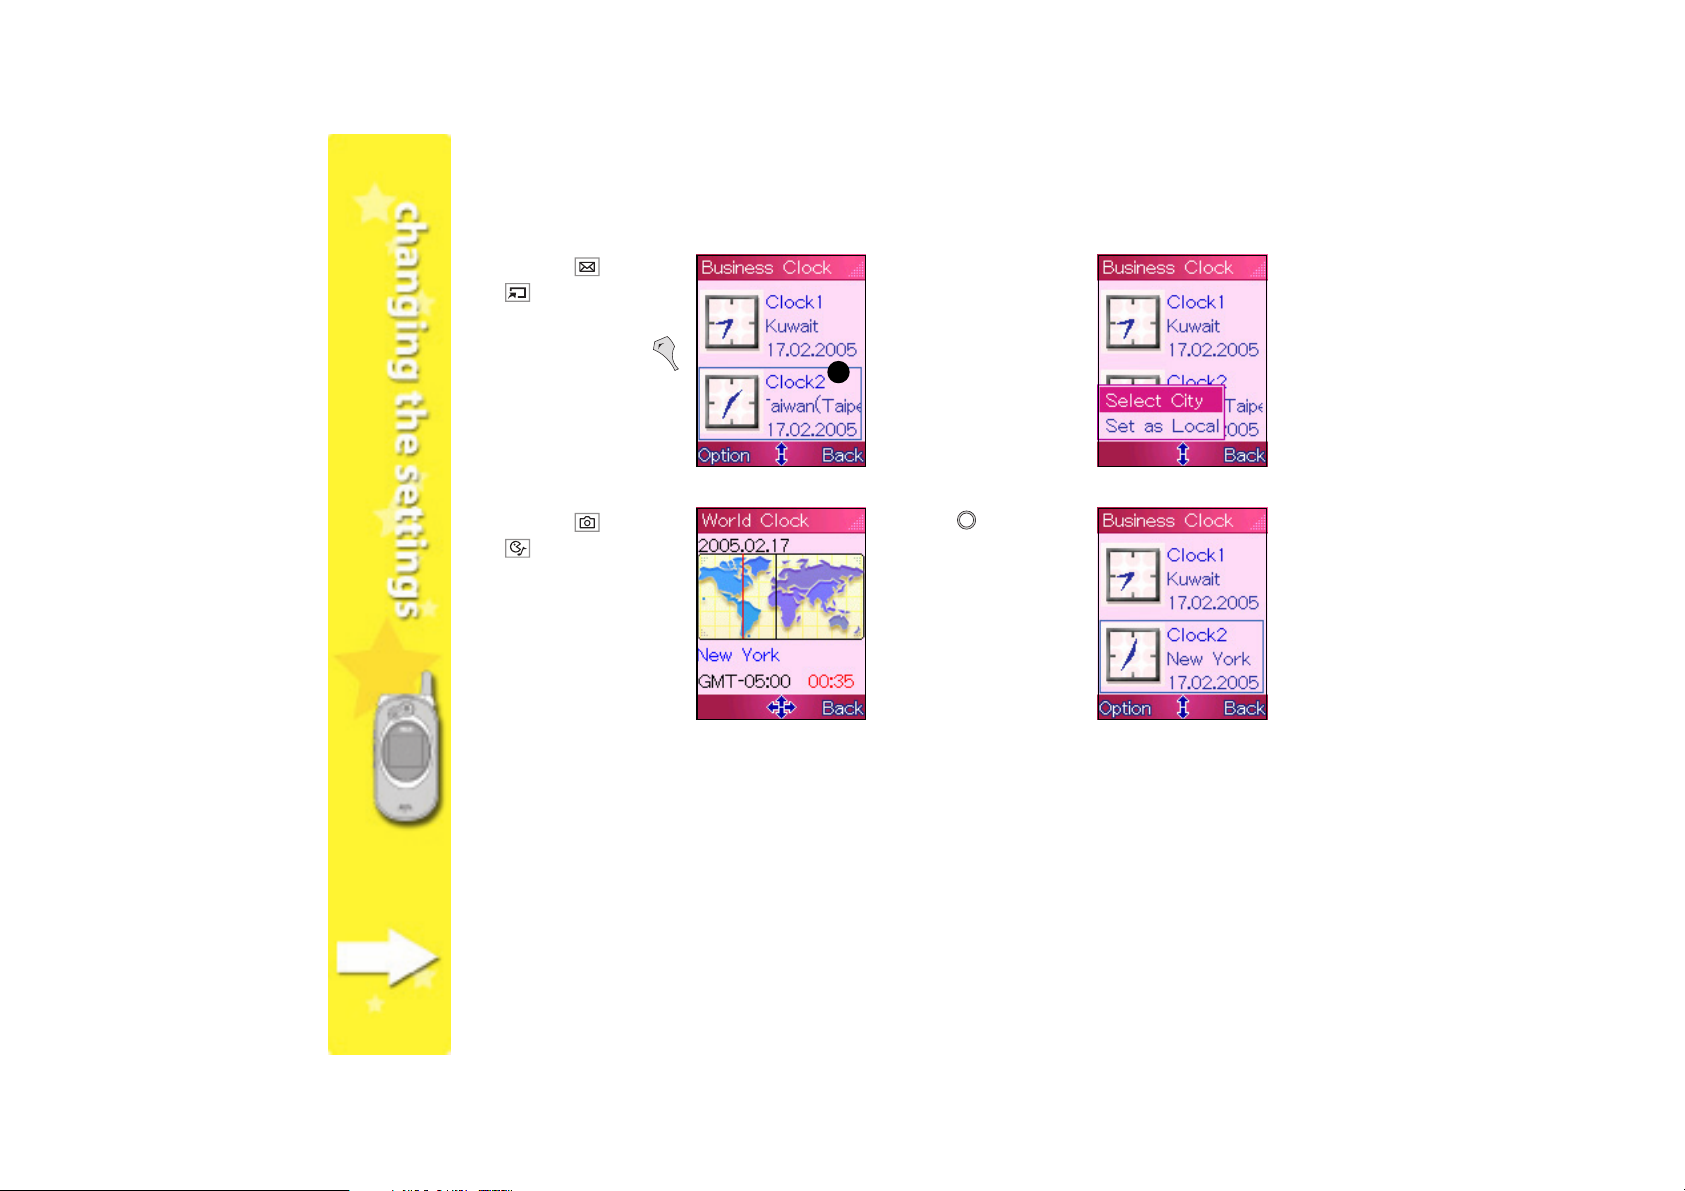
5. Use the (up) or
(down) button
to select the visiting
clock, then press
(Option).
6. Select the option
Select City Select City
Select City from
Select City Select City
the menu to open
World ClockWorld Clock
the
World Clock
World ClockWorld Clock
55
5
55
screen.
9292
92
9292
7. Use the
(left) or
(right) button to
move the dateline
across the world
map until it is over
the time zone for
the visiting clock.
For example, move
the dateline to the
left to select
(Eastern)(Eastern)
(Eastern).
(Eastern)(Eastern)
USUS
US
USUS
8. Press
to select
the visiting clock
time zone. A
Successfully!Successfully!
Successfully!
Successfully!Successfully!
SetSet
Set
SetSet
message appears to
indicate that the
visiting clock has
been set.
The business clock
now shows the local
time and the visiting
time.
Page 93

Clean WallpaperClean Wallpaper
Clean Wallpaper
Clean WallpaperClean Wallpaper
Clean Wallpaper Clean Wallpaper
The
Clean Wallpaper feature allows you to hide all the items
Clean Wallpaper Clean Wallpaper
appearing on the main display when the phone is in idle mode.
To enable the clean wallpaper feature:
1. Select
11
1
11
2. Press
22
2
22
3. When finished, press (Back) to return to the
Clean Wallpaper Clean Wallpaper
Clean Wallpaper from the
Clean Wallpaper Clean Wallpaper
press
select.
• When you select
• When you select
• The feature is disabled when you select
menu.
to display the menu options.
(up) or (down) to highlight an item, then press to
Enable, any key restoreEnable, any key restore
Enable, any key restore, all the main
Enable, any key restoreEnable, any key restore
display items are hidden and restored when you press any key.
Enable, OK key restoreEnable, OK key restore
Enable, OK key restore, all the main
Enable, OK key restoreEnable, OK key restore
display items are hidden and restored when you press
Display Settings Display Settings
Display Settings menu, then
Display Settings Display Settings
.
DisableDisable
Disable.
DisableDisable
Display SettingsDisplay Settings
Display Settings
Display SettingsDisplay Settings
9393
93
9393
Page 94

Backlight TimerBacklight Timer
Backlight Timer
Backlight TimerBacklight Timer
The backlight timer allows you to specify a time before the LCD display
backlight turns off.
Setting a shorter backlight timer saves battery power.
To set the backlight timer:
9494
94
9494
1. Select the
menu, then press
2. From the
the backlight turns off, then press
3. Press
Backlight Timer Backlight Timer
Backlight Timer item from the
Backlight Timer Backlight Timer
.
Backlight Timer Backlight Timer
Backlight Timer list, highlight the desired time before
Backlight Timer Backlight Timer
(Back) to return to the
Display Settings Display Settings
Display Settings menu.
Display Settings Display Settings
Display SettingsDisplay Settings
Display Settings
Display SettingsDisplay Settings
to select.
11
1
11
22
2
22
Page 95

Sleep TimerSleep Timer
Sleep Timer
Sleep TimerSleep Timer
The sleep timer allows you to specify a time before the main and
external display turns off.
Setting a shorter sleep timer saves battery power.
To set the sleep timer:
1. Select the
then press
11
1
11
2. From the
the main and external display turns off, then press
3. Press
22
2
22
Sleep Timer Sleep Timer
Sleep Timer item from the
Sleep Timer Sleep Timer
.
Sleep Timer Sleep Timer
Sleep Timer options, highlight the desired time before
Sleep Timer Sleep Timer
(Back) to return to the
Display Settings Display Settings
Display Settings menu,
Display Settings Display Settings
to select.
Display Settings Display Settings
Display Settings menu.
Display Settings Display Settings
9595
95
9595
Page 96

Ringtone
Ringtone Ringtone
The
Ringtone menu allows you to select, change, adjust, and compose
Ringtone Ringtone
the phone ring tone
To access the
From the
RingtoneRingtone
Ringtone, then press
RingtoneRingtone
OROR
OR
OROR
Press
Ringtone Ringtone
The
Ringtone menu has eight options that you can select using
Ringtone Ringtone
(up) or (down).
Ringtone Ringtone
Ringtone menu:
Ringtone Ringtone
Settings Settings
Settings menu, use (up) or (down) to select
Settings Settings
.
to display the
Ringtone Ringtone
Ringtone menu.
Ringtone Ringtone
9696
96
9696
Page 97

IncomingIncoming
Incoming
IncomingIncoming
The phone comes with 20 pre-installed polyphonic ring tones that you
can select using the
To set the incoming ring tone:
11
1
11
1. Select
2. Highlight a ring tone to play using
22
2
22
3. Click
IncomingIncoming
Incoming from the
IncomingIncoming
press
rename, compose, or delete a ring tone.
to select.
You may assign a different incoming ring tone for a particular phone
number. See Chapter 5 “Managing the phonebook” for details.
(Back) to return to the
Incoming Incoming
Incoming ring tone
Incoming Incoming
RingtoneRingtone
Ringtone menu, then press .
RingtoneRingtone
menu.
(up) or (down), then
RingtoneRingtone
Ringtone menu, or (Option) to
RingtoneRingtone
9797
97
9797
Page 98
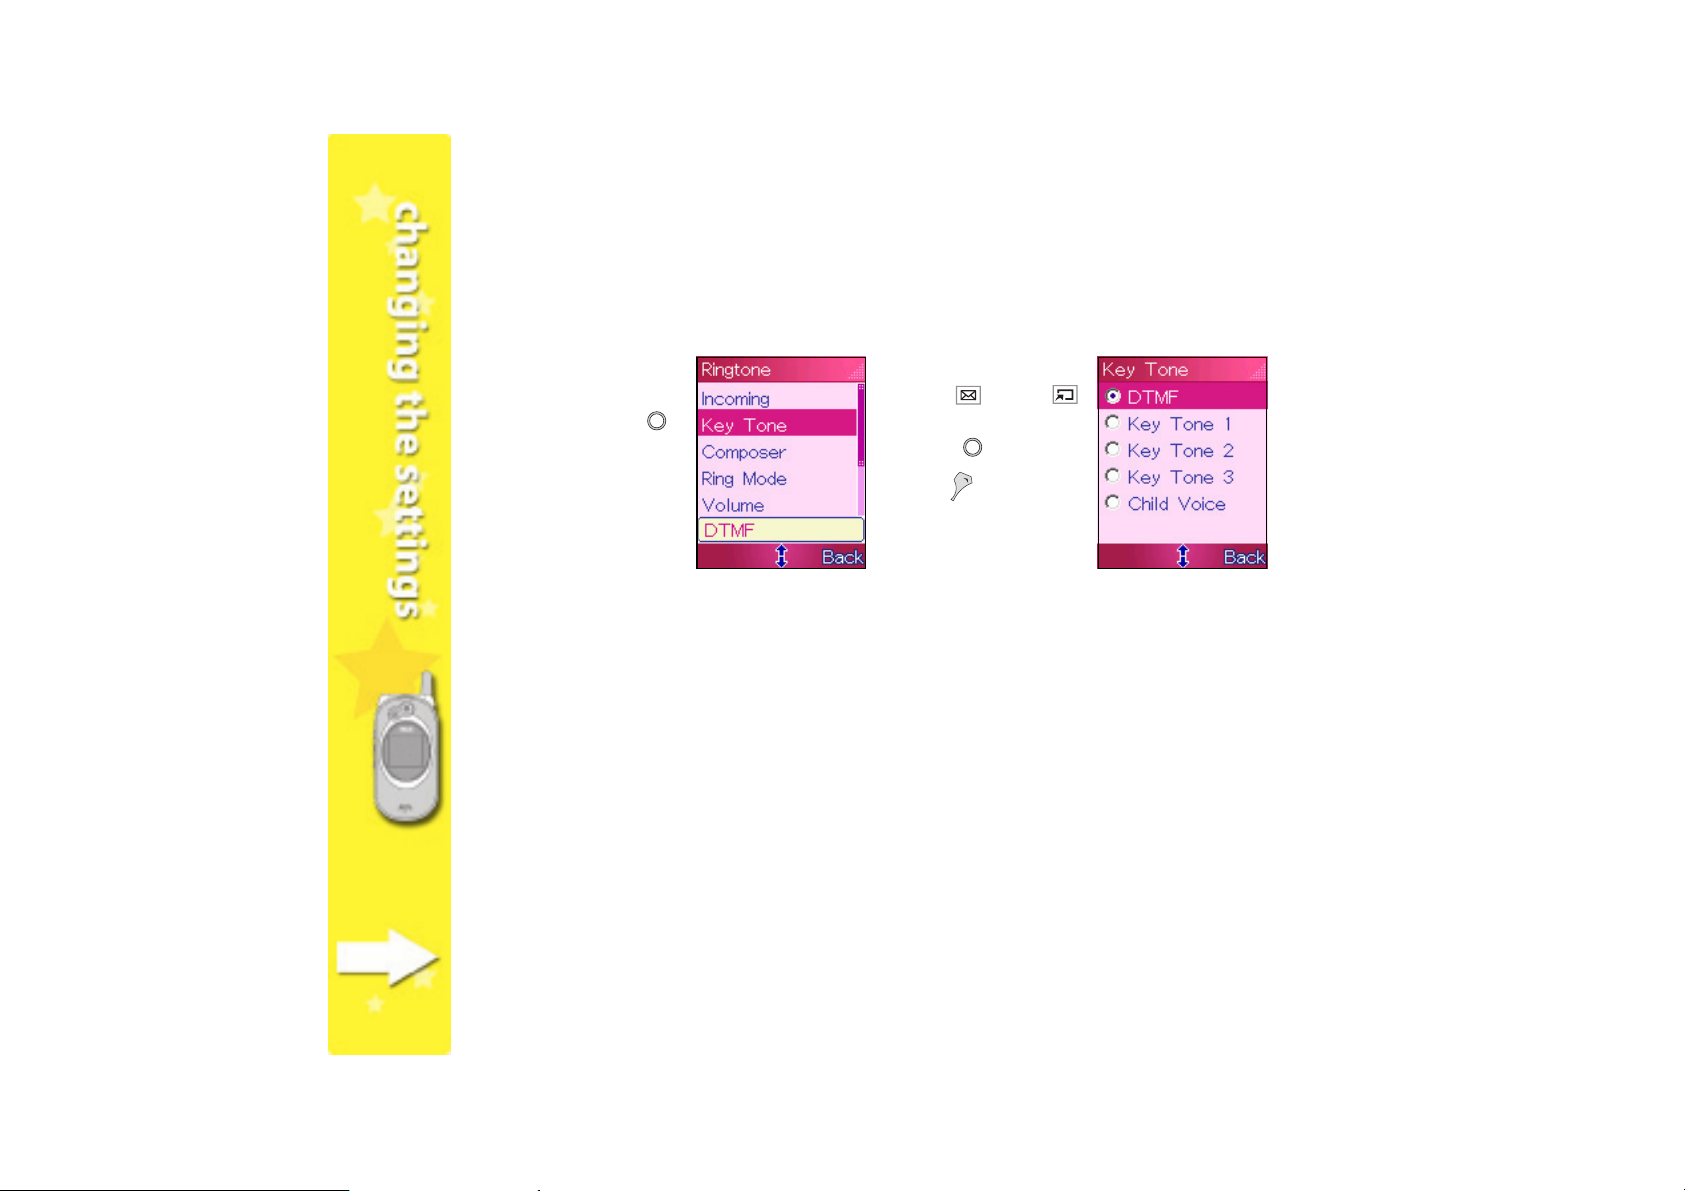
Key ToneKey Tone
Key Tone
Key ToneKey Tone
The key tone sounds off every time you press a key on the keypad.
To select a key tone:
1. Select
Key ToneKey Tone
Key Tone
Key ToneKey Tone
from the
menu, then press
RingtoneRingtone
Ringtone
RingtoneRingtone
2. Highlight a key tone
using
.
(down), then
press
3. Click
return to the
RingtoneRingtone
Ringtone menu.
RingtoneRingtone
(up) or
to select.
(Back) to
9898
98
9898
Page 99
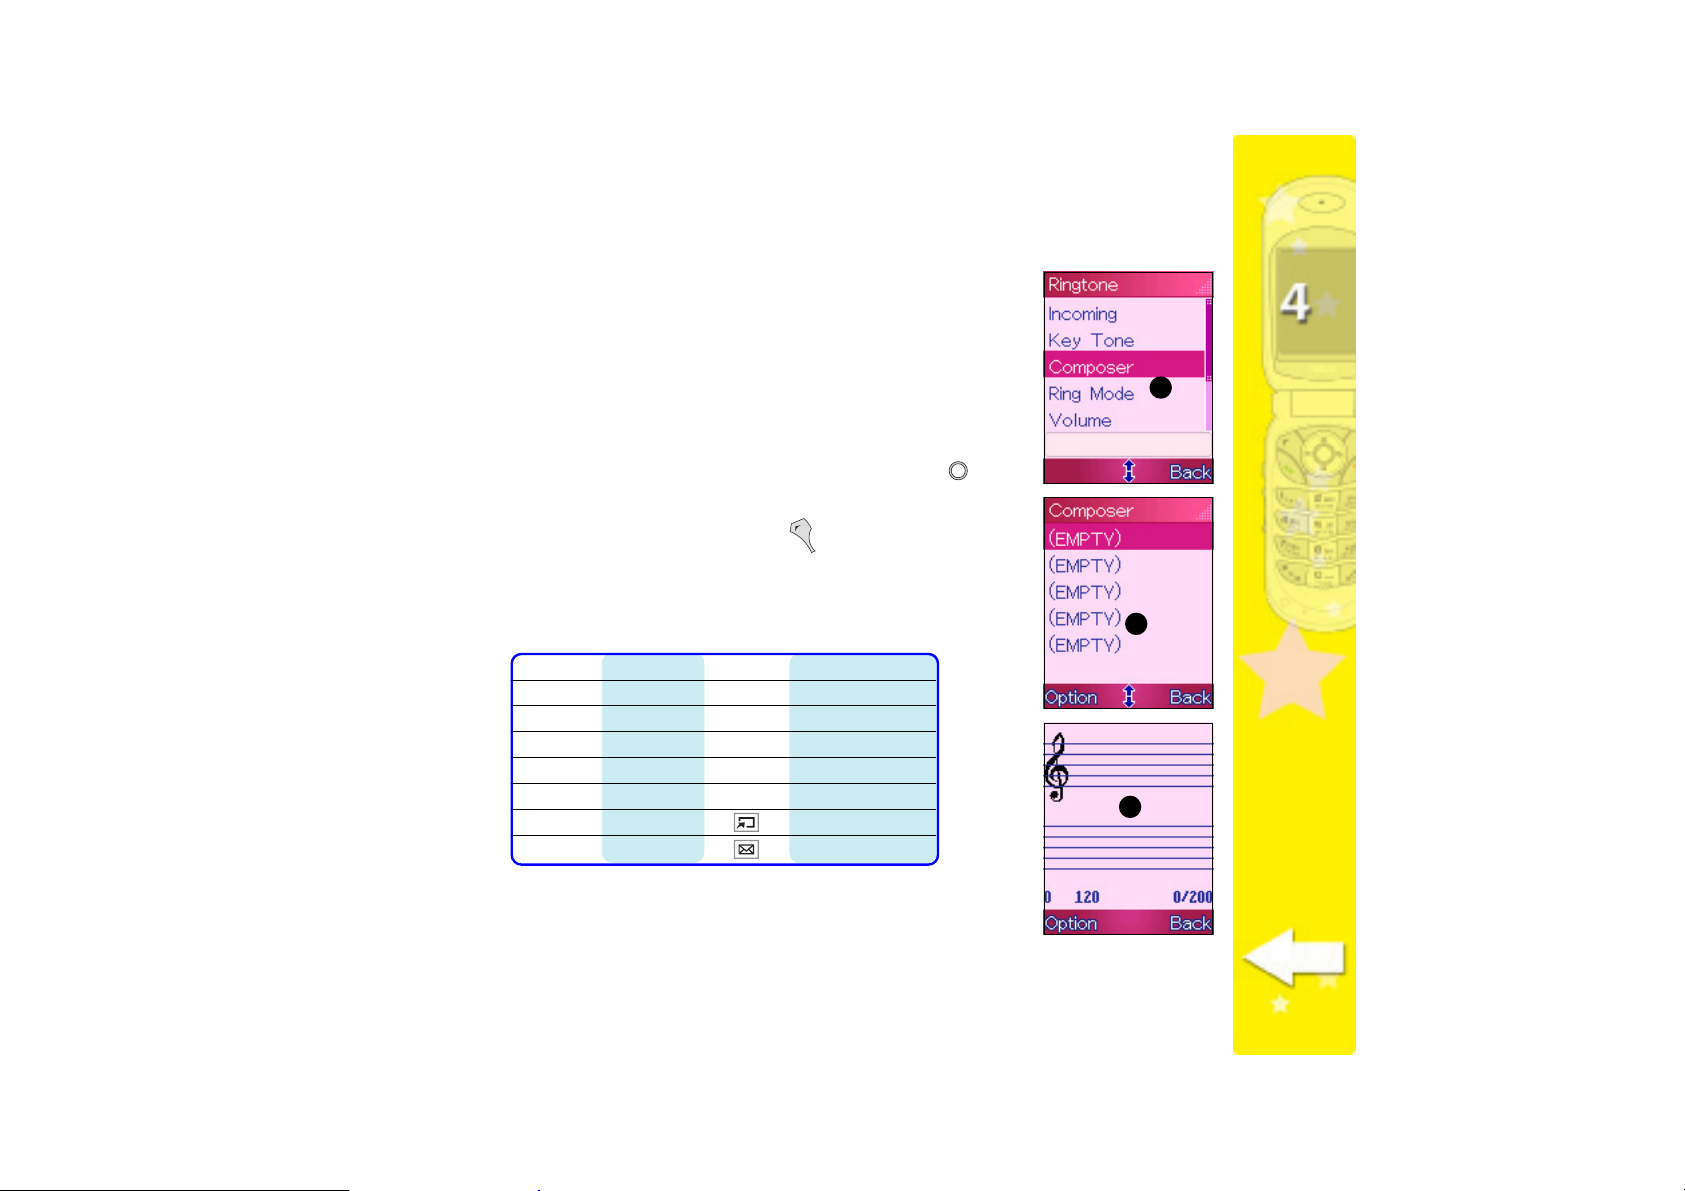
ComposerComposer
Composer
ComposerComposer
In addition to the pre-installed ringtones, you can compose five ring
tones, each with up to 200 notes, if you know how to compose with
musical notes.
Composing a ring toneComposing a ring tone
Composing a ring tone
Composing a ring toneComposing a ring tone
To compose a ring tone:
11
1
11
1. Select
Composer Composer
Composer from the
Composer Composer
RingtoneRingtone
Ringtone menu, then press to
RingtoneRingtone
display the list of composed ring tones.
2. Highlight an
ComposeCompose
Compose. The music staff appears on screen.
ComposeCompose
(EMPTY)(EMPTY)
(EMPTY) ring tone, press
(EMPTY)(EMPTY)
(Option), then select
3. Use the keypad button to key-in the notes. Refer to the table
below for the musical note equivalents of the keypad buttons.
KeyKey
Key
KeyKey
Note/BeatNote/Beat
Note/Beat
Note/BeatNote/Beat
1Do8 Rest
2Re9longer beat
3Mi0dotted note
4Fa* octave
5 Sol # short beat
6La half note lower
7Si half note higher
KeyKey
Key
KeyKey
Note/BeatNote/Beat
Note/Beat
Note/BeatNote/Beat
22
2
22
33
3
33
9999
99
9999
Page 100

4. When done, press
(Option), select
InstrumentInstrument
Instrument,
InstrumentInstrument
press
then
to display
the available
instrument sounds
that you can use.
5. Use
(up) or
(down) to highlight
an instrument, then
press
Press
to select.
(Back) to
return to your
composition.
100100
100
100100
6. Press (Option),
TempoTempo
select
Tempo,
TempoTempo
then press
to
display the available
tempos you can use
for the composed
ring tone.
A low number option means a slow tempo. The higher the number you select, the faster the
tempo. You may try several tempos until you find the appropriate one for your ring tone.
7. Use
to
highlight a tempo,
then press
(Back) to listen to
your composition.
 Loading...