

Asus G71GX, G71V, G71G QUICK START GUIDE [zh]

Notebook PC User’s Manual
G71
T3954 1.00
2008 9

造成的損失。
資訊等。
WEEE /
腦。
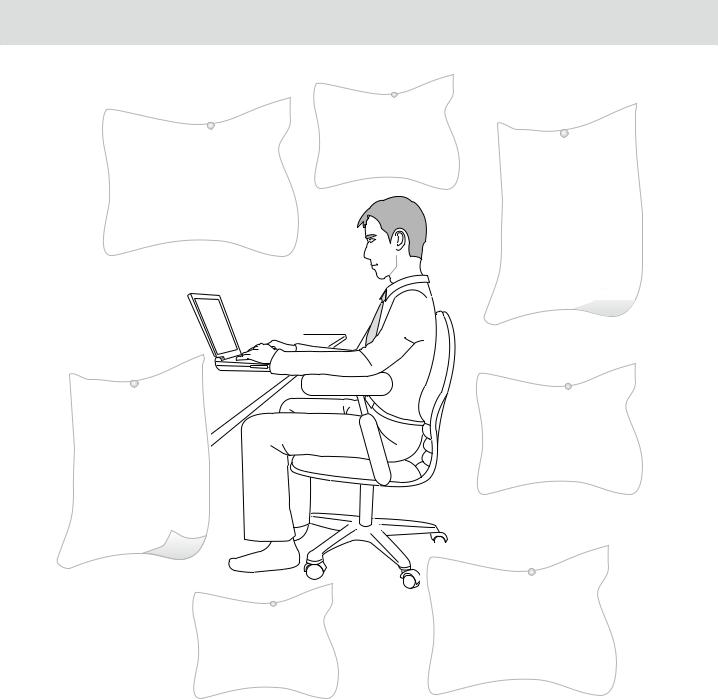
50 70
然著地。
膀跟頸部。
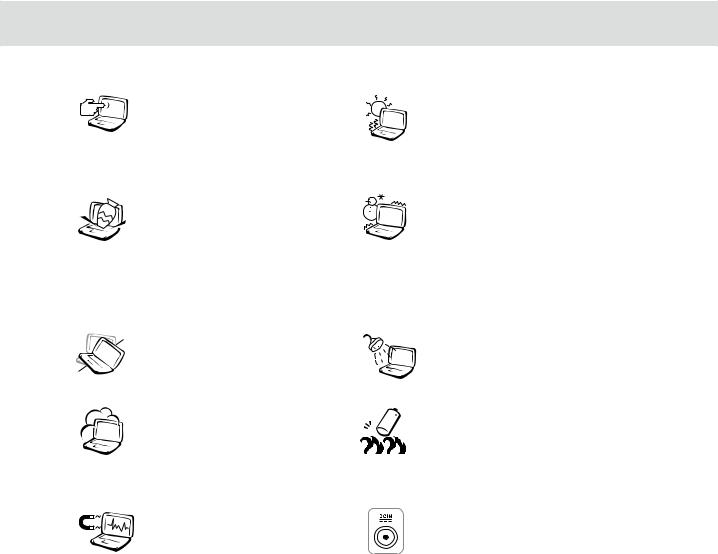
成顯示器損壞。
損壞。
因灰塵容易引起系統故障。
以避免電磁效應造成磁片資 料流失。
不要將筆記型電腦留在陽光 直射的車子裡。
冷的環境中(5 41) (35 95 )
支持回收廢棄電池。
功率的電源變壓器有可能造 成內部零件的損壞。

先安裝於本機上的作業系統可能不提供全部 的功能。
腦時用以保護產品不致損壞。
僅提供一年期間之保固。
高溫可能造成的身體不適。
以防止散熱孔堵塞。
液晶顯示器。
成故障。
|
|
|
|
|
|
|
|
|
|
|
|
|
|
|
|
|
|
|
|
|
|
<Fn> + <F7> |
|
|
|
|
|
|
|
|
|
35 |
|
AWG 26 |
|
|
|
|
|
modem |
|
|
|
|
|
SPDIF |
|
|
|
|
|
|
|
|
|
|
|
|
|
|
|
|
|
|

1. 售後維修服務。
2. 費購買。
(2)Ai-Flash
(3)LCDLCD
(4)http://tw.asus.com
產品資訊並完成註冊手續
1.http://tw.asus.com
2.-
4.http://tw.asus.com
0800-093-456
*∕ ∕
*BIOS ASUS Probe
MODEL : G71xxxxx-------------------- |
|
xxxxxxxxxxxxxxx----------------- |
|
IIIIIIIIIIIIIIIIIIIIIIIII |
|
G71xxxxxx-xxxxxx--------------- |
|
Check Number : xxxx |
|
WARRANTY : xxM |
|

1.0800-093-456
2.4848
3.0800-093-456
6.!!!
3. 損害始成立。
(3) 及節餘損失

................................................................................................................................... |
2 |
............................................................................................................................ |
3 |
..................................................................................................................... |
6 |
........................................................................................................................................ |
9 |
1-1 |
.............................................................................................................. |
12 |
1-2 |
.................................................................................................................. |
19 |
1-3 |
.................................................................................................................. |
20 |
1-4 |
......................................................................................................................... |
24 |
1-5 |
.................................................................................................................. |
26 |
1-6 |
.................................................................................................................. |
29 |
2-1 |
......................................................................................................................... |
32 |
2-2 |
..................................................................................................................... |
34 |
2-3 |
......................................................................................................................... |
35 |
2-4 |
.................................................................................................................. |
37 |
2-5 |
.................................................................................................................. |
37 |
2-6 |
LED ..................................................................................................................... |
40 |
3-1 |
.................................................................................................................. |
44 |
3-2 |
................................................................................................ |
45 |
3-3 |
.................................................................................................................. |
46 |
3-4 |
..................................................................................................................... |
48 |
3-5 Direct Console 2.0 ................................................................................................... |
52 |
|
3-6 |
.................................................................................................................. |
55 |
3-7 USB .......................................................................................................................... |
58 |
|
3-8 |
.................................................................................................................. |
59 |

3-9 EXPRESS .......................................................................................................... |
60 |
|
3-10 |
................................................................................................................. |
61 |
3-11 |
......................................................................................................................... |
62 |
3-12 |
......................................................................................................................... |
63 |
3-13 |
........................................................................................ |
65 |
4-1 |
..................................................................................................................... |
68 |
4-2 |
.............................................................................................................. |
69 |
4-3 |
E-SATA ..................................................................................... |
69 |
4-4 |
.................................................................................................................. |
70 |
4-5 1394 ................................................................................................................. |
71 |
|
4-6 .......................................................................................................... |
72 |
|
4-7 |
.......................................................................................................... |
75 |
4-8 |
............................................................................................................................ |
76 |
4-9 |
..................................................................................................................... |
76 |
4-10 ......................................................................................................................... |
77 |
|
5-1 |
............................................................................................................................ |
80 |
5-2 |
......................................................................................................................... |
81 |
5-3 |
......................................................................................................................... |
84 |
5-4 |
....................................................................................................... |
85 |
6-1 |
............................................................................................ |
88 |
6-2 |
.......................................................................................................... |
90 |
6-3 |
.................................................................................................................. |
94 |
6-4 |
RAID ( )..................................................................................................... |
97 |
10
1-1
1-2
1-3
1-4
1-5
 1-1
1-1
1-1
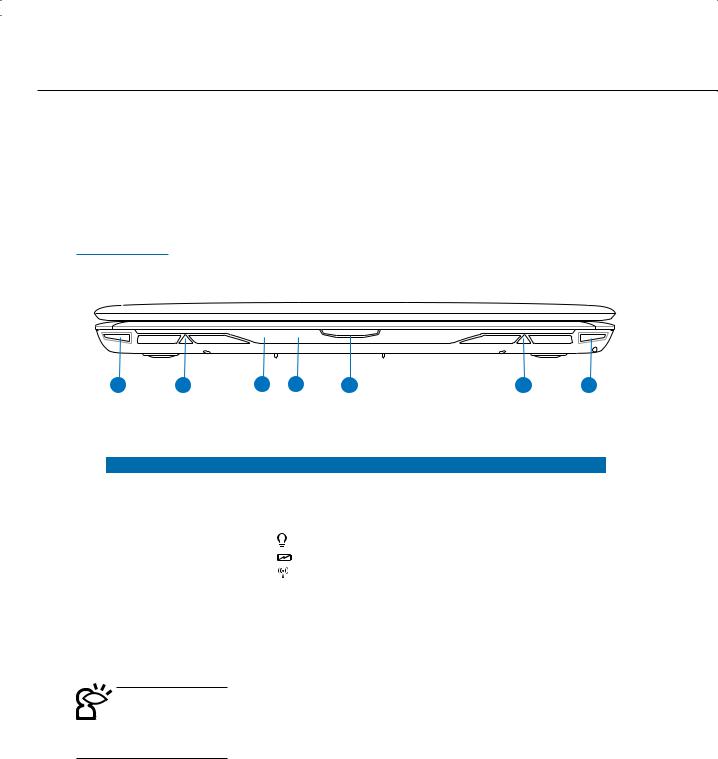
先來看看這台筆記型電腦的各部分組件。

1 |
2 |
3 |
4 |
5 |
2 |
1 |
|
|
|
|||
1 |
|
|
|||
2-6 |
|||||
|
|
||||
|
|
|
|
|
|
2 |
|
|
|||
|
|
|
|
|
|
|
|
|
|
|
|
3 |
|
|
|
|
|
|
|
|
|
|
|
|
|
|
|
||
|
|
|
|
|
|
4 |
CIR |
|
|||
|
|||||
|
|
|
|
||
|
|
|
|
|
|
5 |
|
|
|||
|
|
|
|
|
|

12
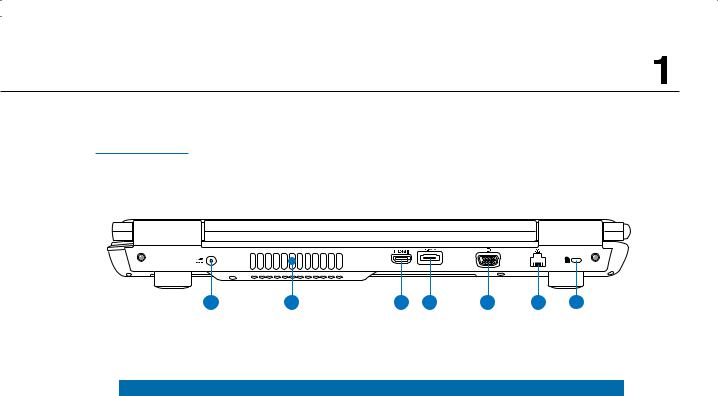

1 |
2 |
3 |
4 |
5 |
6 |
7 |
|
|
|
1 |
|
|
|
|
|
2 |
|
|
|
|
|
3 |
HDMI |
HDMI |
|
|
|
4 |
E-SATA |
E -SATA |
|
|
|
5 |
|
|
|
|
|
6 |
|
RJ-45 |
|
|
|
7 |
|
|
|
|
|
13

 1-1
1-1

1
2
3
4 |
5 |
6 |
7 |
8 |
9
10
14
|
|
|
|
1 |
|
|
|
|
|
|
|
2 |
|
|
|
|
|
|
|
3 |
|
|
|
|
|
|
|
4 |
|
Direct Console 2.0 |
|
MSN E-mail 3-5 |
|||
|
|
||
|
|
|
|
|
|
Direct Console 2 |
|
5 |
|
Express Gate |
|
|
|||
|
|
||
|
|
|
|
|
|
|
|
6 |
|
|
|
|
|
|
|
7 |
|
|
|
|
|
|
|
|
|
|
|
|
|
|
|
8 |
|
|
|
|
|
||
|
|
|
|
|
|
|
|
9 |
|
|
|
|
|
|
|
10 |
|
|
|
|
|
|
15

 1-1
1-1

1 |
2 |
2 |
3 |
4 |
5 |
6 |
7 |
|
|
|
2 USB |
USB |
31394 1394
4 |
|
|
|
|
|
5 |
|
|
6
7
關操作按鈕的位置有可能與 圖示並不相同。
16
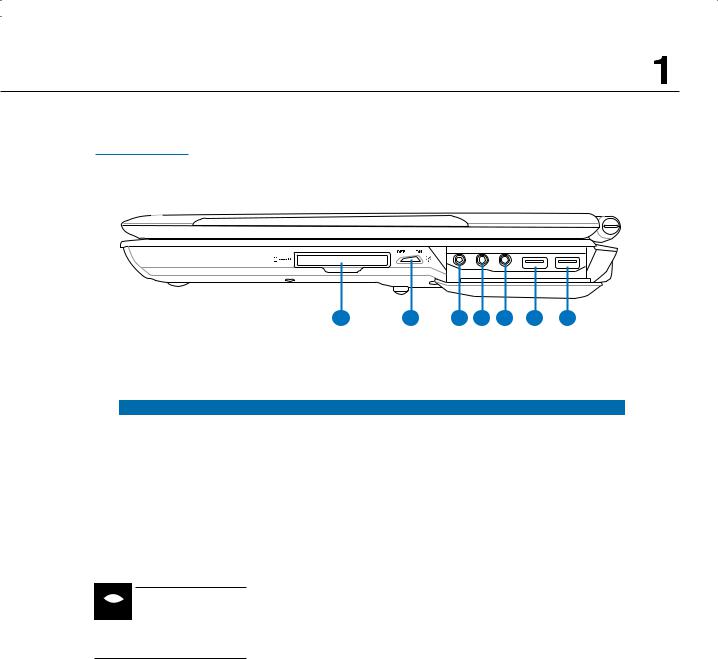

1 |
2 |
3 |
4 |
5 |
6 |
6 |
|
|
|
1 |
EXPRESS |
EXPRESS |
|
|
|
2 |
|
/ |
|
|
|
3 |
/SPDIF |
SPDIF |
|
|
|
4 |
|
|
|
|
|
5 |
Mic in |
|
|
|
|
6 |
USB |
USB |
|
|
|
 USB
USB
17
 1-1
1-1
1 2
3
4
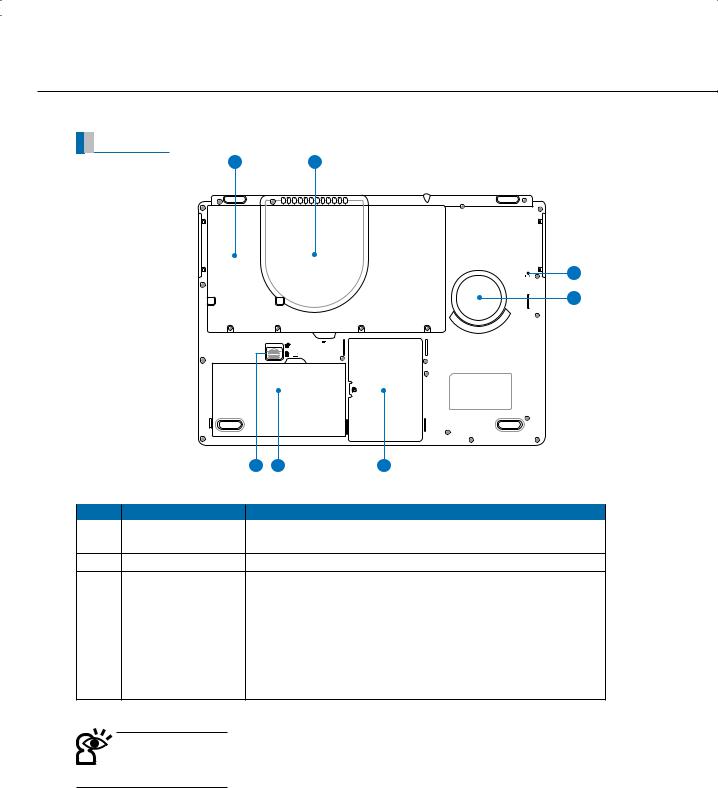
|
|
7 |
6 |
5 |
|
|
|
|
|
|
|
|
|
|
1 |
|
|
||
|
||||
2CPU/ CPU/
3 |
|
|
|
|
|||
|
|
||
|
|
|
|
4 |
|
|
|
|
|||
|
|
||
|
|
|
|
5 |
|
|
|
|
|
|
|
6 |
|
|
|
|
|
|
|
7 |
|
|
CPU
18


說明。


1-2
USB
USB USB Hub
USB
Ai-Flash
USB
▲USB ▲USB
▲USB ▲USB
19

 1-3
1-3

1-3
LCD
晶顯示螢幕玻璃。
的損壞。
<Fn> + <F7>
表面留下些許指紋。
20
5-2
的處理方式妥善處置。
能造成爆炸的意外。
20~30
三十秒左右後再移動電腦。
以在日常使用中稍加注意避免以上情形發生就可以解決此一問 題。
21

 1-3
1-3
盤表面。
象。
使用粗糙的菜瓜布等物品擦拭表面。
亦不需重壓使用以免造成損壞。
外接設備連接線。
毀。
22

度。
以避免不經意的開啟而導致您的筆記型電腦掉落而破損。
避免電子零件提早老化。
便與傷害。
最佳的相容性與穩定性。
23
 1-4
1-4

Hibernation
 (LAN) Outlook
1-4
請遵循以下各項準備步驟並詳細檢查注意事項。
統下察看電池電量顯示。
您的開機密碼及硬碟機密碼。
繼續先前的作業或是馬上進行簡報。
(H)
 +
+ 
24

意以下幾件事
1. 以證明自己為該筆記型電腦的主人。
3. 適合的電源線。
4. 可以在當地使用。
25

 1-5
1-5
1-5
個方便好用的備份方法
過支援Windows Partition Magic
A.Office MP3
C.Explorer
26

D
料備份裝置來存放備份的資料。
USB
USB USB 2.5” 3.5”
A.2.5” 2.5”
B.3.5” 3.5”
IEEE-1394
400Mb/
Ai-Flash
Ai-Flash USB WindowsME/XP USBAi-Flash Windows 98
USB IEEE-1394
27

 1-5
1-5
USB
28

1-6


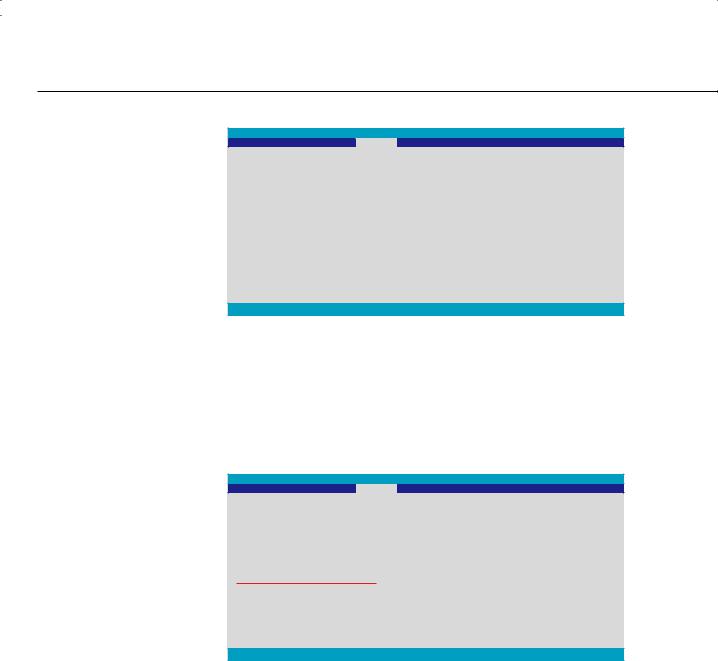
BIOS
BIOS
1.F2 BIOS Security Change Supervisor Password
BIOS Setup Utility
Security
Security Settings |
|
|
Select Menu |
|
|
|
|
|
|
Supervisor Password |
Not Installed |
Install or Change the |
||
User Password |
Not Installed |
password. |
|
|
|
|
|
|
|
Change Supervisor Password |
|
|
|
|
Change User Password |
|
|
|
|
Boot Sector Virus Protection [Disabled] |
|
|
||
▲ Hard Disk Security Setting |
←→ |
Select Menu |
||
▲ I/O Interface Security |
↑↓ |
Select Item |
||
|
|
|
Enter |
Change |
|
|
|
F1 |
General Help |
|
|
|
F9 |
Load Defaults |
|
|
|
F10 |
Save and Exit |
|
|
|
ESC |
Exit |
|
|
|
|
|
v02.59 (C) Copyright 1985-2005, American Megatrends, Inc.
2.Enter New Password
3.Confirm New Password
4.Password Installed <Enter>
1.BIOS Security Change User Password
29
 1-6
1-6
BIOS Setup Utility
Security
|
Security Settings |
|
|
Select Menu |
||
|
|
|
|
|
||
|
Supervisor Password |
Installed |
Install or Change the |
|||
|
User Password |
Not Installed |
password. |
|
||
|
Change Supervisor Password |
|
|
|||
|
Change User Password |
|
|
|
|
|
|
Boot Sector Virus Protection [Disabled] |
|
|
|||
|
▲ |
Hard Disk Security Setting |
←→ |
Select Menu |
||
|
▲ |
I/O Interface Security |
↑↓ |
Select Item |
||
|
|
|
|
|
Enter |
Change |
|
|
|
|
|
F1 |
General Help |
|
|
|
|
|
F9 |
Load Defaults |
|
|
|
|
|
F10 |
Save and Exit |
|
|
|
|
|
ESC |
Exit |
|
|
|
|
|
|
|
v02.59 (C) Copyright 1985-2005, American Megatrends, Inc.
2.Enter New Password
3.Confirm New Password
4.Password Installed <Enter>
1.BIOS Security Hard Disk Security Setting Change HDD Master Password
BIOS Setup Utility
Security
|
Security Settings |
|
|
Select Menu |
|
|
|
|
|
|
|
|
Change Supervisor Password |
|
|
Install or Change the |
|
|
User Acccess Level |
[Full Access] |
password. |
|
|
|
Change User Password |
|
|
|
|
|
Password Check |
[Setup] |
|
|
|
|
Boot Sector Virus Protection [Disabled] |
|
|
||
|
|
|
|
|
|
|
▲ Hard Disk Security Setting |
|
|
←→ |
Select Menu |
|
▲ I/O Interface Security |
|
|
||
|
|
|
|
↑↓ |
Select Item |
|
|
|
|
Enter |
Change |
|
|
|
|
F1 |
General Help |
|
|
|
|
F9 |
Load Defaults |
|
|
|
|
F10 |
Save and Exit |
|
|
|
|
ESC |
Exit |
|
|
|
|
|
|
v02.59 (C) Copyright 1985-2005, American Megatrends, Inc.
2.Enter New Password
3.Confirm New Password
4.Password Installed <Enter>
30
 Loading...