

Page 1

Quick Use Guide
E4158
15G06Q069000
Page 2
Quick Use Guide - 2
Powering on your Eee PC
These are only quick instructions for using your Eee PC. Read the full
manual for detailed information.
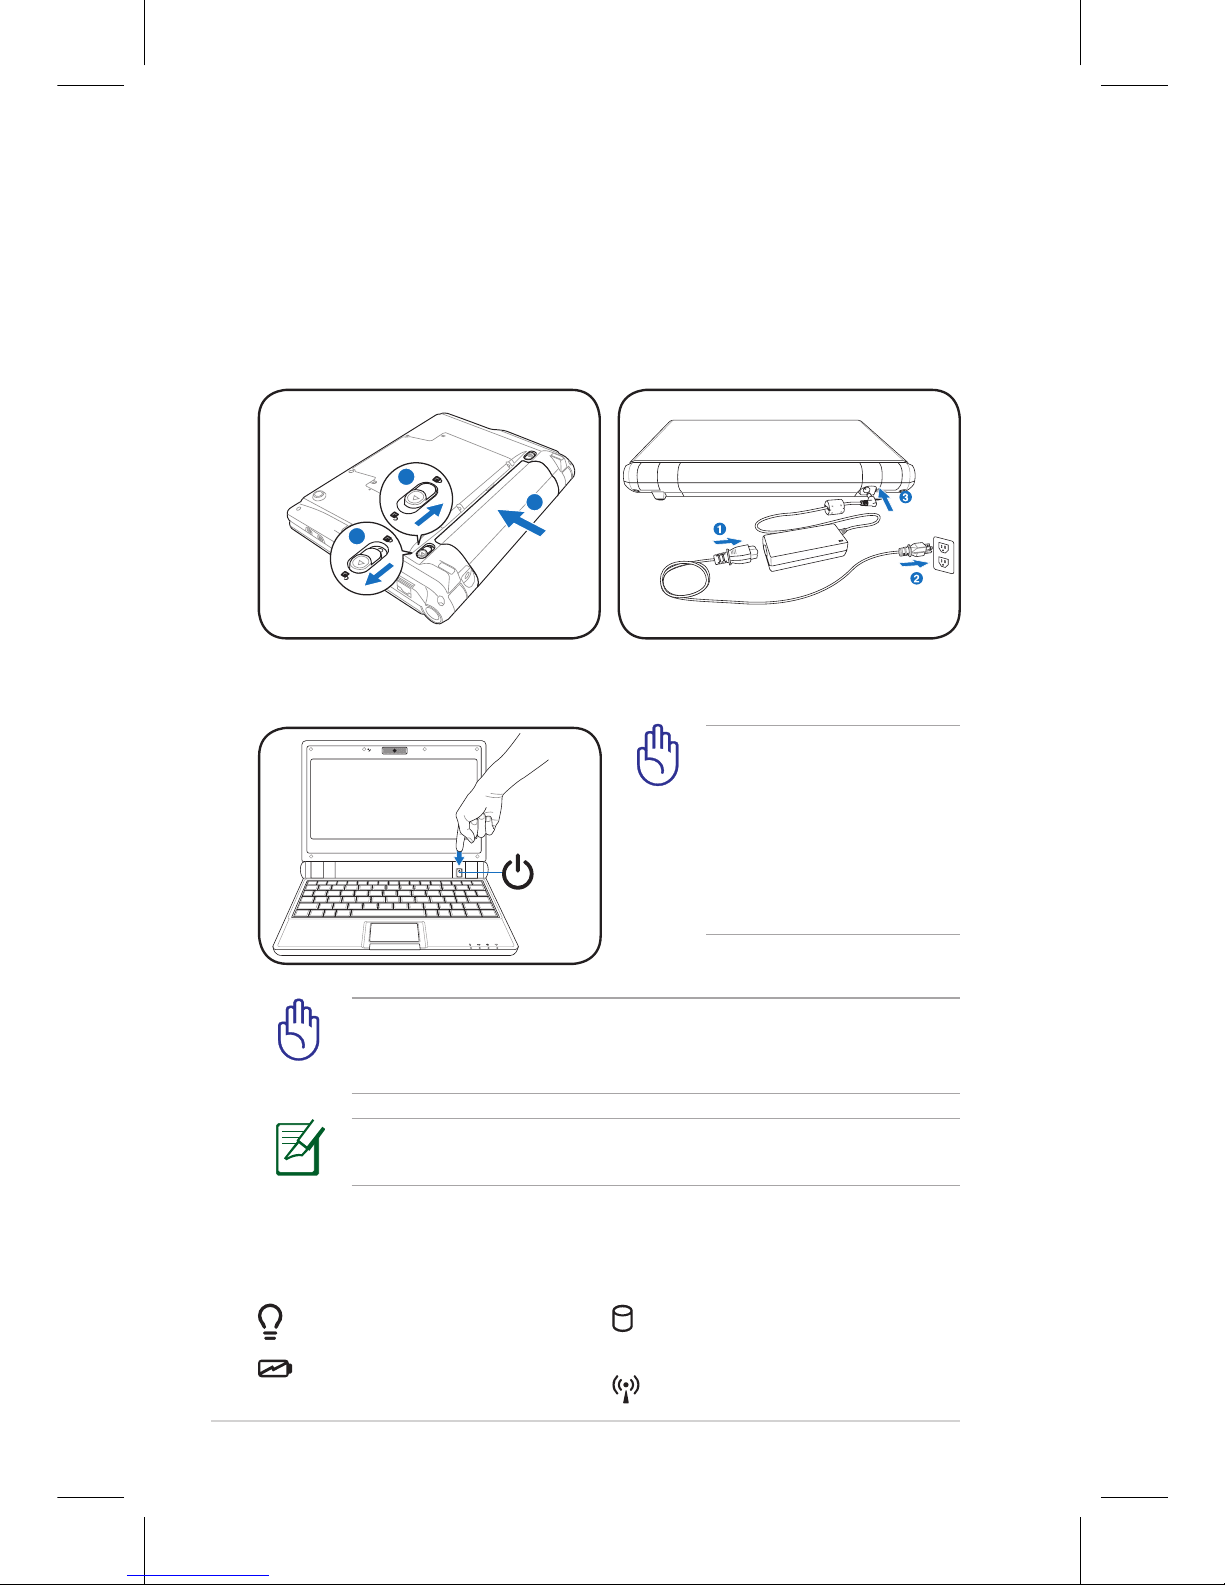
1. Install the battery pack
2. Connect the AC power
adapter
1
3
2
1
2
3
3. Turn ON the Eee PC
Remember to fully charge the battery before first use and
whenever it is depleted to prolong battery life.
Status Indicators
Status indicators represent various hardware/software conditions.
Power Indicator
Battery Charge Indicator
When you open the display panel, do not force it down to the
table or else the hinges may break! Never lift the Eee PC by the
display panel!
Hard Disk Drive (HDD)
Indicator
Wireless Indicator
Damage may occur if you
use a different adapter
to power the Eee PC. You
may damage both your
battery pack(s) and the
Eee PC with a faulty AC-DC
adapter.
Page 3
Quick Use Guide - 3
Powering off your Eee PC
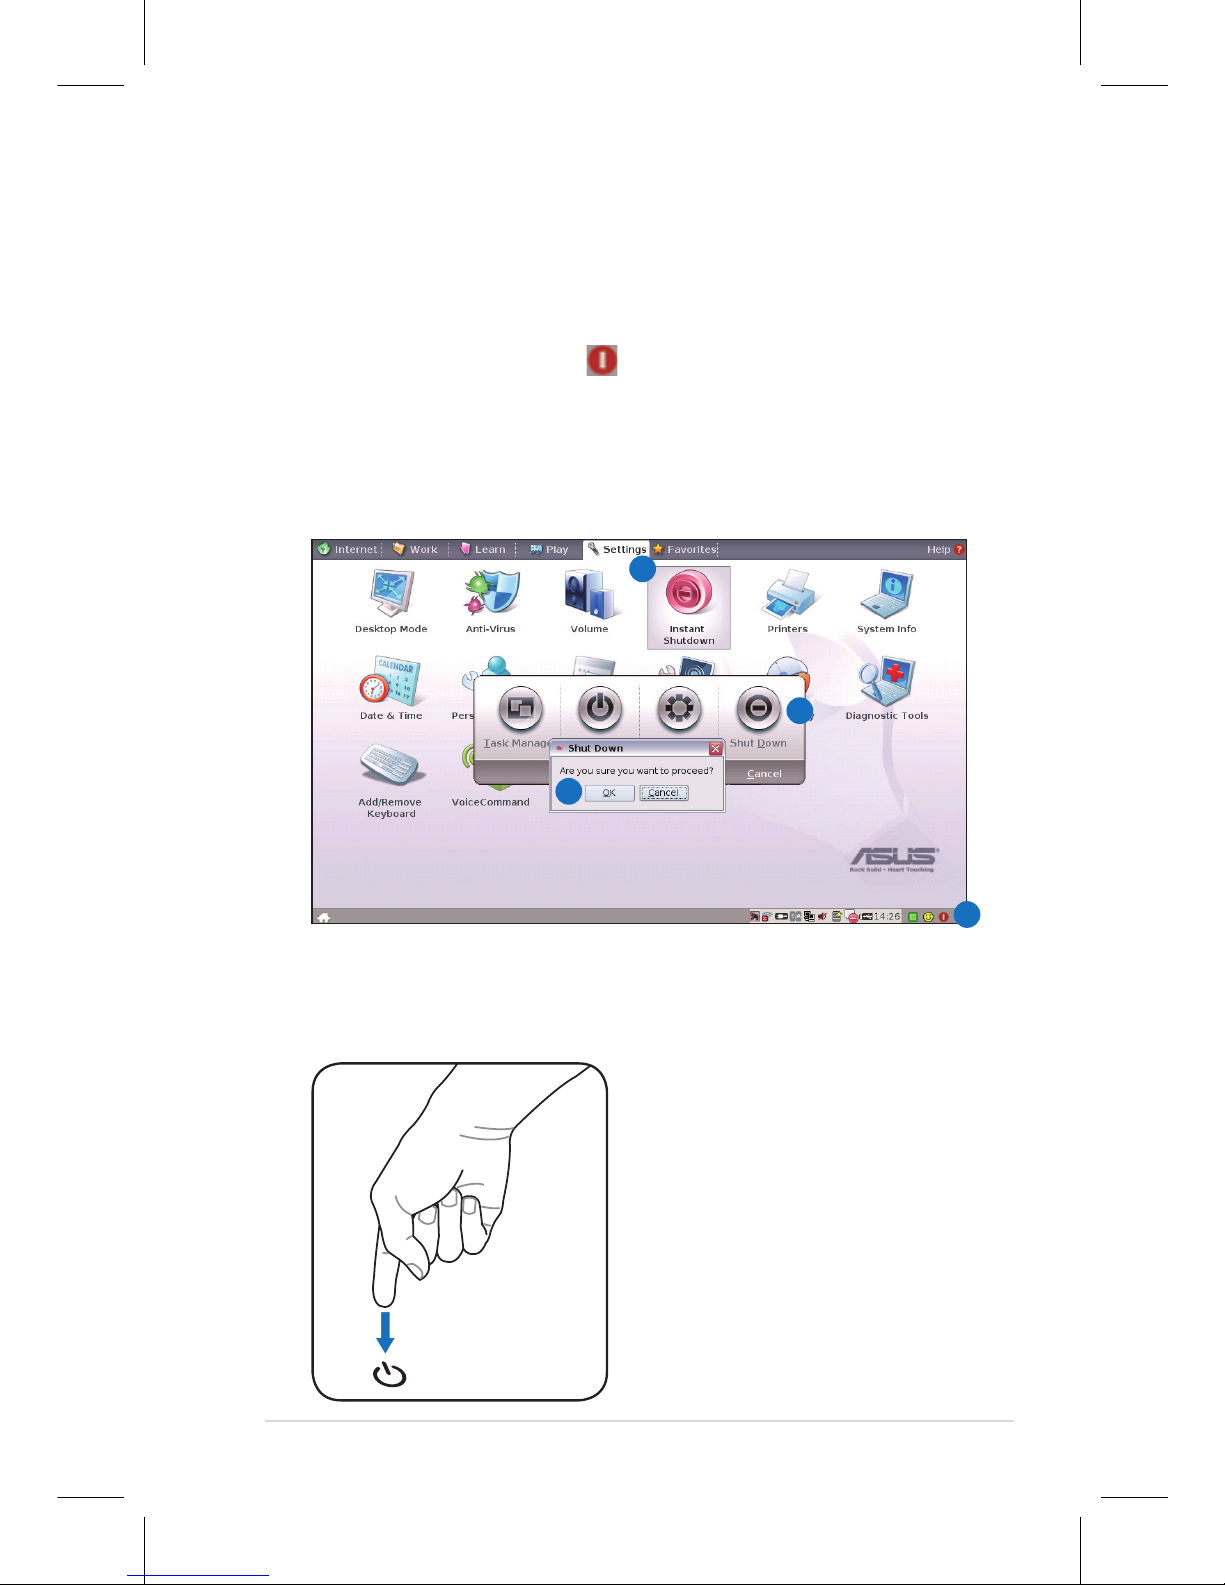
Do the following instructions to turn down your Eee PC.
A.
1. Click the red power switch in the Notification area.
Or, click
Instant Shutdown from the Settings tab and select
Shutdown.
2. Select
Shut Down from the dialogue box.
3. Select
OK to proceed.
B.
Or, press the power switch of the Eee PC directly, and follow the
previous instructions to shut down your Eee PC.
1
2
3
1
Page 4
Quick Use Guide - 4
Launching First Run Wizard
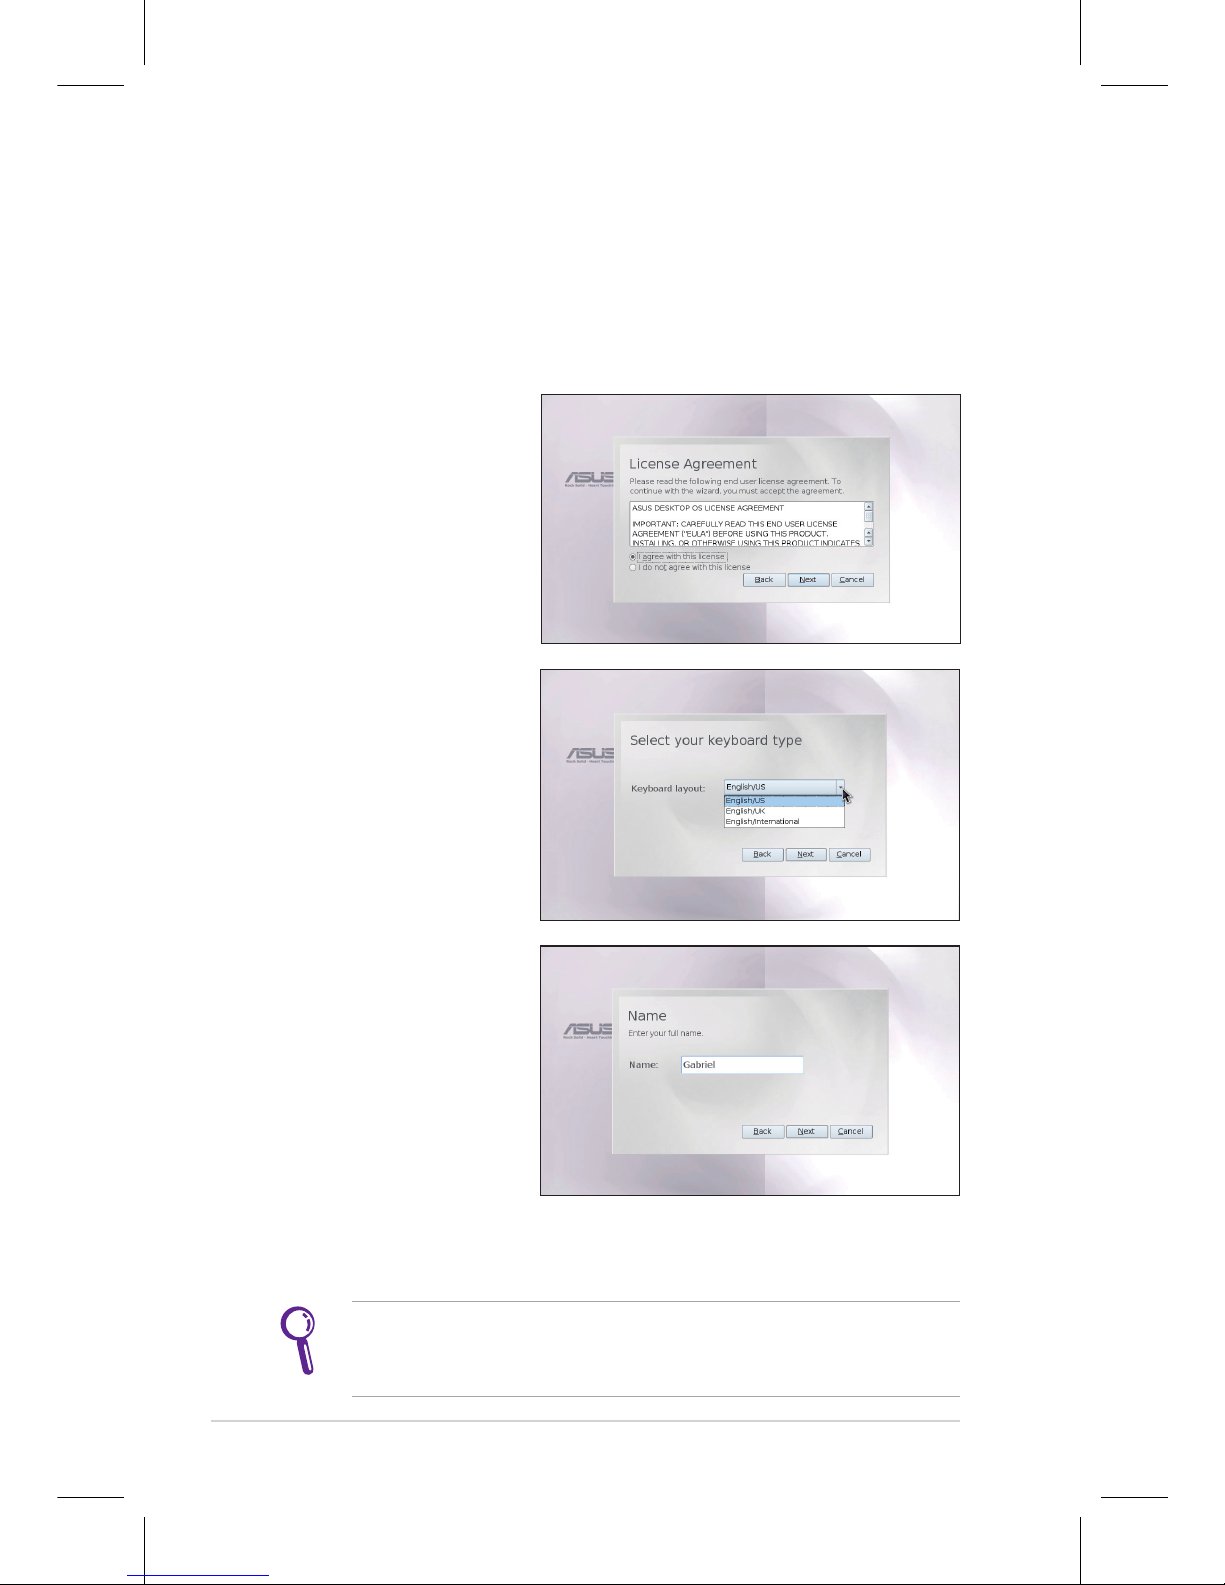
For the first time you start your Eee PC, the First Run Wizard will
auto-launch and lead you through setting up your preferences and
some basic information. Follow the wizard instructions to finish the
initiation.
1. Toggle I agree with
this license and click
Next to continue.
ASUS Eee PC also supports Windows® XP operating system. Refer
to user guide for detailed instructions and notices on installing
the WinXP SP2 32 bit operating system.
4. Follow the on-screen instructions to complete the first run
wizard.
2. Select your keyboard
type and click Next
to continue.
3. Enter your User
Name. Click Next to
continue.
Page 5
Quick Use Guide - 5
Conguring a network connection
Wireless network connection
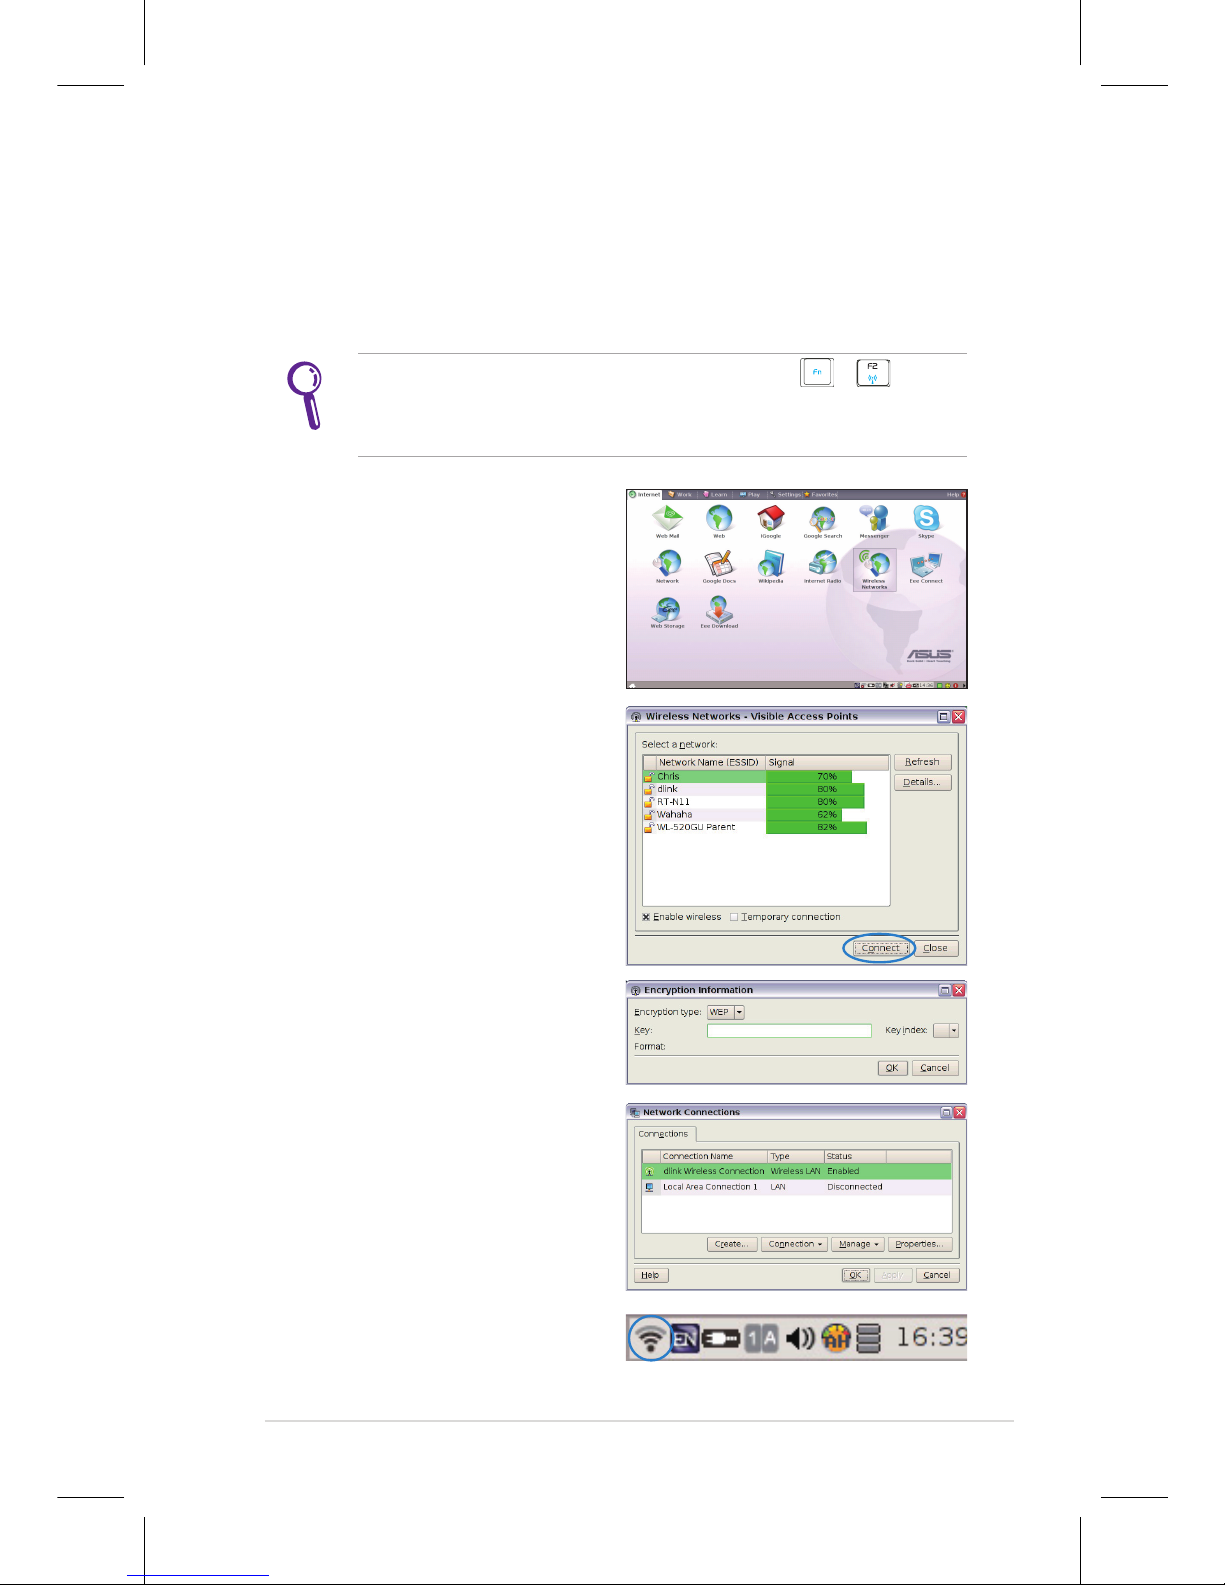
1. Ensure that the wireless LAN function is enabled.
2. Click
Wireless Networks
from Internet tab.
3. Select the wireless access
point you want to connect
to from the list and click
Connect to build the
connection. Ensure that the
box before Enable wireless is
checked.
4. When connecting, you may
have to enter a password.
5. After a connection has been
established, the connection is
shown on the list.
6. You can see the wireless
signal strength bars in the
Notification area.
Activate the wireless LAN function by pressing + (<Fn>
+ <F2>) before configuring a wireless network connection if
needed.
Page 6
Quick Use Guide - 6
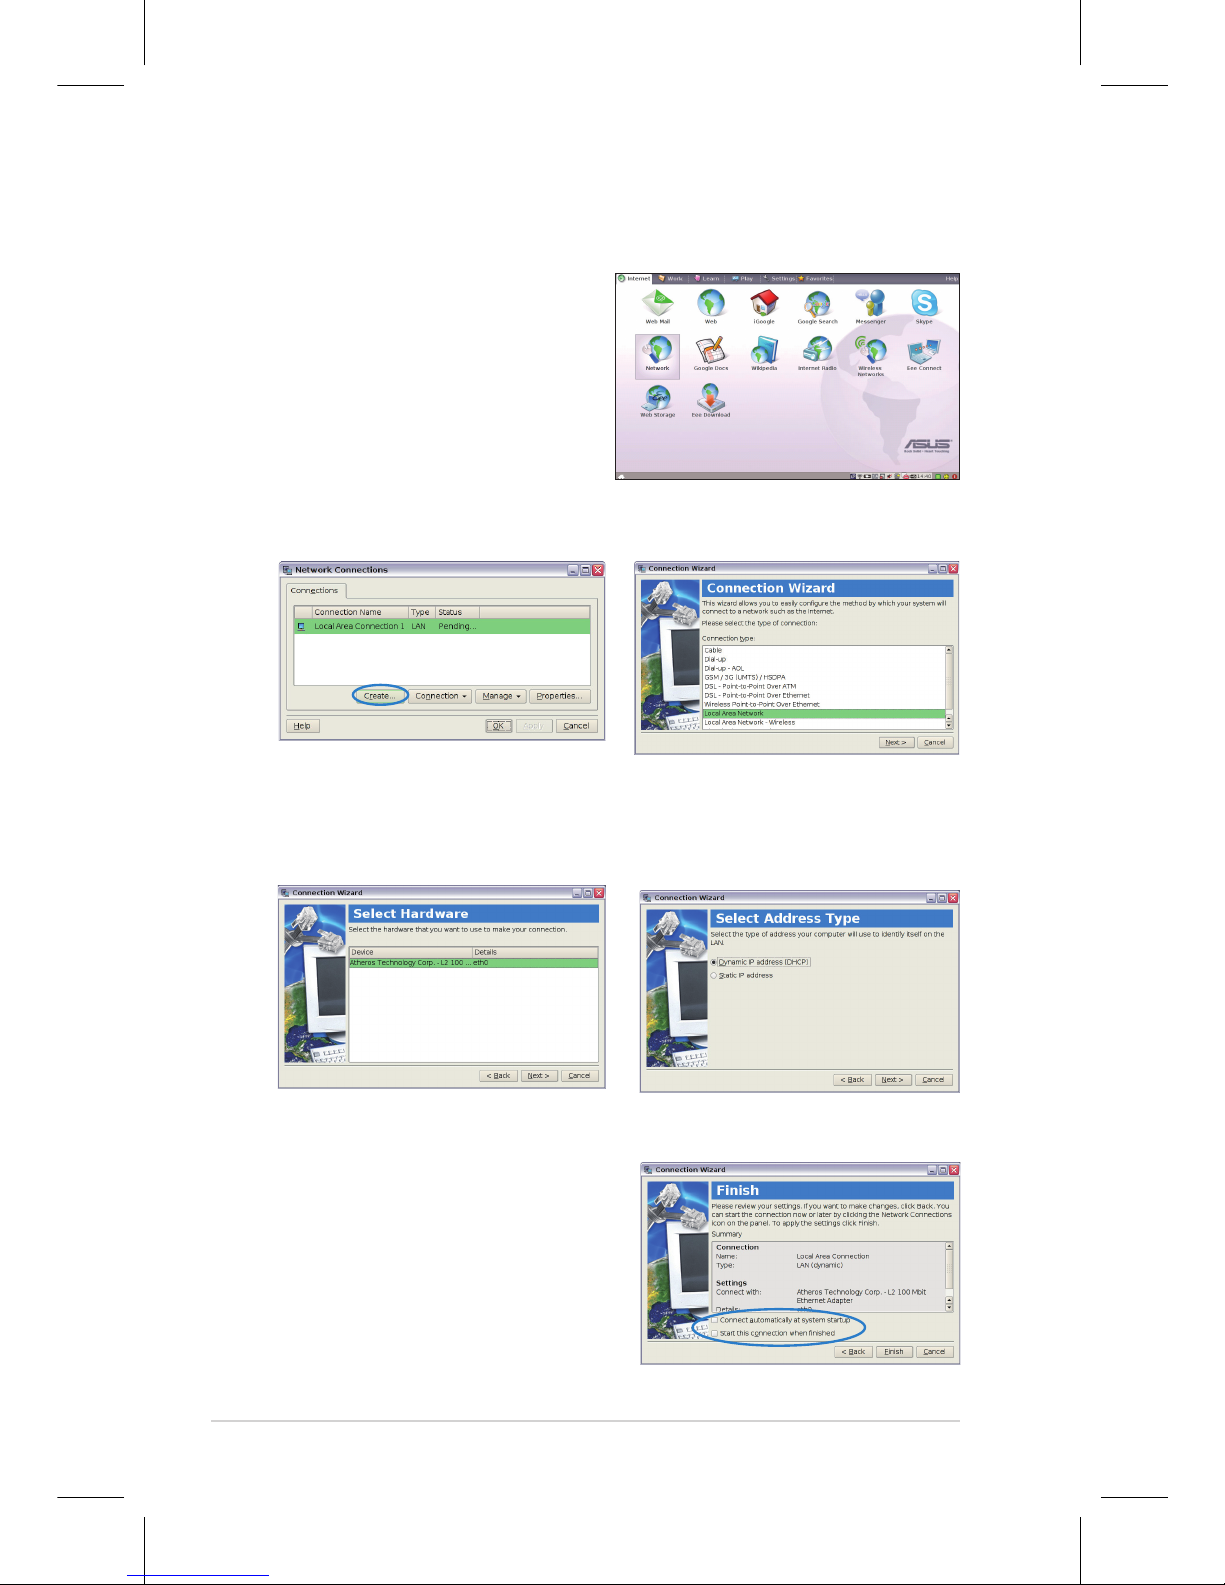
Using a dynamic IP:
1. From the Internet tab,
select Network to start the
configuration.
Local Area Network
3. Select the type of connection
you are using and click Next.
5. Toggle the first option
Dynamic IP address (DHCP)
and click Next.
2. Click Create to create a
network connection.
6. Enter a name for this connection and click
Next.
7. Click
Finish to apply the
settings or click Back to make
changes. Click the box before
Connect automatically at
system startup or before the
box Start this connection
when finished based on your
needs.
4. Select the hardware that you
want to use to make your
connection and click Next.
Page 7
Quick Use Guide - 7
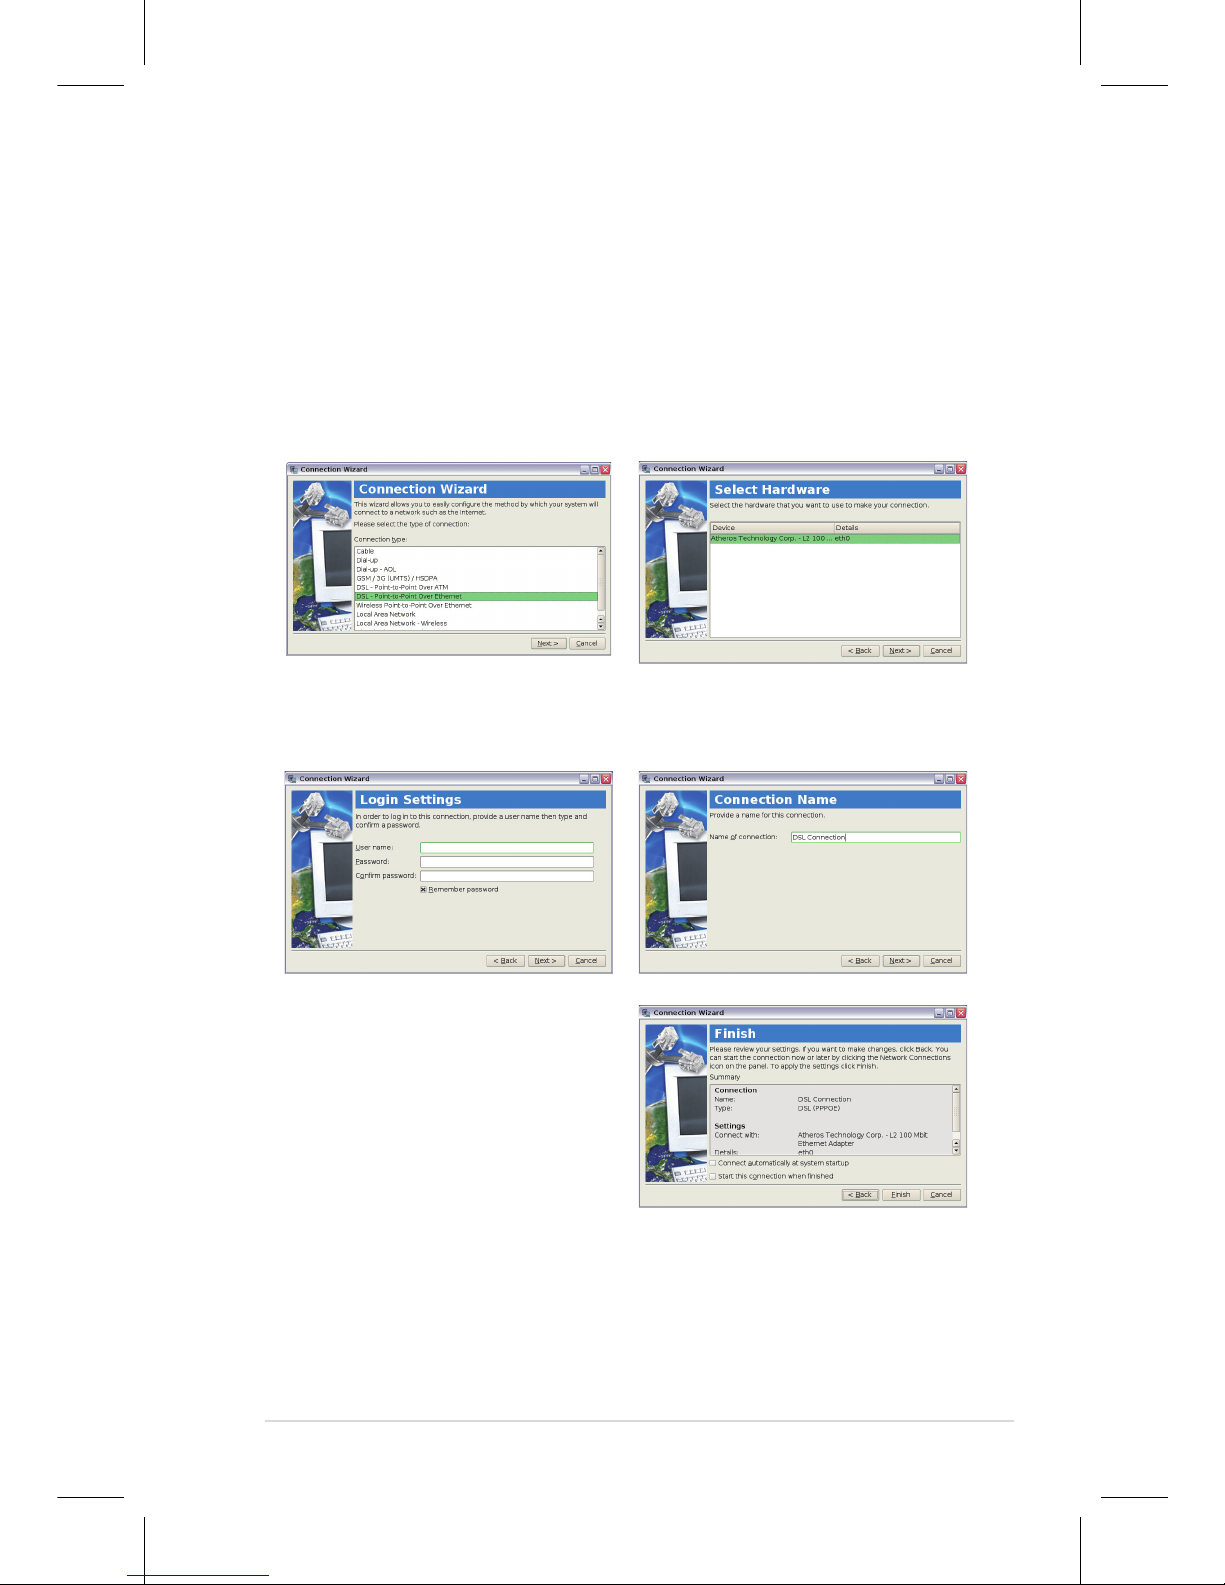
Point-to-Point Protocol over Ethernet (PPPoE)
1. Repeat the step 1–2 of Using a static IP to start the PPPoE
network configuration.
3. Select the hardware that you
want to use to make your
connection and click Next.
5. Enter a name for this
connection and click Next.
6. Click Finish to apply the
settings or click Back to make
changes.
4. Enter your user and password
and click Next..
2. Select the type of connection
you are using and click Next.
Page 8

Quick Use Guide - 8
 Loading...