Asus 90YU00I2-B03EA0 Quick Start Guide

¤

Car Camcorder

Quick Start Guide

Q10364 / First Edition / May 2015

Table of contents

English

Italiano

Русский

Magyar

Português

Polski

Română

Svenska

Türkçe

العربية

NOTE / NOTA / ПРИМЕЧАНИЕ / MEGJEGYZÉS / NOTA / NOTATKA / NOTĂ / NOTERA / NOT / تاظحلام:

The screenshots in this Quick Start Guide are for reference only.

Gli screenshot presenti in questa guida rapida hanno puro scopo illustrativo.

Иллюстрации в этом руководстве приведены в ознакомительных целях.

A Gyors üzembe helyezési útmutató képernyőképei kizárólag hivatkozási célt szolgálnak.

As capturas de ecrã neste Guia de consulta rápida servem apenas como referência.

Zrzuty ekranu zamieszczone w skróconej instrukcji obsługi służą wyłącznie jako odniesienie.

Capturile de ecran din acest Ghid de pornire rapidă sunt doar pentru consultare.

Skärmbilder i den här snabbstartsguiden är endast för referens.

Bu Hızlı Başlatma Kılavuzundaki ekran görüntüleri yalnızca başvuru amaçlıdır.

English

Package contents

Carcamcorder

Warranty card

Carcharger

Quick Start Guide

GPS Mount holder

Self-adhesivecableclips

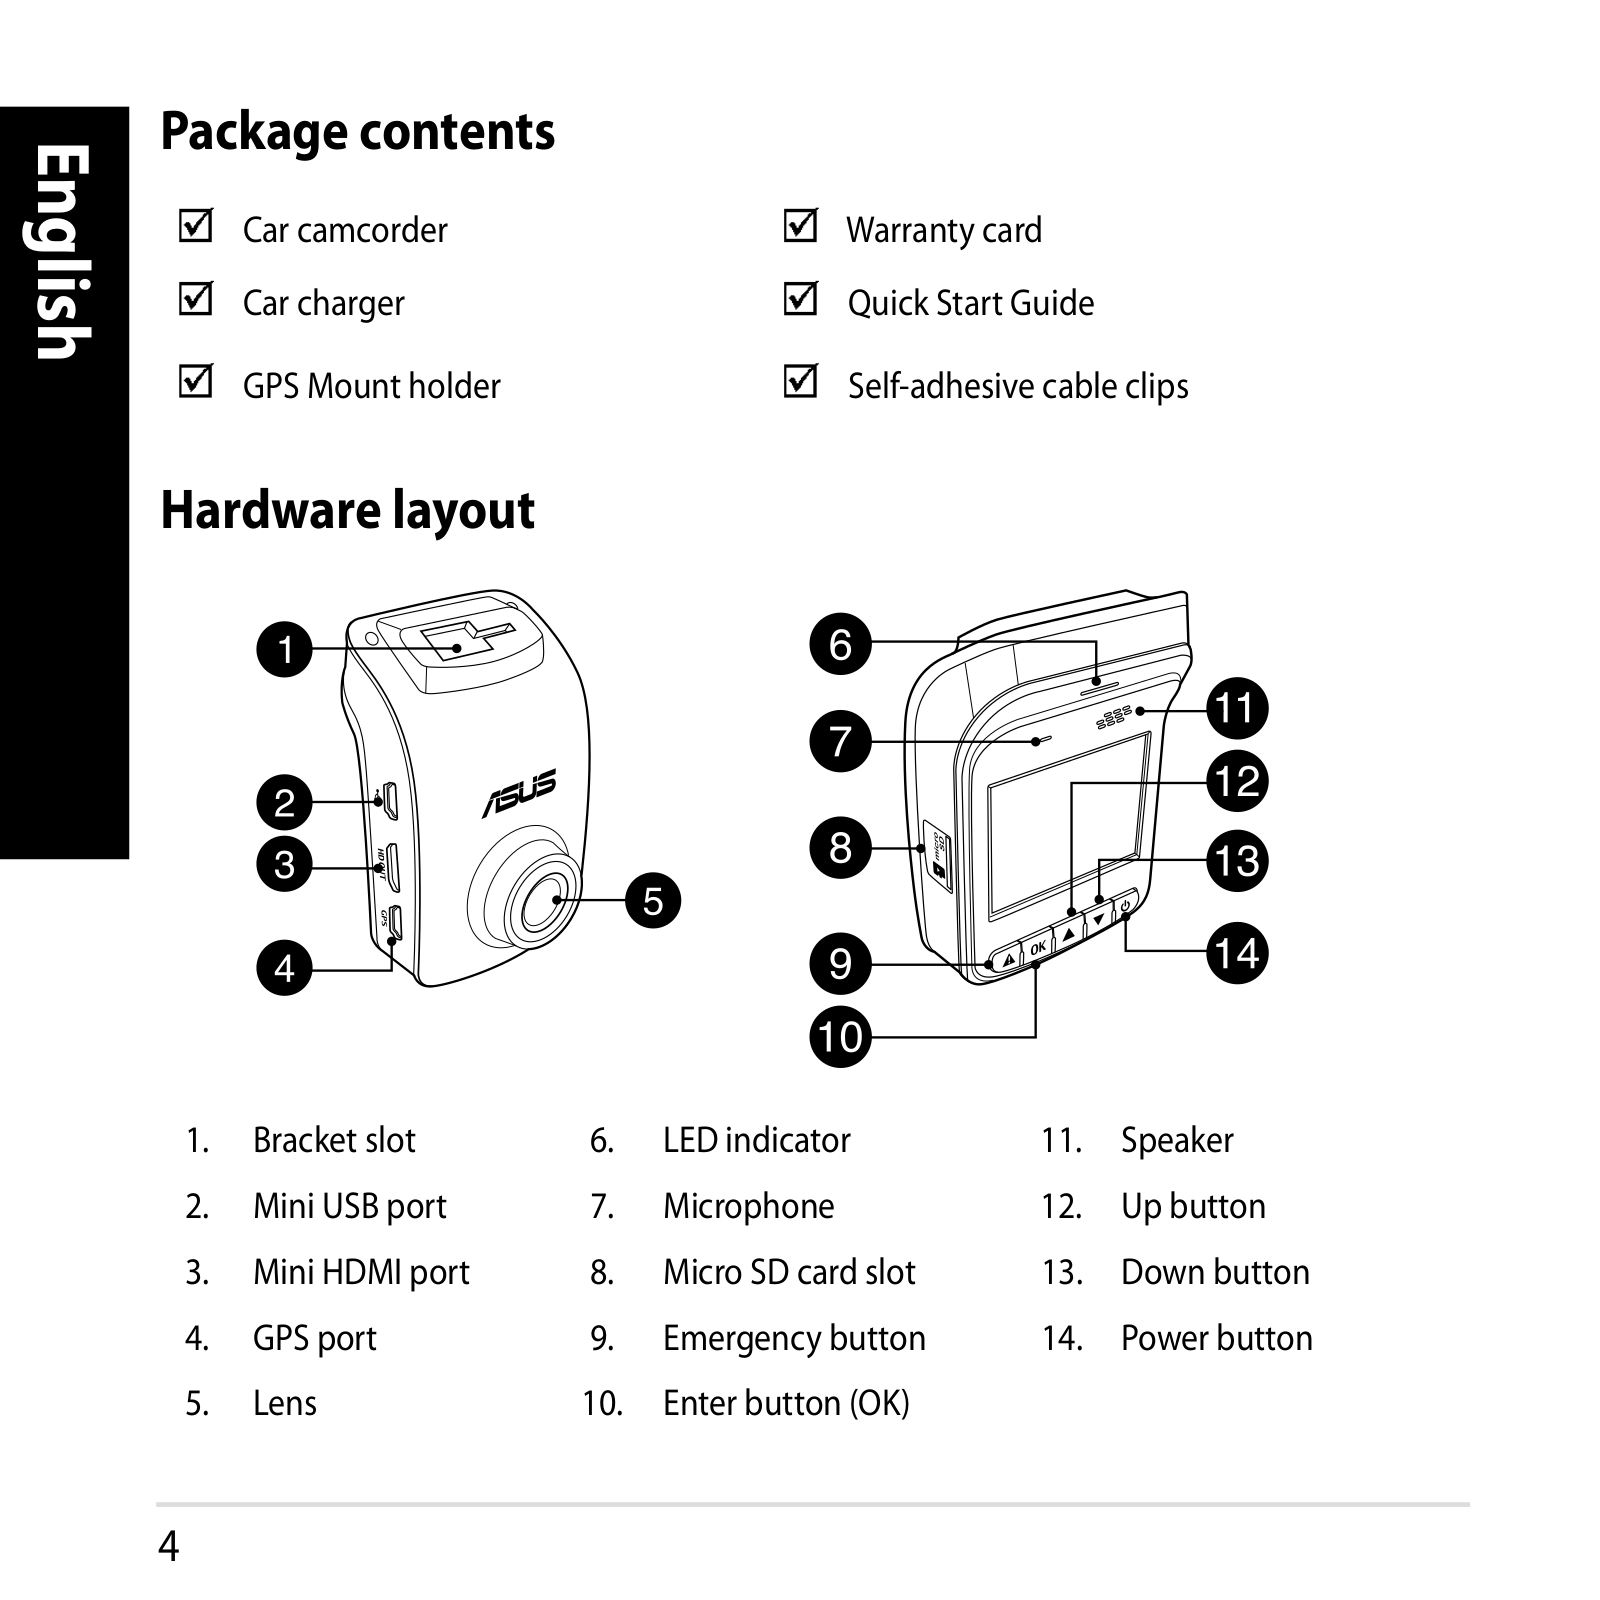
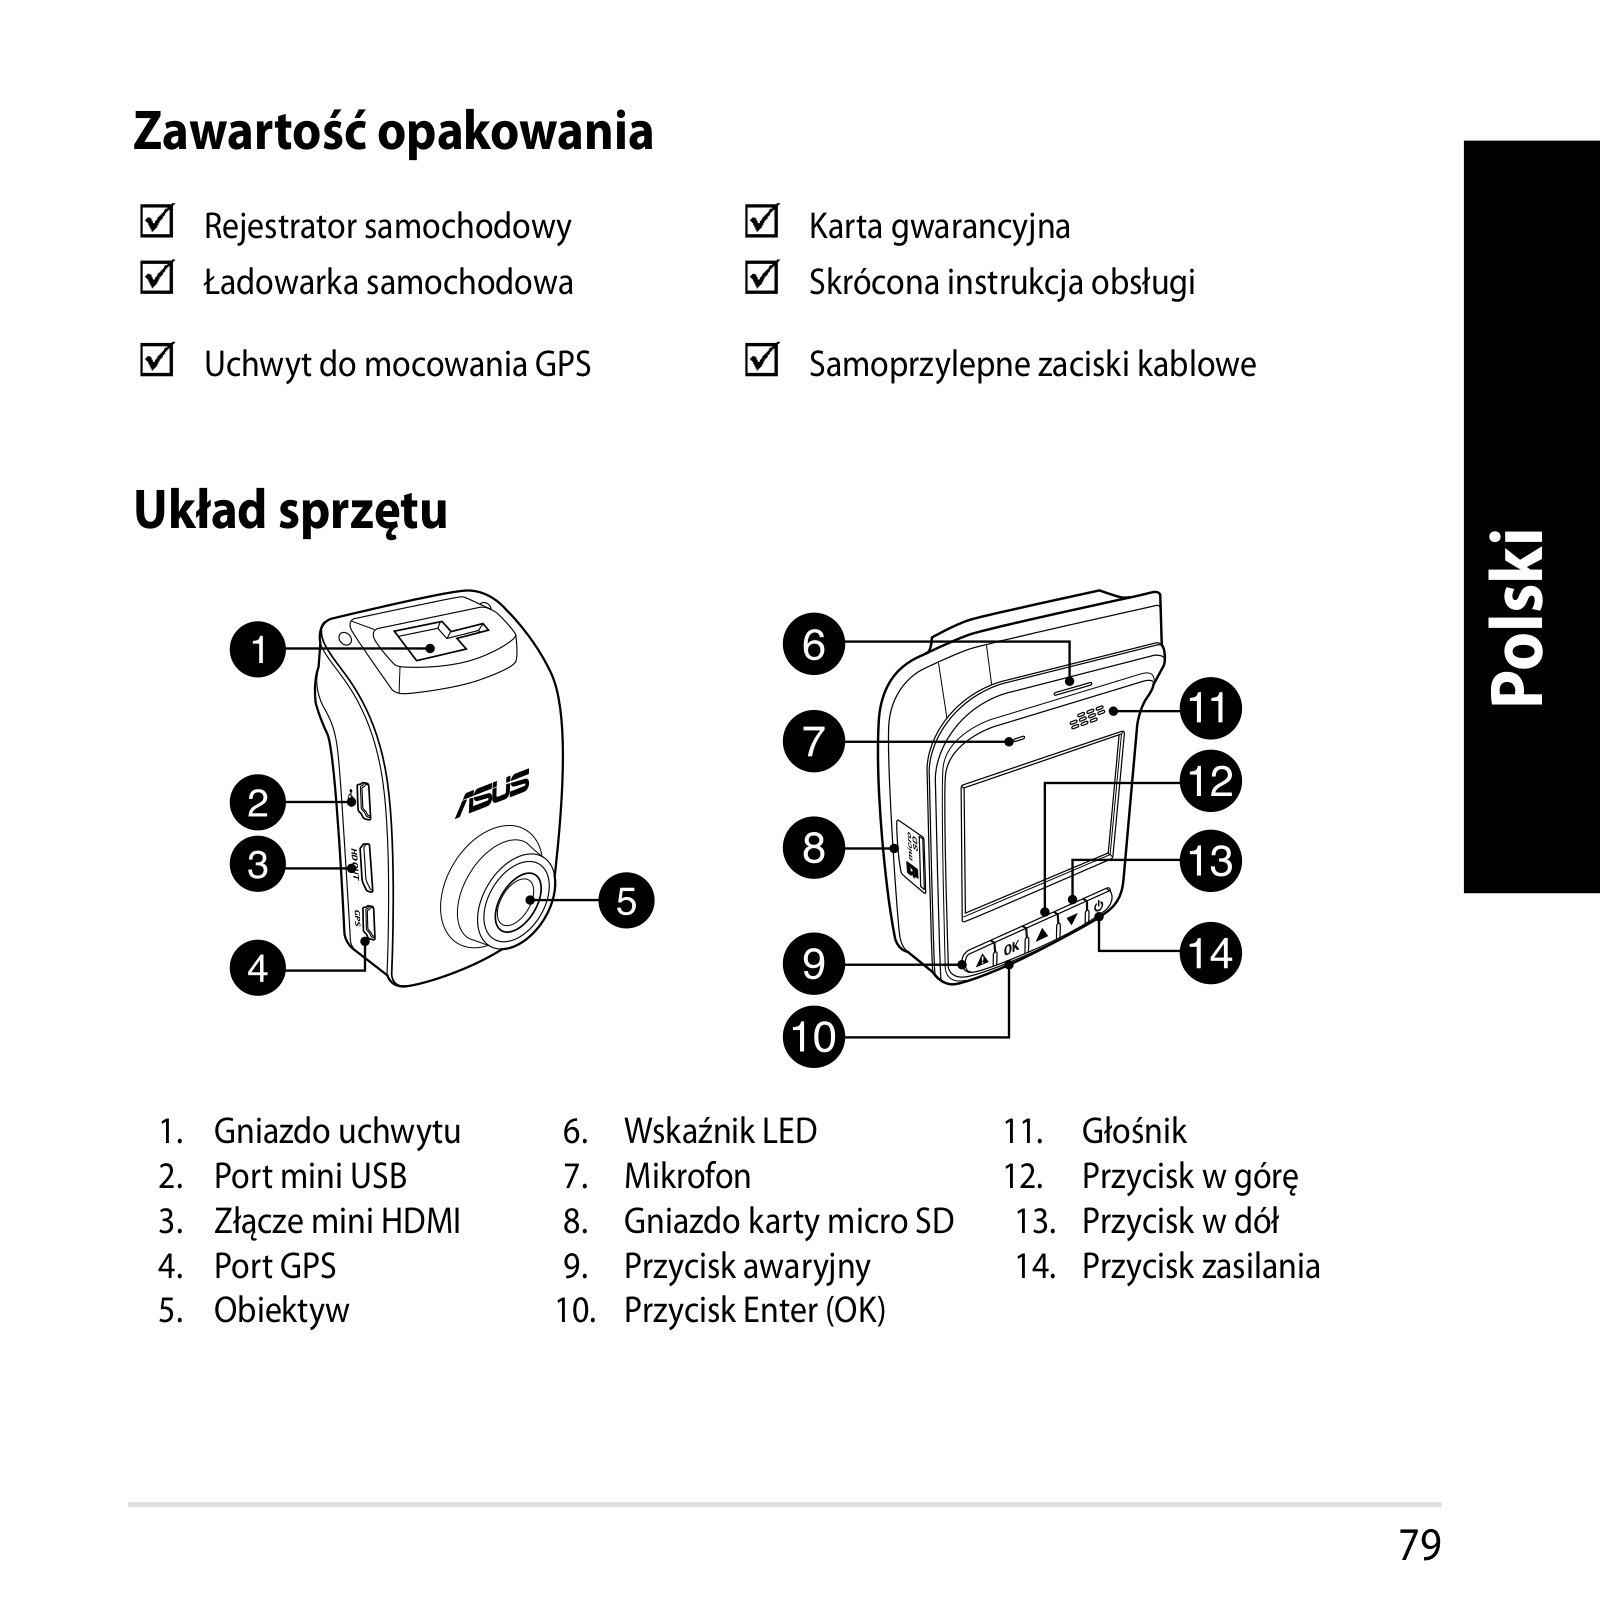
Hardware layout


1.

Bracket slot

6.

LED indicator

11.

Speaker

2.

MiniUSBport

7.

Microphone

12.

Upbutton

3.

MiniHDMIport

8.

Micro SD card slot

13.

Downbutton

4.

GPSport

9.

Emergency button

14.

Powerbutton

5.

Lens

10.

Enter button (OK)


4

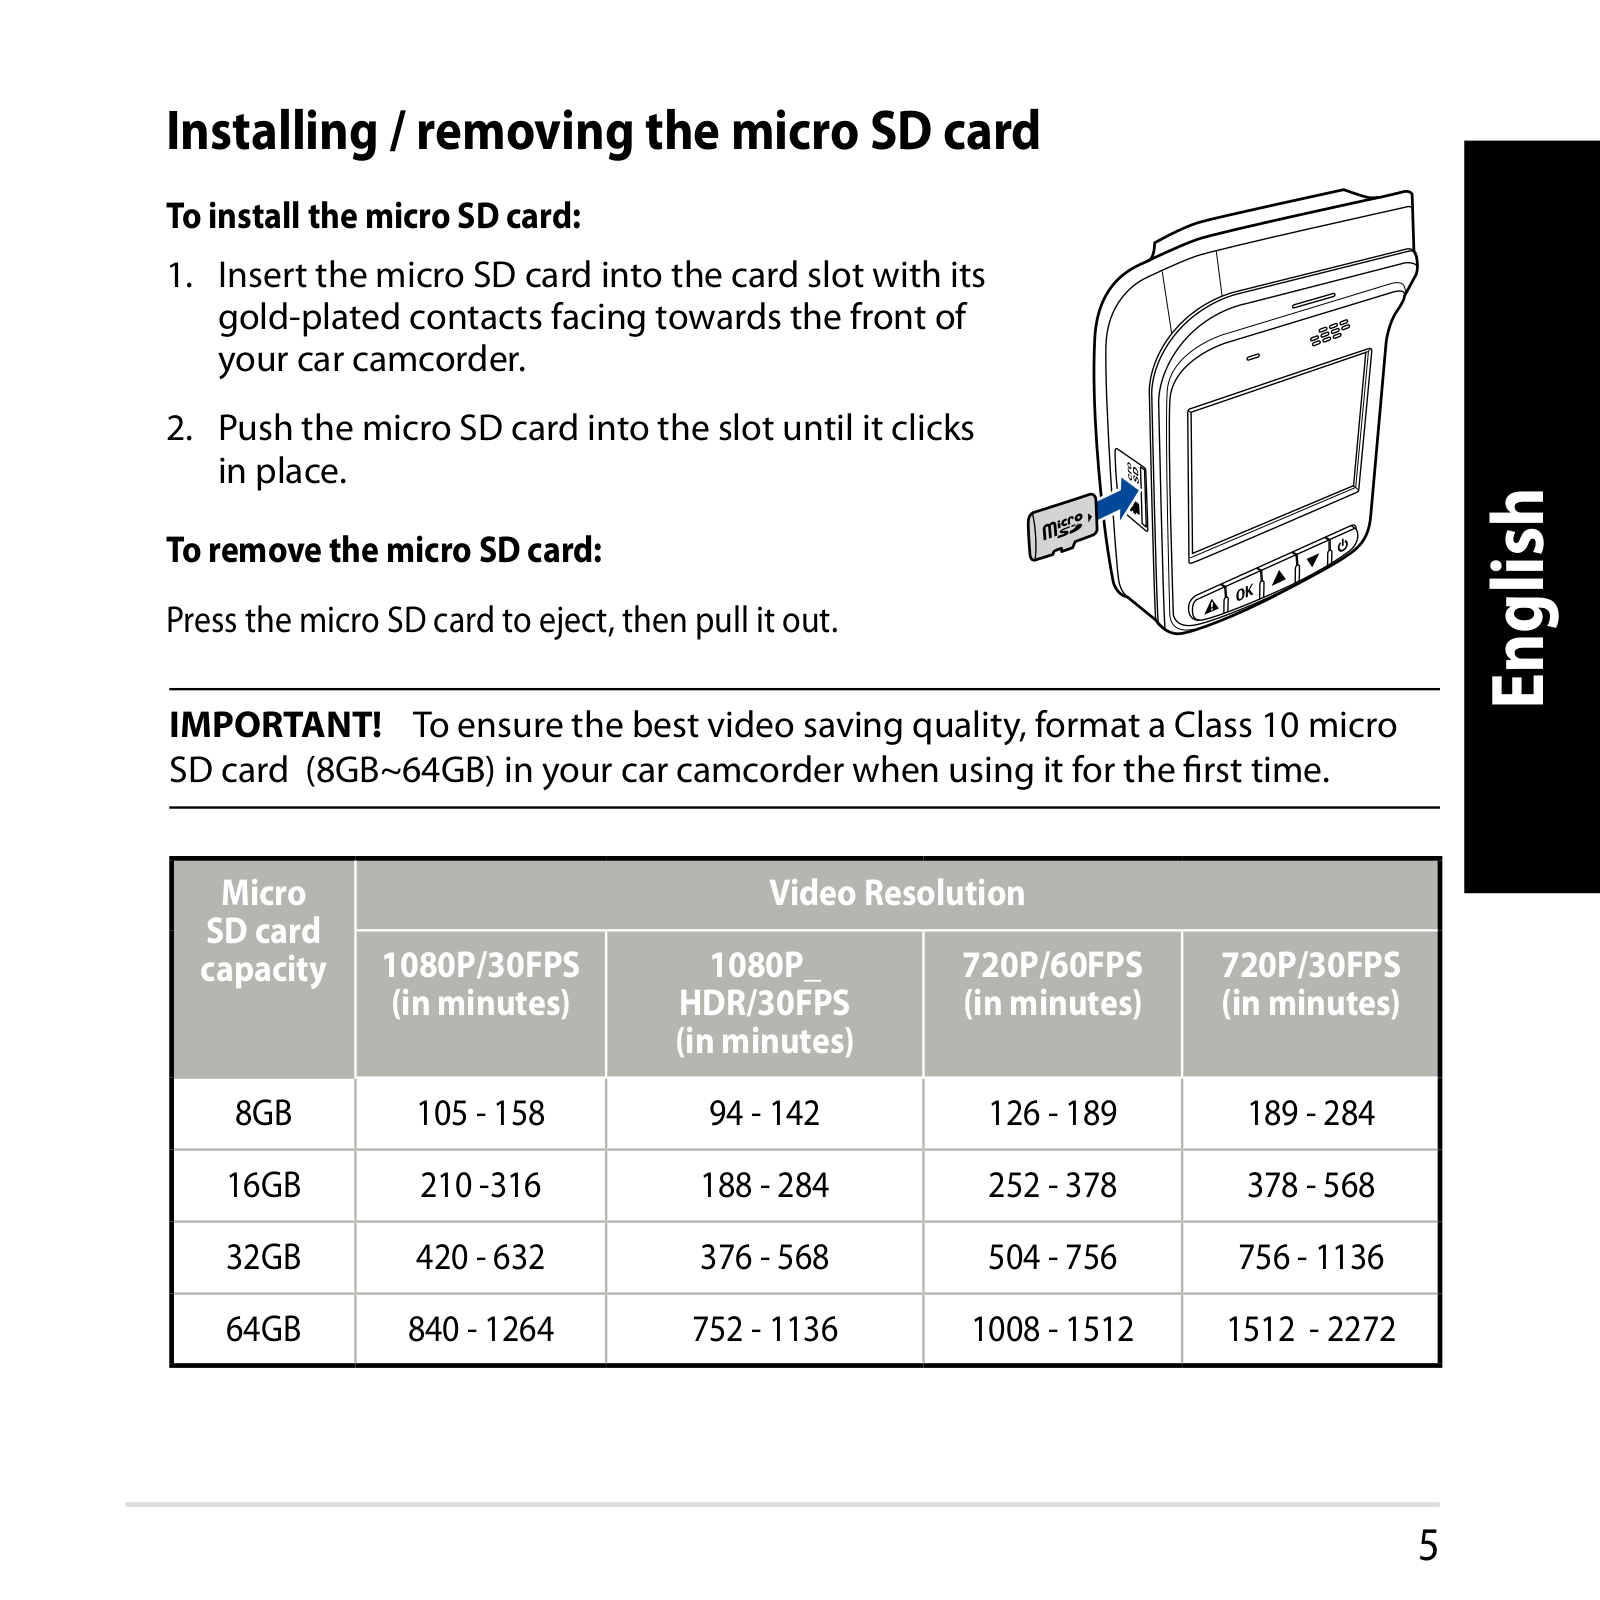
Installing / removing the micro SD card

To install the micro SD card:

1. Insert the micro SD card into the card slot with its gold-plated contacts facing towards the front of your car camcorder.

2. Push the micro SD card into the slot until it clicks

in place.

To remove the micro SD card:

PressthemicroSDcardtoeject,thenpullitout.

IMPORTANT! To ensure the best video saving quality, format a Class 10 micro

SD card (8GB~64GB) in your car camcorder when using it for the first time.

Micro


Video Resolution


SD card

1080P/30FPS

1080P_

720P/60FPS

720P/30FPS

capacity


(in minutes)

HDR/30FPS

(in minutes)

(in minutes)


(in minutes)


8GB

105-158

94-142

126

-189

189-284


16GB

210-316

188-284

252

-378

378-568


32GB

420-632

376-568

504

-756

756-1136


64GB

840-1264

752-1136

1008

-1512

1512 -2272


English

5

English

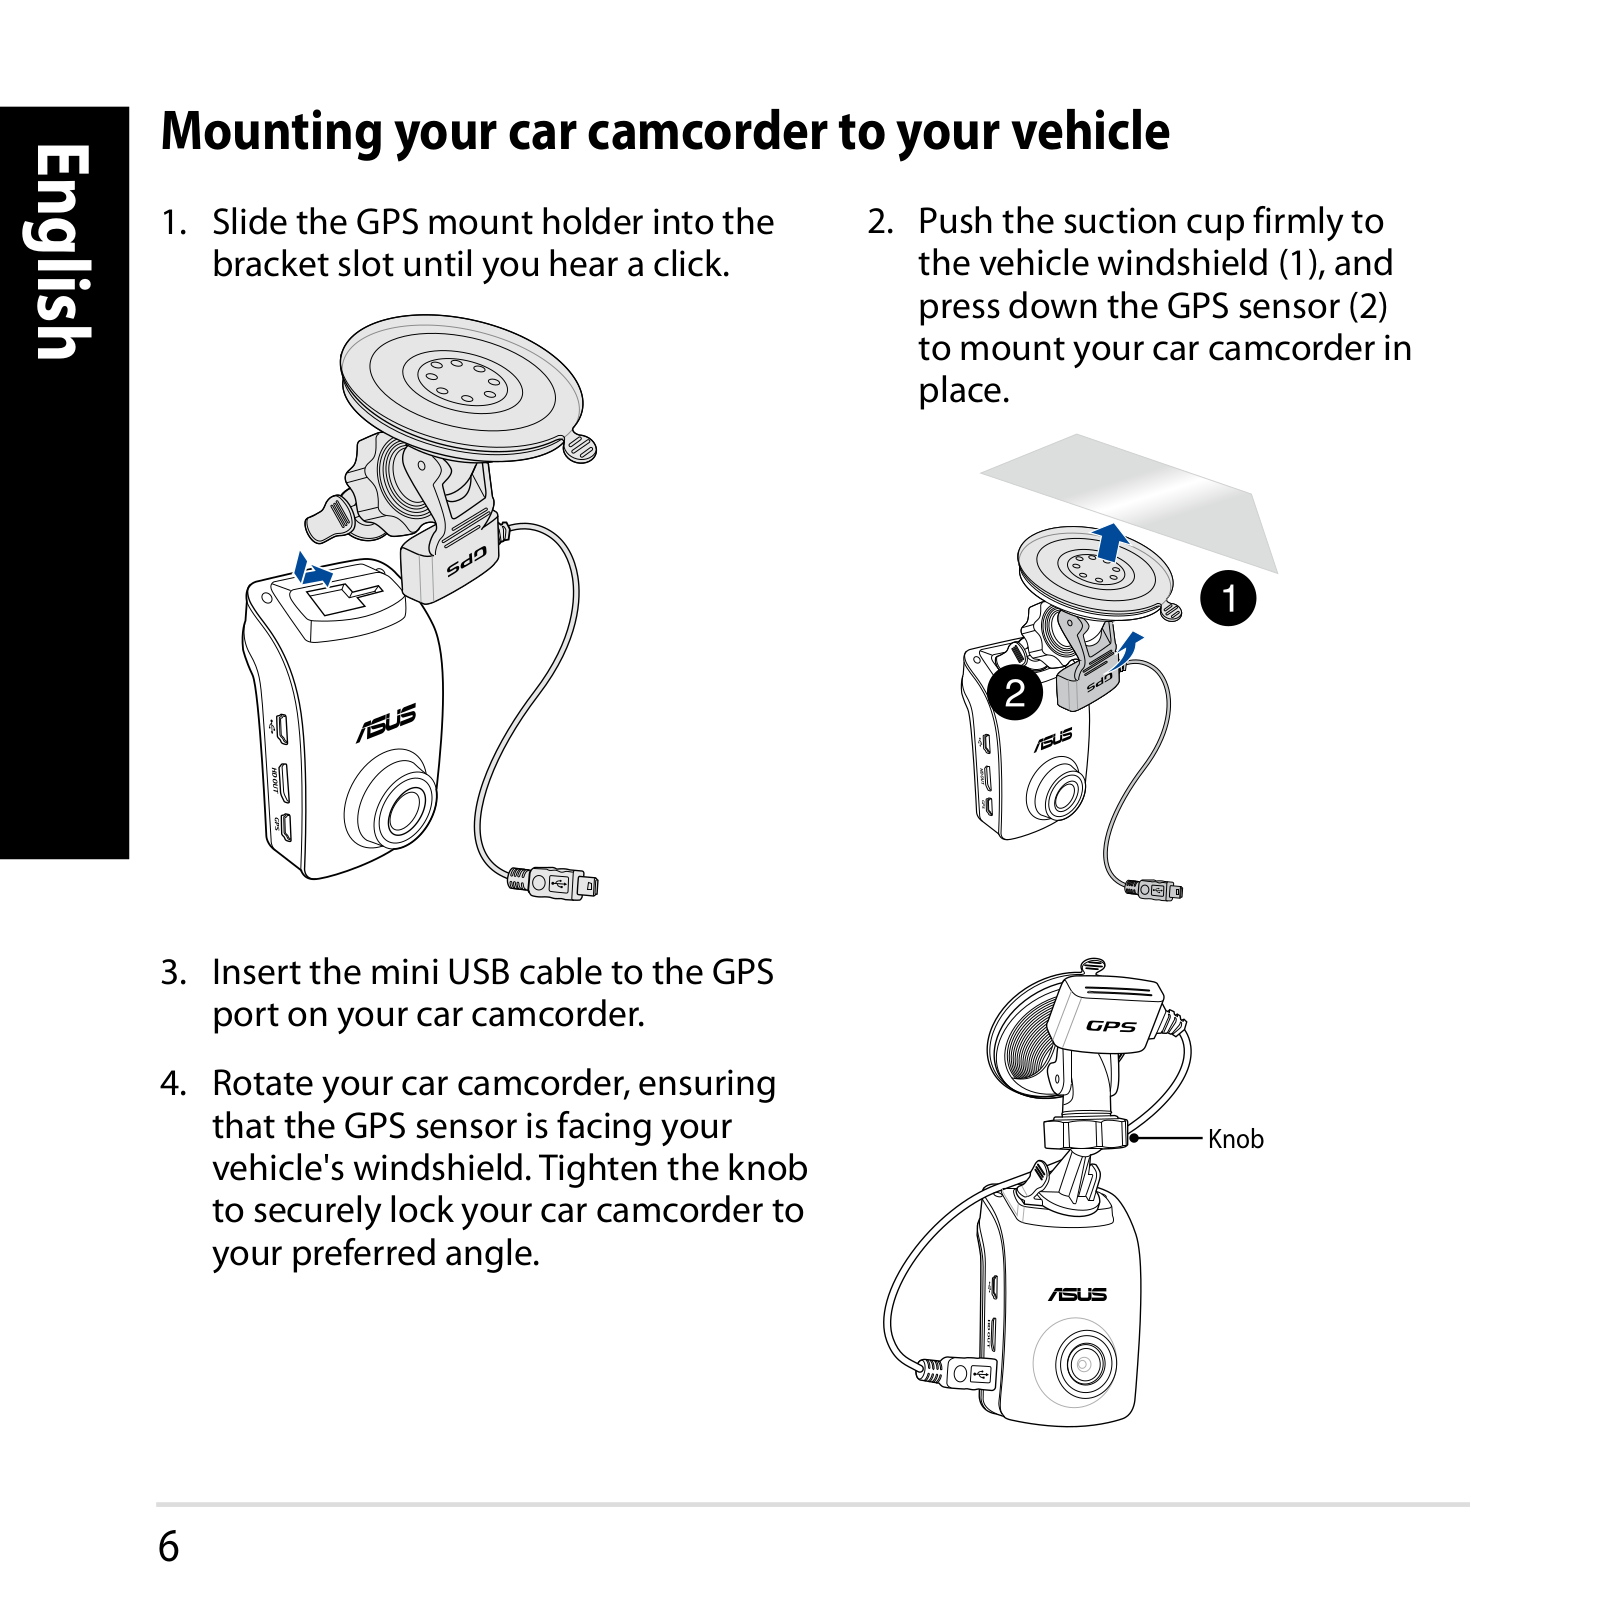
Mounting your car camcorder to your vehicle

1. Slide the GPS mount holder into the

2. Push the suction cup firmly to

bracket slot until you hear a click.

the vehicle windshield (1), and


press down the GPS sensor (2)


to mount your car camcorder in


place.

3.

Insert the mini USB cable to the GPS


port on your car camcorder.


4.

Rotate your car camcorder, ensuring


that the GPS sensor is facing your

Knob

vehicle's windshield.Tighten the knob to securely lock your car camcorder to your preferred angle.

6

Connecting your car camcorder

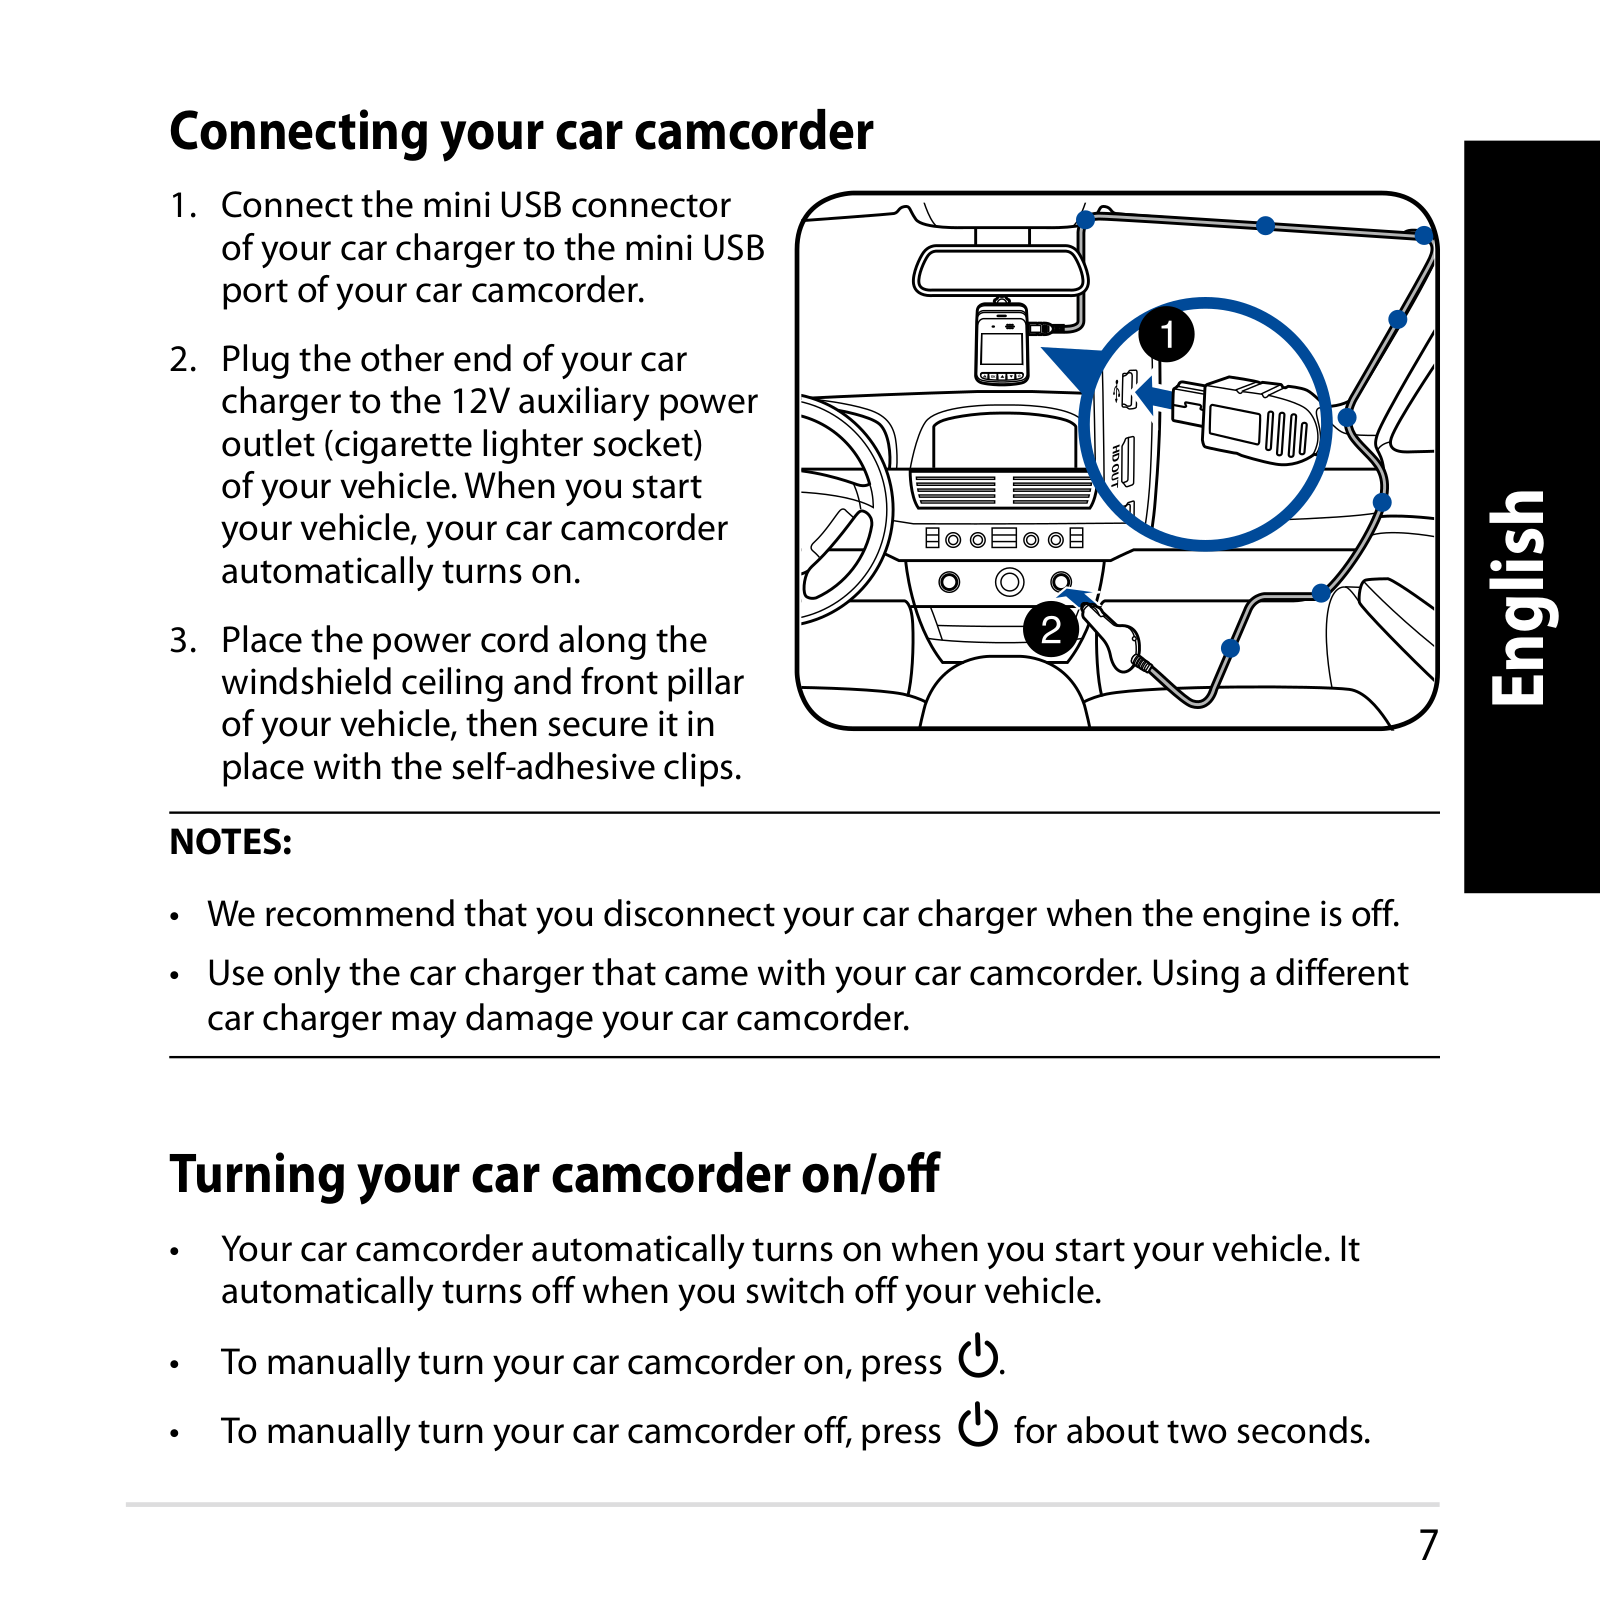
1. Connect the mini USB connector of your car charger to the mini USB port of your car camcorder.

2. Plug the other end of your car charger to the 12V auxiliary power outlet (cigarette lighter socket)

of your vehicle.When you start your vehicle, your car camcorder automatically turns on.

3. Place the power cord along the windshield ceiling and front pillar of your vehicle, then secure it in place with the self-adhesive clips.

NOTES:

We recommend that you disconnect your car charger when the engine is off.

Use only the car charger that came with your car camcorder. Using a different car charger may damage your car camcorder.

Turning your car camcorder on/off

Your car camcorder automatically turns on when you start your vehicle. It automatically turns off when you switch off your vehicle.

To manually turn your car camcorder on, press .

To manually turn your car camcorder off, press for about two seconds.

English

7

English

Using the warning system functions (LDWS and FCWS)

WithitsGPSfunction,yourcarcamcorderlogstheGPSpositionduringrecordingandthe locationinformationisstoredwiththerecordedvideos.

IMPORTANT!

Ensure that the GPS sensor is securely attached to your camcorder. For more details, refer to the section Mounting your car camcorder to your vehicle.

Activate the LDWS and FCWS functions from the Settings menu.

For accurate LDWS and FCWS detection, ensure the following:

The GPS sensor is facing your vehicle's front windshield.

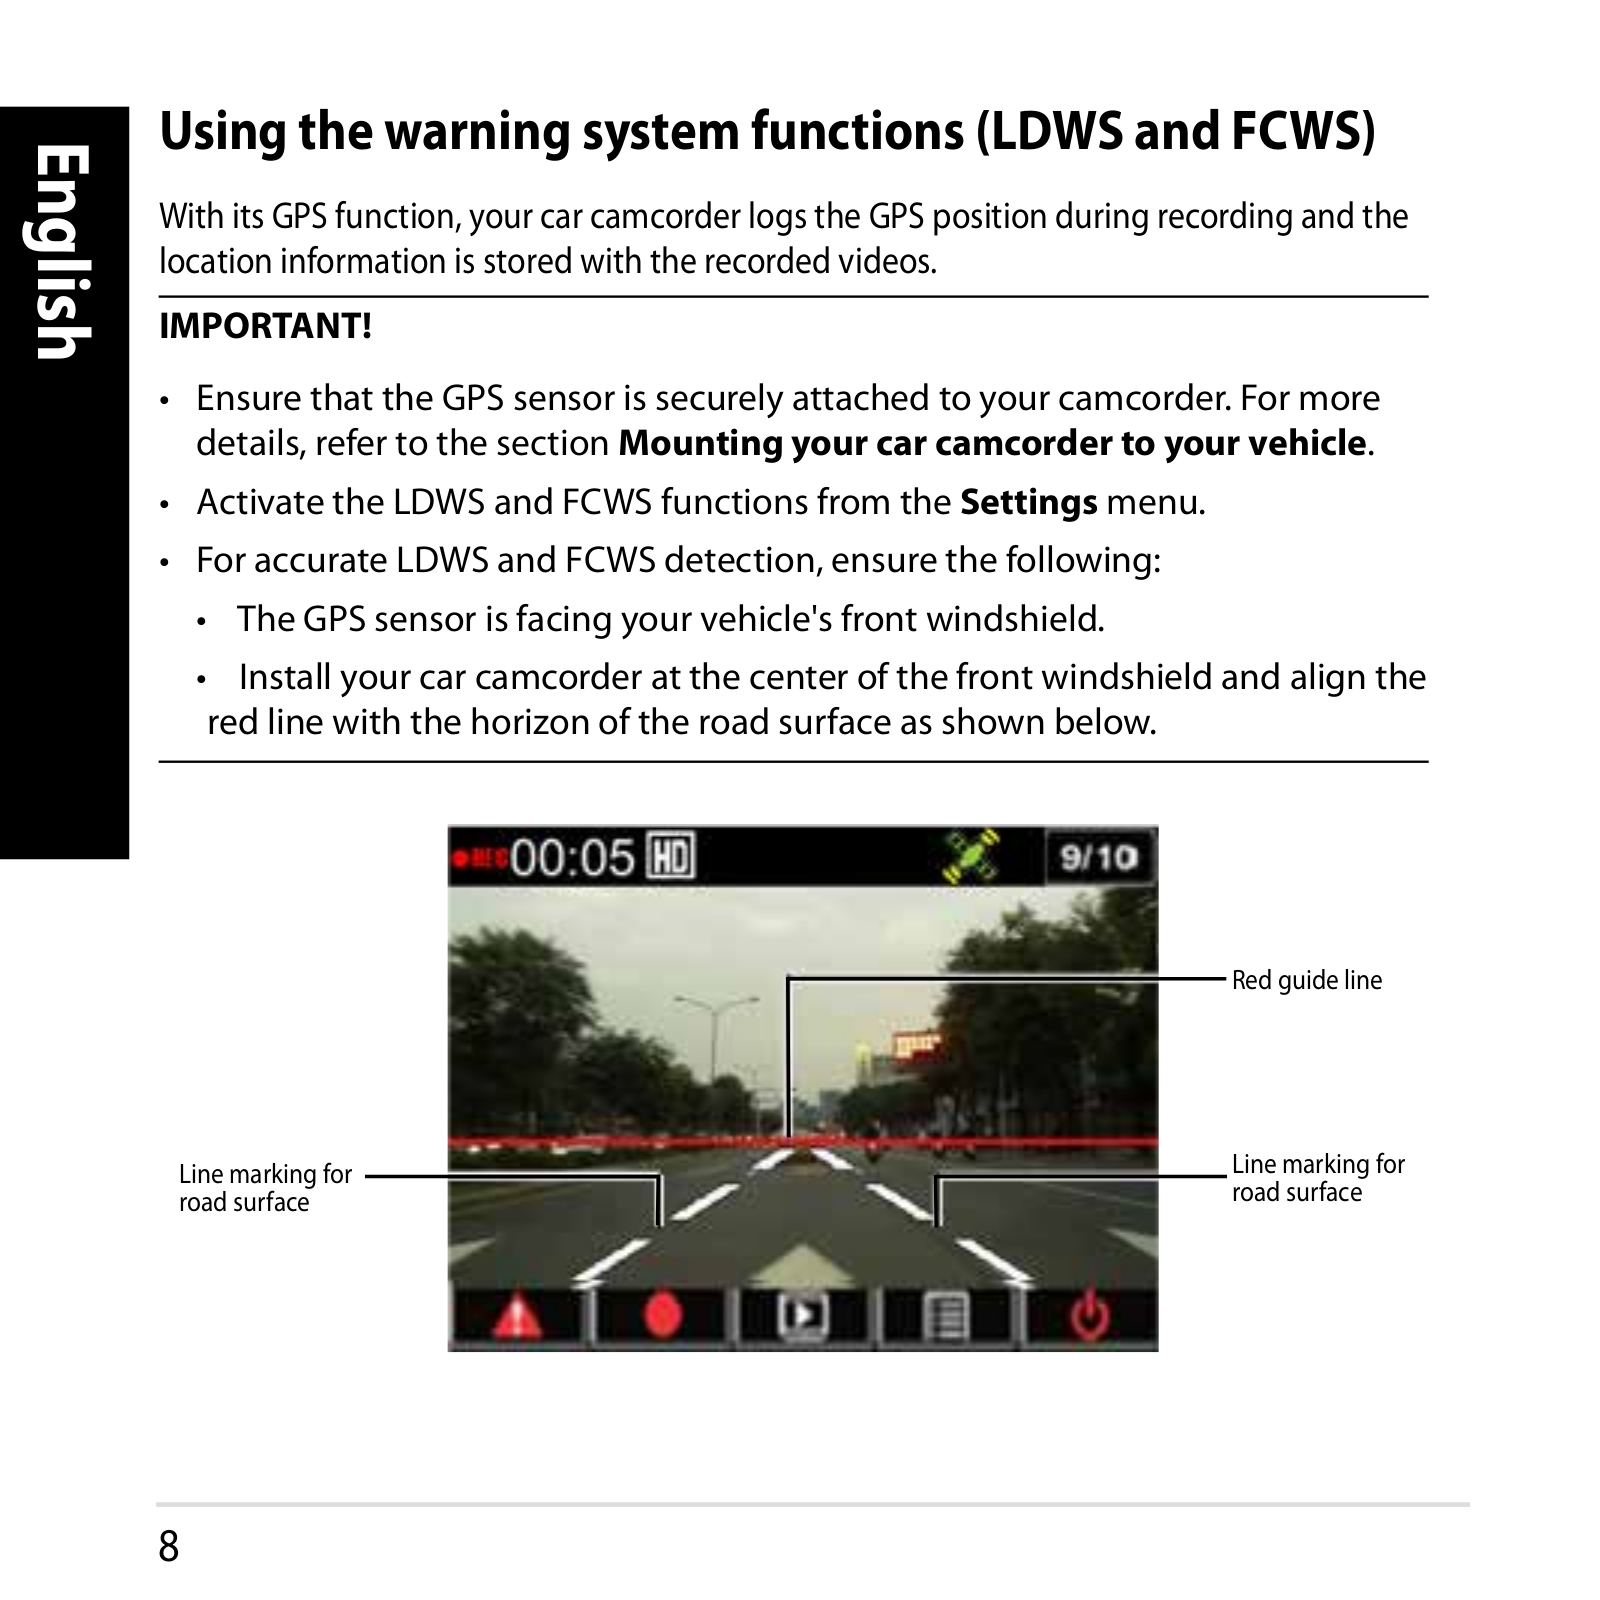
Install your car camcorder at the center of the front windshield and align the red line with the horizon of the road surface as shown below.


Red guide line

Linemarkingfor

Linemarkingfor

roadsurface

roadsurface


8

Lane Departure Warning System (LDWS)

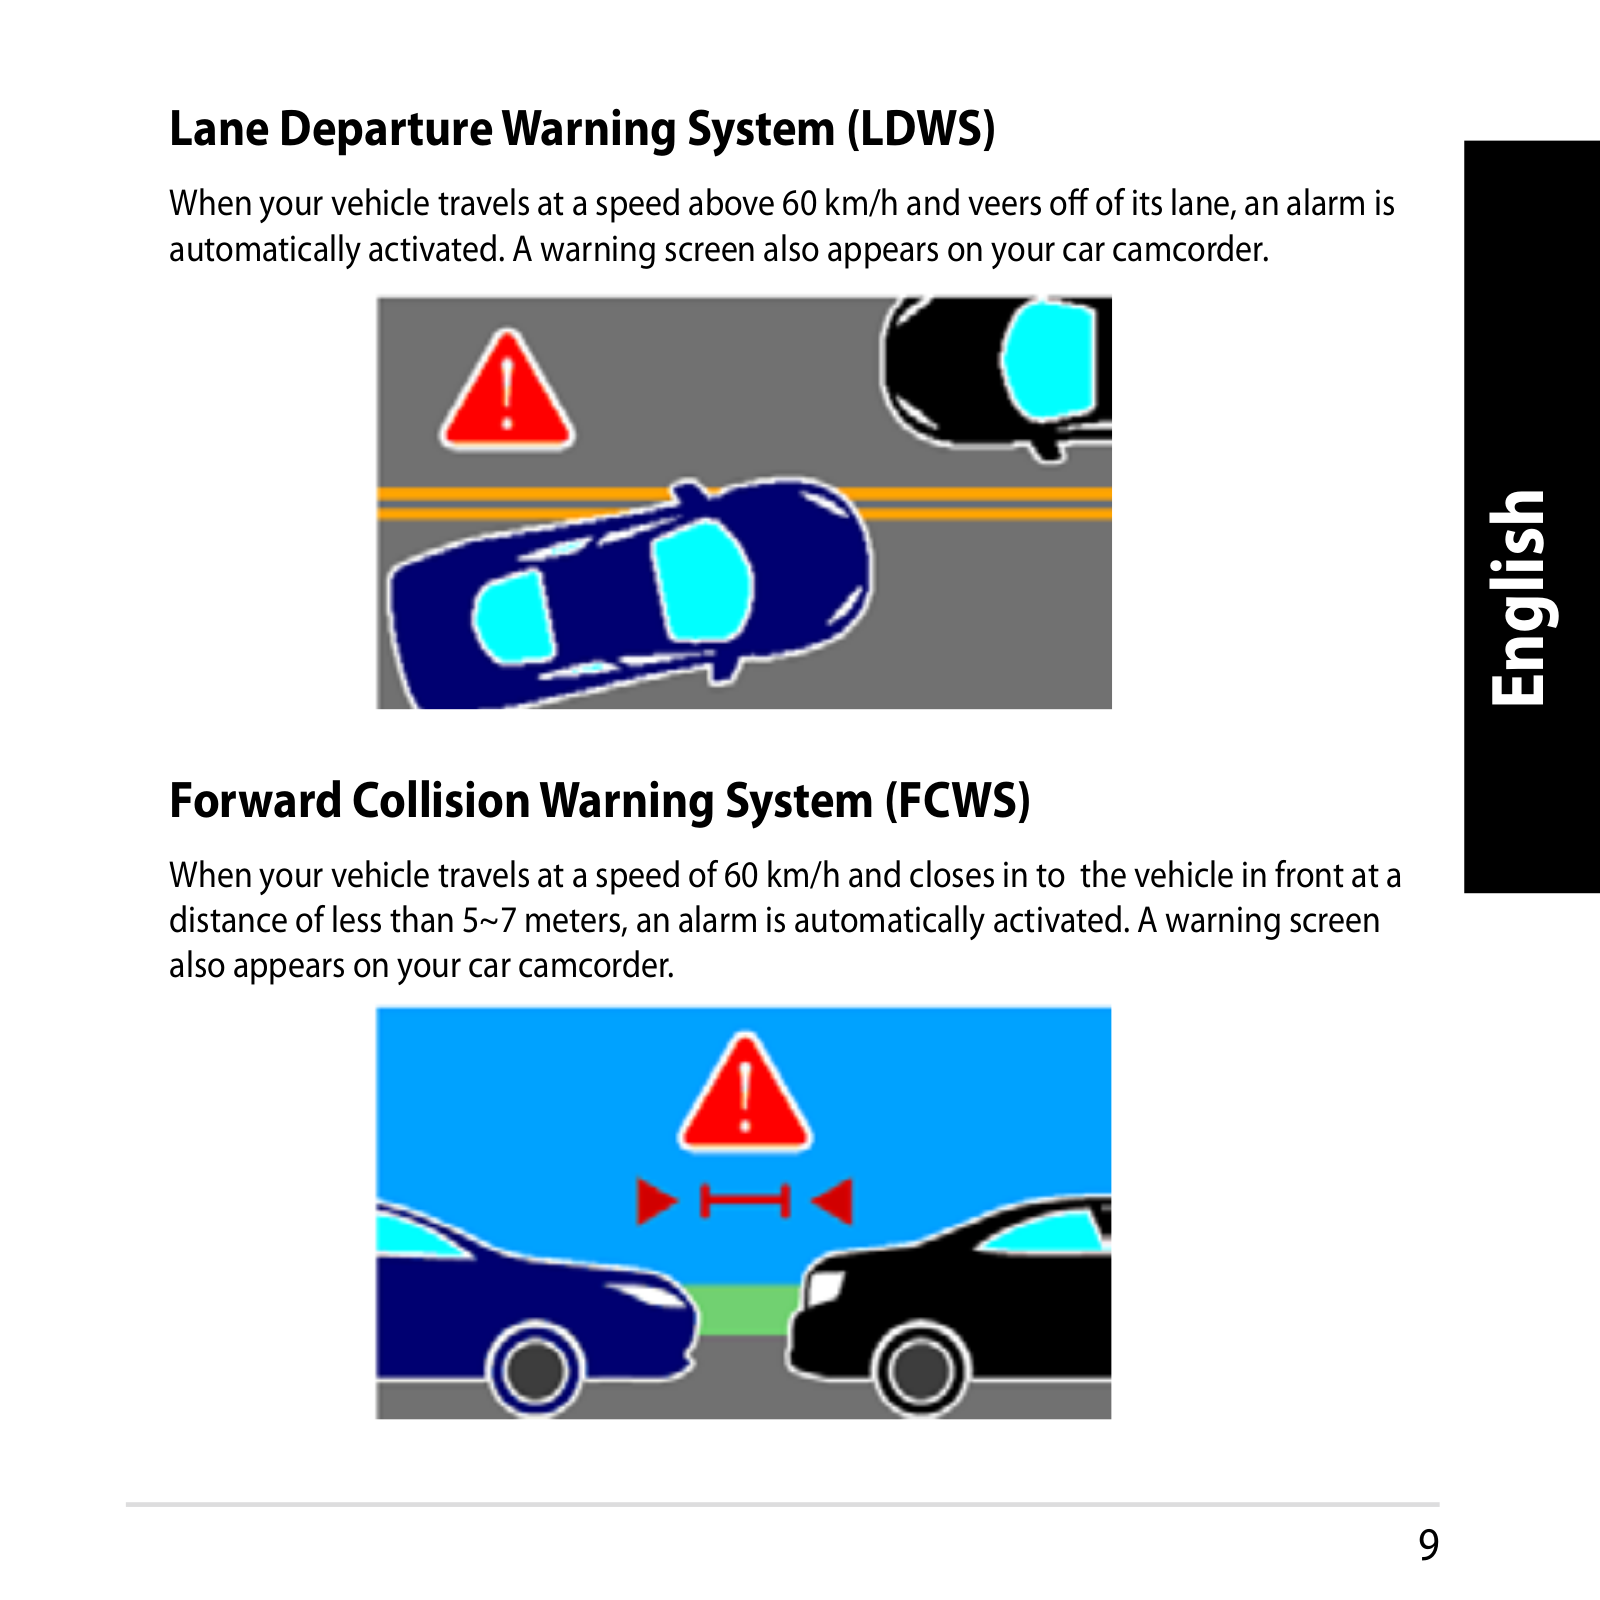
Whenyourvehicletravelsataspeedabove60km/handveersoffofitslane,analarmis automaticallyactivated.Awarningscreenalsoappearsonyourcarcamcorder.

English

Forward Collision Warning System (FCWS)

Whenyourvehicletravelsataspeedof60km/handclosesinto thevehicleinfrontata distanceoflessthan5~7meters,analarmisautomaticallyactivated.Awarningscreen alsoappearsonyourcarcamcorder.

9

English

Setting the date and time

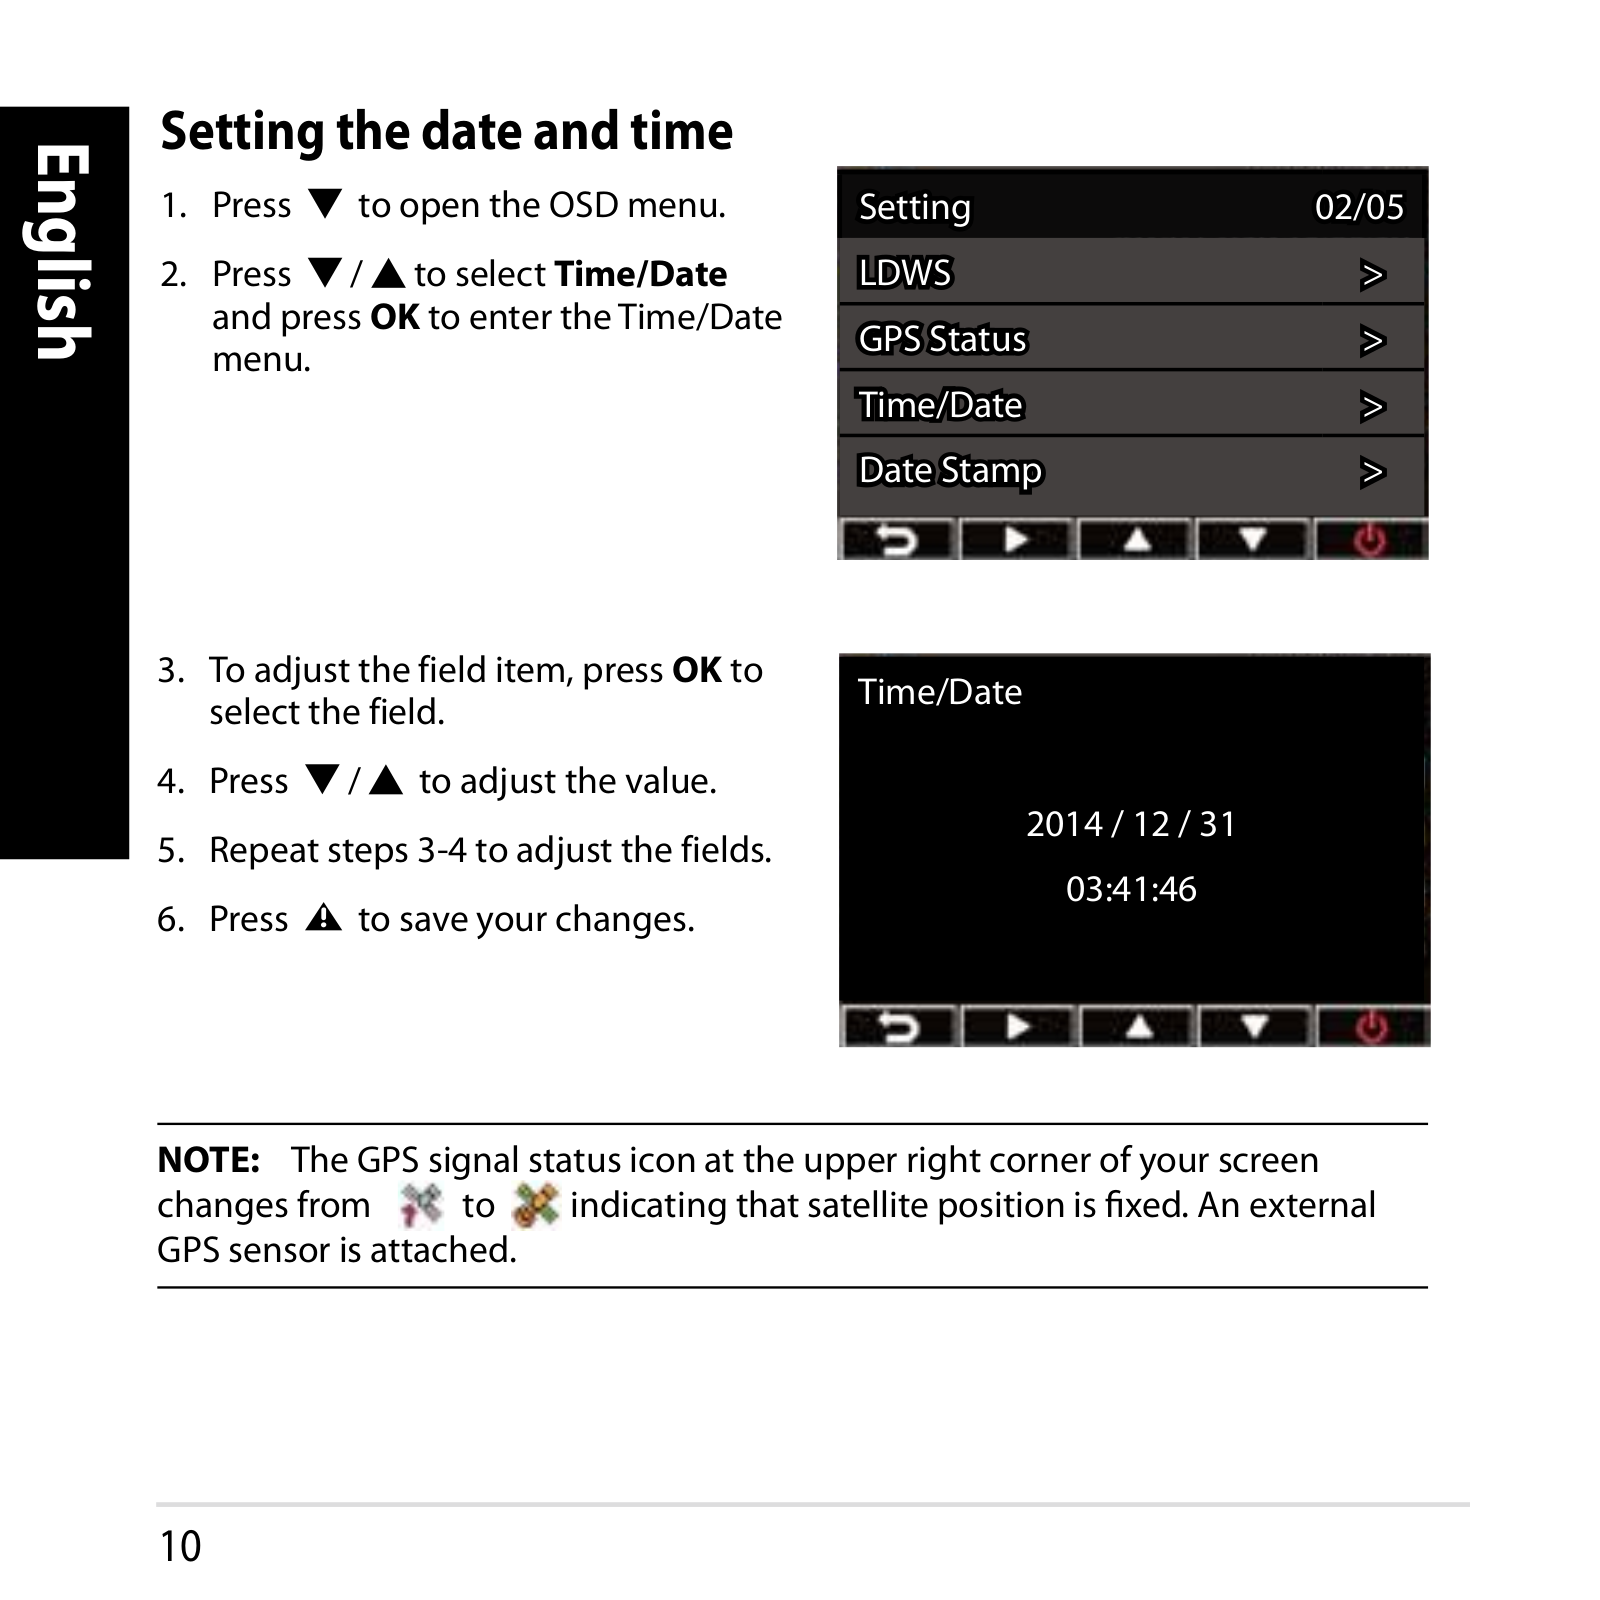
1.Press to open the OSD menu.

2.Press /to select Time/Date and press OK to enter the Time/Date menu.

3.To adjust the field item, press OK to select the field.

4. Press

/

to adjust the value.

5.Repeat steps 3-4 to adjust the fields.

6.Pressto save your changes.

Setting

02/05

LDWS

>

GPS Status

>

Time/Date

>

Date Stamp

>

Time/Date

2014 / 12 / 31

03:41:46

NOTE: The GPS signal status icon at the upper right corner of your screen changes from to indicating that satellite position is fixed. An external GPS sensor is attached.

10

Asus 90YU00I2-B03EA0 Quick Start Guide

Recording Videos

Normal Recording

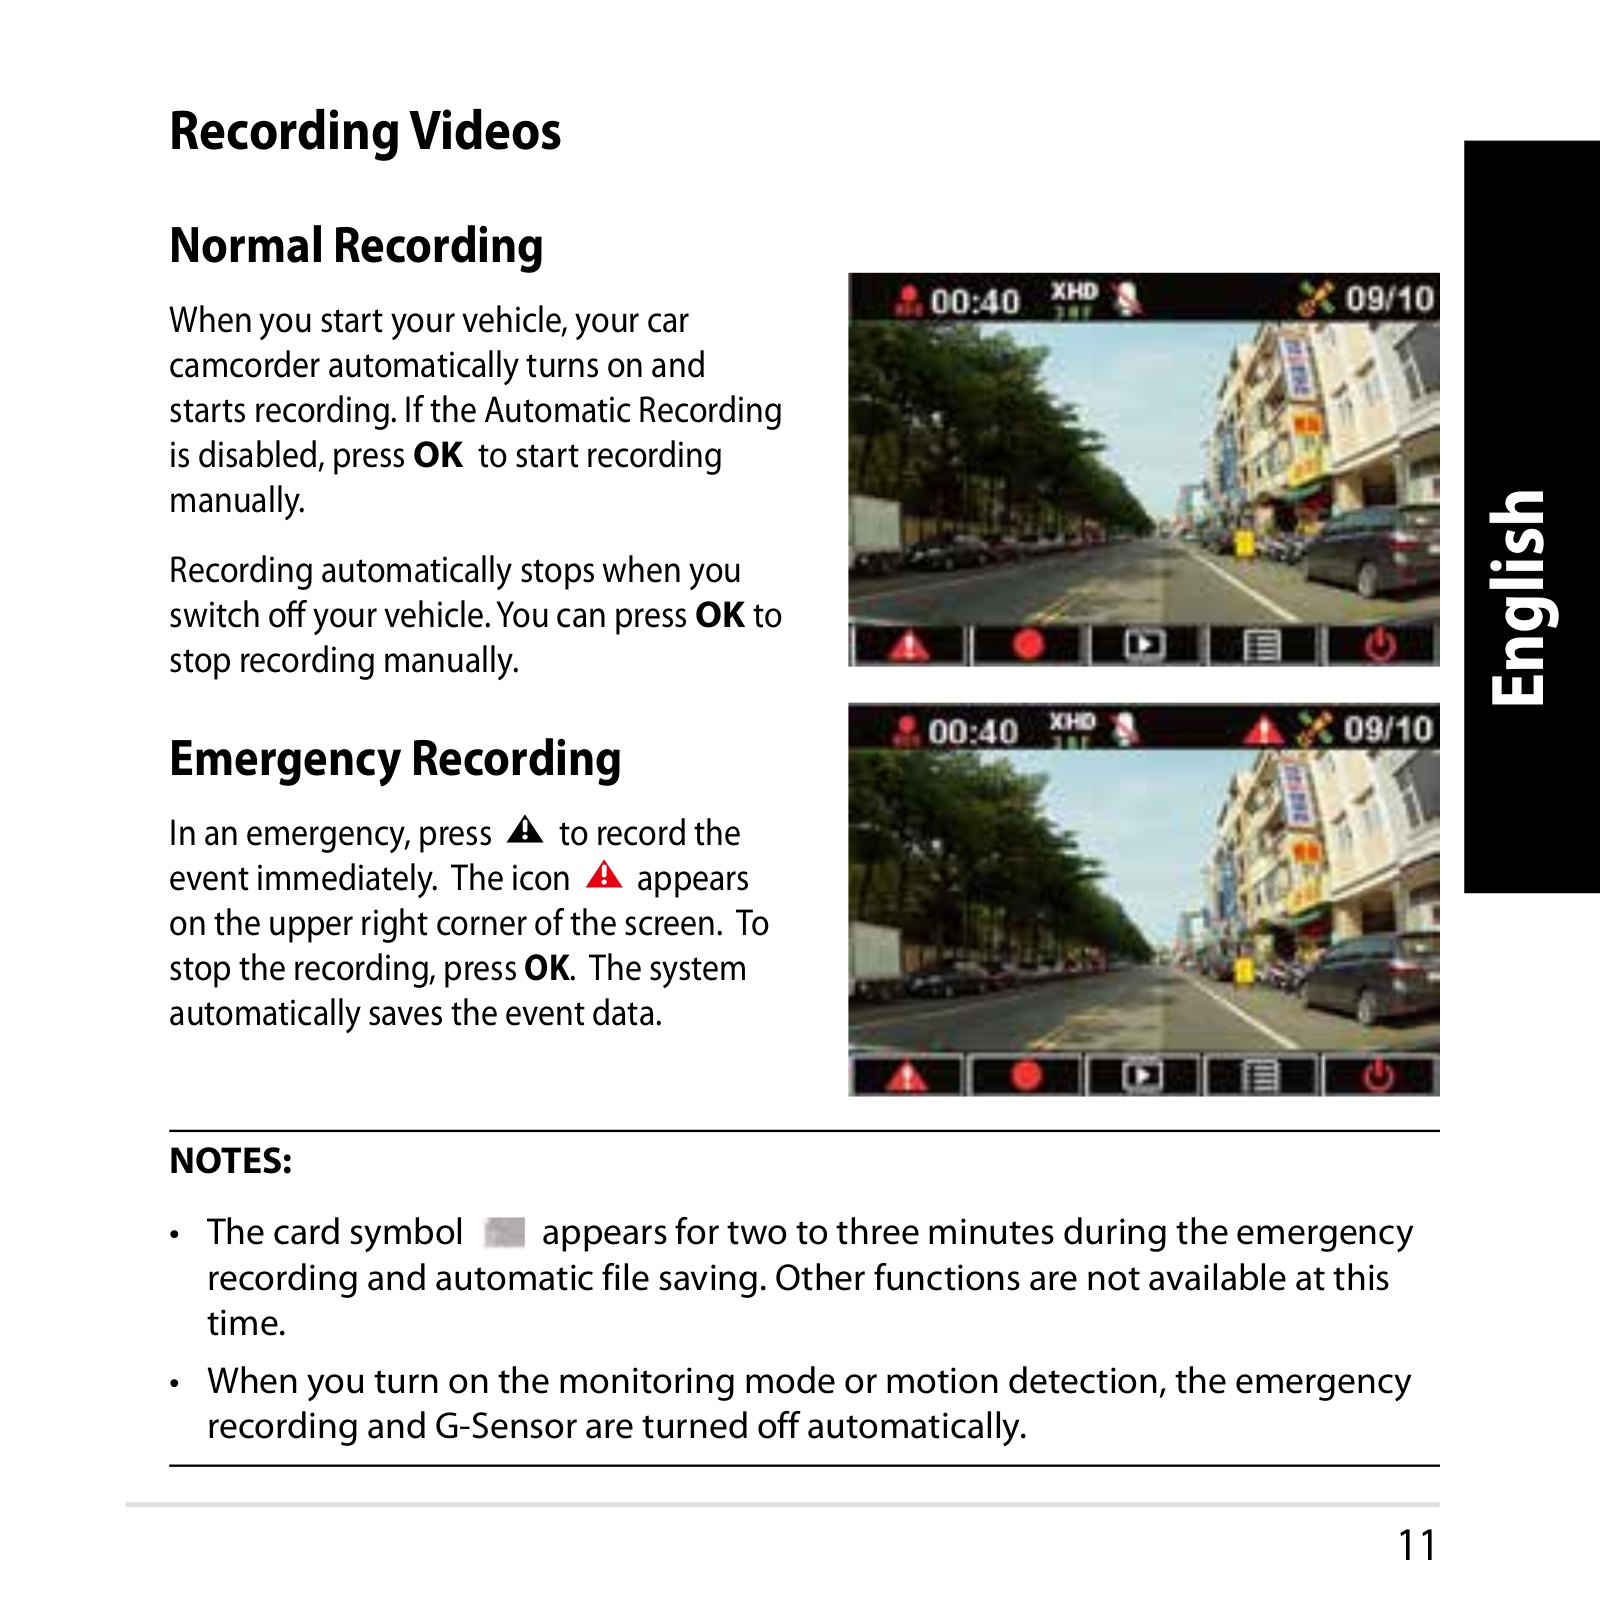
Whenyoustartyourvehicle,yourcar camcorder automatically turns on and startsrecording.IftheAutomaticRecording isdisabled,press OK to start recording manually.

Recordingautomaticallystopswhenyou switchoffyourvehicle.YoucanpressOK to stoprecordingmanually.

Emergency Recording

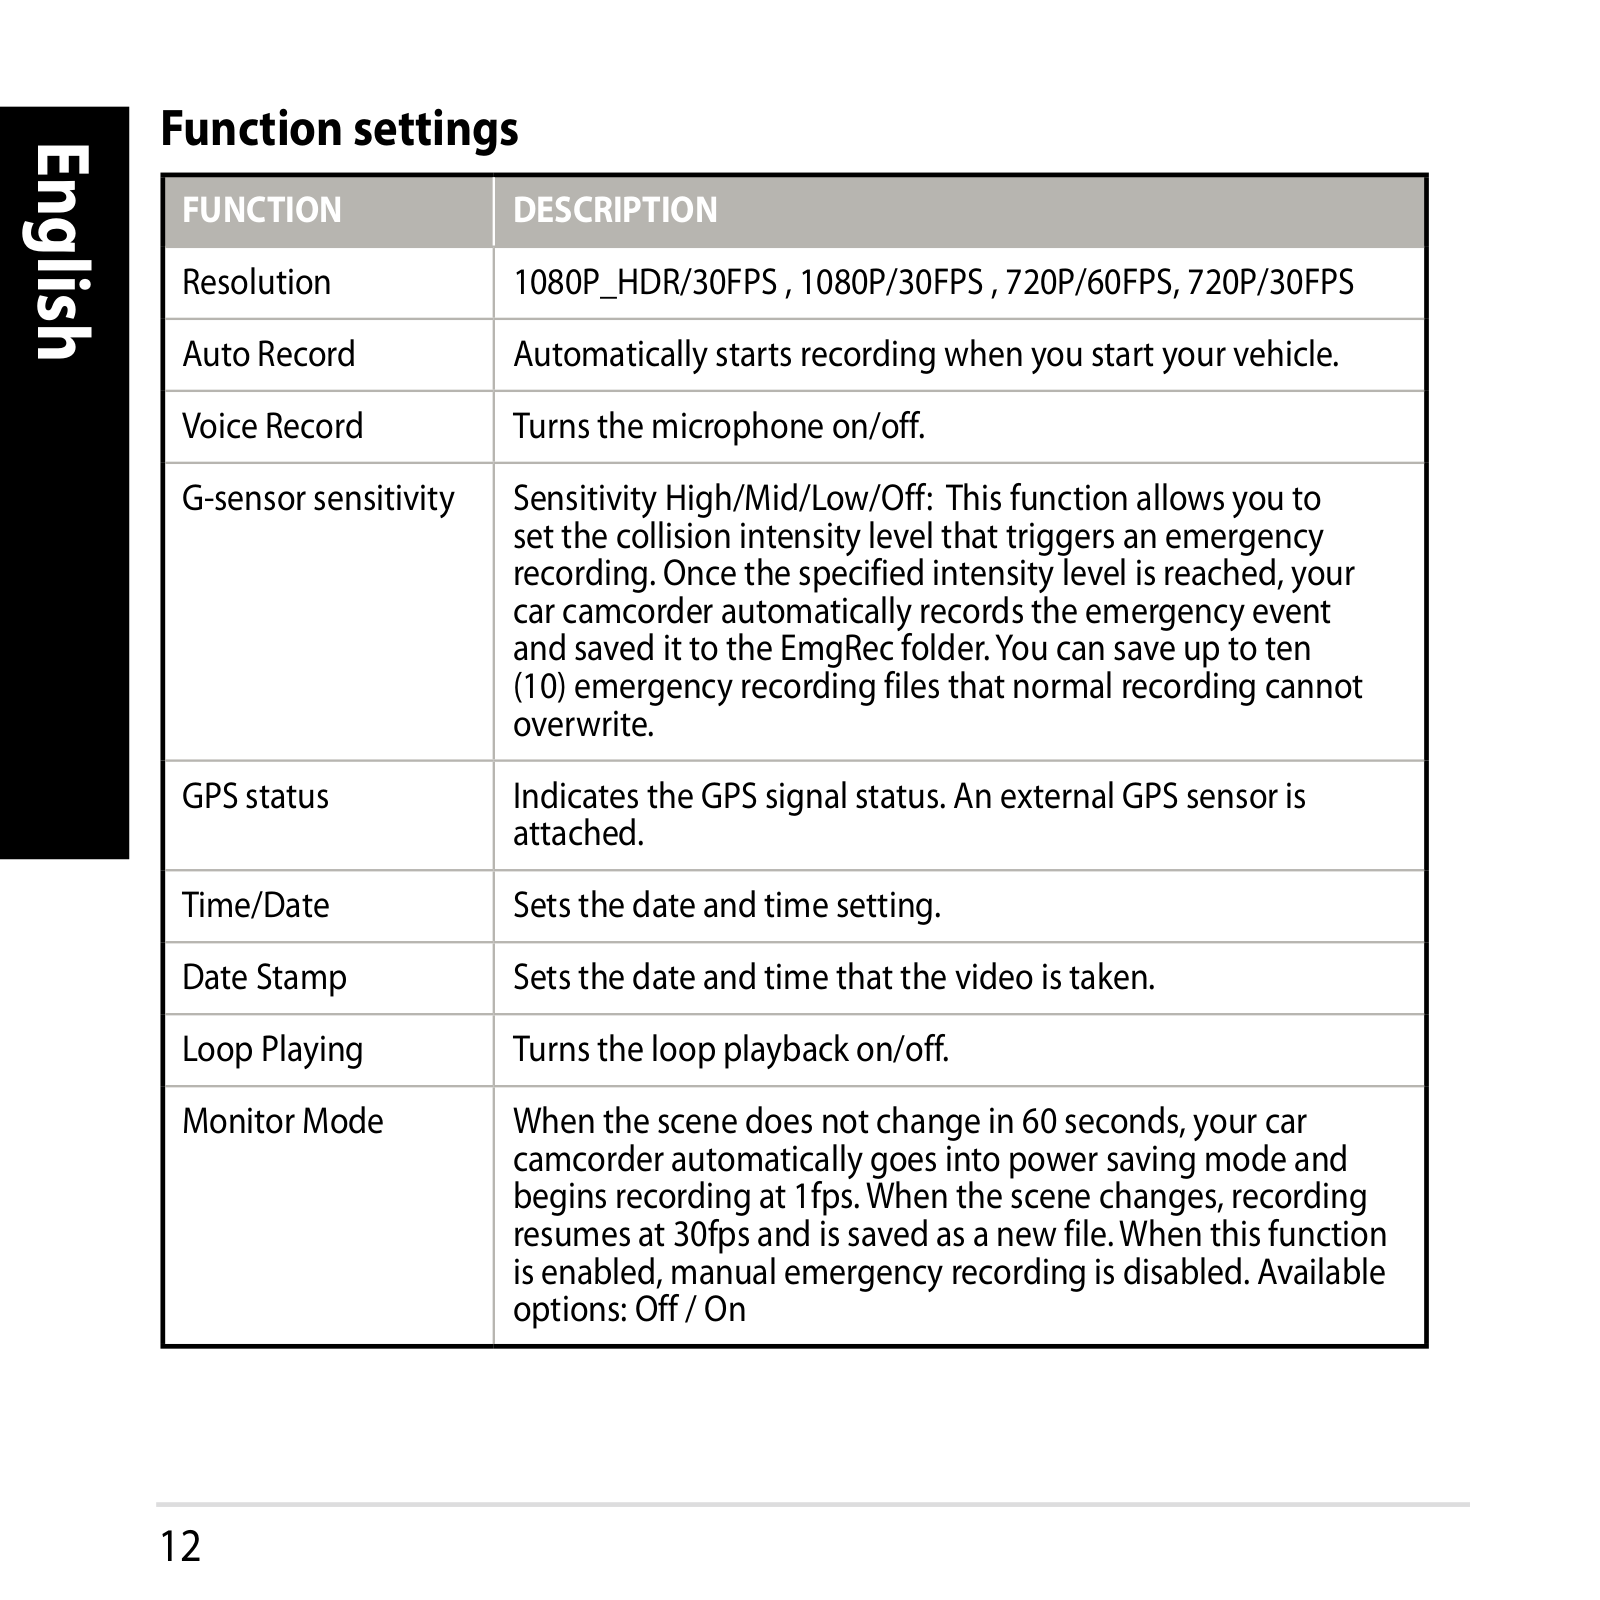
Inanemergency,press to record the eventimmediately. Theicon appears ontheupperrightcornerofthescreen. To stoptherecording,pressOK. Thesystem automaticallysavestheeventdata.

NOTES:

The card symbol appears for two to three minutes during the emergency recording and automatic file saving. Other functions are not available at this time.

When you turn on the monitoring mode or motion detection, the emergency recording and G-Sensor are turned off automatically.

English

11

English

Function settings

FUNCTION

DESCRIPTION


Resolution

1080P_HDR/30FPS,1080P/30FPS,720P/60FPS,720P/30FPS


Auto Record

Automaticallystartsrecordingwhenyoustartyourvehicle.


Voice Record

Turnsthemicrophoneon/off.


G-sensorsensitivity

SensitivityHigh/Mid/Low/Off: Thisfunctionallowsyouto


set the collision intensity level that triggers an emergency


recording.Oncethespecifiedintensitylevelisreached,your


car camcorder automatically records the emergency event


andsavedittotheEmgRecfolder.Youcansaveuptoten


(10)emergencyrecordingfilesthatnormalrecordingcannot


overwrite.


GPS status

IndicatestheGPSsignalstatus.AnexternalGPSsensoris


attached.


Time/Date

Setsthedateandtimesetting.


DateStamp

Setsthedateandtimethatthevideoistaken.


LoopPlaying

Turnstheloopplaybackon/off.


Monitor Mode

Whenthescenedoesnotchangein60seconds,yourcar


camcorderautomaticallygoesintopowersavingmodeand


beginsrecordingat1fps.Whenthescenechanges,recording


resumesat30fpsandissavedasanewfile.Whenthisfunction


isenabled,manualemergencyrecordingisdisabled.Available


options:Off/On


12

FUNCTION

DESCRIPTION


Motion Detection

Enables/disablesthemotiondetectionfunction. Whenthis


functionisenabledandmovementisdetected,yourcamcorder


automaticallystartsrecording.Availableoptions:Off/On


EV

Adjuststheexposurelevel.


Language

Setsthedisplaylanguage.


Format

AllowsyoutoformatamicroSDcardonyourcarcamcorder.


Formatnotification

NotifiesyoutoformatthemicroSDcardregularly.


LCDAutoOff

Setsthetimetoturnthedisplayoffautomaticallyoralwayson.


Frequency

Setsthelightingflickerfrequency.


Default

Resetsyourcarcamcordertoitsfactorydefaultsettings.


FirmwareVersion

Indicatesthesoftwareversionoftheproduct.


English

13

English

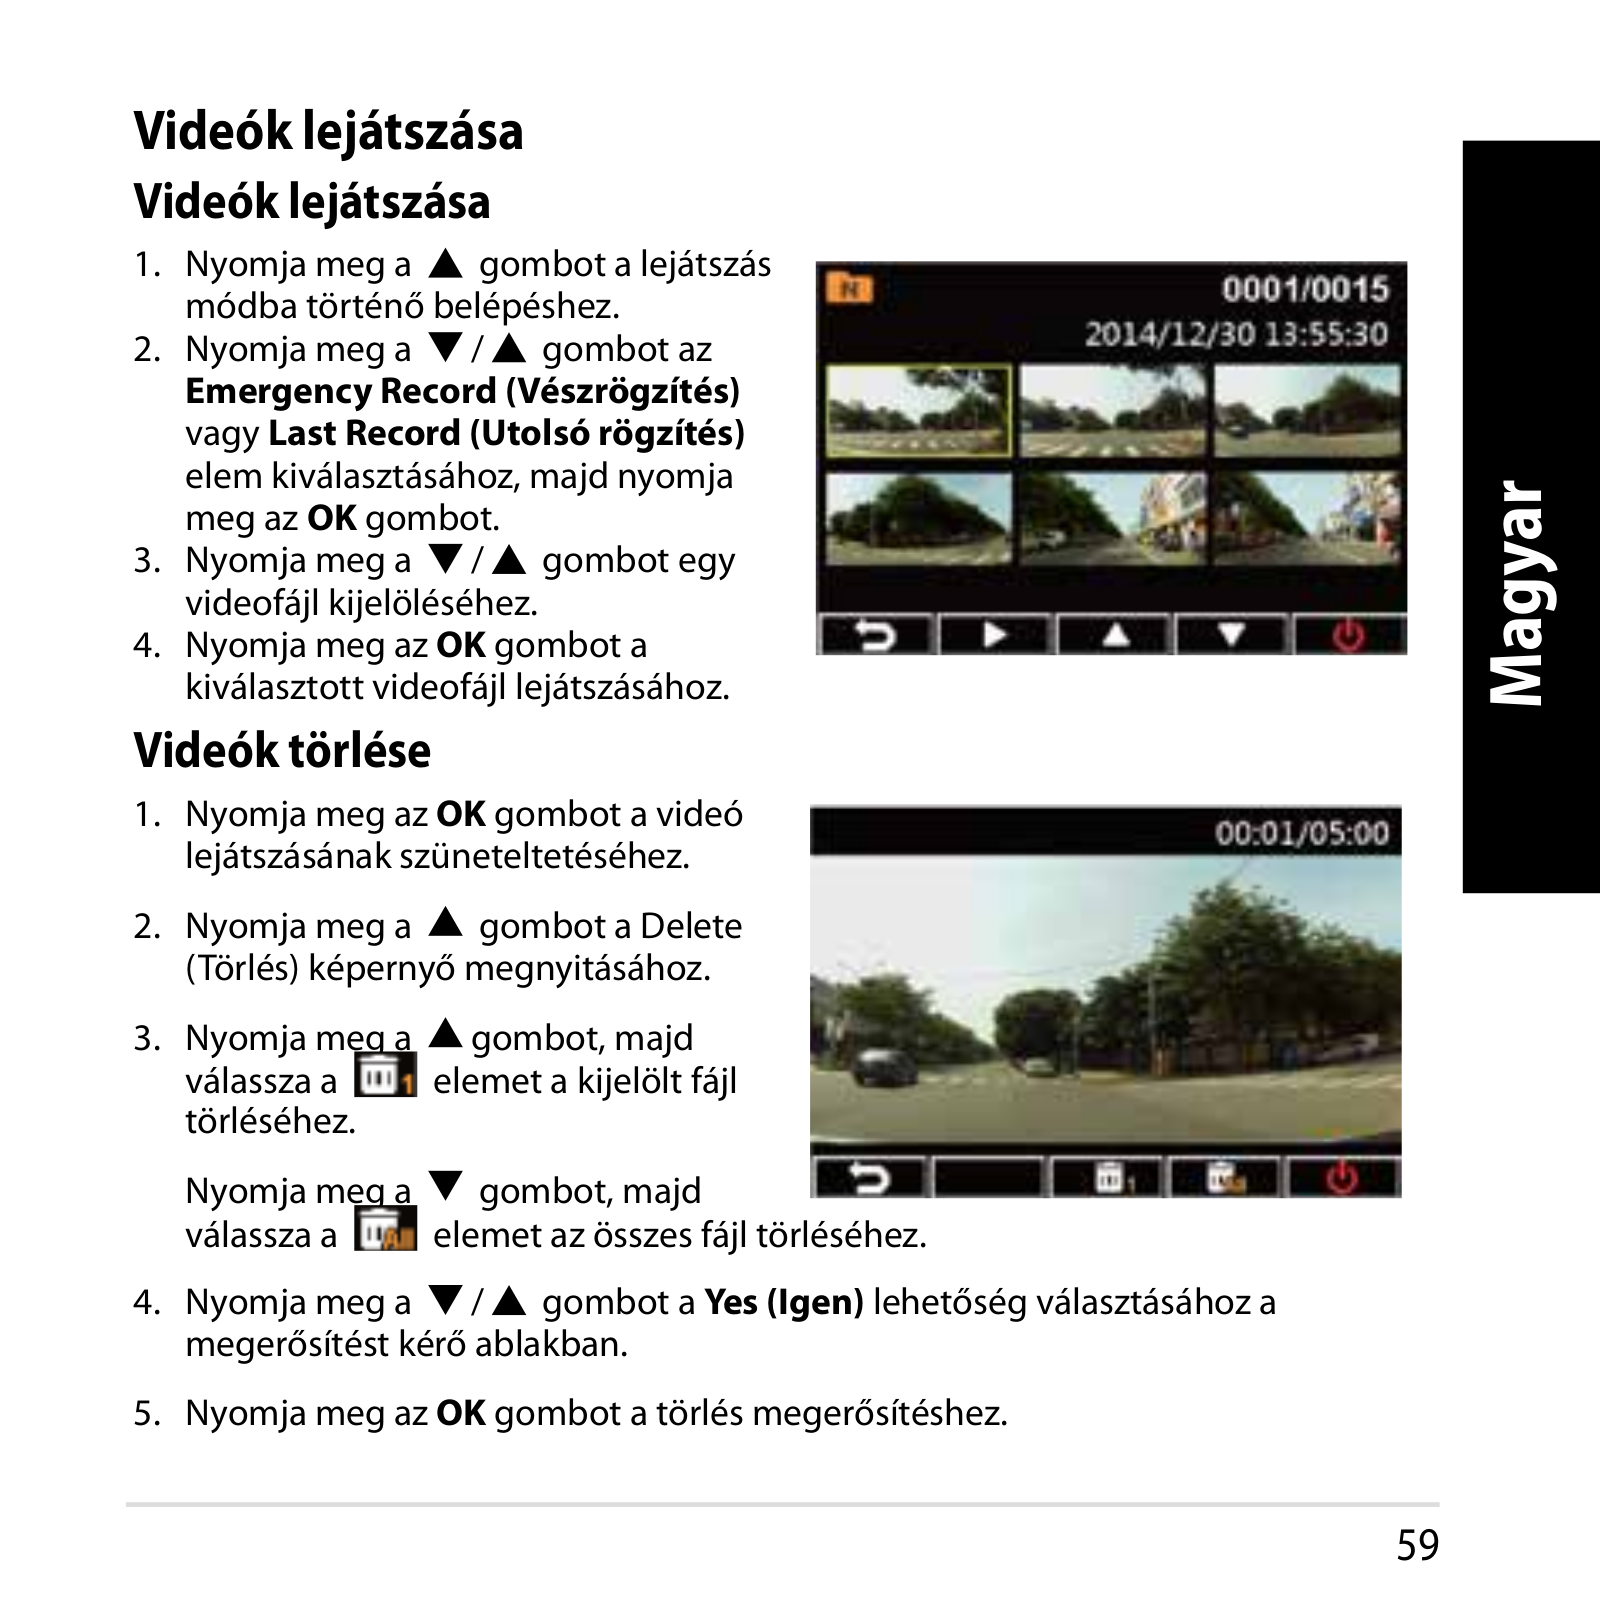
Playback Videos

Playing Videos

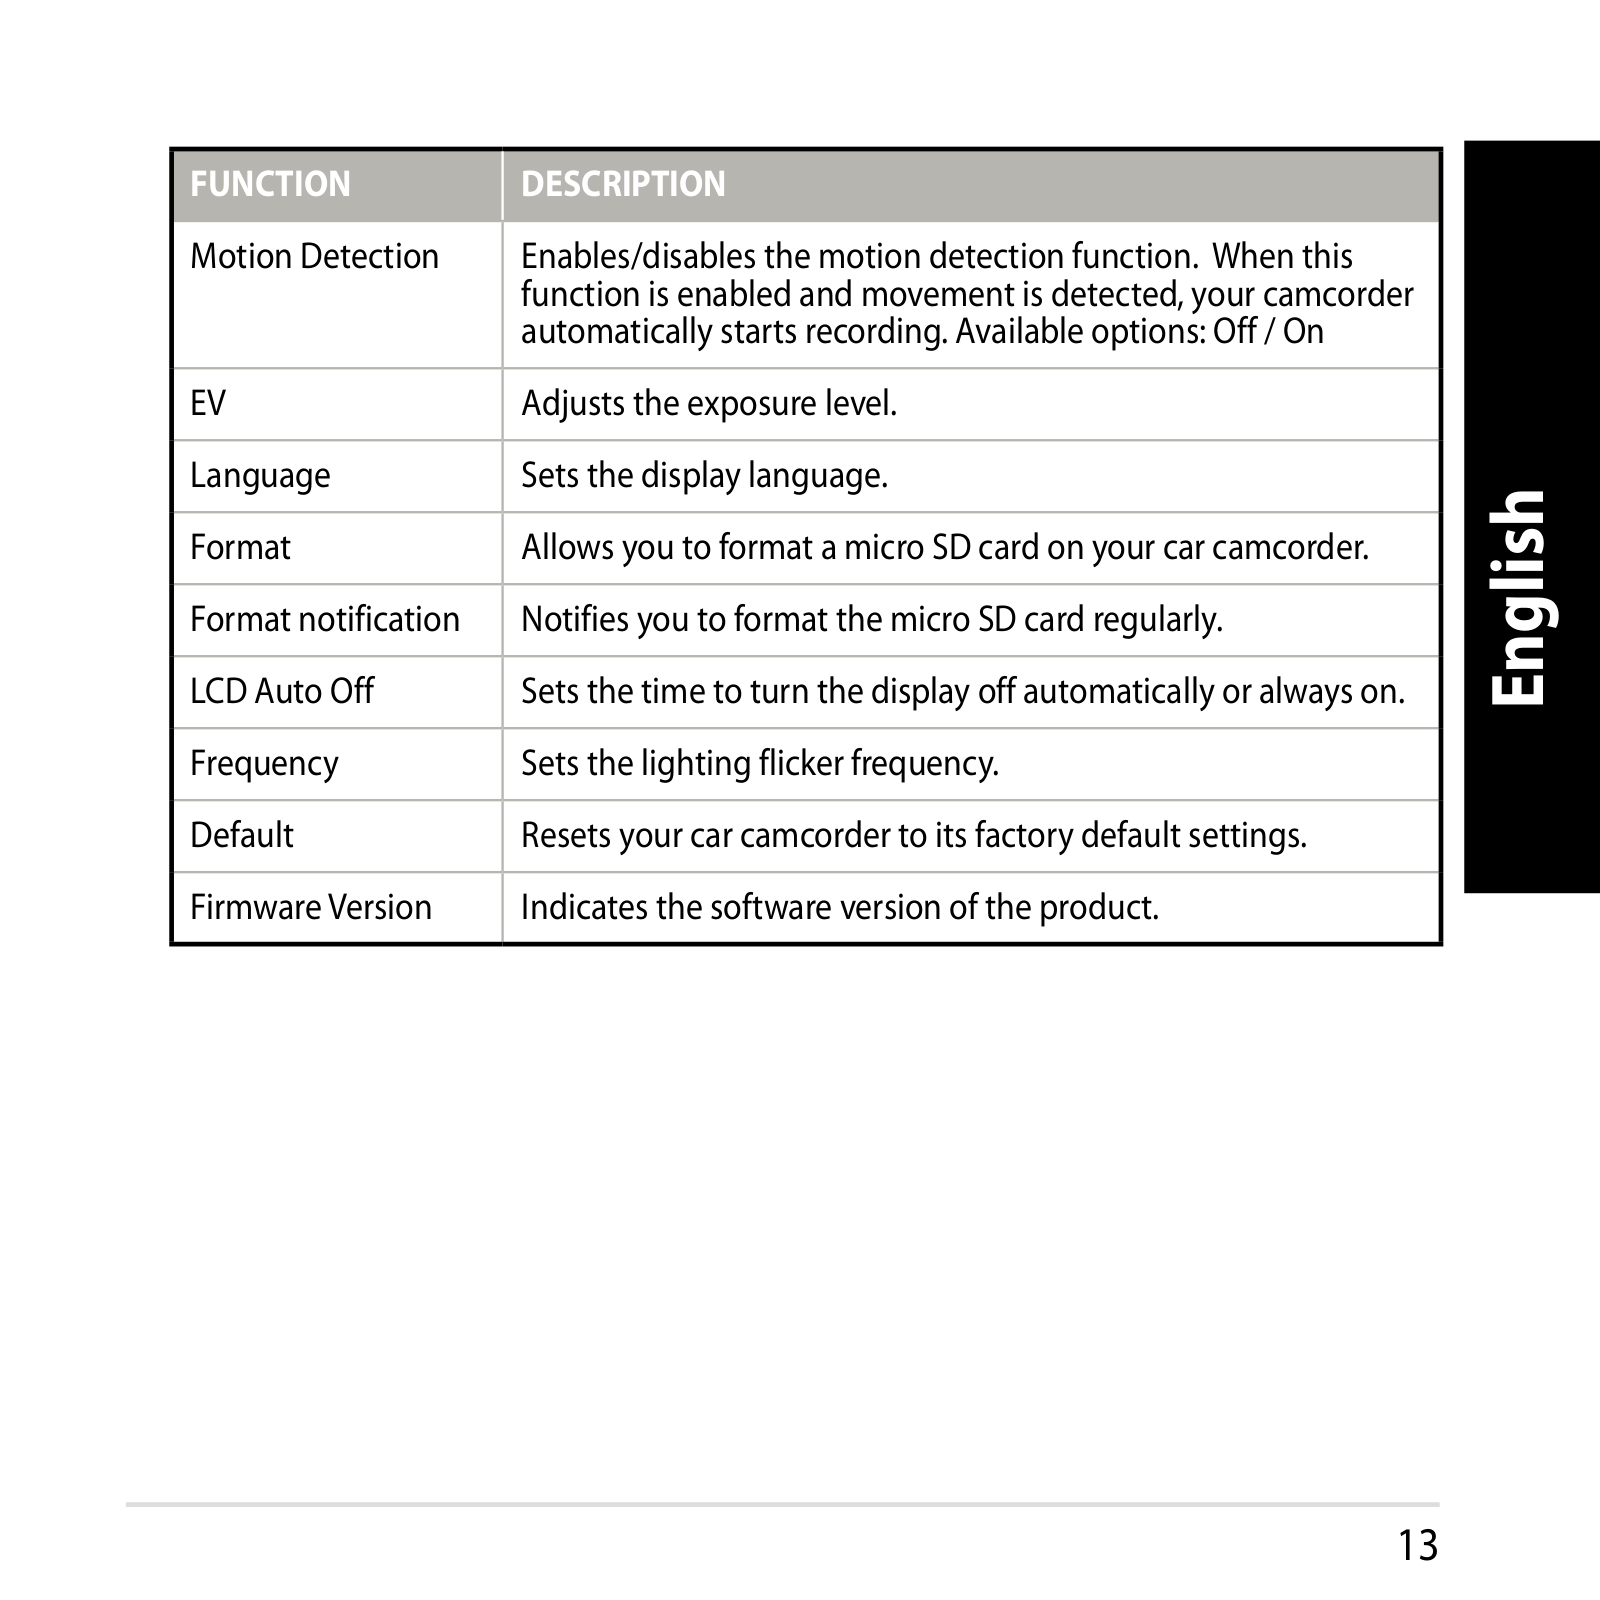
1.Press to enter the playback mode.

2.Press / to select Emergency Record or Last Record and press OK.

3. Press / to select a video file.

4.Press OK to play the selected video file.

Deleting Videos

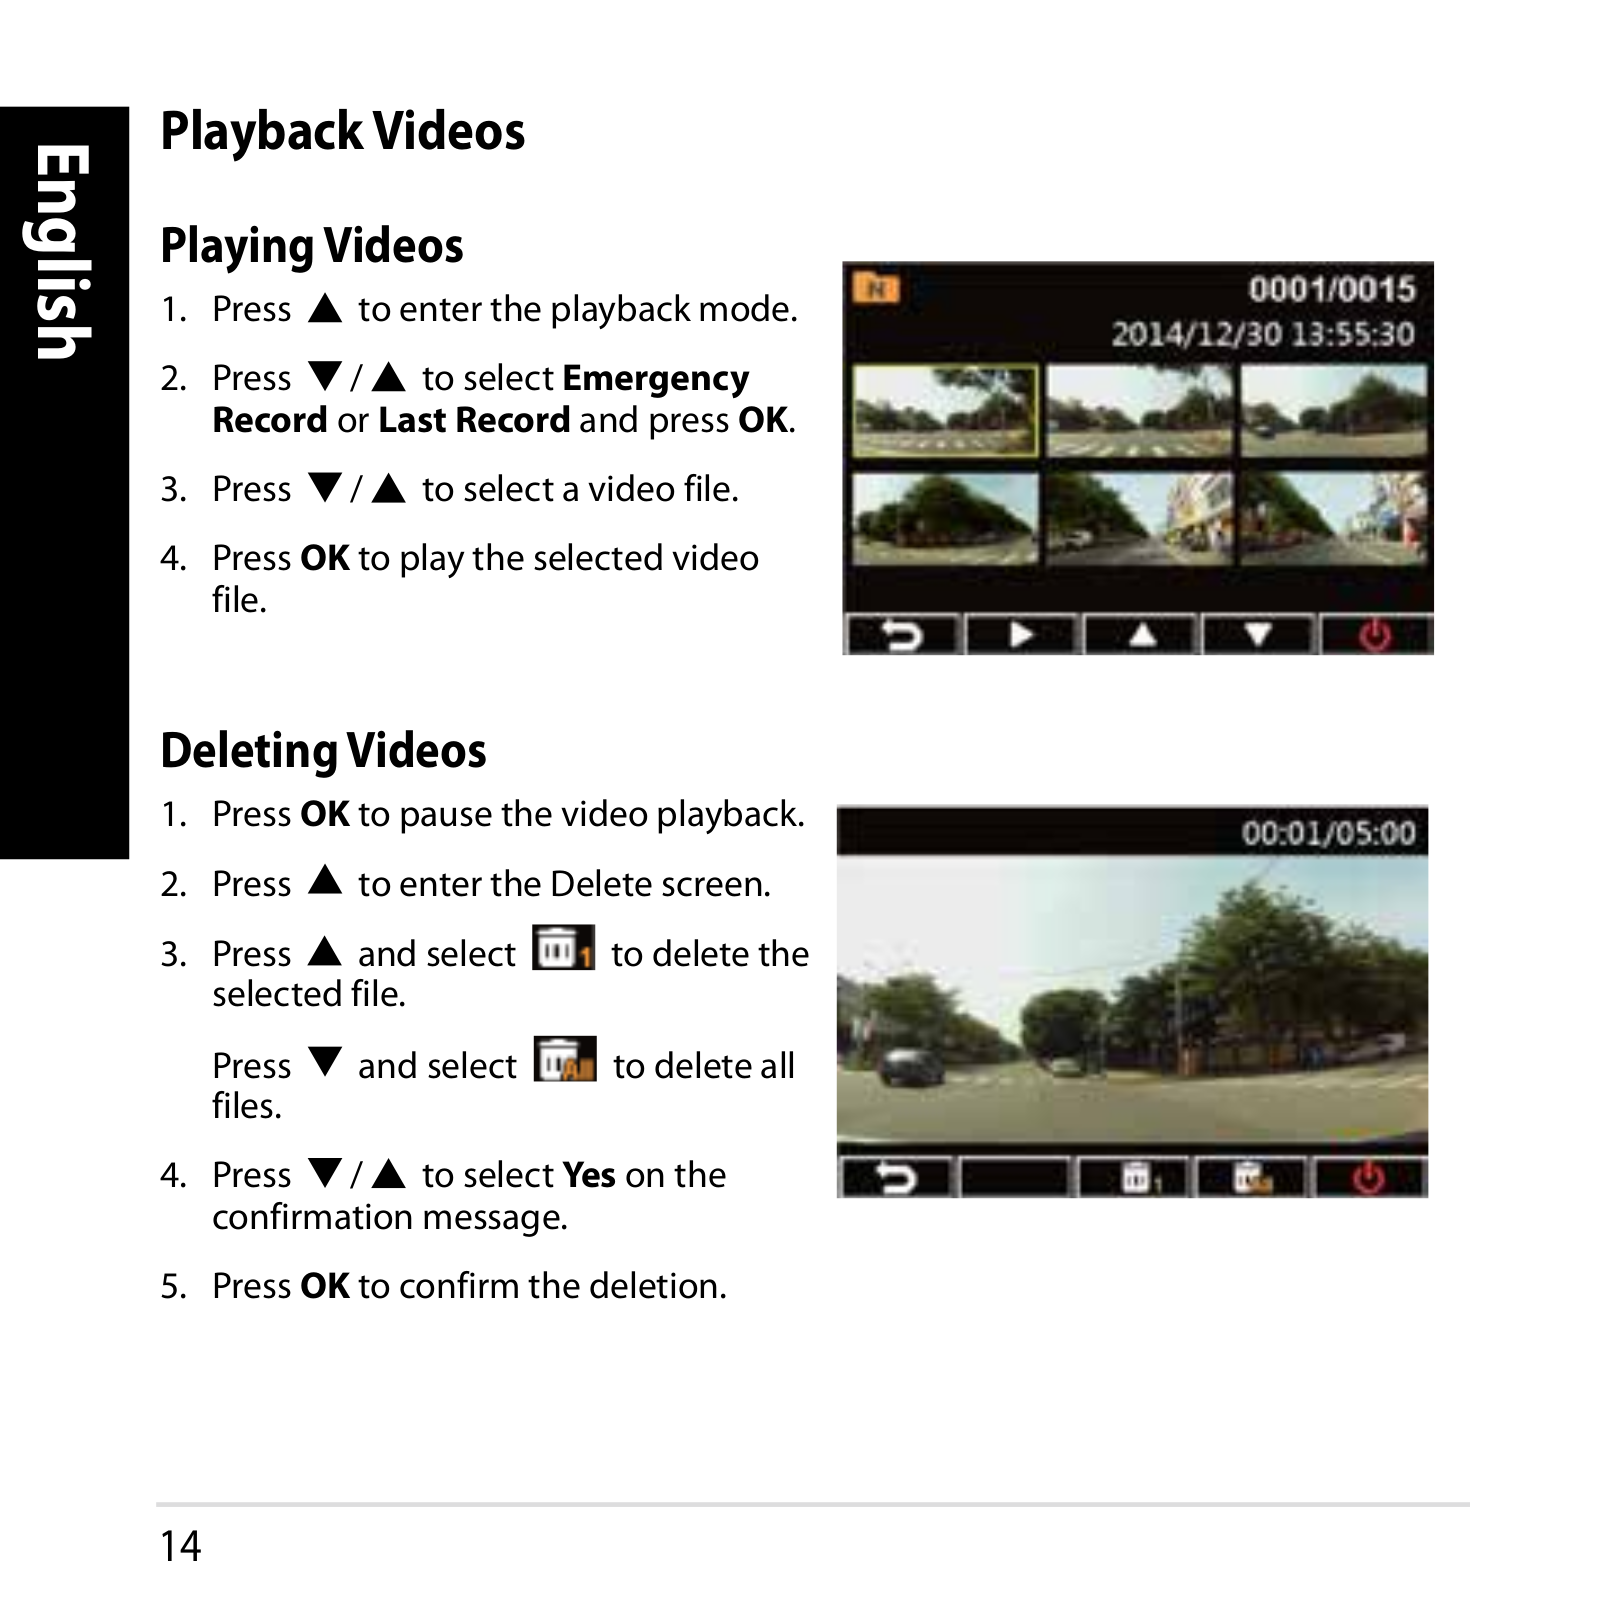
1.Press OK to pause the video playback.

2.Press to enter the Delete screen.

3.Press and select to delete the selected file.

Press and select to delete all files.

4.Press / to select Yes on the confirmation message.

5.Press OK to confirm the deletion.

14

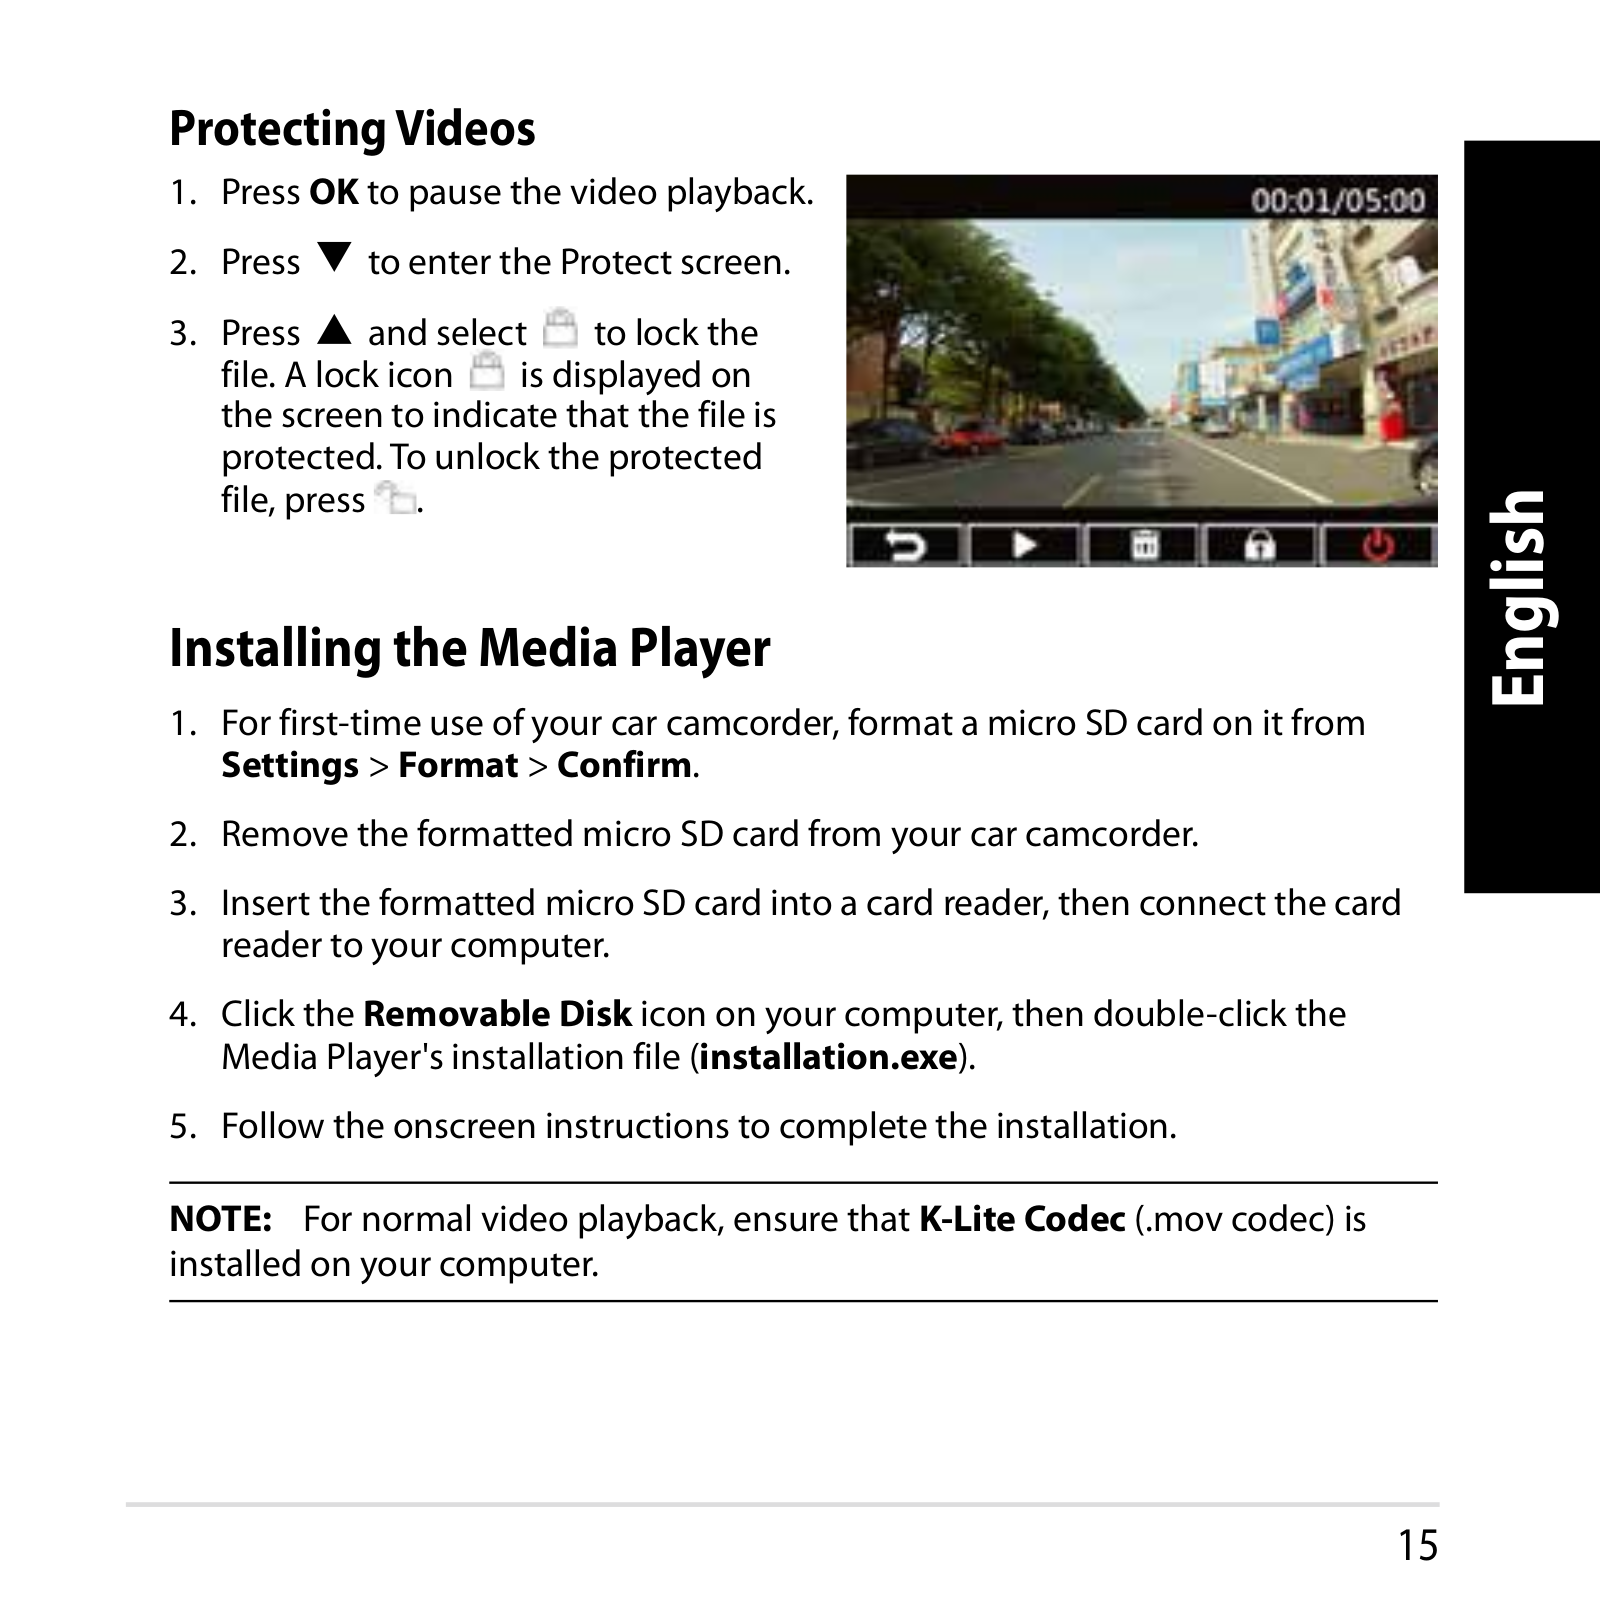
Protecting Videos

1.Press OK to pause the video playback.

2.Press to enter the Protect screen.

3.Press and select to lock the file. A lock icon is displayed on the screen to indicate that the file is protected.To unlock the protected file, press .

Installing the Media Player

1.For first-time use of your car camcorder, format a micro SD card on it from

Settings > Format > Confirm.

2.Remove the formatted micro SD card from your car camcorder.

3.Insert the formatted micro SD card into a card reader, then connect the card reader to your computer.

4.Click the Removable Disk icon on your computer, then double-click the Media Player's installation file (installation.exe).

5.Follow the onscreen instructions to complete the installation.

NOTE: For normal video playback, ensure that K-Lite Codec (.mov codec) is installed on your computer.

English

15

English

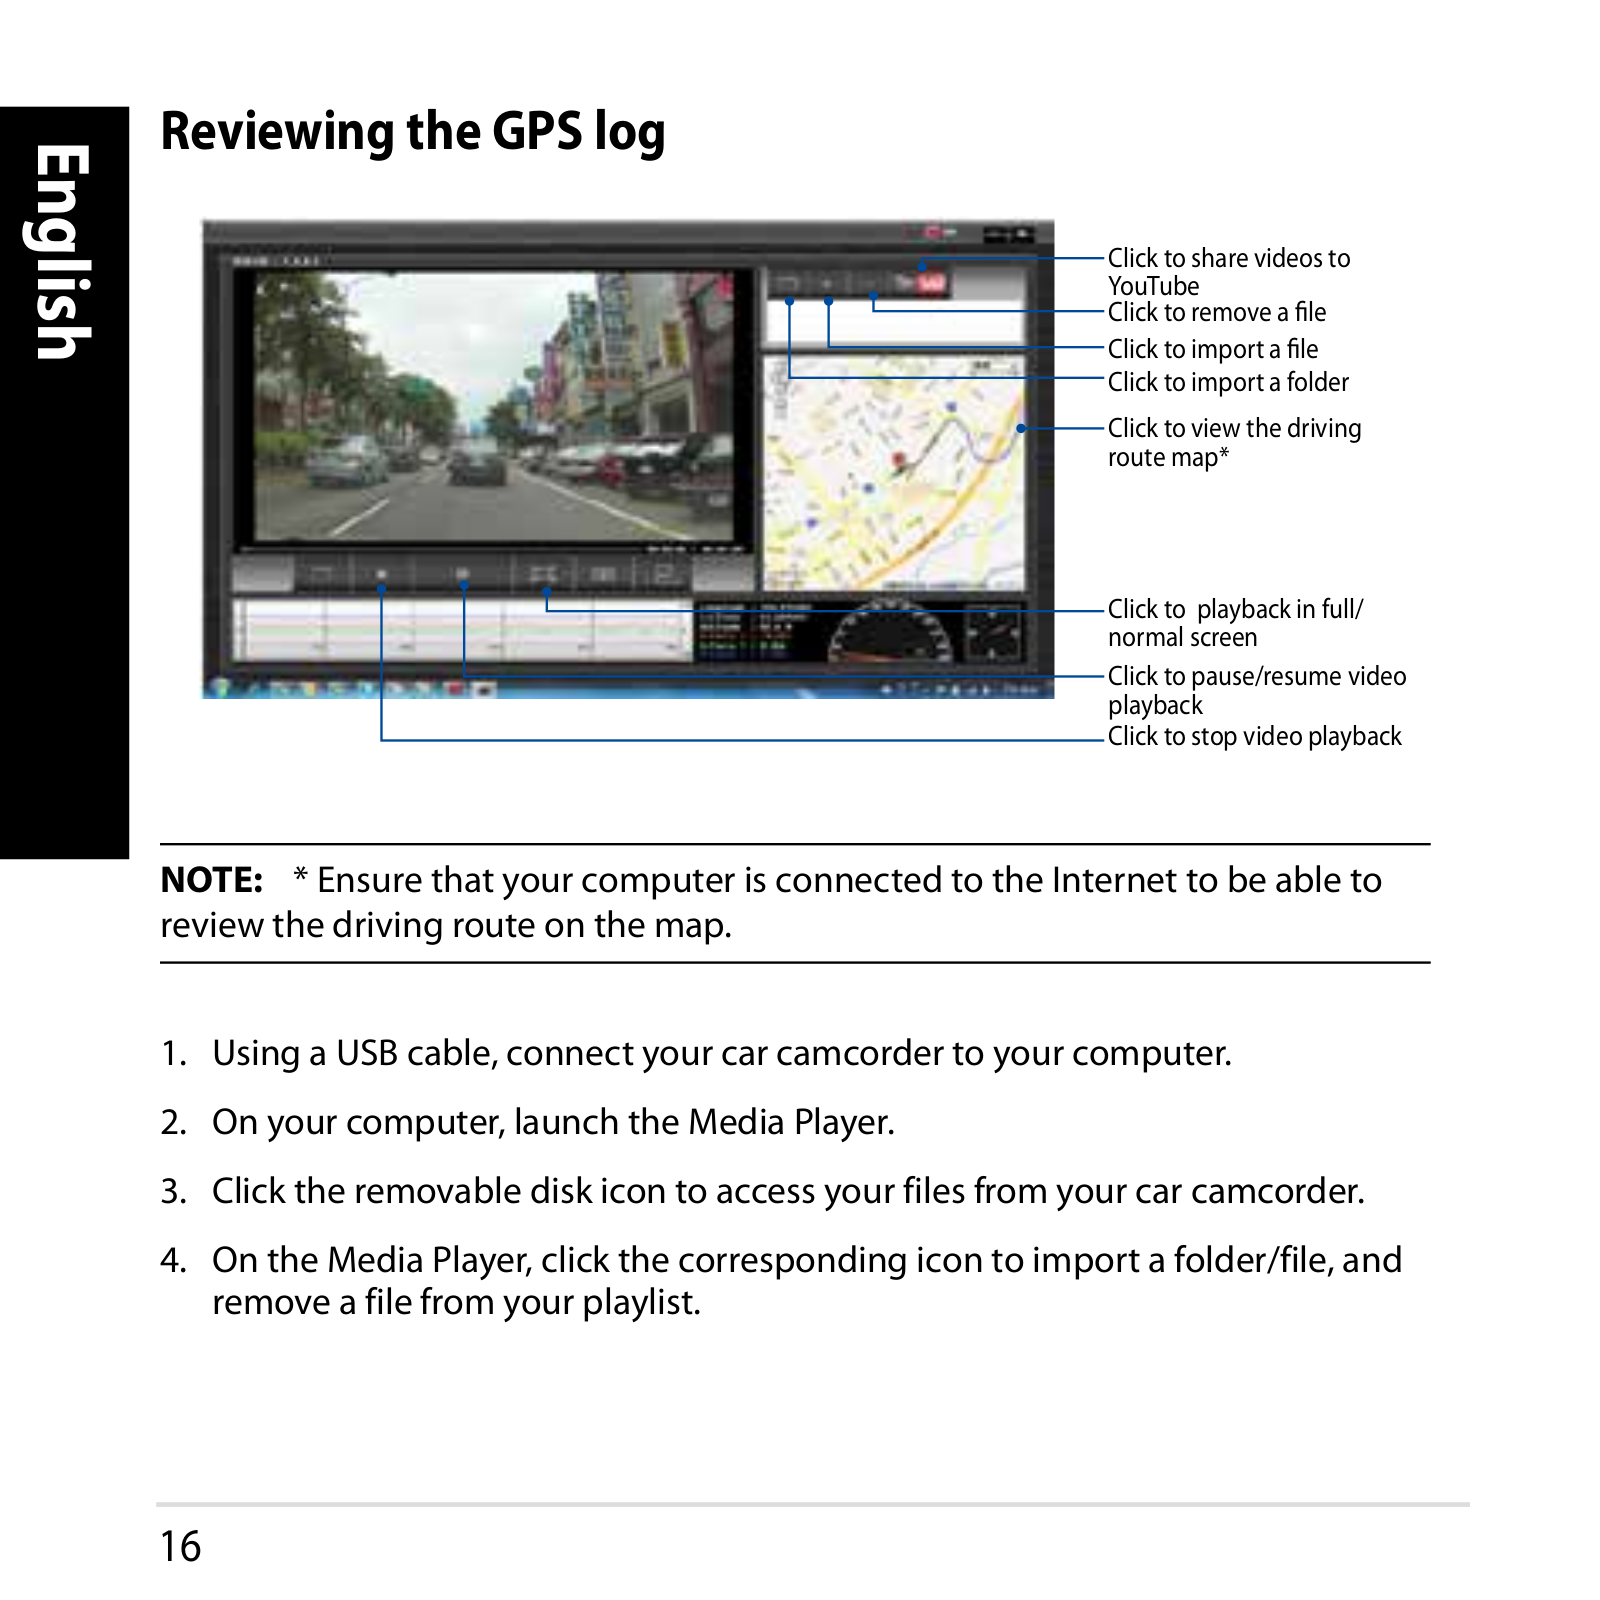
Reviewing the GPS log

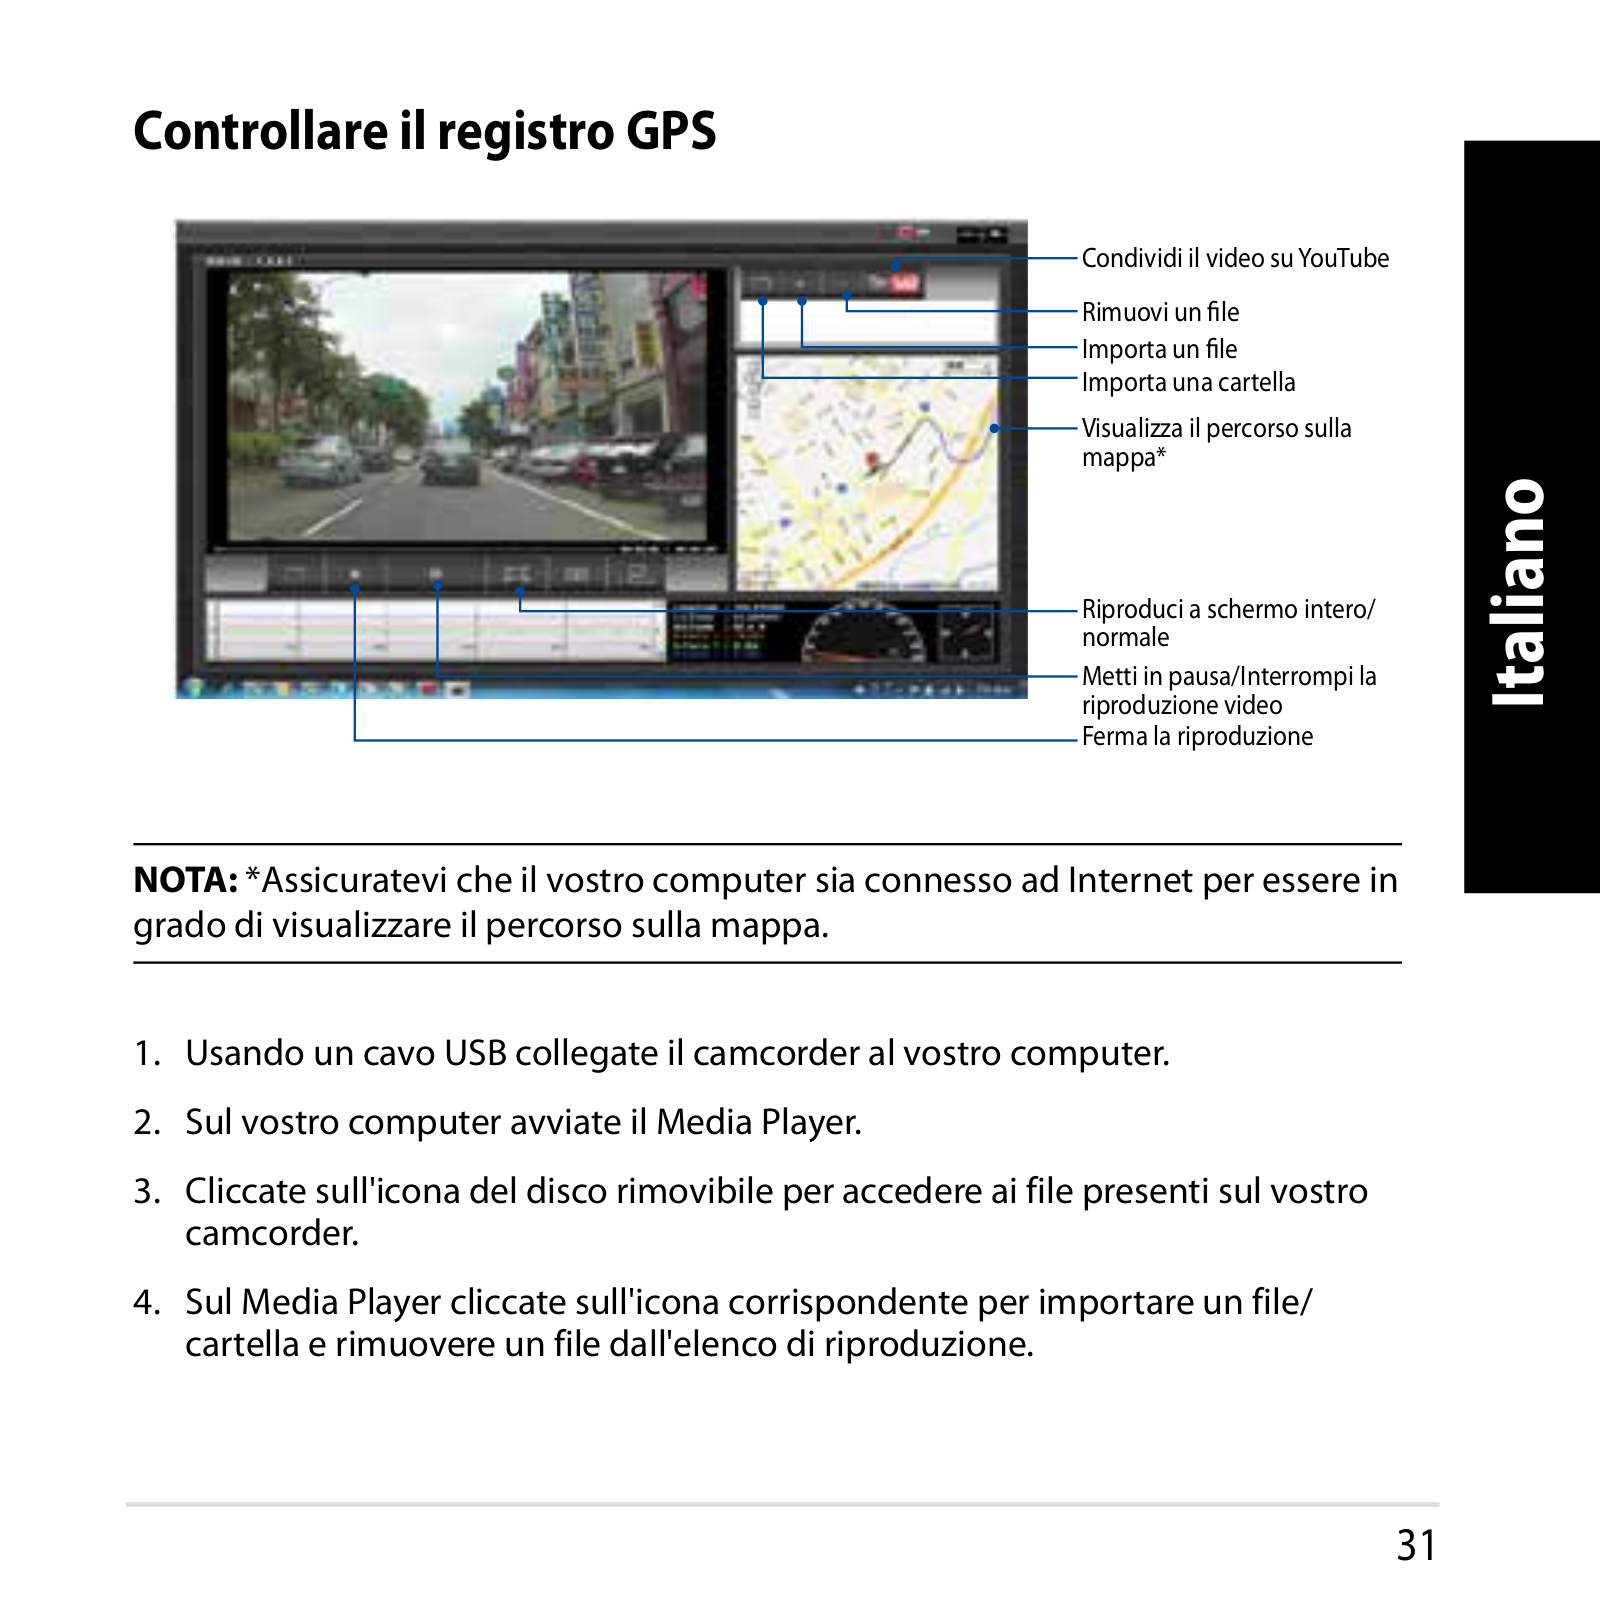
Clicktosharevideosto

YouTube

Clicktoremoveafile

Clicktoimportafile

Clicktoimportafolder

Clicktoviewthedriving routemap*

Clickto playbackinfull/ normal screen

Clicktopause/resumevideo playback

Clicktostopvideoplayback

NOTE: * Ensure that your computer is connected to the Internet to be able to review the driving route on the map.

1.Using a USB cable, connect your car camcorder to your computer.

2.On your computer, launch the Media Player.

3.Click the removable disk icon to access your files from your car camcorder.

4.On the Media Player, click the corresponding icon to import a folder/file, and remove a file from your playlist.

16

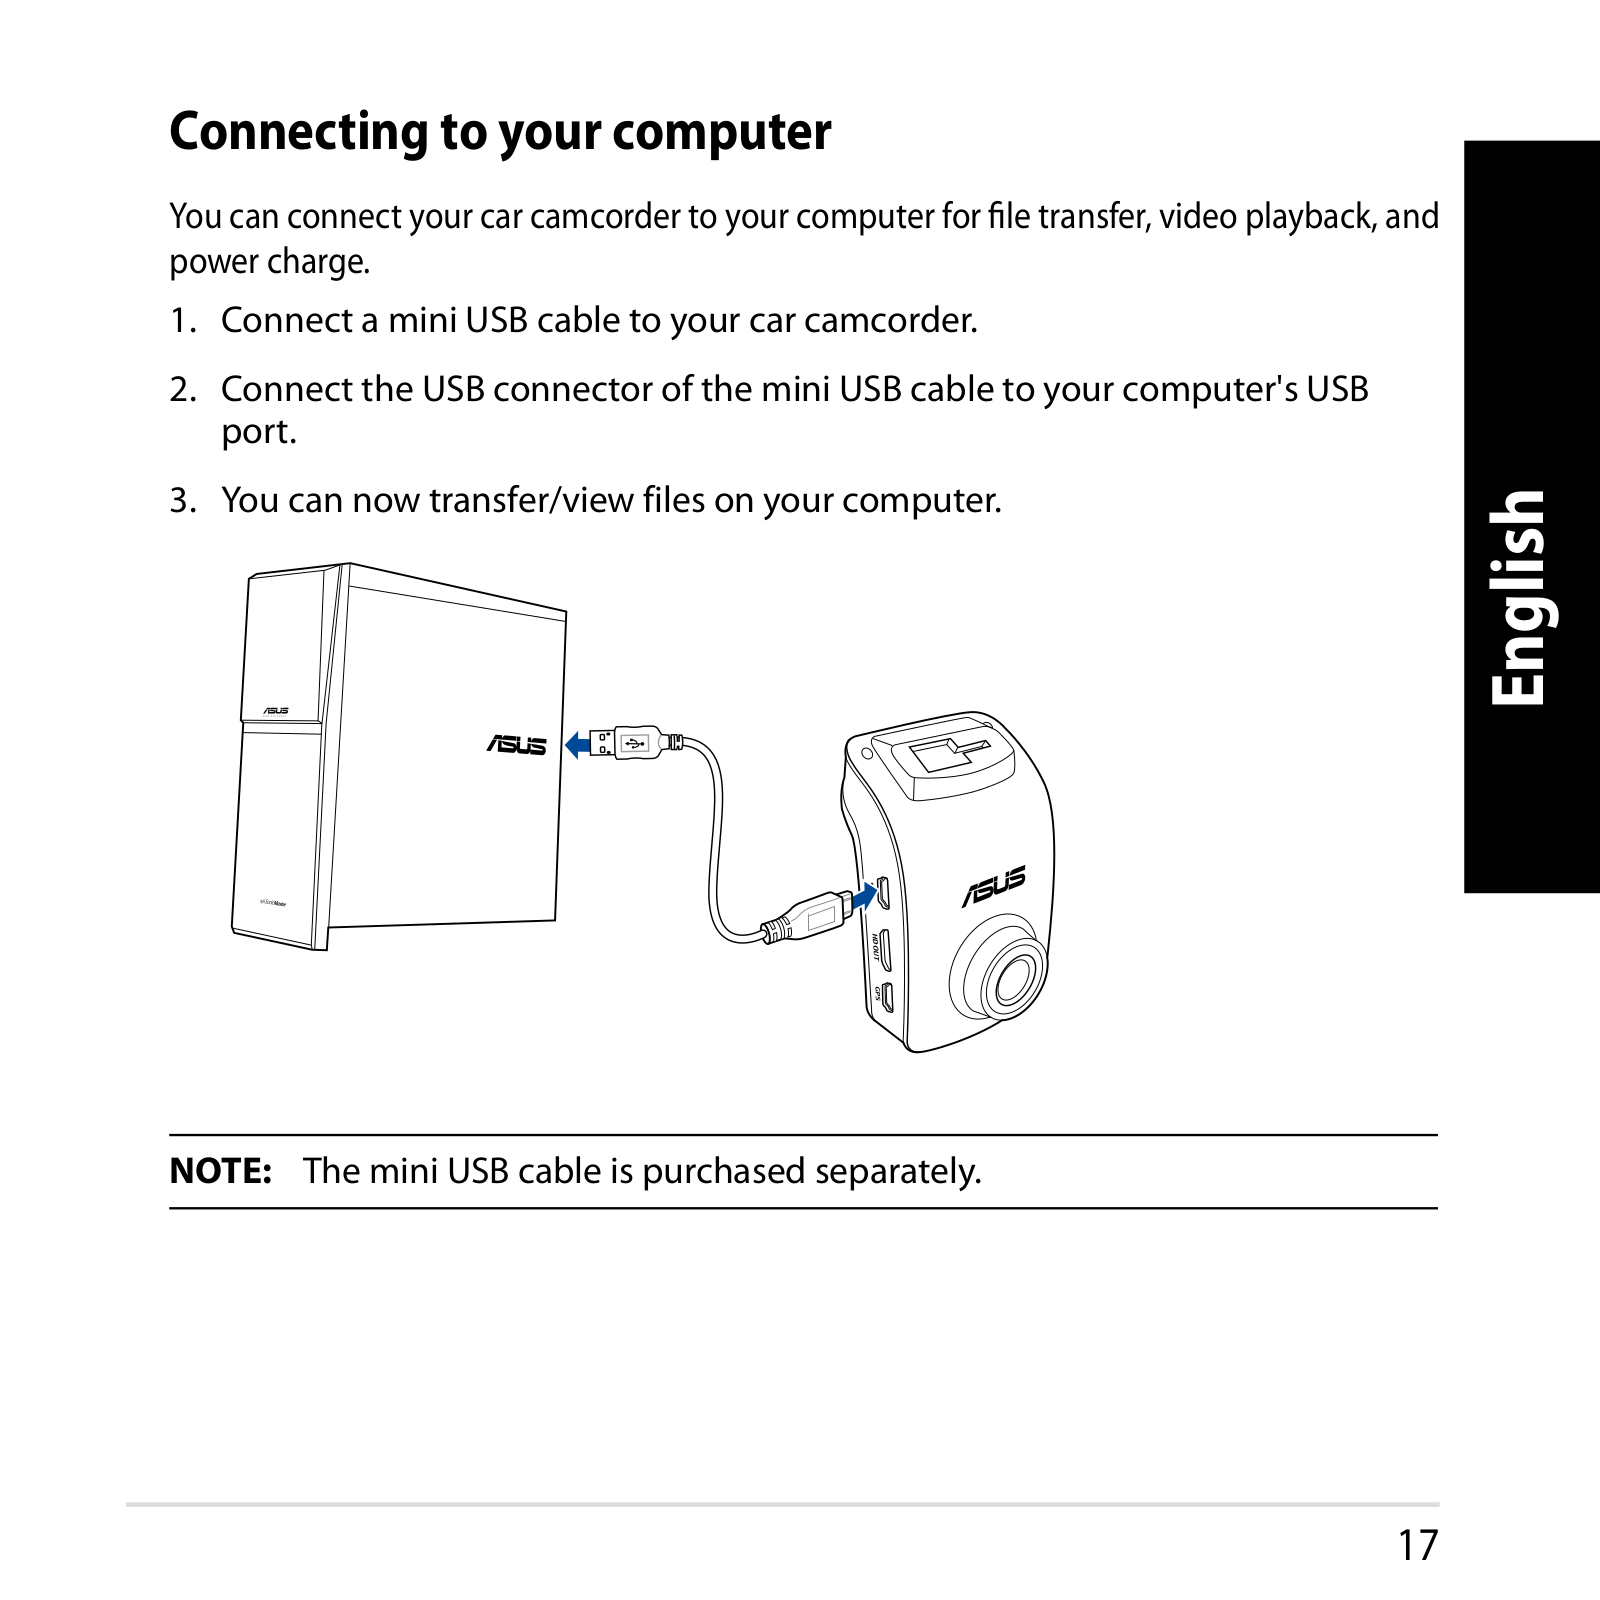
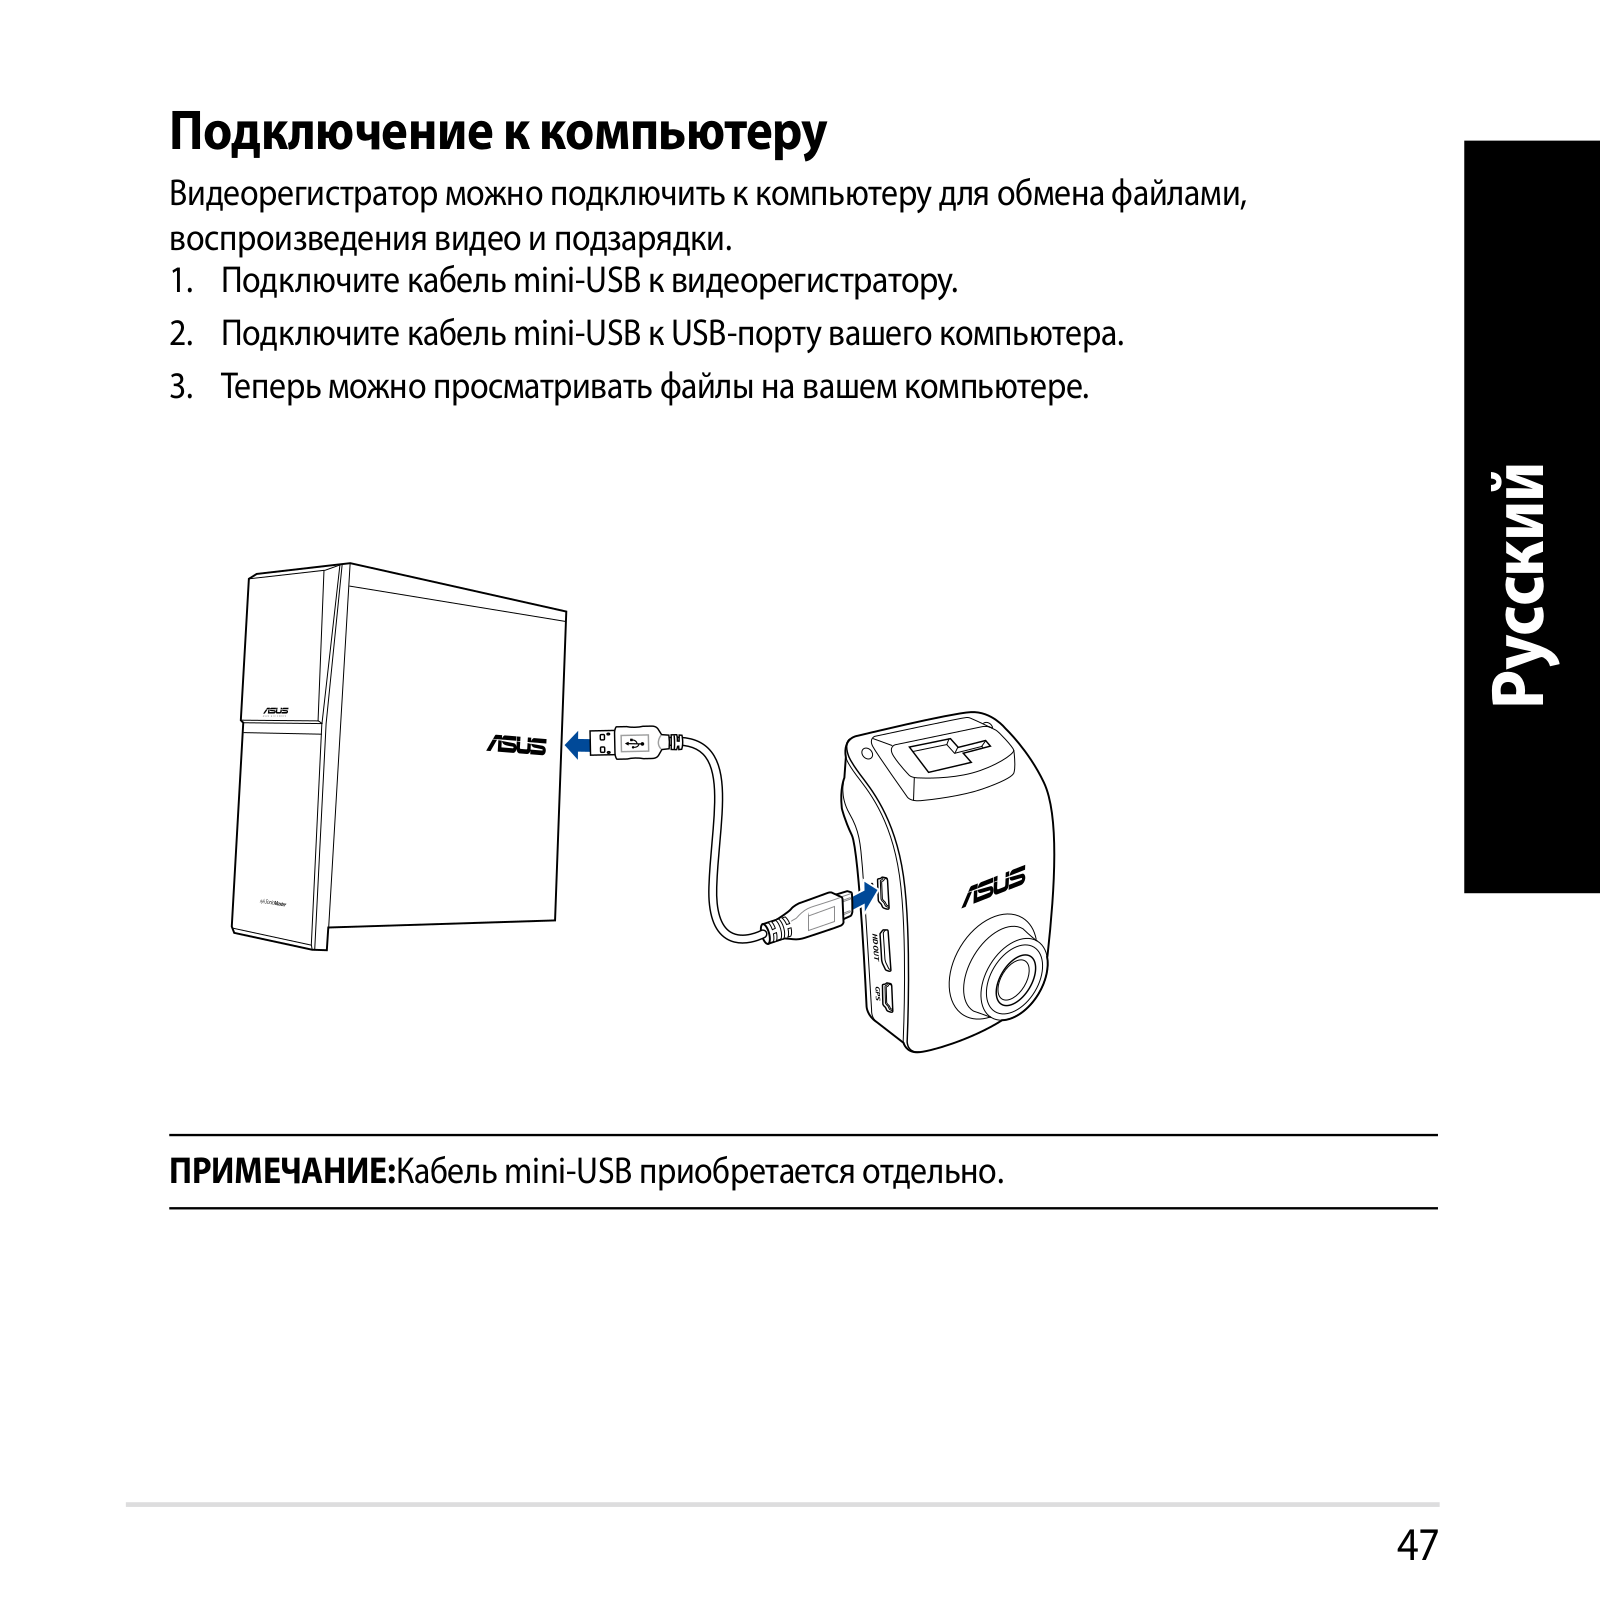
Connecting to your computer

Youcanconnectyourcarcamcordertoyourcomputerforfiletransfer,videoplayback,and powercharge.

1.

Connect a mini USB cable to your car camcorder.


2.

Connect the USB connector of the mini USB cable to your computer's USB


port.


3.

You can now transfer/view files on your computer.

English


NOTE: The mini USB cable is purchased separately.

17

English

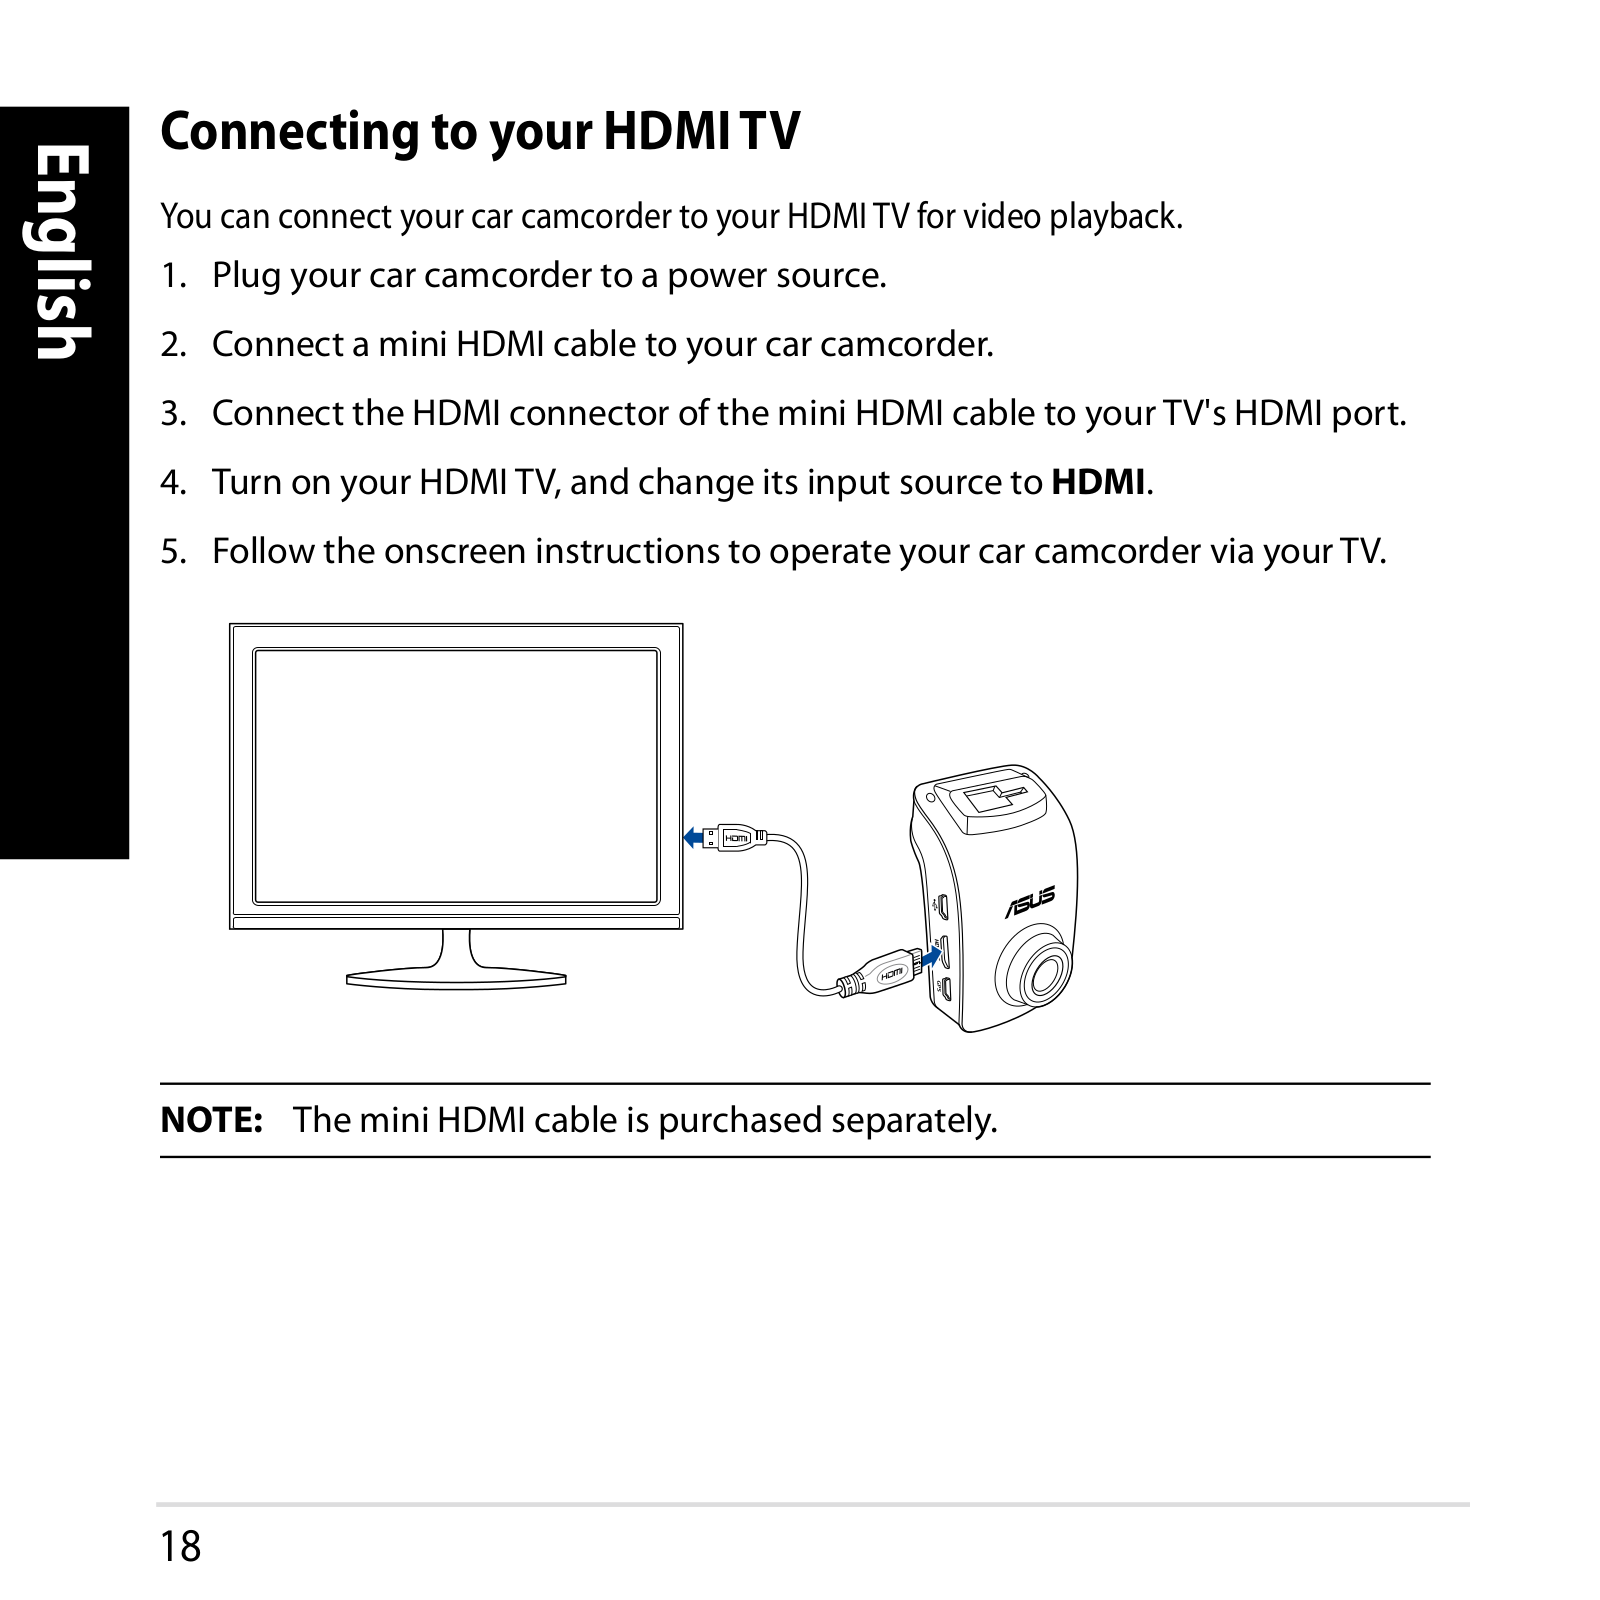
Connecting to your HDMI TV

YoucanconnectyourcarcamcordertoyourHDMITVforvideoplayback.

1.Plug your car camcorder to a power source.

2.Connect a mini HDMI cable to your car camcorder.

3.Connect the HDMI connector of the mini HDMI cable to yourTV's HDMI port.

4.Turn on your HDMITV, and change its input source to HDMI.

5.Follow the onscreen instructions to operate your car camcorder via yourTV.

NOTE: The mini HDMI cable is purchased separately.

18

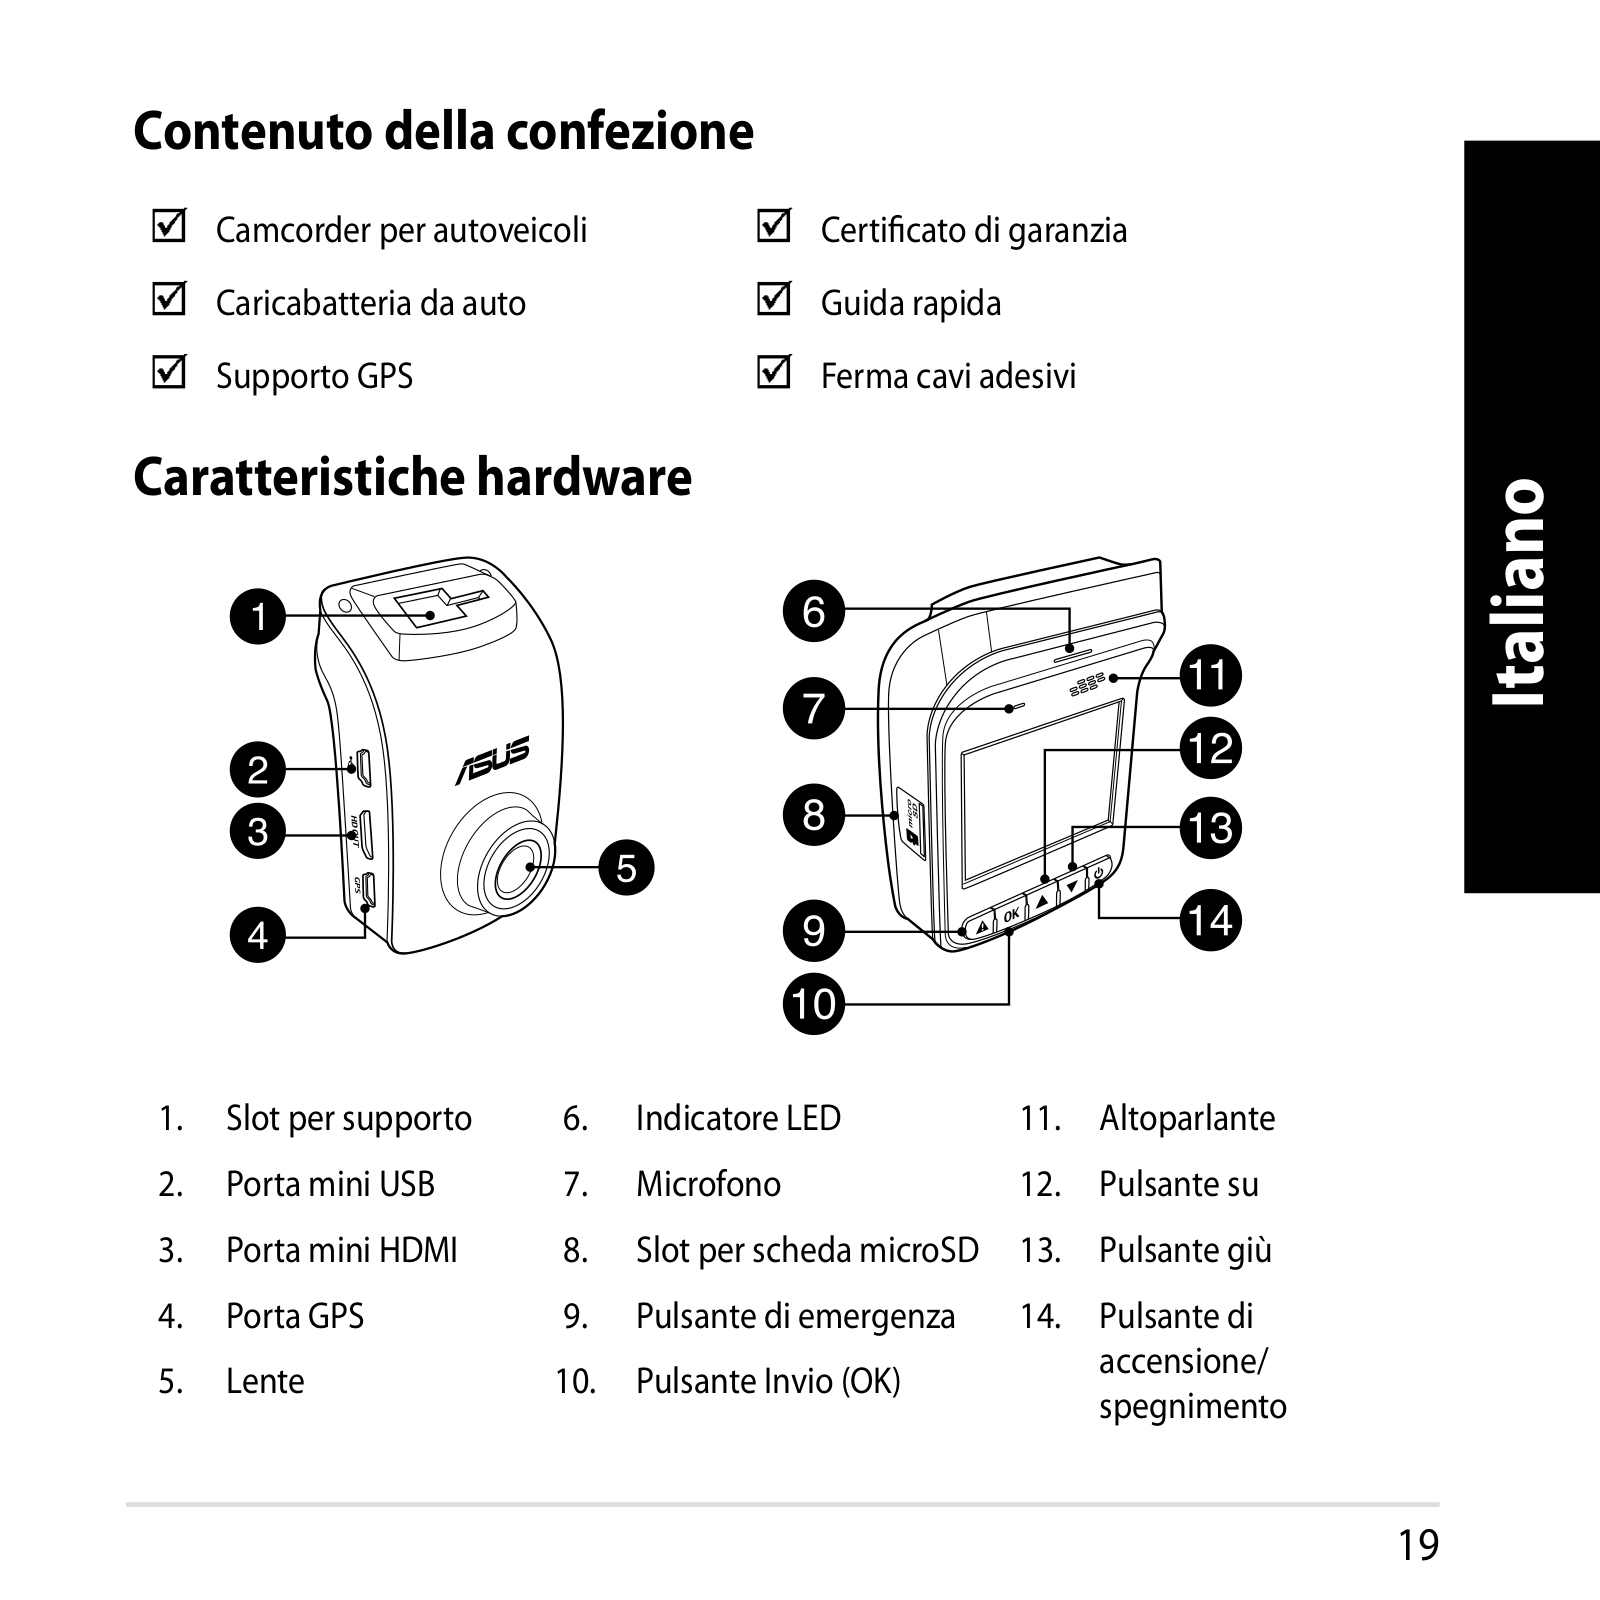
Contenuto della confezione

Camcorder per autoveicoli

Certificato di garanzia

Caricabatteria da auto

Guida rapida

Supporto GPS

Ferma cavi adesivi

Caratteristiche hardware


Italiano

1.

Slot per supporto

6.

Indicatore LED

11.

Altoparlante

2.

Porta mini USB

7.

Microfono

12.

Pulsante su

3.

Porta mini HDMI

8.

Slot per scheda microSD

13.

Pulsante giù

4.

Porta GPS

9.

Pulsante di emergenza

14.

Pulsante di

5.

Lente

10.

Pulsante Invio (OK)


accensione/


spegnimento


19

Italiano

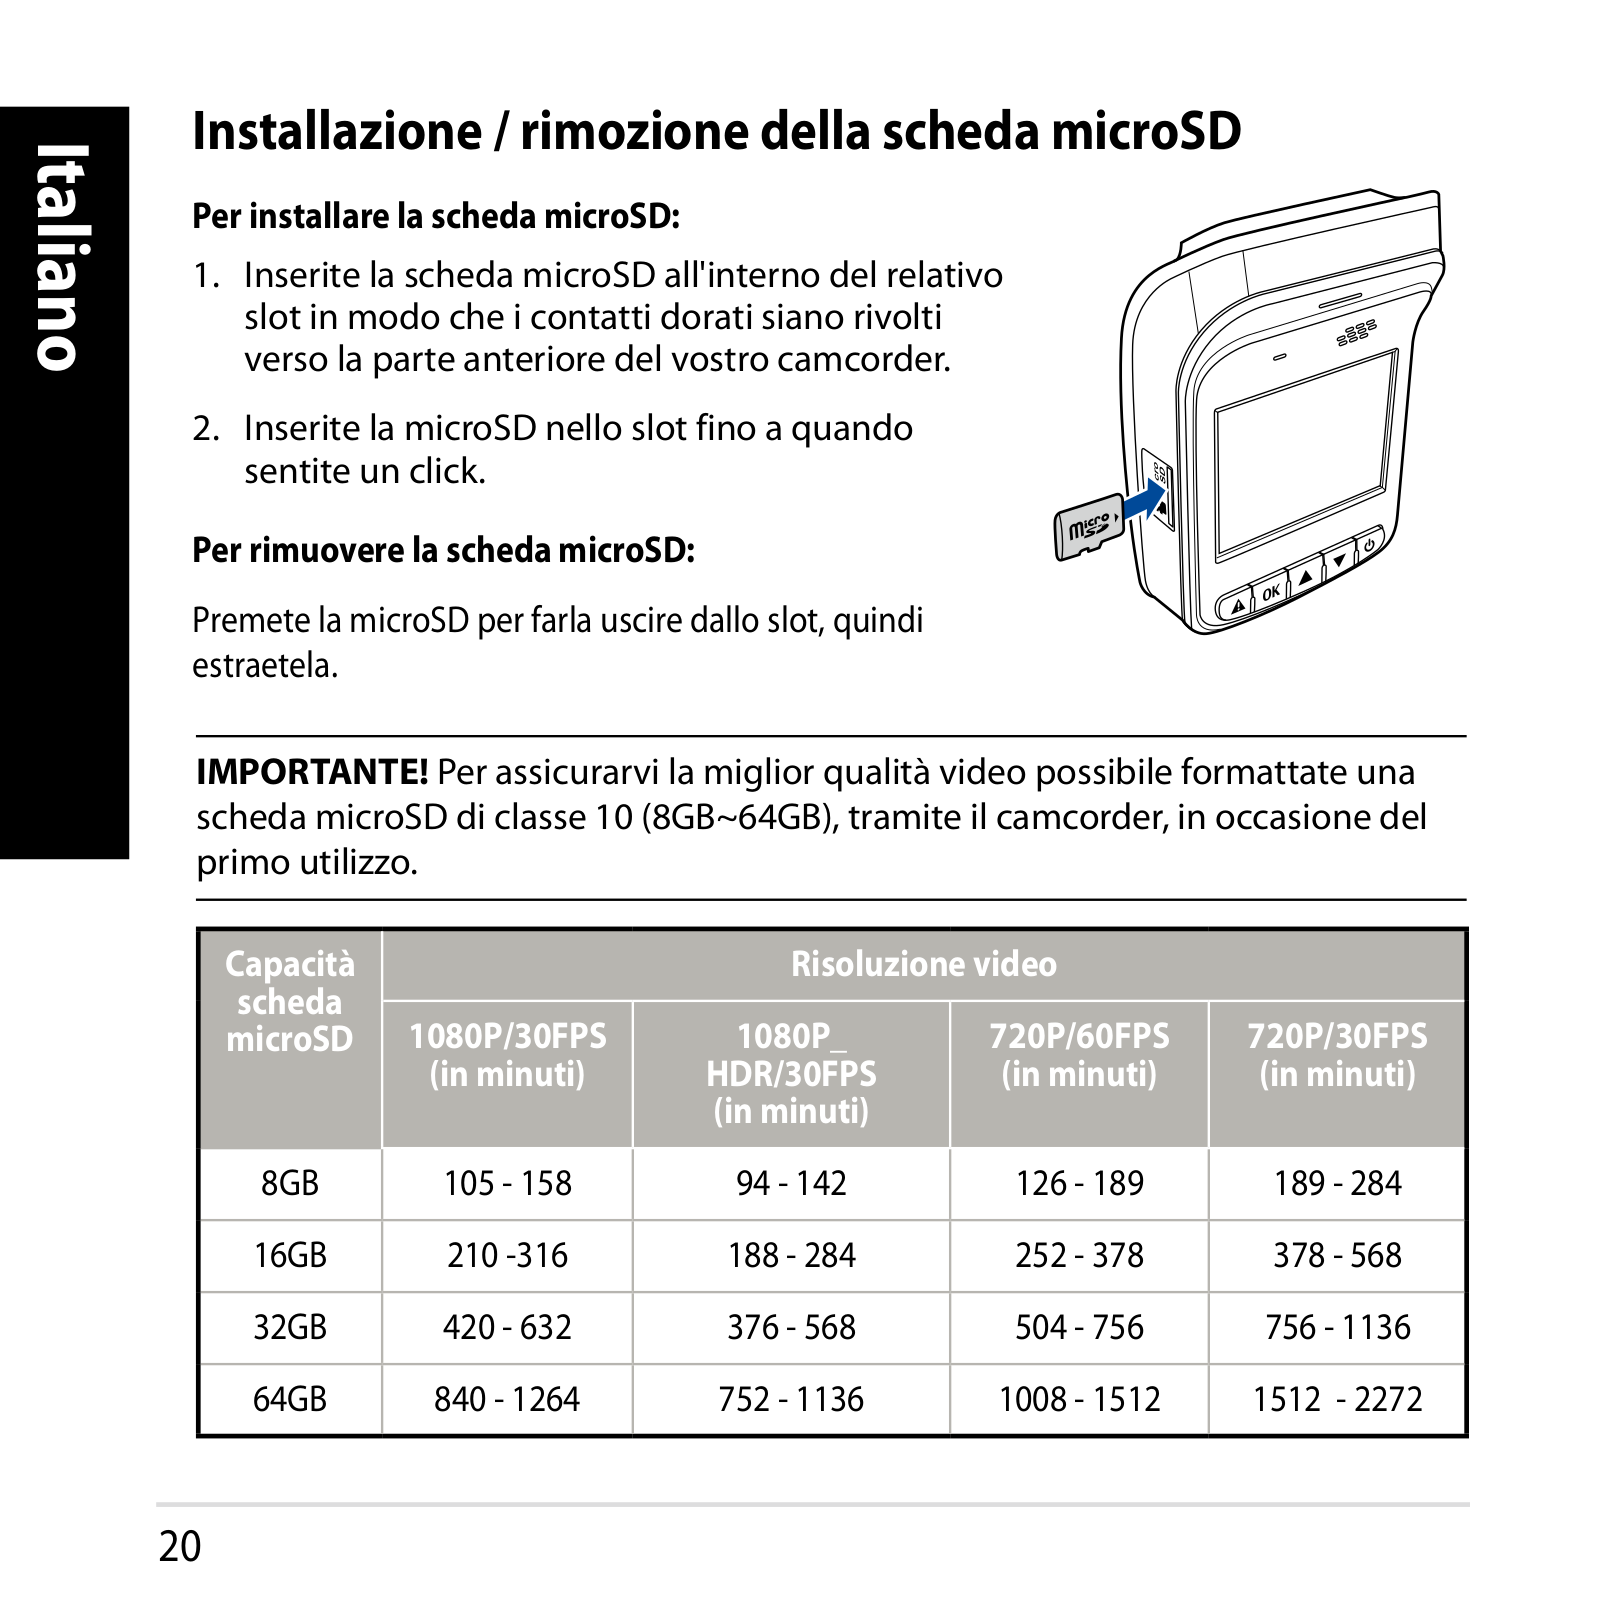
Installazione / rimozione della scheda microSD

Per installare la scheda microSD:

1. Inserite la scheda microSD all'interno del relativo slot in modo che i contatti dorati siano rivolti verso la parte anteriore del vostro camcorder.

2. Inserite la microSD nello slot fino a quando sentite un click.

Per rimuovere la scheda microSD:

Premete la microSD per farla uscire dallo slot, quindi estraetela.

IMPORTANTE! Per assicurarvi la miglior qualità video possibile formattate una scheda microSD di classe 10 (8GB~64GB), tramite il camcorder, in occasione del primo utilizzo.

Capacità


Risoluzione video


scheda

1080P/30FPS

1080P_

720P/60FPS

720P/30FPS

microSD


(in minuti)

HDR/30FPS

(in minuti)

(in minuti)


(in minuti)


8GB

105 - 158

94 - 142

126

- 189

189 - 284


16GB

210 -316

188 - 284

252

- 378

378 - 568


32GB

420 - 632

376 - 568

504

- 756

756 - 1136


64GB

840 - 1264

752 - 1136

1008

- 1512

1512 - 2272


20

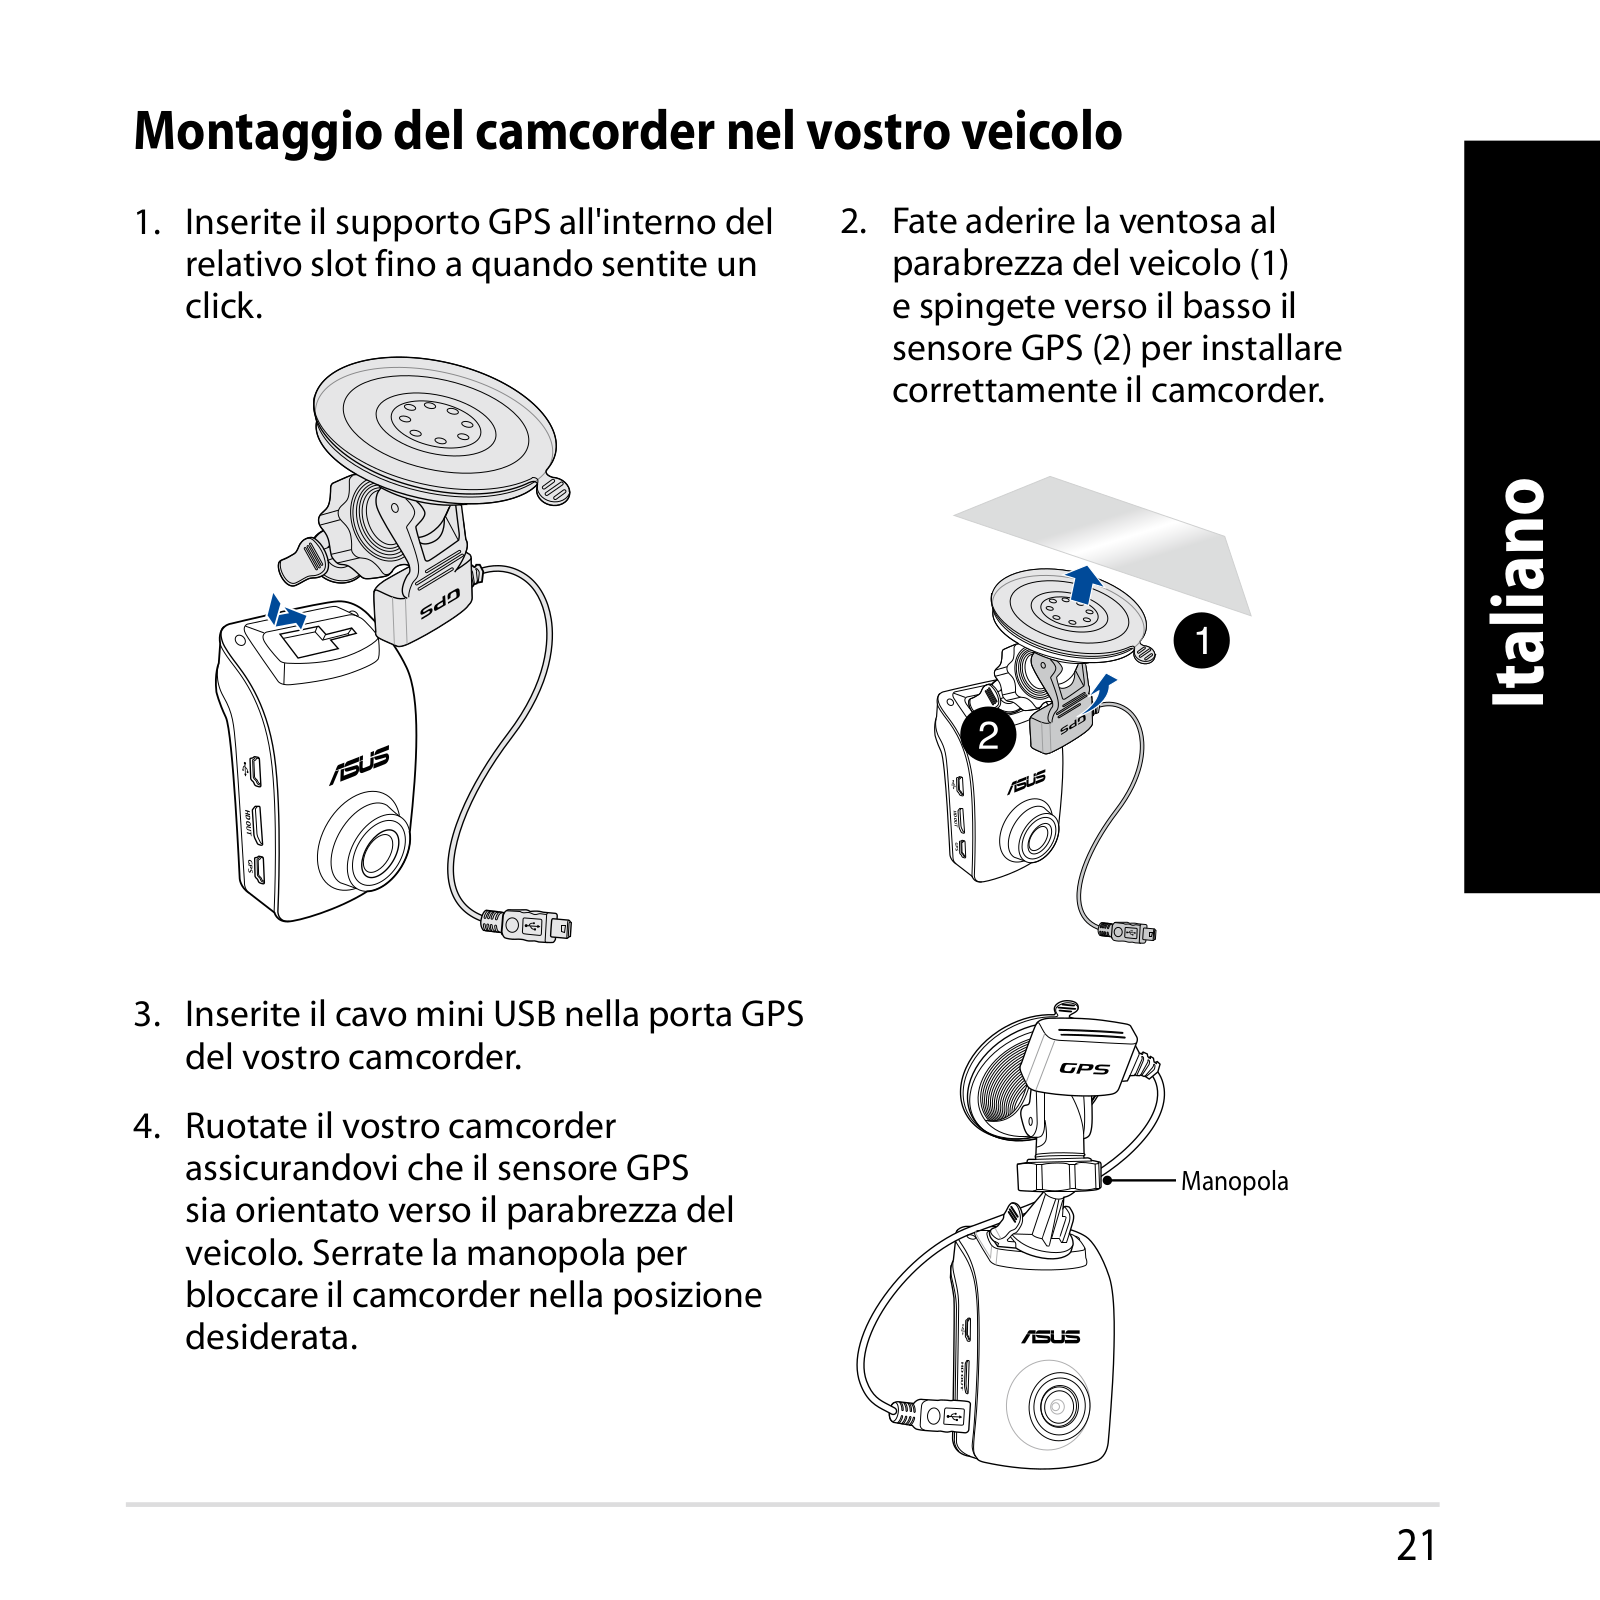
Montaggio del camcorder nel vostro veicolo

1.Inserite il supporto GPS all'interno del relativo slot fino a quando sentite un click.

2.Fate aderire la ventosa al parabrezza del veicolo (1) e spingete verso il basso il

sensore GPS (2) per installare correttamente il camcorder.

Italiano

3.Inserite il cavo mini USB nella porta GPS del vostro camcorder.

4.Ruotate il vostro camcorder assicurandovi che il sensore GPS sia orientato verso il parabrezza del veicolo. Serrate la manopola per

bloccare il camcorder nella posizione desiderata.

Manopola

21

Italiano

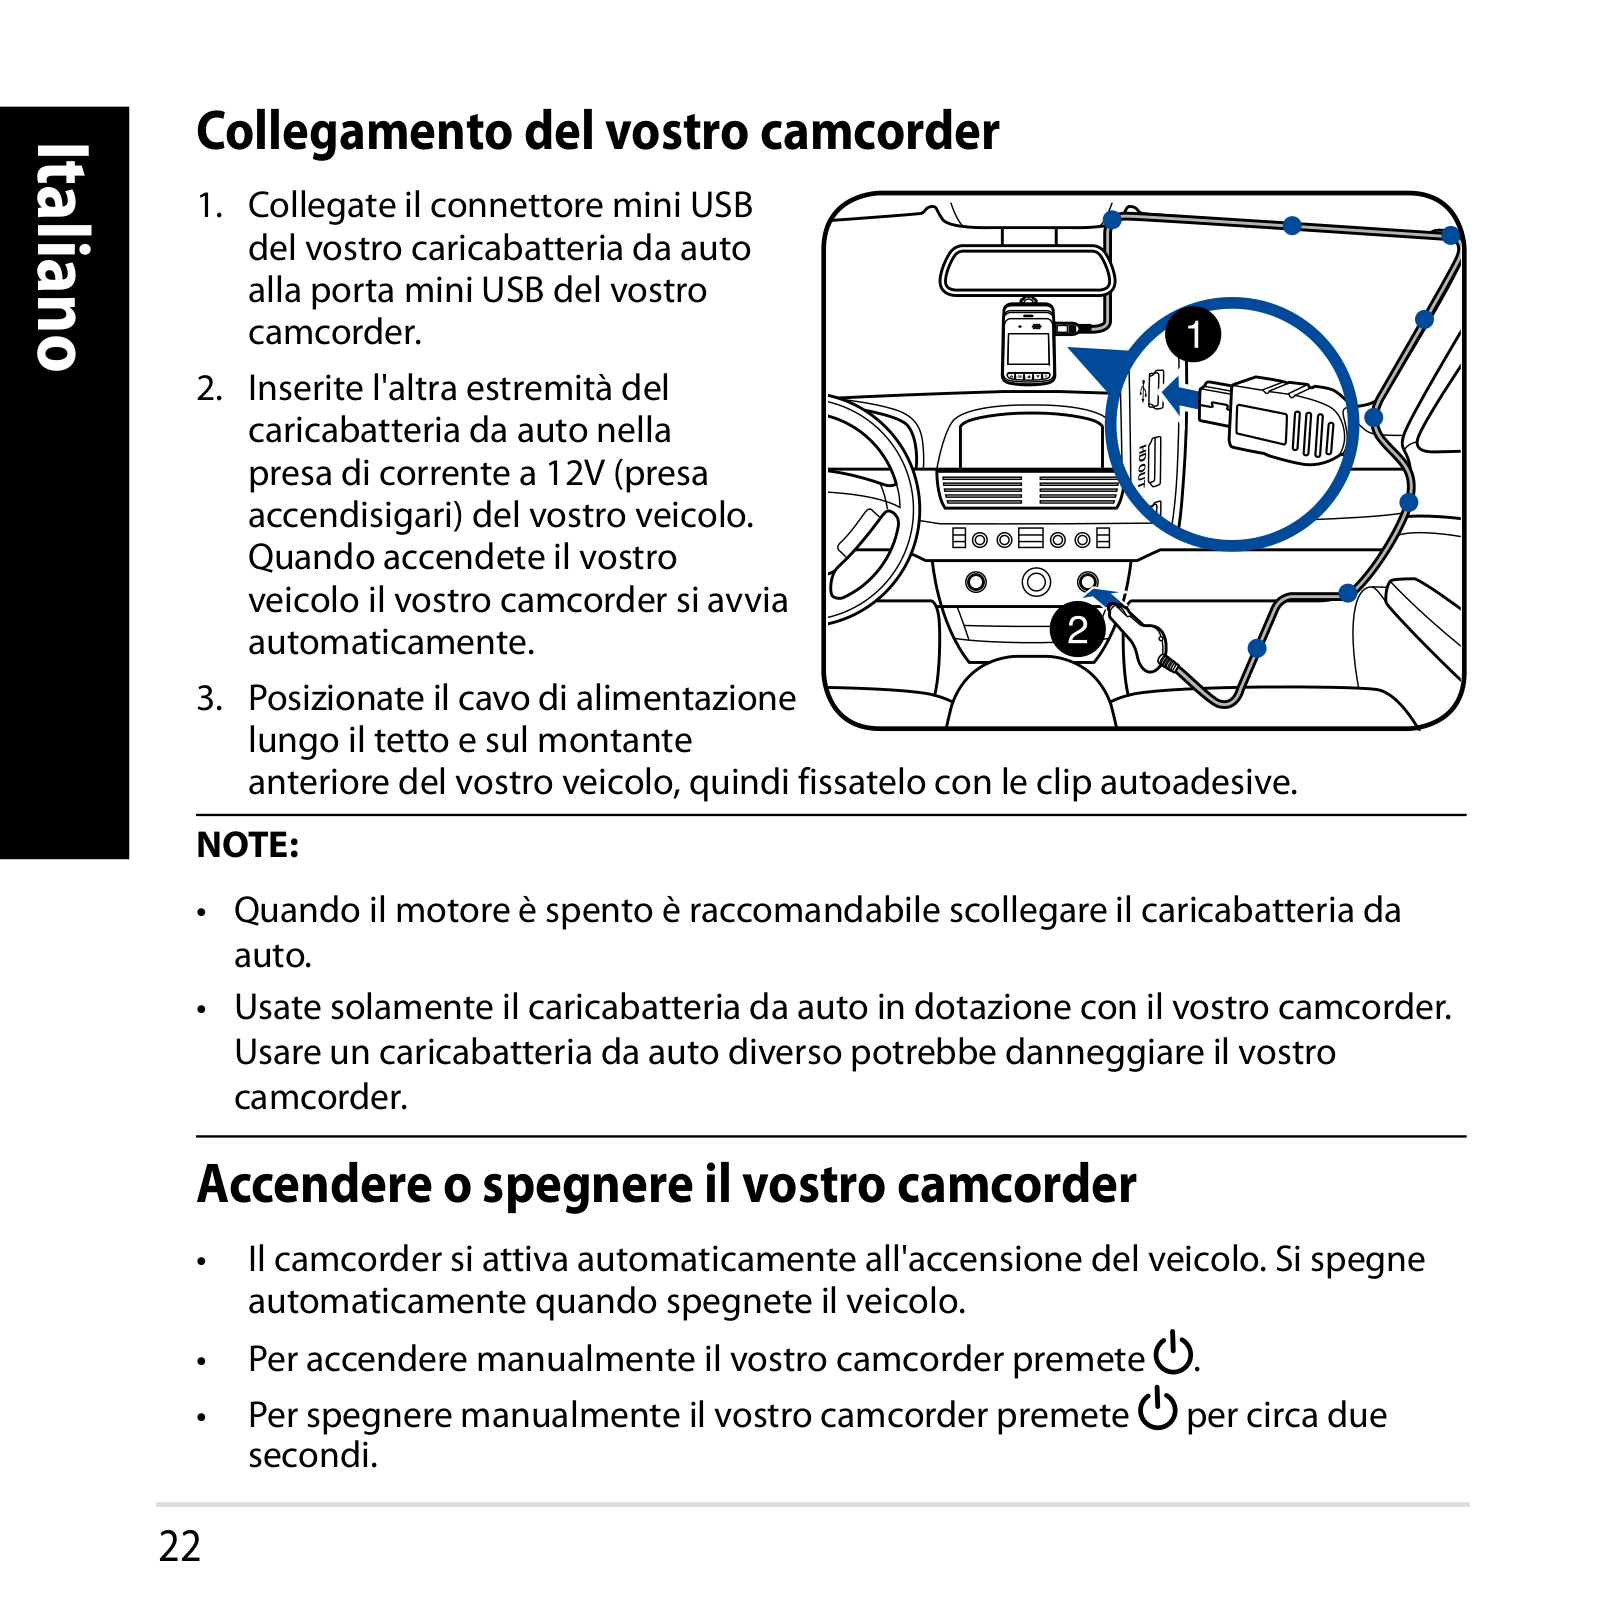
Collegamento del vostro camcorder

1. Collegate il connettore mini USB del vostro caricabatteria da auto alla porta mini USB del vostro camcorder.

2. Inserite l'altra estremità del caricabatteria da auto nella presa di corrente a 12V (presa accendisigari) del vostro veicolo. Quando accendete il vostro

veicolo il vostro camcorder si avvia automaticamente.

3.Posizionate il cavo di alimentazione lungo il tetto e sul montante

anteriore del vostro veicolo, quindi fissatelo con le clip autoadesive.

NOTE:

Quando il motore è spento è raccomandabile scollegare il caricabatteria da auto.

Usate solamente il caricabatteria da auto in dotazione con il vostro camcorder.

Usare un caricabatteria da auto diverso potrebbe danneggiare il vostro camcorder.

Accendere o spegnere il vostro camcorder

Il camcorder si attiva automaticamente all'accensione del veicolo. Si spegne automaticamente quando spegnete il veicolo.

Per accendere manualmente il vostro camcorder premete.

Per spegnere manualmente il vostro camcorder premete per circa due secondi.

22

Utilizzare le funzioni di avviso (LDWS e FCWS)

Grazie alla funzione GPS il vostro camcorder registra la posizione GPS e le memorizza nella registrazione.

IMPORTANTE!

• Assicuratevi che il sensore GPS sia collegato correttamente al vostro camcorder.


Per maggiori dettagli fate riferimento alla sezione Montaggio del camcorder nel

Italiano

vostro veicolo.


• Attivate le funzioni LDWS e FCWS nel menu Impostazione.

• Per un rilevamento LDWS e FCWS accurato assicuratevi che:

• Il sensore GPS sia rivolto verso il parabrezza del vostro veicolo.

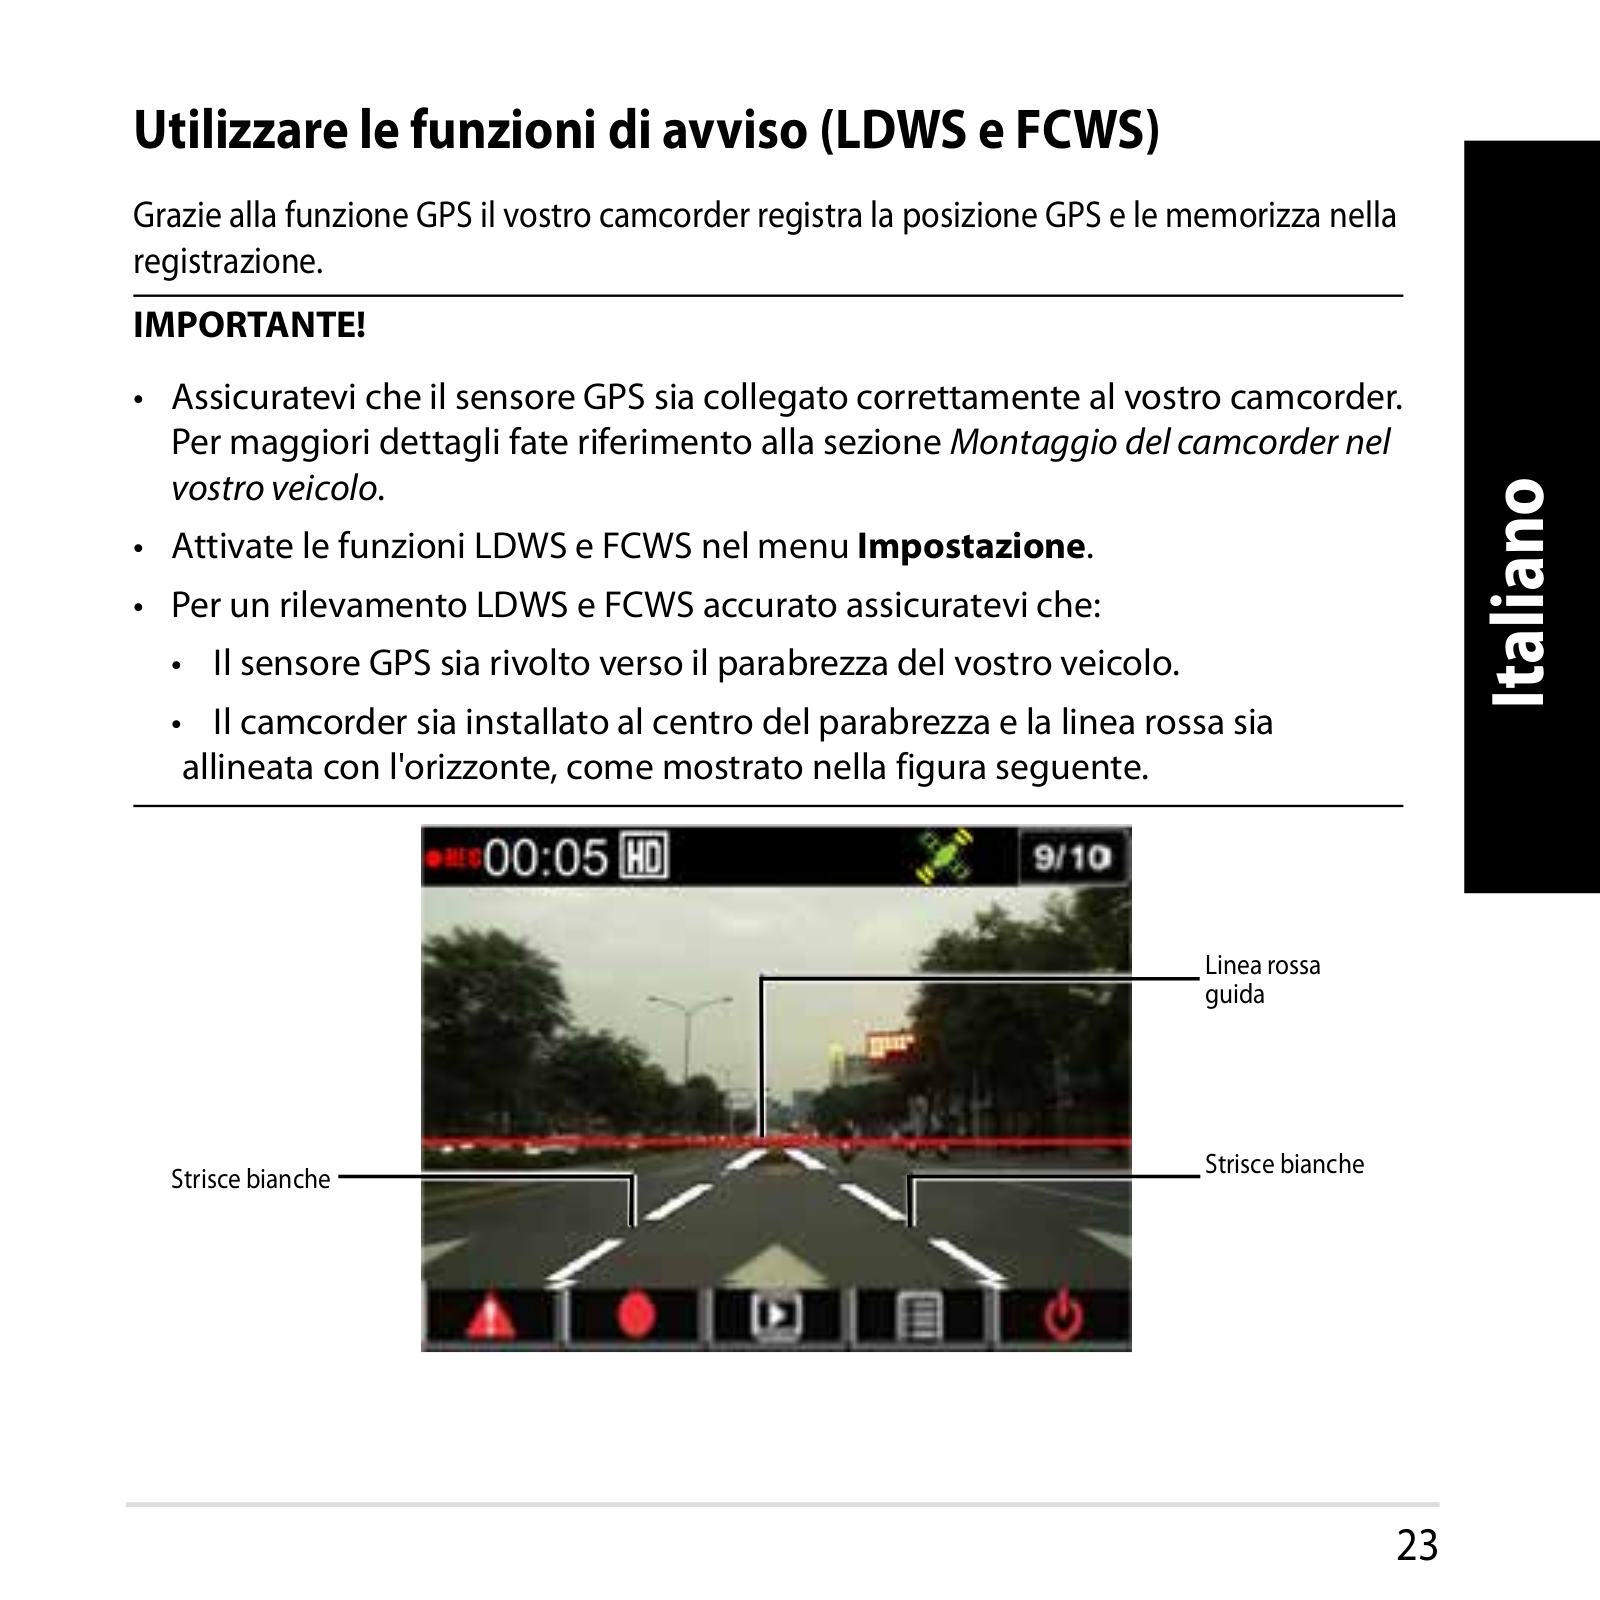
• Il camcorder sia installato al centro del parabrezza e la linea rossa sia

allineata con l'orizzonte, come mostrato nella figura seguente.

Linea rossa guida

Strisce bianche

Strisce bianche


23

Italiano

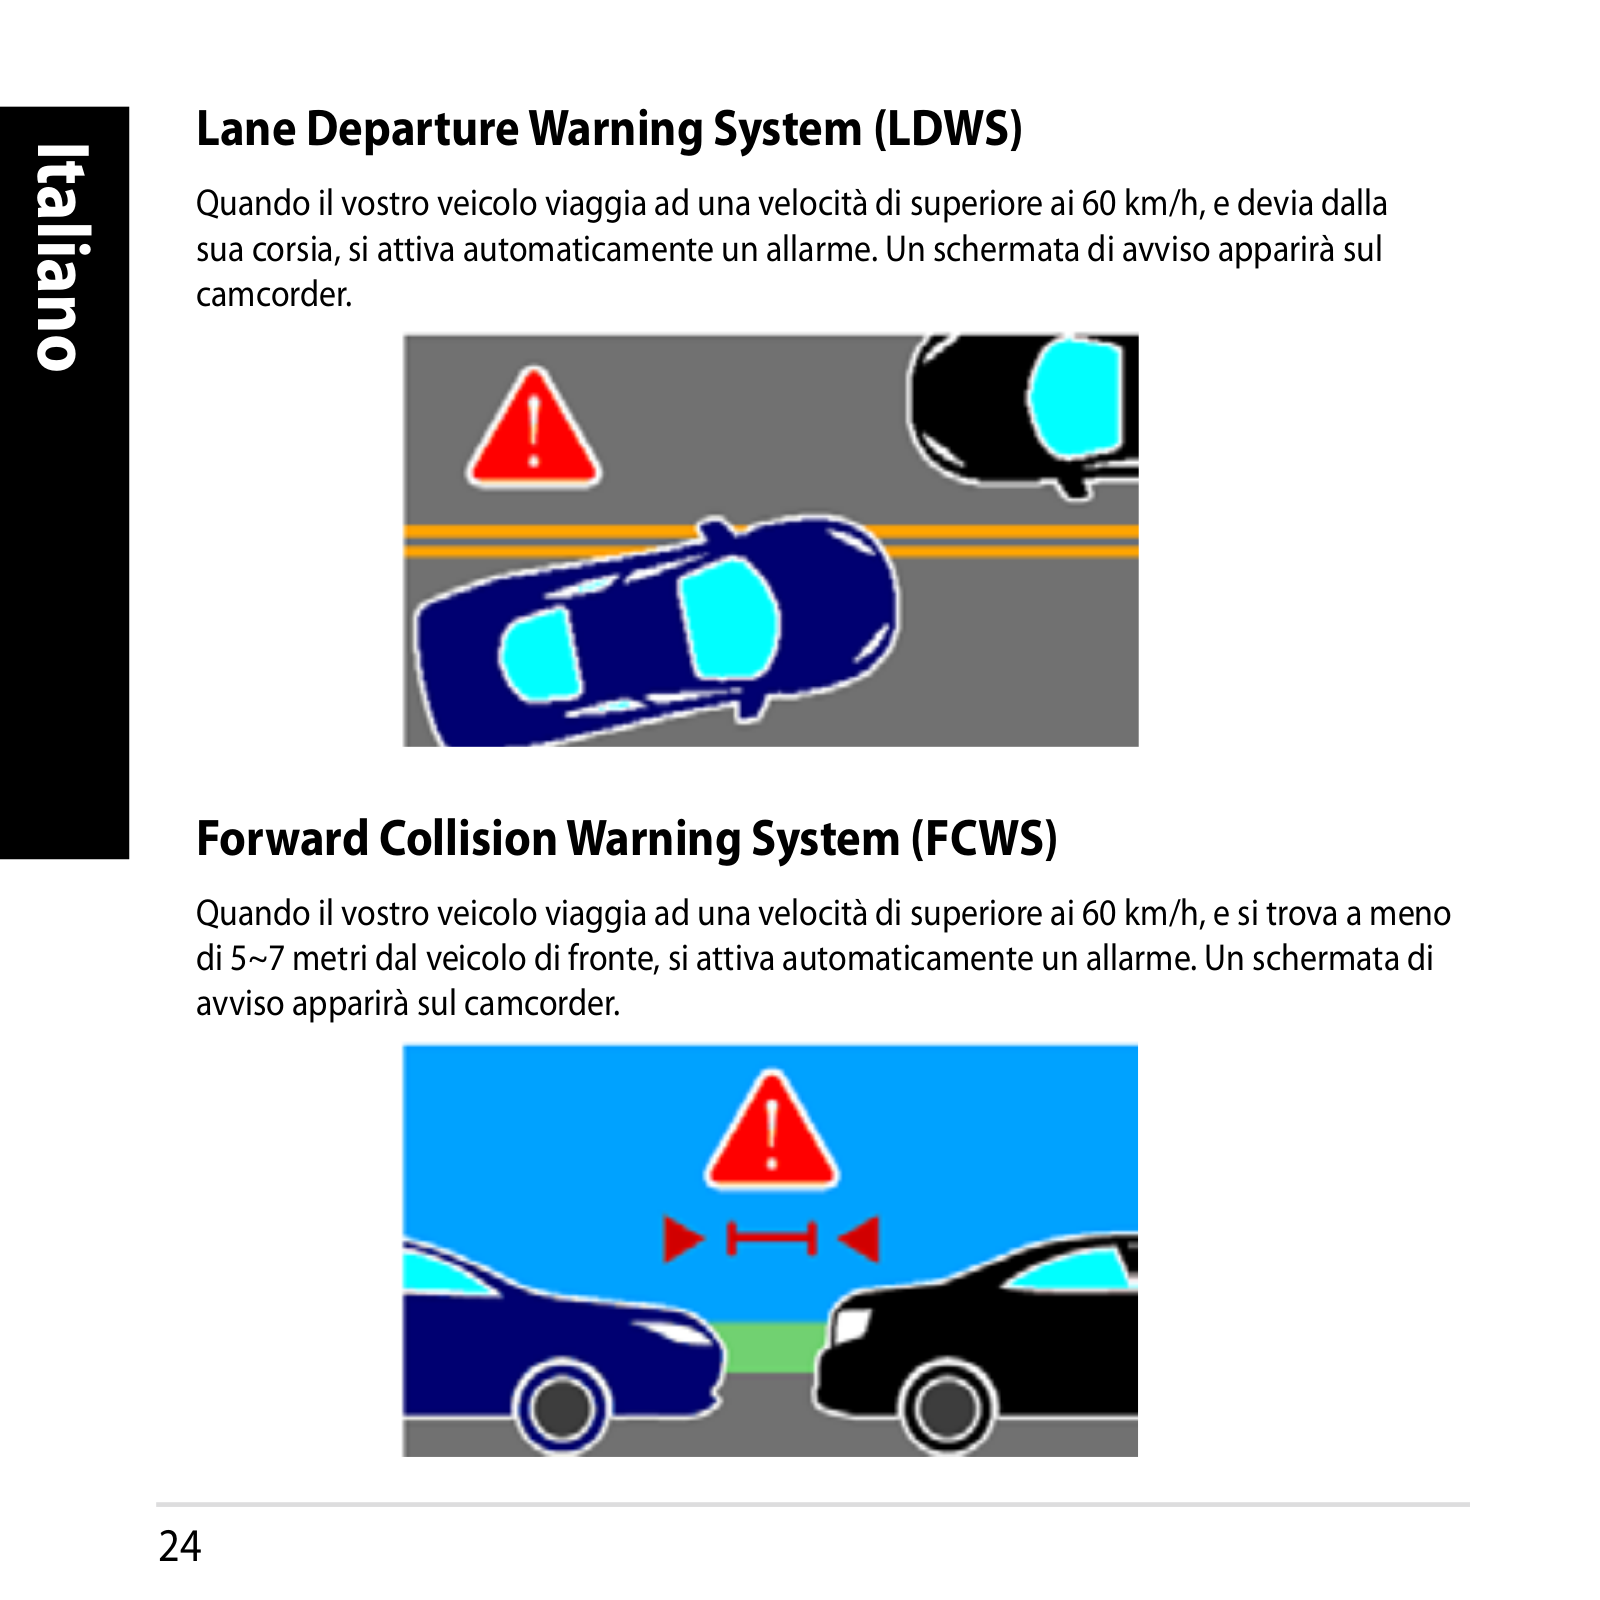
Lane Departure Warning System (LDWS)

Quando il vostro veicolo viaggia ad una velocità di superiore ai 60 km/h, e devia dalla sua corsia, si attiva automaticamente un allarme. Un schermata di avviso apparirà sul camcorder.

Forward Collision Warning System (FCWS)

Quando il vostro veicolo viaggia ad una velocità di superiore ai 60 km/h, e si trova a meno di 5~7 metri dal veicolo di fronte, si attiva automaticamente un allarme. Un schermata di avviso apparirà sul camcorder.

24

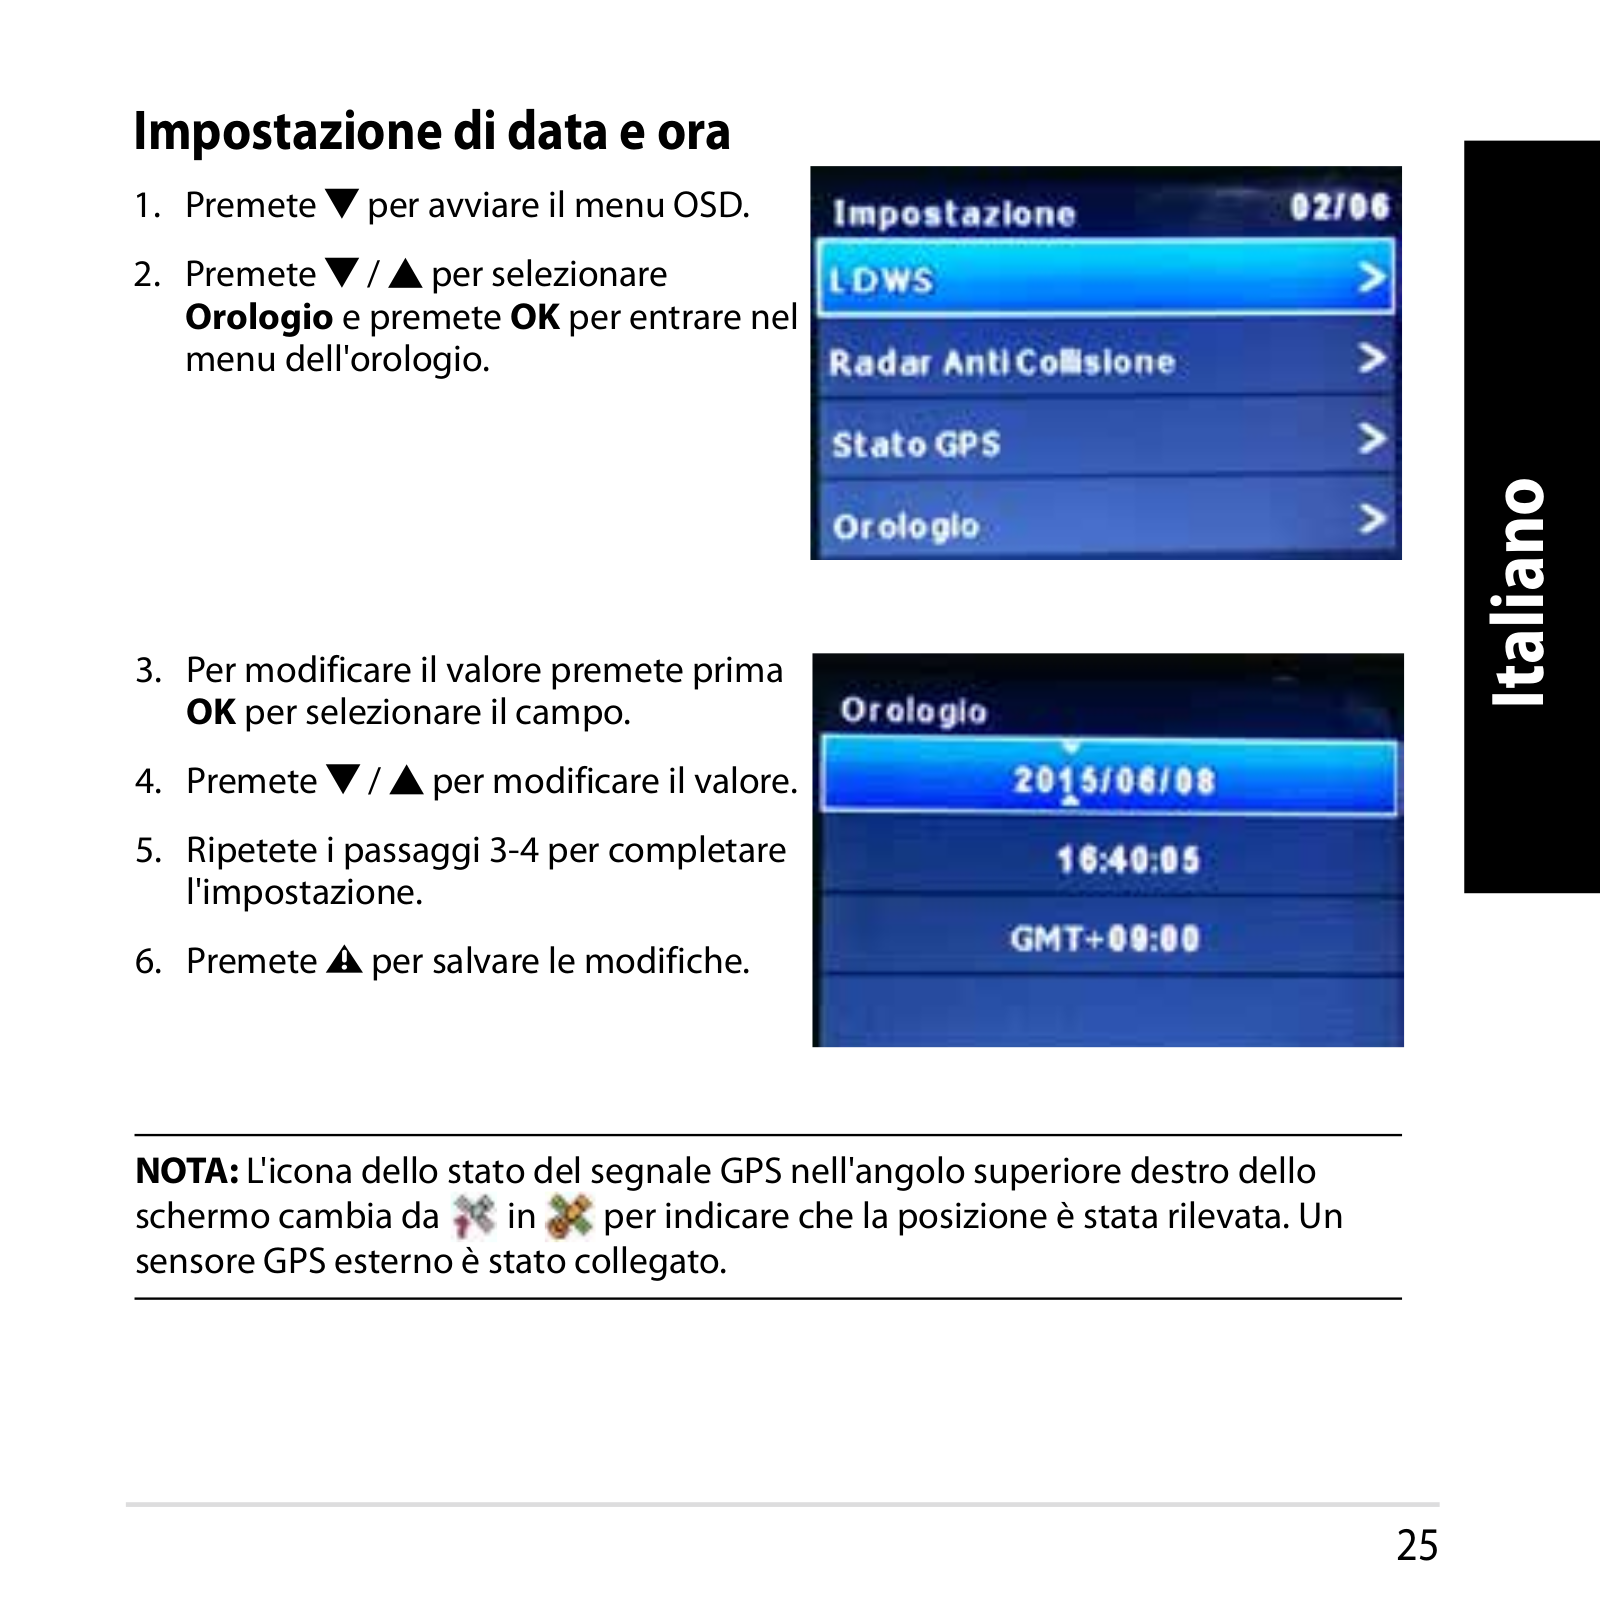
Impostazione di data e ora

1.Premeteper avviare il menu OSD.

2.Premete/per selezionare Orologio e premete OK per entrare nel menu dell'orologio.

3.Per modificare il valore premete prima OK per selezionare il campo.

4.Premete/per modificare il valore.

5.Ripetete i passaggi 3-4 per completare l'impostazione.

6.Premete per salvare le modifiche.

NOTA: L'icona dello stato del segnale GPS nell'angolo superiore destro dello schermo cambia da in per indicare che la posizione è stata rilevata. Un sensore GPS esterno è stato collegato.

Italiano

25

Italiano

Registrazione di video

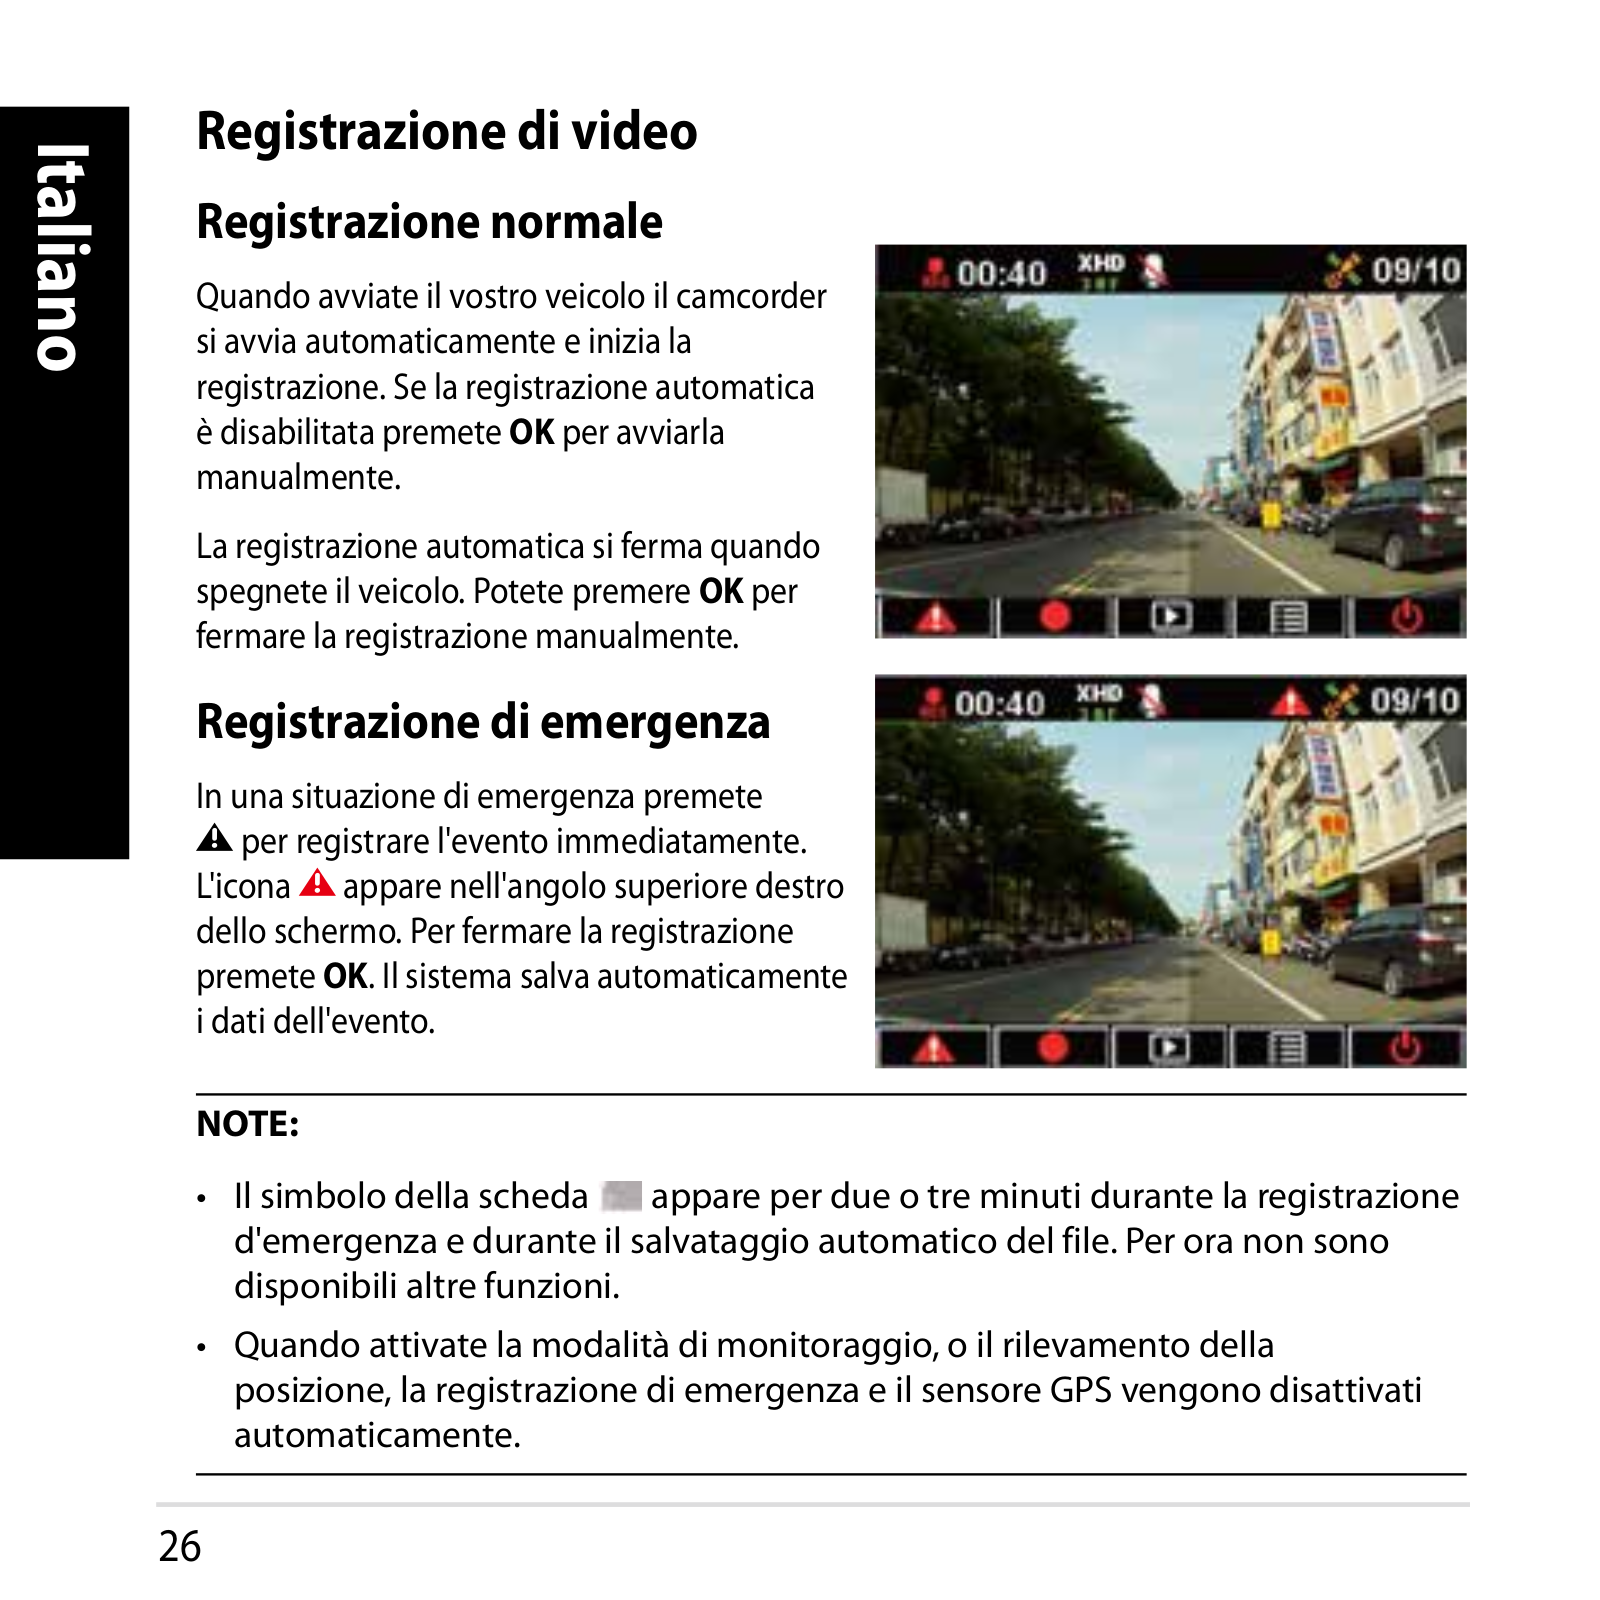
Registrazione normale

Quando avviate il vostro veicolo il camcorder si avvia automaticamente e inizia la registrazione. Se la registrazione automatica

èdisabilitatapremeteOK per avviarla manualmente.

La registrazione automatica si ferma quando spegnete il veicolo. Potete premere OK per fermare la registrazione manualmente.

Registrazione di emergenza

In una situazione di emergenza premete per registrare l'evento immediatamente.

L'icona appare nell'angolo superiore destro dello schermo. Per fermare la registrazione premete OK. Il sistema salva automaticamente i dati dell'evento.

NOTE:

Il simbolo della scheda appare per due o tre minuti durante la registrazione d'emergenza e durante il salvataggio automatico del file. Per ora non sono disponibili altre funzioni.

Quando attivate la modalità di monitoraggio, o il rilevamento della posizione, la registrazione di emergenza e il sensore GPS vengono disattivati automaticamente.

26

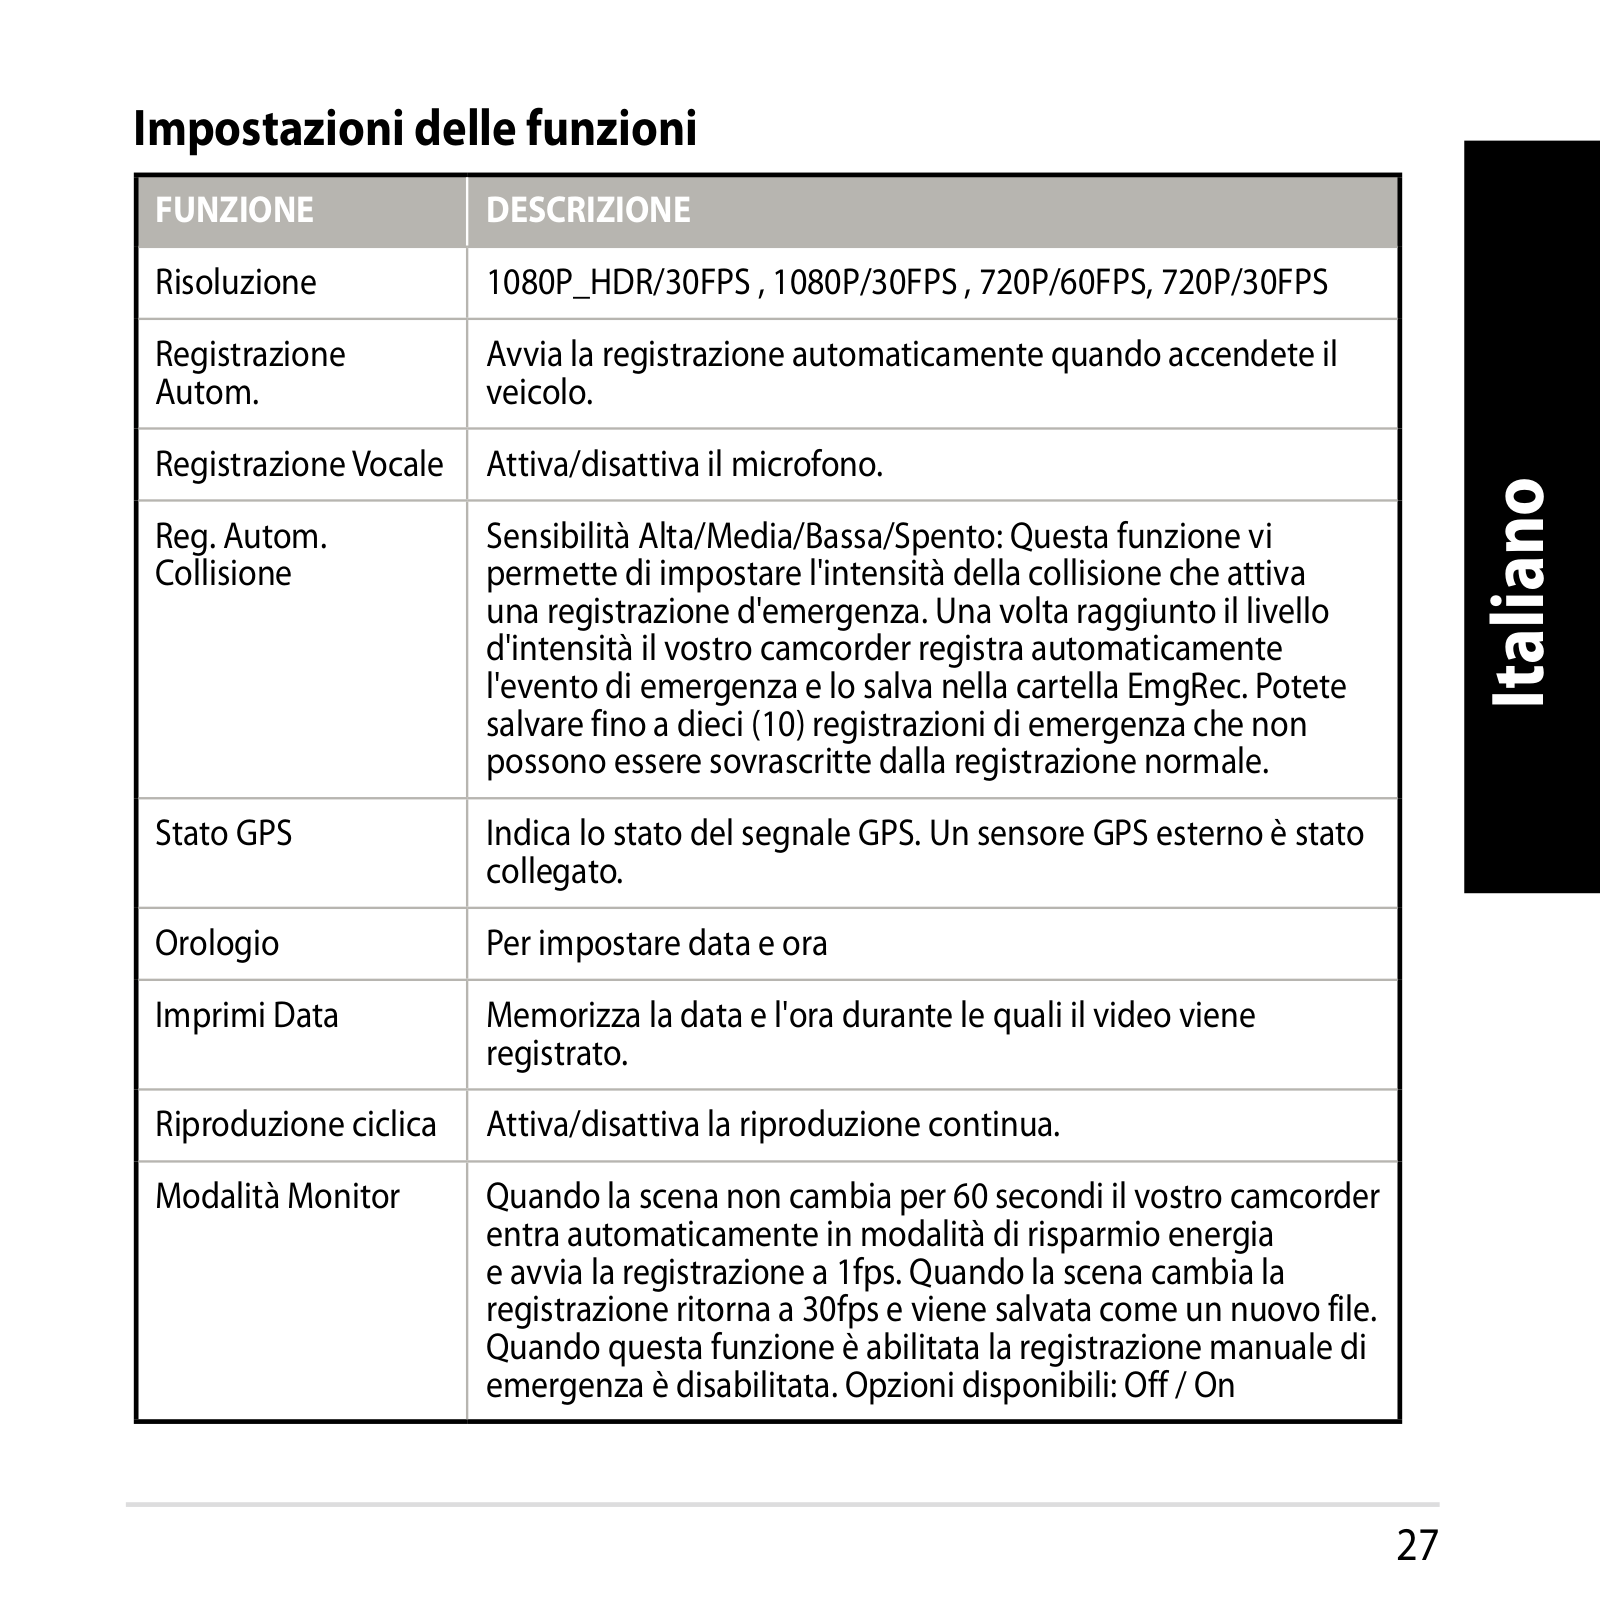
Impostazioni delle funzioni

FUNZIONE

DESCRIZIONE


Risoluzione

1080P_HDR/30FPS , 1080P/30FPS , 720P/60FPS, 720P/30FPS


Registrazione

Avvia la registrazione automaticamente quando accendete il

Autom.

veicolo.


Registrazione Vocale

Attiva/disattiva il microfono.


Reg. Autom.

SensibilitàAlta/Media/Bassa/Spento:Questafunzionevi

Collisione

permette di impostare l'intensità della collisione che attiva


una registrazione d'emergenza. Una volta raggiunto il livello


d'intensità il vostro camcorder registra automaticamente


l'evento di emergenza e lo salva nella cartella EmgRec. Potete


salvare fino a dieci (10) registrazioni di emergenza che non


possono essere sovrascritte dalla registrazione normale.


Stato GPS

IndicalostatodelsegnaleGPS.UnsensoreGPSesternoèstato


collegato.


Orologio

Per impostare data e ora


Imprimi Data

Memorizza la data e l'ora durante le quali il video viene


registrato.


Riproduzione ciclica

Attiva/disattiva la riproduzione continua.


Modalità Monitor

Quando la scena non cambia per 60 secondi il vostro camcorder


entra automaticamente in modalità di risparmio energia


e avvia la registrazione a 1fps. Quando la scena cambia la


registrazione ritorna a 30fps e viene salvata come un nuovo file.


Quandoquestafunzioneèabilitatalaregistrazionemanualedi


emergenzaèdisabilitata.Opzionidisponibili:Off/On


Italiano

27

Italiano

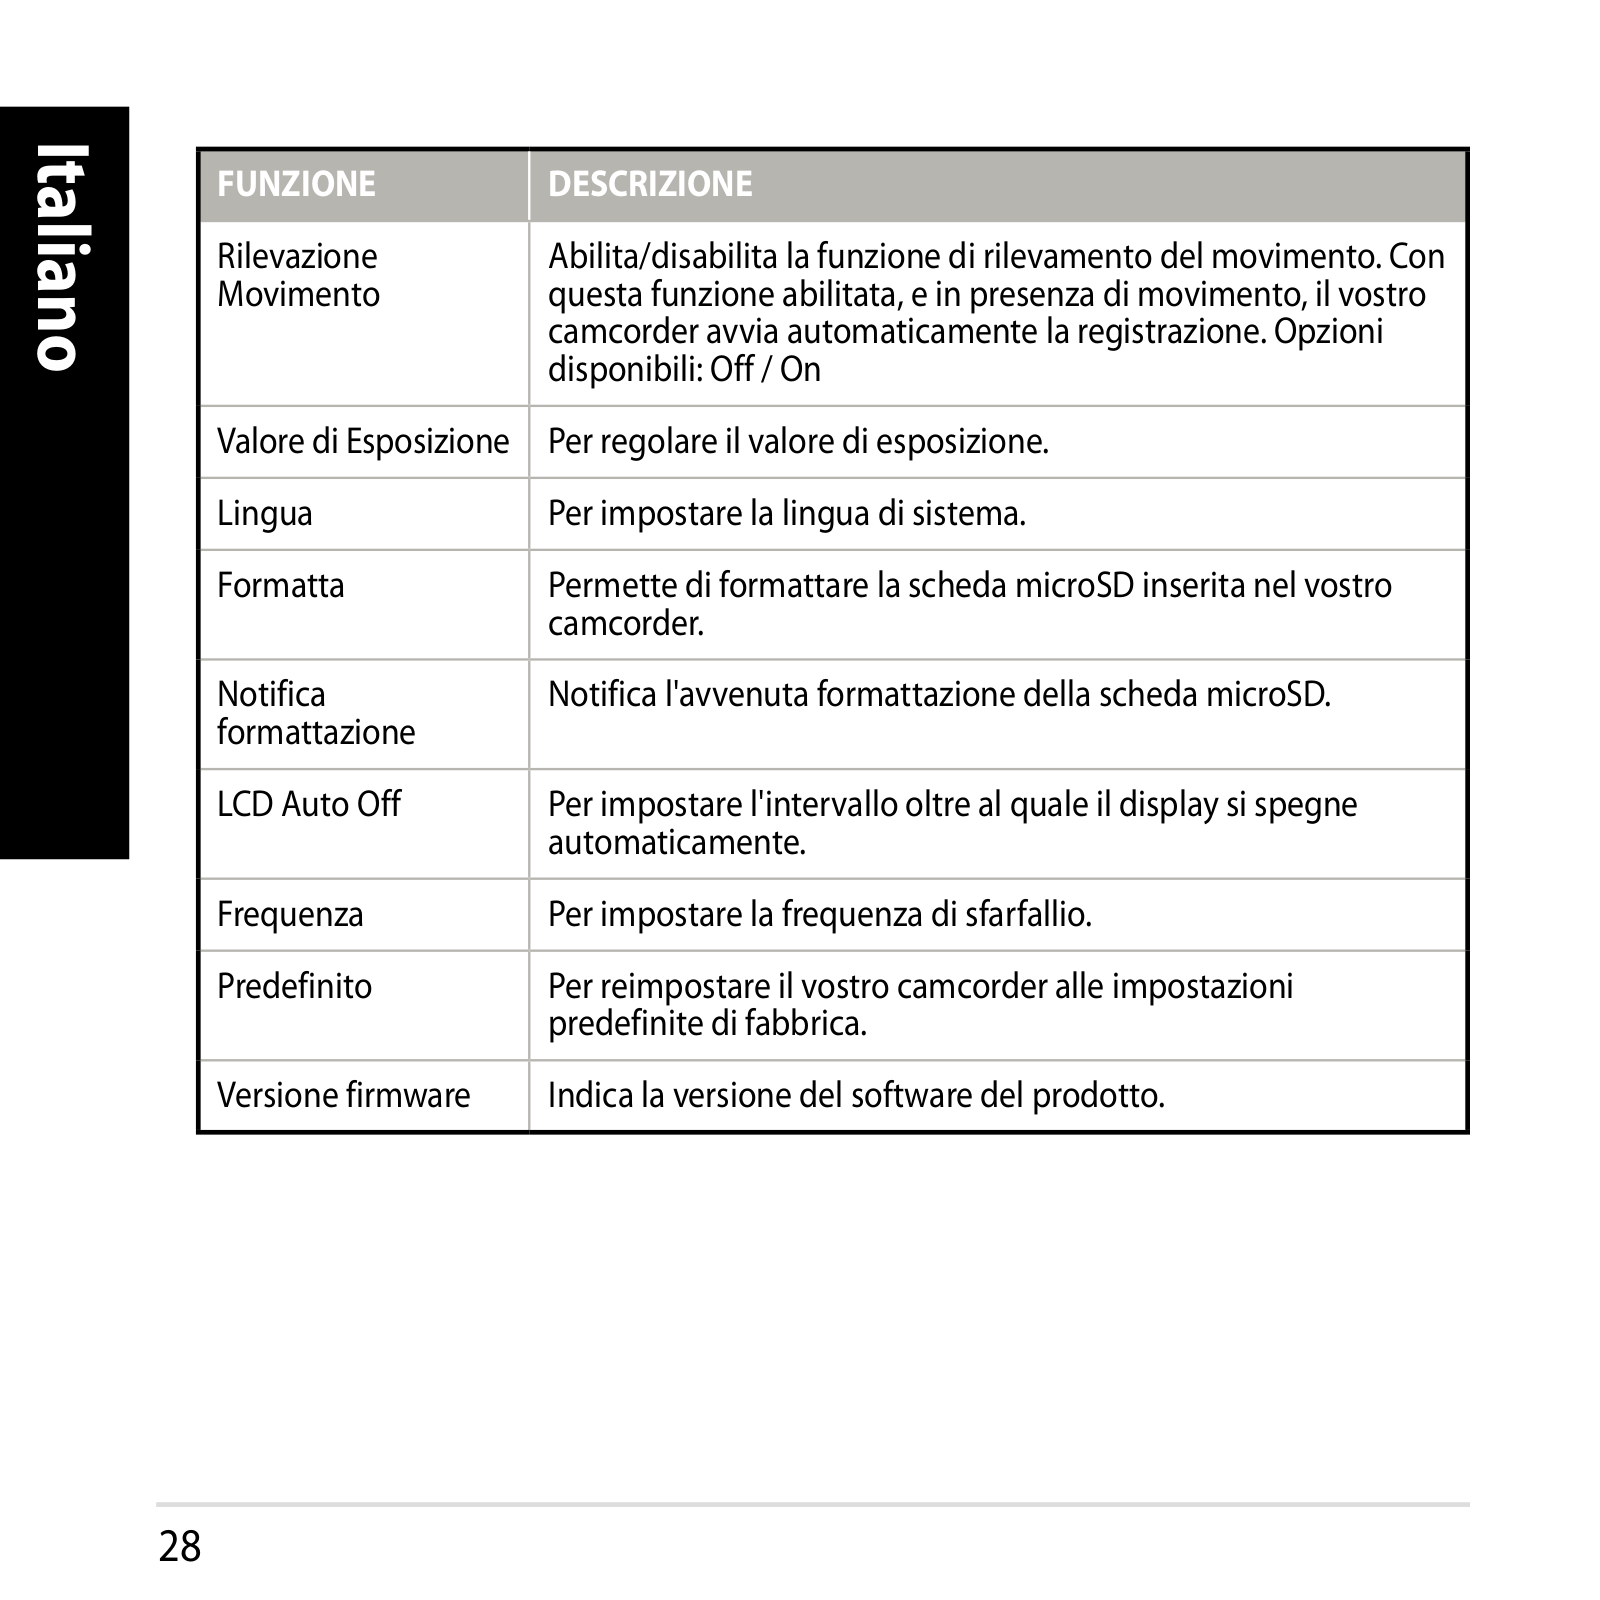
FUNZIONE

DESCRIZIONE


Rilevazione

Abilita/disabilita la funzione di rilevamento del movimento. Con

Movimento

questa funzione abilitata, e in presenza di movimento, il vostro


camcorder avvia automaticamente la registrazione. Opzioni


disponibili:Off/On


Valore di Esposizione

Per regolare il valore di esposizione.


Lingua

Per impostare la lingua di sistema.


Formatta

Permette di formattare la scheda microSD inserita nel vostro


camcorder.


Notifica

Notifica l'avvenuta formattazione della scheda microSD.

formattazione


LCD Auto Off

Per impostare l'intervallo oltre al quale il display si spegne


automaticamente.


Frequenza

Per impostare la frequenza di sfarfallio.


Predefinito

Per reimpostare il vostro camcorder alle impostazioni


predefinite di fabbrica.


Versione firmware

Indica la versione del software del prodotto.


28

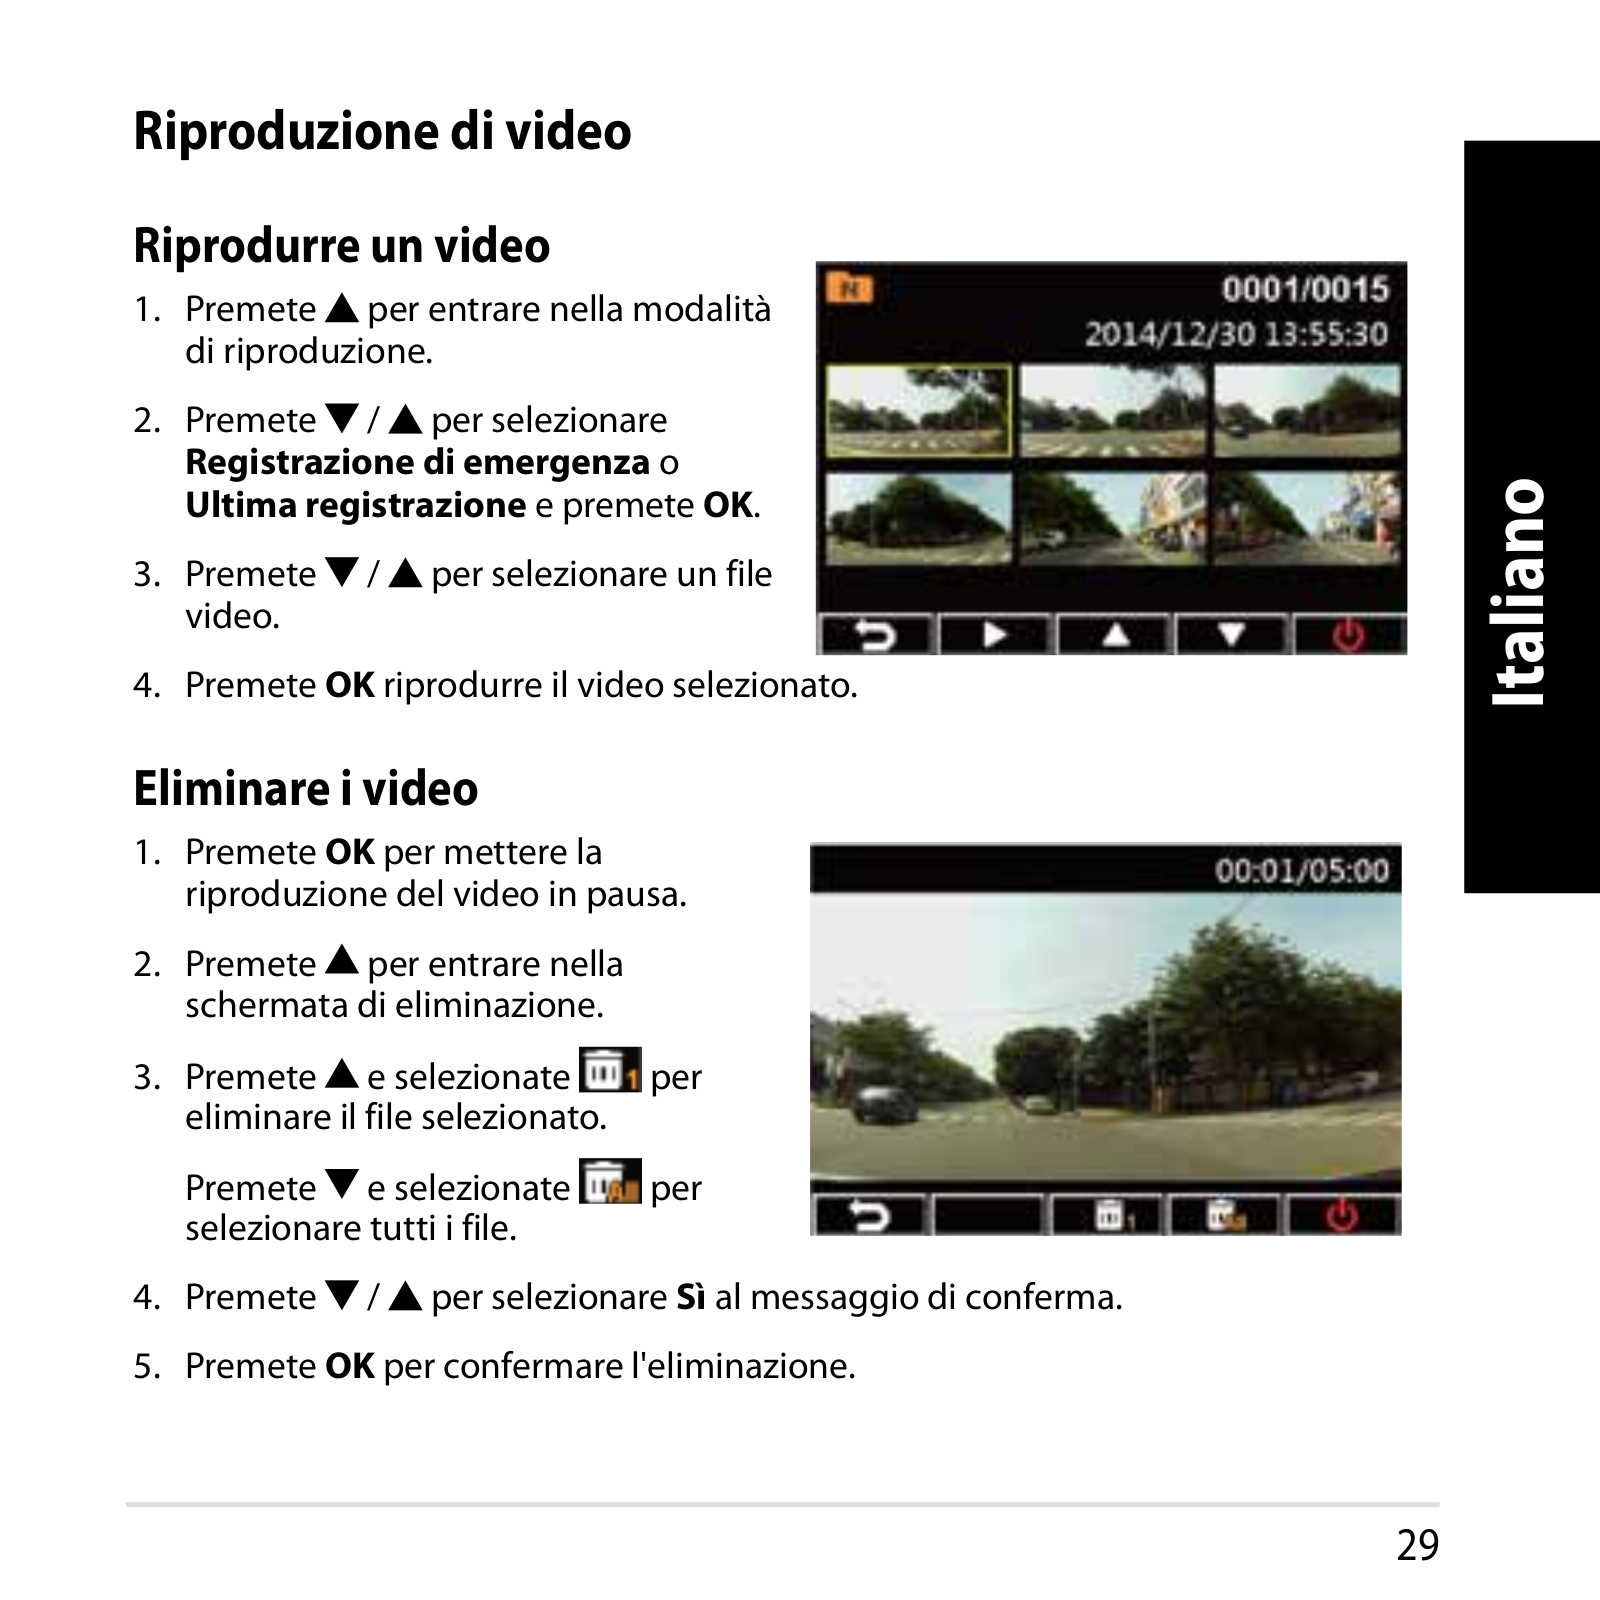
Riproduzione di video

Riprodurre un video

1.Premeteper entrare nella modalità di riproduzione.

2.Premete/per selezionare

Registrazione di emergenza o Ultima registrazione e premete OK.

3.Premete/per selezionare un file video.

4.Premete OK riprodurre il video selezionato.

Eliminare i video

1.Premete OK per mettere la riproduzione del video in pausa.

2.Premeteper entrare nella schermata di eliminazione.

3.Premetee selezionate per eliminare il file selezionato.

Premetee selezionate per selezionare tutti i file.

4.Premete/per selezionare al messaggio di conferma.

5.Premete OK per confermare l'eliminazione.

Italiano

29

Italiano

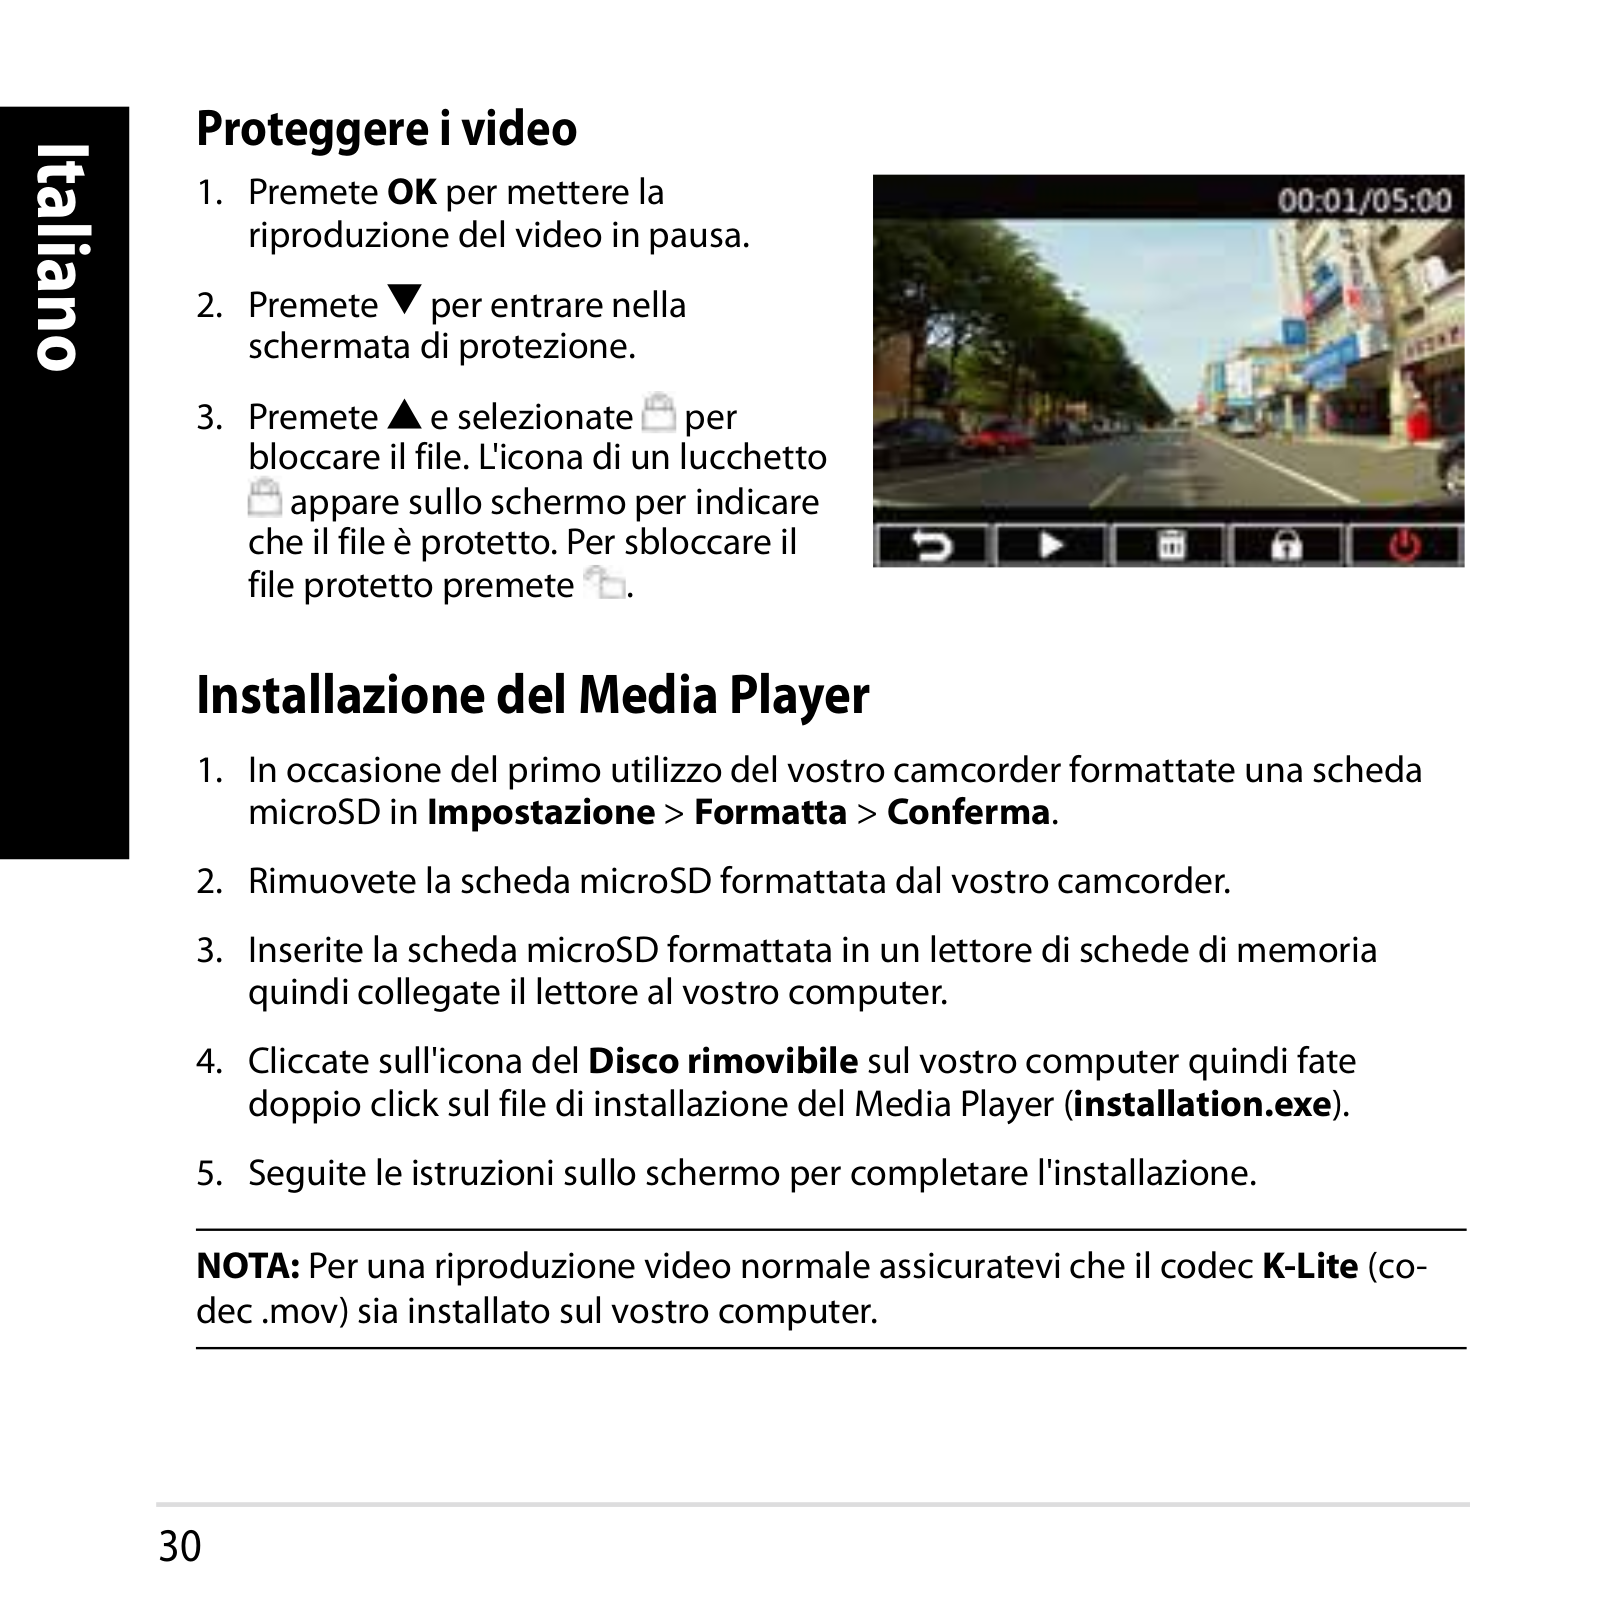
Proteggere i video

1.Premete OK per mettere la riproduzione del video in pausa.

2.Premeteper entrare nella schermata di protezione.

3.Premetee selezionate per bloccare il file. L'icona di un lucchetto

appare sullo schermo per indicare che il file è protetto. Per sbloccare il file protetto premete .

Installazione del Media Player

1.In occasione del primo utilizzo del vostro camcorder formattate una scheda microSD in Impostazione > Formatta > Conferma.

2.Rimuovete la scheda microSD formattata dal vostro camcorder.

3.Inserite la scheda microSD formattata in un lettore di schede di memoria quindi collegate il lettore al vostro computer.

4.Cliccate sull'icona del Disco rimovibile sul vostro computer quindi fate doppio click sul file di installazione del Media Player (installation.exe).

5.Seguite le istruzioni sullo schermo per completare l'installazione.

NOTA: Per una riproduzione video normale assicuratevi che il codec K-Lite (codec .mov) sia installato sul vostro computer.

30

Loading...
+ 123 hidden pages