

Page 1
ASUSTeK COMPUTER
Authorize
Review
ASUSTeK COMPUTER
ASUSTeK COMPUTER ASUSTeK COMPUTER
INC.
INC.
INC.INC.
5870 EYEFINITY 6
5870 EYEFINITY 6
5870 EYEFINITY 65870 EYEFINITY 6
Standard Operation
Standard Operation Procedure
Standard OperationStandard Operation
Procedure
Procedure Procedure
Do
Doc. No
c. No::::
DoDo
c. Noc. No
Date:
Date: Mar
Date: Date:
Revision:
Revision:1.0
Revision:Revision:
Page:
Page: 11111111 Grade::::
Page:Page:
Mar.
. 31
MarMar
. .
1.00000
1.01.0
31,,,, 20
2010
3131
20 20
10
1010
Rev.
1.00
Modified
Chapters
Modification Description
First Release GTC Ariel_wang Mar.31,2010
Issued
Dept.
Issued by
Revised Date
by
by
Originator
By
Form No: T2-009-01 Rev.01
Ariel
Page 2

Doc. No:
ASUSTeK COMPUTER INC
5870 EYEFINITY 6
Standard Operation Procedure
1.Objectives
Create test procedure.
2.Scope
Model:5870 EYEFINITY 6
PN: C3CH35(A01)
3.Test Item
3.1 Diagnostic test in Linux
3.2 3DMark06(contain HDMI test)
3.3 Temperature test
3.4 Fan test (For C3CH35)
4.Relevant Document
None.
Date: Mar. 31, 2010
Rev.: 1.00 Page: 1
5.Definition
:1. If the model name contains P, please test HDCP function.
Ex: EAH***/HTDP/512M/A
2. If you test HDMI already, it’s unnecessary to test HDCP. The HDMI
contains HDCP function.
3. System Memory: 1GB for a single GPU test station; please add an
additional 512MB of system memory for each additional GPU used for
the test configuration
Page 3

Doc. No:
ASUSTeK COMPUTER INC
Standard Operation Procedure
5870 EYEFINITY 6
Date: Mar. 31, 2010
Rev.: 1.00 Page: 2
6. Operation Procedures:
6.1 Attention
6.1.1 To avoid damaging devices or M/B, please turn off A/C power then unplug VGA
card.
6.1.2 While unplugging the card, do it in upright direction to avoid damaging slot &
golden finger.
6.1.3 If any problem happens, please inform test supervisor. Base on ATX power
specification, +5V standby voltage is existed while AC power is connecting. For
safety reason, please turn off main power during break time or idling test.
6.1.4 Some test items should be tested under Windows environment. (Please install
windows test environment by yourself).
Page 4
Doc. No:
ASUSTeK COMPUTER INC
5870 EYEFINITY 6
Standard Operation Procedure
6.2 Fixture connect
6.2.1 Install Intel P5 CPU & CPU Fan.
6.2.2 Install DDR2 1GB Memory to DIMM1~4.
6.2.3 Plug USB Mouse and PS/2 Keyboard into MB.
6.2.4 Plug VGA Card 5870 EYEFINITY 6 into PCIEX16_1.
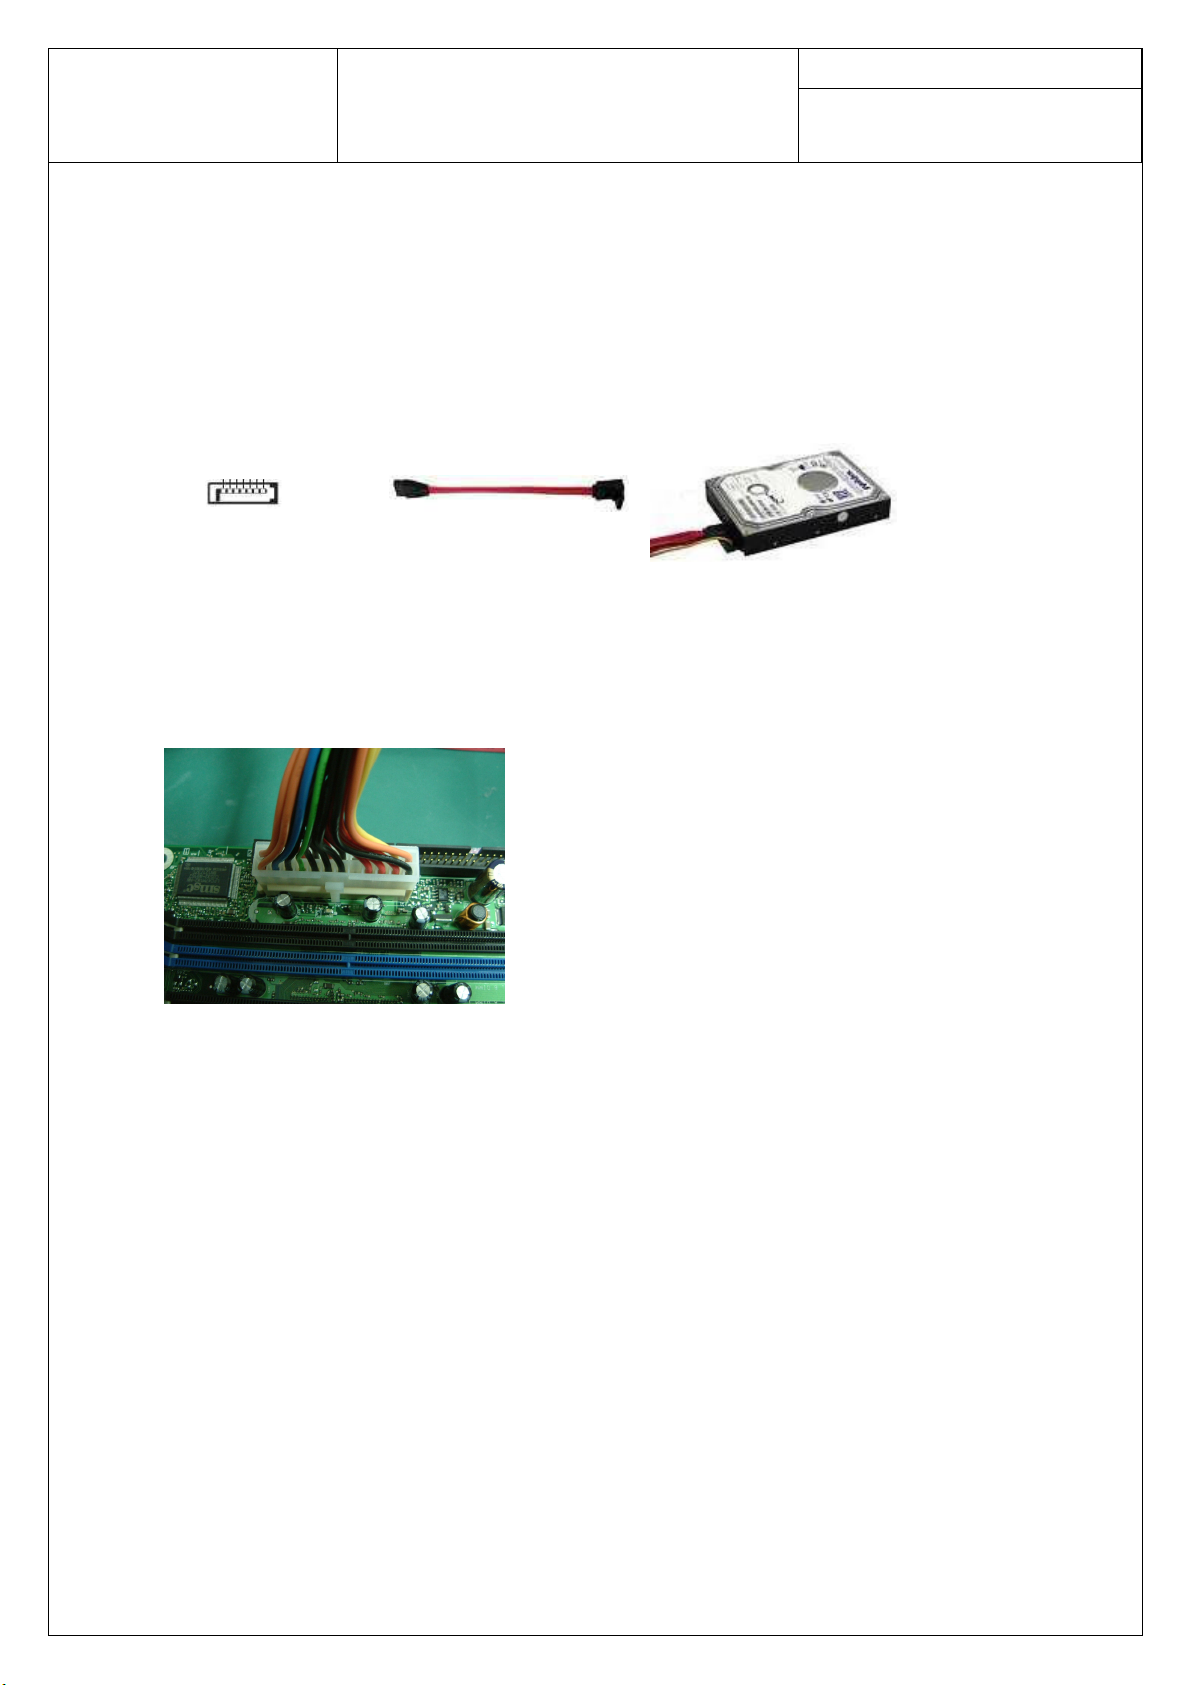
6.2.5 Connect SATA HDD & SATA con via SATA cable
SATA
6.2.6 Plug 4PIN 12V power
6.2.7 Plug ATX Power on Power
(a minimum power of 600W)
(a minimum power of 600W)
(a minimum memory of 2GB for Linux test)
cable into CON12V.
Connector.
Date: Mar. 31, 2010
Rev.: 1.00 Page: 3
Page 5
Doc. No:
ASUSTeK COMPUTER INC
Standard Operation Procedure
5870 EYEFINITY 6
Date: Mar. 31, 2010
Rev.: 1.00 Page: 4
6.3 Certain test.
6.3.1 Diagnostic test in LINUX
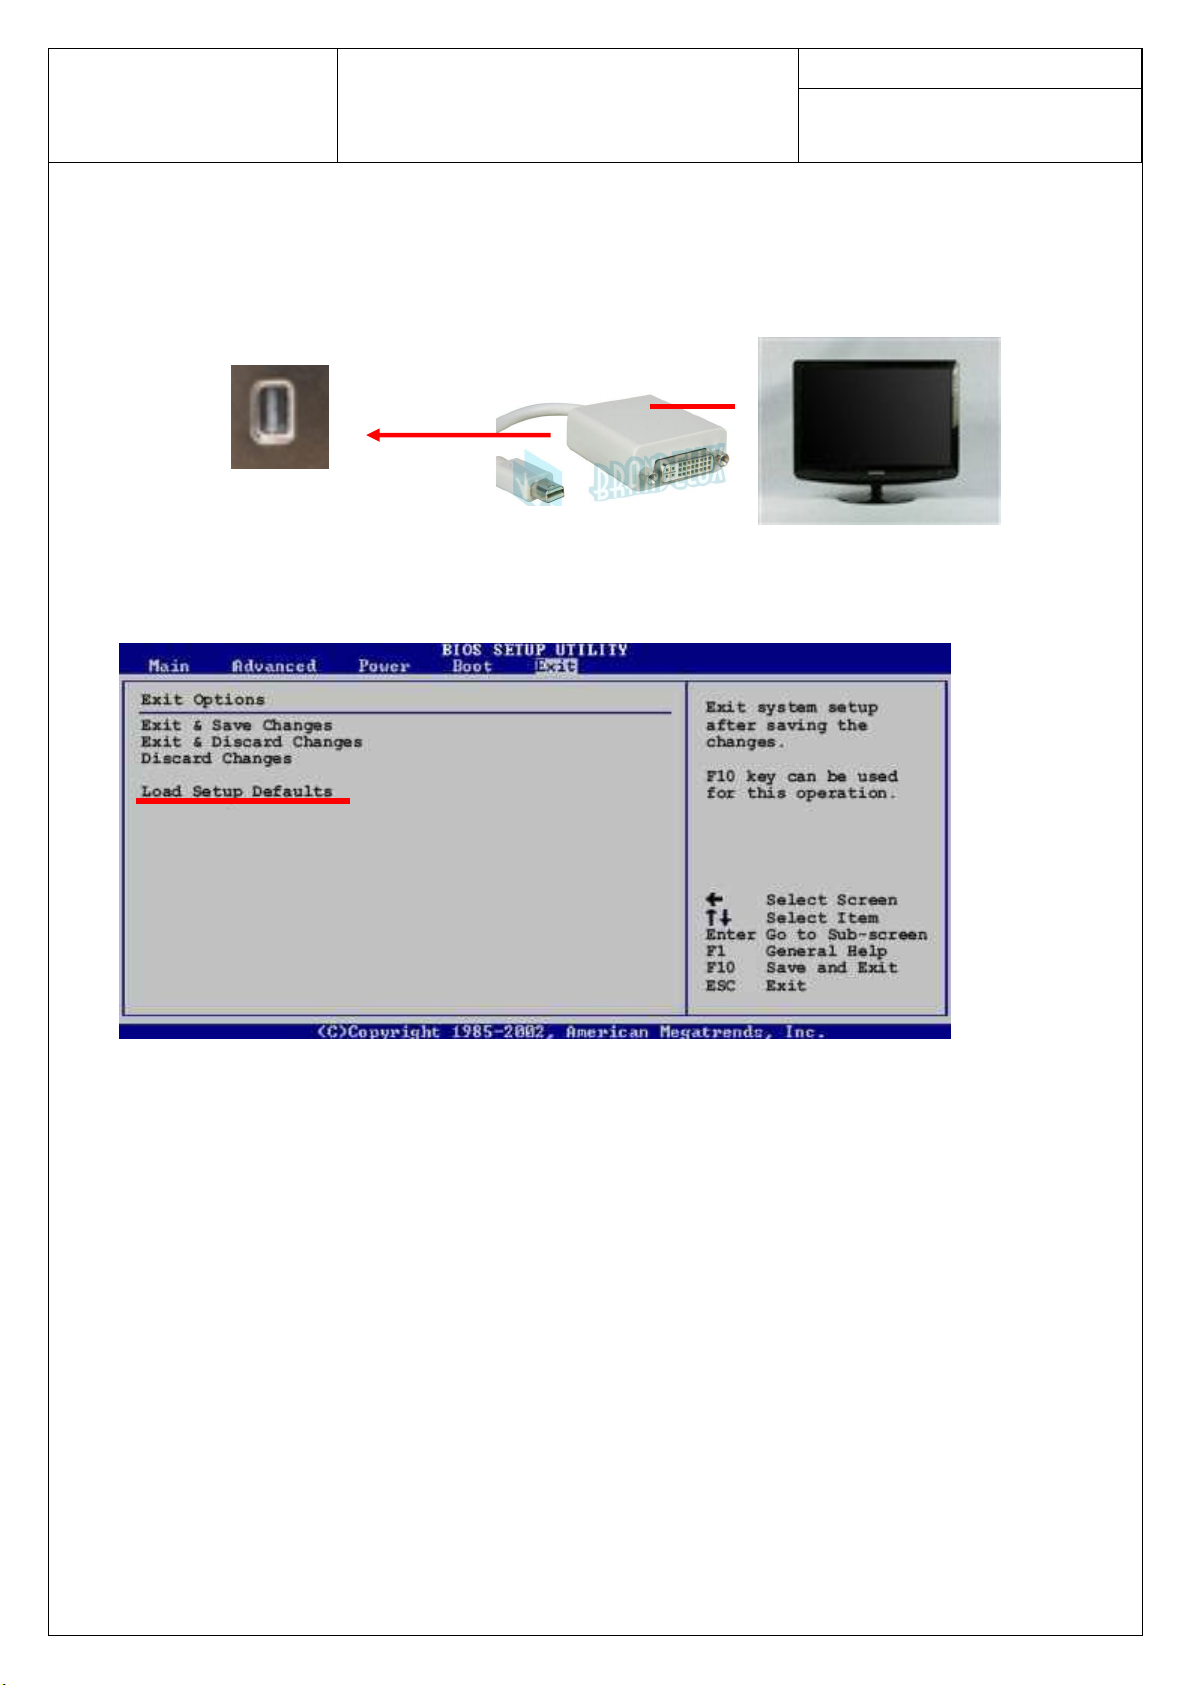
6.3.1.1 Please connect LCD monitor & card’s DVI CON via a Mini DisplayPort to DVI
cable.
6.3.1.2 Press Power Switch then turn on power button.
6.3.1.3 Press “Del” to enter CMOS setup menu while boot screen is displaying.
EXIT -> Load Setup Defaults.
Mini DisplayPort to DVI cable
6.3.1.4 Run test program in linux.
Path:5870eye6/c3ch35a0.sh
Please enter into the file of 5870eye6, enter the following command:cd ./5870eye6
Then,please run ./c3ch35a0.sh
6.3.1.5 Memory test
If you want to test memory,please run ./tserver-exec –test=memfa1.1
Path:5870eye6\
6.3.1.6 BIOS Version
If you want to see the version of bios,please run ./atiflash.sh.
Path:5870eye6\
6.3.1.7 FAN test
If you want to test FAN, please run ./aft
Path:5870eye6/aft101
Notice:
./aft apply the following Part Number
C3CH35-A01
Page 6

Doc. No:
ASUSTeK COMPUTER INC
Standard Operation Procedure
5870 EYEFINITY 6
Date: Mar. 31, 2010
Rev.: 1.00 Page: 5
6.3.1.8 BIOS flash
Please use the following command to flash bios and notice the size of character.
Path: 5870eye6\
Command:./atiflash -p -f 0 xxx.rom
Notice:
If you can not flash bios because of the bios locked, please use ./atiflash –unlockrom
0 to unlock bios. And then, please use ./atiflash –lockrom 0 to lock bios after updating
latest bios.
6.3.1.9 After finish Linux testing, please enter Windows environment to test 3DMark.
Page 7
Doc. No:
ASUSTeK COMPUTER INC
Standard Operation Procedure
5870 EYEFINITY 6
Date: Mar. 31, 2010
Rev.: 1.00 Page: 6
6.3.2 3DMark test(contain HDMI test)
6.3.2.1 Please install 3DMark program by yourself.
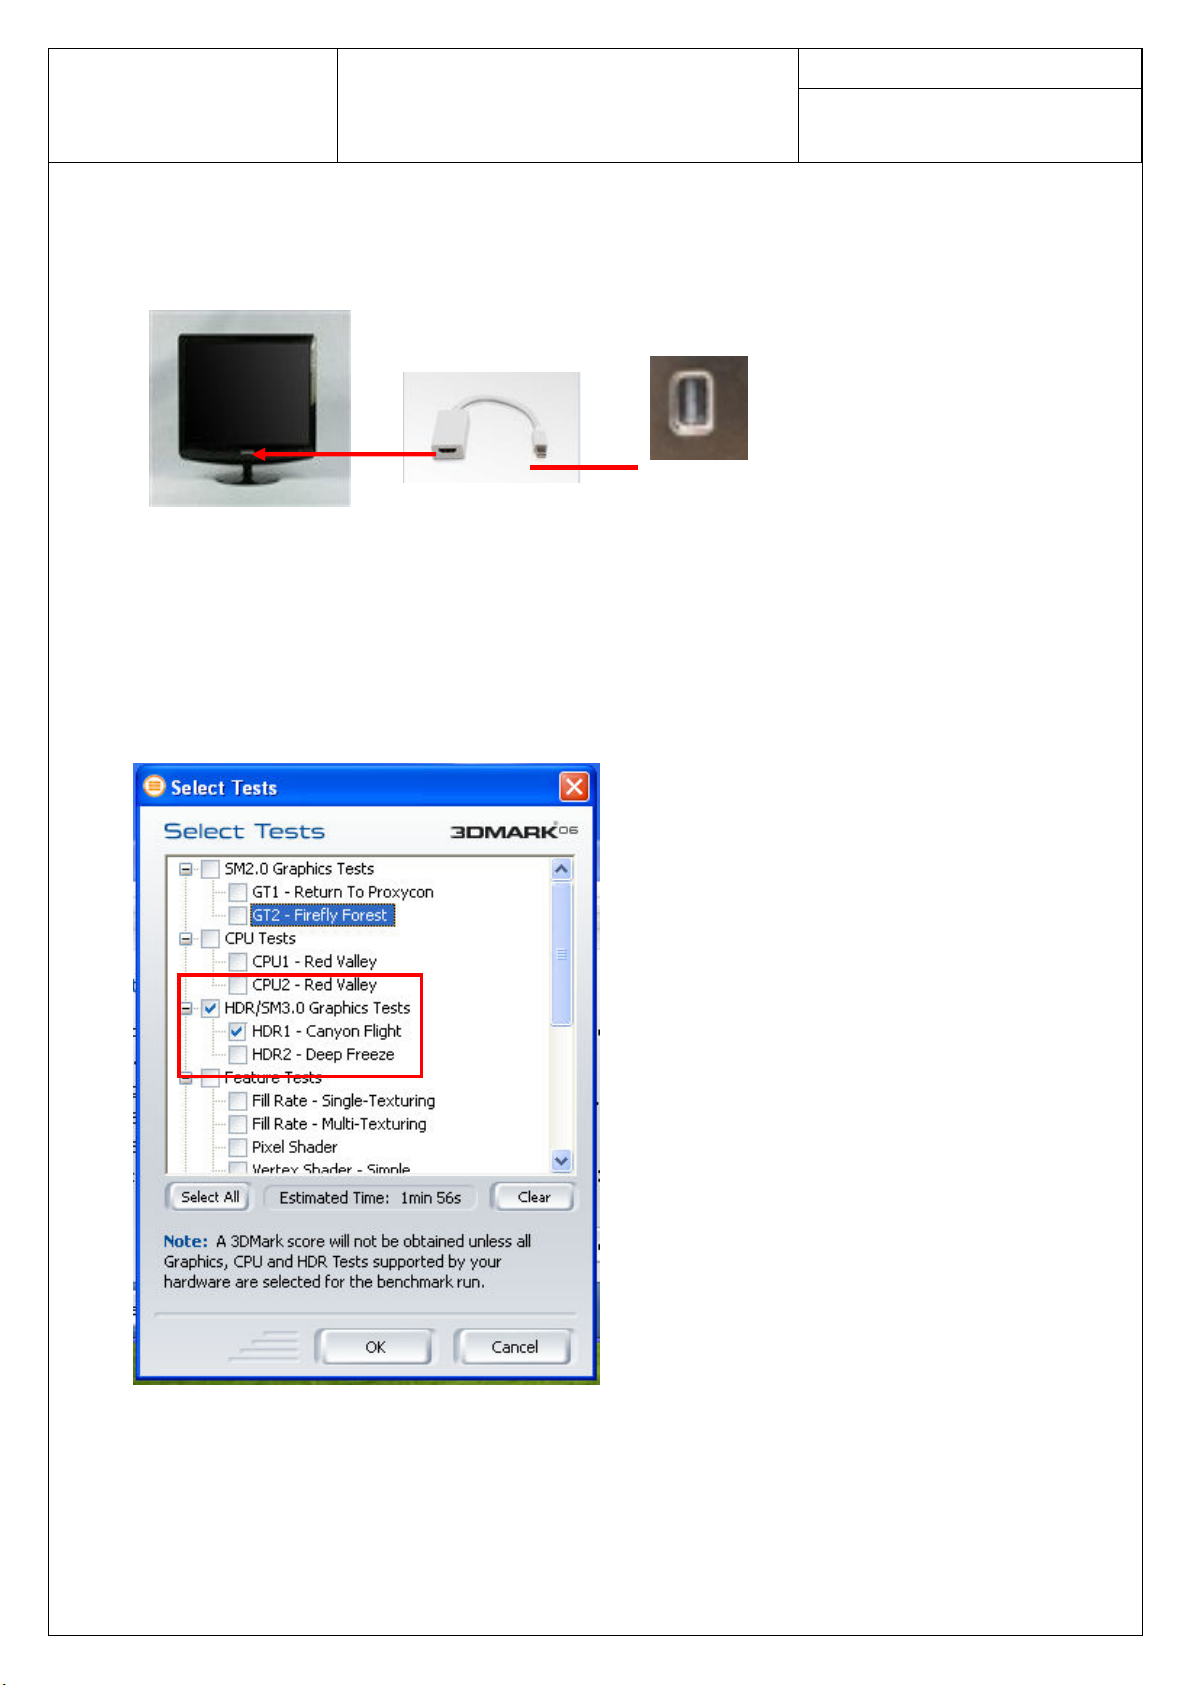
6.3.2.2 Please connect VGA card to LCD via mini displayport to HDMI cable.
mini displayport to hdmi cable
6.3.2.3 Please install VGA card driver in Windows(You must use individual driver of this
card).
6.3.2.4 Please run 3DMark06 base on this card (please test 1 cycle).
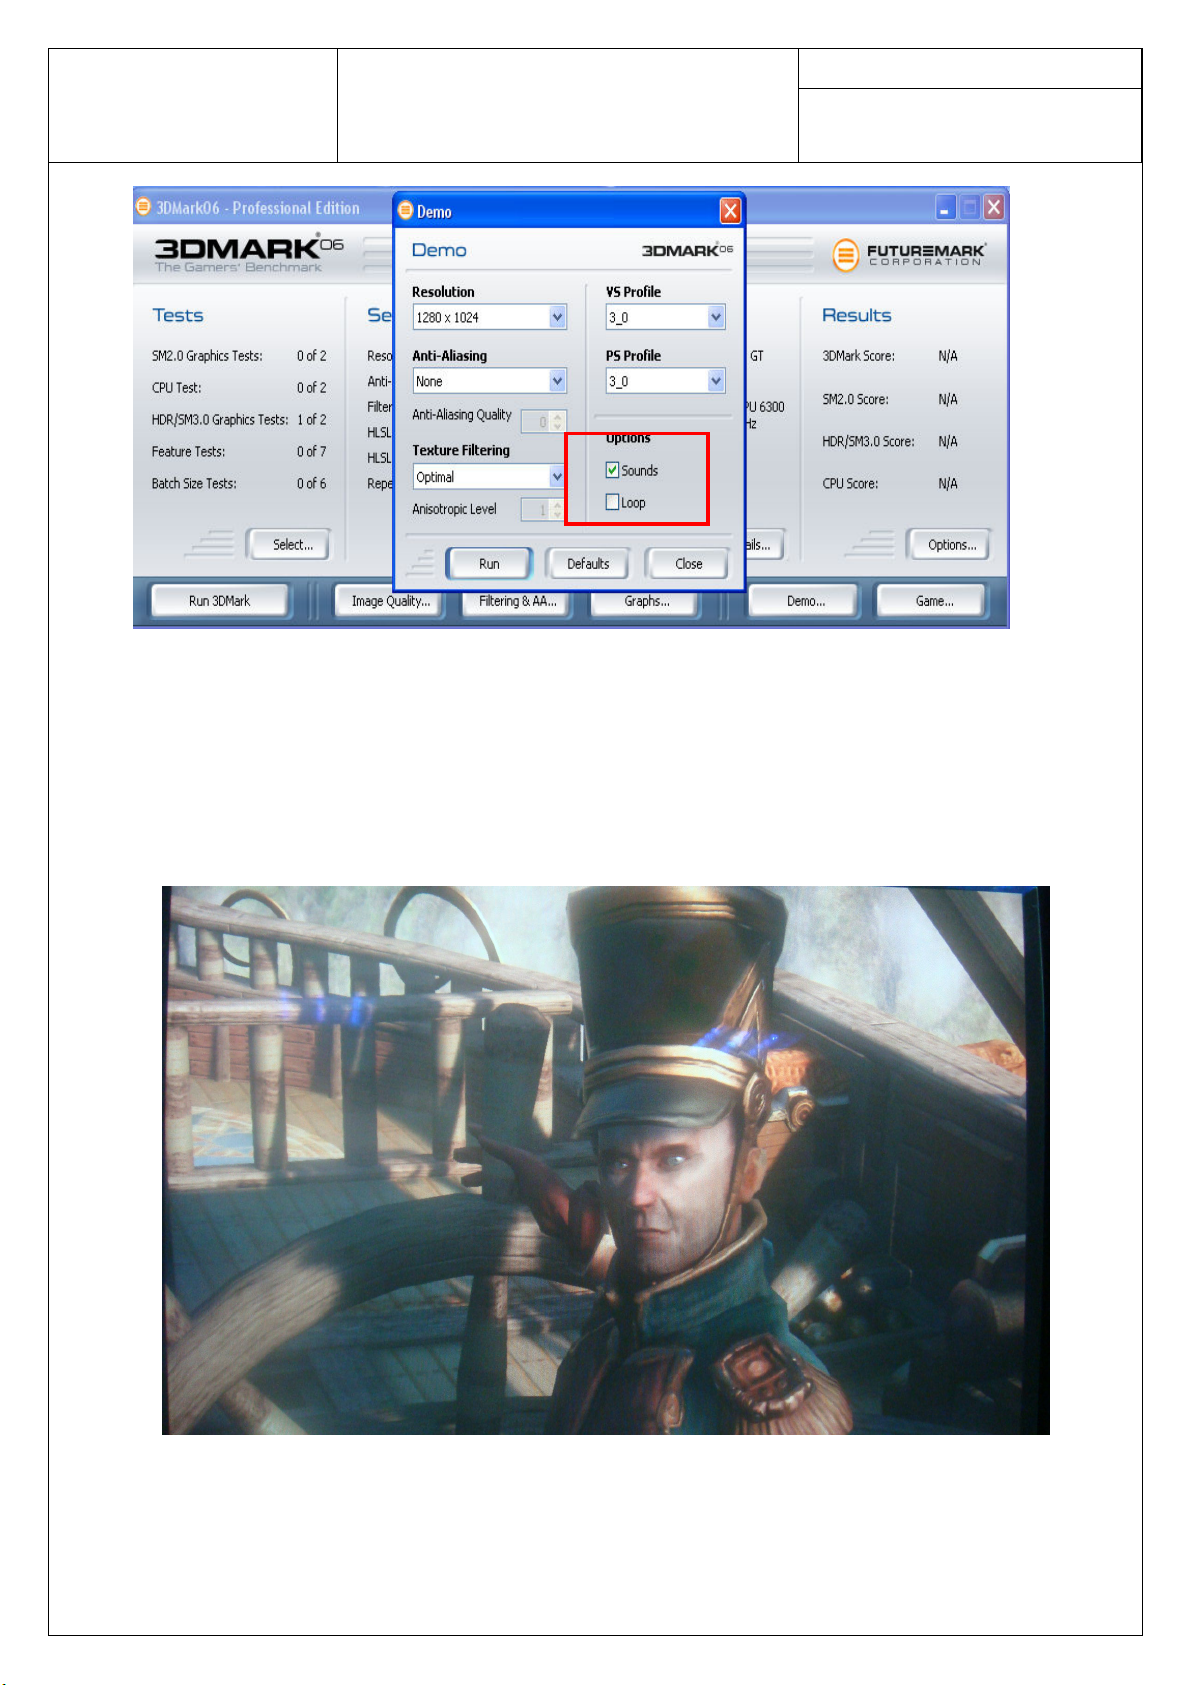
6.3.2.5 Press “Select” to enter Select test menu. You can choose “HDR1” for default
setting.
6.3.2.6 Press “Demo” to enter Demo menu. You can choose “Sounds” for default setting.
Page 8
Doc. No:
ASUSTeK COMPUTER INC
Standard Operation Procedure
5870 EYEFINITY 6
Date: Mar. 31, 2010
Rev.: 1.00 Page: 7
6.3.2.7 Please pay attention to check if there is flickering, discolor, crash and so on.
If there’s no problem, it can be judged OK!
6.3.2.8 Please listen to voice carefully to check whether it outputs sounds. If not, HDMI test
fail.
6. 3.2.9 If test OK, please test other five minidisplay port
Page 9
Doc. No:
ASUSTeK COMPUTER INC
5870 EYEFINITY 6
Standard Operation Procedure
6.4 Temperature test
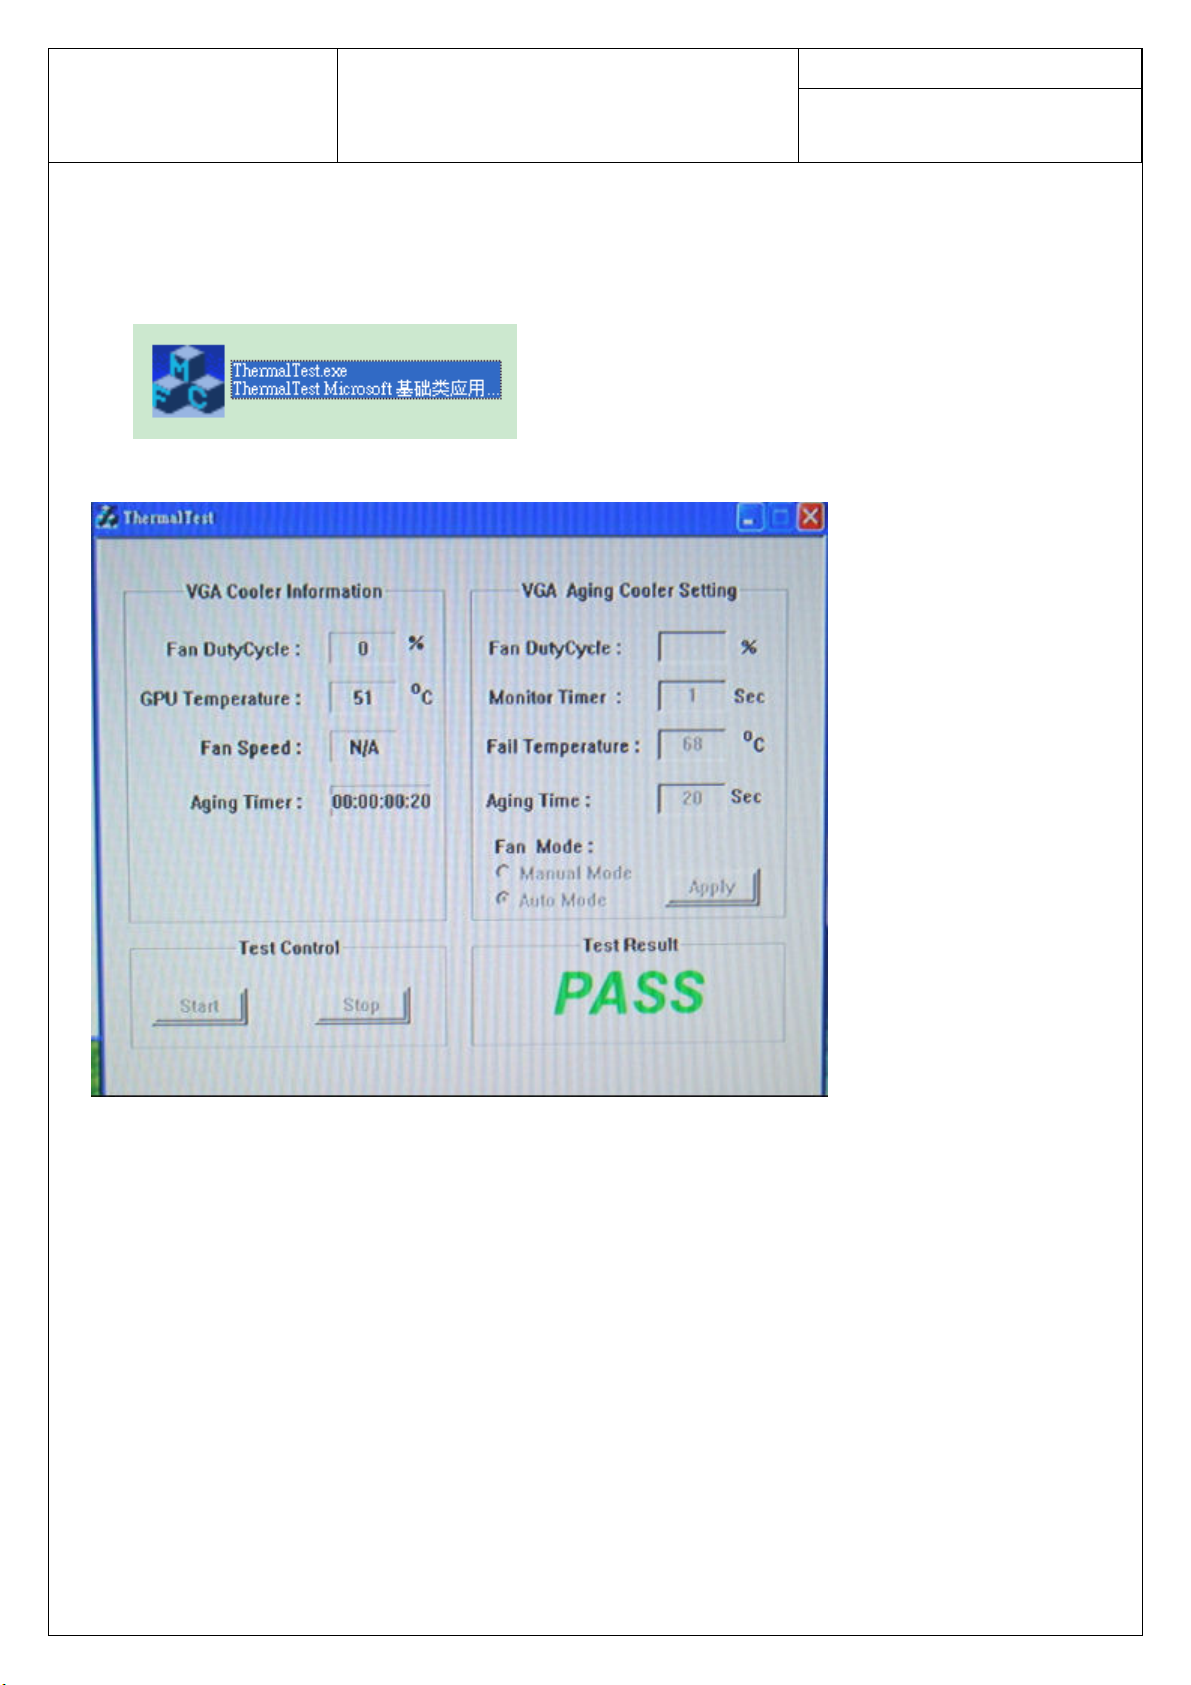
6.4.1 Please copy Thermaltool(1.0.05) to Windows by yourself.
6.4.2 Please run ThermalTest.exe.
6.4.3 If test ok, show pass.
Date: Mar. 31, 2010
Rev.: 1.00 Page: 8
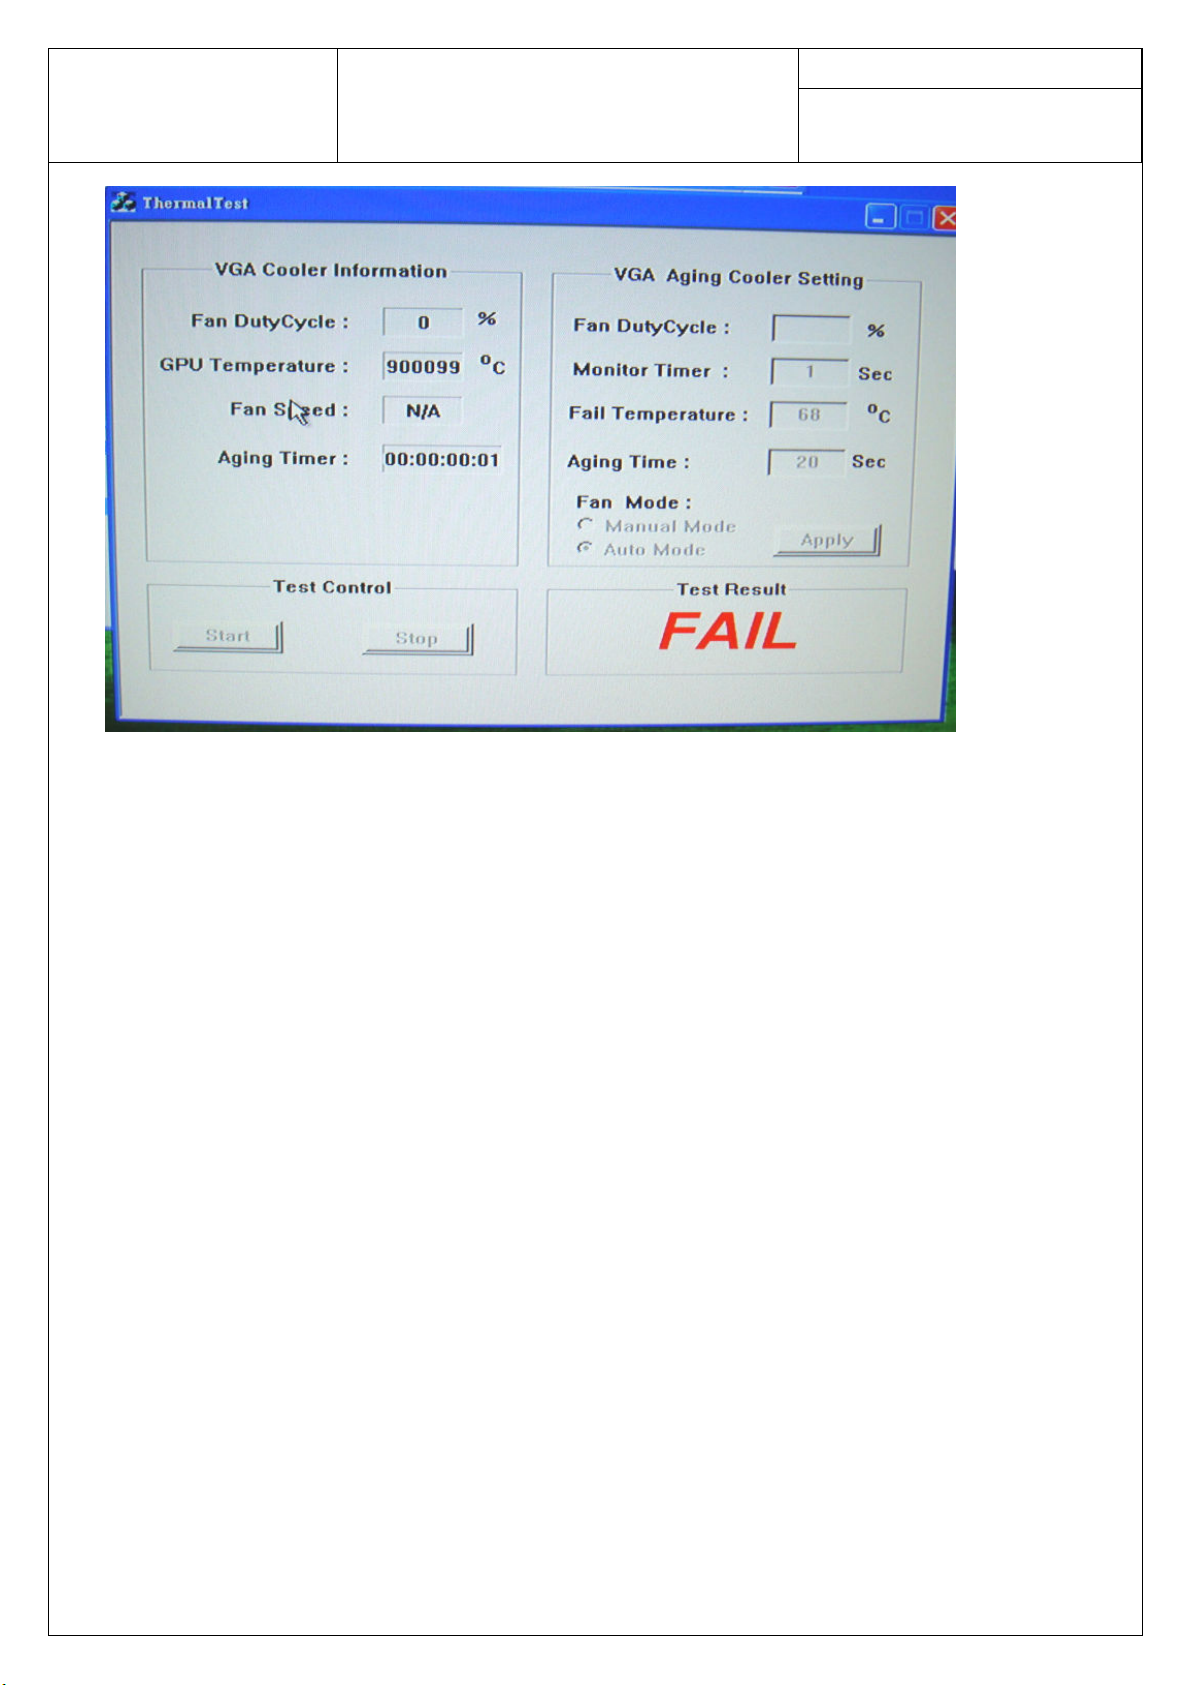
6.4.4 If test fail, show fail.
Page 10
Doc. No:
ASUSTeK COMPUTER INC
5870 EYEFINITY 6
Standard Operation Procedure
Date: Mar. 31, 2010
Rev.: 1.00 Page: 9
6.4.5 If test OK, please NTF test.
Page 11
Doc. No:
ASUSTeK COMPUTER INC
7.Appendix
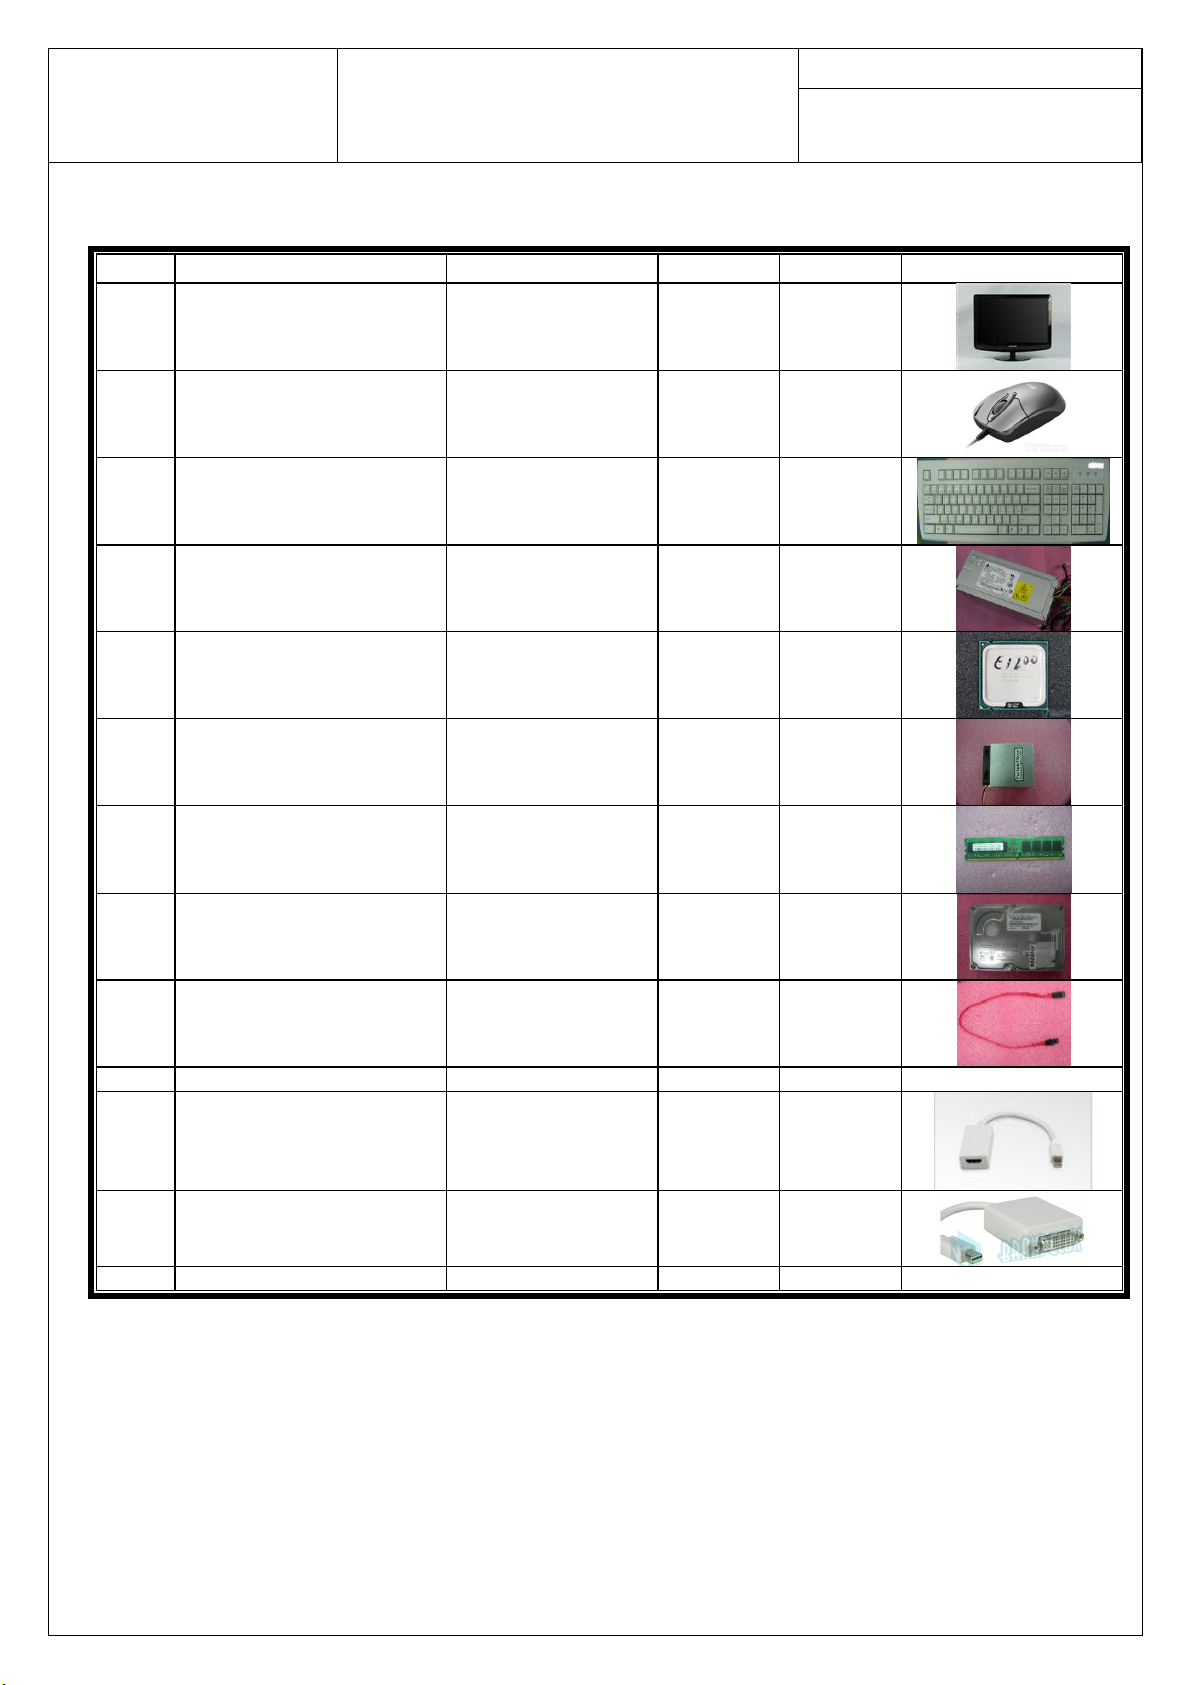
NO# Equipment Description
1
2 USB MOUSE 1
3 PS/2 KEYBOARD 1
4
5 INTEL Celeron E1200 1
SAMSUNG 2232MW
ATX POWER SUPPLY(a
minimum power of 500W)
5870 EYEFINITY 6
Standard Operation Procedure
ASUS Part# Supplier Quantity
1
1
Date: Mar. 31, 2010
Rev.: 1.00 Page: 10
Remarks
6 Heat sink + FAN 22-240000160 1
7 DDR2(667/800) 1G
8 TEST HDD 1
9 SATA HDD Cable 14-000107070 ASUS 1
10 PCIEX16 VGA CARD 1
mini displayport to hdmi
11
12
13
cable (Buying a local DVI
cable by yourself)
mini displayport to dvi
(Buying a local HDMI cable
by yourself)
P5E MB 80- MBB7X0-* 1
04G0016169A9NE
/22-T00642404
1
1
4
 Loading...