

Page 1
Eee PC
Eee PC 2G Series
User’s Manual
November 2007
Page 2

Table of Contents
Chapter 1: Introducing the Eee PC
About This User’s Manual ............................................................................ 1-2
Notes for This Manual ................................................................................... 1-2
Safety Precautions ......................................................................................... 1-3
Transportation Precautions ...................................................................... 1-4
Charging Your Batteries .............................................................................. 1-4
Airplane Precautions ...................................................................................1-4
Preparing your Eee PC .................................................................................. 1-5
Chapter 2: Knowing the Parts
Top Side ............................................................................................................. 2-2
Bottom Side ...................................................................................................... 2-5
Right Side .......................................................................................................... 2-7
Left Side ............................................................................................................. 2-8
Rear Side ............................................................................................................ 2-9
Chapter 3: Getting Started
Power System .................................................................................................. 3-2
Using AC Power ............................................................................................. 3-2
Using Battery Power ....................................................................................3-4
Touchpad Usage ............................................................................................. 3-6
Keyboard Usage .............................................................................................. 3-8
Special Function Keys .................................................................................3-8
Adjust the window .....................................................................................3-10
First Run Wizard ............................................................................................3-11
Operating Mode ...........................................................................................3-13
Shutdown........................................................................................................3-14
Chapter 4: Using the Eee PC
Internet .............................................................................................................. 4-2
Configuring a wireless network connection (optional) .................. 4-2
Configuring a network connection ........................................................ 4-4
Wireless Point-to-Point Protocol over Ethernet ................................. 4-9
Browsing web pages .................................................................................4-14
Enjoying free resources ............................................................................4-15
ii
Table of Contents
Page 3

Table of Contents
Accessing E-mail .........................................................................................4-16
Chatting with friends ................................................................................4-17
Work ...............................................................................................................4-19
Office applications .....................................................................................4-19
File Manager .................................................................................................4-22
Accessories & Dictionary ..........................................................................4-24
Learn ...............................................................................................................4-25
Language .......................................................................................................4-25
Math .........................................................................................................4-25
Paint .........................................................................................................4-26
Web Learn .....................................................................................................4-26
Play ...............................................................................................................4-27
Media Player .................................................................................................4-27
Music Manager ............................................................................................4-28
Photo Manager ............................................................................................4-29
Video Manager ............................................................................................4-30
Webcam (optional) ....................................................................................4-30
Games .........................................................................................................4-31
Settings ............................................................................................................4-32
Desktop Mode .............................................................................................4-32
Anti-Virus .......................................................................................................4-33
Volume .........................................................................................................4-33
Instant Shutdown .......................................................................................4-34
Printers .........................................................................................................4-34
System Info ...................................................................................................4-35
Date & Time ..................................................................................................4-35
Personalization ............................................................................................4-36
Add/Remove Software .............................................................................4-36
Touchpad .......................................................................................................4-39
Disk Utility .....................................................................................................4-39
Diagnostic Tools ..........................................................................................4-40
Task Manager ...............................................................................................4-42
Eee Tips .........................................................................................................4-43
Favorites ..........................................................................................................4-44
ASUS Eee PC 700
iii
Page 4

Table of Contents
Chapter 5: System Recovery
System Recovery ............................................................................................ 5-2
Using Hidden Partition ............................................................................... 5-2
Using the Support CD ................................................................................. 5-3
Using USB Flash Disk ................................................................................... 5-4
Appendix
Trademark Statements .................................................................................A-2
Qualified Vendor List .....................................................................................A-3
Declarations and Safety Statements .......................................................A-6
Internal Modem Compliancy ...................................................................A-6
Federal Communications Commission Statement ........................ A-10
FCC Radio Frequency Interference Requirements ........................A-11
FCC Radio Frequency (RF) Exposure Caution Statement ............ A-11
Declaration of Conformity(R&TTE directive 1999/5/EC) .............. A-12
CE Mark Warning ........................................................................................A-12
IC Radiation Exposure Statement for Canada ................................. A-12
Wireless Operation Channel for Different Domains ...................... A-14
France Restricted Wireless Frequency Bands .................................. A-14
UL Safety Notices ....................................................................................... A-16
Power Safety Requirement ....................................................................A-17
Nordic Lithium Cautions (for lithium-ion batteries) ...................... A-18
CTR 21 Approval(for Eee PC with built-in Modem) ....................... A-19
GNU General Public License .................................................................... A-21
Copyright Information .............................................................................. A-32
Limitation of Liability ................................................................................. A-33
Service and Support ................................................................................... A-33
iv
Table of Contents
Page 5

About This User’s Manual
Notes for This Manual
Safety Precautions
Preparing Your Eee PC
Introducing
the Eee PC
1
Page 6

About This User’s Manual
You are reading the Eee PC User’s Manual. This User’s Manual
provides information regarding the various components in the Eee
PC and how to use them. The following are major sections of this
User’s Manual:
1. Introducing the Eee PC
Introduces the Eee PC and this User’s Manual.
2. Knowing the Parts
Provides information on the Eee PC’s components.
3. Getting Started
Provides information on getting started with the Eee PC.
4. Using the Eee PC
Provides information on using the Eee PC’s utilities.
5. System Recovery
Gives you information on system recovery.
6. Appendix
Provides you QVL and gives safety statements.
Notes for This Manual
A few notes and warnings are used throughout this guide, allowing
you to complete certain tasks safely and effectively. These notes have
different degrees of importance as follows:
WARNING! Important information that must be followed for safe
operation.
IMPORTANT! Vital information that must be followed to prevent
damage to data, components, or persons.
TIP: Tips for completing tasks.
NOTE: Information for special situations.
1-2
Chapter 1: Introducing the Eee PC
Page 7
Safety Precautions
The following safety precautions will increase the life of the Eee
PC. Follow all precautions and instructions. Except as described in
this manual, refer all servicing to qualified personnel. Do not use
damaged power cords, accessories, or other peripherals. Do not use
strong solvents such as thinners, benzene, or other chemicals on or
near the surface.
Disconnect the AC power and remove the battery pack(s)
before cleaning. Wipe the Eee PC using a clean cellulose sponge
or chamois cloth dampened with a solution of nonabrasive
detergent and a few drops of warm water and remove any extra
moisture with a dry cloth.
DO NOT place on uneven or
unstable work surfaces. Seek
servicing if the casing has
been damaged.
DO NOT expose to dirty or
dusty environments. DO NOT
operate during a gas leak.
DO NOT press or touch the
display panel. Do not place
together with small items
that may scratch or enter the
Eee PC.
DO NOT leave the Eee PC on
your lap or any part of the
body to prevent discomfort
or injury from heat exposure.
SAFE TEMP: This Eee PC
should only be used in
environments with ambient
temperatures between 5°C
(41°F) and 35°C (95°F)
DO NOT place or drop
objects on top and do not
shove any foreign objects
into the Eee PC.
DO NOT expose to strong
magnetic or electrical fields.
DO NOT expose to or
use near liquids, rain, or
moisture. DO NOT use the
modem during electrical
storms.
Battery safety warning: DO
NOT throw the battery in
fire.DO NOT short circuit
the contacts. DO NOT
disassemble the battery.
INPUT RATING: Refer to the
rating label on the bottom
of the Eee PC and be sure
that your power adapter
complies with the rating.
DO NOT throw the Eee PC in
municipal waste. Check local
regulations for disposal of
electronic products.
ASUS Eee PC
DO NOT carry or cover a
Eee PC that is powered ON
with any materials that will
reduce air circulation such
as a carrying bag.
1-3
Page 8

Transportation Precautions
To prepare the Eee PC for transport, you should turn it OFF and
disconnect all external peripherals to prevent damage to the
connectors. The solid-state disk drive’s head retracts when the
power is turned OFF to prevent scratching of the solid-state disk
drive surface during transport. Therefore, you should not transport
the Eee PC while the power is still ON. Close the display panel and
check that it is latched securely in the closed position to protect the
keyboard and display panel.
The Eee PC’s surface is easily dulled if not properly cared for. Be
careful not to rub or scrape surfaces when transporting your Eee
PC. You can purchase an optional carrying case for protection
from dirt, water, shock, and scratches.
Charging Your Batteries
If you intend to use battery power, be sure to fully charge your
battery pack and any optional battery packs before going on long
trips. Remember that the power adapter charges the battery pack as
long as it is plugged into the computer and an AC power source. Be
aware that it takes much longer to charge the battery pack when the
Eee PC is in use.
Airplane Precautions
Contact your airline if you want to use the Eee PC on the airplane.
Most airlines have restrictions for using electronic devices. Most
airlines allow electronic use only between and not during takeoffs
and landings.
There are three main types of airport security devices: X-ray
machines (used on items placed on conveyor belts), magnetic
detectors (used on people walking through security checks),
and magnetic wands (hand-held devices used on people or
individual items). You can send your Eee PC and diskettes
through airport X-ray machines. However, it is recommended
that you do not send your Eee PC or diskettes through airport
magnetic detectors or expose them to magnetic wands.
1-4
Chapter 1: Introducing the Eee PC
Page 9
Preparing your Eee PC
1
1
2
These are only quick instructions for using your Eee PC. Read the
following chapters for detailed information.
1. Install the battery pack
2. Connect the AC power adapter
ASUS Eee PC
The wall outlet differs in type by country. Your Eee PC ships
with an adapter compliant with your national standard. The
illustration above is for reference only and may not exactly show
your specific configuration. Refer to page 3-2 for more details.
1-5
Page 10
3. Open the display panel
4. Turn ON the Eee PC
1-6
When you open the display panel, do not force it down to the
table or else the hinges may break! Never lift the Eee PC by the
display panel!
Chapter 1: Introducing the Eee PC
Page 11

Top Side
Bottom Side
Right Side
Left Side
Rear Side
Knowing the Parts
2
Page 12
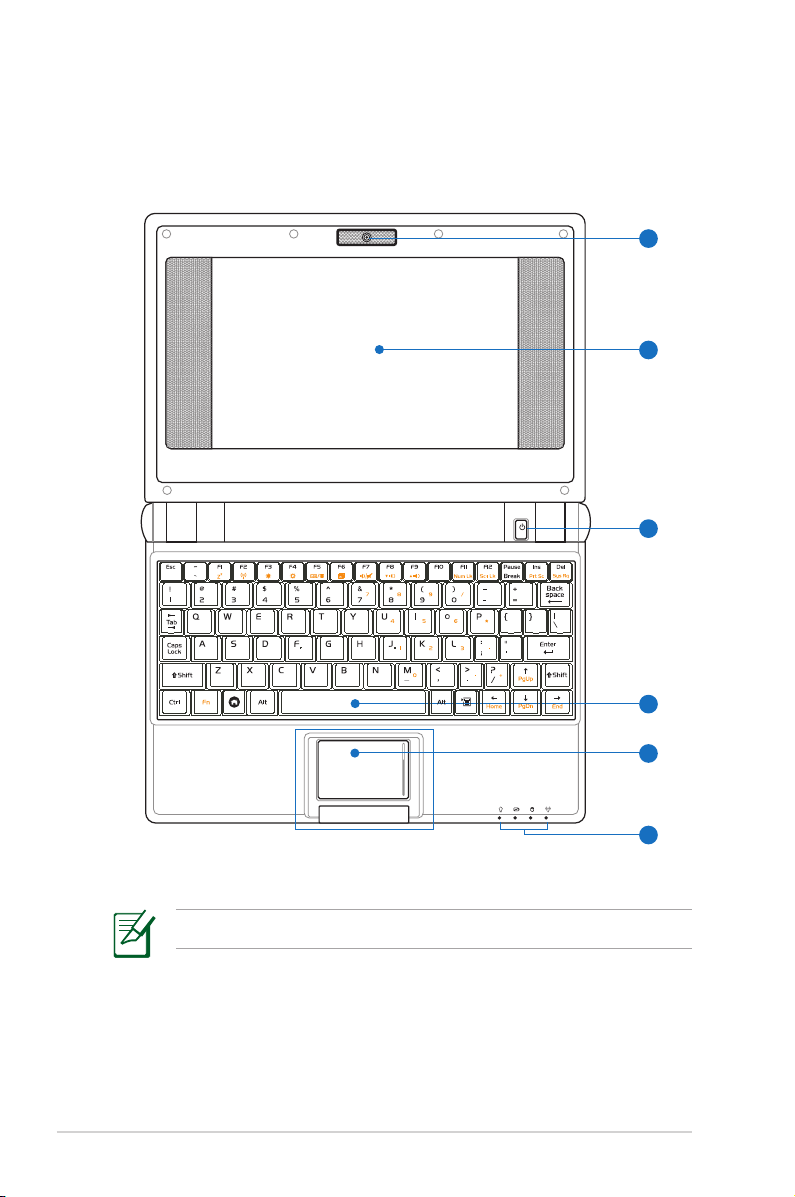
Top Side
2
3
1
5
4
6
Refer to the diagram below to identify the components on this side
of the Eee PC.
2-2
The keyboard will differ for each territory.
Chapter 2: Knowing the Parts
Page 13
1
Built-in Camera (optional)
The built-in camera allows picture taking or video
recording.
2
Display Panel
The display panel functions the same as a desktop monitor.
The Eee PC uses an active matrix TFT LCD, which provides
excellent viewing like that of desktop monitors. Unlike
desktop monitors, the LCD panel does not produce any
radiation or flickering, so it is easier on the eyes. Use a soft
cloth without chemical liquids (use plain water if necessary)
to clean the display panel.
3
Power Switch
The power switch allows powering ON and OFF the Eee PC
and recovering from STR. Press the switch once to turn ON
and hold it to turn OFF the Eee PC. The power switch only
works when the display panel is opened.
4
Keyboard
The keyboard provides keys with comfortable travel (depth
at which the keys can be depressed) and palm rest for both
hands.
5
Touchpad and Buttons
The touchpad and its buttons comprises a pointing device
that provides the same functions as a desktop mouse.
Scrolling is available to allow easy web and document
navigation.
ASUS Eee PC
2-3
Page 14
6
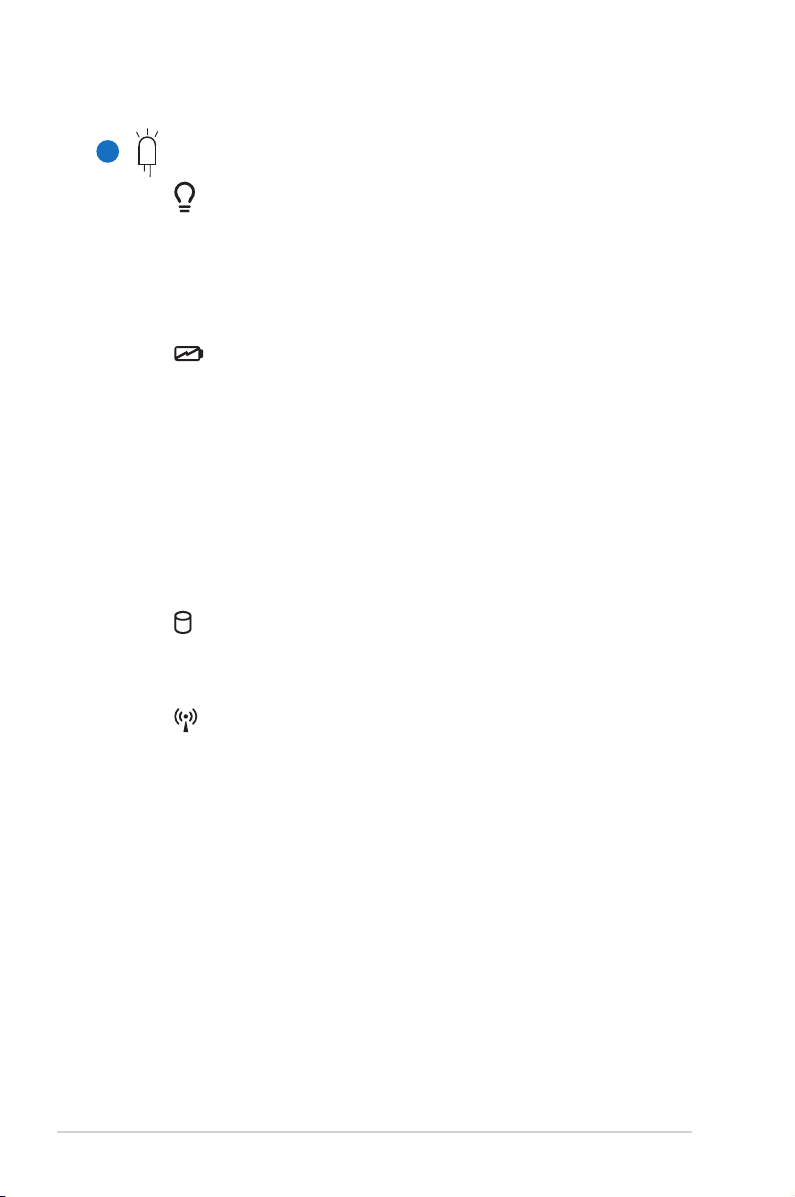
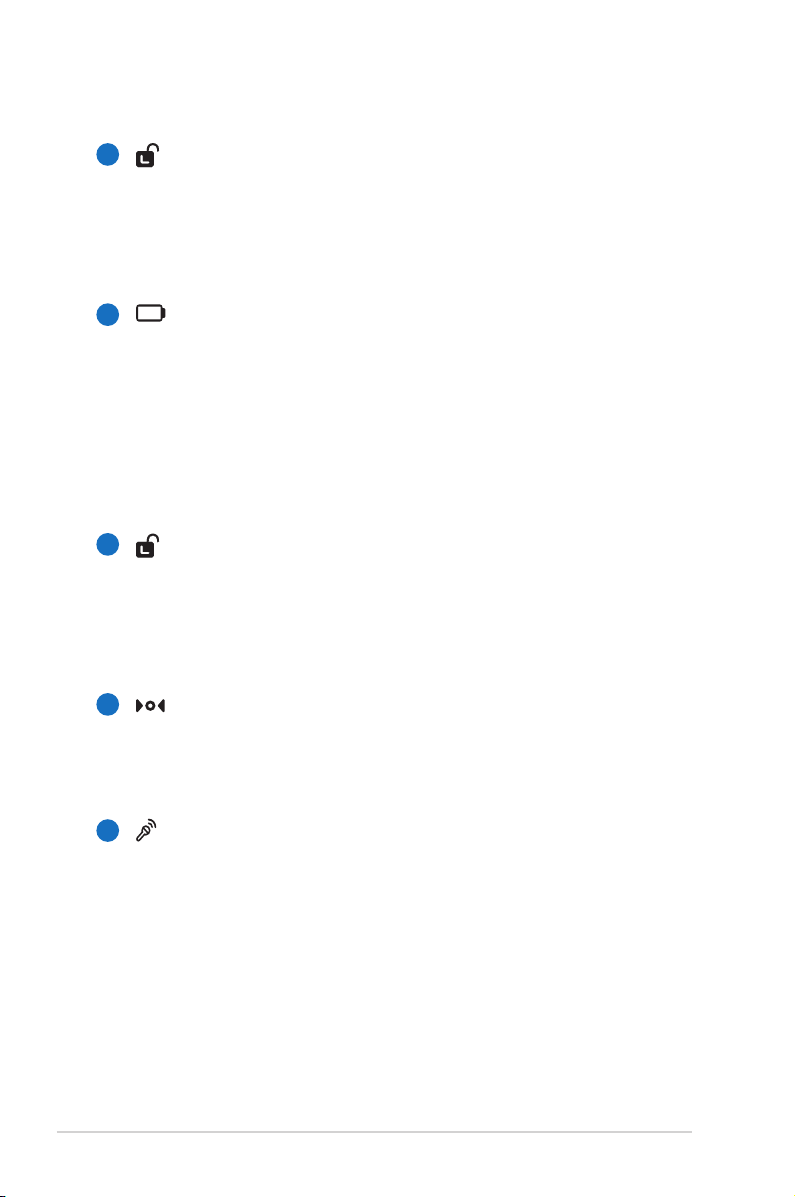
Status Indicators (front)
Power Indicator
The power indicator lights when the Eee PC is turned
ON and blinks slowly when the Eee PC is in the Save-toRAM (Suspend) mode. This indicator is OFF when the
Eee PC is turned OFF.
Battery Charge Indicator
The battery charge indicator (LED) shows the status of
the battery’s power as follows:
ON: The Eee PC’s battery is charging when AC power is
connected.
OFF: The Eee PC’s battery is charged or completely
drained.
Blinking: Battery power is less than 10% and AC
power is not connected.
Solid-State disk (SSD) Indicator
The solid-state disk drive indicator blinks when data is
written to or read from the disk drive.
Wireless Indicator (optional)
This is only applicable on models with built-in wireless
LAN. When the built-in wireless LAN is enabled, this
indicator lights.
2-4
Chapter 2: Knowing the Parts
Page 15
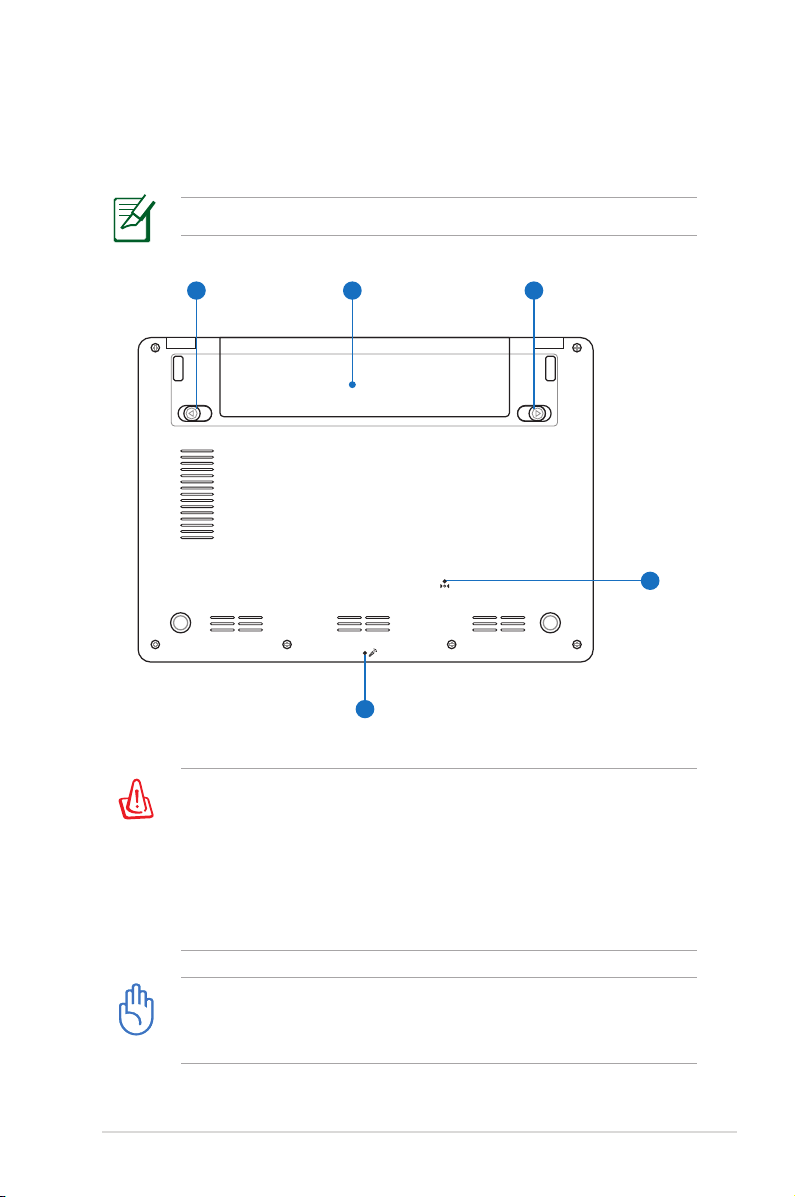
Bottom Side
21
3
4
5
Refer to the diagram below to identify the components on this side
of the Eee PC.
The bottom side may vary in appearance depending on model.
ASUS Eee PC
The bottom of the Eee PC can get very hot. Be careful when
handling the Eee PC while it is in operation or recently been in
operation. High temperatures are normal during charging or
operation. DO NOT use on soft surfaces such as beds or sofas
,which may block the vents. DO NOT PUT THE Eee PC ON YOUR
LAP OR OTHER PARTS OF THE BODY TO AVOID INJURY FROM THE
HEAT.
DO NOT use emergency shutdown/reset while data is being
written or read; doing so can result in loss or destruction of your
data.
2-5
Page 16
1
Battery Lock - Spring
The spring battery lock keeps the battery pack secure.
When the battery pack is inserted, it will automatically lock.
When removing the battery pack, this spring lock must be
retained in the unlocked position.
2
Battery Pack
The battery pack is automatically charged when connected
to an AC power source and maintains power to the Eee PC
when AC power is not connected. This allows use when
moving temporarily between locations. Battery time
varies by usage and by the specifications for this Eee PC.
The battery pack cannot be disassembled and must be
purchased as a single unit.
3
Battery Lock - Manual
The manual battery lock is used to keep the battery pack
secured. Move the manual lock to the unlocked position to
insert or remove the battery pack. Move the manual lock to
the locked position after inserting the battery pack.
4
Reset Button (Emergency)
In case your operating system cannot properly turn OFF or
restart, the reset button can be depressed with a pin or a
straightened paper clip to restart the Eee PC.
Microphone (Built-in)
5
The built-in mono microphone can be used for skype, voice
narrations, or simple audio recordings.
2-6
Chapter 2: Knowing the Parts
Page 17
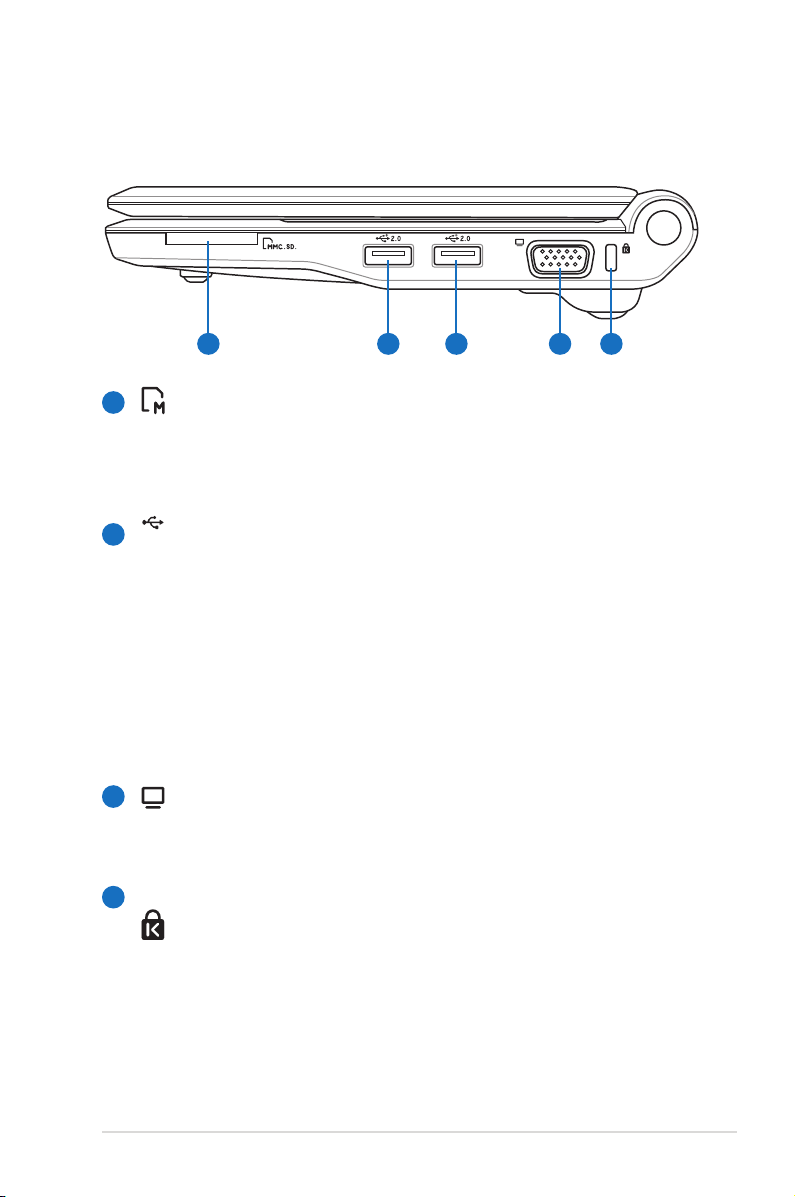
Right Side
1 2 2
3 4
2.0
Refer to the diagram below to identify the components on this side
of the Eee PC.
Memory Card Slot
1
The built-in memory card reader can read MMC/SD cards
from devices such as digital cameras, MP3 players, mobile
phones, and PDAs.
USB Port (2.0/1.1)
2
The USB (Universal Serial Bus) port is compatible with USB
2.0 or USB 1.1 devices such as keyboards, pointing devices,
cameras, and storage devices, connected in a series up to
12Mbits/sec (USB 1.1) and 480Mbits/sec (USB 2.0). USB
allows many devices to run simultaneously on a single
computer, with some peripherals acting as additional
plug-in sites or hubs. Also, the USB supports hot-swapping
function.
3
Display (Monitor) Output
The 15-pin D-sub monitor port supports a standard VGA-
compatible device such as a monitor or projector to allow
4
viewing on a larger external display.
Kensington® Lock Port
The Kensington® lock port allows the Eee PC to be secured
using Kensington® compatible security products. These
security products usually include a metal cable and lock
that prevent the Eee PC to be removed from a fixed object.
ASUS Eee PC
2-7
Page 18
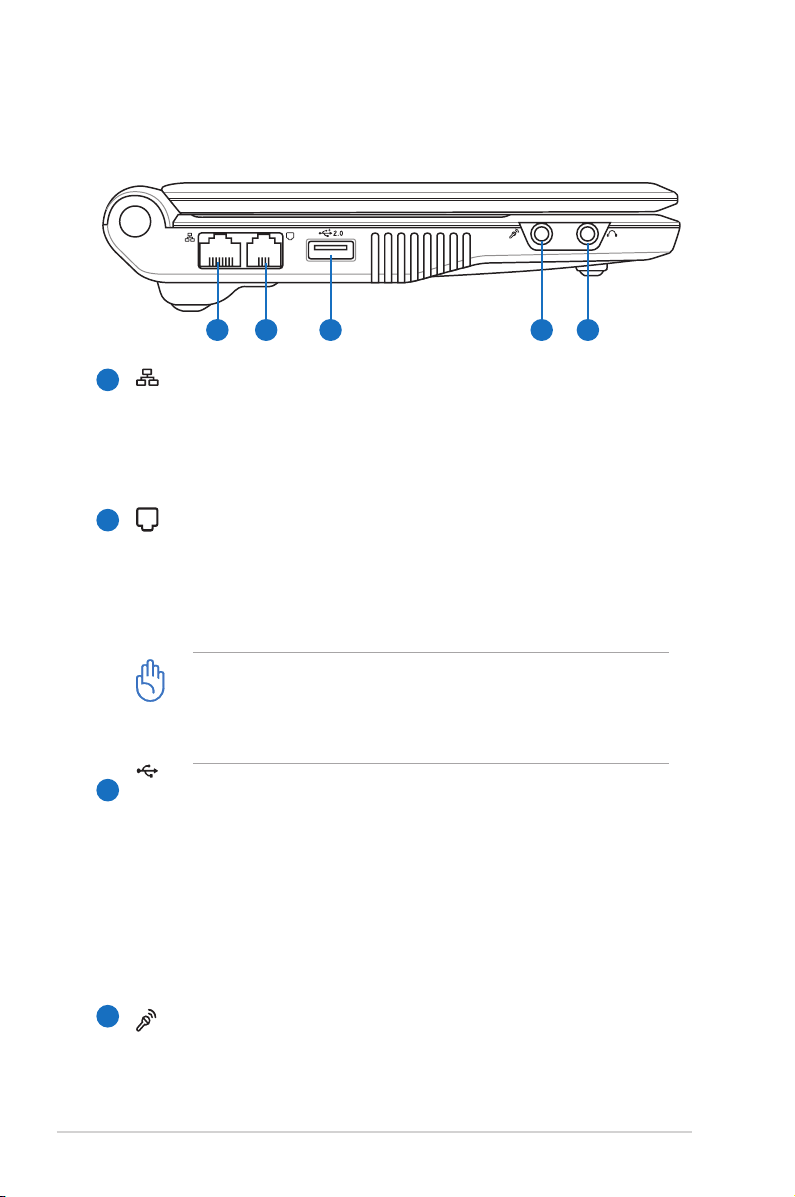
1
2
3 4 5
Left Side
2.0
Refer to the diagram below to identify the components on this side
of the Eee PC.
LAN Port
1
The eight-pin RJ-45 LAN port (10/100M bit) supports a
standard Ethernet cable for connection to a local network.
The built-in connector allows convenient use without
additional adapters.
2
Modem Port (optional)
The two-pin RJ-11 modem port supports a standard
telephone cable. The internal modem supports up to 56K
V.90 transfers. The built-in connector allows convenient use
without additional adapters.
The built-in modem does not support the voltage used in
digital phone systems. DO NOT connect the modem port
to a digital phone system or else damage will occur to the
Eee PC.
2-8
3
USB Port (2.0/1.1)
The USB (Universal Serial Bus) port is compatible with USB
2.0 or USB 1.1 devices such as keyboards, pointing devices,
cameras, and storage devices, connected in a series up to
12Mbits/sec (USB 1.1) and 480Mbits/sec (USB 2.0). USB
allows many devices to run simultaneously on a single
computer, with some peripherals acting as additional plugin sites or hubs. Also, it supports hot-swapping function.
4
Microphone Jack
The microphone jack is designed to connect the
microphone used for Skype, voice narrations, or simple
audio recordings.
Chapter 2: Knowing the Parts
Page 19
1 2
5
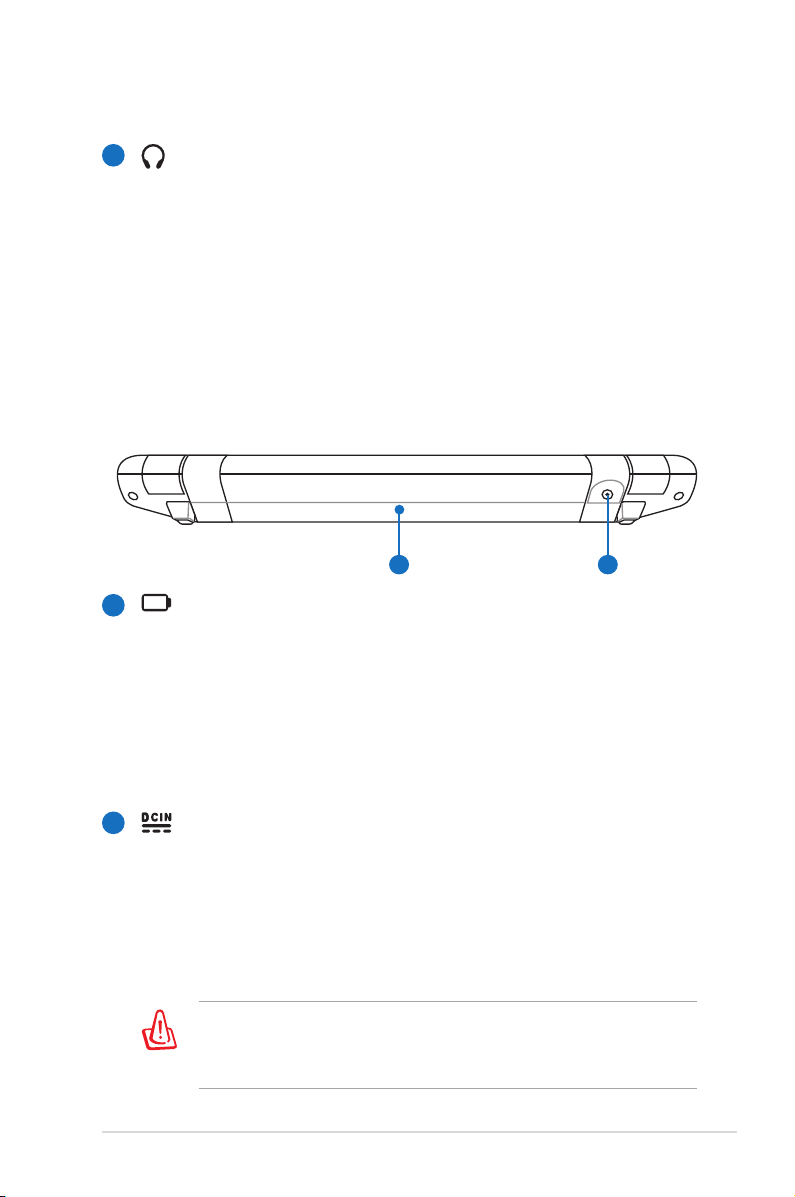
Headphone Output Jack
The 1/8” stereo headphone jack (3.55mm) connects the Eee
PC’s audio out signal to amplified speakers or headphones.
Using this jack automatically disables the built-in speakers.
Rear Side
Refer to the diagram below to identify the components on this side
of the Eee PC.
1
Battery Pack
The battery pack is automatically charged when connected
to an AC power source and maintains power to the Eee PC
when AC power is not connected. This allows use when
moving temporarily between locations. Battery time
varies by usage and by the specifications for this Eee PC.
The battery pack cannot be disassembled and must be
purchased as a single unit.
2
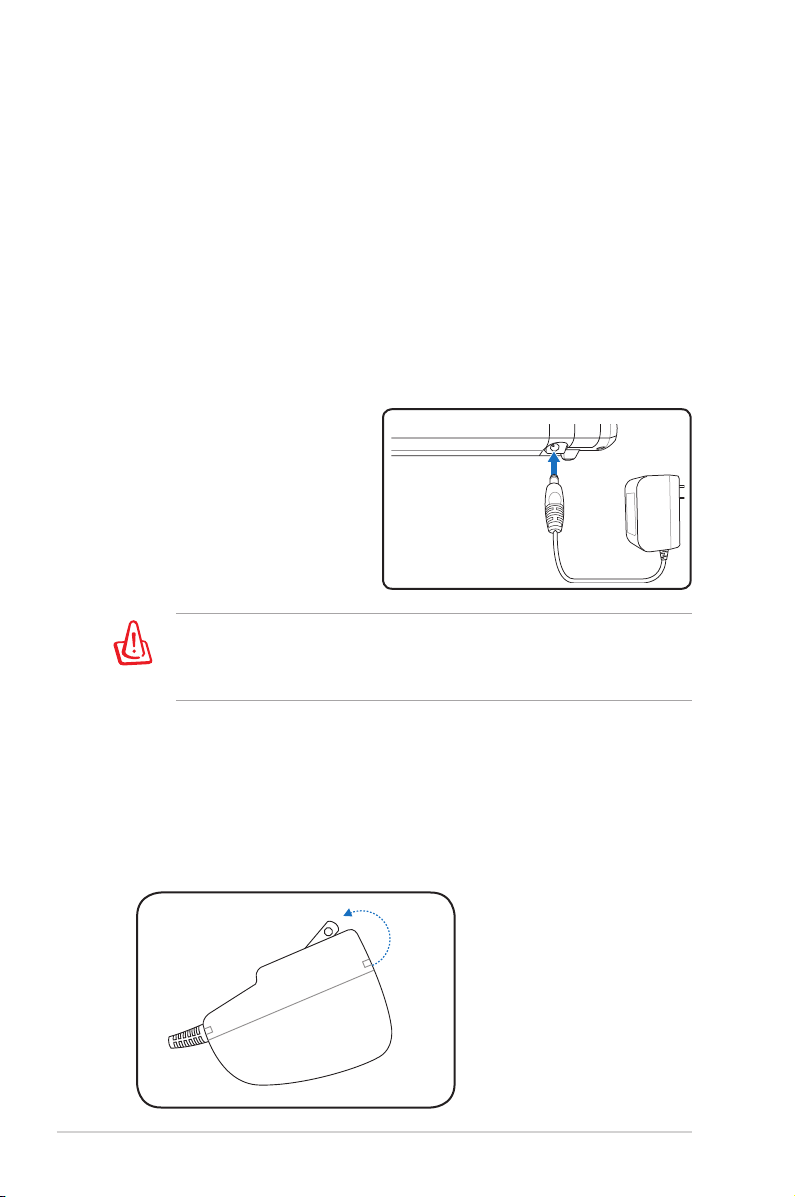
Power (DC) Input
The supplied power adapter converts AC power to DC
power for use with this jack. Power supplied through this
jack supplies power to the Eee PC and charges the internal
battery pack. To prevent damage to the Eee PC and battery
pack, always use the supplied power adapter.
CAUTION: MAY BECOME WARM TO HOT WHEN IN USE. BE SURE
NOT TO COVER THE ADAPTER AND KEEP IT AWAY FROM YOUR
BODY.
ASUS Eee PC
2-9
Page 20

2-10
Chapter 2: Knowing the Parts
Page 21

Power System
Touchpad Usage
Keyboard Usage
First Run Wizard
Operating Mode
Shutdown
Getting Started
3
Page 22
Power System
Using AC Power
The Eee PC power comprises two parts, the power adapter and
the battery power system. The power adapter converts AC power
from a wall outlet to the DC power required by the Eee PC. Your Eee
PC comes with a universal AC-DC adapter for connection to any
100V-120V as well as 220V-240V outlets without setting switches or
using power converters. Different countries may require an adapter
to connect the provided US-standard AC power cord to a different
standard. Most hotels will provide universal outlets to support
different power cords as well as
voltages. It is always best to ask
an experienced traveler about
AC outlet voltages before
travelling.
THE POWER ADAPTER MAY BECOME WARM TO HOT WHEN IN
USE. BE SURE NOT TO COVER THE ADAPTER AND KEEP IT AWAY
FROM YOUR BODY.
Installing the prong-plug adapter
Follow the instructions below to install the prong-plug adapter if
needed.
1. Incline the prong slightly to a bevel angle.
3-2
Chapter 3: Getting Started
Page 23
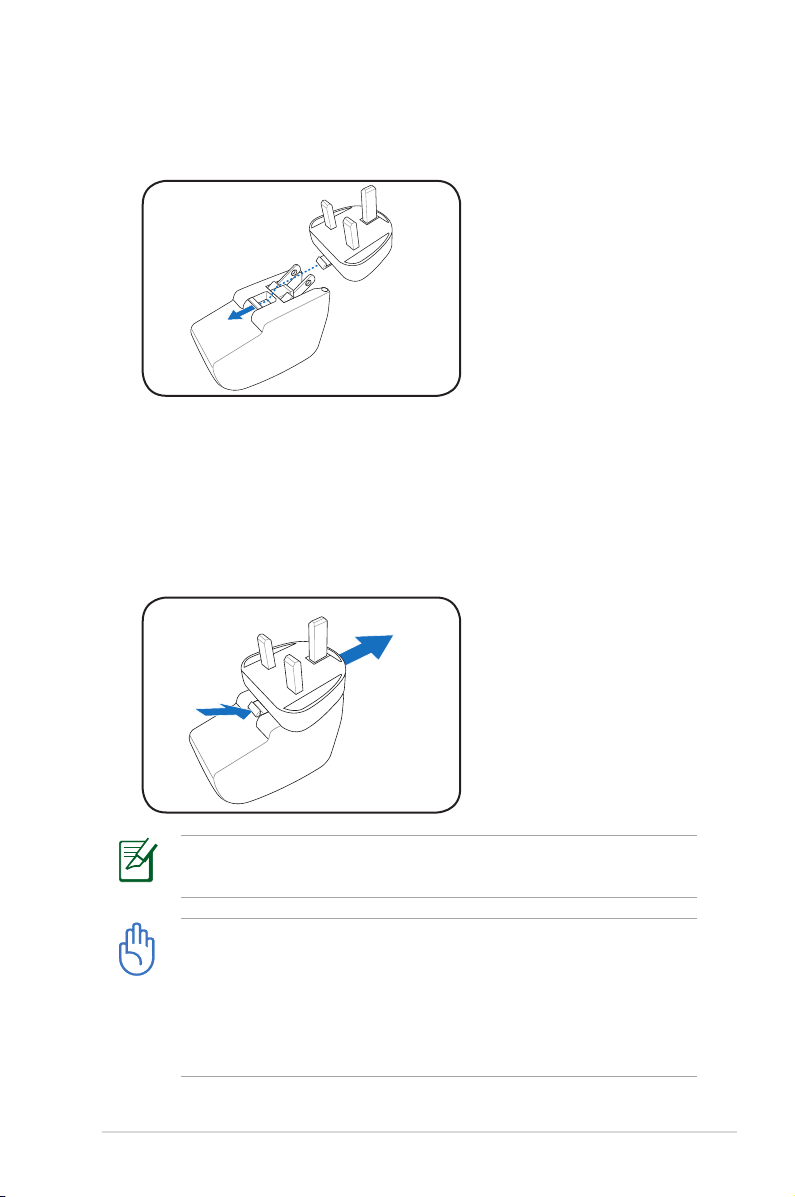
2. Align the plug and snap it in place.
Removing the prong-plug adapter
Follow the instruction below to remove the prong-plug adapter if
needed.
• Press the retaining tab and snap the plug out.
ASUS Eee PC
This Eee PC may come with either a two or three-prong plug
adapter depending on territory to fit your wall outlet.
Damage may occur if you use a different adapter to power the
Eee PC or use the Eee PC’s adapter to power other electrical
devices. If there is smoke, burning scent, or extreme heat coming
from the AC-DC adapter, seek servicing. Seek servicing if you
suspect a faulty AC-DC adapter. You may damage both your
battery pack(s) and the Eee PC with a faulty AC-DC adapter.
3-3
Page 24
Using Battery Power
1
1
2
1
1
2
1
3
2
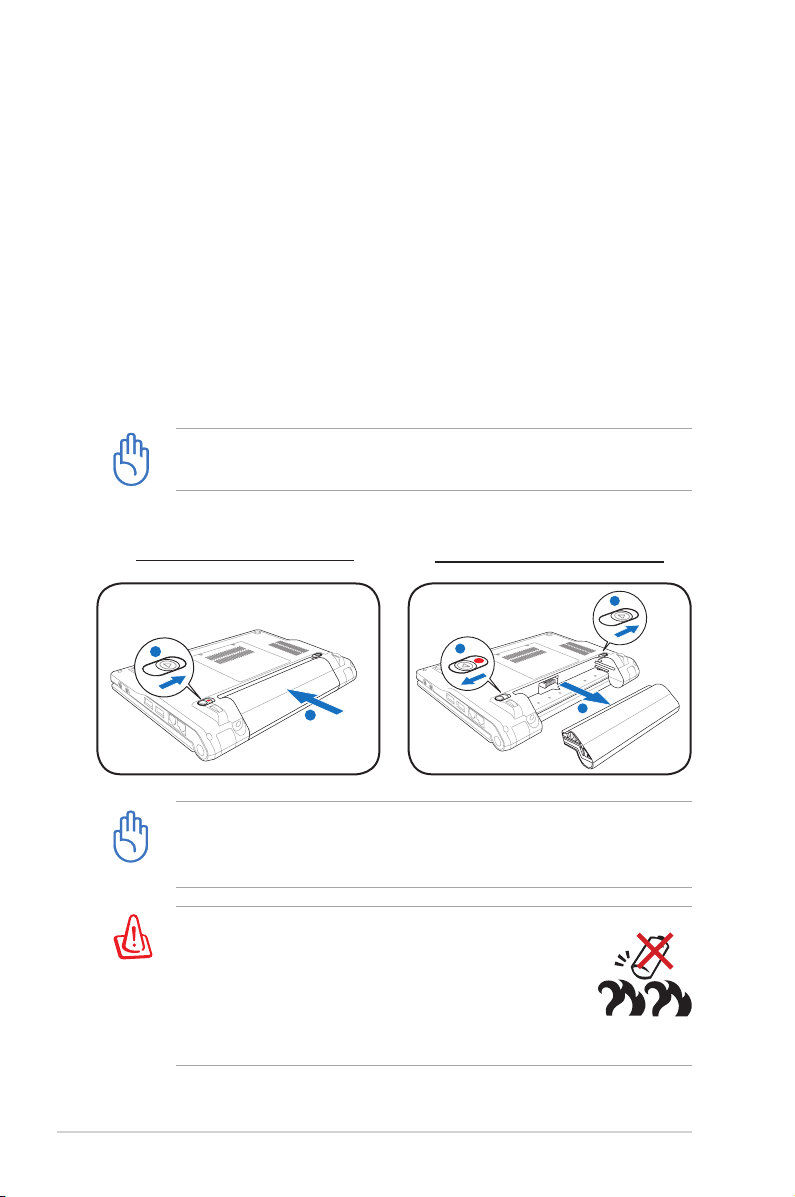
The Eee PC is designed to work with a removable battery pack. The
battery pack consists of a set of battery cells housed together. A fully
charged pack will provide several hours of battery life. Additional
battery packs are optional and can be purchased separately through
an Eee PC retailer. Remember to fully charge the battery before first
use and whenever it is depleted to prolong battery life.
Installing and Removing the Battery Pack
Your Eee PC may not have its battery pack installed. If not, use the
following procedures to install the battery pack.
Never attempt to remove the battery pack while the Eee PC is
turned ON, as this may result in the loss of working data.
To install the battery pack:
To remove the battery pack:
Only use battery packs and power adapters supplied with this
Eee PC or specifically approved by the manufacturer or retailer
for use with this model or else damage may occur to the Eee PC.
For safety reasons, DO NOT throw the battery in
fire, DO NOT short circuit the contacts, and DO NOT
disassemble the battery. If there is any abnormal
operation or damage to the battery pack caused
by impact, turn OFF the Eee PC and contact an
authorized service center.
3-4
Chapter 3: Getting Started
Page 25
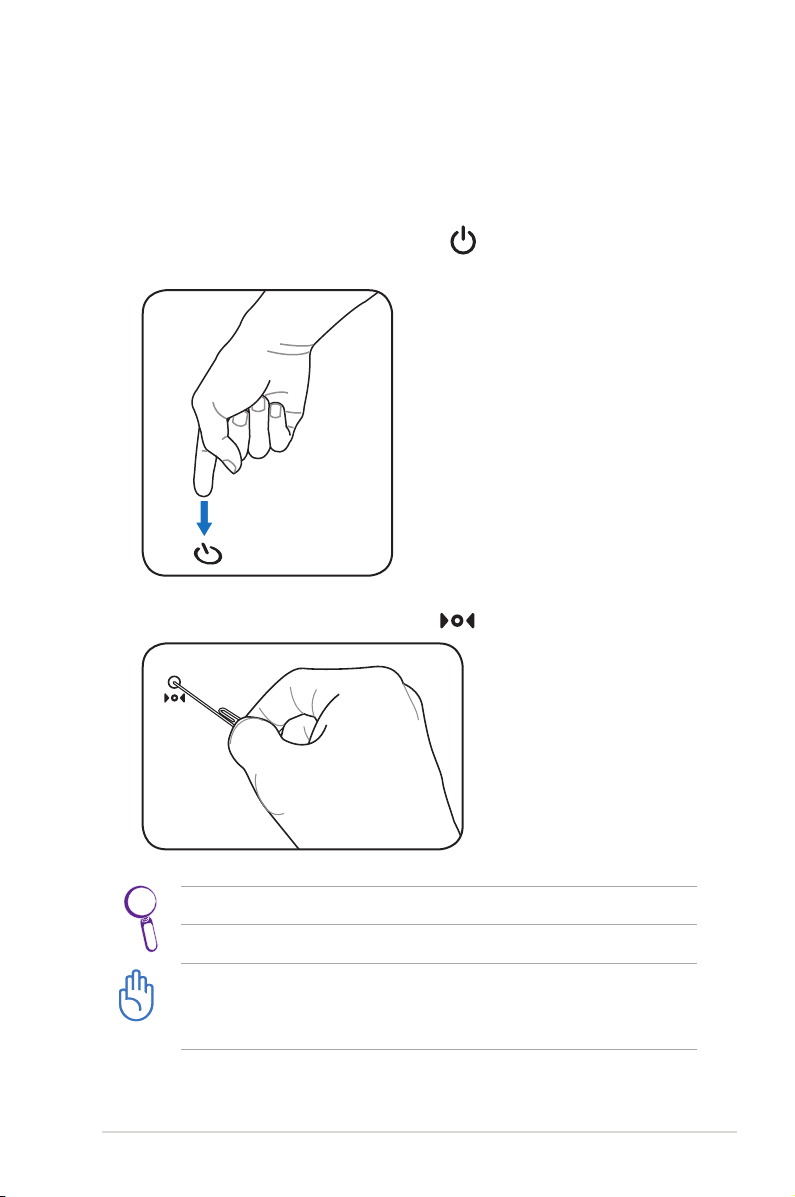
Emergency Shutdown & Reset
In case your operating system cannot properly turn OFF or restart,
there are additional ways to shutdown and reset your Eee PC:
Shutdown: Hold the power button until the system shuts
down.
Reset: Press the reset button .
ASUS Eee PC
Use a pin or a straightened paper clip to press the power switch.
DO NOT use emergency shutdown/reset while data is being
written or read; doing so can result in loss or destruction of your
data.
3-5
Page 26
Touchpad Usage
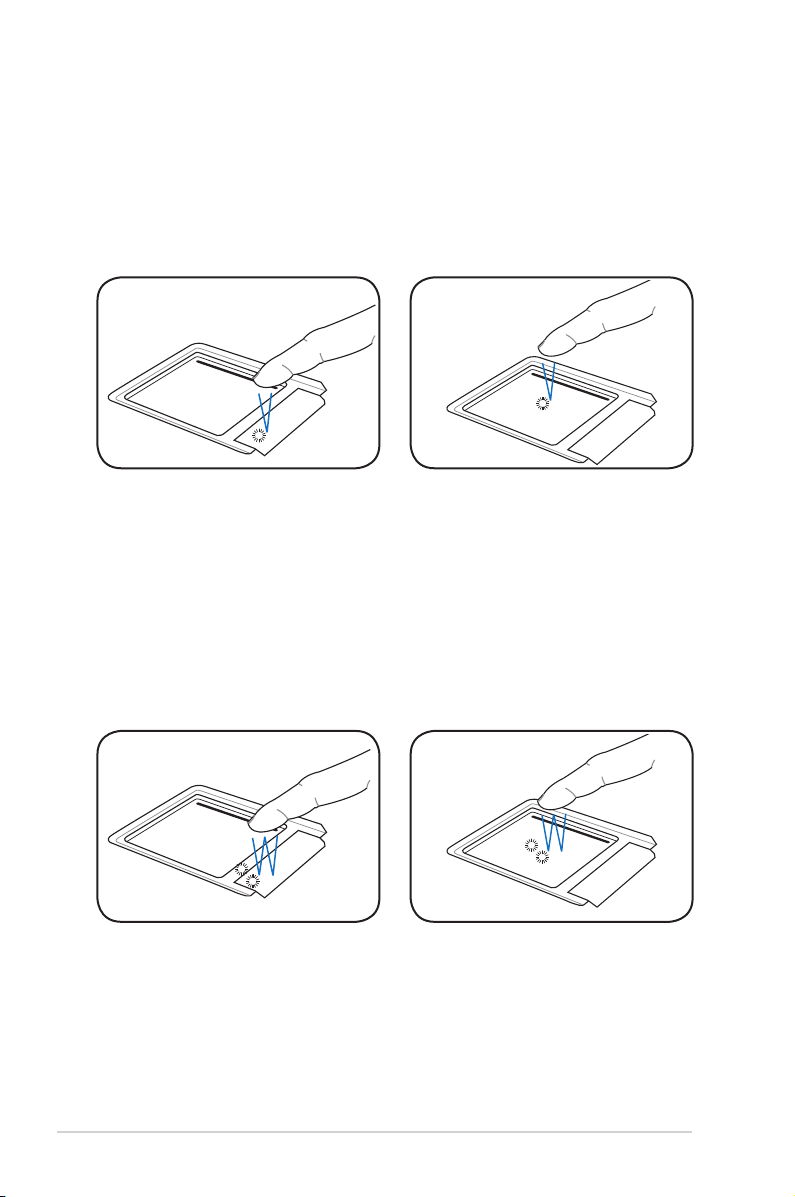
Clicking/Tapping - With the cursor over an item, press the left
button or use your fingertip to touch the touchpad lightly, keeping
your finger on the touchpad until the item is selected. The selected
item will change color. The following 2 illustrations produce the
same results.
Double-clicking/Double-tapping - This is a common skill for
launching a program directly from the corresponding icon you
select. Move the cursor over the icon you wish to execute, press the
left button or tap the pad twice in rapid succession, and the system
launches the corresponding program. If the interval between the
clicks or taps is too long, the operation will not be executed. The
following 2 illustrations produce the same results.
3-6
Chapter 3: Getting Started
Page 27
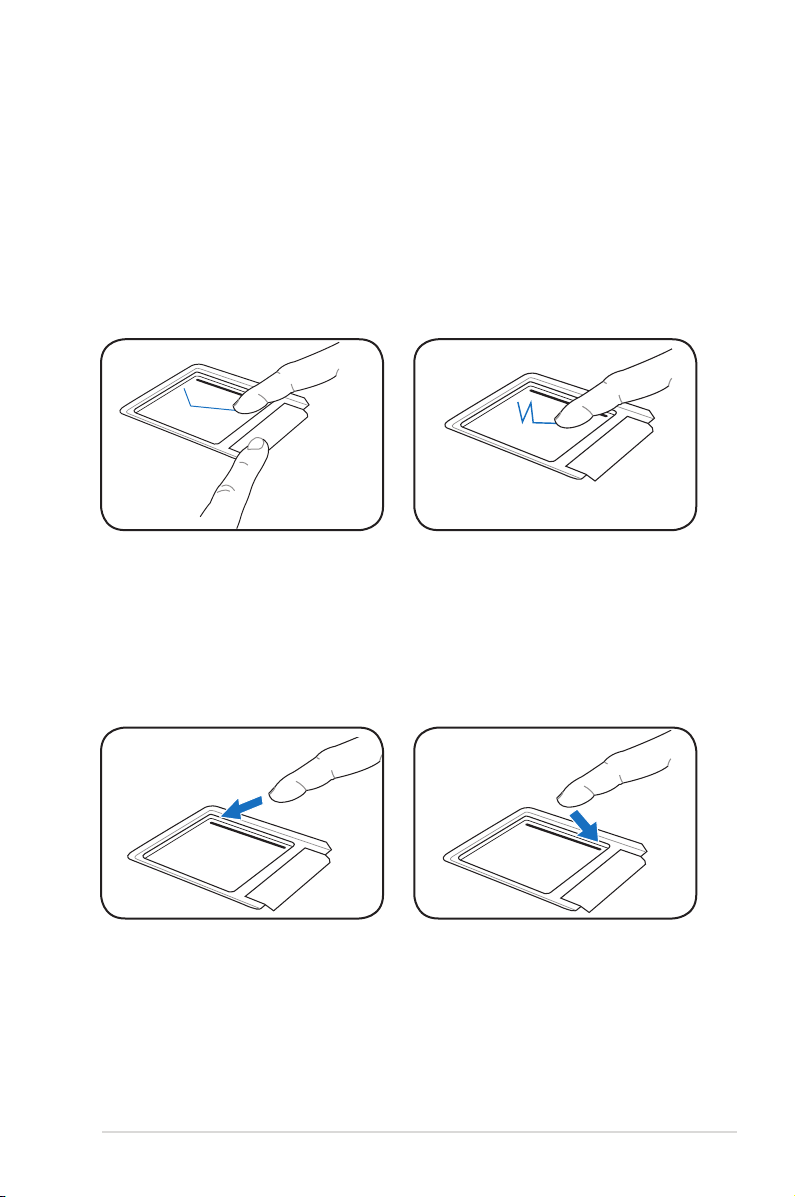
Dragging - Dragging means to pick up an item and place it
anywhere on the screen you wish. You can move the cursor over
the item you select, and while keeping the left button depressed,
moving the cursor to the desired location, then release the button.
Or, you can simply double-tap on the item and hold while dragging
the item with your fingertip. The following illustrations produce the
same results.
Scrolling - Slide you finger up or down on the right side of the
touchpad to scroll a window up or down. If your display window
includes several sub-windows, move the cursor on that pane before
scrolling.
ASUS Eee PC
3-7
Page 28

Keyboard Usage
Special Function Keys
The following defines the colored hot keys on the Eee PC’s keyboard.
The colored commands can only be accessed by first pressing
and holding the function key while pressing a key with a colored
command. Some function icons appear on the OS taskbar after
activation.
The Hot Key locations on the function keys may vary depending
on model but the functions should remain the same. Follow the
icons whenever your hot key locations do not match the manual.
zzZ Icon (F1): Places the Eee PC in suspend mode
(Save-to-RAM).
Radio Tower (F2): Wireless Models Only: Toggles
the internal wireless LAN ON or OFF with an on screen-display. When enabled, the corresponding
wireless indicator will light.
Sun Down Icon (F3): Decreases the display
brightness.
3-8
Sun Up Icon (F4): Increases the display brightness.
LCD/Monitor Icons (F5): Toggles between the Eee
PC’s LCD display and an external monitor in this
series: Eee PC LCD -> External Monitor -> Both.
Dual display mode does not work in 256 Colors, and supports a
resolution of 800 x 480 pixels only.
Connect an external monitor before booting up the Eee PC.
Chapter 3: Getting Started
Page 29
Task Manager Icon (F6): Initiates the Task Manager
to view the application process or terminates
applications.
Crossed Speaker Icon (F7): Mutes the speaker.
Speaker Down Icon (F8): Decreases speaker
volume.
Speaker Up Icon (F9): Increases the speaker
volume.
Num Lk (F11): Toggles the numeric keypad (number
lock) ON and OFF. Allows use of a larger portion
of the keyboard for number entering.
Scr Lk (F12): Toggles the “Scroll Lock” ON and
OFF. Allows you to use a larger portion of the
keyboard for cell navigation.
Prt Sc (Ins): Toggles the “Print Screen” key to
initiate screen capture utility to capture, save, or
print the contents of entire desktop.
Pg Up (↑): Press to scroll up in documents or the
web browser.
Pg Dn (↓): Press to scroll down in documents or the
web browser.
Home (←): Press to move the cursor to the
beginning of the line.
End (→): Press to move the cursor to the end of the
line.
ASUS Eee PC
3-9
Page 30
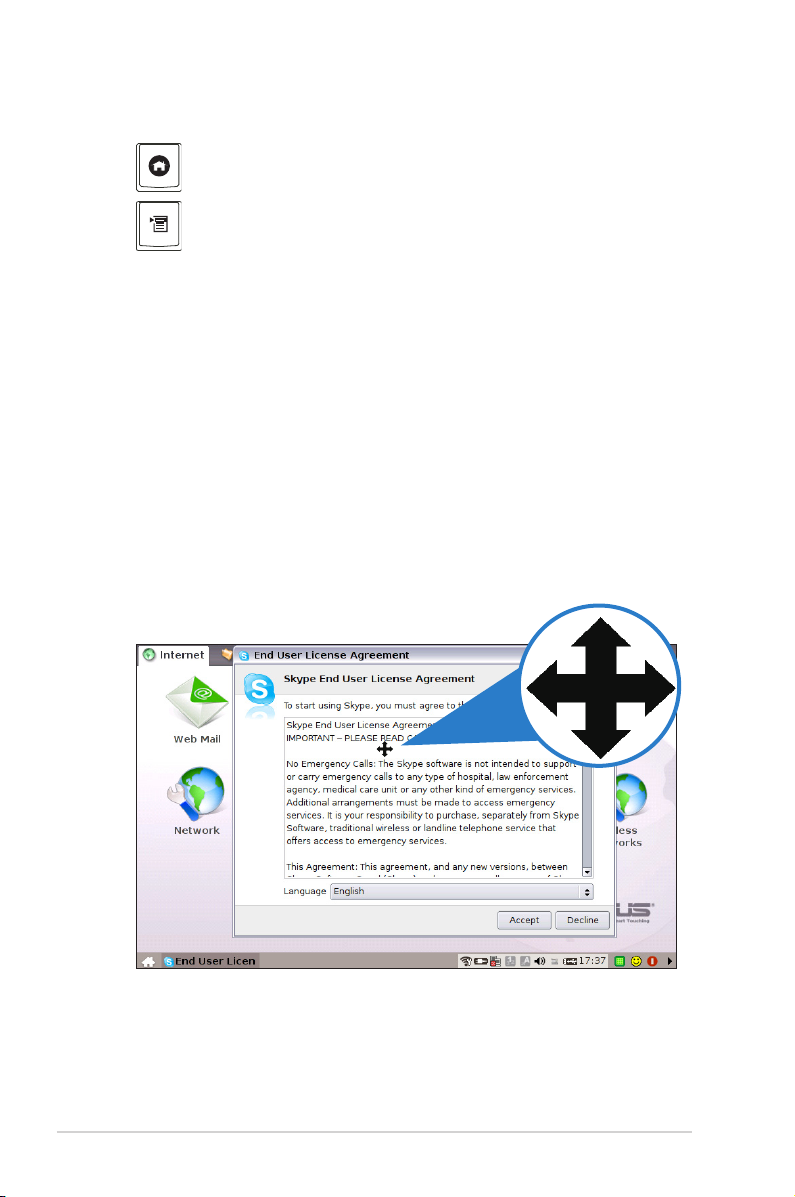
House icon: Returns to the main menu.
Menu with cursor icon : Activates the properties
menu and is equivalent to right-clicking the
touchpad/mouse on an object.
Adjust the window
If the application window is not in the center of the screen and you
want to adjust the position of the window, follow the instructions
below to adjust the window position.
1. Hold <Alt> and the touchpad left button to turn the cursor into
a cross arrow.
2. Use the other finger to move on the touchpad, dragging and, dragging and dragging and
placing the window as desired.
3-10
Chapter 3: Getting Started
Page 31

First Run Wizard
For the first time you start your Eee PC, the First Run Wizard will
auto-launch and lead you through setting up your preferences and
some basic information. Follow the wizard instructions to finish the
initiation.
1. Toggle I agree with
this license and click
Next to continue.
2. Select your keyboard
type and click Next
to continue.
3. Enter your User
Name. Click Next to
continue.
ASUS Eee PC
3-11
Page 32

4. Enter your Password
and enter again
to confirm the
password. Click Next
to continue.
Click the box before Log me in automatically when system
starts up if you want to log in without entering your password.
Doing so will allow people to access your computer without
permission.
Keep your password in mind! You have to pass the password
check every time you start up your Eee PC if you select not to
login automatically.
5. Click to expand the
drop-down menu
and locate the city
you are in or the
nearest city in your
time zone. Adjust the
correct date and your
local time. Click Next
to continue.
6. After you complete
all the wizard
instructions, click
Finish to restart the
system, or click Back
to make changes.
3-12
Chapter 3: Getting Started
Page 33

Operating Mode
The system is designed with an operating mode that is functionoriented and clearly divides functions into six categories, Internet,
Work, Learn, Play, Settings, Favorites. The lucid desktop
categorization is convenient for first-time users to operate this Eee
PC and enables sophisticated users to more easily locate and initiate
applications.
Switch the display category by clicking the category tabs on the
top, at which time the screen changes to the selected category and
shows pertinent items.
Refer to Eee PC Help for detailed
instructions for using your Eee PC
Returns to the
desktop
ASUS Eee PC
Displays the wireless network connection
Shuts down, restarts, or recall Task Manager
Displays network status
Displays power status
Number lock
Caps lock
Adjusts volume
Displays USB connction
Displays the time
Starts the task manager
Shows the Eee PC Tips
Hides or displays the taskbar
3-13
Page 34

Shutdown
Do the following instructions to turn down your Eee PC.
1. Click the red power switch on the taskbar.
Or, click Instant Shutdown from the Settings tab and select
Shutdown.
Or, press the power switch of the Eee PC directly.
2. Select Shut Down from the dialog box.
3. Select OK to proceed.
1
2
3
3-14
1
Chapter 3: Getting Started
Page 35

Internet
Work
Learn
Play
Settings
Favorites
Using the Eee PC
4
Page 36

Internet
Configuring a wireless network connection
(optional)
1. Press
<F2>) to activate the wireless
LAN function.
2. Click Wireless Networks
from Internet tab.
3. Select the wireless access
point you want to connect
to from the list and click
Connect to build the
connection.
+
(<Fn> +
Ensure that the box before Enable wireless is checked.
4. When connecting, you may
have to enter a password.
4-2
Chapter 4: Using the Eee PC
Page 37

5. After a connection has been
established, the connection is
shown on the list.
6. You can see the wireless
signal strength bars on the OS
taskbar.
ASUS Eee PC
4-3
Page 38

Configuring a network connection
If you want to obtain network access, connect the network cable,
with RJ-45 connectors on each end, to the network port on the Eee
PC and the other end to a hub or switch. The illustration below is the
example of your Eee PC connected to a network hub or switch for
use with the built-in Ethernet controller. Connect to network before
enjoying all the network services and functions in Eee PC.
Network hub or switch
Network cable with RJ-45 connectors
Local Area Network
Using a dynamic IP:
1. From the Internet tab,
select Network to start
the configuration.
4-4
Chapter 4: Using the Eee PC
Page 39

2. Click Create to create a
network connection.
3. Select the type of
connection you are using
and click Next.
4. Toggle the first option
Dynamic IP address
(DHCP) and click Next.
5. Enter a name for this
connection and click
Next.
ASUS Eee PC
4-5
Page 40

6. Click Finish to apply the
settings or click Back to
make changes.
Click the box before
Connect automatically
at system startup or
before the box Start
this connection when
finished based on your
needs.
Using a static IP:
1. Repeat the step 1~3 of Using a dynamic IP to start the static
IP network configuraton.
2. Toggle the second
option Static IP address
and click Next.
4-6
3. Enter the IP address,
Subnet mask and
Gateway from your
service provider.
Chapter 4: Using the Eee PC
Page 41

4. There is no need to
enter the DNS and WINS
address unless you want
to override the server
provided DNS server
address. If so, enter the
preferred DNS Server
address, alternative
address and WINS address of your service provider.
5. Enter the DNS domain
name for your network
or click Next to proceed
directly.
6. Enter a name for this
connection and click
Next.
7. Click Finish to apply the
settings or click Back to
make changes.
Contact your service provider if you have problem connecting to
the internet.
ASUS Eee PC
4-7
Page 42

Point-to-Point Protocol over Ethernet (PPPoE)
1. Repeat the step 1~2 of Using a dynamic IP to start the PPPoE
network configuraton.
2. Select the type of connection
you are using and click Next.
3. Select the hardware that you
want to use to make your
connection and click Next.
4. Enter your user name and
password and click Next.
5. Enter a name for this
connection and click Next.
4-8
Chapter 4: Using the Eee PC
Page 43

6. Click Finish to apply the
settings or click Back to
make changes.
Select Connect automatically at system startup or Start
this connection when finished based on your individual
configuration.
Wireless Point-to-Point Protocol over Ethernet
1. Repeat the step 1~2 of Using a dynamic IP to start the wireless
PPPoE network configuraton.
2. Select the type of connection
you are using and click Next.
3. Select the hardware that you
want to use to make your
connection and click Next.
ASUS Eee PC
4-9
Page 44

5. Enter the wireless channel
information and click Next.
6. Set the encryption
information for the wireless
connection and click Next.
7. Enter your user name and
password and click Next.
8. Enter a name for this
connection and click Next.
9. Click Finish to apply the
settings or click Back to
make changes.
4-10
Chapter 4: Using the Eee PC
Page 45

Dial-up (Optional)
The telephone wire used to connect the Eee PC’s internal modem
should have either two or four wires (only two wires (telephone line
#1) is used by the modem) and should have an RJ-11 connector on
both ends. Connect one end to the modem port and the other to an
analog telephone wall socket (as found in residential buildings).
Telephone connector is
the smaller of the two.
Telephone
connection is
optional
ASUS Eee PC
Telephone Wall Jack
Telephone cables
with RJ-11 connectors
Only use analog telephone outlets. The built-in modem does not
support voltages used in digital phone systems. DO NOT connect
the RJ-11 to digital phone systems found in many commercial
buildings or else damage will occur!
4-11
Page 46

1. Repeat the step 1~2 of Using a dynamic IP to start the Dial-up
network configuraton.
2. Select the type of connection
you are using and click Next.
3. Select the hardware that you
want to use to make your
connection and click Next.
4. Enter the phone number
required to connect to your
internet service provider and
click Next.
5. Enter your user name and
password and click Next.
4-12
Chapter 4: Using the Eee PC
Page 47

6. Enter a name for this
connection and click Next.
7. Click Finish to apply the
settings or click Back to
make changes.
ASUS Eee PC
4-13
Page 48

Browsing web pages
After you finish the network setup, click Web from the Internet tab
to launch the Mozilla Firefox web browser and start enjoying net
surfing.
Launches the
Mozilla Firefox
web browser
4-14
Visit our Eee PC homepage (http://eeepc.asus.com) to obtain
the latest information and register at http://vip.asus.com for full
service of your Eee PC.
If you think the browser font size too small to read, go to View >
Text Size to adjust.
Chapter 4: Using the Eee PC
Page 49

Enjoying free resources
Eee PC thoughtfully builds serveral resources shortcuts, including
iGoogle, Google Docs, and Wikipedia. Click an item and enjoy a
charge-free service through Mozilla Firefox web browser.
Connects to
iGoogle (www.
igoogle.com)
Connects to
Wikipedia
Connects to
Google Docs
(docs.google.
com)
ASUS Eee PC
4-15
Page 50

Accessing E-mail
Select Web Mail to display the webmail accesses, including Gmail,
Hotmail, Yahoo Mail, and AOL Mail.
Opens the built-in
webmail list
Select your e-mail service provider. If you do not use any of the
displayed e-mail provider, click the Back to Internet tab button and
select Web to log onto your own e-mail account.
Click to return to
the Internet tab
4-16
Click to link to
the webmail
homepage
Chapter 4: Using the Eee PC
Page 51

Chatting with friends
Messenger
1. Select Messenger from the Internet tab and the Welcome to
Pidgin screen displays. Press the Add button to configure your
instant messaging account.
Press to select an
instant messaging
service
2. Select an instant messaging service you are using from the
drop-down list and fill out your password along with other
necessary information to login your account.
ASUS Eee PC
Select an instant
messaging
service
If you do not have an IM account, apply one from the service
providers. If you have multiple IM accounts from different service
providers, press Add button again to add and configure more IM
accounts.
4-17
Page 52

Skype™
1. Select Skype from the Internet tab and start chatting through
Skype.
Initiate
Skype
application
2. Select your preferred language and press Accept button to
agree to the end user license agreement.
3. Enter your Skype name and password to login.
4-18
Click to
select
language
Press to
continue
Chapter 4: Using the Eee PC
Page 53

Work
Office applications
Documents/Spreadsheets/Presentations/PDF Reader
The Work tab includes several office software items like Documents,
Spreadsheets, Presentations, and PDF Reader. Some applications
may require setup before use. Follow the steps as provided by the
respective wizard to finish the initialization and get your jobs done
more efficiently.
Starts the word
processor to edit
documents
Starts the
spreadsheet
to perform
calculation
and manage
information
Starts the
application to
create, and share
presentations
Starts the Adobe®
PDF reader
ASUS Eee PC
If you have problems using these applications, click Help on the
top right corner and select Work tab for detailed instructions.
4-19
Page 54

Accessing files
The following example describes how to locate and open your
document from the connected external storage device:
1. Double-click Documents to start OpenOffice.org Writer.
2. Click File and select Open, or press <Ctrl> + <O>.
3. At the prompt, click My Home on the left and select Removable
Disk (may be labled as your USB storage brand name) to enter
the sub-directory (may be labeled as FLASH or partition1, etc.).
4-20
Chapter 4: Using the Eee PC
Page 55

4. Double-click the folder to display the files within. Select the
desired file, and click OK to open.
5. After the file is opened, you can start editing your document
and doing your job.
ASUS Eee PC
For other office applications, follow the general steps above to
access files.
4-21
Page 56

File Manager
File Manager provides an overview of all your files and enables easy
management of data.
Starts
the File
Manager
Eee PC supports file compression in a zip and tgz file format only,
and file extraction from zip, gz, tar, and rar formats.
To locate and open your file:
1. Connect your USB flash memory disk or USB portable hard disk
drive containing desired data to your Eee PC.
2. Highlight and select Open in File Manager at the prompt.
4-22
Chapter 4: Using the Eee PC
Page 57

3. (A) Click Removable Disk (may be labeled as your disk drive
brand name) in the left directory tree pane, and (B) double-click
the folder shown in the right pane.
A
B
4. All the files and folders in your USB external storage device are
shown in the right pane. Locate the desired file and double-click
it to open.
• Use the directory tree in the left pane to locate files more quickly
if numerous folders are listed.
• To remove your connecting the USB device, right click the USB
icon on the OS taskbar and select Safely remove.
ASUS Eee PC
4-23
Page 58

Accessories & Dictionary
The bundled accessories, Calculator and Screen Capture, are
convenient and easy to use; the built-in Dictionary prevents you
from lost in translation.
Calculator and Screen Capture
To start these tools:
Click to open the
Accessories
Click to return to the
Work tab
Runs the Screen
capture application
Opens the calculator
Dictionary
4-24
Press
(<Fn> + <Prt Sc>) to initiate the screen capture
+
tool directly and capture the full screen.
Starts the
Dictionary
Chapter 4: Using the Eee PC
Page 59

Learn
Language
Language provides entertaining exercises for English typing.
Click to return to
the Learn tab
Starts the typing
practice tool
Math
TuxMath teaches math more fun, teaching math by incorporating a
shooting game.
Click to return to
the Learn tab
ASUS Eee PC
Starts the Fraction
Tutorial
4-25
Page 60

Paint
Tux Paint makes you enjoy painting.
Click to return to
the Learn tab
Starts Tux Paint
Web Learn
This is a shortcut to Skoool. Double-click the item to link to Skoool
interactive learning site (www.skoool.ie).
4-26
Links to Skoool
Chapter 4: Using the Eee PC
Page 61

Play
Media Player
Enjoy your music and movies with the Media Player.
Starts the Media
Player
Loads
subtitles
10 mins rewind
1 min rewind
10 secs rewind
Jump to
ASUS Eee PC
Play
Pause
Stop
10 secs forward
1 min forward
10 mins forward
Full Screen
Mute
Volume adjustment
Move the cursor over the items on the user interface, and the
pop out message would show the function of the button or the
slider.
4-27
Page 62

Music Manager
The built-in music manager helps you arrange your multi-media data
in a well-organized fashion.
Starts the Music
Manager
Drag and
drop to
create the
playlists
Shows the connected media device
Locates your media files
Shows your playlists
Displays your collection
Shows the track playing, newest albums and favorite albums
4-28
Connect your iPod to your
Eee PC and click the Media
Device tab to show the
playlists in your iPod. You
can drag and drop the
wanted files to create your
playlist in the right pane.
Closing the main window only minimizes the music manager on
the OS taskbar. Quit the music manager by clicking Actions >
Quit.
Chapter 4: Using the Eee PC
Page 63

Photo Manager
Manage, view, and edit image files with the Photo Manager.
Starts the Photo
Manager
Preview pane Adds your comments
Locates pictures
in folders
Photo Manager supports image files in PNG, JPG, TIF, TIFF, GIF,
BMP, XPM, PPM, PNM, XCT, PCX format.
ASUS Eee PC
Displays folders
and files
4-29
Page 64

Video Manager
ASUS Eee PC supports video and audio files in the following
format: wmv, DVD, MPEG1, MPEG2, MPEG4 SP, Xvid, mp3, wma,
ogg, wav, MPEG4 AAC, PCM, Dolby digital (2.0 decode) format.
Starts the Video
Manager
Webcam (optional)
Click Webcam and start video recording or image capture.
4-30
Chapter 4: Using the Eee PC
Activates Webcam
Page 65

Games
Select an available game and have fun.
The built-in games may vary depending on model.
Click to return to the Play tab
ASUS Eee PC
4-31
Page 66

Settings
Desktop Mode
The Desktop Mode allows you to select the display mode and adjust
your Eee PC display resolution.
You can use both external and internal displays, external display only
or internal display only. If an external display is not connected, the
first two options will be grayed out. You can also manually adjust the
display resolution or set it automatically adjust.
Click to switch
display mode and
adjust resolution
4-32
If you set your display resolution to other than 800x480, use the
touchpad scrolling bar to scroll up and down the screen.
Connect an external monitor before booting up the Eee PC.
If you have installed Windows XP to your Eee PC, right-click the
ASUS Eee PC Utitlity icon on the OS taskbar to adjust the
display resolution.
Chapter 4: Using the Eee PC
Page 67

Anti-Virus
From the Settings tab, select Anti-Virus and perform virus scanning
to protect your Eee PC.
Click to start
the anti-virus
application
Volume
Click the speakers icon to open the control panel. Adjust the system
volume and balance by moving the sliders.
Click to adjust
volume
Adjust the system
and microphone
volume
Adjust the
balance
ASUS Eee PC
4-33
Page 68

Instant Shutdown
Click Instant Shutdown and select an action from the dialog box
shown below. You can activate the task manager, put the system in
standby, restart, or shut down the system.
Printers
To setup your printer, double-click Printers and press Add to add a
new printer. The installed printers display in the window.
4-34
Refer to the QVL in Appendix or visit our website for the latest
qualified vendor for the printers.
Chapter 4: Using the Eee PC
Page 69

System Info
This option displays the system information of your Eee PC.
Date & Time
Adjusts the system date and time of your Eee PC.
ASUS Eee PC
4-35
Page 70

Personalization
Select Personalization to renew
your information or change your
preferences.
Add/Remove Software
You can download and install software from our server with network
access. Follow the instructions below to install software. You can
remove the software you install from our server later when they are
no longer needed.
Removing the pre-installed software is not allowed.
To install new software or update the existing software:
1. Make sure you have connected to network.
2. Click the tab on the top to switch the category and the screen
will display the available software on the server.
3. Locate the software you want to install/update.
4. Click the Install/Update button to install/update the selected
4-36
software.
2
3
4
Chapter 4: Using the Eee PC
Click to switch the
category
Press the Update
button to update
the software
Locate the
software you want
to install/update
Page 71

5. Click OK to confirm the installation/update.
6. Your Eee PC starts the download and installs/updates the
selected software from our server..
7. Click Yes to restart the system for the installed/updated
application to work properly.
ASUS Eee PC
4-37
Page 72

BIOS update
To update the BIOS:
DO NOT shut down or reset the system or unplug the power
cord while updating the BIOS! Doing so would cause the system
boot failure!
1. Ensure you are connected to a network.
2. Go to Settings > Add/Remove Software.
3. Click the Settings tab on the top to switch the category.
4. Click the Open button in BIOS Updates
3
Click to
switch the
category
4
Click to
display the
available
BIOS
updates
5. Locate the latest BIOS and click the Install button to update the
BIOS.
Click to
install the
BIOS
4-38
Chapter 4: Using the Eee PC
Page 73

5. Click OK to reboot and update the BIOS.
Touchpad
Edit your touchpad preferences by
clicking Touchpad. You can adjust
touchpad sensitivity, tapping time,
and scrolling settings.
Disk Utility
Selecting Disk Utility allows
you to check your Eee PC SSD
condition including total disk
space, the used space, and the
remaining space. Click the tabs to
switch the displayed disk drive.
• Data in My Documents is stored in the Primary Drive and files
saved to My Documents 2 are located in the Extra Drive.
• Extra Drive may not be available for all Eee PC models.
• The disk space varies depending on model.
ASUS Eee PC
4-39
Page 74

Diagnostic Tools
The Diagnostic Tool helps you with easy trouble-shooting.
System Info.
Click the System Info. button on the left to display the system
information.
The system information varies depending on model.
Click to switch between system
information summary and
details
System Test
Click the System Test button on the left to start the system checkup.
Select the item you want to test and follow the wizard to complete
the test.
4-40
Chapter 4: Using the Eee PC
Page 75

Send Log
If you can't find a solution to your problem after the system test, you
can click Send Log on the left to send the test log to ASUS support
team. Our technical personnel would help you with the problems.
Before you send the log, remember to set up your e-mail account
in the Mozilla Thunderbird client first. Refer to page 4-23 for
details.
ASUS Eee PC
4-41
Page 76

Task Manager
The Task Manager displays the application processes. Tweak your
Eee PC up if it is running slow by killing the application with Task
Manager.
Follow the instructions below to teminate applications:
1. Double click the SOS icon on the OS taskbar to display the
running applications.
Or, press
+
(<Fn> + <F6>) directly to launch Task
Manager.
2. Select an unnecessary application that uses the system
resources and click Kill to teminate the process.
Using Task Manager to terminate applications may cause
damage to the files that the application is reading or editing.
We do not recommend you use Task Manager to stop the
applications that are working on your important data. Or, back
up your important data before using Task Manager.
4-42
Chapter 4: Using the Eee PC
Page 77

Eee Tips
Eee Tips provides quick solutions to your problems.
If Eee Tips cannot fix your problems, visit ASUS website (http://
support.asus.com) for further support.
Follow the instructions below to browse Eee Tips:
1. Click the EeePC Tips icon on the OS taskbar to open Eee Tips.
2. Scroll and find the problem you meet in the left pane and click
it.
3. The answer is displayed in the right pane.
ASUS Eee PC
4-43
Page 78

Favorites
Customize your favorites on the Favorites tab. Click Customize and
start to add or remove your favorites.
From the available favorites list in the left pane, select a desired item
to include in your favorites, and click Add. To remove a favorite from
your current favorites list, select an item from the right pane and
click Remove.
Click to customize
Click to add or
remove
4-44
The available favorites are listed in
alphabetical order
The item order in the list corresponds to the display order on the
Favorites tab.
Chapter 4: Using the Eee PC
Page 79

System Recovery
System Recovery
5
Page 80

System Recovery
There are three ways to perform the system recovery. Refer to the
following sections for details.
The OS image file bundled in the support CD may be not the
latest version. After the system recovery, use the Add/Remove
Software in the Settings tab to update your OS.
You will lose all your data during the system recovery. Ensure to
back up your important data before recovering your system.
Using Hidden Partition
1. Hold <F9> during bootup (requires a Recovery Partition).
If you have installed WIndows XP to your Eee PC, the builtin hidden partition would be cleared and cannot be used for
system recovery.
2. Highlight Restore Factory Settings and press <Enter> to start
the system recovery.
5-2
Normal Boot
Perform Disk Scan
Restore Factory Settings
Use the ↑ and ↓ keys to select which entry is highlighted.
Press enter to boot the selected OS, 'e' to edit the
commands before booting, or 'c' for command-line.
If the system recovery fails, there might be something wrong with
your Eee PC SSD. Contact your local RMA for support.
Chapter 5: System Recovery
Page 81

Using the Support CDCD
1. Connect an external optical drive to your Eee PC and insert the
Support CD into the optical drive (System needs to be powered
ON).
2. Press <ESC> on bootup and the Please select boot device
screen appears. Select USB:XXXXXX (may be labled as the ODD
brand name) to boot from the optical drive.
Please select boot device:
HDD:SM-SILICONMOTION SM223AC
USB:Slimtype DVD
and ↓ to move selection
↑
ENTER to select boot device
3. Key in yes and press <Enter> to continue the system recovery:
4. When the recovery is completed, press <Enter> to reboot the
system.
ASUS Eee PC
5-3
Page 82

Using USB Flash Disk
You need another PC and a USB flash disk (larger than 1GB) for Eee
PC system recovery.
You will lose all your data on the USB flash disk. Back up
important data before using the USB disk as a recovery disk.
Your Eee PC might not be able to detect all the USB flash disks.
We recommend you use a USB flash disk smaller than 2 G.
To use your USB flash disk to perform system recovery:
1. Connect your USB flash disk (size larger than 1GB) to another
PC/NB (bundled with Windows XP or later version) and insert
the Support CD to that PC/NB at the same time.
2. Click Utilities on the left and select ASUS Linux USB Flash
Utility.
5-4
Chapter 5: System Recovery
Page 83

3. Select Copy Eee PC image files to USB flash and make it
bootable and click Run.
Note that the disk for Eee PC recovery is correct if you have
several USB flash disks connected to the PC.
4. Click Yes to continue. The system starts formating your USB flash
disk.
ASUS Eee PC
5-5
Page 84

5. A dialog box appears. Follow the instructions to eject the USB
disk and replug it to your PC/NB. Click Retry to continue.
6. Click OK to complete the process.
7. Connect the USB flash disk to your Eee PC.
8. Start the system and press <F2> on bootup to enter the BIOS
setup. Go to Boot > Hard Disk Drives and select the USB drive
(may be labeled as “USB:XXXX”) as the 1st Drive.
9. Go to Boot > Boot Device Priority and select the USB drive (may
be labeled as “USB:XXXX”) as the 1st Boot Device.
10 Press <F10> to save the configuration and reboot from the USB
flash disk.
11. Key in yes and press <Enter> to continue the system recovery.
12 When the recovery is completed, remove the USB flash disk and
press <Enter> to reboot the system.
5-6
Chapter 5: System Recovery
Page 85

Reformatting the USB flash disk
To use the USB disk on your Windows operating system normally,
follow the instructions below to reformat your USB disk.
1. Connect your USB flash disk to another PC/NB and insert the
Support CD to that PC/NB at the same time.
2. Click Utilities on the left and select ASUS Linux USB Flash
Utility.
3. Select Format the USB flash disk back to Windows format
(FAT16) and click Run.
4. Click OK to complete the disk formatting.
ASUS Eee PC
5-7
Page 86

5-8
Chapter 5: System Recovery
Page 87

Trademark Statements
Qualified Vendor List
Declarations and Safety Statements
GNU General Public License
Copyright Information
Limitation of Liability
Service and Support
Appendix
A
Page 88

Trademark Statements
Google Talk service and its logos are trademarks of Google Inc..
GroupWise service and its logos are trademarks of Novell Inc..
MSN service and its logos are trademarks of Microsoft Corporation.
QQ service and its logos are trademarks of Tencent Inc..
Yahoo! service and its logos are trademarks of Yahoo! Inc..
All other services and logos are either trademarks or registered
trademarks of their respective owners.
A-2
Appendix
Page 89

Qualied Vendor List
Device Model
Display Device AOC 716SW
AOC L154W
ASUS PW191
ASUS MB19
ASUS PW201
BenQ FP94VW
BenQ FP222WH
Samsung 203B
Samsung 226BW
Samsung SyncMaster 740BF
Sony KLV46X200A
ViewSonic VA1912wb
ViewSonic VE710b
ViewSonic VG712S
Floppy Mitsumi D353FUE
IBM CN533
Flash Memory Card
Reader/Writer
Flash Memory Card Transcend TS2GSDC 4.0G
ASIA All in 1 Card Reader
GL816 6in1 Card Reader
Kawau Card Reader
SSK All in 1 Card Reader
Transcend TS4GSD150
Transcend TS512MUSD
Adata TurboSD2.0 4.0G
KingSton SD 1.0G
KingSton SD 2.0G
KingSton SD 4.0G
Toshiba SD 256MB
Panasonic SD 16MB
SanDisk SD 4.0G
SanDisk SD 1.0G
SanDisk ULTRAII 1GB
Canon SD 16MB
Pretec MMC 32MB
Adata MMC 512MB
Transcend TS1GRMMC4
Transcend TS512MMCM
Transcend TS4GMMC4
ADATA SDHC 2.0 8GB
Transcend TS4GSDHC6
Transcend TS8GSDHC6
Toshiba M04GR4W 4G
ASUS Eee PC
A-3
Page 90

Fast Ethernet
Unmanaged Switch/Hub
Adapter
Wireless Lan Access
Point
HUB BELKIN-F5U237
Printer EPSON STYLUS-C43UX
USB Flash disk UNIS USB2.0 1G
Mouse Logitech M-UV83
ALPHA-AFH-805T
ALPHA-AFH-808T
TP-LINK TL-HP5MU
ASUS GIGAX1105N
ASUS GIGAX1108N
D-Link DES-1008D
LINKSYS SD208
NETGEAR FS608
D-Link Di-704P
D-Link Di-604+
D-Link DI 624
Buffalo WZR-G300N
D-Link DIR-635
ASUS WL500G
ASUS WL520G
ASUS WL566GM
ASUS WL 530G
Netcore 615GR
Linksys WRT300N
FEATARES-USB2.0 HUB
HP-7960
EPSON-STYLUS PHOTO R800
HP-PHOTOSMART-D5168
HP Photosmart D5160
HP Desk Jet 5652
Samsung ML2010
Adata 1.0G
Adata 4.0G
PQI 4.0G
Adata 8.0G
SanDisk 2.0G
KingSton 2.0G
ASUS Ai-flash 5
Lenovo USB Flash
MSI MSM-206AC
Microsoft D58
Microsoft Basic Optical Mouse
Logitech M-BE58
Razer Copperhead Laser Mouse
A-4
Appendix
Page 91

External USB DVD drive Sony DRX-820UL
Taidian DWB8PUM
Sony DRX-S50U
Xbox HD DVD
Pioneer DVR-112CH
BenQ TW200D
BenQ EW164B-0K2
ASUS SDRW-0804P-D
Projector Dell 3400MP
Toshiba S8
Monitor and TV Acer AL1916W
AOC 210V
ASUS PW191
ASUS MM19T
ASUS PW201
ASUS MW221U
BenQ DV2680
BenQ FP22W
CHIMEI CMV937A
Dell FP2407FWP
Hannsg GF191
Mozo M7++
Philips 170B5
Philips 190B6
Philips 32PF7320
PSA PD711A
Samsung 225MS
Samsung 940B
Sony KDL-26S2020
ViewSonic G90f+
ViewSonic P70F
ViewSonic PF775
ViewSonic PF790
ViewSonic N3206W
ASUS Eee PC
The Linux-based Eee PC may not support all PC peripherals. Visit
our ASUS website for the latest qualified vendor list before you
purchase peripherals for your Eee PC.
A-5
Page 92

Declarations and Safety Statements
Internal Modem Compliancy
The Eee PC with internal modem model complies with JATE (Japan),
FCC (US, Canada, Korea, Taiwan), and CTR21. The internal modem has
been approved in accordance with Council Decision 98/482/EC for
pan-European single terminal connection to the public switched
telephone network (PSTN). However due to differences between the
individual PSTNs provided in different countries, the approval does
not, of itself, give an unconditional assurance of successful operation
on every PSTN network termination point. In the event of problems
you should contact your equipment supplier in the first instance.
Overview
On 4th August 1998 the European Council Decision regarding the
CTR 21 has been published in the Official Journal of the EC. The CTR
21 applies to all non voice terminal equipment with DTMF-dialling
which is intended to be connected to the analogue PSTN (Public
Switched Telephone Network).
CTR 21 (Common Technical Regulation) for the attachment
requirements for connection to the analogue public switched
telephone networks of terminal equipment (excluding terminal
equipment supporting the voice telephony justified case service)
in which network addressing, if provided, is by means of dual tone
multifrequency signalling.
Network Compatibility Declaration
Statement to be made by the manufacturer to the Notified Body and
the vendor: “This declaration will indicate the networks with which
the equipment is designed to work and any notified networks with
which the equipment may have inter-working difficulties”
A-6
Appendix
Page 93

Network Compatibility Declaration
Statement to be made by the manufacturer to the user: “This
declaration will indicate the networks with which the equipment
is designed to work and any notified networks with which the
equipment may have inter-working difficulties. The manufacturer
shall also associate a statement to make it clear where network
compatibility is dependent on physical and software switch settings.
It will also advise the user to contact the vendor if it is desired to use
the equipment on another network.”
Up to now the Notified Body of CETECOM issued several panEuropean approvals using CTR 21. The results are Europe’s first
modems which do not require regulatory approvals in each
individual European country.
Non-Voice Equipment
Answering machines and loud-speaking telephones can be eligible
as well as modems, fax machines, auto-dialers and alarm systems.
Equipment in which the end-to-end quality of speech is controlled
by regulations (e.g. handset telephones and in some countries also
cordless telephones) is excluded.
ASUS Eee PC
A-7
Page 94

Internal Modem Compliancy (Cont.)
This table shows the countries currently under the CTR21
standard
Country Applied More Testing
Austria1 Yes No
Belgium Yes No
Czech Republic No Not Applicable
Denmark1 Yes Yes
Finland Yes No
France Yes No
Germany Yes No
Greece Yes No
Hungary No Not Applicable
Iceland Yes No
Ireland Yes No
Italy Still Pending Still Pending
.
Israel No No
Lichtenstein Yes No
Luxemburg Yes No
The Netherlands
1
Yes Yes
Norway Yes No
Poland No Not Applicable
Portugal No Not Applicable
Spain No Not Applicable
Sweden Yes No
Switzerland Yes No
United Kingdom Yes No
A-8
Appendix
Page 95

This information was copied from CETECOM and is supplied without
liability. For updates to this table, you may visit http://www.cetecom.
de/technologies/ctr_21.html
1
National requirements will apply only if the equipment may use
pulse dialling (manufacturers may state in the user guide that the
equipment is only intended to support DTMF signalling, which
would make any additional testing superfluous).
In The Netherlands additional testing is required for series
connection and caller ID facilities.
ASUS Eee PC
A-9
Page 96

Federal Communications Commission Statement
This device complies with FCC Rules Part 15. Operation is subject to
the following two conditions:
• This device may not cause harmful interference, and
• This device must accept any interference received, including
interference that may cause undesired operation.
This equipment has been tested and found to comply with the
limits for a class B digital device, pursuant to Part 15 of the Federal
Communications Commission (FCC) rules. These limits are designed
to provide reasonable protection against harmful interference in
a residential installation. This equipment generates, uses, and can
radiate radio frequency energy and, if not installed and used in
accordance with the instructions, may cause harmful interference
to radio communications. However, there is no guarantee that
interference will not occur in a particular installation. If this equipment
does cause harmful interference to radio or television reception,
which can be determined by turning the equipment off and on, the
user is encouraged to try to correct the interference by one or more of
the following measures:
• Reorient or relocate the receiving antenna.
• Increase the separation between the equipment and receiver.
• Connect the equipment into an outlet on a circuit different from
that to which the receiver is connected.
• Consult the dealer or an experienced radio/TV technician for
help.
A-10
The use of a shielded-type power cord is required in order to
meet FCC emission limits and to prevent interference to the
nearby radio and television reception. It is essential that only
the supplied power cord be used. Use only shielded cables to
connect I/O devices to this equipment. You are cautioned that
changes or modifications not expressly approved by the party
responsible for compliance could void your authority to operate
the equipment.
Appendix
Page 97

(Reprinted from the Code of Federal Regulations #47, part 15.193, 1993.
Washington DC: Office of the Federal Register, National Archives and
Records Administration, U.S. Government Printing Office.)
FCC Radio Frequency Interference Requirements
This device is restricted to INDOOR USE due to its operation in the
5.15 to 5.25GHz frequency range. FCC requires this product to be
used indoors for the frequency range 5.15 to 5.25GHz to reduce
the potential for harmful interference to co-channel of the Mobile
Satellite Systems.
High power radars are allocated as primary user of the 5.25 to
5.35GHz and 5.65 to 5.85GHz bands. These radar stations can cause
interference with and / or damage this device.
This device and its antenna(s) must not be co-located or
operating in conjunction with any other antenna or transmitter.
FCC Radio Frequency (RF) Exposure Caution
Statement
Any changes or modifications not expressly approved by the
party responsible for compliance could void the user’s authority
to operate this equipment. “The manufacture declares that
this device is limited to Channels 1 through 11 in the 2.4GHz
frequency by specified firmware controlled in the USA.”
This equipment complies with FCC radiation exposure limits set forth
for an uncontrolled environment. To maintain compliance with FCC
RF exposure compliance requirements, please avoid direct contact
to the transmitting antenna during transmitting. End users must
follow the specific operating instructions for satisfying RF exposure
compliance.
For operation within 5.15GHz and 5.25GHz frequency ranges, it is
restricted to indoor environment, and the antenna of this device
must be integral.
ASUS Eee PC
A-11
Page 98

Declaration of Conformity
(R&TTE directive 1999/5/EC)
The following items were completed and are considered relevant
and sufficient:
• Essential requirements as in [Article 3]
• Protection requirements for health and safety as in [Article 3.1a]
• Testing for electric safety according to [EN 60950]
• Protection requirements for electromagnetic compatibility in
[Article 3.1b]
• Testing for electromagnetic compatibility in [EN 301 489-1] & [EN
301]
• Testing according to [489-17]
• Effective use of the radio spectrum as in [Article 3.2]
• Radio test suites according to [EN 300 328-2]
CE Mark Warning
This is a Class B product, in a domestic environment, this product
may cause radio interference, in which case the user may be required
to take adequate measures.
IC Radiation Exposure Statement for Canada
This equipment complies with IC radiation exposure limits set forth
for an uncontrolled environment. To maintain compliance with IC
RF exposure compliance requirements, please avoid direct contact
to the transmitting antenna during transmitting. End users must
follow the specific operating instructions for satisfying RF exposure
compliance.
Operation is subject to the following two conditions:
• This device may not cause interference and
• This device must accept any interference, including interference
that may cause undesired operation of the device.
A-12
Appendix
Page 99

To prevent radio interference to the licensed service (i.e. co-channel
Mobile Satellite systems) this device is intended to be operated
indoors and away from windows to provide maximum shielding.
Equipment (or its transmit antenna) that is installed outdoors is
subject to licensing.
Because high power radars are allocated as primary users (meaning
they have priority) in 5250-5350 MHz, these radars could cause
interference and/or damage to license exempt LAN devices.
ASUS Eee PC
A-13
Page 100

Wireless Operation Channel for Different Domains
N. America 2.412-2.462 GHz Ch01 through CH11
Japan 2.412-2.484 GHz Ch01 through Ch14
Europe ETSI 2.412-2.472 GHz Ch01 through Ch13
France Restricted Wireless Frequency Bands
Some areas of France have a restricted frequency band. The worst
case maximum authorized power indoors are:
• 10mW for the entire 2.4 GHz band (2400 MHz–2483.5 MHz)
• 100mW for frequencies between 2446.5 MHz and 2483.5 MHz
Channels 10 through 13 inclusive operate in the band 2446.6 MHz to
2483.5 MHz.
There are few possibilities for outdoor use: On private property or on
the private property of public persons, use is subject to a preliminary
authorization procedure by the Ministry of Defense, with maximum
authorized power of 100mW in the 2446.5–2483.5 MHz band. Use
outdoors on public property is not permitted.
In the departments listed below, for the entire 2.4 GHz band:
• Maximum authorized power indoors is 100mW
• Maximum authorized power outdoors is 10mW
Departments in which the use of the 2400–2483.5 MHz band is
permitted with an EIRP of less than 100mW indoors and less than
10mW outdoors:
01 Ain Orientales 02 Aisne 03 Allier
05 Hautes Alpes 08 Ardennes 09 Ariège
11 Aude 12 Aveyron 16 Charente
24 Dordogne 25 Doubs 26 Drôme
32 Gers 36 Indre 37 Indre et Loire
41 Loir et Cher 45 Loiret 50 Manche
55 Meuse 58 Nièvre 59 Nord
A-14
Appendix
 Loading...