

Page 1
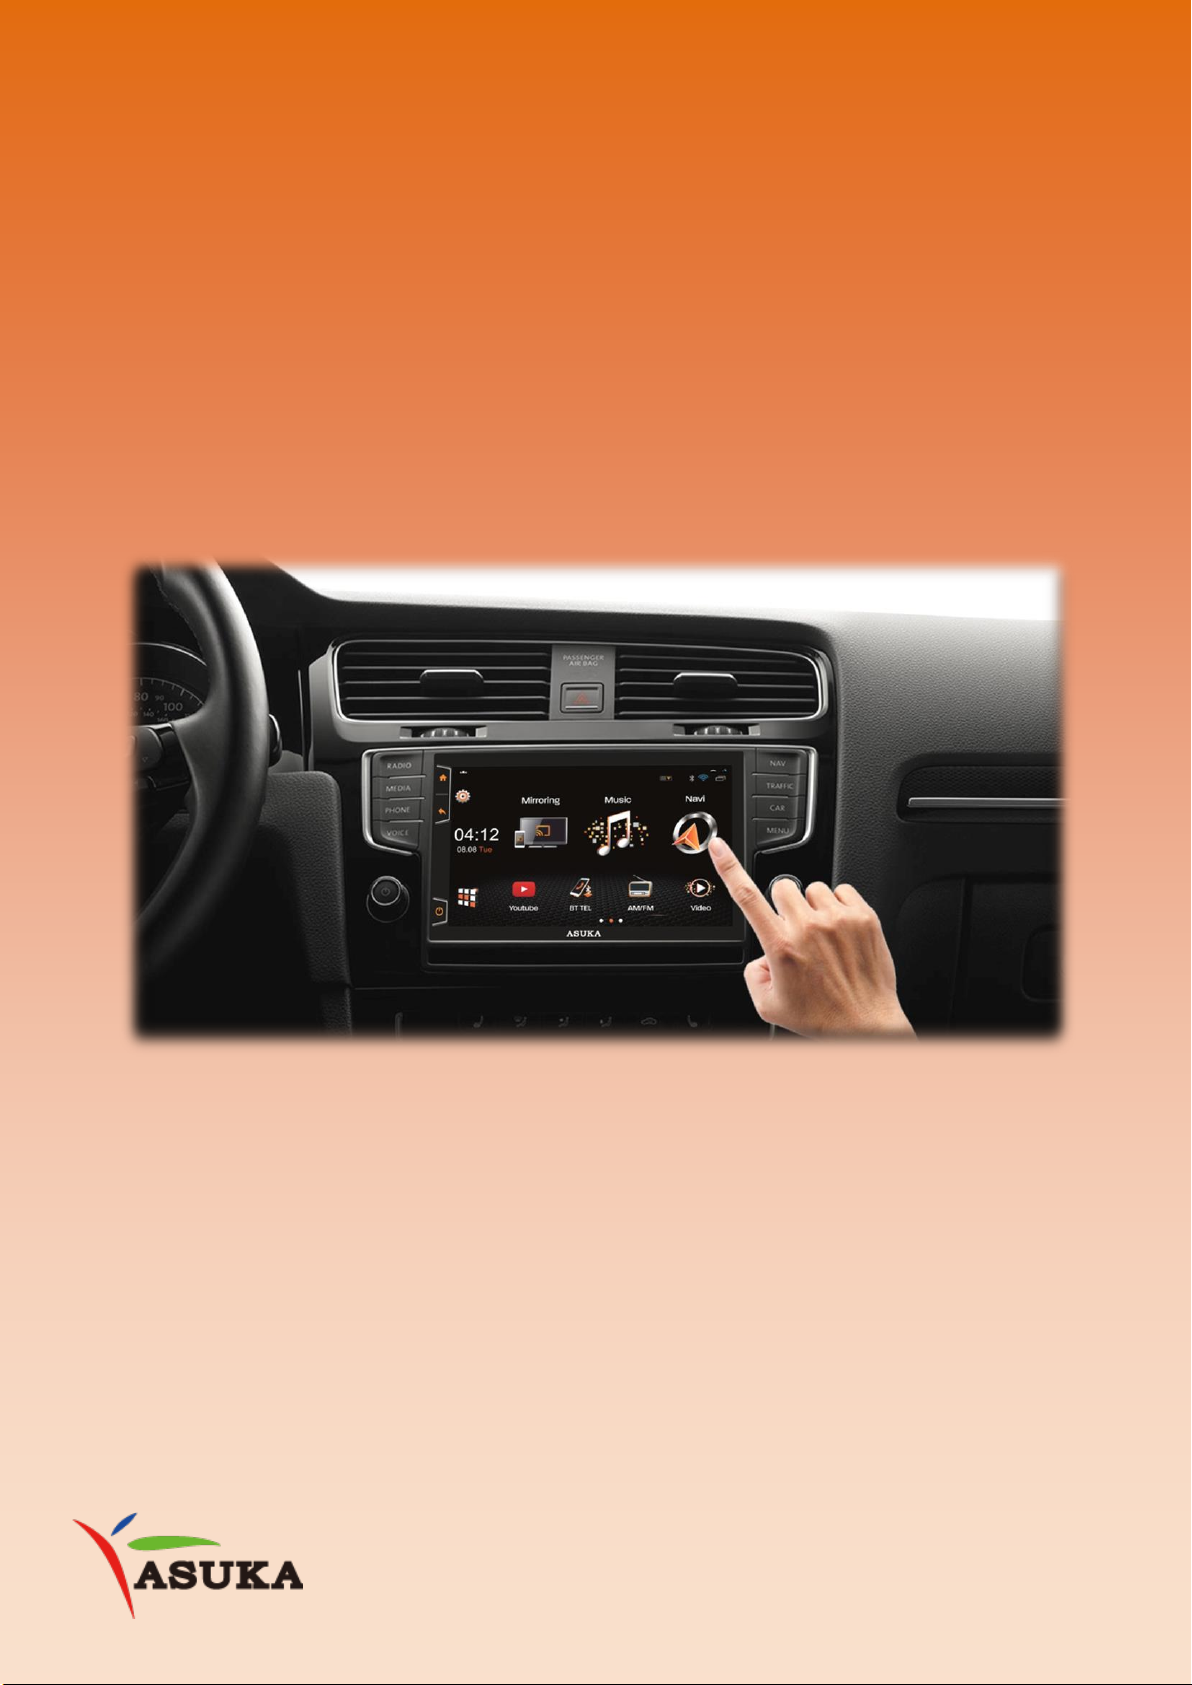
PTA-100
7-inch WiFi Multimedia Navi 2DIN
User Manual
Page 2

Table of Contents
I. Introduction ................................ ................................ ................................ .............. 4
II. Quick Start Guide ..................................................................................................... 5
II.1 Turning the Power On .......................................................................................................... 5
II.2 User Interface ........................................................................................................................ 6
II.3 Common Screen Operation ................................................................................................ 7
III. Bluetooth .................................................................................................................. 8
III.1 Connect to Bluetooth .......................................................................................................... 8
III.2 Bluetooth Dialing ................................................................................................................. 9
IV. Internet Access .......................................................................................................10
V. Mirroring ................................ ................................ ................................ .................. 11
V.1 Android ................................................................................................................................. 11
V.2 Apple iOS ............................................................................................................................. 11
VI. Radio ........................................................................................................................12
VII. Music ........................................................................................................................13
VIII. Video ........................................................................................................................15
IX. Voice Control ...........................................................................................................16
X. Digital Television (Optional) ...................................................................................18
XI. Steering Wheel Control ..........................................................................................20
XII. Reference ................................................................................................................21
XI.1 Maintenance ...................................................................................................................... 21
XI.2 Troubleshooting ................................................................................................................. 21
XIII. Installation/ Wire Connection Guide .....................................................................22
XII.1 Precautions on installation and connection ................................................................. 22
XII.2 Wiring Information ............................................................................................................ 23
XII.3 Installation procedure ...................................................................................................... 24
XIV. GPS and WiFi/BT Antenna .....................................................................................24
XV. Customer Service ...................................................................................................27
2
Page 3

PRECAUTIONS
IMPORTANT
To ensure proper use, please read through this manual before using this product. It is especially important that
you read and observe WARNINGS and CAUTIONS in this manual. Please keep the manual in a safe and
accessible place for future reference.
WARNINGS: (To prevent accidents and damage)
DO NOT install any unit or wire any cable in a location where:
• It may obstruct the steering wheel and gearshift lever operations.
• It may obstruct the operation of safety devices such as air bags.
• It may obstruct visibility.
DO NOT operate the unit while driving.
• If you need to operate the unit while driving, be sure to look around carefully.
• The driver must not watch the monitor while driving.
CAUTION
For safety
• Do not raise the volume level too much, as this will make driving dangerous by blocking outside sounds, and
may cause hearing loss.
• Stop the car before performing any complicated operations.
For a longer service life, be sure to read the following cautions:
• If you have parked the car for a longtime in hot or cold weather, wait until the temperature in the car becomes
normal before operating the unit.
• Do not disassemble or modify the set in any way. Doing so may result in damage.
• If a problem should occur, have the set inspected at your store of purchase
• Small black and shiny spots inside the liquid crystal panel are normal for LCD products.
3
Page 4
I. Introduction
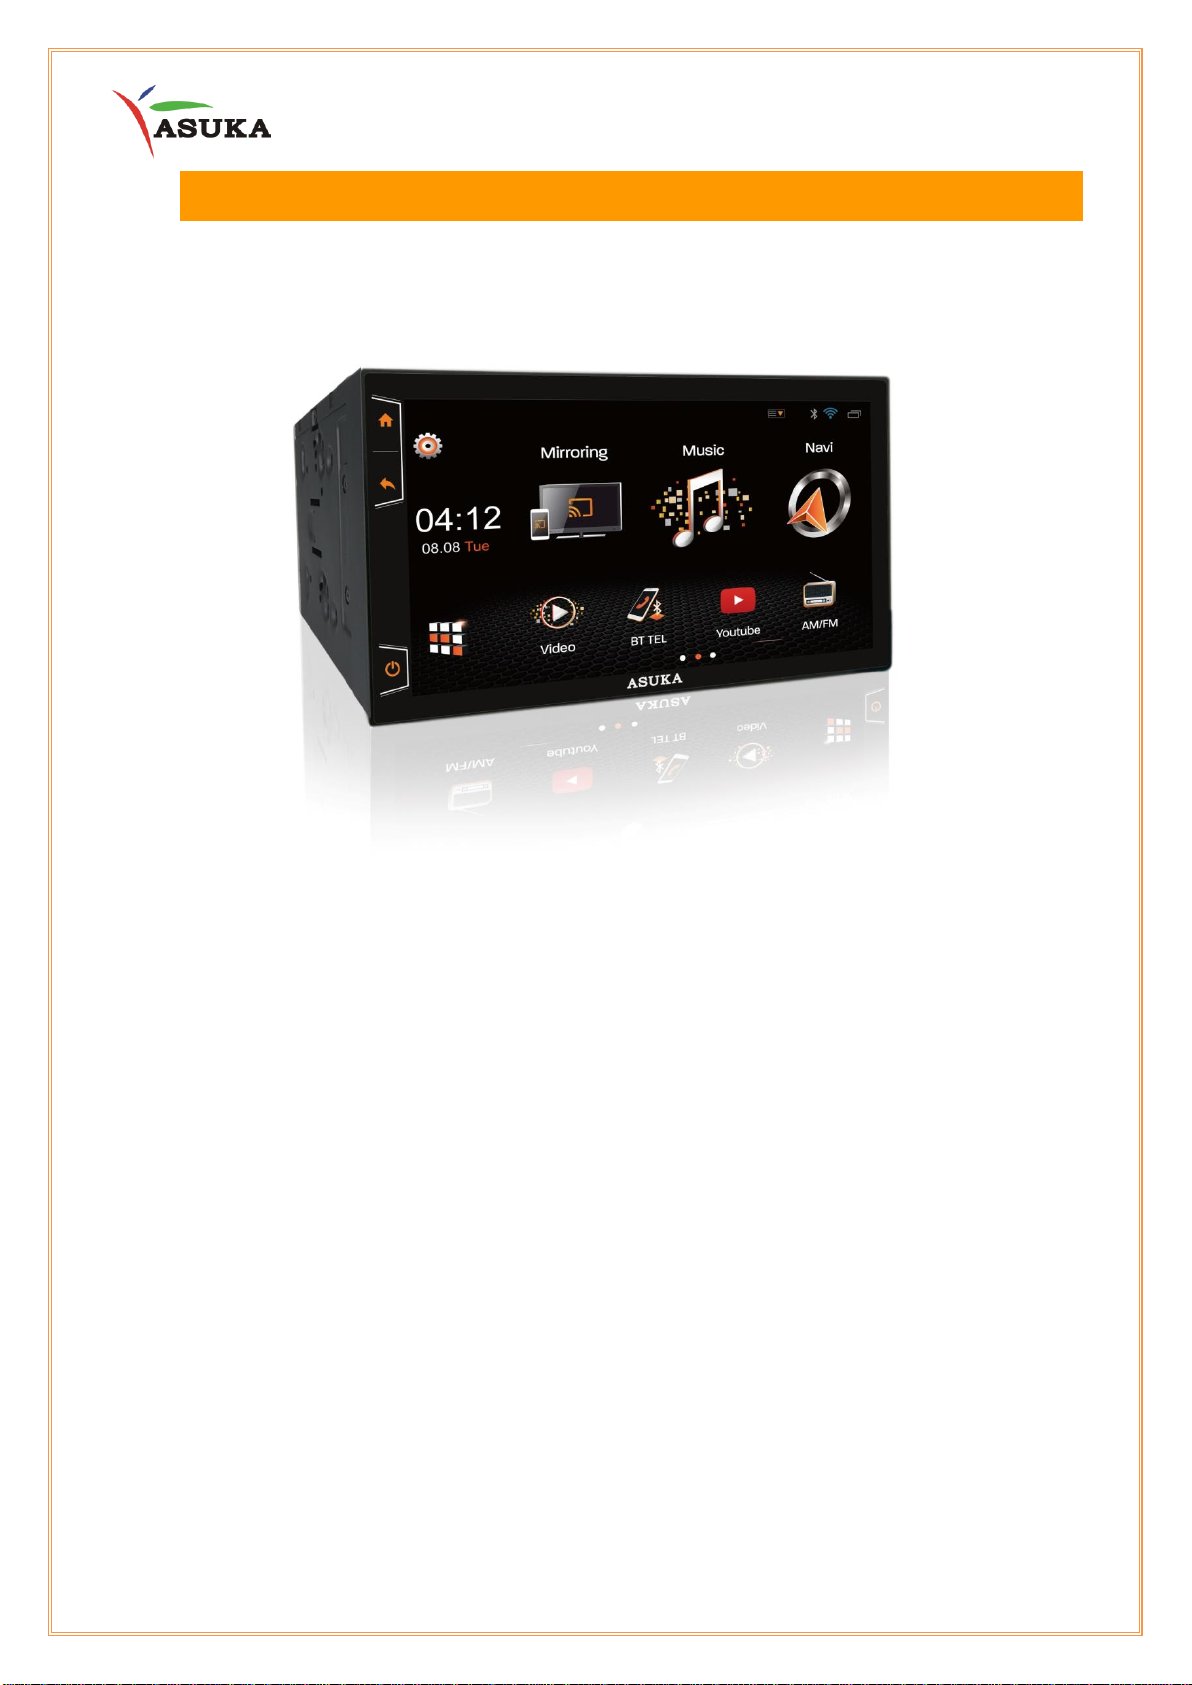
ASUKA PTA-100 is a revolutionary In-car entertainment product. It satisfies all users’ desire
to access the internet while in car. On-line entertainment is beyond traditional broadcasting
services & pre-recorded media contents; it brings you more entertaining and smarter than
ever before.
PTA-100 Product Overview
• ASUKA PTA-100 In-Dash Receiver 7” WiFi Multimedia Navi Double DIN
• ASUKA-style User-Defined User Interface
• Multi-touch Control (for volume adjustment and display off)
• On-line Entertainment & Pre-recorded Media Contents
• Smartphone Mirroring via Cable HDMI in and Wireless Miracast
• Built-in Bluetooth technology for hands-free talking and audio streaming
4
Page 5
II. Quick Start Guide
II.1 Turning the Power On
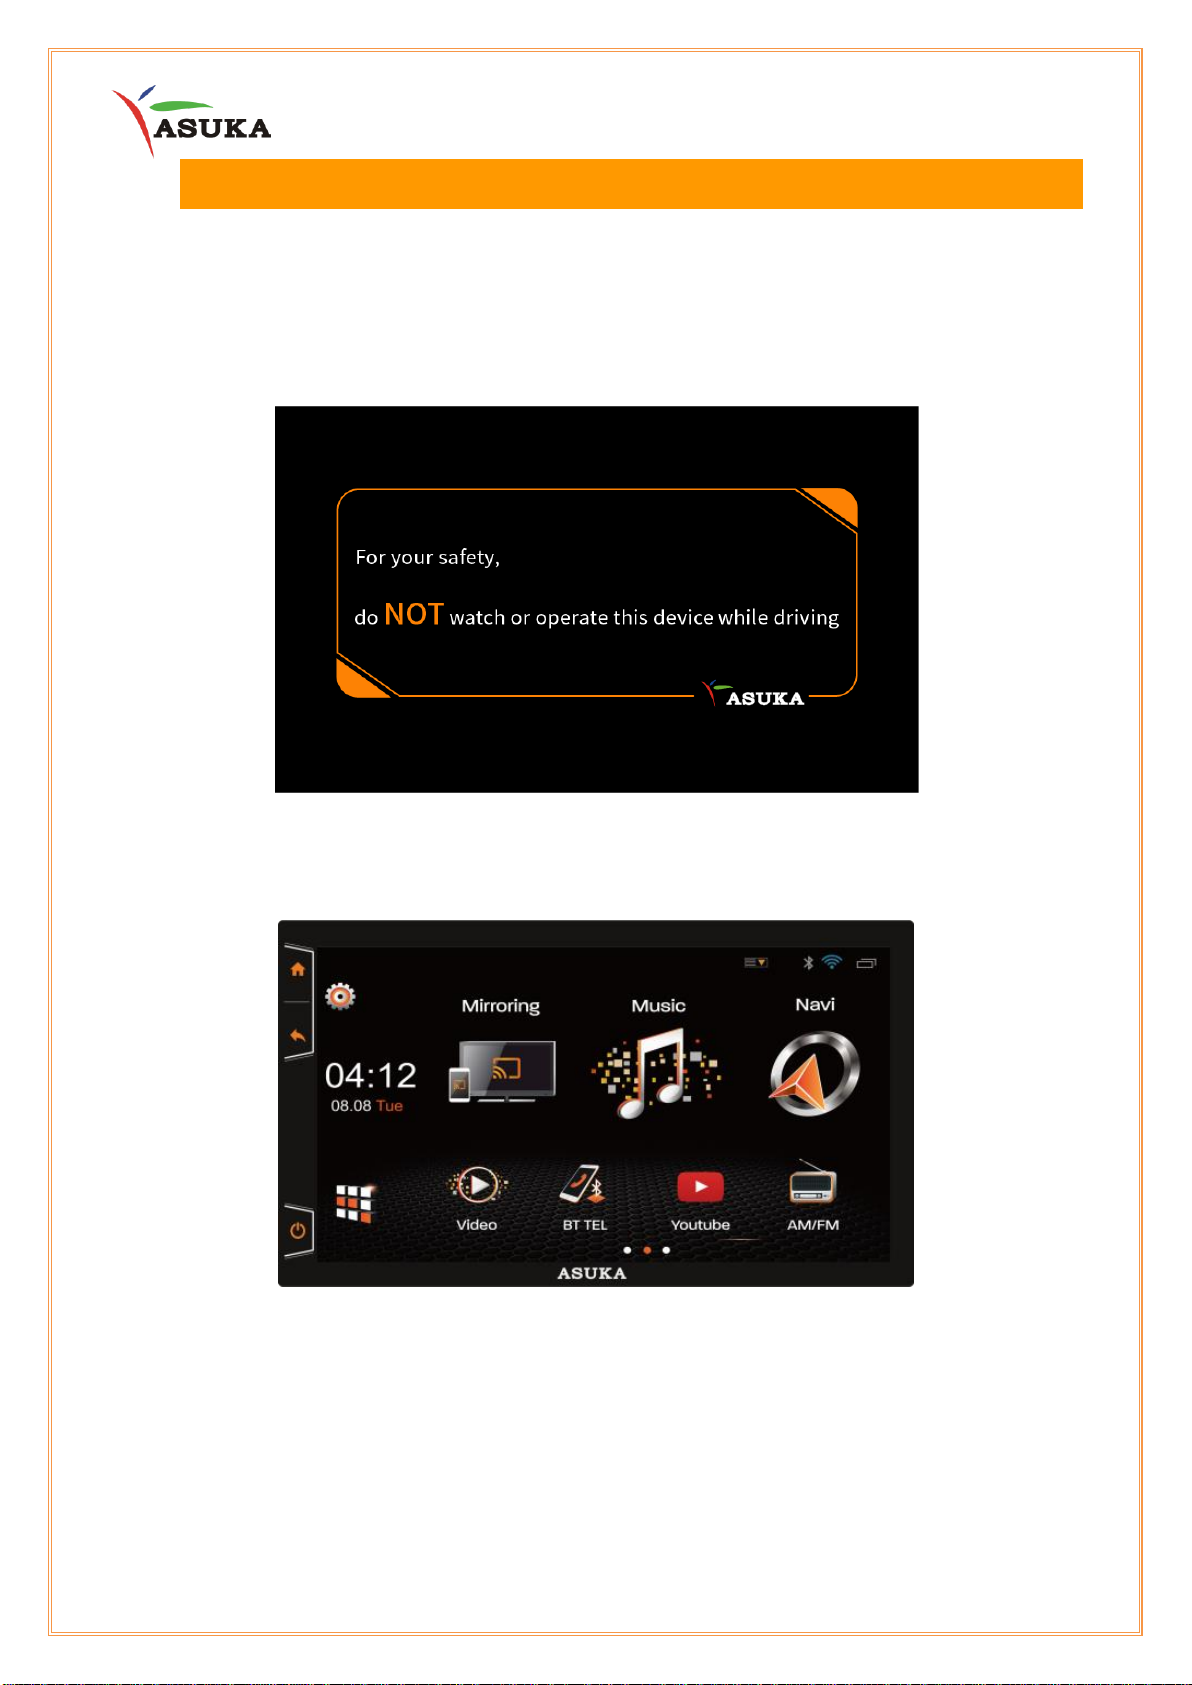
1. Turn on the ACC or IGN of the vehicles.
2. When the head unit activated, you will see a reminder after startup screen.
3. Now you can touch any icon on the screen to activate the corresponding function.
5
Page 6
II.2 User Interface
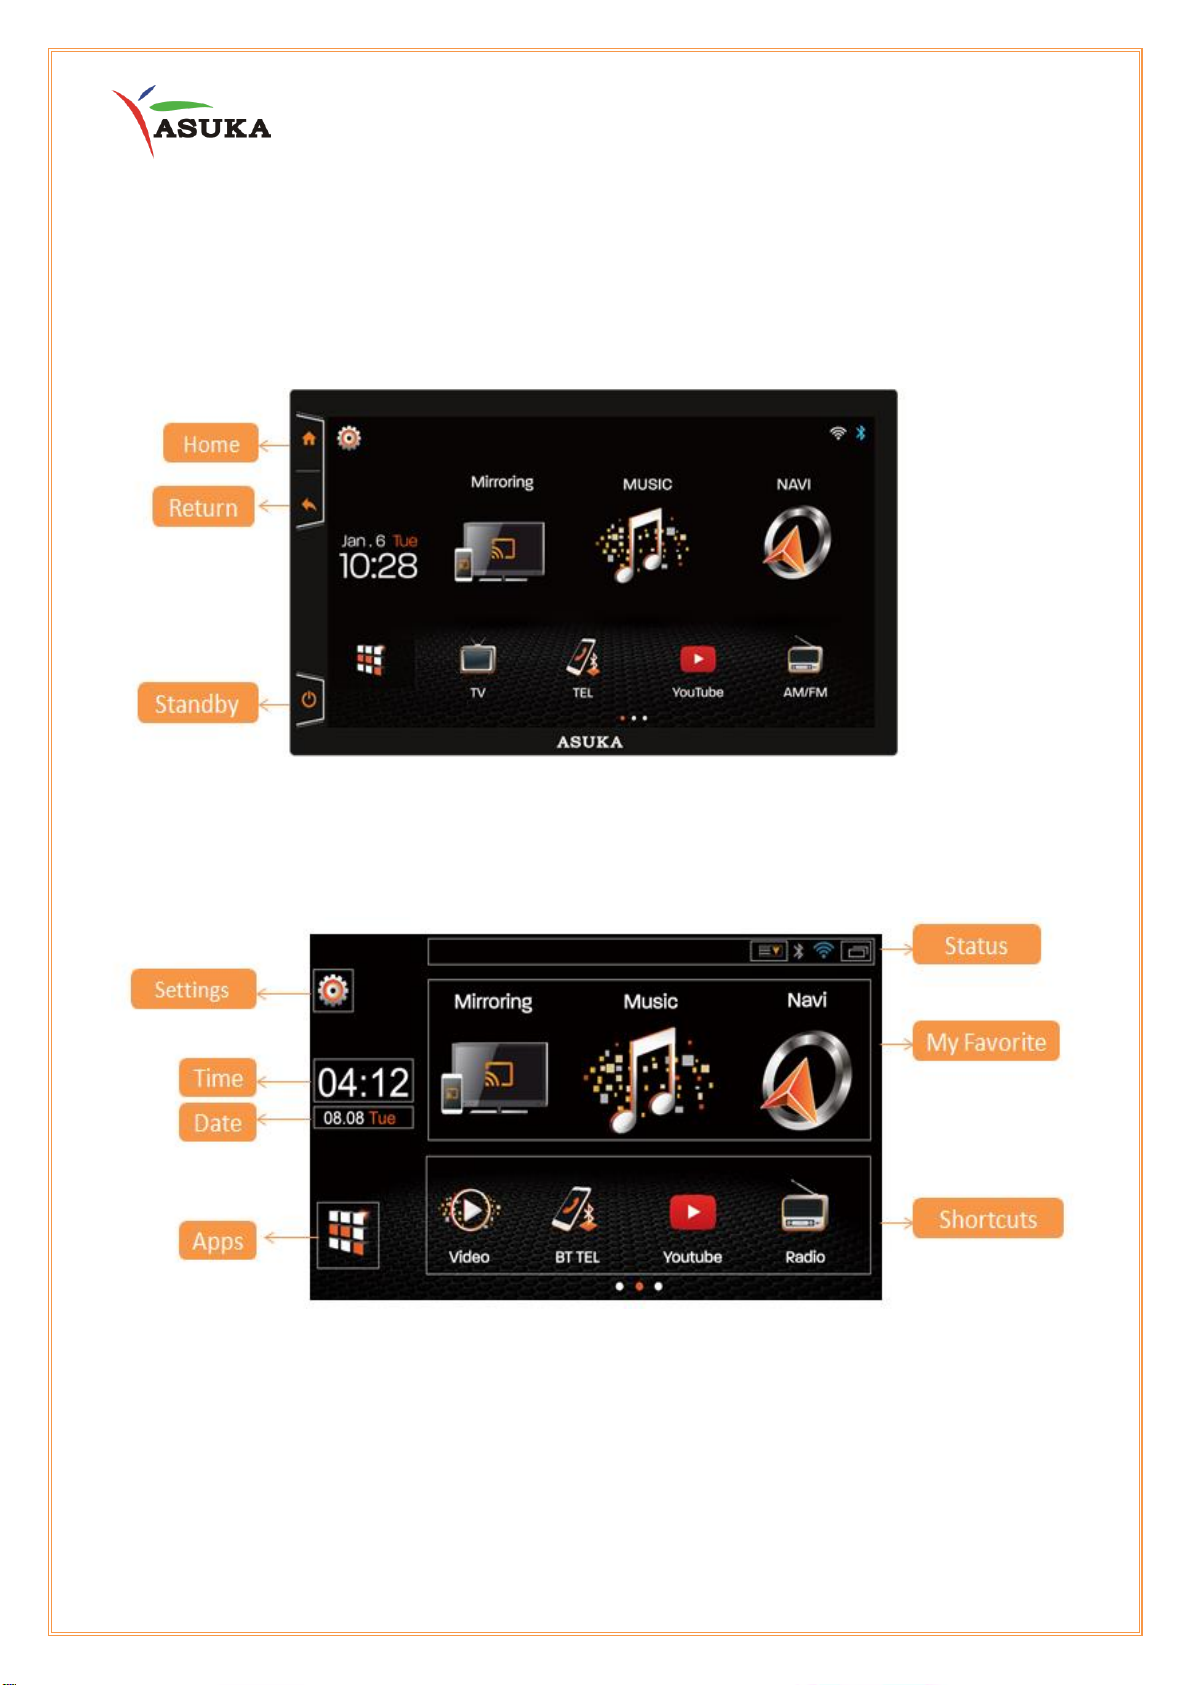
User Interface Introduction
On the left side of the screen, there are three touch keys.
Home Screen
6
Page 7
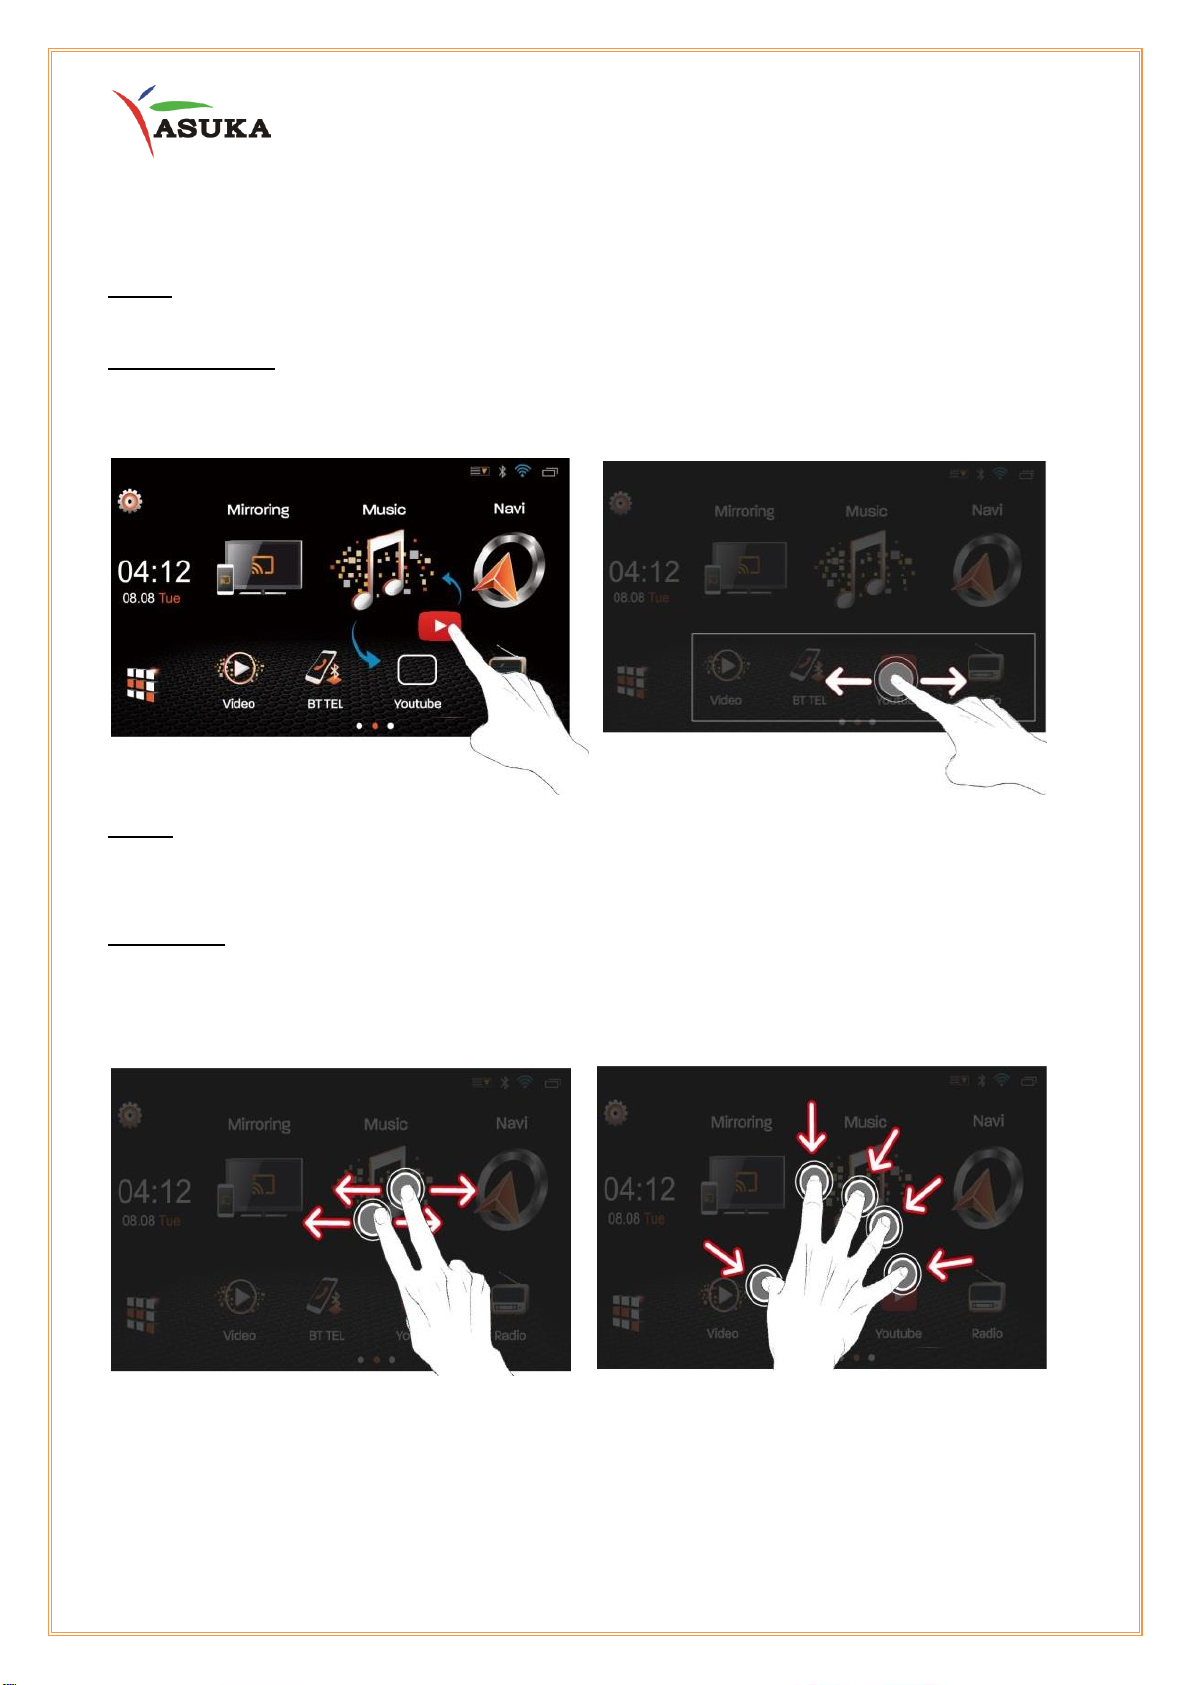
II.3 Common Screen Operation
Touch
Touch the screen gently to select the item on the screen.
Touch and Hold
Touch the screen and keep your finger in place until display changes allow you to drag
the icon to the position you want it to be.
Swipe
Swipe your finger left or right on the screen to change the page.
Swipe your finger up or down on the screen to scroll the screen.
Multi-touch
Swipe left or right with two fingers to adjust the volume.
Pinch three or five fingers together to turn off the display.
7
Page 8
III. Bluetooth
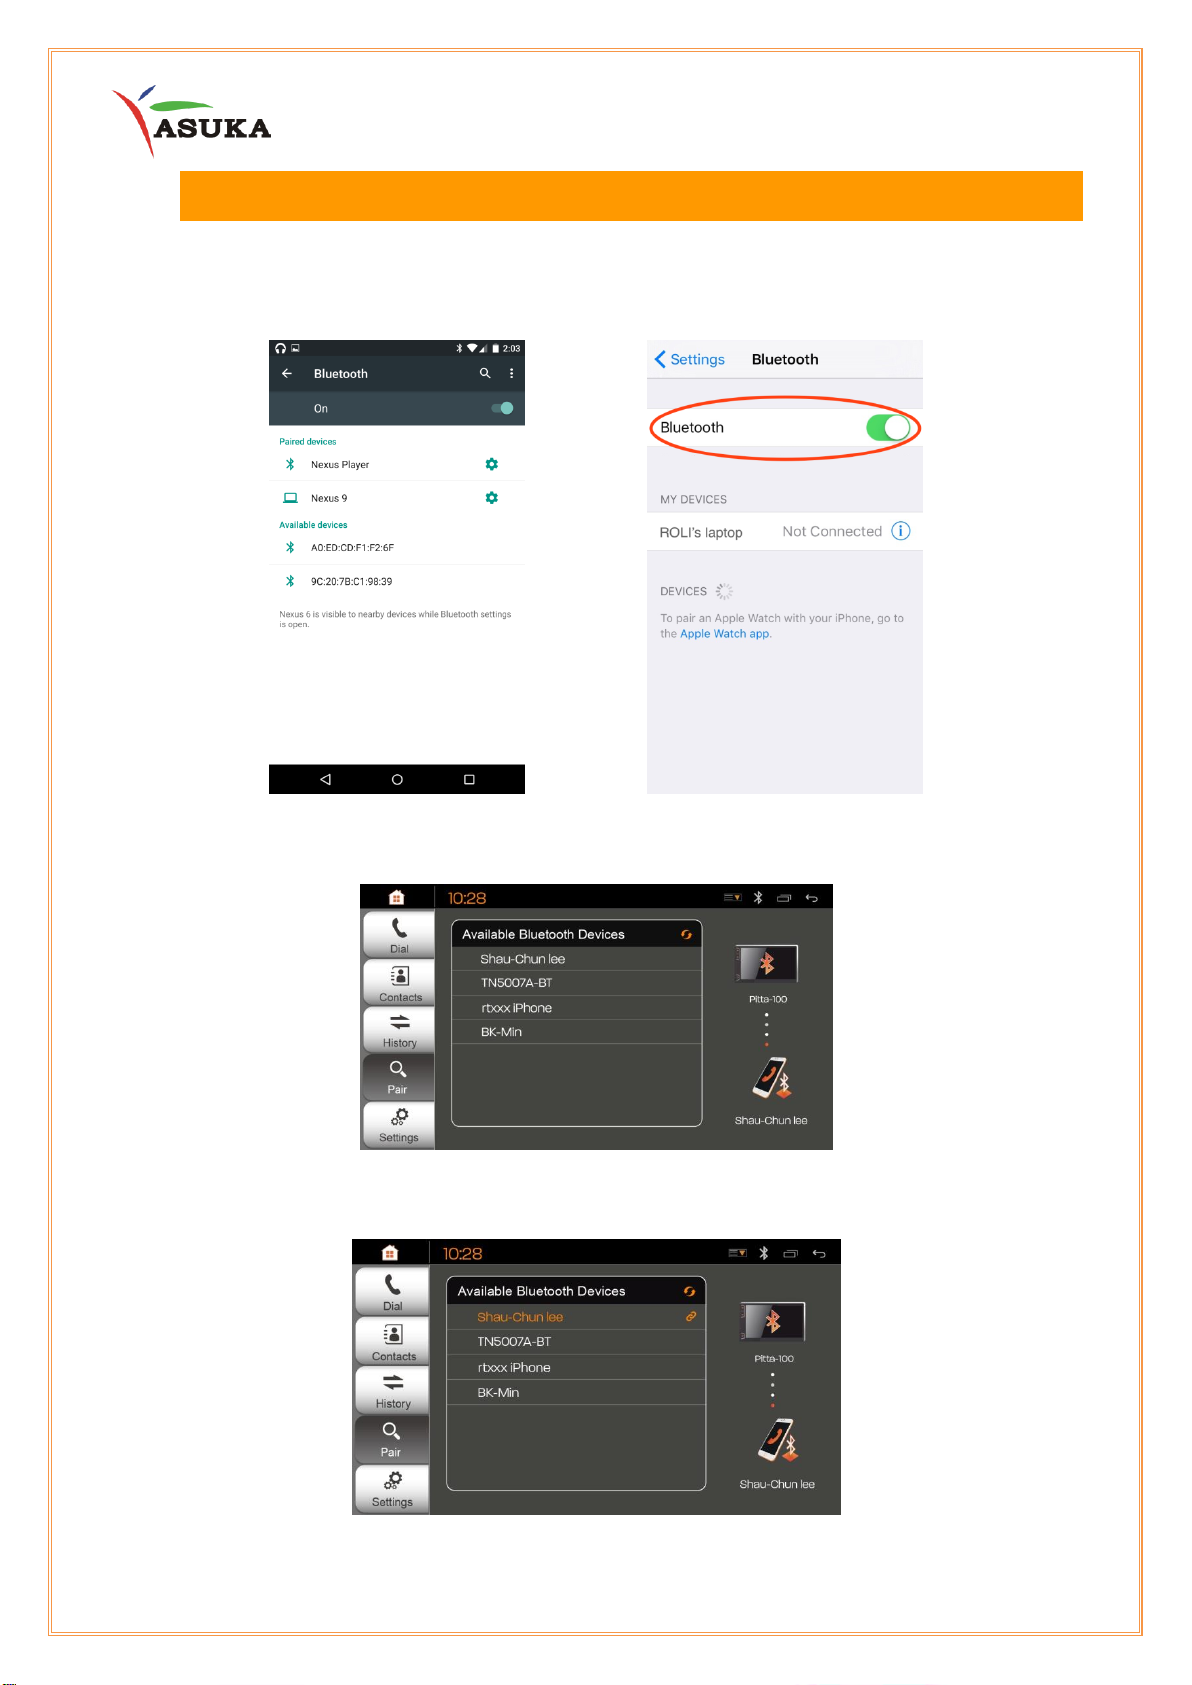
III.1 Connect to Bluetooth
1. Turn on the Bluetooth function of your mobile devices.
Andriod iOS Devices
2. Select “Bluetooth” under Settings.” Select the device you want to pair.
3. When the mobile device is paired with PTA-100 successfully, the indicator on the screen
will turn to orange.
8
Page 9
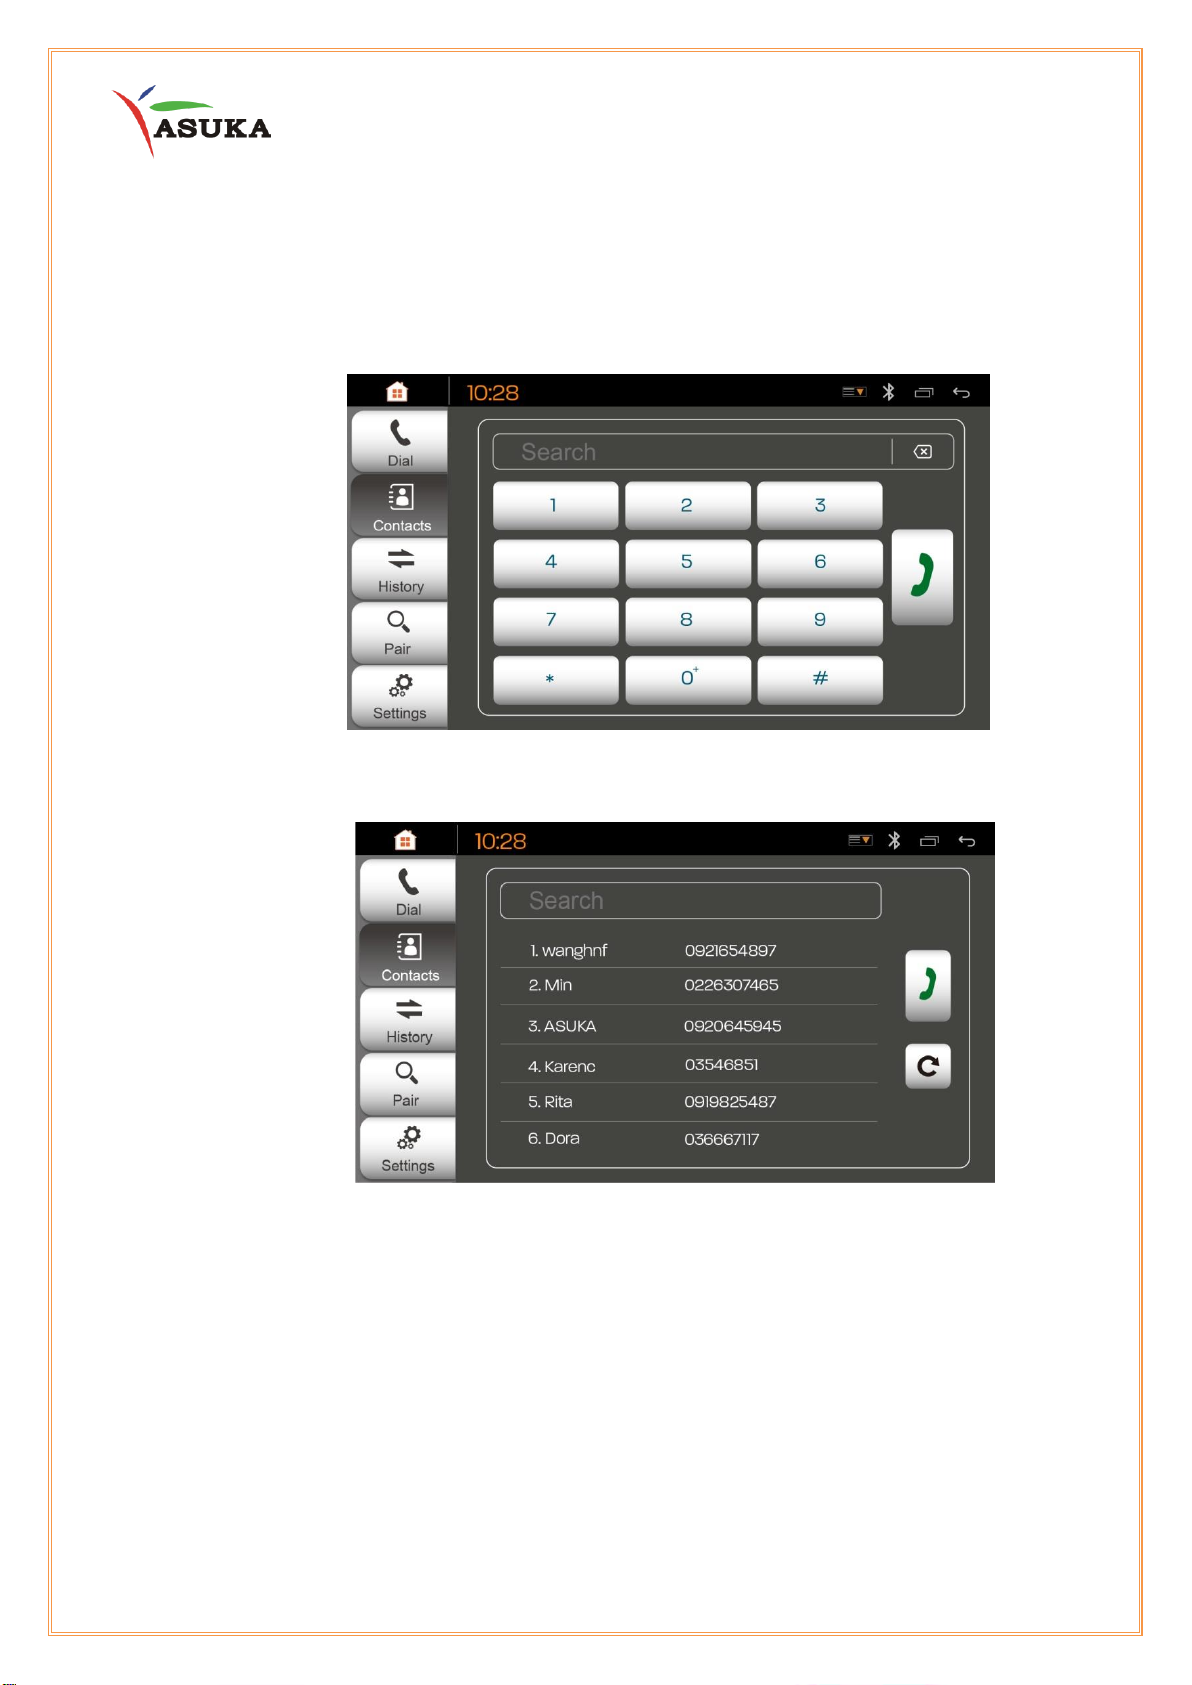
III.2 Bluetooth Dialing
Dial out using keypads and contact list.
Option 1
Keypads
Option 2
Contact List
9
Page 10
IV. Internet Access
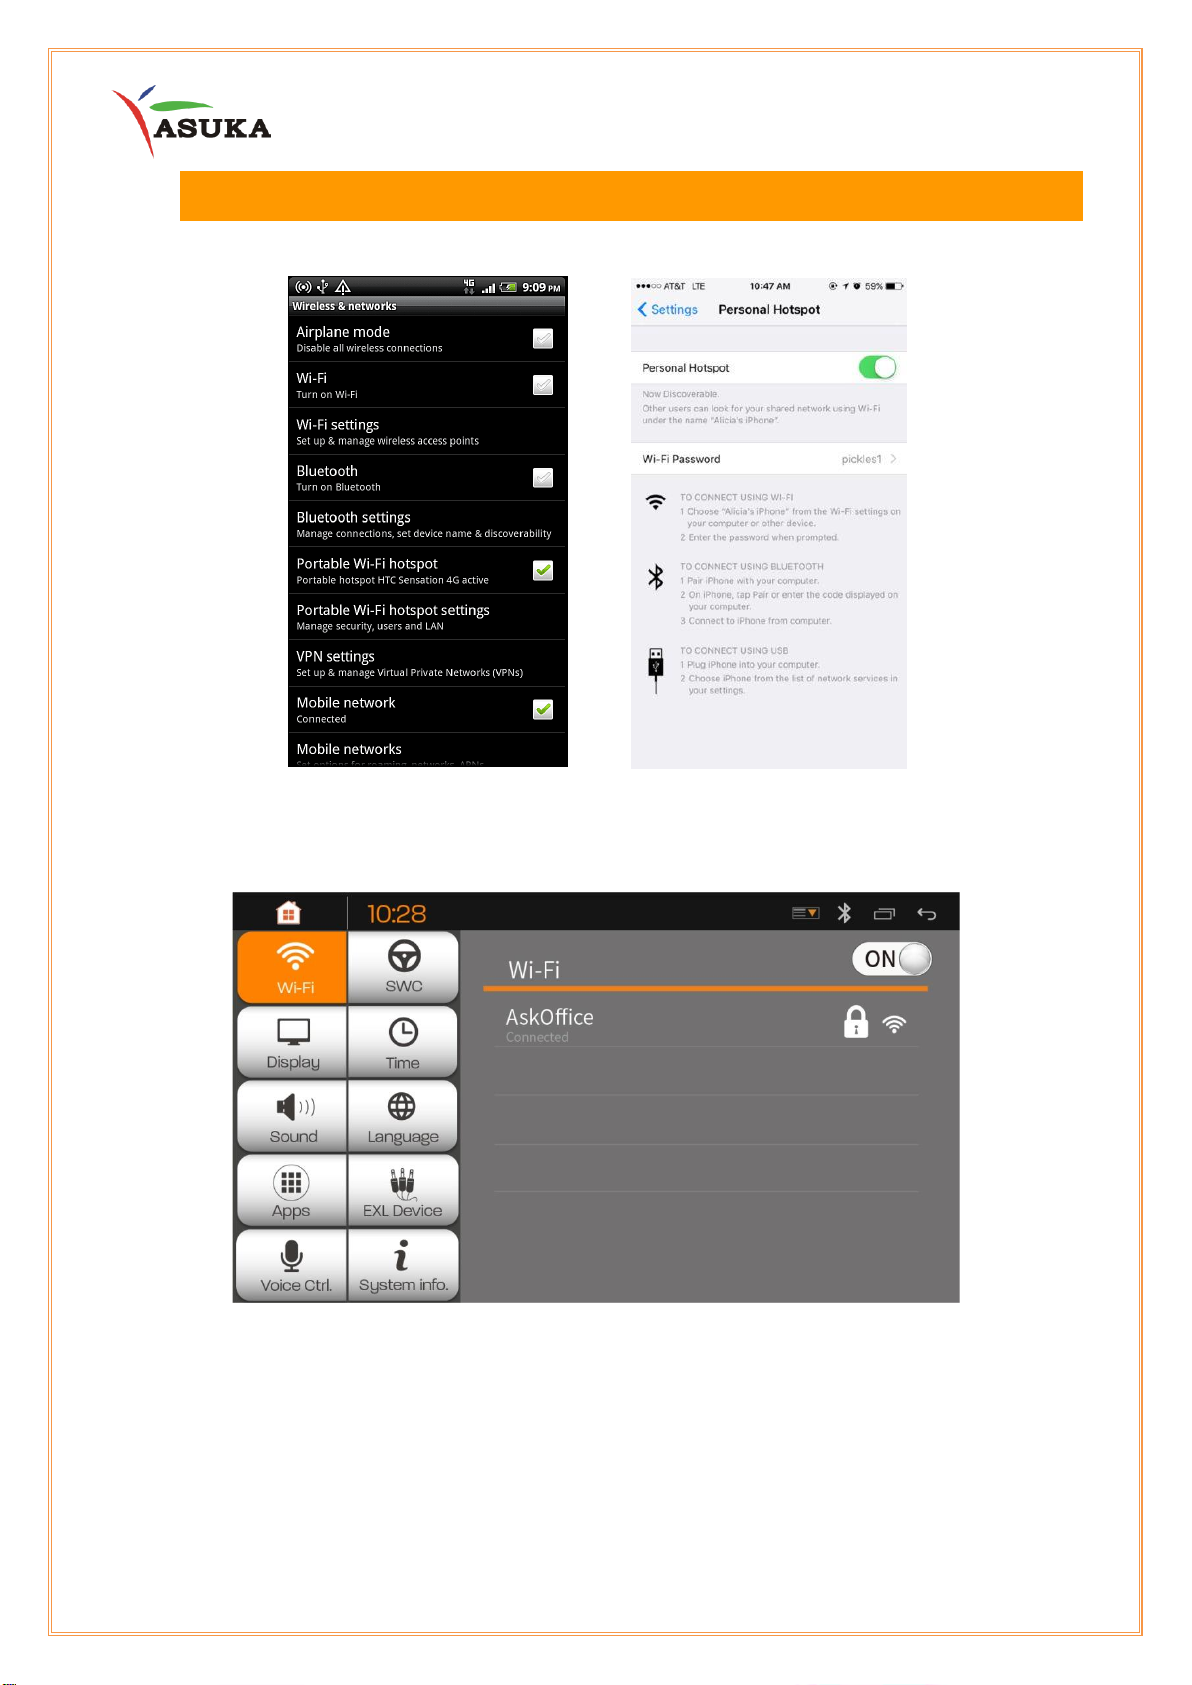
1. Turn on the hotspot of your mobile device.
Android iOS Devices
2. Select “WiFi” under “Settings.”
3. Wi-Fi connected.
10
Page 11
V. Mirroring
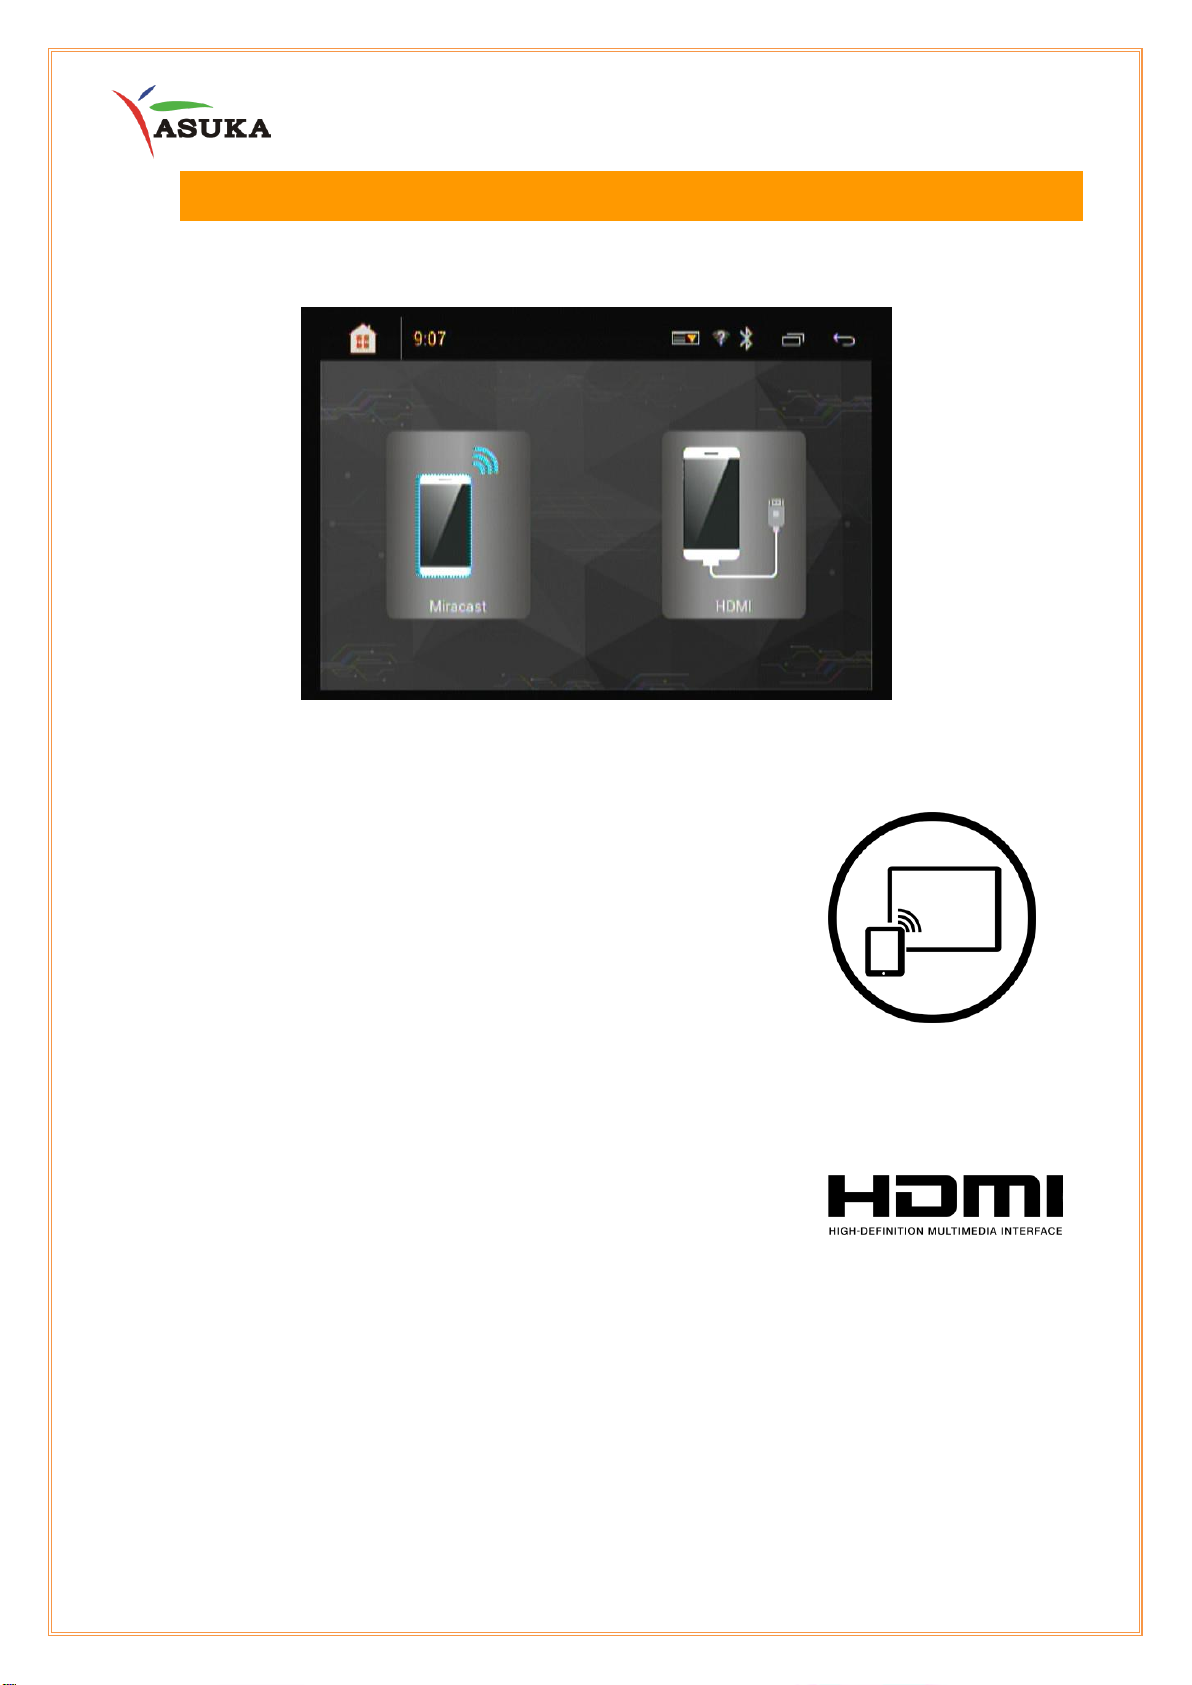
This function allows users to cast the mobile device to the screen of the head unit.
PTA-100 supports two ways of Mirroring: via Miracast for Android and via HDMI for iPhone.
V.1 Android
Step 1: Make sure your mobile device is Miracast-compatible.
Step 2: Select “Miracast” under “Mirroring”.
Connecting your Android device
Step 1: Select Application
Step 2: Select Setting
Step 3: Under Connect and Share tap Screen Mirroring
Step 4: Select PTA-100
Step 5: Once connected, your mobile device’s screen will now be displayed on PTA-100
V.2 Apple iOS
Connecting your iOS device
Step 1: Select mirroring application on PTA-100. Select HDMI.
Step 2: Be sure the iOS device is powered on.
Step 3: Connect the Apple Lightning Digital AV Adapter /Apple 30-pin Digital AV Adapter, to
iOS devices.
Step 4: Connect the HDMI cable to the Apple Lightning AV adapter / Apple 30-pin Digital AV
Adapter
Step 5: You should be able to see your iOS image on PTA-100.
11
Page 12
VI. Radio
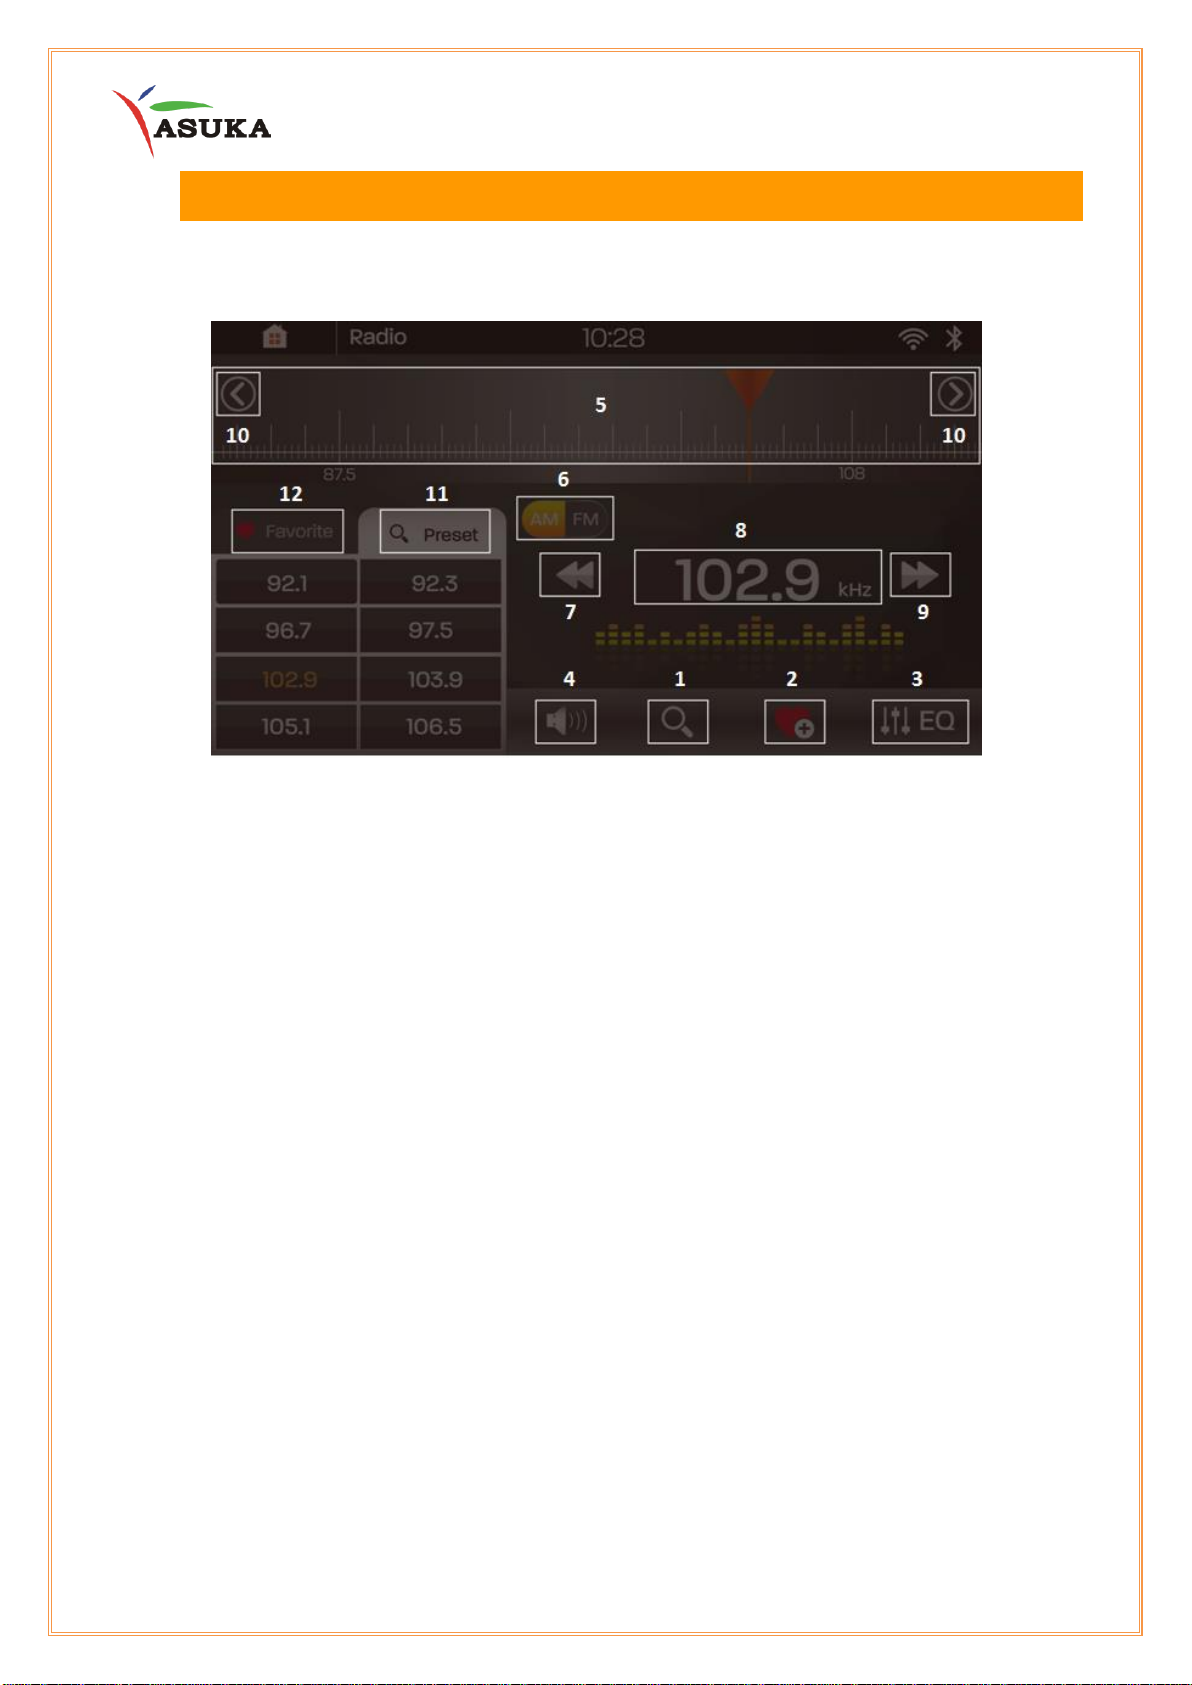
1. Scan Button
2. Add to Favorite
3. Equalizer Settings
4. Mute
5. Drag to change frequency
6. AM/FM band Switch.
7. Manual tune backward
8. Display current frequency
9. Manual tune forward
10. Searches for stations
11. Preset list button
12. Favorite list button
12
Page 13
VII. Music
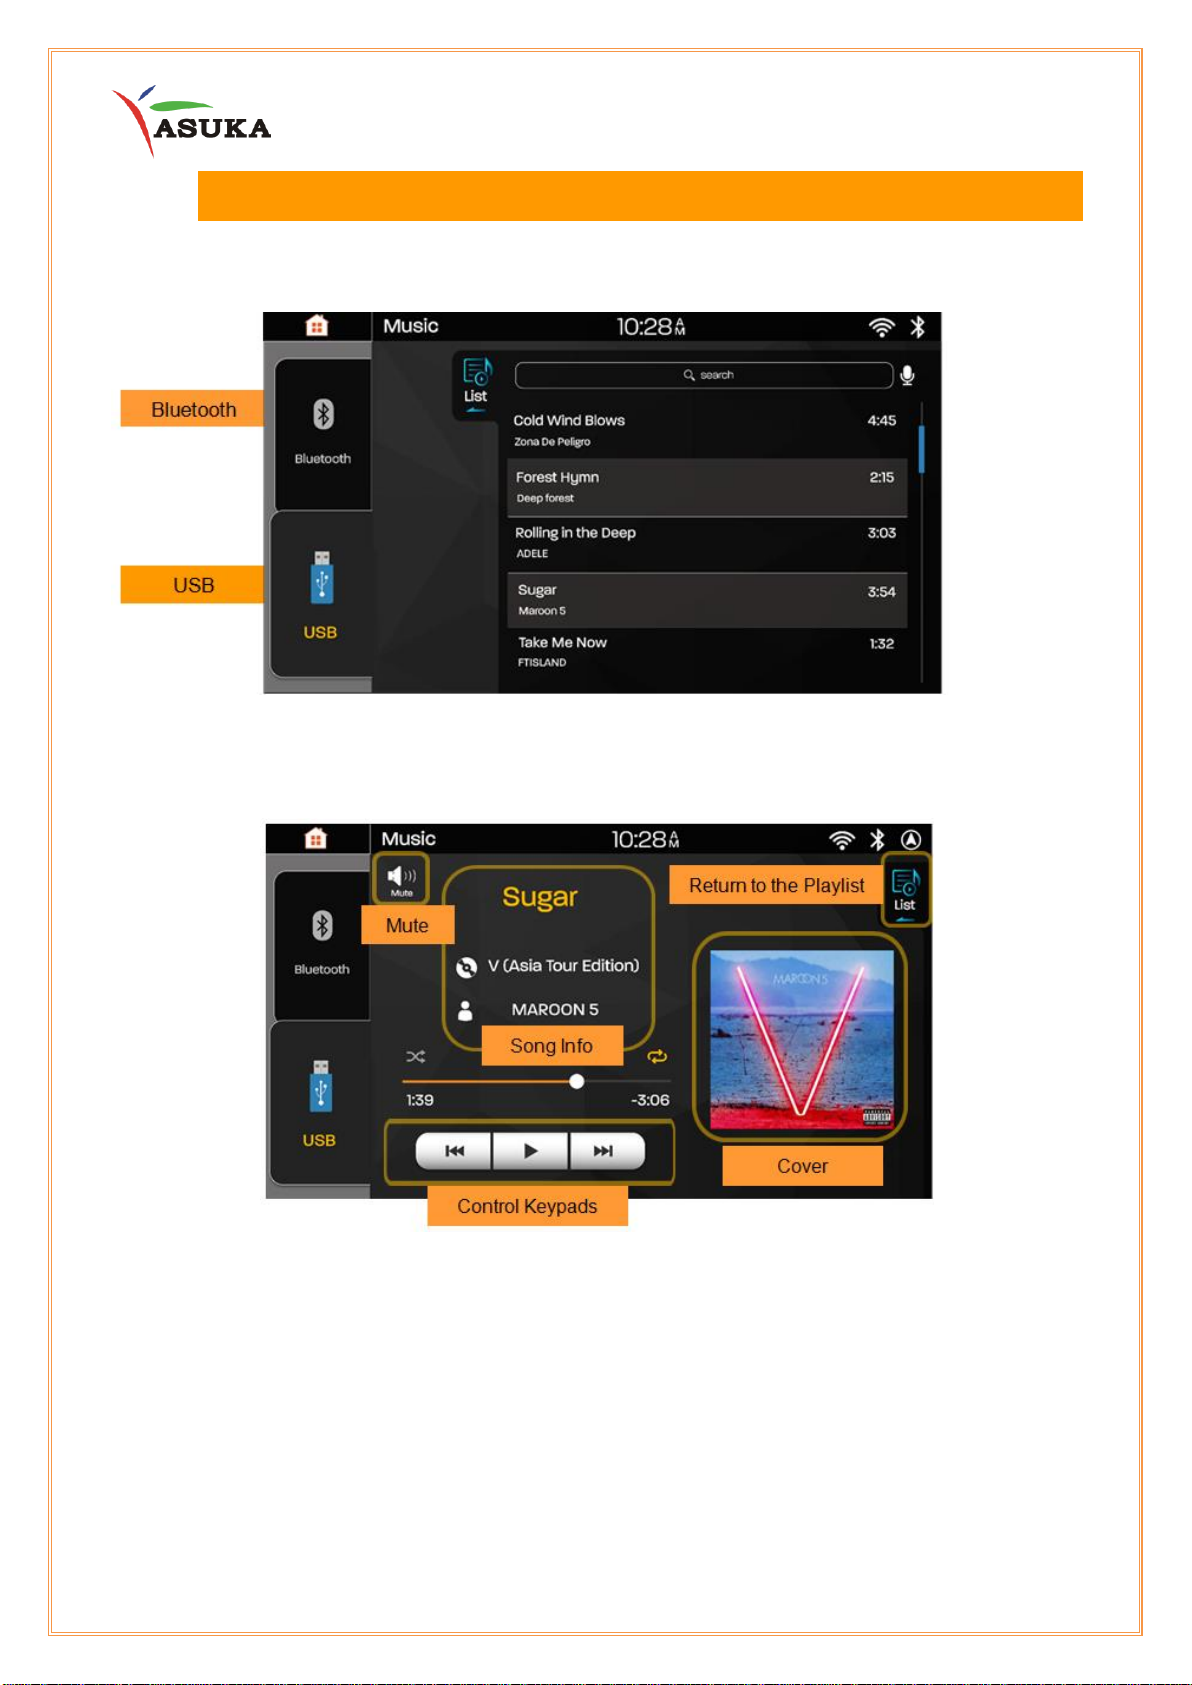
There are two options to choose to play music
[USB] and [Bluetooth]
Basic Music Interface
13
Page 14
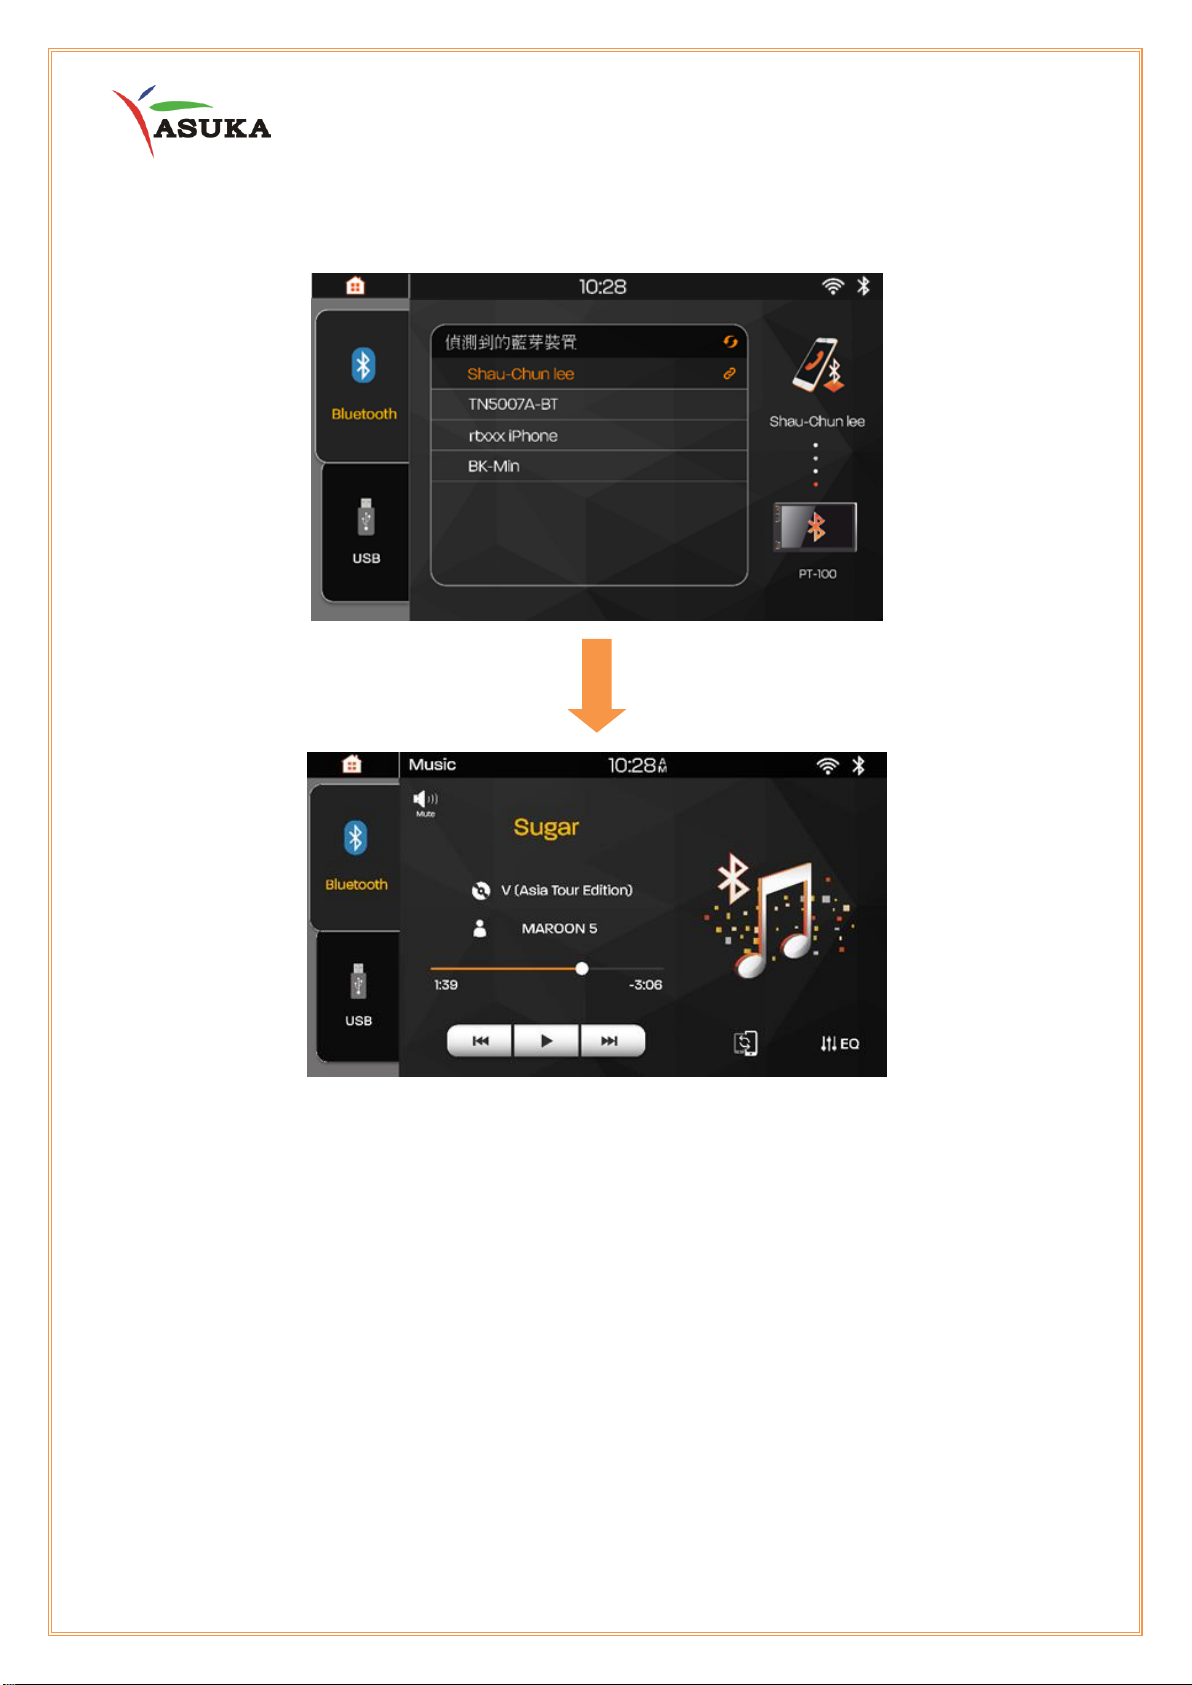
Listen to Music by Bluetooth
Before selecting Bluetooth, pair PTA-100 to your mobile device. [See Page8]
14
Page 15
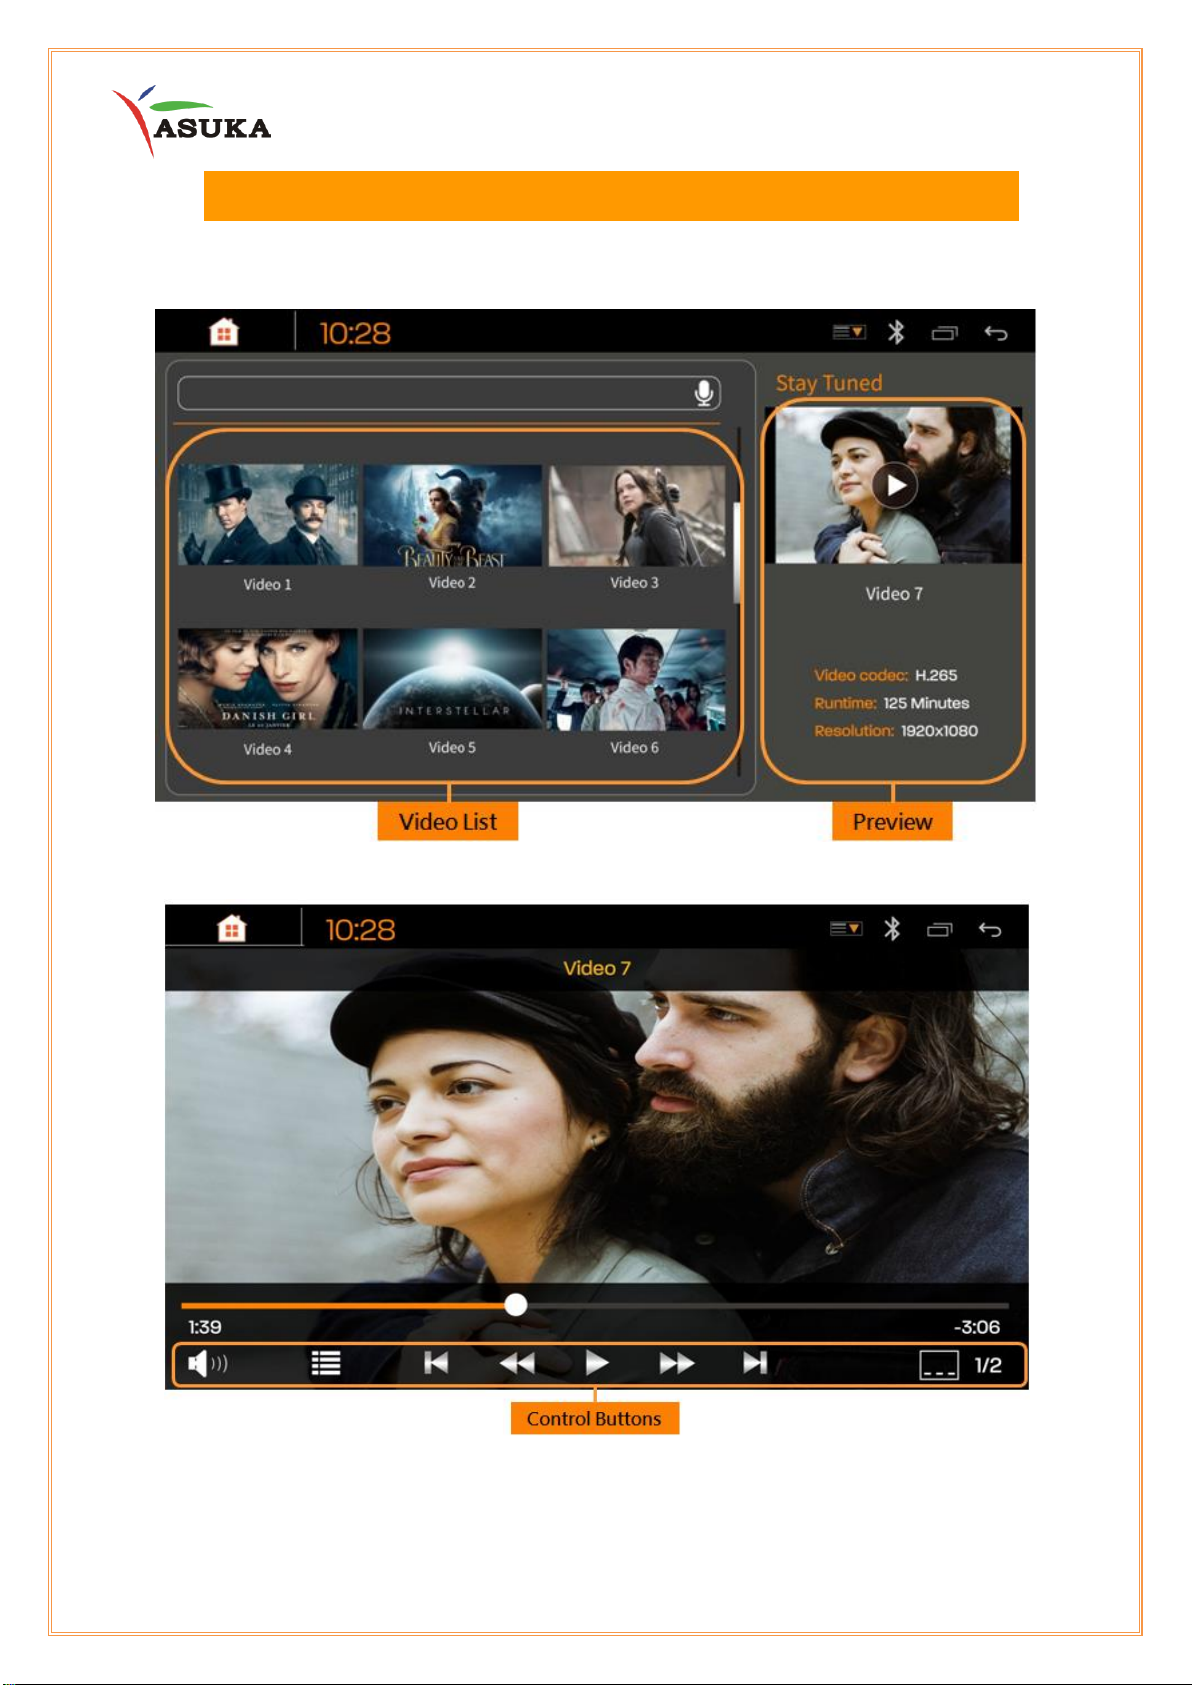
VIII. Video
Video Interface
15
Page 16
IX. Voice Control
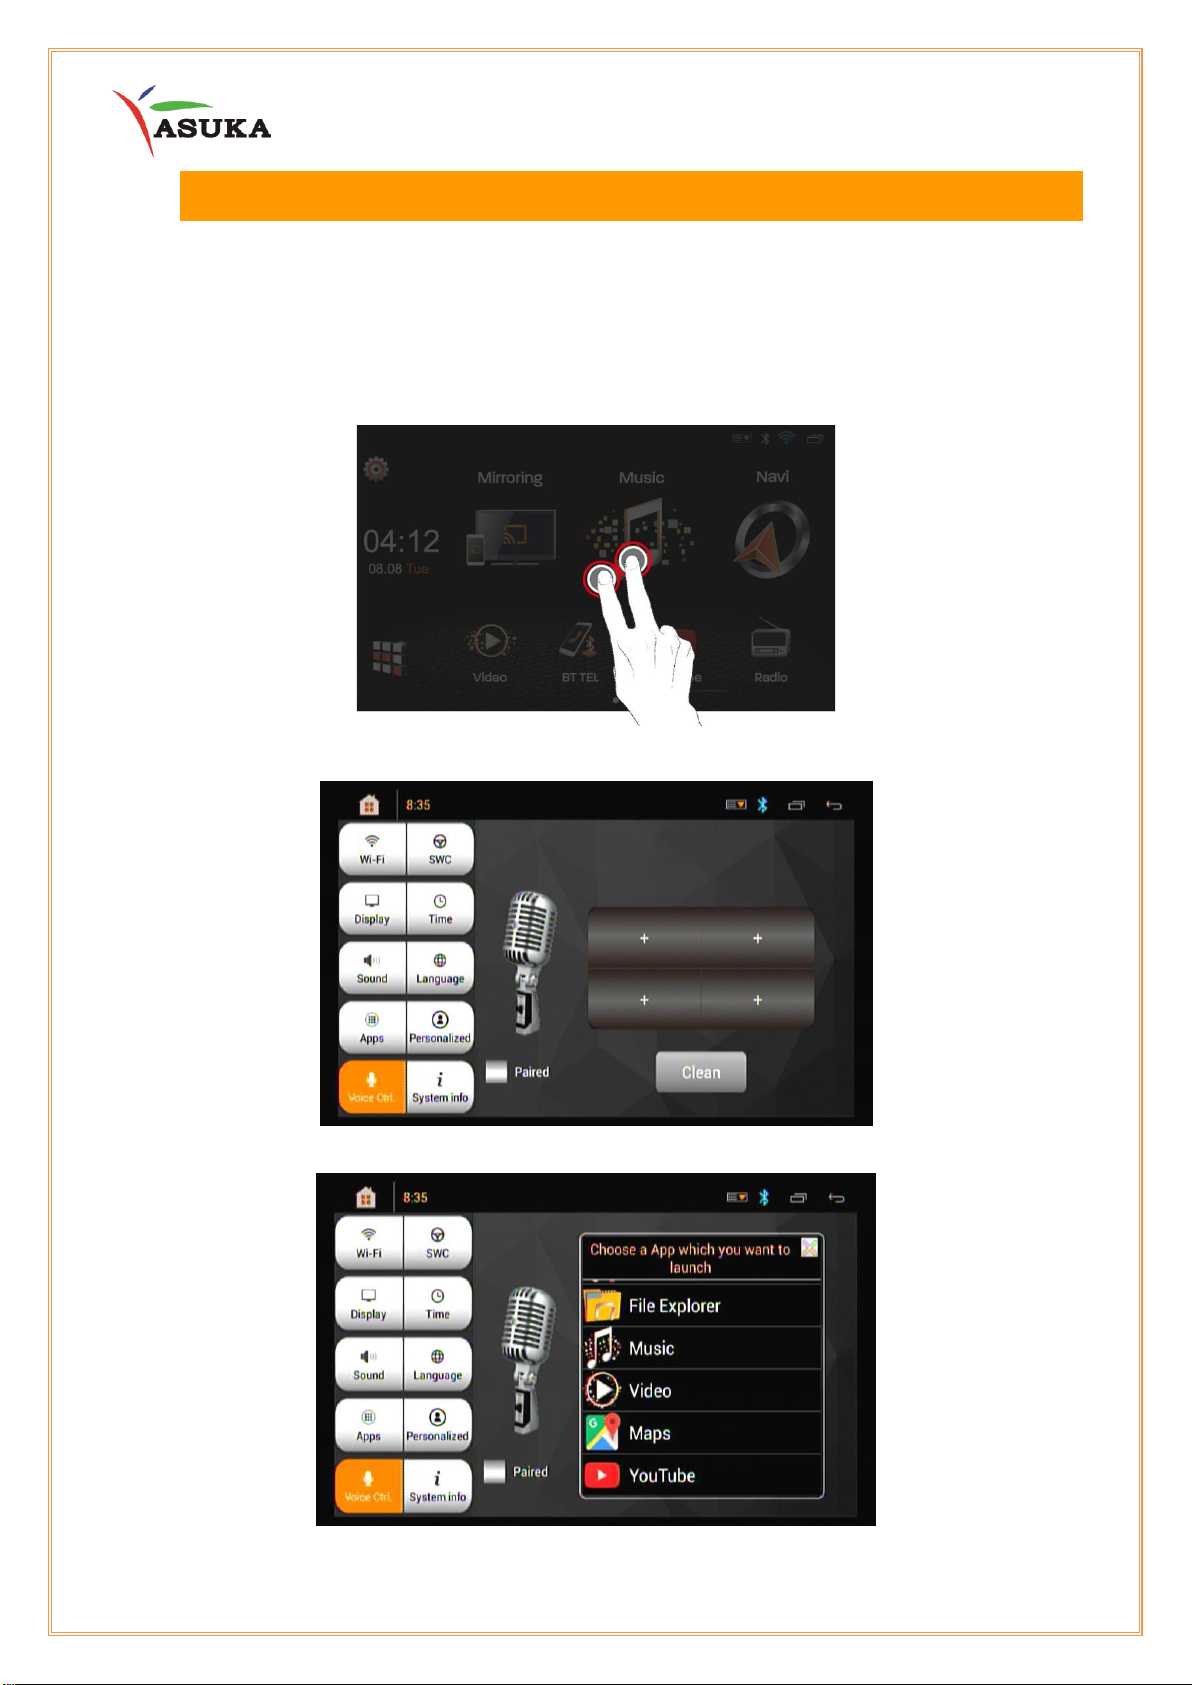
Voice control system, is helpful for the drivers not to look at the screen on the road and is more
convenient for the driver to use PTA-310 while driving.
Pairing
*After pairing the app and voice, simply “double tap” with two fingers on the screen to activate
voice control. Speak into the microphone your choice of the app will appear right away.
1. Press Voice Ctrl in settings to set up Voice Control.
2. Press “+” Sign to choose an App which you want to launch.
16
Page 17
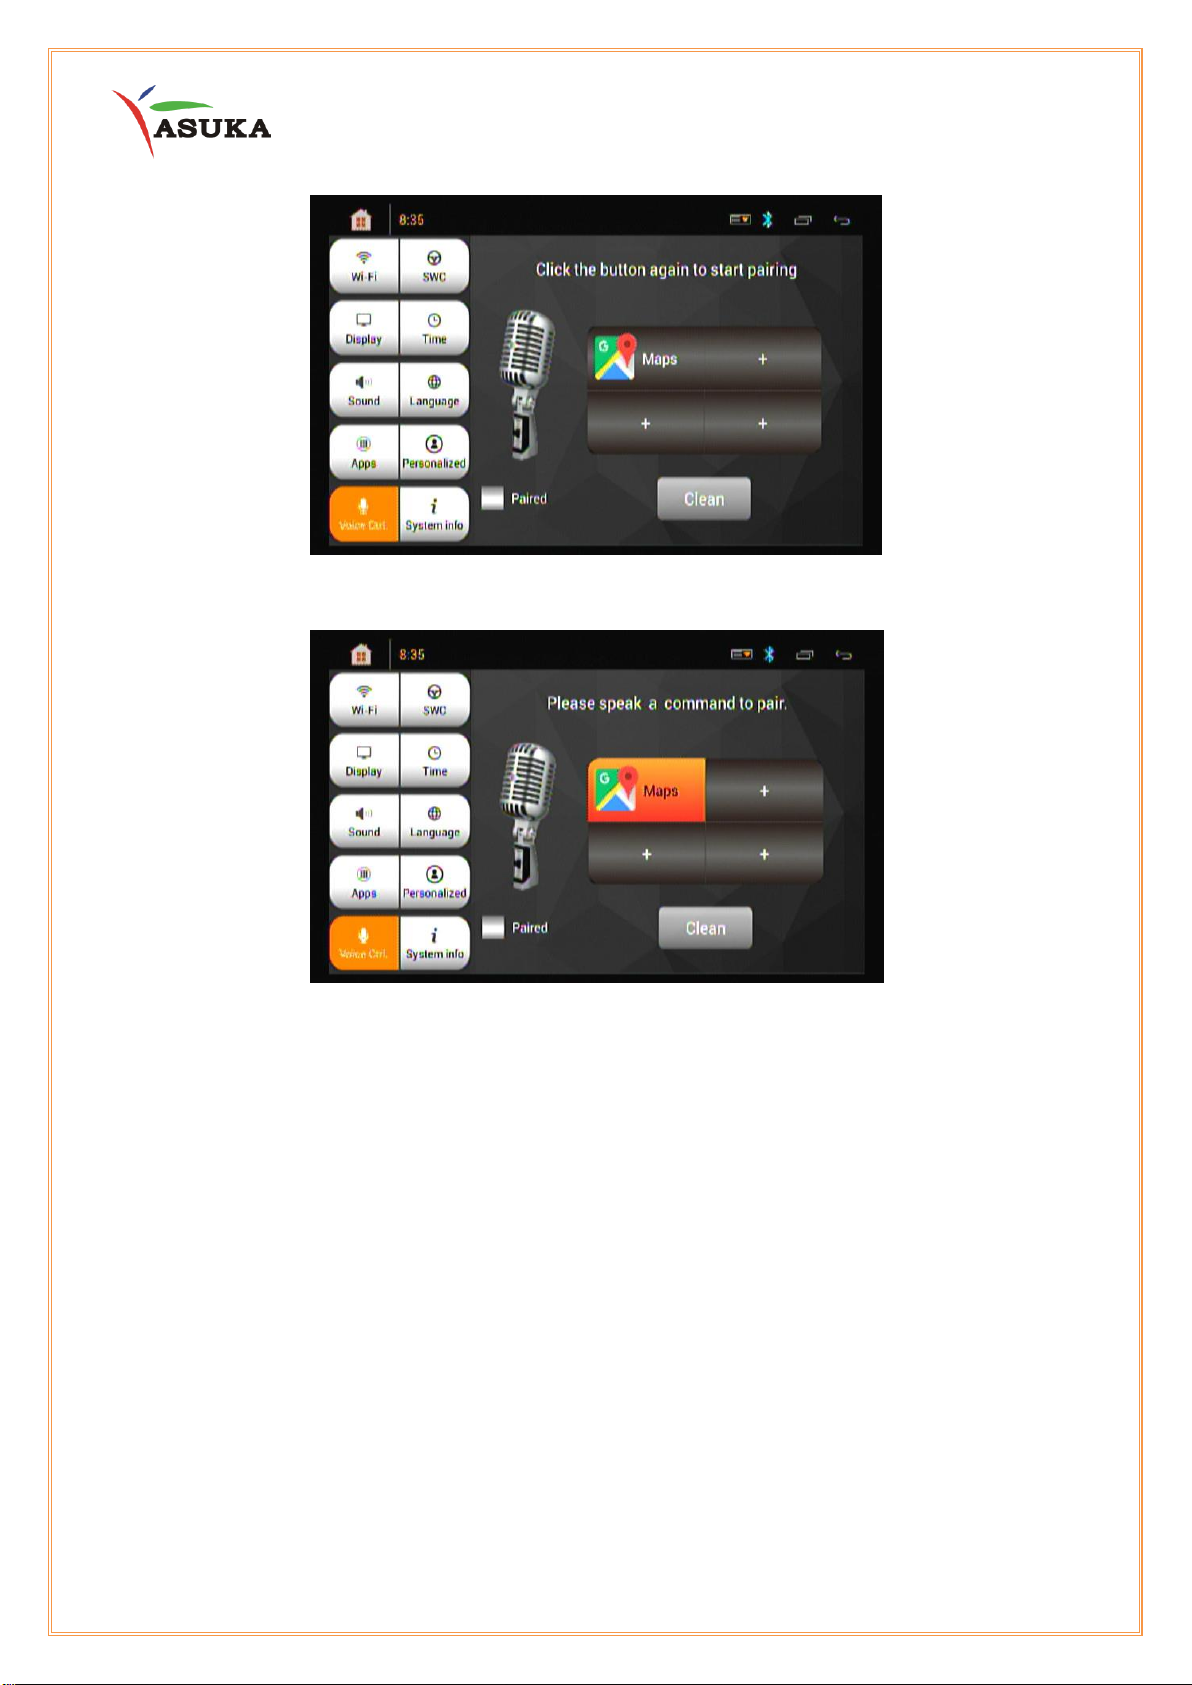
3. Click the App to start pairing.
4. Speak anything you wish the device to learn into the microphone twice
For example speak: Navigation, I’m Lost, Maps …
17
Page 18
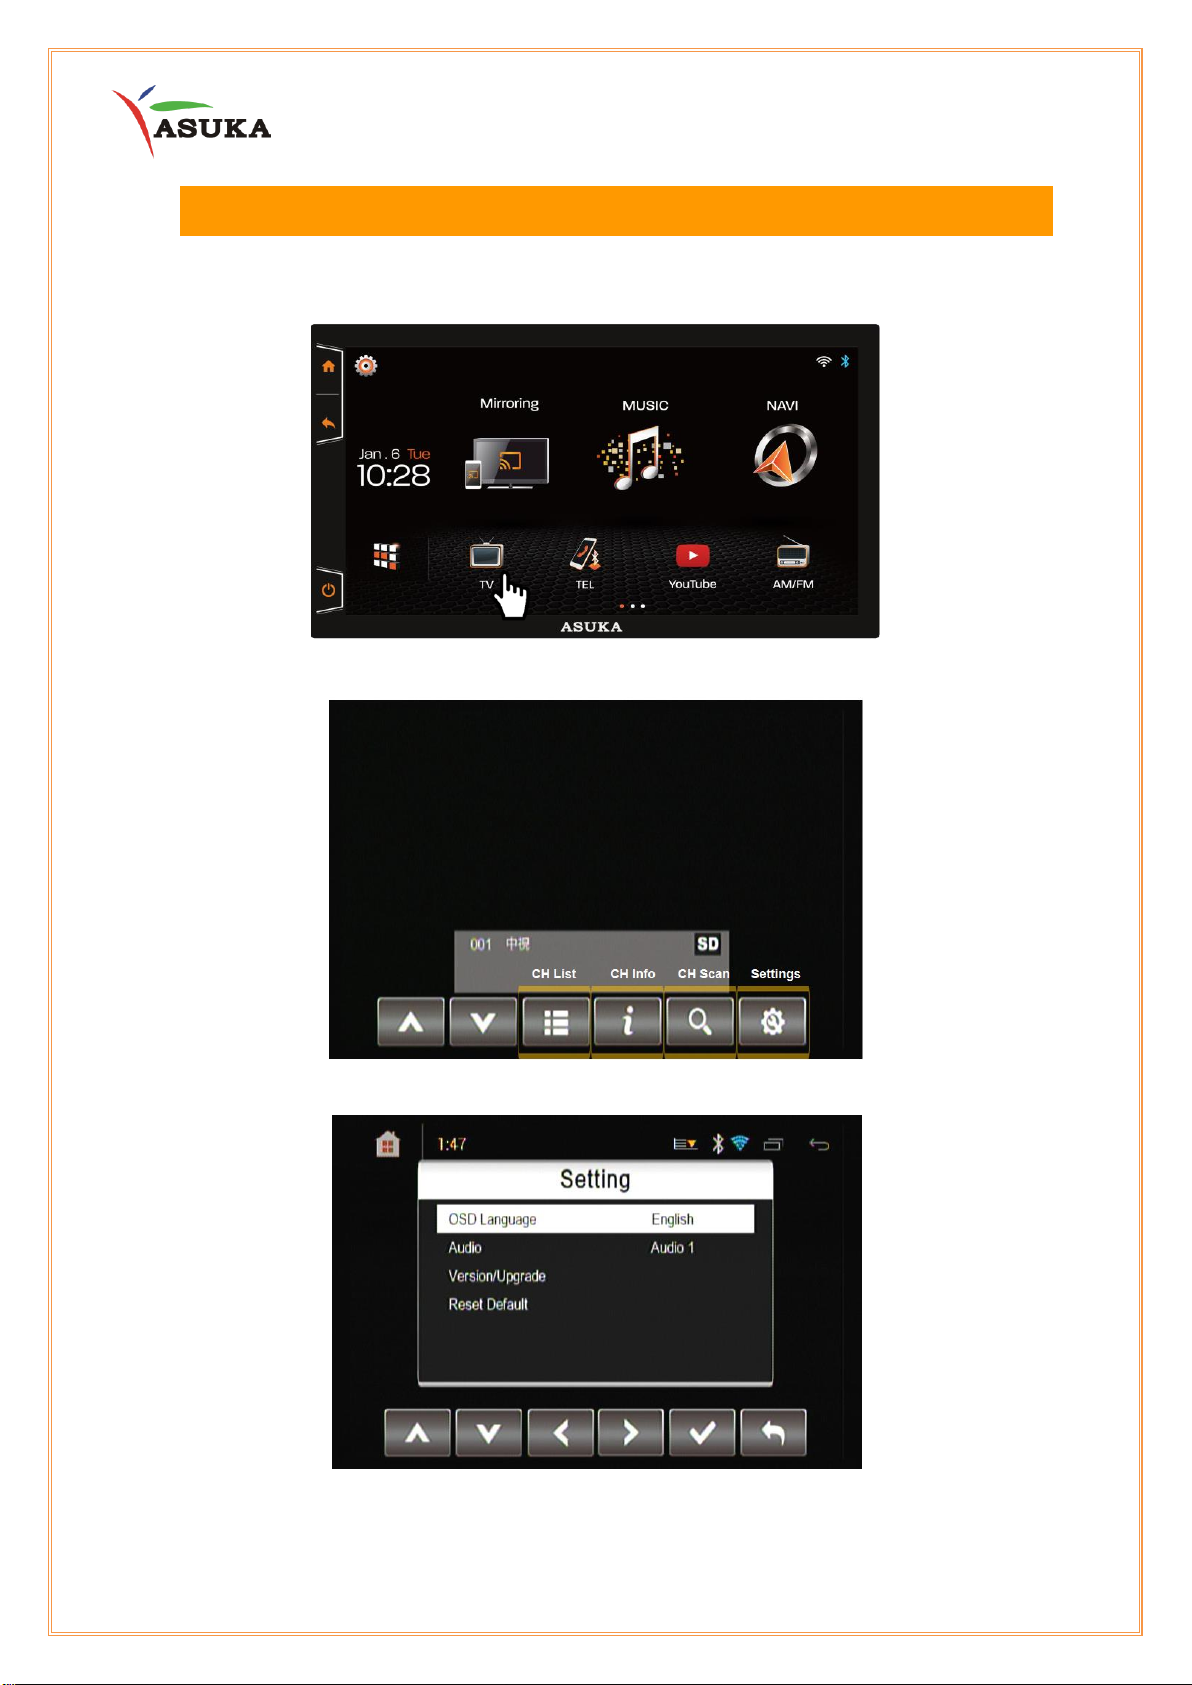
X. Digital Television (Optional)
Digital Television is an optional for countries except North America.
Select TV icon to watch DTV
DTV Interface
To change language by select [Setting]
18
Page 19
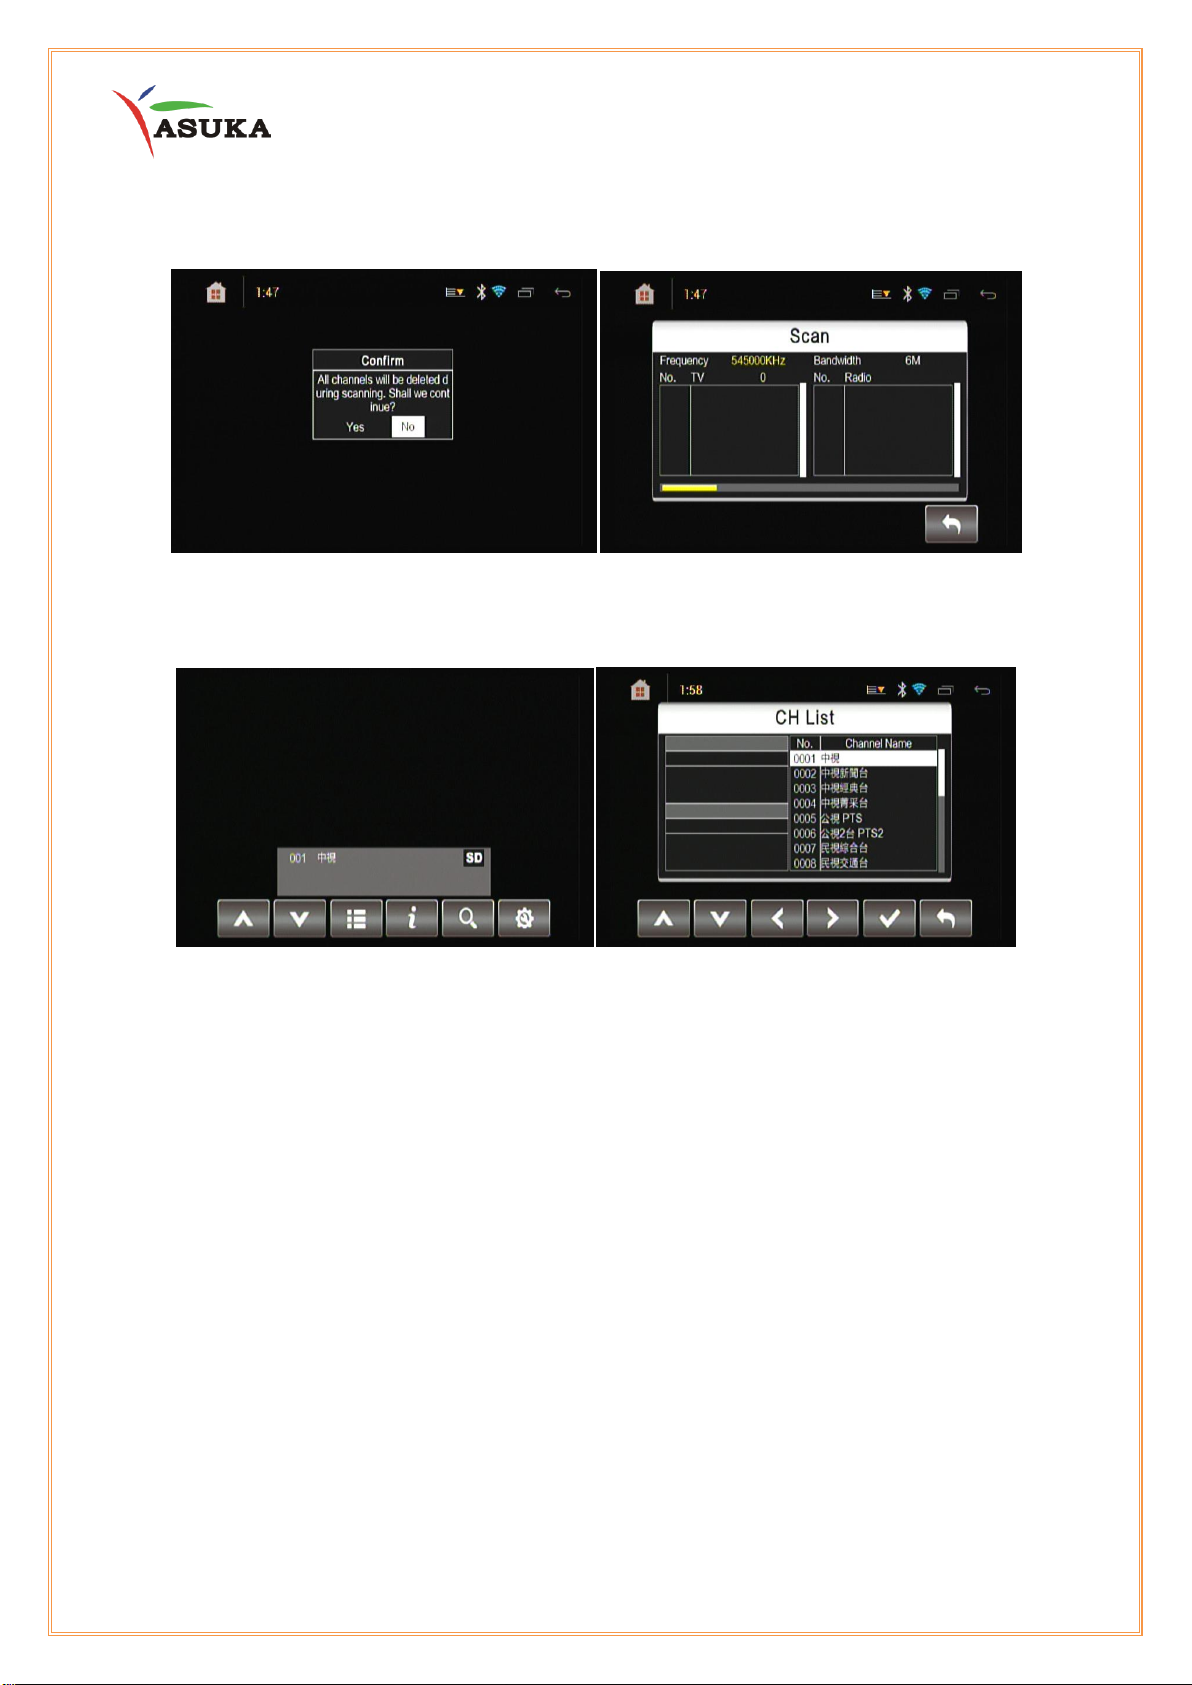
Select [CH Scan] to search for the available channels automatically
Use [CH] / [CH] or Select CH List to change channels
19
Page 20
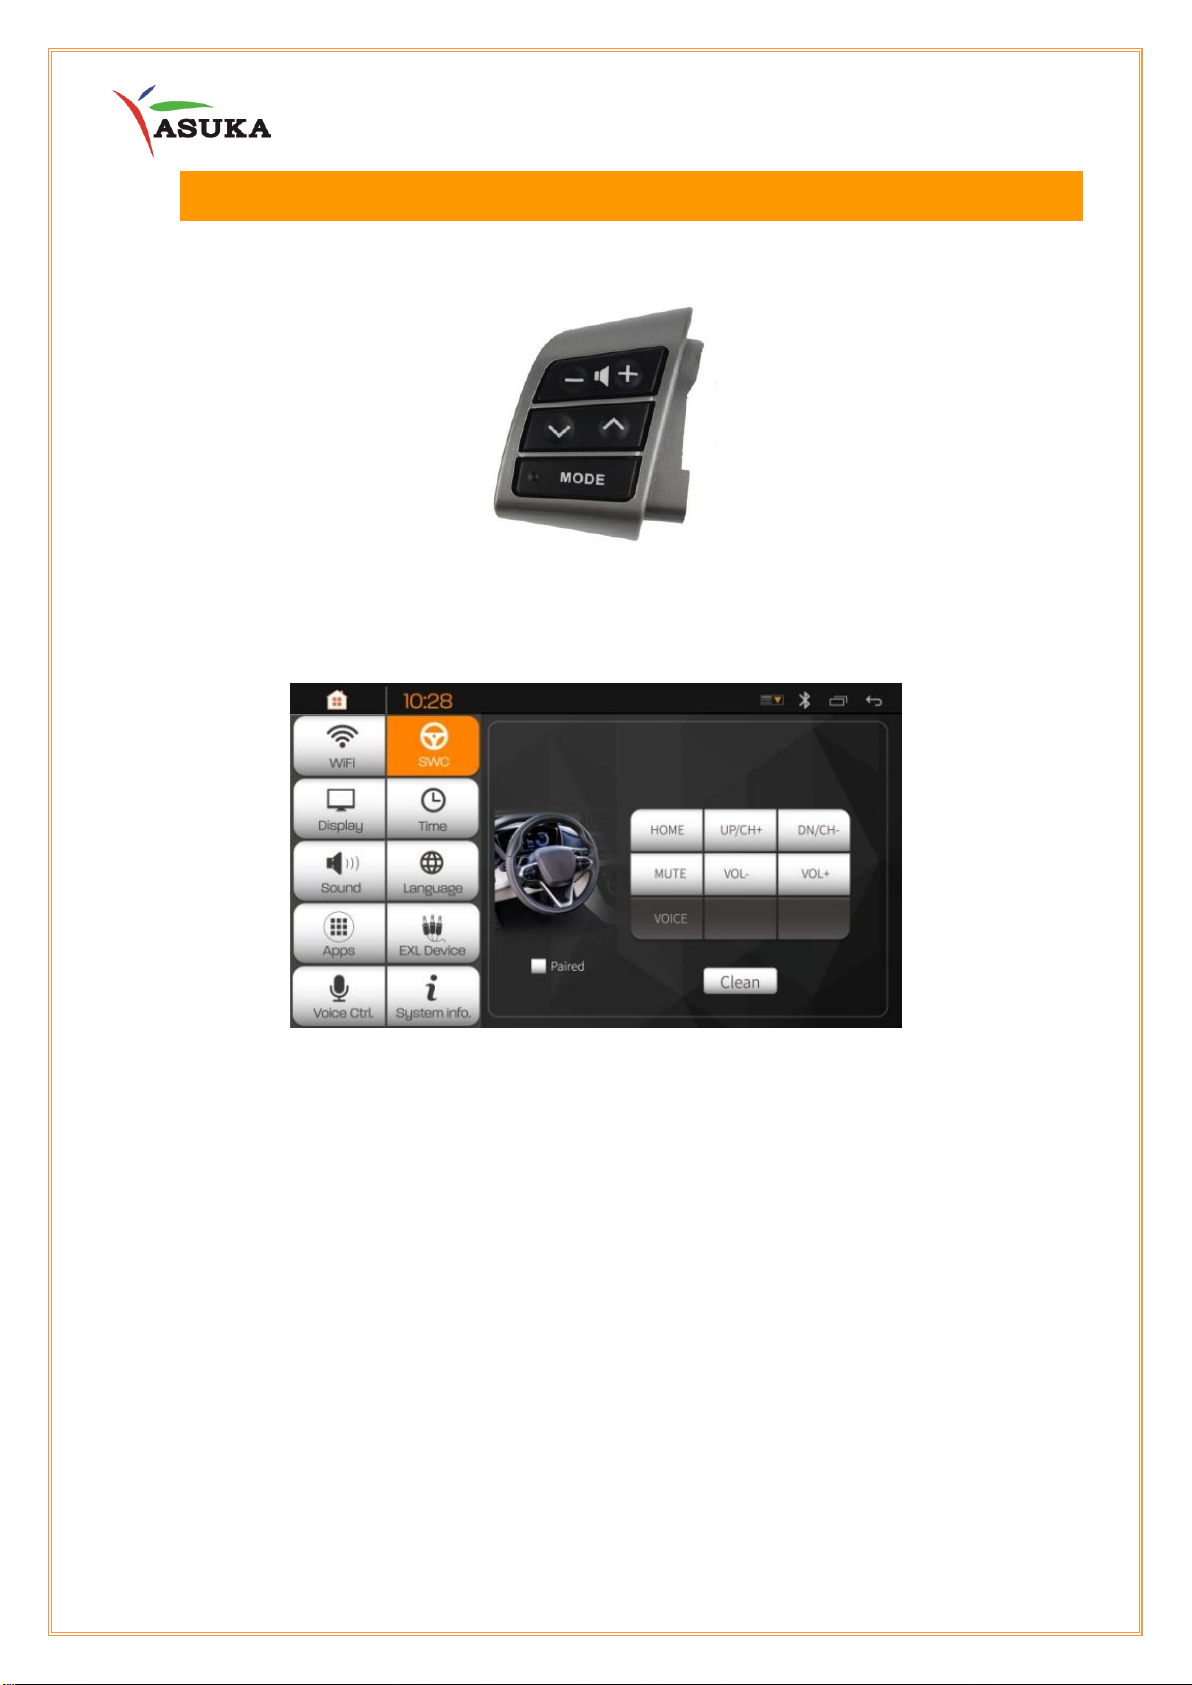
XI. Steering Wheel Control
Steering wheel controls allow drivers to keep their eyes on the road.
Step 1: Select [SETUP ICON] then [SWC]
Step 2: Select VOL+ on PTA-100
Step 3: Press and hold the function button on the steering wheel, wait until the display shows
paired.
Step 4: Repeat this process until all relevant functions are programmed.
Step 5: Once all functions have been set, exit the SWC interface and back to Home screen
Step 6: Double check if programming was successful by pressing the VOL+ and VOL – on
the steering wheel.
20
Page 21
XII. Reference
XI.1 Maintenance
• Do not use any solvent (for example, thinner, benzene, etc.), detergent, or insecticide. This
may damage the monitor or the unit.
• Cleaning the Liquid Crystal Display Screen
The liquid crystal display screen tends to collect dust, so wipe it off occasionally with a soft
cloth. The surface is easily scratched, so do not rub it with hard objects.
XI.2 Troubleshooting
What appears to be trouble is not always serious.
Check the following points before calling dealers/ASUKA.
General
No sound comes out of the speakers.
• Adjust the volume to the optimum level.
• Check the cords and connections.
No picture is displayed on the screen.
• Turn on the screen.
Playback does not start.
• The format of files is not supported by the unit.
No picture appears on the external monitor.
• Connect the video cord correctly.
• Select the correct input on the external monitor.
USB
“Reading” does not disappear from the screen.
• Turn the power off and on again.
While playing a track, sound is sometimes interrupted.
• The tracks are not properly copied into the USB device. Copy the tracks again, and try to
play again.
21
Page 22

XIII. Installation/ Wire Connection Guide
XII.1 Precautions on installation and connection
• Mounting and wiring this product requires skills and experience. For best safety, leave the
mounting and wiring work to professionals.
• Make sure to ground the unit to a negative 12 V DC power supply.
• Do not install the unit in a location exposed to direct sunlight or excessive heat or humidity.
Also avoid places with too much dust or the possibility of water splashing.
• Do not use your own screws. Use only the screws provided. If you use the wrong screws,
you could damage the unit.
• After the unit is installed, check whether the brake lamps, blinkers, wipers, etc. on the car
are working properly.
• Do not press hard on the panel surface when installing the unit in the vehicle. Otherwise
scratches, damage, or failure may result.
22
Page 23
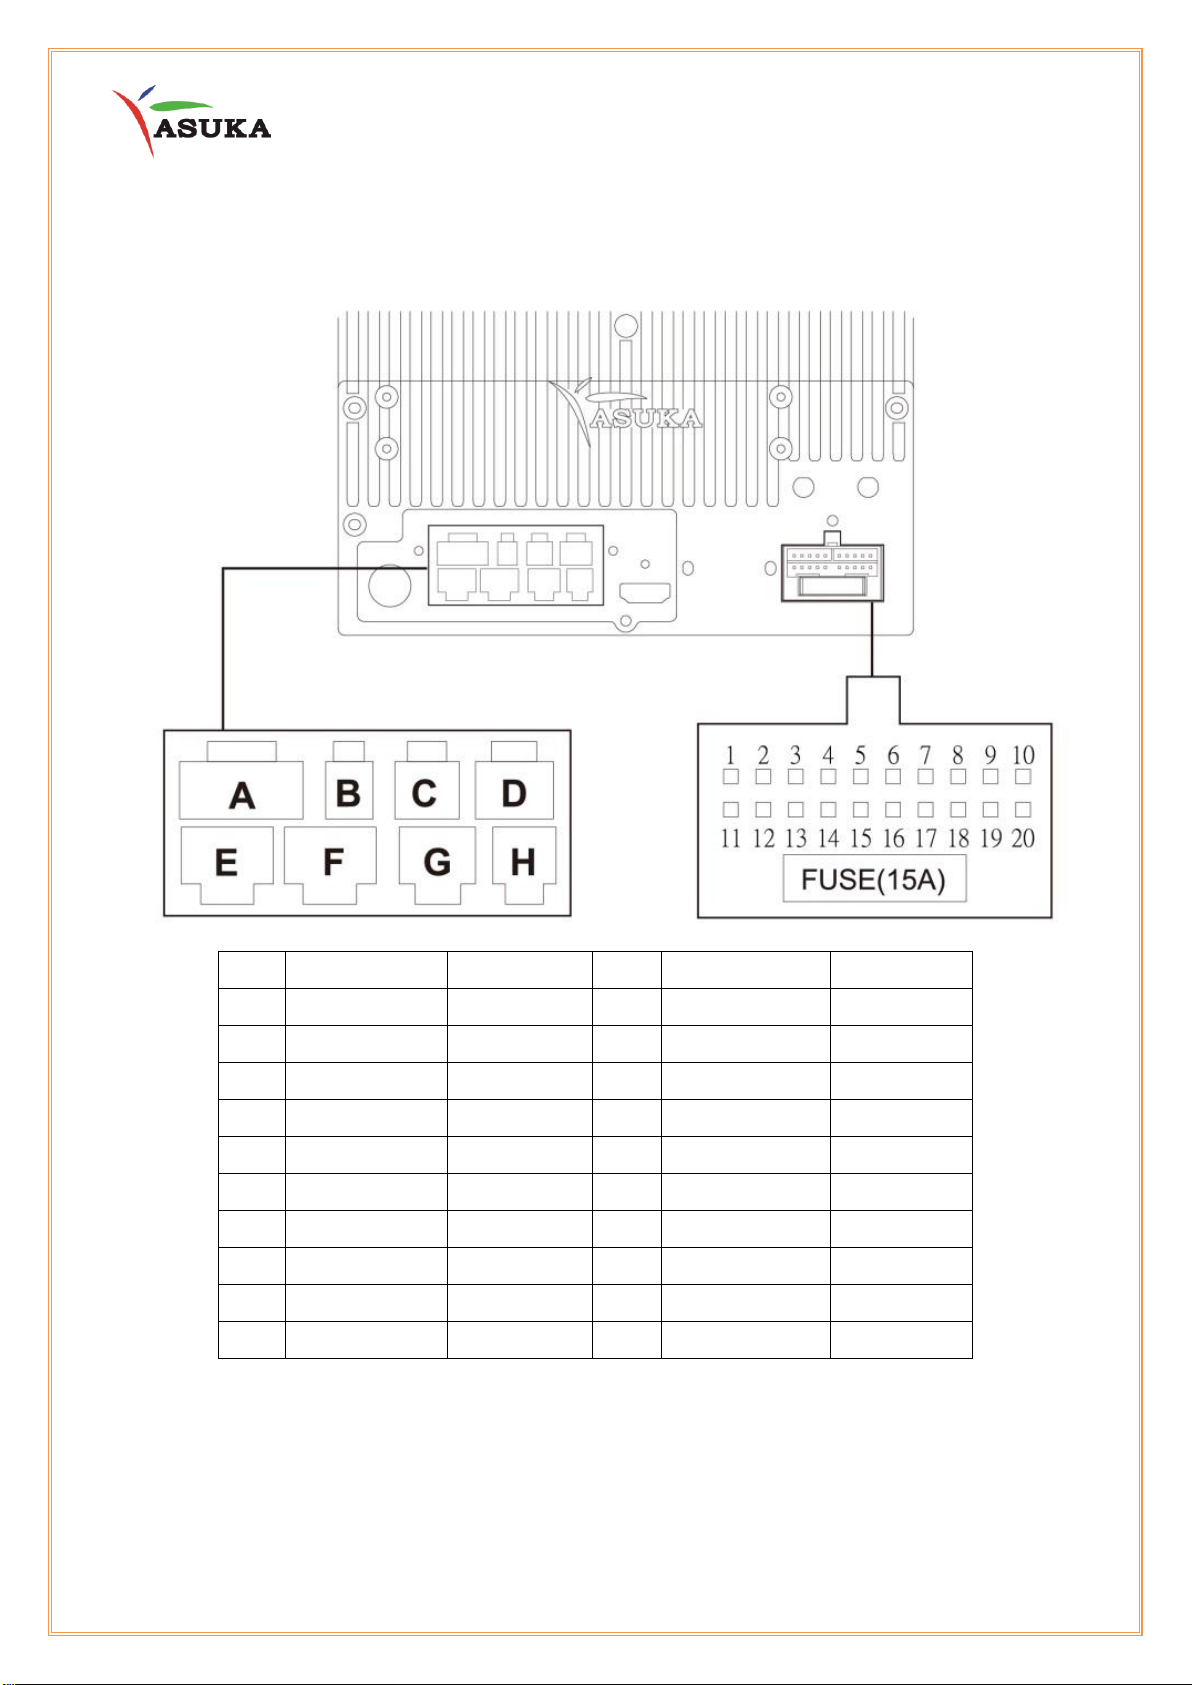
Pin
Color
Function
Pin
Color
Function
1
White
FL+
11
Green
RL+
2
White/Black
FL-
12
Green/Black
RL- 3 Grey
FR+
13
Purple
RR+
4
Grey/Black
FR-
14
Purple/Black
RR- 5 Pink
BRAKE
15
Yellow
BAT+
6
Orange
ILL
16
Black(Thick)
GND
7
Red/Black
RXD
17
Red
ACC
8
Blue/White
SWC 1
18
Blue
ANT+12V
9
Brown
REVERSE
19
Blue/Black
SWC 2
10
Black
SWC GND
20
Red/White
TXD
XII.2 Wiring Information
23
Page 24
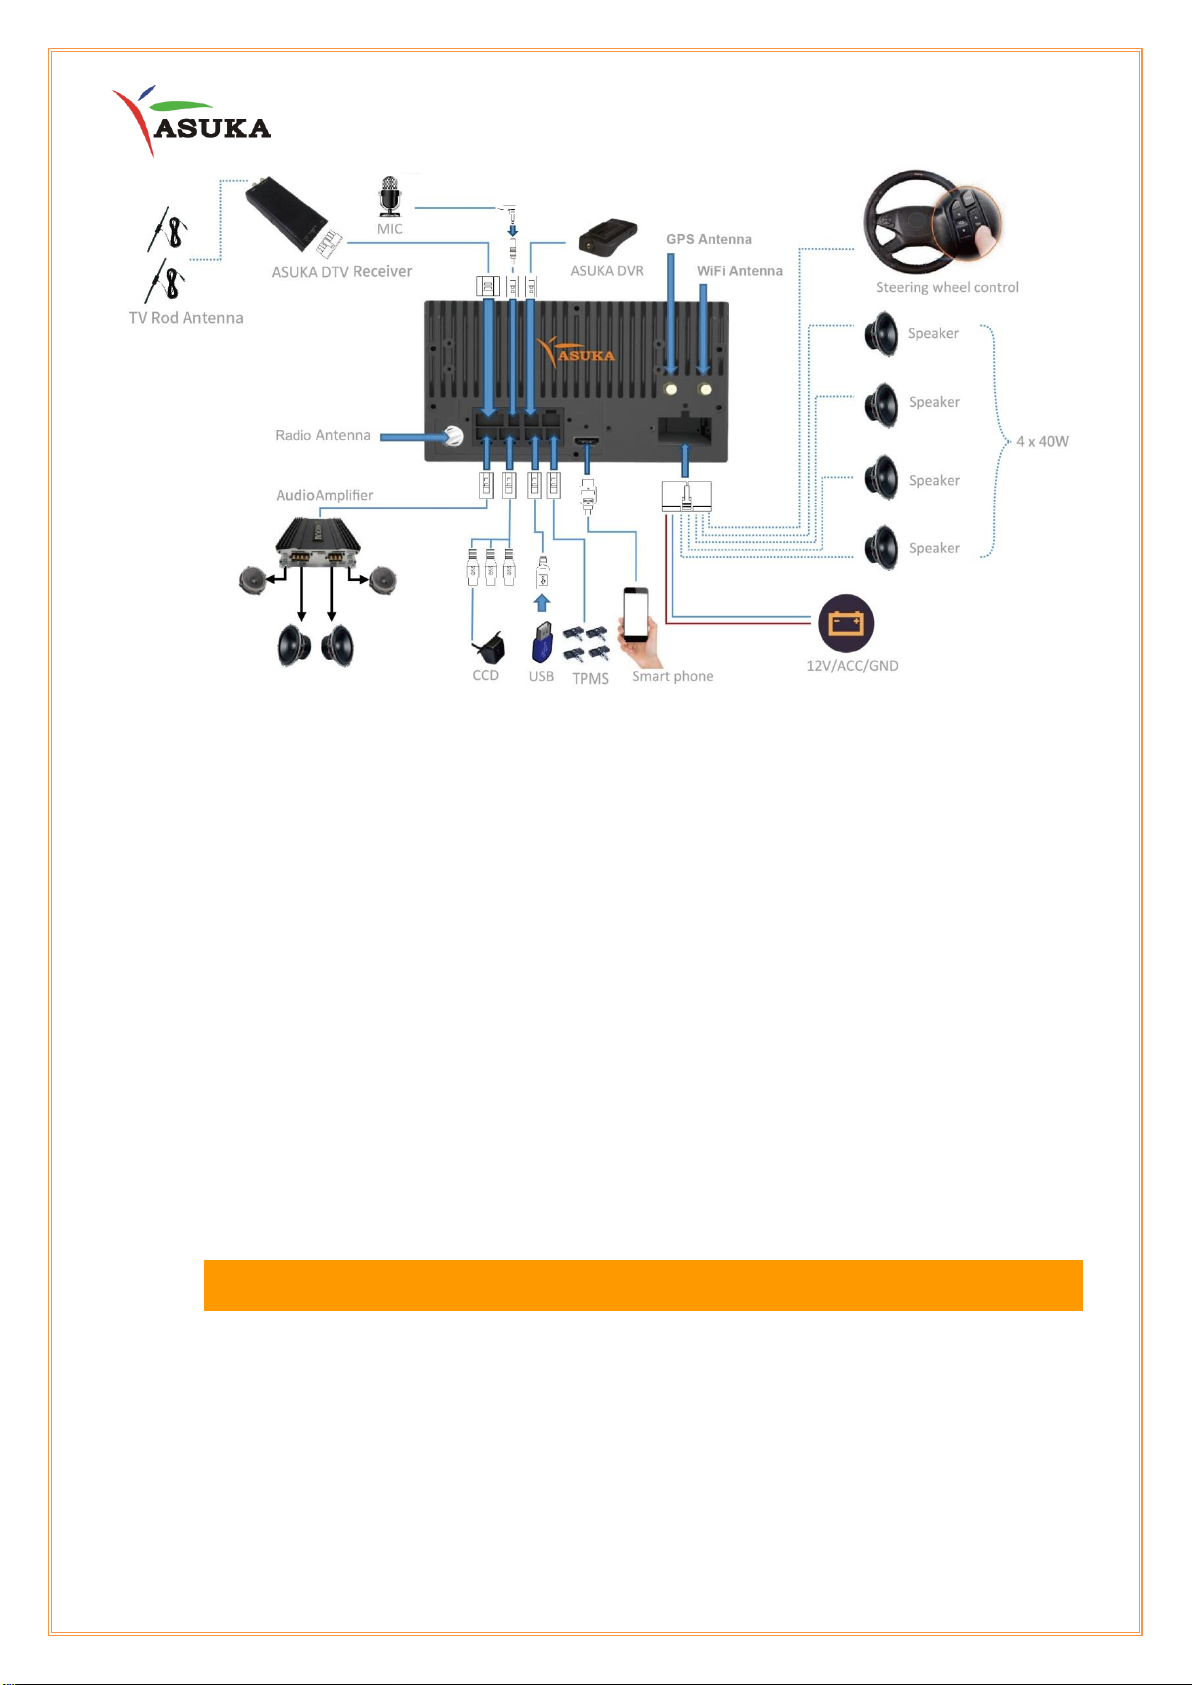
XII.3 Installation procedure
1. To prevent a short circuit, remove the key from the ignition and disconnect the Negative
(-) battery.
2. Make the proper input and output wire connections for each unit.
3. Connect the speaker wires of the wiring harness.
4. Connect the wiring harness wires in the following order: ground, battery, and ignition.
5. Connect the wiring harness connector to the unit.
6. Install the unit in your car.
7. Reconnect the Negative (-) battery
XIV. GPS and WiFi/BT Antenna
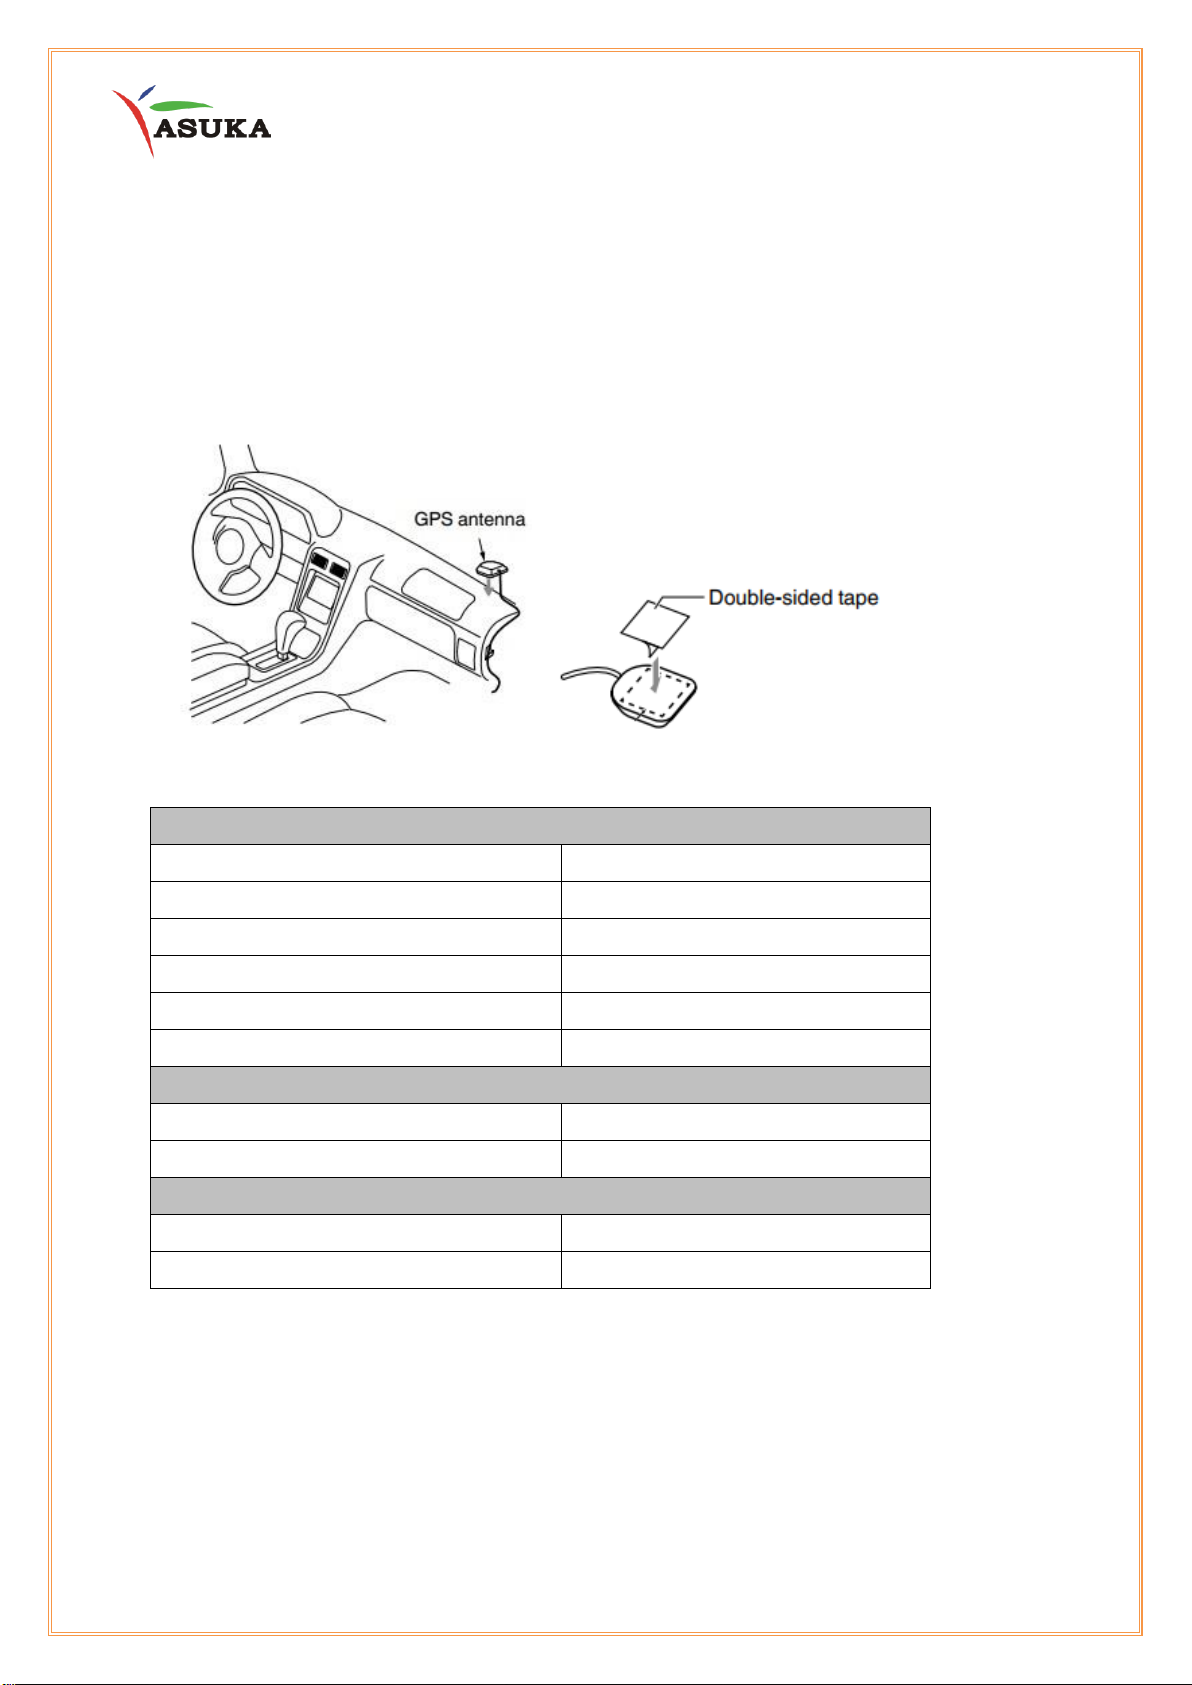
GPS Antenna
Note:
The supplied GPS and WiFi/BT antenna is for installing inside the vehicle. Do not install
it outside the vehicle.
24
Page 25
A. Electrical Characteristics
Frequency
2400MHz ~2500MHz
VSWR
<2.0
Efficiency
>50%
Impedance
50 Ohm
Polarization
Line
Gain
2dBi
B. Material & Mechanical Characteristics
Material of Radiator
Cu
Connector Type
SMA (Female inside)
C. Environmental
Operation Temperature
- 30 ˚C ~ + 80 ˚C
Storage Temperature
- 30 ˚C ~ + 85 ˚C
To improve the GPs signal reception, install the GPs antenna horizontally on a flat
plane.
Do not wax or paint the cover of the GPS antenna. This may reduce the performance of
the GPS antenna.
Wipe off the dirt of the mounting surface before installing the GPS antenna.
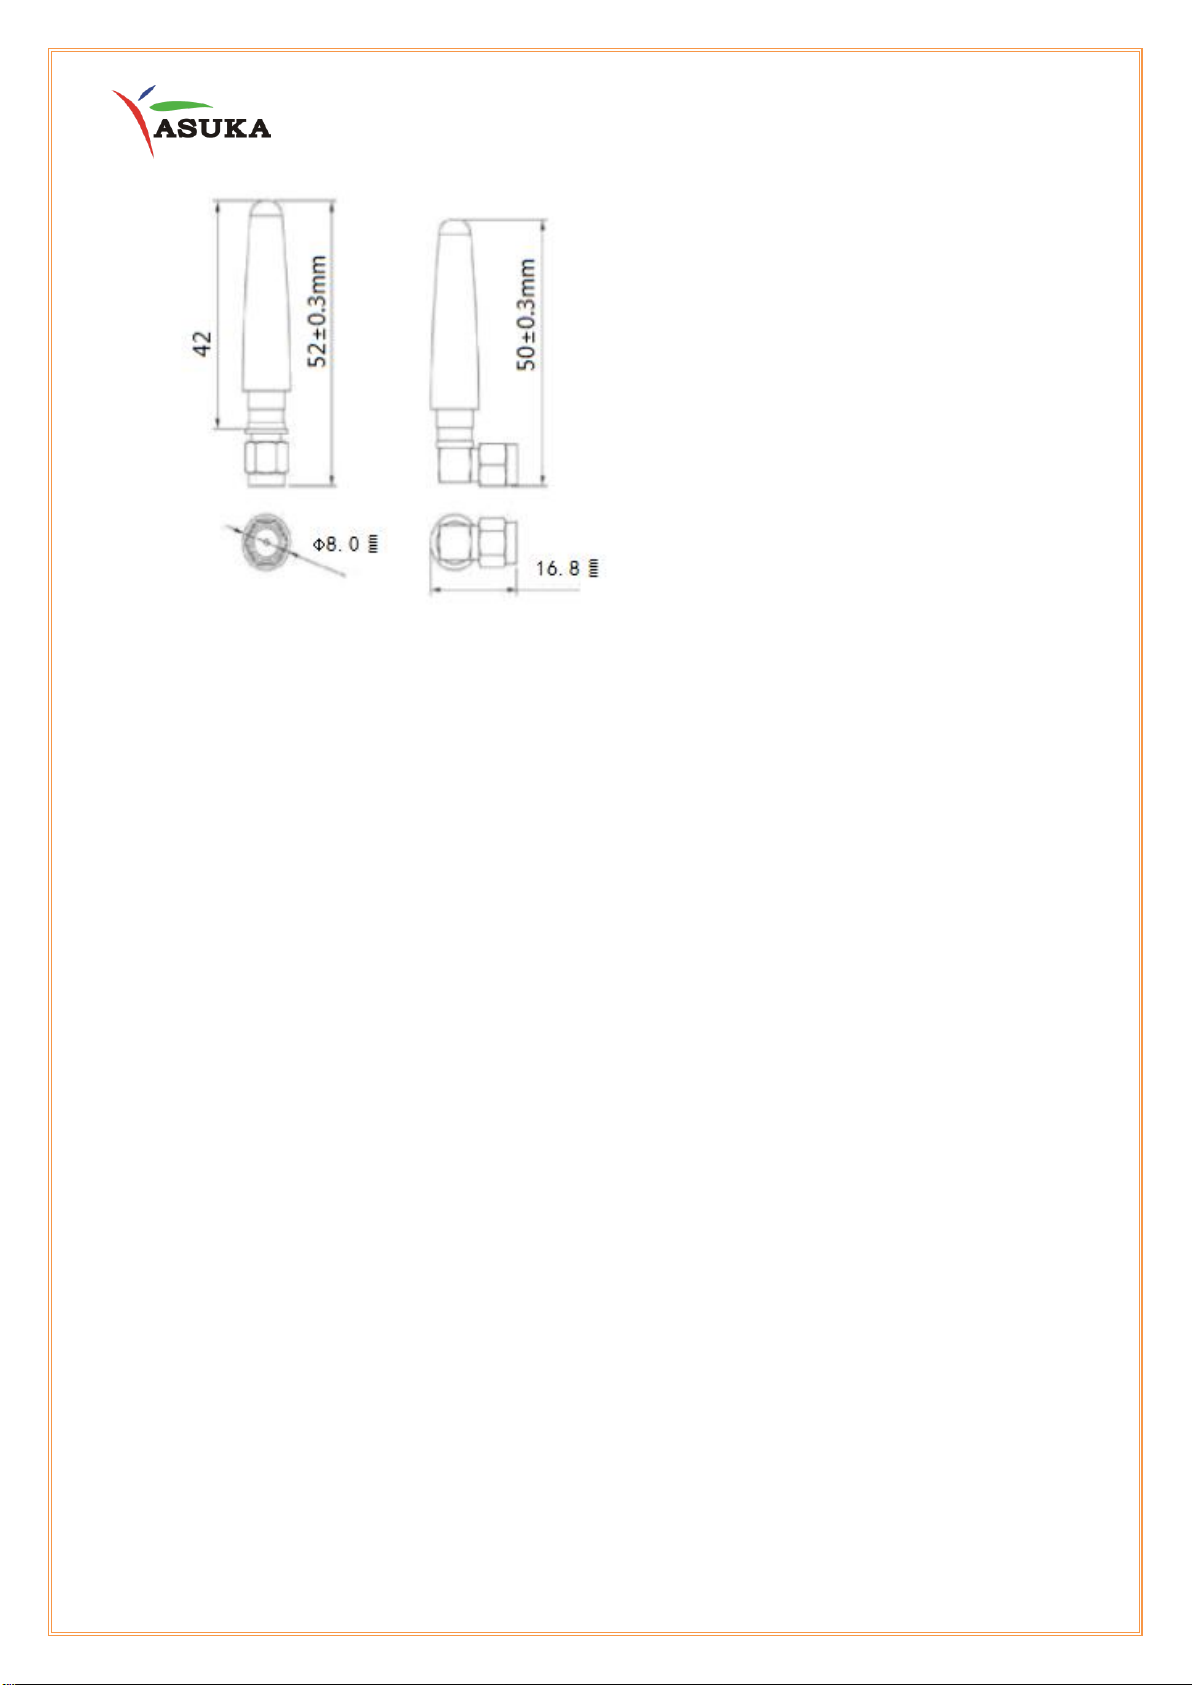
The WiFi/BT antenna Specification (Manufacturer: ShangYu):
25
Page 26
26
Page 27

FCC Compliance Statement
You are cautioned that changes or modifications not expressly approved by the part responsible for compliance
could void the user’s authority to operate the equipment.
This device complies with Part 15 of the FCC Rules. Operation is subject to the following two conditions: (1) this
device may not cause harmful interference, and (2) this device must accept any interference received, including
interference that may cause undesired operation.
Note: This equipment has been tested and found to comply with the limits for a Class B digital device, pursuant to
part 15 of the FCC Rules. These limits are designed to provide reasonable protection against harmful interference
in a residential installation. This equipment generates, uses and can radiate radio frequency energy and, if not
installed and used in accordance with the instructions, may cause harmful interference to radio communications.
However, there is no guarantee that interference will not occur in a particular installation. If this equipment does
cause harmful interference to radio or television reception, which can be determined by turning the equipment
off and on, the user is encouraged to try to correct the interference by one or more of the following measures:
—Reorient or relocate the receiving antenna.
—Increase the separation between the equipment and receiver.
—Connect the equipment into an outlet on a circuit different from that to which the receiver is connected.
—Consult the dealer or an experienced radio/TV technician for help.
Any changes or modifications not expressly approved by the party responsible for compliance could void the
authority to operate equipment.
This device and its antenna must not be co-located or operating in conjunction with any other antenna or
transmitter.
FCC Radio Frequency Exposure
This equipment complies with FCC radiation exposure limits set forth for an uncontrolled environment. This
equipment should be installed and operated with minimum distance 20cm between the radiator & your body.
XV. Customer Service
ASUKA Autotronics Inc.
- Email: [email protected]
- Tel: +886 3-666-7117
- http://www.asuka-autotronics.com
Thanks for your support; we hope you enjoy our product.
27
 Loading...