

Page 1
ASTUTE14 0® METER
M
USER MANUAL
©Astute Medical, Inc. 2017 PN 300153 Rev G 2017/01/16
Page 2

As tu te 140® Meter
Manufactured for Astute Medical, Inc.
3550 General Atomics Ct.
Building 2
San Diego, CA 92121
USA
CONTACT INFORMATION:
Astute Medical, Inc.
3550 General Atomics Ct.
Building 2
San Diego, CA 92121 USA
Phone: +1 (855) 317-2788 (Monday thru Friday, 8am – 5pm PST)
Fax: +1 (858) 332-0690
Email: [email protected]
Website: www.astutemedical.com
2
©Astute Medical, Inc. 2017 PN 300153 Rev G 2017/01/16
Page 3

As tu te 140® Meter
Table of Contents
Introduction ............................................................................................................................................... 5
Intended Use ........................................................................................................................................... 5
Principles of Operation ........................................................................................................................ 5
Astute140® Meter Kit Contents ....................................................................................................... 6
Materials Required But Not Provided ............................................................................................ 7
Optional Accessories ........................................................................................................................... 7
Contacting Astute Medical, Inc. (Technical Support) .............................................................. 7
Product Specications ........................................................................................................................ 8
Warnings, Hazards, Precautions and Limitations .................................................................... 9
Safety Symbols ................................................................................................................................ 9
Safety Information .......................................................................................................................... 9
FCC Testing ...................................................................................................................................... 10
Electromagnetic Capability (EMC) .......................................................................................... 10
Limitations ......................................................................................................................................... 11
Astute140® Meter Features .............................................................................................................. 12
User Types .............................................................................................................................................. 15
Operator ............................................................................................................................................. 15
Supervisor ......................................................................................................................................... 16
Installation ................................................................................................................................................ 17
AC Power Supply .................................................................................................................................. 17
Installation and Replacement of Batteries ................................................................................ 18
Installation and Replacement of Paper ....................................................................................... 21
Powering On the As tute140® Meter ............................................................................................ 22
Supervisor Instructions: Conguration and Settings ........................................................... 23
Adding the First Supervisor User ........................................................................................... 23
Setting or Changing Time .......................................................................................................... 26
Setting or Changing Date .......................................................................................................... 27
Setting or Changing the Language ....................................................................................... 28
Updating System Software ....................................................................................................... 29
Updating Astute140® Meter Languages ............................................................................. 29
Operator Registering Permissions ........................................................................................ 29
Quality Control Settings .............................................................................................................. 31
LIS Settings ..................................................................................................................................... 32
Network Settings .......................................................................................................................... 34
PC Mode ........................................................................................................................................... 36
Printer Settings .............................................................................................................................. 37
Managing Users ............................................................................................................................ 38
Astute140® Meter Information ................................................................................................ 40
Error Log ........................................................................................................................................... 42
©Astute Medical, Inc. 2017 PN 300153 Rev G 2017/01/16
3
Page 4

Table of Contents (Continued)
Astut e140® Meter Operation .................................................................................................... 45
Startup ..................................................................................................................................................... 45
Powering On the As tute140® Meter ...................................................................................... 45
Logging In ........................................................................................................................................ 46
Non-Permanent Settings .......................................................................................................... 46
RFID Cards for Device and Lot Registration ............................................................................ 48
Astute140® EQC Device Registration ......................................................................................... 48
Astute140® Electronic Quality Control (EQC) .......................................................................... 50
Test Lot Registration .......................................................................................................................... 52
Liquid Control Lot Registration ..................................................................................................... 54
External Liquid Quality Control (LQC) ........................................................................................ 56
Calibration Verication Testing .................................................................................................... 60
Testing a Patient Sample ................................................................................................................. 62
Review and Management of Test Results ................................................................................ 65
Patient Results ............................................................................................................................... 65
LQC Results ..................................................................................................................................... 67
EQC Results .................................................................................................................................... 68
Calibration Verication Results .............................................................................................. 69
Send Results to LIS ...................................................................................................................... 70
Shutdown ............................................................................................................................................... 70
As tu te 140® Meter
Maintenance and Troubleshooting ......................................................................................... 71
Cleaning and Decontamination ...................................................................................................... 71
Replacing the Paper ........................................................................................................................... 72
Replacing the Batteries ..................................................................................................................... 72
Disposing of the Batteries ............................................................................................................... 72
Disposing of the Astute140® Meter ............................................................................................. 72
Labels and Symbols ........................................................................................................................... 73
Troubleshooting Tips ......................................................................................................................... 74
Error Messages .................................................................................................................................... 76
End User License Agreement .................................................................................................... 89
Glossary of Terms (Listed Alphabetically) ....................................................................... 90
Index ............................................................................................................................................................ 92
Appendix .................................................................................................................................................. 94
Main Menu Structure ........................................................................................................................ 94
Review Data Menu Structure ......................................................................................................... 95
Operator Menu Structure ................................................................................................................ 96
Supervisor Menu Structure ............................................................................................................. 97
4
©Astute Medical, Inc. 2017 PN 300153 Rev G 2017/01/16
Page 5

As tu te 140® Meter
Introduction
Intended Use
The Astute Medical NephroCheCk® Test System is intended to be used in conjunction
with clinical evaluation in patients who currently have or have had within the past 24
hours acute cardiovascular and or respiratory compromise and are ICU patients as an aid
in the risk assessment for moderate or severe acute kidney injury (AKI) within 12 hours of
patient assessment. The NephroCheCk® Test System is intended to be used in patients 21
years of age or older.
Please read these instructions carefully before using the Astute140® Meter.
Please refer to the assay-speci c Product Insert for detailed test information.
Principles of Operation
The Astute140® Meter uses an optical system to measure the fl uorescent signal
generated from the test sample in the NephroCheCk® Test cartridge. After the addition
of the sample, the NephroCheCk® Test cartridge containing the patient sample is
inserted into the Astute140® Meter. The meter then converts the fl uorescent signal
from each of the two immunoassays (TIMP-2 and IGFBP-7) into a concentration and
then multiplies these concentrations into a single numerical test result and displays
this result to the user. The results from the individual biomarkers are not displayed—
only the single numerical test result is displayed. Multiple quality control procedures
are performed to ensure that the test results are accurate (See “Astute140® Electronic
Quality Control (EQC)” on p. 50 and “External Liquid Quality Control (LQC)” on p. 56
for details).
Results of the test are displayed on the Astute140® Meter’s LCD screen and may be
printed using the meter’s internal printer, or electronically transmitted to a connected
laboratory information system (LIS).
©Astute Medical, Inc. 2017 PN 300153 Rev G 2017/01/16
5
Page 6

Introduction
Astute140® Meter Kit Contents
Inspect the shipping container for obvious shipping damage prior to opening. Unpack
the shipping container and inspect the contents for damage. Following are components
included in the Astute140® Meter Kit along with part numbers for items that can be
ordered separately:
Astu te140® Meter Kit Component Part Number for Re-ordering
Astute140® Meter (1)
As tu te 140® Meter
Power adapter pack (includes AC power cord, switching
power supply and country specic adapter)
(1)
USB cable (1)
Astute140® Electronic Quality Control (EQC) Device
with RFID card*
400016
Astute140® User Manual (1)
Printer paper rolls (2) 100000
AA batteries (4) (1)
(1) This component is only available as part of the Astute140® Meter Kit. Additional
Astute140® Meter Kits can be ordered using Part Number 500017.
*Packaged and shipped in a separate box.
If the shipping container or its contents are damaged, or if any components are missing,
contact Astute Technical Support (See “Contacting Astute Medical, Inc.” on p. 7 for
contact information).
To avoid damaging the Astute140® Meter, DO NOT use any power adapter
other than the one provided.
Batteries are not intended to be used as the main power source for operation
of the Astute140® Meter and should only be used as a backup power source
if there is no electrical output available (See “Installation and Replacement of
Batteries” on p. 18 for further details).
6
©Astute Medical, Inc. 2017 PN 300153 Rev G 2017/01/16
Page 7

As tu te 140® Meter
Introduction
Materials Required But Not Provided
The following materials are required for testing patient samples and may be purchased
and shipped separately from Astute Medical, Inc:
NephroCheCk® Test Kits (PN: 500011)
NephroCheCk® Liquid Control Kits (PN: 500013)
For a list of approved tests and corresponding liquid controls for use with the
Astute140® Meter, go to www.astutemedical.com or consult your Astute Medical, Inc.
sales representative.
Optional Accessories
Optional accessories that may be used with the Astute140® Meter include the
NephroCheCk® Calibration Verication Kit, an external barcode reader and an external
keyboard. A numeric or alphanumeric barcode reader with a PS2 interface will work with
the Astute140® Meter, such as the DataLogic DLC6065-M1, Opticon OPR-2001, or the
Honeywell 3800G (others have not been tested).
A keyboard with a PS2 interface will work with the Astu te140® Meter. Wireless
keyboards are not compatible with the Astute140® Meter.
Contacting Astute Technical Support
Installation, service and maintenance are the responsibility of the End User. For
technical support, please contact Astute Technical Support at:
Astute Medical, Inc.
3550 General Atomics Ct.
Building 2
San Diego, CA 92121 USA
Phone: +1 (855) 317-2788 (Monday thru Friday, 8am – 5pm PST)
Fax: +1 (858) 332-0690
Email: [email protected]
Website: www.astutemedical.com
©Astute Medical, Inc. 2017 PN 300153 Rev G 2017/01/16
7
Page 8

Introduction
Product Specications
Astu te140® Meter Information
Product Number: 500017
Dimensions: 9.8" Length x 6.8" Width x 4.6" Height
Weight: 2.6 lbs. (without batteries or paper roll)
Power Requirements
AC Power Supply Output Voltage: 6 V DC and 4.16 A
As tu te 140® Meter
AC Power Supply Input Voltage/
Voltage Range:
Battery Operation: 4 x LR6 — AA batteries
Operating Environment
Temperature: 59°F – 86°F
Humidity: 30% – 80% rH, non-condensing at 59°F operating temperature
Storage Environment
Temperature: -4°F to 140°F
Humidity: 20% – 85% rH, non-condensing
100V – 240 V, 47Hz – 63 Hz
15% – 80% rH, non-condensing at 86°F
8
©Astute Medical, Inc. 2017 PN 300153 Rev G 2017/01/16
Page 9
As tu te 140® Meter
Introduction
Warnings, Hazards, Precautions, and Limitations
Refer to the Symbols Glossary for more information
Safety Information
Operate the Ast ute140® Meter on a level, dry surface.
Do not move the Astute140® Meter while a test is running.
Do not drop the A s tute140® Meter.
The Astute140® Meter is designed to provide safe and reliable operation
when used according to this User Manual. If the meter is used in a manner not
specied in the User Manual, the protection provided by the equipment will be
impaired.
Use only the AC power adapter supplied with the Astute140® Meter.
Do not immerse the As tute140® Meter in water or any other liquids.
Unplug the AC power adapter from the power supply before cleaning.
Handle and dispose of test cartridges and patient specimens in accordance
with federal, state, and local requirements regarding biohazardous materials.
Handle the Astu te140® Meter in accordance with federal, state and local
requirements regarding biohazardous materials.
Due to potentially infectious nature of the samples used with the Astu te140®
Meter, users should wear gloves.
©Astute Medical, Inc. 2017 PN 300153 Rev G 2017/01/16
9
Page 10

Introduction
FCC Test ing
This device complies with Part 15 of the FCC Rules. Operation is subject to the
following two conditions:
1. This device may not cause harmful interference, and
2. This device must accept any interference received, including interference
that may cause undesired operation.
Changes or modications not expressly approved by the party responsible for
compliance could void the user’s authority to operate the equipment.
NOTE: This equipment has been tested and found to comply with the limits for a
Class A digital device, pursuant to part 15 of the FCC Rules. These limits are designed
to provide reasonable protection against harmful interference when the equipment
is operated in a commercial environment. This equipment generates, uses, and can
radiate radio frequency energy and, if not installed and used in accordance with
the instruction manual, may cause harmful interference to radio communications.
Operation of this equipment in a residential area is likely to cause harmful interference
in which case the user will be required to correct the interference at his own expense.
As tu te 140® Meter
Electromagnetic Capability (EMC)
The electromagnetic environment should be evaluated prior to operation of the
Meter. The Meter generates radio frequency (RF) energy. Do not use this device
in close proximity to sources of strong electromagnetic radiation (e.g. unshielded
intentional RF sources), as these may interfere with proper operation.
Any equipment connected to data ports must be certied to EC61010. If any
equipment is connected that is not recommended it must comply with this
standard. For questions or additional information, please contact Astute Technical
Support (See “Contacting Astute Medical, Inc.” on p. 7 for contact information).
The Astute140
®
Meter complies with the emission and immunity requirements
described in IEC 61326-2-6.
10
©Astute Medical, Inc. 2017 PN 300153 Rev G 2017/01/16
Page 11

As tu te 140® Meter
Introduction
Limitations
The Astute140® Meter does not contain a “batch mode” function. The Astute140®
Meter times the incubation period for the test, and only one test can be run at a time;
therefore, each NephroCheCk® Test cartridge must be run immediately after being
loaded with the patient sample or liquid control. The time delay in testing that would
result from loading more than one cartridge at a time may lead to inaccurate test
results.
©Astute Medical, Inc. 2017 PN 300153 Rev G 2017/01/16
11
Page 12
Introduction
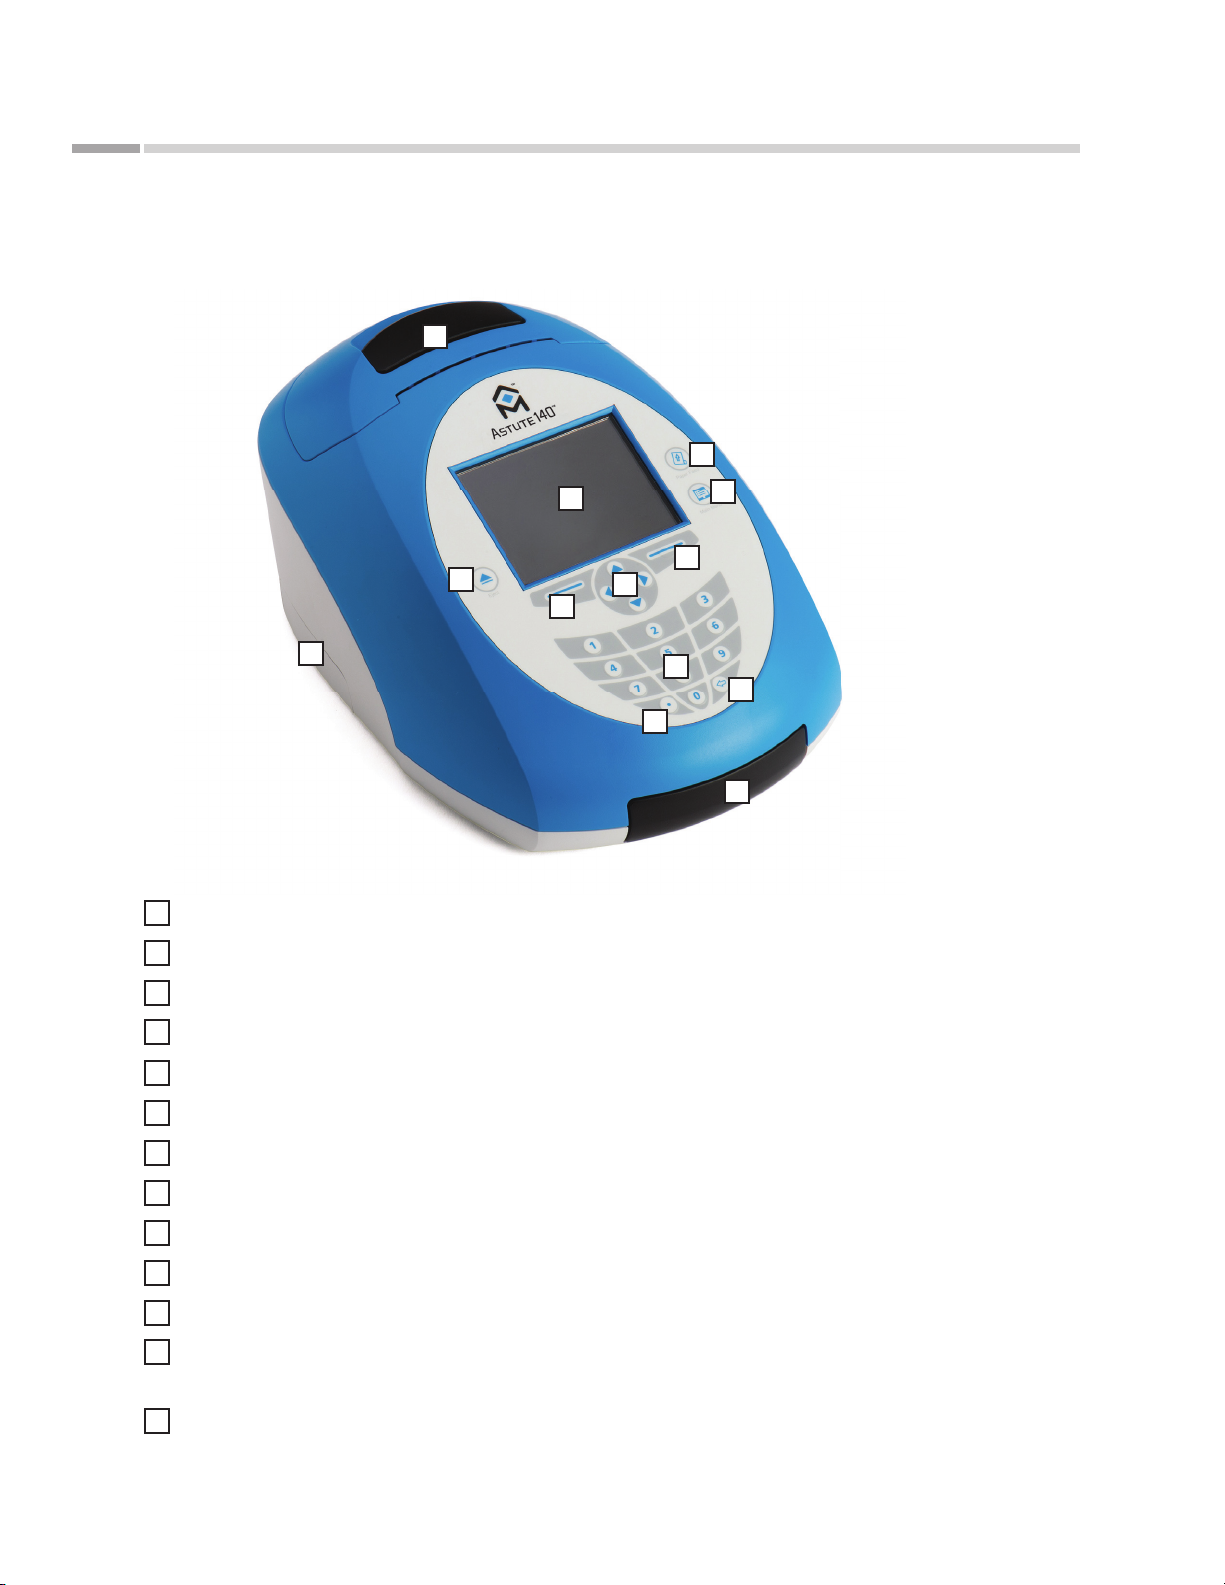
Astute140® Meter Features
1
As tu te 140® Meter
3
5
8
9
11
12
13
2
4
7
6
10
Feature Function
1
Printer Cover Covers the printer
2
LCD Display User interface—displays screens for navigating, entering data, and reviewing data
3
Paper Feed Key Advances the paper roll
4
Eject Key Opens the drawer
Figure 1.
Astute140® Meter
12
5
Main Menu Key Used to return to the Main Menu
6
Navigation Keys Used to navigate up, down, left, and right within menu screens
7
Left Soft Key Used to select the menu option displayed above the key
8
Right Soft Key Used to select the menu option displayed above the key
9
Numeric Keypad Used to enter numerical values into menus and screens
10
Decimal Point Used to add decimal points to numerical values
11
Backspace Key Deletes the character to the left of the cursor
12
Drawer Used to insert a NephroCheCk® Test cartridge and the Electronic Quality Control (EQC)
device into the A
13
Battery Cover Covers the battery compartment
stut e140
®
Meter
©Astute Medical, Inc. 2017 PN 300153 Rev G 2017/01/16
Page 13
As tu te 140® Meter
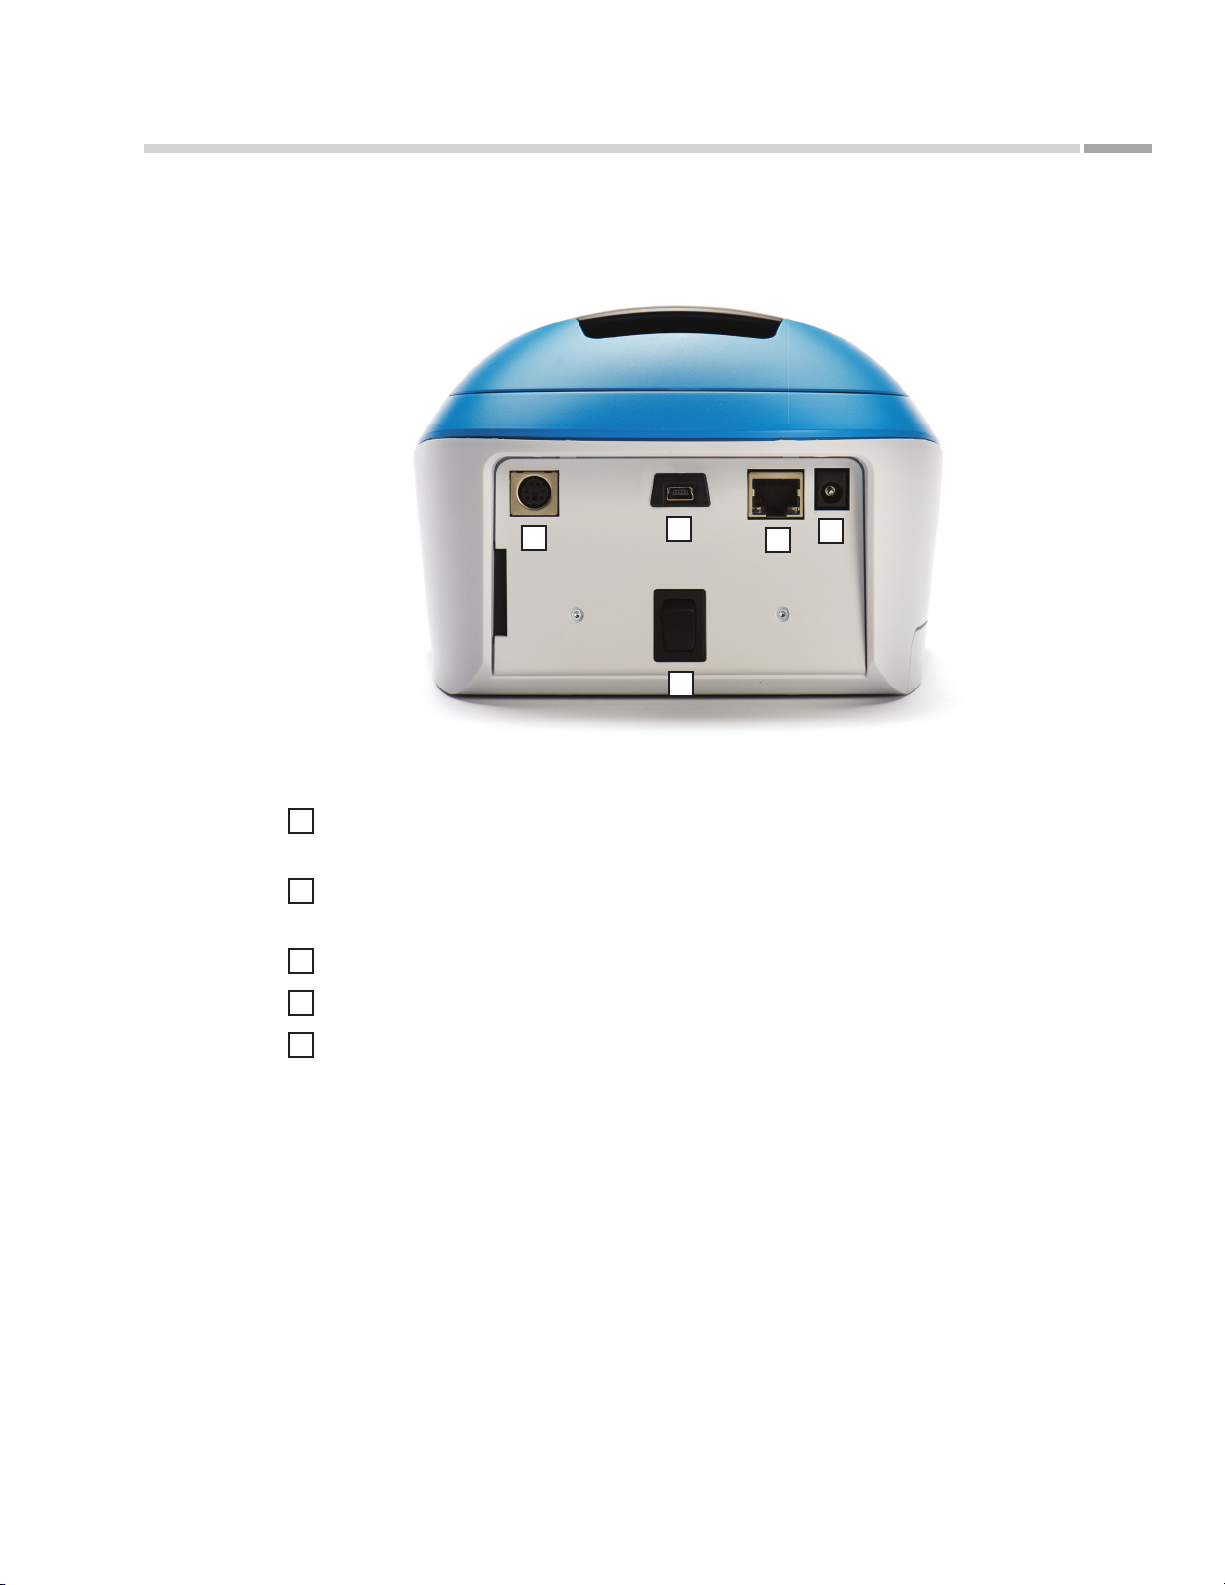
Figure 2.
Astute140®
Meter — back
Astute140® Meter Features (Continued)
1
4
5
2
Introduction
3
Feature Function
1
PS/2 Port Used to connect the optional external barcode reader or keyboard to the
Astute140® Meter
2
Ethernet Port Used to connect the Ast ute140® Meter to an LIS or to a computer network to
download software
3
AC Power Adapter Port Used to connect the AC power adapter to the Astu te140® Meter
4
USB Port Used to connect the Ast ute140® Meter to a computer to download new software
5
On/Off Switch Used to power the As tute14 0® Meter on and off
©Astute Medical, Inc. 2017 PN 300153 Rev G 2017/01/16
13
Page 14
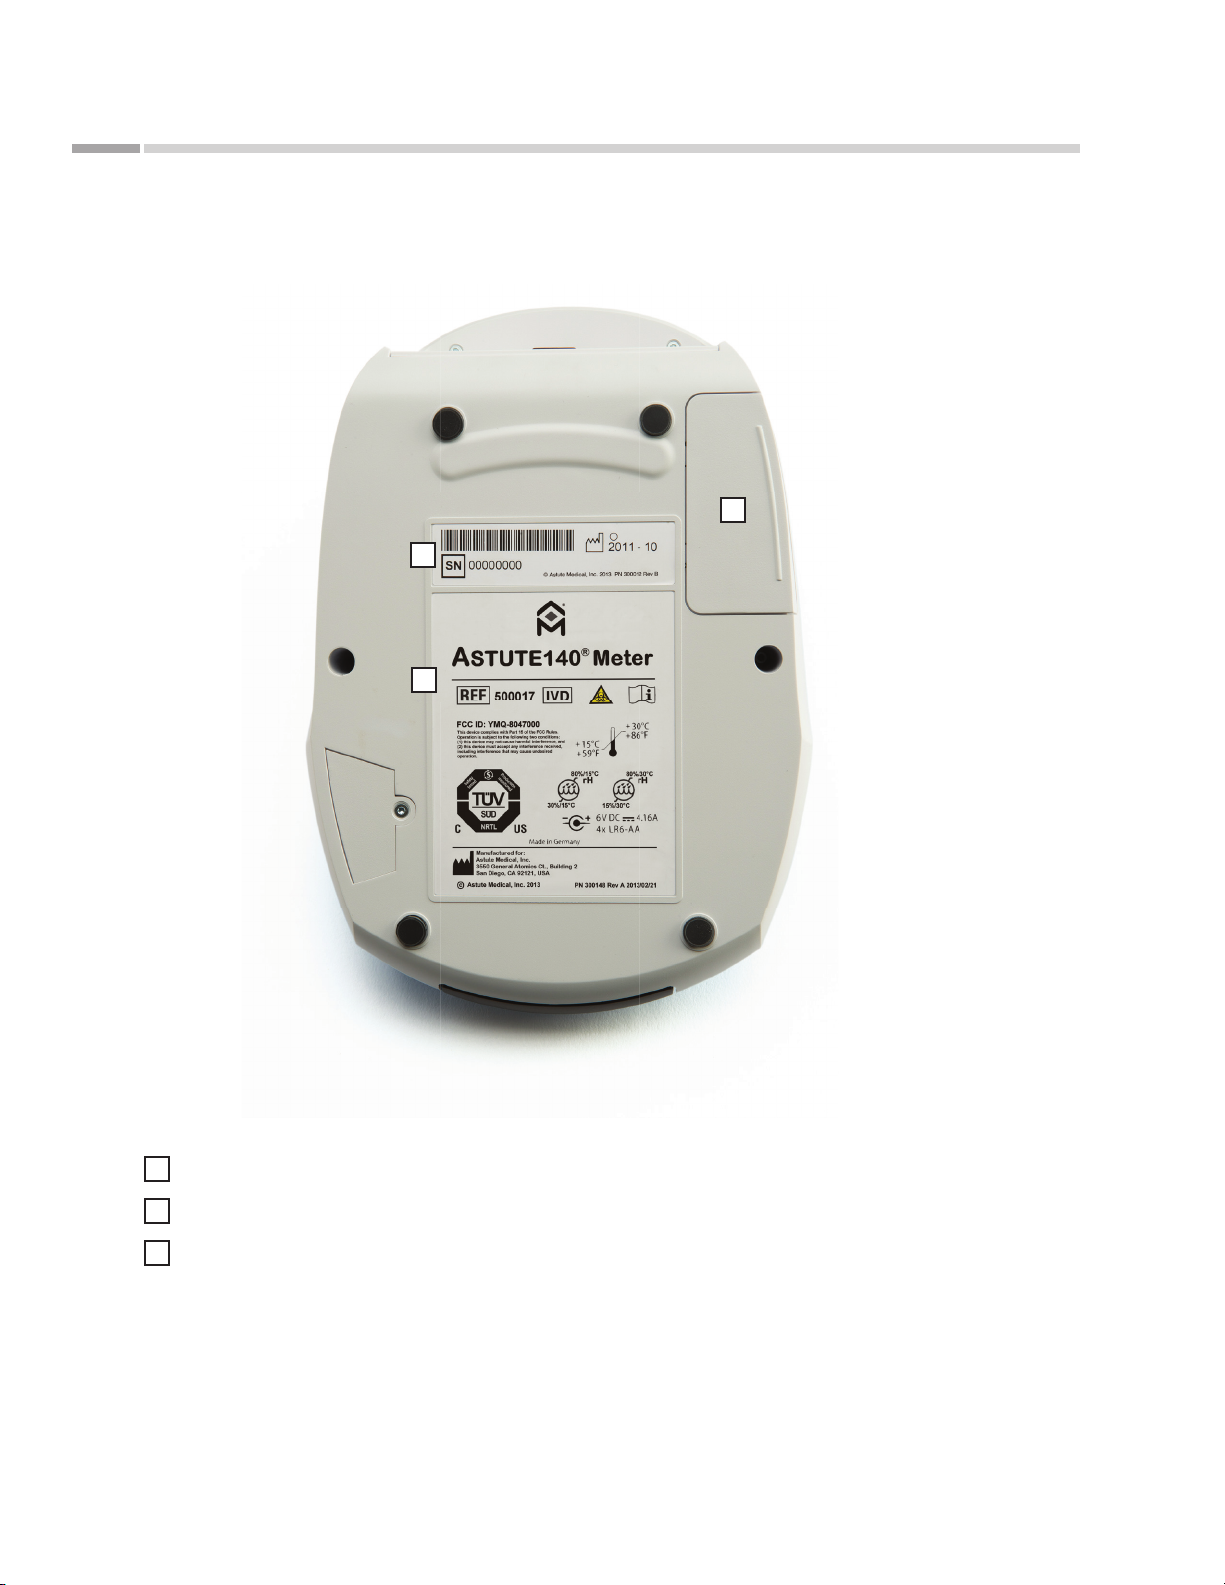
Introduction
Astute140® Meter Features (Continued)
2
3
As tu te 140® Meter
1
Figure 3.
Astute140®
Meter — bottom
14
Feature Function
1
Battery Cover Covers the battery compartment
2
Serial Number Unique number used to identify the As tute140® Meter
3
In Vitro Diagnostic Regulatory labels and symbols used to provide information about the
device labels
Astute140® Meter and its proper use (See “Labels and Symbols” on p. 73
and symbols for de nitions)
©Astute Medical, Inc. 2017 PN 300153 Rev G 2017/01/16
Page 15
As tu te 140® Meter
Introduction
Astute140® Meter Features (Continued)
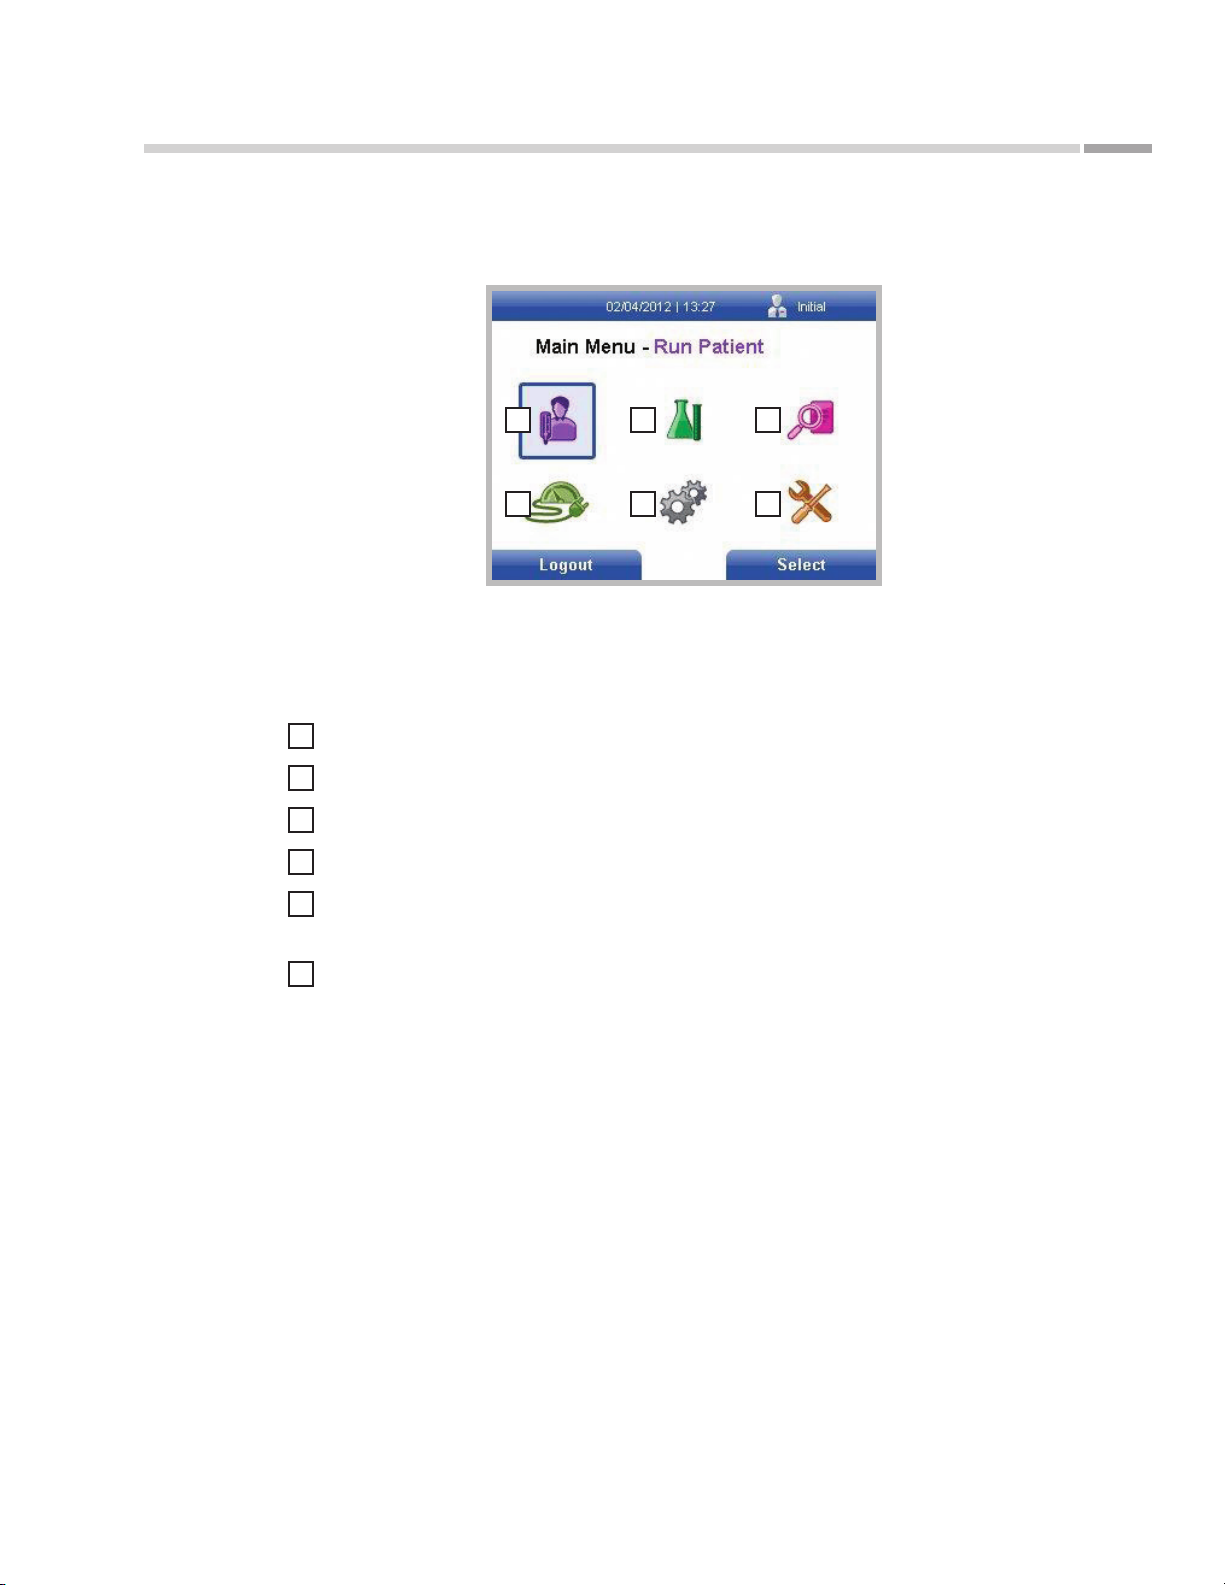
Figure 4.
Main Menu screen
All Astute140® Meter functions are grouped under six icons found on the Main Menu
(For menu structures, see the Appendix):
Feature Function
1
2
3
4
5
6
1 2 3
4 5 6
Run Patient Select to run patient tests
Run LQC Select to run high and low liquid controls
Review Data Select to manage patient, LQC and EQC test results
Run EQC Select to run EQC
Operator Select to manage (register or delete) test lots, liquid control lots, and EQC devices;
temporarily change non-permanent settings, and view error logs
Supervisor Select to set/change general settings, manage users, obtain Astute14 0® Meter
information, or view error logs
User Types
There are two types of users dened for the Astute140® Meter, Supervisor and
Operator. Supervisors and Operators are permitted to perform dierent functions, as
described below.
Operator
Users logged in as Operators may perform the following functions:
Power the Astute140® Meter on/o
Run electronic quality control (EQC)
©Astute Medical, Inc. 2017 PN 300153 Rev G 2017/01/16
15
Page 16

Introduction
Run liquid quality control (LQC)
Run Calibration Veri cation
Test patient samples
Review and print data (Patient test results, QC test results)
View error log
Operators may perform the following functions only if a Supervisor grants permission
in the default settings:
Manage (register/delete/print) test lots
Manage (register/delete/print) LQC lots
Manage (register/delete/print) EQC devices
The Operator may change the following settings temporarily while using the
Astute140® Meter; the settings will return to the default settings programmed by the
Supervisor when the meter is switched o or the Operator is logged out:
As tu te 140® Meter
Date format
Time format
Language
Beeper (On/O )
Supervisor
Users logged in as Supervisors may perform all of the Operator functions and the
following additional functions:
Set or change all default system settings (Time, Date, Language, Log On Setup,
registering lot/control permissions, QC settings)
Set or change LIS settings
Set PC Mode (On/O )
Set or change network settings
Set or change print headers
Manage Users (change/add/delete)
View Astute140® Meter information (hardware/ rmware/bootware/serial
number/IP address)
16
©Astute Medical, Inc. 2017 PN 300153 Rev G 2017/01/16
Page 17
As tu te 140® Meter
Installation
AC Power Supply
The Astute140® Meter is generally meant to be powered by plugging the AC power
adapter into a power source; however, power may be supplied temporarily by four
AA batteries when an electrical power source is unavailable (See “Installation and
Replacement of Batteries” on p. 18). NOTE: If the AC power adapter is in use and the
electrical power fails or the power adapter becomes disconnected, the meter will power
o even if batteries are installed in the As tute140® Meter.
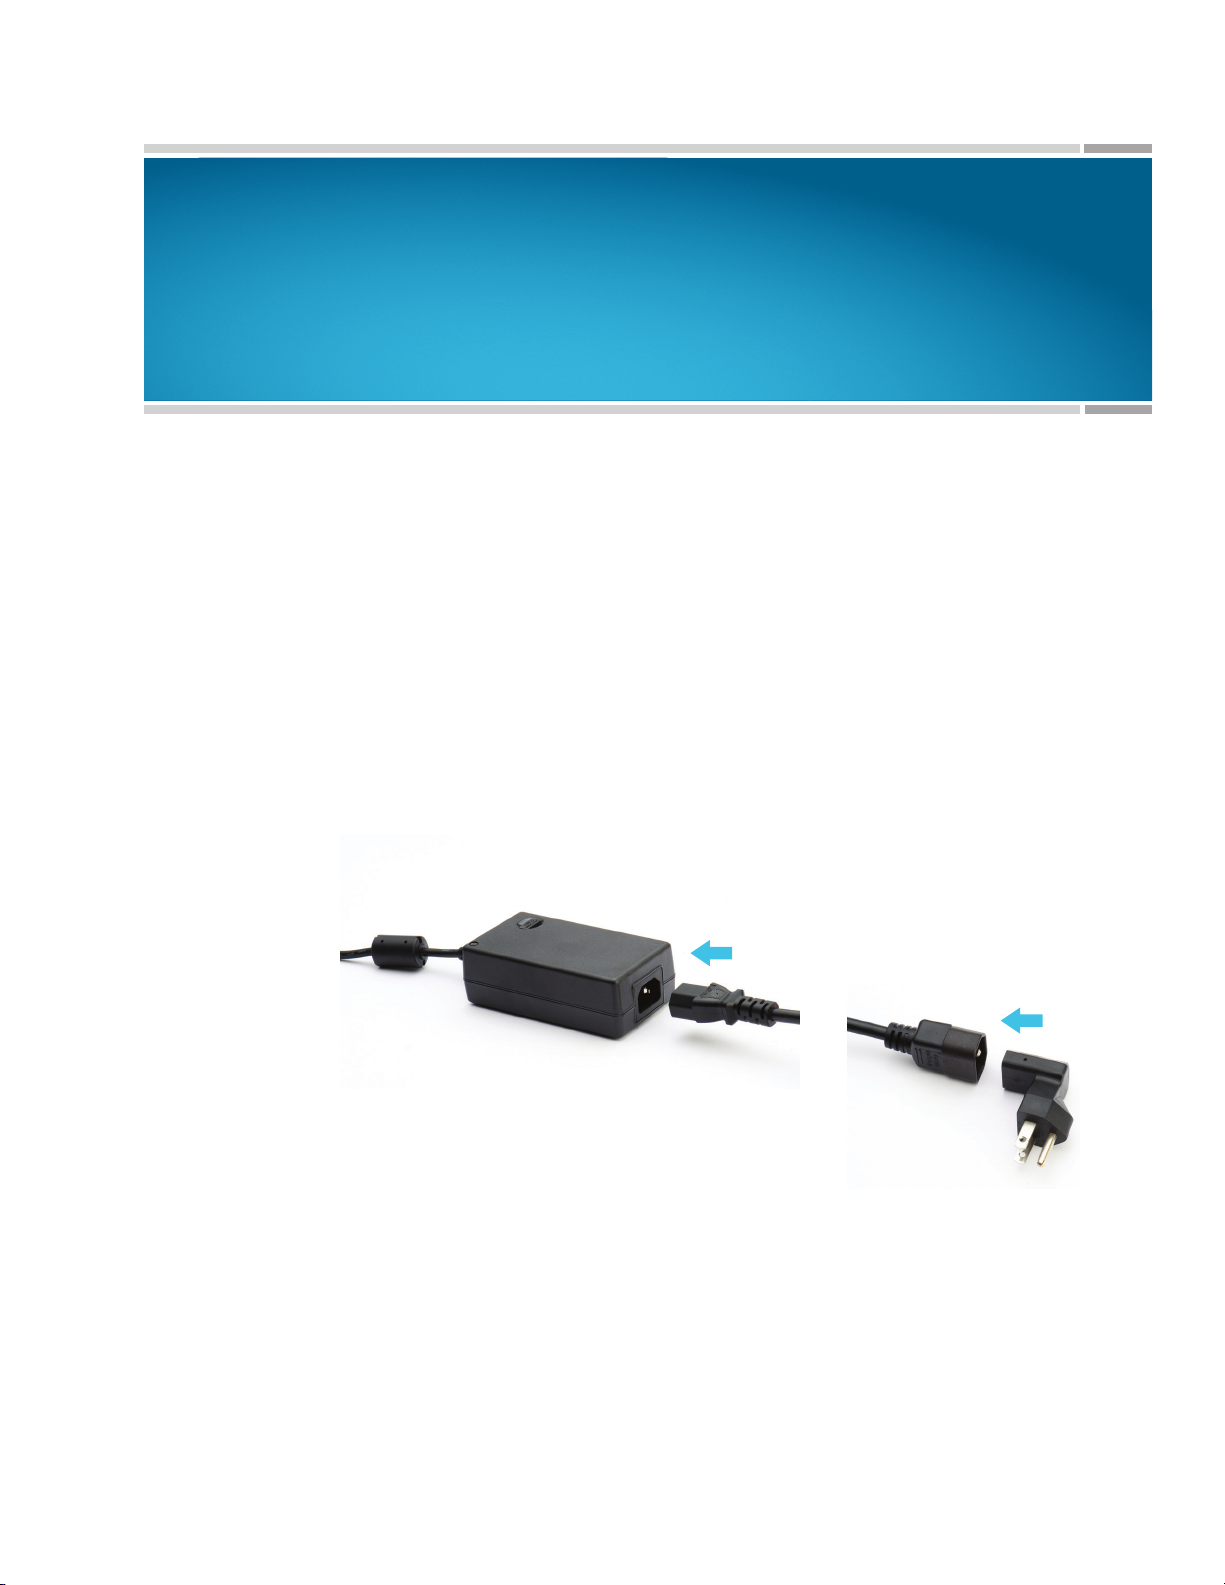
To connect the AC power adapter:
1. Locate the AC power adapter pack containing the AC power cord, the switching
power supply, and the country-speci c adapter, then connect them as shown:
Figure 5.
Connecting power cords
2. Insert the end of the country-speci c adapter into a power source.
©Astute Medical, Inc. 2017 PN 300153 Rev G 2017/01/16
17
Page 18
Installation
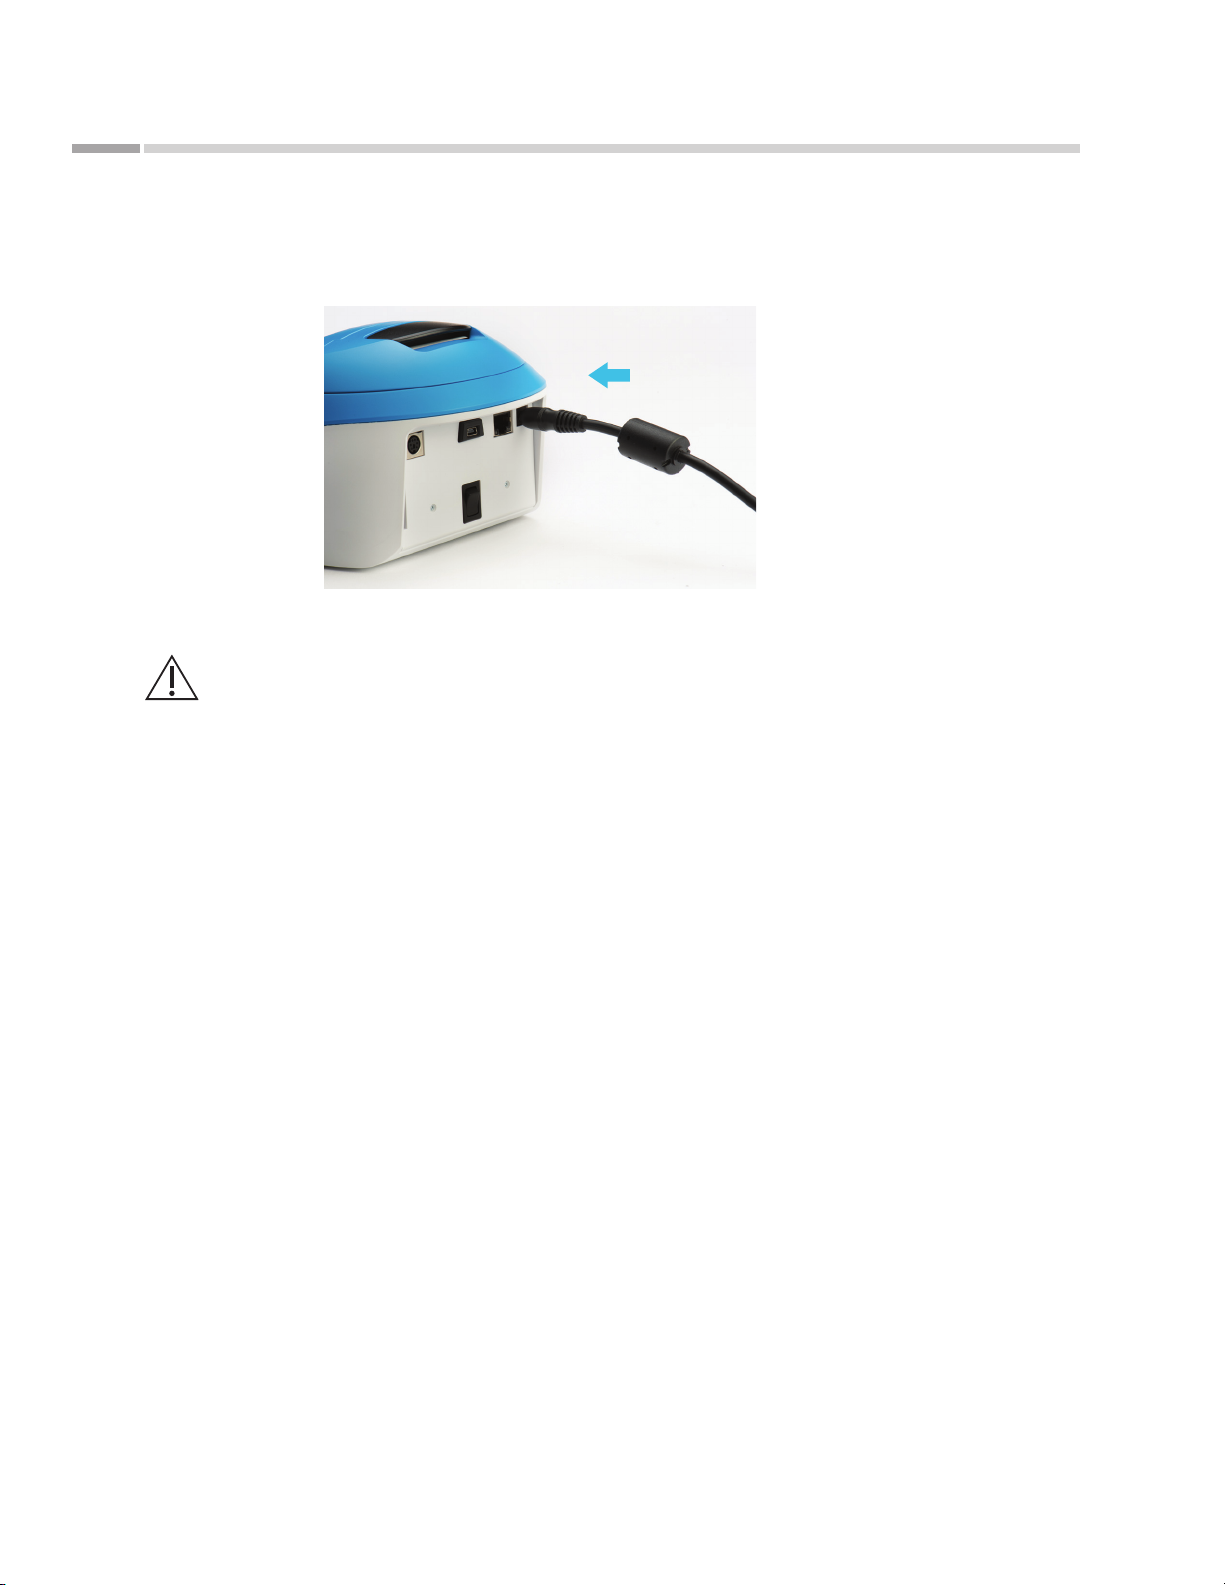
3. Insert the cylindrical end of the switching power adapter into the AC power
adapter port on the back of the Astute140® Meter.
Figure 6.
Connecting AC power
adapter to
Meter
To avoid damage to the Astute140® Meter from a potential power surge, always
plug the AC power adapter into the electrical power source prior to connecting it
to the meter. When removing power, disconnect the AC power adapter from the
Astute140® Meter prior to unplugging it from the electrical power source.
As tu te 140® Meter
Astute140®
Installation and Replacement of Batteries
The Astute140® Meter is generally meant to be powered by plugging the AC power
adapter into an electrical power source (See “AC Power Supply” on p. 17); however,
power may be supplied for a limited period of time by four AA batteries when an
electrical power source is unavailable (for example, in the event of electricity failure
or if the meter must be operated in a location where there is no electric output).
NOTE: If the AC power adapter is in use and the electrical power fails or the power
adapter becomes disconnected, the meter will power o even if batteries are installed in
the Astute140® Meter.
When using alkaline or lithium batteries under a temperature operating range of
20o to 25o C, the Ast ute140® Meter will allow approximately 10 user tests to be
performed before requiring battery replacement.
18
©Astute Medical, Inc. 2017 PN 300153 Rev G 2017/01/16
Page 19
As tu te 140® Meter
Figure 7.
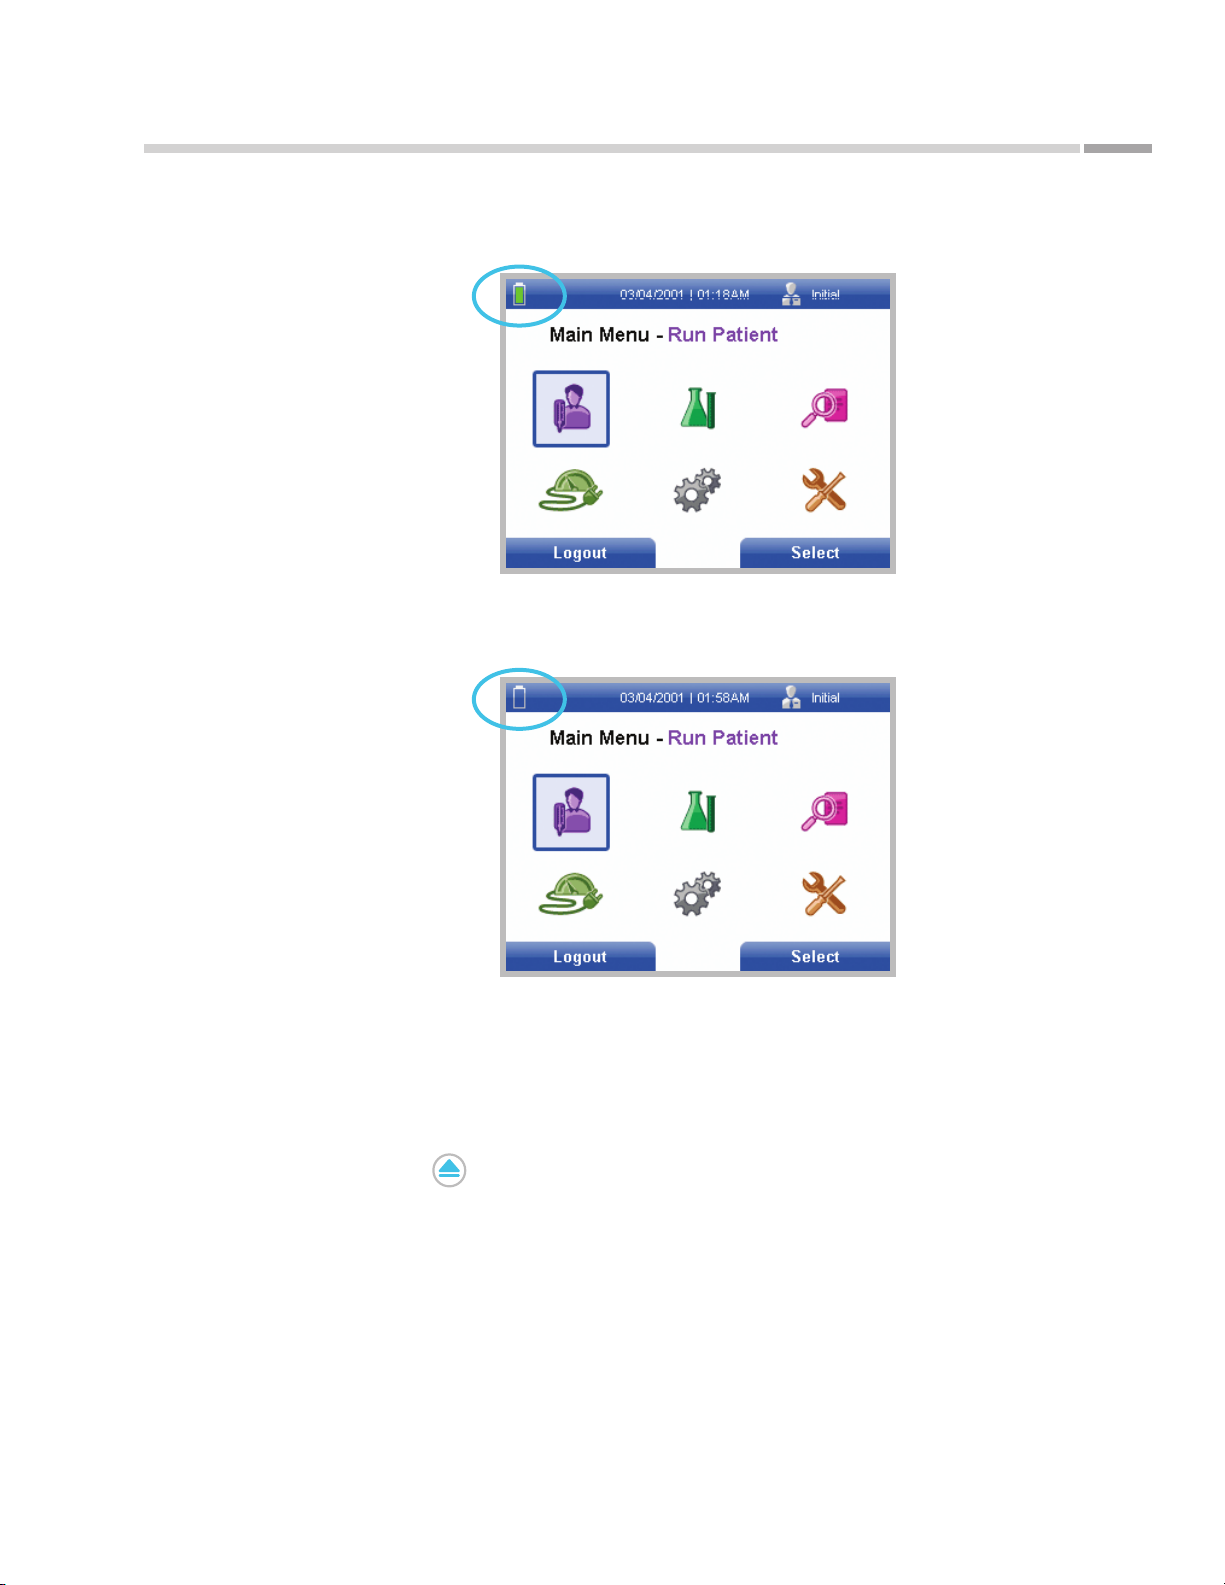
Battery strength
indicator — full
Installation
The Astute140® Meter includes a battery strength indicator.
The batteries should be changed when the battery strength indicator is displayed as
empty and blinking.
Figure 8.
Battery strength
indicator — empty and
blinking
When the battery strength indicator is displayed as empty and blinking, the Astu te140®
Meter can run one additional test within one hour under the same operating conditions
before the batteries will need to be replaced.
To install four AA batteries into the Astute140® Meter or to change the batteries:
1. Press the key to the left of the LCD display to open the Astute140® Meter
2. Power o the Astute140® Meter.
drawer and ensure there is not a cartridge in the meter.
©Astute Medical, Inc. 2017 PN 300153 Rev G 2017/01/16
19
Page 20
Installation
3. Gently turn the Astute140® Meter over so the bottom is facing up and place it on a
fl at surface.
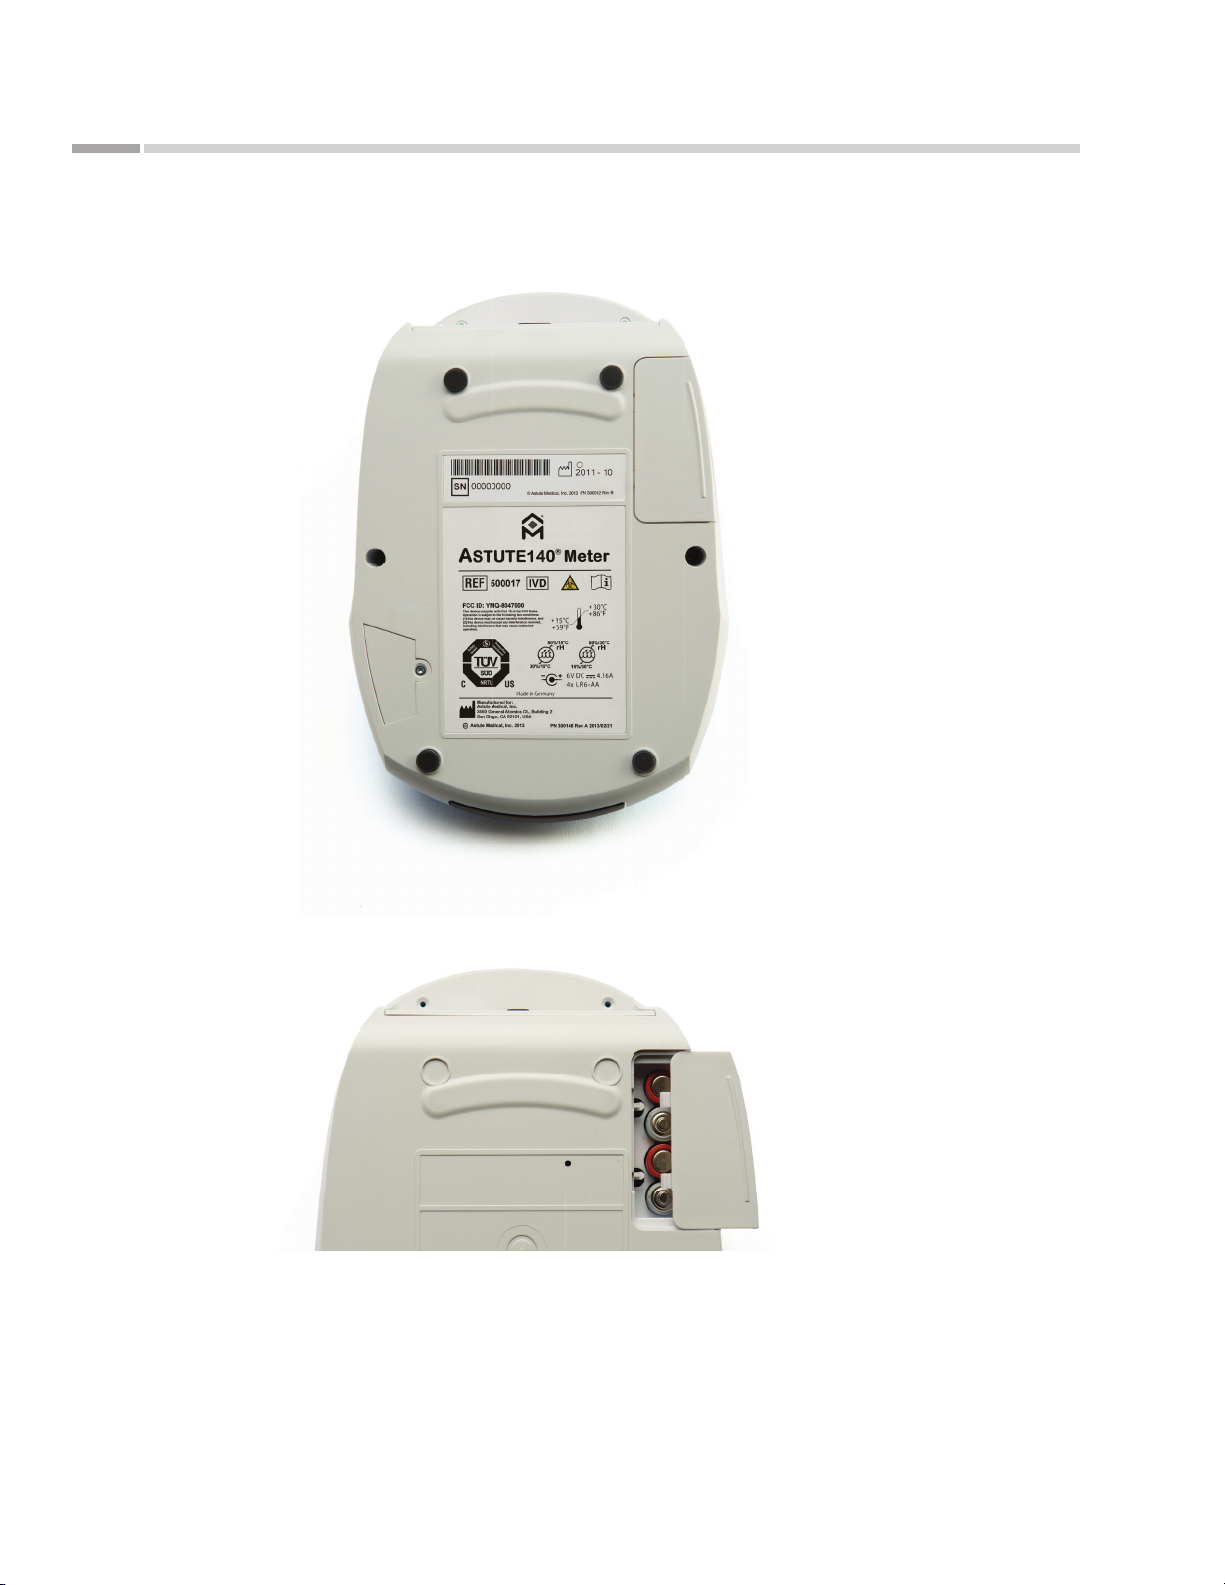
Figure 9.
®
Astute140
bottom facing up
Meter —
As tu te 140® Meter
4. Open the battery cover by pressing your thumb rmly on the center of the battery
cover and sliding it in the direction shown below:
Figure 10.
Removing battery cover
5. If replacing the batteries, remove the old batteries and properly discard them
(See “Disposing of the Batteries” on p. 72).
20
©Astute Medical, Inc. 2017 PN 300153 Rev G 2017/01/16
Page 21
As tu te 140® Meter
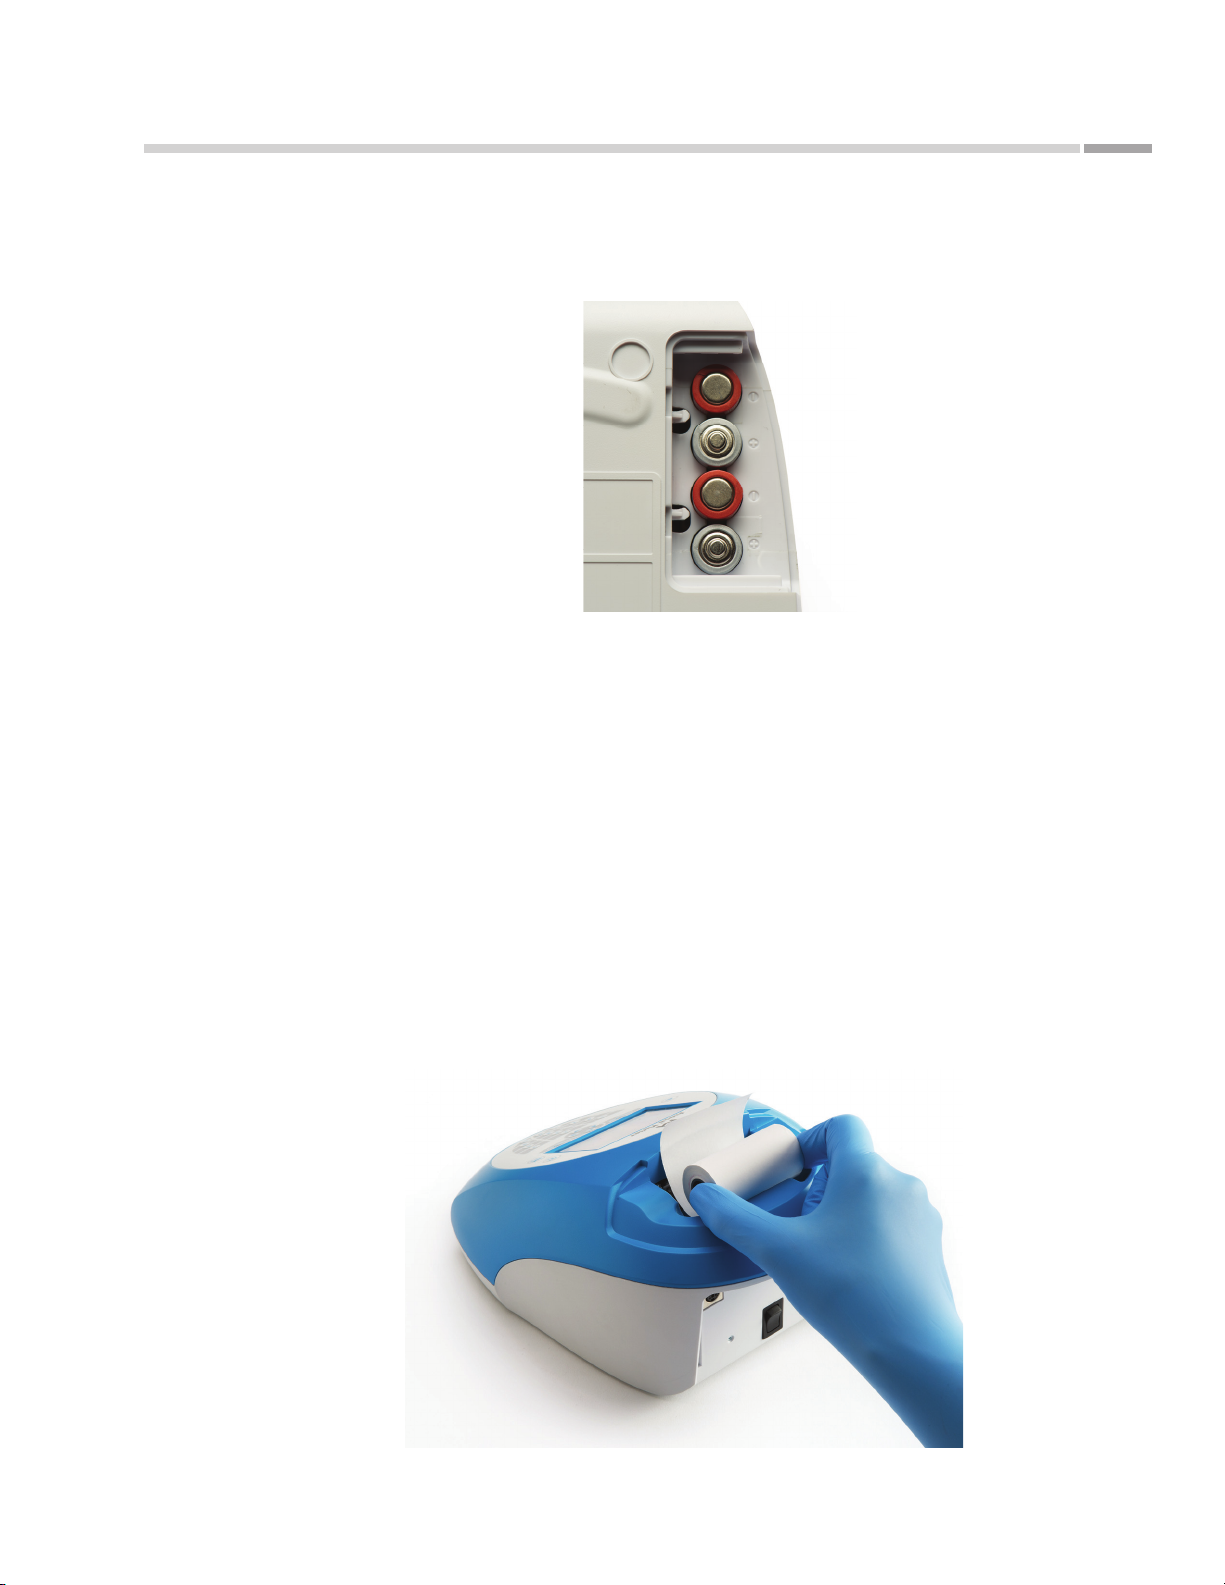
Figure 11.
Battery compartment
Installation
6. Insert four AA 1.5 volt batteries, making sure that the ends of the batteries facing
up correspond to the + and – signs diagrammed in the battery compartment.
7. Replace the battery cover by sliding it back into position as shown until it snaps
rmly in place.
Figure 12.
Installing paper
8. Turn the Astute140® Meter right side up.
Installation or Replacement of Paper
To install or change the internal printer paper, perform the following steps:
1. Remove the printer cover by pulling up on the black handle on top of the cover.
2. If changing the paper, remove the empty spool and any unused paper.
3. Place the paper roll into the holder with the end of the paper coming from under
the roll toward the Astute140® Meter display.
©Astute Medical, Inc. 2017 PN 300153 Rev G 2017/01/16
21
Page 22
Installation
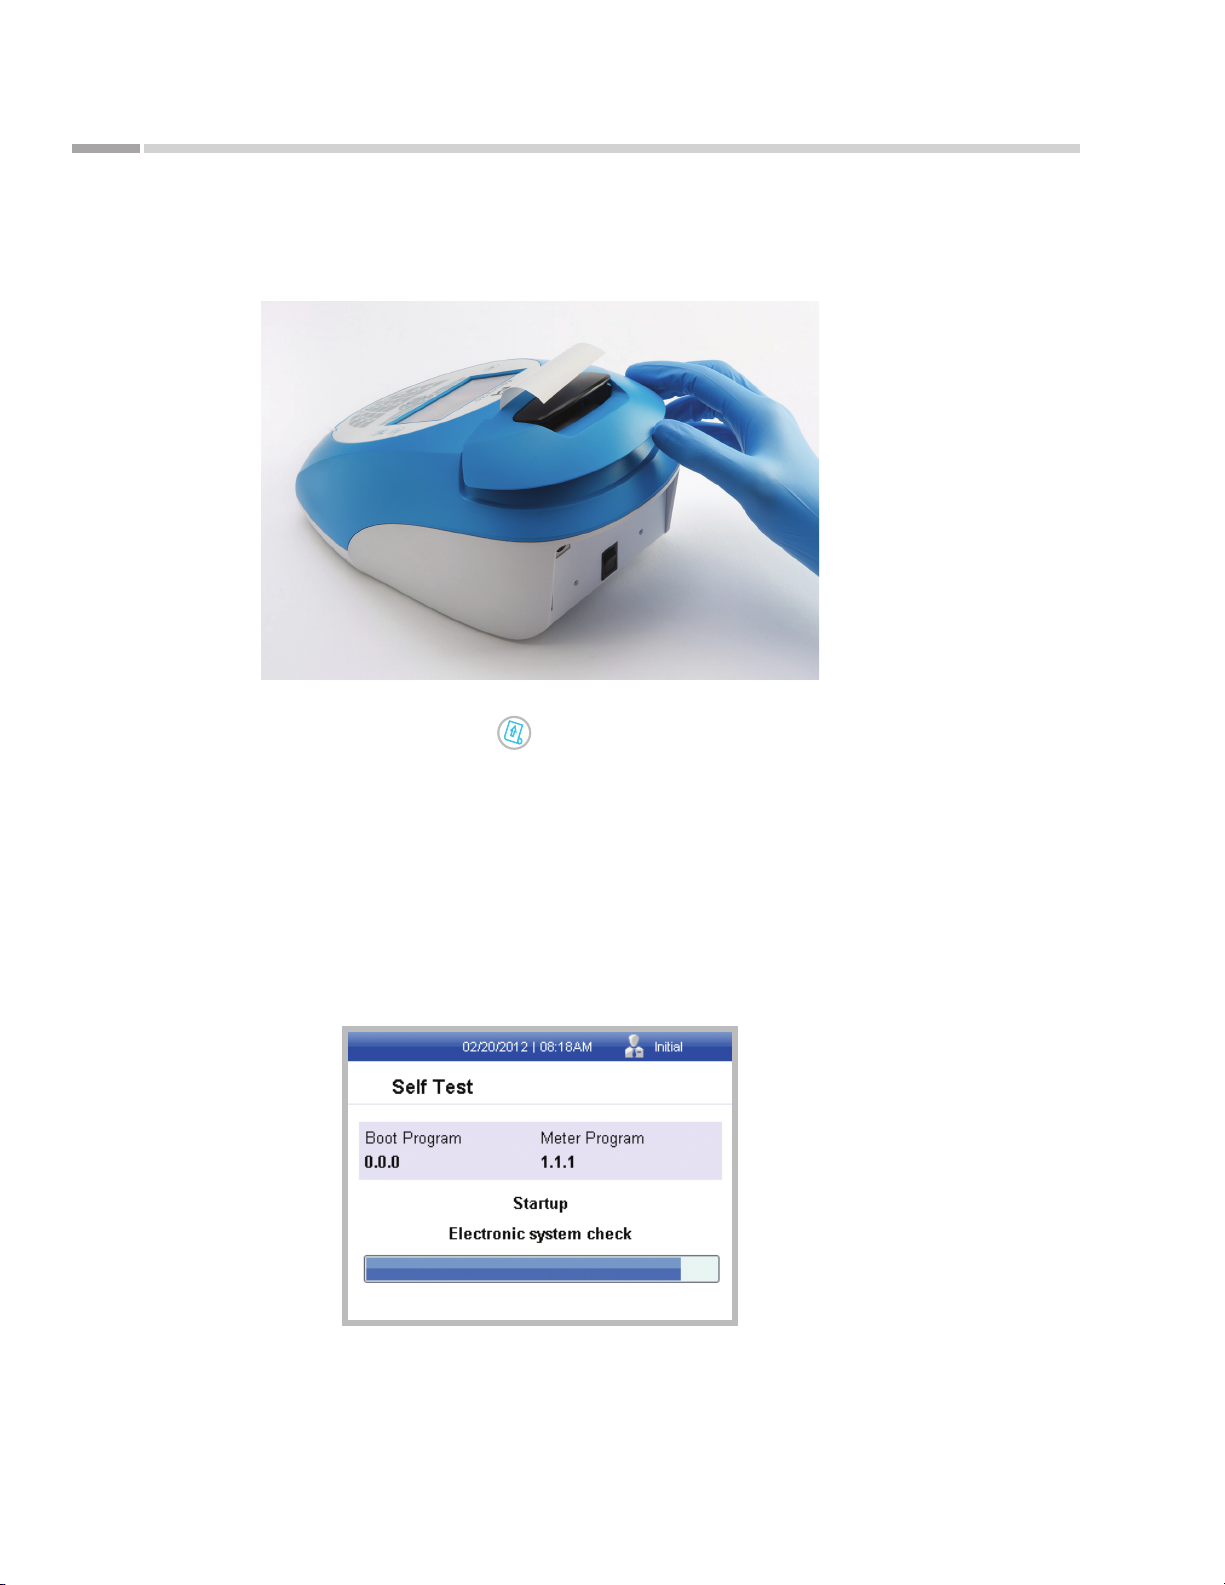
4. Holding the end of the paper, replace the printer cover as shown below until it
snaps into place.
Figure 13.
Replacing printer cover
As tu te 140® Meter
5. To advance the paper feed press .
Powering On the Astute140® Meter
To power on the Astute140® Meter, locate the power switch on the back of the meter
and toggle it upwards, holding it in position until the S elf Tes t screen appears. The
self test feature is intended to check all internal systems of the meter to ensure they
are functioning properly, such as the hardware, software, battery voltage, operating
temperature, and optical system.
Figure 14.
Self Test screen
22
©Astute Medical, Inc. 2017 PN 300153 Rev G 2017/01/16
Page 23
As tu te 140® Meter
Figure 15.
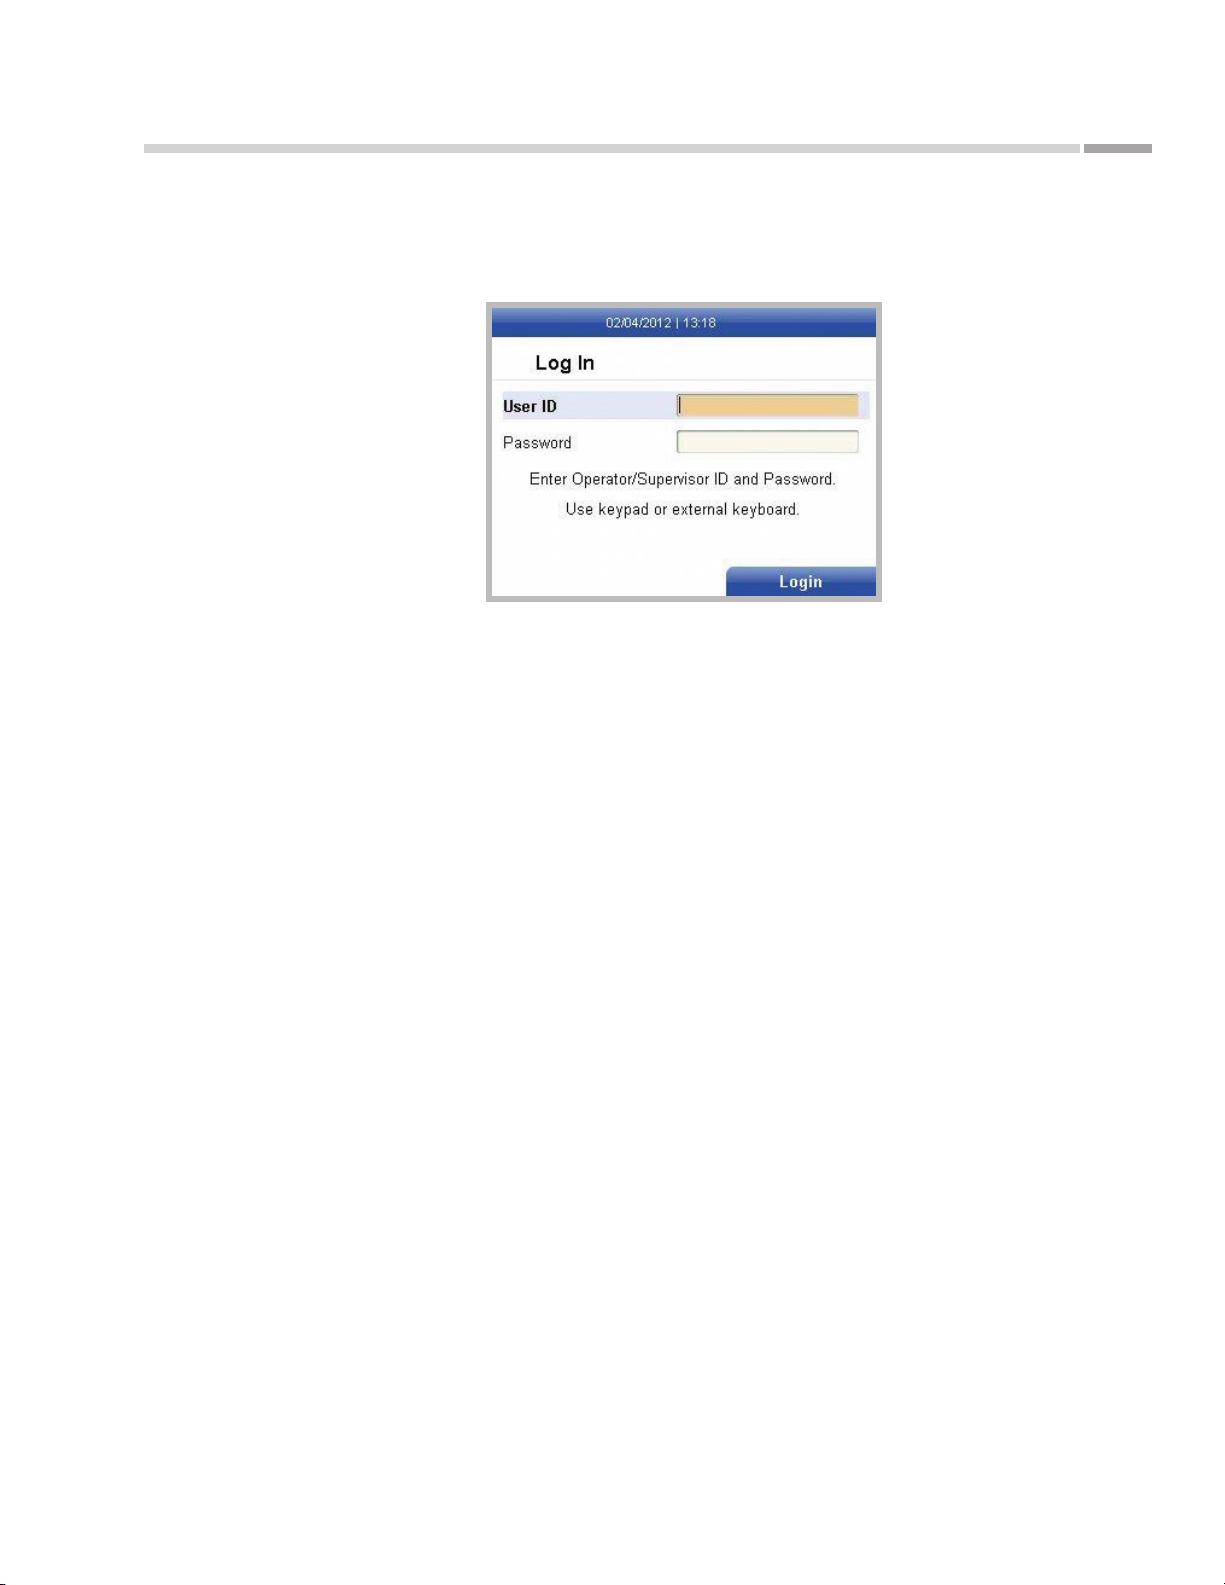
Log In screen
Installation
If all systems pass, the Log In screen will automatically appear, indicating that the
Astute140® Meter is ready for use.
If the self test fails, an error message will be displayed. Press the right soft key to select
OK and close the error message. Restart the Astute140® Meter by turning it o and
back on again (to power o the meter, toggle the power switch upwards and it should
immediately shut down). If after restarting the Astute140® Meter the self test fails again,
contact Astute Technical Support (See “Contacting Astute Medical, Inc.” on p. 7 for
contact information).
Astute140® Meters are factory-calibrated to ensure that the same NephroCheCk® Test
cartridge will provide equivalent results if read in dierent meters. The End User is not
required to calibrate the meter.
Supervisor Instructions:
Conguration and Settings
Adding the First Supervisor User
The rst Supervisor user must be added to the Astu te140® Meter before any default
settings may be set or changed. The Ast ute140® Meter comes from the factory with a
default Supervisor log in ID (1234) that will allow the rst Supervisor user to log in and
create a user prole. Once the new prole is created, the user should log out of the
system and log back in with the new user information before performing any additional
functions. After this process is completed, the default log in (1234) will need to be
manually deleted.
©Astute Medical, Inc. 2017 PN 300153 Rev G 2017/01/16
23
Page 24
Installation
Perform the following steps to add the rst Supervisor user:
1. After powering on the Astu te140® Meter, the Log In screen will be displayed after
a brief self test (See “Powering On the Astute140® Meter” on p. 22 for details).
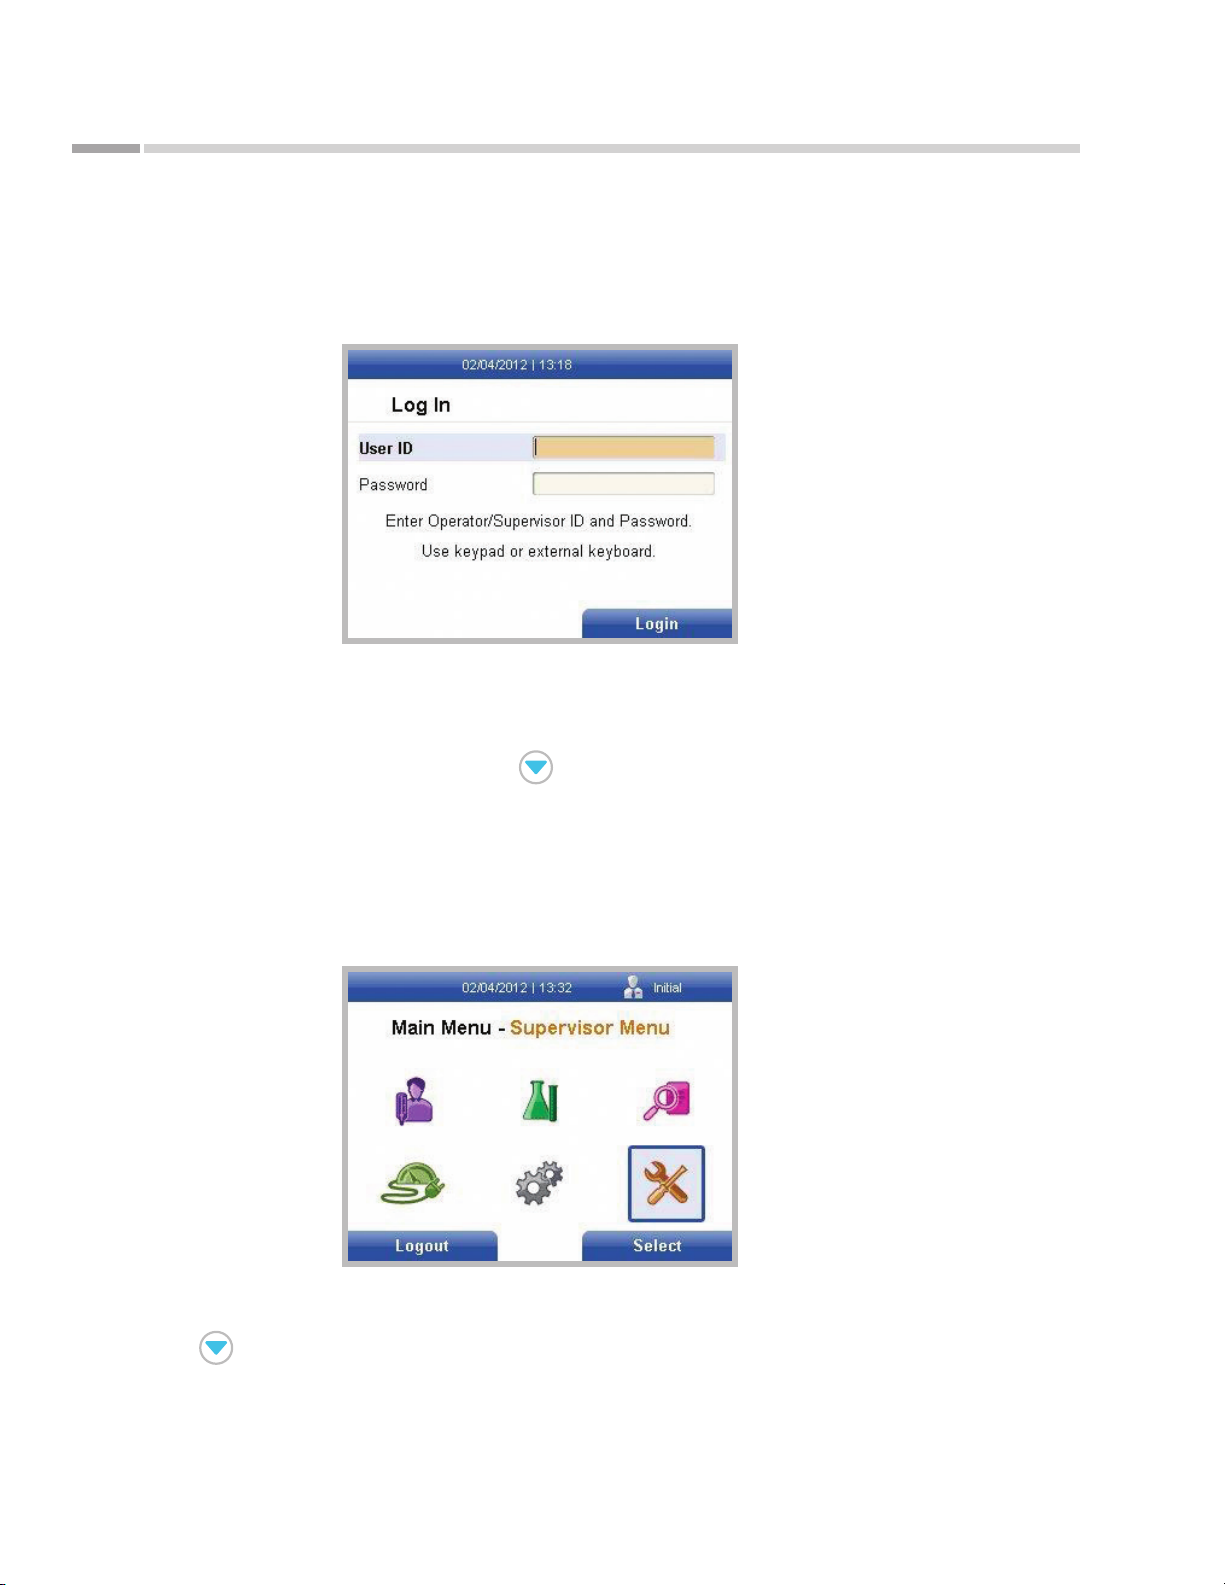
Figure 16.
Log In screen
2. When the Log In screen is displayed, User ID is highlighted. Enter 1234 using the
numeric keypad or an external keyboard (if connected).
As tu te 140® Meter
3. After entering your user ID, use the key to highlight the Password eld.
4. Use the numeric keypad or an external keyboard (if connected) to enter 1234.
Press the right soft key to accept all entries.
5. After logging in, the Main Menu will be displayed. Use the navigation keys
to highlight the Supervisor Menu icon. Press the right soft key to display the
Supervisor Menu.
Figure 17.
Main Menu screen with
Supervisor Menu icon
highlighted
6. When the Supervisor Menu is displayed, General Settings is highlighted. Use the
key to highlight Manage Users and press the right soft key.
24
©Astute Medical, Inc. 2017 PN 300153 Rev G 2017/01/16
Page 25
As tu te 140® Meter
Figure 18.
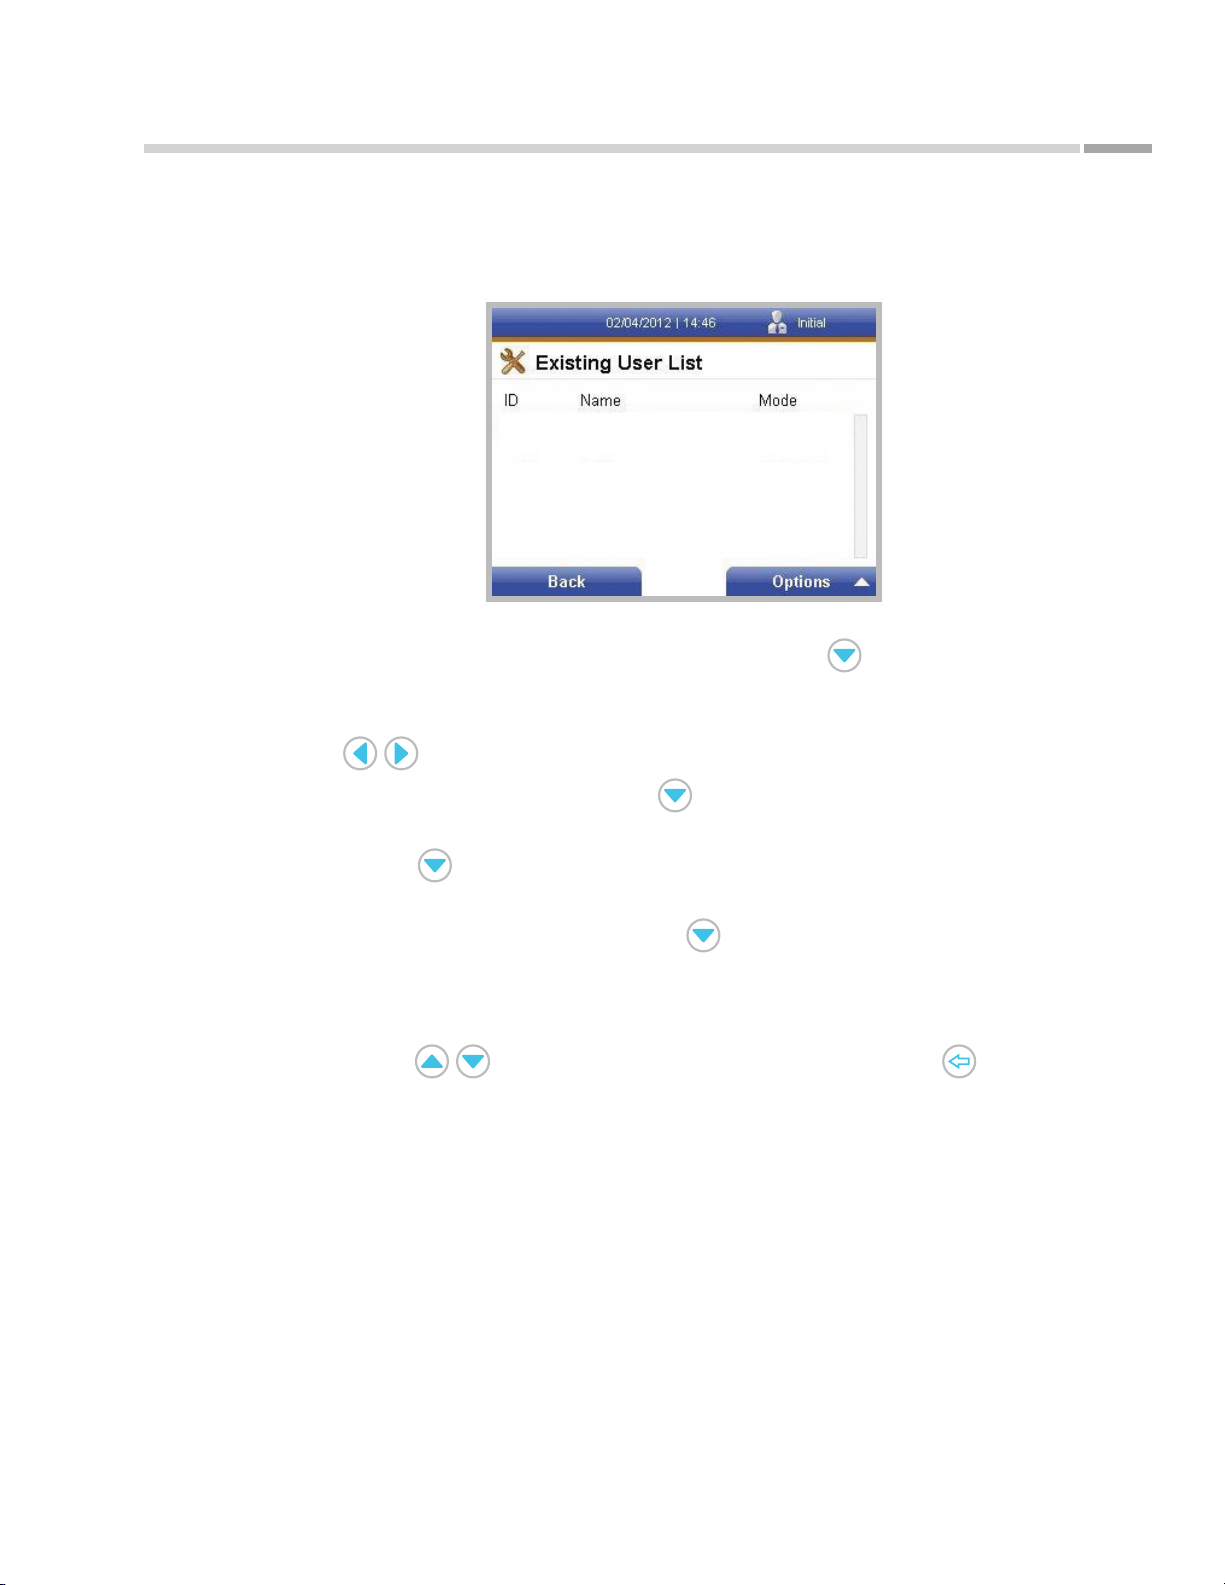
Existing User List screen
Installation
7. The screen should read Existing User List across the top; however, no users
should be listed. Press the right soft key to display the Options pop-up menu.
8. When the Options pop-up menu is displayed, use the key to highlight Add
User and press the right soft key to display the Create New User screen.
9. When the Create New User screen is displayed, Mode will be highlighted. Use the
keys to toggle between Operator and Supervisor. Select Supervisor.
10. After selecting Supervisor, use the key to highlight Name. Use the numeric
keypad or an external keyboard (if connected) to enter a user name.
11. Use the key to highlight ID. Use the numeric keypad or an external keyboard
or barcode reader (if connected) to enter a numeric ID up to 12 digits in length.
12. Once a numeric ID is entered, use the key to highlight Password. Use the
numeric keypad or an external keyboard (if connected) to enter a password up to
12 digits or characters in length.
13. Conrm that the correct information is displayed. To make changes to the entries,
use the keys to highlight the eld to be changed. Use the key
to delete the incorrect entry, and then use the numeric keypad or an external
keyboard (if connected) to change the entries. To clear all entries on the screen,
press the left soft key. Once the correct entries have been made, press the right
soft key to accept all entries.
14. After the new user information is accepted, the Existing User List screen will again
be displayed. The newly created user information should now appear in the list,
including the user ID, Name, and Mode (Supervisor or Operator).
15. Press the left soft key to return to the main Supervisor Menu.
16. Press the left soft key to return to the Main Menu.
17. Press the left soft key to log out of the system.
©Astute Medical, Inc. 2017 PN 300153 Rev G 2017/01/16
25
Page 26
Installation
18. After logging out, the Log In screen will appear and User ID will be highlighted.
Enter your new user ID using the numeric keypad or an external keyboard (if
connected).
19. After entering your user ID, use the key to highlight the Password eld.
20. Use the numeric keypad or an external keyboard (if connected) to enter your new
password.
21. Conrm that the correct log in information is displayed. To make changes to the
entries, use the keys to highlight the eld to be changed. Use the key
to delete the incorrect entry, then use the numeric keypad or an external keyboard
(if connected) to change the entries. Press the right soft key to accept all entries.
Setting or Changing Time
The Supervisor can set or change the time by performing the following steps:
1. Press the key to display the Main Menu.
As tu te 140® Meter
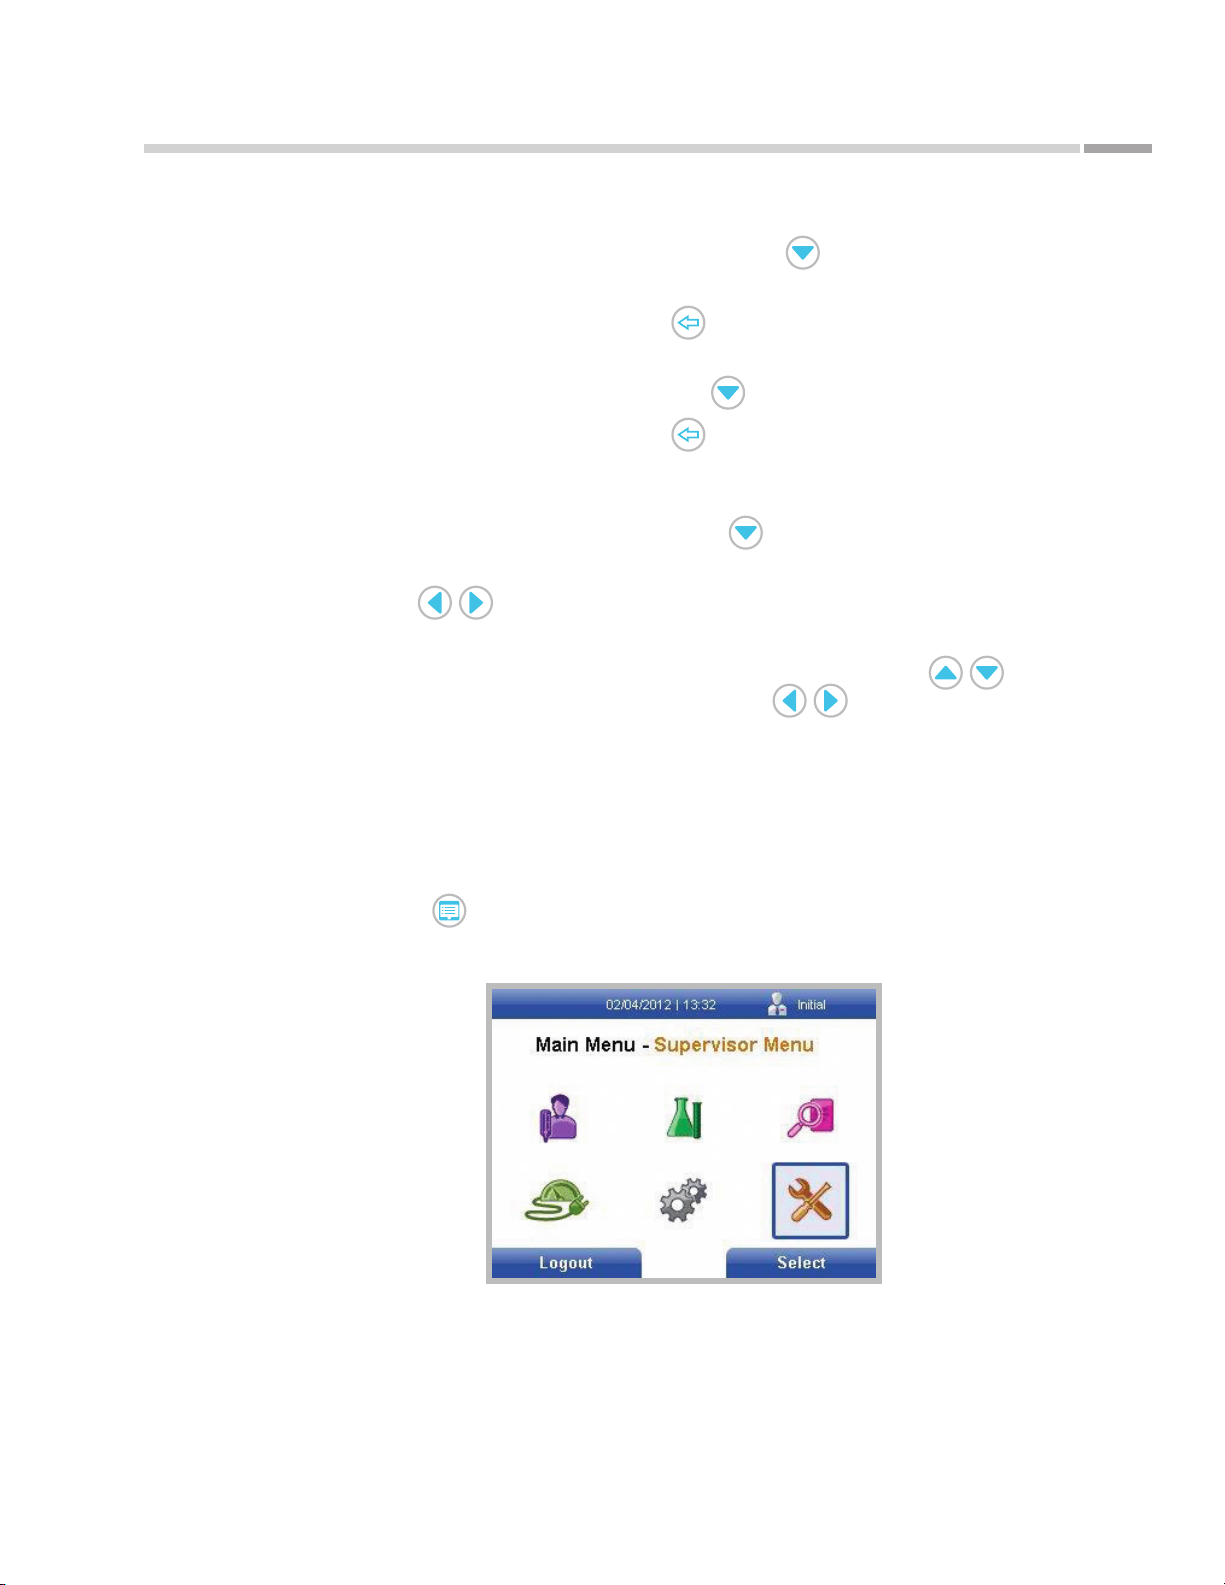
2. Use the navigation keys to highlight the Supervisor Menu icon.
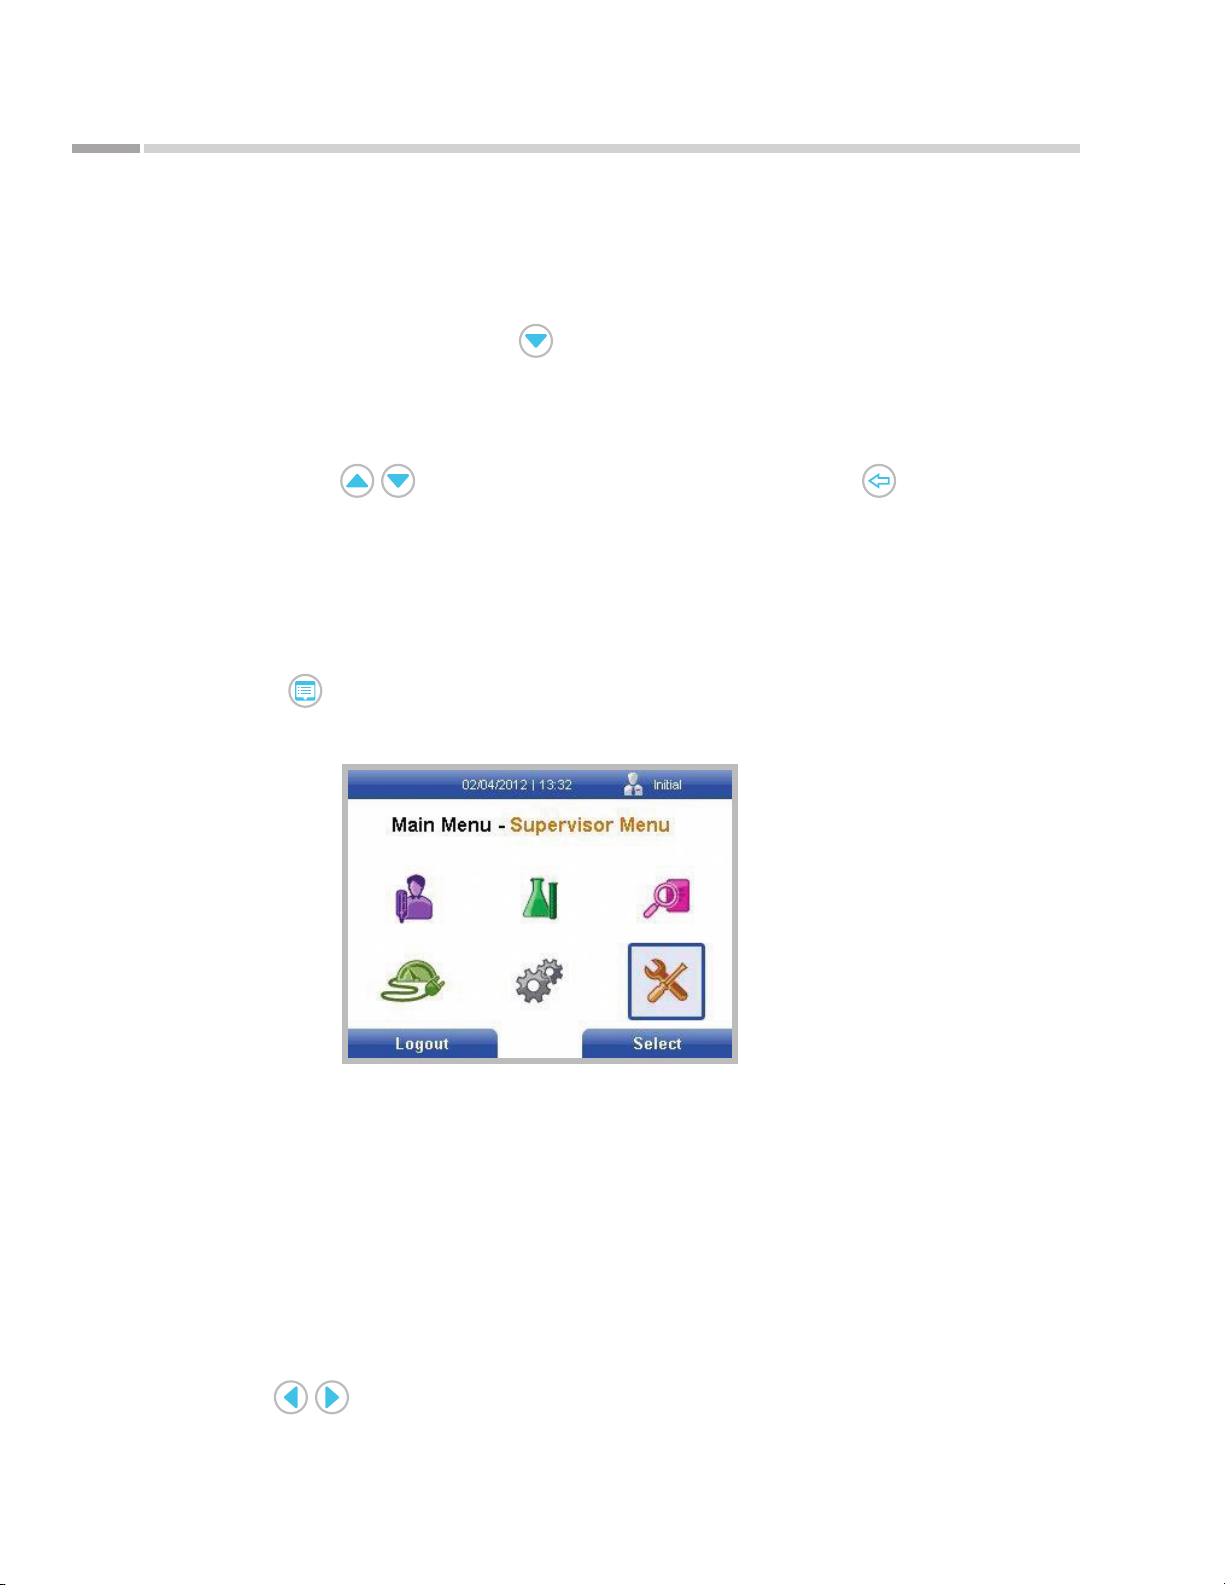
Figure 19.
Main Menu screen with
Supervisor Menu icon
highlighted
3. Press the right soft key to display the Supervisor Menu.
4. When the Supervisor Menu is displayed, General Meter Settings is highlighted.
Press the right soft key to display the General Settings screen.
5. When the General Settings screen is displayed, Default Settings is highlighted.
Press the right soft key to display the Default Settings screen.
6. When the Default Settings screen is displayed, Time & Time Format is highlighted.
Press the right soft key to display the Time & Time Format screen.
26
7. When the Time & Time Format screen is displayed, Time Format is highlighted.
Use the keys to choose either a 12- or 24-hour time format for display on
the screen and printouts.
©Astute Medical, Inc. 2017 PN 300153 Rev G 2017/01/16
Page 27
As tu te 140® Meter
Installation
8. After the desired time format is selected, use the key to highlight the Hours
eld.
9. To change an existing entry, use the key to rst delete the entry, then use the
numeric keypad or an external keyboard (if connected) to enter the correct hour.
10. After the correct hour is entered, use the key to highlight the Minutes eld.
11. To change an existing entry, use the key to rst delete the entry, then use
the numeric keypad or an external keyboard (if connected) to enter the correct
minutes.
12. After entering the correct minutes, use the key to highlight the AM or PM
eld.
13. Use the keys to select AM or PM.
14. After conrming that the correct time information is displayed, press the right soft
key to accept all entries. To make changes to the entries, use the keys
to highlight the eld to be changed and use the keys to toggle between
options, or use the numeric keypad to change numeric entries. To clear all entries
on the screen, press the left soft key.
Setting or Changing Date
The Supervisor can set or change the date by performing the following steps:
1. Press the key to display the Main Menu.
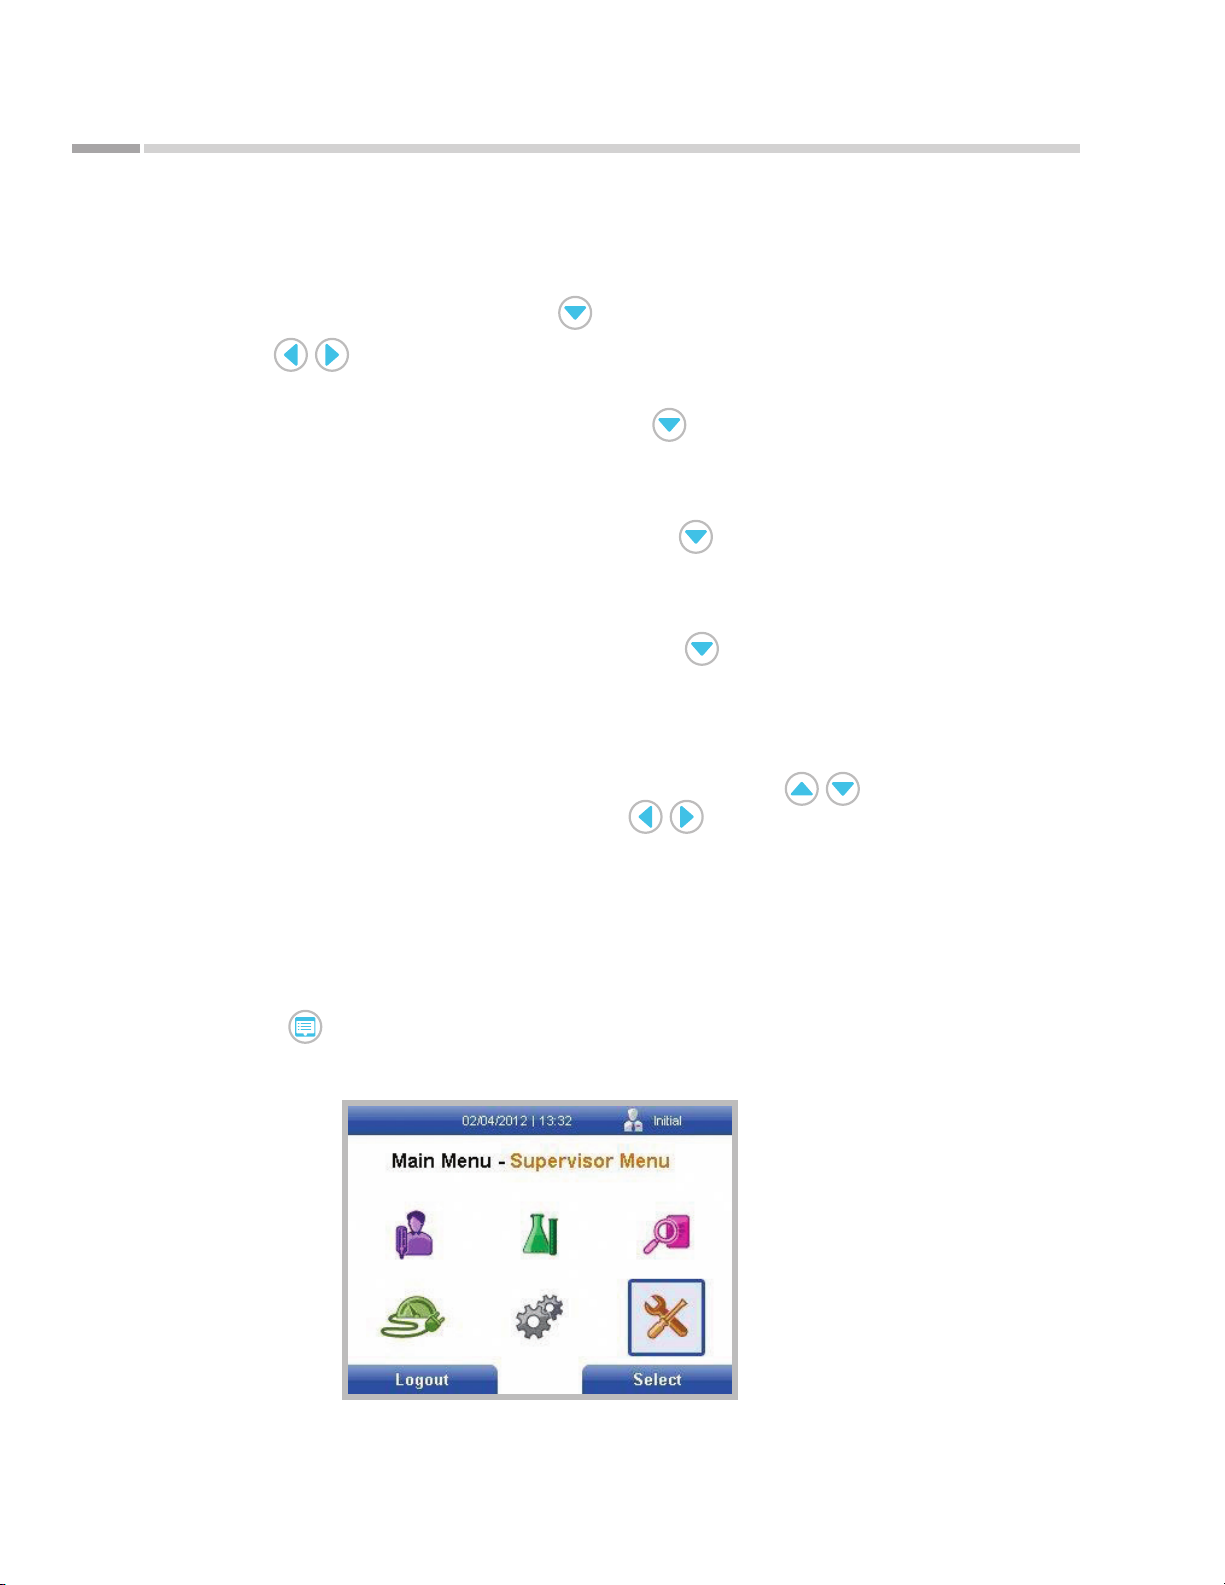
2. Use the navigation keys to highlight the Supervisor Menu icon.
Figure 20.
Main Menu screen with
Supervisor Menu icon
highlighted
3. Press the right soft key to display the Supervisor Menu.
4. When the Supervisor Menu is displayed, General Meter Settings is highlighted.
Press the right soft key to display the General Settings screen.
©Astute Medical, Inc. 2017 PN 300153 Rev G 2017/01/16
27
Page 28
Installation
5. When the General Settings screen is displayed, Default Settings is highlighted.
Press the right soft key to display the Default Settings screen.
6. On the Default Settings screen, use the key to highlight Date & Date Format.
7. Use the keys to scroll through the available date formats for display on
the screen and printouts.
8. After the desired date format is displayed, use the key to highlight the Day
eld.
9. Use the numeric keypad to enter the day of the month.
10. After the correct day of the month is entered, use the key to highlight the
Month eld.
11. Use the numeric keypad to enter the month of the year.
12. After the correct month of the year is entered, use the key to highlight the
Year eld.
As tu te 140® Meter
13. Use the numeric keypad to enter the correct year.
14. After conrming that the correct date information is displayed, press the right soft
key to accept all entries. To make changes to the entries, use the keys
to highlight the eld to be changed and use the keys to toggle between
date format options, or use the numeric keypad to change numeric entries. To
clear all entries on the screen, press the left soft key.
Setting or Changing the Language
The Supervisor can change the default language by performing the following steps:
1. Press the key to display the Main Menu.
2. Use the navigation keys to highlight the Supervisor Menu icon.
Figure 21.
Main Menu screen with
Supervisor Menu icon
highlighted
28
©Astute Medical, Inc. 2017 PN 300153 Rev G 2017/01/16
Page 29

As tu te 140® Meter
Installation
3. Press the right soft key to display the Supervisor Menu.
4. When the Supervisor Menu is displayed, General Settings is highlighted. Press the
right soft key to display the General Settings screen.
5. When the General Settings screen is displayed, Default Settings is highlighted.
Press the right soft key to display the Default Settings screen.
6. On the Default Settings screen, use the key to highlight Language.
7. Press the right soft key to display the Language Menu.
8. When the Language Menu is displayed, use the or keys to highlight the
desired default language.
9. Press the right soft key to select the highlighted default language.
Updating System Software
The software version currently running on the Astute140® Meter can be found on the
Se lf Test screen during start-up (See “Powering On the Astute140® Meter” on p. 22), as
well as on the Meter Information screen (See “Astute140® Meter Information” on p. 40).
Software updates for the Astute140® Meter will be required periodically. When updates
are available, Astute Medical, Inc. will send written notications by email and postal
service including a description of the software update and downloading instructions.
Supervisors can download software updates through the USB and/or Ethernet port.
Updating As tute140® Meter Languages
When new languages for the Astu te140® Meter become available, Astute Medical,
Inc. will send written notications by email and postal service of the newly available
languages and downloading instructions. Supervisors can update the Astu te140®
Meter languages by downloading language updates through the USB and/or Ethernet
port.
Operator Registering Permissions
The Supervisor can grant permission for Operators to register NephroCheCk®
Test cartridge lots, liquid control lots and the EQC device in the default settings. If
permission is not granted, only Supervisors can perform these functions.
To set the registering permissions for Operators, perform the following steps:
1. Press the key to display the Main Menu.
©Astute Medical, Inc. 2017 PN 300153 Rev G 2017/01/16
29
Page 30
Installation
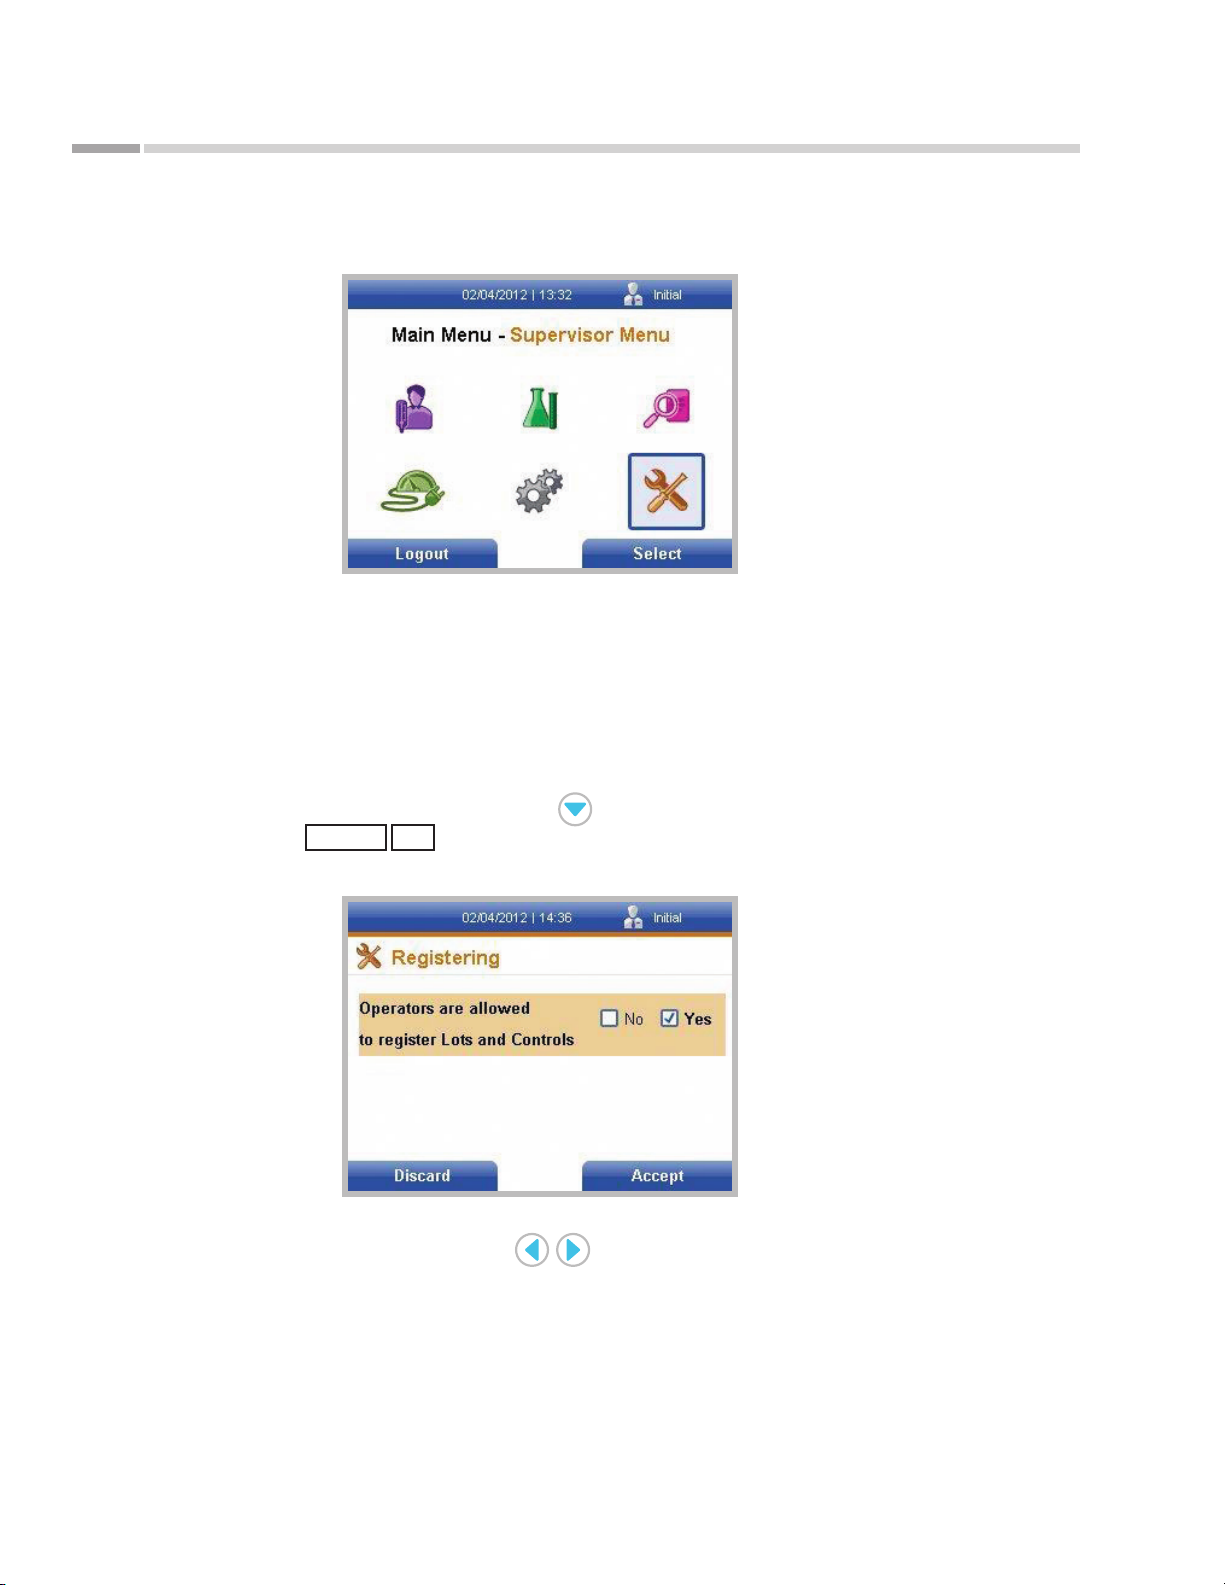
2. Use the navigation keys to highlight the Supervisor Menu icon.
Figure 22.
Main Menu screen with
Supervisor Menu icon
highlighted
3. Press the right soft key to display the Supervisor Menu.
4. When the Supervisor Menu is displayed, General Meter Settings is highlighted.
Press the right soft key to display the General Settings screen.
As tu te 140® Meter
5. When the General Settings screen is displayed, Default Settings is highlighted.
Press the right soft key to display the Default Settings screen.
6. On the Default Settings screen, use the key to highlight
Registering
screen.
CONTROL LOT
and press the right soft key to display the Registering
Figure 23.
Registering screen
7. On the Registering screen, use the keys to toggle between Yes and No
to either allow or not allow Operators to register lots and controls.
30
8. Press the right soft key.
©Astute Medical, Inc. 2017 PN 300153 Rev G 2017/01/16
Page 31
As tu te 140® Meter
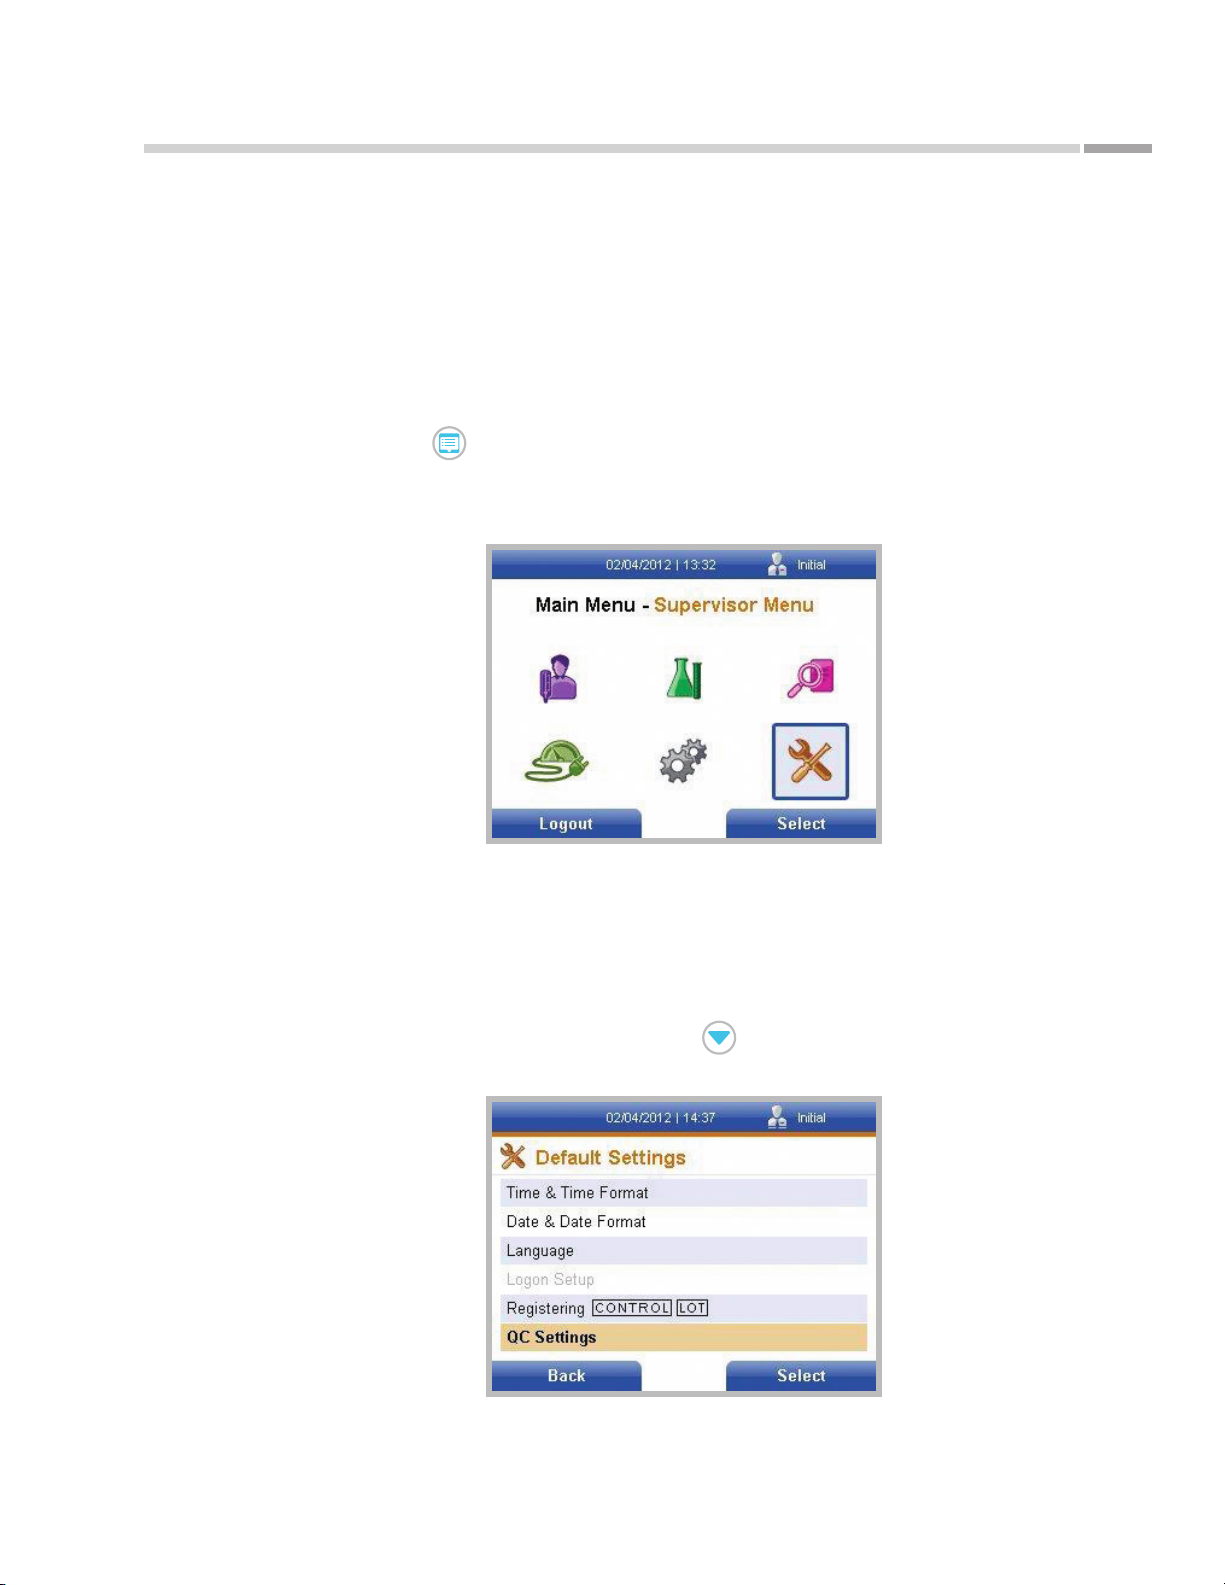
Figure 24.
Main Menu screen with
Supervisor Menu icon
highlighted
Installation
Quality Control Settings
Perform the following steps to set the time intervals at which LQC and EQC must
be run. It is recommended that LQC be run every 30 days (as well as with every new
lot of NephroCheCk® Test cartridges, with each new shipment of NephroCheCk® Test
Kits, or in accordance with the best practices of the institution). EQC should be run in
accordance with the best practices of the institution.
1. Press the key to display the Main Menu.
2. Use the navigation keys to highlight the Supervisor Menu icon and press the right
soft key.
3. When the Supervisor Menu is displayed, General Meter Settings is highlighted.
Press the right soft key to display the General Settings screen.
4. When the General Settings screen is displayed, Default Settings is highlighted.
Press the right soft key to display the Default Settings screen.
5. On the Default Settings screen, use the key to highlight QC Settings and
press the right soft key.
Figure 25.
Default Settings screen
with QC Settings
highlighted
©Astute Medical, Inc. 2017 PN 300153 Rev G 2017/01/16
31
Page 32
Installation
6. When the QC Settings screen is displayed, LQC Interval (Days); 0 = o will be
highlighted. Use the numeric keypad, or an external keyboard (if connected) to
enter the interval in days at which LQC must be run. NOTE: entering “0” indicates
that LQC is not required to be run at all. To change an existing entry, use the
key to rst delete the entry, then enter the new number using the numeric keypad
or an external keyboard (if connected).
7. Press the key to highlight EQC Interval (Hours); 0 = o. Use the numeric
keypad, or an external keyboard (if connected) to enter the interval in hours at
which EQC must be run. NOTE: entering “0” indicates that EQC is not required to
be run at all. To change an existing entry, use the key to rst delete the entry,
then enter the new number using the numeric keypad or an external keyboard (if
connected).
8. Press the right soft key to accept the intervals entered.
LIS Settings
As tu te 140® Meter
If the Astute140® Meter is connected to an LIS, Supervisors can set the timeout interval,
the IP Address, Port Number, and whether results will be automatically transmitted from
the meter to the LIS. To set the LIS settings, follow these steps:
1. Press the key to display the Main Menu.
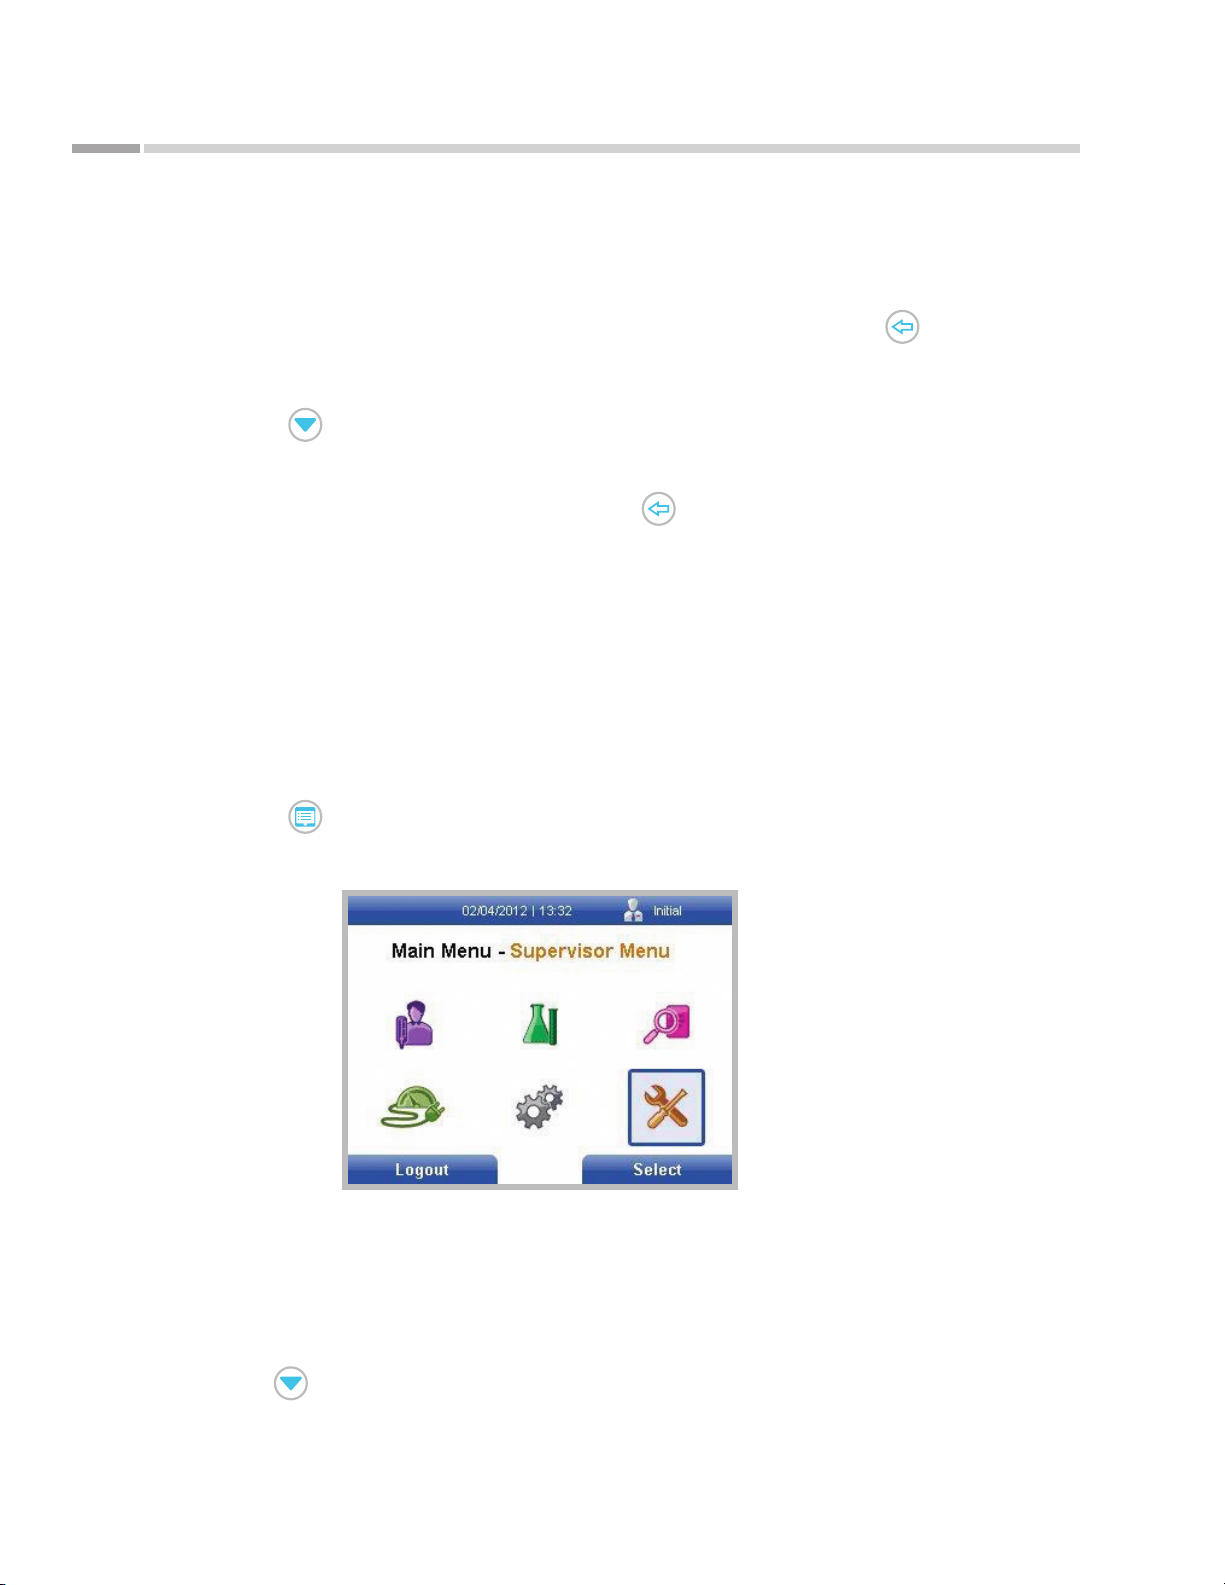
2. Use the navigation keys to highlight the Supervisor Menu icon.
Figure 26.
Main Menu screen with
Supervisor Menu icon
highlighted
3. Press the right soft key to display the Supervisor Menu.
4. When the Supervisor Menu is displayed, General Meter Settings is highlighted.
Press the right soft key to display the General Settings screen.
32
5. When the General Settings screen is displayed, Default Settings is highlighted.
Use the key to highlight LIS Settings and press the right soft key.
©Astute Medical, Inc. 2017 PN 300153 Rev G 2017/01/16
Page 33
As tu te 140® Meter
Figure 27.
LIS Settings screen when
LIS is not available
Installation
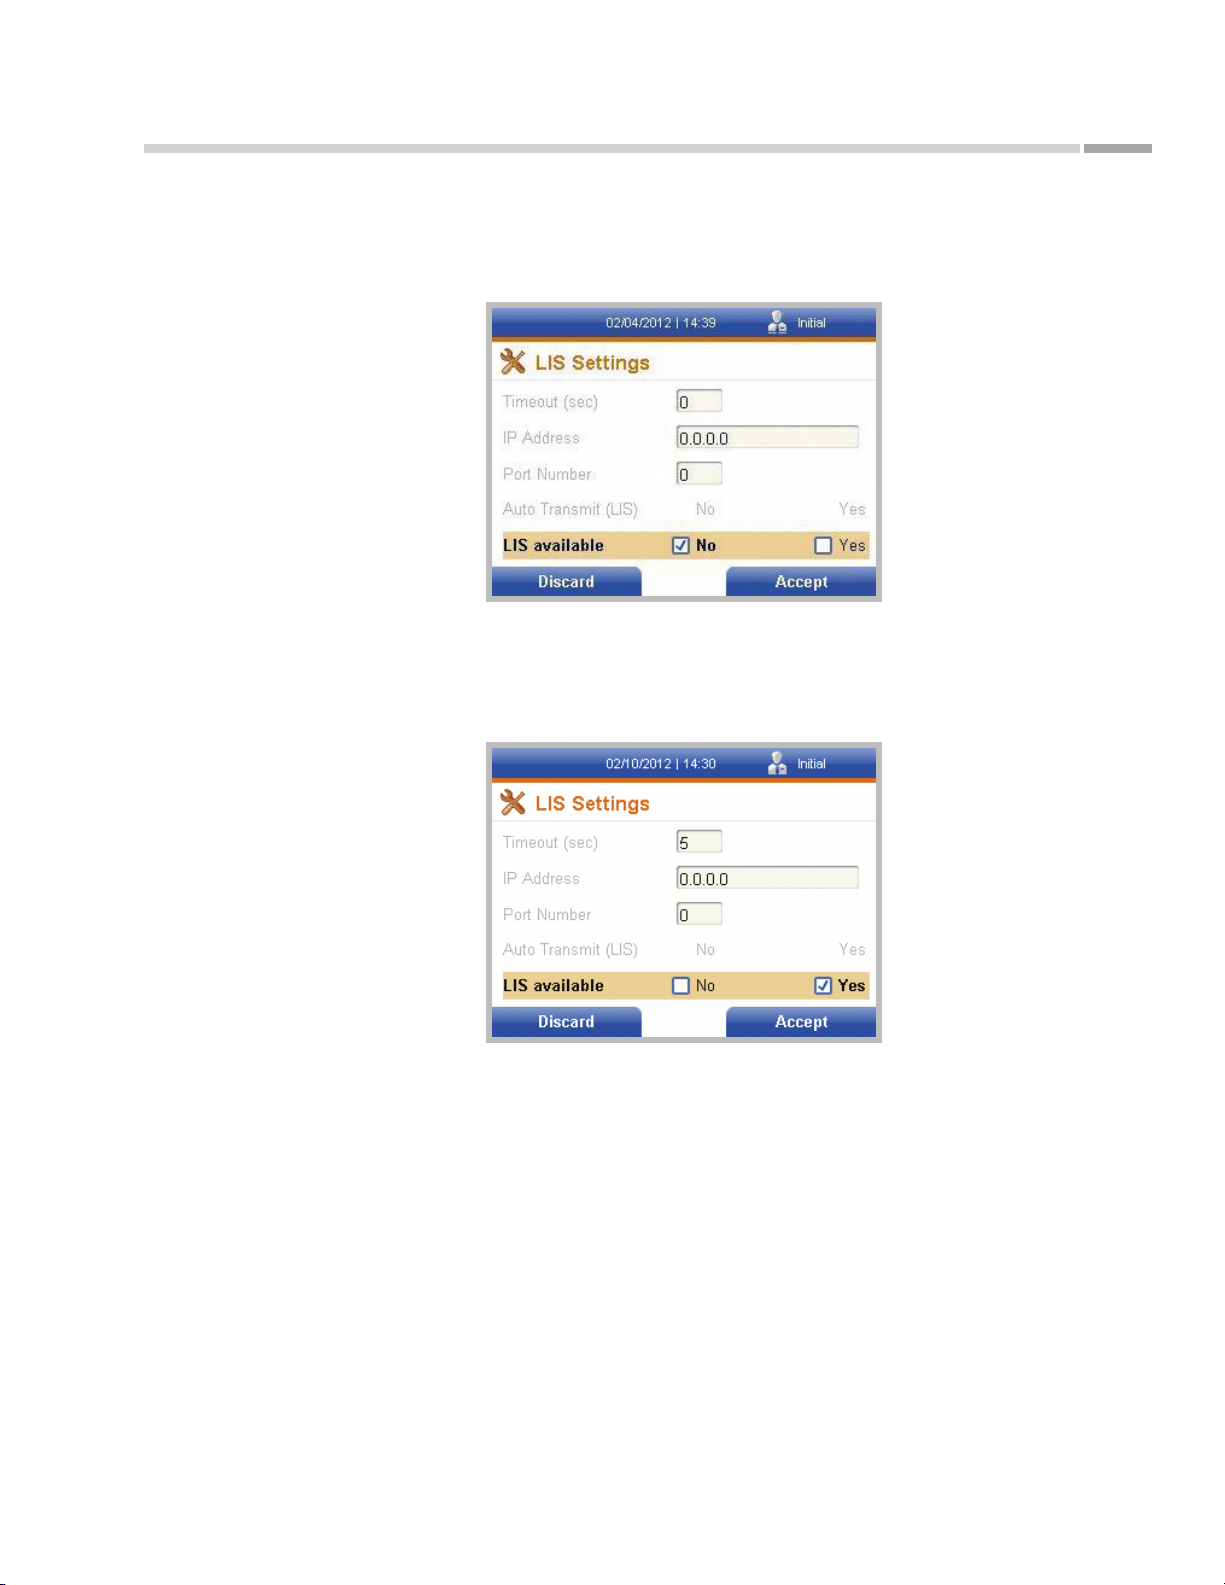
6. If the Astute140® Meter is not connected to an LIS, LIS available will be
highlighted, No will be checked, and none of the LIS parameters may be changed.
If the Astut e140® Meter is connected to an LIS, Yes will be checked and
the timeout interval, IP Address, Port Number, and whether results will be
automatically transmitted to the LIS may be selected.
Figure 28.
LIS Settings screen when
LIS is available
©Astute Medical, Inc. 2017 PN 300153 Rev G 2017/01/16
33
Page 34
Installation
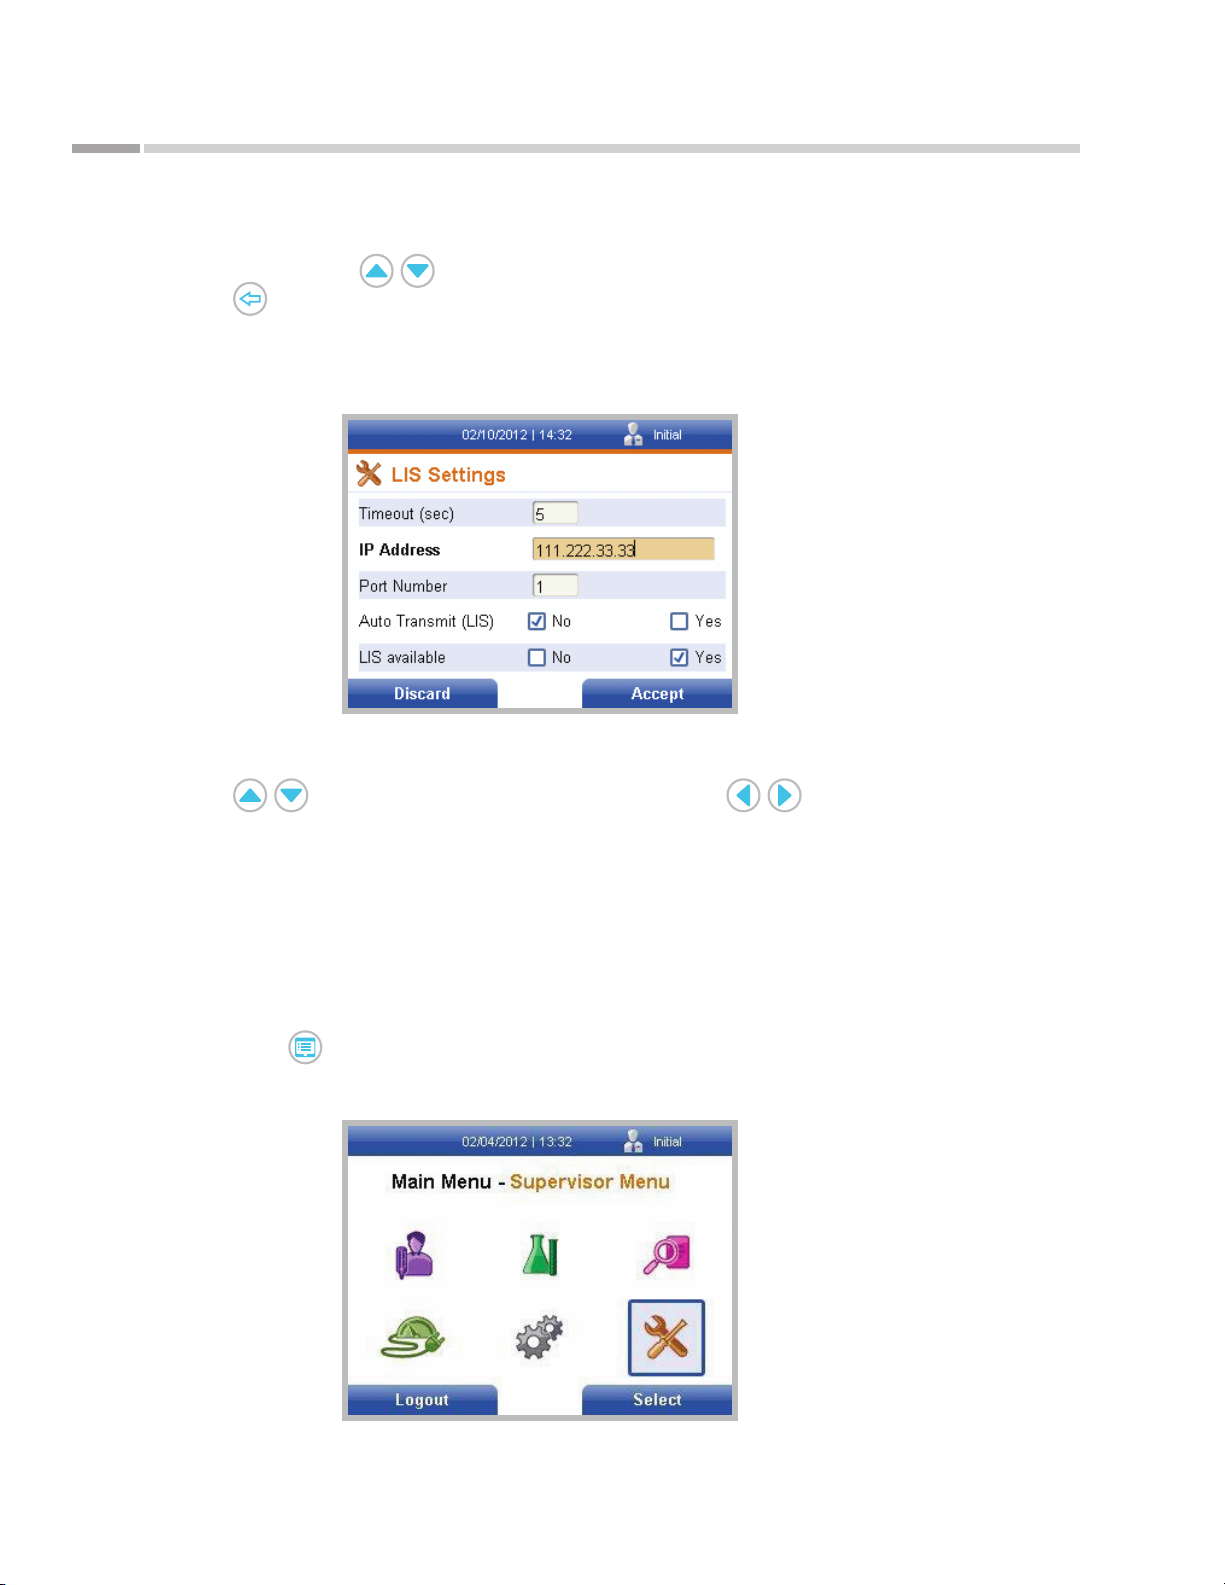
7. To change the numeric LIS settings (Timeout interval, IP Address, and Port
Number), use the keys to highlight the eld(s) to be changed. Use
the key to rst delete any existing numeric entries, and then enter the
new numeric entries using the numeric keypad or an external keyboard (if
connected). NOTE: the IP address must be entered in the following format:
###.###.###.###.
Figure 29.
Correct IP Address format
As tu te 140® Meter
To specify whether test results will be automatically transmitted to the LIS, use
the keys to highlight Auto Transmit (LIS). Use the keys to toggle
between No and Yes.
8. Once all of the entries have been conrmed, press the right soft key to accept all
entries.
Network Settings
To congure the network settings, perform the following steps:
1. Press the key to display the Main Menu.
2. Use the navigation keys to highlight the Supervisor Menu icon.
Figure 30.
Main Menu screen with
Supervisor Menu icon
highlighted
34
©Astute Medical, Inc. 2017 PN 300153 Rev G 2017/01/16
Page 35
As tu te 140® Meter
Figure 31.
Network Settings screen
with DHCP selected
Installation
3. Press the right soft key to display the Supervisor Menu.
4. When the Supervisor Menu is displayed, General Meter Settings is highlighted.
Press the right soft key to display the General Settings screen.
5. When the General Settings screen is displayed, Default Settings is highlighted.
Use the key to highlight Network Settings and press the right soft key.
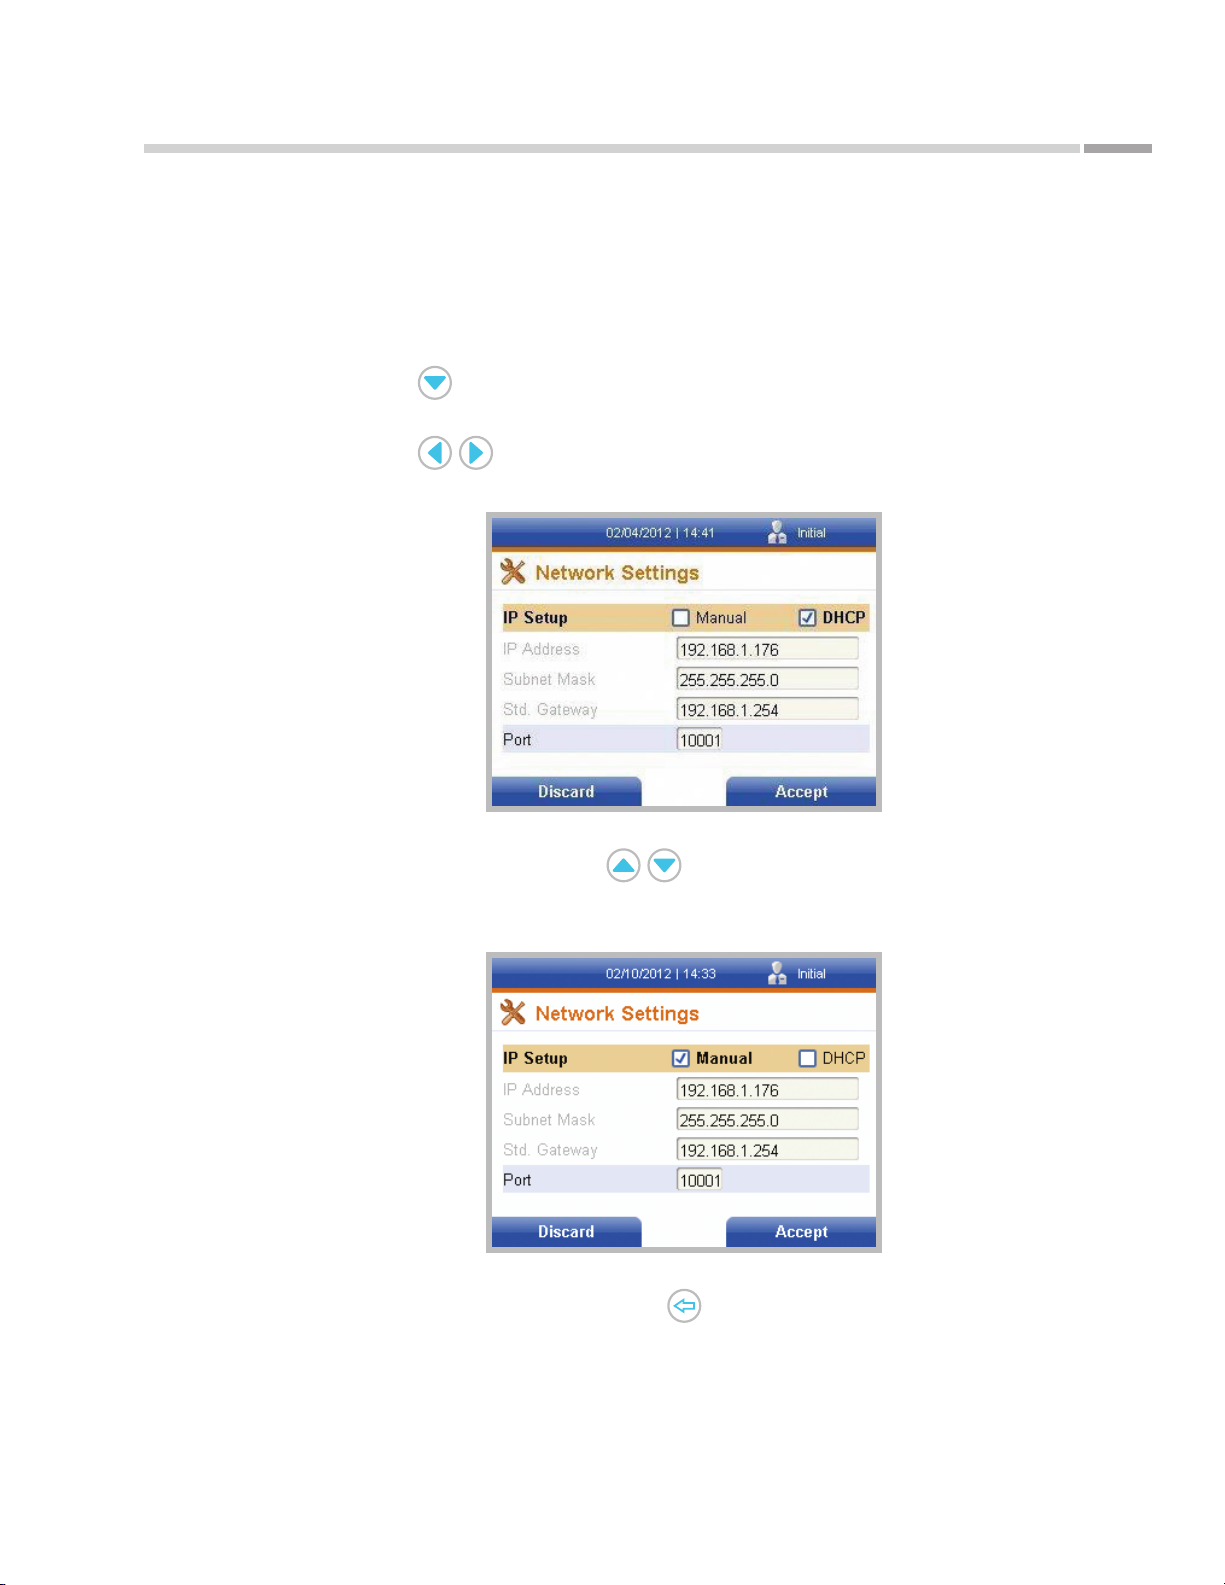
6. When the Network Settings screen is displayed, IP Setup will be highlighted.
Use the keys to toggle between Manual and DHCP. NOTE: If DHCP is
selected, only the Port may be changed.
If Manual is selected, use the keys to highlight the eld to be changed.
For IP Address, Subnet Mask and Std. Gateway, enter the correct information using
the numeric keypad or an external keyboard (if connected) in the format shown.
Figure 32.
Network Settings screen
with Manual selected
To change the Port number, use the key to rst delete the existing entry,
if applicable, and then use the numeric keypad or an external keyboard (if
connected) to enter the correct port number.
7. Once all of the entries have been conrmed, press the right soft key to accept all
entries.
©Astute Medical, Inc. 2017 PN 300153 Rev G 2017/01/16
35
Page 36
Installation
PC Mode
To turn PC Mode o or on, follow these steps:
1. Press the key to display the Main Menu.
2. Use the navigation keys to highlight the Supervisor Menu icon.
As tu te 140® Meter
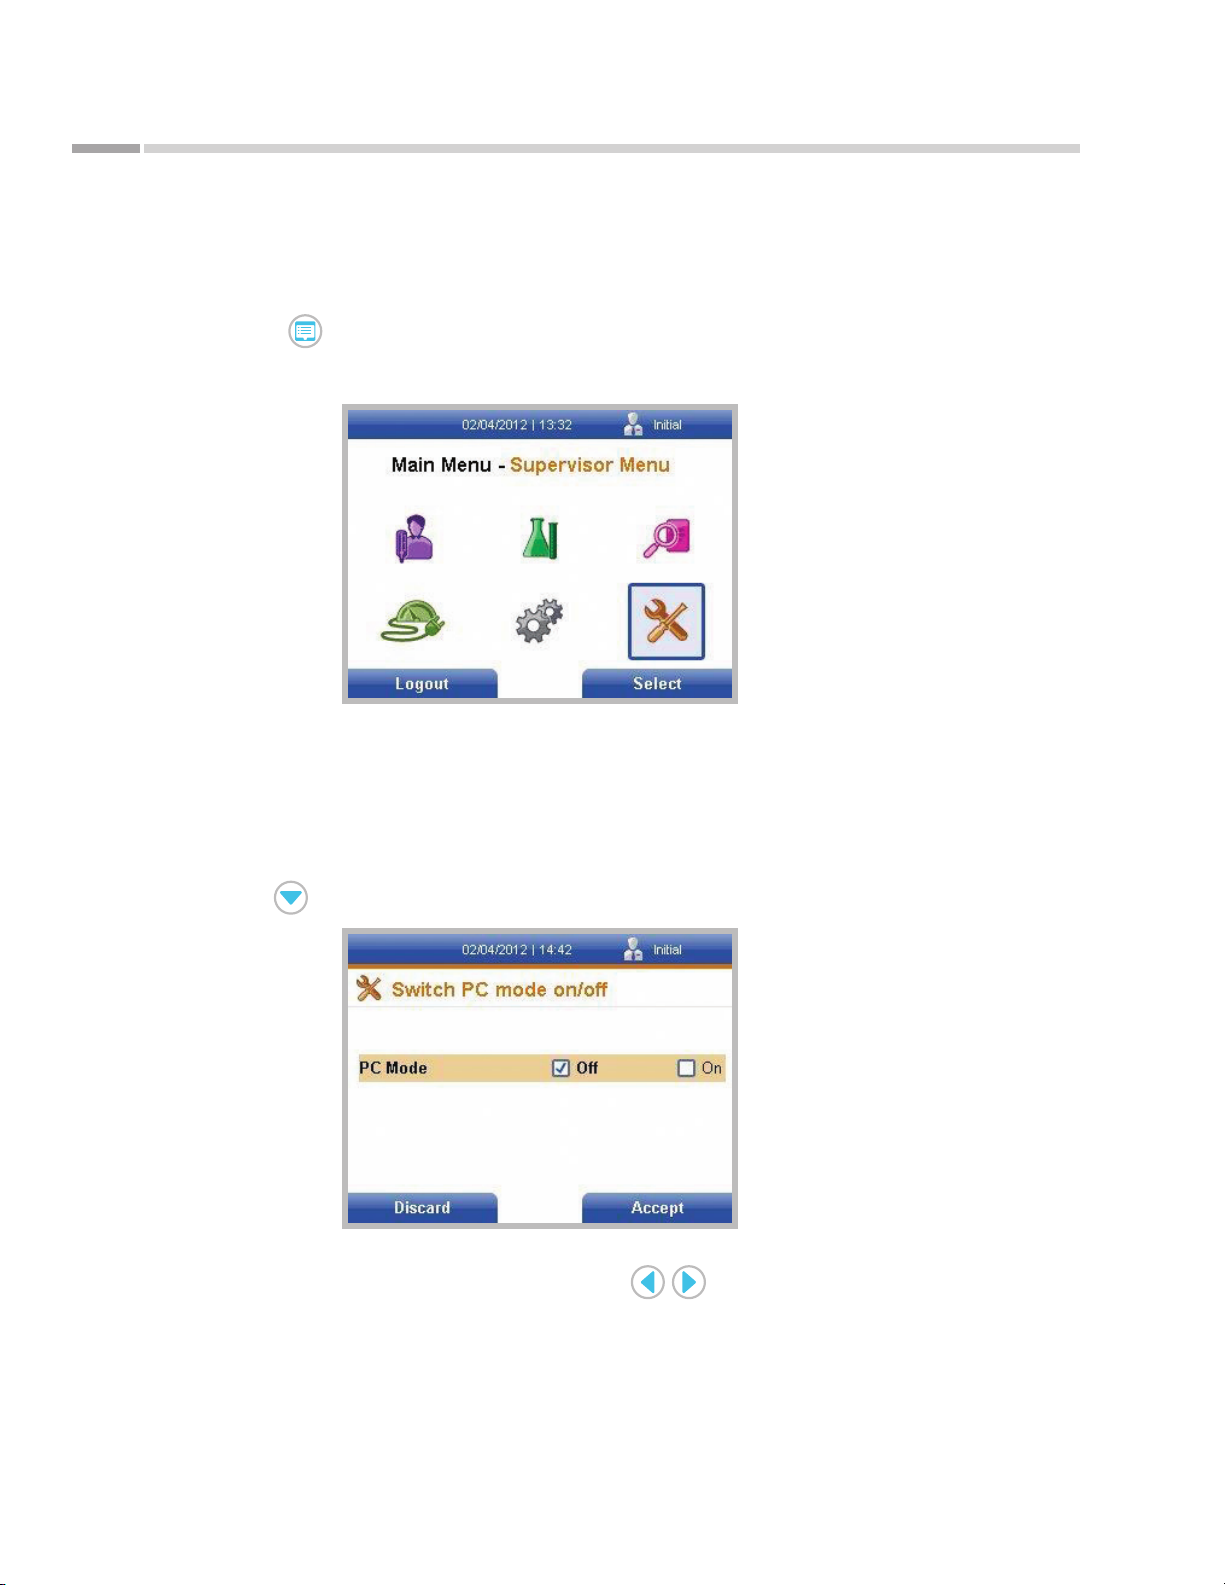
Figure 33.
Main Menu screen with
Supervisor Menu icon
highlighted
3. Press the right soft key to display the Supervisor Menu.
4. When the Supervisor Menu is displayed, General Meter Settings is highlighted.
Press the right soft key to display the General Settings screen.
5. When the General Settings screen is displayed, Default Settings is highlighted.
Use the key to highlight PC Mode and press the right soft key.
Figure 34.
PC Mode screen
6. When the PC Mode screen is displayed, use the keys to toggle between
turning PC Mode O or On.
36
7. Once the selection has been conrmed, press the right soft key.
©Astute Medical, Inc. 2017 PN 300153 Rev G 2017/01/16
Page 37
As tu te 140® Meter
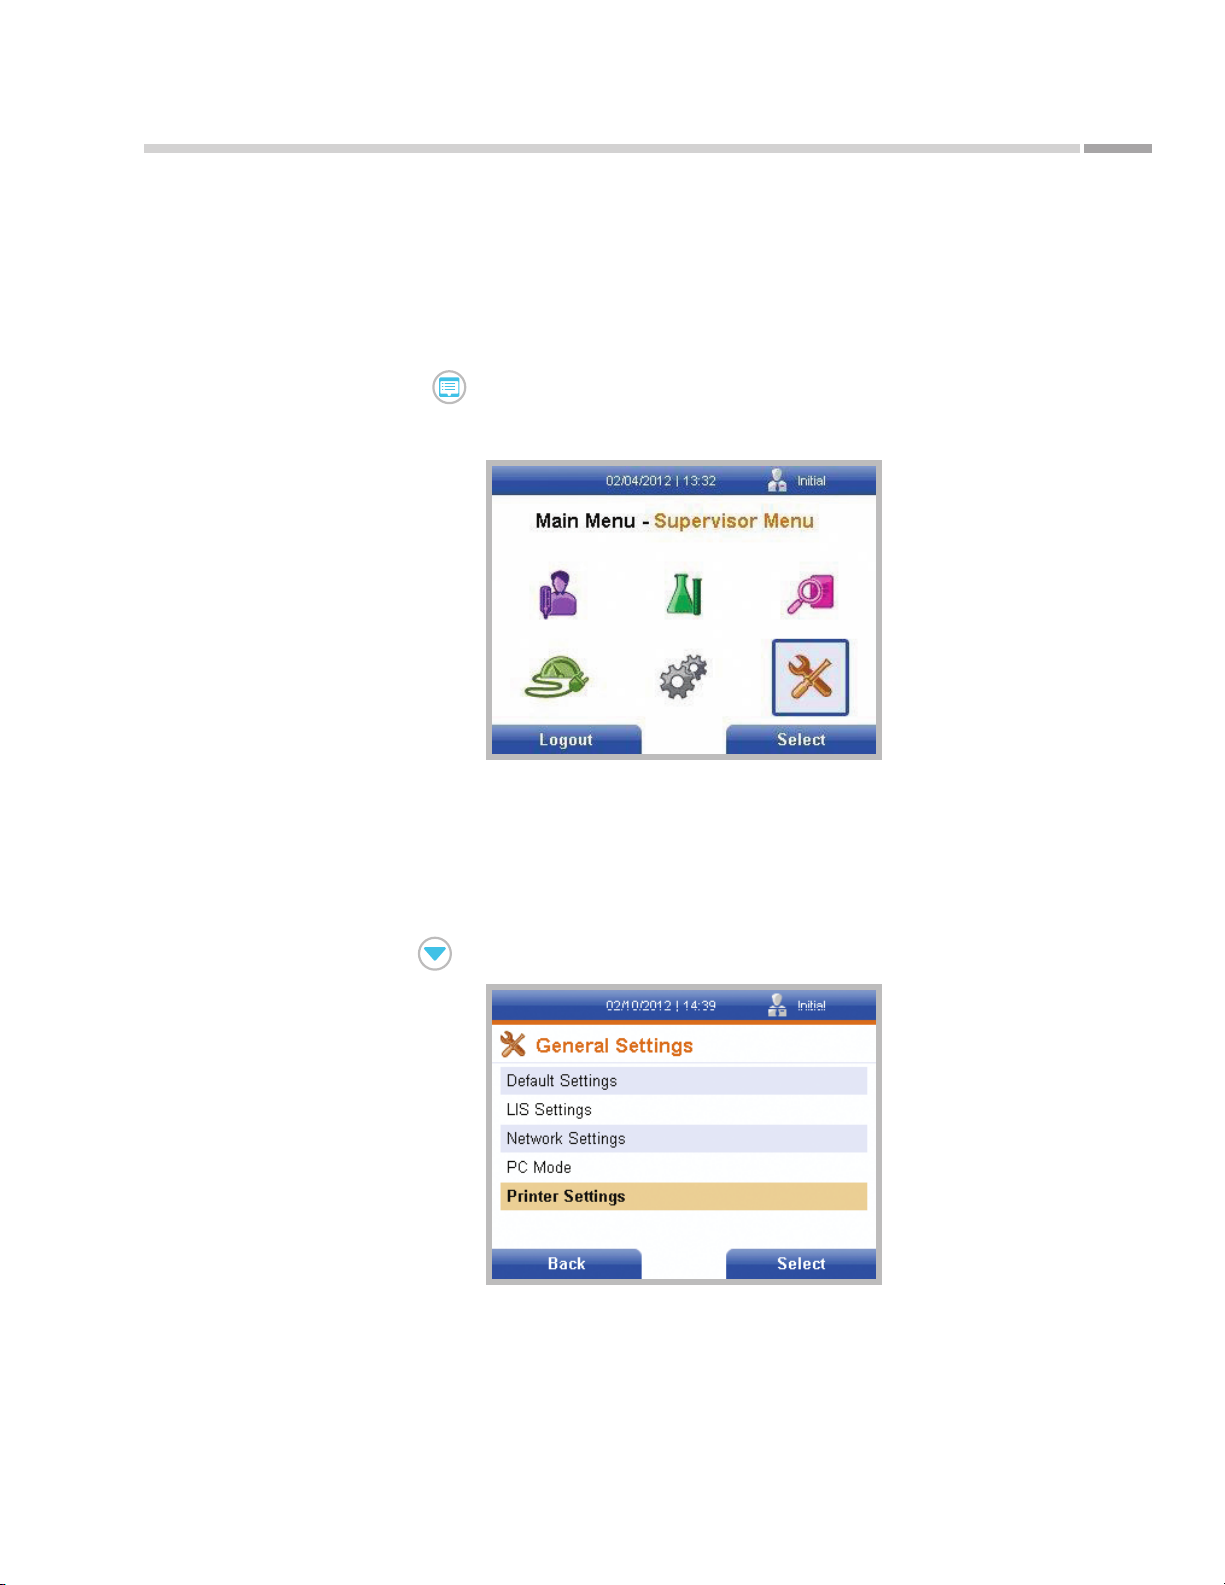
Figure 35.
Main Menu screen with
Supervisor Menu icon
highlighted
Installation
Printer Settings
To specify whether test results are automatically sent to the As tute140® Meter’s
internal printer, or to create a customized header (including institute name, address and
telephone number) to be printed on all printouts, follow these steps:
1. Press the key to display the Main Menu.
2. Use the navigation keys to highlight the Supervisor Menu icon.
3. Press the right soft key to display the Supervisor Menu.
4. When the Supervisor Menu is displayed, General Meter Settings is highlighted.
Press the right soft key to display the General Settings screen.
5. When the General Settings screen is displayed, Default Settings is highlighted.
Use the key to highlight Printer Settings and press the right soft key.
Figure 36.
General Settings screen
with Printer Settings
highlighted
©Astute Medical, Inc. 2017 PN 300153 Rev G 2017/01/16
37
Page 38
Installation
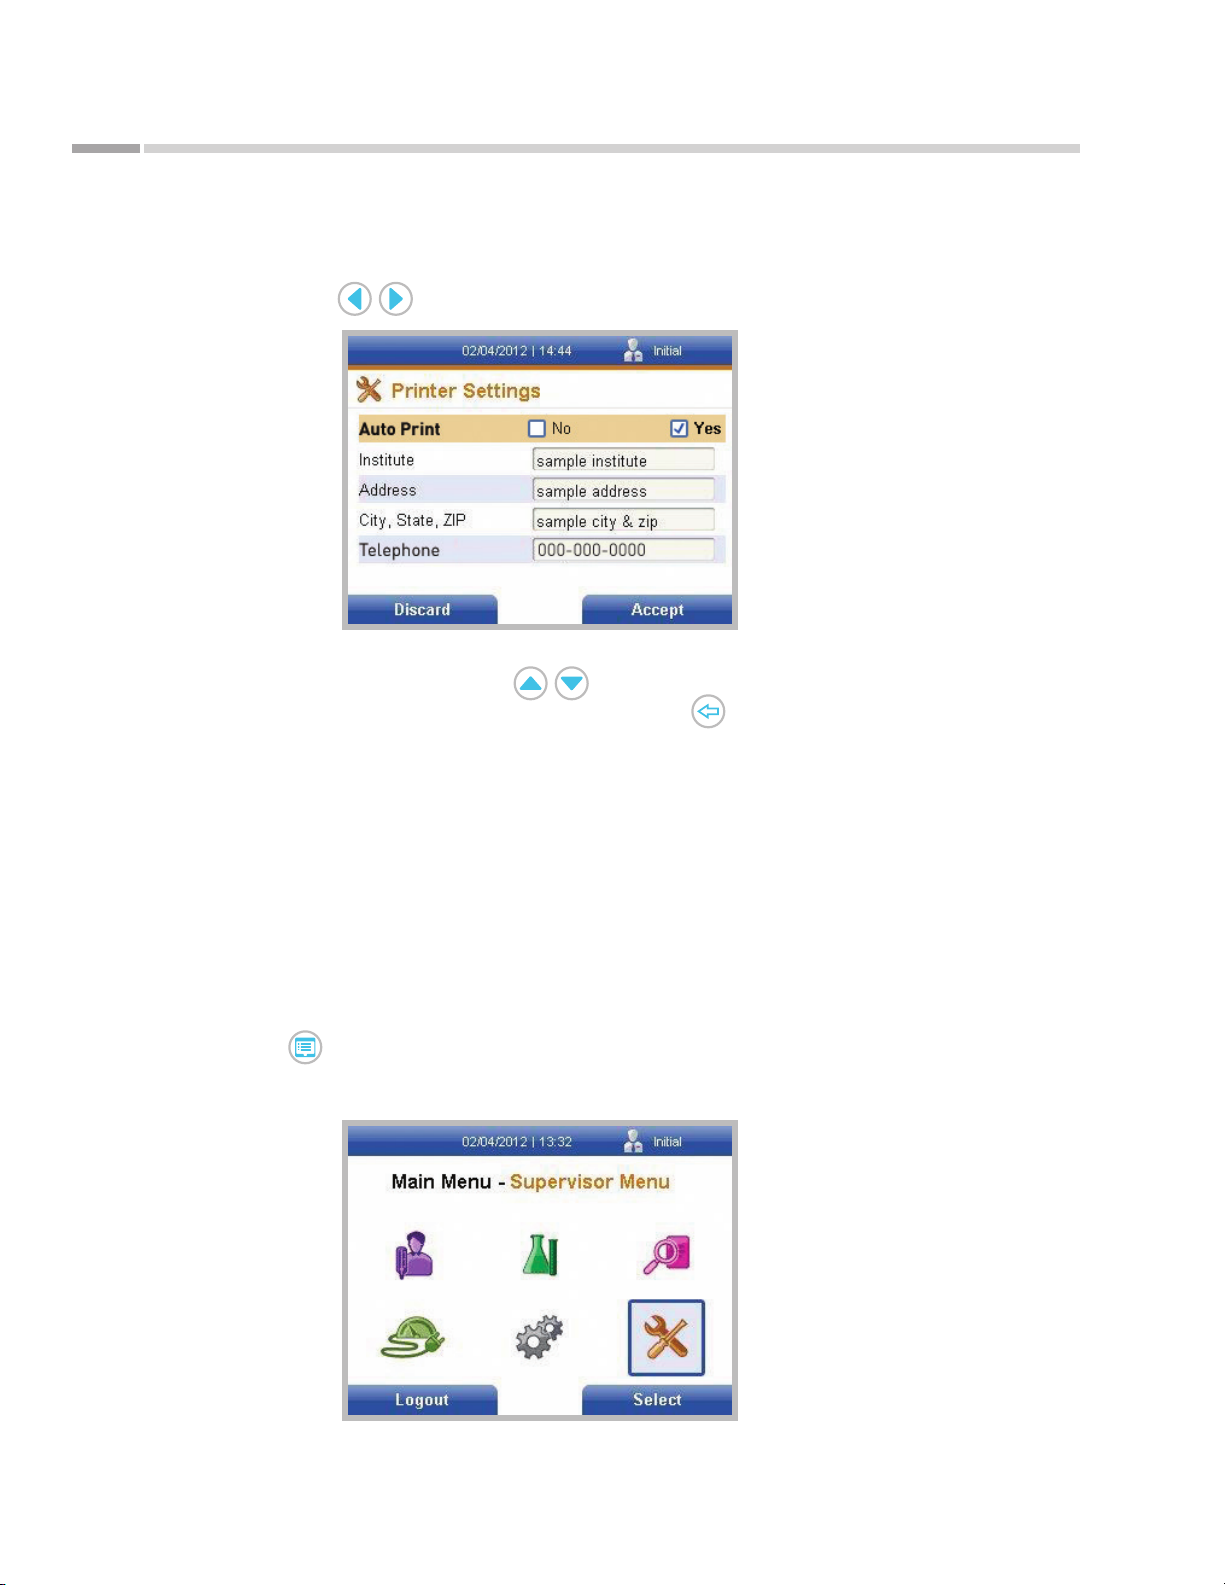
6. When the Printer Settings screen is displayed, Auto Print is highlighted. To select
whether results will be automatically sent to the Astute140® Meter’s internal
printer, use the keys to toggle between No and Yes .
Figure 37.
Printer Settings screen
7. If a print header is desired, use the keys to select the elds to be
included in the header. For each eld selected, use the key to delete any
existing entries if applicable. Enter numerical information using the numeric
keypad or an external keyboard (if connected). An external keyboard must be
connected in order to enter alphanumeric information.
As tu te 140® Meter
8. Once all of the entries have been conrmed, press the right soft key to accept all
entries.
Managing Users
Supervisors can register new users, edit existing user information or delete registered
users from the Astute140® Meter. To perform these functions, follow these steps:
1. Press the key to display the Main Menu.
2. Use the navigation keys to highlight the Supervisor Menu icon.
Figure 38.
Main Menu screen with
Supervisor Menu icon
highlighted
38
©Astute Medical, Inc. 2017 PN 300153 Rev G 2017/01/16
Page 39

As tu te 140® Meter
Installation
3. Press the right soft key to display the Supervisor Menu.
4. When the Supervisor Menu is displayed, use the key to highlight Manage
Users and press the right soft key.
5. The Existing User List screen displays a list of users that have been registered
to operate the Astu te140® Meter with the user ID number, name and mode of
operation (Supervisor vs. Operator user).
To add a new user:
1. From the existing user list, press the right soft key to display the Options
pop-up menu.
2. When the Options pop-up menu is displayed, Edit User is highlighted. Use the
key to highlight Add User and press the right soft key.
3. When the Create New User screen is displayed, Mode is highlighted. Use the
keys to toggle between Supervisor and Operator.
4. To enter a user name, press the key to highlight Name. Use the numeric
keypad or an external keyboard (if connected) to enter the user name.
5. To enter the ID, use the key to highlight ID (numeric). Use the numeric
keypad or an external keyboard (if connected) to enter the desired ID.
NOTE: The ID must be numeric.
6. To enter the password, use the key to highlight Password. Use the
numeric keypad or an external keyboard (if connected) to enter the password.
7. After the password is entered, use the key to highlight Conrm Password.
Use the numeric keypad or an external keyboard (if connected) to re-enter the
password entered above.
8. Once all of the entries have been conrmed, press the right soft key to accept
all entries. To discard all entries and return to the Existing User list, press the
left soft key.
To edit the information for an existing user:
1. Use the keys to highlight the user information to be edited and press
the right soft key to display the Options pop-up menu.
2. When the Options pop-up menu is displayed, Edit User is highlighted. To edit
the user information, press the right soft key.
3. When the Change User screen is displayed, Mode is highlighted. The current
user mode (Supervisor or Operator) is displayed. To change the user mode,
use the keys to toggle between Supervisor and Operator.
©Astute Medical, Inc. 2017 PN 300153 Rev G 2017/01/16
39
Page 40

Installation
4. To change the user Name, use the key to highlight the name. Use the
key to delete the current name, if applicable, and use the numeric keypad or an
external keyboard (if connected) to enter the desired name.
5. To change the user ID, use the key to highlight ID (numeric). Use the
key to delete the current ID, and use the numeric keypad or an external
keyboard (if connected) to enter the desired ID. NOTE: The ID must be
numeric.
6. To change the user password, use the key to highlight Password. Use
the key to delete the current password and use the numeric keypad or
an external keyboard (if connected) to enter the desired password. Use the
key to highlight Conrm Password. Use the key to delete the current
conrmed password and use the numeric keypad or an external keyboard (if
connected) to re-enter the password entered above.
7. Once all of the entries are conrmed, press the right soft key to accept all
entries. To discard all entries and return to the Existing User list, press the left
soft key.
As tu te 140® Meter
To delete an existing user:
1. Use the keys to highlight the user information to be edited and press
the right soft key to display the Options pop-up menu.
2. When the Options pop-up menu is displayed, Edit User is highlighted. Press
the key to highlight Del. Selected. And press the right soft key.
3. A conrmation screen will appear asking if you are sure that you want to
delete the selected user. To delete the user, press the left soft key to choose
Delete. To cancel, press the right soft key.
Astute140® Meter Information
To display the Astute140® Meter information, including the installed hardware, rmware
and bootware versions, the serial number, and the IP address, follow the steps below:
1. Press the key to display the Main Menu.
40
©Astute Medical, Inc. 2017 PN 300153 Rev G 2017/01/16
Page 41
As tu te 140® Meter
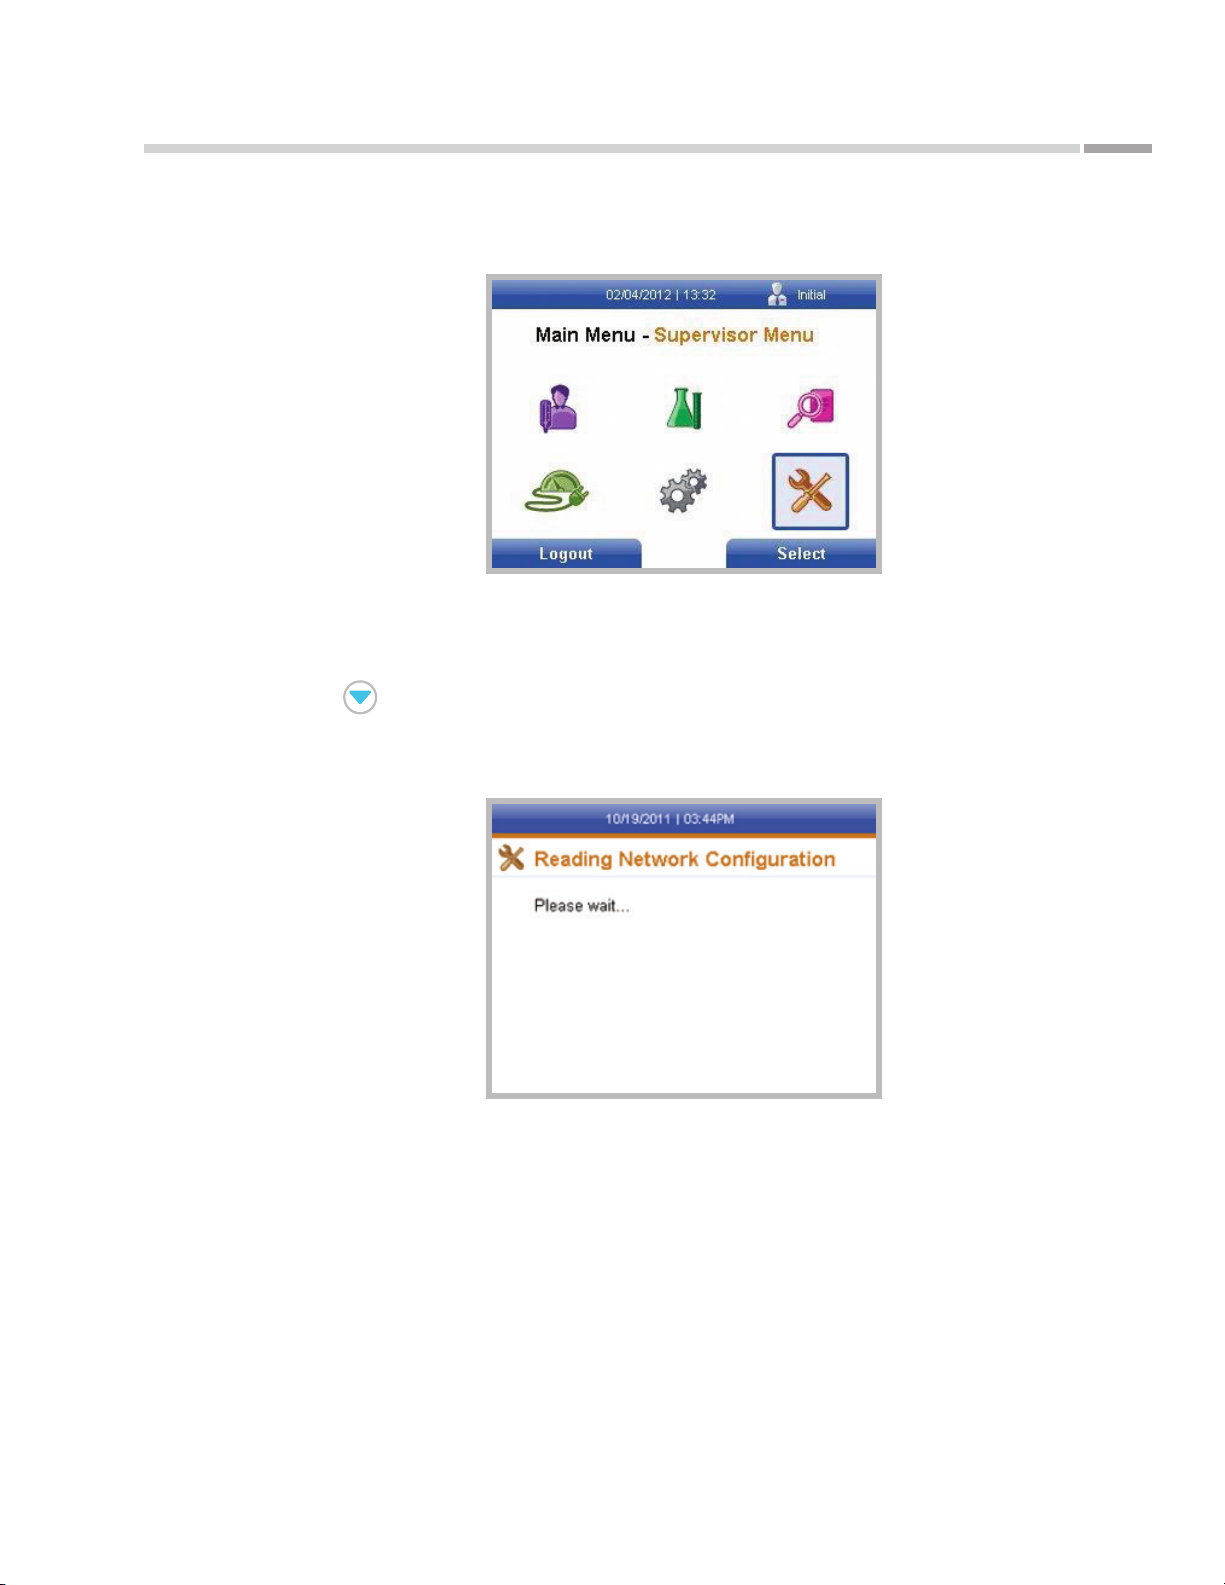
Figure 39.
Main Menu screen with
Supervisor Menu icon
highlighted
Installation
2. Use the navigation keys to highlight the Supervisor Menu icon.
3. Press the right soft key to display the Supervisor Menu.
4. When the Supervisor Menu is displayed, General Settings is highlighted. Use the
key to highlight Meter Info and press the right soft key.
5. A temporary screen will appear while the Astute140® Meter is reading the
Figure 40.
Temporary screen
while
Astute140® Meter
is reading network
con guration
network con guration.
©Astute Medical, Inc. 2017 PN 300153 Rev G 2017/01/16
41
Page 42
Installation
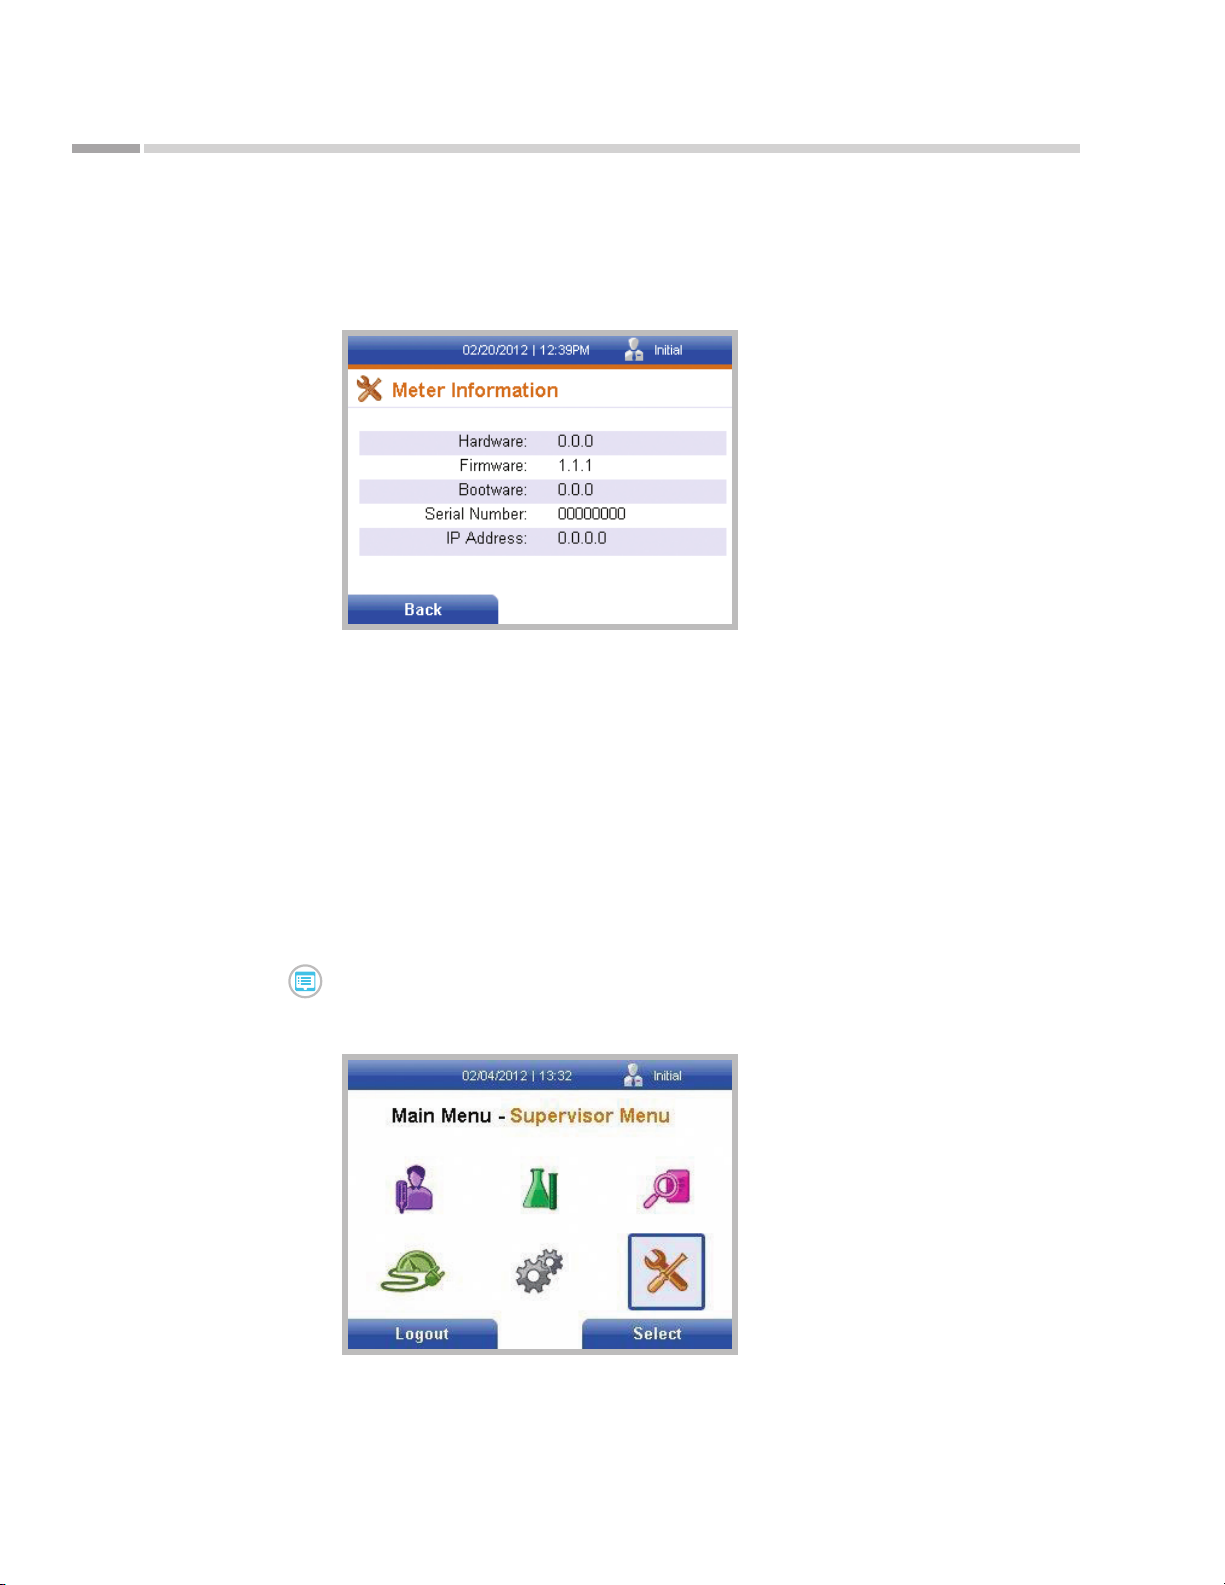
6. When the Astut e140® Meter has read the network conguration, a screen will
appear displaying the Hardware, Firmware, and Bootware versions, the serial
number, and the IP address.
Figure 41.
Meter Information screen
7. Press the left soft key to return to the Supervisor Menu.
As tu te 140® Meter
Error Log
A history of the errors that have occurred while the Astu te140® Meter has been in use,
including the error code and the date/time of occurrence, may be accessed through the
Supervisor Menu or the Operator Menu. To view the Error Log perform the following
steps.
From the Supervisor Menu:
1. Press the key to display the Main Menu.
2. Use the navigation keys to highlight the Supervisor Menu icon.
Figure 42.
Main Menu screen with
Supervisor Menu icon
highlighted
42
3. Press the right soft key to display the Supervisor Menu.
©Astute Medical, Inc. 2017 PN 300153 Rev G 2017/01/16
Page 43
As tu te 140® Meter
Figure 43.
Error Log screen
Installation
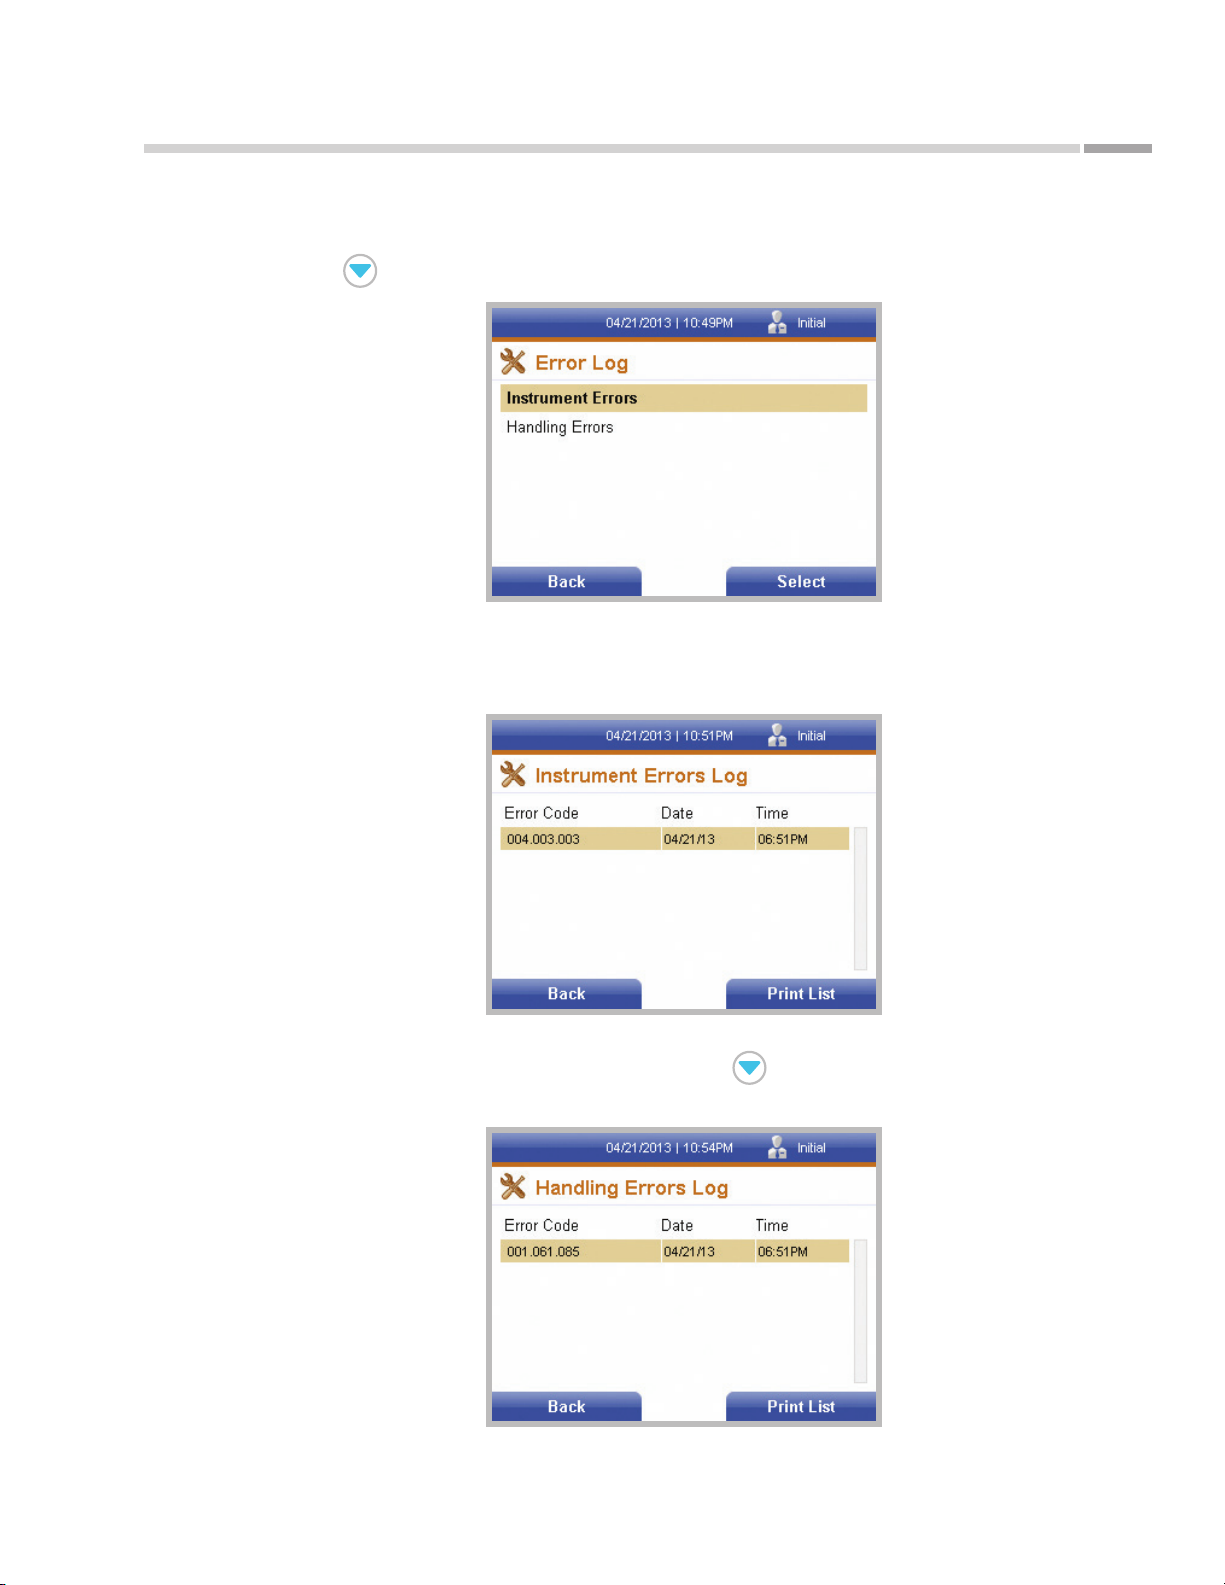
4. When the Supervisor Menu is displayed, General Settings is highlighted. Use the
key to highlight Error Log and press the right soft key.
5. On the Error Log screen, Instrument Errors is highlighted. To display the
Instrument Errors Log, press the right soft key.
Figure 44.
Instrument Errors Log
screen
To display the Handling Errors Log, use the key to highlight Handling Errors
and press the right soft key.
Figure 45.
Handling Errors Log screen
©Astute Medical, Inc. 2017 PN 300153 Rev G 2017/01/16
43
Page 44
Installation
6. To print the errors log once it is displayed, press the right soft key.
7. To return to the Error Log screen, press the left soft key.
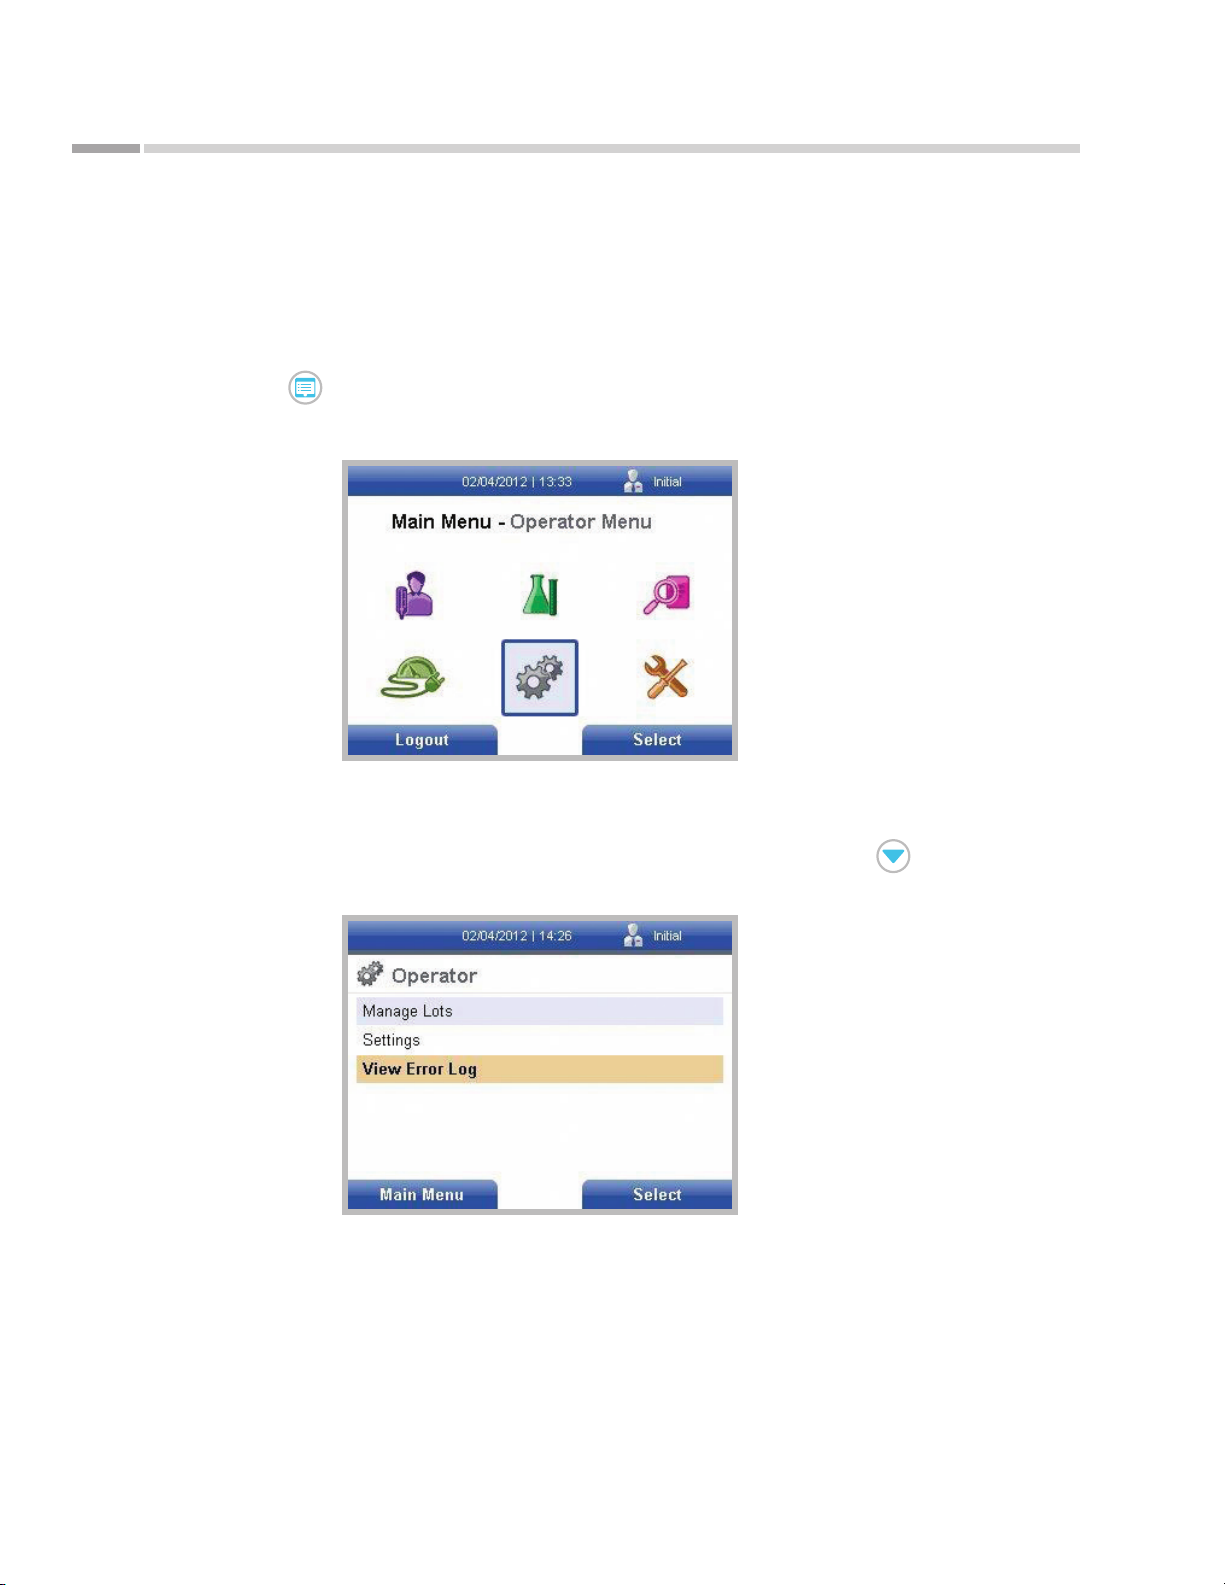
From the Operator Menu:
1. Press the key to display the Main Menu.
2. Use the navigation keys to highlight the Operator Menu icon.
As tu te 140® Meter
Figure 46.
Main Menu screen with
Operator Menu icon
highlighted
3. Press the right soft key to display the Operator Menu.
4. When the Operator Menu is displayed, Manage Lots is highlighted. Use the
key to highlight View Error Log and press the right soft key.
Figure 47.
Operator Menu screen
with View Error Log
highlighted
5. Follow steps 5–7 in the previous section.
44
©Astute Medical, Inc. 2017 PN 300153 Rev G 2017/01/16
Page 45
As tu te 140® Meter
ASTUTE14 0® Meter Operation
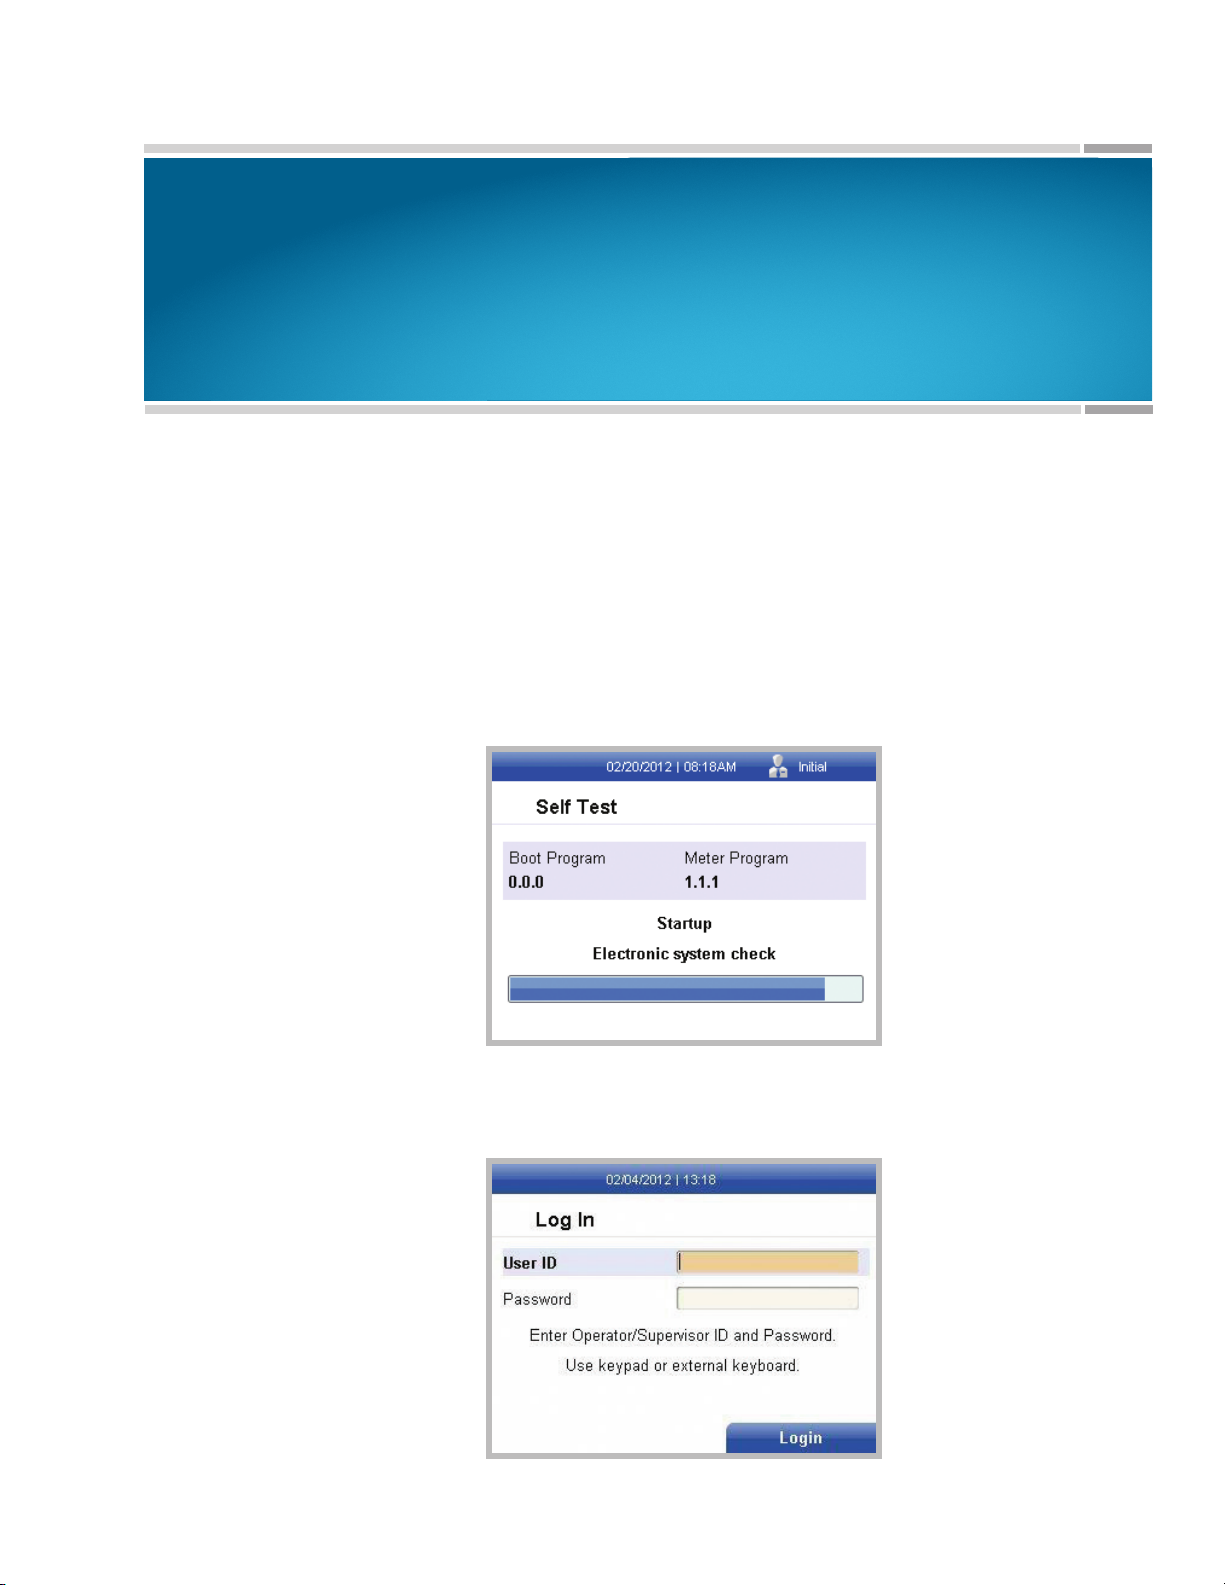
Figure 48.
Self Test screen
The operator should use Standard Precautions when operating the
Astute140® Meter.
Startup
Powering On the Astute140® Meter
To power on the Astute140® Meter, locate the power switch on the back of the meter
and toggle it upwards, holding it in position until the S elf Test screen appears.
If all systems pass, the Log In screen will then automatically appear, indicating that the
Astute140® Meter is ready for use.
Figure 49.
Log In screen
©Astute Medical, Inc. 2017 PN 300153 Rev G 2017/01/16
45
Page 46

A st u t e14 0® Meter Operation
If the self test fails, an error message will be displayed. Press the right soft key to select
OK and close the error message, and then restart the Astute140® Meter by turning it
o and back on again (to power o the meter, toggle the power switch upwards and it
should immediately shut down). If after restarting the Astute140® Meter the self test
fails again, contact Astute Technical Support (See “Contacting Astute Medical, Inc.” on
p. 7 for contact information).
Astute140® Meters are factory-calibrated to ensure that the same NephroCheCk® Test
cartridge will provide equivalent results if read in dierent meters. The End User is not
required to calibrate the meter.
Logging In
In order to operate the Astute140® Meter, the user must log in with a unique user ID
and password. This requirement protects access to patient information stored in the
Astute140® Meter’s memory.
After successfully powering on the Astute140® Meter, the Log In screen will
automatically appear. Perform the following steps to log in to the system:
As tu te 140® Meter
1. When the Log In screen is displayed, User ID is highlighted. Enter your user
ID using the numeric keypad or an external keyboard or barcode reader (if
connected).
2. After entering your user ID, use the key to highlight the Password eld.
3. Use the numeric keypad or an external keyboard (if connected) to enter your
password.
4. Conrm that the correct log in information is displayed. To make changes to the
entries, use the keys to highlight the eld to be changed. Use the
key to delete the incorrect entry, and then use the numeric keypad or an external
keyboard (if connected) to change the entries. Press the right soft key to accept
all entries.
Non-Permanent Settings
Although the default settings for the Astute140® Meter are set by the Supervisor
through the Supervisor Menu, Operator users can select some settings from predened
values that are valid until the meter is switched o or until the Operator is logged out.
At such time the settings will revert to the default settings selected by the Supervisor.
To temporarily set the date and time formats, the language, and to turn the beeper on or
o, follow these steps:
46
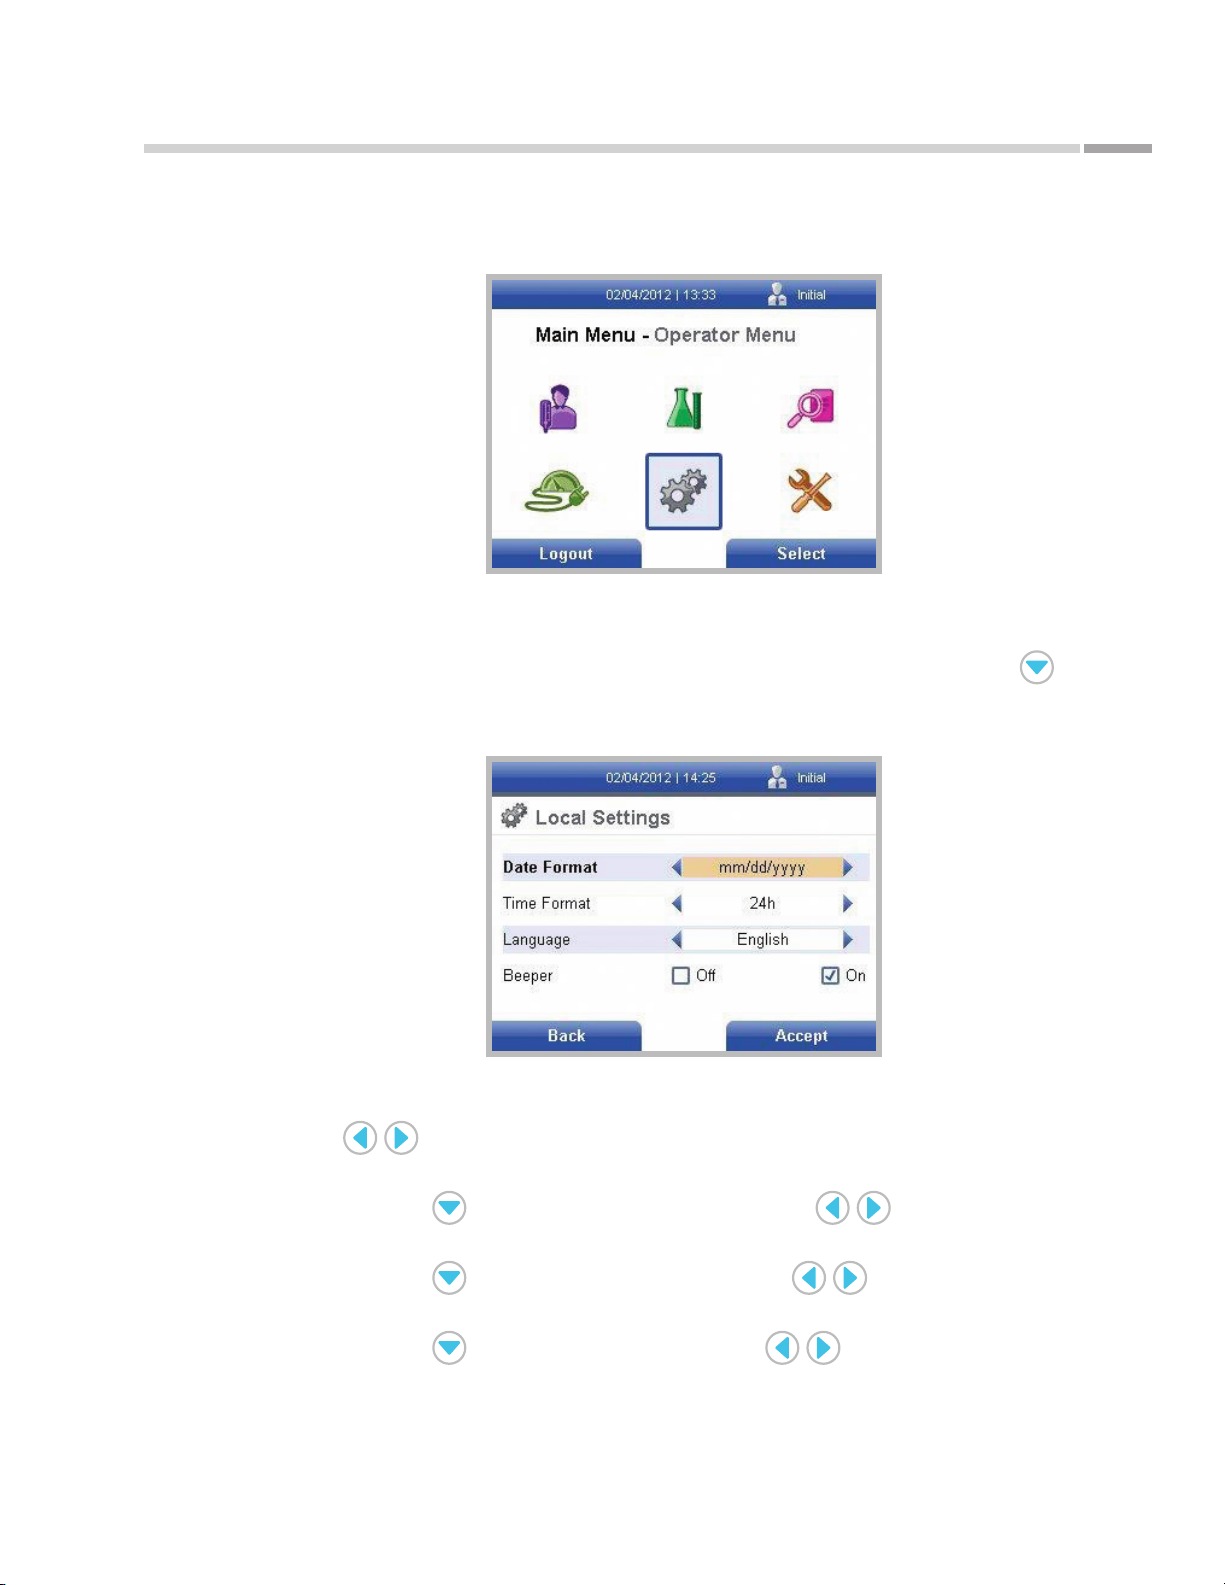
1. Press the key to display the Main Menu (if registering the EQC device
immediately after successful log in, the Main Menu will automatically be
displayed).
©Astute Medical, Inc. 2017 PN 300153 Rev G 2017/01/16
Page 47
As tu te 140® Meter
Figure 50.
Main Menu screen with
Operator Menu icon
highlighted
A st u t e14 0® Meter Operation
2. Use the navigation keys to highlight the Operator Menu icon.
3. Press the right soft key to display the Operator Menu.
4. When the Operator Menu is displayed, Manage Lots is highlighted. Use the
key to highlight Settings and press the right soft key to display the Local Settings
screen.
Figure 51.
Local Settings screen
5. When the Local Settings screen is displayed, Date Format is highlighted. Use the
6. Press the key to highlight Time Format. Use the keys to choose
7. Press the
8. Press the key to highlight Beeper. Use the keys to turn the beeper
9. Once all selections have been conrmed, press the right soft key to accept all
keys to select the desired date format (mm/dd/yyyy or dd.mm.yyyy) for
display on the screen and printouts.
either a 12 or 24-hour time format for display on the screen and printouts.
key to highlight Language. Use the keys to select the
desired language.
on or o.
selections.
©Astute Medical, Inc. 2017 PN 300153 Rev G 2017/01/16
47
Page 48
A st u t e14 0® Meter Operation
RFID Cards for Device and Lot Registration
Each new Astu te140® Electronic Quality Control (EQC) Device, liquid control lot and test
lot must be registered prior to rst use. Operators may register Astut e140® Electronic
Quality Control (EQC) Devices, liquid control lots and test lots only if Supervisors grant
registration permission to Operators in the default settings; otherwise, Supervisors
must carry out registrations. To register an Ast u te140® Electronic Quality Control (EQC)
Device, liquid control lot or test lot, see “Astute140® EQC Device Registration” on p. 48,
“Liquid Control Lot Registration” on p. 54, and “Test Lot Registration” on p. 52.
Astute140® EQC Device Registration
The EQC procedure veries the calibration of the Astute140® Meter, including the
positioning system, optical system and other internal systems of the meter to conrm
that the meter is functioning properly.
As tu te 140® Meter
When not in use, the Astute140® EQC Device should be stored in its original packaging
away from direct light. If lost, a replacement Astute140® EQC Device may be ordered
from Astute Medical, Inc. at www.astutemedical.com or by contacting your Astute
Medical, Inc. sales representative.
The Astute140® EQC Device must be registered prior to rst use. Operators may register
the Astute140® EQC Device only if the Supervisor granted registration permission in the
default settings; otherwise, Supervisors must register the Astute140® EQC Device.
To register the Astu te140® EQC Device, locate the Astute140® EQC RFID Card included
in the Astute140® Meter Kit and perform the following steps:
1. Press the key to display the Main Menu (if registering the Astute140® EQC
Device immediately after successful log in, the Main Menu will automatically be
displayed).
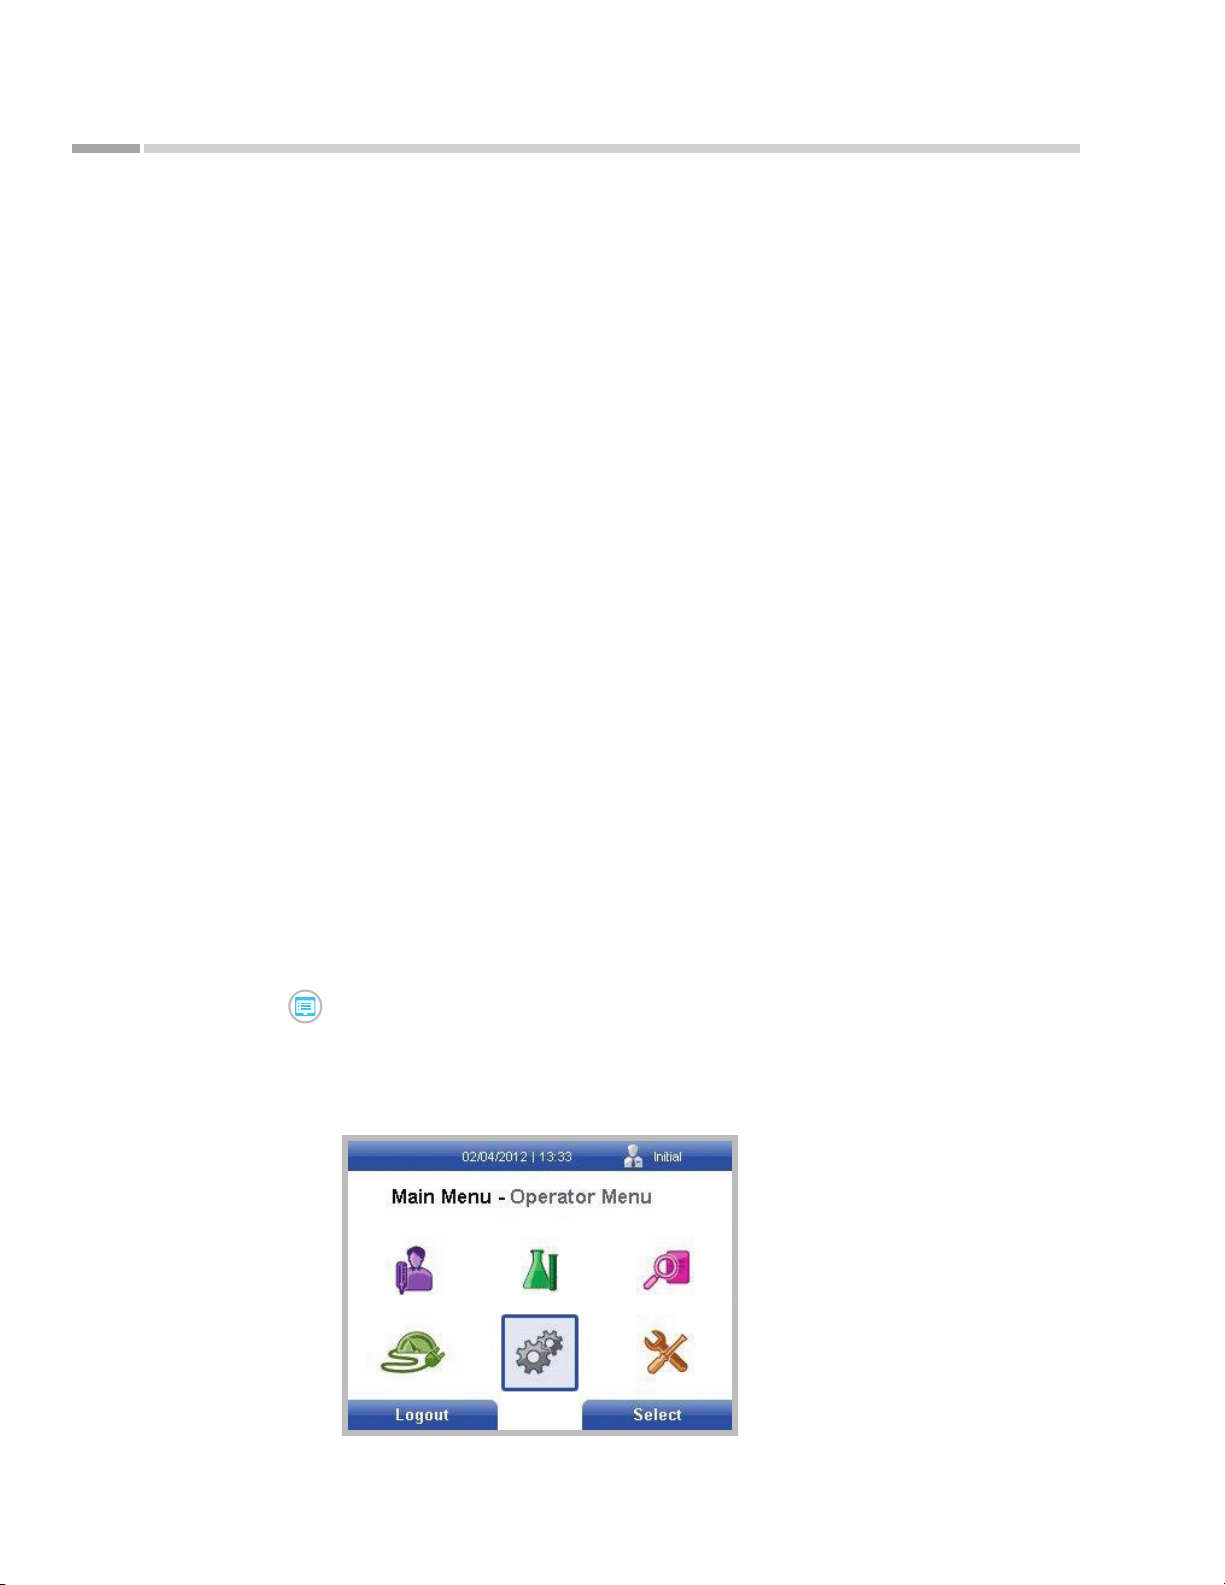
2. Use the navigation keys to highlight the Operator Menu icon.
Figure 52.
Main Menu screen with
Operator Menu icon
highlighted
48
©Astute Medical, Inc. 2017 PN 300153 Rev G 2017/01/16
Page 49
As tu te 140® Meter
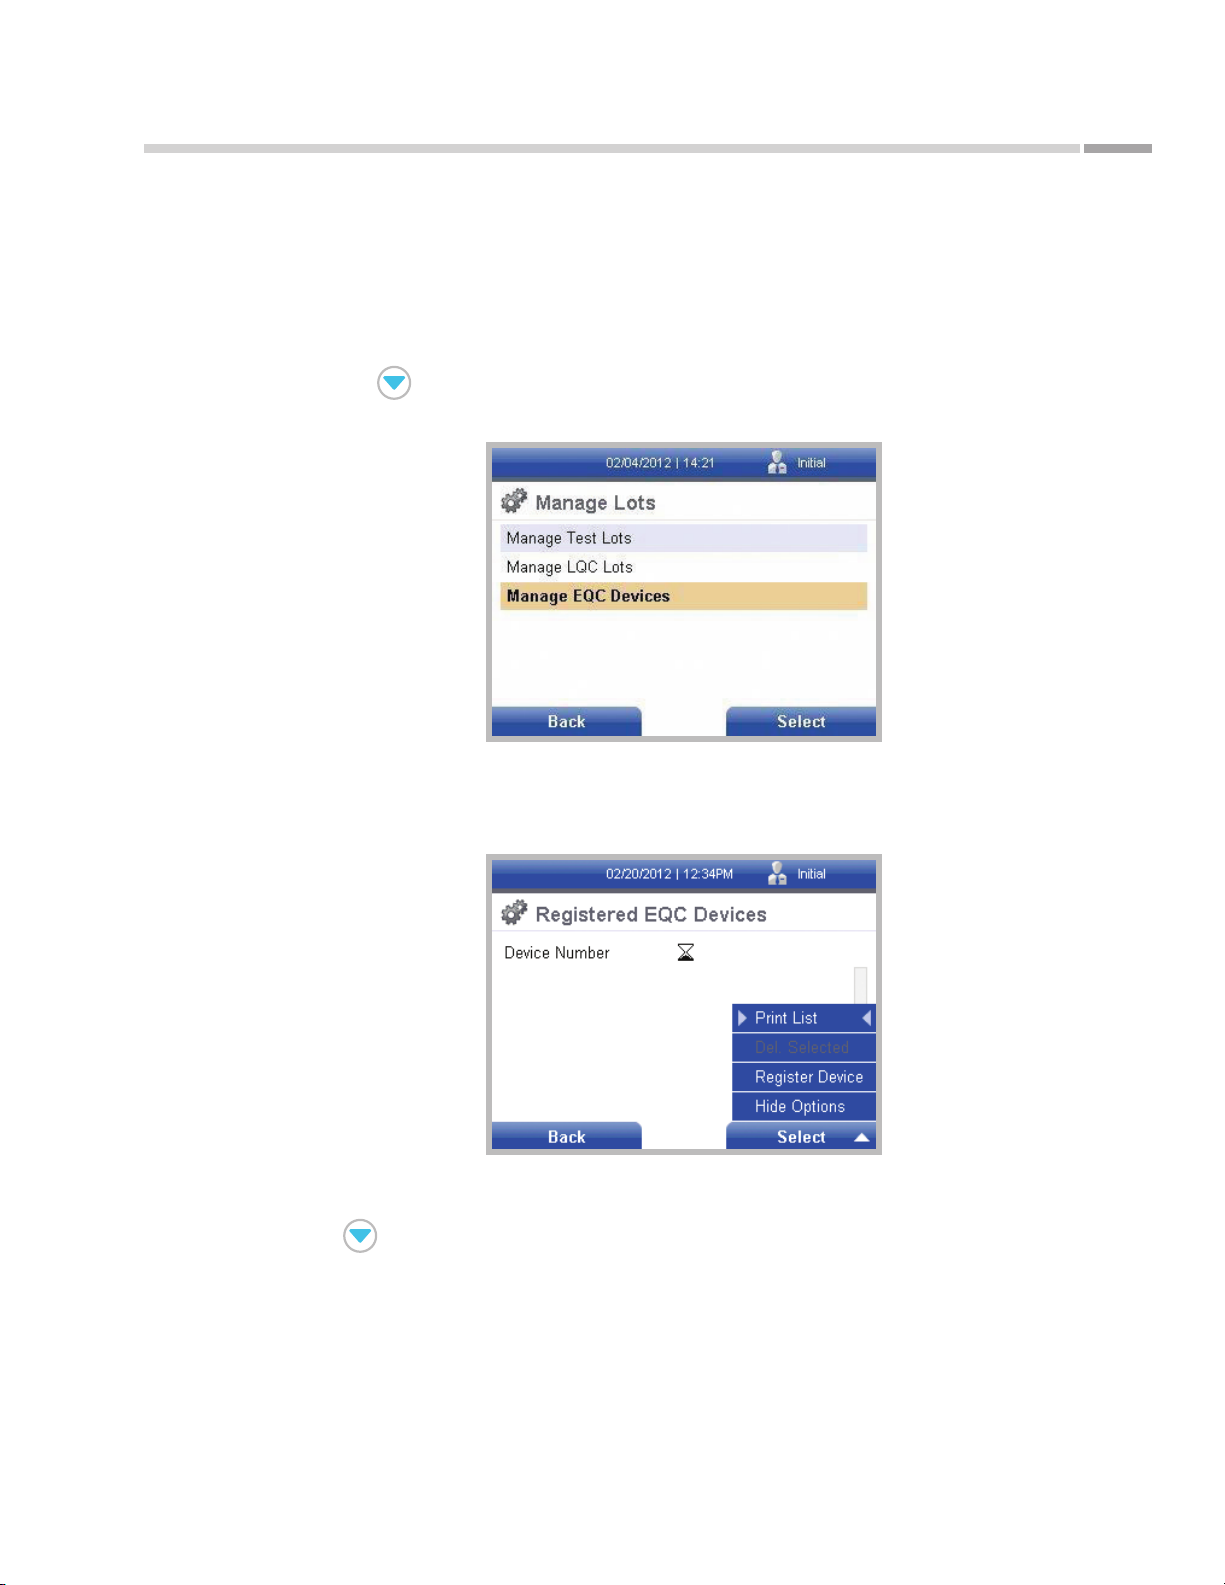
Figure 53.
Manage Lots screen with
Manage EQC Devices
highlighted
A st u t e14 0® Meter Operation
3. Press the right soft key to display the Operator Menu.
4. When the Operator Menu is displayed, Manage Lots is highlighted. Press the right
soft key to display the Manage Lots screen.
5. When the Manage Lots screen is displayed, Manage Test Lots is highlighted. Use
the key to highlight Manage EQC Devices and press the right soft key to
display the Registered EQC Devices screen.
6. On the Registered EQC Devices screen, press the right soft key to display the
Options pop-up menu.
Figure 54.
Registered EQC Devices
screen with options
pop-up menu
7. When the Options pop-up menu is displayed, Print List is highlighted. Use the
key to highlight Register Device and press the right soft key.
©Astute Medical, Inc. 2017 PN 300153 Rev G 2017/01/16
49
Page 50
A st u t e14 0® Meter Operation
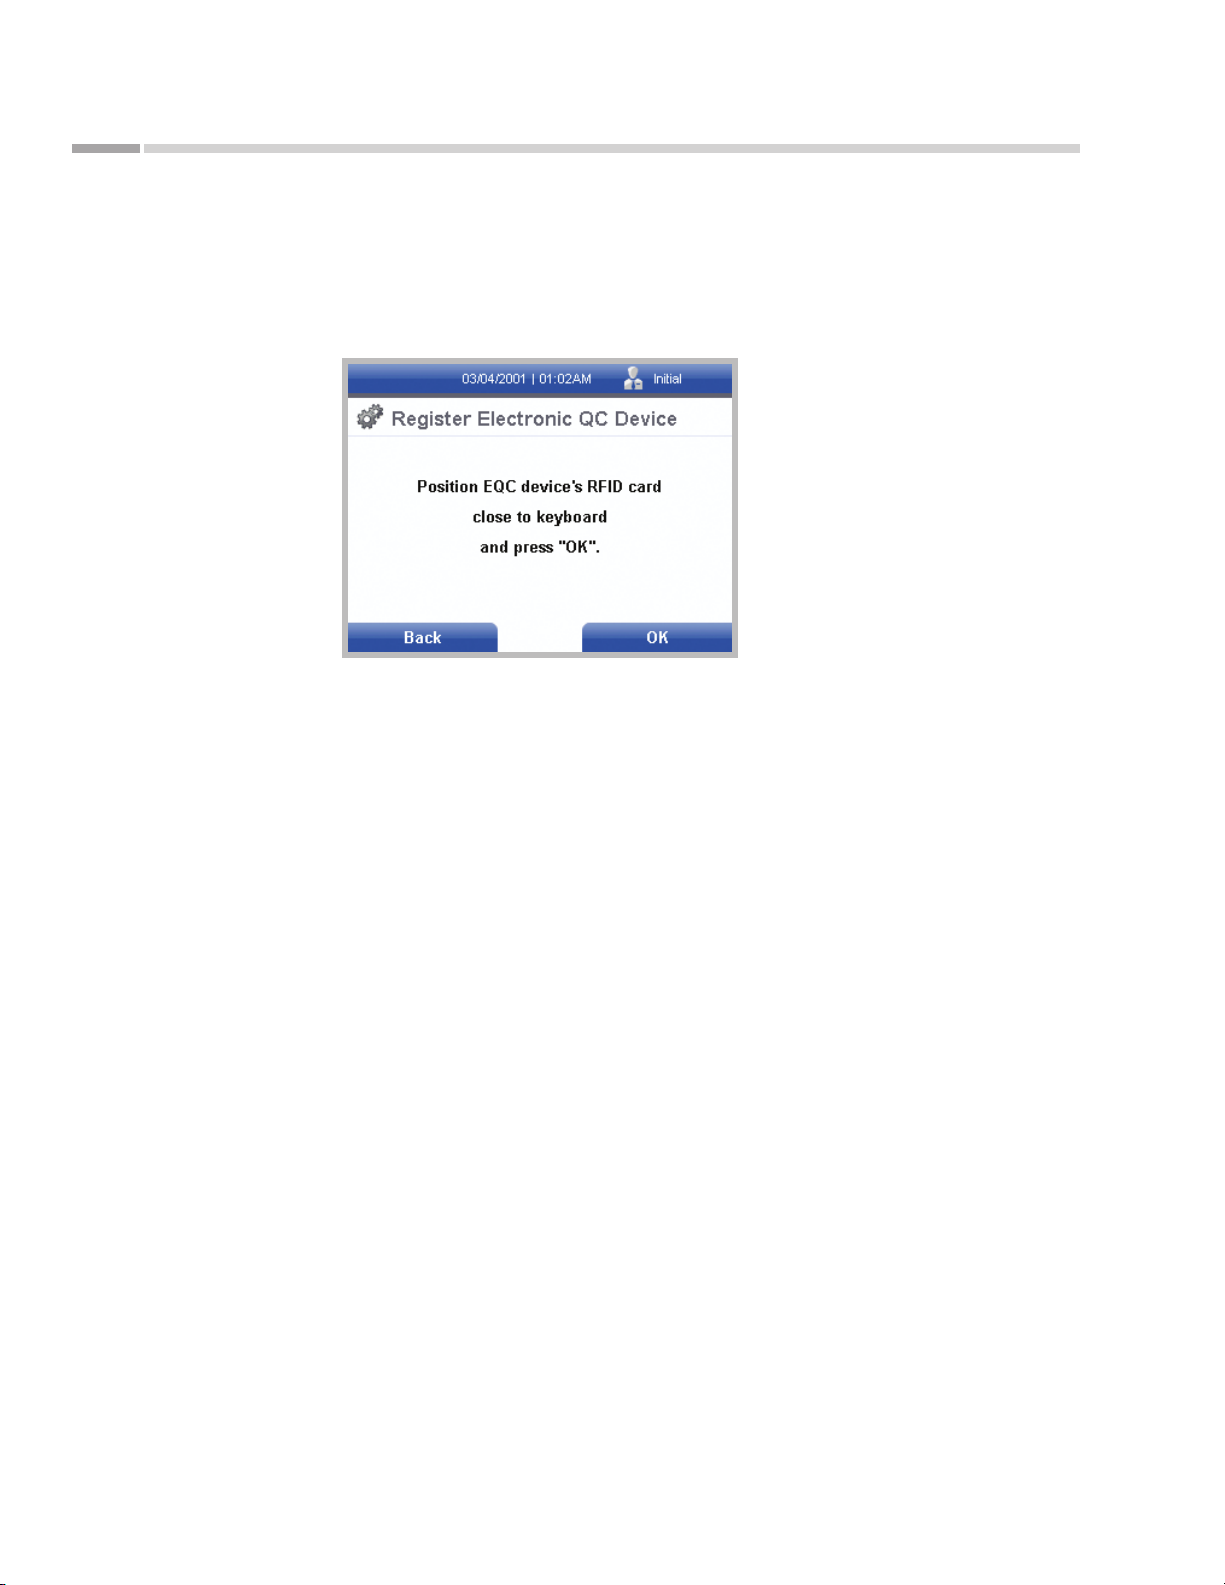
8. When prompted, hold the Astute140® Electronic Quality Control (EQC) RFID Card
for the Astu te140® EQC Device next to or against the numeric keypad to register
the Astute140® EQC Device information and select OK by pressing the right soft
key.
Figure 55.
Register Electronic QC
Device screen
As tu te 140® Meter
9. If registered correctly, a screen indicating that the Astute140® EQC Device
number was successfully read from the Astute140® EQC RFID Card will appear.
Press the right soft key to select Accept. The Astute140® EQC Device that was
just registered should now appear in the list of registered Astute140® EQC
Devices.
10. If registered incorrectly, an error message will appear. Press the right soft key to
select OK and close the error message. Repeat steps 8–9. If registered incorrectly
a second time, contact Astute Technical Support (See “Contacting Astute Medical,
Inc.” on p. 7 for contact information).
11. After use, return the Astute140® EQC RFID Card to its sleeve and store it with the
Astute140® EQC Device in its original packaging.
Astute140® Electronic Quality Control (EQC)
The EQC procedure veries the calibration of the Astute140® Meter, including the
positioning system, optical system and other internal systems of the meter to conrm
that the meter is functioning properly. It is recommended that the EQC procedure be
run daily. The required frequency for running EQC may be set by a Supervisor in the
general Astute140® Meter default settings (See “Quality Control Settings” on p. 31 for
instructions).
50
Prior to running the rst EQC procedure, the As t ute140® EQC Device must be registered
(See “Astute140® EQC Device Registration” on p. 48 for details).
©Astute Medical, Inc. 2017 PN 300153 Rev G 2017/01/16
Page 51
As tu te 140® Meter
A st u t e14 0® Meter Operation
To run the EQC procedure, perform the following steps using the Astute140® EQC
Device provided with the Ast u te140® Meter:
1. Press the key to display the Main Menu (if running EQC immediately after
successful log in, the Main Menu will automatically be displayed).
2. Use the navigation keys to highlight the Run EQC icon.
3. Press the right soft key to select Run EQC. The Astut e140® Meter drawer will
automatically open.
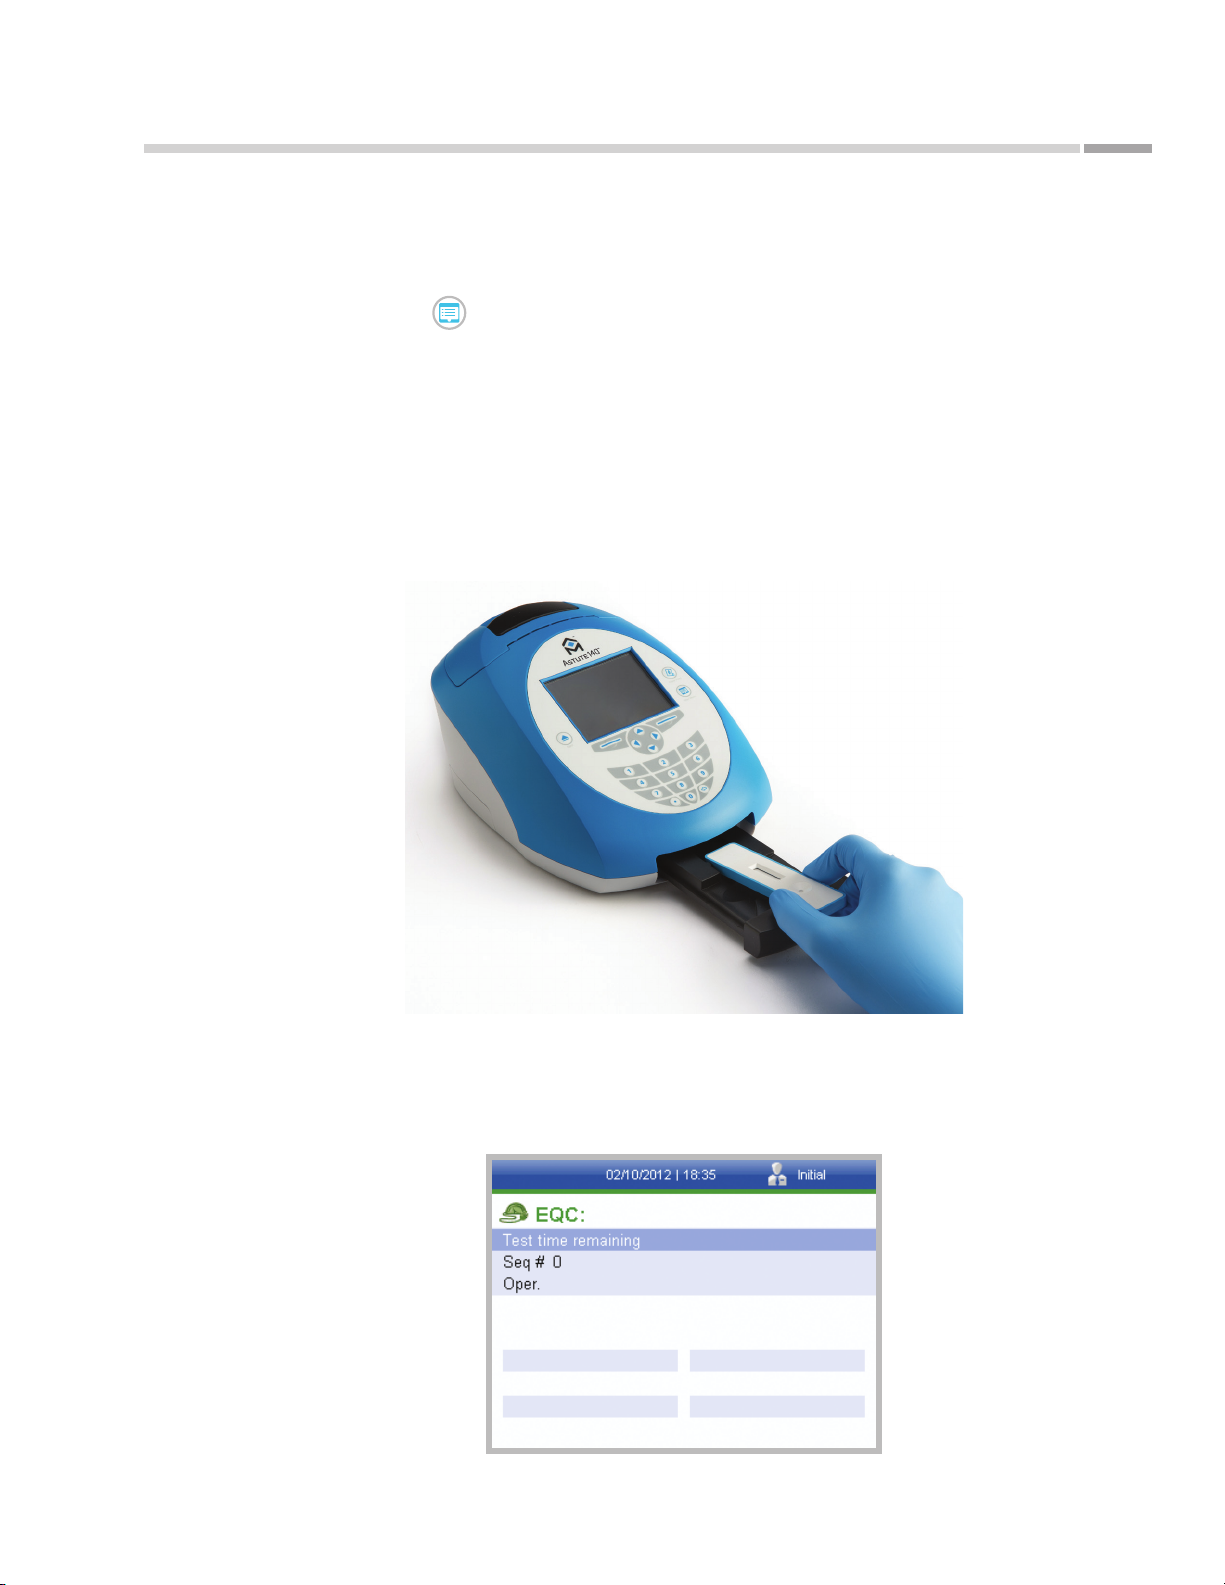
4. When prompted, place the Astute140® EQC Device into the recess inside the
Astute140® Meter drawer with the Astute Medical logo marked on the Astute140®
EQC Device pointed toward the meter. Gently close the drawer until it clicks.
Figure 56.
Inserting
Astute140®
EQC Device
5. After closing the drawer, a temporary screen will appear indicating that the
Astute140® Meter is running the EQC procedure and displaying the amount of
time remaining until test completion will be displayed.
Figure 57.
Temporary screen showing
EQC procedure countdown
©Astute Medical, Inc. 2017 PN 300153 Rev G 2017/01/16
51
Page 52

A st u t e14 0® Meter Operation
6. When the EQC procedure completes, the results will be displayed along with the
word Passed if the meter passed the EQC procedure or Failed if it did not. If the
EQC procedure failed, run the EQC procedure again following the steps below:
a. Press the right soft key to display the Options pop-up menu.
b. Use the key to highlight Next Control and press the right soft key.
c. When the drawer automatically opens, remove the Astute140® EQC Device
and repeat steps 4 and 5. NOTE: If a second Astute140® EQC Device is
available, the second device should be used.
d. When the EQC procedure completes, the results will be displayed along with
the word Passed if the Astut e140® Meter passed the EQC procedure or Failed
if it did not. If the procedure failed, contact Astute Technical Support (See
“Contacting Astute Medical, Inc.” on p. 7 for contact information).
7. To manually print the EQC results if Autoprint is disabled:
a. Press the right soft key to display the Options pop-up menu.
As tu te 140® Meter
b. When the Options pop-up menu is displayed, Print is highlighted. To print the
EQC results, press the right soft key.
c. To hide the Options pop-up menu, use the key to highlight Hide Options
and press the right soft key.
d. To return to the Main Menu, press the left soft key.
8. After completing the EQC procedure, press the key to the left of the LCD
screen to open the Astute140® Meter drawer. Remove the Ast ute140® EQC
Device and store it in the case provided away from direct light.
Test Lot Registration
Assay-specic test cartridges that are uniquely compatible with the Ast ute140® Meter
are used to test patient samples. The Neph roCheCk® Test cartridges designed for use
with the Astut e140® Meter should not be used with any other testing device. Similarly,
only NephroCheCk® Test cartridges designed for use with the Astute140® Meter can be
used with the meter. For a list of approved tests for use with the Astute140® Meter and
to purchase assay-specic test cartridges, go to www.astutemedical.com or consult
your Astute Medical, Inc. sales representative.
52
Each new test lot must be registered prior to use of any NephroCheCk® Test cartridges
from that lot. Operators may register the test lot only if the Supervisor granted registration
permission in the default settings; otherwise, Supervisors must register the test lot.
See the NephroCheCk® Test Kit Package Insert for storage instructions.
©Astute Medical, Inc. 2017 PN 300153 Rev G 2017/01/16
Page 53
As tu te 140® Meter
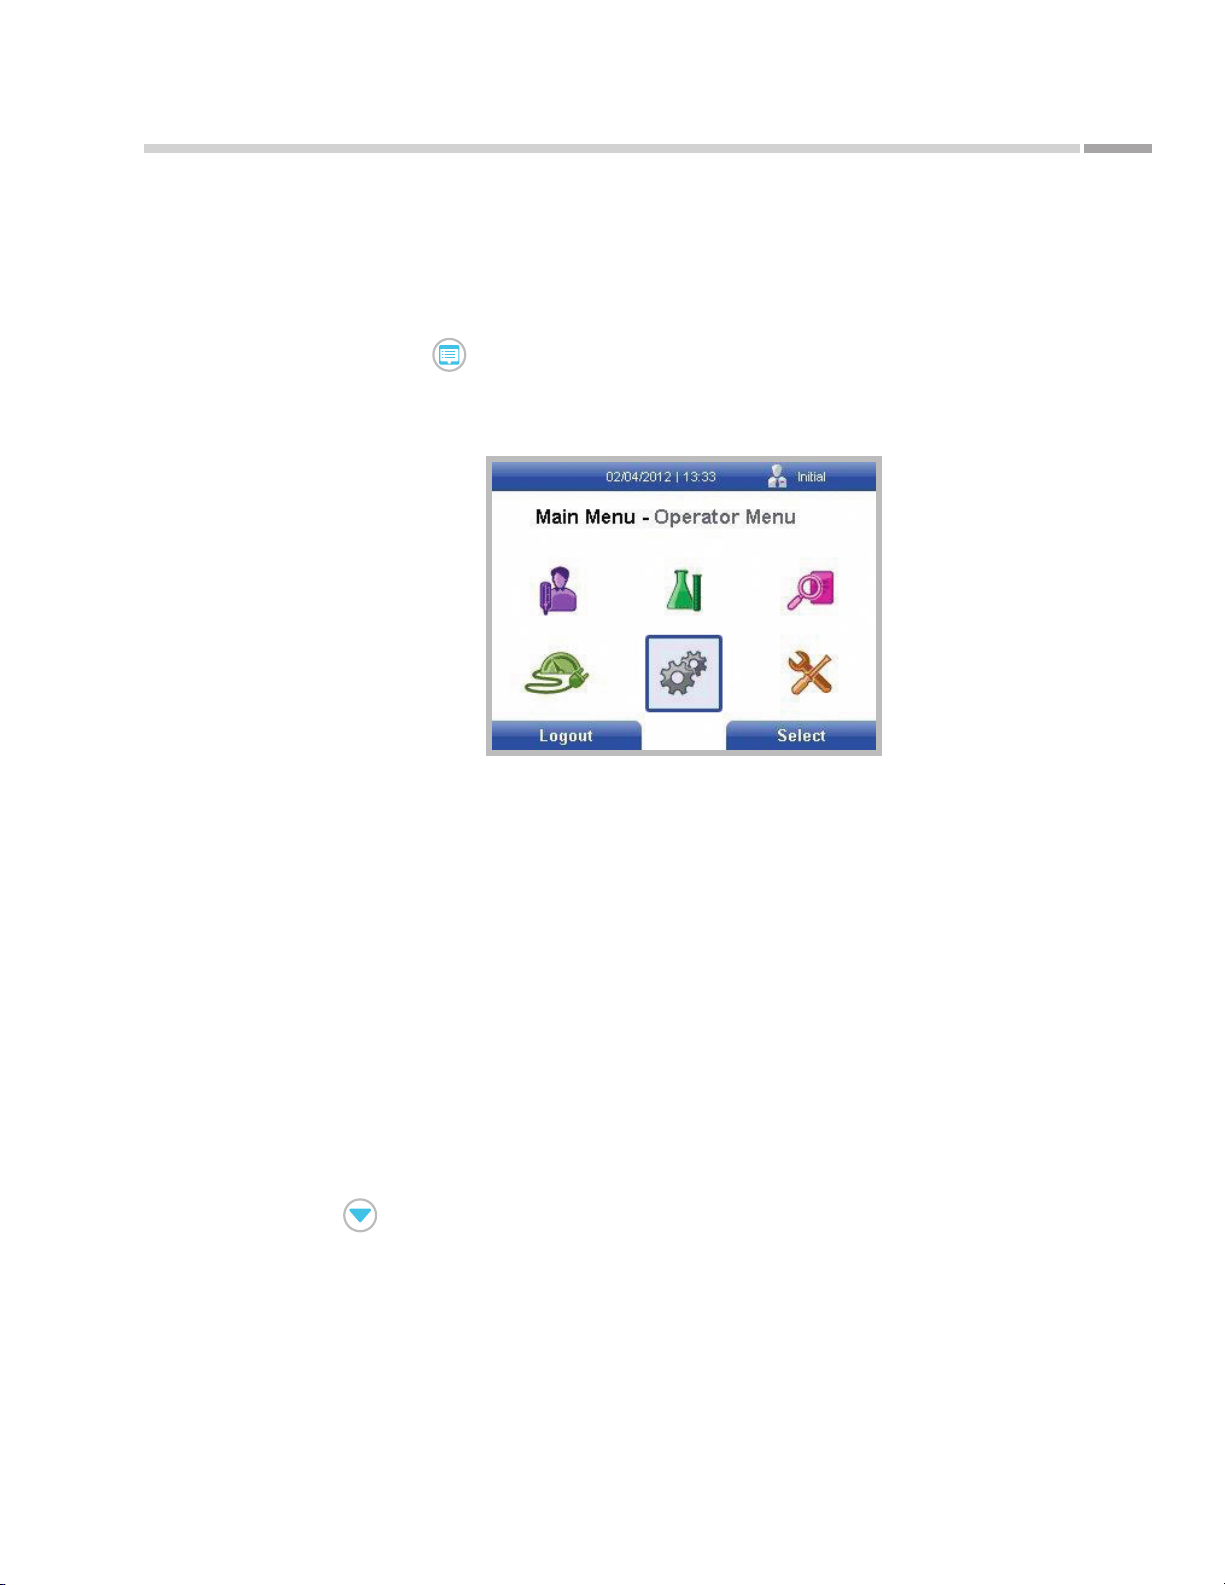
Figure 58.
Main Menu screen with
Operator Menu icon
highlighted
A st u t e14 0® Meter Operation
To register a test lot, perform the following steps:
1. Locate the NephroCheCk® Test RFID Card included in the NephroCheCk® Test K it
from the test lot to be registered.
2. Press the key to display the Main Menu (if registering the test lot immediately
after successful log in, the Main Menu will automatically be displayed).
3. Use the navigation keys to highlight the Operator Menu icon.
4. Press the right soft key to display the Operator Menu.
5. When the Operator Menu is displayed, Manage Lots is highlighted. Press the right
soft key to display the Manage Lots screen.
6. When the Manage Lots screen is displayed, Manage Test Lots is highlighted.
Press the right soft key to display the Registered Test Lots screen.
7. On the Registered Test Lots screen, a list of all the previously registered test lots
will be displayed. If the lot being registered appears on the list, it has already been
registered and need not be registered again. Press the left soft key to return to the
Main Menu. If the test lot does not appear on the list, proceed to step 8.
8. On the Registered Test Lots screen, press the right soft key to display the Options
pop-up menu.
9. When the Options pop-up menu is displayed, Print List is highlighted. Use the
key to highlight Register Lot and press the right soft key.
©Astute Medical, Inc. 2017 PN 300153 Rev G 2017/01/16
53
Page 54
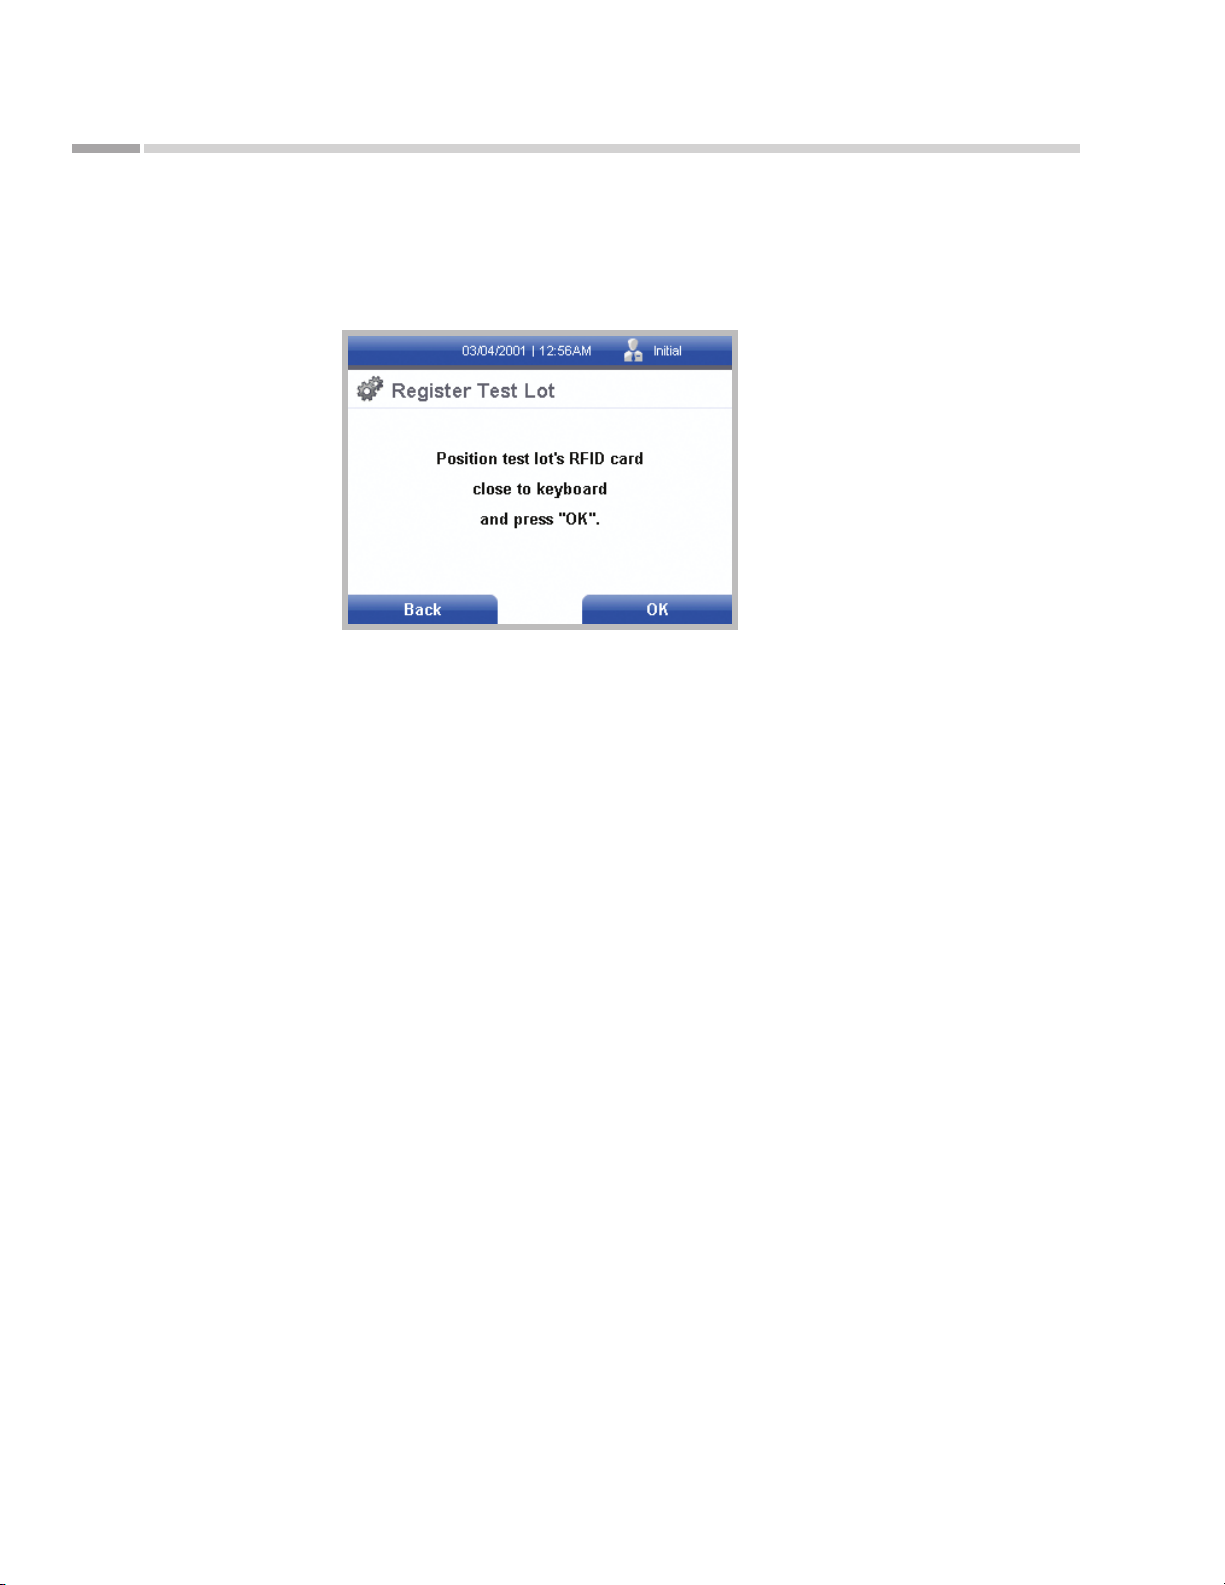
A st u t e14 0® Meter Operation
10. When prompted, hold the NephroCheCk® Test RFID Card for the test lot next to or
against the numeric keypad to register the test lot information and select OK by
pressing the right soft key.
Figure 59.
Register Test Lot
screen
11. If registered correctly, a screen displaying the test lot number, the test type and
the analytes detected by the test will appear. Press the right soft key to select
Accept. The test lot that was just registered should now appear in the list of
registered test lots.
As tu te 140® Meter
12. If registered incorrectly, an error message will appear. Press the right soft key
to select OK and close the error message. Repeat steps 10–11. If registered
incorrectly a second time, contact Astute Technical Support (See “Contacting
Astute Medical, Inc.” on p. 7 for contact information).
13. After use, place the NephroCheCk® Test RFID Card in its sleeve and return it to the
kit from which it was removed. Once all the cartridges in the kit have been used,
the NephroCheCk® Test RFID Card and the NephroCheCk® Test cartridge kit may
be discarded in accordance with local regulations.
14. To register another test lot, locate the NephroCheCk® Test RFID Card for the test
lot to be registered and repeat steps 7–13.
Liquid Control Lot Registration
High and low liquid controls are available to assist the Laboratory in monitoring system
performance, including the test reagents and the Astute140® Meter.
Each assay-specic liquid control kit includes a high and a low liquid control. Each liquid
control in the kit must be registered prior to rst use. Operators may register the liquid
controls only if the Supervisor granted registration permission in the default settings;
otherwise, Supervisors must register the liquid controls.
54
©Astute Medical, Inc. 2017 PN 300153 Rev G 2017/01/16
Page 55
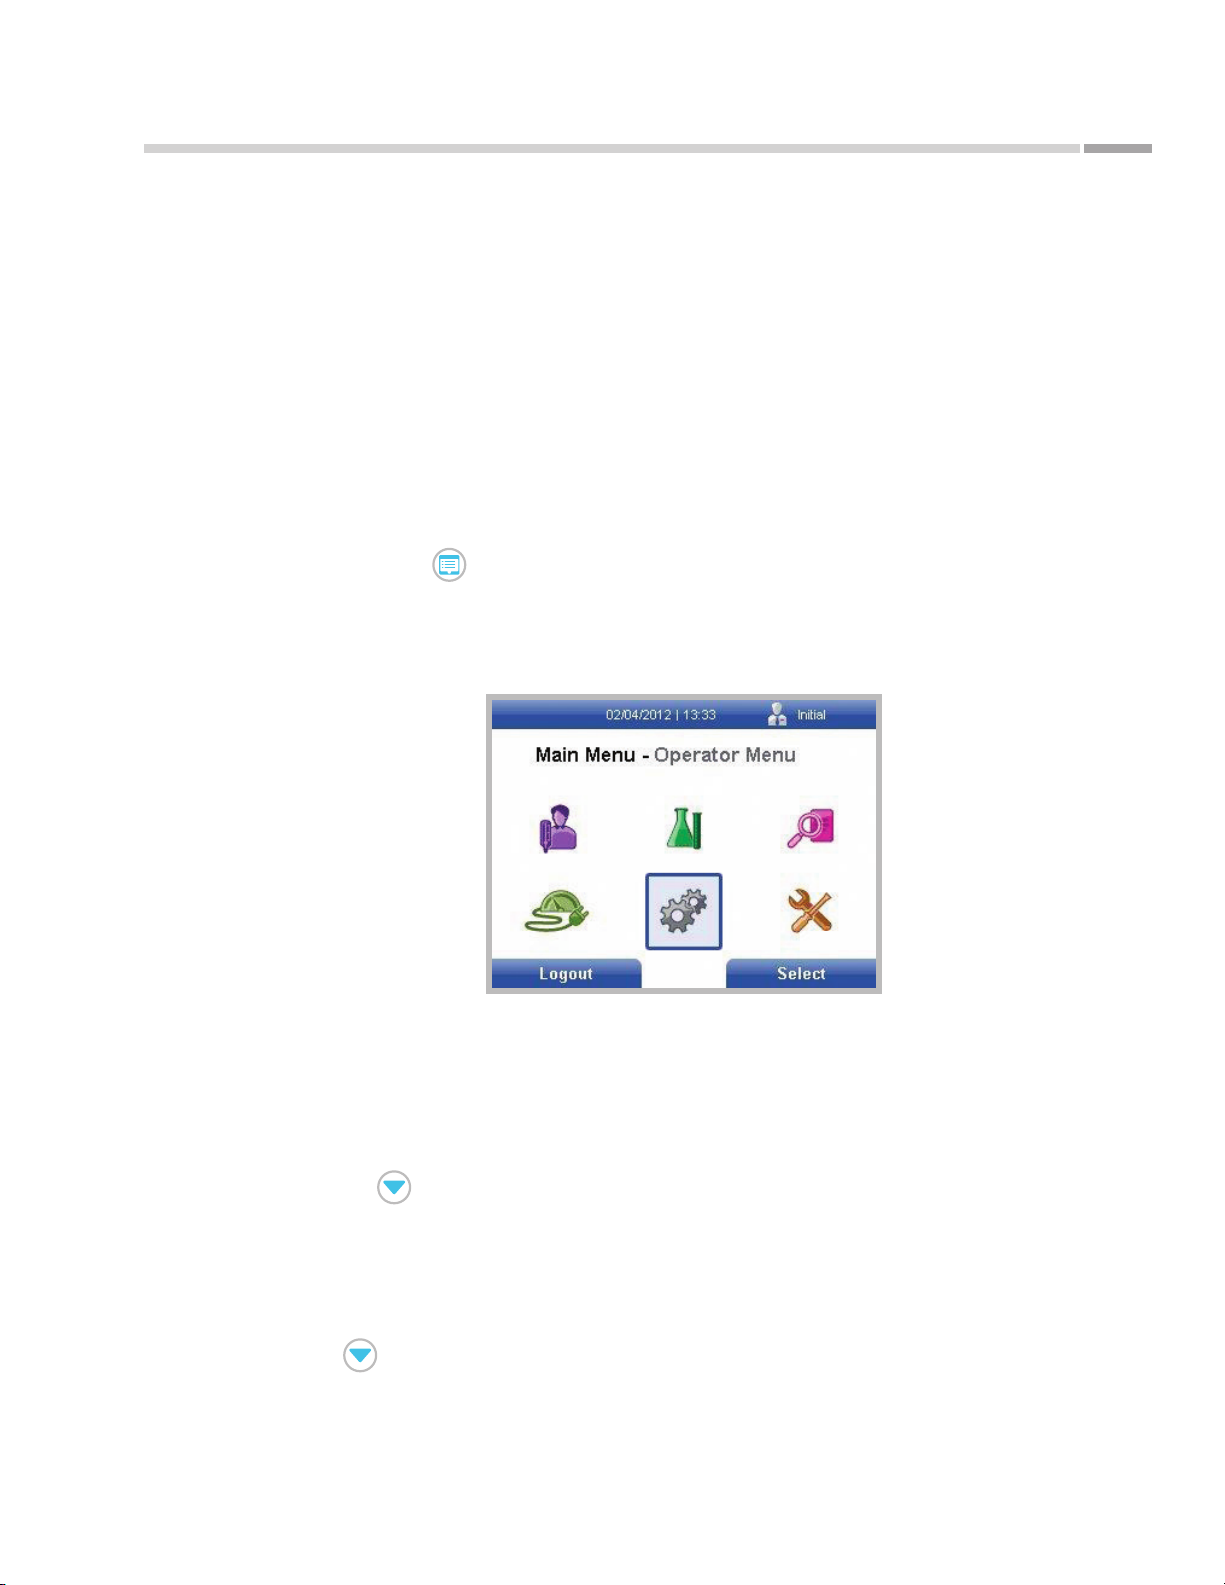
As tu te 140® Meter
A st u t e14 0® Meter Operation
See the assay-specic Package Insert for storage instructions when the liquid control
kit is not in use. Additional liquid controls may be ordered from Astute Medical, Inc. at
www.astutemedical.com or by contacting your Astute Medical, Inc. sales representative.
For each NephroCheCk® Liquid Control Kit, the liquid control registration process must
be carried out twice: once for the high liquid control and once for the low liquid control.
To register each control, perform the following steps:
1. Locate the NephroCheCk® Liquid Control RFID Card for the liquid control lot to
be registered (i.e. the NephroCheCk® High Liquid Control RFID Card if registering
the high liquid control, or the NephroCheCk® Low Liquid Control RFID Card if
registering the low liquid control).
2. Press the key to display the Main Menu (if registering the liquid control
lot immediately after successful log in, the Main Menu will automatically be
displayed).
3. Use the navigation keys to highlight the Operator Menu icon.
Figure 60.
Main Menu screen with
Operator Menu icon
highlighted
4. Press the right soft key to display the Operator Menu.
5. When the Operator Menu is displayed, Manage Lots is highlighted. Press the right
6. When the Manage Lots screen is displayed, Manage Test Lots is highlighted. Use
7. On the Registered LQC Lots screen, press the right soft key to display the Options
8. When the Options pop-up menu is displayed, Print List is highlighted. Use the
soft key to display the Manage Lots screen.
the to highlight Manage LQC Lots and press the right soft key to display the
Registered LQC Lots screen.
pop-up menu.
key to highlight Register Lot and press the right soft key.
©Astute Medical, Inc. 2017 PN 300153 Rev G 2017/01/16
55
Page 56
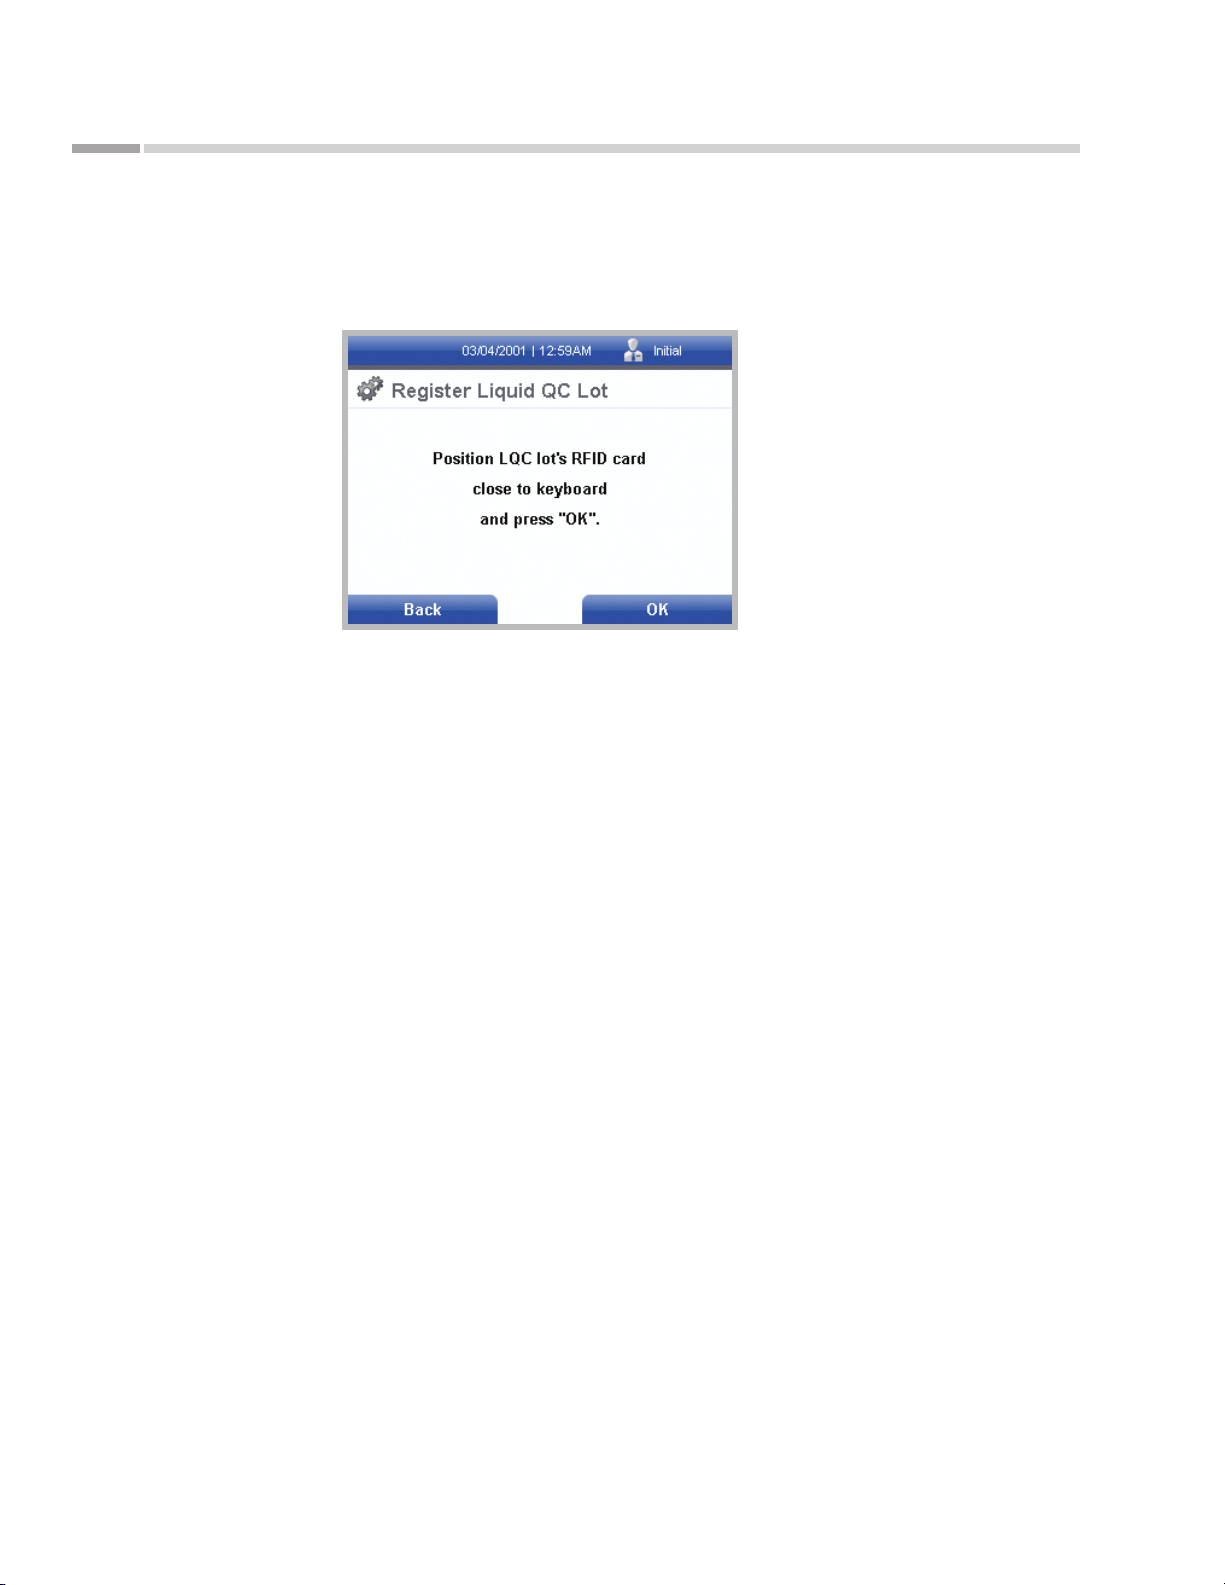
A st u t e14 0® Meter Operation
9. When prompted, hold the NephroCheCk® Liquid Control RFID Card for the liquid
control to be registered next to or against the numeric keypad to register the
liquid control lot information and press the right soft key to select OK.
Figure 61.
Register Liquid QC Lot
screen
10. If registered correctly, a screen indicating that the liquid control lot number was
successfully read from the NephroCheCk® Liquid Control RFID Card will appear,
and the lot number will be displayed. Press the right soft key to select Accept. The
lot that was just registered should now appear in the list of Registered LQC Lots.
As tu te 140® Meter
11. If registered incorrectly, an error message will appear. Press the right soft key
to select OK and close the error message. Repeat steps 9–10. If registered
incorrectly a second time, contact Astute Technical Support (See “Contacting
Astute Medical, Inc.” on p. 7 for contact information).
12. After use, return the NephroCheCk® Liquid Control RFID Card to its sleeve and
store with the corresponding liquid control.
13. To register the second liquid control in the set, or to register another liquid control
set from a dierent lot, repeat steps 7–12.
External Liquid Quality Control (LQC)
High and low liquid controls are available to assist the Laboratory in monitoring system
performance, including the test reagents and the Astute140® Meter.
It is recommended that LQC be performed at the following times:
Every 30 days
With each new lot number of NephroCheCk® Test cartridges
With each new shipment of NephroCheCk® Test Kits
56
After Astute140® Meter servicing
In accordance with the laboratory’s standard quality control procedures
©Astute Medical, Inc. 2017 PN 300153 Rev G 2017/01/16
Page 57
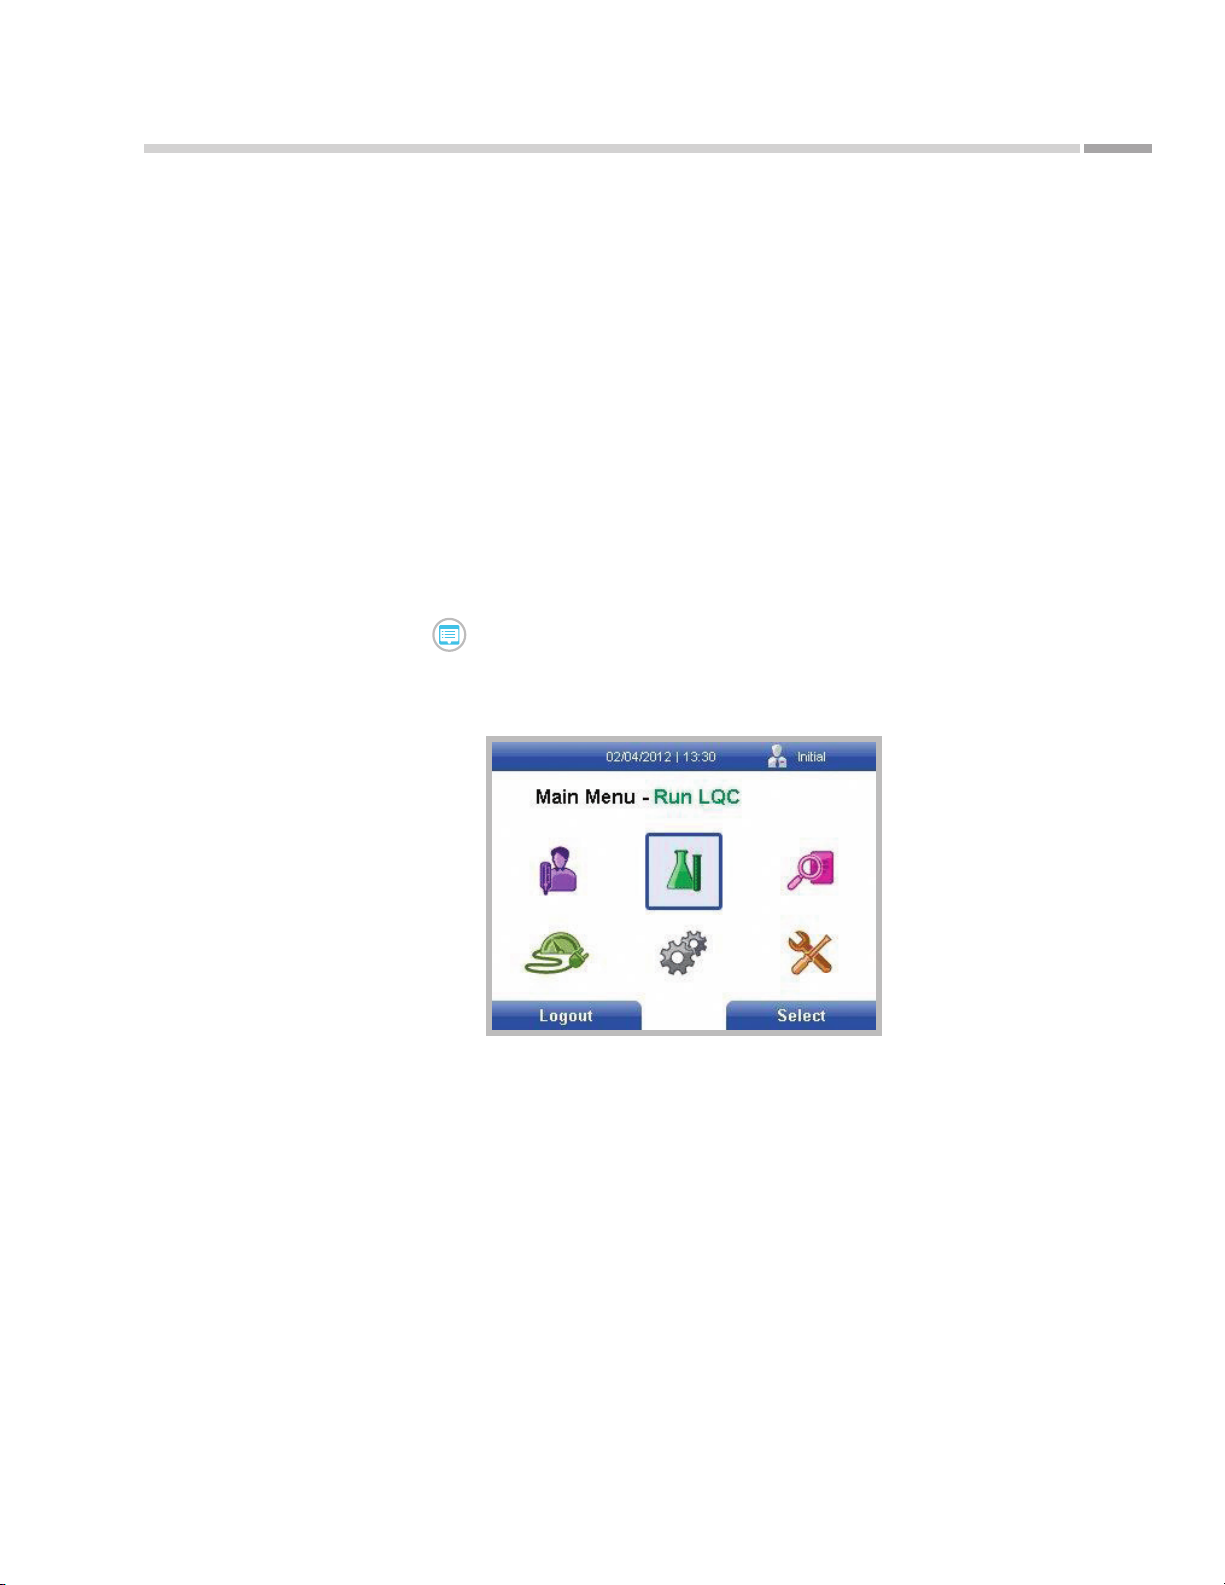
As tu te 140® Meter
A st u t e14 0® Meter Operation
The required frequency for running LQC may be set by a Supervisor in the general
Astute140® Meter default settings (See “Quality Control Settings” on p. 31 for
instructions).
Prior to running the rst LQC procedure, both the high and low liquid controls in the
liquid control kit must be registered if they are from a new liquid control lot (See “Liquid
Control Lot Registration” on p. 54 for instructions).
The LQC procedure must be run twice: once with the high liquid control and once with
the low liquid control. For each lot of NephroCheCk® Test cartridges, both high and low
liquid controls must have passed within the time window set in the default settings
before patient samples can be run using NephroCheCk® Test cartridges from that lot.
To run the LQC procedure, perform the following steps and repeat for the second
control in the liquid control set:
1. Press the key to display the Main Menu (if running LQC immediately after
successful log in, the Main Menu will automatically be displayed).
2. Use the navigation keys to highlight the Run LQC icon.
Figure 62.
Main Menu screen with
Run LQC icon highlighted
3. Press the right soft key to select Run LQC.
©Astute Medical, Inc. 2017 PN 300153 Rev G 2017/01/16
57
Page 58
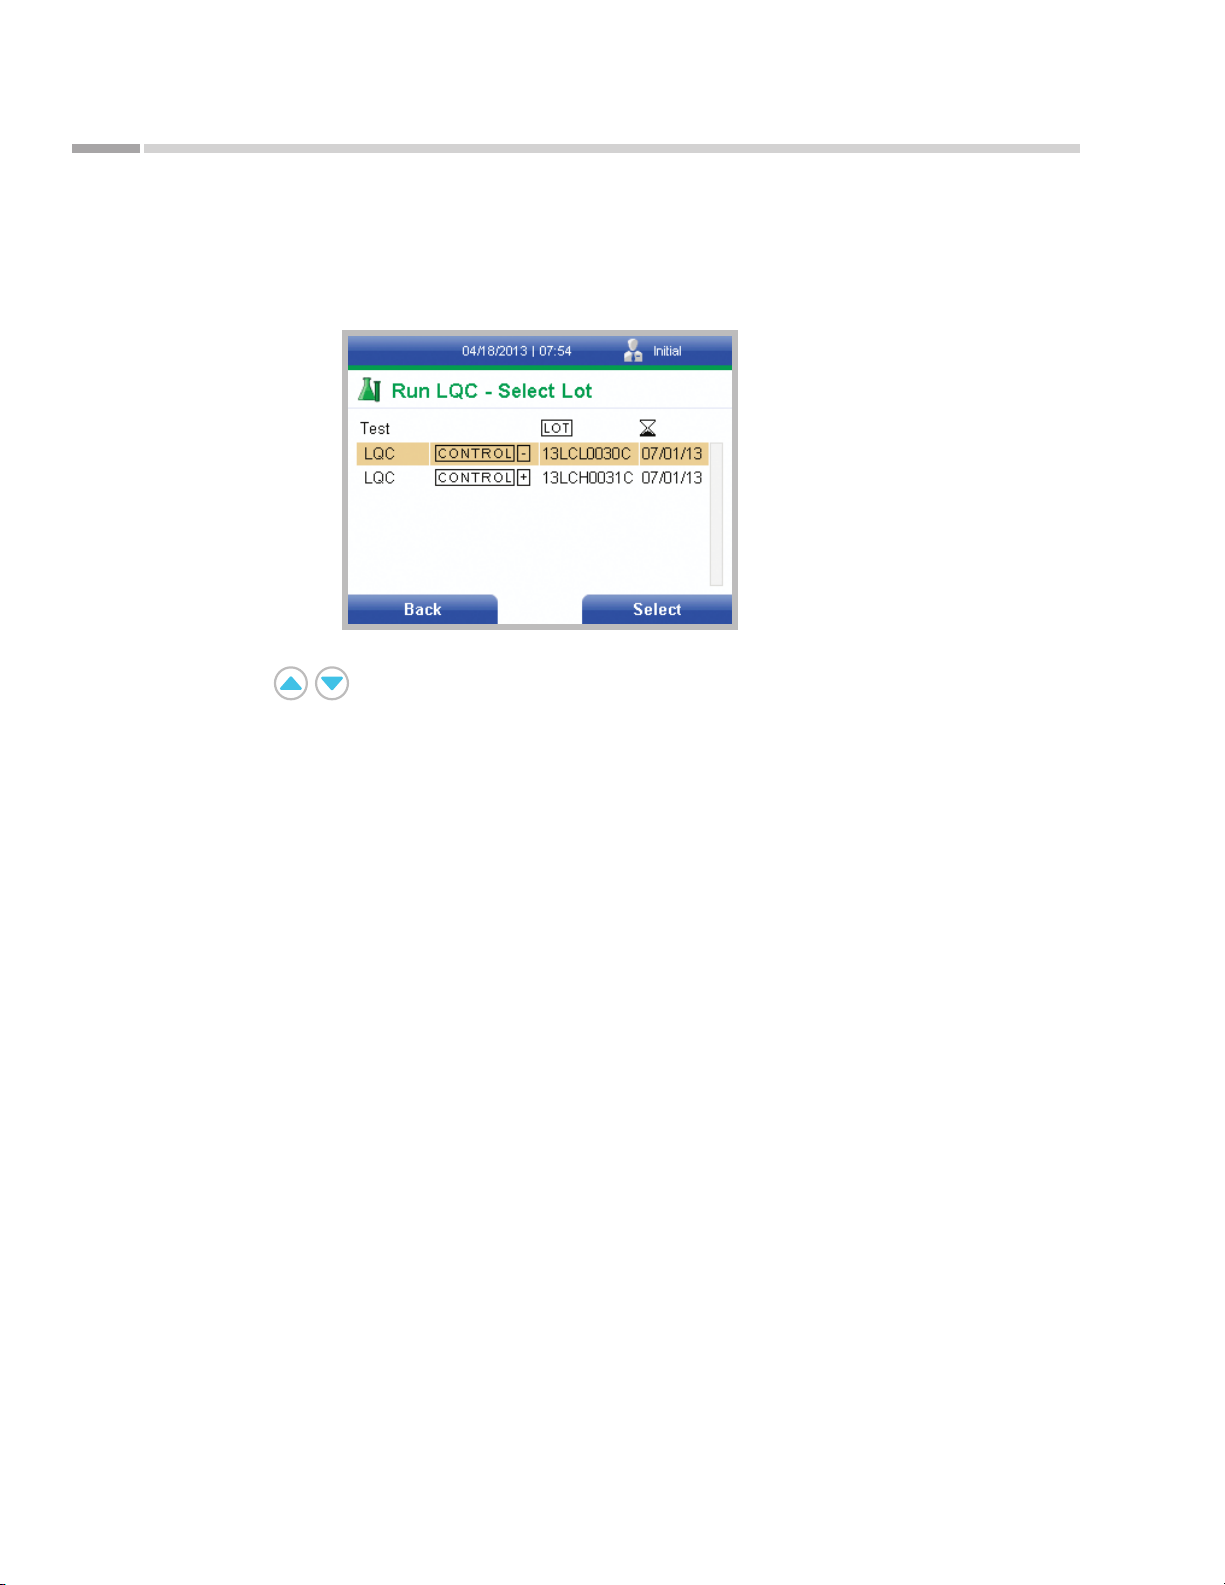
A st u t e14 0® Meter Operation
4. A screen showing all liquid control lots previously registered and their expiration
dates will be displayed. Controls displayed as “Control +” correspond to high liquid
controls and those displayed as “Control –“ correspond to low liquid controls.
Figure 63.
Run LQC — Select Lot
screen
5. Use the keys to highlight the correct liquid control lot being tested and
press the right soft key. If the liquid control lot is not listed, register the liquid
control lot to be tested by following the steps outlined in “Liquid Control Lot
Registration” on p. 54. After the lot is registered, repeat steps 1–6.
As tu te 140® Meter
6. After selecting the liquid control lot to be tested, the Astute140® Meter drawer will
automatically open.
7. Prepare the NephroCheCk® Test cartridge with the liquid control (high or low) as
instructed in the assay-speci c NephroCheCk® Liquid Control Kit Package Insert.
NOTE: The test lot must be registered prior to running LQC (See “Test Lot
Registration” on p. 52 for instructions).
58
©Astute Medical, Inc. 2017 PN 300153 Rev G 2017/01/16
Page 59
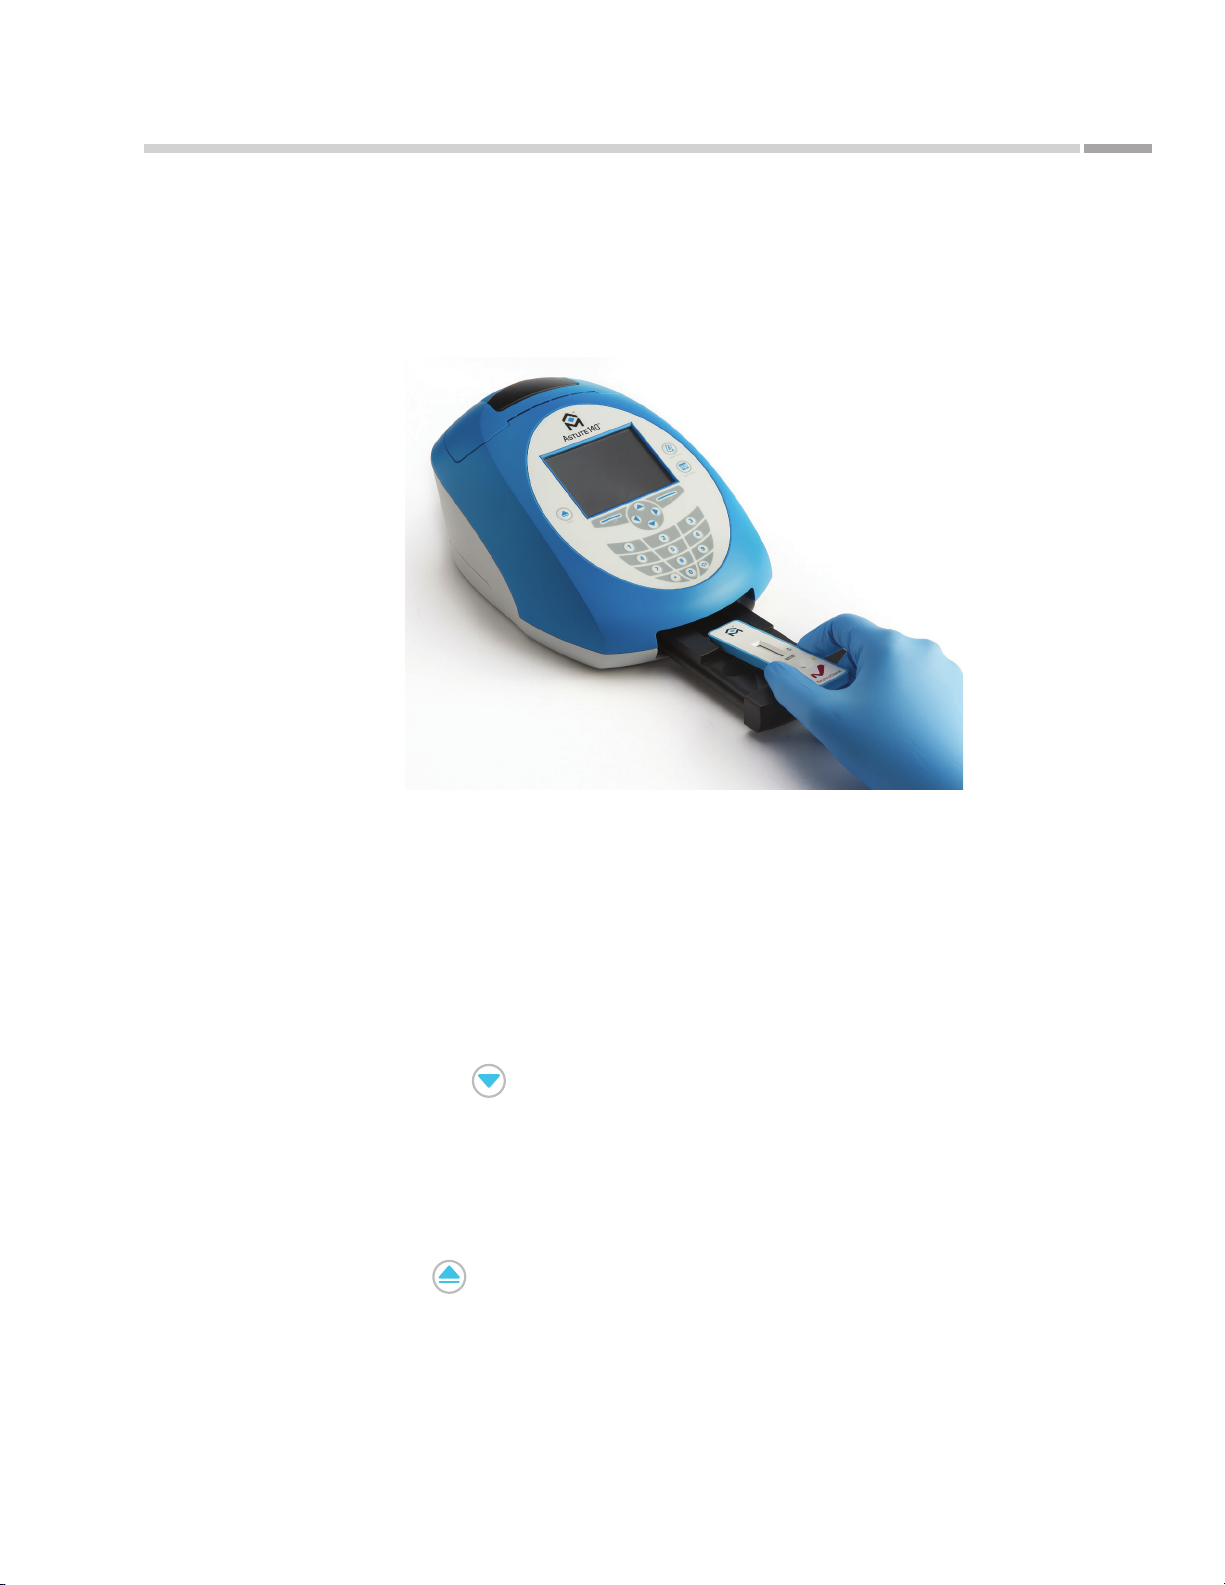
As tu te 140® Meter
Figure 64.
Running LQC
A st u t e14 0® Meter Operation
8. When prompted, place the prepared NephroCheCk® Test cartridge into the recess
inside the Astute140® Meter drawer with the Astute Medical logo marked on the
NephroCheCk® Test cartridge pointed toward the meter. Gently close the drawer
until it clicks.
9. After closing the drawer, a temporary screen will appear indicating that the
Astute140® Meter is running the LQC procedure and the amount of time
remaining until test completion will be displayed.
10. When the LQC procedure completes, the results will be displayed along with the
word Passed if the procedure passed or Failed if it did not. If the LQC procedure
failed, run the LQC procedure again following the steps below:
a. Press the right soft key to display the Options pop-up menu.
b. Use the key to highlight Next Control and press the right soft key.
c. Repeat steps 4–9 using a freshly prepared NephroCheCk® Test cartridge.
When the LQC procedure completes, the results will be displayed along with
the word Passed if the meter passed the LQC procedure or Failed if it did not.
If the procedure failed a second time, contact Astute Technical Support
(See “Contacting Astute Medical, Inc.” on p. 7 for contact information).
11. Press the key to the left of the LCD screen to open the As tute140® Meter
drawer. Remove the cartridge and discard according to the laboratory’s standard
practices for the type of biological sample used.
12. To manually print the LQC results if Autoprint is disabled:
a. Press the right soft key to display the Options pop-up menu.
©Astute Medical, Inc. 2017 PN 300153 Rev G 2017/01/16
59
Page 60
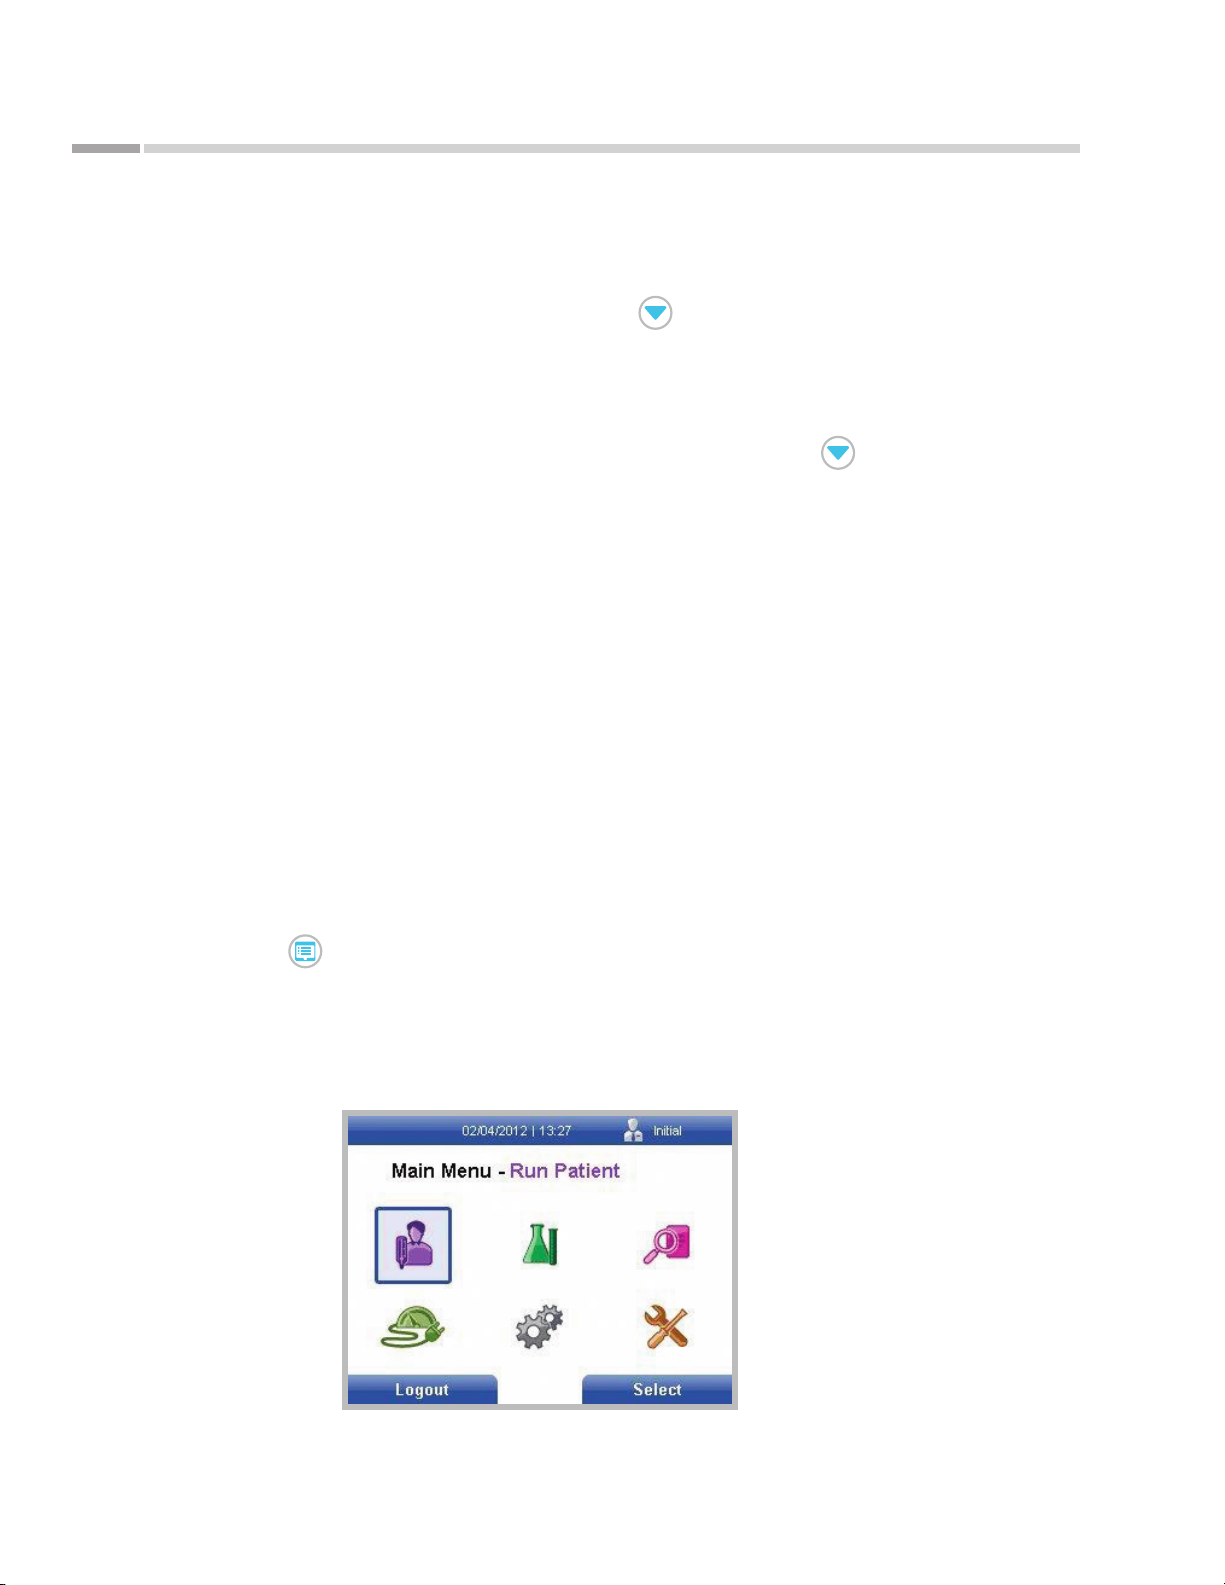
A st u t e14 0® Meter Operation
b. When the Options pop-up menu is displayed, Print is highlighted. To print
the LQC results, press the right soft key.
c. To hide the Options pop-up menu, use the key to highlight Hide
Options and press the right soft key.
d. To return to the Main Menu, press the left soft key.
13. To run the next liquid control (high or low) after viewing or printing the LQC results,
press the right soft key to display the Options pop-up menu. Use the key to
highlight Next Control and press the right soft key. Repeat steps 4–12.
Calibration Verication
A NephroCheCk® Calibration Verication (Cal Vers) Kit is available to assist the
laboratory in monitoring test performance. Good Laboratory Practice suggests that
the NephroCheCk® Calibration Verication Kit should be tested at least once every
6 months, after Astute140® Meter servicing, and in accordance with the laboratory
standard procedures.
As tu te 140® Meter
THE NephroCheCk® Calibration Verication vials should be prepared following the
procedures for preparing and testing patient samples with the Neph roCheCk® Test and
Astute140® Meter.
To test calibration verication materials, perform the following steps for each of the
vials:
1. Press the key to display the Main Menu (if running calibration verication
immediately after successful log in, the Main Menu will automatically be
displayed).
2. When the Main Menu is displayed, use the navigation keys to highlight the Run
Patient icon. Press the right soft key to select Run Patient.
Figure 65.
Main Menu screen
with Run Patient icon
highlighted
60
©Astute Medical, Inc. 2017 PN 300153 Rev G 2017/01/16
Page 61

As tu te 140® Meter
A st u t e14 0® Meter Operation
3. When the Run Patient screen is displayed, Patient ID will be highlighted. When
prompted for Patient ID we suggest entering 001, 002, 003, 004, 005, (or unique
alphanumeric codes as dened by your Laboratory) corresponding to each
NephroCheCk® Calibration Verication Vial level. Enter the Patient ID manually
using the numeric keypad or an external keyboard (if connected). NOTE: The
NephroCheCk® Test cartridge must be run immediately after inoculation with the
calibration verication sample.
4. Using the grips on the side of the NephroCheCk® Test cartridge, position the
cartridge inside the Astute140® Meter drawer with the Astute Medical logo
towards the inside of the meter drawer. Keep the NephroCheCk® Test cartridge
horizontal and avoid tipping the test cartridge during placement into the
Astute140® Meter drawer.
5. Close the Astute140® Meter drawer. In approximately 20 minutes the Calibration
and Verication result will be displayed.
6. Once the calibration verication test is complete, the test results will be displayed.
7. To manually print individual calibration verication test results if Autoprint is
disabled:
a. Press the right soft key to display the Options pop-up menu.
b. When the Options pop-up menu is displayed, Print is highlighted. To print the
individual calibration verication test results, press the right soft key.
c. To hide the Options pop-up menu, use the key to highlight Hide Options
and press the right soft key.
d. To return to the Main Menu, press the left soft key.
8. Press the eject button to the left of the LCD screen to open the Astute140® Meter
drawer. Remove the NephroCheCk® Test cartridge and discard the cartridge,
the calibration verication vial, and the conjugate vial in accordance with local
regulations.
9. Press the right soft key to display the Options pop-up menu. Use the key to
highlight Next Patient and press the right soft key. Repeat steps for the remaining
four levels of Neph roCheCk® Calibration Verication Kit Vials.
©Astute Medical, Inc. 2017 PN 300153 Rev G 2017/01/16
61
Page 62
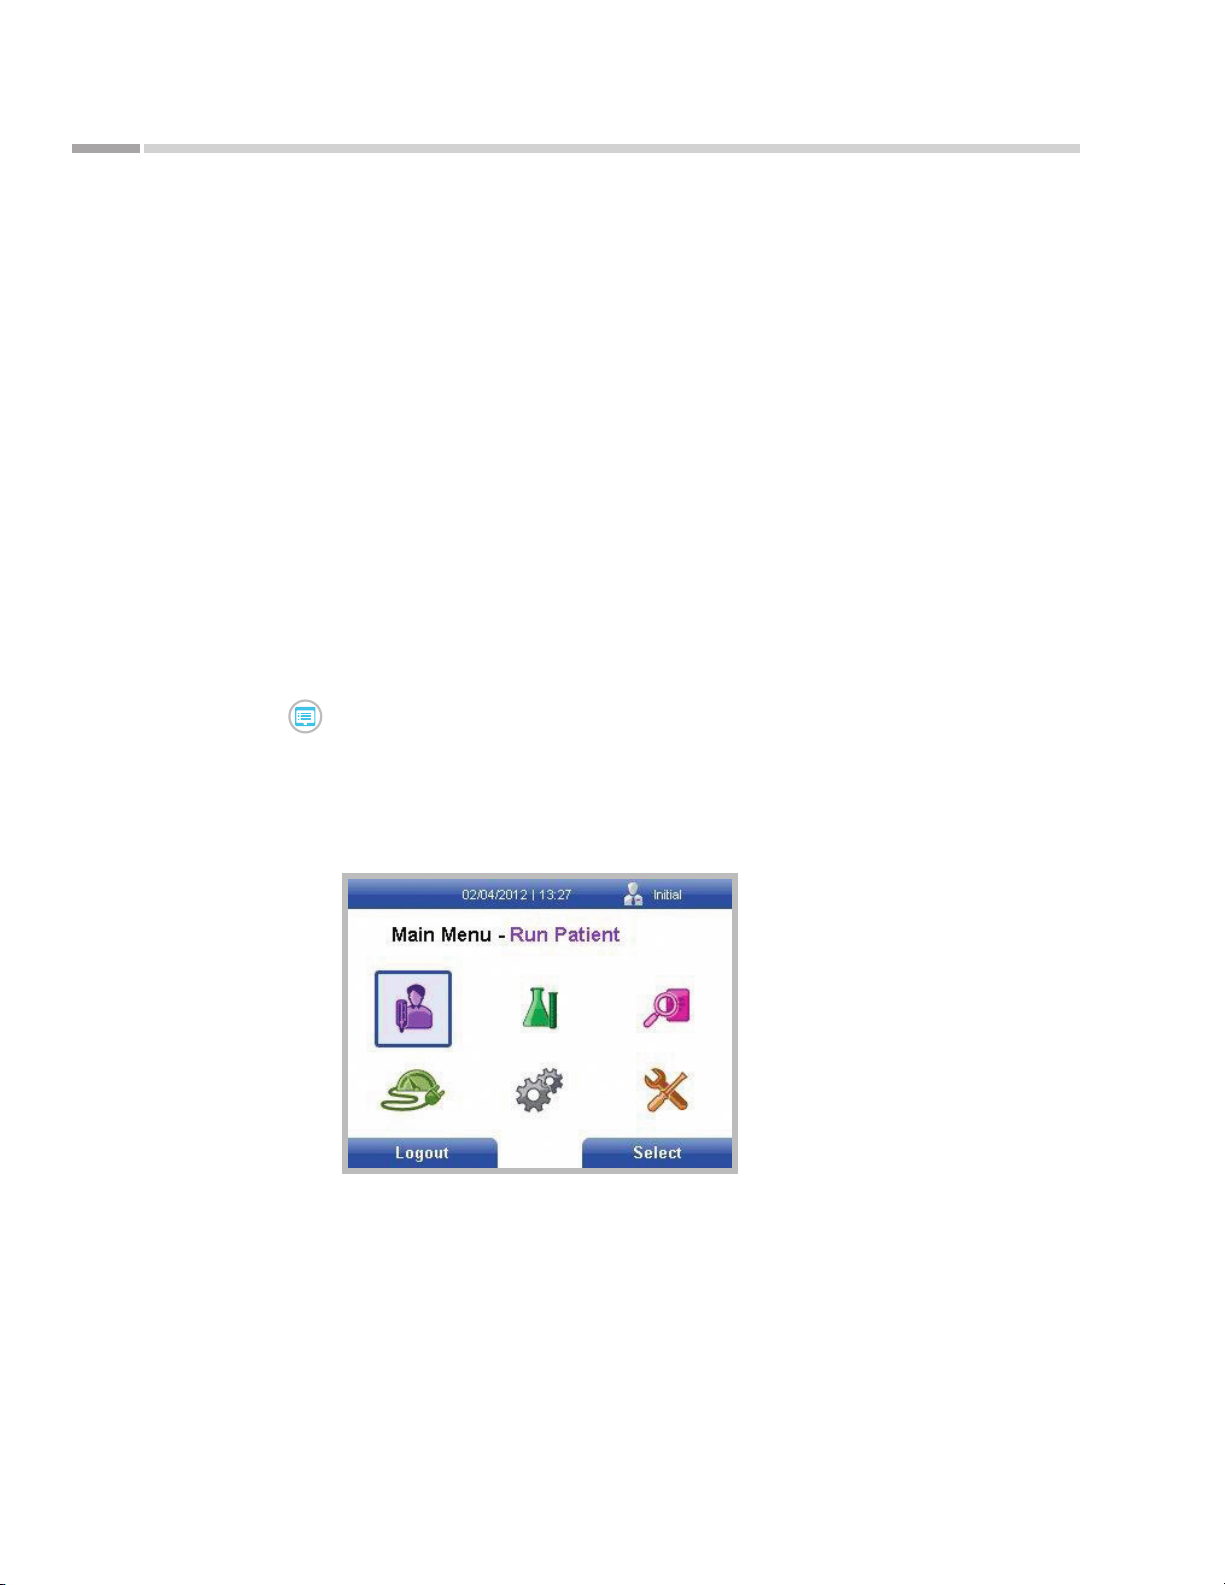
A st u t e14 0® Meter Operation
Testing a Patient Sample
Assay-specic test cartridges that are uniquely compatible with the Ast ute140®
Meter are used to test patient samples. The test cartridges approved for use with the
Astute140® Meter should not be used with any other testing device. Similarly, only
test cartridges approved for use with the Astute140® Meter can be used. For a list of
approved tests for use with the Astute140® Meter and to purchase assay-specic test
cartridges, go to www.astutemedical.com or consult your Astute Medical, Inc. sales
representative.
NOTE: Unless modied by the Supervisor, the Run Patient option will be greyed
out (unavailable) until valid Astu te140® Meter Electronic Quality Control (EQC) and
NephroCheCk® Liquid Control Kit results are detected.
Each new test lot must be registered prior to use of any Neph roCheCk® Test cartridges
from that lot (See “Test Lot Registration” on p. 52 for instructions).
To test a patient sample, perform the following steps:
As tu te 140® Meter
1. Press the key to display the Main Menu (if running patient sample
immediately after successful log in, the Main Menu will automatically be
displayed).
2. When the Main Menu is displayed, use the navigation keys to highlight the Run
Patient icon. Press the right soft key to select Run Patient.
Figure 66.
Main Menu screen
with Run Patient icon
highlighted
3. When the Run Patient screen is displayed, Patient ID will be highlighted. Enter
the Patient ID manually using the numeric keypad or an external keyboard (if
connected) or, if applicable, by scanning the barcode on the patient sample with
the optional barcode reader (if connected).
62
©Astute Medical, Inc. 2017 PN 300153 Rev G 2017/01/16
Page 63
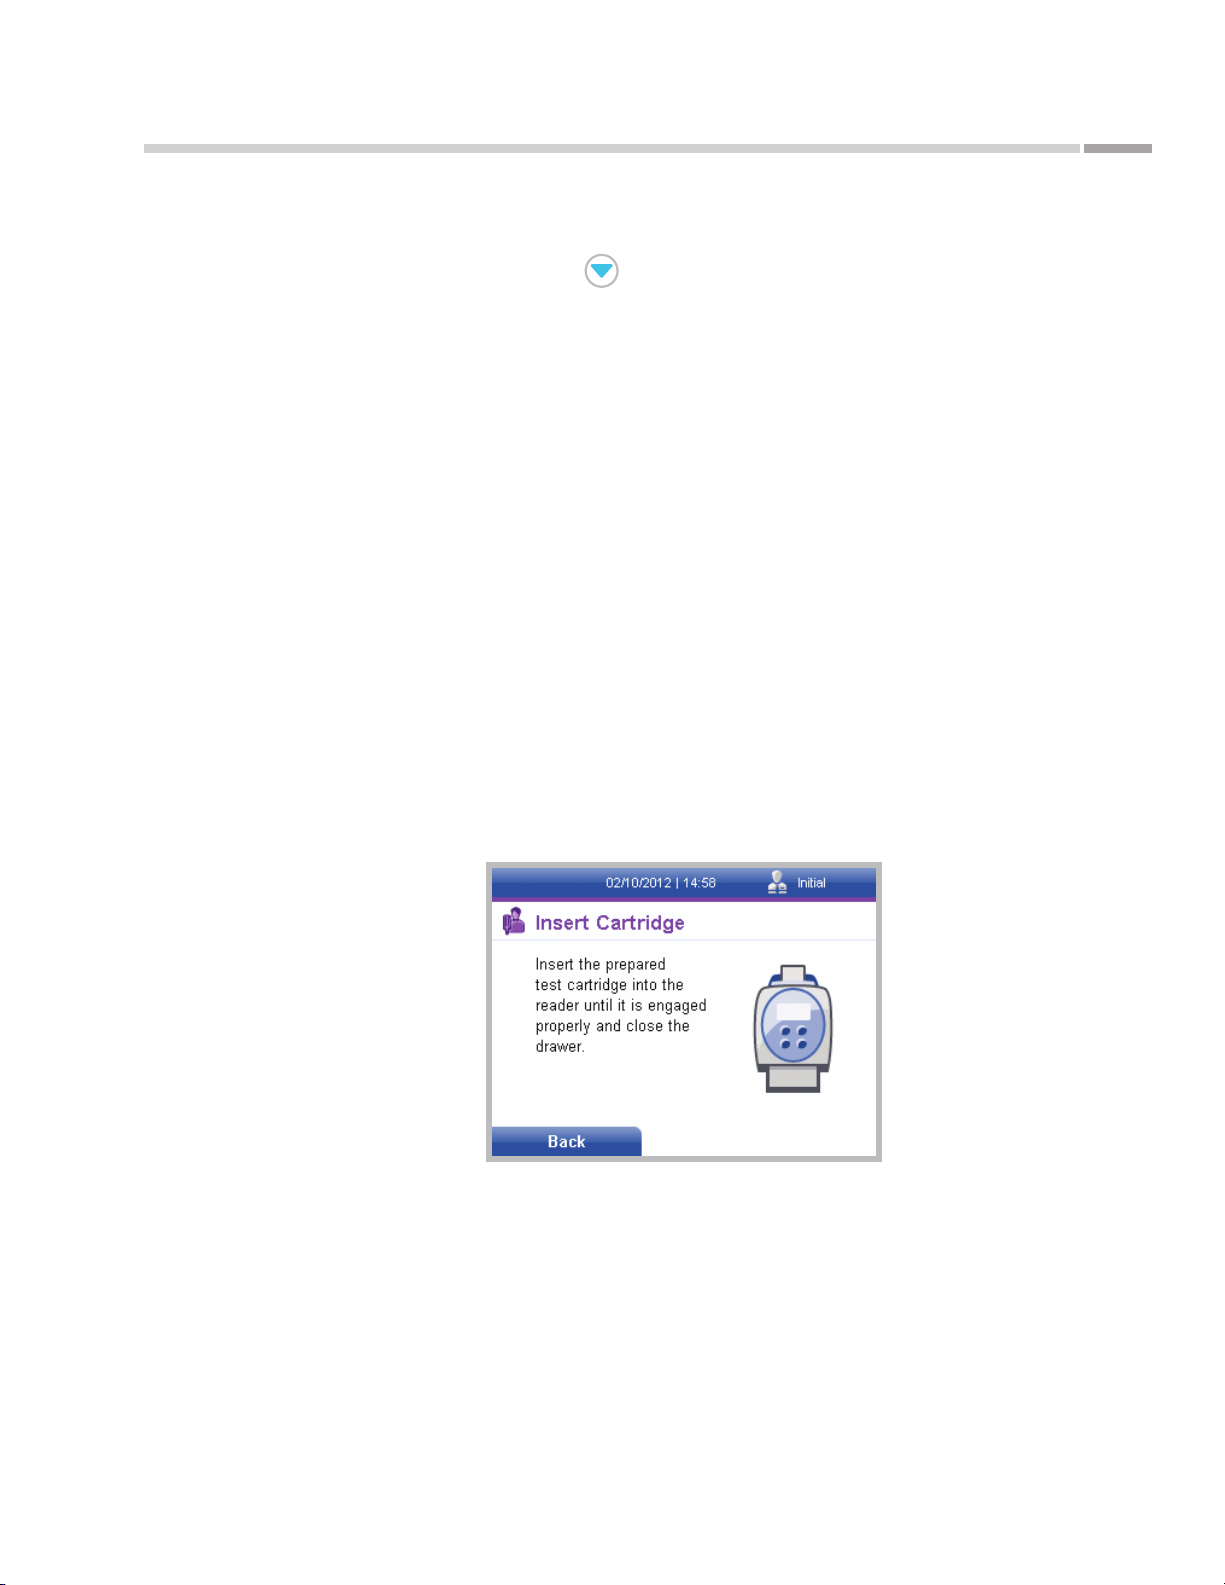
As tu te 140® Meter
A st u t e14 0® Meter Operation
4. If available, a Sample ID may be entered; otherwise, this eld may be left blank. To
enter a Sample ID, use the key to highlight Sample ID and enter the Sample
ID manually using the numeric keypad or an external keyboard (if connected)
or, if applicable, by scanning the barcode on the patient sample with an optional
barcode reader (if connected). NOTE: an external keyboard and barcode reader
are optional devices that are not included with the Astute140® Meter kit.
5. After conrming that the correct Patient ID and/or Sample ID have been entered,
press the right soft key to select Run Patient.
6. After selecting Run Patient, the Astute140® Meter drawer will automatically open.
7. Prepare the NephroCheCk® Test cartridge with the patient specimen according
to the NephroCheCk® Text Kit Package Insert. NOTE: Each NephroCheCk® Test
cartridge must be run immediately after inoculation with the patient sample, and
the next cartridge should not be prepared until testing on the rst has completed.
The Astute140® Meter times the incubation period for the test, and only one test
can be run at a time. Inoculating additional samples before testing has completed
may lead to inaccurate results.
8. When prompted, place the prepared NephroCheCk® Test cartridge into the recess
Figure 67.
Insert Cartridge screen
inside the Astute140® Meter drawer with the Astute Medical logo marked on the
NephroCheCk® Test cartridge pointed toward the meter. Gently close the drawer
until it clicks.
©Astute Medical, Inc. 2017 PN 300153 Rev G 2017/01/16
63
Page 64
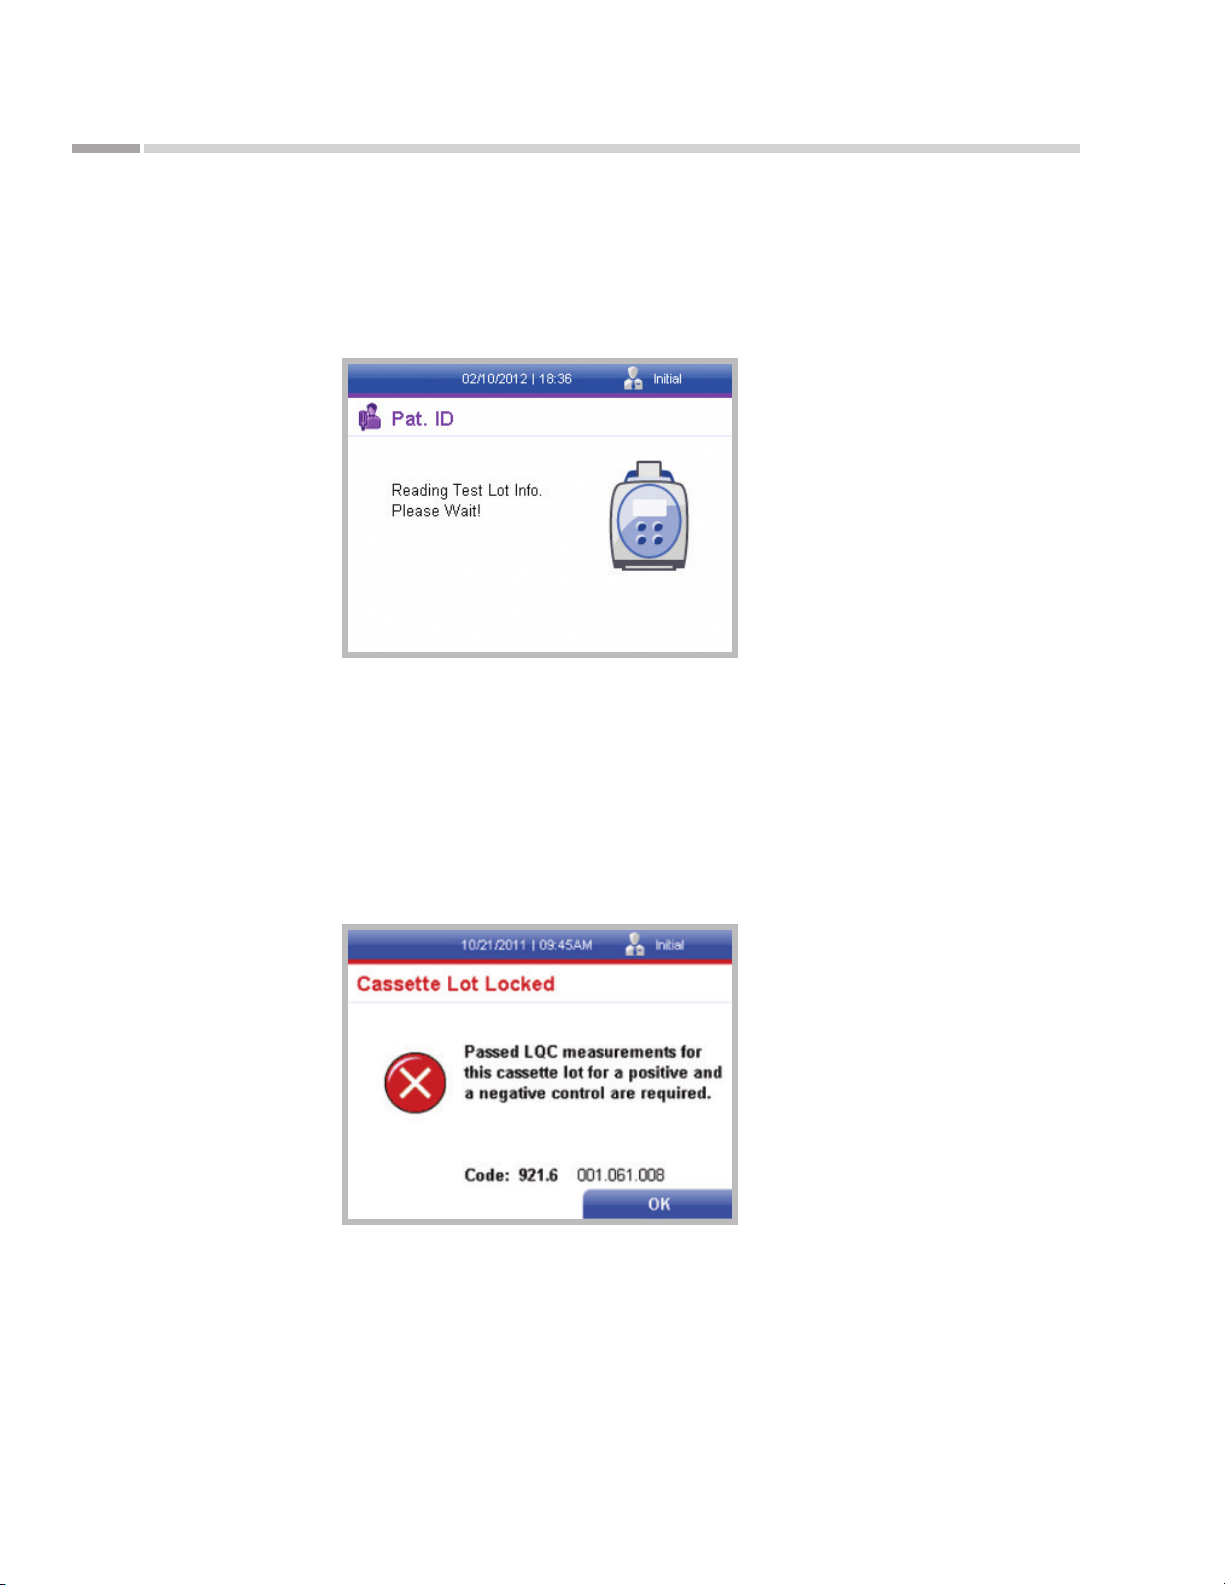
A st u t e14 0® Meter Operation
9. After closing the drawer, a temporary screen will appear indicating that the
Astute140® Meter is reading the test lot information to determine if the test lot is
registered and whether high and low LQC measurements have passed for the test
lot.
Figure 68.
Temporary “Reading Test
Lot Info. Please Wait!”
screen
As tu te 140® Meter
a. If the lot has not been registered, an error message will appear. Press the
right soft key to select OK and close the error message. Register the lot
(See “Test Lot Registration” on p. 52) before running the test again.
b. Unless QC Settings are changed by the Supervisor, if the lot has been
registered, but high and low LQC measurements have not passed for the
NephroCheCk® Test Kit lot, the patient test will not be run and a message
indicating that passed LQC measurements are required will be displayed.
Figure 69.
“Cassette Lot Locked”
error message
If high and low LQC measurements are required, follow these steps:
64
i. Press the right soft key to select OK and close the error message.
ii. Discard the NephroCheCk® Test cartridge prepared with the patient
sample.
©Astute Medical, Inc. 2017 PN 300153 Rev G 2017/01/16
Page 65

As tu te 140® Meter
A st u t e14 0® Meter Operation
iii. Run high and low LQC measurements (See “External Liquid Quality
Control” on p. 56 for instructions).
iv. When high and low LQC measurements have passed, repeat steps
1–9.
10. If LQC measurements for the NephroCheCk® Test cartridge lot have passed,
a screen indicating the amount of time remaining until test completion will be
displayed. To abort the test for any reason, select Cancel by pressing the left soft
key.
11. Once the test is complete, the test results will be displayed.
12. To manually print the patient test results if Autoprint is disabled:
a. Press the right soft key to display the Options pop-up menu.
b. When the Options pop-up menu is displayed, Print is highlighted. To print
the patient test results, press the right soft key.
c. To hide the Options pop-up menu, use the key to highlight Hide
Options and press the right soft key.
d. To return to the Main Menu, press the left soft key.
13. Press the eject button to the left of the LCD screen to open the Astute140® Meter
drawer. Remove the NephroCheCk® Test cartridge and discard according to the
laboratory’s standard practices for the type of biological sample used.
14. To run the next patient sample after viewing or printing the patient test results,
press the right soft key to display the Options pop-up menu. Use the key to
highlight Next Patient and press the right soft key. Repeat steps 4–13.
Review and Management of Test Results
Patient, LQC, EQC and Calibration Verication test results can be recalled, printed or
sent to the LIS at any time. To perform these functions, follow the instructions below.
Patient Results
1. Press the key to display the Main Menu.
©Astute Medical, Inc. 2017 PN 300153 Rev G 2017/01/16
65
Page 66
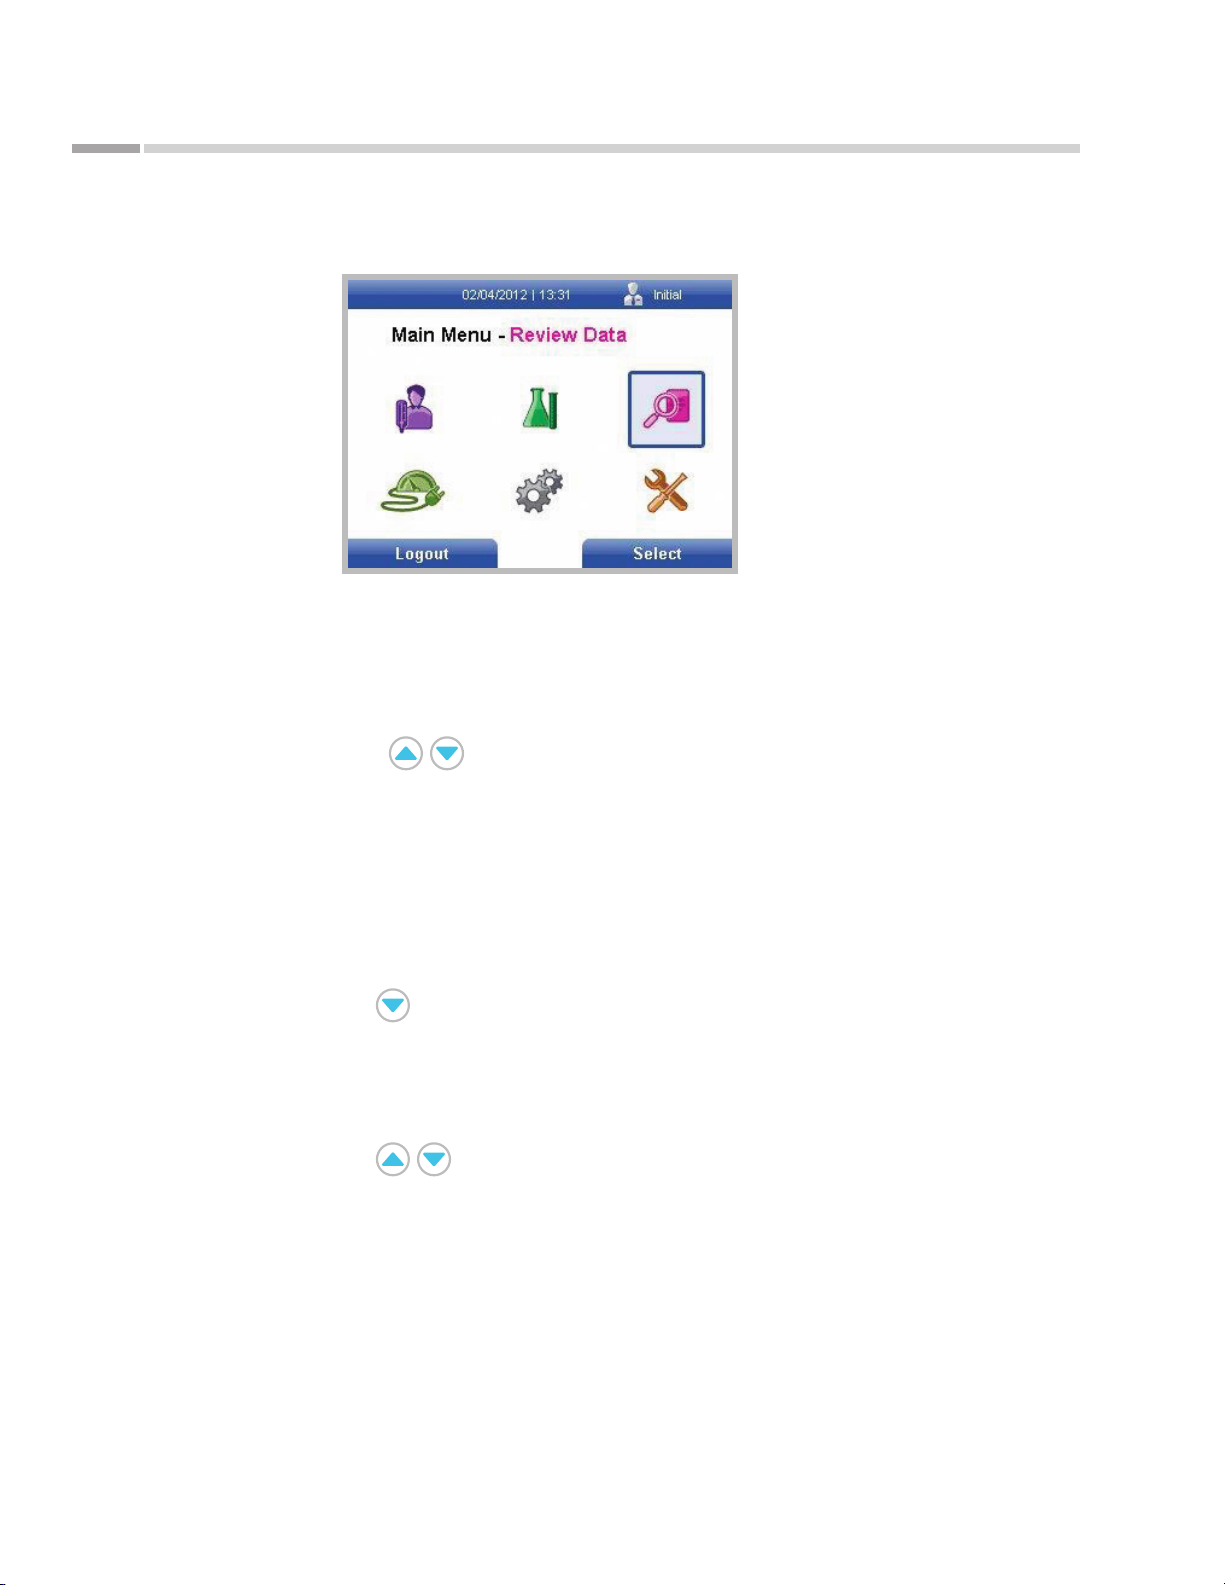
A st u t e14 0® Meter Operation
2. Using the navigation keys, highlight the Review Data icon and press the right soft key.
Figure 70.
Main Menu screen
with Review Data icon
highlighted
3. When the Review Data Menu is displayed, Patient Results is highlighted. Press
the right soft key to display the Patient Results screen.
4. On the Patient Results screen, patient results can be selected by entering a range
of dates, a range of test sequence numbers or a specic Patient ID, Sample ID, or
Operator ID. Use the keys to select the desired data elements, and enter
the data using the numeric keypad or an external keyboard (if connected). NOTE:
date elds must be entered in the format specied in the default settings.
As tu te 140® Meter
5. Once the selection criteria are entered, press the right soft key to display a list of
the patient results meeting the selection criteria.
a. To print the list of patient test results:
i. Display the Options pop-up menu by pressing the right soft key.
ii. Use the key to highlight Print List.
iii. After printing is complete, the list of patient results will again be
displayed.
b. To display and/or print detailed test results for a particular patient sample:
i. Use the keys to highlight the test of interest.
ii. Press the right soft key to display the Options pop-up menu.
iii. When the Options pop-up menu is displayed, Show Details will be
highlighted. Press the right soft key to select Show Details.
iv. Details of the patient test results will be displayed. To print the test
results, press the right soft key to select Print.
v. After printing is complete, press the left soft key to return to the list of
patient results.
66
©Astute Medical, Inc. 2017 PN 300153 Rev G 2017/01/16
Page 67
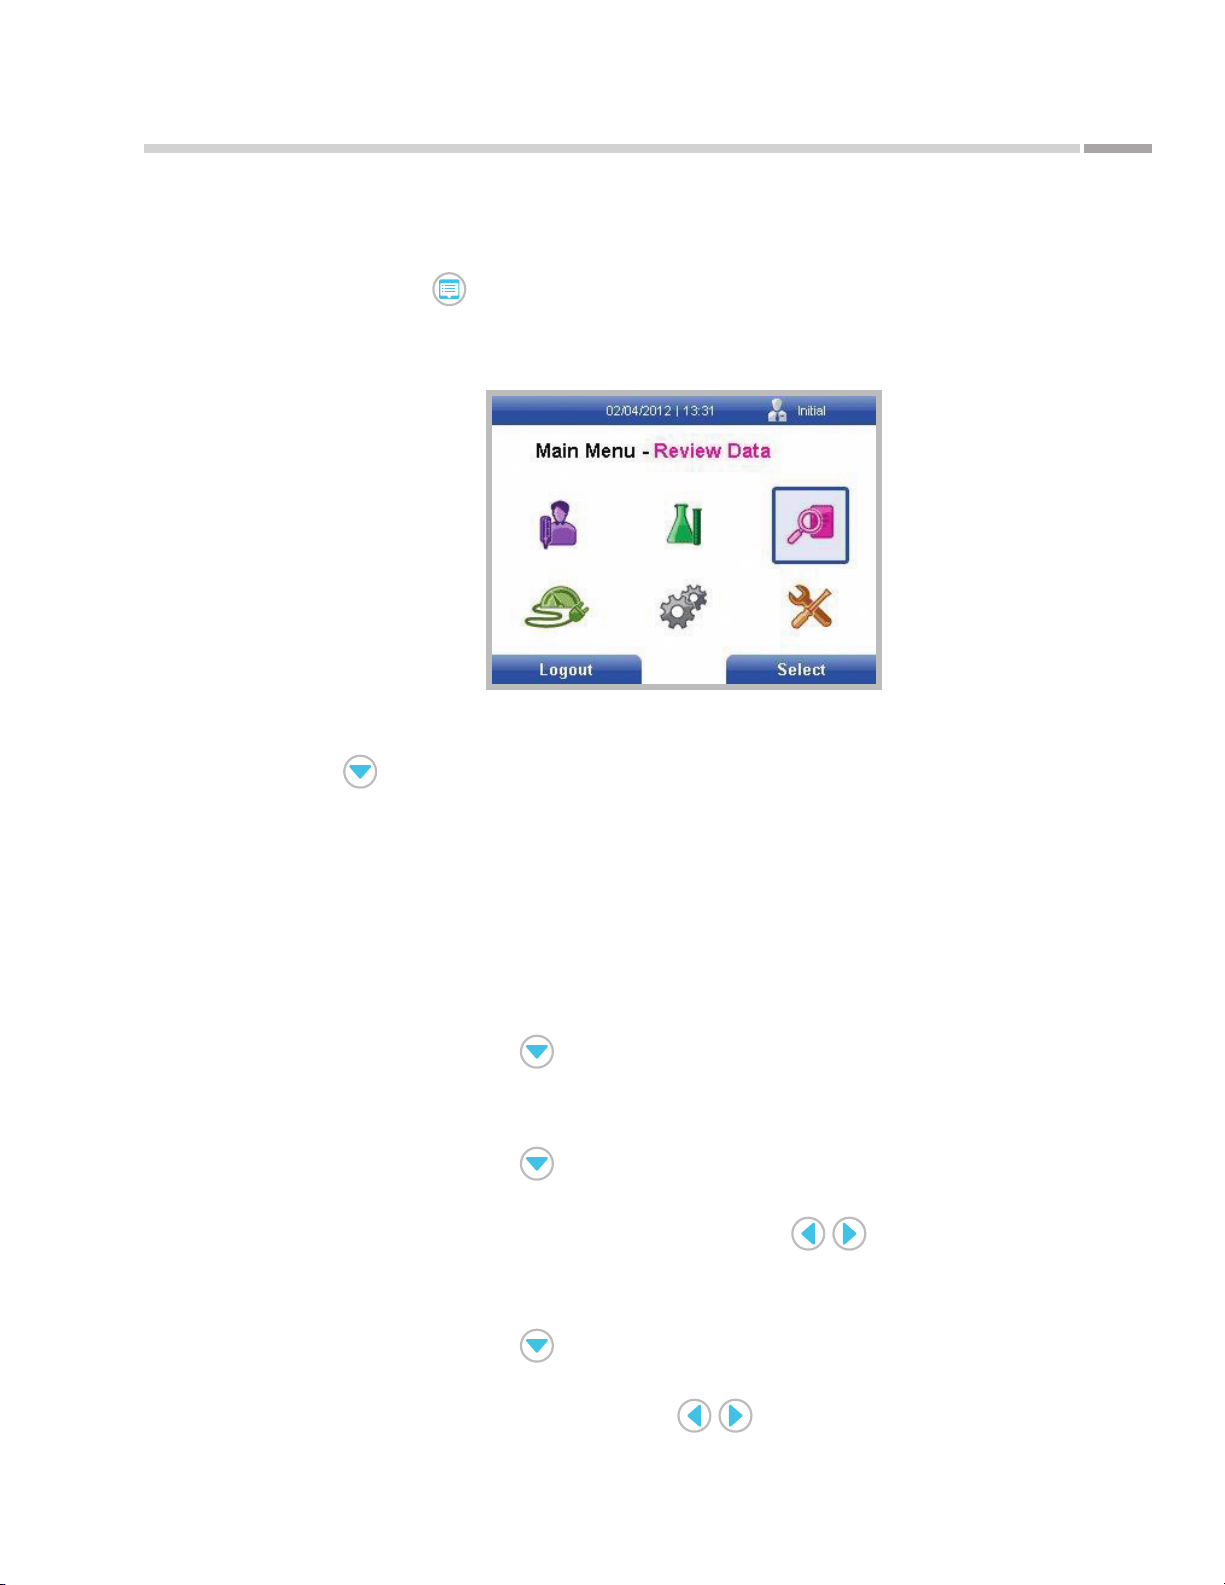
As tu te 140® Meter
Figure 71.
Main Menu screen
with Review Data icon
highlighted
A st u t e14 0® Meter Operation
LQC Results
1. Press the key to display the Main Menu.
2. Using the navigation keys, highlight the Review Data icon and press the right soft
key.
3. When the Review Data Menu is displayed, Patient Results is highlighted. Use the
key to highlight Liquid QC Results and press the right soft key to display the
Review LQC Results screen.
4. On the Review LQC Results screen, LQC results can be selected by entering a
range of dates, or by selecting a specic control lot or test lot number.
a. To select LQC results using a range of dates:
i. Start date will be automatically highlighted. Use the numeric keypad or
an external keyboard (if connected) to enter a date. NOTE: date elds
must be entered in the format specied in the default settings.
ii. Use the key to highlight End Date and enter the end date in the
same manner and format.
b. To select LQC results from a specic control lot:
i. Use the key to highlight Control Lot.
ii. The default selection is to display LQC results from all control lots.
To select a specic control lot, use the keys to display the
desired control lot.
c. To select LQC results from a specic test lot:
i. Use the key to highlight Tes t Lot.
ii. The default selection is to display LQC results from all test lots. To select
©Astute Medical, Inc. 2017 PN 300153 Rev G 2017/01/16
a specic test lot, use the keys to display the desired test lot.
67
Page 68
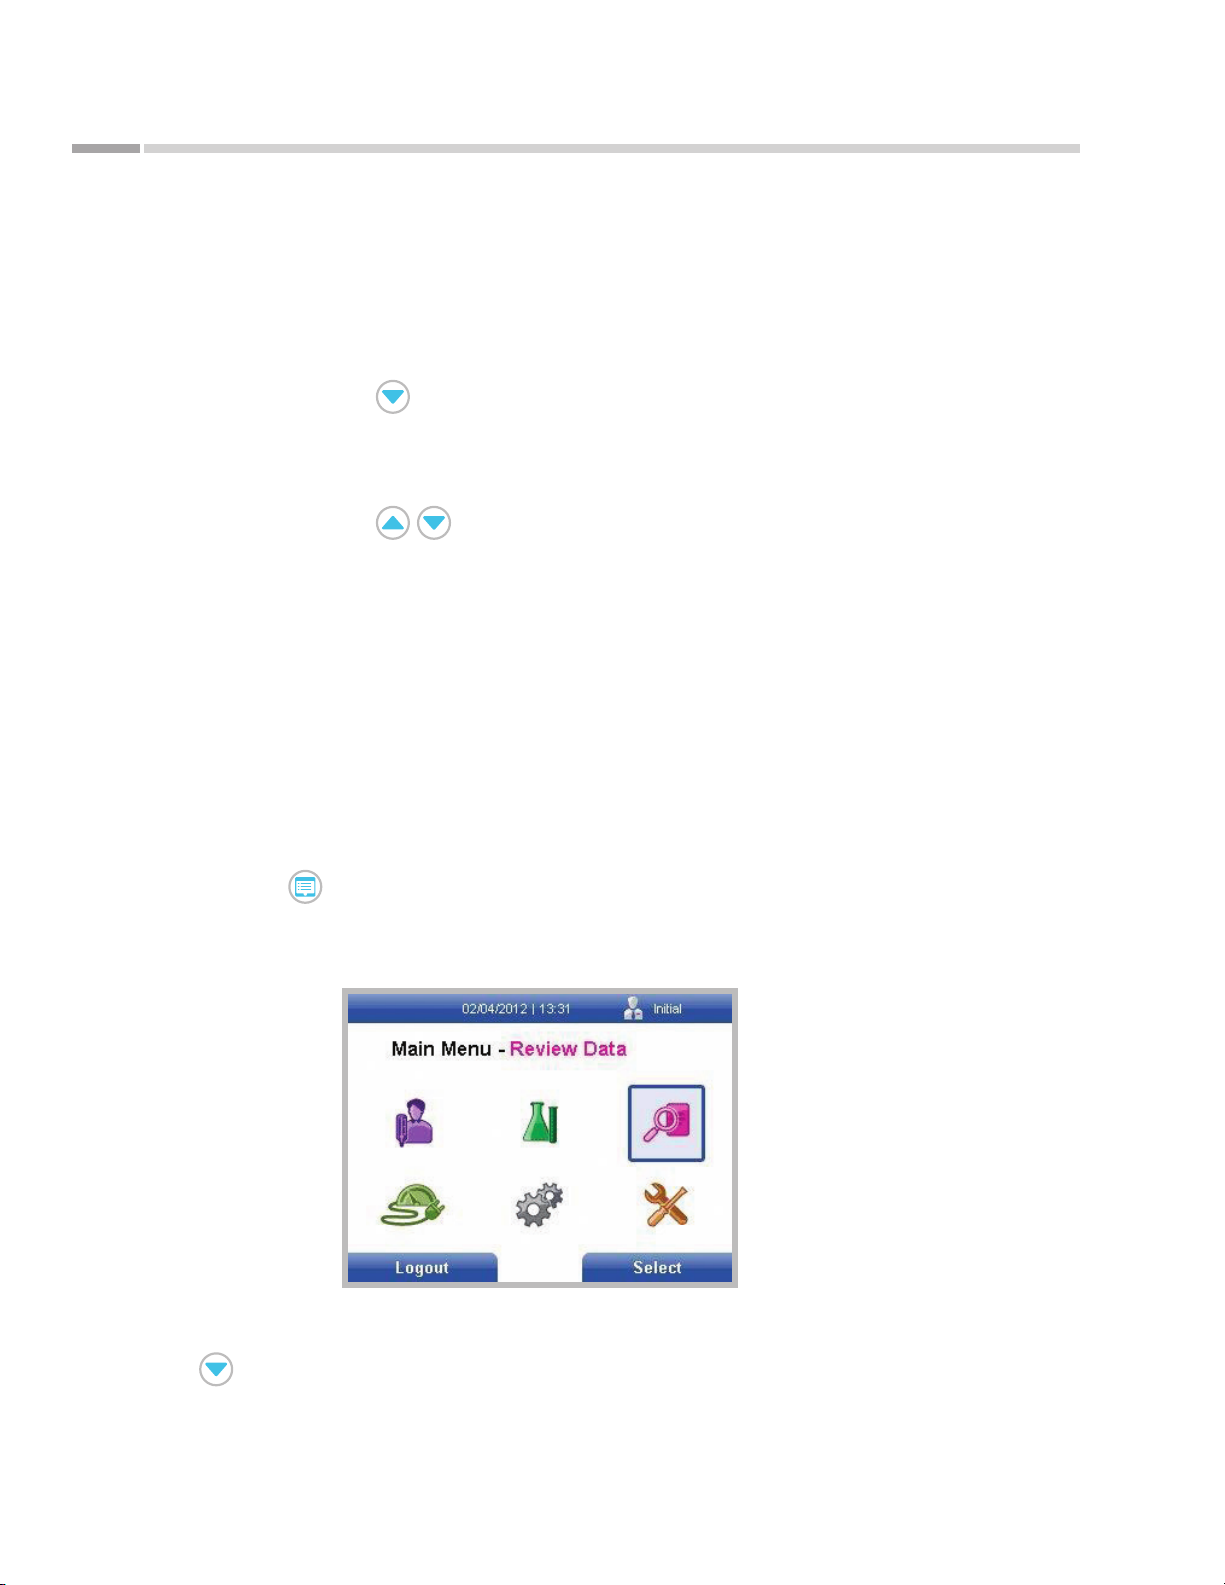
A st u t e14 0® Meter Operation
5. Once all selection criteria are entered, press the right soft key to display a list of
the LQC results meeting the selection criteria.
a. To print the list of LQC test results:
i. Display the Options pop-up menu by pressing the right soft key.
ii. Use the key to highlight Print List.
iii. After printing is complete, the list of LQC results will again be displayed.
b. To examine and/or print test results for a particular patient sample:
i. Use the keys to highlight the LQC result of interest.
ii. Press the right soft key to display the Options pop-up menu.
iii. When the Options pop-up menu is displayed, Show Details will be
highlighted. Press the right soft key to select Show Details.
iv. Detailed LQC results for the selected test will be displayed. To print the
detailed results, press the right soft key to select Print.
As tu te 140® Meter
v. After printing is complete, press the left soft key to return to the list of
patient results.
EQC Results
1. Press the key to display the Main Menu.
2. Using the navigation keys, highlight the Review Data icon and press the right soft
key.
Figure 72.
Main Menu screen
with Review Data icon
highlighted
68
3. When the Review Data Menu is displayed, Patient Results is highlighted. Use the
key to highlight Electronic QC Results and press the right soft key to display
the Review EQC Results screen.
©Astute Medical, Inc. 2017 PN 300153 Rev G 2017/01/16
Page 69

As tu te 140® Meter
A st u t e14 0® Meter Operation
4. On the Review EQC Results screen, all EQC controls can be selected, a specic
EQC control can be selected, or multiple results can be displayed by entering a
range of dates, as follows.
a. The default selection is for all EQC control results to be displayed. To
display all EQC control results, press the right soft key.
b. To select a specic Astute140® EQC device, use the keys to
display the desired control device and press the right soft key.
c. To select EQC results falling within a range of dates:
i. Use the key to highlight Start Date. Use the numeric keypad or
an external keyboard (if connected) to enter a start date. NOTE: date
elds must be entered in the format specied in the default settings.
ii. Use the key to highlight End Date and use the numeric keypad or
an external keyboard (if connected) to enter an end date. NOTE: date
elds must be entered in the format specied in the default settings.
5. Once all selection criteria are entered, press the right soft key to display a list of
the EQC results meeting the selection criteria.
a. To print the list of EQC test results:
i. Display the Options pop-up menu by pressing the right soft key.
ii. Use the key to highlight Print List.
iii. After printing is complete, the list of EQC results will again be
displayed.
b. To examine and/or print test results for a particular EQC result:
i. Use the keys to highlight the EQC result of interest.
ii. Press the right soft key to display the Options pop-up menu.
iii. When the Options pop-up menu is displayed, Show Details will be
highlighted. Press the right soft key to select Show Details.
iv. Detailed EQC results for the selected test will be displayed. To print
the detailed results, press the right soft key to select Print.
v. After printing is complete, press the left soft key to return to the list of
patient results.
Calibration Verication Results
See “Patient Results” on p. 65 for instructions.
©Astute Medical, Inc. 2017 PN 300153 Rev G 2017/01/16
69
Page 70
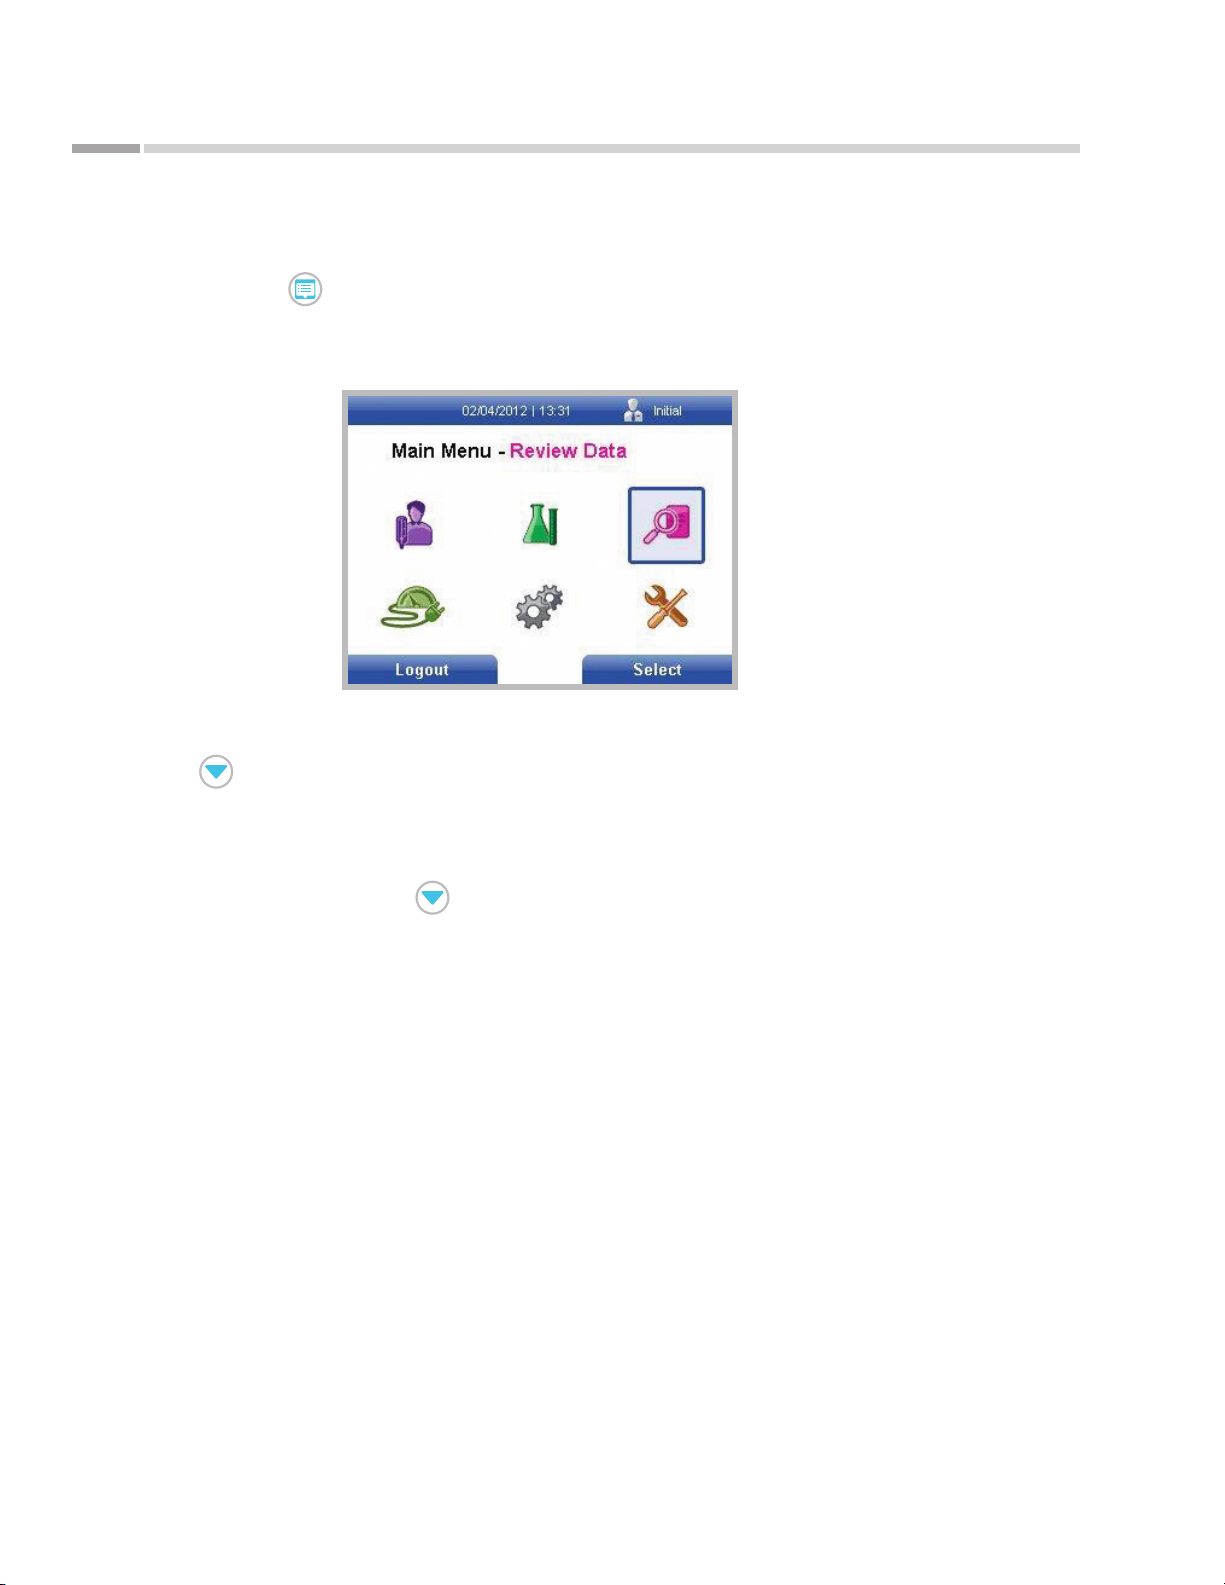
A st u t e14 0® Meter Operation
Send Results to LIS
1. Press the key to display the Main Menu.
2. Using the navigation keys, highlight the Review Data icon and press the right soft
key.
Figure 73.
Main Menu screen
with Review Data icon
highlighted
As tu te 140® Meter
3. When the Review Data Menu is displayed, Patient Results is highlighted. Use the
key to highlight Send Results (LIS) and press the right soft key.
4. On the Send Results to LIS screen, results for all patients, unsent patients, all
LQC, unsent LQC, all EQC and unsent EQC may be sent to the LIS. Results for
all patients will be automatically highlighted. To choose another type of result to
send to the LIS, use the key to highlight the desired results and press the
right soft key.
5. Once sending to the LIS is complete, the Send Results to LIS screen will again be
displayed. Repeat step 4 to send additional results to the LIS.
6. Once all desired results have been sent to the LIS, press the left soft key to return
to the Review Data Menu.
Shutdown
To power o the Astute140® Meter, toggle the power switch on the back of the meter
upwards, and the meter should immediately shut down.
70
©Astute Medical, Inc. 2017 PN 300153 Rev G 2017/01/16
Page 71
As tu te 140® Meter
Maintenance and Troubleshooting
No maintenance is required other than routine external cleaning, changing the paper
and changing the batteries.
To reduce the risk of electrical shock:
Do not disassemble the Astute140® Meter. The warranty will be voided if
disassembled.
Figure 74.
Eject key
Turn o and unplug the Astu te140® Meter prior to cleaning.
Do not immerse the Astute140® Meter in liquid.
Cleaning and Decontamination
To avoid possible electrical shock, turn o and unplug the Astute140® Meter
prior to cleaning.
Gently wipe only the external surface of the Astute140® Meter and the inside of the
meter drawer with a soft cloth slightly dampened with disinfectant (70% alcohol or 0.5%
bleach solution). Do not clean with soap or other solutions. To open the Astu te140®
Meter drawer, press the key on the left side of the LCD display.
©Astute Medical, Inc. 2017 PN 300153 Rev G 2017/01/16
71
Page 72

Maintenance and Troubleshooting
Replacing the Paper
To replace the paper in the internal printer, see instructions for “Installation and
Replacement of Paper” on p. 21.
Replacing the Batteries
For information on when and how to replace the batteries in the Astute140® Meter, see
“Installation and Replacement of Batteries” on p. 18.
Disposing of the Batteries
Batteries are to be removed from the Astute140® Meter and disposed of or recovered
separately. Do not dispose of the batteries in municipal waste; please check with your
local waste disposal authorities for specic requirements for battery disposal.
As tu te 140® Meter
Disposing of the Astute140® Meter
The Astute140® Meter should be considered infectious waste. Dispose of the
Astute140® Meter according to the laboratory’s best practices for disposal of
biohazardous waste.
72
©Astute Medical, Inc. 2017 PN 300153 Rev G 2017/01/16
Page 73
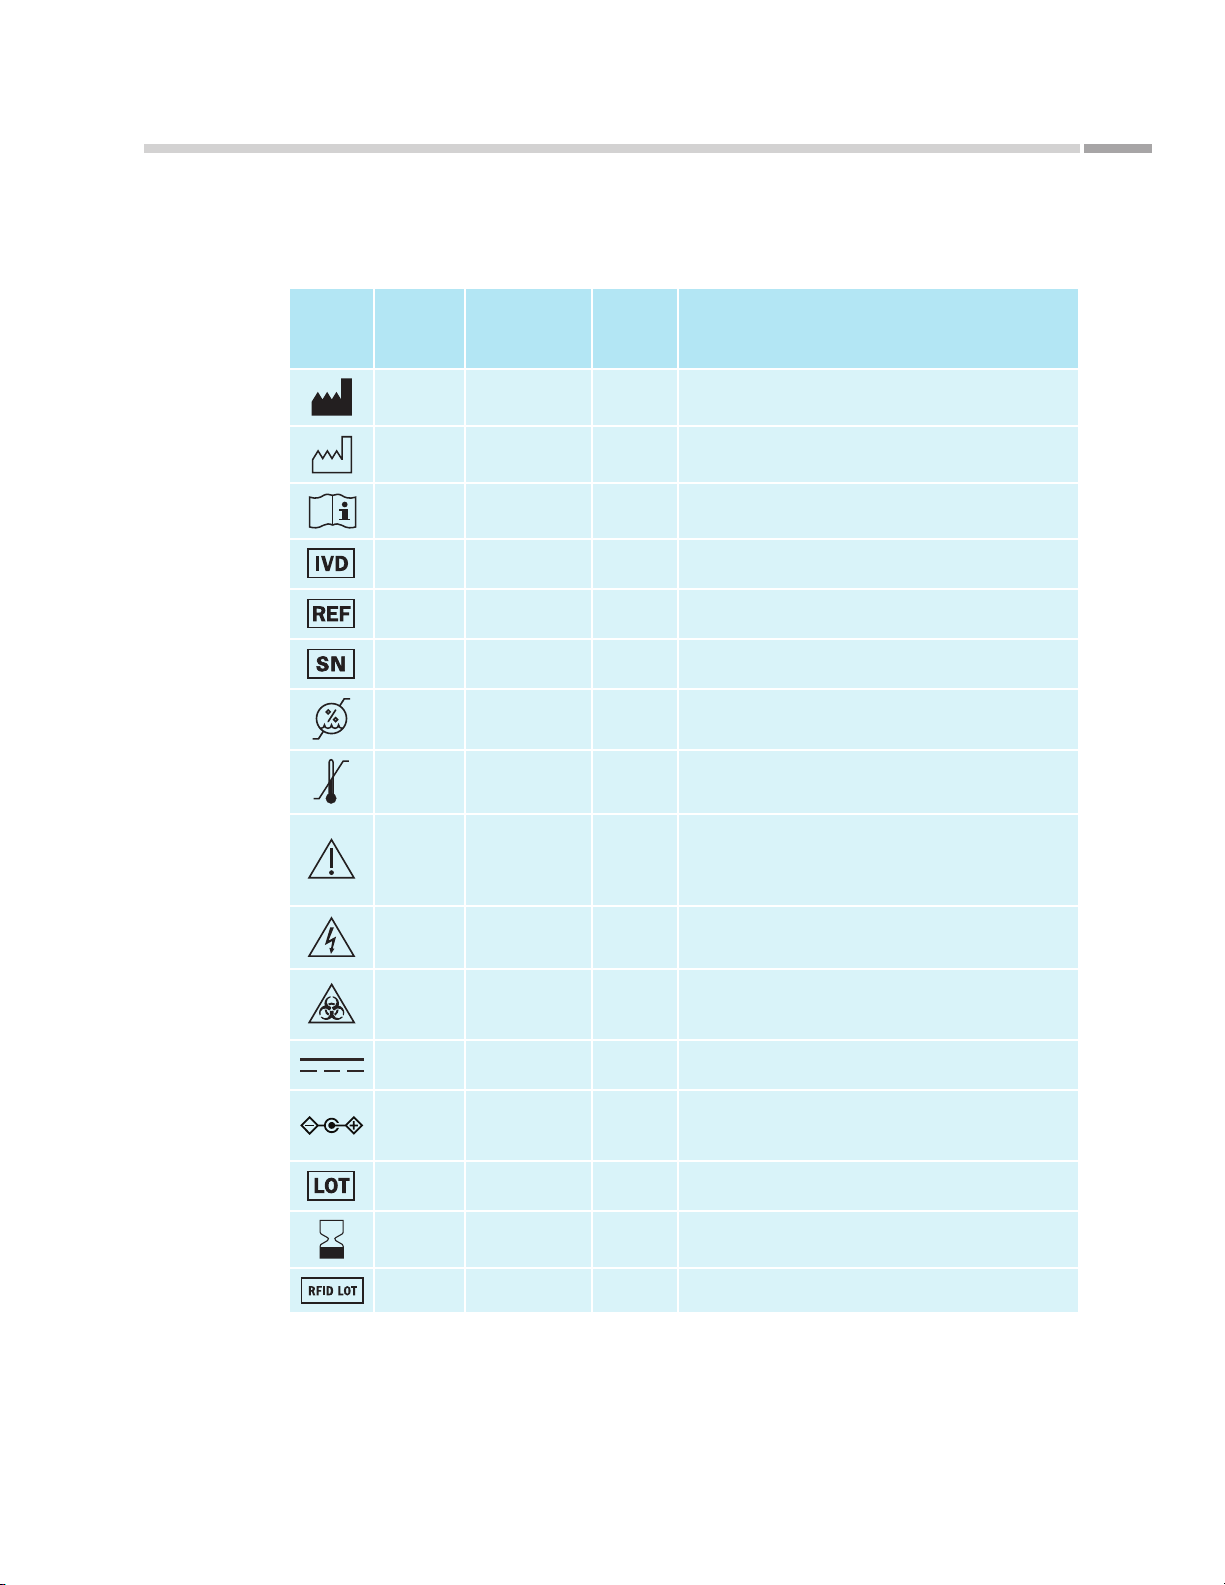
As tu te 140® Meter
Maintenance and Troubleshooting
Symbols Glossary
Symbol
Standard
Reference
a Manufacturer 5.1.1
a
a
a
a
a Serial number 5.1.7
a
a
a Caution 5.4.4
Symbol Title
Date for
manufacture
Consult instructions
for use
In vitro diagnostic
medical device
Catalogue
number
Humidity
limitation
Temperature
limit
Symbol
Reference
Number
Indicates the medical device manufacturer, as dened in EU
Directives 90/385/EEC, 93/42/EEC and 98/79/EC.
5.1.3 Indicates the date when the medical device was manufactured.
5.4.3
5.5.1
5.1.6
5.3.8
5.3.7
Indicates the need for the user to consult the instructions for
use.
Indicates a medical device that is intended to be used as an in
vitro diagnostic medical device.
Indicates the manufacturer’s catalogue number so that the
medical device can be identied.
Indicates the manufacturer’s serial number so that a specic
medical device can be identied.
Indicates the range of humidity to which the medical device can
be safely exposed.
Indicates the temperature limits to which the medical device
can be safely exposed.
Indicates the need for the user to consult the instructions for
use for important cautionar y information such as warnings and
precautions that cannot, for a variety of reasons, be presented
on the medical device itself.
Symbol Description as Provided
by the Referenced Standard
b
c Biological risks 0659
b Direct Current 5031
b
a Batch code 5.1.5
a Use-by date 5.1.4
d RFID Lot — RFID Lot
Legend for Standard Reference (designation number and title):
a) ANSI/AAMI/ISO 15223-1:2012 & ISO 15223-1 Second edition, 2012-07-01 Medical Devices to be used with medical device labels, labeling
and information to be supplied – Part 1: General requirements
b) IEC 60417:2002 DB Graphical Symbols for Use on Equipment
c) ISO 7000: Fifth edition: 2014 Graphical symbols for use on equipment—Registered symbols
d) Symbol containing explanator y text for clarity
©Astute Medical, Inc. 2017 PN 300153 Rev G 2017/01/16
Caution, risk of
electric shock
Polarity of d.c.
power connector
6042
5926
To identify equipment, for example, the welding power source,
that has risk of electric shock.
To indicate a reference to substances that may be hazardous
to men, animals, plants or the environment based on biological
activity (for example, holding a virus)
To indicate on the rating plate that the equipment is suitable for
direct current only; to identify relevant terminals.
To identify the positive and negative connections (the polarity) of
a d.c. power supply, or the positive and negative connections on a
piece of equipment to which a d.c. power supply may be connected.
Indicates the manufacturer’s batch code so that the batch or
lot can be identied.
Indicates the date af ter which the medical device is not to be
used.
73
Page 74
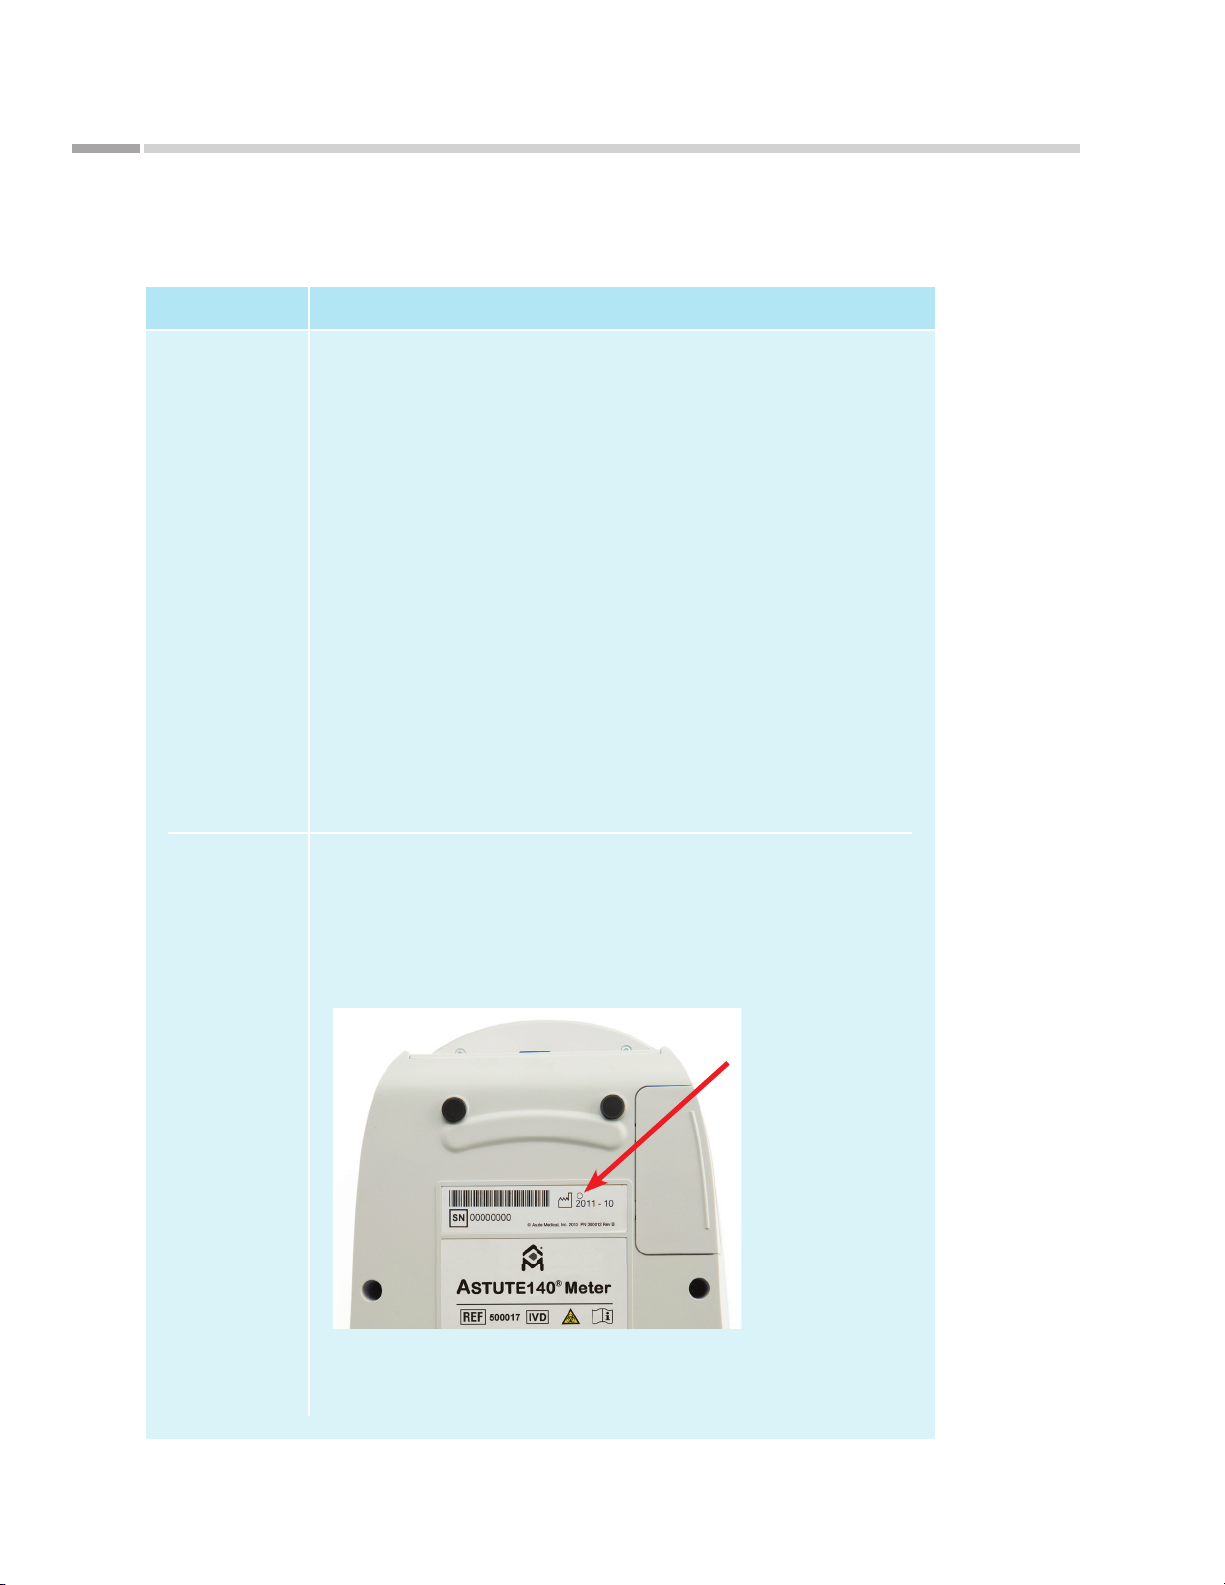
Maintenance and Troubleshooting
Troubleshooting Tips
Problem Action to Take
As tu te 140® Meter
Astute140®
Meter will not
power on
Test cartridge
drawer is
jammed
When AC power is being used:
1. Ensure that the AC power adapter is connected correctly and securely to a
power source and to the
2. If the problem continues, connect the AC power adapter
to a different power source.
3. If the problem persists, call Astute Technical Support (See “Contacting Astute
Medical, Inc.” on p. 7 for contact information).
When battery power is being used:
1. Disconnect the AC power adapter from the electrical power source.
2. Ensure that the four AA batteries are correctly installed, with the ends of the
batteries facing up according to the + and – signs diagrammed in the battery
compartment (See p. 14).
3. If the problem continues, replace the four AA batteries
4. If the problem persists, call Astute Technical Support (See “Contacting Astute
Medical, Inc.” on p. 7 for contact information).
Do not pull or force the drawer open or closed. Reset the
disconnecting the AC power adapter (or removing the AA batteries if the power
adapter is not being used). Wait 30 seconds and reconnect the AC power adapter (or
reinsert the batteries if the AC power adapter is not being used). If the drawer is still
jammed, insert a paper clip into the small hole on the back of the
Astute140® Meter.
Astute140® Meter by
Astute140® Meter
to manually open
the drawer.
74
If the drawer still
does not open, call
Astute Technical
Support (See
“Contacting Astute
Medical, Inc.” on
p. 7 for contact
information).
©Astute Medical, Inc. 2017 PN 300153 Rev G 2017/01/16
Page 75

As tu te 140® Meter
Maintenance and Troubleshooting
Troubleshooting Tips (Continued)
Problem Action to Take
Keypad does
not respond
Unable to
register an EQC
Device
Unable to
register a liquid
control lot
Reset the
AA batteries if the power adapter is not being used). Wait 30 seconds and reconnect
the AC power adapter (or reinsert the batteries if the AC power adapter is not being
used). If the keypad still does not respond, call Astute Technical Support (See
“Contacting Astute Medical, Inc.” on p. 7 for contact information).
Operators can only register an
granted permission in the default settings. If logged in as an Operator, contact
the Supervisor to verify registration permissions. If Operator permission has been
granted, or if logged in as a Supervisor and an EQC device still cannot be registered,
call Astute Technical Support (See “Contacting Astute Medical, Inc.” on p. 7 for
contact information).
Operators can only register a liquid control lot if the Supervisor has granted
permission in the default settings. If logged in as an Operator, contact the Supervisor
to verify registration permissions. If Operator permission has been granted, or if
logged in as a Supervisor and the liquid control lot still cannot be registered, call
Astute Technical Support (See “Contacting Astute Medical, Inc.” on p. 7 for contact
information).
Astute140® Meter by disconnecting the AC power adapter (or removing the
Astute140® EQC Device if the Supervisor has
Unable to
run EQC
Unable to
run LQC
©Astute Medical, Inc. 2017 PN 300153 Rev G 2017/01/16
Make sure the
been registered, register it and try running EQC again (See “
Registration” on p. 48 for registration instructions). If the device has been properly
registered and EQC will not run, call Astute Technical Support (See “Contacting Astute
Medical, Inc.” on p. 7 for contact information).
Make sure both high and low
registered. If the liquid control lots have not been registered, register them one
at a time and try to run LQC again. See “Liquid Control Lot Registration” on p.
54 for registration instructions. If both high and low liquid control lots have been
registered and LQC will not run, call Astute Technical Support (See “Contacting
Astute Medical, Inc.” on p. 7 for contact information).
Astute140® EQC Device has been registered. If the device has not
Astute140® EQC Device
NephroCheCk® liquid control and test lots have been
75
Page 76
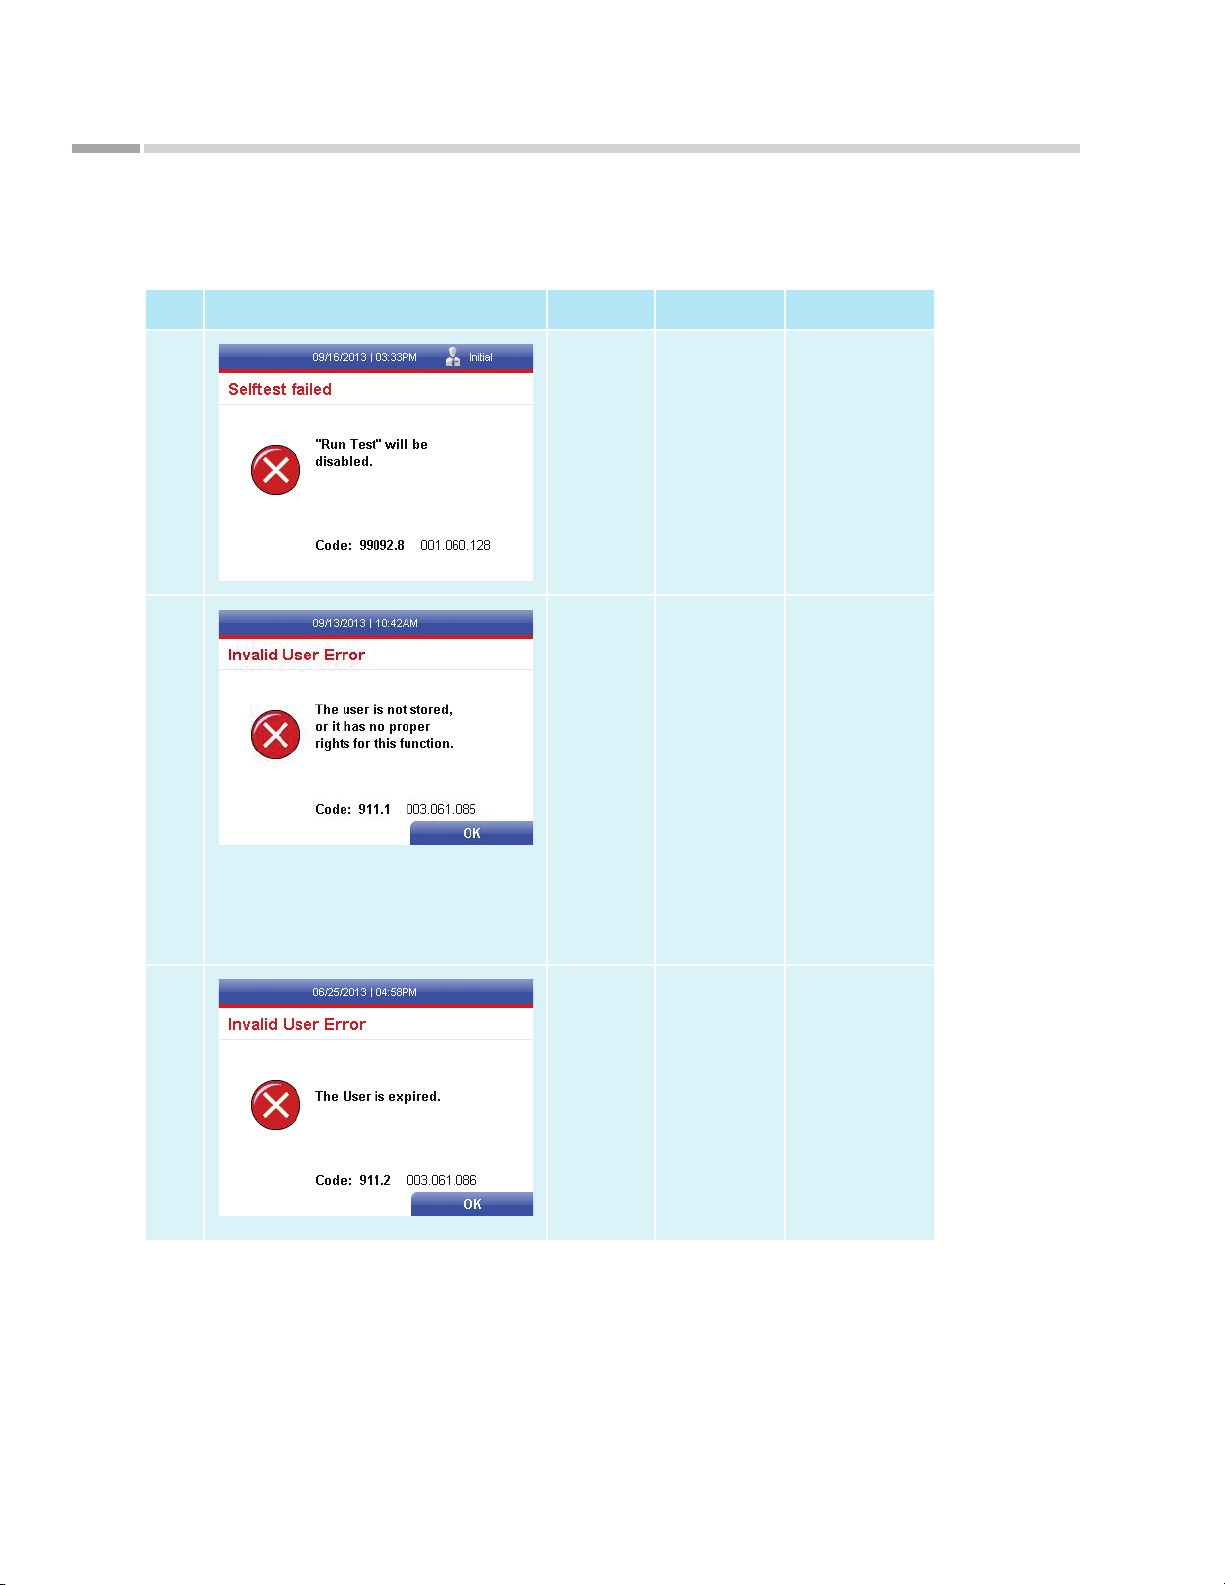
Maintenance and Troubleshooting
Error Messages
Type Screen Display Error Code* What it Means Action to Take
As tu te 140® Meter
00X.060.128 Start-up/
Self-Test
Error.
Start up/Self-Test Error
00X.061.086 Invalid User
Error. User is
not stored or
does not have
permission to
perform the
function.
Log In/User ID/Password Error
Power the
Astut e140®
Meter off and then
on again. If the selftest fails a second
time, discontinue
use and call Astute
Technical Support
(See “Contacting
Astute Medical, Inc.”
on p. 7 for contact
information).
Carefully re-enter
a valid user ID and
password.
Check with
Supervisor regarding
permissions granted.
Supervisor to create
a new user.
If the error persists,
call Astute Technical
Support (See
Contacting Astute
Medical, Inc.” on
p. 7 for contact
information).
76
Log In/User ID/Password Error
*Error codes may begin with 001, 002, 003 or 004.
00X.061.085 Invalid User
Error. User is
expired.
Carefully re-enter
a valid user ID and
password.
Create a new user.
If the error persists,
call Astute Technical
Support (See
Contacting Astute
Medical, Inc.” on
p. 7 for contact
information).
©Astute Medical, Inc. 2017 PN 300153 Rev G 2017/01/16
Page 77
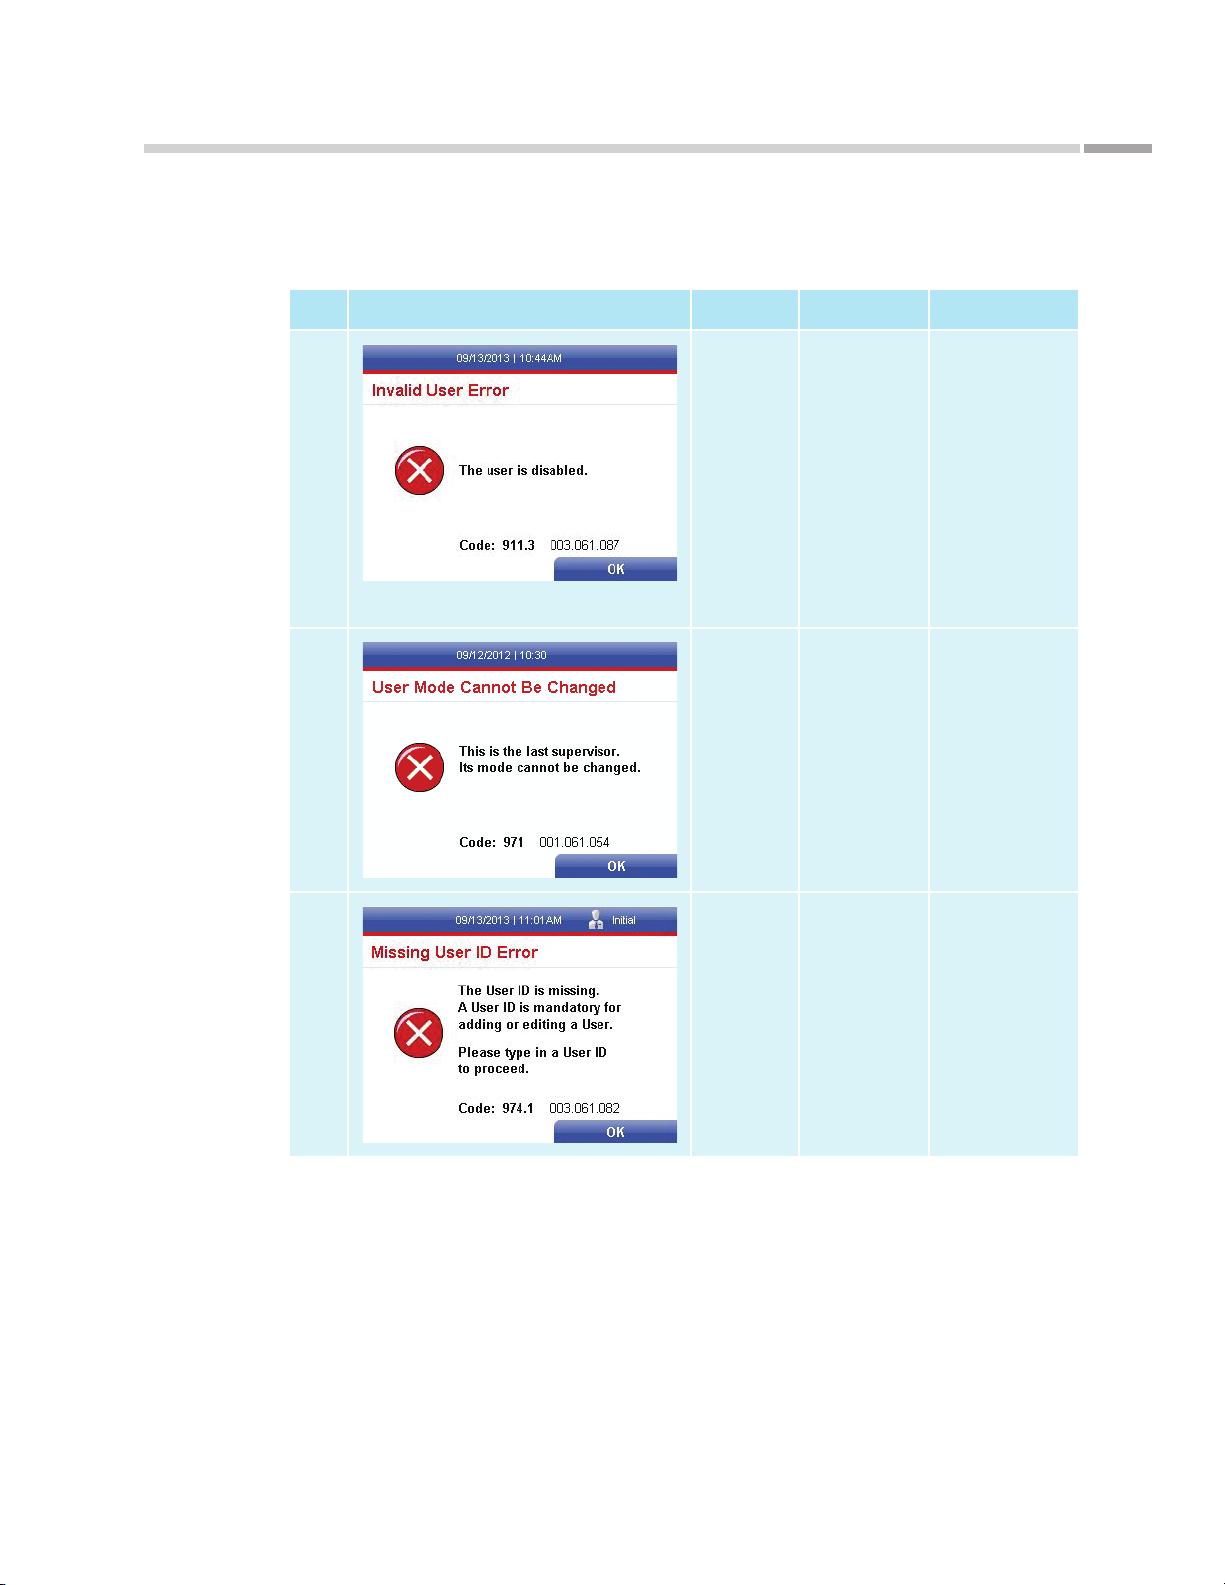
As tu te 140® Meter
Maintenance and Troubleshooting
Error Messages (Continued)
Type Screen Display Error Code* What it Means Action to Take
00X.061.087 Invalid User
Error. User is
disabled.
Log In/User ID/Password Error
00X.061.054 User Mode
Cannot Be
Changed.
Log In/User ID/Password Error
00X.061.082 Missing User
ID Error.
The User ID is
missing. User ID
is mandatory for
adding or editing
a User.
Carefully re-enter
a valid user ID and
password.
Supervisor to create
new user.
If the error persists,
call Astute Technical
Support (See
Contacting Astute
Medical, Inc.” on
p. 7 for contact
information).
The last (or only)
supervisor cannot be
disabled.
Use the supervisor
registered or create
a new User.
Add a User ID when
adding or editing a
User.
Log In/User ID/Password Error
*Error codes may begin with 001, 002, 003 or 004.
©Astute Medical, Inc. 2017 PN 300153 Rev G 2017/01/16
77
Page 78
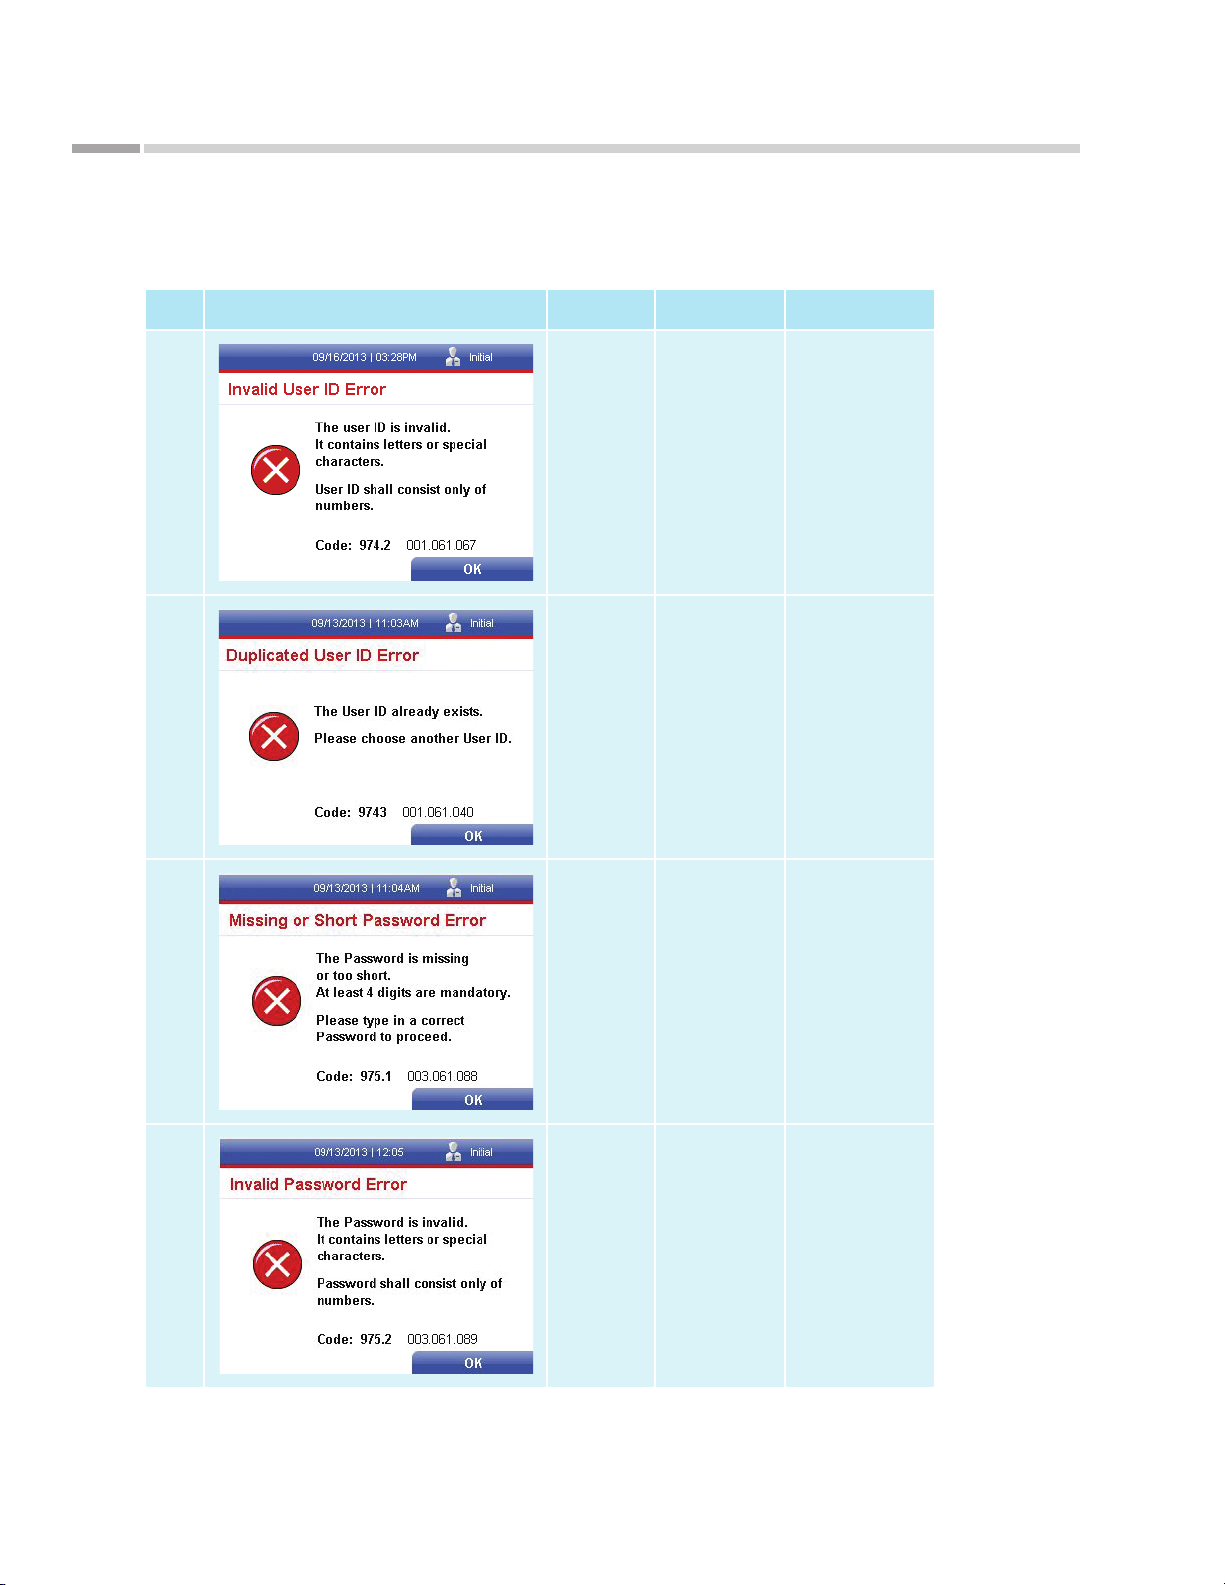
Maintenance and Troubleshooting
Error Messages (Continued)
Type Screen Display Error Code* What it Means Action to Take
As tu te 140® Meter
00X.061.067 Invalid User
ID Error. User
ID must be
numeric and
cannot contain
letters or special
characters.
Log In/User ID/Password Error
00X.061.040 Duplicated
User ID Error.
Log In/User ID/Password Error
00X.061.088 Missing
or Short
Password
Error. The
password is
missing or too
short. At least
4 digits are
Log In/User ID/Password Error
mandatory.
Re-enter User ID
using numbers only.
The User ID already
exists. Create
another User ID and
retry.
Re-enter Password
using at least 4
digits.
78
Log In/User ID/Password Error
*Error codes may begin with 001, 002, 003 or 004.
00X.061.089 Invalid
Password
Error. The
password created
contains letters
or special
characters.
Passwords may
only consist of
numbers.
Create a new
password using
numbers only.
©Astute Medical, Inc. 2017 PN 300153 Rev G 2017/01/16
Page 79
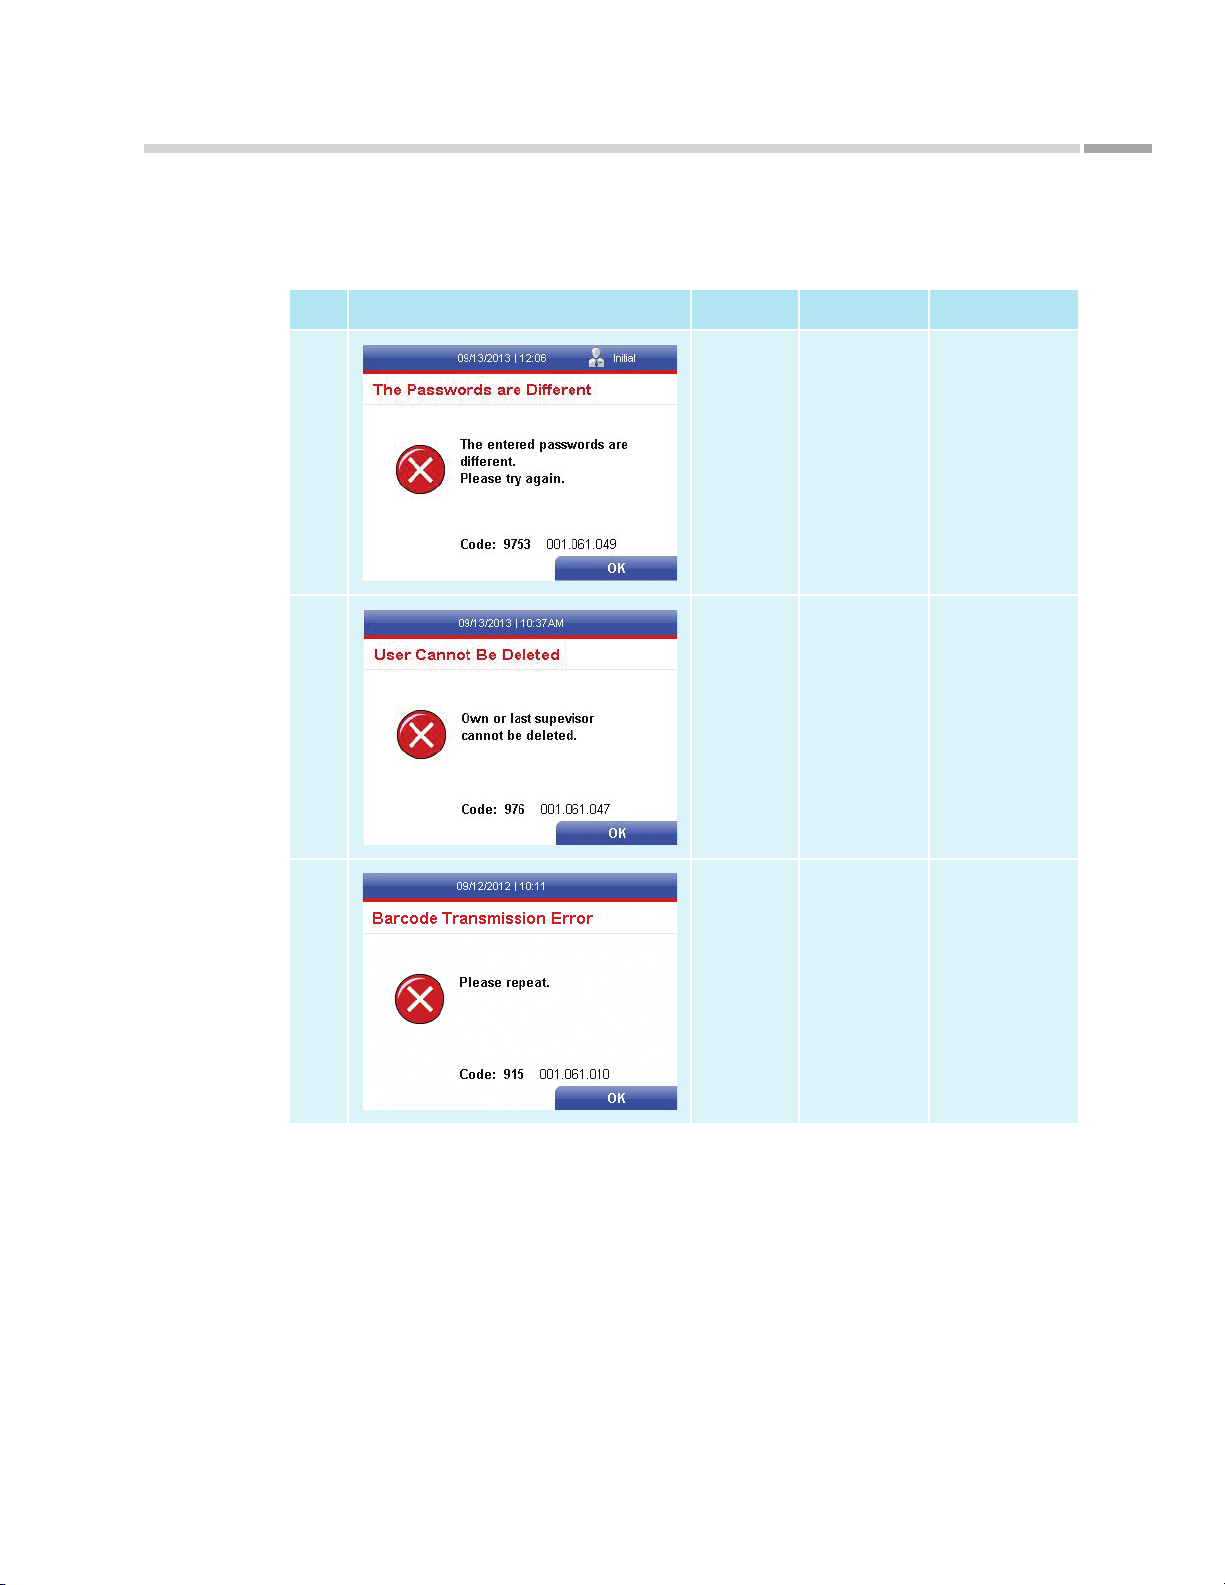
As tu te 140® Meter
Maintenance and Troubleshooting
Error Messages (Continued)
Type Screen Display Error Code* What it Means Action to Take
00X.061.049 The
Passwords are
Different.
Log In/User ID/Password Error
00X.061.047 User Cannot
Be Deleted.
The last or only
supervisor cannot
be deleted.
Log In/User ID/Password Error
00X.061.010 Barcode
Transmission
Error. The bar
code was not
read correctly.
Cartridge Error
Carefully re-enter the
password and retry.
Use the exiting
supervisor or create
a new user.
Press OK and repeat.
If the error
persists, check
that the barcode
isn’t damaged or
incomplete.
*Error codes may begin with 001, 002, 003 or 004.
©Astute Medical, Inc. 2017 PN 300153 Rev G 2017/01/16
79
Page 80
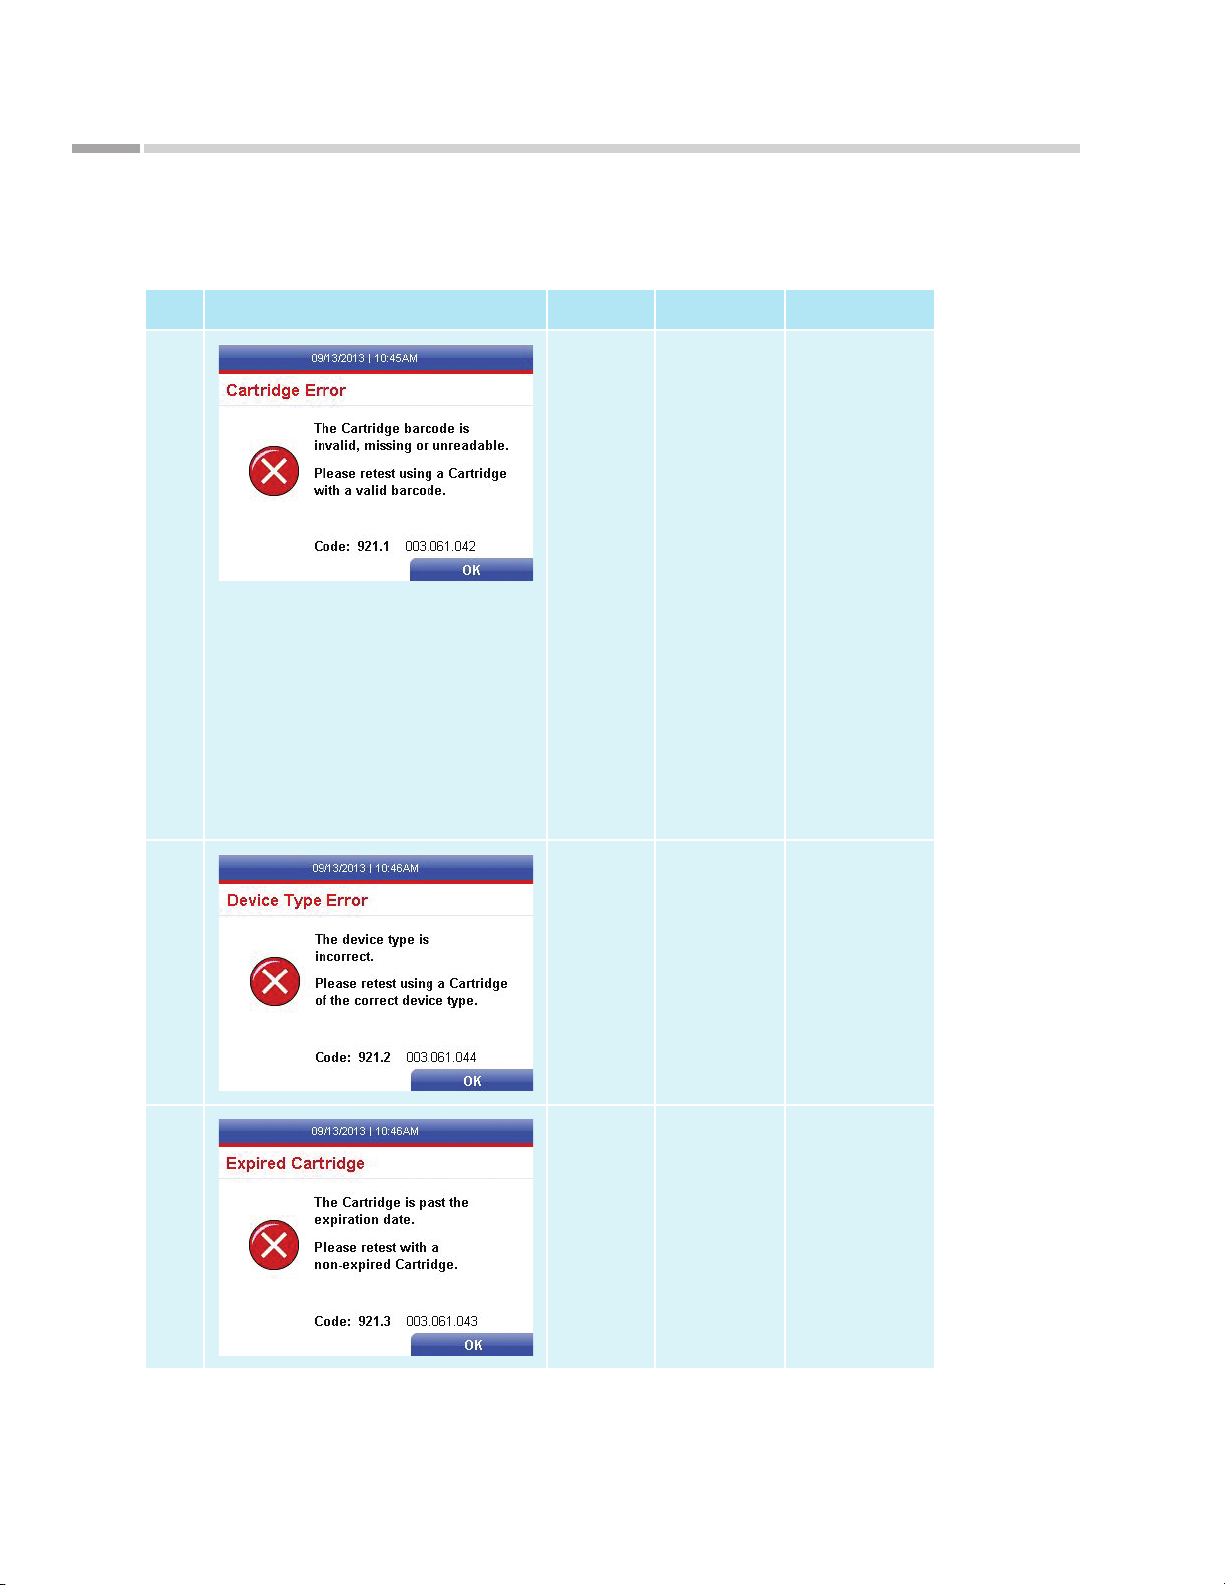
Maintenance and Troubleshooting
Error Messages (Continued)
Type Screen Display Error Code* What it Means Action to Take
As tu te 140® Meter
00X.061.042 Cartridge
Error. The bar
code on the
cartridge is
invalid, missing
or unreadable.
Cartridge Error
00X.061.044 Device Type
Error. The device
type is incorrect
for the testing
being conducted.
Cartridge Error
Press eject button
to open the drawer.
Without removing the
cartridge or touching
the window, check
that the barcode
on the cartridge
is not damaged or
incomplete. Close
the drawer and retry.
If the error reoccurs,
retest with a new
Cartridge with a valid
barcode.
If the problem
persists, see Astute
Medical Technical
Support. (See
Contacting Astute
Medical, Inc.” on
p. 7 for contact
information).
Check the type of
cartridge you are
testing and in which
screen you are
operating in from
the Main Menu (i.e.,
running a patient
sample or EQC
device). Retest using
a Cartridge of the
correct device type.
80
Cartridge Error
*Error codes may begin with 001, 002, 003 or 004.
00X.061.043 Expired
Cartridge. The
Cartridge is past
the expiration
date.
Properly discard
the expired test lot
and use a valid test
lot. Always check
the expiration date
printed on the kit box
prior to beginning a
test procedure.
©Astute Medical, Inc. 2017 PN 300153 Rev G 2017/01/16
Page 81
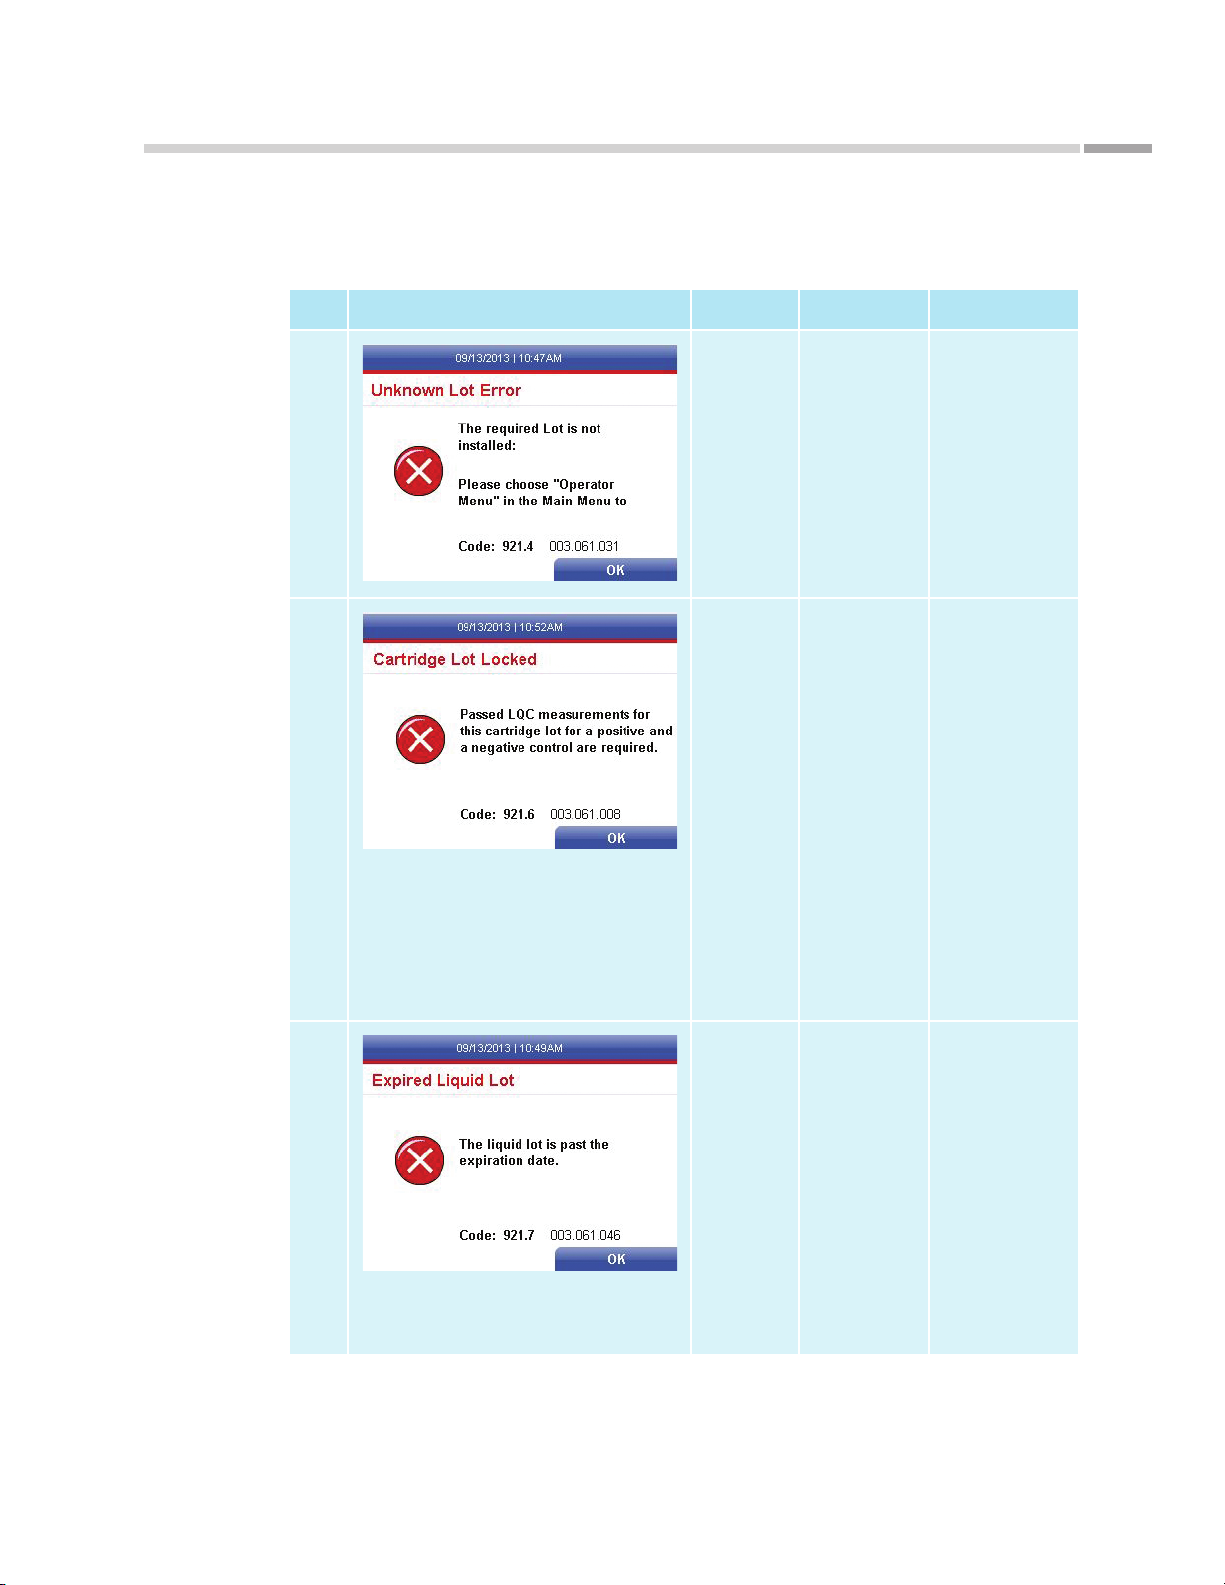
As tu te 140® Meter
Maintenance and Troubleshooting
Error Messages (Continued)
Type Screen Display Error Code* What it Means Action to Take
00X.061.031 Unknown
Lot Error. The
required Lot is
not registered.
Cartridge Error
00X.061.008 Cartridge
Lot Locked.
Passing positive
and negative LQC
measurements
for the test lot is
required.
Cartridge Error
Register a new test
lot (See “Test Lot
Registration” on
p. 4).
If the problem
persists, call Astute
Technical Support
(See “Contacting
Astute Medical, Inc.”
on p. 7 for contact
information).
Perform LQC for
the Test lot. After
receiving passing
measurements for
both positive and
negative LQC, restart
the entire testing
procedure with a new
cartridge.
If the LQC fails
repeatedly or the
problem persists,
call Astute Technical
Support (See
“Contacting Astute
Medical, Inc.” on
p. 7 for contact
information).
Cartridge Error
*Error codes may begin with 001, 002, 003 or 004.
©Astute Medical, Inc. 2017 PN 300153 Rev G 2017/01/16
00X.061.046 Expired liquid
lot. The LQC lot
registered is past
the expiration
date.
Passing positive
and negative LQC
measurements
for the test lot is
required.
Register and perform
testing with a new
LQC lot. A passing
measurement for
both positive and
negative LQC is
required prior to
running a patient
sample.
81
Page 82
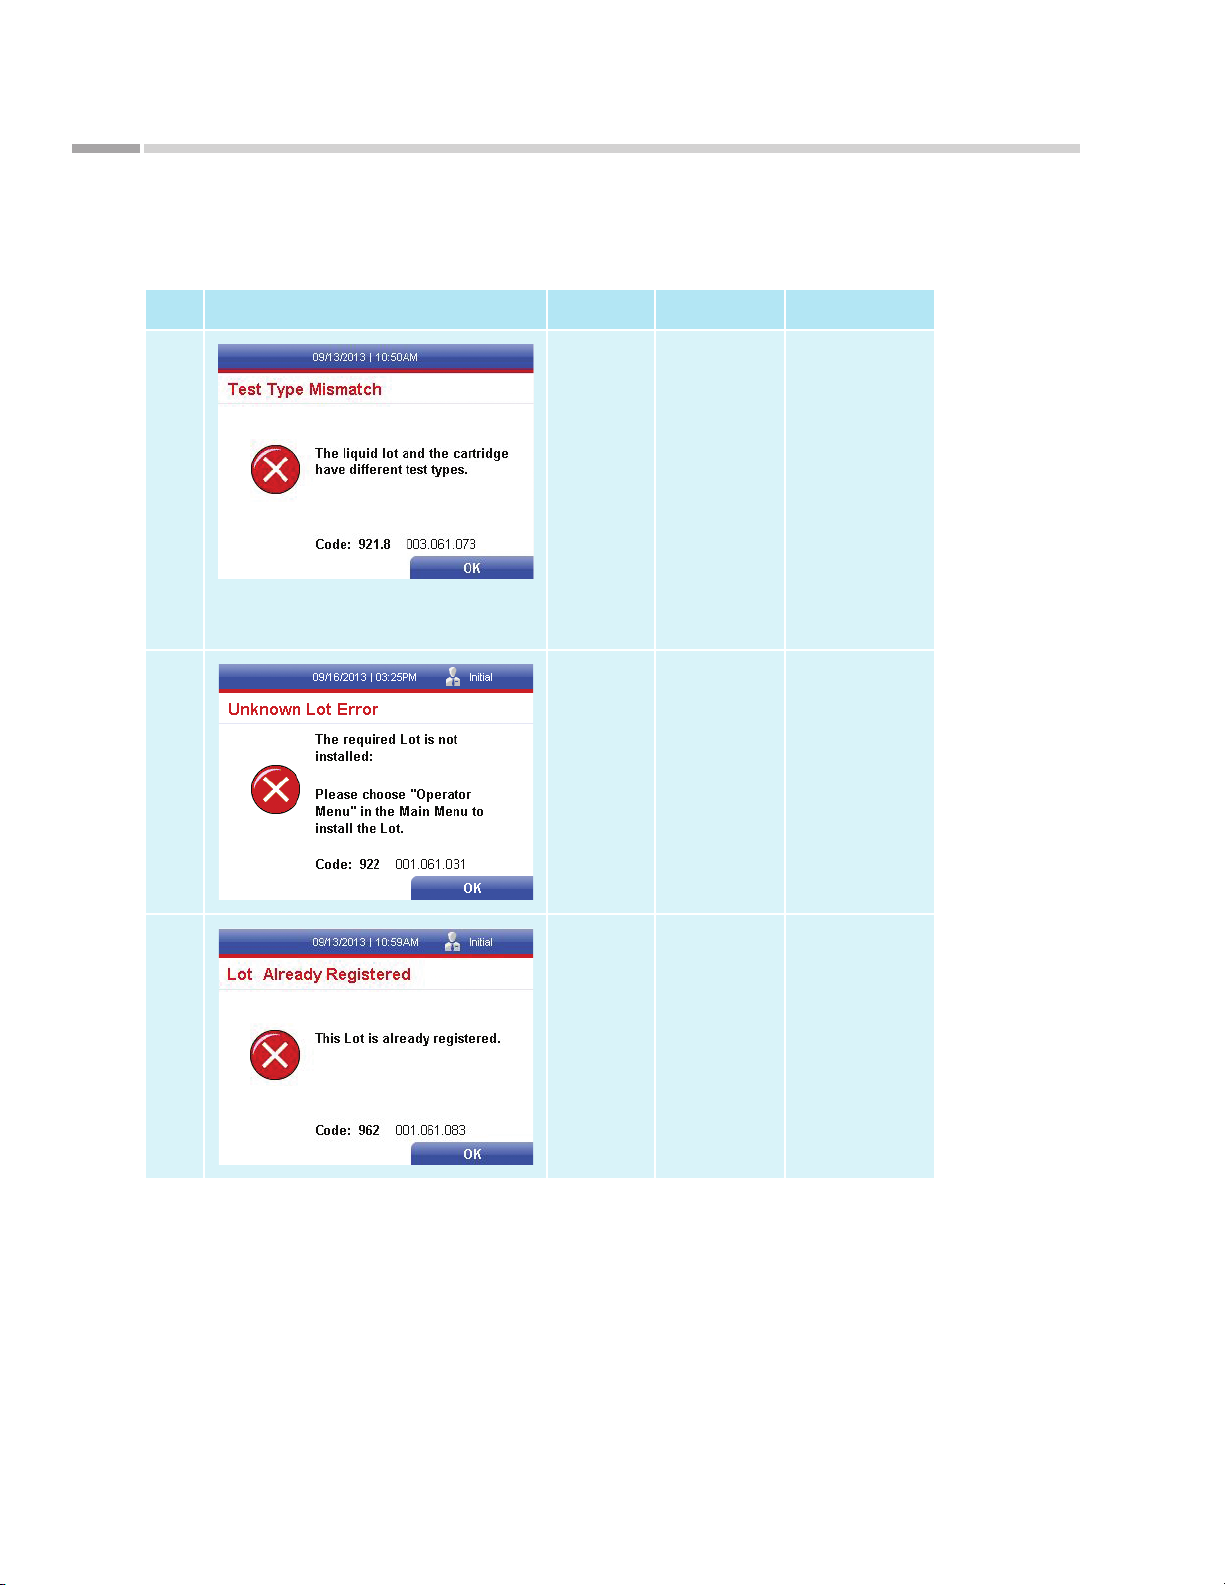
Maintenance and Troubleshooting
Type Screen Display Error Code* What it Means Action to Take
As tu te 140® Meter
00X.061.073 Test Type
Mismatch.
The LQC and the
Cartridge have
different test
types.
Cartridge Error
00X.061.031
00X.061.025
Cartridge Error
Unknown
Lot Error. The
required Lot is
not installed.
Passing positive
and negative LQC
measurements
for the test lot is
required.
Retest using a
Cartridge for which
LQC has been
performed and
passed.
Register and perform
testing with a new
LQC lot.
Kits and devices
must be registered
prior to running
(See “RFID Cards
for Device and Lot
registration” on p. 48
for instructions).
82
Cartridge Error
*Error codes may begin with 001, 002, 003 or 004.
00X.061.083 Lot Already
Registered.
The Lot does
not need to be
registered. Proceed
with testing.
©Astute Medical, Inc. 2017 PN 300153 Rev G 2017/01/16
Page 83
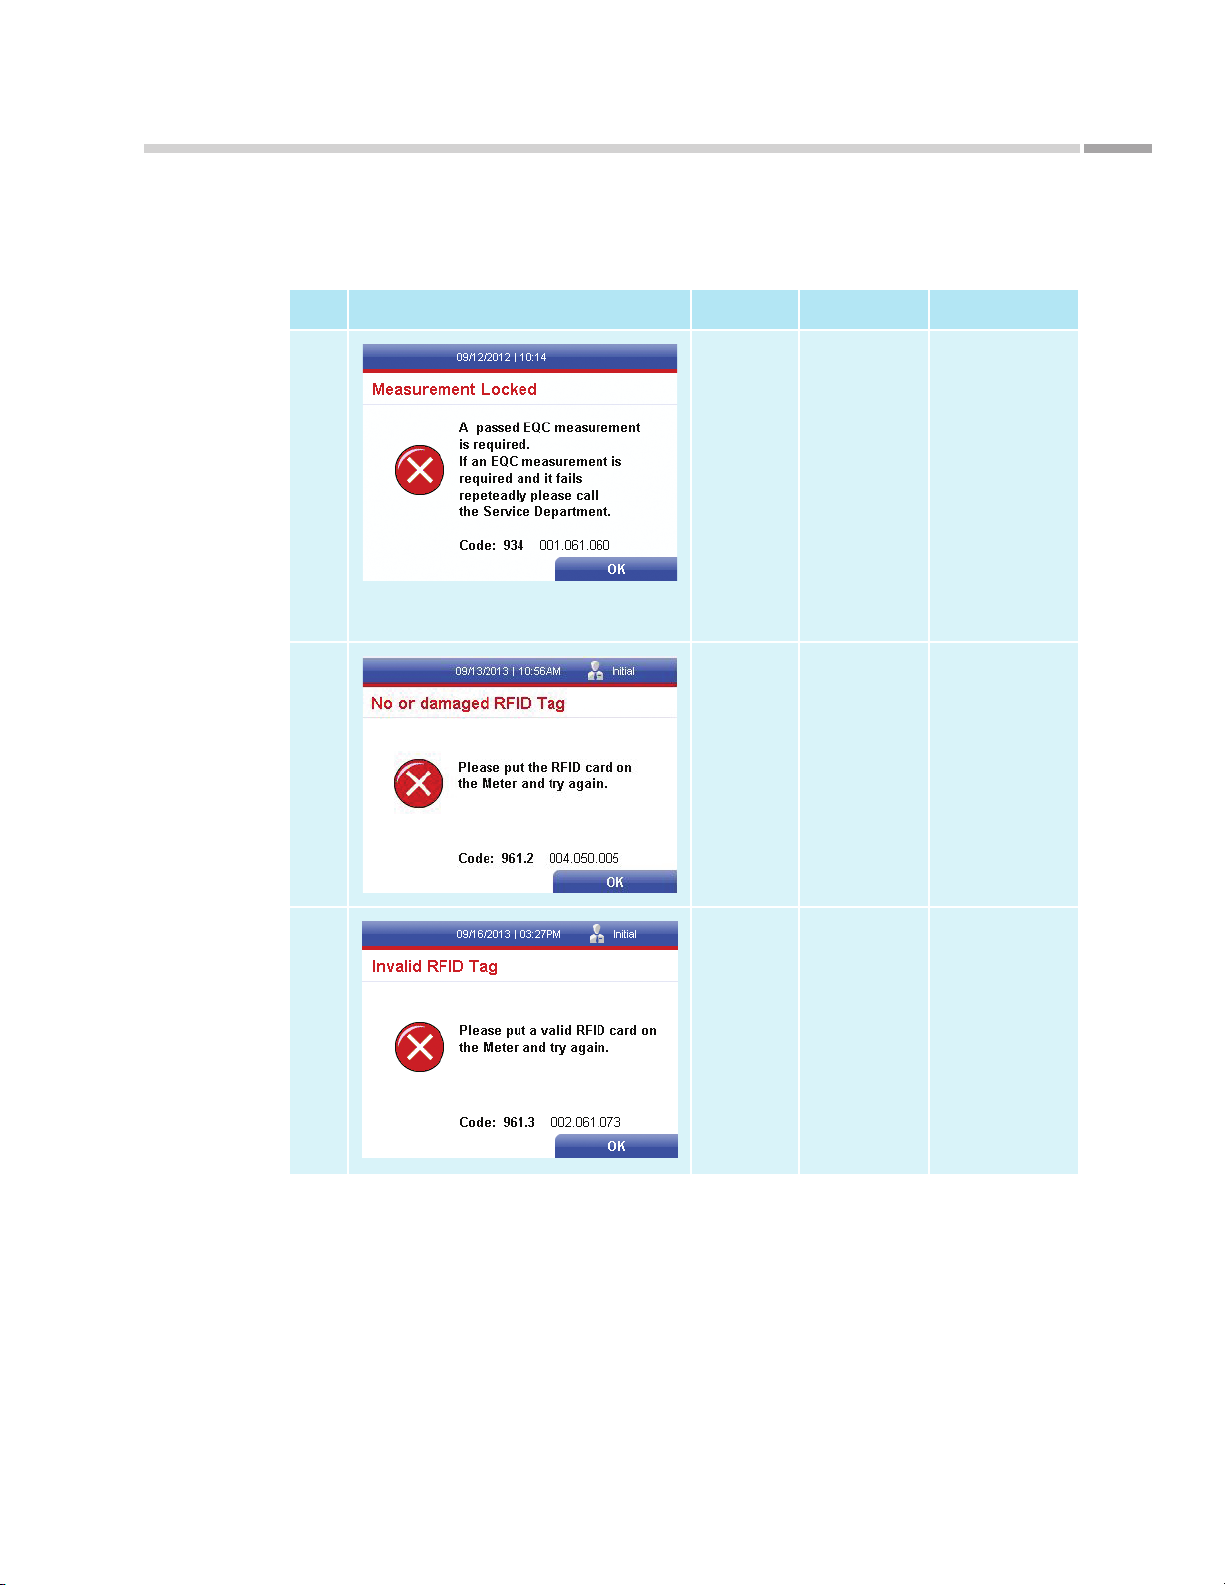
As tu te 140® Meter
Maintenance and Troubleshooting
Type Screen Display Error Code* What it Means Action to Take
00X.061.060 Measurement
Locked. A
passing EQC
measurement is
required.
Cartridge Error
00X.050.005 No or
damaged RFID
Tag.
RFID Error
00X.061.073
00X.061.074
00X.061.075
RFID Error
Invalid RFID
Tag.
Perform an EQC
measurement
(See “
Astut e140®
Electronic Quality
Control (EQC) on
p. 50).
If it fails repeatedly,
call Astute Technical
Support. (See
“Contacting Astute
Medical, Inc.” on
p. 7 for contact
information).
Position the RFID
card over the Meter
keyboard and retry.
If the problem
persists, call Astute
Technical Support.
(See “Contacting
Astute Medical, Inc.”
on p. 7 for contact
information).
Locate and position
the correct RFID
card over the Meter
keyboard and retry.
If the problem
persists, call Astute
Technical Support.
(See “Contacting
Astute Medical, Inc.”
on p. 7 for contact
information).
*Error codes may begin with 001, 002, 003 or 004.
©Astute Medical, Inc. 2017 PN 300153 Rev G 2017/01/16
83
Page 84
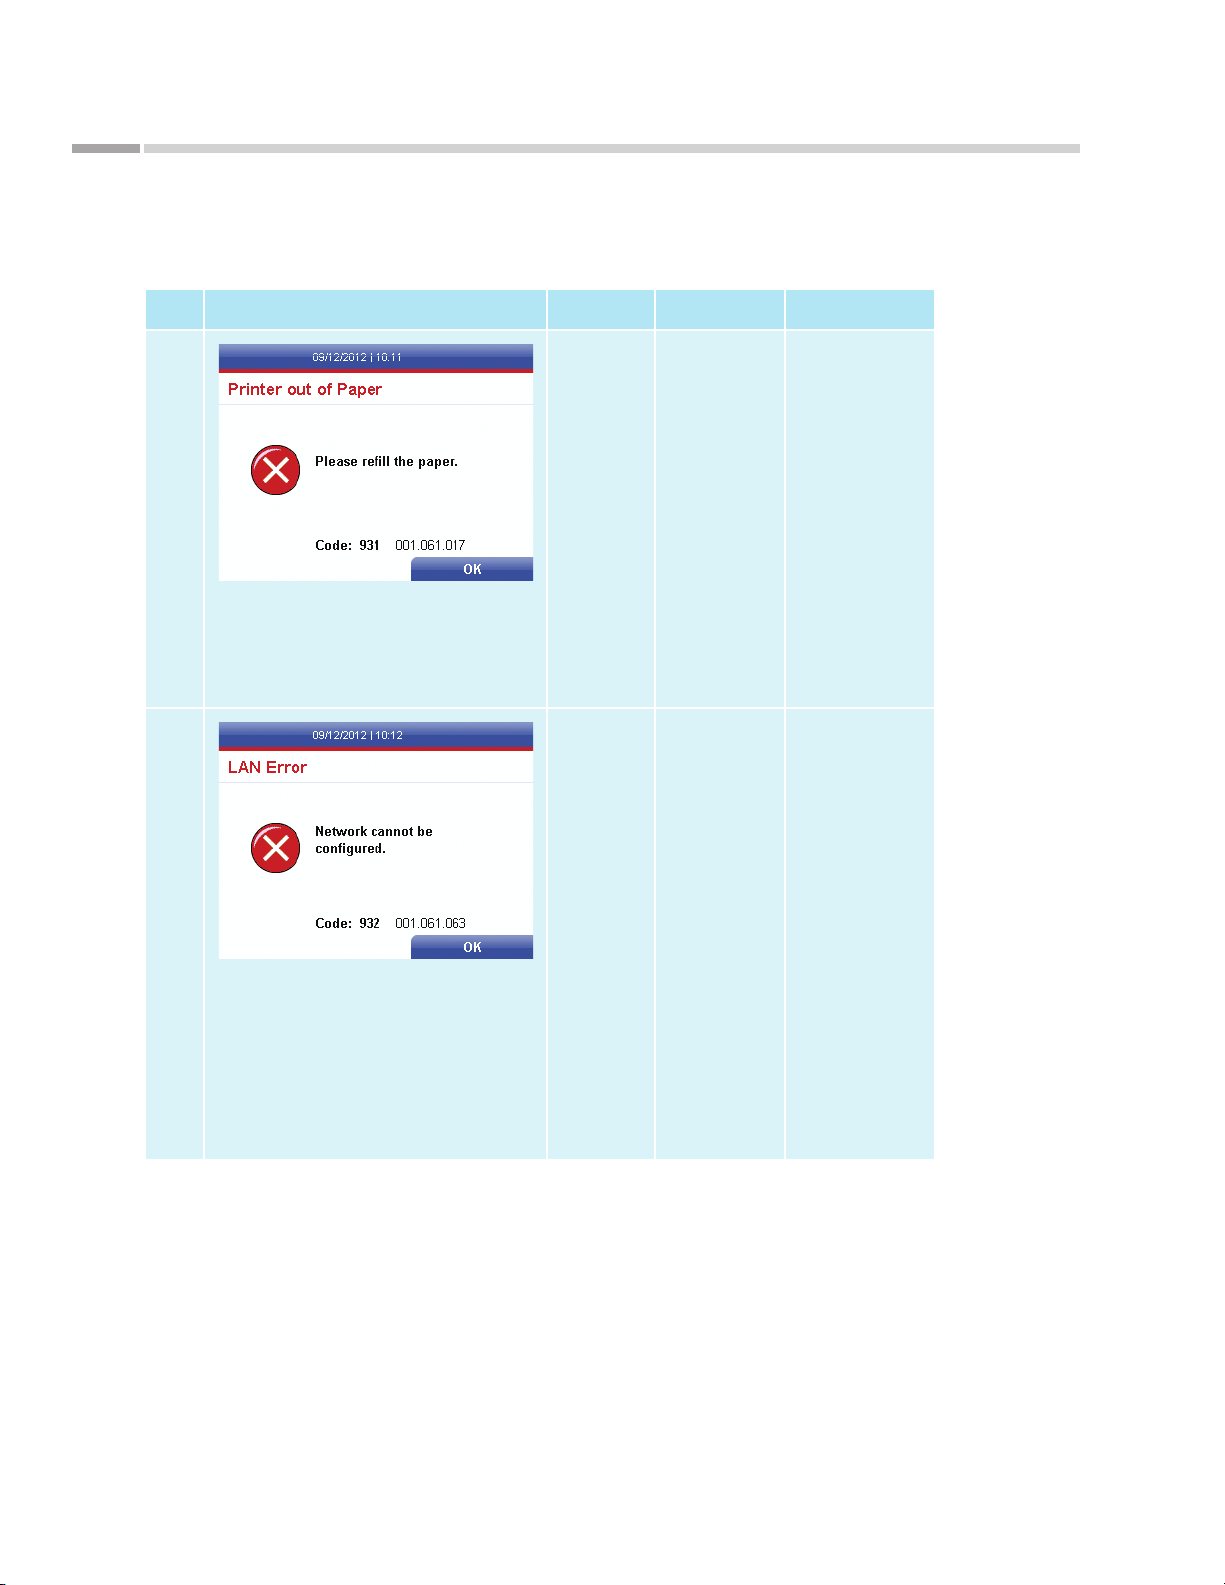
Maintenance and Troubleshooting
Error Messages (Continued)
Type Screen Display Error Code* What it Means Action to Take
As tu te 140® Meter
00X.061.017 Printer out of
Paper.
Print Error
00X.061.063 LAN Error.
Network cannot
be congured.
LAN/LIS Error
Rell printer
with paper (See
“Installation and
Replacement of
Paper” on p. 21 for
instructions).
If this is a result
of a paper jam,
open the internal
printer cover and
remove the paper
roll. Reinsert the roll
(See “Installation
and Replacement of
Paper” on p. 21 for
instructions)
Check to ensure
Ethernet cable is
connected to the
Meter and wall.
Reconrm
the Network
congurations
settings are
appropriate for your
network.
See “Network
Settings” (p. 34)
if you do not want
to connect to the
internet and want
to stop the Meter
from automatically
searching for the
network after log in.
84
*Error codes may begin with 001, 002, 003 or 004.
©Astute Medical, Inc. 2017 PN 300153 Rev G 2017/01/16
Page 85
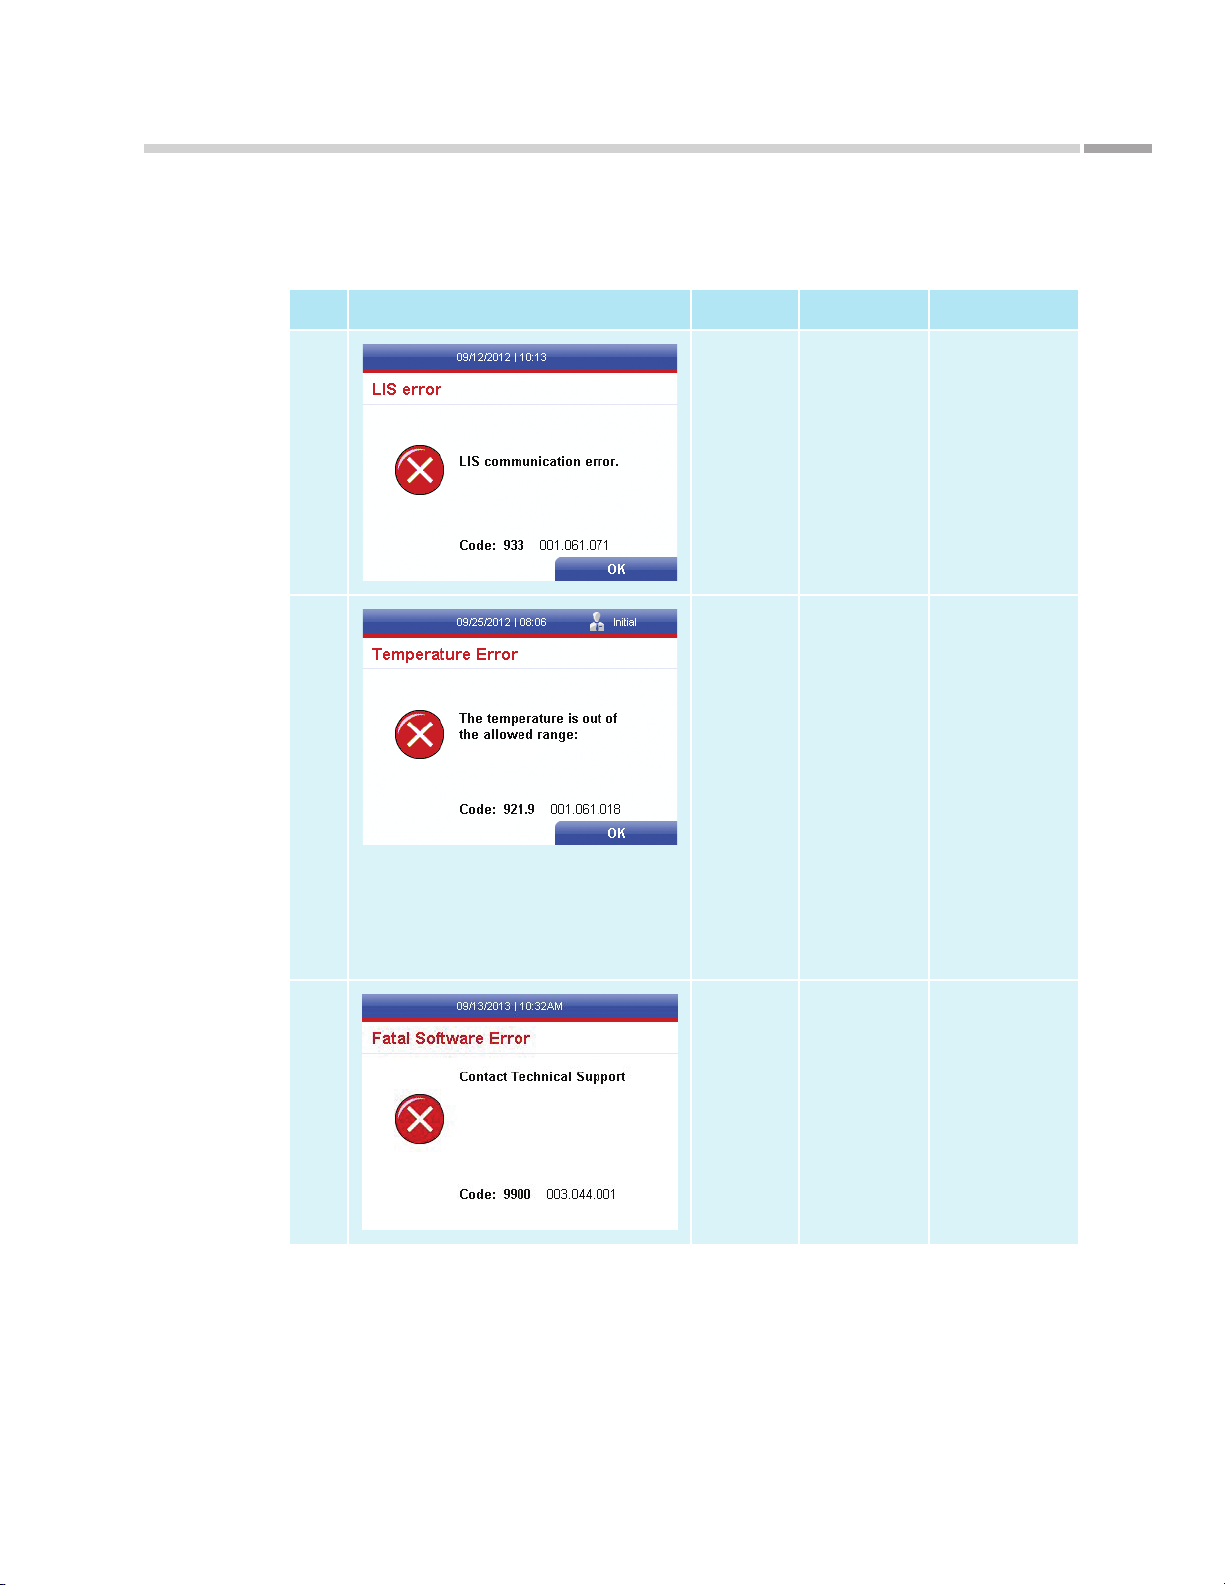
As tu te 140® Meter
Maintenance and Troubleshooting
Error Messages (Continued)
Type Screen Display Error Code* What it Means Action to Take
00X.061.071 LIS error. LIS
communication
error – no
connection.
LAN/LIS Error
00X.061.018 Temperature
Error. The
temperature is
outside of the
allowed range.
Temperature Error
Contact your IT
department or Astute
Technical Support.
(See “Contacting
Astute Medical, Inc.”
on p. 7 for contact
information).
Log off and turn the
Meter off. Turn the
Meter on and retry.
If the error reoccurs,
allow the Meter to
return to the allowed
temperature range
and repeat the whole
test procedure.
Evaluate the location
of the Meter to avoid
exposure to changing
environmental
conditions which may
impact the operating
temperature range.
System Error
*Error codes may begin with 001, 002, 003 or 004.
©Astute Medical, Inc. 2017 PN 300153 Rev G 2017/01/16
00X.044.001 Fatal Software
Error.
Discontinue use
and call Astute
Technical Support.
(See “Contacting
Astute Medical, Inc.”
on p. 7 for contact
information).
85
Page 86
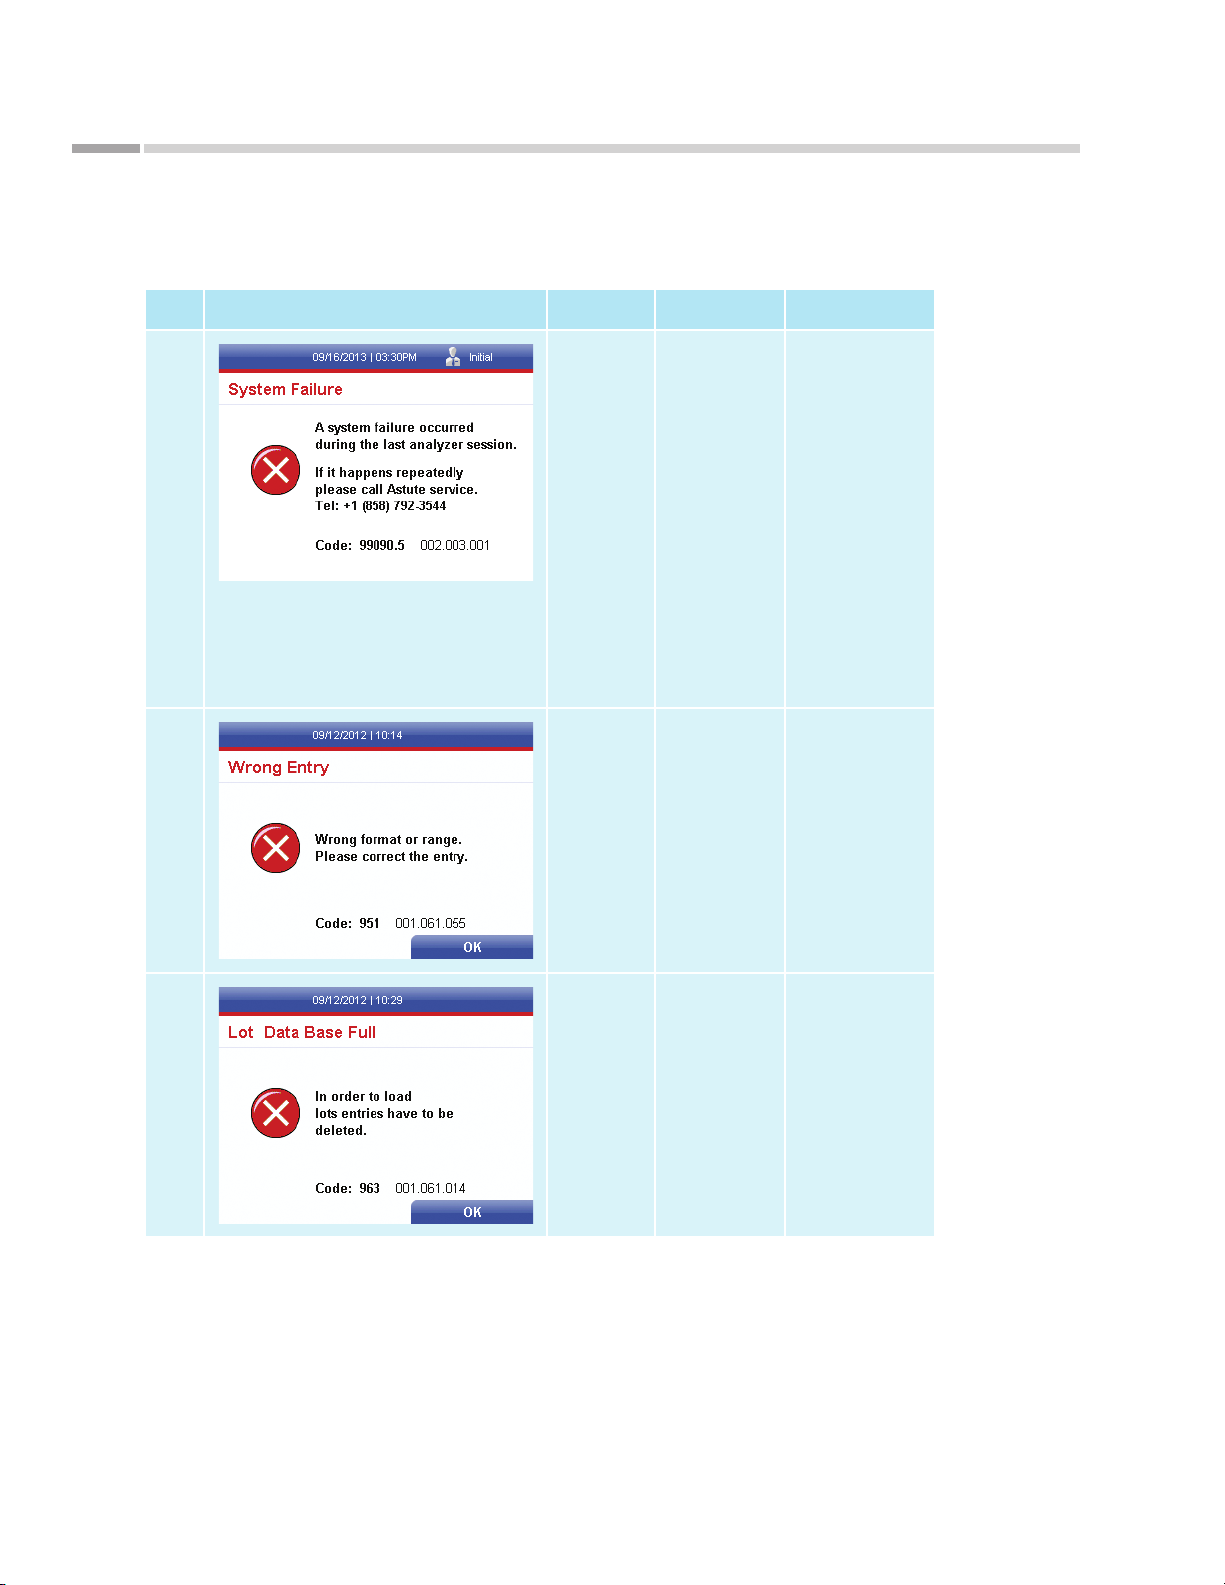
Maintenance and Troubleshooting
Error Messages (Continued)
Type Screen Display Error Code* What it Means Action to Take
As tu te 140® Meter
00X.003.001 System
Failure. A
system failure
occurred during
the last test.
System Error
00X.061.055 Wrong entry.
Wrong format
or date range
entered.
Miscellaneous Error
If you are able, turn
the Meter off and
then back on. Run
an EQC. If it passes,
repeat the whole test
procedure for the
last test performed.
If the EQC fails or
if this happens
repeatedly, call
Astute Technical
Support. (See
“Contacting Astute
Medical, Inc.” on
p. 7 for contact
information).
Review and modify
the format in which
the information was
entered.
86
Miscellaneous Error
*Error codes may begin with 001, 002, 003 or 004.
00X.061.014 Lot Data
Base Full.
The database
containing the
Lots previously
registered is full.
Delete existing
entries in order to
clear memory and
register new lots.
©Astute Medical, Inc. 2017 PN 300153 Rev G 2017/01/16
Page 87
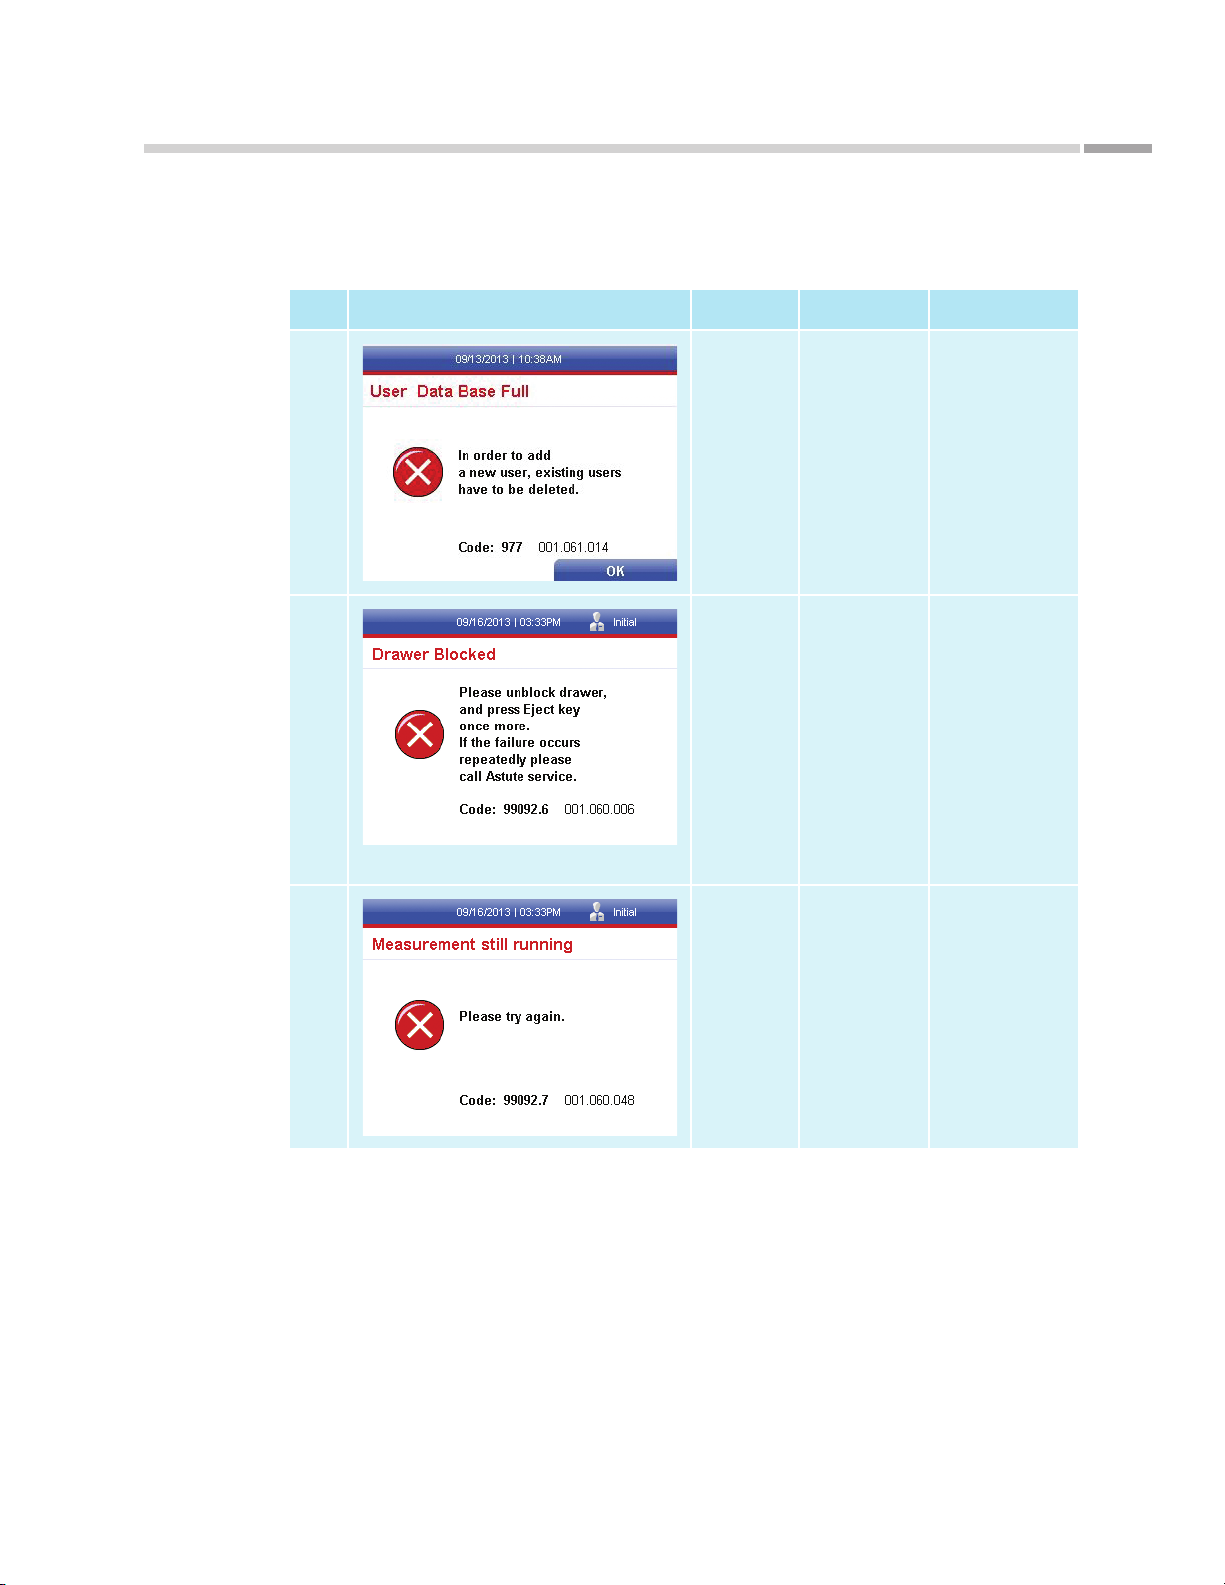
As tu te 140® Meter
Maintenance and Troubleshooting
Error Messages (Continued)
Type Screen Display Error Code* What it Means Action to Take
00X.061.014 User Data
Base Full.
Miscellaneous Error
00X.060.006 Drawer
Blocked.
The opening of
the drawer is
obstructed.
Miscellaneous Error
00X.060.048 Measurement
in process.
Delete existing users
to allow new users to
be created.
Remove anything
obstructing the
drawer from opening
completely.
If this happens
repeatedly, call
Astute Technical
Support. (See
“Contacting Astute
Medical, Inc.” on
p. 7 for contact
information).
Wait until the
measurement has
completed.
Miscellaneous Error
*Error codes may begin with 001, 002, 003 or 004.
©Astute Medical, Inc. 2017 PN 300153 Rev G 2017/01/16
87
Page 88
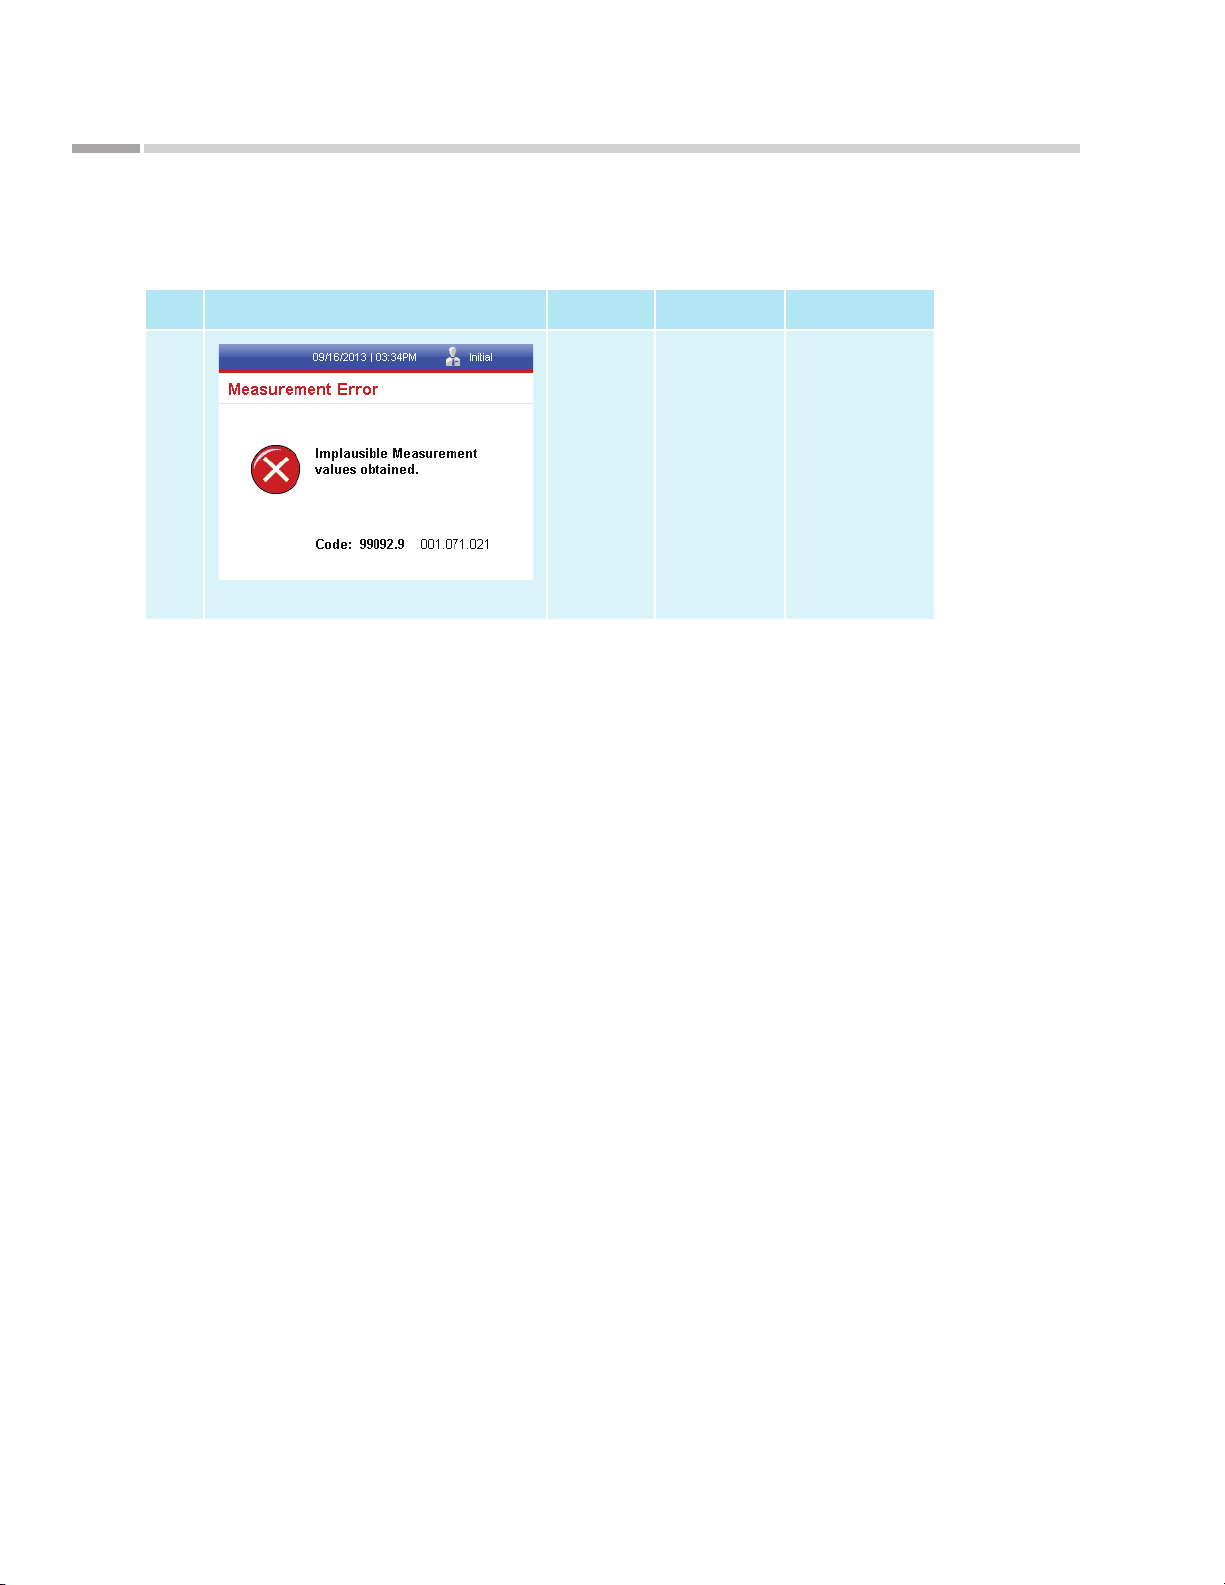
Maintenance and Troubleshooting
Error Messages (Continued)
Type Screen Display Error Code* What it Means Action to Take
As tu te 140® Meter
Miscellaneous Error
*Error codes may begin with 001, 002, 003 or 004.
00X.071.021 Measurement
Error. An error
occurred with the
measurement
ranges permitted.
Perform an EQC
device. If the Meter
passes, repeat
the whole test
procedure.
If this reoccurs, call
Astute Technical
Support. (See
“Contacting Astute
Medical, Inc.” on
p. 7 for contact
information).
88
©Astute Medical, Inc. 2017 PN 300153 Rev G 2017/01/16
Page 89

As tu te 140® Meter
End User License Agreement
End User License Agreement
PURCHASE AND/OR USE OF THIS PRODUCT SHALL CONSTITUTE ACKNOWLEDGMENT AND ACCEPTANCE OF THE TERMS
AND CONDITIONS OF THIS END USER LICENSE AGREEMENT
Astute Medical, Inc. (together with its afliates, “Astute”) hereby grants to the purchaser/user (“you”, “your”) of this
product the limited license to use this product solely for the purpose as specied on the approved label therefor. You
hereby agree that you shall use this product solely for such purpose and for no other purpose.
If you do not agree with each of the terms and conditions set forth in this End User License Agreement, please contact
Astute within ten (10) days after receipt of this product to return the unused and unopened product for a full refund.
LIMITED WARRANTY. FOR THE APPLICABLE WARRANTY PERIOD, ASTUTE WARRANTS THAT THIS PRODUCT SHALL
BE (A) OF GOOD QUALITY AND FREE OF MATERIAL DEFECTS, (B) FUNCTION IN ACCORDANCE WITH THE MATERIAL
SPECIFICATIONS REFERENCED IN THE PRODUCT MANUAL, AND (C) APPROVED BY THE PROPER GOVERNMENTAL
AGENCIES REQUIRED FOR THE SALE OF PRODUCTS FOR THEIR INTENDED USE AS DESCRIBED IN THE APPLICABLE
PRODUCT MANUAL OR INSERT THROUGHOUT THE PRINTED EXPIRATION DATE, OR IN THE CASE OF THE ASTUTE140®
METER FOR A PERIOD OF TWELVE (12) MONTHS FROM THE DATE OF SHIPMENT (THE “LIMITED WARRANTY”). IF THIS
PRODUCT FAILS TO MEET THE REQUIREMENTS OF THIS LIMITED WARRANTY, THEN AS YOUR SOLE REMEDY, ASTUTE
SHALL EITHER REPAIR OR REPLACE, AT ASTUTE DISCRETION, THIS PRODUCT.
EXCEPT FOR THE LIMITED WARRANTY STATED IN THIS SECTION, TO THE EXTENT PERMITTED UNDER APPLICABLE
LAW, ASTUTE DISCLAIMS ANY AND ALL WARRANTIES, EXPRESS OR IMPLIED, INCLUDING BUT NOT LIMITED TO, ANY
WARRANTY OF MERCHANTABILITY, FITNESS FOR A PARTICULAR PURPOSE AND NON-INFRINGEMENT REGARDING THIS
PRODUCT.
ASTUTE’S MAXIMUM LIABILITY FOR ANY CUSTOMER CLAIM SHALL NOT EXCEED THE NET PRODUCT PRICE PAID
THEREFOR.
NO PARTY SHALL BE LIABLE TO ANY OTHER PARTY FOR SPECIAL, INCIDENTAL OR CONSEQUENTIAL DAMAGES, OR LOSS
OF BUSINESS, PROFITS, DATA OR REVENUE, EVEN IF A PARTY RECEIVES NOTICE IN ADVANCE THAT THESE KINDS OF
DAMAGES MIGHT RESULT.
The Limited Warranty above shall not apply if this product has been subjected to physical abuse, misuse, abnormal
use, use inconsistent with the product manual or insert, fraud, tampering, unusual physical stress, negligence or
accidents.
Any warranty claim pursuant to the Limited Warranty shall be made in writing within the applicable Limited Warranty period.
You agree to use this product in strict accordance with all applicable local, state and federal laws, regulations and
guidelines, and industry practices.
You further agree that you shall not resell or otherwise transfer this product to any other person or entity, without
the prior express written approval of Astute Medical, Inc. Information about commercial resale or distribution of the
products of Astute Medical, Inc. may be obtained by e-mailing us at [email protected] or by writing to us at
Astute Medical Inc., General Atomics Court, MS 02/641, San Diego, CA, 92121, USA.
No amendment or addition to this End User License Agreement shall be binding upon the parties unless reduced to
writing and signed by the respective authorized ofcers of the parties.
©2017 Astute Medical, Inc. Astute Medical®, the AM logo, Astute140®, NephroCheck®, the NephroCheck®
logo and AKIRISK® are registered trademarks of Astute Medical, Inc. in the United States. For information
regarding trademarks and other intellectual property applicable to this product, please see
AstuteMedical.com/US/About/IntellectualProperty. PN 0311 Rev B 2017/02/14
©Astute Medical, Inc. 2017 PN 300153 Rev G 2017/01/16
89
Page 90

Glossary of Terms
Glossary of Terms (Listed Alphabetically)
As tu te 140® Meter
Analyte
Assay
Barcode
Barcode Reader
Calibration
Electronic Quality
Control (EQC)
Immunoassay
A substance or chemical constituent that is undergoing analysis.
Analysis to determine the presence, absence or quantity of one or more components
of a substance.
A code consisting of a group of printed and variously patterned bars, spaces and
sometimes numerals that is designed to be scanned and read into computer
memory and that contains information (as identication) about the object it labels.
An electronic device for reading printed barcodes.
The act of checking, adjusting or determining the graduations of a quantitative
measuring instrument by comparison with a standard.
A procedure to check the calibration, alignment, optical system and other internal
systems of the
A technique that detects and/or measures a substance based on its ability to
bind to an antibody.
Astute140® Meter to conrm that the meter is functioning properly.
90
In Vitro
Diagnostic
Liquid Quality
Control (LQC)
Any medical device which is a reagent, reagent product, calibrator, control
material, kit, instrument, apparatus, equipment or system, whether used alone
or in combination, intended by the manufacturer to be used in vitro for the
examination of specimens, including blood and tissue donations, derived from the
human body, solely or principally for the purpose of providing information:
Concerning a physiological or pathological state, or
Concerning a congenital abnormality, or
To determine the safety and compatibility with potential recipients, or
To monitor therapeutic measures.
External quality control materials and procedures that are used to verify the
performance of the test system, including the performance of the
Test cartridges and the
Astute140® Meter.
NephroCheCk®
©Astute Medical, Inc. 2017 PN 300153 Rev G 2017/01/16
Page 91

As tu te 140® Meter
Glossary of Terms
Glossary of Terms (Continued)
NephroCheCk®
Test Cartridge
Operator User
Quality Control
(QC)
RFID card
Supervisor User
A module that holds the biological sample and is designed to be inserted into the
Astute140® Meter for testing. The NephroCheCk® Test cartridge contains reagents
that react with the biological sample, allowing the
level of the analyte present in the sample.
Type of user with privileges to perform day-to-day
An aggregate of activities designed to ensure adequate quality, especially in
manufactured products, or accuracy, reliability and consistency of data, assays,
or tests.
Radio Frequency Identication: A data collection technology that uses tags for
storing data. The
(EQC) RFID Card,
Low Liquid Control RFID Card and the
information that can be automatically transmitted to the
an internal reader.
Type of user with privileges to perform advanced
addition to Operator user functions.
Astute140® RFID Card, Astu te140® Electronic Quality Control
NephroCheCk® High Liquid Control RFID Card, Ne phroCheCk®
NephroCheCk® Test RFID Card contain
Astute140® Meter to detect the
Astute140® Meter operations.
Astute140® Meter via
Astute140® Meter operations, in
©Astute Medical, Inc. 2017 PN 300153 Rev G 2017/01/16
91
Page 92

Index
Index
As tu te 140® Meter
AC power cord, 9, 13, 17–18, 74
Add user, 23–25, 39
Astute contact information, 2, 7
Backspace, 12
Barcode, 90
Barcode reader, 7, 74, 90
Batteries, 6
replacing, 18–21, 72
battery life, 18
disposal, 72
Calibration verication, 60
Cleaning, 71
Default language, 29
Delete user, 40
Dimensions, 8
Edit user, 39–40
Eject cartridge, 12, 61, 65
system/software error, 85
temperature errors, 83–84
External Liquid Quality Control, 56, 90
Hazards, 9
Installing batteries, 18–21
Intended use, 5
Introduction, 5–16
IP address, 16, 32
Keypad, 12
Labels, 73
Laboratory Information Systems (LIS), 5
Limitations, 11
Logging in as supervisor, 23
Lot Status (see test lot registration), 52
Main Menu, 12, 15
Maintenance, 71–72
Memory, 46
92
Enter the Patient ID, 61
Enter the user ID, 39
Error messages, 76–88
barcode error, 79
cartridge errors, 78–81
device type error, 71
LAN/LIS errors, 83
log In/user ID/password errors, 76–78
lot Cartridge errors, 80–81
low Battery error, 85
measurement errors, 81–82
miscellaneous errors, 85–87
print errors, 82
RFID errors, 82
start up/self-test/ error, 85
Meter: back view, 13
Meter: bottom view, 14
Meter: top view, 12
Operating environment, 8
Operating humidity, 8
Operating temperature, 8
Operator, 15
Optional accessories, 7
Paper feed, 12, 22
Patient test result storage, 65
Patient information, security of, 46
Performing a test, 62
Positive and negative quality controls, 91
Power supply, 6, 8–9, 17
Powering on the
Astute140® Meter, 22, 45
©Astute Medical, Inc. 2017 PN 300153 Rev G 2017/01/16
Page 93

As tu te 140® Meter
Index
Index (continued)
Precautions, 9
Principles of operations, 5
Printer settings, 37
Printer paper, 6
install, 21–22
out of paper, 82
replace, 72
Product specications, 8
Quality control, 31, 91
QC results storage, 65–67
Review patient results, 65–66
Run patient specimens, 62
Safety precautions, 9–10
Send to LIS, 70
Set date, 27
Set language & sound, 28
Set LIS, 32–34
Up/Down, Left/Right arrows, 12
Updating system software, 29
User types, 15
Warnings, 9
Warranty, 71, 89
Weight, 8
Set time, 26
Set user access rights, 29
Shutdown, 70
Soft keys, 12
Storage humidity, 8
Storage temperature, 8
Super visor, 15–16
Supervisor menu, 24
Supplies, 6–7
Symbols, 9, 73
System components, 6
Technical Support, 7
Transporting the meter, 9
Troubleshooting, 71
Unpack, 6
©Astute Medical, Inc. 2017 PN 300153 Rev G 2017/01/16
93
Page 94

Appendix
Appendix
Main Menu Structure
Structure
Supervisor MenuRun Patient Run LQC Run EQC Review Data Operator Menu
See Supervisor
Structure
See Operator
As tu te 140® Meter
See Review
Data Structure
Main Menu
Next Control
Select Lot
Print
Next Patient Next Control
Print Print
94
©Astute Medical, Inc. 2017 PN 300153 Rev G 2017/01/16
Page 95
As tu te 140® Meter
Review Data Menu Structure
Send Results (LIS)Patient Results Liquid QC Results
Print ListPrint List Print List Show DetailsShow Details Show Details
Results
Electronic QC
PrintPrint Print
Appendix
All
Electronic QC
Unsent
Liquid QC
All Liquid QC
Unsent
Patients
Review Data Menu
All Patients
©Astute Medical, Inc. 2017 PN 300153 Rev G 2017/01/16
95
Page 96

Appendix
Operator Menu Structure
Errors
Handling
Errors
Instrument
As tu te 140® Meter
List
Print
List
Print
Manage
EQC Devices
Delete
Selected
Register Lot
Operator Menu
Settings
Non-Permanent
Date Format Time Format Language Beeper
Manage
Manage
LQC Lots
Register Lot Register Lot
Delete
Test Lots
Selected
Delete
Selected
Print List
96
Manage Lots View Error Log
Print List Print List
©Astute Medical, Inc. 2017 PN 300153 Rev G 2017/01/16
Page 97

As tu te 140® Meter
Supervisor Menu Structure
Errors
Handling
Appendix
Print List
Errors
Instrument
Add User
Supervisor Menu
Delete
Manage Users
Selected
Print List
Setup
Print Header
(On/Of f)
PC Mode
Network
Conguration
Control
Registering
Log On
Language QC Settings
Permissions
Control Lot/
Setup
©Astute Medical, Inc. 2017 PN 300153 Rev G 2017/01/16
Edit User
LIS
Settings
General Settings Error LogMeter Info
Default
Settings
Date &
Date Format
Time &
Time Format
97
Page 98

As tu te 140® Meter
98
Manufactured for Astute Medical, Inc.
3550 General Atomics Ct.
Building 2
San Diego, CA 92121
USA
©Astute Medical, Inc. 2017 PN 300153 Rev G 2017/01/16
 Loading...