

Page 1
ADN14
MODEL: PRODUCT TYPE:
Page 1
WARNING
PLEASE DO NOT RETURN ANY PRODUCT WITHOUT CALLING
1-800-221-9705 FOR INSTRUCTIONS
PRODUCT INFORMATION:
WARNING
MADE IN CHINA
Study, understand and follow all instructions provided with
this product. Read these instructions carefully before
installing, operating, servicing or repairing this tool. Keep
these instructions in a safe accessible place.
INTENDED USE OF THE TOOL 1 YEAR LIMITED WARRANTY
Before Use
When unpacking, check the parts diagram and part
number listing on page 4 to make sure all parts are
included. If any parts are missing or damaged, please
call your distributor.
DO NOT DISCARD – GIVE TO USER
• Normal use of this product is likely to expose the user
to dust and/or microscopic particles containing
chemicals known to the State of California to cause
cancer, birth defects or other reproductive harm.
Always wear appropriate safety equipment and
clothing when using this product. Study, understand
and follow all instructions provided with this product.
Failure to read and follow all warnings and operating
instructions may result in damages and serious injury
or death.
• Always wear ANSI approved goggles when using this
product. (Users and By standers).
• Never use this tool for any application other than for
which it was designed.
• Only use accessories designed for this tool.
• Never alter or modify this tool in any way.
• Improper operation and/or maintenance of the tool,
modification of the tool, or use of the tool with
accessories not designed for it could result in serious
injury or death.
• Always select the correct accessories of the correct
size and design for the job that you are attempting to
perform.
• Always work in a clean, safe, well-lit, organized and
adequately equipped area.
• Do not begin repairs without assurance that vehicle is
in secure position, and will not move during repair.
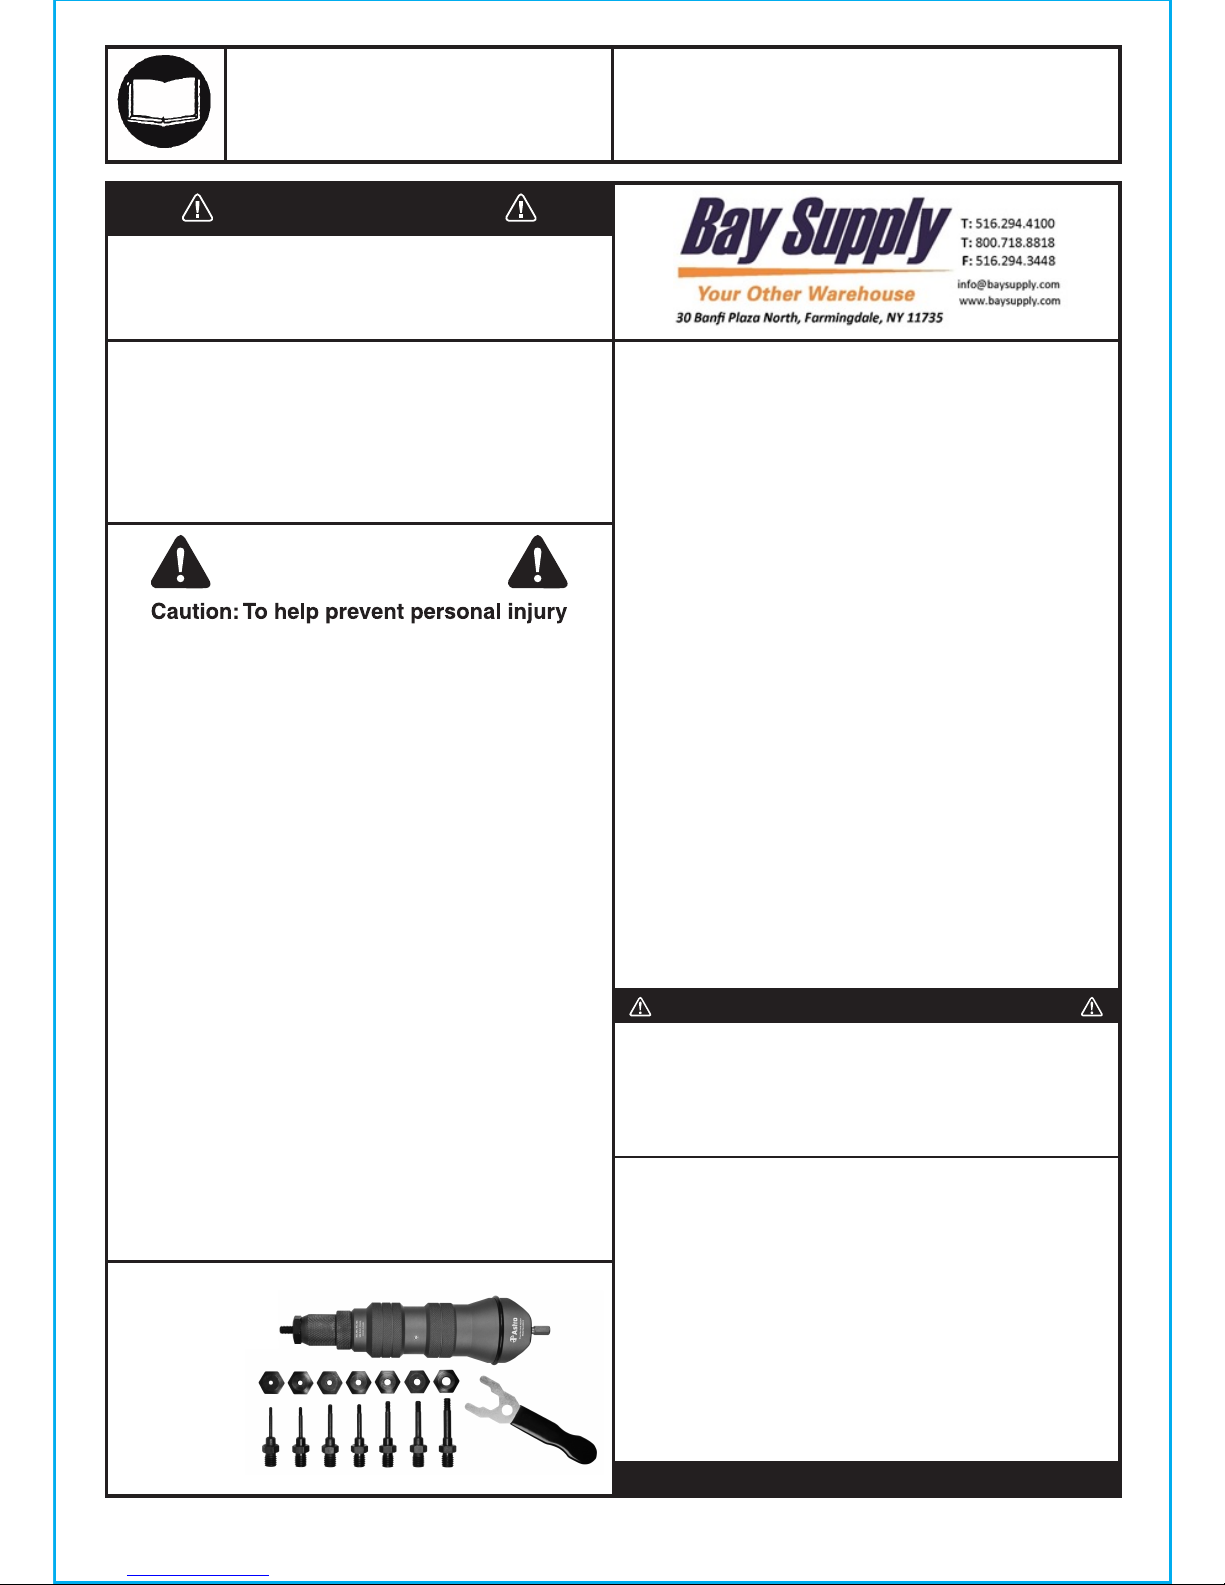
RIVET NUT DRILL ADAPTER KIT
RIVET NUT DRILL
ADAPTER KIT
This tool is designed to be used with a cordless drill that
uses a clutch to limit torque to different settings. Use tool
to set aluminum, steel and stainless rivet nuts up to
1/4" (6mm) in sheet metal. Do not use this tool outside of
the designed intent. Never modify the tool for any other
purpose or use.
• Astro Pneumatic Tool Co. warrants our products to the original
user against defective material or workmanship for a period of 1
year (except where noted on our price schedule) from the date of
1st use. Astro reserves the right to determine whether the product
failed because of defective material, workmanship or other causes
and to charge back for missing parts. Astro Pneumatic Tool Co., at
its discretion, will repair products covered under this warranty free of
charge. The distributor should direct the original user to return the
product (with the exceptions listed below) with the distributor’s
name, address, adequate proof of date of purchase or a copy of
warranty card, and a short note explaining the problem. Failures
caused by accident, alteration, or misuse are not covered by
this warranty.
• If one part of this product fails, please do not return the entire
product. Astro will replace free of charge component parts of
this product that fail within 1 year of first use by the original
user. Items included in this category include but are not
limited to kits, hand tool kits and any other product where there
are multiple items or components that make up the unit. Please
contact the phone number below in order to obtain the
replacement components covered under warranty.
• Astro Pneumatic Tool Co. or its authorized service representatives
must perform all warranty repairs. Any repair to the product by
unauthorized service representatives voids this warranty. The rights
under this warranty are limited to the original user and may not be
transferred to subsequent owners.
• This warranty is in lieu of all other warranties, expressed or
implied, including warranties of merchantability and fitness for a
particular purpose. Some states do not allow the exclusion of
limitations of incidental or consequential damages so the above
limitations may not apply to you.
• Easily convert cordless or corded drills into power
rivet nut setters
• Includes 8 mandrels and nosepieces in Metric and SAE:
M3, M4, M5, M6, 8-32, 10-32, 10-24 and 1/4-20
• Tool is made from a single CNC machined piece of billet
aluminum and features Japanese bearings and Cro-Mo
mandrels
• Use 12V and up cordless drills for aluminum and steel
rivet nuts, or 14.4V and up for stainless up to 1/4"
(all drills must feature torque limiting clutch)
Page 2
ll. SAFETY GUIDE:
1. Wear adequate protective gear including ANSI
approved goggles and
thick work gloves.
2. Only use the nut riveting adapter with driving tool that
matches with requirements specified on Product
Technical Data.
3. Switch off the driving tool before installing or
uninstalling the nut riveting adapter.
I. Product Technical Data:
Dimensions:
Weight:
Hex Shank Size:
Riveting Capability:
Rivet Type:
Stroke Limit:
Working Torque:
Recommended RPM:
Requirements of Driving Tools:
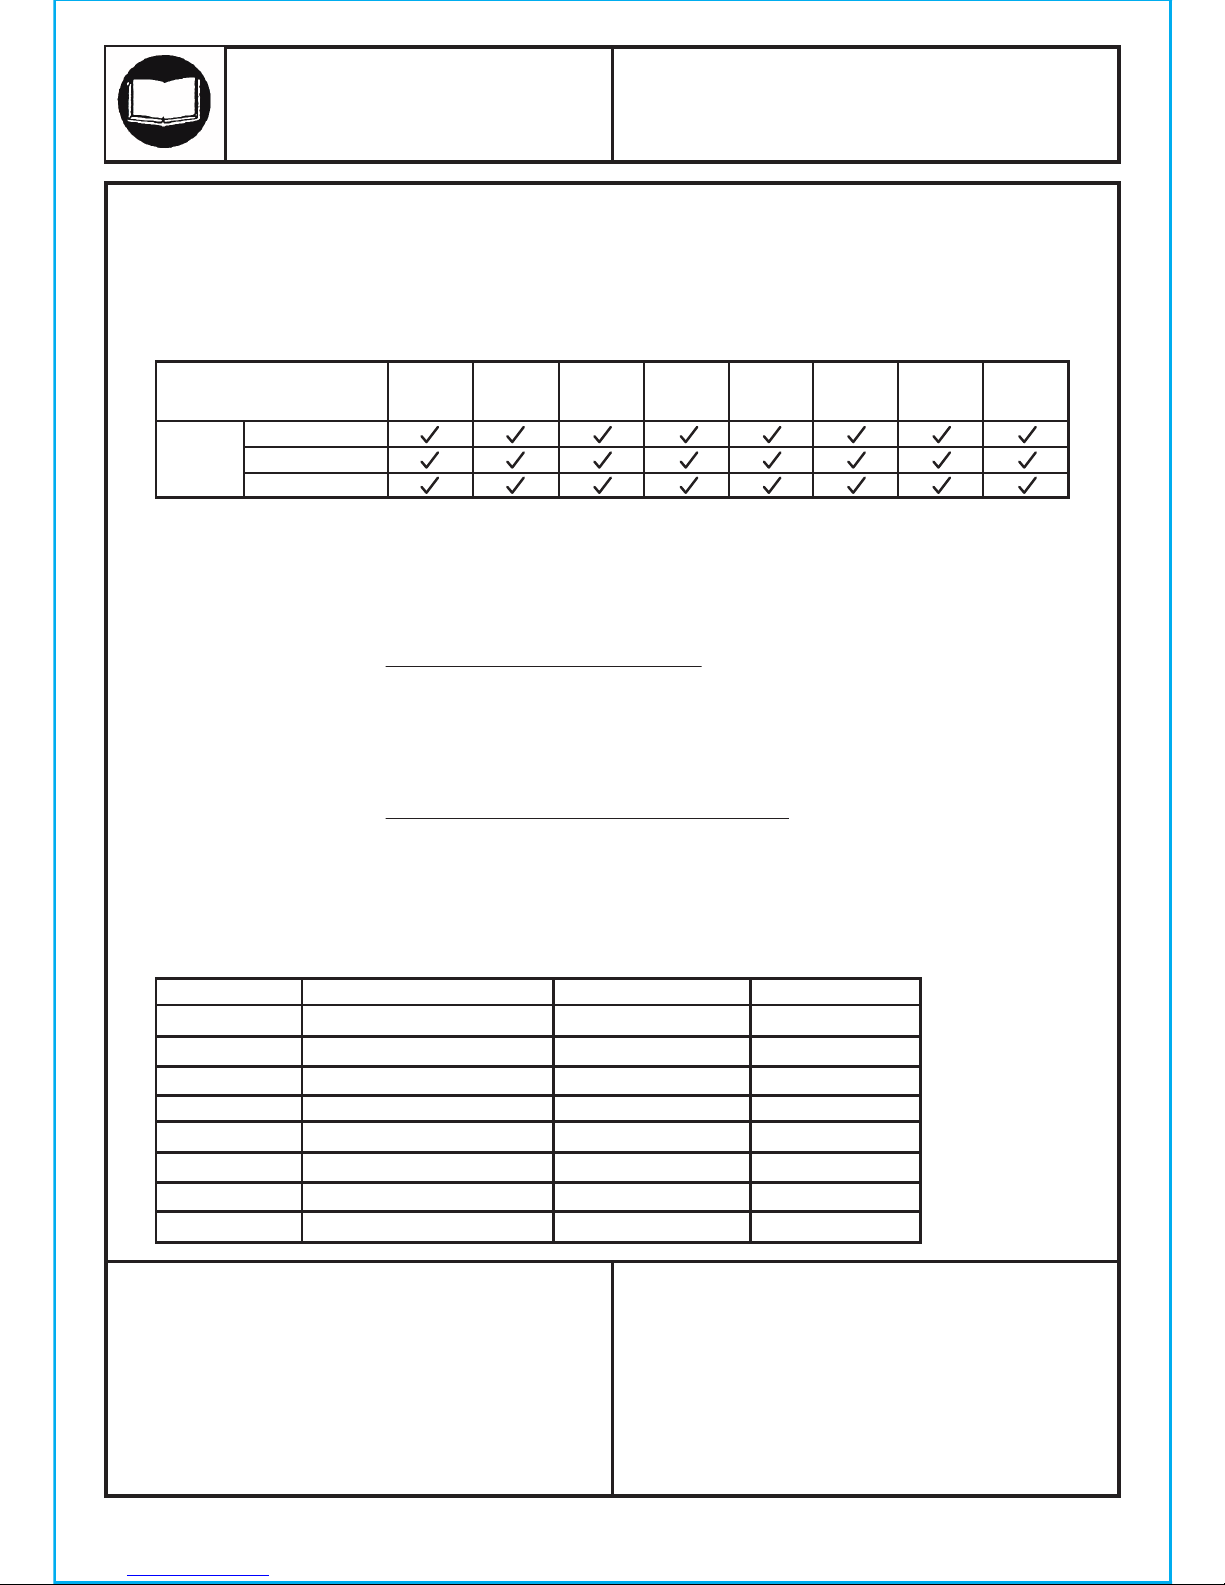
Sizing Chart:
ADN14
MODEL: PRODUCT TYPE:
Page 2
8.5" x 5.5" x 2.4"
2.4 lbs
1/4"
Rivet Nut
Maximum 0.7 inch
Refer to section III. Operation Guide
Low speed (<240 RPM)
Requirements of cordless driving tool:
• adjustable torque setting
• chuck capacity of 6.35 mm (1/4") shank
• min 12V and maximum torque > 190 in/lbs for aluminum and rivet nuts
• min 14.4V and maximum torque > 250 in/lbs for stainless steel rivet nuts
• clutch provides a felt and/or audible indication of reaching max setting
Requirements of elctric or pneumatic driving tool:
• adjustable torque setting
• chuck capacity of 6.35 mm (1/4") shank
• with maximum torque > 190 in/lbs for aluminum and steel rivet nuts
• with maximum torque > 250 in/lbs for stainless steel rivet nuts
• clutch provides a felt and/or audible indication of reaching max setting
Rivet Nut Size
Nut
Material
SAE
8-32
SAE
10-24
SAE
10-32
SAE
1/4-20
M3 M4 M5 M6
Aluminum
Steel/Copper
Stainless Steel
RIVET NUT DRILL ADAPTER KIT
Rivet Nut
M3
M4
M5
M6
8-32
10-32
10-24
1/4-20
Rivet Nut Diameter
4.9mm OD
5.9mm OD
6.87mm OD
8.80mm OD
5.9mm OD
6.87mm OD
6.87mm OD
9.76mm OD
Drill Hole Size
5mm (13/64")
6mm (7/32")
7mm (9/32")
9mm (3/8")
6mm (7/32")
7mm (9/32")
7mm (9/32")
10mm (13/32")
Grip Range
26 – 16ga
26 – 16ga
26 – 16ga
26 – 13ga
26 – 16ga
26 – 16ga
26 – 16ga
26 – 13ga
4. The objects to be riveted MUST BE SECURELY FIXED
BEFORE riveting in order to avoid possible injury.
Unsecured objects may rotate with the driving tool if not
secured.
5. The driving tool MUST be stopped if user releases the
adapter’s body during riveting.
6. During disassembly for mandrel changing or
Maintenance, take care as there are pre-loaded springs
within the tool.
Page 3
lll. OPERATION GUIDE:
lV. MAINTENANCE:
1. The nut riveting adapter is
lubricated before shipping.
Recommended: cleaning
the components of plunger
tube, and using lubricant
grease to re-lubricate its
parts on a yearly basis
or earlier.
2. Threaded mandrel
replacement:
Life span of threaded mandrel varies with usage
frequency and the uses of different rivet nut sizes/types.
Recommended: replacing the threaded mandrel with
new spare and its nosepiece before worn-out.
WARNING: The objects to be riveted MUST BE
SECURELY FIXED BEFORE riveting in order to avoid
possible injury. Unsecured objects may rotate with the
driving tool if not secured.
IMPORTANT: Ensure the threads on mandrels are clean
and the loaded rivet nut has full thread engagement with
threaded mandrel during riveting. It is strongly
recommended to clean and lubricate (ex. silicone spray)
the threads on mandrels before and after use.
CRITICAL: Before using the tool on your intended work
piece, it is REQUIRED that you test the tool with a rivet nut
on a test piece to determine the adequate torque needed
for your rivet nut size, rivet nut material, and sheet metal
thickness and material.
• Ensure drill is in "driver" mode and not drill mode.
Different drills will require different torque limiting settings
for the same material.
• On the test piece, set your drill to a low clutch setting and
work up to higher settings until the torque level is enough
to fully set the rivet nut but not over set - WARNING: Over
setting rivet nuts may permanently damage the mandrel or
tool.
• Once the torque level is determined, test again on a new
hole at your intended setting to confirm. The knurled part
of the rivet nut should look mushroomed and starting to
become flat on the other side of the work piece and should
not rotate when you install a bolt.
ADN14
MODEL: PRODUCT TYPE:
Page 3
RIVET NUT DRILL ADAPTER KIT
2.4 Ensure the rivet nut has adequate thread
engaged
and that there is no cross threading. Check
and confirm the objects to be riveted are SECURE.
2.5 Some small amount of clearance between nose
piece and the flange of rivet nut may be beneficial to
operation, but keep adequate thread engagement on
the nut.
2.6 Refer to Section III. for determining the proper
drill torque settings. (REQUIRED).
2.7 Put the rivet nut now threaded onto the tool's
mandrel fully into the proper size hole (see Sizing Chart
on page 2).
2.8 Align the adapter with the hole angle as best
you can. While gripping the adapter firmly with one hand
(wear work gloves), operate the drill in the FWD
direction until you feel or hear the drill's torque clutch
catching.
The adapter should not rotate while the drill
works. Release your grip on the adapter and reverse
the drill out of the rivet nut. Depending on the material,
you may need to manually help the adapter thread out
of the rivet nut with your off hand.
Tip 1: If the torque setting of your drill is too high,
not on, or on a drill setting, you WILL damage the
rivet nut, workpiece, mandrel or tool. Monitor
threads for burrs and lubricate when needed.
Tip 2: Make a note of the torque setting matching
your application for future use.
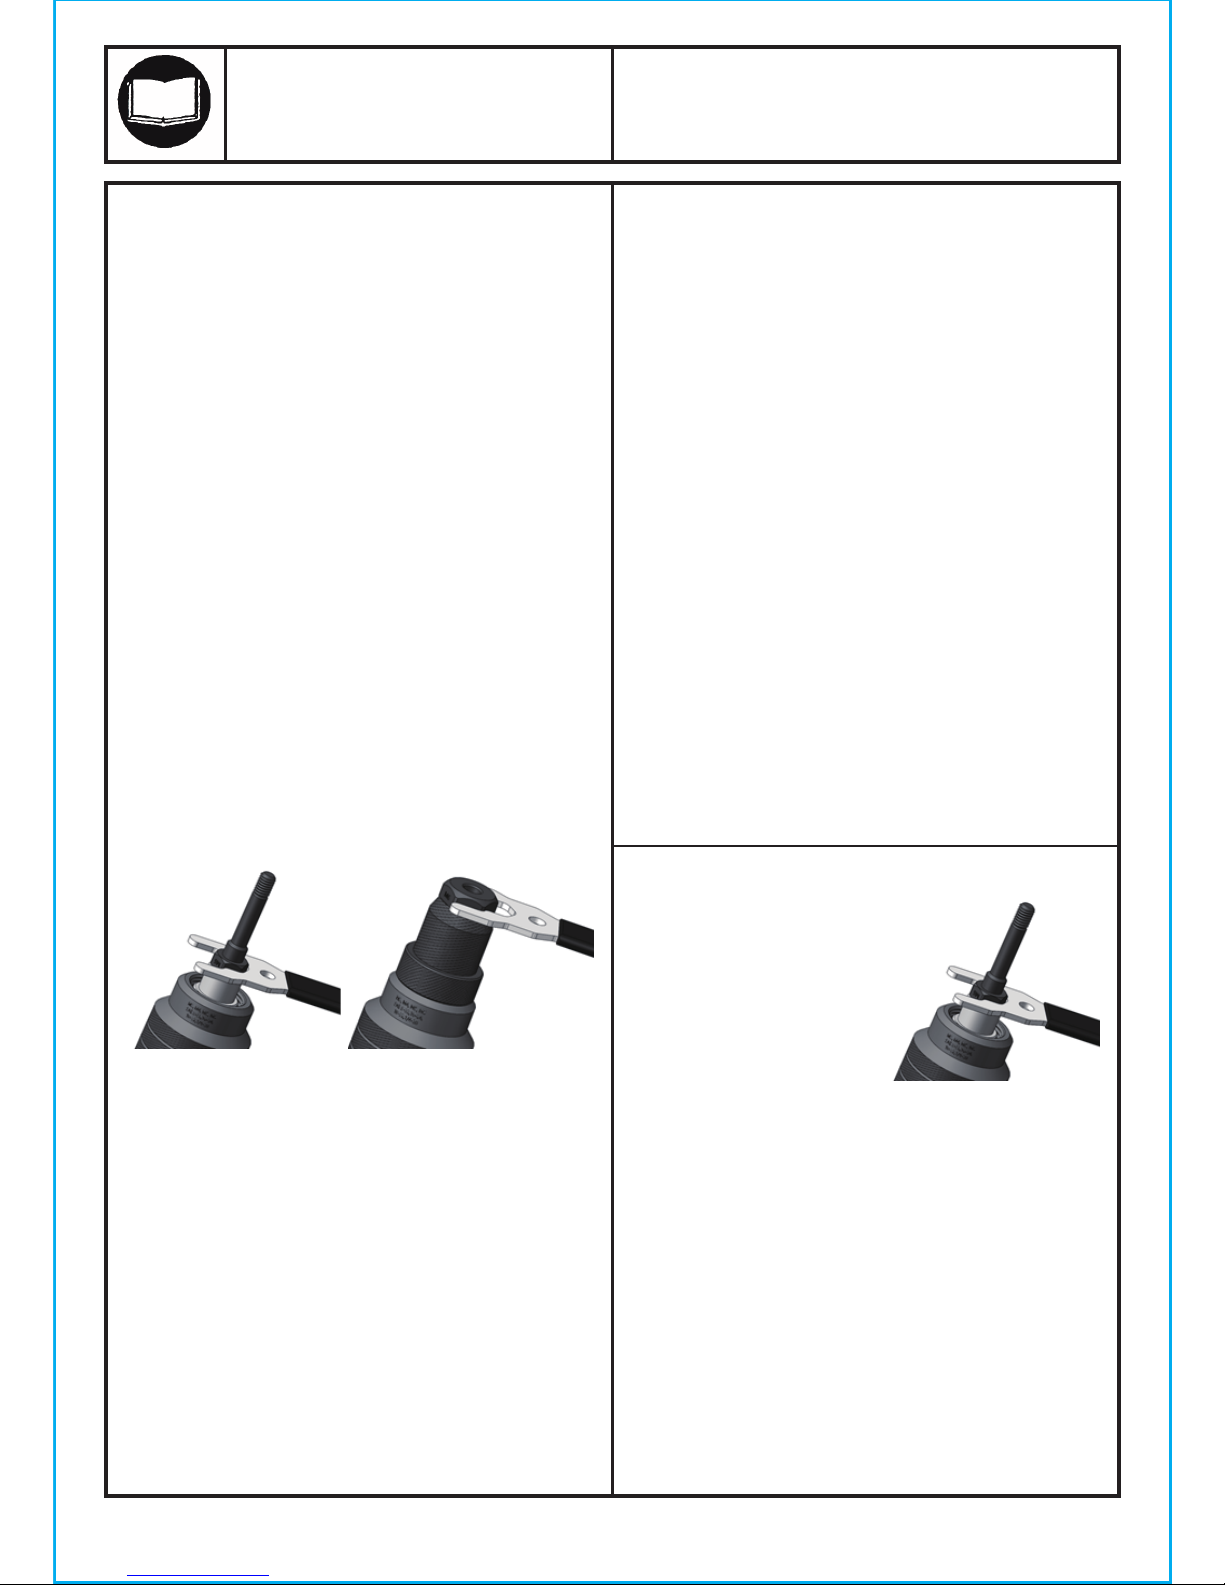
1. Tool Installation:
Install a new mandrel and nosepiece to match your
intended rivet nut thread size. Use the included wrench
to install the new
mandrel into the #2 Plunger Tube.
Ensure that the mandrel and other components are
tightly fixed in position. After installing the front bushing
cover and lock bushing, lightly tighten the new
nosepiece onto the end of the tool. Install the hex shank
drive end of the tool into your drill and affix into its chuck.
2. Riveting:
2.1 While holding the adapter with your hand, operate
the drill in the REV direction until you hear the adapter
start to click. This means it has fully exposed the
mandrel.
2.2 Switch the drill to the FWD setting.
2.3 Manually thread the selected rivet nut onto threaded
mandrel; or hold the rivet nut in one hand and use
another hand to pull the drill trigger slightly to have the
nut threaded on by the tool.
Page 4
ADN14-01
ADN14-02
ADN14-03
ADN14-04
ADN14-05
ADN14-M3N
ADN14-M4N
ADN14-M5N
ADN14-M6N
ADN14-8-32N
ADN14-10-24N
ADN14-10-32N
ADN14-1/4-20N
ADN14-14
ADN14-M3M
ADN14-M4M
ADN14-M5M
ADN14-M6M
ADN14-8-32M
ADN14-10-24M
ADN14-10-32M
ADN14-1/4-20M
ADN14-23
ADN14-24
ADN14-25
ADN14-26
ADN14-27
ADN14-28
ADN14-29
ADN14-30
ADN14-31
ADN14-32
1
2
3
4
5
6
7
8
9
10
11
12
13
14
15
16
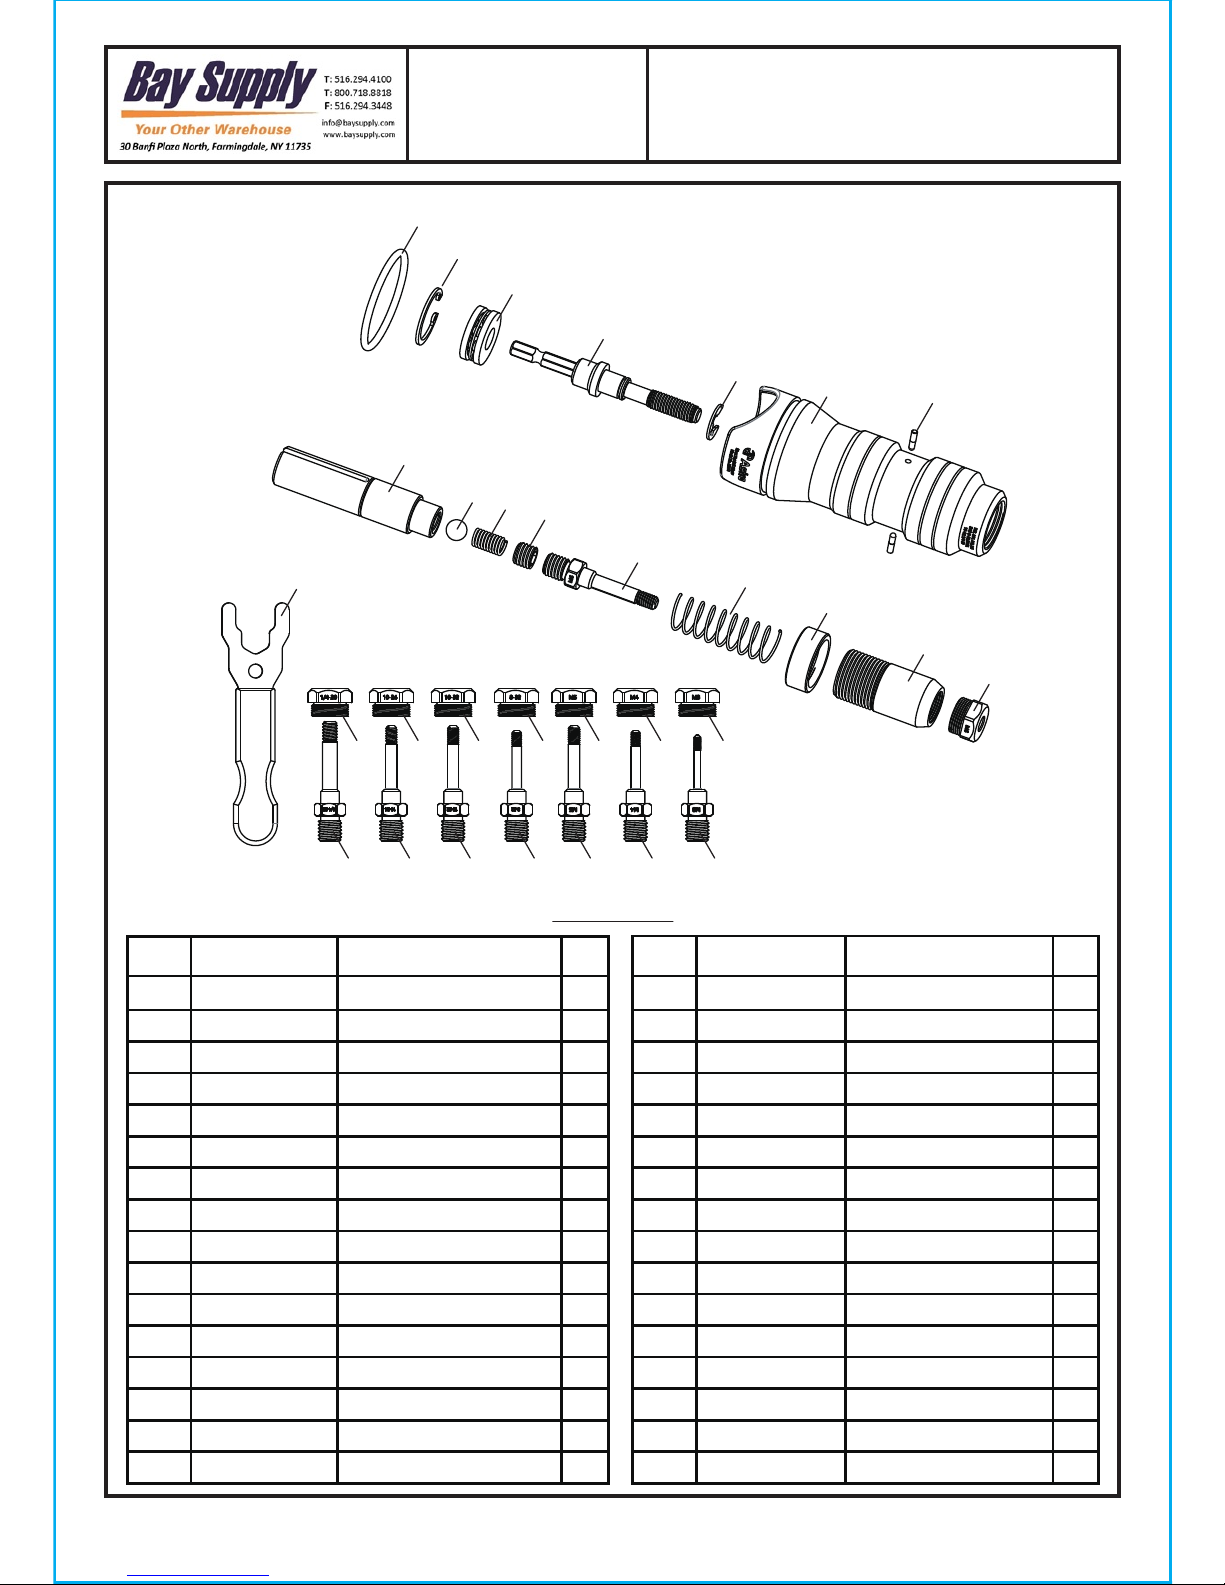
Hex Shank Driving Shaft
Plunger Tube
Front Bushing w/Knurling
Locking Bushing
Set Screw
M3 Nosepiece
M4 Nosepiece
M5 Nosepiece
M6 Nosepiece
SAE 8-32 Nosepiece
SAE 10-24 Nosepiece
SAE 10-32 Nosepiece
SAE 1/4-20 Nosepiece
Aluminum Handle
M3 Mandrel
M4 Mandrel
1
1
1
1
1
1
1
1
1
1
1
1
1
1
1
1
1
1
1
1
1
1
1
1
1
1
1
1
2
1
1
1
Index Part No. Description Qty
17
18
19
20
21
22
23
24
25
26
27
28
29
30
31
32
M5 Mandrel
M6 Mandrel
SAE 8-32 Mandrel
SAE 10-24 Mandrel
SAE 10-32 Mandrel
SAE 1/4-20 Mandrel
Front Spring
Inner Spring
Thrust Ball Bearing
C-clip
E-clip
Steel Ball
Pins
O-ring
Wrench Kit
Blow Mold Case
Index Part No. Description
Qty
Parts List
702
30
26
25
1
27
14
29
9
3
4
23
18
5
24
28
2
31
13 11 12 10 8 7 6
22 20 21 19 17 16 15
PARTS BREAKDOWN:
ADN14
MODEL: PRODUCT TYPE:
Page 4
RIVET NUT DRILL
ADAPTER KIT
 Loading...