

Page 1
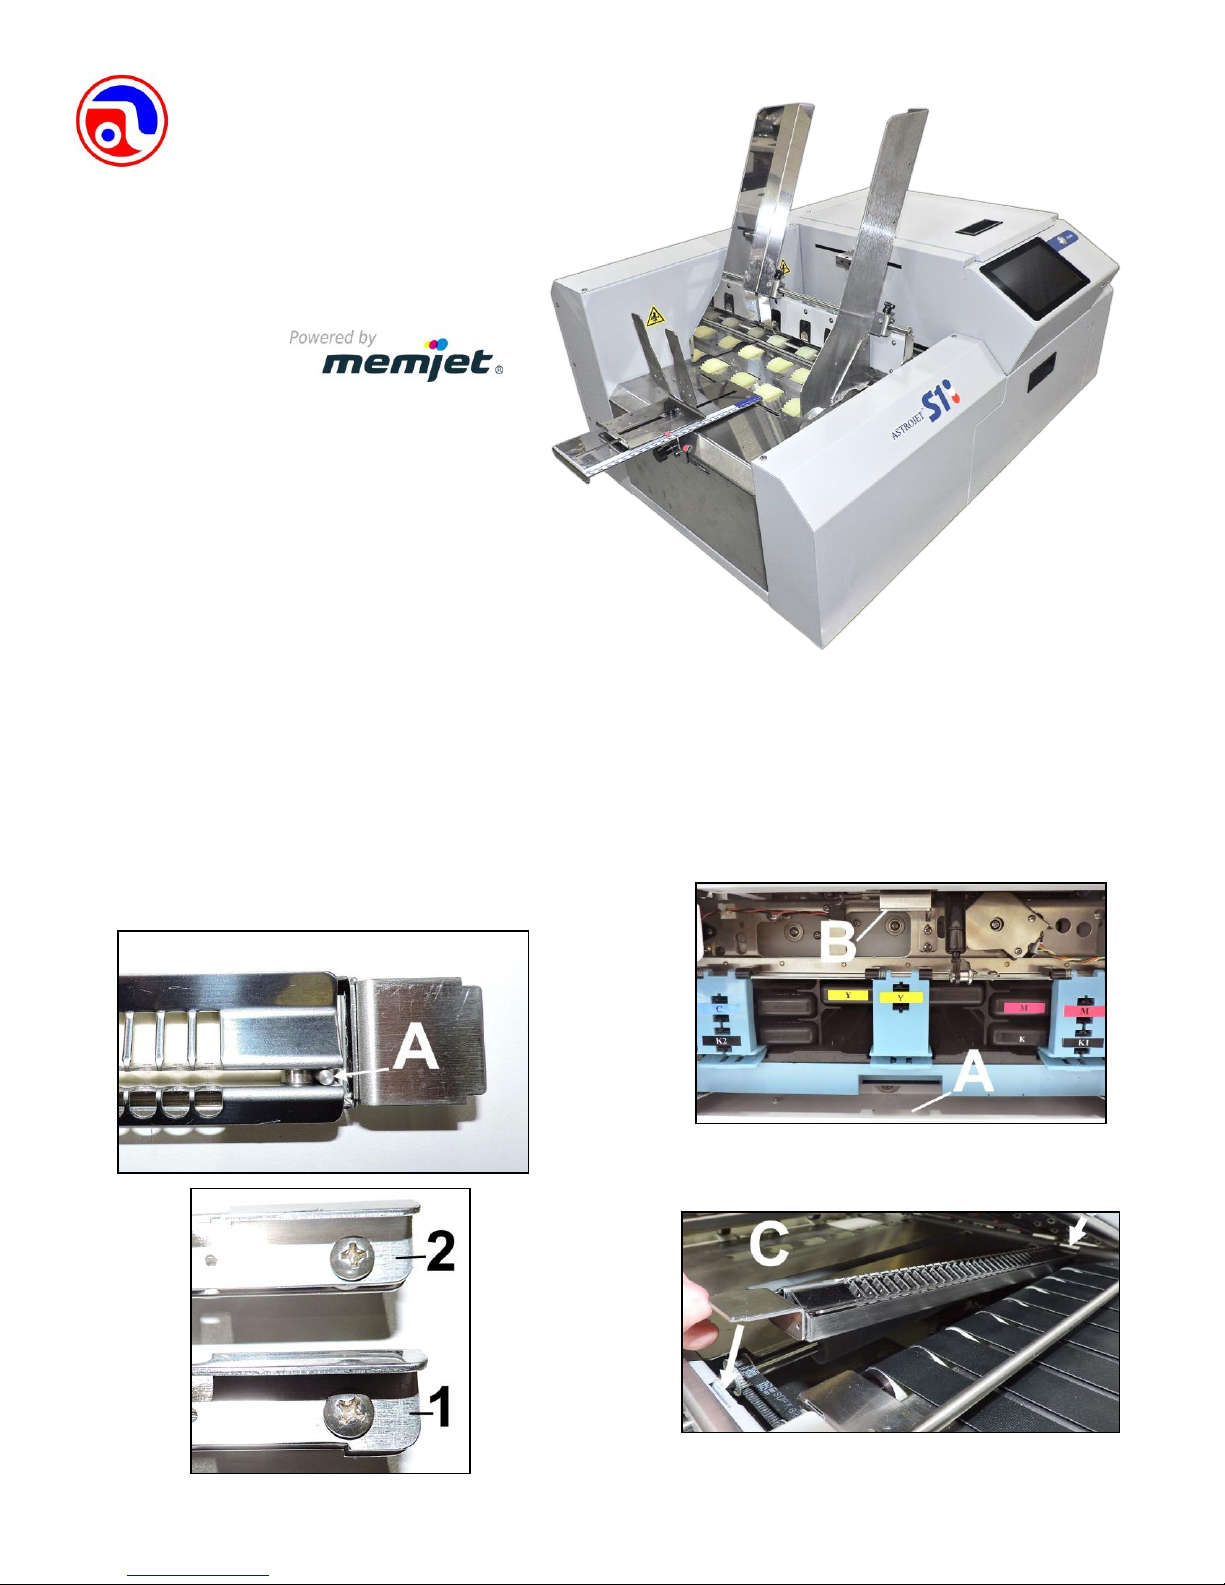
AstroJet S1
Quick Start Guide
Step 1
Remove Printer and Accessories
from packaging
Place Printer on a level, stable surface. Make
sure Printer is level.
Step 2
Assemble Ink Drip Tray Assembly
1. Select the High or Low Grate and install it
on the Ink Tray as shown [A].
High Grate [1] is for thinner media
(paper or envelopes).
Low Grate [2] is for thicker card stock
and cardboard.
Step 3
Install Ink Drip Tray Assembly
1. Open Ink Tank Door [A].
2. Release Latch [B] to raise Top Assembly.
Page 1
3. Insert tabs on Ink Drip Tray into frame slots
[C] as shown.
4. Close Top Assembly.
Page 2
Step 4
Assembly
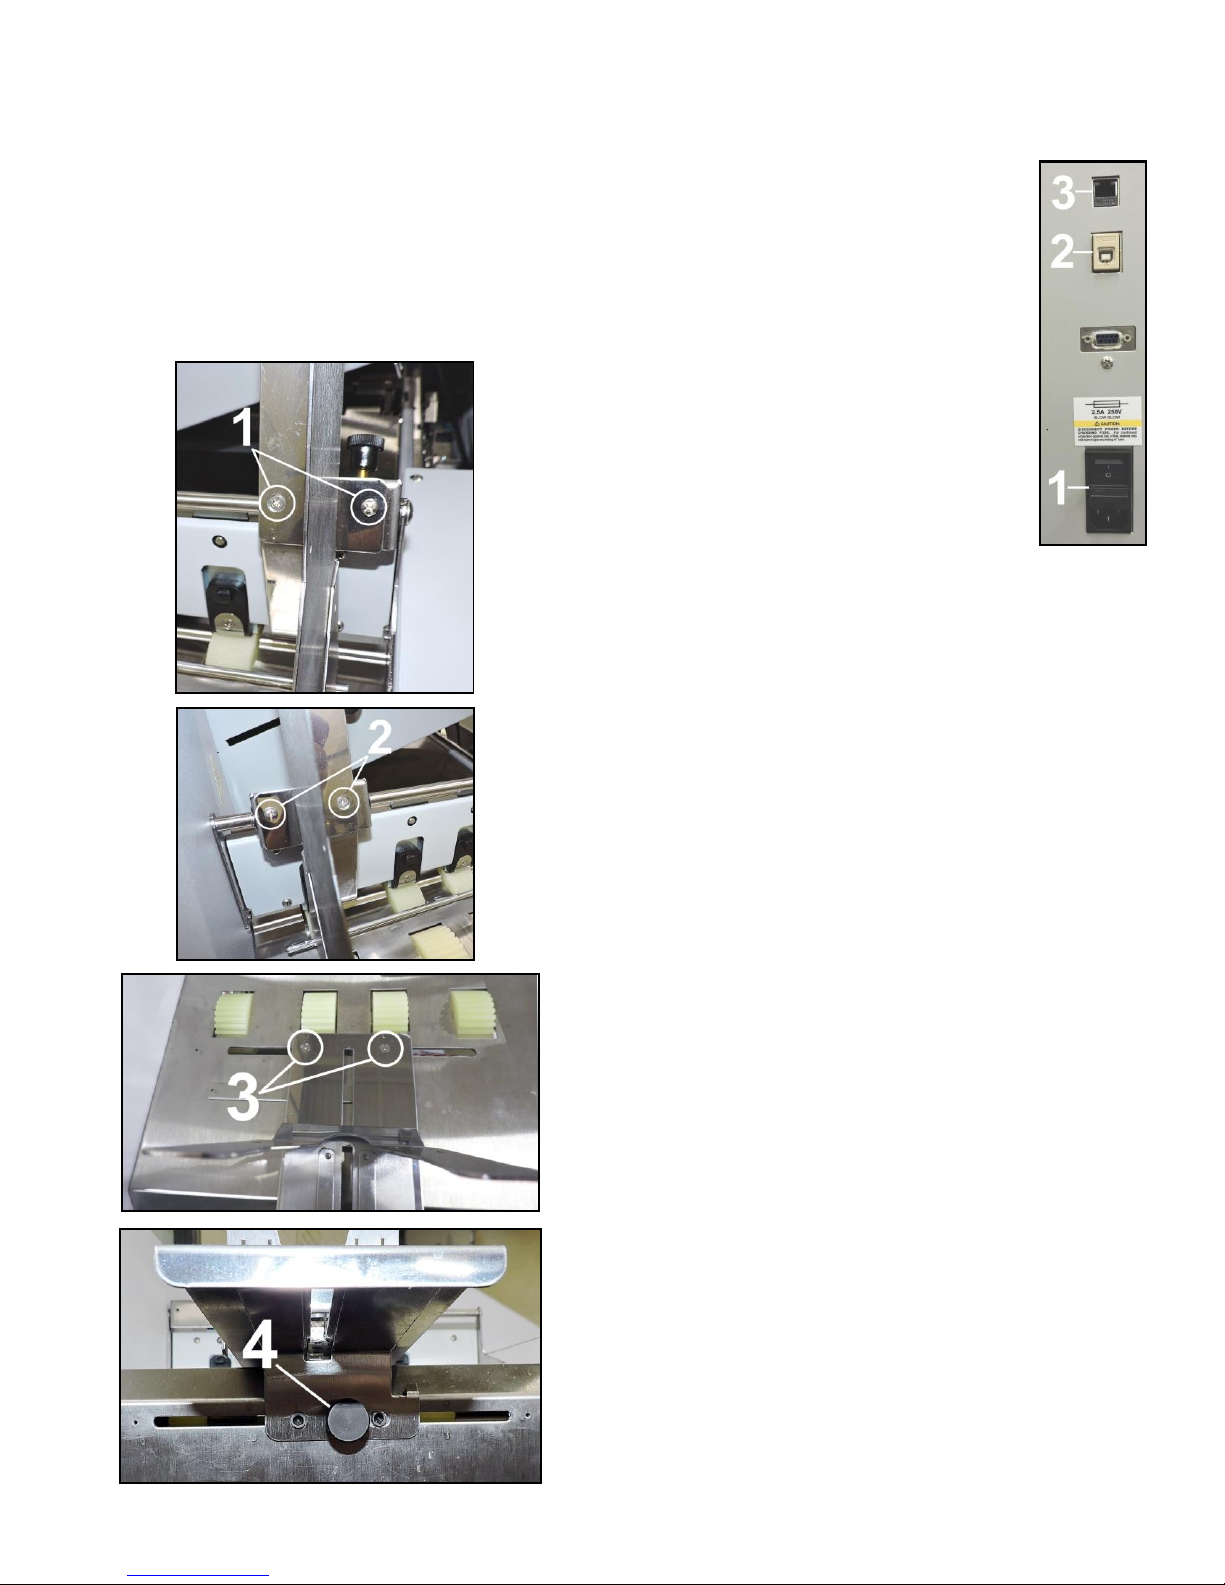
Assemble Adjustable Side Guide [1],
Envelope/Media Side Guide [2],
Rear Media Support and Guide [3 & 4],
Save packing material.
Connect Power to Printer
1. Main Power Switch [1] is OFF.
2. Plug power cord into receptacle
[1] located below the Main Power
Switch. Internal power supply in
Printer is rated 100 to 240VAC,
50/60 Hz.
IMPORTANT!
CLOSE ALL COVERS AND DOORS
BEFORE POWERING THE PRINTER
UP OR DOWN.
NOTE: START ONE PRINTER AT A
TIME WHEN SIMILAR PRINTERS ARE
ON THE SAME NETWORK.
Connect Printer to Computer
[2] USB port for computer connection.
[3] Network Port for connection to a network.
DO NOT CONNECT USB OR NETWORK CABLE OR
TURN PRINTER POWER SWITCH [1] ON YET.
Step 5
Print Driver Installation
Minimum System Requirements:
Operating System: Windows 8/8.1, Windows 10
(Desktop Mode only). Windows XP, Windows Vista,
Windows 7. Supports 32 and 64 bit systems.
(Must have administrative privileges on system.)
NOTE: Windows 8, 8.1 and 10 will only work in
desktop mode. No Windows 8 or 10 metro apps will
be supported (applications that work in a Windows 8
or 10 only environment).
Microprocessor: Pentium II, 2 GHz minimum
(Pentium Dual Core, 2.5 GHz or better, is optimal).
System memory: 2 GB minimum; or as
recommended for your operating system.
Free hard disk space: At least 10 GB.
Browsers: Firefox recommended; Chrome, Safari,
and Opera also supported.
CD/DVD drive.
USB port (2.0/3.0): (Ports are identified as “USB” or
“Enhanced” in Device Manager).
Microsoft .Net Framework version 3.5 (for 32 bit
systems) or Microsoft .Net Framework version 4 (for
64 bit systems) must be installed.
NOTE: Even if a higher .NET Framework version is
installed; version 3.5 or 4 must also be installed, or
Toolbox will not open.
IMPORTANT: Before installing Printer software,
temporarily disable all antivirus programs and
firewalls. In addition, you must be logged onto system
with full administrative privileges (admin rights).
Page 2
Page 3
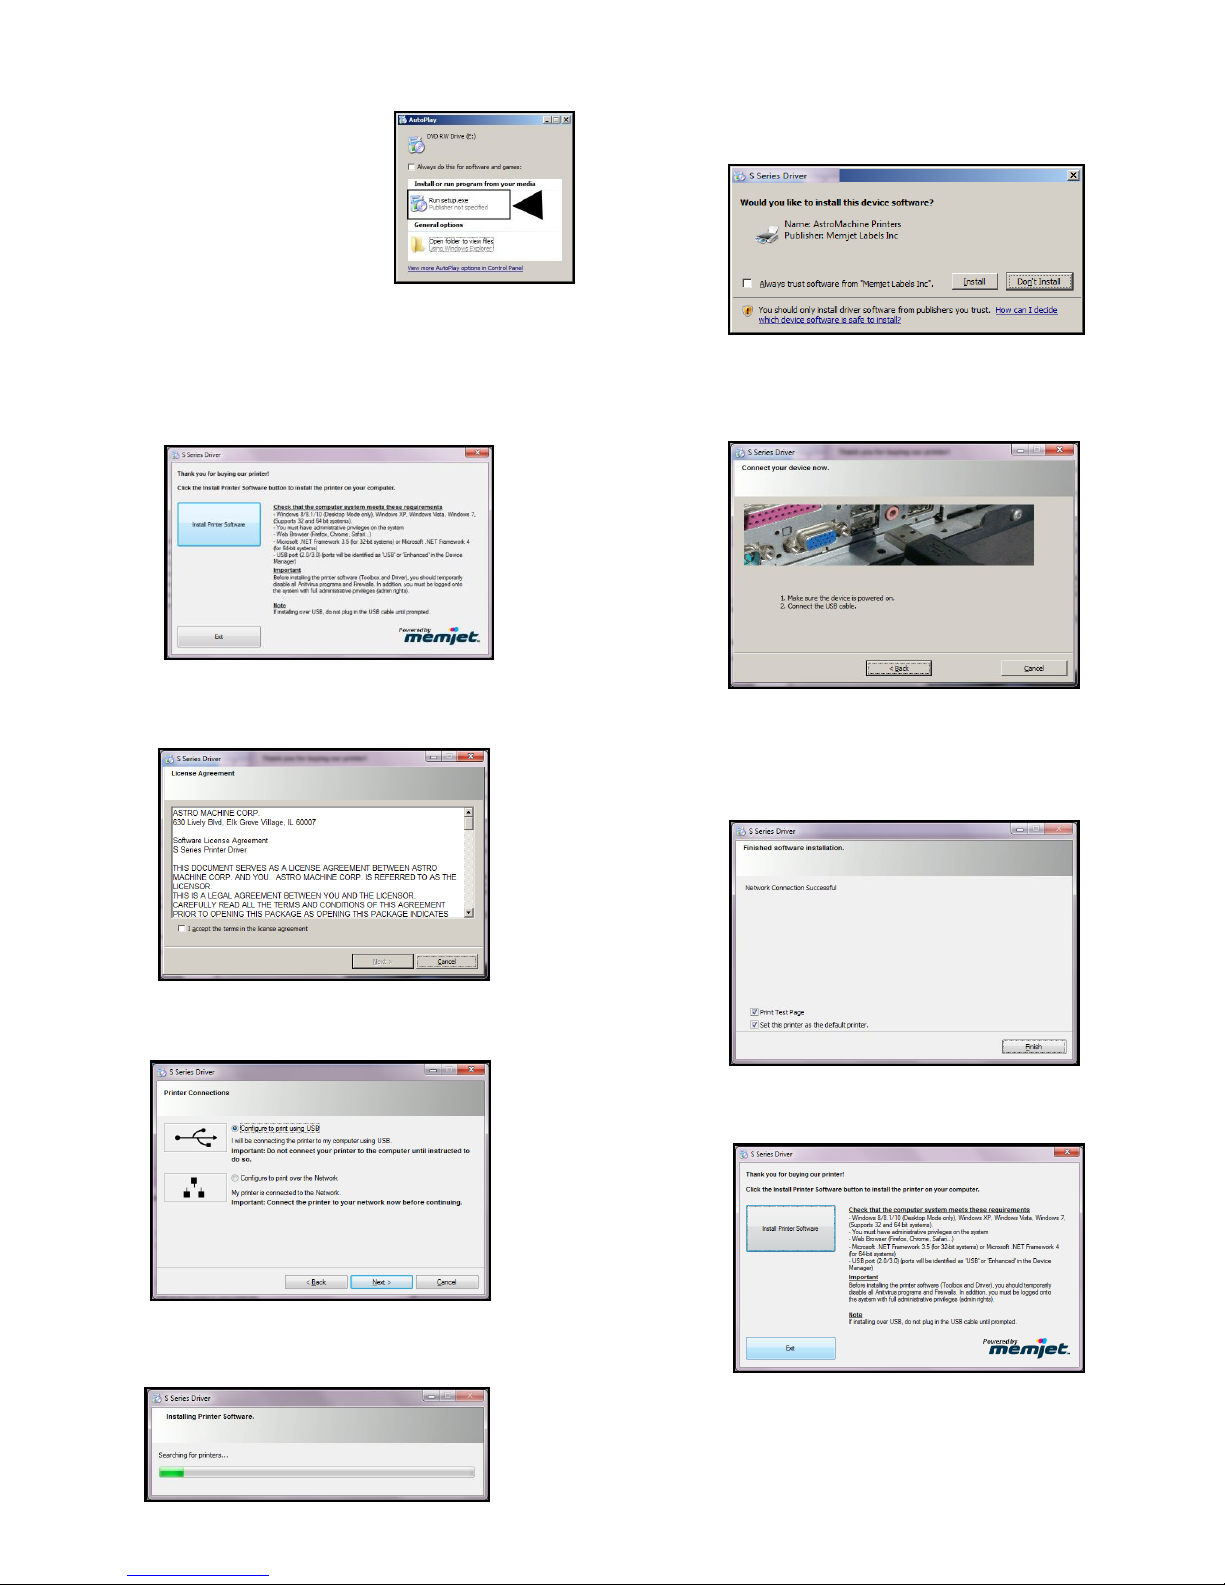
1. Check that Printer is
plugged in and turned
OFF. Disconnect USB
connection if already
plugged in. Install disk
supplied with Printer in
your CD drive. When
AutoPlay Window opens,
click “Run Setup.exe” to start.
2. Install Printer Software. Make sure computer
system meets minimum requirements and you
followed other instructions listed on screen.
Click “Install Printer Software”.
3. License Agreement.
Check “I accept…” then click “Next>”.
6. Would You Like to Install This Device
Software? Click “Install”.
5. Connect Device Now. Turn Printer ON and
connect USB cable. Don’t click on either
button. Software will finish installing.
6. Finished software installation. Do not check
the Print Test Page as Printer is not set up yet.
You can check “Set this printer as the default
printer” at this time. Click “Finish”.
4. Printer Connections. Click “Configure to print
using USB”. Then click “Next>”.
5. Installing Printer Software.
Software download begins.
7. Install Printer Software.
Click “Exit” to close CD.
8. Restart computer to complete installation.
Page 3
Page 4
CAUTION
Use electrostatic discharge (ESD) protection
when handling Printhead.
Hold Printhead Cartridge by handles ONLY.
DO NOT touch ink couplings, nozzle surface
or electrical contacts.
DO NOT unpack Printhead Cartridge until
Printer is ready for installation. Once
unwrapped, delay in installing Printhead can
compromise print quality.
DO NOT place an unwrapped Printhead on any
surface before installing. Protect Printhead
from scratches, dust, fibers, dirt and other
contaminants at all times.
CAUTION
DO NOT PRY OR MANUALLY LIFT PRINTHEAD
LATCH OR LATCH MAY BREAK. ONLY OPEN
LATCH USING THE RELEASE PRINTHEAD
BUTTON ON THE TOUCHSCREEN OR IN THE
PRINTER TOOLBOX.
WARNING!
INK IN INK TANKS MAY BE HARMFUL IF
SWALLOWED. KEEP NEW AND USED INK
TANKS OUT OF REACH OF CHILDREN.
DISCARD EMPTY INK TANKS IMMEDIATELY.
Step 6
Install Ink Tanks
Printer uses (1) Printhead Cartridge and (5) Ink Tanks
(two Black, one Cyan, one Magenta, and one Yellow).
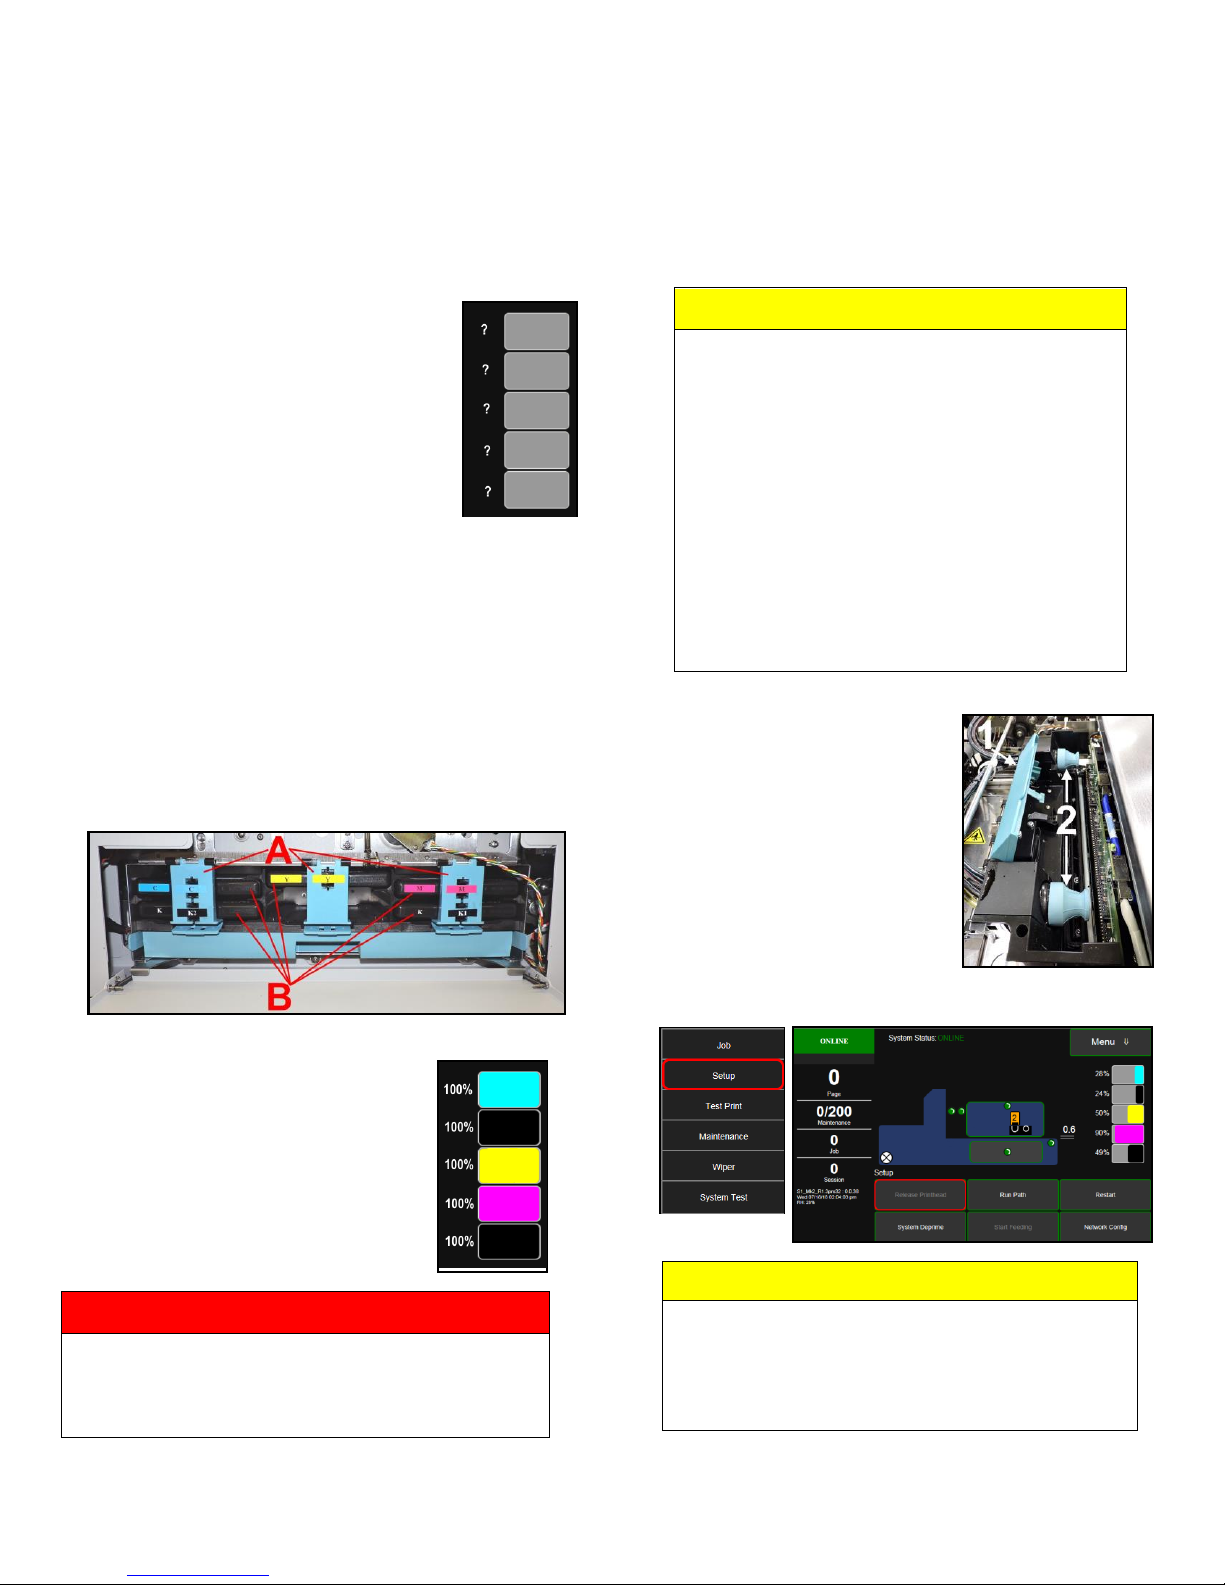
1. Look at the Control Panel
Touchscreen. Ink Tank status
information appears in right side
of the Touchscreen. Note that the
Ink Tank indicator boxes are
empty. NOTE: The question
marks indicate that no Ink Tanks
are detected by the Printer.
2. Open the Ink Tank Door (hinged
at bottom). (Disconnects Printer
communication with Ink Tanks and allows safe
installation and replacement.) Open Ink Tank
Latches [A].
3. Remove new Ink Tank(s) from packaging.
4. Insert Ink Tanks (labels up) into appropriate
color slots [B]. Close Ink Tank Latches.
INSTALLATION TIP: Make sure Ink Tanks
seat properly. Insert Ink Tank into
appropriate Ink Station, then pull Ink Tank
back about an inch and push forward firmly
to insure that Ink Nozzles penetrate seals on
Ink Tanks.
Step 7
Install Printhead Cartridge
Handle Printhead Cartridge with extreme care to
avoid damage.
1. Open the Top Cover.
The Printhead Latch [1]
is shipped in the open
position, if it is not:
Use the Touchscreen to
tap Menu, then Setup.
Tap Release Printhead.
Printer runs, then Latch
[1] pops open.
NOTE: Remove Cap
Protectors [2] on Ink
Nozzles. Be sure to
open Latch fully to retract Ink Nozzles.
5. Close Ink Tank Door. Ink
colors fill in as Ink Tanks are
installed. If ink colors do not fill
in after a few seconds, open
Ink Tank Door again and
reinstall Ink Tank(s).
Page 4
Page 5
WARNING!
TO AVOID ELECTRICAL SHOCK AND SHORTING:
Before installing Printhead, make sure
nozzles are hydrated and contacts are DRY!
Copyright © 2019 Astro Machine Corp.
02/06/2019
630 Lively Blvd.
Elk Grove Village, IL 60007
Phone: (847) 364-6363
Fax: (847) 364 9898
www.astromachine.com
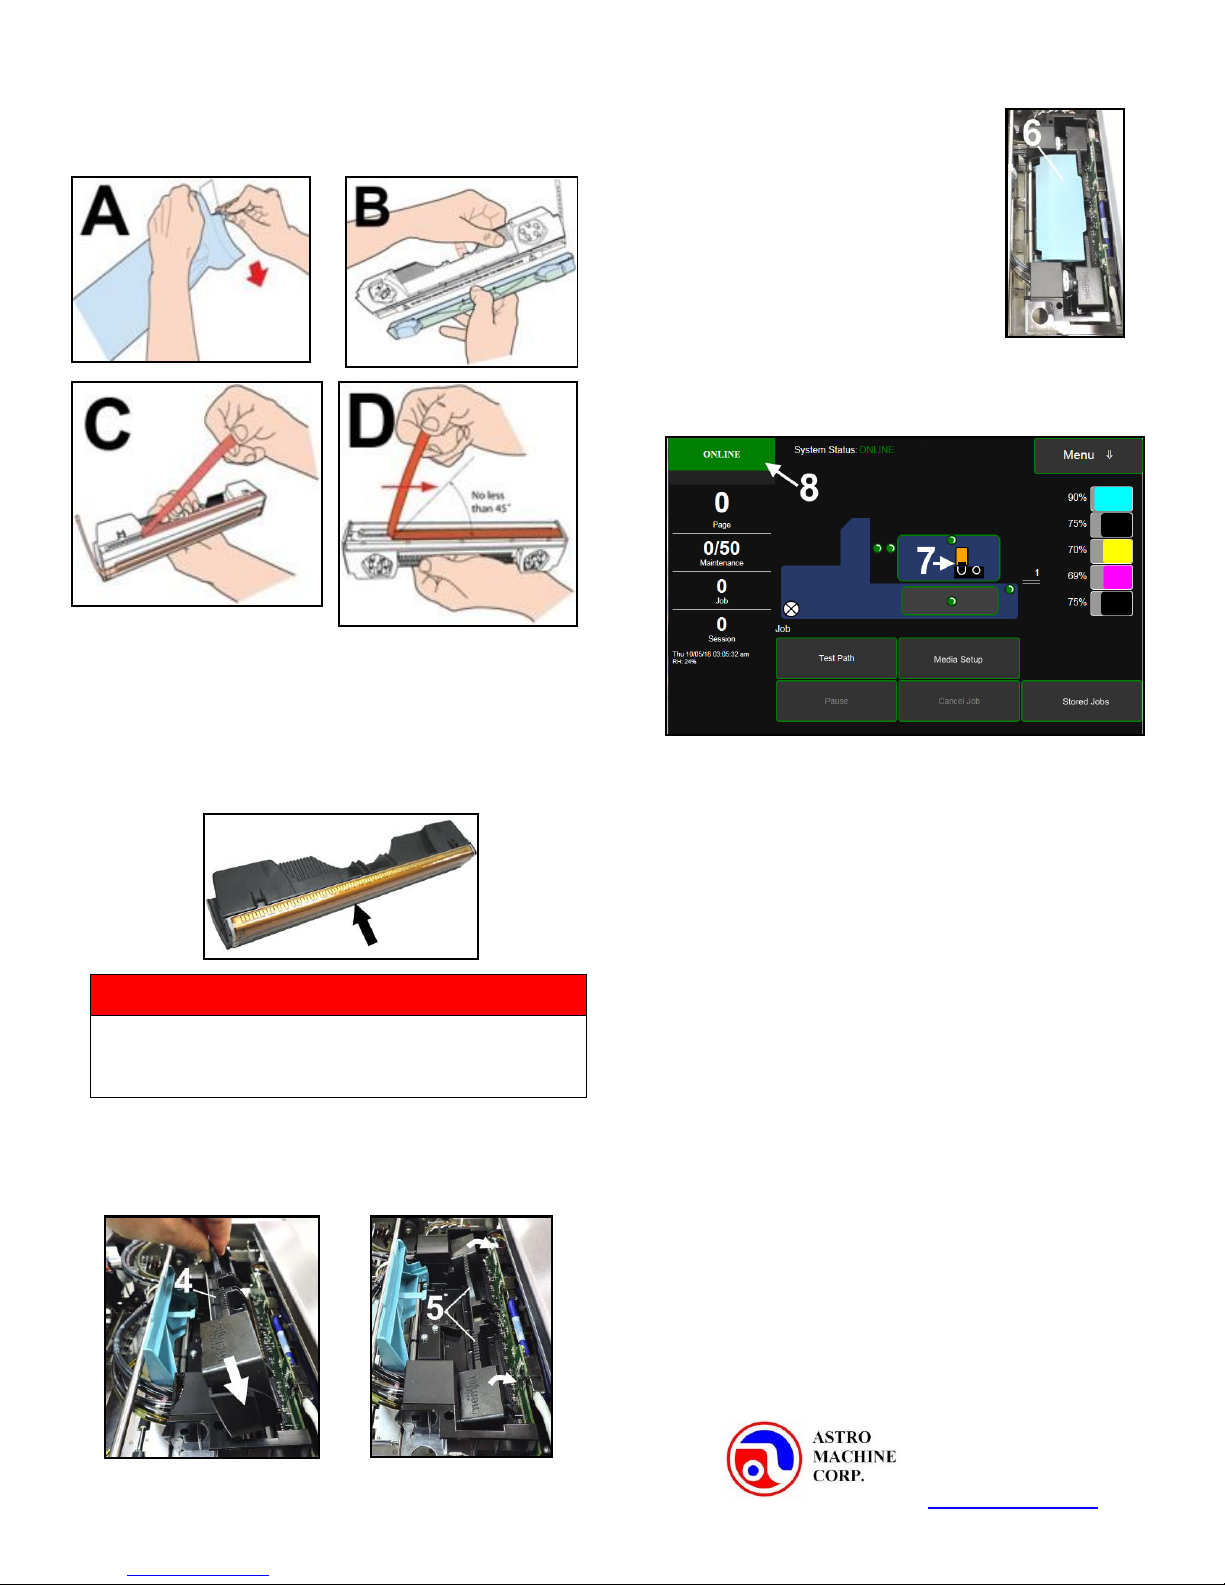
2. Carefully remove Printhead Cartridge from
foil packaging.
3. Wet Printhead Surface. (Ensures that
Printhead will prime correctly.). Moisten
Printhead nozzles using distilled water and a
damp, lint-free cloth, wiping end to end.
(Gray strip located below orange strip.) Take
care not to damage copper contacts, metal
plate, or gold Printhead surface.
4. Carefully insert Cartridge into compartment at an
angle (as shown) [4]. Once seated, gently tilt
Cartridge back until it snaps into position [5].
DO NOT FORCE Cartridge into position.
5. Close Printhead Latch [6].
Printer starts up
and primes ink into Printhead
(this may take a few minutes.)
Make sure ink is flowing
through hoses.
6. Watch the Control Panel Touchscreen. Check
that the Printhead icon [7] in Printer image is
primed (solid color).
7. When ONLINE [8] appears, the Printer is ready
for use. Close the Top Cover.
NOTE: If the Printhead icon continues to display
an outline or a question mark (?) try the
following procedures:
[1] Printhead icon shows an outline
(Printhead unprimed): Click “Circulate
Ink” under “Maintenance” drop-down in
Printer Toolbox. If issue persists, try the
“Install Printhead” procedure again. If this
does not clear up the issue, contact
technical support.
[2] Printhead icon displays a question
mark (Printhead not recognized): Try the
“Install Printhead” procedure again. If the
issue continues, contact technical support.
NOTE: The Printer may take up to 12 minutes
to set itself up during initial startup. This is
normal.
Step 8
For instructions on installing Accessories and Printer setup or operation, please refer to “AstroJet S1 Color
Printer Operator Manual” in Print Driver CD supplied
with Printer.
Page 5
 Loading...