

Page 1

Astrel Instruments AST-8300-B
Astrel Instruments
AST-8300-B
GETTING STARTED
rev A
Getting Started 1/21 rev A
Page 2

Astrel Instruments AST-8300-B
Getting started with the Astrel Instruments AST8300 camera
Thank you for purchasing an Astrel Instruments AST8300 CCD camera. Your new camera is a
leading edge scientific instruments: please take your time to read carefully the following User's
Manual to learn how to get the best out of your equipment.
The philosophy behind the AST8300 is the concept that the CCD camera could be the real brain
of your astronomical equipment. This is possible thanks to the powerful microprocessor that is
in charge of managing not only the camera itself but also, through the extended set of I/O
available on-board, the other components of your system.
Getting Started 2/21 rev A
Page 3
Astrel Instruments AST-8300-B
Camera connections
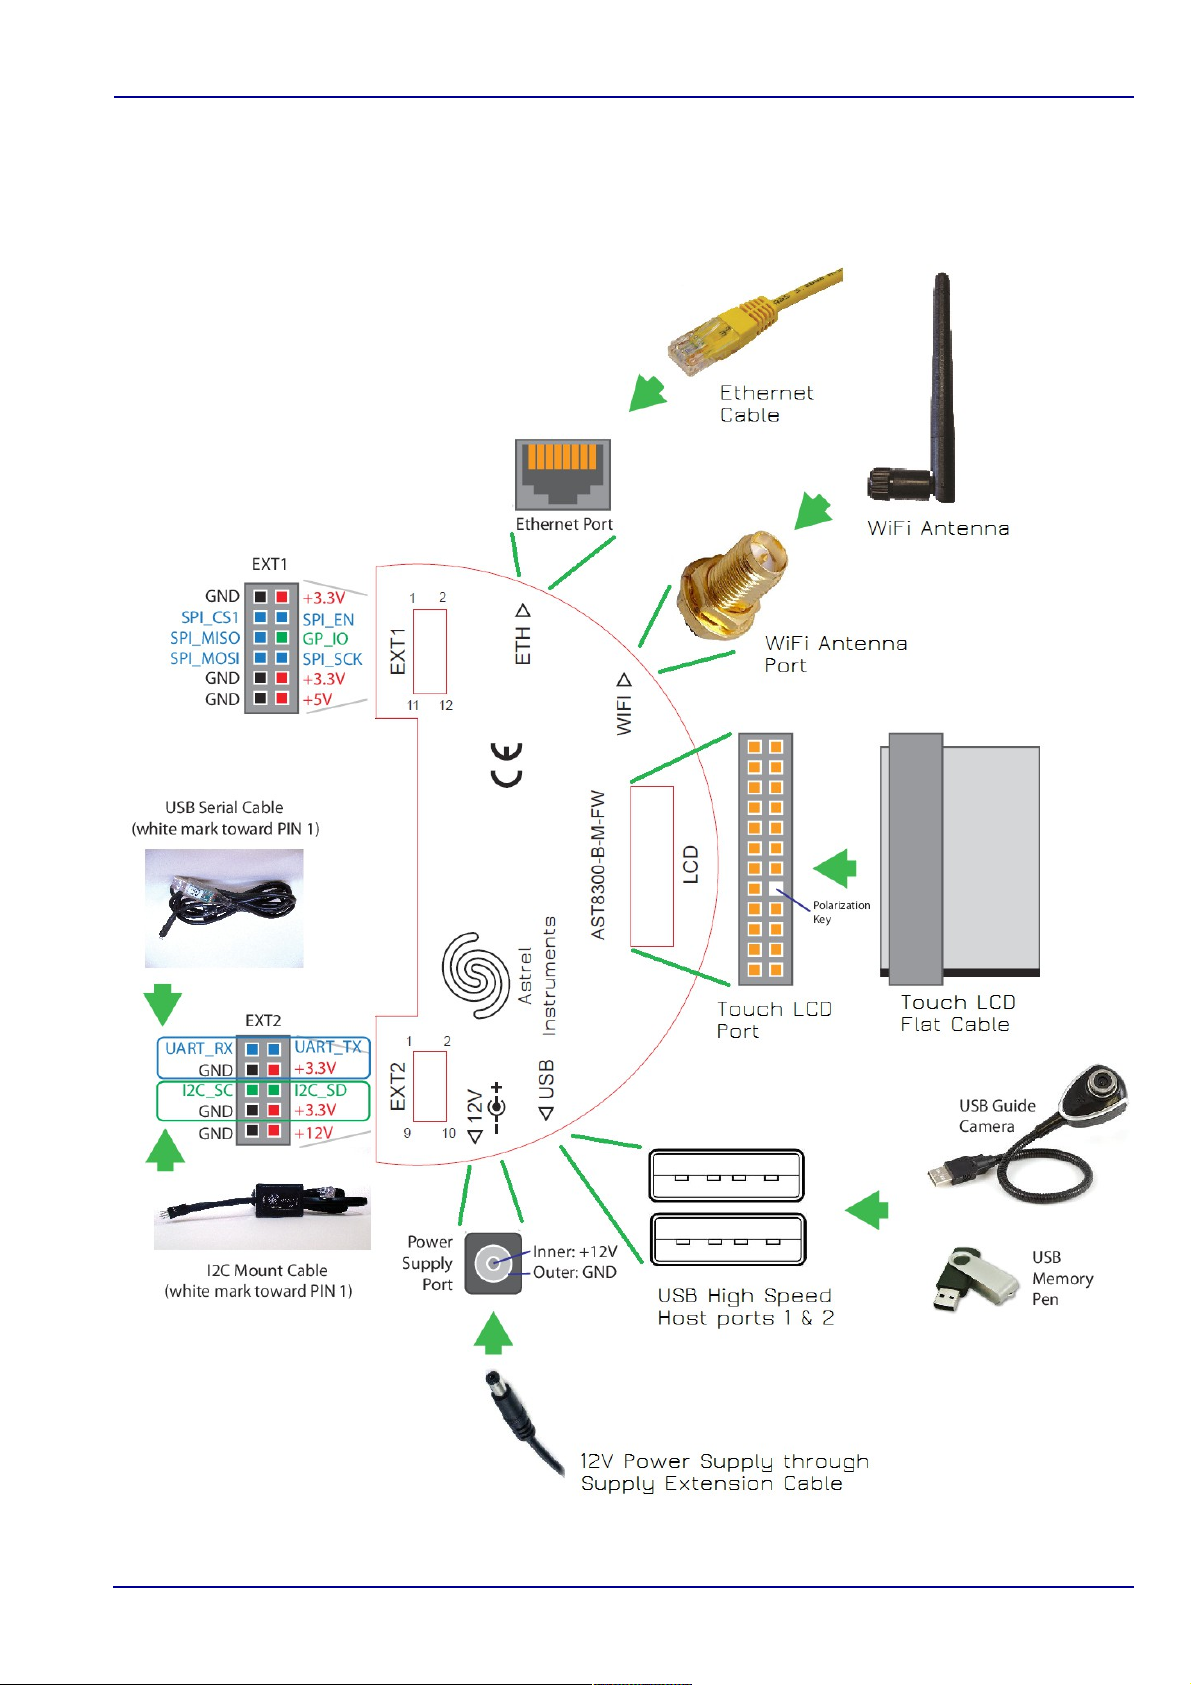
The following picture shows the I/O interfaces available on the AST8300-B:
Getting Started 3/21 rev A
Page 4

Astrel Instruments AST-8300-B
The following connectors are available on the camera:
• 12V: the camera needs a 12V 3A power supply. The use of the included 3 meters cable
with its filter box is strongly suggested to connect the camera to a car lighter receptacle
using the included adapter, or to the optional 12V 3A power supply.
• ETH: the camera can be connected to a PC using a normal cat.5 Ethernet cable.
• LCD: this connector is used to attach the touch LCD monitor to the camera. Please pay
attention to the polarization key inserted inside one of the connector's pins: this is used to
avoid reversed connection that could damage the camera.
WARNING: connect the LCD monitor only while the camera is powered down: connecting the
LCD when the camera is powered could damage the monitor and the camera.
• USB 1&2: these two 480Mbit/sec hi speed USB connectors can be used to connect
devices like USB dongles, guide cameras, keyboards and mice. USB hub can be used
when multiple connections are needed. Each USB port can drive max 500 mA.
• EXT1: this is a 12 pin general purpose connector giving access to 3.3V and 5V power, an
SPI interface and one general purpose I/O pin that can be used to trigger external
devices.
• EXT2: this is a 10 pin general purpose connector giving access to 3.3V and 12V power, a
UART (serial port) connection which can be used for bringing the Linux serial console to
a PC, and an I2C port that can be used to connect the (not included) opto-coupled mount
motors cable used for auto-guiding or any other I2C device.
• WiFi: this SMA connector is used for the included WiFi Antenna.
Getting Started 4/21 rev A
Page 5

Astrel Instruments AST-8300-B
Powering up the camera
To correctly power up the camera, please follow this sequence:
• When needed, connect the touch LCD monitor paying attention to the polarization key.
• When needed, connect the Ethernet cable to the camera and to the PC.
• When needed, connect the wifi Antenna.
• Cables other than USB, for example the mount motors cable or the serial cable, can be
connected and disconnected at any time, but it's always a good rule to connect any
needed device before power up.
• Connect the power supply cable.
After the power supply is connected, the camera boots the Linux operating system and then
starts the Desktop application, from where all the camera's applications can be accessed.
Getting Started 5/21 rev A
Page 6
Astrel Instruments AST-8300-B
Powering down the camera
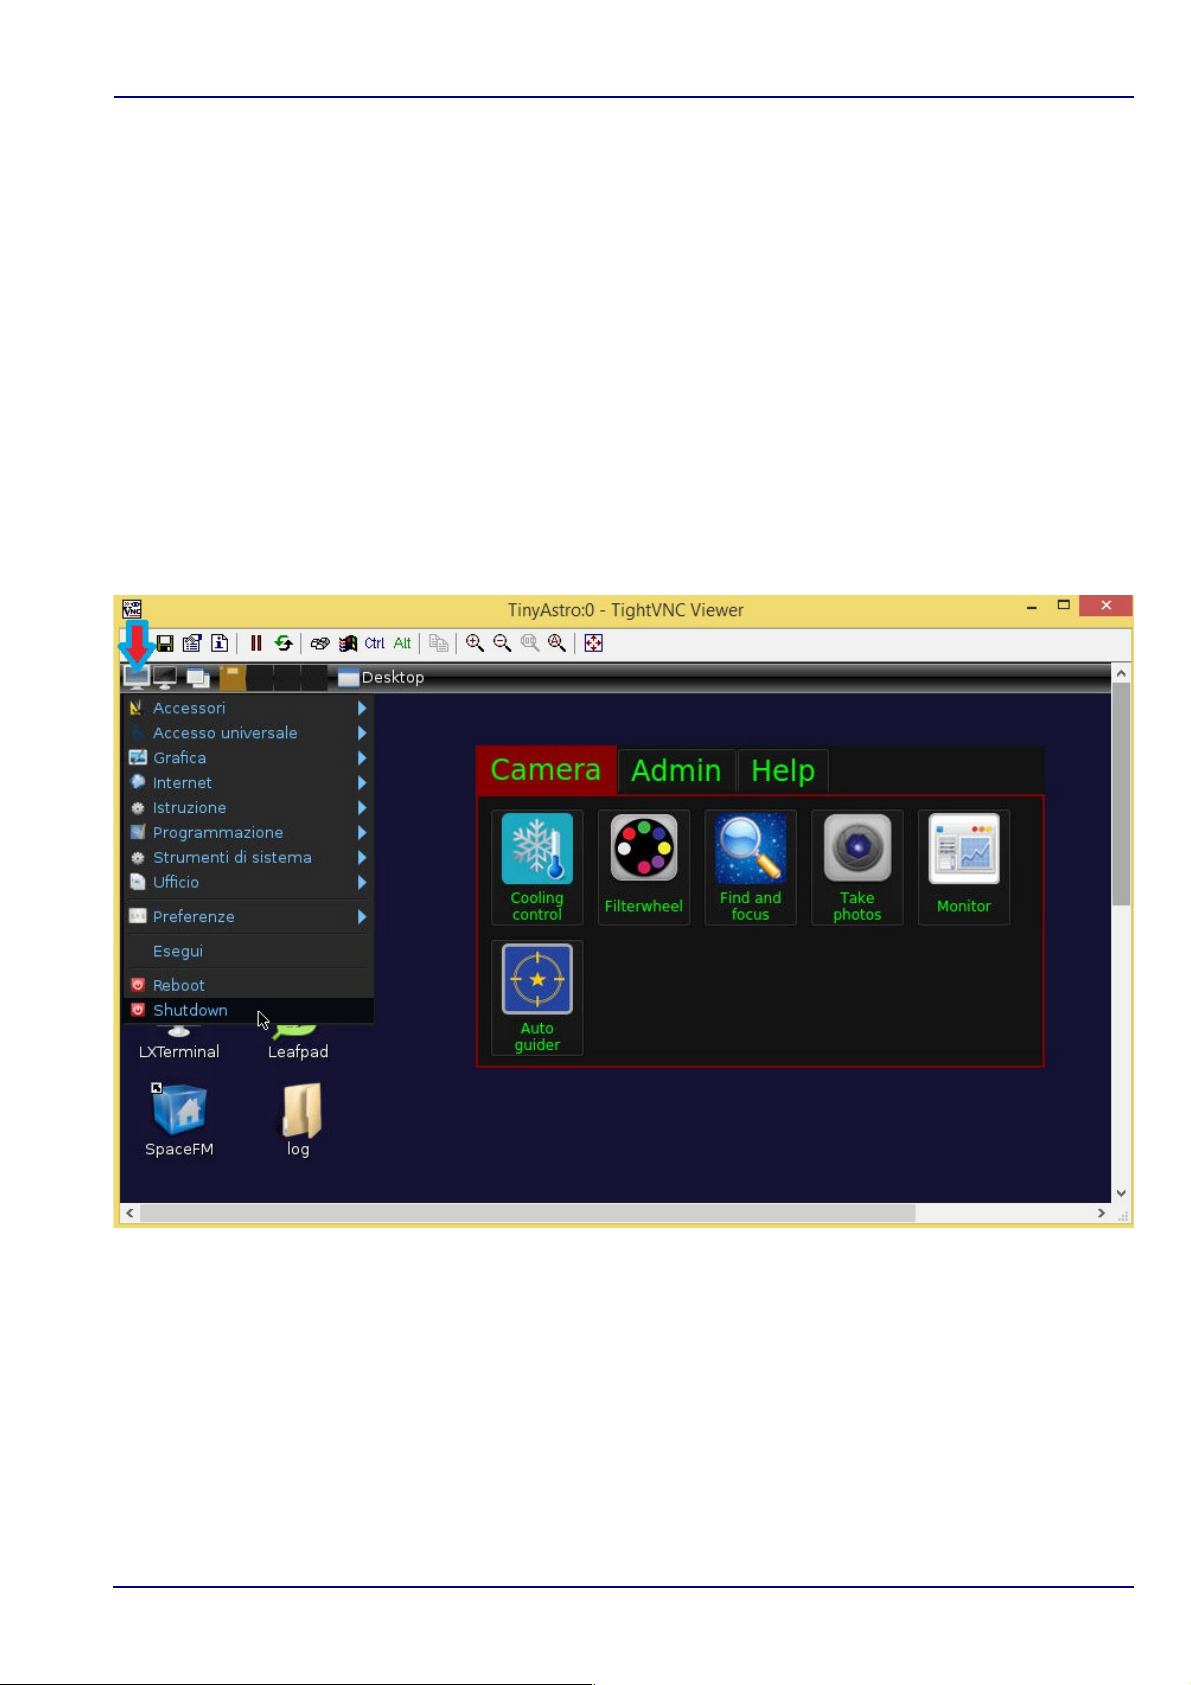
WARNING: never power down the camera by simply disconnecting power supply: your camera
has a true PC inside running Linux and, as any other PC, you should shut it down in the correct
way. The Shutdown application in the main page of the Desktop will take care of all this
sequence, so, before powering down the camera you must run the Shutdown application. At the
end of this application the system can be safely powered down.
The Linux distribution inside the camera is stored into the internal 8Gb SD card, which is the
main storage of the camera. In unlikely situations, removing the power supply while the
operating system or any application is writing on the SD card could damage the files stored on
it.
Getting Started 6/21 rev A
Page 7

Astrel Instruments AST-8300-B
Wifi and Ethernet operations
When the Wifi antenna is mounted the camera acts as a WiFi access point, like a normal wifi
router, that you can connect to using a PC/tablet/smartphone. The wifi connection is open, no
password required, and by default the network name is AST8300_ followed by the camera s/n
while the ip address is 10.0.0.1.
When the camera is connected using an Ethernet cable, the default ip address is 10.42.0.10.
In order to connect to the Camera you also need to configure the PC LAN network accordingly,
assigning for example the 10.42.0.1 IP address.
Your PC/smartphone/tablet should connect automatically when the camera powers up.
The network configuration can be modified using the corresponding application.
WARNING: remember to connect the WiFi antenna.
Once connected, you can operate the camera in Connected mode like described in the
following paragraph.
Getting Started 7/21 rev A
Page 8
Astrel Instruments AST-8300-B
Stand Alone and PC/tablet/smartphone Connected modes
The AST8300 camera is operated using the collection of applications available on-board, which
can be accessed using the touch LCD monitor in the Stand Alone mode, or in the Connected
mode using any VNC compatible remote desktop application on a PC/tablet/smartphone with
Ethernet/wifi connection. There's only one set of applications for both the Stand Alone and
Connected modes, so the users don't need to learn different interfaces, the only difference is
the way to interact with them.
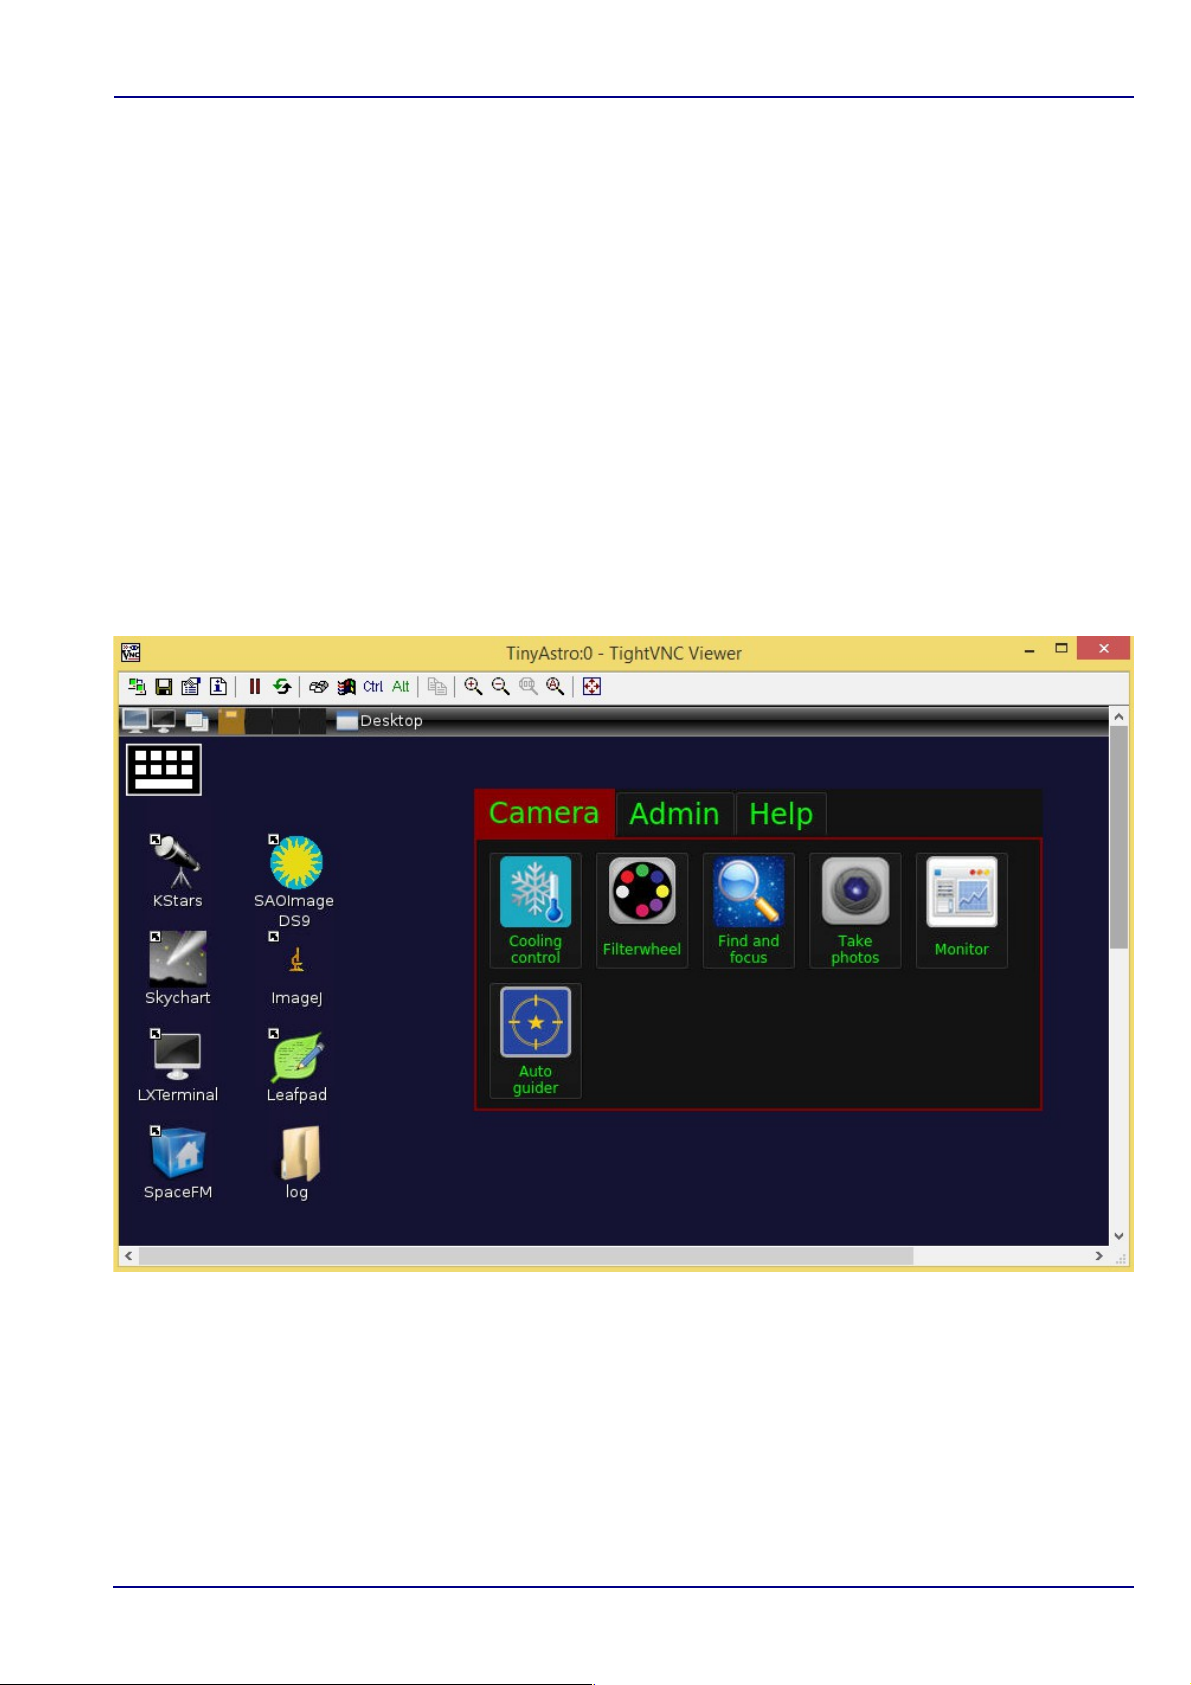
Astrel proprietary applications are collected on the Astrel Desktop, which is organized in pages
of icons corresponding to applications. When choosing one tab, a different page of icons is
displayed. The applications and tabs can be customized modifying the desktop.cfg file. Here
follows a screenshot of the main Desktop page:
Other third-party applications are available on the Linux Desktop.
The camera automatically senses the presence of the touch LCD monitor at boot. When the
monitor is not detected, the applications are started in VNC server mode and can be accessed
by a VNC client.
When operated in Stand Alone mode, the camera is very similar to any smartphone or tablet:
Getting Started 8/21 rev A
Page 9

Astrel Instruments AST-8300-B
just touch the icon of the selected application to start it or touch a tab to navigate to other
pages.
When operated in Connected mode, you only have to install a VNC client application on the
PC/tablet/smartphone, which is an application used to show the camera Desktop in a window in
the PC screen. There's no need to install any driver on the PC because the applications always
run on the camera, not on the PC, and all the communications use Ethernet. This is why you
can run the same applications even with a tablet/smartphone.
Many free VNC client are available for many architectures: here follows a brief list of the tested
ones:
• PC/Windows: TightVNC (http://www.tightvnc.com/)
• PC/Linux: TightVNC (http://www.tightvnc.com/)
• Android: akRDC Free (available on the store)
• Windows Phone: TinyVNC (available on the store)
To install them just follows the steps indicated on their websites.
WARNING: closing the VNC client application doesn't shut down the camera: the VNC client
only shows the camera applications on the PC screen. That means that you always have to run
the Shutdown application before powering down the camera.
Getting Started 9/21 rev A
Page 10

Astrel Instruments AST-8300-B
Accessing the camera storage
The camera main storage is the internal 8Gb SD card, where the operating system and the
photos are stored. You can add more storage by simply connecting a USB dongle or even a
USB hard disk to either USB connectors.
If you need to access other folders (for example a USB dongle or hard disk) or simply prefer to
use a file-manager like application, you can use any remote file-manager application using the
ssh protocol: here follows a brief list of the tested ones:
• PC/Windows: WinSCP (http://winscp.net)
• PC/Linux: any file manager opening the location ssh://<camera ip address>
The username is astro and the password is astronomy.
Getting Started 10/21 rev A
Page 11
Astrel Instruments AST-8300-B
Using the touch LCD monitor
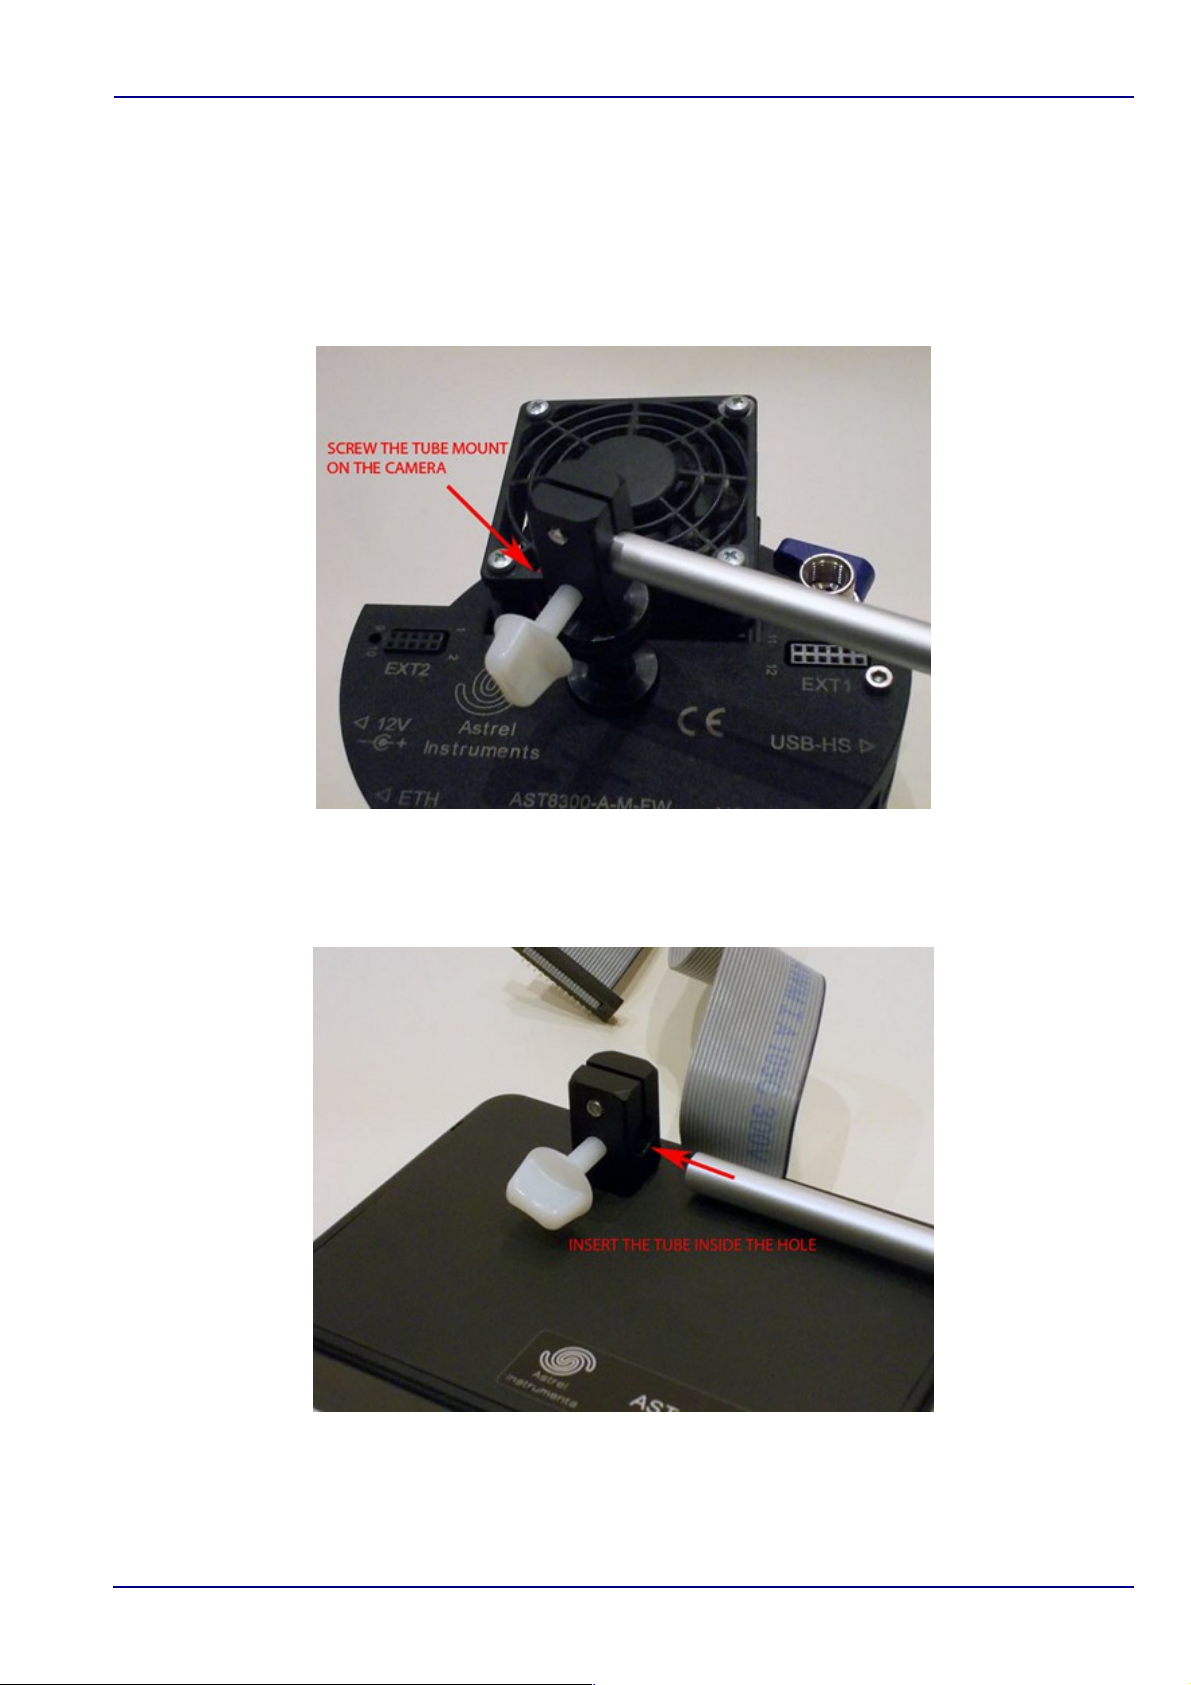
The touch LCD monitor is used in the Stand Alone mode to operate the camera. It is mounted
on the back cover by means of an articulated mount which allows a proper orientation in every
telescope position. The monitor can be rotated around the connecting screw and around the
connecting tube.
Mount the monitor as indicated in the pictures below: start by mounting the connecting tube to
the back of the camera.
Then insert the monitor mount in the other end of the tube:
You can lock the monitor in the right position using the 2 white plastic knobs. Always be sure to
lock the monitor properly to avoid movement during the exposures.
Getting Started 11/21 rev A
Page 12

Astrel Instruments AST-8300-B
Using the vacuum pump
The AST8300 camera adopts a low vacuum approach to avoid frosting on the CCD glass, filters
and optical window. Using the included vacuum pump, you can remove the air from inside the
camera, so that there's no more water vapor to freeze on the CCD glass and filters. Moreover,
reducing the air inside the camera minimizes the heat exchanges due to convection, so the
optical window never get too cold due to the low CCD and cold finger temperature. The included
pump is typically able to reach about 25-26 inHg vacuum in less than a minute of operation, but
anything above 24 inHg is enough. The vacuum pump gauges have a tolerance of about +/- 1
inHg, refer to the “Important Notice” sheet provided with the camera to get the proper vacuum
level to be set before cooling the camera. The camera is tested to maintain a vacuum better
than 24 inHg for at least two days and it's not unusual for cameras to last for weeks, so there's
no need to operate the pump during a photo session.
Always keep the vacuum valve closed even when the camera is not working. When the camera
is not used for long periods, it is advisable to put it into an air tight envelop.
WARNING: never get the camera below the freezing temperature without evacuating it to an
acceptable vacuum level: you will run the risk of frost creation on the CCD glass and even
produce a permanent damage to the camera.
Getting Started 12/21 rev A
Page 13

Astrel Instruments AST-8300-B
Tutorial: from power up to the first photo
This tutorial will guide you in the process of making your first photo with the AST8300 camera.
We will use Windows in Connected mode: most of the steps are the same also with Linux in
Connected mode, while many steps are not needed in Stand Alone mode.
STEP 1: evacuate the camera
• Screw the pump connection tube to the valve on the camera
• Insert the vacuum pump on the other side of the tube
• Start pumping the air: if the vacuum level keeps going back to 0, push the pump nose as
much as possible inside the tube and screw the tube as much as possible inside the
valve, until the vacuum is retained: this means that the pump is correctly connected to
the camera
• Open the vacuum valve (the handle should be perpendicular to the camera back)
• Pump the air until a level of 25-26 inHg vacuum is reached
• Close the valve
• Rotate the knob near the nose of the pump to release the vacuum remained inside the
connecting tube, disconnect the pump and remove the tube
• The camera is now ready for being cooled below freezing temperature and the vacuum
should be retained to an acceptable level for at least 2 days
• You can check the vacuum level connecting the pump to the camera, pumping the air
until a level of 26.5 inHg vacuum is reached with the vacuum valve closed to remove the
air inside the connecting tube, and then opening the vacuum valve and reading the
vacuum level. Remember to close the valve before disconnecting the pump
STEP 2: power up the camera
Stand Alone mode:
• Mount the touch LCD monitor and plug the flat cable to the LCD connector
• If needed plug any USB device and hub to the USB ports
• Plug the power supply
Connected mode:
• Plug the WiFi Antenna or connect the Ethernet cable to the camera and the PC
• If needed plug any USB device and hub to the USB ports
• Plug the power supply
Getting Started 13/21 rev A
Page 14
Astrel Instruments AST-8300-B
After booting (usually after few secons) the camera emits a sound and is ready for operation:
the LCD monitor will display the Desktop in Stand Alone mode, while in Connected mode the
camera is waiting for VNC connection.
STEP 3: connect to the camera
Only for Connected mode:
• When using wifi, look for the camera access point name (the default one is ast8300ap)
and connect to it.
• Windows will complain because the access is limited but this is normal because you don't
have an internet connection, only a local LAN connection.
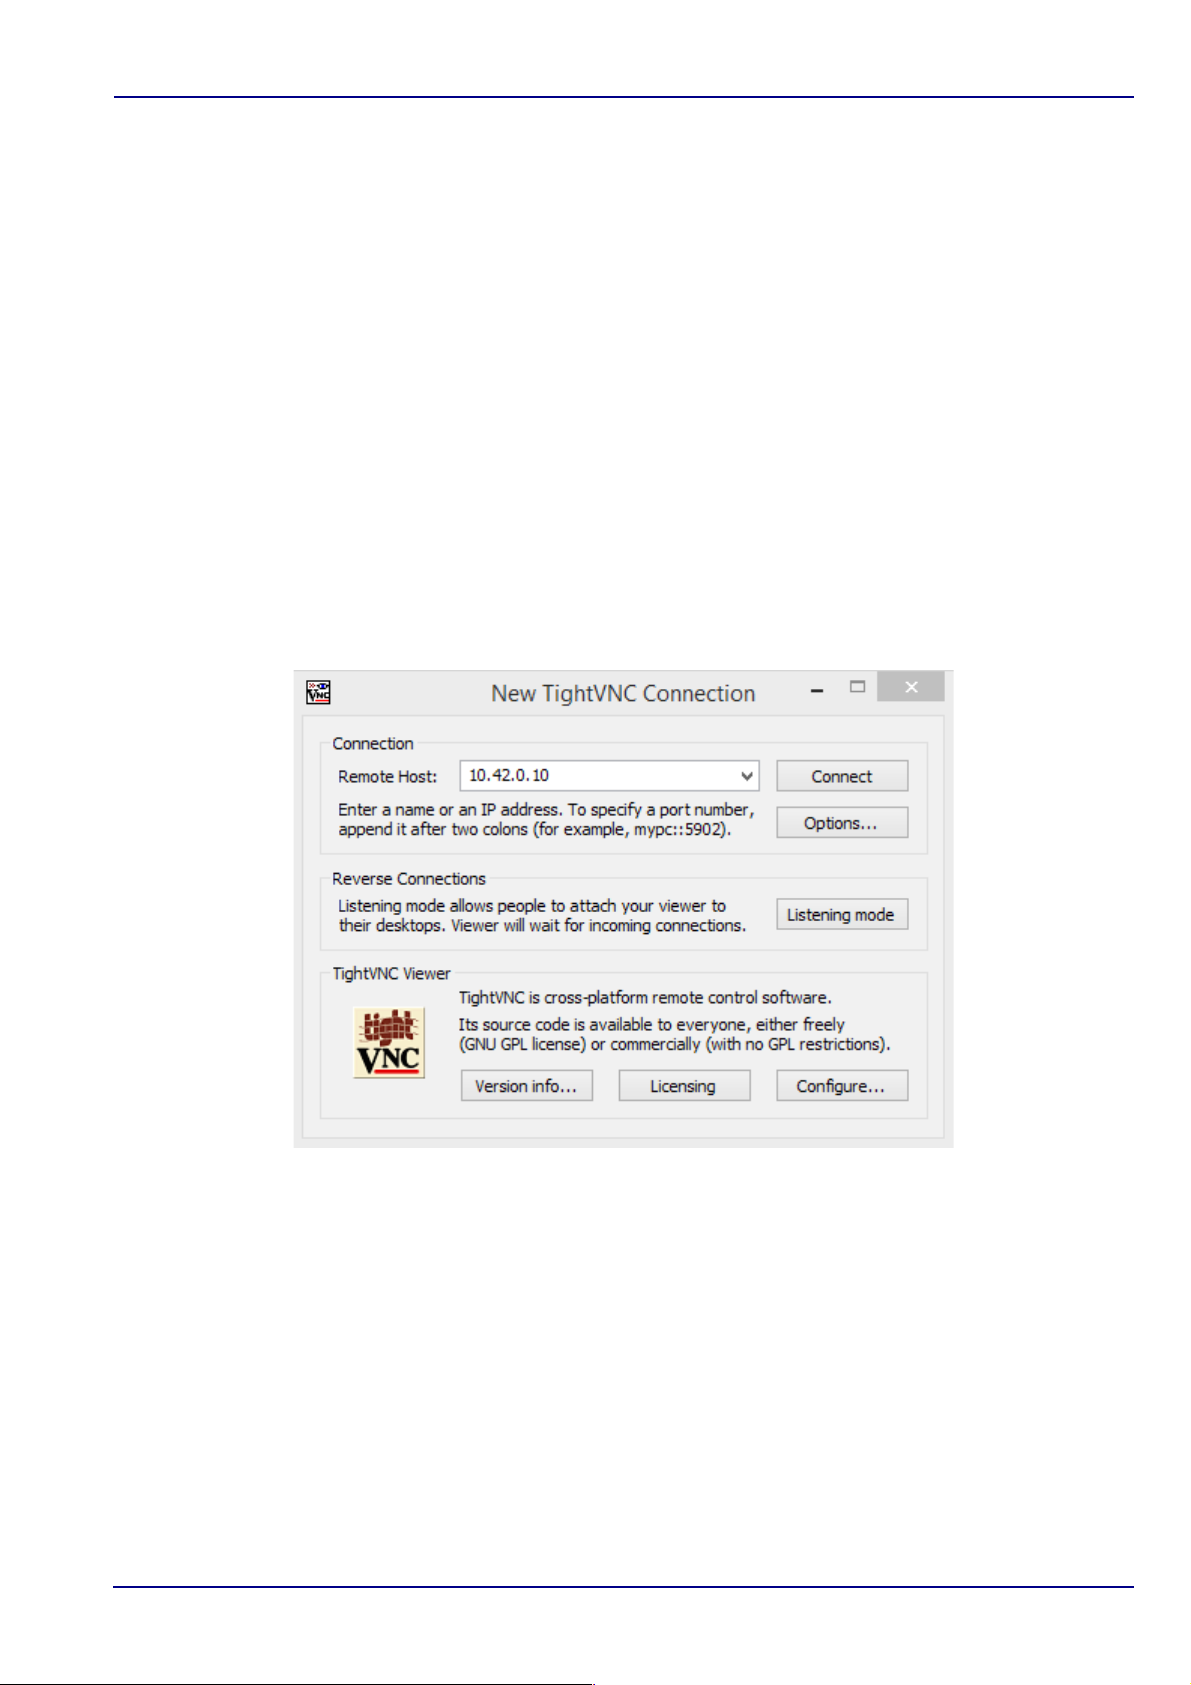
• Start the VNC viewer. When prompted, insert the camera IP address (10.0.0.1 for wifi or
10.42.0.10 for cable) in the Remote Host field, like in the following screenshot:
Getting Started 14/21 rev A
Page 15
Astrel Instruments AST-8300-B
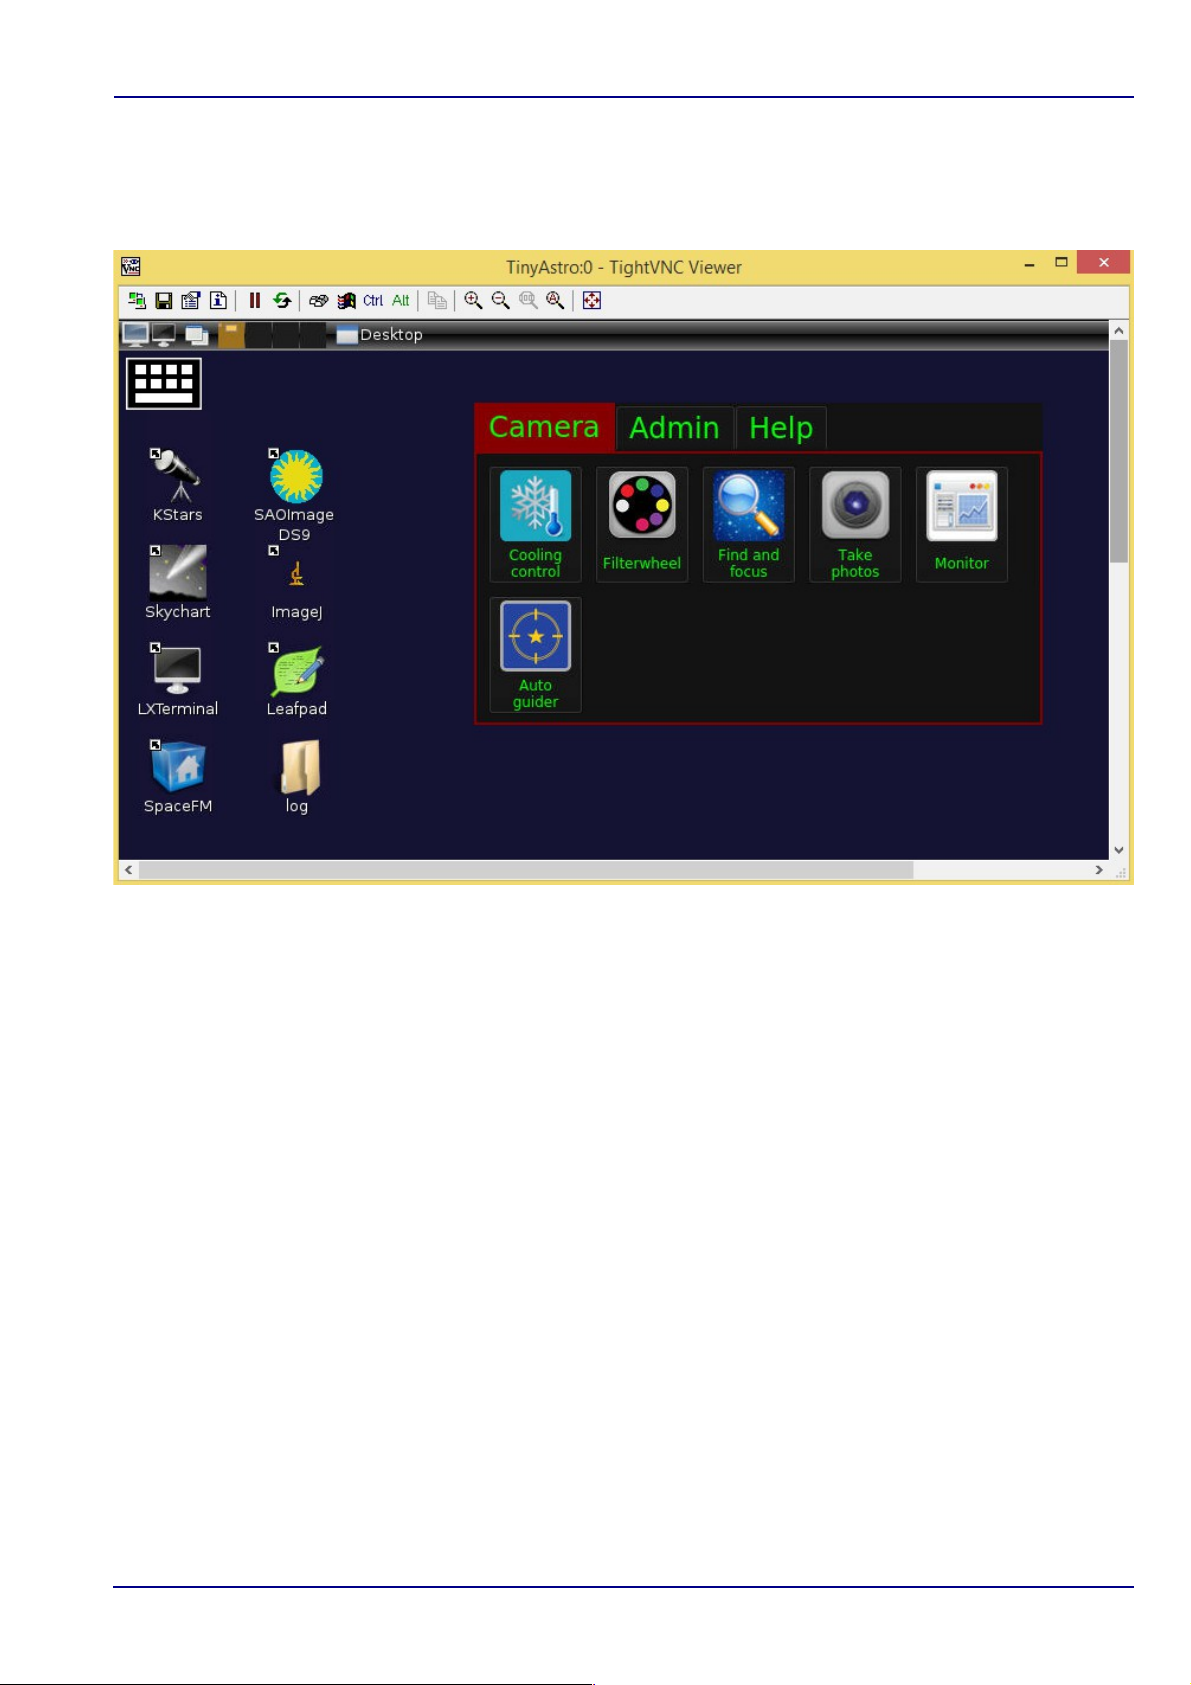
After connection, the TightVNC viewer window will display the Linux Desktop that includes the
Astrel Desktop and the icons of the thid-party applications:
STEP 4: start the cooling process
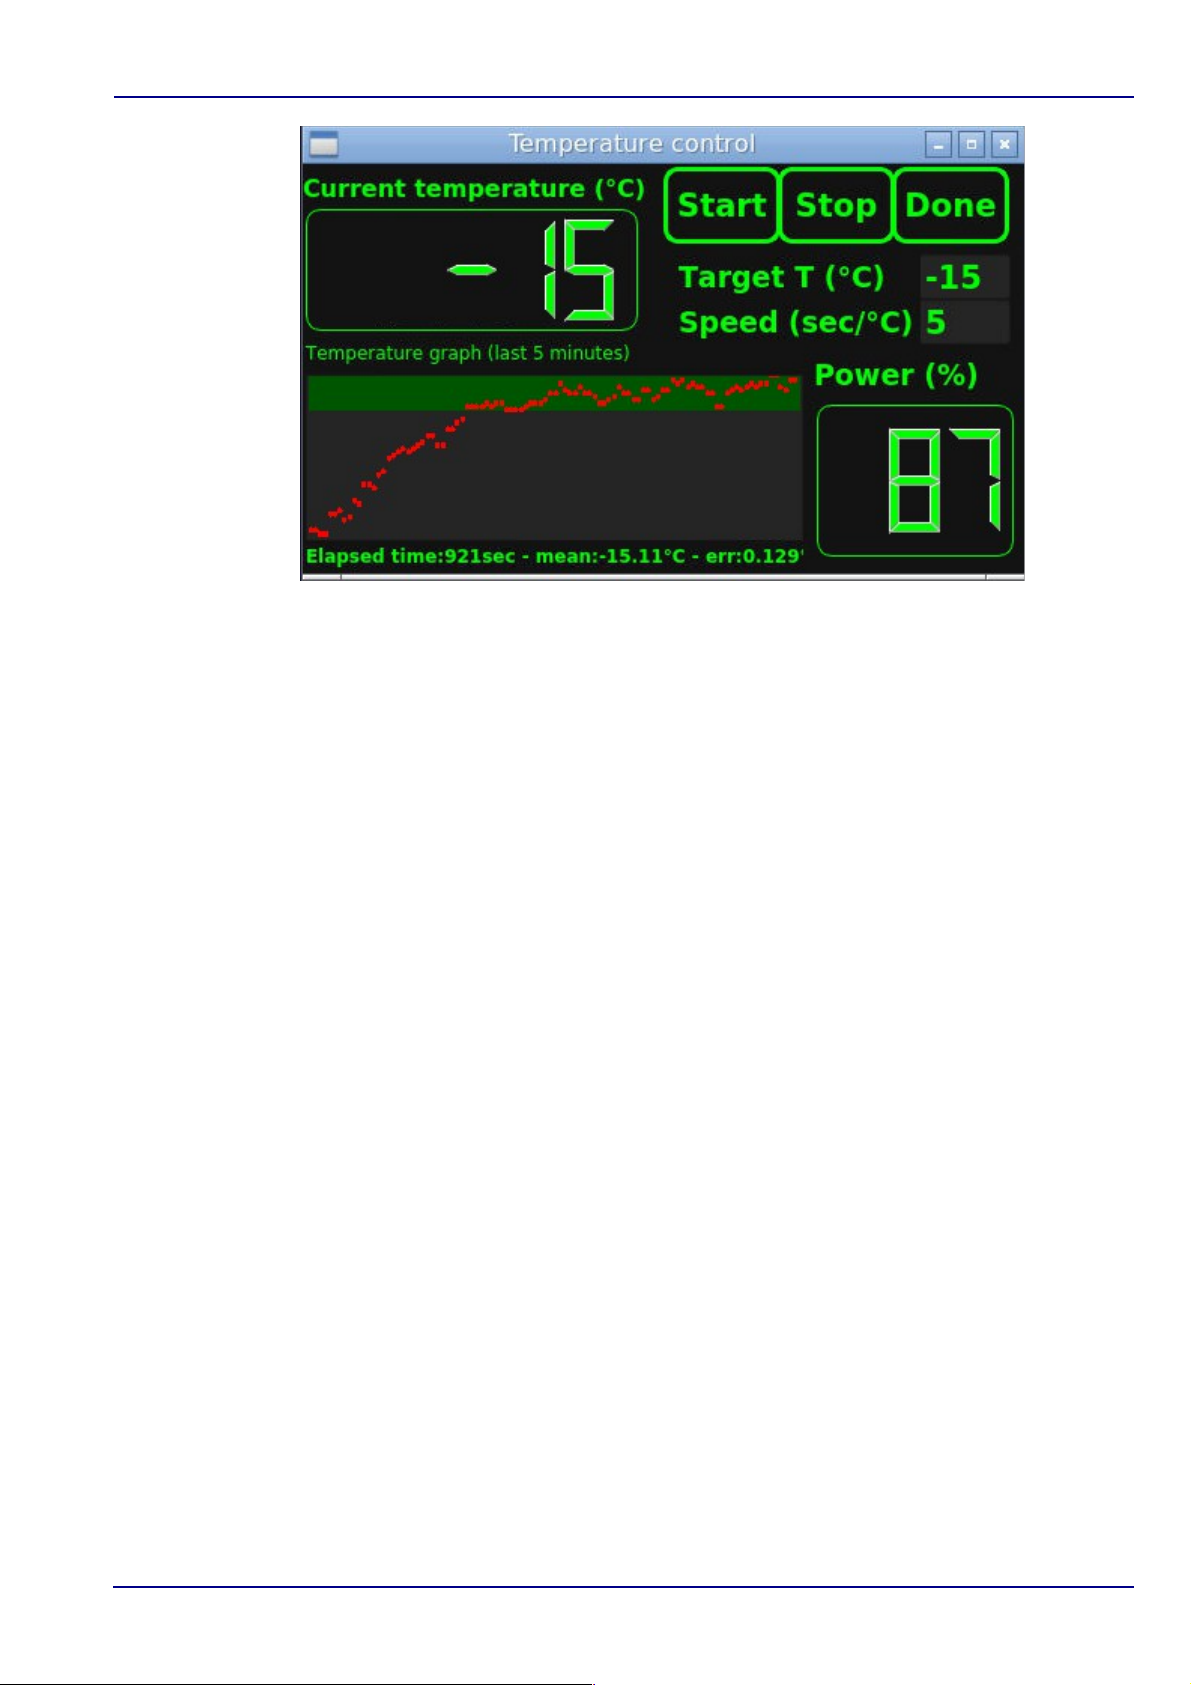
• Start the Temperature Monitor application and insert the desired temperature set point,
then push the Start button. The application will work in background maintaining the
temperature set point with a +/-0.1°C precision.
Getting Started 15/21 rev A
Page 16
Astrel Instruments AST-8300-B
• Push Done to leave the application: leaving the application doesn't stop the cooling
process. Next time you open the Temperature Monitor application it will display the
current cooling process state, until you push the Stop button, which will ramp down and
switch off the cooling process.
• The cooling process needs some time to reach a stable temperature set point, so we will
use this time to find and focus the object to photograph.
Getting Started 16/21 rev A
Page 17
Astrel Instruments AST-8300-B
STEP 5: select a filterwheel position
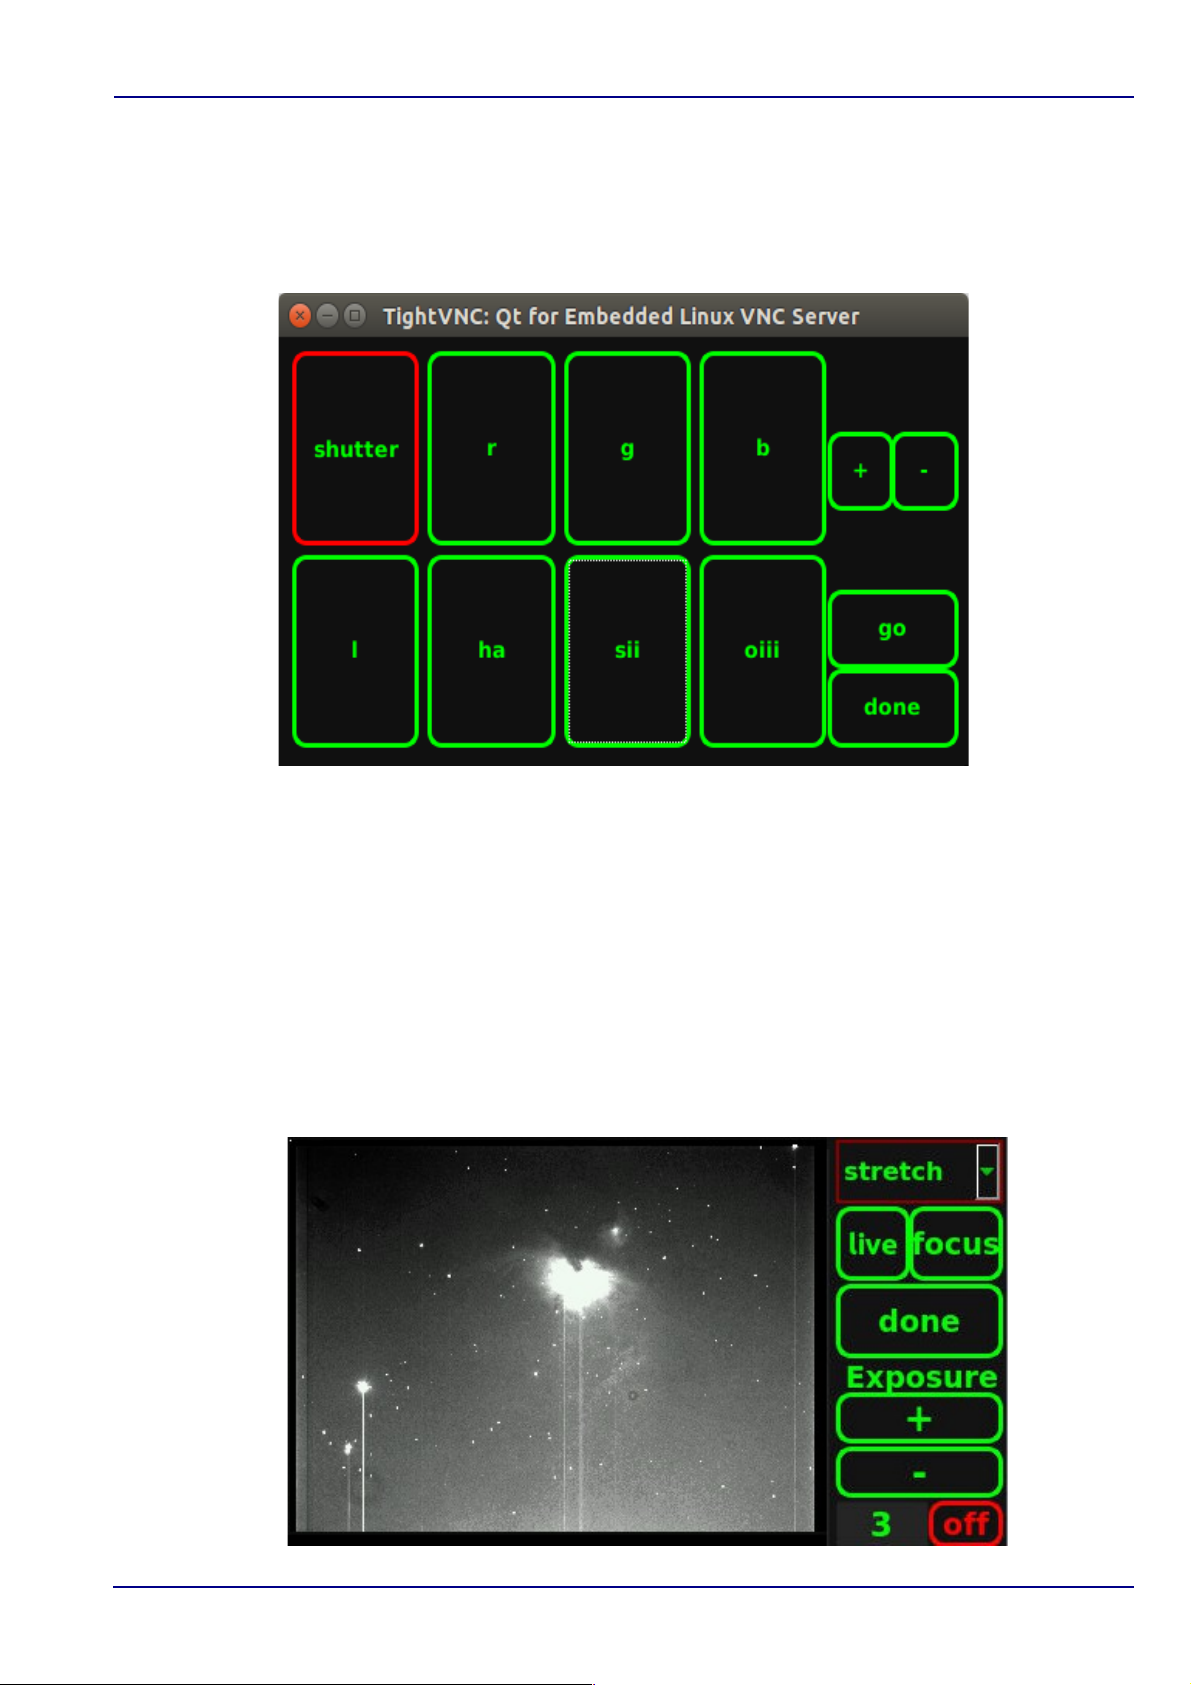
• Start the Filterwheel application by clicking/touching the icon on the desktop, then push
the desired filter button and push go:
• Push done to leave the Filterwheel application.
STEP 6: find and focus
• Start the Find & Focus application to focus the camera and frame the object. Push live to
start acquiring images. You can change the exposure time on the fly depending on your
target brightness: remember that the value refers to tenth of seconds, so for 5 seconds
exposure you have to write the value 50.
Getting Started 17/21 rev A
Page 18
Astrel Instruments AST-8300-B
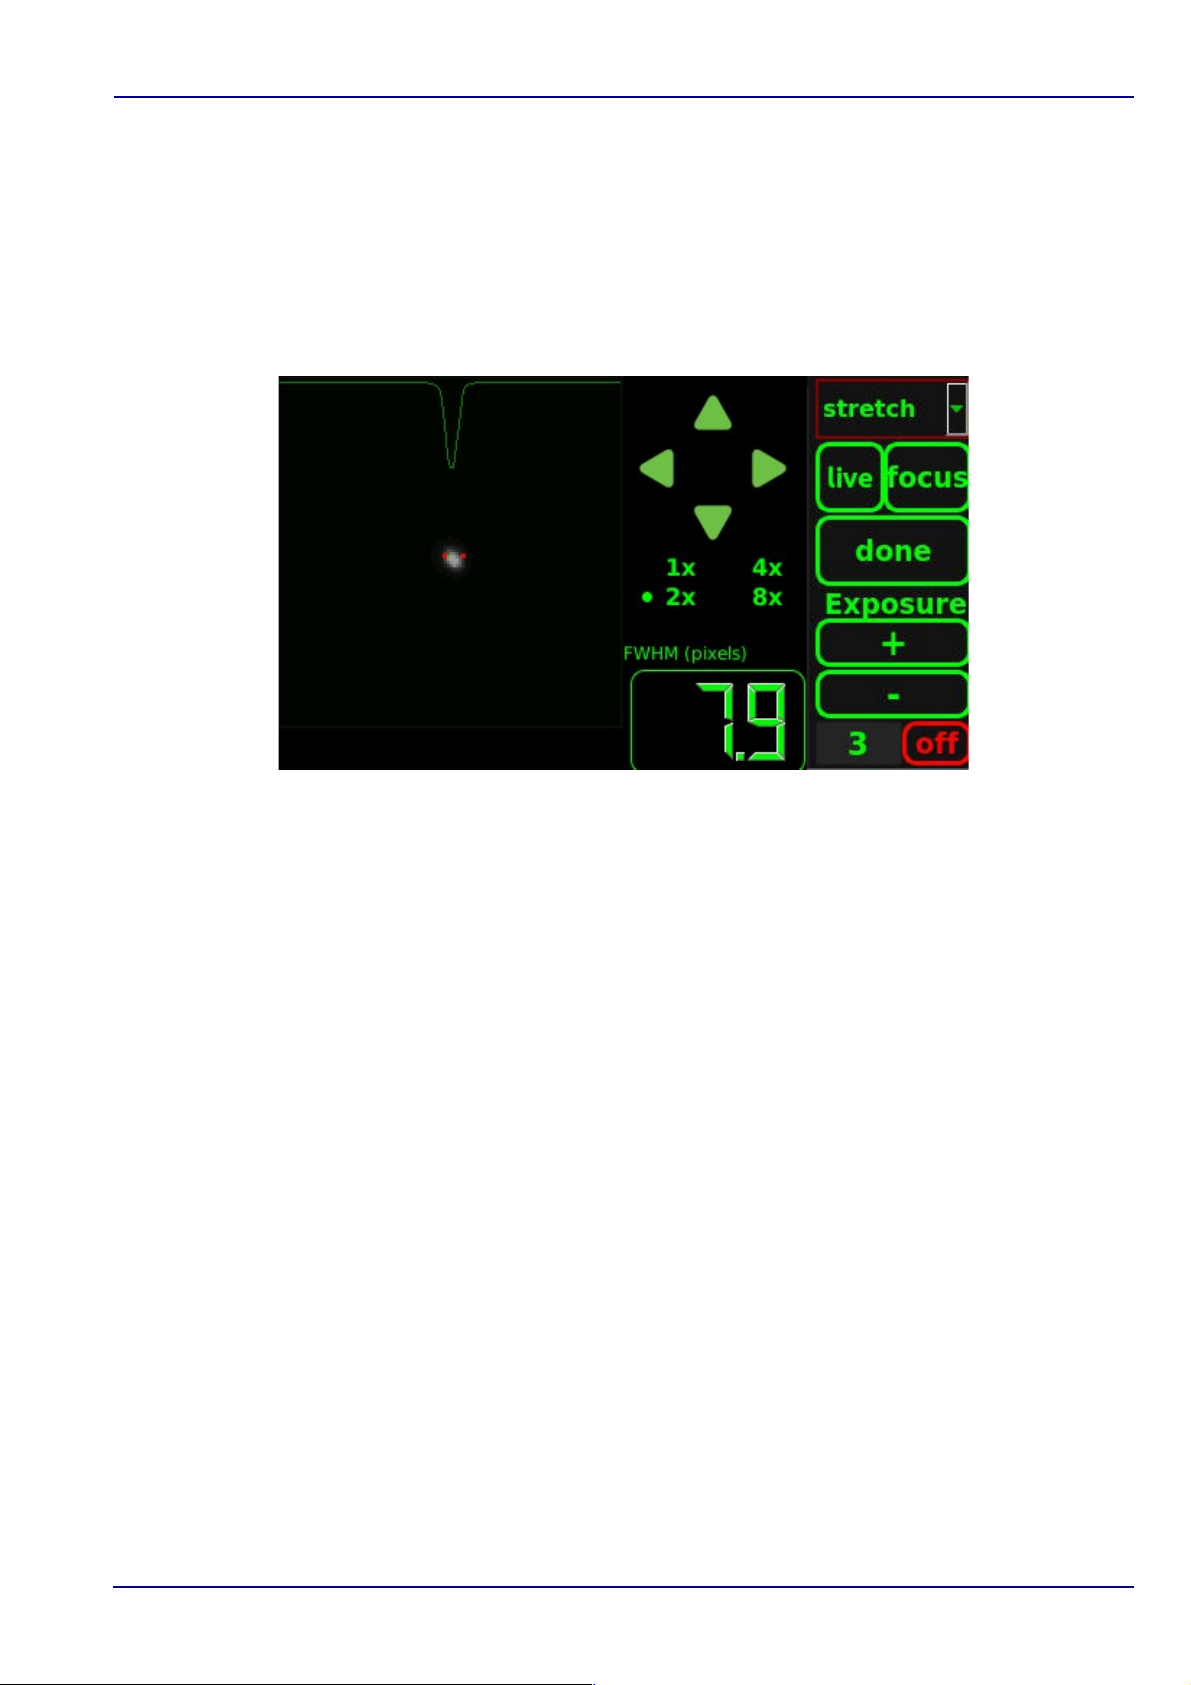
• When in liveview, frame a medium brightness star, push focus and you will be asked to
select the star in the field. After you touch/click the selected star, the focus interface is
started displaying an enlargement of a small portion of sky around the star. The refresh
rate depends on the exposure time and can be as fast as nearly 3 frames per second
• The focus interface displays the star along with a measure of the Full Width Half
Maximum and a plot of the intensity profile: use these parameters together with eye
inspection to focus the camera. You can change the exposure time and the enlargement
of the star field, as well as move around using the arrow buttons
• At the end of the focus process, in order to verify the focus accuracy, it could be useful,
when permitted by the precision of the mount motors, to set the exposure time to 15-20
seconds to possibly show many stars of different brightness. This can also be done after
framing the object to photograph.
• Push live again to come back to the liveview interface and frame your object. With
liveview taking images in 9x10 binning mode, even an exposure of a few seconds easily
reveals most deepsky objects, making the framing process as easy as doing a portrait
with a conventional camera.
STEP 7: check temperature stability
• The cooling process should reach a stable set point temperature after 10-15 minutes
depending on the environment. The time needed to reach the selected temperature set
point may be shorter, but the algorithm needs some more time to calibrate in order to
Getting Started 18/21 rev A
Page 19
Astrel Instruments AST-8300-B
maintain a temperature stable to less then 0.1°C. To check that the temperature is stable,
start the Temperature Monitor application again and monitor the temperature variations
for a while
• Push Done to leave the application and come back to the Desktop
STEP 8: set the exposure parameters and start photographing
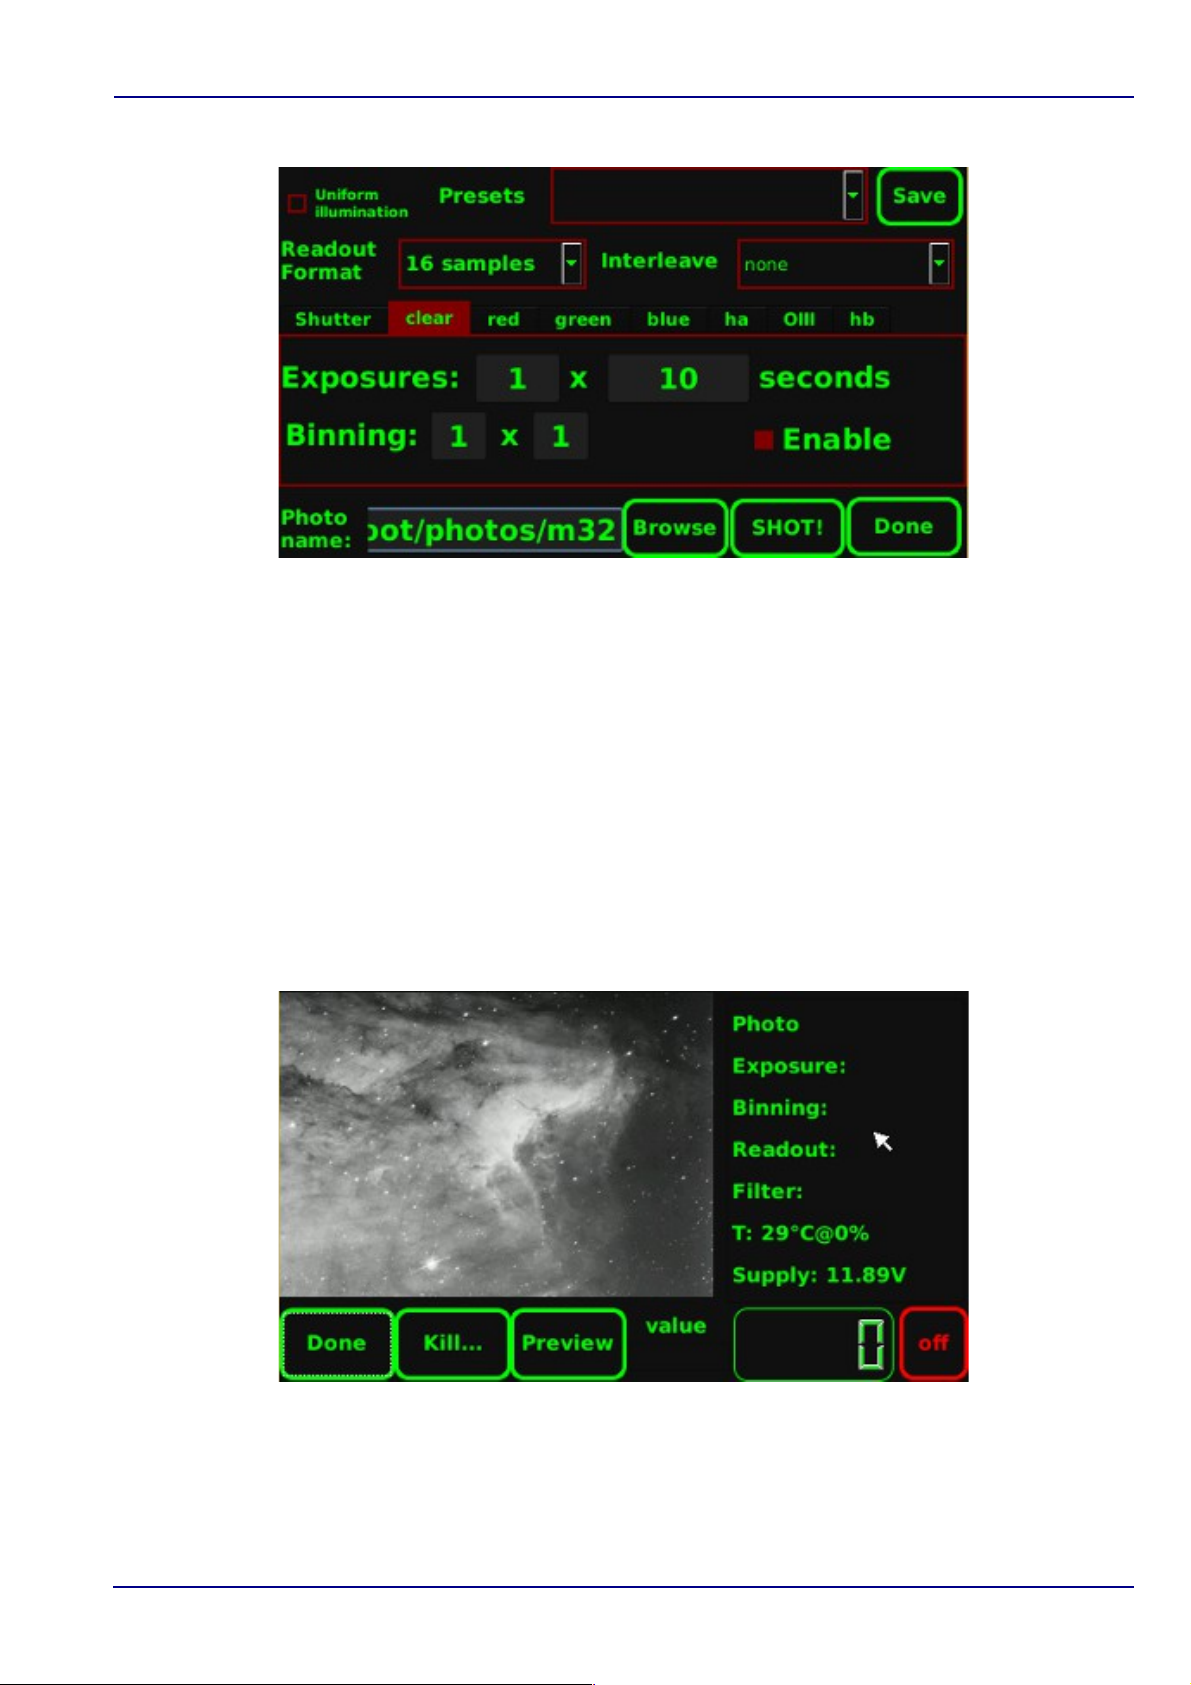
• Stat the Take Photos application.
• Using the tabs named as the filters you set in the Setup application, you can define for
each filter the exposure time, the number of exposures and the binning level. Remember
to check the enabled box in order to use the selected filter.
• Select the readout mode between 2 and 16 samples: the 2 samples readout has about
7.5e- readout noise and about 10 seconds download time, while the 16 samples readout
has about 5e- readout noise and 35 seconds download time
• Choose a photo sequence name. If you omit a path before the name, the photo
sequence will be stored in the default photo folder, which is the 'photos' folder. If you
want the photo sequence to be saved in your external USB storage, browse to the
'usb/sda1' folder. Advanced user can use any existing path on the camera where they
have the permission to write
• Each photo of a sequence can be identified using its name. For example, the third
exposure with the second filter of the 'm31_lrgb' photo sequence will be saved as
'm31_lrgb_filt2_3.fits'
Getting Started 19/21 rev A
Page 20
Astrel Instruments AST-8300-B
• Start the photo sequence pushing the SHOT! Button.
Note: During photo download from the ccd the camera turns off the display, the wifi, the
ethernet and the fan in order to minimize read out noise. After the completion of the photo
(buzzer sound signals it) all these functions turn on again. Your PC or Smartphone could need
to restablish the connection to the camera.
• Using the Monitor application you can monitor the sequence execution
• You can push the off button to turn off the LCD. To turn it back on, just push anywhere
on the display
• Push Kill to stop the photo sequence. You will be asked whether to stop only the current
Getting Started 20/21 rev A
Page 21

Astrel Instruments AST-8300-B
exposure or the whole sequence
• Push Preview to see a thumbnail of the last exposure
• Push the Done button to come back to the Desktop
STEP 9: download the images to a PC
• The camera saves the photos on its internal SD card or on an external USB storage.
There's no need to download them on a PC during the observing session: you can
copy/move the images to a PC in many ways, here follows the most common:
• Method 1: use WinSCP:
• Open WinSCP and create a new connection.
• Choose SFTP protocol and insert the camera ip address, port 22 and your user name
and password
• Copy the files/folders as needed
• Method 2: If you stored the photo sequences in an external USB storage, you can of
course disconnect it from the camera and plug it to the PC.
WARNING: never disconnect the USB storage before correctly unmount it using the Eject USB
application.
Getting Started 21/21 rev A
 Loading...