

Page 1
Owner’s Manual
Mæstro 4625
••••
••••
••••
••••
Sarah
BLANCHARD
Joy
JOHN
DIAL CHNGE
DIAL CHNGE
••••
••••
••••
••••
••••
••••
Page 2

Contents
Introduction 1
Unpacking the phone 2
Handset 3
Base 4
Installation 5
Choosing the best location 5
Connecting the telephone 5
Attaching the stand in the desk mount position 6
Attaching the stand in the wall mount position 7
Charging the handset battery 8
Quick charge 9
Battery level indicator 9
Battery saver mode 9
Changing the battery 10
Range of operation 10
Making basic calls 11
Using the handset 11
Putting a call on hold 11
Using display keys to access features 11
Using the speakerphone 12
Calling on the speakerphone 12
Muting the speakerphone 12
Transferring calls 12
Making a group call 12
Personalizing your telephone 13
Improving call reception 13
Changing the security code 13
Alternate language 13
Handset ringer volume 14
Handset receiver volume 14
Base volume 14
Setting the area code 14
Page 3

Using the Callers List 15
Setting up the Callers List 16
Viewing the Callers List 16
Dialing from the Callers List 17
Copying a number to the Directory 17
Deleting items in the Callers List 17
Using advanced features 18
Other dialing methods 18
Redial List 18
Using the Call Timer 18
Making an intercom call 19
Call Waiting and 3 Way Calling 19
Using the Directory 20
Dialing in the Directory 20
Viewing the Directory 20
Saving numbers 21
Entering names 21
Editing the Directory 22
Display prompts and indicators 23
Display prompts 23
Handset lights 25
Base lights 25
Helpful hints 26
Regulatory information 28
Warranty information 32
Index
Page 4

Introduction
Congratulations on your purchase
of a Mæstro 4625 cordless
telephone.
Walking and talking with cordless
technology
With the Mæstro 4625 you are no
longer tied to your phone. You can
move from room to room, or even
outside while on a call. Now you’re
mobile!
Secure to roam your home
Mæstro 4625 provides 1 million
different security codes so that only
your handset will work with your
base.
Access to Advanced Features
In addition, Mæstro 4625 provides
you with advanced features to save
you time, and provide you with
information. Some of these features
are:
Name and number directory
stores up to 30 personal numbers
for easy dialing.
Number and name display
you the number you’re dialing. With
Caller ID service (available from
your telephone company), you see
the incoming caller’s name and
number before you answer the call.
Caller’s list
service to keep track of everyone
who called (up to 30 entries), and
allows you to easily return their call.
works with Caller ID
shows
Intercom
base from outside a room, or ring
the handset so that you can find it.
Redial
numbers you dialed.
Backlit display and lighted dial
pad
even in the dark.
Any
calls quick and easy.
25 Channel Autoscan
to achieve optimum clarity.
Talk/Mute
conversations.
By the way...
Cordless telephones transmit
conversations using radio waves, so
there is a possibility that your
conversations will be overheard by
others. They should not be treated
as totally confidential.
The base must be located where the
signals will not be blocked by large
metal objects (metal fencing, large
appliances, etc), or interfered with
by electronic devices (microwave
ovens, computers, stereos, etc).
Your handset is powered by
rechargeable batteries, which must
be charged and maintained as
described in the Installation chapter.
This guide covers
• a tour of your telephone
• installation and setup
• using your Mæstro 4625
allows you to call the
key remembers the last 3
lets you know who’s calling
key answer makes answering
allows you
lets you have handsfree
1
Page 5
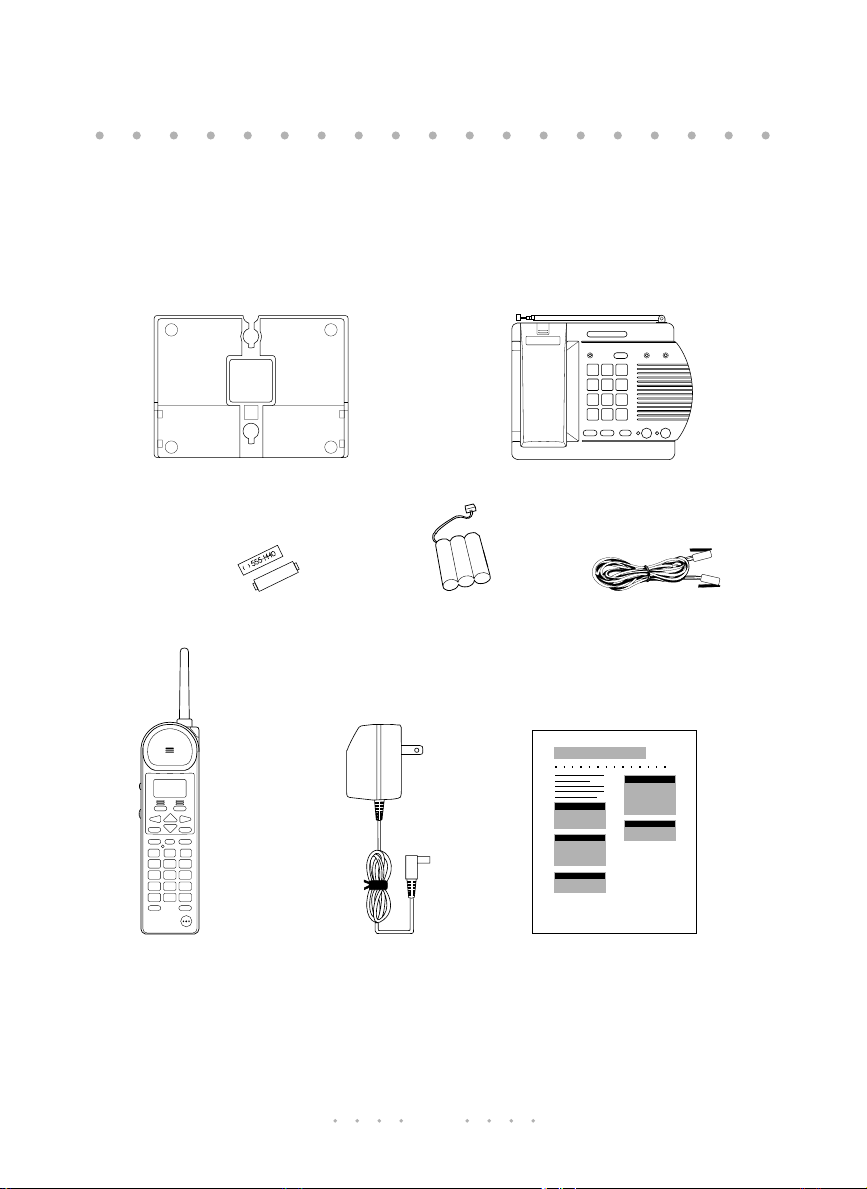
Unpacking the phone
Check to see that the following
parts are included in the box. Keep
the box for future use.
Stand
Number card and lens
(factory-installed)
If any part is missing, contact the
location where you obtained the
phone.
Base
Line cordBattery pack
(factory-installed)
Handset Power adaptor Quick Reference Card
2
Page 6
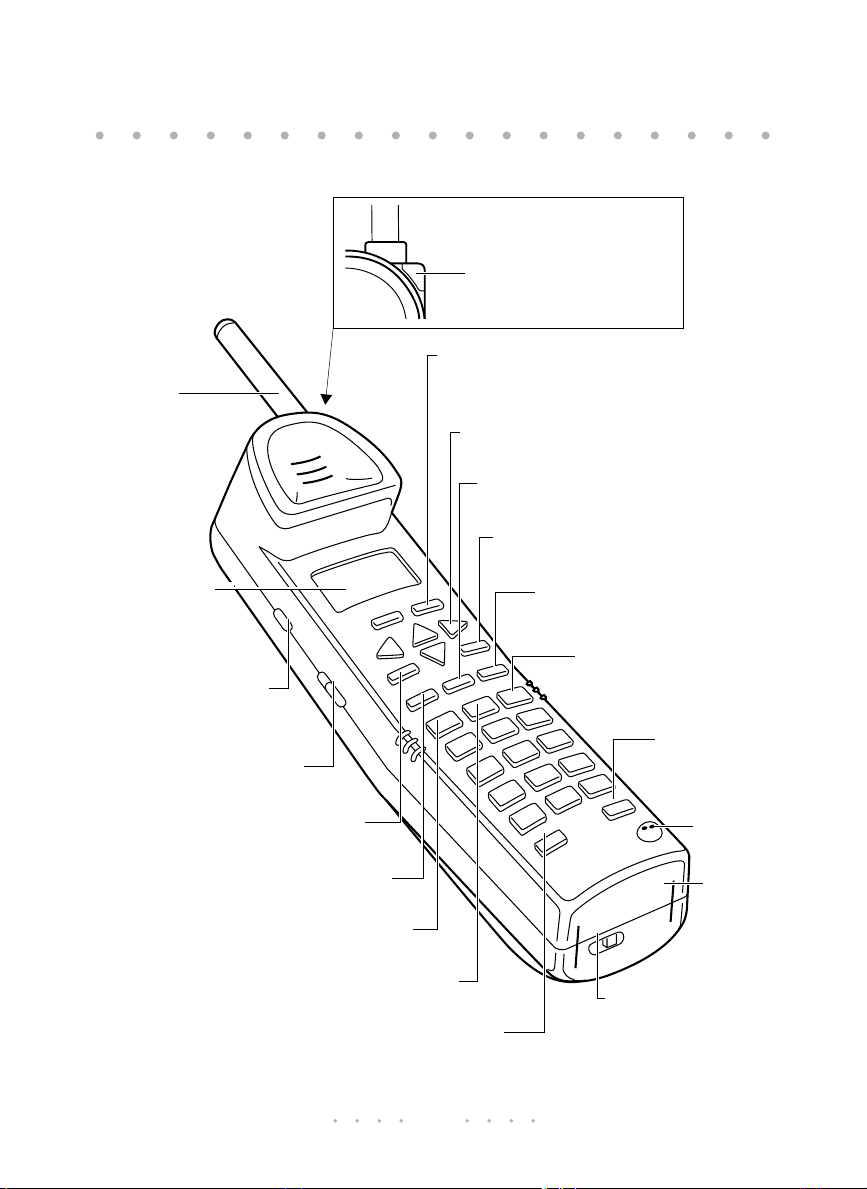
Handset
Antenna
Multipurpose light (page 25).
Two display keys activate
instructions that appear above
them on the display (page 11, 23).
Backlit display shows call
information, phone status
prompts, and Directory items
(page 12-23).
S changes the channel
if you have radio interference
(page 13).
Handset volume control changes the
loudness of the caller’s voice (page 14).
D lets you store and access 30
numbers and names (page 20).
s lets you store numbers
and names in the Directory (page 20).
e lets you hang up a call
(page 11) or exit a list (page 15, 20).
I lets you talk to the
person at the base (page 19).
h lets you place a call on hold
(page 11) or program a pause (page 20).
Navigation keys
move around the display (page 16- 22).
d lets you delete list items or
individual characters (page 17- 22).
c lets you access a list of 30
people who called (page 15-17).
[ ] < >
r lets you call back the
last 3 numbers you dialed on the
handset (page 18).
t lets you make or answer
a call (page 11) although you may
also press any key other than the
arrow keys to answer calls.
Power switch lets you turn off
the handset when not in use for
extended periods (page 8).
let you
f gives you access
to certain subscribed telephone company services
(page 19).
Microphone
Metal contacts let
you charge the
handset (page 8).
3
Page 7

Base
The Charge light lets you know
properly on the base (page 25).
Handset hanger tab
(page 7).
The Base light lets you know the
handset is in use, there is an
incoming call, or someone is on
hold (page 25).
that the handset is seated
r lets you call back the last
number you dialed on the base
(page 18).
Message light shows you that
you have a message waiting
for you at your telephone
company’s Voice Messaging
service (page 26).
Callers light lets you
know that you have new
callers in the Callers List
(page 26).
h lets you hold
a call (page 11).
f gives you access to
certain other subscribed
telephone services (page 19).
e lets you hang up a call
(page 11).
Intercom light (page 26 ).
i lets you make or answer an intercom
call. The light turns on at the same time (page 19).
Talk/Mute light (page 26 ).
Volume control , under the right
edge, changes the volume for the
speaker (page 14).
T lets you make or answer a call,
or retrieve a call that is on hold. It also lets
you turn the base microphone off
(page 12).
4
Page 8
Installation
Choosing the best location
For best results:
• the base should be the only item
plugged into the wall outlet
• the antenna should be fully extended
• the base should be centrally located,
away from electrical equipment such
as computers, refrigerators,
fluorescent lights, stereos, etc.
• locate the base on an upper floor
• the handset should be kept as close to
normal room temperature as possible
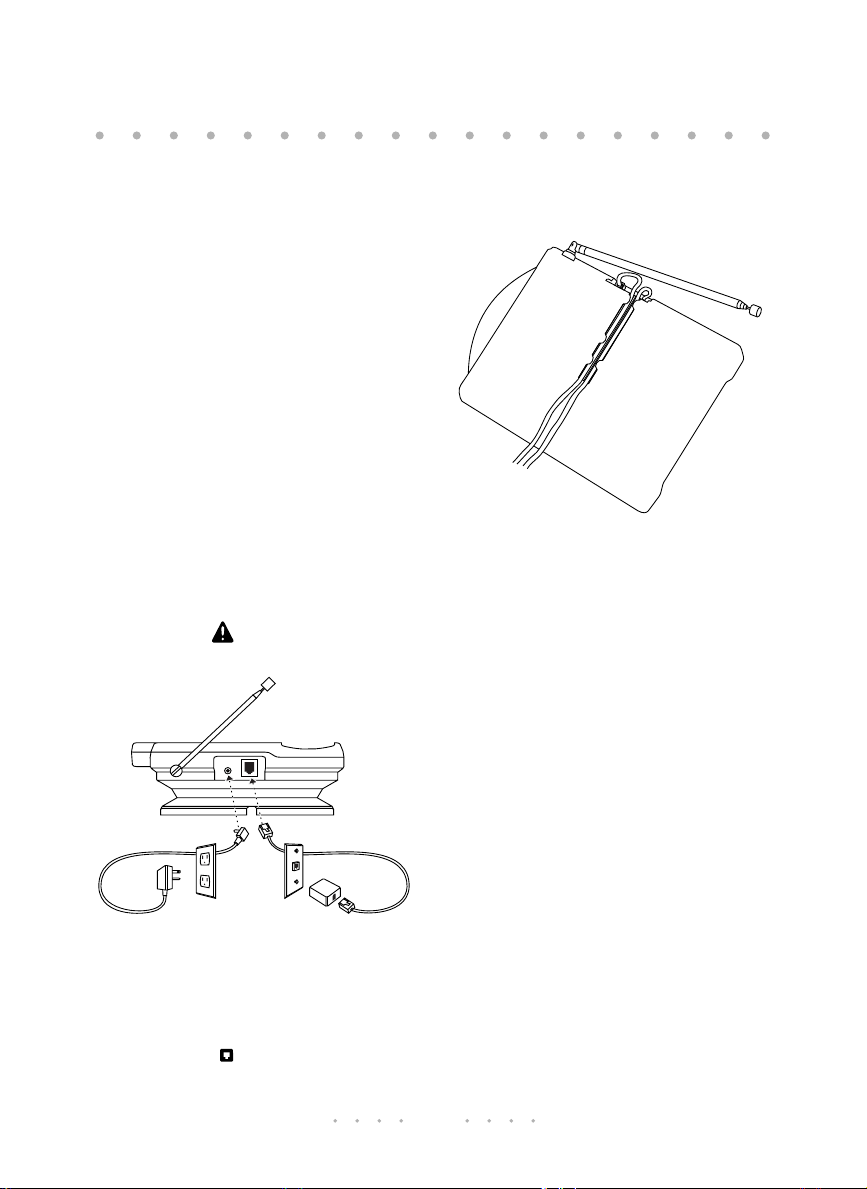
Connecting the telephone
Caution: For eye safety, do not
extend the antenna until installation
is complete.
1. Plug the AC adaptor into a 120 V AC
outlet and insert the small plug into the
DC 12 V jack on the back of the base
(see page 31).
3. To keep the cords from being pulled out,
route the cords in the channel under the
base.
Note:
2. Plug one end of the telephone cord into
The AC outlet should not be
controlled by a switch or
connected to a power bar.
a telephone wall jack and the other end
into the jack on the back of the
base.
5
Page 9

Attaching the stand in the
desk mount position
1. Fold the cords back as shown.
2. Lower the stand into the slots on the
base, as shown below.
3. Slide the stand into the locked position.
4. Continue routing the cords in the
channels on the stand.
5. Place the phone on a desk.
6. Pull the base antenna vertical and
extend it all the way up.
7. Plug the AC adaptor into a 120 V AC
outlet, which is not controlled by a
switch or power bar.
6
Page 10
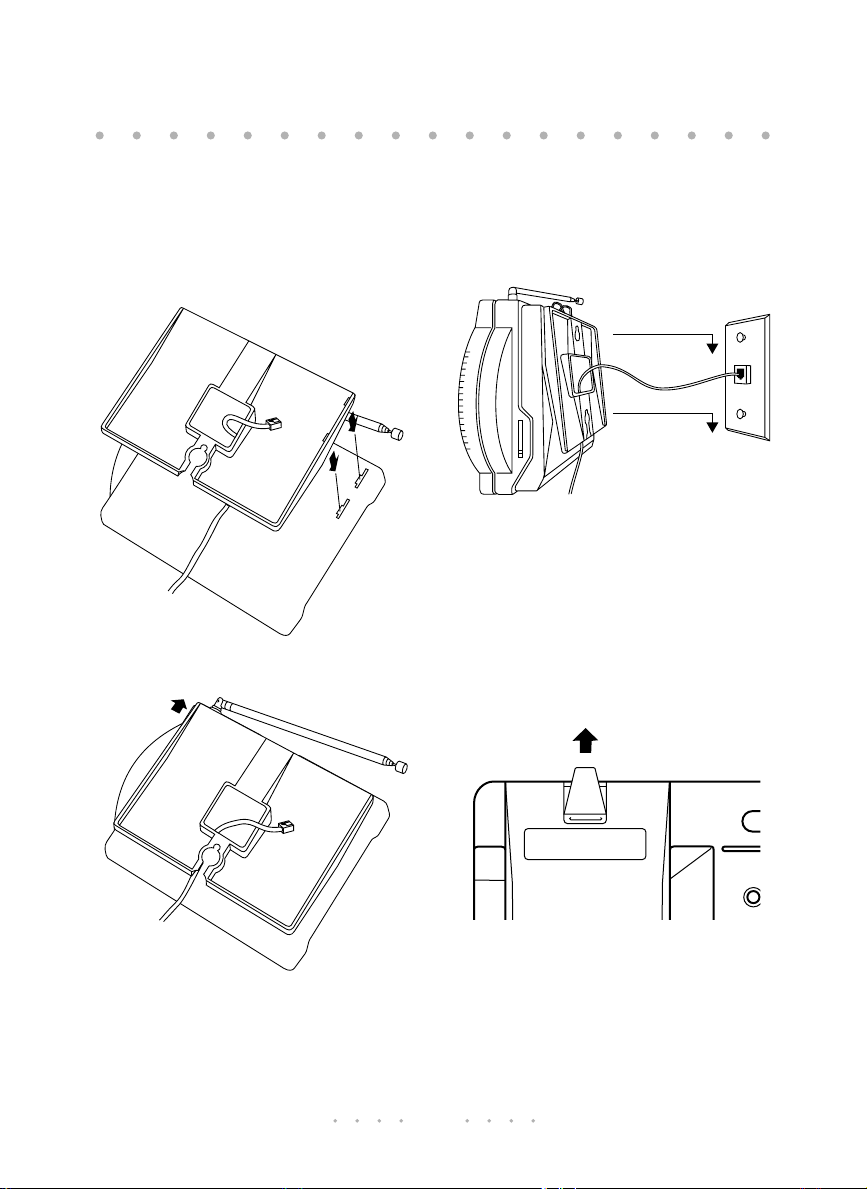
r
Attaching the stand in the
wall mount position
1. Bring the line cord through the opening
in the stand, then lower the stand into
the slots on the base.
2. Slide the stand into the locked position,
as shown below.
*
3. Plug the line cord into the wall jack. Line
up the screws on the wall mount plate
with the openings in the stand and slide
the phone down until the mounting
screws hold firmly.
4. Continue routing the cords in the
channels on the stand.
5. Remove the tab from the base and
reinsert it with the point up.
sure the tab is in all the way
the handset on the tab. If the charge
light does not light up, and the handset
is switched on, the tab has not been
locked into position.
Remove
Retirer
Make
. Hang
* We recommend that you use a wall mounting plate
(available at your phone retailer). If wall mounting
without a plate, use the stand as a template for
positioning screws in the wall.
Cha
6. Pull the base antenna vertical and
extend it all the way up.
7
Page 11
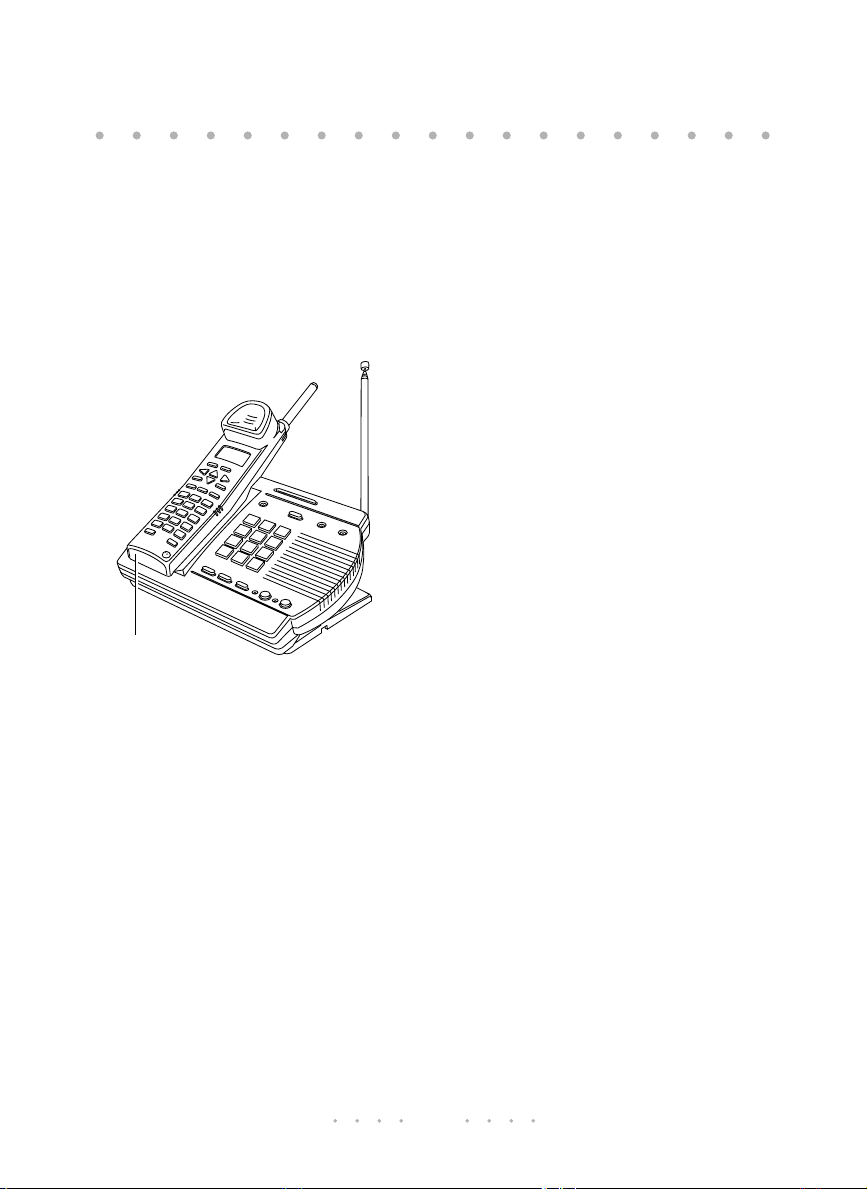
Charging the handset
battery
When you first plug in your phone,
you will need to charge the
battery for at least 5 hours before
you can use the handset. This is
best done by charging overnight.
C
h
a
rg
e
R
e
d
ia
l
M
e
s
s
a
g
e
s
C
a
lle
rs
H
o
ld
F
la
s
h
E
n
d
I
n
t
e
r
c
o
m
T
a
lk
/
M
u
t
e
power switch
1. Leave the phone on the base as shown,
with the charge light on and the
handset power switch off.
Note: The handset power switch is on
the bottom of the handset.
2. After the battery is charged, turn the
handset power on . The display will
show:
NORTEL
Maestro
ENG ESPÑL
3. Select the language you want on the
display by pressing the key under
for English or the key under
Spanish.
ESPÑL
ENG
for
Once you’ve selected your
preferred language, the display will
show:
Ready for
use...
NEXT
This idle display message will
appear from now on unless other
messages take priority, you’re using
the handset, or the handset is
sleeping (see Battery saver mode
page 9). You can press the key
under NEXT to view other display
messages.
Now you’re ready to use the
handset!
If the handset is not working or the
display keeps showing
again
, reset the handset. To do this,
Sorry! Try
follow the procedure for changing
the security code (page 13).
Note: The next time you charge the
handset, simply put it on the base. It
is not necessary to turn the power
OFF after the first charging session
(see page 9).
Note: The handset should be stored
off the base. The battery will last
longer if you allow it to run down
completely between charges .
(Leave it off the base until the
tery Low
prompt appears on the dis-
Bat-
play.)
8
Page 12

Quick charge
The Mæstro 4625 comes with a
reduced charge time feature called
“Quick charge”. Simply place the
handset on the base (no need to
turn the handset switch off). The
Mæstro 4625 is able to determine
how long the handset battery needs
to recharge. When the handset is in
the base and Quick charge is
activated, the display message
battery charging... will be
displayed.
A completely empty battery will
only take 4-5 hours to fully
recharge. The handset may be left
on the base even after Quick charge
is finished. A “trickle” charge will
keep the battery fully charged.
During trickle charge you may view
the Battery level indicator by
NEXT
pressing the
We recommend that you keep the
handset as close to normal room
temperature as possible. In cases of
extreme heat or cold (outside in the
heat or cold), the Battery level
indicator may not display
accurately. To ensure a fully
charged battery, charge the handset
for at least 5 hours. Battery life may
be affected by continued exposure
to extreme heat or cold.
display key.
Battery level indicator
You may check the battery level of
your handset by pressing the
NEXT
display key when at the idle display.
You may check this indicator when
the handset is in or out of the base.
Battery
[ ]
NEXT
Battery
[ ]
NEXT
Battery
[ ]
NEXT
- Battery is fully charged
- Battery is 2/3 charged
- -
- Battery is 1/3 charged
- -
Battery saver mode
The handset saves battery power by
going into battery saver mode 45
seconds after the last key press. In
this mode, the display “sleeps”
(goes blank), but the handset still
receives calls. When you use the
handset again the display
automatically “wakes up” (shows
information). If it doesn’t, make
sure the handset power switch is
on.
Note: Its recommended that you
only charge the battery once the
Battery low
message is displayed.
9
Page 13

Changing the battery
If you’ve charged the battery and
the display still says
the handset will not wake up, it’s
time to replace the battery. New
batteries are available from your
phone retailer. Use either the GESPCH01 or the 3N-270AA Sanyo
battery.
1. Move the handset power switch to OFF.
2. Slide the cover off the battery
compartment.
Off
retirer
3. To remove a dead battery, pull firmly on
the battery cords.
4. To install the new battery, insert the
battery plug, making sure the black wire
is on the left.
Battery low
On
remettre
or
Range of operation
The actual operating range of your
Mæstro 4625 can vary with the
construction of your home,
interference from household
appliances, weather conditions, and
other factors.
For best results:
• the base should be the only item
plugged into the wall outlet
• the antenna should be fully extended
• the base should be centrally located,
away from electrical equipment such
as computers, refrigerators,
fluorescent lights, stereos, etc.
• locate the base on an upper floor
• the handset should be kept as close as
possible to room temperature
5. Slide the battery into the compartment.
6. Replace the cover of the battery
compartment.
7. Charge the new battery, as described
on page 8.
10
Page 14

Making basic calls
Using the handset
When you receive a call, the display
shows caller information.
Note:
You must subscribe to Caller
ID service from your local telephone
company.
The handset power switch must be
ON in order to receive or make
calls.
To answer a call
When you hear the phone ring and see the
multipurpose light flash:
1. Press
2. Press
Note:
To dial a number
1. Press
t
pad. The >, <, and
will not answer a call.
e
handset on the base.
The message
alternate on the display with the
callers incoming name. Press the
MORE
distance number.
t
or any key on the dial
MORE
to hang up or put the
Long distance
display key to view the long
.
display key
will
Putting a call on hold
The hold feature keeps your caller
on the line so you can talk privately
to someone in the room. If you
forget that someone is on hold, the
Mæstro 4625 releases the line after
five minutes.
To put a call on hold
1. Make or answer a call.
2. Press h.
3. To take the call off hold,
press t.
Using display keys to
access features
Display keys are the two keys
below the display on the handset.
555-1234
DIAL CHNGE
2. Dial the number.
3. Press
e
handset on the base.
to hang up or put the
The function of these keys is
written above them in the display,
and will depend on what feature
you are using.
When a command (such as DIAL or
CHNGE) appears on the display,
press the display key below to
activate that command.
11
Page 15

Using the speakerphone
Calling on the
speakerphone
You can dial and answer calls from
the base.
To answer a call
1. Press T.
2. Press e to hang up.
To dial a number
1. Press T.
2. Dial the number using the dial pad or
press r.
3. Press e to hang up.
Muting the speakerphone
The T key stops callers from
hearing background noise or room
conversation. You can hear the
caller but they cannot hear you.
To mute a call
1. While on a call press T. The
light will flash.
2. When you want the caller to hear you,
press T again.
Note: You cannot mute a call on the
handset.
Transferring calls
You can transfer a call between the
base and the handset. So, if you
originally answered the call on the
base, you can transfer it to the
handset and later back to the base
again.
To transfer a call
1. Make or answer a call on the handset
or the base.
2. Press h.
3. Go to to the other device (base or
handset) and press t or
T.
Making a group call
You can have a conversation
between an incoming caller,
someone on the handset, and
someone on the base.
To make a group a call
1. Make or answer a call on the handset
or the base.
2. From the other device (base or
handset) press t or
T.
3. When the call is complete, press
e on both the base and
handset.
Note: You may hang up either device at
any time.
12
Page 16

Personalizing your telephone
Improving call reception
The handset communicates with the
base using one of a combination of
25-channels. Your Mæstro 4625
automatically scans for a clear
channel each time you use the
handset.
If you hear interference, static, or
the message Sorry! Try again, press
S and the Mæstro 4625 will
automatically find a new clear
channel. The S key is on
the left side of the handset.
To change the security code
1. Place the handset on the base.
2. On the base, press and hold i
while also pressing I on the
handset. Hold both keys for 5 seconds.
3. When the display shows Security
Code, press the CHNGE display key.
4. Enter the new security code (6 digits).
5. Press the DONE display key once the
new code has been entered.
Changing the security
code
The security code ensures that
someone else with a cordless
handset cannot use your telephone
line. There are 1 million different
codes, of 6 digits in length.
Note: When the message Sorry! Try
again
won’t disappear, try
recharging the battery.
Alternate language
You can choose between English
and Spanish for the handset display.
English is the factory setting.
To change to Spanish
1. Turn OFF the power switch on the
handset.
2. After a few seconds, turn the power
switch back ON.
3. Press the ESPÑL display key.
13
Page 17

Handset ringer volume
You can choose from three volume
settings for the handset ringer: OFF,
Low, and High (the factory setting).
To change the ringer volume
1. If the Handset Ring prompt is not on the
display, press the
the prompt appears.
2. Press the
you press it, you hear the next ring
setting.
3. Press e.
NEXT display key until
CHNGE display key. Each time
Handset receiver volume
The sliding volume control on the
left side of the handset adjusts the
volume level for what you hear on
the handset. There are three
settings: low volume , medium
(middle position), and high
volume .
Base volume
The sliding volume control under
the right edge of the base sets the
volume level for the base ringer and
the base speaker. It can be set
anywhere between Off, low volume
, and high volume .
dial local numbers directly from the
Callers List without having to
remove the area code first.
To add or change the area code
1. Press c.
2. Press the
3. Press the
(whichever appears on the display).
4. You can use
specific digit.
5. Press d to remove any
existing digits.
OR
Enter the three-digit number using the
dial pad.
6. Press the
CODE display key.
ADD or CHNGE display key
< or > to move to a
DONE display key.
To delete your area code
1. Press c.
2. Press
3. Press d.
4. If you want to delete the item, confirm it
CODE.
by pressing the
d again. If you don’t want to
delete the item, press c or
e.
OK display key or press
Setting the area code
You can enter one area code so that
incoming local calls appear in the
Callers List without it. This lets you
14
Page 18

Using the Callers List
Times are changing. There are more
things to do that take you out of
your home. You probably receive a
lot of calls when you go out. When
you get home, just scroll through
your list of callers to see who
called. You can find and respond to
the important calls quickly (see
page 16).
If you want to call one of the
numbers as it appears on your
display, you can save time just by
pressing
key under DIAL on the display (see
page 17). A will appear on the
Time and Date screen for all entries
you have called from the Callers
List. You’ll know at a glance which
calls you’ve returned.
To save time looking up a number
in the future, you can permanently
save numbers from the Callers List
into your Directory (page 17). Once
a number is in the Directory, it’s
simple to retrieve it!
Note: You must subscribe to Caller
ID service in order for the calls to
register with the Callers List.
The Callers List holds up to 30 calls
and is accessed using the handset.
t or pressing the
Callers List information is sorted
from oldest to newest. When the list
is full, the oldest items are deleted
to make room for the new callers.
When new calls come in, the Callers
light on the base flashes and the
handset multipurpose light flashes.
When you enter the Callers List, the
display may show the following:
— XX New Callers
— XX Callers bumped
— Callers = XX items
Note: For an example and explana-
tion of what might appear on your
display, see page 23.
You can set up your Callers List to
log all calls, no calls, or only those
calls which you do not answer (see
page 16).
To exit the Callers List at any time,
press e or c.
If you are not sure what to do when
you get into the Callers List, press
HELP for some hints.
15
Page 19

Setting up the Callers List
You may set up the Callers List to:
Viewing the Callers List
To view the Callers List
1. Log all calls
(Call Log=All)
2. Log only those calls you didn’t answer
(Call Log=Unanswered)
3. Log no calls
(Call Log=None)
Setting up the Callers List
1. Press c.
2. Press LOG.
3. Press CHNGE until the second line of the
display shows the set up you want:
all , none, or unanswered.
3. Press e.
555-1152
DIAL EDIT
Sarah
Pool-Alexa
DIAL
1. To see the Callers List heading, press
2. Use the
3. Use the
4. To leave the Callers List at any time,
The illustration below shows how
the arrow keys move you up and
down between callers, and left and
right between name, number, and
time and date screens.
Dec 4 1x
9:02 am
DIAL
555-2160
DIAL EDIT
c.
[
and ] keys to move
between callers.
<
and > keys to move
between name, number, and time and
date information.
press c or e.
Unknown
name
DIAL
Dec 5 1x
3:17 pm
DIAL
R
Zimmer
DIAL
555-1376
DIAL EDIT
16
Dec 5 3x
4:34 pm
DIAL
Page 20

Dialing from the
Callers List
You can return a call when it is
displayed in the Callers List. A
will appear on the Time and Date
screen for all entries you’ve called
from the Callers List.
Copying a number to the
Directory
To copy a number to the Directory
1. Press c.
2. Use the [ and ] keys to find the
caller.
To dial from the Callers List
1. Press c.
[
2. Use the
caller.
3. Press the
t.
and ] keys to find the
DIAL display key or
Sometimes you must edit a number
before it can be dialed (for
example, you may have to add “1”
to dial long distance). Changes are
not saved in the Callers List. You
may only edit numbers in the
Callers List.
To edit before dialing
1.Press c.
[
2.Use the
Press
3.Press the
4.To erase digits, press d. To add
digits, use the dial pad. To move
sideways, press the
5.Press the
updated number.
6.Press the
and ] keys to find the caller.
< or > to view the number.
EDIT display key.
<
and > keys.
DONE display key. You see the
DIAL display key or t.
3. If the number requires editing, make the
required changes.
4. Press the DONE display key.
5. Press s.
6. If there is no name for the number, you
may enter a name. See “Saving
numbers” on page 20 or press the NO
display key.
7. Press the
DONE display key.
Deleting items in the
Callers List
To delete in the Callers List
1. Press c.
2. If you want to delete everything in the
list, go to step 3. If you want to delete
just one item, use the
find the caller.
3. Press d.
4. Confirm by pressing the
or by pressing d again. If
you’ve changed your mind, press
c or e.
[
and ] keys to
OK display key
17
Page 21

Using advanced features
Other dialing methods
Predial lets you view the number
first, before you dial it. It helps
prevent dialing errors.
To predial a number
1. Enter the number using the dial pad.
>
2. If required, use
specific digit. Use d to erase
digits.
3. Press the
t.
DIAL display key or
or
<
to move to a
If you want to redial someone you
last spoke with on the handset, you
can use the Redial key.
Redial List
The Redial List lets you view the last
3 outgoing numbers. The last
number dialed will automatically
move to the 1st position in the list.
To redial a number
Using the Call Timer
When you’re on a call, the display
shows the channel you’re using in
the lower left corner. After ten
seconds on the call, it then begins
to show how much time has passed
in minutes and seconds. The timer
starts counting as soon as you press
t, I or the DIAL
display key. It stops counting when
you press e, although the
elapsed time will be displayed for
an additional 5 seconds.
1. Press r.
2. Press [, ] or the MORE display key to
move to the number you wish to dial.
3. Press t or the DIAL display
key to dial that number.
Note: To delete a number in the Redial
List, press r, press
d, then press the
display key or press d
again.
OK
18
Page 22

Making an intercom call
The intercom will let you make a
call between the base and the
handset. You cannot make any
other type of call with the intercom
feature. It also functions as a
handset “beeper”, to help you
locate the handset no matter where
it may be hiding.
If you are on a regular call, you can
make an intercom call to the other
component, which automatically
puts your call on hold.
To call on the intercom
1. Press i on the base or
I on the handset.
To answer on the intercom
1. When you hear the handset or base ring
and you see the Intercom light flashing,
press i or I. On the
handset, the display also indicates
Paging You....
Call Waiting and Three
Way Calling
If you subscribe to Call Waiting or
Three-Way Calling (not available in
some areas), read the information
from your telephone company for
the exact procedures. Whenever it
says to press the hook-switch,
receiver button or Link, press
f instead. This appears as
L on the display.
Meanwhile, if a call comes in, just press
t.
Note: If you call the base from the
handset, the handset display wil
read Paging base.
19
Page 23

Using the Directory
You can store up to 30 frequentlycalled names and numbers in the
Directory. When someone who is in
your Directory calls, that person’s
name and number appear on the
display as you entered it into the
Directory.
Note: You must subscribe to Caller
ID service, available from your local
telephone company.
All Directory items are sorted
alphabetically by the first word. If
you want your Directory sorted by
last name, enter the last name first.
You can enter a name if you want.
If you don’t enter a name, the item
is sorted by number. All number
items are sorted numerically at the
beginning of the Directory listing.
When you are viewing items in the
Directory, the list is circular. This
means you can keep moving in one
direction and come around to the
beginning again.
Dialing in the Directory
Dialing from the Directory
1. Press D.
2. Use the [ and ] keys to find the
number you wish to dial.
3. Press the
t.
DIAL display key or
The following illustration shows
how the arrow keys move you to
different screens in the Directory.
Grandma
Hill
DIAL CHNGE
Sam
Manning
DIAL CHNGE
T
Jones
DIAL CHNGE
555-1440
DIAL CHNGE
555-1234
DIAL CHNGE
1-425
555-7542
DIAL CHNGE
Viewing the Directory
To find items in the Directory
1. To see the Directory list heading, press
D.
2. To go directly to the items that begin
with a particular letter, press the dial
pad key that matches that letter. (The
letters are printed on the dial pad keys.)
Then, to see the other listings under
that letter, press the
example: fi takes you to the first “J”
listing, then the down arrow key takes
you to the next “J” listing. fifi takes you
to the first “K” listing.)
3. Use the
4. To leave the Directory at any time,
[
down between items.
Use the
right between names and numbers.
press D or e.
and ] keys to move up and
<
and > keys to move left and
]
key. (For
Saving numbers
To save a new number
20
Page 24

1. Press s.
2. Enter the number using the dial pad.
Numbers can have up to 16 digits. If you
require a pause (for example, between
a telephone number and an access
code), press h where you
want the pause.
Note: Each pause is 2 seconds. Enter
as many pauses as you need. A
P indicates a pause has been
entered.
3. Press the
DONE display key.
4. If you don’t want to enter a name press
DONE.
To enter a name, use the dial pad. (See
Rules for entering names, on this page.)
If you make a mistake, use the
d,
<
, and > keys.
5. To quit and start over, press e.
6. Press the DONE display key.
To save a number from the display
1. Ensure that a number is on the display.
(This could be a predialed, redialed, or
Callers List number.)
2. Press s.
3. Follow the instructions on the display.
1. Press the key with the desired letter
repeatedly until that letter appears on
the display.
The letters are printed on the dial pad
keys. Names can have up to 16
characters.
2. Advance to the next letter by pressing
>
the
key or the SKIP display key.
< to move backward to insert or
3. Use
delete letters.
4. Press d to delete a letter.
5. Press the
[ or ]
to change the case
for each letter.
6. Press the SPACE display key to enter a
space between letters.
7. When you have finished, press the
DONE
display key.
Note: You don’t always have to
press the
>
key if the next
letter is on a different key.
Example:
To enter the name
Ruth, press:
‡‡‡, °°, >, °, ››.
Chart for special characters
The following symbols are not
shown on your dial pad keys.
4. If you entered a name, press the
display key.
Entering names
Rules for entering names
DONE
Symbol
& ‘ ( ) , - . Press ⁄ until the desired
symbol is displayed.
21
Page 25

Editing the Directory
To change a number
1. Press D.
2. Use the [ and ] keys to find the
number you wish to change.
3. Press
>
to view the number.
4. While the number is on the display,
press the
CHNGE display key. The cursor
appears under the first digit.
5. To insert digits, use the dial pad. (The
existing digits will move to the right.)
To move the cursor sideways, press the
<
and > keys. To erase digits, press
d.
6. Press the
DONE display key.
To add a name to an existing
Directory item
1. Press D.
[
2. Use
3. Press >.
4. Press the ADD display key.
5. Follow the rules for entering names
6. Press the DONE display key once name
or ] to find desired entry.
(page 20).
has been entered.
To change a name
1. Press D.
2. Use [ or ] to find the name that you
wish to change.
3. While the name is on the display, press
the
CHNGE display key. The cursor
appears under the first character.
4. To move the cursor left, press the
<
arrow key. To move the cursor right,
press the
>
arrow key. To erase
letters, press d. To insert
letters, use the dial pad. To insert a
space, press the
SPACE display key.
5. Press the DONE display key.
To delete a Directory item
1. Press D.
2. Find the Directory item that you wish to
delete.
3. Press d.
4. If you want to delete the item, confirm it
by pressing the
pressing d again. If you don’t
want to delete the item, press
D or e.
OK display key or by
22
Page 26

Display prompts and indicators
Display prompts
Your handset display gives you
instructions and information. If you
want to know what to do about a
particular display prompt, look it up
in the following table. The prompts
are listed in alphabetical order.
For other helpful hints, see page 26.
Prompt Meaning
Battery
Low
WARNING: You must
recharge the handset.
Battery
[ ]
NEXT
Battery
[ ]
- -
NEXT
Battery
[ ]
- -
NEXT
Battery
charging...
Callers=
XX items
LOG CODE
Directory
is full
Long
distance
Indicates battery is fully
charged
Indicates battery is 2/3
full
Indicates battery is 1/3
full
Displayed when Quick
charge is active.
Callers List information:
XX is the number of
callers listed. Press LOG
to change set up; press
CODE to change area
code.
You are trying to add an
item to the Directory and
it is full. Delete an item
that you no longer use.
Caller information: The
incoming call is from
outside your local
calling area.
23
Page 27

Prompt Meaning
No info
available
No name The Directory item has a
No number
to save
Oct 12 2x
2:54 pm
DIAL
Out of
Range
(and the
handset
beeps)
Paging
Base
Paging You The base is calling the
Caller information: The
telephone company is
unable to send caller
information.
number but no name.
You may leave it as it is
or add a name by
pressing the
key.
You have tried to copy a
number to the Directory,
but the Callers List item
has an unknown or
private number. These
numbers cannot be
saved. See “Private
name / number” on
page 24
Callers List information:
This is the time and date
display. The caller
called twice (2x), the
last time was at 2:54 pm.
Press the
key to call.
WARNING: You have 30
seconds to move closer
to the base before you
lose the call.
If you were making
changes in the Directory
or Callers List when you
went out of range, those
changes are lost after 30
seconds.
You (on the handset) are
calling the base.
handset. Press
I to
answer the call.
ADD display
DIAL display
Prompt Meaning
Private
name /
number
Ready to
use...
NEXT
Redial
empty
Rick
Brown
DIAL CHNGE
Ringer is
High
NEXT CHNGE
Display prompts © Northern Telecom.
Caller information: The
incoming caller has
requested that the name
(or number) not be
shown.
Usual idle display
prompt.
There are no numbers
stored in the Redial key.
Either you have deleted
the items, have not
dialed out, the handset
has been recently
turned on, or the power
has been out. Dial using
the dial pad, Callers List,
or Directory instead.
Directory information:
This is the name display
of someone in the
Directory. Press the
display key to call, or
press the CHNGE display
key to edit.
This is the volume level
(High, Low, or Off) of
the handset ringer.
DIAL
24
Page 28

Prompt Meaning
Sorry!
Try again
Unknown
number /
name
XX Callers
bumped
XX New
Callers
555-1440
DIAL EDIT
555-1234
DIAL CHNGE
Make sure you are
within range of the base,
then repeat the
procedure. If the prompt
remains, reset the
telephone by following
the procedure for
changing the security
code (see page 13).
Caller information: The
telephone company is
unable to provide the
number (or name) of this
caller.
XX callers were
removed from the
Callers List to make
room for new callers.
XX new calls have been
added to the Callers List
since you last checked
it. Press c to
access the list.
Callers List information:
Press the
key to call, or press the
EDIT display key to edit.
Directory information:
This is the number
display of someone in
the Directory. Press the
DIAL display key to call,
or press the CHNGE
display key to edit.
DIAL display
Handset lights
Multipurpose light (top right corner)
Flash
quickly
Flash You have a call on hold.
Flash
slowly
Flash
periodically
Intercom light
Flash
quickly
You have an incoming
call.
You have new callers.
If the handset is on
battery saver mode, you
have new callers.
You are sending or
receiving an intercom
call.
25
Page 29

Helpful hints
Base lights
Base light
Flash
quickly
Flash You have a call on hold.
Solid The handset is busy.
Charge light
Solid The handset battery is
Callers light
Flash
slowly
Intercom light
Flash
quickly
Solid You are on an intercom
You have an incoming
call.
charging.
You have a new caller in
your Callers List.
The base is calling the
handset or the handset is
calling the base.
call.
Locating the base.
For the best performance, locate the
base centrally in your house,
preferably in an open area, away
from refrigerators, fluorescent lights,
TV’s, etc. In addition, the base
should be plugged directly into a
wall outlet that is not controlled by
a switch. Do not use a power bar.
Do not use a telephone line cord
extension cord. Keep the handset in
a location where it will be as close
to standard room temperature as
possible.
The phone doesn’t work.
Make sure the battery is installed
properly in the handset.
Make sure the battery is charged.
Test the AC outlet; make sure it isn’t
a switched outlet. Make sure the
base is the only item plugged into
the power outlet. Do not use a
power bar. Reset the phone by
changing the security code (see
page 13).
Message light
Flash
slowly
You have new messages.
Talk/Mute light
Flash
quickly
Solid You are on a handsfree
Flash Mute is activated
You have an incoming
call.
call.
You cannot get a call through.
You must subscribe to tone service
from your local telephone
company.
26
Page 30

The battery is low even after charging.
The battery of your telephone can
be recharged and reused many
times. If the battery fails even after
charging for 5 hours, replace it with
a new Sanyo battery pack GESPCH01 or a 3N-270AA. The use of
other battery packs may cause
serious damage or malfunctions.
There is static on the handset.
There may be interference. Press
S to change channels. If any
electrical equipment (such as a
baby monitor) is in use, move away
from it.
You pressed the Scan key and still
have interference.
Keep pressing S until you
find a channel that is clear. You may
have moved to a channel that is
busy on another phone (especially
if you have more than one cordless
phone).
The base should be plugged
directly into a wall outlet, do not
use a power bar.
The handset display says you're out of
range, but you haven't moved.
The base may have lost power.
Check that the power adaptor is
plugged in. If you experience a
power failure, you will lose your
call after 30 seconds.
There may be radio interference
caused by fluorescent lights, electric
motors, or computers. Turn these
devices off, or move away from
them.
The handset display is blank.
The handset may be in battery saver
mode. Press any key to turn the
display on. If that doesn’t work, the
power may be off. Make sure the
handset power switch is On and the
battery is installed.
The display is in the other language.
Turn the handset power off, then
on. Press the ENG display key for
English and the ESPÑL display key
for Spanish.
The Charge light isn't on when the
handset is on the base.
The metal contacts on the handset
are not touching the contacts on the
base. Place the handset on the base
with the display facing up. Make
sure the handset hanger tab has
been inserted all the way.
Your held call is gone.
The telephone only holds a call for
five minutes.
27
Page 31

Regulatory information
Language, ringer volume, and
area code have changed back to
the defaults.
The base has been without power
for more than three days. Follow
the procedures in the Personalizing
your telephone section.
You can’t call on an extension phone.
Make sure that you haven’t left the
line on hold at the cordless phone.
To release the line, press t
and then e.
The handset beeps.
Look at the display and do what is
indicated.
What is a display key?
There are two keys below the
display. When a command (such as
DIAL or CHNGE) appears on the
bottom line of the display, press the
key below it to activate the
command.
Radio/TV interference
Telephones equipped with electronic
push-key dials generate and use radio
frequency energy, and if not installed
and used properly and in strict
accordance with the manufacturer’s
instructions, may cause interference to
radio and television reception.
These telephones have been tested and
found to comply with the limits for a
Class B digital device in accordance
with the specifications in Part 15 of the
FCC rules. While these rules are
designed to provide reasonable
protection, there is no guarantee that
interference will not occur in a
particular installation. You can
determine whether interference occurs
by monitoring your radio or television
reception while placing a call.
If your telephone causes interference,
one of the following measures may
correct the problem:
— Re-orient or relocate the receiving
TV or radio antenna, where this may
be done safely.
— To the extent possible, move the
telephone and the radio or
television farther away from each
other, or connect the telephone and
the radio or television to outlets on
separate circuits.
— Consult the dealer or an experience
radio/television technician for
additional suggestions.
Note: FCC registration does not constitute an expressed or implied guarantee
of performance.
28
Page 32

Rights of the telephone
company
If your telephone causes harm to the
telephone network, the telephone
company may stop your service
temporarily or ask you to remove your
equipment until the problem is
resolved. If possible, they will notify
you in advance. If advance notice is not
practical, you will be notified as soon as
possible and be given the opportunity
to correct the situation. You will also be
informed of your right to file a
complaint with the FCC.
Your telephone company may make
changes in its facilities, equipment,
operations or procedures that could
affect the proper function of your
telephone. If they do, you will be
notified in advance to give you an
opportunity to maintain uninterrupted
telephone service.
Federal Communications
Commission (FCC) notice
FCC registration number
This telephone equipment complies
with Part 68, Rules and Regulations, of
the FCC for direct connection to the
Public Switched Telephone Network.
(The FCC registration number appears
on a sticker affixed to the bottom of the
telephone.)
Your connection to the telephone line
must comply with these FCC rules:
— Use only an FCC standard RJ11W/
RJ14W or RJ11C/RJ14C network
interface jack and FCC-compliant
line cord and plug to connect this
telephone to the telephone line. (To
connect the telephone, press the
small plastic tab on the plug at the
end of the telephone's line cord.
Insert into a wall or baseboard jack
until it clicks. To disconnect, press
the tab and pull out.)
— If a network interface jack is not
already installed in your location,
you can order one from your
telephone company. Order RJ11W/
RJ14W for wall-mounted telephones
or RJ11C/RJ14C for desk or table
use. In some states, customers are
permitted to install their own jacks.
— Your telephone may not be
connected to a party line or coin
telephone line. Connection to Party
Line Service is subject to state tariffs.
(Contact the state public utility
commission, public service
commission, or corporation
commission for information.)
— It is no longer necessary to notify
the telephone company of your
telephone's Registration and REN
numbers. However, you must
provide this information to the
telephone company if they
request it.
— If you make changes or modifica-
tions not expressly approved by the
manufacturer, you could void your
authority to operate the equipment.
29
Page 33

— Equipment cannot be used on
public coin phone service provided
by your telephone company.
Connection to party line service is
subject to state tariffs. (Contact the
state public utility commission,
public service commission or
corporation commission for
information.)
Signaling method
This unit’s push-key dial pad allows it
to signal in tones (DTMF). It can
complete calls to local and longdistance lines and can also complete
long-distance calls using computer
telephone systems such as MCI™ or
SPRINT™.
MCI is a trademark of MCI.
SPRINT is a trademark of United
Telecommunications.
Ringer Equivalence Number
The FCC Registration label (on bottom
of telephone) includes a Ringer
Equivalence Number (REN), which is
used to determine the number of
devices you may connect to your
telephone line. A high total REN may
prevent telephones from ringing in
response to an incoming call and may
make placing calls difficult. In most
areas, a total REN of 5 should permit
normal telephone operation. To
determine the total REN allowed on
your telephone line, consult your local
telephone company.
Hearing aids
This telephone is compatible with
hearing aids equipped with an
appropriate telecoil option.
30
Page 34

Programming emergency numbers
When programming emergency
numbers or making test calls to
emergency numbers:
1. Remain on the line and briefly
explain to the dispatcher the reason
for calling before hanging up.
2. Perform such activities in the offpeak hours, such as early morning
or late evenings.
UL installation
instructions
Warning: To avoid electrical shock hazard to personnel or damage to equipment, observe the following precautions
when installing telephone equipment:
1. Never install telephone wiring
during a lightning storm.
2. Never install telephone jacks in wet
locations unless the jack is
specifically designed for wet
locations.
3. Never touch uninsulated telephone
wires or terminals unless the
telephone line has been
disconnected at the network
interface.
4. Use caution when installing or
modifying telephone lines.
The exclamation point
within an equilateral
triangle is intended to
alert the user to the presence of
important operating and maintenance
(servicing) instructions in the literature
accompanying the product.
This symbol on the product is used to
identify the following important
information. Use only with:
— Northern Telecom model
SPA-3545A-82 (Salom Electric)
power adaptor.
OR
— CSA-NRTL certified or UL listed,
CLASS 2 power source (12 Vac/200
mA max/50 or 60 Hz).
This product contains a
NICKEL-CADMIUM
RECHARGEABLE BATTERY
WHICH MUST BE RECYCLED OR
DISPOSED OF PROPERLY. Recycling
facilities may not be available in all
areas. The enclosed battery is labeled
indicating its type.
Important safety
instructions
1. Read and understand all
instructions.
2. Follow the warnings and
instructions marked on the product.
3. Unplug this product from the wall
outlet before cleaning. Do not use
liquid cleaners or aerosol cleaners.
Use a damp cloth for cleaning.
31
Page 35

C
D
Index
A
Answering calls
any key 1,
Handset
Speakerphone
Antenna 3, 5,
Area code
Arrow keys 3, 16–
Attaching the stand 6,
B
Base
2
Base light
Callers light
Description
Intercom light
Locating
Message light
Mute
Speakerphone
Talk/Mute light
Volume control
Base lights
Battery
Changing
Charging
Level indicator
Replacing
Battery disposal
Battery Low
Battery pack
Call reception
Call timer
Call Waiting
Callers bumped
Callers key
Callers light
Callers List
14
12
18
25
3
8
4
11
5
2
19
,
7
4
10
8
10
,
,
13
16
,
11
,
,
23
10
25
,
4
4
26
23
30
15
25
,
,
,
26
12
22
25
4
25
12
26
,
9
24
Copying to Directory
Deleting items
Description
Dialing
Setting up
Calls
Answering
Holding
7
,
25
Making
Speakerphone
Channel, changing
Charge light
Problems
Charging
CHNGE display key
22
Delete key
Desk mount
,
4
25
,
4
14
,
23
DIAL display key
27
Dialing
Directory 20–
11
Base
Callers List
Directory
Handset
Problems
Adding a pause
Adding names
Copying from Callers
Deleting items
Dialing
Editing
Entering names
Entering numbers
Key 3, 20,
Names 21
9
12
15
17
16
11
11
11
,
4
25
27
,
24
,
,
3
17
18
6
17
17
20
11
26
22
20
22
21
17
–
12
13
22
22
17
,
,
21
21
11
21
18
21
17
,
,
23
24
,
,
,
23
,
16
,
,
24
,
13
20
14
,
17
i
Page 36

Saving numbers 21
Viewing 20
Directory is full 23
Display 1, 3
Language 8, 13, 27
Prompts table 23, 24
Troubleshooting 27
Waking Handset up 9
Display key 3, 11, 27
DONE display key 17, 21, 22
E
EDIT display key 17, 24
End key 3, 4, 11, 12, 14–18, 20–22
Erasing Callers List items 17
Erasing Directory items 22
F
FCC notice 28
Flash key 3, 4, 19
H
Handset 2
Battery Life 8
Beeping 27
Charge contacts 3, 27
Description 3
Lights 25
Multi-purpose light 3, 25
Power switch 3, 8, 9
Volume control 3, 14
Handset display 1, 3
Language 8, 13, 27
Prompts table 23, 24
Troubleshooting 27
Turning it on 8, 9
Handset hanger tab 4, 7
Hearing aid compatibility 29
Hints 26
Hold key 3, 4, 11
Holding calls 11, 12, 27
I
Idle display message 8
Installation 5–9
Batteries 10
Intcm key 3, 19
Intercom call 19
Intercom key 1, 4, 19
Intercom light 4, 19, 25
K
Key description
Base 4
Handset 3
L
Language 8, 13, 27
Lights
Base 4, 25
Handset 3, 25
Line cord 2, 5, 6
Link, see Flash key
Locating the base 5, 8, 9, 10
Long distance 14, 17, 23
M
Message light 4, 25
Microphone 3
Mute 12
Mute light 4, 25
N
New Callers 15, 24
No info available 23
No name 23
No number to save 23
Number card 2
O
Out of range 10, 23, 27
P
Paging Base 19, 23
Paging You 19, 23
Parts list 2
ii
Page 37

Pause 21
Power adaptor 2, 30
Power cord 5
Power switch, handset 3, 8, 9
Predialing a number 18
Private name 24
Private number 24
Problems with phone 26
Prompts table 23, 24
Q
Quick Charge 9
Quick Reference Card 2
R
Radio interference 13, 28
Range 10, 23, 27
Redial empty 24
Redial key 1, 3, 4, 18
Redial List 18
Regulatory information 28
Repair information 32
Ringer Equivalence Number 29
Ringer volume
Base 4, 14
Handset 14
Prompt display 24
S
Safety instructions 30
Save key 3, 17, 21
Scan key 1, 3, 13
Problems 26
Security code 13
Sorry! Try again 24
Spanish language 8, 13, 27
Speakerphone 12
Mute 12
Stand 2
Attaching 6, 7
Subscribed services 19
T
Talk key 3, 11, 15, 17, 18, 19, 20
Talk/Mute key 4
Talk/Mute light 4, 25
Telephone cords 5
Telephone setup 13
Three Way Calling 19
Troubleshooting 26
Battery Low 26
Charge light 27
Dialing problems 26
Display language 27
Handset beeps 27
Holding calls 27
Out of range 27
Phone doesn't work 26
Ringer volume 27
Scan key 26
Static on line 26
U
Unknown name 24
Unknown number 24
Unpacking the phone 2
V
Volume control
Base ringer 4, 14
Base speaker 4, 14
Handset receiver 3, 14
Handset ringer 14
W
Wall mount 7
Warnings
Battery Low 23
Out of range 23
Warranty 32
iii
Page 38

P0844030/01 Printed in Malaysia
*Mæstro is a trademark of Northern Telecom
 Loading...