

Page 1
W
ASSEMBLING & INSTALLATION INSTRUCTIONS
ARNING! SHUT POWER OFF AT FUSE OR CIRCUIT BREAKER .
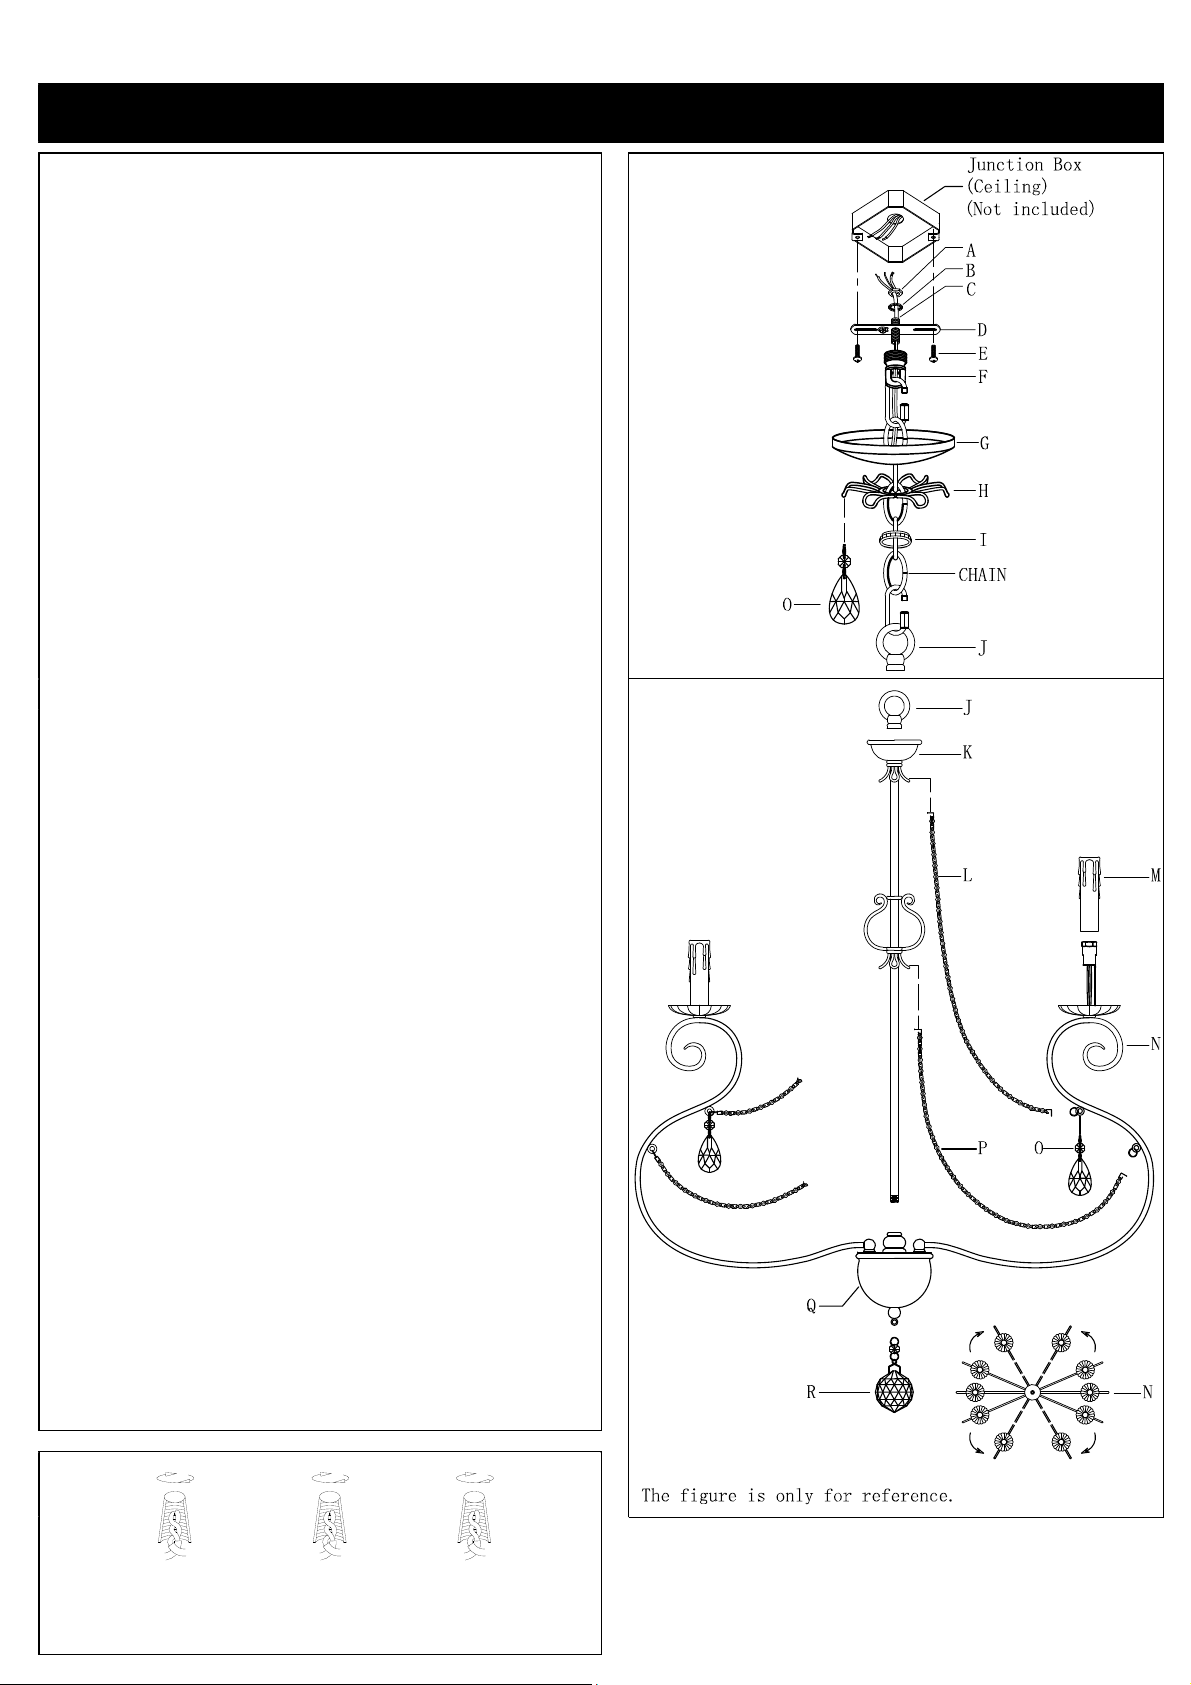
ASSEMBLING THE FIXTURE (Fig.2)
1. Shut off the power at the fuse box or circuit breaker. If
2. Carefully unpack the new fixture and lay all the parts on a clear
3. Attach the loop (J) to the column (K) by turning it clockwise
4. Attach the column (K) to the fixture body (Q) by turning it
5. Set the arms to suitable position, see Fig.2.
6. Hook the end of short
7. Hook the end of long
HANGING THE FIXTURE (Fig.1)
8. Thread the nipple (C) into the loop (F) until snug.
9. Thread the other end of the nipple (C) with the loop attached into
10. Place the lock washer (B) over end of the nipple (C) protruding
11. Take the crossbar assembly and mount to ceiling junction box
12. Use proper chain pliers to open one end link of the chain and
13. By measuring, determine correct number of links needed for
14. Lace the fixture wires through the chain.
15. Slip loop collar (I) and the canopy (G) and the
16. Open the other end link of the chain and hang the fixture on the
17. Feed the fixture wires thro ugh the loop (F) and nipple (C) and
CONNECTING THE WIRES (Fig.3)
18. Connect the electrical wire as shown in figure 3, making sure
COMPLETING THE INSTALLATION (Fig.1 and Fi g .2)
19. Raise the canopy (G)
20. Place the tube (M) over the socket of the arm (N).
21. Hang the crystals (O) to the top loop of the arm (N) and the loop
22. Hang the crystal (R) to the bottom of the fixture body (Q).
23. Install the light bulbs (not included) in accordance with the
Yo ur insta llatio n is now co mplet e. Ret urn po wer to the junctio n box
and test the fixture.
Fig.3
AVERTISSEMENT! COUPER LE COURANT AU NI VEAU DES FUSIBLES OU DU DISJONCTEUR.
necessary, remove the old fixture, including the mounting
hardware.
area. Take care not to lose any parts necessary for installat ion.
until tight.
clockwise u ntil tight.
crystals
(P) to the bottom loop of the column
(K) and the bottom loop of the arm (N).
crystals
(L) to the top loop of the column (K)
and the top loop of the arm (N).
the crossbar (D) until snug.
through the crossbar and thread the hex nut (A) onto the nipple
until tight.
with the junction box screws (E). Tighten the screws securely
with a screwdriver.
connect it to the fixture loop (J); then close the link.
proper hanging height. Using proper chain pliers to disconnect
and discard remaining chain.
column (H)
chain.
loop at the ceiling. Close the link.
pull until tight.
that all wire connector s are secured. If your outlet has a ground
wire (green or bare copper), connect the fixtures ground wire to
it. If t he junct io n box has no g rou nd wire , a tt ach t he bar e c op per
fixture wire to the green ground screw on the crossbar. Tuck the
wire connections neatly into t he ceiling junction box.
and the
ceiling; then raise the loop co llar (I) and thread into ceiling loop
protruding through canopy.
of the column (H).
fixture’s specifications: DO NOT EXCEED THE MAXIMUM
WATTAGE RATING! (NE PAS DEPASSER LA
PUISSANCE NOMINALE MAXIMALE!)
FIXTURE
WIRES
Black or
Smooth
HOUSE
WIRES
Black
(Hot)
FIXTURE
WIRES
White or
Ribbed
column (H) all the way to the
FIXTURE
WIRES
Bare
HOUSE
WIRES
White
(Neutral)
Copper
(Ground)
HOUSE
WIRES
Green or
Bare Copper(Ground)
over the
Fig.1
Fig.2
 Loading...