

CMA MACCHINE PER CAFFÈ S.R.L.
Via Condotti Bardini, 1 - 31058 SUSEGANA (TV) - ITALY - Tel. +39.0438.6615 - Fax +39.0438.60657 - www.astoria.com - info@astoria.com
2006/42/CE Machinery Directive
SAEP
ORIGINAL INSTRUCTIONS
ESPRESSO COFFEE MACHINE
Use and maintenance manual. Instructions for the user.

IMPORTANT: Read carefully before use - Store for future reference
Content rights The partial reproduction and dissemination of the contents in this document without the prior written consent
of the Manufacturer is forbidden. The Company logo is owned by the Manufacturer of the Machine.
Responsibility We are constantly striving to improve the accuracy of the information published in each Manual, but there may be
some inaccuracies. We assume no responsibility for any errors or omissions, or for damages resulting from the use of this document.

ESPRESSO COFFEE MACHINE
Use and maintenance manual. Instructions for the user.
1. SAFETY PRECAUTIONS
1.1 LEVEL OF TRAINING AND KNOWLEDGE REQUIRED OF THE USER
All users must be properly trained and knowledgeable about how the machine works and any residual risks present during its operation.
Users must be able to apply all the good practices in compliance with food
hygiene principles.
1.2 OPERATION
Even though the machine is provided with all the safety devices required to
eliminate possible risks for the User, there are still certain residual risks.
Such risks are related to machine parts that may pose a risk to users, if operated
improperly, assessed or deactivated incorrectly, or because the prescriptions
contained in this Manual were circumvented.
The machine is also equipped with appropriate warnings placed on residual
risk areas, which must be scrupulously observed.
The following residual risks present when the machine is in operation and being
used, must be observed as they cannot be eliminated:
WARNING FOR U.S.A:
Consuming beverages that have been prepared in this espresso machine will
expose you to lead, a chemical known to the State of California to cause birth
defects or other reproductive harm.
USER Manual
3 of 44
ELECTRICAL HAZARD
When using the electrical appliance, several safety standards must be observed:
• Do not touch the appliance with wet or damp hands or feet;
• Do not use the appliance barefooted;
• Do not use extension cords in rooms where there are showers or baths;
• Do not pull the power cord to disconnect the appliance;
• The appliance’s power cord must not be replaced by users. If the cord is dam-
aged, turn the appliance o and contact a Qualied Technician.
• Do not leave the appliance exposed to atmospheric agents (rain, sun, etc.);
• Do not access the inside of the machine;
• Do not spill liquids on the machine;
• Do not allow the appliance to be used by children or incompetent people.
HIGH TEMPERATURE HAZARD
Some parts of the machine can reach high temperatures:
• Avoid contact with the dispensing group, water spouts and steam nozzles;
• Do not place your hands or other body parts near the steam, hot water or
milk dispensing nozzle tips.
4 of 44
USER Manual
The appliance can only be used by people (including children under the
age of 8) with reduced physical, sensory or mental abilities, or lack of
experience or the necessary knowledge, if they are being supervised,
or have received instructions regarding using the appliance safely
and understanding the dangers inherent to it.
Children must be supervised to ensure that they do not play with the
appliance.
Users must promptly inform the Manufacturer if they notice any
machine or accident prevention system defects and/or malfunctions,
as well as any dangerous situations of which they become aware.
It is strictly forbidden to make changes of any kind or extent to the
machine and its functions, as well as to this document.
Make sure that a Qualied Technician periodically carries out routine
maintenance and inspects all safety devices.
Any unauthorised tampering with any parts of the machine renders
any guarantee null and void.
USER Manual
5 of 44

1.3 MAINTENANCE AND CLEANING
The following residual risks are present when maintaining and cleaning the
machine and cannot be eliminated:
ELECTRICAL HAZARD
The maintenance and cleaning operations must comply with the safety regulations:
• Do not carry out maintenance with the machine in operation;
• Do not immerse the machine in water;
• Do not spill liquids on the machine or use water jets when cleaning;
• Do not allow maintenance and cleaning operations to be carried out by chil-
dren or incompetent people;
• Do not remove the guards and/or parts of the body;
• Do not access the inside of the machine;
• Do not perform maintenance and cleaning operations other than those de-
scribed in this manual.
HIGH TEMPERATURE HAZARD
When cleaning, pay attention to the parts of the machine that can become
hot:
• Avoid contact with the dispensing group, water spouts and steam nozzles;
• Do not place your hands or other body parts near the steam, hot water or
milk dispensing nozzle tips.
6 of 44
USER Manual

1.4 PPE FEATURES
When maintaining and cleaning the machine, the following PPE is required:
Gloves
To protect all machine parts that come in contact with food (lter
holders, lters, etc.).
Only perform the maintenance and cleaning operations indicated in
this manual.
Any maintenance and cleaning operations not expressly discussed
in this document must only be performed by the Manufacturer's
Qualied Technicians.
All maintenance operations must be carried out when the power
supply has been turned o, the water mains has been closed o, and
the machine has completely cooled down.
If a malfunction cannot be resolved, turn the machine o and call
out one of the Manufacturer's Qualied Technicians. Do not attempt
any repairs.
The appliance must be descaled by one of the Manufacturer's Qualied
Technicians in order to ensure that its operation does not lead to the
release of materials which are hazardous for food use.
Any unauthorised tampering with any parts of the machine renders
any guarantee null and void.
USER Manual
7 of 44

Table of contents
ESPRESSO COFFEE MACHINE
Use and maintenance manual. Instructions for the user.
English
1. SAFETY PRECAUTIONS ............................................................ 3
1.1
LEVEL OF TRAINING AND KNOWLEDGE REQUIRED OF THE USER ..
1.2 OPERATION ............................................................................3
1.3 MAINTENANCE AND CLEANING .............................................. 6
1.4 PPE FEATURES ....................................................................... 7
2. INTRODUCTION .......................................................................9
2.1 Guidelines for reading the Manual ........................................ 9
2.2 Storing the Manual ............................................................... 9
2.3 Method for updating the Instruction Manual ...................... 10
2.4 Recipients ........................................................................... 10
2.5 Glossary and Pictograms ..................................................... 10
2.6 Guarantee ........................................................................... 10
3. MACHINE IDENTIFICATION .................................................... 11
3.1 Make and model designation .............................................. 11
3.2 General description ............................................................. 11
3.3 Customer service ................................................................. 11
3.4 Intended use ....................................................................... 11
3.5 Machine diagram ................................................................ 13
3.6 Control panel ....................................................................... 14
3.7 Data and marking ............................................................... 15
3.8 Energy Saving System ......................................................... 16
4. STORAGE ..............................................................................16
5. INSTALLATION ...................................................................... 16
6. COMMISSIONING .................................................................. 16
7. OPERATION ...........................................................................16
7.1 Safety precautions .............................................................. 16
7.2 Emissions ............................................................................ 16
7.3 Turning the machine on and o .......................................... 16
7.4 Water renewal ..................................................................... 17
7.5 Preparing the machine ........................................................ 18
7.6 Automatic coee dispensing function ................................. 18
7.7 Manual coee dispensing function (F.R.C. version) ............. 19
7.8 Dispensing steam ................................................................ 19
7.9 Dispensing with Autosteamer ............................................. 20
7.10 Dispensing hot water .......................................................... 20
7.11 Lighting .............................................................................. 21
7.12 Cup warmer ........................................................................ 21
7.13 Energy Saving Management ............................................... 22
8. PROGRAMMING ...................................................................23
8.1 COFFEE DOSE programming ................................................ 23
8.2 Print last dispensed beverage graph ................................... 26
8.3 SERVICE PARAMETER conguration ..................................... 27
3
8.4 DATE and TIME conguration............................................... 28
8.5 COFFEE RECIPE selection ...................................................... 29
8.6 SCREENSAVER conguration ................................................ 30
8.7 BEVERAGE COUNTER list ...................................................... 31
8.8 Viewing the WATER LITRE COUNTER .................................... 32
8.9 Tips for a good cup of coee ................................................ 32
9. MAINTENANCE AND CLEANING ............................................. 33
9.1 Safety precautions .............................................................. 33
9.2 Periodic maintenance .......................................................... 33
9.3 Scheduled maintenance ...................................................... 34
9.4 Grinder wear automatic check ............................................. 34
9.5 Water softener regeneration ............................................... 34
9.6 Malfunctions and solutions ................................................. 35
9.7 Cleaning operations ............................................................ 36
10. SPARE PARTS ........................................................................38
11. DECOMMISSIONING .............................................................. 38
11.1 Short period of machine inactivity ...................................... 38
11.2 Long period of machine inactivity ....................................... 38
12. DISASSEMBLY ....................................................................... 38
13. DISPOSAL ............................................................................. 39
13.1 Disposal information ........................................................... 39
13.2 Environmental information ................................................. 39
14. GLOSSARY ............................................................................ 39
15. ALPHABETICAL INDEX OF TOPICS ..........................................40
8 of 44
USER Manual
2. INTRODUCTION
Please read this Manual in its entirety before using
the appliance, in order to optimise machine performance
and operate it safely.
The espresso coee machine you have purchased
has been designed and manufactured with innovative
methods and technologies which ensure long lasting
quality and reliability.
This Manual is the guide that will enable you to learn
about the benets of choosing our brand. You will nd
information on how to get the best out of your appliance,
how to keep it running eciently and what you should
do if problems occur.
Keep this Manual in a safe place. If you lose it, you can
request another copy from the Manufacturer.
UNITS OF MEASUREMENT
The units of measurement are those provided by the In-
ternational System (SI).
PICTOGRAMS
Descriptions preceded by these symbols contain very
important information/requirements, particularly in regards
to safety. Failure to comply with these may result in:
• Danger to the operator's safety;
• Injury, including serious injury, to users (in some cases,
even death);
• Loss of the guarantee;
• The Manufacturer waiving liability.
DANGER symbol used when there is a risk of permanent serious
injury that would require hospitalisation, or in extreme cases,
even cause death.
Before using the machine, carefully read and follow the
instructions contained in this publication. Keep this manual
and all attached publications in an accessible and secure place.
This document assumes that the machine is installed in a location
where the current work safety and hygiene standards are observed.
The instructions, drawings and documentation contained in this Manual are technical and condential. They
are the sole property of the Manufacturer, and may not
be fully or partially reproduced in any way.
The Manufacturer reserves the right to make any
improvements and/or modications to the product. We
guarantee that this Manual reects the technical state of
the appliance at the time it was released to the market.
We take this opportunity to invite customers to make
any proposals to improve the product or its Manual.
2.1 Guidelines for reading the Manual
This Manual is divided into separate chapters. The chapter
order is linked to the temporal logic of the life of the machine.
Terms, abbreviations and pictograms are used to facilitate
the immediate understanding of the text.
This Manual consists of cover, index and a series of chapters.
Each chapter is sequentially numbered. The page number is
shown in the footer.
The rst page displays the machine identication data and
the last page displays the date and revision of the Instruction
Manual.
CAUTION symbol used when there is a risk of minor injury that
could require medical attention.
WARNING symbol used when there is a risk of minor injury that
could be treated with rst-aid or similar measures.
NOTE symbol used to provide important information about the
topic.
2.2 Storing the Manual
The Instruction Manual must be stored in a safe place and
accompany the machine in all ownership transfers.
The manual should be stored, handled with care with clean
hands and not placed on dirty surfaces. Do not remove, tear
or arbitrarily modify any of its parts.
The manual must be stored away from moisture and heat,
and in close proximity to the machine it refers to.
On the user's request, the Manufacturer can provide additional copies of the Instruction Manual.
ABBREVIATIONS
Sec. = Section
Chap. = Chapter
Para. = Paragraph
P. = Page
Fig. = Figure
Tab. = Table
USER Manual
9 of 44

2.3 Method for updating the Instruction
Manual
The Manufacturer reserves the right to modify and make
improvements to the machine without providing notice or updating the Manual that has already been received by the user.
Moreover, when substantial changes made to the machine
require the modication of one or more chapters of the Instruction Manual, the Manufacturer will send users the chapters
aected by the changes or a revision of the entire Manual.
It is the users' responsibility to replace the old document
with the new revision.
The Manufacturer is responsible for the Italian content.
Translations cannot be fully veried; therefore, in the event
of inconsistency, users can refer to the Italian version or if
necessary, contact the Manufacturer who will make the appropriate changes.
Should the Manual become illegible or otherwise hard to read,
the user must request a new copy from the Manufacturer before
carrying out any work on the machine.
IT is absolutely forbidden to remove or rewrite parts of the
Manual.
The instructions, drawings and documentation contained
in this manual are condential and the sole property of the
Manufacturer. They may not be reproduced in any way, either
in full, or in part without prior authorisation.
Users are responsible for complying with the instructions
contained in this Manual.
Should any incident occur as a result of incorrect use of these
recommendations, the Manufacturer declines any liability.
This manual is also available on the manufacturer’s website.
2.5 Glossary and Pictograms
This paragraph lists uncommon terms or terms whose
meanings are dierent from those most commonly used.
Abbreviations are explained below, as well as the
meaning of pictograms describing the operator's qualication and the machine status; they are used to quickly
and uniquely provide the information needed to correctly and safely use the machine.
2.5.1 GLOSSARY
User
The person or persons in charge of operating, maintaining and cleaning the machine described in this
manual.
Manufacturer's Qualied Technician
A person specially trained and qualied to connect,
install and assemble the machine; use special equipment
(hoists, forklifts, etc.); perform routine or unscheduled
maintenance that may be particularly complex or potentially dangerous if performed by the user; and, pay
special attention to safety and hygiene issues.
All other glossary entries are listed in Chap."14. GLOSSARY" on
page 39.
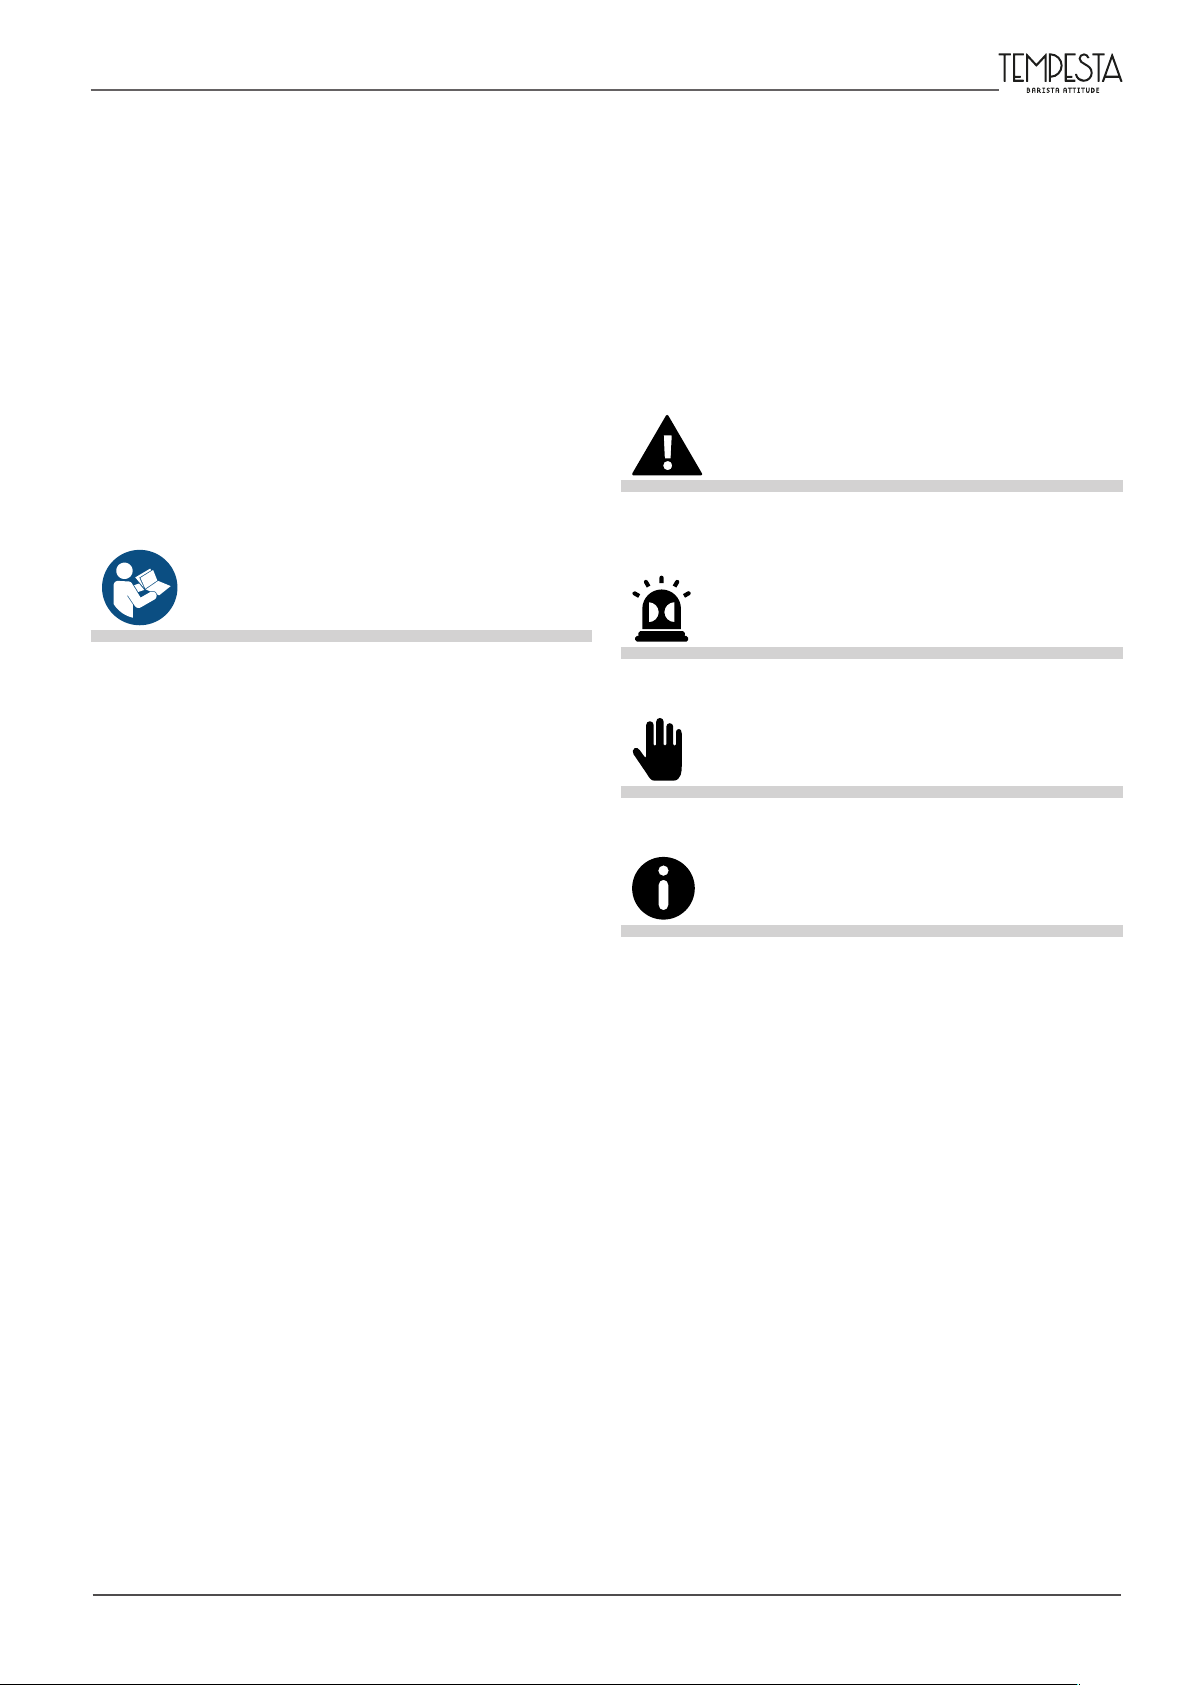
2.5.2 PICTOGRAMS
PICTOGRAM DESCRIPTION
2.4 Recipients
This Manual is addressed to the machine’s User,
namely, the person in charge of operating, maintaining
and cleaning the machine described in this document.
MACHINE RECIPIENT QUALIFICATIONS
The machine is intended for a professional nongeneralised use, so it is to be used by trained people,
and particularly those who:
• Are aged 18 and over;
• Are physically and mentally capable of using the
machine;
• Are able to understand and interpret the Instruction
Manual and safety requirements;
• Know the safety procedures and how they are imple-
mented;
• Are able to use the machine;
• Have understood the procedures of use as dened
by the machine's Manufacturer.
Electrical hazard
High temperature hazard
The use of protective gloves is mandatory
It is mandatory to read the documentation
2.6 Guarantee
All of the machine's components are covered by a
12-month guarantee, except for electrical and electronic
components and parts prone to wear and tear.
10 of 44
USER Manual

3. MACHINE IDENTIFICATION
3.1 Make and model designation
The machine and model ID information
is found on the unit's NAMEPLATE and in
the provided EC DECLARATION OF CONFORMITY.
3.4 Intended use
The espresso coee machine has been
designed to professionally prepare hot
drinks such as tea, cappuccinos and weak,
strong and espresso coee, etc.
The appliance is not intended for domestic use, it is intended for professional
purposes only.
3.2 General description
The machine described in this Manual
consists of mechanical, electrical, and
electronic components which, when used
together, produce milk, coee and waterbased beverages.
This product is manufactured in compliance with the EU Directives, Regulations and Standards indicated in the EC
DECLARATION OF CONFORMITY provided
with the machine.
This machine is designed and constructed to operate only after being
properly connected to a hydraulic and
electrical network and placed so as to be
sheltered from atmospheric agents.
The machine can be used under all the
conditions set forth, contained or described in this document; any other conditions must be considered dangerous.
The machine must be installed in a place
where its access is restricted to qualied
personnel only who have received suitable
training (coee shops, restaurants, etc.).
3.3 Customer service
CMA MACCHINE PER CAFFÈ S.R.L.
Via Condotti Bardini, 1 - 31058 SUSEGANA (TV) - ITALY
Tel. +39 0438 6615 - Fax +39 0438 60657
E-mail: service@astoria.com - Web-site: www.astoria.com
C.M.A. FRANCE
67 rue Marcel Dassault - 93140 BONDY - FRANCE
Tel. +33 1 48547208 - Fax +33 1 48546578
E-mail: bondy@astoria.fr - Web-site: www.astoria.com
G.E.E.C.
7912 Industrial Village Road - GREENSBORO NC 27409 - USA
Tel. 336 393 0224 - Fax 336 393 0295
E-mail: info@geec.com - Web-site: www.usa.astoria.com
USER Manual
SC MACCHINE PER CAFFE' ESPRESSO MCE SRL
Calea Sagului, DN 59, KM 8+300 - 300516 TIMISOARA - ROMANIA
Tel. +40 256 306 492/4 - Fax +40 256 306 496
E-mail: mce@mcesa.com - Web-site: www.mcesa.com
RCW RUS LLC
Business Center PORTPLAZA
Proektiruemy proezd 4062, 6/16 - 115432 MOSCOW - RUSSIA
Tel. +7(495) 925 75 56 - E-mail: info@rcwrussia.ru
11 of 44

PERMITTED USES
with the Manufacturer. Only operations
All uses compatible with the technical features, operations and applications
described in this document which do
not endanger the safety of users or cause
damage to the machine or its surrounding environment.
All uses not specically mentioned in this Manual
are prohibited and must be expressly authorised
by the Manufacturer.
INTENDED USES
The machine has been designed exclusively for professional use.
The use of products/materials other
than those specied by the Manufacturer,
which can cause damage to the machine
and be dangerous for the operator and/or
those in close proximity to the Machine,
is considered incorrect or improper.
CONTRAINDICATIONS OF USE
The machine must not be used:
• For uses other than those listed in para.
3.4, or for uses that dier from or are not
mentioned in this Manual;
• With materials other than those listed
in this Manual;
discussed in this document are allowed;
any operation not listed and described
herein is to be considered improper and,
therefore, hazardous.
IMPROPER USE
The only permitted uses are described
in the Manual; any other use is considered
improper and, therefore, hazardous.
GENERAL SAFETY FEATURES
The user must be aware of accident
risks, safety devices and the general safety
rules set forth in EU directives and by the
legislation of the country where the line
is installed.
The user must know how all the machine's devices work.
They must also have fully read this
Manual.
Maintenance work must be performed
by qualied technicians after the machine
has been properly assembled.
The tampering or unauthorised replacement of one or more machine components, the use of accessories which
modify its use and the use of materials
other than those recommended in this
Manual, can cause accidents.
• With safety devices that have been
disabled or are not working.
INCORRECT USE OF THE MACHINE
The type of application and per-
formance that this machine has been
designed for, requires a number of operations and procedures that cannot
be changed, unless previously agreed
12 of 44
USER Manual

3.5 Machine diagram
7. ON switch
8. Steam lever
9. Steam nozzle anti scalding
10. Hot water spout
11. Back light logo
12. Adjustable foot
13. Filter holders
14. Dispensing compartment
LED light
15. Display touchscreen
16. Cup holder grille
17. Cup warmer shelf
18. Machine on indicator light
19. Manual coee button
20. Manual coee lever
2
11
5
9
3
13
7
6
10
8
12
4
Standard version
14
11
5
7
6
10
2
9
3
13
1
USER Manual
12
8
4
F.R.C. version
13 of 44

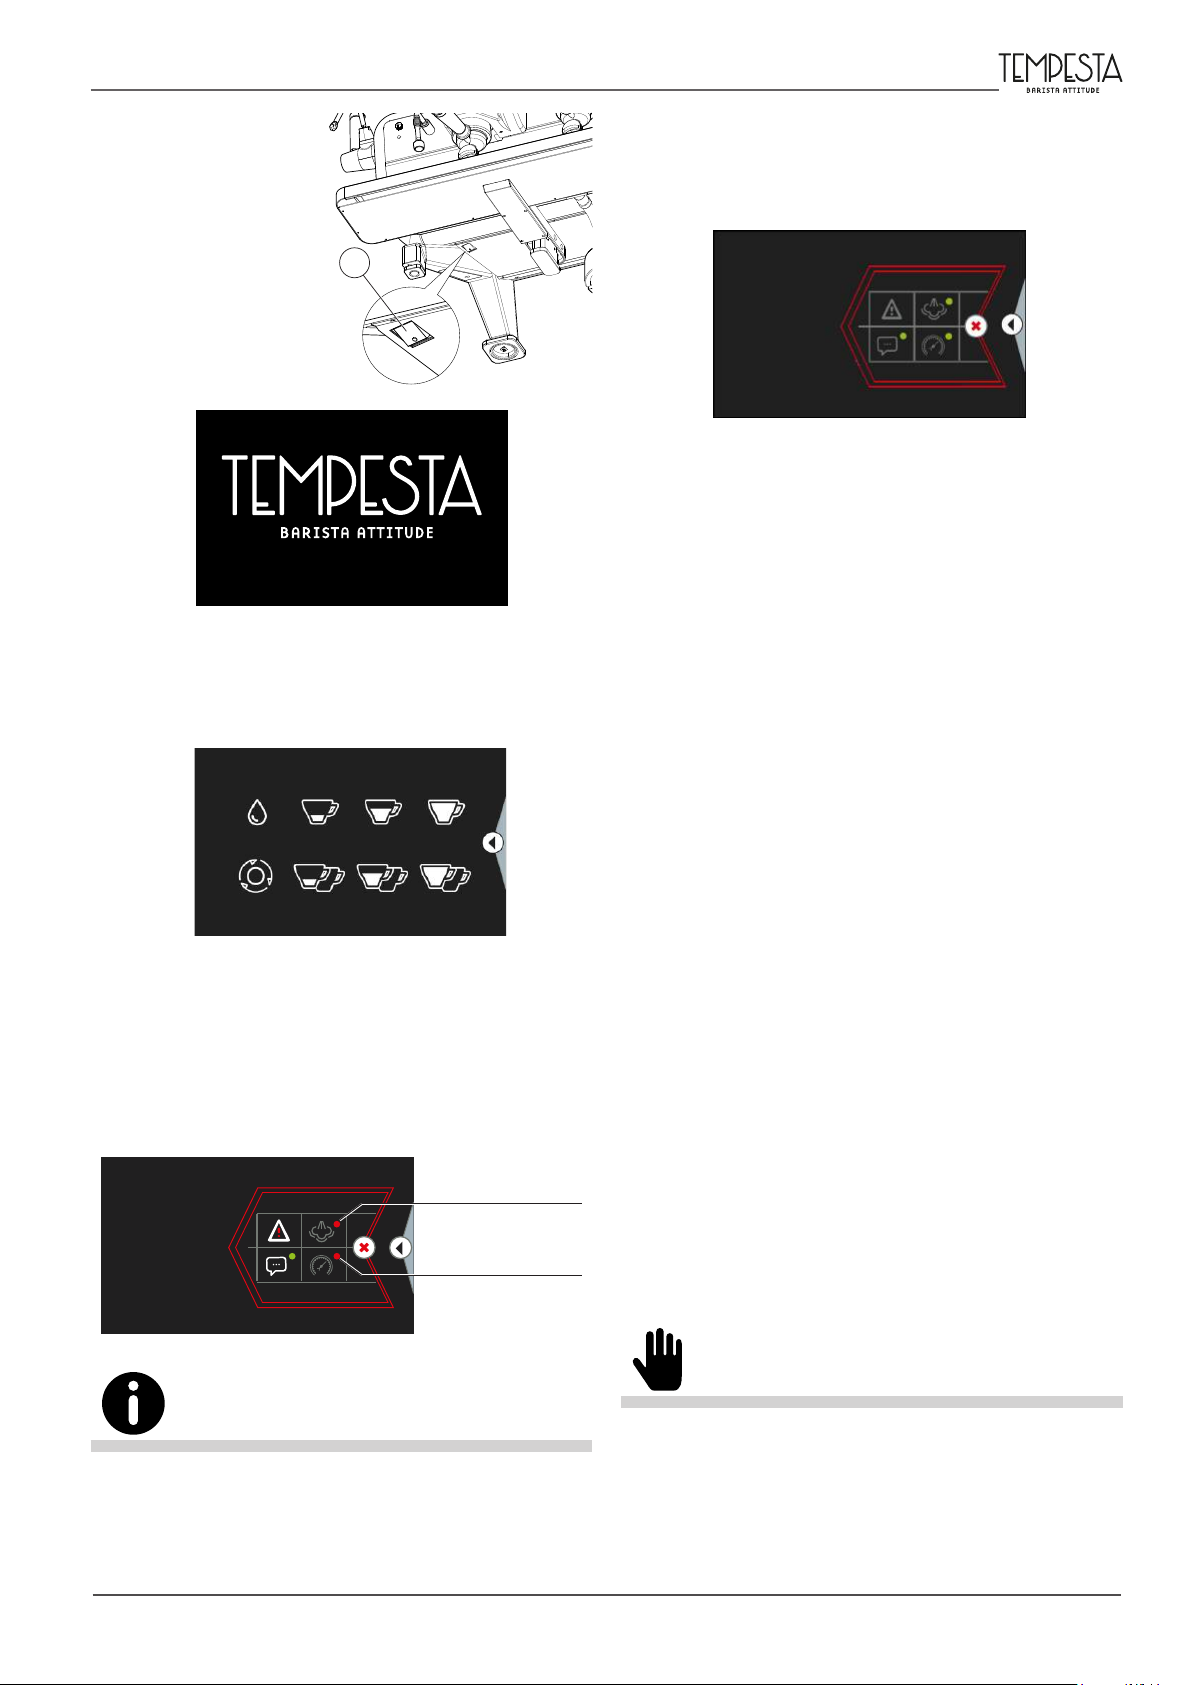
3.6 Control panel
The machine is completely controlled through the touch screen display located on the front. The display will also
show machine malfunctions, if any:
START/STOP button
Warning indication
Operating mode set up
Beverage selection button
Control access
Beverage selection buttons
The main machine parameters are accessible through the key :
MONDAY
steam pressure
value
Machine warnings
EXIT button
Cup warmer
Back light logo
EXIT button
water pressure
value
Parameter menu
Work surface light
The machine menu can be accessed through the key :
MACHINE
Manual shutdown Dispensing group temperature
Manual standby
MONDAY
GROUP
Manual standby
Beverages served over
the course of the day
User conguration
Machine informations
Technical conguration
Manual shutdown
14 of 44
Operating mode set up
CONF / PROG / ECO
USER Manual

3.7 Data and marking
The machine’s technical data is shown in the
following table:
TECHNICAL DATA
TABLE
Voltage (V)
Max. power (W)
Frequency (Hz)
Capacity coee
boiler
Capacity operation pressure
(l)
2GR
(STANDARD / FRC)
2GR
(FRC)
3GR
(STANDARD / FRC)
3GR
(FRC)
220/380 240/415 200 220/380 240/415 200
4.000 5.000 3.500 6.000 7.000 5.000
50-60
1,2 l x 2 1,2 l x 3
8,5
Width (mm) 1035 1175
Depth (mm) 618
Height (mm) 500
Net weight (kg) 97 117
Safety valve
calibration
0,19 MPa (1,9 bar)
Steam heating
unit opera-
0,08 - 0,14 MPa (0,8 - 1,4 bar)
tion pressure
Supply water
pressure
0,15 - 0,6 MPa MAX (1,5 - 6 bar MAX)
Recommended
coee delivery
0,8 - 0,9 MPa (8 - 9 bar)
pressure
Temperature
work envi-
5 - 35°C 95° U.R.MAX
ronment
Sound pressure
level
< 70 dB
According to Directive 2006/42/EC, the machine bears
a CE marking, meaning that the Manufacturer declares,
under his own responsibility, that the unit is safe for
people and property.
The CE label which provides the identication data
is axed under the drain tray. Below is an example of a
nameplate:
MARCHIO COMMERCIALE
CMA MACCHINE PER CAFFÈ S.r.l.
Via C. Bardini,1 SUSEGANA (TV) - ITALY
Tel. +39.0438.6615 Fax +39.0438.60657
S/N:
V
Mod.
W
Y
Hz
MADE IN ITALY
The CE label is axed
under the drain tray
MONDAY
INFO
Keypad software version
Ver. 338 Rev. 013.13
01/04/2016
Basic software version
Ver. 396 Rev. 013.14
18/03/2016
Serial number NNNNNN
WI-FI
Enter the "Menu” section (see the instructions in the
following chapters) and select the
button to view
the machine's serial number.
When contacting the Manufacturer, always provide
the following information:
• S/N - machine serial number;
• Mod. - machine model
• Y - year of manufacture;
The appliance data can also be found on the label
located on the machine's packaging.
It is forbidden to remove or damage the nameplate. If this occurs,
replace it as a matter of urgency, dealing exclusively through the
Manufacturer.
USER Manual
15 of 44

3.8 Energy Saving System
The machine is equipped with software that manages the automatic standby system during breaks, the
night energy-saving feature and the smart temperature
adjustment.
This allows a considerable amount of energy to be
saved during night breaks, whilst maintaining the machine in a condition that can quickly return to operating
mode.
Moreover, the software only distributes the power
where and when needed, thus allowing energy to also
be saved during normal operation.
When programmed, the system automatically puts
one or more groups into standby mode when the workload decreases and prepares them for full capacity when
needed.
Three choices are provided:
•
•
•
: Stand by manual activation
: programmed operation
: self-learning management.
7. OPERATION
7.1 Safety precautions
Carefully read the instructions provided in chapter "1. SAFETY
PRECAUTIONS" on page 3 .
7.2 Emissions
VIBRATIONS
Under conditions of use that meet the indications of
correct use provided in this manual, any detected vibrations do not give rise to dangerous situations.
SOUND EMISSIONS
The noise level emitted by the machine is on average
lower than 70 dB; therefore, there is no obligation to use
personal protective equipment for the auditory system.
Notify the Manufacturer if the machine emits unusual
noises.
To activate the Energy Saving mode, see para. 7.13 on page 22.
4. STORAGE
The machine is stored by the Manufacturer or the
Distributor.
5. INSTALLATION
The machine must only be installed by one of the
Manufacturer's Qualied Technicians.
The machine's support base must be perfectly level and have no
irregularities.
ELECTROMAGNETIC ENVIRONMENT
The machine is designed to work properly in any
industrial electromagnetic environment, falling within
the Emission and Immunity limits provided by current
standards.
7.3 Turning the machine on and o
After the hydraulic and electrical mains have been
connected by a Qualied Technician, make sure that the
drain tray under the cup holder grille (10) is correctly
connected to the drain.
10
6. COMMISSIONING
The machine must only be commissioned by one of
the Manufacturer's Qualied Technicians.
16 of 44
USER Manual
Check that all the
steam valves are closed.
Turn the machine on
using the main switch (1)
and follow the instructions provided on the
display, as described below.
When the machine has started up, the warm-up phase
begins. When the warm-up phase has been completed,
the machine will be ready to dispense coee and the
screen shown below will appear on the display.
1
In some cases, such as, for example, after the groups
have been washed, all the selections may be inactive for
a short time, the display may have reduced brightness
and some messages may appear on the right bar.
Simply wait a few seconds until the temperature has
been fully regulated: the display will return to its normal
brightness and all the selections will once again be active.
7.3.1 Turning the machine o
Turn o the machine via the main switch (1).
7.4 Water renewal
When the machine is being installed, the Qualied
Technician must replace the water inside the hydraulic
circuits by following these steps:
It may sometimes take longer for the steam to be
ready for dispensing than the coee. If this occurs, wait
a few minutes until the green steam icon appears on
the display.
The green icon indicates that the machine is at the
programmed pressure and steam is ready to be dispensed.
Steam
not available
Coee supply
not available
• When the installation is complete, the appliance must
be started, brought to nominal working condition and
left in the “ready-to-operate” status for 30 minutes;
• Next, the appliance has to be turned o and fully
emptied of the rst water introduced into the entire
hydraulic circuit, in order to eliminate any initial
impurities;
• Then, the appliance must be lled with water and
brought to the nominal working conditions;
• Turn the machine o again and empty all the water
in the hydraulic circuit;
• Turn the machine back on, then ll it and bring it to
the nominal working conditions;
• When the "ready to operate" status is reached, continuously dispense from each coee group, in order
to empty the coee circuit of at least 0.5 litres.
• Continuously release steam for at least 1 minute from
each steam dispensing point.
Before using the machine, carry out some empty dispensing cycles
with the lter holders attached for several seconds. This procedure
releases any air inside the hydraulic circuit and in turn, allows the
dispensing groups to fully heat up.
USER Manual
If the machine remains idle for longer than a week, a Qualied
Technician must renew 100% of the water inside the hydraulic
circuits, as indicated above.
17 of 44
7.5 Preparing the machine
7.5.1 Grinding and dosing coee
It is important to have a grinder-dispenser next to the
machine so that the coee can be ground on a daily basis.
The coee must be ground and dispensed according to instructions provided by the manufacturer of the
grinder-dispenser. The following points should also be
kept in mind:
• To make a good espresso, we recommend that you
do not store large amounts of coee beans. Comply
with the expiry date indicated by the producer;
• Never grind large volumes of coee, it is advisable to
prepare the amount that can be held in the dosing
device and if possible, use it by the end of the day;
• Do not buy pre-ground coee, as it perishes quickly.
If necessary, buy coee
in small vacuum-sealed
packs.
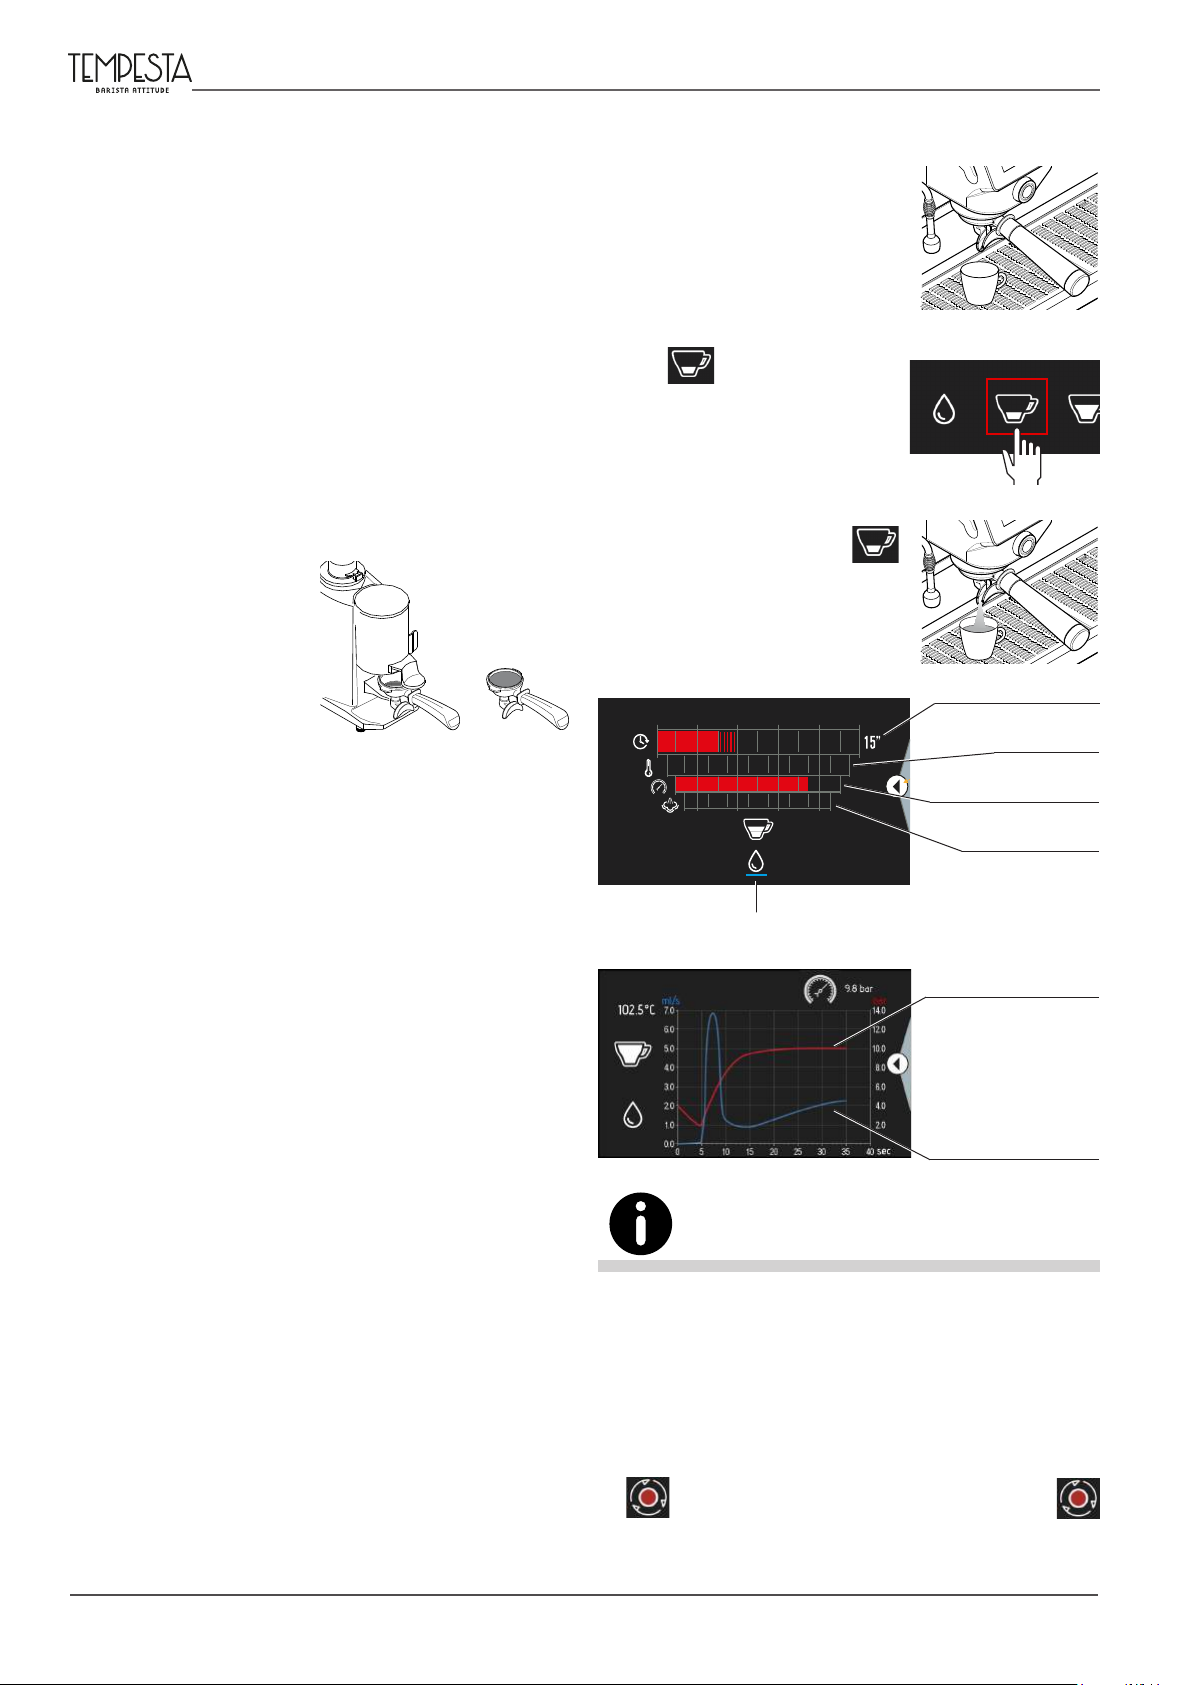
7.6 Automatic coee dispensing function
• Place the cup under the dispensing spout;
• press the desired dose button,
e.g.
coee is dispensed (LED will
switch on);
• To stop coffee dispensing
ahead of time, press the
button again;
and wait until the
Dispensing time
7.5.2 Preparing the lter holder
• Fill the lter with a dose of ground coee (approx. 6-7
g) and compress it with the press;
• Hook the lter holder to the group without closing it
too tightly in order to prevent the gasket from wearing quickly;
• For the same reason we recommend that the edge of
the lter is cleaned before attaching the lter holder
to the dispensing group;
• Follow the procedures specied by the manufacturer
of the grinder-dispenser.
Temperature
Pump pressure
Steam pressure
Hot water dispensing
enabled
Red chart:
delivery pressure
Blue chart:
supply quantity
The graph represents the exact performance of the pressure in the
pre infusion only if only one dispensing is in eect.
In case of two or more concomitant deliveries, the graph on the
other displays will not indicate the actual pressure value of the
pre infusion, but that of the instantaneous pressure because the
pump is already in operation.
18 of 44
• In order to continuously dispense coee, select the
button and stop it by pressing the same
button again.
USER Manual

Continuous
dispensing
7.8 Dispensing steam
• Immerse the steam nozzle into
the liquid to be heated;
COFFEE can be dispensed via
the button under the individual
displays (13).
When the button is pressed, the
machine will dispense the type of
coee pre-set by the manufacturer.
Press the same button again to
stop dispensing.
13
7.7 Manual coee dispensing function
(F.R.C. version)
• Place the cup under the dis-
pensing spout;
• Lower the lever located next
to the group (14). The amount
of coffee dispensed will be
proportional to the downward
position of the lever;
• To stop dispensing, push the
lever back up again.
14
• lower the tap lever;
• to end the delivery, bring the
lever upwards.
Avoid contact with the steam nozzles, do not place your hands or
other body parts near the steam nozzle tips.
To optimally froth the milk, follow these simple rules:
For a better coee, leave the lter to infuse for a few seconds
using the lever.
Do not remove the lter holder from the dispensing group when
coee is being dispensed.
The machine is programmed by default. If you would like to modify
the coee doses, proceed as indicated in para. 8.1 on page 23.
Provided that a group rinse operation has been scheduled, it
is possible to carry it out by pressing the START/STOP button
(continuous supply) or the manual button prior to inserting the
lter holder.
In this case, the 2 buttons must NOT be used to supply coee, as
the quantity of water produced is not sucient.
• Only heat the amount of milk that you intend to use;
once heated, it will have to be completely poured out
of the jug and cannot be reheated;
• Froth the milk which should be at a temperature of
around 4°C.
To keep the steam nozzle tips in perfect working order, it is
advisable to carry out a brief dry dispensing run after each use.
Keep the tips clean at all times using a cloth dampened in
lukewarm water.
The condensation draining operation must be carried out for
at least 2 seconds before using the steam
nozzle.
Only leave the steam wand immersed in the
milk for the time needed to heat it.
Do not open the steam valve with the steam
wand immersed in milk while the machine
is switched o.
MILK
USER Manual
19 of 44

7.9 Dispensing with Autosteamer
• Immerge the tips of the Autosteamer into the milk;
• sur l'écran, sélectionner la touche désirée, par exemple
et patienter jusqu'à ce que la
vapeur s'échappe;;
• wait until the delivery is nished;
Before using the milk frother, press one of the autosteamer
selection buttons to let out some short spurts of air, until all the
condensation water has been released. To stop dispensing, press
the same button again.
• To stop dispensing ahead of
time, press the same key
again.
Medium
autosteamer
dose
Short autoste-
amer dose
• Only heat the amount of milk that you intend to use;
once heated, the milk will have to be completely
poured out of the jug and cannot be reheated;
Long autoste-
amer dose
Continuous
frothing
Keep the tips clean at all times using a cloth dampened in
lukewarm water. The milk can be kept in the refrigerator for a
maximum of 3-4 days.
Leave the steam nozzle immerged in the milk only for the heating
time required.
To change the autosteamer's temperature or to adjust the milk
foaming, require the intervention of a Qualied Technician.
7.10 Dispensing hot water
• Place the pot under the hot
water spout;
• Select the
display and wait for the hot
water to be dispensed;
• To stop the hot water dispensing ahead of time, press the
button again.
button on the
• The steam wand guarantees a correspondence of
± 3°C between the set temperature and the real
temperature of the milk, only if the starting milk
temperature is 4°C;
• Since the steam stops dispensing when the set milk
temperature is reached, in order to prevent the milk
froth from spilling out, do not ll the jug more than
half way with liquid;
• Use a suitably-sized container for the amount of milk
that requires frothing (recommended 200 ml approx.),
and cylindrical shape, not conical (see gure).
20 of 44
Avoid contact with the hot water nozzle,
do not place your hands or other body
parts near the hot water nozzle tips.
The machine is programmed by default. If you would like to modify
the doses, proceed as indicated in para. 8.1 on page 23.
USER Manual
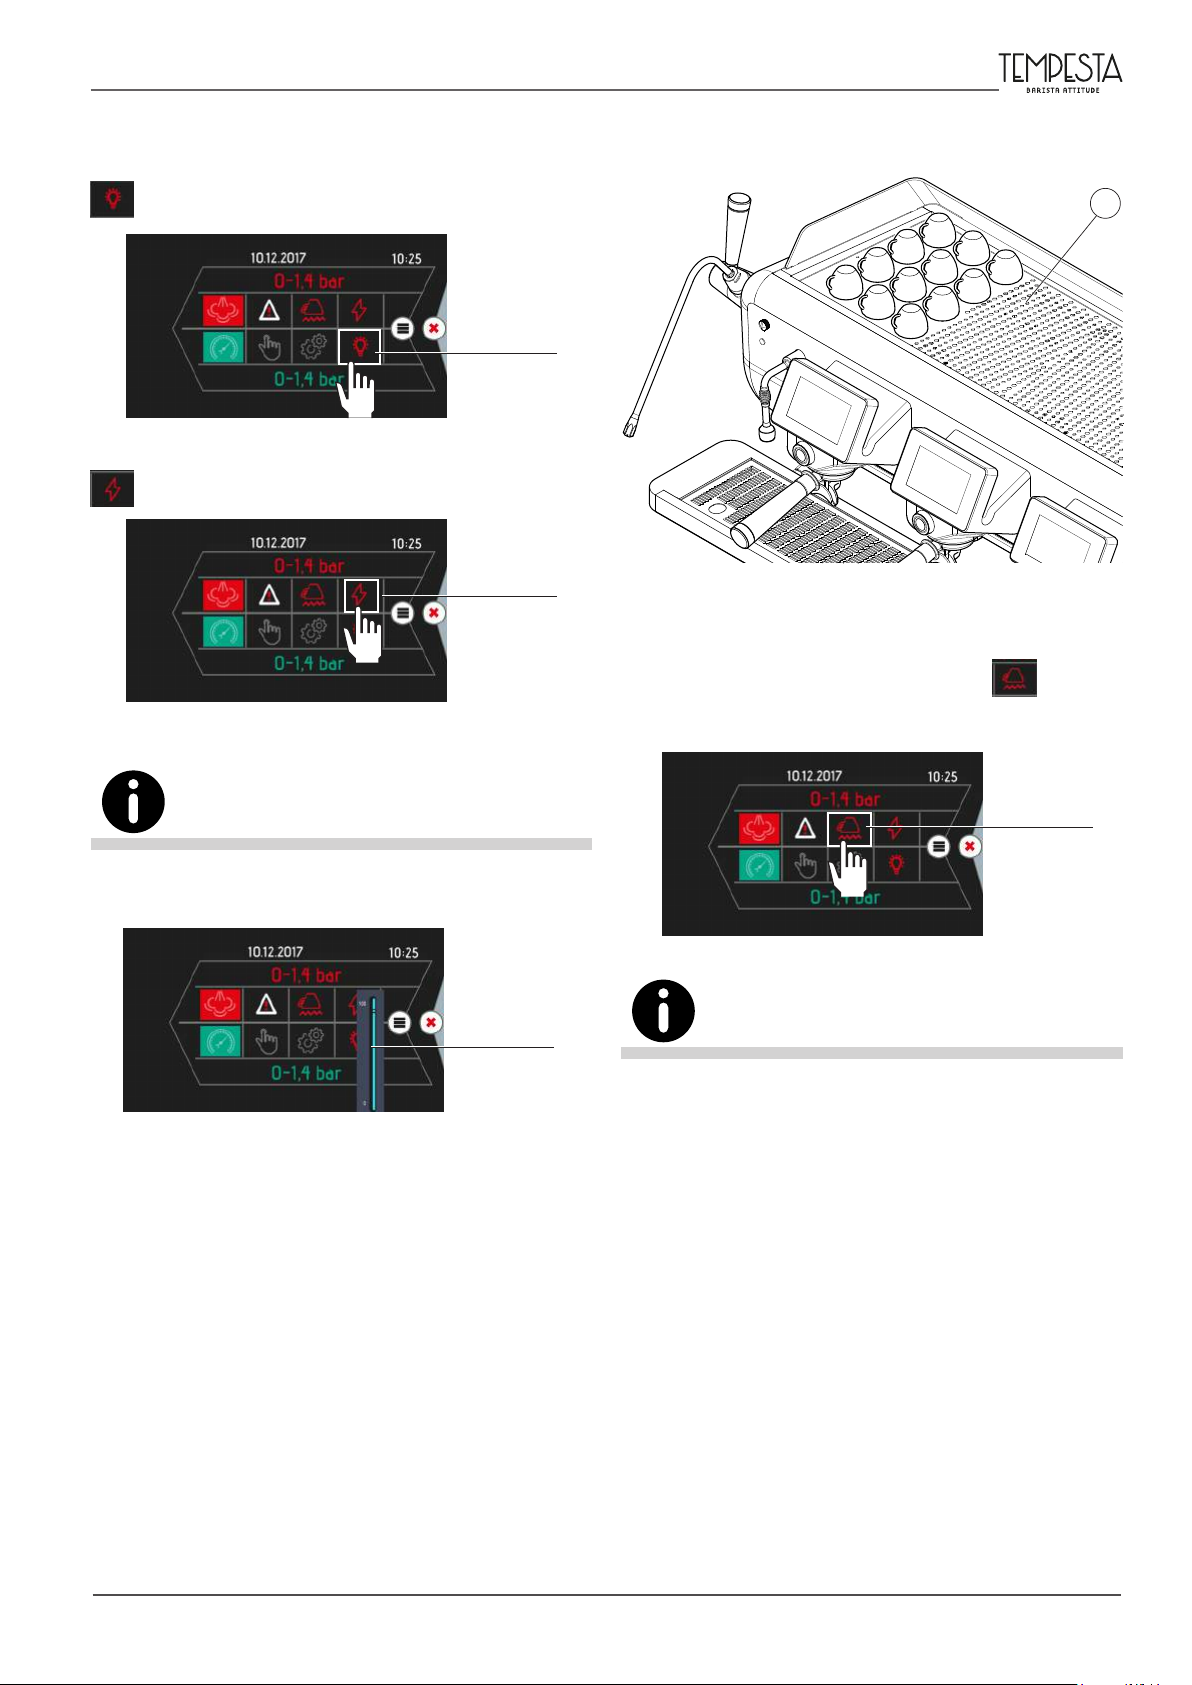
7.11 Lighting
To turn the work surface light on and o, press the
button.
Work surface
light
To turn the side panel lighting on and o, press the
button.
Back light
logo
7.12 Cup warmer
Place the cups to be heated on the specic shelf (11).
11
To activate the cup warmer, press the button.
When the button turns red, the cup warmer is on.
The light intensity calibration (on the work surface or on the sides)
is activated by keeping buttons pressed.
Light intesity
bar
Cup warmer
To change the temperature of the cup warmer, see para. "8.3
SERVICE PARAMETER conguration" on page 27.
USER Manual
21 of 44
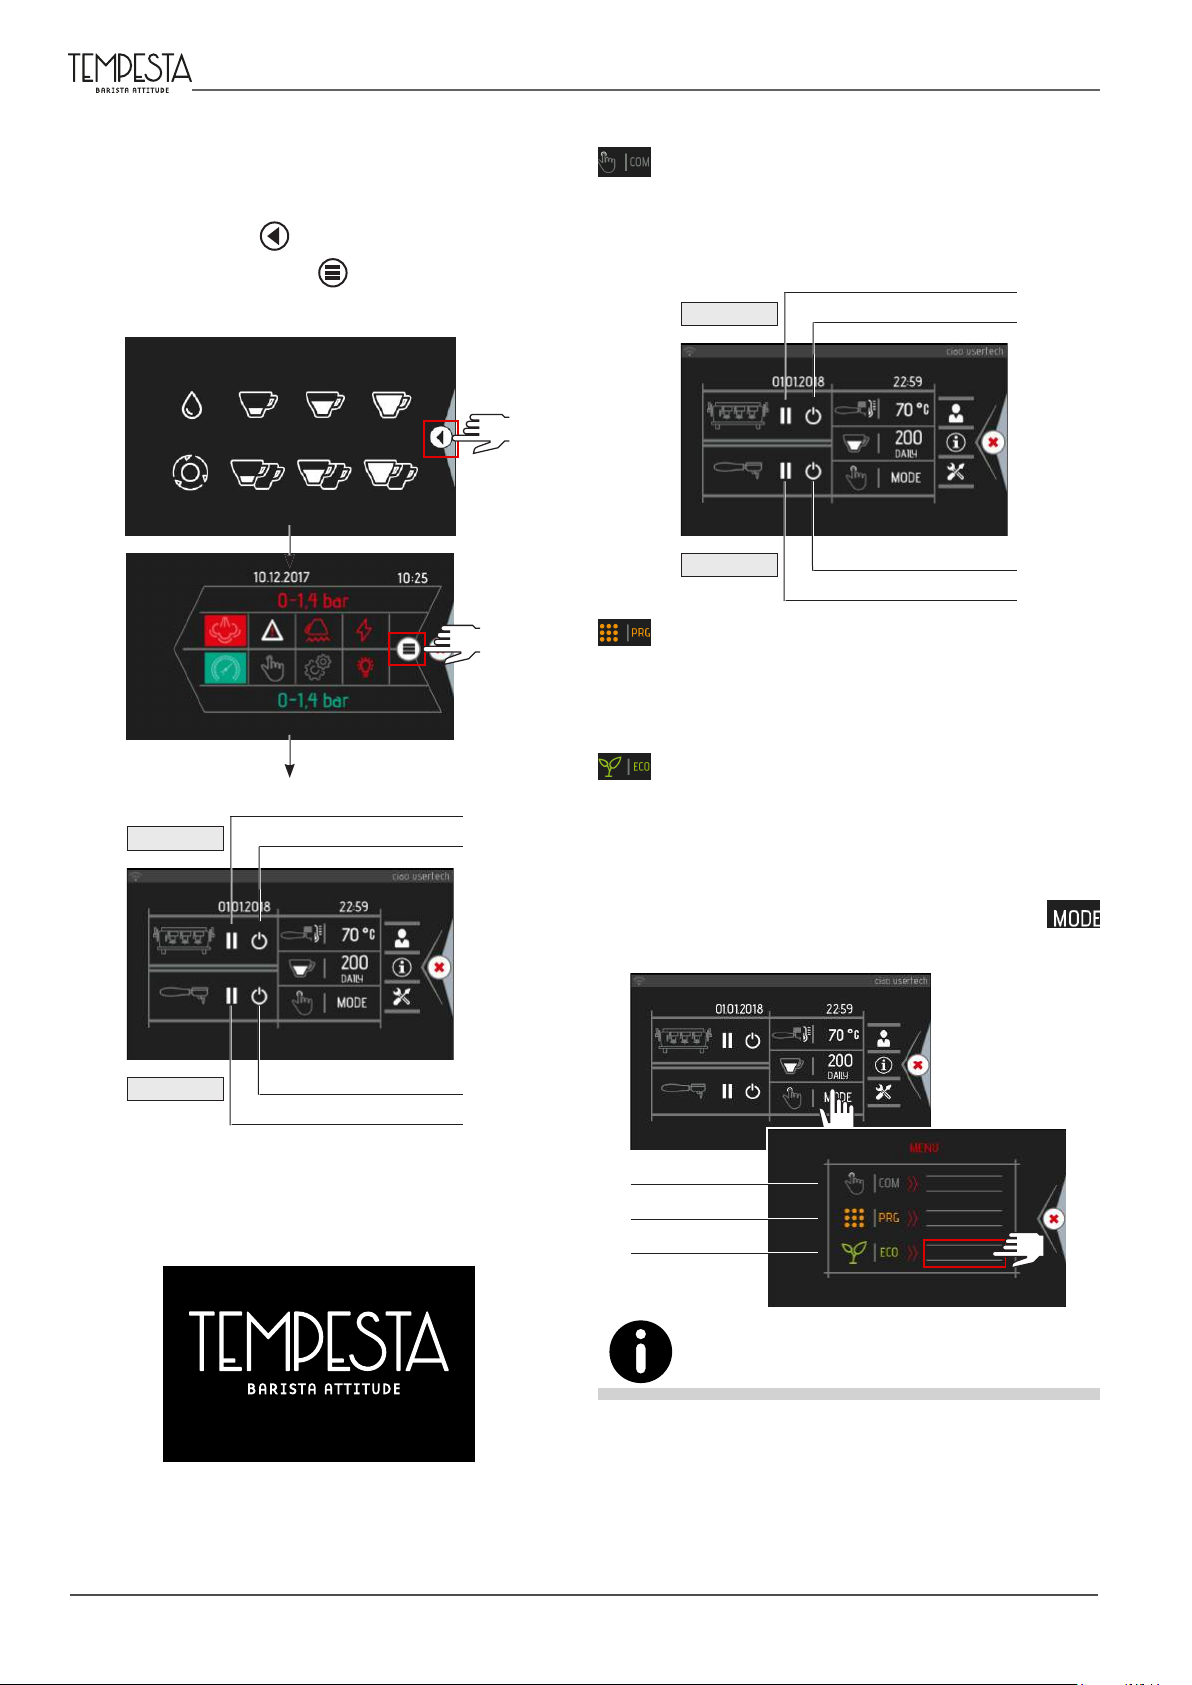
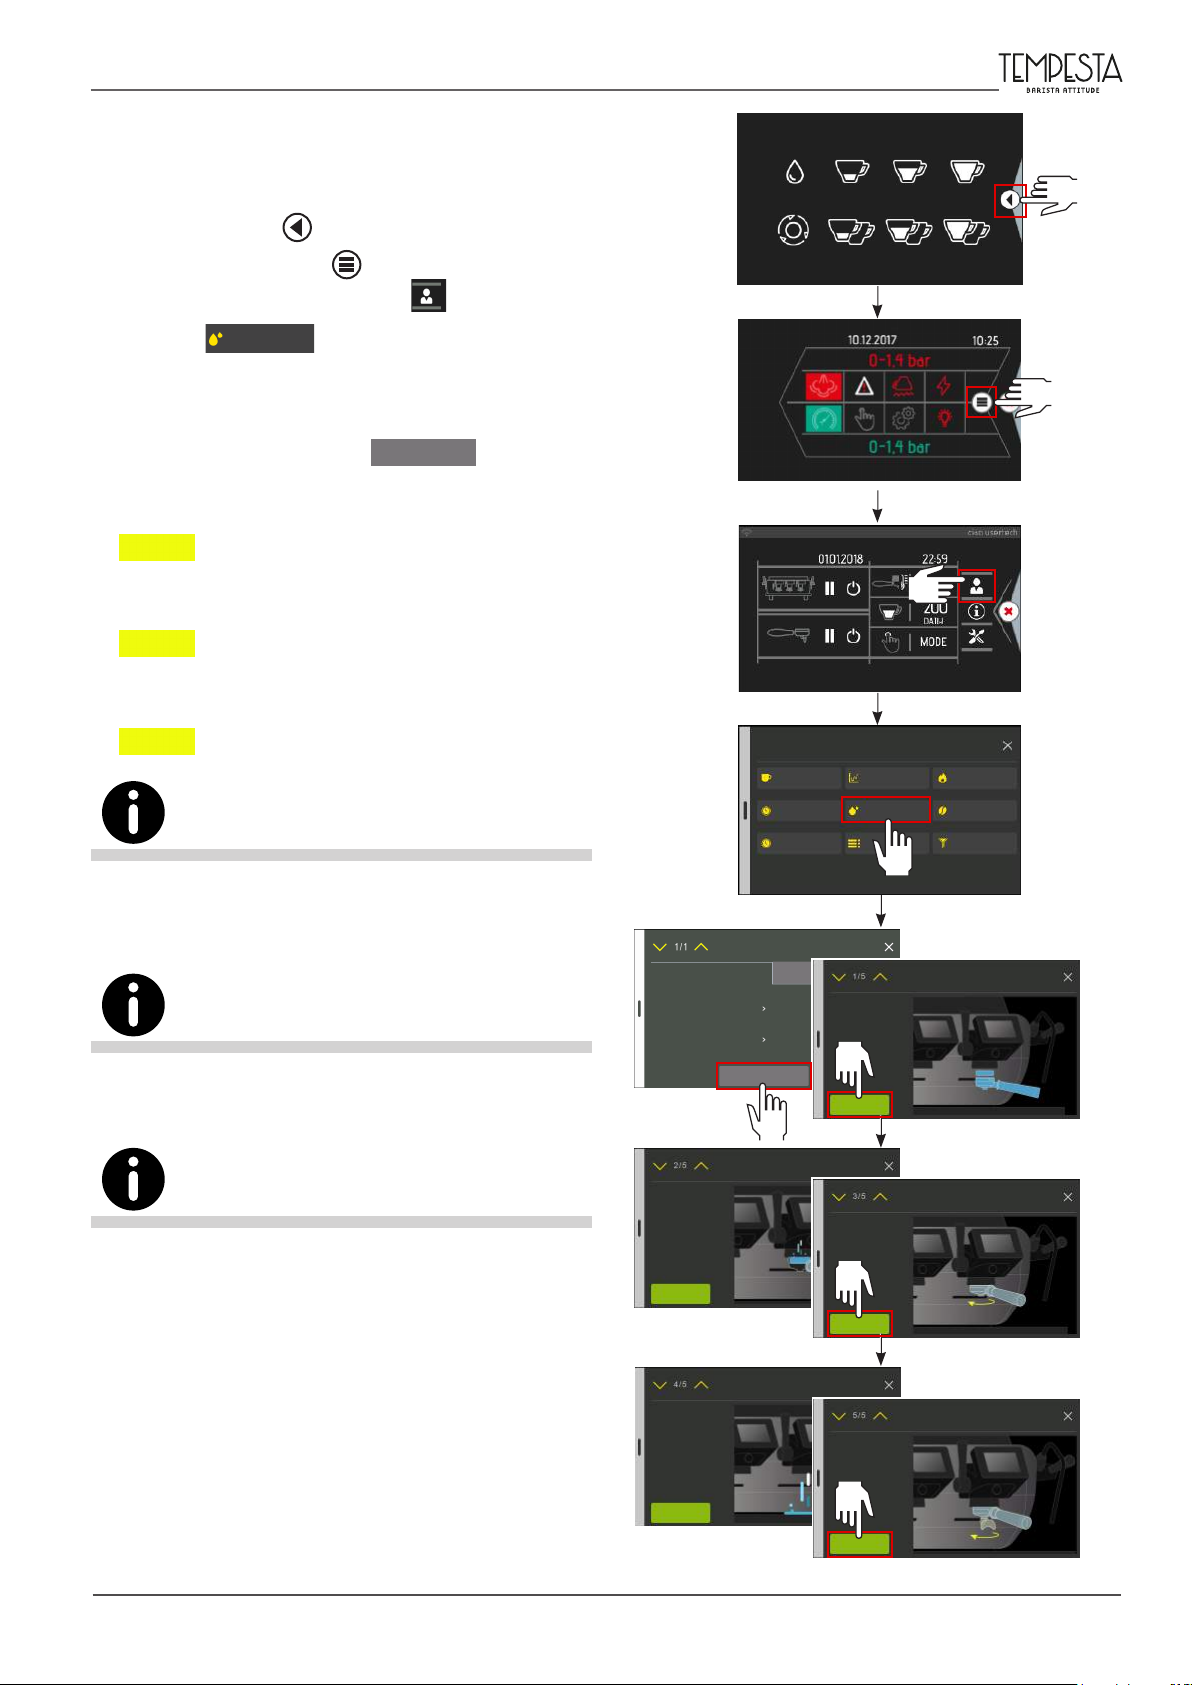
7.13 Energy Saving Management
To turn o the machine or activate the Energy Saving
mode, proceed as follows:
• Select the button
• Select the menu button
• Select the desired function.
;
;
Three "Energy Saving" systems are available:
MANUAL
The Energy Saving features can only be enabled manually by selecting the machine or group icon, as shown
in the gure.
Manual standby
MACHINE
Manual shutdown
MACHINE
GROUP
Manual standby
Manual shutdown
Manual shutdown
Manual standby
GROUP
Manual shutdown
Manual standby
PROGRAMMED
The Energy Saving functions are enabled according to
the programming. Contact a Qualied Technician to
modify the programming.
SELF-LEARNING
The Energy Saving functions are enabled and in selflearning mode. The system automatically manages the
energy saving by lowering the temperature based on the
cycles performed in previous days and weeks.
To enable the "Energy Saving" system, press the
button and select the desired mode:
If the machine is o or in "Energy saving" mode, sim-
ply tap the display to resume operation. The machine
will return to full operation in approximately 1 minute.
In any case, the system will continue to follow the
congured energy-saving settings.
22 of 44
Manual
Scheduled
Self-learning
Mode set
Select
Select
Call out a Qualied Technician to programme the Energy Saving
system.
USER Manual

8. PROGRAMMING
8.1 COFFEE DOSE programming
To programme coee doses, proceed as follows:
• Select the button
;
8.1.1 Programming standard model
• Press the
• To conrm and stop the dose, press the
• Repeat this operation for the other dose buttons;
• To check the dose, press the “Test the dose” button
Start
• To delete the dose settings, press the
Start
button to start dispensing;
button;
Stop
.
button;
• Press the menu
button
;
• Select the conguration button
;
• The dose can be manually adjusted via the
and
buttons.
• you can also change the coee pre-infusion time
by pressing the icon
PREINFUSION
TIME
: Acting with the
and keys (or with the numeric keypad
) modify the selected parameter and conrm with
the ok key.
Do not remove the lter holder from the dispensing group when
coee is being dispensed.
Each dose must be programmed with ground coee and not with
previously-used coee grounds.
Programmable
pre-infusion time
Start/End dispensing
dose simulated
programming
programmed dose
Check the
• Press the dose
MENU UTENTE
programme
button
Programme doses
;
• Select the desired dose
button (e.g.
programme doses
date and time
screensaver
Select the dose to be programmed
Ultima erogazione
washes
counter
PROGRAMME DOSES
recipe selection
“1 espresso”
);
Depending on the machine model, proceed as fol-
lows.
parameter
water lters
Pre-infusion
time
Single group
preinfusion
time 1
PROGRAMME DOSES
PRE-INFUSION
TIME
0.0"
DETAILED
ADJUSTMENT
Manual dose
adjustment (ml)
SINGLE EXTRACTION CURVE
5 20 s0
PROGRAMME
DOSE
TEST THE DOSE
COPY TO ALL
GROUPS
DOSE RESET
0 10 60
Start
Stop
Start
Stop
Delete dose
conguration
USER Manual
23 of 44

8.1.2 Programming FRC model
select the desired programming mode: STANDARD or
WITH LEVER.
Standard doses programming
• press the "STANDARD DOSES
PROGRAMMING", button,
the screen will
appear with the
programming
graph and its
parameters:
• Pre-infusion
time (tenths of
a second)
• Pre-infusion
type
• Phase delivery
level 1
• Start phase 2
erogazione (milliliters)
• Phase delivery
level 2
• Total dose (milliliters)
• Press the key for
the data to be
modified and
change the selected parameter to the desired value, in
order to adjust
the delivery.
• When Setup is
complete, you
can press the
"check dose"
button. Press
the (
) key
to terminate it
in advance.
• Save or cancel
the extraction
curve obtained,
and then switch
to the next dose
schedule.
Selected
dose
pre-infusion
modify
PROGRAM DOSES
PROGRAMMING
STANDARD DOSES
SAVE
DELIVERY CONFIGURATION
DELIVERY CONFIGURATION
1
PRE-INFUSION: 10 ml
PROGRAM DOSES
PROGRAMMING
STANDARD DOSES
SAVE
DOSE PROGRAMING
Which setting do you want to use for
subsequent payments?
parameters
PROGRAMMING
WITH LEVER
CANCEL
15s
8
TOTAL DOSE: 37ml
PROGRAMMING
WITH LEVER
CANCEL
lever
check
dose
Programming with lever
• Press the button "PROGRAMMING WITH LEVER ", the
screen will appear with the programming graph;
• Lower the lever, to start the dispensing, then once the
desired dose
has been obtai-
PROGRAM DOSES
ned, return the
lever to the resting position.
The graph and
PROGRAMMING
STANDARD DOSES
SAVE
PROGRAMMING
WITH LEVER
CANCEL
the length of
the dose will be
updated in real
time according
to the position
of the lever during the dispensing.
• Change the parameter of the
total dose duration (milliliters)
by pressing but-
DELIVERY CONFIGURATION
ton (A).
• When Setup is
complete, you
can press the
selected
dose
"check dose"
button. Press
the (
to terminate it
in advance.
• Save or cancel
the extraction
curve obtained,
) key
selected
dose
PRE-INFUSION: 10 ml
TOTAL DOSE
: 37ml
check
dose
and then switch
to the next dose
schedule.
PROGRAM DOSES
PROGRAMMING
STANDARD DOSES
SAVE
DOSE PROGRAMING
Which setting do you want to use for
subsequent payments?
parameters
PROGRAMMING
WITH LEVER
CANCEL
lever
24 of 44
USER Manual
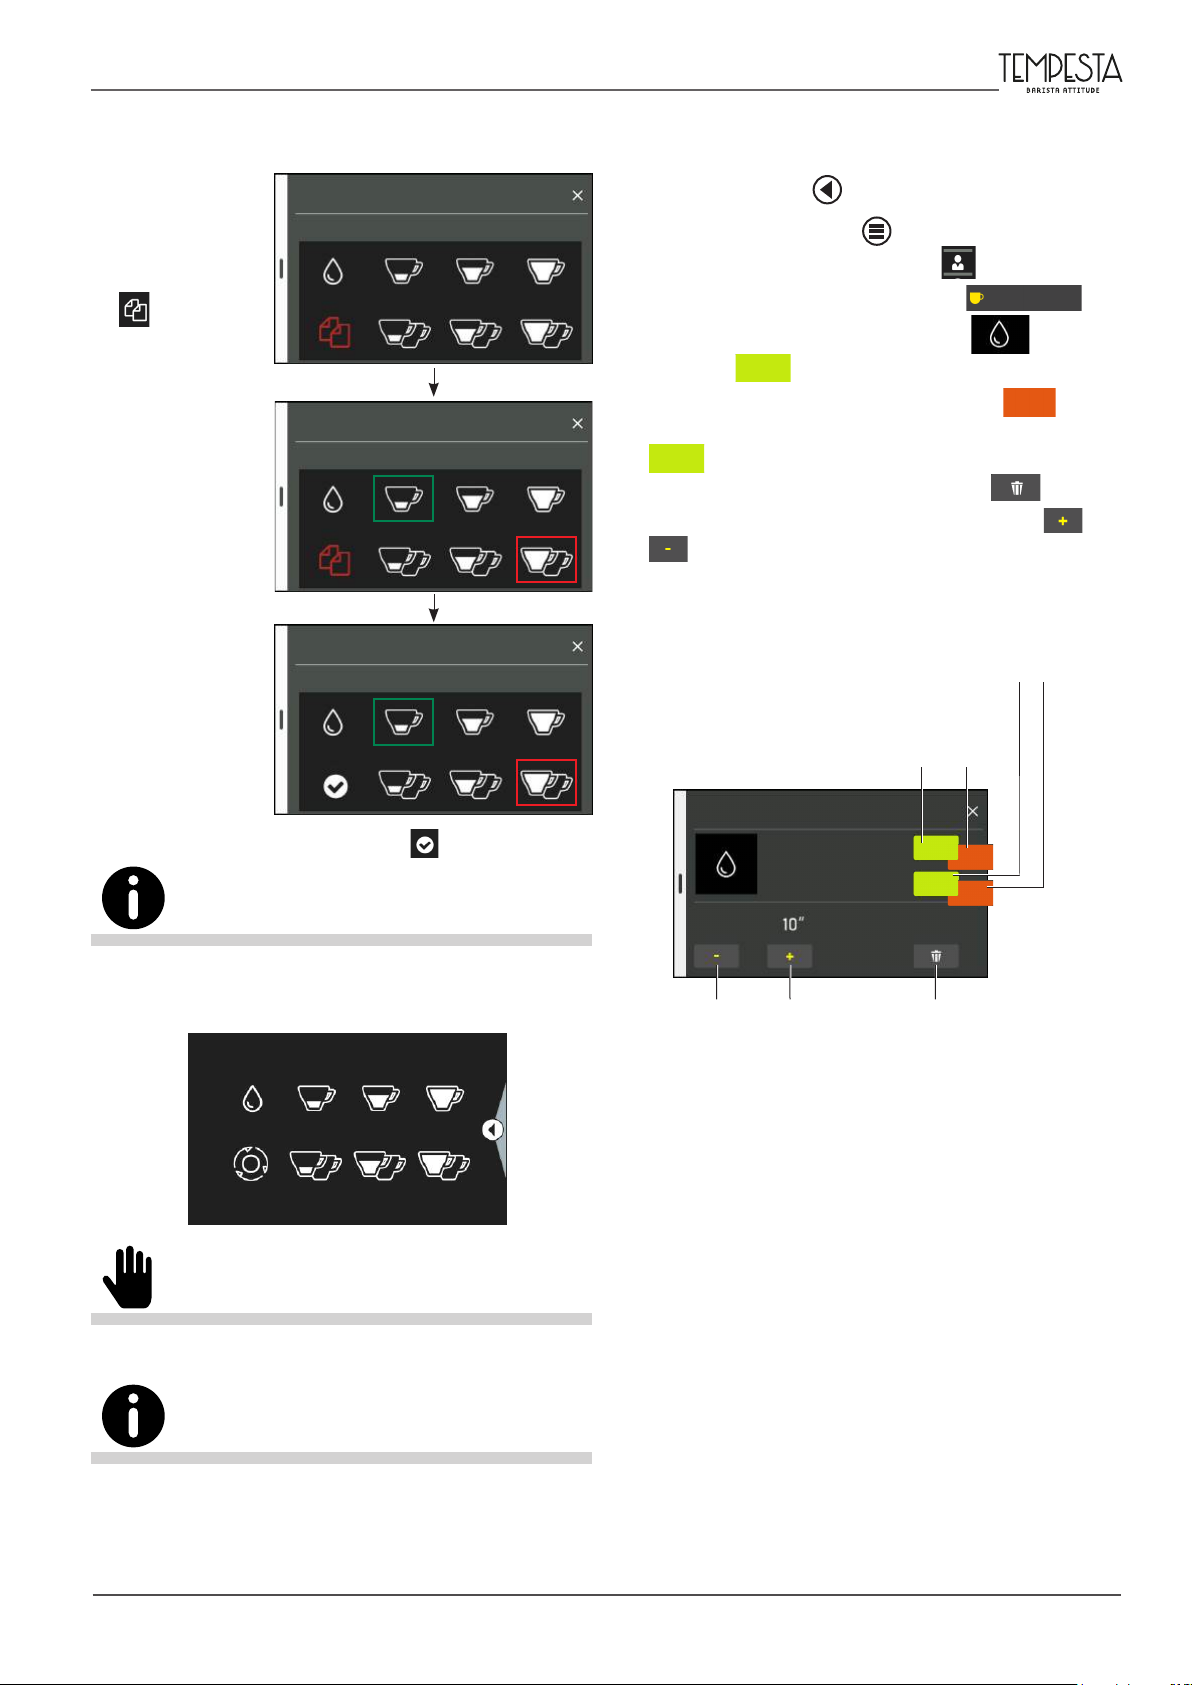
Copy One Dose To Another
To copy a programmed dose to another, proceed as
follows:
• From the dose
selection scre-
Select the dose to be copied
PROGRAM DOSES
en, press the
Copy button
;
• Select the
source dose,
Select the target dose
PROGRAM DOSES
which will be
highlighted in
green;
8.1.3 Water programming
To programme hot water dose, proceed as follows:
• Select the button
• Press the menu button
• Select the conguration button
• Press the dose programme button
• Select the "Hot water" dose button
• Press the
Start
• To conrm and stop the dose, press the
• To check the dose, press the “Test the dose” button
Start
.";
• To delete the dose settings, press the
• The dose can be manually adjusted via the
buttons.
;
;
;
Programme doses
button to start dispensing;
Stop
;
);
button
button;
and
• Select the
target dose,
Copy dose: Conrm your choice
PROGRAM DOSES
which will be
highlighted in
red;
• Conrm by pressing the button
.
The programmed doses refer to the currently selected recipe. The
recipe you are using is displayed on the coee doses selection page.
If no prescription is displayed, the standard recipe will be modied.
"Ricetta in uso"
PROGRAMME DOSES
PRE-INFUSION
TIME
DETAILED
ADJUSTMENT
Manual dose
adjustment (secs)
Check the pro-
grammed dose
Start/End dispensing
dose simulated pro-
gramming
PROGRAMME
DOSES
TEST THE DOSE
DOSE RESET
avvia
avvia
stop
stop
Delete dose
conguration
Do not remove the lter holder from the dispensing group when
coee is being dispensed.
Each dose must be programmed with ground coee and not with
previously-used coee grounds.
USER Manual
25 of 44

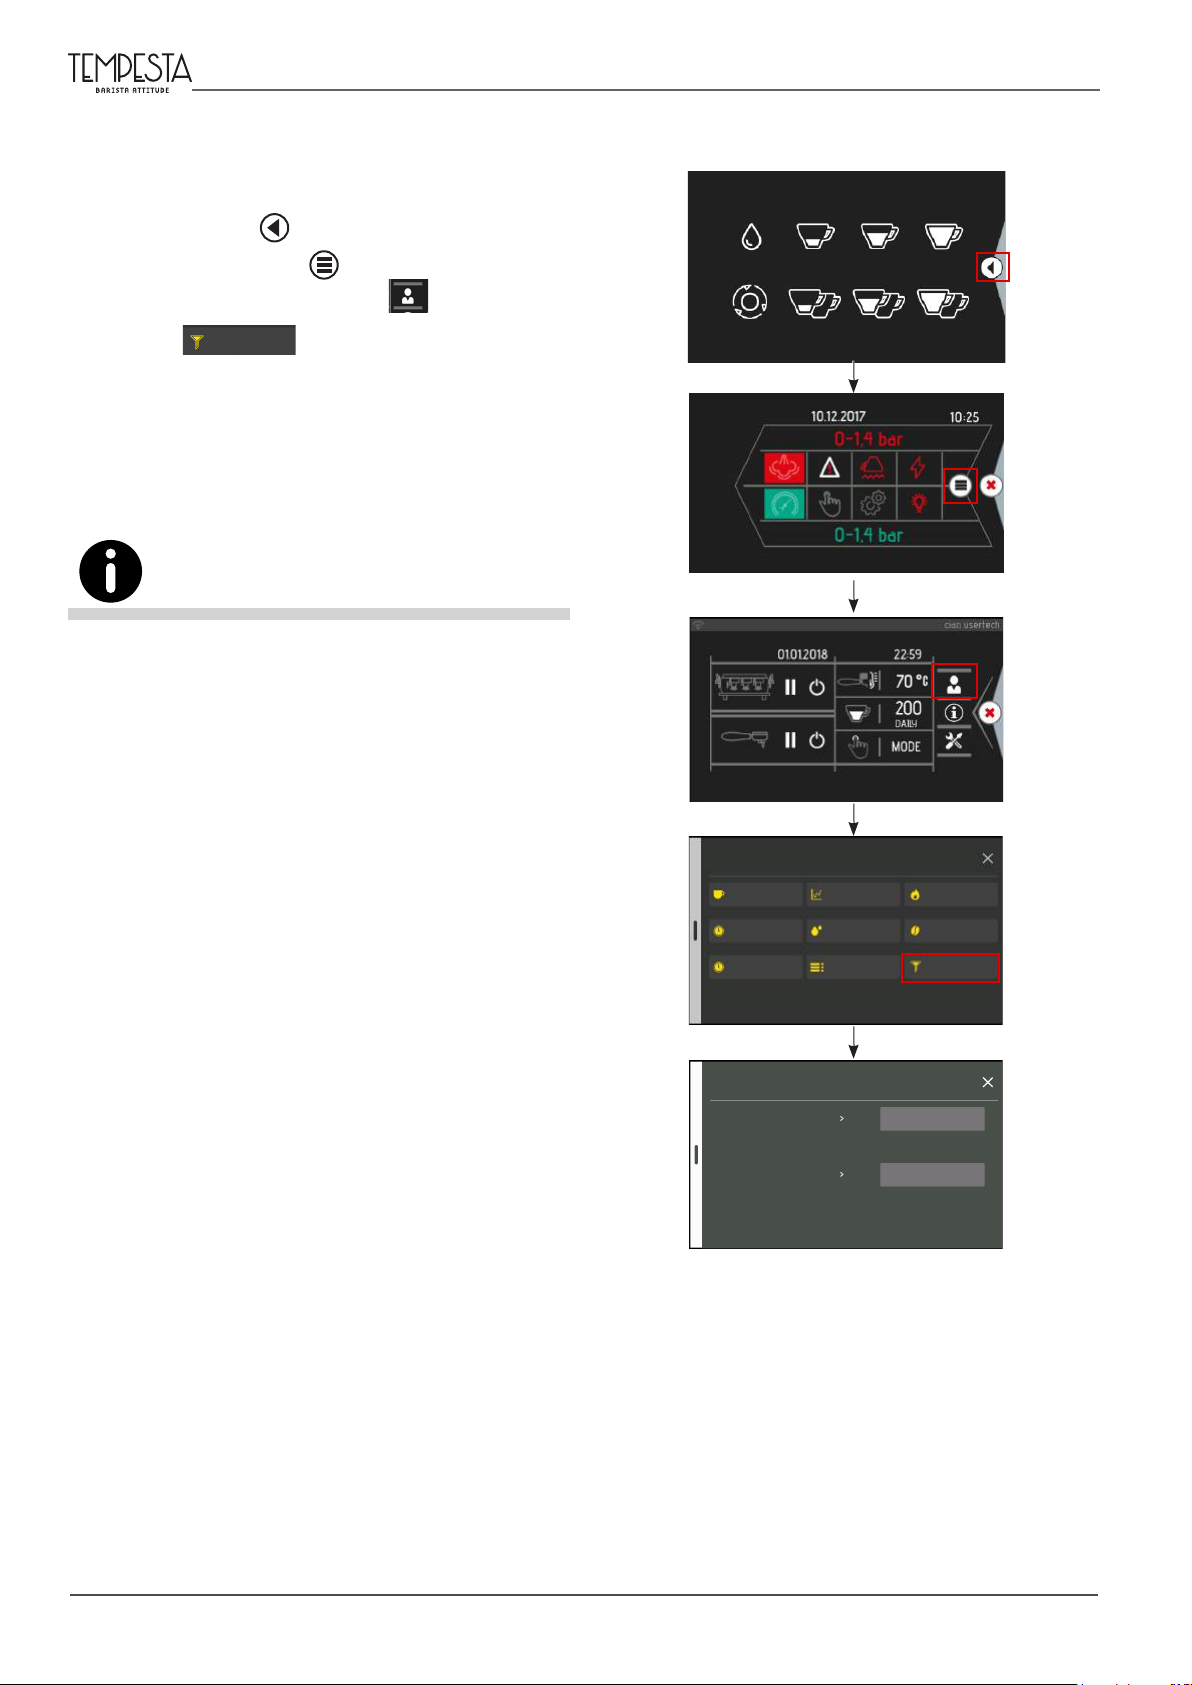
8.2 Print last dispensed beverage graph
To view the data of the last dispensed beverage in a
graph, proceed as follows:
• Select the button ;
• Press the menu button
• Select the user conguration button
• Press the
last dispensed
beverage graph
To view the graph of the last delivery it is necessary that this
function has been programmed by the Qualied Technician.
;
button.
;
programme doses
date and time
screensaver
LAST DISPENSED BEVERAGE
USER MENU
last dispensed
beverage graph
Washes
counter
parameters
recipe selection
water lters
26 of 44
USER Manual

8.3 SERVICE PARAMETER conguration
To adjust the parameters of some of the machine’s
services, proceed as follows:
• Select the button ;
• Press the menu button
• Select the conguration button
• Press the
parameters
• Select the button of the parameter to be modied;
;
button;
;
• Press the
and
buttons to change the desired
value.
The adjustable parameters are:
- The dispensing group temperature
- The heating unit temperature
- The cup warmer temperature
- pressure of the boiler services
- percentage water mixing
Quick access
programme doses
date and time
screensaver
MENU UTENTE
last dispensed
beverage
washes
counter
parameters
recipe selection
water lters
USER Manual
Gruop temperature
Coee heating unit
temperature
Cup warmer temperature
boiler services pressure
percentage water mixing
CUP WARMER TEMPERATURE
27 of 44

8.4 DATE and TIME conguration
To set the date and time on the machine, proceed
as follows:
• Select the button ;
• Press the menu button
• Select the conguration button
• Press the
date and time
• Select the button of the information you would like
to modify;
;
button;
;
• Press the
and
lected parameter and conrm via the
buttons to modify the se-
button.
OK
The adjustable parameters are:
- The date
- The time
- The time zone
- Automatic Daylight Saving Time.
Select the
button to enable the keypad where you
can directly enter the desired value. Press the button
to conrm the value.
Programme doses
date and time
screensaver
USER MENU
last dispensed
beverage
washes
counter
SET DATE AND TIME
parameters
recipe selection
water lters
28 of 44
Date
Time
Time zone
Automatic Daylight Saving Time
Date
2020/12/12
Time
Time zone < GMT+1 Central Europe>
Automatic Daylight
Saving Time
22:59
no < YES > yes
06/11/2021
16:54
GMT+1
Central Europe
YES
X X X
USER Manual

8.5 COFFEE RECIPE selection
To set the machine according to the type of coee
recipe used, proceed as follows:
• Select the bar on the right-hand side of the display;
• Select the button
• Select the conguration button
• Press the
recipe selection
• Select the desired recipe button, e.g.
• Press
OK
to conrm the selection;
;
button;
;
Recipe 4
;
• Wait a few moments and then the machine will be
ready to brew the new recipe;
• The various dispensing groups can be programmed
for dierent recipes. In this case, the display will show
the recipe type.
The coee recipes can only be chosen if they have already been
set up in the machine’s system.
Contact the Technical Support if you would like to insert new
recipes.
The recipe extraction parameters have been programmed by the
installation technician.
programme doses
date and time
screensaver
USER MENU
last dispensed
beverage
washes
counter
parameters
recipe selection
water lters
Group 1 with
Recipe type 1
Recipe 1
Group 2 with
Recipe type 4
Recipe 4
Recipe number 01
Recipe number 02
Recipe number 03
Recipe number 04
Group setpoint
Grind neness
Recipe SELECTION
Recipe 1
Recipe 2
Recipe 3
Recipe 4
Recipe SELECTION
Recipe 4
RECIPE SELECTION
Please wait…
OK recipe selected
USER Manual
29 of 44

8.6 SCREENSAVER conguration
To set the display screensaver, proceed as follows:
• Select the button ;
• Press the menu button
• Select the conguration button
;
;
• Press the
Screensaver
button;
• To set how long after the machine’s last operation to
activate the screensaver, select the
• Press the
and
buttons to change the screen-
saver activation time and conrm via the
3 | Set time
button;
OK
button.
The value can be entered directly by selecting the
button and using the keypad;
• To set the screensaver's brightness, select the
4 | Brightness
• Use the
brightness and conrm via the
button;
and
buttons to adjust the display
OK
button.
Contact a Qualied Technician to insert new screensavers.
programme doses
date and time
screensaver
USER MENU
last dispensed
beverage
washes
counter
parameters
recipe selection
water lter
1 | Start slideshow
4 | Brightness
SET TIME 10 60 mins0
BRIGHTNESS 10 101
SCREENSAVER
2 | Upload slides
5 | Delete slideshow
SCREENSAVER
SCREENSAVER
3 | Set time
0 10 60
30 of 44
USER Manual

8.7 BEVERAGE COUNTER list
To view the beverages dispensed by the machine,
proceed as follows:
• Select the button ;
• Press the menu button
• Select the conguration button
;
;
• Press the
• Use the
Counter
2/14
button;
buttons to scroll through the various
pages and view the counts.
To reset the counter list, contact a Qualied Technician.
programme doses
date and time
USER MENU
last dispensed
beverage
washes
parameters
recipe selection
Part. No. of single short coees
Group 1
Part. No. of single standard coees
Group 1
Part. No. of single long coees
Group 1
Part. No. of double short coees
Part. No. of single long coees
Group 1
Group 1
Part. No. of double standard coees
Group 1
Part. No. of double long coees
Group 1
Total partial coee group 2
Part. No. of double long coees
Group 1
Total partial coee group 2
Total partial coee group 2
Total coee group 2gruppo 1
screensaver
COUNTER LIST1/14
Total coee group 2
Total coee group 3
Total coee group 4
Total global coee supplied
counter
0
0
COUNTER LIST2/14
0
0
COUNTER LIST16/17
water lters
0
0
0
0
0
0
COUNTER LIST16/17
0
0
0
0
0
0
USER Manual
31 of 44
8.8 Viewing the WATER LITRE COUNTER
To view the machine’s water consumption and the wa-
ter softener regeneration threshold, proceed as follows:
• Select the button ;
• Press the menu button
• Select the conguration button
• Press the
Water lters
• When the water consumption exceeds the set value,
the system displays the automatic water softener
regeneration warning;
• If the threshold value is set to zero, the regeneration
warning is not displayed.
To reset the counter list, contact a Qualied Technician.
;
button;
;
8.9 Tips for a good cup of coee
Wash the lters and lter holders on a daily basis,
as indicated in para. 9.7.2 on page 36. The failure to
perform this cleaning operation will negatively aect the
quality of the dispensed coee.
To obtain high-quality coee, it is important that the
water hardness does not exceed 6-7°f (French degrees).
If the water hardness exceeds these values, it is advisable to use a water lter or softener. Avoid using a water
softener if the water hardness is less than 4°f.
If the taste of chlorine in the water is particularly
strong, install a special lter.
Do not to keep large amounts of coee beans on
hand. If you change the type of coee, it is advisable to
contact one of the Manufacturer's Qualied Technicians
to adjust the water temperature and coee grinder.
If the machine has not been used for a certain period
of time (2-3 hours), carry out a few dry runs. Make sure
that the machine is constantly cleaned and periodic
maintenance is carried out.
programme doses
date and time
screensaver
Regeneration threshold
Water consumption
MENU USER
last dispensed
beverage
washes
counter
WATER FILTERS
parameters
recipe selection
water lters
0 L
263 L
32 of 44
USER Manual
9. MAINTENANCE AND CLEANING
9.1 Safety precautions
Carefully read the instructions provided in chapter "1. SAFETY PRECAUTIONS" on page 3 .
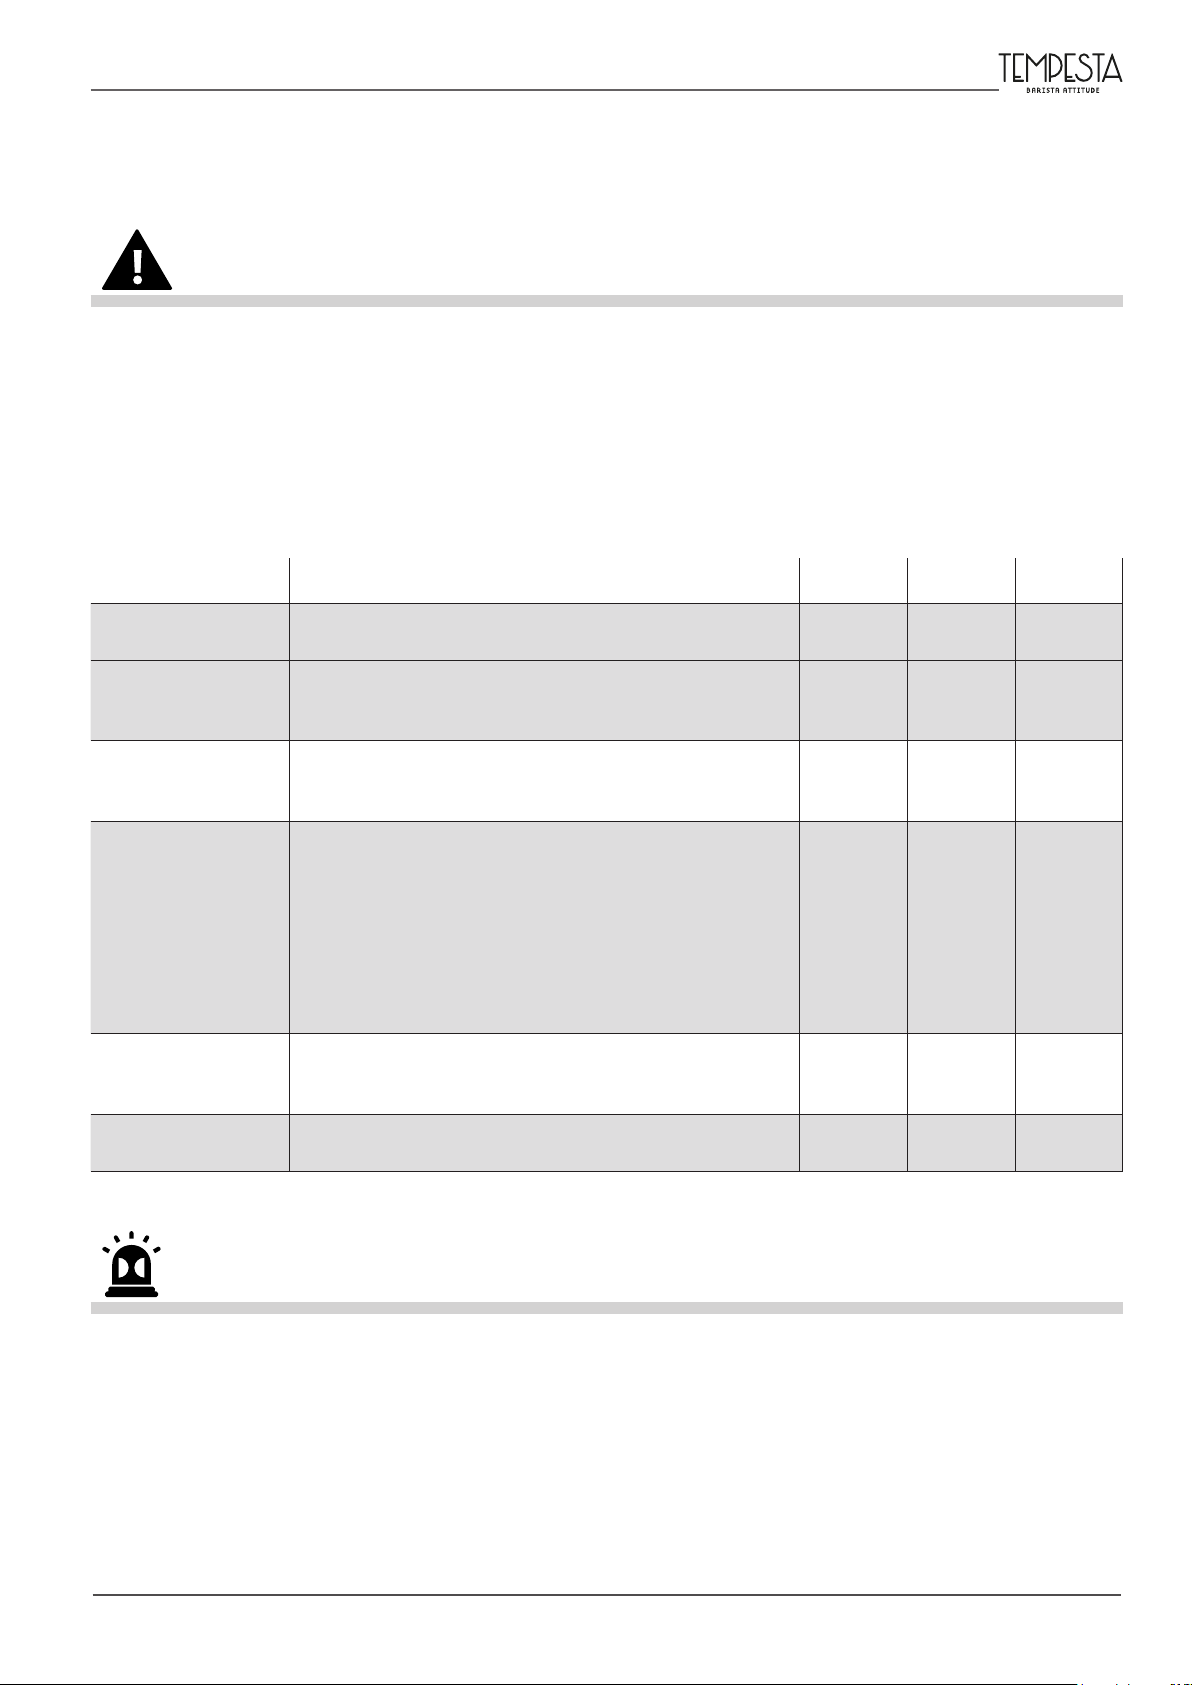
9.2 Periodic maintenance
In addition to performing the following maintenance operations at the specied frequency, have a Qualied
Technician perform an overall inspection of the machine whenever prompted by the warning on the display, as
indicated in para. 9.3 on page 34.
Component Type of operation Weekly Monthly Quarterly
DISPLAY
DISPLAY
FILTERS AND FILTER
HOLDERS
GRINDER-DISPENSER
WATER FILTER
WATER SOFTENER
HEATING UNIT
Keep the heating unit pressure between 0.08 and 0.14 MPa (0.8 and 1.4
bar).
Check the water pressure when coee is being dispensed: check the pressure indicated on the gauge, which must be between 0.8 and 0.9 MPa (8
and 9 bar).
Check the condition of the lters. Check for any damage on the edge of
the lters and check whether any coee grounds settle in the coee cup,
and replace the lters and/or lter holders, as required.
Check the ground coee dose (between 6 and 7 grams per time) and
check the degree of grinding. Grinders must always have sharp cutting
edges. Too much powder in the grounds is an indication that the coee is
deteriorating. We recommend contacting a Qualied Technician to replace
the at burrs after every 400/500 kg of coee, or after every 800/900 kg
for conical burrs.
If the automatic grinder wear warning is enabled, follow the instructions
in para. 9.4 on page 34 .
Replace the water lter cartridge or regenerate the water softener at the
frequency indicated by the manufacturer or whenever the automatic
regeneration warning is displayed (see para. 9.5 on page 34).
We recommend that you call out the Technical Assistance at least once
every three months to replace the water in the heating unit.
X
X
X
X
X
X
Component problems highlighted in grey require the machine to be switched o and one of the Qualied Technicians to be called out.
USER Manual
33 of 44

9.3 Scheduled maintenance
If enabled, this function displays a message to alert
the user when it is necessary to perform scheduled
maintenance.
The rst request for assistance appears when the
number of coee, tea, heating unit lling cycles, or the
number of days elapsed since installation of the machine,
is close to the programmed threshold value.
After reaching the programmed threshold value, the
display shows a window with messages:
Press the icon to read the message:
9.4 Grinder wear automatic check
If enabled, this function displays a message to alert
the user that it is necessary to replace the grinderdispenser burrs.
WARNING: Burr wear and tear
The warning appears when the amount of coee used
(kg) reaches the programmed limit.
The message will remain on the display in the selection standby phase or the programming standby phase.
The warning for reached/exceeded thresholds does
not prevent the machine from functioning.
The count can be reset at any time (even before the
warning is triggered) and by a technician.
WARNING: Maintenance threshold A
This message continues to be displayed until main-
tenance is performed.
If enabled, the display may show various scheduled
maintenance thresholds.
The threshold reached/exceeded warnings do not
prevent the machine from operating.
The messages on the display can be reset at any
time (also before the warning is triggered) and can be
performed by the technician.
When the machine is in operation, the system increases both the cycle counter and time since installation
counter.
The system only operates if the machine is paired with a single
grinder. Contact a Qualied Technician to programme this function.
9.5 Water softener regeneration
The machine counts the amount of water that has
been used (see para. 8.8 on page 32) and if enabled,
indicates the need to regenerate the softener on the
display when the programmed amount is exceeded.
WARNING: Water softener regeneration
The warning for reached/exceeded thresholds does
not prevent the machine from functioning.
The count can be reset at any time (even before the
warning is triggered) by a technician.
Contact a Qualied Technician to programme this function.
34 of 44
Contact a Qualified Technician to programme this function.
To regenerate the water softener, follow the manufacturer’s
instructions.
USER Manual
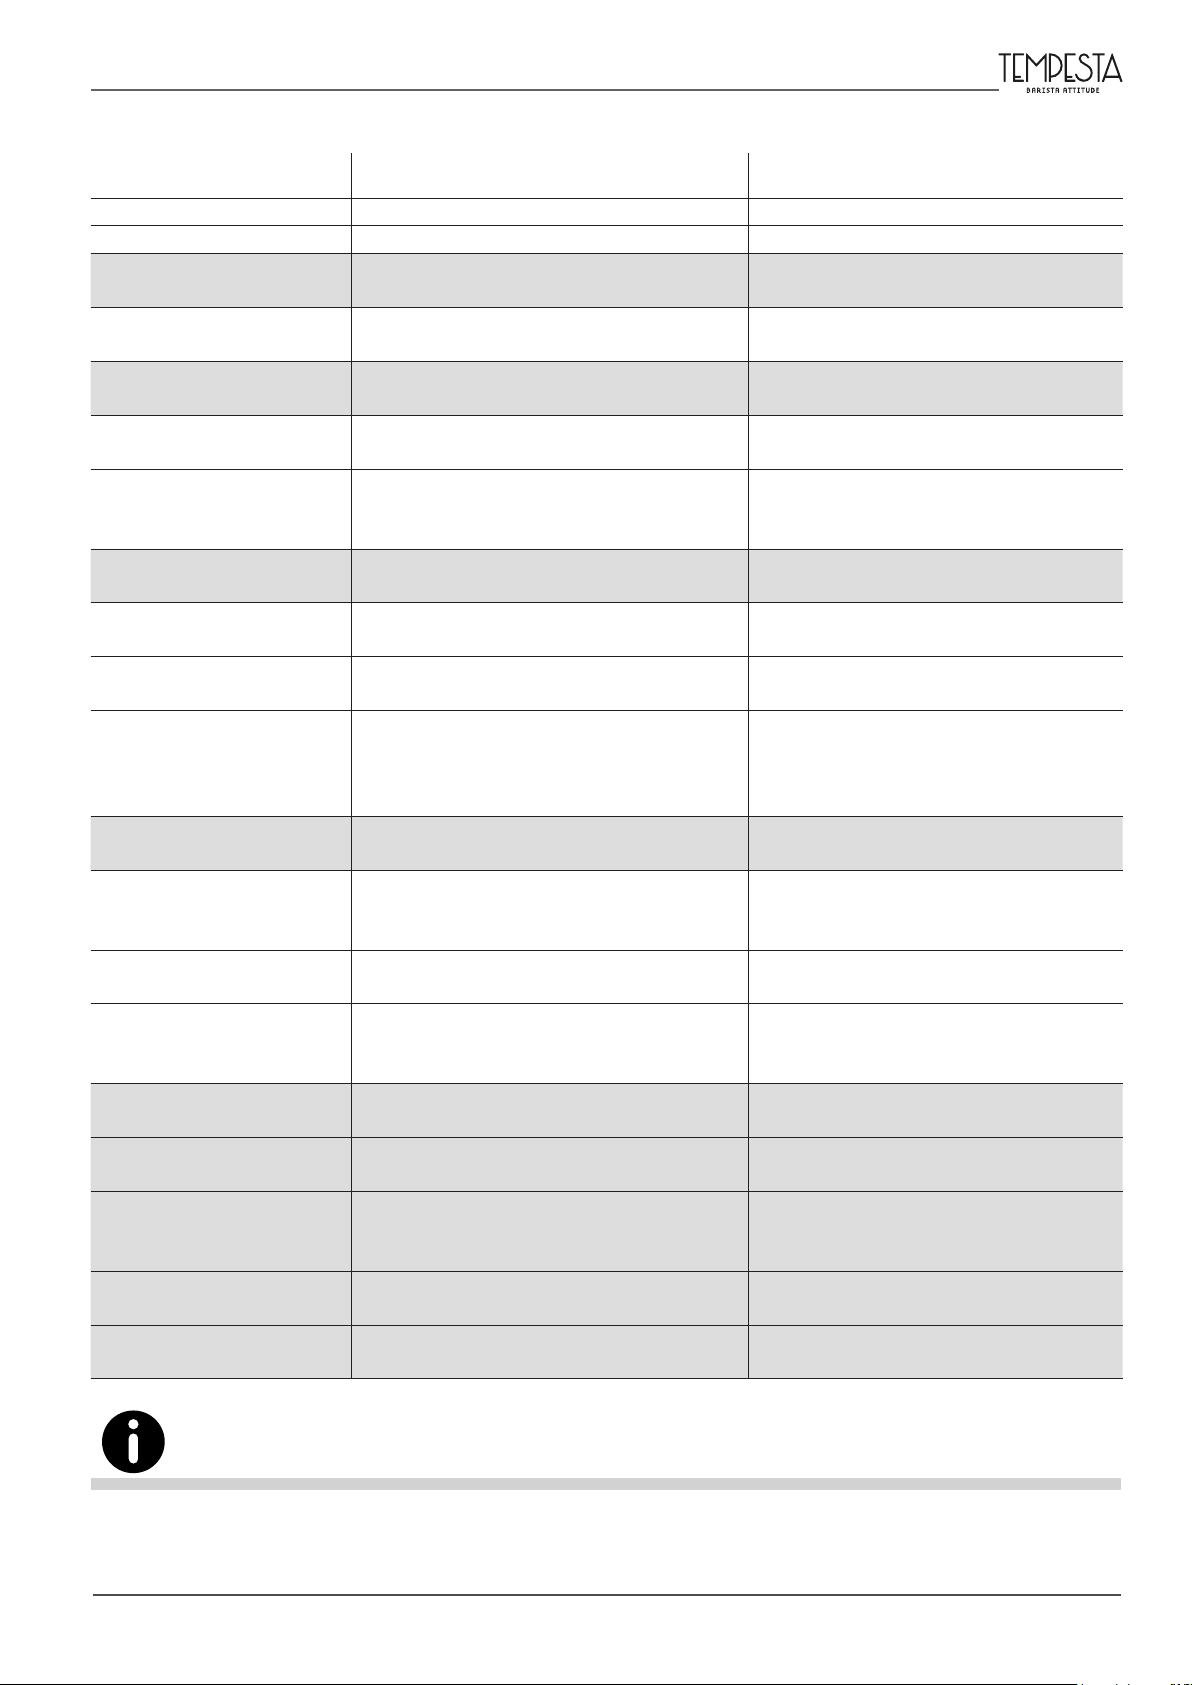
9.6 Malfunctions and solutions
Problem Cause Action
NO MACHINE POWER The machine is switched o. Turn on the machine.
NO WATER IN THE HEATING UNIT The water mains tap is shut o. Open the water mains tap.
TOO MUCH WATER IN THE HEATING
UNIT
STEAM NOZZLES DO NOT RELEASE
STEAM
STEAM NOZZLES RELEASE WATER OR
STEAM MIXED WITH WATER
NO BEVERAGES ARE BEING
DISPENSED
WATER LEAKS FROM THE MACHINE
COFFEE IS TOO HOT OR TOO COLD Electrical system or hydraulic system fault.
COFFEE IS BEING DISPENSED TOO
QUICKLY
COFFEE IS BEING DISPENSED TOO
SLOWLY
COFFEE GROUNDS ARE WET
THE DISPLAY INDICATES NONCOMPLIANT PRESSURE
COFFEE GROUNDS FOUND IN CUPS
THE CUP IS DIRTY WITH COFFEE
SPLASHES
• THE COFFEE IS NOT BEING
DISPENSED CORRECTLY
• THE COFFEE DOSE IS NOT CORRECT
THE ELECTRONIC SYSTEM HAS
SHUTDOWN
WATER IS LEAKING FROM THE PUMP Pump fault.
THE MOTOR STOPS SUDDENLY OR THE
THERMAL PROTECTOR IS TRIGGERED
BY A POWER OVERLOAD
THE PUMP IS WORKING BELOW THE
NOMINAL FLOW RATE
THE PUMP IS NOISY Pump fault.
Electrical system or hydraulic system fault.
• The nozzle sprayer is clogged.
• The machine is switched o.
Electrical system or hydraulic system fault.
• The water mains tap is shut o.
• The coee has been ground too nely.
• The tray is not draining.
• The drain pipe is broken, has detached, or the water
ow is obstructed.
The coee has been ground too coarsely. Adjust the coee grind.
The coee has been ground too nely. Adjust the coee grind.
• The dispensing group is dirty.
• The dispensing group is too cold.
• The coee has been ground too nely.
• The coee is too old.
Hydraulic system fault.
• The lter holder is dirty.
• The lter holes are worn.
• The coee has not been ground evenly.
• The coee has been ground too coarsely.
• The lter's edge is damaged.
The coee has been ground too nely. Adjust the coee grind.
Electrical system or hydraulic system fault.
Pump fault.
Pump fault.
Turn o the machine and call out the Technical
Support.
• Clean the steam nozzle sprayer.
• Turn on the machine.
Turn o the machine and call out the Technical
Support.
• Open the water mains tap.
• Adjust the coee grind.
• Check the sewer drain.
• Check and restore the drain pipe connection to
the tray.
Turn o the machine and call out the Technical
Support.
• Wash the group with the blind lter.
• Wait for the group to fully heat up.
• Adjust the coee grind.
• Replace with fresh coee.
Turn o the machine and call out the Technical
Support.
• Clean the lter holder.
• Replace the lter.
• Adjust the grind as appropriate.
• Adjust the coee grind.
• Replace the lter.
Turn o the machine and call out the Technical
Support.
Turn o the machine and call out the Technical
Support.
Turn o the machine and call out the Technical
Support.
Turn o the machine and call out the Technical
Support.
Turn o the machine and call out the Technical
Support.
Problems highlighted in grey require the machine to be switched o and one of the Qualied Technicians to be called out.
USER Manual
35 of 44

9.7 Cleaning operations
9.7.1 General instructions
A few simple cleaning tasks are required to have a perfectly sanitised and ecient appliance. The instructions
provided here apply when the machine is being used
on a regular basis. If the machine is used consistently,
cleaning should be performed more frequently.
Do not use alkaline cleaners, solvents, alcohol or aggressive
substances. The products/cleaners used must be suitable for this
purpose and not corrode the water circuit elements.
Do not use abrasive cleaners which may scratch the bodywork’s
surface.
Always use clean and sanitised cloths when cleaning.
When washing the filters, filter holders and all machine
components, use Manufacturer-supplied cleaners or products
specic for cleaning professional coee machines.
9.7.2 Cleaning the lters and lter holders
Daily:
• Soak the lter and lter holder in hot water overnight
so that the fatty coee deposits can dissolve;
• Rinse everything in cold
water.
Weekly:
• Use a screwdriver to detach the lter from the
lter holder;
• Soak the lter and lter
holder in warm water with a suitable cleaner for 10
minutes;
• Rinse everything in cold water.
Caution: Only immerse the lter holder cup, avoid soaking the
handle in water.
The cleaner must be diluted in cold water in the doses indicated
on the package (see the manufacturer).
Cleaning
Body and Grilles:
Clean the panels of the body with a cloth dampened in
lukewarm water.
Remove the drip tray and cup holder grille and wash with
hot water.
Filters and Filter Holders:
Wash the lters and lter holders on a daily and weekly
basis, as indicated in para. 9.7.2 on page 36.
Perform cleaning operations daily as indicated in paragraph
9.7.6 on page 38.
Steam nozzle:
Keep the nozzle clean at all times using a cloth dampened
in lukewarm water.
Check and clean the nozzle tips, by clearing the steam
outlet holes with a small needle.
Wash these on a weekly basis, as indicated in para. 9.7.7
on page 38.
Dispensing group:
Wash the dispensing group as described in para. 9.7.3 on
page 36 and 9.7.4 on page 37 .
Perform cleaning operations daily as indicated in paragraph
9.7.6 on page 38.
Grinder-dispenser and Hopper:
Clean the hopper and the dispenser inside and out with a
cloth dampened with warm water.
When nished, dry all parts thoroughly.
Daily
X
X X
X X
X X
Weekly
9.7.3 Dispensing group scheduled wash
If provided, the machine automatically requests that
the dispensing groups be washed on a daily basis.
To begin the wash cycle, proceed as shown on the
display. However you can also cancel the wash prompt
and resume normal operation.
X
36 of 44
USER Manual
9.7.4 Arbitrary dispensing group wash
If desired, it is possible to wash the groups at any time,
proceeding as follows:
• Select the button
• Press the menu button
• Select the conguration button
• Press the
washes
;
;
;
button;
• The display will indicate the date of the last wash cycle
and the number of wash cycles;
• To start the wash, press the
Perform wash
button;
• Insert a suitable detergent in the blind lter holder,
secure it to the dispensing group and press the
Start
button;
• Wait for wash cycle to nish, then remove the lter
holder from the dispensing group and press the
Start
button;
• When the rinse cycle has nished, remove the lter
holder from the dispensing group and press the
End
button.
programme doses
date and time
screensaver
USER MENU
last dispensed
beverage
washes
counter
parameters
recipe selection
water lters
During the washing stage, all the coee selections of that group
are disabled.
Washes are interrupted if the machine is switched o; to resume
the washes automatically, turn the machine on again.
If it has been programmed, it is possible to perform a brief rinsing
of the group (about 3 seconds) by pressing the manual button or
the START/STOP button on the display.
If a certain number of cycles has been programmed and such
number is exceeded, the message “Perform group washing now?”
appears on the display. Proceed with washing following the
instructions on the display.
gruppi
date of last wash
number of wash cycles
Perform a wash
Wash in progress
Rinse in progress
WASHES
WASHES
WASHES
Insert the blind
lter with the
cleaner.
Start
End of wash.
Remove the blind
lter holder.
Start
End of wash
WASHES
WASHES
WASHES
USER Manual
End
37 of 44
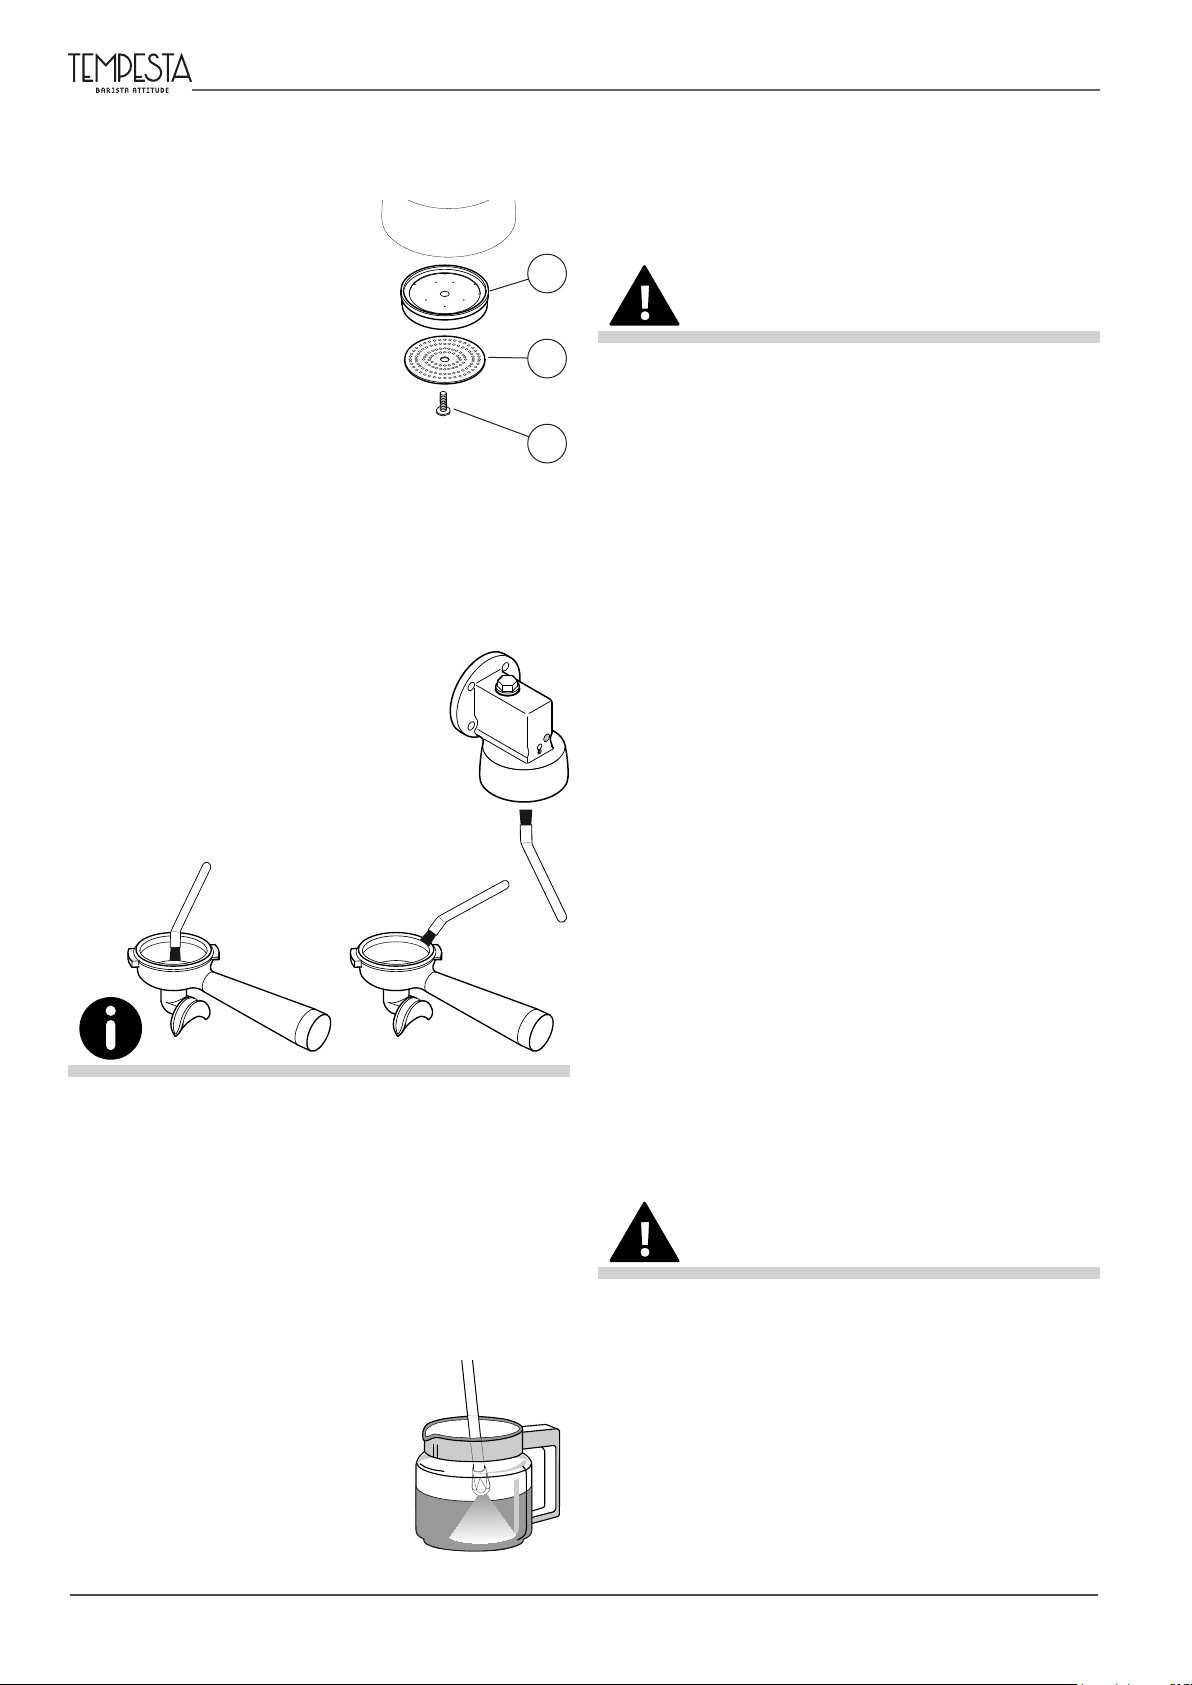
9.7.5 Cleaning the shower screen and shower screen
containment ring
Clean the shower screen and
shower screen containment
ring on a weekly basis, following the steps indicated below:
• Loosen the screw using a
screwdriver (1);
• Remove the shower screen
(2) and the shower screen
containment ring (3);
• Carefully wash the two com-
ponents with hot water;
• Reposition the shower screen and shower screen
containment ring in their original position and lock
everything in place with the screw.
3
2
1
9.7.6 Cleaning the shower screen group and lter holder
Clean daily the shower screen group
and of the lter holder with the brush
provided.
Thoroughly clean the inside of the
coupling ring and of the lter holder; as
well as the edge and the wings of the lter
holder, so as to eliminate any accumulated coee residues.
10. SPARE PARTS
Machine components and/or parts must only be
replaced by one of the Manufacturer's Qualied Technicians.
Under no circumstances are Users authorised to replace machine
components and/or parts.
11. DECOMMISSIONING
11.1 Short period of machine inactivity
“Short period of machine inactivity” refers to a period
of time exceeding one working week.
If the machine is switched back on after this period,
a Qualied Technician must replace all the water inside
the hydraulic circuits as indicated in para. "7.4 Water
renewal" on page 17.
Furthermore, all periodic maintenance operations
must be carried out, see para. "9.2 Periodic maintenance"
on page 33.
Use the special toothbrush supplied (see spare parts catalog).
9.7.7 Cleaning the steam nozzle
Clean the steam nozzle on a weekly basis as follows:
• Insert the steam wand into a jug with water and a
specic cleaner, in accordance with the manufacturer's instructions;
• Heat the solution with the steam nozzle;
• Let the nozzle cool down whilst
keeping it immersed in the solution for at least 5 minutes, so that
cleaner can rise inside the nozzle
due to the cooling eect;
• Repeat the operation 2 or 3 times
until no more milk residue is
dispensed.
11.2 Long period of machine inactivity
"Long period of machine inactivity" refers to a period
of time exceeding 30 working days.
THE machine must be decommissioned by one of
the Manufacturer's Qualied Technicians because the
equipment must be disconnected from the electricity
and water mains, and all the internal circuits must be
emptied of water.
After being decommissioned, the machine can only
be recommissioned by a Manufacturer Qualied Technician.
Under no circumstances are Users authorised to decommission
and/or recommission the machine after long periods of inactivity.
12. DISASSEMBLY
We recommend that the machine is disassembled by
one of the Manufacturer's Qualied Technicians.
38 of 44
USER Manual
13. DISPOSAL
Danger
A potential source of injury or damage to health.
13.1 Disposal information
For the European Union and the European Economic
Area only.
This symbol indicates that the product
cannot be disposed of with household waste,
pursuant to the WEEE Directive (2012/19/EC),
the Battery Directive (2006/66/EC) and/or the
national laws implementing those Directives.
The product should be handed over to
a designated collection point, for example the dealer
when purchasing a new product with similar features,
or an authorised collection site that recycles electrical and electronic equipment waste (WEEE), as well as
batteries and accumulators. Improper handling of this
type of waste can have negative consequences on the
environment and human health, due to the potentially
hazardous substances which are usually found in this
kind of waste.
Your cooperation in correctly disposing of this
product will contribute to the eective use of natural
resources and you will avoid incurring nes provided by
law. For more information about recycling this product,
contact either your local authority, the entity responsible
for waste collection, an authorised dealer or your household waste disposal service.
To dispose of the machine, it is advisable to seek advice from one
of the Manufacturer's Qualied Technicians.
Dangerous area
Any area in the vicinity of the machine where the
presence of a person constitutes a risk to the safety and
health of that person.
User
The person or persons in charge of operating, maintaining and cleaning the machine described in this
manual.
Risk
Combination of the probability and severity of an
injury or damage to health that can arise in a hazardous
situation.
Guard
Machine component used specifically to provide
protection by means of a physical barrier.
Personal protective equipment (PPE)
A device (other than guard) which reduces the risk,
either alone or in conjunction with a guard.
Intended use
The use of the machine in accordance with the information provided in the instructions for use.
Manufacturer’s Qualied Technician
A specialist, specially trained and qualied to connect,
install and assemble the machine; use special equipment
(hoists, forklifts, etc.); perform routine or unscheduled
maintenance which would be particularly complicated
or potentially dangerous if performed by the User.
13.2 Environmental information
The machine features an internal lithium button battery, which is located in the circuit board and ensures
data storage.
Dispose of the battery in accordance with current
national regulations.
14. GLOSSARY
This chapter lists uncommon terms or terms whose
meanings are dierent from those most commonly used.
Abbreviations are explained below, as well as the
meaning of pictograms describing the operator's qualication and the machine status; they are used to quickly
and uniquely provide the information needed to correctly and safely use the machine.
User qualication
Minimum level of skills an operator must have to carry
out the operation described.
Machine status
The machine status includes the mode of operation
and the condition of the machine's safety devices.
Residual risk
Risks that remain despite adopting the protective
measures integrated into the machine's design and
despite the guards and complementary protective measures that have been adopted.
Safety component:
• required to perform a safety function;
• whose failure and/or malfunction endangers the
safety of persons.
USER Manual
39 of 44

15. ALPHABETICAL INDEX OF TOPICS
A
Absorbed power ............................................................ 15
Autosteamer ................................................................... 20
B
Blind lter ......................................................................... 37
C
CE - mark .......................................................................... 15
CE nameplate ................................................................. 15
Cleaning the machine ................................................. 36
Coee - dispensing ....................................................... 18
Coee grind .................................................................... 18
Commissioning .............................................................. 16
Cup warmer ..................................................................... 21
Customer service ........................................................... 11
D
Decommissioning the machine ............................... 38
Disassembling the machine ...................................... 38
Dispensing group wash ........................................ 36
E
Electromagnetic emissions........................................ 16
Emissions .......................................................................... 16
Environmental information ....................................... 39
F
Filter and lter holder wash....................................... 36
G
Glossary ............................................................................ 39
Glossary and pictograms ............................................ 10
Guarantee ........................................................................ 10
,37
Maintenance and cleaning ........................................ 33
Make/Model of the machine ..................................... 11
Malfunctions and solutions ....................................... 35
P
Periodic maintenance .................................................. 33
Pictograms ....................................................................... 10
Programming the machine parameters ............... 23
Push-button panel ........................................................ 14
S
Safety precautions .....................................................3,16
Scheduled maintenance ............................................. 34
Shower screen ................................................................ 38
Shower screen containment ring ............................ 38
Solutions .......................................................................... 35
Sound emissions ........................................................... 16
Spare parts ....................................................................... 38
Steam ................................................................................. 19
Steam nozzle/steam wand wash ............................. 38
T
Technical data ................................................................. 15
Tips ..................................................................................... 21
Turning the machine o ............................................. 17
Turning the machine on ............................................. 16
V
Vibrations ......................................................................... 16
Voltage .............................................................................. 15
W
Water renewal ................................................................17
H
Hot water ......................................................................... 20
I
Installation ....................................................................... 16
Instruction Manual - Update ..................................... 10
Intended use ................................................................... 11
Internal battery .............................................................. 39
M
Machine disposal .......................................................... 39
Machine identication ................................................ 11
Machine inactivity......................................................... 38
Machine operation ....................................................... 16
Machine storage ............................................................ 16
40 of 44
USER Manual
Ogni macchina è corredata dalla Dichiarazione di Conformità CE di cui qui sotto è riportato un esempio
Each machine is accompanied by the EC Declaration of Conformity - see example below
Chaque machine est accompagnée d'une Déclaration de conformité CE dont vous trouverez un exemple ci-dessous
Jeder Maschine liegt die EG-Konformitätserklärung bei, die hier unten als Beispiel abgebildet ist
Cada máquina se suministra junto con la Declaración de Conformidad CE cuyo ejemplo se muestra a continuación
A máquina é fornecida com uma Declaração de Conformidade CE veja abaixo um exemplo
Декларация о соответствии нормам ЕС
IT
DICHIARAZIONE DI CONFORMITÀ CE
FR
DÉCLARATION DE CONFORMITÉ CE
DE
EG - KONFORMITÄTSERKLÄRUNG
RO
DECLARATIE DE CONFORMITATE CE
CMA MACCHINE PER CAFFÈ S.r.l.
Via Condotti Bardini, 1
31058 SUSEGANA (TV) - ITALY
Tipo - Type - Typ - Tip :
Macchina per caè - Cafeteras Machines a cafe
Coee machines - Kaeemaschinen
Máquina de café - Aparat de preparat cafea
- come costruttore di MACCHINE PER CAFFÈ, dichiara che il prodotto:
- como fabricante de CAFETERAS, declara que el producto:
- en tant que constructeur de MACHINES A CAFE, déclare que le produit:
- being the manufacturer of COFFEE MACHINES, hereby declares that the product:
- erklärt als Hersteller von KAFFEEMASCHINEN, daß das Gerät:
- como fabricante de MÁQUINAS DE CAFÉ, declara que a máquina:
- in calitate de producator de APARATE PENTRU PREPARAT CAFEA, declara ca produsul:
ES
DECLARACIÓN DE CONFORMIDAD CE
EC DECLARATION OF CONFORMITY
EN
DECLARAÇÃO DE CONFORMIDADE CE
PT
Modello - Model - Modell - Modelo :
N° di serie - Matricula - N° de serie
Serial No - Seriennummer
N° de série - Numar de fabrica :
- al quale si riferisce questa dichiarazione è conforme ai requisiti previsti dalle seguenti DIRETTIVE e REGOLAMENTI e successive modiche e integrazioni:
- al que se reere esta declaración es conforme con lo que disponen las siguientes DIRECTIVAS y REGLAMENTOS y siguientes modicaciones y correcciones:
- auquel se réfère cette déclaration est conforme aux exigences essentielles de DIRECTIVES et RÈGLEMENTS et modications et ajouts successifs:
- to which this declaration refers, complies with the requirements set forth by the following DIRECTIVES and REGULATIONS and subsequent amendments:
- auf welches sich diese Erklärung bezieht, gemäß den folgenden EG-Vorschriften gebaut ist VORSCHRIFTEN und REGELUNGEN sowie nachfolgendenÄnderungen und Ergänzungen:
- referida nesta declaração, é conforme aos requisitos previstos pelas seguintes DIRECTIVAS e REGULAMENTOS e sucessivas modicações e integrações:
- la care se refera aceasta declaratie, este conform cu prevederile DIRECTIVELOR si REGULAMENTE cu modicarile si completarile ulterioare:
2006/42/CE
2014/30/UE
2014/35/UE
2012/19/UE
2011/65/UE
2009/142/CE
applicabile solo per i modelli con gas - aplicable solamente a los modelos con gas - applicable seulement aux modèles avec gaz - applicable for models with gas kit only
(
)
*
nur fuer die Ausfuehrungen mit Gas erforderlich - aplicável somente para os modelos com gás - aplicabila numai in cazul modelelor cu gaz
2014/53/EU
applicabile solo per i modelli con modulo radio - aplicable sólo a los modelos con módulo radio - applicable uniquement pour les modèles avec module radio - applicable only for models with radio module
)
(
**
anwendbar nur für Modelle mit Radiomodul - aplicável apenas nos modelos com módulo de rádio - aplicabila numai in cazul modelelor cu modul radio
1935/2004
in conformità alle norme - en conformidad de las normas - en conformité avec les normes - in compliace with standards
gemäß den Vorsch - em conformidade com as normas - in conformitate cu normele :
EN 60335-1, EN 60335-2-75, EN 55014-1, EN 55014-2, EN 61000-3-2, EN 61000-3-3, EN 301 489-1, EN 301 489-17, EN 300 328
L’incarico di costituire e conservare il fascicolo tecnico è adato alla CMA MACCHINE PER CAFFÈ S.r.l. in Via Condotti Bardini,1 - 31058 SUSEGANA (TV) - ITALIA
La responsabilidad de elaborar y conservar el expediente técnico corresponde alla CMA MACCHINE PER CAFFÈ S.r.l. Via Condotti Bardini,1 - 31058 SUSEGANA (TV) - ITALIA
La tâche de constituer et de conserver le dossier technique est conée à la CMA MACCHINE PER CAFFÈ S.r.l. Via Condotti Bardini,1 - 31058 SUSEGANA (TV) - ITALIE
The CMA MACCHINE PER CAFFÈ S.r.l. Via Condotti Bardini,1 - 31058 SUSEGANA (TV) - ITALY is responsible for establishing and maintaining the technical le
Die Aufgabe der Einrichtung und Aufrechterhaltung des technischen Unterlagen anvertraut ist, die CMA MACCHINE PER CAFFÈ S.r.l. Via Condotti Bardini, 1-31058 SUSEGANA (TV) - ITALIEN
A responsabilidade de criar e guardar o fascículo técnico é conada à la CMA MACCHINE PER CAFFÈ S.r.l. Via Condotti Bardini,1 - 31058 SUSEGANA (TV) - ITALIA
Sarcina constituirii si pastrarii dosarului tehnic este incredintata CMA MACCHINE PER CAFFÈ S.r.l. Via Condotti Bardini,1 - 31058 SUSEGANA (TV) - ITALIA
La presente dichiarazione perde la sua validità nel caso in cui l’apparecchio venga modicato senza espressa autorizzazione del costruttore oppure se installato o utilizzato in modo non
conforme a quanto indicato nel manuale d’uso e nelle istruzioni - La presente declaración pierde su validez en el caso de que el aparato sea modicado sin expresa autorización del
constructor, o bien si ha sido instalado o utilizado de forma no conforme a lo indicado en el manual de uso y en las instrucciones - La présente déclaration sera considérée comme nulle
et non avenue si l’appareil est modié sans l’autorisation du fabricant ou si l’appareil est installé ou utilisé de façon non conforme à ce qui est indiqué dans le manuel d’utilisation et d’installation - This declaration is null and void if the machine is modied without the express authorization of the manufacturer or if improperly installed and used in a way that does not comply
with indications in the users’ manual and the instructions - Die vorliegende Konformitätserklärung verliert ihre Gültigkeit, falls das Gerät ohne ausdrückliche Genehmigung des Herstellers
modiziert werden sollte oder falls es nicht gemäß den im Bedienungs- und Wartungshandbuch aufgeführten - A presente declaração deixa de ter validade no caso em que o aparelho
seja modicado sem autorização do construtor ou se instalado ou utilizado de maneira não conforme ao indicado no manual de uso e nas instruções - Această declarație își pierde valabilitatea dacă dispozitivul este modicat fără autorizarea expresă a producătorului sau dacă este instalat sau folosit în alt scop decât cel specicat in manualul şi în instrucţiunile de utilizare.
Data di emissione - Fecha de emisión
Date d’émission - Date of Issue
Ausstellungsdatum - Data de emissão
Data emiterii
Direttiva macchine - Directiva sobre las máquinas - Directive machines - Machinery Directive
Maschinenrichtlinie - Directiva sobre máquinas - Directiva privind echipamentele tehnice
Direttiva compatibilità elettromagnetica EMC - Directiva compatibilidad e
Electromagnetic compatibility EMC Directive - Richtlinie elektromagnetische Verträglichkeit EMV
Directiva sobre a compatibilidade electromagnética EMC - Directiva privind compatibilitatea electromagnetică EMC
Direttiva bassa tensione - Directiva baja tensión - Directive de basse tension - Low voltage Directive
Niederspannungsrichtlinie - Directiva sobre baixa tensão - Directiva privind joasa tensiune
Direttiva RAEE - Directiva RAEE - Directive DEEE - WEEE Directive
Directiva RAEE - Directiva DEEE (Deseurile de echipamente electrice si electronice)
Direttiva RoHS - Directiva RoHS - Directive RoHS - RoHS Directive
RoHS-Richtlinie - Directiva RoHS - Directiva privind interzicerea substantelor periculoase (RoHS)
Direttiva apparecchi a gas - Directiva aparatos de gas - Directive pour les appareils au gaz - Gas appliances Directive
(*)
Richtlinie für Gasverbrauchseinrichtungen - Directiva sobre aparelhos a gás - Directiva privind aparatele consumatoare de combustibili gazosi
Direttiva RED - Directiva RED - Directive RED - RED Directive - Directiva RED - Directiva RED
(
)
**
Regolamento sui materiali a contatto con i prodotti alimentari - Reglamentos sobre los materiales en contacto con los productos alimenticios
Règlement sur les matériaux en contact avec les denrées alimentaires - Regulation on food contact materials
Regelung für Materialien, die mit Lebensmitteln in Kontakt kommen - Regulamento sobre materiais em contacto com os produtos alimentares
Regulamentul privind materialele care intră în contact cu produsele alimentare
lectromagnética EMC - Directive de compatibilité électromagnétique EMC
FACSIMILE
Susegana,
Managing Director

Ogni macchina è corredata dalla Dichiarazione di Conformità PED di cui qui sotto è riportato un esempio
Each machine is accompanied by the PED Declaration of Conformity - see example below
Chaque machine est accompagnée d'une Déclaration de conformité PED dont vous trouverez un exemple ci-dessous
Jeder Maschine liegt die PED-Konformitätserklärung bei, die hier unten als Beispiel abgebildet ist
Cada máquina se suministra junto con la Declaración de Conformidad PED cuyo ejemplo se muestra a continuación
A máquina é fornecida com uma Declaração de Conformidade PED veja abaixo um exemplo
Директива для оборудования, работающего под давлением
IT
DICHIARAZIONE DI CONFORMITÀ CE
FR
DÉCLARATION DE CONFORMITÉ CE
DE
EG - KONFORMITÄTSERKLÄRUNG
RO
DECLARATIE DE CONFORMITATE CE
LOGO DEL PRODUTTORE
MANUFACTURER'S LOGO
Indirizzo del Produttore
Manufacturer's address
come costruttore di CALDAIE A VAPORE per macchine da caè e VALVOLE DI SICUREZZA (che la proteggono)
dichiara che il prodotto sotto descritto, è conforme ai requisiti previsti nella DIRETTIVA
como fabricante de calderas a vapor para maquinas de cafè y valvulas de seguridad (que las protegen)
declara que el producto abajo descrito, es conforme a los requisitos previstos en la DIRECTIVA
en qualité de fabricant de chaudières à vapeur pour machines à café et de soupapes de sécurité (qui protègent la
chaudière) déclare que, le produit ci-dessous reporté, est conforme aux normes prévues par la DIRECTIVE
as manufacturer of boilers for espresso coee machines and of security valves for their safety hareby declares that
the item described here below is manufactured according to the norms laid down in DIRECTIVE
als Hersteller von Dampfkessel für Kaeemachinen und Sicherheitsventile, erklärt dass die unten gennanten
Produkte gemäss dem Erfordernis der EG-Vorschrift hergestellt sind
como fabricante de CALDEIRAS A VAPOR para máquinas de café e VÁLVULAS DE SEGURANÇA (que as protegem)
declara que o produto descrito abaixo, é conforme com os requisitos previstos pela DIRECTIVA
in calitate de producator de cazane pentru MASINI DE PREPARAT CAFEA si de supape de siguranta, declara ca
produsul cu descrierea de mai jos este fabricat conform normelor scrise in DIRECTIVE 2014/68/UE
ES
DECLARACIÓN DE CONFORMIDAD CE
EC DECLARATION OF CONFORMITY
EN
DECLARAÇÃO DE CONFORMIDADE CE
PT
CALDAIA - CALDERA - CHAUDIÈRE - BOILER - KESSEL - CALDEIRA - CAZANE
Modello - Modelo - Modele - Model - Modelo - Modell
N° di serie - Matricula - N° de serie - Serial No
Seriennummer - Nº de série - Seria
Lotto - Lote - Lot - Lote - Warenposten
VALVOLA - VALVULA - SOUPAPE - VALVE - VENTILE - VÁLVULA - SUPAPE
Modello - Modelo - Modele - Model - Modelo - Modell
N° di serie - Matricula - N° de serie - Serial No
Seriennummer - Nº de série - Seria
Anno di fabricazione - Año de fabricación
Anneé de fabrication - Year od production
Baujahr - Ano de fabrico - An de fabricatie
Procedimento di valutazione di conformità Classica: Categoria 1 Procedimento: Modulo A
Speciche tecniche utilizzate: I.S.P.E.S.L. Raccolta M, S, VSR e PIVG (ex E) rev. 95
Procedimiento de valuacion de conformidad Clasicacion: Categoria 1 Procedimiento: Modulo
A
Speciche tecniche utilizzate: I.S.P.E.S.L. Tomo M, S, VSR y PIVG (ex E) Rev. 95
Procédure d'évaluation de conformité Classication: Catégorie 1 Procédure: Module A
Spécications technique appliquées: I.S.P.E.S.L. Tome M, S, VSR et PIVG (ex E) Rév. 95
Conformity evaluation procedure Classication: Category 1 Procedure: Form A
Technical specication appled: I.S.P.E.S.L. Tomes M, S, VSR and PIVG (ex E) rev. 95
Bewertungübereinstimmungsverfahren Wertung: Klasse 1 Verfahren: Modul A
Technische Angaben gemäss: I.S.P.E.S.L. Band M, S, VSR und PIVG (ex E) Rev. 95
Processo de avaliação da conformidade Classicação: Categoria 1 Procedimento: Módulo A
Características técnicas utilizadas: I.S.P.E.S.L. Fascículo M, S, VSR e PIVG (ex E) rev. 95
Procedura de evaluare a conformitatii Classicare: Categorie 1 Procedura: Forma A
FACSIMILE
Specicatii tehnice aplicate: I.S.P.E.S.L. Culegere M, S, VSR si PIVG (ex E) Rev. 95
Susegana,
Managing Director


CMA MACCHINE PER CAFFÈ S.R.L.
Via Condotti Bardini, 1 - 31058 SUSEGANA (TV) - ITALY
Tel. +39.0438.6615 - Fax +39.0438.60657
www.astoria.com - info@astoria.com
Cod. 02000760 - Rev. 04 - 01/2019
 Loading...