


SETTING UP1
QUICK START GUIDE
March 2018 V1.0
LED PANELS
FUNCTIONS2 WHAT IS IN THE BOX3
Power Switch
●
●
—
—
—
—
—
○
○
●
●
●
●
●
●
●
●
●
●
●
●
WS 840D
WS 840B
PS 1300D
PS 1300B
SF 100
SF 120
SF 200
12 -24 V DC
12 -24 V DC
12 -24 V DC
12 -24 V DC
12 -24 V DC
12 -24 V DC
24 -36 V DC
14.8 V DC
14.8 V DC
14.8 V DC
14.8 V DC
14.8 V DC
14.8 V DC
29.6 V DC
14.4 V DC
14.4 V DC
14.4 V DC
14.4 V DC
14.4 V DC
14.4 V DC
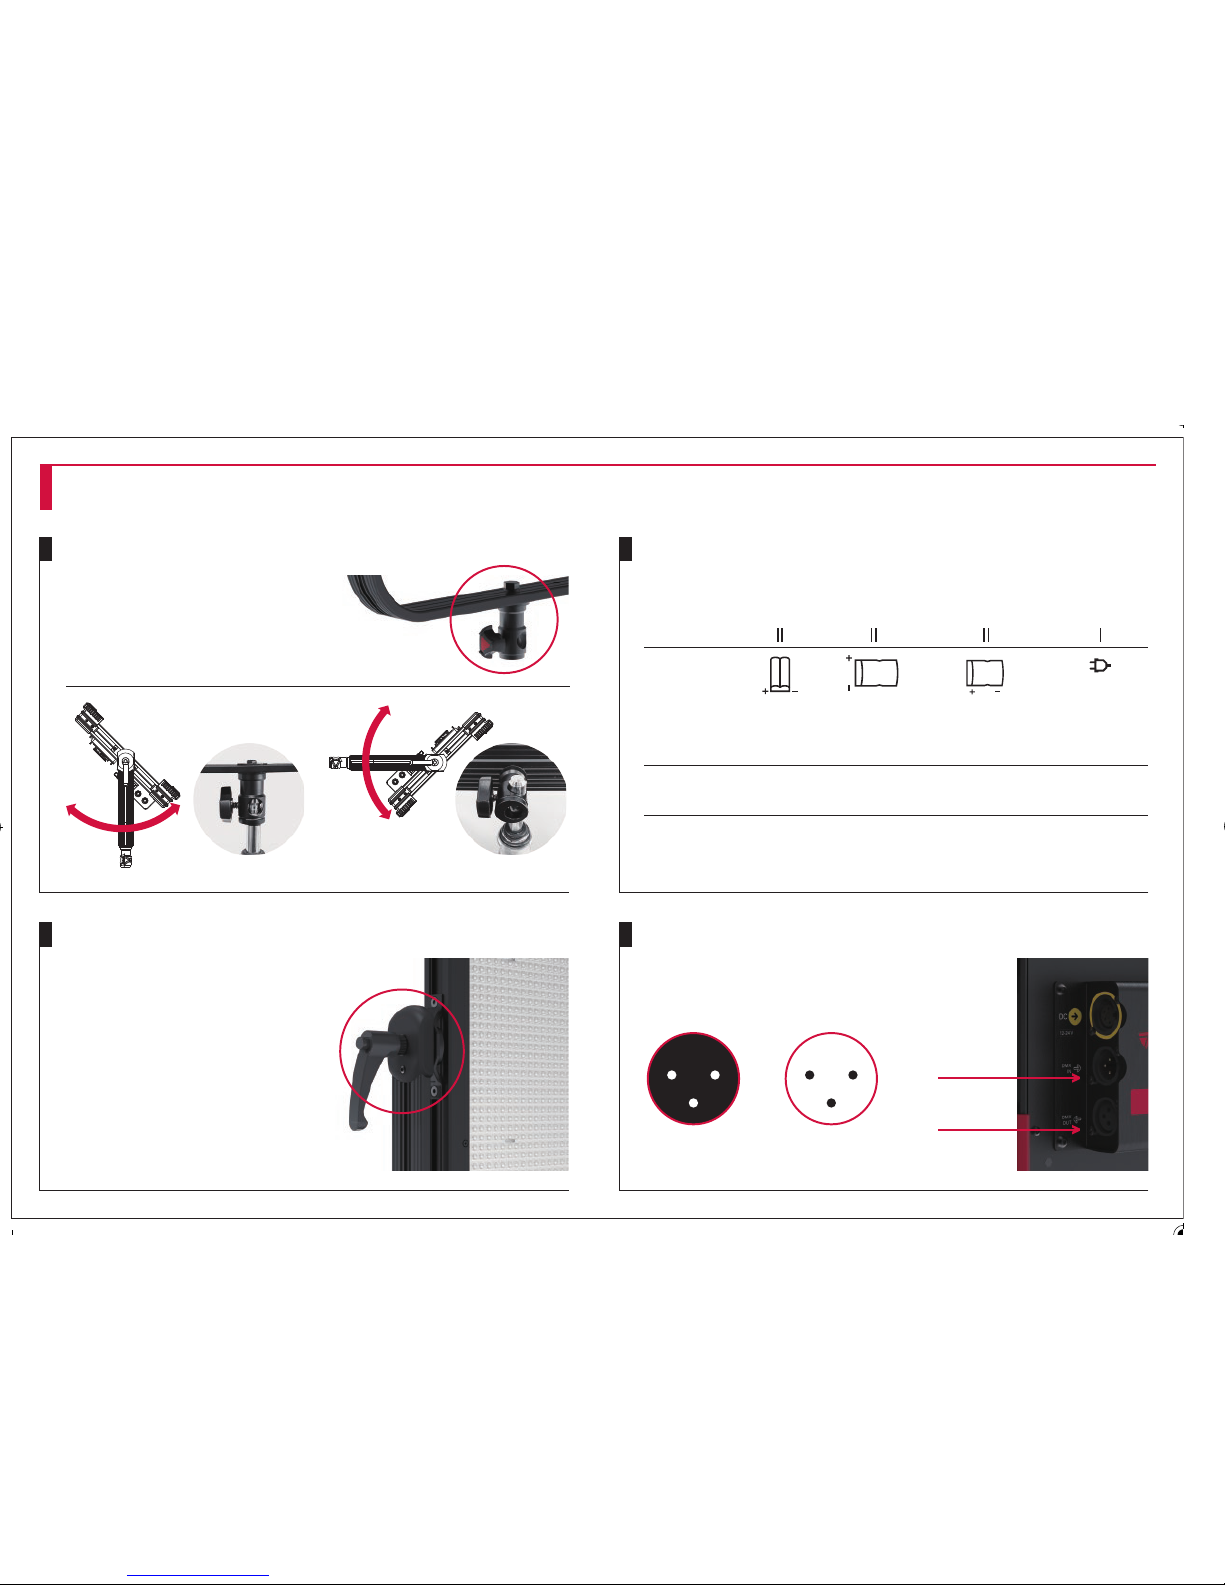
Mounting
Mount the light on a light stand
with the installed TVMP
receptacle. The receptacle
offers two ways to mount the
light to a light stand.
Male Female
Pin 1: Ground Pin 2: Data 1- Pin 3: Data 1+
12
3
21
3
SETTING UP1
Powering
The light can be powered by:
2×NP-F batteries / 1×V-Mount battery / AC adapter through XLR-4 connector.
Tilting
The tilt position of the light can
be adjusted by the high strength
tilt lock lever, which can be
repositioned by pulling and
turning it (lift & lock).
Position 1
2×NP-F V-Mount
AC Adapter
through XLR-4
Position 2
DMX (only models including DMX)
Connect a standard DMX console by the
XLR 3-pin connector.
16mm/28mm
Combo Pin
○
○
○
○
○
○
—
3-stud Mount
DMX IN
DMX OUT
● Standard ○ Optional — Not available

CCT Knob
FUNCTIONS2
Intensity | <Intensity> knob
Turn the <Intensity> knob to adjust intensity between 0 and 100%.
Color Temperature | <CCT> knob
Turn the <CCT> knob to adjust color temperature (only for Bi-color models).
Presets | <MODE> + <1~4> & <1~4>
Save: To save the current state of the light to a preset press <MODE> and one of the Preset number buttons <1><2><3><4>
Recall: To recall a saved state press the Preset number button that you used to save the state.
DMX | <SET> + <1>
Hold the <SET> button and press the DMX Mode button <1> at the same time to switch between 8 bit and 16 bit mode.
To set the DMX channel between 1 and 512 use the Channel <UP> and <DOWN> buttons.
Wireless Settings | <SET> + <3> & <SET> + <4>
Frequency: To set the Frequency for wireless control hold the <SET> button and press the Frequency button <3> at the same time.
With the Channel buttons <UP><DOWN> you can adjust the frequency. To confirm press the <SET> button again.
Password: To set the password for wireless control hold the <SET> button and press the Password button <4> at the same time.
With the Channel buttons <UP><DOWN> you can adjust the password. To confirm press the <SET> button again.
Display View
To toggle between different display views
you can press the <MODE> button.
You can toggle between below views:
Intensity Knob
Intensity / Color temperature
Frequency / Password
Power / Software Version / (Temperature)*
*Soft series only.

Light Body
Barndoors
Remote Controller
AC Adapter & Cable
Note: Fan Speed function is not active with current models and reserved for future products with a built-in fan.
MODEL ASTORA WS 840D ASTORA WS 840B ASTORA PS 1300D ASTORA PS 1300B ASTORA SF 100 ASTORA SF 120 ASTORA SF 200
●
●
●
○
●
●
●
●
●
●
●
●
●
●
●
●
●
●
●
●
●
●
●
●
●
●
●
○
Fan-Less, Silent Operation
Copyright © VIBESTA All Rights Reserved.
VIBESTA B.V. | Professor Rommelaan 2, 5707 KS Helmond, The Netherlands
WHAT IS IN THE BOX3
● Standard ○ Optional — Not available Technical data and offerings are subject to change without notice.
 Loading...