

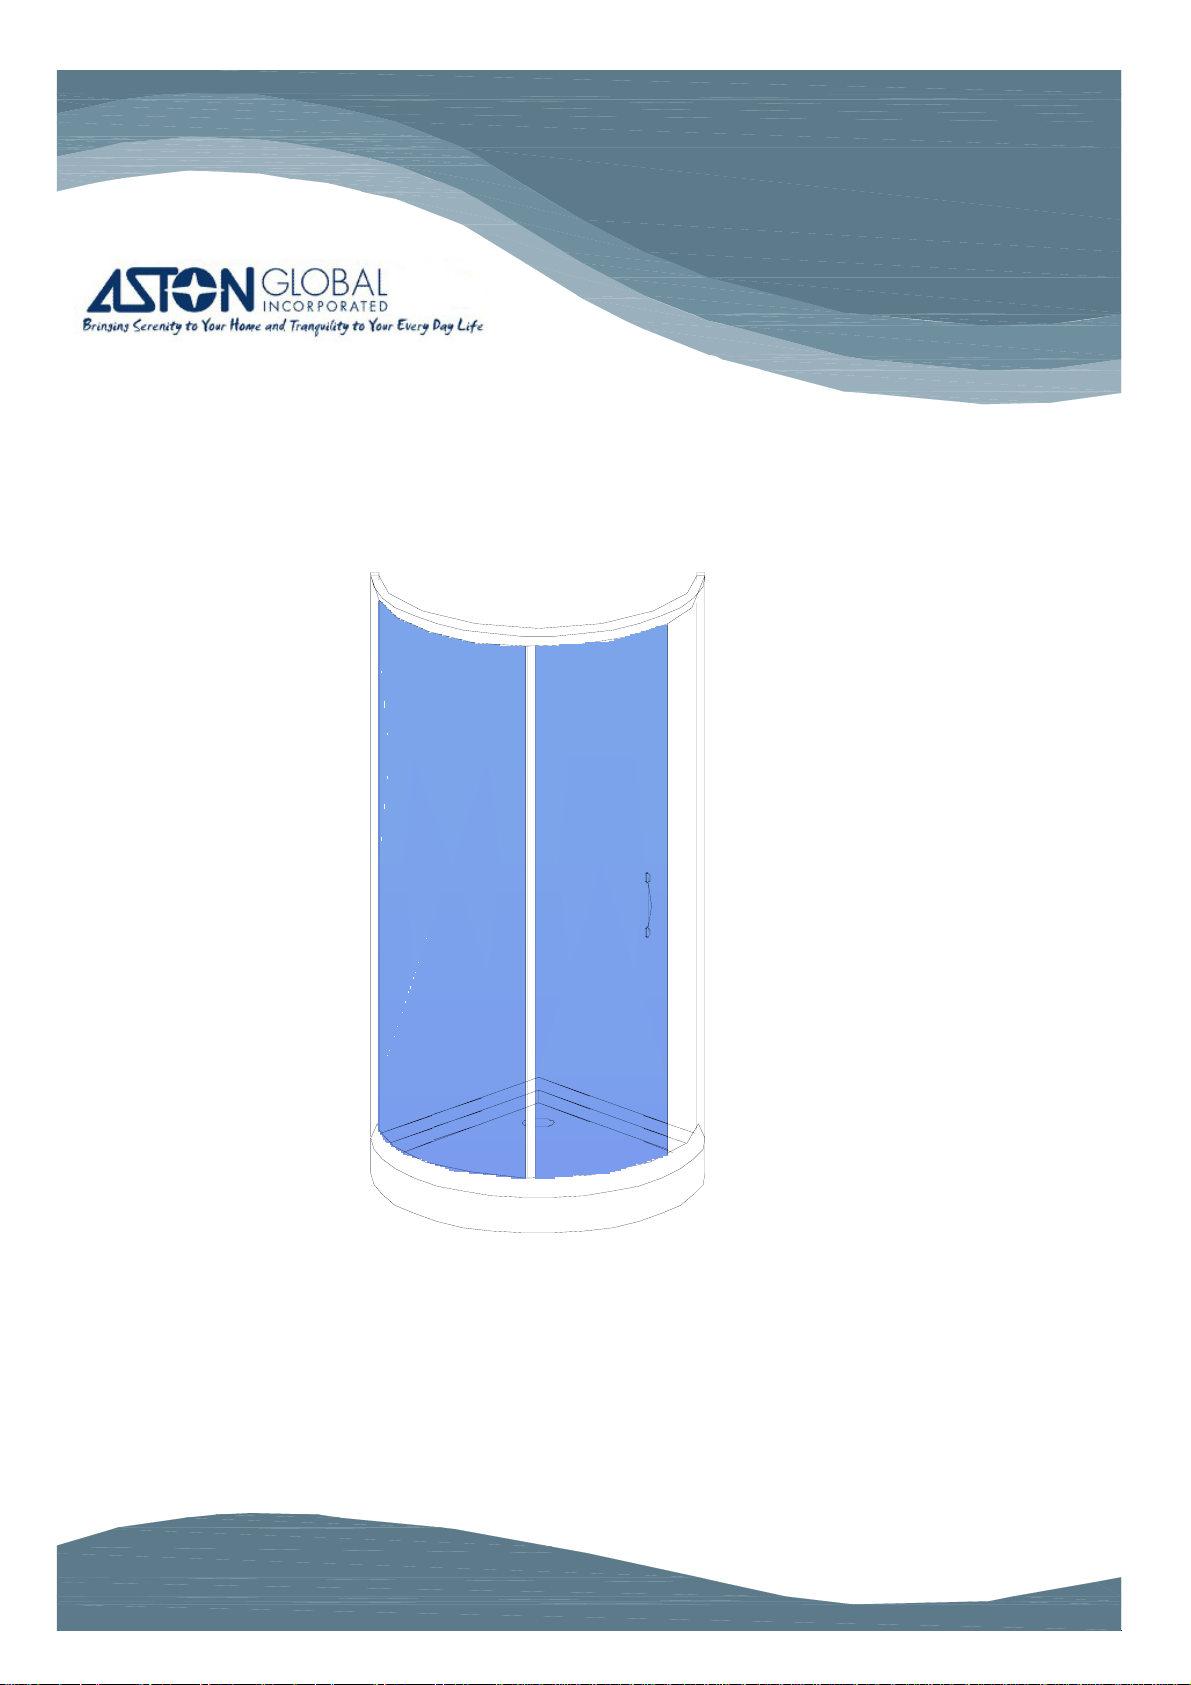
I NST A L LATIO N AND OWNER' S MANUAL
Shower Door Model Numbe r :SD908
Please carefully read these instructions before you begin to install the products.
01 /12 Rev B
P/N:10055-06

Before you start
Thank you for purchasing your Aston shower door and tray. We hope that it will
provide you with years of satisfying use and enjoyment.
Please read this manual carefully because it contains information and instructions
about the proper installation of the unit. If you do not follow certain conditions of
installation and maintenance, your warranty may be affected.
Aston Shower door's and shower tray's feature:
ϒ⁄ Tempered Safety Glass
ϒ⁄ High quality hardware
ϒ⁄ Easy maintena n c e durable fiberglass re inforced ac rylic
1
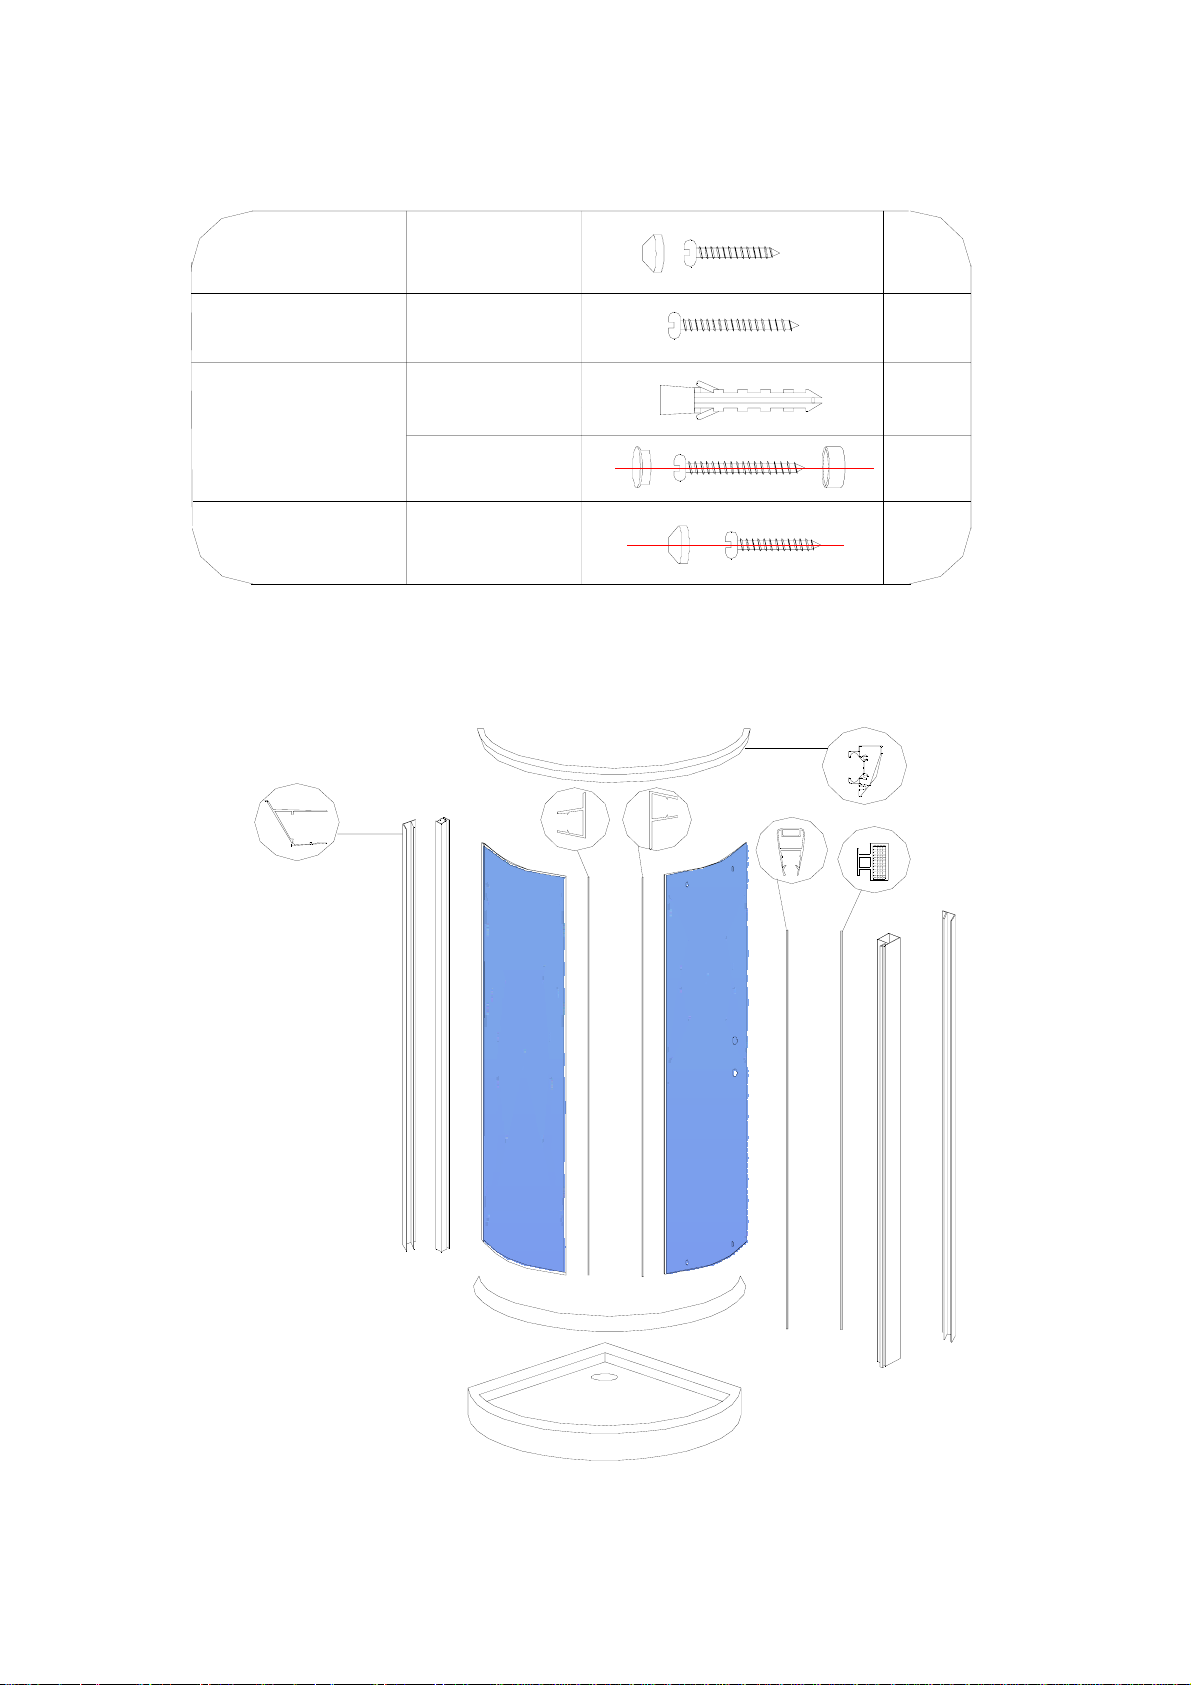
SUPPLIED HARDWARE
SCREW PACK
(1 )
SCREW PACK
(2)
SCREW PACK
( 3 )
SCREW PACK
( 4 )
SUPPLIED PARTS
M5x16.5
M4x30
expand tube
M4x40
M4x12
8
8
6
6
6
2
Installation Gui de
Please read and follow the installation instructions and guidel ines in this section.
Failure to follow the recommended instructions and installation techniques may
lead to possible damage to the unit or the surrounding area and can affect
warranty claims.
3
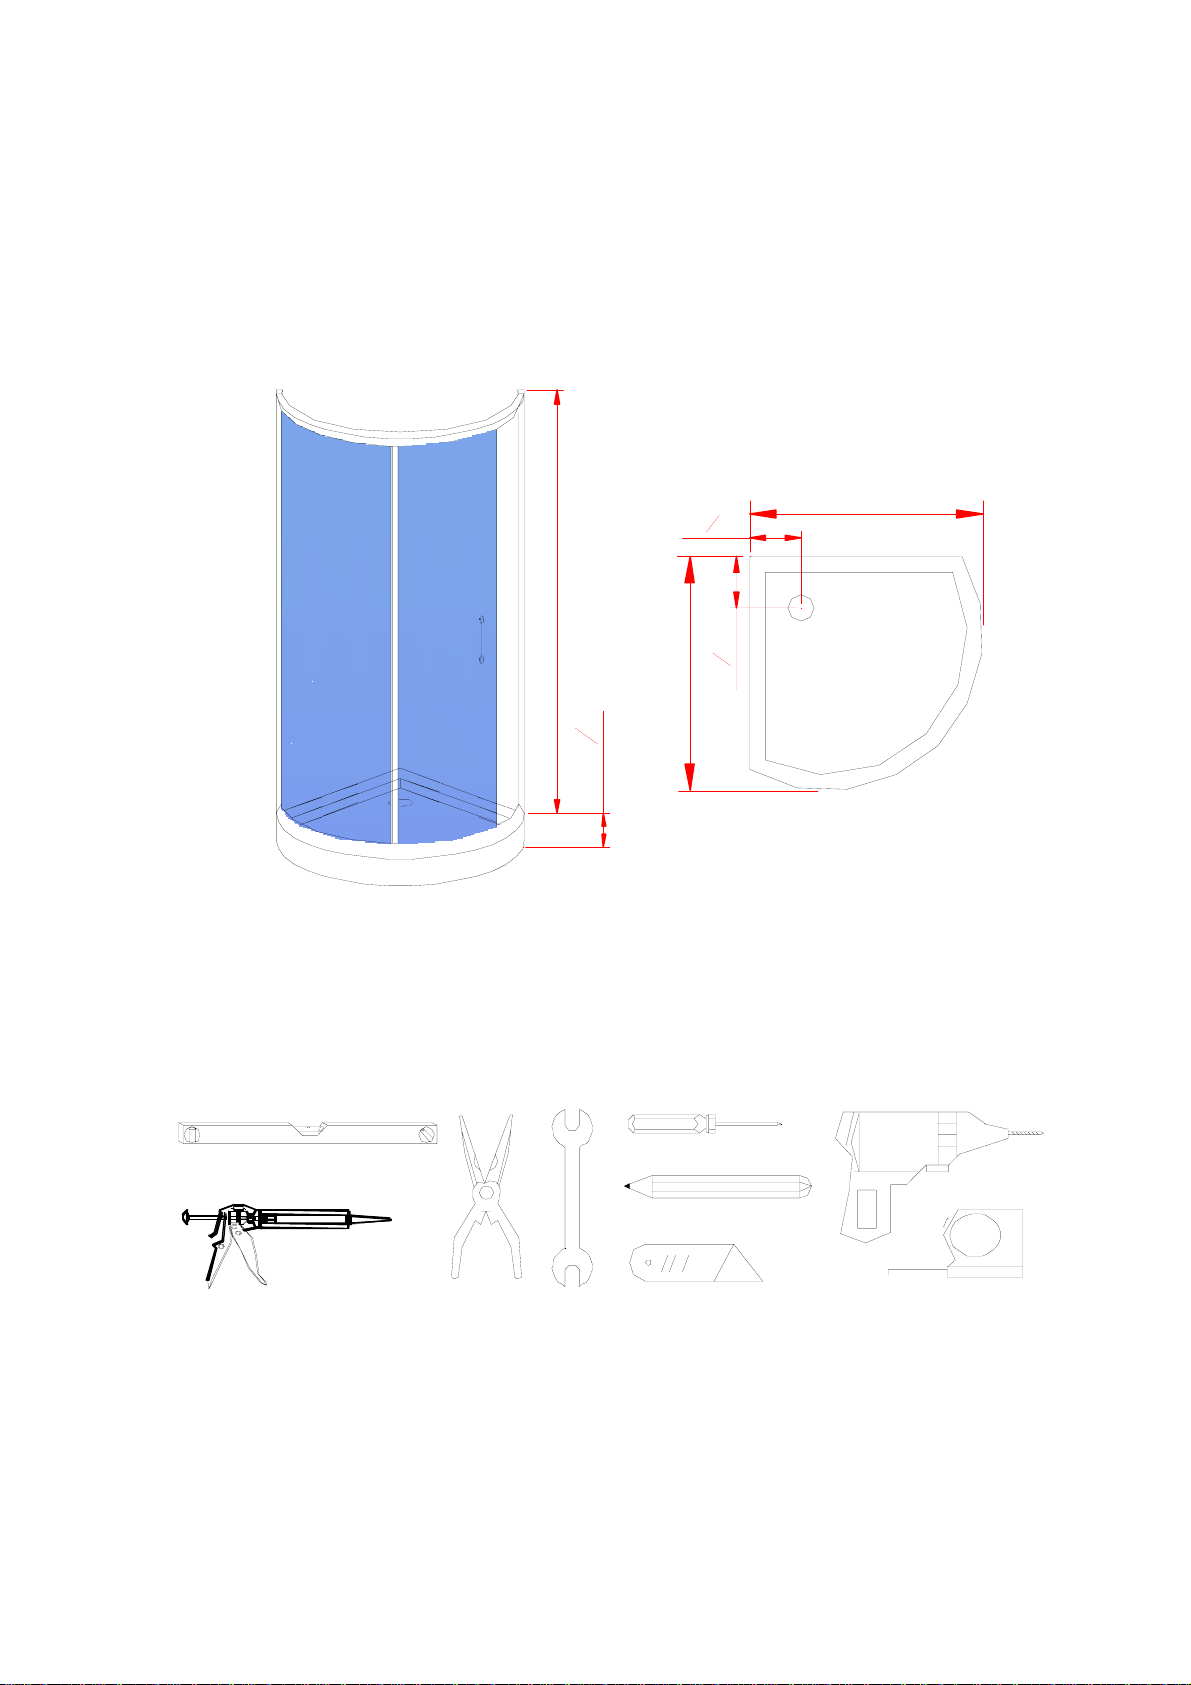
36"
12
5"
75"
5"
3
12
36"
2"
1
2
ATTENTION: This unit requires assembly. A minimum of two people are
required for assembly, as several of the sections can be large and unstable until
assembled.
You will need the following tools:
ϒ⁄ Drill with screwdriver attachments
ϒ⁄ Caulk gun
ϒ⁄ Level (3 foot or longer is recommended)
ϒ⁄ Tape measure
ϒ⁄ Phillips head screw driver
ϒ⁄ Flat head screw driver
3

ϒ⁄ Bathroom rated silicone sealant
Before starting the installation, please ensure that you have inspected all
components of the unit and check for broken or damaged sections. If you find
damage, please contact your dealer or the manufacturer.
Locate the accessory and manual box and remove the individual screw and
hardware packages and lay them out in sequential order to aid in completing
the rest of the installation
4
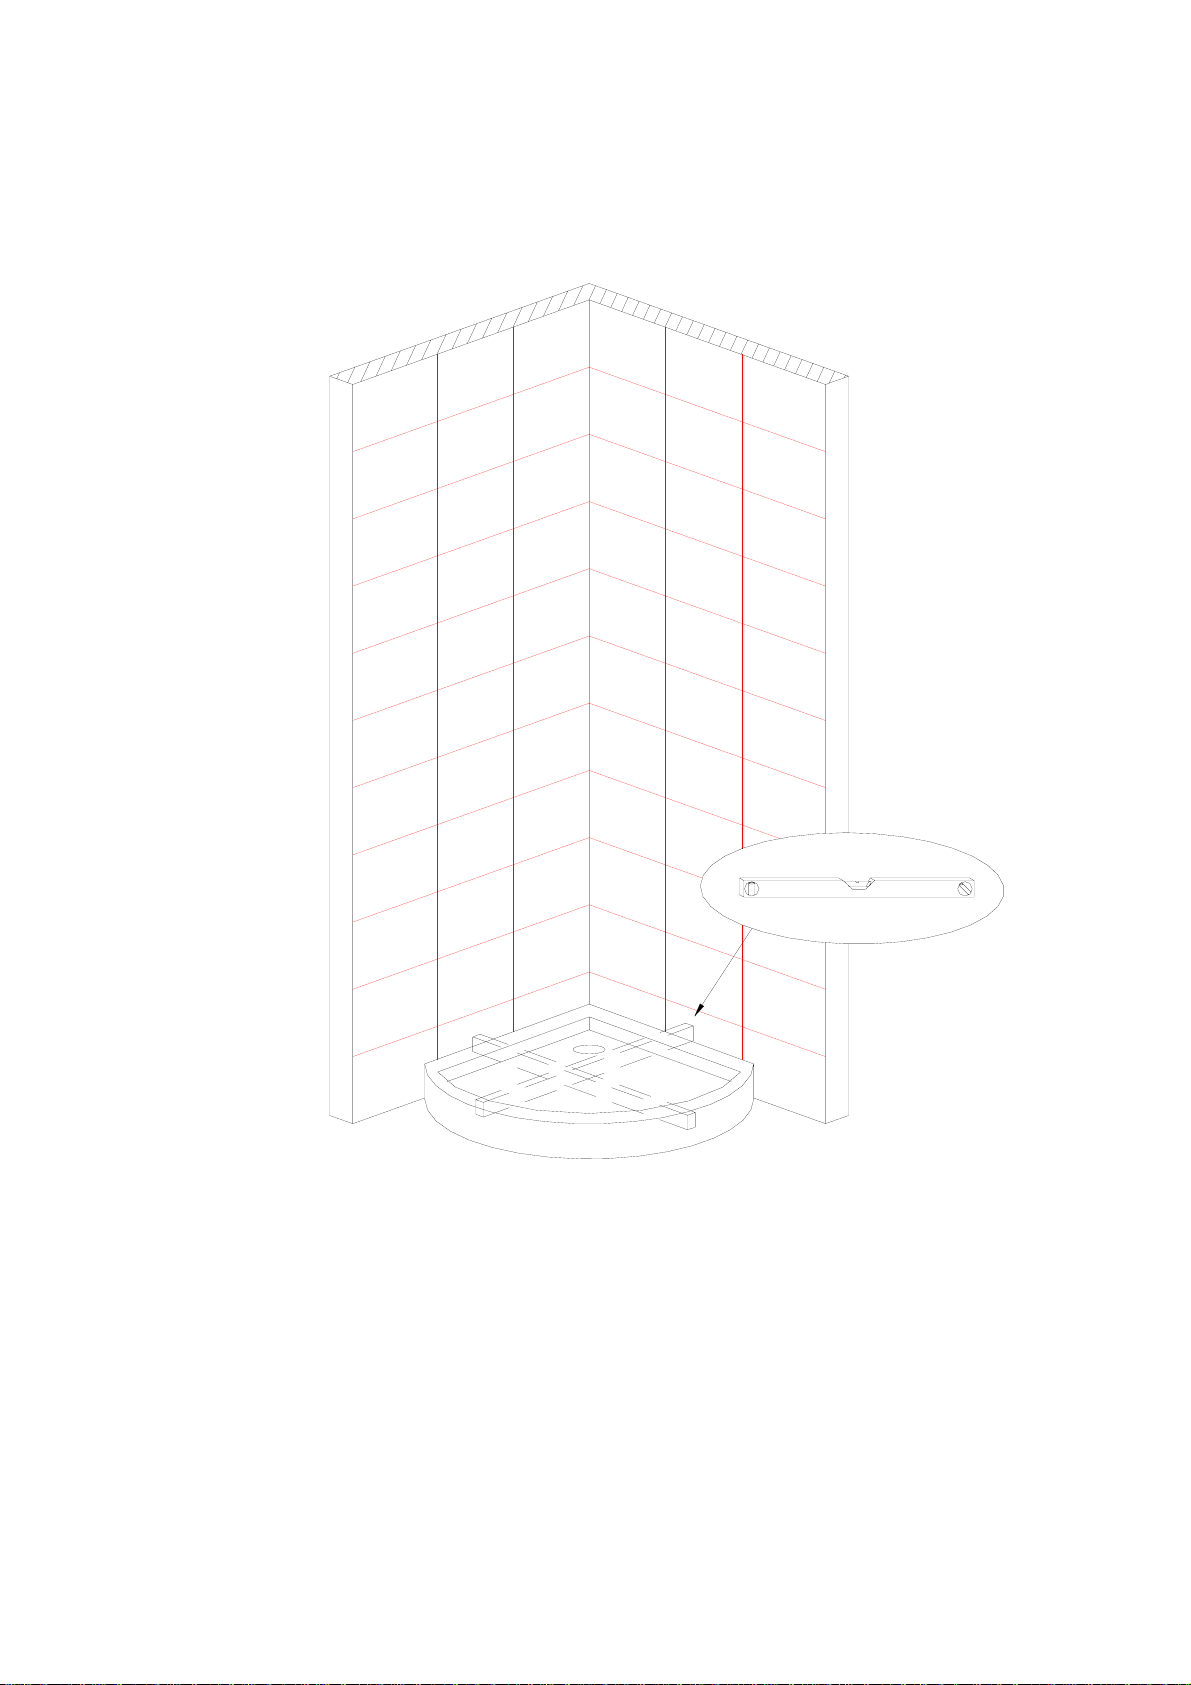
Preparation of base
for installation of shower tray
The shower tray needs to sit on a flat level base for proper support. Ensure that
the area for the shower tray is properly prepared for installation.
Using the drawing provide place the floor drain in the proper location so that the
shower tray drain and the floor drain are in line after final installation.
Place the shower tray in the final installation position line up the drain holes and
check for level. If not level make adjustments to the floor at this time.
5
Assemble the glass panel
M5x16.5mm
M5x16.5mm
SCREW PACK
(1)
1. Remove and inspect all of t he gl ass panels. If any are broken, please cont act
yo ur deal er or the manu fac turer.
NOTE: The glass panels are labeled to indicate the direction for the top of the
glass panels.
2. Remove and inspect the aluminum top and bottom rails for t he glass
assembly.
NOTE: The alumi num rails are l abeled to di sti nguish the top and bot t om r ail and
their or i entation wit hin the assembly.
IMPOR TA NT: P le ase take note th at Scr ew Pac k contains several different
len gt hs of sc re ws each for a spec ific loc at ion wi thin the glass assembly.
Dur ing th e ne xt ste ps of as sembly, pa y cl ose attention so the correct screw
length is used in the correct l ocat ion. Failure to do t hi s ca n caus e da ma ge to
the glass panels and poss ibly result in leaks.
6

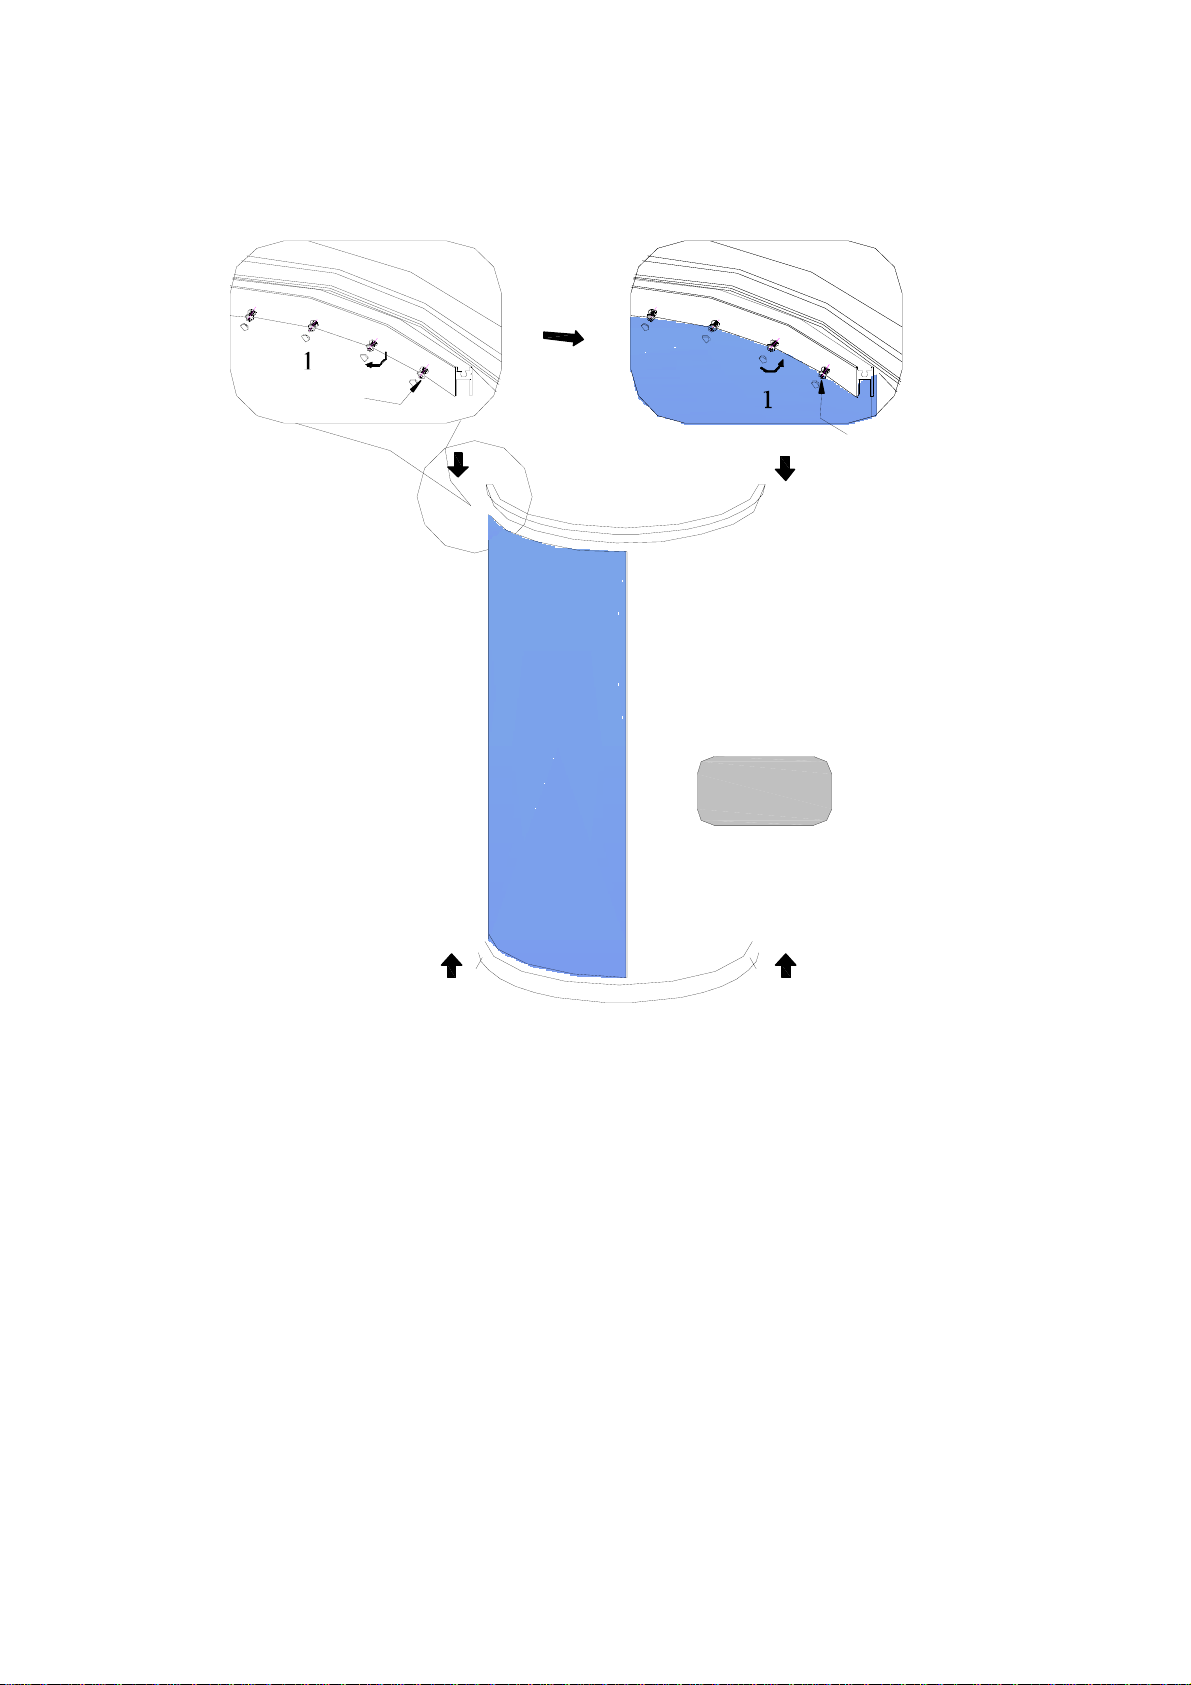
3. Place the bottom aluminum rail on the floor with corr ect orient ation up to
receive the glass panel.
4. Apply a liberal bead of sealant on the bottom rail f rom the slot t hat receives
the glass panel out to the end o f the rai l.
NOTE: The next steps o f ass em bly will r equire two people.
5. Side glas s panel and ins e rt it into the slot on the bottom rail.
6. Take the top aluminum rail and apply a liberal bead o f sealant from the slot
for the glass panel out to the end of the rail.
7. L ine up the slot on the top rail wit h the receiving tabs on the glass panel and
insert th e to p rai l o n to the glass panels.
8. Apply s om e s ealant to the end of the alum inum channels, then u sing the
s crews pro vi ded follow the diagram to insert the cor rect screw length in to the
correct location.
M4X30mm
M4X30mm
S CRE W P A CK
(2)
7
9. After all th e s cr ews are in place and secure, wipe any exce ssive sealant an d
use the exce s s to fill any cracks or gaps bet ween the joints.
10. Cover th e exposed screw heads with decorat ive plastic screw head covers
8

M ark th e Glass pa nel mo unti ng holes
Place the assembled glass wall panel onto the shower tray and mark the predrilled
holes ont o the wal l . Rem ov e after marking the walls.
9

Drilling and installing the wall anchors
?8mm
Using the appropriate drill bit for your wall surface drill each hole location with a
5/16” diameter drill bit. Install the plastic wall anchors provided into the drilled
holes
NOTE: If your surface is prone to cracking or chipping then it is
recommended that you pilot drill first using a smaller drill bit, and then step
up to the final size.
10

Secure t he glass wall panel to the walls
SCREW PACK
(3)
Using the screws provided secure the glass wall panel to the walls.
11

C
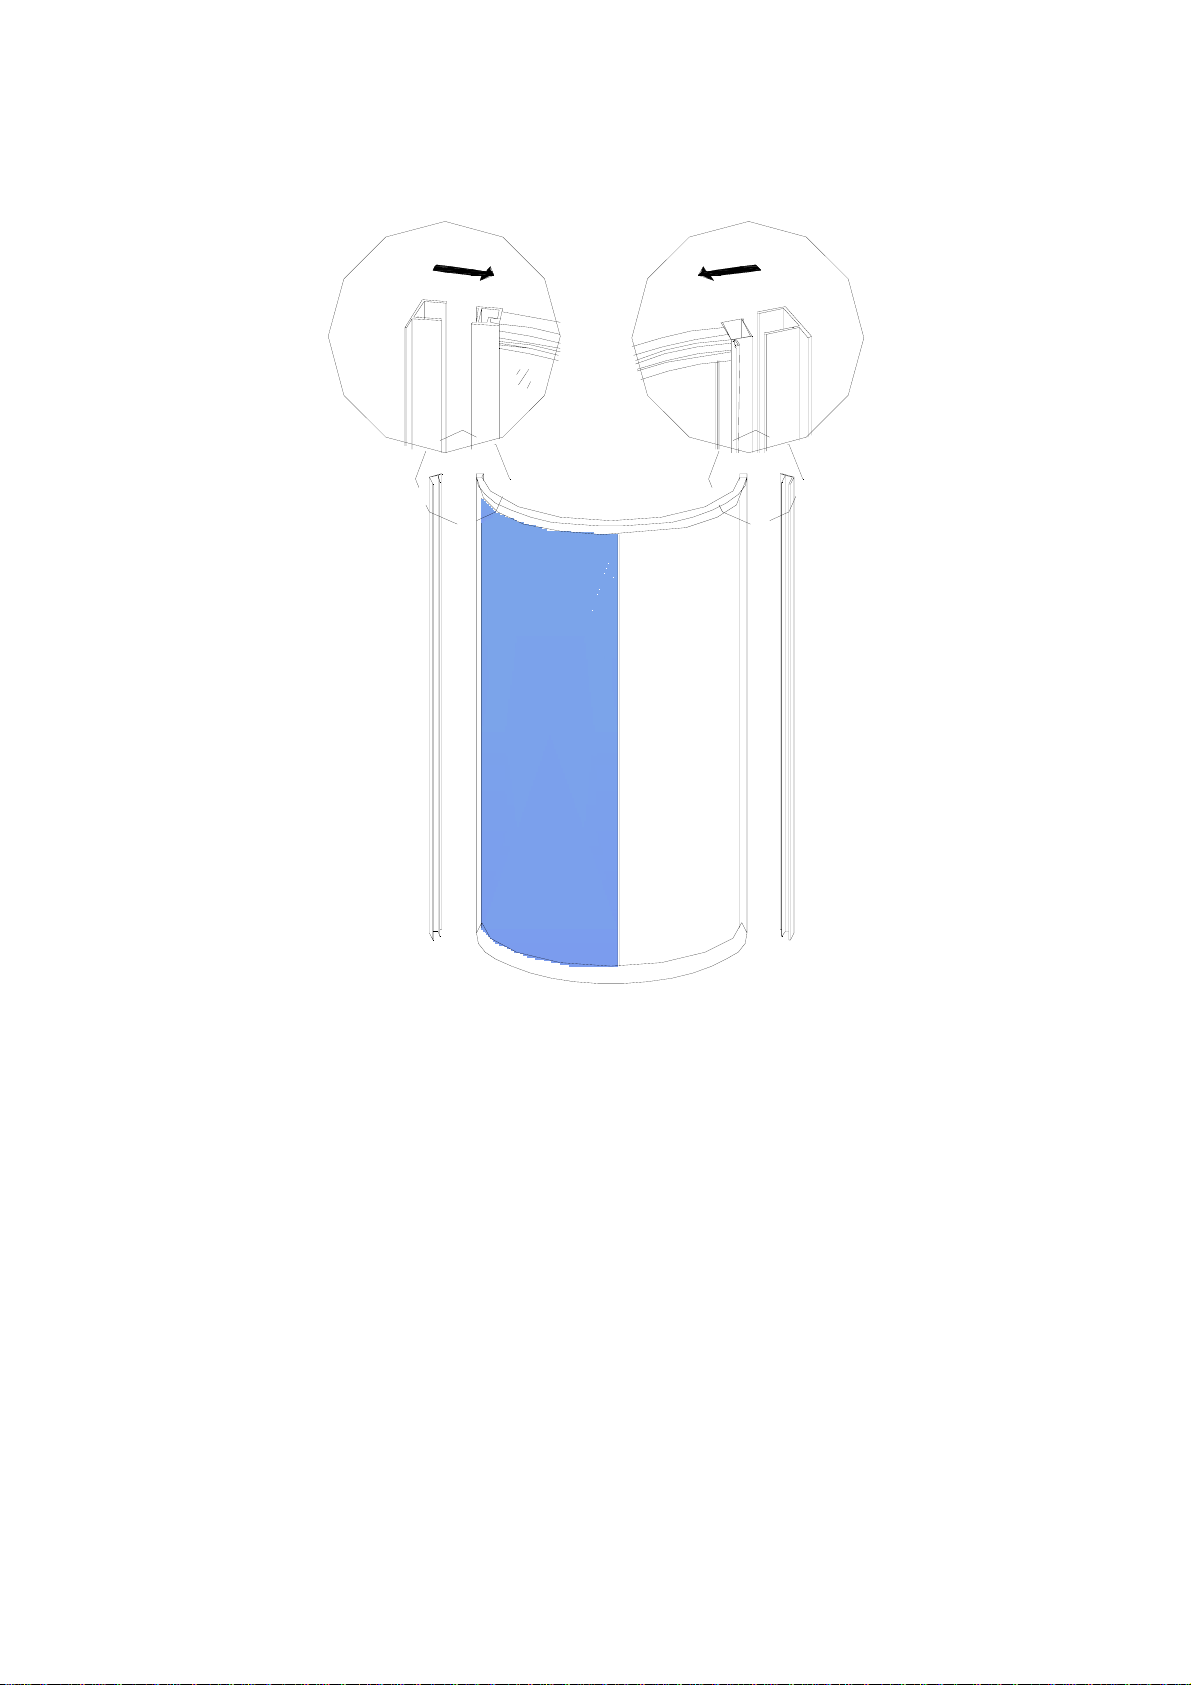
Sec u r e the glas s w all panel
B
?3.2
M4x12mm
SCREW PACK
(4)
Use a ? 1/8 inch diameter dr ill bit and drill 3 equally space d h oles a lo ng ea ch wall
channel on the insid e of the shower. Do not dr ill all the w ay th ru to the other side
drill only until the drill bit enters th e void in th e wall channe l . Using the h a rdware
prov ided s ecure the fixed glass panel to t he wal l c hanne l. Repeat on the o ther
side. Decorative covers are also pr ovided to cover the scr ew heads
12

Install glass sliding door
1. Remove and inspect the glass door. If any are damaged or broken, pl ease
contact your deale r or the manufacturer.
2. Four roller mount assemblies for the door are located inside on the unit on the
upper and lower aluminum rails.
3. Carefully disassemble each door roller mount assembly.
IMPORTANT: Note the disassembly order of the roller mount assembly. It is
critical that the order be repeated for proper adjustments of the doors. Please see
the illustration provided.
13

4. Remove the decorative nut, locking nut, and plastic washer. Leave the plastic
tube and back plastic washer on the door roller.
5. Taking the door, and slide the door over the top two-door roller mounts.
IMPORTANT: The plastic tubes must be inserted into the two top mounting holes
in the door.
6. Reinstall the plastic washers onto the top roller and then install the metal
locking nuts. Hand tighten the locking nuts.
7. Repeat the process on the two lower roller mounts ensuring that the plastic
tubes are inserted in the glass door and then reinstall the plastic washer and metal
locking nut and hand tighten.
8. Check the door seal down the length of the seal. If it is not in fu ll c o n ta c t, u s e
a flat head screw driver and adjust the top roller mounts so that the door seal is in
contact for the entire length of the door.
NOTE: A cam roller inside of the door roller is used for adjustments of the door. By
turning this cam, you will raise or lower the door by adjusting the seal.
9. After making the final adjus tments, tighten all of the metal locking nuts.
10. Install the decorative nut covers.
11. Install the vinyl door “F” type seals on each door so that the squeegee flaps
will wipe the glass when opening and closing.
14
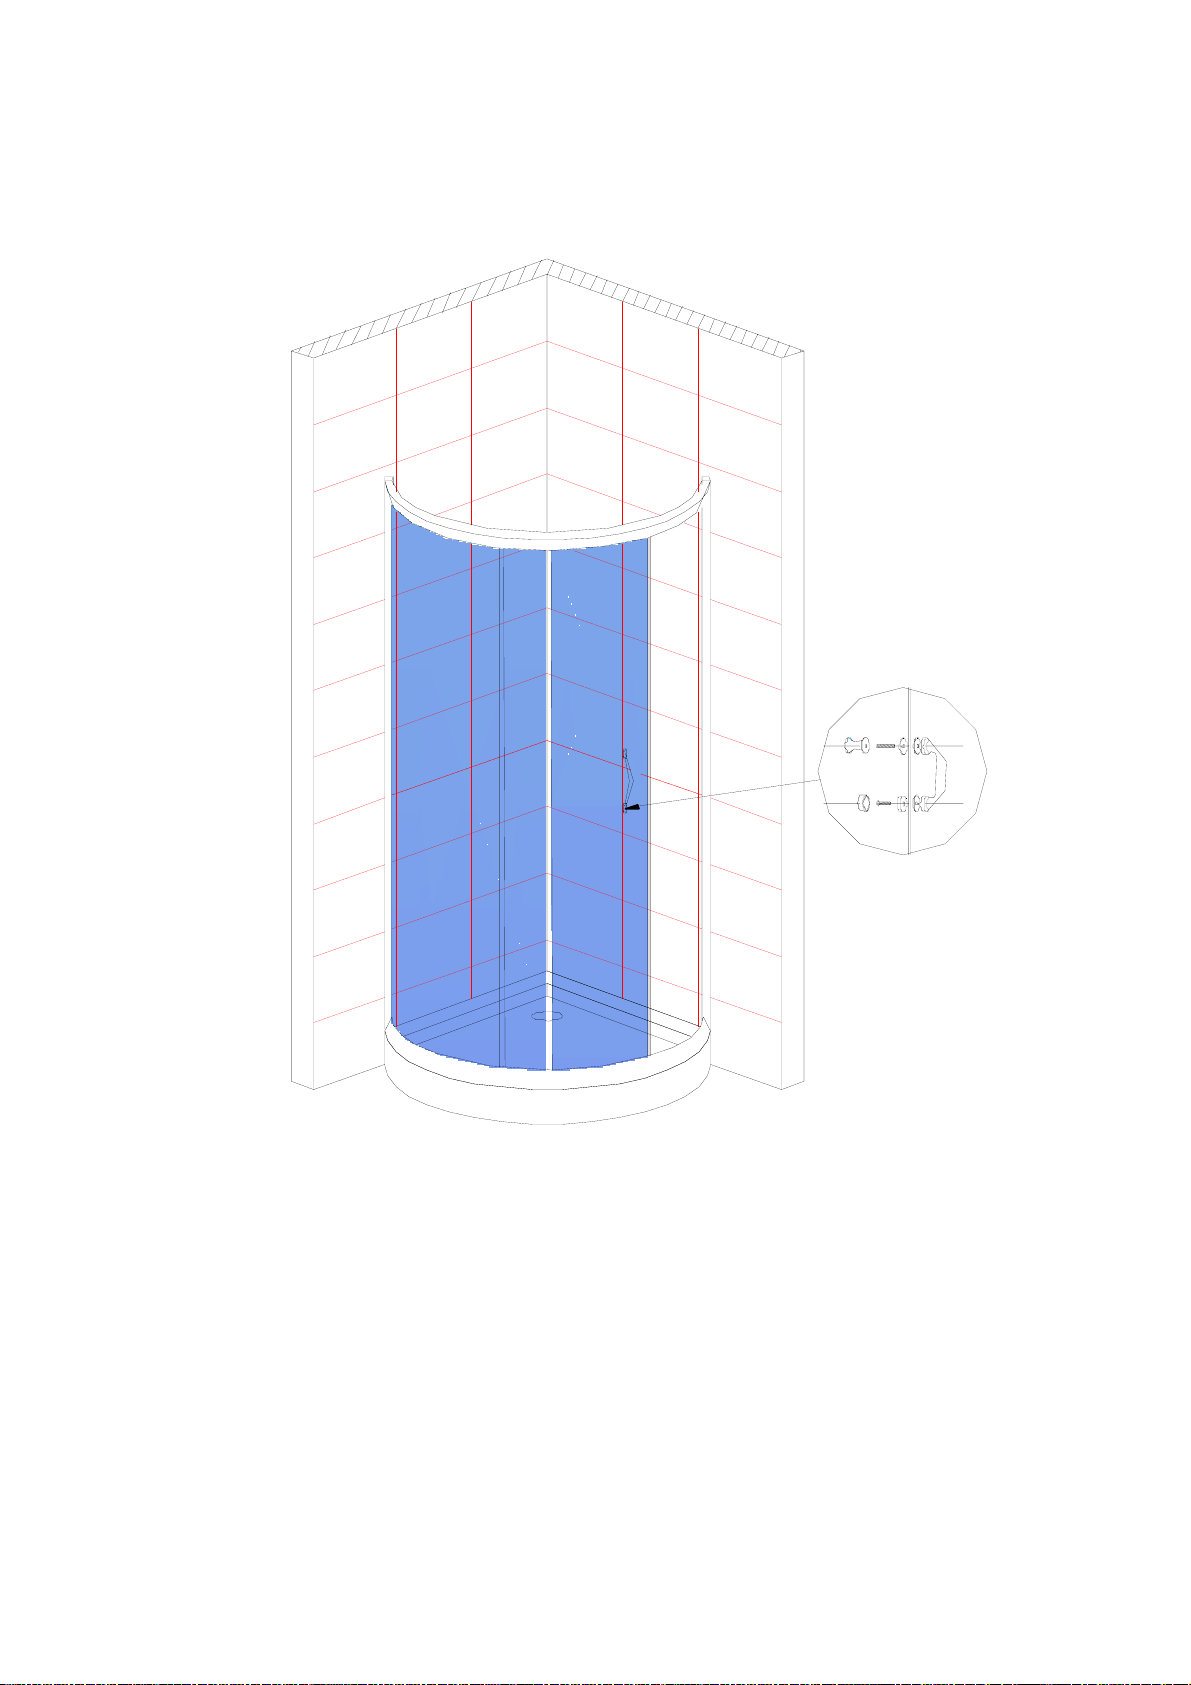
Install the door handles
1. The door handles are located within the accessory manual box. Remove them
from the packaging and note the end with the knob on it. The door knob will be
locate d to the top afte r final installation.
2 . Remove the doorkn ob an d o ne of the vinyl washers, but leave the plastic tube
and the other vinyl washer.
NOTE: Somet ime s when removing the d oorkno b the threa d e d stud will come out.
If this happe ns, remove the stud from t he doorknob and thread it back into the
door handle at least two or three turns or until it bottoms out.
15

3. Insert the door handle with the threaded stud into the top hole on the glass
door with the plas tic tube in the hole and the vinyl washer between the glass and
the door handle.
2. Install the remain in g vinyl washer onto the stud and the n install the doorknob.
Located within the packaging for the door handles you will find:
a.2 Vinyl washer
b.2 Screws
c.1 Hard plastic washers
d.1 Decorative covers
3. Insert one of the screws through the hard plastic washers and then install the
screw with th e plastic washer into the door handle with one of the viny l wa shers in
between th e hard plastic washe r and the glass door.
4. After the door handle is secure, ins tall the decorative cover over the screw
and hard plastic washer.
16

Final sealing
Using bathroom rated silicone seala nt or cau l k s e a l t he bottom of e a c h fixed g l a ss
panels to the shower tray and seal along each wall channel where the wall
channel meets the wall.
17

Care and Maintenance
As with any other luxury item, maintenance and care are critical to the long lasting
quality and enjoyment of your shower door and tray. The proper care and
maintenance outlined in this section are necessary to ensure the longevity of the
unit. Damage caused by not following the care and maintenance guidelines in this
section is not covered under the manufacturer's warranty.
The unit is constructed from high quality acrylic and with proper care the unit will
maintain its nice look and finish.
IMPORTANT: Never use an abrasive cleaner such as Comet or Ajax to clean the
acrylic surface. These cleaners will scratch the surface and dull the finish. In
addition, do not use any of the following products to clean the acrylic surface:
ϒ⁄ Acetone
ϒ⁄ MEK
ϒ⁄ Mineral spirits
ϒ⁄ any other solvent based cleaner
You can clean the acrylic surface with a mild non-abrasive cleaner such as Soft
Scrub or other cleaning products formulated for acrylic surfaces.
You can buff and polish the acrylic surface using any good polishing compound
such as Maguire's #10 Mirror glaze, toothpaste, or automotive polishing paste.
Using these types of products will help maintain the shine and luster of the acrylic
surface.
If you happen to discover any small minor surface scratches in the acrylic, you can
use 600# grit wet sand paper to lightly buff out any scratches, and then use a
surface polish to restore the shine and luster.
For deep scratches or chips where material has been removed, purchase an
acrylic repair kit, which is available through hardware stores and home centers.
Read and follow all of the instruction contained in the kit.
The glass doors and panels can be cleaned using any commercially available
glass cleaner.
We recommend that you clean the glass daily and squeegee the glass with a
silicone or rubber squeegee after each use to help prevent water spots.
18

Warranty
PLEASE READ THESE WARRANTY TERMS AND CONDITIONS CAREFULLY
BEFORE USING YOUR ASTON GLOBAL BATHROOM PRODUCT. BY USING
THE PRODUCT, YOU ARE CONSENTING TO BE BOUND BY THE FOLLOWING
WARRANTY TERMS AND CONDITIONS.
SHOWER DOOR/SHOWER TRAY
Aston Global Inc. Parts-Only Limited Warranty 5 years
Aston Global, Inc. (“Aston Global”) warrants to the original retail purchaser (“Owner”)
of any Shower Door/Tray product (“Produc t”), at the original installation site, for a
period of Five (5) years from date of purchase (whether directly from Aston Global
or an authorized reseller) that the Product manufactured by Aston Global is free
from manufacturing defects in materials and workmanship, when used under normal
conditions and when such Product has not been modified or changed in any manner
after leaving Aston Global's warehouse or plant. If any Product manufactured by
Aston Global is found to have manufacturing defects in materials or workmanship,
such Product will be repaired or replaced by Aston Global. This warranty applies
only against defects discovered within the warranty period and extends only to the
original purchaser of the Product. Parts repaired or replaced under the terms of this
Warranty will be warranted for the remainder of the original warranty period only.
Proof of purchase is required to exercise this Warranty. Aston Global may, at its
option, examine and inspect the alleged defective Product, and Aston Global may
request that parts be returned to Aston Global at Owner's expense for factory
inspection. The determination as to whether Product shall be replaced, or in the
alternative, repaired, shall be made solely by Aston Global. If a Product is
determined to be covered by the above Warranty, Aston Global will ship the
replacement part(s) to Customer by either ground shipping or US postal service.
Increased costs for expedited delivery, if requested by Customer, are the
responsibility of Customer. Parts not currently in stock may require up to a 6 week
delivery time after placement of order.
The above warranty is subject to the following conditions: (1) the Product
must be installed in a single family dwelling unit where the original purchaser
of the Product resides; and (2) the Product must be maintained as described
in the owner's manual supplied with the Product.
For glass and acrylic panels, the customer must (a) open and inspect the
Product upon delivery (without releasing the delivery driver until visual
verification that the Product arrived in a good and acceptable condition); and
(b) clearly notate damage on the delivery acknowledgment receipt. Failure to
do so, and any damage discovered to glass or acrylic panel after delivery, will
be repaired or replaced at the sole discretion of Aston Global.
19

THIS WARRANTY DOES NOT COVER:
1. Product installed in buildings other than single family dwelling units .
2. Product installed outdoors or any other non-standard bathroom location.
3. Component parts not manufactured by Aston Global.
4. Workmanship of any installer of Aston Global Product. This warranty does not
assume any liability of any nature for unsatisfactory performance caused by
improper installation, or any damages to property resulting from improper i n s t all a t ion
or use of the Products, including but not limited to flooring, subfloor, tile, walls, sheet
rock, concrete board, paint, plumbing fixtures and ceilings.
5. Labor costs incurred in the removal, disassembly, reassembly, or i n s t all a tion of
the Product(s), including replacement Products issued under the Warranty, or c os t s
for transportation to Aston Global, and any other materials necessary to retur n
Product to Aston Global.
6. Any Product that has been damaged as a result of being improperly serviced or
operated, including, but not limited to, the following: operated with insufficient water;
allowed to freeze; subjected to flood conditions; operated with water condi t i ons or
additives which cause unusual deposits or corrosion in or on the Product, or sub j ec t
to any other abuse or negligence.
7. Any Product that has been damaged as a result of natural disasters, including,
but not limited to, lightning, fire, earthquake, hurricanes, tornadoes or floods.
8. Product used for any purpose other than residential bathroom usage.
LEGAL DISCLAIMERS
ALL IMPLIED WARR AN TI ES, INCLUDING WARRANTI ES OF ME RC HA NT A BILITY
AND FITNESS FOR A PARTICULAR PURPOSE, ARE HEREBY DISCLAIMED IN
THEIR ENTIRETY WIT H RESPECT TO ALL PURCHASERS OR OWNERS .
FAILURE TO RETURN THE WARRANTY CARD SHALL HAVE NO EFFECT ON
THE DISCLAIMER OF THESE IMPLIED W ARRANTIES. ALL EXPRESS
WARRANTIES SHALL BE LIMITED TO THE DURATION OF THIS EXPRESS
LIMITED WARRANTY AND EXCLUDE ANY LIABILITY FOR CONSEQUENTIAL
OR INCIDENTAL DAMAGES RE SU LTING FROM THE BREACH OF A N Y
EXPRESS WARRANTY. Some states do not allow the exclusion or limitat ion of
incidental or consequential damages, so the above limitations or ex c l us ions may not
apply. No dealer, distributor, service company or other party is authorized to
change, modify or extend the terms of this warranty in any manner whatso ev er.
20

Aston Global and it representatives shall not be liable for any injury, loss, cost or
other damages, whether incidental or consequential, arising out of any defect
covered by this Warranty including and without limitation, loss of use of the Product
and cost for removal of defective Product, even if Aston Global has been advised of
the possibility of such damage. The liability of Aston Global under this Warranty, if
any, shall not exceed the original amount paid for the Product covered by the
Warranty. Coverage under this Warranty shall commence as of the original date of
purchase and the duration of such coverage shall not extend for any reason
whatsoever beyond the stated time period. The Customer is required to provide
adequate access the Product for any repair or inspection. Aston Global shall not be
liable for expenses or damage which may include but are limited to water damage,
removal of any and all common building product such as tile, flooring, wood, sheet
rock, plumbing fixtures, concrete board, vanities, bathtubs and toilets or any other
custom items.
THIS WARRANTY GIVES YOU SPECIFIC LEGAL RIGHTS AND YOU MAY HAVE
OTHER RIGHTS WHICH VARY FROM STATE TO STATE. ASTON GLOBAL'S
FAILURE TO ENFORCE ANY TERMS OR CONDITIONS STATED HEREIN SHALL
NOT BE CONSTRUED TO BE A WAIVER OF SUCH PROVISION.
For prompt service, notify the original installer who, in turn, will notify the Aston
Global distributor who supplied the Product. If this does not result in prompt service,
contact Aston Global, Inc. at the address below with details in support of the
warranty claim. For any questions about coverage of this Warranty, contact Aston
Global at the address below.
Aston Global offers free phone support for the life of the Product to the
original Owner.
The Warranty applies only to Products manufactured on or after January 1,
2012.
This Warranty may not be combined with any other warranty offered by Aston
Global.
21

 Loading...