

Astone Holdings Pty high quality speaker system User Manual
Spherical design to enhance bass performance
INSTRUCTION MANUAL
Address: Unit 5/5 Dunlop St, Strathfield South, NSW 2136, Sydney, Australia.
ASTONE Holding Pty Ltd.
Tel: 61 - 2 - 9742 5790 Fax: 61 - 2 - 9742 5798
www.astone.com.au
English
INSTRUCTION MANUAL
Spherical design to enhance bass performance
Important Safety Instructions
Important Safety Instructions
Thank you for purchasing this high quality speaker system from ASTONE. Please read this manual
before use. If you have any questions, please consult the retailer or us.
Safety Information:
WARNING: To reduce the risk of fire or electrical shock, do not expose the product to rain or moisture.
WARNING: The unit should not be exposed to dripping or splashing, and objects filled with liquids, such as
vases, shall not be placed on the unit. As with any electronic product, use care not to spill liquids into any
part of the system. Liquids can cause a failure and/or a fire hazard.
The lightning flash with arrowhead symbol, within an equilateral triangle, alerts the user to the presence
of uninsulated dangerous voltage within the system enclosure that may be of sufficient magnitude to
constitute a risk of electric shock.
The exclamation point within an equilateral triangle alerts the user to the presence of important
operating and maintenance instructions in this owner’s guide.
NOTE: The product label lies at the bottom of product.
WARNING: No naked flame sources, such as lighted candles, should be placed on the unit.
NOTE: This product is intended to be used only with the power supply provided.
Please read this owner’s guide
Please take the time to follow the instructions in this owner’s guide carefully. It will help you set up and operate your
system properly and enjoy all of its advanced features. Please save this owner’s guide for future reference.
1.
Read these instructions for all components before using this product.
2.
Keep these instructions for future reference.
3.
Heed all warnings on the product and in the owner’s guide.
4.
Follow all instructions.
5.
Do not use this unit near water or moisture. Do not use this product near a bathtub, washbowl, kitchen
sink, laundry tub, in a wet basement, near a swimming pool, or anywhere else that water or moisture are
present.
6.
Clean only with a dry cloth, unplug this product from the wall outlet before cleaning.
7.
Do not block any ventilation openings. Install in accordance with the manufacturer’s instructions. To ensure
reliable operation of the product and to protect it from overheating, put the product in a position and location
that will not interfere with its proper ventilation. For example, do not place the product on openings. Do not
put it in a built-in system, such as a bookcase or a cabinet that may keep air from flowing through its
ventilation openings.
8.
Do not install near any heat sources, such as radiators, heat registers, stoves or other units (including
amplifiers) that produce heat.
9.
Protect the power cord from being walked on or pinched, particularly at plugs, convenience receptacles, and
the point where they exit from the unit.
10.
Only use attachments / accessories specified by the manufacturer.
11.
Unplug this unit during lightning storms or when unused for long periods of time to prevent damage to this
product.
12.
Refer all servicing to qualified service personnel. Servicing is required when the unit has been damaged in
any way: such as power supply cord or plug is damaged; liquid has been spilled or objects have fallen into
the unit; the unit has been exposed to rain or moisture, does not operate normally, or has been dropped. Do
not attempt to service this product yourself. Opening or removing covers may expose you to dangerus
voltages or other hazards. Please call ASTONE to be referred to an authorized service centre near you.
13.
To prevent risk of fire or electric shock, avoid overloading wall outlets, extension cords, or integral
convenience receptacles.
14.
Do not let objects or liquids enter the product as they may touch dangerous voltage points or short-out parts
that could result in a fire or electric shock.
15.
See product enclosure for safety related markings.
16.
Use proper power sources. Plug the product into a proper power source, as described in the operating
instructions or as marked on the product.
2 3
www.astone.com.auwww.astone.com.au
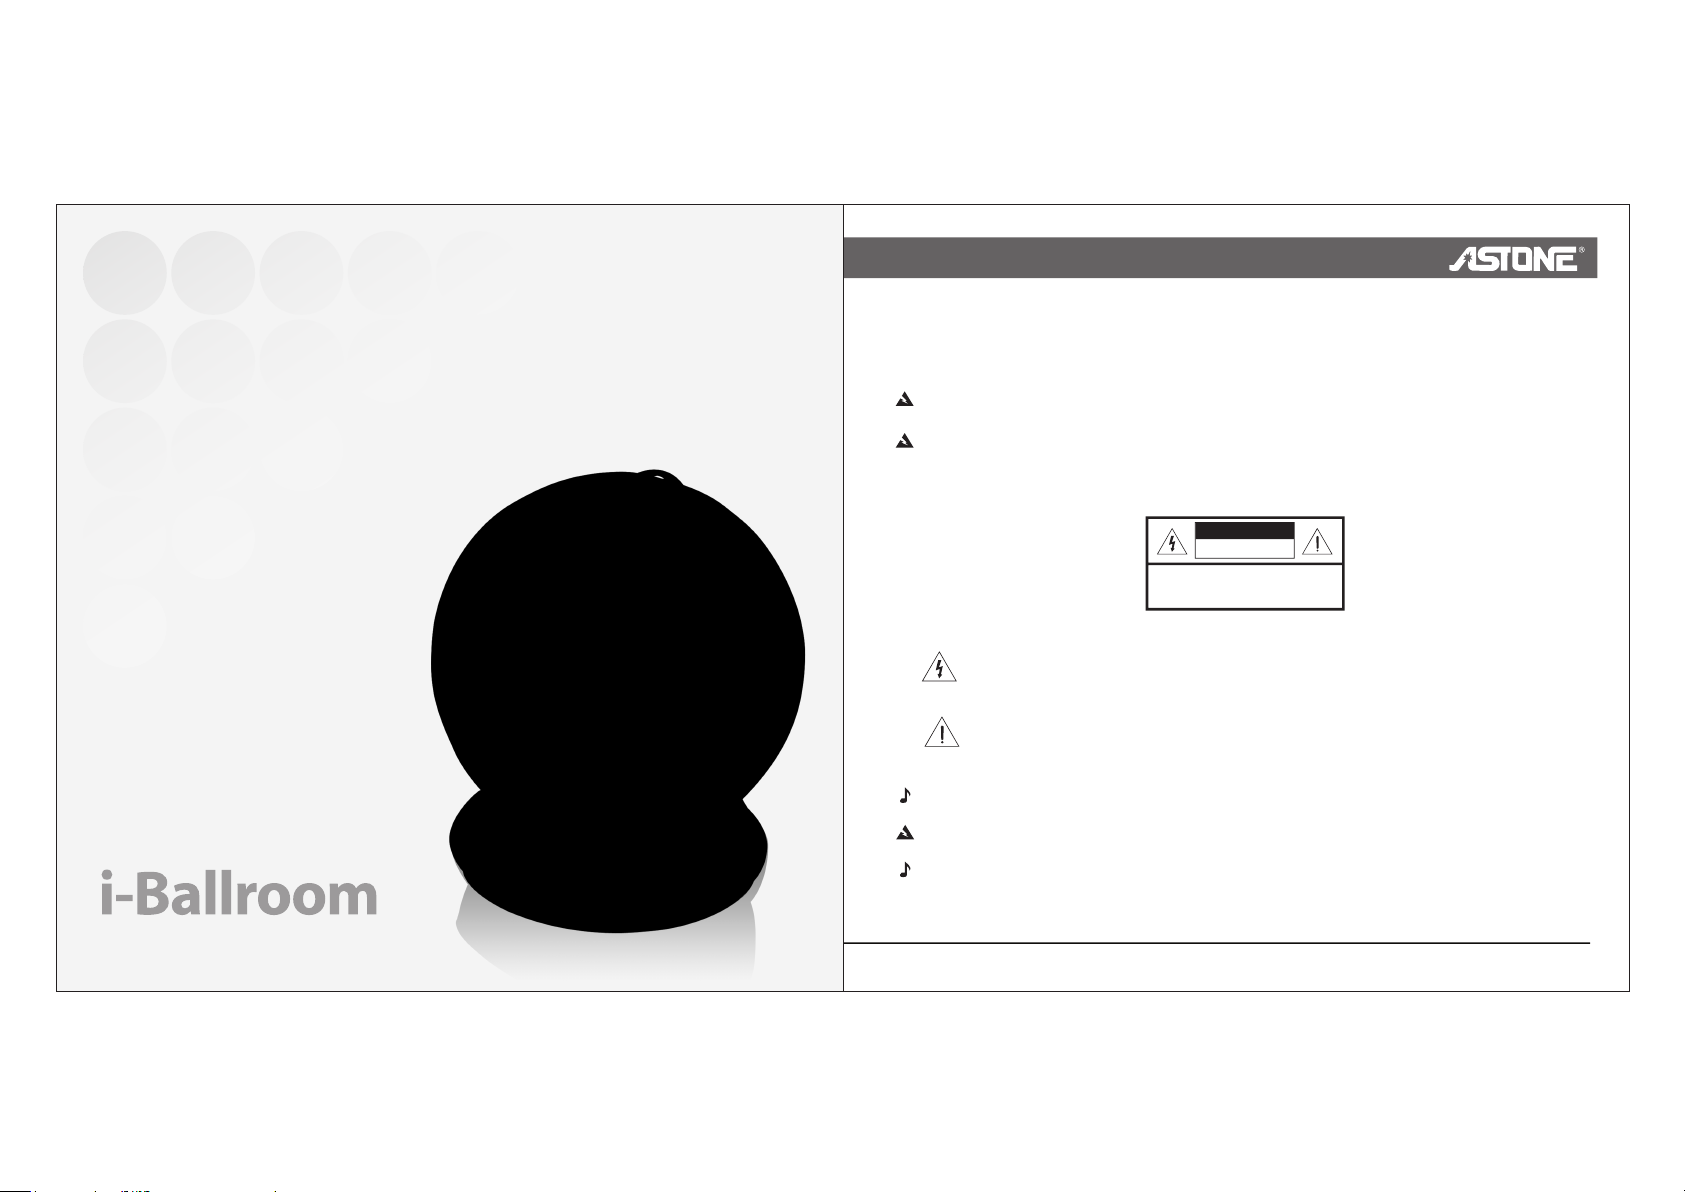
i-Ballroom Basics
i-Ballroom Basics
I. The main characteristics
Congratulations on your choice of the i-Ballroom speaker system from ASTONE. Designed specifically
to work with your iPod, this system provides high-quality audio performance that invites your music to
come out and play.
•
Three audio input modes, including iPod, FM, AUX which could be switched freely, can follow your inclinations.
•
Features a credit card-sized remote for command of the system volume and basic iPod functions from almost
anywhere in the room.
•
S-VIDEO terminal output allows you to view and admire the high clarity
picture as you enjoy the high quality sound (need iPod support).
•
Particular time and alarm functions.
•
Control your iPod fully, and recharge the battery of your iPod while it is docked in the system.
•
Complementary to all iPod models which match with special dock.
Unpacking the system
Check the carton for all of the parts shown in the below figure. Save the carton for possible future use. Be sure to
repack the system in its shipping carton to transport it outside your residence.
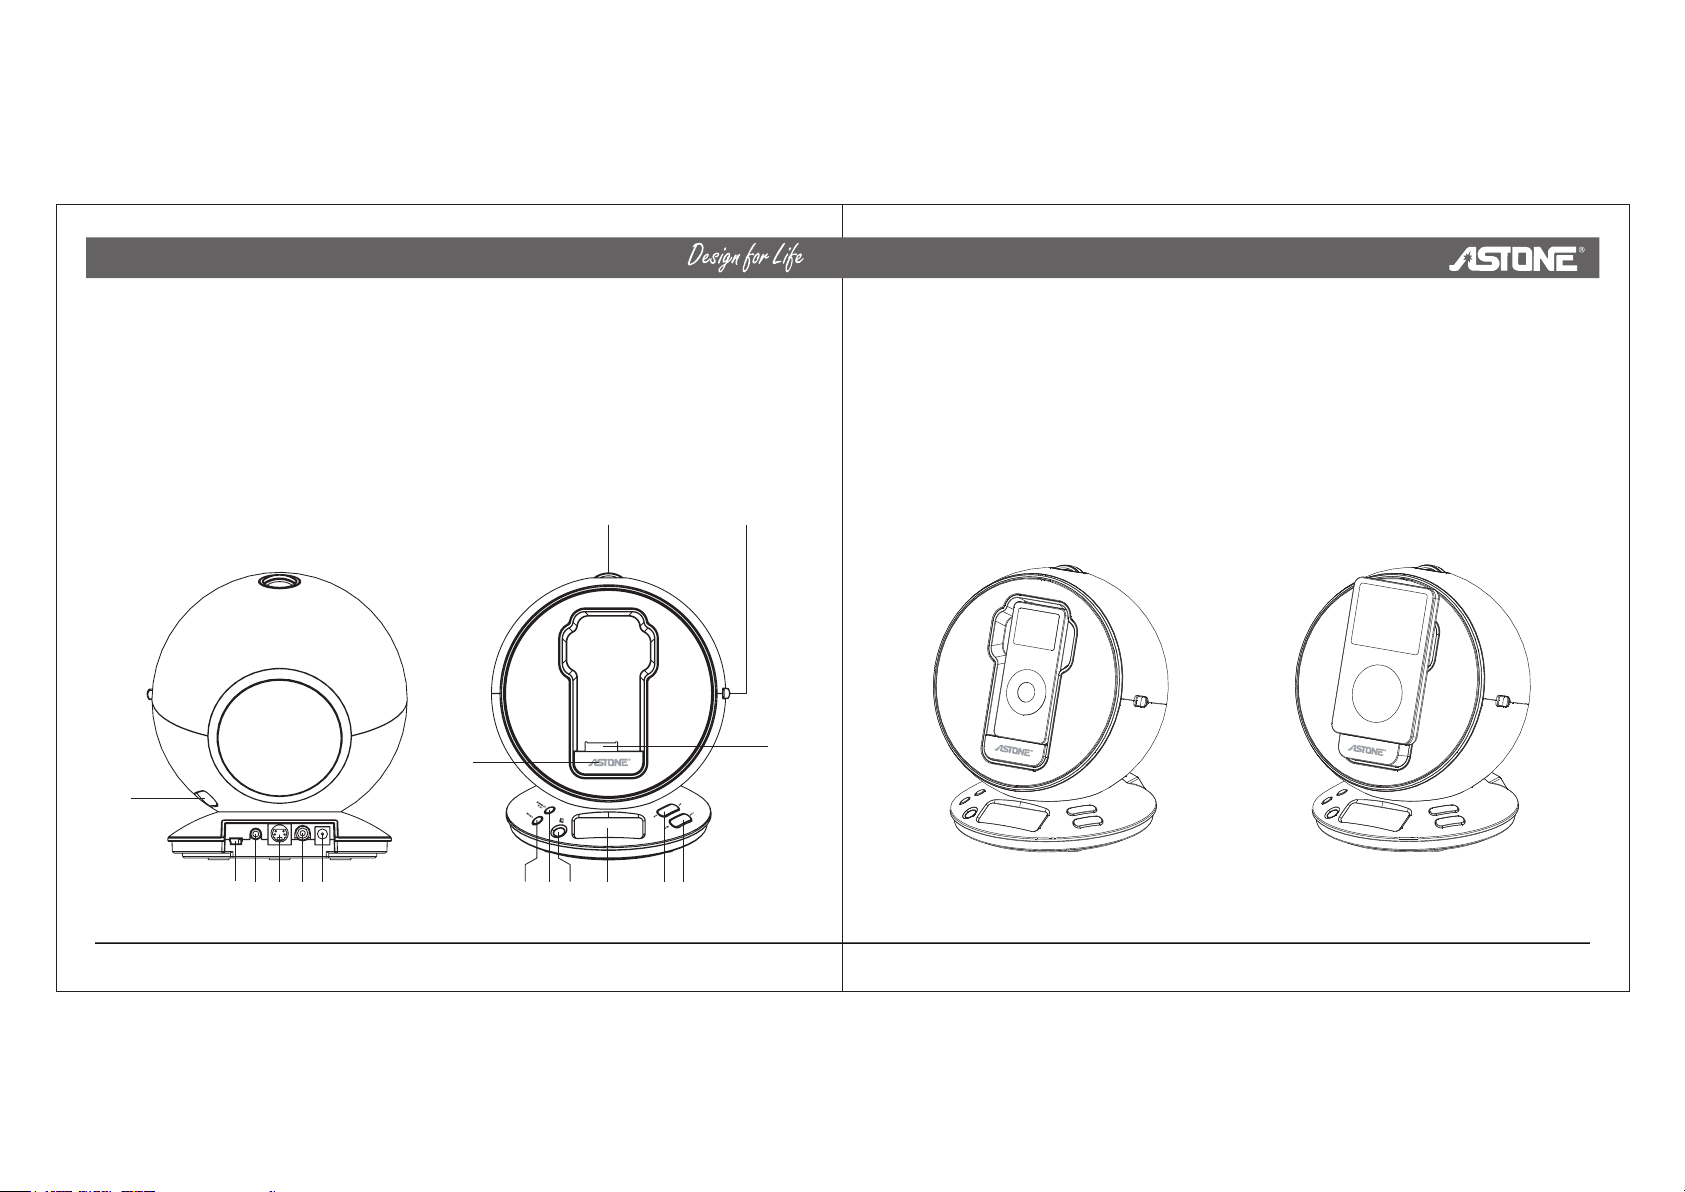
II. Sketch map
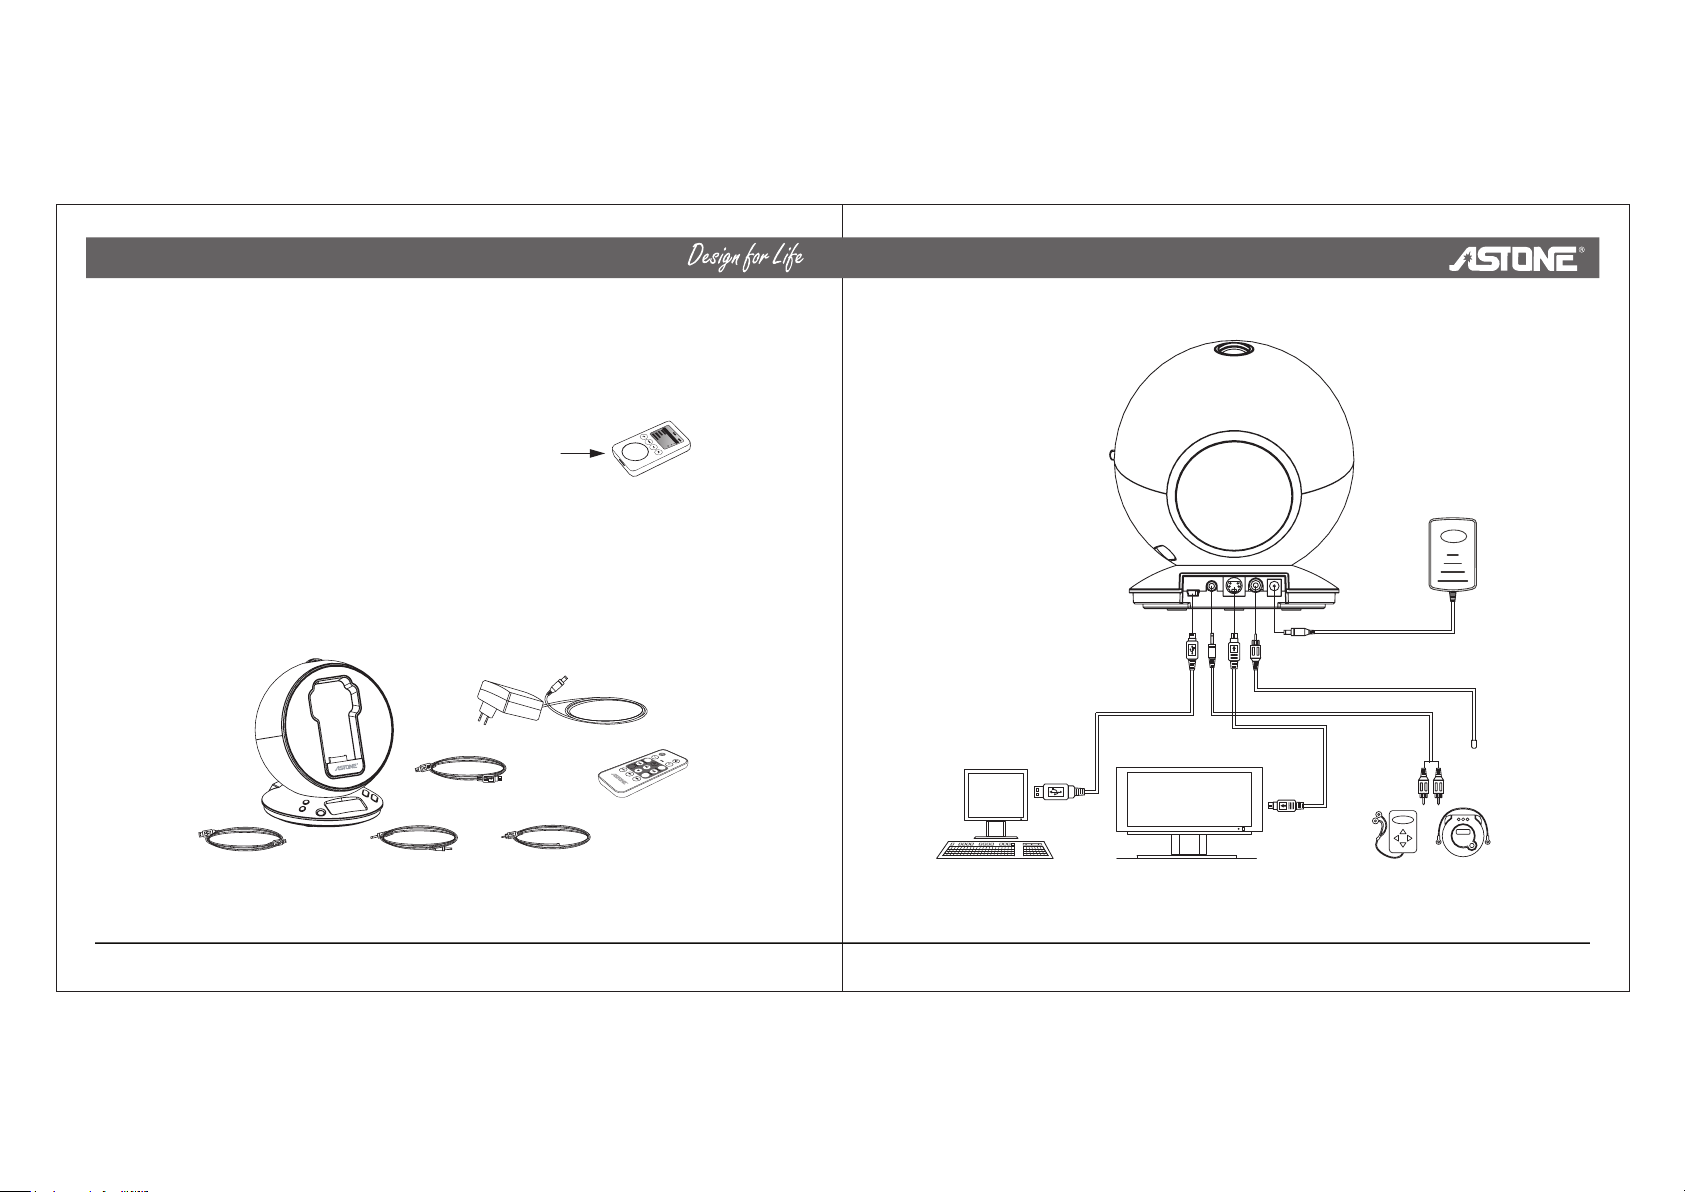
1. What’s included in the carton
Power pack
S-terminal cable
USB cable
Place the system on a firm and level surface. Its speaker drivers are shielded, which diminishes the possibility of
video interference if it is placed near a computer or video screen.
Audio cable
FM antenna
Remote control
2. Connection instruction diagram
Adapter
(DC power)
100 ~ 240V
50 / 60Hz
FM antenna
TV S-VIDEO connectorComputer USB connector
CD / MP3 / MD audio
apparatus output
4 5
www.astone.com.auwww.astone.com.au
i-Ballroom Basics
3. Function key of product and how to connect
1.
USB connector: connect with computer and transmit the data between iPod and PC
2.
AUX input: Audio AUX input, can connect with PC, TV, DVD, CD, MP3, PSP, mobile phone etc audio source
3.
S-terminal output: let the video signal of iPod outputs to TV or any other video apparatus which have
S-VIDEO connector to play the video content (need iPod support)
4.
Radio antenna connector: connect with FM antenna
5.
DC adapter input: input DC 10V
6.
Port tube
7.
iPod retractable dock: switch to iPod with video, iPod NANO, iPod with photo, iPod mini
8.
iPod dock: connect with iPod
10
i-Ballroom Basics
LCD display: display the machine’s operation state
9.
Alarm clock switch: under AUX or iPod mode, when this key is pressed, the display will display “A” which means
10.
turn on alarm clock; when this key is pressed again, “A” will clear away which means turn off the alarm clock
Signal source select: switch iPod or FM or AUX audio input
11.
Standby key: under iPod mode, pressing this key instantaneous to switch the pause and play; under machine
12.
working state, pressing this key for long time to enter the standby state; pressing any key to operate the
machine
Remote control receiver: receive the remote control’s signal
13.
Control key: choose the station to receive radio, or choose previous or next song when using the iPod
14.
Volume control key: turn up or turn down to control the whole unit’s volume
15.
Power switch: control the whole unit’s power supply
16.
16
4. i-Ballroom retractable dock instruction diagram
7
6
1
2 3 4 5
911 12 13 14 15
6 7
8
Instruction chart about push in the
base and dock the iPod NANO
Instruction chart about pull out
the base and dock the iPod
www.astone.com.auwww.astone.com.au
Enjoy Perfect Music
Enjoy Perfect Music
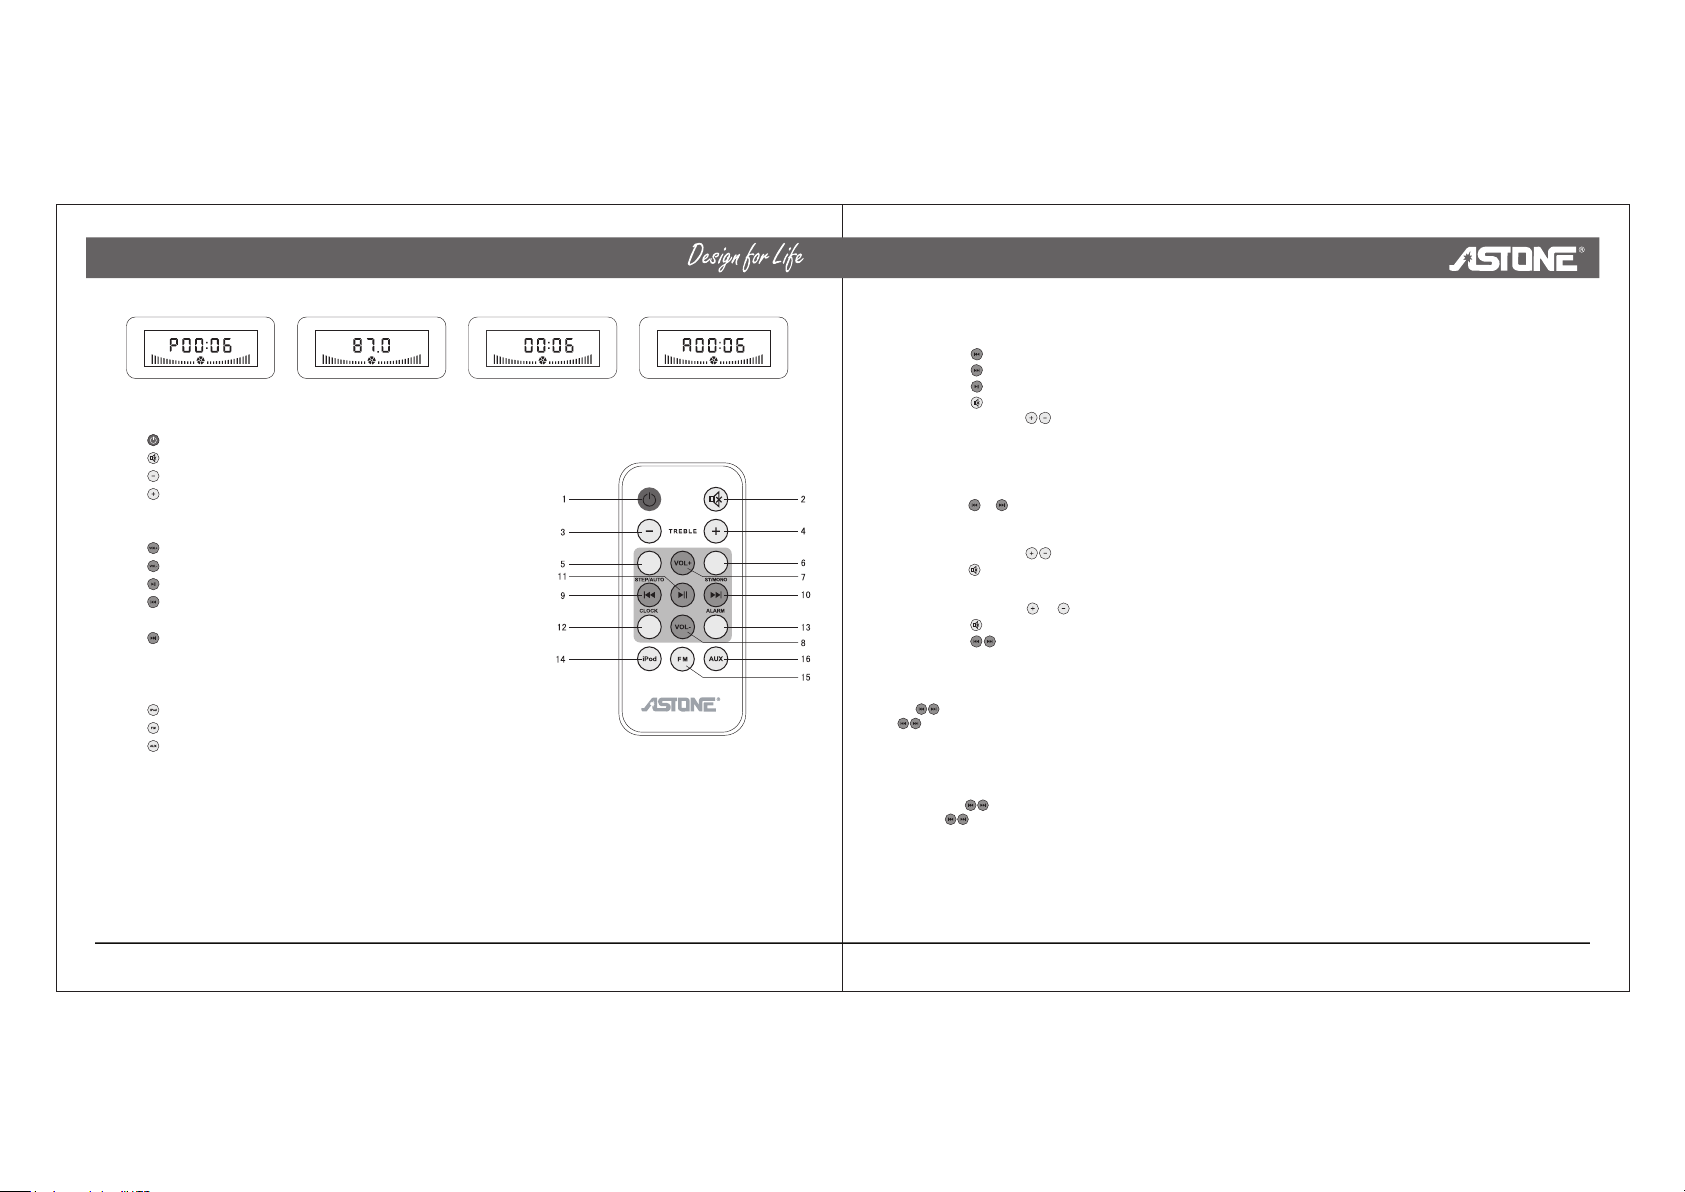
5. Display state sketch map
Connecting iPod state
FM radio reception state Clock state Alarm time state
Function key of Remote control
: standby or play control key, control the whole product’s power
1.
: mute key
2.
: turn down the tweeter volume
3.
: turn up the tweeter volume
4.
STEP/AUTO: choice the broadcasting station by hand or automatic
5.
ST/MONO: choice stereo or single track under FM mode
6.
: turn up the whole product volume
7.
: turn down the whole product volume
8.
: play key, play or pause the iPod working
9.
: Reverse key, control the backward track of iPod or choice the
10.
reverse station under FM mode
: Forward key, control the forward track of iPod or choice the
11.
froward station under FM mode
CLOCK: set up the clock
12.
ALARM: set up the alarm time
13.
: choice the iPod input
14.
: choice the FM input
15.
: choice the AUX input
16.
III. Remote control operation instruction
Connect with the power supply, and open the power switch to relieve the standby state, then the
machine is in working state. (could achieve this function on the control panel of machine)
1. Control the audio source
Please choose one of three modes on the remote control according to your input signal source mode:
A. iPod input
B. FM input
C. AUX audio input
A. iPod signal input mode:
When iPod docks in the system, the control keys of iPod still could be used, but the volume adjust wheel will
not adjust the i-Ballroom volume.
1. Press , play the previous song
2. Press , play the next song
3. Press , play or pause the iPod
4. Press , the whole unit will mute
5. Press TREBLE key to turn up or turn down the tweeter volume
B. FM mode:
Connect the FM antenna to antenna connector, and press the FM key to enter the FM mode.
1.
Under the radio receiving status, press STEP/AUTO key to toggle the radio
station selctor between manual and automatic
2.
Press or , choose go back or go forward in frequency. Under STEP mode, choose go back or go forward
in frequency step by step; under Auto mode, choose go back or go forward in frequency automatically
3.
Press ST/MONO key, to switch between the stereo and the single track
4.
Press TREBLE key, turn up or turn down the tweeter volume
5.
Press , the whole unit will mute
C. AUX audio input mode:
1. Press TREBLE or key to turn up or turn down the tweeter volume
2. Press , the whole unit will mute
3. Press , will be inactive under this mode
2. Control the clock
Under the AUX or iPod mode, press “CLOCK” key to enter the clock set-up status, the default clock display is 00:00
(hour : minute): Press “CLOCK” key the first time and the front two numbers will blink, then you can adjust the hour by pressing
the ; Press “CLOCK” key a second time and the back two numbers will blink, then you can adjust the minute by pressing the
key. Lastly, press “CLOCK” key to confirm the clock setting. (It can display the time normally when power supply is
continuous, and needs to be set up again after power off.)
3. Control the alarm time
Under the AUX or iPod mode, press ALARM key to enter the alarm set-up status, the default alarm display is R, which means the
alarm time function is open. Press ALARM key a first time and the front two numbers will blink then you can adjust the hour by
pressing the ; press ALARM key a second time and the back two numbers will blink, then you can adjust the minute by
pressing ; at last, press ALARM key to confirm the alarm setting. (The alarm will go off every day when power supply is
continuous; and needs to be reset again after power off.)
4. Control the video
Under iPod mode, adjust the iPod video setting to TV-OUT status, and connect the S-VIDEO connector to TV’s or any other video
unit which has an S-VIDEO connector, then set up the TV or relevant video unit on S-VIDEO input status, at this time, the TV or
video unit will play the iPod’s video content. (Please refer the iPod manual.)
8 9
www.astone.com.auwww.astone.com.au
Reference
Reference
Maintaining the system
Changing the remote control battery is the only regular maintenance that is required. You may also clean the
system as needed.
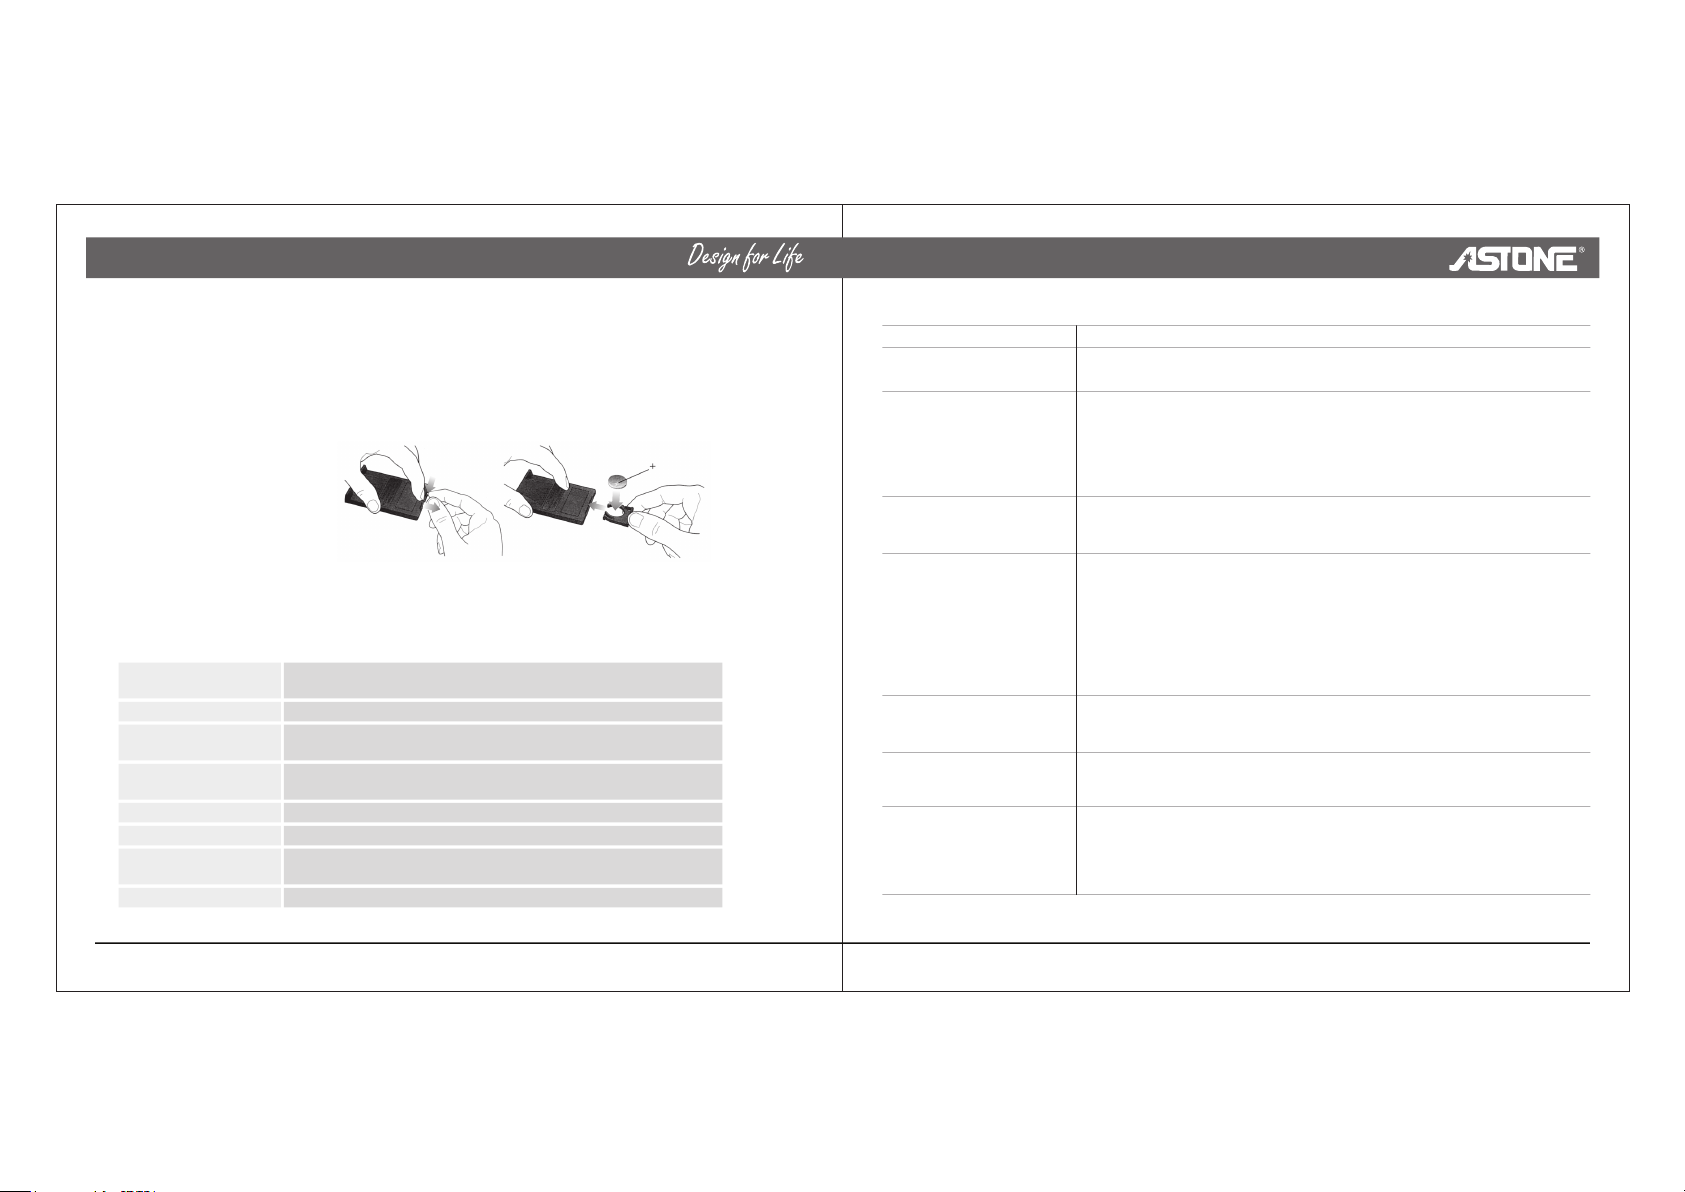
To replace the remote control battery
Replace the remote control battery when it stops operating (normally every year or two), or its range seems
reduced. Use only a Duracell, Eveready, Energizer, Maxell, Toshiba, or Shun Wo CR2032 3-volt lithium battery.
Keep in mind that lighting and other room conditions, in addition to battery age, can affect the operating range
of an infrared remote control.
To clean the system
Wipe the system using a soft dry cloth. You can also lightly vacuum the grille.
• Do not use solvents, chemicals, or sprays.
• Do not allow liquids to spill or objects to drop into any openings.
Specifications
Input Requirement
Power Rating
Satellite speakers
Subwoofer
Power Supply
Frequency response
Dimensions
Weight
Main Connection iPod docking connector
Auxiliary connection - 1 / 8” (3.5mm) mini stereo jack
Total 10 Watts RMS
2 x 2.5 Watts (4 ohm)
30mm drivers
1 x 5 Watts (8 ohm)
2.5” dedicated low frequency high excursion driver
External AC Adapter (100 - 240V)
60Hz - 20KHz
6.1” x 6.9” x 5.7” (width x height x depth)
155mm x 176mm x 145mm (width x height x depth)
28.9oz / 820g
Troubleshooting
What to doProblem
Your iPod does not dock
properly
No sound Make sure the system is plugged in, your iPod is turned on, and a music track is
No sound and your iPod
is not charging
Your iPod does not respond
to the i-Ballroom remote
control buttons shown
No sound, or cacophony
when using the FM function
Low sound Check the system to see whether the volume is adjusted to the smallest status or
Your i-Ballroom system does
not respond to its remote
commands or to the + and
volume buttons on the front
of the system
Check whether there is any barrier in the iPod jack or not.
•
Check whether the direction of iPod jack pins are all the same or not.
•
•
selected and playing.
•
Press the PLAY / PAUSE button on the remote control.
•
Increase the volume setting for the system.
•
Remove your iPod from the dock, wait briefly, then reseat it. You may need to do
this a few times.
•
Make sure the power cable is securely plugged into a functioning outlet and with
the DC plug plugged firmly into the DC input jack.
•
Make sure your iPod is firmly seated in the dock.
Remove your iPod from the dock, wait briefly, then reseat it. You may need to do
•
this a few times.
Try the remote from a different location. If it works there, strong lighting or other
•
room conditions may be causing the problem.
Make sure nothing blocks the infrared (IR) signal path from the remote to your
•
i-Ballroom system. wipe off the small red lens on the front send of the remote.
Check the remote control battery to make sure the + side is up.
•
Replace the remote control battery.
•
•
Check the antenna to make sure it has already been plugged into the matched
jack.
•
Check the system to make sure the FM function has been turned on.
•
not.
Check the audio source to see whether the output is too small or not.
•
•
Unplug the power cable for 1 minute, then plug it back in. This resets the system.
•
Contact ASTONE Customer Service about the problem.
10 11
www.astone.com.auwww.astone.com.au
Français
Manuel d’instruction
Mesures de sécurité importantes
Merci d’avoir acheté ce système de haut-parleurs ASTONE de haute qualité. Veuillez lire ce manuel avant
l’utilisation. Si vous avez des questions, vous pouvez nous consulter ou vous renseigner auprès du
revendeur.
MESURES DE SÉCURITÉ:
AVERTISSEMENT: Afin d’éviter les risques d’électrocution et d’incendie, n’exposez pas l’appareil à la pluie
ou à l’humidité.
AVERTISSEMENT: L’appareil ne doit pas être exposé aux éclaboussures ou aux projections et aucun récipient
rempli de liquide, comme un vase par exemple, ne doit être placé sur l’appareil. Comme pour tout appareil
électrique, soyez vigilants et ne renversez pas de liquide à l’intérieur du système. Les liquides peuvent créer
un dysfonctionnement et/ou un incendie.
ATTENTION
RISQUE D’ÉLECTROCUTION
ATTENTION : Pour réduire les RISQUES D’ÉLECTROCUTION, Ne
tentez pas de retirer le couvercle (ou l’arrière) de l’appareil. IL N’Y A
Ce symbole éclair fléché, dans un triangle équilatéral, avertit l’usager de la présence d’une tension
dangereuse dans l’enceinte du produit d’une puissance suffisante pour constituer un risque
d’électrocution.
Le point d’exclamation dans un triangle équilatéral avertit l’usager de la présence de consignes
importantes pour le fonctionnement ou la maintenance (entretien) dans la documentation qui
accompagne l’appareil.
REMARQUE: l’étiquette du produit se trouve dessous l’appareil.
AVERTISSEMENT: pas de flammes vives, comme des bougies, ne doivent êtres placées sur l’appareil.
NE PAS OUVRIR
PAS DE PIÈCES RÉPARABLES PAR L’UTILISATEUR.
RÉFÉREZ-VOUS AU PERSONNEL service POUR TOUTE
RÉPARATIONS.
Design sphérique pour augmenter la performance des basses
REMARQUE: cet appareil est conçu pour fonctionner uniquement avec la prise secteur fournie.
www.astone.com.au
2
 Loading...