

Page 1
- 1 -
www.astone.com.au
1. Before using the product ......................................................................................................6
1.1 Precautions and safety........................................................................................................6
1.2 Features ..............................................................................................................................7
2. Quick Start ..............................................................................................................................9
2.1 Location of Controls ............................................................................................................9
2.2 LCD Display(Description of Interface)..........................................................................10
2.3 Quick Start.........................................................................................................................17
2.3.1 Power On/Power Off player .....................................................................................17
2.3.2 Playing Music...........................................................................................................18
2.3.3 Selecting application Mode...................................................................................... 19
3. Basic Operation....................................................................................................................20
3.1 Browser .............................................................................................................................20
3.1.1 Using browser ..........................................................................................................20
3.1.2 Coping and Pasting..................................................................................................22
3.1.3 Deleting Files ...........................................................................................................24
3.1.4 Checking Properties.................................................................................................25
3.1.5 Renaming file or folder.............................................................................................26
3.1.6 Create a folder ......................................................................................................... 27
3.1.7 Use the soft keyboard ..............................................................................................28
3.2 Music Play .........................................................................................................................31
3.2.1 Start to play music....................................................................................................31
3.2.2 Basic operation in music play ..................................................................................33
Page 2
- 2 -
www.astone.com.au
3.2.3 Setting playing speed...............................................................................................36
3.2.4 Favorites <play list>................................................................................................. 37
3.2.5 Lyric Synchronization (Karaoke ).......................................................................40
3.3 Photo viewer
(
JPG/BMP/GIF)........................................................................................42
3.3.1 Photo browser..........................................................................................................42
3.3.2 Auto browsing ..........................................................................................................44
3.3.3 Manual browsing......................................................................................................47
3.3.4 Image zoom, move, delete.......................................................................................48
3.4 Recording ..........................................................................................................................50
3.4.1 Voice recording ........................................................................................................50
3.4.2 LINE-IN Recording(LINE-IN)............................................................................... 52
3.4.3 FM Recording .......................................................................................................... 54
3.4.4 Recorder operation (stop/pause/cancel)..................................................................56
3.4.5 Play recording file .................................................................................................... 58
3.4.6 Recording setup.......................................................................................................59
3.5 FM Radio...........................................................................................................................61
3.5.1 Turn on/off FM Radio ...............................................................................................61
3.5.2 Scan FM station (preset)..........................................................................................63
3.5.3 Auto scan radio station ............................................................................................64
3.5.4 Manual scan radio station ........................................................................................ 65
3.5.5 Delete FM station.....................................................................................................67
Page 3
- 3 -
www.astone.com.au
3.5.6 Mono/Stereo.............................................................................................................68
3.5.7 FM station preset with file ........................................................................................ 69
3.6 Video play..........................................................................................................................70
3.6.1 Play a video .............................................................................................................70
3.6.2 Operation in video play ............................................................................................ 71
3.7 Game.................................................................................................................................73
3.7.1 Start game................................................................................................................73
3.8 Digital partner
(
USB Host).............................................................................................75
3.8.1 Enter digital partner function ....................................................................................75
3.9 Parameter setup................................................................................................................76
3.9.1 Enter parameter setup .............................................................................................76
3.9.2 Backlight setup.........................................................................................................77
3.9.3 Language setup .......................................................................................................78
3.9.4 Power off..................................................................................................................79
3.9.5 Version information ..................................................................................................80
3.9.6 Upgrade ...................................................................................................................81
4. Other Functions ...................................................................................................................83
4.1 Install fonts library..............................................................................................................83
4.2 Charging battery................................................................................................................84
5. Communicate and transfer data with computer................................................................ 85
5.1 Connect with computer...................................................................................................... 85
5.2 Install driver in Windows 98...............................................................................................88
Page 4
- 4 -
www.astone.com.au
5.3 Disconnect USB ................................................................................................................90
5.4 Product specification parameter........................................................................................91
Page 5
- 5 -
www.astone.com.au
Legal Disclaimer
1. Astone Holdings Pty Ltd known herein as ‘Astone’, does not guarantee the accuracy or
validity of the information outlined in this user manual, although all attempts have been
made to display the most accurate information.
2. Astone will not be held liable for any loss, accident or miss use caused by incorrectly
following these instructions. At the same time Astone will not be held responsible for
damages caused by misinterpretation.
3. Furthermore any data files that have been damaged or accidentally erased during the
course of operation and or use are not the responsibility or fault of Astone.
4. Astone holds the right to modify this user manual, software, product packaging or
hardware without any advance notice.
Page 6
- 6 -
www.astone.com.au
1. Before using the product
1.1 Precautions and safety
1 To prevent risks of electrical shock, avoid contact with water and other liquids.
2 Keep away from harsh environments including extremely hot, cold, dusty, or humid areas.
3 To prevent risks of electrical shock, this device must only be opened by qualified service
personnel.
4 Do not use headphones/earphones while cycling, driving or operating any motorized vehicle.
5 Do not use headphones/earphones at high volume and do not use at high volume for
continuous listening.
6 Do not drop or subject the device to impact, avoid damage the player permanently.
7 Keep the player away from strong magnets, damage to your player may result from magnets
such as CRT, TV, monitor and speaker.
8 Data can be damaged because of physical impact, users are responsible for creating backup
data, we are not responsible for any damaged data.
Page 7
- 7 -
www.astone.com.au
9 When you upload or download files using USB cable, do not disconnected the USB cable
suddenly or turn it off, Data in HDD can be damaged.
1.2 Features
Digital Music Play Image File Viewer
1
Supports playback such as MP3,
WMA,ASF.
2
Supports JPG, GIF and BMP image
formats and it can zoom in/out.
MP4 Video play Digital Recording
3
Supports AVI video format with XVID
encoding.
4
Supports voice recording/ line in
(MP3 code)
File Management High Speed Mass Storage
5
Powerful file manager allows copying,
pasting, removing and other functions.
6
Supports USB2.0 High Speed
transfer.
Maximum transfer rate up to
480Mbps.
Game 8 FM Radio
Page 8
- 8 -
www.astone.com.au
Built-in interesting games such as Box ,
Block etc.
87.5 ~ 108MHz and stores up to 20
channels.
Digital Partner Firmware Upgrade Function
9
OTG function can backup the data of
UMS device, such as U disk or digital
camera to hard disk.
10
You can obtain more functions by
firmware upgrade
Page 9
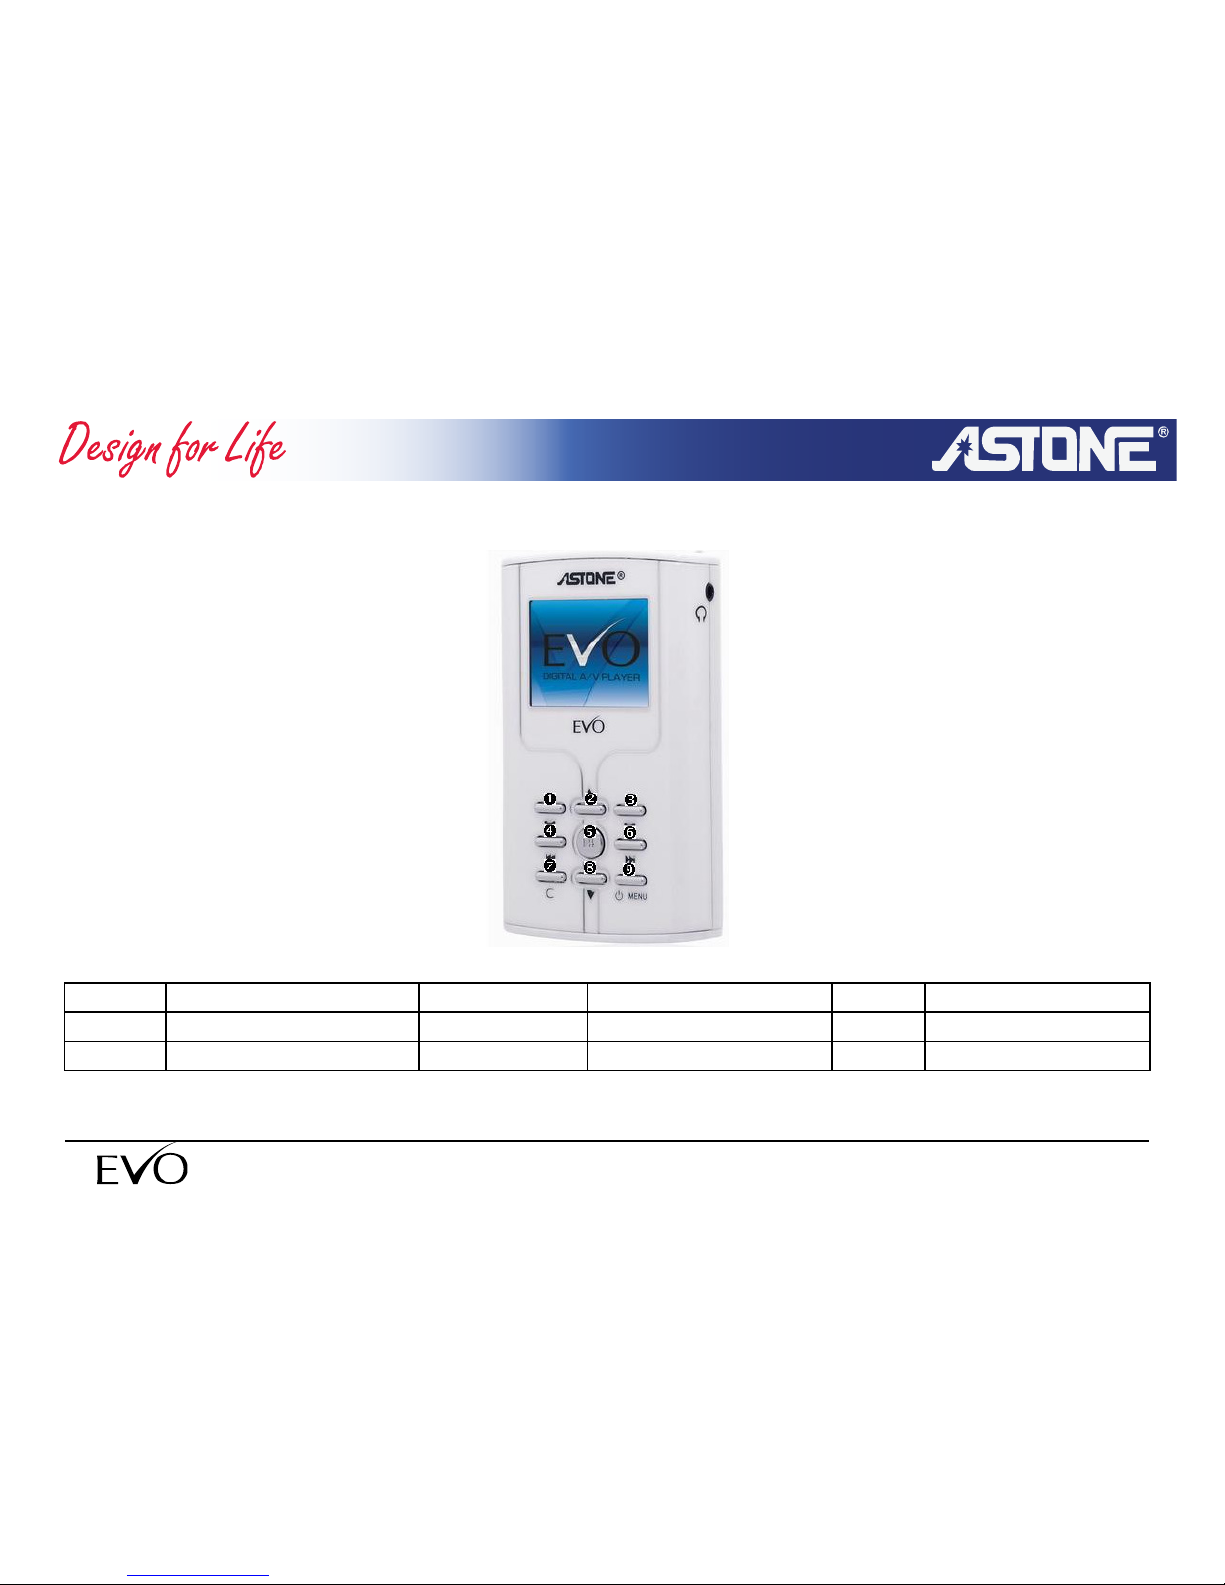
2. Quick Start
2.1 Location of Controls
n
F1
o
Volume+
p
F2
q
Back
r
Play/Pause
s
Forward
t
Cancel
u
Volume-
v
F3 / power on
- 9 -
www.astone.com.au
Page 10
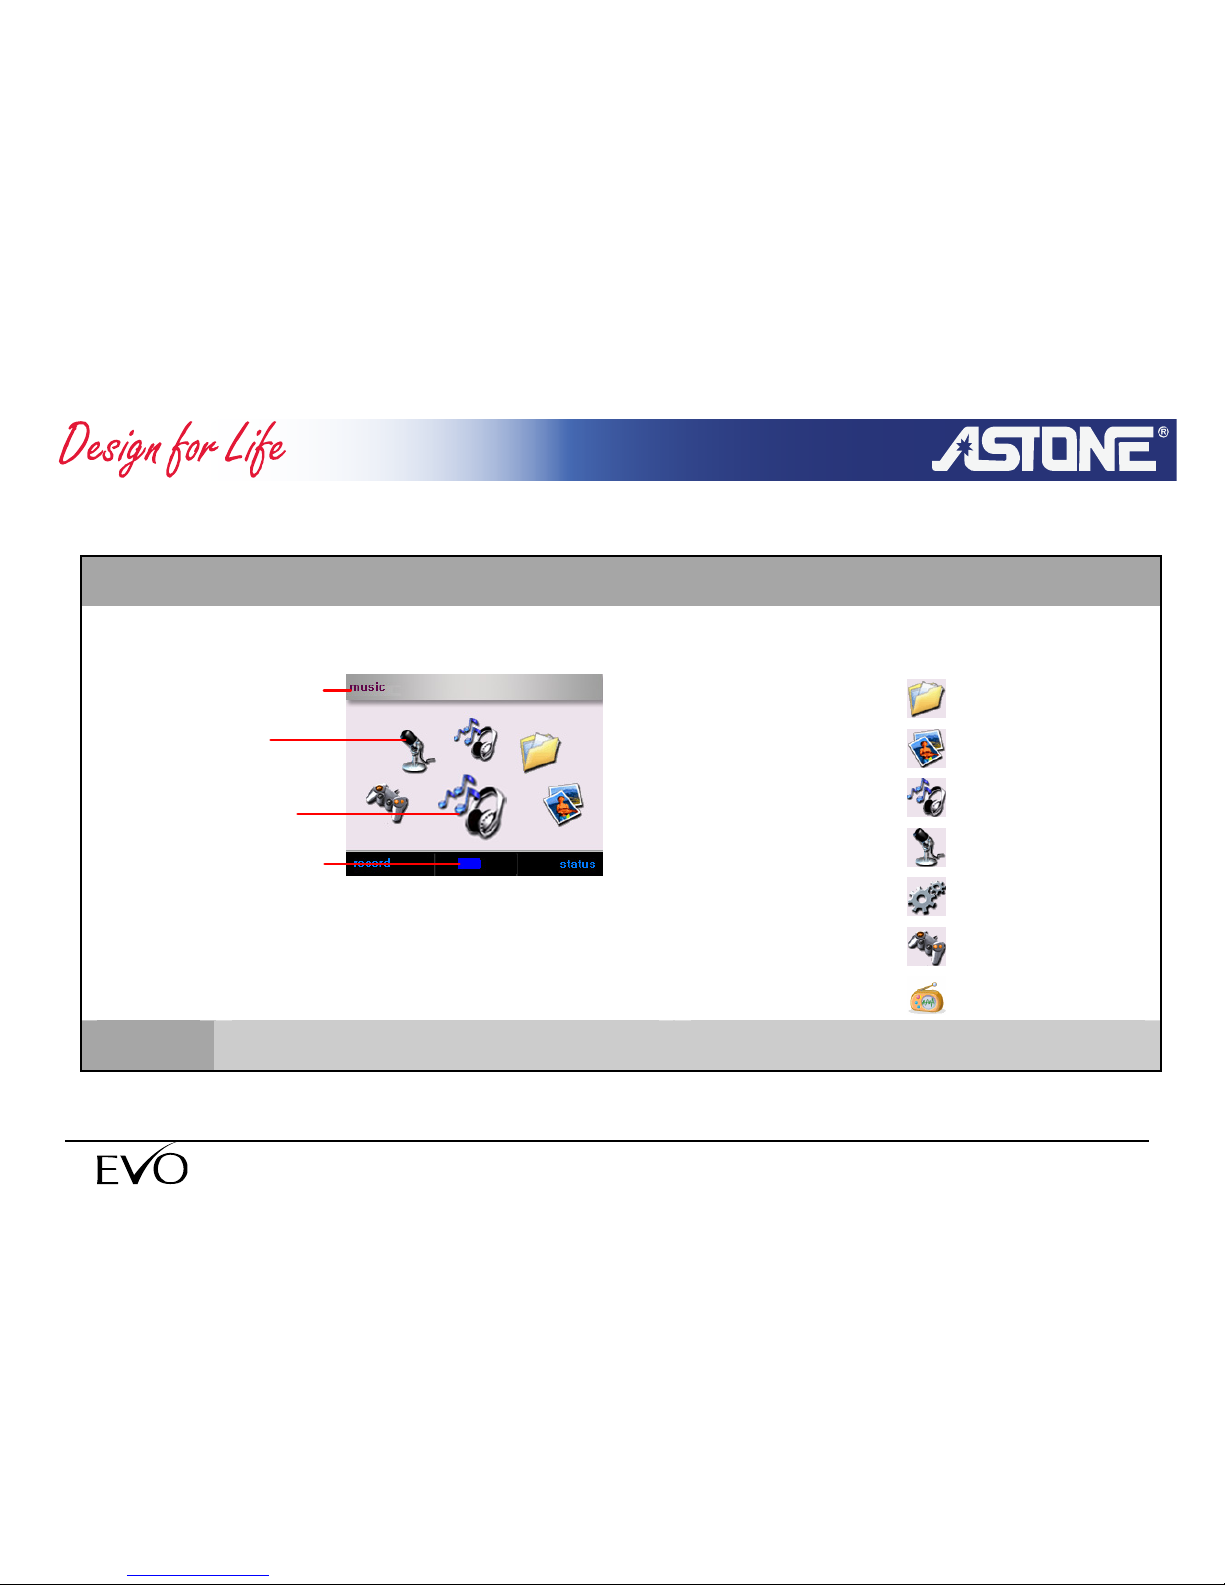
2.2 LCD Display(Description of Interface)
1.Main Menu
Menu List:
File Manager
Photo Viewer
Music Play
Record
Settings
Game
- 10 -
www.astone.com.au
FM Radio
Battery Status
Title Bar
Current Item
NOTE
F1:To enter the record interface
F2: To display the system status
Page 11
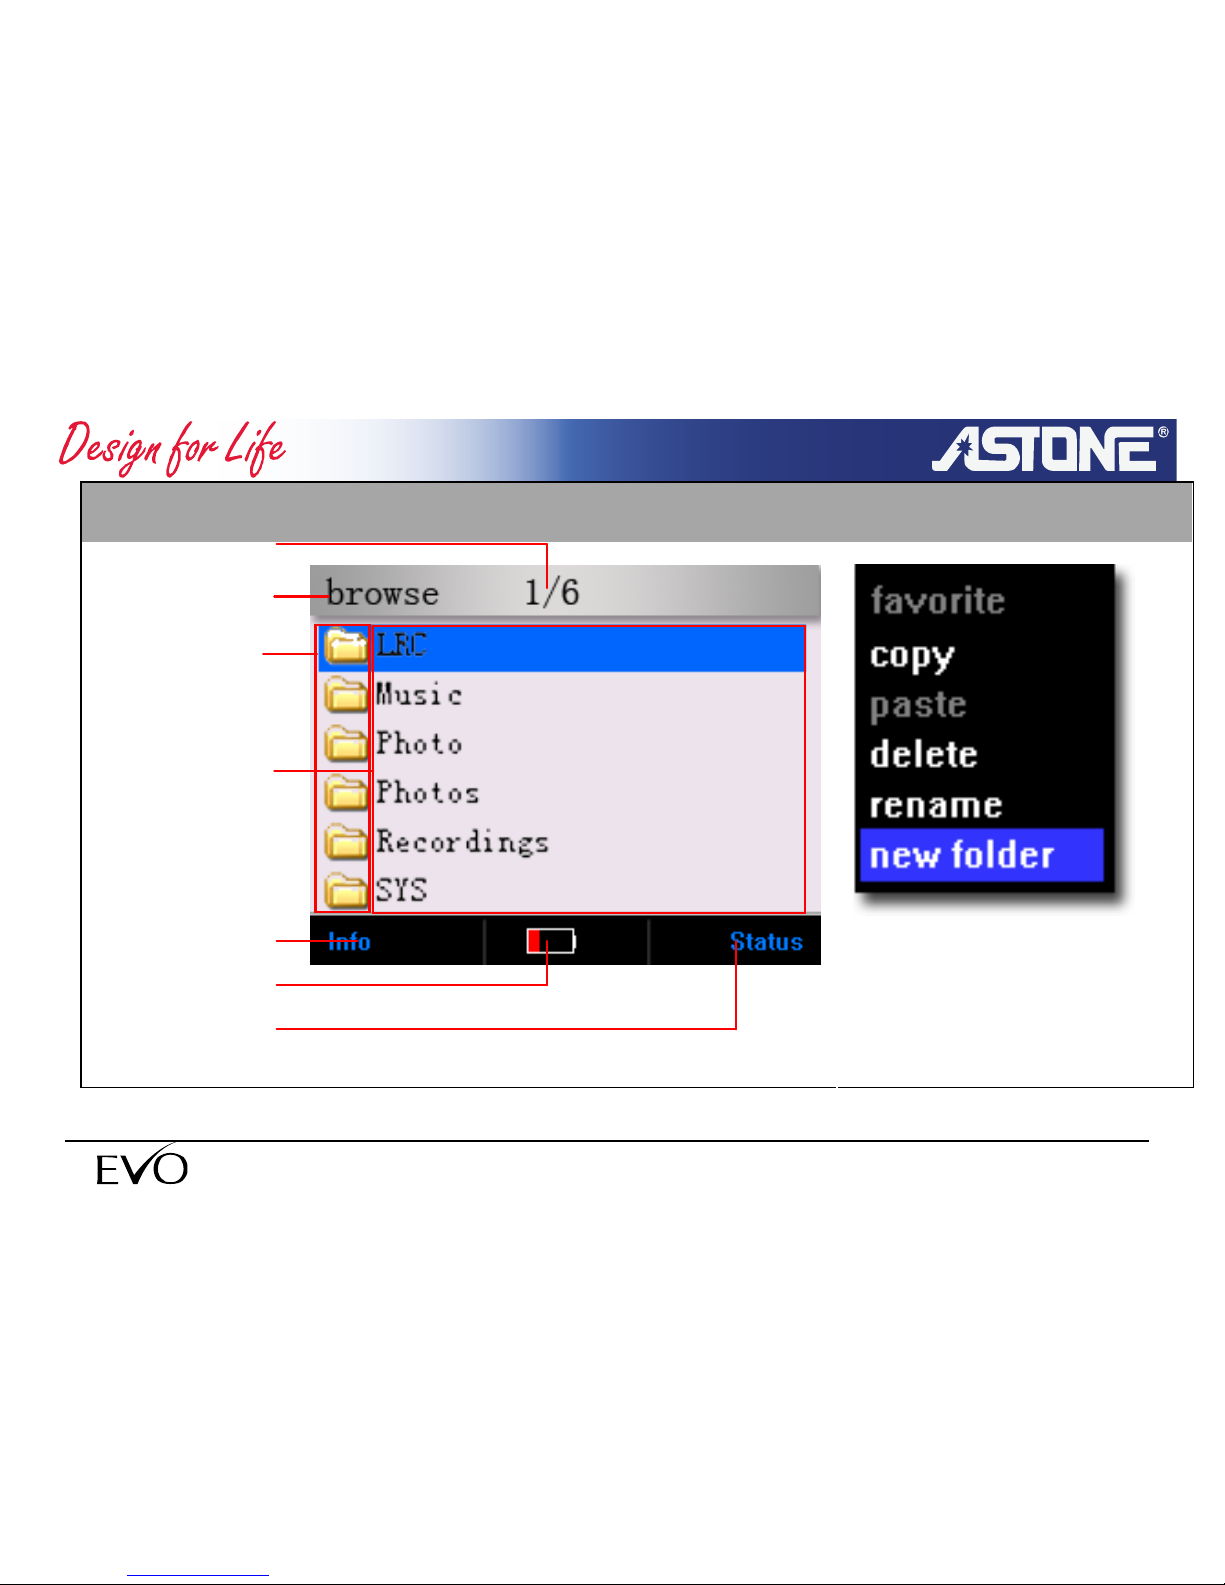
2.Browse file
- 11 -
www.astone.com.au
Pop-up Menu(F3):
Sequence
Icon
Name bar
F1button
F2 button
Battery
Title
Page 12
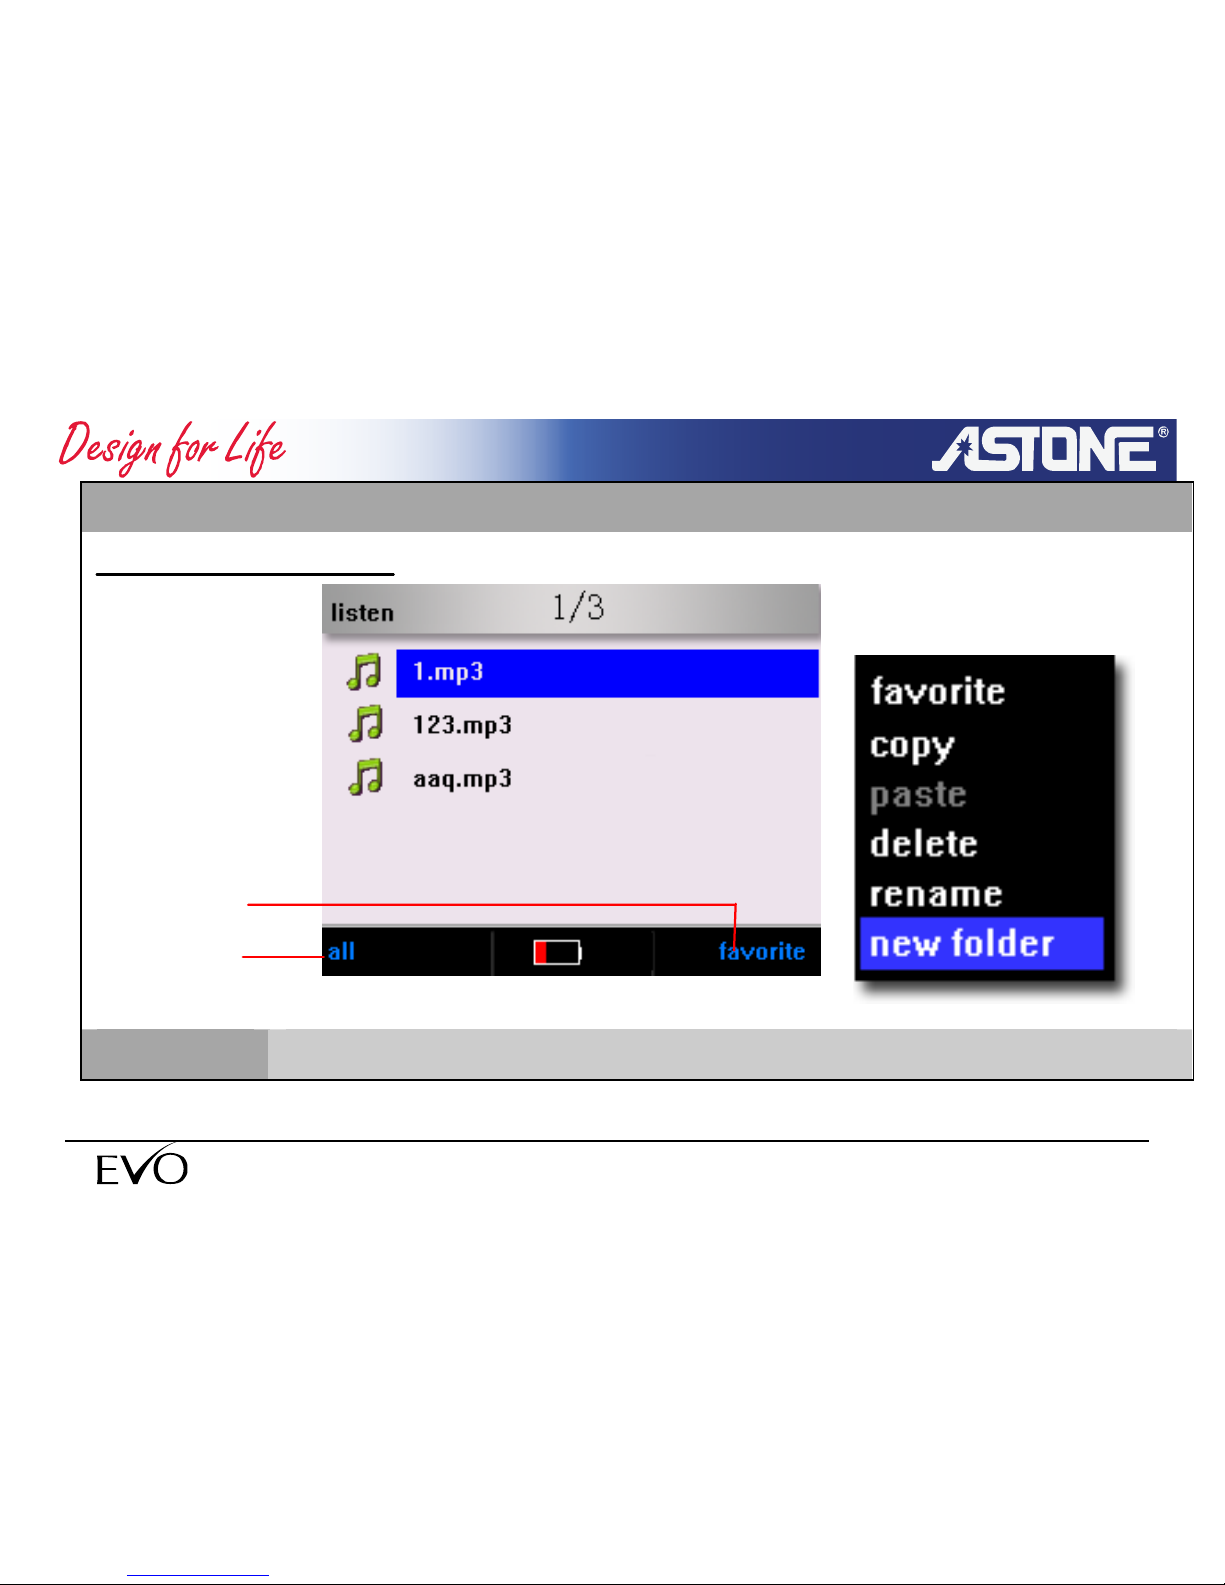
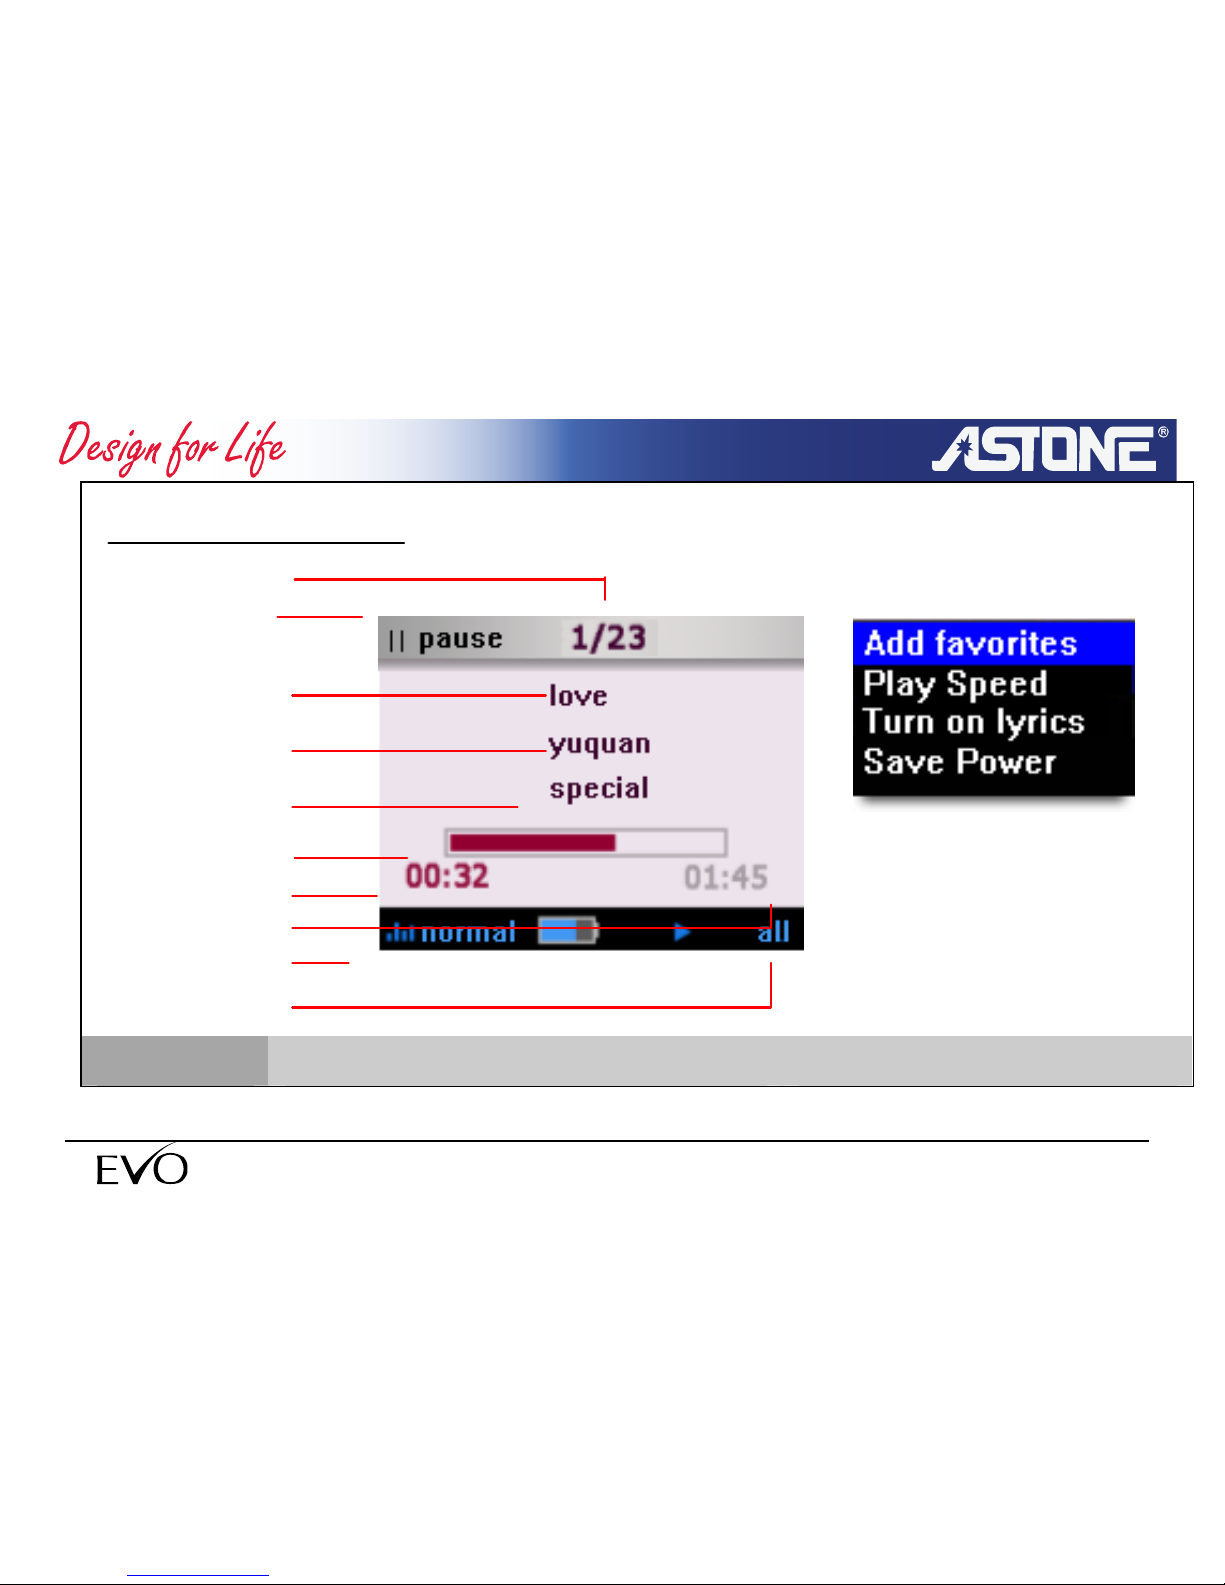
3.Music Play
- 12 -
www.astone.com.au
Pop-up menu(F3):
1) Browse music files
F2shortcut
F1shortcut
NOTE
F1:To switch the play mode F2: To enter the playlist window
Page 13
- 13 -
www.astone.com.au
Pop-up Menu(F3):
2) playing
NOTE
F1:To sw i tc h EQ F2:To switch play mode
1
Play status
Song
Artist
Album
Progress Bar
Played time
Total time
F1shortcut
F2shortcut
Page 14
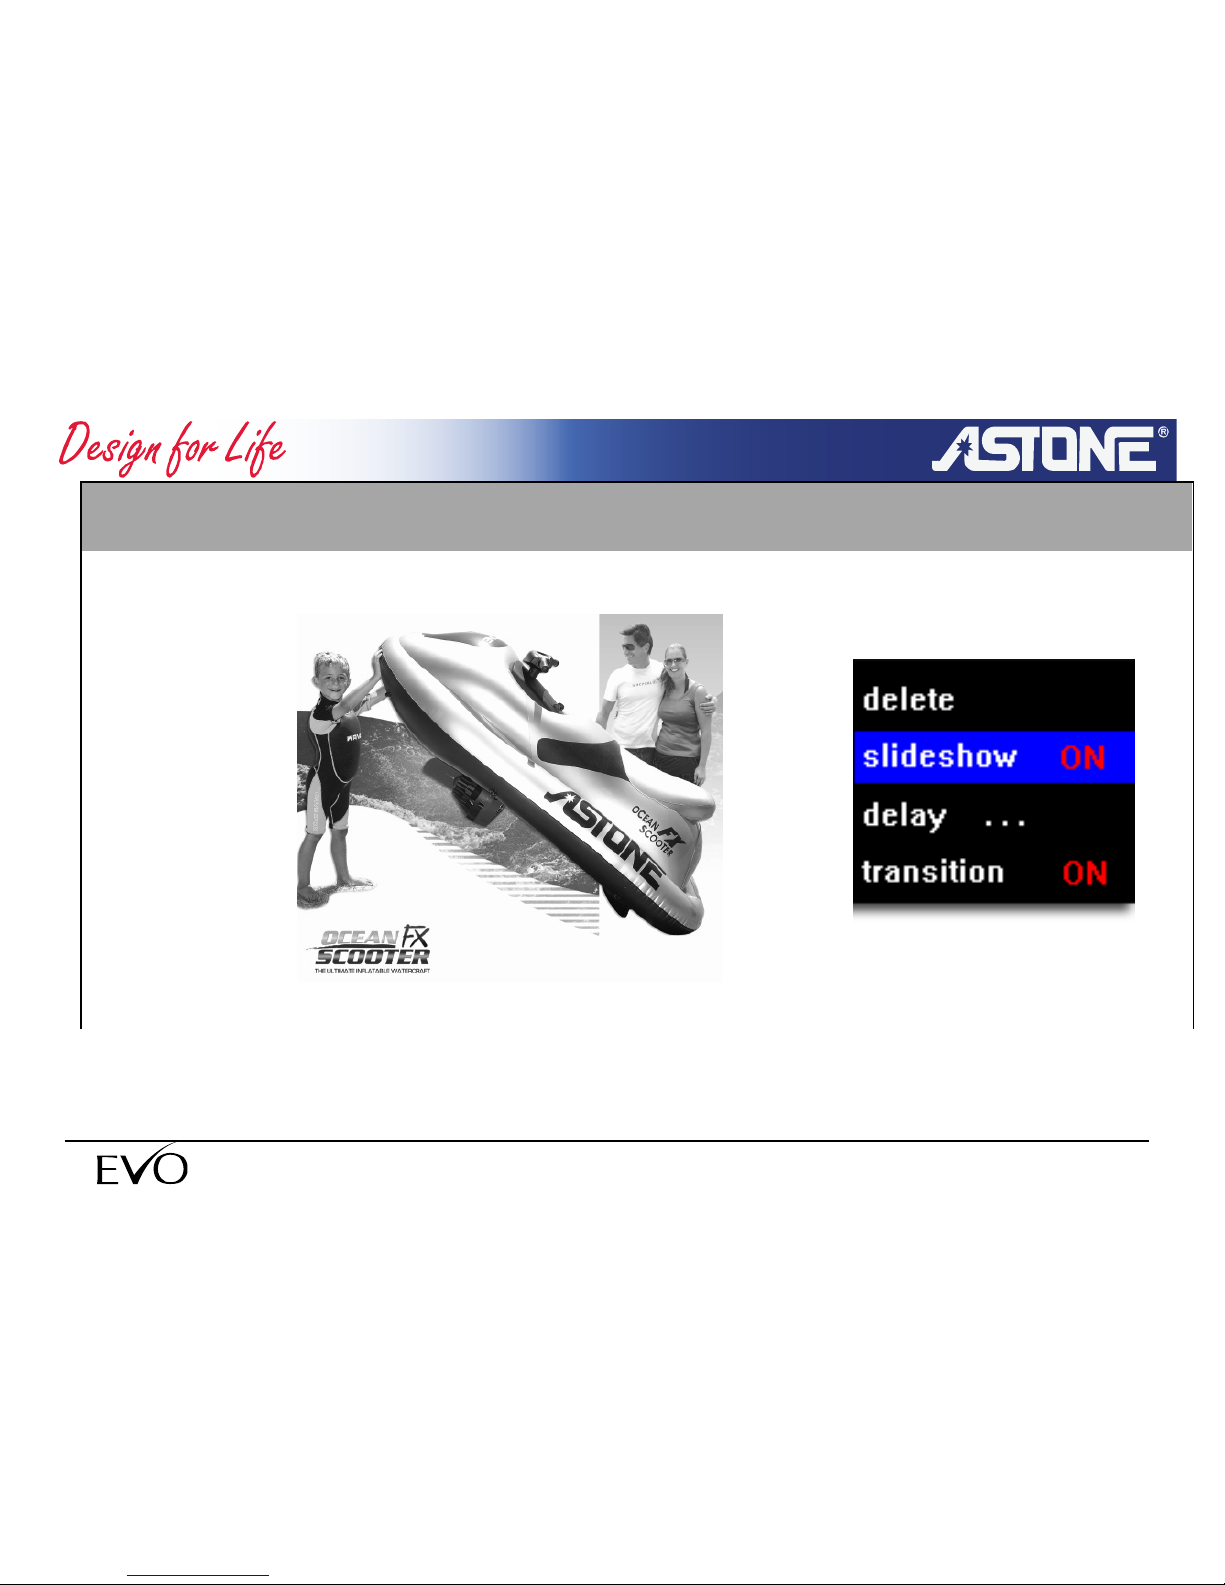
4. Photo Viewer
- 14 -
www.astone.com.au
Pop-up Menu(F3):
NOTE
F1:To diminish a picture F2:To enlarge a picture
Page 15
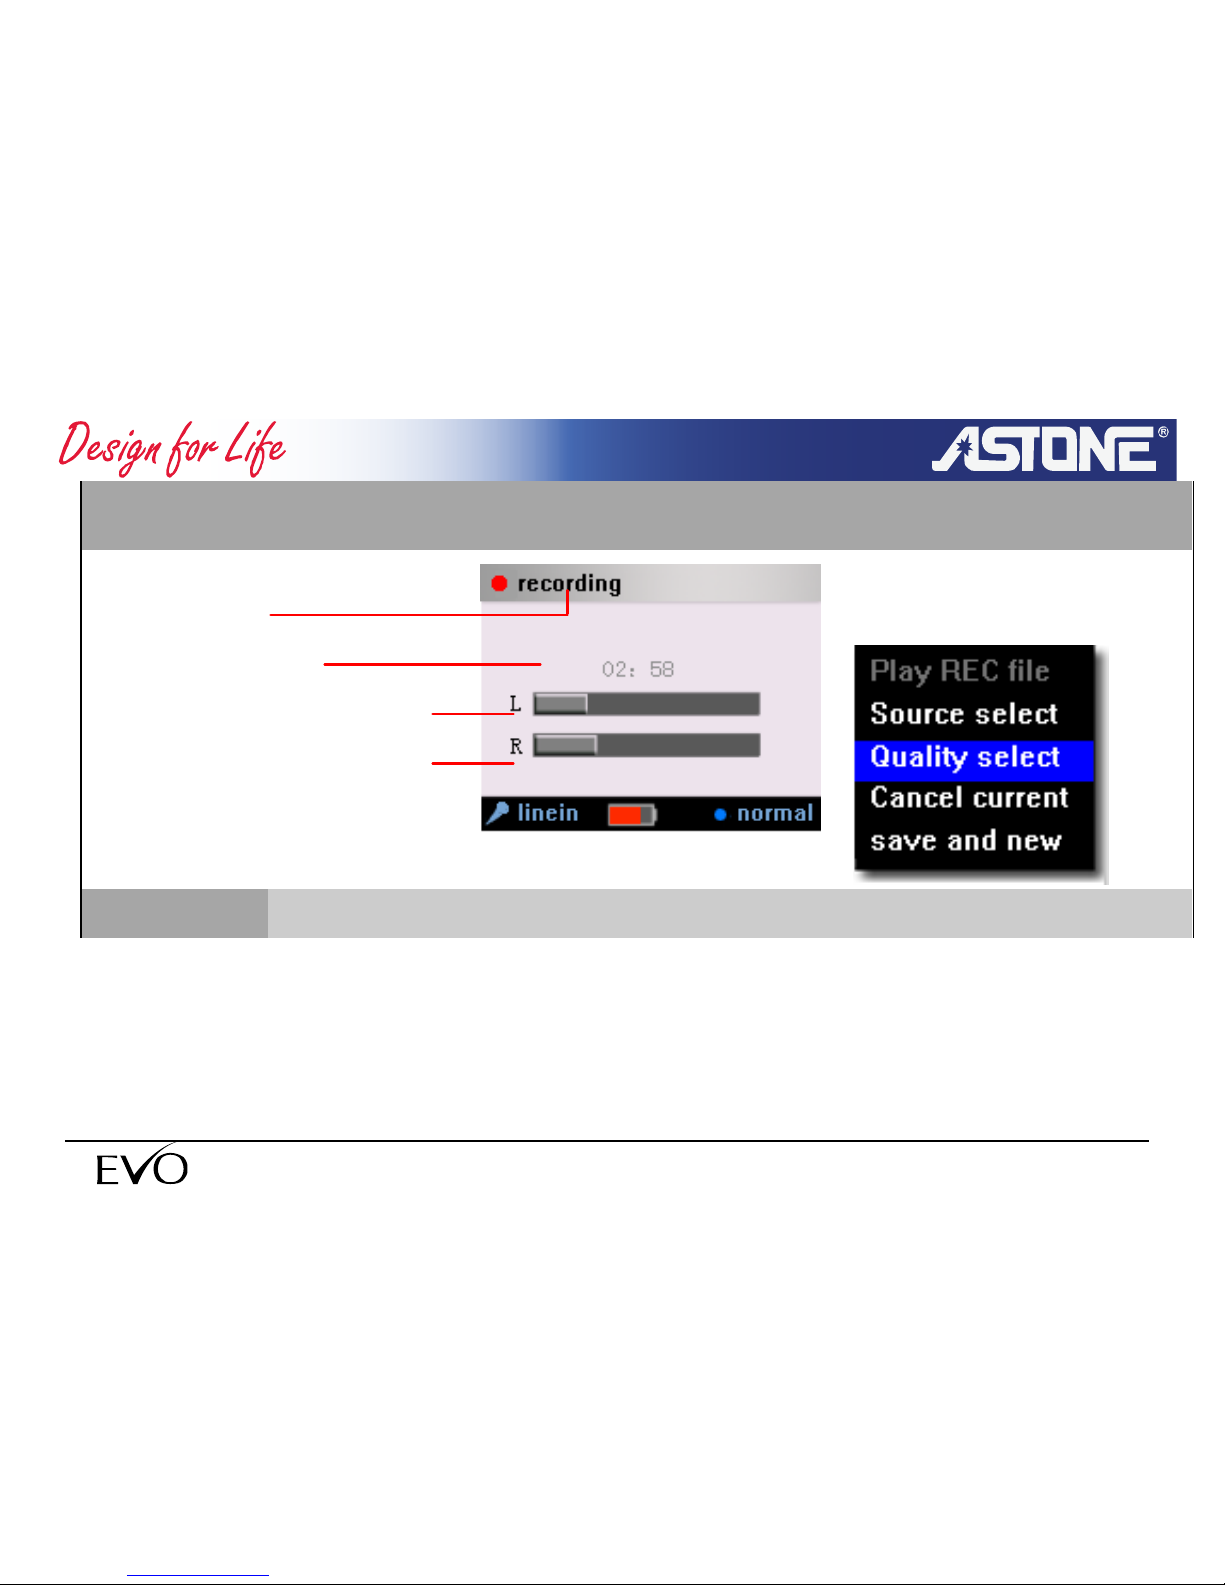
5.Recording
- 15 -
www.astone.com.au
Pop-up Menu:(F3)
NOTE
F1:To switch input source F2:To switch sound quality
REC time
Sort order
L channel
R channel
Page 16
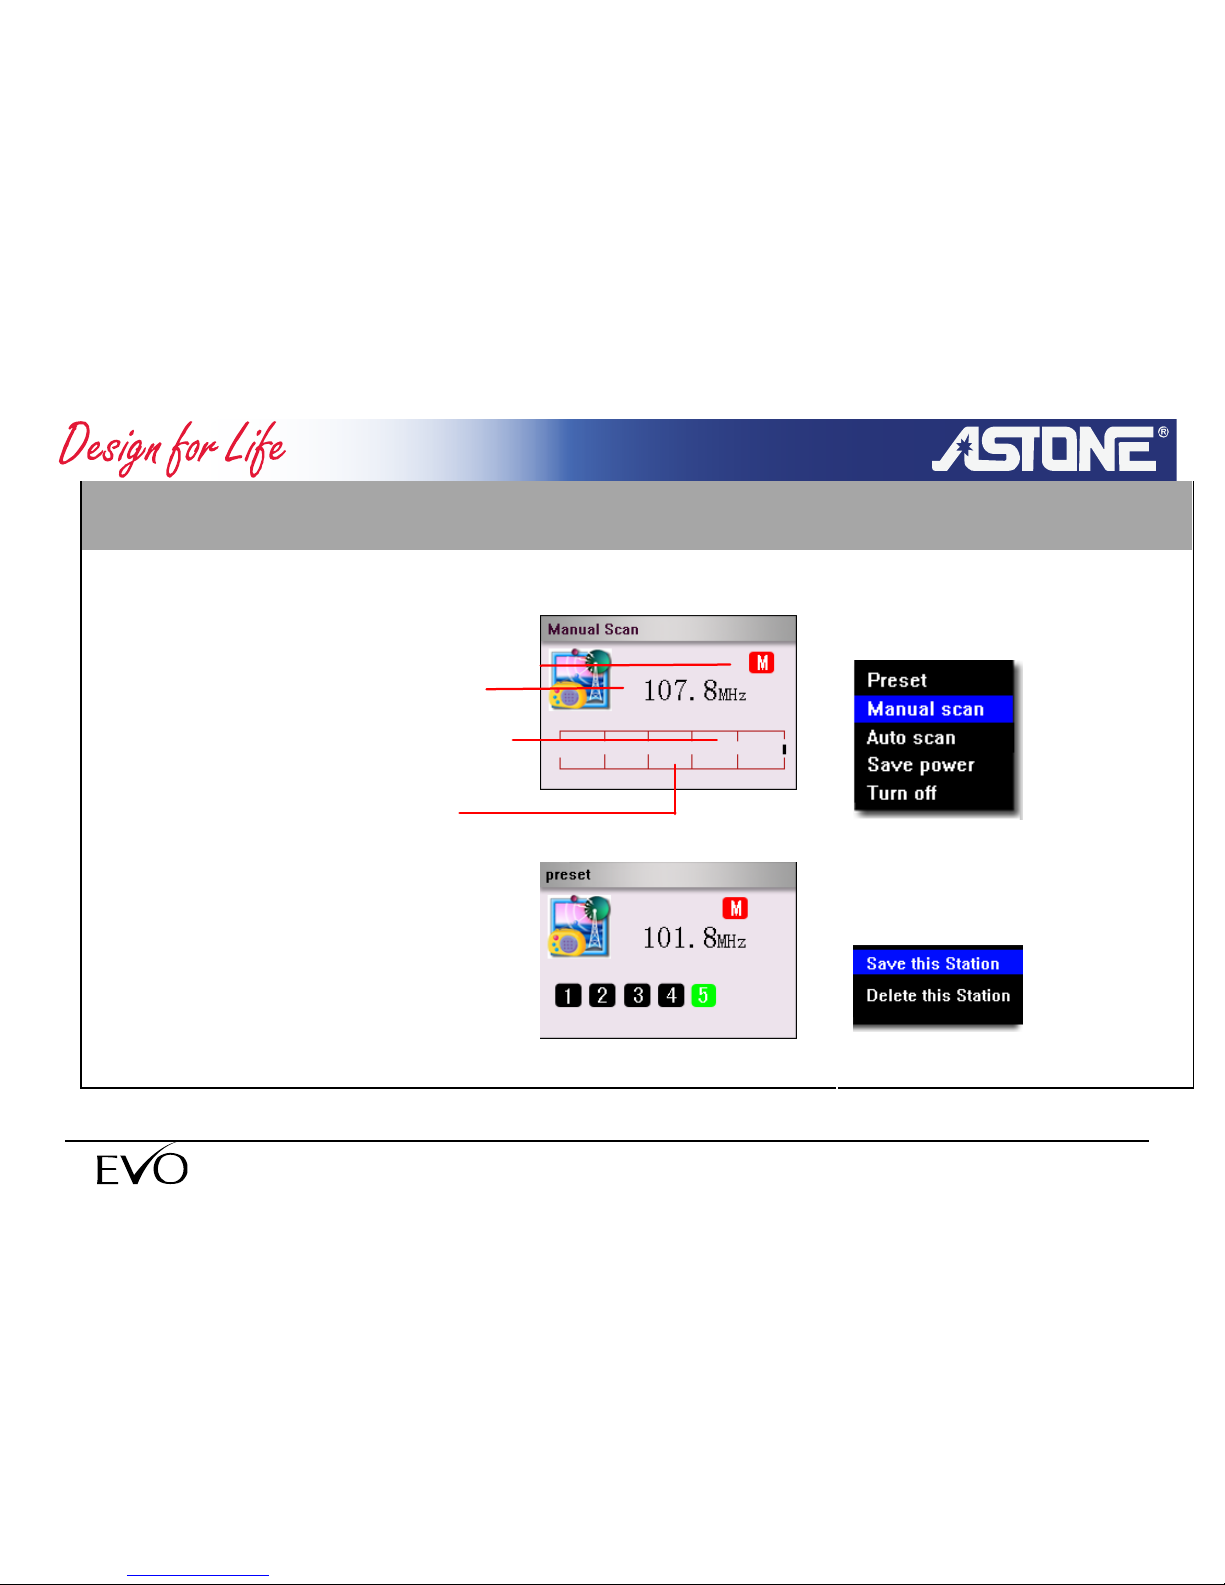
6.FM Radio
Pop-up menu:(press F3)
- 16 -
www.astone.com.au
Pop-up menu:(press and hold
F3)
Frequency
Track
Pointer
Scale
Page 17
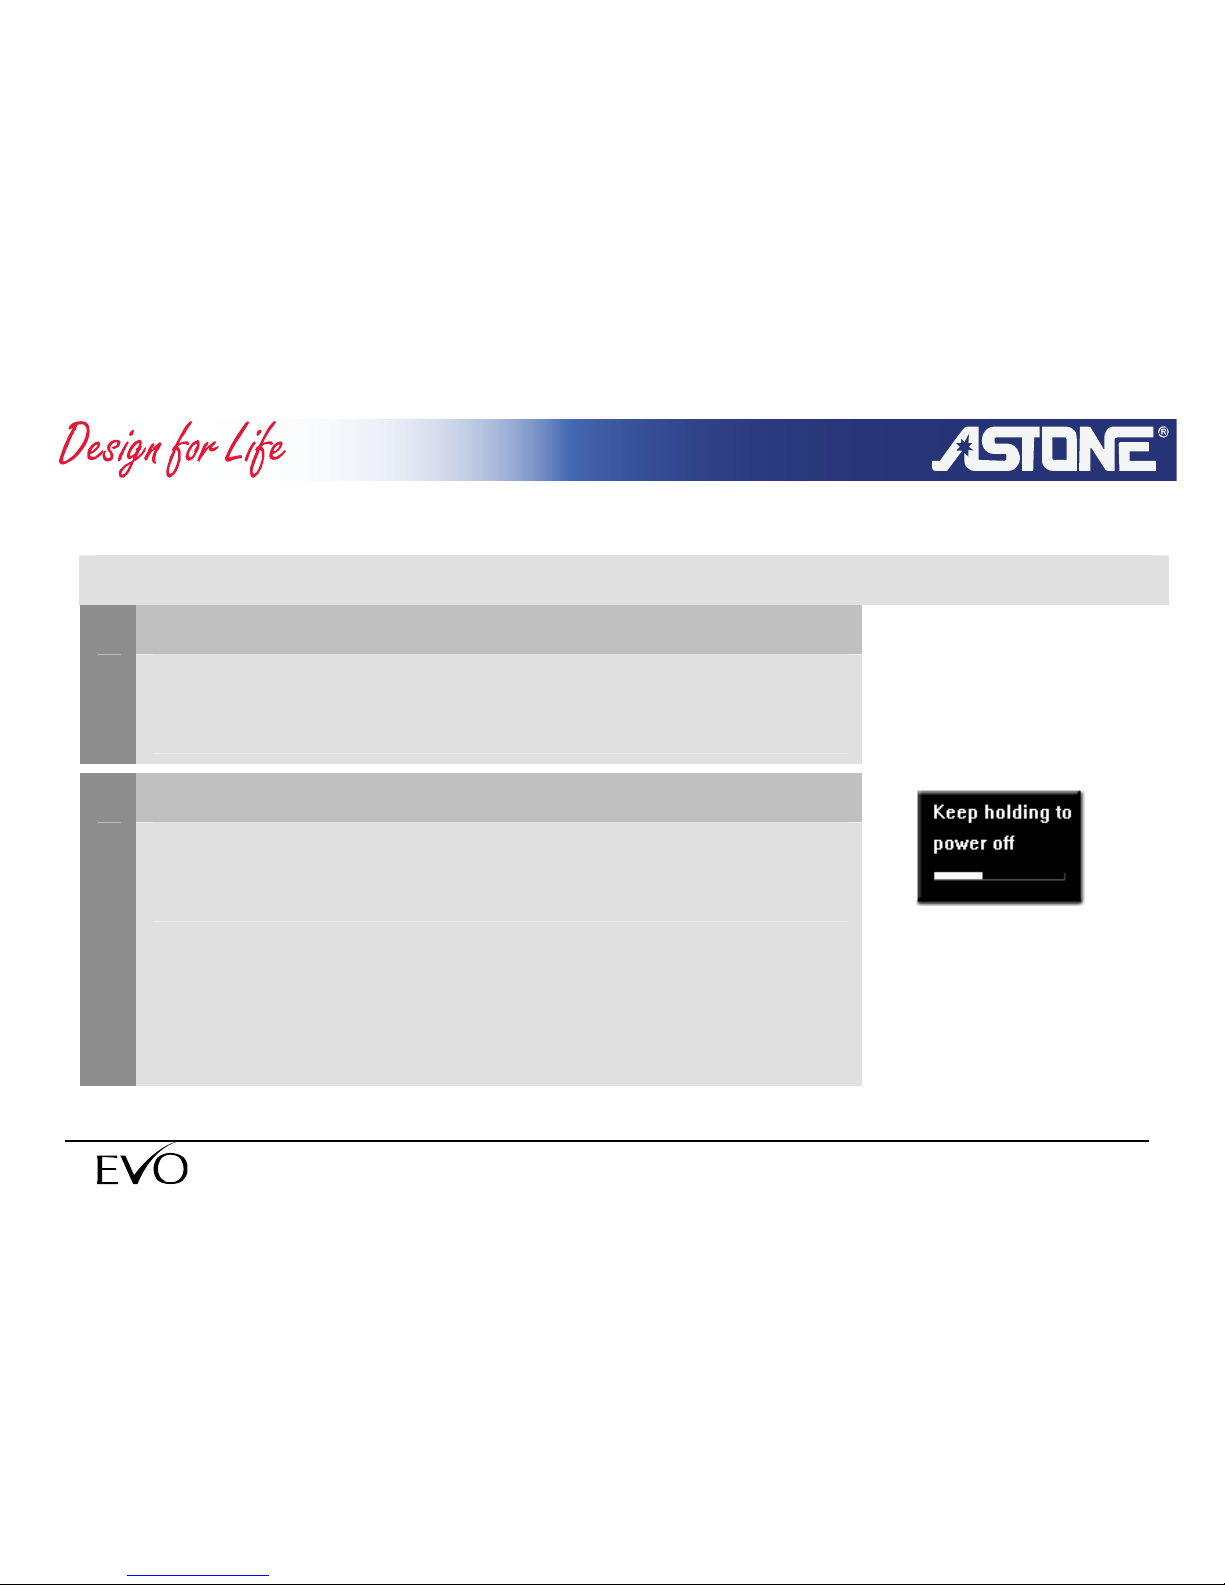
2.3 Quick Start
2.3.1 Power On/Power Off player
Power on
- 17 -
www.astone.com.au
1
Press and hold F3 button then the start-up screen will be
displayed.
Power off
2
Press and hold F3 button until the message box of” Keep holding
to power off” is displayed. Then the player will be shut down.
Page 18
If the player does not run after pressing the button, please check whether the HOLD
switch if set to OFF or the battery is fully charged
NOTE
If it prompts “no disk” during start-up, please restart the player. If there is still error,
please check disk or format disk with your PC. If all the operations above fail, please
contact the dealer.
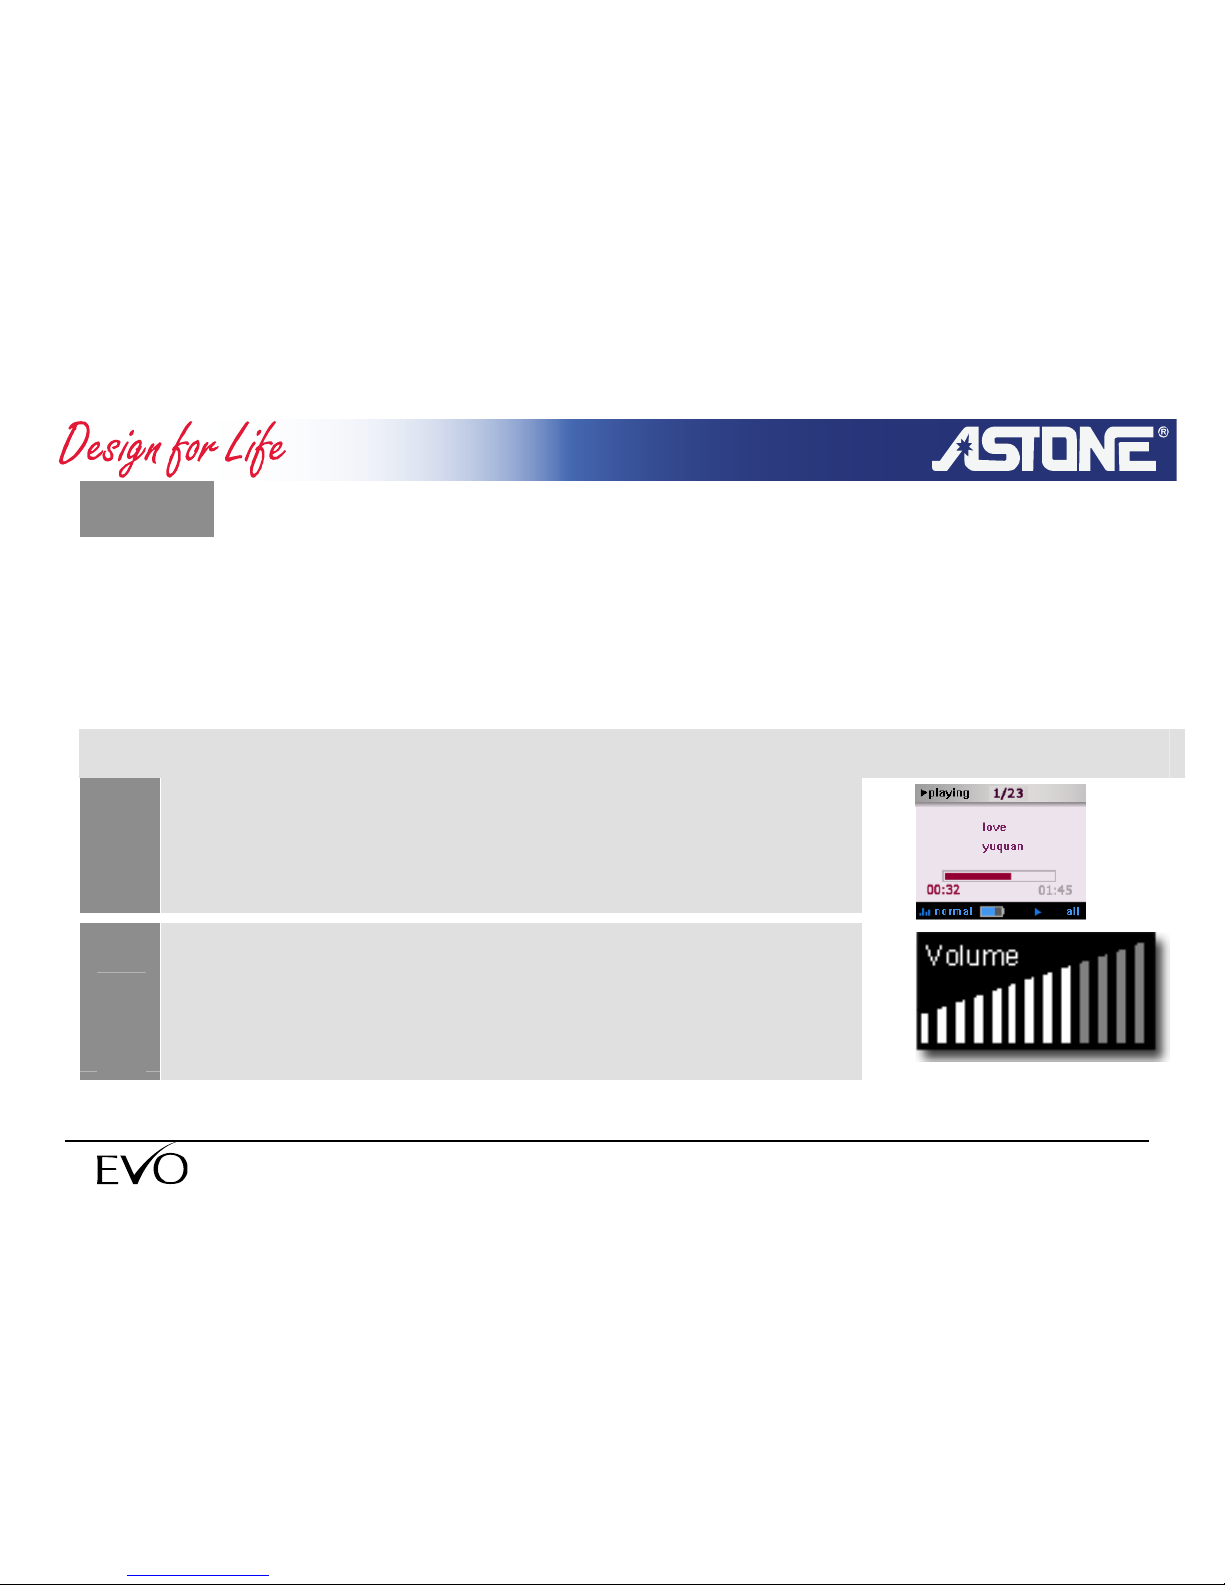
2.3.2 Playing Music
1
Using F1 button in the main menu, enter the sub-menu of “music”
2
Using volume+ and volume- to adjust the volume while playing,
Volume adjustment window will be displayed.
- 18 -
www.astone.com.au
Page 19
The default music directory is “c:\music”. If such folder
doesn't exist, the system will automatically create the
folder.
NOTE
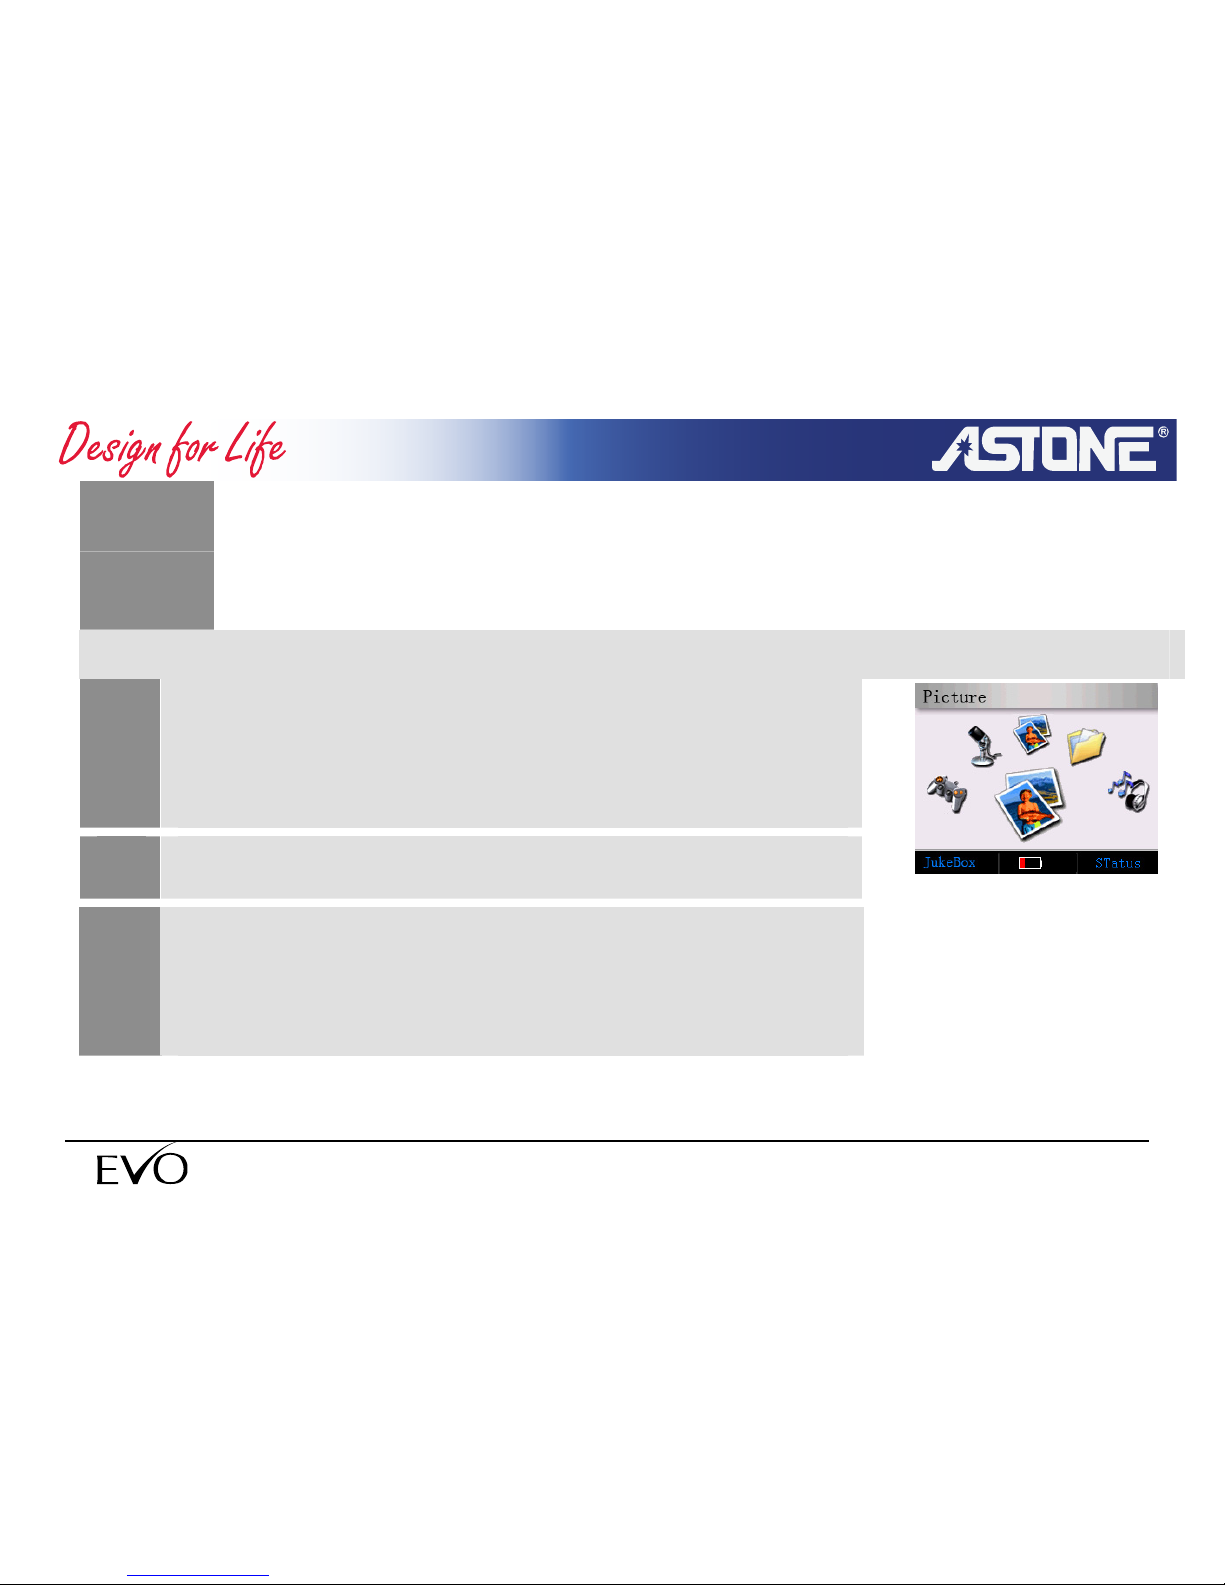
2.3.3 Selecting application Mode
1
Using the Backward/Forward button to switch the application
mode. The ICON of selected mode will be displayed in the
“Current Item” zone.
2
Press OK button to enter the selected mode.
3
In any mode, press CANCEL button to return the previous
operating interface, press and hold CANCEL button to return
main menu.
- 19 -
www.astone.com.au
Page 20
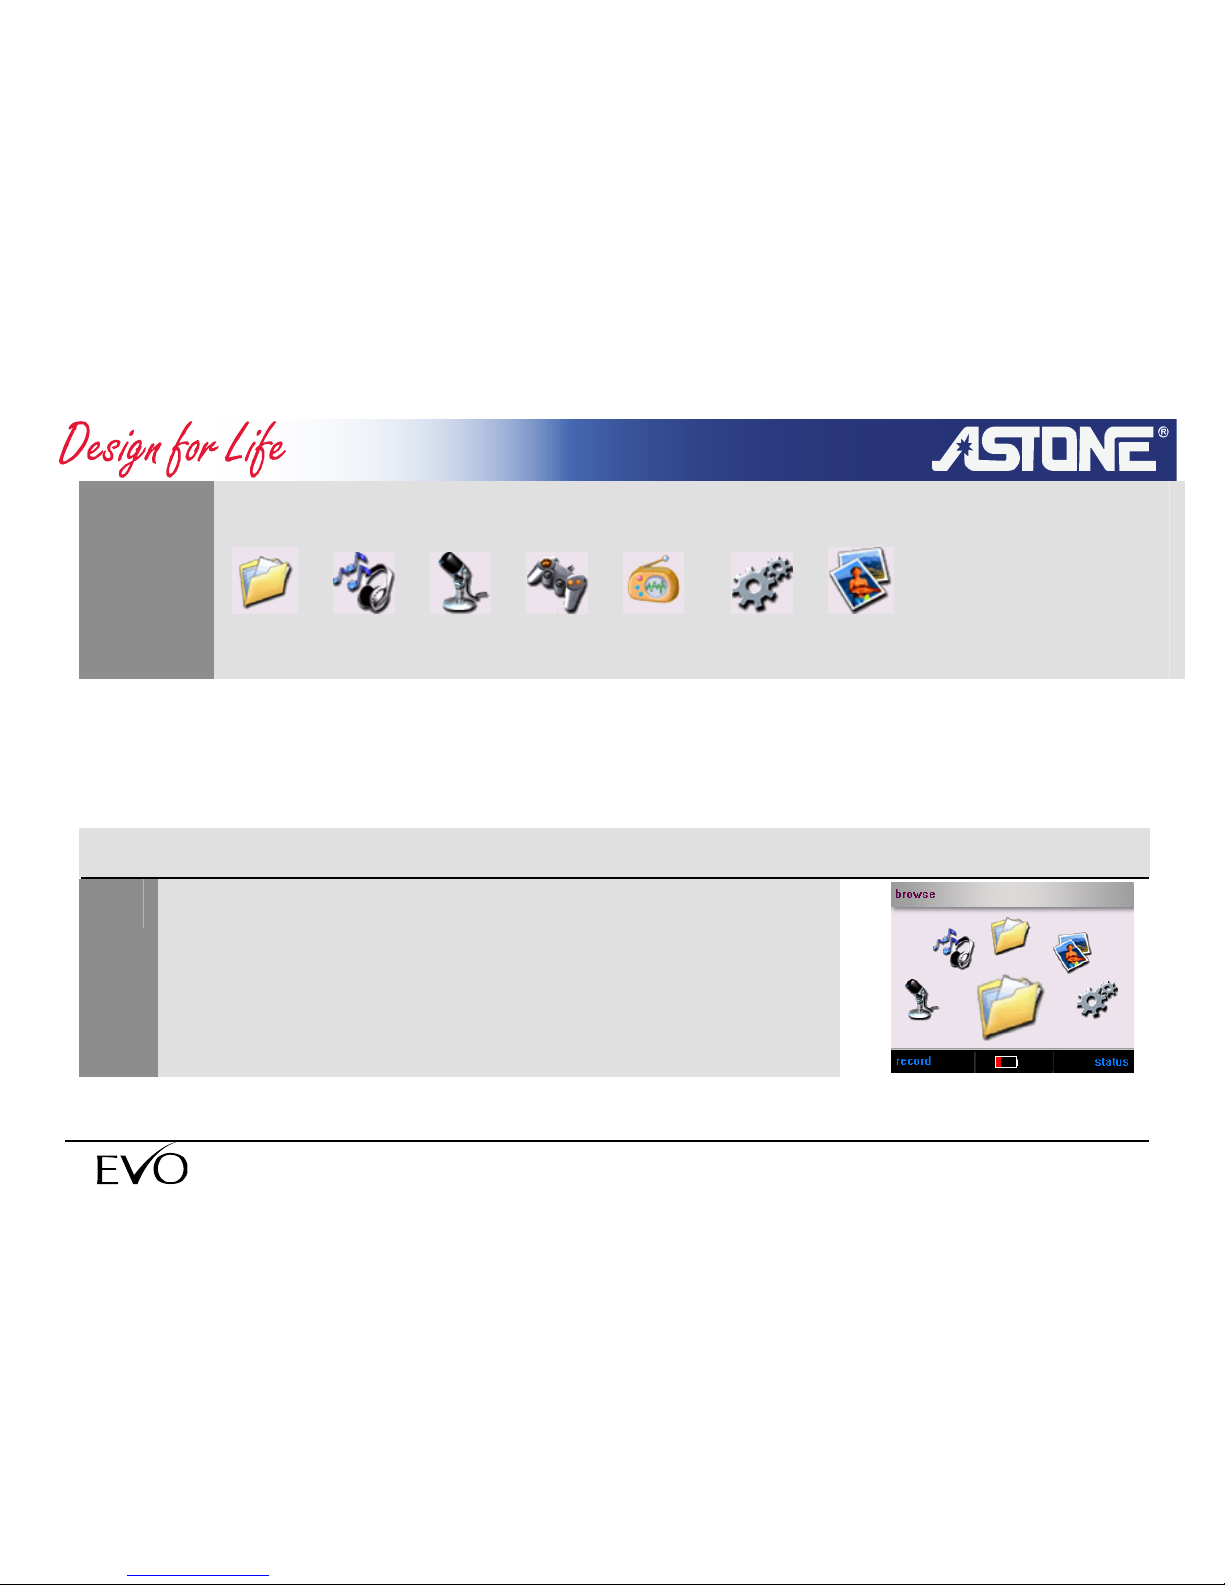
There are seven modes in the player, as following:
NOTE
file music recording game FM setup photo
3. Basic Operation
3.1 Browser
3.1.1 Using browser
1
Select “browse” mode in the main menu,
- 20 -
www.astone.com.au
Page 21
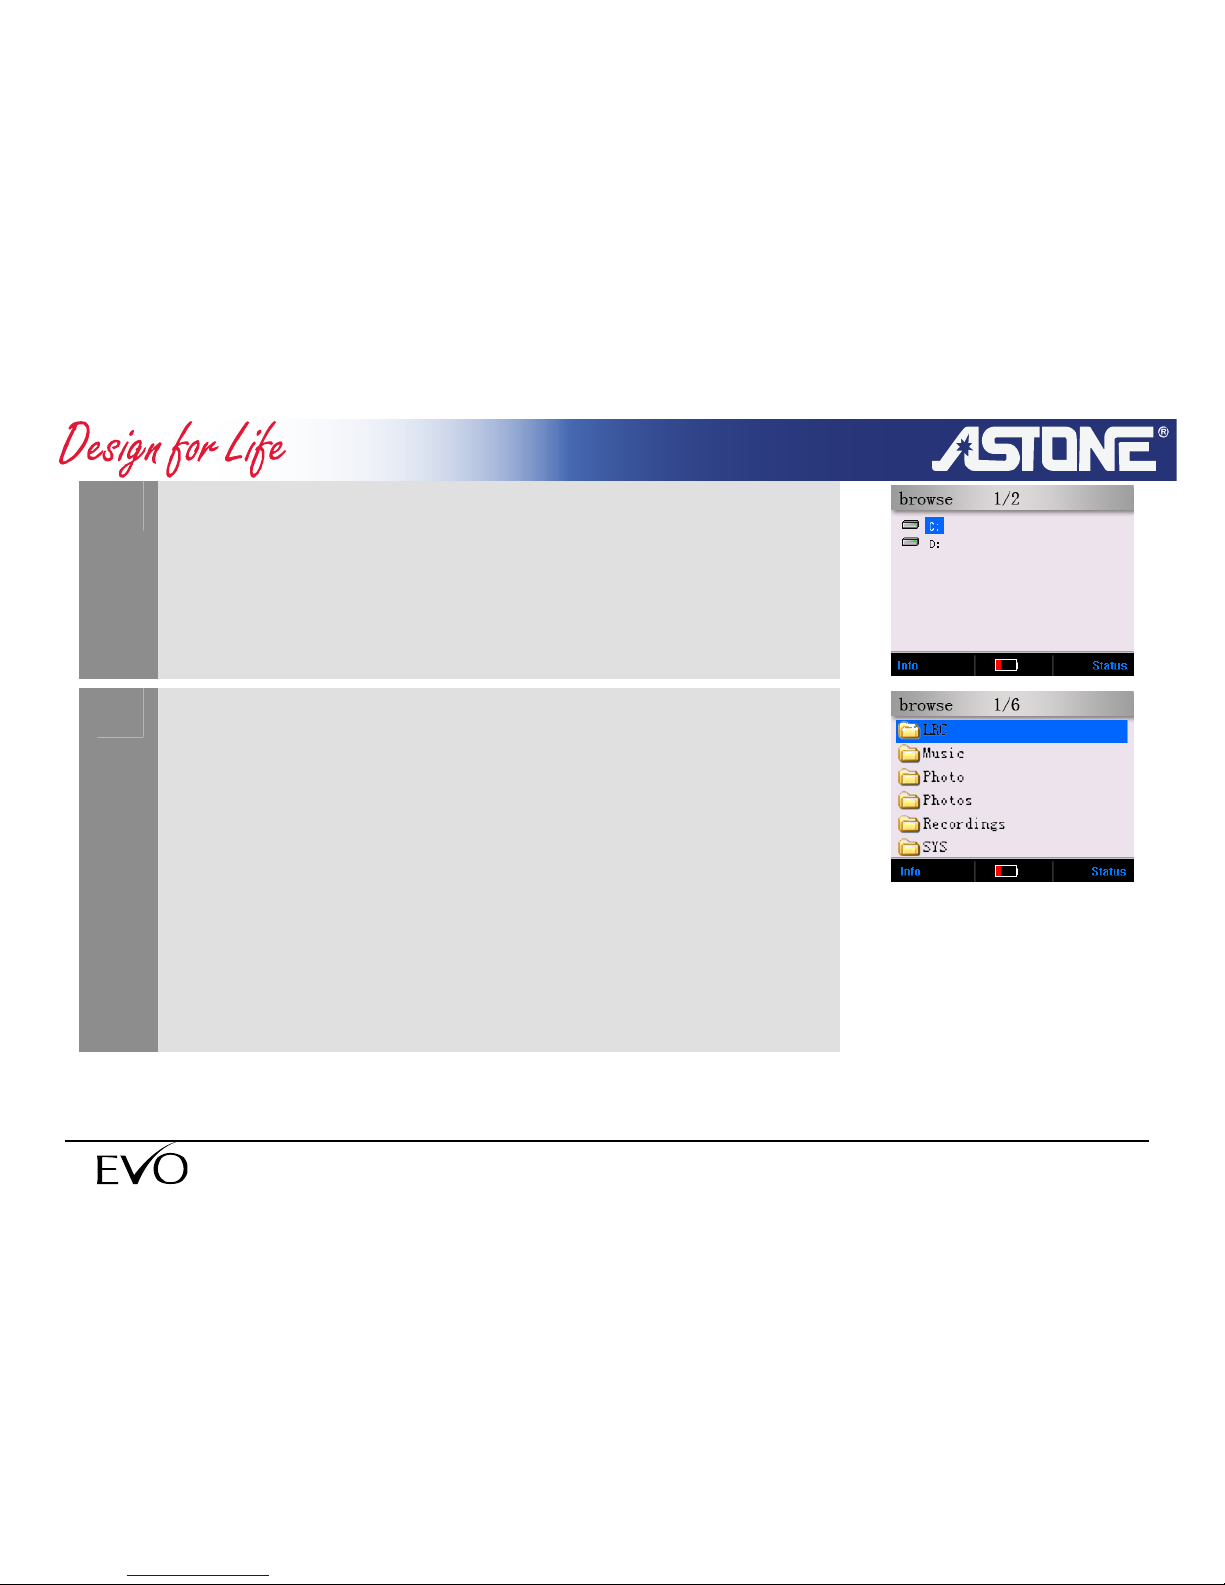
2
Press OK button to enter.
All files will be displayed in a tree-view. If there are more than
one partition, the disk name will be C/D/E in the order.
3
Use the keys to select folder or file.
<volume+ > :up a row
<volume- > : down a row
<forward> : down a page
<back> : up a page
<OK> : enter the sub-folder or run selected file
<CANCEL > : Return to the previous directory
- 21 -
www.astone.com.au
Page 22
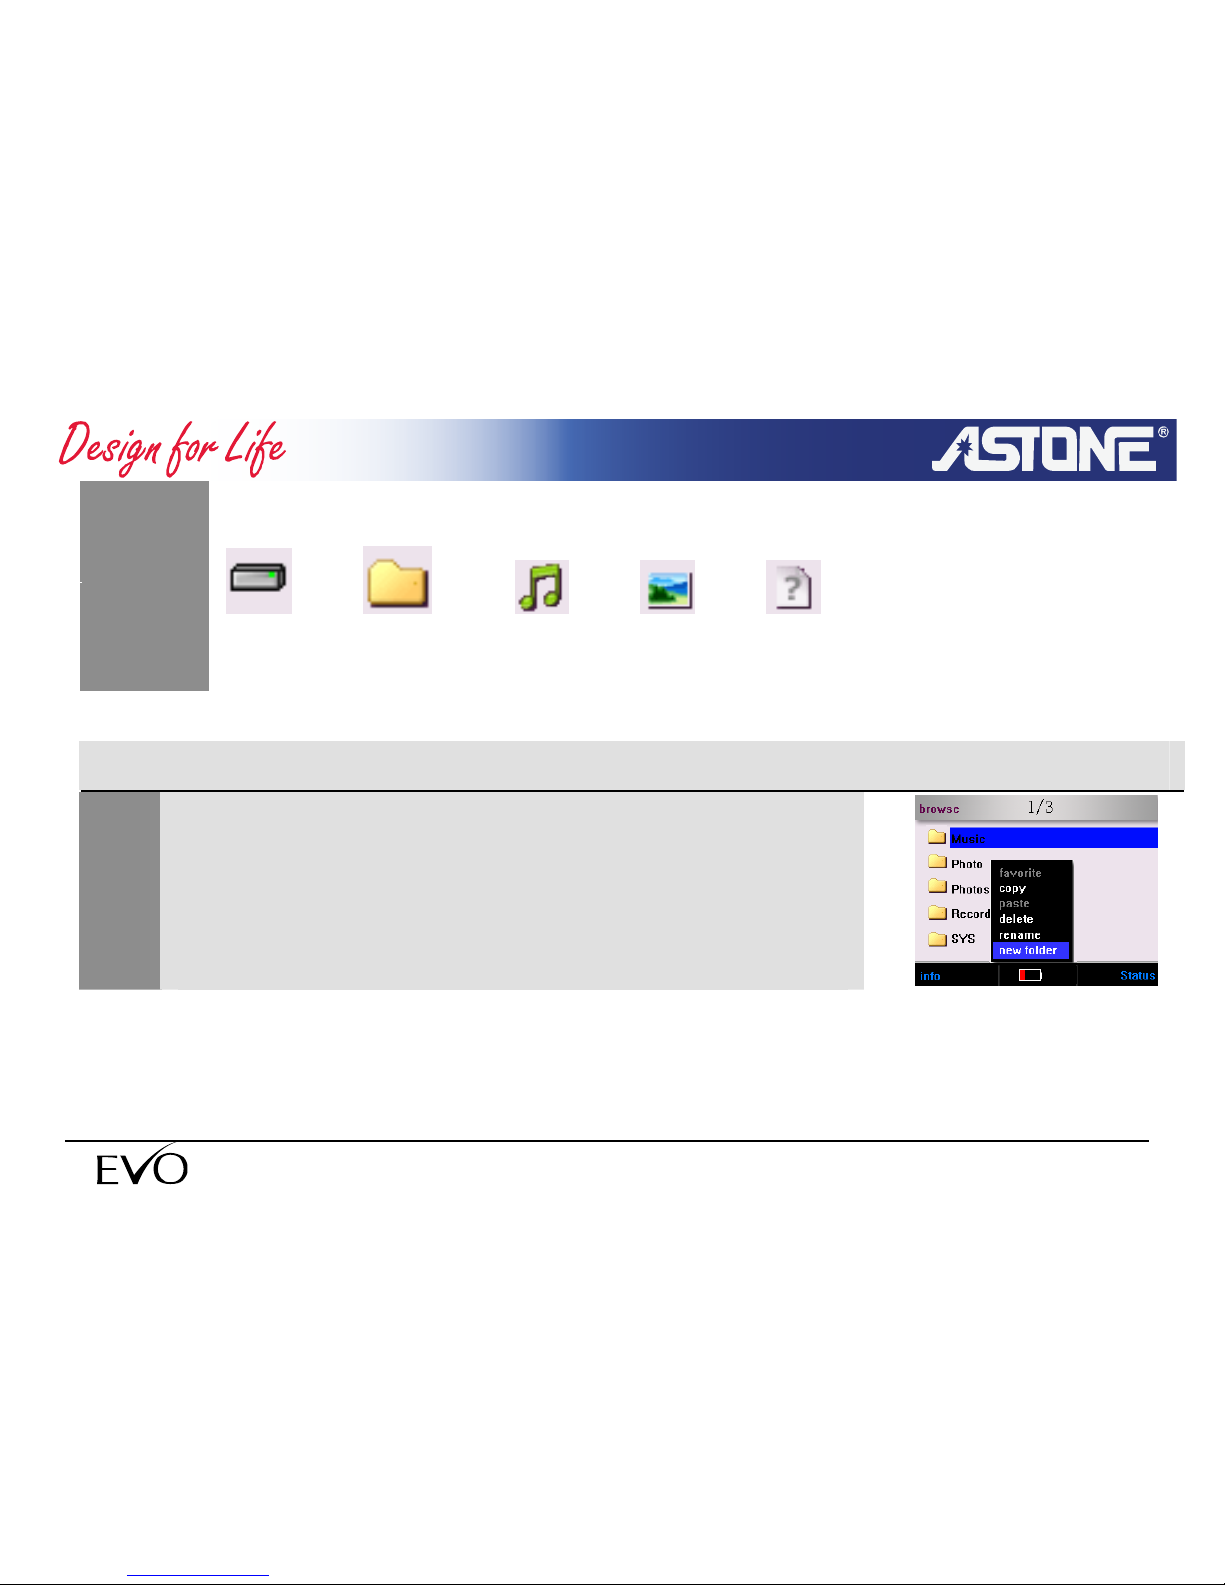
Type signs of browser as following:
NOTE
disk folder music/movie photo unknown
3.1.2 Coping and Pasting
1
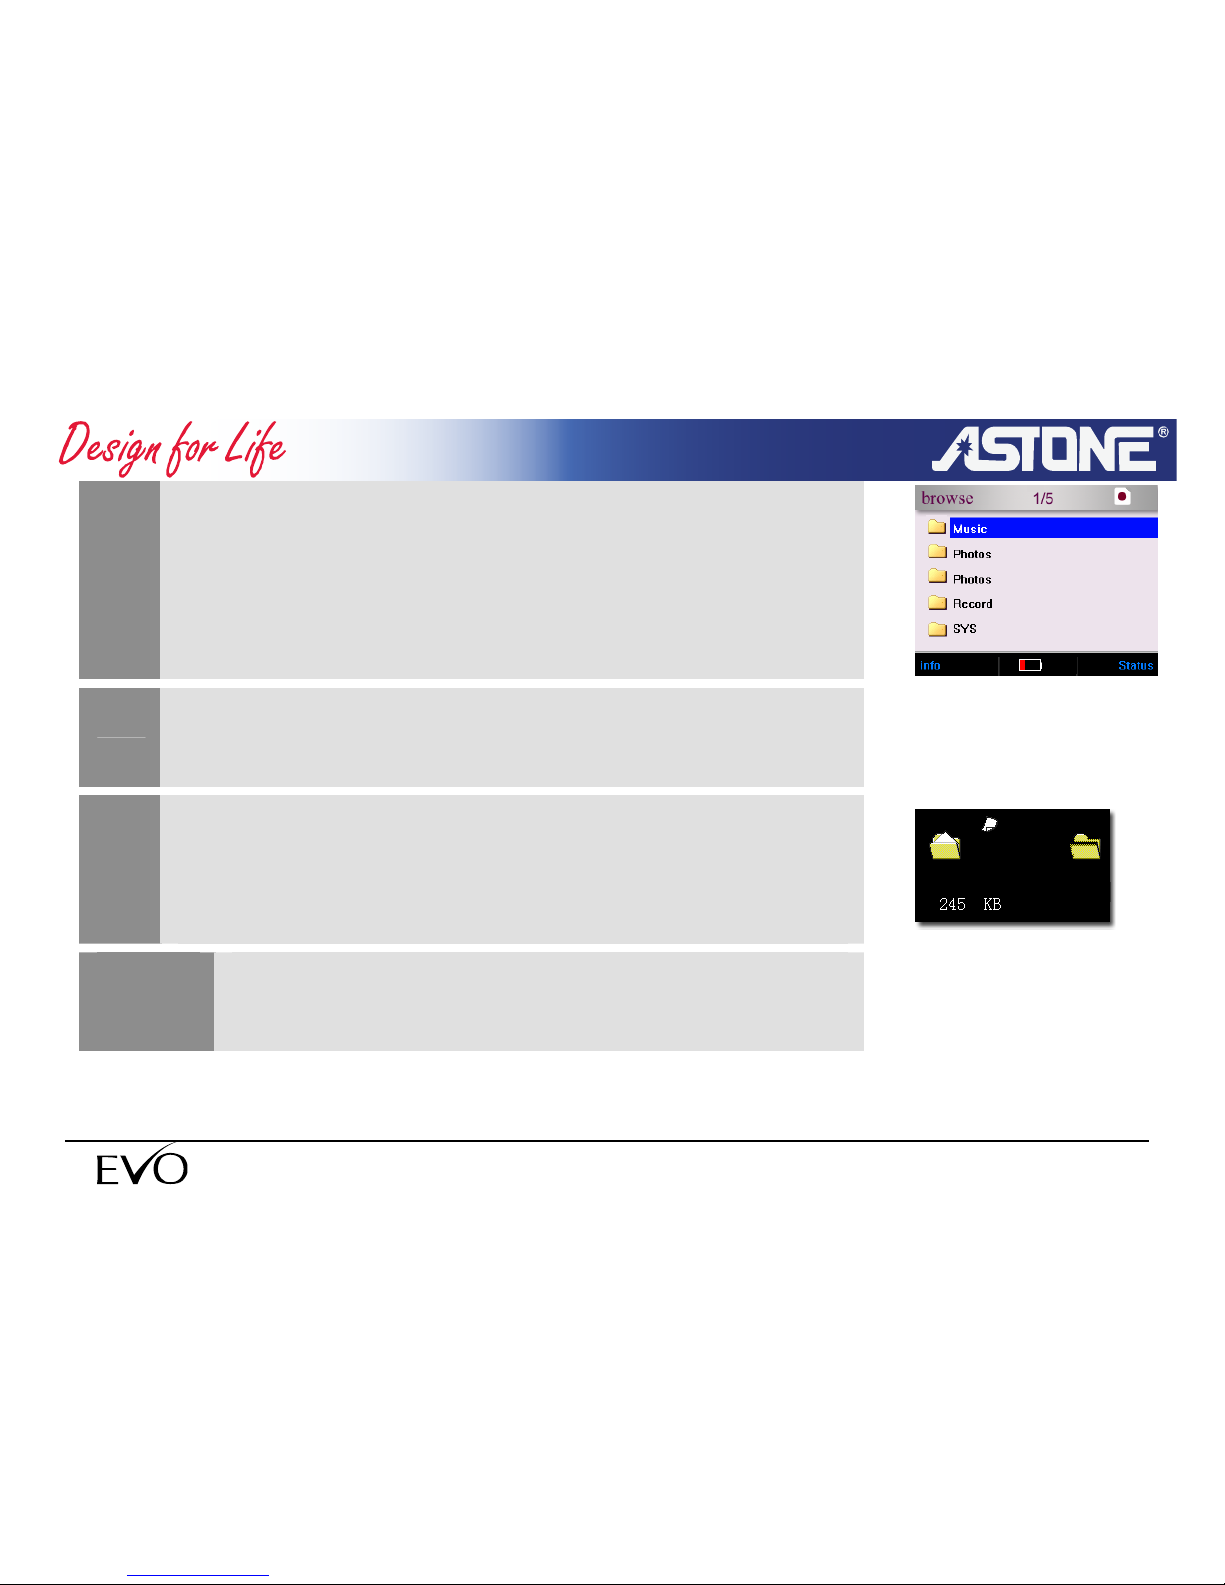
Select the source files in the browser,
press <F3> button to pop up menu
- 22 -
www.astone.com.au
Page 23
2
Use <volume+/-> to select “COPY” item, and press <OK>.
The clipboard icon will be displayed at the right top corner.
3
Enter the destination folder in browser. Press F3 button to pop
up menu
4
Use <volume+/volume-> button to select “Paste” item and
press <OK> button
The copying window will be displayed.
The clipboard icon will disappear when return the
main menu . You will have to repeat the operation.
NOTE
- 23 -
www.astone.com.au
Page 24
3.1.3 Deleting Files
1
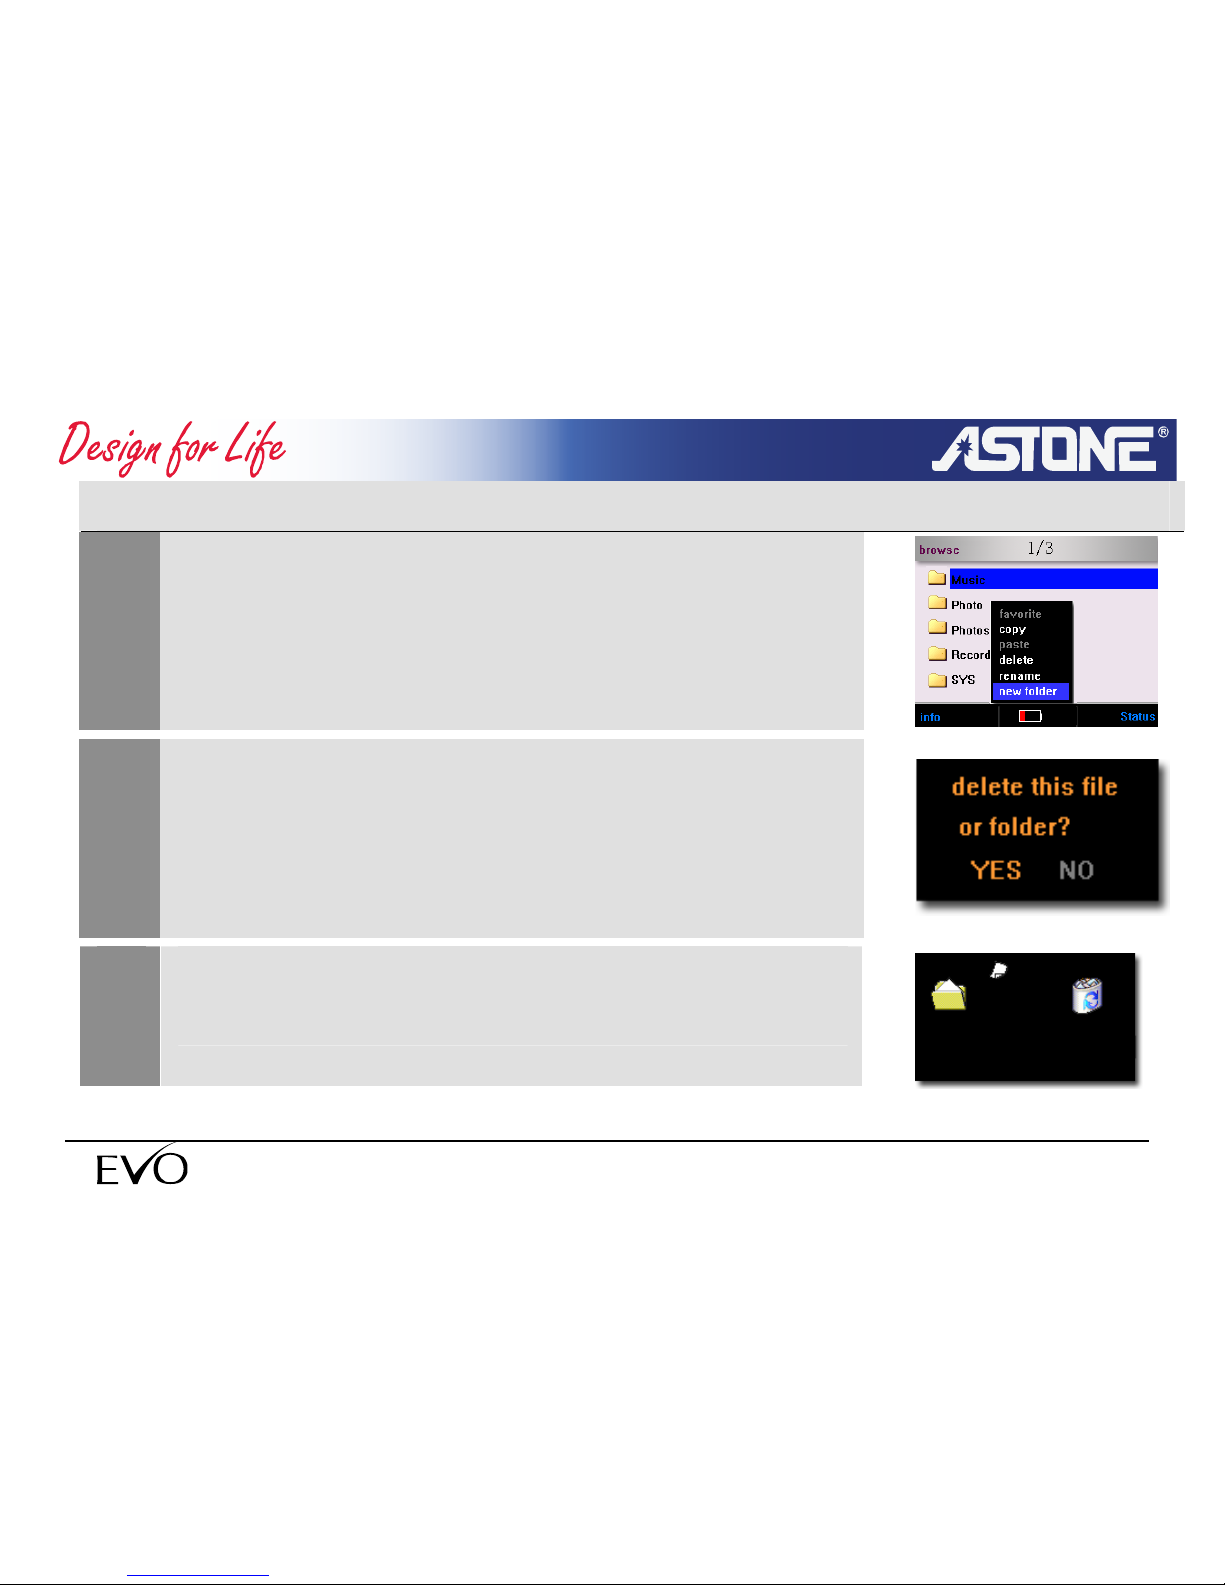
Select the files or folders to be removed and Press F3 button to
pop up menu
2
Use<volume+> /<volume-> button to select “delete” item and
press OK button.
The delete dialog will be displayed.
3
Select <YES> and press the <OK> button
The system will display “Deleting” message box.
- 24 -
www.astone.com.au
Page 25
Only the empty folders can be deleted. If a folder is
not empty, you will need to empty the folder and then
delete it.
NOTE
3.1.4 Checking Properties
1
Select target file or folder in the file browser
2
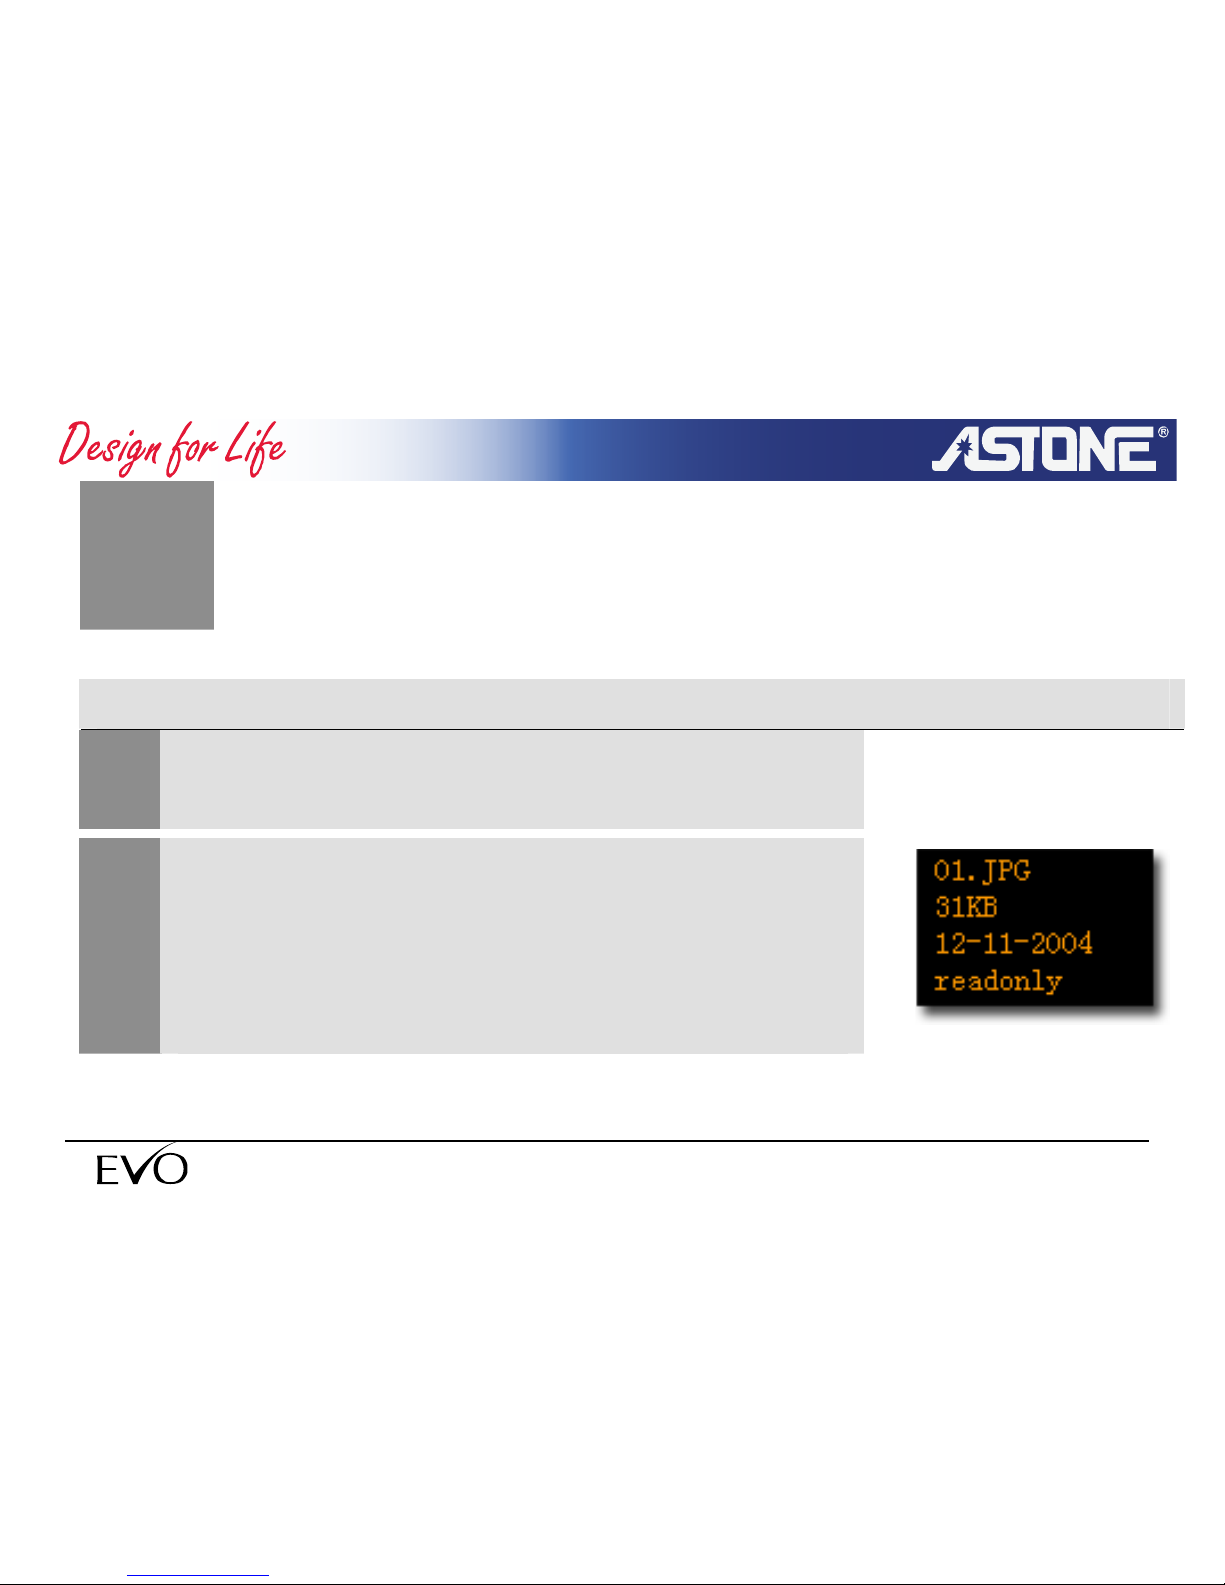
Press F1 button to view the properties of the file or folder.
The system displays a message box of all properties, such as
name, size, date and the status.
- 25 -
www.astone.com.au
Page 26
3.1.5 Renaming file or folder
1
Select the target file or folder in the file browser.
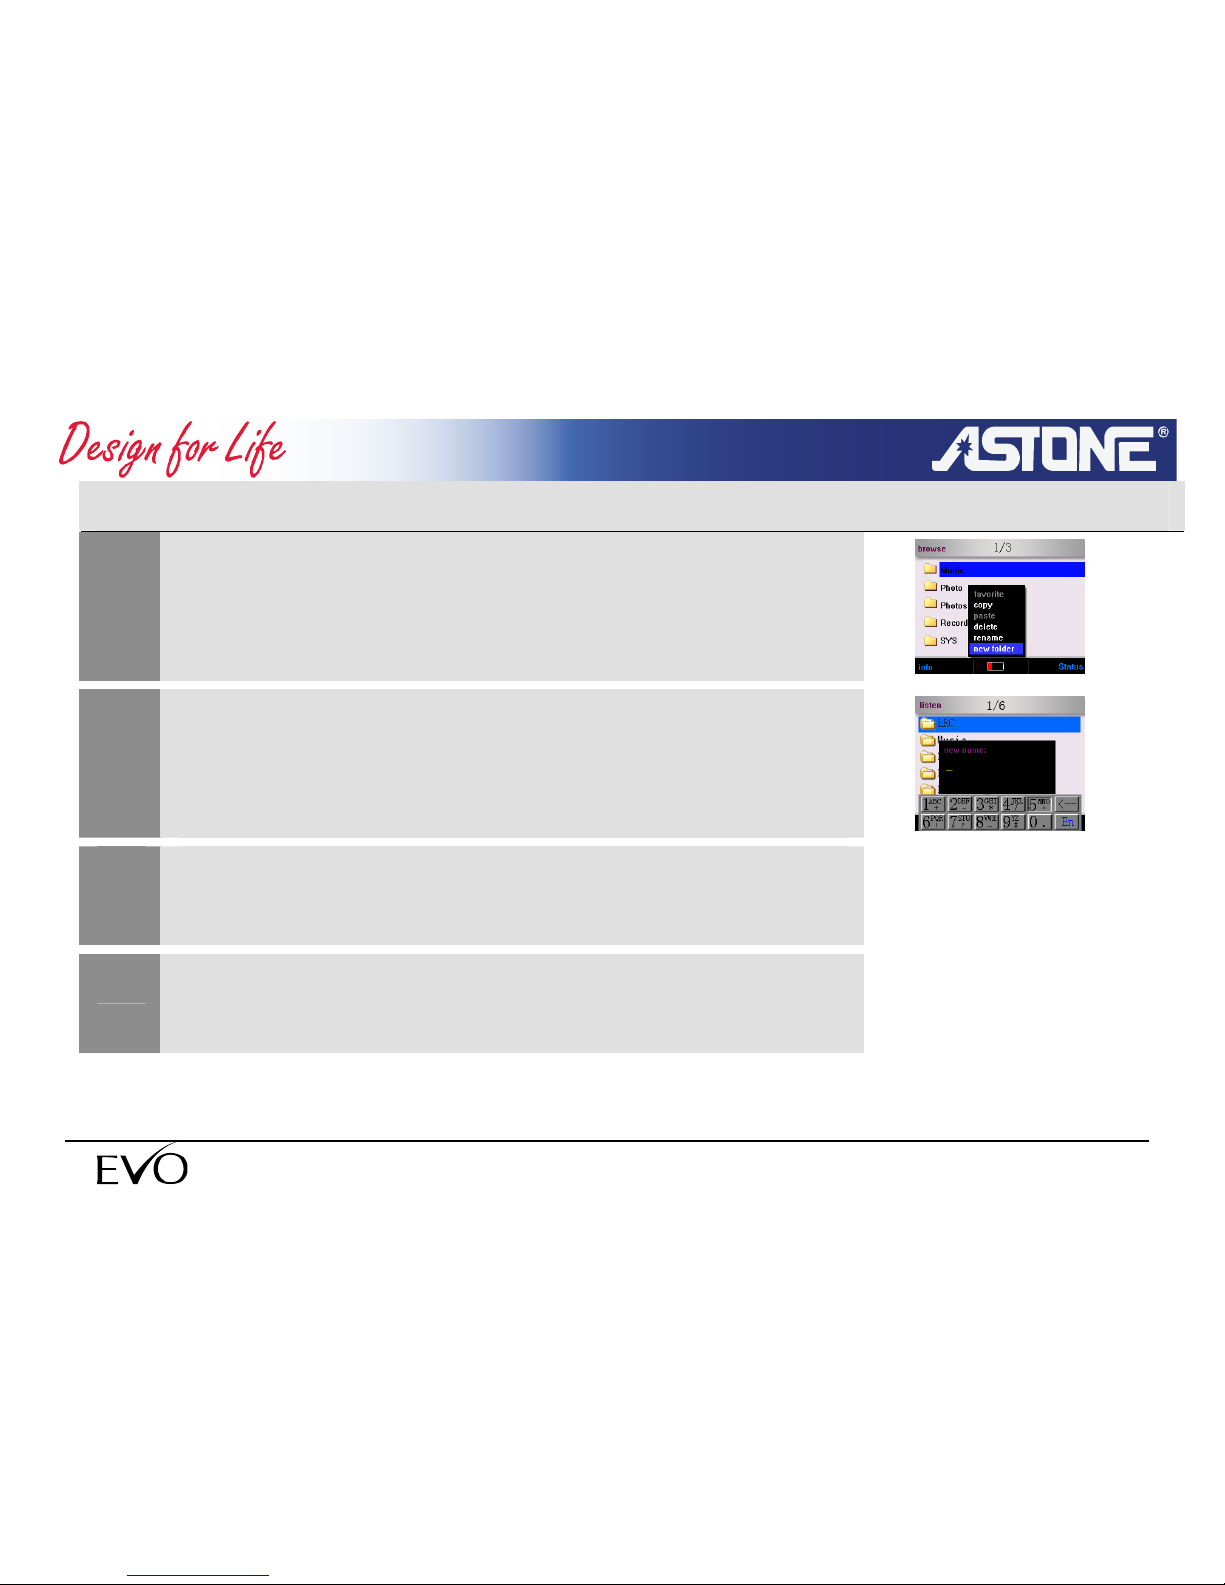
Press F3 button to pop up menu.
2
Select “rename” item and press <OK> button.
The system displays the soft keyboard and dialog
box.
3
Use the soft keyboard , press and hole OK button to
confirm rename.
4
Press and hole <OK> to end input.
If you want to cancel input, press<C>.
- 26 -
www.astone.com.au
Page 27
3.1.6 Create a folder
1
Go in the target folder where the new folder will be.
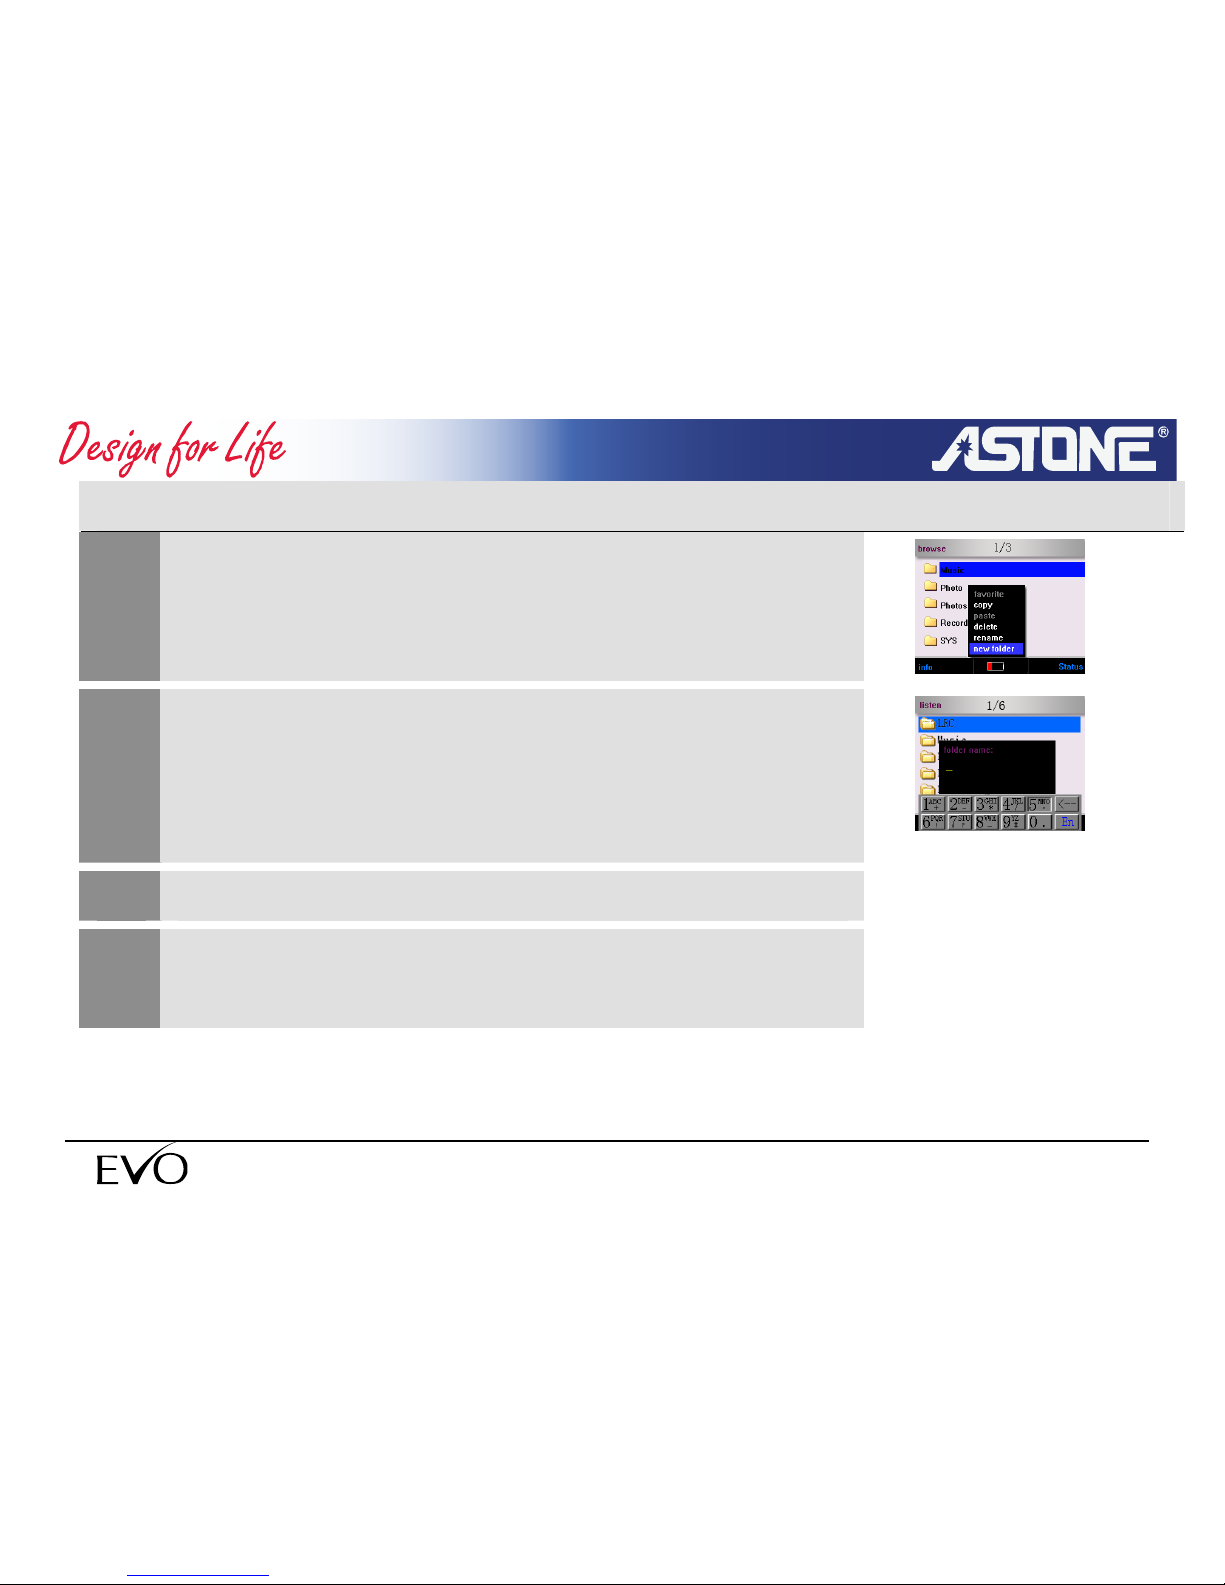
Press F3 button popup menu .
2
Select <new folder>,press OK button to confirm.
The system displays the soft keyboard and dialog box.
3
Key in new name using the soft keyboard.
4
Press and hold <OK> to end input.
If you want to cancel input, press<C>.
- 27 -
www.astone.com.au
Page 28
3.1.7 Use the soft keyboard
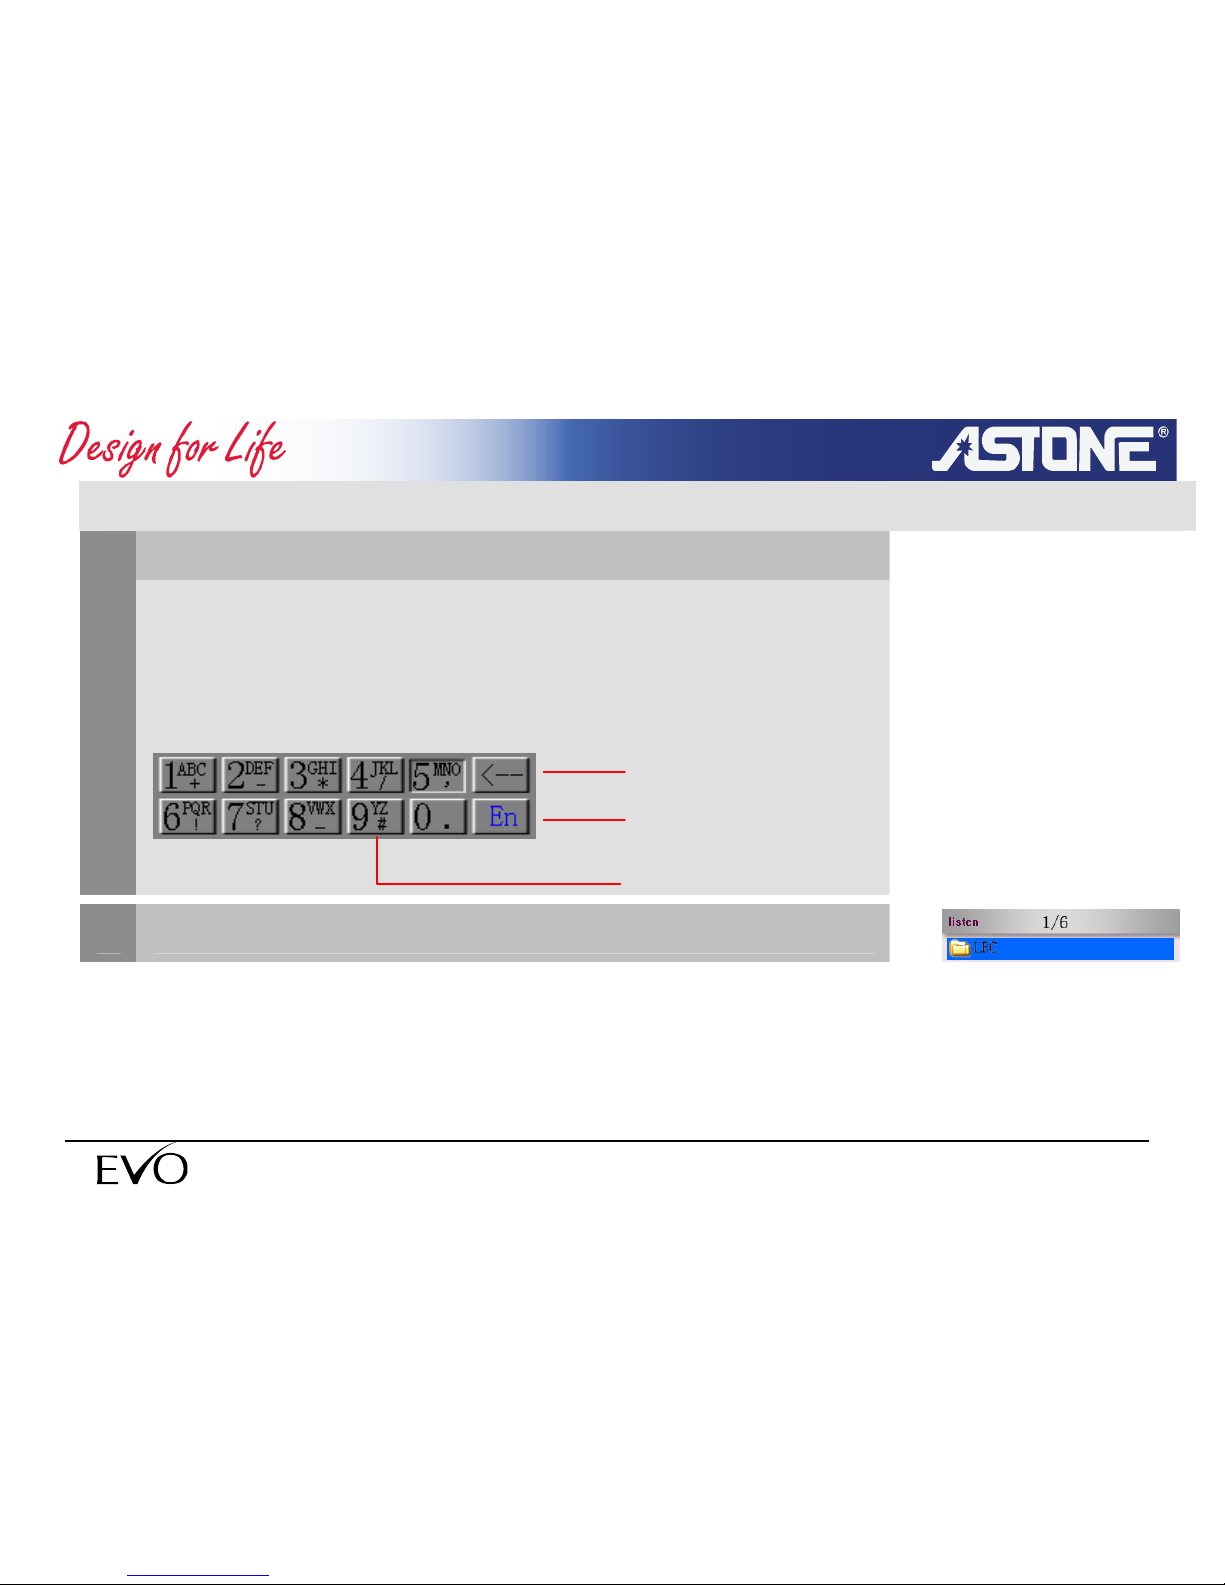
Layout of soft keyboard
1
You can key in English letters or numbers using soft keyboard
There are 12 keys: 10 numeric buttons and mode button and
backspace button.
Backspace
Key mode
- 28 -
www.astone.com.au
2
Switch between English and Character input modes
Key in
Page 29
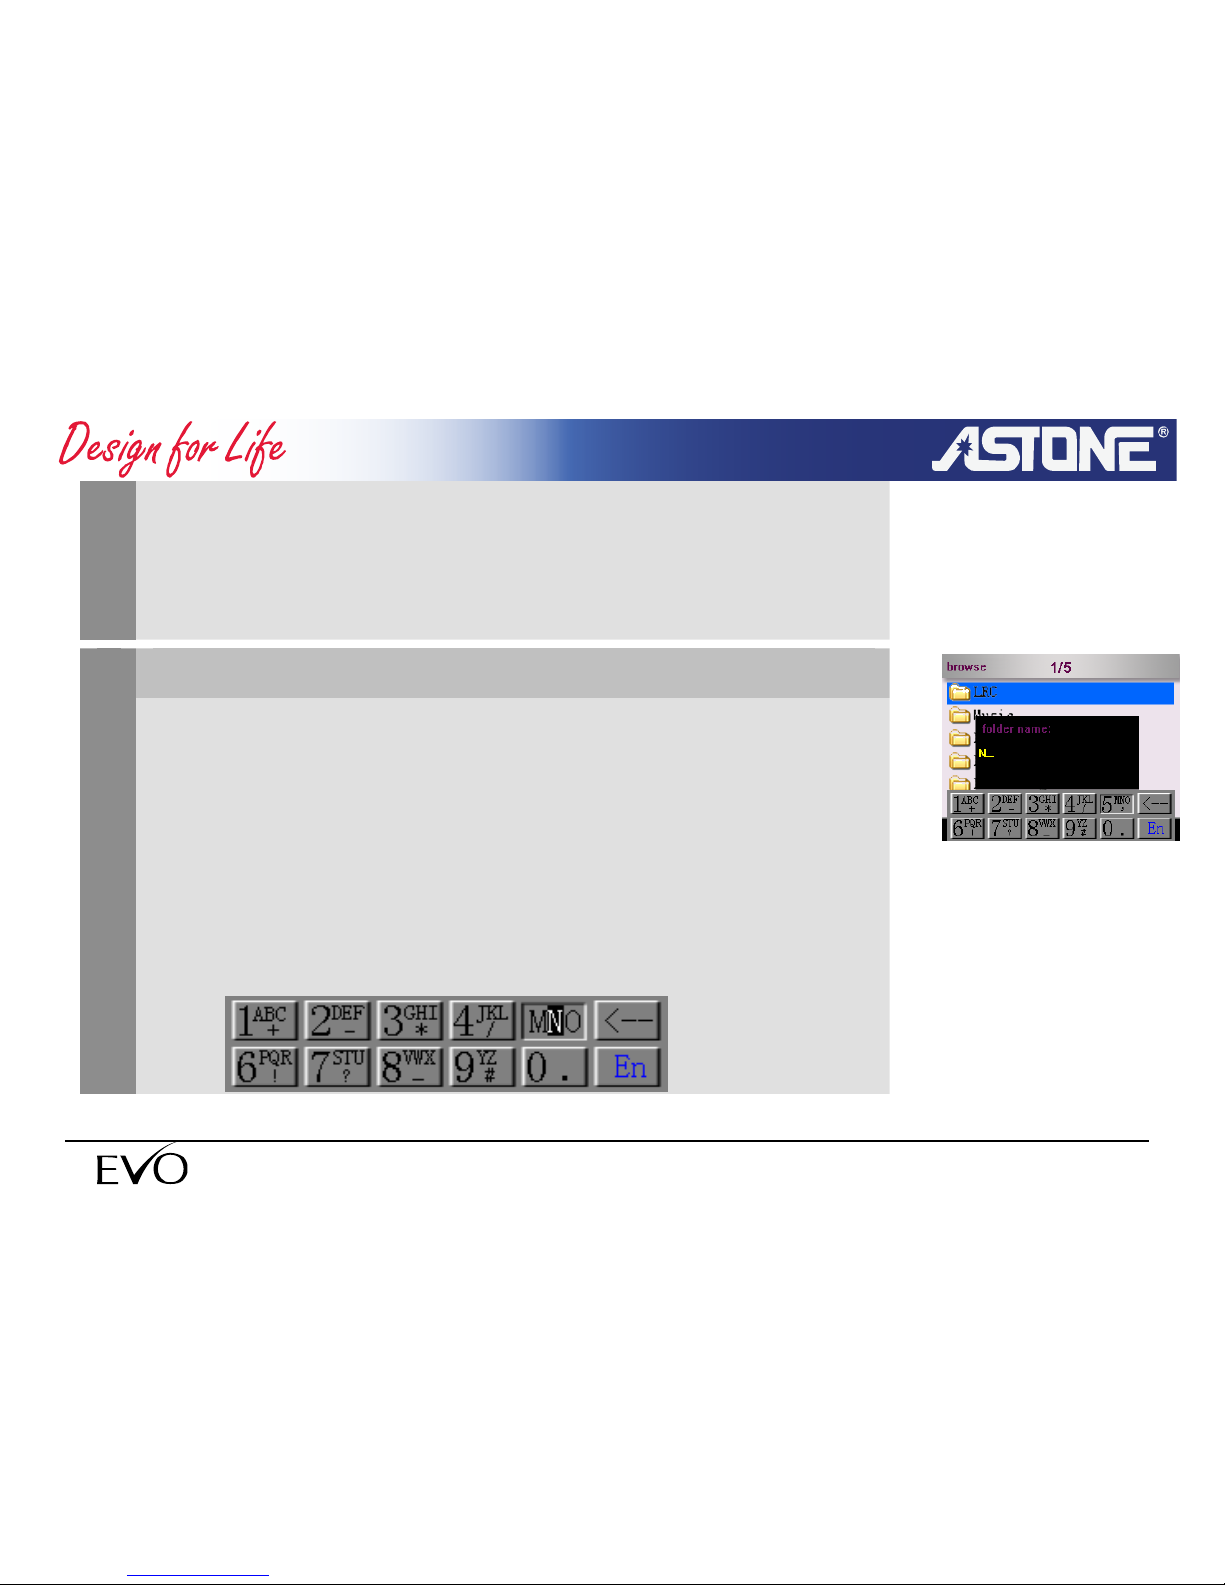
Use direction key, select <MODE> soft key.
Press <OK> button to switch “key mode” key mode :
En(capital) en(small) Nu(number)
Type in letter
3
Switch to<EN> mode and use direction keys to select the key in (for
example, select the key of 5 for N) and press OK button to select the
letter. Use arrow buttons to select the character. And the selected
letter will be displayed in black with white background. Press “OK” to
confirm and the letter will appear in the key-in dialog box.
Press “cancel' to cancel that character.
- 29 -
www.astone.com.au
Page 30
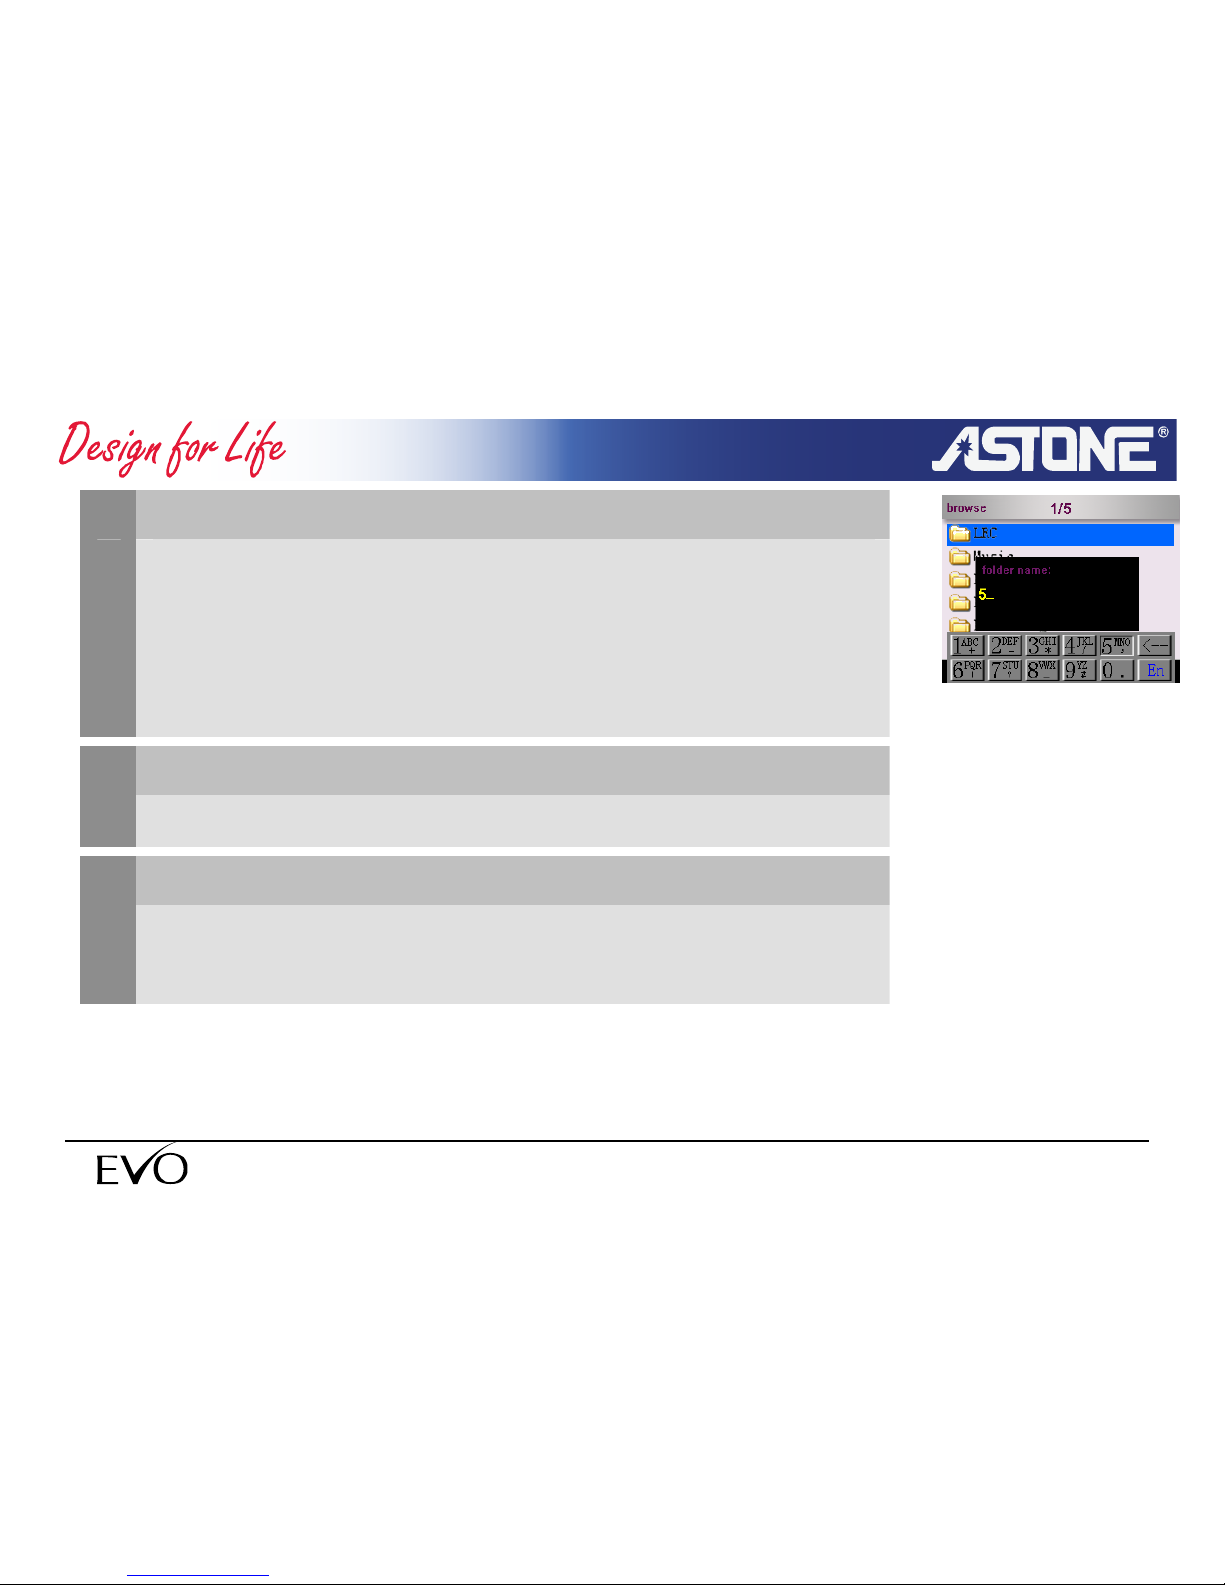
Type in number
4
Switch to<NU> mode and use direction keys to select the key in (for
example, select the key of 5) and press OK button to select the
letter. Press “OK” to confirm and the letter will appear in the key-in
dialog box.
Delete key in character/number
5
Press <←>soft keyboard to delete the typed in character /number.
End/Cancel all of input
6
Press and hold <OK> to end all of input.
Press <C> to cancel all of input.
- 30 -
www.astone.com.au
Page 31
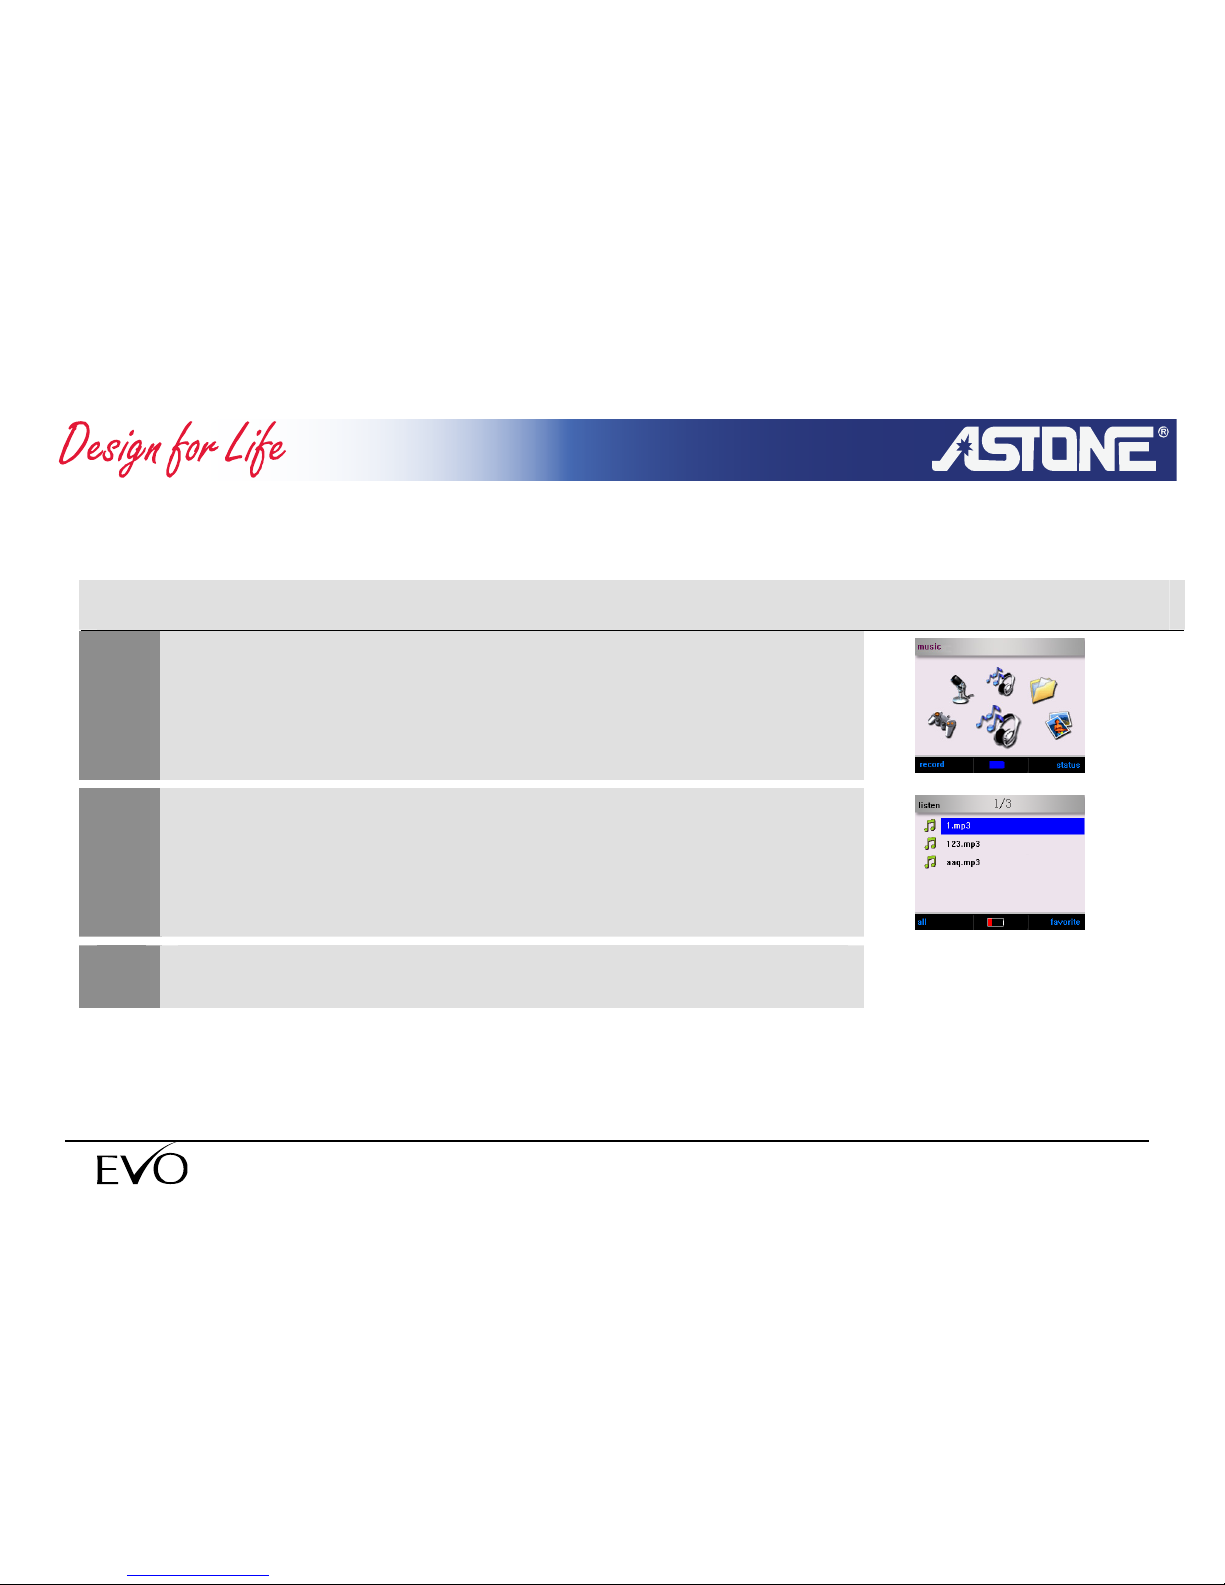
3.2 Music Play
3.2.1 Start to play music
1
Select <music> mode in the main menu.
2
Press OK button to enter the sub-menu of “music”
Select the music file you want to play
3
- 31 -
www.astone.com.au
Page 32
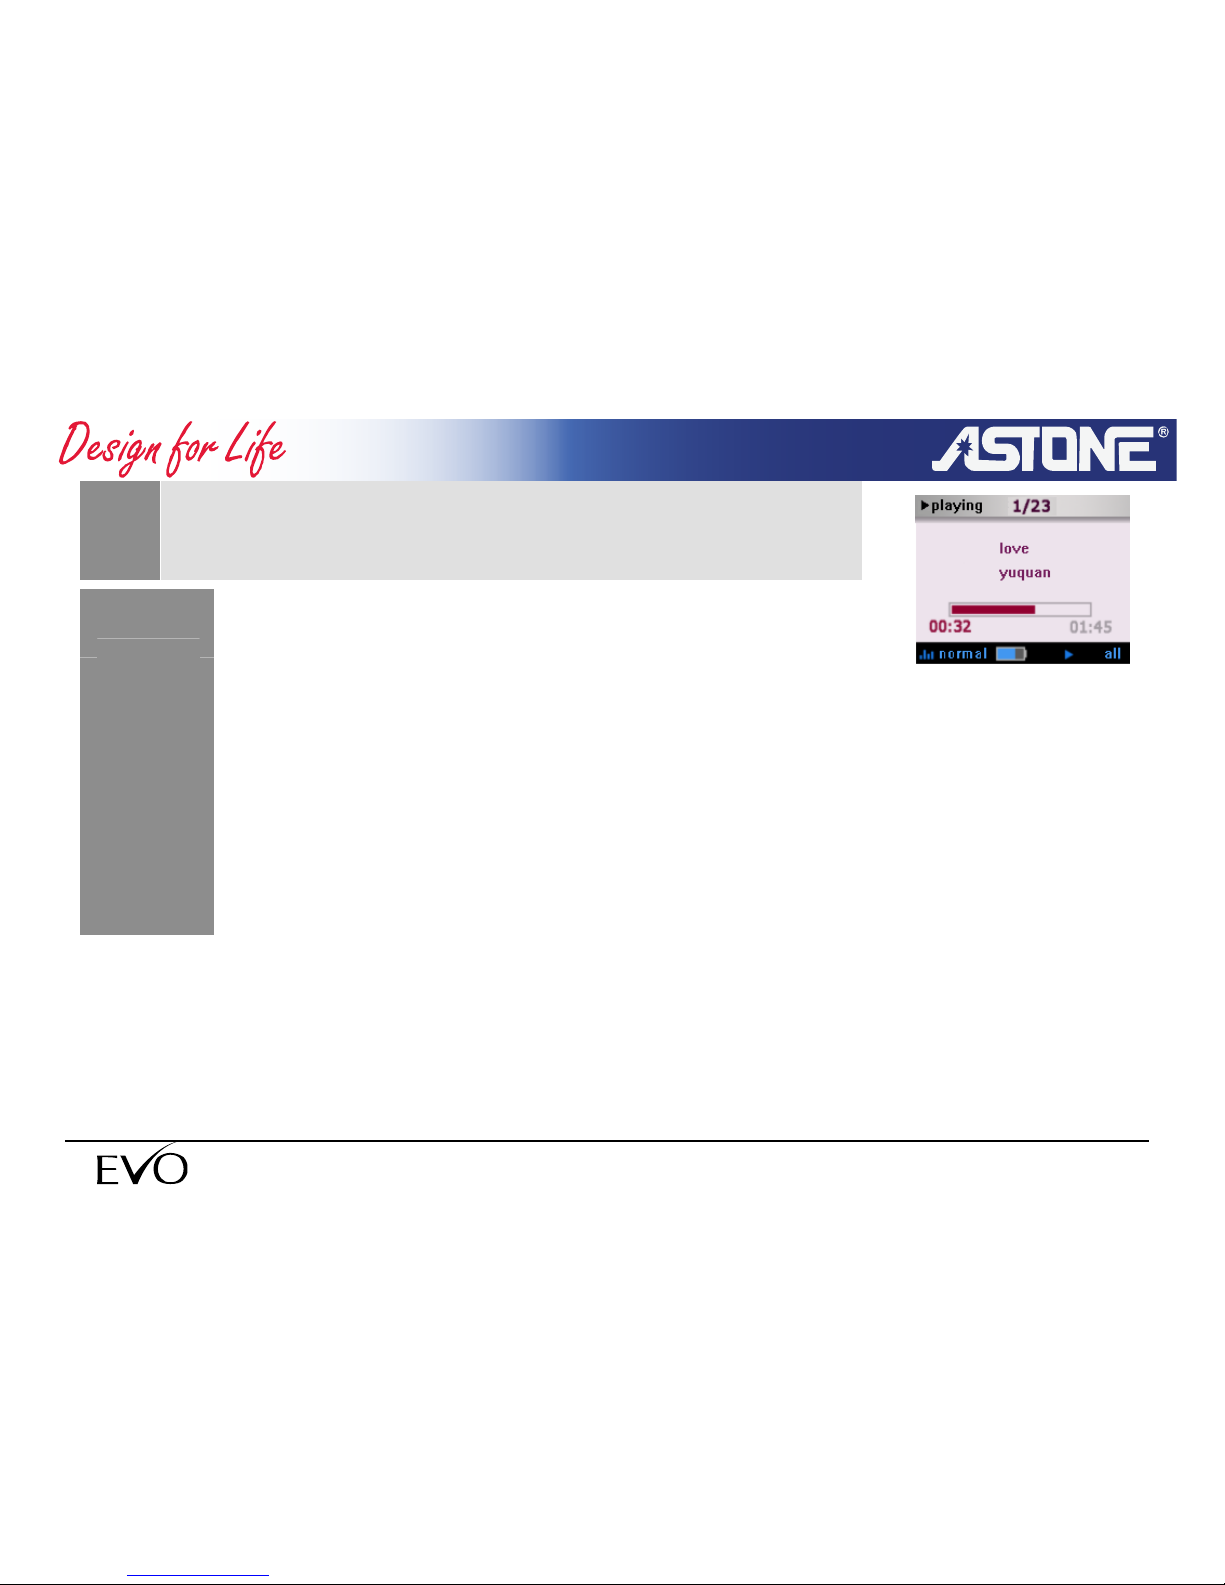
4
Press OK button to play the music and the window of “music
play” will appear
NOTE
The system will go in the default music directory, which is
“music” folder. If such folder doesn't exist, the system will
automatically create the folder. The music browser list
only music files (mp3,wma)You can select other music
files with file browser. If the song selected can't be played,
the next song will be automatically played.
You can sue shortcut to play, reference to 2.3.2.
- 32 -
www.astone.com.au
Page 33
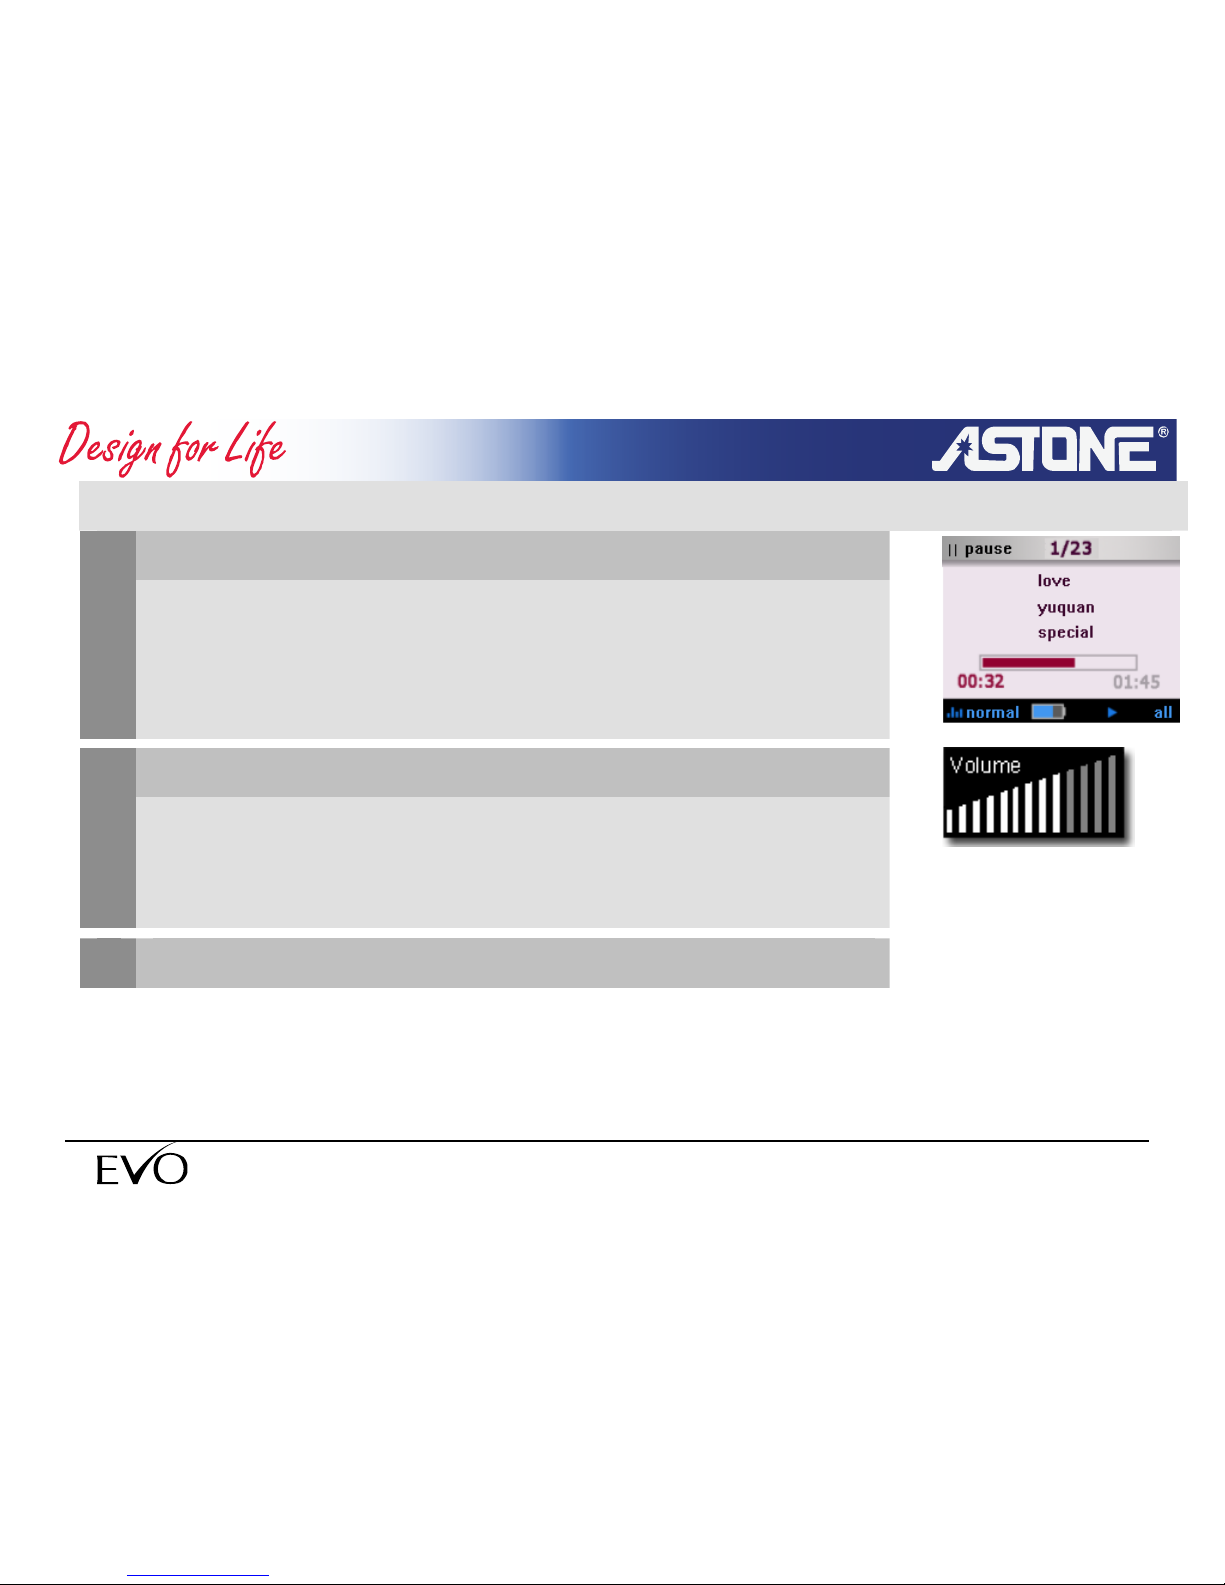
3.2.2 Basic operation in music play
Play/Pause
1
Press <PLAY/PAUSE> button to pause the music when playing the
music.
Repress <PLAY/PAUSE> to continue.
Volume adjust
2
Press <volume+>/<volume-> button to adjust the volume when
playing the music.
3
Play the last or next song
- 33 -
www.astone.com.au
Page 34
- 34 -
www.astone.com.au
Press FORWARD/BACK button to play the last or next song when
playing music.
<FORWARD>: play the next song
<BACK>: play the last song
Forward / Reverse
4
Press and hold <FORWARD> /<BACK> to forward or reverse
when playing music.
<FORWARD>: fast forward
<REVERSE>: fast back
Setting audio effect(EQ)
5
When playing music, press F1 button to switch between different EQ
modes: normal, jazz, classic, pop, rock.
Page 35
- 35 -
www.astone.com.au
Setting playing mode
6
Press F2 button to switch between playing modes when playing the
music.
<all>:Play all of music files in order and cycle
<random>:Randomly play all music files
<single>:Repeat a single song
Exist music playing
7
Press C button to quite playing music and return to the upper menu
Press and hold C button to quit playing music and return to the main
menu
Page 36
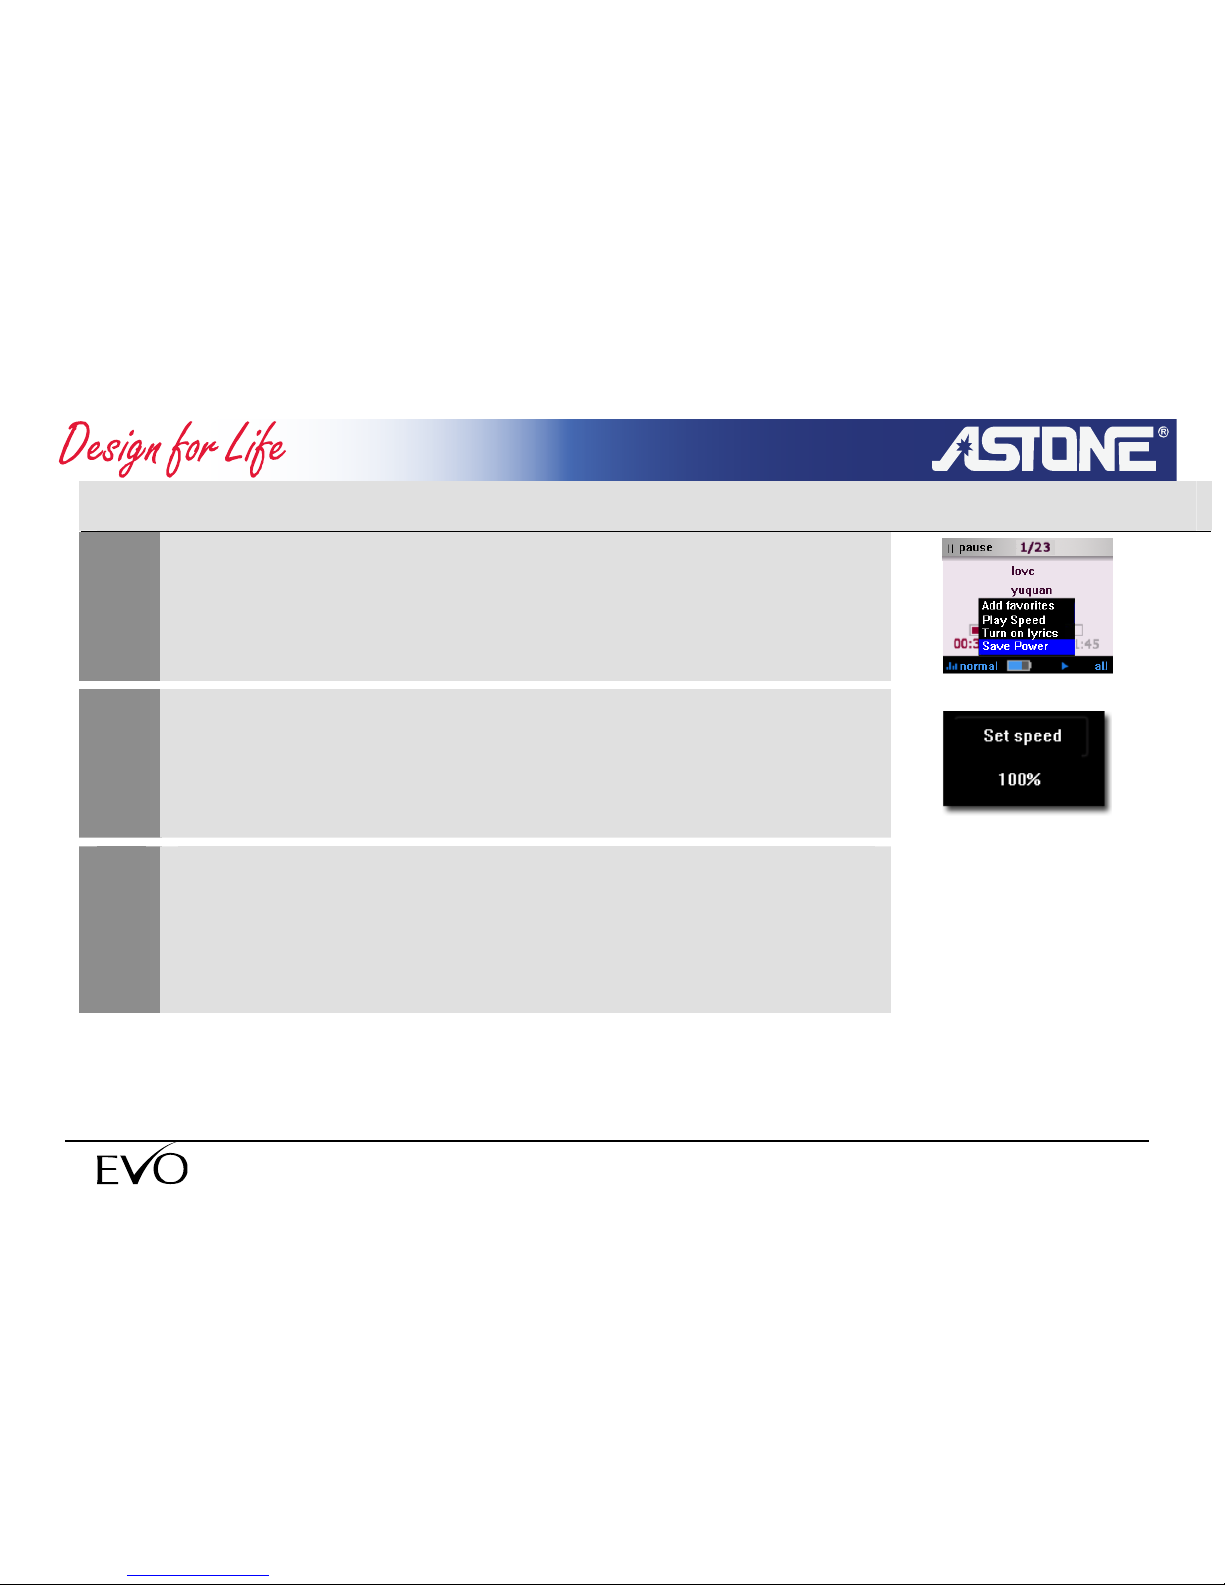
3.2.3 Setting playing speed
1
Press F3 button to popup menu in music play,
select <play speed> and press OK button
2
The system displays the dialog box of <set speed>
3
Use FORWARD /BACK button to adjust the play speed.
The speed can be from 70% to 130% of normal speed,100% is
normal speed
- 36 -
www.astone.com.au
Page 37
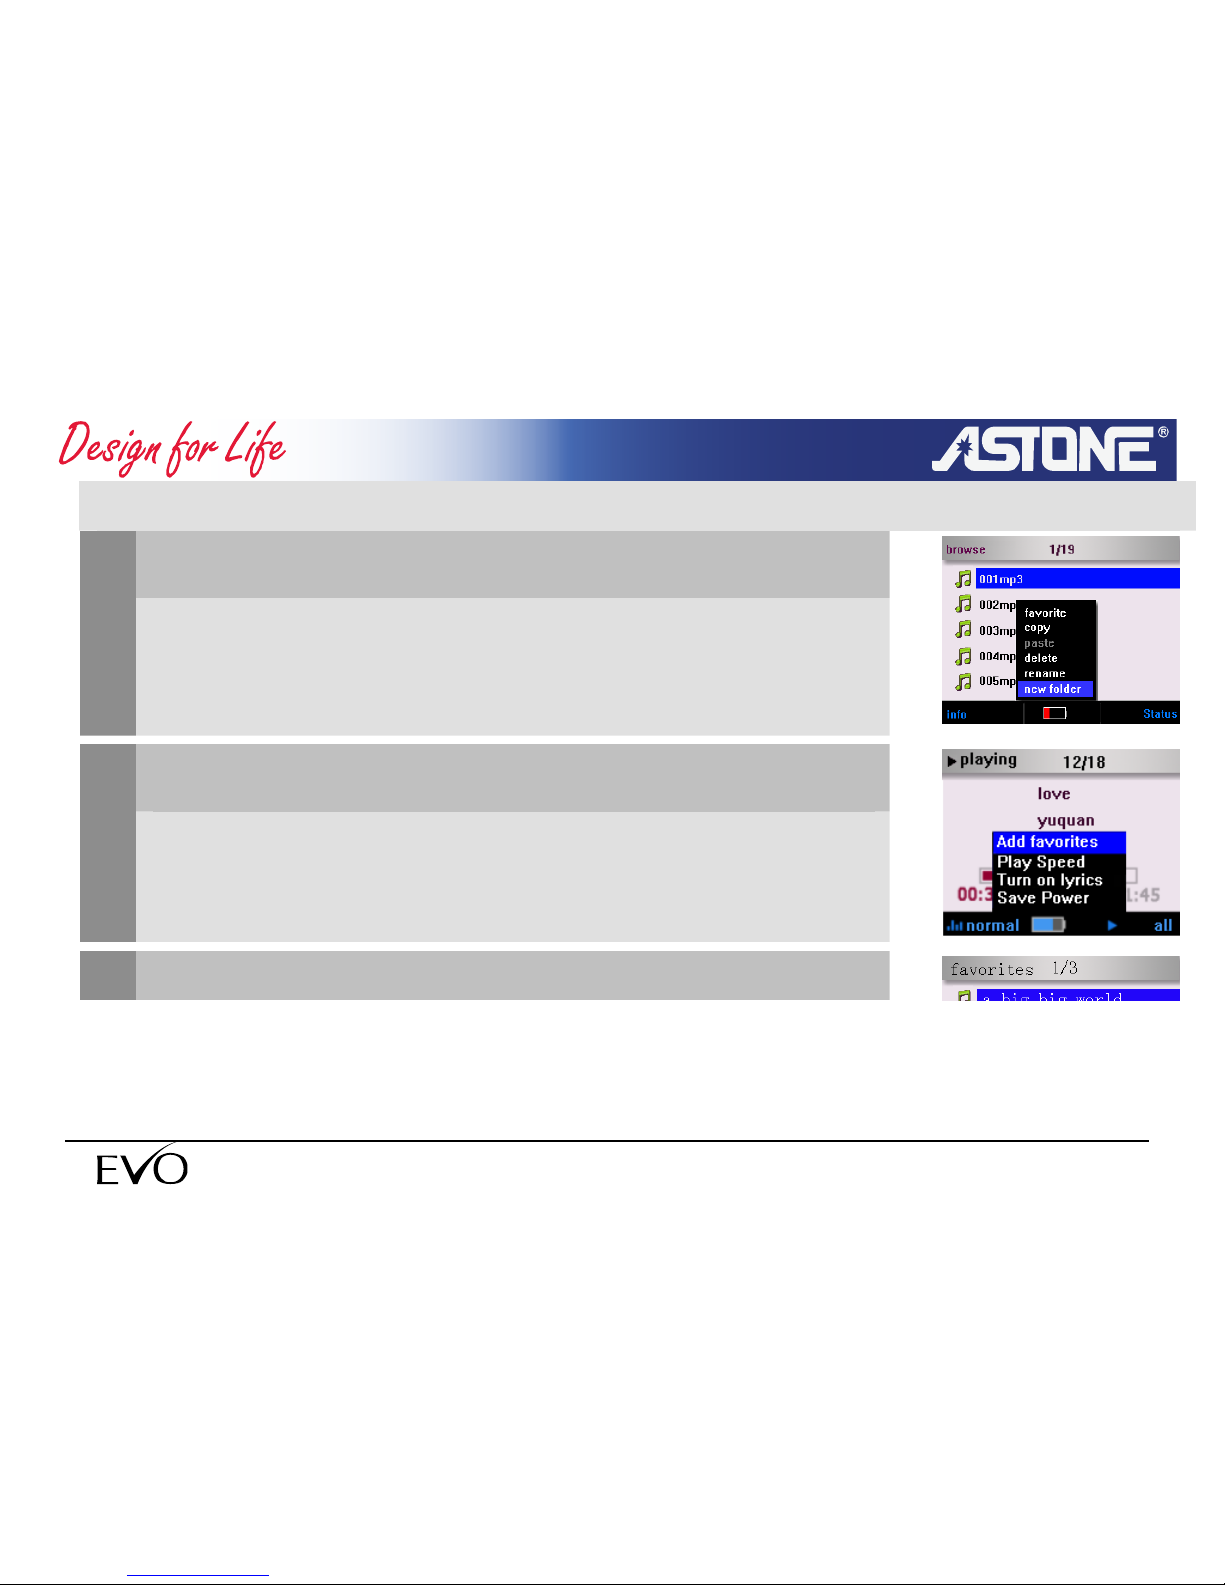
3.2.4 Favorites <play list>
Add songs to Favorites in the browser:
1
choose the songs you like in the browser and press F3 button to
pop-up menu. And select <favorite > and press OK button
Add songs to Favorites in music play.
2
Press F3 button popup menu when playing the music
,Select <Add favorites> and press OK button.
3
View the favorites
- 37 -
www.astone.com.au
Page 38
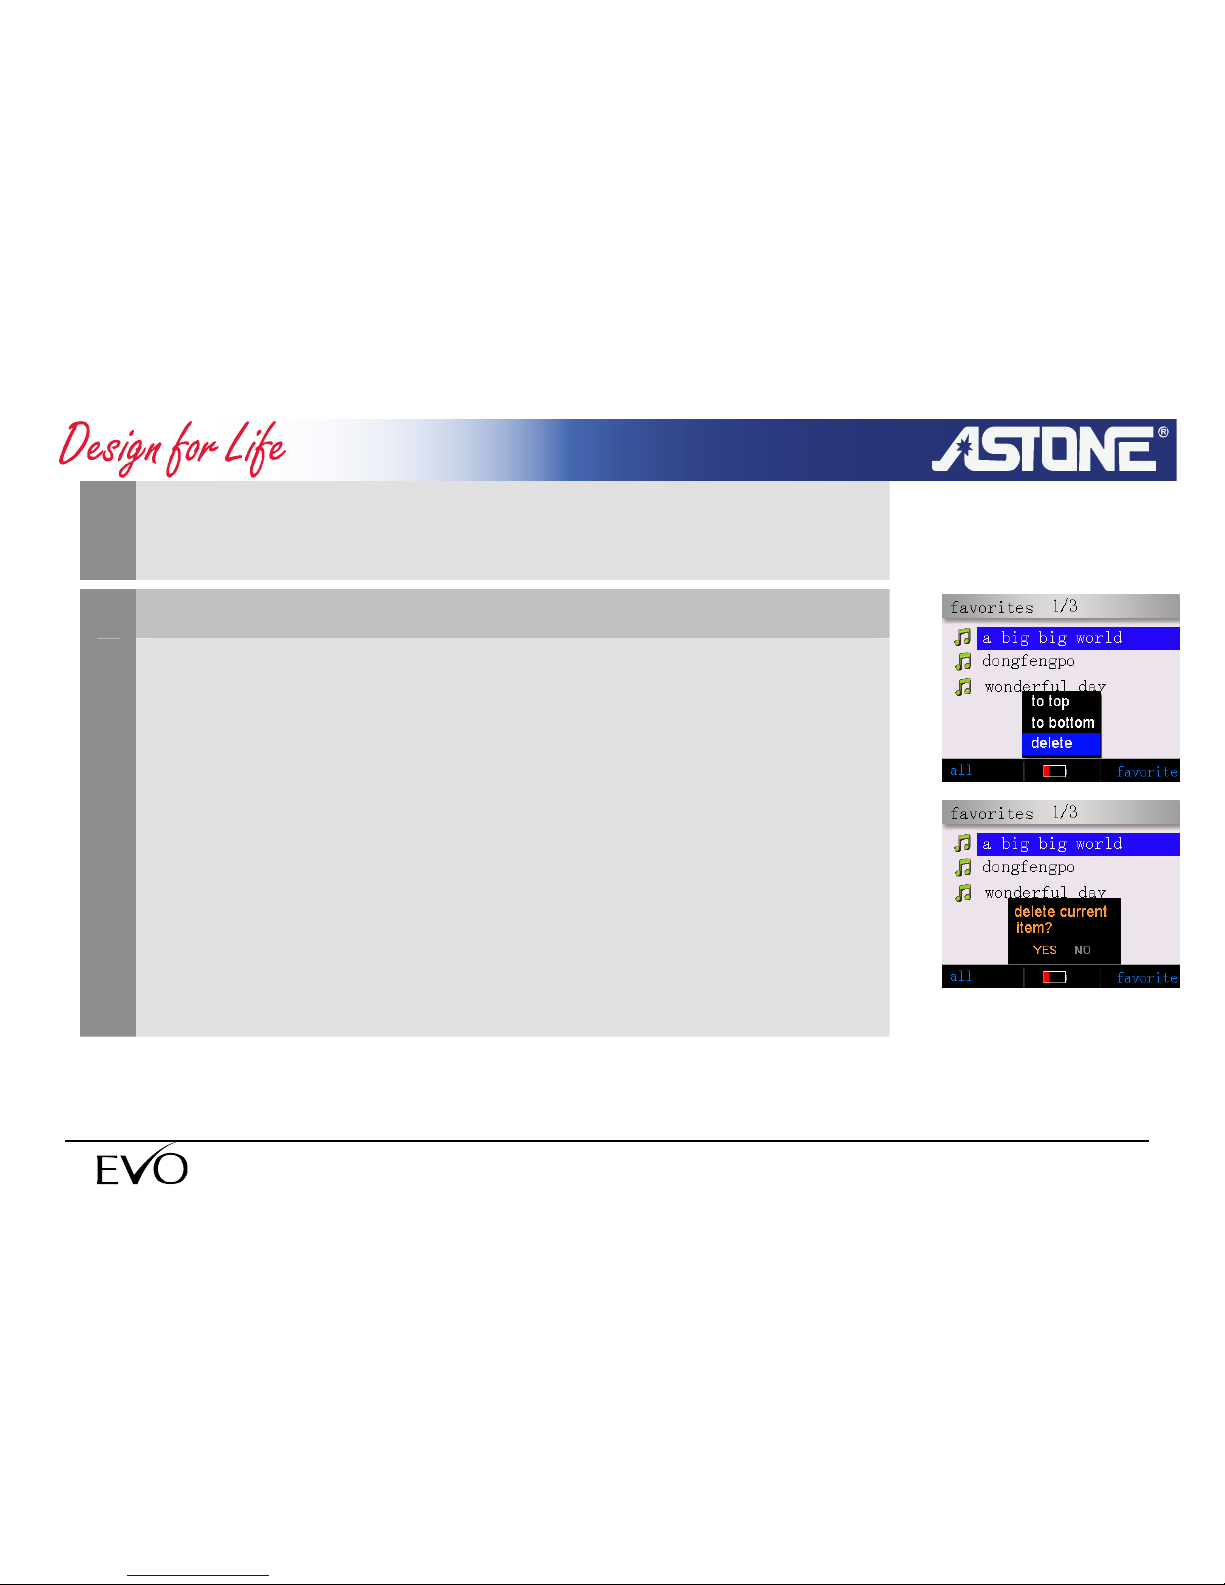
Select <music> mode in the main menu and press OK button to
enter the music browser. Then press F2 button to view the favorites
Delete songs from the favorites
4
Choose the target songs from the favorites list and press F3 button
popup menu.
Select <delete> in the menu and press OK button.
The system will prompt for confirmation to delete. Press OK button
to delete the song from the favorites.
- 38 -
www.astone.com.au
Page 39
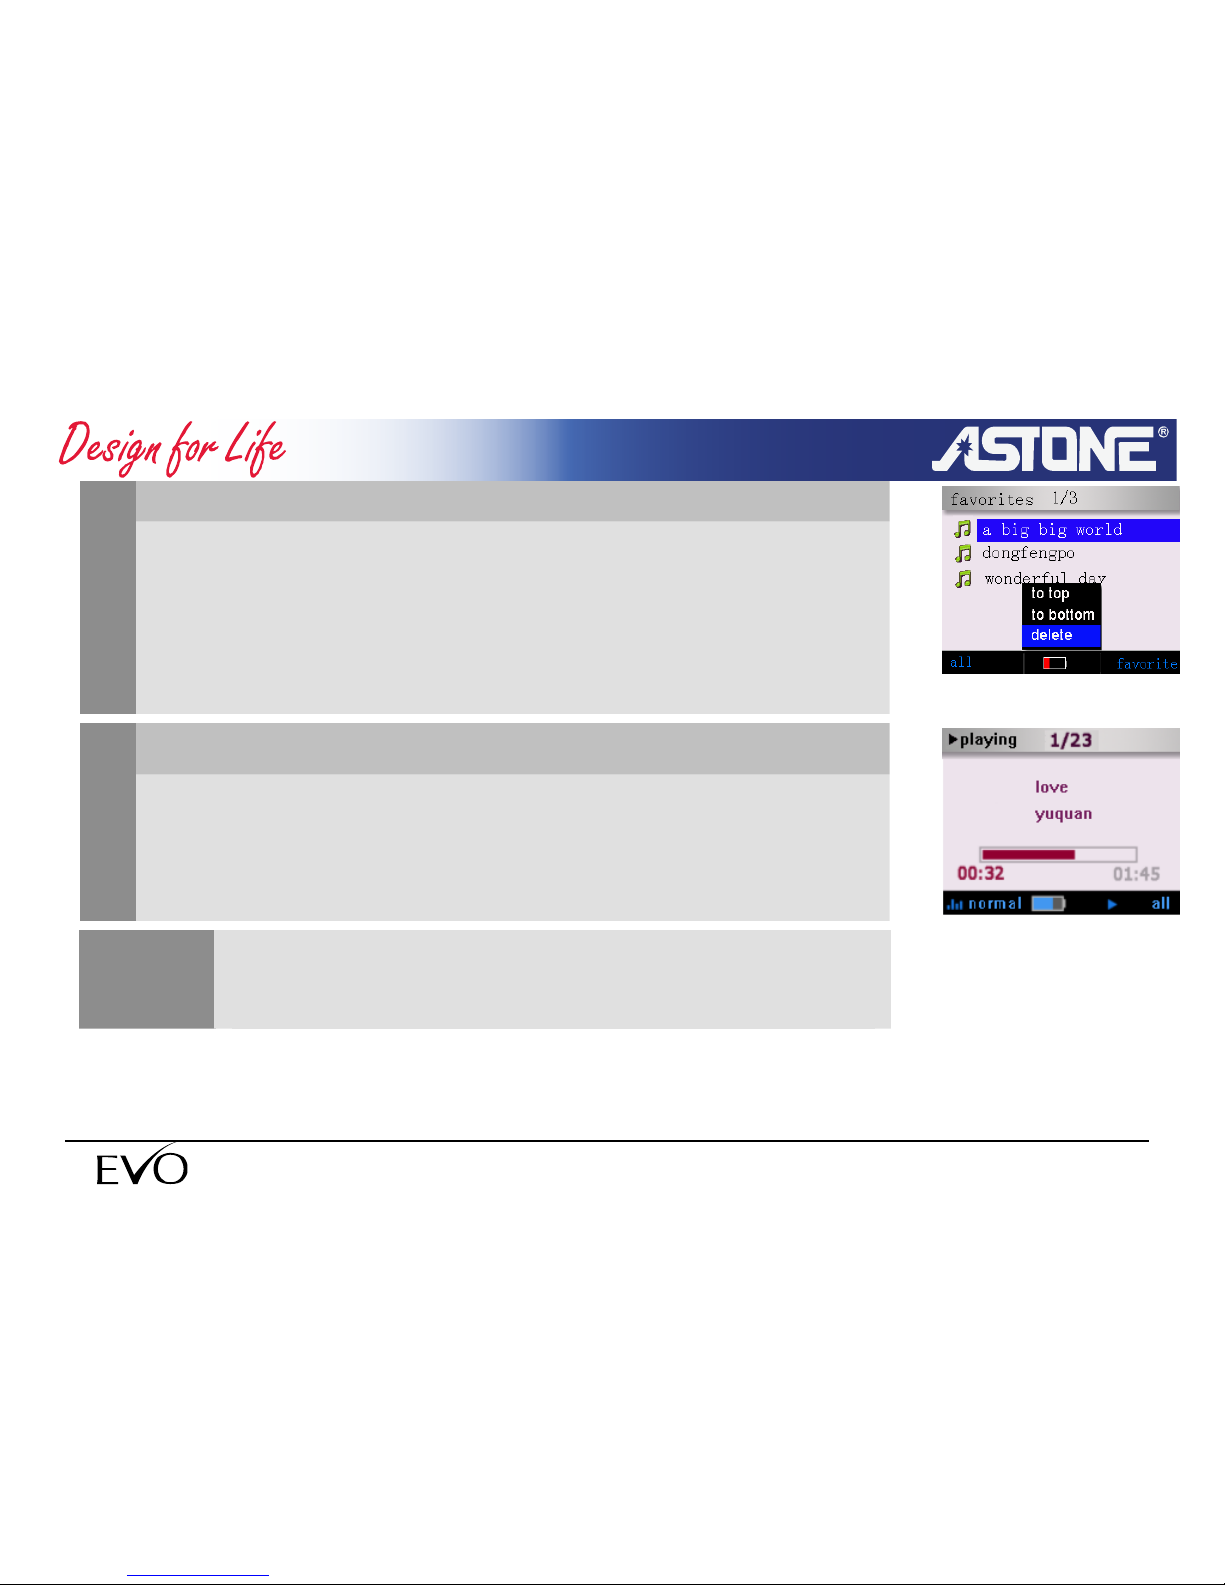
Reorder the favorites 5
Select the songs in the favorites list and press F3 button popup
menu.
Select <to top> to move the song to the beginning of the favorites
list.
Select <to bottom> to move the song to the end of favorites list.
Play the songs in the favorites
6
Choose the songs in the favorites list window and press OK button
to play.
The player will automatically form (Mplist.txt) and save in
the directory <SYS> of disk.
NOTE
- 39 -
www.astone.com.au
Page 40
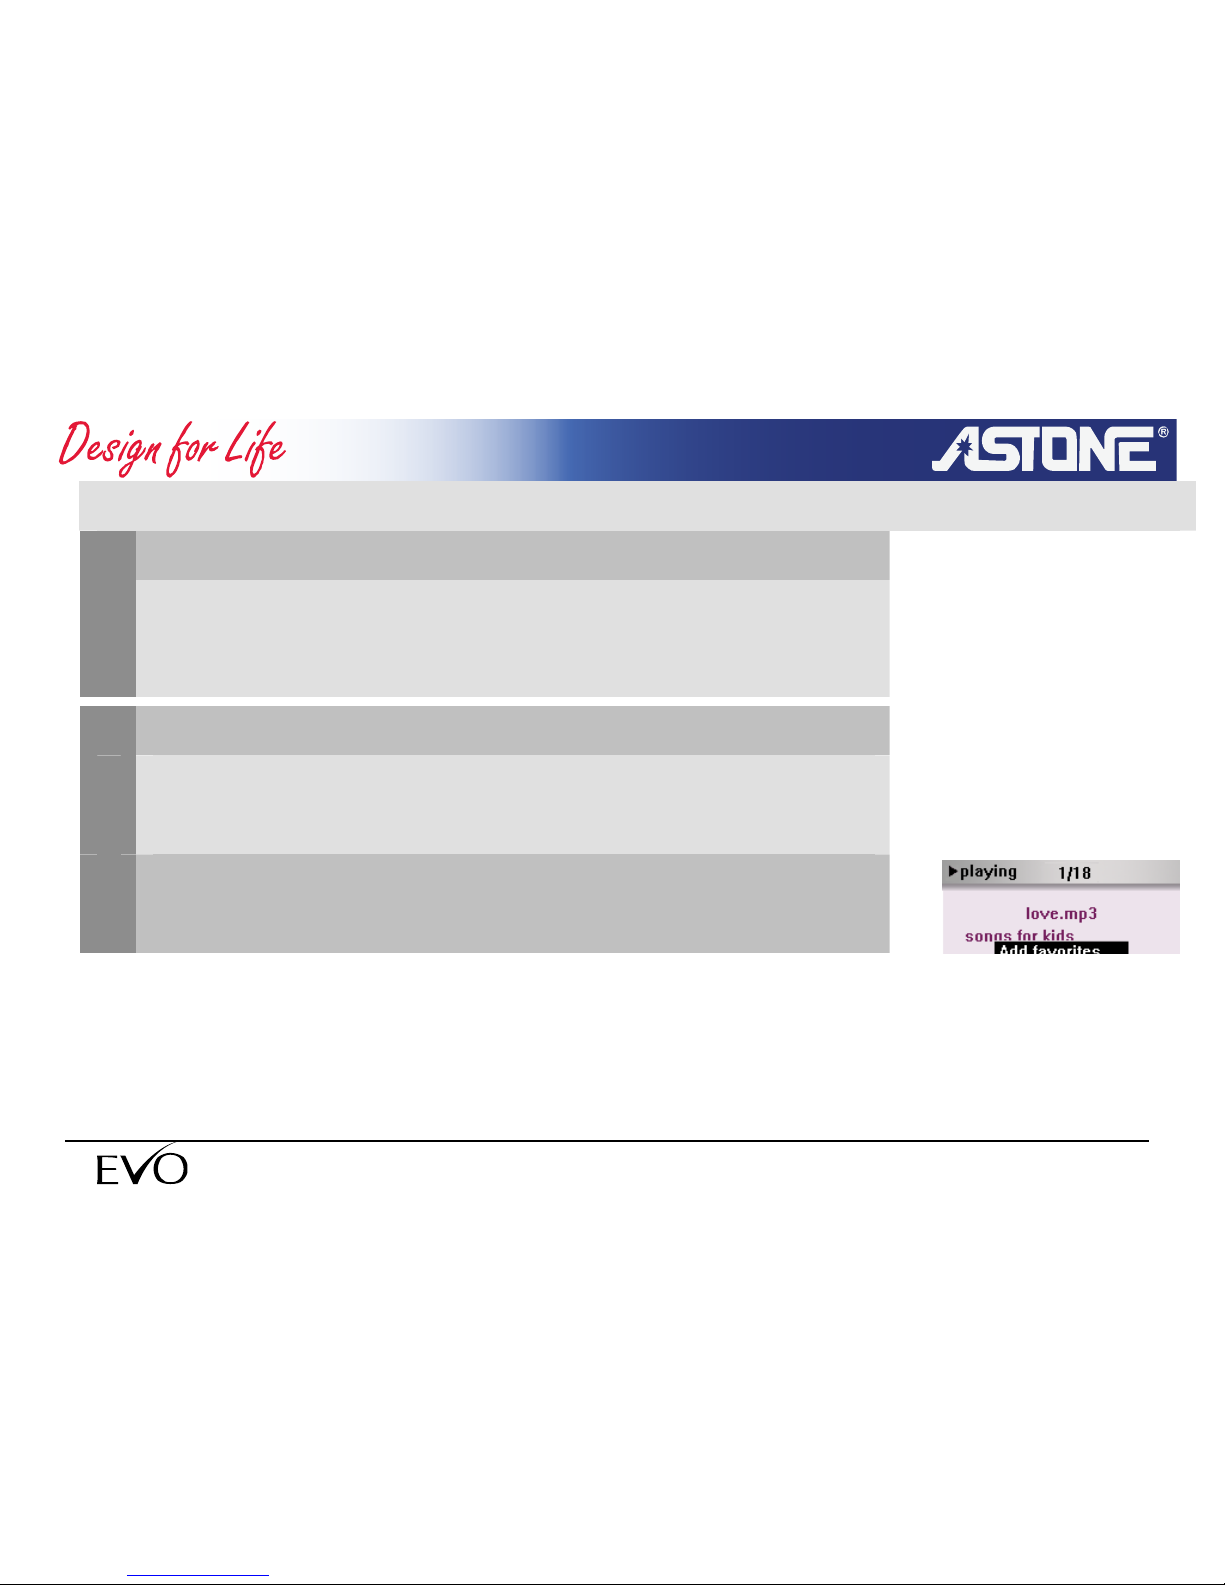
3.2.5 Lyric Synchronization (Karaoke )
Get LRC files
1
You can download the LRC files from the internet or create own LRC
files with the LRC software.
Save the LRC files
2
Copy LRC files to the directory where the songs are
and make sure they have the same name.
3
Turn on LRC(in music play)
- 40 -
www.astone.com.au
Page 41
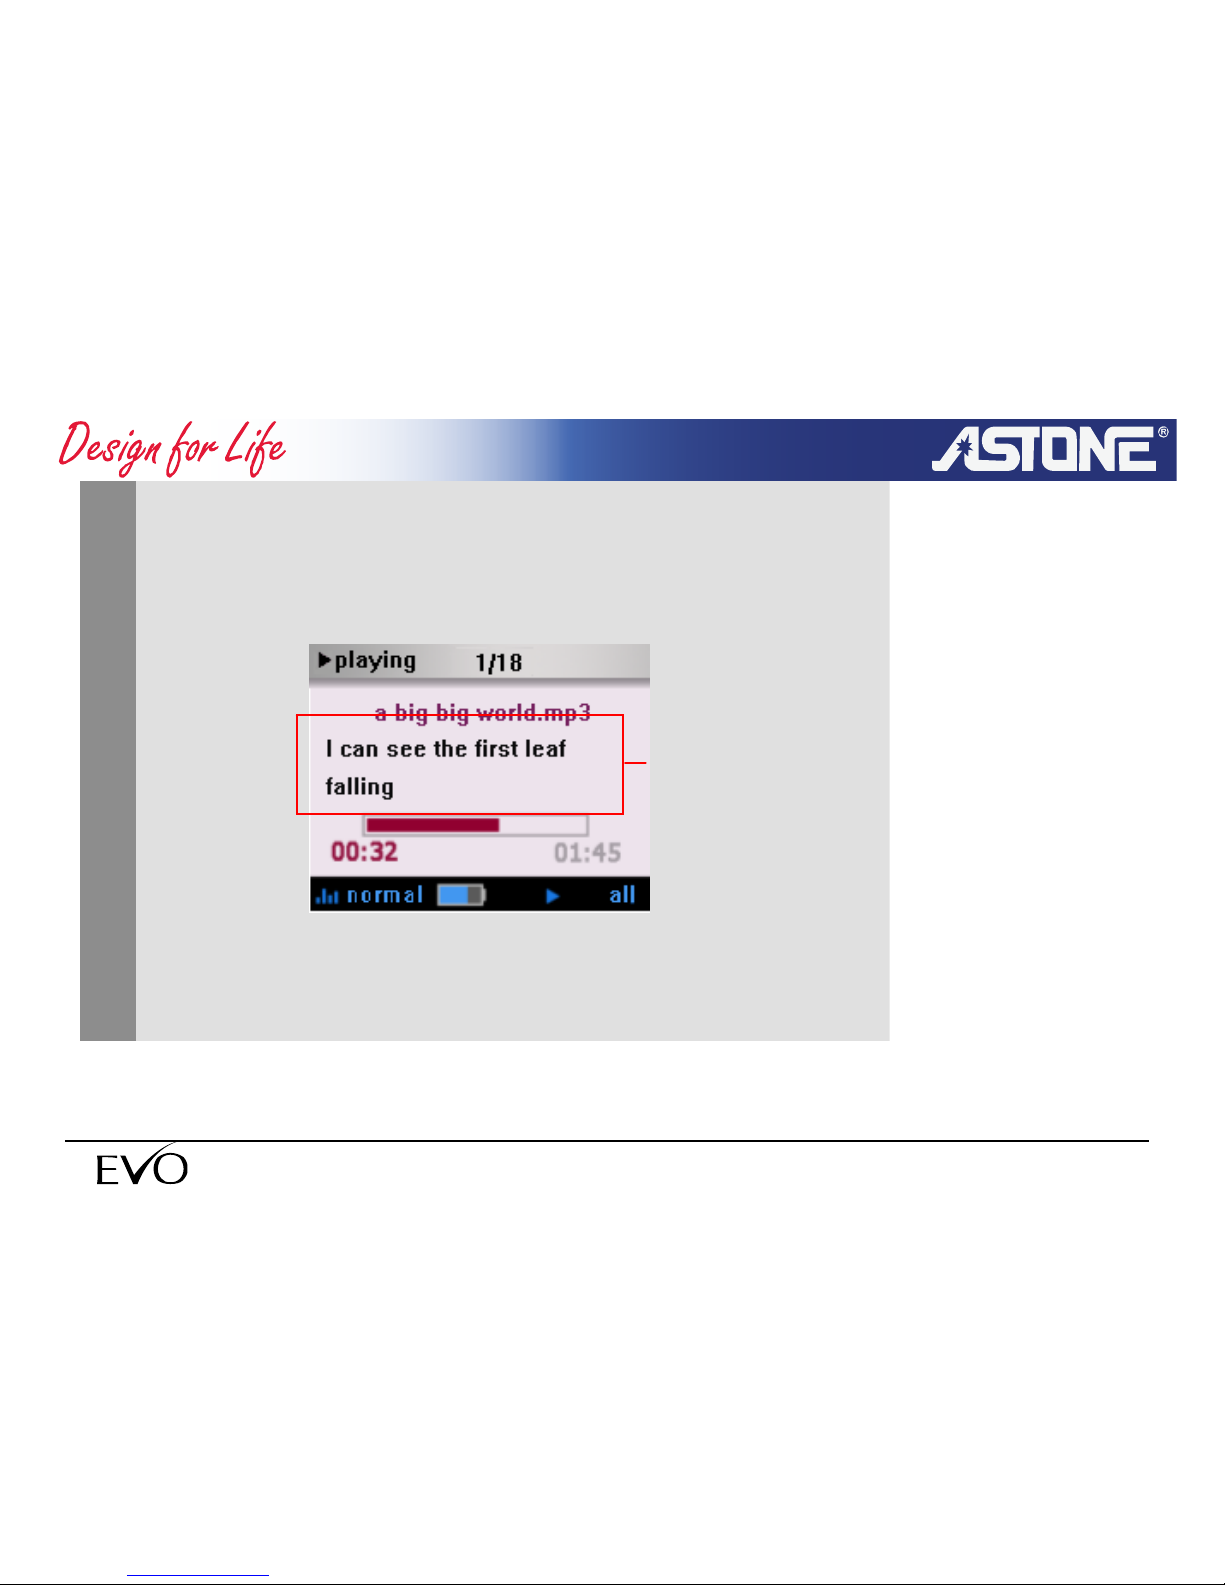
Press F3 button popup menu and select <turn on lyrics>
and press OK. So the subtitle will be displayed in LRC
area and will scroll forward.
LRC
- 41 -
www.astone.com.au
Page 42
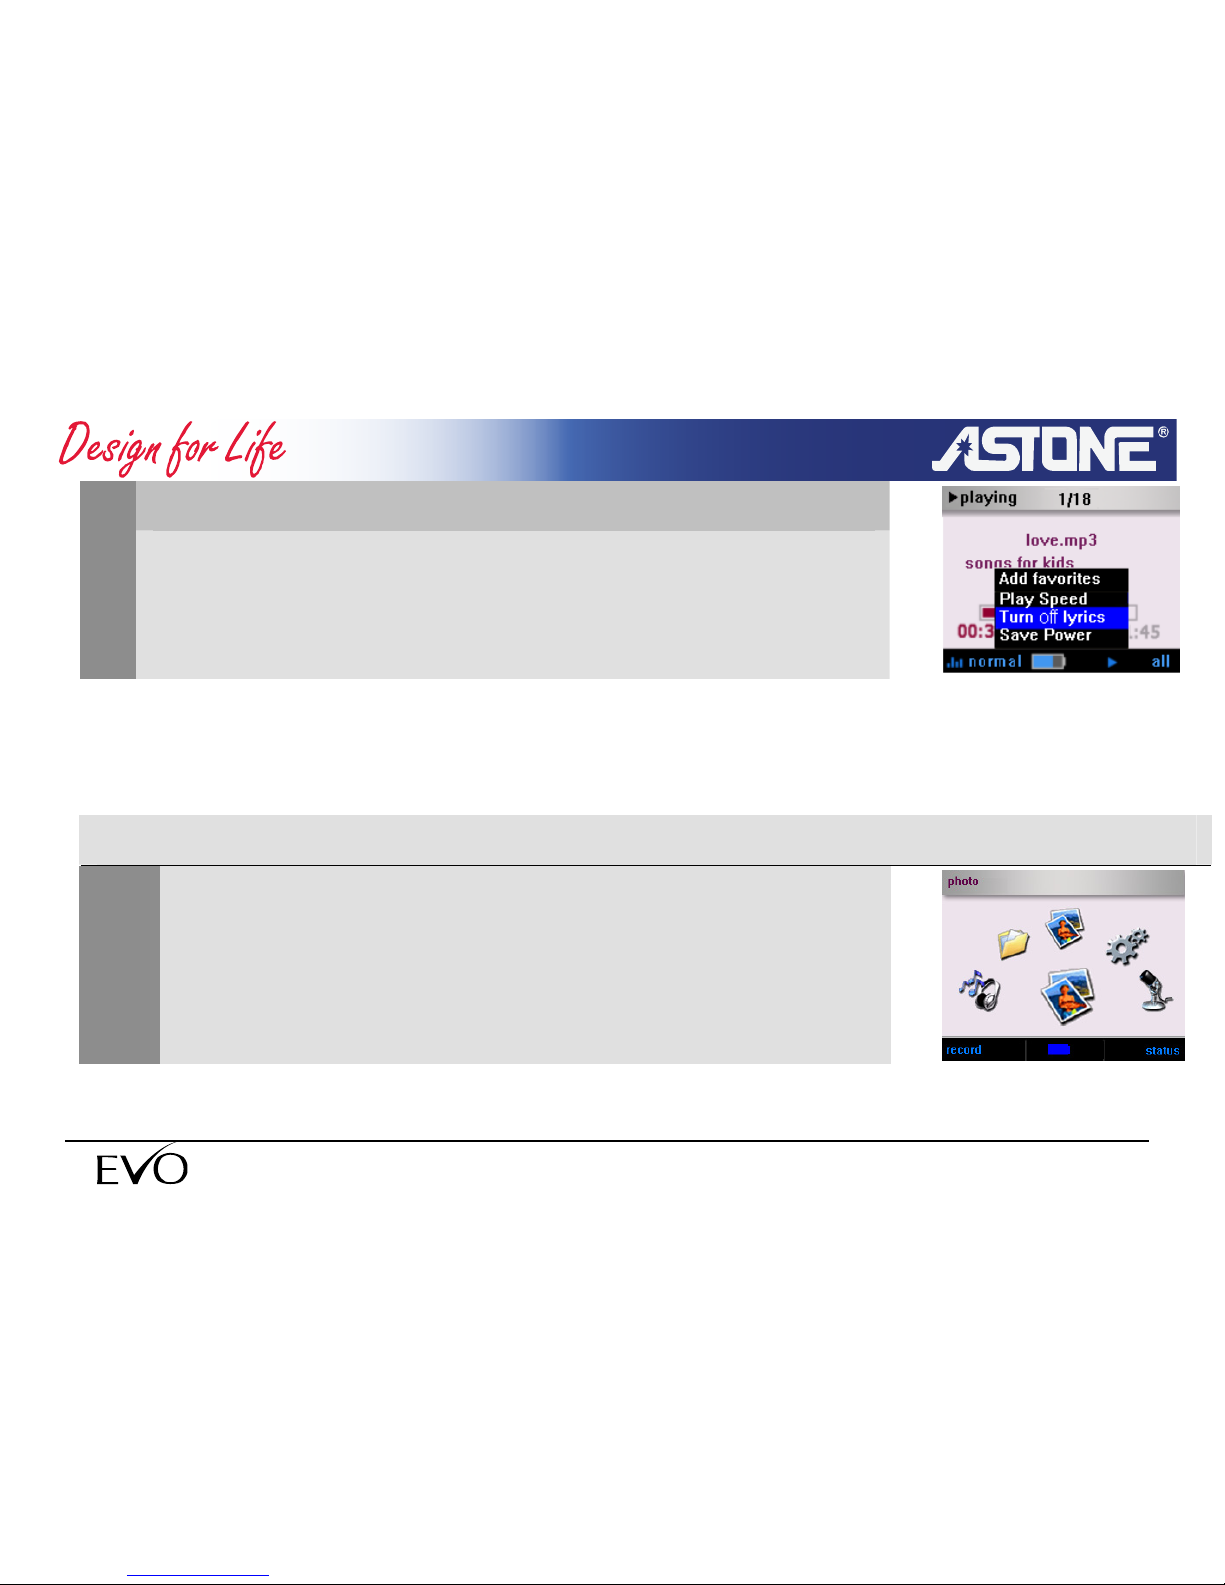
Turn off LRC(in music play)
4
Press F3 button popup menu and
select <turn off lyrics> and press OK.
3.3 Photo viewer(JPG/BMP/GIF)
3.3.1 Photo browser
1
Select <photo> mode in the main menu,
- 42 -
www.astone.com.au
Page 43
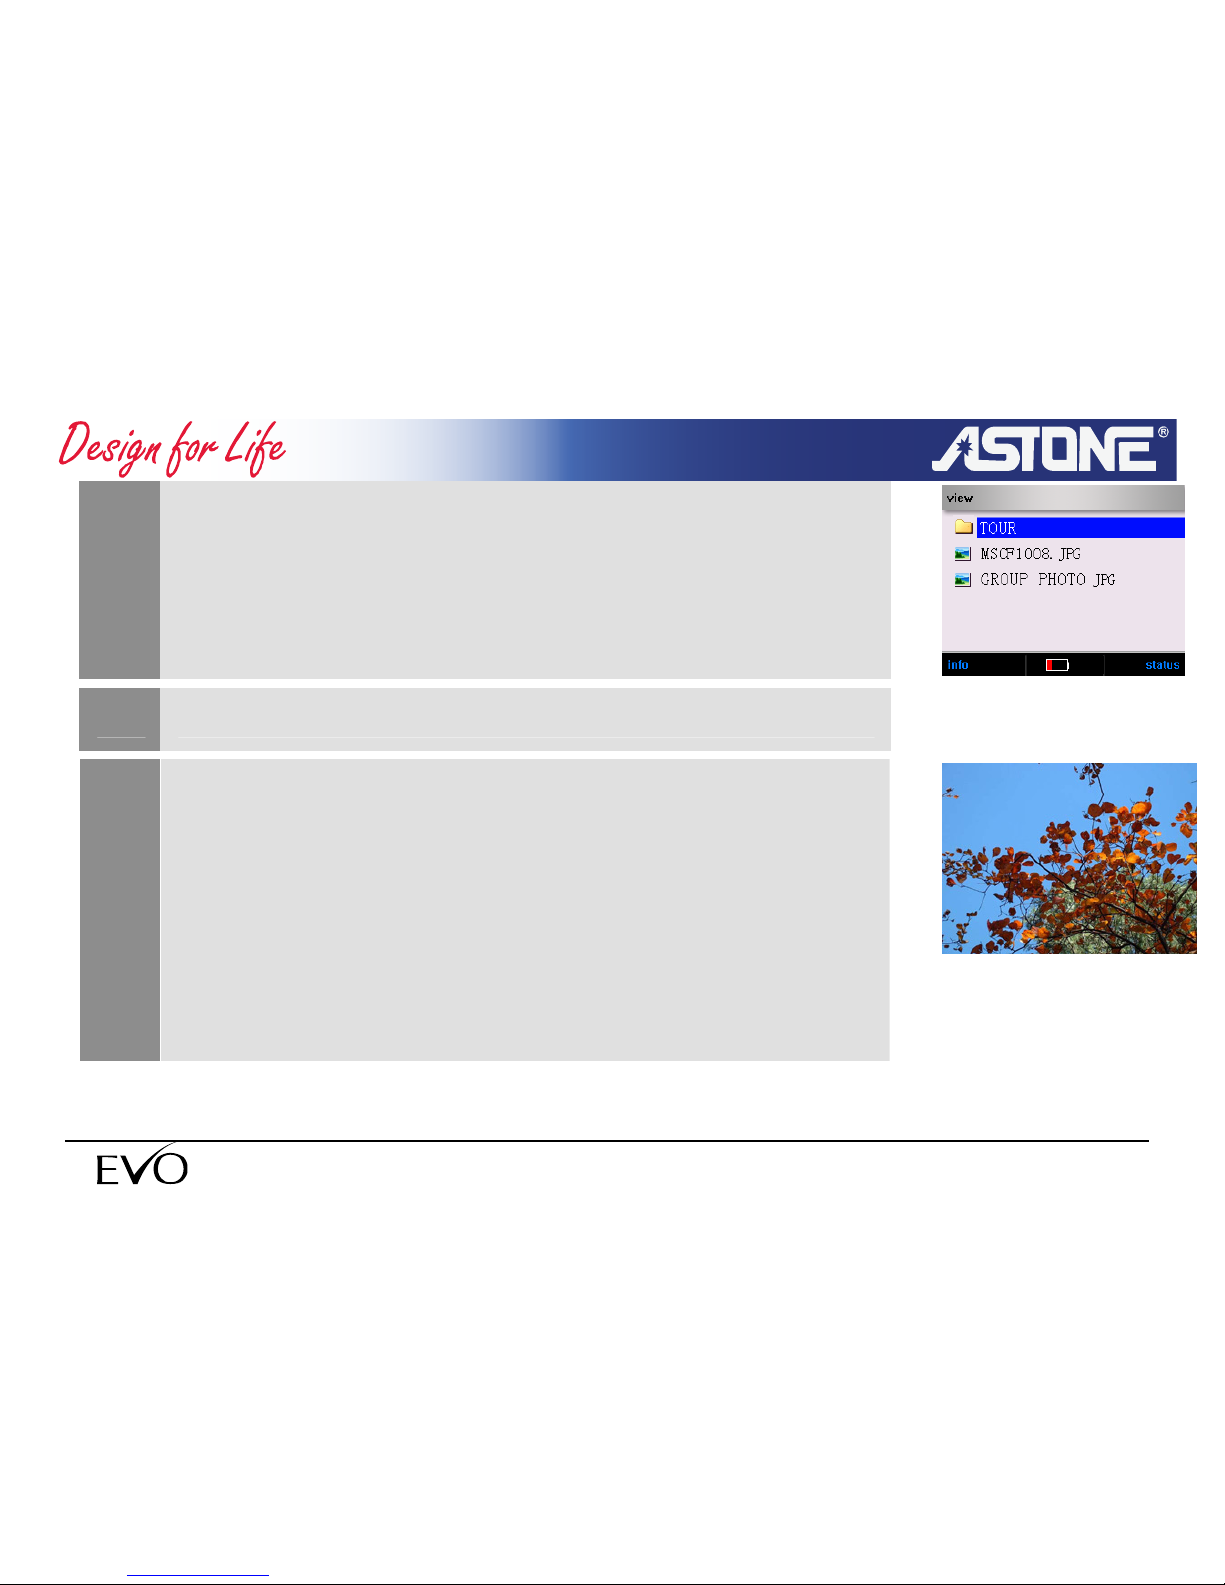
2
press OK button to enter the sub-menu of “photo”
3
Use the direction key to select the image file you want to view,
4
press OK button to start viewing images
The system will automatically
adjust the size of the image to display it full-screen.
- 43 -
www.astone.com.au
Page 44
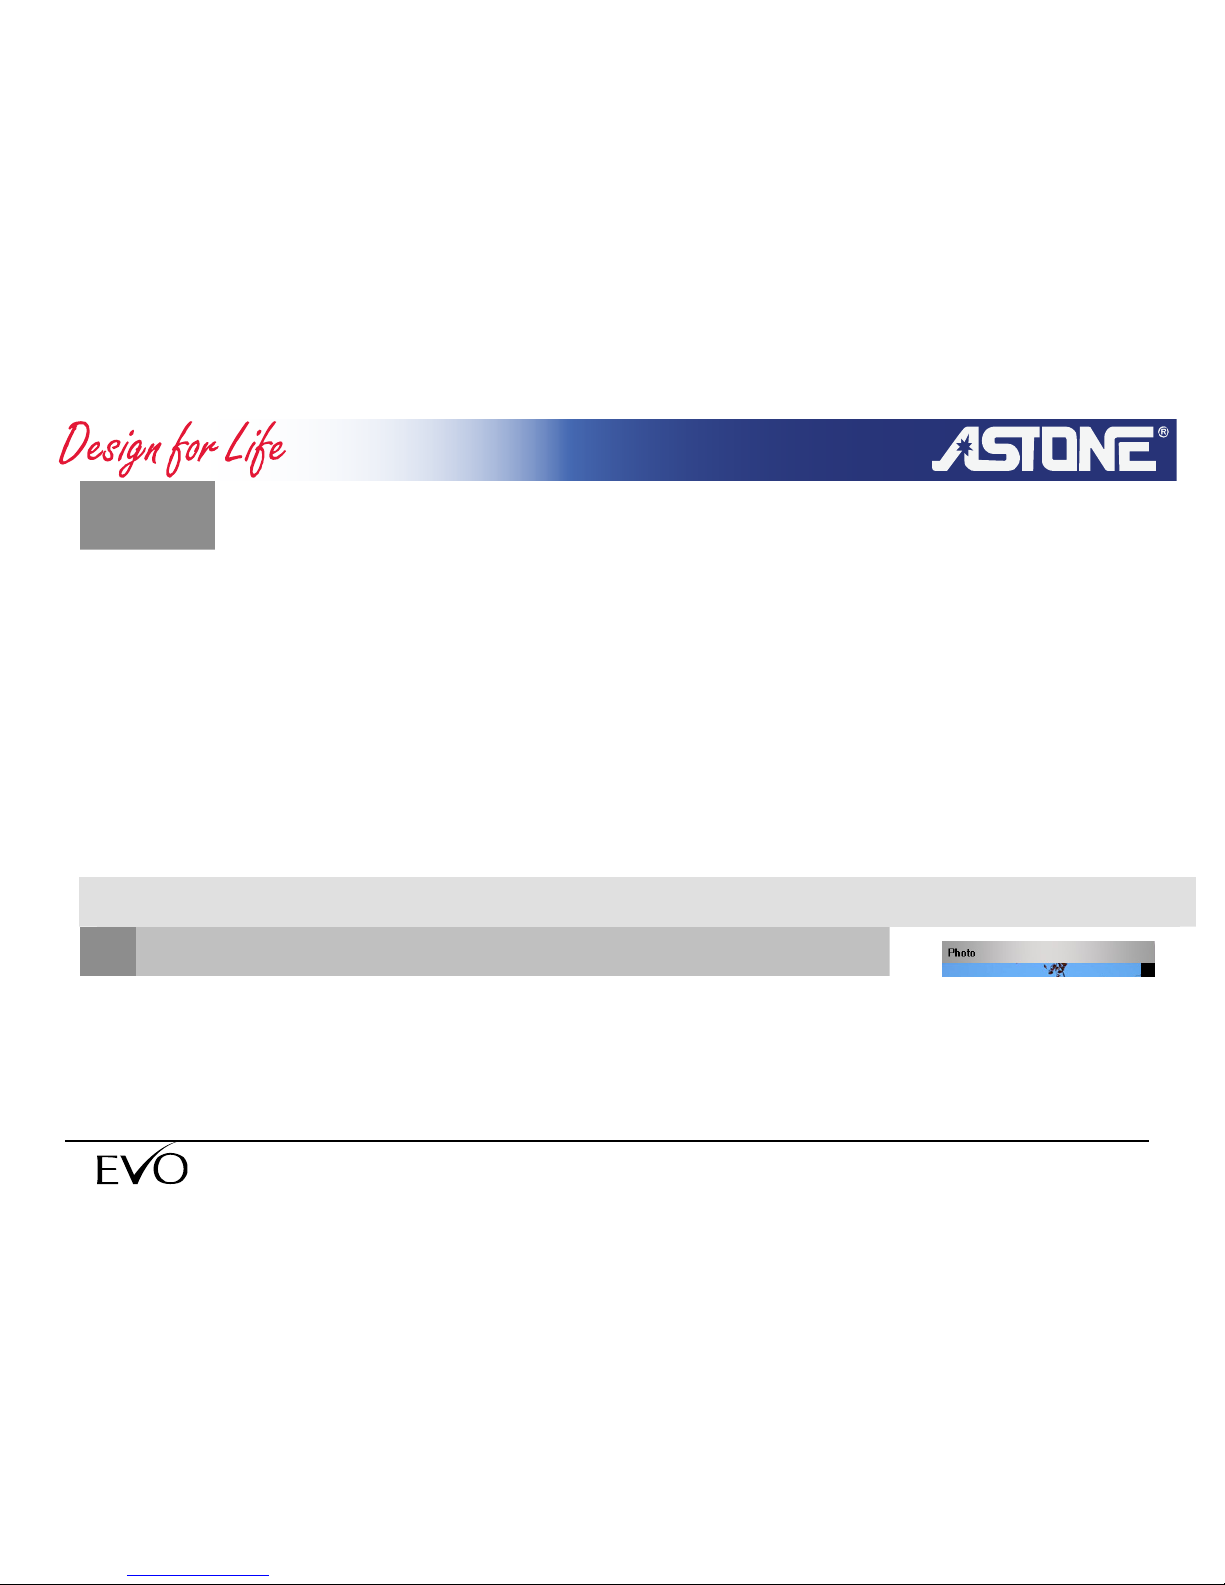
The system default directory for images is <photos> folder. If
such folder doesn't exist, the system will automatically create
one.The photo browser lists only image files. (jpg/ bmp/ gif)
You can select the images in other directories by file
browser.Size of the photo is less than 6M.
files size can't exceed 6MB; animation can't be displayed
Jpg /bmp gif when it requires more than 3MB RAM.Photo
viewer support 24 bit jpg/bmp files.
NOTE
3.3.2 Auto browsing
1
Start auto browsing
- 44 -
www.astone.com.au
Page 45
The system default mode is auto browsing when browsing photo.
If the mode is manual browsing, press F3 button pop up menu.
Select <slide show> , press <OK> button , switch to “OPEN”.
Press <C> or F3 to return to the browsing window then start auto
browsing.
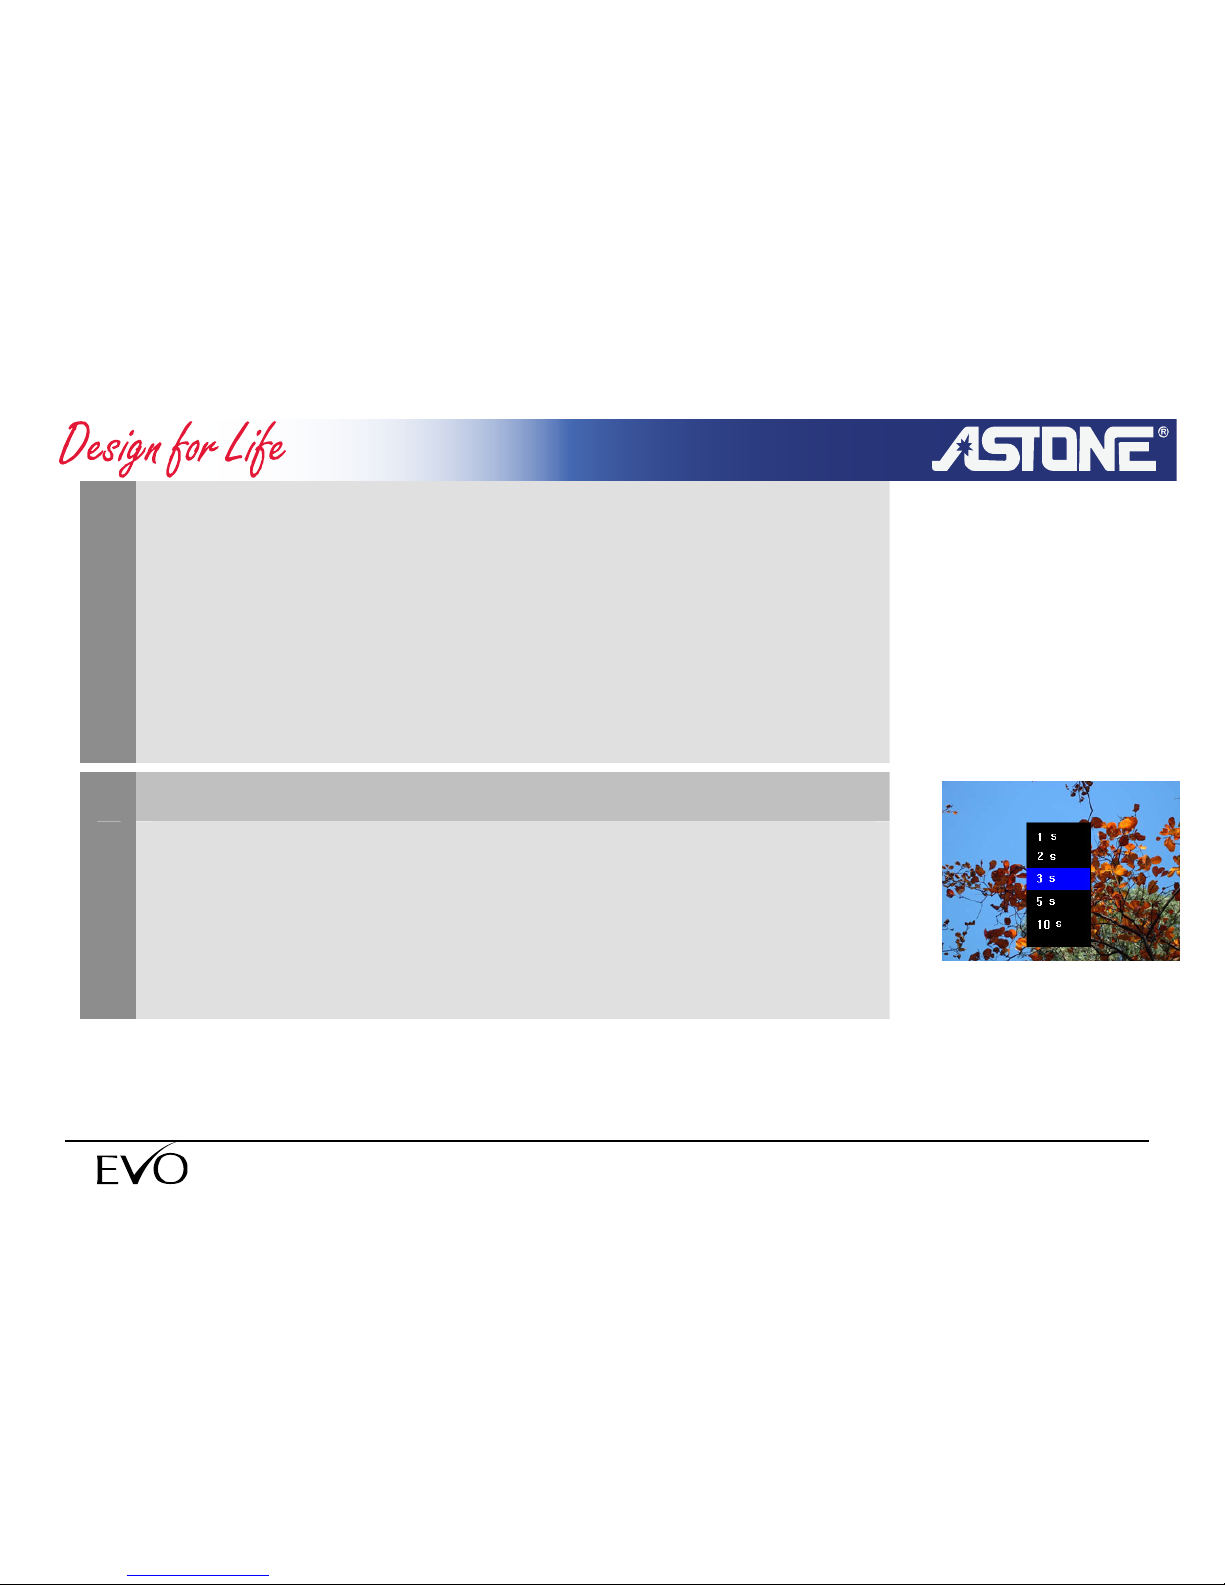
Setting slide show delay
2
Press F3 button pop-up menu in the photo viewer. Select <delay>
and
press OK, then you can choose the appropriate value and press OK.
The delay can be 1 sec, 2, 3,5 or 10 seconds.
- 45 -
www.astone.com.au
Page 46
Pause slide show
3
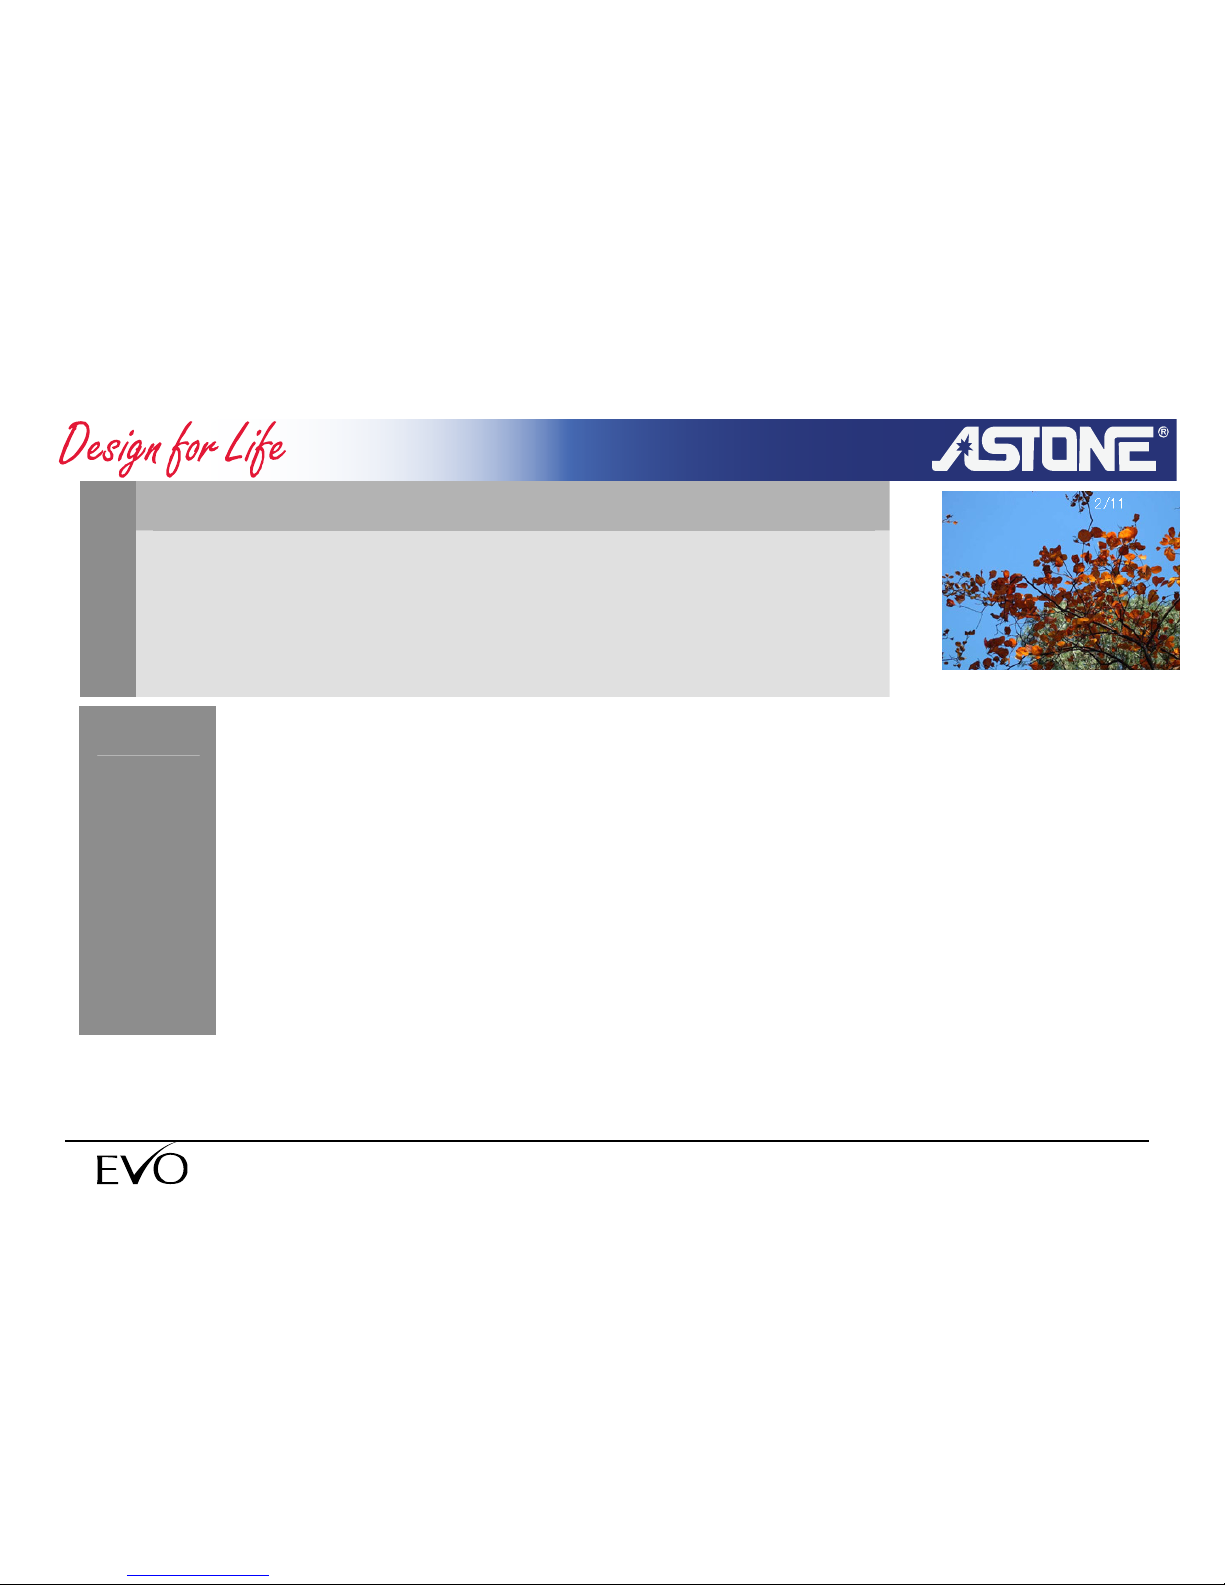
Press <PLAY> button to pause slide show in auto photo viewer.
On the right top corner displays the order of current slide.
Press <PLAY> button again to continue slide show.
NOTE
Only fully display JPG/BMP photo or GIF pause, can
execute F3 function.
Auto browsing will pause whiling operating photo( e.g.
zoom in/out)
Press <C> to stop playing for GIF photo.
- 46 -
www.astone.com.au
Page 47
3.3.3 Manual browsing
Start manual browsing
1
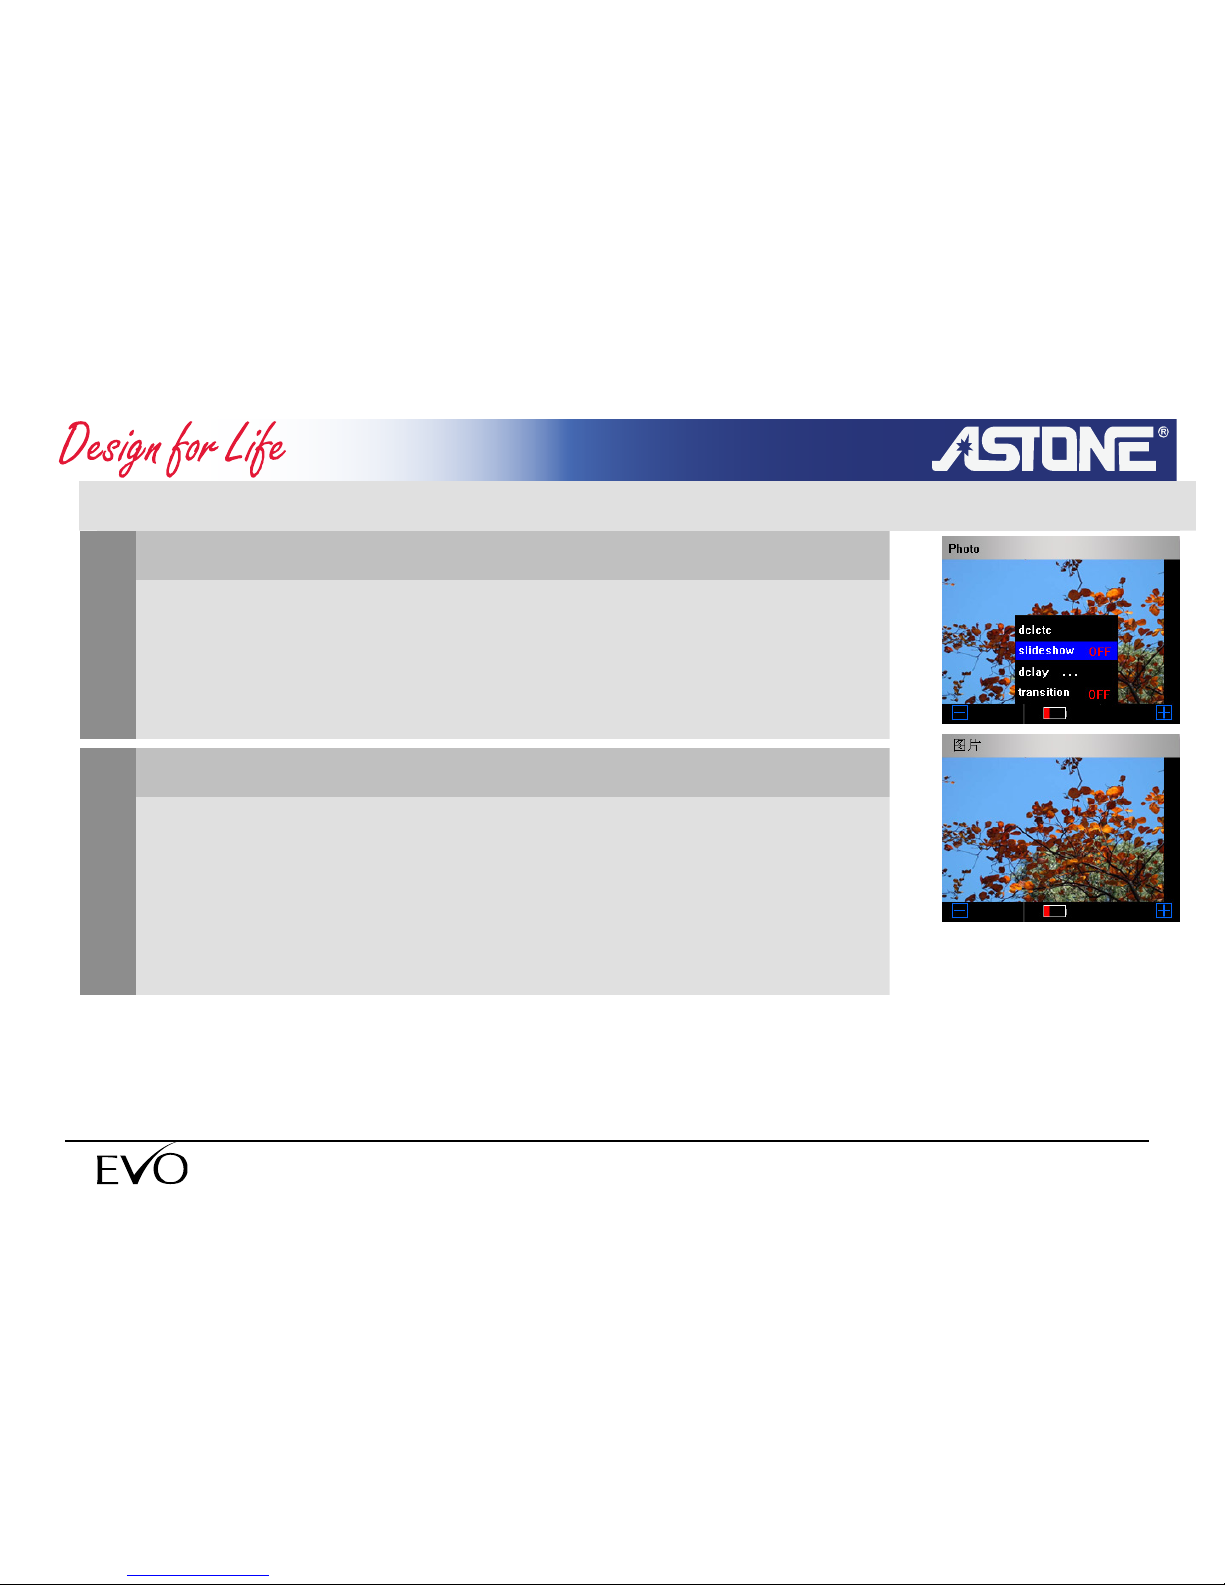
you can press F3 button to pop-up menu in this mode.
Select <slide show> and press OK to set to “OFF”.
Then press C or F3 button to start manual browsing.
View the last or next image
2
In manual browsing, use FORWARD/BACK button to view last/next
image.
F: view the next photo
B: view the last photo
- 47 -
www.astone.com.au
Page 48
- 48 -
www.astone.com.au
NOTE
You can’t operate GIF photo to forward or back until stop
playing, press <C> to stop playing.
3.3.4 Image zoom, move, delete
Zoom in
1
Press F1 button to zoom in/out the image in photo browser
F1: zoom in
Press OK or C button to cancel zoom in/out
2
Move the magnified image
Page 49
Use arrow button to move the magnified image.
F: move right
B: move left
V+:move up
V-: move down
Remove image in photo browser
3
Press F3 button in photo browser to pop-up menu.
Select <delete> and press OK.
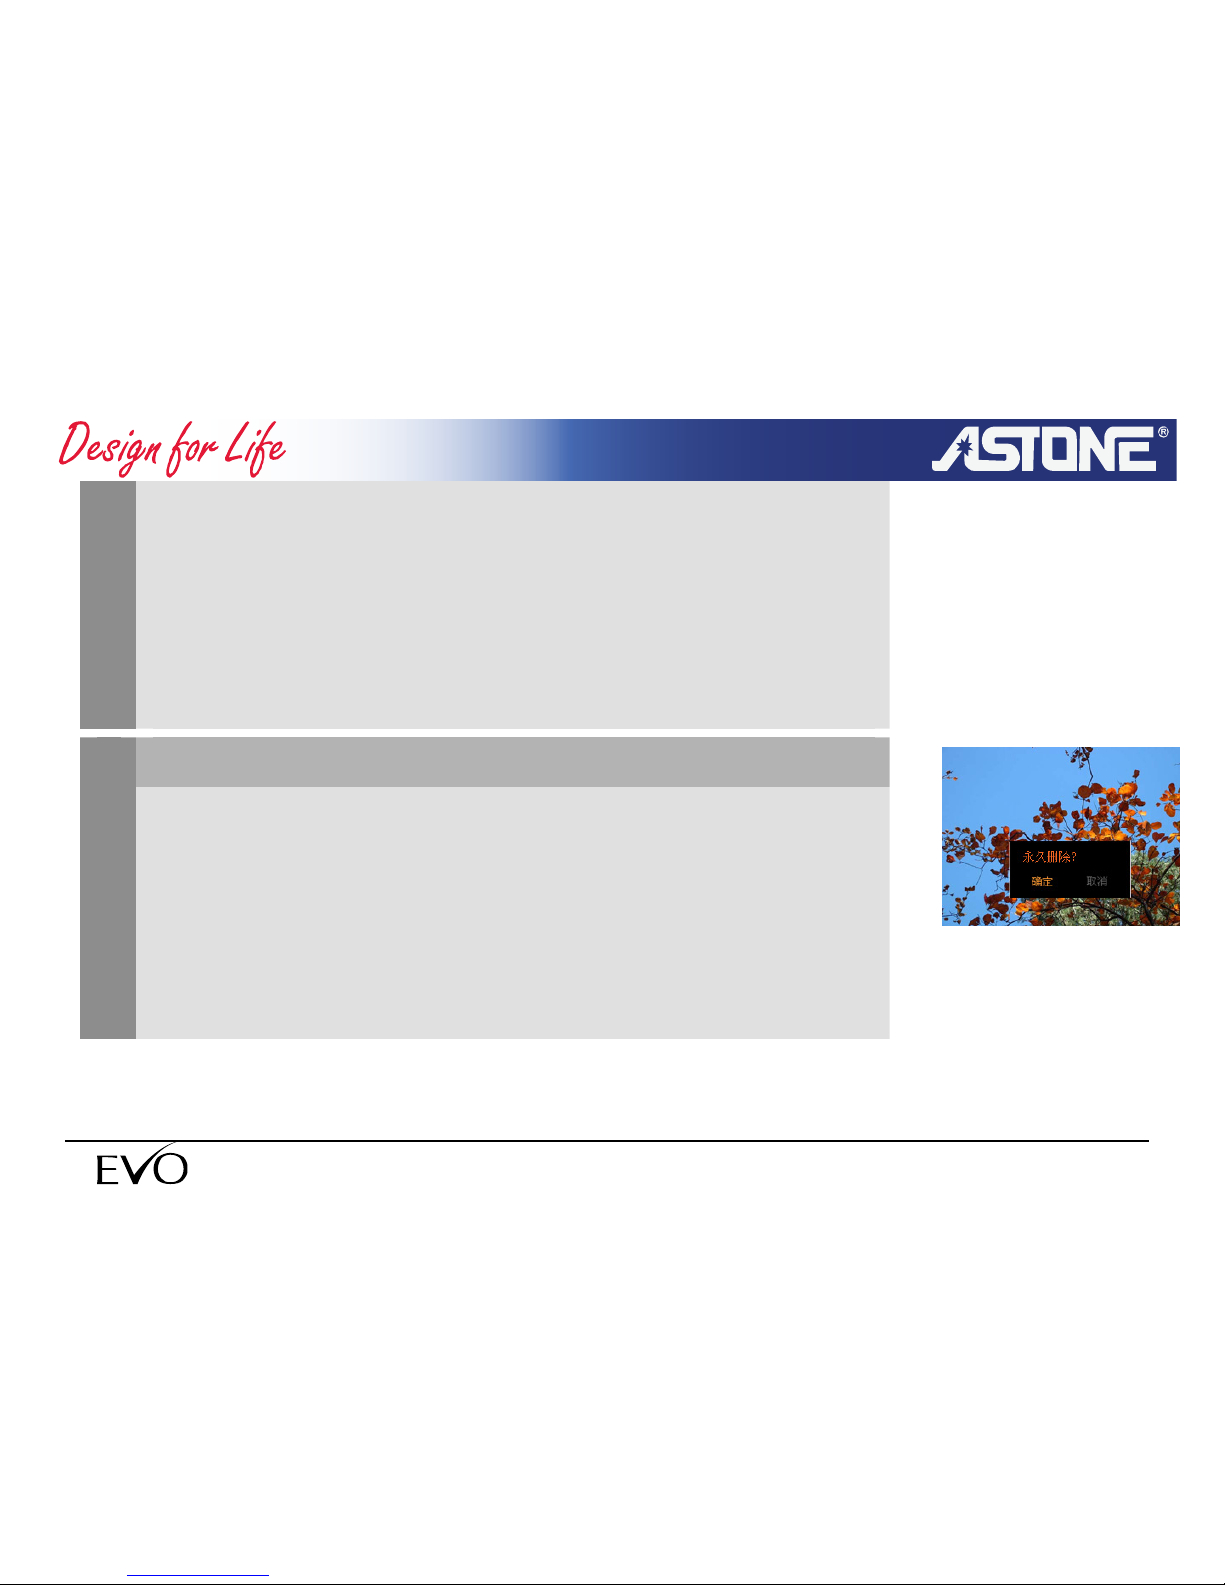
A dialog box is displayed to ask if you want to delete it permanently.
Press OK to confirm.
- 49 -
www.astone.com.au
Page 50
GIF photo can’t be magnified.
NOTE
The proportion of the photo is the displaying 100%~200
%
3.4 Recording
3.4.1 Voice recording
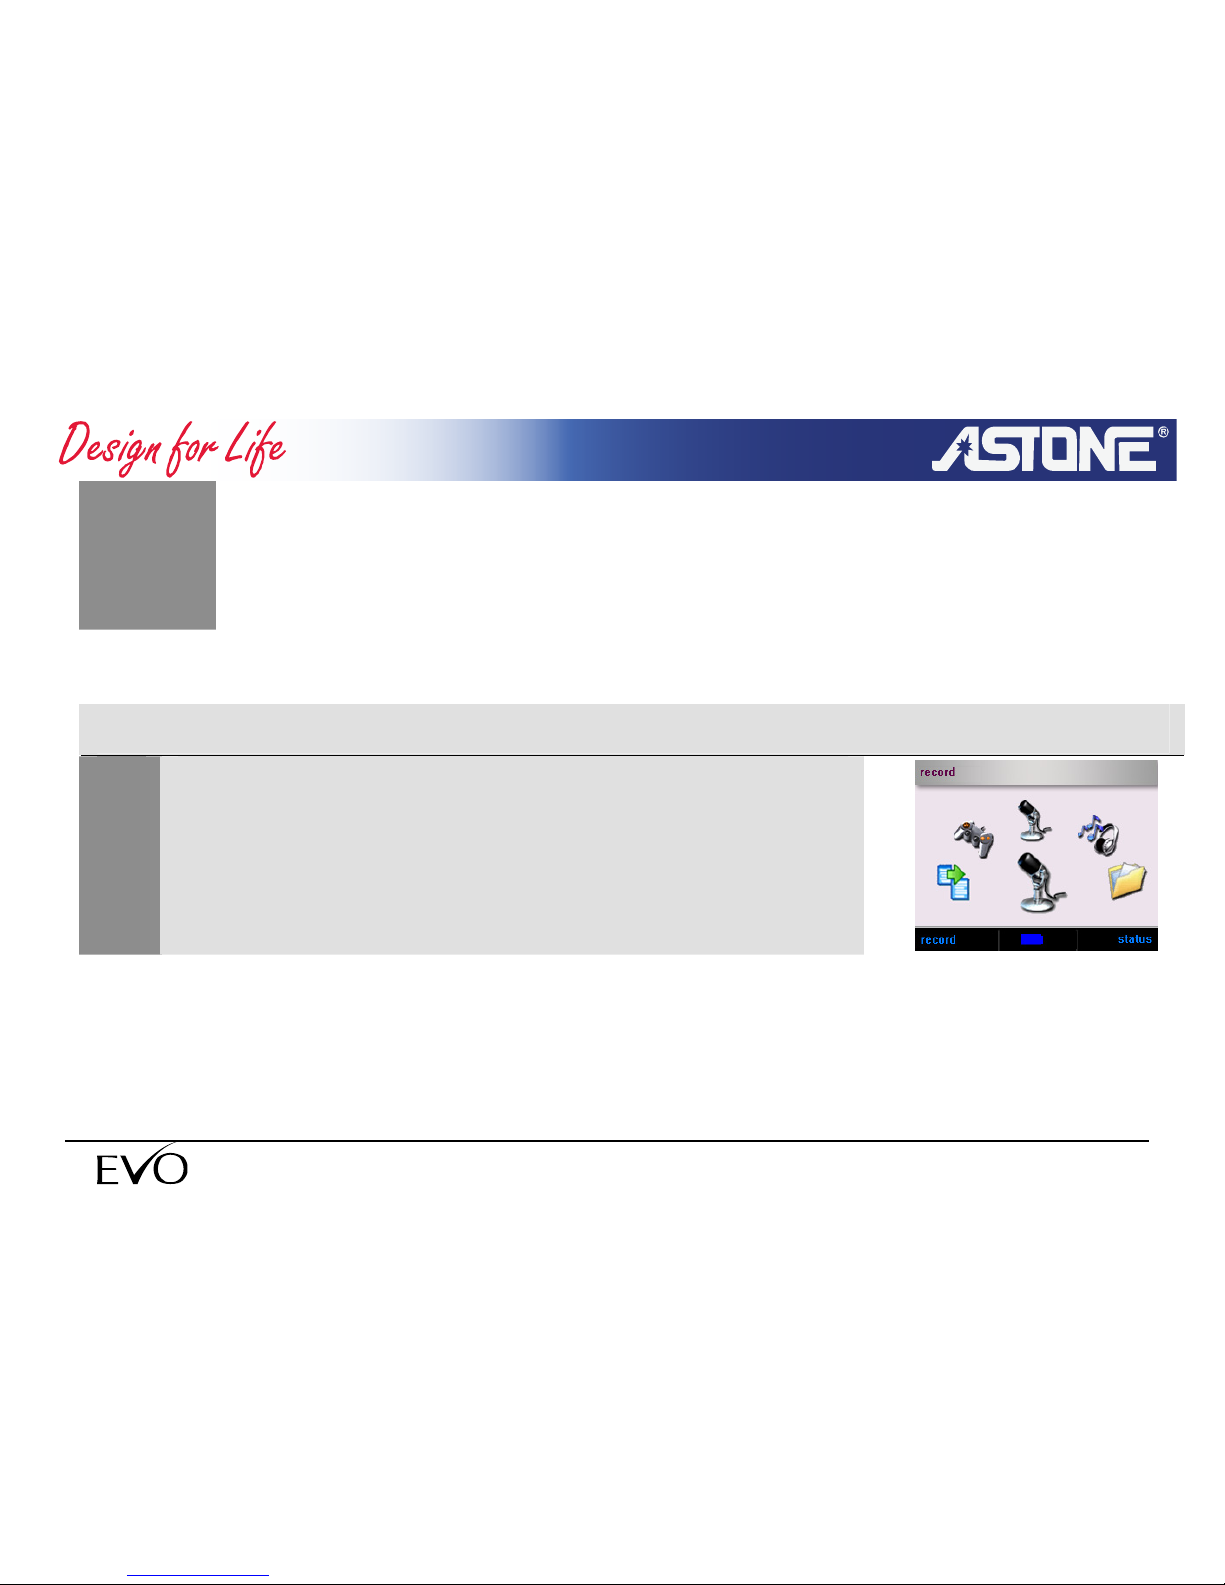
Select record in the main menu.
1
- 50 -
www.astone.com.au
Page 51
2
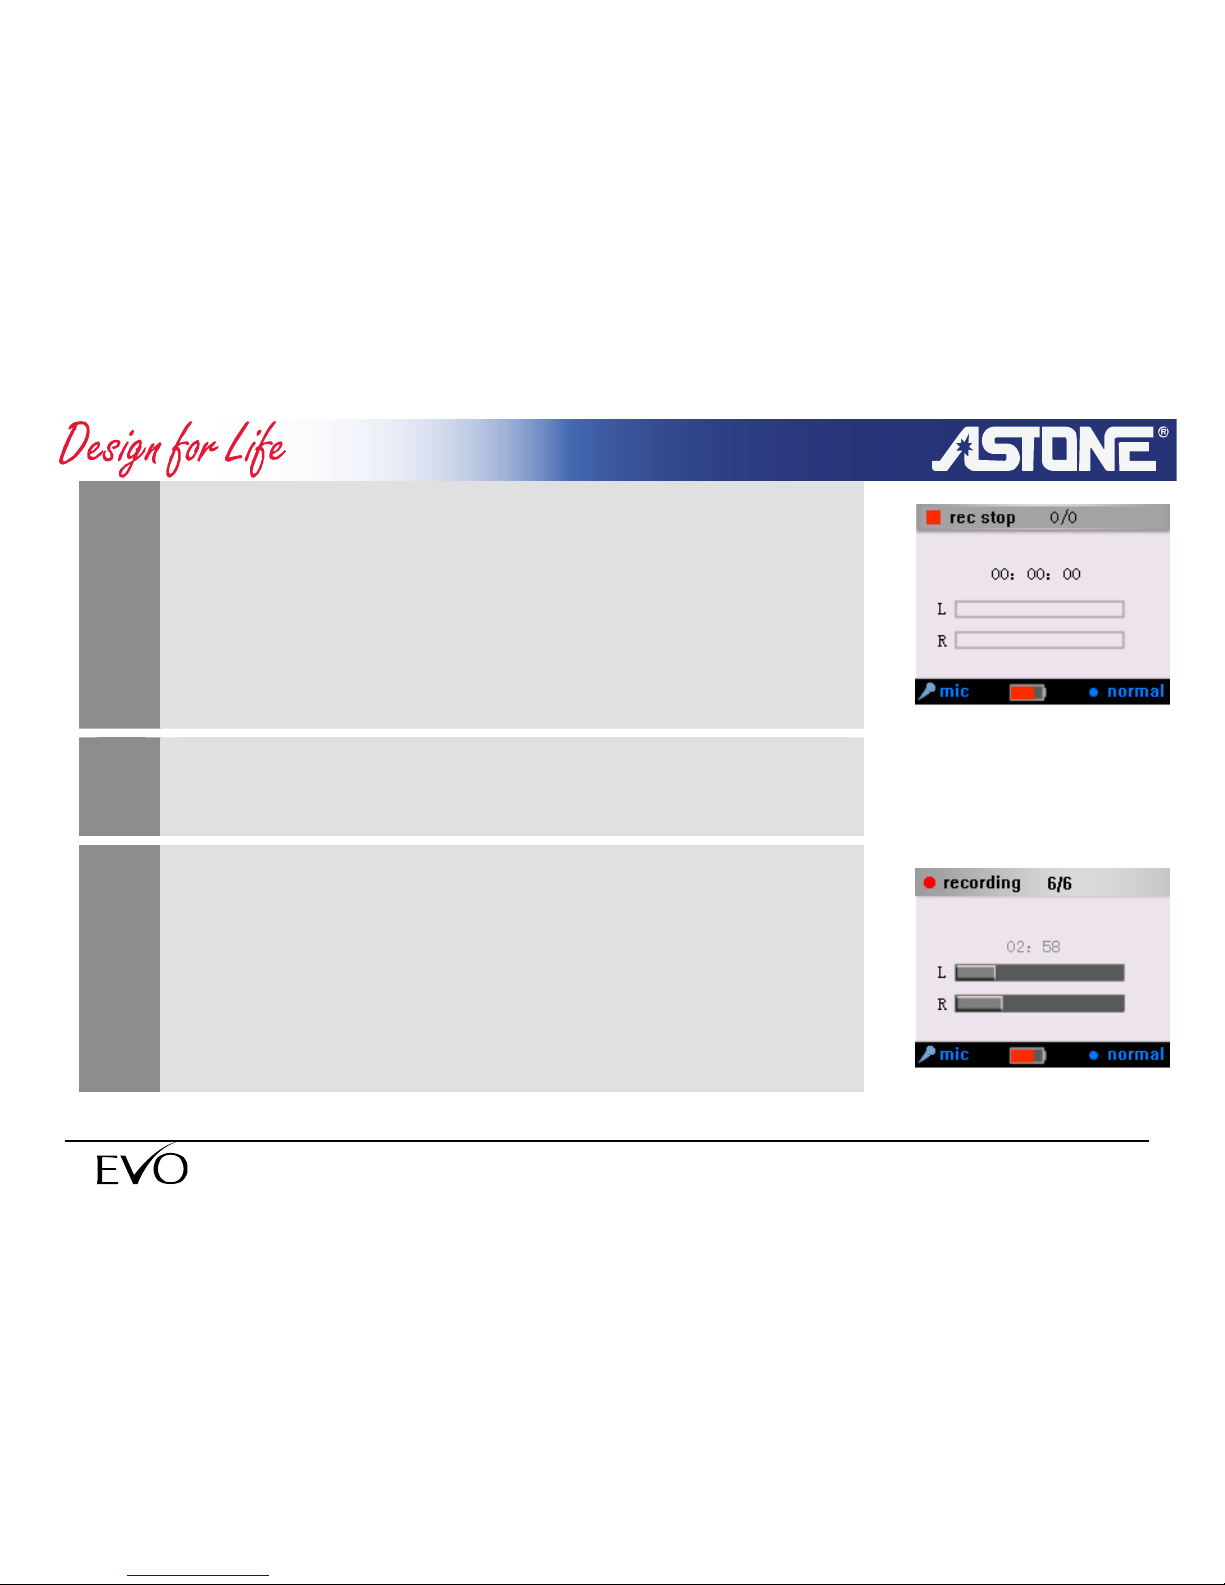
press OK enter.
3
Press F1button to set REC quality (suggest to select the
normal)
4
Press OK button to start REC press and hold OK to pause
REC.
- 51 -
www.astone.com.au
Page 52
3.4.2 LINE-IN Recording(LINE-IN)
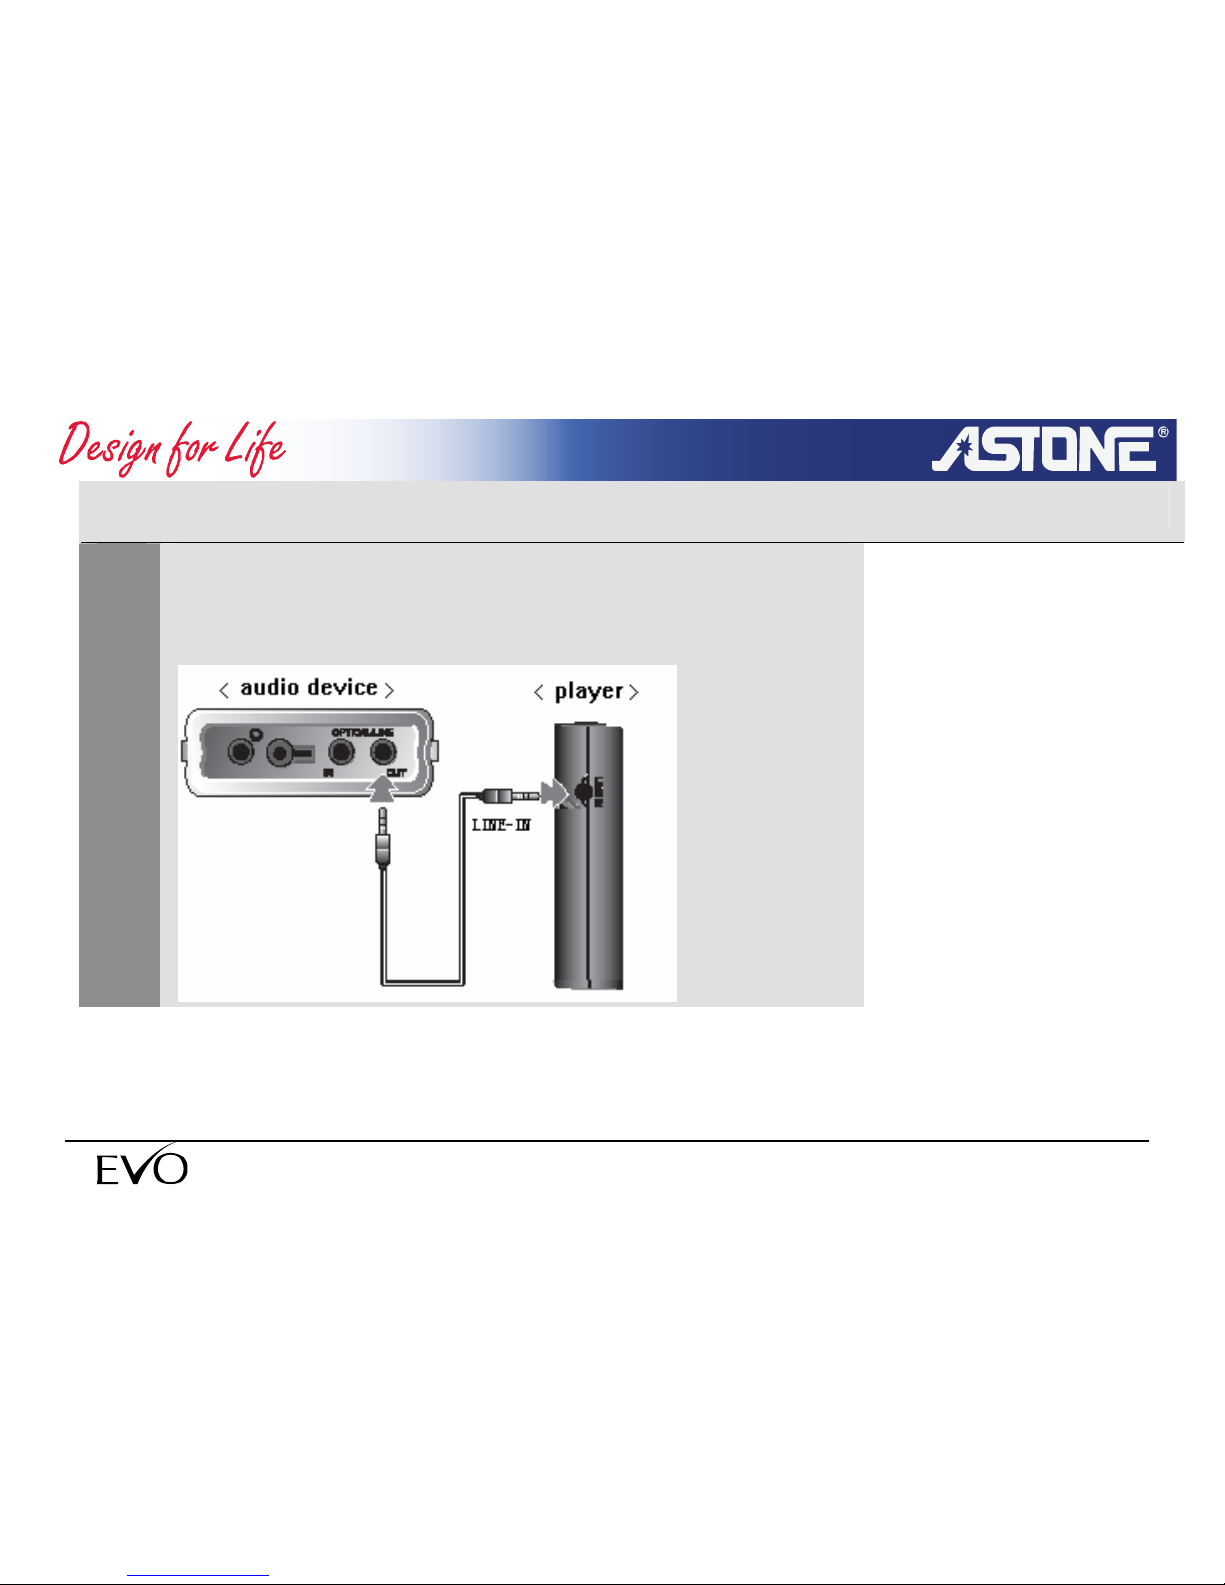
1
Connect line-out of external audio devices to LINE-IN port of
player with line-in/out cable.
- 52 -
www.astone.com.au
Page 53
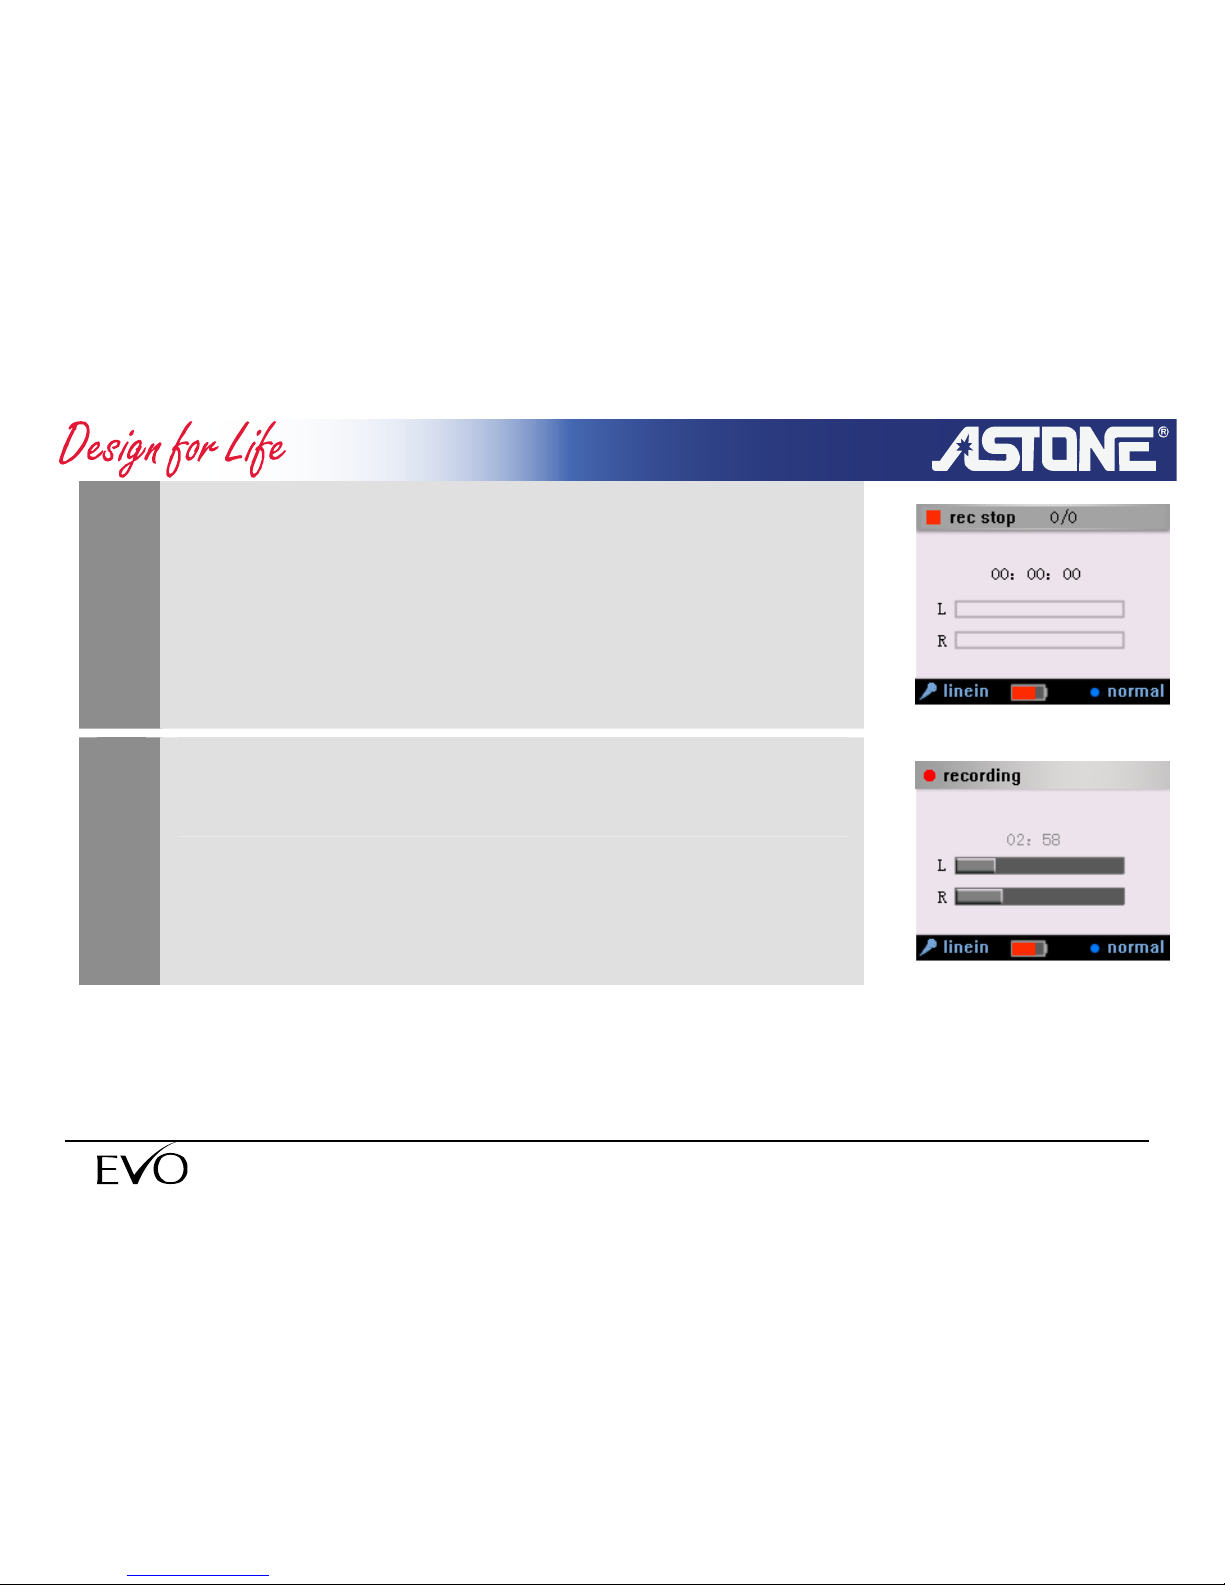
2
Press F1 button switch REC sources to line In other operation
same to MIC recording.
3
Press <OK> to start recording
You can listen with earphone.
- 53 -
www.astone.com.au
Page 54
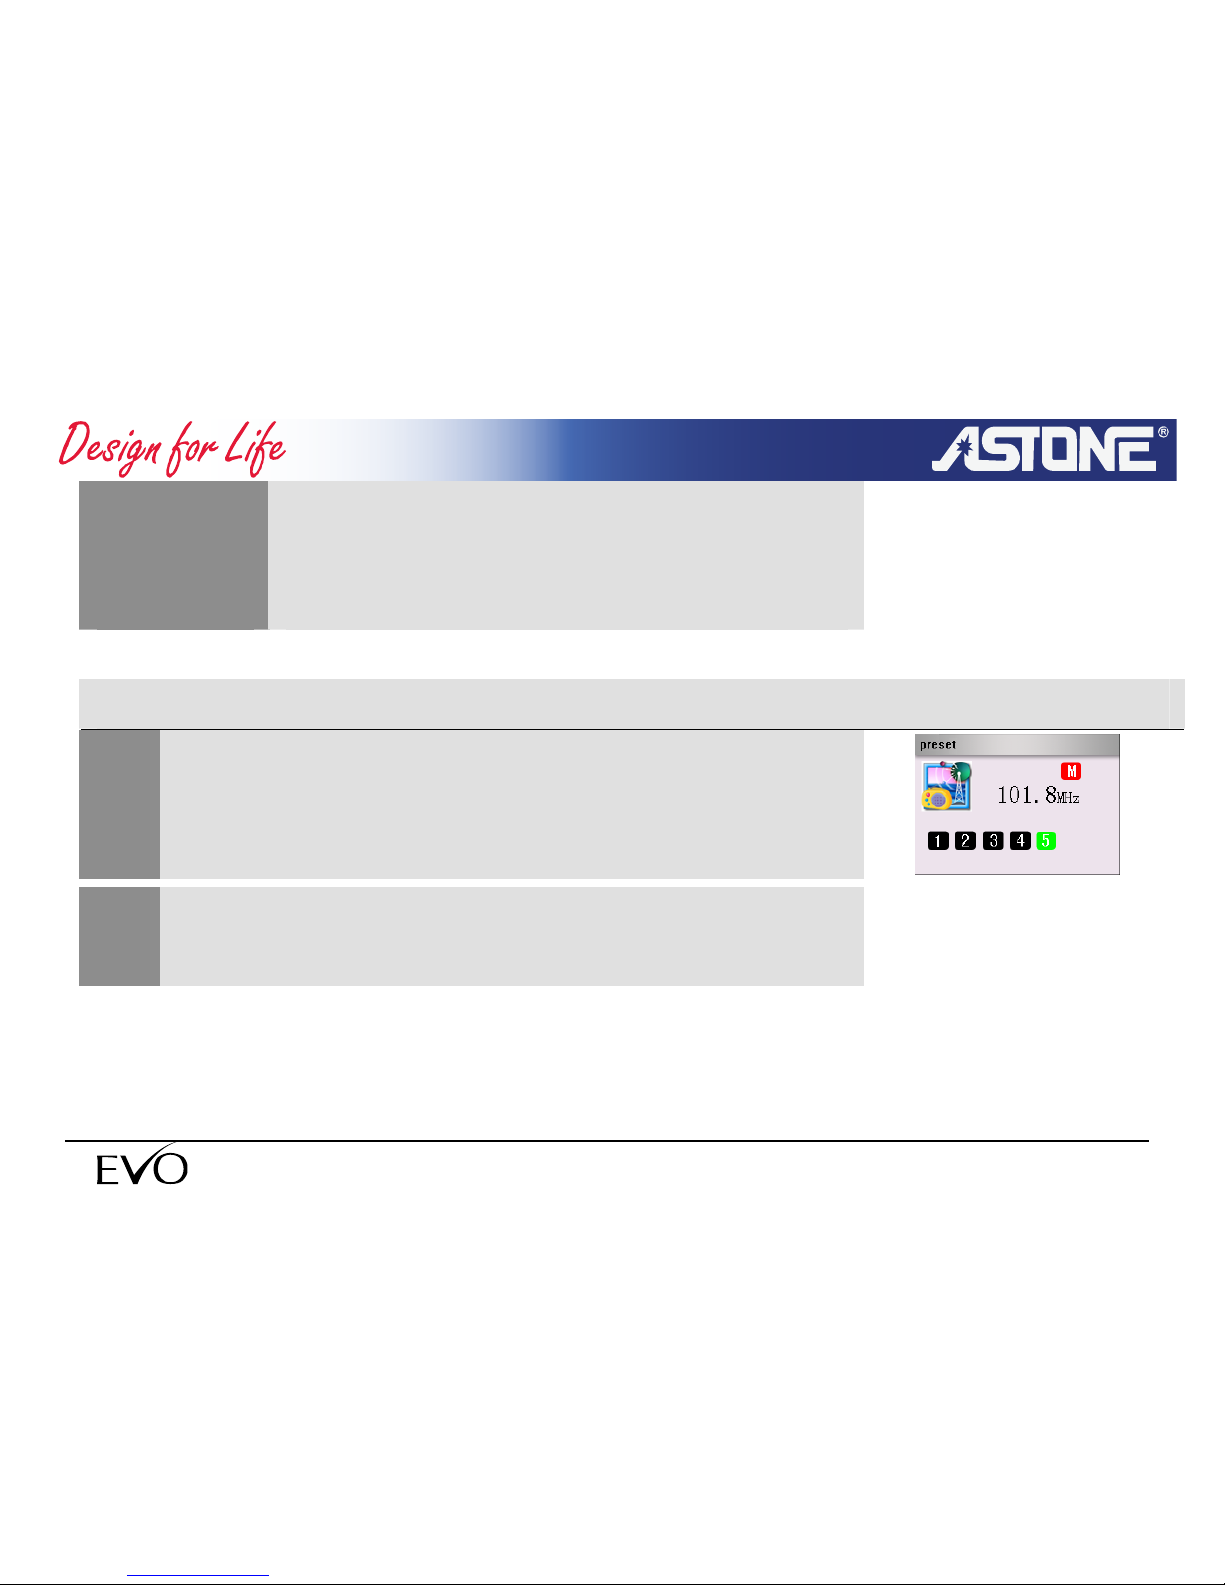
Make sure the external device including output.
Recommended set the MAX VOL of the external
device .
NOTE
3.4.3 FM Recording
1
Enter the FM radio interface and select the channel you want to
record.
2
Press C button quit radio back to recording.
- 54 -
www.astone.com.au
Page 55
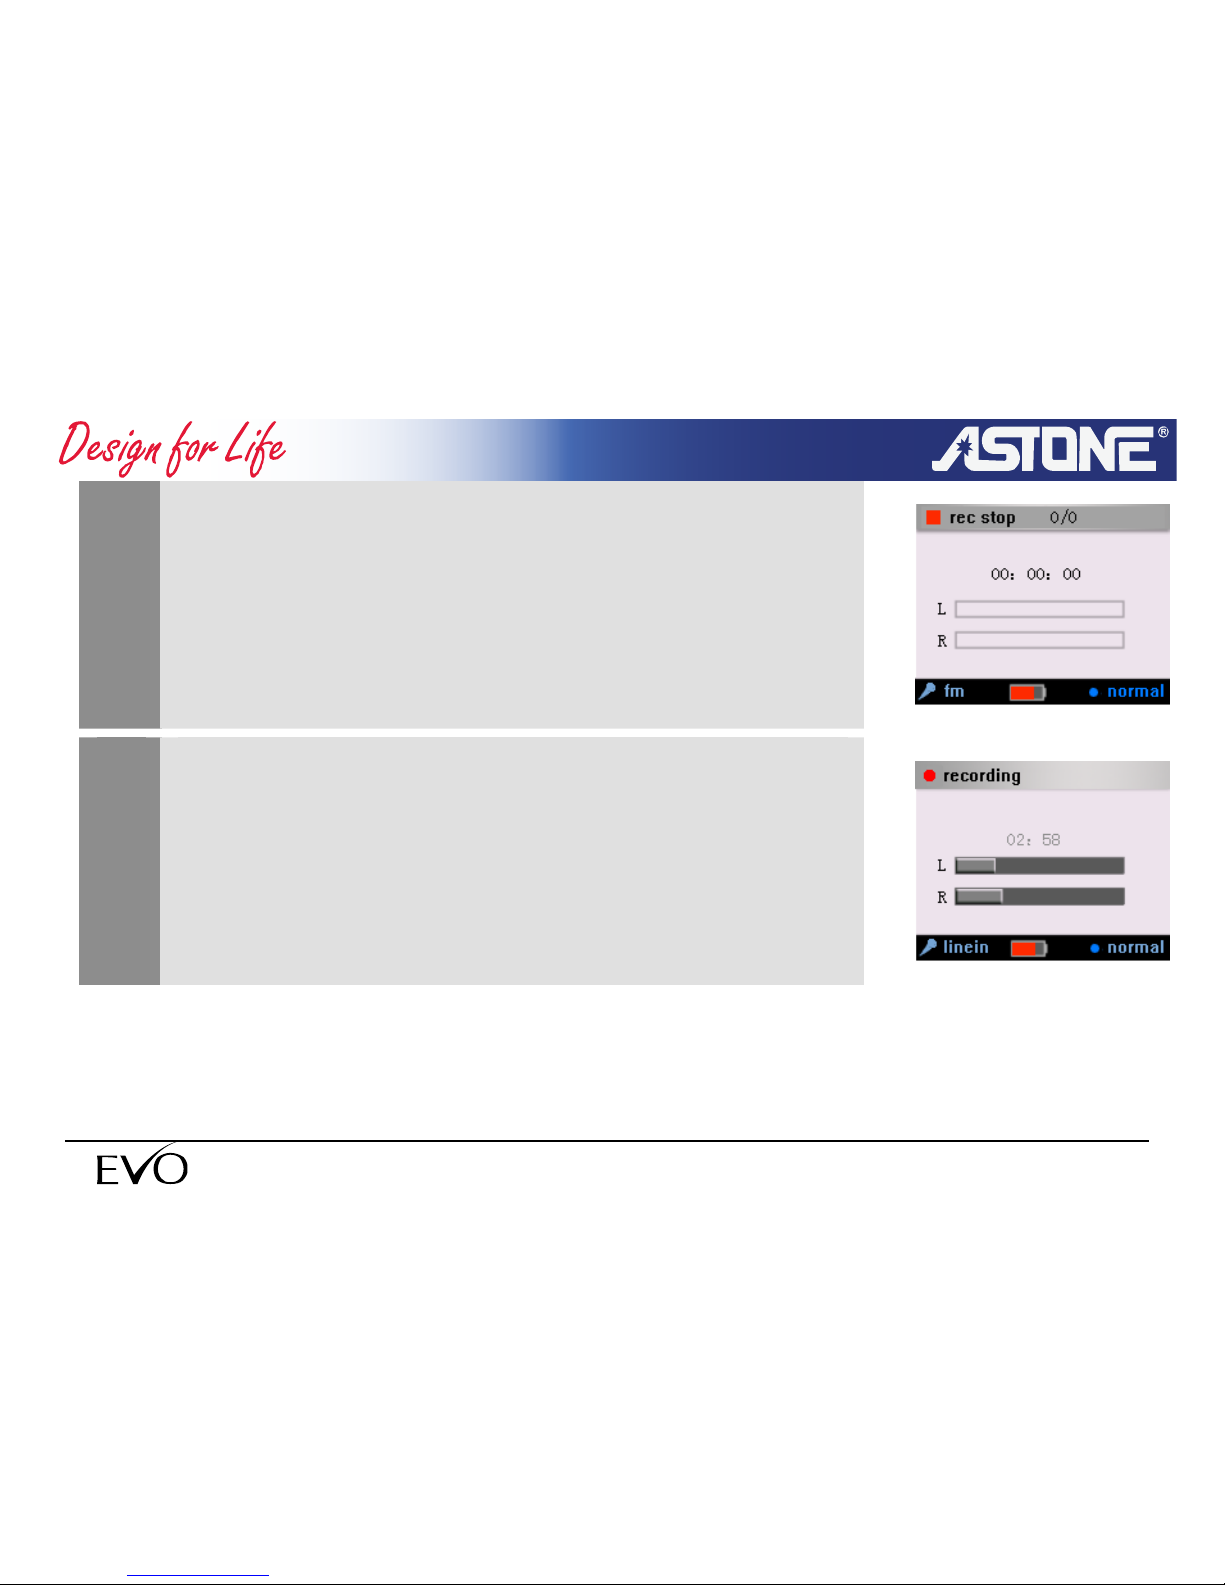
3
Press F3 button pop up menu and switch REC sources to
<radio>
Use F1 function to select the recording quality.
Press <OK> to start.
4
- 55 -
www.astone.com.au
Page 56
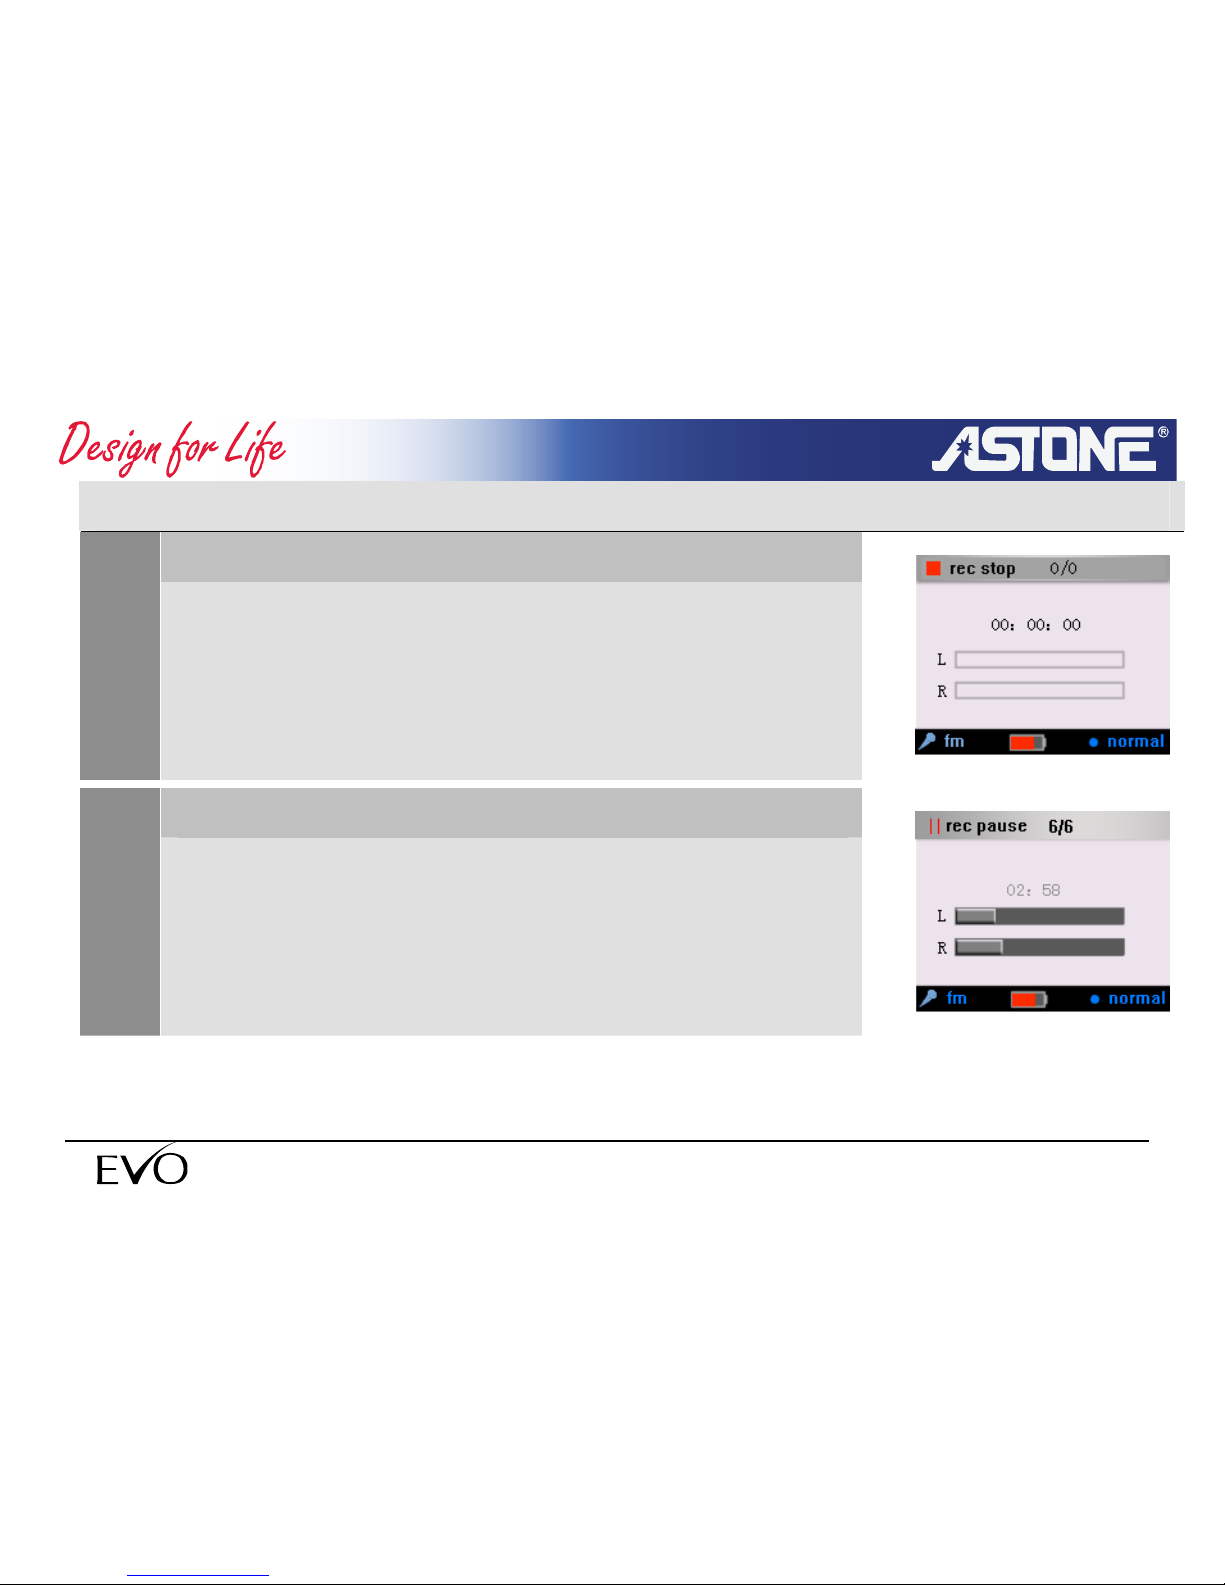
3.4.4 Recorder operation (stop/pause/cancel)
Stop recorder
1
Press and hold OK button to stop REC and the record file will
be saved automatically.
Pause recorder
2
Press OK button to pause REC and press OK again to continue
REC.
- 56 -
www.astone.com.au
Page 57
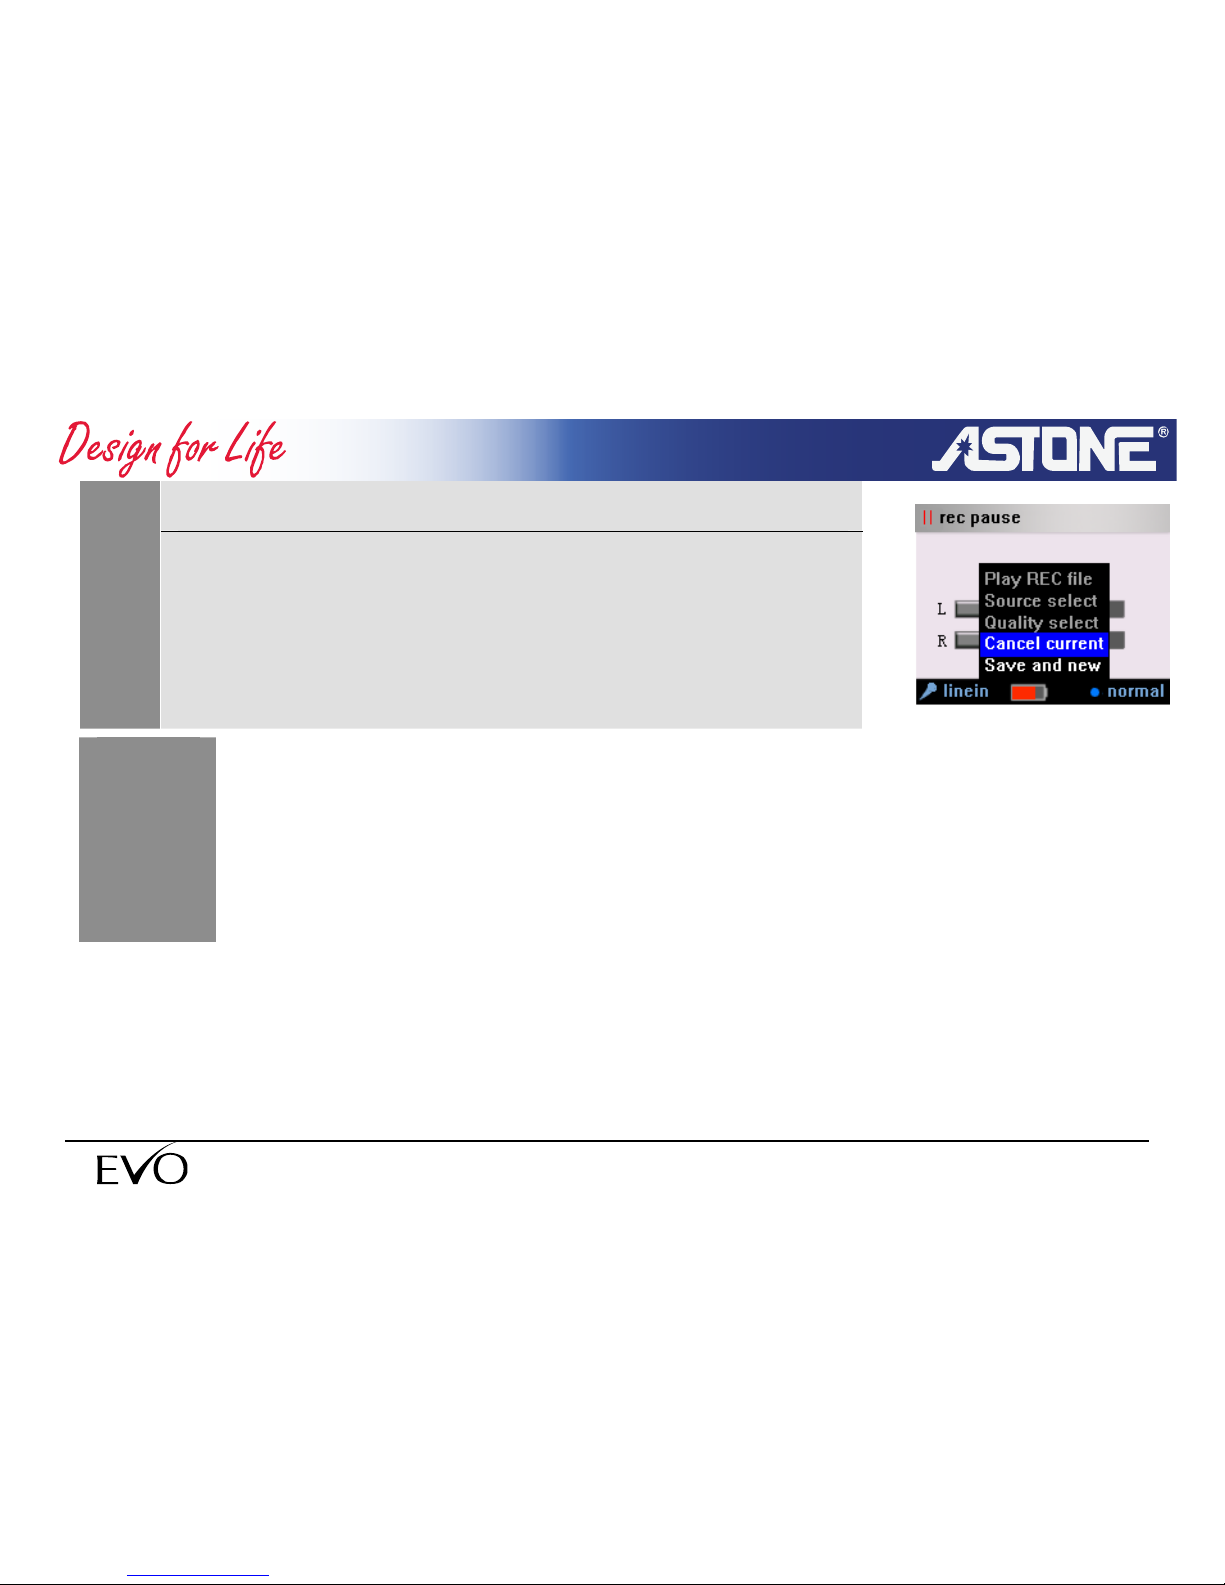
Recorder cancel
3
Press F3 button pop-up menu when the REC paused. Select
<cancel current> and press OK to cancel current recording.
Only the button <OK> <C> <HOLD> can be operated
while recording.
If the memory full or electricity in deficiency, the player
will stop recording automatically.
NOTE
- 57 -
www.astone.com.au
Page 58
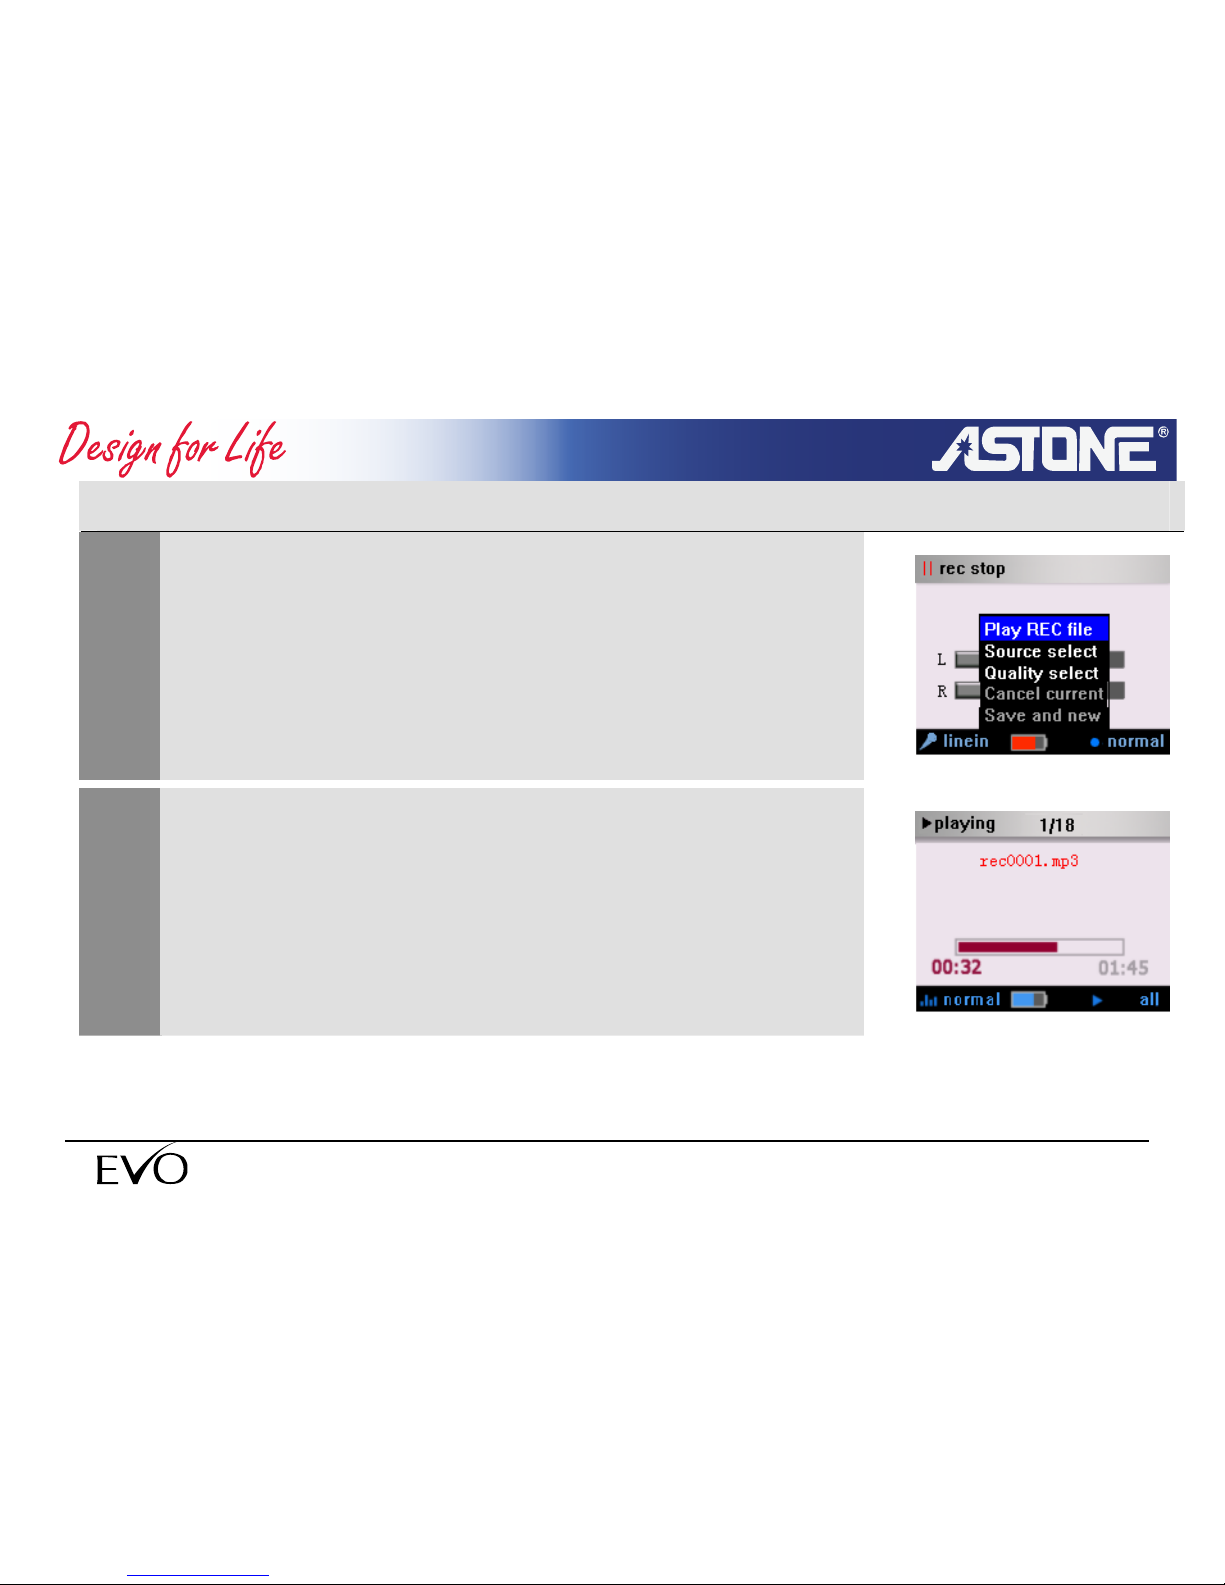
3.4.5 Play recording file
1
Press F3 button pop-up menu when the REC stop,
2
Select <Play REC> and press <OK >, the player will play the
file that was just recorded.
- 58 -
www.astone.com.au
Page 59
- 59 -
www.astone.com.au
NOTE
All REC files are saved in recordings directory.
The files are in mp3 format and the naming convention is
recxxxx.mp3, while xxxx is the order of the file.
You can use file browser to select and play the files.
3.4.6 Recording setup
REC sources
1
Press F3 pop- up menu, select <REC source> and press <OK>
to select.
Page 60
- 60 -
www.astone.com.au
REC quality
2
Press F1 button to set the recording quality while REC stop or
press F3 popup menu and select <quality select> and press
OK to select.
<normal>:REC duration will be about 326 hours. (32kbps,
16khz)
<good>:REC duration will be about 214 hours. (48kbps, 22khz)
<better>:REC duration will be about 160 hours. (64kbps,
22khz)
<best>:REC duration will be about 81 hours. (128kbps, 44khz)
Calculation base on the storage of 4.4G
Page 61
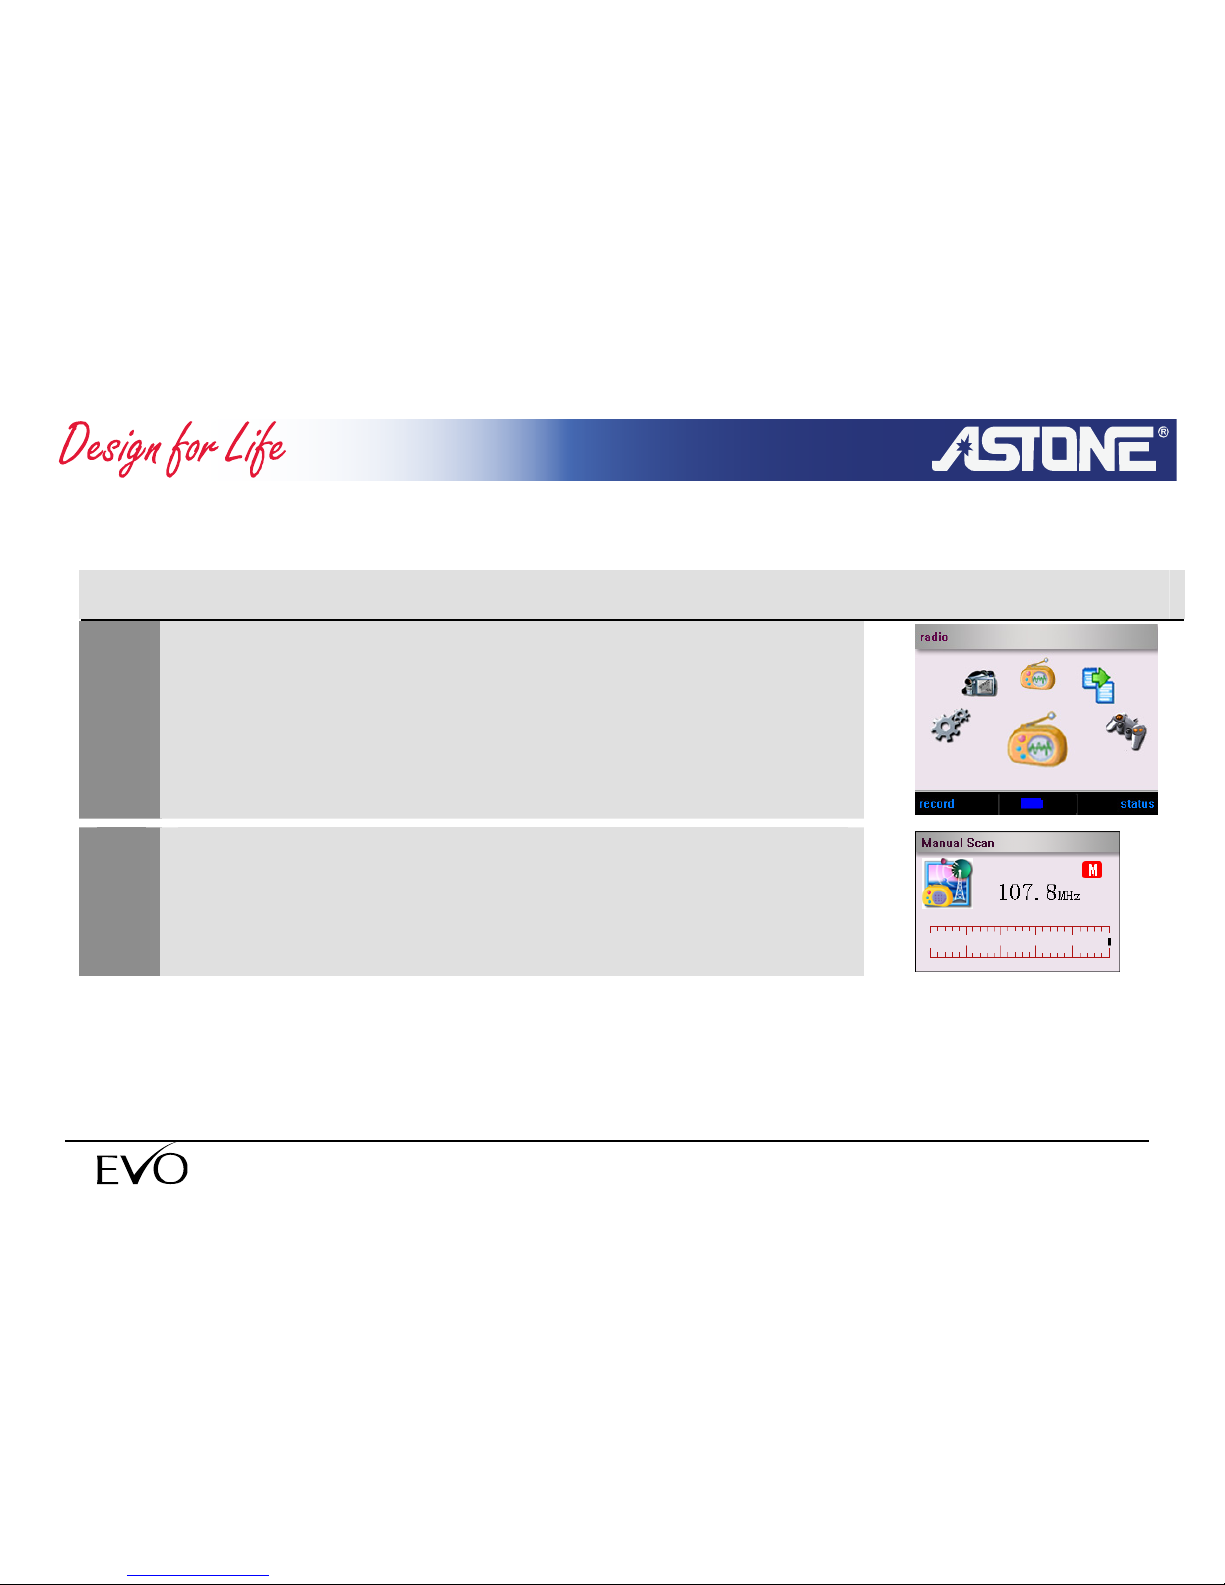
3.5 FM Radio
3.5.1 Turn on/off FM Radio
1
Select <radio> in the main menu.
2
Turn on FM and enter FM interface.
- 61 -
www.astone.com.au
Page 62
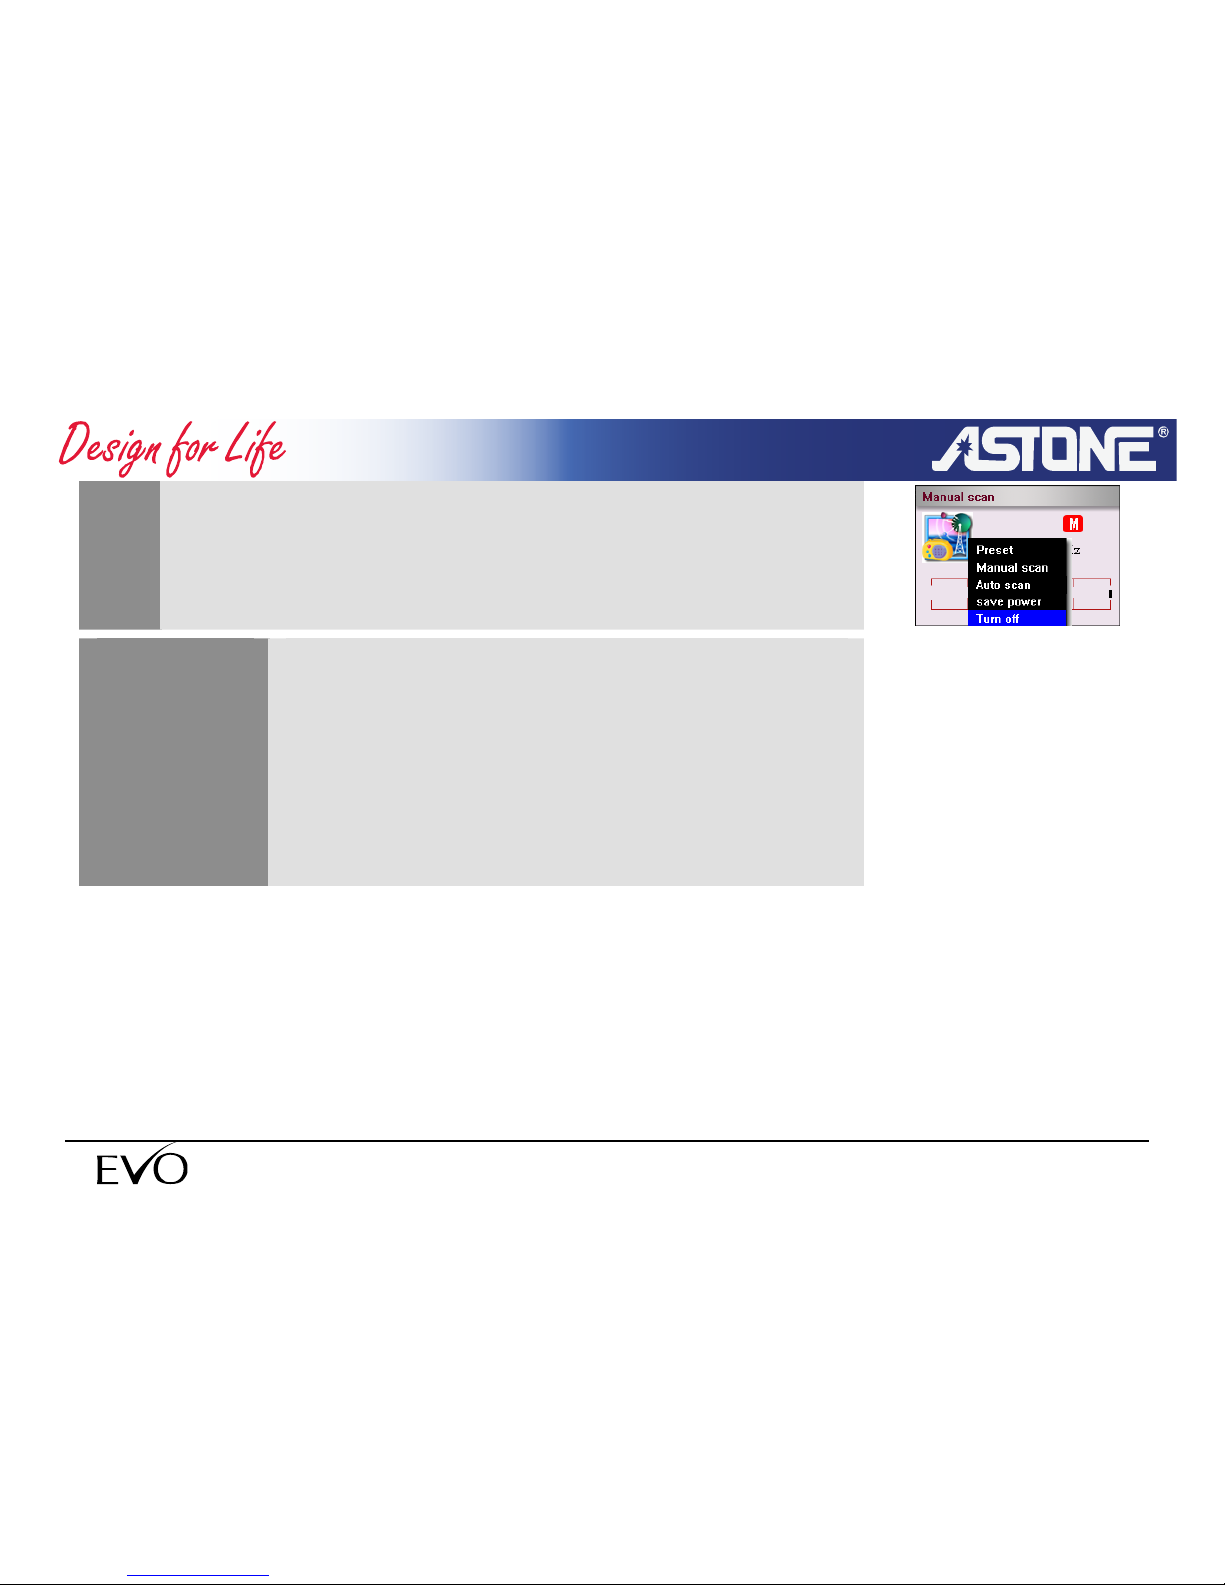
3
Press F3 button pop-up menu and select <Turn off> to turn off
the FM radio and return to the main menu.
Make sure the earphone is connecting while FM
transmitting. NOTE
FM will turn off automatically when you playing
music, recording, playing video, and browsing
photo.
- 62 -
www.astone.com.au
Page 63
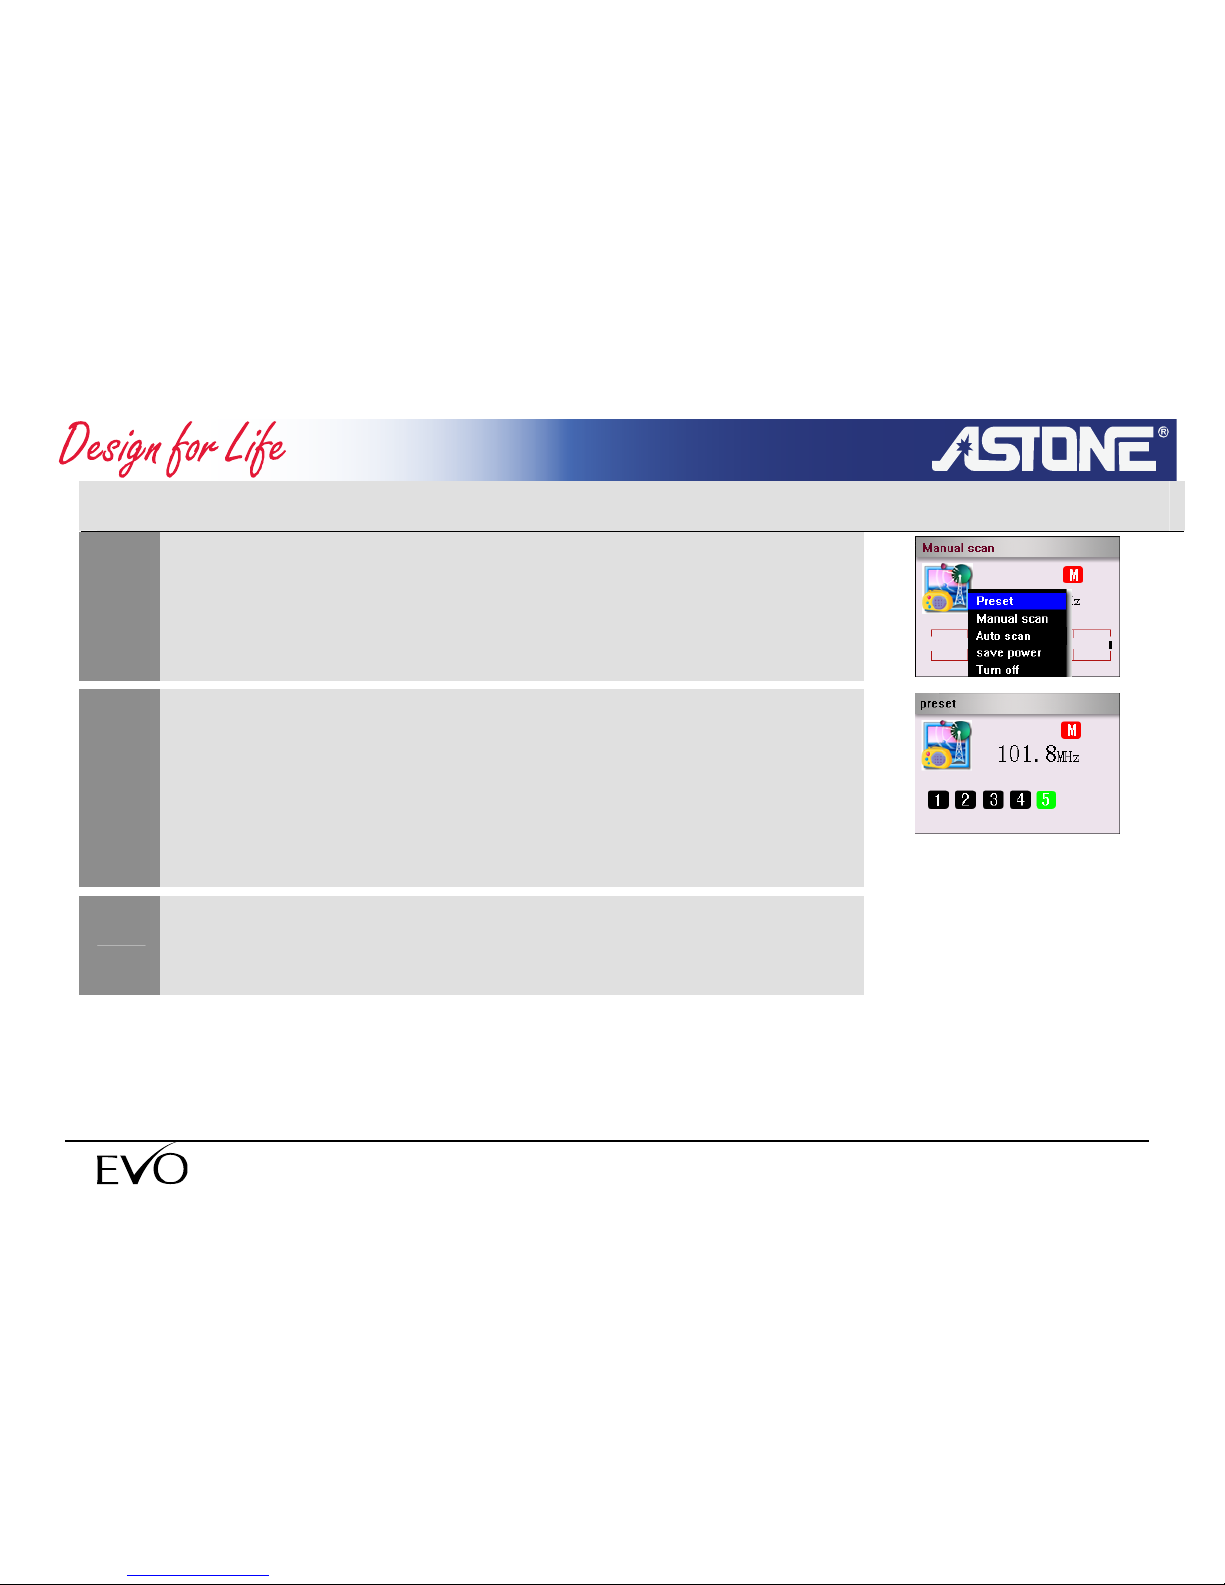
3.5.2 Scan FM station (preset)
1
Make sure FM is in preset mode.
If FM is in other modes, press F3 button popup menu and
select <Preset> confirm,
2
Press FORWARD/BACK button to skip to the last or next FM
station,
Press and hold FORWARD/BACK button to decrease/increase
the frequency
3
- 63 -
www.astone.com.au
Page 64
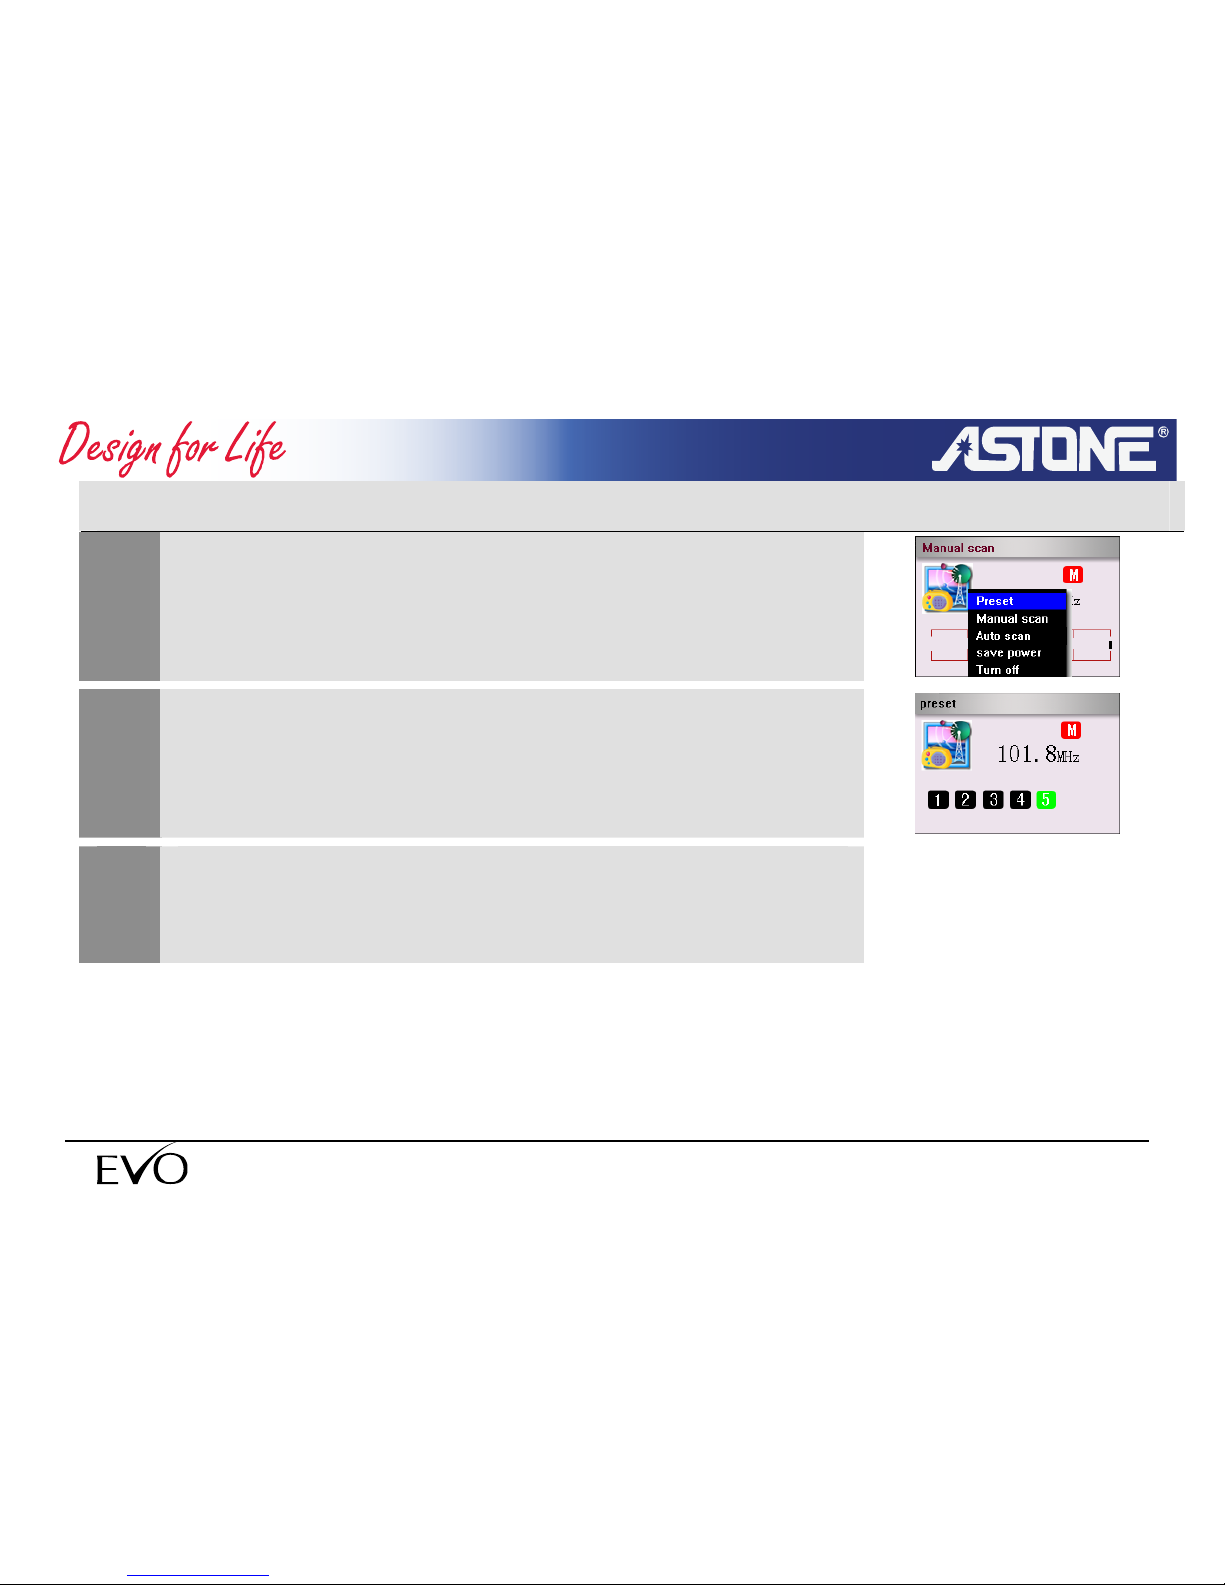
3.5.3 Auto scan radio station
1
Press F3 button popup menu in FM Radio mode.
2
Select <Auto Scan> and press OK,
Player will be to auto scan status.
3
The player will auto search all radio station and store them in
order.
- 64 -
www.astone.com.au
Page 65
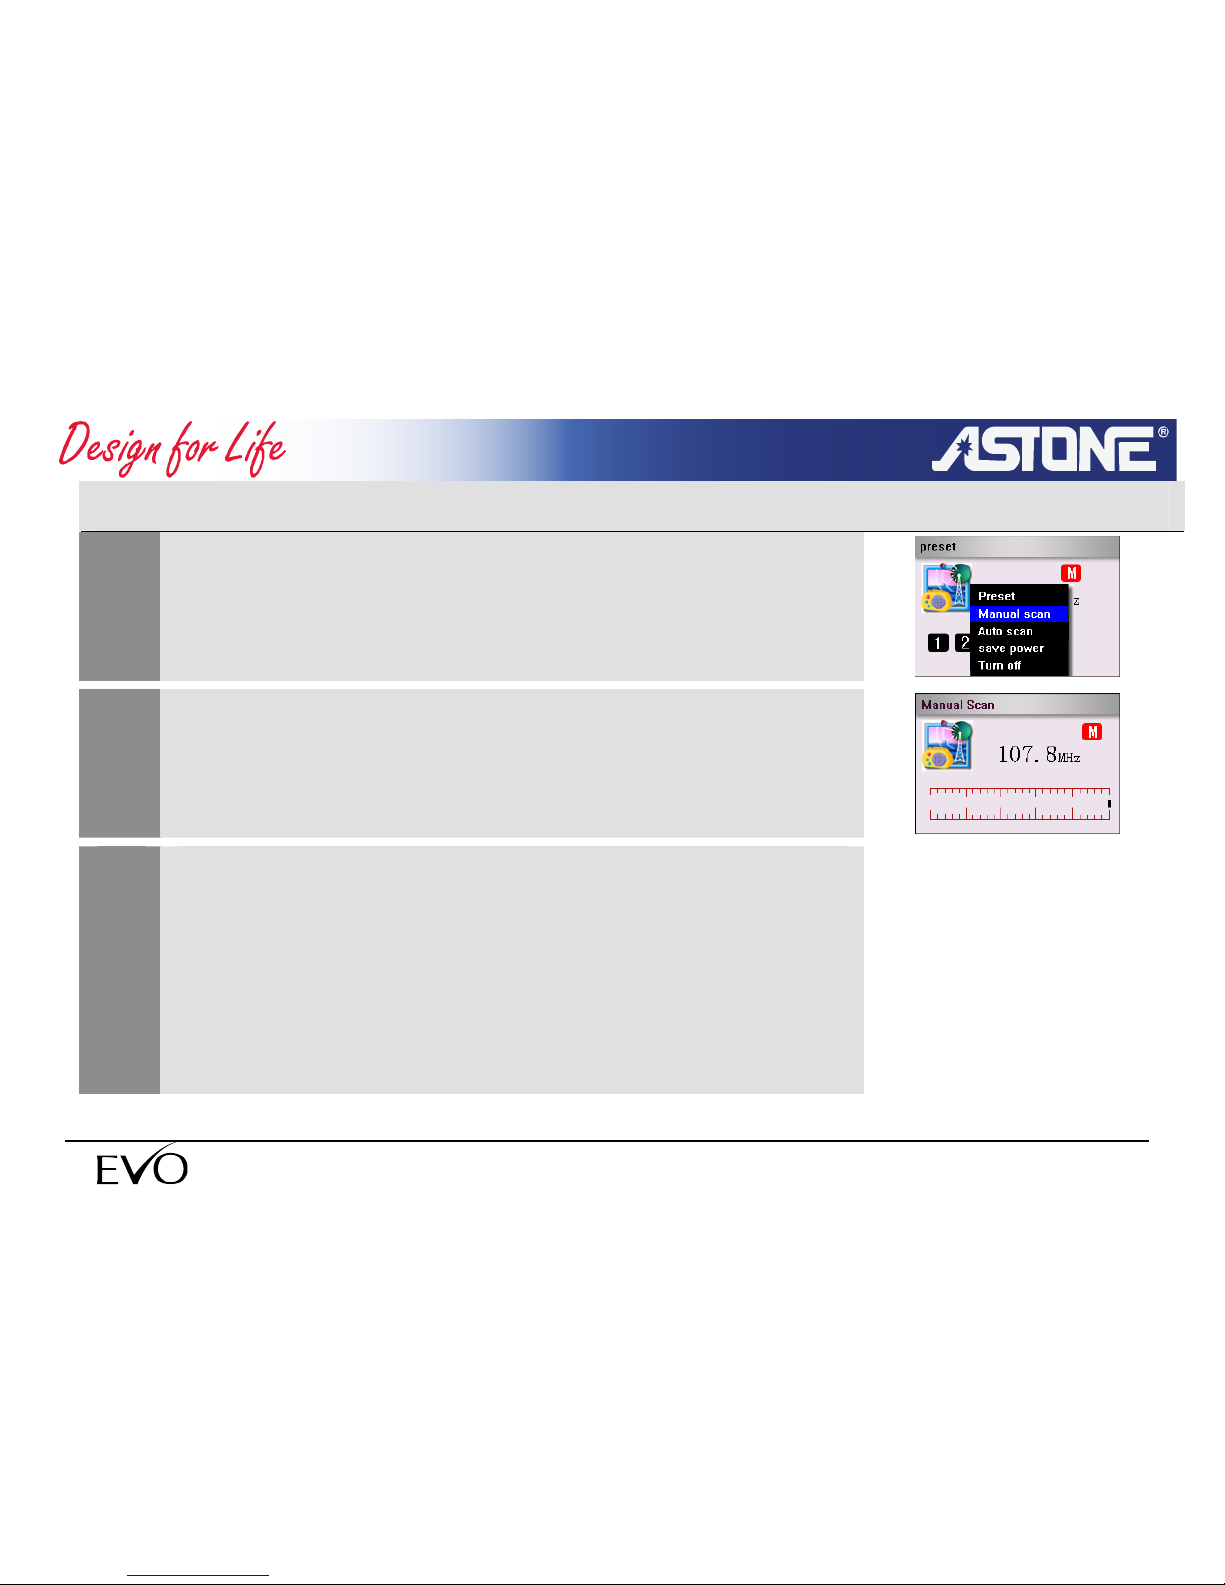
3.5.4 Manual scan radio station
1
Press F3 button popup menu in FM radio mode,
2
Select <Manual Scan> press OK to enter manual scan mode,
3
Press FORWARD/BACK button to manual scan.
Press FORWARD/BACK: decrease/increase the frequency
by 0.1 Mhz,
Press and hold FORWARD/BACK: auto scan last/next radio
station,
- 65 -
www.astone.com.au
Page 66
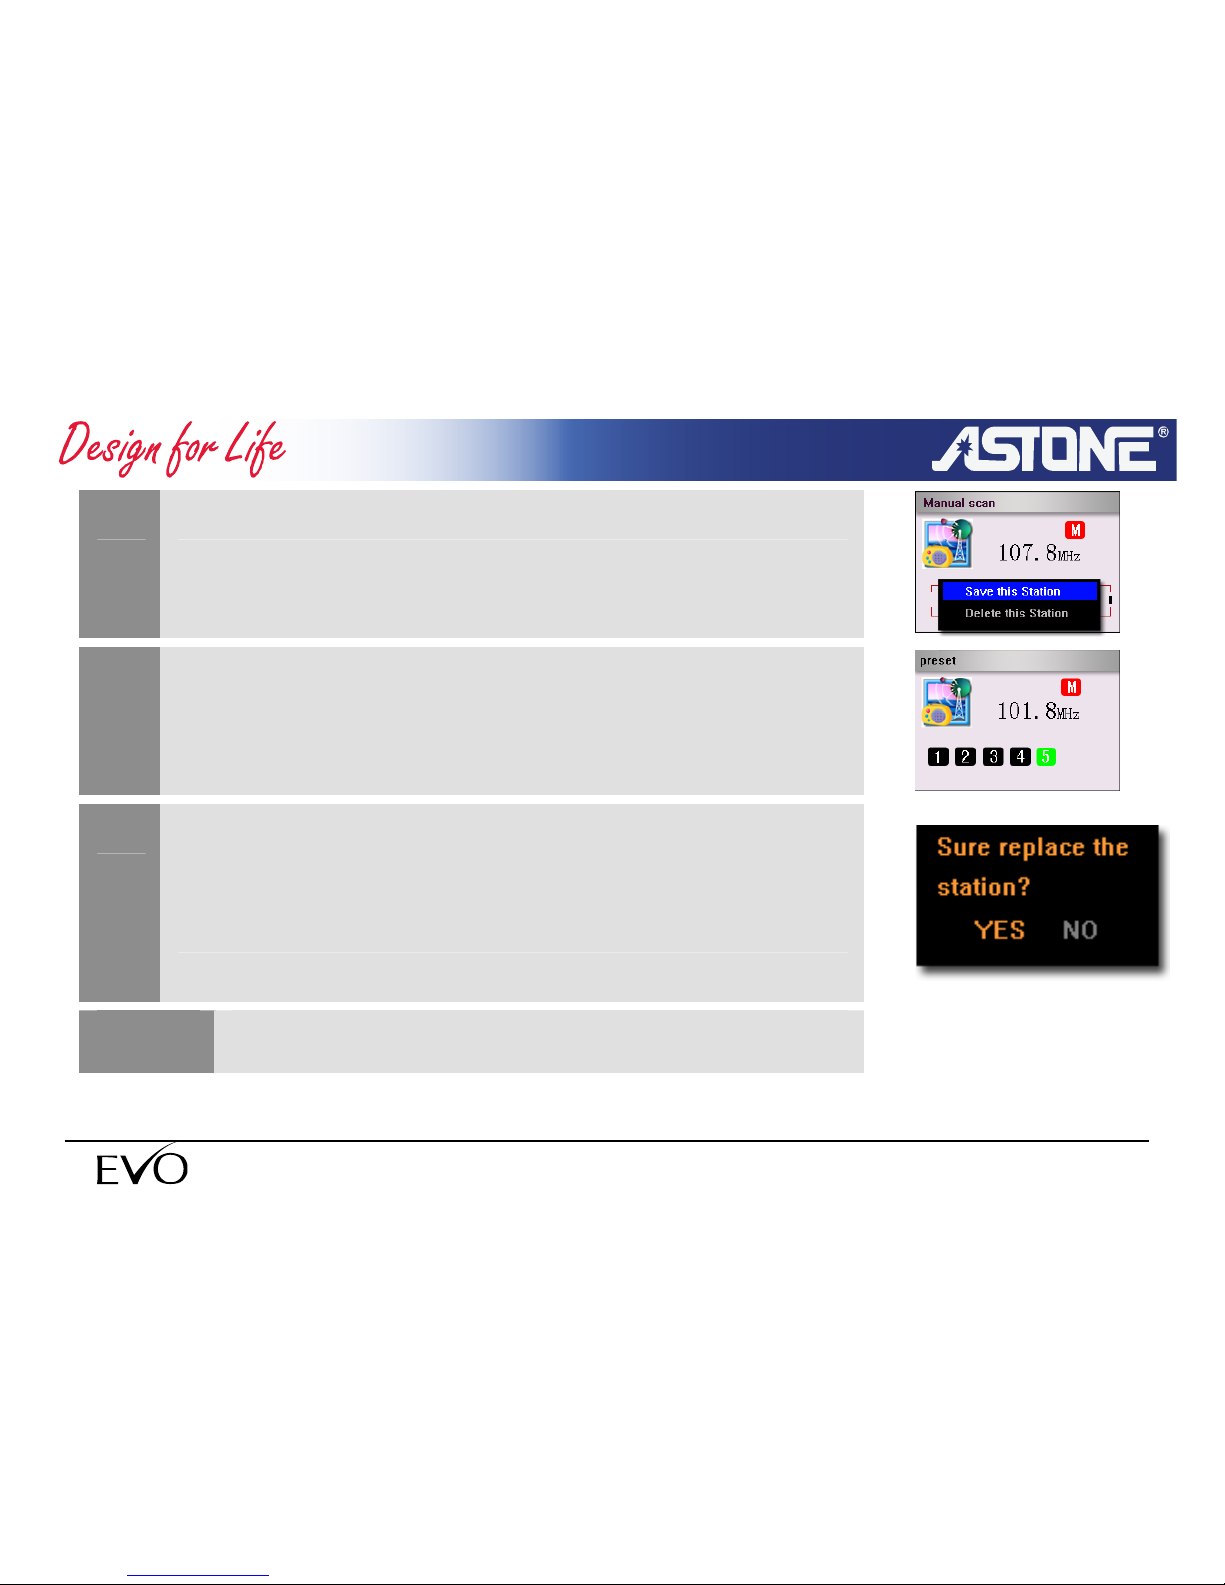
4
Press and hold F3 pop up menu, select <save>to confirm.
5
You will go into select station< NO.> window, Press
FORWARD/BACK button select the station NO..
6
Press OK to save the station.
If the current station NO. has been saved, the system will
prompt to ask if you are sure to save and press OK to confirm.
NOTE
You can save up to 20 stations.
- 66 -
www.astone.com.au
Page 67
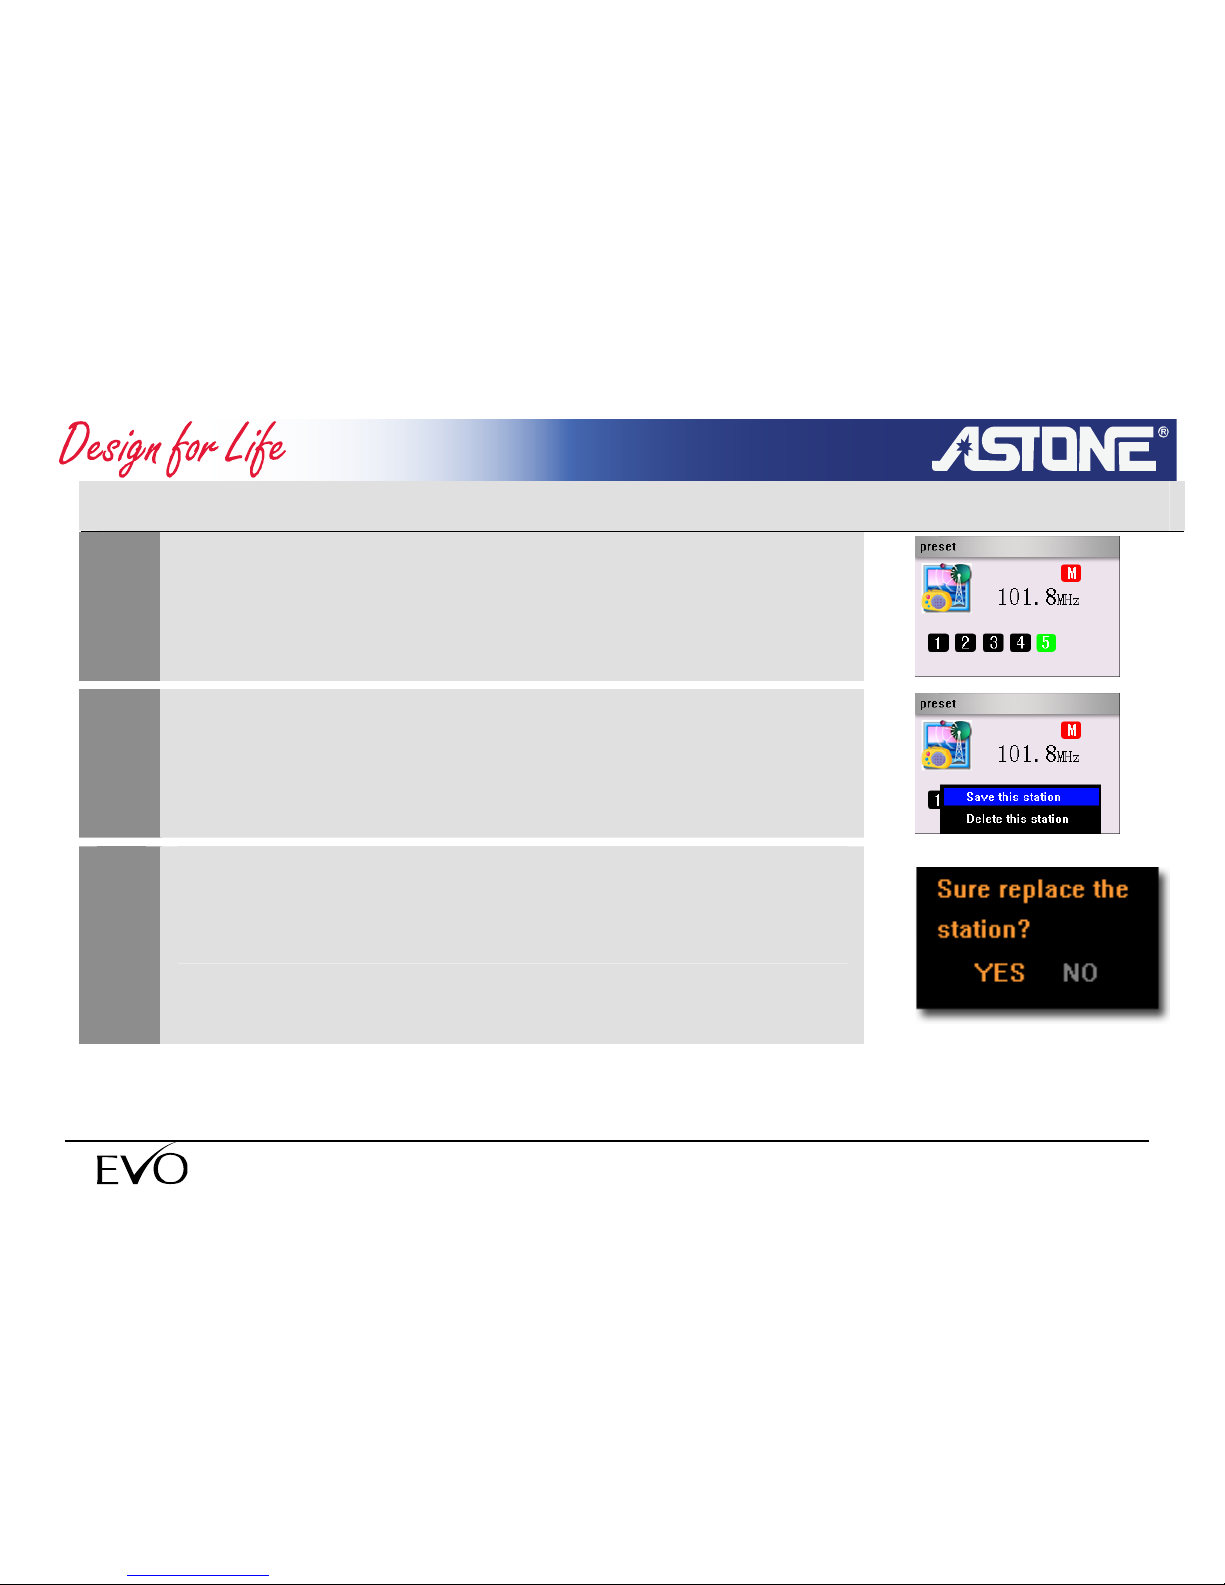
3.5.5 Delete FM station
1
Choose FM station you want delete in preset mode,
2
Press and hold F3 button to select delete this station,
3
The system will prompt to ask if you are sure to delete and
press OK to confirm.
- 67 -
www.astone.com.au
Page 68
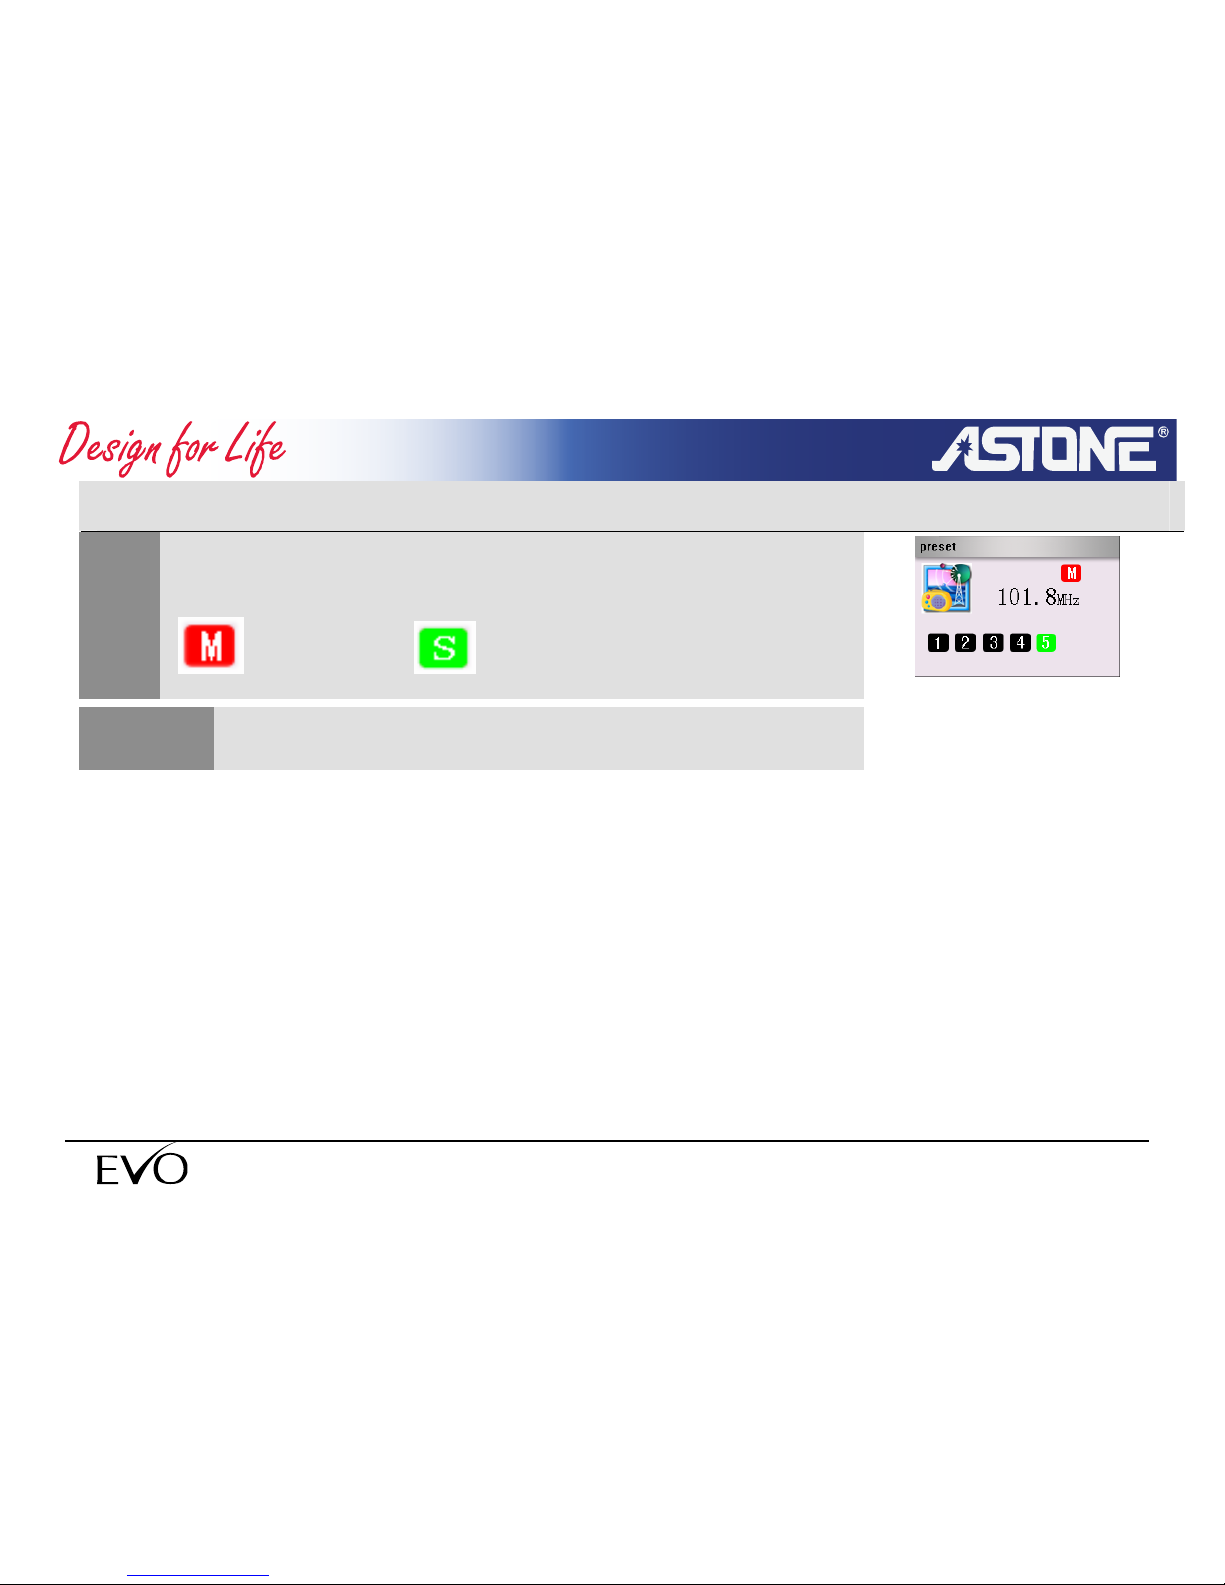
3.5.6 Mono/Stereo
Press F1 button to switch MONO/STEREO in FM radio mode.
:MONO :STEREO
1
NOTE
Recommend set MONO, radio effect can be better
- 68 -
www.astone.com.au
Page 69
- 69 -
www.astone.com.au
.5.7 FM station preset with file
1 You can store the name and the frequency of the radio station
by setting files, as following:
Firstly you need to create a file: fmname.txt and add in the
formatted frequency and the name:
[87600] station 1
[88700] station 2
[107300] station 20
While 87500 means 87.5 MHz, and “station1” is the name of
that station and it can be any name. You can name up to 20
stations.
When finished editing that file, transfer that file to <sys>
directory by USB link and restart the player.
NOTE
The setting file will not work when the <auto scan> or
<manual scan> is selected.
You need to restart the player to use the setting file.
Page 70
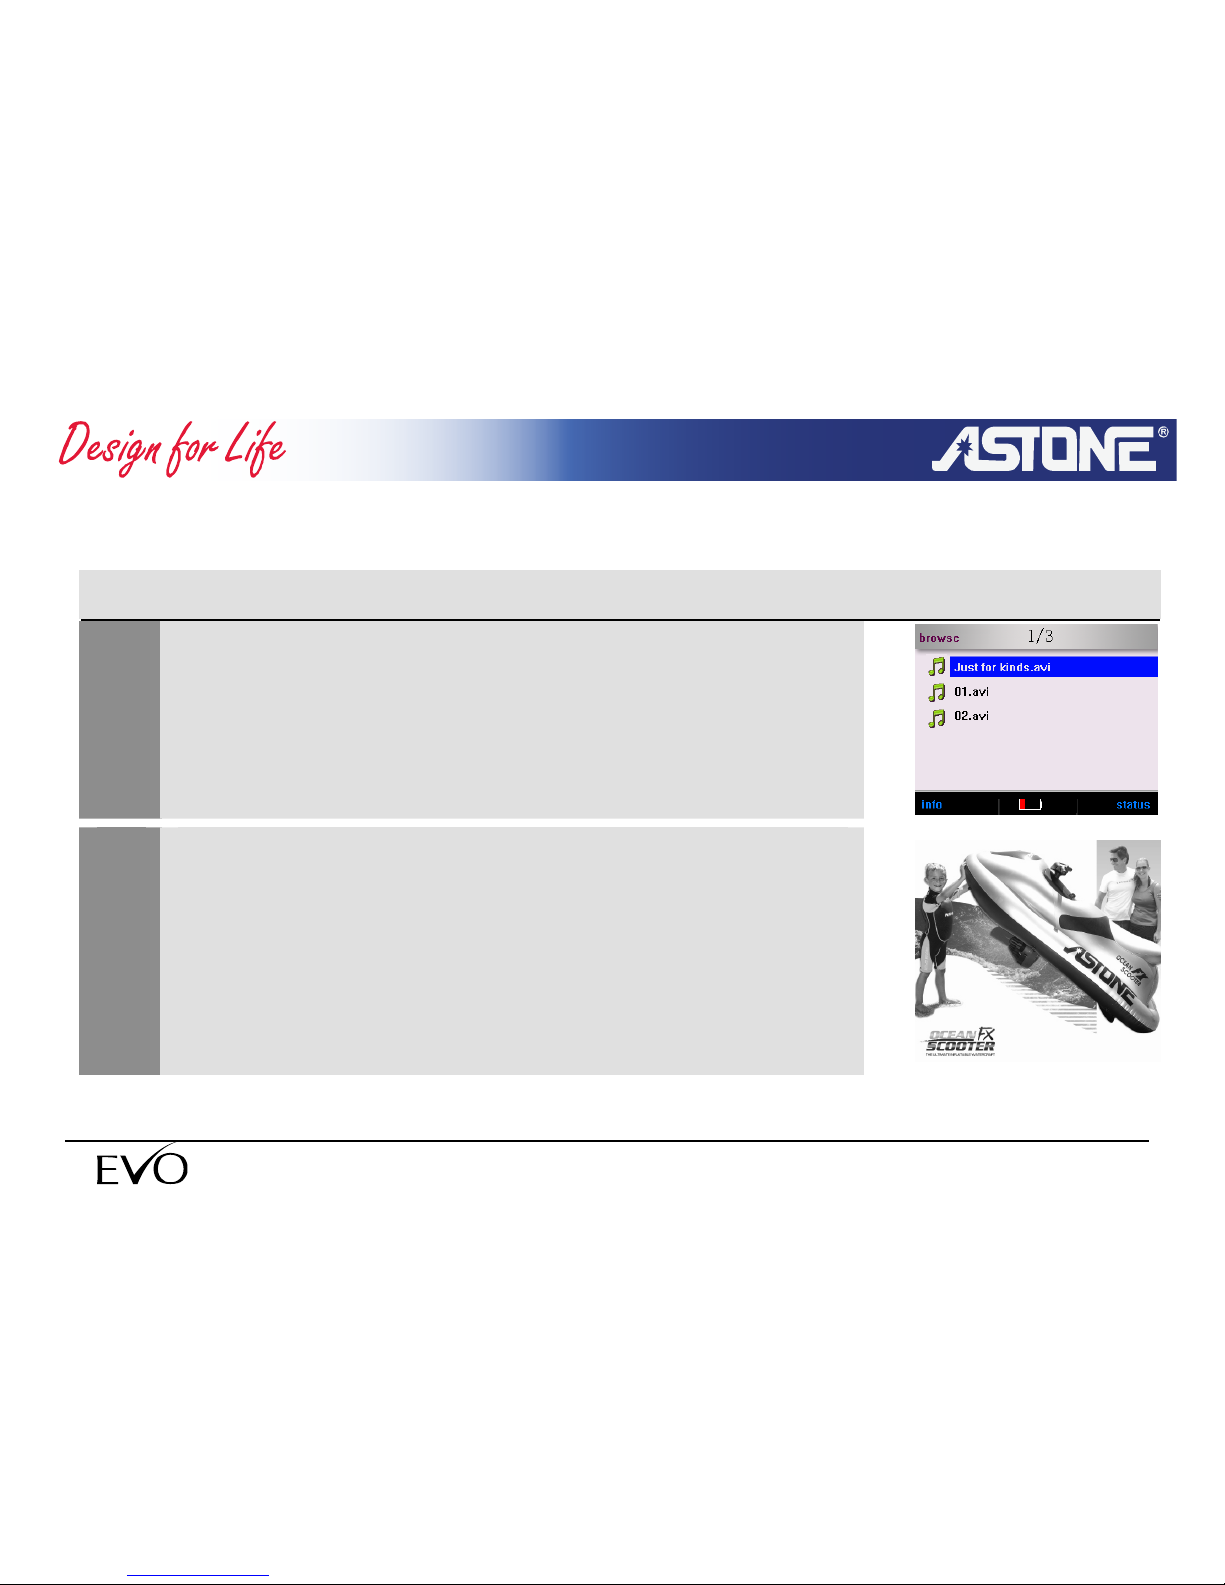
3.6 Video play
3.6.1 Play a video
1
Select video file you want to play in the browser.
2
Press OK button begin play video,
- 70 -
www.astone.com.au
Page 71
The extension file name of the video files is AVI and
they are XVID encoding.
- 71 -
www.astone.com.au
NOTE
You can use the video convert software to convert
(e.g RMVB/WMV/RM/ASF/AVI) different formats in
PC.
3.6.2 Operation in video play
1
Pause video play
Page 72
- 72 -
www.astone.com.au
Press PLAY/PAUSE button to pause while playing video.
The system displays time information <current time/ total
duration> on the right corner.
Press PLAY/PAUSE button again to continue.
2
Fast forward/ reverse
Page 73
- 73 -
www.astone.com.au
NOTE The extension file name of the video files is AVI and
they are XVID encoding.
You can use the video convert software to convert
(e.g RMVB/WMV/RM/ASF/AVI) different formats in
PC.
3.7 Game
3.7.1 Start game
1
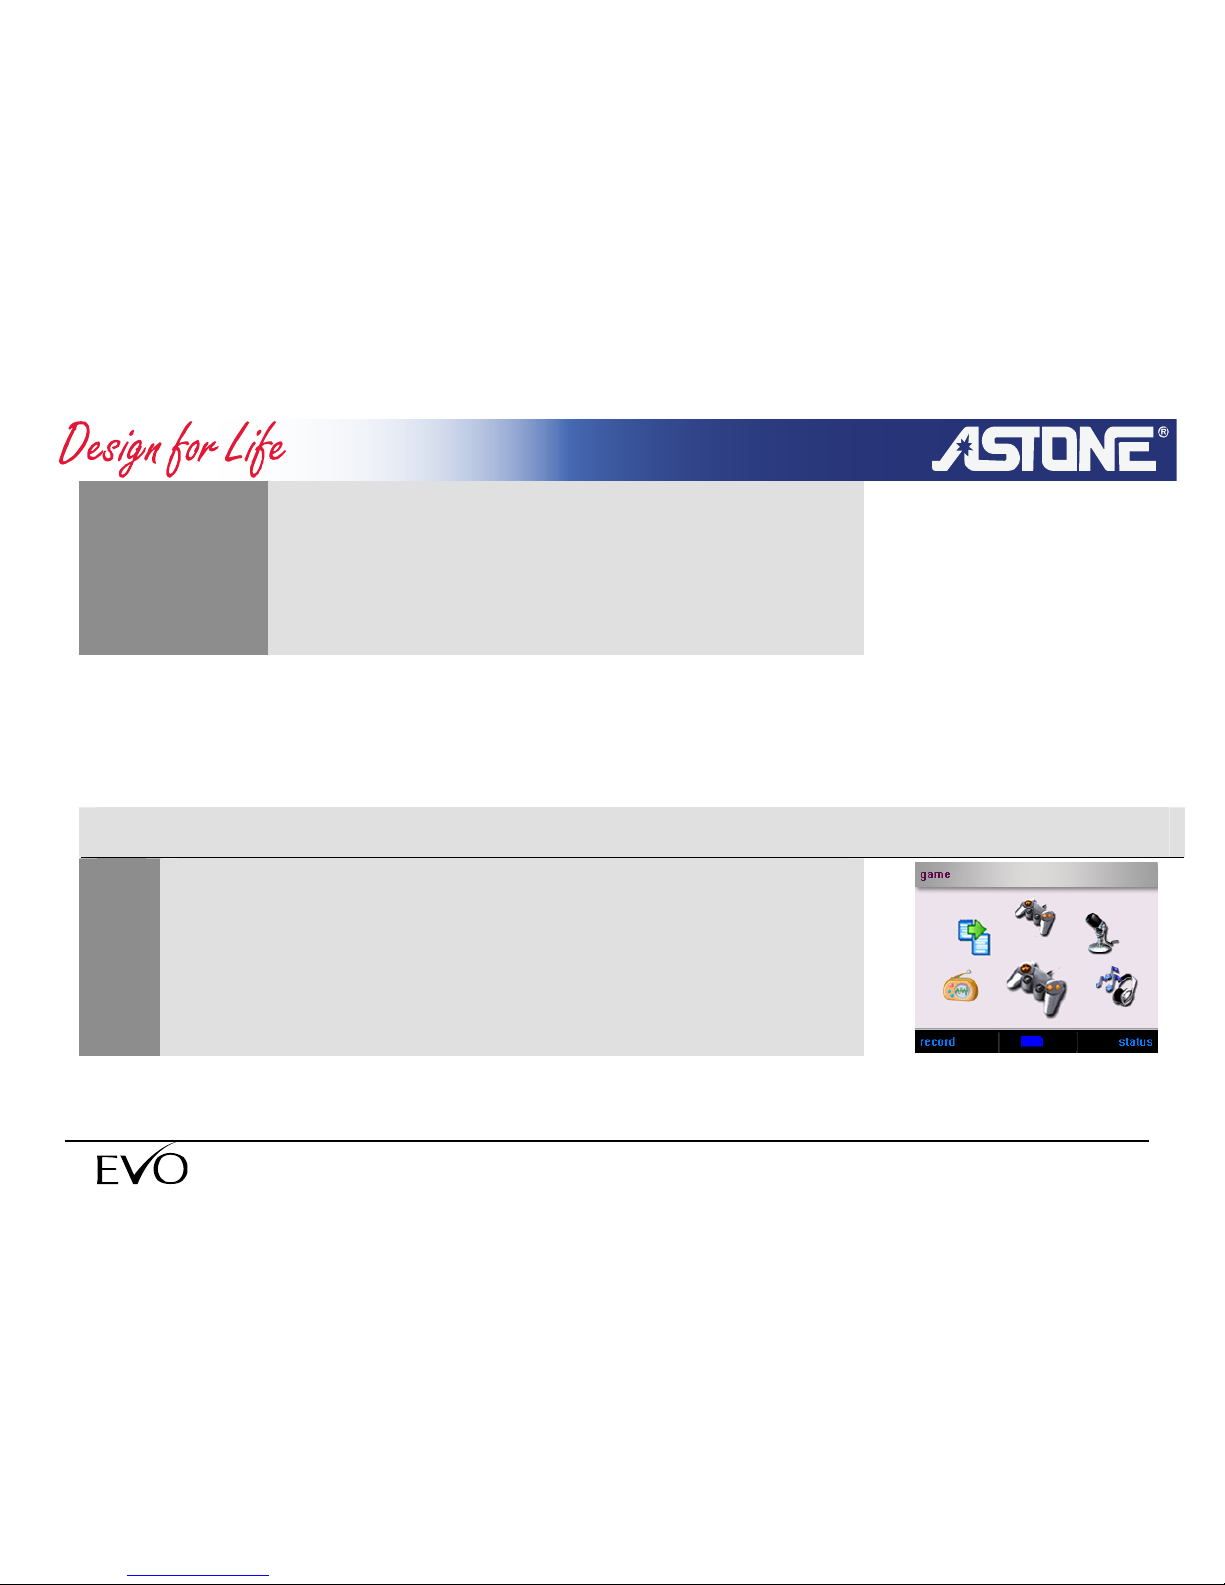
Select <game> in main menu,
Page 74
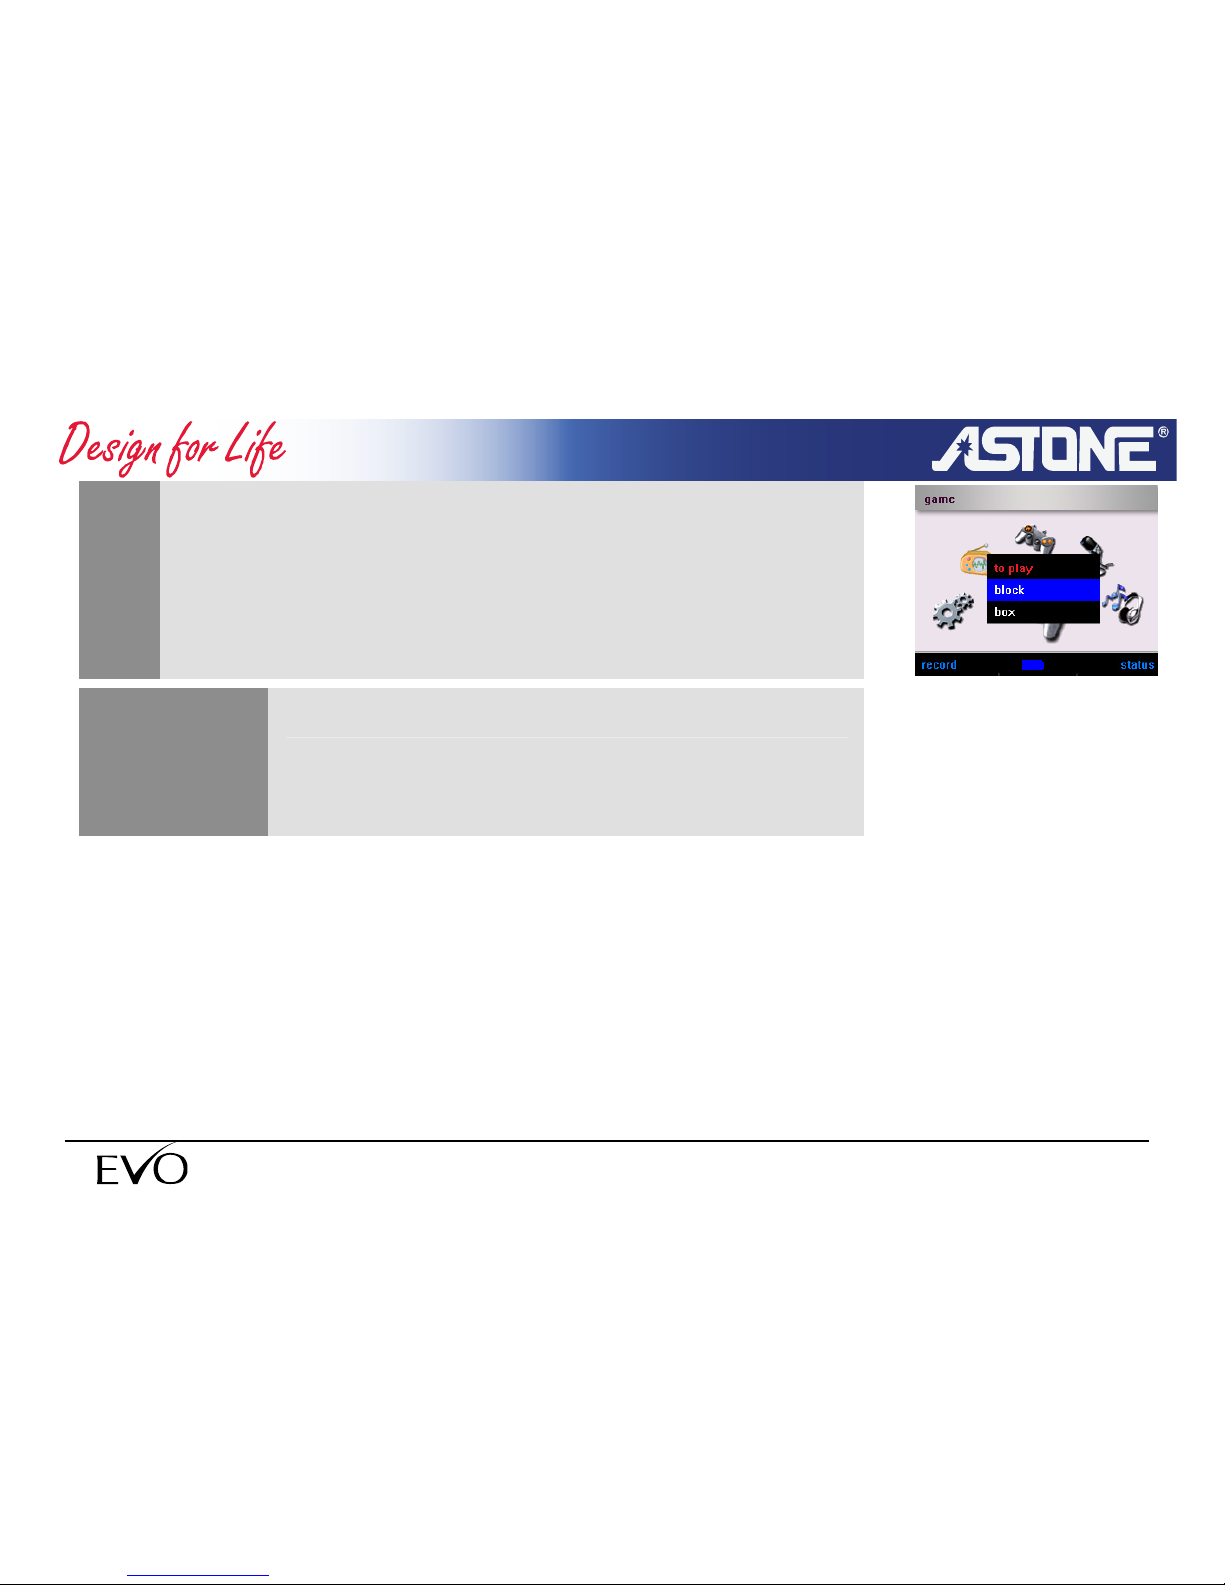
2
Press OK popup the games menu and select the game you
want to play and press OK to enter game.
Two games are built-in: block and box.
NOTE
- 74 -
www.astone.com.au
Page 75
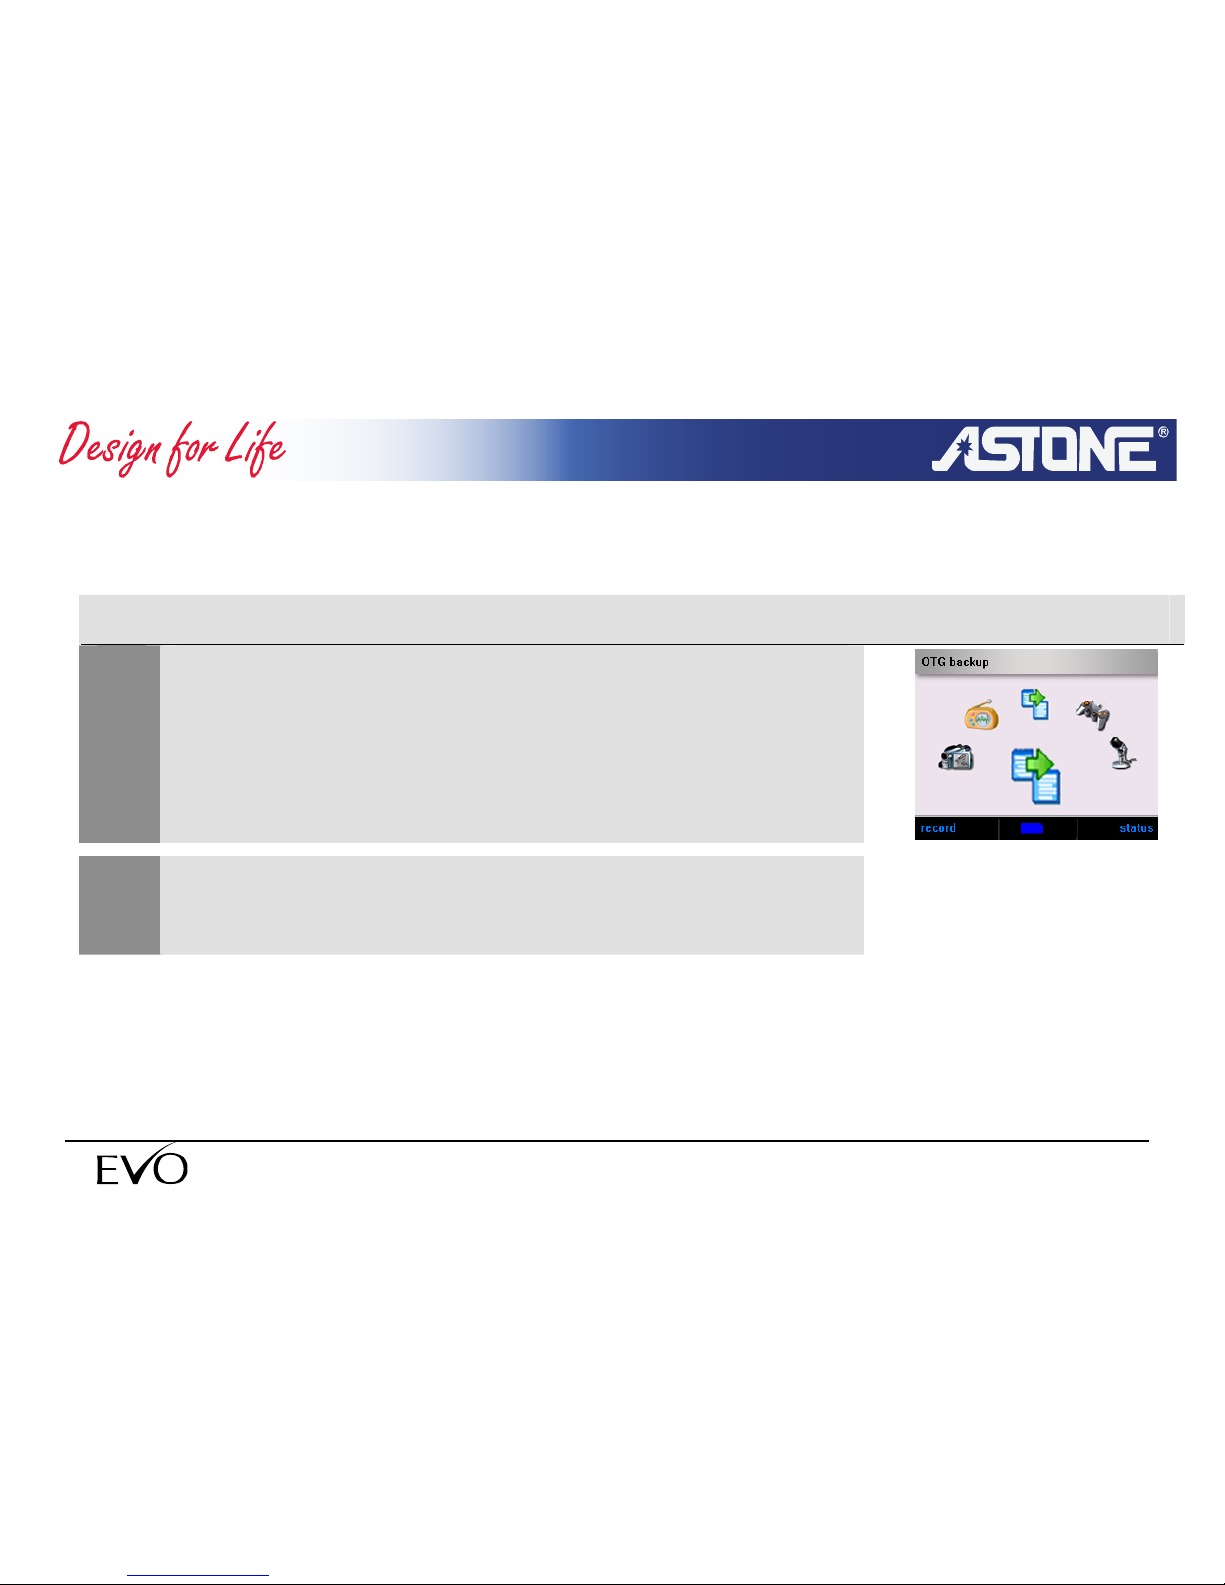
3.8 Digital partner(USB Host)
3.8.1 Enter digital partner function
1
Firstly please connect the storage devices that supports UMS
protocol, like digital camera, flash disk, card reader to USB host
port by the cable, and select <digital partner > in the main
menu.
Press <OK> to begin digital partner function.
2
- 75 -
www.astone.com.au
Page 76
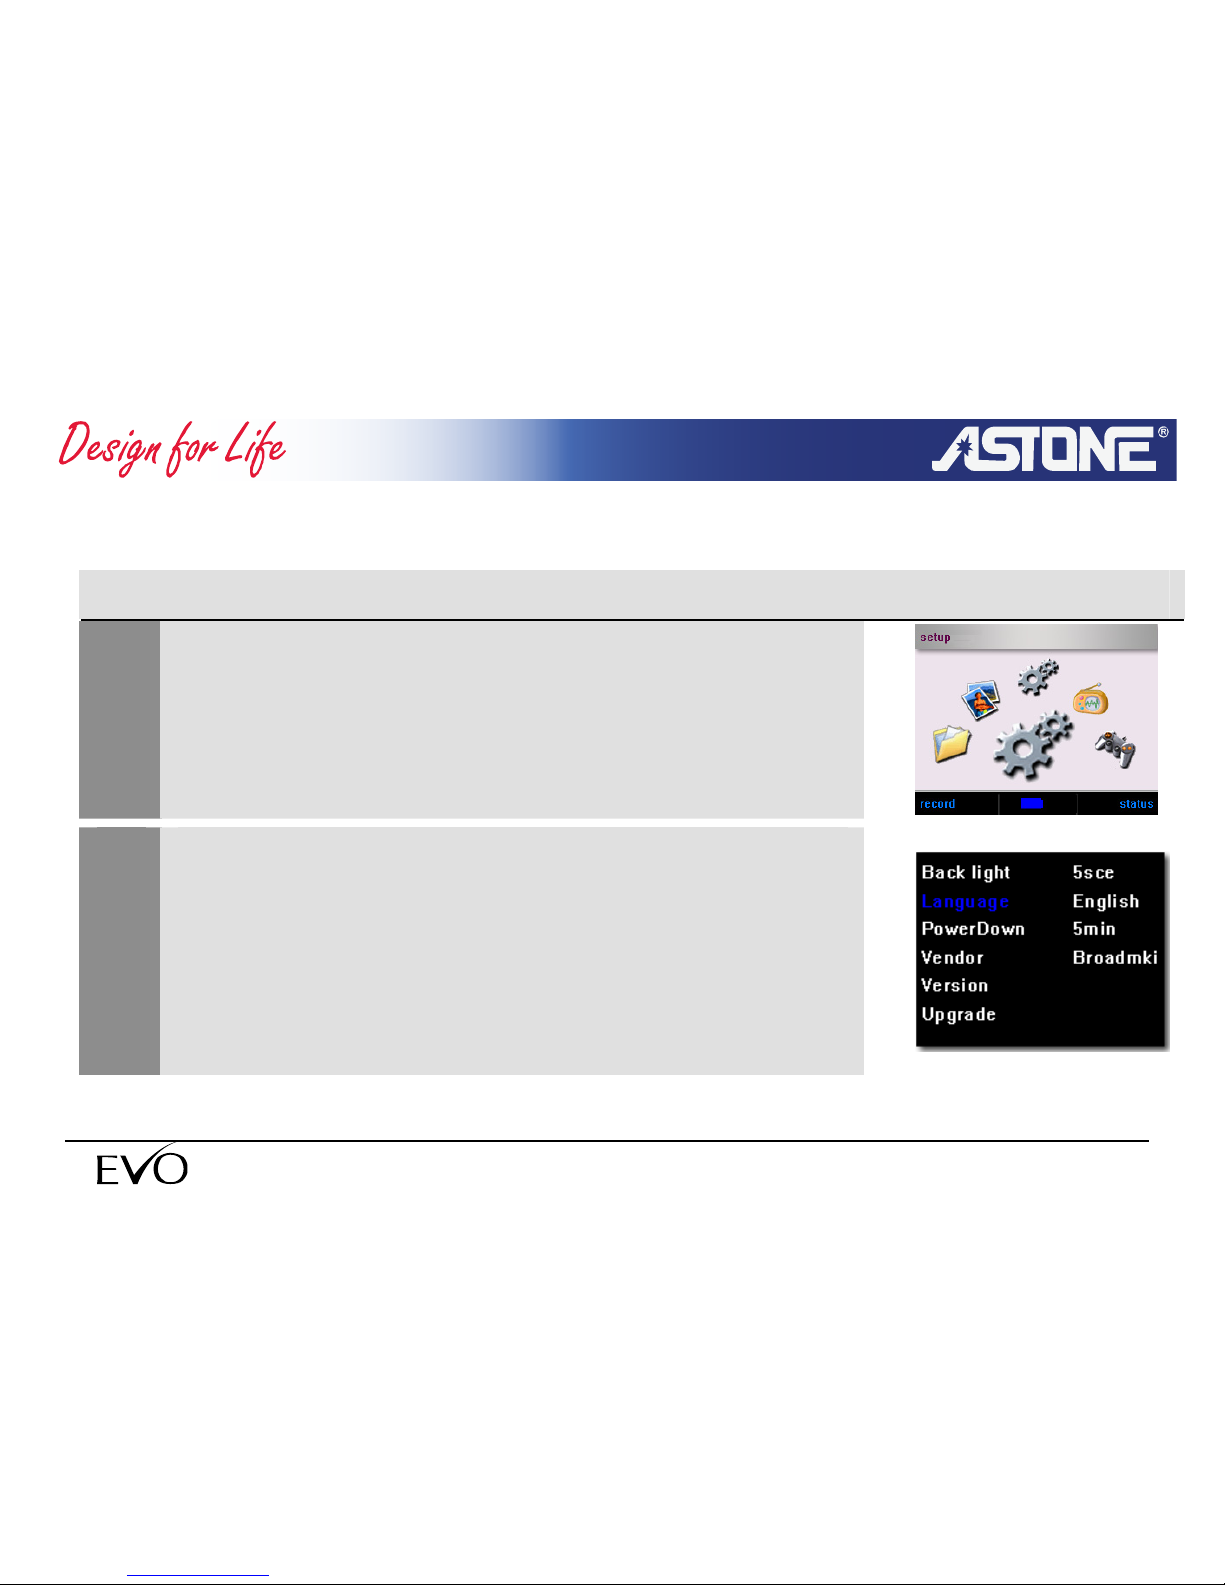
3.9 Parameter setup
3.9.1 Enter parameter setup
1
Select <setup> in main menu.
2
Press OK button enter the setup windows.
- 76 -
www.astone.com.au
Page 77
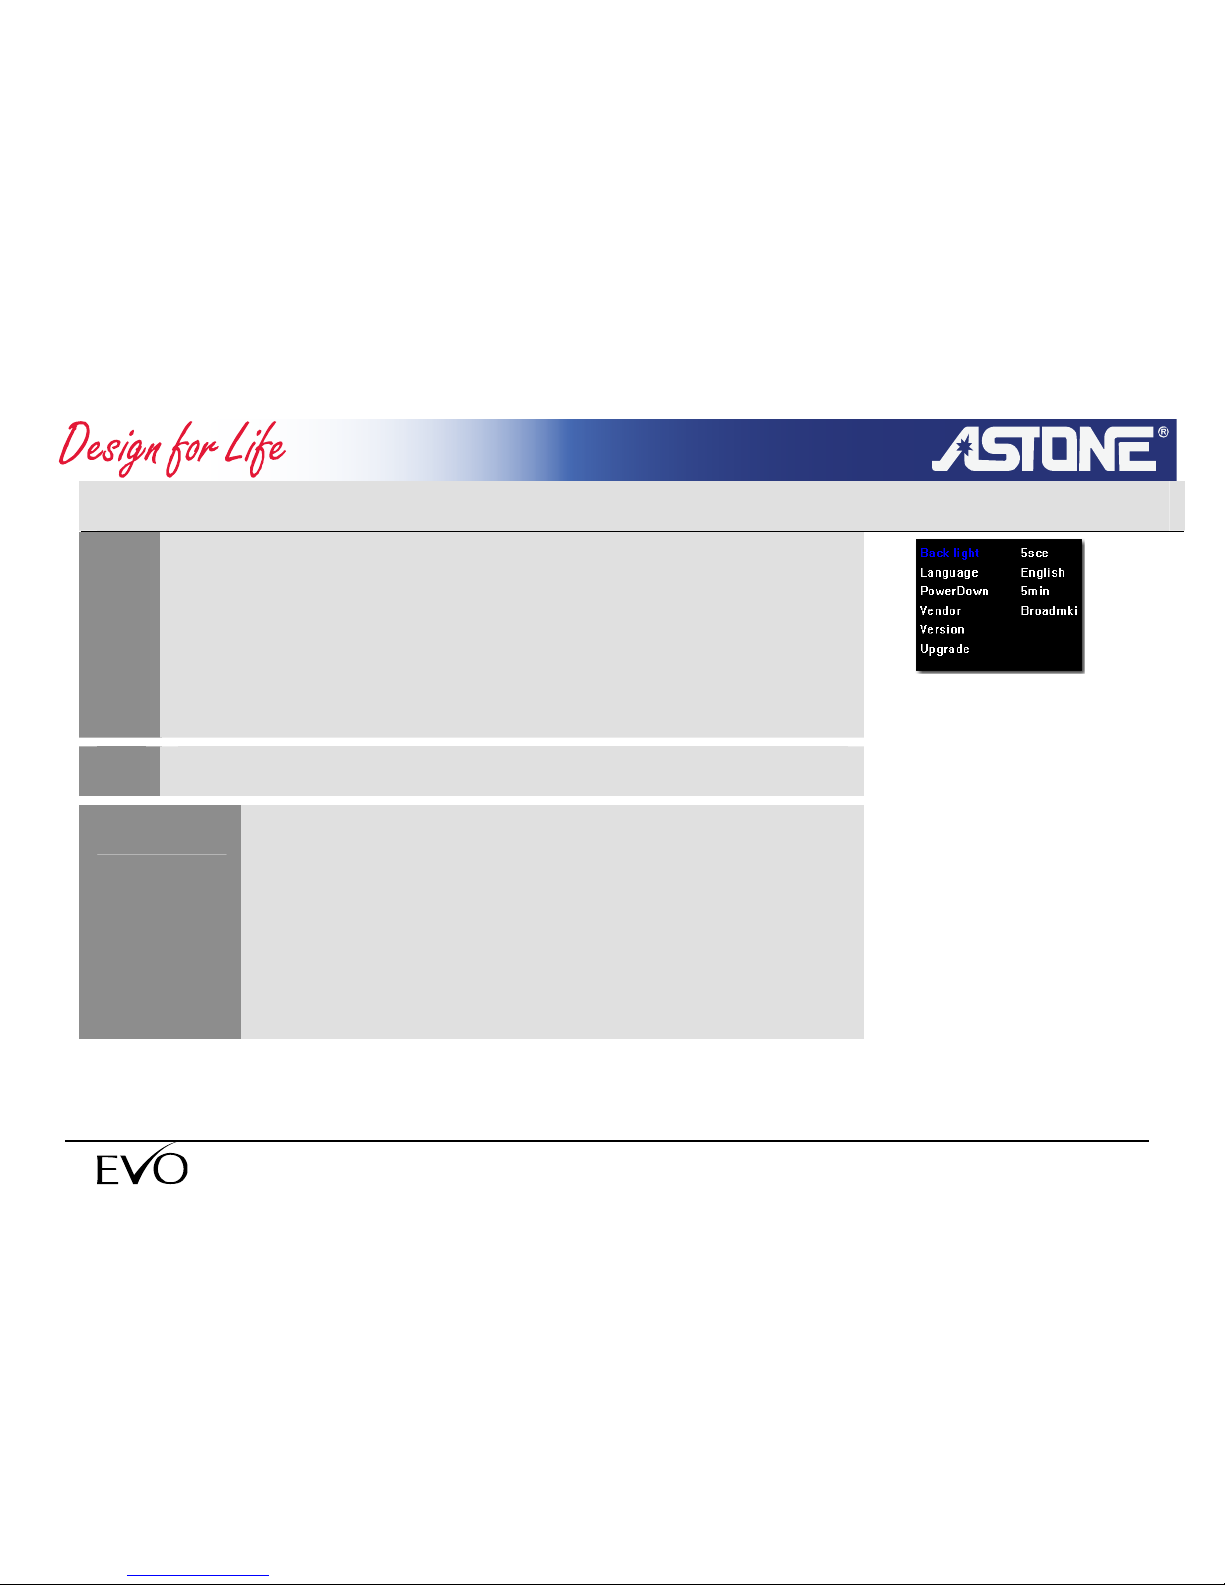
3.9.2 Backlight setup
1
Use arrow button to select <backlight setup> in backlight setup
windows.
<volume+>: move up
<volume->: move down
2
Use FORWARD/BACK button to set parameter value.
Set backlight delay time to low, can extend battery use
time.
- 77 -
www.astone.com.au
NOTE
Set value: off / 5sec / 10sec / 20sec / 30sec / 1min /
2min / 5min / keep on
Page 78
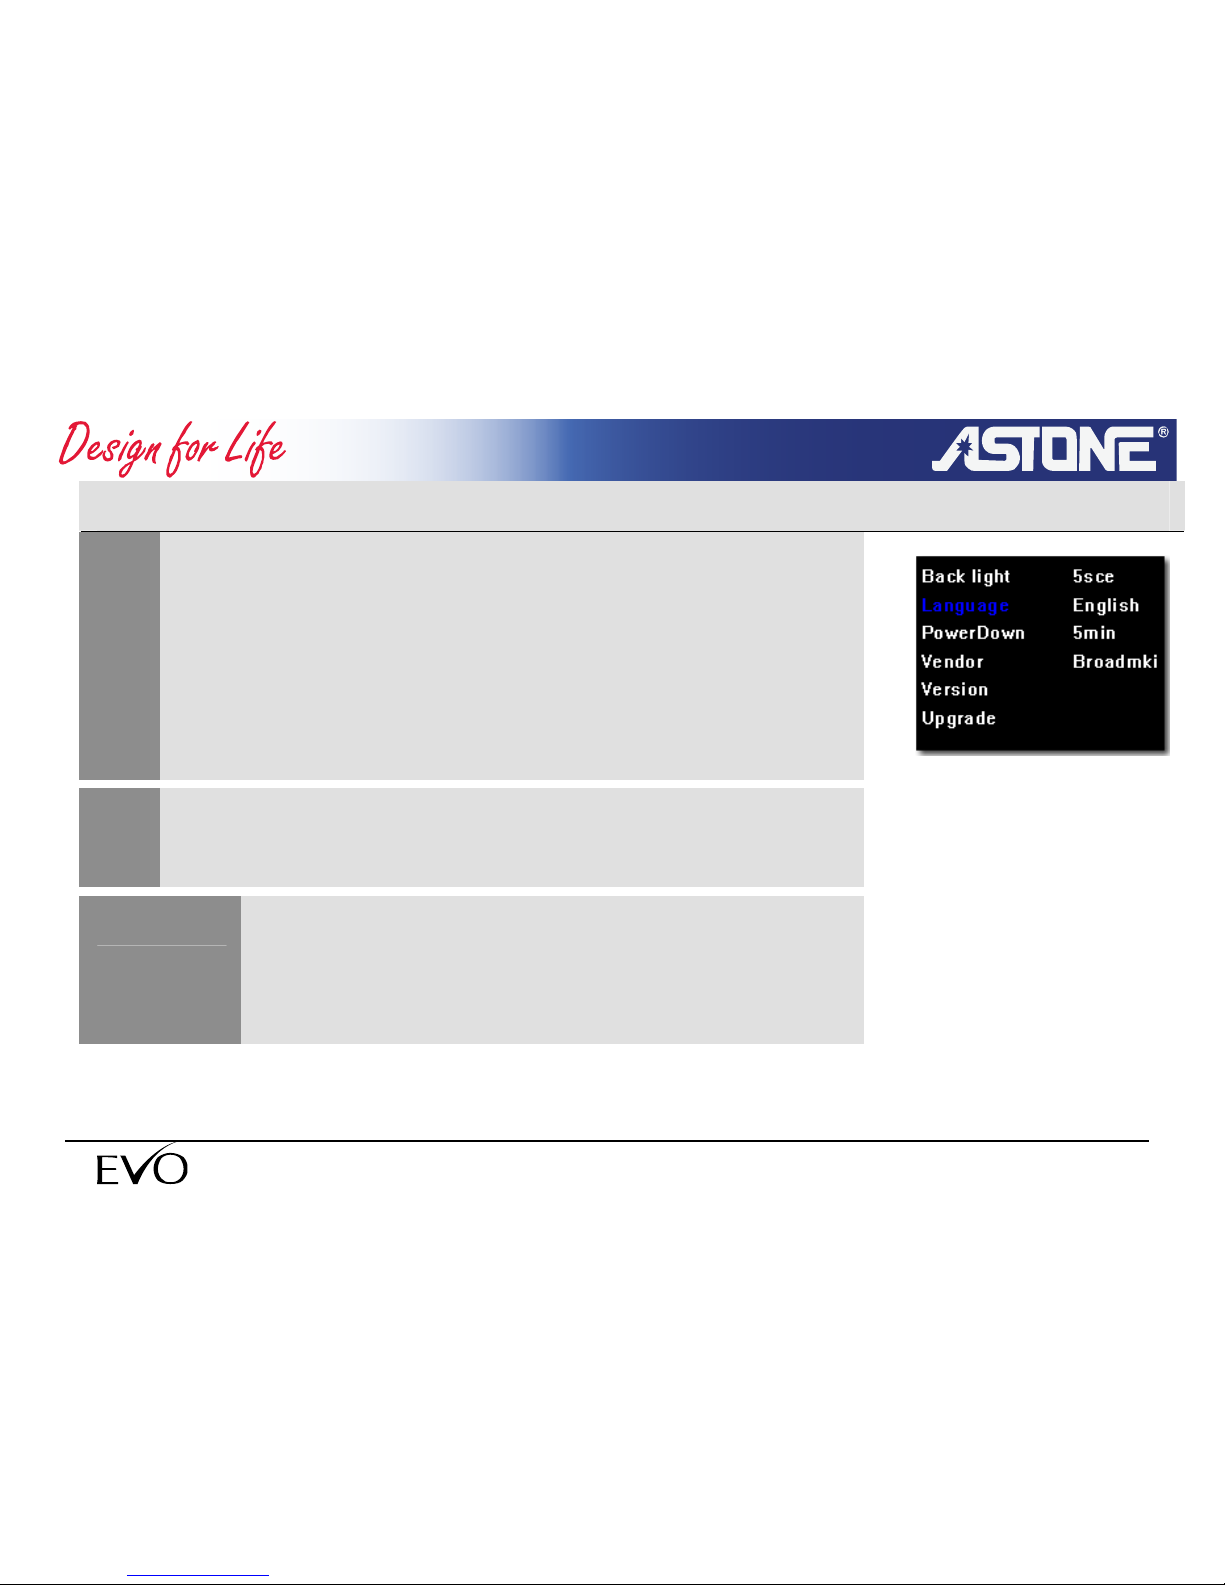
3.9.3 Language setup
1
Use arrow button to select <language setup> in backlight setup
windows.
<volume+>: move up
<volume->: move down
2
Use FORWARD/BACK button set parameter value.
NOTE
The player support multi languages , including
Chinese, English , French, German, Spanish,
Italian and Dutch etc.
- 78 -
www.astone.com.au
Page 79
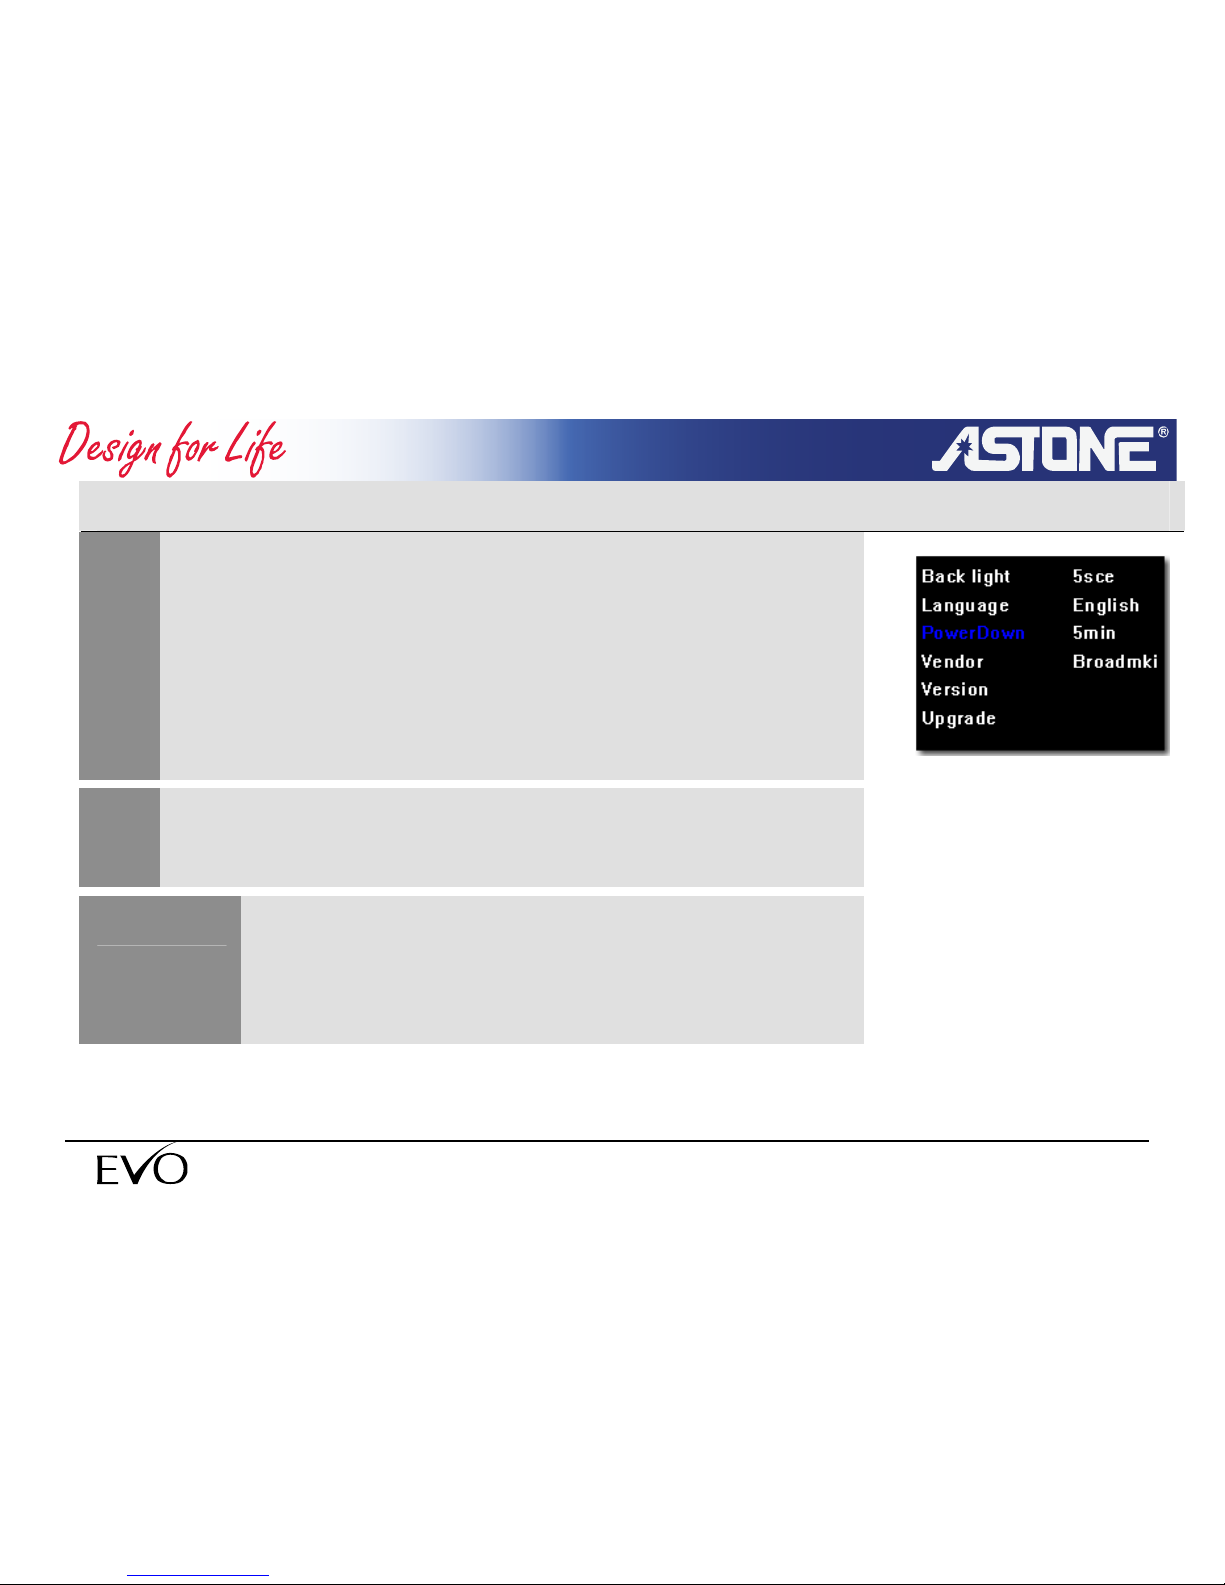
3.9.4 Power off
Use arrow button to select POWER OFF in backlight setup
windows.
1
<volume+> move up
<volume-> move down
2
Use FORWARD/BACK button set parameter value.
Set delay time to power off automatically when no
operation
Set value: never / 1min / 2min / 5min
NOTE
- 79 -
www.astone.com.au
Page 80
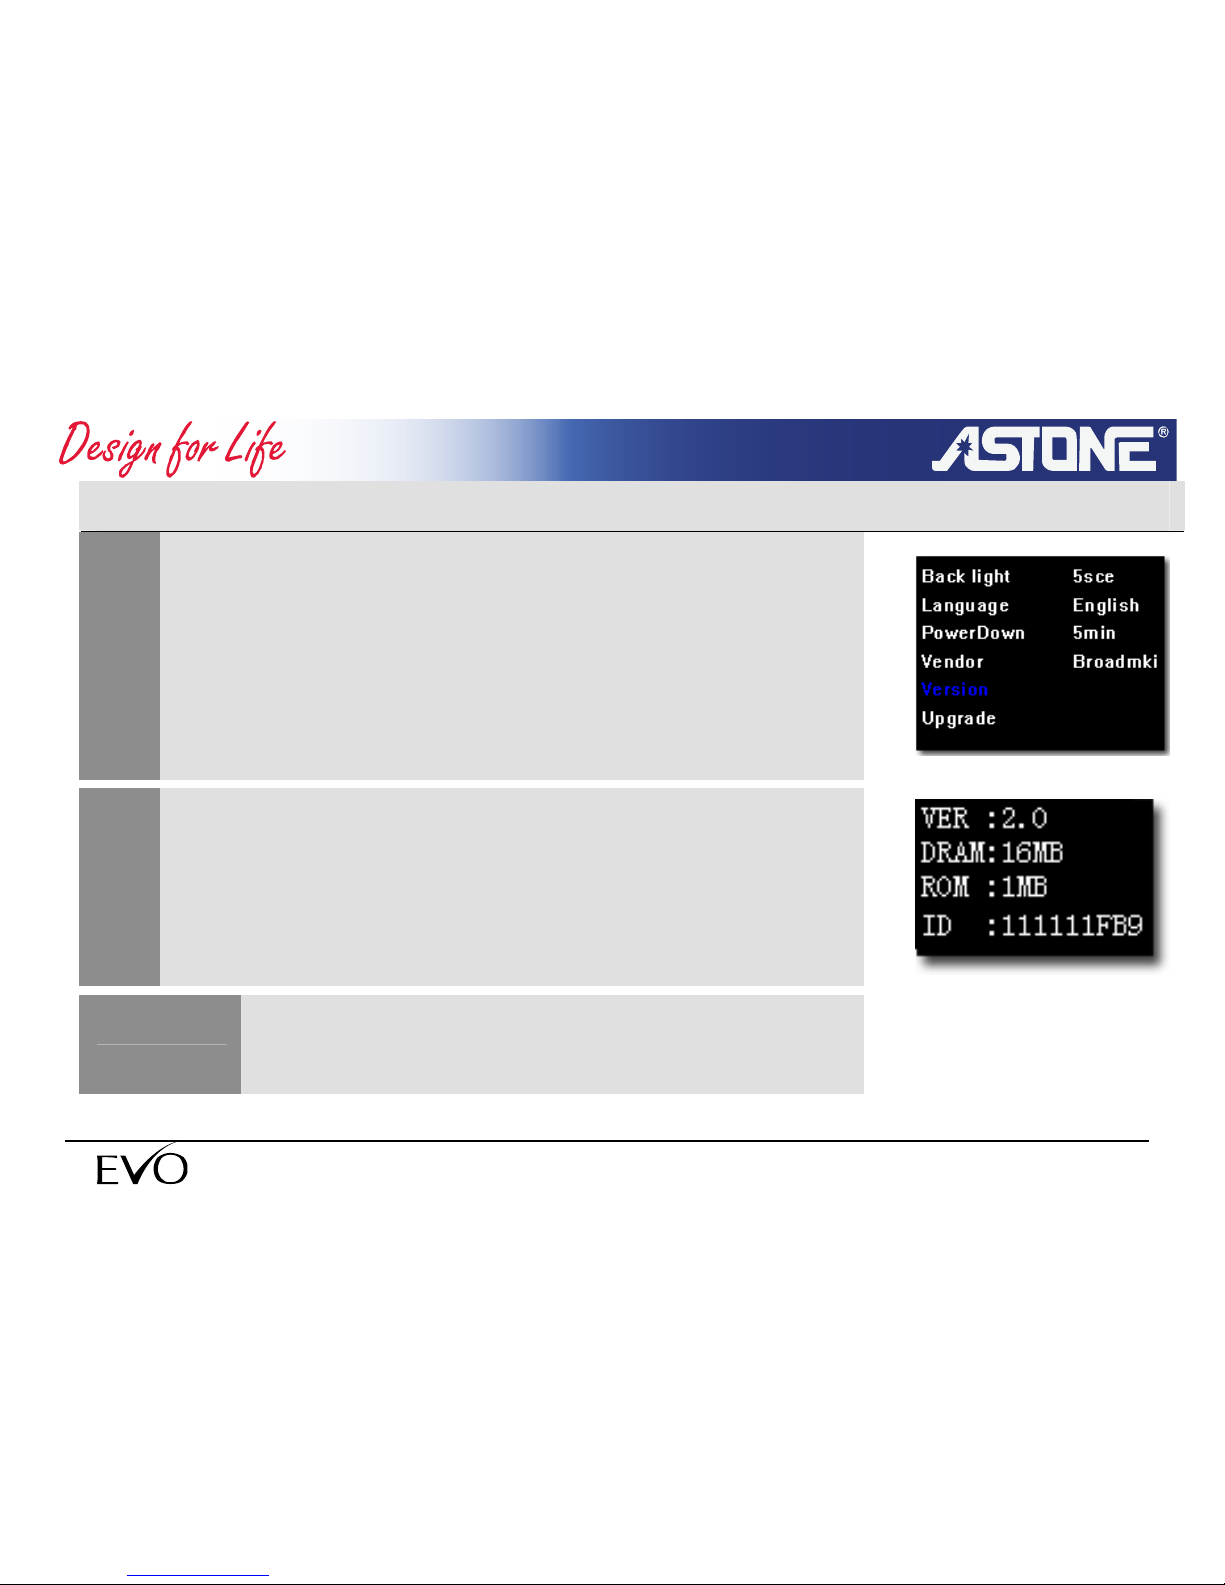
3.9.5 Version information
1
Use arrow button to select VERSION INFO in backlight setup
windows.
<volume+> move up
<volume-> move down
2
Press <OK> pop up VERSION INFO dialog box.
NOTE
Version information contains version number, size
or delay memory, ROM space and ID number.
- 80 -
www.astone.com.au
Page 81
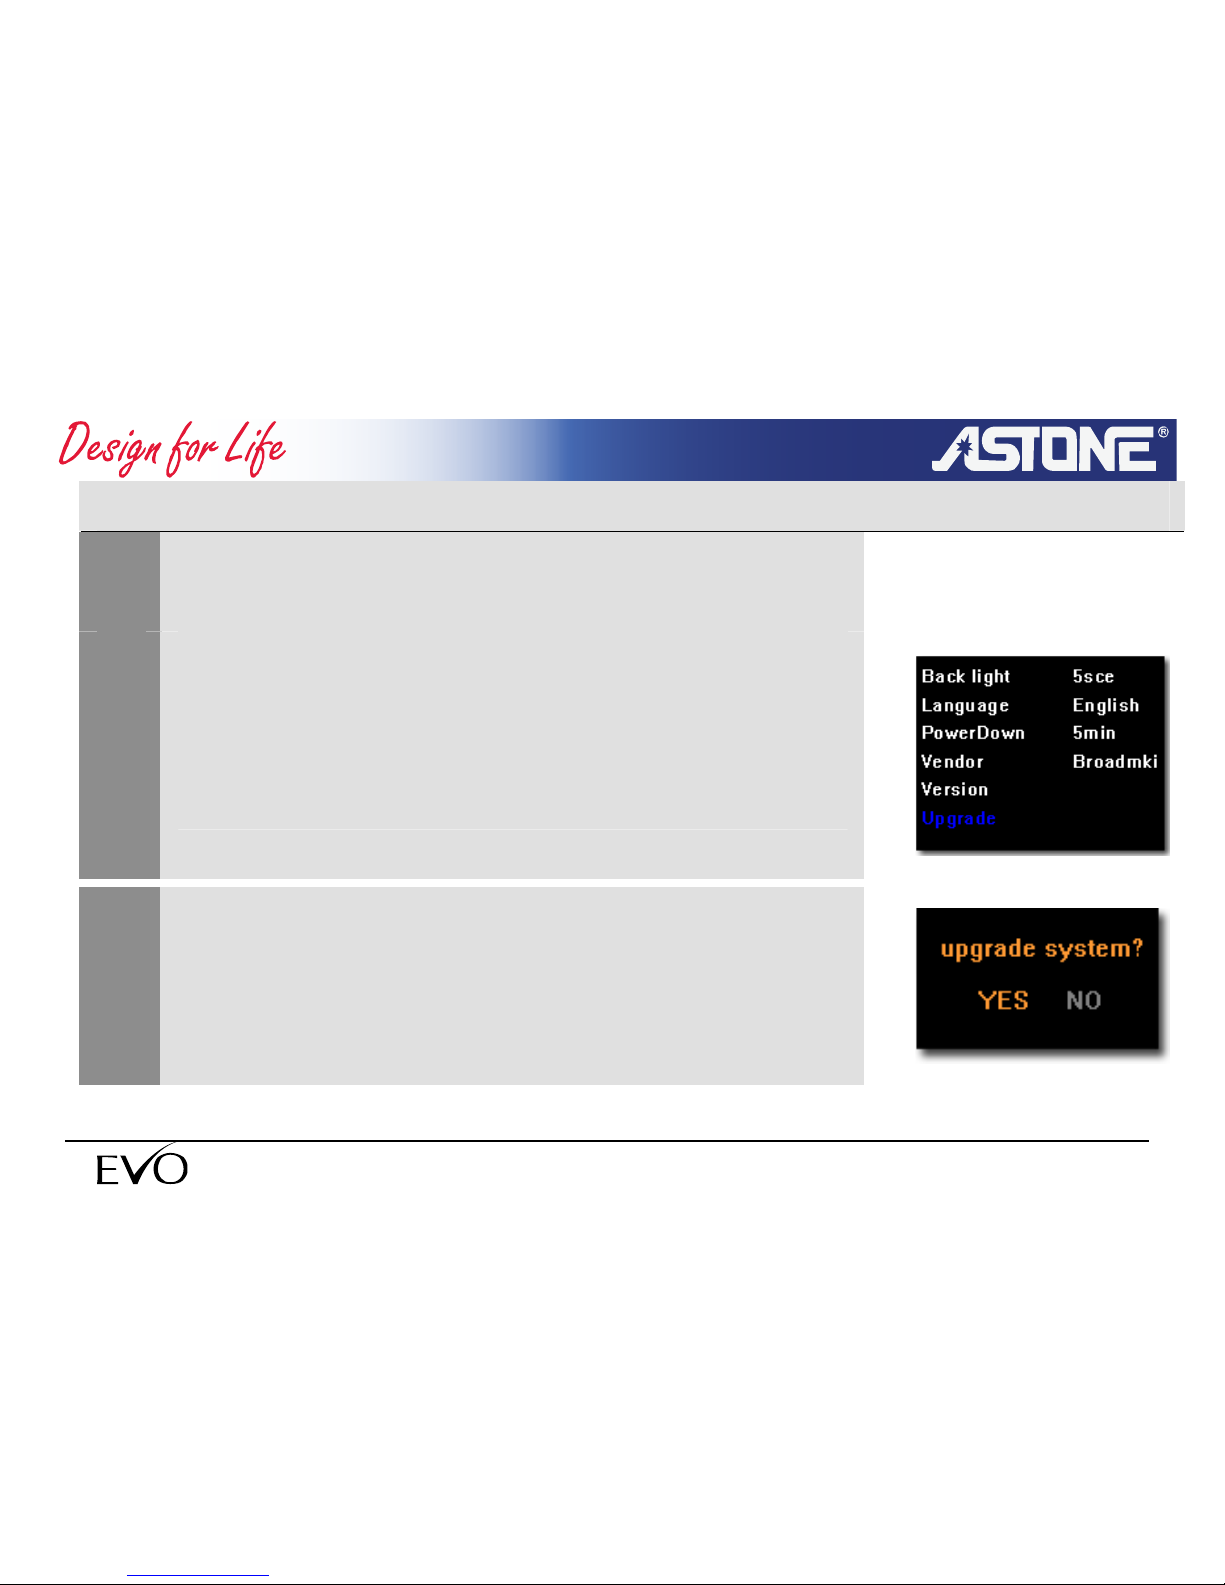
3.9.6 Upgrade
1
Copy upgrading program to <sys> directory, make sure the
device in charging status
2
Use arrow button to select UPGRADE in backlight setup
windows.
<volume+> move up
<volume-> move down
3
Press <OK> pop up SURE dialog box
- 81 -
www.astone.com.au
Page 82
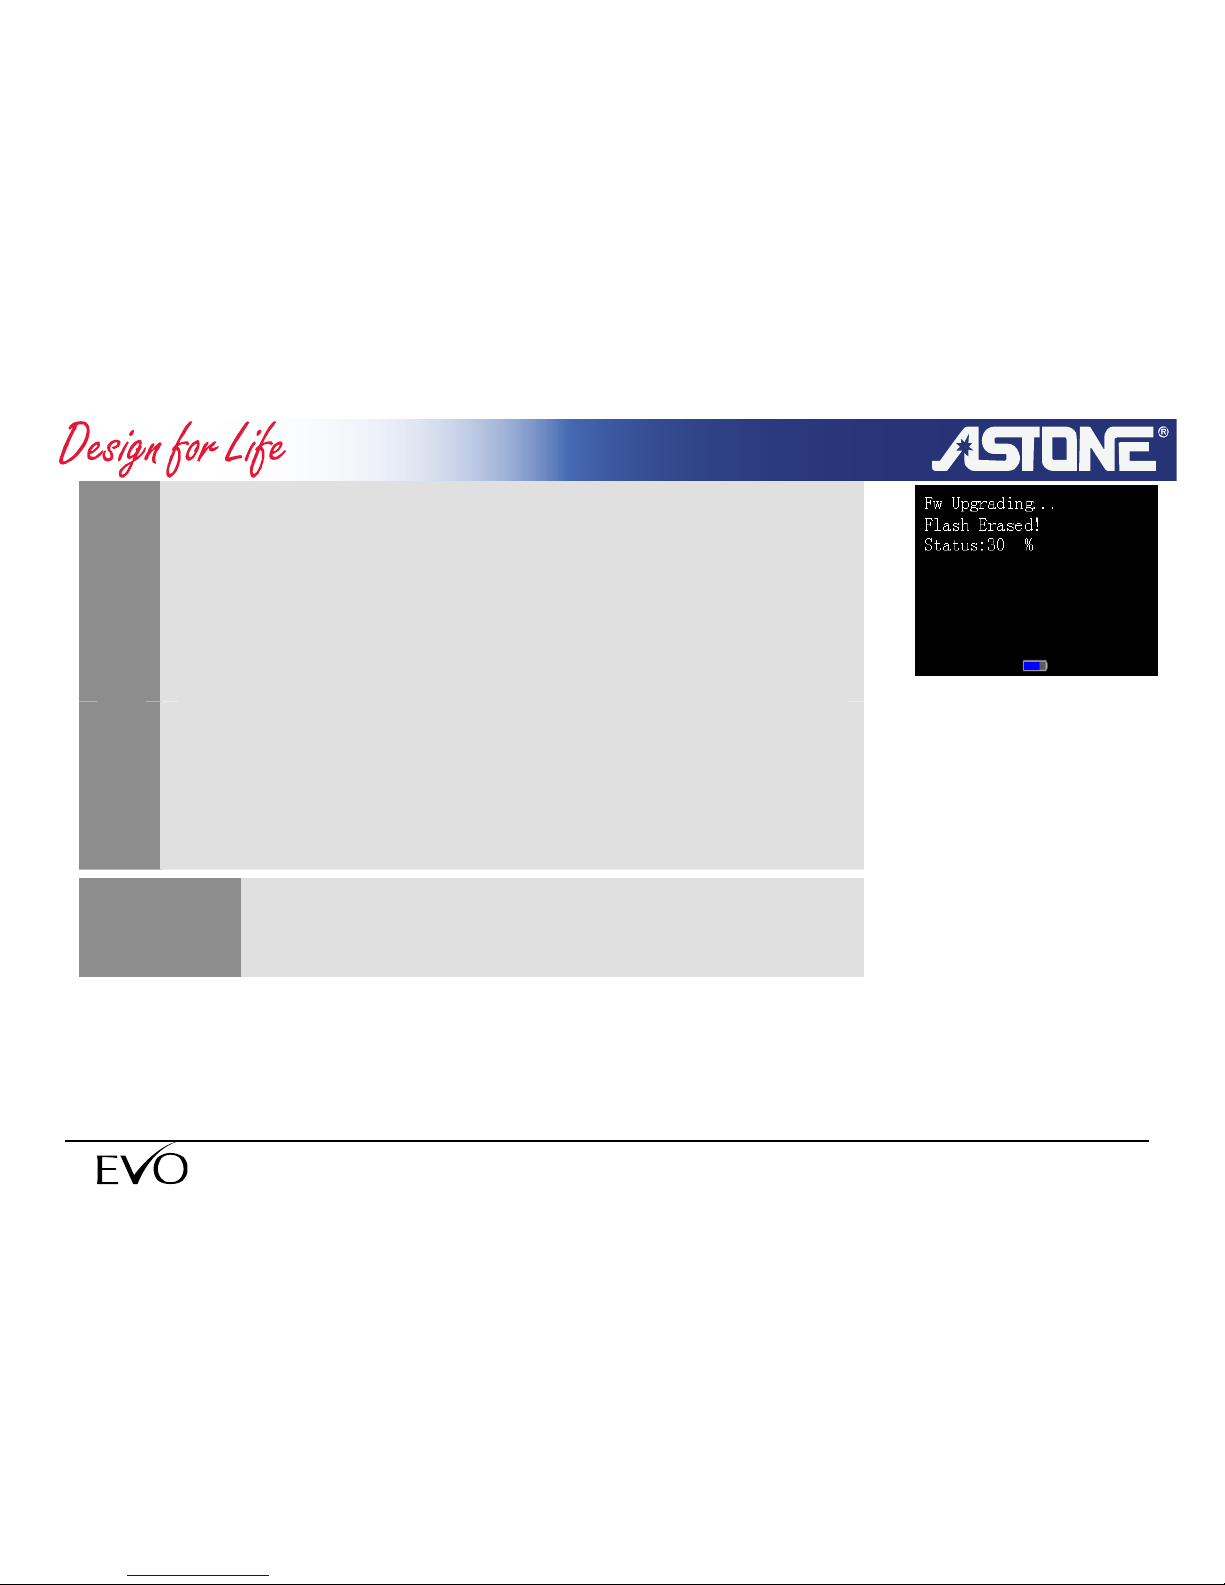
4
Press OK button to confirm, a window of the progress of
upgrading will be displayed.
5
When the upgrading is finished, the system will power off
automatically. Power on the player again, the new program will
be in function.
Make sure the player is in USB charging status
while upgrading.
NOTE
- 82 -
www.astone.com.au
Page 83
- 83 -
www.astone.com.au
4. Other Functions
4.1 Install fonts library
1
The English fonts have been pre-installed. If other fonts have to
be installed, such as Chinese. You need to copy those fonts
files to< sys> directory and restart the player.
NOTE
The system is Unicode, so you should set
corresponding language in “system setup” while
browsing and copying, otherwise it will be wrong.
Page 84
4.2 Charging battery
1
Connect the player USB-SLAVE port to the USB port of a
computer with the USB cable.
2
The player will be charged automatically by computer.
3
The battery status will show the full bar when fully charged.
Normally, it will take 1.5-2 hours to charge the
battery fully with computer.
NOTE
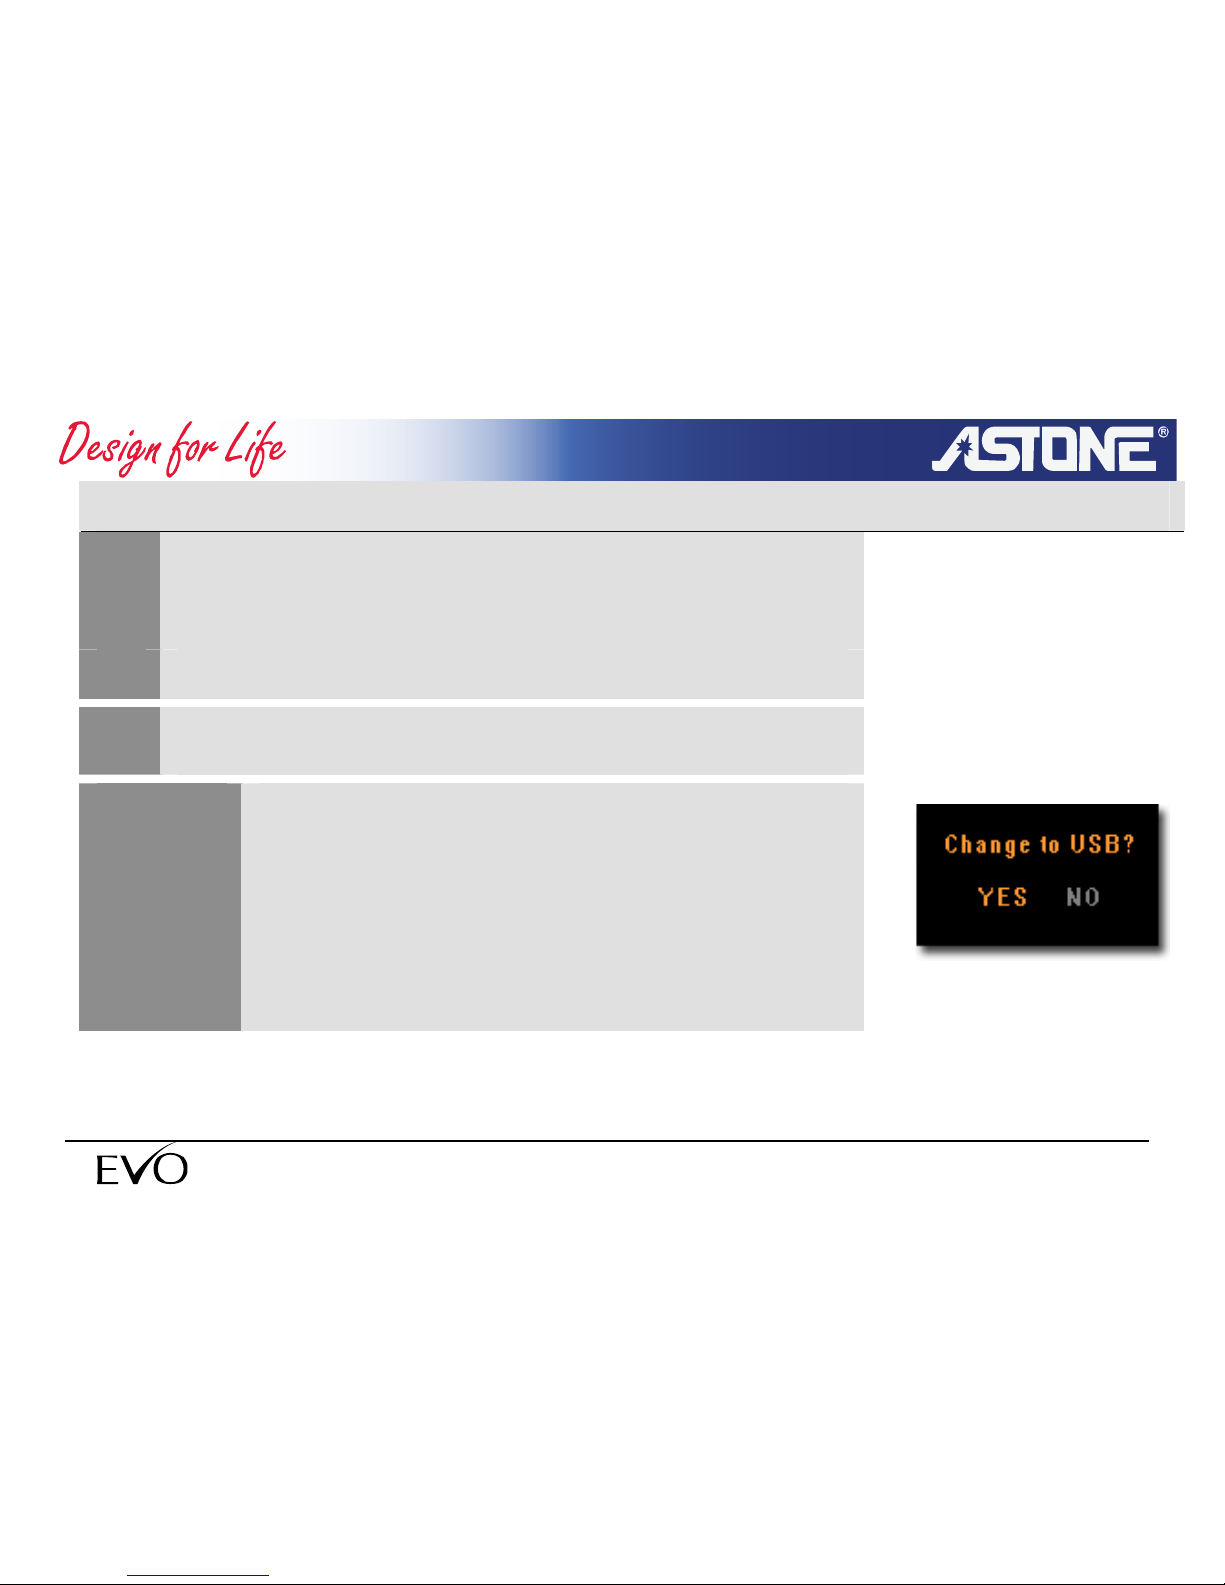
Skill: you should connect USB port to the player as
charging as operating, the system will display
“switch USB?” select “C” is ok.。
- 84 -
www.astone.com.au
Page 85
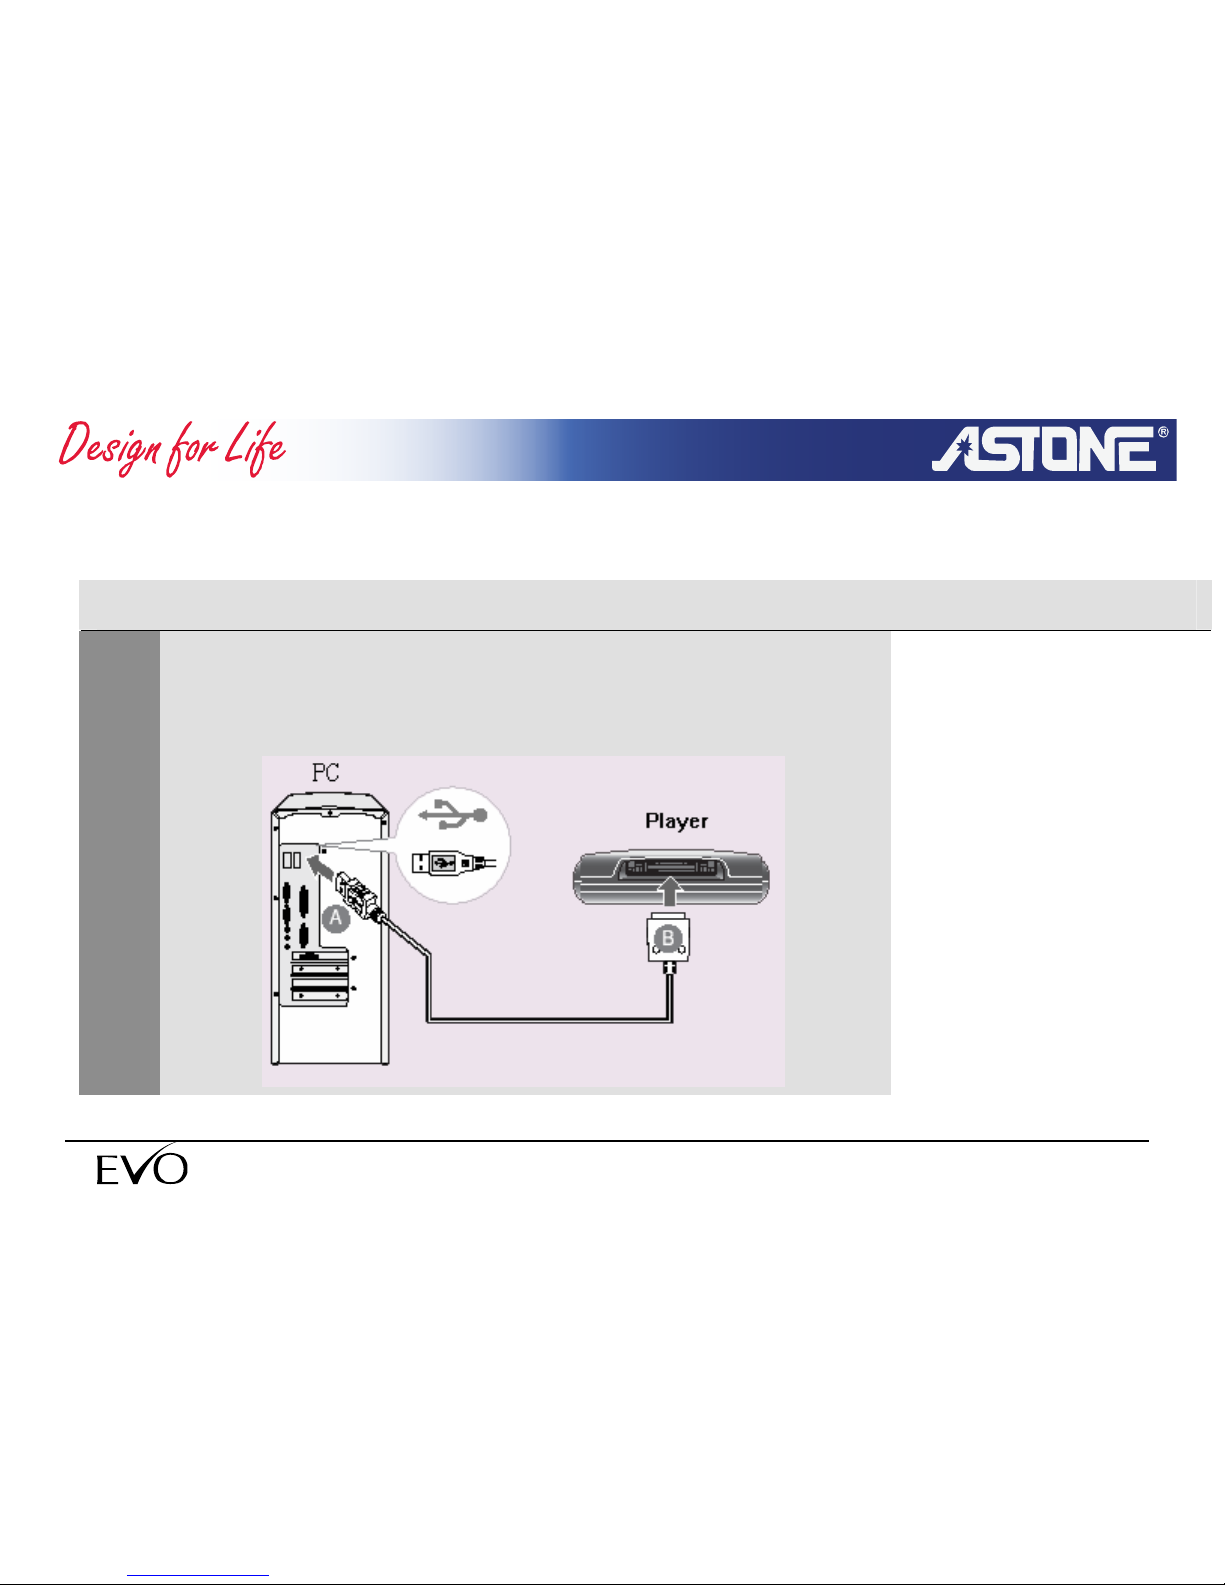
5. Communicate and transfer data with computer
5.1 Connect with computer
1
Connect the player USB-SLAVE port to the USB port of a
computer with USB cable
- 85 -
www.astone.com.au
Page 86
2
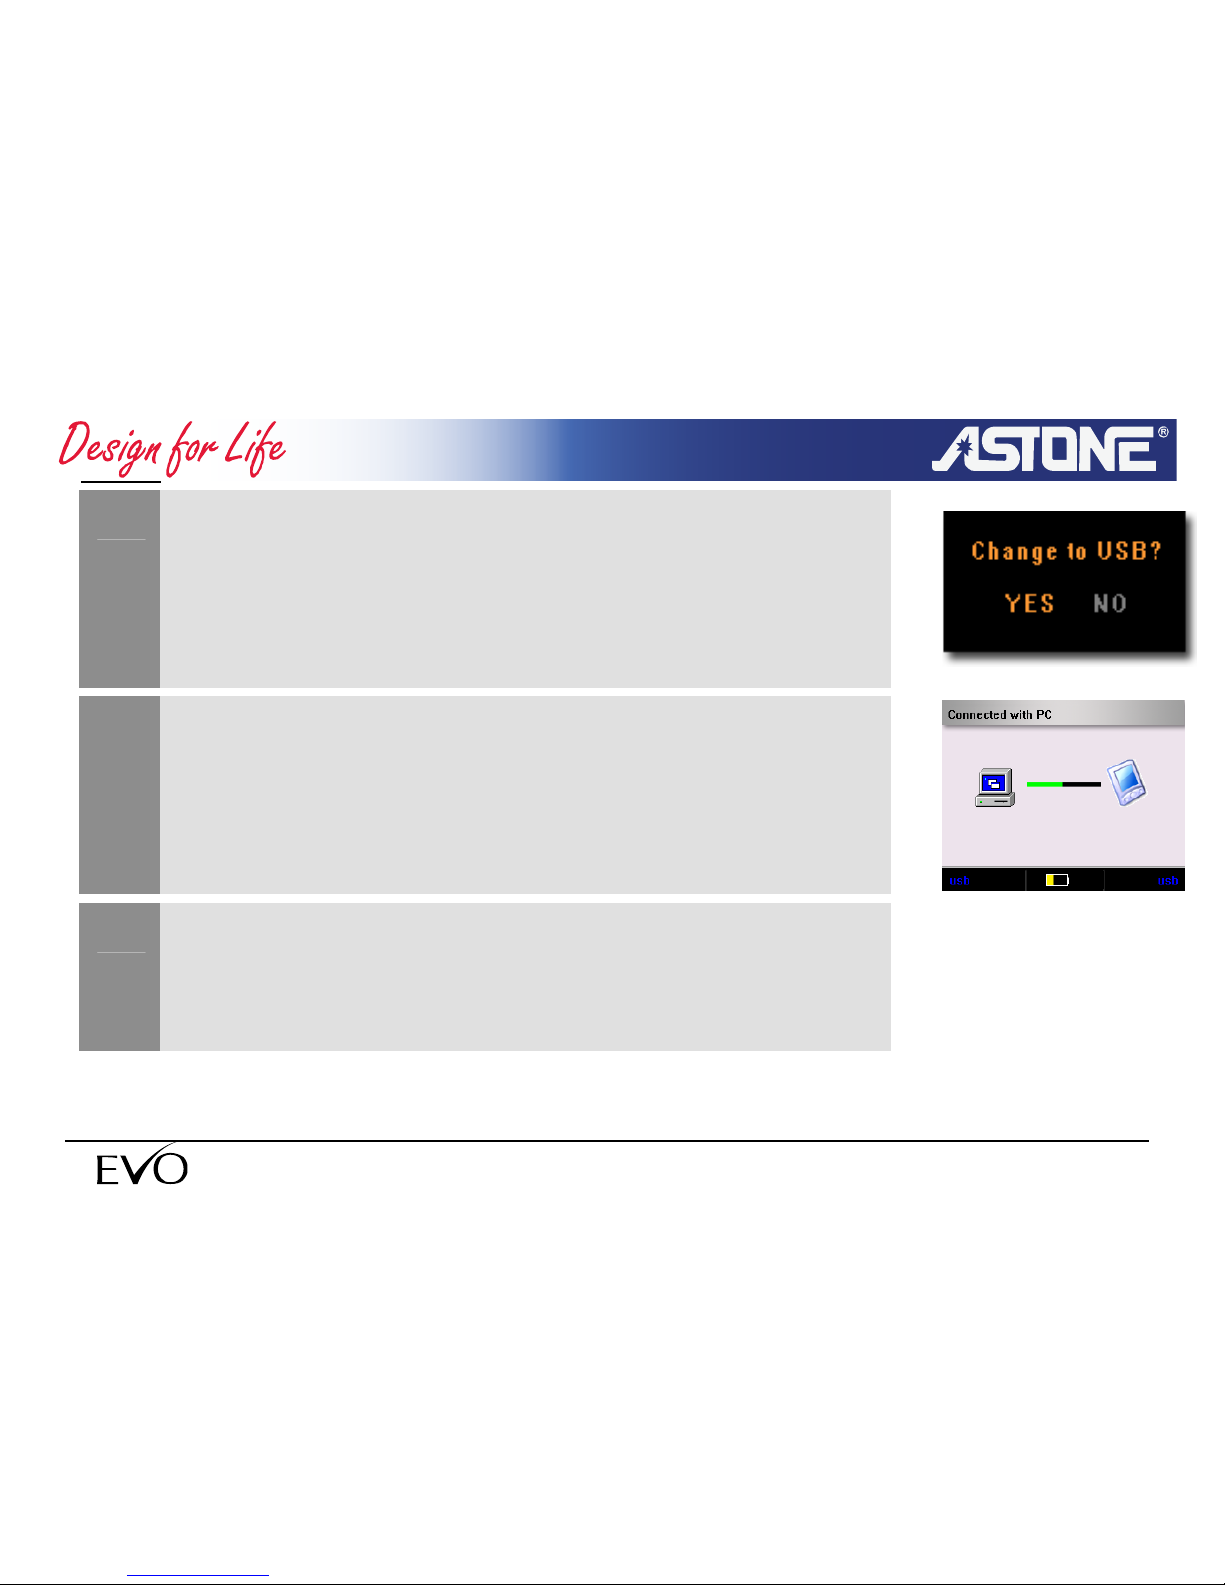
Make sure the player is power on.
System will display <change to USB mode>.
3
Press OK to confirm
System goes into USB transfer window.
4
The windows system will display “found new hardware” icon if it's
first time to connect the computer to the player.
- 86 -
www.astone.com.au
Page 87
5
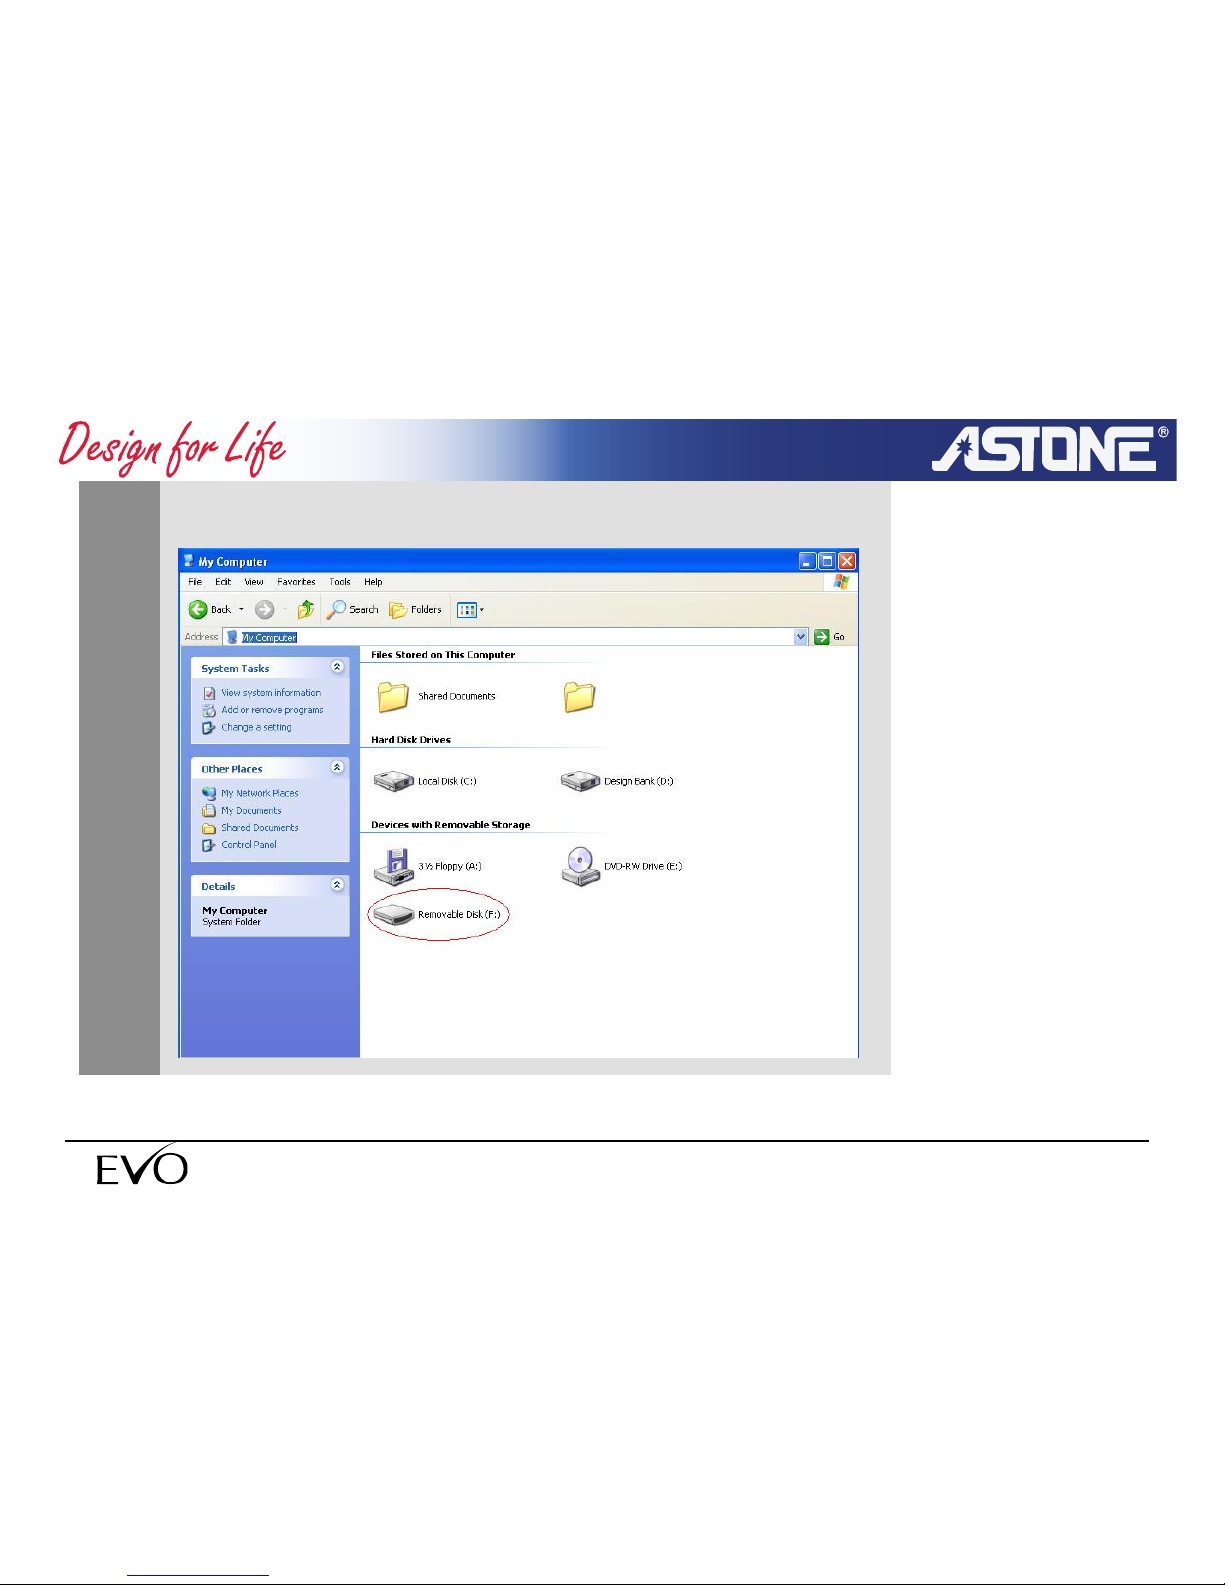
A local disk icon will appear in the windows explorer.
- 87 -
www.astone.com.au
Page 88
- 88 -
www.astone.com.au
6
The player driver has been installed and you can start using the
player just like mobile hard disk.
NOTE
If you connect to a PC running Windows 98 SE for the first
time, you need to install the driver. Please refer to “install
driver in Windows98”
5.2 Install driver in Windows 98
1
Insert driver CD to CD ROM in computer.
2
Run win98drv\Setup exe in the CDROM.
Page 89
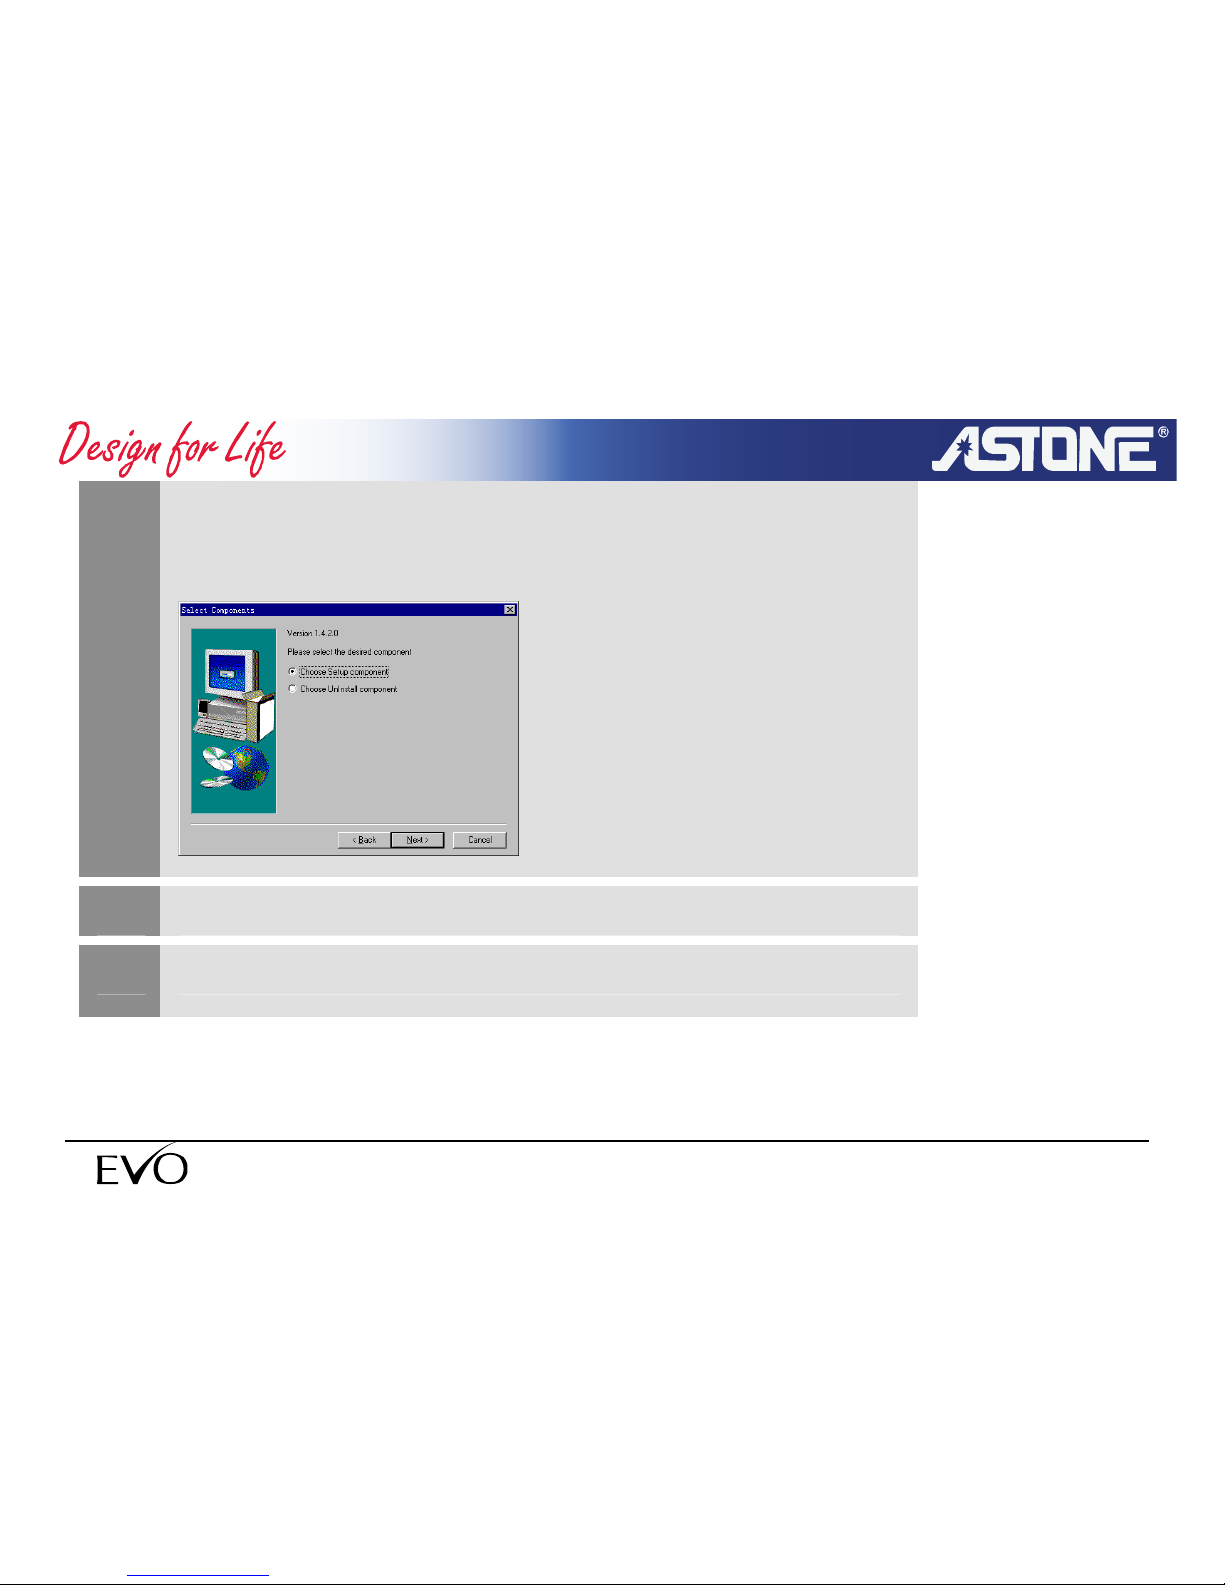
3
Select “choose setup component” in the “Select components”
window, and click “next”,
4
Please restart the PC after installation.
Connect the player to PC as in 5.1
5
- 89 -
www.astone.com.au
Page 90
5.3 Disconnect USB
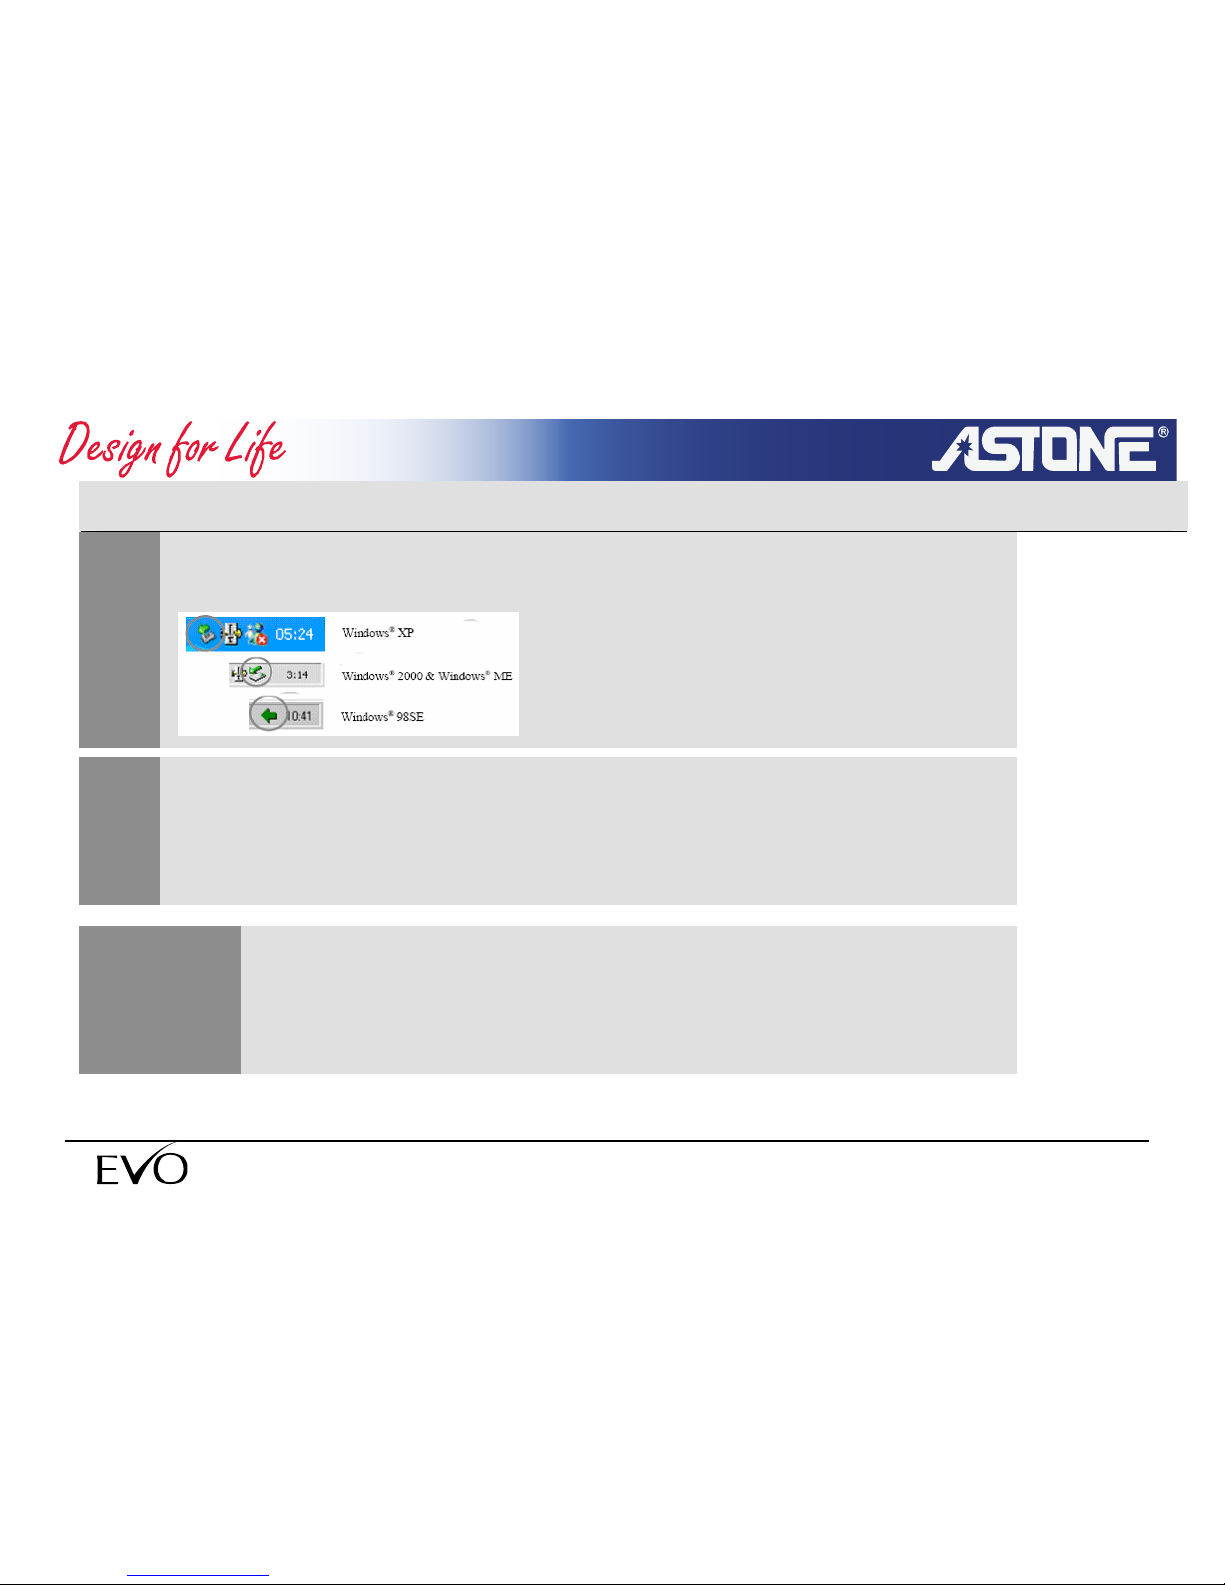
1
Click the icon “pull down or pop up hardware” in system bar.
2
Click the pop-up windows. ”Safely remove USB Mass Storage Device” and
Click “OK” when prompted with the “safely remove hardware” window, and
unplug the USB cable.
Disconnecting the USB link without using “safely remove
hardware” might cause the loss of data or even damage the hard disk.
NOTE
- 90 -
www.astone.com.au
Page 91
- 91 -
www.astone.com.au
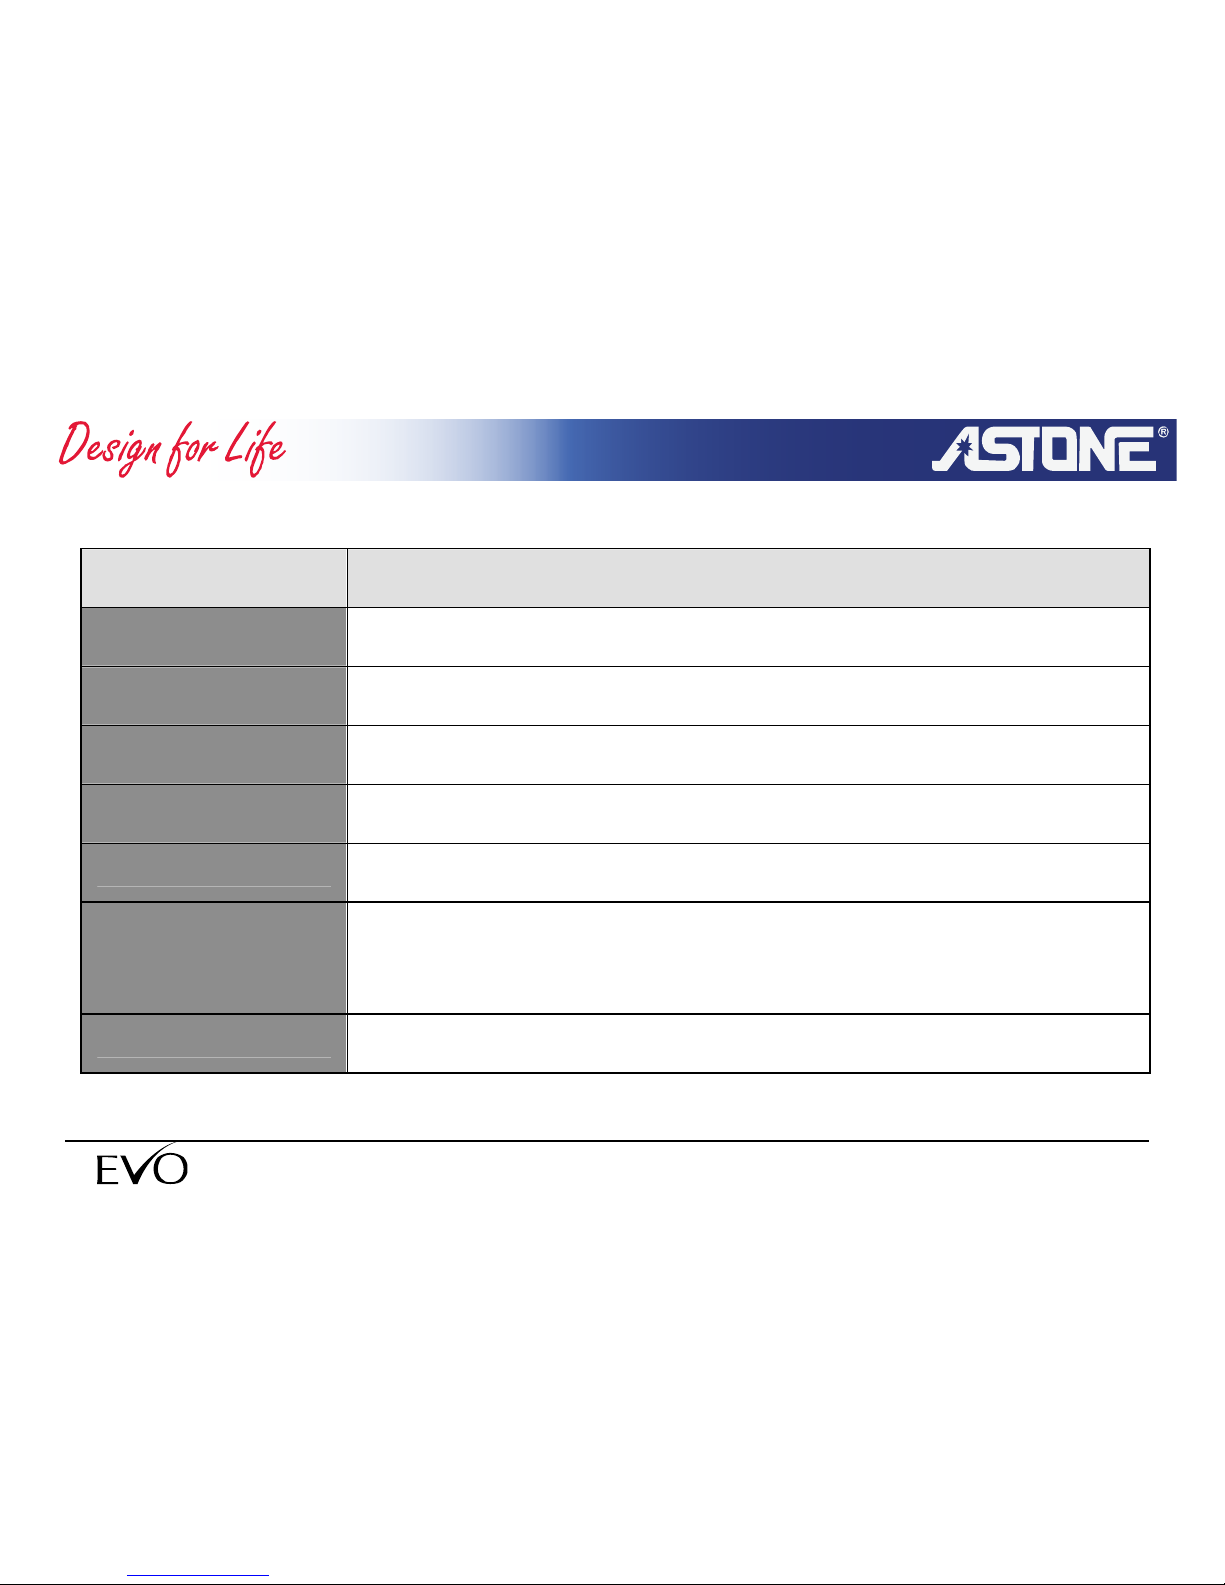
5.4 Product specification parameter
description specification
Dimension 99*57*19mm
Weight 90g
LCD 280 X 220 1.5 inch dot Matrix 262,000 colours TFT LCD,
Battery
build-in Lithium ion 780mA/H rechargeable
The working time to the large extend is 10 hours.
Charge parameter The most charge current 500A, charge time 1.5-2 hours.
Working current
1. 65mA (play Mp3,low backlight, close hard disk)
2. 85mA (play Mp3, high backlight , close hard disk)
3. 300mA (play MP3, turn on backlight, read & write hard disk )
4. 500mA (the largest working current, f hard disk start)
Working 0-40℃
Page 92
- 92 -
www.astone.com.au
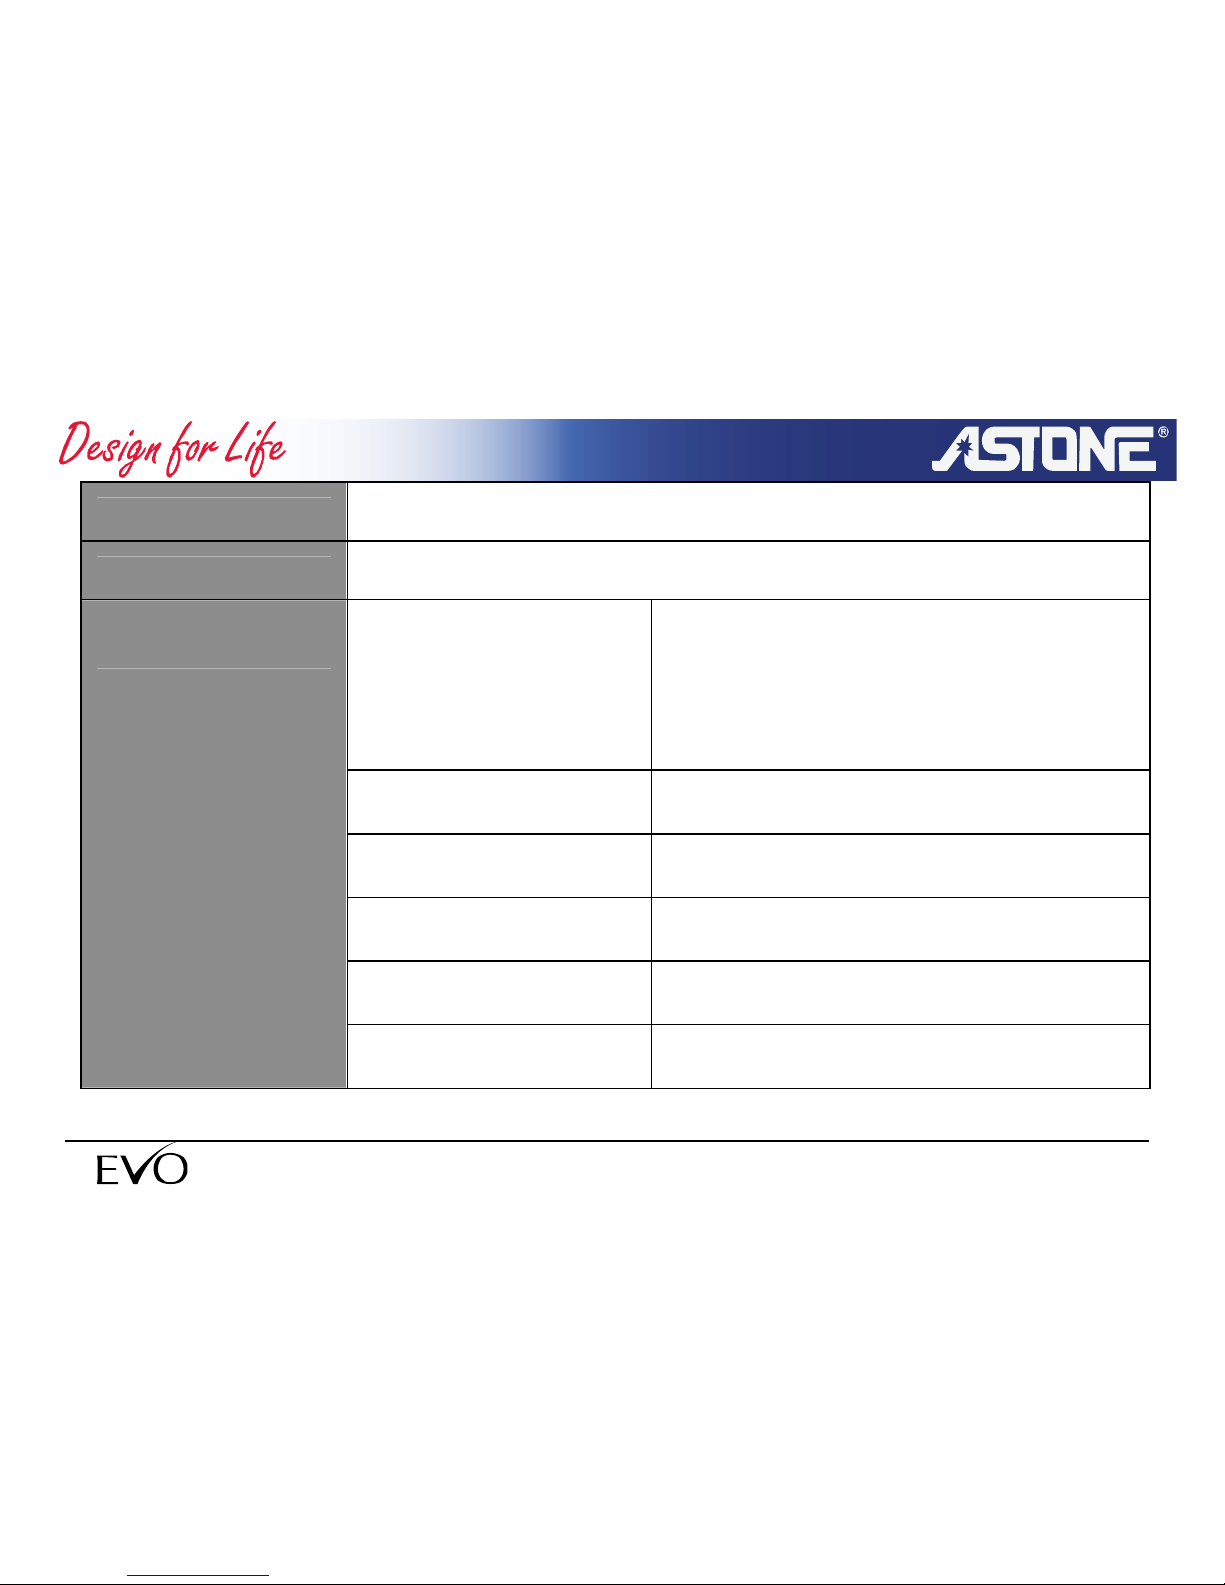
Power adapter 90-230V/50-60Hz AC; 4.5V/700mA DC (optional)
Storage 1 inch HDD
File format
File format: MPEG1/2/2.5 layer3(ISO
compliant) MP3 and WMA
MP3 bit rate: 8Kbps~320Kbps,VBR、
CBR
TAG: ID3 V1 Tag, ID3 V2 2.0, ID3 V2
3.0
File size limit 240MB
EQ Normal, pop, classic, jazz, rock
Cycle mode
All of songs cycle, single cycle and play
at random
Intonation speed
adjustment
Adjustable 12grades of intonation speed
MP3、WAM play
Play list Support 99 files at most
Page 93
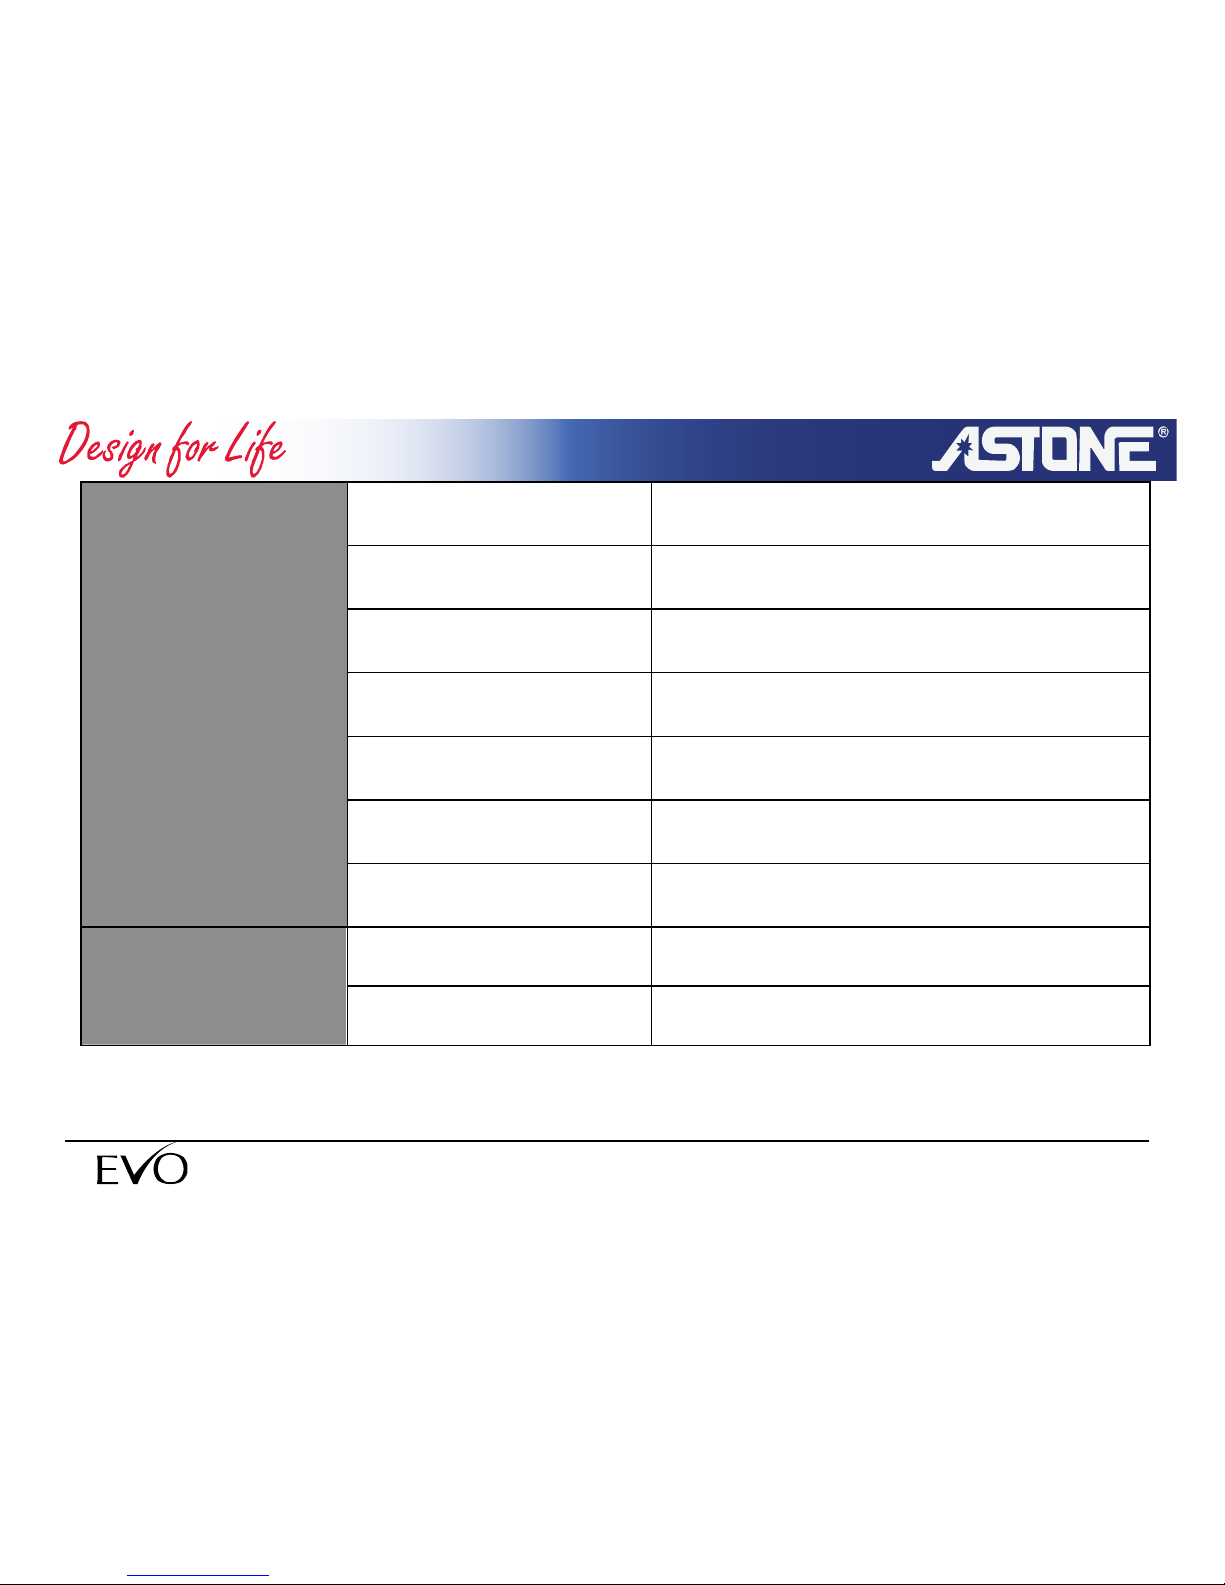
- 93 -
www.astone.com.au
LRC support
SNR >80db
Distortion <0.1%
Frequency response 20Hz~20KHz
Earphone output Max 7mW X 2 (32 ohm)
Supporting code flow
frequency
MP3:8kbps-320kbps
WMA:<192Kbps
Supporting sampling
frequency
MP3:8KHz-48KHz
WMA:8KHz-44KHz
SNR 60db at 1mv 98.1 Mhz
FM Stereo Radio
Preset station 20 个
Page 94
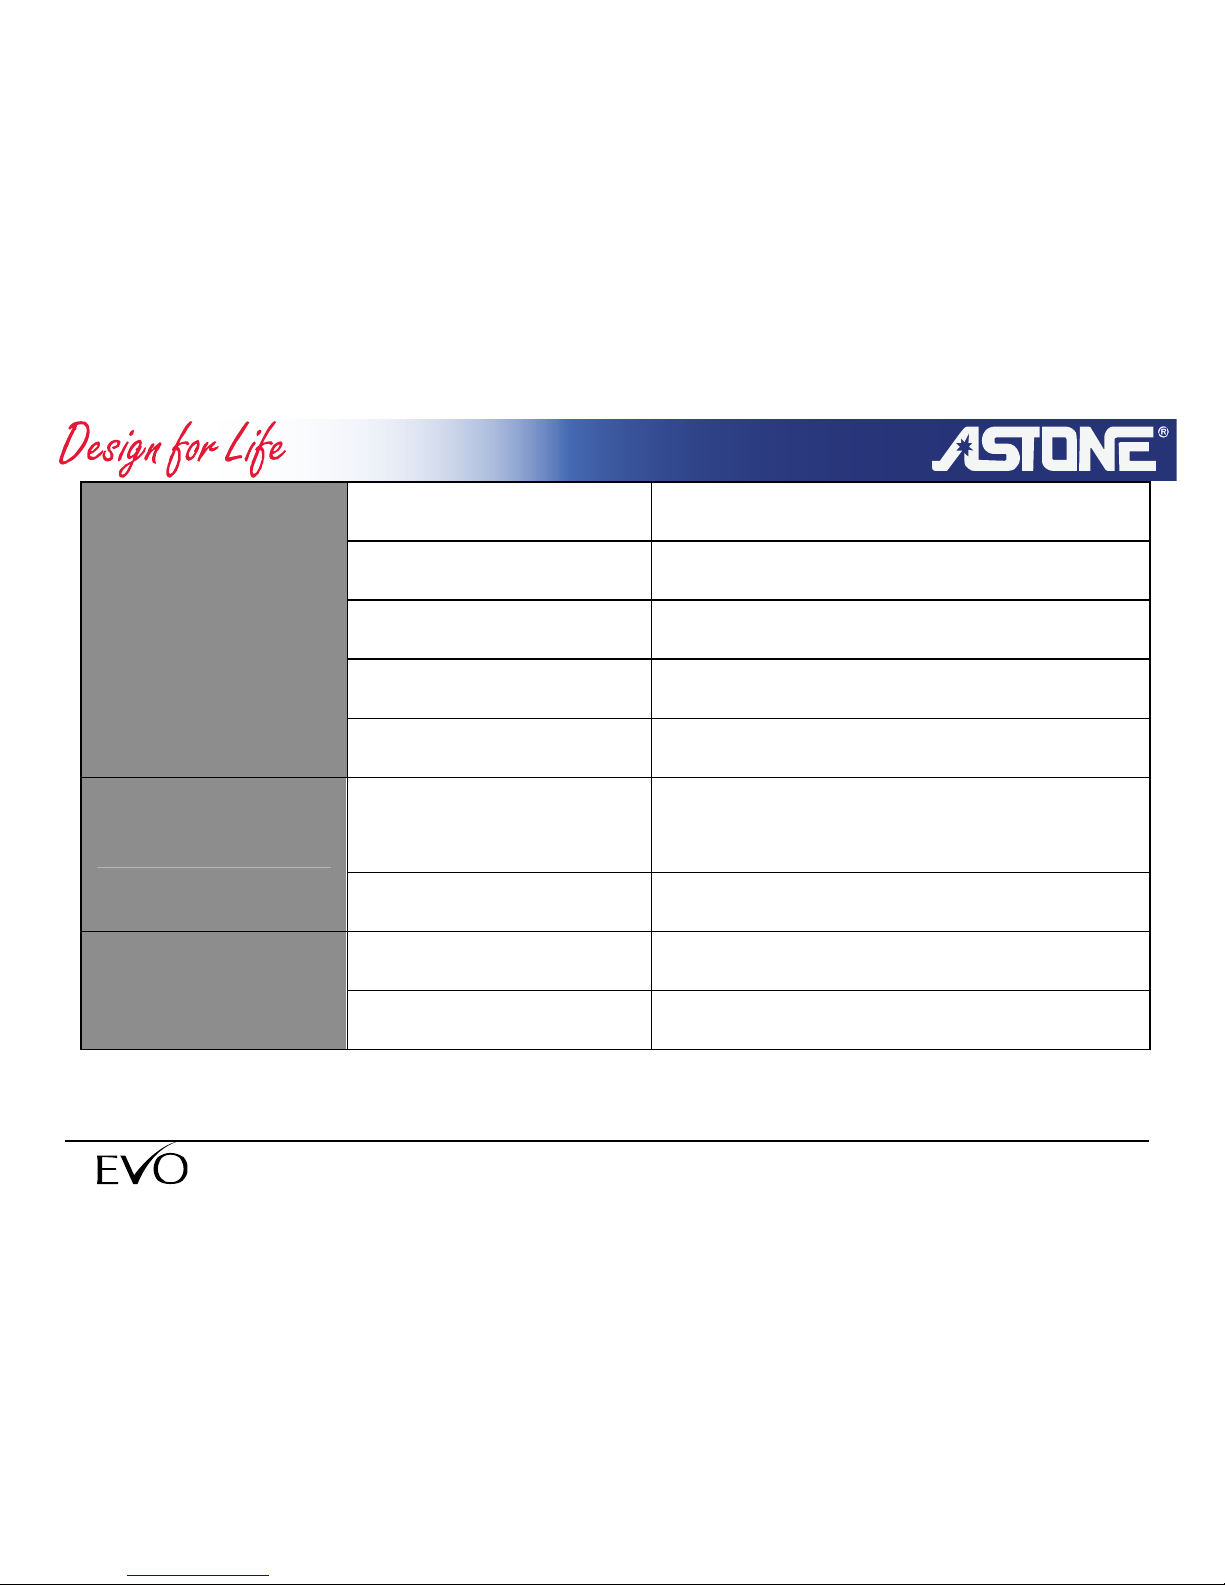
- 94 -
www.astone.com.au
Searching mode Config, auto search and manual search
Distortion 0.8% (Max) at 1mv 98.1 Mhz
Output Max 7mW X 2 (32 ohm)
Frequency scope 87~108Mhz
Noise limit < 40 μv
Format
BMP: 24bit file
JPG: 24bit file
GIF: all
Photo browse
File size limit <6MB
Format XVID code AVI file format
MP4 video play
Frame rate 15 frame/seconds
Page 95
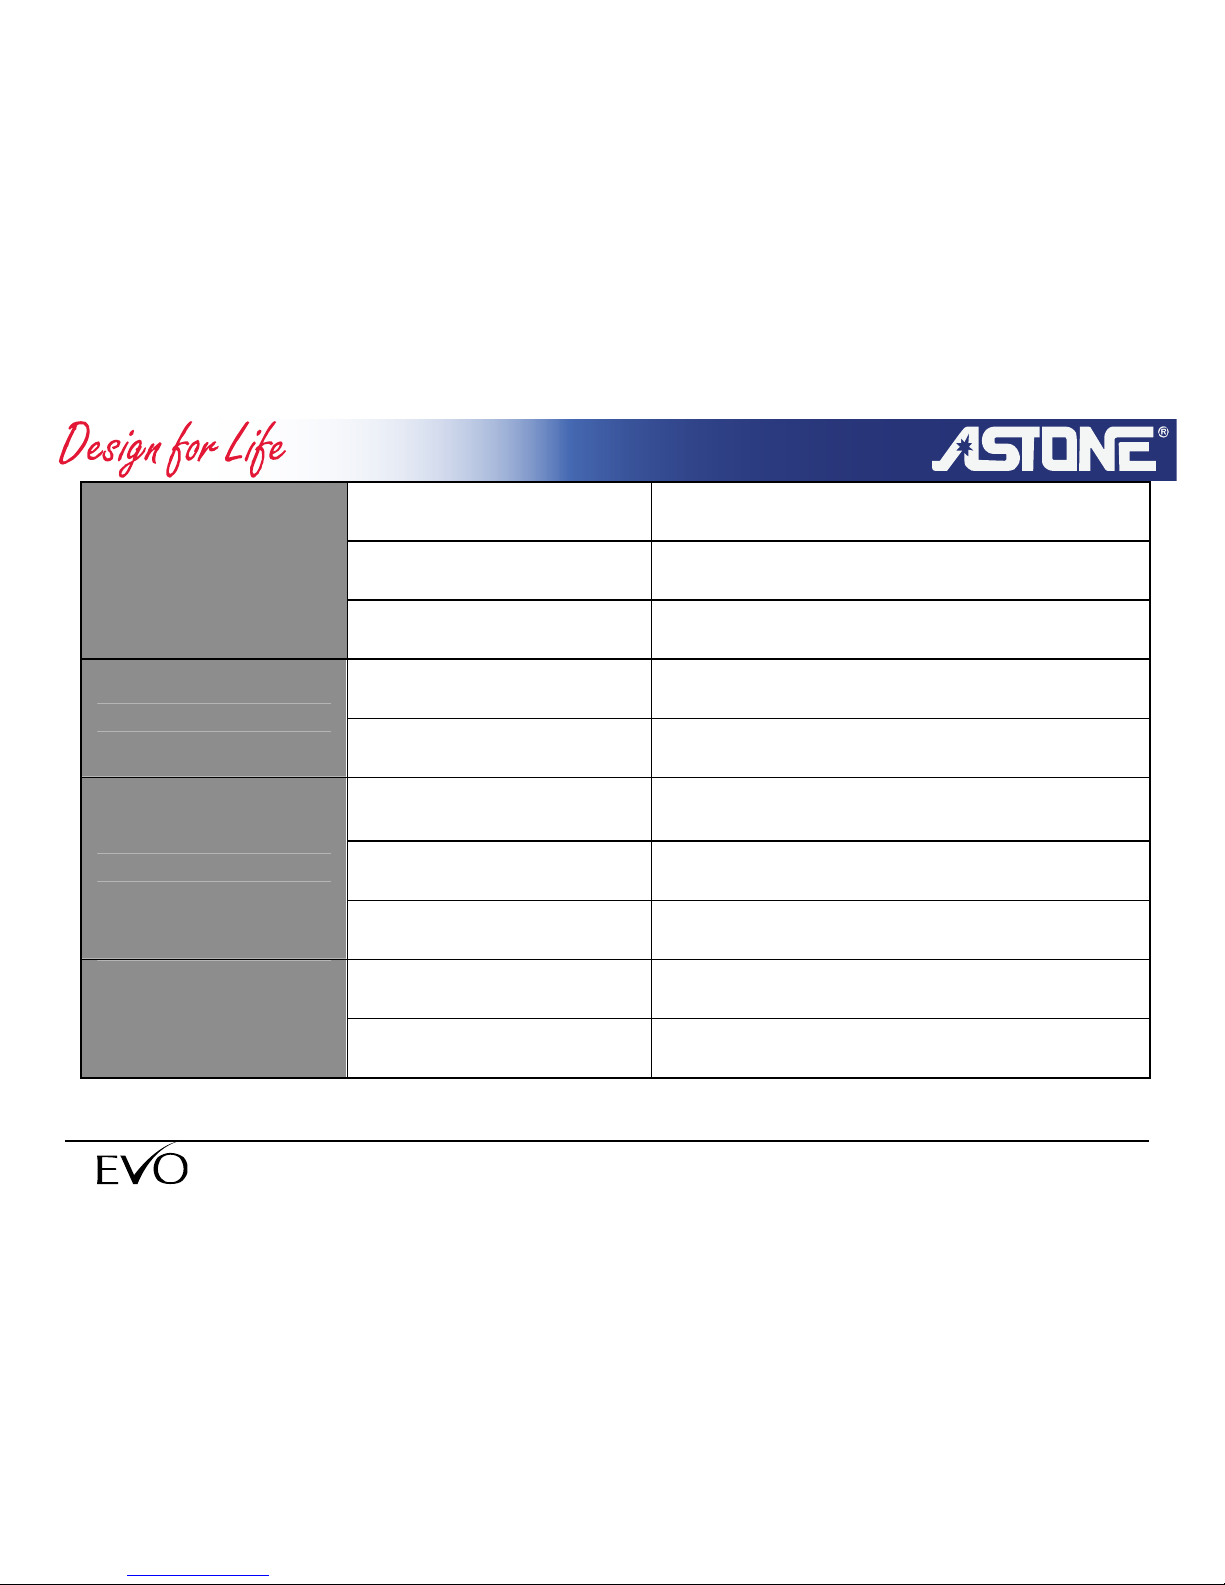
- 95 -
www.astone.com.au
Code flow rate 240-320kbps
PC switch software
Switch file MPG, RM, RMVB, AVI, WMV,
ASF etc to XVID format
File size limit No
Block 9 grades
Game
Box 340 pass
Support device mode
Great capacity storage device(USB
Mass Storage)
Current/voltage output 500mA/5V
Digital partner
Transmission speed 4Mbps(read+write operation)
Recording format MP3
Digital recording
Recording sound
source
Mic,Line In and FM
Page 96
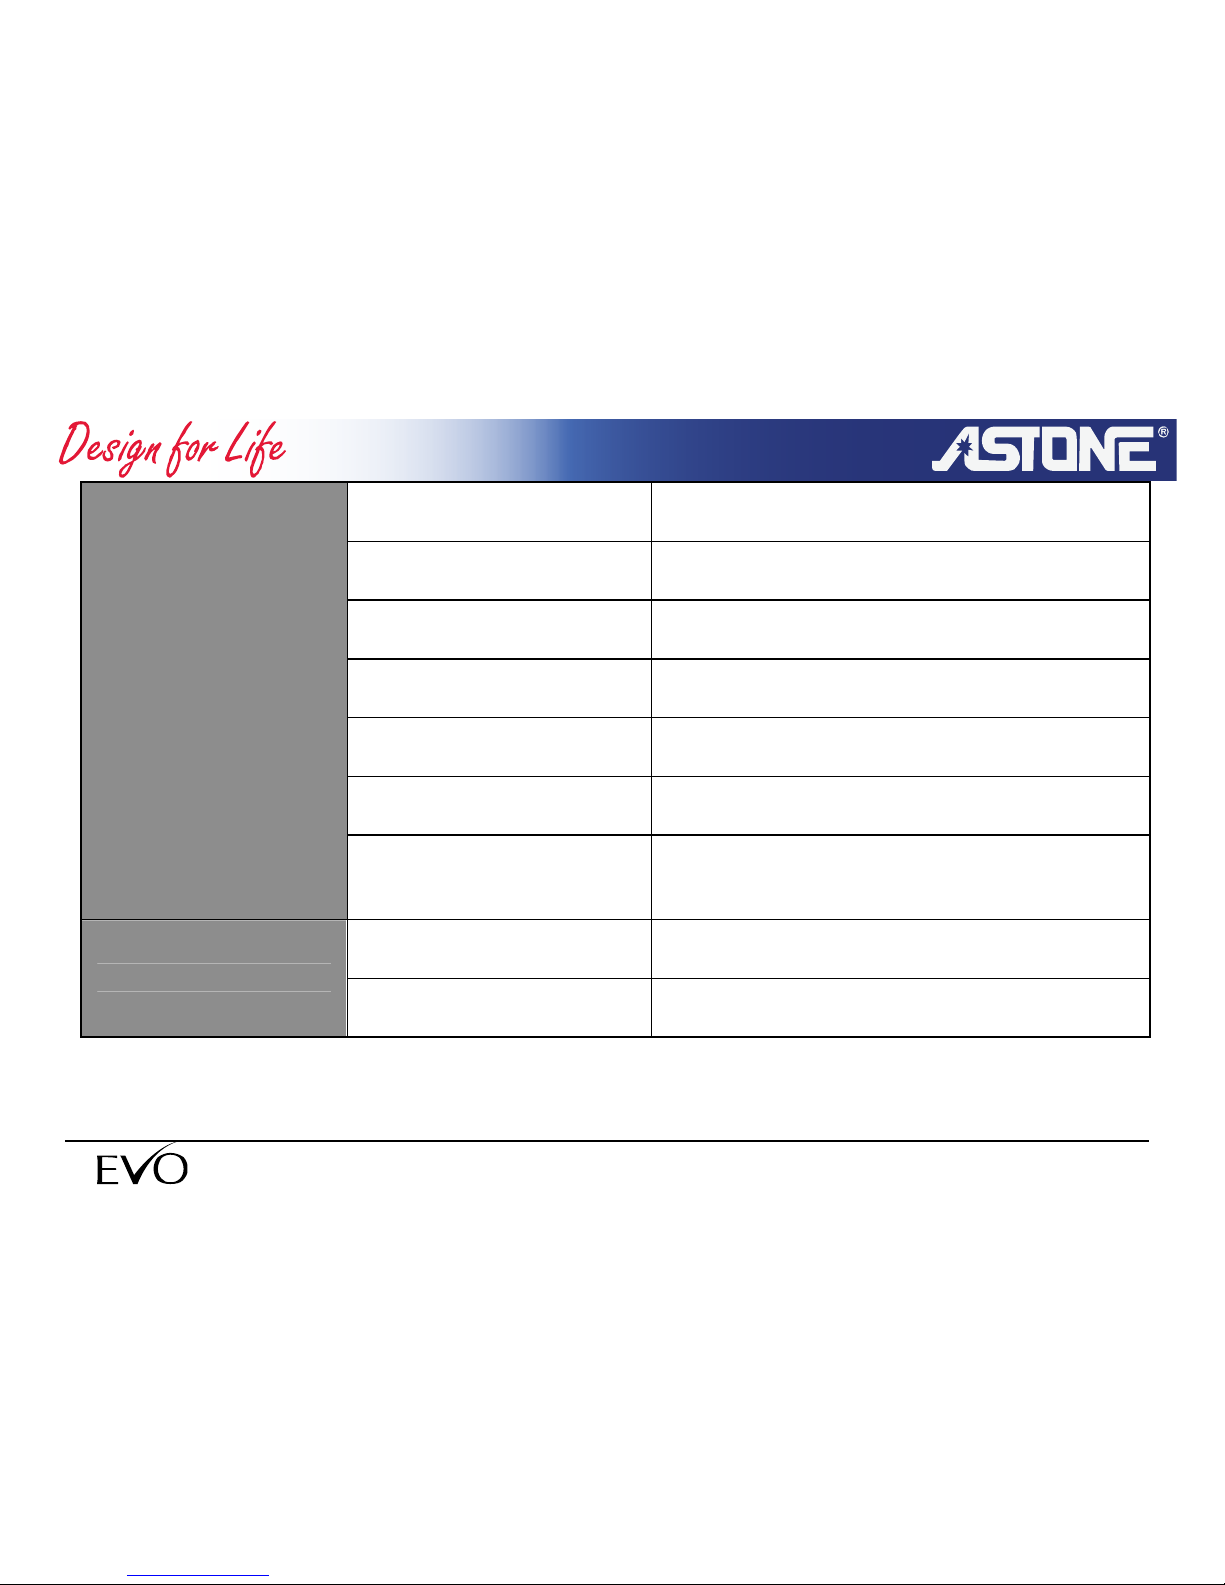
- 96 -
www.astone.com.au
File size No
Recording mode 32~192KBKS
SNR 60db
Distortion 15%+/-0.2
Frequency scope 300Hz~5.0Khz(-6db)
output Max 7mW X 2 (32 ohm)
Compressed and
sampling rate of
recording (MP3 code)
Compressed rate 8Kbps-192Kbps
sampling rate 8KHz-48KHz
Read 6MB/S
USB2.0
Write 2.3-2.5MB/S
Page 97
- 97 -
www.astone.com.au
LINE IN 3.5mm mini plug/stereo
Earphone
3.5 mm earphone (mini plug/stereo) IMP
< 32ohm
Host USB2.0 full speed,support UMS device
I/O
USB spec port USB 2.0 High Speed
 Loading...