

ASTEELFLASH FRANCE ARVANANO User Manual
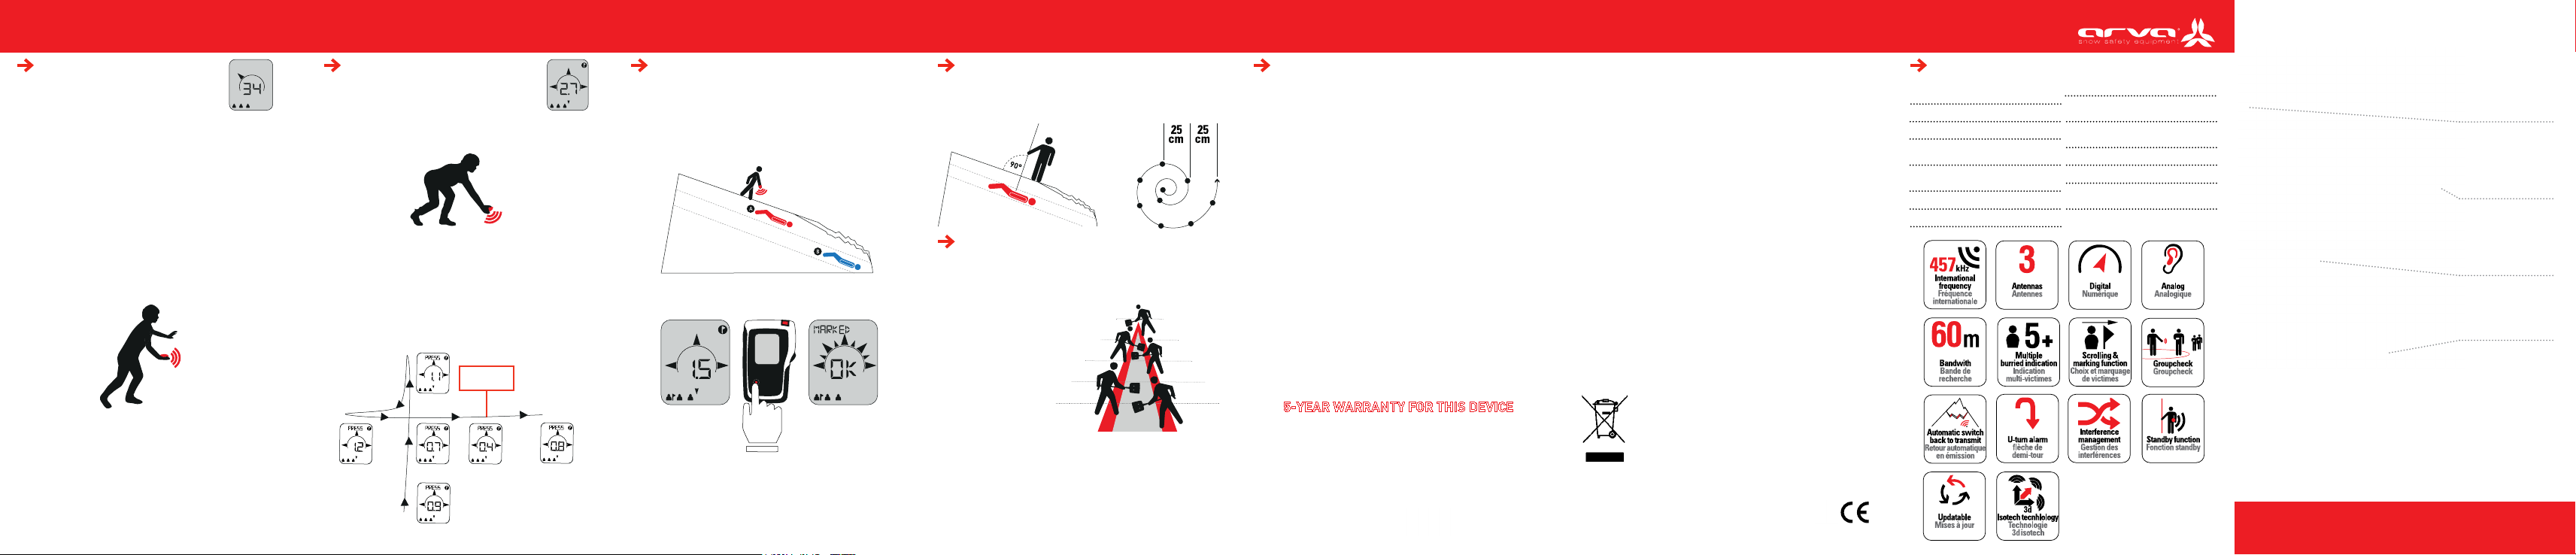
During the coarse search :
• Carefully follow the distance and
direction indicators on the screen.
• Point the device in the direction of the signal.
• Search in a calm and focused manner.
• Slow down as you approach the ne search.
• If the displayed distance starts to increase even though
you are moving in the direction indicated by the arrow, turn
around. A specic return arrow appears.
• In a complex situation with multiple victims, the device may
have trouble analyzing the signal. In this case, move a few
steps away and then return towards the critical point by following another direction.
DURING THE SEARCH, PAY ATTENTION TO VISUAL
CLUES SUCH AS POLES, SKIS, CLOTHING, ETC.
Once within 3 steps of the victim, your ARVA no
longer indicates a direction and you must start
bracketing (searching in a cross pattern).
1. Position your device to near snow level.
2. Move your device in a cross pattern to locate the point
where the distance reading is the lowest.
It is then much quicker to start probing once you have
dened the probable burial zone within a less than one-step
range.
Example of fine search technique :
1st probing
point
MARKING FUNCTION FINE SEARCH COARSE SEARCH
When you are less than 3 m (or 5 m based on the chosen
setting) from the rst victim you have the option of marking
the location in order to continue searching for another signal.
In the illustration example, you can mark victim A. It is possible
to set this distance to 5 m in the settings menu.
To mark the victim, press on the “marking” joystick. The
device will switch to victim B.
Search for the victim by probing in concentric spirals
progressively away from the minimum distance point detected
by your ARVA. Probe perpendicular to the slope.
SHOVELING
Statistically, shoveling takes at least as much time as the ARVA
search. It is important to take a methodic approach to shoveling.
The V-shaped conveyor technique
allows you to optimize uncovering
the victim.
Start shoveling downhill from the victim 1.5 times the burial
depth as indicated on the probe, and create a platform.
We recommend switching your device to STANDBY when
probing and shoveling to avoid disrupting other searches in
progress.
Certain electronic devices as well as electrical and electromagnetic
installations can signicantly interfere with transceiver signals.
These sources are:
• carried: smart phone - analog radio - camera - heart rate
monitors - GPS - etc.
• permanent: relay towers - power lines / electrical generating
equipment - ski lifts, etc.
In order to reduce the risk of signal deterioration, we recommend
that you keep your transceiver as far as possible from sources of
electrical and electromagnetic activity.
IN SEARCH MODE: Move all metallic and electronic devices at
least 50cm away from your transceiver.
During an active search, we recommended turning off all devices
except:
• Analog radio
• Headlamp without dimmer
• Watch without a radio function
• Backup devices in the event of a secondary avalanche
Means of communication:
W e r e c o m m e n d t u r n i n g o f f a l l d i g i t a l t e l e p h o n e s a n d r a d i o s
during the active search phase. All calls should be made at least
25m away from the individuals conducting the active search.
IN TRANSMIT MODE: Move all metallic and electronic devices
at least 20cm away from your transceiver.
5-YEAR WARRANTY FOR THIS DEVICE
REGISTER YOUR DEVICE ON WWW.ARVA-EQUIPMENT.COM
R&TTE Declarations of Conformity
Hereby. Name of manufacturer: AsteelFlash France. Adress: 43, rue du Vieux Chêne.
Zip Code: 38240. City: Meylan. Country: France. Declares that the avalanche beacon. Type
designation: AXIO. Trademark: ARVA, is in compliance with the essential requirements
and other relevant provisions of directive. 1999/5/EC. The compliance of the device
has been evaluated according to the Electromagnetic compatibility standard test: FCC
CFR 47 part 15, Subpart C. The complete declaration of conformity is available at the
address above. Name: DUVAL. Fonction : Establishment Development Director.
Date : 30/06/2016. Signature:
FCC requirements: - FCC ID: O9BARVANANO
NOTE: This equipment has been tested and found
to comply with the limits for a Class B digital de
vice, pursuant to part 15 of the FCC Rules. These
limits are designed to provide reasonable protec
tion against harmful interference in a residential
installation. This equipment generates uses and
can radiate radio frequency energy and, if not
installed and used in accordance with the instruc
tion, may cause harmful interference to radio
communications. However, there is no guarantee
that interference will not occur in a particular in
stallation. If this equipment does cause harmful
interference to radio or television reception which
can be determined by turning the equipment off
This device complies with part 15 of the FCC & IC Rules. Operation is subject to the following two
conditions : (1) This device may not cause harmful interference, and (2) this device must accept any
interference received, including interference that may cause undesired operation.
Under Industry Canada regulations, this radio transmitter may only operate using an antenna of
a type and maximum (or lesser) gain approved for the transmitter by Industry Canada. To reduce
potential radio interference to other users, the antenna type and its gain should be so chosen that
the equivalent isotropically radiated power (e.i.r.p.) is not more than that necessary for successful
communication.
This device complies with Industry Canada licence-exempt RSS standard(s). Operation is subject
to the following two conditions: (1) this device may not cause interference, and (2) this device must
accept any interference, including interference that may cause undesired operation of the device.
This device complies with Industry Canada radiation exposure limits set forth for general popu
lation. This device must not be co-located or operating in conjunction with any other antenna or
transmitter.
Disposal of electronic instruments by users from private households
in the European Union. This symbol stamped on the product or its
packaging indicates that the product is not allowed to be disposed of
with household waste. It is your responsibility to bring your electronics
waste to a designated recycling ofce for proper disposal. Separate
disposal and recycling of your waste will contribute to preserving our
natural resources and ensure an environmentally-friendly disposal
safer for public health. For more information regarding the closest
recycling center to your residence, contact your local city hall, waste
The “CE” was created according to the European legislation. It materializing conformity of a product
with EU requirements for the manufacturer of the product.
It shall be placed on the product before its introduction on the European market.
management company, or the store where you purchased the product.
and on, the user is encouraged to try to correct
interference by one or more of the following
measures:
-
- Reorient or relocate the receiving antenna.
- Increase the separation between the equipment
and receiver.
- Connect the equipment into an outlet on cir
cuit different from that to which the receiver is
connected.
-
- Consult the dealer or an experienced radio/ TV
technician for help.
- Information to user: Changes or modications
not expressly approved by the party responsible
for compliance could void the user’s authority to
operate the equipment.
TECHNICAL FEATURES INTERFERENCE PROBING
• 2 search modes :
analog and digital
• 3 antennas
-
• Distance and direction indicator • Requires 3 alkaline
• Marking function
for multiple burials
• An icon for 1, 2, 3, 4, 5
or more victims
• 60 m search bandwidth
• Spheric search
-
• Weight : 230 g
• Battery life: 250 hours in transmit
mode and 40 hours in receive mode
AAA/ LR03 batteries
• Frequency check
• Active interference management
• Movement sensor to automatically
switch to transmit mode
AXIO
Digital and analog
CDF16AEN
POWER
BUTTON
DEPLOYABLE
ANTENNA
MARKING
JOYSTICK
JACK
USER MANUAL
GETTING STARTED
PRACTICE :
Practicing and being well-trained in using your transceiver is essential
in order to conduct a successful search in the event of an avalanche.
RESPONSABILITY :
Skiing off trail or skiing in the backcountry are activities that present
inherent risks. Wearing a transceiver should in no way inuence your
decision making when in avalanche terrain. Know when to turn around.
STORAGE :
Store your device in a cool and dry place. Remove the batteries
when storing for long periods of time (in summer). The device is no
longer under warranty if the batteries leak.
WARRANTY :
Your device has a 5-year warranty starting at the date of manufacture.
We recommend sending your transceiver in for maintenance on a
regular basis: once every 3 years for amateurs, and once every two
years for professionals.
REGISTRATION :
Every ARVA transceiver has a unique identication number. Registering
your device on www.arva-equipement.com on the “warranty” page
allows us to link your contact information to your device to for optimal
tracking (maintenance, customer service, etc.).
BATTERIES :
The ARVA transceiver only operates with 3 standard Alkaline AAA/LRO3
batteries. Do not use rechargeable or lithium batteries. The batteries
should all be replaced at the same time. The label in the battery
compartment is important for all servicing procedures, do not remove it.
IMPORTANT FOR SWITZERLAND: APPENDIX 4.10 FOR STANDARD
SR 814.013 APPLIES TO BATTERIES
CAUTION: There is a risk of explosion if the battery is thrown into a re
or replaced by the wrong type of battery. Follow instructions on how to
properly dispose of used batteries.
SETTINGS / TURNING ON THE DEVICE SETTINGS
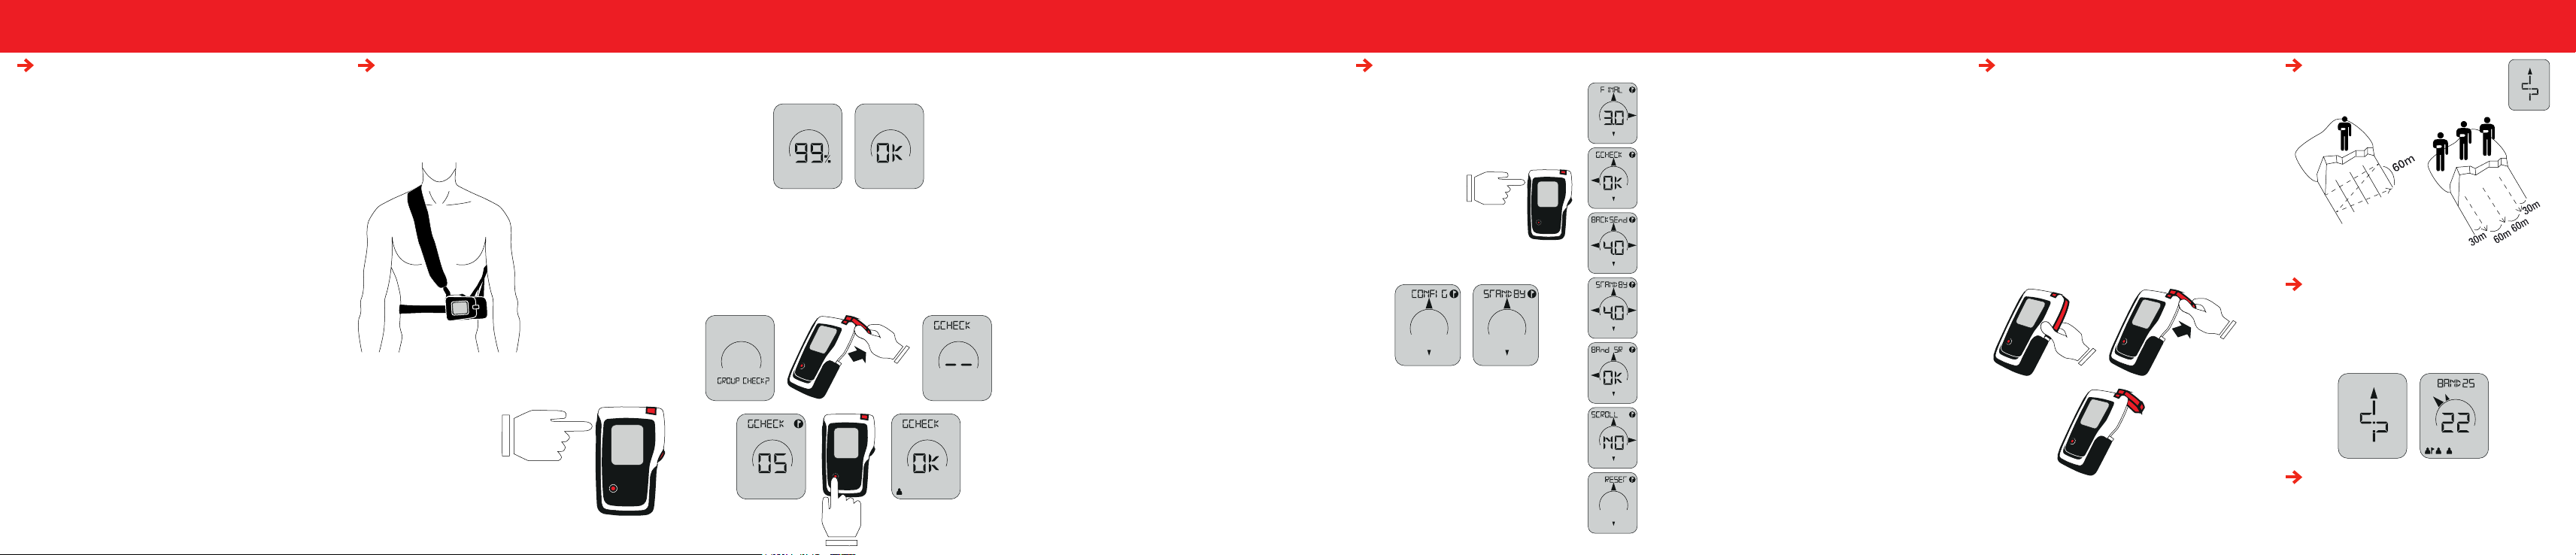
WEARING THE DEVICE :
Your ARVA must always be worn on top of your base layer. Your ARVA
should always be covered by at least one layer of clothing to protect it
from the cold and impacts.
Wear the device in its holster and in the following manner :
You can conduct a search with your transceiver still in its holster.
TINITIAL START-UP :
To turn on your device press
the POWER button located on
the edge of the device. This will
launch a self-checking start-up
process and then display the version number, battery
level, group check (if the function is activated in the
menu).
BATTERY CHECK :
The battery check occurs every time the device is turned on. We
recommend that you replace the batteries once their power level
drops below 50%.
GROUP CHECK :
• The device proposes conducting a Group Check if the function
is activated in the menu. This function allows the group leader to
test one-by-one that every group member’s device is functioning
properly.
• To conduct the test, open the deployable antenna and let the
device check every other transceiver in the group.
• The emitting device must be at least 1m from the transceiver
conducting the group check to properly measure the frequency.
Otherwise, the device conducting the group check will display
an error. If the transceiver checked by the AXIO has a frequency
deviation, the deviation will appear on the screen.
• Once the device has been checked, you can mark it with a
center press of the joystick and then check the next transceiver.
• To exit Group Check mode, fold the antenna. The device then
switches back to transmit mode.
POWER-OFF :
To turn the AXIO off, press and hold the POWER button for 2s,
then validate by pressing the joystick in the center position.
Access the menu when the device is turned
on by pressing the POWER button in transmit
mode. Navigate through the menus using the
joystick.
button allows you to return to the prior menu
and to transmit mode.
You have two choices when entering the menu :
CONFIG (1) and STANDBY (2).
Select the CONFIG menu to access the different
settings.
To switch to STANDBY mode, navigate with the
joystick to STANDBY and then validate with a
center press of the joystick. To exit STANDBY
mode, press on the POWER button.
FINAL denes the distance from which it is possible to mark
a victim. It is possible to set this distance to approximately 3m
or 5m.
GCHECK allows you to activate the option of launching the
Group Check procedure when turning on the device.When navigating through the menu, the POWER
B A C K S E N D a l l o w s y o u t o d e a c t iv a t e o r t o s e t t h e t i m e d e l a y
after which the device automatically switches back to
transmit mode from receive mode.
STANDBY allows you to deactivate or to set the time after
which, without any intervention on the part of the user
through detection by a movement sensor, the device
switches to transmit mode.
This mode corresponds to the device’s neutral state in
which the transmitting and receiving modes are on standby
to allow the user to work on the avalanche without disrupting
the search.
The countdown starts when the movement sensor detects
that the user is no longer moving. Once the set time delay
is up, the device will request validation to remain in STANDBY
mode. If the user does nothing, the device automatically
switches into transmit mode.
BAND SR allows you to activate the automatic bandwidth
reduction in case of interferences.
SCROLL allows you to activate the manual victim selection
function. Caution, the manual selection function should only be
used by experts.
RESET allows you to reset the device to the default settings.
To switch to receive mode once the device is turned on,
open the deployable antenna. Folding the antenna switches the device back to transmit mode. Two additional choices
are available in the menu in receive mode: ANALOG and SEND.
SEND mode allows you to switch to transmit mode from receive
mode via the menu. The ANALOG mode allows you to activate
an analog search.
In ANALOG mode the device provides a sensitivity indication allo wing you to adjust receiver sensitivity based on distance. To
better hear the signal it is possible to use earphones; plugging them into the jack automatically switches the device
to ANALOG mode. An analog search is only recommended
for expert users.
SIGNAL SEARCH WITCHING TO SEARCH MODE
Start searching for a signal based on one of the
two diagrams below.
MANAGING INTERFERENCES
If interferences (see paragraph INTERFERENCE) disrupt
the device, the AXIO will automatically reduce the search
range to 25m and display BAND 25. It is important to take
this information into consideration when conducting the
search.
MULTIPLE VICTIMS INDICATOR
Victims icons appear at the bottom of your screen. When a
victim is marked a ag appears close to it. The + indicates that
there are more than 5 buried victims.
 Loading...