

ASTEELFLASH FRANCE ARVAADV Manual English
using the arvaA
The ARVA ADVANCED has two operating modes:
■ Standard (numerical), involving use of the right and left directional
arrows. The device automatically locks on to the closest victim. Follow the indications given in the form of figures and the direction shown by the red diode. If
pictogram 6 lights up, the device has detected multiple victims.
■ Advanced (analogue with numerical aids), in which receiver sen-
sitivity is adjusted with the + and - buttons. In analogue mode, the Advanced
symbol is displayed on the screen with a sensitivity level value (1,2,3,4,5,6,7,8
or 9). 9 corresponds to greatest sensitivity (distant search) and 1 to lowest
sensitivity (close search). In this mode, the device shows all the signals received.
If there are multiple victims, it indicates the estimated distances to each one.
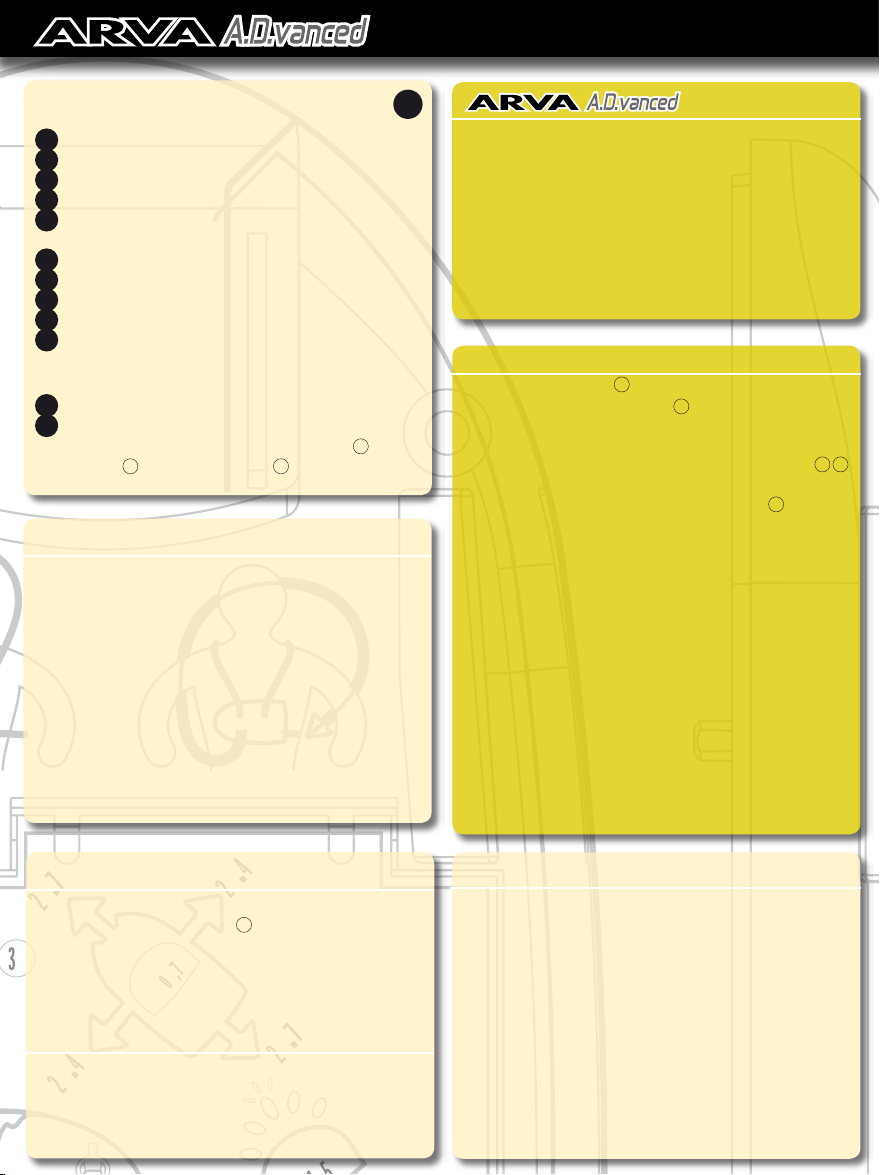
description of the unit
■ Top:
1
On/Off strap switch
2
Transmit/Receive switch (SOS / Search)
3
Directional arrows
4
Loudspeaker
5
Receiver intensity/sensitivity adjustment (Advanced=analogue mode)
■ LCD screen
6
Indicator showing simultaneous detection of multiple victims
7
Initial search distance indicator
8
Battery status/distance indicator
9
Battery status indicator
10
Indicator showing use of Advanced (=analogue) mode with sensitivity level
(9=max. sensitivity, 1=min. sensitivity)
■ Underside:
11
Battery compartment cover
12
Reminder: Attachment of straps - Switching on - Switching to receive
mode - Simulation of initial search by one or more rescuers
1
- Secon-
dary search
2
- Final search (last cross)
3
installing batteries
The ARVA ADVANCED operates exclusively with four standard LR03 alkaline batteries. Open the battery compartment cover
11
with a screwdriver or coin. The four
batteries should be of the same brand and be replaced at the same time. Insert
the batteries carefully in the order shown inside the compartment.
N.B.: Do not store the unit at a temperature of less than 0°C to avoid damaging
the batteries. DO NOT USE rechargeable batteries. Remove the batteries if the unit
is not used for any length of time.
switching the unit on
■ Fasten the On/Off strap
1
■ Auto-control: the direction diodes
3
light up from left to right, and
the LCD screen comes on. 3 beeps are emitted if the loudspeaker is in working
order.
■ Check your batteries using the battery life indicator scale levels
8
9
11 levels: 99,90, 80, 70, 60, 50, 40, 30, 20, 10, 0.
■ The LCS screen then goes off and the central diode
3
flashes to
indicate that the unit is in transmit mode.
■ Check Transmit/Receive functions before setting out. The per-
son checking the unit puts his ARVA in transmit mode and all the other members of
the group check that their ARVAs detect the signal properly in receive mode . The
operation is to be repeated in the opposite direction so that ALL the ARVA units in
the group are checked in both transmit and receive modes.
Possible anomalies...
The ARVA ADVANCED performs a self-test every 5 minutes to check the state of
the batteries, frequency setting, transmission power, etc.
If the unit detects an anomaly, a 5-second beep is emitted,
3 times, separated by 5 minute intervals. This means one of two things:
• The battery charge has dropped to 20% (the unit can still transmit for 48 hours
or search for half an hour). After the 5-second beeps, 20% will stay displayed on
the LCD screen to remind you to change the batteries as soon as possible.
• Technical problems connected with transmission or programming: after the
5-second beeps, the LCD screen displays Er (= Error). Do not set out with
any unit displaying this message.
useful information:
Move forward SLOWLY to avoid going too hastily in the wrong direction. The entire surface
of the avalanche must be investigated. When searching for a victim or testing the unit, stay
away from electrical equipment (high-voltage power lines, radios, mobile phones, etc.) or
impose radio silence (these are just a few examples). This is applicable when using any
ARVA-type transmitter-receiver.
The distance indicator indicates progress along a field line and not a distance in metres.
information for your own safety
Whenever you leave marked-out ski runs or trails, you are in an area where there are
certain risks, particularly of avalanches. When moving around in the mountains, you do so
at your own risk:
• Before setting out, check the local weather with a reliable weather station or professional mountain guides and carry the right equipment. In particular, take an ARVA
and carry a shovel and a probe. But remember, this equipment will not detect avalanches or
provide complete protection and to be fully effective, you need to familiarise yourself with
the use of the ARVA beforehand!
• Never go off on your own and do not follow any trail you happen to
see: they are no guarantee of safety. If there is any doubt about the stability of a slope you
have to cross, YOU MUST leave a good distance between one another or better, cross it one
by one. Keep a good eye on one another.
• Finally, it is best to give up if you are not sure! Be careful: snow conditions change,
and with them the risk of avalanches. Get to know about avalanches. In France, a free catalogue and documentation can be obtained from ANENA (Association Nationale pour l’Etude
de la Neige et des Avalanches, - tel. 04 76 51 39 39 / www.anena.org).
Exclusive features of the ARVA Advanced:
• A powerful 457 kHz ±20 Hz transmitter with transmission level inde-
pendent of battery power.
• In numerical (standard) mode, the search band width is 40 m.
• Multiple victim indicator and automatic synchronisation on closest victim.
• In Advanced (= analogue) mode, indication of a scale of progress and,
in multiple victim situations, indication of estimated distances
along field lines.
• Auto-control of frequency adjustment and transmission level every 5 minutes.
• 16 bit processor with extremely fast analysis speed.
A
standard (nu-
merical) mode
■ Primary search (approach phase) (cf D1)
• Pull 2 SEARCH.- The device is automatically in
completely automatic numerical mode. The LCD
screen displays the arrow diagram continuously
until you pick up a signal from the victim.
• Move backwards and forwards across the
avalanche as shown in diagram B if you are the
only rescuer or diagram C if there are several
rescuers.
• Hold the ARVA horizontally, pointing it
downwards (cf. photo), and sweeping it slowly
from left to right and right to left (making an
angle up to 180°)
• Continue until you pick up a first clear signal
(directional arrows and distance indicator light
up)
N.B: If the ARVA has already picked up a signal it
will go directly to the secondary search.
■ Secondary search (locating phase) (cf D2).
This phase starts when the victim’s signal has
been picked up.
• The ARVA gives you a distance indication on
the LCD screen and one of the directional arrows
lights up.
• As soon as one of the directional arrows lights
up, point your ARVA in such a way that the central
diode lights up and head in that direction.
If the numbers decrease, you are moving closer to the victim. If not, go in
the opposite direction.
• Always try to make sure that the central diode is lit. Sweep the unit gently in the
directly in which the arrows light up. This will enable you to cover the shortest possible distance before reaching the victim. Continue moving forward
until the distance indicator displays 3.0.
■ Final search (detection phase) (cf D3)
At this point, with the arrow lit up, lower the ARVA
unit as close as possible to the snow, pointing it in
the same direction and keeping it horizontal. The
beeps become faster and the distance indicator
keeps decreasing. Keep moving forwards as long
as the number decreases. If it starts to increase,
return to the point where it is smallest and locate
the victim using the cross technique,
always pointing the ARVA in the same
position.
■ Cross technique: The ARVA must be moved
as closely as possible to the snow, in parallel
straight lines. Determine the point along the line
where the distance indicator displays the smallest
number and the beeps are emitted very close
together or continuously. From that point, move
perpendicularly and repeat the operation. The
point at which the maximum signal is obtained is
vertically above the transmitter. If necessary, repeat the operation once or twice to obtain a more
precise position. However, it is not necessary to
determine an extremely precise location using the
ARVA. In fact, it is usually faster to start searching
with a probe as soon as the likely location has
been determined to within about 50 cm.
Simply press simultaneously on the + and - buttons for 3 seconds to flip from Standard (nume-
rical) mode to Advanced (analogue) mode (Advanced logo and sensitivity level are displayed on the
LCD screen). Repeat this operation to return to numerical mode (the logo and sensitivity level
disappear from the LCD screen). This can be done at any time, even if rescue workers have
begun their search in Standard (numerical) mode.
We shall now take a look at the two main modes and study an example of a search in the case of multiple
victims. The cases presented are «typical» ones. With training and experience, the user can change from
Standard (numerical) mode to Advanced (analogue) mode depending on how familiar he is with the device and
the situation in which he finds himself.
advanced (ana-
logue) mode
Diagrams E1 and E2.
When the ARVA is switched to advanced mode,
its sensitivity is maximum (level 9). However, the
Advanced symbol flashes if the sensitivity level
is to be reduced. Decrease the sensitivity with
the - button until the symbol stops flashing.
When the symbol stops flashing, you can use the
numbers, which give an estimation of the distance
that still needs to be covered.
■ Initial search
Moving forward, turn the device in every direction
until the first audible signal is heard. If the signal
is weak, continue to move in the same direction
without changing the position of the device until
the sound is clearer and sufficiently distinct to be
of help. The initial search is over when a clear
signal is obtained.
■ Secondary search (cross or directional
search) There are two possibilities:
• Cross technique Diagram E1:
As you move forward, keep the ARVA in the same
position. It must be moved parallel to itself. When
the first signal is obtained, keep moving in a
straight line. The beep becomes louder and the
distance indicator decreases. Once the maximum
signal has been reached and starts to diminish,
return to the approximate point where it was
strongest. Reduce the sensitivity to minimum in
order to detect the point where the beep will be
loudest, and start moving in a line perpendicular
to the previous direction. You will soon realise if
you are moving in the right direction, as the signal
will quickly become louder, or in the wrong direc-
tion, in which case it will diminish. Once again,
find the point where the beep is loudest, as previously. Continue until the sensitivity is positioned
on one of the two last levels (minimum sensitivity,
and therefore minimum search distance).
• Directional method Diagram E2:
To determine the direction to follow, sweep the
ARVA from left to right over 180°, holding it
horizontally. The stronger the signal, the louder
the beep will be (and the lower the distance indicator). The right direction is the one in which
the beep is the loudest. If the beep gets louder
as you move forward, you are going in the right
direction. If it gets weaker, you are going in the
wrong direction. Turn round, walk back a few metres and check again to find the right direction.
As you advance, turn down the sound level with
the - button (so that it is easier to determine
where the ARVA is emitting the loudest beep).
When the sensitivity is down to 2 or 1, the secondary search is finished.
■ Final search
You are very close to the victim when the sensiti-
vity is down to 2 or 1 (the actual level depends on
the depth at which the victim is buried). The cross
technique should then be used (see opposite). Remember that in this case the distance indication
is replaced by the intensity and frequency of the
beeps. The closer you get to the buried victim, the
louder and faster the beeps are emitted. When the
distance between the transmitter and receiver is
very small, a single continuous beep is emitted.
N.B: This is one possible method for finding
victims. The user may decide to stay in
Advanced mode for the entire search and
adjust the sensitivity level with the +
and - buttons to isolate signals from
different victims
■ Start with the initial search if necessary, in
either Standard (numerical) mode or Advanced
(analogue) mode.
In the secondary search phase, if indicator
6
is
lit, this means that the ARVA is picking up several
signals around you, mark the area with a
ski or pole (F2). In standard mode, the ARVA
will automatically lock on to the unit emitting the
strongest signal, which is theoretically the victim
closest to you. Once you have found the first victim (F3/v1), locate him using your snow probe
and mark the location
■ Return to the point that you marked
earlier and switch the ARVA to Advanced (Analogue) mode (F4): the unit will
indicate the various signals it has picked up.
Several estimated distances are displayed, along
with various levels of sound depending on how
close they are.
N.B As soon as you switch to Advanced mode, the
unit will automatically revert to sensitivity level 9
(maximum range). Use the - button to lower
the level and search for the second victim.
■ When you pick up the signal from the second
victim, two estimated distances will be displayed
on the LCD screen. To obtain a closer estimate,
reduce the sensitivity until the victim’s signal is
barely audible and focus on the higher figure (the
lower figure with a strong signal corresponds to
the first victim v1 and the weaker signal to the
distance of victim v2). Determine the direction to
follow by sweeping the ARVA from right to left and
attempting to reduce the distance of the higher
figure. Once you have found the right direction,
move forward, taking the number of steps indicated. One of the figures will increase and the
other decrease, while at the same time one of the
signals will increase and the other decrease.
When you have taken the number of steps indicated, switch to Standard (numerical) mode (F5).
Make a SLOW sweep with the unit. The ARVA will
automatically lock on to the closest victim, i.e. the
second one. Repeat the standard mode search,
as in the case of a single victim. If you return
towards the first victim, go back to the starting
point (where you obtained the multiple victim
signal) and try to find the direction for the second
victim in Advanced mode.
N.B. In the case of multiple victims, it is advisable
to use an earphone to distinguish the various
signals more clearly.
D
E
F
Case of a single victim Ä
Situations with multiple victims ÄÄ...
english
 Loading...