

Page 1

20” TFT LCD TV20” TFT LCD TV
INSTRUCTION MANUALINSTRUCTION MANUAL
MODEL: LTV-2001MODEL: LTV-2001
Page 2

TABLE OF CONTENTS
IMPORTANT SAFETY INSTRUCTIONS.............................................................................................................
PREFACE..........................................................................................................................................................
WARNINGS AND CAUTIONS .........................................................................................................................
SPECIFICATIONS..............................................................................................................................................
ASSEMBLY DRAWINGS...................................................................................................................................
INSTALLATION .................................................................................................................................................
REMOTE CONTROLLER DESCRIPTION ............................................................................... .......................
BATTERY INSTALLATION (REMOTE CONTROLLER UNIT) ...........................................................................
OPERATION INSTRUCTIONS .........................................................................................................................
TROUBESHOOTING.........................................................................................................................................
2-3
4
5-6
7
8
9-12
13
14
15-23
24-25
-1-
-1-
Page 3
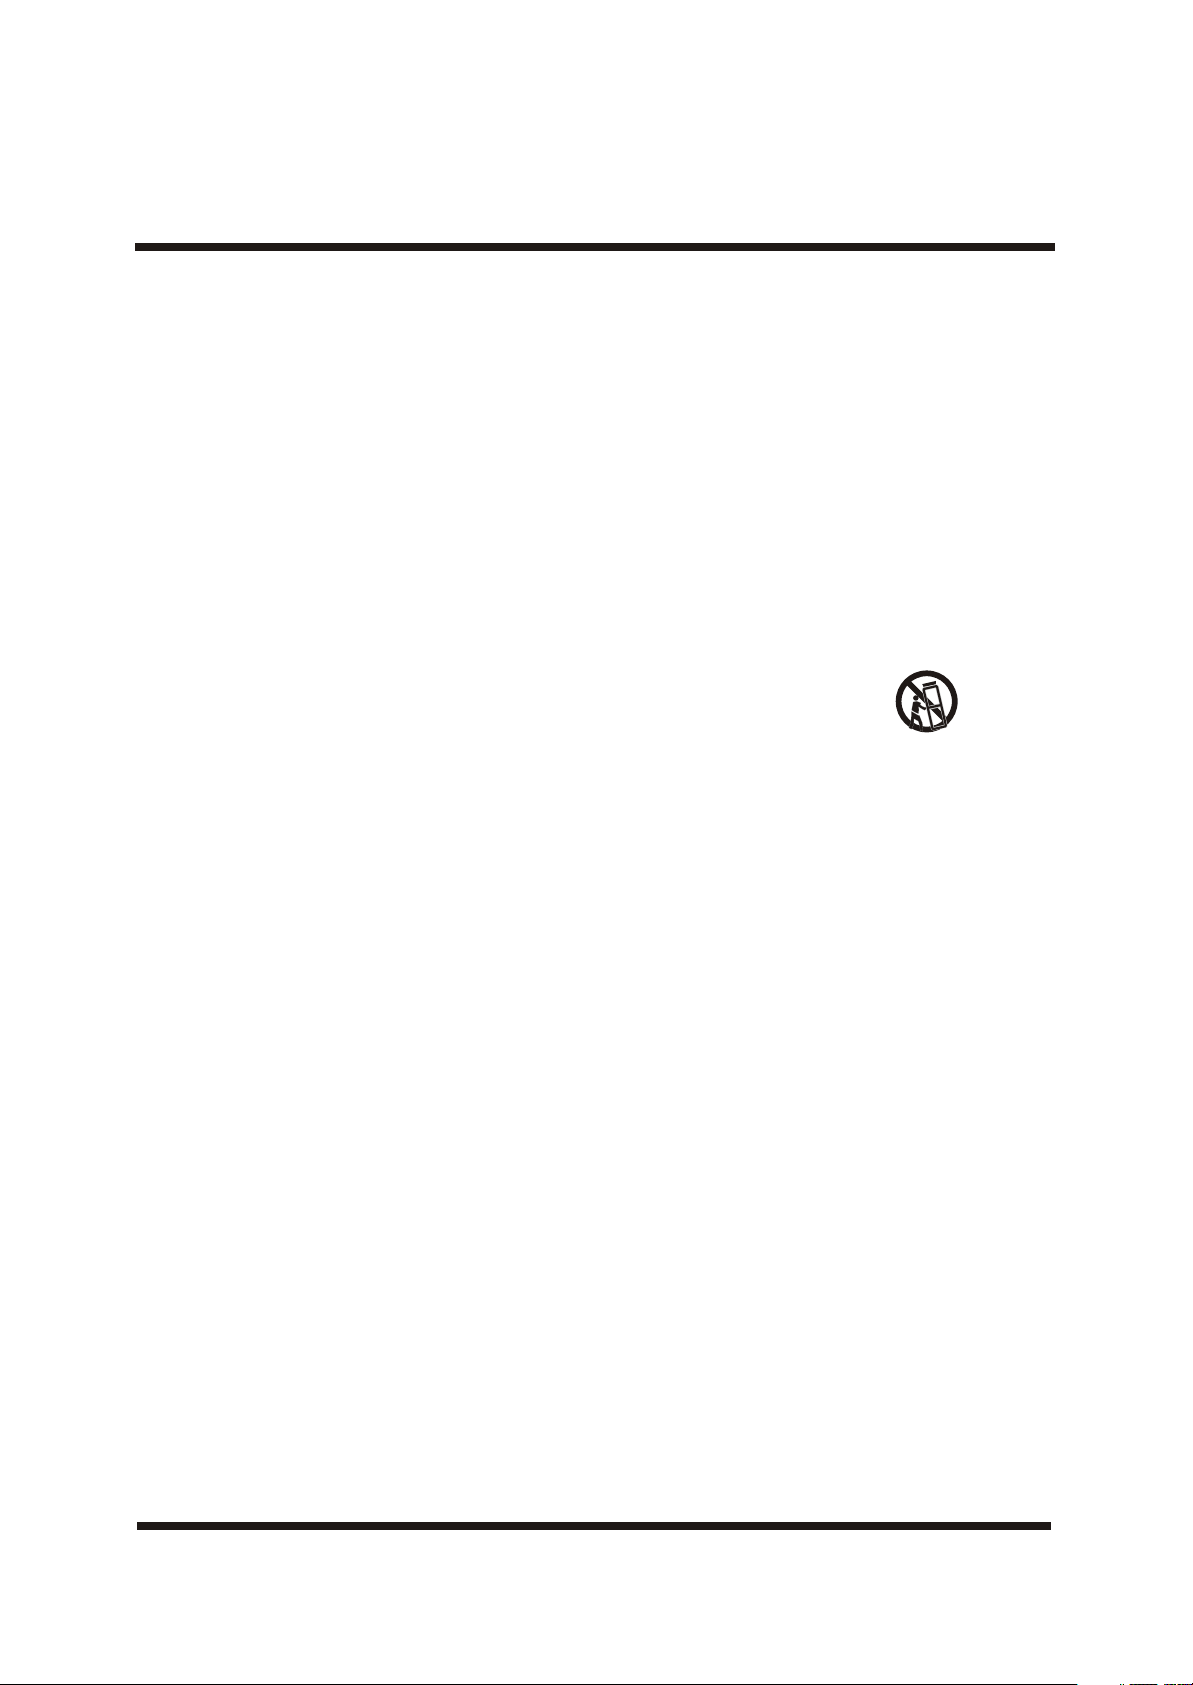
IMPORTANT SAFETY INSTRUCTIONS
IMPORTANT SAFETY INSTRUCTION
1.Read these safety instructions.
2.Keep these safety instructions.
3.Heed all warnings.
4.Follow all safety instructions.
5.Do not use this apparatus near water.
6.Clean only with dry cloth.
7.Do not block any ventilation openings. Install in accordance with the manufacturers instructions.
8.Do not install near any heat sources such as radiators, heat registers,stoves, or other apparatus (including
amplifiers)that produce heat.
9.Do not defeat the safety purpose of the polarized or grounding type plug.A polarized plug has two blades
with one wider than the other. A grounding type plug has two blades and a third grounding prong. The wide
blade or the third prong are provided for your safety. If electrician for replacement of the obsolete outlet.
10.Protect the power cord from being walked on or pinched particularly at plugs convenience receptacles,
and the point where they exit from the apparatus.
11.Only use attachments/accessories specified by the manufacturer.
12.Unplug this apparatus during lightning storms or when unused for long periods of time.
13.Refer all servicing to qualified service personnel. Servicing is required when the apparatus has been
damaged in any way, such as power-supply cord or plug is damaged, liquid has been spilled or objects
have fallen into apparatus, the apparatus has been exposed to rain or moisture , does not operate
Normally, or has been dropped.
14.Apparatus shall not be exposed to dripping or splashing and no objects filled with liquids, such as vases,
shall be placed on the apparatus. important safety instruction.
15.Splashing
The apparatus shall not be exposed to dripping or splashing and no objects filled with liquids, splashing
and no objects filled with liquids such as vases, shall be placed on the apparatus.
16.A warning that an apparatus with class I construction shall be connected to a MAINS socket outlet with a
protective earthing connection.
17.where the MAINS plug or an appliance coupler is used as the disconnect device, the disconnect device
shall remain readily operable.
-2-
Page 4
IMPORTANT SAFETY INSTRUCTION
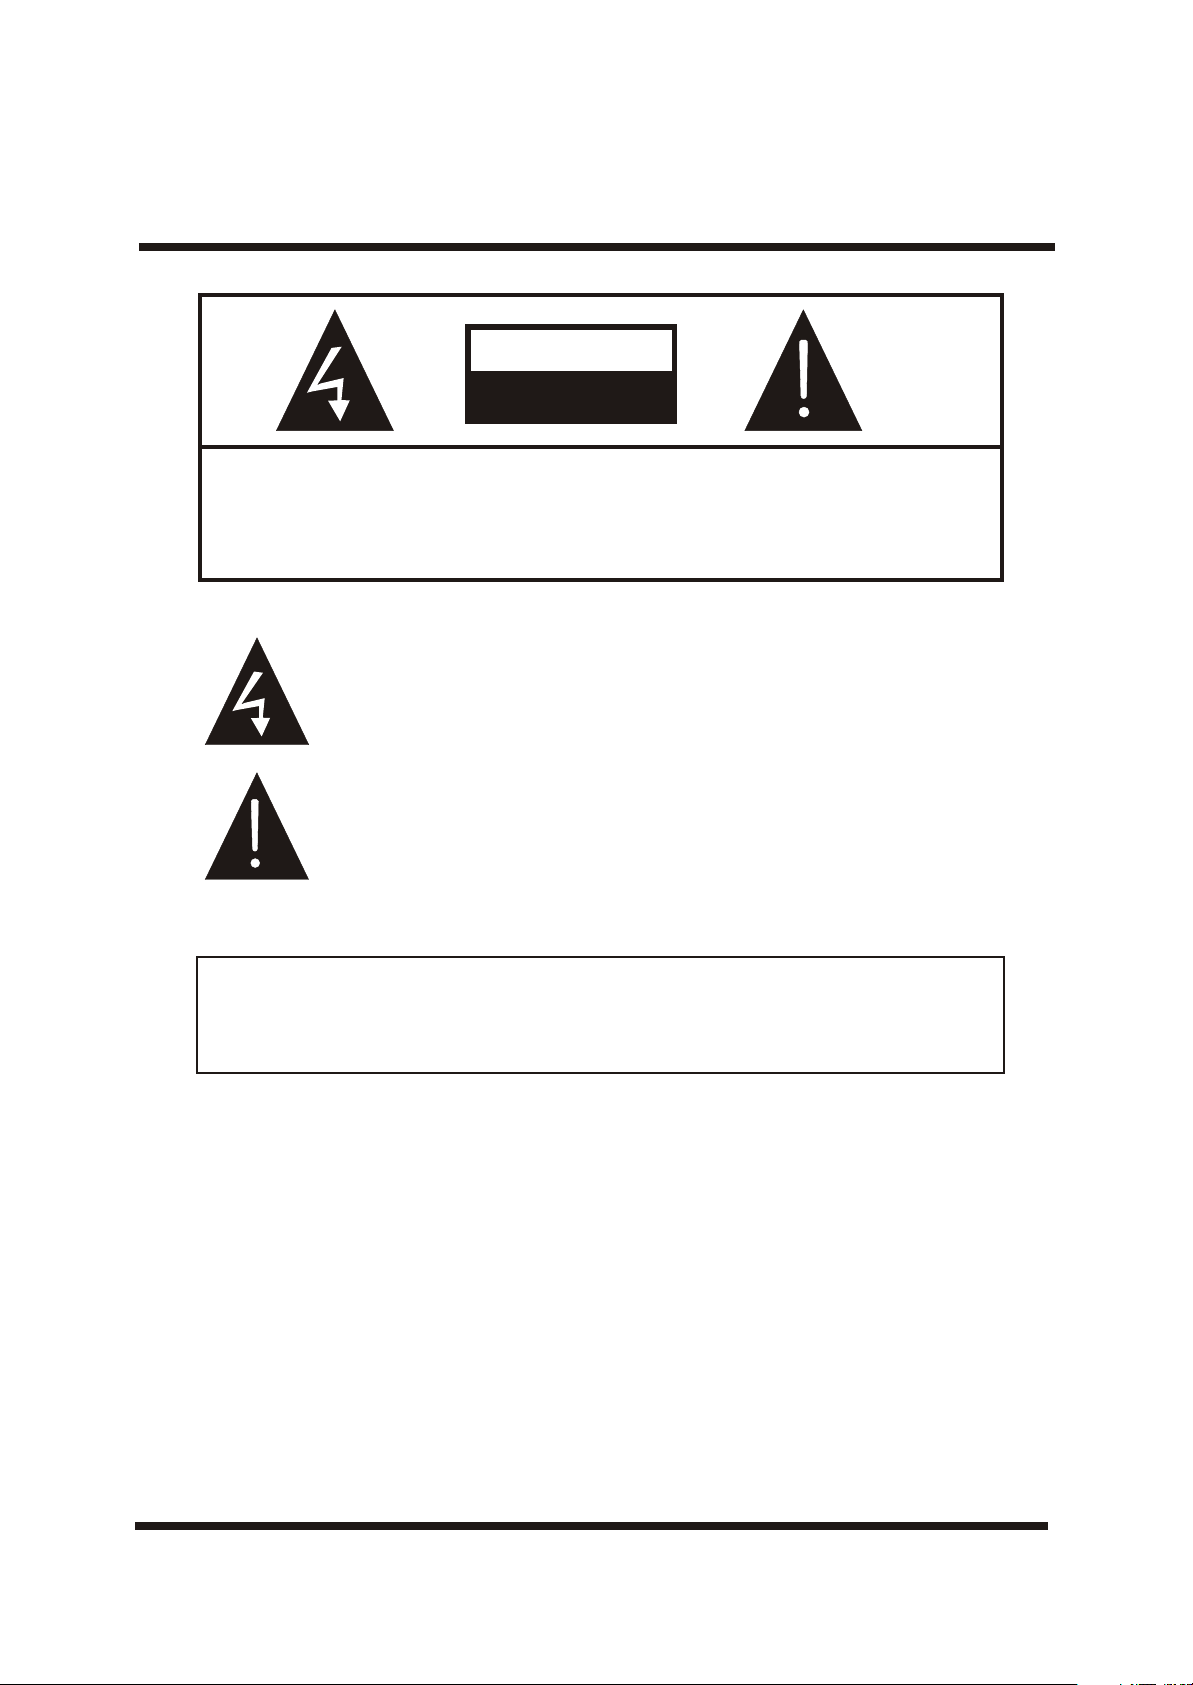
CAUTION
RISK OF ELECTRIC SHOCK
DO NOT OPEN!
CAUTION
TO REDUCE THE RISK OF ELECTRIC SHOCK, DO NOT
REMOVE COVER (OR BACK).NO USER SERVICEABLE
PARTS INSIDE. REFER SERVICING TO QUALIFIED
SERVICE PERSONNEL.
The symbol indicates that dangerous voltage constituting a risk of
electric shock is present within this unit.
The symbol indicates that there are important operating and
maintenance instructions in the literature accompanying this unit.
WARNING:
TO PREVENT FIRE OR SHOCK HAZARD, DO NOT EXPOSE THIS APPLIANCE
TO RAIN OR MOISTURE.
POWER SUPPLY:
Connect a adaptor with 12VDC/4A output to this unit’s power socket. The core
of the cosket is positive pole. Sheet metal outside is cathode.
NOTE:
Before connect the DC power to this unit,make sure that all the connections
have been made.
-3-
Page 5

PREFACE
Thank you very much for purchasing this TV. To enjoy your from the very beginning, read this manual carefully and
keep it handy for ready reference.
INSTALLATION
Locate the TV in the room where light does not strike the screen .
Total darkness or a reflection on the picture screen can cause eyestrain. Soft and indirect lighting is
recommended for comfortable viewing.
Allow enough space between the TV and the wall to permit ventilation.
Avoid excessively warm locations to prevent possible damage to the cabinet or premature component
failure.
This TV's adapter can be connected to AC 110-240 Volts. 50/60 Hz. Never connect to a DC supply or any
other power supply.
Do not cover the ventilation openings when using theTV.
CAUTION
Never tamper with any components inside the TV, or any other adjustment controls not mentioned in this manual.
All LCD-TVs are high voltage instruments. When you clean up dust or a water dropson the LCD PANNEL or
CABINET, the power cord should be pulled out from the receptacle, then wipe the TV with dried soft cloth. During
thunder and lighting, unplug the power cord and antenna cord to prevent damage to your TV. All repairs to this TV
should only be performed by the TV service personnel.
directly
-4-
Page 6
WARNINGS AND CAUTIONS
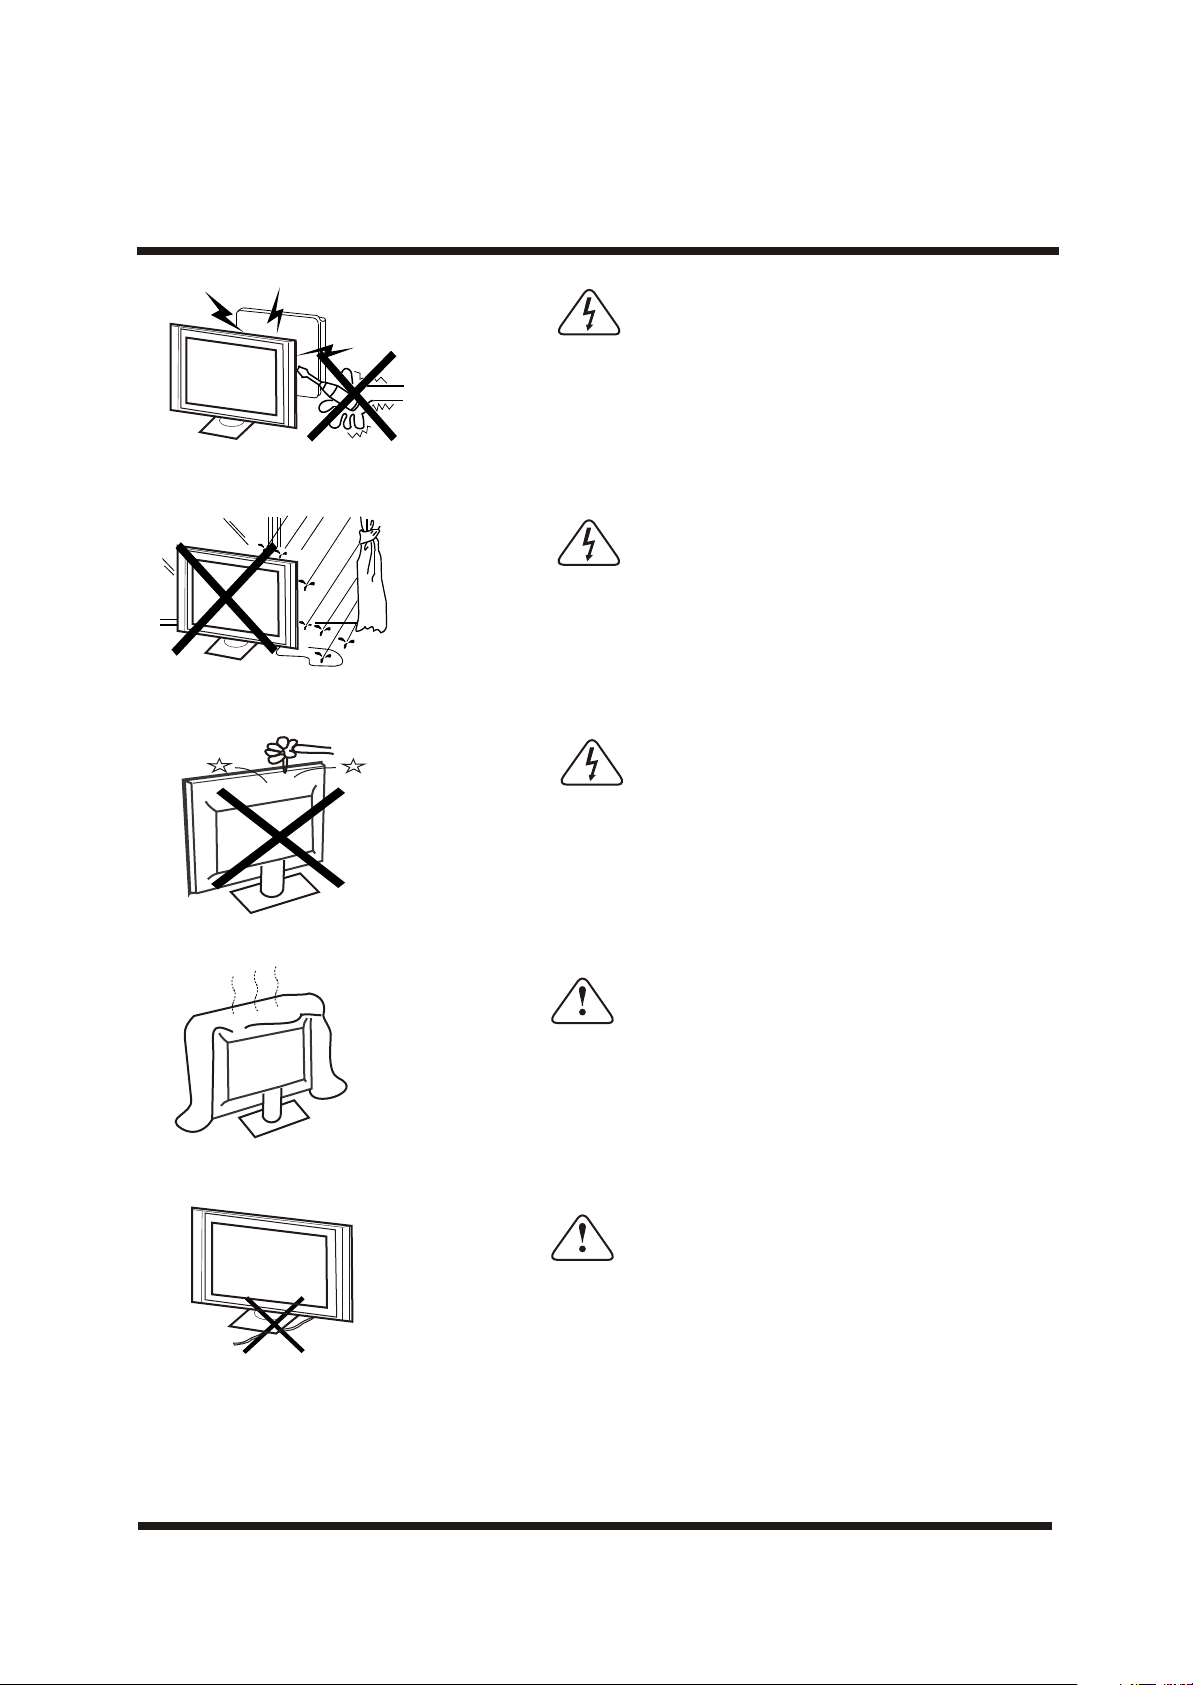
Warning
High voltages are used in the operation of this television receiver.
Do not remove the cabinet back from your set.Refer servicing to
qualified service personnel.
Warning
To prevent fire or electrical shock hazard, do not expose the television
receiver to rain or moisture.
Warning
Do not drop or push objects into the televisiion cabinet slots or
openings. Never spill any kind of liquid on the television receiver.
Caution
Do not block the ventilation holes in the back cover. Adequate
ventilation is essential to prevent failure of electrical components.
Caution
Do not squash power supply cord under the television receiver.
-5-
Page 7
WARNINGS AND CAUTIONS
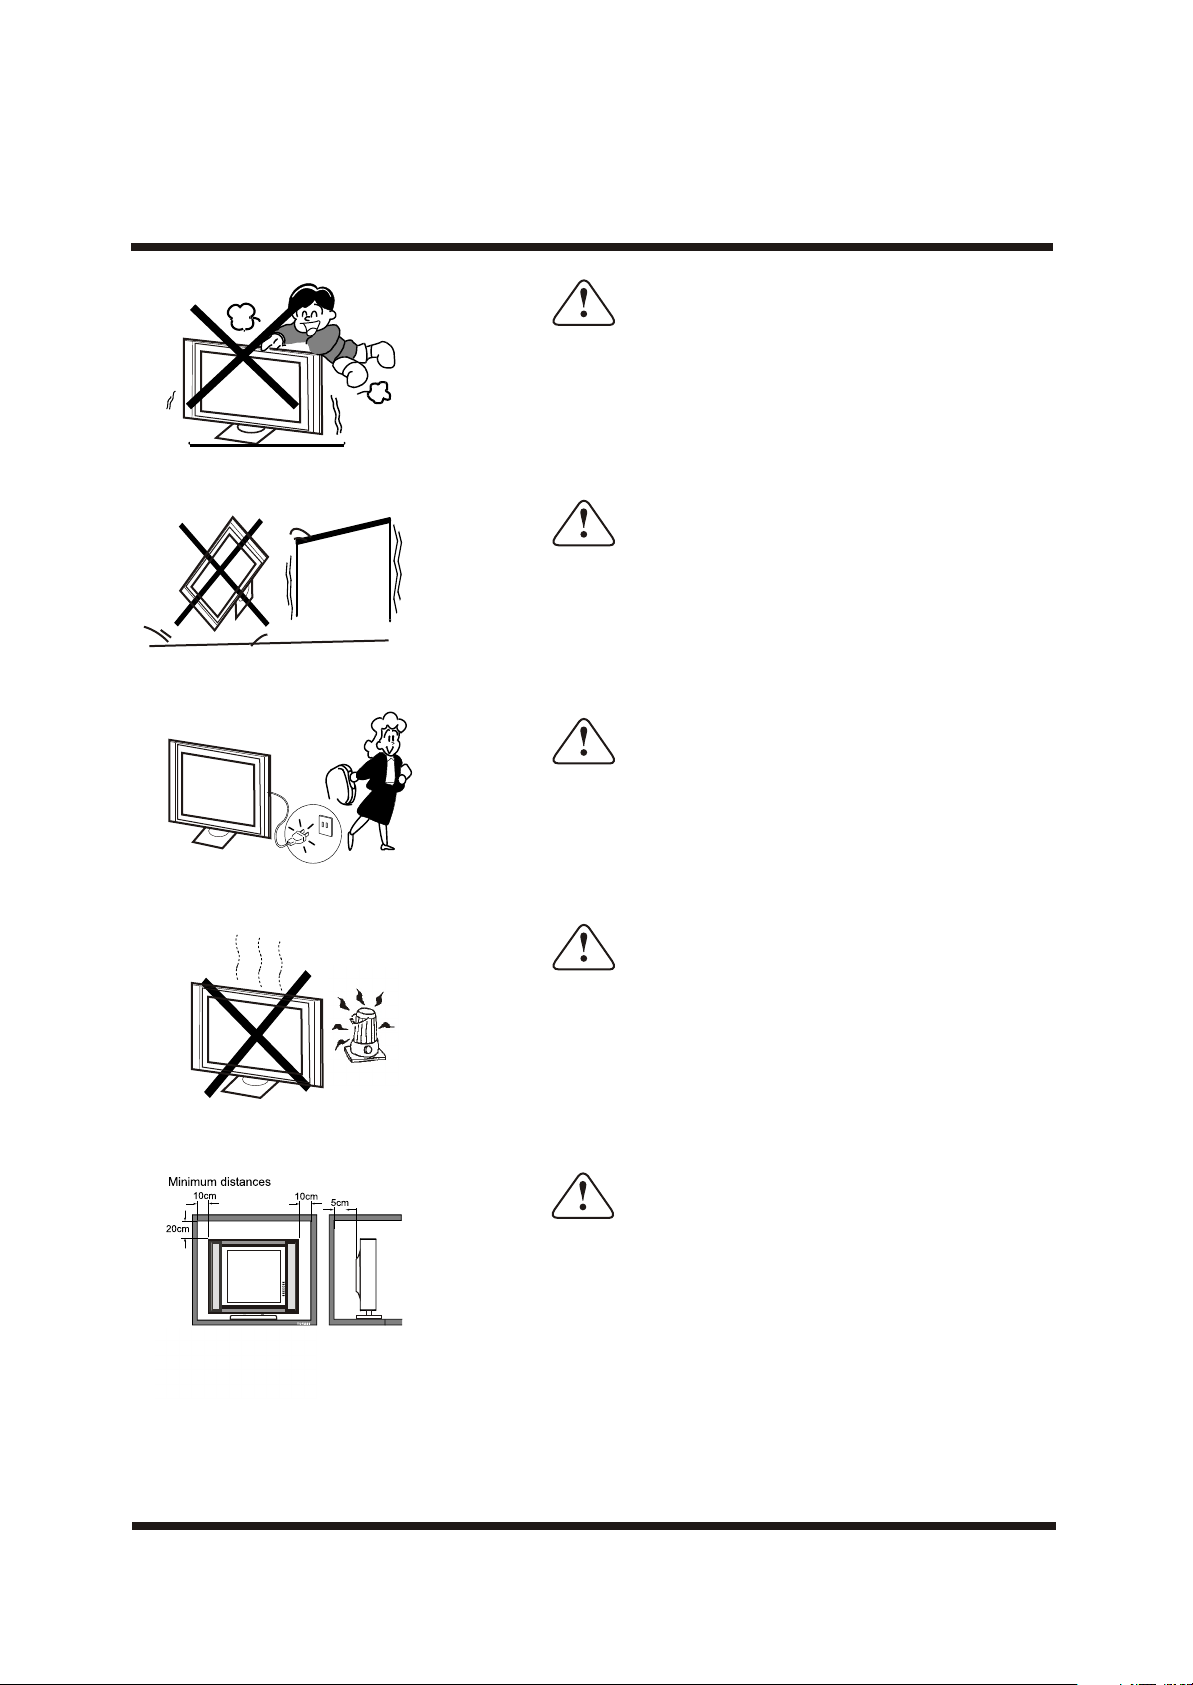
Caution
Never stand on, lean on, or suddenly push the television or its stand.
You should pay special attention to children. Serious injury may result if
it should fall.
Caution
Do not place your television on an unstable cart, stand, shelf or table.
Serious injury to an individual , and damage to the television, may result
If it should fall.
Caution
When the television receiver is not used for an extended period of time,
it is advisable to disconnect the AC power cord from the AC outlet.
Dim:515*320mm(
Caution
Avoid exposing the television receiver to direct sunlight and other
sources of the heat. Do not stand the television receiver directly on
other produces which give off heat.E.g.video cassette players and audio
amplifiers. Do not place naked flame sources, such as lighted candles
on the television.
Caution
If the television is to be built into a compartment or similar enclosed, the
minimum distances must be maintained. Heat build-up can reduce the
service life of your television, and can also be dangerous.
-6-
Page 8
SPECIFICATIONS
Model
LCD panel
Television system
AV system
Channel coverage
Analog RGB mode
Resolution
Display Colour
Comb Filter
Contrast
Brightness
Viewing angle
OSD language
Power source
Power consumption
Audio power
Lamp life
Video/Audio
terminals
LTV-2001
20 INCHES TFT LCD
NTSC-M/N
PAL-M/N
PAL-4.43MHz-50Hz NTSC-3.58MHz-60Hz SECAM-4.29MHz-50Hz
NTSC-4.43MHz-60Hz PAL-3..58MHz-50Hz
PAL-3.58MHz-60Hz PAL-4.43MHz-60Hz
VHF-L:
VHF-H:
UHF:
101 199 MHz
195 499MHz
501 933 MHz
640X480/ 60Hz, 800X600/ 60Hz
800X600
16.7million colours
Adaptive 2/4 line
500:1
450cd/m
2
160° (H)/160° (V)
English/French/Italian/Portuguese /Spanish
DC 12V , AC 100-240V , 50/60Hz
60W
3W+3W
50,000 hours
RF input: Cable/ antenna RFx1
VIDEO input: VIDEOx1
S-VIDEOx1
YCbCrx 1
GRAPHIC input: Analog RGB 15pin x1
AUDIO input: 3(VIDEO,YCbCr PC)
Auto switch off
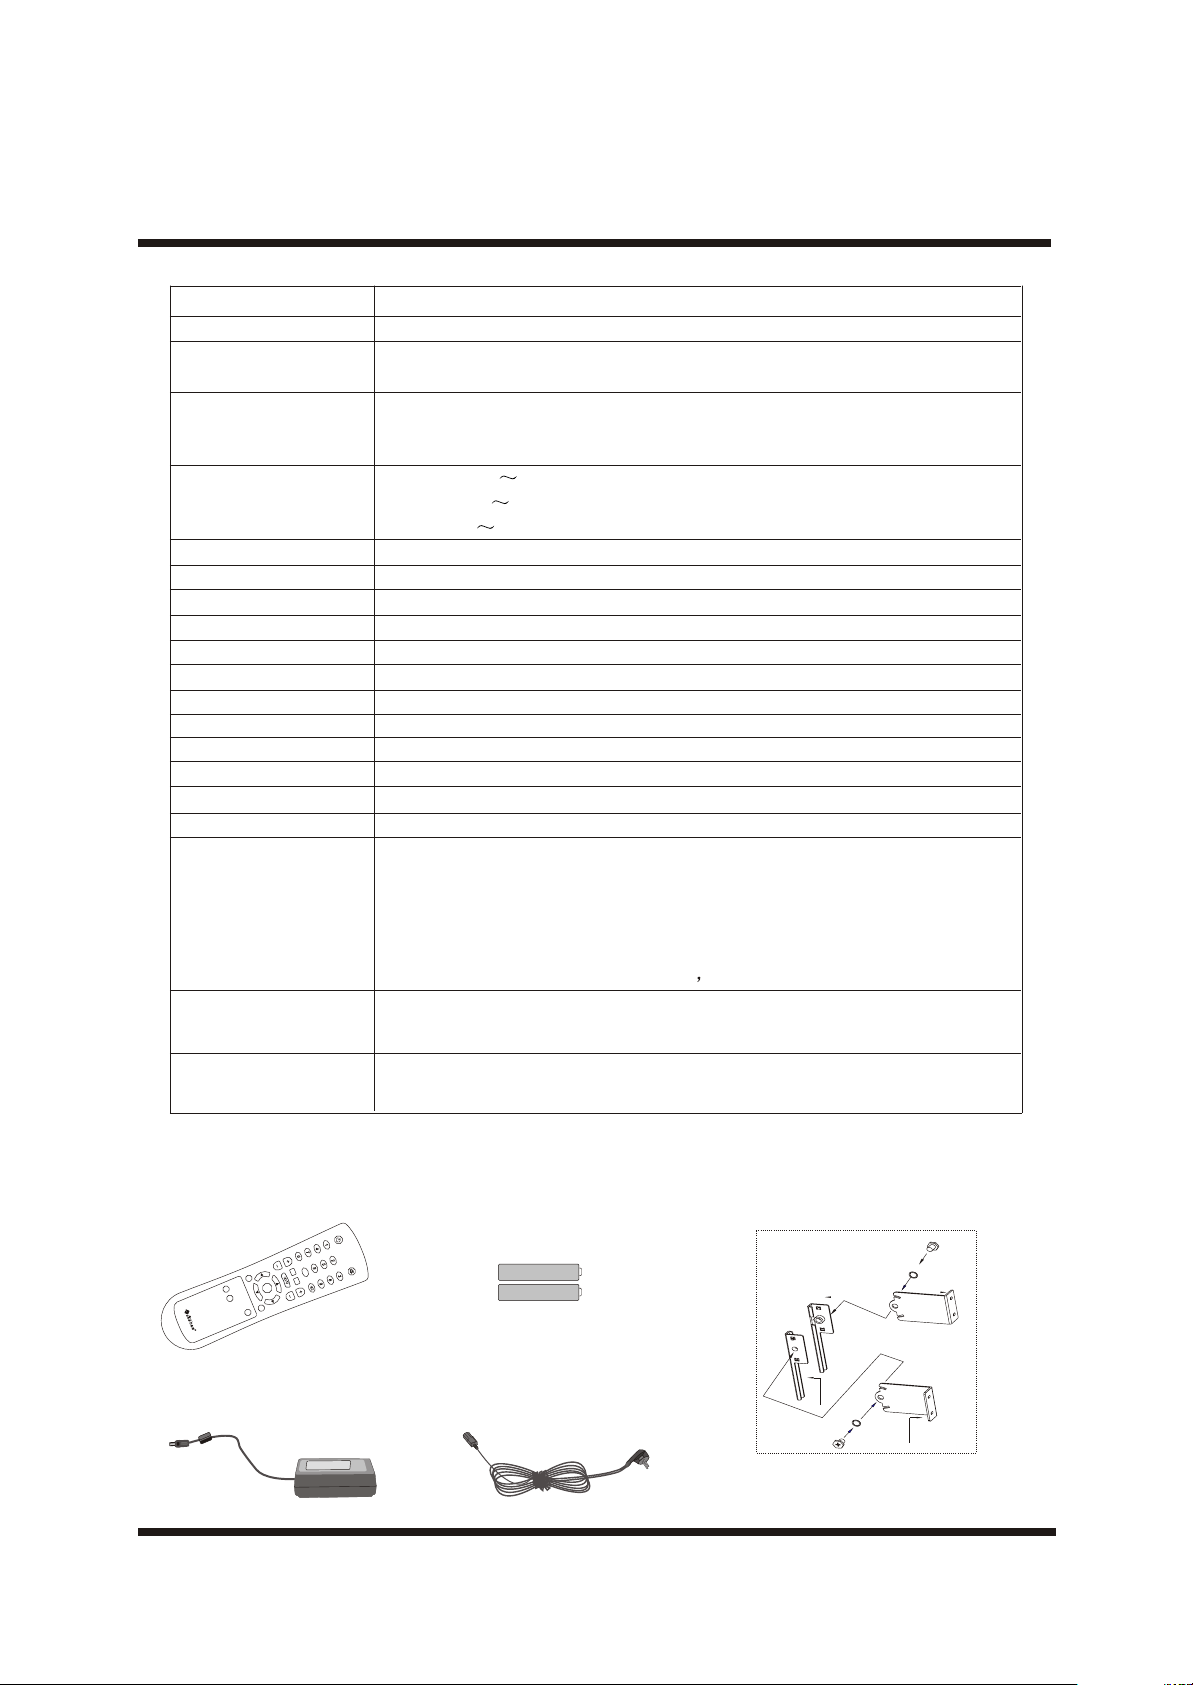
Supplied accessories
Accessories:
One Remote Control
V
O
O
LV
L
S
S
LE
LE
S
S
Y
Y
V
V
E
E
S
S
C
C
P
P
T
T
R
R
E
E
M
M
M
M
A
A
UT
UT
T
T
S
S
O
O
I
S
S
O
O
U
U
N
N
D
D
P
P
I
I
C
C
T
T
URE
URE
DI
DI
S
S
P
P
L
L
AY
AY
One AC ad apter
I
NP
NP
M
U
U
E
E
T
T
N
N
U
UM
CHCH
R
E
E
T
T
U
U
R
R
N
NR
When a signal is absent loner than 10 minutes the unit will
automatically switch off.
Remote control, AC adapter, AC cord, Instruction Manual,batteries,
Accessories for hanging
Two size AAA batteries
P
P
O
O
W
W
E
E
R
R
M
M
UT
UT
E
E
Accessories for hanging
One AC cor d
-7-
A
B
C
D
Page 9
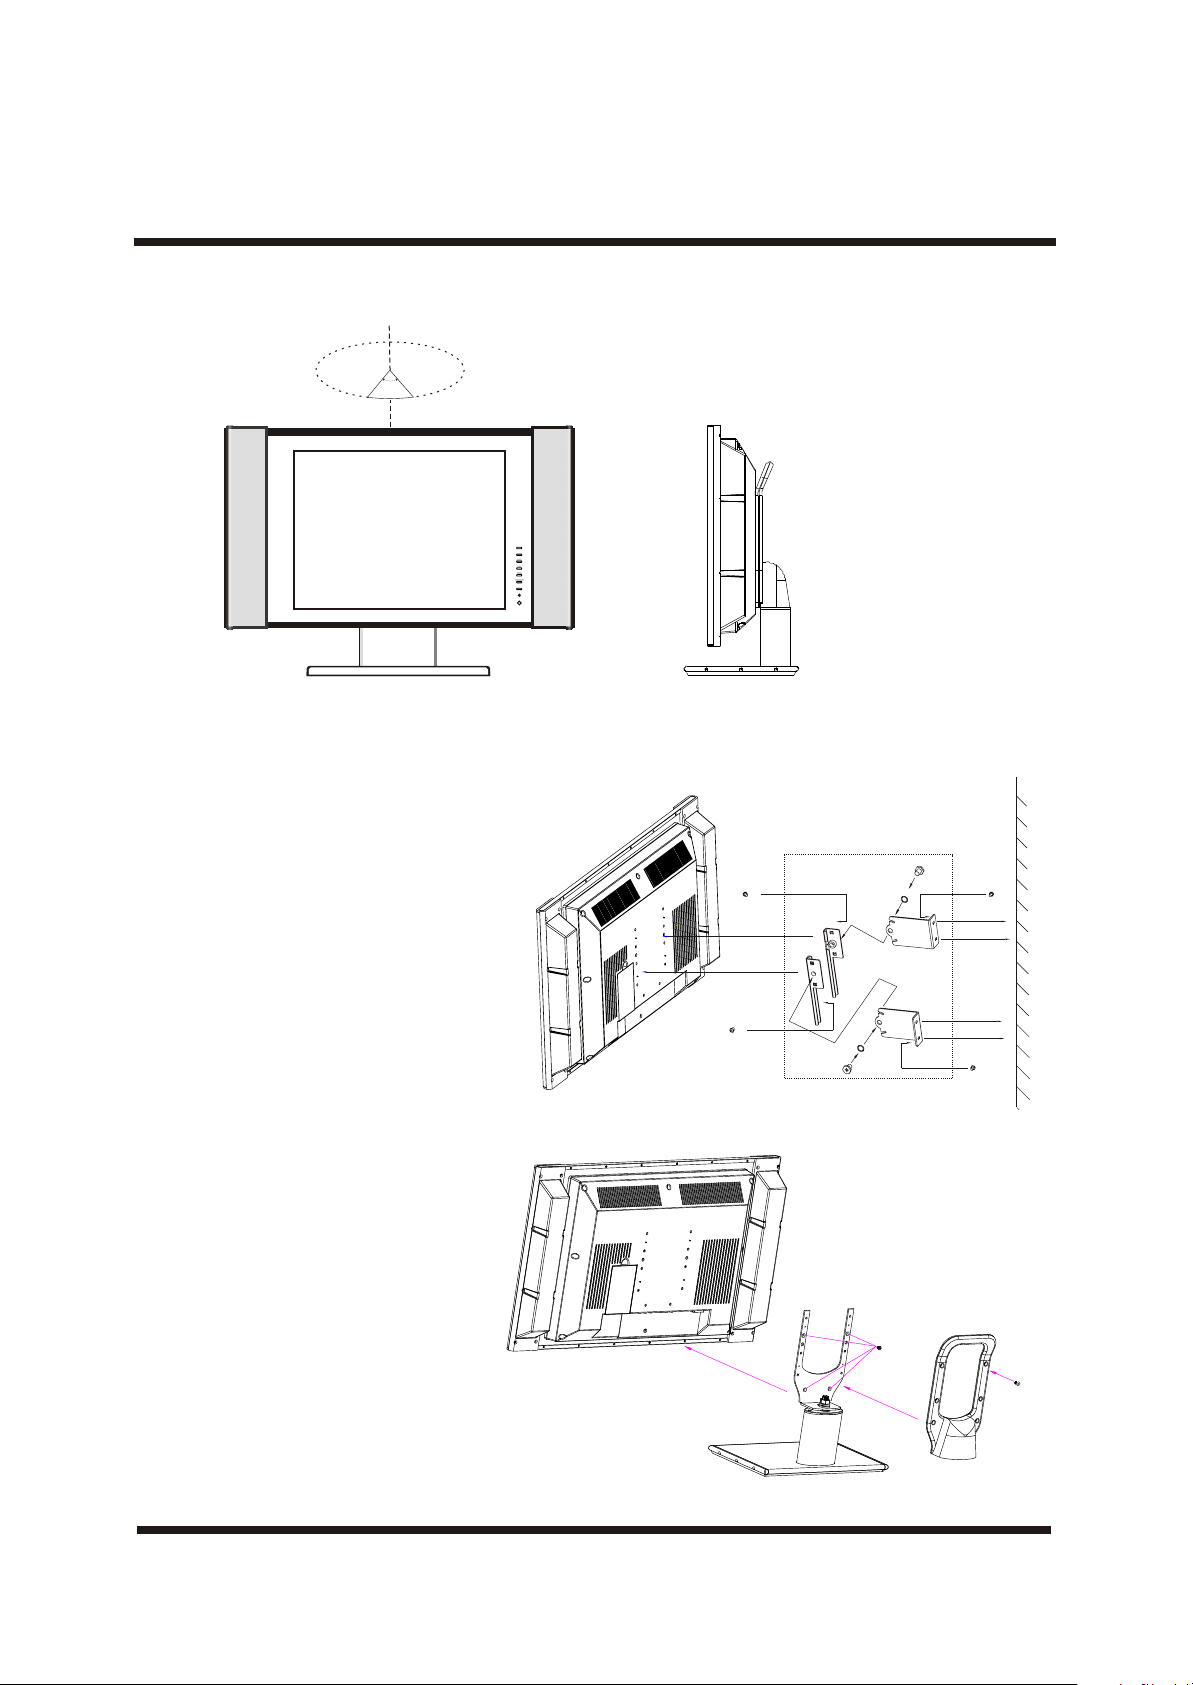
1. Adjust the angle of the screen.
The horizontal angle can be adapted to 40°. Seeing drawings below.
40°
2. Hang the TV on the wall.
Step1:Disassemble the pedestal.
Step2:Hang the TV on the wall refer to drawings below.
Distance between hole A and B is 40mm;
Distance between hole A and C is 175mm;
Angle can be adjust between +/-27° vertically.
Seeing drawings right side:
TV ASSEMBLY DRAWING
X4
X2
A
B
3. Assemble stand
Seeing drawings right side.
-8-
X4
¹Òǣϵͳ
C
D
X2
X4
X6
Page 10
INSTALLATION
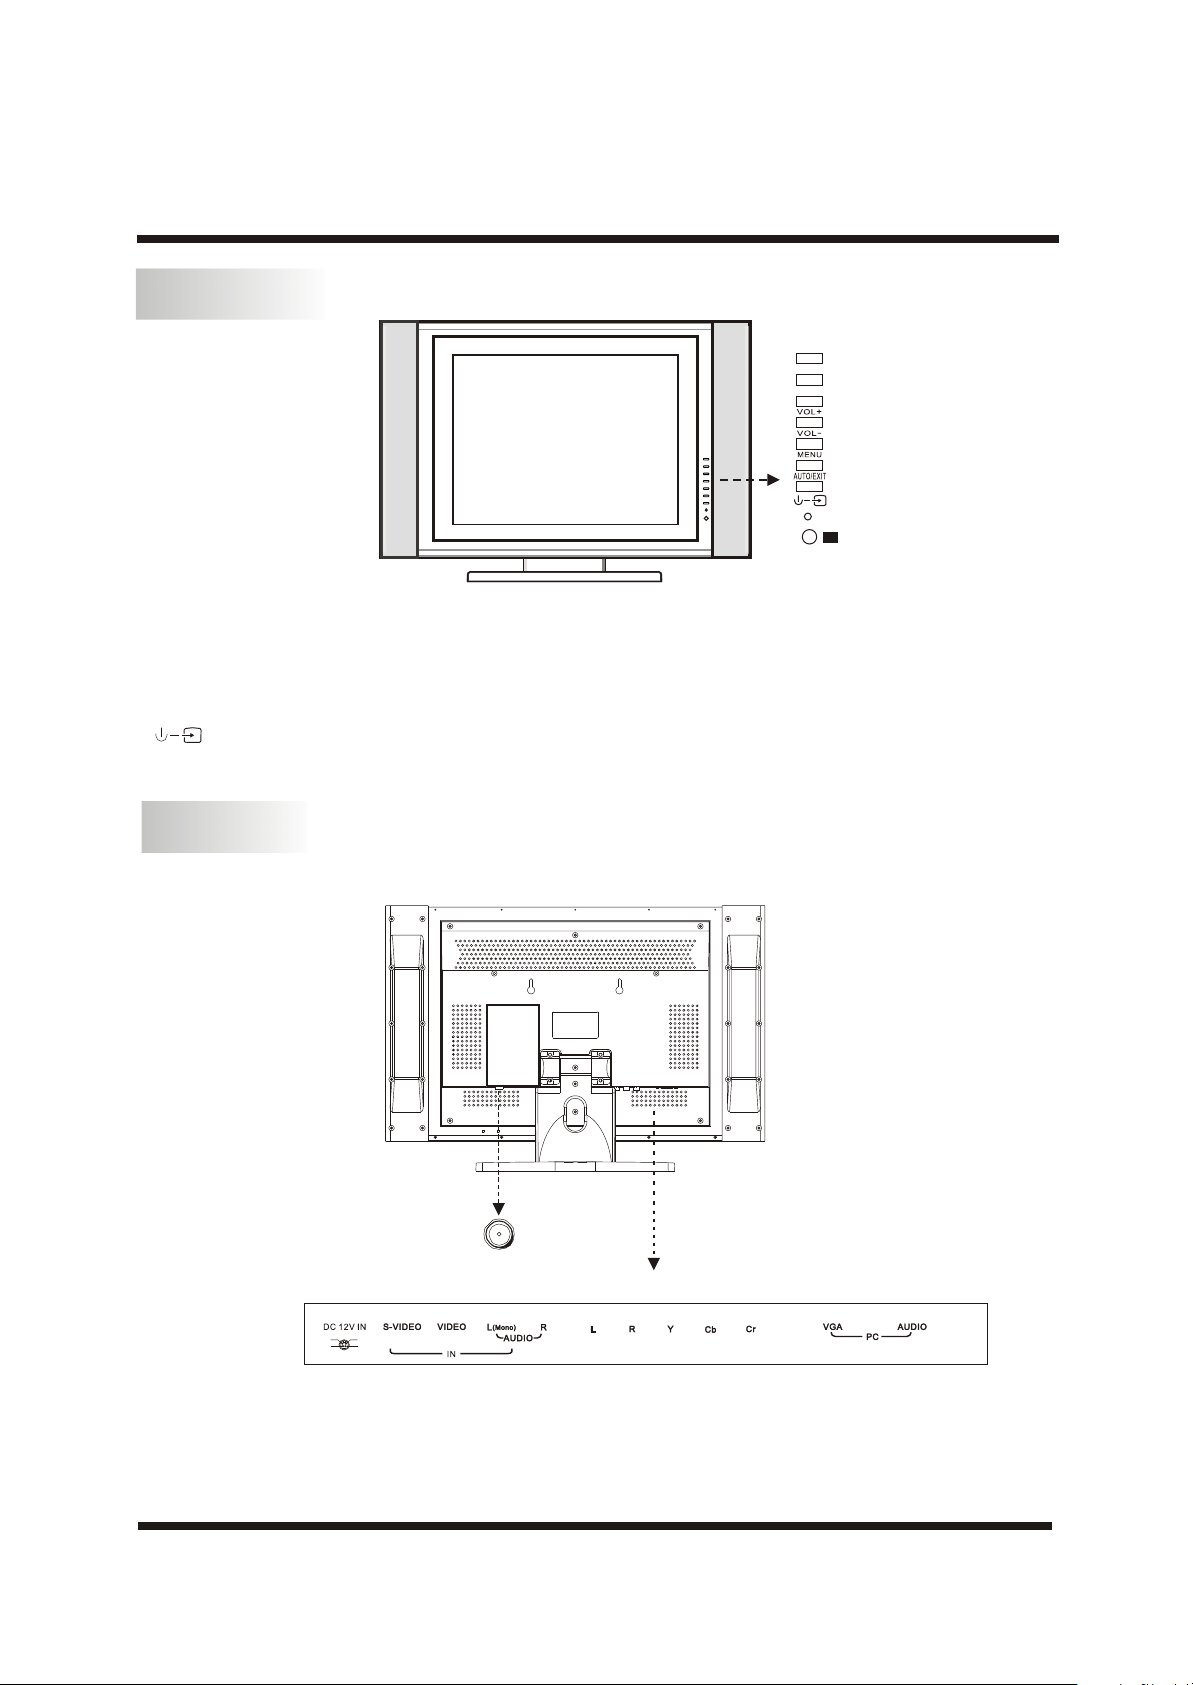
FRONT
CH+
CH-
IRIR
Dim:515*320mm(
KEYS:
1.MENU: To enter main menu or enter the item where the cursor is.
2.CH+/CH-: Move cursor in the main menu or change channel in TV mode.
3.VOL+/VOL-: Adjust the item you select or adjust volume.
4.AUTO/EXIT: Act as AUTO adjustment hot key when OSD is not displayed. Otherwise perform erase OSD.
5. : Video source select or power off. Press this key longer than 3 seconds to turn off the TV.
BACK
ANTENNA INPUT
+-+
-
-9-
Page 11
INSTALLATION
PC
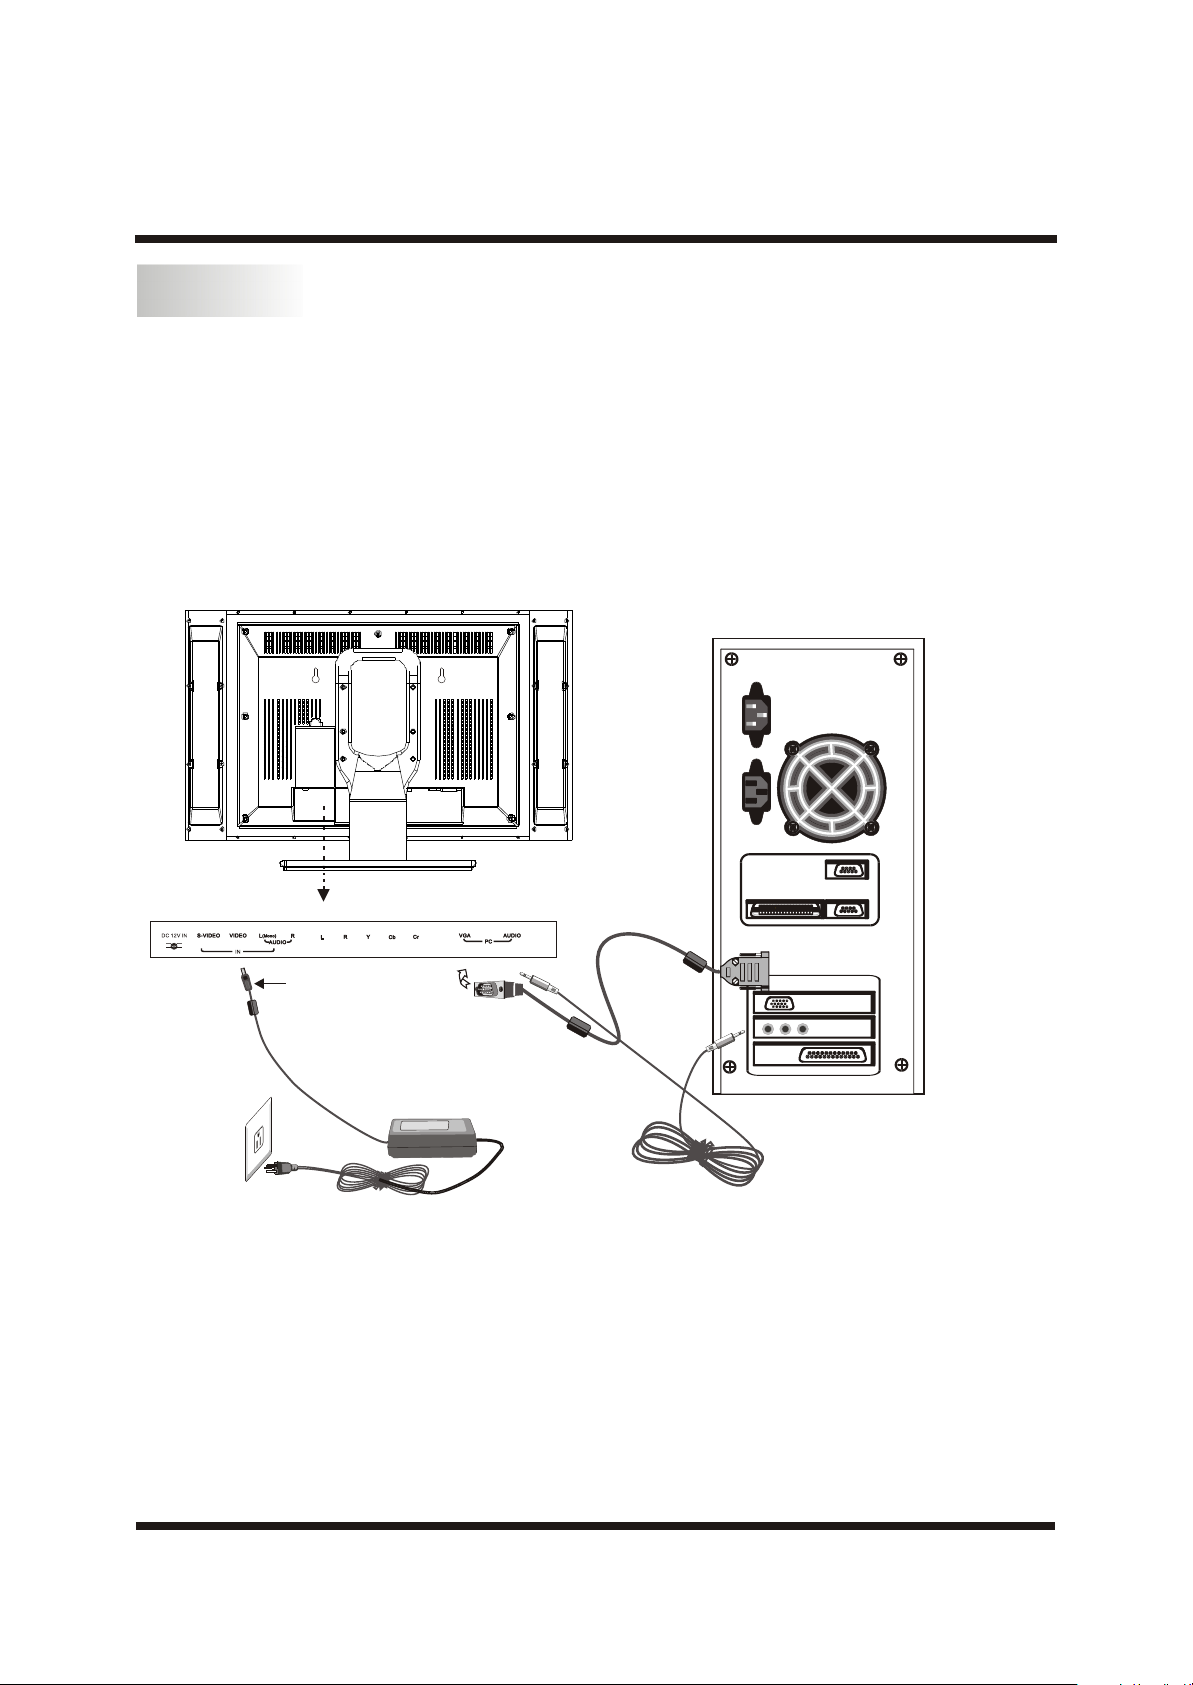
STEPS:
1. Connect Video Cable
a. Make sure both the TV and computer are Powered-OFF.
b. Connect the video cable to the computer.
2. Connect the Audio cable.
3. Connect power cord
Connect the AC ADAPTOR to the TV, then to a properly grounded AC outlet.
4. Power-ON the TV first, then Power-ON the computer.This sequence is very important.
5. If the TV still does not function properly, please refer to the troubleshooting section to diagnose the Problem.
* Please don't open the Cover
8
+-+
-
Connector lug
CAUTION:
Hold on to the connector lug when you unplug any one of the connectors Do not direct pull on the cord as it is
prone to damage.
-10-
Page 12
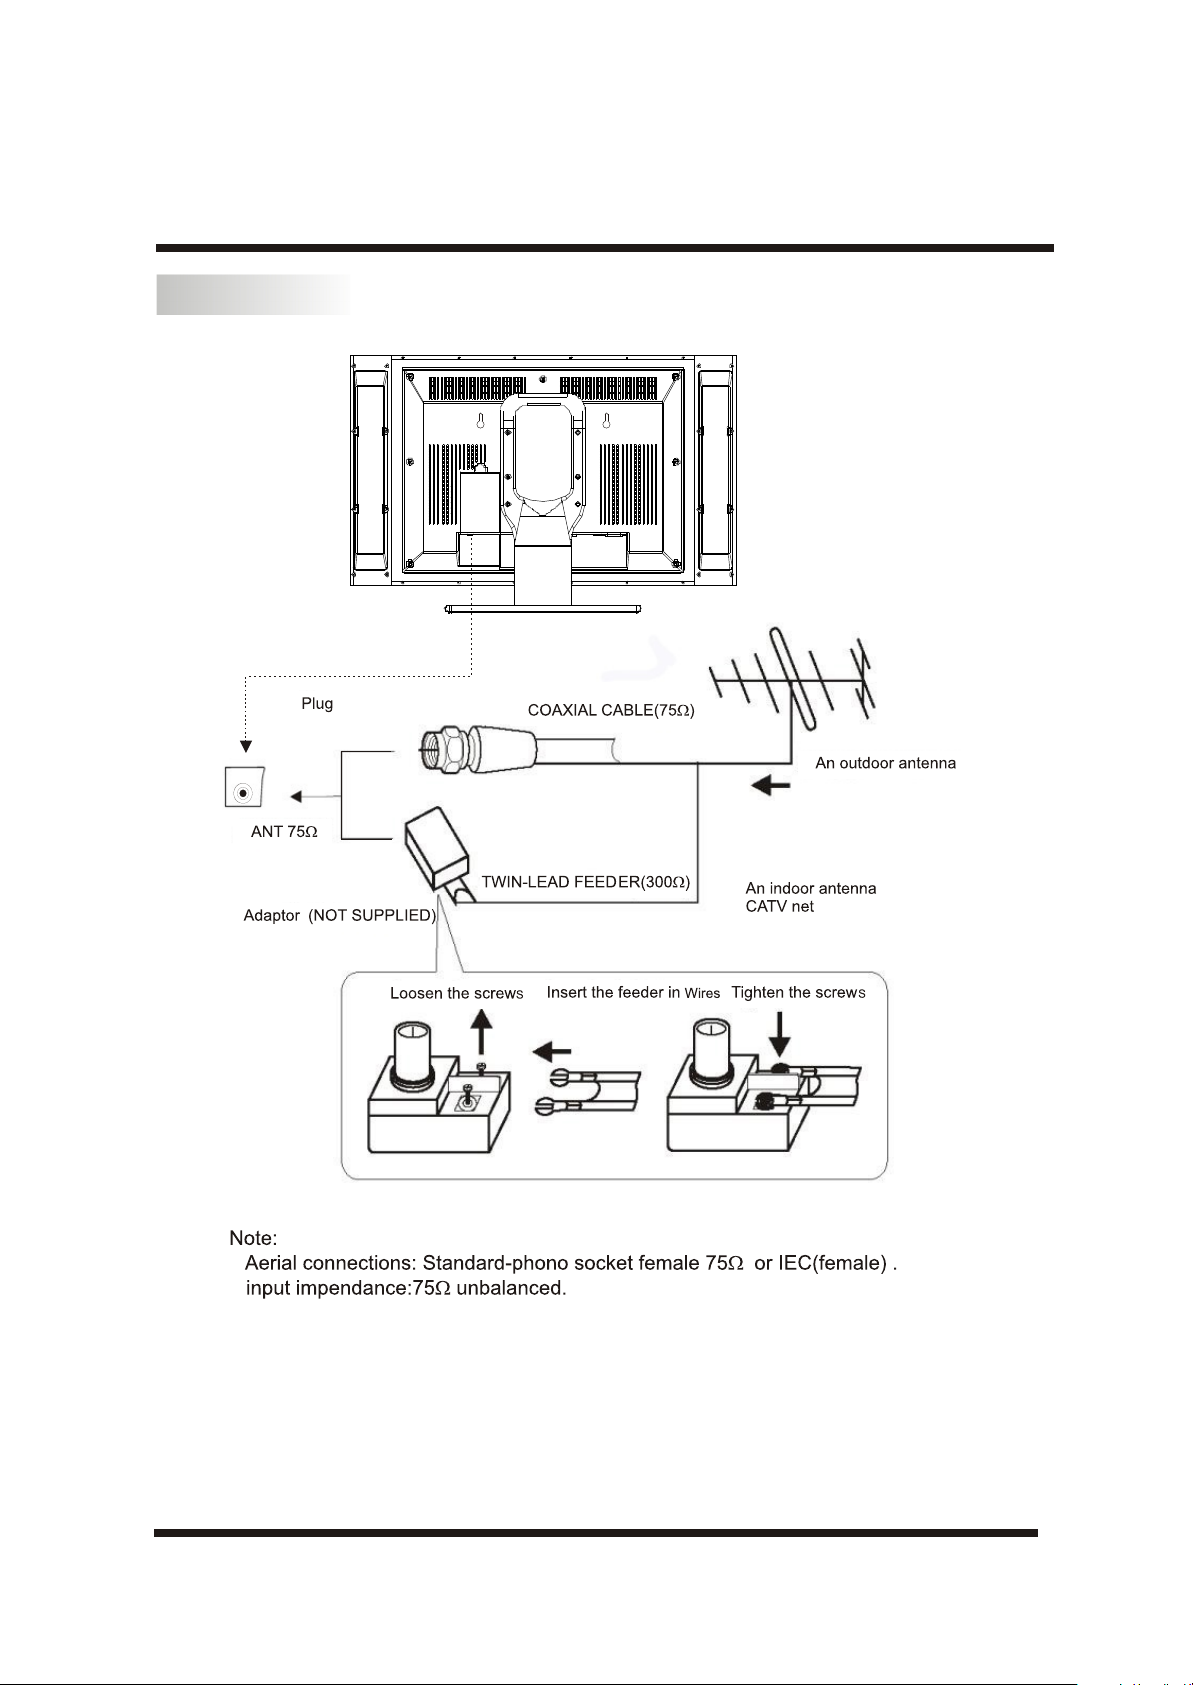
ANTENNA
INSTALLATION
-11-
Page 13
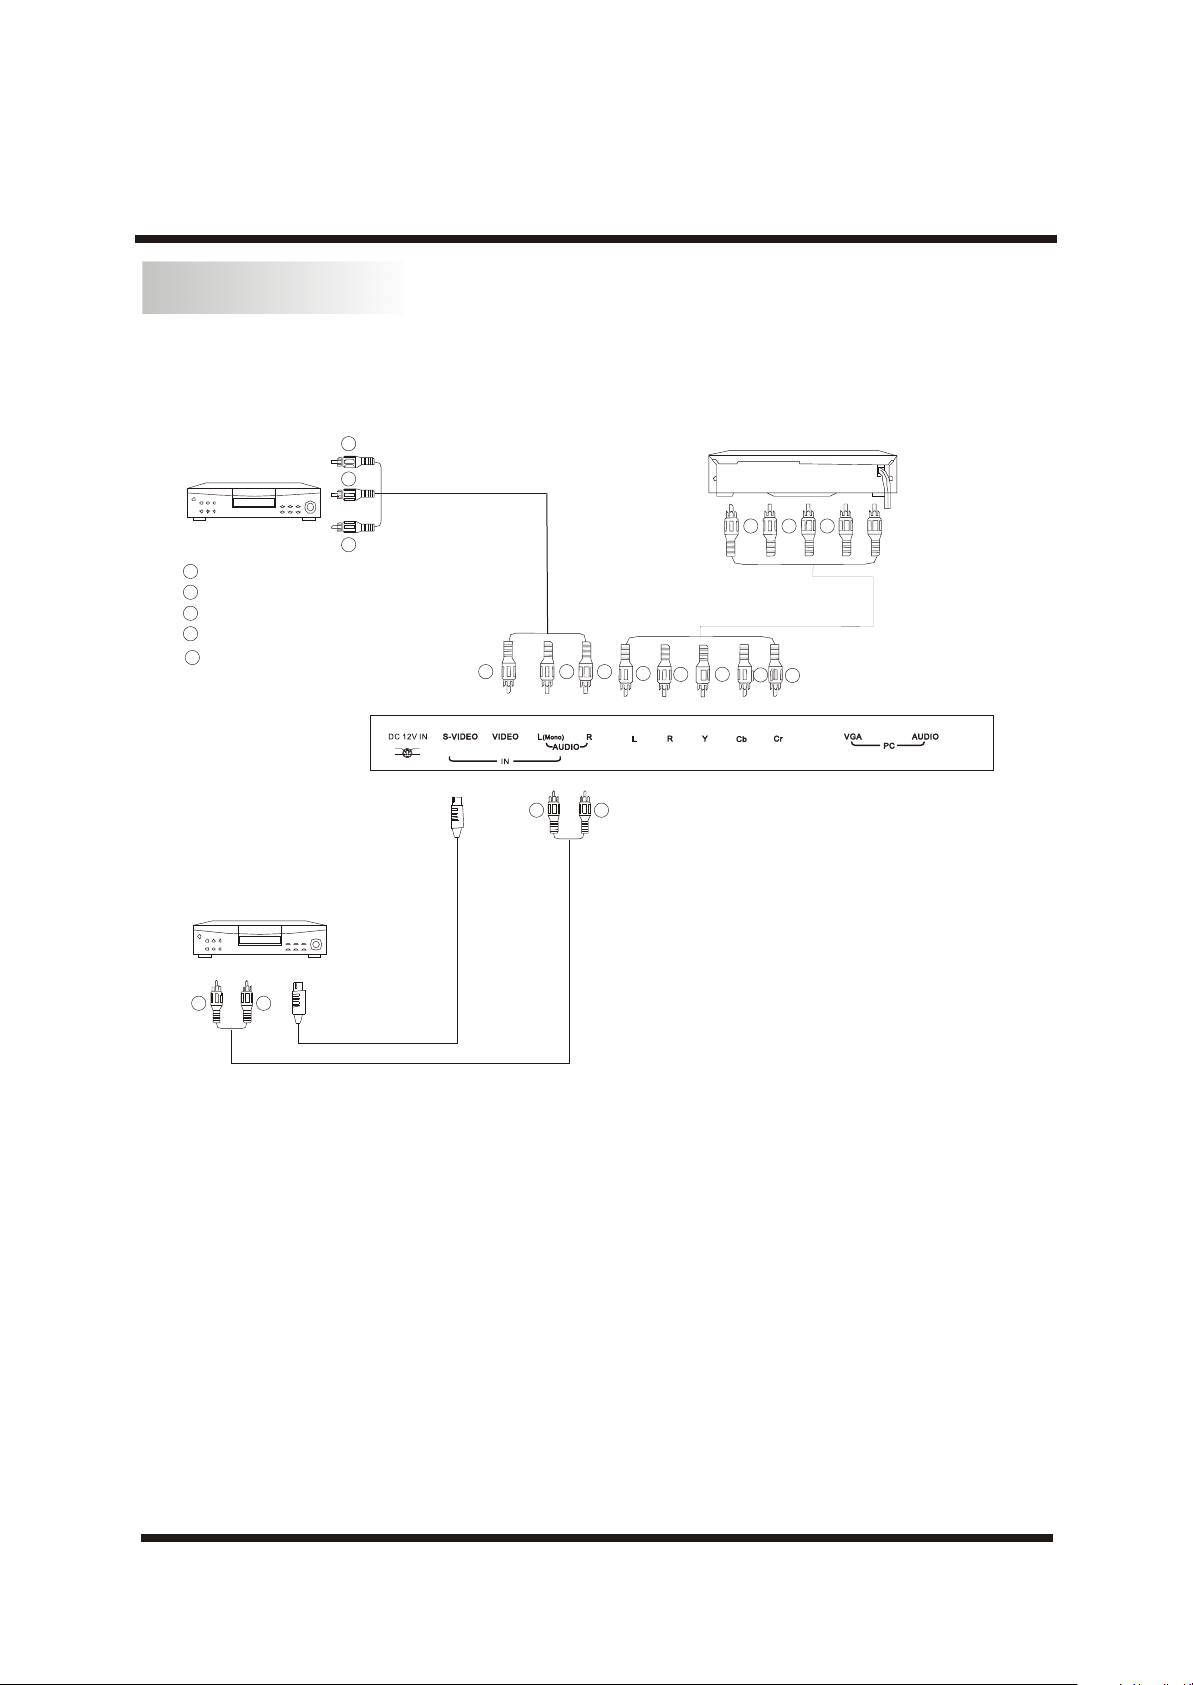
INSTRUCTION
AV EQUIPMENT
This TV provides 1 group of AV input, including one S-Videoand one group (YCbCr) for convenient connection to
VCR,DVD or other video equipment. Please refer to the owner’s manual of the equipment to be connected as well.
You can use the AV and YCbCr input terminals on TV set rear as follows.
terminal
VIDEO EQUIPMENT
Y
Yellow (video)
W
White(audol L,mono input)
Red(audio R,Cr)
R
G
Green(Y)
Blue(Cb)
B
with S-video
terminal
VIDEO EQUIPMENT
W R
RWY
To S-VIDEO
output
To audio
outputswith
To video
output
+-+
-
Y W R
W R
VIDEO EQUIPMENT with YCbCr
G
W
G
R
B
R
B
R
To audio outputs
You can also the S-VIDEO terminal if your video equipment has S-VIDEO.
It can be connected to the following appliances: VCR, multi disc player, DVD, camcorder, video game or stereo
system, etc.....
If your DVD player can output interlace and progressive mode signals , select the interlace output when
connecting to component video input on your TV. Your TV can receive either 525i/60Hz or
625i/50Hz interlace signals.
*Please keep AC cord unplugged when connecting TV system.
-12-
Page 14
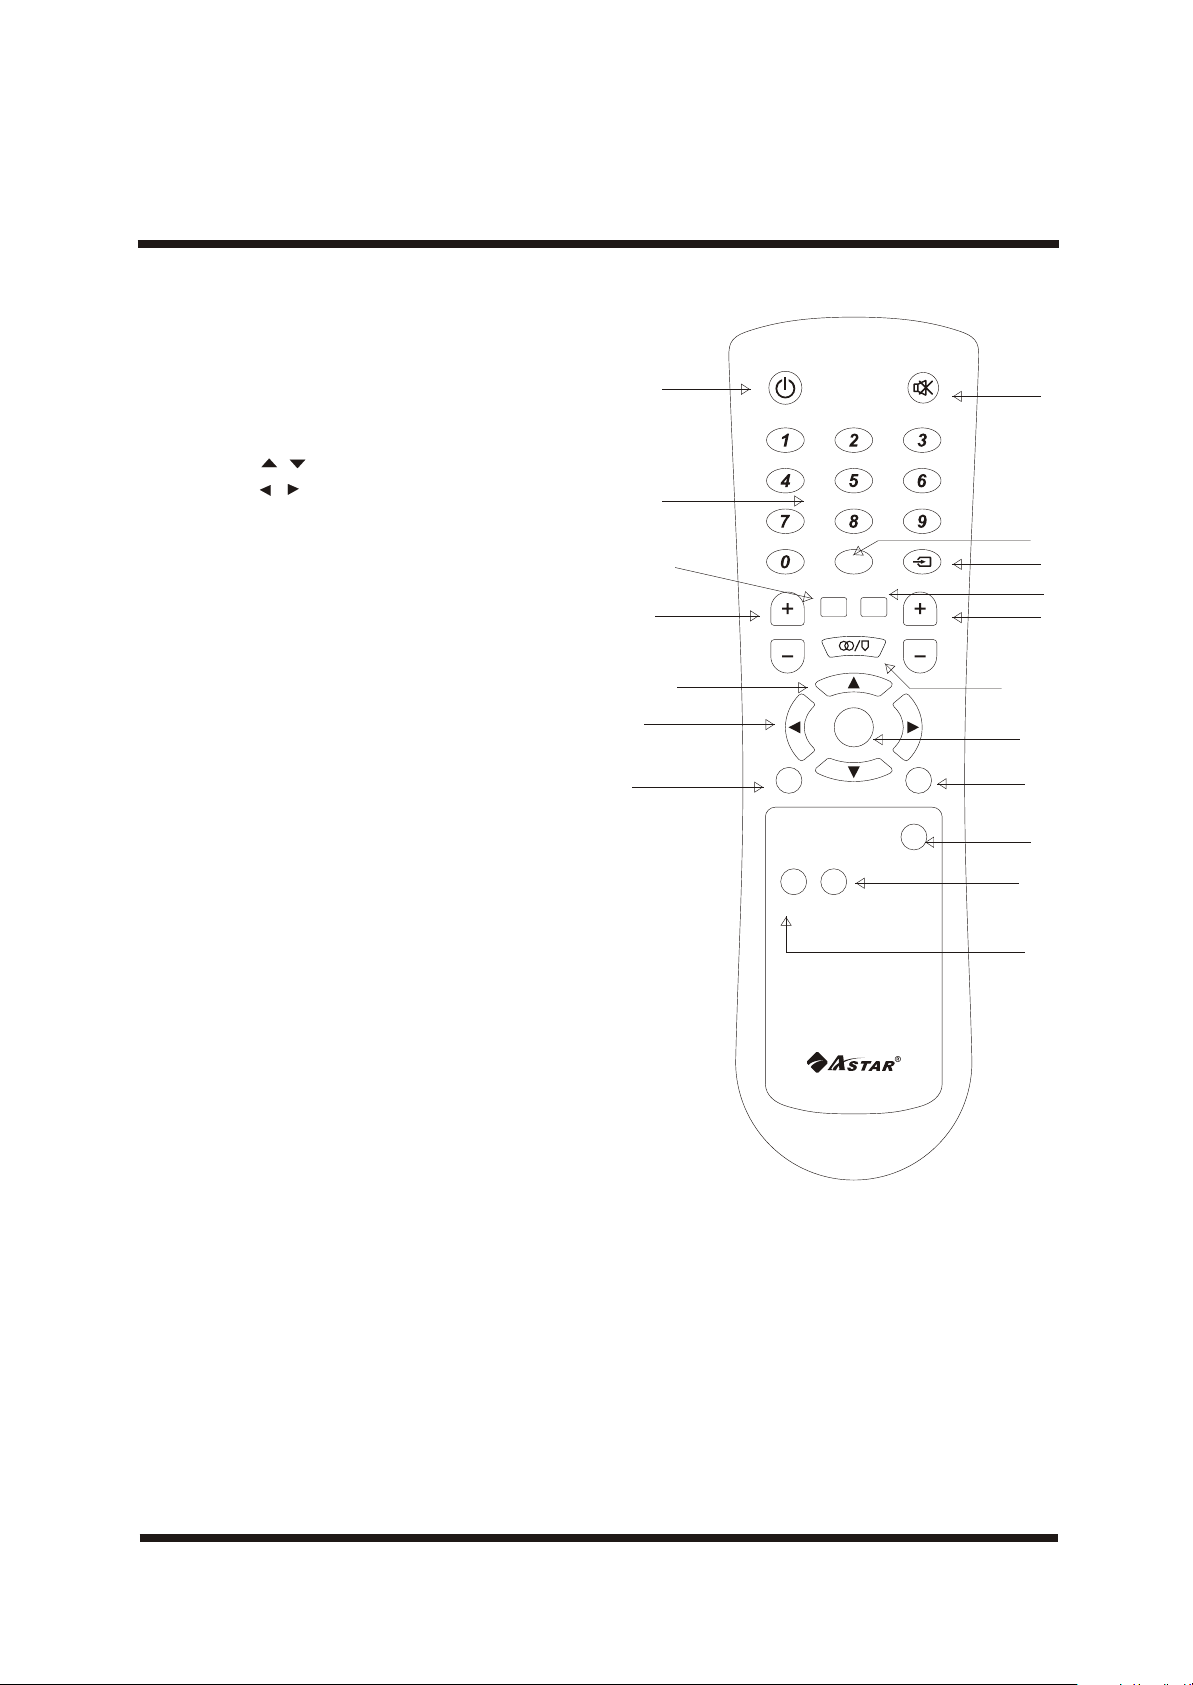
REMOTE CONTROL DESCRIPTION
DESCRIPTION OF REMOTE FUNCTIONS
1.POWER:turn on or off the TV
2.NUMBER BUTTONS
3.VOL+/- :adjust volume
4.CH+/- :change program forward/backward
5.MENU: access main menu
6.BUTTONS / : move cursor in main menu
7.BUTTONS / : adjust item you selected
8.DISPLAY: recall program number, system etc on
the screen
9.RETURN: return to the last viewed program
10.INPUT: select external video source
11. MUTE: mute sound
12.MTS :MONO/STEREO AND SAP
13.SLEEP: set time to turn off the TV
14.SYSTEM:shift frequency system(STD,HRC,IRC,AIR)
VCR: rectify distorted signal from
15.
VCR (video cassette recorder ).
AUTO: auto adust the position and size of the
16.
picture in PC mode
17.SOUND:3 sound mode.SPEECH STANDARD MUSIC
18.PICTURE:3 picture mode.SOFT STANDARD RICH
DIRECT PROGRAM SELECTION (0-9 BUTTONS)
1.To select one-digit channel:
Press 0-9 digit buttons and wait for 2 seconds. For example,you need
channel 5, please input "5"button and the screen displays "5", the TV
set goes to channel 5 in 3 seconds.
2.To select two-digit channel:
Press two digit buttons in order to input the channel number. For
example, you need channel 10, please input "1" button, followed "0"
button and the set goes to channel 10. Be sure that the second press
should be within 2 seconds.
3.To select three-digit channel:
Press three digit buttons in order to input the channel number. For
example, if you need channel 110, please input "1" button firstly,
followed by another "1" and the "0" button,The set will then turn to
channel 110. Be sure to press the buttons all within 2 seconds of each
other
1
2
13
3
6
7
14
POWERPOWER
VCRVCR
SLEEPSLEEP
AUTOAUTO
VOLVOL CHCH
SYSTEMSYSTEM
SOUNDSOUND
MTSMTS
MENUMENU
PICTUREPICTURE
MUTEMUTE
INPUTINPUT
DISPLAYDISPLAY
11
14
10
16
4
12
5
RETURNRETURN
9
8
18
17
-13-
Page 15
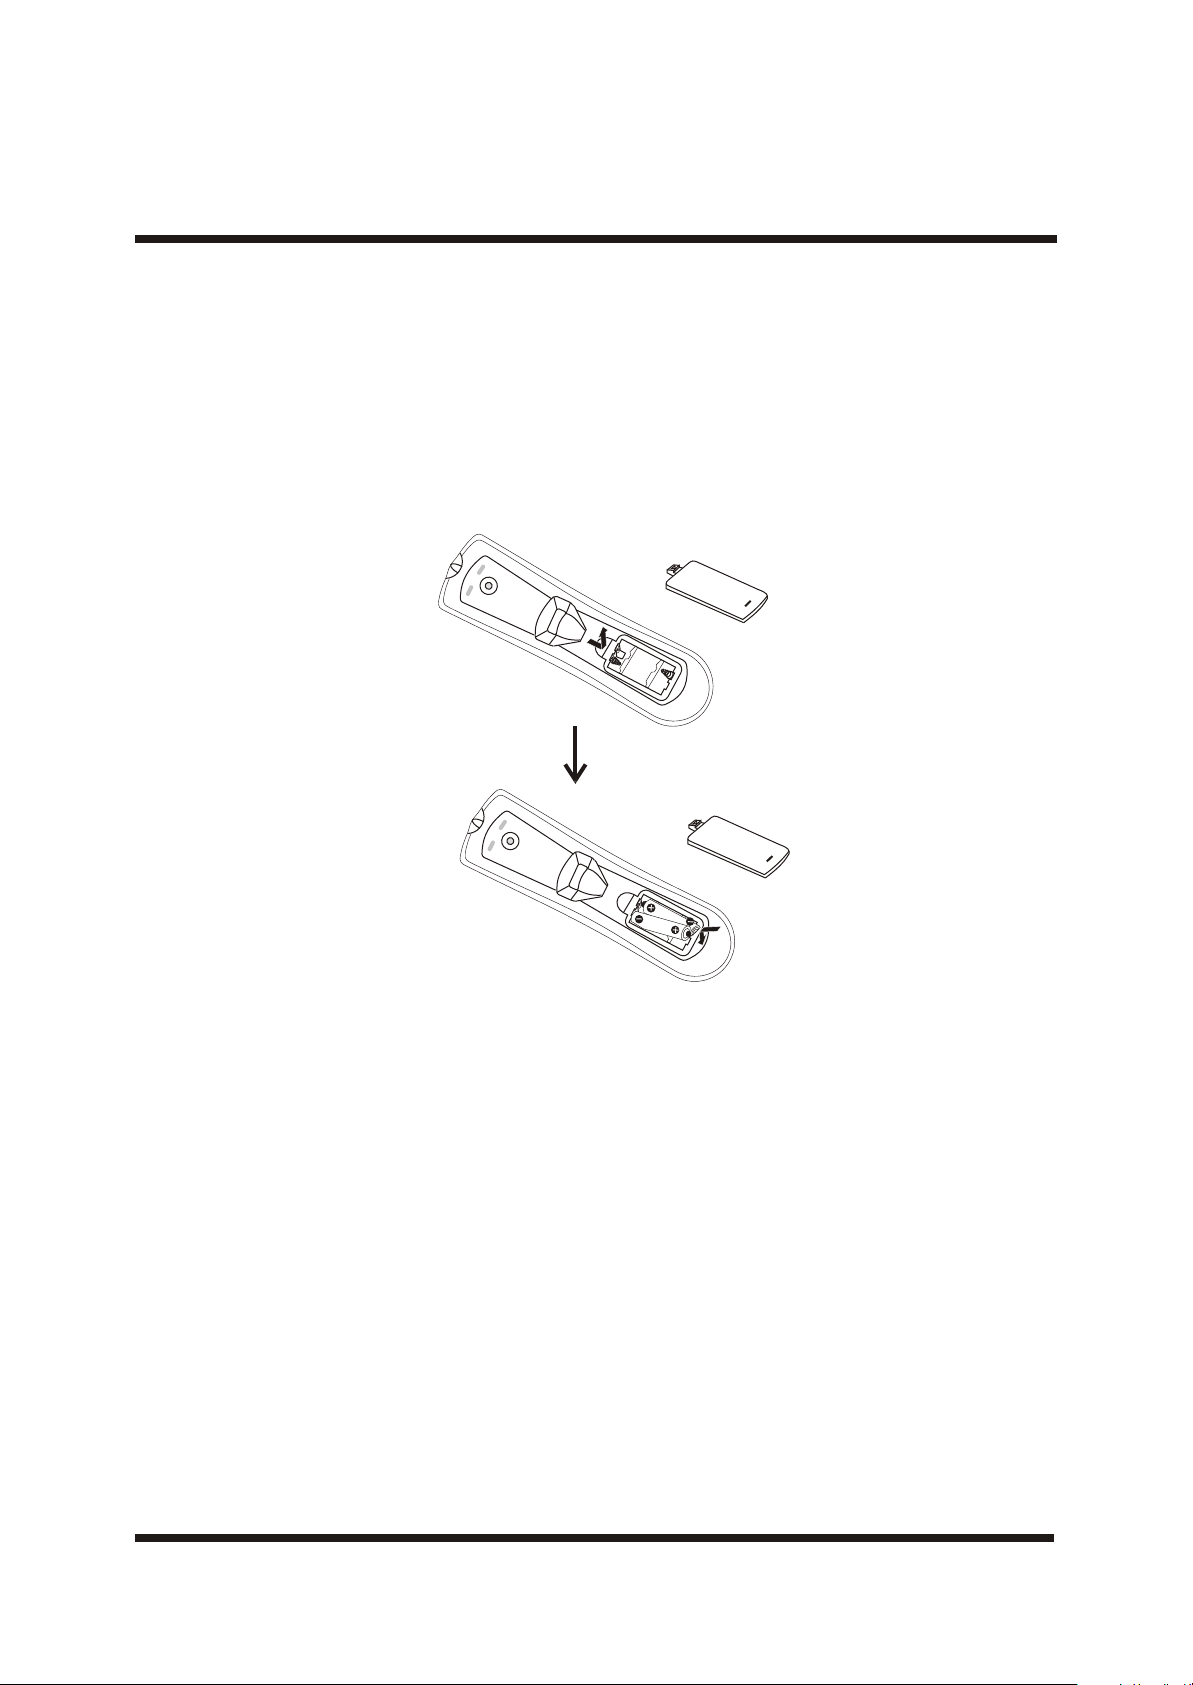
BATTERY INSTALLATION (DREMOTE SONCTOLUNIT)
Insert Batteries Into the Remote Control
1. Remove the battery cover.
2. Insert the 2 AAA 1.5V batteries making sure the polarity (+ or -) of the batteries matches the polarity mark s
Inside the unit.
3. Replace the battery cover.
Replace with new batteries when the TV set begins to show the following symptoms:
Operation is unsteady or erratic. Sometimes the TV set does not function with Remote Control Unit.
Remark:
1) Alkaline Batterie Recommended
2) Remove batteries when they are exhausted or if the remote control is not to be used for a long time.
-14-
Page 16
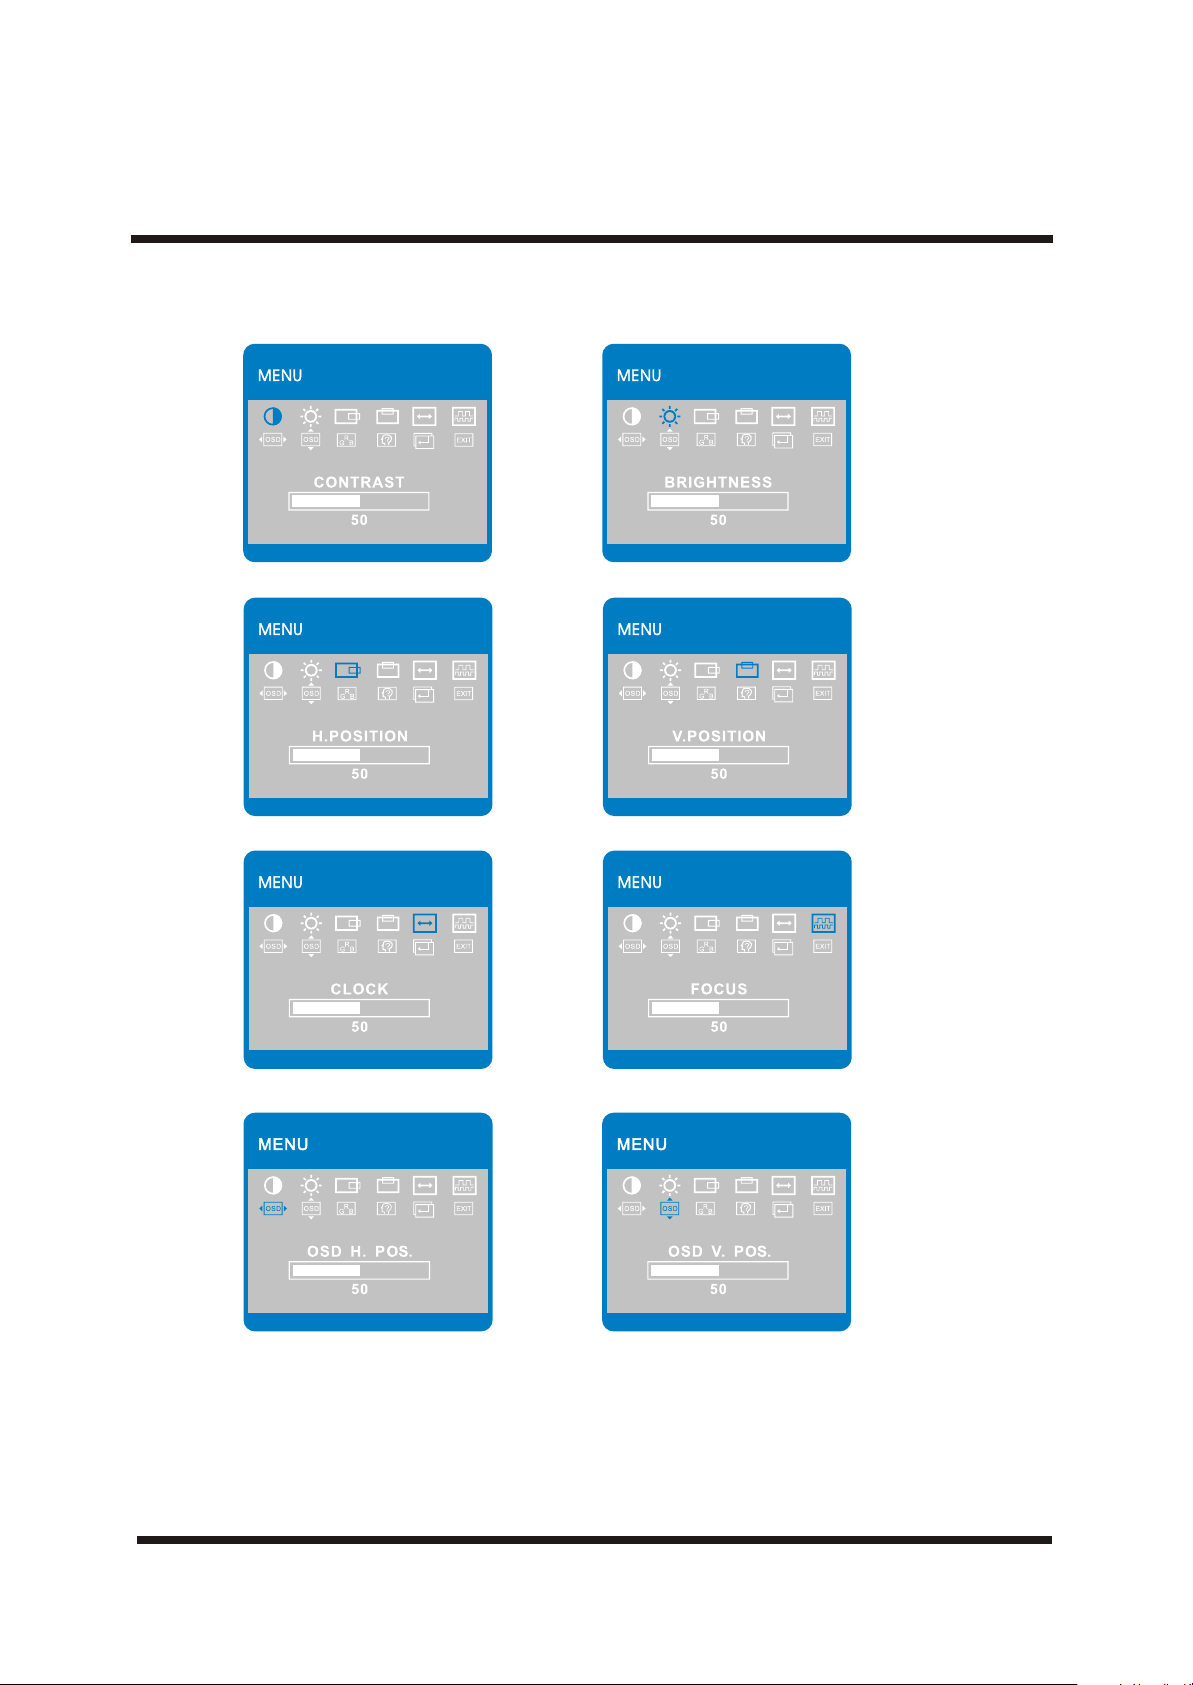
All MENUs are shown below
800x600 48K 60Hz800x600 48K 60Hz 800x600 48K 60Hz800x600 48K 60Hz
OPERATION INSTRUCTIONS PART I (PC)
800x600 48K 60Hz800x600 48K 60Hz 800x600 48K 60Hz800x600 48K 60Hz
800x600 48K 60Hz800x600 48K 60Hz 800x600 48K 60Hz800x600 48K 60Hz
800x600 48K 60Hz800x600 48K 60Hz 800x600 48K 60Hz800x600 48K 60Hz
-15-
Page 17
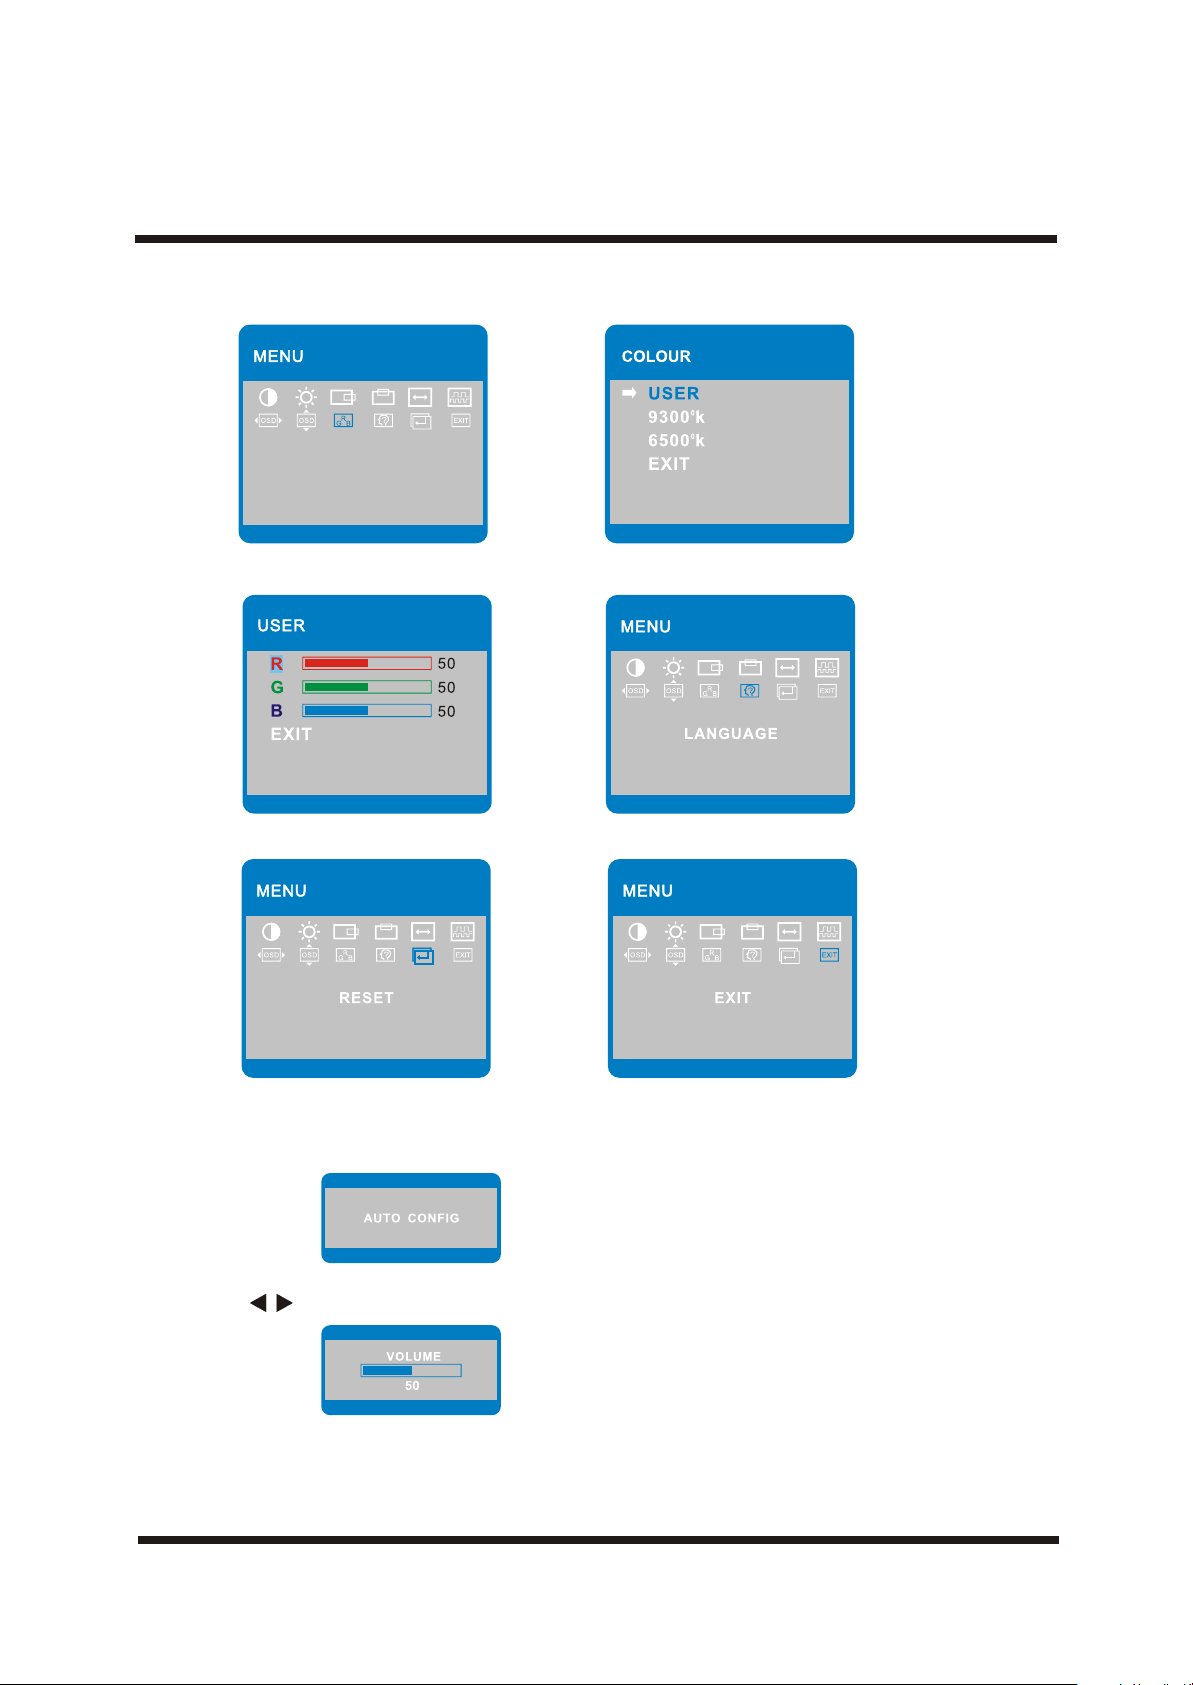
OPERATION INSTRUCTIONS PART I (PC)
COLOUR
800x600 48K 60Hz800x600 48K 60Hz 800x600 48K 60Hz800x600 48K 60Hz
800x600 48K 60Hz800x600 48K 60Hz 800x600 48K 60Hz800x600 48K 60Hz
800x600 48K 60Hz800x600 48K 60Hz 800x600 48K 60Hz800x600 48K 60Hz
AUTO CONFIG:
-16-
Page 18
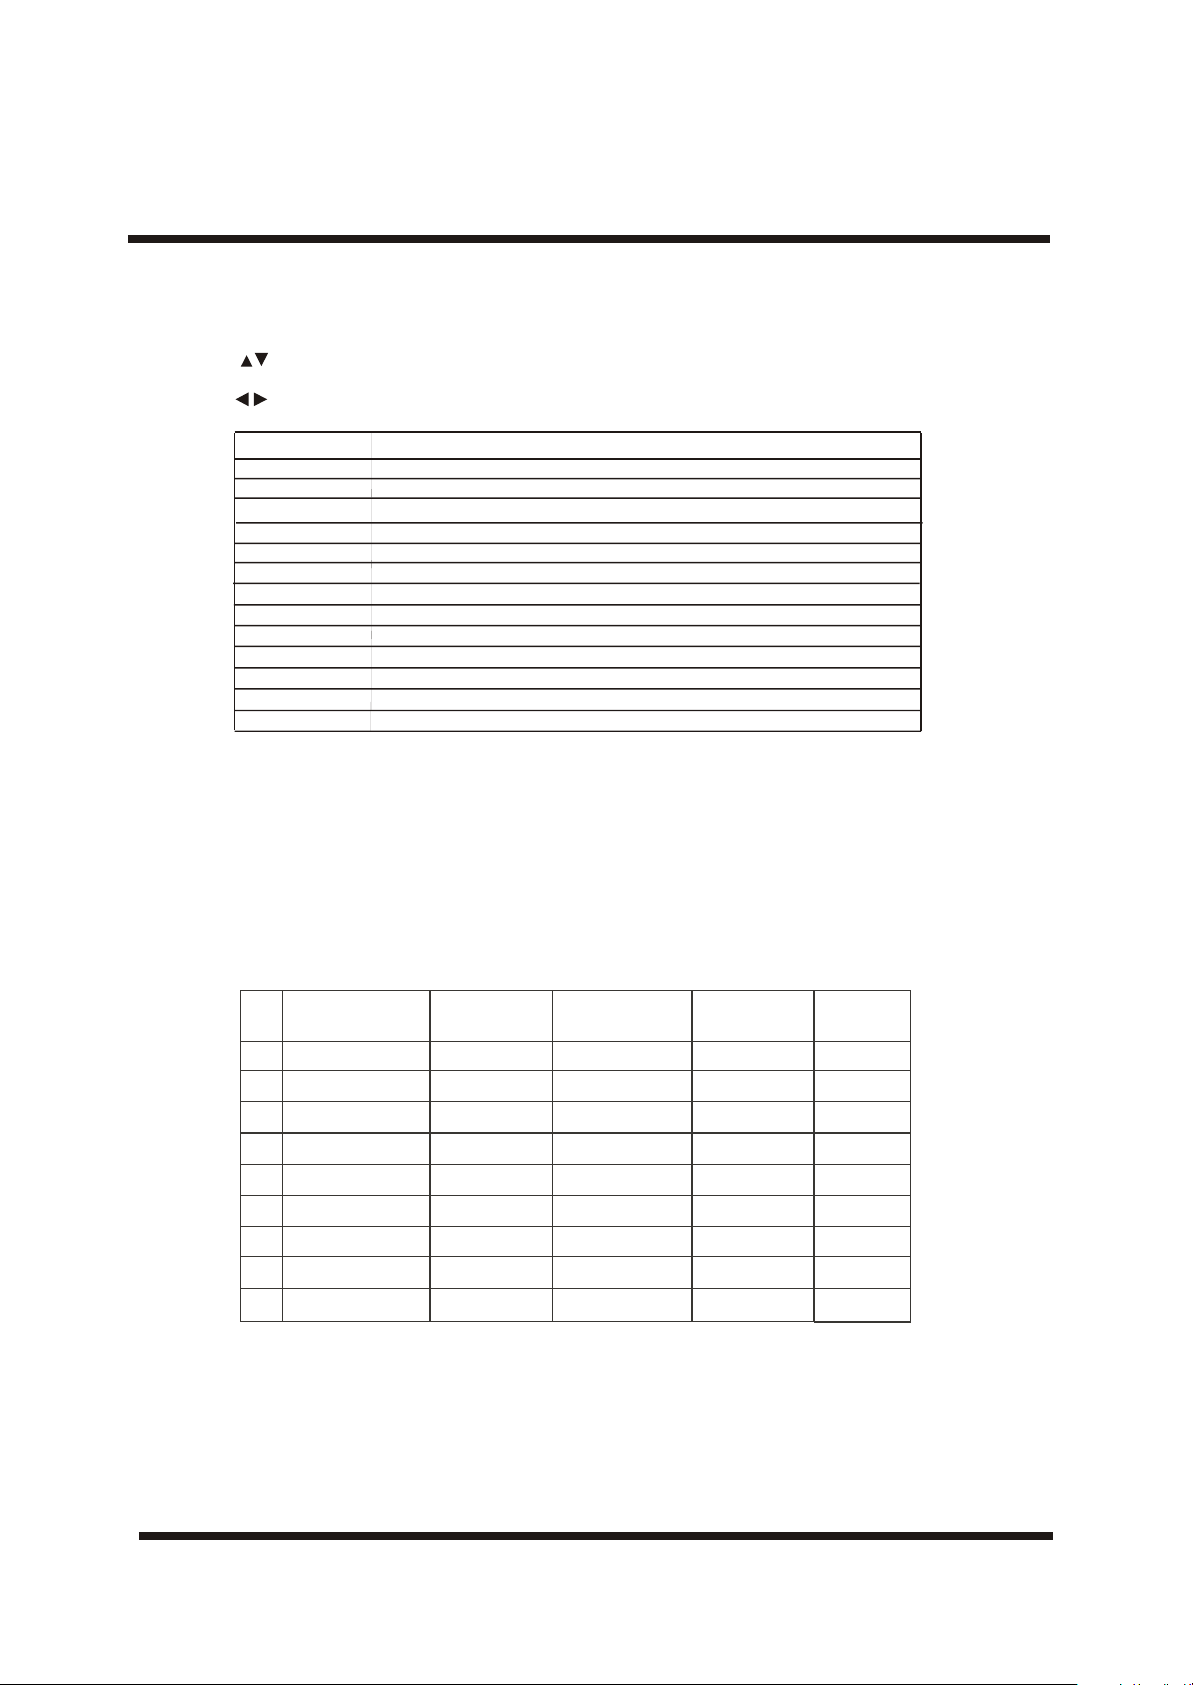
OPERATION OF MAIN MENU
There are 12 items listed in the main menu.
Step1:Press menu to enter the main menu.
Step2:press to select an item.
Step3:press menu to enter this item.
Step4:press to adjust this item.
OPERATION INSTRUCTIONS PART I(PC)
Item
Contrast
Brightness
H.Position
V.Position
Clock
Focus
OSD H.Pos.
OSD V.Pos.
Colour
Language
Reset
Exit
Function description
Increase or decrease contrast
Increase or decrease brightness
Move image toward left or right
Move image toward up or down
Increase or decrease the size of image
Increase or decrease noise of the image
Move OSD position horizontally on the screen
Move OSD position vertically on the screen
Colour temperature:WARM,COOL
6 languags:
Perform auto adjust
Automatically adjust H.Position,V.Position,Clock,Focus,White balance
Exit menu
English/French/Italian/Portuguese /Spanish
12
PRESET MODES
To reduce the need for adjustment for different modes, the TV has default setting modes that are most
commonly used,These are shown in the table below. For optimum adjustment,the user is suggested to perform
the Auto Setup is Windows “Full Screen” pattern.
PRESET MODE (recommended resolution is 800*600@60Hz)
Polarity
H/V
-/+
+/-
-/-
-/-
-/-
+/+
+/+
+/+
+/+
1
2
3
4
5
6
7
8
9
RESOLUTION
720*400
640*350
640*480
640*480
640*480
800*600
800*600
800*600
800*600
V.Freq.(Hz) H.Freq.(KHz)
70
70
60
72
75
56
60
75
72
31.47
31.469
31.47
37.86
37.50
35.156
37.88
46.88
48.08
Band
Width(MHz)
28.322
25.175
25.175
31.5
31.5
36
40
49.5
50
-17-
Page 19
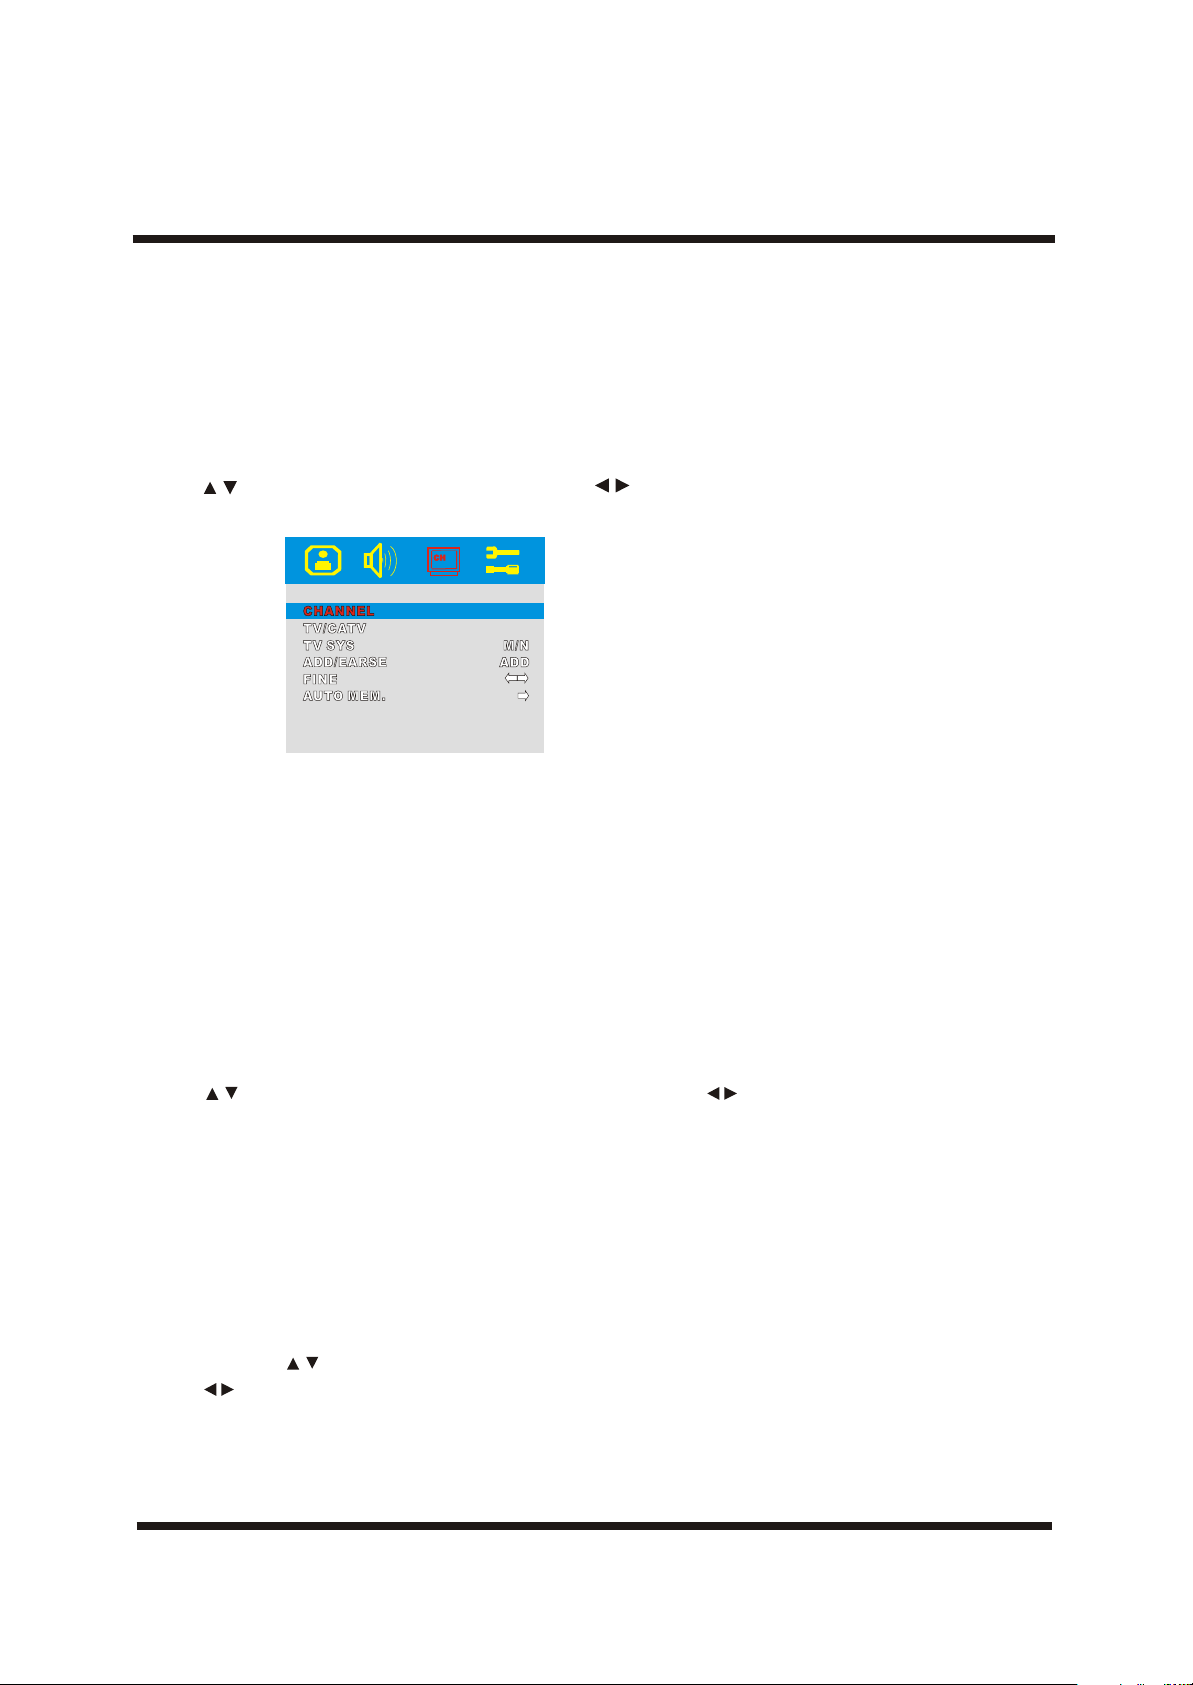
OPERATION INSTRUCTIONS PART II(VIDEO)
TUNING PROCEDURE
STEP 1
Turn on the TV.
STEP 2
AUTO MEMORY
1. Press the MENU button on your TV (or remote controller) three times to enter TUNING menu.
If it is in VIDEO/S-VEDIO/YCbCr /PC mode, it can't enter TUNING menu.
2. Press Buttons to select "AUTO MEM." then press button to automatically search and store all the signals
in your area. broadcasting TV When presetting complete, the initial position number will reappear.
11
STDSTD
NOTE:
You 'd better select the correct frequency system, color and sound system for the first channe before searching.
Detailed discreption is said below.
There are 4 frequency system can be used, such as STD,HRC,IRC,AIR.
In AIR mode, the set receives antenna signals;
In STD/HRC/IRC mode the set receives Cable TV programs.Please select:
AIR: If using VHF/UHF antenna.
STD,HRC,IRC:If using Cable TV.
TO SKIP A PROGRAM
You may skip any program number by following the steps below:
1.Select the program number to be skipped by pressing CH+/CH- button or number button .
2.According to mentioned steps above, enter TUNING menu.
3.Press b uttons to select "ADD/ERASE", then select "ERASE" by b uttons.
4.When the skip is off, it indicates that this channel is not skipped.
NOTE:
If the chann el is skipped,you can't obtain it by CH+/CH-. But you can get it by u sing NUMBER KEY(0-9).
STEP 3
FINE TUNING
If signal is weak, the fine tuning is necessary.
1. Enter the cha nnel you want to by CH+/CH- buttons or NUMBER KEY(0-9).
2. According to mentioned steps above, enter TUNING menu.
3. Select "FINE" by button.
4. Press buttons until the best possible picture and sound are obtained.
NOTE:
You can execute these operations only if a tuner box is connected to the TV.
-18-
Page 20
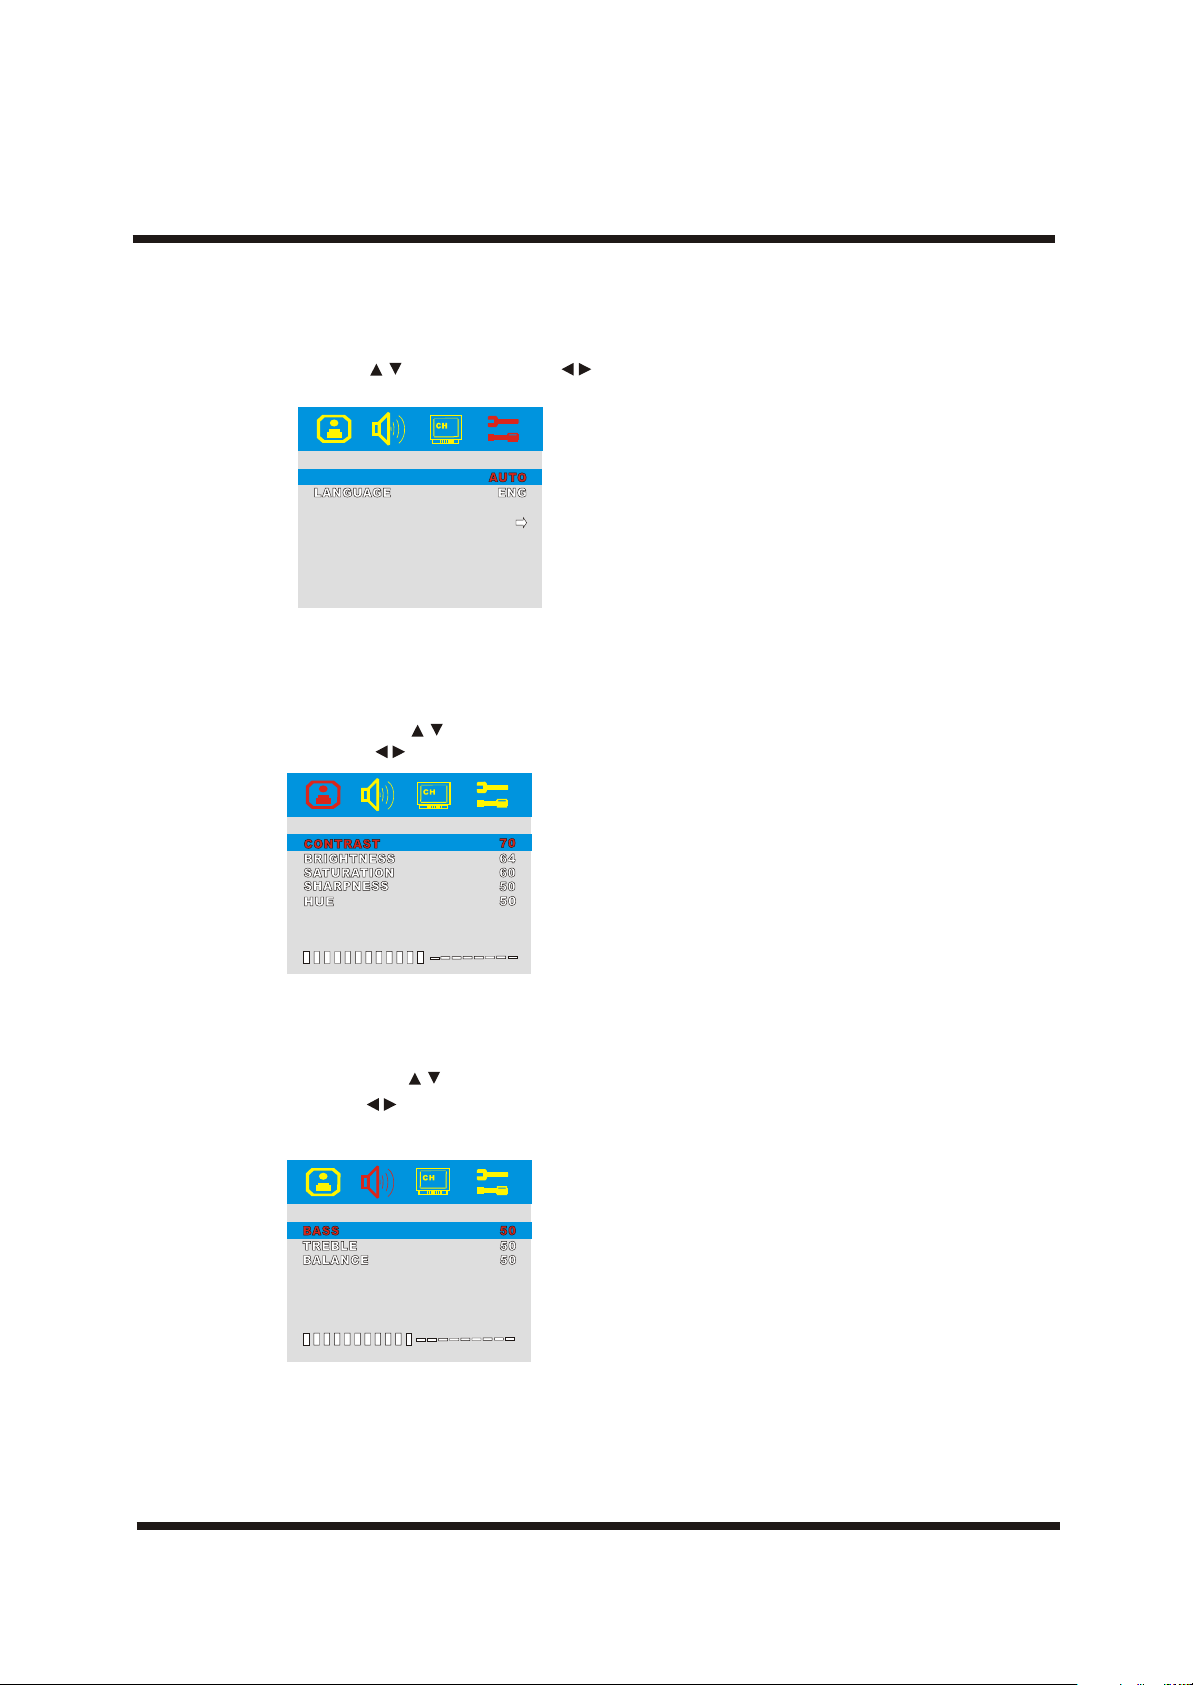
SELECT COLOUR SYSTEM
If the colour system setting is incorrect, the colour will be abnormal.
1.According to mentioned steps above, enter SETUP menu.
2.Enter colour system item by b uttons, then press to adjust .
COLOUR SYSCOLOUR SYS
COLOR TEMPCOLOR TEMP
CC/V-CHIPCC/V-CHIP
WARMWARM
NOTE:There are 4 options in this item:AUTO,PAL,NTSC,SECAM.
ADJUST PICTURE
1.According to mentioned steps above, enter PICTURE menu.
2.Selecttheitem to be adjusted by buttons.
3.Adjust the image quality by buttons.
OPERATION INSTRUCTIONS
ADJUST SOUND
1.According to mentioned steps above, enter SOUND menu.
2.Select the item to be adjusted by b uttons.
3.Adjust the sound quality by b uttons.
-19-
Page 21
OPERATION INSTRUCTIONS
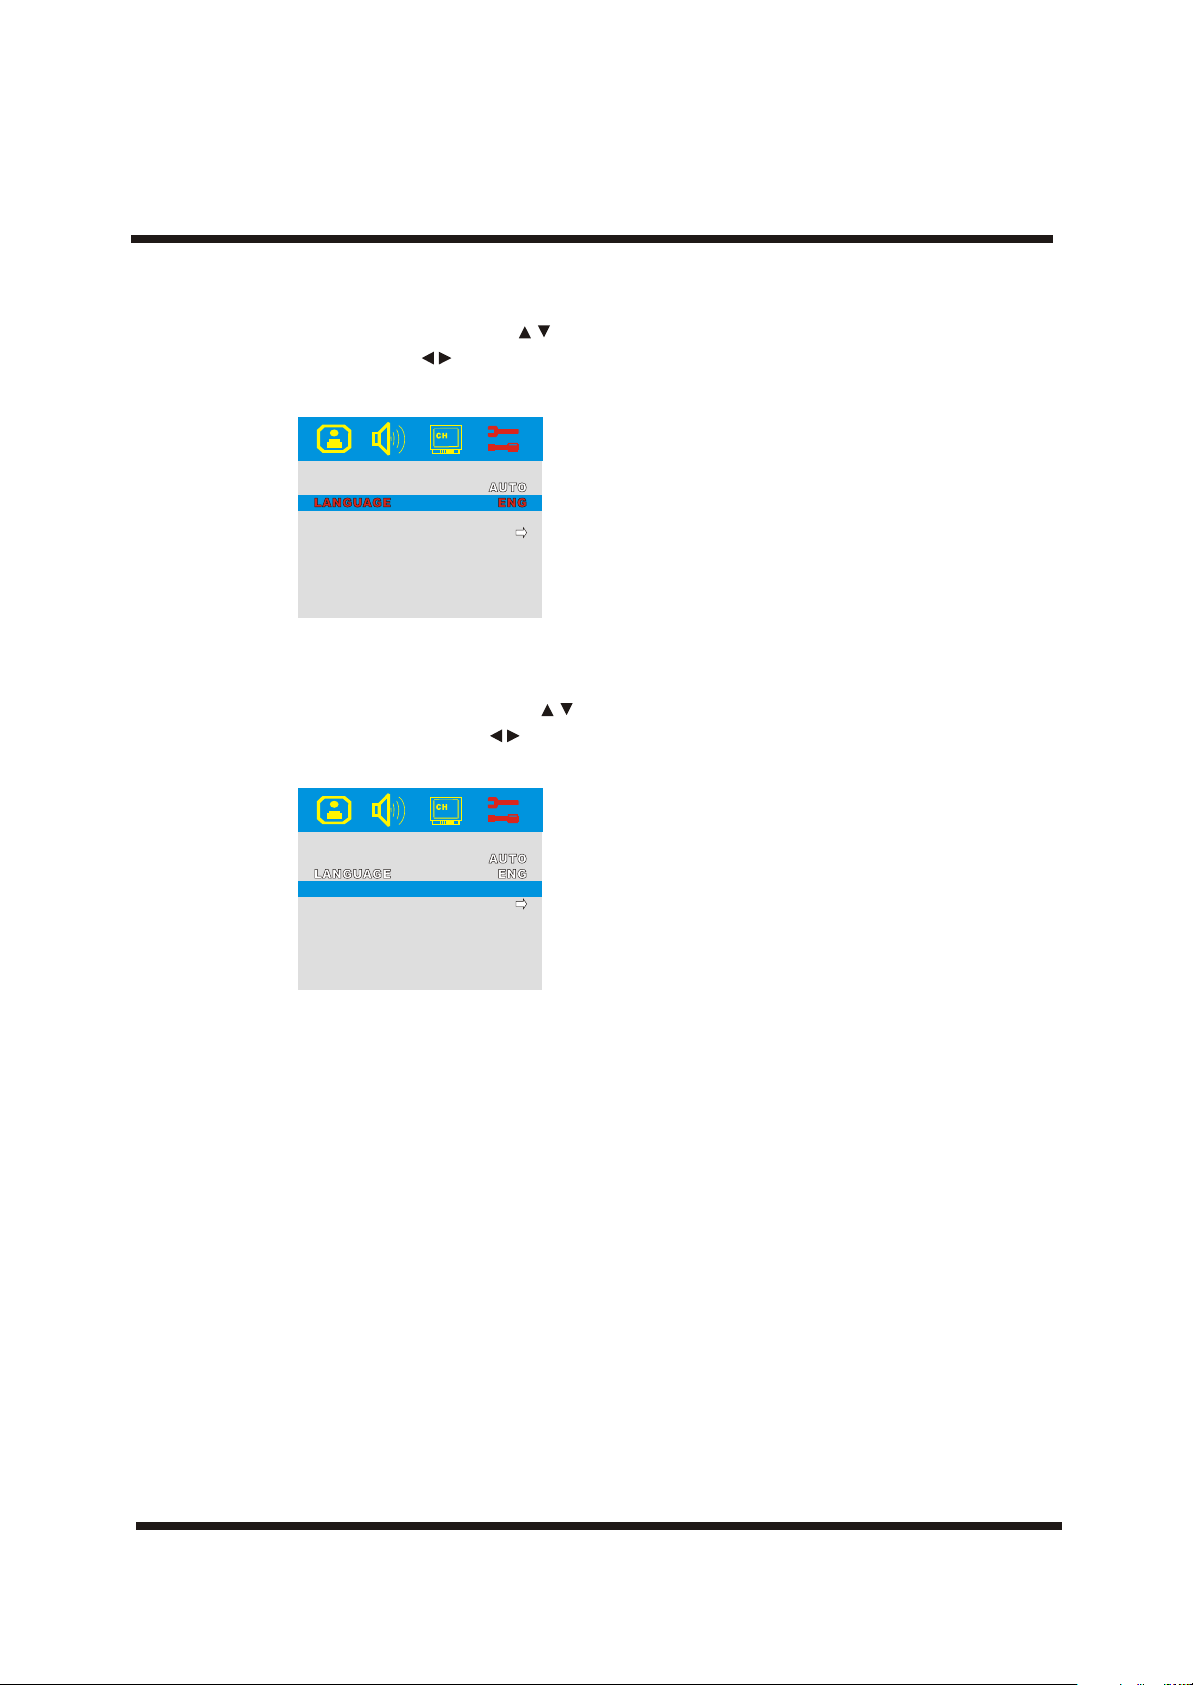
SELECT LANGUAGE:
1.According to mentioned steps above, enter SETUP menu.
2.Select the LANGUAGE item to be adjusted by buttons.
3.Adjust the language you want by buttons.
There are 5 languages:ENGLISH and SPANISH,PORTUGUESE,ITALIAN,FRENCH.
COLOUR SYSCOLOUR SYS
COLOR TEMPCOLOR TEMP
CC/V-CHIPCC/V-CHIP
WARMWARM
SELECT TEMPERATURE
1.According to mentioned steps above, enter SETUP menu.
2.Select the COLOUR TEMP item to be adjusted by buttons.
3.Adjust the colour temperature you want by buttons.
COLOUR SYSCOLOUR SYS
COLOUR TEMPCOLOUR TEMP
CC/V-CHIPCC/V-CHIP
WARMWARM
-20-
Page 22
OPERATION INSTRUCTIONS
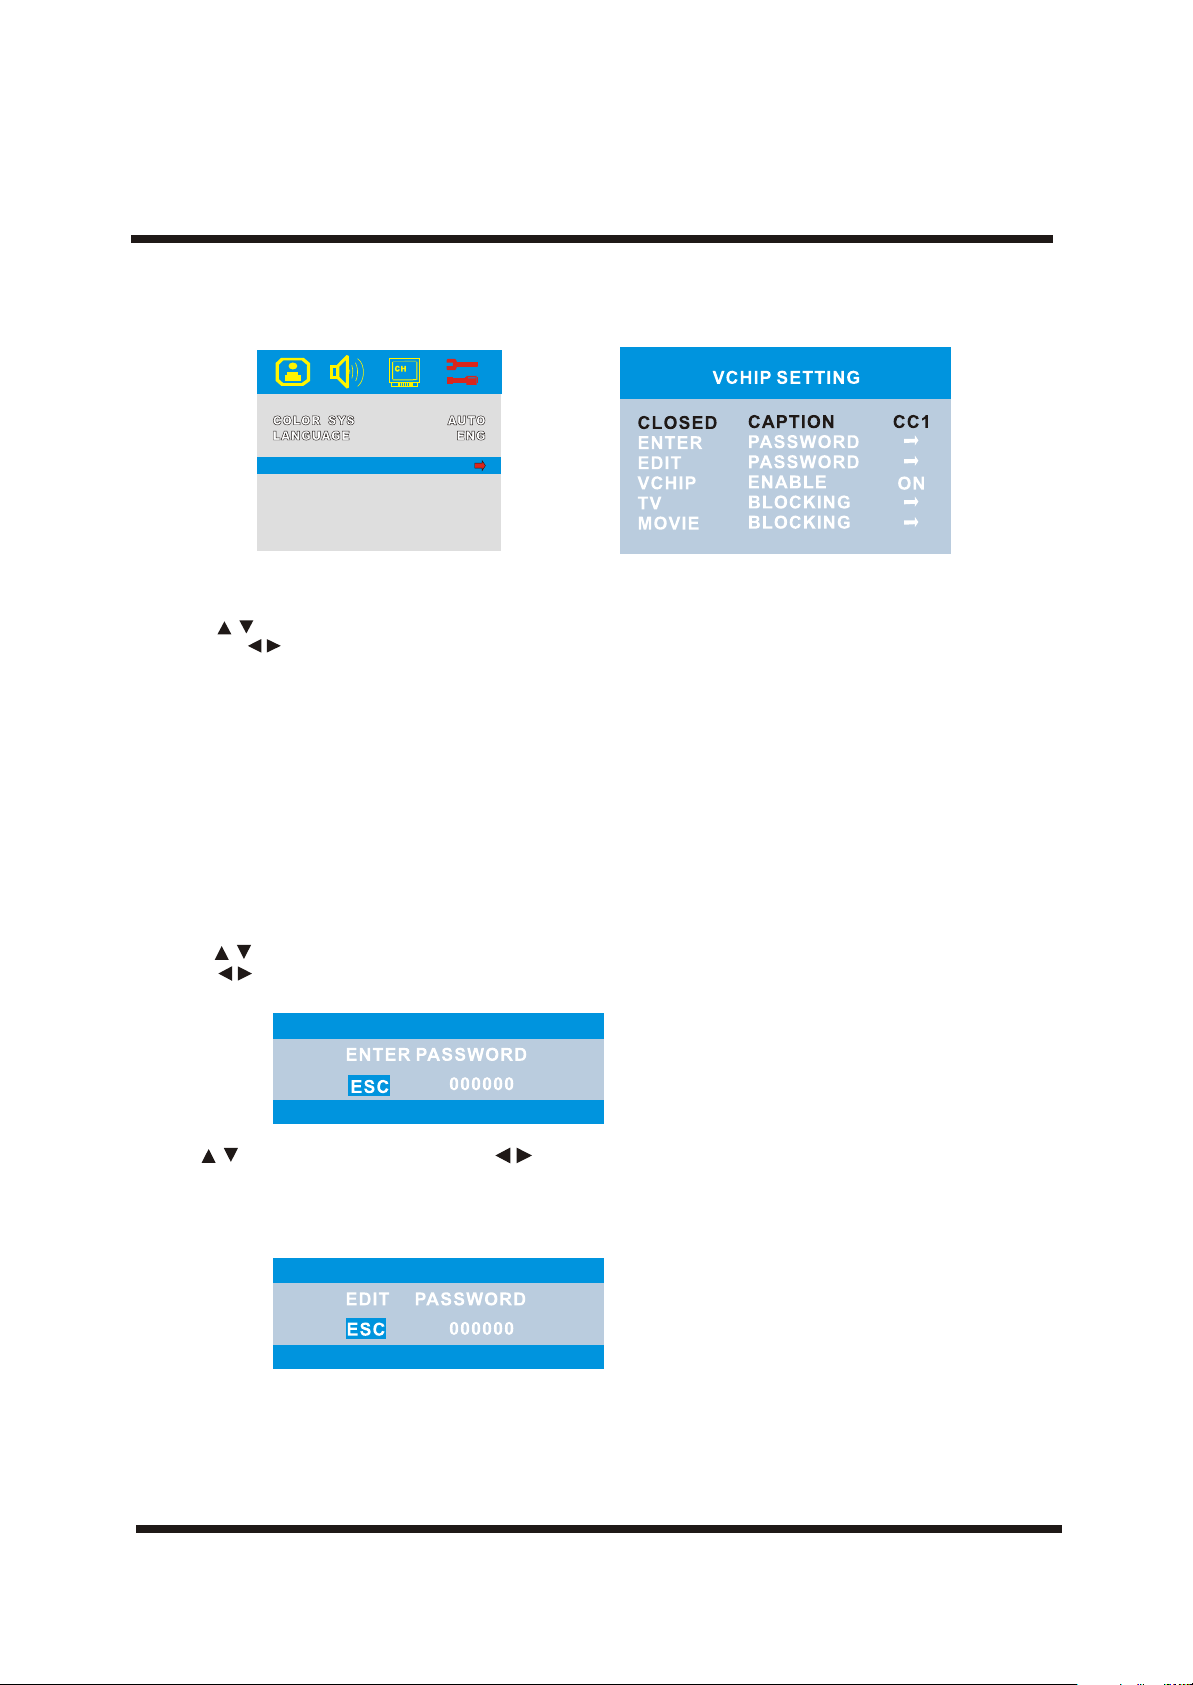
CCD/VCHIP(CCD and VCHIP are in one menu-VCHIP SETTING menu)
COLOR TEMPCOLOR TEMP
CC/V-CHIPCC/V-CHIP
WARMWARM
I Setting Closed Caption(CCD)
1.Press button to select Closed Caption item.
2.Press the button to select.
You can select the caption data channel (C1/C2/C3/C4), the text service channel (T1/T2/T3/T4) or turn
off the Closed Caption (Off).
Notes:
1.Some TV programs may not be broadcast with closed caption signals, and therefore, the TV will not be
able to display captions. Also, text information is not offered by all stations.
2.Some TV programs only provide one channel caption, one channel text , or only caption without text.
3.You can only use this function in TV and VIDEO mode for it can t display in other mode. '
II Setting V-CHIP
PART 1:ENTER/EDIT PASSWORD AND ENABLE V-CHIP
1.Press buttons to select Vchip password item.
2.Press buttons to enter PASSWORD menu .
3.Use buttons to move cursor,use buttons to change number(the preset password is111111).
4.Press CC/V-CHIP button to confirm and exit.
IMPORTANT: This password can be changed after the original password is entered.
5.To edit password,please enter EDIT PASSWORD menu.
6.Enter new password and press CC/V-CHIP button confirm.
-21-
Page 23
OPERATION INSTRUCTIONS
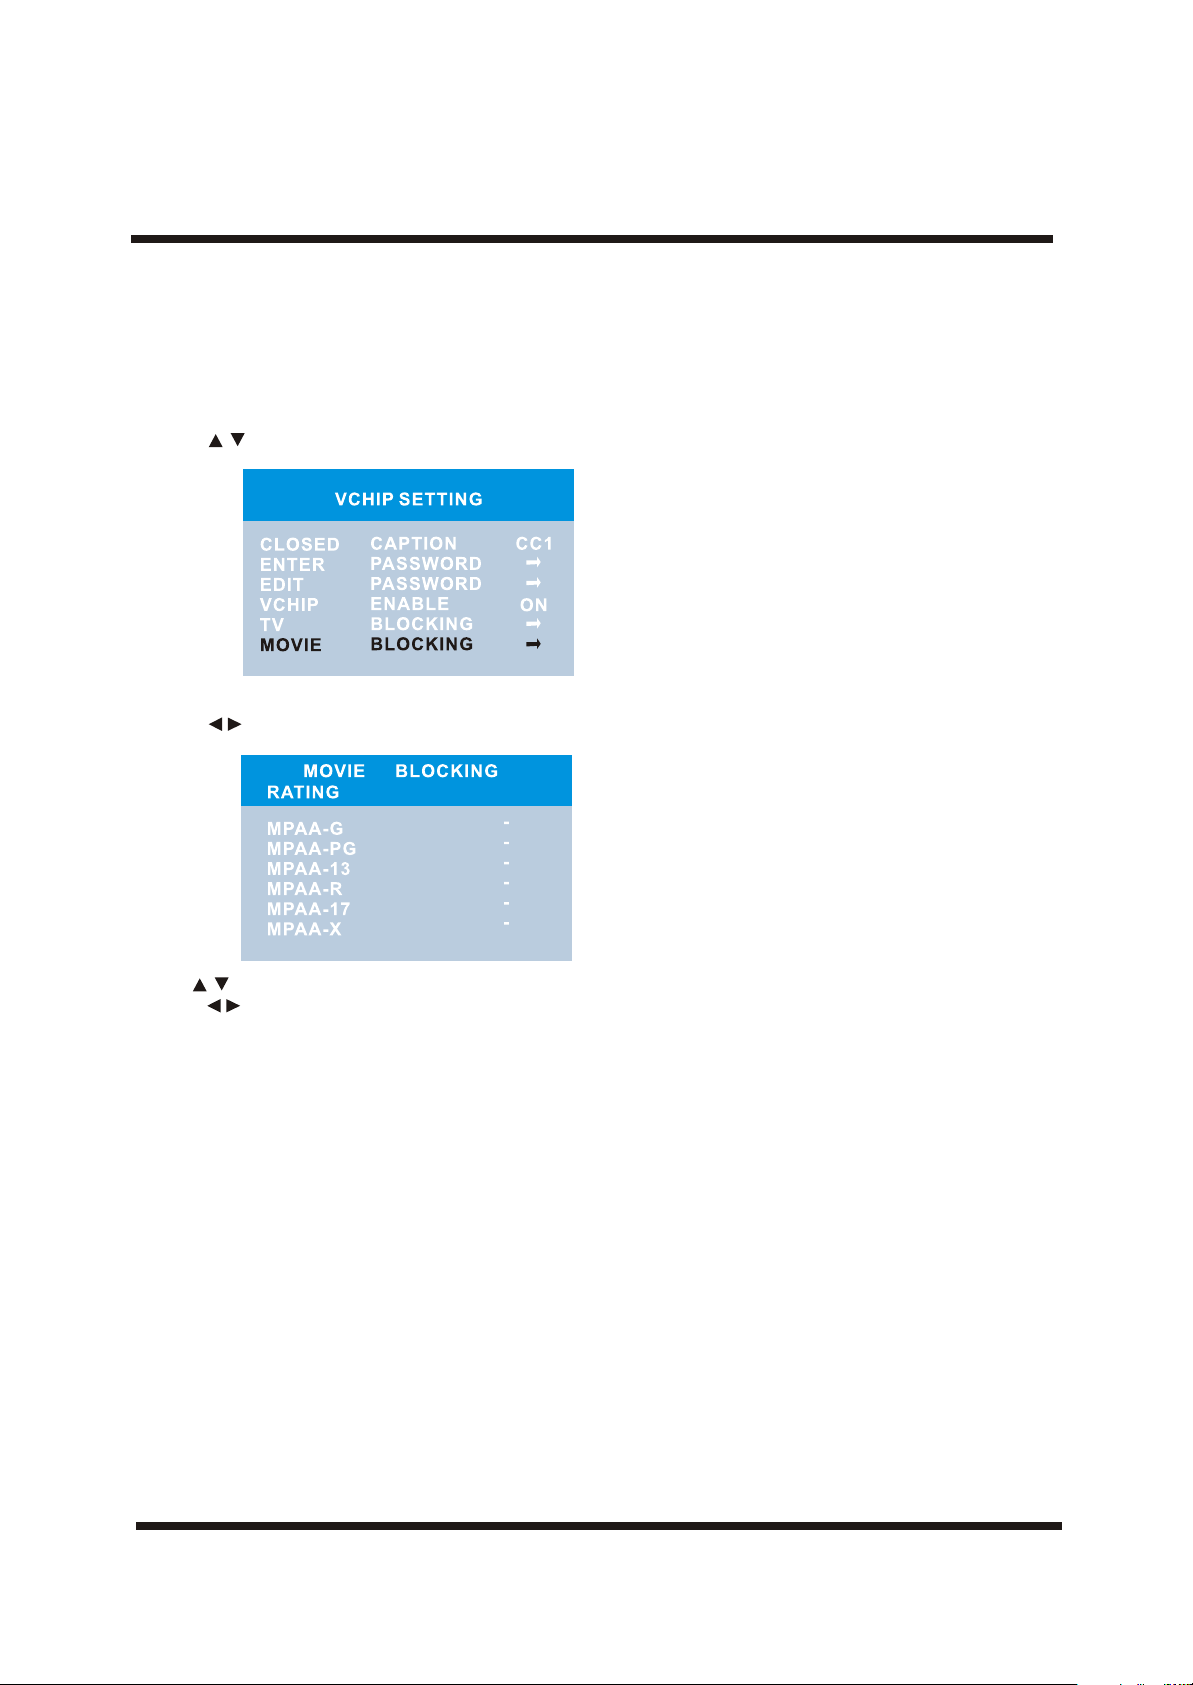
PART 2:MPAA RATING SET-UP
To enable V-chip setting, you should set V-CHIP ENABLE to ON in VCHIP SETTING menu.
Rating guidelines are provided by broadcast stations. Most television programs and television movies can be
blocked by TV Rating and/or Individual Categories. Movies that have been shown at the theaters or direct-to-video
movies use the Movie Rating System (MPAA) only.
1.Press button to select MOVIE BLOCKING item.
2. Press button to enter into MPAA RATING sub-menu.
3.Use to select the desired rating.
4.Press button to block the rating ("+ " will appear), or unblock ("- " will appear).
Movie Ratings:
* Unblocked
* G and Above (general audience)
* PG and Above (parental guidance suggested)
* PG-13 and Above (13 years and up)
* R and Above (restricted)
* NC-17 and Above (18 years and up)
* X (adult)
V-Chip enables parents to prevent their children from watching inappropriate material on TV. V-Chip
reads the ratings for programming (except for news, sports, unedited movies on premium cable and
Emergency System signals ), then denies access to programming if the program's rating meets the
limitations you select. In this case, the program will be blocked.
-22-
Page 24
OPERATION INSTRUCTIONS
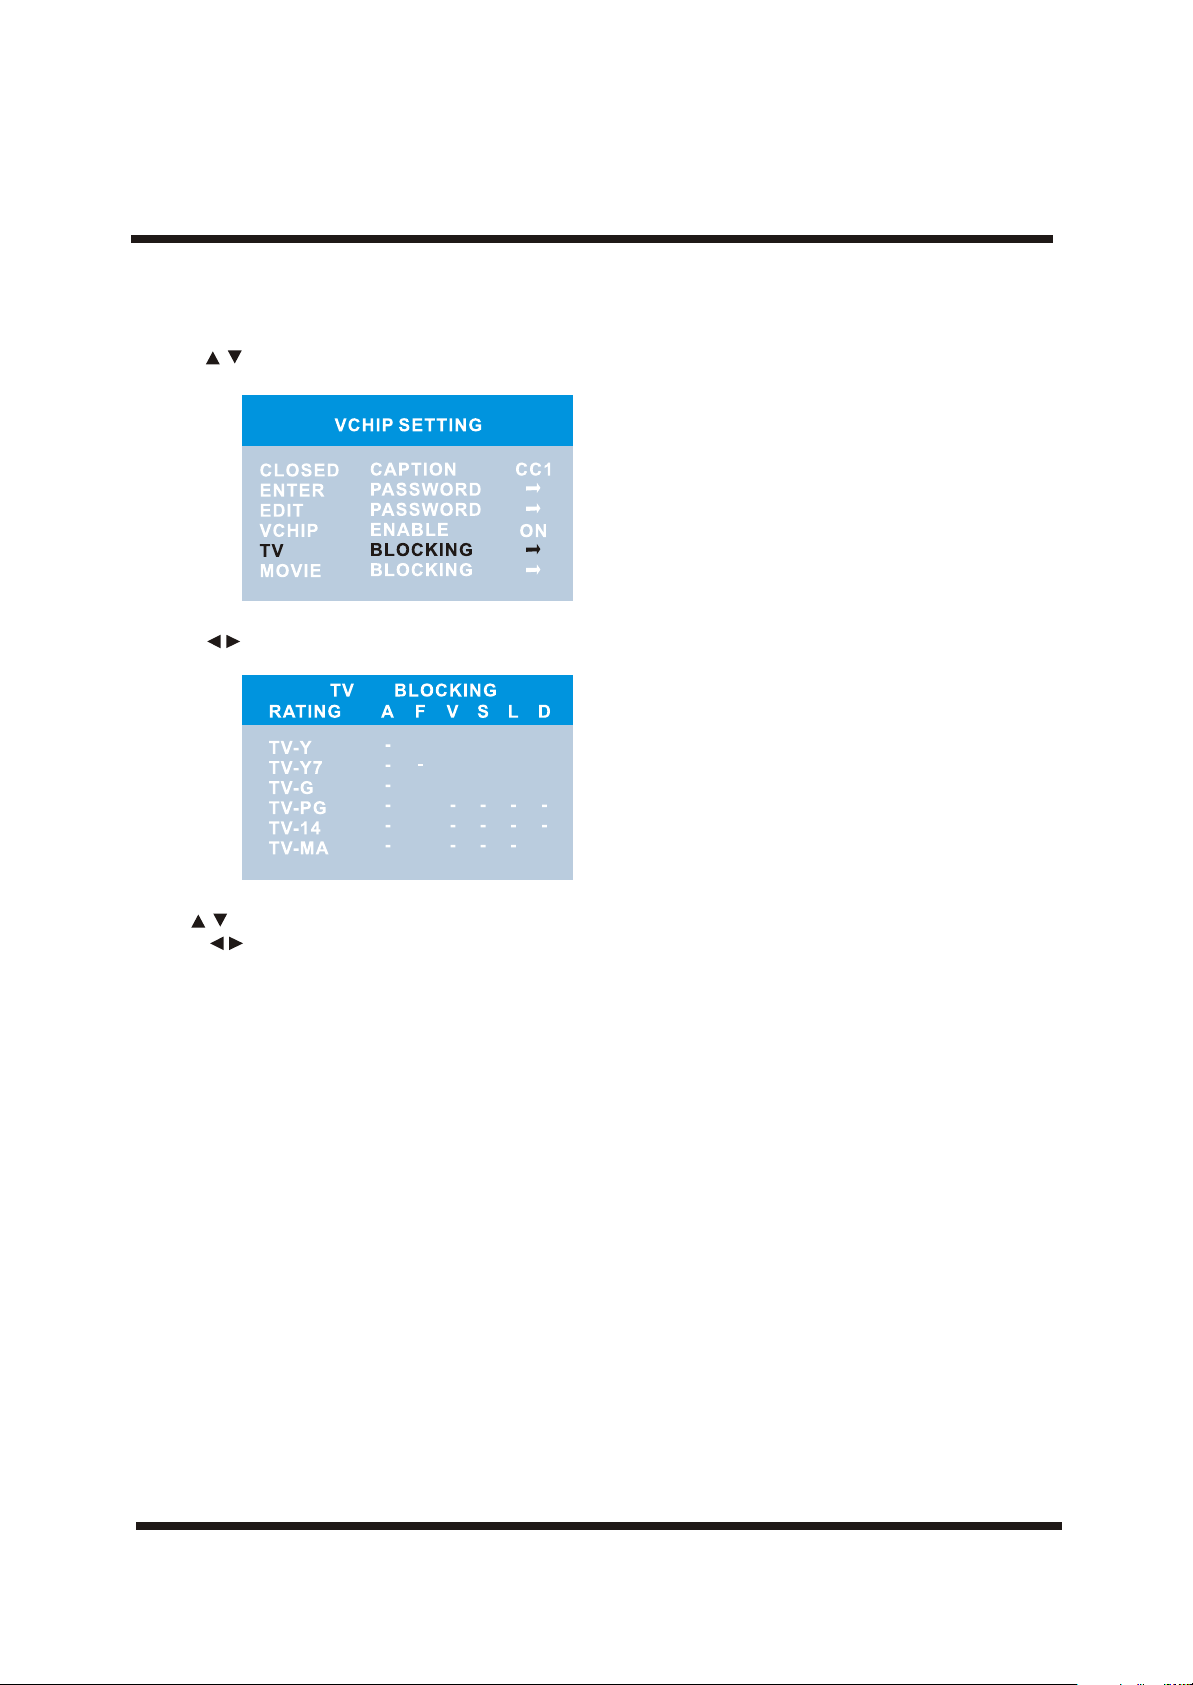
PART 3:TV BLOCKING
TV Parental Guidelines may have one or more letters added to the basic rating to let parents know when a show
contains higher levels of violence, sex, adult language or suggestive dialogue:
1.Press button to select TV BLOCKING item.
2.Press button to enter into TV BLOCKING sub-menu.
3.Use to select the desired rating(column A).
4.Press to block the rating ("+ " will appear), or unblock ("- " will appear).
NOTE:
If there are content categories in the rating that you set,please select and block.They are in column
F,V,S,L,D. If you want to exit the menu,please press CCD/V-CHIP button Repeatedly.
TV Ratings:
* Unblocked
* TV-Y and Above (all children) (individual content categories do not apply)
* TV-Y7 (7 years and up)
* TV-G and above (general audience) (individual categories do not apply)
* TV-PG and Above (parental guidance suggested)
* TV-14 and above (14 years and up)
* TV-MA (mature audience)
Content Categories:
* F Violence: fantasy violence (applies only to TV-Y7)
* Violence: (applies to TV-PG and above, TV-14 and Above, TV-MA)
* Sex scenes: sexual situations (applies to TV-PG and above, TV-14 and Above, TV-MA)
* Language: adult language (applies to TV-PG and above, TV-14 and Above, TV-MA)
* Dialog: sexual dialogue (applies to TV-PG and Above,TV-14)
-23-
Page 25
TROUBLESHOOTING GUIDE
PART I (PC)
This LCD TV has pre-adjusted using factory standard VGA timings. Due to the output timing differences among
various VGA cards in the market, users may initially experience an unstable or unclear display whenever a new
display mode or new VGA card is selected.
Attention
This LCD TV Supports Multiple VGA Modes.
Refer to the Standard Timing Table for a listing of modes supported by this LCD TV.
The picture is unclear and unstable, please perform the following steps:
1.Enter PC to "Shut Down Windows "status while you're in MS-WINDOWS environment.
2.Check the screen to see if there are any black vertical stripes appear. If so, use the "Clock" function in OSD menu
and adjust(by toggling numbers )until those bars disappear.
3.Move to "Phase "function in OSD menu again and adjust the TV screen to the cleares display..
4.Click "No" on "Shut Down Windows" and back to the normal PC operating environment.
If there's no picture on the LCD TV, please perform the following steps:
1.Make sure the power indicator on the LCD TV is ON, all connections are secured, and the system is running on
the correct timing .
2.Turn off the LCD TV and then turn it back on again. If there is still no picture, press the Adjustment Control button
several times.
3. If step 2 doesn't work, connect your PC system to another external CRT. If your PC system functions properly
with a CRT TV but it does not function with the LCD TV, the output timing of the VGA card may be out of the LCD's
synchronous range. Please change to an alternative mode listed in the Standard Timing Table or replace the VGA
card, and then repeat steps 1 and 2.
If you have chosen an output timing that is outside of the LCD TV's synchronous range (Horizontal:24~61KHz and
Vertical: 56~75Hz), the OSD will display a "Out of Range" message, Choose a mode that is supported by your LCD
TV. Also, if the signal cable is not connected to the LCD TV at all or properly, the TV screen will display a message
"No Input Signal".
-24-
Page 26
TROUBLESHOOTING GUIDE
PART II
Incorporated in your TV receiver are the most up-to-date devices to eliminate interference. Local radiation however,
can create disturbances which visibly affect your picture. Proper installation and a good aerial are your best safeguards against these disturbances.
Moving ripples across the screen are caused by nearby transmitting or receiving-short-wave radio equipment.
Herringbone pattern and partial picture loss can result from the operation of diathermy equipment from a nearby
doctor's surgery or hospital.
Weak TV signals from long distant stations result in an instead picture and give the effect of falling snow. Anaerial
adjustment or antenna amplifier may be needed.
Multiple image caused by TV signals reflected back from surrounding buildings, hills, aircraft, etc. is minimized by
correct aerial positioning.
Nearby cars and electrical motors can cause small streaks across the picture or make the picture roll.
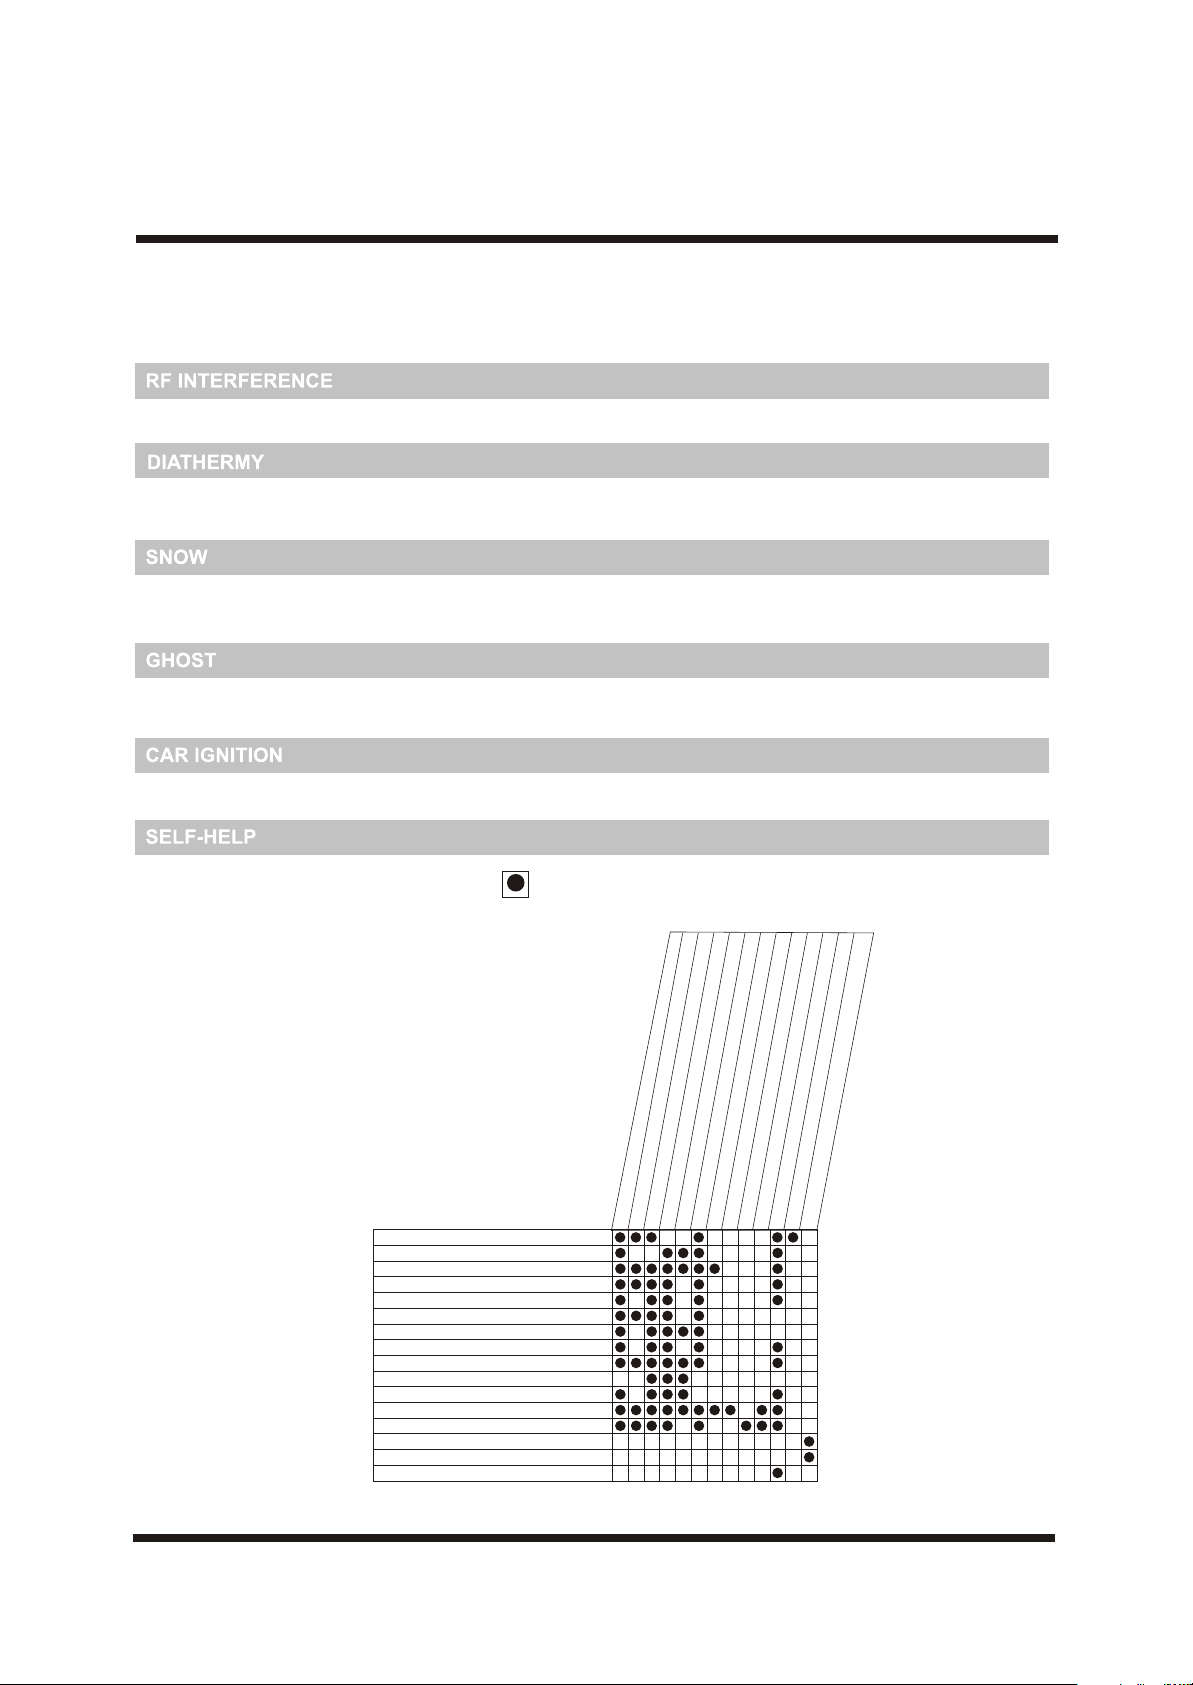
Before calling for service, have you checked ( ) the following chart on symptoms and solutions.
le
e
c
an
i
pl
ap
et
n
s
a
s
of
a
h
c
e)
s
su
p
e
,
y
ir
e
t
w
nc
or
n
e
e
ntr
do
fer
o
in
ok
c
r
f
i
b
(
g
nter
i
in
ial
r
al
c
tun
ae
lo
e
t
y
fin
en
i
t
abl
s
or
b
-
ju
o
e
djus
R
Pr
Ad
A
ur
lo
o
c
g
n
i
t
s
l
o
ol
r
t
adca
ol
o
r
r
on
b
c
t
ont
s
n
c
t
n is
es
co
o
n
i
as
t
r
ur
ht
t
a
t
o
l
ig
r
on
if s
b
c
co
t
t
t
k
c
us
us
j
he
dj
Ad
C
A
C
ol
t
c
e
r
ontr
r
"
o
c
on
te c
"
s
o
i
s
i
m
ch
h
l
t
i
Re
c
o
t
r
i
n
i
w
sw
s
f
ies
em
er
t
n/of
yst
o
at
f s
i
B
if
k
k
k
c
c
ec
e
h
h
he
C
C
Symptoms
No picture, no sound
Poor sound, picture OK
Poor picture, sound OK
Weak picture
Blurred picture
Double image
Lines in picture
Distorted picture
Weak reception on some channels
Horizontal bars
Picture rolls vertically
Poor colour
No colour
Misoperation of Remote control
No Remote control
On Screen Display Control outside the screen
ub
tro
n
atio
st
ly
ab
ck
a
ob
b
pr
on
K,
O
f
i
ions
t
ec
nel,
n
nn
o
or
ha
f
c
c
l
a
al
i
i
nt
r
e
e
er
n
a
a
er
o
i
ff
k
i
t
ck
d
u
l
e
y
hec
h
Tr
So
C
C
-25-
 Loading...