

Page 1

19 TFT LCD TV
INSTRUCTION MANUAL
MODEL: LTV-19WS
Page 2

Please read all the safety and operating instructions carefully before you begin.
Safety class
This is an IEC safety class I product and must be grounded for safety.
CONTENTS
IMPORTANT SAFETY INSTRUCTIONS........................................................................................................................
PREFACE..........................................................................................................................................................................
WARNING AND CAUTIONS..........................................................................................................................................
SPECIFICATIONS ACCESSORIES................................................................................................................................
INSTALLATION
TV ASSEMBLY DRAWINGS......................................................................................................................................
FRONT....................................................................................................................................................... ...............
BACK.........................................................................................................................................................................
PC..............................................................................................................................................................................
ANTENNA.................................................................................................................................................................
AV EQUIPMENT........................................................................................................................................................
BATTERY INSTALLATION (REMOTE CONTROL UNIT)................................................................................................
REMOTE CONTROL DESCRIPTION.......................................................................................................................
OPERATION INSTRUCTIONS
Using the On-Screen Display (OSD)
.........................................................................................................................
Image adjust..............................................................................................................................................................
Audio Adjust
..............................................................................................................................................................
Tuner
........................................................................................................................................................................
PC
..............................................................................................................................................................................
Function
Parental Controls
Movie Rating
CA Fr Rating :
Factory Reset
.........................................................................................................................................................
TROUBLESHOOTING GUIDE........................................................................................................................................
PERSONAL COMPUTER.............................................................................................................................
.....................................................................................................................................................................
.................................................................................................................................................
.............................................................................................................................................................
CA Eng Rating
Parental Lock
Color Temp...............................................................................................................................................................
Screen Format
..........................................................................................................................................................
.............................................................................................................................................................
............................................................................................................................................................
...........................................................................................................................................................
14-16
19-20
.................
1-2
3
4-6
7
8
9
10
10
11
12
13
17
17
18
18
19
19
21
21
22
22
22
23
23
24
24
Page 3
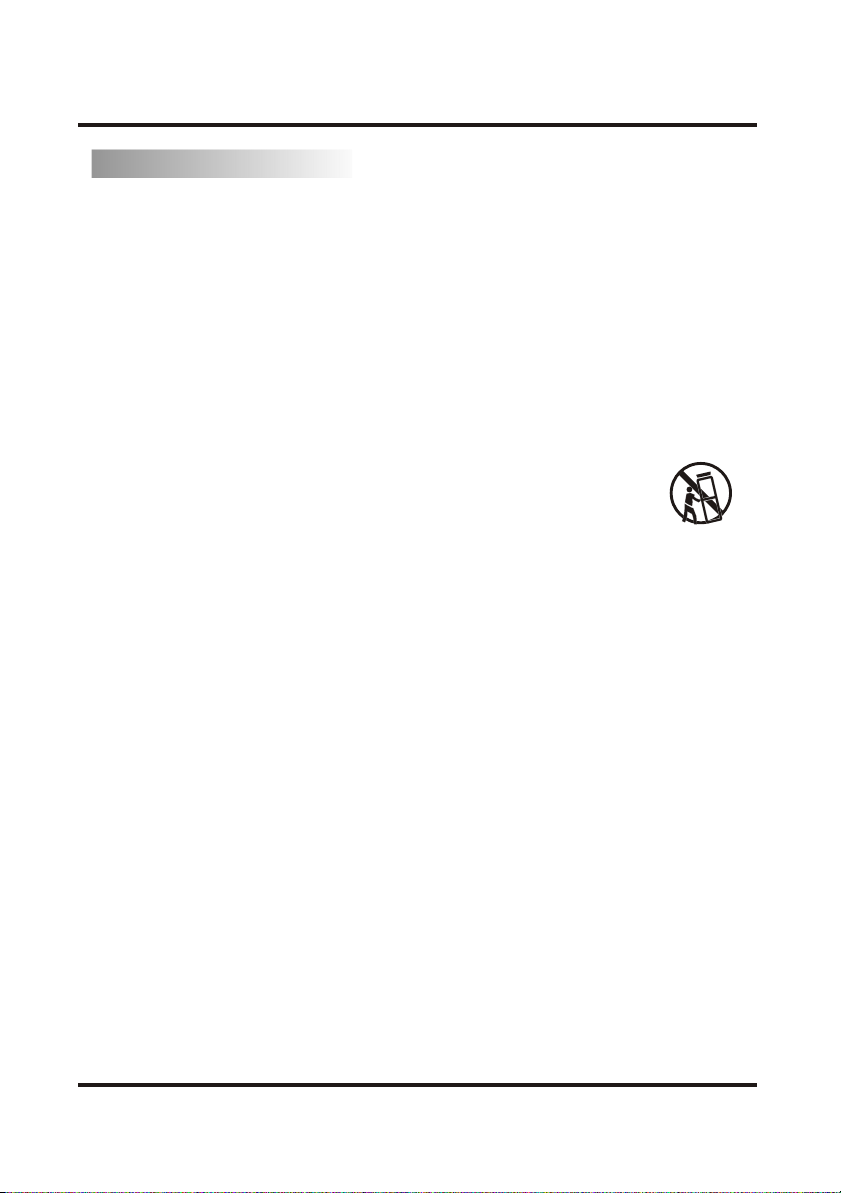
IMPORTANT SAFETY INSTRUCTION
Important safety instruction
1.Read these instructions.
2.Keep these instructions.
3.Heed all warnings.
4.Follow all instructions.
5.Do not use this apparatus near water.
6.Clean only with dry cloth.
7.Do not block any ventilation openings. Install in accordance with manufacturer instructions.
8.Do not install near any heat sources such as radiators, heat registers, stoves, or other apparatus
(including Amplifiers) that produce heat.
9.Do not defeat the safety purpose of the polarized or grounding type plug. A polarized plug has two
blades with one wider than the other. A grounding type plug has two blades and a third grounding
prong. The wide blade or the third prong are provided for you safety.
10.Protect the power cord from being walked on or pinched.
11.Only use attachments/accessories specified by the manufacturer.
12.Unplug this apparatus during lightning storms or when unused for long periods of time.
13.Refer all servicing to qualified service personnel. Servicing is required when the apparatus has
been damaged in any way, such as power-supply cord or plug is damaged, liquid has been spilled or
objects have fallen into apparatus, the apparatus has been exposed to rain or moisture, does not
operate normally, or has been dropped.
14.Apparatus shall not be exposed to dripping or splashing and no objects filled with liquids, such
as vases, shall be placed on the apparatus.
15.A warning that an apparatus with class I construction shall be connected to a MAINS socket
outlet with a protective earthing connection.
-1-
Page 4
IMPORTANT SAFETY INSTRUCTION
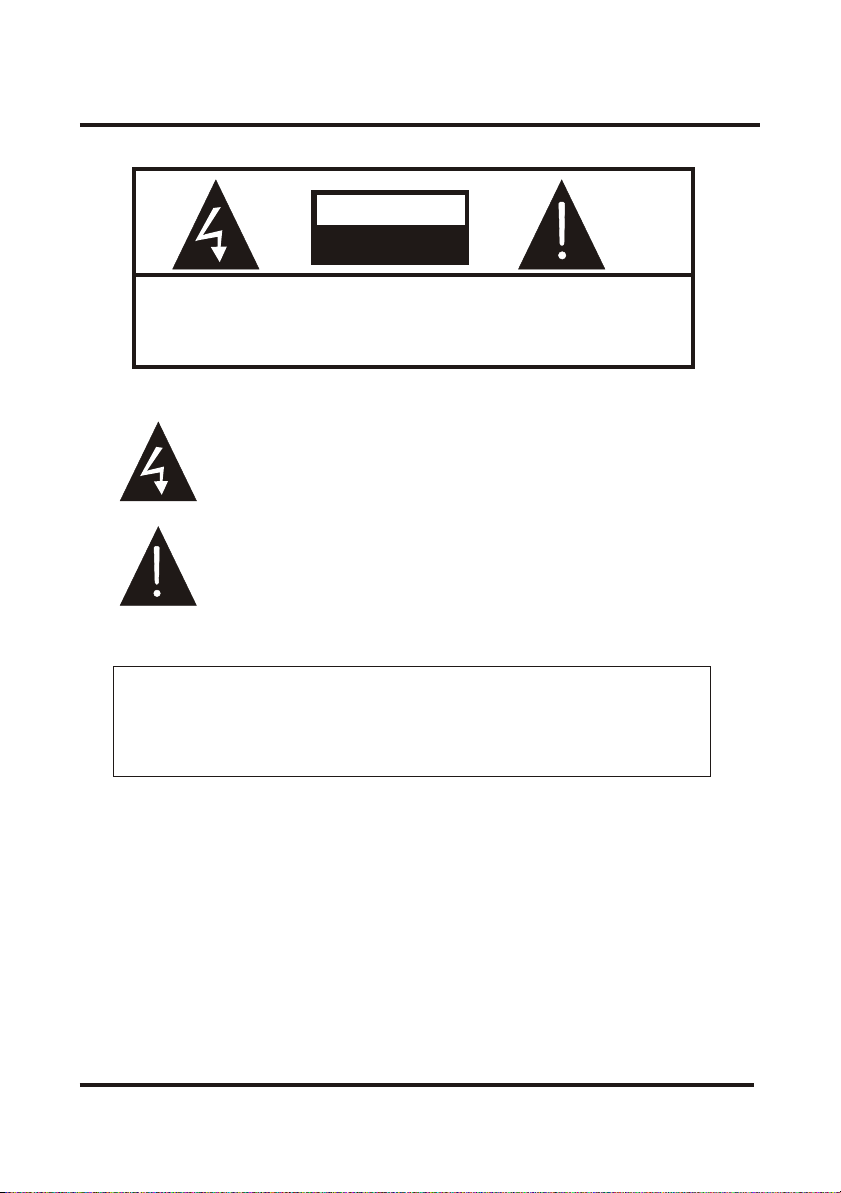
CAUTION
RISK OF ELECTRIC SHOCK
DO NOT OPEN!
CAUTION
TO REDUCE THE RISK OF ELECTRIC SHOCK,DO NOT
REMOVE COVER (OR BACK).NO USE-SERVICEABLE
PARTS INSIDE. REFER SERVICING TO QUALIFIED
SERVICE PERSONNEL.
The symbol indicates that dangerous voltage constituting a risk
of electric shock is present within this unit.
The symbol indicates that there are important operating and
maintenance instructions in the literature accompanying this
unit.
WARNING:
TO PREVENT FIRE OR SHOCK HAZARD, DO NOT EXPOSE THIS APPLIANCE
TO RAIN OR MOISTURE. DO NOT PLACE ANY OBJECTS FILLED WITH LIQUIDS,
SUCH AS VASES ON THE UNIT.
-2-
Page 5

PREFACE
Thank you very much for purchasing this product. To enjoy your set to the finest from the very beginning,
read this manual carefully and keep it handy for future reference.
INSTALLATION
Position the TV in the room where light does not strike the screen .
Total darkness or a reflection on the picture screen can cause eyestrain. Soft and indirect lighting is
recommended for comfortable viewing.
Allow enough space between the receiver and the wall to permit ventilation.
Avoid excessive warm locations to prevent possible damage to the cabinet or premature component
failure.
This AC power can be connected to AC 100-240 volts, 50/60Hz.
Do not cover the ventilation openings when using the set.
directly
CAUTION
Never tamper with any components inside your set, or any other adjustment controls not mentioned in
this manual. All LCD-TVs are high voltage instruments.
Cabinet with a dry or damp cloth, make sure the power cord is removed from the receptacle
thunder and lightning , unplug the power cord and antenna cord to prevent your LCD TV set from
damage. All repairs in this TV should be performed only by qualified TV service personnel.
storms
When you dust or clean the LCD Panel or
. During
-3-
Page 6
WARNINGS AND CAUTIONS
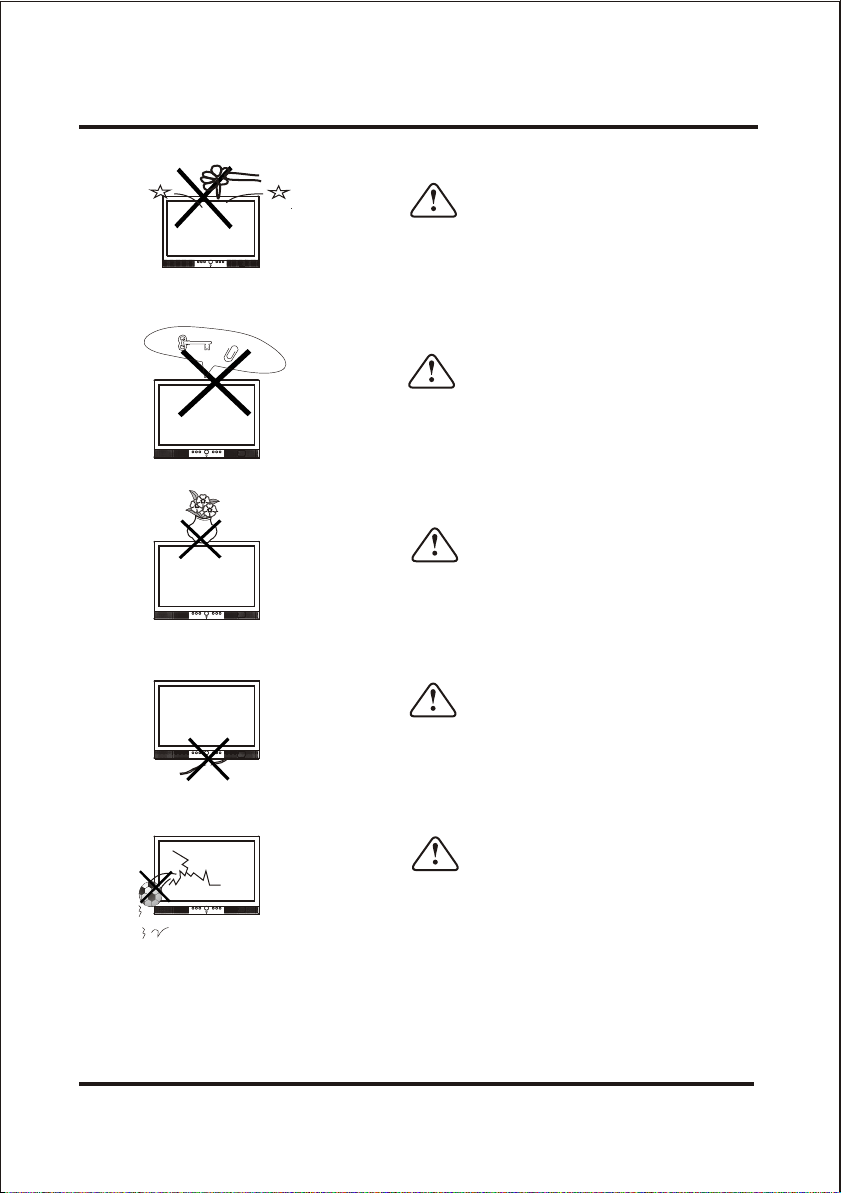
Caution
Do not drop or push objects into the television cabinet
CH+CH-VOL+VOL-SOURCE MENU
slots or openings. Never spill any kind of liquid on the
television receiver.
Caution
Do not insert anything in the ventilation holes. If metal
or something flammable enters, it may result in fire or
CH+CH-VOL+VOL-SOURCEMENU
electric shock.
Caution
Do not place objects on this unit, it may damage the
CH+CH-VOL+VOL-SOURCEMENU
screen surface.
Caution
CH+CH-VOL+VOL-SOURCEMENU
Do not squash power supply cord under the television
receiver.
Caution
CH+CH-VOL+VOL-SOURCEMENU
Do not throw anything at the set. The screen glass may
explode by impact and cause serious injury.
-4-
Page 7
WARNINGS AND CAUTIONS
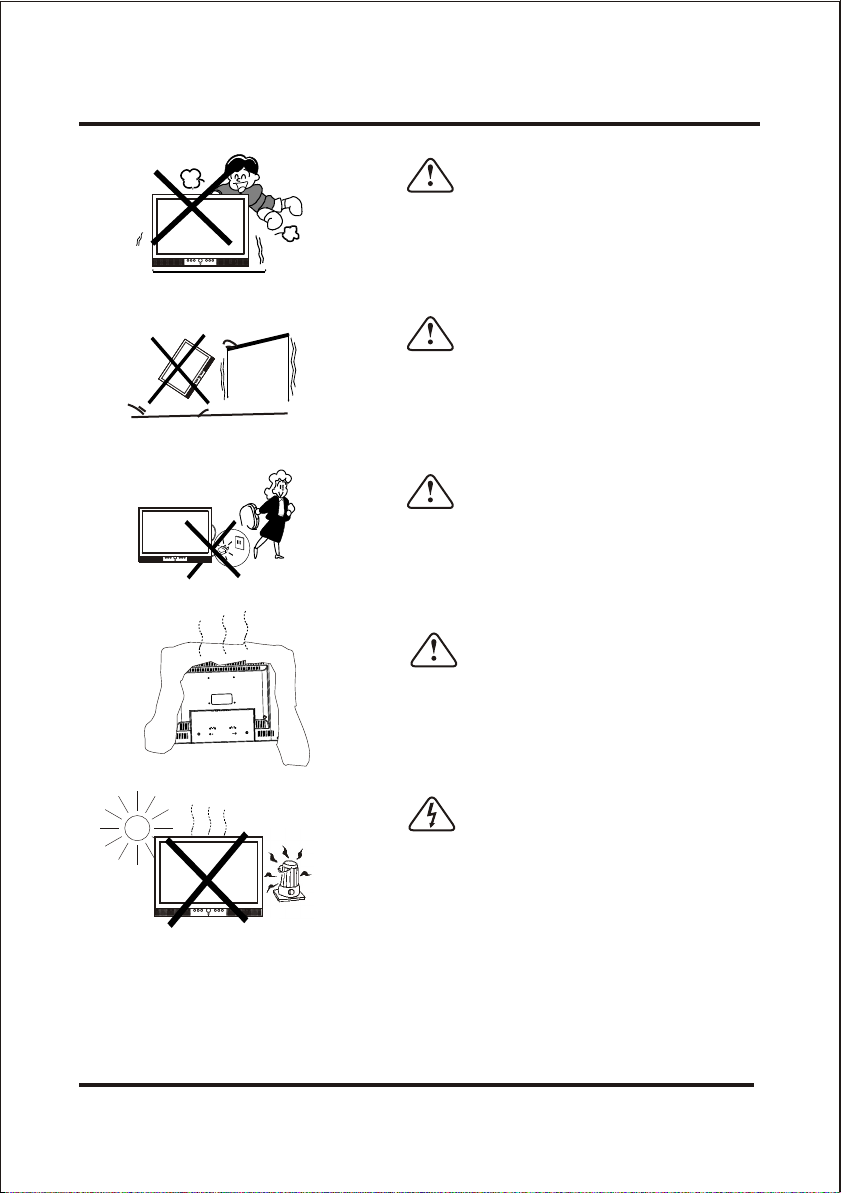
Caution
Never stand on, lean on or roughly push the television
or its stand. You should pay special attention to
CH+CH-VOL+VOL-SOURCE MENU
children. Serious injury may result if it should fall.
Caution
+
H
C
H
C
+
L
O
V
-
L
O
V
U
N
E
M
E
C
R
U
O
S
Do not place your television on an unstable cart, stand,
shelf or table. Serious injury to an individual, and
damage to the television may result if it should fall.
Caution
When the television receiver is not used for an
CH+CH-VOL+VOL-SOURCEMENU
extended period of time, it is advisable to disconnect
the AC power cord from the AC outlet.
Caution
Do not block the ventilation holes on the back cover.
1.000
SCALE
Adequate ventilation is essential to prevent failure of
electrical components.
Warning
Avoid exposing the television receiver to direct sunlight
and other sources of heat.
Do not stand the television receiver directly on other
CH+CH-VOL+VOL-SOURCEMENU
items which give off heat .E.g.video cassette players
and audio amplifiers. Do not place naked flame
sources, such as lighted candles on the television.
Do
not expose the LCD screen surface to the sun as it
may damage the screen surface.
-5-
Page 8
WARNINGS AND CAUTIONS
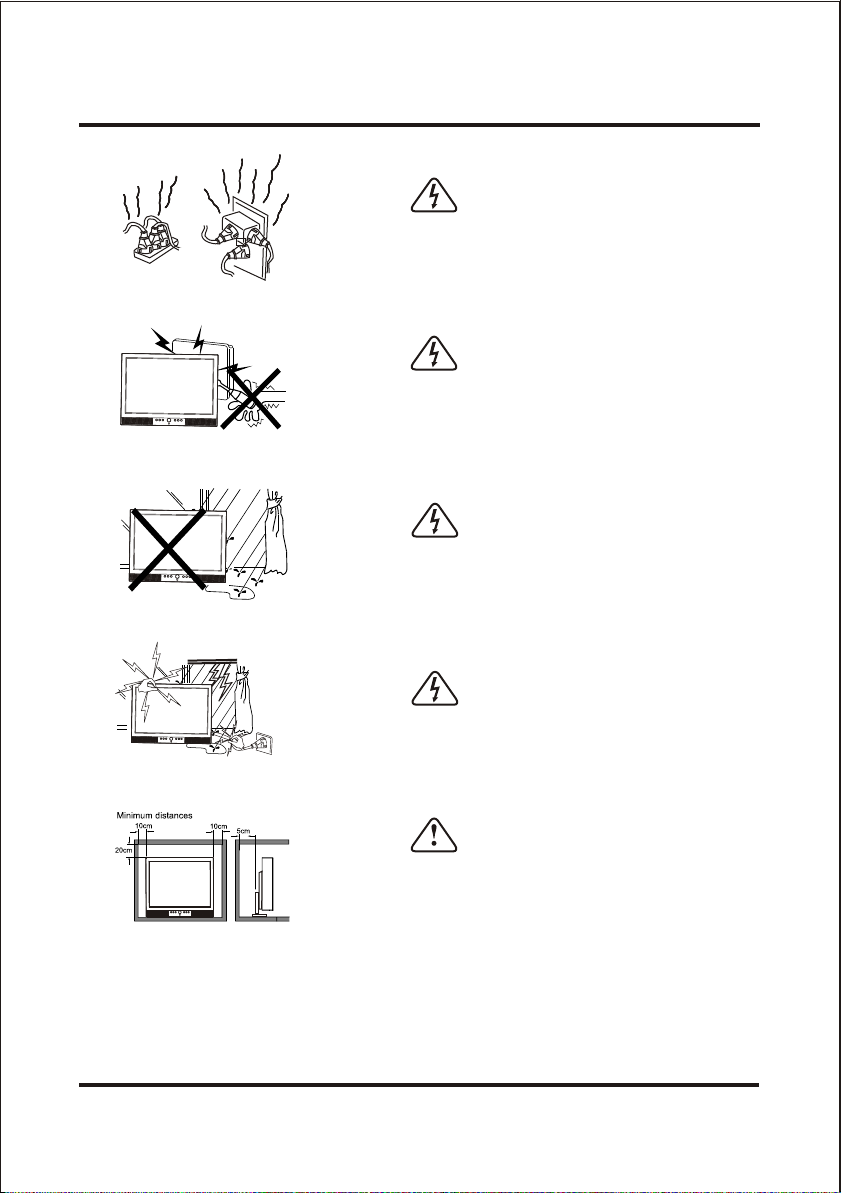
Warning
Do not connect too many appliances to the same mains
socket as it could result in fire or electric shock. Do not
place objects on this unit as it may damage the screen
surface.
Warning
High voltages are used in the operation of this
S
O
U
R
C
E
M
E
N
U
V
O
L
V
O
L
+
C
H
C
H
+
television receiver. Do not remove the cabinet back
from your set. Refer servicing to qualified service
personnel.
Warning
S
O
U
R
C
E
M
E
N
U
V
O
L
V
O
L
+
C
H
C
H
+
the television receiver to rain or moisture.
Warning
To prevent fire or electrical shock hazard, do not expose
S
O
U
R
C
E
M
E
N
U
V
O
L
V
O
L
+
C
H
C
H
+
For you own safey, do not touch any part of the set,
main lead or aerial lead during lightning storms.
Caution
If the television is to be built into a Compartment or
similarly enclosed, the minimum distances must be
CH+CH-VOL+VOL-SOURCEMENU
maintained.
Heat build-up can reduce the life of your television, and
can also be dangerous.
-6-
.
Page 9
Specificatons
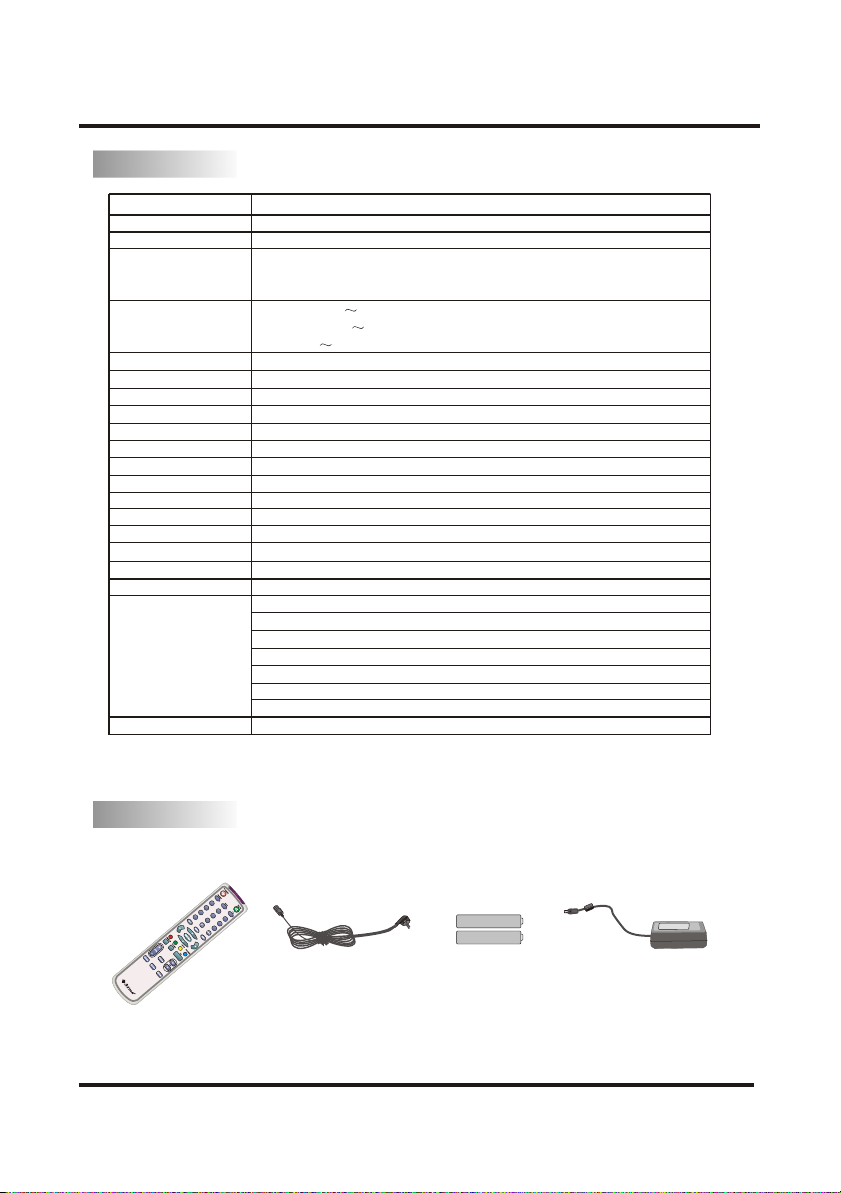
SPECIFICATONS
Model
LCD panel
Television system
LTV-19WS
19 INCH TFT LCD
NTSCPAL-M PAL-N
PAL-4.43MHz-50Hz NTSC-3.58MHz-60Hz
AV system
SECAM-4.29MHz-50Hz NTSC-4.43MHz-60Hz PAL-3.58MHz-50Hz
PAL-3.58MHz-60Hz PAL-4.43MHz-60Hz
Channel coverage
VHF Low 53 153
VHF High 153 453
UHF 453 803
Analog RGB mode
Y Pb/Cb Pr/Cr mode
Resolution
Display Color
Comb Filter
Contrast
Brightness
Viewing angle
Response Time
OSD language
Power source
Power consumption
Audio power
Lamp life
640X480/ 60Hz, 800X600/ 60Hz, 1024X768/ 60Hz,1280X720/60Hz,1280X1024/60Hz
480i,576i,480P,576P,720P,1080i
1440X900
16.2 million colors
Adaptive 2/4 line
500:1
2
400cd/m
170° (H)/170° (V)
12ms
English/French/Spanish/Portuguese
AC 100-240V , 50/60Hz
60W
2W+2W
50,000 hours
RF input: Cable/ antenna RF x1
VIDEO input: Y Pb/Cb Pr/Cr x1
Video/Audio
terminals
AV x1
S-Video x1
GRAPHIC input: Analog RGB 15pin x1
AUDIO input: PC audio x1
Y Pb/Cb Pr/Cr audio x1 AV audio x1
Supplied accessories
Remote control, AC cord, Instruction Manual, Batteries. AC ADAPTOR
*Design and specifications are subject to change without notice.
Accessories:
One Remote Control One AC cord
1
4
2
7
5
0
3
8
6
9
Two AAA size batteries
-7-
One AC ada pter
Page 10
TV ASSEMBLY DRAWINGS
1. l.
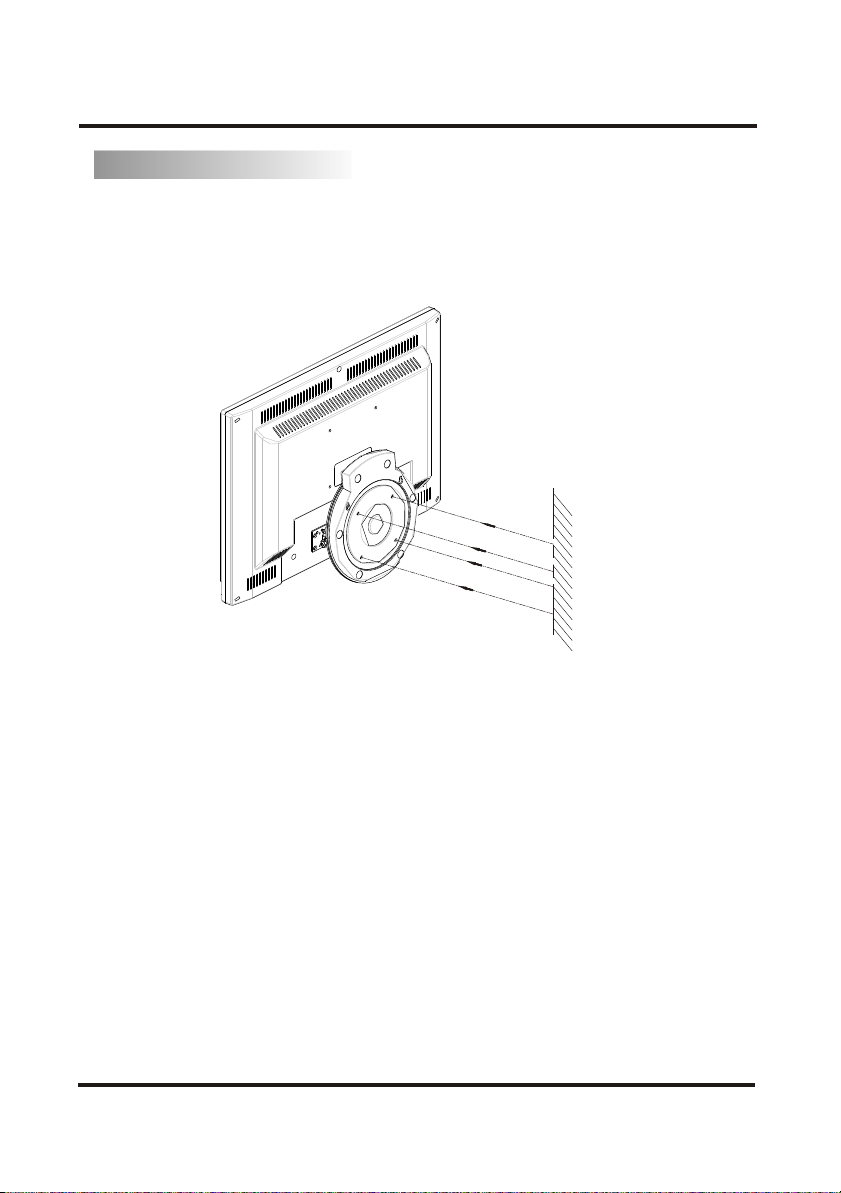
Mount the LCD TV on the wall
Step1: Rotate the base of the TV sets and make sure that the bottom plane of the base is parallel
to the rear cabinet.
Step2: Fix the whole TV sets on the wall.
Refer to drawings below:
WALLWALL
-8-
Page 11
INSTALLA TION
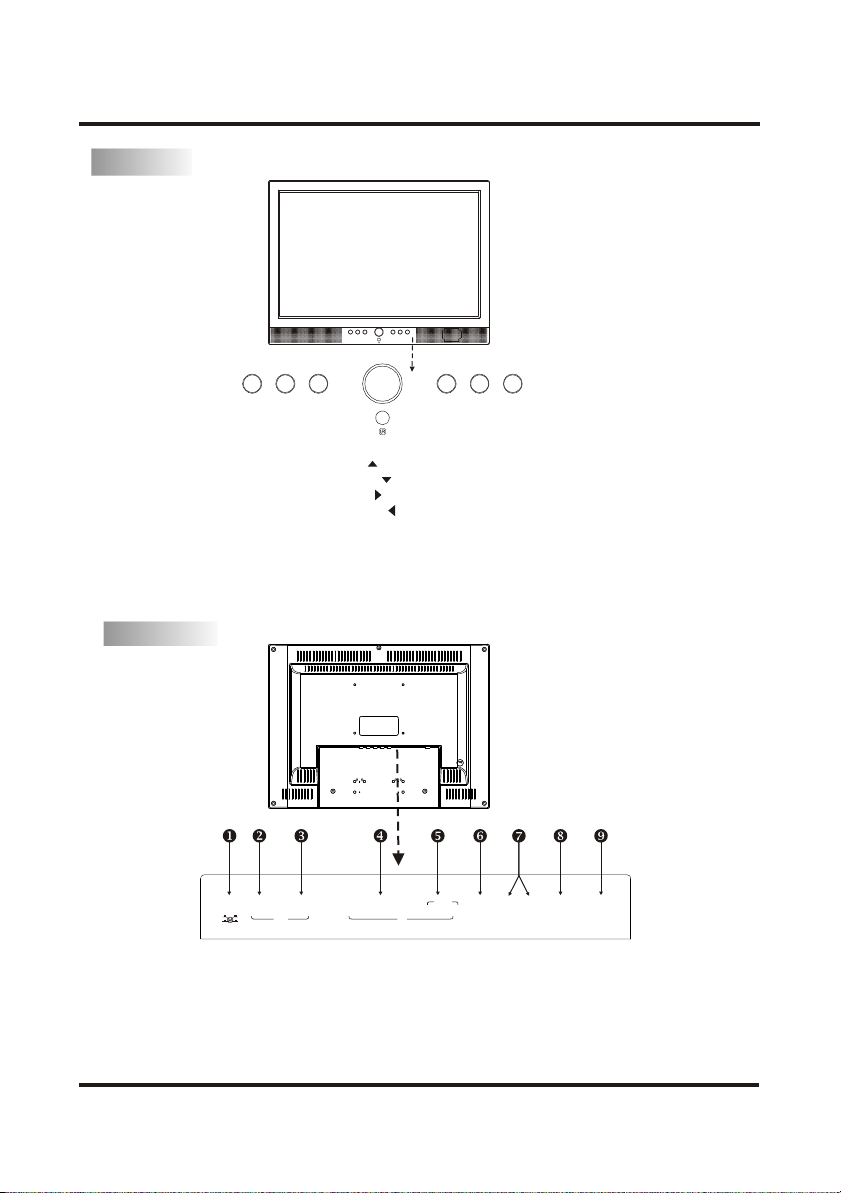
FRONT
CH+CH-VOL+VOL-SOURCE MENU
CH+CH-VOL+VOL-SOURCE MENU
KEYS:
1.CH+: channel up select, it is equivalent .
2.CH-: channel down select, it is equivalent .
3.VOL+: volume up adjust, it is equivalent .
4.VOL-: volume down adjust, it is equivalent .
5.MENU: to enter into menu operation.
6.SOURCE: press the button once to select a signal source.It is "OK" function when the
menu is displayed.
7.POWER: press the key to turn off the set (standby).
8.(Power on/standby)indicator:Lights up in green when the set is working. When in standby
mode, the indicator light red.
BACK
SCALE
1.000
DC 12V IN AUDIO IN
1.Power input(*)
2.PC Audio input
3.Analog RGB input
4.YPbPrCbCr input
(*): When switching the power off, please do not switch it back on within five (5) minutes
VGA IN Y Pb/Cb Pr/Cr
PC IN IN
AUDIO
L/MONOR
5.YPbPrCbCr Audio input
6.AV input
7.AV/S-VIDEO Audio in
8.S-VIDEO input
9.Antenna
L/MONO
RAV
S-VIDEO IN
75W ANT.
-9-
Page 12
INSTALLATION
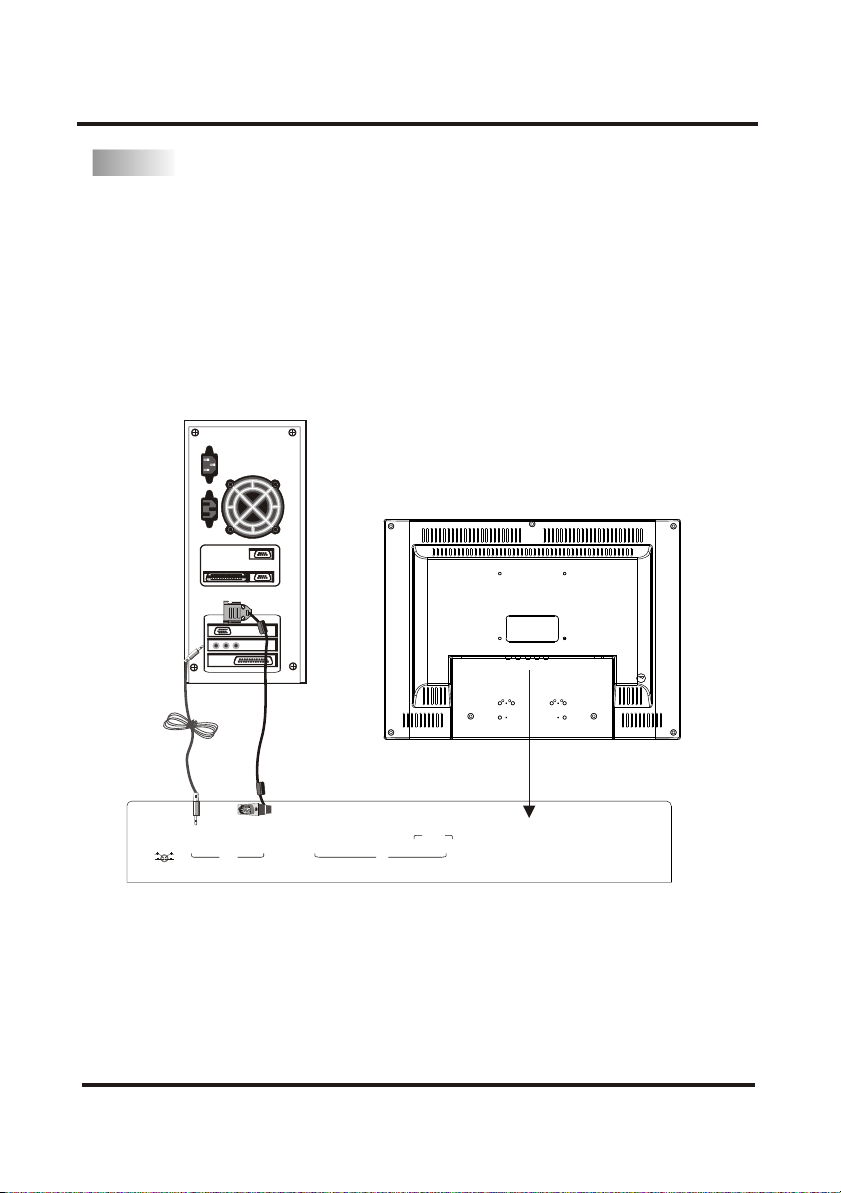
PC
STEPS:
1.Make sure both the LCD TV and Computer are Powered Off.
2. Connect VGA Cable from computer to the TV.
3 Connect the Audio cable.
4. Connect power cord
5. Power On the LCD TV first, then Power on the computer. This sequence is very important.
6. Make sure both computer and LCD TV are powered off before unplugging any one of the
connections. Do not directly pull off the cords as it could cause damage.
Note: Please don't open the Cover.
SCALE
1.000
DC 12V IN AUDIO IN
VGA IN Y Pb/Cb Pr/Cr
PC IN IN
AUDIO
L/MONOR
L/MONO
RAV
S-VIDEO IN
75W ANT.
CAUTION:
Make sure both computer and TV are power off before unplug any one of the connections.
Do not directly pull off the cords as it would cause damage.
-10-
Page 13
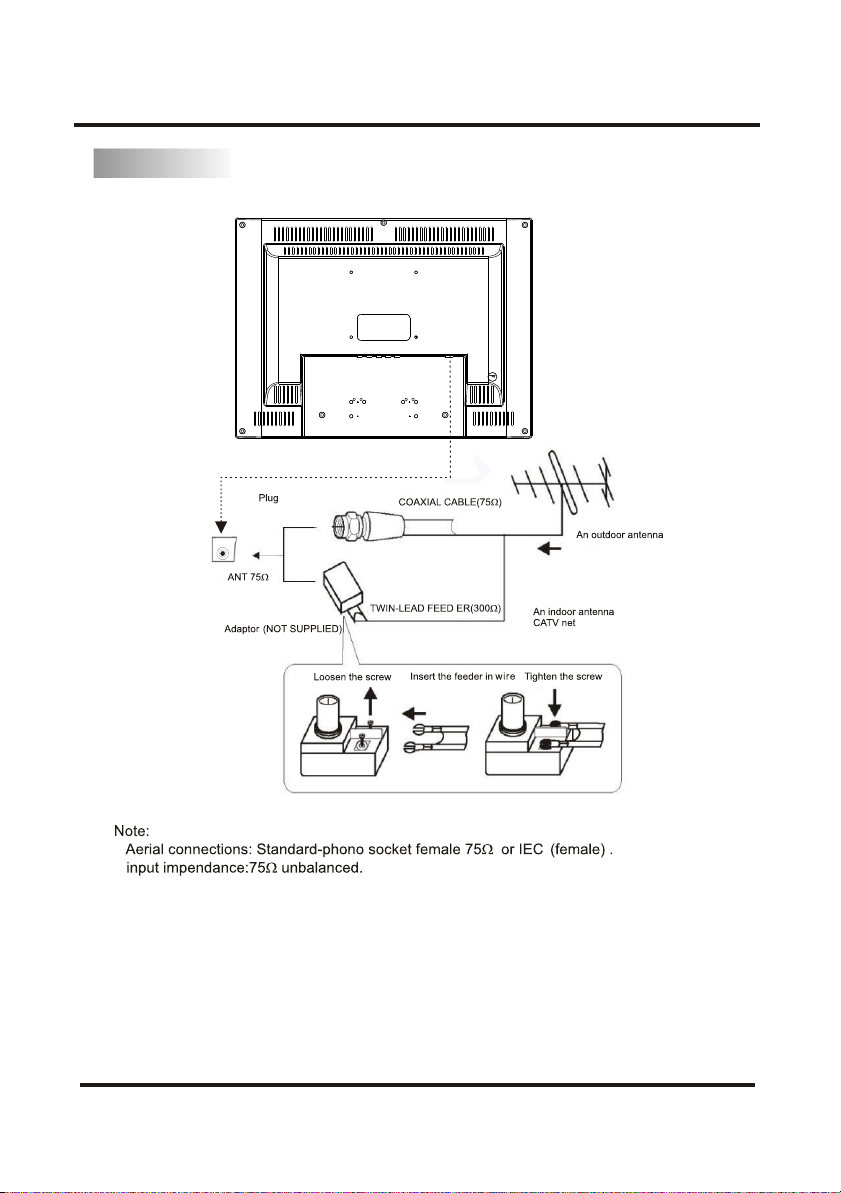
ANTENNA
INSTALLATION
SCALE
1.000
-11-
Page 14
INSTRUCTION
AV EQUIPMENT
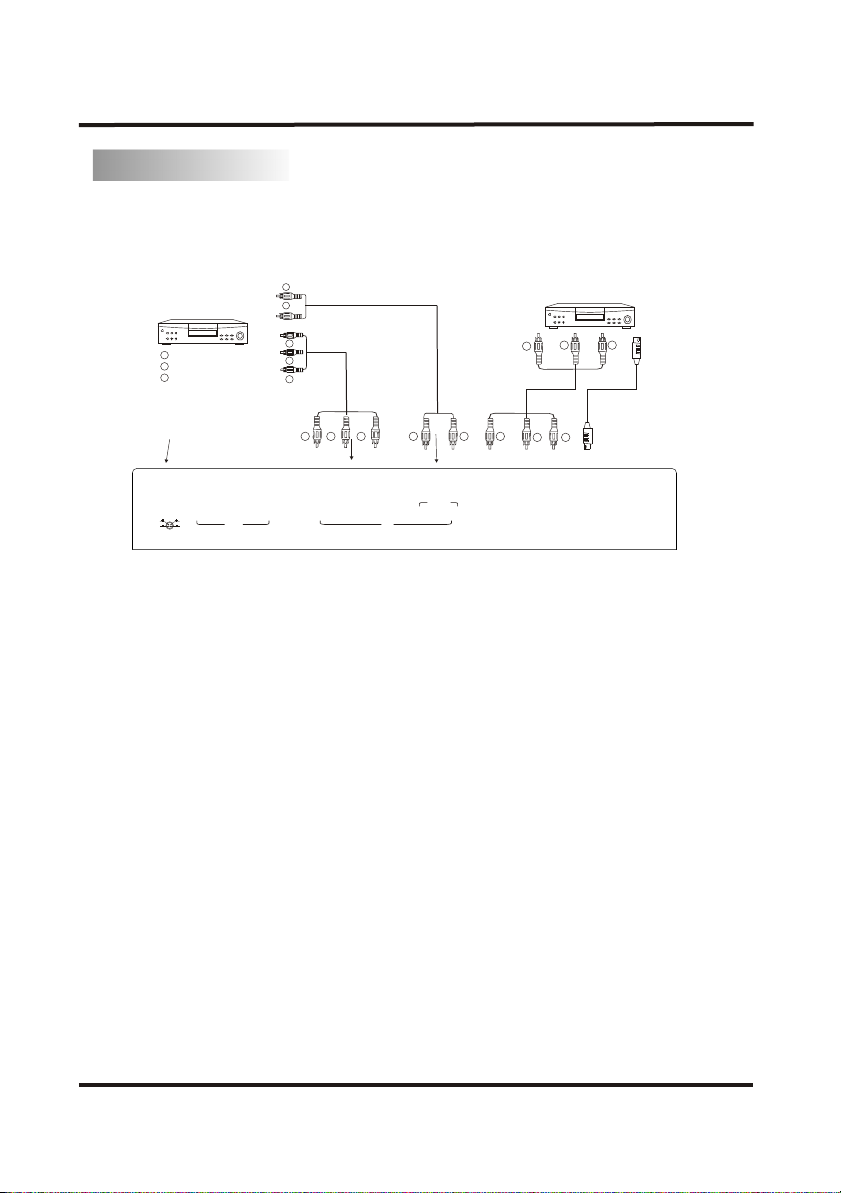
This TV provides one group of YPbCb/PrCr input terminals including one group of CVBS,S-VIDEO
terminals for connection to VCR,DVD or other video equipment. To enjoy high quality picture,
please refer to the owner s manual of the equipment to be connected as well.
You can use the YPbCb/PrCr and CVBS,S-VIDEO input terminals on TV set rear as follows.
'
VIDEO EQUIPMENT
with terminal
Y
Yellow (video)
W
White(audol L,mono input)
Red(audio R)
R
Power Input
DC 12V IN AUDIO IN
PC IN IN
W
R
To video
Y
outputs
R
W
Pb
Pr
Y
VGA IN Y Pb/Cb Pr/Cr
To audio
outputs
AUDIO
WR
L/MONOR
*Please keep AC cord unplugged when connecting TV system.
VIDEO EQUIPMENT
Y
Y
L/MONO
RAV
with terminal
W R
WR
S-VIDEO IN
75W ANT.
-12-
Page 15
BATTERY INSTALLATION (REMOTE CONTROL)
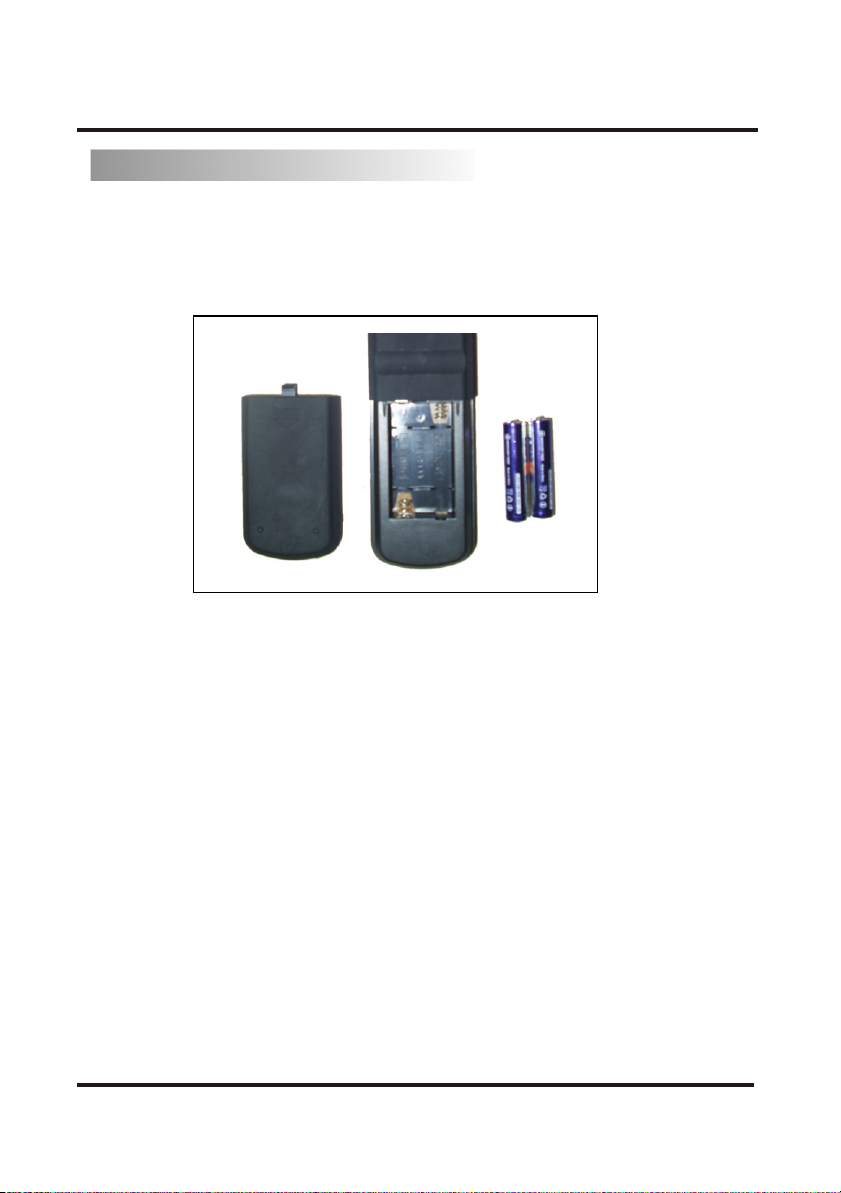
Insert Batteries Into the Remote Control
1. Remove the battery cover.
2. Insert the 2 AAA 1.5V batteries,ensure correct polarity (+ or -)
3. Replace the battery cover. Replace with new batteries when the LCD TV operates unsteady or when
the LCD TV shows no response to the remote control.
Note:
1. Alkaline battery recommended.
2. Remove batteries when they are flat or if the remote control has not been used for a long time.
3. Do not mix new and old batteries or different types/brands.
-13-
Page 16
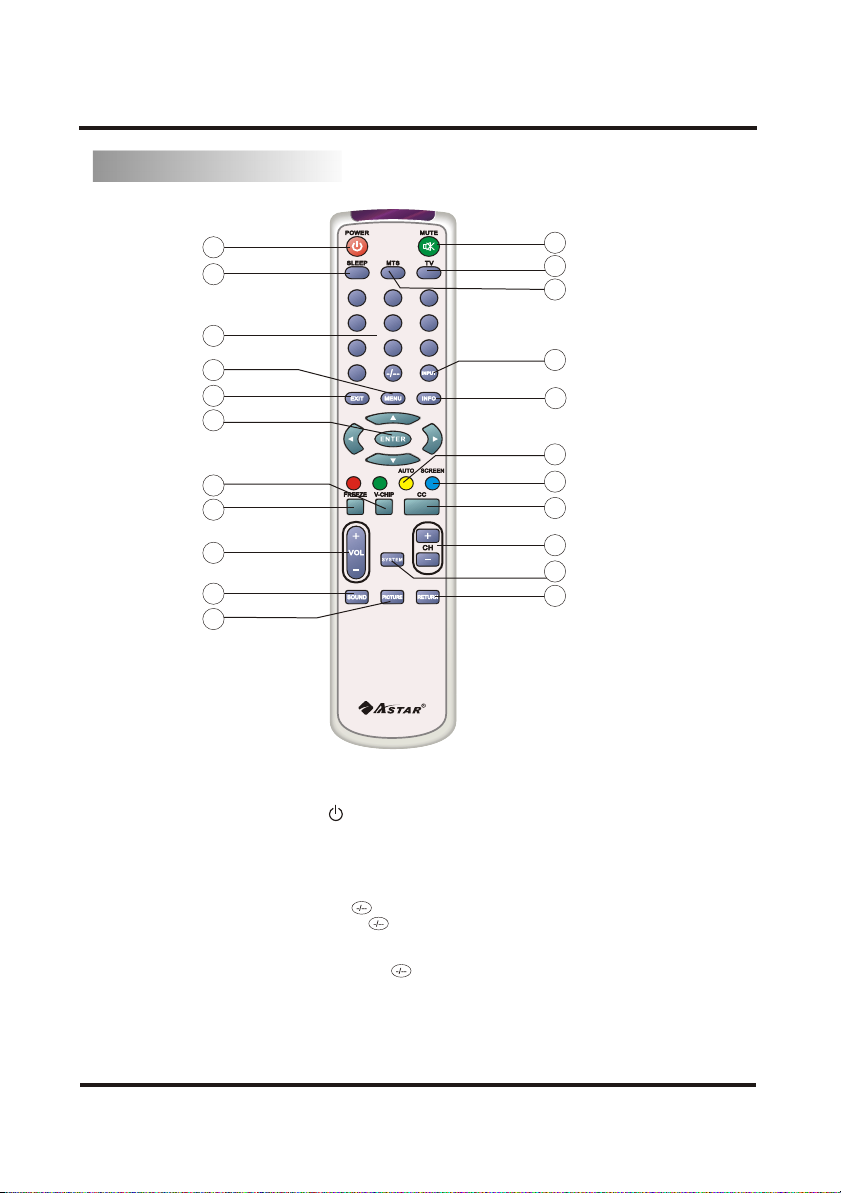
Remote control description
REMOTE CONTROL DESCRIPTION
10
21
11
9
7
20
19
1
6
1 2
2
4 5
7
0
3
6
8 9
5
15
18
22
3
13
16
17
4
12
8
14
1.POWER (STAND BY) BUTTON ( )
Press this button to turn on or turn off (Standby mode). By pressing the Power button, video and
audio should appear on the screen within a few seconds.
2.PROGRAM SELECTION BUTTON (0-9 BUTTONS)
Push the number for your desired program and the program indicator will be displayed on the screen.
1.To input a one-digit number(0-9):press button to display - ,then press 0-9 digit button.
2.To input a two-digit number(10-99):press button to display -- ,then press two digit button in order
to input the channel number.For example, you need channel 25, please input
button.
3.To input a three-digit number(100-134):press button to display press three digit button in
order to input the channel number.
3.VOL+/- BUTTONS (VOL+/-)(TV top control key)
Press VOL+/- buttons to adjust sound level.
-14-
""
""
"---", then
"2" button followed "5"
Page 17
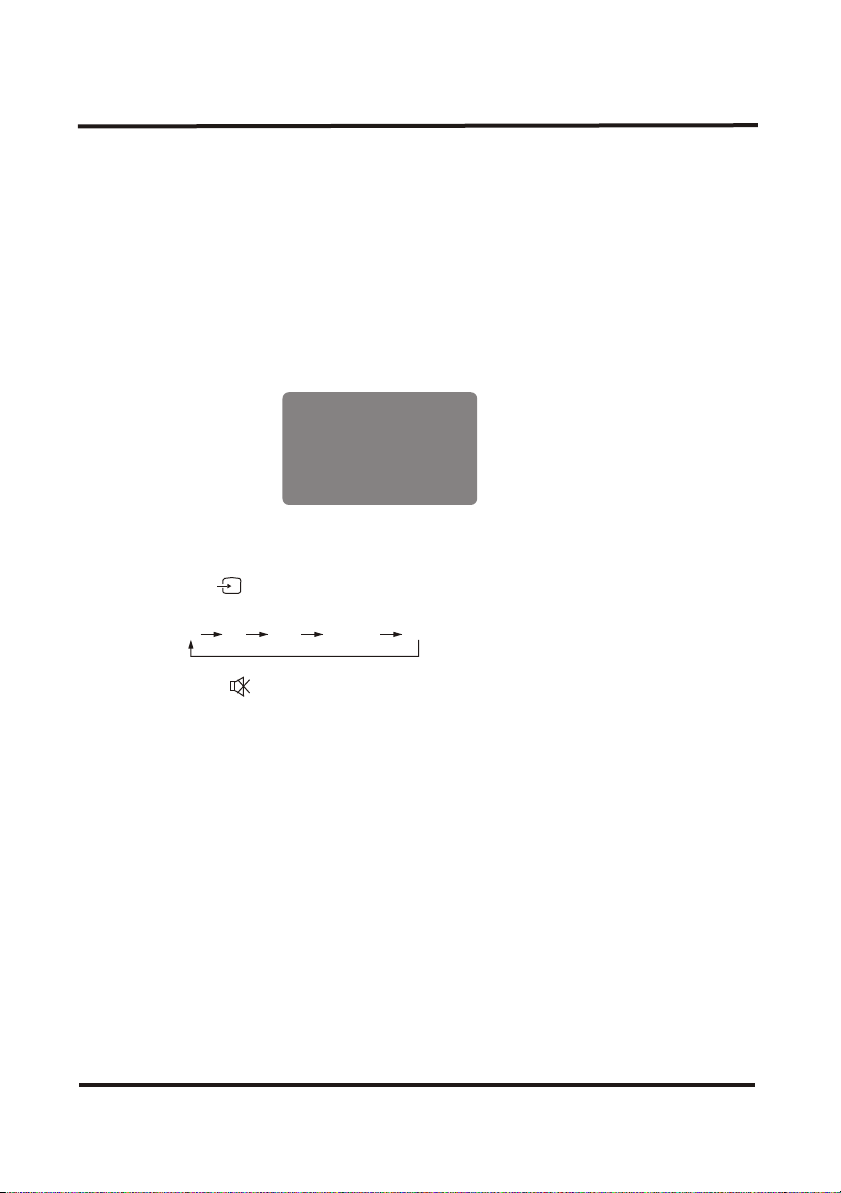
REMOTE CONTROL DESCRIPTION
4.CH+/- (TV top control key)BUTTON
1.Press the CH+/- button to select the program forward.
2.Press the CH+/- button to select the program backward.
5.ENTER BUTTON
Press this button to confirm the setting in On-Screen Display
6.SLEEP BUTTON
This button is used to set the sleep timer from 10 minutes to 120 minutes. Time will display on
Bottom- Center and decrease in seconds . TV will go into standby
mode when time is up. To switch off this function, press this button step by step until off displayed.
7.INFO BUTTON
Press this button to display program number, system etc on the screen.
when one minute remains
" " is
Source :
Audio :
CH NO :
8.RETURN BUTTON
Press this button to return to the previously viewed program.
9.INPUT BUTTON ( )
Press this button to display external video signal such as VCR or DVD player.
*Remark:
VGA TV AV YUVS-VIDEO
10.MUTE BUTTON ( )
Press once to mute the sound, press again to return to previous sound level.
11.MTS BUTTON
When a stereo program is received, you can select STEREO/MONO/SAP.
12.SYSTEM BUTTON
Press this button to select AIR/IRC/HRC/STD format at NTSC TV signal.
13.SOUND BUTTON
Press this button to select the sound mode:Personal/ /Music/Vocal.Concert
14.PICTURE BUTTON
15.AUTO BUTTON
(TV top control key)
TV
Mono
0
Press this button to automatically adjust picture at PC signal.
Press this button to select the user picture mode:Personal/Standard/Bright/Mild.
-15-
Page 18

REMOTE CONTROL DESCRIPTION
16.SCREEN BUTTON
17.CC BUTTON
Press this button to setup the Closed Caption.
18.V-CHIP BUTTON
Press this button to setup V-Chip.
19.EXIT BUTTON
This button exits the OSD menus.
20.MENU BUTTON
This button is used to display the OSD.
21.TV BUTTON
Switch to TV source directly.
22.FREEZE BUTTON
Press this button has no function.
Press this button to select the screen format:Fill Screen/4:3(Video Format).
-16-
Page 19
OPERATION INSTRUCTIONS
Using the On-Screen Display (OSD)
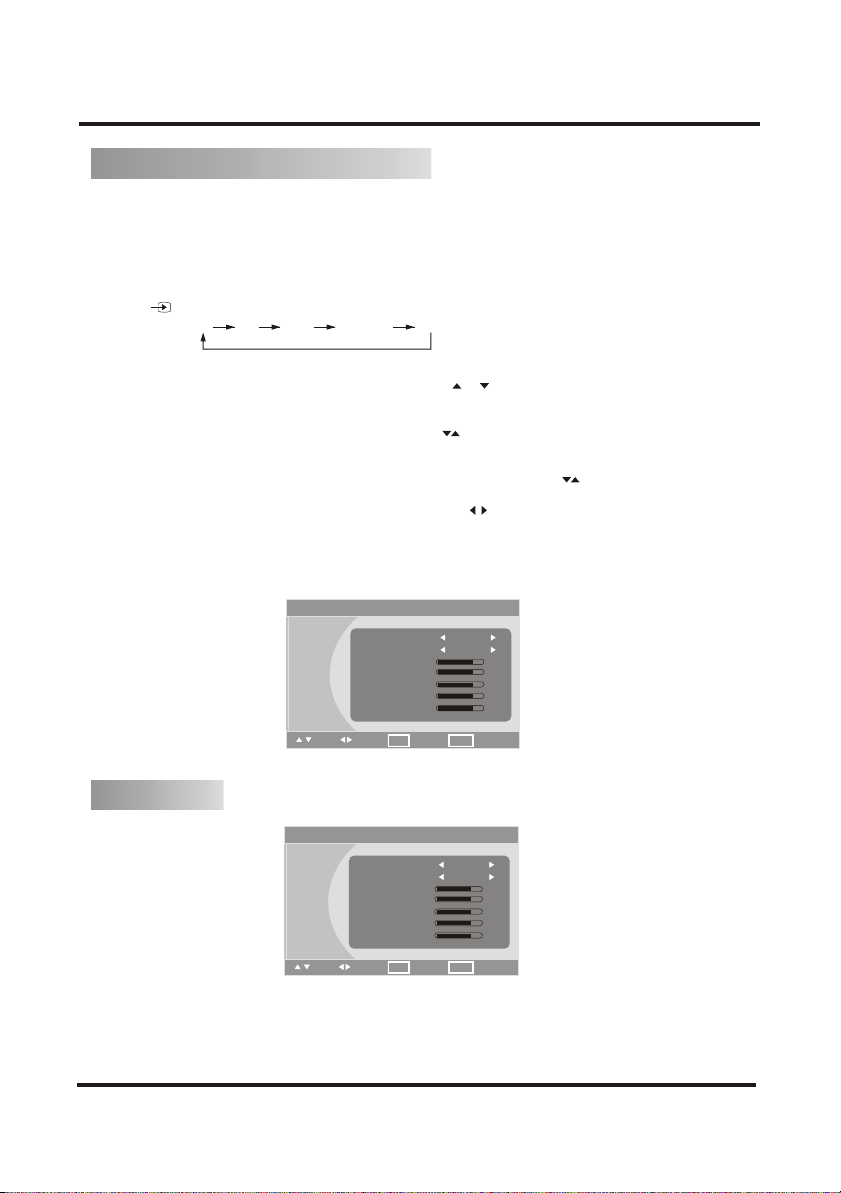
The remote control or the bottom control keys on the front panel of the TV can control all the
function settings. The on-screen display (OSD) allows you to adjust and save contrast,
brightness and other settings. The TV will save changes made to the settings. even if the TV is
turned off.
1.Turn on the TV
2.Press to select the signals
*Remark:
If no signal is input, then a blue background appears.
3.Press menu button and the OSD will display. Press or to select the item you want to change.
4.Press the Menu button on the front of the TV or the menu button on the remote control. The Main
Menu will be displayed on the TV screen.
5.Use the CH (+/-) buttons on the front of the TV or on the remote control to select one of
the submenus-Image, Audio, Tuner, PC, Function or Special Features.
6.Once the submenu is highlighted,
quit current submenu.use the CH(+/-) buttons on the front of the TV or buttons on the remote
to select a menu option.
7.Use the Volume (+/-) buttons on the front of the TV or buttons on the remote control to
select or adjust the options settings.
8.repeat steps 5 through 7 to adjust additional options within this menu.
9.Once the adjustments are completed, press the Exit button on the remote control to exit the
OSD completely.
VGA TV AV YUVS-VIDEO
press "OK"button to enter the submenu, press menu to
Menu
Image
Audio
Tuner
PC
Function
:Sel :Modi
Picture Mode
Backlight
Brightness
Contrast
Hue
Saturation
Sharpness
Personal
Bright
OK : Conf Menu : Exit
76
58
36
46
11
Image adjust
Menu
Image
Audio
Tuner
PC
Function
Picture Mode---Select from one of the following: Personal/Standard/Bright/Mild
Backlight--- Select from one of the following: Bright/Mild/Standard
Brightness---Adjusts the black levels of the picture.Users may need to readjust the brightness
after the TV warms up
:Sel :Modi
Picture Mode
Backlight
Brightness
Contrast
Hue
Color
Sharpness
OK : Conf Menu : Exit
-17-
Personal
Bright
76
58
36
46
11
Page 20
OPERATION INSTRUCTIONS
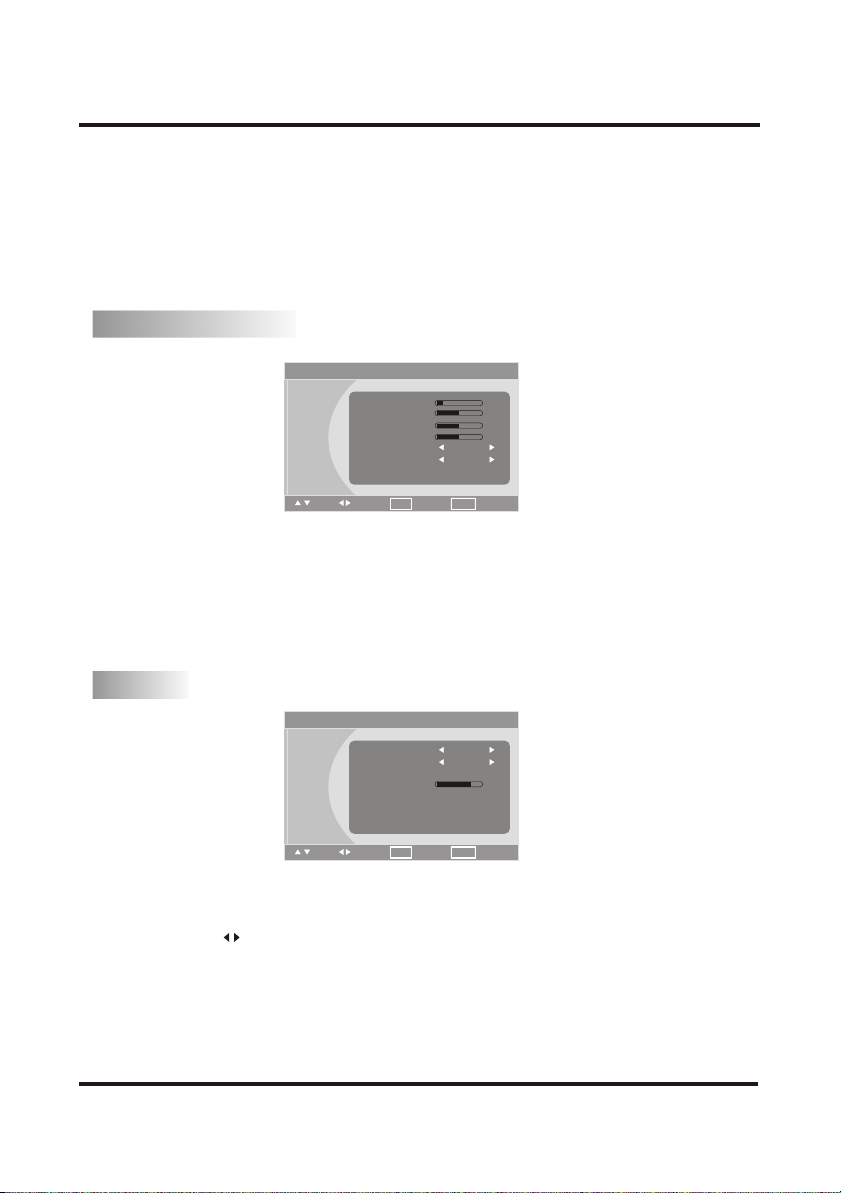
Contrast-Adjusts the level of white between the lightest and darkest portions of an image,
If the contrast is too low,the picture appears dark and lacks detail. If The contrast is too high,
the picture appears faded and lacks shadow and depth.
Hue-Adjusts to make the flesh tones more natural.
Color-Adjusts the levesl of white and color in the picture.Highly saturated colors then to be
deep and strong while unsaturated colors are weaker and lighter.
Sharpness-Adjusts the clarity of the picture.If the sharpness is set too high,hard edges in the
picture appear to have a ghost image.
Audio Adjust
Menu
Image
Audio
Tuner
PC
Voloume
Bass
Treble
Balance
Auto Volume
Sound Mode
On
Personal
15
0
0
0
Function
:Sel :Modi
Volume-Adjusts the volume.
Adjusts the low-pitched sound
Bass-.
Adjusts the high-pitched sound
TrebleBalance-Adjust the balance level between the channels.
Auto Volume-(ON/OFF)Volume level of the channels will stay the same, independent of the
broadcast signal.
Sound Mode---Select from one of the following: Personal/Concert/Music/Vocal.
OK : Conf Menu : Exit
Tuner
Menu
Image
Audio
Tuner
PC
Channel No.
Channel System
Skip Channel
Fine Tune
Auto Scan
111
STD
No
Press<Enter>
0
Function
:Sel :Modi
Channel No.--- Select the channel .
Channel System---Select the format(AIR,STD,IRC,HRC) of NTSC signal.
Skip Channel--- Delete the set channel from the channel list.
Fine Tune---Press button Search the best possible picture and sound are obtained.If signal is
weak, the fine tuning is necessary.
Auto Scan---Searching and storing all available broadcast channels for you.
OK : Conf Menu : Exit
-18-
Page 21
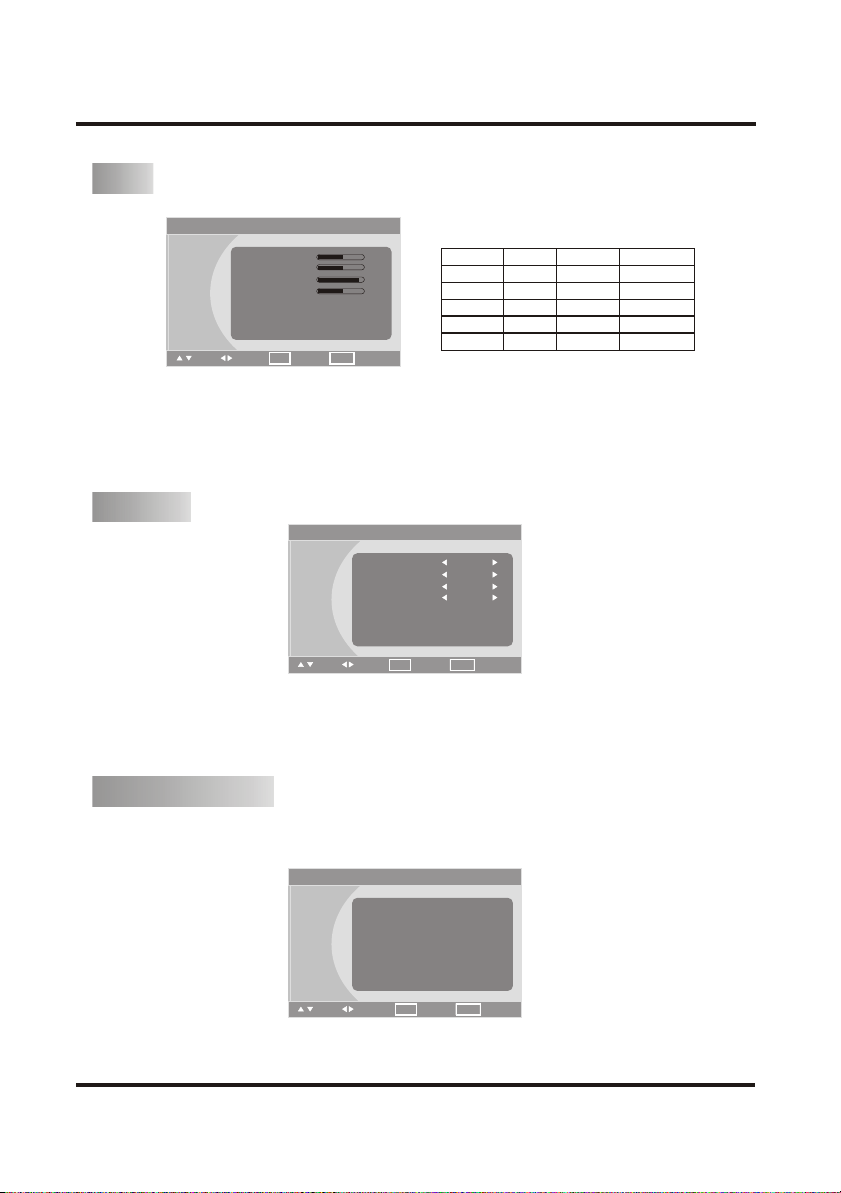
PC
OPERATION INSTRUCTIONS
Menu
Image
Auto
Tuner
PC
H Position
V Position
Phase
Clock
Auto Adjust
Auto Color
Press<Enter>
Press<Enter>
50
50
90
50
Function
:Sel :Modi
H Position---Adjusts the horizontal position on the image adjustment.
V Position---Adjusts the vertical positionl on the image adjustment.
Phase---Adjusts the effect of image. strongly suggested: Don't adjust the item.
Clock---Adjusts the size of image.
Auto Adjust---Automatically adjust picture at PC signal.
Auto Color---Automatically adjust color at PC signal.
OK : Conf Menu : Exit
Following modes are strongly suggested for set up mode.
RESOLUTION
640x480
800x600
1024x768
1280x720
1280x1024
V.Freq.(Hz) H.Freq.(KHz)
59.940
60.317
60.004
59.870 47.776
60.020
31.469
37.879
48.363
63.981
GRAPHIC MODE
VGA
VGA
VGA
VGA
VGA
Function
Menu
Image
Audio
Tuner
PC
Function
OSD Language---Select from one of the following: English/French/Spanish/Portuguese
OSD Timer--- Select the displayed time of the OSD from 10s to 60s.
OSD Position--- Select the position of the OSD.
CC Mode--- Select from one of the following: Off/CC1/CC2/CC3/CC4/TEXT1/TEXT2/TEXT3
/TEXT4.
:Sel :Modi
OSD Language
OSD Timer
OSD Position
CC Mode
Parental Controls
Factory Reset
Color Temp.
OK : Conf Menu : Exit
English
10
3
Off
Press<OK>
Press<OK>
Press<OK>
Parental Controls
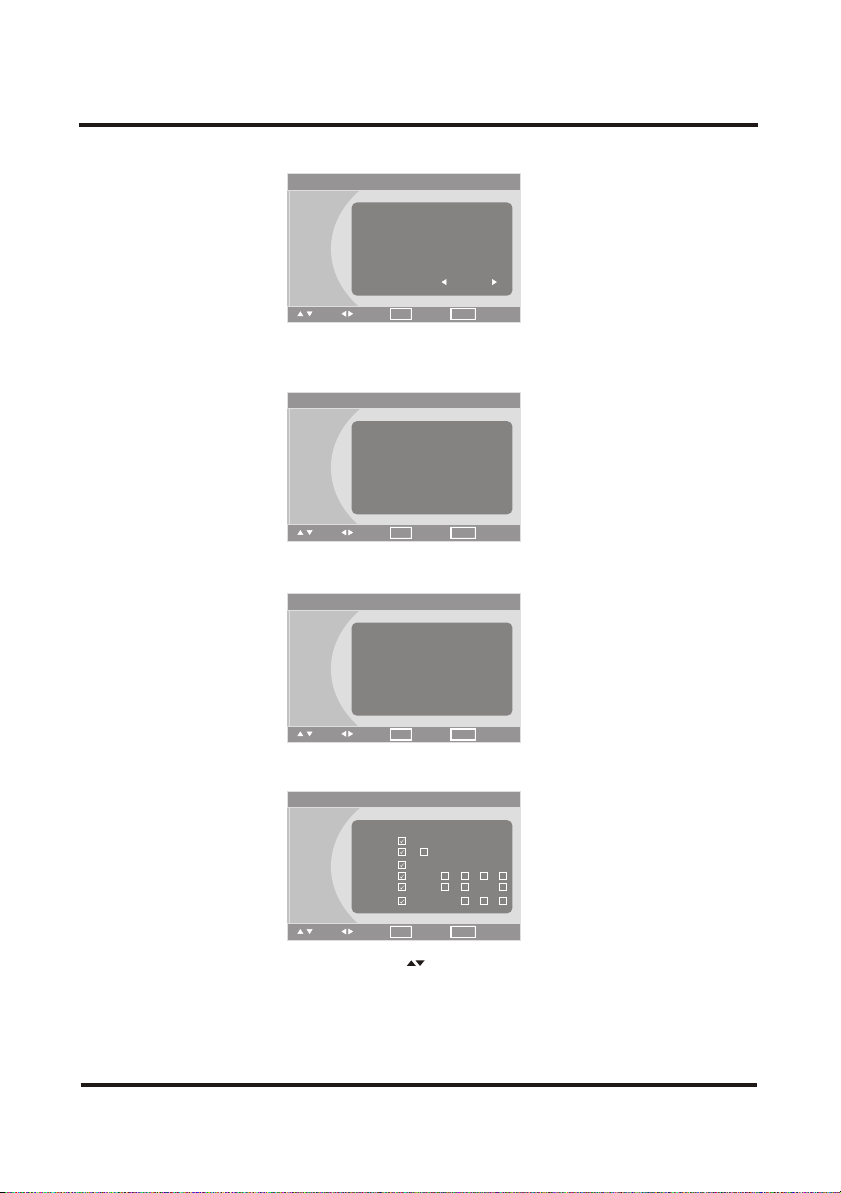
The parental function operate by remote control.
The Parental Controls feature prevents viewers from watching programs
that are not age-appropriate, such as programs containing violence or adult language.
Menu
Image
Auto
Tuner
PC
Function
Press the digital buttons on remote control to enter code. The original code is 1111. If you want
to clear the code, press and hold the "OK" button on the remote control for five (5) seconds
under the "Enter PIN" menu.
:Sel :Modi
Enter PIN
OK : Conf Menu : Exit
----
-19-
Page 22
Menu
Image
Auto
Tuner
PC
Function
Change PIN---Change the code.
Menu
Image
Auto
Tuner
PC
Function
Clear All---Clear the Ratings.
Menu
Image
Auto
Tuner
PC
Function
TV Rating
:Sel :Modi
:Sel :Modi
:Sel :Modi
Change PIN
Clear All
TV Rating
Movie Rating
CA Eng Rating
CA Fr Rating
Parental Lock
OK : Conf Menu : Exit
New PIN
Re-Enter PIN
OK : Conf Menu : Exit
Clear All
OK : Conf Menu : Exit
Press<OK>
Press<OK>
Press<OK>
Press<OK>
Press<OK>
Press<OK>
----
Yes
No
OPERATION INSTRUCTIONS
On
Menu
Image
Auto
Tuner
PC
Function
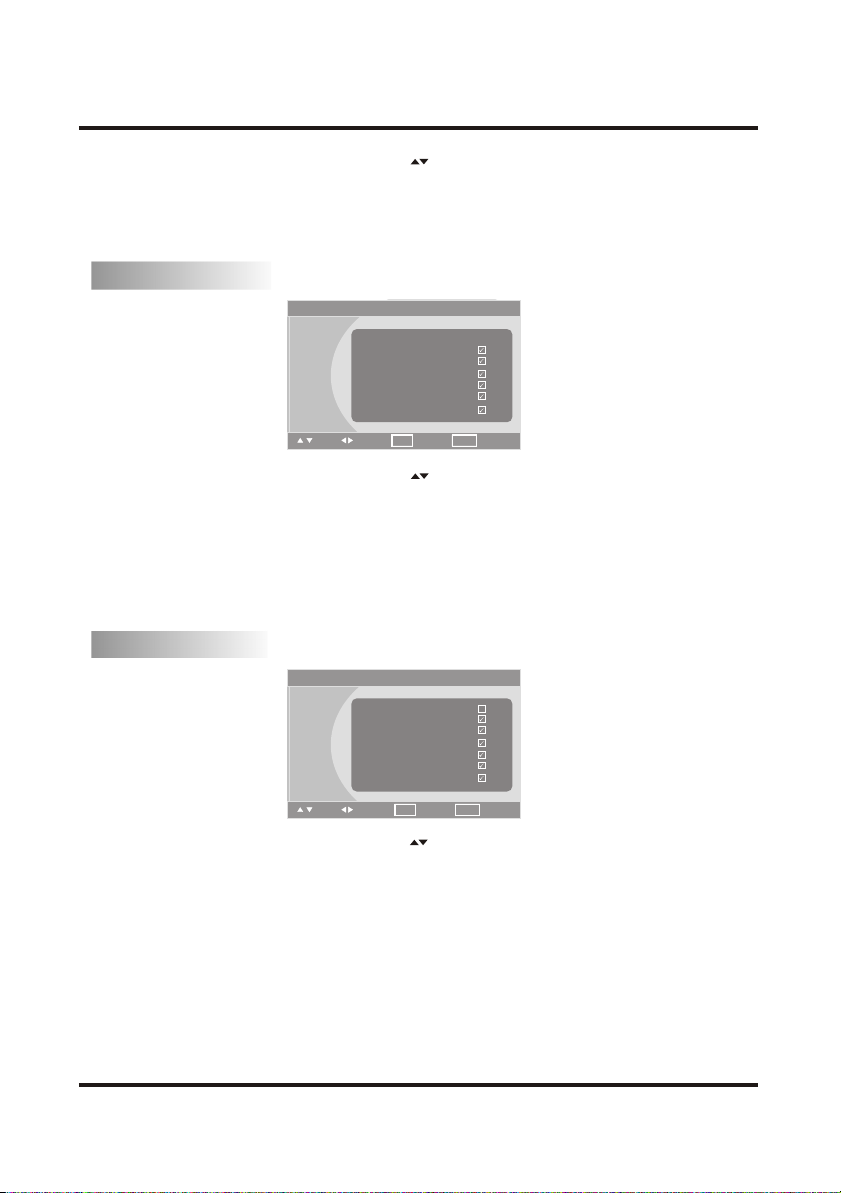
Use the CH+/- buttons on the front of the TV or on the remote control to select the item you
want to alter and press " OK" button to setup or cancel .
The window will allow the user to setup the following TV ratings:
Y(all children) Y7(older children)
G( general audience) PG(guidance suggested)
14(strongly cautioned) MA(mature audience)
:Sel :Modi
Rating
Allow FV D L S V
TV-Y
TV-Y7
TV-G
TV-PG
TV-14
TV-MA
OK : Conf Menu : Exit
-20-
Page 23
OPERATION INSTRUCTIONS
Use the CH+/- buttons on the front of the TV or on the remote control to select the item you
want to alter and press " OK" button to setup or cancel .
You can also customize the TV rating for the following content:
FV(fantasy violence) D(sexual dialog)
L(adult language) S(sexual situations)
V(violence)
Movie Rating
Menu
Image
Audio
Tuner
PC
Function
Use the CH+/- buttons on the front of the TV or on the remote control to select the item you
change
want to and press " OK" button to setup or cancel .
The window will allow the user to setup the following MPAA movie ratings:
MPAA G(general audience).
MPAA PG(parental guidance suggested).
MPAA PG-13(recommended for children 13 years of age or older).
MPAAR (mature audience).
MPAA NC-17(no one under 17 years of age).
MPAA X( no one under17 years of age).
:Sel :Modi
Rating
MPAA G
MPAA PG
MPAA PG-13
MPAA R
MPAA NC-17
MPAA X
OK : Conf Menu : Exit
Allow
CA Eng Rating
Menu
Image
Auto
Tuner
Function
Use the CH+/- buttons on the front of the TV or on the remote control to select the item you
want to and press " OK" button to setup or cancel .
change
The window will allow the user to setup the following
E:Exempt.
C:Children.
C8+:Children 8 years and older.
G:General program, suitable for all audiences.
PG: Parents guidance.
18+:Adult program.
:Sel :Modi
CA Eng Rating E
OK : Conf Menu : Exit
C
C8+
G
PG
14+
18+
Canadian English Language Ratings:
-21-
Page 24
OPERATION INSTRUCTIONS
CA Fr Rating:
Menu
Image
Auto
Tuner
PC
CA Fr Rating
E
G
8 ans+
13 ans+
16 ans+
18 ans+
Function
:Sel :Modi
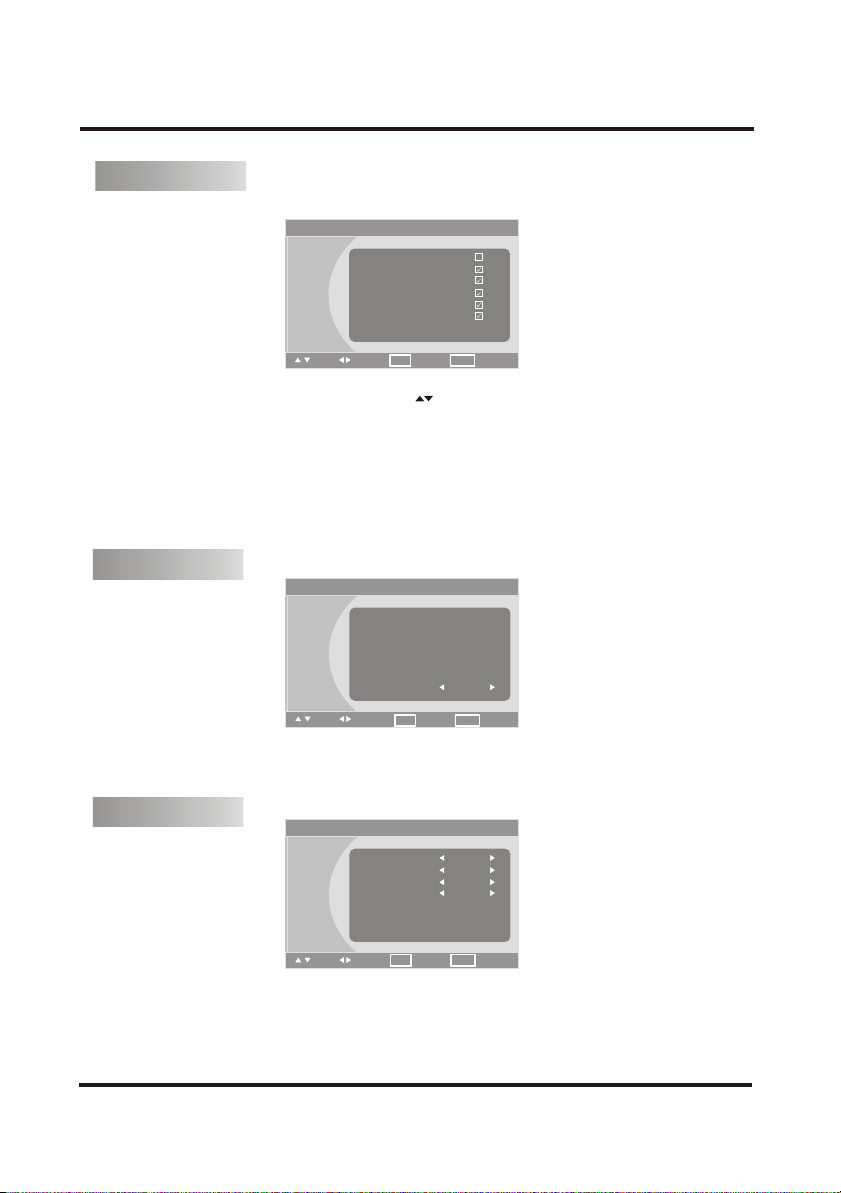
Use the CH+/- buttons on the front of the TV or on the remote control to select the item you
want to alter and press " OK" button to setup or cancel .
The window will allow the user to setup the following
E:Exempt.
G:Children.
8ans+: Children 8 years and older.
13ans+:Children 13 years and older.
16ans+:Viewers 16 years and older.
18ans+:Adult program.
OK : Conf Menu : Exit
Canadian French Language Ratings:
Parental Lock
Menu
Image
Auto
Tuner
PC
Function
:Sel :Modi
Change PIN
Clear All
TV Rating
Movie Rating
CA Eng Rating
CA Fr Rating
Parental Lock
OK : Conf Menu : Exit
Press<OK>
Press<OK>
Press<OK>
Press<OK>
Press<OK>
Press<OK>
On
Turns TV Rating / movie Rating/CA Eng Rating/CA Fr Rating blocking on or off.
Factory Reset
Menu
Image
Audio
Tuner
PC
Function
Press "OK" to resume the originally setting.
:Sel :Modi
OSD Language
OSD Timer
OSD Position
CC Mode
Parental Controls
Factory Reset
Color Temp.
OK : Conf Menu : Exit
-22-
English
10
3
Off
Press<OK>
Press<OK>
Press<OK>
Page 25
OPERATION INSTRUCTIONS
Color Temp
Menu
Image
Audio
Tuner
Color Temp.
Red Color
Green Color
Blue Color
Personal
202
206
206
PC
Function
:Sel :Modi
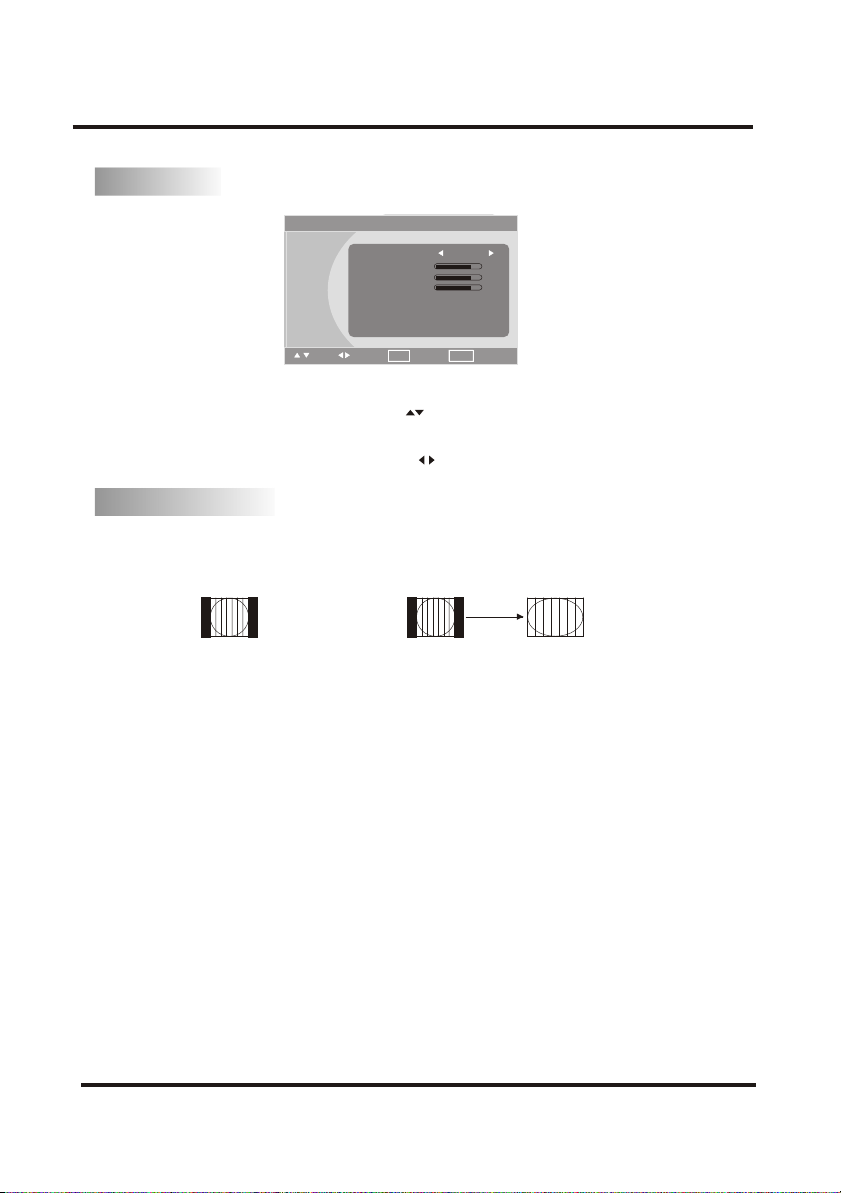
Use the CH+/- buttons on the front of the TV or the remote control to select one of the
submenus -Color Temp./Red Color/Green Color/Blue Color.
The Red color /Green color/ Blue color/ may adjust only the color Temp be set personal.
Use the VOL+/- buttons on the front of the TV or ont the remote control to adjust.
OK : Conf Menu : Exit
Screen Format
Press screen button on the remote control to select the Screen format.
Fill screen --- each format signal is displayed to fill the screen.
4:3 --- Conventional 4:3 picture size, full picture information.
4:3
Note :In VGA source, format 4:3 is unavailable.
Fill screen
-23-
Page 26
TROUBLESHOOTING GUIDE
TROUBLESHOOTING GUIDE
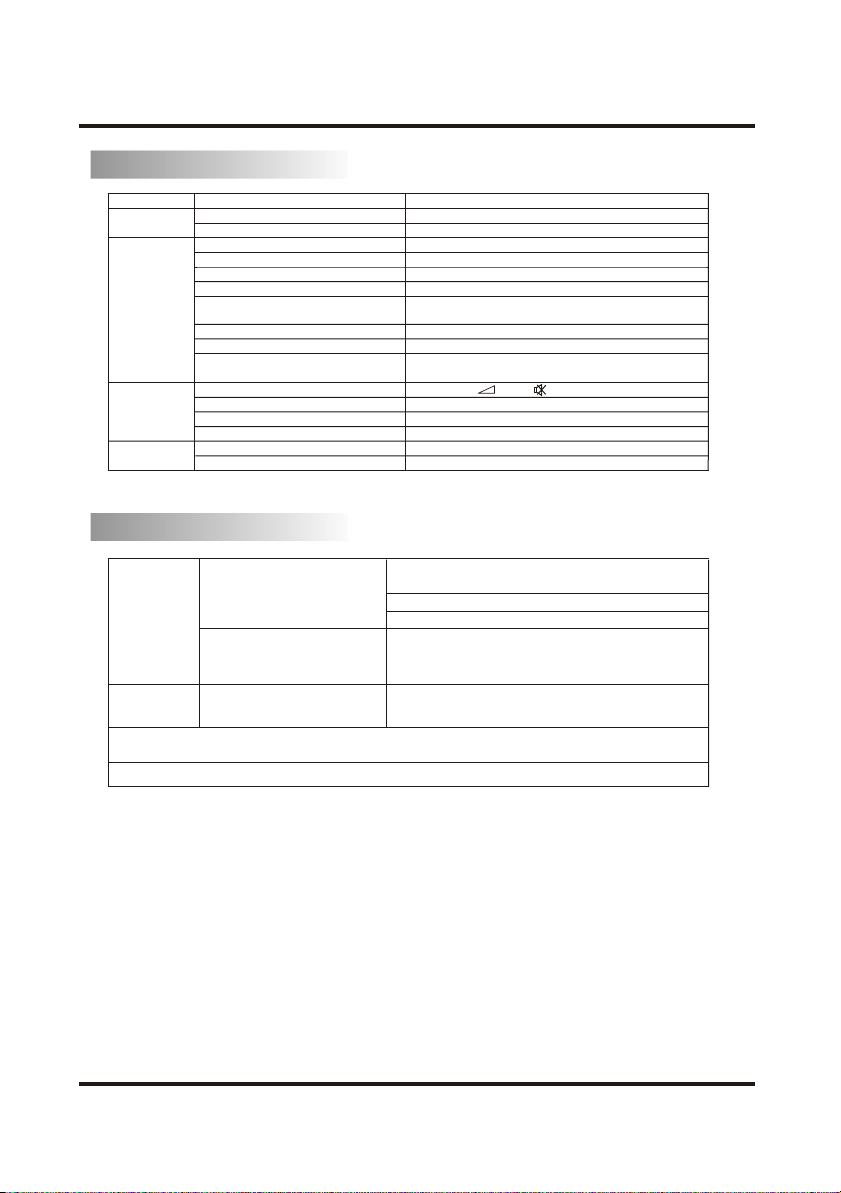
SYMPTOM POSSIBLE CAUSE POSSIBLE SOLUTION
No power
Poor/no
picture
Poor/no sound
TV shuts off
The AC power cord is not connected
The switch is switch off
TV station experiencing problems
Picture setting is not adjusted
Possible local interference
Double images or ghosting
Only snow and noise appears on the
Screen
Some tiny black points or bright
points on the screen
Noisy picture when viewing a
TV channel
Good picture, no sound
TV station experiencing problems
Possible local interference
Good picture ,noisy sound
Sleep timer is set
Off timer is set
Connect the AC power cord to the AC outlet
Turn on the switch
Try another channel
Check picture control adjustments
Check for source of reception
Check aerial cable connections
Check if the aerial cable is broken or bent.
The picture of a LCD Display is composed of pixels.
It is not a malfunction
Using the menu system, select the "Channel setting"to
adjust Fine Tune to obtain better picture reception
Press the + - or (mute)
Try another channel
Check for source of reception disturbance
Check the "sound sys"
Set sleep timer to "off"
Clear off timer
PERSONAL COMPUTER
The computer is in power saving mode.Try Pressing any
The NO INPUT SIGNAL message
appears on the screen
No picture
Picture is fuzzy
If the set doesn’t turn on when you turn the AC power on, please turn off AC power and wait a moment,
then turn on AC power.
If you feel the pictures is glaring,please adjust the lightness of backlight.
If the input signal out of range
message appears on the screen
key on the computer key board.
Check the computer power is"on".
Check the cable is properly connected.
Check the video frequency range is within
that specified for the monitor ,adjust the
frequency range to the following:
Using the menu system, adjust "Brightness"
and "Contrast".
-24-
 Loading...