

Page 1
User Manual
DVX-6881
POWER
OFF
ON
DVD/CD/CD-R/CD-RW/DVD-R/DVD-RW/HDCD/DIVX/JPEG PLAYER
DIGITAL AUDIO
OPEN/CLOSE
PLAY STOP PREV NEXT
Certified DivX Player
DVX-6881
Please read this User Manual carefully to ensure proper use of this product and
keep this manual for further reference.
Page 2
Content
Introduction
Safety Precautions
Important Safety Instructions
Caution
Features
Front Panel and Rear Panel Illustration
Remote Control
Connections
Connecting to a TV set
Connecting to an AV Receiver with 5.1 Channel Analog Audio Input
Connecting to an AV Receiver with Digital Audio Input
Basic Playback
2
3
5
6
7
8
9
10
11
Basic Operation
Advanced Features
Modes and Features Setup
Remote Control Operation
KODAK Picture CD playback
Others
Troubleshooting
Remote Control Preparation
Specifications
12
13
20
27
28
29
30
1
Page 3
Safety Precautions
Introduction
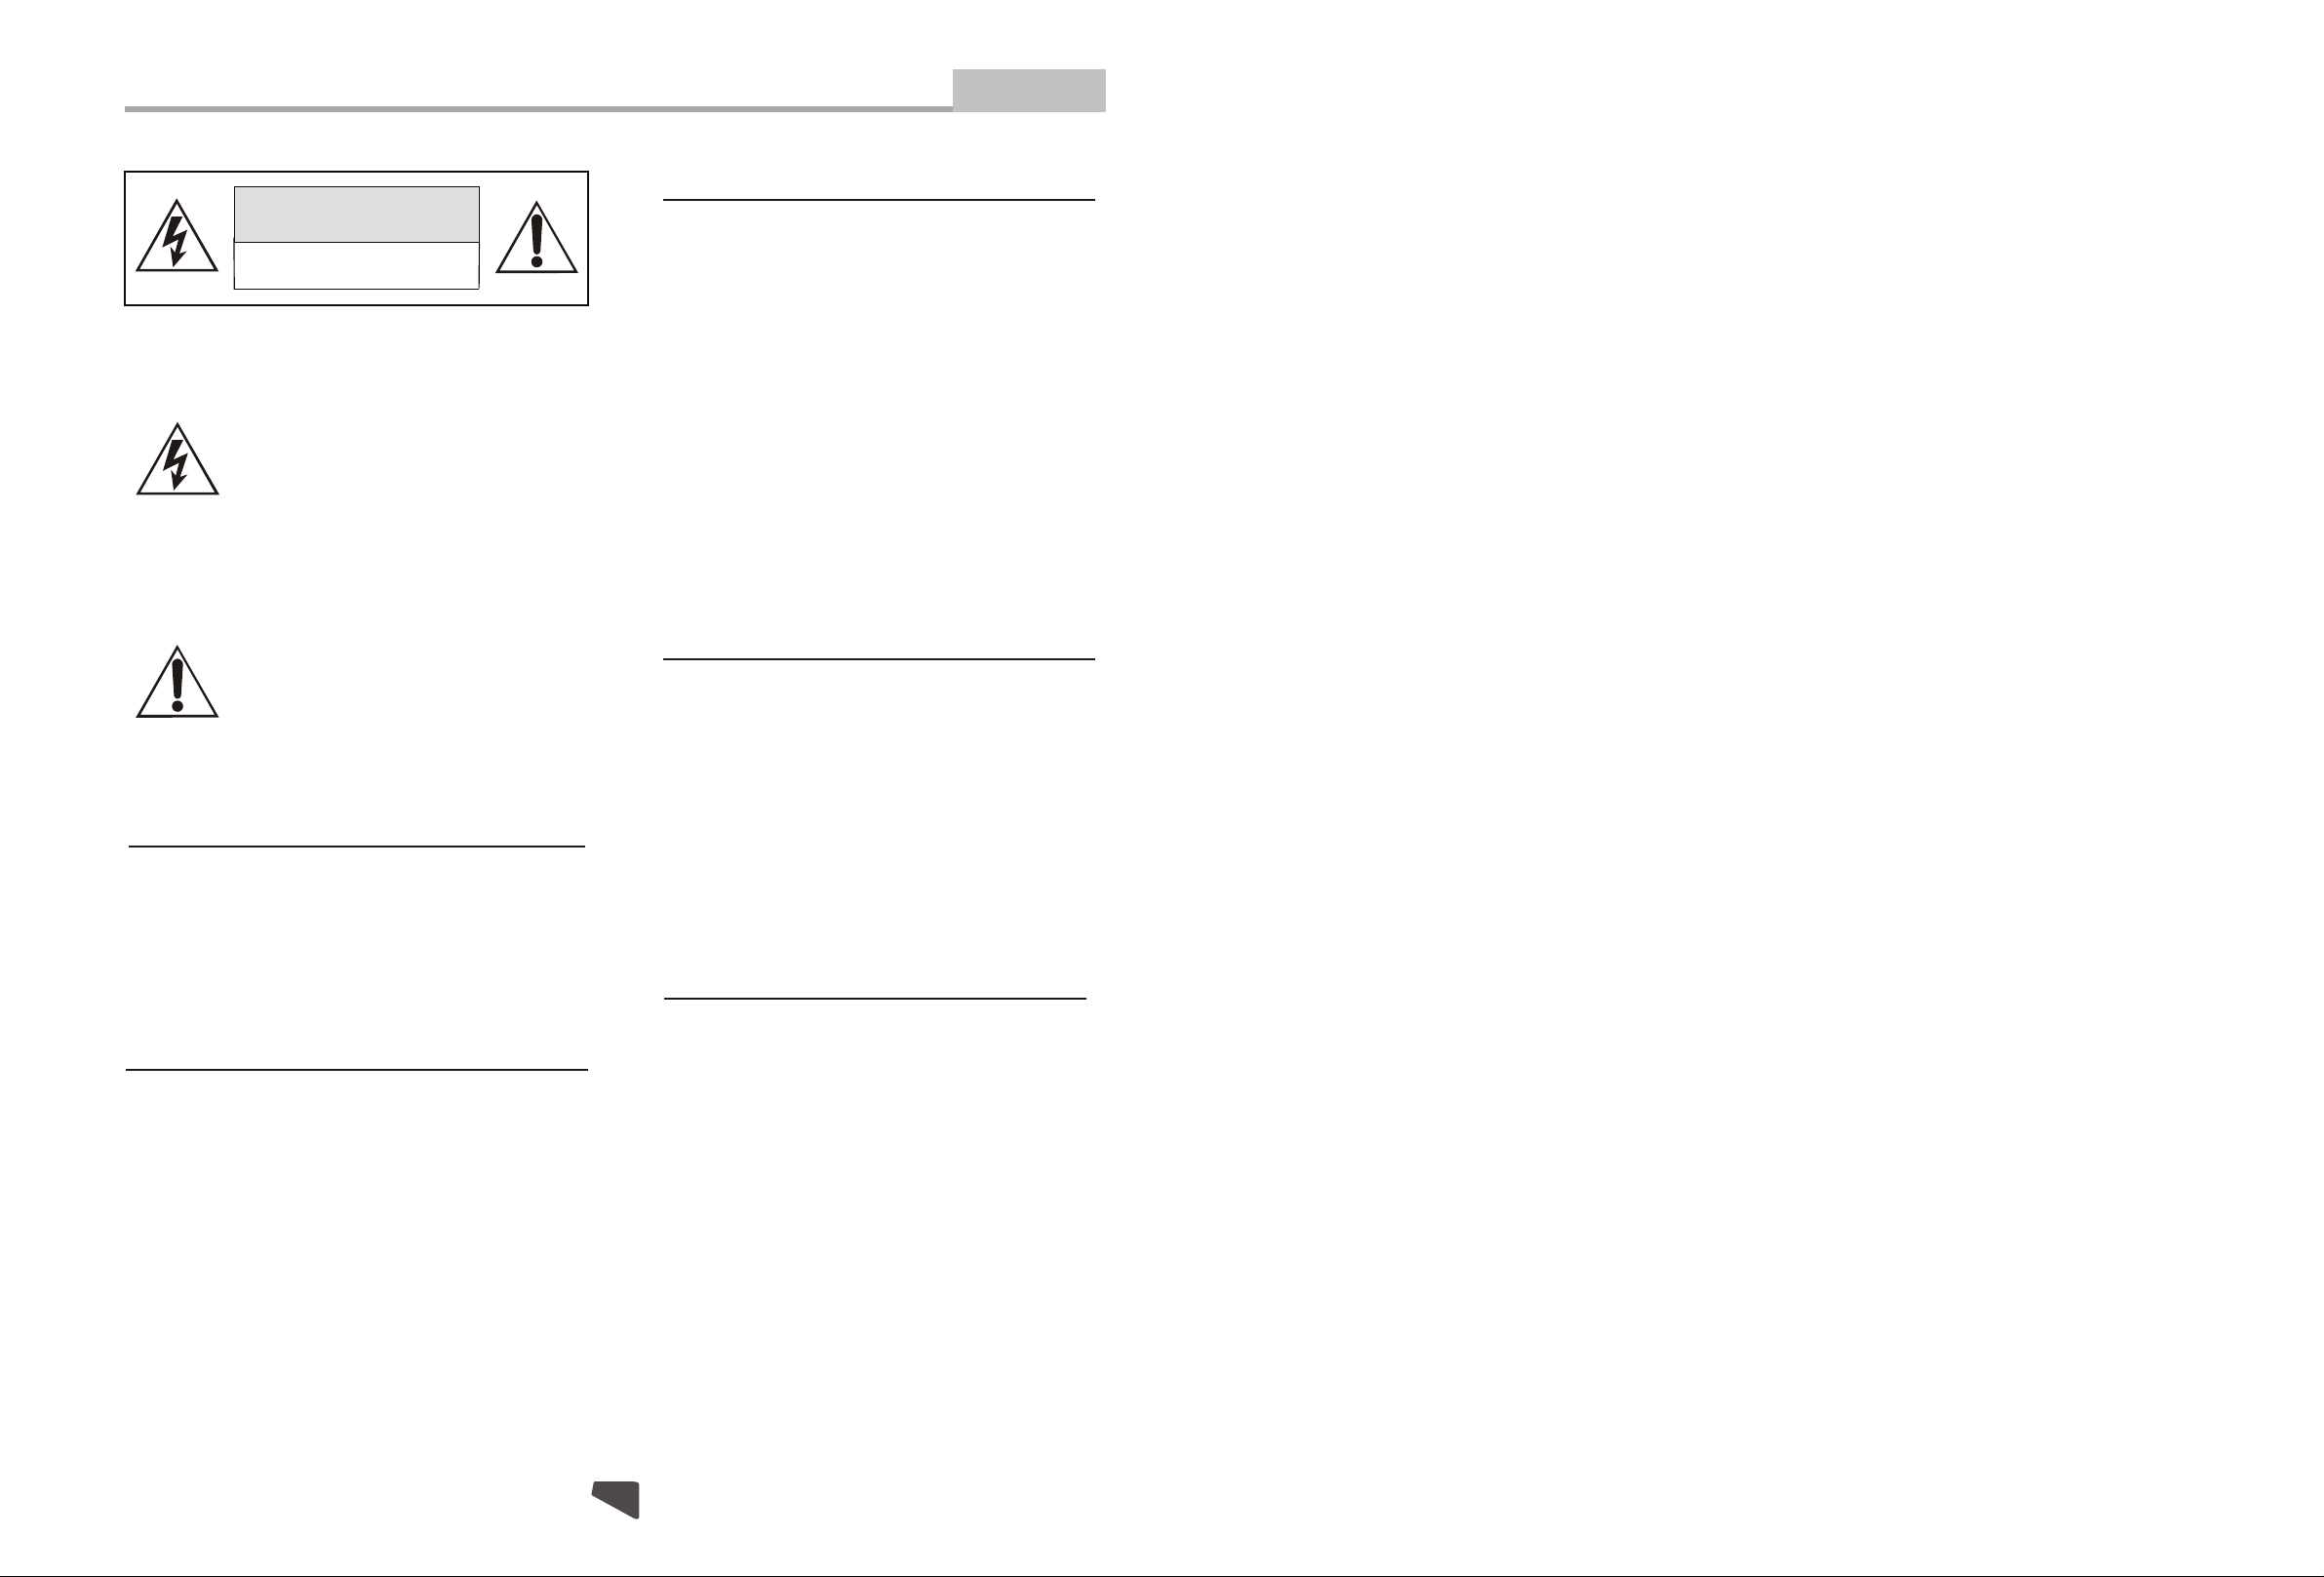
CAUTION:
CAUTION
RISK OF ELECTRIC SHOCK
DO NOT OPEN
THE LIGHTNING FLASH WITH ARROWHEAD SYMBOL WITHIN AN EQUILATERAL TRIANGLE IS INTENDED TO
ALERT THE USER T O THE PRESENCE OF UNINSULATED "DANGEROUS
VOLTAGE" WITHIN THE UNIT'S CABINET THAT MAY BE OF SUFFICIENT
MAGNITUDE TO CONSTITUTE A RISK
OF ELECTRIC SHOCK TO PERSONS.
THE EXCLAMATION POINT WITHIN AN
EQUILATERAL TRIANGLE IS
INTENDED TO ALERT THE USER TO
THE PRESENCE OF IMPORTANT
OPERATING AND MAINTENANCE
(SERVICING) INSTRUCTIONS IN THE
MANUAL ACCOMPANYING THE UNIT.
WARNING:
TO PREVENT FIRE OR ELECTRIC SHOCK, DO
NOT EXPOSE THE UNIT TO RAIN OR MOISTURE.
NEVER ATTEMPT TO OPEN THE CABINET,
DANGEROUS HIGH VOLTAGES ARE PRESENTED
IN THE UNIT. REFER SERVICING TO QUALIFIED
SERVICE PERSONNEL.
THE UNIT EMPLOYS A LASER SYSTEM. TO ENSURE THE PROPER USE OF THE UNIT, READ
THIS MANUAL CAREFULLY AND KEEP IT FOR
FUTURE REFERENCE.
IF THE UNIT REQUIRES SERVICING, CONTACT
THE SELLER OR SEE "TROUBLESHOOTING".
TO PREVENT DIRECT EXPOSURE TO THE
LASER RADIATION, DO NOT OPEN THE
CABINET. VISIBLE LASER MAY RADIATE
WHEN THE CABINET IS OPENED OR THE
INTERLOCKS ARE DEFEATED. DO NOT
STARE INTO THE LASER BEAMS.
CAUTION:
THE DVD VIDEO PLAYER IS A CLASS 1 LASER
PRODUCT. USE OF CONTROLS OR ADJUSTMENTS OR PERFORMANCE OF PROCEDURES
OTHER THAN THOSE SPECIFIED HEREIN MAY
RESULT IN HAZARDOUS RADIATION
EXPOSURE.
AS THE LASER BEAM USED IN THIS DVD
VIDEO PLAYER IS HARMFUL TO THE EYES, DO
NOT ATTEMPT TO DISASSEMBLE THE
CABINET.
REFER SERVICING TO QUALIFIED
PERSONNEL ONLY.
WARNING:
CAUTION:
TO PREVENT ELECTRIC SHOCK, MATCH
WIDE- BLADE PLUG WITH WIDE SLOT AND
FULLY INSERT.
THE APPARATUS SHALL NOT BE EXPOSED
TO WATER AND NO OBJECTS FILLED WITH
LIQUID SUCH AS VASES SHALL BE PLACED ON THE APPARATUS.
FCC REGULATIONS STATE THAT ANY CHANGE
OR MODIFICATION TO THE EQUIPMENT, NOT
EXPRESSLY APPROVED BY MAKER OR ITS
AUTHORIZED PARTIES, COULD VOID USER'S
AUTHORITY TO OPERATE THIS EQUIPMENT.
2
Page 4

Specifications
Other
Important Safety Instructions
Introduction
Power requirements: 90-240V~50/60Hz
Power consumption: 15W
Video standard: NTSC/PAL/AUTO
Unit Weight: 5.03Lbs (2.28kg)
Video out
Video out: 1.0V(p-p)/75 , sync, negative polarity, RCA pin Jack x 1
S-video output connector(separate Y C signal output connector):
Y output: 1.0V(p-p)/ 75 , sync, negative polarity
C output: 0.286 V(p-p)/75
Audio out
2.1channel out: 1.85V(rms)/10k , RCA pin Jack(L,R) x 1
5.1channel out: RCA pin Jackx6
Coaxial out/Optical: 0.5V(p-p)/75 , RCA pin Jack x 1
Frequency response: 20Hz to 20kHz
S/N ratio: >90dB
Total harmonic distortion: < 0.05%
[Accessories]
Video/Audio cablex1
Remote Controlx1
User s Manualx1
1.5V AAA batteriesx2
Specifications are subject to change without notice.
Weight and dimensions are approximate.
This product incorporates copyright protection technology that
is protected by method claims of certain U.S. patents and other
intellectual property rights owned by Macrovision Corporation
and other rights owners. Use of this copyright protection
technology must be authorized by Macrovision Corporation,
and is intended for home and other limitedviewing uses only
unless otherwise authorized by Macrovision Corporation.
Reverse engineering or disassembly is prohibited.
1. Read Instructions
All the safety and operating instructions should be read
before the product is operated.
2. Retain Instructions
The safety and operating instructions should be
retained for future reference.
3. Heed Warnings
All warnings on the product and in the operating
instructions should be adhered to.
4. Follow Instructions
All operating instructions should be followed.
5. Cleaning
Unplug this product from the wall outlet before cleaning.
Do not use liquid cleaners or aerosol cleaners. Use a
damp cloth for cleaning.
6. Attachments
Do not use attachments not recommended by the
product manufacturer as they may cause hazards.
7. Water and Moisture
Do not use this product near water for example, near
a bathtub, wash bowl, kitchen sink, or laundry tub; in a
wet basement; or near a swimming pool; and the like.
8. Accessories
Do not place this product on an unstable cart, stand,
tripod, bracket, or table. The product may fall, causing
serious injury to a child or adult, and serious damage
to the product. Use only with a cart, stand, tripod,
bracket, or table recommended by the manufacturer, or
sold with the product. Any mounting of the product
should follow the manufacturer's instructions, and
should use a mounting accessory recommended by
the manufacturer.
9. Portable Cart Warning
A product and cart combination should be moved with
care. Quick stop, excessive force, and uneven
surface may cause the product and cart combination
to overturn.
10. Ventilation
Slots and openings in the cabinet are provided for
ventilation and to ensure reliable operation of the
product and to protect it from overheating, and these
openings must not be blocked or covered. The
openings should never be blocked by placing the
product on a bed, sofa, rug, or other similar surface.
This product should not be placed in a built-in
installation such as a bookcase or rack unless proper
ventilation is provided or the manufacturer's
instructions have been adhered to.
11. Power Sources
This product should be operated only from the type of
power source indicated on the marking label. If you are
not sure of the type of power supply to your home,
consult your product dealer or local power company.
For products intended to operate from battery power
or other sources, refer to the operating instructions.
12. Grounding or Polarization
This product may be equipped with a polarized
alternating current line plug (a plug having one blade
wider than the other). This plug will fit into the power
outlet only one way. This is a safety feature. If you are
unable to insert the plug fully into the outlet, try
reversing the plug. If the plug should still fail to fit,
contact your electrician to replace your obsolete outlet.
Do not defeat the safety purpose of the polarized plug.
13. Power Cord Protection
Power supply cords should be routed so that they are
not likely to be walked on or pinched by items placed
upon or against them, paying particular attention to
cords at plugs, convenience receptacles, and the point
where they exit from the product.
14. Protective Attachment Plug
The product is equipped with an attachment plug
having overload protection. This is a safety feature.
See Instruction Manual for replacement or resetting of
protective device. If replacement of the plug is required,
be sure the service technician has used a replacement
plug specified by the manufacturer that has the same
overload protection as the original plug.
(Symbol provided by RETAC)
330
Page 5
Important Safety Instructions
Introduction
Remote Control Preparation
Other
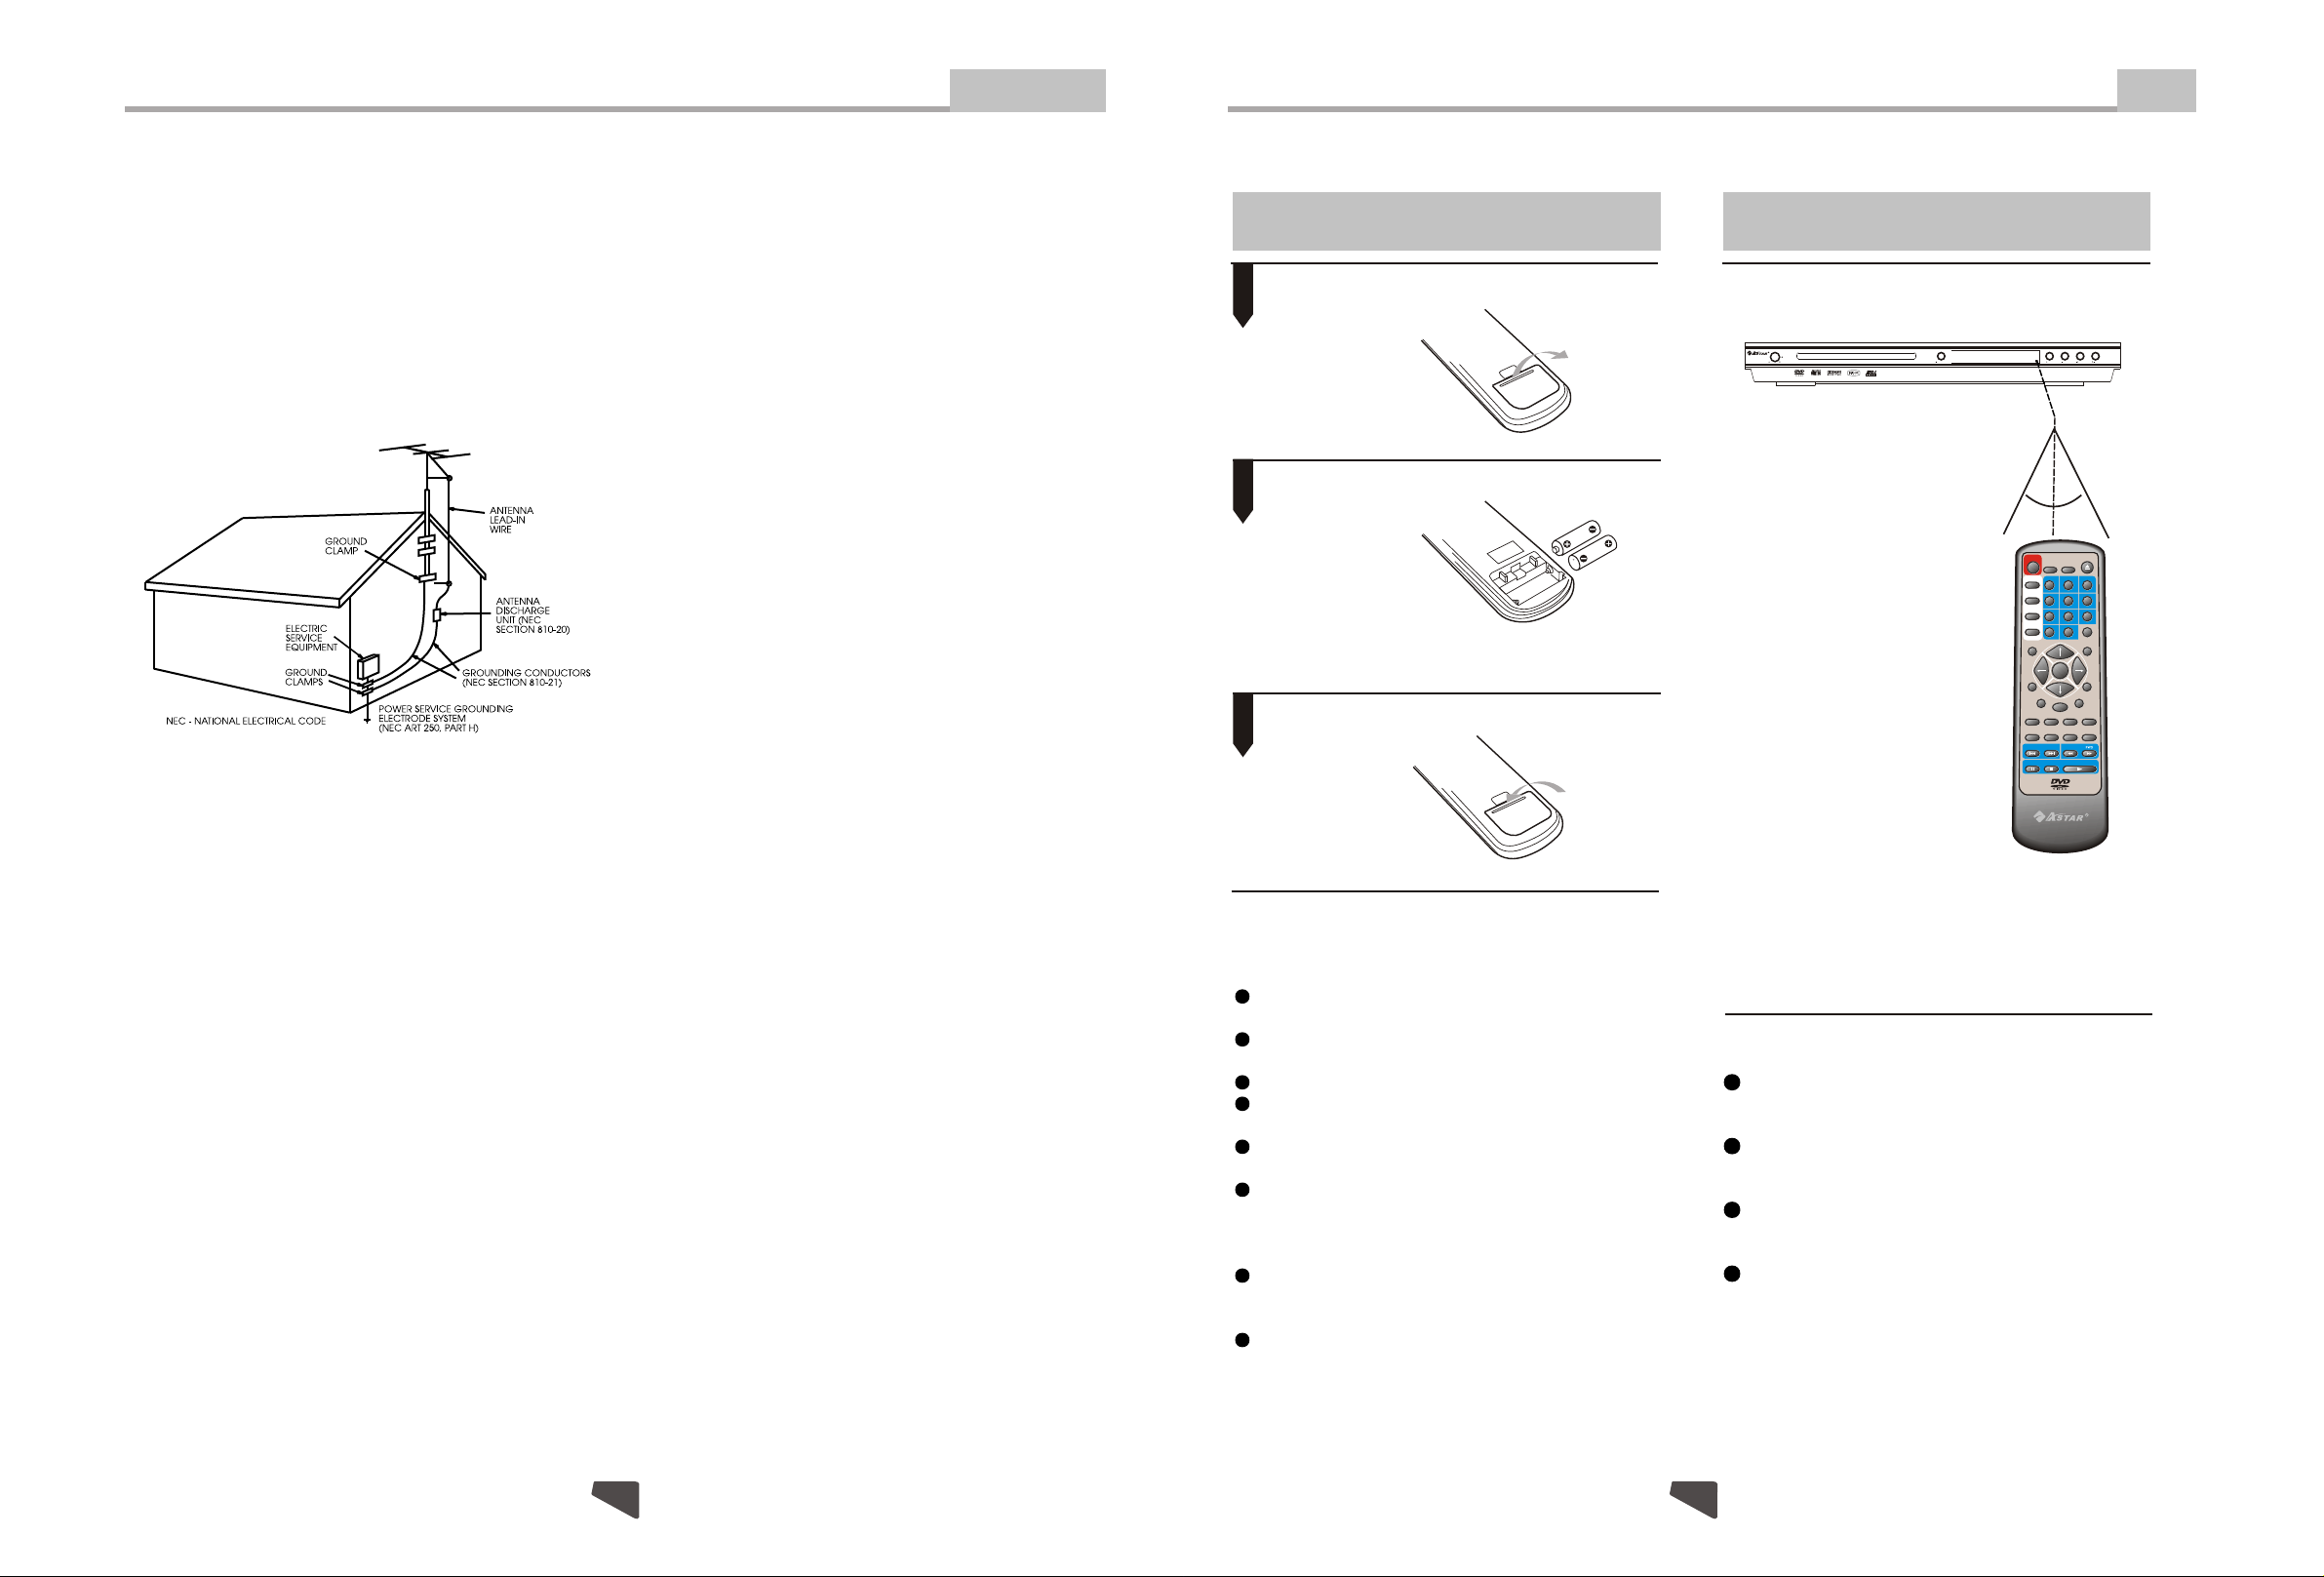
15. Outdoor Antenna Grounding
If an outside antenna or cable system is connected to
the product, be sure the antenna or cable system is
grounded so as to provide some protection against
voltage surges and built-up static charges. Article 810
of the National Electrical Code, ANSI/NFPA 70,
provides information with regard to proper grounding of
the mast and supporting structure, grounding of the
lead-in wire to an antenna discharge unit, size of
grounding conductors, location of antennadischarge
unit, connection to grounding electrodes, and
requirements for the grounding electrode. See figure
below.
16. Lightning
For added protection for this product during a lightning
storm, or when it is left unattended and unused for long
periods of time, unplug it from the wall outlet and
disconnect the antenna or cable system. This will
prevent damage to the product due to lightning and
power lines surges.
17. Power Lines
An outside antenna system should not be located in
the vicinity of overhead power lines or other electric
light or power circuits, or where it can fall into such
power lines or circuits. When installing an outside
antenna system, extreme care should be taken to keep
from touching such power lines or circuits as contact
with them might be fatal.
.
18. Overloading
Do not overload wall outlets, extension cords, or
integral convenience receptacles, as this can result in a
risk of fire or electric shock.
19. Object and Liquid Entry
Never push objects of any kind into this product
through openings as they may touch dangerous
voltage points or short-out parts that could result in a
fire or electric shock. Never spill liquid of any kind on
the product.
20. Servicing
Do not attempt to service this product yourself as
opening or removing covers may expose you to
dangerous voltage or other hazards. Refer all servicing
to qualified service personnel.
21. Damage Requiring Service
Unplug this product from the wall outlet and refer
servicing to qualified service personnel under the
following conditions:
A)When the power-supply cord or plug is damaged,
B)If liquid has been spilled, or objects have fallen
into the product,
C)If the product has been exposed to rain or water,
D)If the product does not operate normally by
following the operating instructions. Adjust only
those controls that are covered by the operating
instructions as an improper adjustment of other
controls may result in damage and will often
require extensive work by a qualified technician
to restore the product to its normal operation,
E)If the product has been dropped or damaged in
any way, and
F)When the product exhibits a distinct change in
performance this indicates a need for service.
22. Replacement Parts
When replacement parts are required, be sure the
service technician has used replacement parts
specified by the manufacturer or have the same
characteristics as the original part. Unauthorized
substitutions may result in fire, electric shock, or other
hazards.
23. Safety Check
Upon completion of any service or repairs to this
product, ask the service technician to perform safety
checks to determine that the product is in proper
operating condition.
24. Wall or Ceiling Mounting
The product should be mounted to a wall or ceiling only
as recommended by the manufacturer.
25. Heat
The product should be situated away from heat
sources such as radiators, heat registers, stoves, or
other products (including amplifiers) that produce heat.
Insert batteries
1
2
Make sure to match the "+" and "-" of the batteries
with the marks inside the battery compartment.
3
Notes:
Improper use of batteries may cause battery
leakage and corrosion. To operate the remote
control correctly,follow the instructions below:
Do not insert the batteries in the wrong dir-
ection.
Do not charge, heat, open, or short-circuit
the batteries.
Do not throw batteries into a fire.
Do not leave dead batteries in the Remote
Control.
Do not use different types of batteries tog-
ether, or mix old and new batteries.
If you do not use the remote control for a
long period of time, remove the batteries
to avoid possible damage from battery
corrosion.
If the remote control does not function cor rectly or the operating range becomes re duced, replace all batteries with new ones.
If battery leakage occurs, clean the battery
compartment, then insert new ones.
1. Open the cover.
2. Insert batteries.
3. Close the cover.
Using the remote control
Point the remote control at the remote sensor.
(The pictures below are for reference only.)
DVD/CD/CD-R/CD-RW/DVD-R/DVD-RW/HDCD/DIVX/JPEG PLAYER
POWER
OFF
ON
DIGITAL AUDIO
Remarks: Do not expose the remote sensor of the
DVD Player to a strong light source, such as direct
sunlight.
Notes:
Point the remote control directly at the
player's remote sensor.
Do not leave the remote control in an
extremely hot or humid place.
Do not spill water or put anything wet
on the remote control.
Battery life is ~1 year under normal
conditions.
OPEN/CLOSE
PLAY STOP PREV NEXT
Certified DivX Player
o
30
STANDBY
PROG
N/P
1 2
SUBTITLE
4
LANGUAGE
7
ANGLE
0 10+
SETUP
ENTER
VOL-
ZOOM
STEP L/R
TITLE
SLOW
PREV NEXT
PAUSE
STOP
DISPLAY
30
5
8 9
MUTE
AB
REV
o
OPEN/CLOSE
MODERETURN
PLAY
DVX-6881
REPEAT
RESUME
3
6
TIME
VOL+
MENU
294
Page 6
Troubleshooting
If you have any questions, please consult the troubleshooting guide below.
Advanced Features
Caution
Introduction
NO PICTURE OR SOUND
Ensure the power button is on.
Ensure the power outlet is operational.
Ensure the power cord is not damaged.
Ensure the power plug is connected firmly to the
outlet.
PICTURE BUT NO SOUND
Ensure the audio jacks are securely connected.
Ensure the audio connector is not damaged.
Ensure the volume is turned up in VOL/CH setup.
Ensure you have set the player's AUDIO settings correctly.
Ensure you have ENTERed the correct AV input for your TV.
Ensure the audio is not set to mute.
"BAD DISC" DISPLAYED
Ensure the disc is not warped, damaged or deformed.
Ensure the disc is not badly stained or damaged.
Ensure the disc format is compatible with the player.
Please check whether you have tried to play a software CD.
If so, please restart the player.
REMOTE NOT WORKING
Ensure the remote batteries are working.
Point the remote control directly at the player's IR
sensor.
Remove any obstacles between the remote and
the IR sensor.
Please use the original box and packing materials for safe
transportation of this product.
It is normal for the cover and rear panel to become warm after the
player has been operating for an extended period of time.
Do not move this product during playback. Doing so may cause damage to
SOUND BUT NO PICTURE
Ensure the video jacks are securely connected.
Ensure you have ENTERed the correct AV input for your TV.
Ensure the video connector is not damaged.
Ensure you have set the player's VIDEO settings correctly.
POOR PICTURE OR SOUND
Ensure you have set the player's AUDIO settings correctly.
Ensure the disc is not scratched or stained.
Ensure the AV connector or the output terminal is not
damaged.
UNIT NOT WORKING
Turn off the power, and then turn it on again.
"NO DISC" DISPLAYED
Ensure you have put the disc on the tray.
Ensure the disc is not upside down.
Ensure the disc is not distorted, stained or
scratched.
the pickup and the disc.
Press OPEN/CLOSE on the front panel or remote to open or close the disc
tray. Do not push or touch the tray while it is opening or closing.
28
5
Page 7
Features
Full compatibility with DVD, CD, Kodak Picture CD, CD-R and CD-RW (finalized)
Screensaver
Multiple playback modes: Program, Search, 10-Second Review
Dynamic spectrum display
Coaxial and Optical digital audio output
S-video, composite video and component (Y, Pb, Pr) video outputs
Disc formats supported by this player:
Introduction
Kodak Picture CD Playback
The introduction of KODAK Picture CD
A Kodak Picture CD has the size and shape of a regular CD. You can order a KODAK Picture CD simply by checking
the box on the photo finishing envelope when you drop off a roll of film (35 mm or Advanced Photo System (APS)
color print film) at the time of processingin Kodak Express store displaying "Kodak Picture CD" sign. When your
order is returned, you receive your prints, negatives, and your full roll of pictures safely stored on your KODAK
Picture CD. Each KODAK Picture CD brings you the tools to enhance, share and manage your pictures on your
computer. You also can record the JPEG picture into CD-R or CD-RW with the CD-Rewriter yourself.
Note: 1. The Max. Size of JPEG Picture can be supported: 3840X3840 pels
2. JPEG stands for Joint Picture Experts Group. It is the first International Standard on Still Picture
Compressing: ISO 10918-1, constituted by the Committee on Still Picture Compressing Standard of ISO.
The pictures on KODAK Picture CD are stored in this format (JPEG). This player can decode the JPEG
pictures in KODAK Picture CD and playback the pictures in different modes.
Now, you can playback Kodak Picture CDs on this player and view your wonderful pictures on your TV in the
comfort of your living room.
When a Kodak Picture CD is inserted on a player an automatic slide show is launched. Each picture in the Kodak
Picture CD will be displayed consecutively in a slide-show fashion and will be scaled to fit in the whole TV screen.
Advanced Features
R
RESTRICTED
Dolby Digital
KODAK picture CDs
DVD video
Parental Lock
Multi-angle
CC
32
8
16:9
Closed Caption
Subtitle choices
Audio choices
TV Aspect Ratio modes
LB
9
This product incorporates copyright protection technology that is protected by method claims of certain U.S.
patents and other intellectual property rights owned by Macrovision Corporation and other rights owners.
Use of this copyright protection technology must be authorized by , and is intended
for home and other limited viewing uses only unless otherwise authorized by .
Reverse engineering or disassembly is prohibited.
The product complies with the KODAK Picture CD format and will display KODAK Picture CDs. The "KODAK
Picture CD Compatible" logo is a trademark of Eastman Kodak Company and is used with permission.
Macrovision Corporation
Macrovision Corporation
General function:
You can set slideshow transition modes for any pictures.
Press PAUSE to stop playing.
Press or to see the previous or next picture.
Press PLAY to continue slideshow transitions.
Press STOP to return to root menu.
Image Rotation
There are three modes to rotate a picture: original, 90 Deg, and 180 Deg. These operations are
allowed only when a picture is being displayed normally and will be cancelled automatically
when a new picture is displayed. The ANGLE keys are used to select the different rotation modes:
Press ANGLE OSD display original.
Press ANGLE again OSD display 90 Deg.
Press ANGLE again OSD display 180 Deg.
Zoom Function:
This player provides both Zoom in/out and Zoom pan function. Press the ZOOM
consecutively, the picture will zoom in/out in turn as followings:
3
Manufactured under license from Dolby Laboratories.
Dolby Laboratories. Confidential Unpublished Works.c 1992-1997 Dolby Laboratories, Inc. All rights reserved.
"Dolby" and the double-D symbol are trademarks of
Note: During the ZOOM function, slideshow transitions and image rotation are disabled.
Q off: close zoom, press PLAY again to resume slideshow transition mode.
276
Page 8
Remote Control Operation
ANGLE
During DVD playback
Press ANGLE to view scenes from different camera angles.
Press ANGLE repeatedly to change from one camera angle to
another.
Note: This function is disc specific.
Advanced Features
Front Panel and Rear Panel Illustration
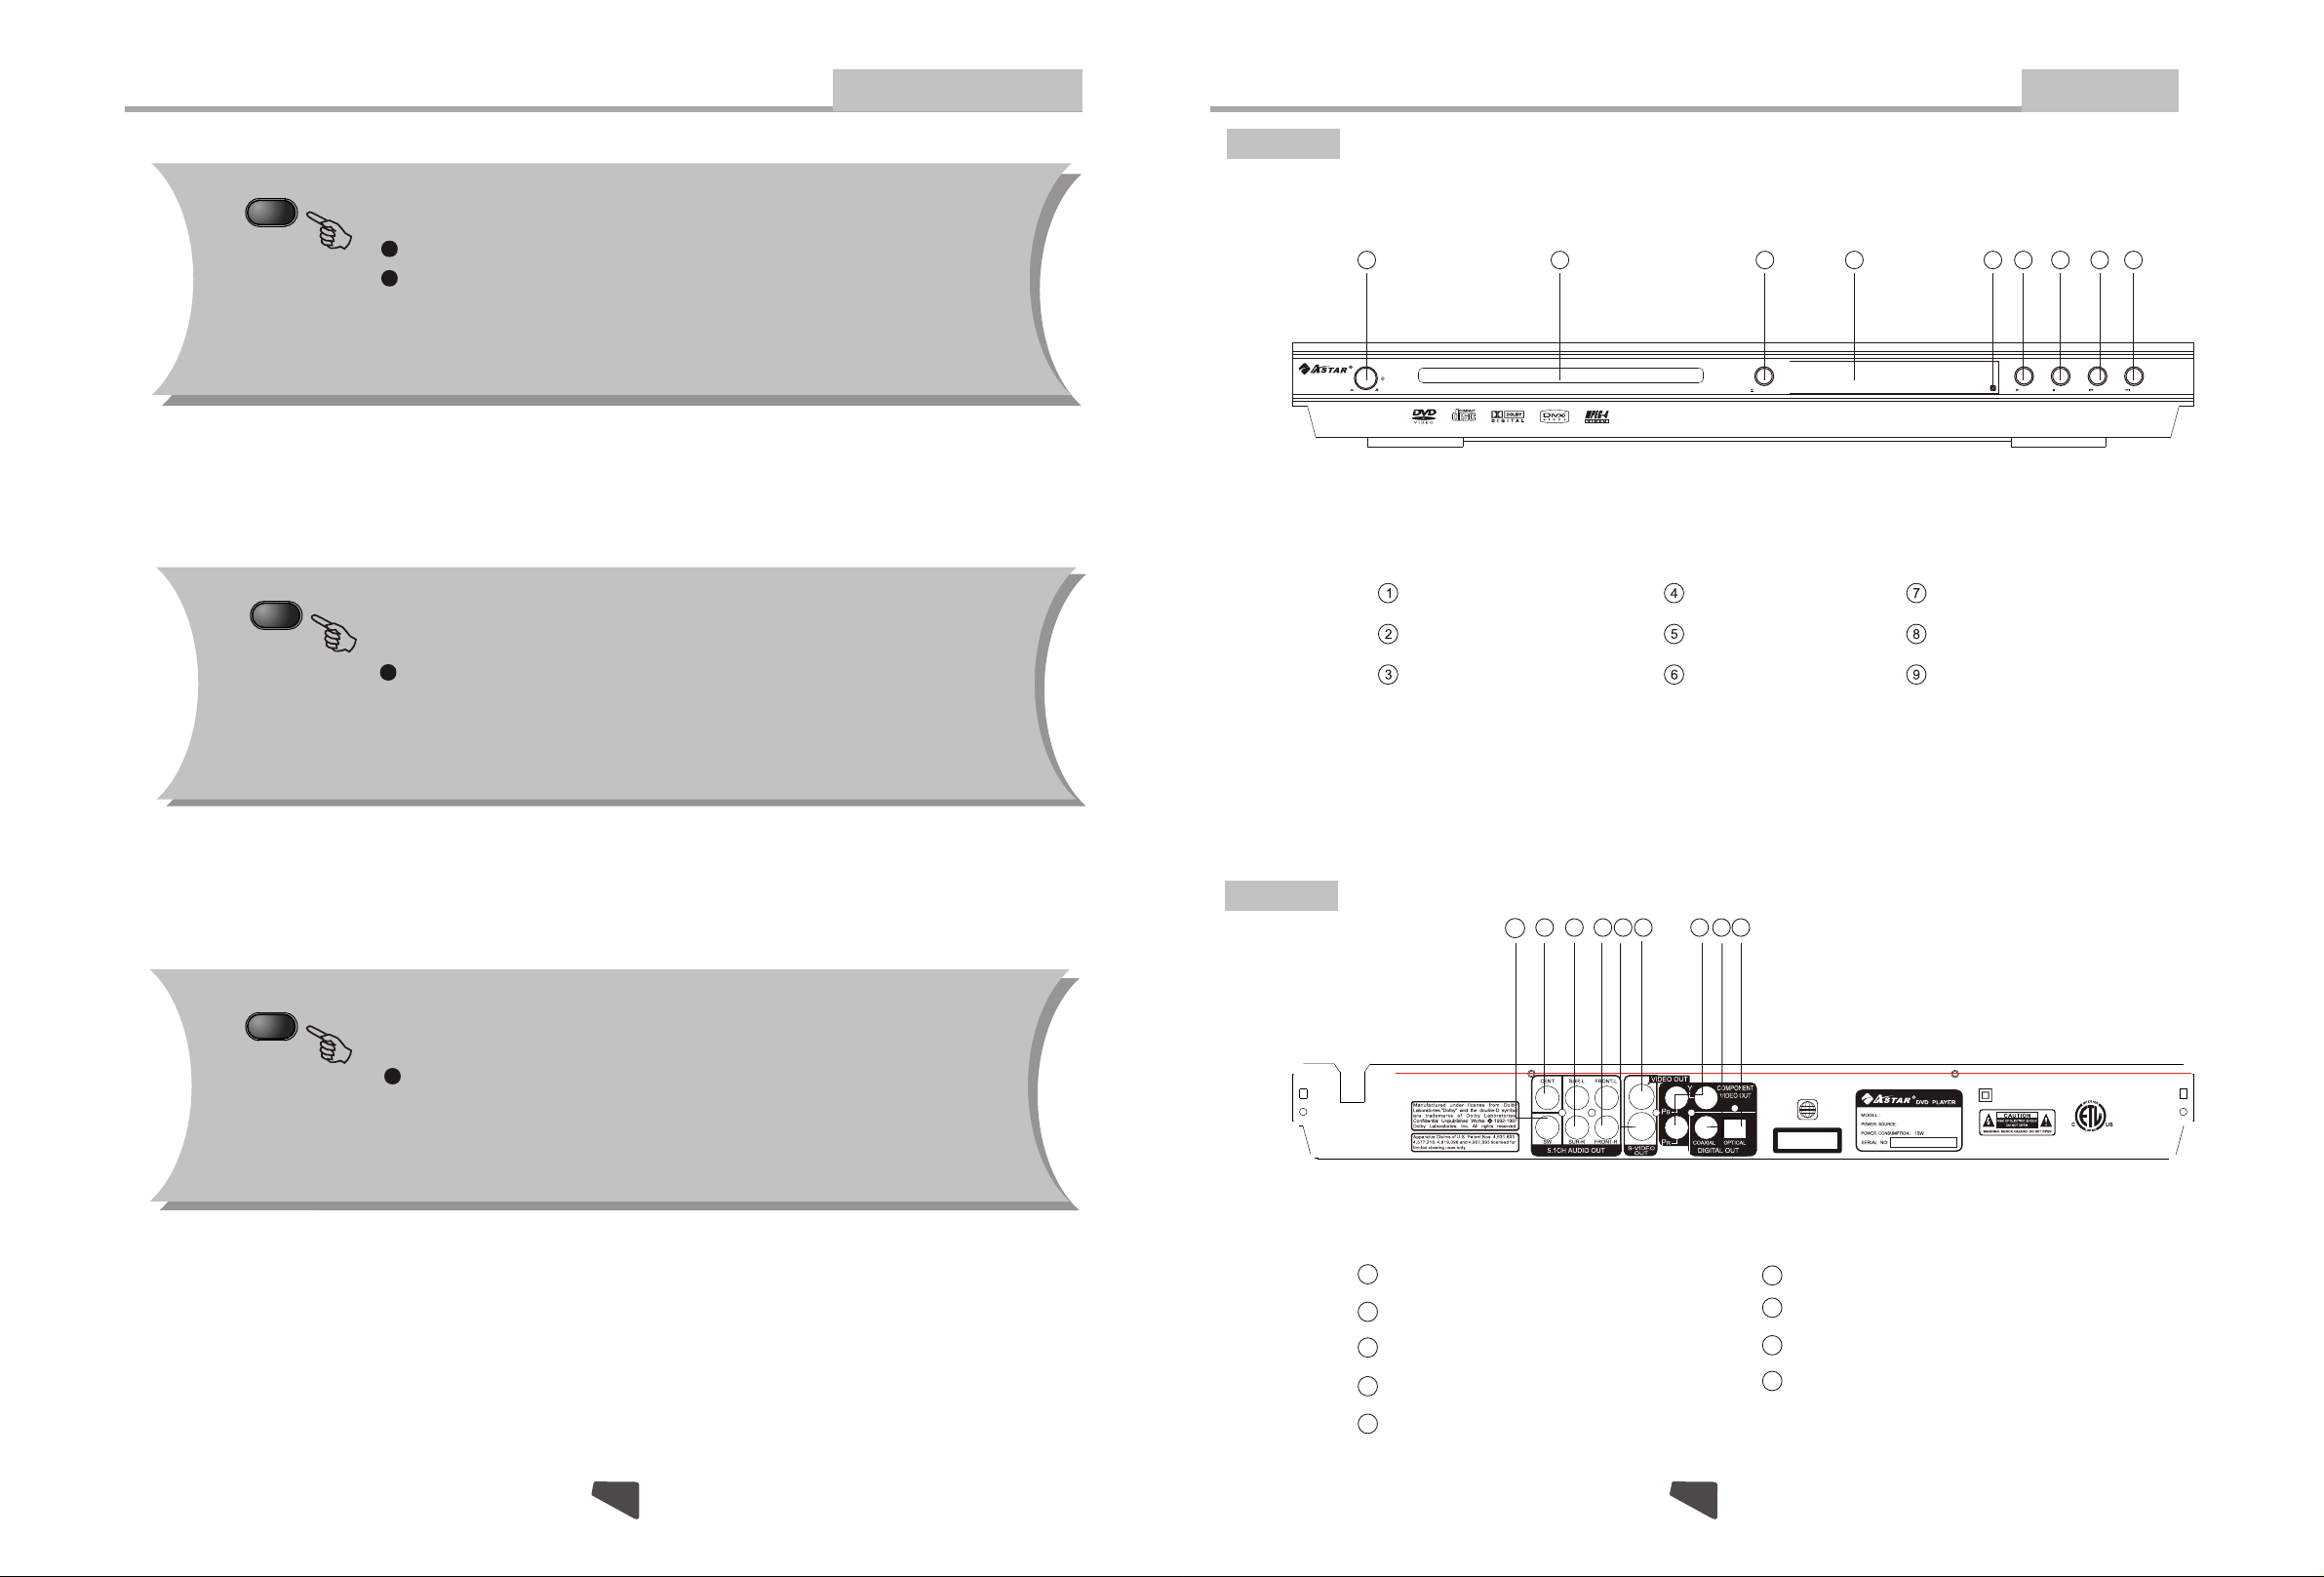
Front panel
1 2 3 4 5 6 7 8 9
POWER
OFF
ON
DVD/CD/CD-R/CD-RW/DVD-R/DVD-RW/HDCD/DIVX/JPEG PLAYER
DIGITAL AUDIO
OPEN/CLOSE
Introduction
PLAY STOP PREV NEXT
Certified DivX Player
DVX-6881
LANGUAGE
SUBTITLE
During DVD playback
Press LANGUAGE repeatedly to select from up to 8 audio
languages/formats.
Note: This function is disc specific.
During DVD playback
Press SUBTITLE repeatedly to select from up to 32
subtitle languages.
Note: This function is .
disc specific (languages will vary)
Rear panel
90-240V~ 50/60Hz
POWER
CABIN DOOR
OPEN/CLOSE
12
13 141615
VFD SCREEN
SENSOR
PLAY
17 18 19
STOP
PREV
NEXT
20
DOUBLE INSULATIONWHEN SERVICING USE ONLY
1
CLASS 1 LASER
PRODUCT
DVX-6881
90-240V~ 50/60Hz
IDENTICAL REPLACEMENT PARTS.
Certified DivX Player
3046730
CONFORMS TO
UL STD. 6500
CERTIFIED TO
CAN/CSA STD. E60065
12
5.1 CH SW output jack
13
5.1 CH CEN output jack
14
5.1CH SUR output jack
15
5.1CH FRONT output jack
16
S-Video output jack
17
Video output jack
18
Component output jack
19
Digital signal coaxial output jack
20
Digital signal optical output jack
726
Page 9
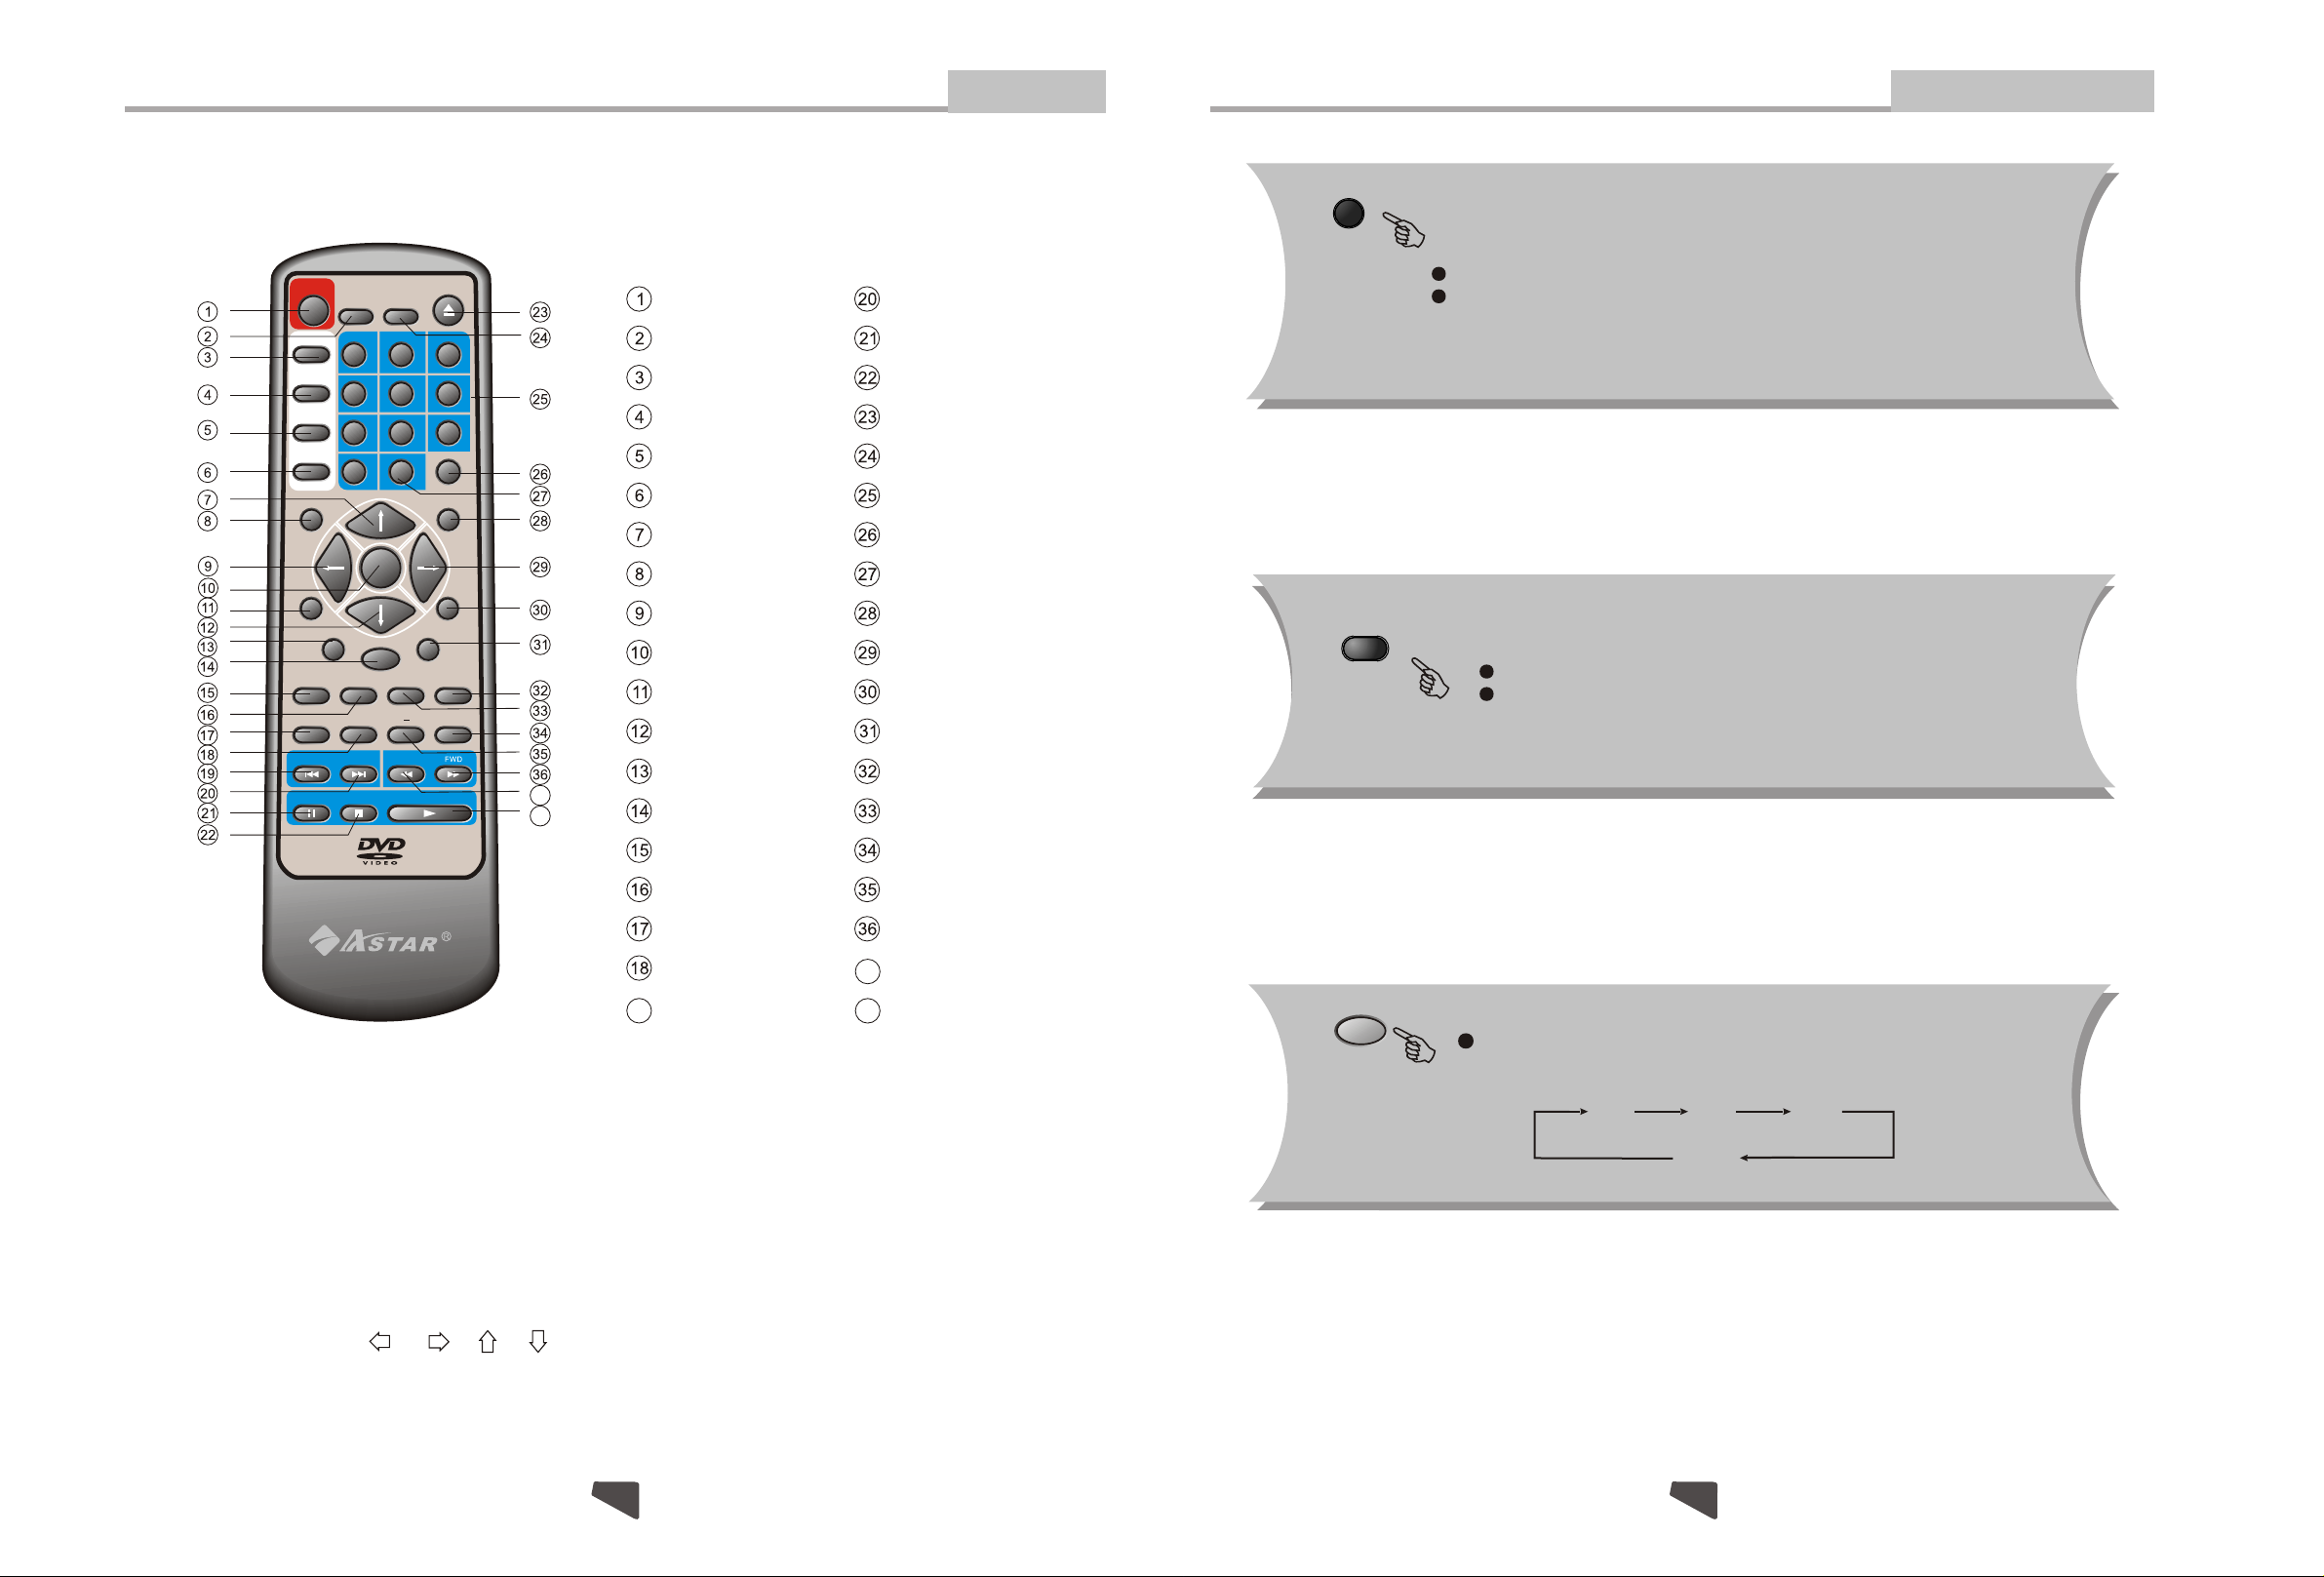
Remote Control
Introduction
Remote Control Operation
VOL+ VOL-
Advanced Features
STANDBY
N/P
SUBTITLE
LANGUAGE
ANGLE
SETUP
VOL-
STEP L/R
SLOW
PREV NEXT
PAUSE
PROG
1 2
4
7
0 10+
ENTER
ZOOM
TITLE
STOP
DISPLAY
5
8 9
MUTE
AB
REV
OPEN/CLOSE
3
6
TIME
REPEAT
VOL+
MODERETURN
RESUME
MENU
PLAY
37
38
STANDBY
PROG
N/P
SUBTITLE
LANGUAGE
ANGLE
UP
SETUP
LEFT
ENTER
VOLDOWN
RETURN
ZOOM
NEXT
PAUSE
STOP
OPEN/CLOSE
DISPLAY
0-9 NUMBER KEY
TIME
10+ KEY
REPEAT
RIGHT
VOL+
MODE
RESUME
MUTE
Press Volume <VOL+> button to increase Volume
Press <VOL-> button to reduce volume till to no volume output.
MUTE
Press MUTE to mute the Audio output
Press MUTE again to resume normal audio output
MENU
A-B REPEAT
FWD
37
REV
38
PLAY
19
STEP
L/R
SLOW
TITLE
PREV
Note:
1. Please note that reference numbers for the remote are described beginning on page 18 of this
manual.
2. In this manual, " " " " " " " " will be used to represent different NAVIGATION ARROWS
on the remote respectively.
ZOOM
During DVD playback, press ZOOM to magnify the image as
follows:
Q1 Q2 Q3
Q Off
258
Page 10
Remote Control Operation
SLOW
Advanced Features
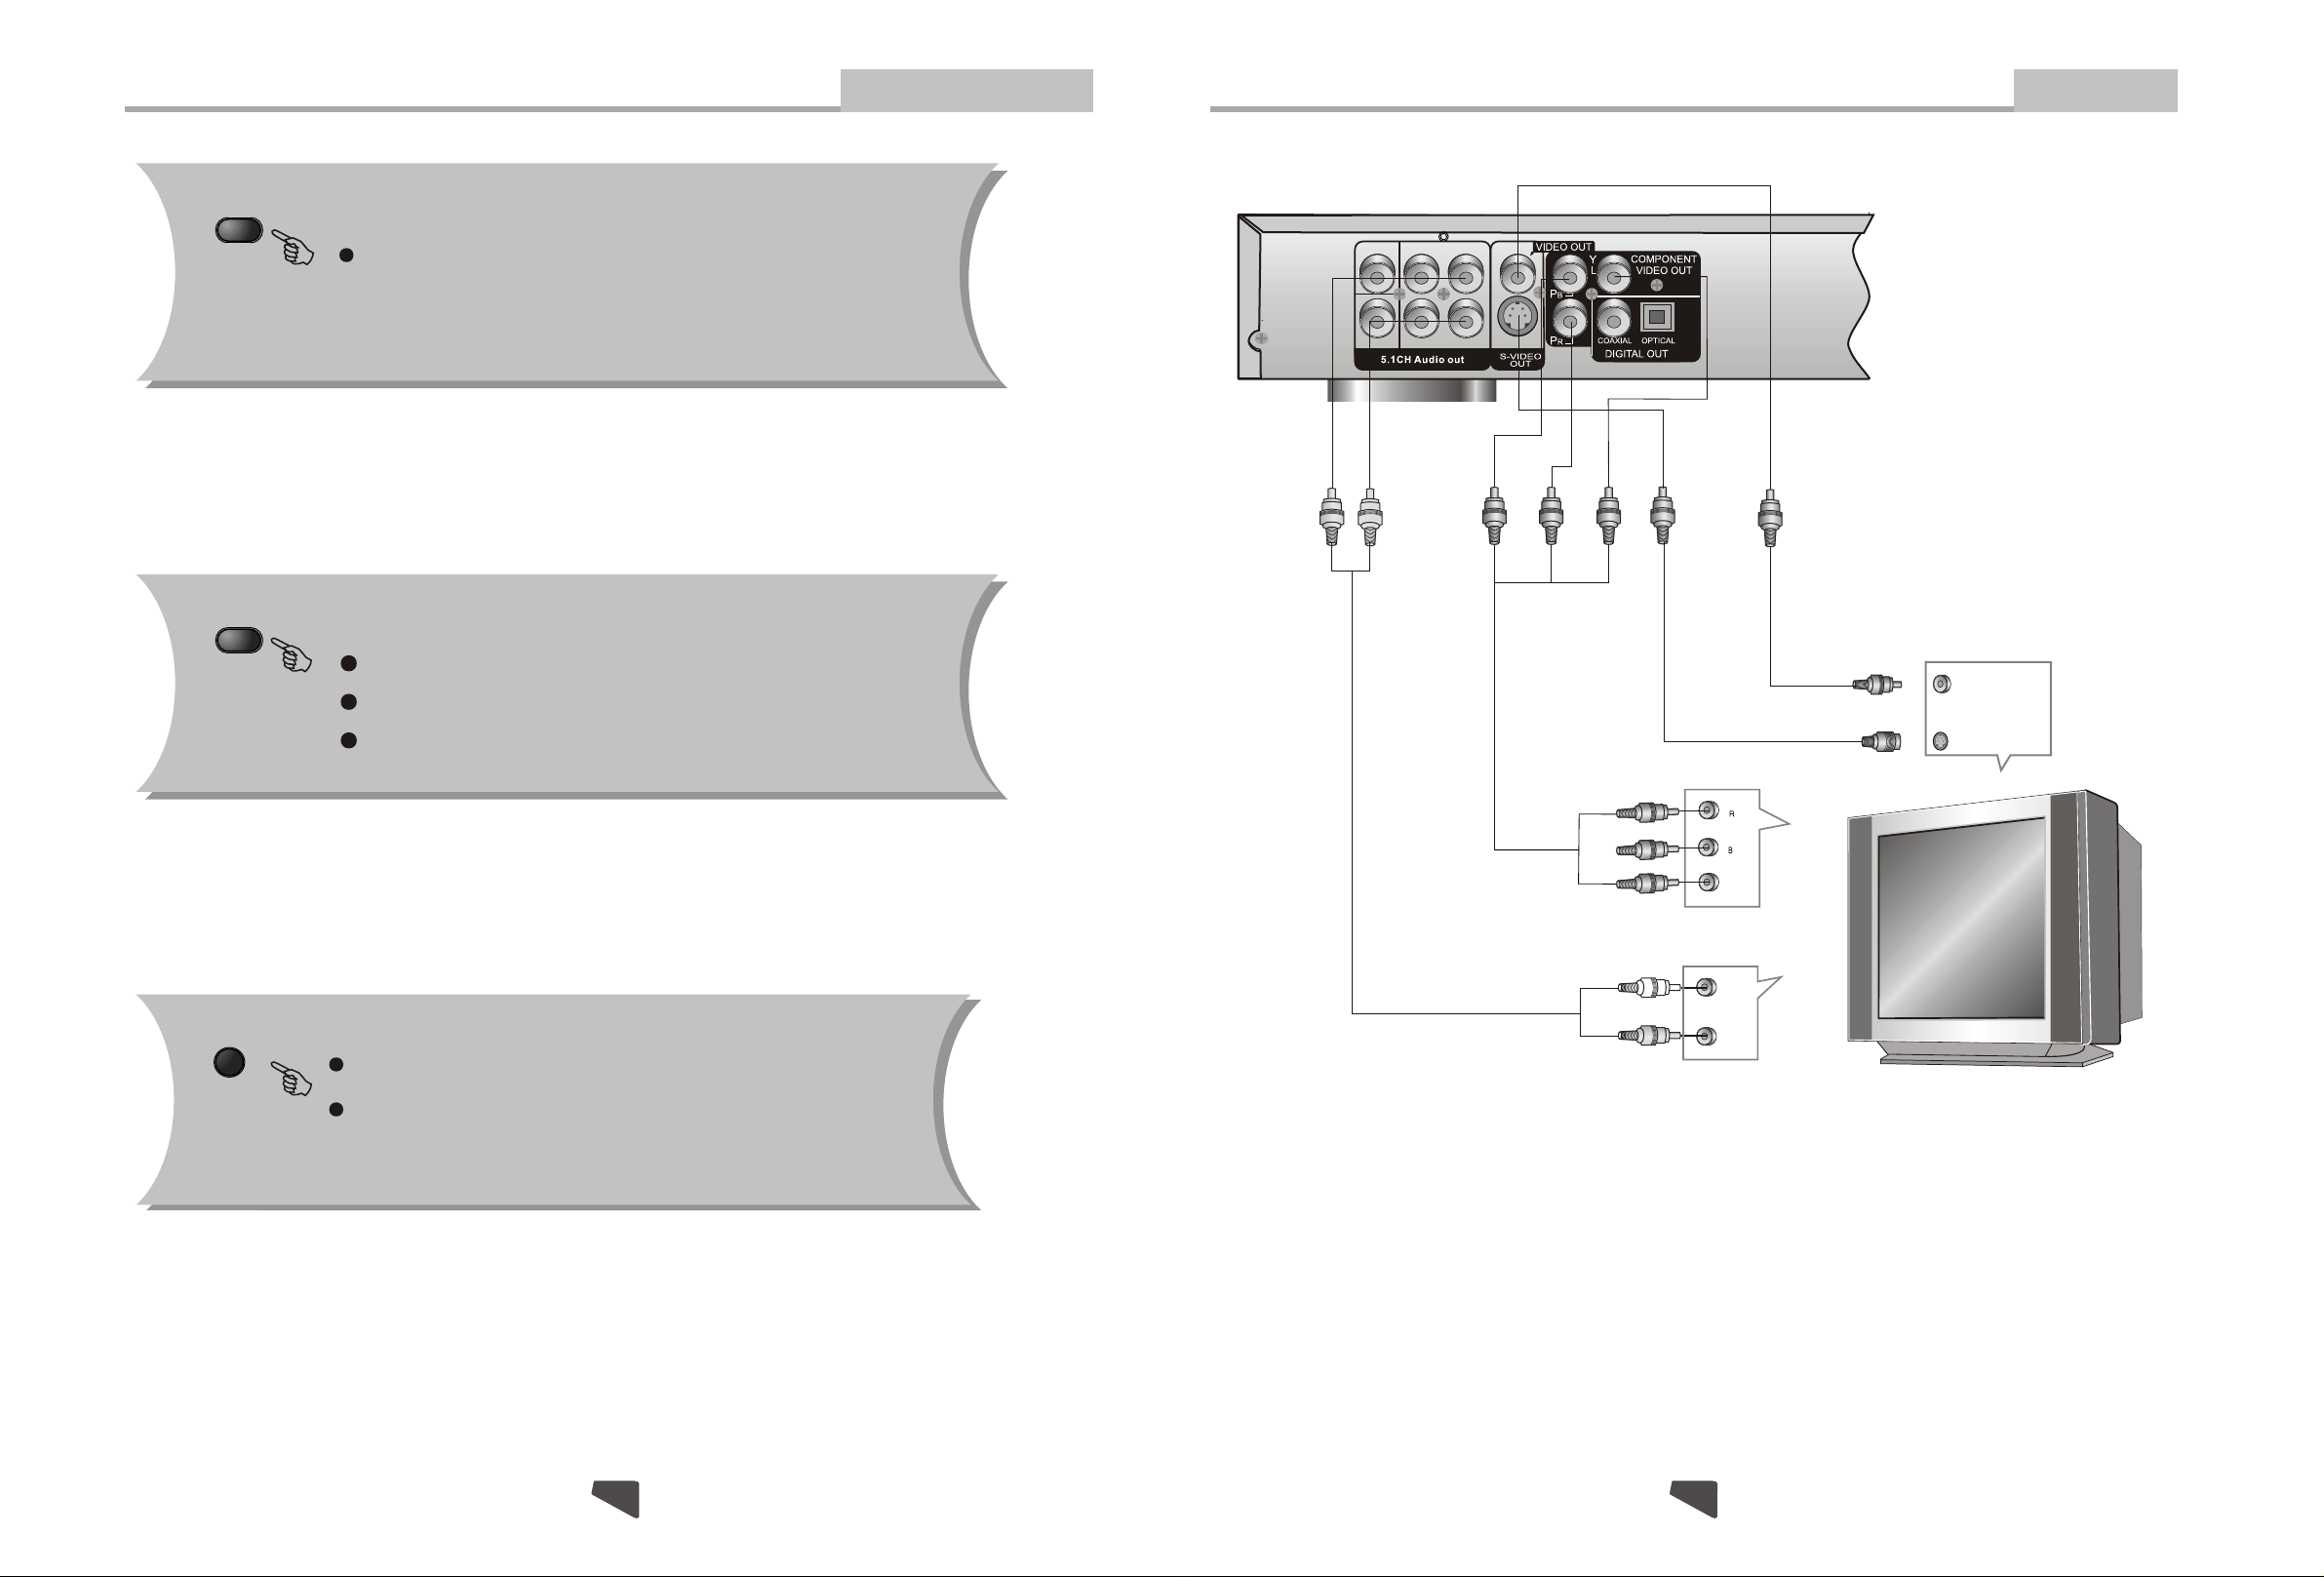
Connecting to a TV Set
Connections
STEP
Press slow repeatedly to slow motion playback at
variable speeds.
Press STEP during playback to pause playback.
Press STEP repeatedly to play frame.
Press play to resume normal playback.
WHITE
CENT
SW
RED
SUR-L
SUR-R
FRONT-L
FRONT-R
Composite video
YELLOW
Component video
(for progressive scan)
VIDEO IN
VIDEO
S-VIDEO
VIDEO IN
P
REPEAT
P
Y
AUDIO IN
R
L
Select to press REPEAT to select Repeat Title, Repeat chapter,
Repeat off During DVD playback.
Press REPEAT to select Repeat Single, Repeat All and Repeat
off ( CD or Others).
Notes:
There are three ways of connecting the player's AV output to the TV set:
1. S-video cable and left/right audio cable [set the (Video Type) to (S-Video)].
2. Composite video cable and left/right audio cable.
3. Component video cable and left/right audio cable [set the (Video Type) to (Y, Pb, Pr)].
924
Page 11
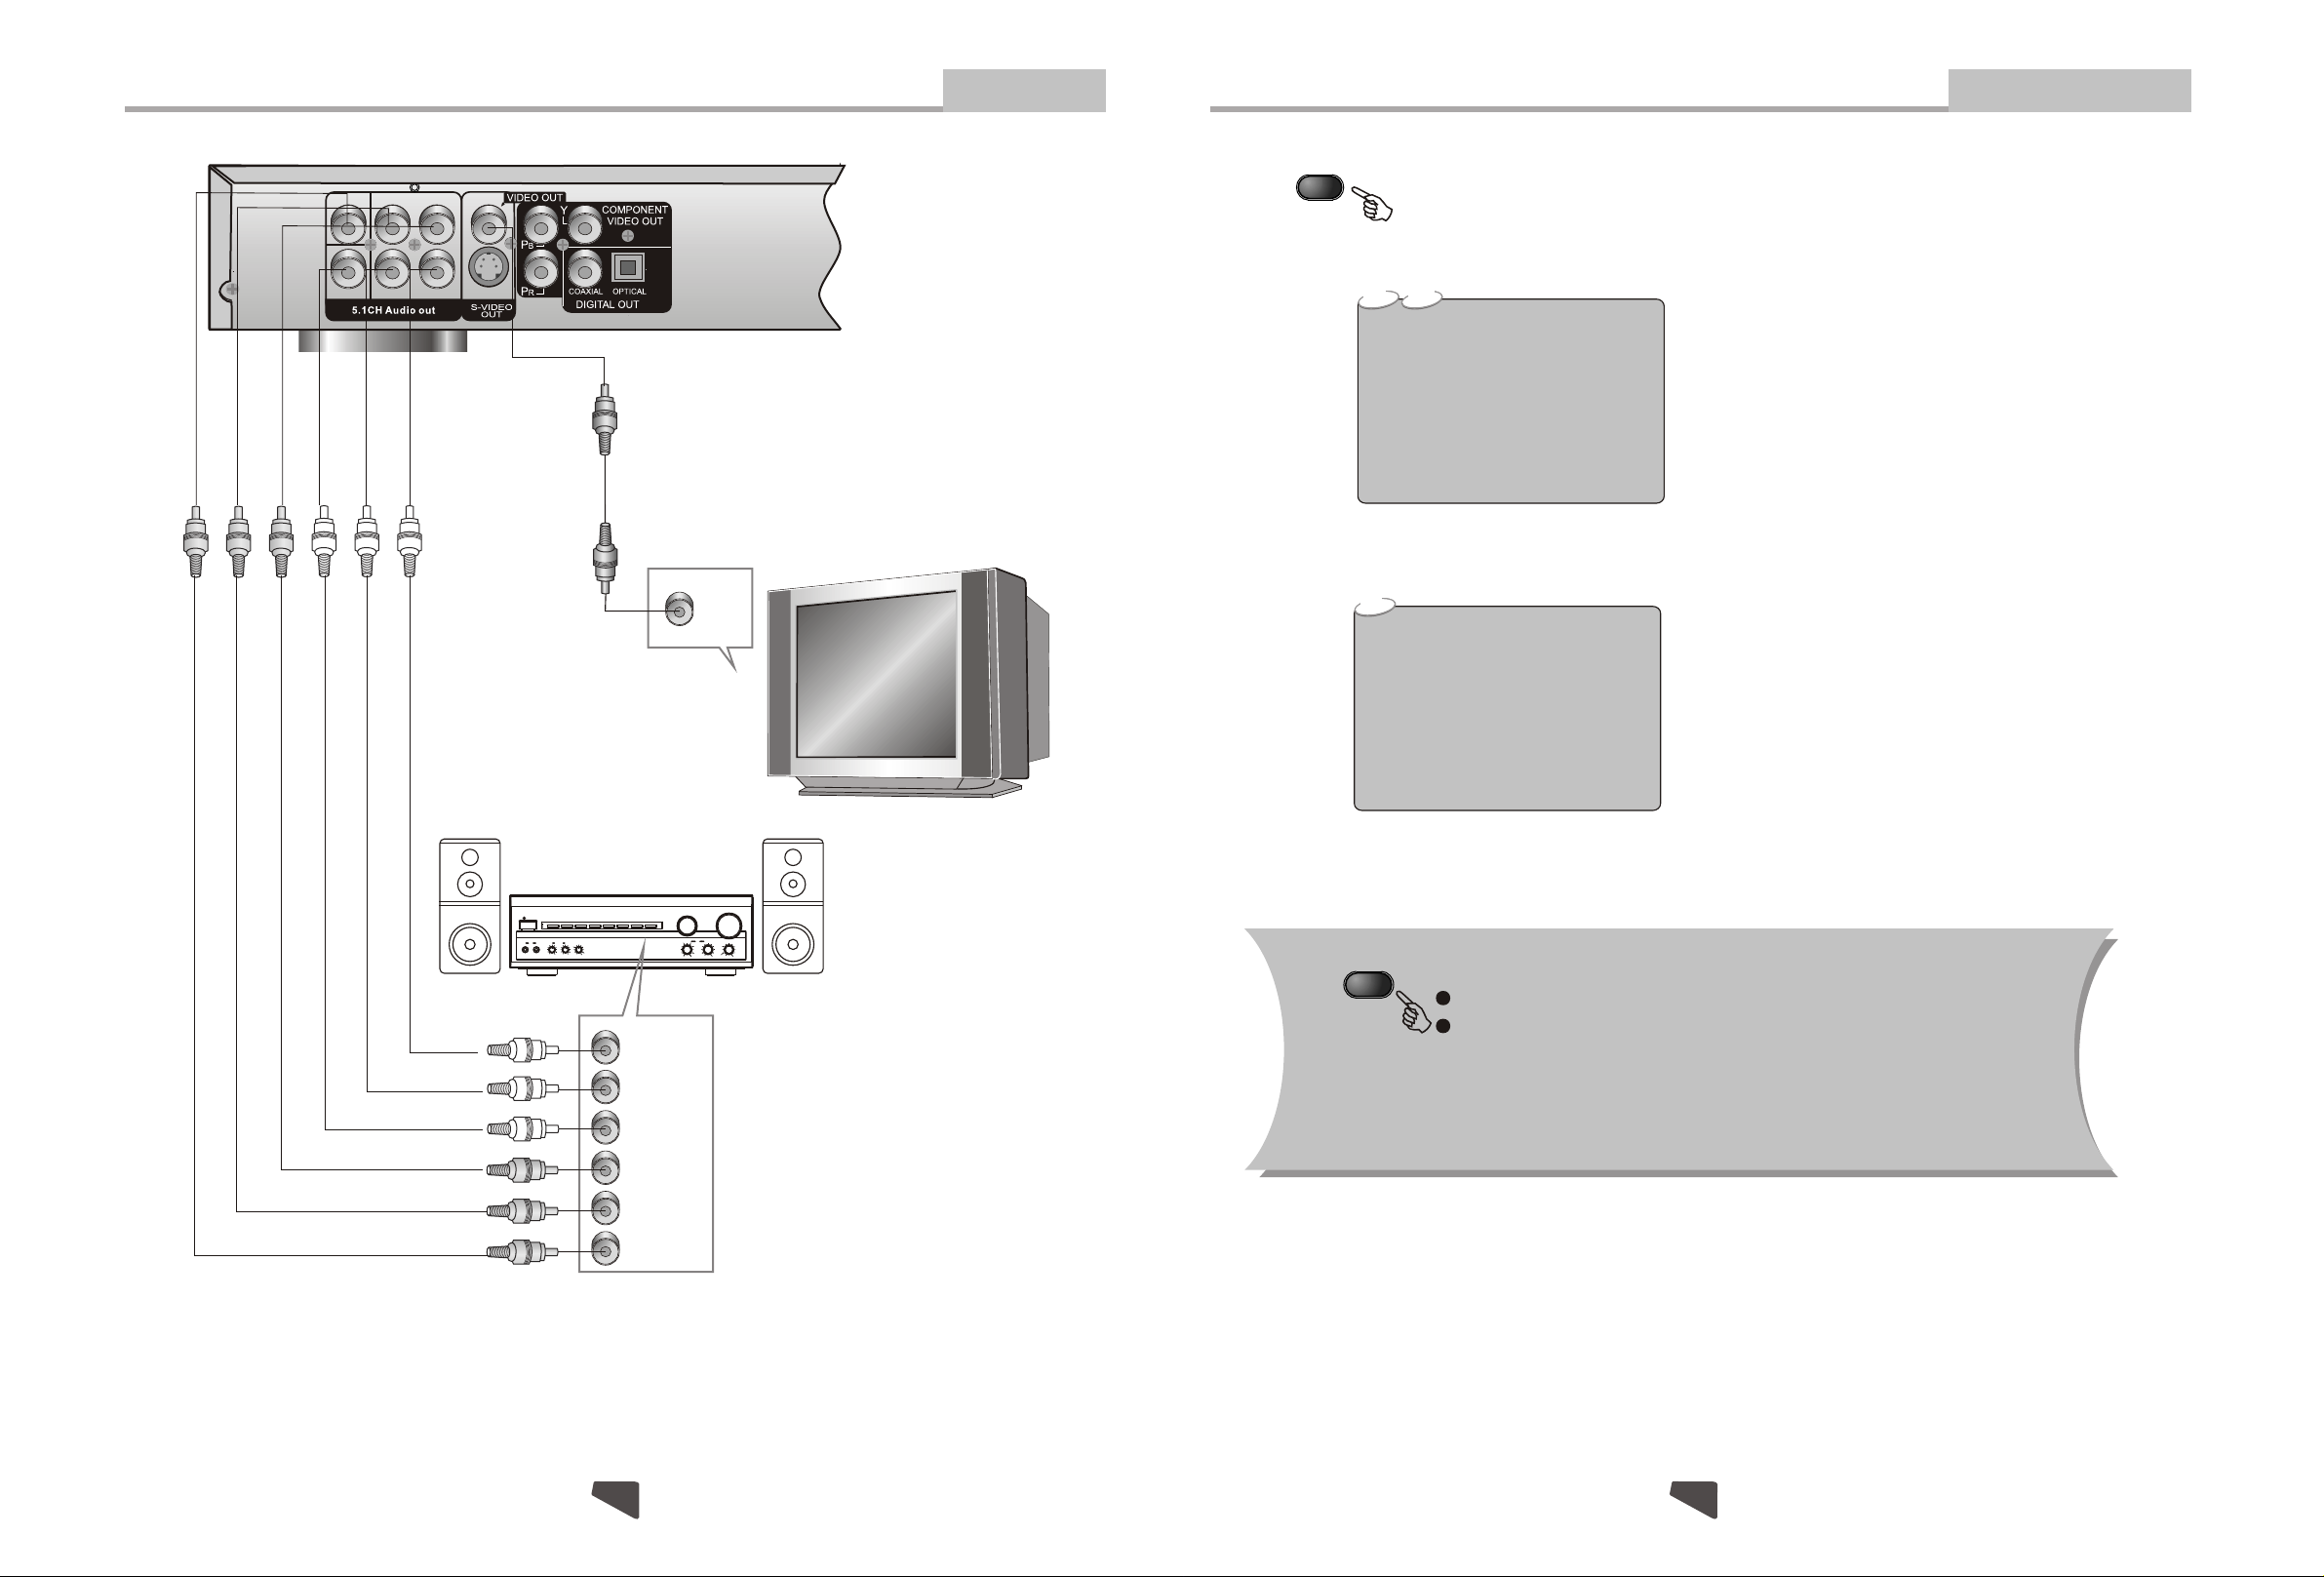
Connecting to an AV A mplifier with 5.1 Channel Analog Audio Input
Connections
Remote Control Operation
PROG
Advanced Features
CENT
SW
SUR-L
SUR-R
FRONT-L
FRONT-R
WHITERED
YELLOW
VIDEO
VIDEO
IN
While [PROGRAM] is on, press ENTER to display the [Program] submenu:
Others
CD
Input the track numbers in the order you would like them to
Program Input
1 _ _
_ _
2
3 _ _
4 _ _
5 _ _
6 _ _
7 _ _
8 _ _
9 _ _
Play Program Clear All
DVD
Program Input Title / chapter
1 _ _:_ _
2 _ _:_ _
3 _ _:_ _
4 _ _:_ _
5 _ _:_ _
6 _ _:_ _
7 _ _:_ _
8 _ _:_ _
9 _ _:_ _
10 _ _:_ _
11 _ _:_ _
12 _ _:_ _
Play Program Clear All
10 _ _
11 _ _
12 _ _
play. When finished, select [Play Program] and then press
ENTER to play the tracks in the new programmed order.
Select [Clear All] and press ENTER to clear all the numbers
you have input.
Input the title number and the chapter number in the desired
order. Then select [Play Program] and press ENTER to play
the chapters in the order you have set.
Select [Clear All] and press ENTER to clear all the numbers
you have input.
.
Amplifier
VOLUME
POWER
PRO LOGIC
CHANNEL
TEST
MODE
3 STEREO
BYPASS
EXCITE
MIC
MIC VOL
211
2
INPUT SELECTOR
MUTE
KARAOKE
DOWN UP
BASS
ECHO
MIC
TREBLE
DVD IN
FRONT-R
SUR-R
SW
FRONT-L
SUR-L
CENT
Notes:
1. Set the TV to the AV input connected to the DVD player.
2. Set the Amplifier to the AV input connected to the DVD player.
MODE
During playback is stopped
Press MODE button twice to switch to S-Video,YUV,YPbPr.
Note: If you connect the DVD player to your TV using the
component Video Output, you can use the MODE button to
switch to progressive scan for superior video quality.
2310
Page 12
Remote Control Operation
Advanced Features
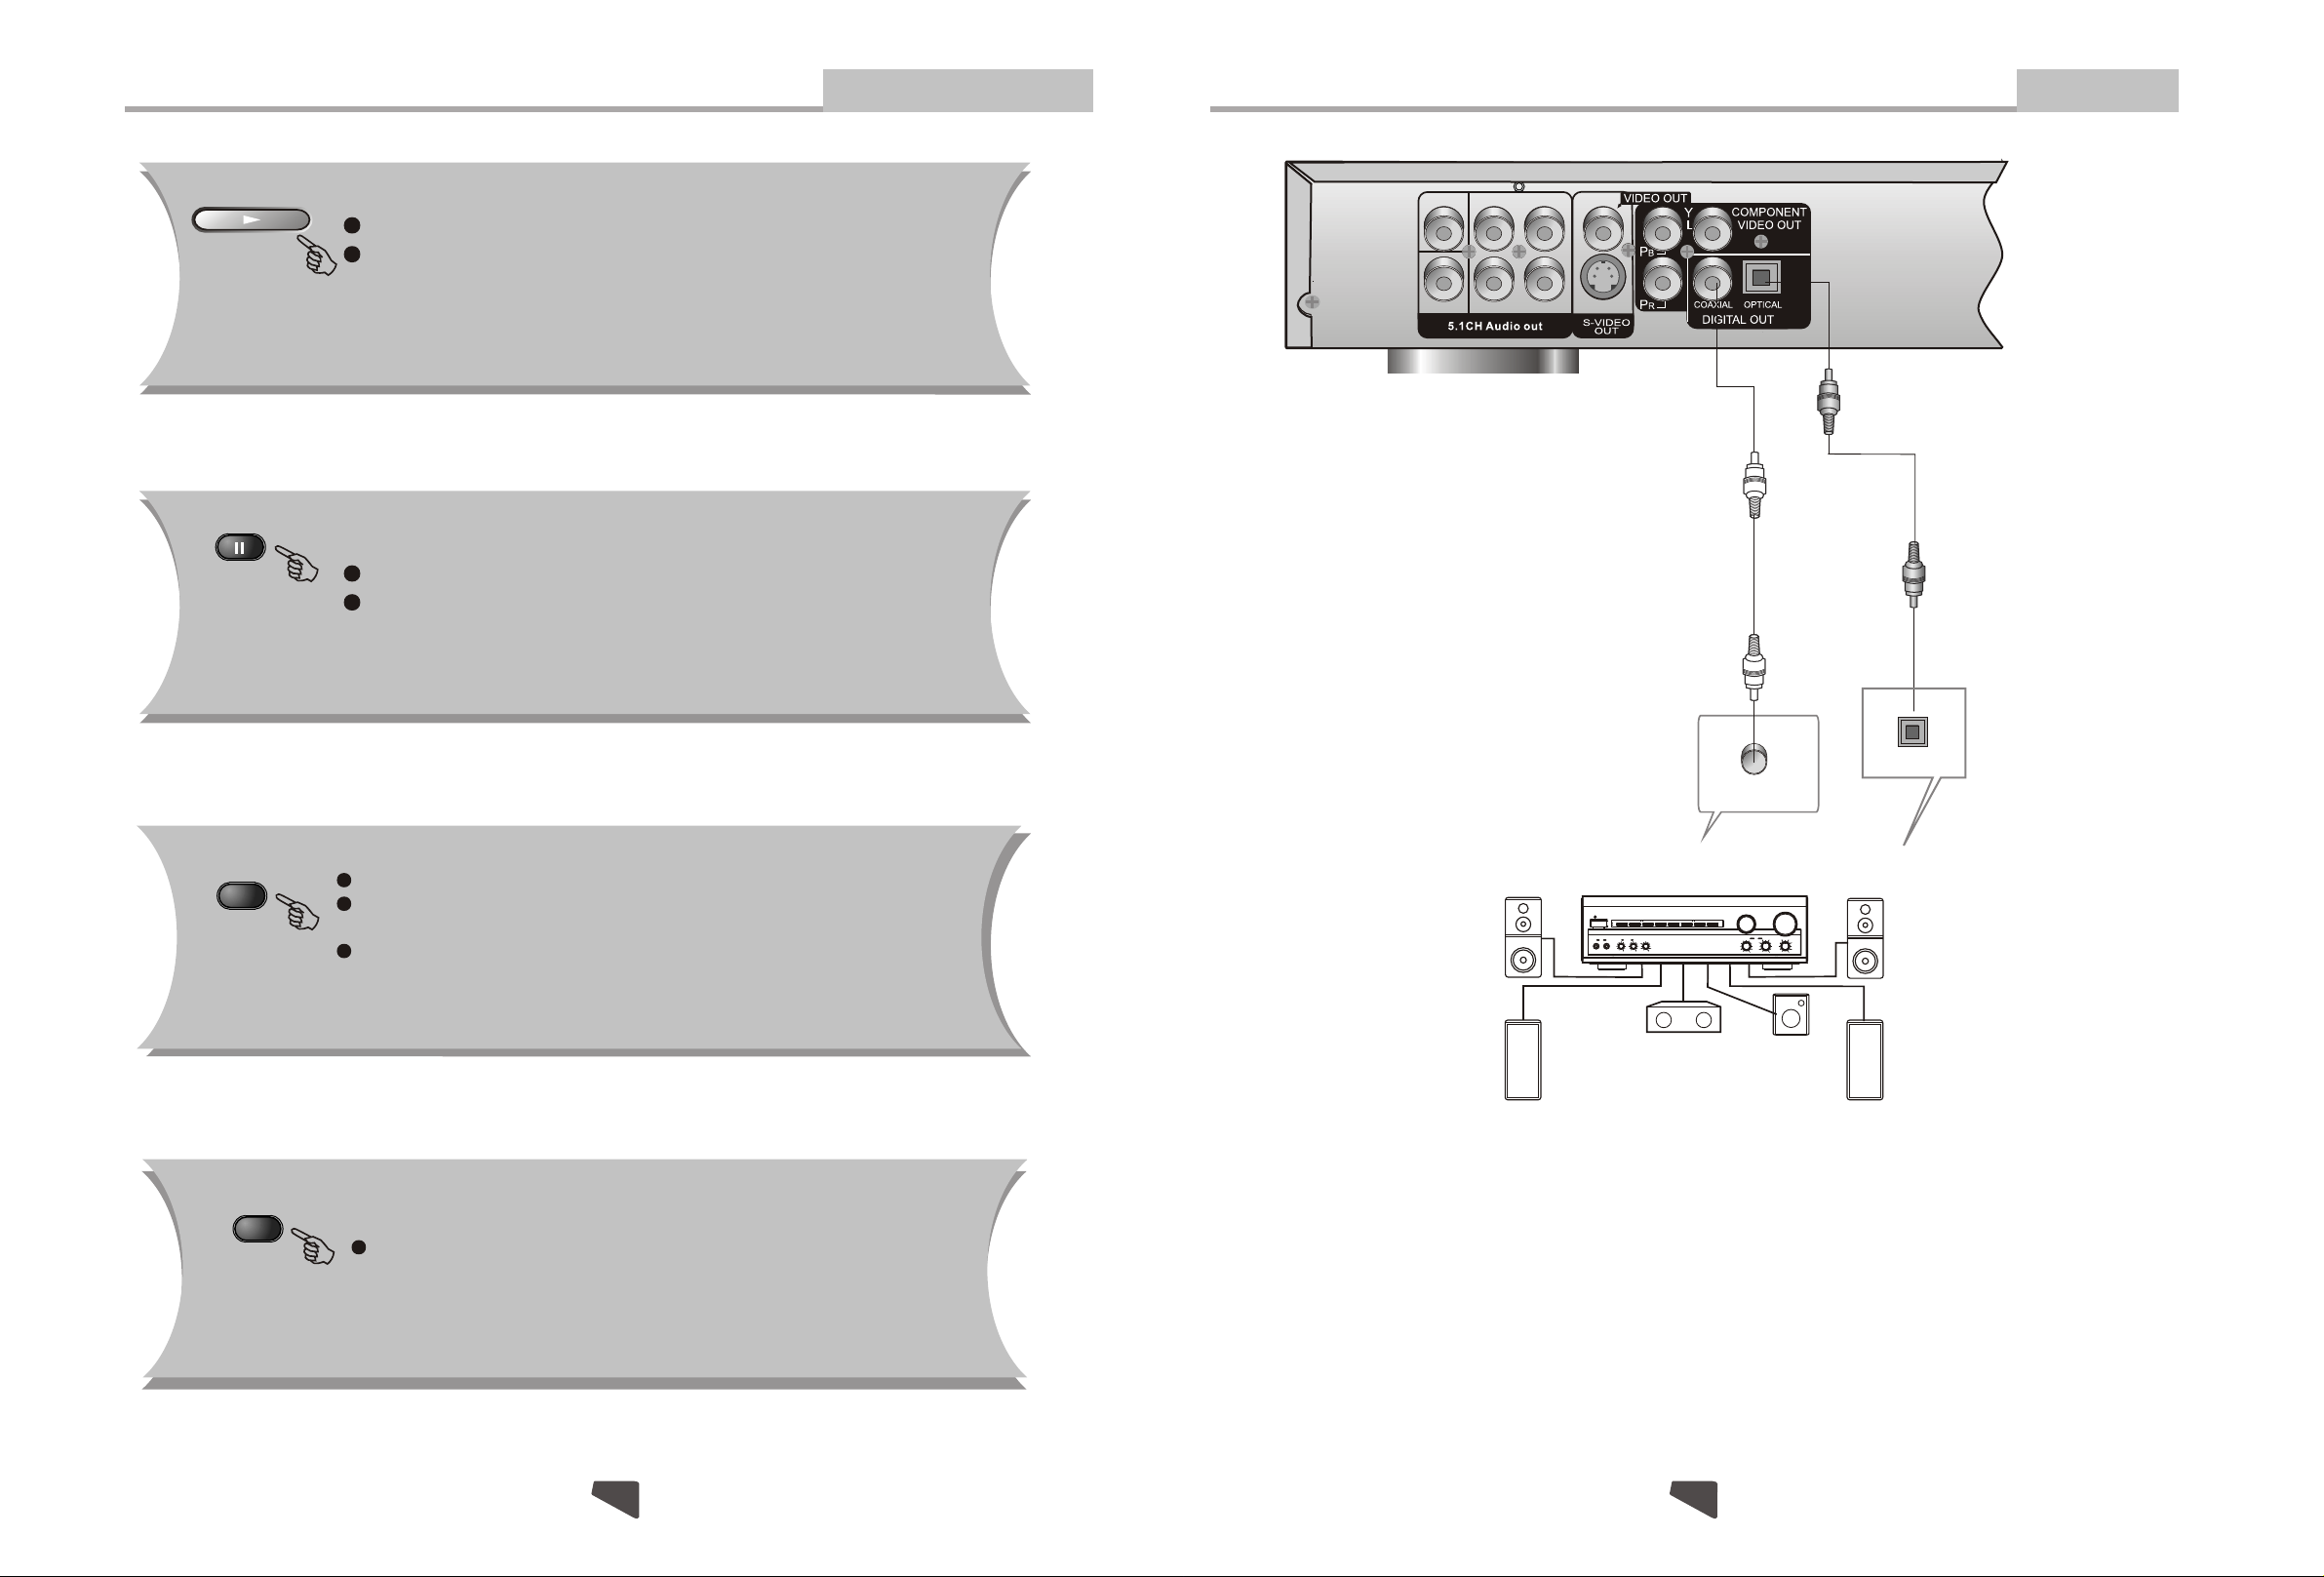
Connecting to an AV Amplifier with Digital Audio Input
Connections
PLAY
PAUSE
Press PLAY from stop mode to start playback.
Press PLAY during playback to replay the last 10 seconds.
This function is not available if the elapsed time of current
track is less than 10 seconds.
Note: MP3 discs and some DVD discs do not have a 10 second review feature.
Press PAUSE during playback to pause playback.
Press PLAY to resume normal playback.
CENT
SW
SUR-L
SUR-R
FRONT-L
FRONT-R
Optic
a
l c
a
ble
Coaxial cable
Coaxial cable
MENU
TITLE
During DVD, playback , press MENU to return to the program menu.
In the Setup Menu, press MENU to return to the main menu
or stop mode.
Any time, press MENU to cancel the current OSD or some menus
Note: This function is subject to the disc.
During DVD playback, press TITLE to display the DVD title
menu or play the first title.
Note: This function is subject to the disc.
Optical
Coaxial
Amplifier
VOLUME
POWER
PRO LOGIC
TEST
MODE
3 STEREO
BYPASS
MIC
MIC VOL
EXCITE
211
2
INPUT SELECTOR
MUTE
CHANNEL
KARAOKE
DOWN UP
BASS
ECHO
MIC
TREBLE
Notes:
1. Select the Coaxial digital audio output.
2. Set the player's audio out to Raw or PCM mode .
3. Set the Amplifier to the AV input connected to the DVD player.
1122
Page 13
Basic Operation
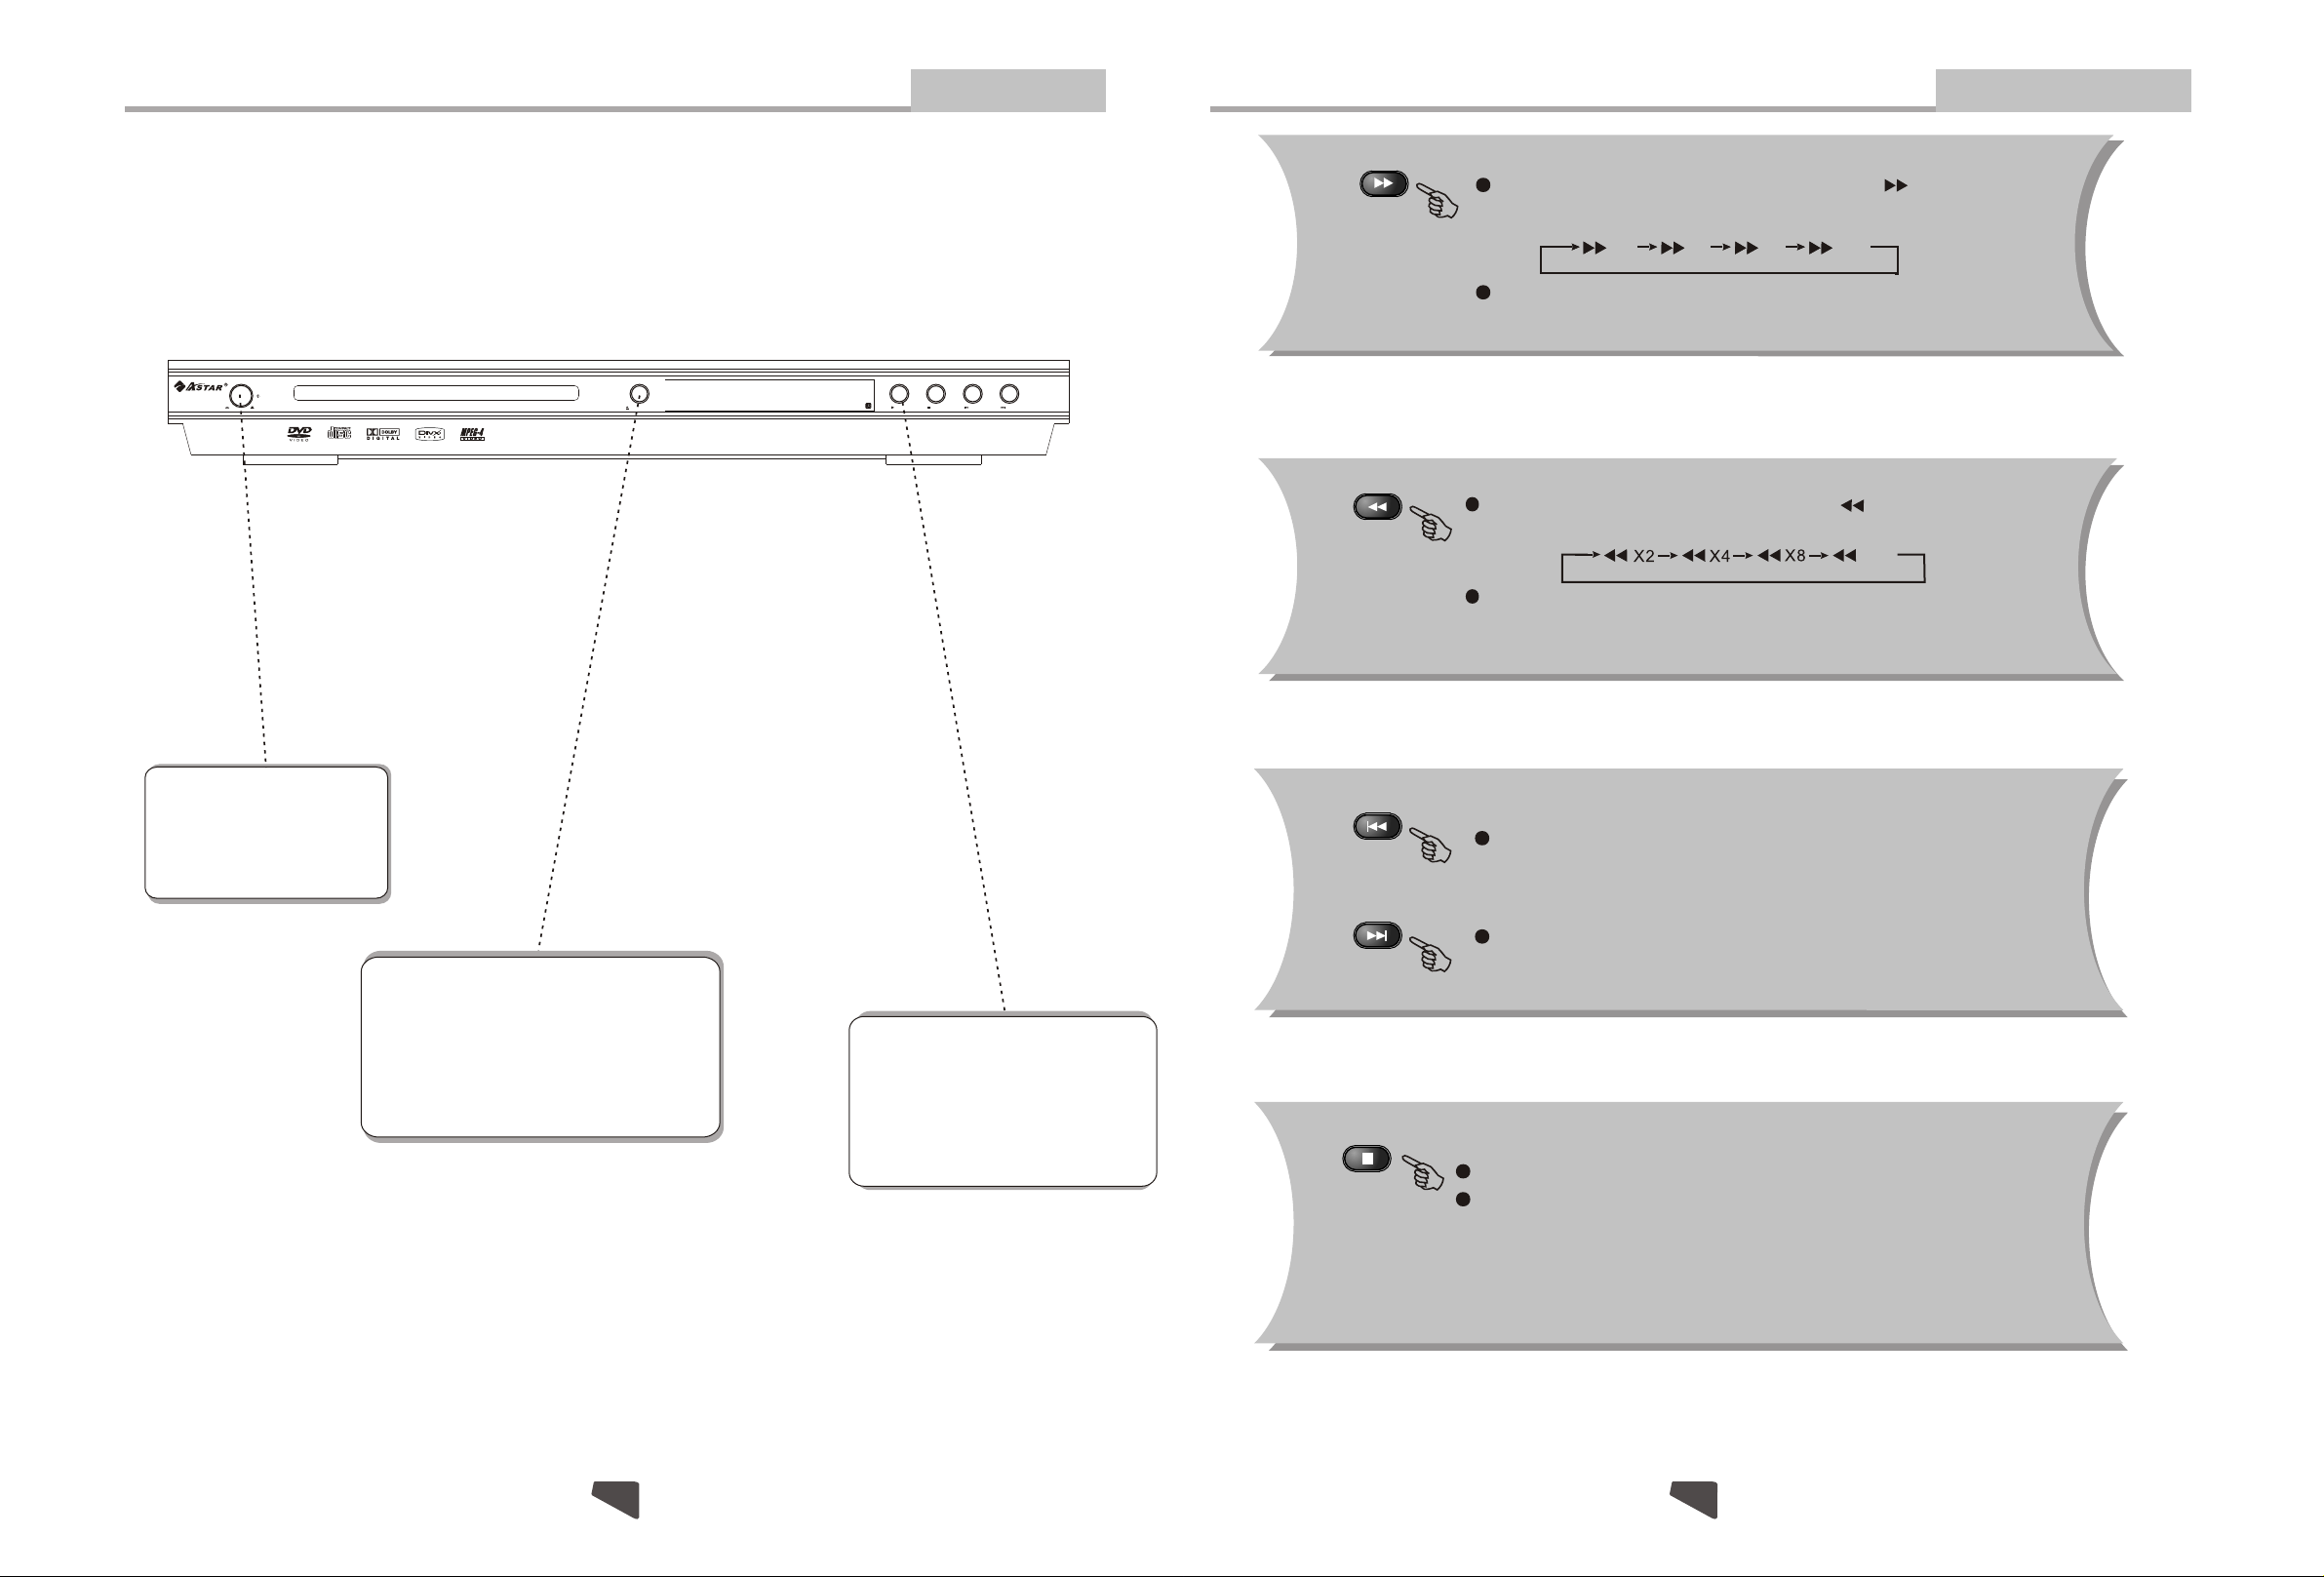
Preparation before playing:
1. Connect the DVD player to your TV and amplifier.
2. Turn on the TV.
Set the TV to the AV input connected to the DVD player.
3.
4. Turn down the volume on your amplifier, and then power it on.
5.
Set the amplifier to the AV input connected to the DVD player.
Basic Playback
Remote Control Operation
During DVD or CD playback, press and hold to scan forward.
The player will review the disc at 2, 4, 8 and 20 times normal speed
as follows:
Press PLAY to resume normal playback.
Advanced Features
X2 X4 X8 X20X2 X4 X8
POWER
OFF
ON
DVD/CD/CD-R/CD-RW/DVD-R/DVD-RW/HDCD/DIVX/JPEG PLAYER
DIGITAL AUDIO
STEP 1 - Press POWER to
start the player. The DVD
logo appears on the TV
screen.
OPEN/CLOSE
PLAY STOP PREV NEXT
Certified DivX Player
DVX-6881
During DVD or CD playback, press and hold to scan in reverse.
The player will review the disc at 2, 4, 8 and 20 times normal speed as follows:
X20
Press PLAY to resume normal playback.
PREV
Press PREV to skip to previous chapter or track.
NEXT
Press NEXT to skip to the next chapter or track.
STEP 2 - Press OPEN/CLOSE either on
the front panel or remote control. When
the tray is opened, place the disc on the
tray with the label side up. Press OPEN/
CLOSE again to close the disc tray.
STEP 3 - Press the PLAY button
on the front panel or remote control. The player will automatically read and identify the disc, and
begin playback.
STOP
Press STOP to stop and hold playback.
Press RESUME to resume playback from the point you pressed STOP.
Note: T f playback is
he screen saver will automatically turn on i
stopped about 5 minutes(when Screen Saver is set to on).
2112
Page 14
Remote Control Operation
TIME
Advanced Features
Modes and Features Setup
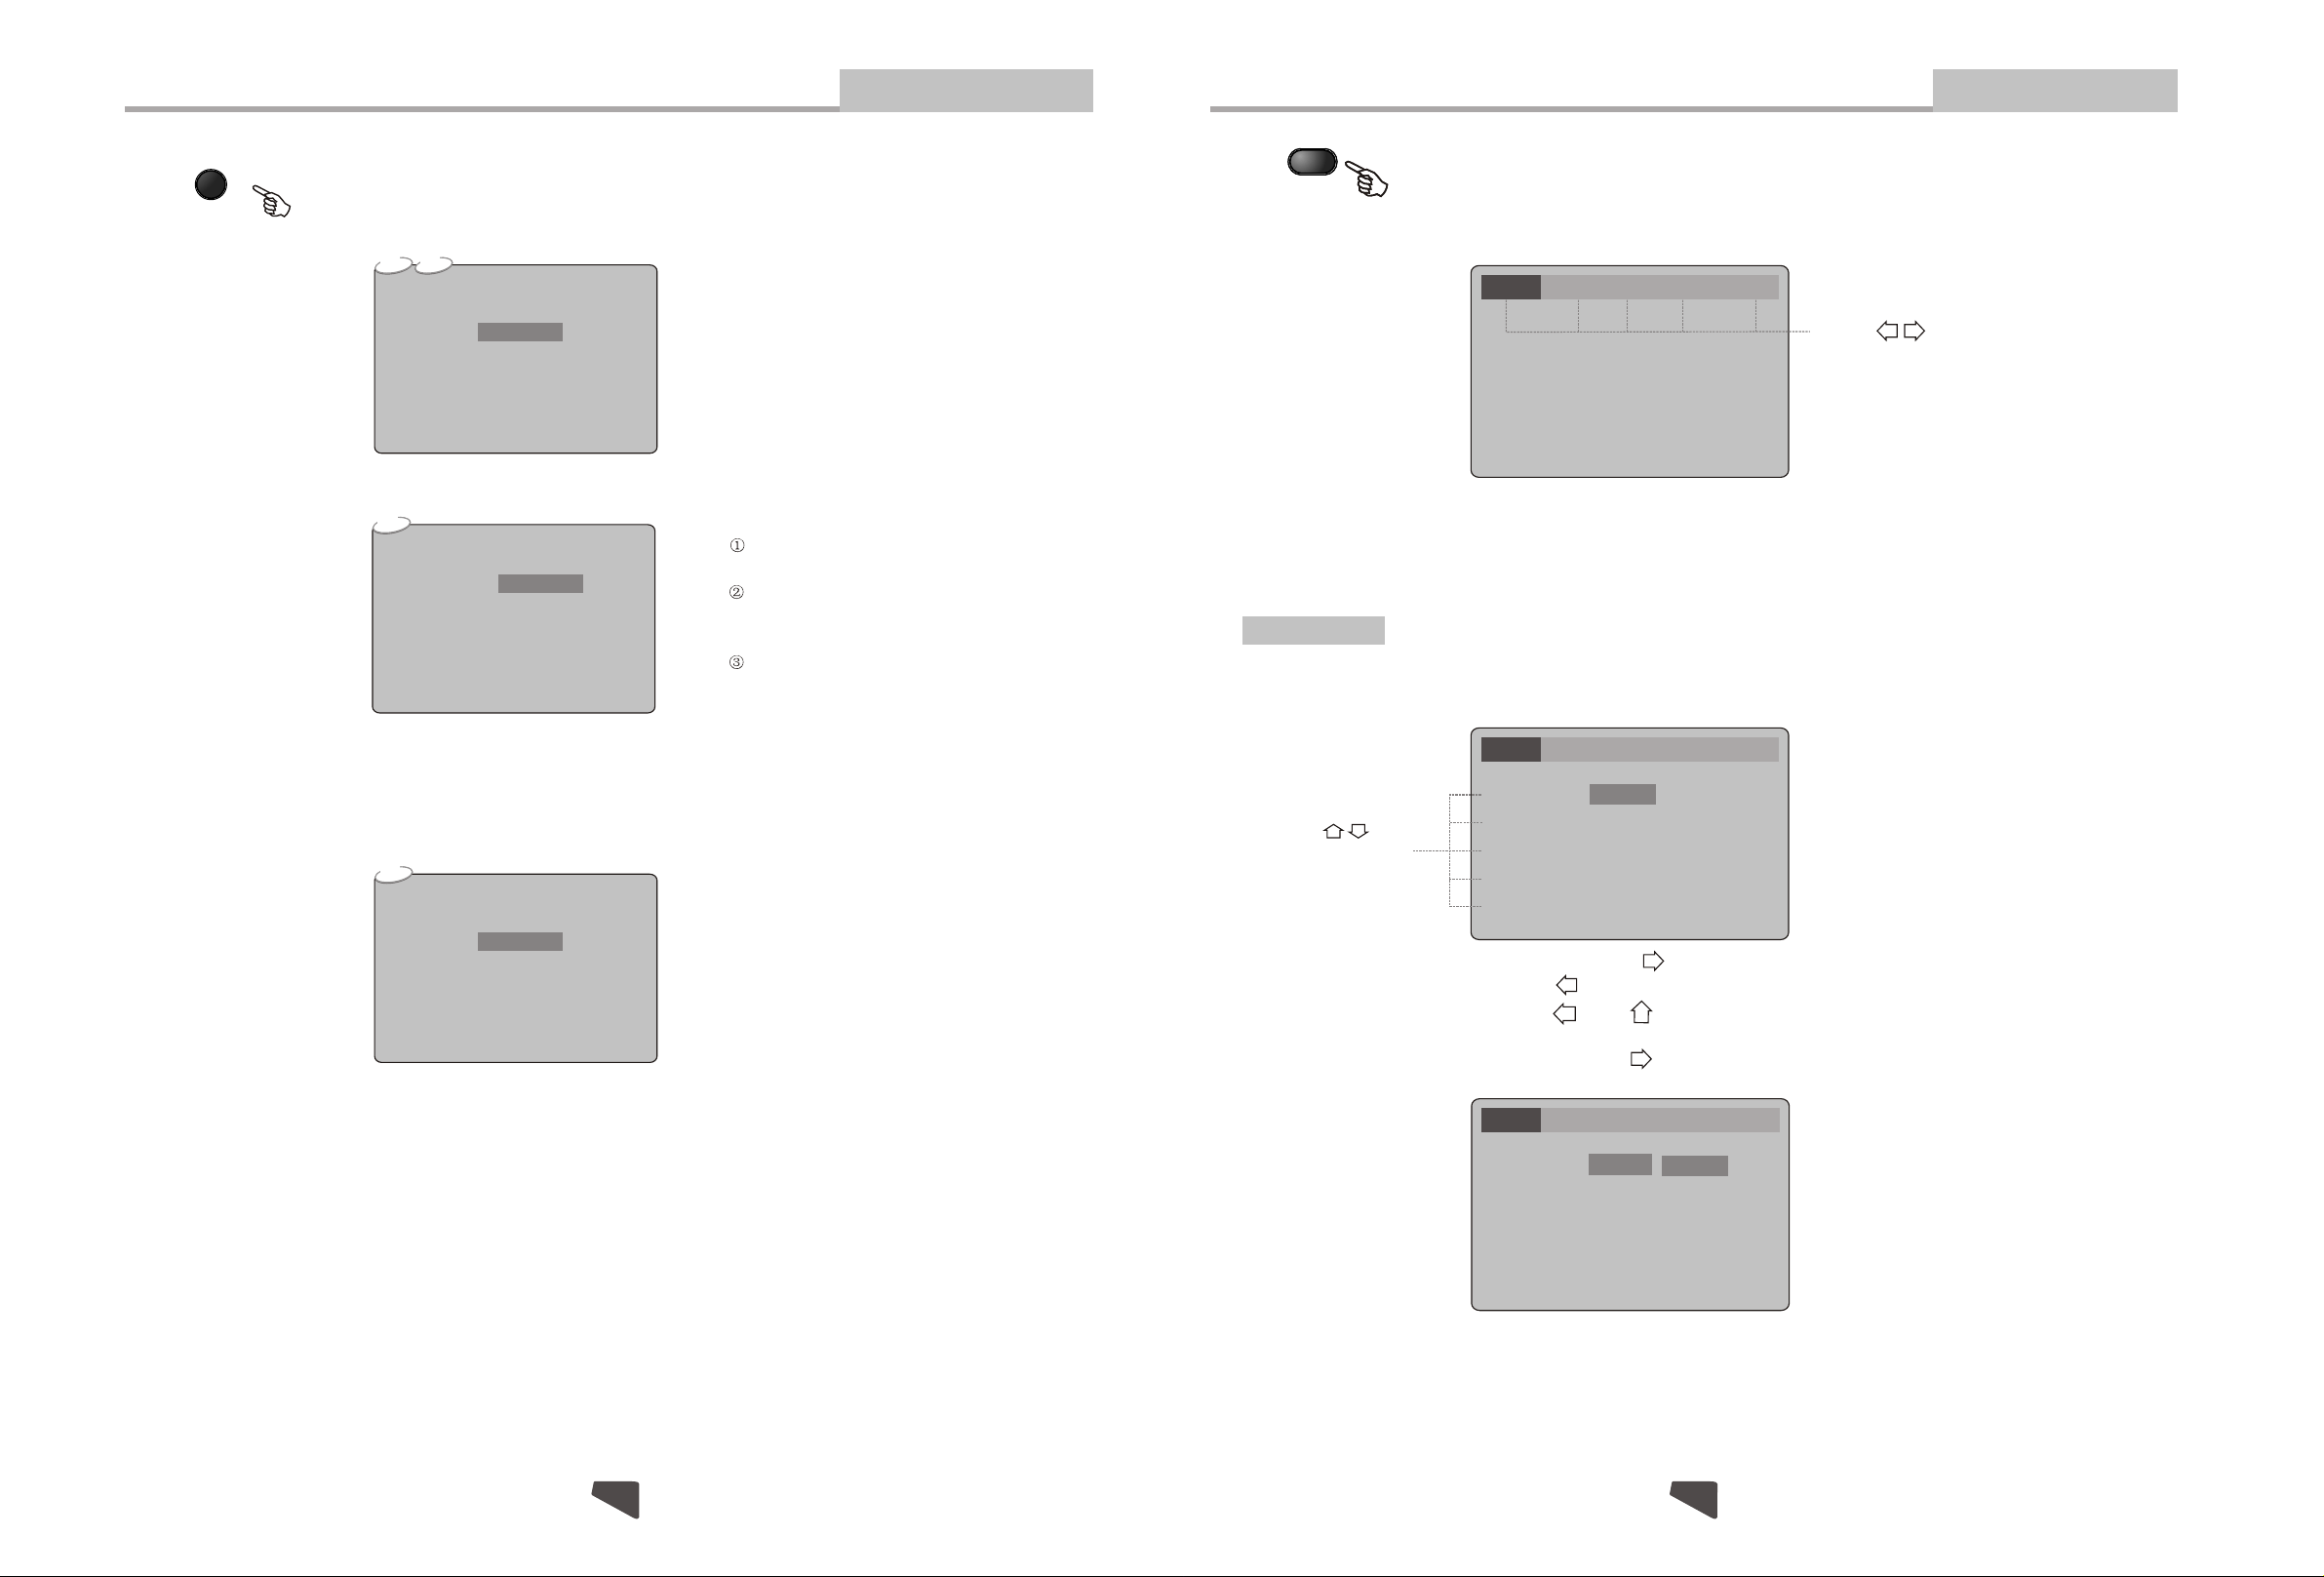
SETUP
Advanced Features
During playback, press TIME, and the [Track Search] menu will display as follows:
CD
Others
Search
Time
Track
DVD
Search
Time
Title / Chapter
-:--:--
- -
-:--:--
- - / - -
Notes:
the movie.
SELECT a value outside the range of the
total number of titles or chapters
function is unavailable.
Time searches for an exact time in
In Title/Chapter mode, you cannot
.
For some DVD discs, the Search
Use the number keys to input the desired Time, Title or Chapter, then press ENTER to confirm.
Press TIME again , the [Disc Search] menu will display as follows:
CD
Disc Search
Time
-:--:--
In s t op mode, press SETUP, and the TV screen will display the Setup
Menu as follows:
Language Video Audio MoreAud Rating
Press to change items
Setup Menu
A. Press ENTER to display each submenu
B. Press SETUP to exit the Setup Menu
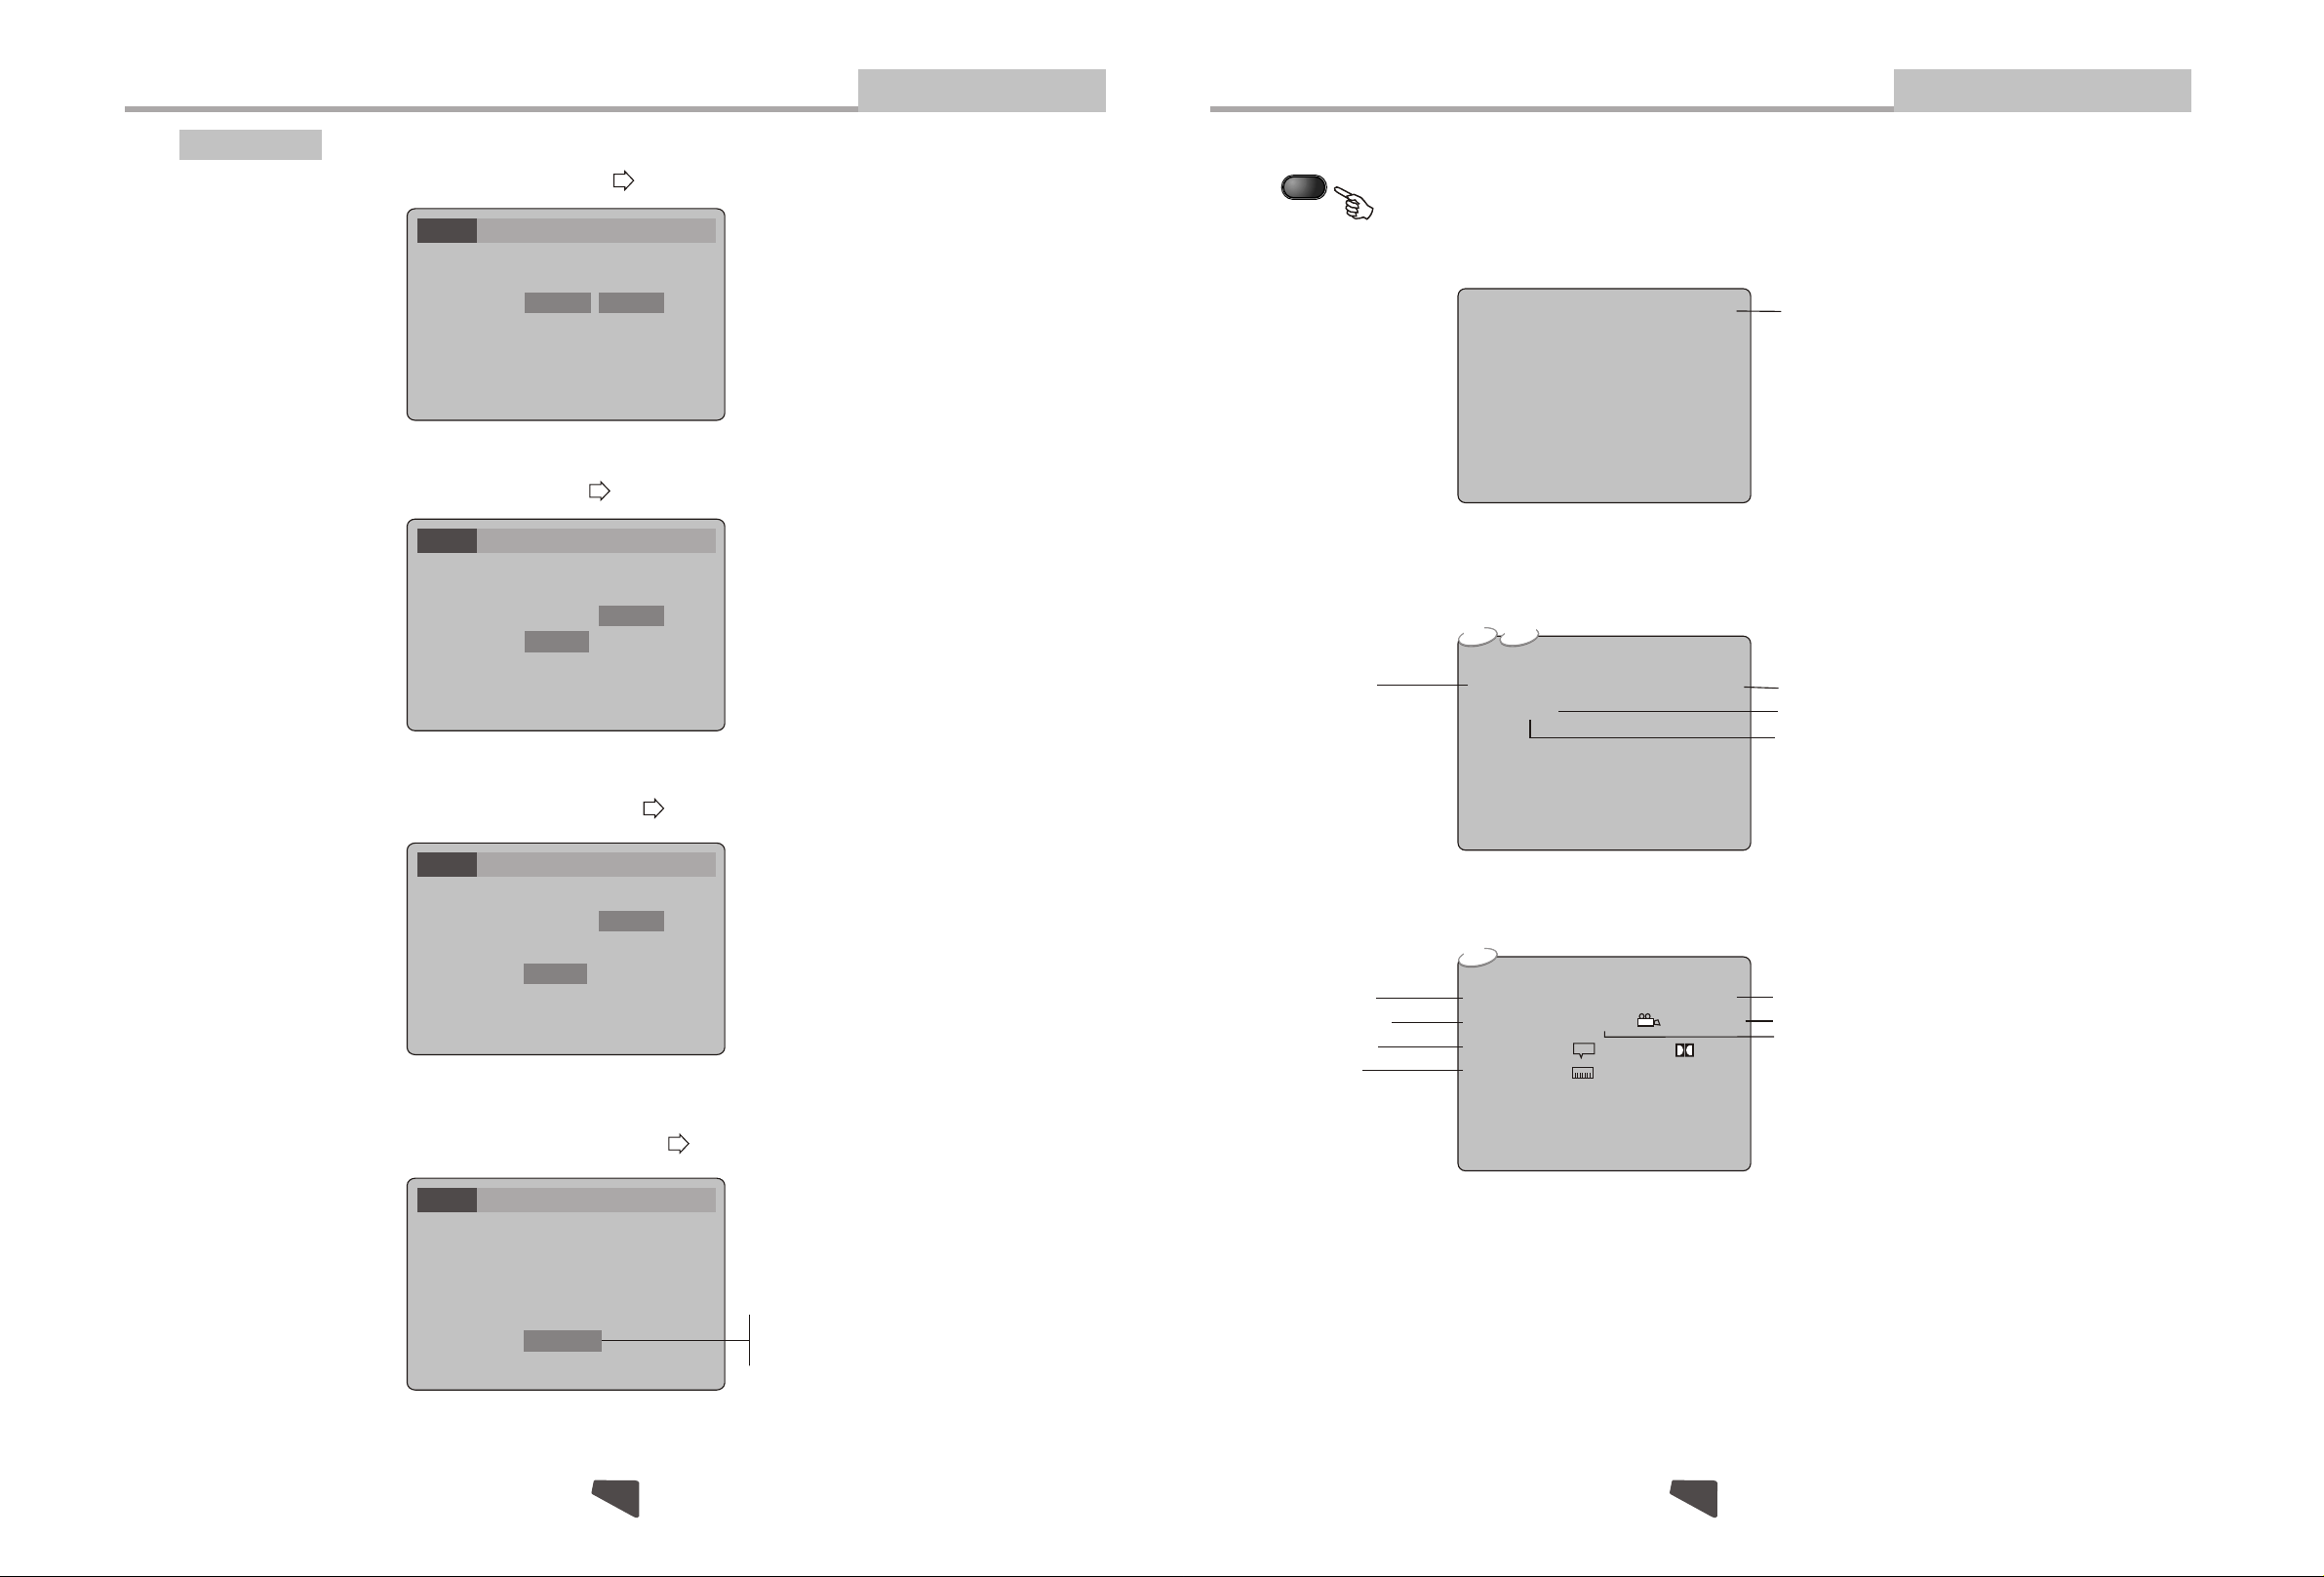
Language Setup
Select [Language] in the Setup Menu, and press ENTER to display [Language] submenu: the
Language Video Audio MoreAud Rating
Press to
select the menu
item
OSD Menu
Subtitle
Audio
DVD Menu
DivX subtitle
A or . Press ENTER to set
B. Press to go back one menu
C. Press OR repeatedly to return to the Setup Menu
English
English
English
English
Western Europe
Select press ENTER to display submenu[OSD Menu], and or the [OSD Menu] :
Language Video Audio MoreAud Rating
OSD Menu
Subtitle
Audio
DVD Menu
DivX subtitle
English
English
English
English
Western Europe
English
A . Press ENTER to confirm.
B. Press SETUP to exit the Setup Menu.
1320
Page 15
Modes and Features Setup
Advanced Features
Remote Control Operation
Advanced Features
Language Setup
Select [Subtitle], and press ENTER or to display the [Subtitle] submenu:
Language Video Audio MoreAud Rating
OSD Menu
Subtitle
Audio
DVD Menu
DivX subtitle
English
English
English
English
Western Europe
English
French
Spanish
German
A. Press ENTER to confirm
B. Press SETUP to exit the Setup Menu
Select [Audio],and press ENTER or to display the [Audio] submenu:
Language Video Audio MoreAud Rating
OSD Menu
Subtitle
Audio
DVD Menu
DivX subtitle
English
English
English
English
Western Europe
English
French
Spanish
German
A. Press ENTER to confirm
B. Press SETUP to exit the Setup Menu
Select [DVD Menu], and press ENTER or to display the [DVD Menu] submenu:
DISPLA Y
During playback, press DISPLAY to display the current time counter position.
0:00:10
0:04:45
Elapsed time of the current track/chapter
Press DISPLAY again to display additional information about the playing disc.
Others
CD
Disc type
Other
Track
1/15
0:00:10
0:04:45
Elapsed time of the current track
Total tracks
Current track
Language Video Audio MoreAud Rating
OSD Menu
Subtitle
Audio
DVD Menu
DivX subtitle
English
English
English
English
Western Europe
English
French
Spanish
German
A. Press ENTER to confirm
B. Press SETUP to exit the Setup Menu
Select [DivX Subtitle], and press ENTER or to display the [DivX Subtitle] submenu:
Language Video Audio MoreAud Rating
OSD Menu
Subtitle
Audio
DVD Menu
DivX subtitle
A. Press ENTER to change your selection
B. Press SETUP to exit the Setup Menu
English
English
English
English
Western Europe
Western Europe
Centra Europe
Off
Disc type
Current title
Audio type
Subtitle
DVD
DVD
Title 1/10
Audio
Subtitle
0:00:10
Chapter 2/20 Angle 2/2
1 Eng
1 Eng
0:04:45
5.1Ch
Elapsed time of the current title
Angle
Current chapter
1914
Page 16
Remote Control Operation
Advanced Features
Modes and Features Setup
Advanced Features
STANDBY
OPEN/CLOSE
During playback, press ST ANDBY to stop the
player and return to standby mode.
While the player is in standby, press STANDBY
or any key on the front panel to resume normal
operation.
To open the disc tray, press OPEN/CLOSE.
To close the disc tray, press OPEN/CLOSE again.
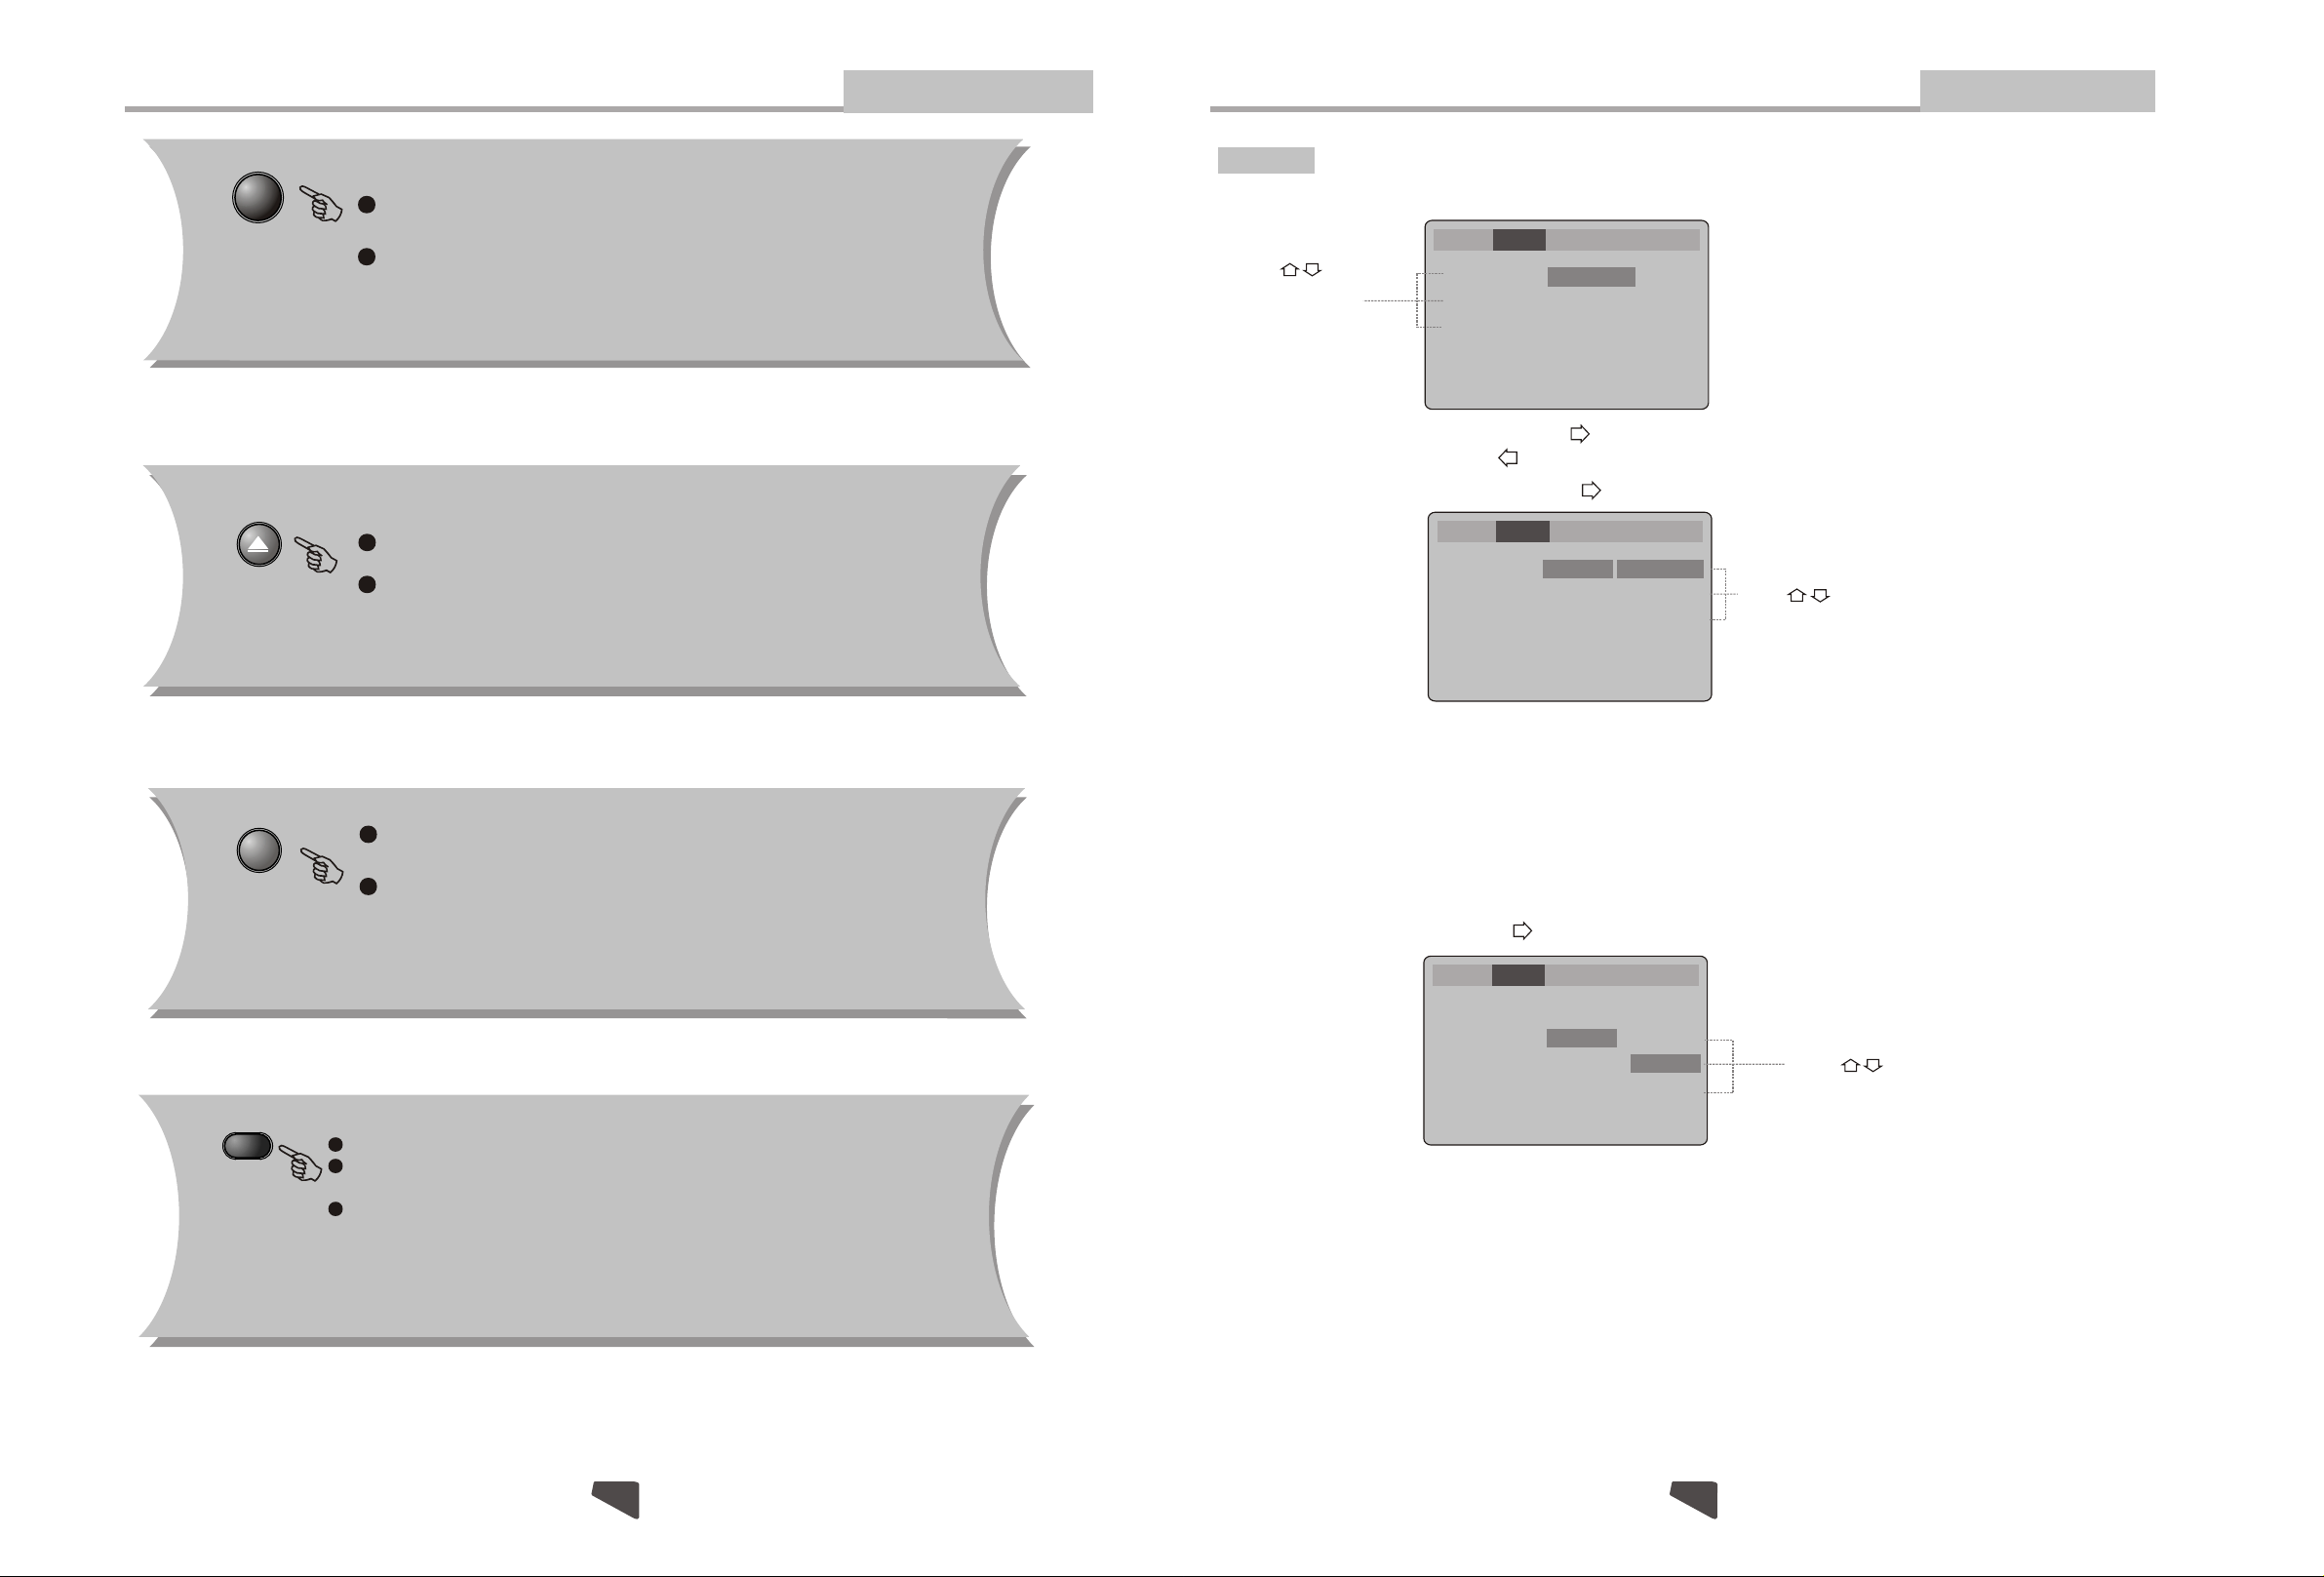
Video Setup
[Video] the [Video] sub :Select in the Setup Menu, and press ENTER to display menu
Language Video Audio MoreAud Rating
Press to
select the menu
item
TV shape
TV system
Video Output
A or set. Press ENTER to
B. Press to return to the Setup Menu
4:3 PS
NTSC
S-Video
Select [TV shape], and press ENTER or to display the [TV shape] submenu:
Language Video Audio MoreAud Rating
TV shape
TV system
Video Output
4:3 PS
NTSC
S-Video
4:3 PS
4:3 LB
16:9
Press to change your selection
0-10+ keys
These keys are used to input the time, as well as
title, chapter and track numbers.
When a numeric item is displayed on the screen,
press the 0-10+ keys to select the desired entry,
and press ENTER to confirm.
A-B
During playback, press A-B to select point A.
Press it again to select point B. The player will repeat the section from A
to B automatically.
Press A-B third time to cancel A-B repeat and clear points A and B.
Note: 1. During CD playback, points A and B must be within the same track.
During DVD playback, points A and B can be selected from different chapters.
2. This function is subject to the disc.
A . Press ENTER to confirm B. Press SETUP to exit the Setup Menu
[4:3 PS] -Pan and scan refers to pictures where part of pictures is cut
off so it fills the whole screen.
[4:3LB] -Letter Box refers to pictures where black bands appear at the
top and bottom.
[16:9] -The picture fills the screen of a wide-screen (16:9) television.
Note: Not all DVDs offer movies in Full Screen format. If not, the disc will override your
TV Display setting and the movie will be displayed in Letterbox format.
[TV system] the [TV system] sub :Select and press ENTER or to display menu
Language Video Audio MoreAud Rating
TV shape
TV system
Video Output
A . Press ENTER to confirm
B. Press SETUP to exit the Setup Menu.
4:3 PS
NTSC
S-Video
NTSC
PAL
AUTO
[NTSC] -Select if you are using NTSC signal system to match your TV set.
[PAL] -Select if you are using PAL signal system to match your TV set.
[AUTO]- Select if you are using AUTO signal system to match your TV set.
Press to change your selection
1518
Page 17
Modes and Features Setup
Advanced Features
Modes and Features Setup
Advanced Features
Language Video Audio MoreAud Rating
Select [Video Output], and press ENTER or to display
the [Video Out] submenu:
A . Press ENTER to confirm
B. Press SETUP to exit the Setup Menu
Note: The Composite video and
TV shape
TV system
Video Output
4:3 PS
NTSC
S-Video
S-Video
YUV
YPbPr
S-video output is always available.
[S-Video] -Select if you connected the DVD player
to your TV using thecomposite Video output.
[YUV] -Select if you connected the DVD player to your TV using the YUV output.
[Y Pb Pr] - Select if you connected the DVD player to your TV using progressive scan.
Press to change your selection
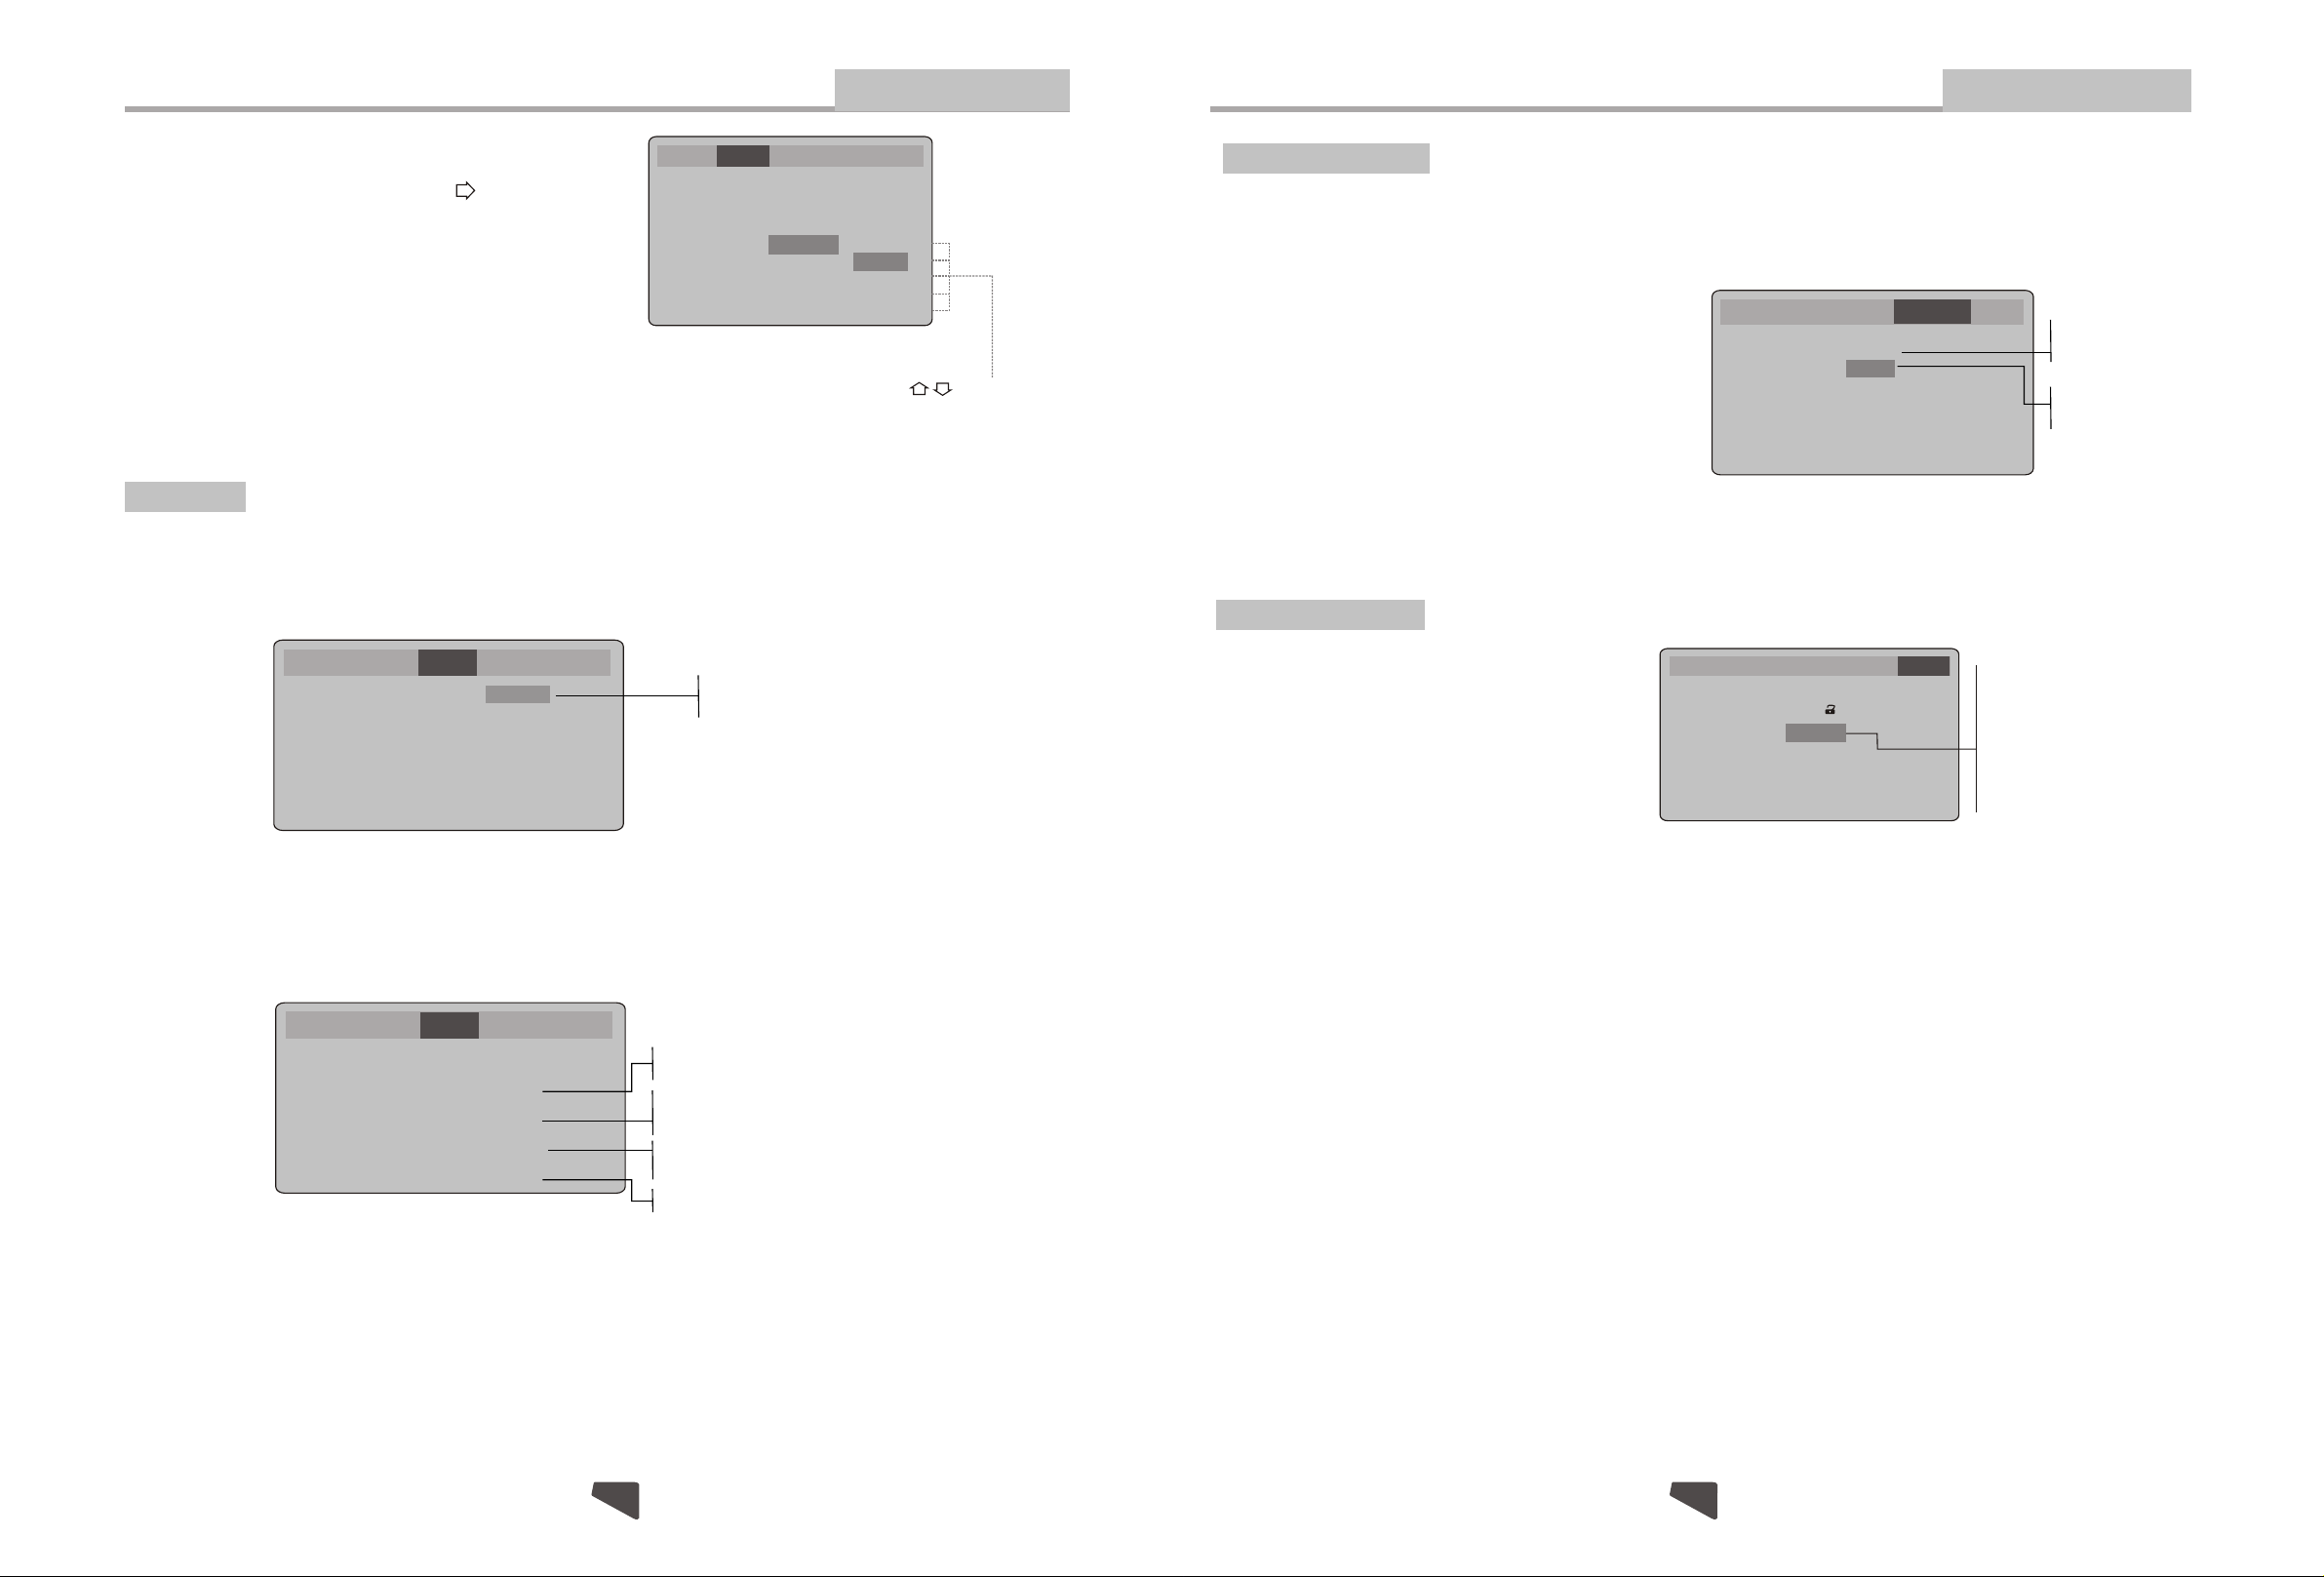
Audio Setup
The Audio menu allows you to set the analog audio outputs to correspond with the external components you have connected
to the player. For example, if you connected the player to a TV using the Stereo Audio jacks, you should set
front speaker to PRESENT and other speaker to NONE to enjoy down mixed stereo audio.
Language Video Audio MoreAud Rating
Bass Management
Front Speakers
Center Speakers
Surround Speakers
Subwoofer
Off
Present
Present
Present
Present
Off
ON
A. Press ENTER to confirm
B. Press SETUP to exit the Setup Menu
Bass Management: you can select Bass redirection or not.
Language Video Audio MoreAud Rating
Present
Bass Management
Front Speakers
Center Speakers
Surround Speakers
Subwoofer
Off
Present
Present
Present
Present
Large
Small
Present
Large
Small
None
Present
Large
Small
None
Present
None
More Audio Setup
The More Audio menu includes Pro Logic and Subwoofer settings.
Pro Logic Setting
The DVD player has a built-in Dolby Pro Logic decoder to provide virtual surround sound for PCM
(stereo) source material from the 5.1 channel analog audio outputs.
A. From Stop mode, press SETUP.
B. Select More Audio and press ENTER.
Language Video Audio Rating
More Aud
C. Select Pro Logic and press ENTER.
D. Select the desired Pro Logic setting and press
ENTER:
Auto Stereo audio soundtracks will
be output in Dolby Pro Logic mode.
On All audio soundtracks will be output in
Dolby Pro Logic mode.
Off (default) Dolby Pro Logic decoding will always
Digital Output
Pro Logic
Pinknoise
DRC
CNTR
REAR
Down
CTRL
CTRL
Sampling
Raw
Off
Off
Off
0ms
0ms
Off
be inactive.
E. Press SETUP to save and exit.
Rating Setup
The Rating menu allows you to block playback
of DVDs based on their ratings.
Setting the Password & Rating Level
The DVD player allows you to block playback
of inappropriate content with a passwordprotected Rating system (not all discs are rated).
A. From Stop mode, press SETUP.
B. Select Rating and press ENTER.
C. Select Rating and press ENTER repeatedly to set the rating from 1 (most restrictive)
to 8( least restrictive ).
If a password has already been set, the lock icon will be closed. You will not be
able to select Rating until you SELECT the correct password using the 0-9 keys.
D. Select Password.
E. Use the 0-9 keys to SELECT a 4-digit password and press ENTER. The lock icon will
close to indicate that the rating and password are set.
F. Press SETUP to save and exit.
Setting DivX registration
Here, you will get a registration code, you can use the code to download some movies from DivX.
Not all DVDs are rated.
DVDs that are rated higher than the level you select will not play without SELECTING
the correct password.
If you forget your Rating password, select 8888 to clear the memory. Keep this pass word out of reach of children as if will always unlock the Parental Control setting.
Language Video Audio MoreAud Rating
Password ---Rating
LOAD Factory
DivX Registration
8. Adult
Reset
Display
1:Kid Safe
2:G
3:PG
4:PG-13
5:PG-R
6:R
7:NC-17
8:Adult
RAW
PCM
Off
Auto
On
Off
A. Press ENTER to confirm
B. Press SETUP to exit the Setup Menu
you can change the status of these speakers by select these items.
-16-
1716
-17-
 Loading...