

Page 1
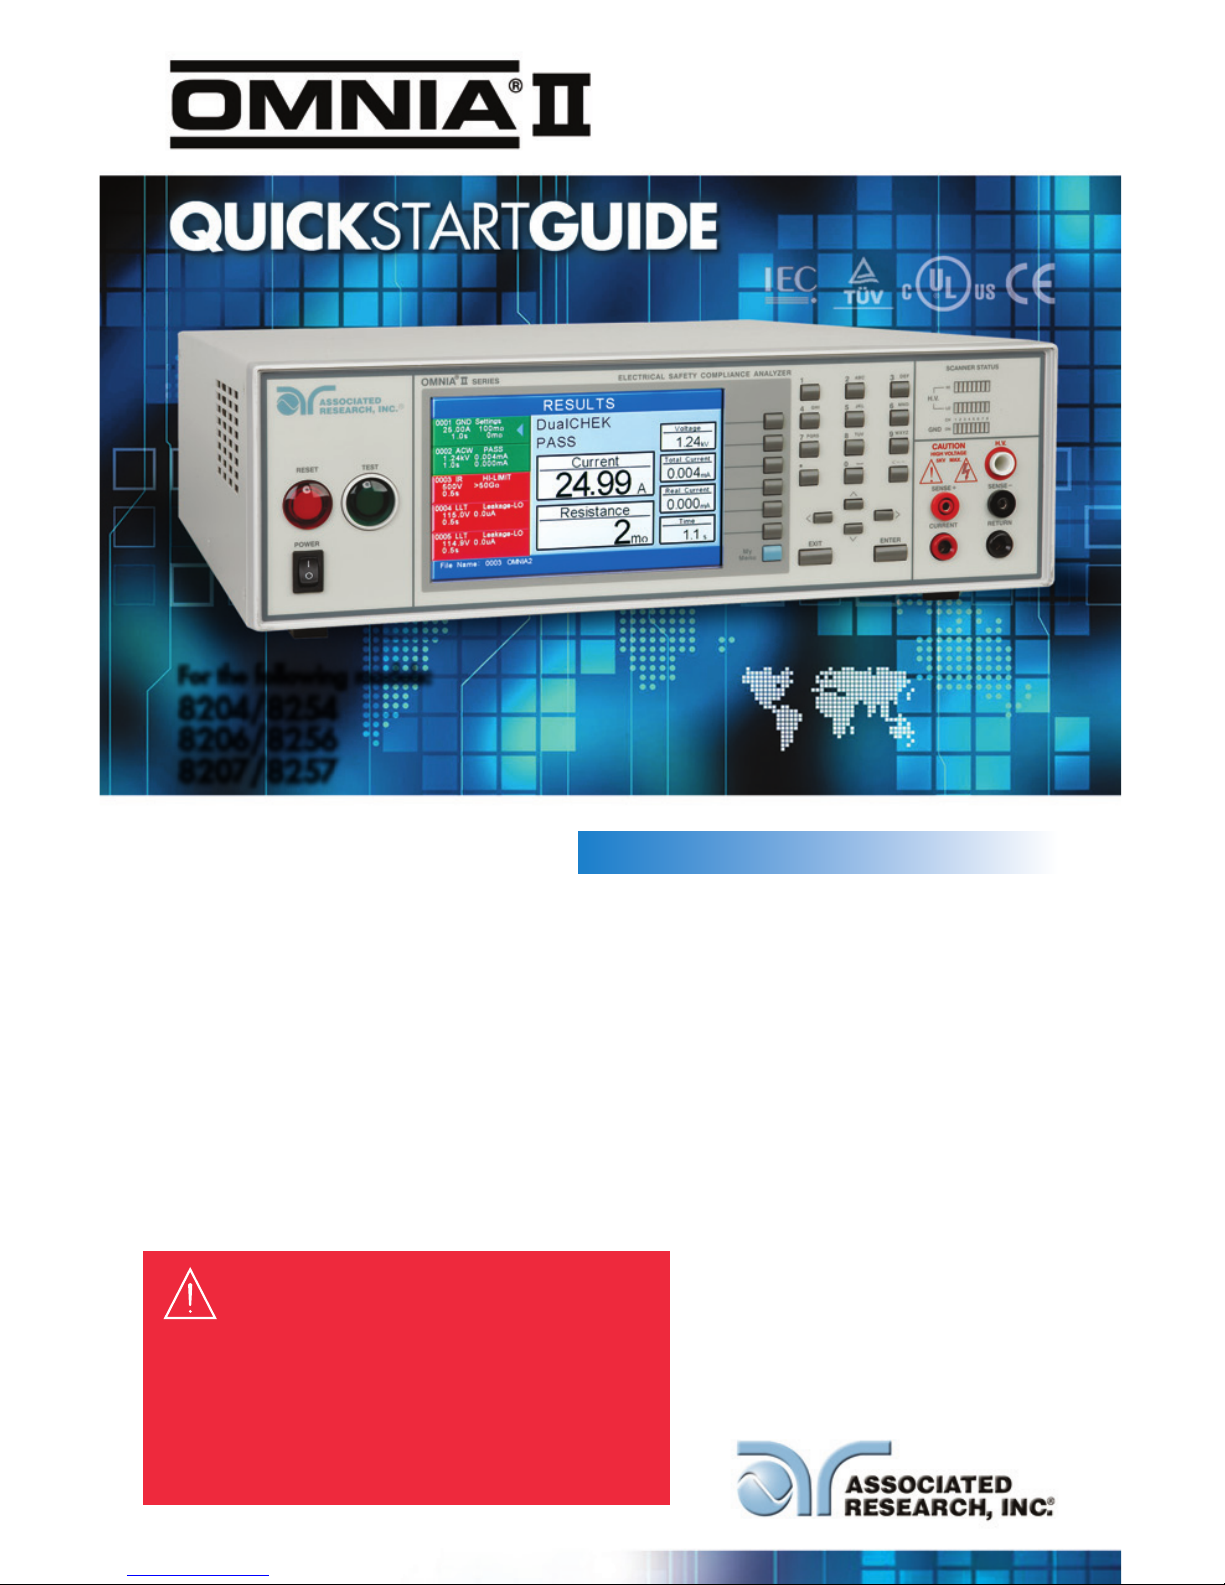
For the following models:
8204/8254
8206/8256
8207/8257
SafetyCHECKLIST
KeeP unqualified/unauthorized personnel away from test area
arrange test stations in a safe and orderly manner
never touch products or connections during a test
StOP the test first in the event of a problem
never perform a ground bond test on energized circuitry or equipment
be Sure to always connect the return test lead first
handle test clips by insulation only, never touch clips directly
WARNING: THIS GUIDE WAS CREATED FOR
OPERATORS HAVING SOME FAMILIARITY WITH
ELECTRICAL SAFETY TESTING. AN ELECTRICAL SAFETY
TESTER PRODUCES VOLTAGES AND CURRENTS THAT
CAN CAUSE HARMFUL OR FATAL ELECTRIC SHOCK.
TO PREVENT ACCIDENTAL INJURY OR DEATH, THESE
SAFETY PROCEDURES MUST BE STRICTLY OBSERVED
WHEN HANDLING AND USING A TEST INSTRUMENT.
Page 2
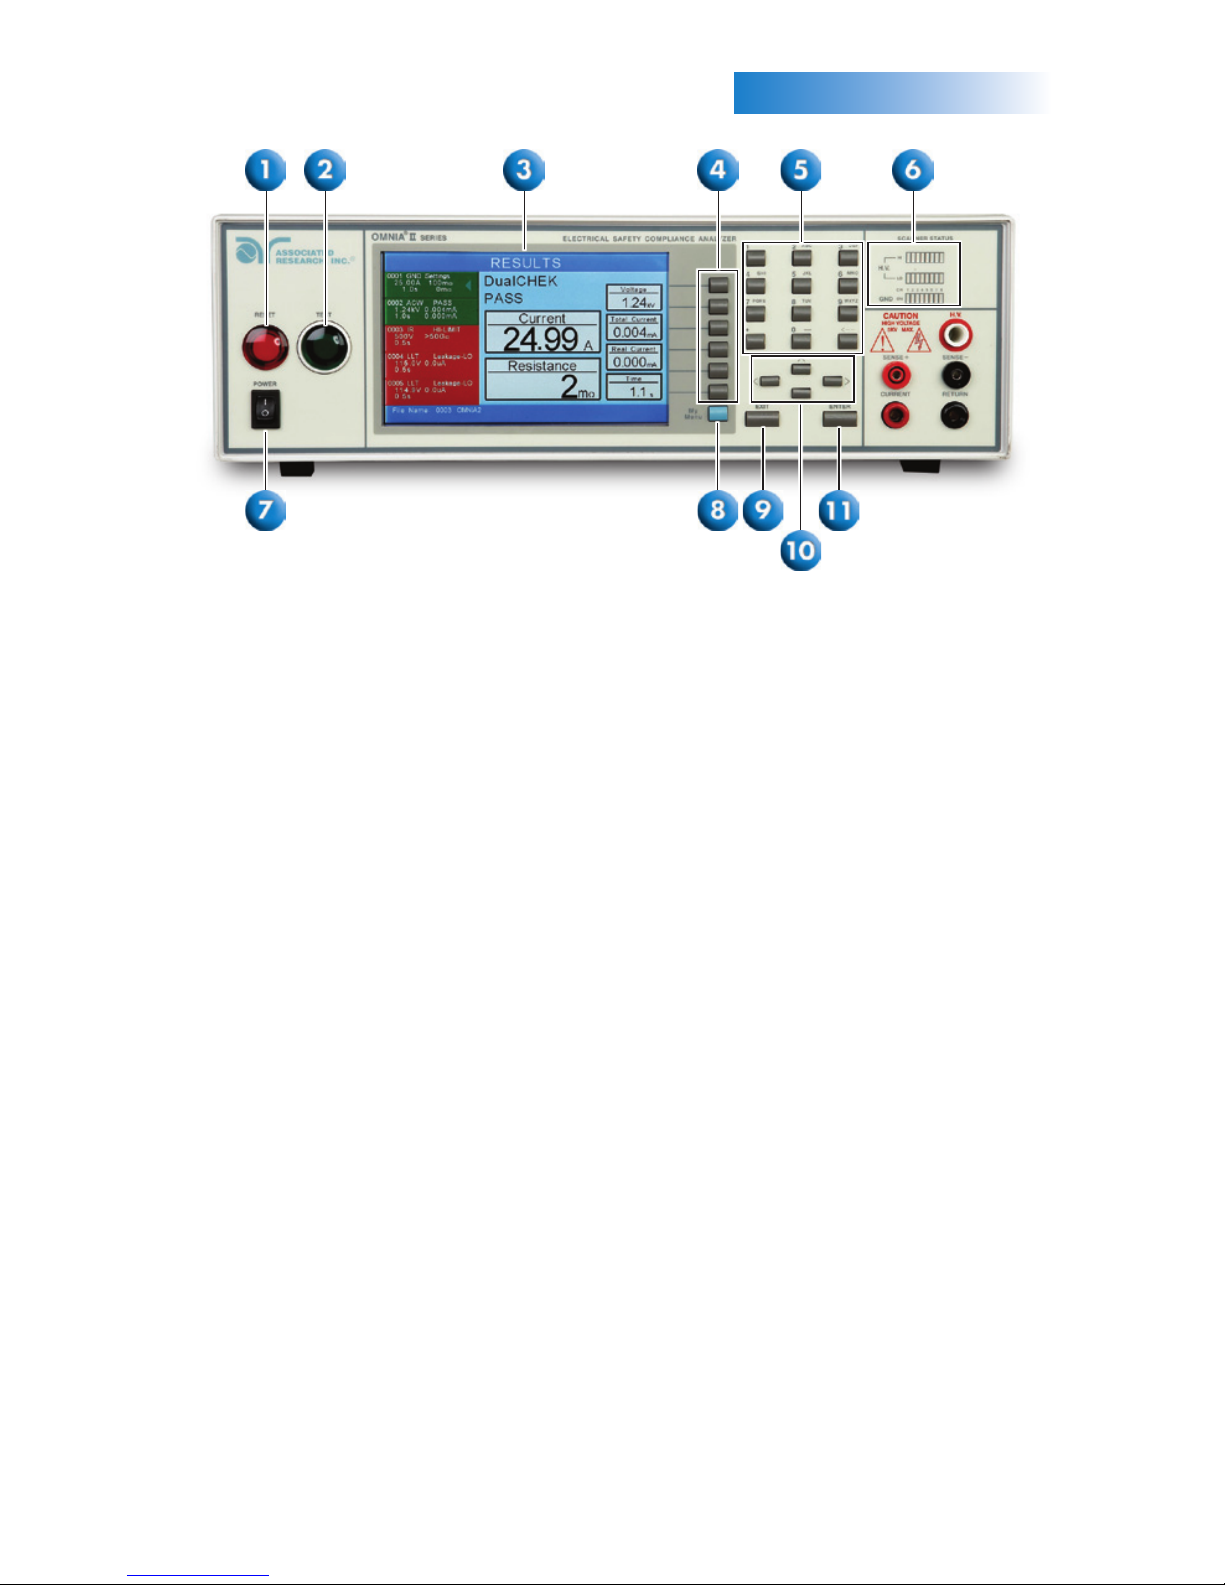
frOntPANELcOntrOlS
1.
1. RESET BUTTON: Red momentary contact switch used to reset the instrument in case
of a failure or to proceed to the next test. Also serves as an abort signal to stop any
test in progress.
2. TEST BUTTON: Green momentary contact switch used to start a test.
3. GRAPHIC TFT: 800 X 480 Color TFT display.
4. SOFT KEYS: Multi-function keys used to select screens and change parameters.
5. NUMERIC DATA ENTRY: Keys used to enter numeric data.
6. SCANNER STATUS LED’s: Color coded LED’s that indicate the status of the eight H.V.
and eight G-Bond channels on the internal scanner.
7. POWER SWITCH: Rocker style switch with International ON (I) and OFF (0)
markings.
8. MY MENU KEY: Selects the My Menu screen with user-customizable soft keys.
9. EXIT KEY: Key used to escape from parameter editing and return to prior screens.
10. UP, DOWN, LEFT, AND RIGHT ARROW KEYS: Keys used to scroll the highlighted
area or cursor in the specified direction.
11. ENTER KEY: Key used to finalize parameter entries. The ENTER key may also
be used to scroll the highlighted area to different parameters in the parameter
setting screens.
Page 3
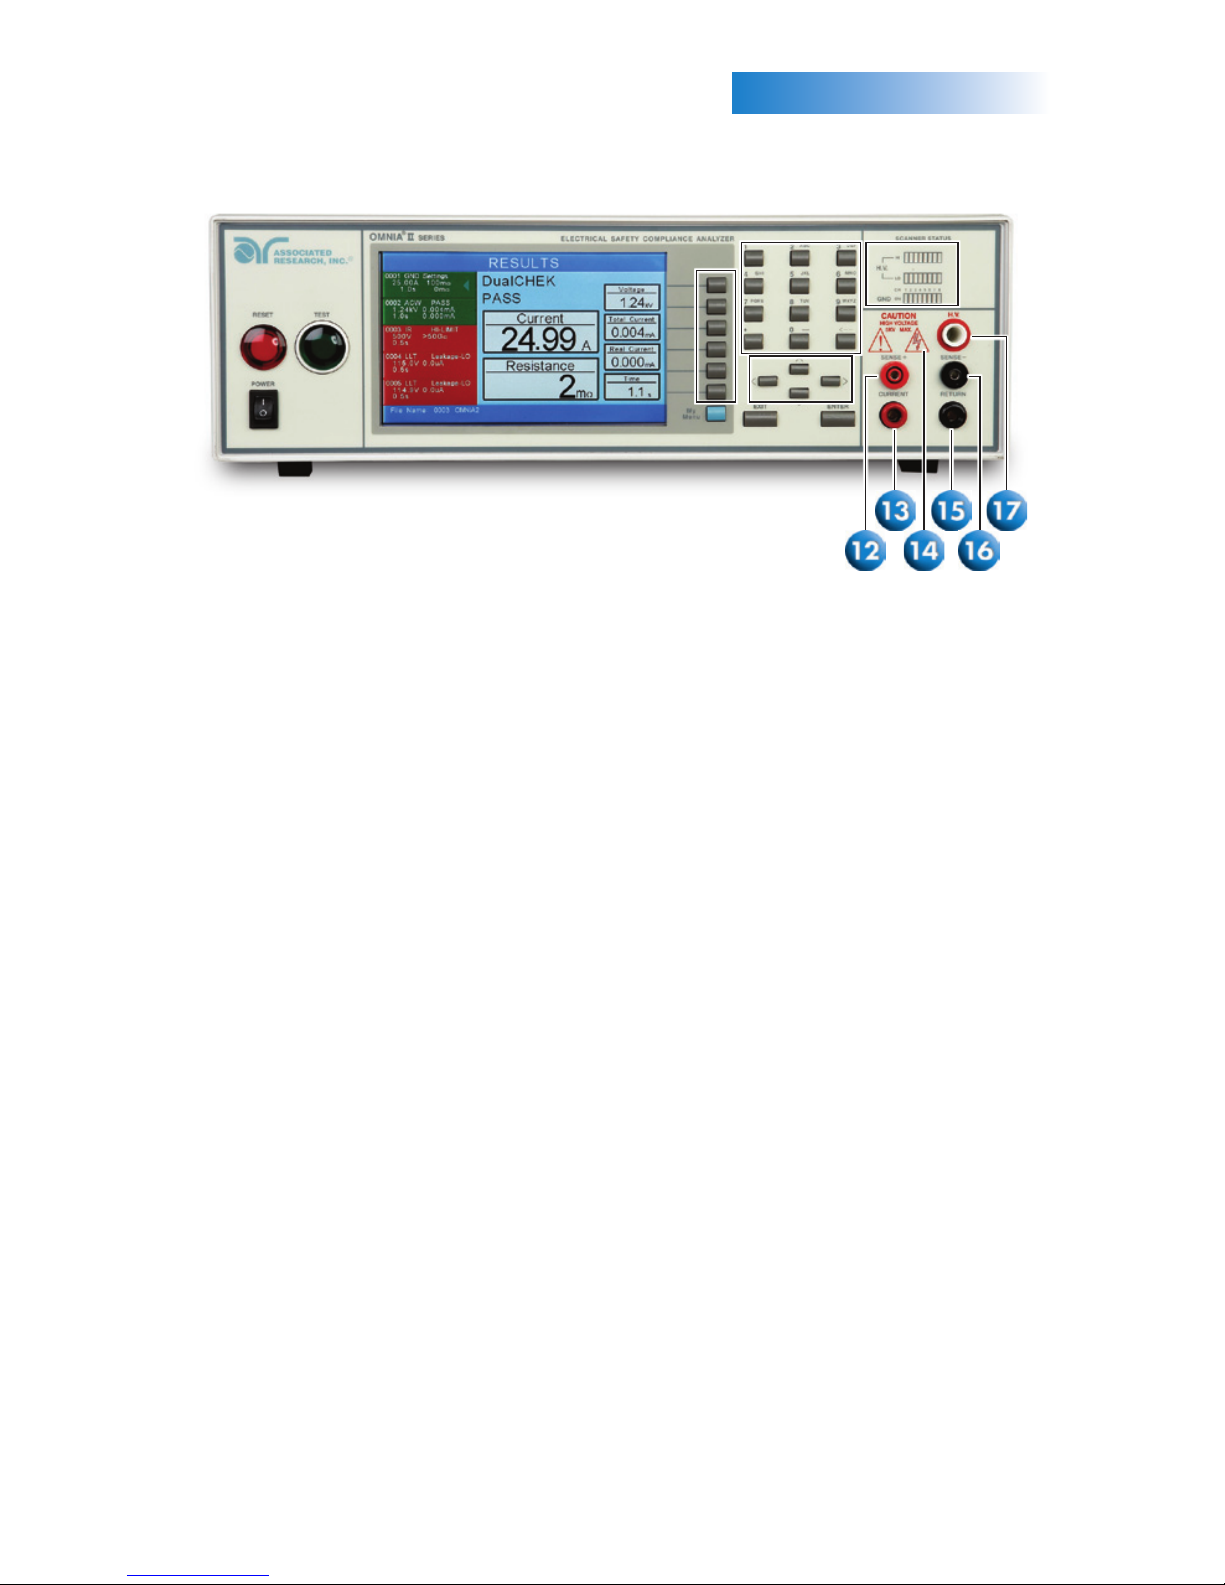
frOntPANELcOntrOlS
2.
12. SENSE (+) TERMINAL: Connector used to attach the (+) sense lead for 4-wire
Kelvin current measurement. This connection provides for accurate current
measurement during the Ground Bond test.
13. CURRENT OUTPUT TERMINAL: Connector used to attach the high current output
lead, adapter box high current lead or test fixture high current lead to the
instrument. This connection provides the output current for the ground bond and
continuity.
14. HIGH VOLTAGE INDICATOR: Flashing indicator to warn the operator high voltage
is present at the high voltage output terminal.
15. RETURN OUTPUT TERMINAL: Connector used to attach the return test lead,
adapter box return lead or test fixture return lead to the instrument. This
connection provides the return current path for the high voltage, ground bond
and continuity current.
16. SENSE (-) TERMINAL: Connector used to attach the (-) sense lead for 4-wire Kelvin
current measurement. This connection provides for accurate current measurement
during the Ground Bond test.
17. HIGH VOLTAGE OUTPUT TERMINAL: Connector used to attach the high voltage
test lead, adapter box high voltage lead or test fixture high voltage lead to the
instrument. This connection provides the high voltage used during a Hipot test.
Page 4
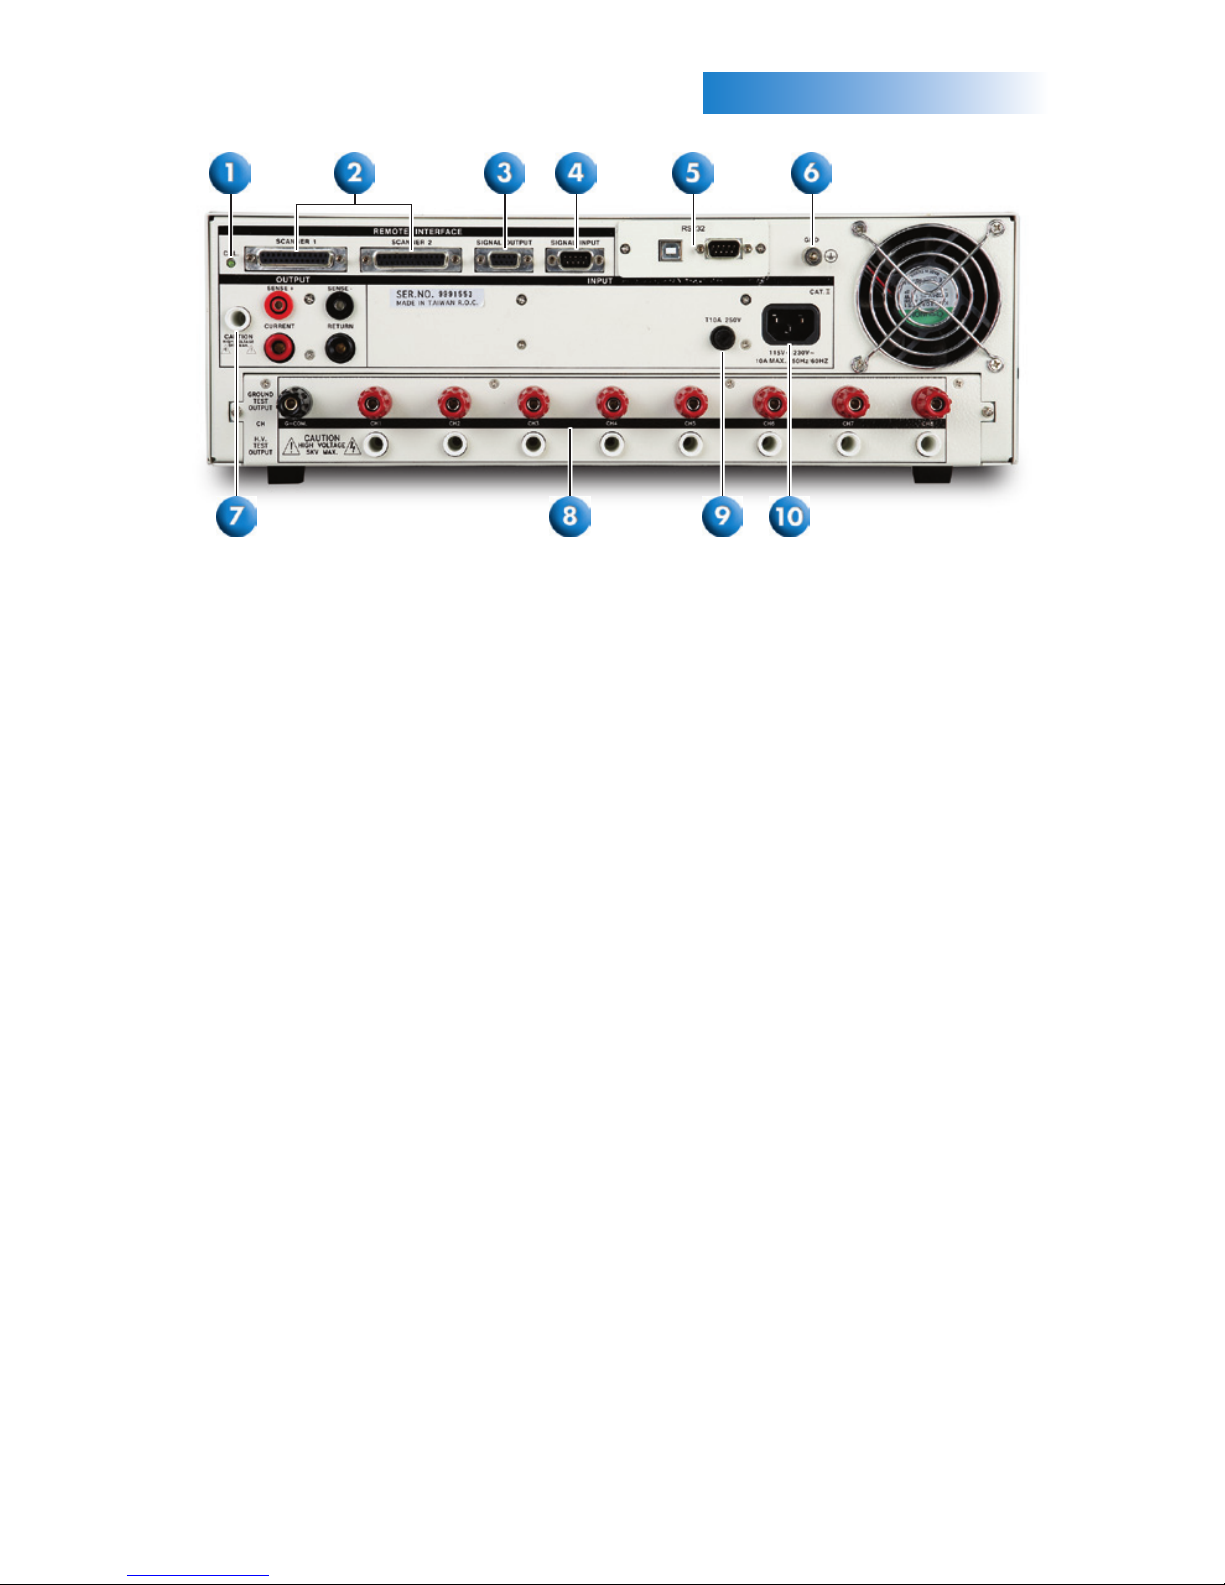
bacKPANELcOntrOlS
3.
1. CALIBRATION BUTTON: To put the instrument into the calibration mode push this
button and turn on the power switch simultaneously.
2. SCANNER CONNECTOR: For connection of optional external Scanner.
3. REMOTE SIGNAL OUTPUT: 9-Pin D sub-miniature female connector for monitoring
PASS, FAIL, and PROCESSING output relay signals.
4. REMOTE SIGNAL INPUT: 9-Pin D sub-miniature male connector for remote control
of TEST, RESET, and REMOTE INTERLOCK DISABLE functions, as well as MEMORY
SELECTION.
5. BUS INTERFACE: Standard connector for interconnection to the USB/RS-232 Bus
interface. Optional IEEE 488 and Ethernet interface also available.
6. CHASSIS GROUND (EARTH) CONNECTION: This terminal should be connected to a
good earth ground before operation.
7. REAR PANEL OUTPUT TERMINALS: Second set of output connectors in parallel with
the front panel connectors.
8. SCANNER OUTPUTS: Optional scanning matrix that provides eight HV/Return
connections and eight Ground Bond connections.
9. FUSE RECEPTACLE: To change the fuse, unplug the power (mains) cord and turn
the fuse receptacle counter-clockwise. The fuse compartment will be exposed. Please
replace the fuse with one of the proper rating.
10. INPUT POWER RECEPTACLE: Standard IEC 320 connector for connection to a
standard NEMA style line power (mains) cord.
(Model 8204/8254, Back Panel)
Page 5
bacKPANELcOntrOlS
4.
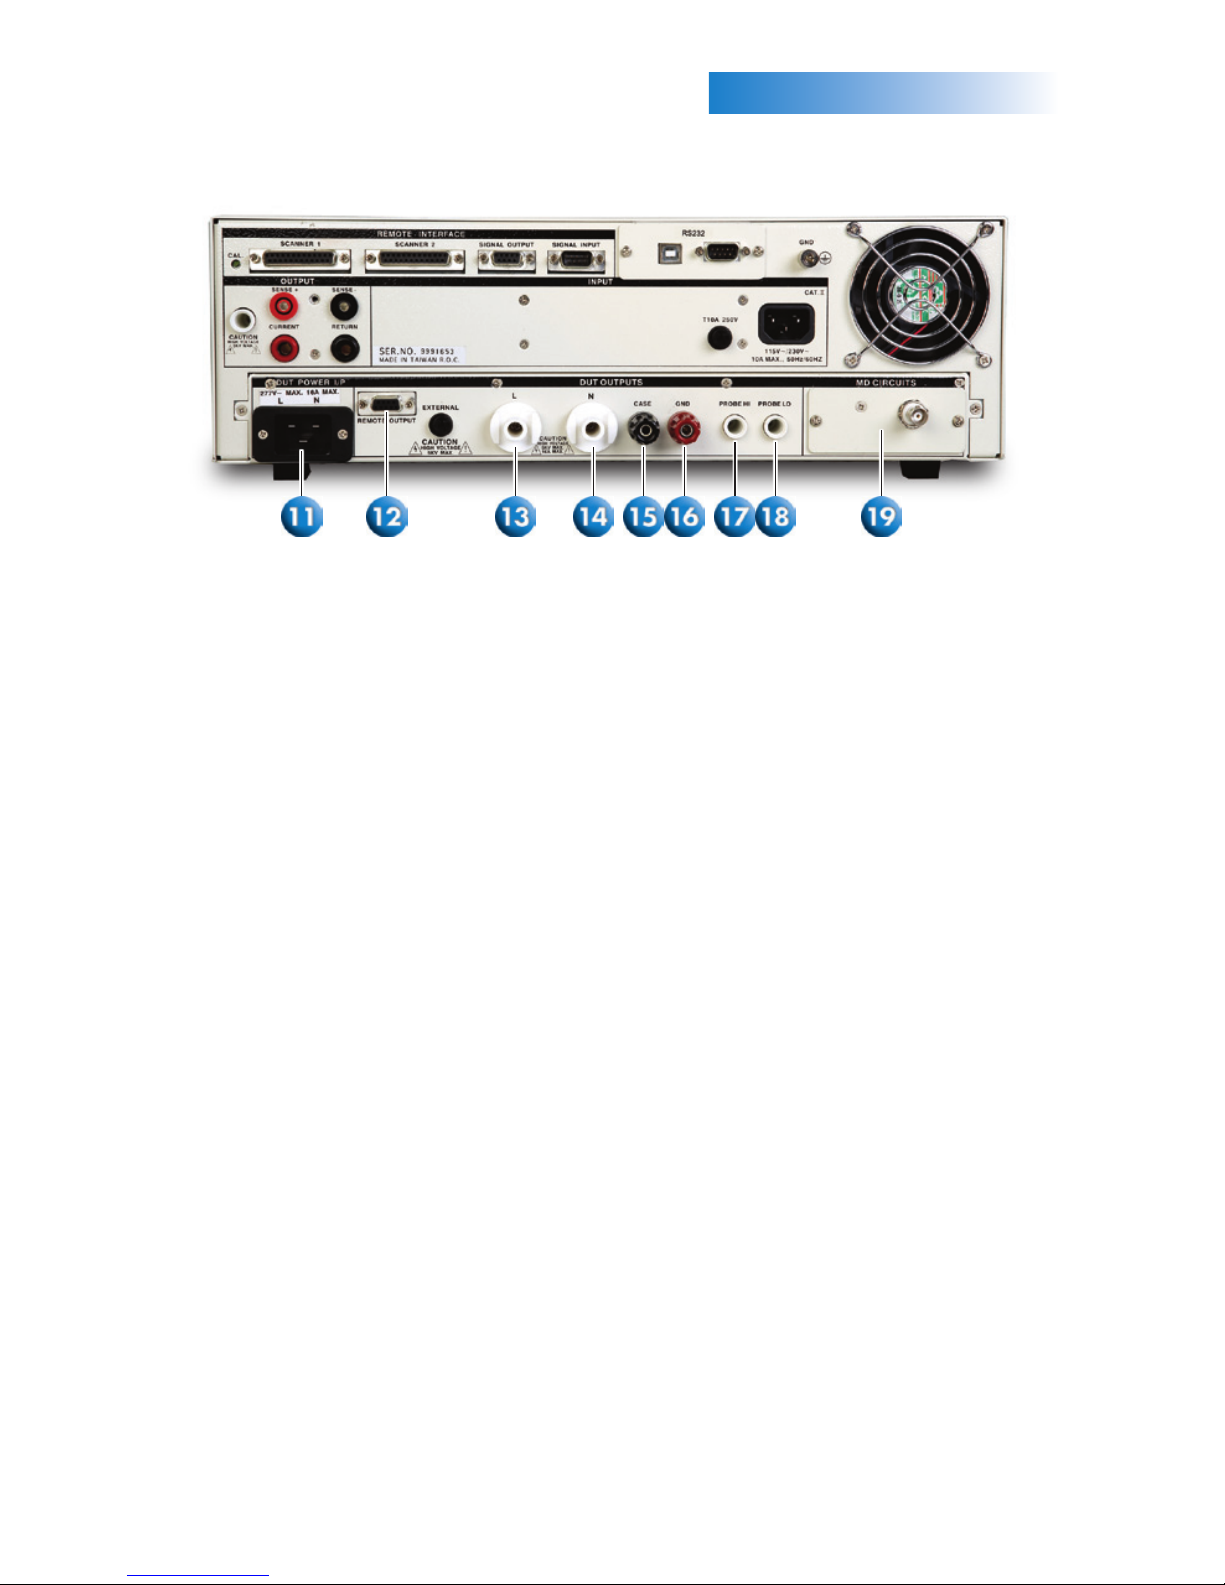
11. DUT POWER INPUT: Provides line and neutral input power connections. The input
is rated for 0-277 V 50/60 Hz.
12. REMOTE OUTPUT: Optional connector used to interface the OMNIA II with an APT
AC power source for remote memory selection (option 05).
13. L OUTPUT TERMINAL: Output terminal where the line power connection from the
adapter box is plugged in for the Functional Run test or Line Leakage test.
14. N OUTPUT TERMINAL: Output terminal where the neutral power connection from
the adapter box is plugged in for the Functional Run test or Line Leakage test.
15. CASE: Terminal connected to the DUT case or dead metal and provides the return
for the Ground Bond, Dielectric Withstand, and Insulation Resistance tests.
16. GND: Connector used to attach the adapter box Ground or Earth lead to the
instrument.
17. PROBE HI: Connector used to attach the Probe-HI test lead to the DUT. When
used with an appropriate test lead, this terminal connects one side of the MD
(measuring device) to the DUT during Enclosure or Applied Part Line Leakage tests.
18. PROBE LO: Connector used to attach the Probe-LO test lead to the DUT. When
used with an appropriate test lead, this terminal connects one side of the MD
(measuring device) to the DUT during Applied Part Line Leakage tests. The terminal
is always used in conjunction with the Probe-HI terminal.
19. MD CIRCUITS: Contains an external Measuring Device PCB that will enable during
a Line Leakage test when “External” is selected using the “Meas. Device” soft key.
The external MD allows the operator to configure a custom measuring device using
either a simple resistive component or a complex two pole network.
(Model 8206/8256 & 8207/8257, Back Panel)
Page 6
InStruMentSETUP
changIngTHEtyPeOFteSt
WarnIng: LOCATE A SUITABLE TESTING AREA WITH A THREE-PRONG,
GROUNDED OUTLET. BE SURE THAT YOUR THREE-PRONG OUTLET HAS
BEEN TESTED FOR PROPER WIRING. ALSO, MAKE SURE YOU READ
THE SAFETY CHECKLIST OF THIS GUIDE BEFORE STARTING TO TEST.
1. Connect the line cord into the rear of the instrument and plug the male end of the
cord into a grounded power source.
2. Plug the interlock connector into the Signal Input connector on the rear panel of the
instrument. OMNIA II is equipped with a Remote Interlock feature which utilizes a
set of closed contacts to enable the instrument’s output. In order to perform a test, the
interlock connector must be plugged into the Signal Input connection of the rear
panel of the instrument.
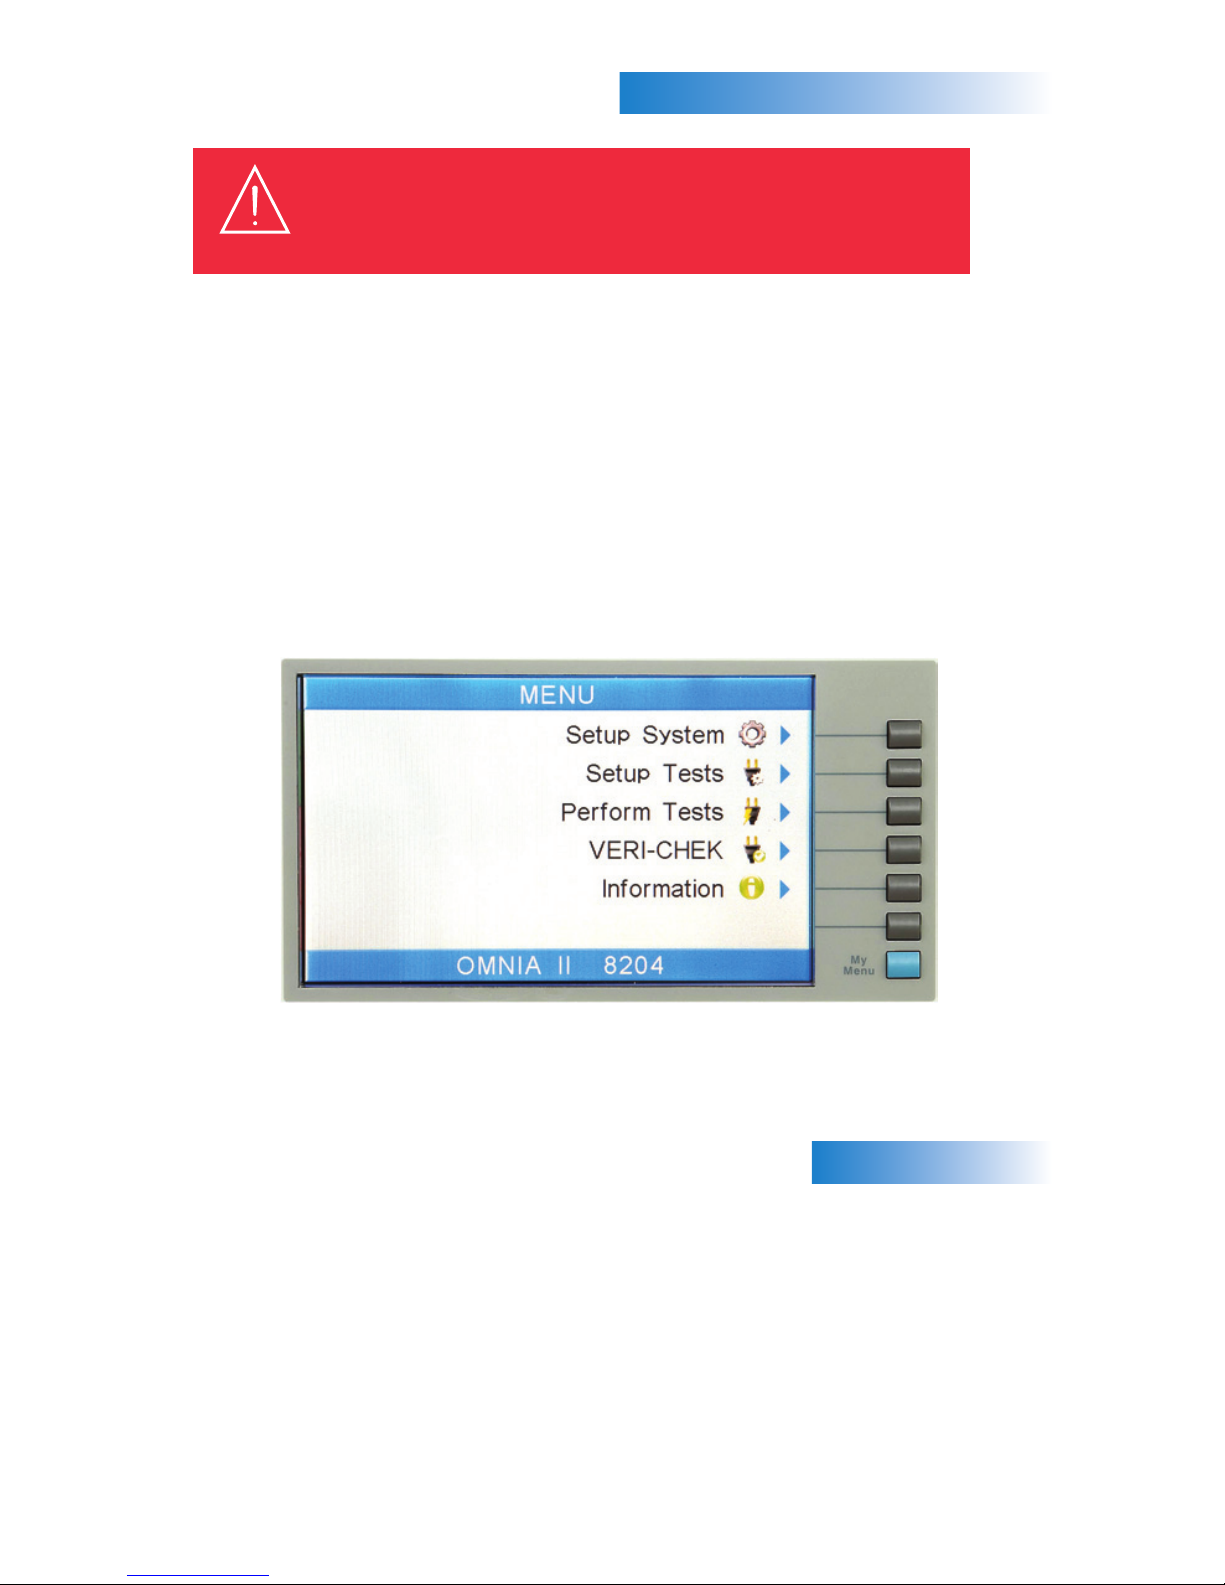
3. Turn the POWER switch to ON. The initialization screen will appear. After three
seconds the Main Menu screen will appear as shown below. (See Figure 1.)
addIng neW teStS
From the Main Menu screen, press the “Setup Tests” soft key.
On the Setup Tests screen, the test and step number will be highlighted.
Press the “Add” soft key and specify the type of test with the soft key options given
(Dielectric Withstand, Insulation Resistance, AC Ground Bond, DC Continuity, RUN
or LLT tests).
5.
(Figure 1. Main Menu Screen)
Page 7
6.
Once the test has been added, the parameters for the chosen test type will appear.
Use the soft keys to edit parameters on the right side of the screen (examples:
Frequency, Arc Detect and Ramp- HI).
Use the arrow keys (up, down, left, right) to scroll between test parameters on the left
side of the screen (examples: voltage, Hi-Limit T, Lo-Limit T, dwell time, ramp time, etc.).
Use the numeric keypad to change a parameter value. Once the desired value has been
entered, press EXIT to go back to the Setup Tests screen.
If default parameters are acceptable, press EXIT to go back to the Setup Tests screen.
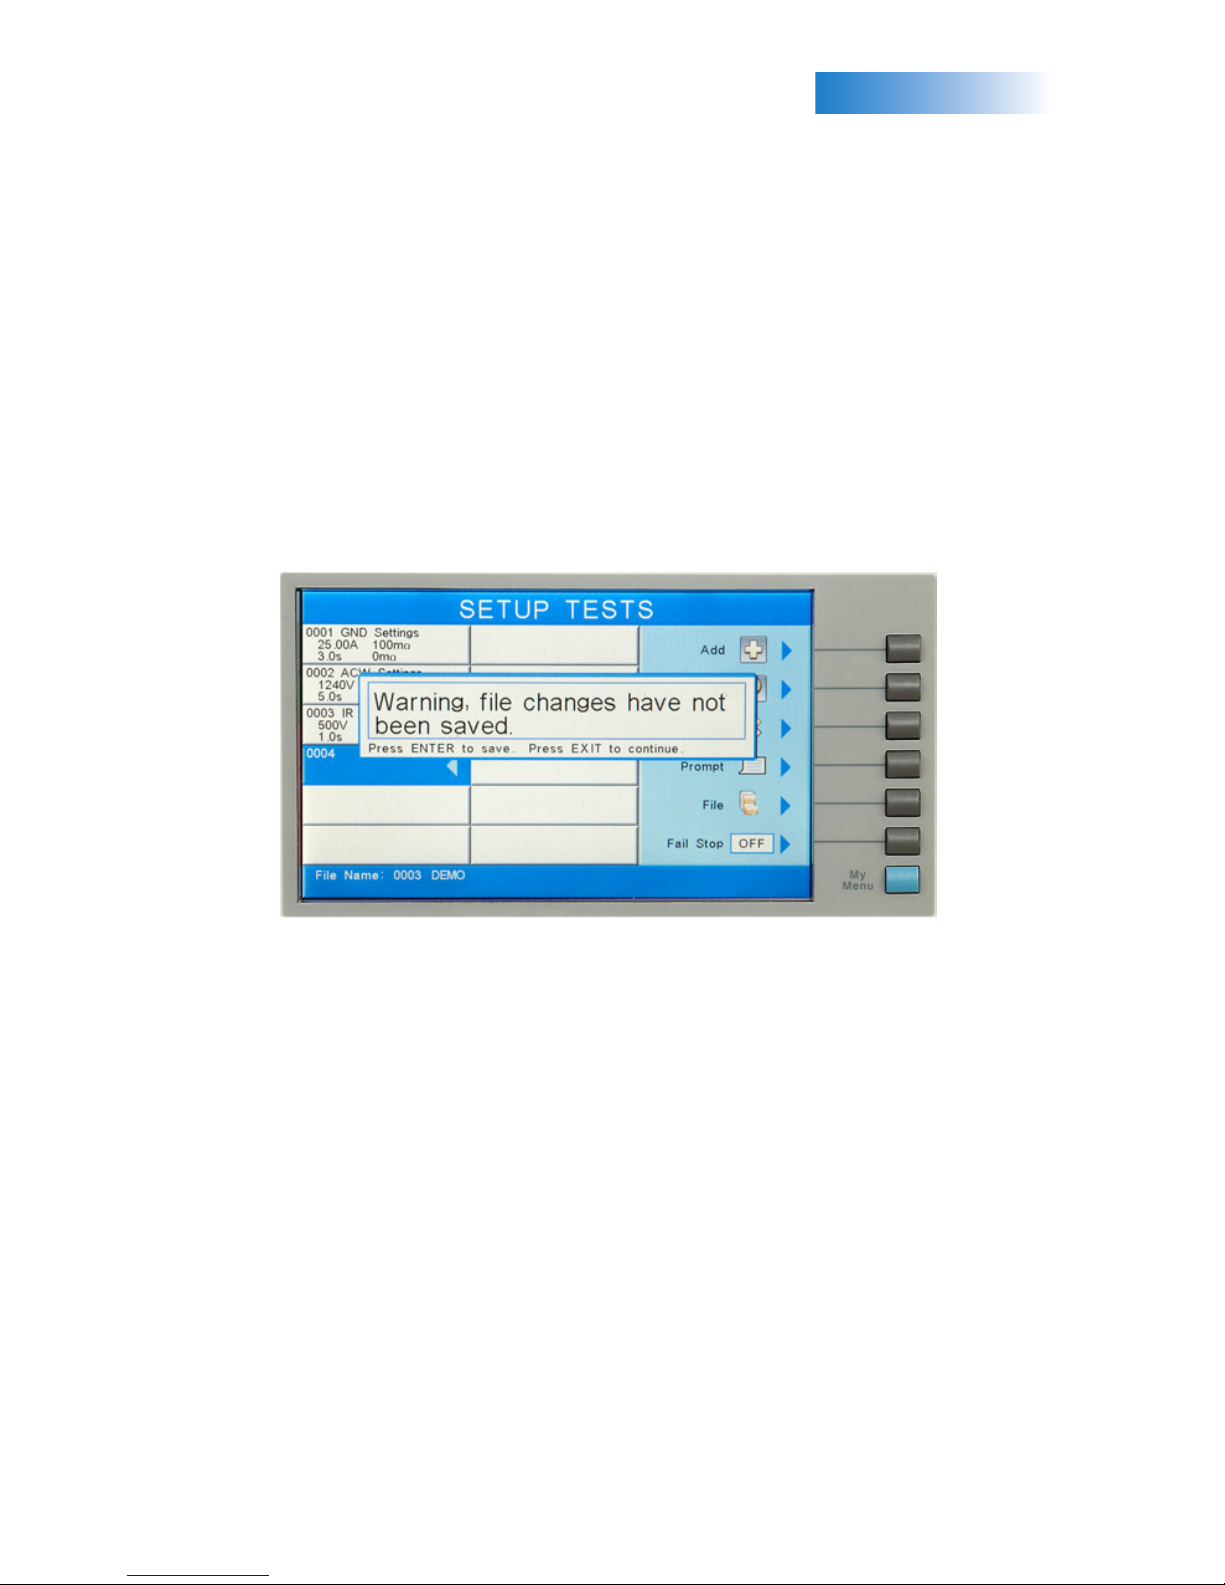
To save the test program, press EXIT from the Setup Test screen. You will see the
following prompt. (See Figure 2)
changIngTHEtyPeOFteSt
Press EXIT to continue without saving. Press ENTER to save.
Adding multiple tests to the same screen automatically creates a multiple step test
sequence. The tests will run in sequential order unless Single Step control in initiated. To
perform single steps, press the “Perform Test” soft key from the Main Menu screen. On
the right hand side of the Perform Test screen, there is a selection named Single Test.
Press the “Single Step” soft key to turn Single Step on. The tests will now run individually.
Press EXIT to go back to the Main Menu screen.
changIng teSt SettIngS and deletIng teStS
Test parameters on OMNIA II are fully adjustable. Common parameters that can be
adjusted include voltage, Hi-Limit, Lo-Limit, ramp up, dwell time, ramp down, Hi-Limit R
and Lo-Limit R among others.
From the Main Menu screen, press the “Setup Tests” soft key.
Use the up and down arrow keys to highlight the test to be edited and press the “Edit”
soft key.
(Figure 2. Setup Tests Screen)
Page 8
7.
Use the soft keys to edit parameters on the right side of the screen. Use the arrow keys (up,
down, right, left) to scroll between test parameters on the left side of the screen.
Use the numeric keypad to change a parameter value. Once the desired value has been
entered, press EXIT to go back to the Setup Tests screen.
Press EXIT to go back to the Setup Tests screen. Press EXIT to go back to the Main Menu
screen and you will be prompted to save your test file.
Deleting a test step is also done from the Setup Tests Screen. Highlight the test you want to
delete and press the “Delete” soft key.
Press ENTER and the step will be deleted. Press EXIT and step will not be deleted.
SavIng and lOadIng teSt fIleS
Test Programs can be saved in files for easy recall of test conditions.
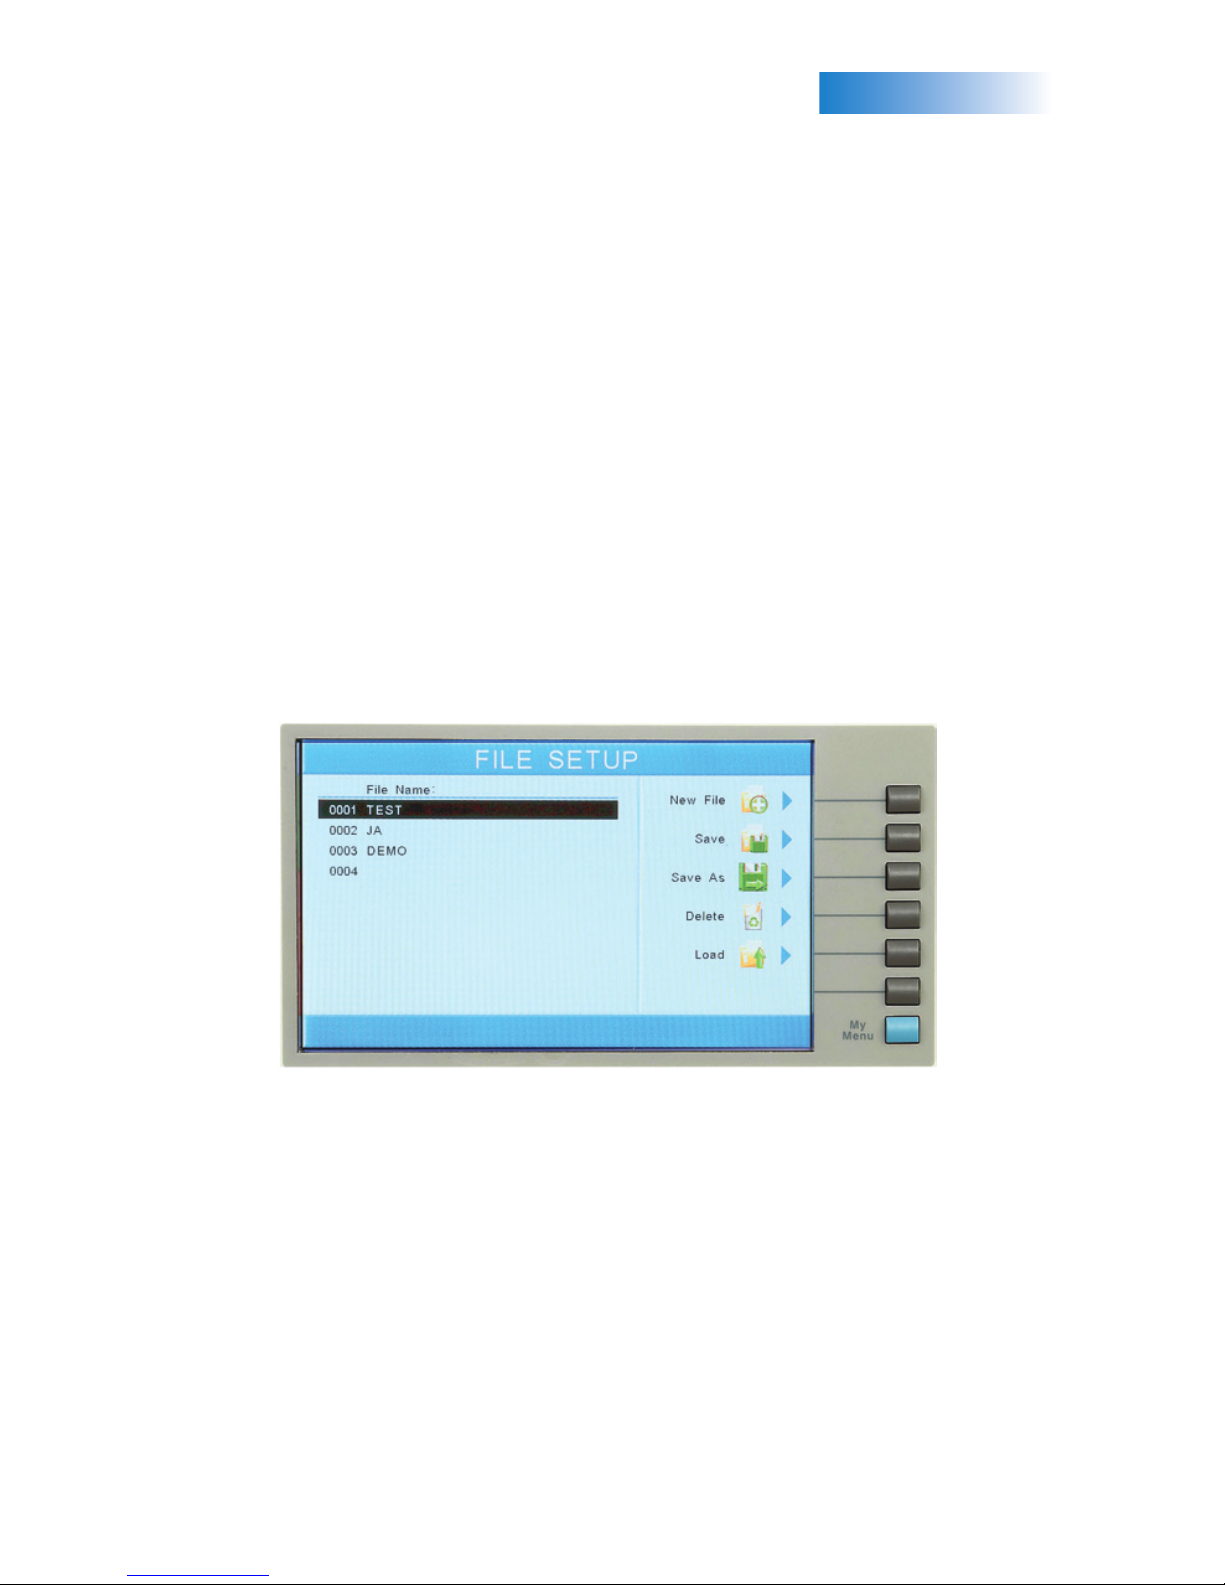
From the Main Menu screen, press the “Setup Tests” soft key. Press the “File” soft key from
the Setup Tests window. The files currently on the system will be displayed on the left side of
the screen under “File Name”. (See Figure 3)
Using the up and down arrow keys, highlight the number of the file slot where the test
sequence is to be saved. Press the “Save As” soft key and the Create File screen will appear.
Use the arrow keys (up, down, left, right) to select letters on the virtual keypad or use the
numeric keypad to enter numbers for the file name. When the correct characters are chosen,
use the “Select” soft key to enter the character. When finished, press the ENTER key. The
system will exit back to the Setup Tests screen with the current file now loaded.
To recall any test file, press the “File” soft key from the Setup Tests screen.
Use the up and down arrow keys to select the file to be loaded. Press the “Load” soft key
and the test sequence associated with the file will automatically be loaded.
changIngTHEtyPeOFteSt
(Figure 3. File Setup Screen)
Page 9
8.
PerfOrMIngAteSt
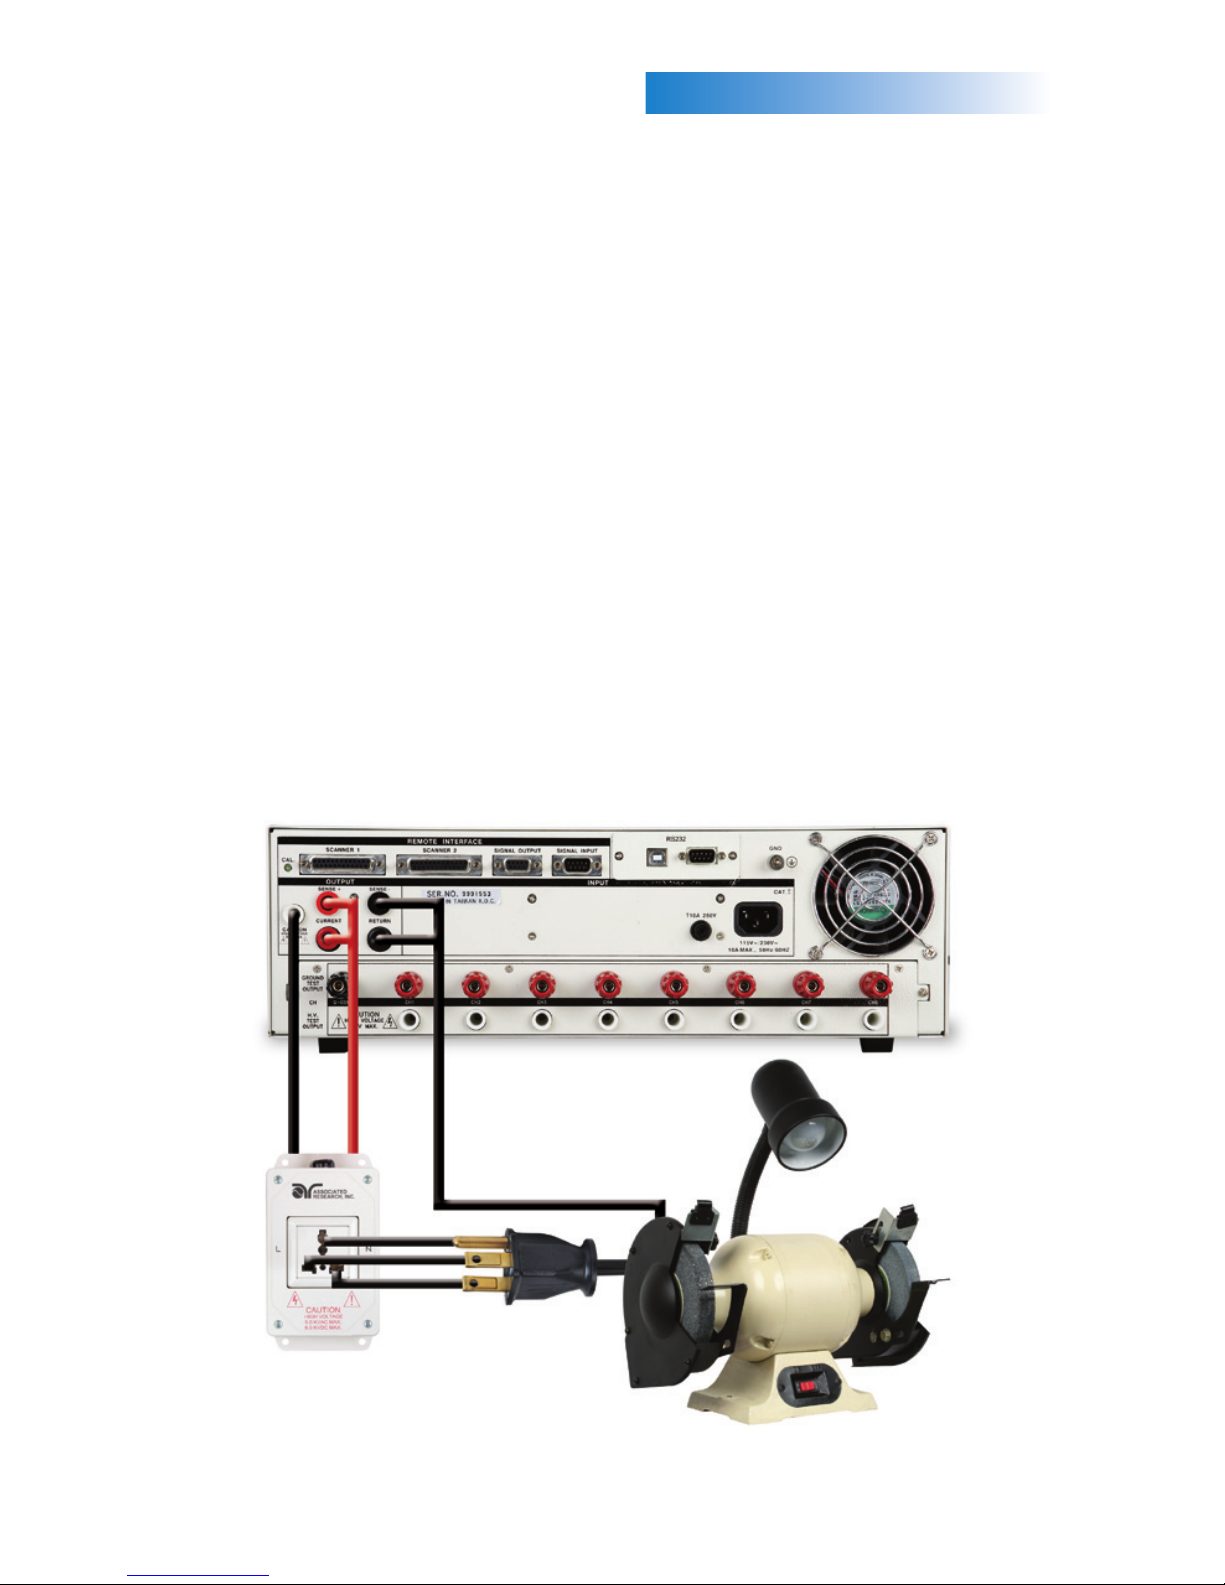
teSt cOnnectIOnS (8204/8254)
The adapter box is an easy way to connect a Device Under Test (DUT) that terminates in
either a two or three-prong line cord. The following diagram shows how to connect the
adapter box to the instrument and the DUT (See Figure 4). If you are testing a Class I
product, you may elect to perform a Ground Bond test on the ground circuit of the DUT
along with the Hipot test.
Using the output ports on the back panel, plug the black high voltage lead in the High
Voltage terminal. This acts as a line and neutral together.
Plug the Kelvin lead into the Sense (+) jack and the high current test lead into the Current
jack. These two red leads act as the ground connection.
Connect the ground return clip to the dead metal on the chassis of the DUT. Plug the
Kelvin lead into the Sense (+) jack and the return lead into the Return jack. Always check
to make sure a good connection is made between the DUT and the return clip.
Plug the line cord of the DUT into the adapter box receptacle.
(Figure 4. Adapter Box Connection, 8204/8254)
HV
RTN
DUT
38482
Page 10
PerfOrMIngAteSt
9.
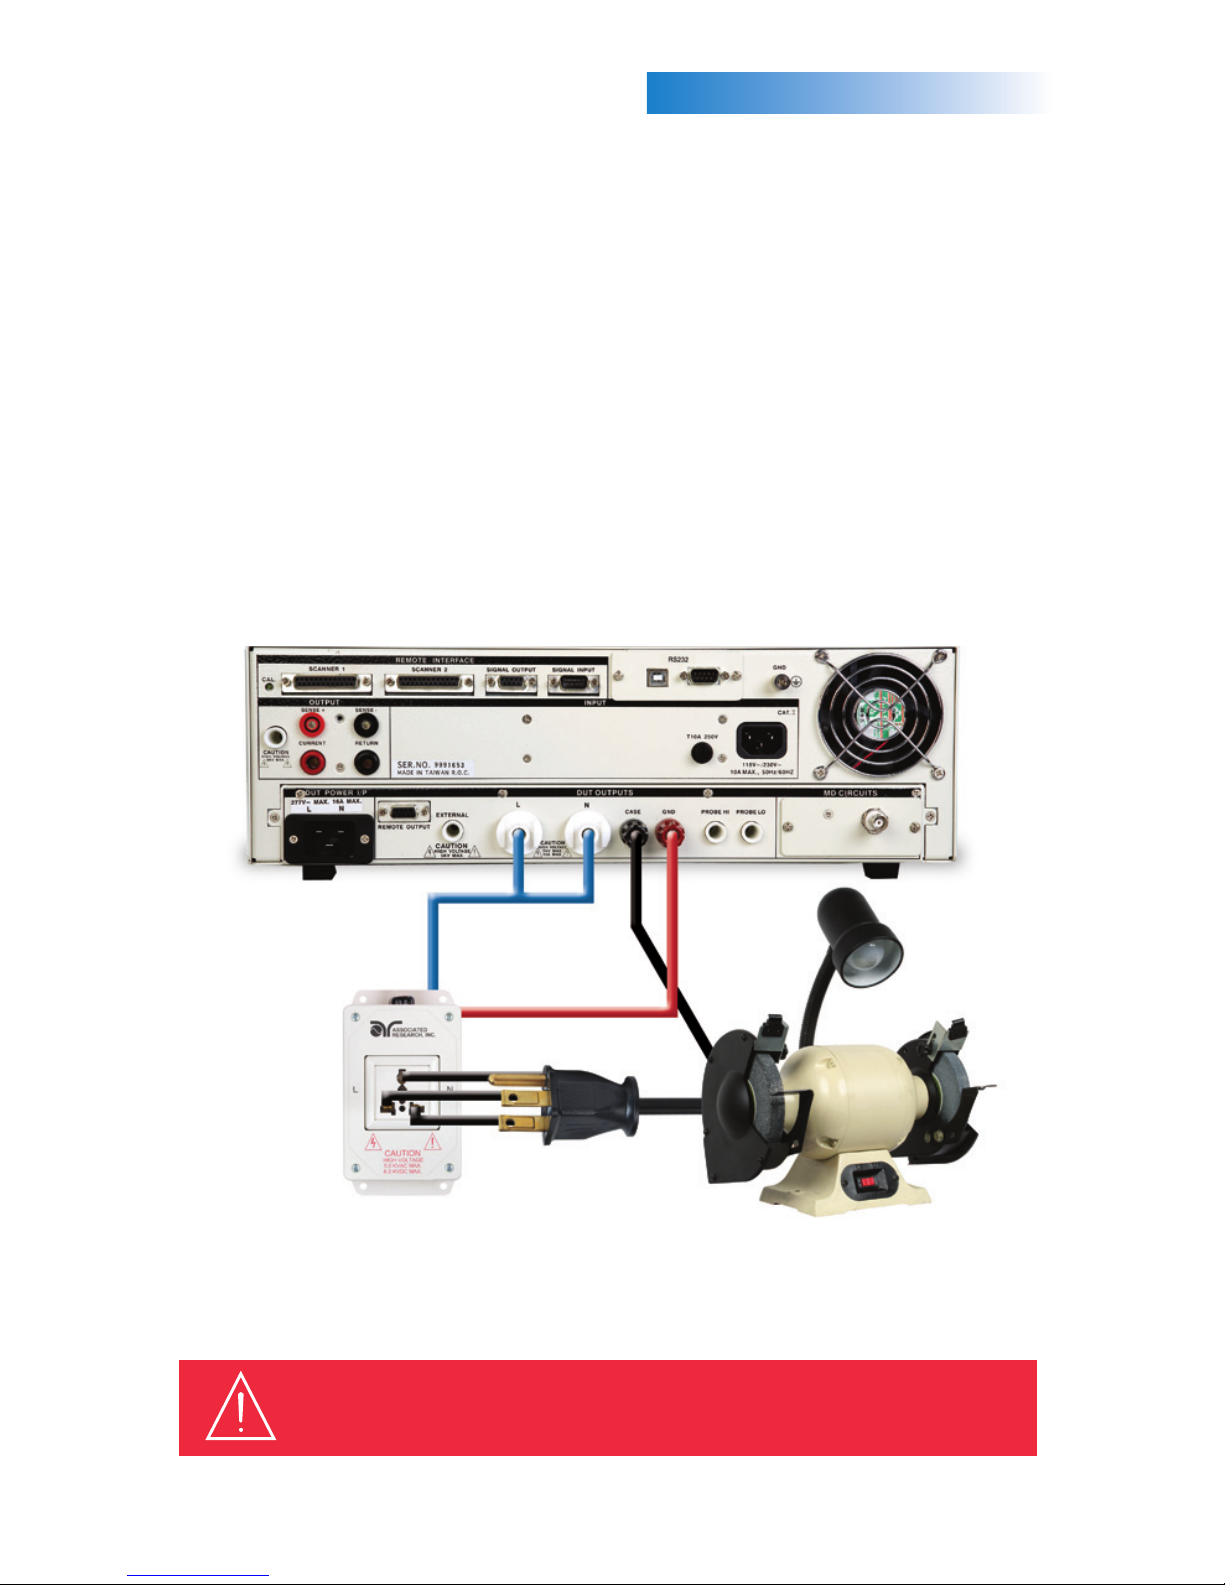
teSt cOnnectIOnS (8206/8256 & 8207/8257)
Using the DUT output ports on the back panel, plug the line lead from the adapter box
into the L terminal and the neutral lead into the N terminal.
Next attach the red ground lead from the adapter box to the GND terminal.
Attach the black case return lead into the case terminal.
Connect the ground return clip to dead metal on the chassis of the DUT.
Plug the line power cord from the DUT into the adapter box receptacle.
Only the rear output connections may be used for connecting the adapter box on the
8206/8256 and 8207/8257 models. (See Figure 5)
(Figure 5. Adapter Box Connection, 8206/8256 & 8207/8257)
WarnIng: DO NOT TOUCH THE DEVICE UNDER TEST ONCE
THE TEST HAS BEEN STARTED.
L N GND
RTN
DUT
38578
Page 11
10.
PerfOrMIngAteSt
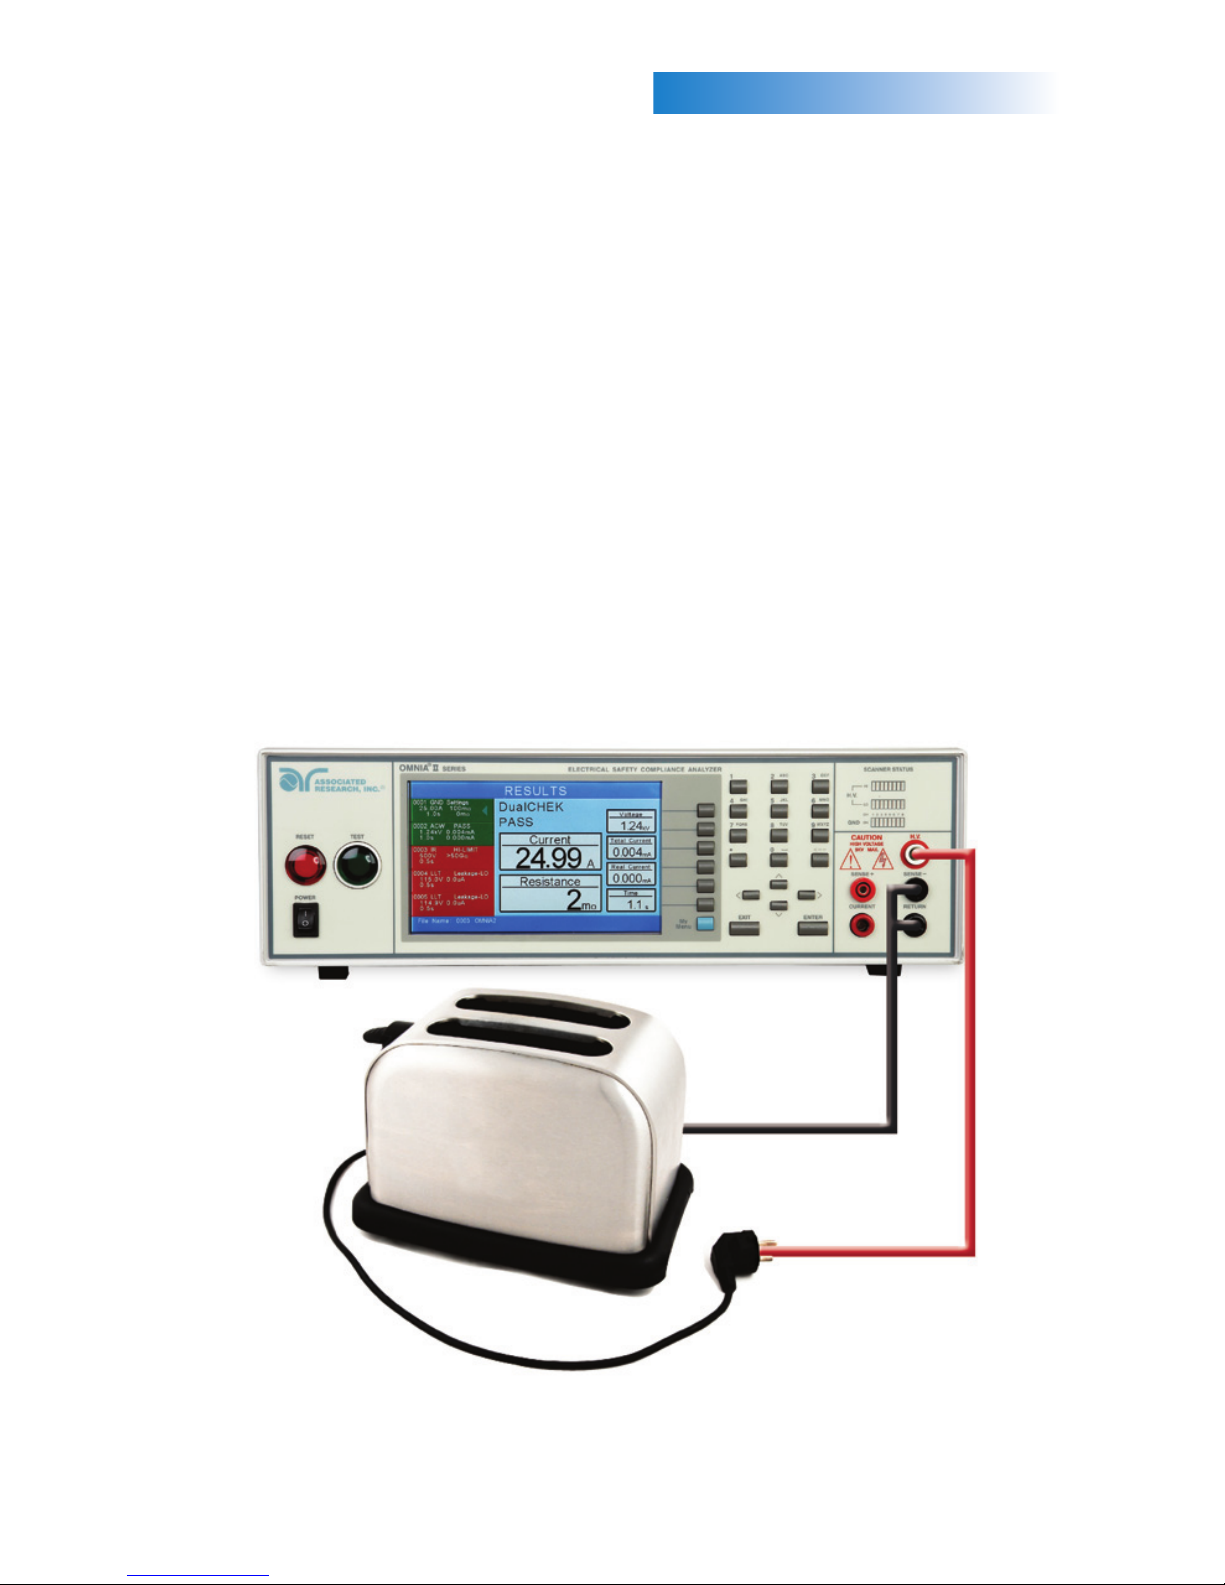
teSt cOnnectIOnS
There is no ground circuit on the DUT of a Class II product. Therefore, test leads may be
utilized to connect the OMNIA II to a DUT. (See Figure 6)
Plug the black return lead into the Return terminal and black Kelvin lead into the Sense (-)
lead. Then connect the high voltage lead terminated in a red clip into the H.V. terminal on
the front panel of the instrument.
Attach the clip-terminated end of the return lead to the dead metal on the chassis of the
DUT. If necessary, a 10 x 20 cm piece of foil can be attached to the enclosure to simulate
a full hand contact to the DUT. This foil acts as the return point. The Return and Sense
(-) jack are attached to the foil. Always check to make sure a good connection is made
between the DUT and the return clip.
Attach the high voltage lead to the current-carrying conductors of the DUT.
If performing a ground test on a Class I product (connection not shown), connect the red
high current lead into the Current terminal and red Kelvin lead into the Sense (+) jack.
The clip at the other end will connect to the ground pin of the DUT plug.
(Figure 6. Test Lead Connections)
HV
RTN
DUT
Page 12
PerfOrMIngAteSt
InItIatIng a teSt
To perform a test, you should save steps, return to the main menu and press the
correlating soft key for “Perform Tests.” You can now initiate a test through the front panel
by pressing the green TEST button. The red RESET button will abort a test in progress.
vIeWIng teSt reSultS
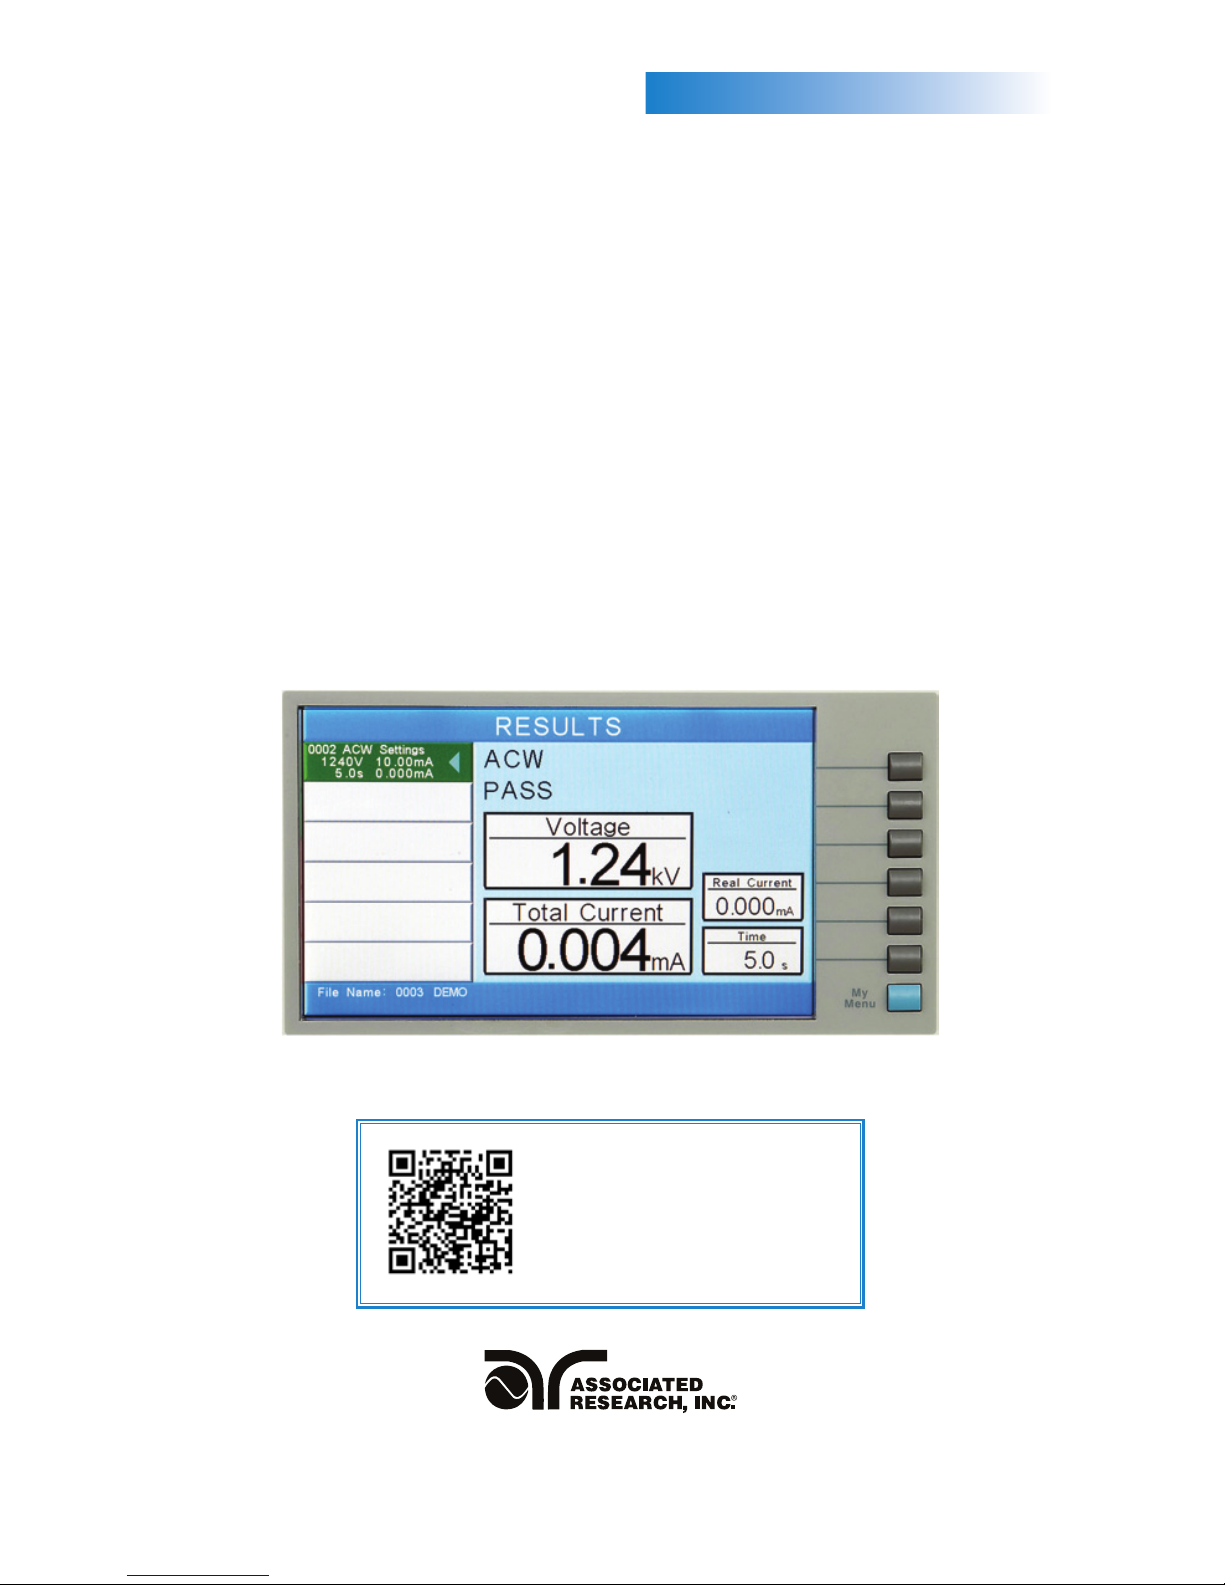
From the Perform Tests screen, press the “Results” soft key. (See Figure 7)
Use the up and down arrow keys to select the test to be reviewed or use the left and right
arrow keys to page up and page down.
Results are displayed on the right hand side of the screen including the test type, reason
for failure and test parameter results.
Press the EXIT key to go back to the Perform Tests screen and press EXIT again to go back
to the Main Menu.
(Figure 7. Results Screen)
For additional information about these and other key features of the OMNIA II, please consult the full
Operation and Service Manual or call us toll-free 1-800-858-TEST (8378) or +1-847-367-4077
©2012 Associated Research, Inc. www.asresearch.com
To learn more about OMNIA II, scan
the QR code with your smartphone or
visit www.asresearch.com/O2support
OnlIne reSOurceS
OMINA II 12/12
 Loading...