

Page 1

Version 1.0
Published May 2020
Copyright©2020 ASRock INC. All rights reserved.
Copyright Notice:
No part of this documentation may be reproduced, transcribed, transmitted, or
translated in any language, in any form or by any means, except duplication of
documentation by the purchaser for backup purpose, without written consent of
ASRock Inc.
Products and corporate names appearing in this documentation may or may not
be registered trademarks or copyrights of their respective companies, and are used
only for identication or explanation and to the owners’ benet, without intent to
infringe.
Disclaimer:
Specications and information contained in this documentation are furnished for
informational use only and subject to change without notice, and should not be
constructed as a commitment by ASRock. ASRock assumes no responsibility for
any errors or omissions that may appear in this documentation.
With respect to the contents of this documentation, ASRock does not provide
warranty of any kind, either expressed or implied, including but not limited to
the implied warranties or conditions of merchantability or tness for a particular
purpose.
In no event shall ASRock, its directors, ocers, employees, or agents be liable for
any indirect, special, incidental, or consequential damages (including damages for
loss of prots, loss of business, loss of data, interruption of business and the like),
even if ASRock has been advised of the possibility of such damages arising from any
defect or error in the documentation or product.
is device complies with Part 15 of the FCC Rules. Operation is subject to the following
two conditions:
(1) this device may not cause harmful interference, and
(2) this device must accept any interference received, including interference that
may cause undesired operation.
CALIFORNIA, USA ONLY
e Lithium battery adopted on this motherboard contains Perchlorate, a toxic substance
controlled in Perchlorate Best Management Practices (BMP) regulations passed by the
California Legislature. When you discard the Lithium battery in California, USA, please
follow the related regulations in advance.
“Perchlorate Material-special handling may apply, see www.dtsc.ca.gov/hazardouswaste/
perchlorate”
ASRock Website: http://www.asrock.com
Page 2

AUSTRALIA ONLY
Our goods come with guarantees that cannot be excluded under the Australian
Consumer Law. You are entitled to a replacement or refund for a major failure and
compensation for any other reasonably foreseeable loss or damage caused by our
goods. You are also entitled to have the goods repaired or replaced if the goods fail
to be of acceptable quality and the failure does not amount to a major failure. If
you require assistance please call ASRock Tel : +886-2-28965588 ext.123 (Standard
International call charges apply)
e terms HDMI® and HDMI High-Denition Multimedia Interface, and the
HDMI logo are trademarks or registered trademarks of HDMI Licensing LLC in the
United States and other countries.
Page 3

CE Warning
is device complies with directive 2014/53/EU issued by the Commision of the European
Community.
is equipment complies with EU radiation exposure limits set forth for an uncontrolled
environment.
is equipment should be installed and operated with minimum distance 20cm between
the radiator & your body.
Operations in the 5.15-5.35GHz band are restricted to indoor usage only.
Radio transmit power per transceiver type
Function Frequency Maximum Output Power (EIRP)
2400-2483.5 MHz 18.5 + / -1.5 dbm
5150-5250 MHz 21.5 + / -1.5 dbm
WiFi
Bluetooth 2400-2483.5 MHz 8.5 + / -1.5 dbm
5250-5350 MHz
5470-5725 MHz
18.5 + / -1.5 dbm (no TPC)
21.5 + / -1.5 dbm (TPC)
25.5 + / -1.5 dbm (no TPC)
28.5 + / -1.5 dbm (TPC)
Page 4

Page 5

3
4
10
11
1
ATXP WR1
Sup er
I/O
CLRCMOS1
1
PCIE1
HD_AUDIO1
1
SOCKETAM4
F_USB3 _1_2
1
CHA_FAN1/WP
1
RoHS
SPK_PLED1
1
DDR 4_A1 (6 4 bit, 288 -pin mo dule)
DDR 4_A2 (6 4 bit, 288 -pin mo dule)
DDR 4_B1 (6 4 bit, 288 -pin mo dule)
DDR 4_B2 (6 4 bit, 288 -pin mo dule)
PCIE2
PCIE3
HDLED RESET
PLED PWRBTN
PANEL1
M2_1
AMD
Promontory
B550
1
USB_3_4
19
26
CPU_FAN1
CHA_FAN4/WP
1
USB_5_6
24
23
25
ATX12V1
2
ADDR_LED1
1
1
RGB_LED1
6
5
SATA3_1
SATA3_2
9
1
SPI_TPM_J1
1
F_USB3_3_4
20
CHA_FAN2
/WP
RGB_LED2
1
ADDR_LED2
1
CMOS
Battery
LAN
AUDIO
CODEC
22
17
CPU
DRAM
VGA
BOOT
16
M2_3
NUT1
1
COM1
21
B5 50 M /a c
Top:
LINE IN
Center :
FRONT
Bottom :
MIC IN
RJ- 45 LAN
USB 3.2 Gen1
T: USB3
B: USB4
USB 3.2 Gen1
T: USB1
B: USB2
USB 2.0
T: USB1
B: USB2
PS2
Keyboard/
Mouse
HDM I1
WiFi-802.11ac
Module
SATA3_4
SATA3_3
Motherboard Layout
B550M/ac
7
8
12
13
14
15
English
18
1
Page 6

No. Description
1 8 pin 12V Power Connector (ATX12V1)
2 CPU Fan Connector (CPU_FAN1)
3 2 x 288-pin DDR4 DIMM Slots (DDR4_A1, DDR4_B1)
4 2 x 288-pin DDR4 DIMM Slots (DDR4_A2, DDR4_B2)
5 RGB LED Header (RGB_LED1)
6 Addressable LED Header (ADDR_LED1)
7 ATX Power Connector (ATXPWR1)
8 USB 3.2 Gen1 Header (F_USB3_1_2)
9 SATA3 Connector (SATA3_2)
10 SATA3 Connector (SATA3_1)
11 SATA3 Connector (SATA3_4)(Upper), SATA3 Connector (SATA3_3)(Lower)
12 System Panel Header (PANEL1)
13 Power LED and Speaker Header (SPK_PLED1)
14 USB 3.2 Gen1 Header (F_USB3_3_4)
15 Chassis/Water Pump Fan Connector (CHA_FAN4/WP)
16 Post Status Checker (PSC)
17 SPI TPM Header (SPI_TPM_J1)
18 USB 2.0 Header (USB_3_4)
19 USB 2.0 Header (USB_5_6)
20 Chassis/Water Pump Fan Connector (CHA_FAN2/WP)
21 Clear CMOS Jumper (CLRCMOS1)
22 COM Port Header (COM1)
23 Addressable LED Header (ADDR_LED2)
24 RGB LED Header (RGB_LED2)
25 Front Panel Audio Header (HD_AUDIO1)
26 Chassis/Water Pump Fan Connector (CHA_FAN1/WP)
English
2
Page 7

I/O Panel
B550M/ac
3
1 2 4
10
6789
No. Description No. Description
1 USB 2.0 Ports (USB_12)* 6 USB 3.2 Gen1 Ports (USB3_34)
2 LAN RJ-45 Port** 7 USB 3.2 Gen1 Ports (USB3_12)
3 Line In (Light Blue)*** 8 PS/2 Mouse/Keyboard Port
4 Front Speaker (Lime)*** 9 HDMI Port
5 Microphone (Pink)*** 10 Antenna Ports
* Please note that the USB_ 2 consumes auxiliary power (+5VSB) while the other USB por ts consume DUAL
Power (+5VDUAL). e USB_ 2 is optimal for connecting the USB Type speake r and headset .
** ere are two LEDs on each LAN port. Please refer to the table below for the LAN port LED indications.
ACT/LINK LED
SPEED LED
LAN Por t
Activity / Link LED Speed LED
Status Description Status Description
O No Link O 10Mbps connection
Blinking Data Activity Orange 100Mbps connection
On Link Green 1Gbps connection
5
English
3
Page 8

*** Function of the Audio Ports in 7.1-channel Conguration:
Port Function
Light Blue (Rear panel) Rear Speaker Out
Lime (Rear panel) Front Speaker Out
Pink (Rear panel) Central /Subwoofer Speaker Out
Lime (Front panel) Side Speaker Out
English
4
Page 9

B550M/ac
WiFi-802.11ac Module and ASRock WiFi 2.4/5 GHz Antennas
WiFi-802.11ac + BT Module
is motherboard comes with an exclusive WiFi 802.11 a/b/g/n/ac + BT v4.2 module
that oers support for WiFi 802.11 a/b/g/n/ac connectivity standards and Bluetooth
v4.2. WiFi + BT module is an easy-to-use wireless local area network (WLAN) adapter
to support WiFi + BT. Bluetooth v4.2 standard features Smart Ready technology that
adds a whole new class of functionality into the mobile devices. BT 4.2 also includes
Low Energy Technology and ensures extraordinary low power consumption for PCs.
* e transmission speed may vary according to the environment.
English
5
Page 10

WiFi Antennas Installation Guide
Step 1
Prepare the WiFi 2.4/5 GHz Antennas that come
with the package.
Step 2
Connect the two WiFi 2.4/5 GHz Antennas to
the antenna connectors. Turn the antenna clockwise until it is securely connected.
Step 3
Set the WiFi 2.4/5 GHz Antenna as shown in the
illustration.
*You may need to adjust the direction of
the antenna for a stronger signal.
English
6
Page 11

Chapter 1 Introduction
ank you for purchasing ASRock B550M/ac motherboard, a reliable motherboard
produced under ASRock ’s consistently stringent quality control. It delivers excellent
performance with robust design conforming to ASRock ’s commitment to quality
and endurance.
Becau se the motherboard specications and the BIOS soware might be updated, the
content of this documentation will be subject to change without notice. In case any modications of this documentation occur, the updated version will be available on ASRock’s
website w ithout further notice. If you require technical support related to this motherboard, please visit our website for specic information about the model you are using. You
may nd the l atest VGA cards and CPU suppor t list on ASRock’s website a s well. ASRock
website http://www.asrock.com.
1.1 Package Contents
ASRock B550M/ac Motherboard (Micro ATX Form Factor)
•
ASRock B550M/ac Quick Installation Guide
•
ASRock B550M/ac Support CD
•
1 x I/O Panel Shield
•
2 x Serial ATA (SATA) Data Cables (Optional)
•
2 x ASRock WiFi 2.4/5 GHz Antennas (Optional)
•
1 x Screw for M.2 Socket (Optional)
•
B550M/ac
English
7
Page 12

English
1.2 Specications
Platform
CPU
Chipset
Memory
•
•
•
•
* Not compatible with AMD Ryzen™ 5 3400G and Ryzen™ 3
3200G.
•
•
•
•
•
•
•
* Please refer to Memory Support List on ASRock’s website for
more information. (http://www.asrock.com/)
* Please refer to page 24 for DDR4 UDIMM maximum
frequency support.
•
•
•
Micro ATX Form Factor
Solid Capacitor design
2oz Copper PCB
Supports 3rd Gen AMD AM4 Ryzen™ / future AMD Ryzen™
Processors (3000 and 4000 Series Processors)*
Digi Power design
8 Power Phase design
AMD B550
Dual Channel DDR4 Memory Technology
4 x DDR4 DIMM Slots
AMD Ryzen series CPUs (Matisse) support DDR4
4533+(OC)/4466(OC)/4400(OC)/4333(OC)/4266(OC)/
4200(OC)/4133(OC)/4000(OC)/3866(OC)/3800(OC)/3733
(OC)/3600(OC)/3466(OC)/3200/2933/2667/2400/2133 ECC
& non-ECC, un-buered memory*
AMD Ryzen series APUs (Renoir) support DDR4 4733+
(OC)/4666(OC)/4600(OC)/4533(OC)/4466(OC)/
4400(OC)/4333(OC)/4266(OC)/4200(OC)/4133(OC)/
4000(OC)/3866(OC)/3800(OC)/3733(OC)/3600(OC)/
3466(OC)/3200/2933/2667/2400/2133 ECC & non-ECC, unbuered memory*
Max. capacity of system memory: 128GB
Supports Extreme Memory Prole (XMP) memory modules
15μ Gold Contact in DIMM Slots
Expansion
Slot
AMD Ryzen series CPUs (Matisse)
2 x PCI Express x16 Slots (PCIE1: Gen4x16 mode; PCIE3:
•
Gen3 x4 mode)*
8
Page 13

AMD Ryzen series APUs (Renoir)
2 x PCI Express x16 Slots (PCIE1: Gen3x16 mode; PCIE3:
•
Gen3 x4 mode)*
* Supports NVMe SSD as boot disks
1 x PCI Express 3.0 x1 Slot
•
Supports AMD Quad CrossFireXTM and CrossFireX
•
1 x M.2 Socket (Key E) with the bundled WiFi-802.11ac
•
module
B550M/ac
TM
Graphics
Audio
Integrated AMD Radeon
•
TM
Vega Series Graphics in
Ryzen Series APU*
* Actual support may vary by CPU
DirectX 12, Pixel Shader 5.0
•
Shared memory default 2GB. Max Shared memory supports
•
up to 16GB.
* e Max shared memory 16GB requires 32GB system
memory installed.
Supports HDMI 2.1 with max. resolution up to 4K x 2K
•
(4096x2160) @ 60Hz
Supports Auto Lip Sync, Deep Color (12bpc), xvYCC and
•
HBR (High Bit Rate Audio) with HDMI 2.1 Port
(Compliant HDMI monitor is required)
Supports HDR (High Dynamic Range) with HDMI 2.1
•
Supports HDCP 2.3 with HDMI 2.1 Port
•
Supports 4K Ultra HD (UHD) playback with HDMI 2.1
•
Port
Supports Microso PlayReady®
•
7.1 CH HD Audio with Content Protection (Realtek
•
ALC1200 Audio Codec)
Premium Blu-ray Audio support
•
Supports Surge Protection
•
PCB Isolate Shielding
•
Individual PCB Layers for R/L Audio Channel
•
Nahimic Audio
•
English
9
Page 14

LAN
Wireless
LAN
Rear Panel
I/O
Storage
PCIE x1 Gigabit LAN 10/100/1000 Mb/s
•
Realtek RTL8111H
•
Supports Wake-On-LAN
•
Supports Lightning/ESD Protection
•
Supports Energy Ecient Ethernet 802.3az
•
Supports PXE
•
Intel® 802.11ac WiFi Module
•
Supports IEEE 802.11a/b/g/n/ac
•
Supports Dual-Band (2.4/5 GHz)
•
Supports high speed wireless connections up to 433Mbps
•
Supports Bluetooth 4.2 + High speed class II
•
2 x Antenna Ports
•
1 x PS/2 Mouse/Keyboard Port
•
1 x HDMI Port
•
4 x USB 3.2 Gen1 Ports (ASMedia ASM1074 hub) (Supports
•
ESD Protection)
2 x USB 2.0 Ports (Supports ESD Protection)
•
1 x RJ-45 LAN Port with LED (ACT/LINK LED and SPEED
•
LED)
HD Audio Jacks: Line in / Front Speaker / Microphone
•
4 x SATA3 6.0 Gb/s Connectors, support RAID (RAID 0,
•
RAID 1 and RAID 10), NCQ, AHCI and Hot Plug
1 x Hyper M.2 Socket (M2_1), supports M Key type 2280
•
M.2 PCI Express module up to Gen4x4 (64 Gb/s) (with
Matisse) or Gen3x4 (32 Gb/s) (with Renoir)*
* Supports NVMe SSD as boot disks
* Supports ASRock U.2 Kit
English
10
Connector
1 x COM Port Header
•
1 x SPI TPM Header
•
1 x Power LED and Speaker Header
•
2 x RGB LED Headers
•
* Support in total up to 12V/3A, 36W LED Strip
Page 15

BIOS
Feature
2 x Addressable LED Headers
•
* Support in total up to 5V/3A, 15W LED Strip
1 x CPU Fan Connector (4-pin)
•
* e CPU Fan Connector supports the CPU fan of maximum
1A (12W) fan power.
3 x Chassis/Water Pump Fan Connectors (4-pin) (Smart
•
Fan Speed Control)
* e Chassis/Water Pump Fan supports the water cooler fan
of maximum 2A (24W) fan power.
* CHA_FAN1/WP, CHA_FAN2/WP and CHA_FAN4/WP can
auto detect if 3-pin or 4-pin fan is in use.
1 x 24 pin ATX Power Connector
•
1 x 8 pin 12V Power Connector
•
1 x Front Panel Audio Connector
•
2 x USB 2.0 Headers (Support 4 USB 2.0 ports) (Supports
•
ESD Protection)
2 x USB 3.2 Gen1 Headers (Support 4 USB 3.2 Gen1 ports)
•
(Supports ESD Protection)
AMI UEFI Legal BIOS with GUI support
•
Supports “Plug and Play”
•
ACPI 5.1 compliance wake up events
•
Supports jumperfree
•
SMBIOS 2.3 support
•
CPU, CPU VDDCR_SOC, DRAM, VPPM, +1.8VSB Voltage
•
Multi-adjustment
B550M/ac
Hardware
Monitor
Temperature Sensing: CPU, Chassis/Water Pump Fans
•
Fan Tachometer: CPU, Chassis/Water Pump Fans
•
Quiet Fan (Auto adjust chassis fan speed by CPU
•
temperature): CPU, Chassis/Water Pump Fans
Fan Multi-Speed Control: CPU, Chassis/Water Pump Fans
•
Voltage monitoring: +12V, +5V, +3.3V, CPU Vcore, CPU
•
VDDCR_SOC, DRAM, VPPM, +1.8V
English
11
Page 16

Microso® Windows® 10 64-bit
OS
Certications
* For detailed product information, please visit our website: http://www.asrock .com
Please realize that the re is a certain risk involved with overclocking, including adjusting
the setting in the BIOS, applying Untied Overclocking Technology, or using third-party
overclocking tools. O verclocking may aect your system’s stability, or even cause damage to
the components and devices of your system. It should be done at your ow n risk and expense.
We are not responsible for possible damage caused by overclocking.
•
FCC, CE
•
ErP/EuP ready (ErP/EuP ready power supply is required)
•
English
12
Page 17

Chapter 2 Installation
is is a Micro ATX form factor motherboard. Before you install the motherboard,
study the conguration of your chassis to ensure that the motherboard ts into it.
Pre-installation Precautions
Take note of the following precautions before you install motherboard components
or change any motherboard settings.
Make sure to unplug the power cord before installing or removing the motherboard.
•
Failure to do so may cause physical injuries to you and damages to motherboard
components.
In order to avoid damage from static electricity to the motherboard’s components,
•
NEVER place your motherboard directly on a carpet. Also remember to use a grounded
wrist strap or touch a safety grounded object before you handle the components.
Hold components by the edges and do not touch the ICs.
•
Whenever you uninstall any components, place them on a grounded anti-static pad or
•
in the bag that comes with the components.
When placing screws to secure the motherboard to the chassis, please do not over-
•
tighten the screws! Doing so may damage the motherboard.
B550M/ac
13
English
Page 18

2.1 Installing the CPU
Unplug all power cables be fore installing the CPU.
1
English
14
2
Page 19

B550M/ac
3
15
English
Page 20

2.2 Installing the CPU Fan and Heatsink
Aer you install the CPU into this motherboard, it is necessary to install a larger
heatsink and cooling fan to dissipate heat. You also need to spray thermal grease
between the CPU and the heatsink to improve heat dissipation. Make sure that the
CPU and the heatsink are securely fastened and in good contact with each other.
Please turn o the power or remove the power cord before changing a CPU or heatsink.
Installing the CPU Box Cooler SR1
1
English
16
2
Page 21

B550M/ac
3
4
1
N
FA
_
U
P
C
English
17
Page 22

Installing the AM4 Box Cooler SR2
1
2
English
18
Page 23

B550M/ac
3
19
English
Page 24

4
1
N
FA
_
U
P
C
*e diagrams shown here are for reference only. e headers might be in a dierent position on
your motherboard.
English
20
Page 25

Installing the AM4 Box Cooler SR3
1
B550M/ac
2
English
21
Page 26

3
4
English
22
Page 27

B550M/ac
5
FAN1
CPU_
6
1
N
FA
_
U
P
C
2
D
E
L
_
B
RG
+12V
*e diagrams shown here are for reference only. e headers might be in a dierent position
on your motherboard.
English
23
Page 28

2.3 Installing Memory Modules (DIMM)
is motherboard provides four 288-pin DDR4 (Double Data Rate 4) DIMM slots,
and supports Dual Channel Memory Technology.
1. For dual channel conguration , you always need to in stall identical (the same
brand, speed , size and chip-type) DDR4 DIMM pairs.
2. It is unable to activate Du al Channel Memory Technology with only one or three
memory module installed.
3. It is not allowed to install a DDR, DDR2 or DDR3 memory module into a DDR4
slot; otherwise, this motherboard and DIMM may be damaged.
4. We suggest that you install the memory modules on DDR4_A 2 and DDR4_B2 rst
for better DRAM compatibility on 2 DIMM s conguration.
AMD non-XMP Memory Frequency Support
Ryzen Series CPUs (Matisse):
English
UDIMM Memory Slot
A1 A2 B1 B2
Frequency
(Mhz)
- SR - - 3200
- DR - - 3200
- SR - SR 3200
- DR - DR 3200
SR SR SR SR 2933
SR/DR DR SR/DR DR 2667
SR/DR SR/DR SR/DR SR/DR 2667
24
Page 29

Ryzen Series APUs (Renoir):
B550M/ac
UDIMM Memory Slot
A1 A2 B1 B2
- SR - - 3200
- DR - - 3200
- SR - SR 3200
- DR - DR 3200
SR SR SR SR 2933
SR/DR DR SR/DR DR 2667
SR/DR SR/DR SR/DR SR/DR 2667
SR: Single rank DIMM, 1Rx4 or 1Rx8 on DIMM module label
DR: Dual rank DIMM, 2Rx4 or 2R x8 on DIMM module label
Frequency
(Mhz)
25
English
Page 30

e DIMM only ts in one correct orientation. It will cause permanent damage to
the motherboard and the DIMM if you force the DIMM into the slot at incor rect
orientation.
1
2
English
26
3
Page 31
2.4 Expansion Slots (PCI Express Slots)
ere are 3 PCI Express slots on the motherboard.
Before installing an ex pansion card, please make sure that the power supply is
switched o or the power cord is unplugged. Plea se read the documentation of the
expan sion card and make necessary hardware settings for the card before you start
the installation.
PCIe slots:
PCIE1 (PCIe 4.0 x16 slot) is used for PCI Express x16 lane width graphics cards.
PCIE2 (PCIe 3.0 x1 slot) is used for PCI Express x1 lane width cards.
PCIE3 (PCIe 3.0 x16 slot) is used for PCI Express x4 lane width graphics cards.
PCIe Slot Congurations
PCIE1 PCIE2 PCIE3
Ryzen Series CPUs (Matisse) Gen4x16 Gen3x1 Gen3x4
B550M/ac
Ryzen Series CPUs (Renoir) Gen3x16 Gen3x1 Gen3x4
For a better ther mal environment, please connect a ch assis fan to the motherboard’s
chassis fan connector (CHA_ FA N1/WP, CHA_ FAN2/WP , CHA_ FAN3/WP or CHA_
FAN4/WP ) when using multiple graphics card s.
English
27
Page 32
2.5 Jumpers Setup
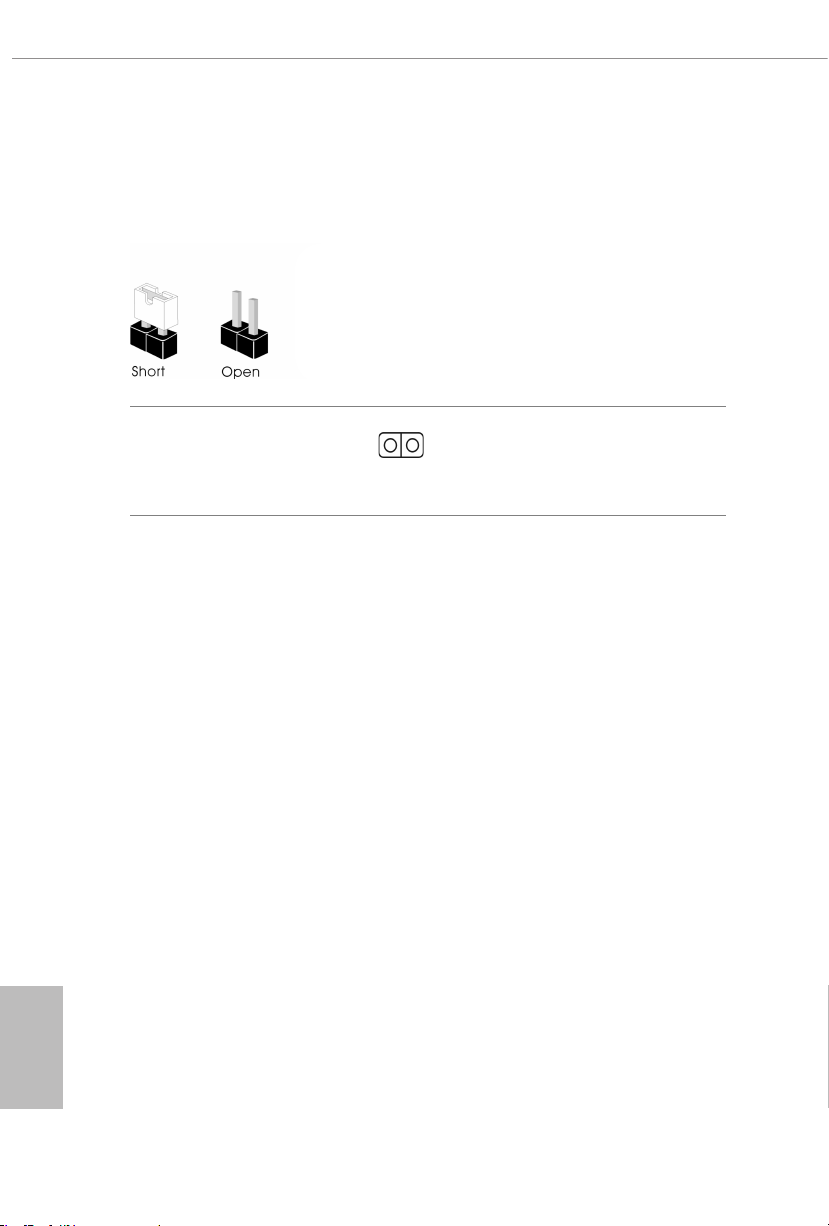
e illustration shows how jumpers are setup. When the jumper cap is placed on
the pins, the jumper is “Short”. If no jumper cap is placed on the pins, the jumper is
“Open”.
English
Clear CMOS Jumper
(CLRCMO S1)
(see p.1, No. 21)
CLRCMOS1 allows you to clear the data in CMOS. e data in CMOS includes
system setup information such as system password, date, time, and system setup
parameters. To clear and reset the system parameters to default setup, please
turn o the computer and unplug the power cord, then use a jumper cap to short
the pins on CLRCMOS1 for 3 seconds. Please remember to remove the jumper
cap aer clearing the CMOS. If you need to clear the CMOS when you just nish
updating the BIOS, you must boot up the system rst, and then shut it down
before you do the clear-CMOS action.
2-pin Jumper
Short: Clear CMOS
Open: Default
28
Page 33
2.6 Onboard Headers and Connectors
Onboard headers and connectors are NOT jumpers. Do NOT place jumper caps over these
heade rs and connectors. Placing jumper caps over the headers and connectors will cause
permanent damage to the motherboard.
B550M/ac
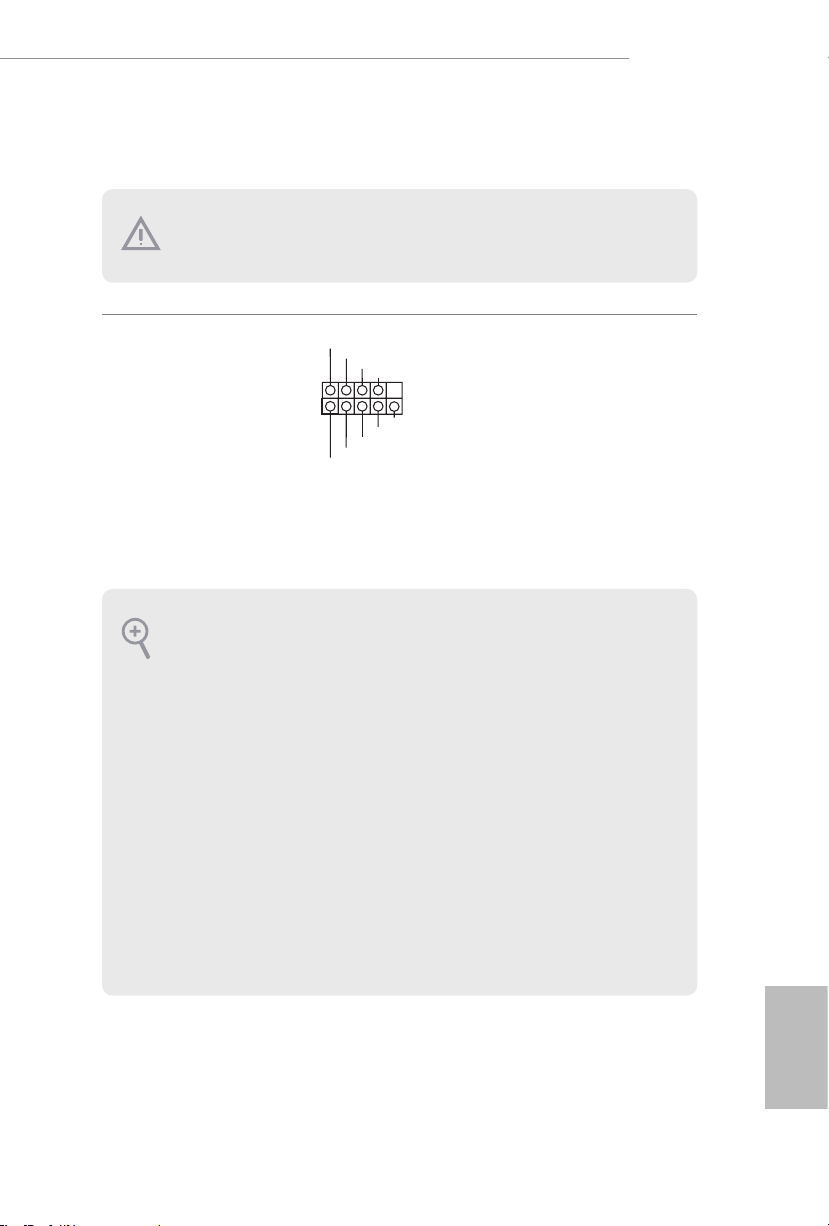
System Panel Header
(9-pi n PANEL1)
(see p.1, No. 12)
PWRBTN (Power Button):
Connec t to the power button on the chassi s front panel. You may congure the way to tur n
o your system using the power button.
RESET (Reset B utton):
Connec t to the reset button on the chassi s front panel. Press the reset button to restart the
computer if the computer f reezes and fails to per form a normal restar t.
PLED (Syste m Power LED):
Connec t to the power status indicator on the chassis front panel. e LED i s on when the
system is operating. e LED keeps blinking when the system is in S1/S3 sleep state. e
LED is o when the system is in S4 slee p state or powered o (S5).
HDLED (Ha rd Drive Activity LED):
Connec t to the hard drive activity LED on the chassis front panel. e LED is on when the
hard drive is reading or wr iting data.
e front panel design may dier by chassis. A front panel module mainly consists of powe r
button, reset button , power LED, hard dr ive activity LED, speaker and etc. When connecting your chassi s front panel module to thi s header, make sure the wire a ssignments and the
pin assignments are matched correctly.
1
PLED+
PLED-
HDLED-
HDLED+
PWRBTN#
GND
GND
RESET#
GND
Connect the power
button, reset button and
system status indicator on
the chassis to this header
according to the pin
assignments below. Note
the positive and negative
pins before connecting
the cables.
29
English
Page 34
Power LED and Speaker
1
+5V
DUMMY
PLED+
PLED+
PLED-
DUMMY
SPEAKER
DUMMY
GND
GND
P+
P-
USB_PWR
P+
P-
USB_PWR
1
1
1
IntA_P_D+
IntA_P_SSRX-
Header
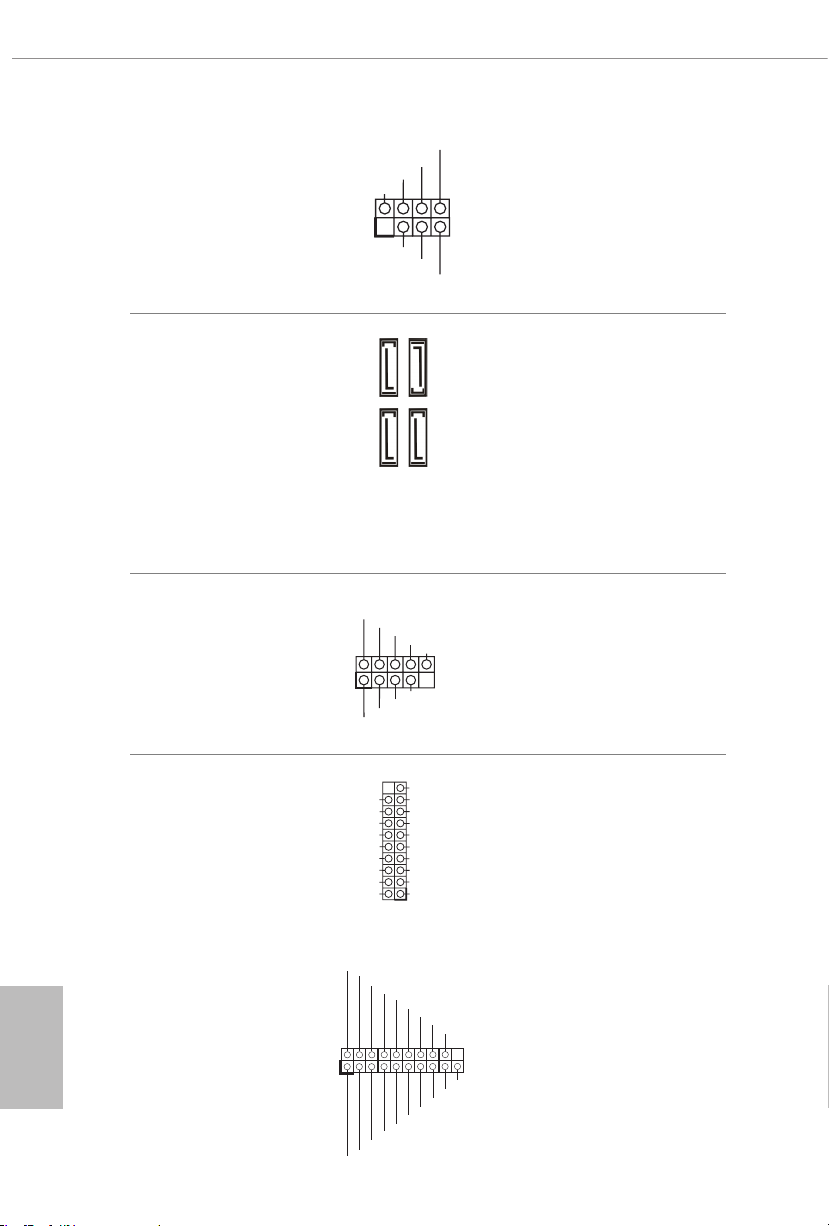
(7-pin SPK_PLED1)
(see p.1, No. 13)
Please connect the
chassis power LED and
the chassis speaker to this
header.
Serial ATA3 Connectors
(SATA3_1:
see p.1, No. 9)
(SATA3_2:
see p.1, No. 10)
(SATA3_3:
see p.1, No. 11)(Lower)
(SATA3_4:
see p.1, No. 11)(Upper)
USB 2.0 Headers
(9-pin USB_3_4)
(see p.1, No. 18)
(9-pin USB_5_6)
(see p.1, No. 19)
USB 3.2 Gen1 Headers
(19-pin F_USB3_1_2)
(see p.1, No. 8)
Vbus
IntA_PA_SSRX-
IntA_PA_SSRX+
GND
IntA_PA_SSTX-
IntA_PA_SSTX+
GND
IntA_PA_D-
IntA_PA_D+
SATA3_1
SATA3_4
SATA3_2
SATA3_3
VbusVbus
IntA_PB_SSRX-
IntA_PB_SSRX+
GND
IntA_PB_SSTX-
IntA_PB_SSTX+
GND
IntA_PB_D-
IntA_PB_D+
Dummy
ese four SATA3
connectors support SATA
data cables for internal
storage devices with up to
6.0 Gb/s data transfer rate.
ere are two headers
on this motherboard.
Each USB 2.0 header can
support two ports.
ere are two headers on
this motherboard. Each
USB 3.2 Gen1 header can
support two ports.
English
30
(19-pin F_USB3_3_4)
(see p.1, No. 14)
IntA_P_D-
IntA_P_D+
ID
GND
IntA_P_SSTX+
GND
IntA_P_D-
IntA_P_SSTX-
GND
IntA_P_SSRX+
GND
IntA_P_SSTX-
IntA_P_SSTX+
IntA_P_SSRX-
Vbus
Vbus
IntA_P_SSRX+
Page 35
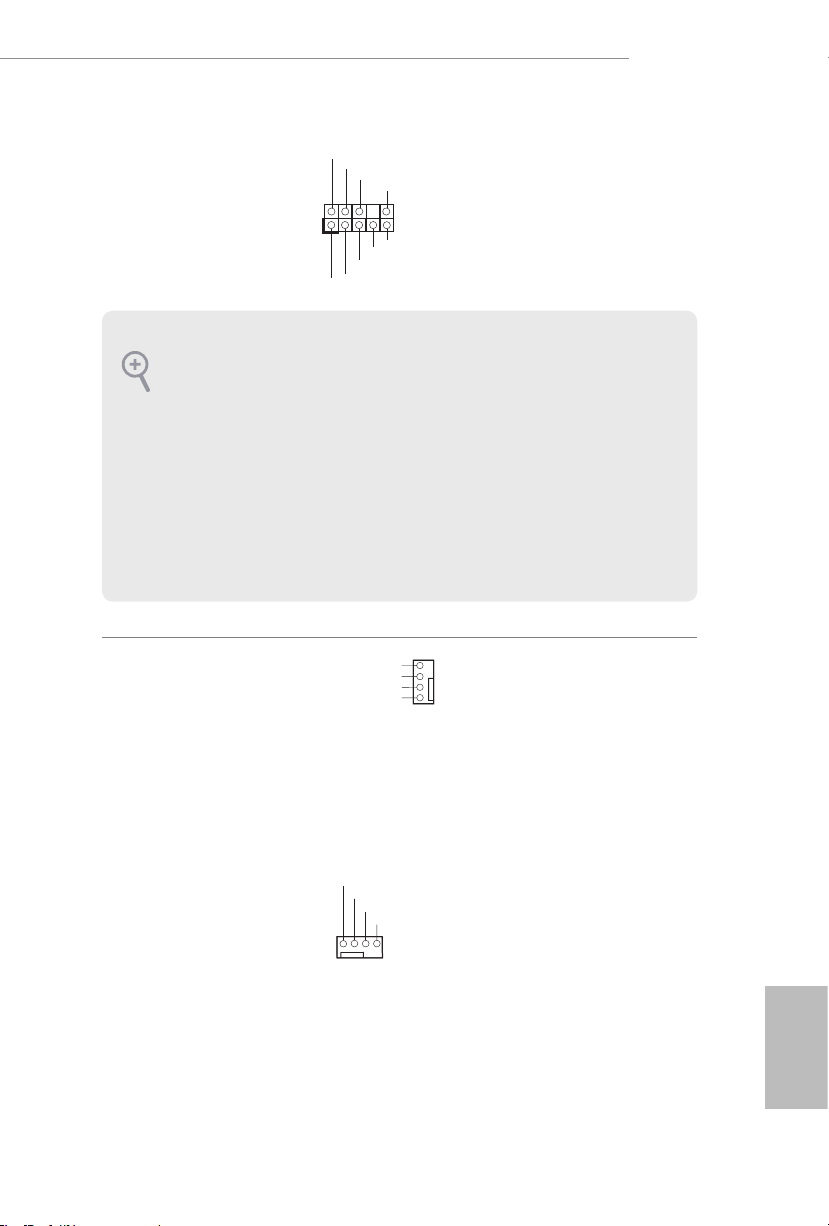
B550M/ac
J_SENSE
OUT2_L
1
MIC_RET
PRESENCE#
GND
OUT2_R
MIC2_R
MIC2_L
OUT_RET
FAN_SPEED_CONTROL
4
GND
1 2 3 4
Front Panel Audio Header
(9-pin HD_ AUDIO1)
(see p.1, No. 25)
is header is for
connecting audio devices
to the front audio panel.
1. High Denition Audio supports Jack Sensing, but the panel wire on the chassis must support HDA to function correctly. Please follow the instructions in our manual and chassis
manual to install your system.
2. If you use an AC’97 audio panel , please install it to the front panel audio header by the
steps below:
A. Connect Mic_IN (MIC) to MIC2_ L.
B. Conne ct Audio_R (RIN) to OUT2_R and Audio_ L (LIN) to OUT2_ L.
C. Connect Ground (GND) to Ground (GND).
D. MIC_ RET and OUT_RET are for the HD audio panel only. You don’t need to connect
them for the AC’97 audio panel .
E. To activate the front mic, go to the “FrontMic” Tab in the Realtek Control panel and
adjust “Recording Volume”.
Chassis Water Pump Fan
Connectors
(4-pin CHA_FAN1/WP)
(see p.1, No. 26)
CHA_FAN_SPEED
FAN_VOLTAGE
GND
is motherboard
3
2
provides three 4-Pin water
1
cooling chassis fan
connectors. If you plan to
connect a 3-Pin
water cooler fan, please
connect it to Pin 1-3.
chassis
(4-pin CHA_FAN2/WP)
(see p.1, No. 20)
(4-pin CHA_FAN4/WP)
(see p.1, No. 15)
FAN_VOLTAGE
FAN_SPEED
FAN_SPEED_CONTROL
English
31
Page 36
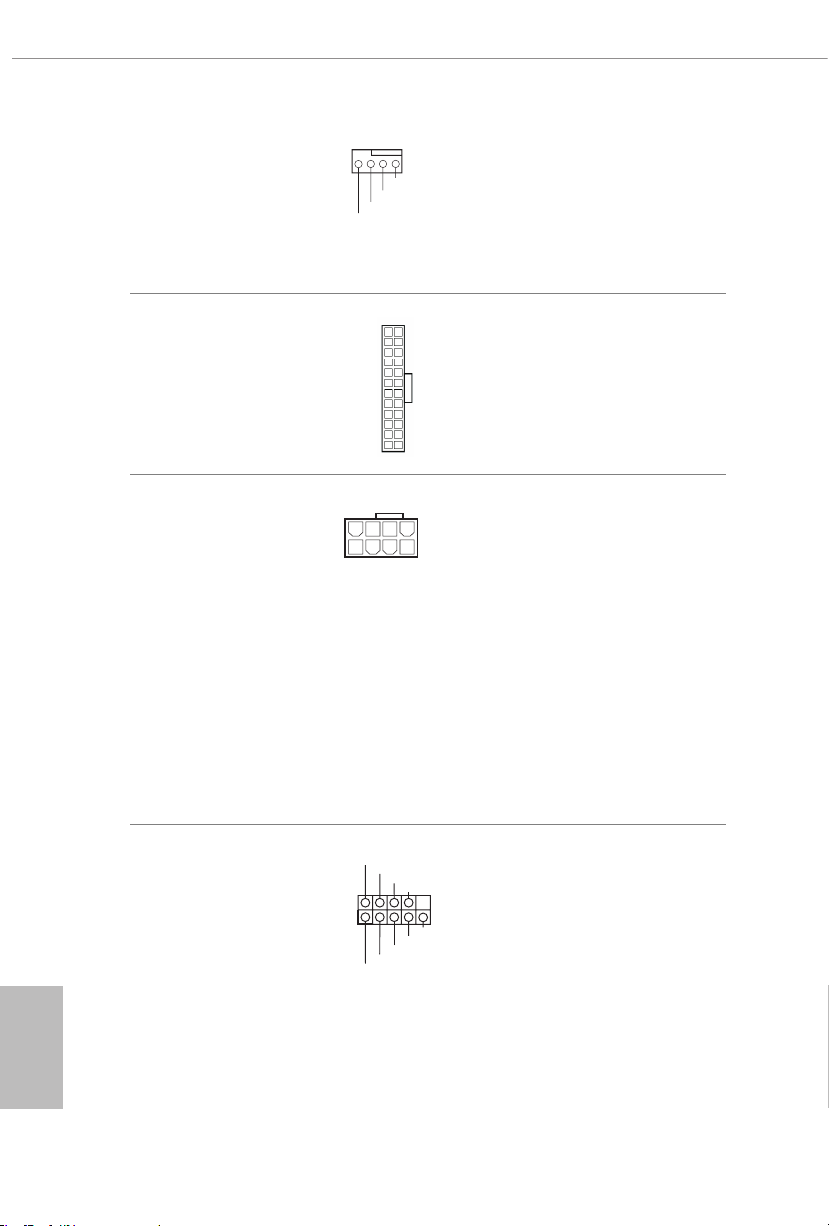
CPU Fan Connector
4 3 2 1
4
1
8 5
(4-pin CPU_FAN1)
(see p.1, No. 2)
GND
FAN_VOLTAGE
CPU_F
AN_SPEED
FAN_SPEED_CONTROL
is motherboard provides a 4-Pin CPU fan
(Quiet Fan) connector.
If you plan to connect a
3-Pin CPU fan, please
connect it to Pin 1-3.
ATX Power Connector
(24-pin ATXPWR1)
(see p.1, No. 7)
ATX 12V Power
Connector
(8-pin ATX12V1)
(see p.1, No. 1)
Serial Port Header
(9-pin COM1)
(see p.1, No. 22)
1
12
1
RRXD1
DDCD#1
DDTR#1
DDSR#1
GND
TTXD1
24
13
CCTS#1
RRI#1
RRTS#1
is motherboard provides a 24-pin ATX power
connector. To use a 20-pin
ATX power supply, please
plug it along Pin 1 and Pin
13.
is motherboard
provides an 8-pin ATX
12V power connector. To
use a 4-pin ATX power
supply, please plug it along
Pin 1 and Pin 5.
*Warning: Please make
sure that the power cable
connected is for the CPU
and not the graphics
card. Do not plug the
PCIe power cable to this
connector.
is COM1 header
supports a serial port
module.
English
32
Page 37
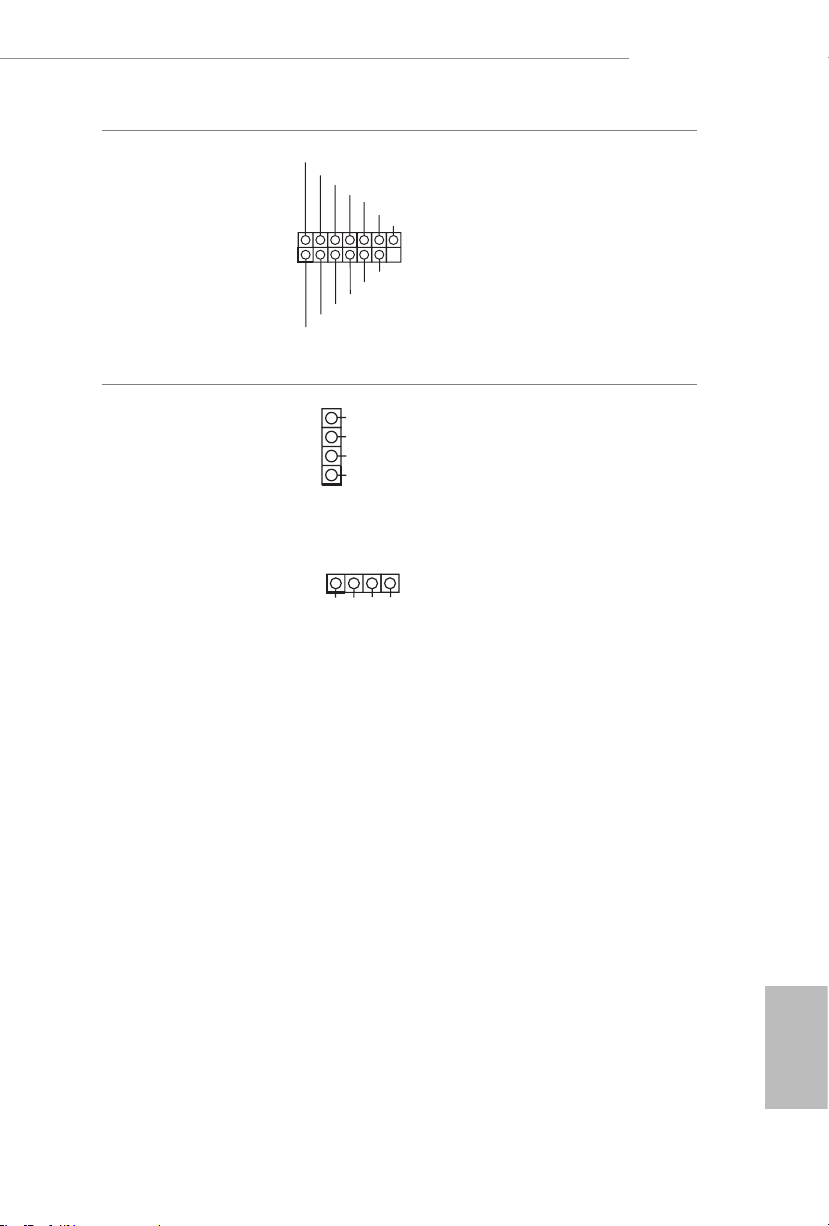
B550M/ac
1
SPI_DQ3
#
1
1
SPI TPM Header
(13 -pi n SPI_TPM _J1)
(see p.1, No. 17)
RGB LED Headers
(4-pin RGB_LED1)
(see p.1, No. 5)
(4-pi n RGB _LED2)
(see p.1, No. 23)
+3.3V
Dummy
SPI_MISO
SPI_CS0
SPI_DQ2
12V GRB
CLK
SPI_MOSI
GND
RSMRST#
B
R
G
12V
RST#
TPM_PIRQ
SPI_TPM_CS
is connector supports SPI
Trusted Platform Module (TPM)
system, which can securely store
keys, digital certicates, passwords, and data. A TPM system
also helps enhance network
security, protects digital
identities, and ensures platform
integrity.
ese two RGB headers are used
to connect RGB LED extension
cable which allows
users to choose from various LED
lighting eects.
Caution: Never install the RGB
LED cable in the wrong orienta-
tion; otherwise, the cable may
be damaged.
*Please refer to page 39 for
further instructions on these two
headers.
English
33
Page 38
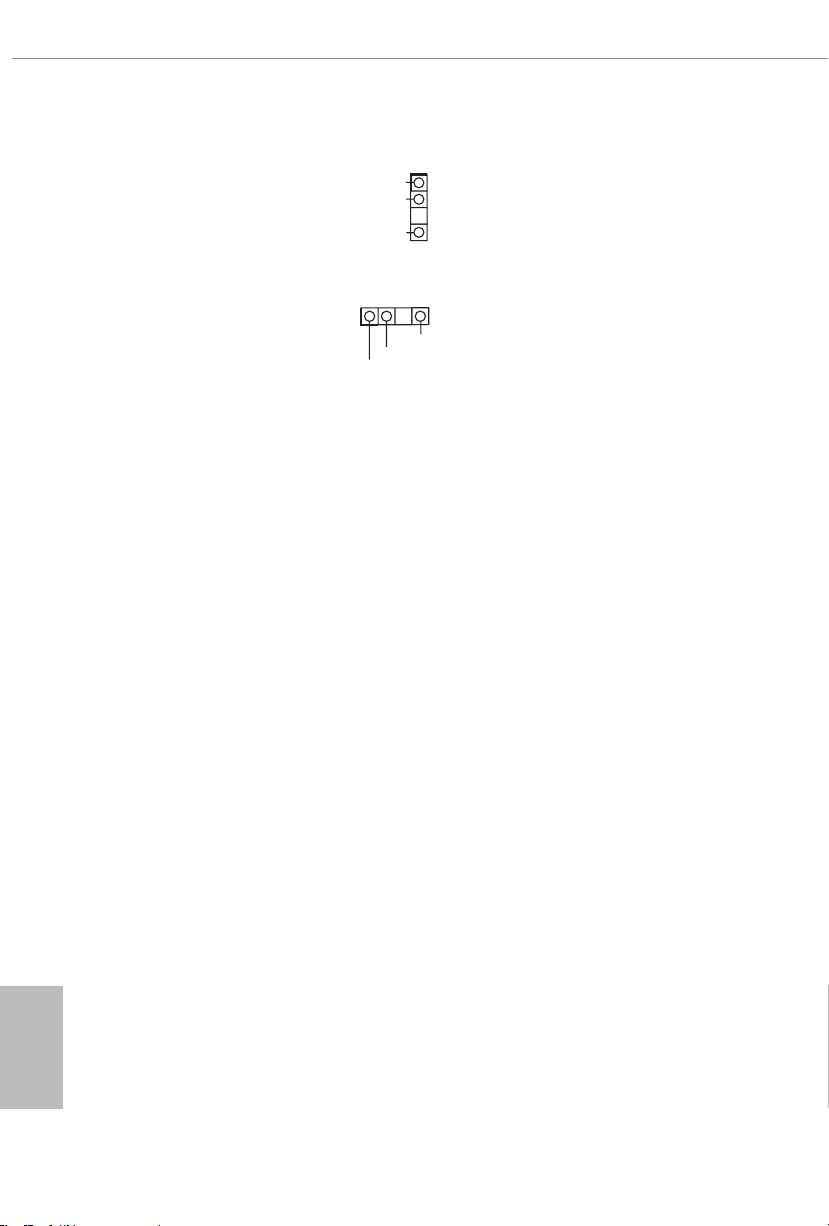
Addressable LED Headers
D
1
DO_ADDR
1
(3-pin A DDR_LE D1)
(see p.1, No. 6)
(3-pin A DDR_LE D2)
(see p.1, No. 24)
VOUT
VOUT
GND
DO_ADDR
ese two
are used to connect
Addressable
Addressable
headers
LED extension cable which
allows users to choose from
various LED lighting eects.
Caution: Never install the
Addressable LED cable in the
GN
wrong orientation; otherwise,
the cable may be damaged.
*Please refer to page 40 for
further instructions on this
header.
English
34
Page 39

2.7 Post Status Checker
Post Status Checker (PSC) diagnoses the computer when users power on the
machine. It emits a red light to indicate whether the CPU, memory, VGA or storage is dysfunctional. e lights go o if the four mentioned above are functioning
normally.
B550M/ac
35
English
Page 40
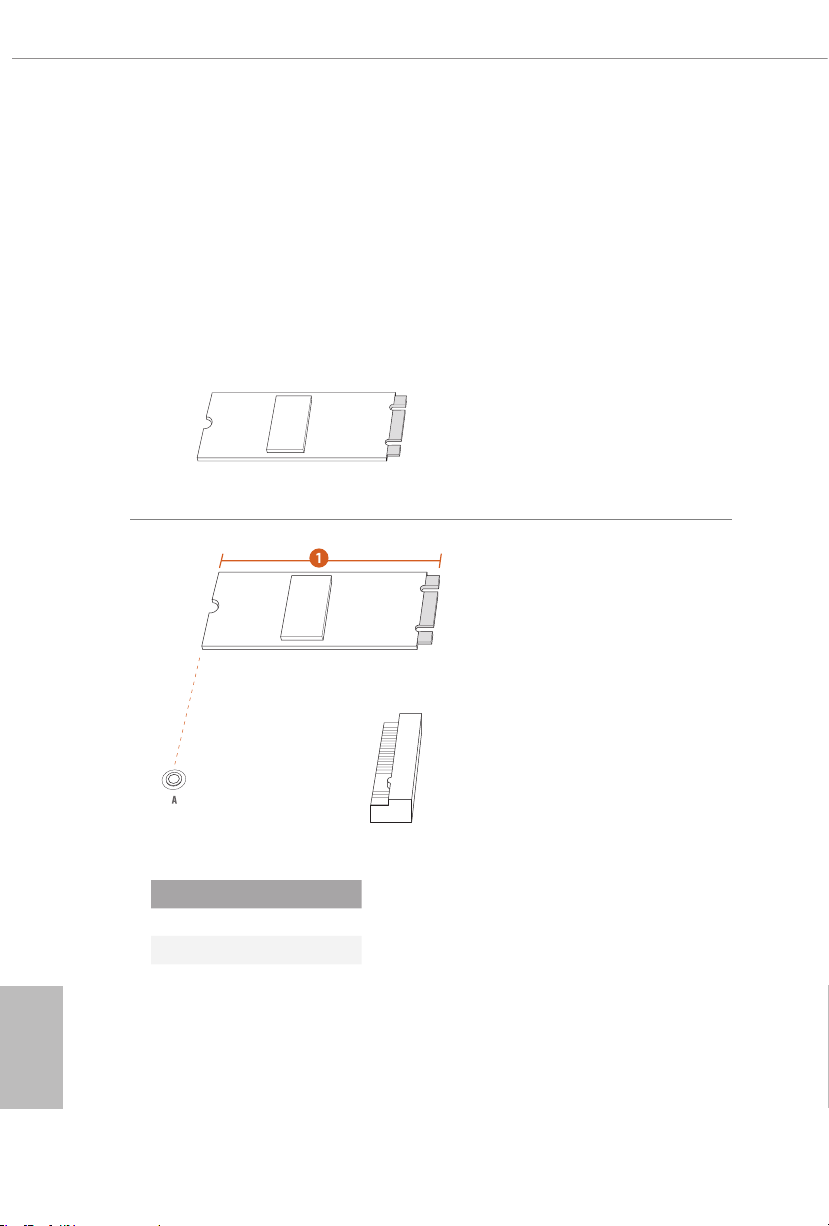
2.8 M.2_SSD (NGFF) Module Installation Guide (M2_1)
The M.2, also known as the Next Generation Form Factor (NGFF), is a small size and
versatile card edge connector that aims to replace mPCIe and mSATA.
e Hyper M.2 Socket (M2_1) supports M Key type 2280 M.2 PCI Express module up to
Gen4x4 (64 Gb/s) (with Matisse) or Gen3x4 (32 Gb/s) (with Renoir).
Installing the M.2_SSD (NGFF) Module
Step 1
Prepare a M.2_SSD (NGFF) module
and the screw.
Step 2
Depending on the PCB type and
length of your M.2_SSD (NGFF)
module, nd the corresponding nut
location to be used.
English
36
No. 1
Nut Location A
PCB Length 8cm
Module Type Type2280
Page 41
B550M/ac
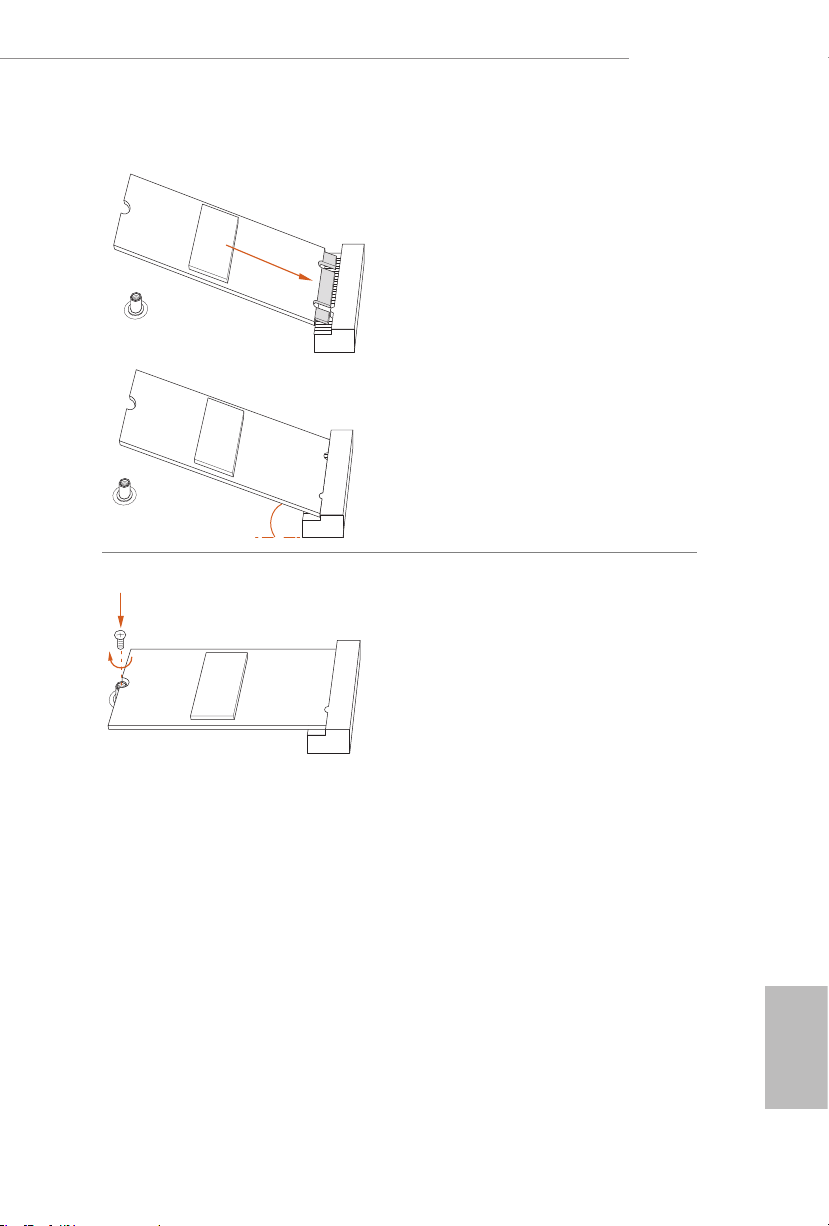
Step 3
Align and gently insert the M.2
(NGFF) SSD module into the M.2
slot. Please be aware that the M.2
(NGFF) SSD module only ts in one
orientation.
A
A
o
20
Step 4
Tighten the screw with a screwdriver
to secure the module into place.
Please do not overtighten the screw
as this might damage the module.
NUT1NUT2
English
37
Page 42

M.2_SSD (NGFF) Module Support List (M2_1)
Vendor Interface P/ N
ADATA PCIe3 x4 ASX7000NP-128GT-C
ADATA PCIe3 x4 ASX8000NP-256GM-C
ADATA PCIe3 x4 ASX7000NP-256GT-C
ADATA PCIe3 x4 ASX8000NP-512GM-C
ADATA PCIe3 x4 ASX7000NP-512GT-C
Apacer PCIe3 x4 AP240GZ280
Corsair PCIe3 x4 CSSD-F240GBMP500
Intel PCIe3 x4 SSDPEKKF256G7
Intel PCIe3 x4 SSDPEK KF512G7
Kingston PCIe3 x4 SKC1000/480G
Kingston PCIe2 x4 SH2280S3/480G
OCZ PCIe3 x4 RVD400-M2280-512G (NVME)
PATR IOT PCIe3 x4 PH240GPM280SSDR NVME
Plextor PCIe3 x4 PX-128M8PeG
Plextor PCIe3 x4 PX-1TM8PeG
Plextor PCIe3 x4 PX-256M8PeG
Plextor PCIe3 x4 PX-512M8PeG
Plextor PCIe PX-G256M6e
Plextor PCIe PX-G512M6e
Samsung PCIe3 x4 SM961 MZVPW128HEGM (NVM)
Samsung PCIe3 x4 PM961 MZVLW128HEGR (NVME)
Samsung PCIe3 x4 960 EVO (MZ-V6E250) (NVME)
Samsung PCIe3 x4 960 EVO (MZ-V6E250BW) (NVME)
Samsung PCIe3 x4 SM951 (N VME)
Samsung PCIe3 x4 SM951 (MZHPV256HDGL)
Samsung PCIe3 x4 SM951 (MZHPV512H DGL)
Samsung PCIe3 x4 SM951 (N VME)
Samsung PCIe x4 XP941-512G (MZHPU512HCGL)
SanDisk PCIe SD6PP4M-12 8G
SanDisk PCIe SD6PP4M-256G
TEAM PCIe3 x4 TM8FP2240G0C101
TEAM PCIe3 x4 TM8FP2480GC110
WD PCIe3 x4 WDS256G1X0C-00ENX0 (NVME)
WD PCIe3 x4 WDS512G1X0C-00ENX0 (N VME)
English
38
For the latest updates of M.2_SSD (NFGG) module support list, please visit our website for
details: http://www.asrock.com
Page 43
B550M/ac
1
1
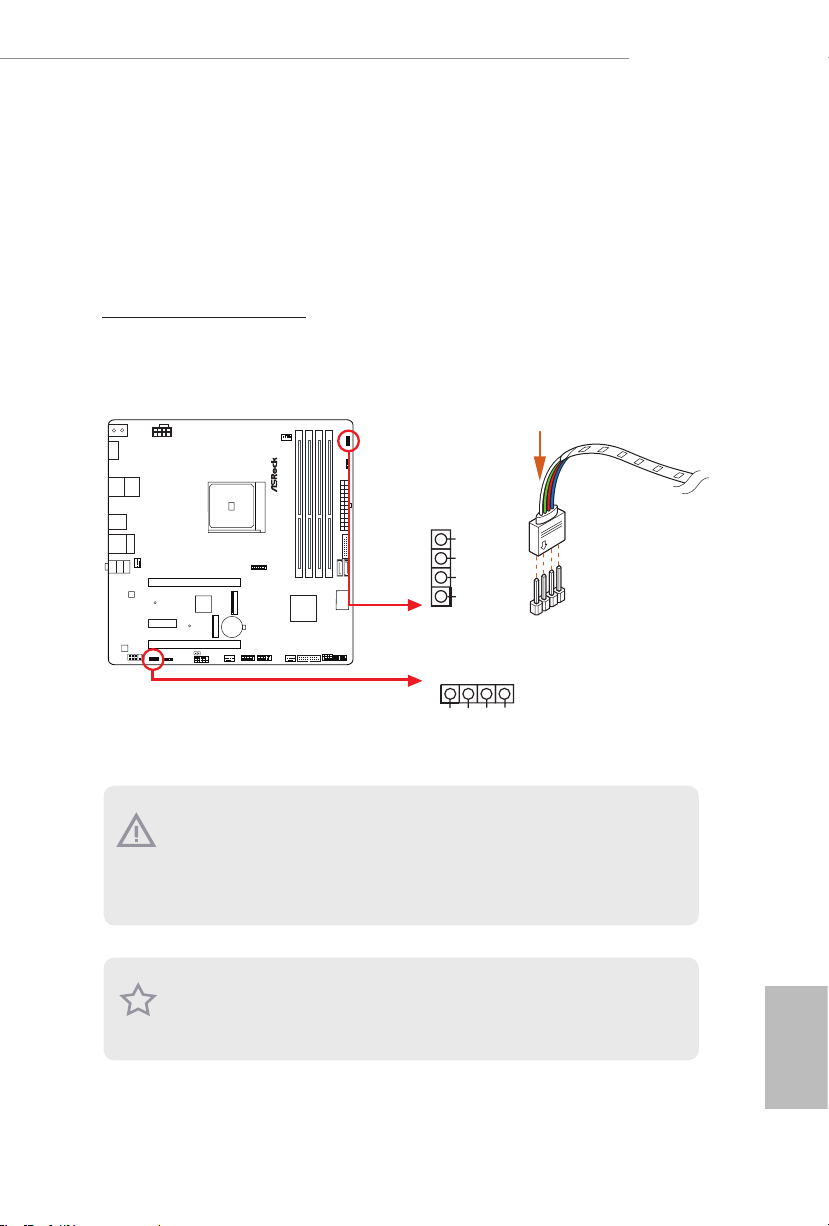
2.9 ASRock Polychrome SYNC
ASRock Polychrome SYNC is a lighting control utility specically designed for unique individuals with sophisticated tastes to build their own stylish colorful lighting system. Simply by
connecting the LED strip, you can customize various lighting schemes and patterns, including
Static, Breathing, Strobe, Cycling, Music, Wave and more.
Connecting the LED Strip
Connect your RGB LED strips to the
motherboard.
B550 M/ac
RGB LED Headers (RGB_LED1, RGB_LED2)
RGB_LED1
B
R
G
12V
1
B
R
G
V
2
1
on the
RGB_LED2
12V GRB
1. Never install the RGB LED cable in the wrong orientation; otherwise, the cabl e may be
damaged.
2. Before installing or removing your RGB LED cable, please power o your system and
unplug the power cord from the power supply. Failure to do so may c ause damages to
motherboard components.
1. Please note that the RGB LED strips do not come with the package.
2. e RGB LED header suppor ts standard 5050 RGB LED str ip (12V/G/R/B), with a
maximum power rating of 3A (12V) and length within 2 meters.
English
39
Page 44
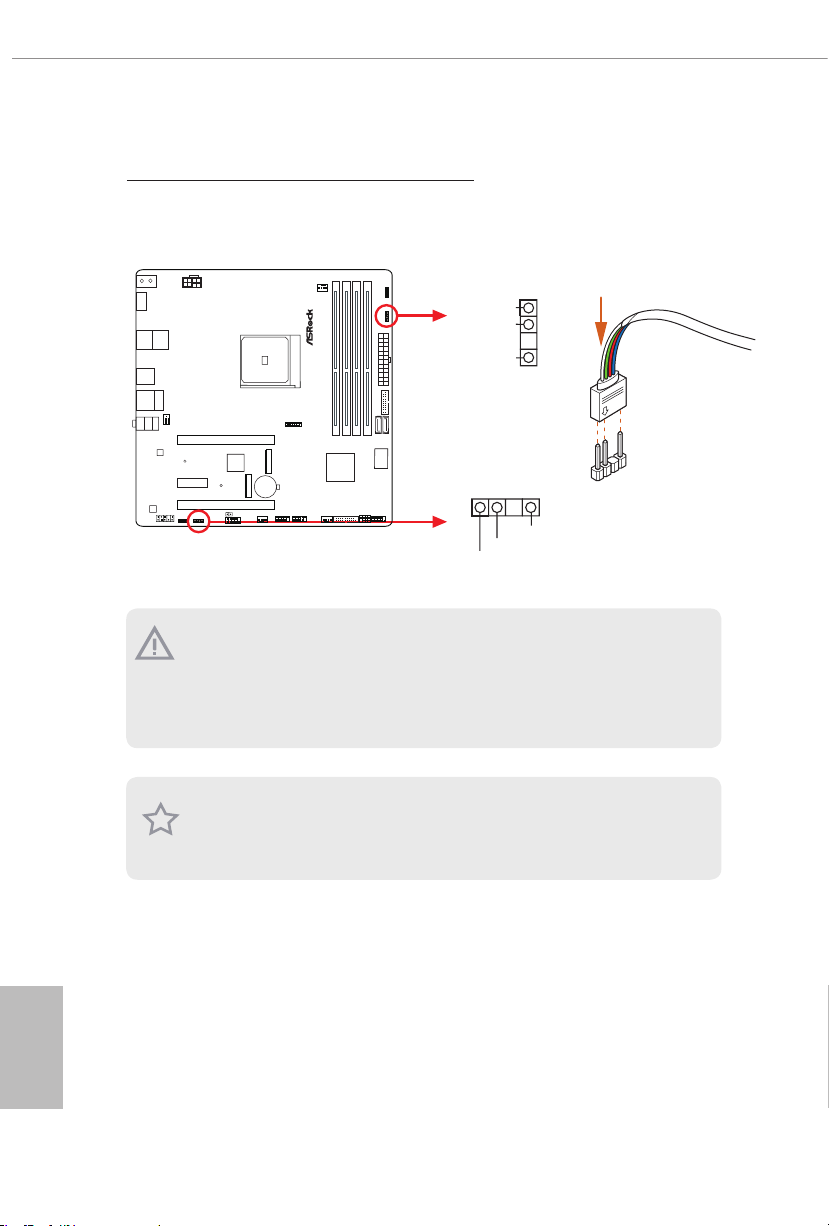
Connecting the Addressable RGB LED Strip
D
1
DO_ADDR
1
Connect your
ADDR _LED2)
Addressable RGB LED
strips to the
Addressable LED Headers (ADDR_LED1,
on the motherboard.
ADDR_LED1
B550 M/a c
1. Never install the RGB LED cable in the wrong orientation; otherwise, the cabl e may be
damaged.
2. Before installing or removing your RGB LED cable, please power o your system and
unplug the power cord from the power supply. Failure to do so may c ause damages to
motherboard components.
VOUT
GND
ADDR_LED2
GN
DO_ADDR
VOUT
1
1. Please note that the RGB LED strips do not come with the package.
2. e RGB LED header suppor ts WS2812B addressable RGB LED strip (5V/Data/
GND), with a ma ximum power rating of 3A (5V) and length within 2 meters.
English
40
Page 45
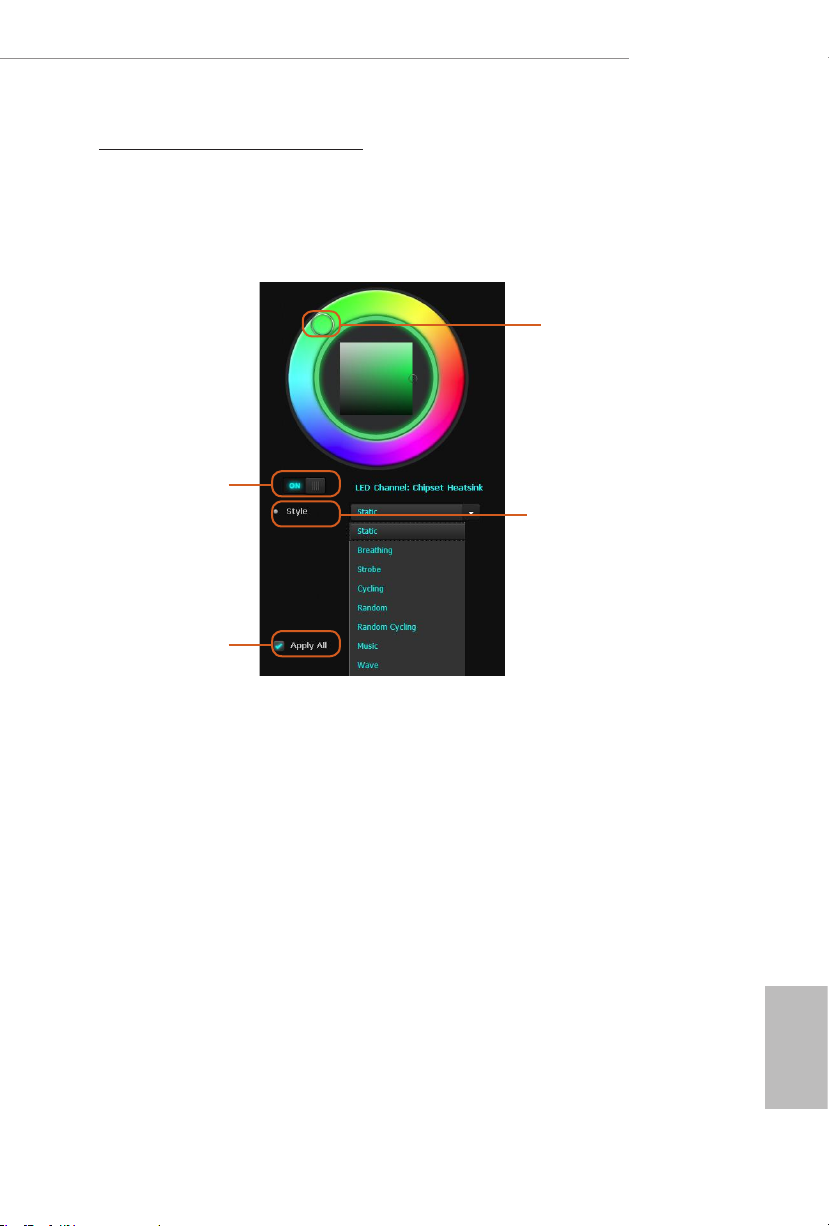
ASRock Polychrome SYNC Utility
Now you can adjust the RGB LED color through the ASRock Polychrome SYNC Utility.
Download this utility from the ASRock Live Update & APP Shop and start coloring your
PC style your way!
Drag the tab to customize your
preference.
Toggle on/o the
RGB LED switch
Sync RGB LED eects
for all LED regions of
the motherboard
Select a RGB LED light eect
from the drop-down menu.
B550M/ac
41
English
Page 46

1 Einleitung
Vielen Dank, dass Sie sich für das B550M/ac von ASRock entschieden haben – ein
zuverlässiges Motherboard, das konsequent unter der strengen Qualitätskontrolle von
ASRock hergestellt wurde. Es liefert ausgezeichnete Leistung mit robustem Design, das
ASRock Streben nach Qualität und Beständigkeit erfüllt.
Da die technischen Daten des Motherboards sowie die BIOS-Soware aktualisiert werden
können, kann der Inhalt dieser Dokumentation ohne Ankündigung geändert werden. Falls diese
Dokumentation irgendwelchen Änderungen unterliegt, wird die aktualisierte Version ohne weitere
Hinweise auf der ASRock-Webseite zur Verfügung gestellt. Sollten Sie technische Hilfe in Bezug auf
dieses Motherboard benötigen, erhalten Sie auf unserer Webseite spezischen Informationen über
das von Ihnen verwendete Modell. Auch nden Sie eine aktuelle Liste unterstützter VGA-Karten
und Prozessoren auf der ASRock-Webseite. ASRock-Webseite http://www.asrock.com.
1.1 Lieferumfang
ASRock B550M/ac-Motherboard (Micro-ATX-Formfaktor)
•
ASRock B550M/ac-Schnellinstallationsanleitung
•
ASRock B550M/ac-Support-CD
•
1 x E/A-Blendenabschirmung
•
2 x Serial-ATA- (SATA) Datenkabel (optional)
•
2 x ASRock-WiFi-2,4/5-GHz-Antennen (optional)
•
1 x Schraube für M.2-Sockel (optional)
•
Deutsch
42
Page 47

1.2 Technische Daten
Micro-ATX-Formfaktor
Plattform
Prozessor
Chipsatz
Speicher
•
Feststoondensator-Design
•
Platine mit zwei Unzen Kupfergehalt
•
Unterstützt AMD AM4 Ryzen™ der 3. Generation / AMD Ryzen™-
•
Prozessoren und höher (Prozessoren der 3000er- und 4000erSerie)*
* Nicht kompatibel mit AMD Ryzen™ 5 3400G und Ryzen™ 3 3200G
Digi Power design
•
8-Leistungsphasendesign
•
AMD B550
•
Dualkanal-DDR4-Speichertechnologie
•
4 x DDR4-DIMM-Steckplätze
•
Prozessoren der AMD-Ryzen-Serie (Matisse) unterstützen DDR4
•
4533+(OC)/4466(OC)/4400(OC)/4333(OC)/4266(OC)/
4200(OC)/4133(OC)/4000(OC)/3866(OC)/3800(OC)/
3733(OC)/3600(OC)/3466(OC)/3200/2933/2667/2400/2133
ECC und non-ECC, ungepuerter Speicher*
APUs (Renoir) der AMD-Ryzen-Serie unterstützen DDR4 4733+
•
(OC)/4666(OC)/4600(OC)/4533(OC)/4466(OC)/4400(OC)/
4333(OC)/4266(OC)/4200(OC)/4133(OC)/4000(OC)/3866(
OC)/3800(OC)/3733(OC)/3600(OC)/3466(OC)/3200/2933/
2667/2400/2133 ECC und non-ECC, ungepuerter Speicher*
* Weitere Informationen nden Sie in der Speicherkompatibilitätsliste
auf der ASRock-Webseite. (http://www.asrock.com/)
* Bitte beachten Sie Seite 22 für die maximal unterstützte Frequenz
von DDR4-UDIMM.
Systemspeicher, max. Kapazität: 128GB
•
Unterstützt Extreme-Memory-Prole- (XMP) Speichermodule
•
15-μ-Goldkontakt in DIMM-Steckplätze
•
B550M/ac
Erweiterungssteckplatz
Prozessoren der AMD-Ryzen-Serie (Matisse)
2 x PCI-Express x16-Steckplätze (PCIE1: Gen4x16-Modus;
•
PCIE3: Gen3 x4-Modus)*
APUs (Renoir) der AMD-Ryzen-Serie
2 x PCI-Express x16-Steckplätze (PCIE1: Gen3x16-Modus;
•
PCIE3: Gen3 x4-Modus)*
Deutsch
43
Page 48

Grakkarte
* Unterstützt NVMe-SSD als Bootplatte
1 x PCI-Express 3.0-x1-Steckplatz
•
Unterstützt AMD Quad CrossFireX
•
1 x M.2-Sockel (Key E) mit dem mitgelieferten 802.11ac-WLAN-
•
TM
und CrossFireX
TM
Modul
Integrierte Grakkarte der AMD-RadeonTM-Vega-Serie in APU
•
der Ryzen-Serie*
* Tatsächliche Unterstützung kann je nach Prozessor variieren
DirectX 12, Pixel Shader 5.0
•
Freigabespeicher von standardmäßig 2GB. Max. Freigabespeicher
•
unterstützt bis zu 16GB.
* Der max. Freigabespeicher von 16GB erfordert die Installation von
32GB Systemspeicher.
Unterstützt HDMI 2.1 mit maximaler Auösung von 4K x 2K
•
(4096 x 2160) bei 60Hz
Unterstützt Auto-Lippensynchronizität, hohe Farbtiefe (12 bpc),
•
xvYCC und HBR (Audio mit hoher Bitrate) mit HDMI 2.1-Port
(konformer HDMI-Monitor erforderlich)
Unterstützt HDR (High Dynamic Range) mit HDMI 2.1
•
Unterstützt HDCP 2.3 mit HDMI 2.1-Port
•
Unterstützt 4K-Ultra-HD- (UHD) Wiedergabe mit HDMI 2.1-
•
Port
Unterstützt Microso PlayReady®
•
Deutsch
44
Audio
LAN
7.1-Kanal-HD-Audio mit Inhaltsschutz (Realtek ALC1200-
•
Audiocodec)
Erstklassige Blu-ray-Audiounterstützung
•
Unterstützt Überspannungsschutz
•
PCB-isolierte Abschirmung
•
Individuelle PCB-Layer für rechten/linken Audiokanal
•
Nahimic Audio
•
PCIE-x1-Gigabit-LAN 10/100/1000 Mb/s
•
Realtek RTL8111H
•
Unterstützt Wake-On-LAN
•
Unterstützt Schutz gegen Blitzschlag/elektrostatische Entladung
•
Unterstützt energieezientes Ethernet 802.3az
•
Unterstützt PXE
•
Page 49

Wireless
LAN
Rückblende,
E/A
Speicher
Intel®-802.11ac-WLAN-Modul
•
Unterstützt IEEE 802.11a/b/g/n/ac
•
Unterstützt Dualband (2,4/5 GHz)
•
Unterstützt drahtlose Hochgeschwindigkeitsverbindungen
•
bis 433 Mb/s
Unterstützt Bluetooth 4.2 + High-Speed, Klasse II
•
2 x Antennenanschluss
•
1 x PS/2-Maus-/Tastaturanschluss
•
1 x HDMI-Port
•
4 x USB-3.2-Gen1-Ports (ASMedia-ASM1074-Hub) (unterstützt
•
Schutz vor elektrostatischer Entladung)
2 x USB-2.0-Ports (unterstützt Schutz gegen elektrostatische
•
Entladung)
1 x RJ-45-LAN-Port mit LED (Aktivität/Verbindung-LED und
•
Geschwindigkeit-LED)
HD-Audioanschlüsse: Line-in / Vorderer Lautsprecher / Mikrofon
•
4 x SATA-III-6,0-Gb/s-Anschlüsse, unterstützt RAID (RAID 0,
•
RAID 1 und RAID 10), NCQ, AHCI und Hot-Plugging
1 x Hyper-M.2-Sockel (M2_1), unterstützt M-Key-Typ-2280-
•
M.2-PCI-Express-Modul bis Gen4 x 4 (64 Gb/s) (mit Matisse)
oder Gen3 x 4 (32 Gb/s) (mit Renoir)*
* Unterstützt NVMe-SSD als Bootplatte
* Unterstützt ASRock U.2-Kit
B550M/ac
Anschluss
1 x COM-Anschluss-Stileiste
•
1 x SPI-TPM-Stileiste
•
1 x Betrieb-LED- und Lautsprecher-Stileiste
•
2 x RGB-LED-Stileisten
•
* Unterstützt insgesamt bis zu 12 V/3 A, 36-W-LED-Streifen
2 x Adressierbare-LED-Stileiste
•
* Unterstützen insgesamt bis zu 5 V/3 A, 15-W-LED-Streifen
1 x CPU-Lüeranschluss (4-polig)
•
* Der CPU-Lüeranschluss unterstützt einen CPU-Lüer mit einer
maximalen Lüerleistung von 1 A (12 W).
Deutsch
45
Page 50

BIOSFunktion
3 x Anschlusse für Gehäuse-/Wasserpumpenlüer (4-polig)
•
(intelligente Lüergeschwindigkeitssteuerung)
* Der Gehäuse-/Wasserpumpenlüer unterstützt einen
Wasserkühlerlüer mit einer maximalen Lüerleistung von 2 A
(24 W).
* CHA_FAN1/WP, CHA_FAN2/WP, CHA_FAN3/WP und CHA_
FAN4/WP können automatisch erkennen, ob ein 3- oder 4-poliger
Lüer verwendet wird.
1 x 24-poliger ATX-Netzanschluss
•
1 x 8-poliger 12-V-Netzanschluss
•
1 x Audioanschluss an Frontblende
•
2 x USB 2.0-Stileisten (unterstützt 4 USB 2.0-Ports) (unterstützt
•
Schutz gegen elektrostatische Entladung)
2 x USB 3.2 Gen1-Stileiste (unterstützt 4 USB 3.2 Gen1-Ports)
•
(unterstützt Schutz gegen elektrostatische Entladung)
AMI-UEFI-Legal-BIOS mit Unterstützung grascher
•
Benutzerschnittstellen
Unterstützt „Plug-and-Play“
•
ACPI 5.1-konforme Aufweckereignisse
•
Unterstützt Jumper-frei
•
SMBIOS 2.3-Unterstützung
•
CPU, CPU VDDCR_SOC, DRAM, VPPM, +1.8VSB
•
Mehrfachspannungsanpassung
Deutsch
46
Hardwareüberwachung
Betriebssystem
Zertizierungen
Temperaturerkennung: CPU-, Gehäuse-/Wasserpumpenlüer
•
Lüertachometer: CPU-, Gehäuse-/Wasserpumpenlüer
•
Lautloser Lüer (automatische Anpassung der
•
Gehäuselüergeschwindigkeit durch CPU-Temperatur): CPU-,
Gehäuse-/Wasserpumpenlüer
Mehrfachgeschwindigkeitssteuerung: CPU-, Gehäuse-/
•
Wasserpumpenlüer
Spannungsüberwachung: +12V, +5V, +3.3V, CPU Vcore, CPU
•
VDDCR_SOC, DRAM, VPPM, +1.8V
Microso® Windows® 10, 64 Bit
•
FCC, CE
•
ErP/EuP ready (ErP/EuP ready-Netzteil erforderlich)
•
Page 51
* Detaillierte Produktinformationen nden Sie auf unserer Webseite: http://www.asrock.com
Bitte beachten Sie, dass mit einer Übertaktung, zu der die Anpassung von BIOS-Einstellungen, die
Anwendung der Untied Overclocking Technology oder die Nutzung von Übertaktungswerkzeugen
von Drittanbietern zählen, bestimmte Risiken verbunden sind. Eine Übertaktung kann sich auf die
Stabilität Ihres Systems auswirken und sogar Komponenten und Geräte Ihres Systems beschädigen.
Sie sollte auf eigene Gefahr und eigene Kosten durchgeführt werden. Wir übernehmen keine
Verantwortung für mögliche Schäden, die durch eine Übertaktung verursacht wurden.
B550M/ac
47
Deutsch
Page 52
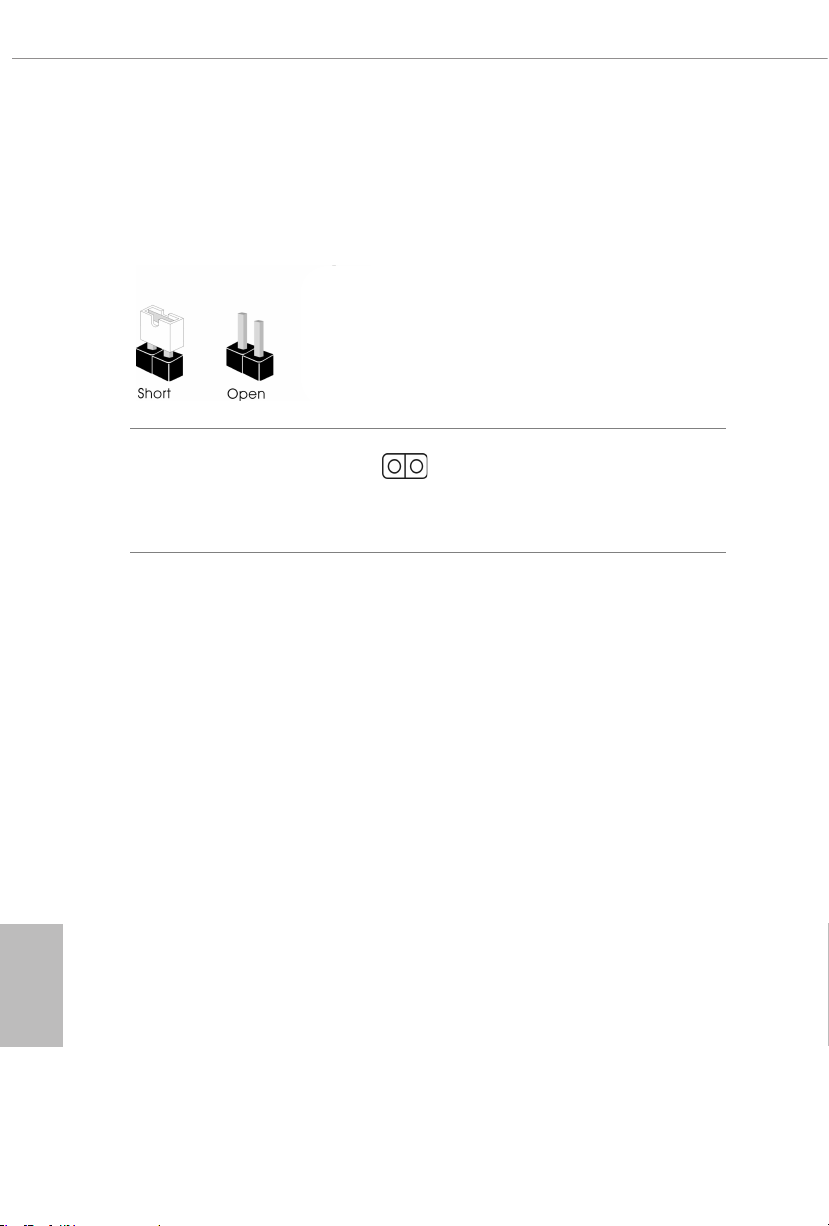
1.3 Jumpereinstellung
Die Abbildung zeigt, wie die Jumper eingestellt werden. Wenn die Jumper-Kappe auf den
Kontakten angebracht ist, ist der Jumper „kurzgeschlossen“. Wenn keine Jumper-Kappe auf
den Kontakten angebracht ist, ist der Jumper „oen“.
Deutsch
CMOS-löschen-Jumper
(CLRCMOS1)
(siehe S. 1, Nr. 21)
CLRCMOS1 ermöglicht Ihnen die Löschung der Daten im CMOS. Die Daten im CMOS
beinhaltet Systemeinrichtungsinformationen, wie Systemkennwort, Datum, Zeit und
Systemeinrichtungsparameter. Zum Löschen und Rücksetzen der Systemparameter auf
die Standardeinrichtung schalten Sie den Computer bitte ab und ziehen das Netzkabel;
schließen Sie dann die Kontakte an CLRCMOS1 3 Sekunden mit einer Jumper-Kappe kurz.
Bitte denken Sie daran, die Jumper-Kappe nach der CMOS-Löschung zu entfernen. Falls
Sie den CMOS direkt nach Abschluss der BIOS-Aktualisierung löschen müssen, starten Sie
das System zunächst; fahren Sie es dann vor der CMOS-Löschung herunter.
2-poliger
Jumper
Kurzgeschlossen: CMOS löschen
Oen: Standard
48
Page 53
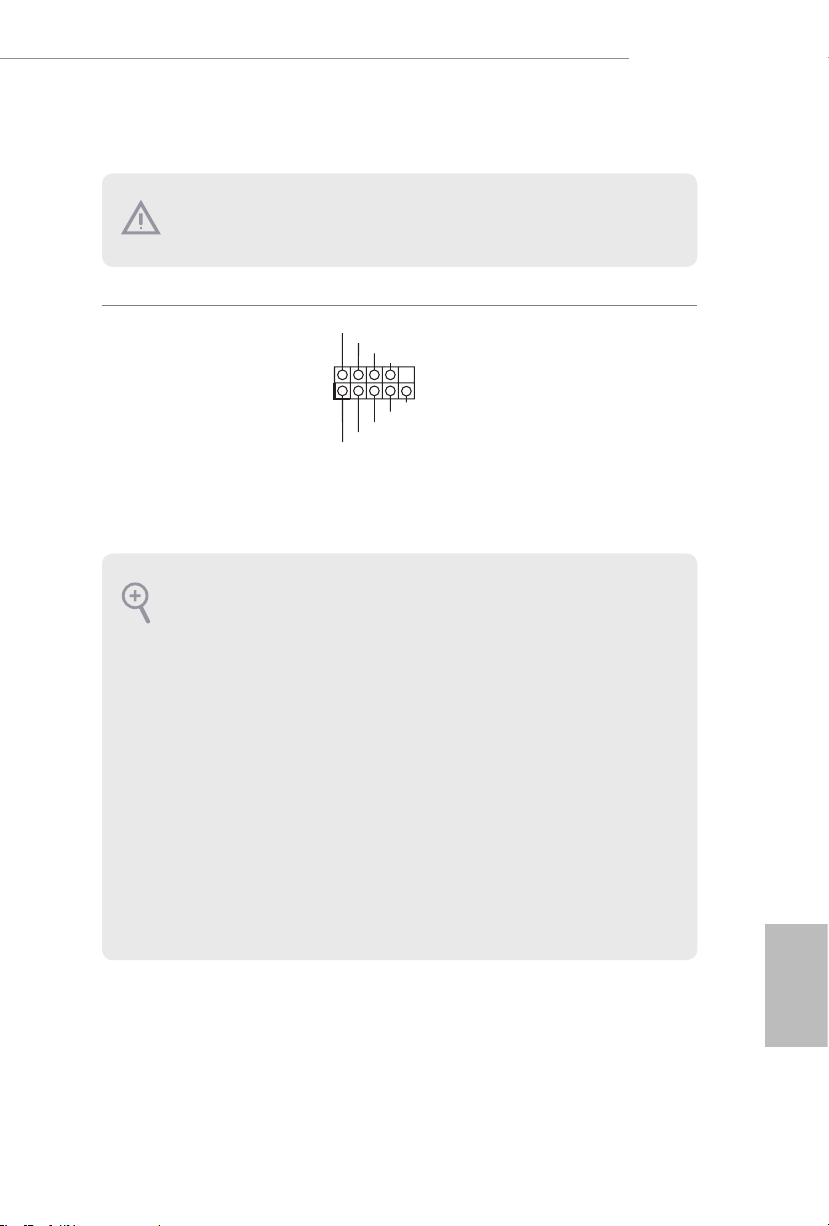
1.4 Integrierte Stiftleisten und Anschlüsse
Integrierte Stileisten und Anschlüsse sind KEINE Jumper. Bringen Sie KEINE Jumper-Kappen an
diesen Stileisten und Anschlüssen an. Durch Anbringen von Jumper-Kappen an diesen Stileisten
und Anschlüssen können Sie das Motherboard dauerha beschädigen.
B550M/ac
Systemblende-Stileiste
(9-polig, PANEL1)
(siehe S. 1, Nr. 12)
PWRBTN (Ein-/Austaste):
Mit der Ein-/Austaste an der Frontblende des Gehäuses verbinden. Sie können die Abschaltung Ihres
Systems über die Ein-/Austaste kongurieren.
RESET (Reset-Taste):
Mit der Reset-Taste an der Frontblende des Gehäuses verbinden. Starten Sie den Computer über die
Reset-Taste neu, wenn er abstürzt oder sich nicht normal neu starten lässt.
PLED (Systembetriebs-LED):
Mit der Betriebsstatusanzeige an der Frontblende des Gehäuses verbinden. Die LED leuchtet, wenn
das System läu. Die LED blinkt, wenn sich das System im S1/S3-Ruhezustand bendet. Die LED
ist aus, wenn sich das System im S4-Ruhezustand bendet oder ausgeschaltet ist (S5).
HDLED (Festplattenaktivitäts-LED):
Mit der Festplattenaktivitäts-LED an der Frontblende des Gehäuses verbinden. Die LED leuchtet,
wenn die Festplatte Daten liest oder schreibt.
Das Design der Frontblende kann je nach Gehäuse variieren. Ein Frontblendenmodul besteht
hauptsächlich aus Ein-/Austaste, Reset-Taste, Betrieb-LED, Festplattenaktivität-LED, Lautsprecher
etc. Stellen Sie beim Anschließen Ihres Frontblendenmoduls an diese Stileiste sicher, dass Kabelund Pinbelegung richtig abgestimmt sind.
1
PLED+
PLED-
HDLED-
HDLED+
PWRBTN#
GND
RESET#
GND
GND
Verbinden Sie Ein-/Austaste,
Reset-Taste und
Systemstatusanzeige am Gehäuse
entsprechend der nachstehenden
Pinbelegung mit dieser Stileiste.
Beachten Sie vor Anschließen der
Kabel die positiven und negativen
Kontakte.
49
Deutsch
Page 54
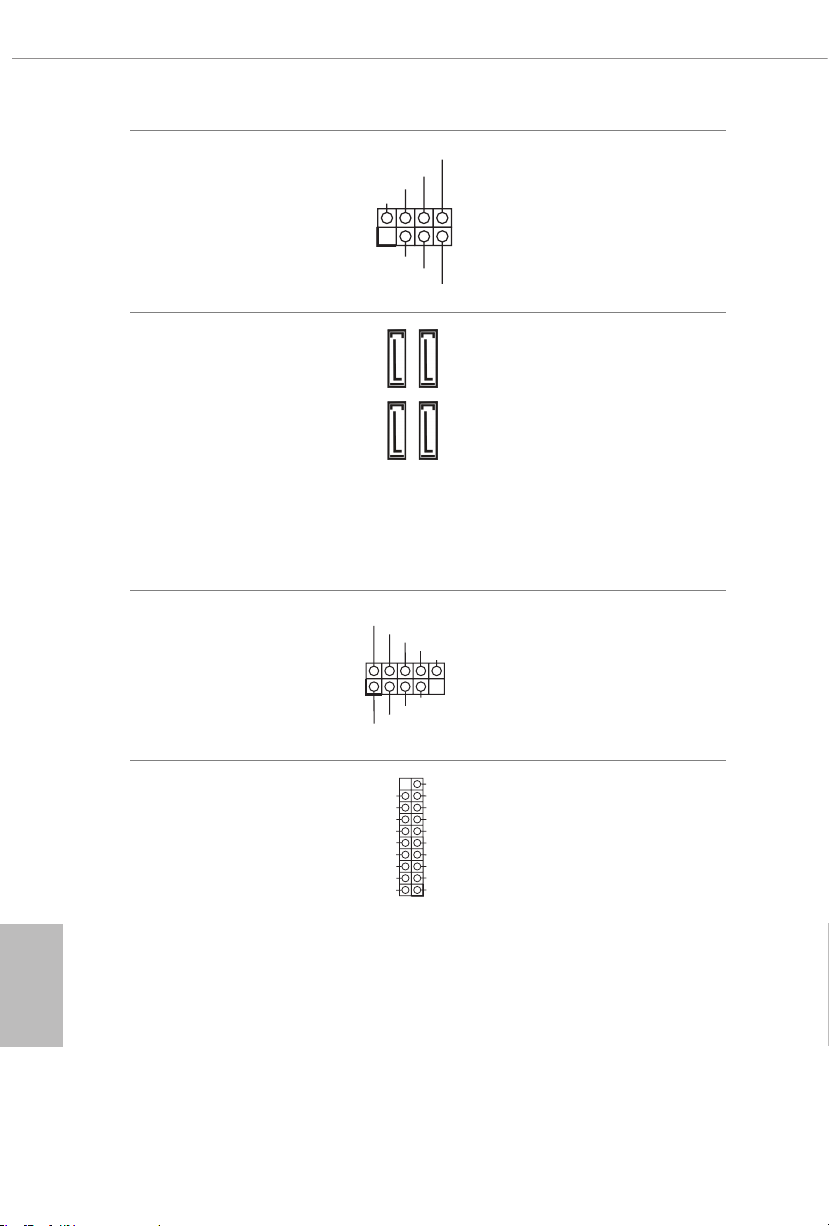
Betrieb-LED- und
1
+5V
DUMMY
PLED+
PLED+
PLED-
DUMMY
SPEAKER
DUMMY
GND
GND
P+
P-
USB_PWR
P+
P-
USB_PWR
1
1
Lautsprecher-Stileiste
(7-polig, SPK_PLED1)
(siehe S. 1, Nr. 13)
Bitte verbinden Sie die BetriebLED des Gehäuses und den
Gehäuselautsprecher mit dieser
Stileiste.
Serial-ATA-III-Anschlüsse
(SATA3_1:
siehe S. 1, Nr. 9)
(SATA3_2:
siehe S. 1, Nr. 10)
(SATA3_3:
siehe S. 1, Nr. 11)(Niedriger)
(SATA3_4:
siehe S. 1, Nr. 11)(Oberer)
USB 2.0-Stileisten
(9-polig, USB_3_4)
(siehe S. 1, Nr. 18)
(9-polig, USB_5_6)
(siehe S. 1, Nr. 19)
USB 3.2 Gen1-Stileisten
(19-polig, F_USB3_1_2)
(siehe S. 1, Nr. 8)
SATA3_2 SATA3_4
IntA_PA_SSRX-
IntA_PA_SSRX+
IntA_PA_SSTX-
IntA_PA_SSTX+
IntA_PA_D-
IntA_PA_D+
Vbus
GND
GND
SATA3_3
SATA3_1
VbusVbus
IntA_PB_SSRX-
IntA_PB_SSRX+
GND
IntA_PB_SSTX-
IntA_PB_SSTX+
GND
IntA_PB_D-
IntA_PB_D+
Dummy
Diese vier SATA-III-Anschlüsse
unterstützen SATA-Datenkabel
für interne Speichergeräte mit
einer Datenübertragungsgeschwindigkeit bis 6,0 Gb/s.
Es gibt zwei Stileisten an
diesem Motherboard. Jede USB
2.0-Stileiste kann zwei Ports
unterstützen.
Es gibt zwei Stileisten an diesem
Motherboard. Jede USB 3.2
Gen1-Stileiste kann zwei Ports
unterstützen.
Deutsch
50
Page 55
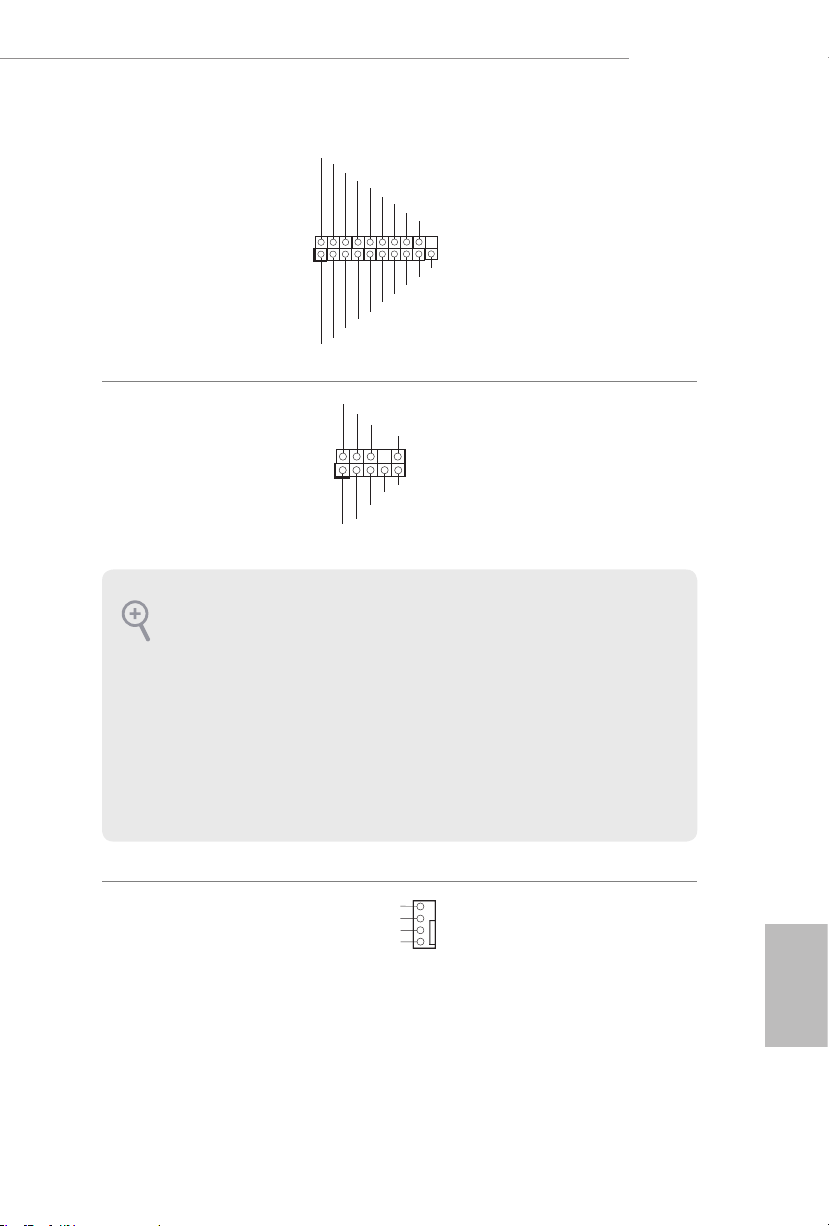
B550M/ac
1
IntA_P_D+
IntA_P_SSRX-
J_SENSE
OUT2_L
1
MIC_RET
PRESENCE#
GND
OUT2_R
MIC2_R
MIC2_L
OUT_RET
4
(19-polig, F_USB3_3_4)
(siehe S. 1, Nr. 14)
Audiostileiste Frontblende
(9-polig, HD_AUDIO1)
(siehe S. 1, Nr. 25)
IntA_P_D-
IntA_P_D+
ID
GND
IntA_P_SSTX+
GND
IntA_P_D-
IntA_P_SSTX-
GND
IntA_P_SSRX+
GND
IntA_P_SSTX-
IntA_P_SSTX+
IntA_P_SSRX-
Vbus
Vbus
IntA_P_SSRX+
Diese Stileiste dient dem
Anschließen von Audiogeräten
an der Frontblende.
1. High Denition Audio unterstützt Anschlusserkennung, der Draht am Gehäuse muss dazu jedoch
HDA unterstützt. Bitte befolgen Sie zum Installieren Ihres Systems die Anweisungen in unserer
Anleitung und der Anleitung zum Gehäuse.
2. Bei Nutzung eines AC’97-Audiopanels dieses bitte anhand folgender Schritte an der
Audiostileiste der Frontblende installieren:
A. Mic_IN (Mikrofon) mit MIC2_L verbinden.
B. Audio_R (RIN) mit OUT2_R und Audio_L (LIN) mit OUT2_L verbinden.
C. Erde (GND) mit Erde (GND) verbinden.
D. MIC_RET und OUT_RET sind nur für das HD-Audiopanel vorgesehen. Sie müssen sie nicht
für das AC’97-Audiopanel verbinden.
E. Rufen Sie zum Aktivieren des vorderen Mikrofons das „FrontMic (Vorderes Mikrofon)“-Register
in der Realtek-Systemsteuerung auf und passen „Recording Volume (Aufnahmelautstärke)“ an.
Gehäuse-WasserpumpenLüeranschlusse
(4-polig, CHA_FAN1/WP)
(siehe S. 1, Nr. 26)
FAN_SPEED_CONTROL
CHA_FAN_SPEED
FAN_VOLTAGE
GND
Dieses Motherboard bietet
3
2
drei 4-polige Wasserkühlung-
1
Gehäuselüeranschlüsse Falls
Sie einen 3-poligen
Wasserkühlerlüer
Gehäuse-
anschließen
möchten, verbinden Sie ihn bitte
mit Kontakt 1 bis 3.
Deutsch
51
Page 56
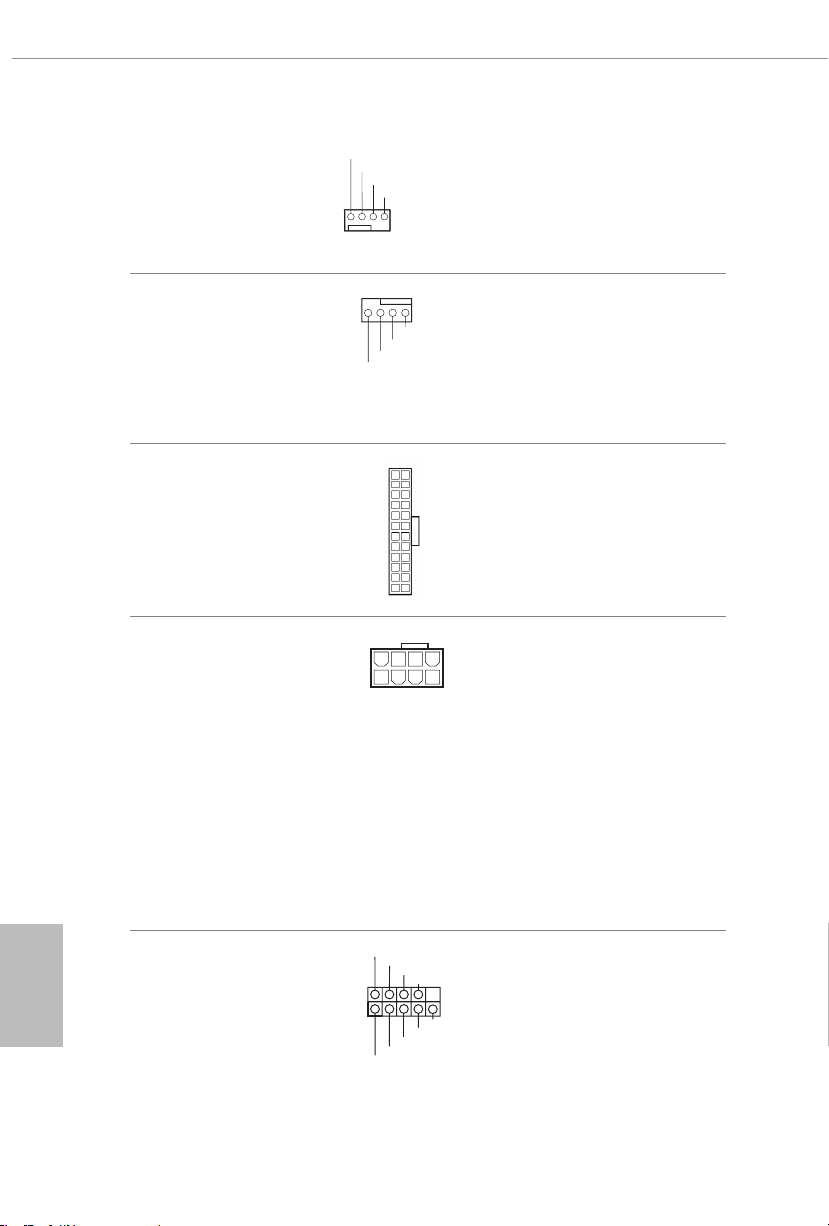
(4-polig, CHA_FAN2/WP)
GND
OL
1 2 3 4
L
4 3 2 1
4
1
8 5
DDCD#1
1
RRI#1
(siehe S. 1, Nr. 20)
(4-polig, CHA_FAN4/WP)
(siehe S. 1, Nr. 15)
FAN_VOLTAGE
FAN_SPEED
FAN_SPEED_CONTR
CPU-Lüeranschluss
(4-polig, CPU_FAN1)
(siehe S. 1, Nr. 2)
ATX-Netzanschluss
(24-polig, ATXPWR1)
(siehe S. 1, Nr. 7)
ATX-12-V-Netzanschluss
(8-polig, ATX12V1)
(siehe S. 1, Nr. 1)
GND
FAN_VOLTAGE
CPU_F
AN_SPEED
FAN_SPEED_CONTRO
12 124
13
Dieses Motherboard bietet einen
4-poligen CPU-Lüeranschluss
(lautloser Lüer). Falls Sie einen
3-poligen CPU-Lüer anschließen
möchten, verbinden Sie ihn bitte
mit Kontakt 1 bis 3.
Dieses Motherboard bietet einen
24-poligen ATX-Netzanschluss.
Bitte schließen Sie es zur Nutzung
eines 20-poligen ATX-Netzteils
entlang Kontakt 1 und Kontakt 13
an.
Dieses Motherboard bietet
einen 8-poligen ATX-12-VNetzanschluss. Bitte schließen Sie
es zur Nutzung eines 4-poligen
ATX-Netzteils entlang Kontakt 1
und Kontakt 5 an.
*Warnung: Bitte stellen Sie sicher,
dass das Stromkabel der CPU
und nicht das der Grakkarte
angeschlossen ist. Schließen Sie
das PCIe-Stromkabel nicht an
diesen Anschluss an.
Deutsch
52
Serieller-Port-Stileiste
(9-polig, COM1)
(siehe S. 1, Nr. 22)
RRXD1
DDTR#1
DDSR#1
GND
TTXD1
CCTS#1
RRTS#1
Diese COM1-Stileiste unterstützt
ein Modul für serielle Ports.
Page 57
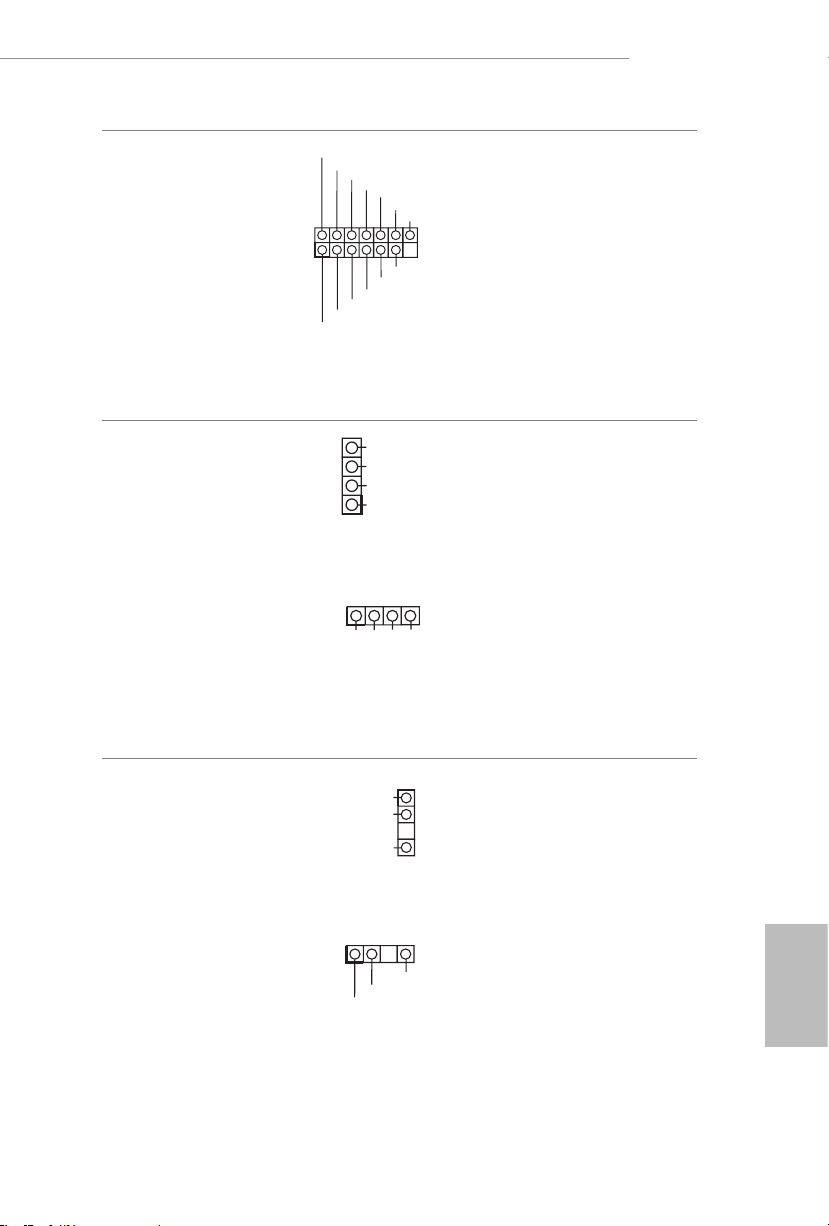
B550M/ac
1
SPI_DQ3
SPI_DQ2
#
1
1
D
1
DO_ADDR
1
SPI-TPM-Stileiste
(13-polig, SPI_TPM_J1)
(siehe S. 1, Nr. 17)
RGB-LED-Stileisten
(4-polig, RGB_LED1)
(siehe S. 1, Nr. 5)
(4-polig, RGB_LED2)
(siehe S. 1, Nr. 23)
+3.3V
Dummy
CLK
RSMRST#
SPI_MISO
SPI_CS0
12V GRB
SPI_MOSI
SPI_TPM_CS
GND
B
R
G
12V
RST#
TPM_PIRQ
Dieser Anschluss unterstützt
das SPI Trusted Platform
Module- (TPM) System, das
Schlüssel, digitale Zertikate,
Kennwörter und Daten sicher
auewahren kann. Ein TPMSystem hil zudem bei der
Stärkung der Netzwerksicherheit,
schützt digitale Identitäten
und gewährleistet die
Plattformintegrität.
Diese beiden RGB-Stileisten
dienen dem Anschließen eines
RGB-LED-Erweiterungskabels, das
dem Nutzer die Auswahl zwischen
verschiedenen LED-Lichteekten
ermöglicht.
Achtung: Installieren Sie das
RGB-LED-Kabel niemals falsch
herum; andernfalls könnte das
Kabel beschädigt werden.
*Weitere Anweisungen zu diesen
beiden Stileisten nden Sie auf
Seite 39.
Adressierbare-LEDStileisten
(3-polig, ADDR_LED1)
(siehe S. 1, Nr. 6)
(3-polig, ADDR_LED2)
(siehe S. 1, Nr. 24)
VOUT
VOUT
GND
DO_ADDR
Diese beiden
LED
Anschließen eines
Adressierbare-
-Stileisten dienen dem
Adressierbare
LED-Erweiterungskabels, das
dem Nutzer die Auswahl zwischen
verschiedenen LED-Lichteekten
ermöglicht.
Achtung: Installieren Sie das
GN
Adressierbare-LED-Kabel
niemals falsch herum; andernfalls
könnte das Kabel beschädigt
Deutsch
werden.
*Weitere Anweisungen zu dieser
Stileiste nden Sie auf Seite 40.
53
Page 58

1 Introduction
Nous vous remercions d’avoir acheté cette carte mère ASRock B550M/ac, une carte mère
able fabriquée conformément au contrôle de qualité rigoureux et constant appliqué par
ASRock. Fidèle à son engagement de qualité et de durabilité, ASRock vous garantit une carte
mère de conception robuste aux performances élevées.
Les spécications de la carte mère et du logiciel BIOS pouvant être mises à jour, le contenu de ce
document est soumis à modication sans préavis. En cas de modications du présent document, la
version mise à jour sera disponible sur le site Internet ASRock sans notication préalable. Si vous
avez besoin d’une assistance technique pour votre carte mère, veuillez visiter notre site Internet
pour plus de détails sur le modèle que vous utilisez. La liste la plus récente des cartes VGA et des
processeurs pris en charge est également disponible sur le site Internet de ASRock. Site Internet
ASRock http://www.asrock.com.
1.1 Contenu de l’emballage
Carte mère ASRock B550M/ac (facteur de forme Micro ATX)
•
Guide d’installation rapide ASRock B550M/ac
•
CD d’assistance ASRock B550M/ac
•
1 x panneau de protection E/S
•
2 x câbles de données Serial ATA (SATA) (Optionnel)
•
2 x antenne Wi-Fi 2,4/5 GHz ASRock (Optionnel)
•
1 x vis pour socket M.2 (Optionnel)
•
Français
54
Page 59

1.2 Spécications
Facteur de forme Micro ATX
Plateforme
Processeur
Chipset
Mémoire
•
Conception à condensateurs solides
•
PCB cuivre 2 onces
•
Prend en charge la 3
•
prochaine génération (processeurs séries 3000 et 4000)*
* Non compatible avec AMD Ryzen™ 5 3400G et Ryzen™ 3 3200G
Digi Power design
•
Alimentation à 8 phases
•
AMD B550
•
Technologie mémoire double canal DDR4
•
4 x fentes DIMM DDR4
•
Les Processeurs AMD série Ryzen (Matisse) prennent en charge
•
les mémoires sans tampon ECC et non ECC DDR4 4533+(OC)/
4466(OC)/4400(OC)/4333(OC)/4266(OC)/4200(OC)/4133(OC)/
4000(OC)/3866(OC)/3800(OC)/3733(OC)/3600(OC)/3466(OC)/
3200/2933/2667/2400/2133*
Les APU AMD série Ryzen (Renoir) prennent en charge les
•
mémoires sans tampon ECC et non ECC DDR4 4733+
(OC)/4666(OC)/4600(OC)/4533(OC)/4466(OC)/4400(OC)/4333
(OC)/4266(OC)/4200(OC)/4133(OC)/4000(OC)/3866
(OC)/3800(OC)/3733(OC)/3600(OC)/3466(OC)/3200/
2933/2667/2400/2133*
* Veuillez consulter la liste de prise en charge des mémoires sur le site
Web d'ASRock pour de plus amples informations.
(http://www.asrock.com/)
* Veuillez consulter la page 22 pour connaître la prise en charge de la
fréquence maximale de l'UDIMM DDR4.
Capacité max. de la mémoire système : 128 Go
•
Prend en charge les modules mémoire Extreme Memory Prole
•
(XMP)
Contacts dorés 15μ sur fentes DIMM
•
ème
AMD AM4 Ryzen™ / AMD Ryzen™
B550M/ac
Français
Fente
d’expansion
Processeurs AMD série Ryzen (Matisse)
2 x fentes PCI Express x 16 (PCIE1: mode Gen4x16 ; PCIE3:
•
mode Gen3x4)*
APU AMD série Ryzen (Renoir)
2 x fentes PCI Express x 16 (PCIE1: mode Gen3x16 ; PCIE3:
•
mode Gen3x4)*
55
Page 60

Graphiques
* Prend en charge les SSD NVMe comme disques de démarrage
1 x fente PCI Express 3.0 x1
•
Prend en charge AMD Quad CrossFireX
•
1 x socket M.2 (touche E) avec le module Wi-Fi 802,11ac fourni
•
Carte graphique AMD RadeonTM série Vega intégrée dans APU
•
TM
et CrossFireX
TM
série Ryzen*
* La prise en charge réelle peut varier selon le processeur
DirectX 12, Pixel Shader 5.0
•
Mémoire partagée par défaut 2Go. Mémoire partagée maximum
•
prise en charge 16Go.
* La mémoire partagée maximum de 16Go nécessite 32Go de
mémoire système installée.
Prend en charge la technologie HDMI 2.1 avec résolution
•
maximale de 4K x 2K (4096x2160) @ 60Hz
Prend en charge les technologies Auto Lip Sync, Deep Color
•
(12bpc), xvYCC et HBR (High Bit Rate Audio) avec port
HDMI 2.1 (un écran compatible HDMI est requis)
Prend en charge HDR (Plage dynamique étendue) avec
•
HDMI 2.1
Prend en charge HDCP 2.3 via port HDMI 2.1
•
Prend en charge la lecture 4K Ultra HD (UHD) avec le port HDMI
•
2.1
Prend en charge Microso PlayReady®
•
Français
56
Audio
Réseau
Audio 7.1 CH HD avec protection du contenu (codec audio
•
Realtek ALC1200)
Compatible audio Blu-ray Premium
•
Prend en charge la protection contre les surtensions
•
Blindage isolant PCB
•
Couches de PCB individuelles pour canal audio D/G
•
Audio Nahimic
•
PCIE x1 Gigabit LAN 10/100/1000 Mo/s
•
Realtek RTL8111H
•
Prend en charge la fonction Wake-On-LAN
•
Prend en charge la protection contre la foudre/les décharges
•
électrostatiques
Prend en charge la fonction d’économie d’énergie Ethernet 802.3az
•
Prend en charge PXE
•
Page 61

Réseau
sans-l
Connectique
du panneau
arrière
Stockage
Module Wi-Fi 802.11ac Intel®
•
Prend en charge IEEE 802.11a/b/g/n/ac
•
Prend en charge le mode Dual-Band (2.4/5 GHz)
•
Prend en charge la connexion sans-l à haute vitesse jusqu’à
•
433Mbps
Prend en charge Bluetooth 4.2 + haute vitesse classe II
•
2 x ports antenne
•
1 x port souris/clavier PS/2
•
1 x port HDMI
•
4 x ports USB 3.2 Gen1 (concentrateur ASMedia ASM1074)
•
(Protection contre les décharges électrostatiques)
2 x ports USB 2.0 (Protection contre les décharges électrostatiques)
•
1 x port RJ-45 LAN avec LED (LED ACT/LIEN et LED VITESSE)
•
Connecteurs jack audio HD : Entrée ligne / haut-parleur avant /
•
microphone
4 x connecteurs SATA3 6,0 Go/s, prise en charge de RAID
•
(RAID 0, RAID 1 et RAID 10), NCQ, AHCI et branchement à
chaud
1 x socket Hyper M.2 (M2_1), prend en charge les modules M.2
•
PCI Express type 2280 touche M jusqu'à Gen4 x4 (64Go/s) (avec
Matisse) ou Gen3 x4 (32Go/s)(avec Renoir)*
* Prend en charge les SSD NVMe comme disques de démarrage
* Prend en charge le kit ASRock U.2
B550M/ac
Connecteur
1 x embase pour port COM
•
1 x embase SPI TPM
•
1 x prise DEL d’alimentation et haut-parleur
•
2 x embase DEL RVB
•
* Prend en charge les rubans LED jusqu’à 12 V/3 A, 36 W au total
2 x embases DEL adressables
•
* Prend en charge les rubans DEL jusqu’à 5 V/3 A, 15 W au total
1 x connecteur pour ventilateur de CPU (4 broches)
•
* Le connecteur pour ventilateur de CPU prend en charge un
ventilateur de CPU d’une puissance maximale de 1 A (12 W).
3 x connecteurs pour ventilateur de châssis /pompe à eau
•
(4 broches) (contrôle de vitesse de ventilateur intelligent)
Français
57
Page 62

Français
Caractéristiques du
BIOS
Surveillance
du matériel
* Le ventilateur de châssis /pompe à eau prend en charge un
ventilateur de refroidisseur d'eau d'une puissance maximale de 2 A
(24 W).
* CHA_FAN1/WP, CHA_FAN2/WP, CHA_FAN3/WP et CHA_
FAN4/WP peuvent détecter automatiquement si un ventilateur 3
broches ou 4 broches est utilisé.
1 x connecteur d’alimentation ATX 24 broches
•
1 x connecteur d’alimentation 12V 8 broches
•
1 x connecteur audio panneau frontal
•
2 x embases USB 2.0 (4 ports USB 2.0 pris en charge) (Protection
•
contre les décharges électrostatiques)
2 x embase USB 3.2 Gen1 (4 ports USB 3.2 Gen1 pris en charge)
•
(Protection contre les décharges électrostatiques)
BIOS UEFI AMI avec prise en charge d’interface graphique
•
Prend en charge la fonction «Plug and Play»
•
Compatible ACPI 5.1 Wake Up Events
•
Prend en charge la conguration Jumpfree
•
Compatible SMBIOS 2.3
•
Réglage de la tension CPU, CPU VDDCR_SOC, DRAM, VPPM,
•
+1.8VSB
Détection de température : Ventilateurs de CPU, châssis /pompe à
•
eau
Tachymètre de ventilateur : Ventilateurs de CPU, châssis /pompe à
•
eau
Ventilateur silencieux (réglage automatique de la vitesse
•
du ventilateur du châssis d’après la température du CPU) :
Ventilateurs de CPU, châssis /pompe à eau
Contrôle simultané des vitesses du ventilateur : Ventilateurs de
•
CPU, châssis /pompe à eau
Surveillance de la tension d’alimentation : +12V, +5V, +3.3V, CPU
•
Vcore, CPU VDDCR_SOC, DRAM, VPPM, +1.8V
58
Système
d’exploitation
Certications
Microso® Windows® 10 64 bits
•
FCC, CE
•
ErP/EuP Ready (alimentation ErP/EuP ready requise)
•
Page 63
* pour des informations détaillées de nos produits, veuillez visiter notre site: http://www.asrock.com
Il est important de signaler que l’overclocking présente certains risques, incluant des modications
du BIOS, l’application d’une technologie d’overclocking déliée et l’utilisation d’outils d’overclocking
développés par des tiers. La stabilité de votre système peut être aectée par ces pratiques, voire
provoquer des dommages aux composants et aux périphériques du système. L’overclocking se fait
à vos risques et périls. Nous ne pourrons en aucun cas être tenus pour responsables des dommages
éventuels provoqués par l’overclocking.
B550M/ac
59
Français
Page 64
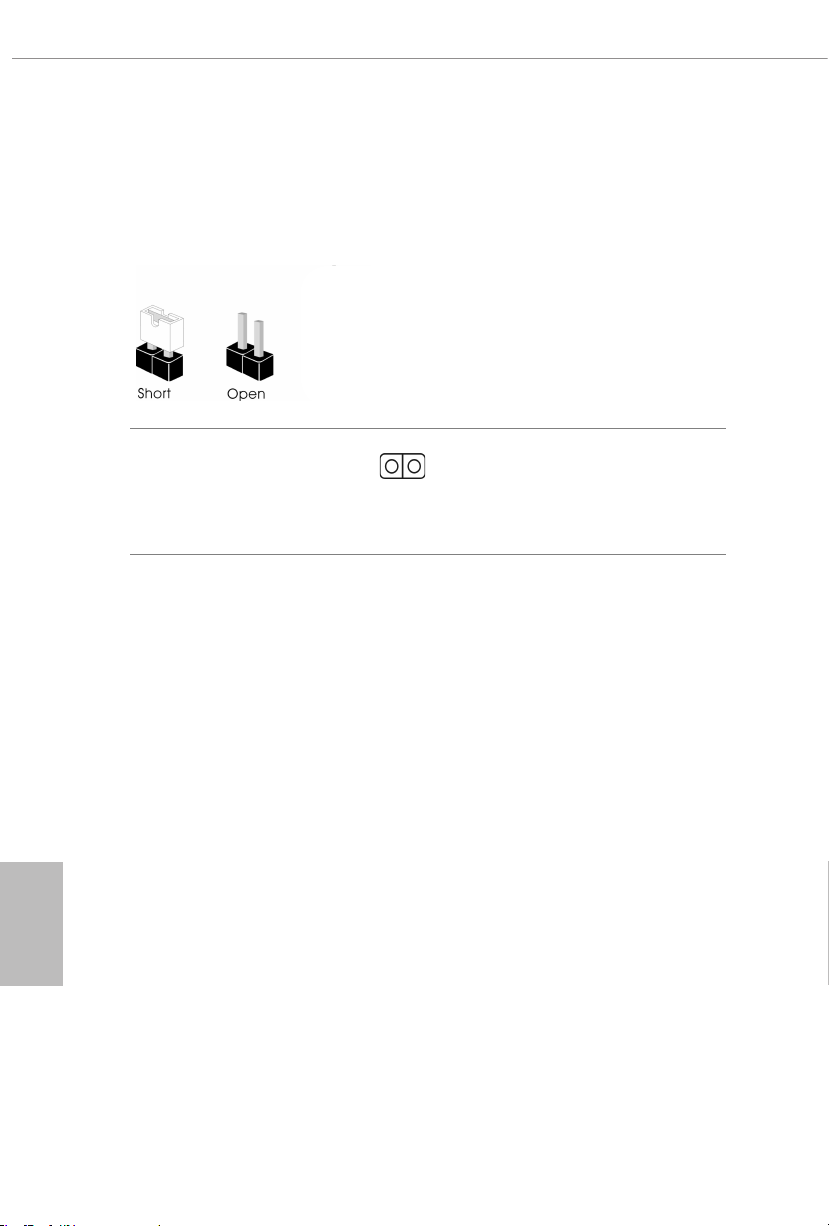
1.3 Conguration des cavaliers (jumpers)
L’illustration ci-dessous vous renseigne sur la conguration des cavaliers (jumpers). Lorsque
le capuchon du cavalier est installé sur les broches, le cavalier est «court-circuité». Si le
capuchon du cavalier n’est pas installé sur les broches, le cavalier est «ouvert».
Français
Cavalier Clear CMOS
(CLRCMOS1)
(voir p.1, No. 21)
CLRCMOS1 vous permet d’eacer les donnés de la CMOS. Les données de la CMOS
incluent les informations de conguration du système telles que mot de passe, date,
heure et paramètres de réglage du système. Pour eacer les paramètres du système et
rétablir les valeurs par défaut, veuillez éteindre votre ordinateur et débrancher son cordon
d’alimentation; utilisez ensuite un capuchon de cavalier pour court-circuiter les broches
CLRCMOS1 pendant 3 secondes. N’oubliez pas de retirer le capuchon du cavalier une fois
les données CMOS eacées. Si vous avez besoin d’eacer les données CMOS après une
mise à jour du BIOS, vous devez tout d’abord redémarrer le système, puis l’éteindre avant
de procéder à l’eacement de la CMOS.
Cavalier (jumper) à
2 broches
Court-circuité: Fonction Clear
CMOS
Ouvert: Par défaut
60
Page 65
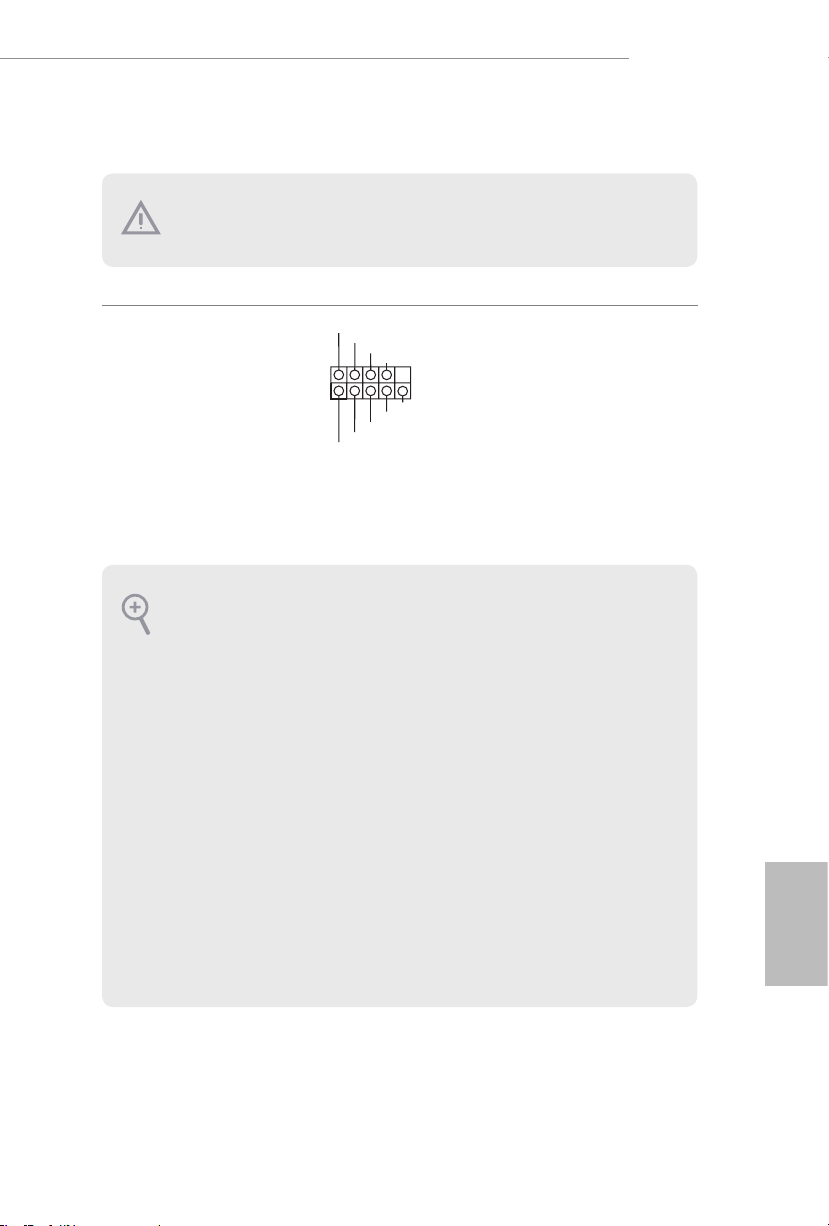
1.4 Embases et connecteurs de la carte mère
1
Les embases et connecteurs situés sur la carte NE SONT PAS des cavaliers. Ne placez JAMAIS de
capuchons de cavaliers sur ces embases ou connecteurs. Placer un capuchon de cavalier sur ces
embases ou connecteurs endommagera irrémédiablement votre carte mère.
B550M/ac
Embase du panneau
système
(PANNEAU1 à 9 broches)
(voir p.1, No. 12)
PWRBTN (bouton d’alimentation):
pour brancher le bouton d’alimentation du panneau frontal du châssis. Vous pouvez congurer la
façon dont votre système doit s’arrêter à l’aide du bouton d'alimentation.
RESET (bouton de réinitialisation):
pour brancher le bouton de réinitialisation du panneau frontal du châssis. Appuyez sur le bouton
de réinitialisation pour redémarrer l’ordinateur en cas de plantage ou de dysfonctionnement au
démarrage.
PLED (LED d’alimentation du système) :
pour brancher le témoin d’état de l’alimentation du panneau frontal du châssis. Le LED est allumé
lorsque le système fonctionne. Le LED clignote lorsque le système se trouve en mode veille S1/S3. Le
LED est éteint lorsque le système se trouve en mode veille S4 ou hors tension (S5).
HDLED (LED d’activité du disque dur) :
pour brancher le témoin LED d’activité du disque dur du panneau frontal du châssis. Le LED est
allumé lorsque le disque dur lit ou écrit des données.
La conception du panneau frontal peut varier en fonction du châssis. Un module de panneau frontal
est principalement composé d’un bouton d'alimentation, d'un bouton de réinitialisation, d'un témoin
LED d’alimentation, d'un témoin LED d’activité du disque dur, d'un haut-parleur etc. Lorsque vous
reliez le module du panneau frontal de votre châssis sur cette embase, veillez à parfaitement faire
correspondre les ls et les broches.
PLED+
PLED-
HDLED-
HDLED+
PWRBTN#
GND
GND
RESET#
GND
Branchez le bouton de mise
en marche, le bouton de
réinitialisation et le témoin d’état
du système présents sur le châssis
sur cette embase en respectant la
conguration des broches illustrée
ci-dessous. Repérez les broches
positive et négative avant de
brancher les câbles.
Français
61
Page 66
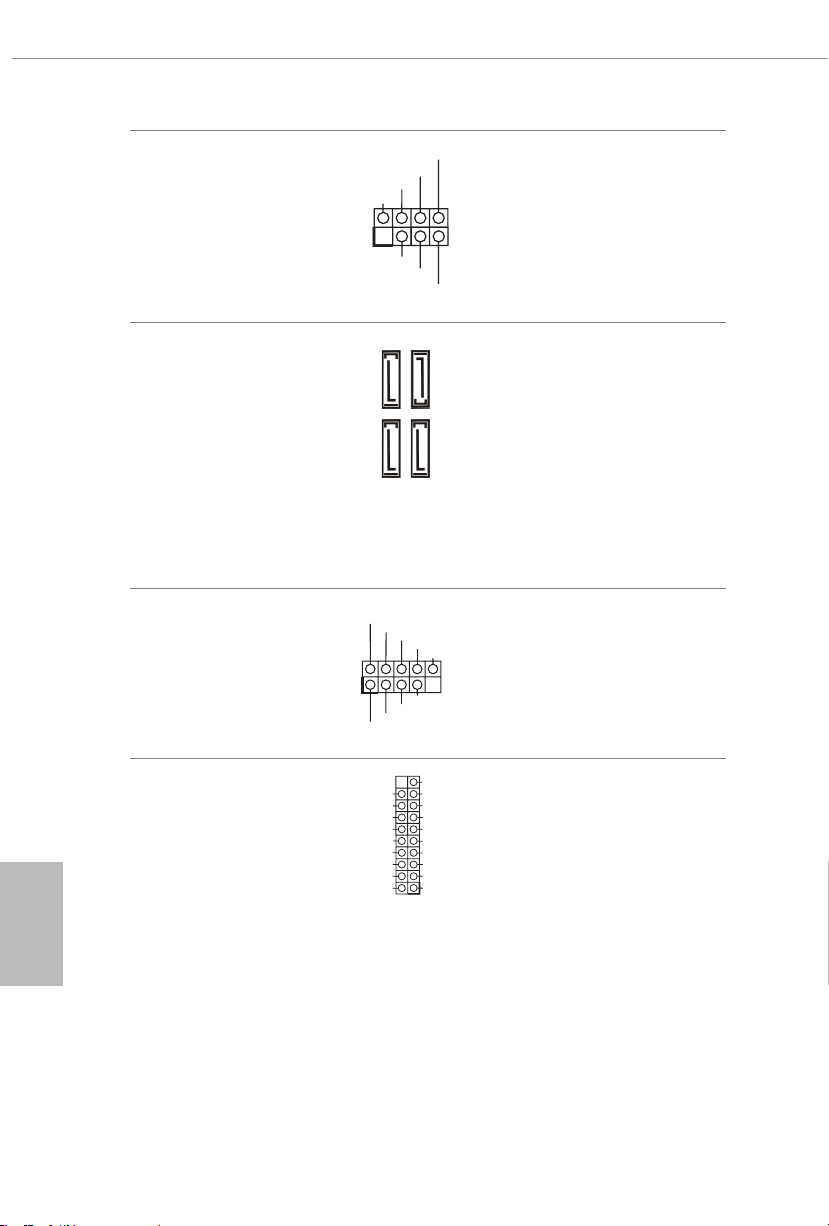
Prise DEL d’alimentation et
1
+5V
DUMMY
PLED+
PLED+
PLED-
DUMMY
SPEAKER
DUMMY
GND
GND
P+
P-
USB_PWR
P+
P-
USB_PWR
1
1
haut-parleur
(SPK_PLED1 à 7 broches)
(voir p.1, No. 13)
Veuillez brancher la DEL
d'alimentation du châssis et le
haut-parleur du châssis sur ce
connecteur.
Français
Connecteurs Serial ATA3
(SATA3_1:
voir p.1, No. 9)
(SATA3_2:
voir p.1, No. 10)
(SATA3_3:
voir p.1, No. 11)(Sous
)
(SATA3_4:
voir p.1, No. 11)(Sur
)
Embases USB 2.0
(USB_3_4 à 9 broches)
(voir p.1, No. 18)
(USB_5_6 à 9 broches)
(voir p.1, No. 19)
Embases USB 3.2 Gen1
(F_USB3_1_2 à 19 broches)
(voir p.1, No. 8)
SATA3_1
SATA3_4
Vbus
IntA_PA_SSRX-
IntA_PA_SSRX+
GND
IntA_PA_SSTX-
IntA_PA_SSTX+
GND
IntA_PA_D-
IntA_PA_D+
SATA3_2
SATA3_3
VbusVbus
IntA_PB_SSRX-
IntA_PB_SSRX+
GND
IntA_PB_SSTX-
IntA_PB_SSTX+
GND
IntA_PB_D-
IntA_PB_D+
Dummy
Ces quatre connecteurs SATA3
sont compatibles avec les câbles de
données SATA pour les appareils
de stockage internes avec un taux
de transfert maximal de 6,0 Go/s.
Cette carte mère comprend deux
connecteurs. Chaque embase
USB 2.0 peut prendre en charge
deux ports.
Cette carte mère comprend deux
connecteurs. Chaque embase
USB 3.2 Gen1 peut prendre en
charge deux ports.
62
Page 67
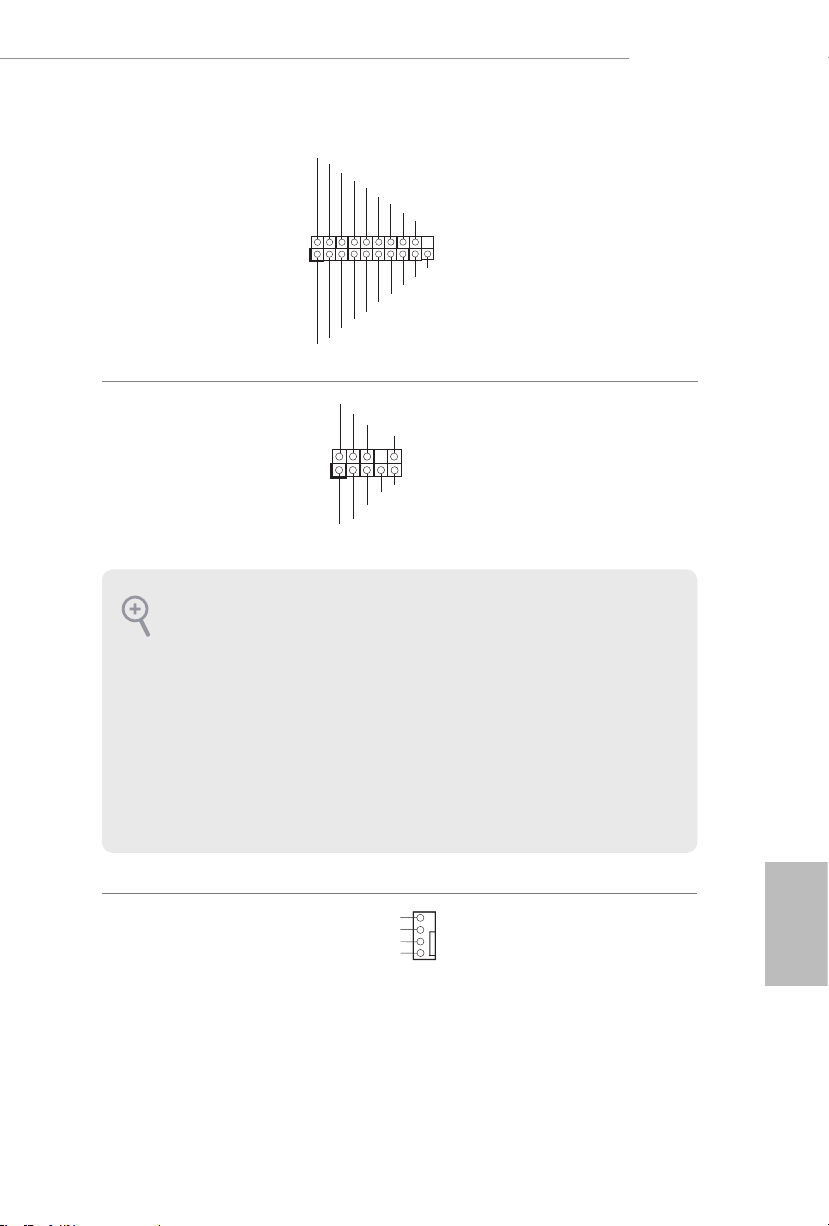
B550M/ac
1
IntA_P_D+
IntA_P_SSRX-
J_SENSE
OUT2_L
1
MIC_RET
PRESENCE#
GND
OUT2_R
MIC2_R
MIC2_L
OUT_RET
4
(F_USB3_3_4 à 19 broches)
(voir p.1, No. 14)
Embase audio du panneau
frontal
(HD_AUDIO1 à 9 broches)
IntA_P_D-
IntA_P_D+
ID
GND
IntA_P_SSTX+
GND
IntA_P_D-
IntA_P_SSTX-
GND
IntA_P_SSRX+
GND
IntA_P_SSTX-
IntA_P_SSTX+
IntA_P_SSRX-
Vbus
Vbus
IntA_P_SSRX+
Cette embase sert au branchement
des appareils audio au panneau
audio frontal.
(voir p.1, No. 25)
1. L’audio haute dénition prend en charge la technologie Jack Sensing (détection de la che), mais
le panneau grillagé du châssis doit être compatible avec la HDA pour fonctionner correctement.
Veuillez suivre les instructions gurant dans notre manuel et dans le manuel du châssis pour
installer votre système.
2. Si vous utilisez un panneau audio AC’97, veuillez le brancher sur l’embase audio du panneau
frontal en procédant comme suit :
A. branchez Mic_IN (MIC) sur MIC2_L.
B. branchez Audio_R (RIN) sur OUT2_R et Audio_L (LIN) sur OUT2_L.
C. branchez la mise à terre (GND) sur mise à terre (GND).
D. MIC_RET et OUT_RET sont exclusivement réservés au panneau audio HD. Il est inutile de les
brancher avec le panneau audio AC’97.
E. Pour activer le micro frontal, sélectionnez l’onglet «FrontMic» du panneau de contrôle Realtek
et réglez le paramètre «Volume d’enregistrement».
Connecteurs du ventilateur
de pompe à eau du châssis
(CHA_FAN1/WP à
4 broches)
(voir p.1, No. 26)
FAN_SPEED_CONTROL
CHA_FAN_SPEED
FAN_VOLTAGE
GND
Cette carte mère est dotée de trois
3
2
connecteurs pour ventilateur de
1
châssis à refroidissement par eau
à 4 broches. Si vous envisagez
de connecter un ventilateur de
refroidisseur d'eau pour
3 broches, veuillez le brancher sur
la Broche 1-3.
châssis
Français
à
63
Page 68
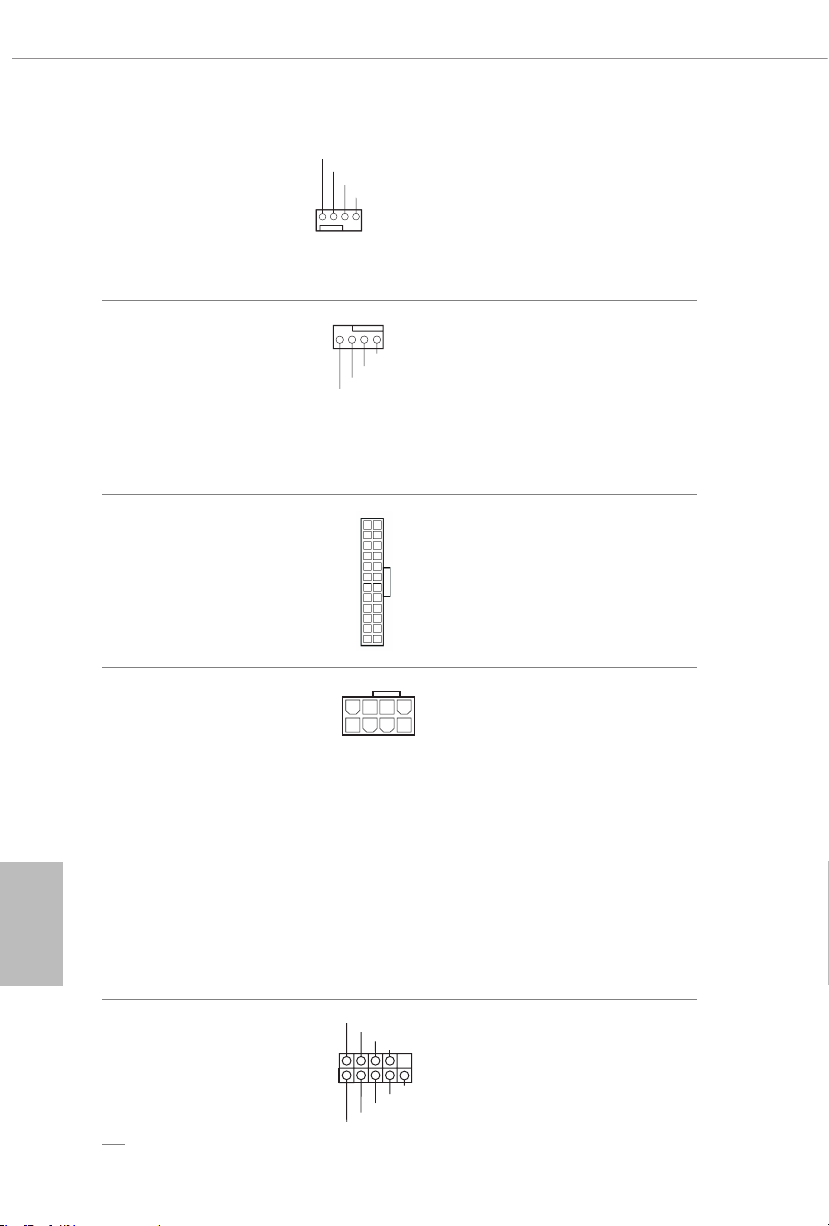
(CHA_FAN2/WP à
GND
OL
1 2 3 4
4 3 2 1
4
1
8 5
RRI#1
4 broches)
(voir p.1, No. 20)
(CHA_FAN4/WP à
4 broches)
(voir p.1, No. 15)
FAN_VOLTAGE
FAN_SPEED
FAN_SPEED_CONTR
Français
Connecteur du ventilateur
du processeur
(CPU_FAN1 à 4 broches)
(voir p.1, No. 2)
Connecteur d’alimentation
ATX
(ATXPWR1 à 24 broches)
(voir p.1, No. 7)
Connecteur d’alimentation
ATX 12 V
(ATX12V1 à 8 broches)
(voir p.1, No. 1)
GND
FAN_VOLTAGE
CPU_F
AN_SPEED
FAN_SPEED_CONTROL
12 124
13
Cette carte mère est dotée d’un
connecteur pour ventilateur de
processeur (Quiet Fan) à 4 broches.
Si vous envisagez de connecter
un ventilateur de processeur à 3
broches, veuillez le brancher sur la
broche 1-3.
Cette carte mère est dotée d’un
connecteur d’alimentation ATX
à 24 broches. Pour utiliser une
alimentation ATX à 20 broches,
veuillez eectuer les branchements
sur la Broche 1 et la Broche 13.
Cette carte mère est dotée d’un
connecteur d’alimentation ATX
12V à 8 broches. Pour utiliser une
alimentation ATX à 4 broches,
veuillez eectuer les branchements
sur la Broche 1 et la Broche 5.
*Avertissement : Veuillez vérier
que le câble d'alimentation
connecté est pour l'unité
centrale et non pour la carte
graphique. Ne branchez pas le
câble d'alimentation PCIe sur ce
connecteur.
Embase pour port série
(COM1 à 9 broches)
(voir p.1, No. 22)
64
1
RRXD1
DDTR#1
TTXD1
DDCD#1
DDSR#1
CCTS#1
RRTS#1
GND
Cette embase COM1 prend en
charge un module de port série.
Page 69
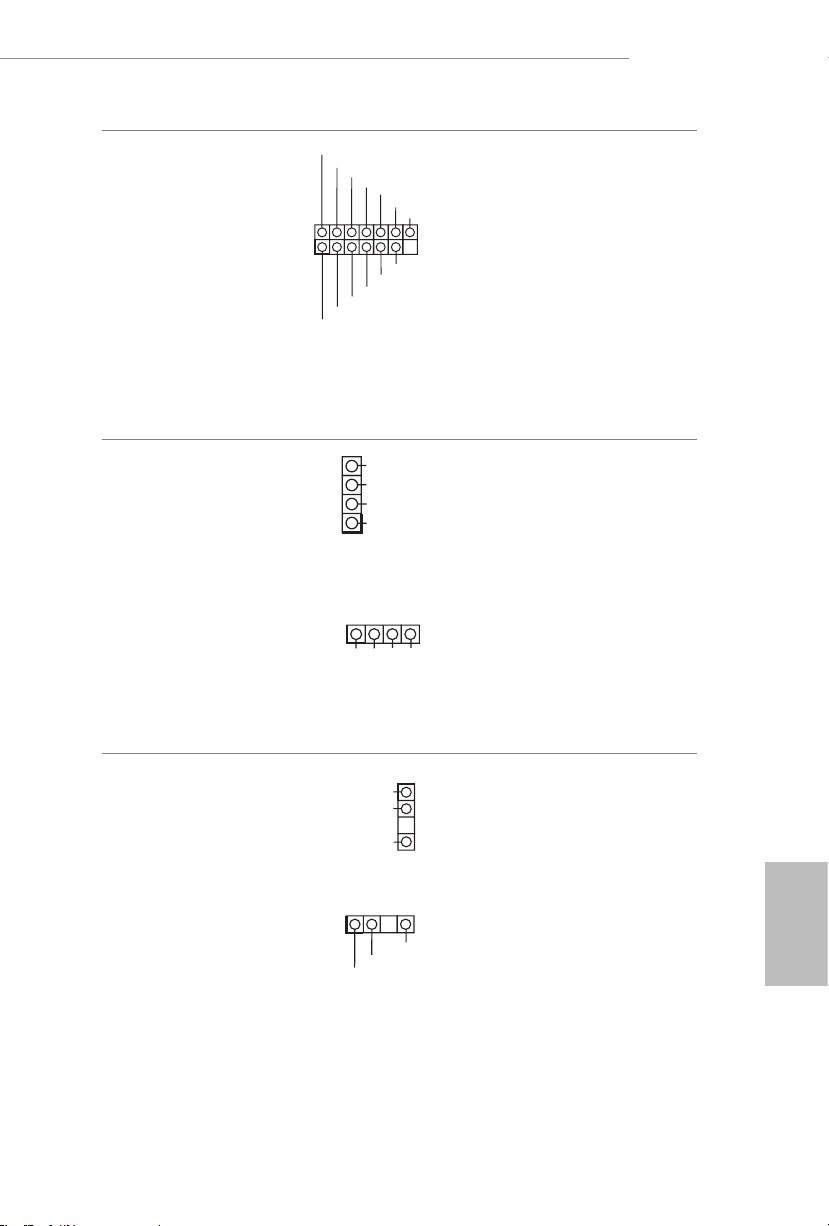
B550M/ac
1
SPI_DQ3
SPI_DQ2
#
1
1
D
1
DO_ADDR
1
Embase SPI TPM
(SPI_TPM_J1 à 13 broches)
(voir p.1, No. 17)
Embase LED RVB
(RGB_LED1 à 4 broches)
(voir p.1, No. 5)
(RGB_LED2 à 4 broches)
(voir p.1, No. 23)
+3.3V
Dummy
CLK
RSMRST#
SPI_MISO
SPI_CS0
12V GRB
SPI_MOSI
SPI_TPM_CS
GND
B
R
G
12V
RST#
TPM_PIRQ
Ce connecteur prend en charge
un module SPI TPM (Trusted
Platform Module – Module de
plateforme sécurisée), qui permet
de sauvegarder clés, certicats
numériques, mots de passe et
données en toute sécurité. Le
système TPM permet également de
renforcer la sécurité du réseau, de
protéger les identités numériques
et de préserver l’intégrité de la
plateforme.
Ces deux embases RVB servent à
connecter le câble d'extension LED
RVB qui permet aux utilisateurs
de choisir parmi plusieurs eets
lumineux LED.
Attention : N'installez jamais le
câble LED RVB dans le mauvais
sens ; dans le cas contraire, le
câble peut être endommagé.
*Veuillez consulter la page 39 pour
des instructions supplémentaires
sur ces deux embases.
Embases LED adressables
(ADDR_LED1 à 3 broches)
(voir p.1, No. 6)
(ADDR_LED2 à 3 broches)
(voir p.1, No. 26)
VOUT
VOUT
GND
DO_ADDR
Ces deux embases
adressables
servent à connecter le câble
d'extension LED
adressable
qui
permet aux utilisateurs de choisir
parmi plusieurs eets lumineux
LED.
Attention : N’installez jamais
GN
le câble LED adressable dans
le mauvais sens. Dans le cas
Français
contraire, le câble peut être
endommagé.
*Veuillez consulter la page 40 pour
des instructions supplémentaires
sur cette embase.
65
Page 70

1 Introduzione
Congratulazioni per l’acquisto della scheda madre ASRock B550M/ac, una scheda madre
adabile prodotta secondo i severissimi controlli di qualità ASRock. La scheda madre ore
eccellenti prestazioni con un design robusto che si adatta all'impegno di ASRock di orire
sempre qualità e durata.
Dato che le speciche della scheda madre e del soware BIOS possono essere aggiornate, il contenuto
di questa documentazione sarà soggetto a variazioni senza preavviso. Nel caso di eventuali modiche
della presente documentazione, la versione aggiornata sarà disponibile sul sito Web di ASRock senza
ulteriore preavviso. Per il supporto tecnico correlato a questa scheda madre, visitare il nostro sito
Web per informazioni speciche relative al modello attualmente in uso. È possibile trovare l'elenco
di schede VGA più recenti e di supporto di CPU anche sul sito Web di ASRock. Sito Web di ASRock
http://www.asrock.com.
1.1 Contenuto della confezione
Scheda madre B550M/ac ASRock (fattore di forma Micro ATX)
•
Guida all'installazione rapida di ASRock B550M/ac
•
CD di supporto ASRock B550M/ac
•
1 x mascherina metallica posteriore I/O
•
2 x cavi dati Serial ATA (SATA) (opzionali)
•
2 x antenne ASRock WiFi da 2,4/5 GHz (opzionali)
•
1 x vite per Socket M.2 (opzionale)
•
Italiano
66
Page 71

1.2 Speciche
Piattaforma
CPU
Chipset
Memoria
Alloggio
d’espansione
B550M/ac
Fattore di forma Micro ATX
•
Design condensatore solido
•
PCB 2oz rame
•
Supporta AMD AM4 Ryzen ™/AMD Ryzen™ di terza generazione
•
e successive generazioni (processori serie 3000 e 4000) *
* Non compatibile con AMD Ryzen™ 5 3400G e Ryzen™ 3 3200G.
Digi Power design
•
Potenza a 8 fasi
•
AMD B550
•
Tecnologia memoria DDR4 Dual Channel
•
4 x alloggi DIMM DDR4
•
Le CPU serie AMD Ryzen (Matisse) supportano DDR4
•
4533+(OC)/4466(OC)/4400(OC)/4333(OC)/4266(OC)/
4200(OC)/4133(OC)/4000(OC)/3866(OC)/3800(OC)/
3733(OC)/3600(OC)/3466(OC)/3200/2933/2667/2400/2133
ECC e non ECC, senza buer*
Le APU AMD Ryzen (Renoir) supportano DDR4 4733+
•
(OC)/4666(OC)/4600(OC)/4533(OC)/4466(OC)/4400(OC)/
4333(OC)/4266(OC)/4200(OC)/4133(OC)/4000(OC)/3866
(OC)/3800(OC)/3733(OC)/3600(OC)/3466(OC)/
3200/2933/2667/2400/2133 ECC e non ECC, senza buer*
* Per maggiori informazioni fare riferimento all'elenco dei supporti
di memoria sul sito di ASRock. (http://www.asrock.com/)
* Fare riferimento a pagina 22 per il supporto della frequenza
massima DDR4 UDIMM.
Capacità max. della memoria di sistema: 128GB
•
Supporta moduli di memoria Extreme Memory Prole (XMP)
•
Contatti d’oro 15μ negli alloggi DIMM
•
CPU serie AMD Ryzen (Matisse)
2 x PCI Express x 16 slot (PCIE1: modalità Gen4x 16; PCIE3:
•
modalità Gen3 x4)*
APU serie AMD Ryzen (Renoir)
2 x PCI Express x 16 slot (PCIE1: modalità Gen3x 16; PCIE3:
•
modalità Gen3 x4)*
Italiano
67
Page 72

Italiano
Graca
Audio
* Supporto di SSD NVMe come disco d’avvio
1 x alloggio PCI Express 3.0 x1
•
Supporta AMD Quad CrossFireXTM e CrossFireX
•
1 x Socket M.2 (Key E) con il modulo WiFi-802.11ac fornito
•
Graca AMD RadeonTM serie Vega integrata nelle APU serie
•
Ryzen*
* Il supporto eettivo può variare in base alla CPU
DirectX 12, Pixel Shader 5.0
•
Memoria condivisa predenita 2GB. Memoria condivisa massima
•
supporta no a 16GB.
* La memoria condivisa massima di 16GB richiede che sia installata
una memoria di sistema da 32GB.
Supporta HDMI 2.1 con risoluzione massima no a 4K x 2K (4096
•
x 2160) a 60Hz
Supporto delle funzioni Auto Lip Sync, Deep Color (12bpc),
•
xvYCC e HBR (High Bit Rate Audio) con porta HDMI 2.1
(è necessario un monitor compatibile HDMI)
Supporta HDR (High Dynamic Range) con HDMI 2.1
•
Supporta HDCP 2.3 con porta HDMI 2.1
•
Supporto riproduzione 4K Ultra HD (UHD) sulla porta
•
HDMI 2.1
Supporto Microso PlayReady®
•
Audio HD a 7.1 canali con Content Protection (codec audio
•
Realtek ALC1200)
Supporto audio Blu-ray Premium
•
Supporta protezione da sovratensione
•
Schermatura isolata PCB
•
Layer PCB individuali per canali audio R/L
•
Nahimic Audio
•
TM
68
LAN
1 x PCIE LAN Gigabit 10/100/1000 Mb/s
•
Realtek RTL8111H
•
Supporto WOL (Wake-On-LAN)
•
Supporta protezione da fulmini/scariche elettrostatiche
•
Supporto Energy Ecient Ethernet 802.3az
•
Supporto PXE
•
Page 73

LAN wireless
I/O pannello
posteriore
Archiviazione
Modulo Intel® 802.11ac WiFi
•
Supporta IEEE 802.11a/b/g/n/ac
•
Supporta Dual-Band (2,4/5 GHz)
•
Supporta la connessione wireless ad alta velocità no a
•
433 Mbps
Supporto di Bluetooth 4.2 + High speed Classe II
•
2 x porte antenna
•
1 x porta mouse/tastiera PS/2
•
1 x porta HDMI
•
4 porte USB 3.2 Gen1 (hub ASMedia ASM1074) (Supporta la
•
protezione ESD)
2 x porte USB 2.0 (supporto protezione da scariche elettrostatiche)
•
1 x porta LAN RJ-45 con LED (ACT/LINK LED e SPEED LED)
•
Connettori audio HD: Ingresso linea / altoparlante frontale /
•
microfono
4 x connettori SATA3 6,0 Gb/s, supporto RAID (RAID 0, RAID 1,
•
e RAID 10), NCQ, AHCI e Hot Plug
1 x socket Hyper M.2 (M2_1), supporta il modulo M.2 PCI
•
Express di tipo M Key 2280 no a Gen4 x4 (64 Gb/s) (con
Matisse) o Gen3 x4 (32 Gb/s) (con Renoir)*
* Supporto di SSD NVMe come disco d’avvio
* Supporta kit ASRock U.2
B550M/ac
Connettore
1 x connettore porta COM
•
1 x connettore SPI TPM
•
1 x connettore LED alimentazione e altoparlante
•
2 x collettore LED RGB
•
* Supporto totale di no a 12 V/3 A, 36 W strip LED
2 x Header LED indirizzabili
•
* Supporto totale di strisce LED no a 5 V/3 A, 15 W
1 x connettore ventola CPU (4-pin)
•
* Il connettore ventola CPU supporta ventole CPU con potenza
massima di 1 A (12 W).
3 x connettori ventola telaio/ventola pompa dell’acqua (4-pin)
•
(Controllo intelligente della velocità della ventola)
* La ventola Chassis/ventola pompa dell’acqua supporta ventole di
sistemi di rareddamento ad acqua di potenza massima di 2 A (24W).
* CHA_FAN1/WP, CHA_FAN2/WP, CHA_FAN3/WP e CHA_
FAN4/WP sono in grado di rilevare se è in uso una ventola a 3 pin o
4 a pin.
Italiano
69
Page 74

Funzionalità
BIOS
Hardware
Monitor
SO
1 x connettore alimentazione ATX 24-pin
•
1 x connettore alimentazione 12 V 8-pin
•
1 x connettore audio pannello frontale
•
2 x connettori USB 2.0 (supporto di 4 porte USB 2.0) (supporta
•
protezione da scariche elettrostatiche)
2 x header USB 3.2 Gen1 (supporto di 4 porte USB 3.2 Gen1)
•
(supporto protezione da scariche elettrostatiche)
AMI UEFI Legal BIOS con interfaccia di supporto
•
Supporta “Plug and Play”
•
Eventi di riattivazione conformi a ACPI 5.1
•
Supporta jumperfree
•
Supporto di SMBIOS 2.3
•
Regolazione variabile tensione CPU, CPU VDDCR_SOC, DRAM,
•
VPPM, +1.8VSB
Sensore di temperatura: Ventole CPU, telaio/pompa dell'acqua
•
Tachimetro ventola: Ventole CPU, telaio/pompa dell'acqua
•
Ventola silenziosa (regolazione automatica velocità in base alla
•
temperatura della CPU): Ventole CPU, telaio/pompa dell'acqua
Controllo velocità ventola: Ventole CPU, telaio/pompa dell'acqua
•
Monitoraggio tensione: +12V, +5V, +3.3V, CPU Vcore, CPU
•
VDDCR_SOC, DRAM, VPPM, +1.8V
Microso® Windows® 10 64 bit
•
Italiano
70
FCC, CE
Certicazioni
* Per informazioni dettagliate sul prodotto, visitare il nostro sito Web: http://www.asrock.com
Prestare attenzione al potenziale rischio previsto nella pratica di overclocking, inclusa la regolazione
delle impostazioni nel BIOS, l'applicazione di tecnologia di Untied Overclocking o l'utilizzo di
strumenti di overclocking di terze parti. L'overclocking può inuenzare la stabilità del sistema o
perno provocare danni ai componenti e ai dispositivi del sistema. Occorre eseguirlo a proprio
rischio e spese. Non ci riterremo responsabili per possibili danni provocati da overclocking.
•
ErP/EuP Ready (è necessaria alimentazione ErP/EuP ready)
•
Page 75
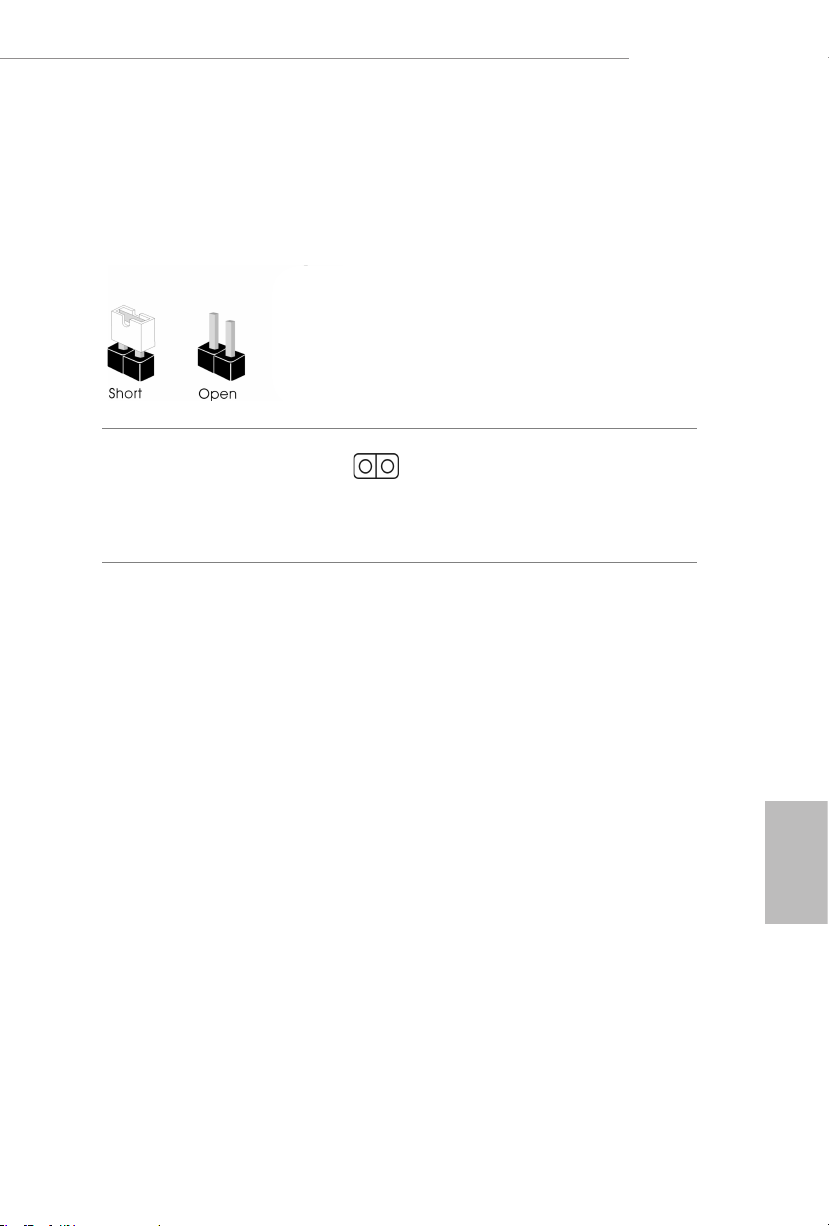
B550M/ac
1.3 Impostazione jumper
L'illustrazione mostra in che modo vengono impostati i jumper. Quando il cappuccio del
jumper è posizionato sui pin, il jumper è “cortocircuitato”. Se sui pin non è posizionato alcun
cappuccio del jumper, il jumper è “aperto”.
Jumper per azzerare la
CMOS
(CLRCMOS1)
(vedere pag. 1, n. 21)
CLRCMOS1 consente di azzerare i dati presenti nella CMOS. I dati presenti nella CMOS
includono informazioni relative all'impostazione del sistema quali password del sistema,
data, ora e parametri di impostazione del sistema. Per azzerare e reimpostare i parametri
del sistema alla congurazione predenita, spegnere il computer e scollegare il cavo di
alimentazione, quindi utilizzare un cappuccio del jumper per cortocircuitare i pin su
CLRCMOS1 per 3 secondi. Ricordarsi di rimuovere il cappuccio del jumper dopo aver
azzerato la CMOS. Se è necessario azzerare la CMOS dopo l'aggiornamento del BIOS, è
necessario riavviare prima il sistema e in seguito spegnerlo prima di eseguire l'operazione
di azzeramento della CMOS.
Jumper a 2 pin
Cortocircuitato: Azzerare la
CMOS
Aperto: Predenito
Italiano
71
Page 76
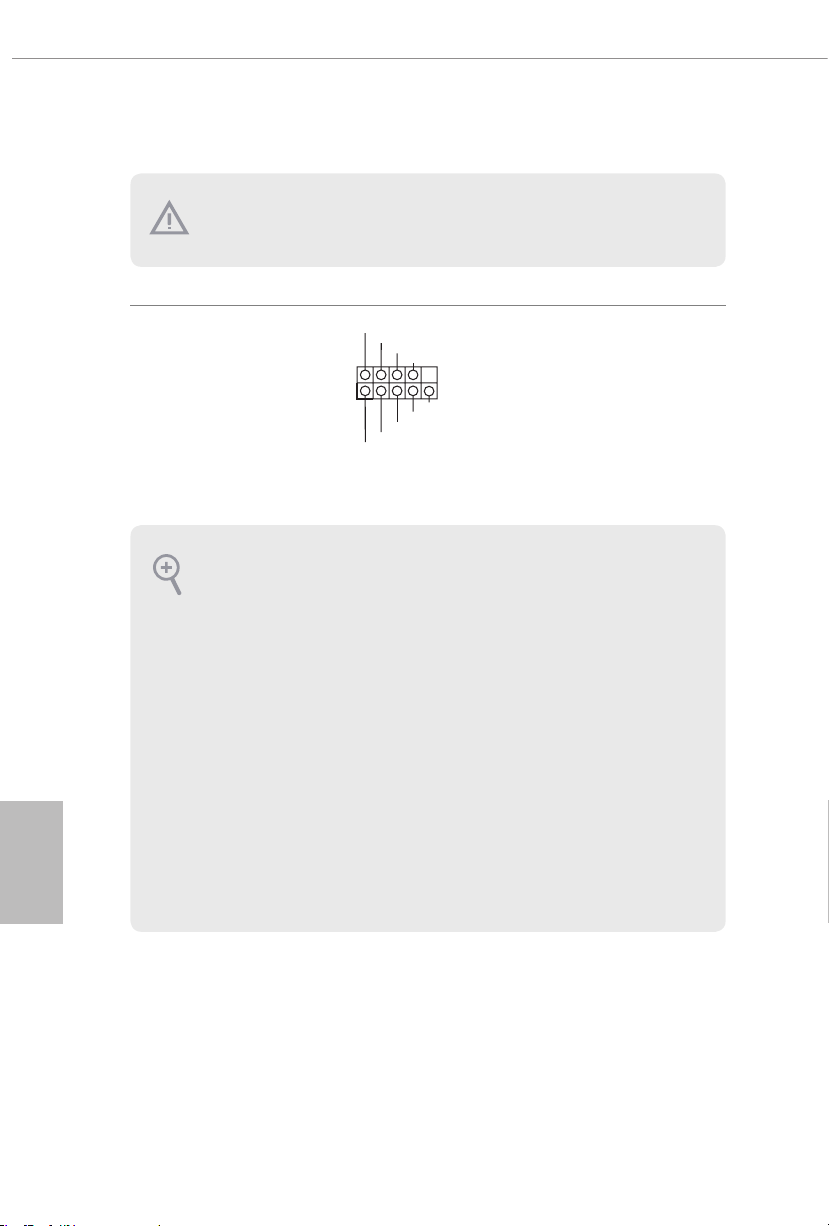
1.4 Header e connettori su scheda
1
Gli header e i connettori sulla scheda NON sono jumper. NON posizionare cappucci del jumper
su questi header e connettori. Il posizionamento di cappucci del jumper su header e connettori
provocherà danni permanenti alla scheda madre.
Italiano
Header sul pannello del
sistema
(PANEL1 a 9 pin)
(vedere pag. 1, n. 12)
PWRBTN (tasto d’alimentazione):
Collegare al tasto d’alimentazione del pannello frontale del telaio. Utilizzando il tasto d’alimentazione
è possibile congurare il modo in cui si spegne il sistema.
RESET (tasto di ripristino):
Collegare all'interruttore di ripristino del pannello frontale del telaio. Premere il tasto di ripristino
per riavviare il sistema se il computer si blocca e non riesce ad eseguire un normale riavvio.
PLED (LED alimentazione del sistema):
collegare all'indicatore di stato dell'alimentazione sul pannello anteriore dello chassis. Il LED è
acceso quando il sistema è in funzione. Il LED continua a lampeggiare quando il sistema si trova
nello stato di sospensione S1/S3. Il LED è spento quando il sistema si trova nello stato di sospensione
S4 o quando è spento (S5).
HDLED (LED di attività disco rigido):
collegare al LED di attività disco rigido sul pannello anteriore dello chassis. Il LED è acceso quando
il disco rigido sta leggendo o scrivendo dati.
Il design del pannello anteriore può cambiare a seconda dello chassis. Un modulo del pannello
frontale consiste principalmente di tasto d’alimentazione, tasto di ripristino, LED d’alimentazione,
LED attività del disco rigido, altoparlanti e così via. Quando si collega il modulo del pannello
frontale del telaio a questa basetta, assicurarsi che l’assegnazione dei cavi e l’assegnazione dei pin
siano corrette.
PLED+
PLED-
HDLED-
HDLED+
PWRBTN#
GND
RESET#
GND
GND
Collegare il tasto d'alimentazione,
il tasto di ripristino e l'indicatore di
stato del sistema del telaio a questa
basetta in base all'assegnazione dei
pin denita di seguito. Annotare
i pin positivi e negativi prima di
collegare i cavi.
72
Page 77
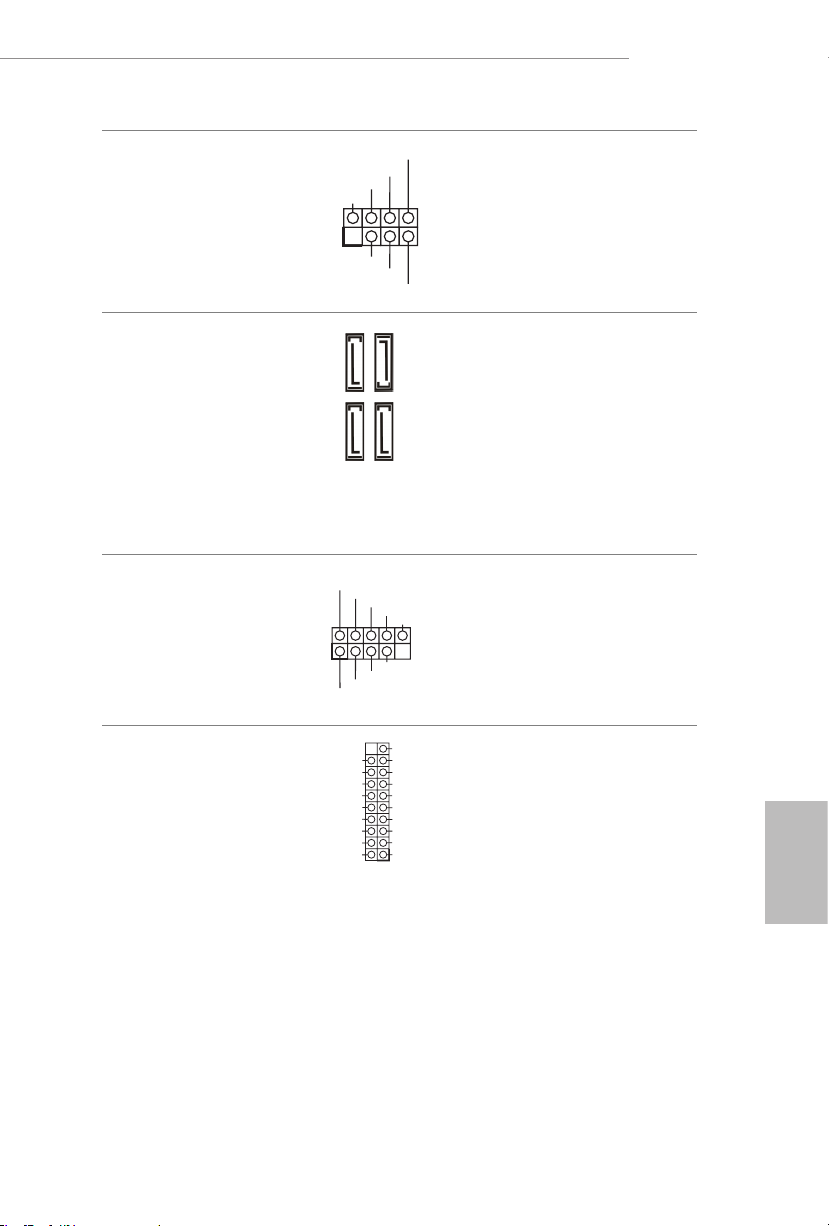
B550M/ac
1
+5V
DUMMY
PLED+
PLED+
PLED-
DUMMY
SPEAKER
DUMMY
GND
GND
P+
P-
USB_PWR
P+
P-
USB_PWR
1
1
Connettore LED
alimentazione e
altoparlante
(SPK_PLED1 a 7 pin)
(vedere pag. 1, n. 13)
Connettori Serial ATA3
(SATA3_1:
vedere pag. 1, n. 9)
(SATA3_2:
vedere pag. 1, n. 10)
(SATA3_3:
vedere pag. 1, n. 11) (Sotto)
(SATA3_4:
vedere pag. 1, n. 11)(Sopra)
Header USB 2.0
(USB_3_4 a 9 pin)
(vedere pag. 1, n. 18)
(USB_5_6 a 9 pin)
(vedere pag. 1, n. 19)
SATA3_1
SATA3_4
Collegare i LED alimentazione e
l’altoparlante a questo connettore.
Questi quattro connettori SATA3
supportano cavi dati SATA
per dispositivi di archiviazione
SATA3_2
interna, con una velocità di
trasferimento dati no a 6,0 Gb/s.
SATA3_3
Ci sono due connettori su questa
scheda madre. Ciascun header
USB 2.0 può supportare due porte.
Header USB 3.2 Gen1
(F_USB3_1_2 a 19 pin)
(vedere pag. 1, n. 8)
Vbus
IntA_PA_SSRX-
IntA_PA_SSRX+
GND
IntA_PA_SSTX-
IntA_PA_SSTX+
GND
IntA_PA_D-
IntA_PA_D+
VbusVbus
IntA_PB_SSRX-
IntA_PB_SSRX+
GND
IntA_PB_SSTX-
IntA_PB_SSTX+
GND
IntA_PB_D-
IntA_PB_D+
Dummy
Ci sono due connettori su questa
scheda madre. Ciascun header
USB 3.2 Gen1 può supportare due
porte.
Italiano
73
Page 78
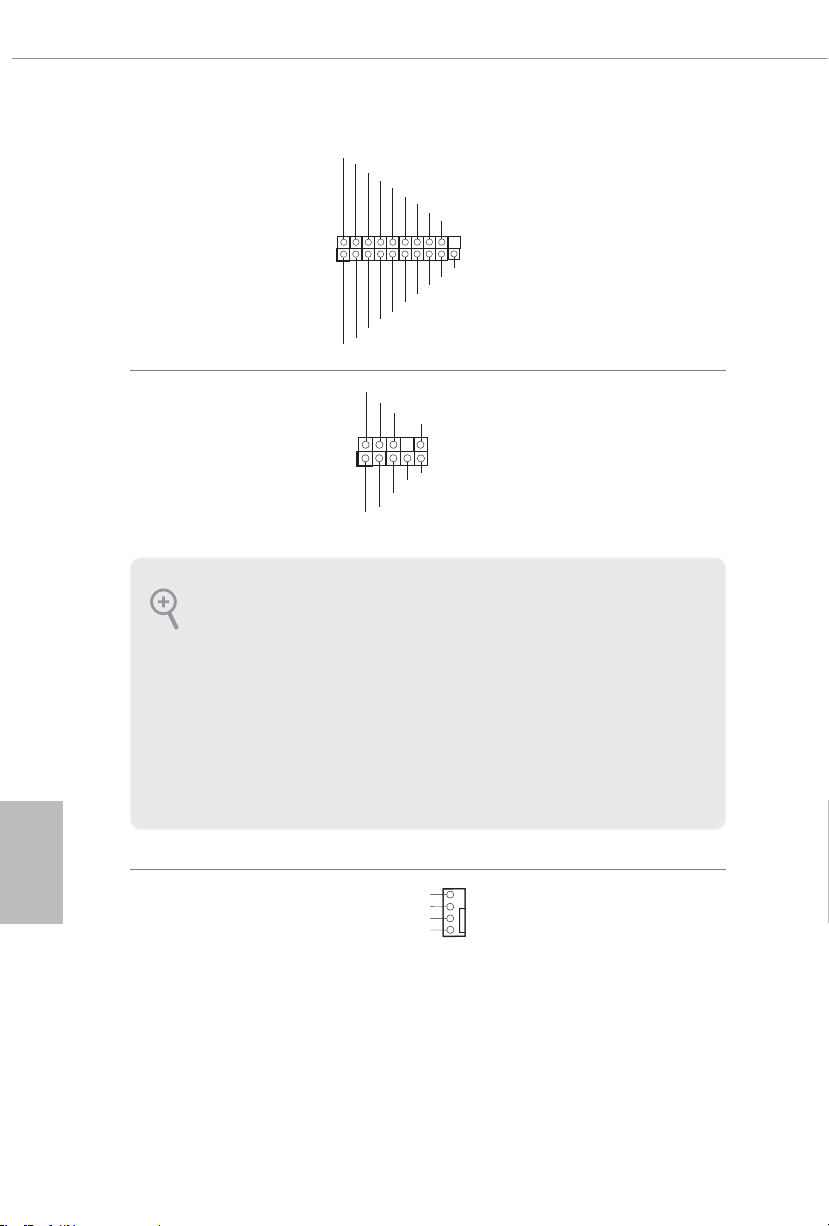
(F_USB3_3_4 a 19 pin)
1
ID
IntA_P_D+
IntA_P_SSRX-
J_SENSE
OUT2_L
1
MIC_RET
PRESENCE#
GND
OUT2_R
MIC2_R
MIC2_L
OUT_RET
FAN_SPEED_CONTROL
4
(vedere pag. 1, n. 14)
IntA_P_D-
GND
IntA_P_D-
IntA_P_D+
IntA_P_SSTX+
IntA_P_SSTX-
GND
IntA_P_SSTX-
IntA_P_SSTX+
GND
IntA_P_SSRX+
IntA_P_SSRX-
Vbus
IntA_P_SSRX+
GND
Vbus
Italiano
Header audio pannello
anteriore
(HD_AUDIO1 a 9 pin)
Questo header serve a collegare i
dispositivi audio al pannello audio
anteriore.
(vedere pag. 1, n. 25)
1. L'audio ad alta denizione supporta le funzioni Jack sensing, ma il lo del pannello sullo chassis
deve supportare HDA per funzionare correttamente. Seguire le istruzioni presenti nel nostro
manuale e nel manuale dello chassis per installare il sistema.
2. Se si utilizza un pannello audio AC’97, installarlo sull'header audio del pannello anteriore
seguendo le fasi di seguito:
A. Collegare Mic_IN (MIC) a MIC2_L.
B. Collegare Audio_R (RIN) a OUT2_R e Audio_L (LIN) a OUT2_L.
C. Collegare Ground (GND) a Ground (GND).
D. MIC_RET e OUT_RET servono soltanto per il pannello audio HD. Non è necessario collegarli
per il pannello audio AC’97.
E. Per attivare il microfono anteriore, andare alla scheda “FrontMic” nel pannello di controllo
Realtek e regolare il “Volume di registrazione”.
Connettori ventola pompa
dell’acqua telaio
(CHA_FAN1/WP a 4 pin)
(vedere pag. 1, n. 26)
CHA_FAN_SPEED
FAN_VOLTAGE
GND
Questa scheda madre è dotata di
3
2
tre connettori ventola a 4 pin per
1
il rareddamento ad acqua del
telaio. Se si decide di collegare una
ventola
telaio
ad acqua a 3 pin, collegarla al pin
1-3.
con rareddamento
74
Page 79
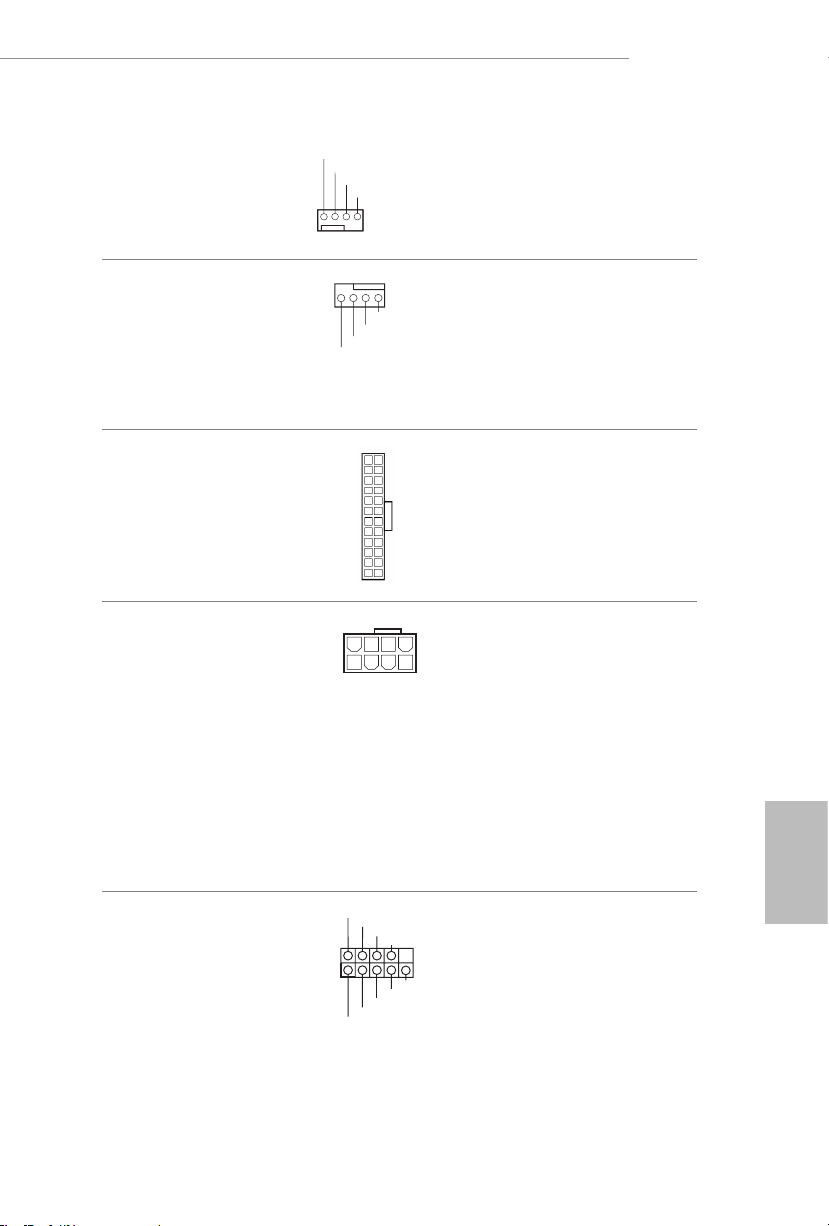
B550M/ac
GND
OL
1 2 3 4
4 3 2 1
4
1
8 5
1
RRI#1
(CHA_FAN2/WP a 4 pin)
(vedere pag. 1, n. 20)
(CHA_FAN4/WP a 4 pin)
(vedere pag. 1, n. 15)
Connettore ventola CPU
(CPU_FAN1 a 4 pin)
(vedere pag. 1, n. 2)
Connettore di alimentazione
ATX
(ATXPWR1 a 24 pin)
(vedere pag. 1, n. 7)
Connettore di alimentazione
ATX da 12 V
(ATX12V1 a 8 pin)
(vedere pag. 1, n. 1)
Header porta seriale
(COM1 a 9 pin)
(vedere pag. 1, n. 22)
FAN_VOLTAGE
FAN_SPEED
FAN_SPEED_CONTR
GND
FAN_VOLTAGE
CPU_F
AN_SPEED
FAN_SPEED_CONTROL
12 124
RRXD1
DDTR#1
DDSR#1
CCTS#1
RRTS#1
GND
TTXD1
DDCD#1
Questa scheda madre è dotata
di un connettore per la ventola
della CPU (Ventola silenziosa)
a 4 pin. Se si decide di collegare
una ventola della CPU a 3 pin,
collegarla al pin 1-3.
Questa scheda madre è dotata di
un connettore di alimentazione
ATX a 24 pin. Per utilizzare
un'alimentazione ATX a 20 pin,
collegarla lungo il pin 1 e il pin 13.
13
Questa scheda madre è dotata di
un connettore di alimentazione
ATX da 12 V a 8 pin. Per utilizzare
un'alimentazione ATX a 4 pin,
collegarla lungo il pin 1 e il pin 5.
*Attenzione: Assicurarsi che il
cavo di alimentazione collegato
sia per la CPU e non la scheda
graca. Non inserire il cavo di
alimentazione PCIe in questo
connettore.
Italiano
Questo header COM1 supporta
un modulo di porta seriale.
75
Page 80
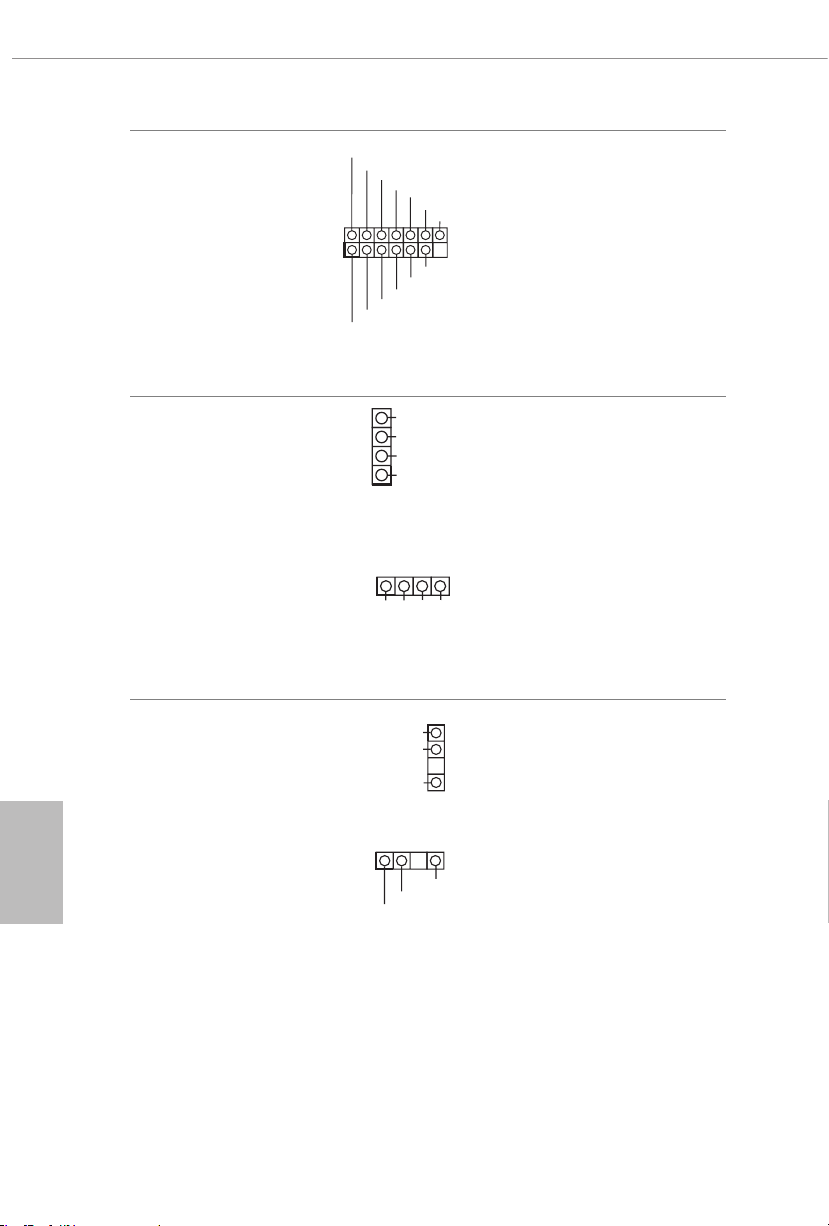
Connettore SPI TPM
1
SPI_DQ3
SPI_DQ2
#
1
1
D
1
DO_ADDR
1
(SPI_TPM_J1 a 13 pin)
(vedere pag. 1, n. 17)
+3.3V
SPI_CS0
Dummy
CLK
RSMRST#
SPI_MISO
SPI_MOSI
RST#
SPI_TPM_CS
GND
TPM_PIRQ
Questo connettore supporta il
sistema SPI Trusted Platform
Module (TPM), che può archiviare
in modo sicuro chiavi, certicati
digitali, password e dati. Un
sistema TPM permette anche di
potenziare la sicurezza della rete,
di proteggere identità digitali
e di garantire l'integrità della
piattaforma.
Italiano
Collettore LED RGB
(RGB_LED1 a 4 pin)
(vedere pag. 1, n. 5)
(RGB_LED2 a 4 pin)
(vedere pag. 1, n. 23)
Header LED indirizzabili
(ADDR_LED1 a 3 pin)
(vedere pag. 1, n. 6)
(ADDR_LED2 a 3 pin)
(vedere pag. 1, n. 24)
B
R
G
12V
12V GRB
VOUT
GND
DO_ADDR
VOUT
Questi due collettori RGB vengono
utilizzati per collegare la prolunga
LED RGB, che consente agli
utenti di scegliere tra vari eetti di
illuminazione a LED.
Attenzione: Non installare il cavo
LED RGB in senso errato; in
caso contrario, il cavo potrebbe
danneggiarsi.
*Fare riferimento a pagina 39 per
ulteriori istruzioni su questi due
connettori.
Questi due header
indirizzabili
LED
vengono utilizzati
per collegare la prolunga LED
indirizzabile
, che consente agli
utenti di scegliere tra vari eetti di
illuminazione a LED.
Attenzione: Non installare mai
GN
il cavo del LED indirizzabile
secondo un orientamento
errato, altrimento potrebbe
danneggiarsi.
* Fare riferimento a pagina 40
per ulteriori istruzioni su questa
basetta.
76
Page 81
B550M/ac
1 Introducción
Gracias por comprar la placa base ASRock B550M/ac, una placa base able fabricada según el
rigurosísimo control de calidad de ASRock. Ofrece un rendimiento excelente con un diseño
resistente de acuerdo con el compromiso de calidad y resistencia de ASRock.
Ya que las especicaciones de la placa base y el soware de la BIOS podrán ser actualizados, el
contenido que aparece en esta documentación estará sujeto a modicaciones sin previo aviso. Si esta
documentación sufre alguna modicación, la versión actualizada estará disponible en el sitio web de
ASRock sin previo aviso. Si necesita asistencia técnica relacionada con esta placa base, visite nuestro
sitio web para obtener información especíca sobre el modelo que esté utilizando. Podrá encontrar
las últimas tarjetas VGA, así como la lista de compatibilidad de la CPU, en el sitio web de ASRock.
Sitio web de ASRock http://www.asrock.com.
1.1 Contenido del paquete
Placa base ASRock B550M/ac (Factor de forma Micro ATX)
•
Guía de instalación rápida de ASRock B550M/ac
•
CD de soporte de ASRock B550M/ac
•
1 x escudo panel E/S
•
2 x Cables de datos Serie ATA (SATA) (Opcional)
•
2 x Antenas ASRock WiFi 2,4/5 GHz (Opcional)
•
1 x Tornillo para socket M.2 (opcional)
•
77
Español
Page 82

Español
1.2 Especicaciones
Factor de forma Micro ATX
Plataforma
CPU
Conjunto de
chips
Memoria
•
Diseño de condensador sólido
•
Circuito impreso (PCB) de 2 oz de cobre
•
Admite AMD AM4 Ryzen™ / Ryzen™ de 3ª generación y posteriores
•
Procesadores (Procesadores de las Series 3000 y 4000)*
* No es compatible con AMD Ryzen™ 5 3400G o Ryzen™ 3 3200G.
Digi Power design
•
Diseño de 8 fases de alimentación
•
AMD B550
•
Tecnología de memoria DDR4 de doble canal
•
4 x ranuras DIMM DDR4
•
Las CPU de la serie AMD Ryzen (Matisse) admiten memoria sin
•
búfer DDR4 4533+(OC)/4466(OC)/4400(OC)/4333(OC)/
4266(OC)/4200(OC)/4133(OC)/4000(OC)/3866(OC)/3800(OC)/
3733(OC)/3600(OC)/3466(OC)/3200/2933/2667/2400/2133
ECC y no ECC*
Las APU de la serie AMD Ryzen (Renoir) admiten memoria sin
•
búfer DDR4 4733+(OC)/4666(OC)/4600(OC)/4533(OC)/4466
(OC)/4400(OC)/4333(OC)/4266(OC)/4200(OC)/4133(OC)/4000
(OC)/3866(OC)/3800(OC)/3733(OC)/3600(OC)/3466
(OC)/3200/2933/2667/2400/2133 ECC y no ECC*
* Para obtener más información, consulte la lista de memorias
compatibles en el sitio web de ASRock. (http://www.asrock.com/)
* Consulte la página 22 para conocer las frecuencias máximas
compatibles de DDR4 UDIMM.
Capacidad máxima de memoria del sistema: 128GB
•
Admite módulos de memoria Extreme Memory Prole (XMP)
•
Contacto 15μ Gold en ranuras DIMM
•
78
Ranura de
expansión
CPU de la serie AMD Ryzen (Matisse)
2 ranura PCI Express x16 (PCIE1: modo Gen4x16; PCIE3: modo
•
Gen3 x4)*
APU de la serie AMD Ryzen (Renoir)
2 ranura PCI Express x16 (PCIE1: modo Gen3x16; PCIE3: modo
•
Gen3 x4)*
Page 83

Grácos
B550M/ac
* Admite unidad de estado sólido de NVMe como disco de arranque
1 x ranura PCI Express 3.0 x1
•
Compatible con AMD Quad CrossFireX
•
1 x Zócalo M.2 (clave E) con el módulo WiFi-802.11ac
•
Tarjeta gráca de la serie AMD RadeonTM Vega integrada en
•
APU de la serie Ryzen*
* El soporte real puede variar según la CPU
DirectX 12, Pixel Shader 5.0
•
Memoria compartida predeterminada de 2 GB. Memoria máxima
•
compartida admite hasta 16 GB.
* La memoria compartida máxima de 16GB requiere que haya una
memoria del sistema de 32 GB instalada.
Compatible con HDMI 2.1 con una resolución máxima de 4K x
•
2K (4096x2160) a 60Hz
Admite Sincronización automática entre audio y vídeo, color
•
profundo (12 bpc), xvYCC y HBR (audio de alta tasa de bits) con
puerto HDMI 2.1 (se necesita un monitor compatible con HDMI)
Admite HDR (alto rango dinámico) con HDMI 2.1
•
Admite HDCP 2.3 con puerto HDMI 2.1
•
Admite reproducción 4K Ultra HD (UHD) con puerto HDMI 2.1
•
Compatible con Microso PlayReady®
•
TM
y CrossFireX
TM
Audio
7.1 Audio CH HD con Protección de contenido (Realtek ALC1200
•
Audio Codec)
Compatible con audio Blu-ray Premium
•
Admite protección contra sobretensiones
•
Protección de aislamiento de PCB
•
Capas PCB individuales para canal de audio D/I
•
Audio Nahimic
•
Español
79
Page 84

LAN
LAN inalámbrica
E/S en panel
posterior
PCIE x1 Gigabit LAN 10/100/1000 Mb/s
•
Realtek RTL8111H
•
Admite la función Reactivación de LAN
•
Admite protección contra rayos y descargas electrostáticas (ESD)
•
Admite Ethernet 802.3az de eciencia energética
•
Admite PXE
•
Módulo WiFi Intel® 802.11ac
•
Compatible con IEEE 802.11a/b/g/n/ac
•
Compatible con Banda Dual (2,4/5 GHz)
•
Compatible con conexión inalámbrica de alta velocidad hasta
•
433Mbps
Compatible con Bluetooth 4.2 + Alta velocidad clase II
•
2 x Puertos de antena
•
1 x puerto de ratón/teclado PS/2
•
1 x puerto HDMI
•
4 x Puerto USB 3.2 Gen1 (concentrador ASMedia ASM1074)
•
(Admite protección contra descargas electrostáticas)
2 x Puertos USB 2.0 (admite protección contra descargas
•
electrostáticas)
1 x Puerto LAN RJ-45 con LED (LED DE ACTIVIDAD/ENLACE
•
y LED DE VELOCIDAD)
Conector de audio HD: Entrada de línea / Altavoz frontal /
•
Micrófono
Español
80
Almacenamiento
4 x conectores SATA3 de 6,0 Gb/s, compatible con RAID (RAID 0,
•
RAID 1 y RAID 10), NCQ, AHCI y conexión en caliente
1 x Zócalo Hyper M.2 (M2_1), compatible con el módulo PCI
•
Express M.2 tipo 2280 con clave M hasta Gen4 x4 (64 Gb/s)(con
Matisse) o Gen3 x4 (32 Gb/s) (con Renoir)*
* Admite unidad de estado sólido de NVMe como disco de arranque
* Admite el kit U.2 de ASRock
Page 85

Conector
B550M/ac
1 x Base de conexiones de puerto COM
•
1 x Conector SPI TPM
•
1 x LED de alimentación y base de conexiones para el altavoz
•
2 x Cabezales de indicador LED RGB
•
* Admite una tira de LED de hasta 12 V/3 A (36 W) en total
2 x cabezales de LED direccionables
•
* Admite una tira de LED de hasta 5 V/3 A (15W) en total
1 x Conector para ventilador de la CPU (4 contactos)
•
* El conector para ventilador de la CPU admite ventilador de la CPU
con una potencia de ventilador de 1 A (12 W) máxima.
3 x Conectores (4 contactos) para el ventilador de la bomba de
•
agua/chasis (control de velocidad de ventilador inteligente)
* El ventilador de la bomba de agua/Chasis admite ventilador del
disipador por agua con una potencia de ventilador máxima de 2 A
(24 W).
* CHA_FAN1/WP, CHA_FAN2/WP, CHA_FAN3/WP y CHA_FAN4/
WP se pueden detectar automáticamente si se usa el ventilador de 3 o
4 contactos.
1 x conector de alimentación ATX de 24 contactos
•
1 x conector de alimentación de 12V de 8 contactos
•
1 x Conector de audio en el panel frontal
•
2 x Bases de conexiones USB 2.0 (Admite 4 puertos USB 2.0)
•
(Admite protección contra descargas electrostáticas)
2 x base de conexiones USB 3.2 Gen1 (admite 4 puertos USB 3.2
•
Gen1) (Admite protección contra descargas electrostáticas)
Función de
la BIOS
BIOS legal UEFI AMI compatible con interfaz gráca de usuario
•
Compatible con “Plug and Play”
•
Eventos de reactivación conformes con ACPI 5.1
•
Compatible con Jumper FREE
•
Admite SMBIOS 2.3
•
Multi-ajuste de voltaje de CPU, CPU VDDCR_SOC, DRAM,
•
VPPM, +1.8VSB
Español
81
Page 86
Español
Detección de temperatura: Ventiladores de la bomba de agua/
Monitor de
hardware
•
chasis, CPU
Tacómetro del ventilador: Ventiladores de la bomba de agua/
•
chasis, CPU
Ventilador silencioso (ajuste automático de la velocidad del
•
ventilador del chasis por temperatura de la CPU): Ventiladores de
la bomba de agua/chasis, CPU
Control de varias velocidades del ventilador: Ventiladores de la
•
bomba de agua/chasis, CPU
Supervisión del voltaje: +12V, +5V, +3.3V, CPU Vcore, CPU
•
VDDCR_SOC, DRAM, VPPM, +1.8V
Microso® Windows® 10 64 bits
SO
Certicaciones
•
FCC y CE
•
Preparado para ErP/EuP (se necesita una fuente de alimentación
•
preparada para ErP/EuP)
* Para obtener información detallada del producto, visite nuestro sitio Web: http://www.asrock.com
Tenga en cuenta que hay un cierto riesgo implícito en las operaciones de overclocking, incluido el
ajuste de la BIOS, aplicando la tecnología de overclocking liberada o utilizando las herramientas
de overclocking de otros fabricantes. El overclocking puede afectar a la estabilidad del sistema e,
incluso, dañar los componentes y dispositivos del sistema. Esta operación se debe realizar bajo su
propia responsabilidad y usted debe asumir los costos. No asumimos ninguna responsabilidad por
los posibles daños causados por el overclocking.
82
Page 87
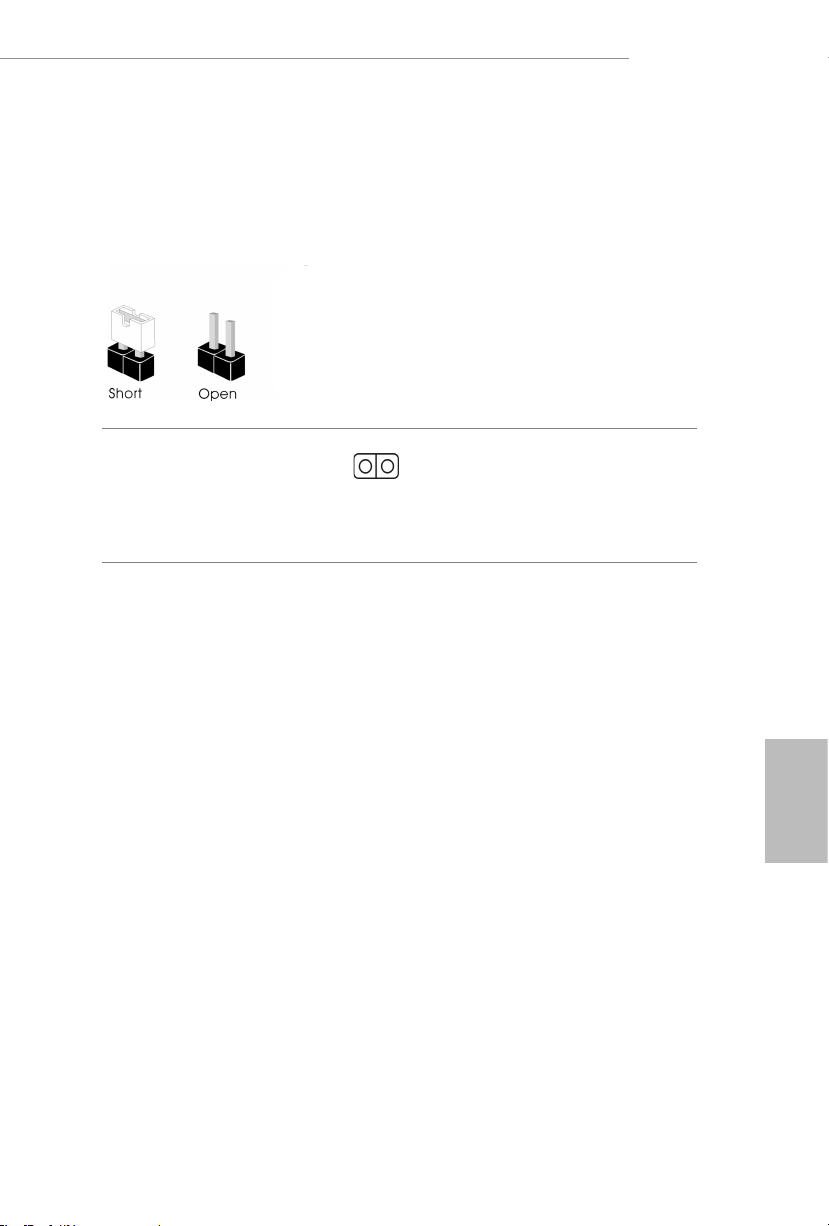
1.3 Instalación de los puentes
La instalación muestra cómo deben instalarse los puentes. Cuando la tapa de puente se
coloca en los contactos, el puente queda “Corto”. Si no coloca la tapa de puente en los
contactos, el puente queda “Abierto”.
B550M/ac
Puente de borrado de
CMOS
(CLRCMOS1)
(consulte la pág. 1, nº 21)
CLRCMOS1 le permite borrar los datos del CMOS. Los datos del CMOS incluyen
información de instalación del sistema como, por ejemplo, la contraseña, la fecha y la
hora del sistema y los parámetros de instalación del sistema. Para borrar y restablecer los
parámetros del sistema a los valores predeterminados de instalación, apague el ordenador
y desenchufe el cable de alimentación. A continuación, utilice una tapa de puente para
acortar los contactos del CLRCMOS1 durante 3 segundos. Acuérdese de retirar la tapa de
puente después de borrar el CMOS. Si necesita borrar el CMOS cuando acabe de actualizar
la BIOS, deberá arrancar el sistema primero y, a continuación, deberá apagarlo antes de
que realice el borrado del CMOS.
Puente de 2 contactos
Corto: Borrado de CMOS
Abierto: Predeterminado
Español
83
Page 88
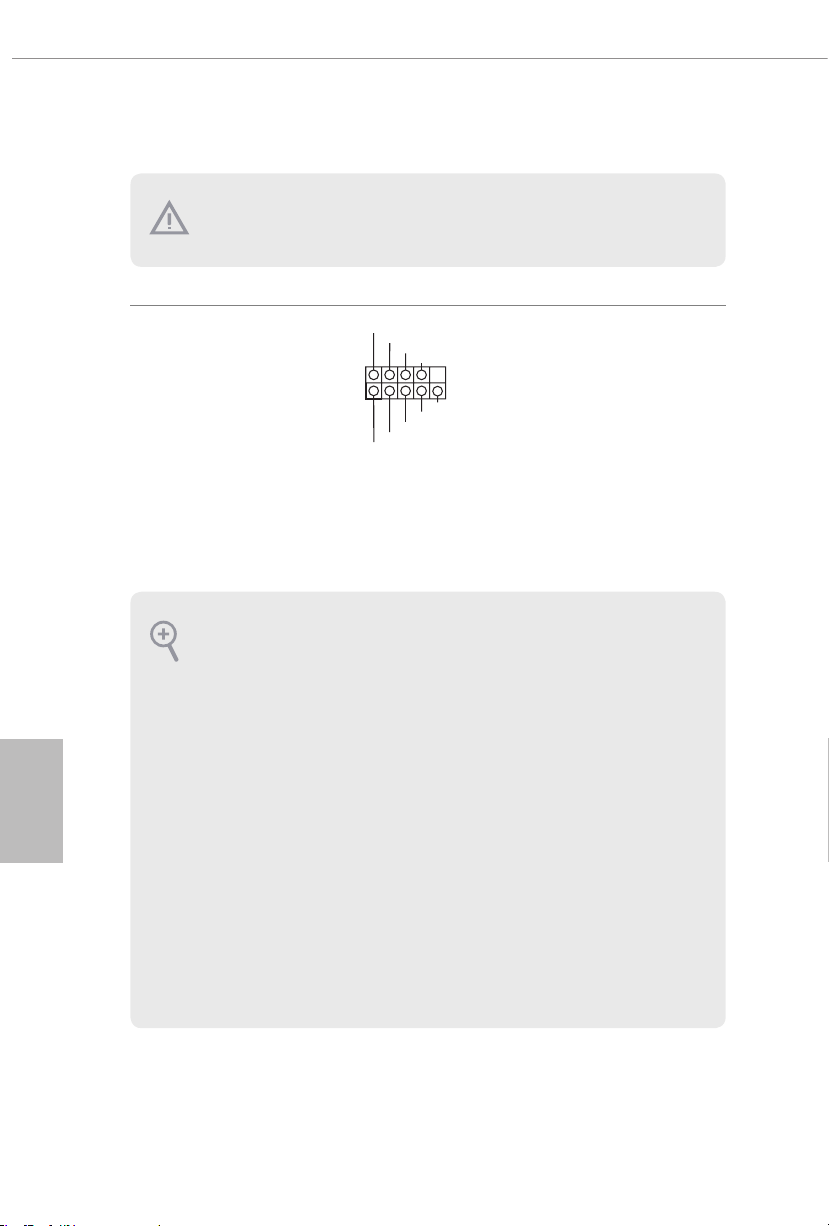
1.4 Conectores y cabezales incorporados
1
Los cabezales y conectores incorporados NO son puentes. NO coloque tapas de puente sobre estos
cabezales y conectores. Si coloca tapas de puente sobre los cabezales y conectores dañará de forma
permanente la placa base.
Español
Cabezal del panel del sistema
(PANEL1 de 9 contactos)
(consulte la pág. 1, nº 12)
PWRBTN (botón de alimentación):
Conéctelo al botón de alimentación del panel frontal del chasis. Deberá congurar la forma en la que
su sistema se apagará mediante el botón de alimentación.
RESET (botón de restablecimiento):
Conéctelo al botón de restablecimiento del panel frontal del chasis. Pulse el botón de restablecimiento
para resetear el ordenador si éste está bloqueado y no se puede reiniciar de forma normal.
PLED (Indicador LED de la alimentación del sistema):
Conéctelo al indicador de estado de la alimentación del panel frontal del chasis. El indicador LED
permanece encendido cuando el sistema está funcionando. El indicador LED parpadea cuando el
sistema se encuentra en estado de suspensión S1/S3. El indicador LED se apaga cuando el sistema se
encuentra en estado de suspensión S4 o está apagado (S5).
HDLED (Indicador LED de actividad en el disco duro):
Conéctelo al indicador LED de actividad en el disco duro del panel frontal del chasis. El indicador
LED permanece encendido cuando el disco duro está leyendo o escribiendo datos.
El diseño del panel frontal puede ser diferente dependiendo del chasis. Un módulo de panel frontal
consta principalmente de: botón de alimentación, botón de restablecimiento, indicador LED de
alimentación, indicador LED de actividad en el disco duro, altavoz, etc. Cuando conecte su módulo
del panel frontal del chasis a este cabezal, asegúrese de que las asignaciones de los cables y los
contactos coinciden correctamente.
PLED+
PLED-
HDLED-
HDLED+
PWRBTN#
GND
RESET#
GND
GND
Conecte el botón de alimentación,
el botón de restablecimiento y el
indicador de estado del sistema
que se encuentran en el chasis a
esta base de conexiones según las
asignaciones de contactos que se
indica a continuación. Cerciórese
de cuáles son los contactos
positivos y los negativos antes de
conectar los cables.
84
Page 89
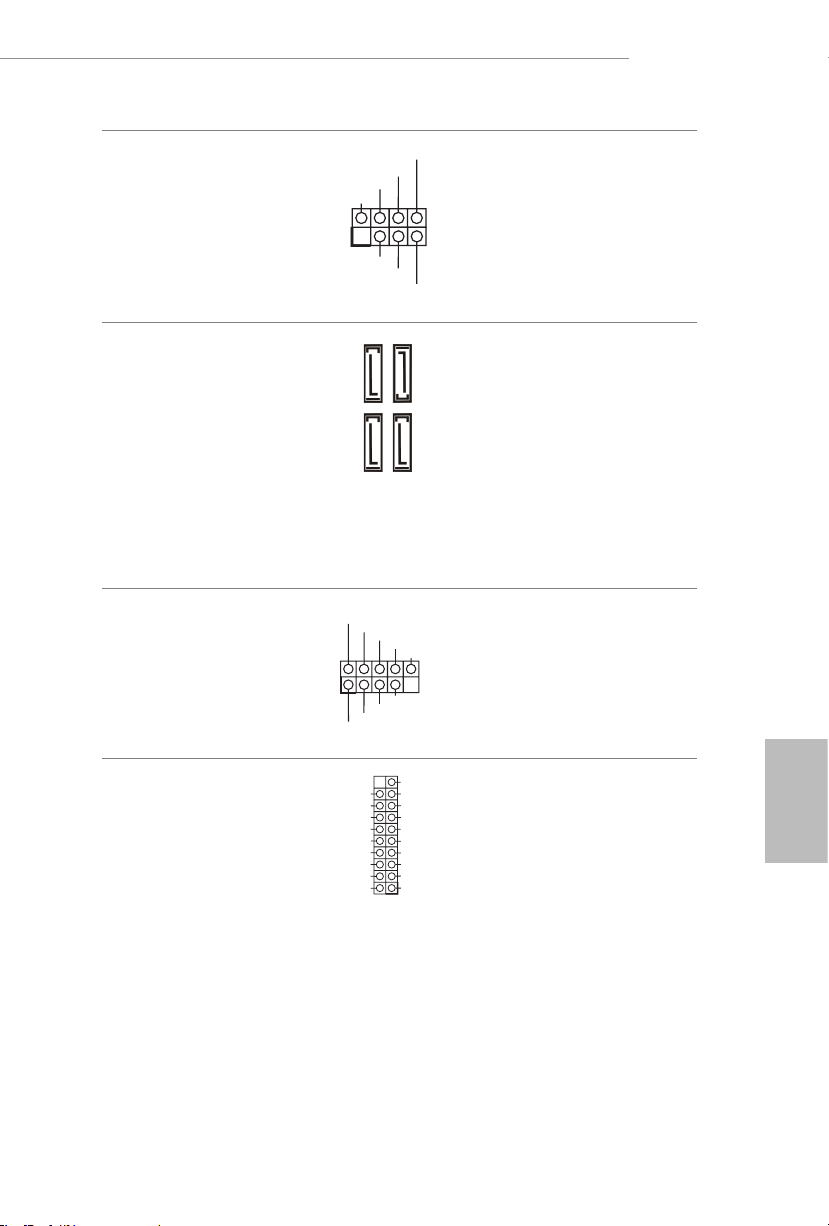
B550M/ac
1
+5V
DUMMY
PLED+
PLED+
PLED-
DUMMY
SPEAKER
DUMMY
GND
GND
P+
P-
USB_PWR
P+
P-
USB_PWR
1
1
LED de alimentación y base
de conexiones para la altavoz
(SPK_PLED1 de 7 contactos)
(consulte la pág. 1, nº 13)
Conectores Serie ATA3
(SATA3_1:
consulte la pág.1, nº 9)
(SATA3_2:
consulte la pág.1, nº 10)
(SATA3_3:
consulte la pág.1, nº 11)
(Debajo)
(SATA3_4:
consulte la pág.1, nº 11)(En)
Cabezales USB 2.0
(USB_3_4 de 9 contactos)
(consulte la pág. 1, nº 18)
(USB_5_6 de 9 contactos)
(consulte la pág. 1, nº 19)
SATA3_1
SATA3_4
Conecte el LED de alimentación
del chasis y el altavoz del chasis a
esta base de conexiones.
Estos cuatro conectores SATA3
son compatibles con cables de
datos SATA para dispositivos de
SATA3_2
almacenamiento interno con una
velocidad de transferencia de
SATA3_3
datos de hasta 6,0 Gb/s.
Hay dos bases de conexiones en
esta placa base. Cada cabezal
USB 2.0 admite dos puertos.
Cabezales USB 3.2 Gen1
(F_USB3_1_2 de
19 contactos)
(consulte la pág. 1, nº 8)
IntA_PA_SSRX-
IntA_PA_SSRX+
IntA_PA_SSTX-
IntA_PA_SSTX+
IntA_PA_D-
IntA_PA_D+
Vbus
GND
GND
VbusVbus
IntA_PB_SSRX-
IntA_PB_SSRX+
GND
IntA_PB_SSTX-
IntA_PB_SSTX+
GND
IntA_PB_D-
IntA_PB_D+
Dummy
Hay dos bases de conexiones en
esta placa base. Cada cabezal
USB 3.2 Gen1 admite dos
puertos.
Español
85
Page 90
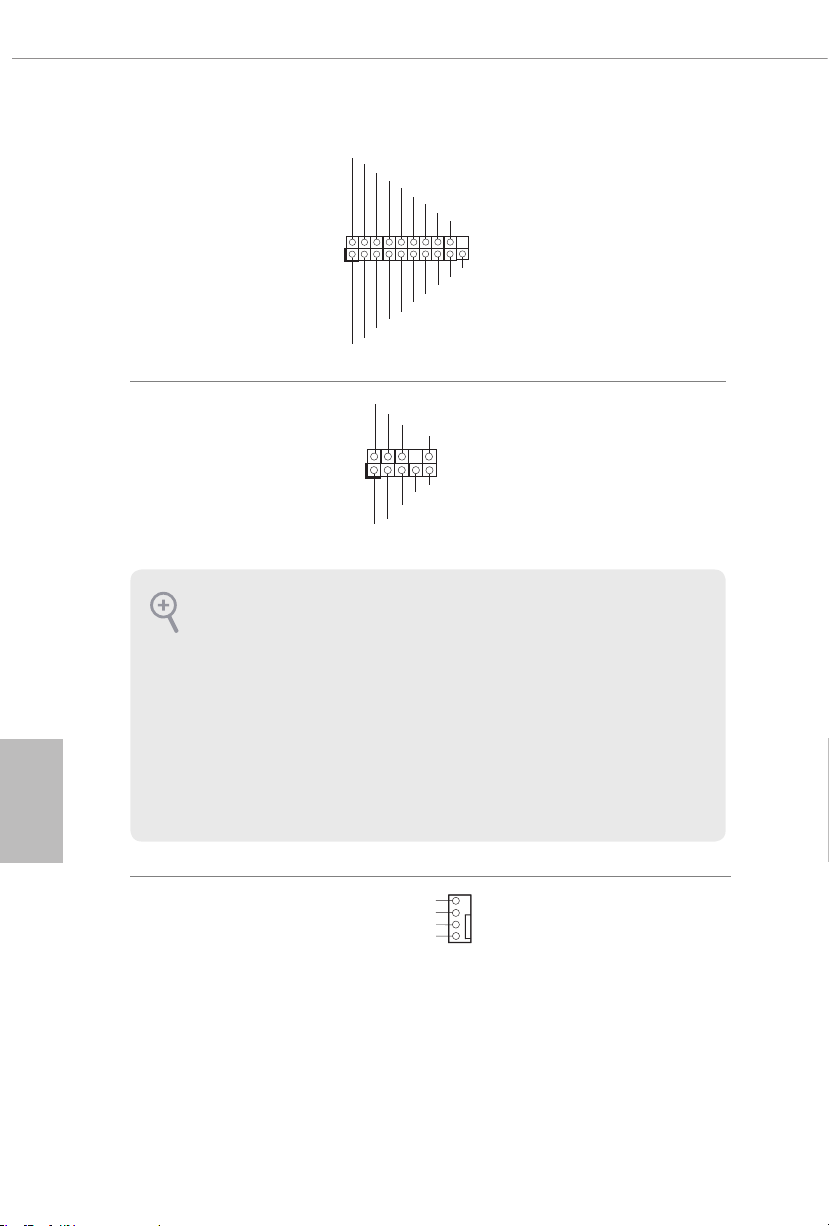
(F_USB3_3_4 de
1
IntA_P_D+
IntA_P_SSRX-
J_SENSE
OUT2_L
1
MIC_RET
PRESENCE#
GND
OUT2_R
MIC2_R
MIC2_L
OUT_RET
FAN_SPEED_CONTROL
4
19 contactos)
(consulte la pág. 1, nº 14)
IntA_P_D-
IntA_P_D+
ID
GND
IntA_P_SSTX+
GND
IntA_P_D-
IntA_P_SSTX-
GND
IntA_P_SSRX+
GND
IntA_P_SSTX-
IntA_P_SSTX+
IntA_P_SSRX-
Vbus
Vbus
IntA_P_SSRX+
Español
86
Cabezal de audio del panel
frontal
(HD_AUDIO1 de
9 contactos)
(consulte la pág. 1, nº 25)
1. El Audio de Alta Denición (HDA, en inglés) es compatible con el método de sensor de conectores,
sin embargo, el cable del panel del chasis deberá ser compatible con HDA para que pueda
funcionar correctamente. Siga las instrucciones que se indican en nuestro manual y en el manual
del chasis para instalar su sistema.
2. Si utiliza un panel de audio AC’97, colóquelo en el cabezal de audio del panel frontal siguiendo
los pasos que se describen a continuación:
A. Conecte Mic_IN (MIC) a MIC2_L.
B. Conecte Audio_R (RIN) a OUT2_R y Audio_L (LIN) a OUT2_L.
C. Conecte Ground (Conexión a tierra) (GND) a Ground (GND).
D. MIC_RET y OUT_RET se utilizan únicamente con el panel de audio HD. No es necesario que
los conecte en el panel de audio AC’97.
E. Para activar el micrófono frontal, vaya a la cha “micrófono frontal” (Front Mic) en el panel de
control de Realtek y ajuste el “Volumen de grabación” (Recording Volume).
Conectores del ventilador de
la bomba de agua del chasis
(CHA_FAN1/WP de
4 contactos)
(consulte la pág. 1, nº 26)
CHA_FAN_SPEED
FAN_VOLTAGE
GND
Este cabezal se utiliza para
conectar dispositivos de audio al
panel de audio frontal.
Esta placa base proporciona tres
3
2
conectores para el ventilador
1
del chasis para refrigeración
por agua de 4 contactos. Si tiene
pensando conectar un ventilador
de refrigeración por agua del
chasis
de 3 contactos, conéctelo al
contacto 1-3.
Page 91
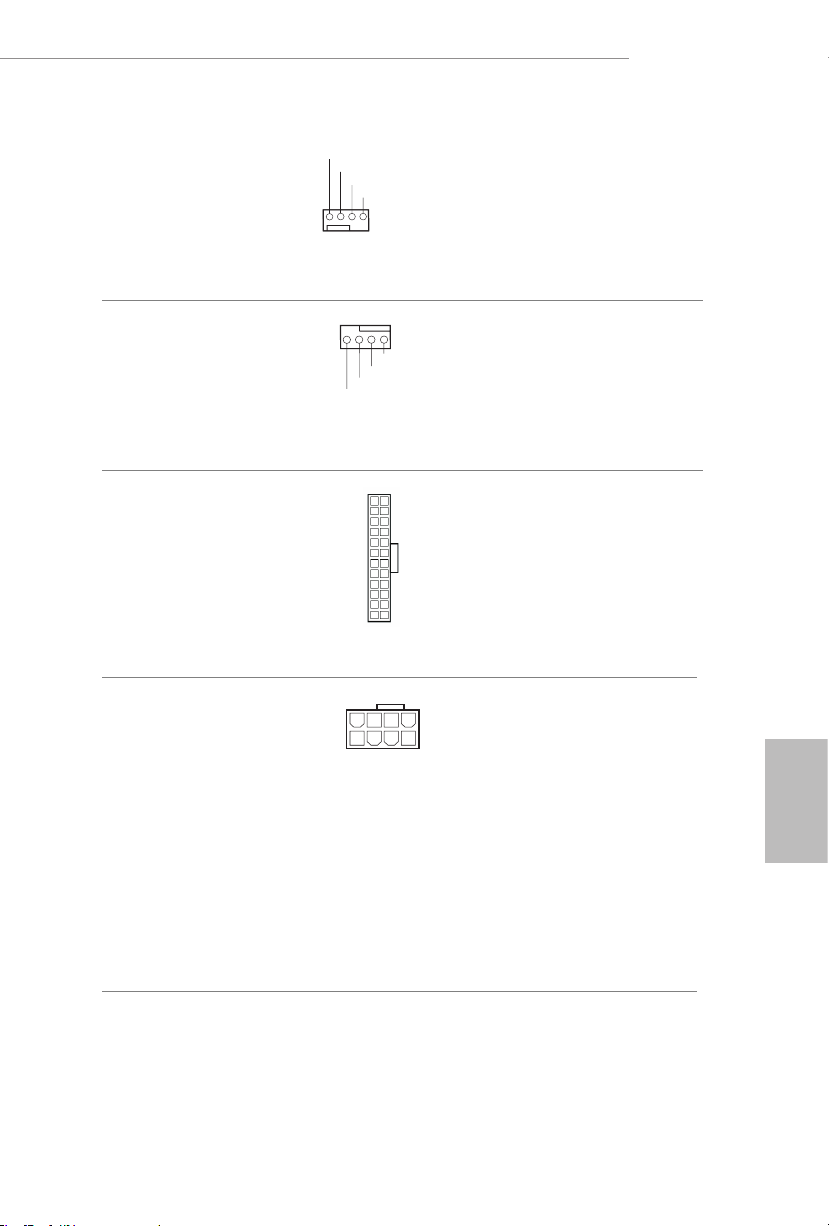
B550M/ac
GND
OL
1 2 3 4
L
4 3 2 1
4
1
8 5
(CHA_FAN2/WP de
4 contactos)
(consulte la pág. 1, nº 20)
(CHA_FAN4/WP de
4 contactos)
(consulte la pág. 1, nº 15)
Conector del ventilador de la
CPU
(CPU_FAN1 de 4 contactos)
(consulte la pág. 1, nº 2)
Conector de alimentación
ATX
(ATXPWR1 de 24 contactos)
(consulte la pág. 1, nº 7)
Conector de alimentación
ATX de 12V
(ATX12V1 de 8 contactos)
(consulte la pág. 1, nº 1)
FAN_VOLTAGE
FAN_SPEED
FAN_SPEED_CONTR
GND
FAN_VOLTAGE
CPU_F
AN_SPEED
FAN_SPEED_CONTRO
12
1
Esta placa base contiene un
conector de ventilador (ventilador
silencioso) de CPU de 4 contactos.
Si tiene pensando conectar un
ventilador de CPU de 3 contactos,
conéctelo al contacto 1-3.
24
Esta placa base contiene un
conector de alimentación ATX
de 24 contactos. Para utilizar
una toma de alimentación ATX
de 20 contactos, conéctela en los
13
contactos del 1 al 13.
Esta placa base contiene un
conector de alimentación ATX de
12V y 8 contactos. Para utilizar
una toma de alimentación ATX
de 4 contactos, conéctela en los
contactos del 1 al 5.
*Advertencia: Asegúrese de
Español
que el cable de alimentación
conectado corresponda a este
CPU y no a la tarjeta gráca. No
conecte el cable de alimentación
PCIe a este conector.
87
Page 92
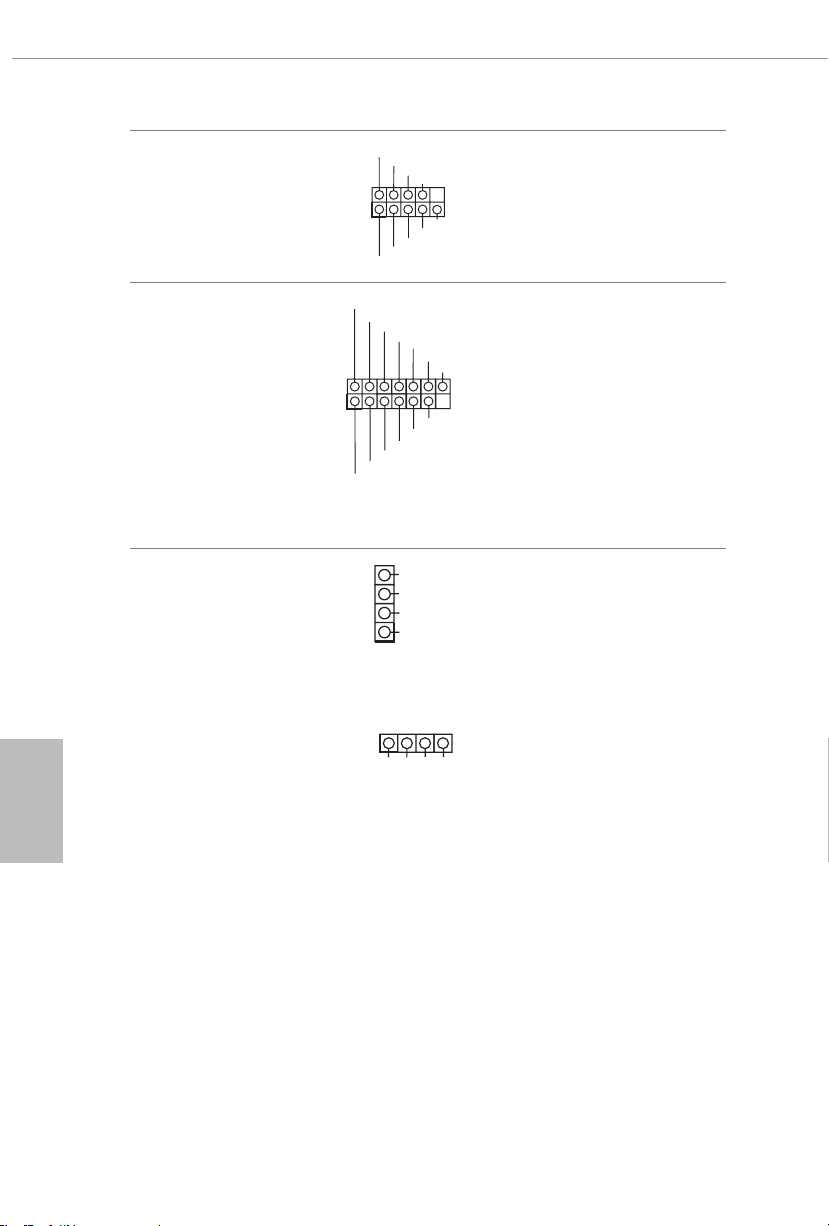
Cabezal de puerto serie
1
RRI#1
1
SPI_DQ3
SPI_DQ2
1
1
(COM1 de 9 contactos)
(consulte la pág. 1, nº 22)
RRXD1
DDTR#1
TTXD1
DDCD#1
DDSR#1
CCTS#1
RRTS#1
GND
Este cabezal COM1 admite un
módulo de puerto serie.
Español
Conector SPI TPM
(SPI_TPM_J1 de 13
contactos)
(consulte la pág. 1, nº 17)
Cabezales de LED RGB
(RGB_LED1 de 4 contactos)
(consulte la pág. 1, nº 5)
(RGB_LED2 de 4 contactos)
(consulte la pág. 1, nº 23)
+3.3V
Dummy
CLK
RSMRST#
SPI_MISO
SPI_CS0
12V GRB
SPI_MOSI
RST#
SPI_TPM_CS#
GND
B
R
G
12V
TPM_PIRQ
Este conector es compatible con el
sistema SPI Módulo de Plataforma
Segura (TPM, en inglés), que
puede almacenar de forma segura
claves, certicados digitales,
contraseñas y datos. Un sistema
TPM también ayuda a aumentar
la seguridad en la red, protege las
identidades digitales y garantiza la
integridad de la plataforma.
Estas dos bases de conexiones
RGB se utilizan para conectar
el alargador de LED RGB que
permite a los usuarios elegir entre
varios efectos de iluminación de
LED.
Precaución: Nunca instale
el cable de LED RGB con la
orientación incorrecta ya que,
de lo contrario, el cable puede
dañarse.
*Consulte la página 39 para
obtener más instrucciones sobre
estas dos bases de conexiones.
88
Page 93
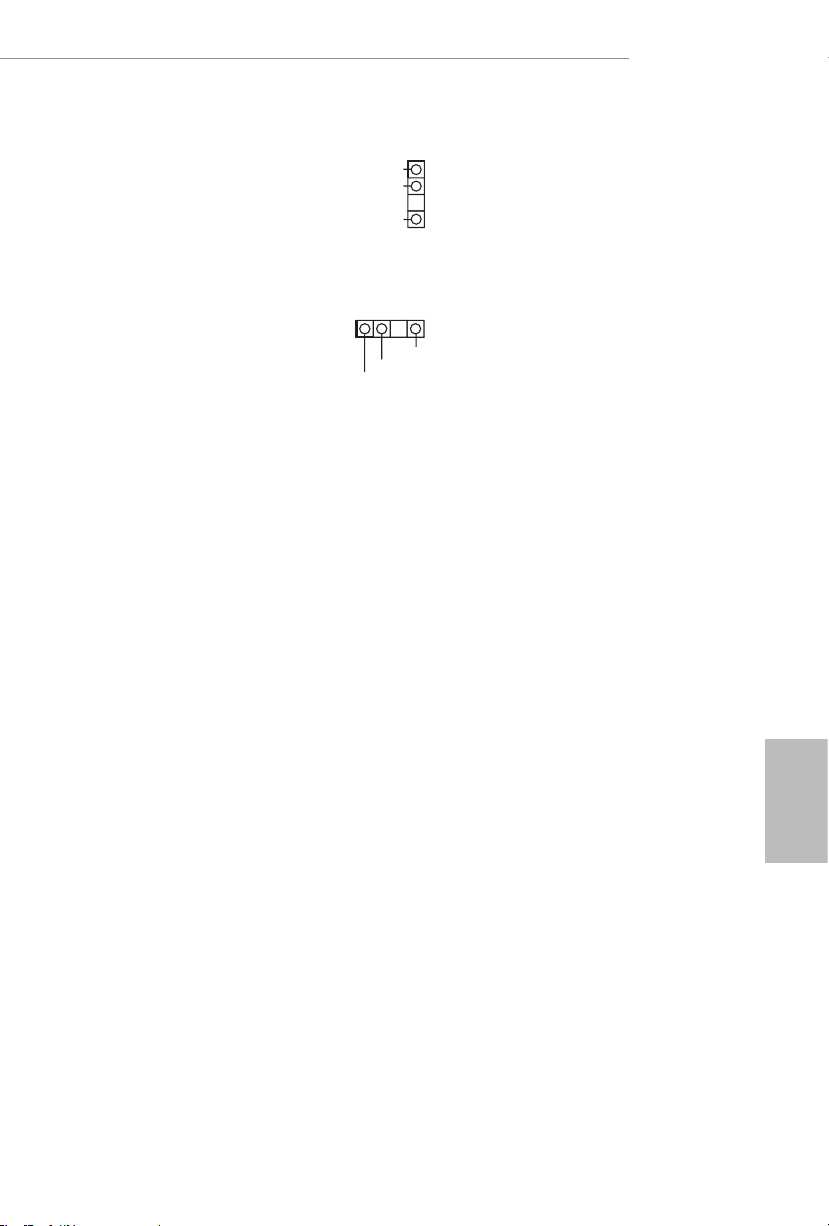
B550M/ac
D
1
DO_ADDR
1
Cabezales de LED
direccionables
(ADDR_LED1 de 3 contactos)
(consulte la pág. 1, nº 6)
(ADDR_LED2 de 3 contactos)
(consulte la pág. 1, nº 24)
VOUT
VOUT
GND
DO_ADDR
Estas dos
cabezales de LED
direccionables se utilizan para
conectar el cable de la extensión
LED
direccionable
que permite
a los usuarios elegir entre varios
efectos de iluminación de LED.
Precaución: Nunca instale el
cable de LED direccionable con
GN
la orientación incorrecta ya que,
de lo contrario, el cable puede
dañarse.
*Consulte la página 40 para
obtener más instrucciones sobre
esta base de conexiones.
Español
89
Page 94

Русский
1 Введение
Благодарим вас за приобретение надежной материнской платы ASRock B550M/ac,
выпускаемой под постоянным строгим контролем компании ASRock. Эта материнская
плата обеспечивает великолепную производительность и отличается надежной
конструкцией в соответствии с требованиями компании ASRock в отношении
качества и долговечности.
По причине обновления характеристик системной платы и программного обеспечения
BIOS содержимое настоящей документации может быть изменено без предварительного
уведомления. При изменении содержимого настоящего документа его обновленная
версия будет доступна на веб-сайте ASRock без предварительного уведомления. При
необходимости технической поддержки, связанной с материнской платой, посетите вебсайт и найдите на нем информацию о модели используемой вами материнской платы. На
веб-сайте ASRock также можно найти самый последний перечень поддерживаемых VGAкарт и ЦП. Веб-сайт ASRock http://www.asrock.com.
1.1 Комплект поставки
Материнская плата ASRock B550M/ac (форм-фактор Micro ATX)
•
Краткое руководство по установке ASRock B550M/ac
•
Диск с ПО для ASRock B550M/ac
•
1 экран панели с портами ввода-вывода
•
2 кабеля передачи данных Serial ATA (SATA) (приобретаются отдельно)
•
2 x ASRock WiFi-антенны 2,4/5 ГГц (приобретаются отдельно)
•
1 винт для слота M.2 (приобретаются отдельно)
•
90
Page 95

1.2 Технические характеристики
Форм-фактор Micro ATX
Платформа
ЦП
Чипсет
Память
•
Схема на основе твердотельных конденсаторов
•
Медная печатная плата (2 унции)
•
Поддержка процессоров AMD AM4 Ryzen™ / AMD Ryzen™ 3-го
•
и будущих поколений (процессоры серии 3000 и 4000)*
* Несовместимо с процессорами AMD Ryzen™ 5 3400G и Ryzen™ 3
3200G
Digi Power design
•
Система питания 8
•
AMD B550
•
Двухканальная память DDR4
•
4 гнезда DDR4 DIMM
•
ЦП серии AMD Ryzen (Matisse) поддерживают модули
•
памяти DDR4 4533+(OC)/4466(OC)/4400(OC)/4333(OC)/
4266(OC)/4200(OC)/4133(OC)/4000(OC)/3866(OC)/3800(OC)/
3733(OC)/3600(OC)/3466(OC)/3200/2933/2667/2400/2133 с
ECC и без ECC, небуферизованной памяти*
Гибридные процессоры AMD серии Ryzen (Renoir)
•
поддерживают модули памяти DDR4 4733+
(OC)/4666(OC)/4600(OC)/4533(OC)/4466(OC)/4400(OC)/
4333(OC)/4266(OC)/4200(OC)/4133(OC)/4000(OC)/3866
(OC)/3800(OC)/3733(OC)/3600(OC)/3466(OC)/3200/
2933/2667/2400/2133 с ECC и без ECC, небуферизованной
памяти*
* Дополнительная информация представлена в Списке
совместимой памяти (Memory Support List) на веб-сайте ASRock.
(http://www.asrock.com/)
* Максимальные поддерживаемые частоты DDR4 UDIMM см на
стр. 22.
Максимальный объем ОЗУ: 128ГБ
•
Поддержка модулей памяти XMP (Extreme Memory Prole)
•
Позолоченные (15мкм) контакты слотов DIMM
•
B550M/ac
Русский
Слоты
расширения
ЦП серии AMD Ryzen (Matisse)
2 x PCI Express x16 гнезд (PCIE1: режим Gen4x16; PCIE3:
•
режим Gen3 x4)*
Гибридные процессоры AMD серии Ryzen (Renoir)
2 x PCI Express x16 гнезд (PCIE1: режим Gen3x16; PCIE3:
•
режим Gen3 x4)*
91
Page 96

Русский
Графическая
подсистема
* Поддерживаются в качестве загрузочных SSD-диски типа
NVMe
1 слот PCI Express 3.0 x1
•
Поддержка AMD Quad CrossFireXTM и CrossFireX
•
1 слот M.2 (ключ E) с входящим в комплект поставки
•
модулем WiFi-802.11ac
Встроенный видеоадаптер AMD RadeonTM серии Vega в
•
процессорах APU серии Ryzen*
*Фактическая поддержка зависит от процессора
DirectX 12, пиксельные шейдеры 5.0
•
Общий объем памяти по умолчанию 2 ГБ. Поддерживается
•
максимальный общий объем памяти до 16 ГБ.
* Для максимального общего объема памяти 16 ГБ требуется
установить системную память емкостью 32 ГБ.
Поддержка HDMI 2.1 с максимальным разрешением до
•
4K × 2K (4096x2160) при 60 Гц
Поддерживаются Auto Lip Sync, Deep Color (12 бит/цвет),
•
xvYCC и HBR (High Bit Rate Audio) через порт HDMI 2.1
(требуется соответствующий HDMI-монитор)
Поддерживается расширенный динамический диапазон
•
(HDR) в режиме HDMI 2.1
Поддерживается HDCP 2.3 через порт HDMI 2.1.
•
Поддержка вывода видео с разрешением 4K Ultra HD (UHD)
•
на порт HDMI 2.1
Поддержка Microso PlayReady®
•
TM
92
Звук
7.1-канальный звук высокой четкости HD Audio с защитой
•
данных (аудиокодек Realtek ALC1200)
Поддержка Premium Blu-ray Audio
•
Защита от перепадов напряжения в электрической сети
•
Изолирующее экранирование печатной платы
•
Отдельные слои печатной платы для левого и правого
•
аудиоканалов
Аудио Nahimic
•
Page 97

LAN
PCIE x1 Gigabit LAN 10/100/1000 Мбит/с
•
Realtek RTL8111H
•
Поддерживается пробуждение по ЛВС
•
Молниезащита и защита от электростатических разрядов
•
Поддерживается Energy Ecient Ethernet 802.3az
•
Поддерживается PXE
•
B550M/ac
Беспроводная
ЛВС
Тыловые порты
ввода-вывода
Запоминающие
устройства
Модуль WiFi Intel® 802.11ac
•
Поддержка IEEE 802.11a/b/g/n/ac
•
Поддержка двух диапазонов (2,4/5 ГГц)
•
Поддержка высокоскоростного беспроводного
•
подключения до 433 Мбит/с
Поддержка Bluetooth 4.2 + High speed class II
•
2 антенных порта
•
1 порт PS/2 для мыши/клавиатуры
•
1 порт HDMI
•
4 порта USB 3.2 Gen1 (концентратор ASMedia ASM1074)
•
(с защитой от электростатического напряжения)
2 порта USB 2.0 (с защитой от электростатических
•
разрядов)
1 порт ЛВС RJ-45 с индикаторами («Активность/
•
Соединение» и «Скорость»)
Разъемы HD Audio: линейный вход / фронтальные АС /
•
микрофон
4 порта SATA3 со скоростью передачи данных 6,0Гбит/с,
•
поддержка RAID (RAID 0, RAID 1 и RAID 10), NCQ, AHCI и
«горячего подключения».
1 слот Hyper M.2 (M2_1), поддерживается модуль M.2 PCI
•
Express типа 2280 с ключом M до версии Gen4 x4 (64 Гбит/с)
(с Matisse) или Gen3 x4 (32 Гбит/с) (с Renoir)**
* Поддерживаются в качестве загрузочных SSD-диски типа
NVMe
* Поддерживается комплект ASRock U.2
Русский
93
Page 98

Русский
Разъемы
1 колодка СОМ-порта
•
1 колодка SPI ТРМ
•
1 колодка светодиодного индикатора питания и корпусного
•
динамика
2 колодки для подключения светодиодной RGB-подсветки
•
* Поддерживается светодиодная лента (максимум 12В/3А,
суммарной мощностью до 36Вт)
2 колодки адресуемой светодиодной подсветки
•
* Поддерживается светодиодная лента (максимум 5В/3А,
суммарной мощностью до 15Вт)
1 разъем для вентилятора охлаждения ЦП (4-контактный)
•
* Разъем процессорного вентилятора поддерживает
вентилятор с потребляемым током не более 1А (12Вт).
3 разъемы для корпусного вентилятора или водяной помпы
•
(4-контактный) (смарт-регулятор скорости вентилятора)
* Разъем для корпуса корпусного вентилятора или водяной
помпы поддерживает вентилятор с потребляемым током не
более 2А (24Вт).
* Для разъемов CHA_FAN1/WP, CHA_FAN2/WP, CHA_FAN3/
WP и CHA_FAN4/WP автоматически определяется тип
подключенного вентилятора: 3- или 4-контактный.
1 разъем питания АТХ, 24-контактный
•
1 разъем питания 12 В, 8-контактный
•
1 аудиоразъем для передней панели
•
2 колодки USB 2.0 (4 порта USB 2.0) (с защитой от
•
электростатических разрядов)
2 колодка USB 3.2 Gen1 (4 порта USB 3.2 Gen1) (с защитой
•
от электростатических разрядов)
94
Параметры
BIOS
AMI UEFI Legal BIOS с поддержкой графического
•
интерфейса
Поддержка технологии «Plug and Play»
•
Совместимость с управлением энергопотреблением по
•
ACPI 5.1
Поддержка функции JumperFree
•
Поддерживается SMBIOS 2.3
•
Регулировка напряжений ЦП, CPU, CPU VDDCR_SOC,
•
DRAM, VPPM, +1.8VSB
Page 99
B550M/ac
Контроль температуры: Вентилятор ЦП; Вентилятор или
Контроль
оборудования
Операционные
системы
Сертификация
* С дополнительной информацией об изделии можно ознакомиться на веб-сайте: http://www.asrock.com
•
помпа водяного охлаждения корпуса
Тахометр: Вентилятор ЦП; Вентилятор или помпа водяного
•
охлаждения корпуса
Бесшумная работа (с автоматической регулировкой
•
скорости вращения в зависимости от температуры ЦП):
Вентилятор ЦП; Вентилятор или помпа водяного
охлаждения корпуса
Регулировка скорости вращения: Вентилятор ЦП;
•
Вентилятор или помпа водяного охлаждения корпуса
Контроль напряжений: +12В, +5В, +3,3В, напряжение
•
ядра ЦП, VDDCR_SOC ЦП, DRAM, VPPM, +1,8В
Microso® Windows® 10 (64-разрядная)
•
FCC, CE
•
Совместимость с ErP/EuP (необходим блок питания,
•
соответствующий стандарту ErP/EuP)
Следует учитывать, что разгон процессора, включая изменение настроек BIOS, применение
технологии Untied Overclocking и использование инструментов разгона независимых
производителей, сопряжен с определенным риском. Разгон процессора может снизить
стабильность системы или даже привести к повреждению ее компонентов и устройств.
Разгон процессора осуществляется пользователем на собственный риск и за собственный
счет. Мы не несем ответственность за возможный ущерб, вызванный разгоном процессора.
Русский
95
Page 100
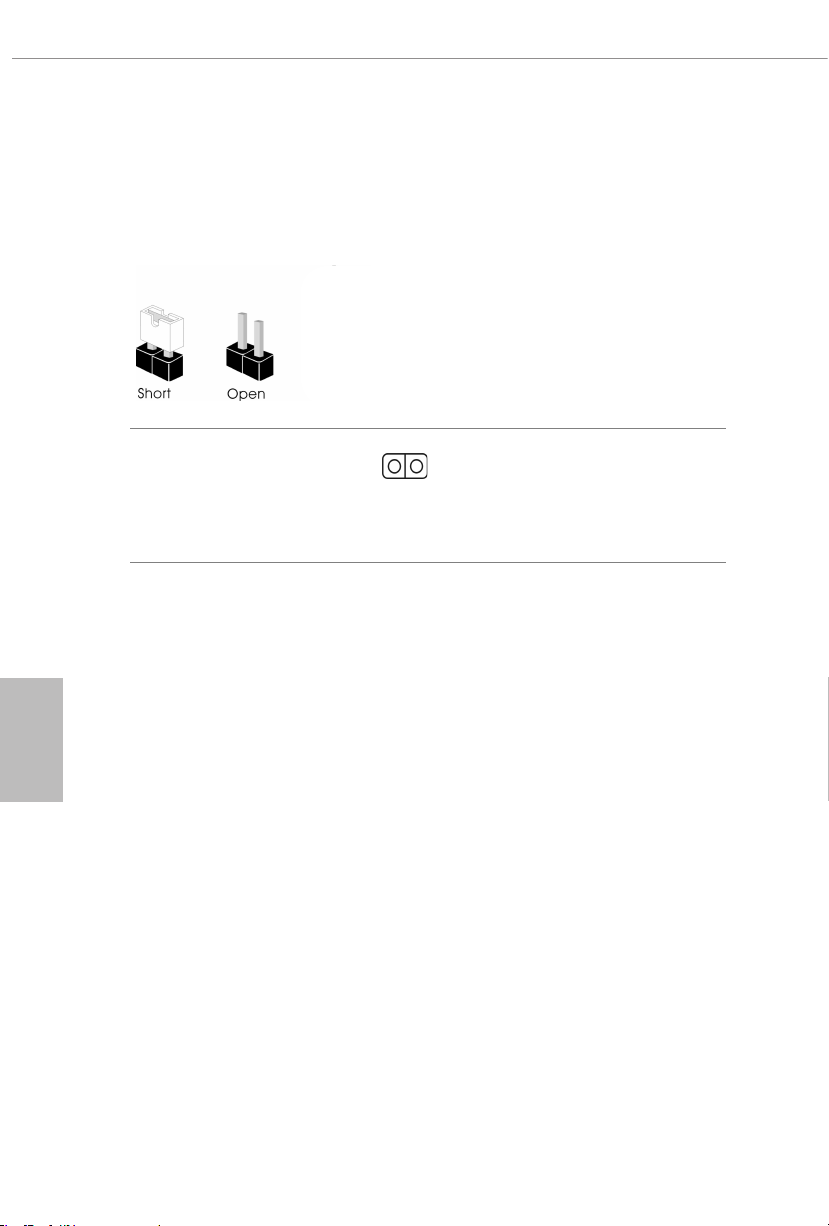
1.3 Установка перемычек
Установка перемычек показана на рисунке. При установке перемычки-колпачка
на контакты перемычка «замкнута». Если перемычка-колпачок на контакты не
установлена, перемычка «разомкнута».
Русский
Перемычка сброса
настроек CMOS
(CLRCMOS1)
(см. стр. 1, № 21)
CLRCMOS1 используется для удаления данных CMOS. В памяти CMOS содержатся
такие данные о настройке системы, как системный пароль, дата, время и параметры
настройки системы. Чтобы сбросить и обнулить параметры системы на настройки
по умолчанию, выключите компьютер и извлеките вилку из розетки, а затем
колпачковой перемычкой замкните контакты на CLRCMOS1 на 3 секунды.
После сброса настроек CMOS не забудьте снять колпачковую перемычку. При
необходимости сбросить настройки CMOS сразу после обновления BIOS сначала
перезагрузите систему, а затем выключите компьютер перед сбросом настроек
CMOS.
2-контактная
перемычка
Замкнута: Сброс настроек
CMOS
Разомкнута: По умолчанию
96
 Loading...