

Installation instructions
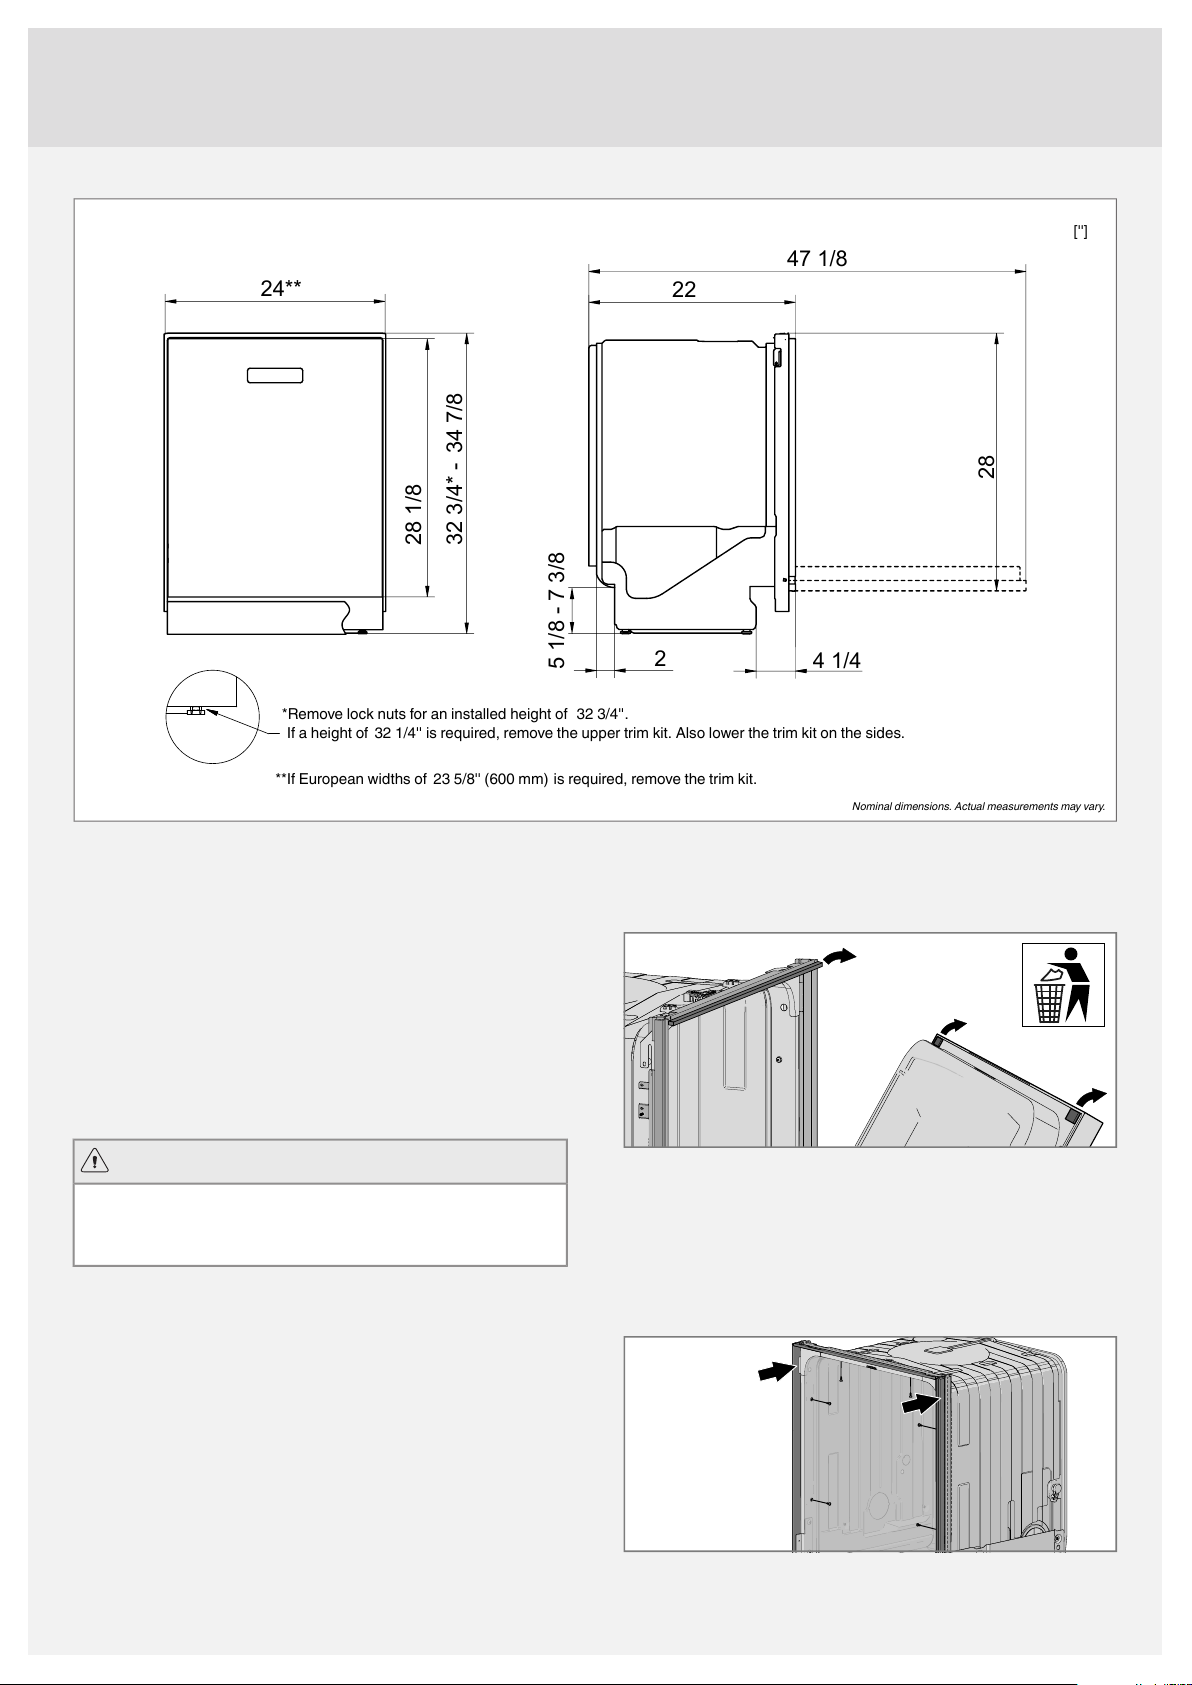
32 3/4* - 34 7/8
22
28 1/8
24**
5 1/8 - 7 3/8
2
4 1/4
47 1/8
28
['']
Nominal dimensions. Actual measurements may vary.
*Remove lock nuts for an installed height of 32 3/4''.
**If European widths of 23 5/8'' (600 mm) is required, remove the trim kit.
If a height of 32 1/4'' is required, remove the upper trim kit. Also lower the trim kit on the sides.
REMOVE
Important safety instructions
• Connections to electricity, water, and drainage must be performed
by a qualified professional.
• Always follow applicable regulations for water, drainage, and
electricity.
• Take care during installation! Wear protective gloves! There must
always be two people!
• Place a drip tray on the floor beneath the dishwasher to prevent
damage from any water leaks.
• Before screwing the dishwasher into place, test the dishwasher by
running the Rinse and hold program. Check that the dishwasher
fills with water and drains. Also check that none of the connections
leak.
WARNING!
Turn off the water supply when installing the dishwasher!
The plug must be disconnected or power to the outlet turned off while
installing the dishwasher!
Transport protection for the door
Do not forget to remove the transport protection for the door when
unpacking the dishwasher.
Trim kit
The dishwasher is equipped with a trim kit to fit the 24'' cutout standard.
If a European width of 23 5/8'' (600 mm) is required, remove the trim
kit.
Adjust the trim kit
The trim kit can be adjusted backward to level the dishwasher tub.
21
If a height of 32 1/4'' is required, remove the upper trim kit. Also lower
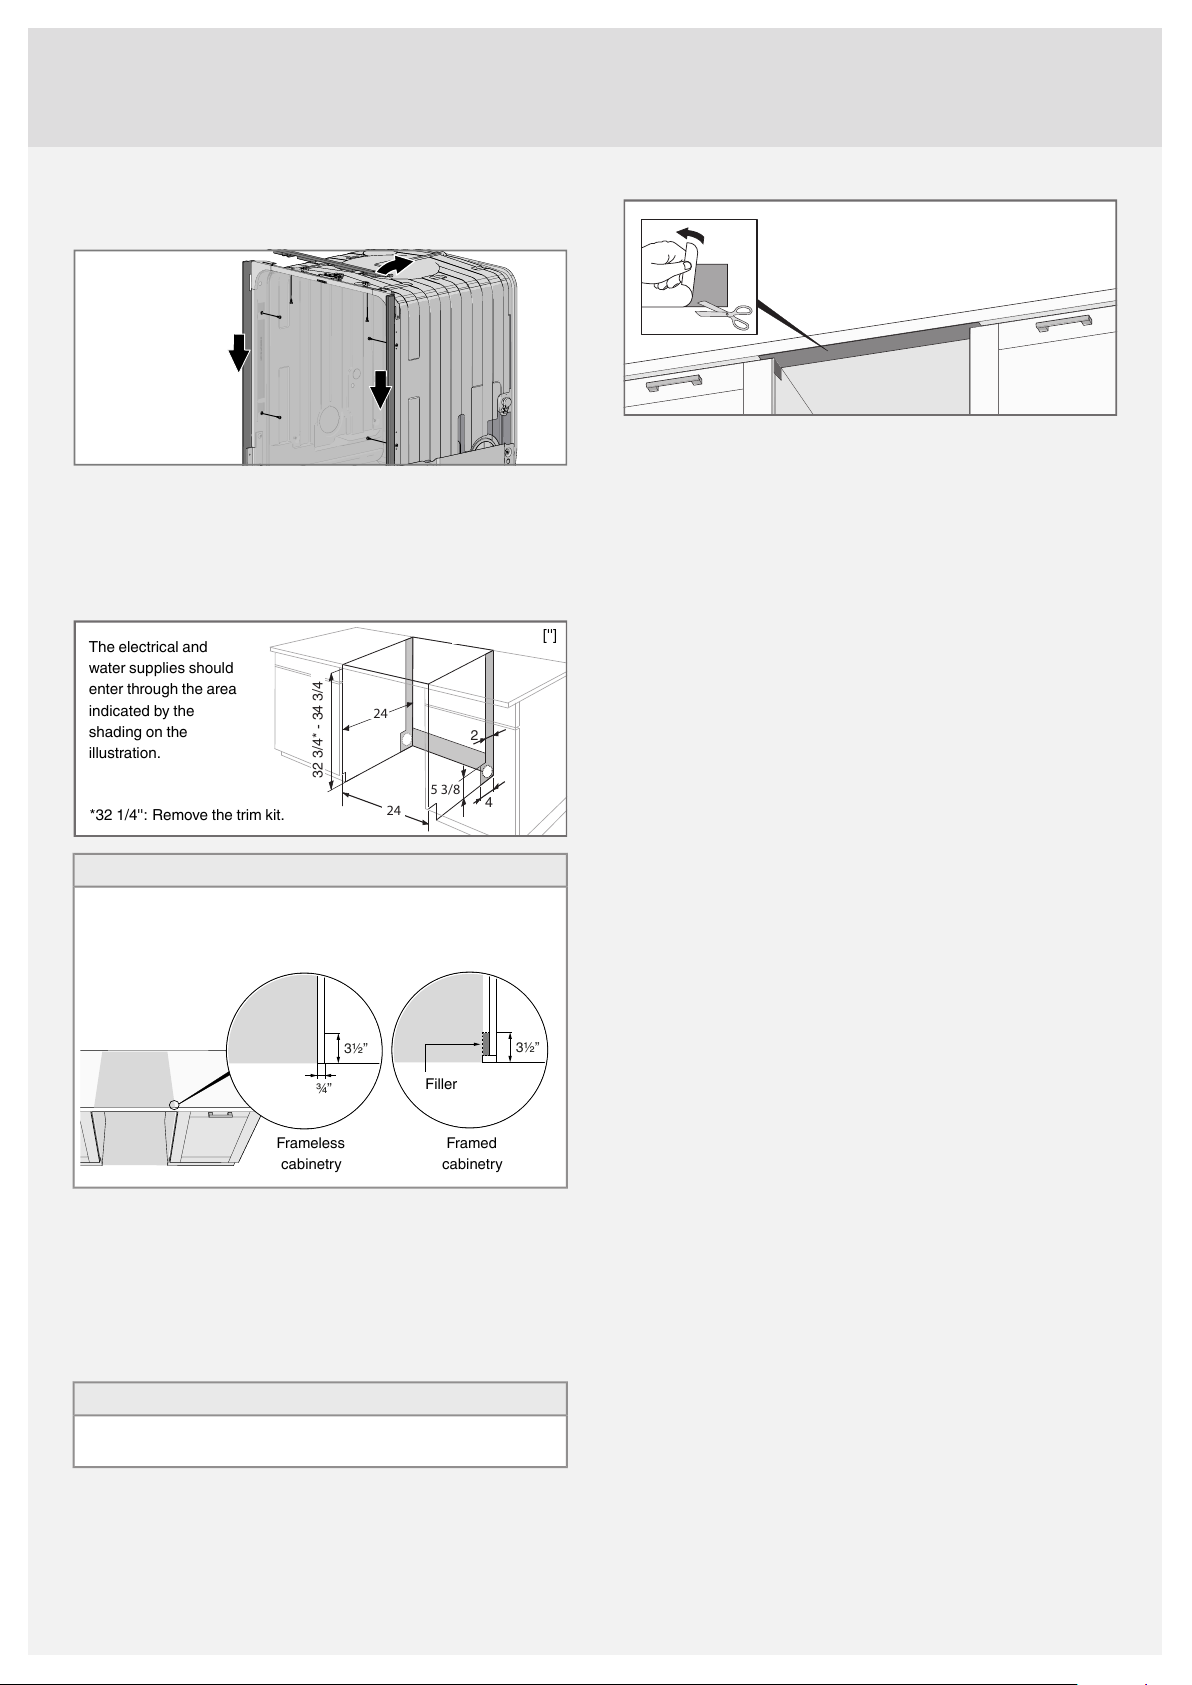
24
5 3/8
2
4
24
32 3/4* - 34 3/4
['']
*32 1/4'':
The electrical and
water supplies should
enter through the area
indicated by the
shading on the
illustration.
Remove the trim kit.
3½”
¾”
3½”
Frameless
cabinetry
Filler
Framed
cabinetry
the trim kit on the sides.
Placing the dishwasher
The dishwasher is intended to be built in under a countertop. The
built-in measurements are shown in the illustration. Make sure that the
cord and hose hole's edges are even and will not damage the drain
and inlet hoses or the power cord.
NOTE!
Framed cabinets require additional finished filler material behind the
face frame for a proper installation. A minimum 3½” (89 mm) finished
return is required on all sides of the opening.
If the dishwasher is built-in, the surrounding furnishings must be
resistant to any condensation from the dishwasher.
Fit the protective film
Fit the protective film (packed in the document bag) to the underside
of the countertop. The protective film is to protect the countertop from
moisture.
NOTE!
The surface to which the protective film is fitted must be clean and
dry.
22

Adjust the height and slide the
2x
1''
5/8''
min.
1/2''
Max. 373/8''
dishwasher into place
1 Start by measuring the height from the floor to the bottom edge of
the countertop.
2 Measure the height from the floor to the top edge of the dishwasher.
3 Lean the dishwasher forward a little and roughly adjust the rear foot
by turning the adjustment screw at the front clockwise to raise and
counterclockwise to lower the dishwasher (see illustration below).
Use a flat head screwdriver or a socket screwdriver.
4 Adjust the front feet by turning them clockwise to raise and
counterclockwise to lower the dishwasher.
Drain connection
This dishwasher is suitable for installing in a raised recess (to attain
an ergonomic working height). This means that the dishwasher can be
placed so that the drain hose runs to a lower level than the bottom of
the dishwasher, such as by routing it directly to a floor drain. The
dishwasher is fitted with an integrated anti-siphon device to prevent
the machine from being emptied of water during the wash cycle.
5 Verify there is an air gap of at least 1/8'' between the underside of
6 Slide the dishwasher into place.
7 Make any final adjustments to the feet (the dishwasher may lean
the countertop and the top edge of the dishwasher.
• Pull the drain and supply hoses through the opening as the
dishwasher is slid into place.
• Check that the hoses have no kinks or sharp bends, and check
that there is nothing that can damage the hoses.
no more than 1/4'') and tighten the lock nuts on the front feet.
The drain hose can also be connected to a connection nipple on the
sink unit's water trap. The connection nipple must have an internal
diameter of at least 1/2''.
The drain hose may be extended by a maximum of 87" (2.2 m) (the
total length of the drain hose must not exceed 177" (4.5 m)). Any joins
and connecting pipes must have an internal diameter of at least 1/2''.
However, the drain hose should ideally be replaced with a new hose
without joins.
No part of the drain hose may be more than 37 3/8'' above the bottom
of the dishwasher.
Attach the drain hose with a hose clamp. Ensure that the drain hose
has no kinks.
Connection to water supply
Use only the inlet hose supplied with the dishwasher. Do not re-use
old or other spare hoses.
The supply pipe must be fitted with a water supply valve. The water
supply valve must be easily accessible, so that the water can be shut
off if the dishwasher has to be moved.
Once the installation is complete, turn on the water supply valve and
allow the pressure to settle for a while. Check that all connections are
watertight.
Water supply
The machine can be connected to either a cold or a hot (max. 160 °F
(70 °C)) water supply. The water pressure should be 4.2-140 psi.
23

Connection to cold water supply
2x
2x
KNOCK
OUT
Connect the dishwasher to the cold water supply if the building is
heated using oil, electricity, or gas.
Connection to hot water supply
Connect the dishwasher to the hot water supply (max. 160 °F (70 °C))
if the building is heated using an energy-efficient means such as district
heating, solar power, or geothermal power. Choosing a hot water
connection cuts dishwashing times and reduces the dishwasher's
energy consumption.
NOTE!
Do not exceed the permitted water supply temperature. Certain
materials used in some cookware cannot withstand strong heat. See
Fragile dishes in the chapter Loading the dishwasher.
Electrical connection
Information about the electrical connection can be found on the serial
number plate. This specification must match the electricity supply.
The power supply receptacle for the appliance must be installed in a
cabinet or on a wall adjacent to the undercounter space in which the
appliance is to be installed. Do not use an extension cord for this
appliance.
The access hole for the the electrical supplie must be round and smooth
and no bigger than 1 1/2'' in diameter. If the partition is metal, it needs
to be covered with an edge protector.
Use caution when the appliance is installed or removed to reduce the
likelihood of damage to the power supply cord.
Grounding Instructions
This appliance must be grounded. In the event of a malfunction or
breakdown, grounding will reduce the risk of electric shock by providing
a path of least resistance for electric current. This appliance is
equipped with a cord fitted with an equipment grounding conductor
and a grounding plug. The plug must be plugged into an appropriate
outlet that is installed and grounded in accordance with all local codes
and ordinances.
Screwing the dishwasher into place
(Applicable only to built-in dishwashers.)
After fastening the machine, check that the front feet still touch the
floor.
Screw the dishwasher into place with two extra screws
If there is an air gap of more than 1/8'' between the underside of the
countertop and the top edge of the dishwasher, the dishwasher ought
to be screwed into place with two extra screws.
WARNING!
Improper connection of the equipment grounding conductor can
result in a risk of electric shock. Check with a qualified electrician or
service representative if you are in doubt as to whether the appliance
is properly grounded. Do not modify the plug provided with the
appliance. If it does not fit the outlet, have an appropriate outlet
installed by a qualified electrician.
24

Service
Dishwasher toe kick
The dishwasher is supplied with a toe kick.
Fit the sound insulation
(only certain models)
Fit the toe kick
Limited Warranty – Residential
Appliances
ASKO Distribution North America, LLC. (“ASKO”) warrants to the original
purchaser (the “ASKO Customer”) of the ASKO product (the “ASKO
Product”), who purchased the ASKO Product from a distributor, dealer,
manufacturer’s representative or other seller who has been authorized
by ASKO, that this ASKO Product is free of defects in materials and/or
workmanship, subject to the terms and conditions set forth herein. This
Limited Warranty covers parts and labor, except as set forth in this
Limited Warranty. Service must be provided by an authorized ASKO
service company. YOUR SOLE AND EXCLUSIVE REMEDY UNDER
THIS LIMITED WARRANTY SHALL BE PRODUCT REPAIR AS
PROVIDED HEREIN. This Limited Warranty is valid only when the ASKO
Product is used in the country in which it was purchased. Proof of
original purchase date is required to obtain service under this Limited
Warranty.
Residential ASKO Products Used Exclusively for
Household/Personal Purposes:
Two (2) Years limited Warranty – Any warranty service claims for
residential ASKO Products must be filed with ASKO within two (2) years
from date of purchase. Service will be provided during normal business
hours.
Residential ASKO Products Not Used Exclusively for
Household/Personal Purposes or used Commercially or used in
Marine, Mobile or Aeronautical Applications:
One (1) Year limited Warranty – Any warranty service claims for ASKO
Products not used exclusively for household and personal use, or used
commercially or used in marine, mobile, or aeronautical applications
must be filed with ASKO within one (1) year from date of purchase.
Service will be provided during normal business hours.
Ensure the floor underneath the toe kick is at same height as the floor
underneath the dishwasher.
Items excluded from warranty
This limited warranty does not cover:
1 Replacement parts or repair labor if the ASKO Product is used in
a manner that is inconsistent with published user or operator
instructions and/or installation instructions.
2 Service calls to correct the installation of the ASKO Product, to
instruct you on how to use the ASKO Product, to replace or repair
house fuses, or to correct house wiring or plumbing.
3 Consumable items and parts, such as filters.
4 Damage resulting from accident, alteration, misuse, abuse,
negligence, fire, flood, acts of God, improper use, improper
installation, installation not in accordance with electrical or plumbing
codes, or use of products not approved by ASKO, as well as any
attempted repair by other than authorized ASKO service companies.
5 Cosmetic damage, including scratches, dents, chips or other
damage to the finish of the ASKO Product, unless such damage
results from defects in materials or workmanship and is reported
to ASKO within 5 days from date of purchase.
6 Pickup and delivery. The ASKO Product is intended to be repaired
in your home.
7 Repairs to parts or systems resulting from unauthorized
modifications made to the ASKO Product.
8 Expenses for travel and transportation for product service if the
ASKO Product is located in a remote area where service by an
authorized ASKO service company is not available.
9 The removal and reinstallation of the ASKO Product if it is installed
in an inaccessible location or is not installed in accordance with
ASKO’s published installation instructions.
10 Replacement parts or repair labor on ASKO Products with original
model/serial numbers that have been removed, altered or cannot
be easily determined.
Disclaimer
YOUR SOLE AND EXCLUSIVE REMEDY UNDER THIS LIMITED
WARRANTY SHALL BE PRODUCT REPAIR AS PROVIDED HEREIN.
25
 Loading...