

Page 1
How to use the
washing machine
Important!
The machine must not be started until the
transit packing has been removed. (It prevents
the tub from shaking while the machine is
being transported.)
Read right through these instructions before
using your machine for the first time.
12605
Printed on paper friendly to the environment.
AU/NZ
1
Page 2
Before using the machine
for the first time
Read right through these instructions.
Don’t forget to remove the transit
packing (see page 10).
The door is opened electrically, and
cannot therefore be opened in the normal
way until the machine is connected to
the electricity supply.
The machine must not be used for dry-
cleaning or similar applications.
Contents:
How to use the machine 2
The part of the machine 2
The control panel 3
Opening the door 3
Sorting the washing 4
Detergent 5
Which program should I use? 6
Program examples 6–7
Care of the machine 8
Safety 9
If the machine won't work 9
Technical details 10
Installation 10–11
Removing the transport braces
Adjusting the feet
Building in the machine
Electrical installation
Water supply
Draining connection
Service and guarantee 11
Instructions summary 12
How to use the machine
Choosing the right program
How to use
the machine
Follow the steps in the strip along the top
of each page for a brief summary of the
instructions.
Further details and comments can be found
on the page below the strip.
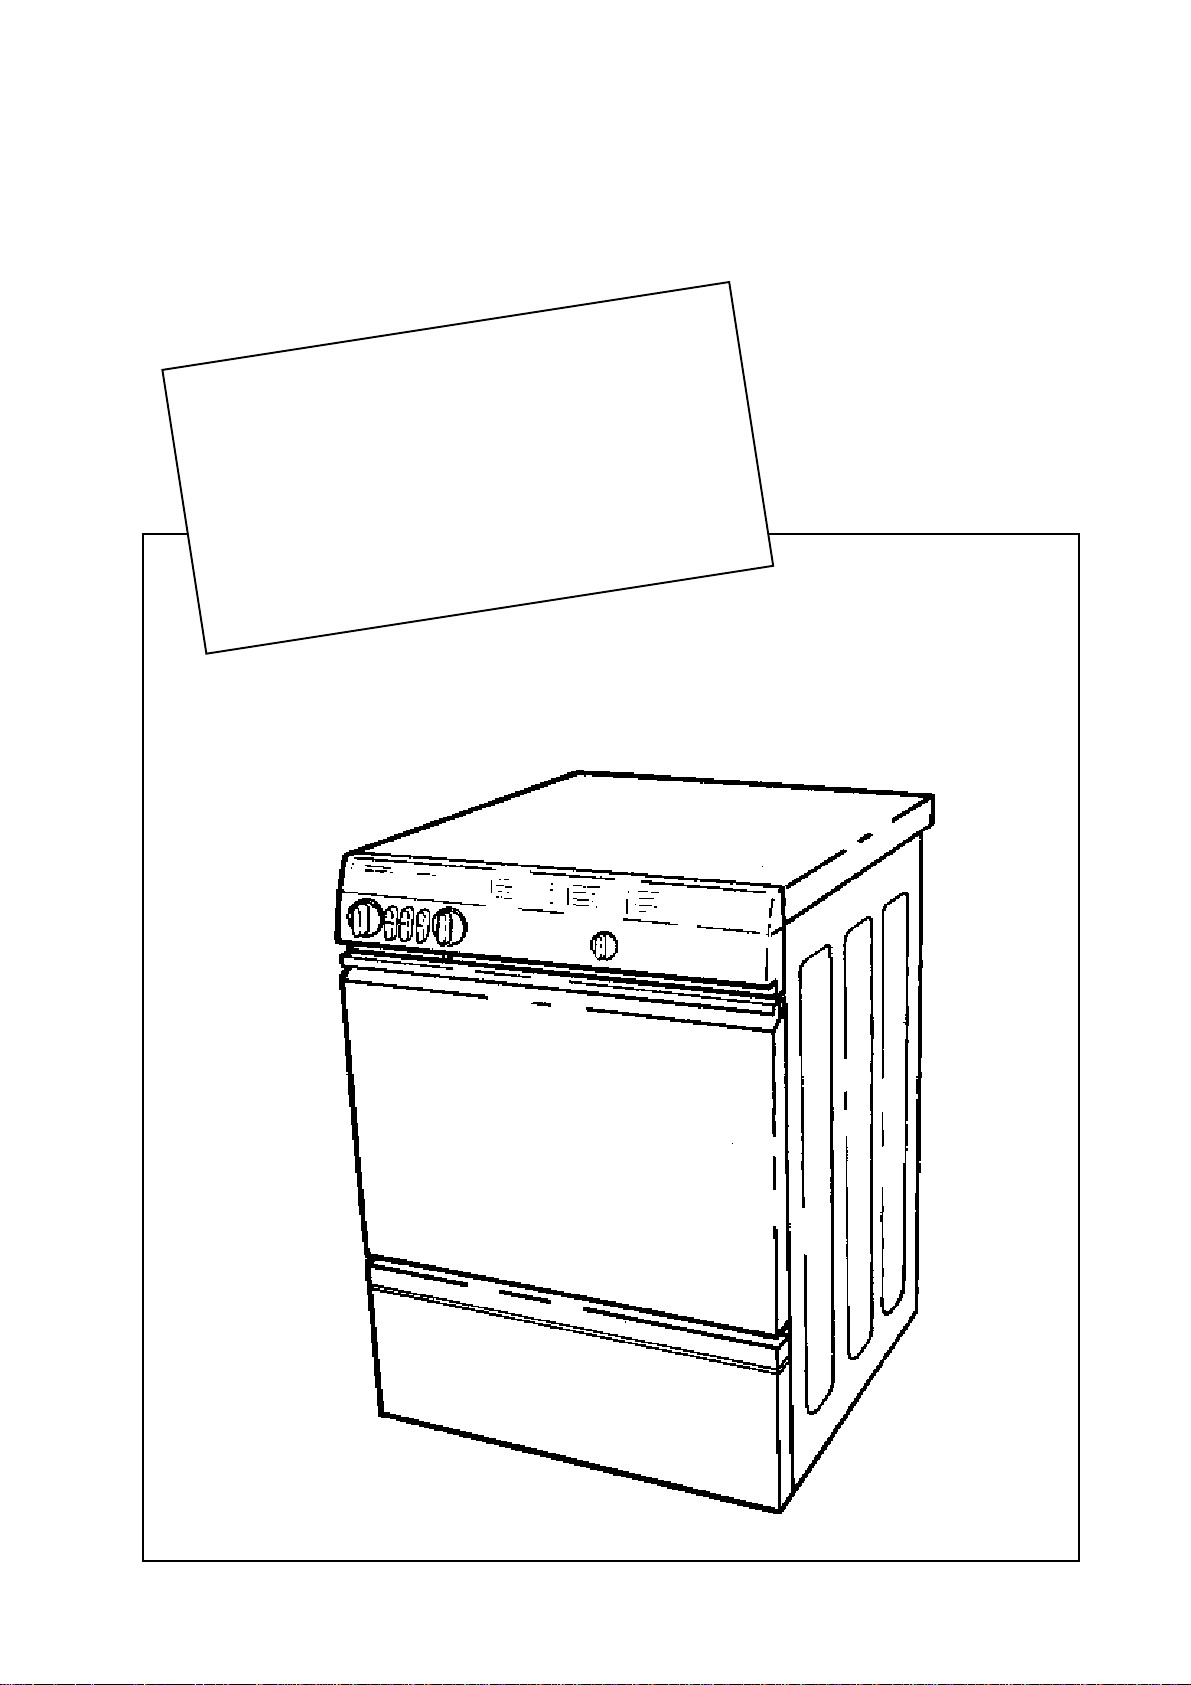
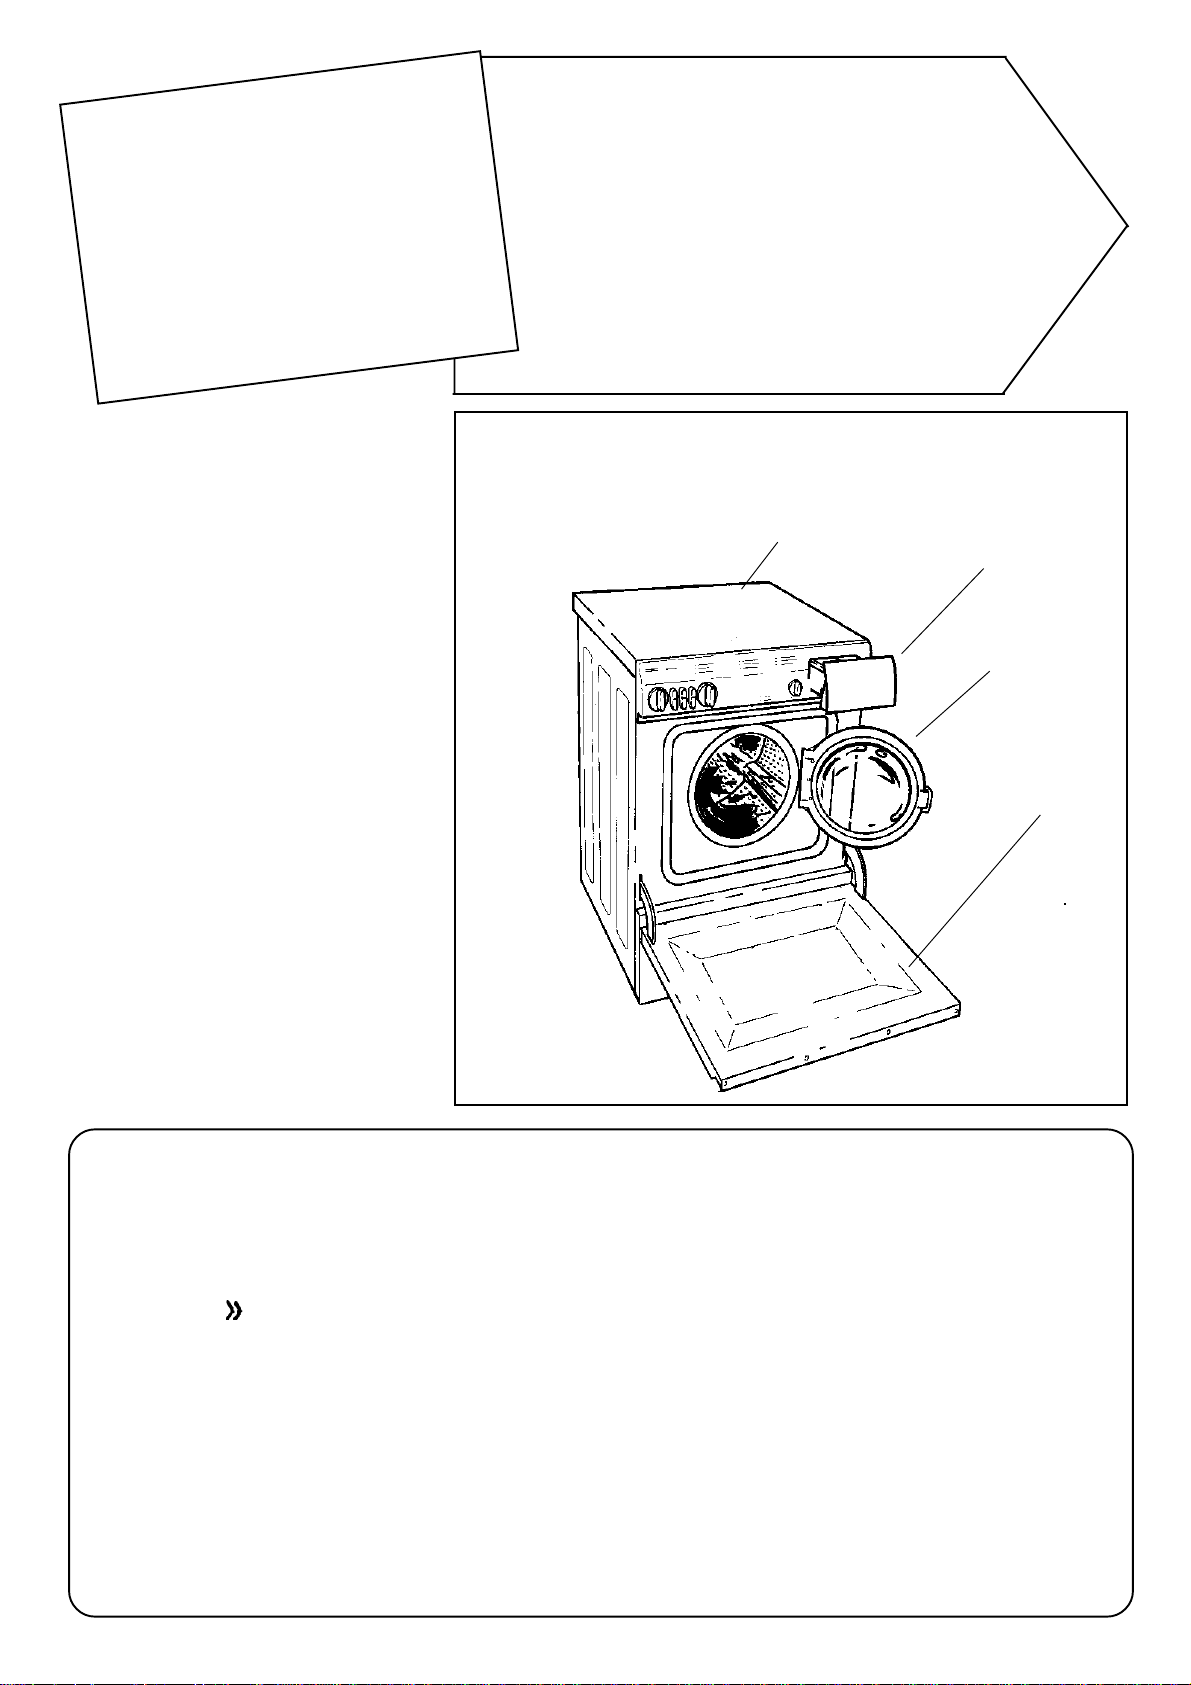
The parts of the machine
Top panel
Detergent and fabric
conditioner compartment
Door
Outer door
(depending
on model)
Environment facts
Choose the right program
You can save considerable energy by not using ’stronger’ programs
than necessary.
• Press the -button to save water.
• Press the Economy button and reduce the temperature to save
energy.
• Use the higher spin speed, to remove the maximum amount of
water, so reducing the energy required in subsequent tumble drying.
Detergent
Using more detergent does not improve the washing performance, but
merely imposes an extra load on the environment.
Try reducing the amount of detergent you use, and increase it only if
the results are unsatisfactory.
2
Economy button
Pressing the Economy button
extends the main wash by 22
minutes. This allows you to
reduce the temperature and yet
obtain as good a result as if you
had used a higher temperature
for the shorter period. The
Economy button + lower washing
temperature reduces pollution.
Page 3
1. Turn on the main switch
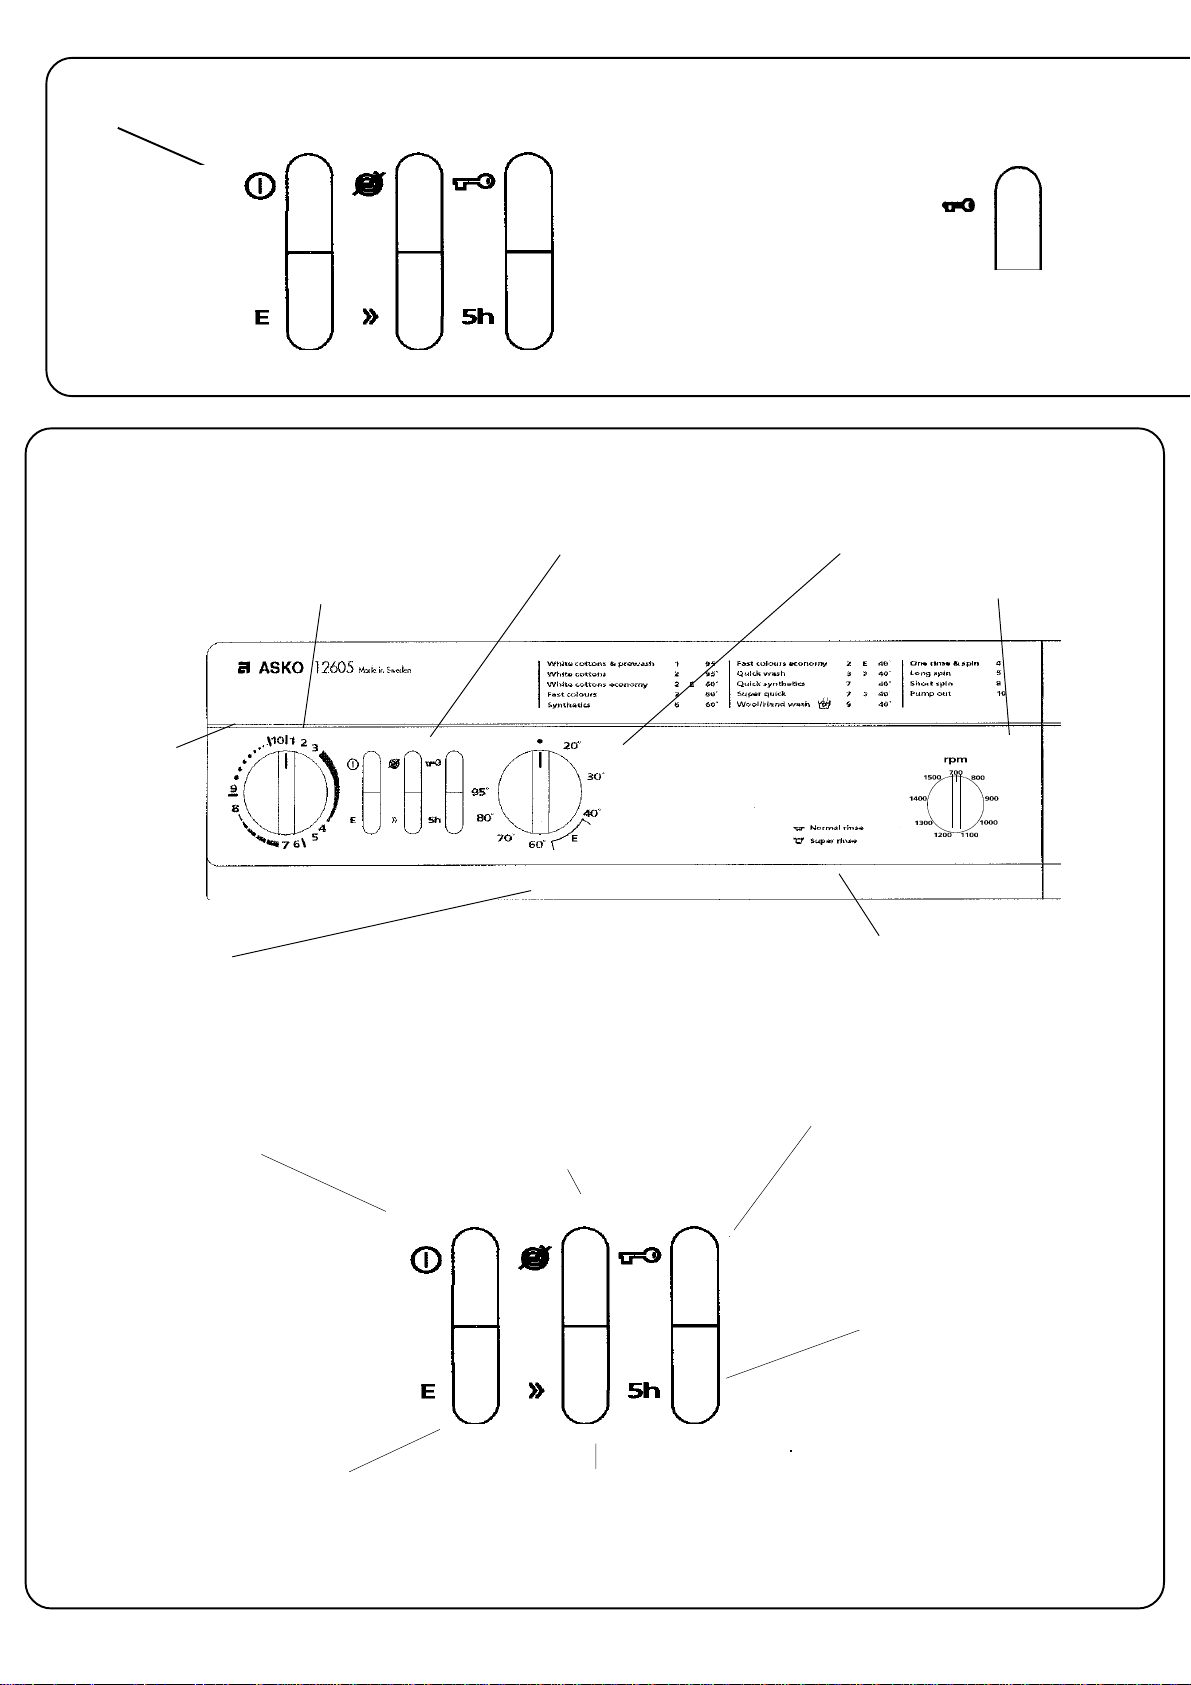
The control panelThe control panel
2. Open the door by
pressing
If the door does not open,
see below.
Program control knob Program options Thermostat knob
The program control knob
must be turned clockwise
only.
Indicating
lamp
Lights to show
that the power
is turned on.
Safety device
Ensures that a child cannot change the temperature setting.
Press the button while turning the temperature knob to a
higher temperature (clock-wise). See also page 9.
No spin
Press this button to omit all spins in all
Main On/Off switch
Must be pressed in when
opening the door.
programs. Programs 1–4 will pump water out
after the last rinse: programs 6, 7 and 9 will
stop with water still in the machine.
Knob for
centrifugations
spin speed
Rinse level
For a normal rinse water level, press the
button. To get Super rinse level, release
the button.
Door opening
The door can be opened only when the
program control knob is at the end of a
program, as shown by the red mark. If it
has stopped anywhere else, turn it to
position 10 to pump out the water.
Economy button
Pressing the Economy button
extends the main wash by 22
minutes. This allows you to
reduce the temperature and yet
obtain as good a result as if you
had used a higher temperature
for the shorter period. The
Economy button + lower
washing temperature reduces
pollution, and helps the
environment.
Quickwash button
Use this button for small loads. Pressing
it omits two rinses and the intermediate
spin in programs 1–3. One rinse is
omitted in programs 6 and 7.
Delayed start
Press this button and the
machine will start 5 hours later.
OBS! Check that the main switch is
on, push this button and choose
program.
(The program control knob have to
be on red marks, indicating the
program finishing points, when the
main switch is pressed in.)
3
Page 4

3. Load the washing into the drum . . .
Sorting the washing
. . . and close the
door.
Press firmly: the
door cannot be
closed by
slamming.
Sort washing by:
* how dirty it is
* colour
* material
Check the fabric care label in the
garment. The table shows suitable
programs for different materials and
quantities.
Remember . . .
* The dye can run in new coloured
garments, so they should be washed
separately for the first few times.
* Turn delicate garments inside out to
reduce the risk of colour streaking
etc.
* Empty pockets and leave them
inside out.
* Close zips to prevent them snagging
garments.
Stain removal
Textil
care label
3
Material
Cotton, linen, white and
pale coloured garments
Cotton, linen, darker
coloured garments
Polyester, cotton/polyester,
nylon: white garments
Polyester, cotton/polyester,
nylon: coloured garments
Rayon, acetate, acrylic.
Garments with more
sensitive colours
Articial silk and very delicate
garments.
Garments with the IWS or
Superwash symbols
Suitable programs
White wash, 90° (or 60°)
White wash, 60° + E
Coloured wash, 60°
Coloured wash, 40° + E
White synthetics
wash, 60°
Coloured synthetics
wash, 40°
Delicates wash, 40°
Delicates wash, 30°
Wool, 40° 1.5 kg
Quantity
of washing
4.5 kg
Full drum
4.45kg
Full drum
2.2 kg
1/2 drum
2.2 kg
1/2 drum
2.2 kg
1/2 drum
1.5 kg
1/3 drum
1/3 drum
The golden rule is to remove a stain as soon as possible. The fresher it is, the easier it is to remove.
Stain Treatment
Felt tip or ball pen Dampen with methylated spirit. Rinse off the dye that is dissolved, and repeat the process.
Mildew Soak in yoghourt for 24 hours. Rinse and wash. For white fabrics, use a detergent containing
Nail varnish Acetone (but not on acetate fibres). Methylated spirit to remove any residual colour.
Pine resin Methylated spirit or turpentine.
Chewing gum Cool with ice cubes or in the freezer, and rub off carefully.
Rust Oxalic acid solution.
Oil, grease, fat Turpentine or stain remover and luke-warm soapy water.
Paint Remove immediately in accordance with the instructions on the paint tin. Dried paint cannot be
Candle wax Allow to harden. Break it up and pick it off. Apply two thicknesses of kitchen paper on each side of
Blood Cold water for fresh blood. For dried blood, use an enzyme detergent, possibly with oxalic acid.
Grass Methylated spirit, followed by washing with enzyme detergent.
Berries and fruit stains Wash at high temperature. Oxalic acid can also be tried.
Coffee, tea and red wine Wash at high temperature: use a detergent with optical whitener.
optical whitener.
removed.
the fabric, and press with a hot iron. Remove any residual grease mark with stain remover, and
wash as usual.
4
Page 5

4. Add the detergent and fabric
conditioner (if used) to their
respective compartments.
How much detergent should I use?
Detergent packets indicate the quantities that should be used. The machine has a capacity of 4.5 kg of
washing. If you have only a small load, you can reduce the amount of detergent.
Powder detergents
Follow the instructions on the packet.
Tip the powder into the pre-wash and
main wash compartments.
Liquid detergents
Pour liquid detergent directly into
the main wash compartment, just
like a powder detergent.
You can use thin liquid detergent
only with the main wash, and not
with the pre-wash. This means that
you must use programs 2, 3 or 4.
Adding it for program 1 will mean
that it is rinsed away with the prewash water.
If you are using a detergent ball
or dosing bag, load it with the
washing and select programs 2, 3
or 4.
Pre-wash detergent
Fabric conditioner
Fabric conditioner compartment
Main wash
detergent
For best washing performance, only use low
sudsing detergent.
Fabric conditioner
Pour the fabric conditioner into the
insert in the left-hand compartment.
Follow the instructions on the container, but do not fill to above the level of
the syphon lip. If you do, the syphon
will immediately discharge the conditioner into the main or pre-wash and
degrade washing performance.
Clean the detergent
compartment regularly
1. Pull out the compartment and
remove the fabric conditioner
insert.
2. Select any program.
3. Clean the compartment with
a brush while water flows
through it.
4. When finished, select
program 10 to pump the
water out of the machine.
5
Page 6

5. Set the required temperature
on the thermostat . . .
6. Press any required
program option
buttons
7. Chose cenrtifugations
spin speed...
What the figures on the
program knob mean
9 Wool program
9. Start wool
10 Pumping out
6–8 Synthetics
6. Start long
Synthetics
wash**
7. Start short
Synthetics wash
1–5 Whites/Colors
1. Start Whites/Colors
with prewash
2. Start Whites/Colors,
main wash**
The marks
indicate program finishing points. The door
can be opened only
when the pointer is
against a mark.
3. Start Quick
wash program
4. Start Rinse
program
5. Long spin
Which program should I choose?
You can naturally select a standard program or, by combining
your preferred temperature setting, program and option
selection, produce a program to suit your requirements.
The programs below are suggestions.
*
Pro-
Fabric
care
label
Type of fabric
White Cottons
with pre-wash
White Cottons
without pre-wash
Fast colors
White Cottons
Fast colors
+ Economy
Quick wash
***
Fill
gram
1
2
2
2
2
3
Option
button
E
Tempe-
rature
60-95°
60-95°
40-60°
40°
40°
40°
Time,
minutes
110-125
85-110
75-85
75
95
50
8. Short spin
** When you choose program 2 (6) the knob
advances directly to 3 (7). The machine still
performs all stages of program 2 (6) .
Quick Wash program
The machine has a special Quick Wash
program, which saves both time and energy.
The program can be used at any temperature.
If the load is small, you can also press the
button and speed the program up even more.
6
Synthetics
colours, white
Quick synthetics *
Superquick
Wool,
Handwash
6
7
7
9
30-40°
30-40°
40°
40°
50
40
35-40
40-45
Page 7

. . . and start the program
with the program knob.
Remember – turn the program knob
clockwise only.
7. The machines starts
and works through
the stages shown
below.
If you change your mind . . .
. . . and want a different program:
Turn the program knob and program selector to
the required positions, and choose the
temperature you want
. . . or want to interrupt the program
Turn the program knob to10 to make the machine
pump out. After about two minutes, you can open
the door. If you add more washing and restart the
machine, check that there is detergent left in the
detergent compartment.
Points to note:
Water-
con-
sump-tion,
lit.
80
73
73
73
Pre-wash
• The Wool program cannot be modified by the option buttons, except for (no spin).
• The main wash water is always cooled by the admission of cold water before pumping out in order
to prevent risk of scalding, shrinking and wrinkling.
• Before starting to spin, the machine checks that the load is evenly distributed in the drum. If not, it
redistributes the load by turning at normal drum speed and then makes another attempt to start
spinning.
Time use figures are based on inlet
*
cold water 20°C, inlet cold water
60°C.
Energy use figures includes use
of hot water.
Automatic operations:
Main wash
3 rinses
*
Appr.
2 rinsesSpin
Spin
Energi
consump.
kWh
1,1-1,7
This program is ideal for small,
**
0,8-1,5
slightly soiled loads, which only need
freshening. For best results, use only
1/3 of the normal recommended
dosage of detergent.
0,5-0,8
Programme used for AU Energy
***
Rating Label Acc. to AS2040, dry
0,5
load 4,5 kg
73
39
39
39
36
65
0,6
0,3
0,3
0,3
0,3
0,6
The machine finishes
these programs with a
short spin.
Press if you do not
want any spin at all.
The machine stops with
the final rinse water still
in it.
Turn the program knob
to 10 to pump out the
machine. Or you can
turn it to 8 for pumping
out followed by a short
spin. Most garments can
withstand a short,
careful spin.
7
Page 8

9. When the machine has stopped:
Open the door
by pressing
• After a program, which concludes by
pumping out the water, the door can be
opened directly.
• After a program which stops with water in
the machine, turn to
6 – pumping out
7 – spinning
8 – pumping out
After pumping out (and spinning) the
door can be opened.
User -Maintenance Instructions – Care of the machine
Check the needle trap and outlet pump
The machine has a needle trap which
will trap needles, hairpins, coins and
similar items. Clean it at intervals as
follows:
1. Open the lower cover in front of the
pump, pull the small drain hose and
drain off water into a shallow bowl
after removing the plug from the end
of the hose (1).
2. Turn the pump cover anticlockwise to
the position shown in (2). This uncovers the drain holes and water will
run out into the bowl.
3. When the water has finished draining
out, turn the pump cover further and
pull it off. Clean out the needle trap,
and clean the pump rotor at the back
of the pump housing (3).
4. Check that there is no grit or small
objects in the pump, and replace the
pump cover. Turn it clockwise in two
stages: when you hear a click, turn it
a little more to its end stop, as shown
in (4).
1
Top
Open
Bottom
Top
Closed
Bottom
Access openings under the drum paddles
If an object has fallen between the drum and the outer
container, you can get it out as follows:
1. Undo the screw on top of the paddle with a screwdriver
(three turns).
2. Pull the paddle towards you and lift it upwards.
3. Remove the object. Be careful not to bend the immersion
heater elements.
4. Locate the paddle in its fixing hole, with the F-mark to the
front (i.e. facing you). Slide the paddle backwards as far
as it will go. Check that its clips are properly located in the
slots in the drum, and retighten the screw.
8
Page 9

10. After washing:
Turn off the machine by turning
the thermostat knob to 0. This
turns off the power, and the
indicator lamp goes out.
NOTE!
Leave the inner door slightly ajar
after use to allow air to circulate
within the machine.
If the machine won't work
Problem Response
Safety
The machine cannot be started if the inner door is open. The inner door
cannot be opened while the machine is running or if it has stopped with
water in. It is a good rule never to leave a switched-on machine unattended.
Safety catch
The machine has a safety catch which prevents children from turning the thermostat/main switch away from
the 0 position or increasing the temperature. As supplied, the safety catch on the machine is disengaged.
To engage it:
• Press the button beneath the thermostat knob and
then release it.
To disengage the safety catch:
• Press the slot in the end of the button with a coin.
• Push and turn the button slightly in the same
direction as if screwing in a screw (clockwise).
The door will not open.
The machine does not fill with water
when started.
The machine does not start when the
program knob is turned to the starting
position.
1. Check that the temperature knob is in a position of at least 30°C (then the
power supply is connected).
2. If the indicator lamp is not lit, there is no power supply. Check the plug and
fuses. The door cannot be opened normally if there is no power supply.
3. If the door cannot be opened in the normal manner, it can be opened as
follows:
• Remove the lower front panel.
• Unscrew the plastic ring and pull. Then the door opens.
• Replace the ring and the front panel.
If the door still cannot be opened in the normal way afterwards, call a
service engineer.
1. Is the water tap turned on?
2. Is the strainer in the inlet connection blocked? Unscrew the hose and
check. Remember to turn off the water supply first.
1. Is the door properly closed? Press it shut firmly – don't slam it.
2. Is the main On/Off switch turned on?
3. Check that the temperature knob shows a temperature higher than 30°C.
The machine will not spin.
A lot of foam in the final rinse water, or
water left in the machine after spinning
and pumping out.
1. Is the pump or outlet hose blocked? Clean if necessary, as described on
page 8. If there is too much water left in the machine, the spinning will be
omitted.
2. Has the power supply failed? Check the plug and fuses.
3. Check that the -button is not pressed in.
1. Is anything blocking the outlet hose? A button or a coin can do so. Make
sure that no part of the hose (including any hose extension) is less than 15
mm in diameter.
2. Is the pump blocked? Clean it as described on page 8.
3. Is the outlet hose kinked?
9
Page 10
Technical data
Installation
Dimensions, mm 820 x 595 x 595
Weight 12605 76 kg
Washing capacity 4.5 kg of dry fabrics
Drum volume 43 litres
Spin speed 700/1500 r/min
Rated load 2060 W
Supply voltage 240 V, 50 Hz
single-phase
Heater rating 1960 W
Material of drum Stainless steel
and barrel
Material of Stove-enamelled
outer casing hot-dip-galvanised
steel sheet
Mounting Stationary: four
adjustable rubbercovered feet
Water supply 1.5 m pex hose
hose
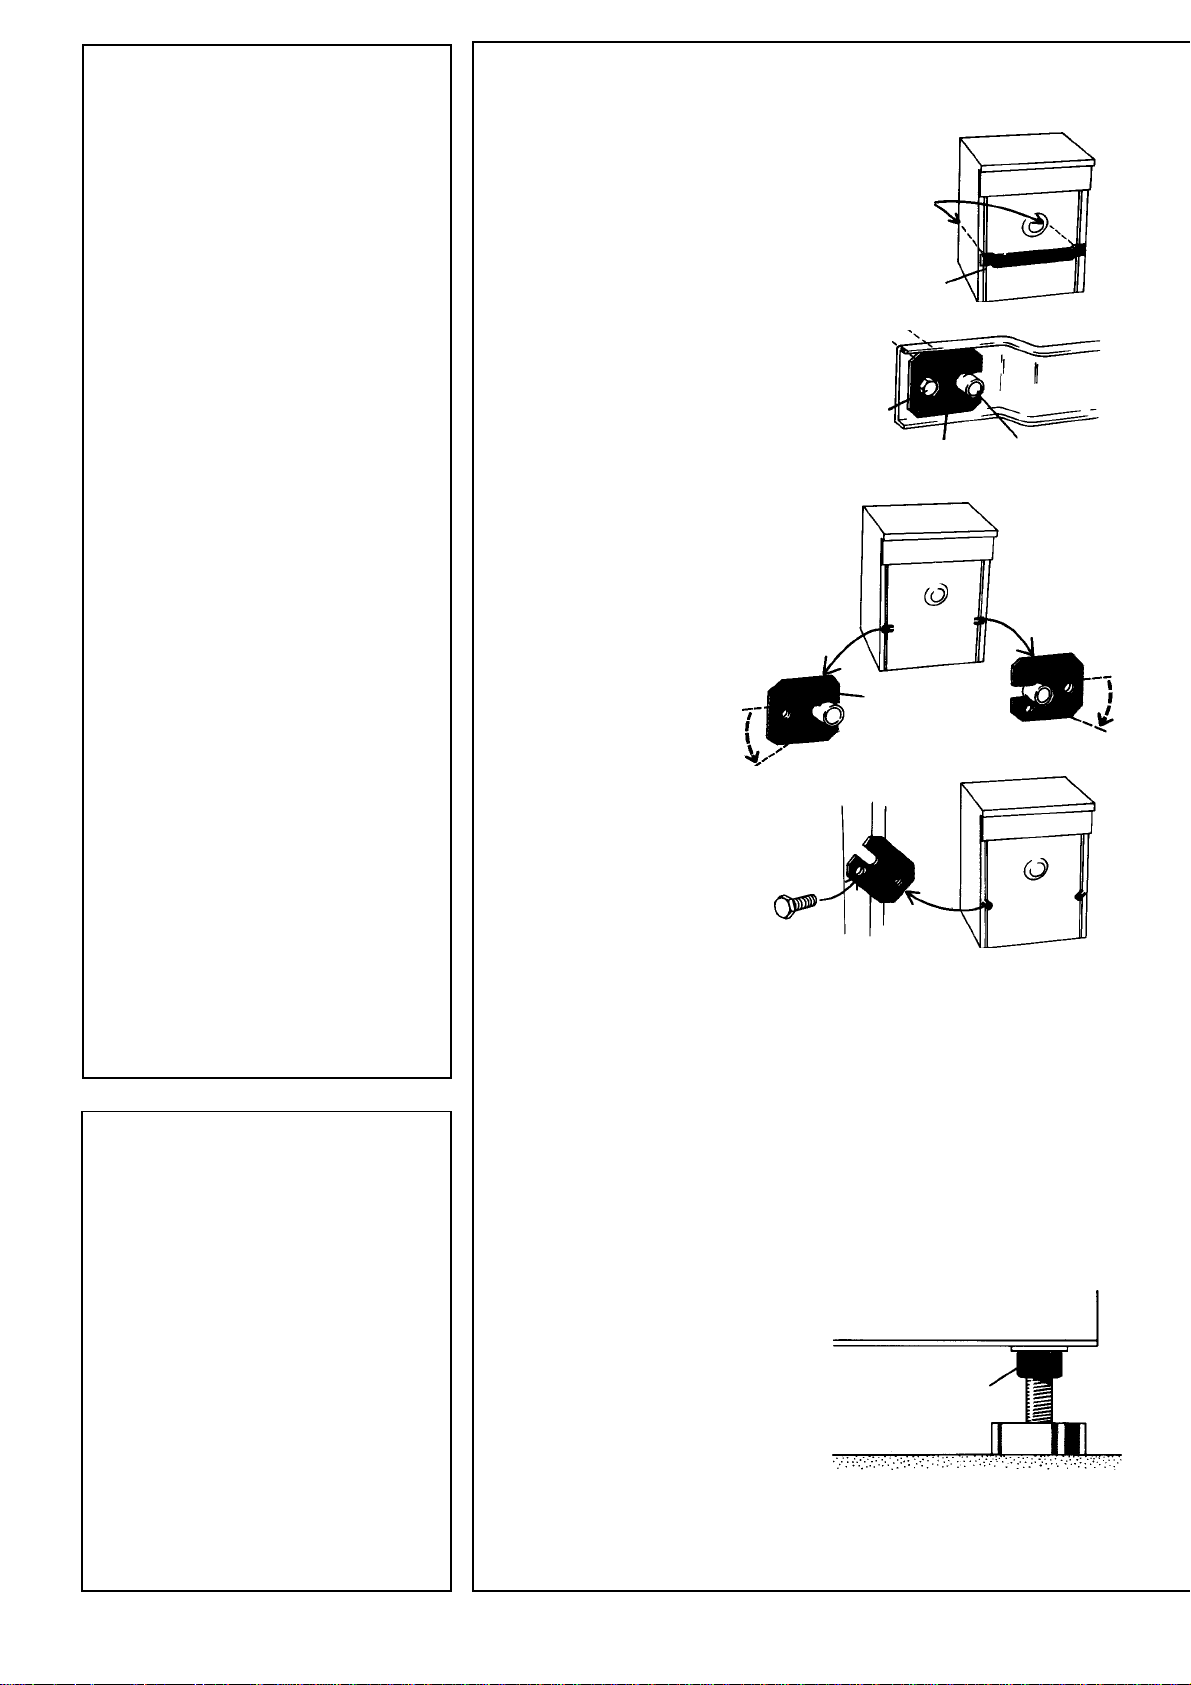
Removing the shipping brace
The shipping brace consists of two tubes
which prevent the drum from moving
around inside the machine during
transport. The tubes are secured to a
cross beam at the back of the machine.
Remove the shipping brace as follows:
1. Remove the bolts and special
washers which retain the beam,
and remove the beam.
2. Replace the washers on the
flattened part of the tubes.
Use them as tools to turn the
tubes through about 45°, as
shown in the drawing, and
pull out the tubes.
3. Turn the washers
so that they cover
the holes where
the tubes were
fitted and replace
the bolts.
Two tubes
inside
the machine
Cross beam
Washer
Washer Tube
Supply pressure 0.1–1 MPa
(10–100 N/cm2,
1–10 kp/cm2,
15–142 PSI)
Outlet 1.7 m of poly-
propene hose,
20 mm internal
diameter
Accessories
The machine is supplied with:
• Operating instructions and
installation instructions.
• Guarantee card.
• Type-approved inlet hoses for
connection to water supply.
Optional extras::
• Decor frames
• Work top
• Plinth
• Edging frame by stacked
machines
• Frame set with pull-out shelf by
stacked machines
Save the tubes and cross
beam, which will be needed
if the machine has to be
transported elsewhere. Fit
them in the reverse order to
that described above.
Adjusting the feet
It is important that the machine
does not move around when it is
spinning. This means that it must
be standing firmly and level on the
floor. The four feet are individually
adjustable. Set them carefully so
that the machine is standing level,
and tighten the locknuts securely.
Positioning the machine
The machine can be installed beneath a
worktop with a height of 850–900 mm.
There must be a gap of about 5 mm all
round the machine, including between
the rear edge of the machine top panel
and the wall behind.
Lock nut
10
Page 11

Water supply connection
The water supply connections must be made by
a person having the necessary competence.
Water pressure must be in the range 0.1–1 MPa
(ca 1–10 kp/cm2, 10–100 N/cm2, 15–142 PSI).
A tap must be fitted in the supply pipe for the
hose.
If a new supply pipe has been installed for the
machine, it should be flushed through thoroughly
in order to remove any particles of dirt which
might otherwise block the strainer in the water
inlet of the machine.
Shut-off taps
Hot water supply
Cold water supply
Drain outlet connection
The machine is supplied with the outlet hose
ready fitted. The hose should be hung over a
suitable sink edge or drain pipe at a height of
50–90 cm above the floor: the lower height is
preferable. Make sure that the hose is not
kinked.
NB! If the hose is extended, the internal
diameter of the coupling must not be less
than 15 mm.
Service and guarantee
50–90 cm
Sink
Guarantee Service
For guarantee details, see the
guarantee card.
Before calling for service, check to see whether the fault is due
to something that you can put right yourself. See the checklist.
If you do require service, telephone your local ASKO retailer or
the ASKO representative for your country. (See guarantee
card for address and telephone number.)
11
Page 12

Summary of washing instructions
1
3
5
7
Turn the temperature
knob to the required
temperature. Then the
electrical supply is on.
Load the washing and
close the door firmly.
Select any program
options.
If you change your mind . . .
. . . and want another program, turn the program
knob to the required position.
. . . and want to interrupt, turn the program knob
to 10. The machine pumps out the water. After 1
min the door can be opened, see point 2 above.
When restarting the machine, check there is still
detergent in the detergent compartment.
2
4
6
8
Open the door
by pressing
Pour detergent and
fabric conditioner
into the detergent
compartment.
Turn the program
knob to the required
program, and the
machine will start.
When the machine has stopped:
* Open the door by pressing
* When a program finishes with water still in
the machine, turn to 10 and the machine
pumps out the water. Open the door as
described in point 2 above.
Choosing
the right
program
9
After using the machine:
Turn off the main switch.
Leave the door ajar.
We reserve the right to make changes.
12
Art.nr 80 631 32
WM 120– 12605
Page 13

Sid 1
Important!
Before using the machine
for the first time
The machine must not be started until the
transit packing has been removed. (It prevents
the tub from shaking while the machine is
being transported.)
Read right through these instructions before
using your machine for the first time.
Washing
time min
(approx.)
Fabric
care
label
Sid 6-7
Type of fabric
Fill
Pro-
gram
Option
button
Tempe-
rature
Read right through these instructions.
Don’t forget to remove the transit
packing (see page 10).
The door is opened electrically, and
cannot therefore be opened in the
normal way until the machine is connected to the electricity supply.
The machine must not be used for drycleaning or similar applications.
Sid 2
*
Time,
minutes
Water-
con-
sump-tion,
lit.
White Cottons
with pre-wash
White Cottons
without pre-wash
Fast colors
White Cottons
Fast colors
+ Economy
Quick wash
Synthetics
colours, white
Quick synthetics *
Superquick
***
80
73
73
73
73
39
39
39
36
E
60-95°
60-95°
40-60°
40°
40°
40°
40°
40°
30-40°
110-125
85-110
75-85
75
95
50
50
40
35-40
1
2
2
2
2
3
6
7
7
Wool,
Handwash
9
30-40°
© 1993 ASKO CYLINDA AB Jönssons Tryckeri AB, Vara 93.03 89044
40-45
65
13
 Loading...