

Page 1

Wireless LAN Access Point
User’s Guide
Page 2

Information in this document is subject to change without notice. Complying with
all applicable copyright laws is the responsibility of the user. No part of this
document may be reproduced or transmitted in any form or by any means,
electronic or mechanical, for any purpose, without the express written permission
of Askey Computer Corp. If, however, your only means of access is electronic,
permission to print one copy is hereby granted.
Askey Computer Corp. provides this documentation without warranty, term, or
condition of any kind. Askey Computer Corp. may make improvements or
changes in the product(s) and/or the program(s) described in this documentation
at any time.
Other product and company names herein may be trademarks of their respective
owners.
2000 Askey Computer Corp. All rights reserved
Page 3

Contents
Contents
Contents.................................................................................................................. i
Introduction ........................................................................................................... 1
Identifying External Components on the Access Point................................2
Access Point Status LEDs ...........................................................................4
Wireless LAN Networking .................................................................................... 6
Introduction to Networks.............................................................................6
Wireless LAN Networks .............................................................................7
Stand-Alone Wireless Network........................................................8
Infrastructure Network ..................................................................... 9
TCP/IP Addressing.................................................................................... 10
Selecting an IP Address .................................................................10
Creating a Subnet Mask ................................................................. 12
DHCP Server............................................................................................. 13
Internet Connection Sharing (ICS) ............................................................ 14
Access Point Manager............................................................................... 15
Verifying the TCP/IP Protocol Settings.........................................15
Configuring Access Point with Wired Clients................................16
i
Page 4

Wireless LAN Access Point User’s Guide
Installing the Wireless LAN Access Point........................................................... 18
Installing the Access Point Manager.................................................................... 24
Configuring the Access Point ..............................................................................28
Configuring Access Point with Wireless Clients............................17
Verifying Supplied Access Point Components.......................................... 18
Mounting the Access Point to a Vertical Surface ......................................20
Making Network Connections................................................................... 22
Connecting to a Wired Client.........................................................22
Connecting to a Wireless Client.....................................................22
Making Modem Connections (Optional)...................................................23
Making Power Connections....................................................................... 23
Installing the PCMCIA Card .....................................................................23
Using the Default Access Point Configuration Settings ............................28
Starting the Access Point Manager............................................................ 30
Changing the Access Point IP Address......................................................30
Changing the Device Name and Location Description.............................. 32
Viewing the Status Page ............................................................................34
Configuring the Wireless LAN Settings.................................................... 36
Configuring the SSID................................................................................ 36
Configuring the Privacy Setting.................................................................38
Configuring the Transmission Rate Setting............................................... 40
Configuring the RTS Threshold Setting ....................................................42
Configuring the Long/Short Retry Limit Setting .......................................44
Configuring the Channel Setting ...............................................................46
Setting Up DHCP Service .........................................................................48
ii
Page 5

Contents
Setting Up Internet Connection Sharing (ICS).......................................... 52
Changing Your Password .......................................................................... 56
Saving a Configuration.............................................................................. 58
Loading a Configuration............................................................................ 60
Rebooting the Access Point....................................................................... 62
Rebooting Remotely.......................................................................62
Rebooting Manually.......................................................................62
Upgrading............................................................................................................ 64
Upgrading Access Point Manager ............................................................. 65
Upgrading Access Point Firmware............................................................ 66
Upgrading PCMCIA Card Firmware.........................................................68
Uninstalling the Access Point Manager ............................................................... 70
Troubleshooting................................................................................................... 72
Cannot Establish Wireless Link to Access Point....................................... 72
Radio Interference..................................................................................... 73
PCMCIA Card Not Detected..................................................................... 73
Cannot Connect to Another Wireless Client..............................................73
Wireless Client Cannot Connect to Access Point...................................... 74
Technical Support .....................................................................................75
Glossary............................................................................................................... 76
Index.................................................................................................................... 80
iii
Page 6

Page 7

Introduction
Introduction
This User’s Guide contains information on how to install and configure your
Wireless LAN Access Point.
A local area network (LAN) is a network that exists in a relatively limited area. A
network is two or more computers connected together sharing files and peripheral
devices, such as printers.
A wireless LAN allows you to interact with other computers without having to
run cables normally associated with networks, and the Wireless LAN Access
Point allows computers equipped with wireless LAN cards (wireless clients) to
have access to an existing wired LAN, forming an infrastructure wireless
network.
The Access Point is capable of being used in a wide variety of applications, and
offers the following functions:
• stand-alone wireless intranet relay station that increases communication range
• wireless access to Ethernet intranet
• wireless access to Internet
• DHCP server to automate IP address assignment
• Internet connection to a single ISP shared by multiple wireless intranet clients
1
Page 8

Wireless LAN Access Point User’s Guide
Identifying External Components on the Access Point
Component Description
• PCMCIA slot
• 6 LEDs
• DC power socket
• Recessed reset button
• Power switch
• 9-pin serial/RS-232
connector
• RJ-45/10BaseT jack
• 2 slotted holes Vertical mounting screw holes
Accepts Access Point PCMCIA card only
Status/Function. See table on page 4.
DC power cable connection
Restores Access Point to factory settings
Turns power to Access Point on and off
Modem connection
Network interface connection
2
Page 9
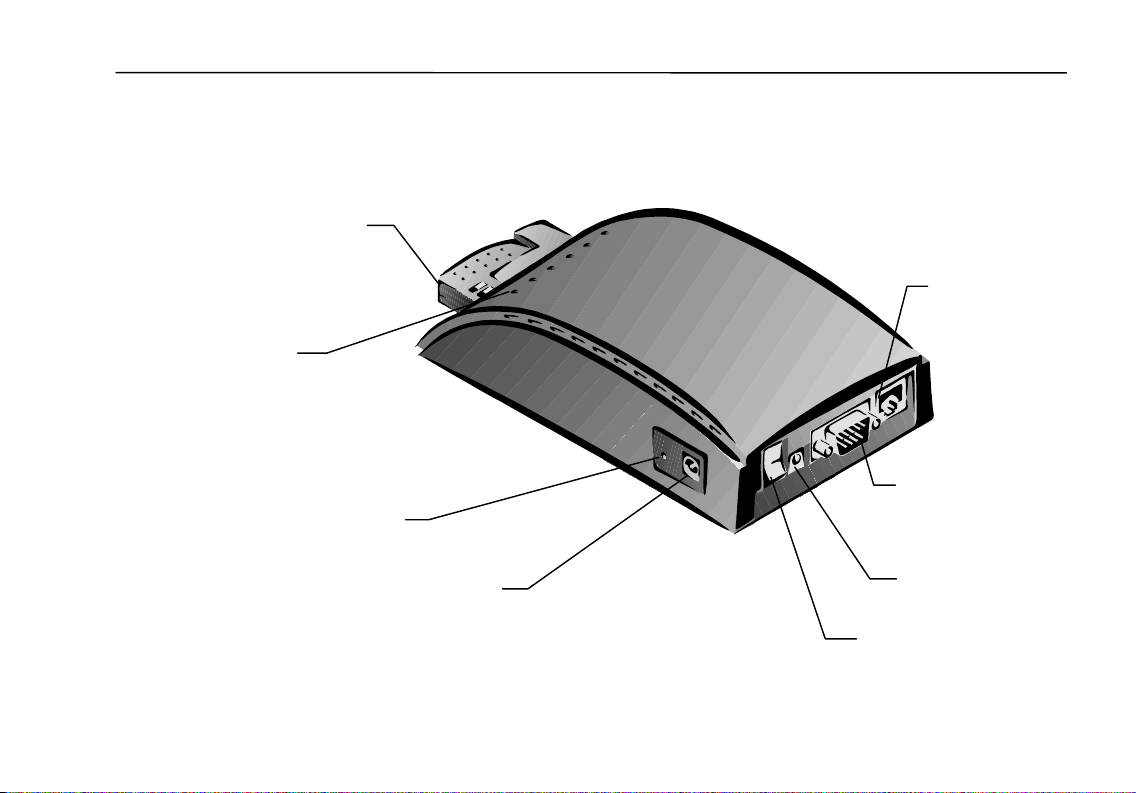
PCMCIA Card
Status LEDs
Recessed Reset Button
Introduction
RJ-45 Ethernet
Jack
9-pin Serial
Connector
DC Power Socket
Ground Lug
Power Switch
3
Page 10

Wireless LAN Access Point User’s Guide
Access Point Status LEDs
When the power to the Access Point is turned on, the Access Point will perform
its startup diagnostics and initialization. After a few seconds, the LEDs will
display the operating mode of the Access Point.
Six LEDs on the Access Point indicate the connection status and data transfer
operation status of the Access Point. Viewing the Access Point from the
PCMCIA slot end, the LEDs are described in the table below, starting from the
left side.
LED Color State Description
Ready Green On Access Point is in ready mode.
Link Green Blinking Wireless station communicating with the
WireLink Orange On Access Point is connected to an Ethernet
WireAct Orange Blinking Access Point is transmitting or receiving data
LineLink Red On Access Point is connected to a modem.
LineAct Red Blinking Access Point is transmitting or receiving data
Access Point.
network hub or switch through the RJ-45 port.
through the Ethernet port.
through the COM port to a modem.
4
Page 11
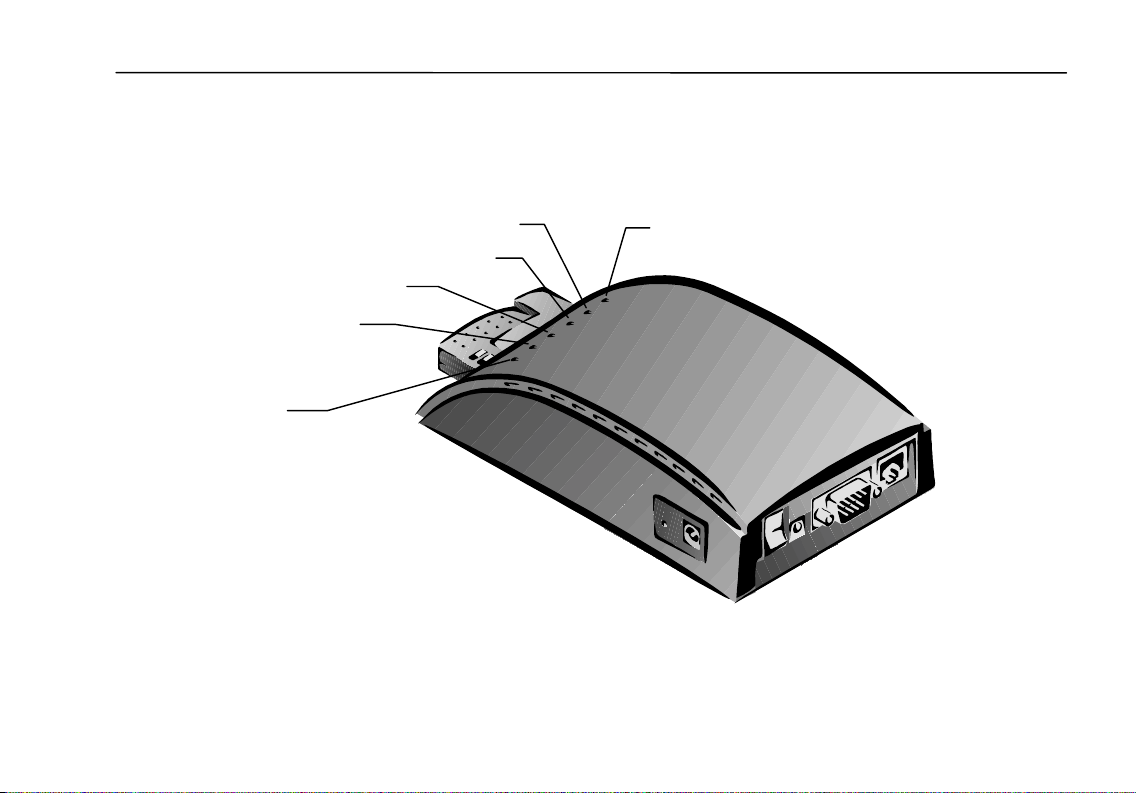
Introduction
LineAct
WireAct
LineLink
WireLink
Link
Ready
5
Page 12

Wireless LAN Access Point User’s Guide
Wireless LAN Networking
Introduction to Networks
A network is a group of computers and associated devices that can communicate
with each other through permanent connections, such as cables, or temporary
connections made through telephone or other communication links. A network
can be as small as a local area network (LAN) consisting of a few computers,
printers, and other devices, or it can consist of many small and large computers
distributed over a vast geographic area as a wide area network (WAN).
A network allows you to share files, programs, scanners, printers, fax machines,
etc.
6
Page 13

Wireless LAN Networks
A wireless LAN is a network that uses radio signals to send and receive data
between individual devices. Wireless LANs are often used in office or factory
settings where a user must carry a portable computer from place to place.
Wireless LANs are also becoming a popular and convenient way of connecting
computers in a home environment.
Wireless LANs perform the same functions as a wired LAN, but without the wire.
The network devices are connected to each other by radio waves. By using the
Wireless LAN Access Point, the wireless LAN can be connected to a wired
network.
The Wireless LAN Access Point provides connectivity between wireless clients
and Ethernet (wired) clients. The Access Point complies with the IEEE 802.11
standard, enabling communication among all wireless clients that meet this
standard.
Wireless LAN Networking
7
Page 14

Wireless LAN Access Point User’s Guide
Stand-Alone Wireless Network
The stand-alone wireless network is the simplest use of an Access Point. In this
configuration, the Access Point acts as a relay between wireless clients. This
enables the transfer of information among all computers within the Access Point
coverage area.
To communicate with the Access Point and other computers in the network, the
Access Point and all computers in the network must have the same Group ID.
While an Access Point is not required, its relay capability effectively doubles the
communication distance between two computers.
Wireless Client
Access Point
8
Wireless Client
Page 15
Wireless LAN Networking
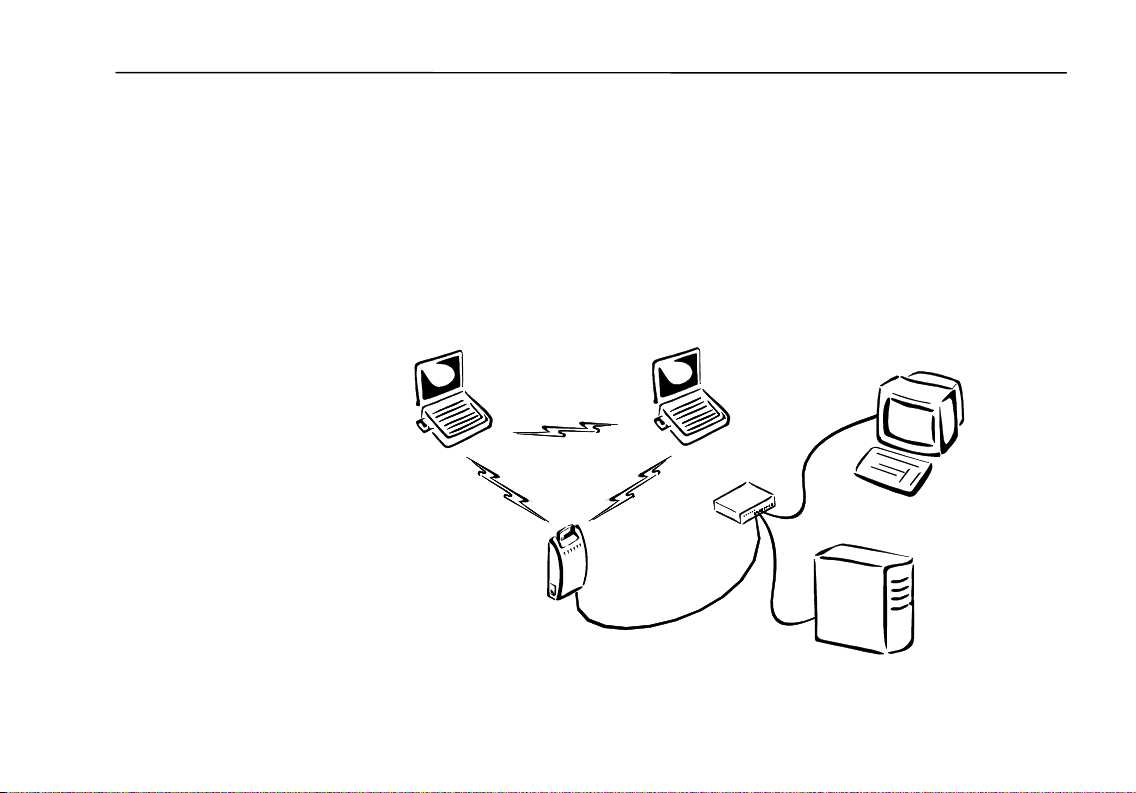
Infrastructure Network
In an infrastructure network, the Access Point connects clients to a wired
network. This enables the wireless clients to access all computers and peripherals
on the wired network.
Multiple Access Points can be used to achieve seamless wireless access
throughout an extended service area. All Access Points and wireless clients must
have the same Group ID. Roaming among different Access Points is controlled
automatically to maintain the wireless connection at all times.
Wireless Client
Wireless Client
Wired Client
Hub or Switch
Access Point
Network Server
9
Page 16

Wireless LAN Access Point User’s Guide
TCP/IP Addressing
TCP/IP (Transmission Control Protocol/Internet Protocol) has become the
standard for network data transmission. The Wireless LAN Access Point uses
TCP/IP addressing to communicate between both wired and wireless clients.
For correct IP address
information for your wireless
LAN installation, contact your
network administrator.
For more information on IP
addresses, see the Network
Working Group Specification
RFC 1918 on the Internet.
If you are installing the Wireless LAN Access Point into a wired LAN, you must
obtain a static IP address and a subnet mask for the Access Point from the wired
network administrator. See Configuring the Wireless LAN Settings.
If you don’t have a network administrator, you will have to select an IP address
from one of the available blocks of addresses.
Selecting an IP Address
An IP address consists of four components. Each component can contain up to
256 numbers (0 to 255). Thus, you can select a unique address from a range of
addresses (0.0.0.0 to 255.255.255.255) to identify a device within a network.
Not all addresses are available for private networks. Only the addresses in the
following three blocks are available:
Define your network by determining the number of addresses you will need
(allow for expansion).
10. 0 . 0. 0 — 10.255.255.255
172. 16. 0. 0 — 172. 31.255.255
192.168. 0. 0 — 192.168.255.255
10
Page 17

Wireless LAN Networking
For example:
If your network will consist of 10 wired clients and 10 wireless clients, you
could define the first 3 components of your address as 10.100.100. Next, you
would define the fourth component range. You need 20 (allowing for an
expansion of 10) addresses for your wired clients and 20 (allowing for an
expansion of 10) addresses for your wireless clients.
You could then reserve a block of addresses for the wired clients of
10.100.100.0 through 10.100.100.19 and another block for wireless clients of
10.100.100.20 through 10.100.100.39. Now you can start assigning appropriate
addresses to individual clients.
11
Page 18

Wireless LAN Access Point User’s Guide
Creating a Subnet Mask
In addition to an IP address, you will need to define a subnet mask to ensure that
your computers only communicate with other computers and devices that are
within your network.
A subnet mask has four components that correspond to the four components of
the IP address. Like the IP address, each component can contain up to 256
numbers (0 to 255). These numbers determine if an IP address component must
be an exact match or if a range of numbers is acceptable.
If the subnet mask number for an IP component is 255, that component must be
an exact match for communication to take place. If the mask number is 0, any
number in the component is acceptable. A mask number between 0 and 255
determines a range of numbers between the number and 255 that are acceptable.
If you use a mask number of 250, IP address numbers between 250 and 255 are
acceptable.
For example: if you choose an IP address of 10.100.100.1 and a subnet mask of
255.255.255.0, the first three components of the IP address must match exactly,
and any number from 0 to 255 in the fourth component is acceptable for
communication to take place.
The use of these addresses and masks is limited only by your imagination. You
can use any rationale you like to select your addressing scheme.
12
Page 19

DHCP Server
DHCP (Dynamic Host Configuration Protocol) is a TCP/IP protocol that enables
a host connected to a network to assign a temporary IP address to a client
automatically when the client connects to the network.
The Access Point can function as a DHCP server to dynamically assign IP
addresses and provide other configuration parameters to wireless LAN clients
when requested by the client. This function reduces the network administrator’s
workload and increases the usage efficiency of the IP addresses by recycling the
addresses when the lease time is up.
The DHCP function of the Access Point can be enabled or disabled. You can also
define a lower boundary and an upper boundary to establish a range of addresses
that can be assigned. The Access Point can manage a maximum of 256 IP
addresses (0 to 255).
In addition to providing an IP address, the Access Point provides the subnet
mask, DNS IP address, domain name, gateway IP address, and lease period to
complete the configuration of the wireless LAN clients. The Access Point
maintains a mapping table with IP address, MAC (Media Access Control)
address, and lease period for each client to control and manage the dynamic
configuration.
Wireless LAN Networking
13
Page 20

Wireless LAN Access Point User’s Guide
Internet Connection Sharing (ICS)
Internet connection sharing (ICS) enables you to configure your network to share
a single connection to the Internet. The Wireless LAN Access Point acts as a
gateway that allows multiple clients to connect to the Internet by sharing a single
modem and ISP (Internet Service Provider) account.
When a client on your network sends a request to the Internet, its private IP
address is transmitted to the Access Point, which translates it to the Internet IP
address (specified by the ISP) of the Access Point, and then sends it on to the
Internet. When the results are returned, the Access Point translates the IP address
back again and routes it to the correct client on your network. The only device on
your network visible to the Internet is the Access Point. None of the computers on
your network have a direct connection to the Internet.
Wireless Client
14
Internet
Modem
Access
Point
Wired Client
Hub or Switch
Page 21

All Access Points are
shipped with a factoryset IP Address of
192.168.1.1 to allow
your APM computer to
communicate with new
Access Points.
Wireless LAN Networking
Access Point Manager
When Access Point Manager (APM) is installed on a computer in the network,
you can change all operating parameters of the Access Point. The APM enables
you to configure and monitor the operational performance of your network.
You can install the APM on as many computers in your network as you want,
either wired or wireless. The choice for a wireless or wired computer depends on
your preferences and your network configuration.
Verifying the TCP/IP Protocol Settings
Any computer you install the APM on must have TCP/IP networking protocol
installed to be able to communicate with the Access Point. Using Windows
Control Panel, double-click Network and check that TCP/IP is installed. If
TCP/IP is not installed, install it (refer to TCP/IP Addressing on page 10 for a
proper IP addressing).
15
Page 22
Wireless LAN Access Point User’s Guide
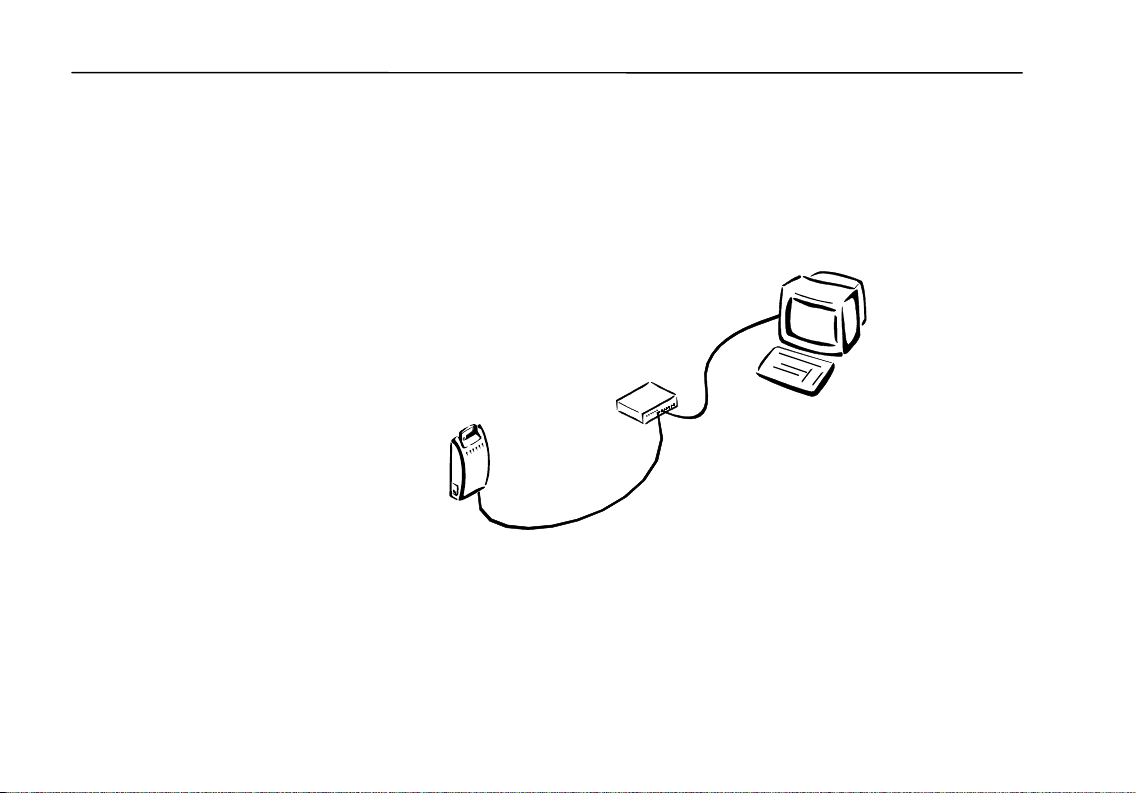
Configuring Access Point with Wired Clients
If your Access Point is connected to an established wired network, you can install
APM on any computer on the network. The first time you run APM, you will
need to change the IP address of the Access Point to be compatible with the IP
address of your network.
Wired Client
Hub or Switch
Access Point
16
Page 23

Wireless LAN Networking
Configuring Access Point with Wireless Clients
If you want to configure an Access Point from a wireless client, you need to
install APM on the wireless client. The SSID of the wireless client must match
the SSID factory setting of the Access Point, or be set to “any”, or left blank.
The first time you run APM, you will need to change the IP address of the Access
Point to be compatible with the IP address of your network.
Wireless Client
Access Point
17
Page 24

Wireless LAN Access Point User’s Guide
Installing the Wireless LAN Access Point
Verifying Supplied Access Point Components
When you unpack the Access Point, you should have the following components:
• Access Point
• Mounting screws (2), 3/16-inch (5-mm) diameter head
• PCMCIA Card
• RJ-45 Ethernet cable
• AC Power Adapter
18
Page 25

PCMCIA Card
AC Power
Installing the Wireless LAN Access Point
Access Point
RJ-45 Ethernet
Cable
Adapter
19
Page 26

Wireless LAN Access Point User’s Guide
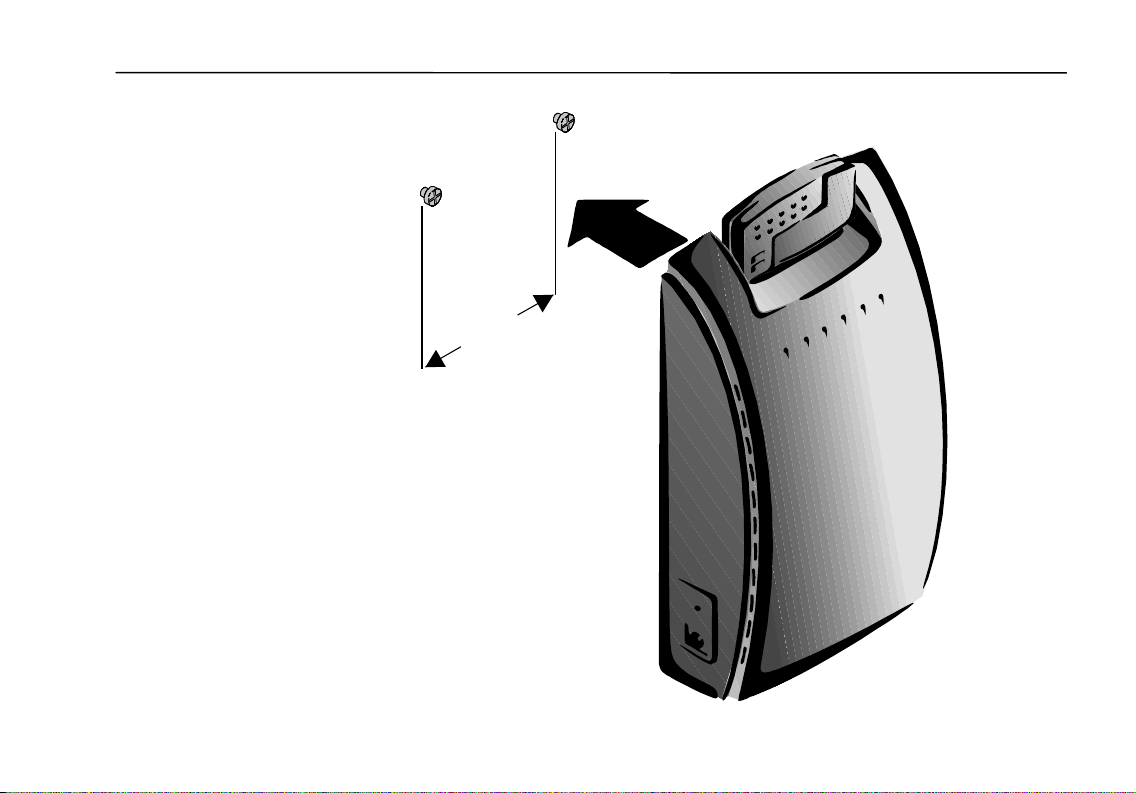
Mounting the Access Point to a Vertical Surface
The Access Point module can sit on a horizontal surface or it can be mounted to a
wall or other vertical surface. Select a location that provides both convenient
access and a clear radio signal path to wireless clients.
The Access Point case has two slotted holes on its underside that enable you to
mount the Access Point securely to two screws.
To mount the Access Point to a vertical surface:
1. Install the two mounting screws to a suitable vertical surface at a distance of
2-3/4 inches (70 mm) apart. Tighten the screws, leaving about 1/16 inch
(1.5 mm) between screw head and surface.
2. Position the Access Point so the connector end is pointing downward. Engage
the slotted holes on the bottom with the screw heads, and slide the unit down
slightly until it is firmly seated.
20
Page 27
2 ¾ inches
(70 mm)
Installing the Wireless LAN Access Point
21
Page 28

Wireless LAN Access Point User’s Guide
Making Network Connections
You can install the APM on as many computers in your network as you want,
either wired or wireless. The choice for a wireless or wired computer depends on
your preferences and your network configuration.
Connecting to a Wired Client
An alternate connection method
is to use a null-modem RJ-45
Ethernet network cable that has
the transmit and receive
connections reversed on one end
of the cable. This cable can be
used to connect the Access Point
directly to the computer NIC.
You can also enter “any” in the
SSID box, or leave it blank.
The RJ-45 Ethernet connector jack on the Access Point is used to connect to a
network switch that is connected to your wired client. Connect one end of an RJ45 Ethernet network cable to the jack on the Access Point and connect the other
end of the cable to a jack on the network switch that is connected to the wired
client.
Connecting to a Wireless Client
You can run APM (Access Point Manager) from a wireless client if you configure
the wireless client properly.
1. In the Wireless LAN Configuration Utility dialog box, click the
Configuration tab.
2. In the Mode list, click Infrastructure.
3. In the SSID list, enter the SSID used by Access Point.
4. Click Apply Changes, and then click OK.
22
Page 29

Installing the Wireless LAN Access Point
Making Modem Connections (Optional)
If you will be using an external modem and the Wireless Gateway function to
connect to an Internet Service Provider (ISP), connect the modem to the Access
Point using a 9-pin RS-232 cable connector, and turn on the power to the modem.
Making Power Connections
Connect the power cord’s AC plug into an AC power socket, plug the single DC
plug at the other end of the power cord into the DC power jack on the side of the
Access Point, and turn on the power.
Installing the PCMCIA Card
Insert the PCMCIA card into the Access Point PCMCIA slot and push it straight
in until it is firmly seated.
23
Page 30

Wireless LAN Access Point User’s Guide
Installing the Access Point Manager
To install the Access Point Manager:
1. Run setup.exe from the Wireless LAN Access Point Installation disc.
2. Close all Windows programs that are running, and then click Next.
3. In the Welcome dialog box, click Next.
4. In the User Information Name and Company boxes, enter your name and
company name, and then click Next.
5. In the Choose Destination Location dialog box, click Next.
Continue with step 6 on page 26.
24
Page 31

Click Next
Enter Your Name
Enter Company Name
Installing the Access Point Manager
Click Next
Click Next
25
Page 32

Wireless LAN Access Point User’s Guide
6. In the Select Program Folder dialog box, click Next to accept the default
folder.
A new group named Wireless Home is created that will be listed in the
Start\Programs menu.
7. In the Start Copying Files dialog box, click Next.
8. In the Setup Complete dialog box, click Finish.
26
Page 33

Click Next
Installing the Access Point Manager
Click Next
Click Finish
27
Page 34

Wireless LAN Access Point User’s Guide
Configuring the Access Point
Using the Default Access Point Configuration Settings
Your Access Point is supplied with operating firmware pre-installed at the
factory. After making all the proper connections, when you turn on its power,
Access Point will use the factory settings shown in the table on the opposite page.
28
Page 35

Configuring the Access Point
Access Point Parameter Factory Setting
IP Address 192.168.1.1
Subnet Mask 255.255.255.0
Password “1234567890”
RF-Channel Number Channel 1 (2.412 GHz)
SSID “WLAN_abcdef”
(where “abcdef” represents the first threebyte characters of the unique MAC address)
MAC Address MAC address of network device
Encryption Key 12345 (Encryption disabled)
Transmission Rate Auto
29
Page 36

Wireless LAN Access Point User’s Guide
Starting the Access Point Manager
Click Start, point to Programs, point to WirelessHome, and then click APM
(Access Point Manager).
Changing the Access Point IP Address
1. In the Access Point Manager dialog box, click Search to display your Access
Point device, and then click the Change IP button.
2. In the Confirm message box, to continue click OK.
For correct IP address
information for your wireless LAN
installation, contact your network
administrator.
For more information on IP
addresses, see the Network
Working Group Specification RFC
1918 on the Internet.
The subnet mask is a value that
defines whether your computer
communicates only within your
LAN (for example,
255.255.255.0) or communicates
outside of your LAN.
3. In the New Access Point’s IP Address box, enter a valid static fourcomponent IP address for the Access Point.
The following three blocks of IP addresses are available for private networks:
4. In the Subnet Mask box, enter a valid four-component IP address for the
Access Point.
5. In the Password box, enter the Password (the default password is
“1234567890”), and then click OK.
6. Wait 5 seconds and click Search to find and display the Access Point with the
new IP address.
10. 0 . 0. 0 — 10.255.255.255
172. 16. 0. 0 — 172. 31.255.255
192.168. 0. 0 — 192.168.255.255
30
Page 37

Click Search
Click Search
Configuring the Access Point
Click OK
Enter IP Address
Enter Subnet Mask
Enter Password
Click OK
31
Page 38

Wireless LAN Access Point User’s Guide
Changing the Device Name and Location Description
1. In the Access Point Manager dialog box, click Access.
2. In the Access AP dialog box, enter the Password (the default password is
“1234567890”), and then click OK.
3. In the Access Point Configuration dialog box, click the General tab, and
then click Change.
4. In the Device Name box, enter a name you want to use to identify your Access
Point.
5. In the Location box, enter a description of where your Access Point is being
used.
6. Click OK.
32
Page 39

Click Access
Enter Password
Configuring the Access Point
Click OK
Click General Tab
Click Change
Enter Name
Enter Location
Click OK
33
Page 40

Wireless LAN Access Point User’s Guide
Viewing the Status Page
To view the read-only Status page, which displays the current Access Point
Configuration settings:
In the Access Point Configuration dialog box, click the Status tab.
34
Page 41

Click Status Tab
Configuring the Access Point
35
Page 42

Wireless LAN Access Point User’s Guide
Configuring the Wireless LAN Settings
To connect wireless clients to the Access Point using the default startup
configuration settings, you will need to reconfigure the wireless clients so that the
following parameters are the same as the Access Point:
• SSID (Service Set ID) setting, see Configuring the SSID
All wireless clients that you want to communicate with the Access Point must
have the same SSID as the Access Point.
• Privacy setting (optional, if enabled), see Configuring the Privacy Setting
If the Privacy Setting is set to Plain, wireless clients can communicate freely
with the Access Point.
• Channel setting (optional, if enabled), see Configuring the Channel Setting
If the Channel Setting is set to Auto, wireless clients can automatically select
the correct communications channel.
Configuring the SSID
The SSID must be the same
for each client computer so
that they can establish a
connection with each other
on the network.
36
The Service Set ID (SSID) is a group name that is shared by every computer on a
wireless network. To set up the SSID for the Access Point:
1. In the Access Point Configuration dialog box, click the Wireless tab.
2. Click Change SSID.
3. In the New SSID dialog box, in the SSID box, enter the wireless LAN group
name, and then click OK.
Page 43

Click Wireless Tab
Click Change SSID
Configuring the Access Point
Enter New SSID
Click OK
37
Page 44

Wireless LAN Access Point User’s Guide
Configuring the Privacy Setting
The Encryption option of the Privacy Setting allows you to enter a five-digit
encryption/decryption key to enable wireless clients to transmit and receive data
in a secure communications mode. All users must use the same encryption key to
ensure that they can communicate with the Access Point properly. The default
five-digit encryption key is “12345.”
For no encryption, the default Privacy Setting is Plain, which allows any wireless
client computer to communicate with the Access Point without encryption.
To change the Privacy Setting from Plain to Encryption:
1. In the Access Point Configuration dialog box, click the Wireless tab.
2. Click Advanced.
3. In the Advanced setting and configuration dialog box, click the Privacy tab.
4. Click Encryption.
5. In the Privacy Key box, enter a five-digit letter or number combination with
no spaces.
6. Click OK.
38
Page 45

Configuring the Access Point
Click Advanced
Click Wireless
Tab
Click Privacy Tab
Click Encryption
Enter Privacy Key
Click OK
39
Page 46

Wireless LAN Access Point User’s Guide
Configuring the Transmission Rate Setting
The Transmission Rate Setting allows you to select the speed at which data is sent
between the Access Point and wireless clients. You may choose a single rate
setting between 1 Megabits per second (Mbps) and 11 Mbps, or Fully Auto. Fully
Auto mode enables the Access Point to automatically set the best transmission
rate for the current conditions and location.
To change the Transmission Rate Setting:
1. In the Access Point Configuration dialog box, click the Wireless tab.
2. Click Advanced.
3. In the Advanced setting and configuration dialog box, click the
Transmission Rate tab.
4. Click Fully auto or a specific rate.
5. Click OK.
40
Page 47

Click Wireless
Tab
Configuring the Access Point
Click Advanced
Click Transmission
Rate Tab
Click Fully Auto
or Specific Rate
Click OK
41
Page 48

Wireless LAN Access Point User’s Guide
Configuring the RTS Threshold Setting
The RTS (Request To Send) Threshold sets the minimum data block size that is
sent for any connection speed to avoid transmission collision and the resulting
errors, loss of data, or throughput decrease. CSMA/CA protocol defines that an
RTS-CTS frame exchange shall be performed to avoid transmission collision
before the actual data frame is sent. RTS Threshold range is between 100 and
2346, with 2346 being the default setting.
To change the RTS Threshold:
1. In the Access Point Configuration dialog box, click the Wireless tab.
2. Click Advanced.
3. In the Advanced setting and configuration dialog box, click the RTS
Threshold tab.
4. In the RTS Threshold box, enter a number between 100 and 2346.
5. Click OK.
42
Page 49

Click Wireless Tab
Configuring the Access Point
Click Advanced
Click RTS Threshold Tab
Enter Threshold Value
Click OK
43
Page 50

Wireless LAN Access Point User’s Guide
Configuring the Long/Short Retry Limit Setting
The Retry Limit Setting sets the maximum number of transmission attempts the
wireless client will make for a frame before it determines a frame transmission
failure.
The Long Retry Limit setting determines the number of retries for frames longer
than the RTS threshold setting.
The Short Retry Limit setting determines the number of retries for frames shorter
than or equal to the RTS threshold setting.
To change the Long/Short Retry Limit:
1. In the Access Point Configuration dialog box, click the Wireless tab.
2. Click Advanced.
3. In the Advanced setting and configuration dialog box, click the Long/Short
Retry Limit tab.
4. In the Long Retry Limit box, enter a number between 0 and 15.
5. In the Short Retry Limit box, enter a number between 0 and 15.
6. Click OK.
44
Page 51

Click Wireless
Tab
Configuring the Access Point
Click Advanced
Click Long/Short
Retry Limit Tab
Enter Long Retry Limit
Enter Short Retry Limit
Click OK
45
Page 52

Wireless LAN Access Point User’s Guide
Configuring the Channel Setting
The Access Point can be configured to automatically select a channel to
communicate with a wireless client, or you can select a fixed channel if you are
experiencing interference or need to use a specific channel.
The table below lists the channels between 1 and 14 that are available for your
region.
Region
North America FCC 1 – 11
Europe ETSI 1 – 13
Japan 14 (2.471 – 2.497 GHz frequency band)
To change the Channel Settings:
1. In the Access Point Configuration dialog box, click the Wireless tab.
2. Click Advanced.
3. In the Advanced setting and configuration dialog box, click the Channel
tab.
4. In the Channel Setting list, click Auto or a specific channel.
5. Click OK.
Communication
Authority Channel Range
46
Page 53

Click Wireless
Tab
Configuring the Access Point
Click Advanced
Click Channel
Tab
Click Auto or Specific Channel
Click OK
47
Page 54

Wireless LAN Access Point User’s Guide
Setting Up DHCP Service
The DHCP (Dynamic Host Configuration Protocol) Service enables the Access
Point host computer to assign available IP addresses dynamically to other
computers on the network. The Access Point host computer assigns IP addresses
on an as-needed basis and controls the traffic between those computers and the
Internet.
To find addresses on the Internet, your computer needs to connect to a Domain
Name Service (DNS) computer, called a DNS server. The DNS server answers
DNS queries and keeps a database of host computers and their corresponding IP
addresses. The DNS Server Address is the IP address of the computer to which
the Access Point is connected.
The Boundary area is where the range of IP addresses for computers connected to
the Access Point wireless LAN are defined, using the fourth component of the IP
Address.
To set up DHCP Service:
1. In the Access Point Configuration dialog box, click the DHCP Service tab.
2. Select the DHCP Service check box.
3. In the DNS Server Address box, enter the IP Address for the DHCP Server.
Continue with step 4 on page 50.
48
Page 55

Click DHCP Service
Select DHCP Service
Enter DHCP Server IP Address
Configuring the Access Point
Tab
49
Page 56

Wireless LAN Access Point User’s Guide
4. Select the Boundary check box.
5. In the Lower and Upper boxes, select the numbers between 1 and 256 that
define the range of IP addresses you want to make available.
6. Select the Time to Lease check box.
7. In the Days and Hours boxes, select numbers that define the amount of time
that the DHCP server grants permission to use a particular IP address.
8. Click Apply, and then click Close.
50
Page 57

Select Time to Lease
Select Number of Days
Select Number
of Hours
Click Apply
Configuring the Access Point
Select Boundary
Select Lower Limit
Select Upper Limit
Click Close
51
Page 58

Wireless LAN Access Point User’s Guide
Setting Up Internet Connection Sharing (ICS)
The Access Point allows multiple wireless clients to share a modem and a single
ISP account. Use the ICS Service page of the Access Point Configuration dialog
box to connect to an Internet Service Provider using an external modem that is
connected to the Access Point.
To connect to an ISP:
1. In the Access Point Configuration dialog box, click the ICS Service tab.
2. Select the ICS Enabled check box.
3. Click the DCE Setting tab.
If you have already set up
and saved an ISP connection
configuration in Dial-Up
Networking, click the
from Dial-Up Networking
button, select the ISP, then
click OK.
Select
4. In the Connection box, enter the name of an ISP.
5. In the User Name box, enter a user name.
6. In the Password box, enter a valid password.
7. In the Confirm box, enter the password again.
8. In the Phone Number box, enter the ISP access phone number.
9. Click Apply.
Continue with step 10 on page 54.
52
Page 59

Click ICS Service Tab
Select ICS Enabled
Configuring the Access Point
Enter ISP Name
Click DCE Setting Tab
Click Apply
Enter User Name
Enter Password
Enter Password Again
Enter ISP Phone
Number
53
Page 60

Wireless LAN Access Point User’s Guide
10. Click the Main Control tab.
11. Click the Refresh button.
12. Click Dialup to connect to the ISP.
54
Page 61

Click Main Control Tab
Configuring the Access Point
Click Refresh
Click Dialup
ICS Status Icons
Access Point has a PCMCIA card and is
connected to wired client
Modem is connected to Access Point
Modem is dialing ISP phone number
55
Page 62

Wireless LAN Access Point User’s Guide
Changing Your Password
The default password that is used by Access Point when it is installed is
“1234567890.” You should change this password to one that is easy to remember.
The password must consist of at least 1 character and up to 32 characters with no
spaces.
To change your password:
1. In the Access Point Configuration dialog box, click the Configuration tab.
2. Click Change Password.
3. In the New Password box, enter a new password.
4. In the Confirm box, enter the new password again.
5. Click OK.
56
Page 63

Enter New Password
Enter Password Again
Click OK
Configuring the Access Point
Click Configuration Tab
Click Change Password
57
Page 64

Wireless LAN Access Point User’s Guide
Saving a Configuration
If you need to create a different configuration for your Access Point that has
different settings, such as one that has a different SSID name or DHCP settings,
you can save it as a file on your hard drive with an .ini extension.
To save a configuration:
1. In the Access Point Configuration dialog box, click the Configuration tab.
2. Click Save Configuration.
3. In the Save As dialog box, select the folder you want to save the file in, enter
the name of the new configuration file in the File name box, and then click
Save.
58
Page 65

Select Folder
Enter File Name
Configuring the Access Point
Click Configuration Tab
Click Save Configuration
Click Save
59
Page 66

Wireless LAN Access Point User’s Guide
Loading a Configuration
If you have created and saved more than one Access Point configuration file, you
can easily load the file for the current session.
To load a configuration:
1. In the Access Point Configuration dialog box, click the Configuration tab.
2. Click Load Configuration.
3. In the Open dialog box, select the folder that contains the configuration file
that has an .ini extension you want to load, and then click the file name.
4. Click Open.
60
Page 67

Select Folder
Click File Name
Configuring the Access Point
Click Configuration Tab
Click Load Configuration
Click Open
61
Page 68

Wireless LAN Access Point User’s Guide
Rebooting the Access Point
If the Access Point has stopped responding to commands for any reason, it can be
rebooted either remotely or manually.
Rebooting Remotely
Do not press the Reset button
on the side of the Access
Point to reboot, as this will
replace your network
configuration settings with
the default factory settings.
To reboot the Access Point remotely from the Access Point Manager:
1. In the Access Point Configuration dialog box, click the Configuration tab.
2. Click Reboot AP.
3. In the Confirm dialog box, click Yes.
The Access Point will cycle its power and then restart, using its current
network configuration settings. The startup diagnostics take approximately 60
seconds to complete.
Rebooting Manually
To reboot the Access Point manually:
1. Turn off the power to the Access Point by using the power switch on the back.
2. Remove the power cable from its connection on the side of the Access Point.
3. Wait 5 seconds.
4. Plug in the power cable to the connector on the side of the Access Point.
5. Turn on the power to the Access Point using the switch on the back.
62
Page 69

Click Yes
Configuring the Access Point
Click Configuration Tab
Click Reboot AP
63
Page 70

Wireless LAN Access Point User’s Guide
Upgrading
There may be situations where you need to upgrade your Access Point Manager
or firmware; for example, if:
• errors have been corrected
• a new version is required to support new functions
• you were advised to do so by a wireless LAN technical support technician
64
Page 71

Do not uninstall an earlier
version of Access Point
Manager.
Upgrading
Upgrading Access Point Manager
To upgrade the Access Point Manager:
1. Close all programs and dialog boxes.
2. Download updated files from the FTP site as instructed by a technical support
technician.
3. Run the updated file.
4. Install the new version to the same folder where your previous version is
installed.
65
Page 72

Wireless LAN Access Point User’s Guide
Upgrading Access Point Firmware
The Access Point operates using firmware, which is a set of factory-installed
software instructions stored in read-only memory (ROM). The Access Point
firmware is in the form of a binary file of the format “wlan_xxx” (where “xxx”
identifies the Access Point firmware version). A copy of this file is stored in the
folder where the Access Point Manager was installed.
To upgrade the Access Point firmware:
1. Download the updated file from the FTP site as instructed by a technical
support technician.
2. Copy the file into the same folder where Access Point Manager is installed.
3. In the Access Point Configuration dialog box, click the Configuration tab.
4. Click Upgrade AP Firmware.
5. In the Confirm dialog box, click OK.
If directed to do so by a
technical support technician,
go to the directory where you
saved the firmware upgrade
file that you downloaded
from the website.
6. In the Open dialog box, go to the folder where Access Point Manager is
installed, click the file named wlan_xxx.bin, where “xxx” represents the
Access Point firmware version, and then click Open.
7. When the file has been loaded and saved, an “Upgrade success” message will
be displayed, and the Access Point will reboot.
66
Page 73

Click OK
Select Folder
Click File Name
Upgrading
Click Configuration Tab
Click Upgrade AP Firmware
Click Open
67
Page 74

Wireless LAN Access Point User’s Guide
Upgrading PCMCIA Card Firmware
To upgrade the PCMCIA card firmware:
1. Download the updated file from the FTP site as instructed by a technical
support technician.
2. Copy the file into the same folder where Access Point Manager is installed.
3. In the Access Point Configuration dialog box, click the Configuration tab.
4. Click Upgrade Card Firmware.
5. In the Confirm dialog box, click OK.
If directed to do so by a
technical support technician,
go to the directory where you
saved the firmware upgrade
file that you downloaded
from the website.
6. In the Open dialog box, go to the folder where Access Point Manager is
installed, and click the file named boot_xxx.bin, where “xxx” represents the
Access Point firmware version, and then click Open.
7. When the file has been loaded and saved, an “Upgrade success” message will
be displayed, and the Access Point will reboot.
68
Page 75

Click OK
Select Folder
Click File Name
Upgrading
Click Configuration Tab
Click Upgrade Card Firmware
Click Open
69
Page 76

Wireless LAN Access Point User’s Guide
Uninstalling the Access Point Manager
To uninstall Access Point Manager:
1. Close all open applications.
2. Click Start, point to Settings, and then click Control Panel.
3. In the Control Panel dialog box, double-click Add/Remove Programs.
4. In the Add/Remove Programs Properties dialog box, click
LAN-TO-HOME in the list of software, and then click Add/Remove.
5. In the Confirm File Deletion dialog box, click Yes.
70
Page 77

Click Yes
Uninstalling the Access Point Manager
Click Program
Name
Click Add/Remove
71
Page 78

Wireless LAN Access Point User’s Guide
Troubleshooting
Cannot Establish Wireless Link to Access Point
You may be able to establish a wireless link to the Access Point by trying the
following:
• Make sure the power to the Access Point is connected and turned on (LEDs
• Make sure there are no physical connection problems. Make sure the
• Make sure the Access Point and wireless clients are configured with the same
• If you are sure that the Access Point is configured properly, reboot the
will light on the Access Point).
PCMCIA card is firmly seated and the cables are plugged in securely.
SSID and channel. If you don’t know the SSID, use “any” in the SSID box
on the wireless client Configuration page, or leave it blank.
Access Point.
72
Page 79

Radio Interference
You may be able to eliminate any interference by trying the following:
• Reseat the PCMCIA card in the Access Point and in each wireless client.
• Increase the distance between the wireless clients, the Access Point, and the
device causing the radio interference.
• Plug the wireless client into an outlet on a different branch circuit from that
used by the affecting device.
• Keep the wireless client away from microwave ovens and large metal
objects.
• Consult the dealer or an experienced radio technician for help.
PCMCIA Card Not Detected
If the PCMCIA card is not detected by Windows, try the following:
• Make sure the card is properly inserted in the PCMCIA slot.
• Make sure the PCMCIA slot in your computer is working.
• Contact your dealer for additional testing if there is a hardware problem with
the PCMCIA card.
Cannot Connect to Another Wireless Client
If you cannot make a connection to another wireless client from your computer, it
could be due to one of the following reasons:
Troubleshooting
73
Page 80

Wireless LAN Access Point User’s Guide
• Incorrect SSID. Make sure the SSID is the same for all wireless clients. If
• Changes not recognized by your computer. Restart your computer.
• Make sure the Log on to Windows NT domain check box is not selected in
• Incorrect IP Address or Subnet Mask. Check these settings in the TCP/IP
Wireless Client Cannot Connect to Access Point
If you cannot make a connection to the Access Point, it could be due to one of the
following reasons:
• Make sure the wireless client and Access Point have no physical connection
• Make sure the SSID for the wireless client is the same as the Access Point,
• Make sure the Channel for the wireless client is set to the same number or is
• Make sure the Tx Rate for the wireless client is set to Fully Automatic or is
you don’t know the SSID, use “any” in the SSID box on the wireless client
Configuration page, or leave it blank.
the Client for Microsoft Networks Properties dialog box in the Network
Configuration tab.
Properties dialog box in the Network Configuration tab.
problems.
set to “any”, or is blank.
the same as the Access Point.
the same as the Access Point.
74
Page 81

• Make sure the privacy type is the same as that of Access Point. If both are
using a Passphrase, make sure it is the same. Also, make sure the Default
Key is the same.
Technical Support
If problems are still not solved, please contact our Technical Support Department
to obtain further assistance.
Taiwan Voice: +886-3-591-8089
Fax: +886-3-582-0037
Troubleshooting
75
Page 82

Wireless LAN Access Point User’s Guide
Glossary
10BaseT An IEEE standard (802.3) for operating 10 Mbps Ethernet networks (LANs) with
twisted pair cabling and a wiring hub.
Access Point An internetworking device that seamlessly connects wired and wireless networks.
Several Access Points combined with a distributed system support the creation of
multiple radio cells that enable roaming throughout a facility.
Ad Hoc A network composed solely of stations within mutual communication range of
each other (no Access Point connected).
BSS Basic Service Set. A set of stations controlled by a single coordination function.
Channel A medium used to pass protocol data units that can be used simultaneously in the
same volume of space by other channels of the same physical layer, with an
acceptably low frame error ratio due to mutual interference.
ESS Extended Service Set. A set of one or more interconnected Basic Service Sets
(BSSs) and integrated Local Area Networks (LANs) can be configured as an
Extended Service Set.
Ethernet The most widely used medium access method, which is defined by the IEEE 802.3
standard. Ethernet is normally a shared media LAN; i.e., all the devices on the
76
Page 83

Glossary
network segment share total bandwidth. Ethernet networks operate at 10Mbps
using CSMA/CD to run over 10BaseT cables, which typically use an RJ-45
connector.
Gateway A network component that acts as an entrance to another network.
IEEE 802.11 The IEEE 802.xx is a set of specifications for LANs from the Institute of
Electrical and Electronic Engineers (IEEE). Most wired networks conform to
802.3, the specification for CSMA/CD based Ethernet networks or 802.5, the
specification for token ring networks. 802.11 defines the standard for wireless
LANs encompassing three incompatible (non-interoperable) technologies:
Frequency Hopping Spread Spectrum (FHSS), Direct Sequence Spread Spectrum
(DSSS), and Infrared.
Infrastructure A wireless network centered around an Access Point. In this environment, the
Access Point not only provides communication with the wired network but also
mediates wireless network traffic in the immediate neighborhood.
IP Internet Protocol. The standard protocol within TCP/IP that defines the basic unit
of information passed across an Internet connection by breaking down data
messages into packets, routing and transporting the packets over network
connections, then reassembling the packets at their destination. IP corresponds to
the network layer in the ISO/OSI model.
IP Address An IP address is a 32-bit number that identifies each sender or receiver of
information sent across the Internet. An IP address has two parts: the identifier of
a particular network on the Internet and an identifier of the particular device
(which can be a server or a workstation) within that network.
77
Page 84

Wireless LAN Access Point User’s Guide
ISP Internet Service Provider. An organization that provides access to the Internet.
Small ISPs provide service via modem and ISDN while the larger ones also offer
private line hookups (T1, fractional T1, etc.).
LAN Local Area Network. A communications network that serves users within a
defined geographical area. The benefits include the sharing of Internet access,
files, and equipment, such as printers and storage devices. Special network
cabling (10BaseT) is often used to connect the PCs together.
MAC Address Media Access Code Address. A unique, 48-bit number assigned to network
interface cards by the manufacturer. MAC addresses are used for mapping in
TCP/IP network communication.
NAT Network Address Translation. The translation of an Internet Protocol address (IP
address) used within one network to a different IP address known within another
network. One network is designated the internal network and the other is the
external. The internal network then appears as one entity to the outside world.
PCMCIA Personal Computer Memory Card International Association. This Association
develops standards for PC cards, formerly known as PCMCIA cards. These cards
are available in three types, and are about the same length and width as credit
cards. However, the different cards range in thickness from 3.3 mm (Type I) to
5.0 mm (Type II) to 10.5 mm (Type III). These cards can be used for various
functions, including memory storage, landline modems, and wireless modems.
PS Power Save Mode. This mode is recommended for devices where power
consumption is a major concern, such as battery-powered devices.
Radio Frequency RF, Terms: GHz, MHz, Hz —The international unit for measuring frequency is
Hertz (Hz), equivalent to the older unit of cycles per second. One megahertz
78
Page 85

Glossary
(MHz) is one Million-Hertz. One gigahertz (GHz) is one Billion-Hertz. The
standard U.S. electrical power frequency is 60 Hz, the AM broadcast radio
frequency band is 0.55–1.6 MHz, the FM broadcast radio frequency band is
88–108 MHz, and wireless 802.11 LANs operate at 2.4GHz.
SSID Service Set ID. A group name shared by every member of a wireless network.
Only client PCs with the same SSID are allowed to establish a connection.
Subnet Mask A value that defines whether your computer communicates only within your LAN
or communicates outside of your LAN, where it is routed out to the rest of the
Internet. A Subnet Mask that has the same first three components (for example,
255.255.255.0) is the routing pattern for a Class C address.
TCP Transmission Control Protocol. The standard transport level protocol that
provides the full duplex, stream service on which many applications’ protocols
depend. TCP allows a process on one machine to send a stream of data to a
process on another. Software implementing TCP usually resides in the operating
system and uses the IP to transmit information across the network.
WEP Wired Equivalent Privacy. The optional cryptographic confidentiality algorithm
specified by 802.11 used to provide data confidentiality that is subjectively
equivalent to the confidentiality of a wired LAN medium that does not employ
cryptographic techniques to enhance privacy.
79
Page 86

Wireless LAN Access Point User’s Guide
Index
1
10BaseT, 76
A
Access Point
definition, 76
description, 1
Access Point Manager, 15
starting, 30
Access Point parameters, 29
Ad Hoc, 76
B
BSS, 76
80
C
Channel, 76
Channel setting, 36
configuring, 46
Configuration
loading, 60
saving, 58
Configuring the Access Point, 28
D
Default settings, 28
Device Name
changing, 32
DHCP, 13, 58
DHCP service
setting up, 48
Page 87

Index
E
ESS, 76
Ethernet, 76
External Components, 2
F
Factory settings, 28
Firmware, 28
G
Gateway, 77
Glossary, 76
I
ICS, 14, 52
IEEE 802.11, 77
Infrastructure network, 1, 9, 77
Installing the Access Point Manager, 24
Internet connection sharing, 14
Internet Connection Sharing
setting up, 52
Internet Service Provider, 14
IP, 77
IP address, 10, 29
IP Address, 77
changing, 30
ISP, 14, 52, 78
L
LAN, 1, 6, 78
LEDs, 2, 4
Loading a configuration, 60
Local Area Network, 1
Location description
changing, 32
Long/Short Retry Limit setting
configuring, 44
M
MAC Address, 78
Manual reboot, 62
Modem, 2
Modem connections, 23
Mounting the Access Point to a vertical surface, 20
N
NAT, 78
Network, 1
Network connections, 22
81
Page 88

Wireless LAN Access Point User’s Guide
Network interface connection, 2
P
Password, 29, 30
changing, 56
PCMCIA, 78
PCMCIA card, 18
installing, 23
PCMCIA slot, 2
Power connections, 23
Power socket, 2
Power switch, 2
Privacy setting, 36
configuring, 38
PS, 78
R
Radio Frequency, 78
Rebooting the Access Point, 62
Remote reboot, 62
Reset button, 2
RJ-45, 18
RJ-45 connector, 2
RTS Threshold setting
configuring, 42
S
Saving a configuration, 58
Serial connector, 2
Software
installing, 24
uninstalling, 70
SSID, 17, 22, 29, 36, 58, 79
configuring, 36
Stand-alone wireless network, 8
Status page, 34
Subnet Mask, 12, 29, 30, 79
T
TCP, 79
TCP/IP, 10, 15
Technical Support, 75
Transmission Rate setting
configuring, 40
Troubleshooting, 72
cannot connect to a wireless client, 74
cannot establish wireless link, 72
card not detected, 73
PCMCIA card not detected, 73
Radio Interference, 73
wireless client cannot connect to Access Point, 74
82
Page 89

Index
U
Uninstalling the Access Point Manager, 70
Upgrading
Access Point, 64
Access Point firmware, 66
Access Point Manager, 65
PCMCIA Card Firmeware, 68
W
WEP, 79
Wired client, 22
Wireless client, 22
Wireless LAN settings
configuring, 36
83
 Loading...