

Page 1

RTA300W Wireless ADSL Router
User’s Manual
Rev:01
2002/07/16
Page 2

No part of this publication may be reproduced in any form by any means without the prior written permission. Other
trademarks or brand names mentioned herein are trademarks or registered trademarks of their respective companies.
2002/07/16
Rev:01
000300w-rta
ii
Page 3

ADSL Router User Manual
Safety Notes
For Installation
Use only the type of power source indicated on the marking labels.
Use only the power adapter supplied with the product.
Do not overload wall outlet or extension cords as this may increase the risk of electric shock or file. If the
power cord is frayed, replace it with a new one.
Proper ventilation is necessary to prevent the product overheating. Do not block or cover the slots and
openings on the device, which are intended for ventilation and proper operation. It is recommended to
mount the product with a stack.
Do not place the product near any source of heat or expose it to direct sunshine.
Do not expose the product to moisture. Never spill any liquid on the product.
Do not attempt to connect with any computer accessory or electronic product without instructions from
qualified service personnel. This may result in risk of electronic shock or file.
Do not place this product on an unstable stand or table.
For Using
Power off and unplug this product from the wall outlet when it is not in use or before cleaning. Pay
attention to the temperature of the power adapter. The temperature might be high.
After powering off the product, power on the product at least 15 seconds later.
Do not block the ventilating openings of this product.
When the product is expected to be not in use for a period of time, unplug the power cord of the product to
prevent it from the damage of storm or sudden increases in rating.
For Service
Do not attempt to disassemble or open covers of this unit by yourself. Nor should you attempt to service the product
yourself, which may void the user’s authority to operate it. Contact qualified service personnel under the following
conditions:
If the power cord or plug is damaged or frayed.
If liquid has been spilled into the product.
If the product has been exposed to rain or water.
If the product does not operate normally when the operating instructions are followed.
If the product has been dropped or the cabinet has been damaged.
If the product exhibits a distinct change in performance.
Warning
This equipment must be installed and operated in accordance with provided instructions and a minimum 20
cm spacing must be provided between computer mounted antenna and person’s body (excluding
extremities of hands, wrist and feet) during wireless modes of operation.
This device complies with Part 15 of the FCC Rules. Operation is subject to the following two conditions: (1)
this device may not cause harmful interference, and (2) this device must accept any interference received,
including interference that may cause undesired operation.
Caution
Any changes or modifications not expressly approved by the party responsible for compliance could void
the authority to operate equipment.
iii
Page 4

Contents
Contents
Before You Use ................................................................................................. vi
Features..................................................................................................vi
System Requirements ..............................................................................vii
Unpacking.............................................................................................. viii
Subscription for ADSL Service .................................................................. viii
Chapter 1: Overview ..........................................................................................1
Physical Outlook ....................................................................................... 1
Front Panel..................................................................................... 1
Rear Panel...................................................................................... 1
Chapter 2: Installation.......................................................................................3
Choosing a place for the ADSL Router ......................................................... 3
Connecting the ADSL Router ...................................................................... 3
USB Driver Installation .............................................................................. 4
For Windows 98 .............................................................................. 4
For Windows ME.............................................................................. 6
For Windows 2000........................................................................... 7
For Windows XP .............................................................................. 9
Uninstall the USB Driver ...........................................................................10
For Windows 98 .............................................................................10
For Windows ME.............................................................................10
For Windows 2000..........................................................................10
For Windows XP .............................................................................10
Chapter 3: Connection Mode ............................................................................11
Bridge Mode............................................................................................12
Router Mode ...........................................................................................13
MER Mode...............................................................................................15
PPPoA + NAT Mode ..................................................................................16
PPPoE + NAT Mode ..................................................................................17
PPPoE Relay............................................................................................18
Multiple PVCs Mode..................................................................................19
Chapter 4: Configuration.................................................................................. 21
Setting TCP/IP on Client PC.......................................................................21
For Windows 98 .............................................................................21
For Windows NT .............................................................................25
For Windows 2000..........................................................................28
For Windows ME.............................................................................30
For Windows XP .............................................................................31
Configure PC to get IP address from DHCP..................................................32
For Windows 98 .............................................................................32
For Windows NT .............................................................................33
For Windows 2000..........................................................................33
For Windows ME.............................................................................33
iv
Page 5

Contents
For Windows XP .............................................................................34
Renew IP Address on Client PC ..................................................................35
For Windows 98 .............................................................................35
For Windows NT .............................................................................35
For Windows 2000..........................................................................36
For Windows ME.............................................................................36
For Windows XP .............................................................................37
Chapter 5: Web Configuration.......................................................................... 39
Using Web-Based Manager........................................................................39
Outline of Web Manager ..................................................................39
To Have the New Settings Take Effect...............................................40
Quick start..............................................................................................40
System...................................................................................................41
Device Information .........................................................................41
Administrative Security ...................................................................41
Save Configuration .........................................................................43
Upgrade Software...........................................................................43
Reset Router..................................................................................43
Status ....................................................................................................44
DSL Connection..............................................................................44
WAN Connection ............................................................................45
Traffic Counter...............................................................................45
Routing Table.................................................................................45
DHCP Table ...................................................................................46
Wireless Client ...............................................................................46
Configuration ..........................................................................................47
DSL Configuration ..........................................................................47
LAN Configuration ..........................................................................47
WLAN Configuration........................................................................50
WAN Configuration .........................................................................52
IP Route........................................................................................54
DNS..............................................................................................55
Security ........................................................................................57
Virtual Server ................................................................................59
UPnP (Optional) .............................................................................61
Chapter 6: Troubleshooting ............................................................................. 63
Problems with LAN...................................................................................63
Problems with WAN..................................................................................63
Problems with Upgrading ..........................................................................64
Chapter 7: Glossary ......................................................................................... 67
Appendix: Specification ................................................................................... 69
Software .......................................................................................69
Hardware ......................................................................................70
v
Page 6

Before You Use
BBeeffoorree YYoouu UUsse
Thank you for choosing the Asymmetric Digital Subscriber Line (ADSL) Router. With the asymmetric technology,
this device runs over standard copper phone lines and provides a downstream rate at up to 8 Mbps and upstream rate
at up to 1 Mbps. In addition, ADSL allows you to have both voice and data services in use simultaneously all over
one phone line.
Equipped with Ethernet LAN interface, this ADSL Router can be connected to a LAN or a single Ethernet-equipped
PC. A built-in dynamic host configuration protocol (DHCP) server automatically assigns IP addresses to PCs on the
LAN, and with Network Address Translation (NAT) these PCs can communicate with the outside world with only
one public IP. This ADSL Router provides an ideal Internet access solution for the corporate environment, the small
office and the home user.
e
Features
ADSL Compliance
ANSI T1.413 Issue 2
ITU G.992.1 Annex A (G.dmt)
ITU G.992.2 Annex A (G.lite)
ITU G.994.1 (G.hs)
Wireless LAN Featur es
Fully compatible to IEEE 802.11b standard and allow operating range up to 300 meters (open space) and 100
meters (indoor).
The Direct Sequence Spread Spectrum (DSSS) technology is exploited.
Seamless roaming within the 802.11 and 802.11b wireless LAN infrastructure
Low power c onsumption via efficient power management
Support the Association Control function: Only registered wireless clients can be allowed to associate to
wirele s s ADSL route r.
ATM Features
Compliant to ATM Forum UNI 3.1 / 4.0 Permanent Virtual Circuits (PVCs)
Support up to 8 AAL5 Virtual Circuit Channels (VCCs) for UBR, CBR, VBR-rt, and VBR-nrt with traffic
shaping
TR-037 Auto PVC
RFC1483 (RFC2684) LLC Encapsulation and VC Multiplexing over AAL5
RFC2364 Point-to-Point Protocol (PPP) over AAL5
RFC2225 Classical IP and ARP over ATM
RFC2516 PPP over Ethernet: support Relay (Transparent Forwarding) and Client functions
OAM F4/F5 End-to-End/Segment Loopback Cells
*1
(auto-provisioning)
Bridging Features
Supports self-learning bridge specified in IEEE 802.1D Transparent Bridging
Supports up to 4000 learning MAC addresses
Transparent bridging among 10/100 Mb Ethernet and 802.11b Wireless LAN interfaces
vi
Page 7

ADSL Router User Manual
Routing Features
*2
UPnP IGD
(Internet Gateway Device) with NAT traversal capability support
NAT (Network Address Translation) / PAT (Port Address Translation) let multiple users on the LAN to access
the internet for the cost of only one IP address and enjoy various multimedia applications.
ALGs (Application Level Gateways): such as NetMeeting, FTP, Quick Time, mIRC, Real Player, CuSeeMe, etc.
Multiple Virtual Servers (e.g., Web, FTP, Mail servers) can be setup on user’s local network.
Static routes, RFC1058 RIPv1, RFC1723 RIPv2.
DNS Relay and DNS Server
*3
ARP Proxy
Security Features
PAP (RFC1334), CHAP (RFC1994) for PPP session
Firewall support IP packets filtering based on IP address/Port numb er/Protocol type and TCP code field flags
Intrusion Detection provides protection from a number of attacks (such as SYN/FIN/RST Flood, Smurf,
WinNuke, Echo Scan, Xmas Tree Scan, etc)
WEP (Wired Equivalent Privacy) encryption uses RC4 with 64/128 bit key length
Configuration and Management
User-friendly embedded web configuration interface with password protection
Remote management accesses control
Telnet session for local or remote management
HTTP firmware upgrades via web browser GUI directly
Distribute IP addresses to end users via DHCP server provided by ADSL router
SNMPv1/v2c agent with MIB-II, PPP MIB, ADSL Line MIB.
Note:
*1 This is optional. TR-037 Autopvc provisioning can be provided on demand.
*2 This is optional. UPnP IGD and NAT Traversal function can be provided on demand.
*3 This is optional. DNS server can be provided on demand.
System Requirements
For using this, you have to ma ke sure you have the following that installed on the client s:
For Wireless Clients
Operating System must be Windows98/2000/NT/ME/XP
Wireless card installed
Wireless card driver
For Ethernet Clients
Operating System must be Windows98/2000/NT/ME/XP
10/100 Base-T NIC
10/100 Base-T(UTP) network cable
A Hub
For USB Clients
Operating System must be Windows98/2000/NT/ME/XP
USB cable
vii
Page 8

ADSL Router User Manual
Unpacking
Check the contents of the package against the pack contents checklist below. If any of the items is missing, then
contact the dealer from whom the equipment was purchased.
ADSL Router
Power Adapter and Cord
RJ-11 ADSL Line Cable
RJ-45 Ethernet Cable
USB Cable
Quick Start Guide
Driver & Utility Software CD
Depending on the service type your vendor offers, you may be provide with the devices below:
Splitter (for G.dmt version)
Micro filter (for G.lite version)
Subscription for ADSL Service
To use the ADSL Router, you have to subscribe for ADSL service from your broadband service provider. According
to the service type you subscribe, you will get various IP addresses:
Dynamic IP: If you apply for dial-up connection, you will be given an Internet account with username and
password. You will get a d ynamic IP b y dialing up to your ISP.
Static IP address: If you apply for full-time connectivity, you may get either one static IP address or a range of IP
addresses from your ISP. The number of IP addresses varies according to different ADSL
service provider.
viii
Page 9
Chapter 1: Overiew
CChhaapptteerr 11:: OOvveerrvviieew
w
Physical Outlook
FFrroonntt PPaanneel
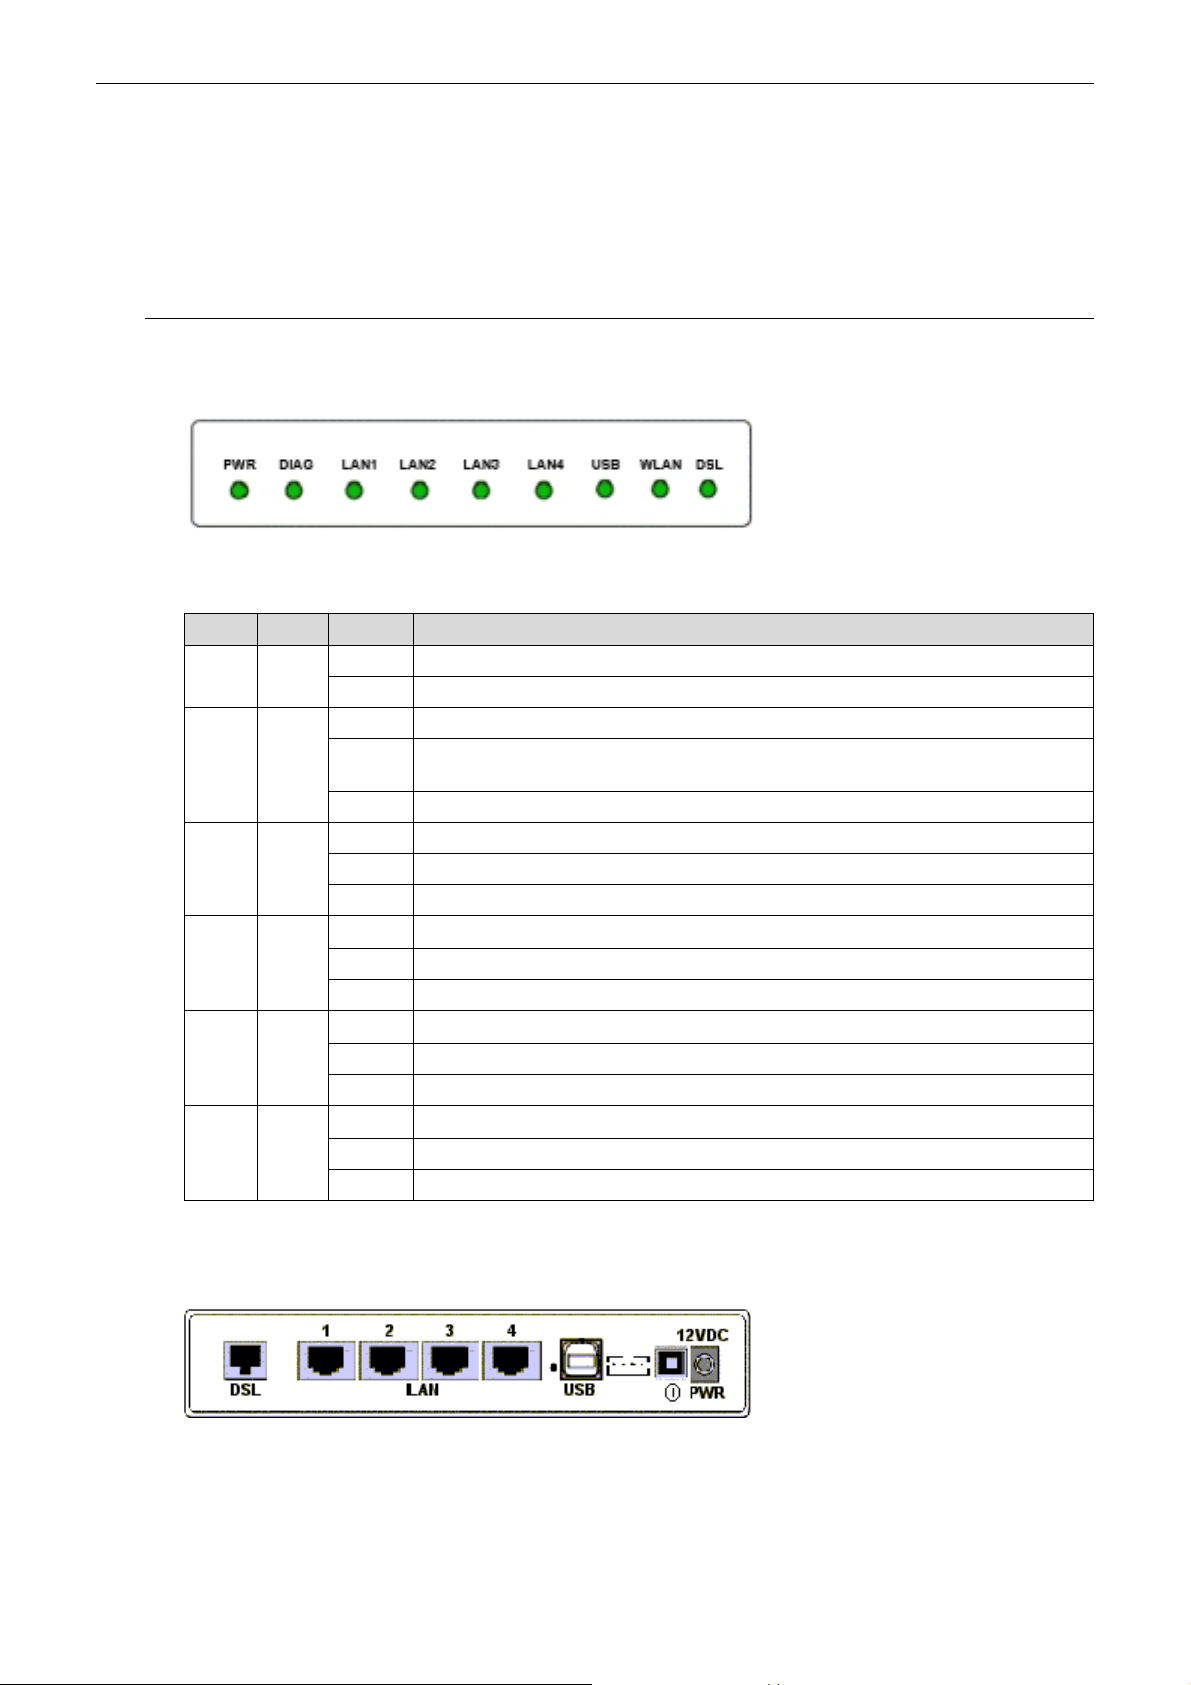
The following illustration shows the front panel of the ADSL Router:
LED Indicators
The ADSL Router is equipped with LEDs on the front panel as described in the table below (from left to right):
LED Color Status Description
DIAG Green
LAN1
to
LAN4
USB Green
WLAN Green
DSL Green
l
Green
Unlit Power off.PWR Green
Solid Power on.
Unlit Power off or initial self-test of the unit is OK.
Blinking When software downloading or updating operation parameters located in FLASH memory
is in progress.
Solid Initial self-test failure or programming FLASH memory failure.
Unlit Power off or no Ethernet carrier is present.
Blinking Ethernet carrier is present and user data is going through Ethernet port.
Solid Ethernet carrier is present.
Unlit Power off or wait for USB connection going up.
Blinking User data is going through USB port.
Solid USB connection is OK.
Unlit Power off or no radio signal (WLAN card is not present or fails to function).
Blinking Traffic is going through Wireless LAN interface.
Solid Wireless LAN interface ready to work.
Unlit Power off or ADSL line connection is handshaking or training is in progress.
Blinking User data is going through ADSL port.
Solid ADSL line connection is OK.
RReeaarr PPaanneel
l
The following figure illustrates the rear panel of your ADSL Router.
DSL: RJ-11 connector
LAN: Ethernet RJ-45 connector
USB: USB Connector
Console: Console connector
1
Page 10

ADSL Router User Manual
: Power switch
12VDC: Power connector
Note: The Router incor porates a four-port switch for co nnection to your local Ethernet ne twork.
The Ethernet ports are marked LOCAL, and are capable of operation at either 10 Mbps (10
BASE-T) or 100 Mbps (100 BASE-Tx).
2
Page 11
Chapter 2: Insta llation
CChhaapptteerr 22:: IInnssttaallllaattiioon
n
Choosing a place for the ADSL Router
1. Place the ADSL Router close to ADSL wall outlet and power outlet for the cable to reach it easily.
2. Avoid placing the device in places where people may walk on the cables. Also keep it away from direct
sunshine or heat sources.
3. Place the device on a flat and stable stand.
Connecting the ADSL Router
Follow the steps below to connect the related devices.
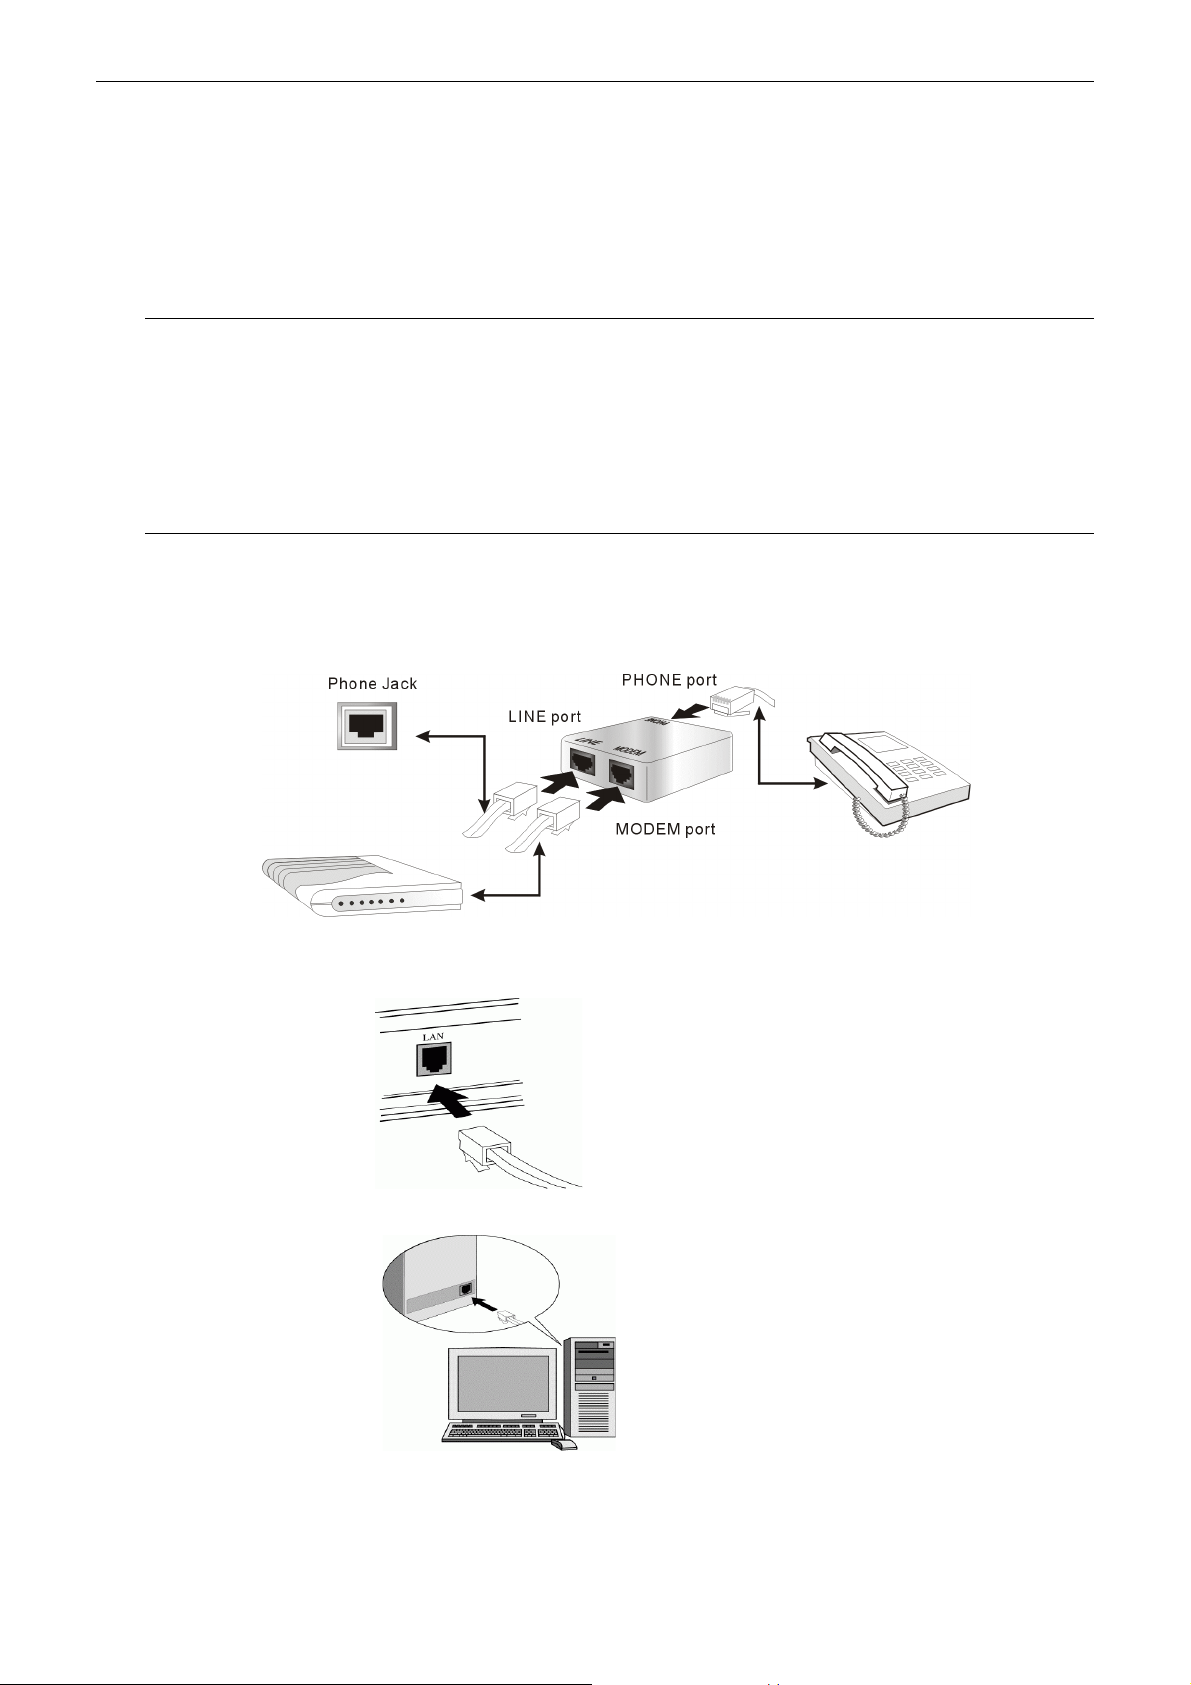
1. Remove the end of the phone line from your phone connector and plug it onto the “LINE” port of the POTS
Splitter. Use another phone line to connect your phone and splitter. Plug this phone line onto the “PHONE” port
of the ADSL splitter, and plug the other end of the line onto your phone.
2. Use the line to connect the ADSL splitter (MODEM port) and your ADSL LAN port.
3. Please attach one end of the Ethernet cable with RJ-45 connector to the LAN port of your ADSL Router.
4. Connect the other end of the cable to the Ethernet port of the client PC.
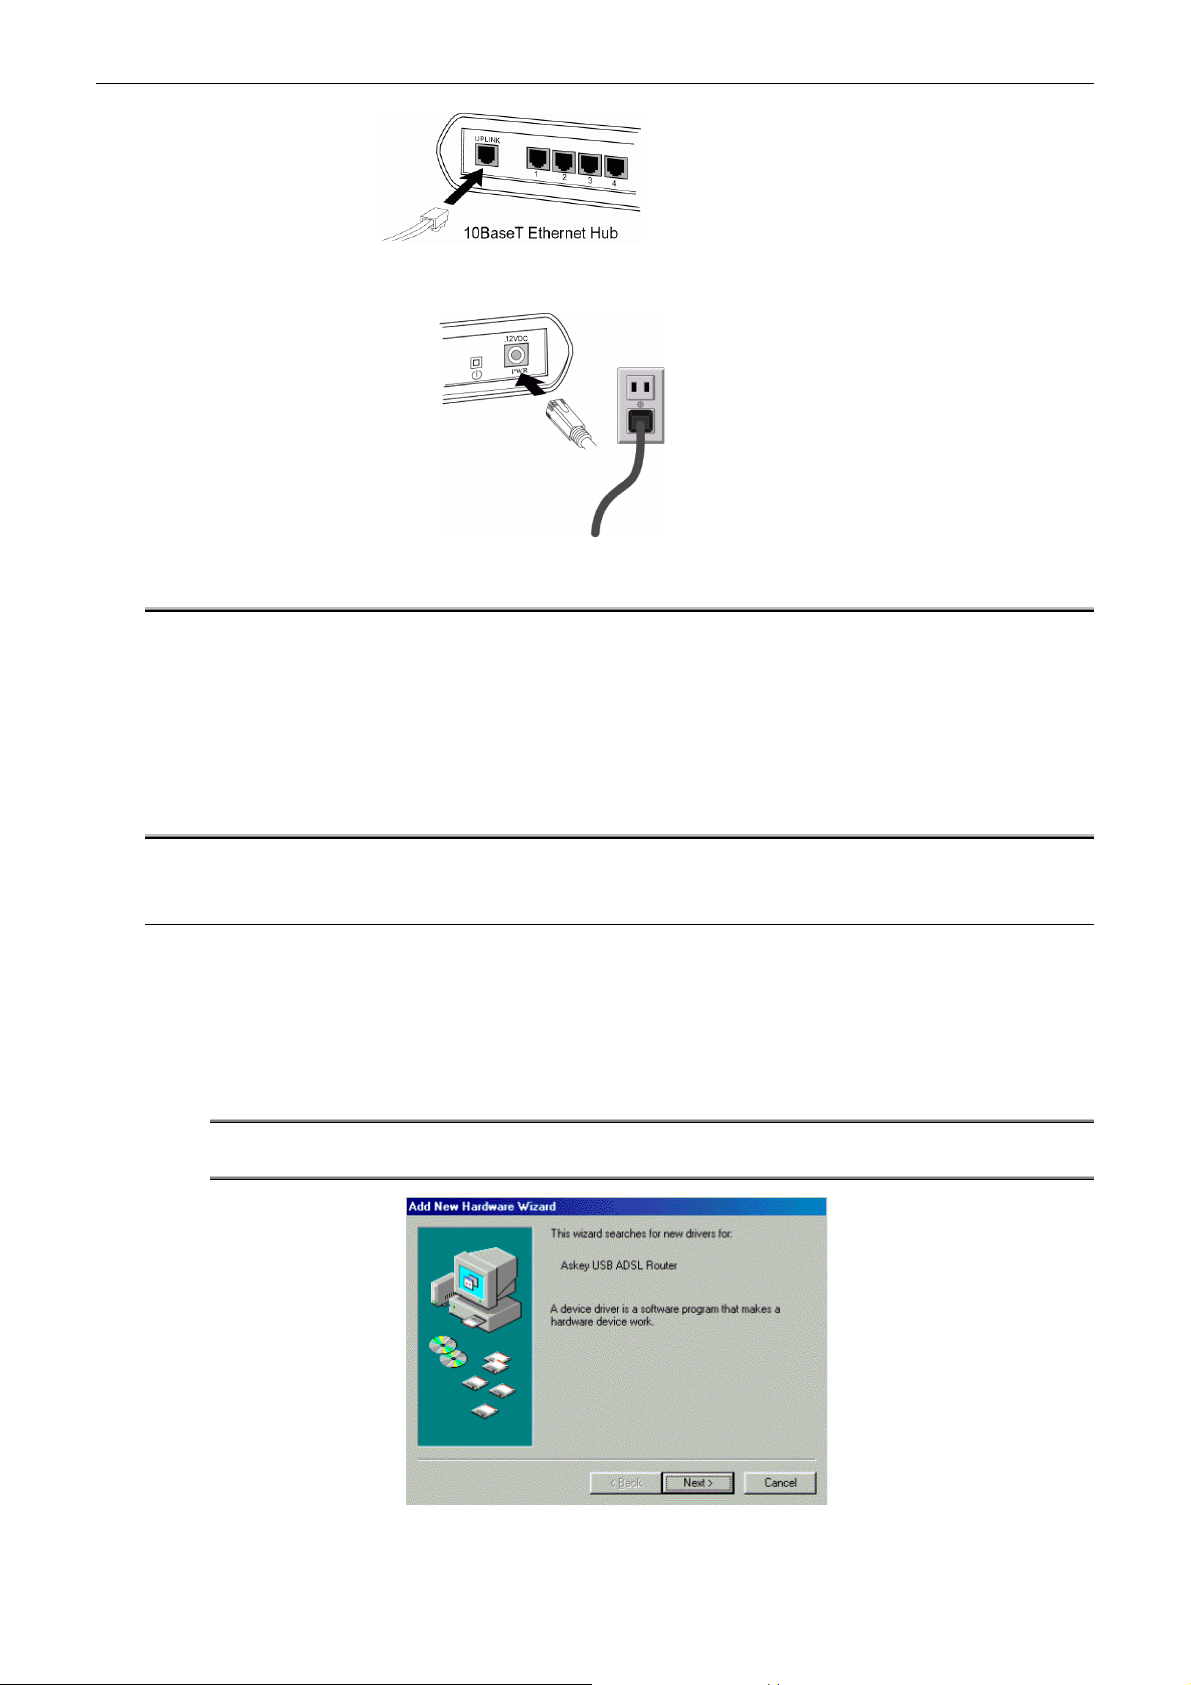
5. If you want to connect to a hub for used by many devices, please connect the other end to the uplink port of the
hub.
3
Page 12
ADSL Router User Manual
6. Connect the supplied power adapter to the PWR port of your ADSL Router, and plug the other end to a power
outlet.
7. Turn on the power switch.
Note:
For Full Rate (G.dmt) s tandard, a POTS Splitter is necessary on subscriber’s premise to keep the
telephone and ADSL signals separated, giving them the capability to provide simultaneous
Internet access and telephone service on the same line. To connect a POT S Splitter:
1. Connect the port Phone to your telephone.
2. Connect the port Modem to your ADSL Router.
3. Connect the port Line to the ADSL wall jack.
USB Driver Installation
If the ADSL Router is connected to a PC through USB interface, you will be prompted for the USB drivers when
plugging the USB cable to the PC. Refer to the relevant operating system to install the USB drivers. Ot herwise, you
may skip this chapter.
FFoorr WWiinnddoowwss 998
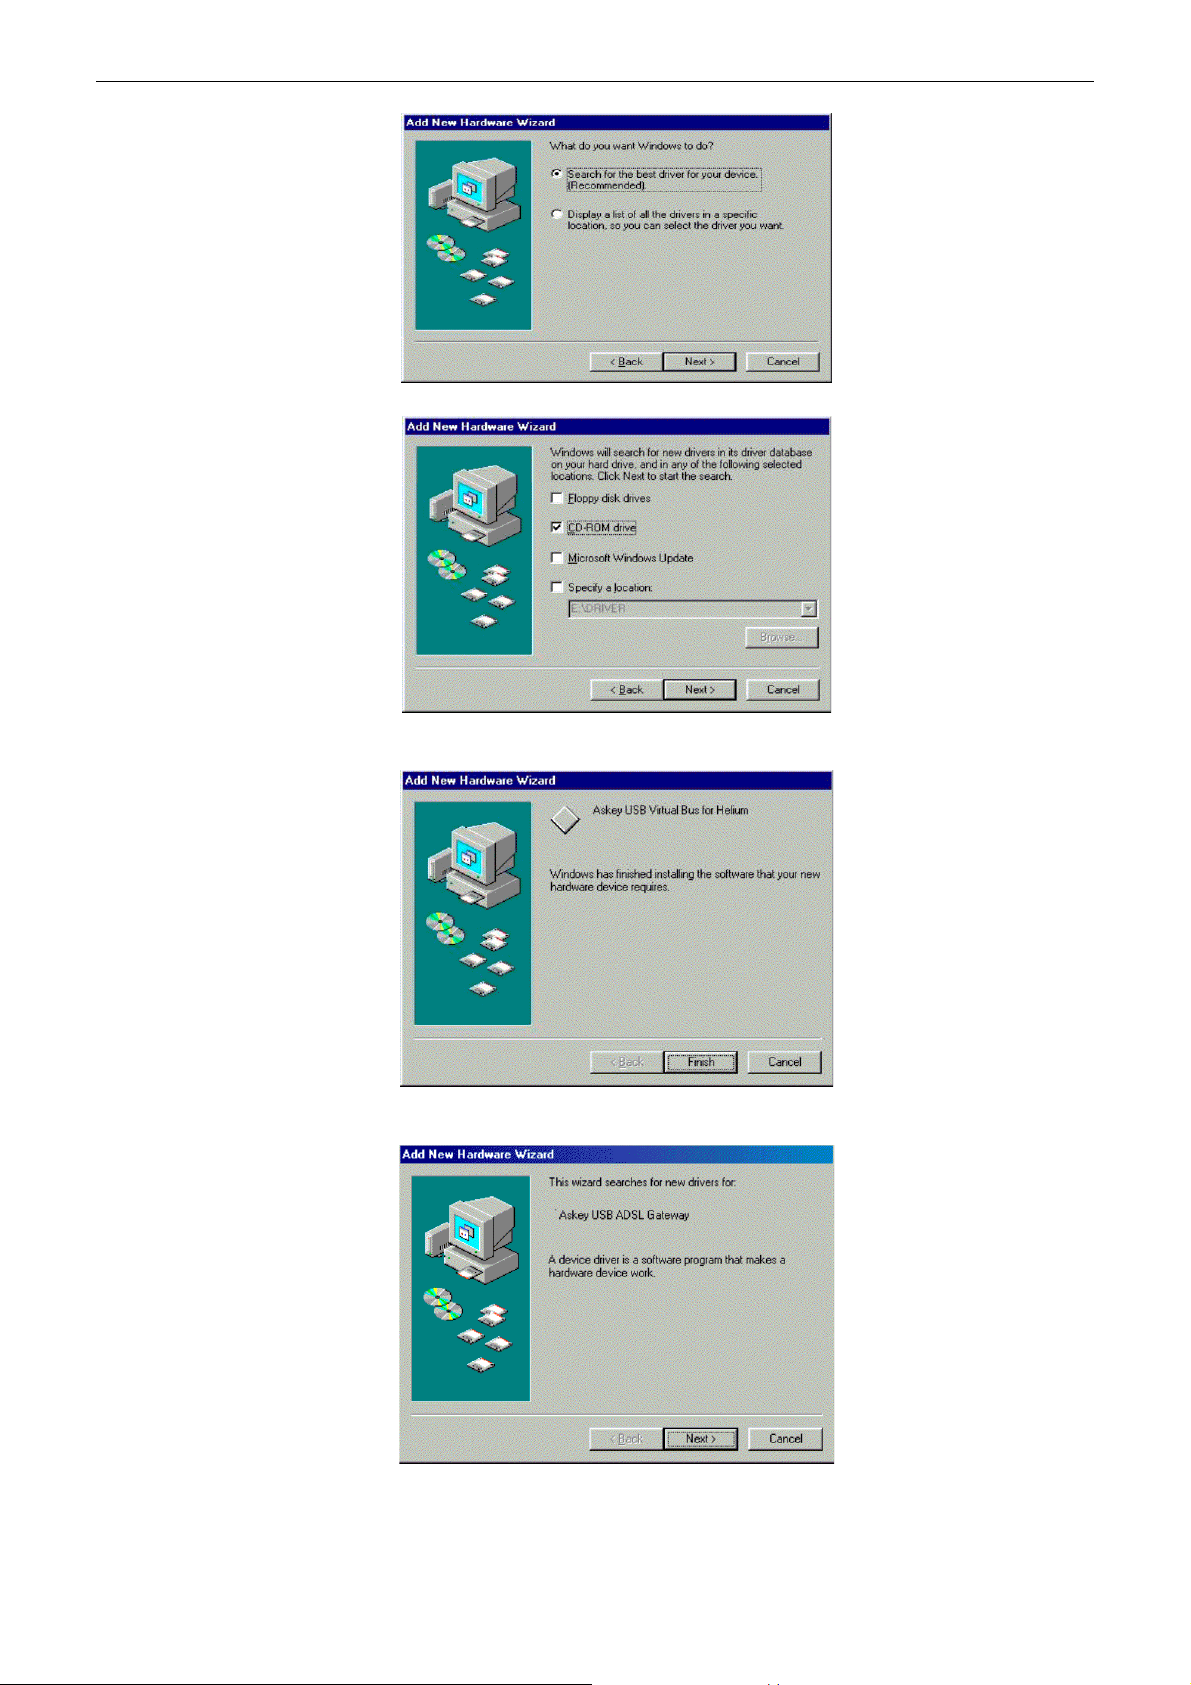
Step 1 When plugging the USB cable to the PC, the system will automatically detect the USB ADSL Router.
When Add New Hardware Wizard window announc es detecting of the USB de vice, click Next.
Note: If the USB device is not detected, check the USB cable between the PC and the
device. Also verify that the device is power on.
8
Step 2 When prompted for driver files, select Search for the best driver… and click Next.
4
Page 13
Chapter 2: Insta llation
Step 3 Insert the Installation CD into your CD-ROM drive. Select CD-ROM drive and click Next .
Step 4 When the system finds the driver, click Next.
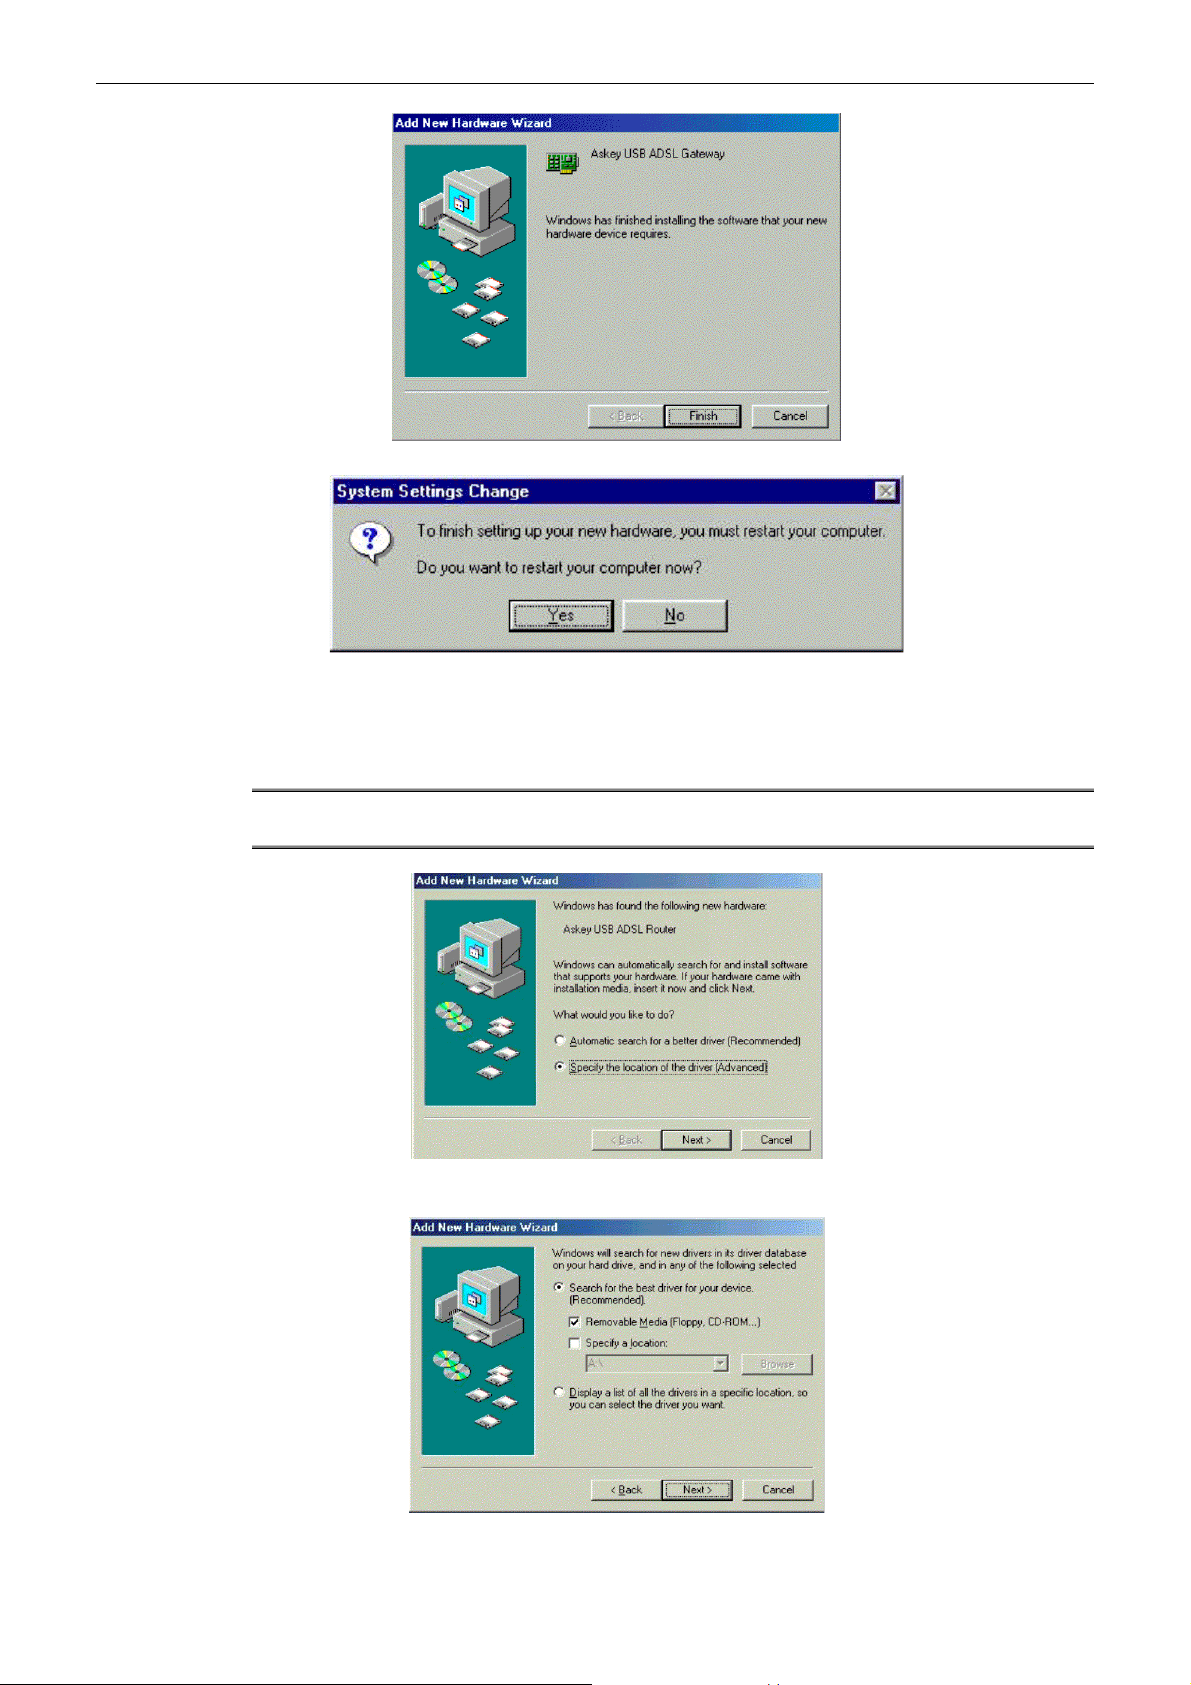
Step 5 When Windows has finished installing the driver required, click Finish.
Step 6 After the USB driver installation, the system will automatically detect the USB ADSL Gatewa y. When
Add New Hardware Wizard window a nnounces detecting of the USB device, click Next.
Step 7 Repeat steps 2-4.
Step 8 Click Finish to complete the installation.
5
Page 14
ADSL Router User Manual
Step 9 When you are prompted with System Settings Change dialog box, click Yes to restart your computer.
FFoorr WWiinnddoowwss MME
Step 1 While plugging the USB cable to the PC, the system will automatically detect the USB ADSL Router.
When Add New Hardware Wizard window announces detecting of the USB devic e, select Specify
the location of the driver (Advanced) and click Next.
Note: If the USB device is not detected, check the USB cable between the PC and the
device. Also verify that the device is power on.
Step 2 Insert the Installation CD into your CD-ROM drive. Select the Search for the best drive for your
device option and then check the Removable Media box. Then click Next.
E
Step 3 While the system finds the driver, click Next.
Step 4 Click Finish to complete the installation.
6
Page 15
Chapter 2: Insta llation
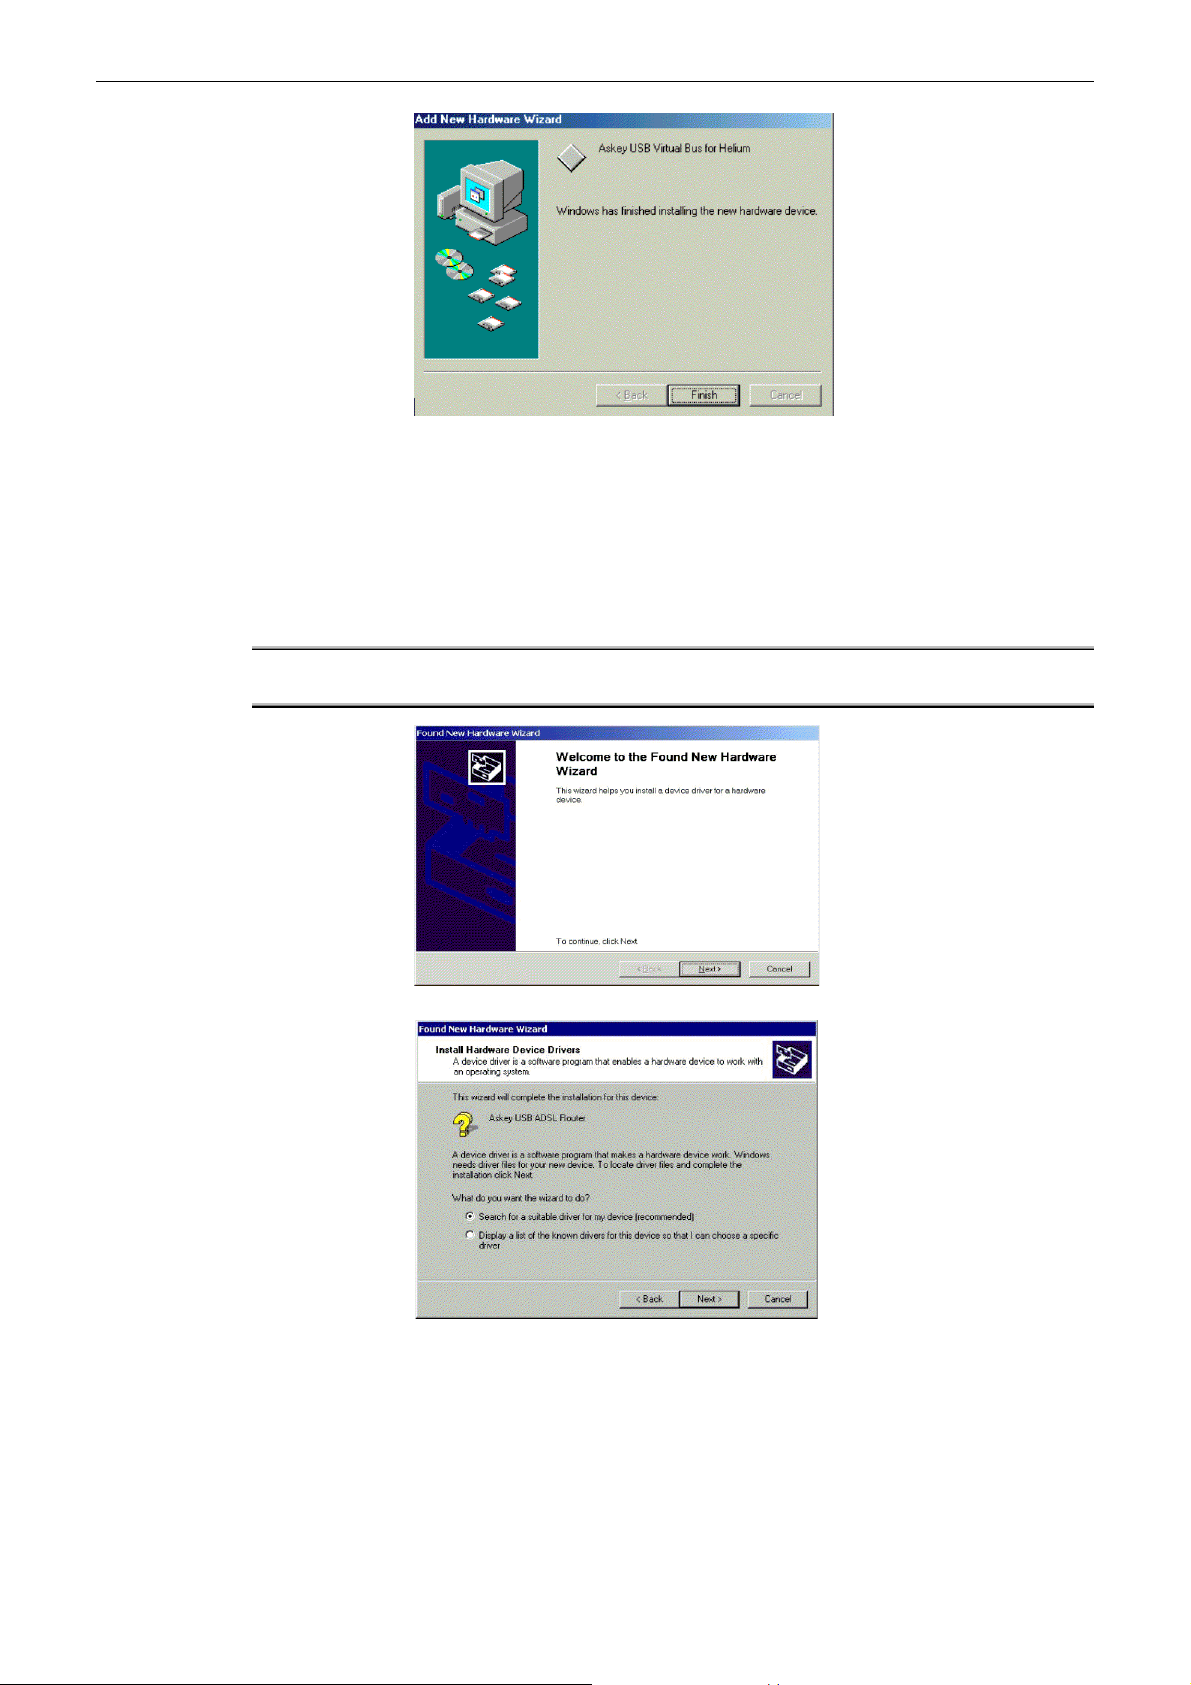
Step 5 After the USB driver installation, the system will automatically detect the USB ADSL Gateway. When
Found New Hardware Wizard window announces detecting of the USB device, click Next.
Step 7 Repeat steps 2-4.
Step 8 Click Finish to complete the installation.
FFoorr WWiinnddoowwss 2200000
Step 1 When plugging the USB cable to the PC, the system will automatically detect the USB ADSL Router.
When Found New Hardware Wizard window announces detecting of the USB device, click Next.
Note: If the USB device is not detected, check the USB cable between the PC and the
device. Also verify that the device is power on.
Step 2 Select Search for a suitable device… and click Next.
0
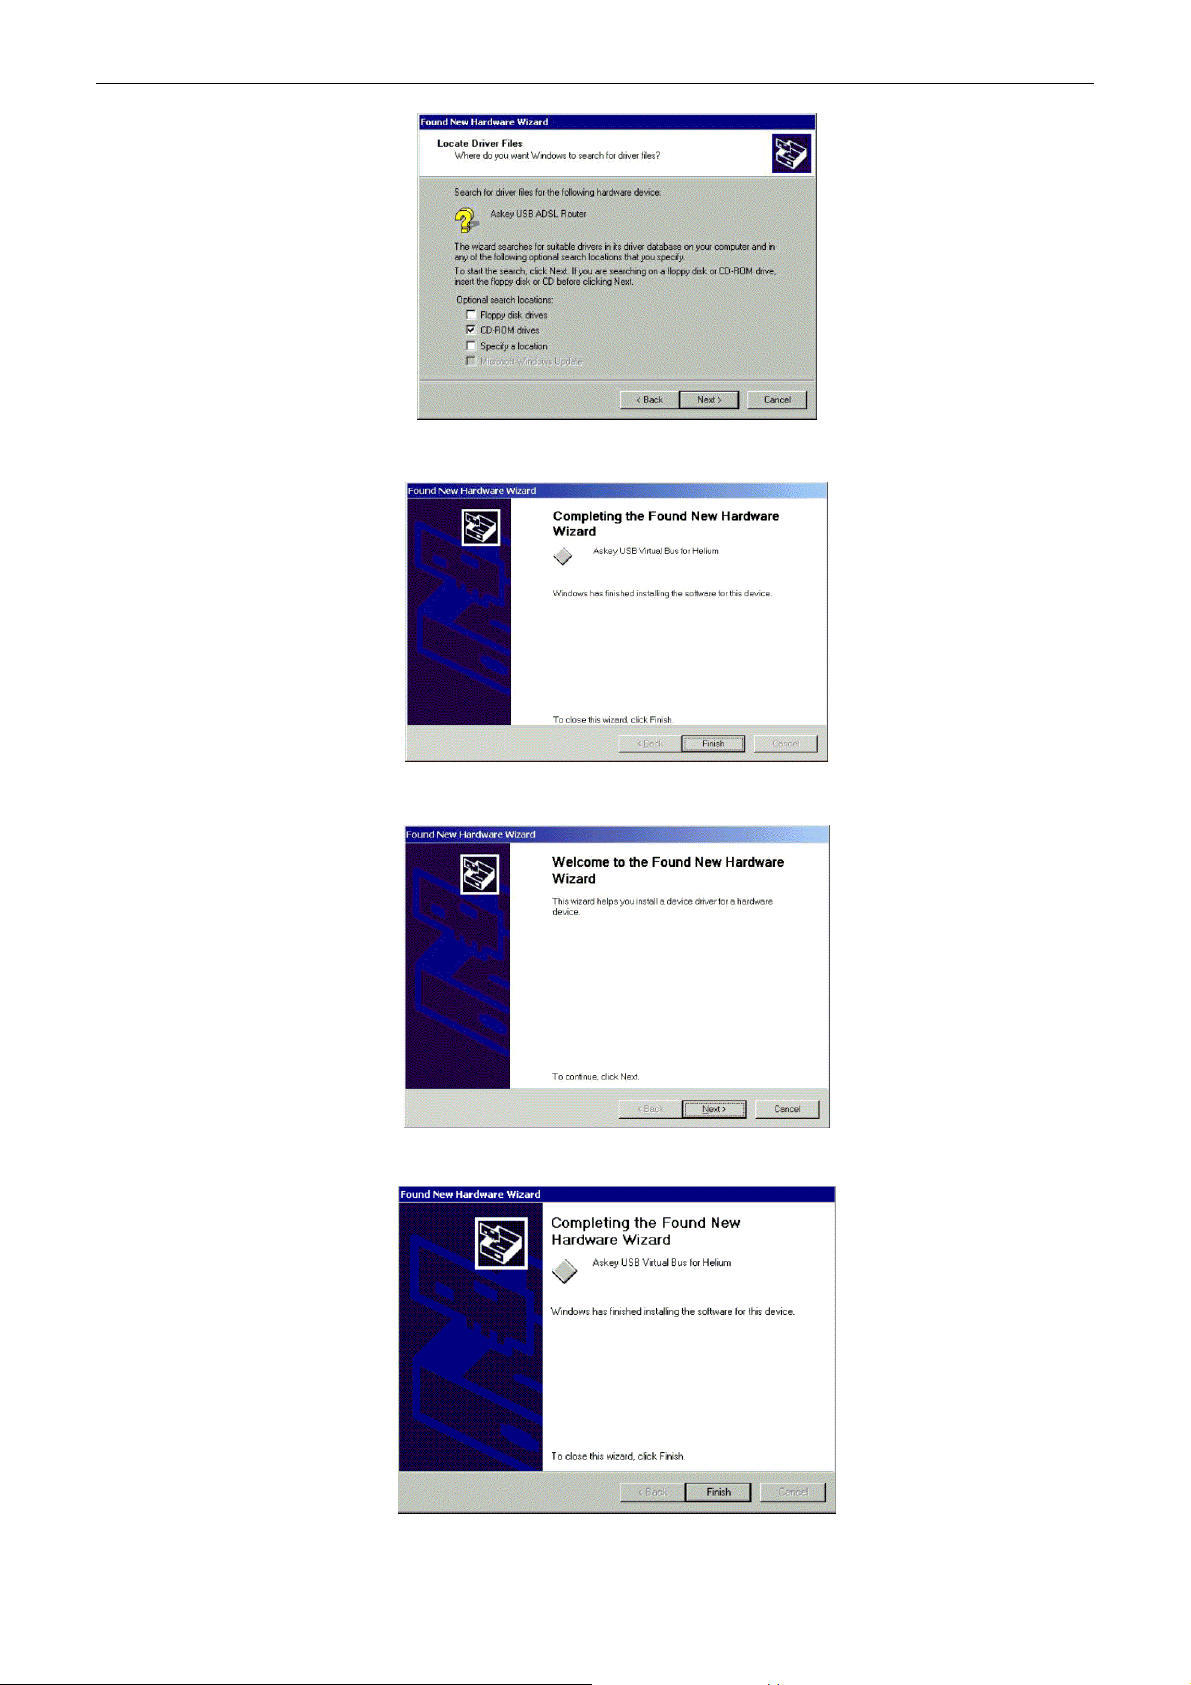
Step 3 When you are prompted for driver files, insert the Installation CD into your CD-ROM drive. Select CD-
ROM drives and click Next.
7
Page 16
ADSL Router User Manual
Step 4 Wilen the system finds the driver, click Next.
Step 5 Click Finish to complete the installation.
Step 6 After USB driver installation, the system will automatically detect the USB ADSL Gateway. When
Found New Hardware Wizard window announces detecting of the USB device, click Next.
Step 7 Repeat steps 2-4.
Step 8 Click Finish to complete the installation.
8
Page 17
Chapter 2: Insta llation
FFoorr WWiinnddoowwss XXP
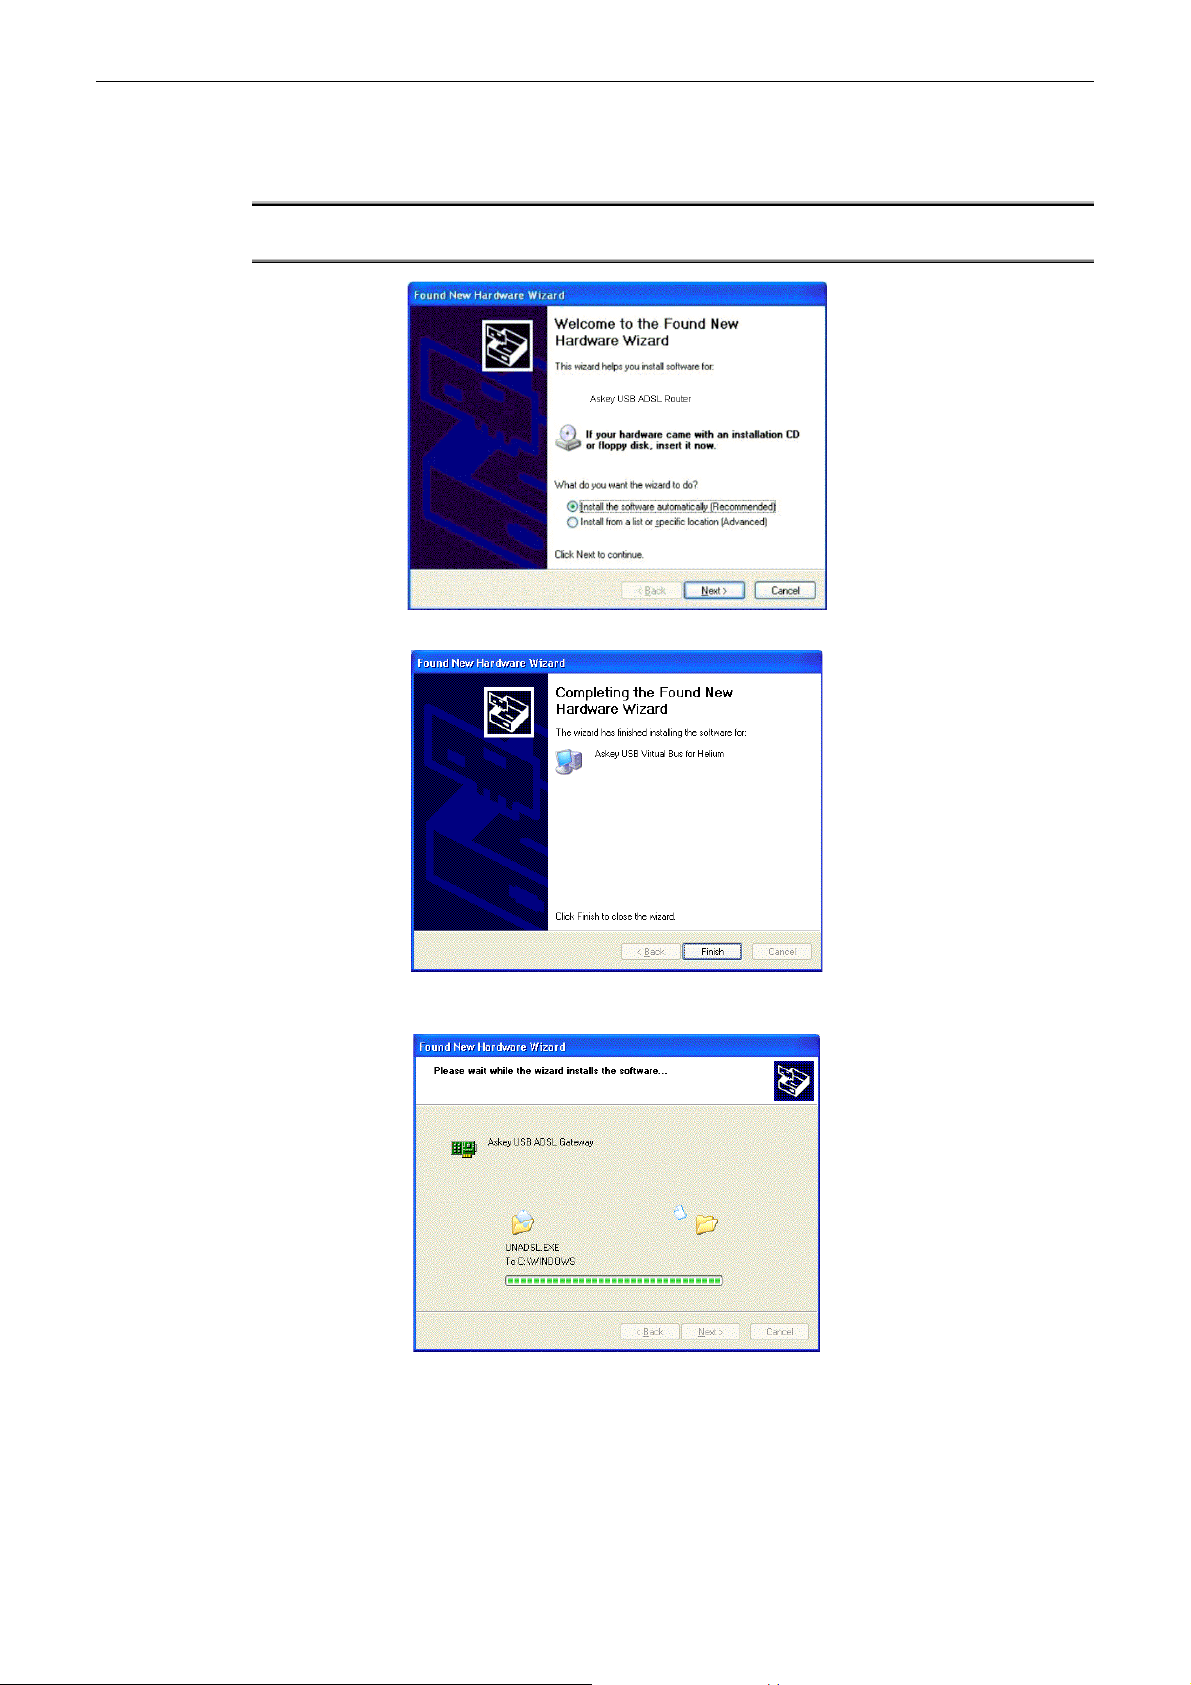
Step 1 When plugging the USB cable to the PC, the system will automatically detect the USB ADSL Router.
When Found New Hardware Wizard window announces detecting of the USB device, click Next.
Note: If the USB device is not detected, check the USB cable between the PC and the
device. Also verify that the device is power on.
Step 2 The Windows will copy the drivers form the Software Utilit y CD.
P
Step 3 When the driver for USB Virtual Bus are copied onto your computer, click Finish for next step.
Step 4 The system will automatically install the driver for USB ADSL Gateway.
Step 5 After Windows XP copied the drivers from the Software Utility CD, click Finish.
9
Page 18

ADSL Router User Manual
Uninstall the USB Driver
FFoorr WWiinnddoowwss 998
Step 1 Click on the Start menu, point to Settings and click on Control Panel.
Step 2 Select Add/Remove Programs.
Step 3 On the Install/Uninstall tab, select Askey USB ADSL Gateway Driver from the list box.
Step 4 Click the Add/Remove button.
Step 5 Later, click Ok.
FFoorr WWiinnddoowwss MME
Step 1 Click on the Start menu, point to Settings and click on Control Panel.
Step 2 Select Add/Remove Programs.
Step 3 On the Install/Uninstall tab, select Askey USB ADSL Gateway Driver from the list box.
Step 4 Click the Add/Remove button.
Step 5 Later, click Ok.
FFoorr WWiinnddoowwss 2200000
Step 1 Click on the Start menu, point to Settings and click on Control Panel.
Step 2 Select Add/Remove Programs.
Step 3 Select Askey USB ADSL Gateway Driver from the list box.
8
E
0
Step 4 Click the Change/Remove button.
Step 5 Later, click Ok.
FFoorr WWiinnddoowwss XXP
Step 1 Click on the Start menu, point to Settings and click on Control Panel.
Step 2 Select Add/Remove Programs.
Step 3 Select Askey USB ADSL Gateway Driver from the list box.
Step 4 Click the Change/Remove button.
Step 5 Later, click Ok.
10
P
Page 19

Chapter 3: Connection Mode
CChhaapptteerr 33:: CCoonnnneeccttiioonn MMoodde
Prior to configuring the ADSL Router, you must decide whether to configure the ADSL Router as a bridge or as a
router. This chapter presents some deployment examples for your reference. Each mode includes its general configure
procedures. For more detailed inforamtion about web configuration, refer to "Web Configuration".
Bridge Mode
Router Mode
MER Mode
PPPoA+ NAT Mode
PPPoE + NAT Mode
Multiple PVCs Mode
For making sure that you can connect the ADSL to your computer well and get into Internet successfully, please
make sure the following first.
1. Make sure you have installed a network interface card onto your computer.
2. Make sure the connection between the ADSL and your computer is OK.
3. Check to see the TCP/IP protocol and set the IP address as “Auto Get IP Address”.
When you are sure all above is Ok, you can open the Browser and type in “192.168.1.1” and start to do the web
configura tion with different connection modes.
e
This chapter is going to introduce the function of each connection mode and tell you the basic configuring steps that
you have to d o. If you did not follow the co nfiguring steps for using these connection modes, you might get some
connection problems and can not connect to Internet well.
11
Page 20
ADSL Router User Manual
A
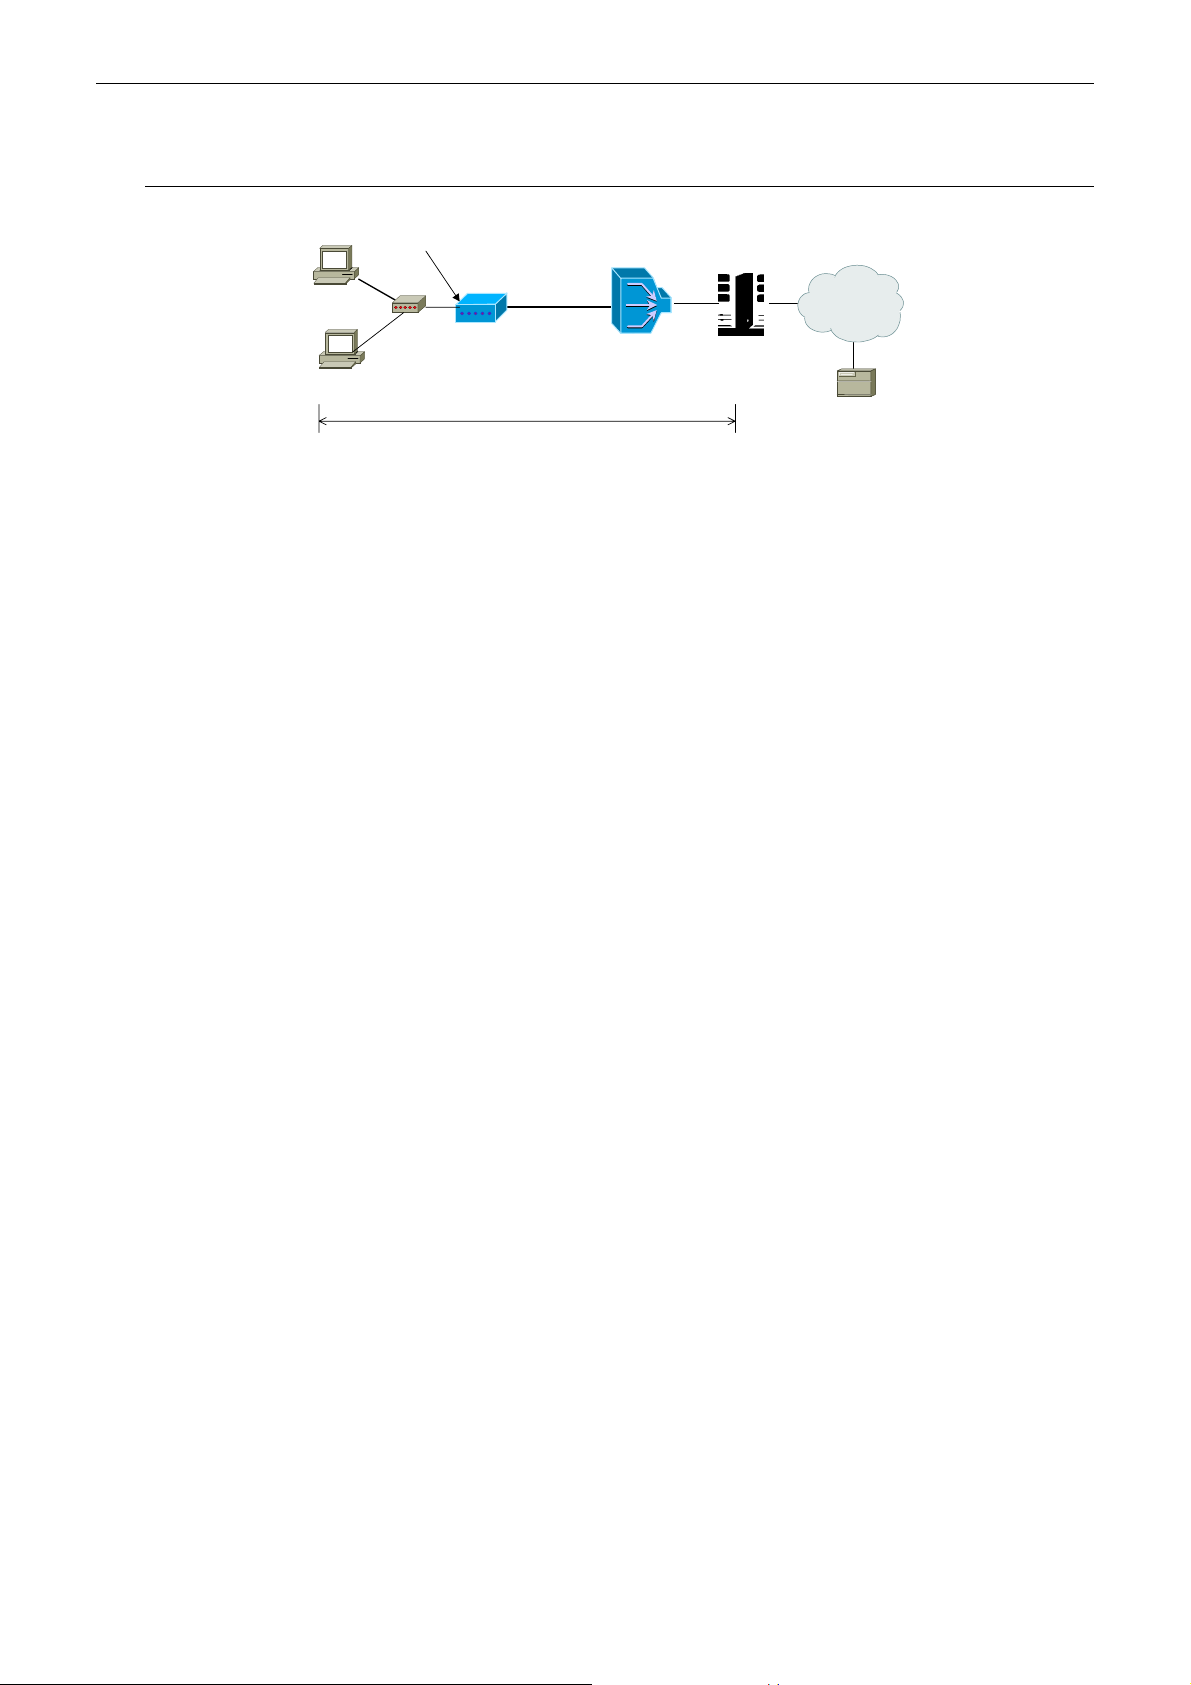
Bridge Mode
PC(s)
PPPoE
Client S/W
Public IP assigned
by BRAS
Default Private IP
192.168.1.1
Bridge
Hub
Mode
ADSL
Router
Loop
DSLAM
STM-1
ISP
BRAS
AA
RADIUS
Server
PPP over Ethernet
BRAS Broadband Remote Access Server
Description:
In this example, the ADSL Router acts as a bridge which bridging PC IP address from LAN to WAN. PC IP address
can be a static public address that is pre-assigned by ISP or a dynamic public address that is assigned by ISP DHCP
server, or can be got from PPPoE software.
Therefore, it does not require a public IP address. It only has a default private IP address (192.168.1.1) for
manageme nt purpose.
Configuration:
1. Choose a client PC and set the IP as 192.168.1.x (x is between 2 and 254) and the gateway as 192.168.1.1. Or
enter the IP address that came from the ISP DHCP server of the Router.
2. Start up your browser and type 192.168.1.1 as the address to enter the web-based manager.
3. Go to Configuration >WAN Configuration > Create a New PVC and select the Data Mode –RFC1483
Bridged. Then click Next button.
4. Enter the VPI/VCI values provided by your ISP and select the encapsulation type as LLC/SNAP or VC MUX.
Then click Apply.
5. Save the config uration from System >Save Configuration and System >Restart to restart your router for
initiating these settings.
12
Page 21

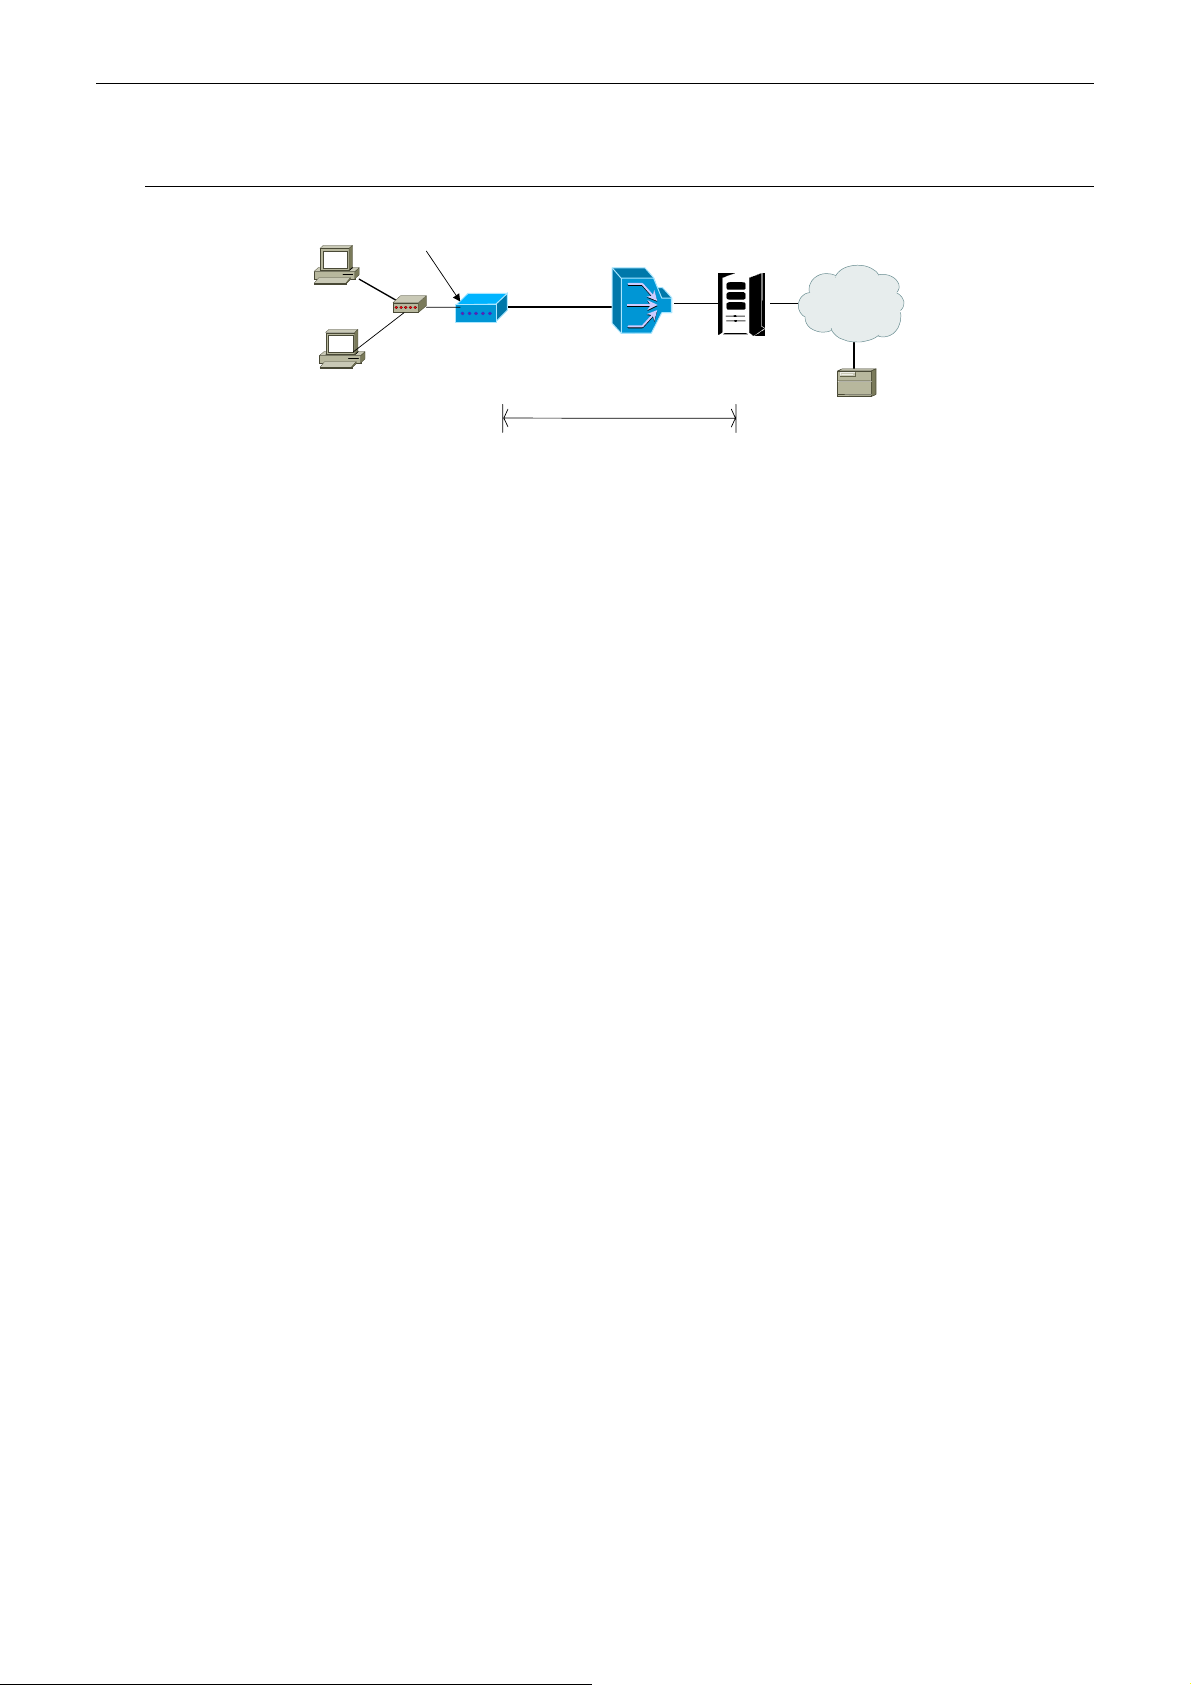
Router Mode
Default Private IP
192.168.1.1 for
Management
ADSL
Hub
Router
Loop
Chapter 3: Connection Mode
STM-1
ISP
BRAS
AAA
RADIUS
Server
PC(s)
Public IP(s)
Pre-assigned
by ISP (+ NAT)
DSLAM
IP over ATM
* BRAS:Broadband Remote Access Server
Description:
In this deployment environment, we make up a private IP network of 192.168.1.1. NAT function is enabled (on
ADSL Router or use another NAT box connected to hub) to support multiple clients to access the Router and some
public servers (WWW, FTP).
If you apply for multiple IP addresses from your ISP, you can assign these public IP addresses to the ADSL Router
and public server, e.g., Web or FTP server. Typically the first IP is network address, the second is used as router IP
address and the last one is subnet broadcasting. Other remaining IP addresses can be assigned to PCs on the LAN.
For example: You are given the IP addresses 10.251.2.0 ~ 10.251.2.7. Then:
10.251.2.0 is network IP address
10.251.2.1 is assigned to router IP address.
10.251.2.7 is subnet broadcasting
10.251.2.2~10.251.2.6 can be assigned to public servers on the LAN.
Configuration:
1. Start up your browser and type 192.168.1.1 as the address to enter this ADSL web-based manager.
2. Go to Configuration > WAN Configuration > Create a new PVC. and select the Data Mode –RFC1483
Routed. Then click Next button.
3. Enter the VPI/VCI values provided by your ISP and select the encapsulation type as LLC/SNAP or VC MUX.
Then click Apply.
4. Set IP configuration for Local WAN IP Address. Choose Specify an IP Address item. Please set as the
following example,
IP Address: 10.3.80.105(should be the one that you get from ISP)
Subnet Mask: 255.255.255.248
Check on Enable NAT on this interface and click Apply.
5. Go to Configuration > LAN Configuratio n and set as the following
Primary IP: 192.168.1.1, Subnet Mask: 255.255.255.0
Secondary IP: 10.3.80.105, Subnet Mask: 255.255.255.248
(should be t he one that you get from ISP )
Then click Apply.
6. Go to Configuration > IP Route and click Create a New Route to add a new route.
Destination Address: leave default
Netmask: leave default
Forward packets to: Interface
Then click Apply.
7. Go to Configuration > DNS and enable DNS Relay setting and click Next. On the DNS Relay web page, enter
the DNS Server IP address, for example 168.95.1.1 (you should get this value from your ISP).
8. Save the config uration from System >Save Configuration and System >Restart to restart your router for
initiating these settings.
13
Page 22

ADSL Router User Manual
9. Then you have set the web configuration successfully. And you can surf on the Internet.
Note:
If you ha ve m ult iple PCs on the LAN , y ou m ay e nab le DH CP func tion on the priv a te or p ublic I P
address. The ADSL Router implements a built-in DHCP server, which assigns IP addresses to the
clients PCs on the LAN.
14
Page 23
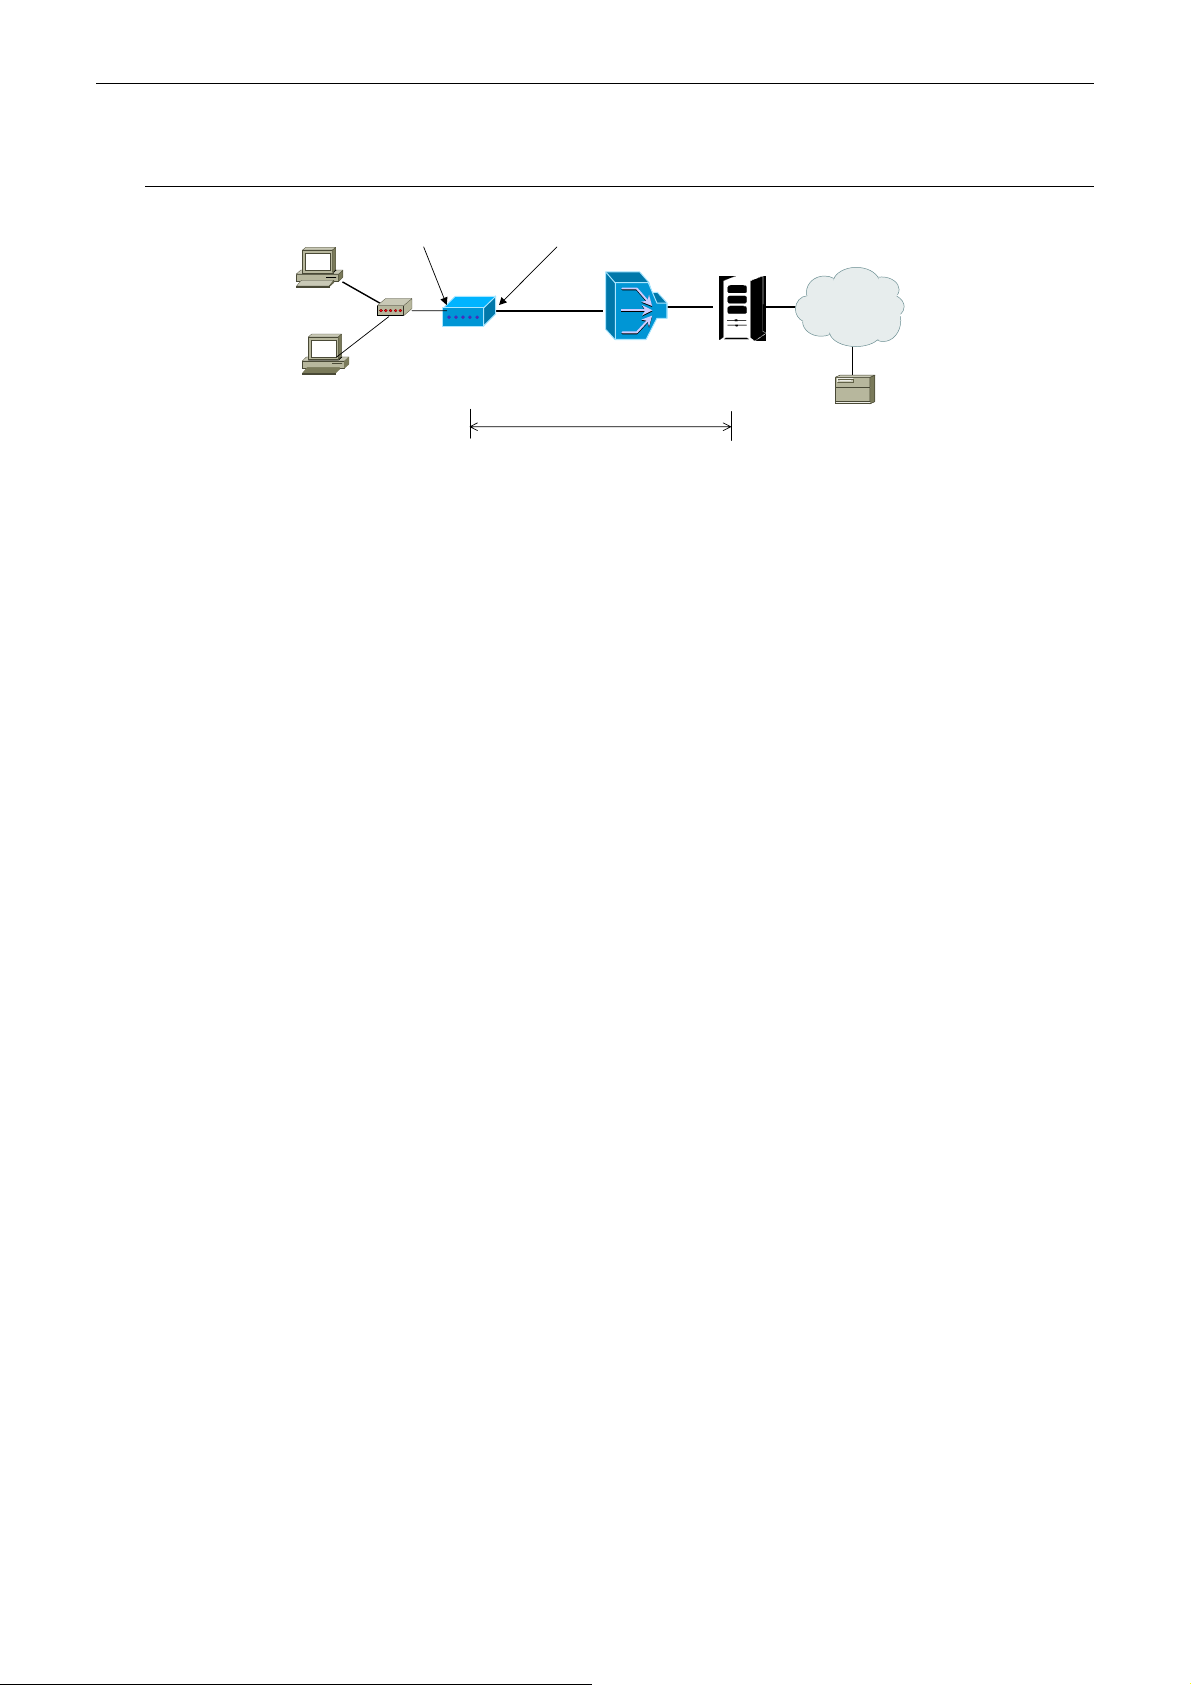
MER Mode
Chapter 3: Connection Mode
PC(s)
PPPoE Clent
S/W
Default Private IP
192.168.1.1
MER
Mode
ADSL
Router
Public IP assigned
by BRAS
Loop
DSLAM
STM-1
ISP
BRAS
AAA
RADIUS
Server
MER
BRAS Broadband Remote Access Server
Description:
In this deployment environment, we make up a private IP network of 192.168.1.1. NAT function is enabled to support
multiple clients to access Internet.
In this example, the ADSL Router acts as NAT device which translate a private IP address into a public address.
Therefore multiple users can share with one public IP address to access Internet through this router. The public
address can be a static public address that is pre-assigned by ISP or a dynamic public address that is assigned by ISP
DHCP server.
Configuration:
1. Start up your browser and type 192.168.1.1 as the address to enter this ADSL web-based manager.
2. Go to Configuration > WAN Configuration > Create a new PVC. and select the Data Mode –RFC1483
MER. Then click Next button.
3. Enter the VPI/VCI values provided by your ISP and select the encapsulation type as LLC/SNAP or VC MUX.
Then click Apply.
4. Set IP configuration for Local WAN IP Address. Choose Specify an IP Address item. Please set as the
following example,
IP Address: 10.3.86.105(should be the one that you get from ISP)
Subnet Mask: 255.255.255.0
5. Go to Configuration > IP Route and click Create a new route to add a new route. Configure the settings as
the following example,
Destination Address: leave default
Netmask: leave default
Forward packets to: Gateway Address: 10.3.86.1 (you should get this value from your ISP)
Then click Apply.
6. Go to Configuration > DNS and enable DNS Relay setting and click Next. On the DNS Relay web page, enter
the DNS Server IP address, for example 168.95.1.1 (you should get this value from your ISP).
7. Save the config uration from System >Save Configuration and System >Restart to restart your router for
initiating these settings.
8. Then you have set the web configuration successfully. And you can surf on the Internet.
15
Page 24
ADSL Router User Manual
PPPoA + NAT Mode
192.168.1.3
Ethernet
PC(s)
192.168.1.2
Default Private IP
192.168.1.1
ADSL
Hub
* BRAS:Broadband Remote Access Server
Router
PPP + NAT +
DHCP on
Private LAN
Dynamic Public IP
assigned by BRAS
Loop
DSLAM
PPP over ATM
STM-1
ISP
BRAS
AAA
RADIUS
Server
Description:
In this deployment environment, the PPPoA session is between the ADSL WAN interface and BRAS. The ADSL
Router gets a public IP address from BRAS when connecting to DSLAM. The multiple client PCs will get pr ivate IP
address from the DHCP server enabled on private LAN. The enabled NAT mechanism will translate the IP
information for clients to access the Internet.
Configuration:
1. Start up your browser and type 192.168.1.1 as the address to enter this ADSL web-based manager.
2. Go to Configuration > WAN Configuration > Create a new PVC. and select the Data Mode – PPPoA. Then
click Next button.
3. Enter the VPI/VCI values provided by your ISP and select the encapsulation type as LLC/SNAP or VC MUX.
4. Fill in the User Name and Password (you should get from ISP). Check on Enable NAT on this interface and
click Apply.
5. Go to Configuration > DNS and enable DNS Relay setting and click Next. On the DNS Relay web page, enter
the DNS Server IP address, for example 168.95.1.1 (you should get this value from your ISP).
6. Save the configuration by execute System >Save and System >Restart to restart your router for initiating these
settings.
16
Page 25

PPPoE + NAT Mode
Chapter 3: Connection Mode
192.168.1.3
Ethernet
PC(s)
192.168.1.2
Default Private IP
192.168.1.1
ADSL
Hub
Router
PPPoE + NAT +
DHCP on
Private LAN
Loop
DSLAM
PPP over Ethernet
* BRAS:Broadband Remote Access Server
STM-1
ISP
BRAS
AAA
RADIUS
Server
Description:
In this deployment environment, the PPPoE session is between the ADSL WAN interface and BRAS. The ADSL
Router gets a public IP address from BRAS when connecting to DSLAM. The multiple client PCs will get pr ivate IP
address from the DHCP server enabled on private LAN. The enabled NAT mechanism will translate the IP
information for clients to access the Internet.
Configuration:
1. Start up your browser and type 192.168.1.1 as the address to enter this ADSL web-based manager.
2. Go to Configuration > WAN Configuration > Create a new PVC. and select the Data Mode – PPPoE. Then
click Next button.
3. Enter the VPI/VCI values provided by your ISP and select the encapsulation type as LLC/SNAP or VC MUX.
4. Fill in the User Name and Password (you should get from ISP). Check on Enable NAT on this interface and
click Apply.
5. Go to Configuration > DNS and enable DNS Relay setting and click Next. On the DNS Relay web page, enter
the DNS Server IP address, for example 168.95.1.1 (you should get this value from your ISP).
6. Save the configuration by execute System >Save and System >Restart to restart your router for initiating these
settings.
17
Page 26

ADSL Router User Manual
A
PPPoE Relay
PC(s)
PPPoE
Client S/W
Default Private IP
192.168.1.1
Bridge
Hub
Mode
ADSL
Router
Loop
DSLAM
STM-1
ISP
BRAS
AA
RADIUS
Server
PPP over Ethernet
BRAS Broadband Remote Access Server
Description:
In this example, the ADSL Router acts as a bridge which bridging PC IP address from LAN to WAN. Client PCs on
the LAN should be equipped with PPPoE software to get public IP address from BRAS.
That is to say, the router does not require a public IP address. It only has a default private IP address (192.168.1.1) for
manageme nt purpose.
Configuration:
1. Choose a client PC and set the IP as 192.168.1.x (x is between 2 and 254) and the gateway as 192.168.1.1. Or
enter the IP address that came from the ISP DHCP server of the Router.
2. Start up your browser and type 192.168.1.1 as the address to enter the web-based manager.
3. Go to Configuration >WAN Configuration > Create a New PVC and select the Data Mode –RFC1483
Bridged. Then click Next button.
4. Enter the VPI/VCI values provided by your ISP and select the encapsulation type as LLC/SNAP or VC MUX.
Then click Apply.
5. Save the config uration from System >Save Configuration and System >Restart to restart your router for
initiating these settings.
6. Run Windows PPPoE client application. Fill in the User Name and Password (you should get from ISP).
7. Click Connect.
18
Page 27

Multiple PVCs Mode
Chapter 3: Connection Mode
PC(s)
ADSL
Hub
Router
Public IP(s)
Pre-assigned by ISPs
(PPPoE)
PVC2
Loop
PVC1
(IPoA)
DSLAM
STM-1
Service
Aggregator
RADIUS
Server
128.12.0.0
PVC2b
PVC1a
140.196.0.0
ISP
ISP
a
b
Description:
As this ADSL Router supports multiple PVCs in the ADSL loop, you are allowed to configure several logical
channels in one physical loop. You can use mixed encapsulation types by applying them to different PVCs. When the
system starts up, it will connect to CO site through the PVCs according to the sequence they are created. Therefore
the default route will be the last PVC you created. You can also modify the default route manually from the IPRoute
page.
The traffic from CPE side will be sent to different PVCs according to the routing rules.
Configuration:
1. Start up your browser and type 192.168.1.1 as the address to enter this ADSL web-based manager.
2. Create the first PVC (e.g. PVC1) using the RFC1483 data mode.
Refer to the section of “Router Mode” for details.
3. Create the second PVC (e.g.PVC2) using the PPPoE data mode. Refer to the section of “PPPoE + NAT
Mode” for details.
4. Save the configuration by execute System >Save and System >Restart to restart your router for initiating these
settings.
19
Page 28

ADSL Router User Manual
20
Page 29

Chapter 4:Configuration
CChhaapptteerr 44:: CCoonnffiigguurraattiioon
In order to access the Internet through the router, each host on your network must install/setup TCP/IP. Please follow
the steps below for select a network adapter.
n
Setting TCP/IP on Client PC
To access the ADSL Router via Ethernet, the host computer must meet the following requirements:
With Ethernet network interface.
Must have TCP/IP installed.
Set client PC with obtain an IP address automatically or set fix IP address.
With a web browser installed: Internet Explorer 5.x or later.
The ADSL Router is configured with the default IP address of 192.168.1.1 and subnet mask of
255.255.255.0. As the DHCP server is Enable by default, The DHCP clients should be able to access the
ADSL Router. Or you could assign an IP address to the host PC first for initial configuration.
You also can manage the ADSL Router through a web browser-based manager: ADSL ROUTER CONTROL
P ANEL. The ADS L Router manage r uses the HTTP protocol via a web browser to a llow you to set up and manage
the device.
To configure the device via web browser, at least one properly-configured PC must be connected to the network
(either connected directly or through an external hub/switch to the LAN port of the device).
If TCP/IP is not already installed, follow the steps below for installation.
FFoorr WWiinnddoowwss 998
1. Click on the Start menu, point to Settings and click on Control Panel.
2. Double-click the Network icon.
8
21
Page 30

ADSL Router User Manual
3. The Network window appears. On the Configuration tab, check out the list of installed network components.
Option 1: If you have no TCP/IP protocol, click Add.
Option 2: If you have TCP/IP protocol, go to Step 6.
Your network
interface card.
4. Highlight Protocol and click Add.
Check out if TCP/IP
for your NIC is
installed or not.
22
Page 31

Chapter 3 Connection Mode
5. On the left side of the windows, highlight Microsoft and then select TCP/IP on the right side. Then click OK.
6. When returning to Network window, highlight TCP/IP protocol for your NIC and click Properties.
7. On IP Address tab:
Enable Specify an IP address option. Enter the IP Address: 192.168.1.x (x is between 2 and 254) and Subnet
Mask: 255.255.255.0 as in figure below. On Gateway tab: Add a gateway IP address: 192.168.1.1.
8. When returning to Network window, click OK.
23
Page 32

ADSL Router User Manual
9. Wait for Windows copying files.
10. When prompted with System Settings Change dialog box, click Yes to restart your computer.
24
Page 33

Chapter 3 Connection Mode
FFoorr WWiinnddoowwss NNT
1. Click Start, point to Settings, and then click Control Panel.
2. Double-click the Network icon.
T
3. The Network window appears. On the Protocols tab, check out the list of installed network components.
Option 1: If you have no TCP/IP Protocol, click Add.
Option 2: If you have TCP/IP Protocol inst alled, go to Step 7.
4. Highlight TCP/IP Protocol and click OK.
25
Page 34

ADSL Router User Manual
5. Click Yes to use DHCP.
6. Insert the Windows NT CD into your CD-ROM drive and type the location of the CD. Then click Continue.
7. Returning to the Network window, you will find the TCP/IP Protocol among the list. Select TCP/IP Protocol
and click Properties.
26
Page 35

Chapter 3 Connection Mode
8. Enable Specify an IP address option. Enter the IP Address: 192.168.1.x (x is between 2 and 254) and Subnet
Mask: 255.255.255.0 and Default Gateway: 192.168.1.1 as in figure below.
9. When returning to Network window, click Close.
10. When prompted with Network Settings Change dialog box, click Yes to restart your computer.
27
Page 36

ADSL Router User Manual
FFoorr WWiinnddoowwss 2200000
1. From the Start menu, point to Settings and then click Network and Dial-up Connections.
2. Right-click the Local Area Connection icon and then click Properties.
0
3. On the General tab, check out the list of installed network components.
Option 1: If you have no TCP/IP Protocol, click Install.
Option 2: If you have TCP/ IP Protocol, go to Step 6.
4. Highlight Protocol and then click Add.
28
Page 37

5. Click Internet Protocol(TCP/IP) and then click OK.
Chapter 3 Connection Mode
6. When returning to Local Area Connection Properties window, highlight Internet Protocol (TCP/IP) and then
click Properties.
7. Under the General tab, enable Use the following IP Address. Enter the IP address: 192.168.1.x (x is between
2 and 254), Subnet Mask: 255.255.255.0 and Default gateway: 192.168.1.1. Then click OK. When prompted
to restart your computer, reboot it to enable the settings.
29
Page 38

ADSL Router User Manual
FFoorr WWiinnddoowwss MME
Step 1 Click on the Start menu, point to Settings and click on Control Panel.
Step 2 Double-click the Network icon.
Step 3 The Network window appears. On the Configuration tab, check out the list of installed network
components.
Step 4 Highlight Protocol and click Add.
Step 5 On the left side of the windows, highlight Microsoft and then select TCP/IP on the right side. Then
click OK.
Step 6 While returning to Network window, hi ghlight TCP/IP protocol for your NIC and click Properties.
E
Option 1: If you have no TCP/IP protocol, click Add.
Option 2: If you have TCP/IP protocol, go to Step 6.
30
Step 7 On the IP Address tab, select Obtain an IP address automatically. Then click OK.
Page 39

Chapter 3 Connection Mode
Step 8 While returning to the Network window, click OK.
Step 9 Wait for Windows copying files.
Step 10 When prompted with the System Settings Change dialog box, click Yes to restart your computer.
FFoorr WWiinnddoowwss XXP
Step 1 From the Start menu, point to Control Panel and then click Network and Internet Connections.
Step 2 Click Network Connection and then click Properties.
Step 3 On the General tab, check out the list of installed network components.
Step 4 Highlight Protocol and then click Add.
Step 5 Click Internet Protocol(TCP/IP) and then click OK.
Step 6 On the Local Area Connection Properties window, highligh t Internet Protocol (TCP/IP) and then
click Properties.
P
Option 1: If you have no TCP/IP Protocol, click Install.
Option 2: If you have TCP/ IP Protocol, go to Step 6.
Step 7 Under the General tab, enable Obtain an IP address automatically and then click OK. When
prompted to restart your computer, reboot it to enable the settings.
31
Page 40

ADSL Router User Manual
Configure PC to get IP address from DHCP
If your ADSL Router operates as a DHCP server for the client PCs on the LAN, you should configure the client PCs
to obtain a dynamic IP address. Please follow the previous section to install TCP/IP component. Only that you do not
need to specify an IP address when configuring TCP/IP properties.
The following section describe the procedures for CPEs to get IP address:
FFoorr WWiinnddoowwss 998
On the IP Address tab, select Obtain an IP address automatically. Then click OK.
8
32
Page 41

Chapter 3 Connection Mode
FFoorr WWiinnddoowwss NNT
On the IP Address tab, click on the drop-down arrow of Adapter to select required adapter. Enable Obtain an IP
address from a DHCP server and then click OK.
When prompted with the message below, click Yes to continue.
T
FFoorr WWiinnddoowwss 2200000
Enable Obtain an IP address automatically and then click OK.
FFoorr WWiinnddoowwss MME
On the IP Address tab, select Obtain an IP address automatically. Then click OK.
0
E
33
Page 42

ADSL Router User Manual
FFoorr WWiinnddoowwss XXP
On the IP Address tab, select Obtain an IP address automatically. Then click OK.
P
34
Page 43

Chapter 3 Connection Mode
Renew IP Address on Client PC
There is a chance that your PC does not renew its IP address after the ADSL Router is on line and the PC can not
access the Internet. Please follow the procedures below to renew PC’s IP address.
FFoorr WWiinnddoowwss 998
1. Select Run from the Start menu.
2. Type winipcfg in the dialog box and the click OK.
8
3. When the figure below appears, click Release and then Renew to get an IP address.
FFoorr WWiinnddoowwss NNT
1. Select Run from the Start menu.
T
35
Page 44

ADSL Router User Manual
2. Type cmd in the dialog box and the click OK.
3. Type ipconfig at prompt. Then you will see the IP information from DHCP server.
4. If you want to ge t a new IP addr ess, type ipconfig /release to release the previous IP address and then
type ipconfig /renew to get a new one.
FFoorr WWiinnddoowwss 2200000
1. From the Start menu, point to Programs, Accessories and then click Command Prompt.
2. Type ipconfig at prompt. Then you will see the IP information from DHCP server.
3. If you want to ge t a new IP addr ess, type ipconfig /release to release the previous IP address and then
type ipconfig /renew to get a new one.
0
FFoorr WWiinnddoowwss MME
1. Select Run from the Start menu.
2. Type winipcfg in the dialog box and the click OK.
3. When the figure below appears, click Release and then Renew to get an IP address.
36
E
Page 45

Chapter 3 Connection Mode
FFoorr WWiinnddoowwss XXP
1. From the Start menu, point to Programs, Accessories and then click Command Prompt.
2. Type ipconfig at prompt. Then you will see the IP information from DHCP server.
3. If you want to ge t a new IP addr ess, type ipconfig /release to release the previous IP address and then
type ipconfig /renew to get a new one.
P
37
Page 46

ADSL Router User Manual
38
Page 47

Chapter 5: Web Configuration
CChhaapptteerr 55:: WWeebb CCoonnffiigguurraattiioon
n
Using Web-Based Manager
Once your host PC is properly configured, please proceed as follows:
1. Start your web browser and type the private IP address of the ADSL Router in the URL field: 192.168.1.1.
2. After connecting to the device, you will be prompted to enter username and password. By default, the username
is admin and the password is admin.
If you login successfully, the main page of ADSL ROUTER-CONTROL PANEL appears. From now on the ADSL
Router acts as a web server sending HTML pages/forms on your req uest. You can fill in these pages/forms and apply
them to the ADSL Router.
OOuuttlliinnee ooff WWeebb MMaannaaggeer
The home page is composed of 3 areas:
r
Title: It indicates the title of this management interface.
Main Menu: Includes Quick start, System, Status, and Configuration.
Quick Start: Allows you to select some pre defined profile to have basic configuration.
System: The system menu includes the sub-menus of Device Info, Administration, Save
Configuration, Upgrade Firmware and Reset Router.
Status: Displays the current status of the ADSL Router, including DSL Connection, WAN
39
Page 48

ADSL Router User Manual
Connection, Traffic Counter, Routing Table, DHCP Table and Wireless Client.
Configuration: It displays the configuration categories of t he ADSL Router, including DSL, LAN,
WLAN, WAN, IP Route, DNS, Security, Virtual Server and UPnP settings.
You can move the mouse cursor over the sub-menu to display the hierarchy popup menu. Clicking
on each of the item will bring out its content in main window accordingly.
Main Window: It is the current workspace of the web management, containing configuration or status
information.
TToo HHaavvee tthhee NNeeww SSeettttiinnggss TTaakkee EEffffeecct
The ADSL Router uses the following mechanism to enable new settings:
Apply button.
When Apply is clicked, your customizations will only be stored to the DRAM. If you do not execute Save &
Restart, the custo mizations wil l not take effect for rebooting the ADSL Router next time.
Save & Restart button.
When Save is clicked, your customizations will be saved to the flash memory. After clicking Restart, your
customizations take effect.
t
Quick start
On this page you can see some pre-defined connection services. Select that you want to be used connection mode and
execute the Apply and Save to change and save configuration.
This application provides some pre-defined profile for you to select for the router. Please use the drop-down menu to
the right side and select the one which suits for your system. Then click on Apply and Save to show the selected
profile data.
Click on the Connect button to choose the one to be connected to your ISP. Enter the Username and Password
provide by ISP and then click the connect button.
40
Page 49

Chapter 4 Web Configuration
If you want block the connection, just click the Action mode—Disconnect button. If you choose any one of RFC
series frofiles, there is no Connect button on the Action mode. In addition, you can click on the item below VPI/VCI
to show/modify the more detail configurations.
System
DDeevviiccee IInnffoorrmmaattiioon
This page shows the basic information of your ADSL Rout er, including the hardware board and software version, etc.
It provides a general overview of your ADSL Router.
AAddmmiinniissttrraattiivvee SSeeccuurriitty
There are three types of administration, Account, Remote Access and Web Port.
n
y
Account
It limits this web-based manager access to users with the correct user name and password. After entering user name
& password, click Apply. By default, both the user name and password values are admin.
Clicking Create a new user to add a new user account. After that, specify required User Name and Password.
41
Page 50

ADSL Router User Manual
To modify the password of the user account, just click Modify field of the user account and enter the new password.
Clicking on Delete of that user account will delete the user account.
Note: After clic kin g Apply to change the use name and password, the new setting takes effect
immediately. When you continue to access other pages, you will be prompted to re-login with
new user name and password immediately.
To save the new settings to flash memory and take effect next time your reboot the ADSL
Router, after clicking Apply, you should perform the tas k o f Save Configuration.
Remote Access
This function allows remote client to access this router from WAN side. Yo u can set the lease time and click Enable
to enable this setting. To disable this function, just click Disable.
Web Port
The default web server port is 80. You can change the web server port to another one and then click Apply to enable
this setting.
42
Page 51

Chapter 4 Web Configuration
Note: Clicking Apply will enable the new setting right away. W hen you continue to access other
pages, you will need to re-login at new web port.
SSaavvee CCoonnffiigguurraattiioon
This page allows you to save all current configuration settings to non-volatile memory. Please wait for several
seconds to complete this process.
UUppggrraaddee SSooffttwwaarre
The ADSL Router supports the upgrading by using HTTP. To transfer the firmware file, follow the steps below:
1. Download and unzip the new software file from vendor.
2. In the File Name of Firmware field, click Browse to locate the upgrade file.
3. Click the Upgrade button.
n
e
After upgrading, the original configuration will still exist and not reset to the factory defaults.
RReesseett RRoouutteer
This page allows you to restart your router for invoking new configuration. After restarting, you should wait for
several seconds to let the system come up. When restarting the system, your brower session will be disconnected .
Please wait until the device finish restarting.
r
43
Page 52

ADSL Router User Manual
Note: If Reset to factory default settings is checked, the settings will return to factory
defaults, including the Username and Password.
Status
DDSSLL CCoonnnneeccttiioon
This page shows the DSL line connection status as below:
Line Mode: The ADSL Router supports multi-mode standard: ANSI T1.413, G.lite (ITU-T G.992.2)and
DS (Downstream)/US (Upstream) Speed: The downstream/upstream speed of the DSL line.
n
G.dmt (ITU-T G.922.1).
DS/US Latency: Disp lays whether a fast or interleaved latency path is specified.
Trellis coding: Indicates trellis coding is enabled or disabled. Trellis coding is a method of providing better
performance in a noisy environment. It helps to transmit at faster line rates with lower error rates,
thus providing a faster overall throughput in a moderately noisy environment.
Line Attenuation: Indicates the signal attenuatio n caused by line length. It increases with line length and frequency
and decreases as wire diameter increases.
Noise Margin: Signal to noise ratio. The ratio of good data (signal) to bad (noise) on the line, expressed in
decibels (dB).
Loss of Signal /Frame: Indicates the loss of signals or frames detected.
CRC Error: Cyclic Redundancy Chec ksum generate d.
Line Up Count: The number of times that you connet to.
Line Up Time: The duration time of the line connecting.
Error Second: The accumulated seconds of the seconds during which packet error message occur.
System Up Time: The time from system startup.
44
Page 53

Chapter 4 Web Configuration
WWAANN CCoonnnneeccttiioon
This page shows all the ATM PVC interfaces you defined. For each ATM PVC interface, it shows the parameter you
defined for ATM PVC name, VPI/VCI values, Mode, Encapsulation Type and Local WAN IP address.
TTrraaffffiicc CCoouunntteer
This page shows the records of data going through the LAN and WAN interface. For each interface, cumulative totals
are displayed for Sent/Received Packets and Sent/Received Bytes.
n
r
By clicking Refresh, all the records will be reset.
RRoouuttiinngg TTaabblle
This page shows all the routi ng rules of data packets going through your ADSL Router if it runs in routing mode. By
clicking Refresh, all the records will be reset.
e
45
Page 54

ADSL Router User Manual
DDHHCCPP TTaabblle
This page shows all DHCP clients who get their IP addresses from your ADSL Router. For each DHCP client, it
shows the Host Name, MAC Address, IP Address and the Lease Time.
WWiirreelleessss CClliieennt
This page shows wireless clients that associated to the router. For each client, it shows the MAC Address and the
On-Line Time.
e
t
46
Page 55

Configuration
Chapter 4 Web Configuration
DDSSLL CCoonnffiigguurraattiioon
DSL Line Mode: The ADSL Router supports multi-mode standard: Auto, G.lite, G.dmt and ANSI T1.413. Choose
an appropriate line mode according to the setting of DSLAM in central office and then click Apply.
n
The DSL line mode you specify will be applied to the entire ADSL Router unit. All ATM PVC profiles created will
use the same line mode. Consult your ISP to find out which option app lies to your DSL line.
LLAANN CCoonnffiigguurraattiioon
For the LAN Configuration, there are two types that you have to know, IP Address and DHCP Server.
n
47
Page 56

ADSL Router User Manual
IP Address
LAN Configuration allows you to define the public/private IP address over the LAN interface.
Primary IP Address: Private IP address is used for the purpose of system management. When it is assigned, PC on
the LAN is able to use the specified address to access this ADSL Router through Ethernet.
By default, the IP address and subnet mask is 192.168.1.1 and 255.255.255.0 respectively. This
will give you an available range of IP addresses from 192.168.1.2 to 192.168.1.254 that can be
assigned to PCs on the LAN.
Secondary IP Address:If you applied for multiple IP address from your ISP, you will have a range of IP address for
the ADSL Router and other network devices on the LAN. You can fill in the IP address
assigned by ISP in the public IP address field.
DHCP Server
This page allows you to enable DHCP server on LAN interface and then your router can assign IP addresses to those
PCs connected to your router.
The ADSL Router implements a built-in DHCP (Dynamic Host Configuration Protocol) server, which dynamically
assigns IP addresses and DNS server to the PCs on the LAN. DHCP function spares yo u the hassle of manually
assigning a fixed IP address to each PC on the LAN. It is probably you already have a DHCP server on your network
and you do not enable this function. By default the DHCP Server is enabled on private LAN interface (192.168.1.0).
48
Page 57

Chapter 4 Web Configuration
DHCP lease time: Specify the time that a network device can lease a private IP address before the ADSL Router
reassigning the IP address.
Default Gateway: You check the Report this host as the default gateway box to use this host as the default
gateway or fill in an IP address as the default gateway.
Domain Name Servers: You can check the Report this host as the DNS server box to use this host as the default
DNS. Or you can uncheck the box and manually set up the DNS IP address in the
Primary/Secondary DNS IP address fields. The DNS server addresses will be passed to the
DHCP clients along with the IP addresses. The DHCP clients use the DNS to map a domain
name to its corresponding IP address and vice versa.
Click Configure to get advanced settings. Please enter the requiring information and click Apply to inoke the
configurations
49
Page 58

ADSL Router User Manual
WWLLAANN CCoonnffiigguurraattiioon
This section shows you how to configure the wireless LAN setting. To types are provided here, Basic Setup and
Association Control.
Basic Setup
n
Wireless SSID (Service Set Identity): A name that uniquely identifies a wireless domain. All wireless clients that
want to communicate with the ADSL Router must have the same SSID as it.
Frequency Domain: The frequency in which the radio links are about to be established.
Desired Channel: The frequency in which the radio links are about to be establis hed. Select channel that you
want. Usually the wireless clients will scan the whole operable channels and then select the
desired communications channel automatically.
Authentication Type: The ADSL Router supports three authentication types: Open System, Shared key and Auto.
This should be considered with the WEP(Wired Equivalent Privacy) mechanism.
50
Page 59

Chapter 4 Web Configuration
Wired Equivalent Privacy Mechanism
The privacy security function can enhance wireless media security by encryption technology. All wireless clients
must set the same encryption key to maintain the tightened communication with the ADSL Router properly. The
Authenticate Algorithm options are:
When the wired Equivalent Privacy Mechanism is Turns off. Using Open-key as authentication algorithm, you are
running the risk of allowing some unauthorized wireless LAN cards that have the capability of eavesdropping your
SSID to associate itself to the device.
Turns on encryption. Wired Equivalent Privacy Mechanism is Turns on. You should select the encryption key length
as 64 or 128 bit key. Then enter the encryption key in Key Entry fields.
Note: When Wired Equivalent Privacy Mechanism is enabled, the wireless client must be
configured with exactly the same encryption level (64 or 128-bit) and encryption key as
identified in the ADSL Router, so that access to the unit is allowed.
Association Control
You can enable this control to associate to your router with other wireless clients.
You can add a new client for associating to the router. Click Add a new client to get into another page. Enter the
MAC address for the new wireless LAN clent and click Apply.
51
Page 60

ADSL Router User Manual
WWAANN CCoonnffiigguurraattiioon
The ADSL Router supports for Asynchronous Transfer Mode (ATM) over ADSL. To set up connections over the
WAN, you have to define ATM PVC interface for each remote connection. On this page, you can create, modify and
delete PVC interface.
You can select an existing ATM PVC interface and click Modify to edit its parameters or click Delete if you want to
delete it.
To add a new PVC interface, click Create a new PVC and follow these steps:
1. Select one of connection type in the Data Mode (RFC1483 Bridged, RFC1483 Routed, RFC1483 MER, PPPoA
or PPPoE) and click Next.
n
2. Fill in the VPI/VCI values and select ATM Service Type, Encapsulation Type and PCR.
3. Click Apply.
4. At RFC1483 Routed, RFC1483 MER and PPP mode Configuration, you can select Specify an IP address or
Server assigned IP address.
52
Page 61

Chapter 4 Web Configuration
5. Unless your ATM PVC is set on RFC1483 Bridged mode, you can check NAT box to enable NAT function.
6. If you are using PPP configuration mode, you need to fill in the user name and password and you can set the
PPP session to Dial on demand or Always on mode.
The parameters are described as below:
VPI (Virtual Path Identifier): Identifies the virtual path between endpoints in an ATM network. The valid range is
from 0 to 255.
VCI (Virtual Channel Identifier): Identifies the virtual channel endpoints in an ATM network. The valid range is
from 32 to 4095 (1 to 31 is reserved for well-known protocols).
ATM Service Type: Currently, the ADSL Router supports the UBR (Unspecified Bit Rate) service type.
PCR (Peak Cell Rate): Specify the PCR cells per second.
Encapsulation Type: There are two types for your choosing, VC MUX or LLC/SNAP. Select the encapsulation
based on the setting of the ISP. Consult your ISP for this information.
Local WAN IP Address: On Router mode, selecting None means you have public LAN IP address setting. If you
select Specify an IP address, you can specify a WAN IP provided by ISP for your router. If
Server assigned IP address is selected, the router will get a dynamic WAN IP address
whenever it connects to the remote server or ISP.
Note: If a fixed WAN IP is entered, note that this IP address and the subnet mask could not be
the same with the public LAN interface.
Enable NAT on this infterface: If your LAN interface is set on primary LAN you should check the box of the
Enable Network Address Translation. NAT translates a private IP within one network to a
public IP address.
User Name/Password: The user name and password used to access the remote server or ISP.
53
Page 62

ADSL Router User Manual
Dial On Demand: If checked, under disconnected status, if any client PC sends out request for connection, the
ADSL Router will dial the ISP automatically. In this case, if the system administrator wants
to disconnect the PPP session, just click the Disconnect button at Quick Start page.
Always On: Enabling this feature will send echo request to ISP. This prevents the connection from being
hung up by ISP.
The parameters for PPPoE configuration are generally the same as those of PPPoA. The
additional parameters are:
Service Name: Enter the name of your PPPoE service here.
Service Server: Enter the name of your PPPoE service server here.
Note: When you initially add an PVC for the PPP connection and connec t to ISP, a default
routing of 0.0.0.0 is added automatically to the IP Static Routing. If you set up more than one
PVC profiles and the first PVC is deleted, then you have to manually add the default routing.
IIPP RRoouutte
Static Route
This page shows all static route status and allows you to add new static IP route or delete IP route. A Static IP
Routing is a manually defined path, which determines the data transmitting route. If your local network is composed
of multiple subnets, you may want to specify a routing path to the routing table.
You can click Create a new route to add new route.
e
Destination Address: The destination IP address of the network where data packets are to be sent.
Netmask: The subnet mask of the destination IP address.
Forward packets to: If you want add a rout on LAN side, you should choose the Gateway Address. Enter the
router address and then click Apply. If you want add a rout on WAN side, you should choose
the Interface. Select ATM PVC interface and then click Apply.
54
Page 63

Chapter 4 Web Configuration
Dynamic Routing
Routing Information Protocol (RIP) is utilized as a means of exchanging routing information between routers. It
helps the routers to determine optimal routes. This page allows you to enable/disable this function.
By default, RIP is disabled with Disabled selected. You are allowed to enable RIP over the primary LAN interface.
Upon each interface, you can customize the RIP on Receive Mode and Transmit Mode respectively.
Receive Mode: It incorporates the RIP information when receiving the RIP packets. From the drop-down list
select which RIP version should be accepted, RIP disable, RIPv1, RIPv2 and both.
Transmit Mode: It broadcasts the routing table. From the drop-down list select which RIP versio n should b e
broadcasted, RIP disable, RIPv1, RIPv2 and both.
S
DDNNS
DNS Relay
On this page you can choose to disable or enable DNS Relay function. If your DNS is disabled and you choose to
enable DNS relay, after selecting the Enabled option, please click Configure and then specify up to three DNS IP
addresses in the DNS server 1-3 IP address fields. Then click Apply to enable the DNS relay function.
If you log in DNS Relay page for the first time: when you choose Enabled and enter this page by clicking Configure.
The page will show DNS server 1-3 IP address fields specify up to three DNS IP addresses click Apply.
55
Page 64

ADSL Router User Manual
If you have been setting before, the page will show all the DNS Relay status. To disable DNS relay, just select the
Disabled option then click Configure. To modify setting select enable and click Configure again.
DNS Server
The DNS server address will be passed to the DHCP clients along with the IP address and the DHCP clients use the
DNS to map a domain name to its corresponding IP address and vice versa.
DNS Server: Select Enabled or Disabled to enable/disable the DNS server and then click Configure.
The DNS hostname table shows all the current DNS clients, whether created by DHCP client
or manually created. If it created by manual client, you can delete the hostname entry on the
table.
If you want to change the domain name, please select Enabled and click Configure. Then
fill in Domain Name and click Apply.
Create New DNS Hostname Entry: To add new hostname entry, please clic k Create a new DNS hostname entry
manually button. Then fill in the Hostname and IP address and click Apply.
56
Page 65

Chapter 4 Web Configuration
Delete Hostname Entry: To delete the hostname entry, select the required one from the DNS hostname table. After
confirming the data, click Delete.
Note:
1. When DNS Relay is disabled, the DNS server function is invalid.
2. If DNS IP is left as 0.0.0.0, then you should specify the DNS on each client PC.
SSeeccuurriitty
Firewall
This page is used to set the firewall for your system. Please choose one from the provided ite ms and click Apply to
enable it.
y
Click on The table of default policies for various security levels to see the traffic blocked status for each setting.
57
Page 66

ADSL Router User Manual
The higher the security level is, the more traffic blocked for the service is.
If you are not satisfied with the preset functions such as Low, Medium, High, please click Advance (User Define) for
setting them by yourself.
58
Page 67

Intrusion Detection
This page displays the rules for intrusion detection.
Chapter 4 Web Configuration
You can select Disable a nd click Apply to disabled intrusion detection. Select Enabled to invoke this function. In
addition, click Modify Rules to enter or modify details for the rules if necessary. After finishing the modification,
click Apply.
VViirrttuuaall SSeerrvveer
This page shows all virtual server rules co nfigured in your ADSL Router.
r
The Router implements NAT to let your entire local network appear as a single machine to the Internet. The typical
situation is that you have local servers for different services and you want to make them publicly accessible. With
NAT applied, it will translate the inter nal IP addresses of these servers to a single IP address that is unique on the
Internet. NAT function not only eliminates the need for multiple public IP addresses but also provides a measure of
security for your LAN.
When the router receives an incoming IP packet requesting for access to your local server, the router will recognize
the service type according to the port number in this packet (e.g., port 80 indicates HTTP service and port 21
59
Page 68

ADSL Router User Manual
indicates FTP service). By specifying the port number, you tell the router which service should be forwarded to the
local IP address you specify.
After you setting the virtual server you should modify the filter rule whichever port and service you set on virtual
server. Because the firewall has protect the route by filter rule so that you should update the filter rule after you set up
virtual server.
Protocol: Select a protocol type used by the service that will be forwarded.
TCP/IP Port: The Router supports port mapping function that translates a standard port number to a non-
standard number. Incoming data packets sent to a specific IP port can be mapped to the port
you specify. The most often used port numbers include:
21 (FTP), 80 (HTTP), 23 (Telnet) and 25(SMTP)
IP Address: Specify the internal IP address to which the packets are forwarded.
In the virtual server list table, you may select required entry to modify or delete it by clicking Modify or Delete. In
order to add new virtual server service entry, click Create a new server button.
Then follow the steps below:
1. Select the ATM PVC interface.
2. Select the protocol type from the drop-down list.
3. Select a service in TCP /IP Port field and enter the port number you want to use.
4. Enter the IP address of the internal server in the IP Address filed.
5. Click Apply to commit the setting.
60
Page 69

Chapter 4 Web Configuration
UUPPnnPP ((OOppttiioonnaall)
Universal plug and play (UPnP) is an architecture for pervasive peer to peer network connectivity of intelligent
appliances, wireless devices and PCs of all form factors. It is designed to bring easy-to-use, flexible, standards-based
connectivity to ad-hoc or unmanaged networks whether in the home, in a small business, public spaces, or attached to
the Internet.
To enable UPnP functio n, just check the Enable UPnP Function box and then click Apply to activate the function.
)
61
Page 70

ADSL Router User Manual
62
Page 71

Chapter 6:Troubleshooting
CChhaapptteerr 66:: TTrroouubblleesshhoooottiinng
If the suggested solutions in this section do not resolve your issue, contact your syste m administrator or Internet
service provider.
g
Problems with LAN
PCs on th e LAN can no t get IP addresses fro m the ADSL Router.
The chances are that the interface used as DHCP server is modified and the client PCs do not renew IP addresses.
If your DHCP server is enabled on Private IP Address previously and you modify the interface to Public IP Address,
the client PCs should renew IP addresses.
The PC on the LAN canno t a ccess the We b page of the ADSL Router.
Check that your PC is on the same subnet with the ADSL Router.
The virtual server can’t be access after setting virtual server.
Check the filter rule of the port that virtual server service setting for example, the virtual server service set FTP 21
you need update the filter rule of the ftp 21 Direction setting: Choose filter the packets that incoming action (In
Bound) are Allow on the interface.
Problems with WAN
You cann ot access the Internet.
If your ADSL Router is set to r outing mode and you use privat e IP addresses o n the LAN, go to WAN
Configuration > ATM PVC > Setup the ATM PVC Interface page. Make sure that Enable network address
Translation (NAT) is checked.
Check the IP settings:
Go to LAN Configuration > IP Address page, ensure you specify IP address on Public IP Address field.
Or go to WAN Configuration > ATM P VC > Setup the ATM PVC Interface page, ensure you specify IP address
on Specified Local WAN IP address field
Check the physical connection between the ADSL Router and the LAN.
If the DSL LED on the front panel is off or keeps blinking, there may be problem on the cable connecting to the
ADSL Router.
At the DOS prompt, ping the IP address of the ADSL Router, e.g, ping 192.168.1.1. If the following response
occurs:
Relay from 192.168.1.1 bytes=32 time=100ms TTL=253
Then the connection between the ADSL Router and the network is OK.
If you get a failed ping with the response of:
Request time out
Then the connection is fail. Check the cable between the ADSL Router and the network.
Check the DNS setting of the ADSL Router.
At the DOS prompt, ping the IP address of the DNS provided by your ISP. For example, if your DNS IP is
168.95.1.1, then ping 168.95.1.1. If the following response occurs:
Relay from 168.65.1.1 bytes=32 time=100ms TTL=253
Then the connection to the DNS is OK.
63
Page 72

ADSL Router User Manual
If you get a failed ping with the response of:
Request time out
Then the DNS is not reachable. Check your DNS setting on the ADSL Router.
Problems with Upgrading
The following lists the error messages that you may see during upgrading and the action to take.
Error Message: invalid checksum
Possible cause: The firmware file to be used is damaged or the file format is wrong.
Action: Make sure that your firmware file format is valid or get a new firmware file.
Error Message: invalid hardcode
Possible cause: The firmware file is not compatible with the model of your ADSL Router.
Action: Download a compatible firmware from the web.
Error Message: unknown flags type
Possible cause: The firmware version is not compatible.
Action: Download a compatible firmware from the web.
Error Message: internal isfs error / internal flashfs error
Possible cause: System error occurs. It may caused by the lack of memory.
Action: Reboot your ADSL Router and perform the upgrade task again.
Error Message: invalid file format
Possible cause: The firmware file format is invalid.
Action: Check the file format is correct, otherwise download a firmware file with correct format.
Error Message: get an error message
Possible cause: The TFTP server responses with error message.
Action: Make sure the file name you enter is correct. Otherwise the TFTP server may response with the error
message “File not found”.
Error Message: transfer time out
Possible cause: The transfer session is interrupted.
Action:
a. Make sure the TFTP server is on the same subnet with the ADSL Router.
b. Make sure you the IP address of the TFTP server you specify is correct and that your TFTP server is started.
c. If error still occurs, reboot your ADSL Router and perform the upgrade task again.
Error Message: firmware update in process
Possible cause: The upgrade is already in process.
Action: Do not turn off your ADSL Router otherwise you will cause damage to t he device.
Error Message: no remote server IP
Possible cause: The IP address of the TFTP server is not specified.
Action: Specify the IP address of the TFTP server is not specified.
64
Page 73

Error Message: can’t allocate update buffer
Possible cause: It may caused by the lack of memory.
Action: Reboot your ADSL Router and perform the upgrade task again.
Troubleshooting
65
Page 74

ADSL Router User Manual
66
Page 75

Chapter 6:Troubleshooting
CChhaapptteerr 77:: GGlloossssaarry
y
ARP (Address Resolution Protocol )
ARP is a TCP/IP protocol for mapping an IP address to a physical machine address that is
recognized in the local network, such as an Ethernet address.
A host wishing to obtain a physical address broadcasts an ARP request onto the TCP/IP network.
The host on the network that has the IP address in the request then replies with its physical
hardware address.
Inverse ARP (In-ARP), on the other hand, is used by a host to discover its IP address. In this
case, the host broadcasts its physical address and a RARP server replies with the host's IP
address.
DHCP (Dynamic Host Configuration Protocol)
When operates as a DHCP server, the ADSL Router ass ign IP addresses to the client PCs on the
LAN. The client PCs “leases” these Pr ivate IP addresses for a user-defined amount of time. After
the lease time expires, the private IP address is made available for assigning to other network
devices.
The DHCP IP address can be a single, fixed public IP address, an ISP assigned public IP addres s,
or a private IP address.
If you enable DHCP server on a private IP address, a public IP address will have to be assigned
to the NAT IP address, and NAT has to be enabled so that the DHCP IP address can be
translated into a public IP address. By this, the client PCs are able to access the Internet.
LAN (Local Area Network) & WAN (Wide A rea Network)
A LAN is a computer network limited to the immediate area, usually the s ame building or floor
of a building. A WAN, on the other hand, is an outside connection to another network or the
Internet.
The Ethernet side of the ADSL Router is called the LAN port. I t is a twiste d-pair Ethernet
10Base-T interface. A hub can be connected to the LAN port. More than one computers, such as
server or printer, can be connected through this hub to the ADSL Router and composes a LAN.
The DSL port of the ADSL Router composes the WAN interface, which supports PPP or RFC 1483
connecting to another remote DSL device.
NAT (Network Address Translation) IP Address
NAT is an Internet standard that translates a private IP within one network to a public IP
address, either a static or dynamic one. NAT provides a type of firewall by hiding internal IP
addresses. It also enables a company to use more internal IP addresses.
If the IP addresses given by your ISP are not enough for each PC on the LAN and the ADSL
Router, you need to use NAT. With NAT, you make up a private IP network for the LAN and
assign an IP address from that network to each PC. One of some public addresses is configured
and mapped to a private workstation addr ess when accesses are made through the gateway to
a public network.
For example, the ADSL Router is assigned with the public IP address of 168.111.2.1. With NAT
enabled, it creates a Virtual LAN. Each PC on the Virtual LAN is assigned with a privat e IP
address with default value of 192.168.1.2 to 192.168.2.254. These PCs are not accessible by
the outside word but they can communicate with the outs ide world through the public IP
168.111.2.1.
67
Page 76

ADSL Router User Manual
Private IP Address
Private IP addresses are also LAN IP addresses, but are considered “illegal” IP addresses to the
Inter net . They are p riv ate to an en ter pris e w hile sti ll pe rmit tin g f ull n etw or k laye r c onne ct ivity
between all hosts inside an enterprise as well as all public ho sts of different enterprises.
The ADSL Router uses private IP addresses by assigning them to the LAN that c a nnot be
directly accessed by the Internet or remote server. To access the Internet, private network
should have an agent to translate the private IP address to public IP address.
Public IP Address
Public IP addresses are LAN IP addresses that can be considered “legal” for the Internet,
because they can be recognized and accessed by any device on the other side of the DSL
connection. In most cases they are allocated by your ISP.
If you are given a range of fixed IP addresses, then one can be assigned to the router and the
others to network devices on the LAN, such as computer workstations, ftp servers, and web
servers.
PVC (Permane nt V irtual Circuit)
A PVC is a logical point-to-point circuit between customer sites. PVCs are low-delay circuits
because routing decisions do not need to be made along the way. Permanent means that the
circuit is preprogrammed by the carrier as a path through the networ k. It does not nee d to be
set up or torn down for each session.
RIP (Routing Information Protocol)
RIP is a routing protocol that uses the distance-vector routing algorithms to calculate leasthops routes to a destin ation. It is used on the Internet and is common in the NetWare
environment. It exchanges routing information with other routers. I t includes V1, V2 and
V1&V2, which controls the sending and receiving of RIP packets over Ethernet.
UDP (User Datagram Protocol)
UDP is a connectionless transport service that dispenses with the reliability services provided
by TCP. UDP gives applications a direct interface with IP and the ability to addr ess a par ticular
application process running on a hos t via a por t number without setting up a connection
session.
Virtual Server
You can designate virtual servers, e.g., a FTP, web, telnet or mail server, on your local network
and make them accessible to the outside world. A virtual server me ans that it is not a dedicated
server -- that is, the entire computer is not dedicated to running on the public network but in
the private network.
VPI (Virtual Path Identifier) & VCI (Virtual Channel Identifier)
A VPI is a 8-bit field while VCI is a 16-bit field in the ATM cell header. A VPI identifies a link
formed by a virtual path and a VCI identifies a channel within a virtual path. In this way, the
cells belonging to the same connection can be distinguished. A unique and separate VPI/VCI
identifier is assigned in advance to indicate which type of cell is following, unassigned cells,
physical layer OAM cells, metasignalling channel or a generic broadcast signaling channel. Your
ISP should supply you with the values.
68
Page 77

Appendix
AAppppeennddiixx:: SSppeecciiffiiccaattiioon
SSooffttwwaarre
ADSL Compliance
ANSI T1.413 Issue 2
ITU G.992.1 Annex A (G.dmt)
ITU G.992.2 Annex A (G.lite)
ITU G.994.1 (G.hs)
Wireless LAN Featur es
Fully compatible to IEEE 802.11b standard and allow operating range up to 300 meters (open space) and 100
The Direct Sequence Spread Spectrum (DSSS) technology is exploited.
Seamless roaming within the 802.11 and 802.11b wireless LAN infrastructure
Low power c onsumption via efficient power management
ATM Features
Compliant to ATM Forum UNI 3.1 / 4.0 Permanent Virtual Circuits (PVCs)
e
meters (indoor).
n
Support up to 8 AAL5 Virtual Circuit Channels (VCCs) for UBR, CBR, VBR-rt, and VBR-nrt with traffic
shaping
TR-037 Auto PVC (auto-provisioning)
RFC1483 (RFC2684) LLC Encapsulation and VC Multiplexing over AAL5
RFC2364 Point-to-Point Protocol (PPP) over AAL5
RFC2225 Classical IP and ARP over ATM
RFC2516 PPP over Ethernet: support Relay (Transparent Forwarding) and Client functions
OAM F4/F5 End-to-End/Segment Loopback Cells
Bridging Features
Supports self-learning bridge specified in IEEE 802.1D Transparent Bridging
Supports up to 4000 learning MAC addresses
Transparent bridging among 10/100 Mb Ethernet and 802.11b Wireless LAN interfaces
Routing Features
UPnP IGD (Internet Gateway Device) with NAT traversal capability support
NAT (Network Address Translation) / PAT (Port Address Translation) let multiple users on the LAN to access
the internet for the cost of only one IP address and enjoy various multimedia applications.
ALGs (Application Level Gateways): such as NetMeeting, FTP, Quick Time, mIRC, Real Player, CuSeeMe, etc.
Multiple Virtual Servers (e.g., Web, FTP, Mail servers) can be setup on user’s local network.
Static routes, RFC1058 RIPv1, RFC1723 RIPv2.
DNS Relay
ARP Proxy
Security Features
69
Page 78

ADSL Router User Manual
PAP (RFC1334), CHAP (RFC1994) for PPP session
Firewall support IP packets filtering based on IP address/Port numb er/Protocol type and TCP code field flags
Intrusion Detection provides protection from a number of attacks (such as SYN/FIN/RST Flood, Smurf,
WinNuke, Echo Scan, Xmas Tree Scan, etc)
WEP (Wired Equivalent Privacy) encryption uses RC4 with 64/128 bit key length
Configuration and Mana gement
User-friendly embedded web configuration interface with password protection
Remote management accesses control
Telnet session for local or remote management
HTTP firmware upgrades via web browser GUI directly
Distribute IP addresses to end users via DHCP server provided by ADSL router
SNMPv1/v2c agent with MIB-II, PPP MIB, ADSL Line MIB
HHaarrddwwaarre
Interface
One RJ-11 port for ADSL connection
Four RJ-45 port for IEEE 802.3 10/100 Base-T auto-sensing Ethernet connection
One USB port compliant to USB v1.1 for 12 Mbps connection rate
Hidden PCMCIA interface for IEEE 802.11b (2.4 GHz) wireless LAN connection
One hidden reset button for restoring to factory default settings
Regulatory Approvals and Compliance
EMI/Immunity: FCC part 15 and part 68 Class B
Safety: UL, CE
Power Requirement and Operation Environment Requirement
Power Adaptor: Input 110±10 or 230±10 VAC; Output 12 VDC, 1A
Power Consumption: less than 10 Walt
Ambient Temperature: 0 to 45°C (32 to 113°F)
Relative Humidity: 20% to 90% (non-condensing)
Physical
Dimensions: 159
e
mm(L) x 122mm(W) x 41.5mm(H)
Weight: 282g
70
 Loading...