

Page 1
Setting Up Your Phone
Setting Up Your Phone
Device Overview
Using Your Phone
QUICK STA RT GUIDE
Welcome. This guide will show you how to set up and
use your phone, access features, and find help.
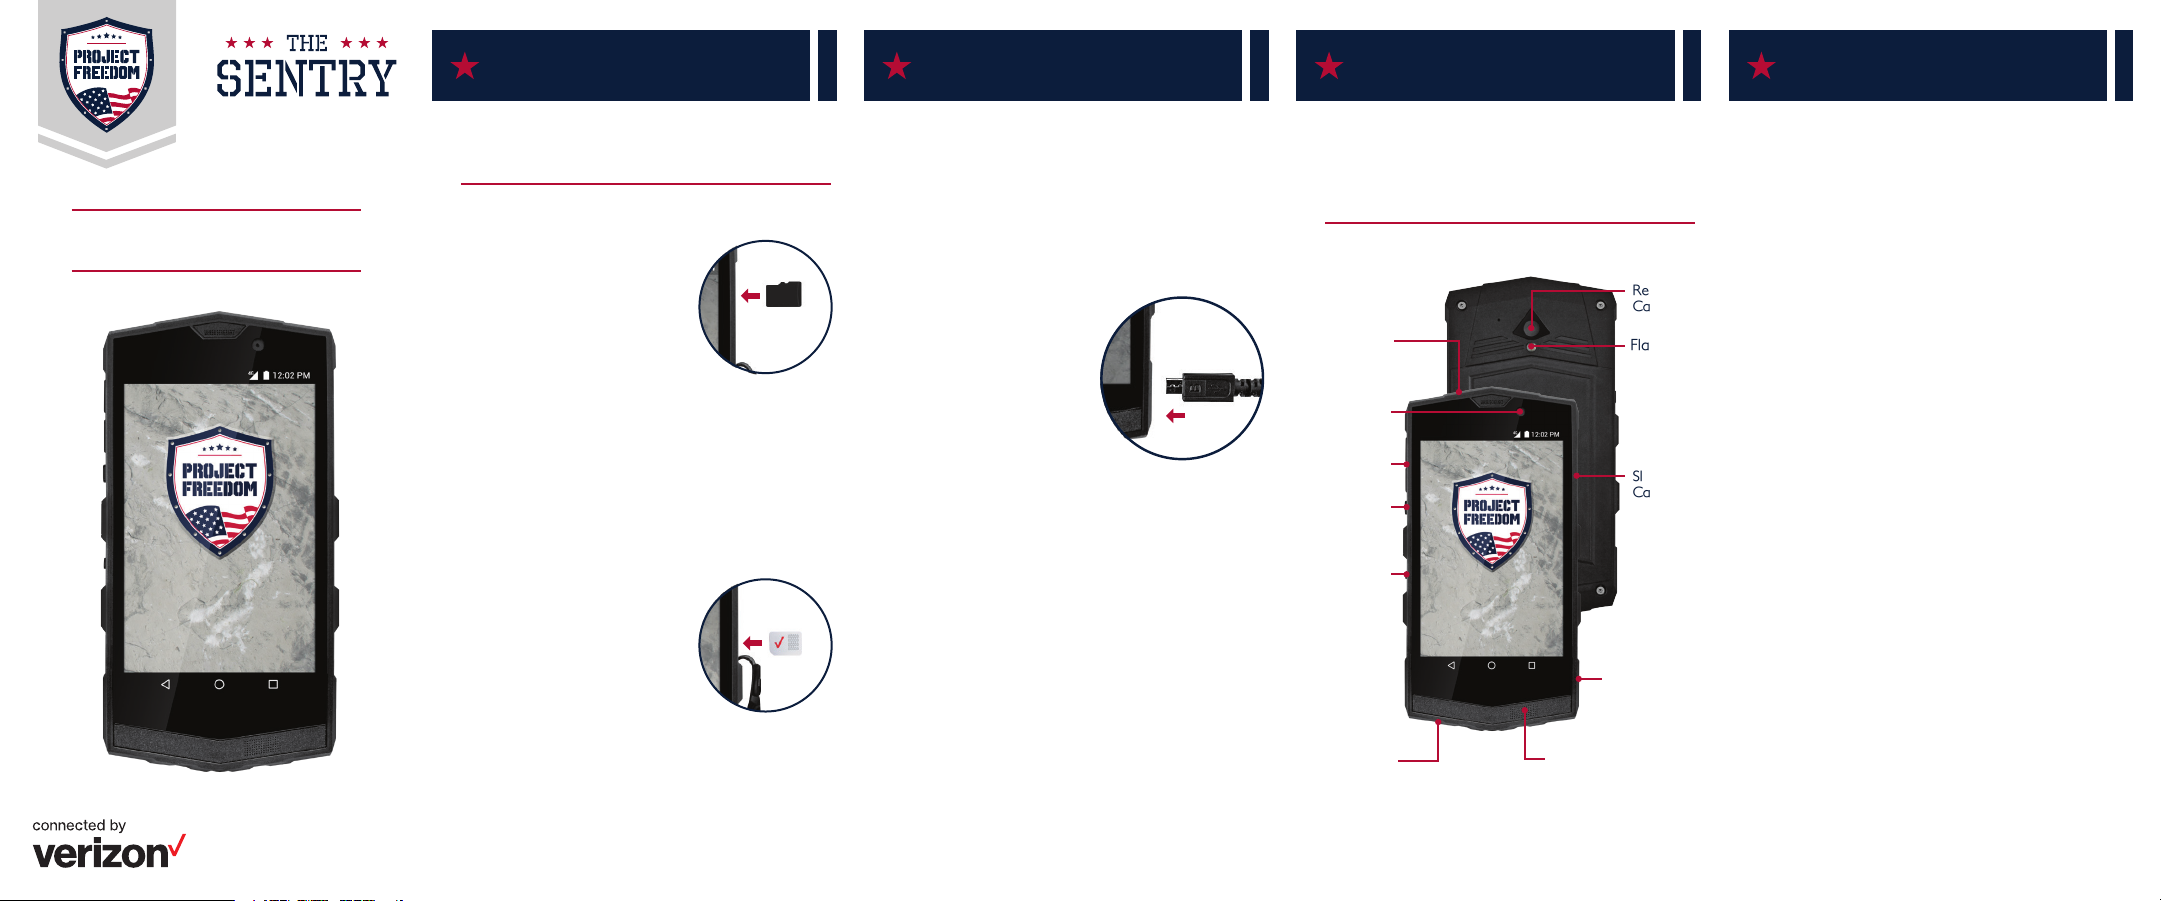
Optional: Insert the microSD Card*
If you have a microSD card, open
the SIM/microSD card slot cover,
and carefully slide it into the
slot with the gold contacts
facing down. Replace the
cover; making sure that it
is completely closed.
* The microSD card is sold separately.
Optional: Replace the SIM Card
Your phone comes with the SIM card already installed.
If you need to replace it, follow these steps.
1. Open the SIM/microSD card slot
cover, located on the right
side of the phone.
2. Using the included SIM/SD tool,
press to release the SIM card,
then gently pull it out of the
slot.
3. Carefully press the new SIM
card into the slot with the
gold contacts facing down.
4. Replace the cover; making
sure that it is completely closed.
WARNING! Failure to completely reseal the
SIM/microSD card slot cover may lead to water or
other liquids entering the casing, which may cause
damage to the phone.
Charge the Phone
Your phone comes with a pre-installed, non-removable
battery. Before turning on your phone, charge it fully.
Your phone comes with a USB/Charger Adapter
and a USB cable that connect together to charge
your phone.
Carefully slide your USB charging
cable into the port on the
bottom right side of your
phone.
WARNING! Please use only an approved charging
accessory to charge your phone. Improper handling of
the USB/Charging Por t, as well as the use of an
incompatible charger may cause damage to your
phone, and void the warranty.
• Connecting the charger improperly may cause
serious damage to the phone. Any damage caused
by misuse is not covered by the warranty.
• Ensure that there is no foreign material, such as sand
or dust near the USB/Charging Port.
• Be careful not to damage or detach the SIM/microSD
card slot cover. A damaged or missing cover can
result in water damage to the device.
The Sentry was designed specif ically to appeal to U.S.
armed forces members and their families. From the
cockpit inspired rear camera, to the chevron back
panel, this device combines style with toughness.
Rear
Camera
Headset
Jack
Front
Camera
Volume
Keys
Shortcut
Key
Power/Lock
Key
SpeakerMicrophone
NOTE: Devices and software are constantly evolving – the
screen images and icons you see here are for reference only.
Flash
SIM/microSD
Card Slot
USB/Charging
Por t
Turning Your Phone On/Off
• To turn ON, press and hold the Power/Lock Key.
• To turn OFF, press and hold the Power/Lock Key
and follow the instructions.
Locking and Unlocking Your Phone
Prevent accidental key presses by locking your phone.
• To LOCK, press the Power/Lock Key.
• To UNLOCK, press the Power/Lock Key and then
swipe your finger up, to unlock.
Using the Touch Screen
Use touch gestures to move around the screen, open
menus, select items, zoom in or out on web pages, and
more.
Swipe – Swipe by quickly sliding your finger in any
direction.
Drag – Drag by touching an item and sliding it to a
new position.
Double-Tap – Tap two times rapidly to zoom in or out
on a web page or picture.
Multi Touch – Pinch or spread your thumb and index
finger to zoom in or out.
Page 2

Customer Information
Using Your PhoneUsing Your Phone Support & More
Activate Your Device
Your Wireless Device and Third Party Services
Many services and features offered through this
wireless device are provided by or in conjunction with
third parties. Your wireless service provider or the
phone retailer, are not responsible for your use of this
wireless device or any applications, ser vices and
products including any personal information you
choose to use, submit or share with others. Specif ic
third party terms and conditions, terms of use, and
privacy policies shall apply. Please review carefully all
applicable terms and conditions and policies prior to
using this wireless device and any associated
application, product or service.
Hearing Aid Compatibility Information
This phone has been tested and rated for use with
hearing aids for some of the wireless technologies that
it uses. However, there may be some newer wireless
technologies used in this phone that have not been
tested yet for use with hearing aids. It is important to
try the dif ferent features of this phone thoroughly and
in different locations, using your hearing aid or cochlear
implant, to determine if you hear any interfering noise.
Consult the manufacturer of this phone for information
on hearing aid compatibility. If you have questions
about return or exchange policies, consult the phone
retailer.
©2016 Project Freedom. Project Freedom, Sentry and their
respective design marks are registered trademarks of Project
Freedom, LLC. All rights reserved. Screen images simulated.
Appearance of the device may vary. LTE is a trademark of ETSI.
Making a Call
1. From the Home screen, tap the Phone icon.
2. Enter the number you want to call, and tap the
Phone icon to place the call.
Receiving a Call
• Tap ANSWER to accept the incoming call.
• Tap DISMISS to ignore the incoming call.
Setting Up Voice Mail
1. From the Home screen, tap the Phone icon.
2. Dial *86 and tap the Phone icon to place the call.
3. When you hear the greeting, tap # to interrupt.
4. Follow the instructions to set up your voice mail.
NOTE: Voice mailboxes not setup within 45 days will be
canceled. Your voice mailbox is not password protected until
you create a password by following the setup instructions.
Sending a Text
1. From the Home screen, tap the Message icon.
2. Tap the Compose icon to start a new message.
3. Enter a contact’s name or number in the To f ield
and enter your message in the text f ield.
4. To add an attachment to your message, tap the
Paperclip icon.
5. Tap the Send icon to send your message.
Taking Photos
1. From the Home screen, tap Camera.
2. Tap the Shutter icon to take a picture (if shown)
or just tap the screen.
TIP: From the Lock screen, press the Power/Lock key
twice to open the Camera app.
Setting Up Email
1. From the Home screen, tap Apps > Settings >
Accounts.
2. Select the desired email provider.
3. Enter your email address and password and any
other necessary information.
Installing Apps
Hundreds of thousands of apps are available to
download from the Google Play Store.
1. From the Home screen, tap the Play Store icon.
Viewing Apps
To view preloaded or downloaded apps on your
phone, from the Home screen, tap the Apps icon.
Uninstalling Apps
1. From the Home screen, touch and hold the
downloaded app icon you would like to remove.
2. Drag it to X Remove, and when the font turns
red, release your finger to uninstall.
Get Help Using Your Phone
• From your computer, visit:
ww w.projectfreedom.com/Support
Customer Service
Call (800) 467-5842
More Information
Download a User Guide from
ww w.projectfreedom.com
or call (800) 467-5842 to order a copy.
Activate Online:
• Before you start, please have your IMEI and SIM
Card ICCID on-hand. This information can be found
on the retail box label.
• Go to http://ww w.verizonwireless.com/certif ieddevice
• Follow the instructions on the website to add your
smartphone to your existing wireless account or to
create a new account.
QSG1776 • Printed in USA
 Loading...