

Page 1
CDR8011 Series Manual
iDVR800
Quick Start Guide
Page 2

Important Notes to Read Before Use
The CDR8011 operates on a voltage of 5 V DC. To power up the product, connect it to a cigarette
lighter socket.
The CDR8011 accepts SD cards formatted to FAT32 only. For optimum results, format the SD card
before initial use with the CDR8010.
Operating environment: Charge Temperature 0~60C; Discharge Temperature 0~50C
The CDR8011 may not be able to use the Global Positioning System (GPS) in the following areas:
Indoor parking lot
Tunnels
While under multi-layer highways
Between closely positioned high buildings and trees
ii CDR8010 – Quick Start Guide
Page 3
Failure to follow the instructions
Failure to follow the instructions
Instructions provided under
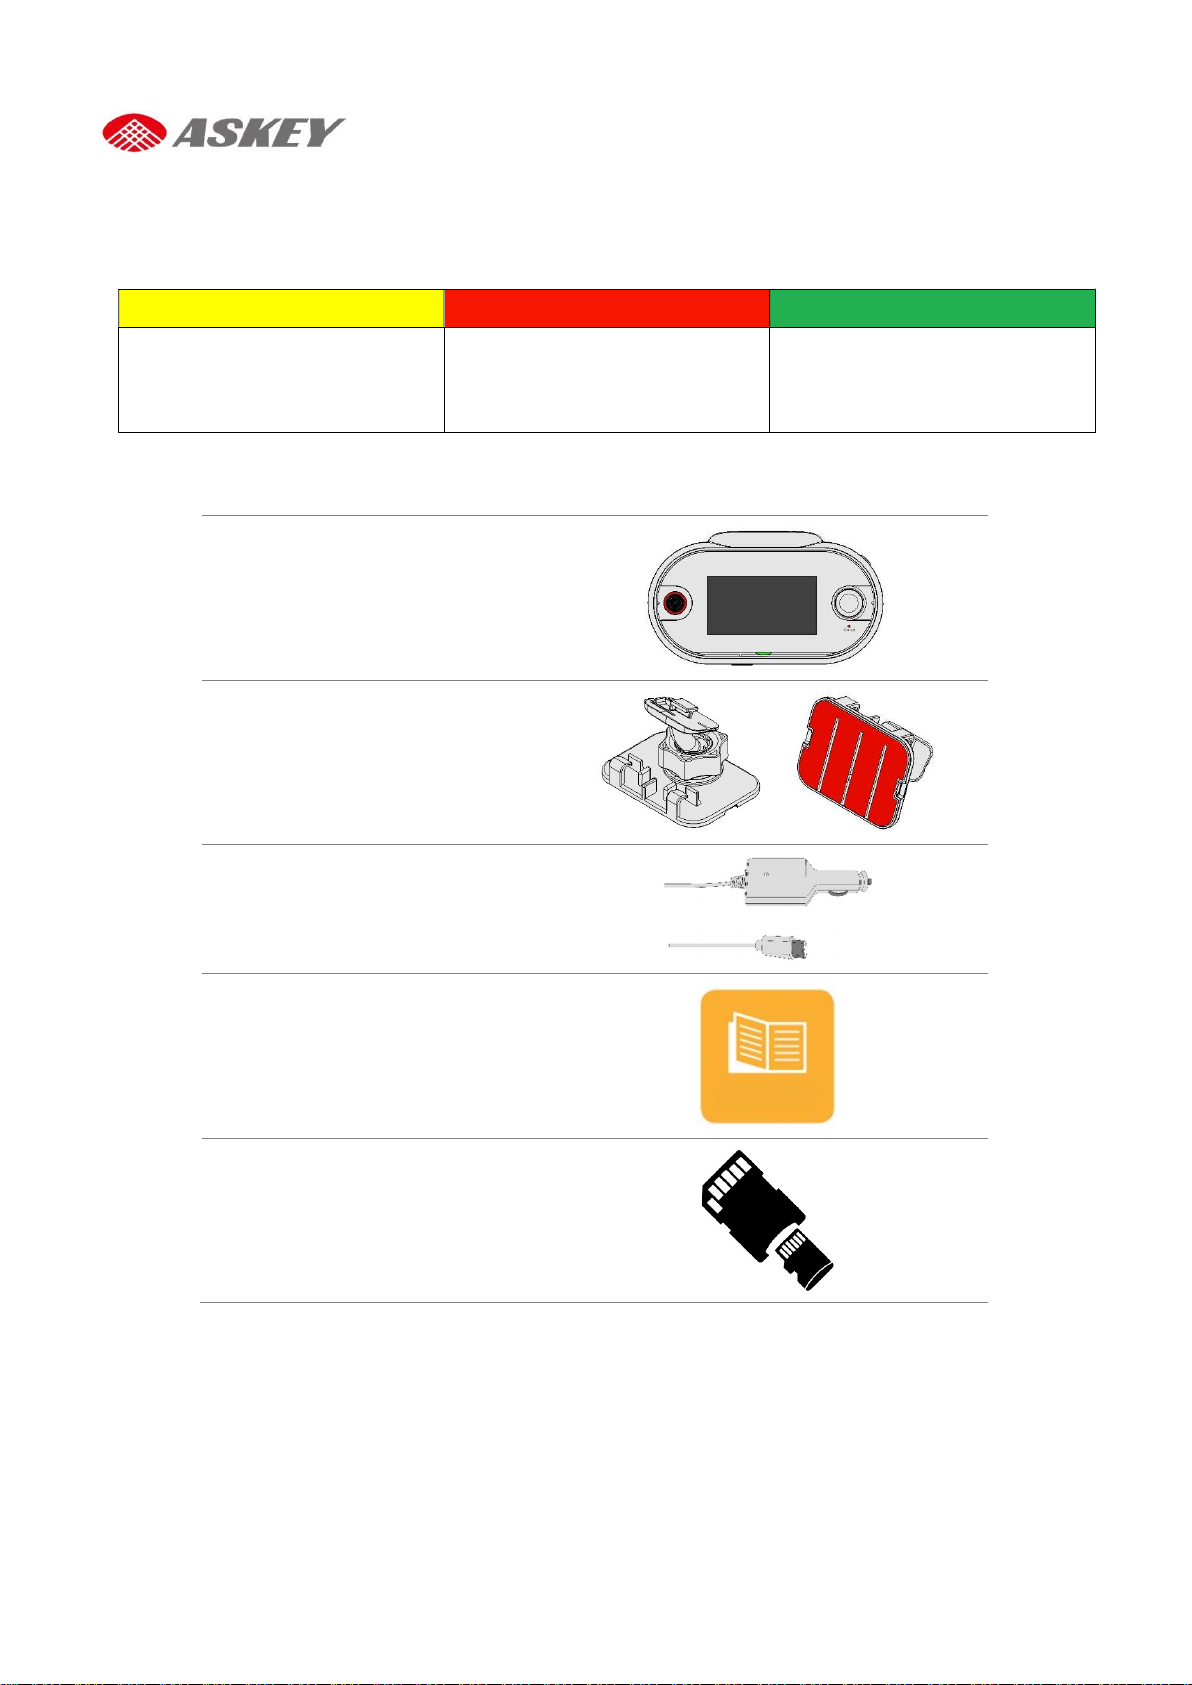
CDR801
1 Connected Car CAM
Mount Bracket
USB Type C to Cigarette Car Char
ger
Quick Start Guide
Micro SD card and SD Card Adaptor
QSG
Safety Instructions
For users’ attention, scenario-specific safety instructions are provided in the following three boxes
throughout the document. Following these instructions will help prevent untoward incidents in the use
of the CDR8011.
CAUTION WARNING NOTE
provided under “Caution” will lead
to data loss.
Package Contents
provided under “Warning” will
lead to serious injury or death, and
property damage.
“Note” provides insights for
prudent use of the product.
Page 4
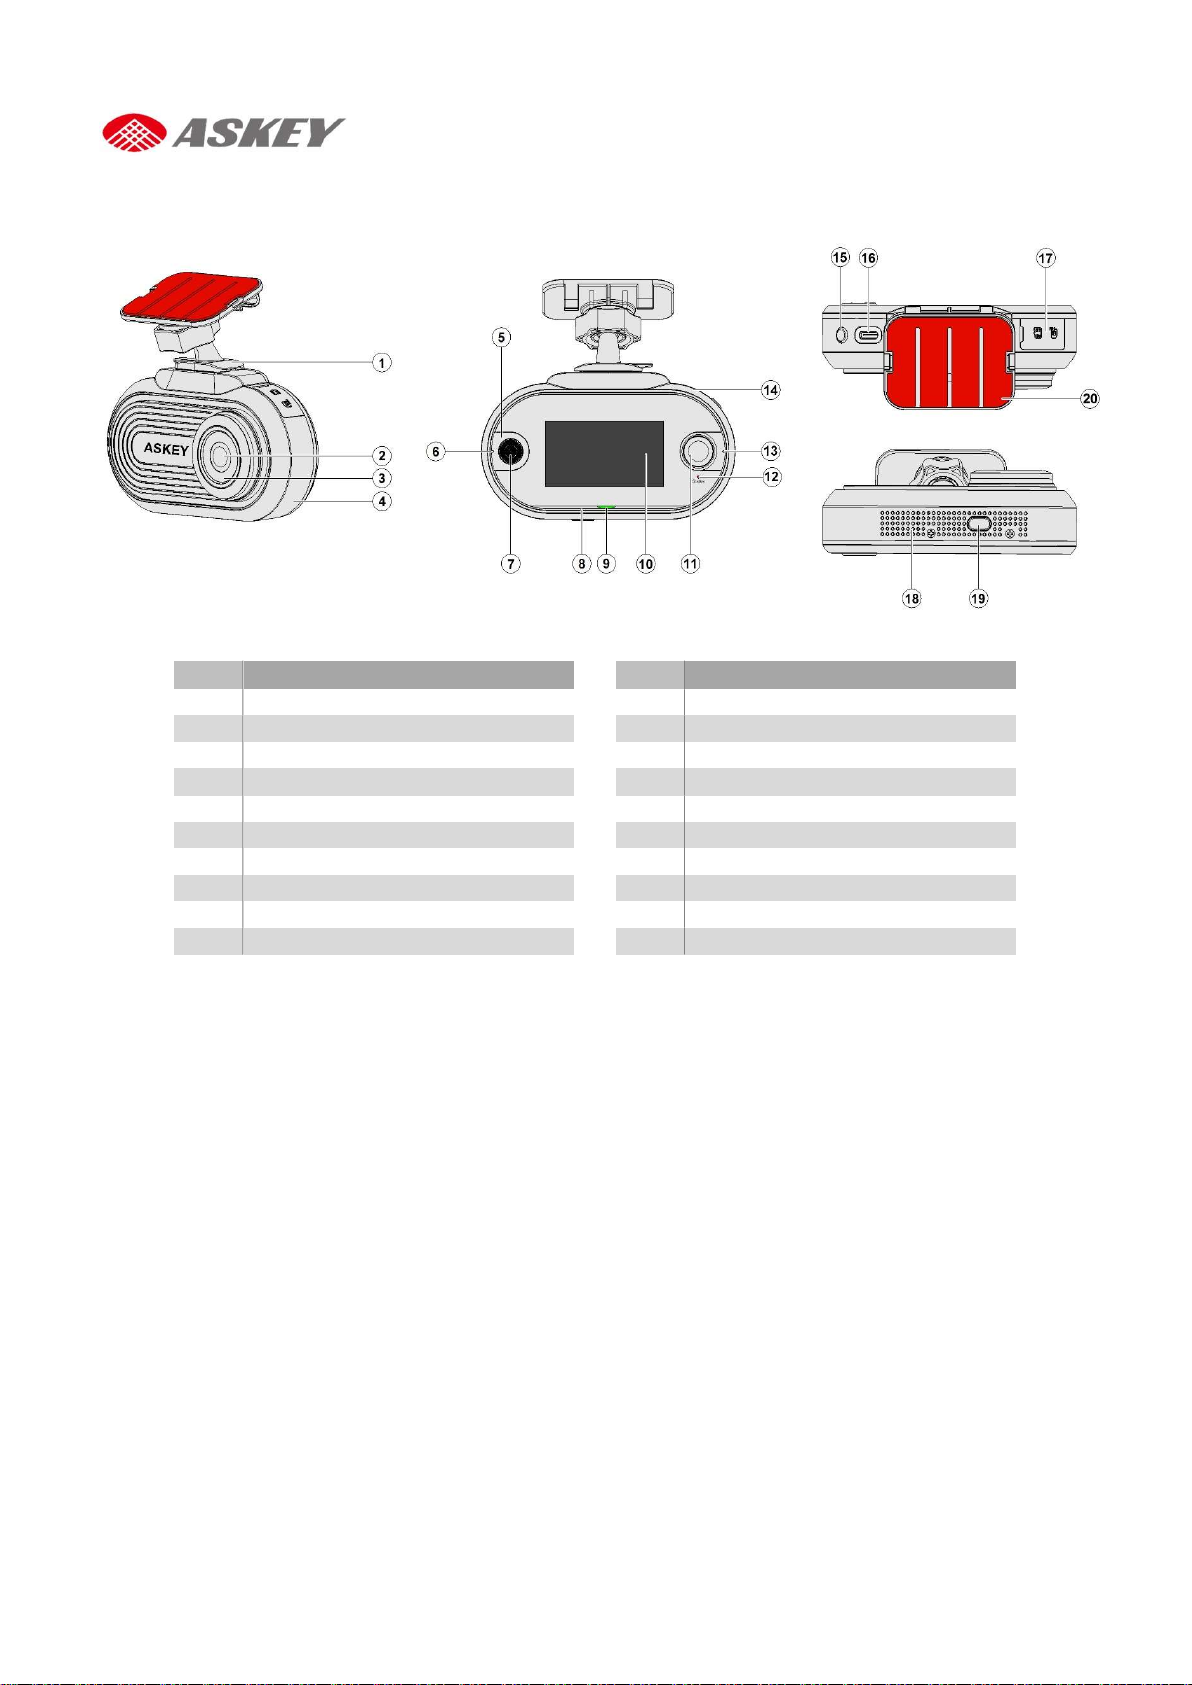
1 Bracket
11 Rear Camera
2 Front Camera
12 Status Light
3
Metal Decoration
13 Microphone 3
5 E-Call Light Guide
15 Power Button
6
Microphone 1
16 USB Type C
-
Port
8 Microphone 2
18 Speaker Opening
Overview
Device Overview
No.
Description No.
Description
4 Front Housing
7 E-Call Button
9 Alexa Light Guide
10 Touch Panel
14 Rear Housing
17 SD Card Cover
19 Mute Button
20 Film
2 CDR8010 – Quick Start Guide
Page 5
Getting Started
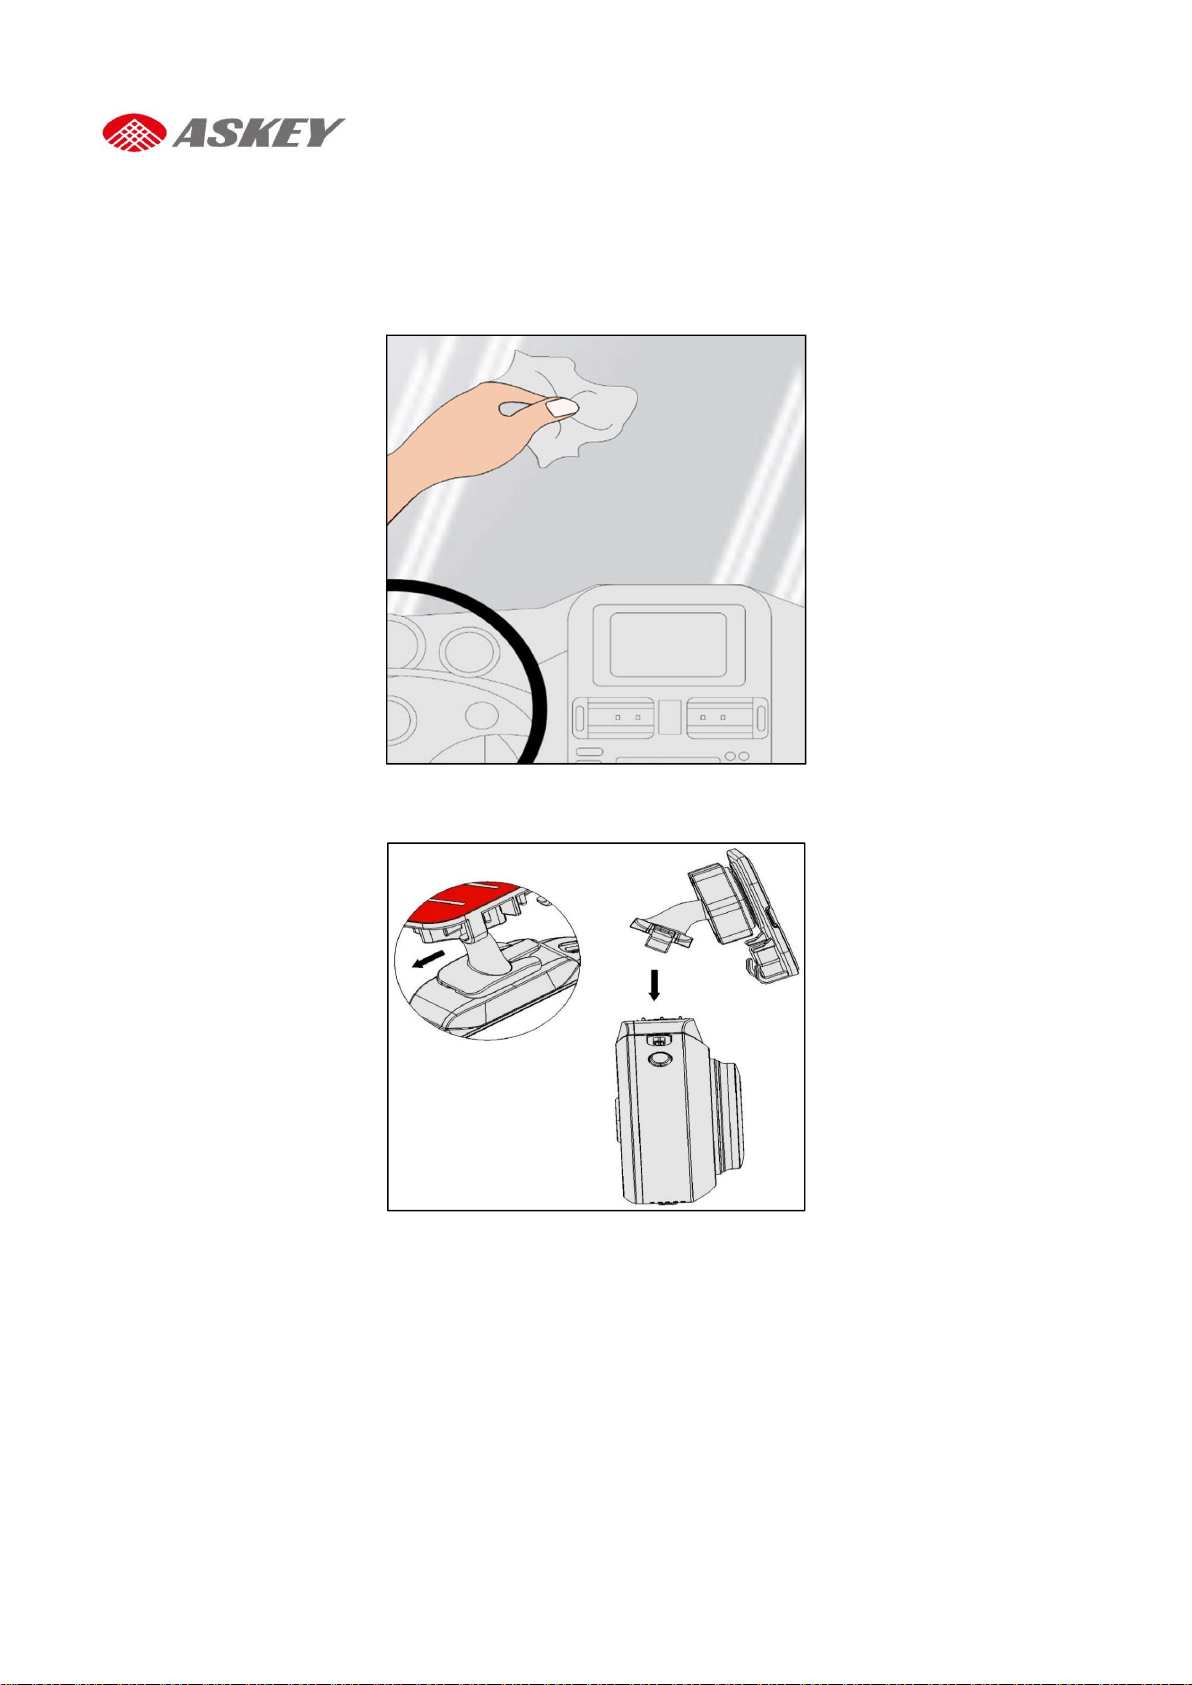
Mounting Instructions
Step 1: Clean the windshield area properly using a soft cloth. Apply a glass cleaner liquid to the cloth, if
required.
Step 2: Lock the mounting bracket into the mounting slot of the device.
Page 6
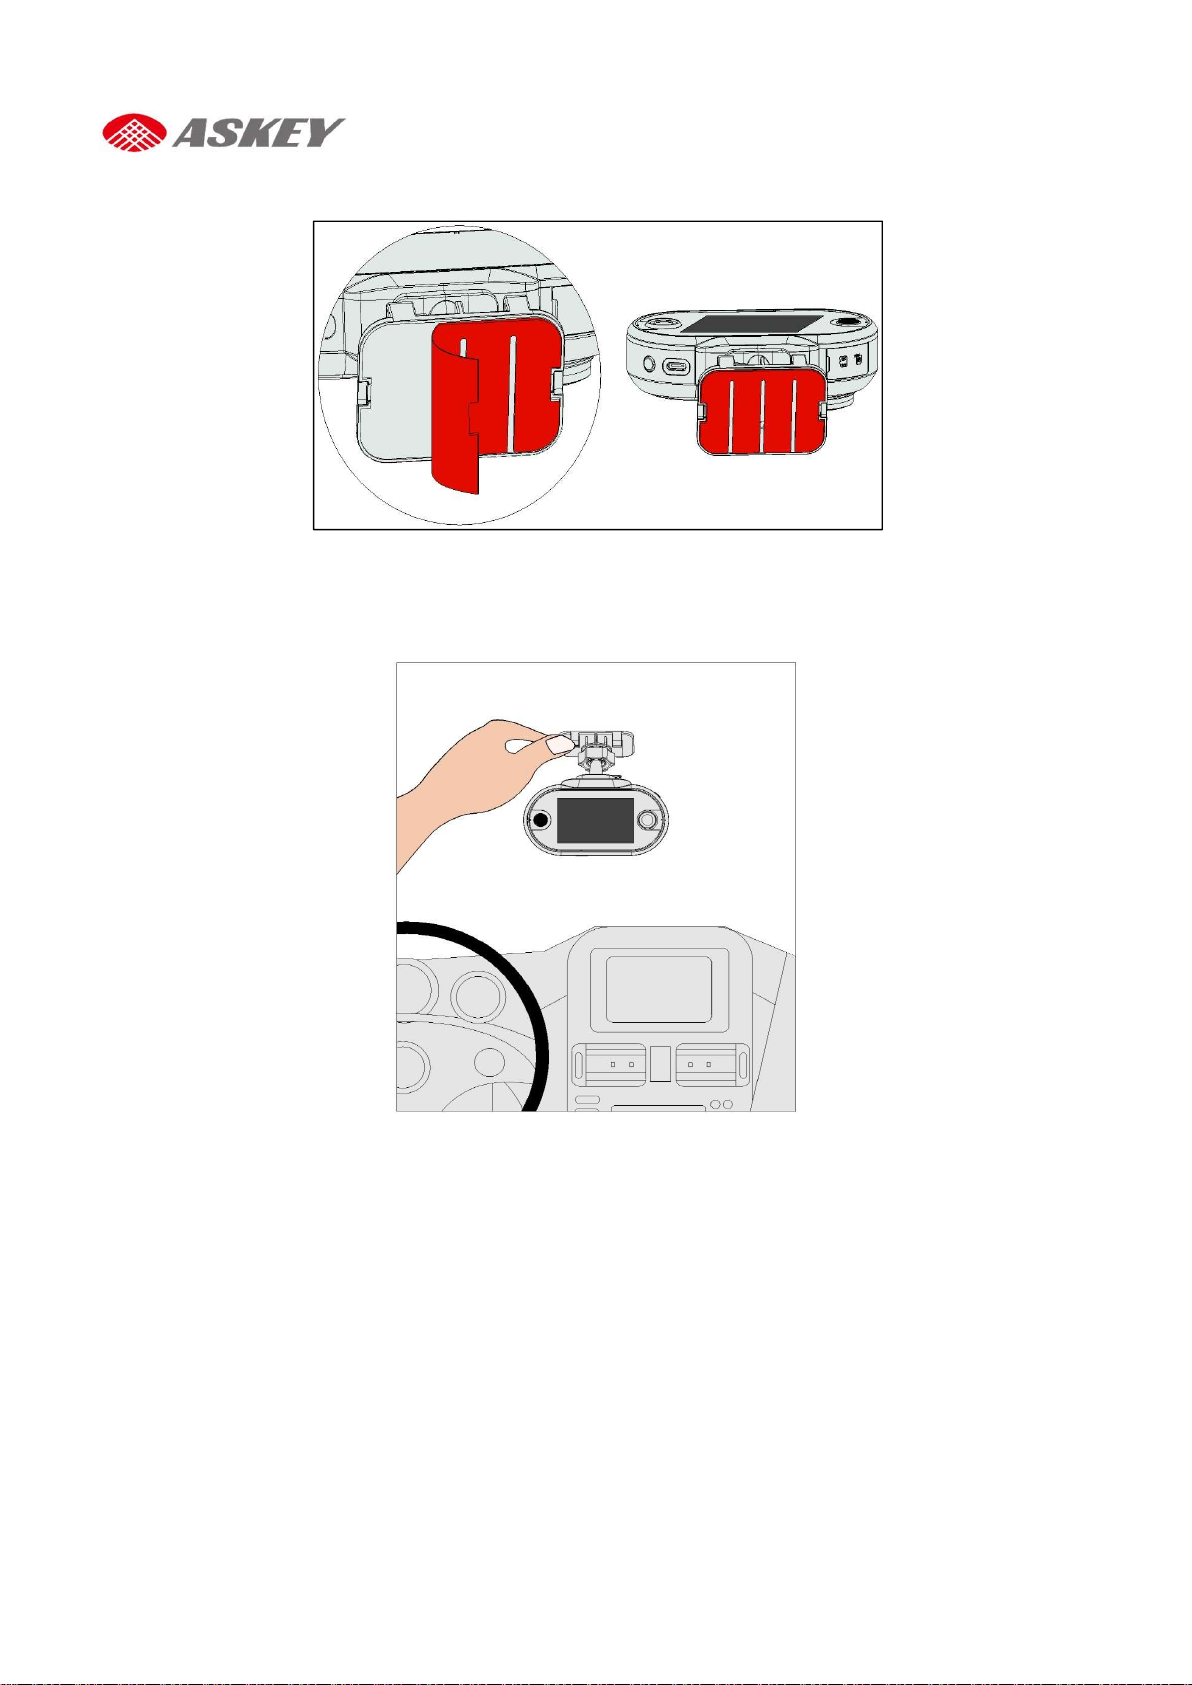
Step 3: Peel off the film from the upper surface of the mounting bracket.
Step 4: Position the mounting bracket on the windshield; press the bracket with your thumb to against the
windshield.
4 CDR8010 – Quick Start Guide
Page 7
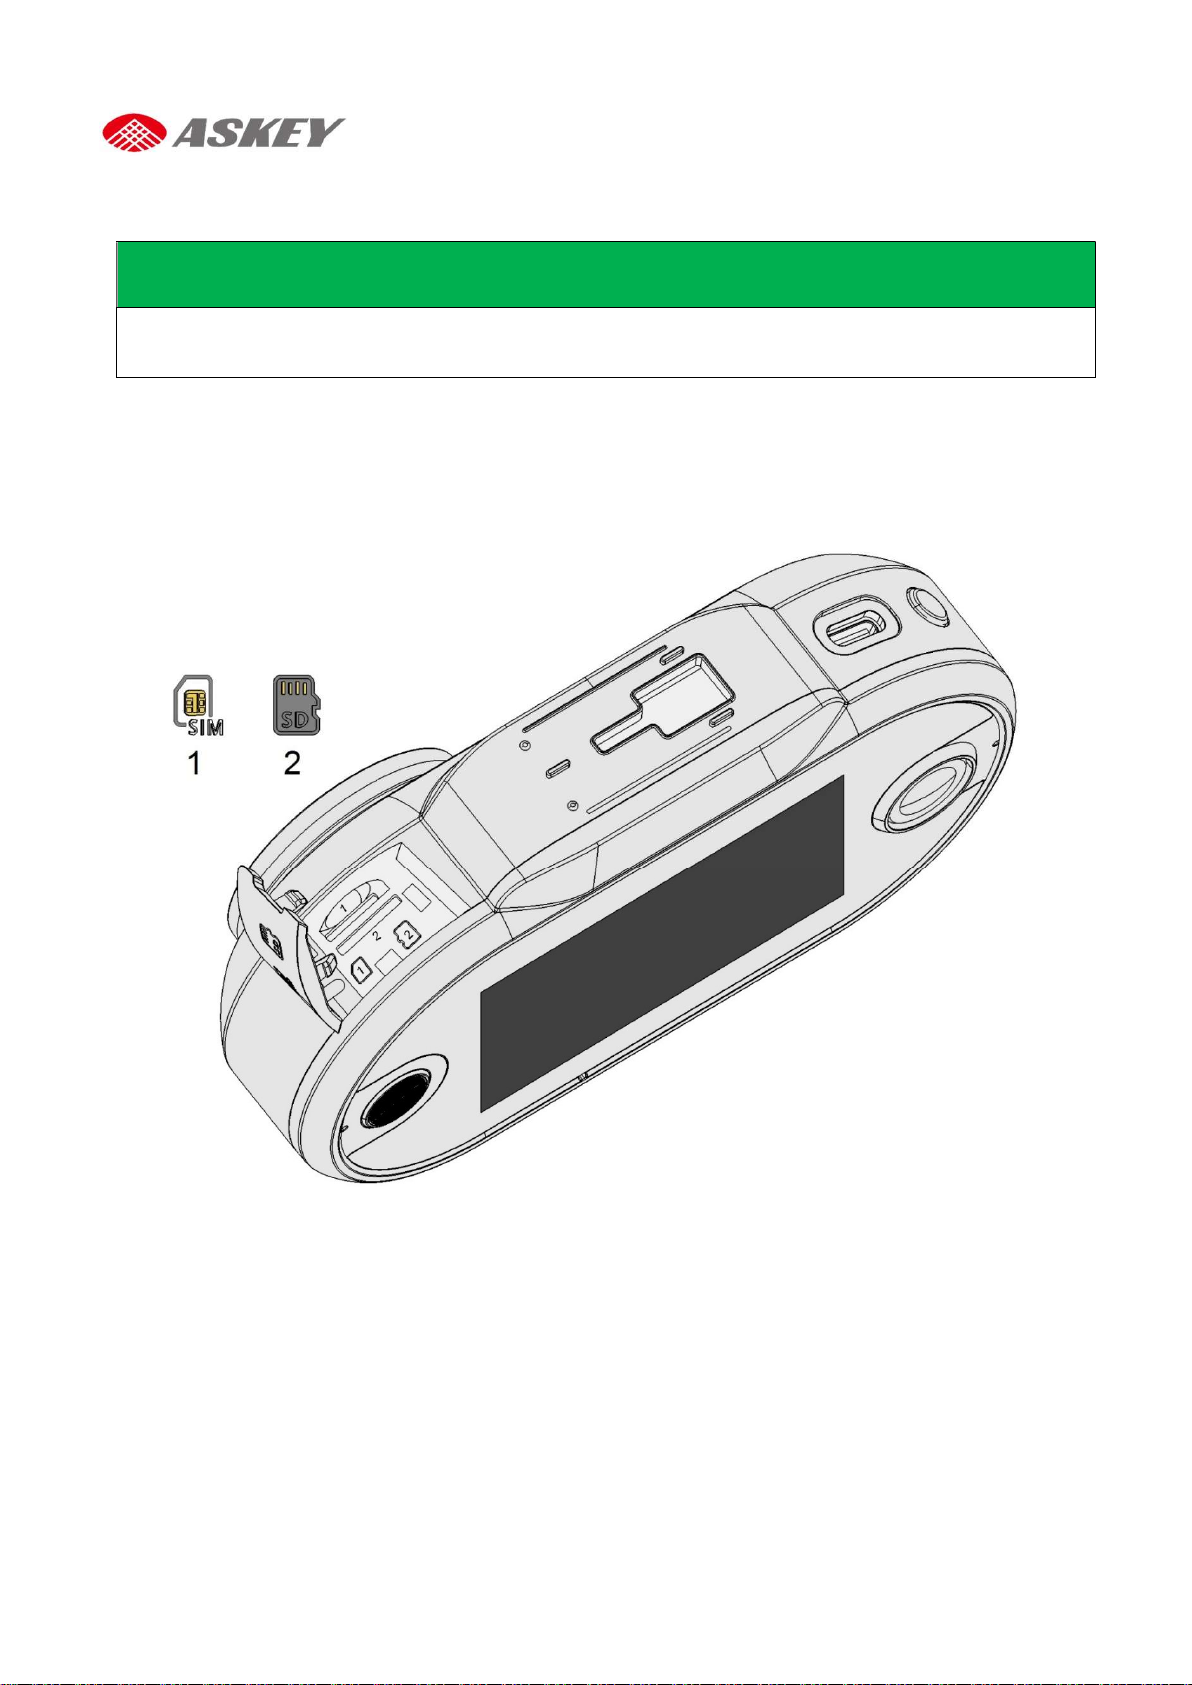
Insertion of SD Card and SIM Card
The CDR8011 does not function without SD card.
The CDR8011 supports only Nano sim cards (LTE/3G).
To insert the SIM card (1)/ SD card (2):
1. Open the SD card cover.
2. Place the SIM card (1)/ SD card (2) in the slot per orientation marking.
3. Push the SIM card (1)/ SD card (2) into the slot.
4. Close the SD card cover properly.
NOTES
Page 8
Activation and Battery Charge
NOTES
Make sure that SD card is inserted into the CDR8011. If the SD card is not inserted, you cannot activate
the CDR8011.
Always use the attached car charger to activate and charge the CDR8011.
To activate and charge the CDR8011:
1. Plug one end of the charger into device’s USB Type C-Port.
2. Plug the other end of the charger into the cigarette lighter socket of your vehicle.
3. When the vehicle’s engine starts, the CDR8011 turns on and the built-in battery begins to charge.
When the ignition key is turned off and the vehicle’s engine stops, the CDR8011 goes to “Sleep” mode
3 seconds later. Note that while in “Sleep” mode, the CDR8011 consumes battery power.
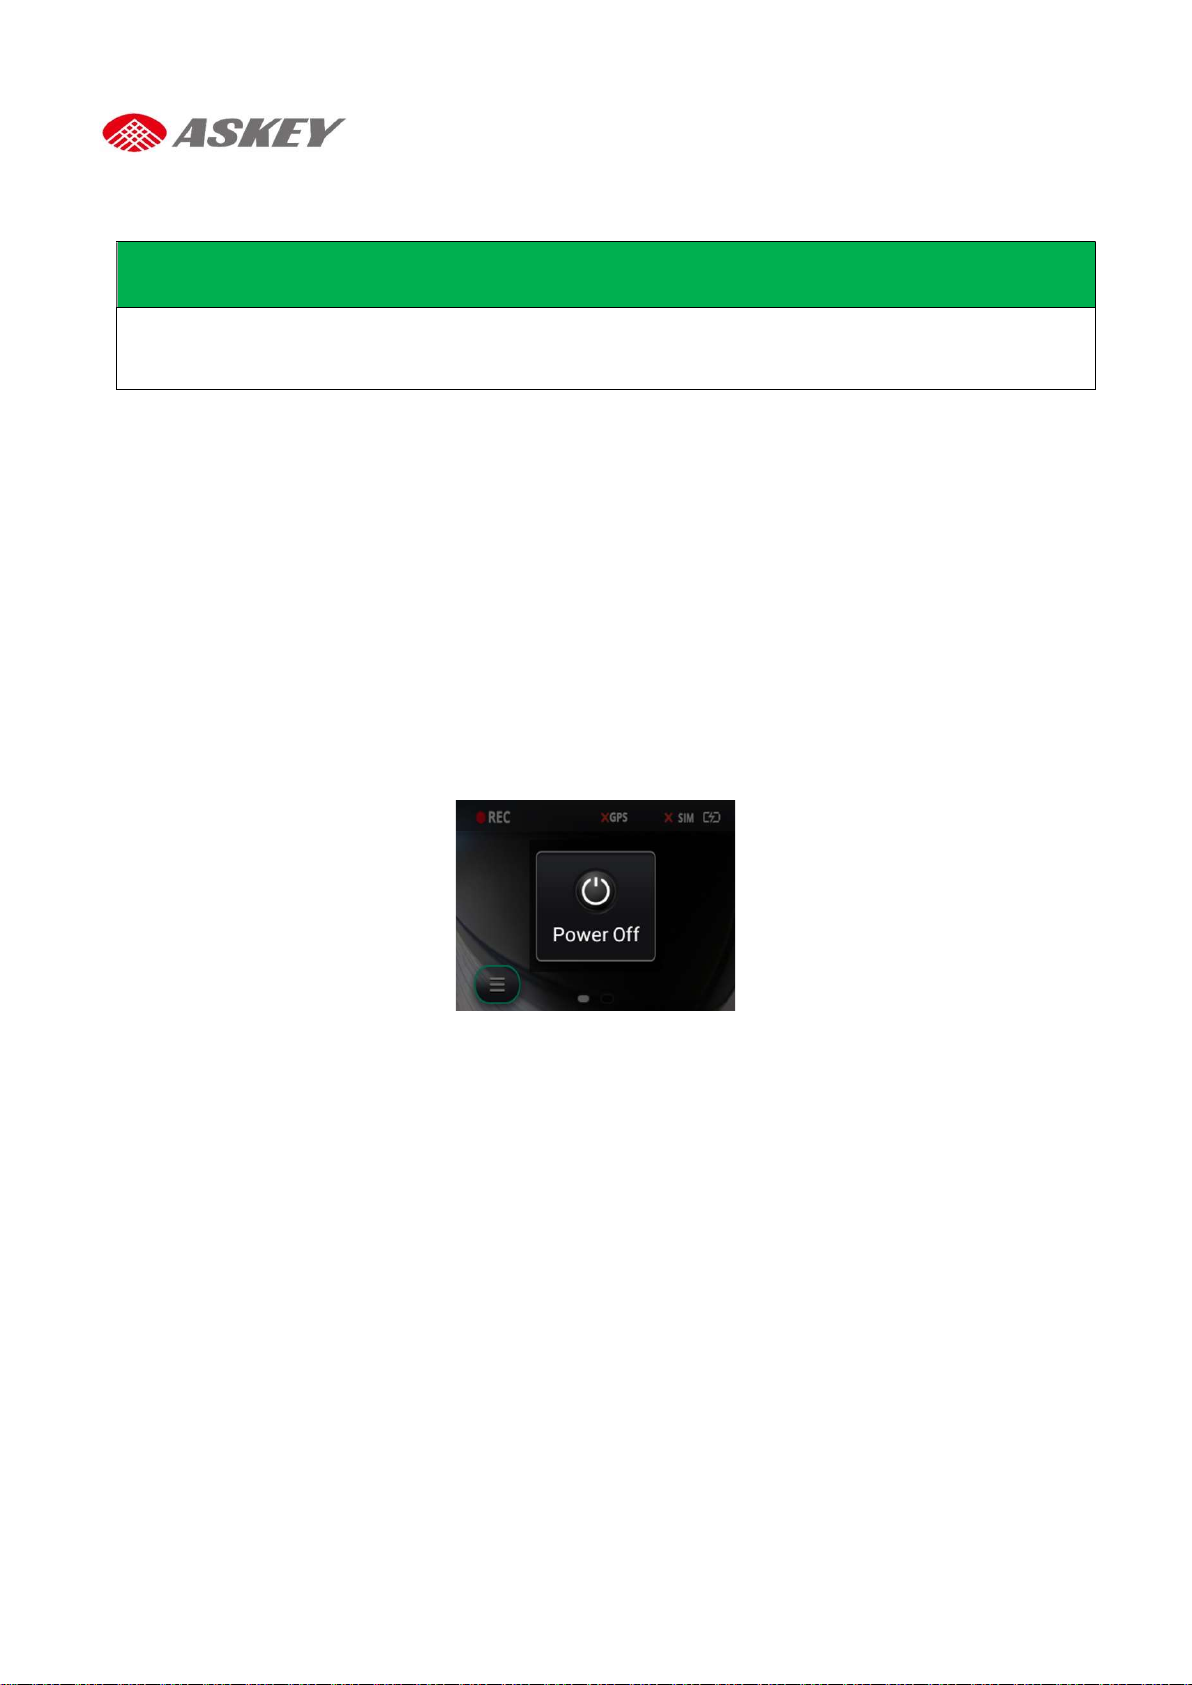
Manual Power Off
To turn CDR8010 off manually:
1. Press the “Power Off” button and Hold for 3 seconds. The “Power off” confirmation dialog box
displays on touch screen.
2. On the confirmation dialog box, touch:
Touch “Power off” to turn off the device.
Touch other areas on the display to cancel.
6 CDR8010 – Quick Start Guide
Page 9
Icons/Buttons/
Icons/Buttons/
Firmware update
Wi-Fi connection status with
Recording error/OFF
3G/4G Cellular
Battery Charge Level
,
Battery Charge in
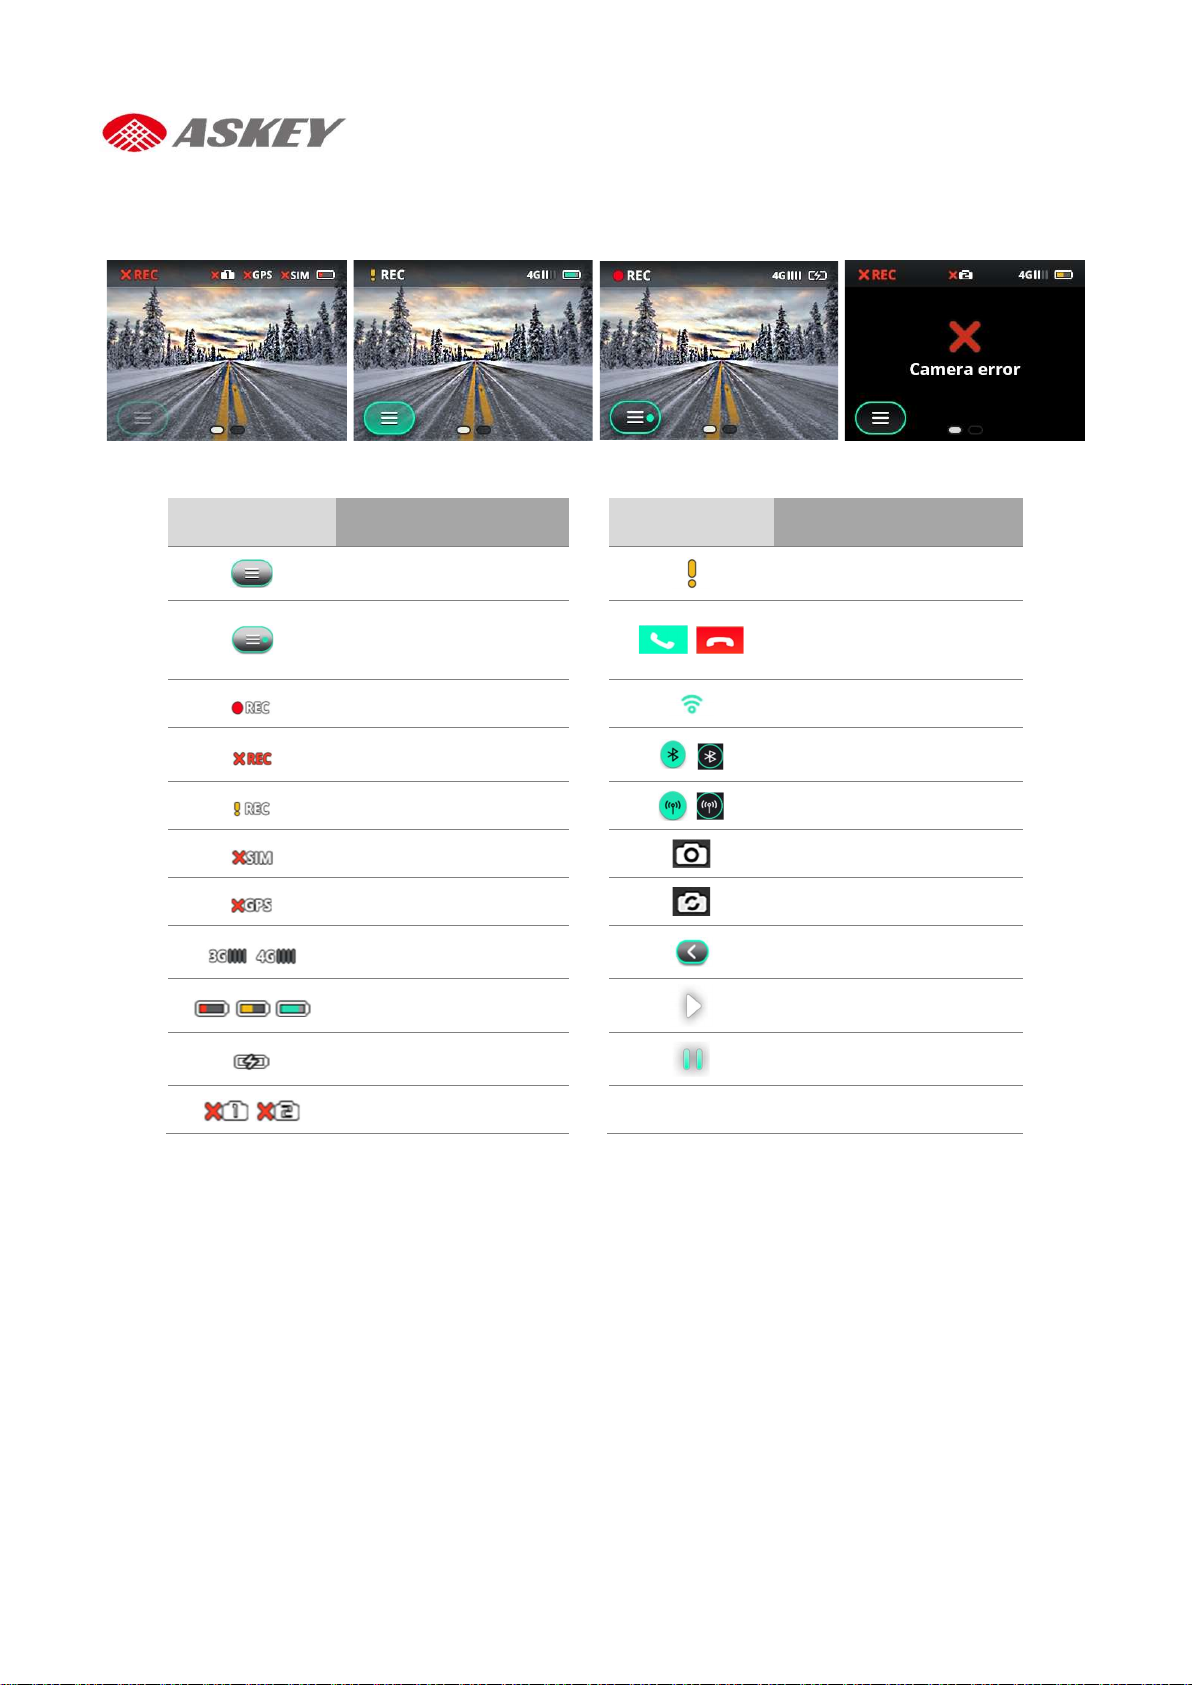
Screen Icons/Buttons
Description
Indicators
Main menu
available (dot on Main
Indicators
Impact
E-call Answer/End buttons
menu)
Recording ON icon
icon
Recording event icon
No SIM card
No GPS signal
connection
25%, 50% and 75%
signal strength
Bluetooth on/off
Hotspot on/off
Front cam recording icon
Rear cam recording icon
Back button
Play button
Description
progress
Broken cameras
Pause button
Page 10

Touch Screen Operations
Description Operation Example Action
Volume Adjustment
(from Default
Recording Screen)
Toggle between
Cameras (from
Default Recording
Screen)
Swipe up to increase the
volume.
Swipe down to decrease the
volume.
Swipe right to use the rear cam.
Swipe left to use the front cam.
Forward or Rewind
Video (from Playback
option)
Screen Brightness
Adjustment (from
Display option)
Swipe right to forward.
Swipe left to rewind
Swipe up to increase the
brightness.
Swipe down to decrease the
brightness.
8 CDR8010 – Quick Start Guide
Page 11

To access the
Main menu:
Menu Operations
NOTES
Ensure the CDR8011 is activated and battery charging is in progress
Ensure the CDR8011 is registered on an LTE/3G or Wi-Fi network
Ensure the automatic video recording mode (default screen) is on.
1. Touch the Menu icon on the recording screen to access all the operational functions of the
CDR8011.
2. The Menu is displayed on as shown below.
3. To go back to the previous (recording) screen, touch the Back icon .
Page 12

Connection Menu
The Connection menu allows user to set up (Wi-Fi, cellular data), Bluetooth and hotspot connections.
This section explains you on how to connect/disconnect the CDR8011 to/from the network (Wi-
Fi/Cellular data), Bluetooth, and share Cellular data to co-passengers through Hotspot option.
To set connectivity options, open the default recording screen and go to Menu icon >
Connection.
NOTE
The Cellular and Hotspot options become unavailable when the CDR8010 is disconnected from an LTE/3G
network.
With Wi-Fi Connection With LTE/3G Network
Wi-Fi
The CDR8010 supports IEEE_802.11 a/b/g/n/ac, 2.4 GHz and 5 GHz Wi-Fi connections. Perform the
following steps to access the Wi-Fi connectivity option:
1. To find and register the CDR8011 on the available Wi-Fi network, go to Menu > Connection >
WiFi.
2. WiFi screen displays on touch screen.
3. Select the WiFi check box .
On selecting the WiFi check box , a list of Available networks is displayed on the screen.
10
CDR8010 – Quick Start Guide
Page 13

Bluetooth
4. Select the required network from the Available networks list and enter the password to connect to
the network if required.
5. To go back to previous screens, touch the Back icon .
6. If you want to disconnect the CDR8011 from the Wi-Fi network, clear the WiFi check box or touch
the cross icon , to disconnect the current WiFi connection.
The CDR8011 supports Bluetooth 4.2, on Serial Port Profile (SPP). To pair the CDR8011 with a Bluetooth
device:
1. Go to Menu > Connection > Bluetooth.
2. The Bluetooth screen is displayed on the touch screen.
3. Select the Bluetooth check-box .
On selecting the Bluetooth check box , a list of Available devices is displayed on the
screen.
Page 14

4. Select the required device from the Available devices list to pair.
5. On successful pairing, paired Bluetooth device appears in the Paired devices.
6. If your Bluetooth device is already available in Paired devices list, you can skip previous step.
7. Touch required Bluetooth device from Paired devices list to connect. It takes couple of seconds to
connect.
8. Successful connection is indicated by the Bluetooth icon against the device name.
9. To go back to the previous screens, touch the Back icon .
12
CDR8010 – Quick Start Guide
Page 15

10. To disconnect the CDR8011 from the connected Bluetooth device, clear the Bluetooth check box
or from the default recording screen, swipe down and clear the Bluetooth icon selection.
Bluetooth ON Bluetooth OFF
Page 16

Cellular Data (LTE/3G)
NOTE
To enable Cellular Data, make sure that SIM card is inserted and working fine.
To use Cellular Data on the CDR8011:
1. Go to Menu > Connection > Cellular data.
Cellular data screen displays on touch screen.
2. Select the Cellular data check box .
On selecting the Cellular data check box , CDR8011 connects to Cellular data and shows the
Data usage for the current month.
3. To go back to the previous screens, touch the Back icon .
4. To turn Cellular data off, clear the Cellular data check box .
14
CDR8010 – Quick Start Guide
Page 17

Hotspot
NOTE
The CDR8010 acts as a Wi-Fi hotspot access point only when Cellular data is enabled.
To activate Hotspot on the CDR8011:
1. Go to Menu > Connection > Hotspot.
Hotspot screen displays on touch screen.
2. Select the Hotspot check box .
On selecting the Hotspot check box , Co-passenger will now be able to find the CDR8011
listed on their phones and connect to the Wi-Fi network by entering the associated password,
which is available on the Hotspot screen.
3. To turn Hotspot off, clear the Hotspot check box or from the default recording screen, swipe
down and clear the Hotspot icon selection.
Hotspot ON Hotspot OFF
Page 18

Playback Menu
The Playback provides access to all the Event and Continuous Videos and to view Still images stored on SD
card or CDR8011 internal memory.
To access the Playback menu, go to Menu > Playback on the default recording screen.
NOTE
If the SD card does not have sufficient memory, the older files are overwritten automatically by newly
recorded files.
NOTE
CDR8010 records videos using both front and rear cameras simultaneously.
The CDR8011 stores the recorded video clips in the following location: \\sdcard\event\event_data_video.
Videos are uploaded on to the cloud from this path.
The CDR8011 records clips for a maximum of 15 seconds.
Videos recorded by the front camera are indicated by , those recorded by the rear camera are
indicated by
16 CDR8010 – Quick Start Guide
Page 19

Settings Menu
To access the Settings menu, go to Menu > Settings.
Device Setup
To access the Device Setup option, go to Menu > Setting > Device Setup.
NOTE
For accurate ADAS calibration, first mount the device and then select the device setup.
1. Touch Go
2. Select the type of vehicle to be driven: Sedan, SUV, or Truck.
3. Touch Next
Page 20

4. Adjust the Horizon line and the hood to arrive at an appropriate field of view.
5. Touch Next
6. Adjust the vertical line along the center of the lane.
7. Touch Done .
18
CDR8010 – Quick Start Guide
Page 21

Advanced Driver-Assistant System Alerts
The ADAS helps detect dangerous driving conditions such as a Forward Collision and Lane Departure. In slowmoving traffic and tailbacks conditions, the Stop & Go function examines the distance between the host
vehicle and other vehicles in the front, and triggers an alert for the driver to move carefully with the traffic.
The ADAS generates a voice alert if:
The vehicle is too close to the moving vehicle in the front.
The vehicle deviates from the original lane.
NOTE
If ADAS alerts are not turned on, the CDR8011 fails to trigger an alert when the vehicle faces a risk, which
will eventually lead to accidents.
To turn ADAS alerts on:
1. Go to Menu > Settings > ADAS alerts.
2. Select the check boxes for Forward collision and Lane departure .
ADAS Alerts OFF ADAS Alerts ON
Auto Calibration with ADAS
When the ADAS (contains LDWS + FCWS) is enabled, the ADAS engine calibrates parameters of hood
level, horizontal level and horizontal pan automatically. It takes 1-2 minutes to calibrate these
parameters.
Page 22

Technical Specifications
Category
Specification
Details
Hei
ght 29.5 mm
Weight with Cradle
229 g
Screen Resolution
QVGA 320 × 240 pixel
Brightness
200 nits
Touch Screen
Capacitive Touchscreen, Multi
-
touch
Processor
Qualcomm SDM450 (8 core ARM A53 1.8 GHz)
Main Memory
On board 2 GB LPDDR3 and 16 GB eMMC (eMCP)
Camera angle: 1ch Camera & 2ch Camera: Horizon FOV 153°
G-Sensor (Accelerometer)
Capacity
750 mAh
Type
Lithium
-
ion
Removable
No
Standby time
30 minutes at 100 nits, 720 p, Playback
Wi-Fi IEEE802.11 a/b/g/n/ac, 2.4 GHz and 5 GHz
Wi-Fi Features
Mobile Hotspot
v 4.2,
GPS GNSS, AGPS, Beidou, Galileo, GLONASS, QZSS
NFC Type A, B, F
Audio
1x Built
-
in high
-
quality speaker (normal 1 W, max 1.5
W)
Voice Function
Amazon Alexa
SSIDMAC Address filtering, Multi
-
SSID
Length 124 mm
Design
Width 69.4 mm
Screen Size 2.7-inch
Display
Performance
Storage
Camera (Main and
CH2)
Special Features Sensors
Battery
Display Type LED backlight TFT panel
Operating System Android 9.0
SD Card Slot Single Micro-SD
Expandable Memory Support up to 128 GB SDXC
Resolution 4 MP
Physical Aperture 2.0
Video Recording
(HFOV 136°)
Video recording 1080p 30fps
Gyroscope
GPS, GNSS, A-GPS, Galileo, Glonass, and QZSS
Network and
Connectivity
Network and
Connectivity
Multimedia
WLAN
Bluetooth
USB Type-C USB charging
Microphone 3x Digital Microphone
Security
Profile – HFP- AG, HSP - AG, PAN - NAP, PANU, HID - Host,
A2DP - Source, BNEP, SDP, SPP, GATT, AVRCP
WPA (TKIP/AES)/WPA2-PSK (TKIP/AES), WEP (128 bit)
20 CDR8010 – Quick Start Guide
Page 23

Environmental Conditions
Condition
Range
Operation
-10 to 60 °C
Mechanical
-1
0 to 85 °C
Storage
-40 to 85 °C
Humidity
95 % at 60 °C
Low: 12 VDC
Charger
Current
1.5 RMS max at low line input and DC output at full load
Protection
3A Fuse
EUT Voltage
5V
EUT Cur
rent 2.1A
1x Dual color LED (Power Button)
Buttons
3x Function Keys (Power, E
-
Call, and Mute)
Conducted Immunity
Conducted Emission
Radiated Emission
Safety (on request)
CE-
LVD, CB
SD card
Self-verification
Carrier Type Approval
For JP: DOCOMO
ARIB
STD-T66 Only Test (No
Wi-Fi Alliance
GCF
Input Parameters
Condition Range
Car Charger Voltage
Max: 24 VDC
LEDs and Buttons
Condition Range
LED Status
1x Red LED (E-Call button)
1x Light Guide (Alexa's Mute)
Certifications
Description Certification
Radio Act NCC (Taiwan), JRF/JPA (Japan), FCC(NA), CE (EU)
e/E/CE Mark
CI_ISO7637-2
e/E/CE Mark
e/E/CE Mark
Certification)
CE_ISO7637-2
RE_CISPR25
IEC 60950 or 60065
JASO D014 POWER SUPPLY VARIATION TEST
For NA: AT&T
Page 24

Unable to View
Troubleshooting
Description Sample Screen Rectification
No SD Card
SD Card Error
Impact Detected
Format
Incomplete
Insert SD card
Remove SD card
Retry format again or replace SD card
with another SD card
System Unknown
Error
Unable to Play
Videos
Still Images
22 CDR8010 – Quick Start Guide
Reset the device
Page 25

Camera Error
Page 26

FCC
LTE and 3G Frequency Bands
Please make sure the LTE frequency bands with your operator in local before you insert the SIM card into the device.
• Support LTE Band
FCC requirement:
2 (1900 MHz)
4(1700 MHz)
5(850 MHz)
12(700 MHz)
13(700 MHz)
17(700 MHz)
26(850 MHz)
• Peak Downlink/Uplink
HSPA+ DL: 42Mbps, UL: 5.76Mbps,
LTE Cat4 DL: 150Mbps, UL: 50Mbps
Federal Communication Commission Interference Statement
This device complies with Part 15 of the FCC Rules. Operation is subject to the following two conditions: (1)
This device may not cause harmful interference, and (2) this device must accept any interference received,
including interference that may cause undesired operation.
This equipment has been tested and found to comply with the limits for a Class B digital device, pursuant
to Part 15 of the FCC Rules. These limits are designed to provide reasonable protection against harmful
interference in a residential installation. This equipment generates, uses and can radiate radio frequency
energy and, if not installed and used in accordance with the instructions, may cause harmful interference
to radio communications. However, there is no guarantee that interference will not occur in a particular
installation. If this equipment does cause harmful interference to radio or television reception, which can
be determined by turning the equipment off and on, the user is encouraged to try to correct the
interference by one of the following measures:
- Reorient or relocate the receiving antenna.
- Increase the separation between the equipment and receiver.
- Connect the equipment into an outlet on a circuit different from that
to which the receiver is connected.
- Consult the dealer or an experienced radio/TV technician for help.
24 CDR8010 – Quick Start Guide
Page 27

FCC Caution: Any changes or modifications not expressly approved by the party responsible for compliance
could void the user's authority to operate this equipment.
This transmitter must not be co-located or operating in conjunction with any other antenna or transmitter.
This device meets all the other requirements specified in Part 15E, Section 15.407 of the FCC Rules.
Radiation Exposure Statement:
This equipment complies with FCC radiation exposure limits set forth for an uncontrolled environment. This
equipment should be installed and operated with minimum distance 20cm between the radiator & your
body.
Note: The country code selection is for non-US model only and is not available to all US model. Per FCC
regulation, all WiFi product marketed in US must fixed to US operation channels only.
 Loading...