

Page 1

ASKEY Connected DashCAM
CDR6013-WG
User Manual
Nov. 2017
ASKEY Computer Corp.
Page 2

Connected Car Cam CDR6012 User Manual
Content
1. Introduction....................................................................................................................... 3
1.1 Features........................................................................................................................................... 3
1.1.1 Package Contents................................................................................................................... 3
1.2 Device Overview............................................................................................................................ 4
1.3 Getting Started............................................................................................................................... 5
1.3.1 Insert Memory Card and SIM Card........................................................................................ 5
1.3.2 Install in Vehicles..................................................................................................................... 5
1.4 Power the Device On / Off............................................................................................................ 5
1.4.1 Auto Power On/Off.................................................................................................................. 6
1.4.2 Manually Power Off................................................................................................................. 6
1.4.3 Reset the Device..................................................................................................................... 7
1.4.4 Set the Date / Time.................................................................................................................. 7
1.4.5 LED Indicator........................................................................................................................... 7
1.4.6 Menu Operation....................................................................................................................... 7
2. Using the Driving Recorder.............................................................................................. 8
2.1 Recording Videos.......................................................................................................................... 8
2.1.1 The Recoding Screen ............................................................................................................. 8
2.1.2 Voice On/Off when recording ................................................................................................. 9
2.1.3 Take Picture............................................................................................................................. 9
2.1.4 Screenshot............................................................................................................................... 9
2.2 Playback the Videos and Photos................................................................................................ 9
2.2.1 Normal Videos......................................................................................................................... 9
2.2.2 Event Videos...........................................................................................................................10
2.2.3 Risky Driving Videos ..............................................................................................................10
2.3 Network Settings ..........................................................................................................................11
2.3.1 LTE and 3G Frequency Bands..............................................................................................11
2.3.2 Wi-Fi........................................................................................................................................12
2.3.3 Bluetooth.................................................................................................................................12
2.3.4 APN Setting ............................................................................................................................12
2.4 Menu Options................................................................................................................................13
2.5 ADAS...............................................................................................................................................16
2.5.1 Auto Calibration......................................................................................................................16
2.5.2 FCWS (FrontCollision Warning System).............................................................................16
2.5.3 LDWS (Lane Departure WaringSystem).............................................................................17
2.6 Firmware Upgrade........................................................................................................................18
1
Page 3

Connected Car Cam CDR6012 User Manual
2.6.1 Firmware Upgrade via OTA...................................................................................................18
2.7 Emergency Call.............................................................................................................................18
2.8 Technical Specifications.............................................................................................................19
3. Appendix.......................................................................................................................... 20
3.1. Package........................................................................................................................ 20
3.2. Memory Card Capacity................................................................................................ 21
4. Troubleshooting.............................................................................................................. 21
Copyright © 2017, All rights reserved.
All rights reserved. Printed in the Taiwan, 2017.
The information in this document is subject to change without notice. The statements,
configurations, technical data, and recommendations in this document are believed to be
accurate and reliable, but are presented without express or implied warranty. Users must take
full responsibility for their applications of any products specified in this document.
The information in this document is proprietary to ASKEY Computer Corp. The software
described in this document is furnished under a license agreement and may only be used in
accordance with the terms of that license.Asummaryof the Software License is included in this
document.
Statement of Conditions
In the interest of improving internal design, operational function, and/or reliability, ASKEY
Computer Corp. reserves the right tomake changes to the products described in this document
without notice.
ASKEY Computer Corp. does not assume any liability that may occur due to the use or
application of the product(s) or circuit layout(s) described herein.
In addition, the program and information contained herein are licensed only pursuant to a
license agreement that contains restrictions on use and disclosure (that may incorporate by
reference certain limitations and notices imposed by third parties)
2
Page 4
Connected Car Cam CDR6012 User Manual
1.Introduction
Thank you for purchasing this advanced Connected Car Cam. This device is specifically
designed for the functions descript as the following.
1.1 Features
• Full HD 1080p single camera driving recorder
• 1920x1080p video recording
• Wide view angel FOV 120˚(H)
• 2 Mega Pixel CMOS Sensor
• 2inch LED backlight TFTpanel, QVGA 320 x 240 pixel color screen
• Built in LTE/3G, Wi-Fi, Bluetooth and GPS function
• 3.7V, 750 mAh rechargeable Li-ion battery non removable battery
• Seamless looping recording
• Support up to 128GB Class 10 Micro SDHC
(Suggest to use Micro SDHC 95 MB/s R, 90 MB/s W)
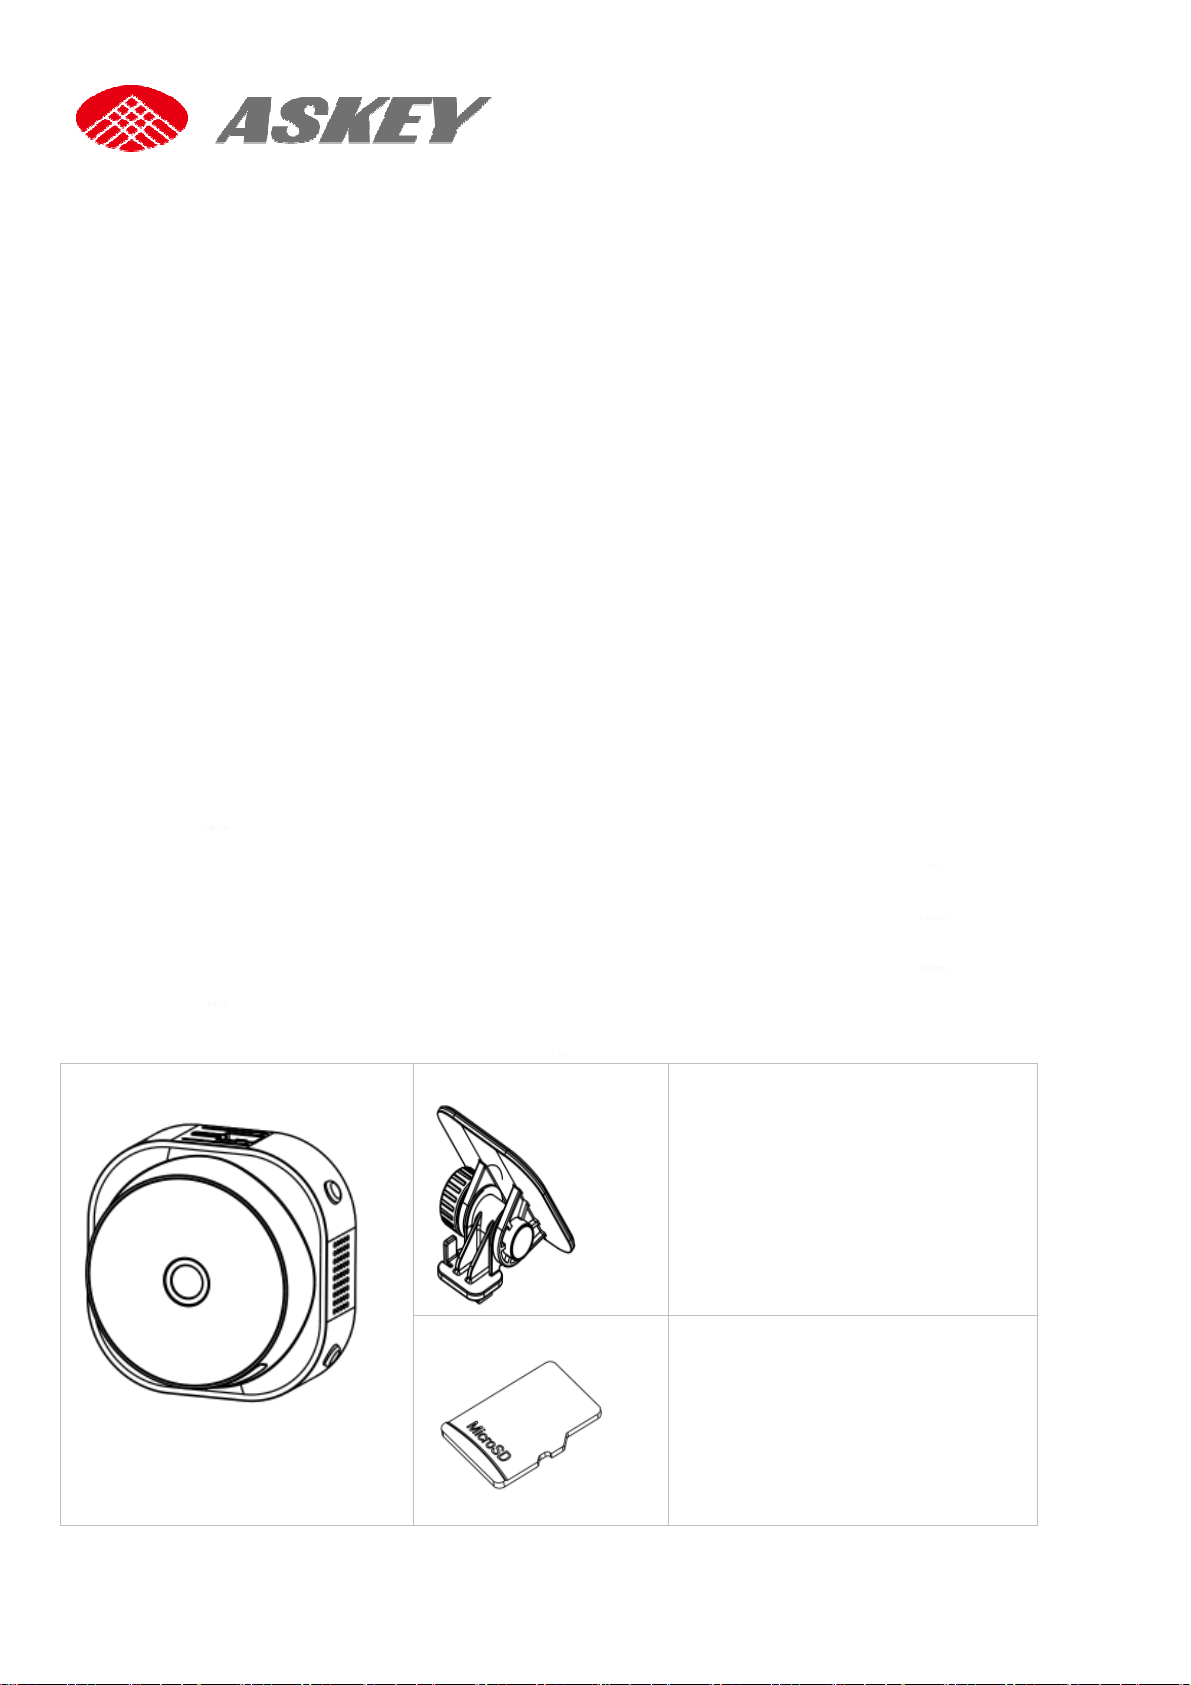
1.1.1 Package Contents
The package contains the following items. In case there is any missing or damaged item,
contact your dealer immediately.
The device Mount bracket Power Cable 1: Cigarette Car
Charger
5V 2A Cigarette Car Charger
with 5m cable with USB mini-B
connector.
Micro SD card Power Cable 2: Power Box
5V 2A power box with 5m cable
with USB mini-B connector.
Remark: Please notice there is one power cable in your package box. You could confirm with
3
Page 5

before your purchasing.
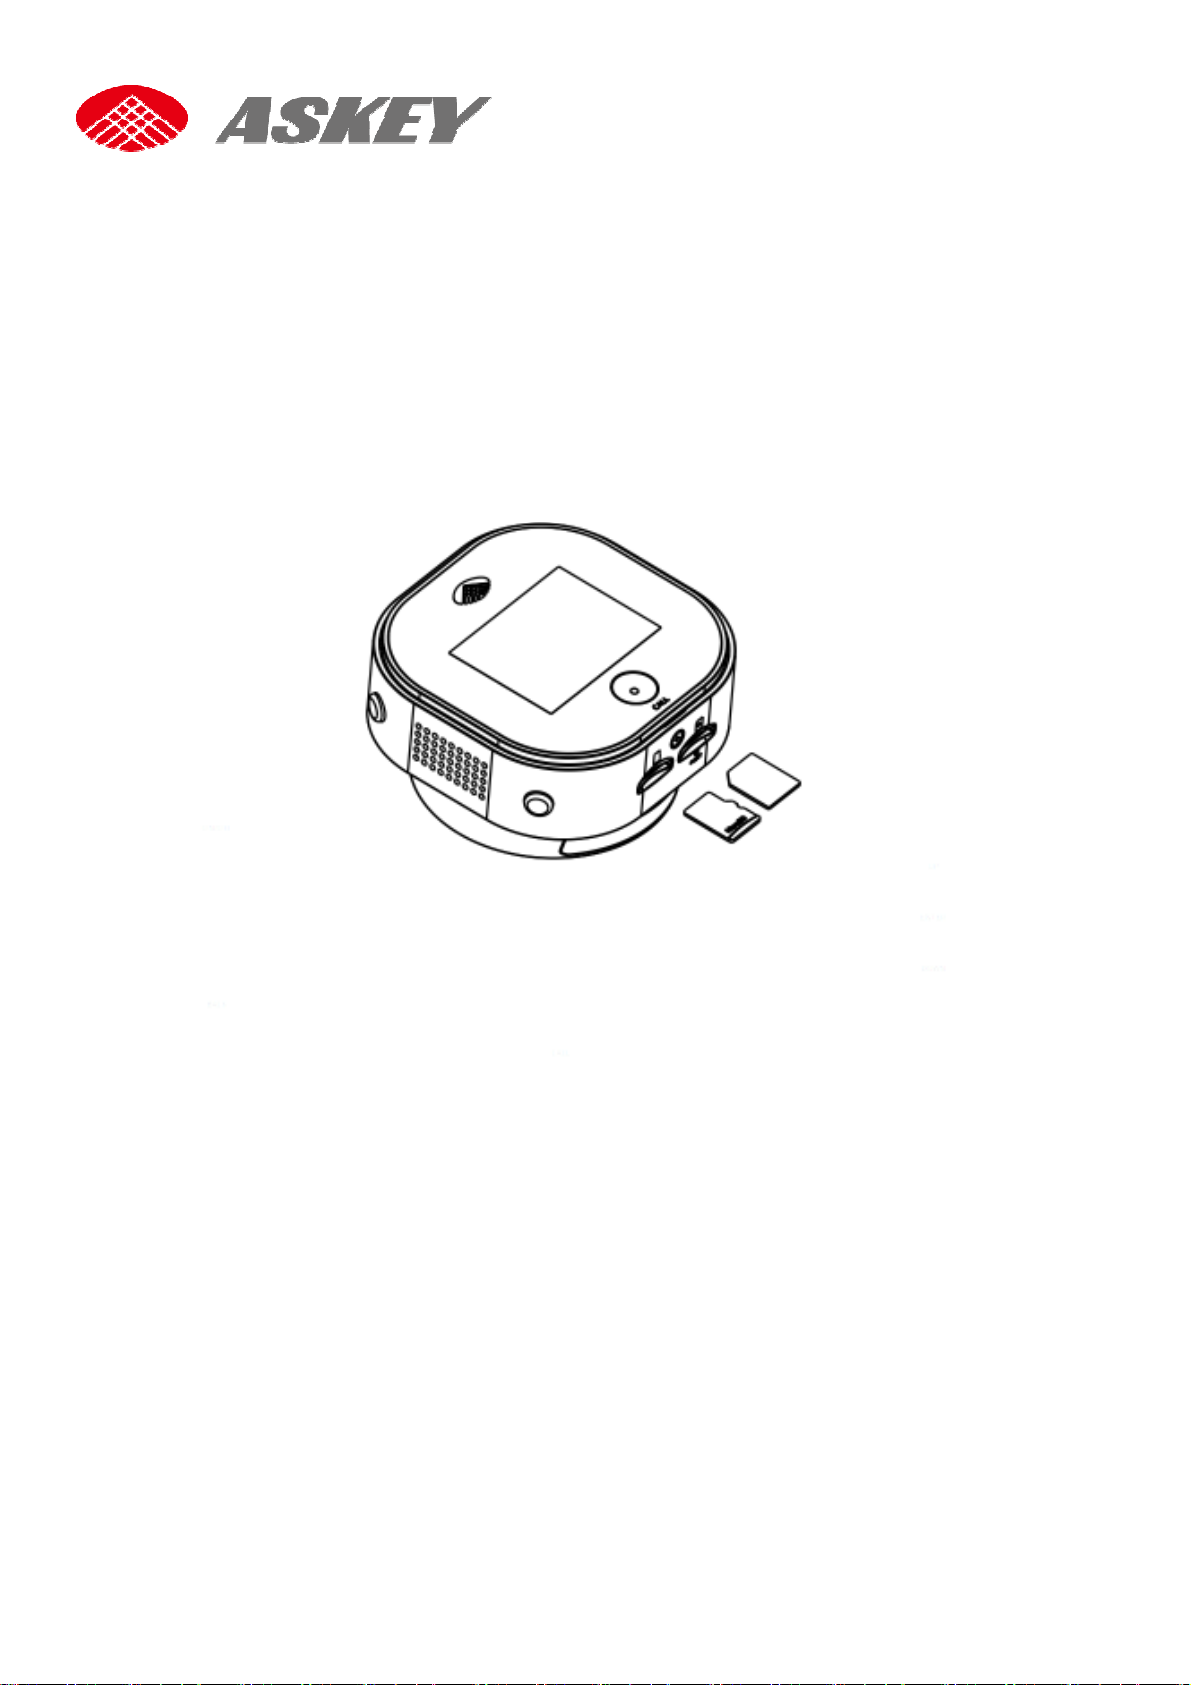
1.2 Device Overview
No. Description No. Description
1 Mount Bracket 11 Up Button
Connected Car Cam CDR6012 User Manual
2 Knob/Hinge 12 Enter/OK Button
3 Power Button 13 Down Button
4 Main Device 14 Microphone-2
5 Camera 15 Call Button
6 Speaker 16 SIM Card Slot
7 Back/Return Button 17 Reset Button
8 Microphone-1 18 Micro SD Card Slot
9 USB port
10 LED Indicator
4
Page 6
Connected Car Cam CDR6012 User Manual
1.3 Getting Started
1.3.1 Insert Memory Card and SIM Card
Follow the direction indicated as the following to insert the memory card and SIM card.
(Please contact with your Operator to get the SIM card.)
Micro SIM card
Micro SD card
1.3.2 Install in Vehicles
Please follow the steps to make sure the device is securely locked in place.
1. This device shall be installed near the rear view-mirror, at the center of windshield, if
possible, for optimal viewing.
2. Mount the device nearby the room mirror. Make sure the camera view area in LCD.
3. Position the mount bracket on the windshield, and then press to paste on the windshield.
Make sure the base is securely locked in place.
4. Loosen the knob swivel to adjust tilt angle. Locking knob, and confirm that the device is
securely locked in place.
1.4 Power the Device On / Off
Use only the attached car charger for activating the device and charging the built-in battery.
1. Connect one end of car charger connector to USB port on the device.
5
Page 7

Connected Car Cam CDR6012 User Manual
2. Plug the other end of the car charger to the cigarette lighter socket of your vehicle. Once
the vehicle engine is started, the device automatically turns on.
3. Switch key from ACC to OFF position, then device will enter sleep mode and start
consuming battery power.
1.4.1 Auto Power On/Off
Once the vehicle engine is started, the device automatically turns on and starts recording
(must have SD card).
When the vehicle engine stopped, the device will turn to sleep mode after 5 seconds, in sleep
mode, the device gets the power by battery. Turn device off, long pressing the Power button
around 3 seconds, a power off confirm dialog shows, pressing Enter button to power off the
device completely.
1.4.2 Manually Power Off
Press the power button around 2-3 seconds to power off, a dialog will be shown and press
Enter button to confirm it.
6
Page 8

Connected Car Cam CDR6012 User Manual
1.4.3 Reset the Device
In case the device fails to function normally due to unknown causes, click the reset key on the
bottom of the device.
1.4.4 Set the Date / Time
Date and Time will be automatically updated after registered the LTE/3G network, connected
to Wi-Fi or receive the GPS signal
1.4.5 LED Indicator
LED Indicator Status Description
Red light keeps flashing Power on and recording
Red light on Sleep mode
Call Button LED Status Description
Red light keeps flashing Connecting to service center and
waiting answer the eCall.
Red light on Answered the eCall
1.4.6 Menu Operation
Press Enter button to enter menu setting, press Up / Down button to select sub menu, then
press Enter button OK to enter the setting, press Up / Down button to select the option, and
then press Enter button OK confirm. After completing the setting, press Back button to exit
menu setting.
7
Page 9

Connected Car Cam CDR6012 User Manual
2.Using the Driving Recorder
2.1 Recording Videos
Before starting recording, please insert a SD card into the SD card slot. With car charger
connected the device will automatically turn on and start recording, the video recording icon
shown on the left top of the screen and a red color LED blinks . The recorded files are saved
on the SD card. To stop recording, press Enter button again.
The recorded files are saved on the SD card, you can get these video files under path
\\sdcard\DVR\driving\normal_video when you insert the SD card into your PC or playback these
files under the menu items of “Video and photos/Normal”.
2.1.1 The Recoding Screen
Icons on the recording screen.
Status icon What it means
00:00
Video is recorded
Show the battery level and charging status
Recording time counter
No sound when recording video
Tell you the current vehicle speed
ADAS is disabled
Display the current time
Satellite signal is acquired
No satellite signalis acquired
GPS location information is acquired
8
Page 10

Connected Car Cam CDR6012 User Manual
Connected to Wi-Fi network
Wi-Fi hotspot allow other device sharing your 3G/LTE
connection.
Connected to 3G/LTE network and show the signal
strength.
2.1.2 Voice On/Off when recording
Enter the Video Setting to enable Voice when recording Off / On.
2.1.3 Take Picture
During recording, press Back button can capture the current scenery as a picture.
2.1.4 Screenshot
Press Power and Down button at the same time can capture the current screen as a
picture. The screen pictures are saved on the SD card, you can get these under path
\\sdcard\pictures\screenshots when you insert the SD card into your PC.
2.2 Playback the Videos and Photos
2.2.1 Normal Videos
As mentioned, video recording is started as soon as the device is powered on, but you have
to insert a SD card before recording. Without any setting in advance, the video recording will
keep continuous. The recorded video can be categorized into 4 types of Normal video, Collision
event video, Risking driving video and Security monitor video in Parking mode (Vehicle engine
is off), and video files are saved on the SD card under path \\sdcard\DVR\driving. The oldest
files will be overwritten if the SD card fills up. All kinds of video files can be played directly on
device. Enter into its corresponding sub menu item of “Video and photos” for normal, event,
risking driving and parking videos, scrolling through video clips or photos using “UP” and
“DOWN” button, to playback or view chosen video or photo files by pressing “ENTER” button.
The difference of 4 types of recorded files will be explained in later sections.
9
Page 11

Connected Car Cam CDR6012 User Manual
2.2.2 Event Videos
The Event video record is triggered and activates in the case of a car collision accident
which is determined by the gravitational acceleration.
When collision is detected, this device will save the recorded video clips under \\sdcard
DVR\event\event_data_video and upload them to cloud forcibly.
2.2.3 Risky Driving Videos
Risking driving is indicated the behaviors of hard-brake or hard-turn. The video record of
risking driving is activated and determined according to the variation ofAngular velocity via
gyroscope and g-sensor.
When risking driving is detected, this device will save the recorded video clips under
\\sdcard\DVR\event\rdb_video and upload them to cloud forcibly.
10
Page 12

Connected Car Cam CDR6012 User Manual
2.3 Network Settings
The device built-in LTE/3G,Wi-Fi and GPS module, please insert a SIM card before power on,
when LTE/3G or GPS signal has been received, the recorded video can be tracked at this time.
2.3.1 LTE and 3G Frequency Bands
Please make sure the LTE and 3G frequency bands with your operator in local before you
insert the SIM card into the device.
• Support LTE Band
EU/JP/TW/APAC requirement:
2 (1900 MHz)
4(1700 MHz)
5(850 MHz)
17(700 MHz)
26(850 MHz)
• Support 3G Bands:
WCDMA2(1900 MHz), 4(1700 MHz),5(850 MHz)
• Peak Downlink/Uplink
HSPA+ DL: 42Mbps, UL: 5.76Mbps, LTE Cat4 DL: 150Mbps, UL: 50Mbps
11
Page 13

Connected Car Cam CDR6012 User Manual
2.3.2 Wi-Fi
The device support IEEE802.11 b/g/n, 2.4GHzWi-Fi connections. Press Enter button to
select Network Setting menu to activate the Wi-Fi hotspot function. Insert a SIM card before
you activate the Wi-Fi hotspot function. (Please notice you will be charged by local operator if
you activate it).
2.3.3 Bluetooth
The device support Bluetooth 4.1, the profile can support SPP. Press Enter button to select
Network Setting menu to activate the Bluetooth function. Make sure the profile can be
connected to your mobile device before you activate it.
2.3.4 APN Setting
Press Enter button to select Network Setting menu, enter LTE to select "Access Point
Names", press " + " icon then use on-screen keypad to input the APN.
12
Page 14

Connected Car Cam CDR6012 User Manual
2.4 Menu Options
Main Menu Description Available Option
Videos and
photo
ADAS Setting LDWS Off – No warning tone
Normal Playback recorded
movies and view
Event Event data / Risky driving
Parking Review / Delete
Photo Review / Change to Event /
FCWS Off – No warning tone
capture photos.
when lane departure.
On – Turns on the
LDWS, there will be
warning when depart
from the lane.
when collision occur.
Review / Change to Event
folder / Delete
behaviors / FCWS: Review /
Delete
Delete
-Off
-On
-Off
-On
Network
Settings
On – Turns of the
FCWS, there will be
warning before a
possible collision
when the vehicle in
front of you.
Operator Name Display the Operator
name after insert an
available SIM card.
13
Page 15

Connected Car Cam CDR6012 User Manual
Parking mode
Wi-Fi Set the Wi-Fi
connection.
LTE Set the LTE
connection and APN.
Wi-Fi Hotspot Set the Wi-Fi as an
AP router.
Bluetooth Set the Bluetooth
connection.
SD card Format Delete movies and
photos saved on the
SD card.
USB port Mini USB Only for charger,
Can’t data
transmission
Set the parking mode
on / off and the
sensitivity.
Video Setting Recording time Select to limit
Roaming / Network / Access
Point Name(APN)
On / Off
Set up ID/Password
On / Off
Yes / Cancel
On / Off / Auto detection
1minutes / 3minutes / 5minutes
recording time pre
file.
Resolution Set the video
resolution.
Display Set the display
brightness and on /
1080p(FHD) / 720p(HD)
Brightness / On / Off
off when recording.
Information Setting the location
14
-Off
Page 16

Connected Car Cam CDR6012 User Manual
data on the video
recorded.
-On
System
setting
Voice when
recording
Set the voice
recording on / off
when video
recording.
Manufacture Display the
manufacture.
Model name Display the model
name for the device.
IMEI Display the IMEI for
the device.
System Update Select to update the
firmware if you
receive the
notification from the
service center.
Serial number Display the serial
On / Off
Check current version / Version
update
number of the device.
Certificate ID Display the
Certificate ID of the
device.
Volume Select the volume of
the device and the
voice(TTS) alert.
For more Regulatory
compliance and marks
(E-labels) about
NCC/FCC/JRF/JPA, please
refer to your device via the
following steps: System
setting Certificate.
15
Page 17

Version Display the current
2.5 ADAS
2.5.1 Auto Calibration
Connected Car Cam CDR6012 User Manual
firmware version of
the device.
When the ADAS (containing the sub functions of LDW, FCW) is enabled, the ADAS engine
will take around 1-2 minutes to calibrate its parameters of hood level, horizontal level and
horizontal Pan automatically. With these 3 parameters obtained accurately such that the ADAS
can further work correctly. Three short lines will appear on the screen once the calibration
procedure is finished. Please notice ADAS doesn’t work if the parameters are not acquired.
2.5.2 FCWS (Front Collision Warning System)
When FCWS is enabled after satellite positioning, the system calculates distances between
the front vehicle and our vehicle and the headway time, the device will has voice alert and
display an alarm screen before a possible collision when the vehicle in front of you.
16
Page 18

Connected Car Cam CDR6012 User Manual
• Notice
FCWS turned on, a green square wireframewith distance is displayed on the screen from the
moment the front vehicle is detected, and as long as the headway is greater than the
predefined headway time threshold.
• Warning
FCWS turned on, a red square wireframe with distance is displayed on the screen with
voice alert, when the headway is less than 2.5 second.
2.5.3 LDWS (Lane Departure Waring System)
When LDWS is enabled after satellite positioning, the device will has voice alert and display
an alarm screen if vehicle begin to depart from the original lane. Press Enter button to select
the LDWS setting (the default setting is Off).
Turn on LDWS function, the recorded movie will give a voice alert and a red line is displayed
on the screen if the vehicle depart from the original lane.
17
Page 19

Connected Car Cam CDR6012 User Manual
2.6 Firmware Upgrade
Check the device has already connected to the vehicle power before you activate the
firmware upgrade service. While the firmware upgrading, do not remove or stop the vehicle
engine. This information may be important for service and support communications.
2.6.1 Firmware Upgrade via OTA
Enter the System Upgrade and select Check Version to check and upgrade the firmware
version. Make sure the device already connected to Internet before proceed firmware
upgrading. Please notice you will be charged by local operator if you activate it.
2.7 Emergency Call
When detect car crash, the device will trigger voice call to service center automatically, and
you will receive the phone call from service center who will communication with you. (Please
notice you will be charged by local operator if activate it).
18
Page 20

Connected Car Cam CDR6012 User Manual
2.8 Technical Specifications
Model Name
Support OS Android 6.0
Display 2inch LED backlight TFT panel, QVGA 320 x 240 pixel, brightness 200 nits ,
Dimensions 76mm (L) x 76mm (W) x 40.7mm(H)
Weight Around 150g
Battery Pack & Life 3.7V, 750mAh(non-removable lithium-ion battery), target 30minutes @
100nits, 720p, playback
Processor Qualcomm MSM8956 (Dual core AMR A72 1.8GHzandQuad core ARM
A53 1.6GHz)
Graphics Adreno 510 @ 600MHz
Main Memory On board 2GB LPDDR3 and 8GB eMMC
Sensors 1. G-Sensor(Accelerometer)
2. Gyroscope
3. GPS
WLAN 802.11 b/g/n
Wi-Fi Antenna*1
CDR6013-WG
Bluetooth BT 4.1., Profile: SDP, HFP, HSP, PAN, HID, SPP, FMP, GATT
Modem WCDMA HSPA+/FDD LTE and TD-LTE
SIM card slot Support, single Micro SIM(3FF)
GPS GPS, AGPS & Glonass
Interface 1 x micro USB
1 x Card reader (Micro-SD),
Camera Single camera: 2MP with 1080p/720p video recording, FOV 120˚(H)
Audio Built-in high quality speaker x 1
Microphone Analog Microphone x2
LED Status Dual color LED x1(power button), red LED x2(callbutton)
Buttons 5 function keys(power, back, enter, up anddown)
Reset and eCall button
AC adapter Output: 5V 2A ;9V .15ACigarette Car Charger
Input: 12V/24V DC
Cable length: 5m cable with USB mini-B connector
Environment Operation Temperature: -20 to 60 ℃.
Storage Temperature: -20 to 85 ℃
Humidity: 95%(60 ℃)
19
Page 21

3.Appendix
3.1. Package
Planning.
Connected Car Cam CDR6012 User Manual
20
Page 22

Connected Car Cam CDR6012 User Manual
3.2. Memory Card Capacity
Capacity Normal
recording
4GB 1.6GB 1.12GB 0.16GB 0.32GB 0.8GB
8GB 3.6GB 2.52GB 0.36GB 0.72GB 0.8GB
16GB 7.6GB 5.32GB 0.76GB 1.52GB 0.8GB
32GB 15.6GB 10.92GB 1.56GB 3.12GB 0.8GB
The oldest files will be overwritten if the SD card fills up.
Event
recording
Log Photo Capacity for
Firmware Update
4.Troubleshooting
Contact us if you have questions need some help or cannot use the device normally.
Telephone: E-mail: sales@askey.com.tw
Manufactured by Askey Computer Corporation
10F, No.119, Jiankang Road., Zhonghe Dist., New Taipei City 23585, Taiwan
21
Page 23

Connected Car Cam CDR6012 User Manual
5. FCC warning statement
This radio transmitter FCCID: H8NCDR6013 has been approved by FCC to operate with the antenna types
listed below with the maximum permissible gain and required antenna impedance for each antenna
type indicated. Antenna types not included in this list, having a gain greater than the maximum gain
indicated for that type, are strictly prohibited for use with this device.
FEDERAL COMMUNICATIONS COMMISSION INTERFERENCE STATEMENT
This equipment has been tested and found to comply with the limits for a Class B digital device, pursuant to part
15 of the FCC Rules. These limits are designed to provide reasonable protection against harmful interference in a
residential installation. This equipment generates, uses and can radiate radio frequency energy and, if not
installed and used in accordance with the instructions, may cause harmful interference to radio communications.
However, there is no guarantee that interference will not occur in a particular installation. If this equipment
does cause harmful interference to radio or television reception, which can be determined by turning the
equipment off and on, the user is encouraged to try to correct the interference by one or more of the following
measures:
-Reorient or relocate the receiving antenna.
-Increase the separation between the equipment and receiver.
-Connect the equipment into an outlet on a circuit different from that to which the receiver is connected.
-Consult the dealer or an experienced radio/ TV technician for help.
CAUTION:
Any changes or modifications not expressly approved by the grantee of this device could void the user's
authority to operate the equipment.
RF exposure warning
This equipment must be installed and operated in accordance with provided
instructions and the antenna(s) used for this transmitter must be installed to provide a
separation distance of at least 20 cm from all persons and must not be co-located or
operating in conjunction with any other antenna or transmitter. End-users and installers
must be provide with antenna installation instructions and transmitter operating
conditions for satisfying RF exposure compliance.
This device complies with Part 15 of the FCC Rules. Operation is subject to the following
two conditions:
(1) this device may not cause harmful interference, and
(2) this device must accept any interference received, including interference that may
cause undesired operation.
22
 Loading...