

Page 1

PLEASE READ
We are in no way responsible for the
contents of the manual. We do not guarantee
its accuracy and we do not make any claim
of copyright. The copyright remains the
property of their respective owners.
Visit the site to read the latest projector
news and reviews, read and comment on
projector specifications, download user
manuals and much more.
Page 2
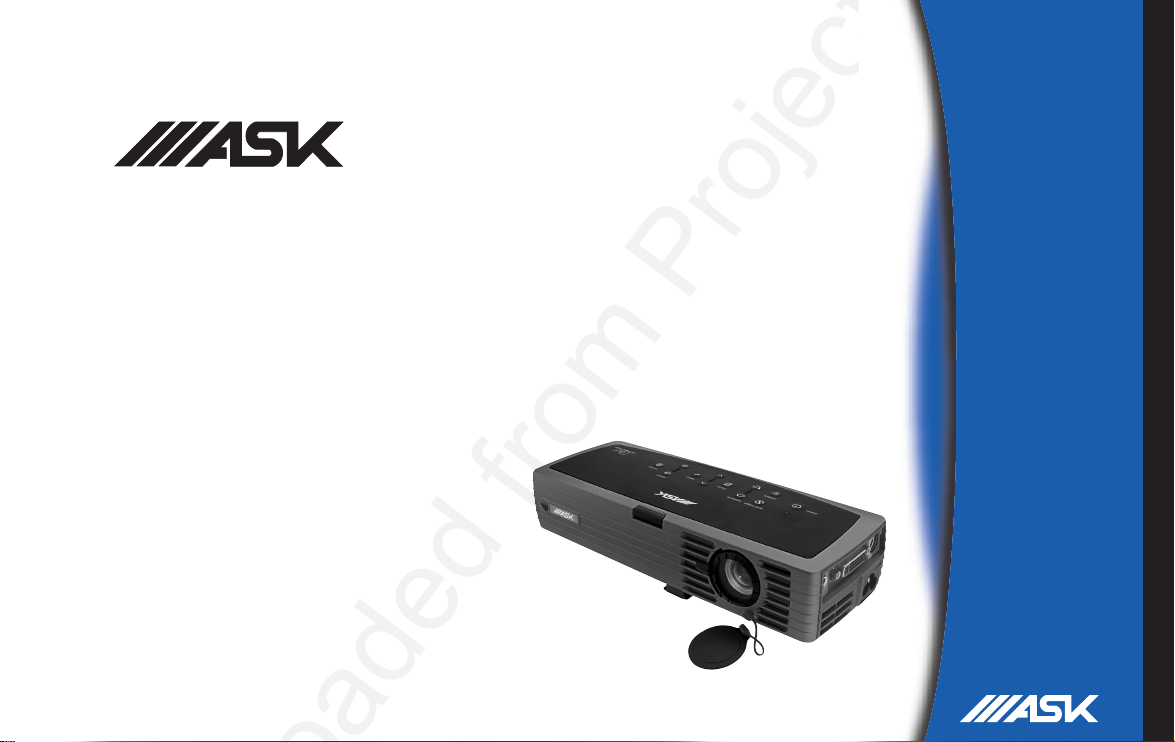
M1
Personal projection. Perfected.
User’s
Guide
Page 3

Page 4

This entire user’s guide is available on the enclosed CD as an Adobe Acrobat pdf file in the following languages: English, French, German, Italian, Norwegian, Portuguese, Spanish, Russian, Japanese, Korean, Traditional Chinese, Simplified Chinese. Before using this projector, please read these instructions.
Le mode d'emploi complet est disponible sur le CD joint sous forme de fichier pdf d'Adobe Acrobat dans les langues suivantes : anglais, français,
allemand, italien, norvégien, portugais, espagnol, russe, japonais, coréen, chinois traditionnel, chinois simplifié. Avant d'utiliser ce projecteur, veuillez
lire ces instructions.
Die vollständige Benutzeranleitung ist auf der im Lieferumfang enthaltenen CD als Adobe Acrobat PDF-Datei in den folgenden Sprachen verfügbar:
Englisch, Französisch, Deutsch, Italienisch, Norwegisch, Portugiesisch, Spanisch, Russisch, Japanisch, Koreanisch, Traditionelles Chinesisch und
Vereinfachtes Chinesisch. Bitte lesen Sie diese Anweisungen vor der Verwendung des Projektors.
La presente guida è disponibile sul CD allegato, come file Adobe Acrobat pdf, nelle seguenti lingue: inglese, francese, tedesco, italiano, norvegese,
portoghese, spagnolo, russo, giapponese, coreano, cinese tradizionale e cinese semplificato. Prima di usare questo proiettore, leggere le seguenti istruzioni.
Hele denne brukerhåndboken finnes på den vedlagte CD-en som en Adobe Acrobat pdf-fil på følgende språk: Engelsk, fransk, tysk, italiensk, norsk,
portugisisk, spansk, russisk, japansk, koreansk, tradisjonell og forenklet kinesisk. Les diss anvisningene før projektoren tas i bruk.
Este guia do usuário completo está disponível no CD anexo, como um arquivo pdf do Adobe Acrobat nos seguintes idiomas: inglês, francês, alemão, italiano,
norueguês, português, espanhol, russo, japonês, coreano, chinês tradicional, chinês simplificado. Antes de utilizar este projetor, leia estas instruções.
Este manual de uso está disponible en su totalidad en el CD incluido, como archivo pdf de Adobe Acrobat, en los siguientes idiomas: inglés, frances, alemán,
italiano, noruego, português, español, ruso, japonés, coreano, chino tradicional, chino simplificado. Antes de usar el proyector, lea estas instrucciones.
Ⱦɚɧɧɨɟ ɪɭɤɨɜɨɞɫɬɜɨ ɩɨɥɶɡɨɜɚɬɟɥɹ ɜ ɩɨɥɧɨɦ ɨɛɴɟɦɟ ɩɪɟɞɫɬɚɜɥɟɧɨ ɧɚ ɩɪɢɥɚɝɚɟɦɨɦ ɤɨɦɩɚɤɬ-ɞɢɫɤɟ ɜ ɜɢɞɟ pdf-ɮɚɣɥɚ Adobe Acrobat ɧɚ ɫɥɟɞɭɸɳɢɯ
ɹɡɵɤɚɯ: ɚɧɝɥɢɣɫɤɨɦ, ɮɪɚɧɰɭɡɫɤɨɦ, ɧɟɦɟɰɤɨɦ, ɢɬɚɥɶɹɧɫɤɨɦ, ɧɨɪɜɟɠɫɤɨɦ, ɩɨɪɬɭɝɚɥɶɫɤɨɦ, ɢɫɩɚɧɫɤɨɦ, ɪɭɫɫɤɨɦ, ɹɩɨɧɫɤɨɦ, ɤɨɪɟɣɫɤɨɦ,
ɬɪɚɞɢɰɢɨɧɧɨɦ ɢ ɭɩɪɨɳɟɧɧɨɦ ɤɢɬɚɣɫɤɨɦ. ɉɟɪɟɞ ɢɫɩɨɥɶɡɨɜɚɧɢɟɦ ɩɪɨɟɤɬɨɪɚ, ɩɪɨɱɢɬɚɣɬɟ ɞɚɧɧɵɟ ɢɧɫɬɪɭɤɰɢɢ.
ŘųKПП .ŴЕ<R$Ű֞ඤŜūʼnƐ CD Ű Adobe Acrobat ų PDF :P༜ŭŜūⲟŚƑūʼnƃŞЖᜑų➸⠰ųKПП
.Ɨřߓ᰻ʼnŤťŖƃŞЖ␣⠰Е:NX⠰Е.)⠰Е$O⠰Е3PП⠰ЕBP-P⠰Е?X⠰ЕR⠰ЕᎣᒍ⠰Е⺩ઞ⠰Е‱ת
Ԟઞ⠰Е↭תԞઞ⠰ЖŘų<R$Ɨ᰻ŞƐ߰ŰЕKПП .Ɨ྿şŏ⠿ƄŔťŚʼnЖ
&' $GREH$FURE DW S GI
Adobe Acrobat (PDF)
동봉된 CD에는 Adobe Acrobat pdf 파일 형식의 사용 설명서가 영어, 프랑스어, 독일어, 이탈리아어, 노르웨이어, 포르투갈어, 스페인어, 러시아어, 일본어, 한국
어, 중국어(번체 및 간체)로 제공됩니다. 이 프로젝터를 사용하기 전에 다음 지침을 읽으십시오.
Page 5

Declaration of Conformity
Manufacturer: InFocus Corporation, 27500 SW Parkway Ave. Wilsonville, Oregon
97070 USA
European Office: Strawinskylaan 585, 1077 XX Amsterdam, The Netherlands
We declare under our sole responsibility that the projector conforms to the following
directives and norms:
EMC Directive 89/336/EEC, Amended by 93/68/EEC
EMC: EN 55022
EN 55024
EN 61000-3-2
EN 61000-3-3
Low Voltage Directive 73/23/EEC, Amended by 93/68/EEC
Safety: EN 60950: 2000
July, 2002
Trademarks
Apple, Macintosh, and PowerBook are trademarks or registered trademarks of Apple
Computer, Inc. IBM is a trademark or registered trademark of International Business
Machines, Inc. Microsoft, PowerPoint, and Windows are trademarks or registered
trademarks of Microsoft Corporation. Adobe and Acrobat are trademarks or registered trademarks of Adobe Systems Incorporated. Digital Light Processing is a trademark or registered trademark of Texas Instruments. InFocus and LP are trademarks
or registered trademarks of InFocus Corporation.
FCC Warning
This equipment has been tested and found to comply with the limits for a Class A
digital device, pursuant to part 15 of the FCC Rules. These limits are designed to provide reasonable protection against harmful interference when the equipment is operated in a commercial environment. This equipment generates, uses, and can radiate
radio frequency energy and, if not installed and used in accordance with the instruction manual, may cause harmful interference to radio communications. Operation of
this equipment in a residential area is likely to cause harmful interference in which
case the user will be required to correct the interference at his own expense.
Canada
This Class A digital apparatus complies with Canadian ICES-003.
Cet appareil numérique de la classe A est conforme à la norme NMB-003 du Canada.
Remote Control Warning
Laser radiation class II product; wavelength 650nm; maximum output 1mW. Remote
control complies with applicable requirements of 21 CFR 1040.10 and 1040.11.
Remote control complies with applicable requirements of EN 60 825-1: 1994 +A11.
Do not look into the laser beam emitted
from the top of the remote control.
2
Page 6

Table of Contents
Introduction 5
Connecting a computer 6
Required computer connections 6
Displaying a computer image 7
First-time projector use with Windows 98 8
Adjusting the image 10
Connecting a video device 11
Displaying a video image 12
Shutting down the projector 14
Troubleshooting your setup 14
Using the keypad buttons 22
Using the remote control 23
Using the audio 24
Optimizing computer images 25
Presentation features 25
Optimizing video images 26
Customizing the projector 26
Using the menus 27
Picture menu 28
Settings menu 31
If you are experienced in setting up presentation systems, use the Quick Set
Up card that was included in the box. For complete details on connecting
and operating the projector, refer to this User’s Guide. Electronic versions of
this User’s Guide in multiple languages are available on the included CD
and on our website.
The website also has technical specifications (an interactive image size calculator, laptop activation commands, connector pin outs, a glossary, the
product data sheet), a web store to buy accessories, and a page for online
registration. See the inside of the back cover for a list of all contact numbers
and relevant web addresses.
Important Operating Considerations
Do not place the projector on a tablecloth or other soft covering that may
block the vents. Intake vents are placed along the left, front and back sides
of the projector.
Exhaust vents are placed along the right side of the projec-
tor. In the unlikely event that the lamp ruptures, discard any edible items
and thoroughly clean the area along the right side of the projector.
Do not place objects in the area along the right side of the projector
Maintenance 34
Cleaning the lens 34
Replacing the projection lamp 35
Appendix 37
Accessories 37
Red LED Behavior and Projector Errors 38
2 ft (.6m)
3
Page 7

4
Page 8
Introduction
Your new digital projector packs great performance into a shape and size
customized for the mobile professional. It fits comfortably in your laptop
bag then transitions easily into your presentation environment. It is easy to
connect, easy to use, and easy to maintain.
projector
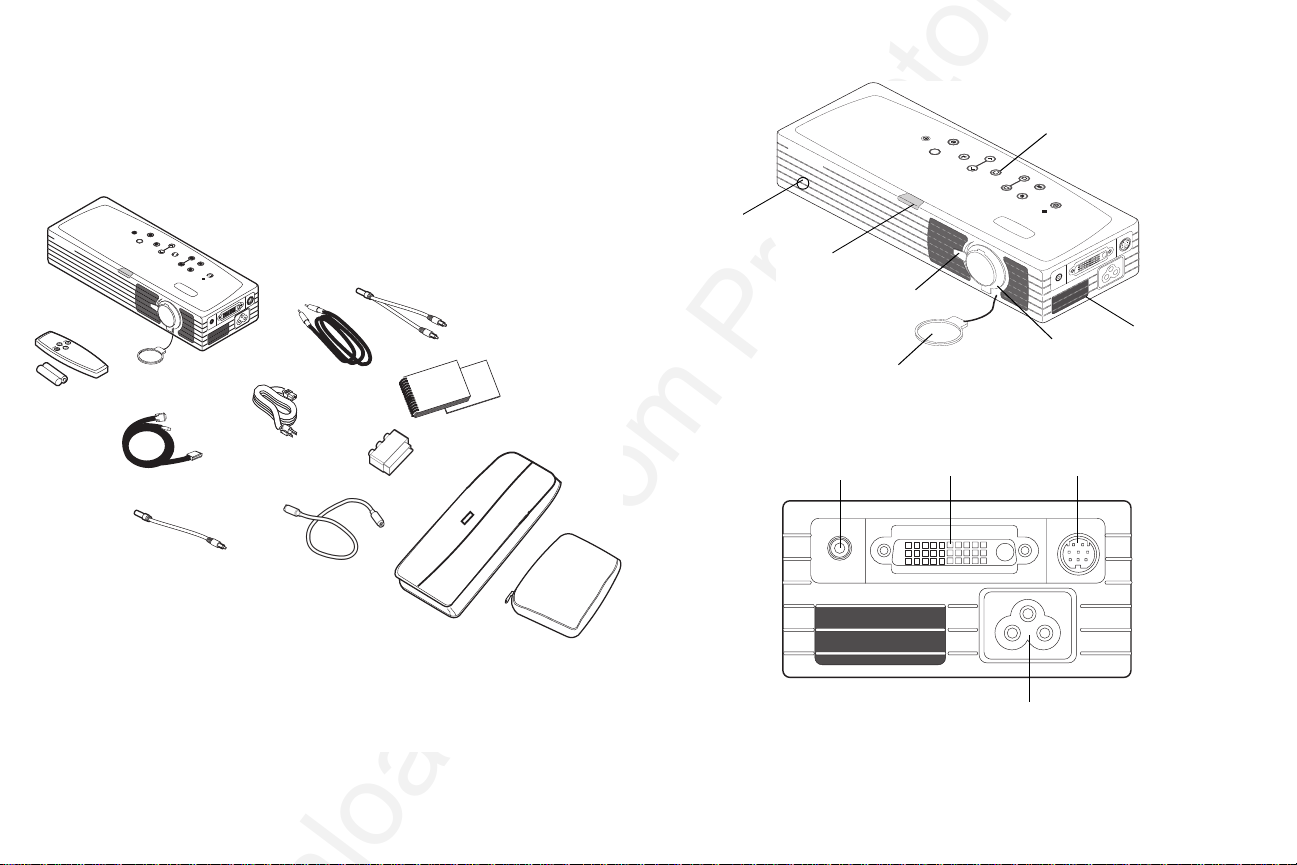
Projector components and features
keypad
IR receiver
for remote
elevator foot release
audio cable adapter
lens cap*
remote
computer
cable
S-video to composite adapter
* the lens cap with tether ships in the accessory pouch. Insert the tether into the small
hole under the lens when you unpack your projector.
power
cable
S-video cable
audio cable
documentation
SCART adapter
protective sleeve
accessory pouch
zoom
connectors
focus
lens cap
audio
computer
s-video
power cord
5
Page 9

Connecting a computer
Required computer connections
Connect the black end of the computer cable to the Computer in connector
on the projector. Connect the blue end to the video (VGA) port on your computer. If you are using a desktop computer with a single VGA port, you first
need to disconnect the monitor from that computer’s video port.
connect computer cable
Connect the black power cable to the connector on the side of the projector
and to your electrical outlet.
The Power LED on the projector’s keypad turns solid green and the fans
start to run.
NOTE: Always use the power cable that shipped with the projector.
Optional computer connections
To advance slides in a PowerPoint™ presentation using the remote, plug the
USB connector on the computer cable into the USB mouse connector on
your computer. USB drivers must be installed to use the USB feature. For
more information, see page 9.
To have sound with your presentation, connect the audio cable to your computer and to the computer Audio In connector on the projector.
connect power cable
connect USB portion of
computer cable
connect audio cable
6
Page 10
Displaying a computer image
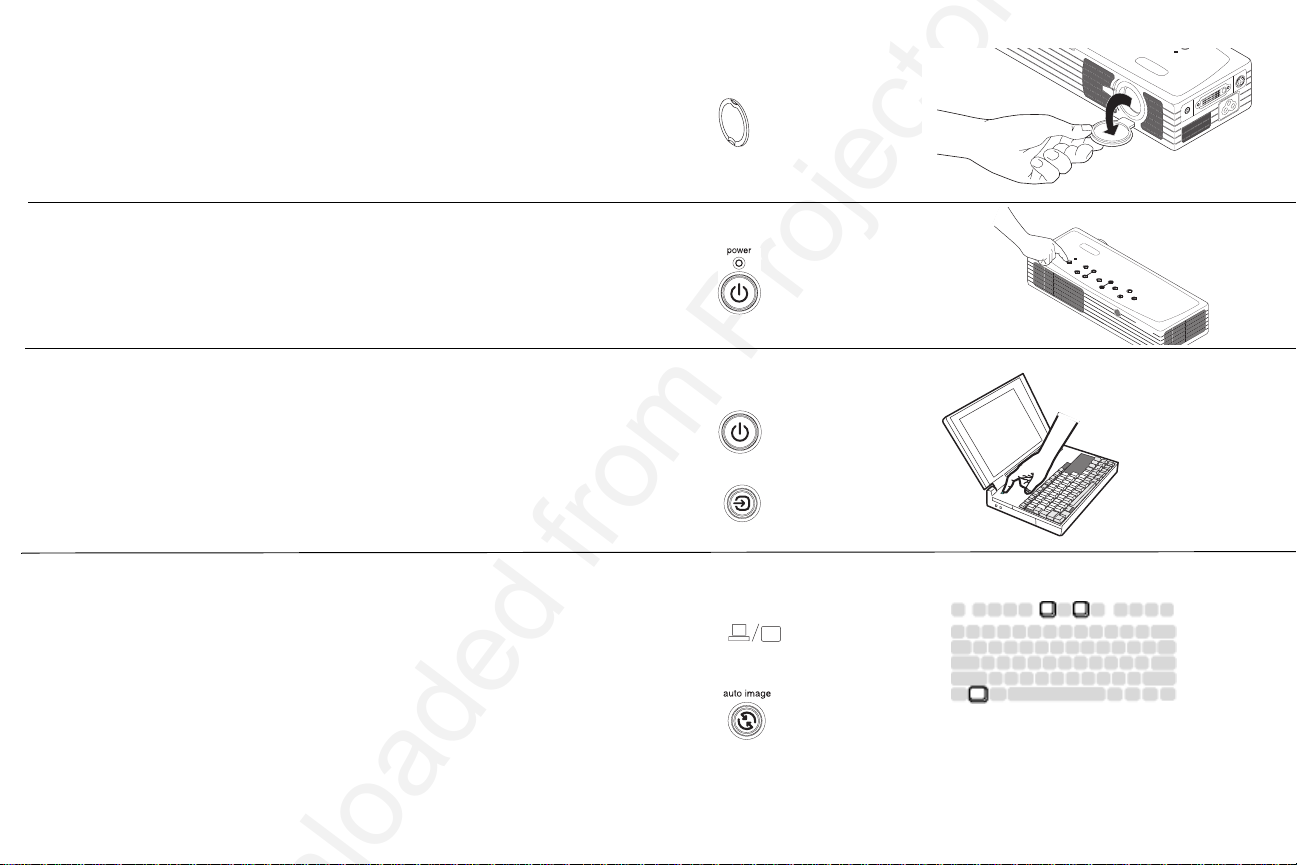
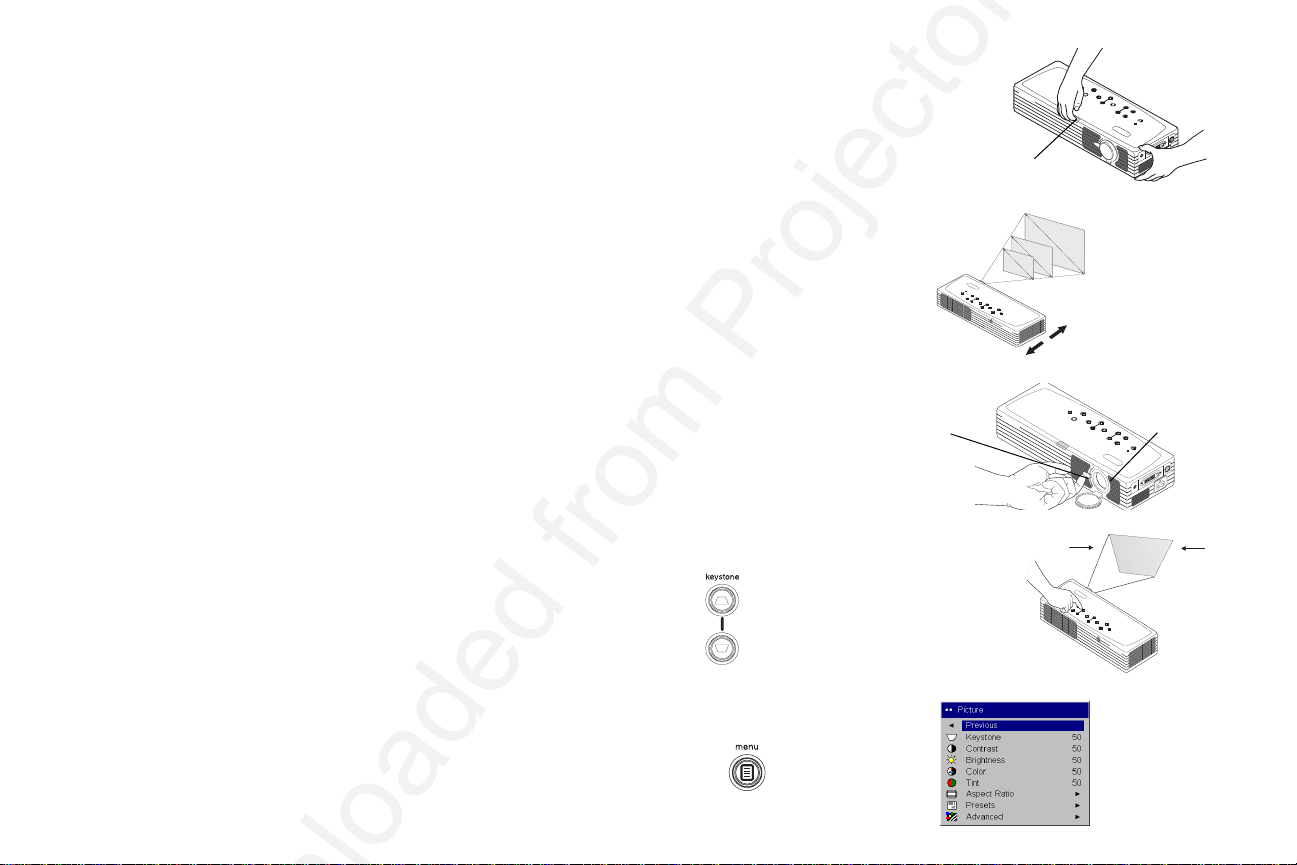
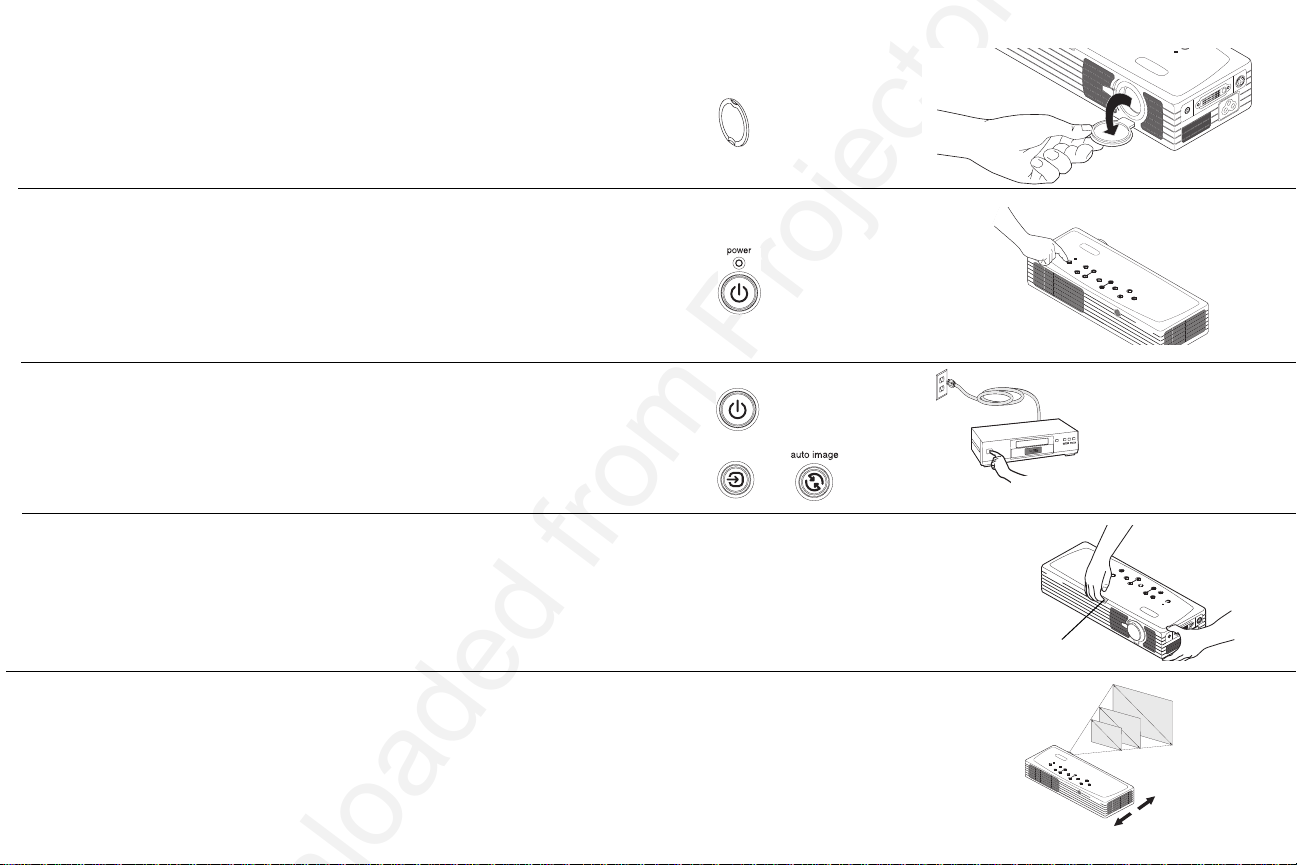
Remove the lens cap.
remove lens cap
Press the Power button on the top of the projector.
The LED flashes green. When the lamp comes on, the startup screen is displayed and the LED is steady green. It can take a minute for the image to
achieve full brightness.
? No startup screen? Get help on page 15.
Turn on your computer.
The computer’s image should appear on the projection screen. If it doesn’t,
press the Source button on the projector’s keypad.
Make sure your laptop’s external video port is active.
Many laptops do not automatically turn on their external video port when a
projector is connected. Refer to your computer’s documentation to learn the
activation commands specific for your computer. For example, some laptops use a key combination of FN + F5 to turn the external display on and
off.
? No computer image? Try pressing the Auto Image
button on the keypad. Get help on page 16.
press Power
turn on computer
source
activate laptop’s external port
7
Page 11
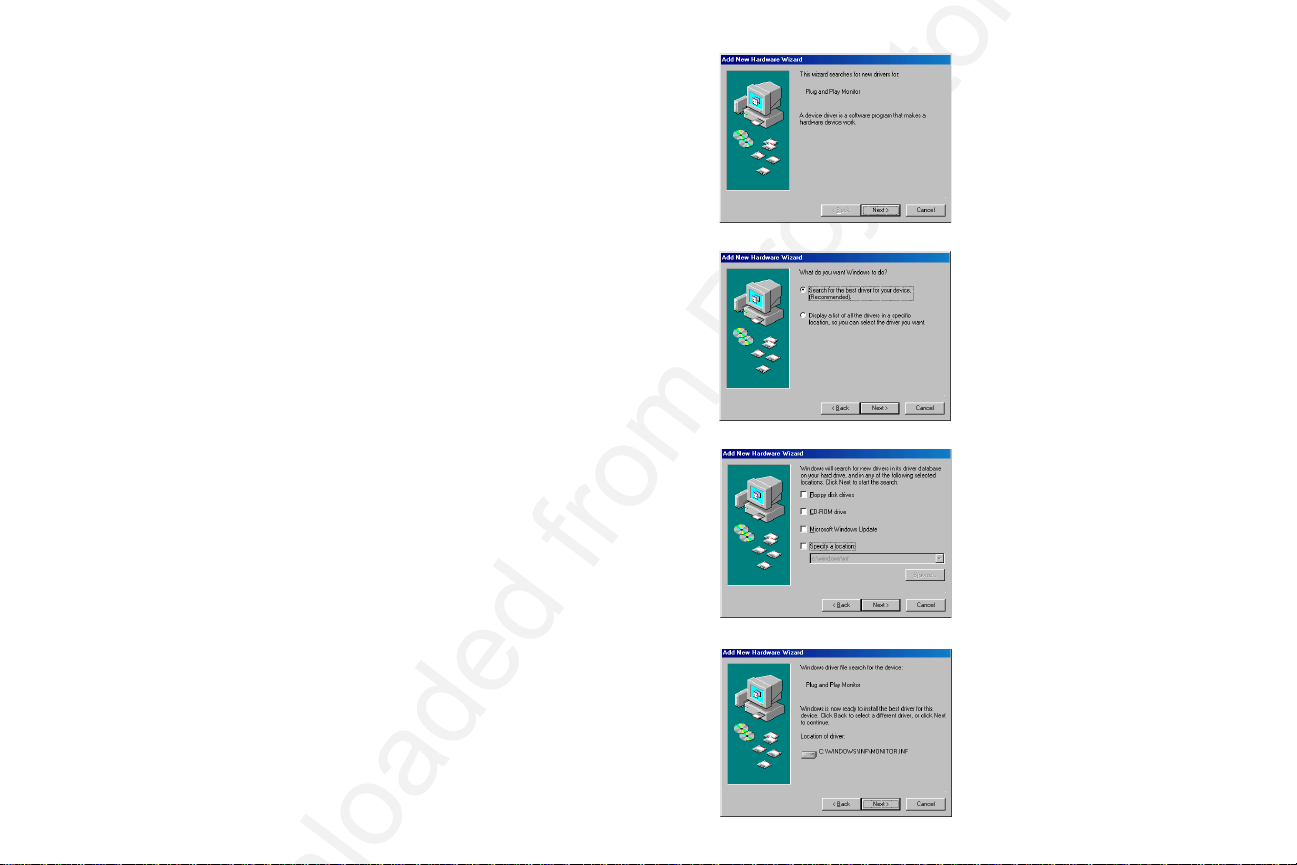
First-time projector use with Windows 98
The first time you connect a computer running Windows 98 to the projector,
the computer recognizes the projector as “new hardware” and the Add
New Hardware Wizard appears. Follow these instructions to use the Wizard to load the correct driver (which was installed with your Windows
operating system).
If you are running Windows 2000, Windows ME, or Windows XP, skip these
steps and go to “Adjusting the image” on page 10.
a
a Click Next to begin searching for the driver.
b Make sure “Search for the best driver” is selected, then click Next.
c Uncheck any checked boxes, then click Next. Windows automatically
locates the driver. If this driver has been removed, reload the driver using
your Windows operating system CD.
d When Windows finds the driver, you are ready to install it. Click Next.
b
c
d
8
Page 12

Skip this page if you did not connect the USB portion of the computer
cable. The USB connection enables slide advance during presentations
and projector control software.
For Windows 98:
• If you connected the USB cable, the Add New Hardware Wizard
appears again. Drivers must be installed to use the USB functionality.
• The Wizard launches three times.
The first time it detects a USB Composite Device.
The second time a USB Human Interface Device (for the keyboard).
The third time it detects a USB Human Interface Device (for the
mouse).
For Windows 2000, Windows ME, and Windows XP:
• The USB drivers are automatically installed.
9
Page 13
Adjusting the image
Adjust the height of the projector, if necessary, by pressing the release button to extend the elevator foot.
Position the projector the desired distance from the screen at a 90 degree
angle to the screen.
See page 38 for a table listing screen sizes and distances.
Adjust the zoom tab or the focus dial by rotating them until the desired
image size and sharpness are produced.
adjust height
adjust distance
adjust zoom and focus
zoom
release button
focus
If the image is not square, adjust the keystone by using the buttons on the
keypad.
Press the upper Keyst one button to reduce the upper part of the image, and
press the lower Keys tone button to reduce the lower part.
Adjust the Contrast or Brightness in the Picture menu.
See page 27 for help with the menus.
adjust keystone
adjust Contrast or Brightness
10
Page 14
Connecting a video device
Standard video connections
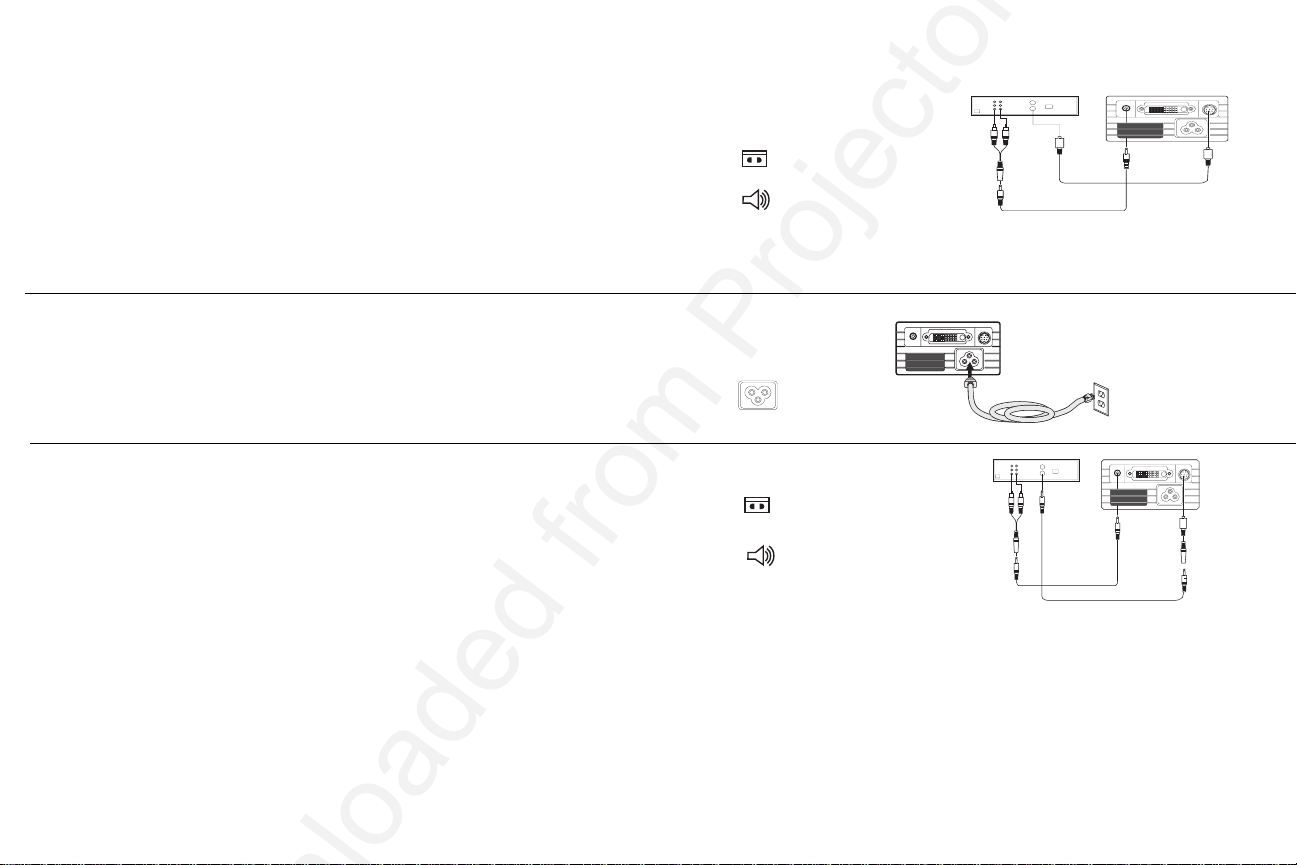
Plug the S-video cable’s connector into the S-video-out connector on the
video device. Plug the other connector into the S-Video connector on the
projector.
Plug the white connector of the audio adapter into the left audio out connector on the video device and plug the red connector into the right audio
out connector on the video device.
Plug the audio cable into the other end of the audio cable adapter and into
the audio in connector on the projector.
Connect the black power cable to the connector on the side of the projector
and to your electrical outlet. The Power LED on the keypad turns solid
green and the fans start to run.
NOTE: Always use the power cable that shipped with the projector.
Optional video connections
If the video device uses a composite video connector, plug a composite
video cable (sold separately) into the composite connector on the video
device and into the S-video adapter. Plug the S-video adapter into the
S-video connector on the projector. Use the audio cables as described above.
connect S-video cable and
audio cable and adapter
connect power cable
connect composite video cable and adapter
and audio cable and adapter
11
Page 15
Displaying a video image
Remove the lens cap.
remove lens cap
Press the Power button on the top of the projector.
The LED flashes green. When the lamp comes on, the startup screen is displayed and the LED is steady green. It can take a minute for the image to
achieve full brightness.
? No startup screen? Get help on page 15.
Plug in and turn on the video device.
? No video image? Try pressing the Source or Auto Image
button on the keypad. Get help on page 15.
Adjust the height of the projector by pressing the release button to extend
the elevator foot.
Position the projector the desired distance from the screen at a 90 degree
angle to the screen. See page 38 for a table listing screen sizes and distances
to the screen.
press Power
turn on video device
source
adjust height
release button
adjust distance
12
Page 16

Adjust the zoom using the tab or the focus using the dial by rotating them
until the desired image size and sharpness are produced.
adjust zoom and focus
zoom
focus
If the image is not square, adjust the keystone using the buttons on the keypad. Press the upper Keyst o ne button to reduce the upper part of the
image, and press the lower Key ston e button to reduce the lower part.
Adjust the volume on the keypad.
Adjust the Contrast, Brightness, Color, or Tint in the Picture menu.
See page 27 for help with the menus.
adjust keystone
adjust volume
adjust Picture menu
13
Page 17

Shutting down the projector
Troubleshooting your setup
By default, the projector automatically displays a blank screen after no
active source is detected for 30 minutes. This blank screen helps preserve
the life of the projector. The image returns when an active source is detected
or a remote or keypad button is pressed.
Screen Save
You can make the blank screen appear after a different time interval using
the Settings>System menu. See page 32. There are six time options, ranging from five minutes to 30 minutes with five minute intervals.
Power S av e
The projector also has a Power Save feature that, when activated, automatically turns the lamp off after no signals are detected for 20 minutes. After 10
additional minutes with no signal, the projector powers down. If an active
signal is received before the projector powers down, the image is displayed.
You must press the Power button to display an image after 30 minutes have
passed. When Power Save is enabled, Screen Save is disabled. See page 31.
Turning off the projector
To turn off the projector, press the power button and verify that you want to
turn the projector off by pressing the power button again within 3 seconds.
You can cancel the shutdown by not pressing the power button a second
time. The lamp turns off and the LED blinks green for 1 minute. When the
lamp has cooled, the LED lights green. Unplug the power cable to completely power off the projector.
If your image appears correctly on the screen, skip to the next section
(page 23). If it does not, troubleshoot the setup.
The LED on top of the projector indicate the state of the projector and can
help you troubleshoot.
Table 1: LED behavior and meaning
LED color/behavior Meaning
solid green The projector is plugged in, or the projec-
tor has been turned on and the software
has initialized or the projector has been
turned off.
blinking green The power button has been pressed and
the software is initializing, or the projector is powering down.
blinking red
see page 38 for more information
A fan or lamp failure has occurred. Make
sure the vents aren’t blocked (see
page 20).Turn off the projector and wait
one minute, then turn the projector on
again. If the Change Lamp message
appears, replace the lamp and reset the
lamp timer. Contact Technical Support if
the problem persists
.
solid red An unidentifiable error: please contact
Technical Support.
The following tables show common problems. In some cases, more than one
possible solution is provided. Try the solutions in the order they are presented. When the problem is solved, you can skip the additional solutions.
14
Page 18

Source Troubleshooting
Problem Solution Result
Plug power cable in and press the power
button. Remove lens cap.
No startup screen
Correct image
startup
screen
Only startup screen appears
A
startup
screen
source
Press the Source button
Activate laptop’s external port
or restart
laptop
15
Computer image projected
A
A
Page 19

No computer image, just the words “Signal out of
range”
Adjust computer refresh rate in Control
Panel>Display>Settings>Advanced>
Adapter (location varies by operating
system)
Computer image projected
A
Signal out of
range
You may also need to set a different
resolution on your computer, as shown
on the following page
16
A
A
Page 20

Image fuzzy or cropped
A
A
Remote control not advancing PowerPoint slides
A
X
Set your computer’s display resolution to
the native resolution of the projector
(Start>Settings>Control
Panel>Display>Settings tab,
select1024x768)
For a laptop,
disable laptop
monitor
or turn-on dualdisplay mode
Connect computer cable (page 6), then
load USB drivers, if needed (page 8)
Check batteries in remote
Image clear and not cropped
A
Remote advances slides.
See page 23 for information on the remote
17
Page 21

Projector troubleshooting
Problem Solution Result
Image not square
Edges of video image distorted
AB
Image not sharp
ABAB
Adjust keystone on keypad
Turn Overscan on in the Picture>Advanced
menu
Adjust Sharpness in the Picture>Advanced
menu
Square image
Correct image
AB
Correct image
AB
18
Page 22

Image does not fit 16:9 screen
Change aspect ratio to 16:9 in
Picture>Aspect ratio menu
Correct image
Image reversed left to right
A
Video image “torn” and fragmented
A
A
B
B
Turn off Rear in Settings>System menu
Change Video Standard in
Picture>Advanced menu
19
Correct image
AB
Correct image
AB
Page 23

Projected colors don’t match source
Adjust color temperature, color space,
color control, brightness, and contrast in
the Picture and Advanced menus. Also,
adjust color and tint (video sources only).
Correct image
COLOR
Lamp won’t turn on, LED blinking red (page 14)
blinks
red
Make sure vents aren’t blocked; allow
projector to cool for one minute
COLOR
Unplug projector; wait one minute; plug in
projector and turn it on: lamp lights
startup
screen
20
Page 24

Lamp won’t turn on, LED blinking red (page 14)
Lamp must be replaced (page 35)
Lamp turns on
blinks
red
Image not centered on screen
Move projector, adjust zoom, adjust height
zoom
Adjust horizontal or vertical position in
Picture>Advanced menu
startup
screen
Correct image
This product is backed by a limited two-year warranty. An extended warranty plan may be purchased from your dealer. When sending the projector
in for repair, we recommend shipping the unit in its original packing material, or having a professional packaging company pack the unit for shipping.
An optional ATA shipping case is available for purchase that provides adequate protection for shipping. Please insure your shipment for its full value.
21
Page 25

Using the keypad buttons
Most buttons are described in detail in other sections, but here is an overview of their functions:
power–turns the projector on (page 7) and off (page 14).
menu–displays the on-screen menus (page 27).
select–confirms choices made in the menus (page 27).
up/down arrows–navigates to and adjusts settings in the menus (page 27).
auto image–resets the projector to the source.
presets–cycles through the available preset settings (page 29).
keystone–adjusts squareness of the image (page 10).
volume–adjusts sound (page 24).
source–changes the active source between computer and video.
source
menu navigation buttons
22
Page 26

Using the remote control
The remote uses two (2) provided AAA batteries. They are easily installed
by sliding the cover off the remote’s back, aligning the + and - ends of the
batteries, sliding them into place, and then replacing the cover.
To operate, point the remote at the projection screen or at the projector (not
at the computer). The range of optimum operation is about 30 feet (9.14m).
To use the laser pointer, press and hold the Laser button. The laser turns off
when the button is released, or times out after two (2) minutes of continuous operation.
WARNING: Do not look into the laser beam emitted from the top of the
remote control.
Previous and Next buttons allow you to navigate through your PowerPoint
presentation while in Slide Show mode. Connect the USB connector on the
computer cable to your computer to use these buttons. When you do this for
the first time, the Add New Hardware wizard may appear. See page 8 for
details on loading the correct USB drivers.
The effect button allows you to invoke a user-definable action, such as
freeze or blank the screen (see page 32 to learn to program this button).
Troubleshooting the remote
• Make sure the batteries are installed in the proper orientation and are
not dead. When battery power is adequate, the LED at the top of the
remote lights when any button is pressed.
• Make sure you’re pointing the remote at the projector, not the computer, and are within the remote range of 30 feet (9.14m).
• If you are trying to advance PowerPoint slides, make sure the USB
cable is connected (page 6) and the correct drivers are installed
(page 8).
23
Page 27

Using the audio
To play sound from the projector, connect your source to the Audio In connector on the projector.
To adjust the volume, use the buttons on the keypad.
Troubleshooting audio
If there is no sound, check the following:
• Make sure the audio cable is connected.
• Make sure mute isn’t active (used with the Effect key).
• Make sure the volume is turned up enough. Press the volume button
on the keypad.
• Adjust the audio source.
• If playing a video, make sure the playback has not been paused.
connect audio cable
24
Page 28

Optimizing computer images
Presentation features
After your computer is connected properly and the computer’s image is on
the screen, you can optimize the image using the onscreen menus. For general information on using the menus, see page 27.
• Adjust the Keystone, Contrast, or Brightness in the Picture menu.
• Change the Aspect Ratio. Aspect Ratio is the ratio of the image width to
image height. TV screens are usually 1.33:1, also known as 4:3. HDTV
and most DVDs are 1.78:1, or 16:9. Choose the option that best fits your
input source. See page 28 for details.
• Adjust the Color Space, Color Temperature, or Color Control in the
Advanced menu.
• Adjust the Phase, Tracking, or Horizontal or Vertical position in the
Advanced menu.
• Once you have optimized the image for a particular source, you can
save the settings using Presets. This allows you to quickly recall these
settings later. See page 29.
Several features are provided to make it easier to give presentations. The
following is an overview, details are found in the menu section on page 27.
•The remote’s Effect button allows you to assign various features to the
key. The default effect is About, which displays information about the
projector and current source. You can select from Blank, Mute, Aspect
Ratio, Source, Auto Image, Freeze, Zoom, and About. See page 32 for
details.
• The Freeze effect allows you to freeze the displayed image. This is useful if you want to make changes on your computer without your audience seeing them.
• The Startup Logo and Blank Screen menu options let you change the
default startup screen to a black, white, or blue screen. See page 32.
• Two menu options, Power Save and Screen Save, are provided to automatically shut down the projector after several minutes of inactivity or
display a black screen. This helps preserve lamp life. See page 31 and
page 32.
• A Lamp Mode option is also available to let you optimize lamp brightness or lamp life. See page 31.
25
Page 29

Optimizing video images
Customizing the projector
After the video device is connected properly and the image is on the screen,
you can optimize the image using the onscreen menus. For general information regarding menu usage, see page 27.
• Adjust the Keystone, Contrast, Brightness, Color, or Tint in the Picture
menu. See page 28.
• Change the Aspect ratio. Aspect ratio is the ratio of the image width to
image height. TV screens are usually 1.33:1, also known as 4:3. HDTV
and most DVDs are 1.78:1, or 16:9. Choose the option that best fits your
input source. See page 28.
• Select a Sharpness setting in the Advanced menu. See page 30.
• Select a different Color Temperature, or use the Color Control to individually adjust the intensity of the red, green, and blue color. See
page 30.
• Select a different Video Standard. Auto tries to determine the standard
of the incoming video. Select a different standard if necessary. See
page 30.
• Turn overscan on to remove noise around the video image. See page 30.
• Once you have optimized the image for a particular source, you can
save the settings using Presets. This allows you to quickly recall these
settings later. See page 29.
You can customize the projector for your specific setup and needs. See
page 31 to page 33 for details on these features.
• For rear projection, turn Rear mode on in the Settings>System menu.
• Specify which source the projector checks first for active video during
power-up.
• Specify the function of the Effect Key on the remote.
• Turn the projector’s display messages on and off.
• Turn on power saving features.
• Specify blank screen colors and startup logos.
• Specify the menu language.
• Specify a lamp mode to optimize either brightness or lamp life.
• Prevent your computer from entering Screen Save mode.
• Save settings for the active source as a preset.
26
Page 30

Using the menus
To open the menus, press the Menu button on the keypad. (The menus automatically close after 60 seconds if no buttons are pressed.) The Main menu
appears. Use the arrow buttons to move up and down to highlight the
desired submenu, then press the Select button.
To change a menu setting, highlight it, press Select, then use the up and
down arrow buttons to adjust the value, select an option using radio buttons, or turn the feature on or off using check boxes. Press Select to confirm
your changes. Use the arrows to navigate to another setting. When your
adjustments are complete, navigate to Previous, then press Select to go to
the previous menu; select Exit or press the Menu button at any time to close
the menus.
Dots appear before the menu name. The number of dots indicate the menu’s
level, ranging from one (the Main menu) to four (the most nested menus).
The menus are grouped by usage:
• The Picture menu provides image adjustments.
• The Settings menu provides set-up type adjustments that are not
changed often.
• The About menu provides a read-only display of information about the
projector and source.
Certain menu items may be hidden until a particular source is connected.
For example, Sharpness is only available for video sources and will be hidden when a computer source is active. Other menu items may be grayed out
when they are not available. For example, Brightness is grayed out until an
image is active.
Dot
Main menu
Menu
button
Keypad navigation
buttons
Picture
menu
Dots
Settings
menu
About menu
27
Page 31

Picture menu
To adjust the following five settings, highlight the setting, press Select, use
the up and down arrows to adjust the values, then press Select to confirm
the changes.
Key ston e : adjusts the image vertically and makes a squarer image. You can
also adjust keystone from the keypad.
Contrast: controls the degree of difference between the lightest and darkest
parts of the picture and changes the amount of black and white in the
image.
Brightness: changes the intensity of the image.
Color: (video sources only) adjusts a video image from black and white to
fully saturated color.
Tint: (NTSC video sources only) adjusts the red-green color balance in the
image.
increasing keystone
decreasing keystone
Aspect Ratio: Aspect ratio is the ratio of the image width to image height.
TV screens are usually 1.33:1, also known as 4:3. HDTV and most DVDs are
1.78:1, or 16:9. The default is 4:3, which displays the input resized up or
down to fill the display area.
Select Native to see the unmodified input with no resizing by the projector.
Select 16:9 to watch enhanced widescreen DVDs.
Aspect ratio
28
Page 32

Presets: The provided Presets optimize the projector for displaying com-
puter presentations, film images, and video images. (Film input is material
originally captured on a film camera, like a movie; video input is material
originally captured on a video camera, like a TV show or sporting event.)
You can use the preset as a starting point, then further customize the settings for each source. The settings you customize are saved in the preset for
each source. To restore the factory default settings, choose Factory Reset in
the Settings>Service menu.
There are also three user-definable presets. To set a preset for the current
source, adjust the image, select Save Settings in the Presets menu, then
choose Save User 1, 2, or 3. You can recall these settings in the future by
selecting the appropriate user presets.
Presets
Save User Presets
29
Page 33

Advanced menu
Sharpness: (video sources only) changes the clarity of the edges of a video
image. Select a sharpness setting.
Color Space: (computer sources only) allows you to select a color space
that has been specifically tuned for the input. When Auto is selected, the
projector automatically determines the standard. To choose a different setting, turn off Auto, then choose either RGB, REC709 or REC601.
Color Temperature: changes the intensity of the colors. Select a listed setting.
Color Control: allows you to individually modify each color. Highlight the
color, press Select, then use the arrows to adjust the value.
Video Standard: (video sources only) When it is set to Auto, the projector
attempts to pick the video standard automatically based on the input signal
it receives. (The video standard options may vary depending on your region
of the world.) If the projector is unable to detect the correct standard, the
colors may not look right or the image may appear “torn.” If this happens,
manually select a video standard by selecting NTSC, PAL, or SECAM from
the Video Standard menu.
Overscan: (video sources only) removes noise around the video image.
The following 4 options are for computer sources only.
Phase: adjusts the horizontal phase of a computer source.
Tr a c k i ng : adjusts the vertical scan of a computer source.
Color Space
Video Standard
Color Temperature
Sharpness
Color Control
Horizontal/Vertical Position: adjusts the position of a computer source.
30
Page 34

Settings menu
Audio: allows volume adjustments. You can also adjust volume from the
keypad.
Sources: allows you to assign a particular input to a specific source key
when using certain optional remotes. Also allows selection of a default
Power-up Source and enables or disables Autosource. When Autosource is
not checked, the projector defaults to the source selected in Power-up
Source. If no source is found, a blank screen displays. When Autosource is
checked, Power-up Source determines which source the projector defaults
to at power-up. If no signal is present, the projector checks the sources in
order until a source is found or until power down.
Power- u p Source: determines which source (computer or video) the projector checks first for active video during power-up.
System menu
Rear: reverses the image so you can project from behind a translucent
screen.
Auto Power: When Auto Power is checked, the projector turns on when
power is applied and turns off if a source becomes inactive.
Display Messages: displays status messages (such as “Searching” or
“Mute”) in the lower-left corner of the screen.
Lamp Mode: allows you to optimize the lamp mode for your specific use.
The default is High Bright, which maximizes the light output. Select Long
Life to maximize lamp life and minimize fan noise, or Nominal to balance
brightness, lamp life, and fan noise.
NND (Notebook No-Doze): prevents your notebook computer from going
into Screen Save mode (functions only when the USB connector is plugged
in).
Power Sav e : automatically turns the lamp off after no signals are detected
for 20 minutes. After 10 additional minutes with no signal, the projector
powers down. If an active signal is received before the projector powers
down, the image will be displayed.
Audio
Sources
Power-up
Source
System menu
Lamp mode
31
Page 35

Screen Save: automatically blanks the screen with a black color after no sig-
nals are detected for a preset number of minutes (the default is 30 minutes).
The image returns when an active source is detected or a remote or keypad
button is pressed. Screen Save is disabled when Power Save is enabled.
Screen Save
Startup logo
Startup Logo: allows you to display a blank Black, White, or Blue screen
instead of the default screen at startup and when no source is detected.
Blank Screen: determines what color displays when no source is active.
Effect Key: allows you to assign a different function to the Effect button on
the remote to quickly and easily use the effect. Only one effect can be
enabled at a time. Highlight an effect and press Select to choose a different
one.
Blank: shows an empty screen.
Mute: turns off all sound.
Aspect Ratio: sets the ratio of the image width to image height.
Source: cycles through the available sources.
Auto Image: causes sources to be reacquired.
Freeze: pauses the projected image.
Zoom: lets you magnify a part of the screen. This feature only works if
you purchase an optional remote control with mouse buttons and cursor control. To use the Zoom effect, press Effect, then press the left but-
ton to zoom the image, press the right mouse decrease the
magnification. You can use the cursor control to pan the image, displaying different parts of it (only if the image is magnified). To return to the
original size and cancel Zoom, press the Effect button a second time.
Blank Screen
Effect Key
About: is the default effect. It displays the About menu.
32
Page 36

Language: allows you to select a language for the onscreen display of
menus and messages.
Language
Service: to use these features, highlight them and press Select.
Factory Reset: restores all settings (except Lamp Hours) to their default
after displaying a confirmation dialog box.
Lamp Reset: resets the lamp hours counter in the About menu to zero after
displaying a confirmation dialog box. Do this only after changing the lamp.
Service Code: only used by authorized service personnel.
Service menu
33
Page 37

Maintenance
Cleaning the lens
1 Apply a non-abrasive camera lens cleaner to a soft, dry cloth.
Avoid using an excessive amount of cleaner, and don’t apply the
cleaner directly to the lens. Abrasive cleaners, solvents or other harsh
chemicals might scratch the lens.
2 Lightly wipe the cleaning cloth over the lens in a circular motion. If you
don’t intend to use the projector immediately, replace the lens cap.
clean the lens
with a soft dry cloth
and non-abrasive
cleaner
34
Page 38

Replacing the projection lamp
The lamp hour timer in the About menu counts the number of hours the
lamp has been in use. Fifty hours before the specified end of the lamp’s life,
the message “Change lamp” briefly appears on the screen at each startup.
After 50 additional hours, the lamp will no longer light. You can order new
lamp modules from your dealer. See “Accessories” on page 37 for information.
1 Turn off the projector and unplug the power cable.
2 Wait 60 minutes to allow the projector to cool thoroughly.
About menu
turn off and unplug
the projector
wait 60 minutes
3 Turn the projector upside down and loosen the two screws on the lamp
door. Pry the door straight up to disengage the power interrupt connector (located on the underside of the door) and remove the lamp door. Be
sure to pry the door straight up, not at an angle, to avoid damaging the
power interrupt connector.
NOTE: The projector will not turn on while the lamp door is removed.
4 Pull the pull tab on the lamp module up to release the catch.
remove lamp door screws
pry door off
release the pull tab
35
Page 39

Pinch the lamp cable’s connector tabs to release the catch while pulling
5
firmly on the connector to unplug the lamp.
WARNINGS:
• To avoid burns, allow the projector to cool for at least 60 minutes before
you replace the lamp.
• Do not drop the lamp module. The glass may shatter and cause injury.
• Do not touch the glass lamp screen. Fingerprints can obscure projection
sharpness.
• Be extremely careful when removing the lamp housing. In the unlikely
event that the lamp ruptures, small glass fragments may be generated.
The lamp module is designed to contain most of these fragments, but
use caution when removing it.
6 Carefully remove the lamp module. Note that the lens end of the mod-
ule has a tab that connects in a slot in the bottom of the lamp cavity. You
must pull upward with enough force to disconnect the tab from the slot.
Dispose of the lamp in an environmentally proper manner.
disconnect lamp cable
tab on lamp module
7 Install the new lamp module. Slide the new module straight down over
the tunnel/hood, align the tab with the slot, then press to connect.
8 Re-latch the pull tab while pressing down on the lamp module.
9 Re-plug in the lamp cable.
10 Replace the lamp door by aligning the connector on the back of the door
with the projector and replacing the two lamp door screws.
11 Plug in the power cable, then press the Power button to turn the projec-
tor back on. Reset the lamp hour timer by simultaneously holding down
the two Vo lu me keys on the projector’s keypad for 10 seconds. At that
point the LED will turn green and you can power on the projector. You
can also navigate to the Settings>Service menu and select Lamp Reset
to reset the lamp timer.
slot on projector
reset lamp time in Service menu
36
Page 40

Appendix
Accessories
Standard Accessories
(ship with the projector)
Protective Sleeve 110-0694-xx
Accessory Pouch 110-0693-xx
Shipping Box (with packaging) 110-0696-xx
Computer Cable 6.6 ft (2 m) SP-DVI-A
S-Video Cable 6 ft (1.8 m) 210-0125-xx
S-video to RCA Adapter 515-0027-xx
Audio Cable 6 ft (1.8 m) 210-0118-xx
Audio Cable Adapter 210-0177-xx
Power Cable (US) 10 ft (3m) 210-0255-xx
Power Cable (European) 10 ft
(3m)
Presenter Remote 590-0562-xx
Projection Lamp Module (included
in projector)
Quick Setup card 009-0791-xx
User’s Guide with CD 010-0457-xx
Technical Support Contacts Card 009-0658-xx
Safety Card 009-0659-xx
Color-coded Cable Ties, 3 set SP-CABLETIES
SCART Adapter 301130B
Part Number
210-0254-xx
SP-LAMP-013
Optional Accessories Part Number
ATA Shipping Case CA-ATA-016
Soft Carry Case CA-C220
Digital Computer Cable 6 ft (1.8 m) SP-DVI-D
50” Diagonal Screen (portable) A650
60” Diagonal Screen (portable) HW-DLXSCRN
84” Diagonal Wall/Ceiling Mounted Screen HW-WALLSCR84
Portable Projector Stand SP-STND
Replacement Lamp Module SP-LAMP-013
MindPath RF PocketPoint Remote HW-RF-POCKTPNT
Conductor + Remote HW-CONDUCTOR +
Integrator Remote HW-INTEGRATOR
Wireless Connectivity Module LP-LITESHOW
Wireless Connectivity Module + PC Card LP-LITESHOWCARD
NOTE: Use only approved accessories.
37
Page 41

Red LED Behavior and Projector Errors
If the projector is not functioning properly and the red LED is blinking, consult Ta b l e 2 to determine a possible cause. There are two second pauses
between the blinking cycles. Visit our website for more details on the red
LED error codes. See the inside back cover for contact details.
Table 2:
Red LED Behavior Explanation
One (1) blink The lamp won't strike after five (5)
attempts. Check the lamp and lamp door
installations for loose connections.
Projected image size
Table 3:
Range of distance to the screen for a given screen size
Distance to screen
Diagonal
Screen Size
(inches/m)
40/1 32/0.8 5.6/1.7 4.8/1.5
50/1.3 40/1 6.9/2.1 6/1.8
60/1.5 48/1.2 8.2/2.5 7.2/2.2
100/2.5 80/2 13.8/4.2 12.1/3.7
Image Width
(inches/m)
Maximum
distance
(feet/m)
Minimum
Distance
(feet/m)
Two (2) blinks The lamp counter hours have exceeded
lamp life hours. Replace the lamp and
reset the lamp hours counter.
Three (3) blinks The projector has shut down the lamp.
Turn off the projector and wait one
minute, then turn the projector on again.
Replace the lamp. Contact Technical Support for repair if replacing the lamp does
not solve the problem.
Four (4) blinks The fan has failed. Contact Technical Sup-
port for repair.
Five (5) blinks The projector is overheating. Check for a
blocked air vent. Contact Technical Support for repair if clearing the air vents
does not solve the problem.
Solid red Unidentifiable error: contact Technical
Support
NOTE: Visit our website for an interactive image size calculator.
38
Page 42

A
About 32
accessories 5, 37
activation commands for laptops 7
Advanced menu 30
advancing slides 6
Aspect Ratio 32
audio 24
audio adapter 11
Audio In connector 6, 11
audio volume 13
Auto Image 22, 32
Auto Power 31
B
Blank Screen 32
blinking green 14
blinking red 14
Brightness 10, 28
C
cleaning the lens 34
Color 13, 28
Color Control 30
Color Space 30
Color Temperature 30
colors are incorrect 20
computer connections
optional 6
required 6
computer image
optimize 25
Contrast 10, 13, 28
D
Display Messages 31
Drivers 8
USB 9
Windows 98 9
E
Effect Key 32
elevator foot 10
F
first time use
driver installation 8
focus 10, 13
Freeze 32
fuzzy image 17
I
image
displaying computer 7
displaying video 12
optimizing computer 25
optimizing video 26
image does not fit screen 19
image edges distorted 18
image not centered 21
image not sharp 18
image not square 18
image reversed 19
image size matrix 38
image torn 19
Interactive Display 5, 7, 14
K
keypad buttons 22
Keystone 10, 13, 22
L
Lamp Mode 31
lamp replacement 35
lamp won’t turn on 20, 21
Language 33
laptop
connecting 6
external video port 7
LED
blinking green 14
blinking red 20
solid red 21
LED behavior 14, 38
lens cap, attaching 5
lens cleaning 34
Low Power 31
39
Page 43

M
Main menu 27
menu system 27
Mute 32
N
no computer image 16
no startup screen 15
O
only startup screen appears 15
optional accessories 37
Overscan 30
P
Phase 30
Picture menu 28
Power button 12
power cable 6, 11
Power Save 31
Power-up Source 31
presentation features 25
Presets 29
projector
accessories 5, 37
changing language 33
customizing 26
optional accessories 37
resetting 33
shutdown 14
standard accessories 37
troubleshooting problems 14
projector height 10, 12
projector positioning 10, 12, 30, 38
R
Rear 31
remote control
advancing slides 6, 23
batteries 23
Effect key 23
laser pointer 23
not working 17
Previous/Next buttons 23
replacing the lamp 35
reset 33
S
Screen Save 14
Service menu 33
Settings menu 31
Sharpness 30
shutting down projector 14
Source troubleshooting 15
Sources 31, 32
standard accessories 37
Startup Logo 32
S-video adapter 11
S-video connector 11
T
Tint 13, 28
Tracking 30
Troubleshooting 14, 15
U
USB, connecting 6
V
video connections
optional 11
standard 11
Video connector 11
video images
optimizing 26
Video Standard 30
W
warranty 21, 41
Windows 98 8
Windows ME, XP, 2000 9
Z
zoom 10, 13, 32
40
Page 44

Limited Warranty
InFocus Corporation (“InFocus”) warrants that the Projector (“Product”) purchased
from InFocus, an InFocus distributor, or an InFocus reseller will conform to the man-
ufacturer's specifications and be free from defects in material or workmanship for the
Warranty period provided below. InFocus does not warrant that the Product will
meet the specific requirements of the end-user customer.
If the Product, which is the subject of this Limited Warranty, is defective in material or
workmanship during the warranty period, InFocus, at its option
REPLACE the Product.
All exchanged parts and products replaced under this Warranty will become prop-
erty of InFocus. InFocus’ sole obligation
repair the Product found to be defective within the Warranty period and to repair or
replace defective parts with new parts or, at the option of InFocus
parts that are equivalent or superior to new parts performance.
is to supply (or pay for) all labor necessary to
, will REPAIR or
, serviceable used
Limited Warranty Alternatives: Subject to the Limitations, Exclusions and Dis-
claimers, InFocus Warrants as follows:
• 2 Year Parts and Labor Product Warranty - From the date of purchase, InFo-
cus warrants that the Product will conform to the manufacturers’ specifications
and be free from defects in material or workmanship for a period of two (2)
years.
• 1 Year Parts Only Accessory Warranty - From the date of purchase, InFocus
warrants that the customer replaceable and accessory products will conform to the
manufacturers’ specifications and be free from defects in material or workmanship
for a period of one (1) year.
• 90 Day/500 Hour Replacement Lamp Warranty - Lamp Products purchased
in projectors or separately as replacements after the original projector purchase is
Ninety (90) days or 500 hours, whichever comes first. During the Warranty period for the
Product, InFocus warrants that Replacement lamps, which are purchased at the time of projector purchase, will have a 90-day or 500 hour warranty, whichever comes first, from the date
the spare lamp is put into use.
WARRANTY LIMITATION AND EXCLUSION
THIS WARRANTY SETS FORTH INFOCUS’ MAXIMUM LIABILITY FOR ITS
PRODUCT. THIS WARRANTY EXTENDS ONLY TO PRODUCTS PURCHASED
FROM INFOCUS OR AN INFOCUS AUTHORIZED RESELLER. InFocus shall have
no further obligation under the foregoing Limited Warranty if the Product has been
damaged due to abuse, misuse, neglect, smoke exposure (cigarette or otherwise),
accident, unusual physical or electrical stress, unauthorized modifications (including
use of an unauthorized mount), tampering, alterations, or service other than by InFocus or its authorized agents, causes other than from ordinary use or failure to properly use the Product in the application for which said Product was intended.
This Warranty excludes Product or accessory cleaning, repair, or replacement of plas-
tics due to cosmetic damage and damage as a result of normal wear. Product repair
outside of the terms of the Limited Warranty will be on a time and materials basis.
Prolonged Product “demonstration” causes unusual Product wear and is not consid-
ered normal use under the terms of this Limited Warranty.
The Accessory Warranty covers the accessory item only and excludes normal wear.
The Lamp Product Warranty excludes expected lamp degradation.
Remanufactured Products and Software Products are exempt from the foregoing
Limited Warranty. Please refer to the appropriate Remanufactured Product Limited
Warranty or Software Product Limited Warranty for applicable Warranty informa-
tion.
DISCLAIMER OF UNSTATED WARRANTIES
THE WARRANTY PRINTED ABOVE IS THE ONLY WARRANTY APPLICABLE TO
THIS PRODUCT. ALL OTHER WARRANTIES, EXPRESS OR IMPLIED, INCLUD-
ING, BUT NOT LIMITED TO, THE IMPLIED WARRANTIES OF MERCHANTABIL-
ITY AND FITNESS FOR PARTICULAR PURPOSE ARE DISCLAIMED. THERE ARE
NO WARRANTIES THAT EXTEND BEYOND THE DESCRIPTION ON THE FACE
HEREOF AND THE FOREGOING WARRANTY SHALL NOT BE EXTENDED,
ALTERED OR VARIED EXCEPT BY WRITTEN INSTRUMENT SIGNED BY INFO-
CUS. SOME JURISDICTIONS DO NOT ALLOW LIMITATIONS ON HOW LONG
AN IMPLIED WARRANTY MAY LAST, SO SUCH LIMITATIONS MAY NOT APPLY
TO YOU.
41
Page 45

Limited Warranty Period
The Limited Warranty period commences on the date of purchase by the end-user
customer for both the 2 year Product Warranty and the 1 year Accessory Warranty.
These Limited Warranty provisions shall apply only to the end-user purchaser (first
person or entity that purchased a new Product for personal or business use and not
for the purpose of distribution or resale).
No repair or replacement of Product or part thereof shall extend the Limited War-
ranty period as to the entire Product. Warranty on the repair part and workmanship
shall only be effective for a period of ninety (90) days following the repair or replace-
ment of that part or the remaining period of the Product Limited Warranty whichever
is greater.
LIMITATION OF LIABILITY
To Be Eligible For Limited Warranty Coverage
Any person exercising a claim under this Limited Warranty must establish to the sat-
isfaction of InFocus both the date of purchase and that the Product was purchased
new. The sales receipt or invoice, showing the date of purchase of the Product or
Accessory is the proof of the date of purchase.
To Obtain Warranty Service
During the Limited Warranty period, to exercise this Limited Warranty, the purchaser
must first contact 1) InFocus, 2) a service facility authorized by InFocus or 3) the place
of original purchase.
InFocus Customer Service - 1-800-799-9911 or techsupport@infocus.com
For Warranty service, the purchaser will be advised to return or deliver the defective
Product freight and all fees prepaid, to an InFocus Service Center or to a service facility authorized by InFocus. When returning Product to InFocus, a Return Material
Authorization Number (RMA #) is required and must be clearly displayed on the outside of the shipping carton or a similar package affording an equal degree of protection. InFocus or the service facility authorized by InFocus will return the repaired/
replaced Product freight prepaid to the purchaser.
Products returned for Warranty service must be accompanied by a written letter that:
(i) explains the problem; (ii) provides proof of date of purchase; (iii) provides the
dealer’s name; and (iv) provides the model and serial number of the Product. Upon
request of InFocus Corporation or an InFocus authorized repair center receiving the
Product, proof of legal importation must accompany the warranty repair Product,
otherwise the Product must be returned to the place of original purchase, to the manufacturer (Purchaser must bear all tax, duty and freight), or the Purchaser must bear
charges for the warranty repair.
IT IS UNDERSTOOD AND AGREED THAT INFOCUS’ LIABILITY WHETHER IN
CONTRACT, IN TORT, UNDER ANY WARRANTY, IN NEGLIGENCE OR OTHER-
WISE SHALL NOT EXCEED THE RETURN OF THE AMOUNT OF THE PUR-
CHASE PRICE PAID BY PURCHASER AND UNDER NO CIRCUMSTANCES
SHALL INFOCUS BE LIABLE FOR SPECIAL, INDIRECT, INCIDENTAL OR CON-
SEQUENTIAL DAMAGES OR LOST PROFITS, LOST REVENUES OR LOST SAV-
INGS. THE PRICE STATED FOR THE PRODUCTS IS A CONSIDERATION IN
LIMITING INFOCUS’ LIABILITY.
Limitation on Bringing Action - No action, regardless of form, arising out of the
agreement to purchase the product may be brought by purchaser more than one year
after the cause of action has accrued.
Governing Law - Any action, regardless of form, arising out of the agreement to
purchase the product is governed by Oregon law.
Mandatory Arbitration - Any action, regardless of form, arising out of the agree-
ment to purchase the product is subject to mandatory arbitration.
SOME JURISDICTIONS DO NOT ALLOW THE EXCLUSION OR LIMITATION OF
INCIDENTAL OR CONSEQUENTIAL DAMAGES SO THE ABOVE LIMITATION
OR EXCLUSION MAY NOT APPLY TO YOU. THIS LIMITED WARRANTY GIVES
YOU SPECIFIC LEGAL RIGHTS, AND YOU MAY ALSO HAVE OTHER RIGHTS,
DEPENDING ON JURISDICTION.
42
Page 46

IF YOU NEED ASSISTANCE…
call your ASK partner or InFocus Corporation Customer Service directly
at (+31) 20 579 2820.
SUPPORT IS FREE
between 8 a.m. and 6 p.m. CET,
Monday through Friday. Support
is available in EMEA after hours
and weekends for a fee at
(+31) 20 579 2828.
Or, send us an e-mail at
emea.support@infocus.com.
Safety Cer tifications UL, CUL, TÜV, GOST, CCC
IN NORTH AMERICA,
call InFocus Corporation at
1-800-799-9911.
Support is free between 6 a.m.
and 6 p.m. PST, Monday through
Friday. Support is available in
North America after hours
and weekends for a fee at
1-888-592-6800.
Or, send us an e-mail at
techsupport@infocus.com.
IN ASIA,
call InFocus Corporation in
Singapore at (65) 6334-9005.
Many resources are
available on our website at
www.askprojectors.com.
Here’s a sample:
• product data sheet at
www.askprojectors.com/M1
• technical specifications, an
interactive image size calculator,
laptop activation commands,
connector pin outs, command line
interface (CLI) and a glossary at
www.askprojectors.com/support
• product registration at
www.infocus.com/register
Page 47

M1
InFocus Corporation
27700B SW Parkway Avenue
Wilsonville, Oregon 97070-9215
1-800-294-6400 •503-685-8888
Fax: 503-685-8887
http://www.infocus.com
In Europe:
InFocus International B.V.
Strawinskylaan 585
1077 XX Amsterdam,The Netherlands
Phone: +31 20 579 2000
Fax: +31 20 579 2999
In Asia:
238A Thomson Road
#18-01/04 Novena Square
Singapore 307684
Telephone: (65) 6334-9005
Fax: (65) 6333-4525
Page 48

PLEASE READ
We are in no way responsible for the
contents of the manual. We do not guarantee
its accuracy and we do not make any claim
of copyright. The copyright remains the
property of their respective owners.
Visit the site to read the latest projector
news and reviews, read and comment on
projector specifications, download user
manuals and much more.
 Loading...