

Page 1
Model: C3000 Series
LCD Multi-Media Projector
P/N: 4100568500
Downloaded from ProjectorsManual.com Manuals
Page 2

Statement
The copyright of this manual belongs to ASK Proxima Co., Ltd.and is protected by copyright and
related laws. No unit or individual is allowed to extract, copy, translate or issue any part of the
publication in any form or by any means without the prior permission of the copyright owner.
ASK Proxima Co., Ltd. shall investigate the criminal responsibilities of the infringing party who
have damaged the interests of the copyright owner.
ASK Proxima Co., Ltd. reserves the right to modify or improve the product without prior notice.
ASK Proxima Co., Ltd. reserves the right to modify the manual. Please consult the company or the
dealer for any unclear part.
ASK PROXIMA CO., LIMITED
Note:
- The screen menu and pictures in the manual may slightly differ from the real product.
- The manual is subject to change without prior notice.
2
Downloaded from ProjectorsManual.com Manuals
Page 3

Contents
Statement 2
Contents 3
Safety Instructions 4
Safety Guide 5
Air circuitlation 6
Moving the projector 6
Installing the projector properly 6
Part names and functions 7
Front 7
Back 7
Bottom 7
Terminals 8
Top Control and Indicators 9
Remote control 10
Install remote control batteries 12
Operating range 12
Adjustable foot 12
Installation 13
Positioning the projector 13
Connecting to computer(Digital and analog
RGB) 14
Connecting to video equipment (Video,
S-Video) 15
Connecting to audio equipment 16
Connecting the AC power cord 17
Basic operation 18
Turn on the projector 18
Turn off the projector 19
How to operate the screen menu 20
Menu bar 21
Adjust zoom and foucus 22
Auto setup function 22
Keystone 22
Volume* 23
Remote control operation 24
Input select 26
PC Adjust 27
Auto PC adj. 27
Manual PC adj. 28
Display 29
Screen Size 29
Keystone 30
Project Way 30
Menu Position 31
Background Display 31
System 32
Color adjust 34
Image Mode 34
Color adjust(Computer) 35
Color adjust 36
(Vdieo,S-video,Component) 36
Setting 37
On start 37
Standby mode 37
High land 38
Lamp control 38
Cooling fast 38
Closed Caption 39
Key lock 39
Iris* 40
Terminal* 40
Sound* 40
Expand 41
Language 41
Auto setup 41
Logo 42
Security 43
Power management 44
Filter counter 44
Test Pattern 45
Network* 45
Infomation 47
Maintenance and cleaning 48
POWER indicator 48
Cleaning the lter 49
Filter counter reset 49
Clean the project lens 50
Clean the cabinet 50
Replace the lamp 51
Appendix 53
Troubleshooting 53
Indicator and projector state 55
Compatible computer specications 56
Congurations of terminals 57
Content of hazardous substances and
elements 57
Dimensions 58
PIN code memorandum 59
RS232 Control Method 60
Downloaded from ProjectorsManual.com Manuals
3
Page 4
Safety Instructions
0.7’(20cm)
1.5’(50cm)
3’(1m)
3’(1m)
Please read this manual completely before installing
and operating the projector.
The projector provides many convenient features
and functions. Proper operation may enable you to
fully utilize the features and keep it in good condition.
Otherwise, it will not only shorten the service life of
the unit, but also may cause malfunction, a fire, or
other accidents.
If your projector cannot work properly, please read
this manual again, check the operating methods and
cable connection, and try the solutions in the part of
Troubleshooting. If the problem still exists, contact the
dealer or the service center.
The lamp of the projector is a wearing part. The
luminance may decrease after a period of operation
and be weaker than that of a new lamp. This is
normal. Please strictly follow the steps in Turning
on the unit and Turning off the unit to turn on/off
the projector, and the requirements in Maintaining
and cleaning the projector to service and clean the
projector regularly. Or the high temperature residual
heat may not radiate, greatly shortening the service
life of the projector and lamp, or even damaging them
within a short period.
Caution
ELECTRIC SHOCK
DO NOT OPEN
Safety precautions
Caution: • The projector must be grounded.
• Do not expose the projector to
raindrops or high humidity to avoid
a re or electric shock.
- This projector produces intense light from the
projection lens. Avoid staring directly into the
lens, otherwise eye damage could be caused.
Be especially careful that children do not stare
directly into the beam.
- Place the projector in a proper position.
Otherwise it may result in re hazard.
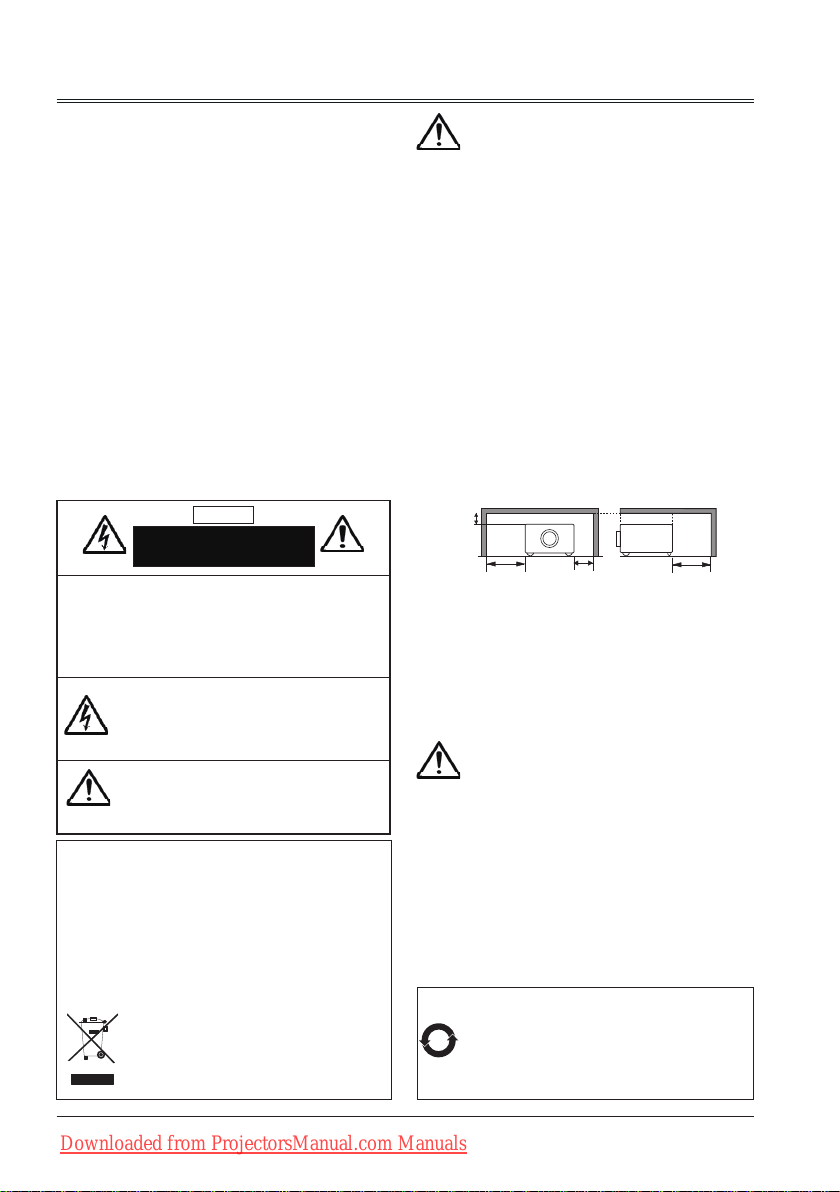
- Leave an appropriate space from the top,
sides, and back of the shell in order to
ventilate and cool down the projector. The
gures below indicate the minimum distance
to be left. It must be satised if the projector is
placed in sealed environment like a cabinet.
SIDE and TOP REAR
CAUTION:
TO REDUCE THE RISK OF ELECTRIC SHOCK,
DO NOT REMOVE COVER (OR BACK NO
USER SERVICEABLE PARTS INSIDE EXCEPT
LAMP REPLACEMENT. REFER SERVICING TO
QUALIFIED SERVICE PERSONNEL.
THIS SYMBOL INDICATES
THAT DANGEROUS VOLTAGE
CONSTITUTING A RISK OF ELECTRIC
SHOCK IS PRESENT WITHIN THIS
UNIT.
THIS SYMBOL INDICATES THAT THERE
ARE IMPORTANT OPERATING AND
MAINTENANCE INSTRUCTIONS IN THE
USER’S MANUAL WITH THIS UNIT.
Disposal of old Electrical & Electronic Equipment (Applicable throughout
the European Union and other European countries with separate
collection programs)
This symbol found on your product or on its packaging, indicates that
this product should not be treated as household waste when you wish
to dispose of it. Instead, it should be handed over to an applicable
collection point for the recycling of electrical and electronic equipment.
By ensuring this product is disposed of correctly, you will help prevent
potential negative consequences to the environment and human
health, which could otherwise be caused by inappropriate disposal of
this product. The recycling of materials will help to conserve natural
resources.
This symbol is only valid in the European Union.
If you wish to discard this product, please contact
your local authorities or dealer and ask for the correct
method of disposal.
4
Downloaded from ProjectorsManual.com Manuals
- Do not cover the vent of the projector. Poor
radiation may shorten the service life or even
cause dangers.
- Remove the AC power plug if the projector
is not to be used for a long time.
- Do not project the same image for a long time;
otherwise, a residual image may appear on
the LCD panel due to its characteristic.
Caution
Do not set the projector in greasy, wet, or smoky
conditions such as in a kitchen, to prevent a
malfunction or accident. If the projector comes
in contact with oil or chemicals, it may become
deteriorated.
Read and keep this manual for future reference.
The mains plug/appliance coupler is used as
disconnect device, the disconnect device shall
remain readily operable.
Environment-friendly use conditions: The environmentfriendly life time of the projector and remote control is 10
years, the lamp (consumable) 5 years, and the provided
batteries (consumable) 5 years.
10
The use conditions of the environment-friendly use period
are the same with that of the product. Properly operate and
effectively maintain the projector according to the requirements
in this manual.
Page 5
Safety Guide
All the safety and operating instructions should be
read before the product is operated.
Read all of the instructions given here and retain them
for later use. Unplug this projector from AC power
supply before cleaning. Do not use liquid or aerosol
cleaners.
Use a damp cloth for cleaning.
Never push objects of any kind into this projector
through cabinet slots as they may touch dangerous
voltage points or short out parts that could result in a
re or electric shock. Never spill liquid of any kind on
the projector.
Do not install the projector near the ventilation duct of
air-conditioning equipment.
Follow all warnings and instructions marked on the
projector.
For added protection to the projector during a lightning
storm, or when it is left unattended and unused for
long periods of time, unplug it from the wall outlet.
This will prevent damage due to lightning and power
line surges.
Do not expose this unit to rain or use near water... for
example, in a wet basement, near a swimming pool,
etc...
Do not use attachments not recommended by the
manufacturer as they may cause hazards.
Do not place this projector on an unstable cart,
stand,or table. The projector may fall, causing serious
injury to a child or adult, and serious damage to the
projector.
Use only with a cart or stand recommended by the
manufacturer, or sold with the projector. Wall or
shelf mounting should follow the manufacturer’s
instructions, and should use a mounting kit approved
by the manufacturers.
An appliance and cart combination
should be moved with care. Quick
stops, excessive force, and uneven
surfaces may cause the appliance
and cart combination to overturn.
Slots and openings in the back and bottom of the
cabinet are provided for ventilation, to ensure reliable
operation of the equipment and to protect it from
overheating.
The openings should never be covered with cloth or
other materials, and the bottom opening should not be
blocked by placing the projector on a bed, sofa, rug,
or other similar surface. This projector should never
be placed near or over a radiator or heat register.
This projector should be operated only from the type
of power source indicated on the marking label. If you
are not sure of the type of power supplied, consult
your authorized dealer or local power company.
Do not overload wall outlets and extension cords as
this can result in re or electric shock. Do not allow
anything to rest on the power cord. Do not locate this
projector where the cord may be damaged by persons
walking on it.
Do not attempt to service this projector yourself as
opening or removing Covers may expose you to
dangerous voltage or other hazards. Refer all
servicing to qualied service personnel.
Unplug this projector from wall outlet and refer
servicing to qualied service personnel under the
following conditions:
a. When the power cord or plug is damaged or
frayed.
b. If liquid has been spilled into the projector.
c. If the projector has been exposed to rain or water.
d. If the projector does not operate normally by
following the operating instructions. Adjust only
those controls that are covered by the operating
instructions as improper adjustment of other
controls may result in damage and will often
require extensive work by a qualied technician to
restore the projector to normal operation.
e. If the projector has been dropped or the cabinet
has been damaged.
f. When the projector exhibits a distinct change in
performance-this indicates a need for service.
When replacement parts are required, be sure the
service technician has used replacement parts
specied by the manufacturer that have the same
characteristics as the original part. Unauthorized
substitutions may result in re, electric shock, or injury
to persons.
This projector should not be placed in a built- in
installation such as a book case unless proper
ventilation is provided.
Upon completion of any service or repairs to this
projector, ask the service technician to perform routine
safety checks to determine that the projector is in safe
operating condition.
Downloaded from ProjectorsManual.com Manuals
5
Page 6

M4x 10
10mm
Torque:1.40N.m
Safety Guide
Air circuitlation
Vents in the cabinet are provided for ventilation.
To ensure reliable operation of the product and
to protect it from overheating, these openings
must not be blocked or covered.
Caution
Hot air is exhausted from the exhaust vent.
When using or installing the projector, the
following precautions should be taken.
- Do not put any ammable objects, or spray
can near the projector. Hot air is exhausted
from the air vents.
- Keep the exhaust vent at least 1 m away from
any objects.
- Do not touch a peripheral part of the exhaust
vent, especially screws and metallic part. This
area will become hot while the projector is
being used.
- Do not put anything on the projector. Objects
put on the cabinet will not only get damaged
but also may cause re hazard by heat.
Cooling fans are provided to cool down the
projector.
The fan’s running speed is changed according
to the temperature inside the projector.
Installing the projector properly
Be sure to install the projector properly.
Improper installation may reduce the lamp
lifetime and even cause a re hazard.
Do not roll the projector over 20
degrees from side to side.
Do not point the projector up to
project an image.
Do not point the projector down
to project an image.
Do not put the projector on either
side to project an image.
Caution in ceiling installation the projector
- Only qualied personal is authorized for ceiling
installation.
- We are not responsible for the hurt and damage
caused by ceiling brakect that purchased from
unauthorized dealer even in warranty period.
- Remove the ceiling bracket immediately while
not use.
- While installing, torque screwdriver is suggested,
don't use electric or impact-type screwdriver.
Air Intake Vent Exhaust Vent
– Do not drop or bump the projector, otherwise
damages or malfunctions may result.
– When carrying the projector, use a suitable
carrying case.
Air Intake Vent
Moving the projector
When moving the projector, cover the lens
cap and retract the adjustable feet to prevent
damage to the lens and cabinet. Put it into a
pouch (provided) with the lens facing upwards
if the projector is not in use for a long period.
6
Downloaded from ProjectorsManual.com Manuals
– Do not transport the projector by courier or
any other transport service in an unsuitable
transport case. This may cause damage
to the projector. For information about
transporting the projector by courier or any
other transport service, consult your dealer.
– Do not put the projector in a case before it is
cooled enough.
Caution in moving or transporting the
projector
Page 7
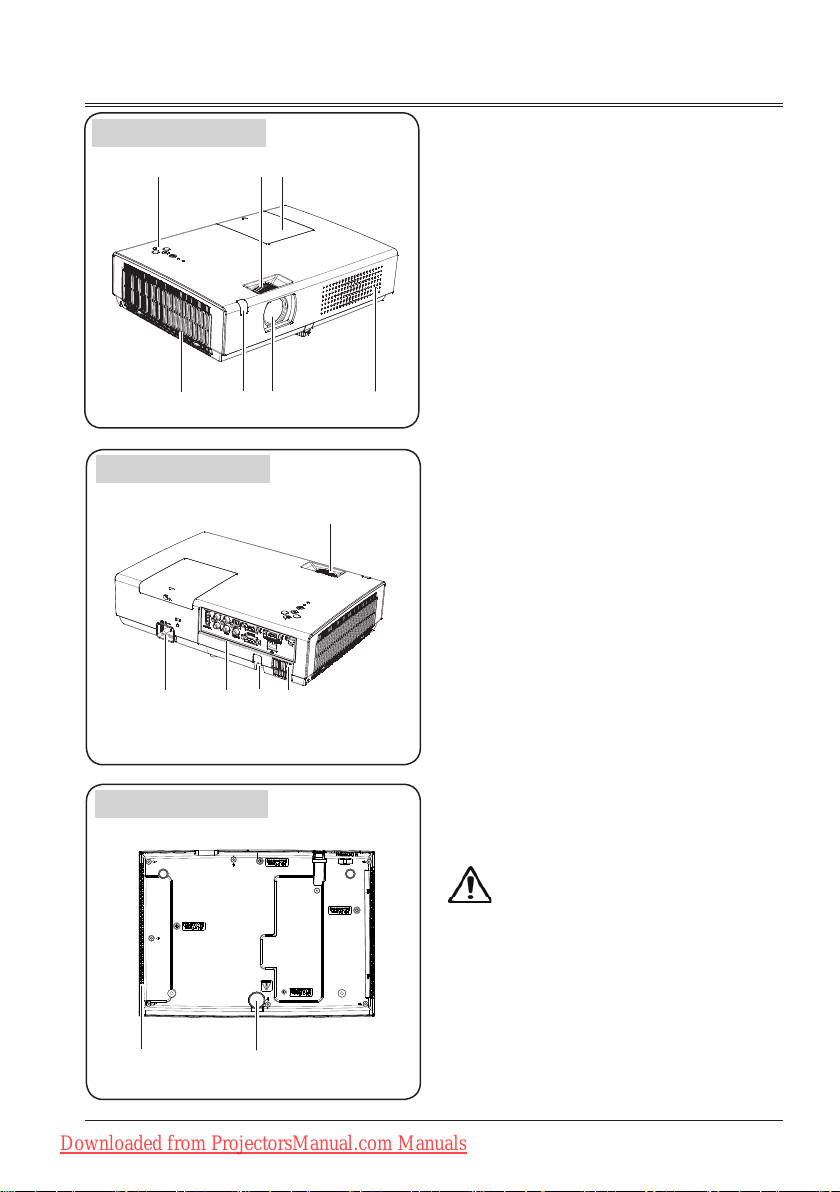
Part names and functions
Front
Back
Top control and Indicators
①
Zoom ring
①
④
⑨
⑤
⑩ ⑪
② ③
⑥
⑦
⑧
⑫
②
Lamp cover
③
Filter
④
Remote control receiver
⑤
Projector lens
⑥
Air intake vent
⑦
Focus ring
⑧
AC cord connector
⑨
Terminals
⑩
Anti-thief slot
⑪
Speaker
⑫
Bottom
⑭
⑬
⑬
⑭
Hot air is exhausted from the exhaust vent. Do
not put heat-sensitive objects near this side.
Downloaded from ProjectorsManual.com Manuals
Adjustable foot
Exhaust vent
Caution
7
Page 8
Part names and functions
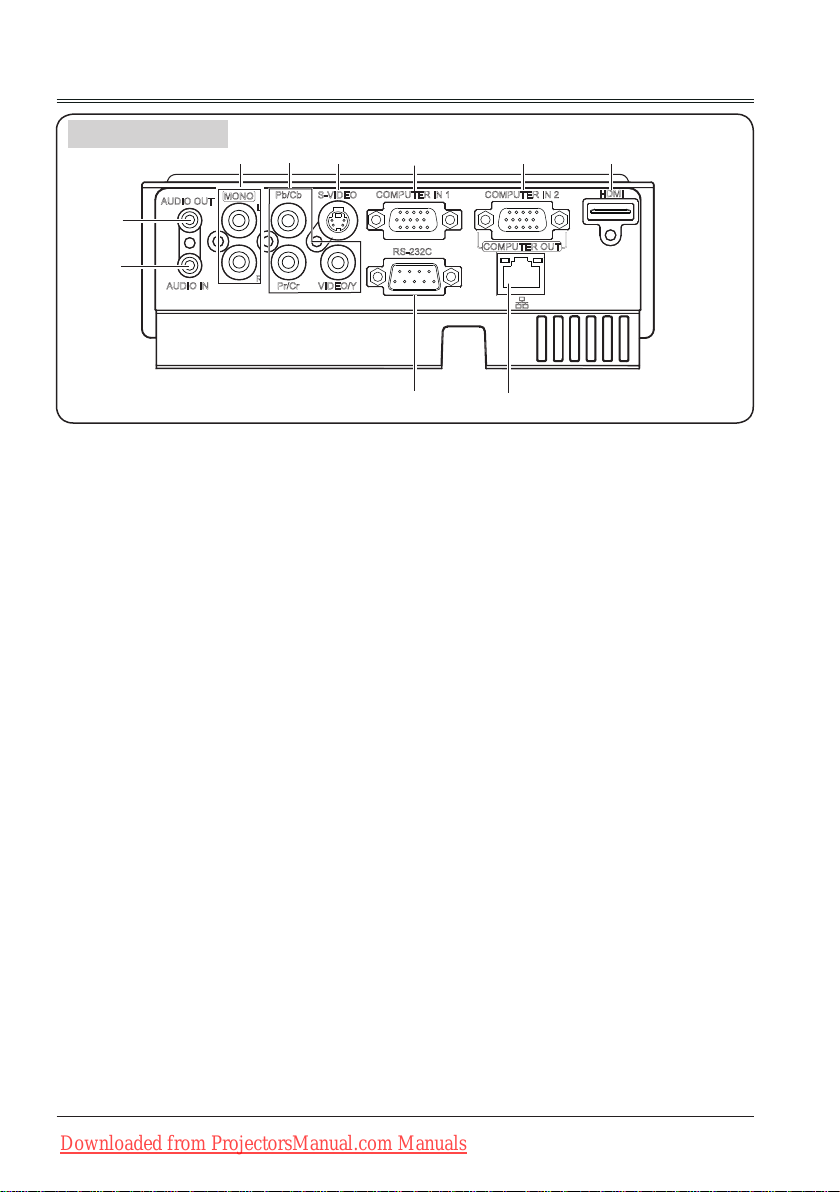
Terminals
② ③
①
⑧
AUDIO OUT
①
Connect external audio amplier to this
-
jack.
Output audio signal from
-
Audio out/MONO(R/L)
②
Connect the video equipment connected
-
to
For a mono audio signal (a single audio
-
jack), connect it to L(MONO) jack.
Pb/Cb,Pr/Cr,Y/VIDEO
③
Connect video signal to VIDEO port.
-
Connect composite video or component
-
video signal to this jack.
S-VIDEO
④
Connect S-Video signal to this jack.
*
or ④ to this jack.
③
*
②,⑦or⑧
④
⑤ ⑥ ⑦
⑨ ⑩
HDMI*
⑦
Connect a HDMI output to this terminal.
.
AUDIO IN*
⑧
Connect the audio signal output from
computer equipment connected to ⑤or
to this jack.
RS-232C
⑨
When using RS232 to control the projector,
please connect the serial control line to this
terminal.
*
LAN
⑩
Connect the wired LAN cable to this port.
Some model has no this terminal.
*:
⑥
COMPUTER IN1
⑤
Connect a computer output to this terminal.
COMPUTER IN2/COMPUTER OUT
⑥
Connect a computer output to this
-
*
terminal.
- Output the analog signal form ⑤ to
other monitor.
8
Downloaded from ProjectorsManual.com Manuals
Page 9

Top Control and Indicators
⑤
POWER indicator
①
- Lights red when the projector is in stand-
by mode.
- Lights green during operations.
Flashes green in the Power management
-
mode.
Flashes red during fans cooling.
-
- lights orange when abnormal is detected
in the projector.
- Flashes orange when internal temperature
is abnormally high.
WARNING indicator
②
Lights red when the life of the projection
lamp draws to an end.
Part names and functions
①
②
③
④
⑥
OK/INPUT button
④
Press INPUT button to select input source
-
while no screen menu displayed.
Enter screen menu or execute the
-
selected item.
MENU button
⑤
Open or close the screen menu.
▲▼/Keystone button
⑥
Select items or adjust the data in screen
-
menu.
Correct image keystone distortion.
-
POWER button
③
To turn on/off the projector.
Downloaded from ProjectorsManual.com Manuals
9
Page 10
Part names and functions
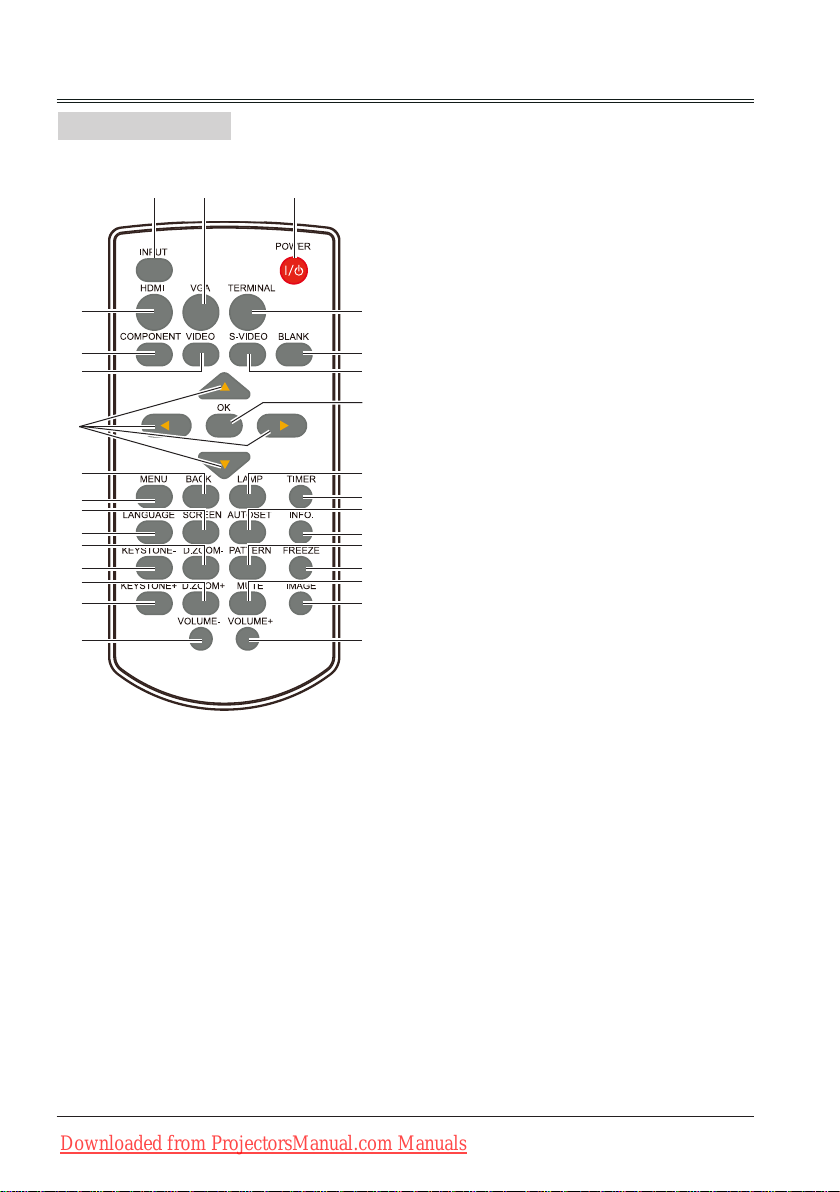
Remote control
④
POWER button
①
①③ ②
Turn on or turn off the projector.
VGA button
②
Select VGA as input source.
INPUT button
③
Enter input source menu to select input
⑤
source directly.
⑥
⑧
⑩
⑫
⑭
⑯
⑱
⑳
㉒
㉔
㉖
㉘
⑦
⑨
⑪
⑬
⑮
⑰
⑲
㉑
㉓
㉕
㉗
㉙
HDMI button
④
Select HDMI as input source.
TERMINAL button
⑤
Select property of COMPUTER IN 2/
COMPUTER OUT terminal.
COMPONENT button
⑥
Select component as input source.
BLANK button
⑦
Temporarily close the image on the screen.
VIDEO button
⑧
Select Video as input source.
S-VIDEO button
⑨
Select S-video as input source.
button
⑩
Select items or adjust the data in screen
-
menu.
Select the image display area in digital
-
zoom mode.
OK button
⑪
Enter screen menu or execute selected
items.
BACK button
⑫
Return to main menu.
LAMP button
⑬
Select lamp mode.
MENU button
⑭
Open or close the screen menu.
10
Downloaded from ProjectorsManual.com Manuals
Page 11
Part names and functions
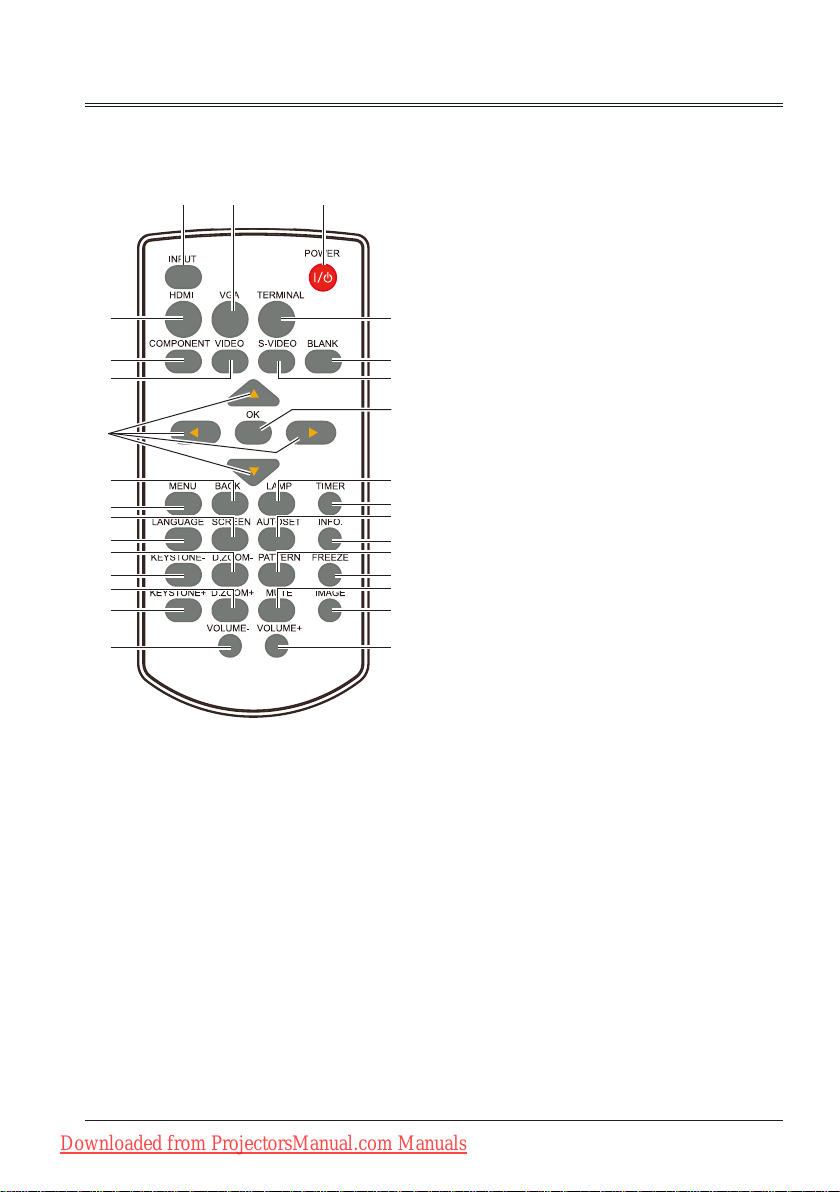
TIMER button
⑮
①③ ②
④
⑥
⑧
⑩
⑫
⑭
⑯
⑱
⑳
㉒
㉔
㉖
㉘
Enable the timer function.
SCREEN button
⑯
Select the screen size.
AUTOSET button
⑰
Enter auto setup mode.
⑤
LANGUAGE button
⑱
⑦
Select the language for screen menu.
⑨
INFO. button
⑲
⑪
Display the projector information.
DZOOM- button
⑳
⑬
Select the digital zoom - mode.
⑮
⑰
⑲
㉑
㉓
㉕
㉗
㉙
PATTERN button
㉑
Select internal test image.
KEYSTONE- button
㉒
Execute keystone correction, decrease the
bottom width of distorted image.
FREEZE button
㉓
Freeze the projected image.
㉔
Select the digital zoom + mode.
㉕
Mute the sound.
㉖
upper width of distorted image.
㉗
Select the image mode.
㉘
㉙
Downloaded from ProjectorsManual.com Manuals
DZOOM+ button
MUTE button
KEYSTONE+ button
Execute keystone correction, decrease the
IMAGE button
VOUME - button
Decrease the volume level.
VOUME + button
Increase the volume level.
11
Page 12
Part names and functions
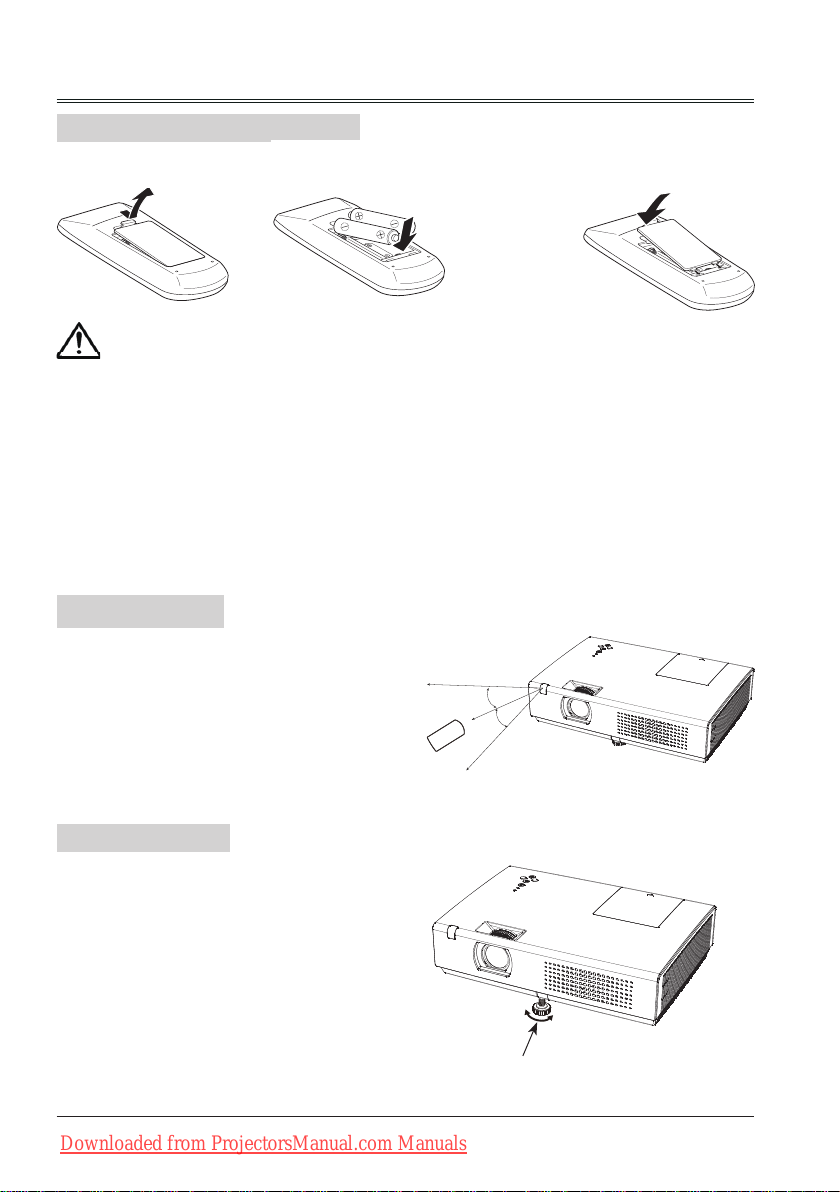
Install remote control batteries
① Open the battery
compartment lid.
To ensure safe operation, please observe the following precautions:
● Use two (2) AAA or LR03 type alkaline batteries.
● Always replace batteries in sets.
● Do not use a new battery with a used battery.
● Avoid contact with water or liquid matter.
● Do not expose the remote control to moisture or heat.
● Do not drop the remote control.
● If the battery has leaked on the remote control, carefully wipe the case clean and
install new batteries.
● Risk of explosion if a battery is replaced by an incorrect type.
● Dispose of used batteries according to the instructions on the battery or local
regulations or guides.
②Install new batteries
into the compartment.
Two AAA batteries
For correct polarity
(+ and –), be sure
battery terminals
are in contact
with pins in the
compartment.
Operating range
Point the remote control toward the projector
remote receiver when pressing any button.
The maximum operating range for the remote
control is about 5 meters and 60 degrees.
30°
30°
5m
Replace the
③
compartment lid.
Adjustable foot
The projection angle can be adjusted up to
10.0 degrees with the adjustable foot.
Lift the front of the projector and press the lock
on the adjustable foot to release it.
The foot is then locked. Rotate the foot to
adjust the height and tilt angle.
Keystone distortion of projected images can be
corrected by remote control or menu operation.
12
Downloaded from ProjectorsManual.com Manuals
Adjustable foot
Page 13
Installation
30”
(Diagonal:Inch)
Max.
Min.
(Center)
6:1
0.89m(0.87m)
3.01m(3.62m)
4.53m(4.46m)
6.04m(7.26m)
9.08m(10.90m)
10.90m(10.75m)
30”
30”
(Diagonal:Inch)
Max.
Min.
(Center)
(Diagonal:Inch)
Max.
Min.
(Center)
6:1
12.9:1
0.89m(0.87m)
3.01m(3.62m)
4.53m(4.46m)
6.04m(7.26m)
9.08m(10.90m)
10.90m(10.75m)
0.97 m(0.95m)
3.28m(3.24m)
4.93 m(4.87m)
6.59 m(6.50m)
9.89 m(9.77m)
11.88m(11.72m)
30”
30”
30”
(Diagonal:Inch)
Max.
Min.
(Center)
(Diagonal:Inch)
Max.
Min.
(Center)
(Diagonal:Inch)
Max.
Min.
(Center)
13:1
6:1
12.9:1
0.89m(0.87m)
3.01m(3.62m)
4.53m(4.46m)
6.04m(7.26m)
9.08m(10.90m)
10.90m(10.75m)
0.97 m(0.95m)
3.28m(3.24m)
4.93 m(4.87m)
6.59 m(6.50m)
9.89 m(9.77m)
11.88m(11.72m)
(0.93m)
3.19 m(3.15m)
4.80 m(4.74m)
6.41 m(6.32m)
9.62m(9.50m)
11.56m(11.40m)
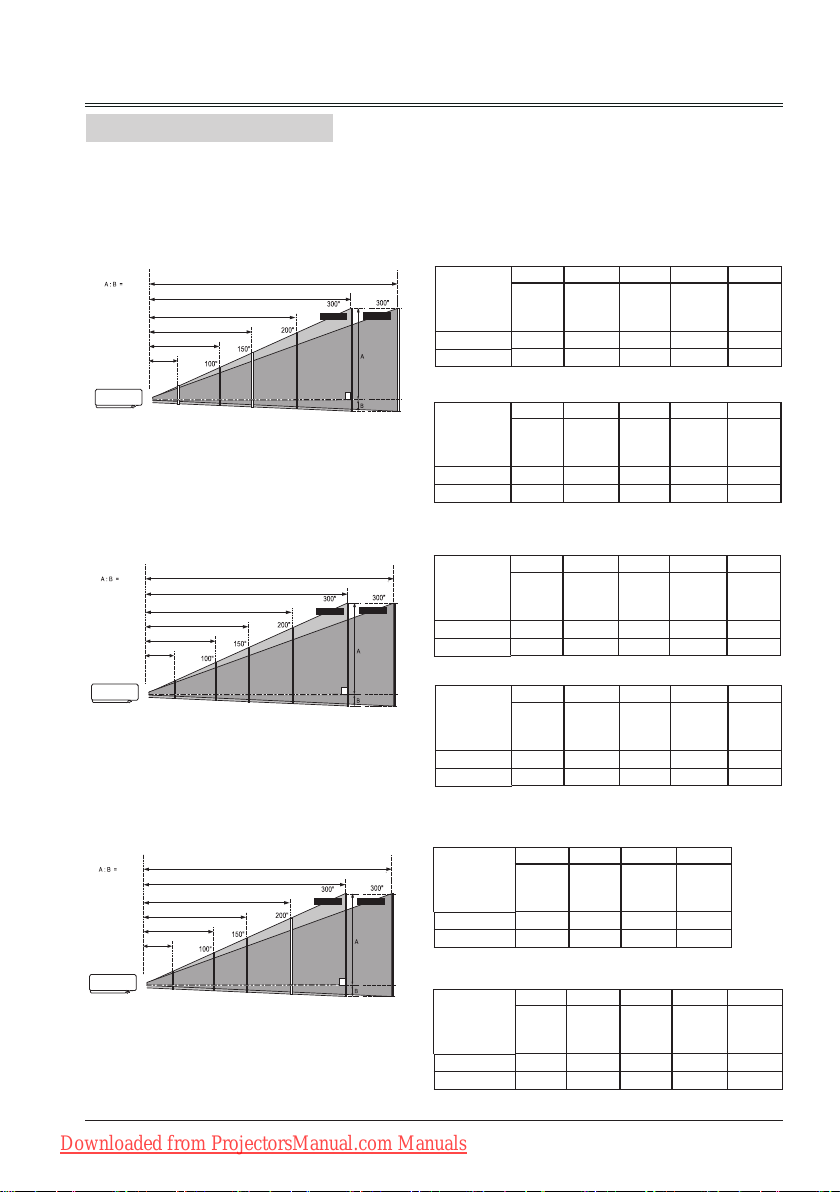
Positioning the projector
Note:
The brightness in a room has a great inuence on picture quality. It is recommended to limit the
●
ambient lighting in order to get the best image.
All measurements are approximate and may vary from the actual sizes.
●
4:3
C3255/C3257(4:3)
Screen size
(WxH)mm
4:3 aspect
ratio
Maximum 0.89m 3.01m 4.53m 6.04m 9.08m
Minimum 1.07m 3.62m 5.44m 7.26m 10.90m
C3305/C3307(4:3)
Screen size
(WxH)mm
4:3 aspect
ratio
Maximum 0.87m 2.97m 4.46m 5.96m 8.95m
Minimum 1.05m 3.57m 5.36m 7.16m 10.75m
:
30"100"150"200"300
610x457 2032x1524
3048x2286 4064x3048
:
30"100"150"200"300
610x457 2032x1524
3048x2286 4064x3048
"
6096x4572
"
6096x4572
16:9
16:10
Note:
Data in "()" is the throw distance for C3255/
C3257, data out of "()" is for C3305/C3307/
C3327W.
Downloaded from ProjectorsManual.com Manuals
C3255/C3257(16:9)
Screen size
(WxH)mm
16:9 aspect
ratio
:
30"100"150"200"300
664x374 2214x1245
3321x1868 4428x2491
6641x3736
Maximum 0.97m 3.28m 4.93m 6.59m 9.89m
Minimum 1.17m 3.94m 5.93m 7.91m 11.88m
C3305/C3307(16:9)
Screen size
(WxH)mm
16:9 aspect
ratio
664x374 2214x1245
:
30"100"150"200"300
3321x1868 4428x2491
6641x3736
Maximum 0.95m 3.24m 4.87m 6.50m 9.77m
Minimum 1.15m 3.89m 5.85m 7.80m 11.72m
(
:
C3255/C3257
Screen size
(WxH)mm
16:10 aspect
ratio
16:10)
100"150"200"300
2154x1346
3231x2019 4308x2692
"
6462x4039
Maximum 3.19m 4.80m 6.41m 9.62m
Minimum 3.84m 5.77m 7.70m 11.56m
C3327W(16:10)
Screen size
(WxH)mm
16:10 aspect
ratio
:
30"100"150"200"300
646x404 2154x1346
3231x2019 4308x2692
6462x4039
Maximum 0.93m 3.15m 4.74m 6.32m 9.50m
Minimum 1.12m 3.78m 5.69m 7.59m 11.40m
"
"
"
13
Page 14
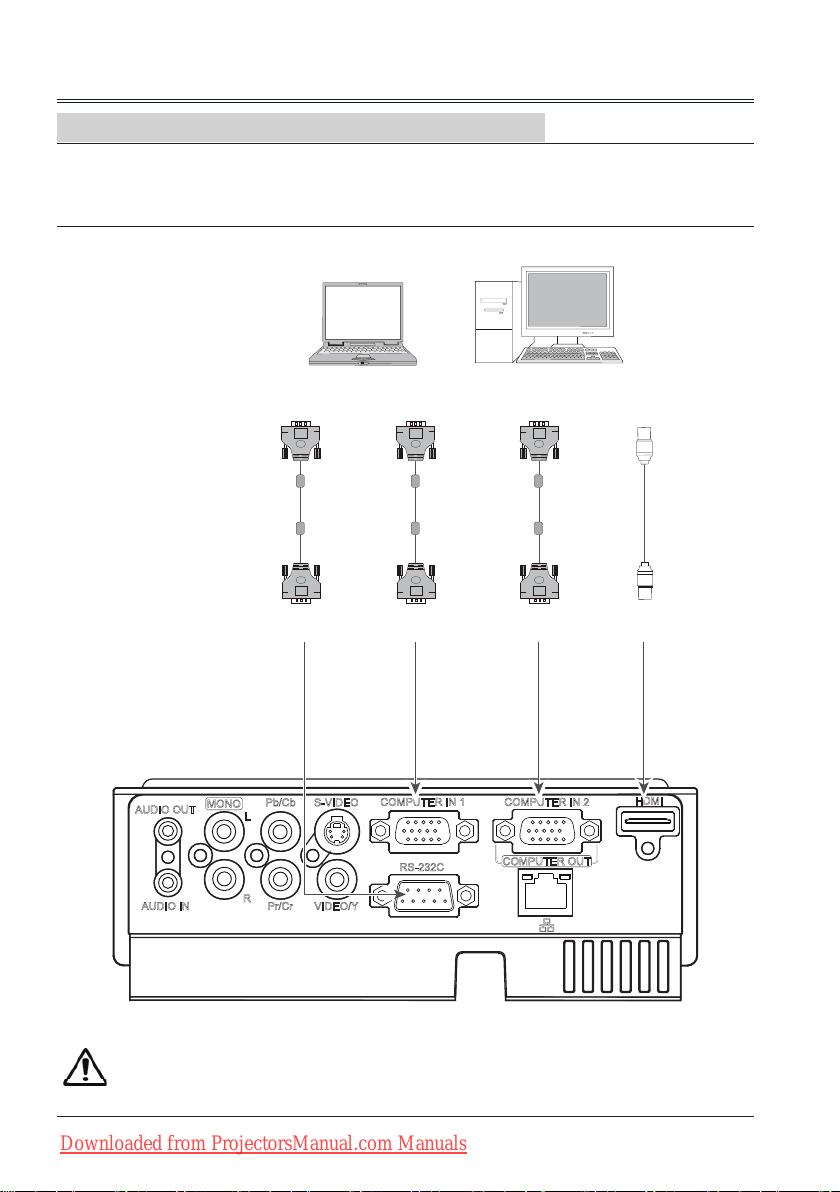
Installation
Connecting to computer(Digital and analog RGB)
Cables used for connection:
● VGA cable ● Serial direct cable*
● HDMI cable*
(*=Cables are not supplied with the projector)
Serial output
Serial
direct
cable
Monitor output Monitor input
VGA
cable
Analog input Analog output
VGA
cable
HDMI output
HDMI
cable
HDMIControl port
Unplug the power cords of both the projector and external equipment from the AC outlet
before connecting the cables.
14
Downloaded from ProjectorsManual.com Manuals
Page 15
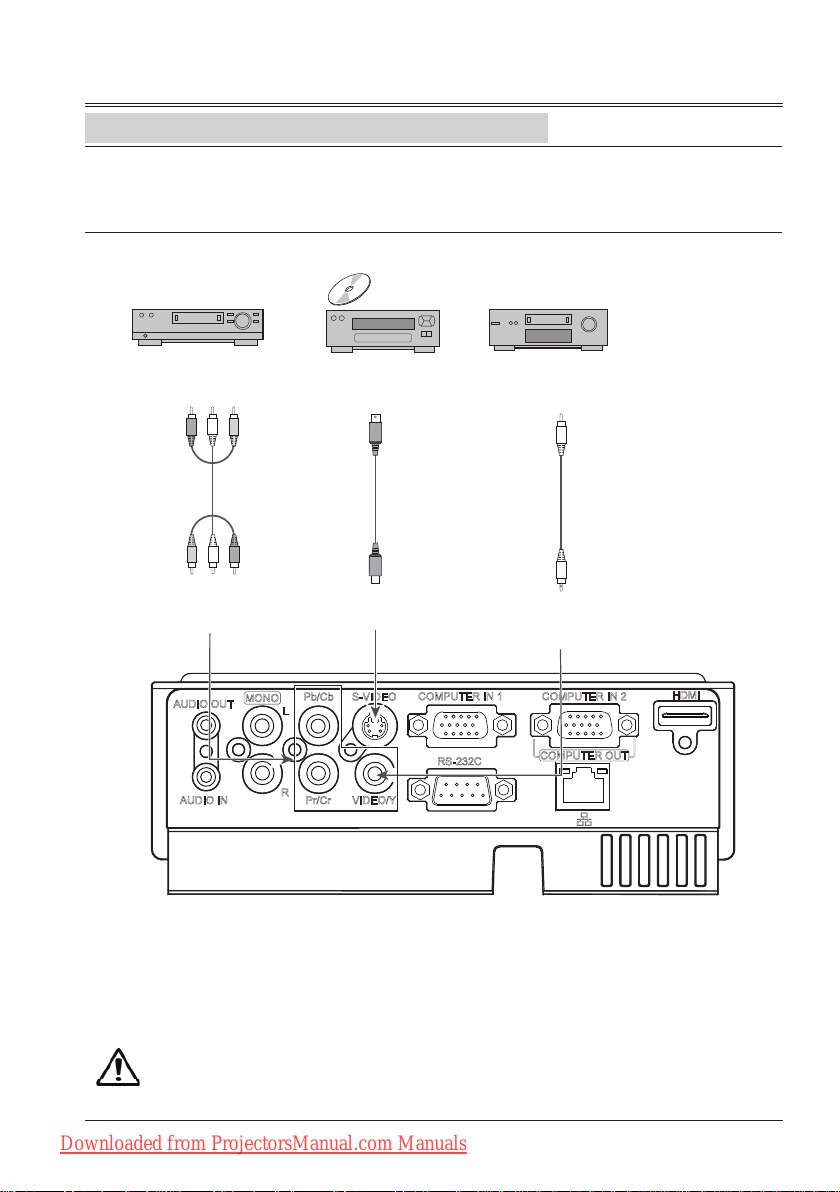
Connecting to video equipment (Video, S-Video)
Cables used for connection:
● Video cable* ● S-Video cable*
● RCA cable*
(*=Cables are not supplied with the projector)
Installation
Component output
RCA
cable
Y Cb/Pb Cr/Pr
S-video ouput Video ouput
S-VIDEO
cable
S-VIDEO
Video
cable
VIDEO
Unplug the power cords of both the projector and external equipment from the AC outlet
before connecting the cables.
Downloaded from ProjectorsManual.com Manuals
15
Page 16
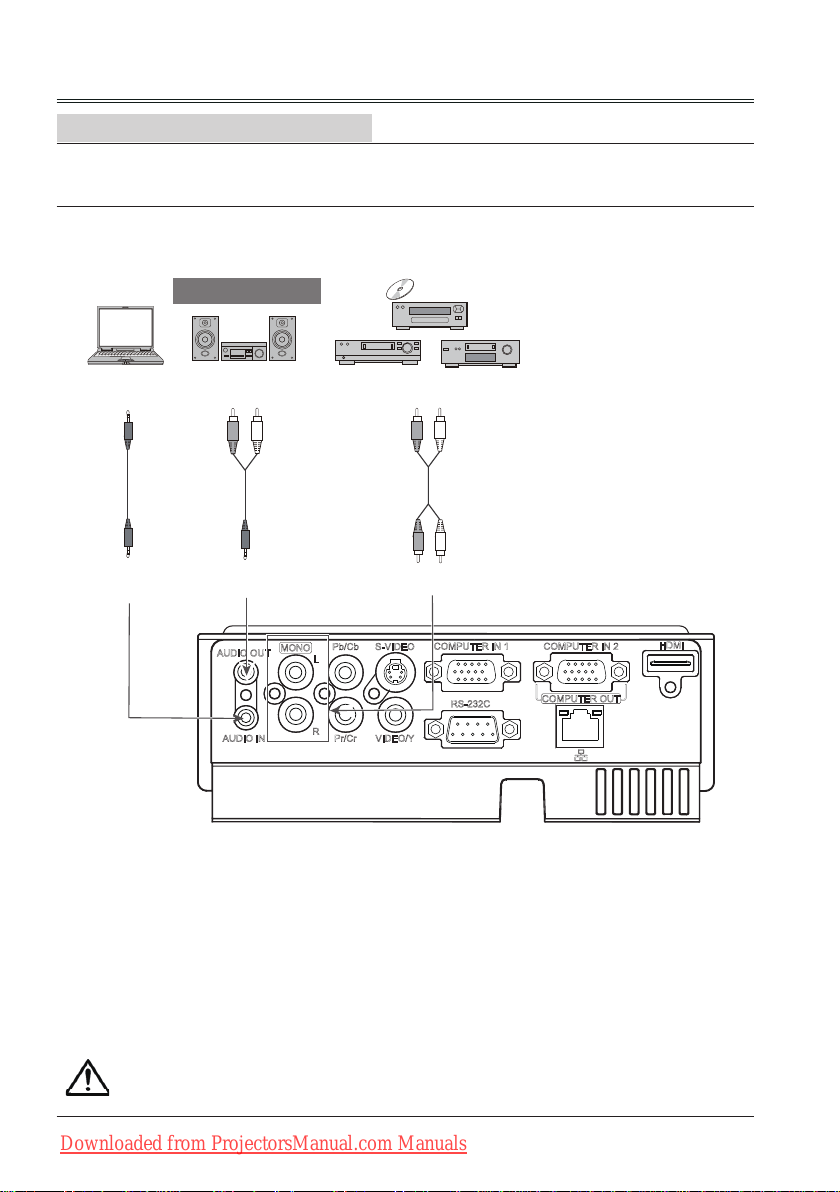
Installation
Connecting to audio equipment
Cables used for connection:
● Audio cable*
(*=Cables are not supplied with the projector)
External audio equipment
Audio input
Audio cable
(stereo)
Audio output
Audio output
Audio cable
(stereo)
Audio input
(R) (L)
Note: The left and right
Audio
channels are combined when
there is only the L(mono) is
cable
inserted.
(R) (L)
Unplug the power cords of both the projector and external equipment from the AC outlet
before connecting the cables.
16
Downloaded from ProjectorsManual.com Manuals
Page 17
Installation
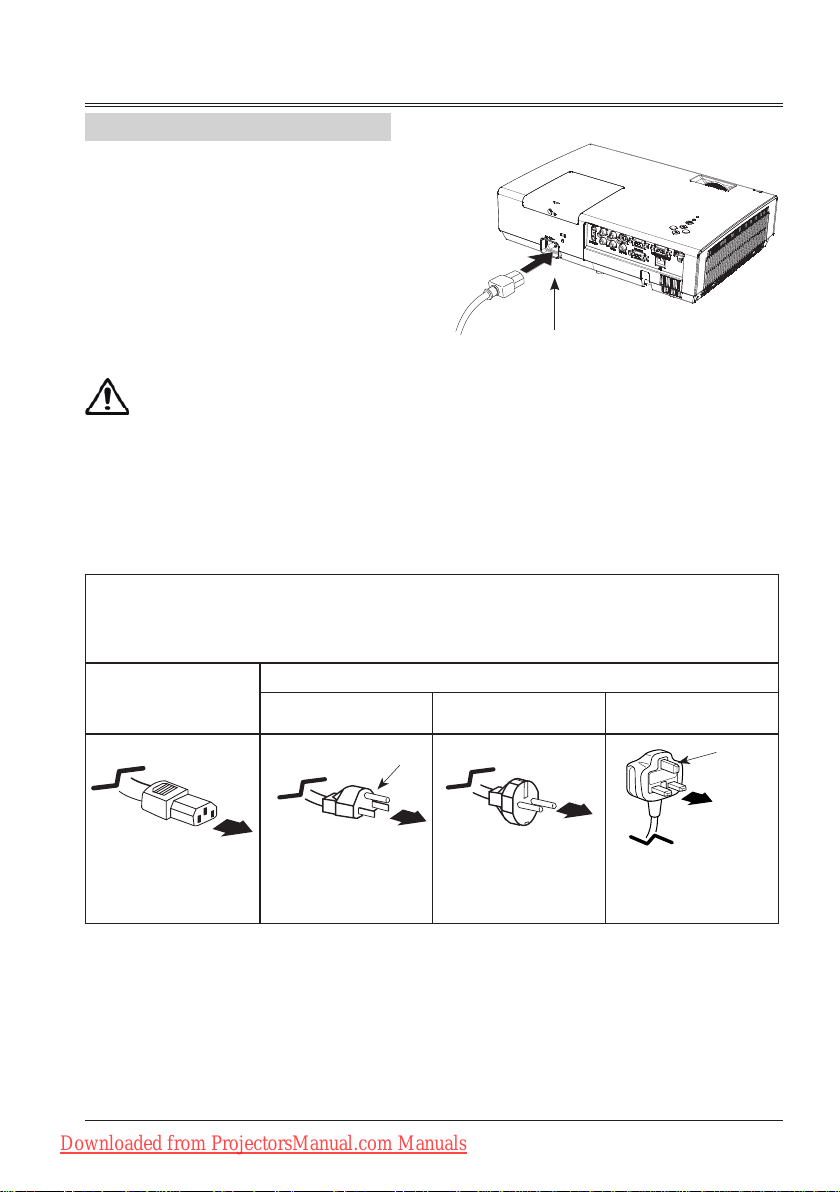
Connecting the AC power cord
This projector uses nominal input voltages of
100–240V AC and it automatically applies to
different input voltages. It is designed to work
with a single-phase power system having a
grounded neutral conductor. To reduce the risk
of electrical shock, do not plug into any other
type of power system. If you are not sure of
the type of power being supplied, consult your
authorized dealer or service station. Connect
the projector with all peripheral equipment
before turning it on.
Note:
The AC outlet should be near this equipment
and must be easily accessible.
Note:
For safety, unplug the AC power cord when the projector is not in use. When the projector is
connected to an outlet with AC power cord, it is in stand-by mode and consumes a little electric
power.
Note on the power cord
AC power cord must meet the requirements of the country where you use the projector. Conrm the AC
plug type with the chart below and proper AC power cord must be used. If the supplied AC power cord
does not match.
Projector side
For the U.S.A. and
Canada
Ground
Connect the AC power cord
(supplied) to the projector.
AC outlet side
For Continental
Europe
For the U.K.
Ground
To power cord
connector on your
projector.
√ Note:
● Using incorrect power cord may inuence the product performance, or even cause hazards like an
electric shock or re. To ensure the product performance and security, please apply the cable of the
same model with the original one.
● Common connecting cables include the AC power cord, various VGA cables, video cable,and serial
control cable.
To the AC outlet.
(110 V AC)
To the AC outlet.
(200 - 240 V AC)
To the AC outlet.
(200 - 240 V AC)
Downloaded from ProjectorsManual.com Manuals
17
Page 18
Basic operation
Turn on the projector
1.Complete peripheral connections (with a
computer, VCR,etc.) before turning on the
projector.
2. Connect the projector’s AC power cord into
AC outlet.The POWER indicator turns red.
3. Press the POWER button on top control or
on the remote control. The POWER indicator
becomes green and the cooling fans start to
work. The preparation display appears on
the screen.
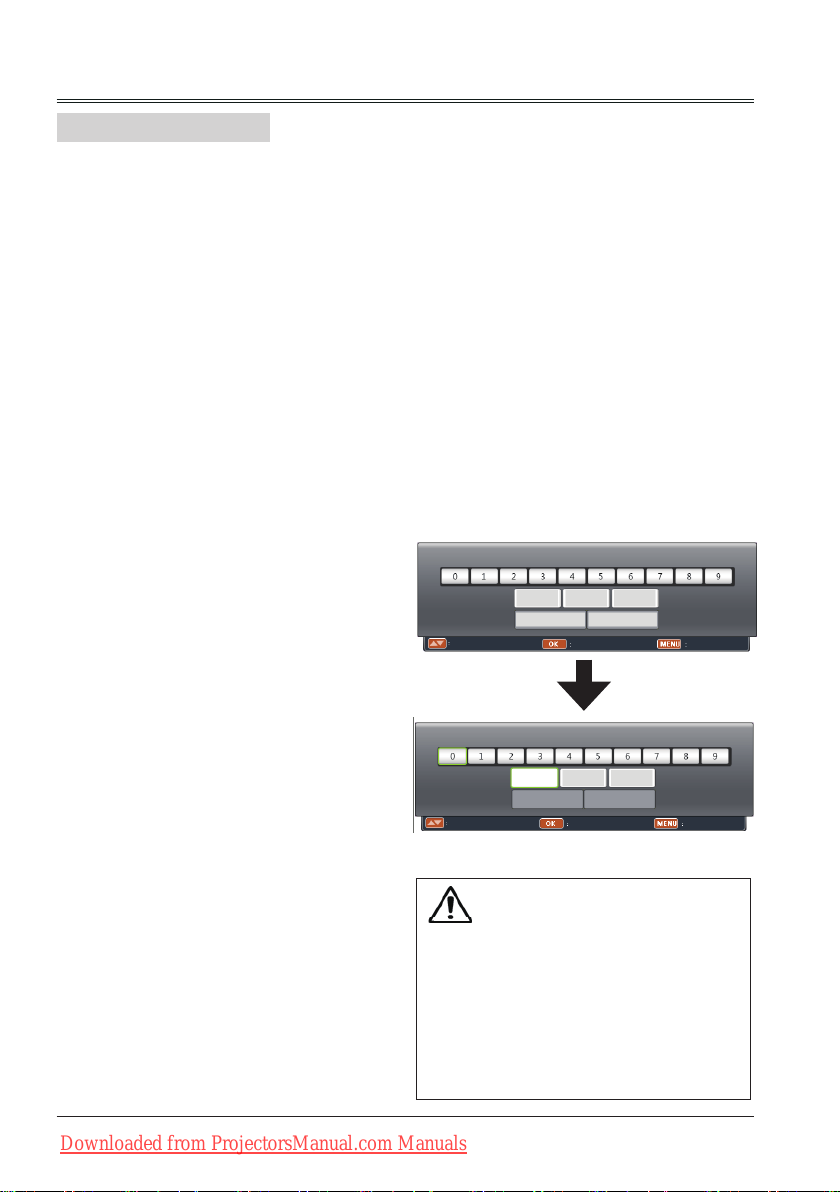
4. If the projector is locked with a PIN code, a
PIN code input dialog box appears. Enter
the PIN code as instructed below.
Note:
● When the logo select is set to be "Off", the
logo will not be displayed on the screen.
Enter a PIN code
Press OK button, press
button to select a
number, then press OK button. select a number
and enter it to the PIN code box, then number
changes to "*", automatically move the cursor
to next box.If you fixed an incorrect number,
press MENU button to reset it again.
Repeat this step to complete entering a threedigit number.
After entering the three-digit number, move the
cursor to “OK”, then you can start to operate
the projector.
If you entered an incorrect PIN code, the “PIN
code” and the number (***) turn red.PIN dode
will be reset within one second automatically,
Enter the correct PIN code all over again.
What is PIN code?
PIN (Personal Identification Number) code is a
security code that allows the person who knows
it to operate the projector. Setting the PIN code
can prevent unauthorized use of the projector.
A PIN code consists of a three-digit number.
Refer to the PIN code lock function in the
"Expand" "Security" menu on pages 42 for PIN
code lock operation of the projector.
PIN Code
OK Cancel
----- Input PIN code Exit
PIN Code
*
OK Cancel
Move Select Reset
Move the cursor to OK, and press OK.
Caution on handling the PIN code
If you forget your PIN code, the
projector can not longer be started.
Take a special care in setting a
newPIN code. Write down the
number in a column on page 59 of
this manualand keep it properly.
Should the PIN code be missing
or forgotten, consult your dealer or
service center.
18
Downloaded from ProjectorsManual.com Manuals
Page 19
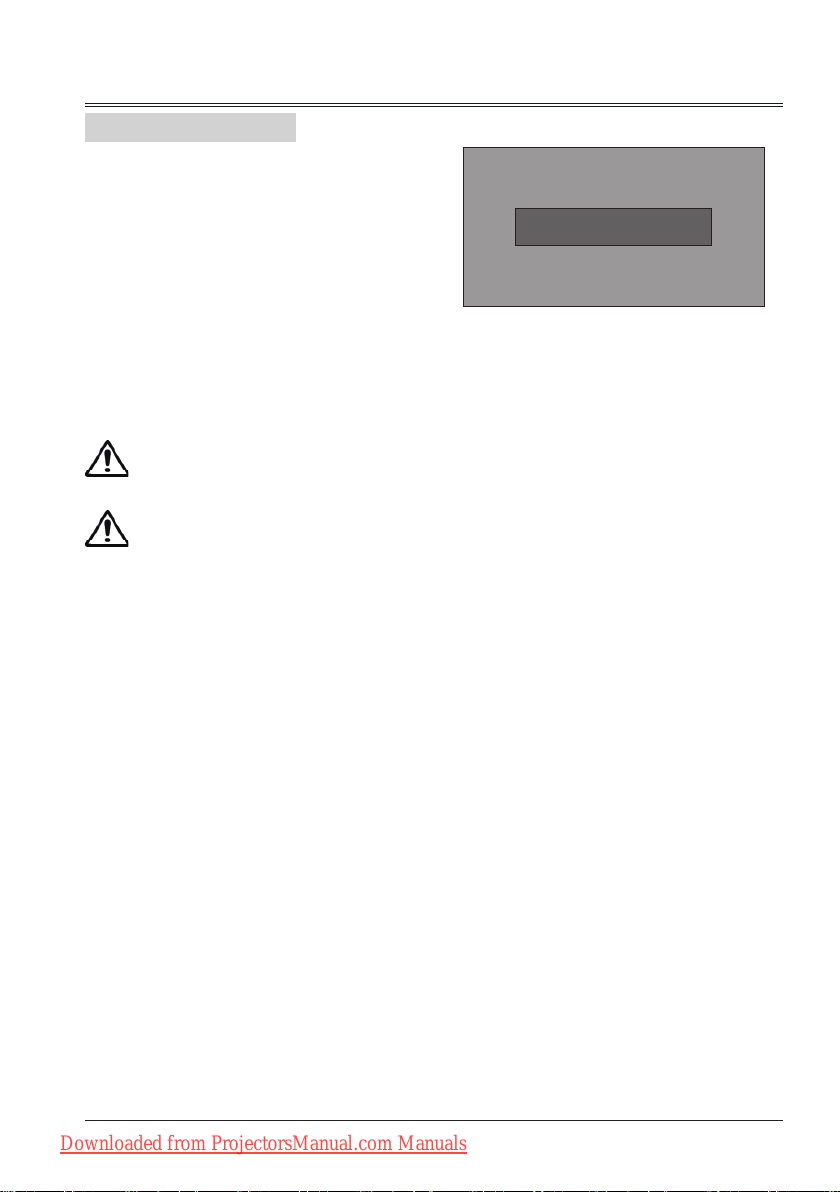
Turn off the projector
1. Press the POWER button on top control
or on the remote control, and “Power off?”
appears on the screen.
Basic operation
2. Then, press the POWER button again in 4
seconds. The POWER indicator starts to
ash red, and the cooling fans keep running
(You can select the level of fans’ quietness
and running speed.). Now you can unplug
the AC power cord even if the fans are still
running.
3 When the projector has cooled down enough
to be turned on again, the POWER indicator
stops ashing.
To maintain the lamp life, once you turn
the projector on, wait at least 5 minutes
before turning it off.
Do not operate the projector
continuously without reset.
Continuous use may result in shortening
the lamp life.Turn off the projector and
let it stand for about an hour in every 24
hours.
Note:
● When the On start function is “On” , this
projector is turned on automatically by
connecting the AC power cord to an AC outlet .
● The running speed of cooling fans is changed
according to the temperature inside the
projector.
● Do not put the projector in a case before it is
cooled enough.
● If the POWER indicator flashes or emits a
red light, see “Power Indicator”.
● While the POWER indicator is flashing, the
lamp is being cooled down and the projector
cannot be turned on. Wait until the POWER
indicator turns red to turn on the projector
again.
● The fan rotation will terminate directly if the
AC power cord is unplugged immediately after
the projector is turned off.
● The projector can be turned on after the
POWER indicator turns red. The waiting
time to restart will be shortened when the
normal power-off processing for fan cooling
is completed, comparing with the time the AC
power cord is immediately unplugged after the
power-off.
Power off ?
“Power off ? ” disappears after 4 seconds.
Downloaded from ProjectorsManual.com Manuals
19
Page 20

Basic operation
How to operate the screen menu
The projector can be adjusted or set via the onscreen menu,Each main menu can be divided
into several levels of submenus, and subme
nus are also divided into several levels of subsubmenus.
For each adjustment and setting procedure,
refer to the respective sections in this manual.
Top control
Menu button
Remote control
OK button
Menu button
OK/INPUT button
button
button
1 Press the MENU button on the top control or
Screen menu
the remote control to display the screen menu.
2 Press
buttons to select an entry in the main
menu and then press OK button to enter the
submenu.
3 Press
buttons to select your required item,
and then press OK button to set or enter
required item.
4 Press
buttons to adjust settings or switch
among the items. Press the OK button for
corresponding operation and then press MENU
button return to the submenu.
5 Press MENU button to return to the previous
menu. Press MENU button again to exit the
screen menu.
20
Downloaded from ProjectorsManual.com Manuals
PC adjust
Display
Color adjust
Setting
Expand
Info.
Auto PC adj.
Fine sync 16
Total dots 1056
Horizontal 216
Vertical 27
Display area H 800
Display area V 600
Reset
Mode free
Store
Move Next Exit
Page 21

Basic operation
Menu bar
PC adjust
①
Adjust computer parameters to match with VGA input signal format: auto PC adj, Fine sync,
①
②
③
④
⑤
⑥
Main menu
PC adjust
Display
Color adjust
Setting
Expand
Info.
Sub meu
Auto PC adj.
Fine sync 16
Total dots 1056
Horizontal 216
Vertical 27
Display area H 800
Display area V 600
Reset
Mode free
Store
Move Next Exit
Total dots, Horizontal, Vertical, Display area H, Display area V.
Display
②
- Screen Size: select the projecting image screen size.
If a computer is selected as a signal source, the following setup options for the image size are
available: Normal,Wide and Custom.
If video equipment is selected as a signal source, the following setup options for the image
size are available: Normal,Wide or Custom (for XGA models) / Normal, Wide or Custom
(for WXGA models).
- Keystone:select keystone function to correct image keystone distortion.
- Project Way:select a project way among Front, Rear, Celing/Front, Ceiling/Rear, Auto
Ceiling/Front and Auto Ceiling/Rear.
- Menu Position: set the menu's position on the screen.
- Background Display:set the background display color for project screen.
- System:select a system signal format to match the input source.
Color adjust
③
- Image mode:the available image modes is Normal, Natural, Cinema, Blackboard (green),
Colorboard or User Image.
- Image color adjust:
If a computer is selected as a signal source, the following image adjusting options are
available: Contrast, Brightness,Color temp., White balance (R/G/B) and Sharpness.
If video equipment is selected as a signal source, the following image adjusting options are
available: Contrast, Brightness,Color, Tint, White balance (R/G/B), Sharpness and
Progressive.
Setting
④
Congure basic operation settings of the projector: On start, Standby mode, High land,
Lamp control, Cooling fast, Closed caption, Key lock, Iris, Terminal and Sound.
Expand
⑤
Congure expand operation settings of the projector: Language, Auto setup, Logo, Security,
Power management, Filter counter, Pattern, Network and Factory default.
Info.
⑥
Display the system information of the projector.
Downloaded from ProjectorsManual.com Manuals
21
Page 22

Basic operation
Adjust zoom and foucus
Rotate the zoom ring to zoom in or zoom out
the image.
Rotate the focus ring to adjust the focus of the
image.
Auto setup function
This function is available just by pressing the
AUTOSET button on the remote control. The
system then automatically performs various
settings in the setup menu, including input source
search and auto pc adjust.
Zoom ring
(back)
Remote control
KEYSTONE+/button
Focus ring
(front)
button
AUTOSET
button
Keystone
If a projected picture has keystone distortion,
follow the steps below to manually correct the
image.
Press the KEYSTONE button on the remote
control. The keystone dialog box appears.
Correct keystone distortion with
Keystone adjustment can be stored.
Reduce the upper
width with
22
Downloaded from ProjectorsManual.com Manuals
button.
Reduce the lower
width with
buttons.
button.
● The arrows are white when there is no
correction.
● The arrows that are used for correction turns
red.
● The arrows disappear at the maximum
correction.
● If you press the KEYSTONE button on the
remote control once more while the keystone
dialog box is being displayed, the keystone
adjustment is canceled.
● The adjustable range can be limited
depending on the input signal.
Keystone
Page 23

Volume*
Direct operation
Basic operation
Remote control
Volume
Press the VOLUME +/- button on the on the
remote control to adjust the volume.
Mute
Press the MUTE button on the remote control
and select On to turn off the audio temporarily. To
restore the audio to its previous level, press the
MUTE button again and select Off or press the
VOLUME+/– buttons.
Mute function is also effective for AUDIO OUT
jack.
Menu operation
1 Press the MENU button to display the screen
menu. Press
button to select the Setting
menu icon. Press OK to enter the submenu
entry.
2 Press
button to select Volume and then
press OK button.
3 Press
button to select Volume or Mute to
adjust.
Volume
Press to increase the volume and to
decrease the volume.
VOLUME +/- button
Volume menu
PC adjust
Display
Color adjust
Setting
On Start Off
Standby Mode Normal
High Land Off
Lamp Control
Cooling Fast Normal
Closed caption Off
Key Lock
Iris On
Expand
Terminal Monitor out
Sound
Info.
MUTE button
Volume 12
Mute Off
Move Next Exit
Mute
Press
button to switch the mute function On/
Off.
* Note:
Some model has no volume adjustment function.
Downloaded from ProjectorsManual.com Manuals
23
Page 24

Basic operation
Remote control operation
Using the remote control for some frequently used operations is advisable. Just pressing one of the
buttons enables you to make the desired operation quickly without calling up the screen menu.
INPUT button
Press INPUT button on the remote control to
select the input source.
FREEZE button
Press FREEZE button to freeze the picture on the
screen. To cancel the freeze function, press the
FREEZE button again or press any other button.
MUTE button
Press MUTE button on the remote control to turn
off the volume. Press MUTE button again or any
other buttons to cancel mute function.
Remote control
INPUT button
LAMP button
INFO. button
FREEZE button
IMAGE button
LAMP button
Press LAMP button to select a lamp mode to
change the brightness of the screen.
Normal ..Normal brightness
Auto....... Adjust the lamp brightness
according to the input signal.
ECO ..... Lower brightness, reducing the
lamp power consumption and
extending the lamp life.
IMAGE button
Press IMAGE button on the remote control to
select the image mode you desire.
INFO button
Press INFO button on the remote control to
display the projector information.
VOLUME +/- button
Press image VOLUME +/- button on the remote
control to increase or decrease the volume.
MUTE button
VOLUME +/- button
Note:
See the next page for the description of other
buttons.
24
Downloaded from ProjectorsManual.com Manuals
Page 25

BLANK button
02
02
Press BLANK button to black out the image.
To restore to normal, press the BLANK button
again or press any other button.
Blank Image
Blank
Basic operation
The screen changes each time you press the
button as follows:
Black out →Normal →Black out →Normal ...
TIMER button
Press TIMER button. The timer display “00:00”
appears on the screen and the timer starts to
count time (00:00–59:59).
To stop the Timer, press TIMER button. Press
TIMER button again, and then the Timer display
disappears.
SCREEN button
Press SCREEN button on the remote control to
select the screen size you desire.
D.ZOOM+ button
Press D.ZOOM+ button, the on-screen menu
will disappear, while the information on digital
zoom + appears. You can press Select to zoom
in the image size, and press ▲▼◄►to move
the image horizontally and vertically.
The moving is effective only when the image is
larger than the size of the screen.
“Blank” disappears after 4 seconds if there is
no other button operation.
:
Timer display
Remote control
BLANK button
SCREEN
button
D.ZOOM
+/- button
TIMER button
D.ZOOM- button
Press D.ZOOM- button, the on-screen menu
will disappear, while the information on digital
zoom - appears. Press OK button to zoom in
the image size.
To exit the “digital zoom +/-“mode, press any
button except the D.ZOOM+/- and the OK
button.
To return to normal size, select “ Screen size”
in "Display" menu to adjust screen size, or
Press
horizontally or vertically.
button to move the image
Downloaded from ProjectorsManual.com Manuals
25
Page 26

Input select
HDMI
Computer 1
Computer 2
Component
S-video
Video
Direct Operation
Press HDMI, VGA, COMOPNENT, S-VIDEO
or VIDEO button to select HDMI, Computer,
Component, S-video or Video as input source.
Top control
INPUT button
Menu operation
Remote control
INPUT button
HDMI
button
COMPONENT
button
VGA button
S-video
button
VIDEO
button
1 Press MENU button on the remote control or
Input select menu
top control to display the input select menu.
2 Press button to select HDMI, Computer,
Component, S-video or Video , then press
OK button.
HDMI
When input source is from
equipment connected to HDMI
terminal with HDMI cable,
please select HDMI.
Computer 1
When input source is from
computer connected to
CONPUTER IN 1 terminal
with VGA cable, please select
Computer 1.
Computer 2
When input source is from
computer connected to
CONPUTER IN 2/COMPUTER
OUT terminal with VGA cable,
please select Computer 2.
Component
Select it when the input source
is from the video equipment
connected to Y, Cb/Pb, and Cr/
Pr terminals with a RCA cable.
S-video
Select it when the video input
signal is connected to S-VIDEO
terminal.
Video
Select it when the video input
signal is connected to VIDEO
terminal.
Note:
- When the Input Search function is set to On in the Auto setup function, the input signal will be
searched automatically.
- When COMPUTER IN 2/COMPUTER OUT terminal is used as COMPUTER OUT, Computer 2
can not be selected.
26
Downloaded from ProjectorsManual.com Manuals
Page 27

PC Adjust
Auto PC adj.
Auto PC Adjustment function is provided to automatically adjust Fine sync, Total dots, Horizontal and
Vertical to conform to your computer.
Menu operation
Auto PC adj.
1 Press MENU button on remote control to
display screen menu. Press
button to
select PC adjust,then press OK button.
2 Press
button to select Auto PC adj.,
then press OK button.
Store
The system parameters adjusted in the Auto PC
adj. can be stored in the projector.
PC adjust Menu
PC adjust
Display
Color adjust
Setting
Expand
Info.
Auto PC adj.
Fine sync 16
Total dots 1056
Horizontal 216
Vertical 27
Display area H 800
Display area V 600
Reset
Mode free
Store
Move Next Exit
√ Note:
- Total dots and horizontal & vertical positions of some computers cannot be fully adjusted with this
Auto PC adj. function. When the image is not provided properly with this function, manual adjustments
are required.
- The Auto PC adj. cannot be operated when 480i, 576i, 480p, 576p, 720p or 1080i is selected in
the System menu of computer inputx.
Downloaded from ProjectorsManual.com Manuals
27
Page 28

PC Adjust
Manual PC adj.
Some computers employ special signal formats which may not be tuned by Multi-scan system of this
projector. Manual PC Adjustment is provided for you to precisely adjust several parameters to match
those signal formats. The projector has five independent memory areas to store those parameters
manually adjusted, which allows you to recall the setting for a specic computer.
1 Press MENU button on remote control to
display screen menu. Press
butto to
select PC adjust,then press OK button.
2 Press
want to adjust ,then
button to select the item you
button to adjust
the data.
Fine sync
To cut off icker from the image displayed by
pressing
to adjust the value.(from 0 to 31).
Total dots
Press to adjust the total dots for a cycle so
that it can match the image on computer.
Horizontal
Press
to adjust the horizontal picture
position.
Vertical
Press
to adjust the vertical picture position.
Clamp
Press
to adjust the clamp level. When
the image has dark bars, try this function for
adjustment.
Display area H
Press
to adjust the horizontal area displayed
by the projector.
Display area V
Press
to adjust the vertical area displayed by
the projector.
Reset
To reset the adjusted data, select Reset and press
OK . A conrmation box appears and then select
Yes. All adjustments will return to their previous
gures.
Mode free
To clear the adjusted data, select Mode free and
then press or OK .Move or OK to highlight
the Mode you want to clear and then press OK.
Store
To store the adjusted data, select Store and then
press or OK. Move the red arrow indicator to
one of the Mode 1 to 5 in which you want to store,
and then press OK.
Manual PC adj. menu
PC adjust
Display
Color adjust
Setting
Auto PC adj.
Fine sync 16
Total dots 1056
Horizontal 216
Vertical 27
Display area H 800
Display area V 600
Reset
Expand
Mode free
Store
Info.
Move Next Exit
√ Note:
If you select 480i, 576i, 480p, 576p, 720p or
1080i from the system menu, the functions of
both horizontal image and vertical image will be
disabled.
28
Downloaded from ProjectorsManual.com Manuals
Page 29

Display
Following items can be set in Display menu:Screen Size, Keystone, Project Way, Menu Position,
Background Display and System.
Screen Size
The screen size can be reset to the value as
you desire.
1 Press MENU button on remote control to
display screen menu. Press
select Display,then press OK button.
2 Press button to select Screen Size,
press OK button.
3 Pressbutton to select the size you
desire,and then press OK button
Normal
To project images in the same aspect ratio with
the input signals.
Wide
provide an image with an aspect ratio of 16:9
(XGA:1024x768) or
WXGA:1280x800
16:10(
by expanding the image width uniformly.
Custom
Adjust the proportion and position of the screen
manually.
Press OK button at Custom, Custom menu
appears on the screen.Press
adjust your required item.
H/V scale: Adjust the horizontal/vertical screen
scale.
H&V: When set to “On”, the aspect ratio is
fixed. The Scale V appears dimmed and
becomes unavailable. Adjust Scale H, and
then the screen scale is automatically modied
based on the aspect ratio.
H/V position: Adjust the horizontal/vertical
screen position.
Common: Save the adjusted scale to all the
inputs. Press OK at Common to display a
conrmation box. To save the scale, press OK.
When Custom is selected, the saved scale is
used.
Reset: Reset all the adjusted values. Press OK
at Reset to display a conrmation box. To set,
press OK at “Yes”.
Note
:
To abtain perfect image quality, please set
the display resolution as XGA(1024x768) or
WXGA(1280x800).
button to
.
button to
Display menu
PC adjust
Display
Color adjust
Setting
Screen Size Normal
Keystone Stored
Project Way Front
Menu Position Upper left
Background Display Blue
System 1024x768@60
Expand
Info.
Move Next Exit
Screen Size
PC adjust
)
Display
Color adjust
Setting
Screen Size Normal
Keystone Stored
Project Way Front
Menu Position Upper left
Background Display Blue
System 1024x768@60
Expand
Info.
Adjust Select Back
Advanced
This function is used to set the horizontal/
vertical position and quantities of the projector
in image segment and mosaics.
Press OK button at Advanced, Advanced menu
appears on the screen. Press
toselect and adjust your required item.
H total: set the total quantities of the projector
at horizontal direction. Image will be segmented
by vertical direction. setting value from 1 to 512.
(WXGA mode:1-640)
V total: set the total quantities of the projector
at vertical direction. Image will besegmented by
horizontal direction.setting value from 1 to 384.
(WXGA mode: 1-400)
Position H: set the horizontal position of the
projector. Setting range: from 1 to the total
quantitiy of projectors at horizontal direction.
Position V: set the vertical position of the
projector. Setting range: from 1 to the total
quantitiy of projectors at vertical direction.
Note
:
"Advanced" is enable only for VGA1 input.
Normal
Wide
Custom
Advanced
button
Downloaded from ProjectorsManual.com Manuals
29
Page 30

Display
PC adjust
Display
Color adjust
Setting
Expand
Info.
Adjust Select Back
Screen Size Normal
Keystone Stored
Project Way Front
Menu Position Upper left
Background Display Blue
System 1024x768@60
Reset
Stored
Adjust
PC adjust
Display
Color adjust
Setting
Expand
Info.
Adjust Select Back
Screen Size Normal
Keystone Stored
Project Way Front
Menu Position Upper left
Background Display Blue
System 1024x768@60
Front
Rear
Ceiling/Front
Ceiling/Rear
Auto Ceiling/Front
Auto Ceiling/Rear
Keystone
This function is used to store or reset the
keystone correction when the AC power cord is
unplugged.
1 Press MENU button on remote control to
display screen menu. Press
button to
select Display,then press OK button.
2 Press button to select Keystone, press
OK button.
3 Press button to select the item you want
to set, press OK button.
Store ...Store the keystone correction even
when the AC power cord is unplugged.
Reset ...Reset the keystone correction when
the AC power cord is unplugged.
Adjust ..Press OK for keystone correction.
Keystone correction menu appears on
the screen. Press to correct
keystone distortion.
Project Way
This function is used to set the project way,
1 Press MENU button on remote contro to
display screen menu. Press
select Display,then press OK button.
2 Press button to select Project Way, press
OK button.
3 Press button to select the item you want
to set, press OK button.
Front........Project to front screen when
projector is front standing.
Rear........Project to rear screen when
projector is front standing.
Ceiling/Front..Project to front screen when
projector is in ceiling state.
Ceiling/Rear..Project to rear screen when
projector is in ceiling state.
Auto Ceiling/Front
.Project to front screen
automatically when projector
is in ceiling state.
Auto Ceiling/Rear
automatically when projector
is in ceiling state.
30
Downloaded from ProjectorsManual.com Manuals
.Project to rear screen
butto to
Keystone menu
Project way menu
Page 31

Menu Position
PC adjust
Display
Color adjust
Setting
Expand
Info.
Adjust Select Back
Screen Size Normal
Keystone Stored
Project Way Front
Menu Position Upper left
Background Display Blue
System 1024x768@60
Upper left
Upper right
Center
Lower left
Lower right
PC adjust
Display
Color adjust
Setting
Expand
Info.
Adjust Select Back
Screen Size Normal
Keystone Stored
Project Way Front
Menu Position Upper left
Background Display Blue
System 1024x768@60
Black
Blue
You can use this function to change the
position of screen menu.
1 Press MENU button on remote control to
display screen menu. Press
select Display,then press OK button.
2 Press button to select Menu Position,
press OK button.
3 Press button to select the item you want
to set, press OK button.
Upper left....Menu locates on upper left of
the screen.
Upper right..Menu locates on upper right of
the screen.
Center.........Menu locates at the center of
the screen.
Lower left....Menu locates on lower left of
the screen.
Lower right..Menu locates on lower right of
the screen.
button to
Display
Menu position
Background Display
This function is used to select the screen
background of the projector when there is no
signal detected.
1 Press MENU button on remote contro to
display screen menu. Press
select Display,then press OK button.
2 Press button to select Background
Display, press OK button.
3 Press button to select the item you want
to set, press OK button.
Black....Select black background.
Blue......Select blue background.
Downloaded from ProjectorsManual.com Manuals
butto to
Background display
31
Page 32

Display
System
Computer system select
The projector automatically tunes to various types of computers with its function of Multi-scan
system and Auto PC Adjustment. If a co mputer is selected as a signal source, the projector
automatically detects the signal format and tunes to project proper images without any additional
setting.
One of the following messages may appear
when:
Auto
When the projector cannot recognize
the connected signal conforming to
the provided computer system, Auto
is displayed on the System menu
box and the Auto PC Adj. function
works to display proper images. If
the image is not projected properly,
a manual adjustment is required.
PC adjust
Display
Color adjust
Setting
Expand
Info.
Screen Size Normal
Keystone Stored
Project Way Front
Menu Position Upper left
Background Display Blue
System 1024x768@60
Move Next Exit
There is no signal input from
----computer. Check the connection
between your computer and
projector.
Select computer system manually
System for computer signal
The system can also be selected manually.
1 Press MENU button on remote control to display
the screen menu.Press button to select the
Display icon, and press OK button.
2 Press button to select System and press
OK button.
3 Press button to select your required
system, and then press the OK button.
Note:
When HDMI is selected, System menu for
computer is disable.
32
Downloaded from ProjectorsManual.com Manuals
PC adjust
Display
Color adjust
Setting
Expand
Info.
System
System RGB(PC1)
1024x768@60
1366x768@60
----
----
----
Adjust Select Back
Page 33

PC adjust
Display
Color adjust
Setting
Expand
Info.
Adjust Select Back
System Component
Auto
1080i
720p
576p
480p
576i
480i
PC adjust
Display
Color adjust
Setting
Expand
Info.
Adjust Select Back
System Video
Auto
PAL
SECAM
NTSC
NTSC4.43
PAL-M
PAL-N
Video or S-video
Auto
The projector automatically detects an
incoming video system,and adjusts itself to
optimize its performance. When Video System
is PAL-M or PAL-N, select the system manually.
PAL/SECAM/NTSC/NTSC4.43/PAL-M/PAL-N
If the projector cannot reproduce proper video
images, select a specific broadcast signal
format from PAL, SECAM, NTSC,NTSC 4.43,
PAL-M and PAL-N.
Display
System for Video or S-video signal
Component
Auto
The projector automatically detects an input
video system,and adjusts itself to optimize its
performance.
Component video signal format
If the projector cannot reproduce proper video
images, select a specific broadcast signal
format from 480i, 576i, 480p, 576p, 720p and
1080i.
Downloaded from ProjectorsManual.com Manuals
System for Component signal
33
Page 34

Color adjust
Color adjust menu is used to set the image mode and adjust the image.
Image Mode
Direct operation
Press IMAGE button on remote control to
select the image mode.
Menu operation
1 Press MENU button on remote contro to
display screen menu. Press
select Color adjust,then press OK button.
2 Press button to select Image Mode,
press OK button.
3 Press button to select the item you want
to set, press OK button.
Normal
Image quality preset by the system on the
projector.
Natural
For viewing images in a bright room.
Cinema
For watching movies with multiple gray scale
levels.
Blackboard (Green)
For viewing the image projected on a
blackboard (green) by enhancing the image
quality. This is mainly effective on a green
colored board instead of a black colored board.
Colorboard
For images projected onto the red, blue, yellow,
or green wallpaper.
butto to
Remote control
IMAGE button
Image mode (Computer)
PC adjust
Display
Color adjust
Setting
Expand
Info.
Image Mode
Contrast 32
Brightness 32
Color temp. 自然
Red 32
Green 32
Blue 32
Sharpness 8
Adjust Select Back
Normal
Natural
Cinema
Blackboard(Green)
Colorboard Red
User Image
Image mode (Video, S-video, Component)
PC adjust
Display
Color adjust
Setting
Expand
Info.
Image Mode 标准
Contrast 32
Brightness 32
Color 自然
Tint
Red 32
Green 32
Blue 32
Sharpness 8
Progressive L1
Adjust Select Back
Normal
Natural
Cinema
Blackboard(Green)
Colorboard Red
User Image
User Image
Image quality preset by the user in the Image
adjustment menu.
34
Downloaded from ProjectorsManual.com Manuals
Page 35

Color adjust(Computer)
1 Press MENU button on remote contro to
display screen menu. Press
select Color adjust,then press OK button.
2 Press button to select the item you want
to set, press OK button.
3 Press button to adjust the data.
Contrast
Press to decrease the contrast and to
increase it.
Brightness
Press to decrease the brightness and to
increase it.
Color temp.
Press to select your desired color
temperature.( Low, Mid and High )
Red(White balance)
Press to lighten the red tone and to
deepen it.
Green(White balance)
Press to lighten the green tone and to
deepen it.
Blue(White balance)
Press to lighten the blue tone and to
deepen it.
Sharpness
Press to decrease the sharpness of an
image and to increase it.
butto to
Color adjust(Computer)
PC adjust
Display
Color adjust
Setting
Image Mode Normal
Contrast 32
Brightness 32
Color temp. Mid
Red 32
Green 32
Blue 32
Sharpness 8
Expand
Info.
Move Next Exit
Color adjust
Downloaded from ProjectorsManual.com Manuals
35
Page 36

Color adjust
Color adjust
(Vdieo,S-video,Component)
1 Press MENU button on remote contro to
display screen menu. Press
select Color adjust,then press OK button.
2 Press button to select the item you want
to set, press OK button.
3 Press button to adjust the data.
Contrast
Press to decrease the contrast and to
increase it.
Brightness
Press to decrease the brightness and to
increase it.
Color
Press to decrease the chorma and to
increase it.
Tint
Press
to select the appropriate tone for
the image.
Red(White balance)
Press to lighten the red tone and to
deepen it.
Green(White balance)
Press to lighten the green tone and to
deepen it.
Blue(White balance)
Press to lighten the blue tone and to
deepen it.
Sharpness
Press to decrease the sharpness of an
image and to increase it.
Progressive
An interlaced video signal can be displayed
in a progressive picture. Select one of the
following options:
Off....Disabled.
L1....For an active picture.
L2....For a still picture.
Film...For watching a lm. With this function,
the projector reproduces pictures faithful
to the original lm quality,reducing
distortion.
butto to
Color adjust(Video,S-video, Component)
PC adjust
Display
Color adjust
Setting
Image Mode Normal
Contrast 32
Brightness 32
Color 32
Tint 32
Red 32
Green 32
Blue 32
Expand
Sharpness 8
Progressive L1
Info.
Move Next Exit
36
Downloaded from ProjectorsManual.com Manuals
Page 37

Setting
PC adjust
Display
Color adjust
Setting
Expand
Info.
Move Next Exit
On start Off
Standby mode Normal
High land Off
Lamp control
Cooling fast Normal
Closed caption Off
Key lock
Iris Off
Terminal Monitor out
Sound
PC adjust
Display
Color adjust
Setting
Expand
Info.
Adjust Select Back
On start Off
Standby mode Normal
High land Off
Lamp control
Cooling fast Normal
Closed caption Off
Key lock
Iris Off
Terminal Monitor out
Sound
Off
On
PC adjust
Display
Color adjust
Setting
Expand
Info.
Adjust Select Back
On start Off
Standby mode Normal
High land Off
Lamp control
Cooling fast Normal
Closed caption Off
Key lock
Iris Off
Terminal Monitor out
Sound
Eco
Normal
The projector has Setting menu that allows you to set the other various functions described as
follows.
1 Press MENU button on remote contro to
display screen menu. Press
butto to
select Setting ,then press OK button.
2 Press button to select the item you want
to set, press OK button.
3 Press button to adjust the item, then
press OK button.
Setting menu
On start
Enable the projector to be turned off
automatically just by connecting the AC power
cord to an outlet when this function is set to
On.
Standby mode
Press button to select the item below:
Eco..........In this state, network function,
RS232C and COMPUTER OUT are
disable after turning off the projetcor.
Normal ...Supply power to the projector
enve after turning off the projector.
You can turn on or turn off the
projector via series port.
Downloaded from ProjectorsManual.com Manuals
On start
Standby mode
37
Page 38

Setting
PC adjust
Display
Color adjust
Setting
Expand
Info.
Adjust Select Back
On start Off
Standby mode Normal
High land Off
Lamp control
Cooling fast Normal
Closed caption Off
Key lock
Iris Off
Terminal Monitor out
Sound
Off
On
PC adjust
Display
Color adjust
Setting
Expand
Info.
Adjust Select Back
On start Off
Standby mode Normal
High land Off
Lamp control
Cooling fast Normal
Closed caption Off
Key lock
Iris Off
Terminal Monitor out
Sound
PC adjust
Display
Color adjust
Setting
Expand
Info.
Adjust Select Back
On start Off
Standby mode Normal
High land Off
Lamp control
Cooling fast Normal
Closed caption Off
Key lock
Iris Off
Terminal Monitor out
Sound
Normal
60 sec
0 sec
High land
Enable to control the fan through the Setting
menu.
You can select the running speed of the fan
according to the altitude of the location where
the projector is installed.
Off......Normal speed. Set it so if the projector
is operated at a lower altitude.
On......Faster than Off. Set it so if the projector
is operated at a higher altitude because
fans will produce weaker effects.
Note:
Plese set High land "On" when operating the
projector higher than 2000 meters.
Lamp control
Change the brightness of the screen.
Normal ... Normal brightness.
Auto....... Adjust the lamp brightness
according to the input signal.
Eco ... .....Lower brightness, reducing
power consumption and
extending the lamp life.
High land
Lamp control
Cooling fast
This function provides the following options in
the cooling fans’ operation after turning off the
projector.
Normal... Normal cooling speed.
60 sec ... Faster and lounder than Normal,
cooling time is shorter.
0 sec ..... Enable you directlt unplug the AC
power cord after turning off the
projector, no need waiting for cooling.
38
Downloaded from ProjectorsManual.com Manuals
Cooling fast
Page 39

Closed Caption
PC adjust
Display
Color adjust
Setting
Expand
Info.
Adjust Select Back
On start Off
Standby mode Normal
High land Off
Lamp control
Cooling fast Normal
Closed caption Off
Key lock
Iris Off
Terminal Monitor out
Sound
Off
CC1
CC2
CC3
CC4
Setting
Allows the subtitle to be displayed for the
audio contents or other information. If the input
source contains closed caption, you can enable
this function and change the channel. Press
to select OFF, CC1, CC2, CC3 or CC4.
If Closed Caption is not clear, you can change
the text color to white from the original.
Note:
- The icon of Closed Caption is displayed in
grey when it is disable.
- Closed caption is disable when screen menu
or Timer displayed on screen.
Key lock
This function allows you to use the Key lock
and PIN code lock function to set the security
for the projector operation.
Select "Key lock" and press OK button, then
press button to select the item you desire.
top control. To unlock,
use the remote control.
of the remote control. To
unlock, use the top control.
If the top control accidentally becomes locked
and you do not have the remote control
nearby or there is something wrong with your
remote control, contact the dealer where you
purchased the projector or the service center.
Off ....Unlock.
Projector . Lock the operation of the
Remote Control ..... Lock the operation
Closed Caption
Key lock
PC adjust
Display
Color adjust
Setting
Expand
Info.
On start Off
Standby mode Normal
High land Off
Lamp control
Cooling fast Normal
Closed caption Off
Key lock
Iris Off
Terminal Monitor out
Sound
Adjust Select Back
Downloaded from ProjectorsManual.com Manuals
39
Page 40

Setting
*
Iris
This function is used to increase the contrast of
the image.
On.... Enable Iris function, increase the
contrast of the image.
Off....Disable Iris function.
*:Some models have no this function.
Iris
PC adjust
Display
Color adjust
Setting
Expand
Info.
On start Off
Standby mode Normal
High land Off
Lamp control
Cooling fast Normal
Closed caption Off
Key lock
Iris Off
Terminal Monitor out
Sound
Adjust Select Back
Off
On
Terminal
*
The COMPUTER IN 2/COMPUTER OUT
terminal can be used as computer input or
monitor output.Press
▲
to select input or
output.
PC 2 ...................Computer 2 input
Monitor out..........Monitor out
*:Some models have no this function.
Sound
*
This item is used to adjust the volume.
Sound...Press
volume, press
button to increase the
button to
decresce the volume.
Mute.....Press OK button to swicth mute
function.(On/Off)
*:Some models have no this function.
Terminal
PC adjust
Display
Color adjust
Setting
Expand
Info.
Sound
PC adjust
Display
Color adjust
Setting
Expand
Info.
On start Off
Standby mode Normal
High land Off
Lamp control
Cooling fast Normal
Closed caption Off
Key lock
Iris Off
Terminal Monitor out
Sound
Adjust Select Back
On Start Off
Standby Mode Normal
High Land Off
Lamp Control
Cooling Fast Normal
Closed caption Off
Key Lock
Iris On
Terminal Monitor out
Sound
Move Next Exit
PC 2
Monitor out
Volume 12
Mute Off
40
Downloaded from ProjectorsManual.com Manuals
Page 41

Expand
PC adjust
Display
Color adjust
Setting
Expand
Info.
Move Next Exit
Language
Auto setup
Logo
Security
Power management
Filter counter
Test pattern
Network
Factory default
PC adjust
Display
Color adjust
Setting
Expand
Info.
Move Next Back
Auto setup
Input search Off
Auto PC adj. On
Auto keystone Off
The projector has Expand menu that allows you to set the other various expand functions
described as follows.
1 Press MENU button on remote contro to
display screen menu. Press
butto to
select Expand ,then press OK button.
2 Press
button to select the item you
want to set, press OK button.
3 Press
button to adjust the item, then
press OK button.
Language
Expand menu
Press
button to select the language for
screen manual.
This projector provides 23 lanuages.
Auto setup
Press AUTOSET button on the remote control
to execute Input search and Auto PC adj.
functions.
Input search
Allows you to automatically detect input
signals. It stops when a signal is found.
Press
below:
Off........Disabled.
On........Enabled. This function is used to
detect input signals automatically
and stops when nding a signal
Auto PC adj
On........Press the AUTOSET button on the
remote control to enable Auto PC
adj. function automatically.
Off........Cancel Auto PC adj. function.
Auto keystone
Off........Disabled.
Auto......To correct keystone distortion
depending on the slope of the
projector all the time.
Manual ..To enable the function by
pressing AUTOSET on the top
control or remote control.
Downloaded from ProjectorsManual.com Manuals
button to select an option
.
Auto setup
Note:
- Only the last selected input source can be
detected.
- If the INPUT button on the top control or on the
remote control is pressed during Input search is in
progress, Input search will stop and go back to the
previous input signal.
- Input Search and Auto PC Adj.cannot be set Off at
the same time.
- Fine sync., Total dots, Horizontal and Vertical
position of some computers cannot be fully
adjusted with the Auto PC Adj. function.
When the image is not provided properly with this
operation, manual adjustments are required.
41
Page 42

Expand
PC adjust
Display
Color adjust
Setting
Expand
Info.
Move Next Back
Logo
Logo Select Default
Capture
Logo PIN code lock Off
Logo PIN code change
Logo
This function allows you to customize the screen logo with Logo select, Capture, Logo PIN code
lock and Logo PIN code change functions.
Logo Select
This function decides on the starting-up display
from among following options.
Default .... Show the factory-set logo.
User..........Show the image captured by user.
Off ........... Show the countdown display only.
Capture
You can capture a projected image as start
logo or interval of presentation.
Select Capture and press OK button.
Conrmation dialog box appears, select
"Yes" to start capturing.
You can set Logo Select as "User" after
capturing, then captured image will appear on
sreen next time you start the projector.
Logo PIN code Lock
This function prevents an unauthorized person from changing the screen logo.
Off ...... .....The screen logo can be changed freely from the Logo menu.
On ...... .....The screen logo cannot be changed without a Logo PIN code.
If you want to change the Logo PIN code lock setting, press OK button and the Logo PIN code dialog
box appears. Enter a Logo PIN code by following the steps below.
PIN code reset
Press button to select a number, and then press OK button to enter this number,
automatically move the cursor to next box.If you fixed an incorrect number, press MENU button
to reset it again.
Repeat this step to complete entering a three-digit number.
After entering the three-digit number, automatically move the cursor to “OK”, and press OK
button, then you can start to operate the projector.
If you entered an incorrect PIN code, the “PIN code” and the number (***) turn red, it will be
reset automatically within one second. Enter the correct PIN code all over again.
Logo
Logo PIN code change
Logo PIN code can be changed to your desired three-digit number. Press OK button to select Logo
PIN code change. Logo Pin code dialog box appears, press ▲▼ button to enter the correct code. The
New Logo PIN code input dialog box appears. Set a new Logo PIN code, conrmation box appears,
select Yes to set the new Logo Pin code.
Be sure to note the new Logo PIN code and keep it on hand. If you lost the number, you could no
longer change the Logo PIN code setting.
CAUTION:
WHEN YOU HAVE CHANGED THE LOGO PIN CODE, WRITE DOWN THE NEW PIN CODE
IN COLUMN OF THE LOGO PIN CODE NO. MEMO ON PAGE 59, AND KEEP IT SECURELY.
SHOULD THE LOGO PIN CODE BE LOST OR FORGOTTEN, THE LOGO PIN CODE
SETTING CAN NO LONGER BE CHANGED.
42
Downloaded from ProjectorsManual.com Manuals
Page 43

PC adjust
Display
Color adjust
Setting
Expand
Info.
Move Next Back
Security
PIN code lock Off
PIN code change
Security
This function allows you to use the PIN code
lock and PIN code change functions to set the
security for the projector operation.
PIN code lock
This function prevents the projector from
being operated by unauthorized persons
and provides the following setting options for
security.
Off ............ Unlocked.
On ........... Enter the PIN code every time
turning on the projector.If you
want to change PIN code lock
setting or PIN code,you must
enter the PIN code. The orignal
PIN code is "111".
If tou want to change the PIN code lock setting,
press OK button, then PIN code dialog box
appears.
Enter PIN code
Press button to select a number, and
then press OK button to enter this number,
automatically move the cursor to next box.If
you fixed an incorrect number, press MENU
button to reset it again.
Repeat this step to complete entering a threedigit number.
After entering the three-digit number, move the
cursor to “OK”, and press OK button, then you
can start to operate the projector.
If you entered an incorrect PIN code, the “PIN
code” and the number (***) turn red, it will be
reset automatically within one second. Enter
the correct PIN code all over again.
Expand
Security
Change Logo PIN code lock setting
Press button to select On or Off, then
press OK button.
PIN code change
The PIN code can be changed to your desired
three-digit number. Press
select PIN code change. Pin code dialog box
appears, Press
button to enter the correct
code. The New PIN code input dialog box
appears. Set a new PIN code.
Downloaded from ProjectorsManual.com Manuals
button to
CAUTION:
WHEN YOU HAVE CHANGED THE LOGO
PIN CODE, WRITE DOWN THE NEW PIN
CODE IN COLUMN OF THE LOGO PIN CODE
NO. MEMO ON PAGE 59, AND KEEP IT
SECURELY. SHOULD THE LOGO PIN CODE
BE LOST OR FORGOTTEN, THE LOGO
PIN CODE SETTING CAN NO LONGER BE
CHANGED.
43
Page 44

Expand
PC adjust
Display
Color adjust
Setting
Expand
Info.
Adjust Select Back
Power management
Ready
Shut down
Off
Timer 5 Min
Ready countdown 0 Min
PC adjust
Display
Color adjust
Setting
Expand
Info.
Move Next Back
Filter counter
Filter counter 0 H
Timer 200 H
Filter counter reset
No signal
01 : 20
Power management
For reducing power consumption as well as maintaining the lamp life, the Power management
function turns off the projection lamp when the projector is not operated for a certain period.Select
one of the following options:
Ready .................. When the lamp has been fully cooled down, the POWER indicator changes to
green blinking.In this condition, the projection lamp will be turned on if the input
signal is reconnected or any button on the side control or remote control is
pressed.
Shut down .......... When the lamp has been fully cooled down, the power will be turned off.
Off ....................... Power management function is off.
Timer ................... If the input signal is interrupted and no button is pressed for more than 30
seconds, the timer display with No signal appears. It starts the countdown until
the lamp is turned off. Press button to set the Timer(1~30min.)
Ready countdown..Set the time that ready status transfers to standby status automatically.(0-
30min.0 Min: not transfer automatically)
In ready status, press POWER button to swicth to standby status, and press
any other button to turn on the projector.
Power management
Time left before Lamp is off.
Note:
Factory default: "Ready: 5 min".
Power management
Filter counter
This function is used to set a frequency for lter
cleaning.
When the projector reached a specified time
between cleanings, a Filter warning icon
appears on the screen, notifying the cleaning
is necessary. After cleaning the filter, be sure
to select RESET and set the timer. The Filter
warning icon will not turn off until the filter
counter is reset.
Filter counter............The time that lter used.
Timer............ Frequency for lter cleaning.
Filter counter reset..Reset the lter counter.
44
Downloaded from ProjectorsManual.com Manuals
Filter counter
Page 45

Test Pattern
PC adjust
Display
Color adjust
Setting
Expand
Info.
Move Next Back
Test Pattern
Off
Gray scale 1
Gray scale 2
Gray scale 3
Gray scale 4
Color bar
Red
Green
Blue
Cross hatch
PC adjust
Display
Color adjust
Setting
Expand
Info.
Move Next Exit
Network
Network setting
Network information:
MAC address: 000000000000
IP address: 192.168.001.023
This function is used to set the internal test
signal:Gray scale 1,Gray scale 2,:Gray scale
3,:Gray scale 4, Color bar, Red, Green, Bluw,
Cross hatch,White,Black and Gray.
Expand
Test Pattern
Network
*
Function : PC controls projector via LAN.
Preparation:
1. Equipments: PC, projector, cables
2. Connection procedures:
Connect the projector to routers or switches of the LAN by direct or cross cable. If it fails to
connect PC and projector by parallel cable, please switch to cross cable as suggested.
3. After the computer is booted and the projector is plugged in, indicator lights of LAN interface
on will ash continuously.
Operation procedures:
1 Turn on the projector.
2 Obtain network address. DHCP set is displayed as On and obtain network address
automatically.( If familiar with network, you can set DHCP as Off and obtain network
address manually.)
3 Enter network settings menu.
(1) Press MENU button on remote control
to display screen menu. Press
button to select Expand, then press
OK button.
(2) Press button to select Network,
and then press OK button to enter the
newtork menu.
Downloaded from ProjectorsManual.com Manuals
45
Page 46

Expand
Network setting
DHCP Off
Set Cancel
IP address 0 0 0 0
Subnet 0 0 0 0
Gateway 0 0 0 0
DNS 0 0 0 0
Move Select Back
Network setting
DHCP On
Set Cancel
IP address
Subnet
Gateway
DNS
Adjust Select Back
(3) When DHCP is set On, IP address,
Subnet, Gateway and DNS will be
abtained automatically, press OK at
"Set" to confrim the parameters.
When DHCP is set Off, press OK
button to enter IP address, then
press button to enter Subnet,
Gateway and DNS respectivelt,
press OK at "Set" to conrm the
parameters.
Factory default
This function returns all setting values except
for the User logo, PIN code lock, Logo PIN
code lock, Lamp counter and Filter counter to
the factory default settings.
46
Downloaded from ProjectorsManual.com Manuals
Page 47

Infomation
The information menu is used to detect signal of projected image and running state.
Menu operation
Press MENU button on remote control to
display the screen menu. Press to select
Info., then press OK button, the information
menu will appear as the right picture.
The information below will display in
information menu.
Input
The selected input source is displayed.
H-sync freq .
The horizontal frequency of the input signal is
displayed in KHz or - - - -KHz when no signal.
V-sync freq .
The vertical frequency of the input signal is
displayed in Hz or - - - - Hz when no signal.
Numbers of Hz doubles when during Interlace.
Lamp status
Display the lamp mode you select.
Lamp counter
Display the time that lamp used.
Power management
Display the power management setting.
Image mode
Display the selected image mode.
info. menu
PC adjust
Display
Color adjust
Setting
Expand
Info.
Input Computer 1
1024x768@60
H-sync freq. 48.3 KHz
V-sync freq. 59.9 Hz
Lamp status
Lamp counter 16 H
Power management Off
5 Min
Image Mode Normal
Move Next Exit
Downloaded from ProjectorsManual.com Manuals
47
Page 48

Maintenance and cleaning
POWER indicator
The POWER indcator shows the state of the function which protects the projector. Check the state
of the POWER indicator to take proper maintenance.
The projector is shut down and the POWER
indicatoris fashing orange.
When the temperature inside the projector
exceeds the normal temperature, the projector
is automatically shut down to protect internal
components. The POWER indicator is blinking
while the projector is being cooled down. When
the projector has cooled down enough (to its
normal operating temperature), it can be turned
on again by pressing the POWER button.
Note:
The POWER indicator continues to
blink even after the temperature inside
the projector returns to normal. When the
projector is turned on again, the
POWER indicator stops blinking.
Check the items below:
– Did you provide appropriate space for the
projector to be ventilated?
Check the installing condition to see if
ventilation slots are not blocked.
– Has the projector been installed near the
duct or vent of an airconditioning?
Move the installation of the projector away
from the duct or vent.
– Are the air lters clean? Clean the air lters
periodically.
The projector is shut down and the POWER
indicator lights orange.
When the projector detects an abnormal
condition, it is automatically shut down to
protect the internal components and the
POWER indicator lights orange. In this case,
unplug the AC power cord and plug it, and
then turn on the projector once again to verify
operation. If the projector cannot be turned on
and the POWER indicator lights red, unplug the
AC power cord and contact the service station
for servicing and maintenance.
POWER indicator
POWER indicator
ashes orange.
POWER indicator
POWER indicator
lights orange.
Caution
Do not leave the projector with the AC power cord connected under an abnormal condition.
It may result in re or electric shock.
48
Downloaded from ProjectorsManual.com Manuals
Page 49

Maintenance and cleaning
Cleaning the lter
The air filter prevents dust from accumulating on the surface of the optical elements inside
the projector. Should the air filter become clogged with dust particles, it will reduce cooling
fans’ effectiveness and may result in a buildup of internal heat and adversely affects the life of
the projector. If the Filter warning icon appears on the screen, the air filter should be cleaned
immediately. Clean the air lter following the steps below.
1 Turn off the projector, and unplug the AC
power cord from the AC outlet.
2 Remove the air lter.
3 Gently clean the lter with a brush.
4 Reinstall the lter into the projector properly.
Filter
Caution
Do not operate the projector with
the air filter removed. Dust may
accumulate on the optical elements,
degrading picture quality.
Do not put any small objects into the
air intake vents. Otherwise, it may
result in malfunction of the projector.
Filter counter reset
Be sure to reset the lter counter after cleaning
or replacing the lter.
1. Press Menu on the remote control to display
the screen menu. Press to select
Expand, then press OK button.
2. Press to select Filter, and then press
OK button.
Press to select Filter counter reset and
press OK button, "Filter counter Reset?"
appears on sreen, select "Yes" to continue.
3. When another dialog box pops up, select
"Yes" to reset the lter.
Recommendation
We recommend avoiding dusty/smoky
environments when you operate the projector.
Usage in these environments may cause poor
image quality.
When you use the projector under dusty or
smoky conditions, dust may accumulate on the
lens, LCD panels, or optical elements inside the
projector. When the symptoms above are
noticed, contact your authorized dealer or
service station for proper cleaning.
Downloaded from ProjectorsManual.com Manuals
49
Page 50

Maintenance and cleaning
Clean the project lens
Unplug the AC power cord before cleaning.
Gently wipe the projection lens with a cleaning
cloth that contains non-abrasive camera
lens cleaner, or use a lens cleaning paper or
commercially available air blower to clean the
lens.
Avoid using an excessive amount of cleaner.
Abrasive cleaners, solvents, or other harsh
chemicals might scratch the surface of lens.
Clean the cabinet
Unplug the AC power cord before cleaning.
Gently wipe the projector surface with a soft
dry cleaning cloth. When the cabinet is heavily
soiled, use a small amount of mild detergent
and nish with a soft dry cleaning cloth. Avoid
using an excessive amount of cleaner. Abrasive
cleaners, solvents, or other harsh chemicals
might scratch the surface of the cabinet.
When the projector is not in use, put the
projector in a pouch to protect it from dust and
scratches.
50
Downloaded from ProjectorsManual.com Manuals
Page 51

Replace the lamp
When the projection lamp of the projector
reaches its end of life,the Lamp replacement
icon appears on the screen,please replace the
lamp immediately.
Maintenance and cleaning
Lamp replacement icon
Lamp replace
As temperature inside the projector is high,
you should cool the projector for at least 45
minutes before you open the lamp cover.
Note
When the lamp isn’t illuminated, it may indicate that the lamp has been damaged.
When you replace the lamp in a projector installed on the ceiling, you should stand beside
the lamp cover but not under it; for the broken glass may fall down to hurt you. To do that,
remove the lamp cover gently to avoid being hurt by the dropped glass. If glass drops into
your eyes or mouth, you should see the doctor immediately.
To replace the lamp, follow the steps below:
1. Power off the projector and unplug the
power cord. Then let the project cool for at
least 45 minutes.
2. Loosen the screws on the lamp cover to
remove the cover.
3. Make sure the lamp is well protected and
remove three screws. Hold the handle to
take out the lamp.
4. Install a new lamp with the same model and
tighten the three screws. Make sure the
installation is correct. Put lamp cover in
place and then tighten the screw.
For the sake of safety, only use the lamp of
the same model. Never drop the lamp onto the
ground nor touch the glass bulb! The glass can
shatter and hurt.
Screw
Handle
Lamp cover
Screw
5. Plug the AC power cord and power on the
projector.
Downloaded from ProjectorsManual.com Manuals
51
Page 52

Maintenance and cleaning
ORDER REPLACEMENT LAMP
Replacement lamp can be ordered through your dealer. When ordering a projection lamp, give the
following information to the dealer.
Replacement Lamp Type No.:APP-L3
LAMP HANDLING PRECAUTIONS
This projector uses a high-pressure lamp which must be handled carefully and properly.
Improper handling may result in accidents, injury, or create a re hazard.
● Lamp life may differ from lamp to lamp and according to the environment of use. There is
no guarantee of the same life for each lamp. Some lamps may fail or terminate their life
in a shorter period of time than other similar lamps.
● If the projector indicates that the lamp should be replaced, i.e., if the WARNING indicator lights up,
replace the lamp with a new one IMMEDIATELY after the projector has cooled down. (Follow
carefully the instructions in the Lamp Replacement section of this manual.) Continuous use of the
lamp with the WARNING indicator lighted may increase the risk of lamp explosion.
● A Lamp may explode as a result of vibration, shock or degradation as a result of hours of
use as its lifetime draws to an end. Risk of explosion may differ according to the
environment or conditions in which the projector and lamp are being used.
IF A LAMP EXPLODES, THE FOLLOWING SAFETY PRECAUTIONS SHOULD
BE TAKEN .
If a lamp explodes, disconnect the projector’s AC plug from the AC outlet immediately. Contact an
authorized service station for a checkup of the unit and replacement of the lamp. Additionally, check
carefully to ensure that there are no broken shards or pieces of glass around the projector or coming
out from the cooling air circulation holes. Any broken shards found should be cleaned up carefully.
No one should check the inside of the projector except those who are authorized trained technicians
and who are familiar with projector service. Inappropriate attempts to service the unit by anyone,
especially those who are not appropriately trained to do so, may result in an accident or injury caused
by pieces of broken glass.
52
Downloaded from ProjectorsManual.com Manuals
Page 53

Appendix
Troubleshooting
Before calling your dealer or service center for assistance, check the items below once again.
- Make sure you have properly connected the projector to peripheral equipment.
- Make sure all equipment is connected to the AC outlet and the power is turned on.
- If the projector does not project an image when it is connected to a PC, restart the PC.
Problems – Solutions
No power - Plug the power cord of the projector into the AC power outlet.
No initial displaying - Make sure that Logo function is not set to "Off".
Initial displaying is inconsistent
with factory defaults
Input signals are automatically
switched (can’t be switched)
Ambiguous images - Adjust the focus.
Image turns over leftward/
rightward
Image turns over upward/
downward
Image not bright enough - Check whether the contrast or brightness is adjusted correctly.
No image - Check the connection between Computer or video equipment.
- Check whether the POWER indicator lights red.
- Only when the POWER indicator lights red can you power on the
projector again.
- Check the WARNING indicator. If it lightsred, the projector can not be
powered on.
- Check the projection lamp.
- Unlock the “Key lock” function.
- Make sure that Logo function is not set to "User" or "Off".
- Properly ajust the Input search function.
- Set a more proper projection distance.
- Check whether the lens needs to be cleaned.
- When moved from a environment with low temperature to
the one with higher temperature, water will be condensed
on the lens. If so, you have to wait till the condensed water
disappears.
- Check the function of “Ceiling/rear”.
- Check the function of “Ceiling”.
- Check whether the Image mode is properly selected.
- Check the function of lamp brightness adjusting.
- Check the WARNING indicator. If the indicator lights red, it means
the service life of the lamp is over. You should replace the lamp with
a new one of the same model immediately.
- Check with the signal from Computer is correct. If connected to
certain laptops, the settings of their video adapters need to be
changed.You can refer to the operating instructions of the Computer
for such modication.
- Images can show up only about 20 seconds after the projector
is powered on.
- Check the input signal, color system, video system or Computer
system mode.
- Make sure that the temperature doesn’t exceed the permitted
operating temperature
- If BLANK function is enabled, no image will appear on
the screen. You can then press the BLANK button or other button on
the remote control.
41˚F–95˚F[5˚C–35˚C
(
])。
Downloaded from ProjectorsManual.com Manuals
53
Page 54

Appendix
No Sound - Check the audio cable connection from audio input source.
The color is abnormal - Check the input signal, color system, video system or computer
Auto PC adj. function does not
work.
The Settings cannot be saved
after turing off the projector.
Power management function does
not work.
Logo function does not work. - Check connections and input source.
Auto setup function does not work. - Make sure no function in the Auto setup menu is set to “Off”.
The image is distorted or
disappears.
PIN code dialog box appears at
start-up
The remote control does not work. - Check the batteries.
Indicators light or ash. - Refer to Indicators and projector condition to check the status of
Exclamatory mark appears on the
screen.
Top control cannot be operated. - Unlock the Key lock in Security -> Key lock.
Unable to unlock the Logo PIN
code, Key lock or PIN code lock.
- Adjust the audio source.
- Press the VOLUME + button.
- Press the Mute button.
- When the AUDIO OUT is plugged in, the projector’s built-in
speaker is not available.
- Is the image projected? The sound can only be heard when the
image is projected.
system mode.
- Make sure that Blackboard is not selected in Image Mode menu.
- Check the Input signal. Auto PC adj. function can not work when
480p, 576p, 720p, 480i, 576i, 1035i or 1080i is selected
- Make sure you selected “Store” after adjusting settings.
- Power management function can not work while Freeze or Blank
function is running.
- Make sure “On” is not chosen in the Ceiling function.
- Check and adjust “PC adjust” menu or “ Screen size” menu.
- PIN code lock is being set.
- Make sure no obstruction is between the projector and the
remote control.
- Make sure you are not too far from the projector when using the
remote control. Maximum operating range is 5 m.
- Make sure the code of the remote control is conformed to that of
the projector.
- Unlock the Key lock function in the Setup menu for the remote
control.
the projector.
- Your operation is invalid. Operate correctly.
- Contact the dealer or the service center.
.
Warning:
Is operated with high voltage. Do not open its casing!
If the problem still exists after you take the aforesaid measures, you should contact the local
distributor or the repair center and tell the machine model. The projector will tell you how to handle
the issue.
54
Downloaded from ProjectorsManual.com Manuals
Page 55

Indicator and projector state
?
?
Check the indicator to know about the state of projector.
Indicator
POWER
(Green/Red/Blue)
or
WARNING
(Orange/Red)
In power-off state (AC power cord not connected).
In normal working state.
In standby state. Press POWER to power on the projector.
Internal temperature too high and can’t be turned on. When the
projector is cool enough, the temperature is restored to the normal
value and the POWER indicator lights red, you can turn on the
projector .
In suspension state.
Ready for standby mode or the lamp is being cooled. Before you
turn on the projector, you should wait till the lamp is cool enough
and the WARNING indicator ashes.
Can’t be turned on because error is detected. You should unplug
the power cord. Then insert it again and power on the projector.
If the projector is powered off again, you should cut off the power
and contact the local distributor or repair center. In this case, stop
the projector. Otherwise, electric shock or re may occur.
The service life of the lamp is over. You should replace it with a
new one in time.
When the projector is cool enough, the temperature is restored to
the normal value , you can turn on the projector. the WARNING
indicator stops ashing.
Appendix
State of projector
....Green
....Green ashes
* When the lamp reaches the end of its life, the WARNING indicator lights red. In this case,
replace the lamp with a new one promptly.
Downloaded from ProjectorsManual.com Manuals
....Red
....Red ashes
....Orange
....Orange ashes
....Off
55
Page 56

Appendix
Compatible computer specications
This projector can receive the signals below:
Scanning frequency
Signal format Resolution
NTSC/NTSC443/PAL-M (720x487) 15.734 59.940 - o
PAL/PAL-N/SECAM (720x576) 15.625 50.000 - o
525i (480i) 720x480i 15.734 59.940 13.500 o
625i (576i) 720x576i 15.625 50.000 13.500 o
525p (480p) 720x483 31.469 59.940 27.000 o o
625p (576p) 720x576 31.250 50.000 27.000 o o
750 (720)/60p 1280x720 45.000 60.000 74.250 o o
750 (720)/50p 1280x720 37.500 50.000 74.250 o o
1125 (1080)/60i 1920x1080i 33.750 60.000 74.250 o o
1125 (1080)/50i 1920x1080i 28.125 50.000 74.250 o o
1125 (1080)/24p 1920x1080 27.000 24.000 74.250 o
1125 (1080)/25p 1920x1080 28.125 25.000 74.250
1125 (1080)/30p 1920x1080 33.750 30.000 74.250
1125 (1080)/60p 1920x1080 67.500 60.000 148.500 o
1125 (1080)/50p 1920x1080 56.250 50.000 148.500
VGA 640x480
MAC16 832x624 49.725 74.550 57.283 o o
XGA 1024x768
MXGA 1152x864 63.995 70.020 94.200 o o
1280x768 1280x768
1280x800 1280x800
MSXGA 1280x960 60.000 60.000 108.000 o o
SXGA 1280x1024
1366x768 1366x768 47.720 59.799 84.750 o o
SXGA+ 1400x1050 65.317 59.978 121.750 o o
UXGA 1600x1200 75.000 60.000 162.000 o o
WSXGA+ 1680x1050 65.290 59.954 146.250 o o
WUXGA 1920x1200 74.038 59.950 154.000 0 0
720(1440)x480i 15.734 59.940 27.000 o
720(1440)x576i 15.625 50.000 27.000 o
horizontal
frequency
(Khz)
44.955 59.940 74.176
33.716 59.940 74.176
26.973 23.976 74.176
33.716 29.970 74.176
67.433 59.940 148.352
31.469 59.940 25.175 o o
35.000 66.667 30.240 o o
37.861 72.809 31.500 o o
37.500 75.000 31.500 o o
43.269 85.008 36.000 o o
35.156 56.250 36.000 o o
37.879 60.317 40.000 o o
48.077 72.188 50.000 o o
46.875 75.000 49.500 o o
53.674 85.061 56.250 o o
48.363 60.004 65.000 o o
56.476 70.069 75.000 o o
60.023 75.029 78.750 o o
68.678 84.997 94.500 o o
47.776 59.870 79.500 o o
60.290 74.890 102.250 o o
68.630 84.840 117.500 o o
49.702 59.810 83.500 o o
62.795 74.934 106.500 o o
71.554 84.880 122.500 o o
63.981 60.020
76.968 71.932 133.000 o o
79.977 75.025 135.001 o o
91.150 85.020 157.500 o o
Field
Frequceny
(Hz)
Dot Frequceny
(Mhz)
108.000 o o
RGB Component HDMI Video/S-Video
√ Note:
The specication is subject to change without any prior notice.
Signal
o
56
Downloaded from ProjectorsManual.com Manuals
Page 57

Congurations of terminals
COMPUTER IN 1/SCART, COMPUTER IN 2/MONITIOR OUT
Terminal: Analog RGB (D-sub 15 pin)
1 Red (Input/output) 9 -----
2
9 678
13
1
34
1112
5
10
15
14
CONTROL terminal (D-SUB-9 pin)
HDMI terminal (HDMI Type A 19 pin)
19
17 15 13 11
12141618
9 7 5 3
8
10
1
246
2 Green (Input/output) 10 Grounding (eld synchronizing)
3 Blue (Input/output) 11 Grounding
4 ----- 12 DDC data
5 Grounding (line synchronizing) 13
6 Grounding (red) 14 Vertical synchronizing input/output
7 Grounding (green) 15 DDC Clock
8 Grounding (blue)
LAN terminal
1 ----2 RXD
3 TXD
4 ----5 GND
6 ----7 ----8 ----9 -----
1 TMDS Data2+ 11 TMDS Clock Shield
2 TMDS Data2 Shield 12 TMDS Clock–
3 TMDS Data2– 13 CEC
4 TMDS Data1+ 14 Reserved (N.C. on device)
5 TMDS Data1 Shield 15 SCL
6 TMDS Data1– 16 SDA
7 TMDS Data0+ 17 DDC/CEC Ground
8 TMDS Data0 Shield 18 +5V Power
9 TMDS Data0– 19 Hot Plug Detect
10 TMDS Clock+
876 5 4 321
Appendix
Horizontal synchronizing
(compound sync.) input/output
1 TX + 5 ----2 TX - 6 ----3 ----- 7 RX +
4 ----- 8 RX -
Content of hazardous substances and elements
Name of parts
Optical parts
Electric parts
*1
*2
Cabinet, mechanical parts
Lamp unit
Batteries
Others(Remote contro,
cable and other parts)
Pb Hg Cd Cr6+ PBB PBDE
○ ○ ○ ○ ○ ○
○: It means that contents of hazardous substances in all homogeneous materials in this part don’t
exceed “Required Limitations” specied in SJ/T11363-2006.
×: It means that contents of hazardous substances in at least one homogeneous material in this part
exceed “Required Limitations” specied in SJ/T11363-2006.
Note:
*1 :
Optical parts includes optical lens, monitor, reection lens ect.
*2 :
Electric parts includes PCB, internal wires, fans, power sulpply, sensors etc.
Hazardous substances and elements
○ ○ ○ ○ ○
○ ○ ○ ○ ○
○ ○ ○ ○ ○
○ ○ ○ ○
○ ○ ○ ○ ○
Downloaded from ProjectorsManual.com Manuals
57
Page 58

Appendix
Dimensions
Screw Holes for Ceiling Mount
Screw: M4
Depth: 10.0
Unit: mm
58
Downloaded from ProjectorsManual.com Manuals
Page 59

PIN code memorandum
Write down the PIN code in the blank below and keep it, please contact the repair center.
Factory default PIN code 111*
PIN code lock
Factory default PIN code 111*
Locking startup-animation PIN code
*If this 3-digit number is changed,
the factory default number will be ineffective.
Appendix
Downloaded from ProjectorsManual.com Manuals
59
Page 60

Appendix
RS232 Control Method
1. Connection
1.1 Port Setting
Item Value
Method Asynchronous communication
Bits per seconds 19200
Data bits 8
Parity none
Stop bits 1
Flow control none
1.2 Wiring
Connect the computer and projector with RS232 direct cable.
PC Projector
COM Control Port
(D-Sub 9 Pin) (D-Sub 9 Pin)
2. Commands
Case sensitive, each command end by[CR](Carriage). The time out for each command is one
second. If you want to cancel the time out setting temporarily. Please send "#!"[CR].( It should be
sent within one second).
Command Item Command Item
A00 POWER ON A07
POWER OFF
A01
A02 POWER OFF A34 S-video
A05 Computer 1 A36 HDMI
A06 Computer 2
60
Downloaded from ProjectorsManual.com Manuals
(Power OFF immediately)
A33
Component
Video
Page 61

2.1 POWER ON
Command “A00”[CR] (Hex: 41 30 30 0d)
Appendix
Details
Return
2.2 POWER OFF (Power OFF immediately)
Command“A01”[CR
Details
Return
2.3 POWER OFF
Command“A02”[CR
Details "Power off?" displays while send the command, just like press the "POWER"key.
Return
2.4 Computer1
Command“A05”[CR
Power on when projector standby
OK
NG
] (
Power Off immediately
OK
NG
] (
OK
NG
] (
ACK][CR
[
“?” [CR]
Hex: 41 30 31 0d
ACK][CR
[
“?” [CR]
Hex: 41 30 32 0d
ACK][CR
[
“?” [CR]
Hex: 41 30 35 0d
]
)
]
)
]
)
Details Change the input to "Computer1".
Return
2.5 Computer 2
Command“A06”[CR
Details
Return
OK
NG
When COMPUER IN 2/MONOTOR OUT ternima is used as COMPUTER IN 2,Change
the input to "Computer 2".
OK
NG
] (
ACK][CR
[
“?” [CR]
Hex: 41 30 36 0d
ACK][CR
[
“?” [CR]
]
)
]
Downloaded from ProjectorsManual.com Manuals
61
Page 62

Appendix
2.6 Component
Command“A07”[CR] (Hex: 41 30 37 0d
Details Change the input to "Component".
)
Return
2.7 Video
Command“A33”[CR] (Hex: 41 33 33 0d
Details Change the input to "Video".
Return
2.8 S-video
Command“A34”[CR] (Hex: 41 33 34 0d
Details Change the input to "S-video".
Return
2.9 HDMI
Command“A36”[CR] (Hex: 41 33 36 0d
Details Change the input to "HDMI".
OK
NG
OK
NG
OK
NG
ACK][CR
[
“?” [CR]
ACK][CR
[
“?” [CR]
ACK][CR
[
“?” [CR]
]
)
]
)
]
)
Return
62
Downloaded from ProjectorsManual.com Manuals
OK
NG
ACK][CR
[
“?” [CR]
]
Page 63

FCC Caution
This device complies with part 15 of the FCC Rules. Operation is subject to the following two
conditions: (1) This device may not cause harmful interference, and (2) this device must accept
any interference received, including interference that may cause undesired operation.
NOTE 1: This equipment has been tested and found to comply with the limits for a Class A
digital device, pursuant to part 15 of the FCC Rules. These limits are designed to provide
reasonable protection against harmful interference when the equipment is operated in a
commercial environment. This equipment generates, uses, and can radiate radio frequency
energy and, if not installed and used in accordance with the instruction manual, may cause
harmful interference to radio communications. Operation of this equipment in a residential area
is likely to cause harmful interference in which case the user will be required to correct the
interference at his own expense.
NOTE 2: Any changes or modifications to this unit not expressly approved by the party
responsible for compliance could void the user's authority to operate the equipment.
Downloaded from ProjectorsManual.com Manuals
 Loading...