

FCC Part 15 C Notice
CAUTION: Changes or modifications not expressly approved by the party responsible for compliance
could void the user’s authority to operate the equipment.
NOTE: This equipment has been tested and found to comply with the limits for a Class B digital device,
pursuant to Part 15 of the FCC Rules. These limits are designed to provide reasonable protection against
harmful interference in a residential installation. This equipment generates, uses and can radiate radio
frequency energy and, if not installed and used in accordance with the instructions, may cause harmful
interference to radio communications. However, there is no guarantee that interference will not occur in
a particular installation. If this equipment does cause harmful interference to radio or television
reception, which can be determined by turning the equipment off and on, the user is encouraged to try
to correct the interference by one or more of the following measures:
• Reorient or relocate the receiving antenna.
• Increase the separation between the equipment and receiver.
• Connect the equipment into an outlet on a circuit different from that to which the receiver is
connected.
• Consult the dealer or experienced radio/TV technician for help.
This device complies with Part 15 of the FCC Rules. Operation is subject to the following two conditions :
(1) This device may not cause harmful interference, and
(2) this device must accept any interference received, including interference that may cause undesired
operation.
INDUSTRY CANADA NOTICE: CANADA ONLY.
This device complies with Industry Canada licence-exempt RSS standard(s). Operation is subject to the following two conditions:
(1) this device may not cause interference, and (2) this device must accept any interference, including interference that may cause
undesired operation of the device.
Le présent appareil est conforme aux CNR d'Industrie Canada applicables aux appareils radio exempts de licence. L'exploitation est
autorisée aux deux conditions suivantes : (1) l'appareil ne doit pas produire de brouillage, et (2) l'utilisateur de l'appareil doit
accepter dout brouillage radioélectrique subi, même si le brouillage est susceptible d'en compromettre le fonctionnement.
The U.S. Department of Transportation’s Federal Aviation Administration (FAA) announced a streamlined and
user-friendly web-based aircraft registration process for owners of small unmanned aircraft (UAS) weighing
more than 0.55 pounds (250 grams) and less than 55 pounds (approx. 25 kilograms) including payloads such
as on-board cameras.
Owners can get more info and may register through a web-based system at www.faa.gov/uas/registration
WARNING!
CHOKING HAZARD
Not suitable for children under 3 years.
-
Small parts.
Conforms to safety requirements of ASTM, CPSIA and FCC.
8619 Wall street, Suite 400, Austin, TX 78754
©2017 Rooftop Brands™ All rights reserved
Tel:
949.566.9573
11
Important! Register You Drone
• www.propelrc.com
Made in China
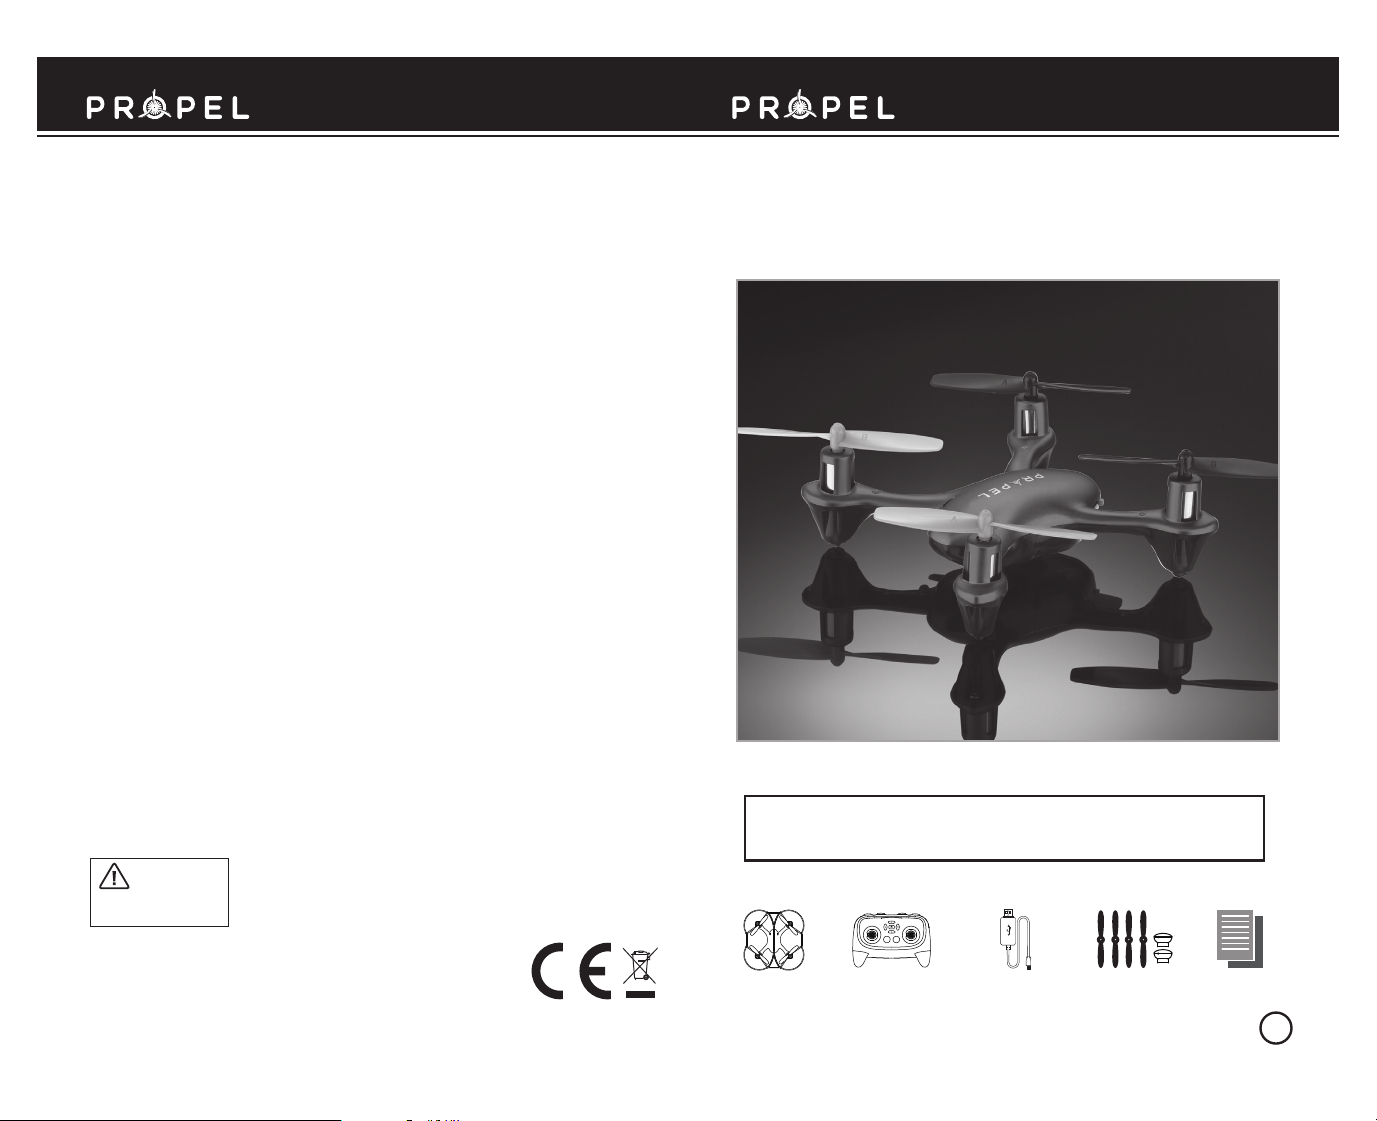
DART™ 1.0
2.4Ghz Indoor/Outdoor High-performance Drone
INSTRUCTION BOOKLET
WARNING: Never leave product charging unattended for extended periods
of time. Always disconnect DART ™ 1.0 from charger immediately after the
DART ™ 1.0 is fully charged. Please refer to enclosed safety instructions.
PACKAGE CONTAINS:
2
4
3
1
C
3
H
T
4CH3CH
DART ™ 1.0
2.4G Wireless Controller Instruction BookletSpare PartsUSB Charging Cord
Colours and styles may slightly vary.
BC
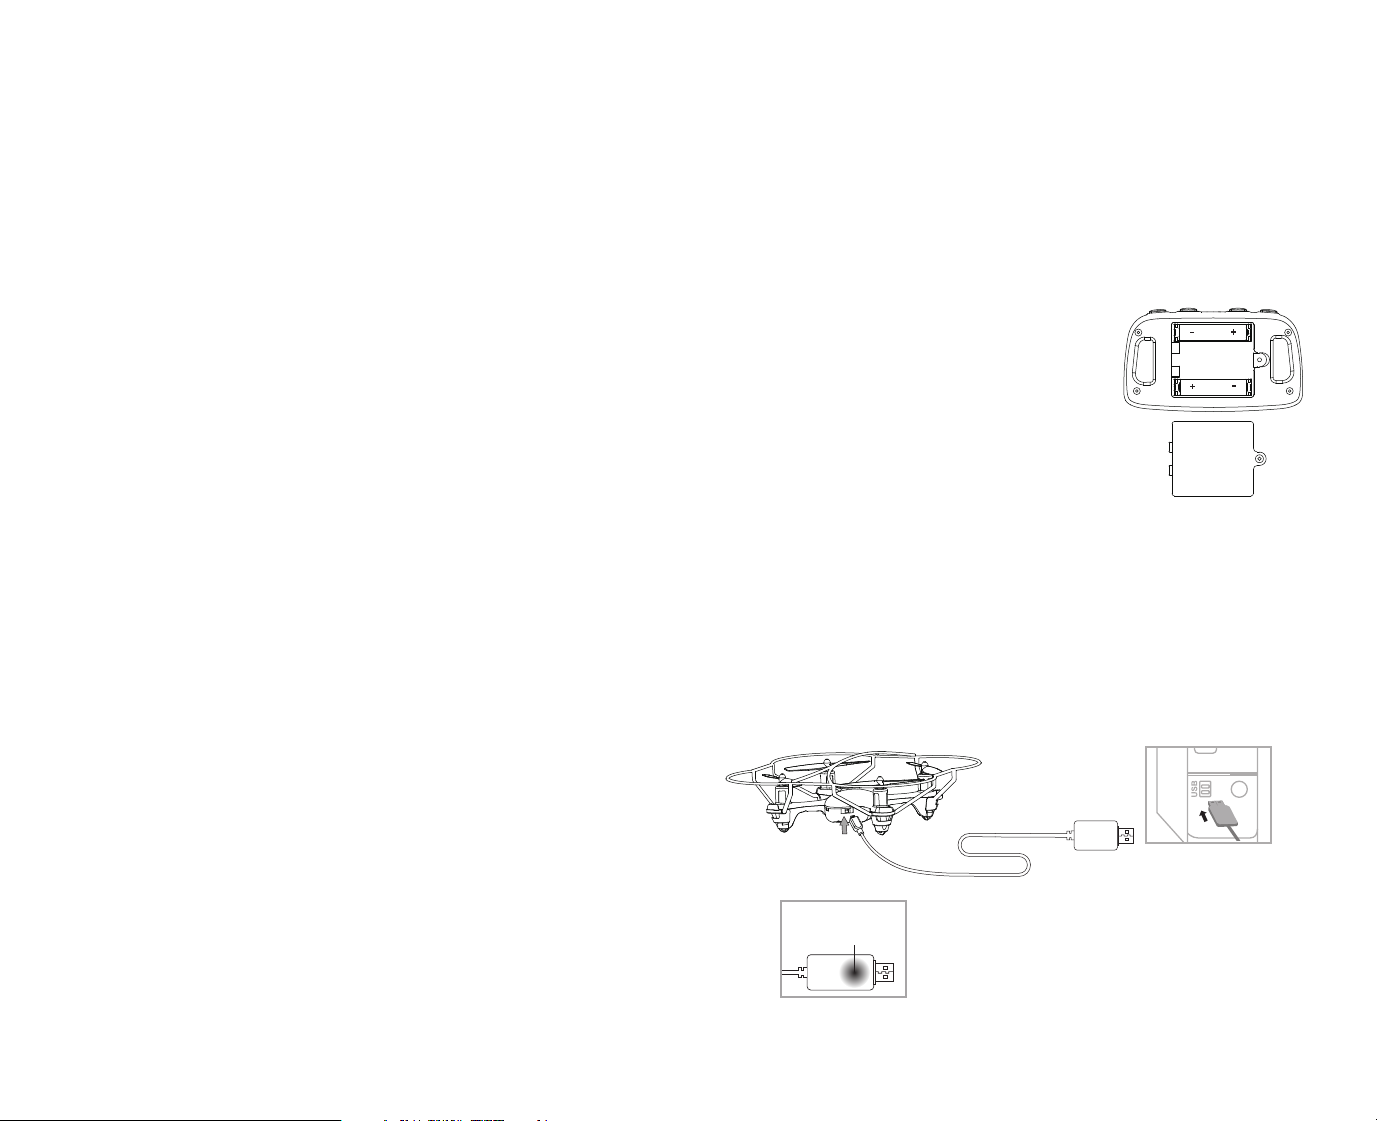
TABLE OF CONTENTS
Features
............................................................................................................ 2
Remote Control Battery Installation
Charging the DART ™ 1.0
DART ™ 1.0 Diagram, Remote Diagram
Removable Controller Grips
Preparing for Flight
...............................................................................................
Syncing Your DART ™ 1.0
Flying Tips
.......................................................................................................... 4
Now You Are Ready To Fly !
Recognizing the Front and Back of the DART ™ 1.0
Automatically Take Off / Land
Speed Setting Button
T (Training) Mode
Auto Shut Off
3/4 Channel Selection
............................................................................................. 5
................................................................................................. 5
...................................................................................................... 5
............................................................................................ 6
Forward / Backward Trim
Banking Left / Right Trim
4 Channel Flight Control
3 Channel Flight Control
Calibrating the DART ™ 1.0
How To Do 360º Stunt Rolls
DART ™ 1.0 Warning:
Battery Warnings, Care and Maintenance
Replacing the Propeller Blade
FCC Part 15 C Notice
............................................................................................ 11
.............................................................................. 2
......................................................................................... 2
.......................................................................... 3
............... ........................................................................ 3
..........................................................................................
...................................................................................... 5
....................................................... 5
................................................................................. 5
....................................................................................... 6
....................................................................................... 6
.......................................................................................... 7
.......................................................................................... 8
....................................................................................... 8
....................................................................................... 9
....................................................................................... 10
...................................................................... 10
...................................................................................10
FEATURES
• Built-in 6-axis gyroscopic chip keeps the DART ™ 1.0 extremely stable in all conditions.
• Automatically start and lands with the push of a button
• New T (training ) mode helps beginner pilots learn how to fly.
• Unique switchblade technology allows for 3ch and 4ch flight modes.
• 3 different speed settings for slow- to high-speed flying.
• Air pressure sensor locks flight altitude.
• LED directional lights makes the DART ™ 1.0 easy to follow.
• 2.4G radio allows for a 61 m/200 ft operational range.
4
4
• The DART ™ 1.0 is engineered for incredible maneuverability including 360˚ aerial stunts!
REMOTE CONTROL BATTERY INSTALLATION
1. Unscrew the battery cover from the back of the remote control.
2. Install 2 “AAA” alkaline batteries into the battery pack as shown in the
diagram.
3. Replace the battery cover and secure it.
CHARGING THE DART ™ 1.0
1. Make sure the
USB charging cord into the charging socket of the DART ™ 1.0(see diagram A ).
Caution: The USB plug fits the charging socket only in one way. Do not force it.
2. Connect the DART ™ 1.0 charging cord to your computer’s USB port (see diagram B).
Caution: Only use this charging cord with a computer USB port! Do not attempt
to use other USB charging devices.
3. The red LED on the USB plug lights up when charging is complete (See diagram C).
Note: If the red LED lights up, either the charging is complete or the USB plug is
not properly connected.
4. The charging time will vary depending on the percentage of battery already charged.
The average charging time is approximately 30-45 minutes. The DART ™ 1.0
operates for approximately 5-7 minutes per charge.
Low battery indication: the DART ™ 1.0 ‘s LED lights will begin to flash to notify
you that the battery is running low. The lights will continue to flash for 45 seconds
before the DART ™ 1.0 automatically lands.
DART ™ 1.0
’s power switch is in the “OFF” position and plug the
Battery Cover
Battery Compartment
(2 “AAA” batteries not included)
A
The red LED on the USB
plug lights up when
charging is complete
B.
Thank you for purchasing the 2.4 G Indoor /Outdoor DART ™ 1.0. Please read this instruction booklet as it
contains valuable information on how to properly fly and care for your DART ™ 1.0.
C.
1 2

DART ™ 1.0 DIAGRAM
Rotor Blade
Landing Gear
Safety Guard
OFF ON
WARNING
DO NOT FLY YOUR DART ™ 1.0 IN FOUL WEATHER!
PREPARING FOR FLIGHT
• Verify that there are 2 “AAA” batteries inside the remote control unit and the DART ™ 1.0 has been fully charged.
• Make sure to be in a large space with an open radius of at least 50 feet.
• Make sure the empty space has no obstacles or rivers.. Set your DART ™ 1.0 on a clean flat surface before take-off.
DO NOT ATTEMPT TO FLY YOUR DART ™ 1.0 IF THERE IS RAIN, SNOW, HEAVY WINDS, THUNDER OR LIGHTNING
OUTDOORS. IT COULD DAMAGE YOUR PRODUCT AND POSSIBLY EVEN CAUSE BODILY HARM.
The safety guard is easy to clip on and off. Simply pull the clips away
from each motor mount and remove the DART ™ 1.0 from below.
Note: Always have the safety guard attached when flying in T-Mode and Mode 1.
REMOTE DIAGRAM
Speed Indicator
Left Bank Trim
Throttle/Yaw
AUTO Start / land
SPEED
Speed Setting Button
T
3 CH Mode
1
2
START/LAND
3
Calibrate Button
CALIBRATE
Power Indicator
4CH3CH
Backward Trim
STUNT
360˚ Stunt Rolls Button
4
3
C
H
4 CH Mode
REMOVABLE CONTROLLER GRIPS
Easily slide off and on. (see grip extenders card)
Power On/Off
Forward Trim
Power On/Off
Right Bank Trim
Direction Control
Removable grip
Extender
Charging
Socket
SYNCING YOUR DART ™ 1.0
Important! When syncing your DART ™ 1.0 copter with the controller always make sure that the
copter is on a flat level surface. This insures that the 6-axis gyro is properly programmed to mimic
your trim settings.
Your
DART ™ 1.0
utilizes an automatic 2.4G channel selection system that allows up to 8 people to fly side
by side in the same wireless range.
For One-person Play:
1. Before starting, make sure that the power on both your controller and DART ™ 1.0 are in the OFF
position. Make sure that there are no other 2.4G devices in the area as well.
2. Turn ON the DART ™ 1.0 and set it down on a flat surface. The white and red LED indicators of the
DART ™ 1.0 should flash.
3. Turn ON your remote and you will hear 2 short beeps,the white and red LED lights will start flashing
slower. Push the throttle all the way up and pull it down; You will hear 2 beeps and the LED
lights will turn solid, your DART ™ 1.0 and remote should have successfully synced. Should this
not happen, repeat all steps again.
For Multi-person Play:
4. Before starting, make sure that the power on all DART ™ 1.0s and Controllers are in the OFF position.
Make sure that there are no other 2.4G devices in the area as well.
5. Each person will have to sync their DART ™ 1.0 individually at a different time to avoid
interference.
Follow steps 1 to 3 above, making sure to keep away from other people while also making sure that
no one else is syncing at the same time.
6.
After syncing a player's DART ™ 1.0, it should be left ON until all players have synced their
DART ™ 1.0s
.
7. Should there be a mistake/interference, all players must turn off their controllers and DART ™ 1.0s
and start the process all over again.
FLYING TIPS
• It is recommended that you operate the DART ™ 1.0 in a wide space. The ideal space should have a
61 m/200 ft radius.
• Parental guidance or adult supervision is suggested at all times.
• If you are flying the DART ™ 1.0 with others, make sure all spectators are behind you.
• For best performance, it is recommended that you operate the DART ™ 1.0 in zero wind conditions.
Wind can greatly affect the performance of the DART ™ 1.0.
3 4

4CH3CH
4CH3CH
NOW YOU ARE READY TO FLY!
If you have successfully synced your DART ™ 1.0 to your controller as explained on page 4 you are now
ready to fly. Before beginning to fly your drone you should familiarize yourself with how to start and stop
the rotors, how to use your take off and auto land feature and how the controls work. please carefully read
and familiarize yourself with various control features explained in the next few pages. Once again as a
beginner pilot you should learn how to control your drone in a large open field or park on a day with zero or
very light wind. Do not try to fly your DART ™ 1.0 too high until you become a more experienced pilot.
RECOGNIZING THE FRONT AND BACK OF THE DART ™ 1.0
Even though the DART ™ 1.0 has four rotors there is still a
front or forward-facing direction and back or backwardsfacing direction. TheFront and forward-facing direction of the
DART ™ 1.0 is the side with two holes. The rear and back of the
DART ™ 1.0 is where the battery charging socket and the
power ON/OFF is. The DART ™ 1.0 when in flight will also help
you keep aware of the orientation with lighted LED lights in
the arms of the DART ™ 1.0
NOTE: The front of the copter displays WHITE LED lights and the
back of the copter displays RED LED lights.
A
Front
B
B
A
3/4 CHANNEL SELECTION
DART ™ 1.0 allows you to control your Quadrocopter in 3 channel mode (beginner) or 4 channel mode
(advanced flying). The DART ™ 1.0 default setting is 4 Channel mode.
To change to 3 Channel mode:
PRESS the 3CH button (see remote diagram on pg 3); you will hear 3 short beeps indicating the DART ™
1.0 now is set to 3CH mode.
To change back to 4 Channel mode:
PRESS the 4CH button (see remote diagram on pg 3); you will hear 4 short beeps indicating the Zipp
Nano™ is now set to 4CH mode.
UNDERSTANDING TRIM ADJUSTMENTS
Forward/Backward Trim
�• If your DART ™ 1.0 is moving forwards or backwards automatically, you may need to adjust the
FORWARD/BACKWARD TRIM buttons.
•�If your DART ™ 1.0 flies forward, push and release the B TRIM button repeatedly until the
moving stops and proper flight is maintained.
•�If your DART ™ 1.0 flies backwards, push and release the F TRIM button in the same manner
until the problem is resolved.
• From time to time you may have to adjust the FORWARD/BACKWARD TRIM to ensure the
DART ™ 1.0 will hover in mid-air and respond accurately to your commands.
Forward/Backward
Trim
AUTOMATICALLY TAKE OFF / LAND
Make sure you have properly synced The DART ™ 1.0.
• simply press the “start/land” button on the top of controller, your DART ™ 1.0 will automatically
take off.
• To stop or land the DART ™ 1.0 just press the “START/LAND” button again and the DART ™ 1.0 will
descend and land automatically.
Tips: You also can move the two control sticks simultaneously down to the inside corners, hold them till you
hear a “beep” and the blades start spinning. Release the control sticks and push the throttle stick slowly to
take off manually.
In case of emergency : to stop the rotors instantly, simply press the calibrate button on the top of
the cotroller, located in the center.
Back
If flying forward... If flying backward...
Forward/Backward
Trim Controls
Push backward
trim button
Push forward
trim button
Banking Left/Right Trim
�• If your DART ™ 1.0 is not steadily hovering and is banking to the left or right automatically, you may
need to adjust the BANKING TRIM buttons.
•��If your DART ™ 1.0 banks to the left, push and release the R TRIM button repeatedly until the
banking stops and proper flight is maintained.
•��If your DART ™ 1.0 banks to the right, push and release the L TRIM button in the same manner until
the problem is resolved.
SPEED SETTING BUTTON
The DART ™ 1.0 has 4 speed settings; T(Training),1(SLOW ),2(MEDIUM) and 3(HIGH). The Default
setting when you first turn on your DART ™ 1.0 is T(Traning). To exit T Mode and to increase the speed
simply press the speed button(see remote diagram on page 3). You will hear a beep and the speed
• From time to time you may have to adjust the BANKING TRIM to ensure the DART ™ 1.0 will steadily
hover in mid-air and respond accurately to your commands.
Banks Trim Banks Trim
indicator will display the current speed setting with the Number. Number 1 indicates slow speed, 2
indicates medium speed and 3 indicates high speed.
T (Training)MODE
Simply press and hold the Speed Setting Button; you will hear a long beep and the speed indicator will
change to "T." Now you are in T mode. T mode allows you to learn how to operate your DART ™ 1.0 at a
very slow speed. To exit T mode just press the speed setting button again.
AUTO-SHUT-OFF
In T-Mode and Mode 1 (with safety cage fitted), The DART ™ 1.0’s motors will automatically shut off
when it comes into contact with the ground, walls or any other objects. This is a safety feature for
beginner pilots and is disabled in modes 2 and 3.
5 6
4 CH Left/Right Banking
Controls
Push the “L” trim button to
increase left banking
sensitivity
Push “R” trim button to
increase right banking
sensitivity
NOTE: The use of the Trim buttons are accompanied with a beep tone. A single long beep indicates the product is
centre-trimmed. No beeping after press the trim button indicates the product is trimmed to the maximum on a particular side.

4 CHANNEL FLIGHT CONTROL
Below is a list of basic flight functions for your long-range remote control DART ™ 1.0. While learning to
fly your DART ™ 1.0 it is best to start with a large space until you get used to the basic controls. As you
master flying your DART ™ 1.0 you can move to more advanced maneuvering techniques. Practice makes
perfect! When you have these basic steps down you can move to the next level.
3 CHANNEL FLIGHT CONTROL
Below is a list of basic flight functions for your long-range remote control DART ™ 1.0. While learning to
fly your DART ™ 1.0 it is best to start with a large space until you get used to the basic controls. As you
master flying your DART ™ 1.0 you can move to more advanced maneuvering techniques. Practice makes
perfect! When you have these basic steps down you can move to the next level.
Move the Throttle up to increase the speed of
the motors and the DART ™ 1.0 will rise up.
Move the Throttle stick left and the DART ™ 1.0
will rotate left.
Move the Direction Control up and the DART ™
1.0 will move forward.
Move the Throttle down to decrease the speed of
the motors and the DART ™ 1.0 will descend.
Move the Throttle stick right and the DART ™ 1.0
will rotate right.
Move the Direction Control down and the DART
™ 1.0 will move backward.
CALIBRATING THE ZIPP DART ™ 1.0
If the DART ™ 1.0 becomes unstable during the course of flying, you may need to calibrate the internal
gyros. To do this place the DART ™ 1.0 on a flat level surface, press and hold the CALIBRATE button till you
hear a long beep.The LEDs on the DART ™ 1.0 will flash quickly and then remain solid, this indicates your
drone has been recalibrated (see diagram D).
Move the Direction Control left and the DART ™
1.0 will bank to the left.
Move the Direction Control right and the DART
™ 1.0 will bank to the right.
SPEED
START/LAND
STUNT
CALIBRATE
D
7 8

HOW TO DO 360º STUNT ROLLS
1. In order to make your DART ™ 1.0 do 360º rolls you must fully charge your battery.
Note: The DART ™ 1.0 will not do 360º stunt rolls in T-Mode, Mode 1 or under low battery
indication (The LED lights on the drone will be flashing).
2. Once you are ready to attempt a 360º roll, simply depress and let go of the "STUNT" button on the top
right hand side of your controller (see Remote Diagram on page 3); you will hear a sound. This means
you are now in “STUNT MODE."
3. Now quickly move your right control stick in any of 4 directions; up, down, left or right. Your
1.0
copter will instantly roll in the associated direction. See diagram below.
360˚Stunt Roll
L
M
DART ™
DART ™ 1.0 WARNING
The DART ™ 1.0 is designed for INDOOR and OUTDOOR use.
cause damage to the user, spectators and animals. Stand away from the DART ™ 1.0 to reduce the risk of getting into the
flight path. Warn spectators that you will be flying your DART ™ 1.0 so that they are aware of its position. Before flight,
inspect the rotor blades to make certain that the blades are securely fastened to the DART ™ 1.0.
WARNING!
• Choking/Cutting Hazard. Small Parts/Sharp Rotor Blades.
• Keep hands, hair and loose clothing away from the propeller when the power switch is turned to the ON position.
• Turn off the transmitter and DART ™ 1.0 power switches when not in use.
• The included charger is built specifically for the DART ™ 1.0 Li-Poly battery. Do not use it to charge any other battery.
• New alkaline batteries are recommended for maximum performance.
• Parental supervision recommended when flying DART ™ 1.0.
:
The DART ™ 1.0 blades revolve at high speeds and can
BATTERY WARNINGS
RECHARGEABLE BATTERY:
This DART ™ 1.0 uses a Li-Poly rechargeable battery. If battery no longer stays charged, dispose of battery properly
according to local disposal requirements.
CONTROLLER BATTERIES:
Remote control requires 2 “AAA” batteries (included). Please read the important battery safety warning below.
• Do not mix alkaline, standard (carbon-zinc) and rechargeable batteries (nickel metal hydride).
• Do not mix old and new batteries.
• Non-rechargeable batteries are not to be recharged.
• Rechargeable batteries are to be removed from the item before being charged (if removable).
• Rechargeable batteries are only to be charged under adult supervision.
• Exhausted batteries should be removed immediately and must be recycled or disposed of properly
according to state or local government ordinances and regulations.
• The supply terminals are not to be short-circuited.
• Only batteries of the same or equivalent type as recommended are to be used.
• Batteries are to be inserted with the correct polarity (see inside booklet for diagram).
• Do not dispose of batteries in a fire - batteries may leak or explode.
CARE AND MAINTENANCE
• Always remove the batteries from the wireless infrared remote control when it is not being used for an extended period
of time.
• To clean, gently wipe the remote control and DART ™ 1.0 with a clean damp cloth.
• Keep the toy away from direct heat or sunlight.
• Do not submerge the toy into water. This can damage the unit beyond repair.
• Parental guidance recommended when installing or replacing the batteries.
REPLACING THE PROPELLER BLADE
Your
DART ™ 1.0
time to time for optimal flight function. Crash landing from high-speed aerial flights may cause damage
to your
1. The
(see diagram E).
2. Pick up a blade from the included spare parts and match
the marking to diagram E.
3. Replace the broken blade with the correct spare blade.
9 10
propeller system is a precision instrument that may need repair or replacement from
DART ™ 1.0
propellers.
DART ™ 1.0
has four blades: one A and one B blades on front, and one B and one A blades on back
Front
A
A
B
Back
E
B
A

 Loading...