

Page 1

Get Started With
1
Page 2

System requirements
AShop is a web application that must be installed on a website before you
can use it. It is written in the very common script language PHP and uses
a MySQL database as its backend, which is supplied by most hosting
providers.
In addition to PHP and MySQL the web server also needs to be able to run
the IonCube loader software. AShop is encoded with the IonCube PHP
code protection system in order to protect the copyright of AShop
Software as well as make the software itself more secure. It is a well
known fact that open source web applications are heavily targeted by
hackers. By protecting the source code we are also protecting your
website.
Unfortunately the IonCube loader is not always available by default on a
new hosting account. Some hosting providers will install it for you when
requested and many also give you access to your own PHP configuration
file: php.ini which means that you can install it yourself. In many cases
AShop can also install the IonCube loader for you through the dynamic
extension loading feature in PHP, if it is activated.
If you already have a hosting account you can run the AShop system
requirements check script on your site to check if your site meets the
requirements. You can download it here:
www.ashopsoftware.com/dlcounter
When you have unpacked the system requirements check script to your
hard drive you should upload it to your website. To do so you will need ftp
login information for your site: host name, username and password,
which should have been given to you by your hosting provider. You will
also need an ftp client software to be able to upload files to your site. If
you haven’t already got one you can download an excellent free software
here: http://filezilla-project.org/
Note: You should download the Client, not the Server software.
The process of uploading files with an ftp client will be described here
using Filezilla but is very similar in other software, such as WS_ftp or Cute
Ftp. When you have installed the Filezilla software and started it you
should add your site in the Filezilla Site Manager. Click the Site Manager
icon in the toolbar or open the menu File and click Site Manager.
To add your website, follow these steps:
1. Click the button “New Site”.
2. Enter a name for your site, for example the domain name or your
company’s name, and confirm by pressing the Enter key.
2
Page 3
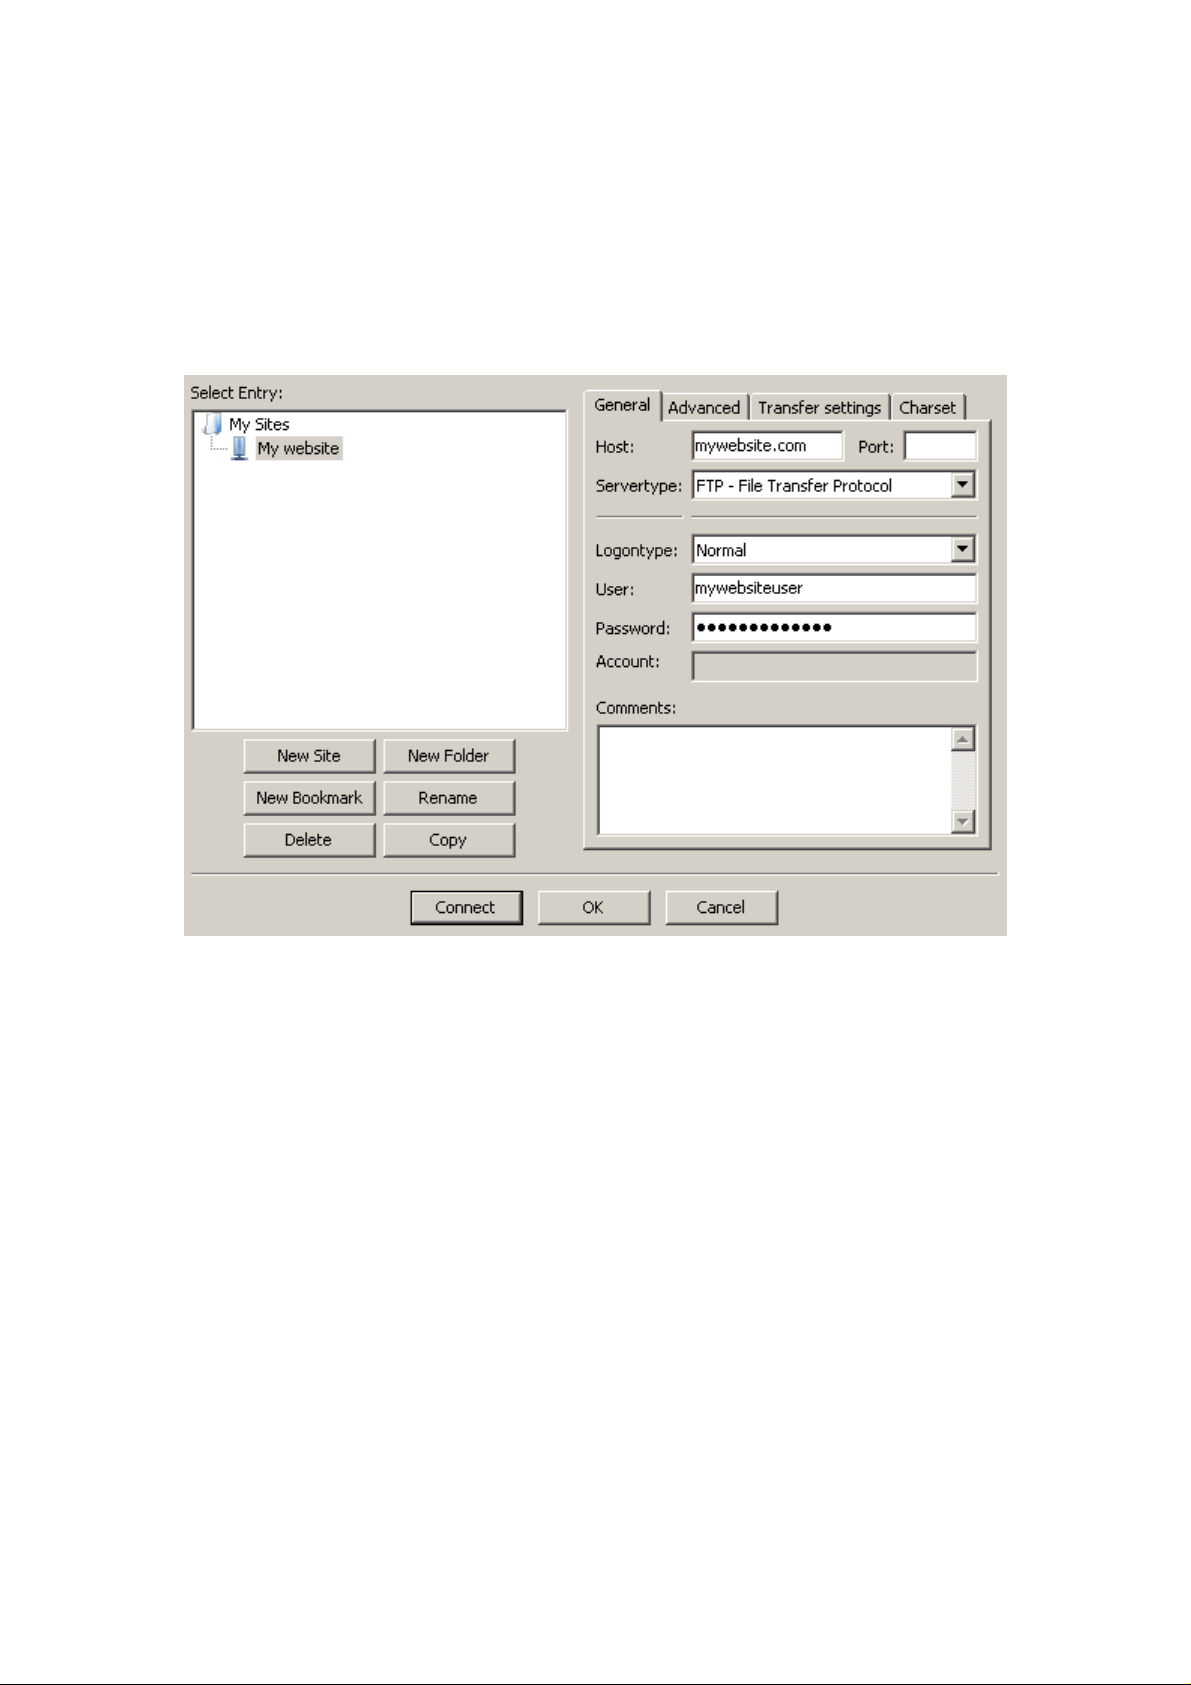
3. Enter the ftp host name of your site, usually your domain name but
the exact host name should have been given to you by your hosting
provider.
4. Change the “Logontype” setting to “Normal”.
5. Enter the ftp username for your site in the “User” field.
6. Enter the ftp password for your site in the “Password” field.
7. Click the “Connect” button to save your site and connect to it.
The Filezilla Site Manager
Now you should see the contents of your hard drive in the left area and
the contents of your website in the right area of the Filezilla window. In
the left area, navigate to the folder where you unpacked the AShop
system requirements check script. It should contain the files:
ashoptest.php and README.TXT and one folder named ioncube.
Navigate to where your publicly available content is stored on your
website in the right area. It is usually called public_html, www or
httpdocs. If you are unsure you should ask your hosting provider. If you
wish to run AShop from a subdirectory you can add it by right clicking in
the right area and selecting Create directory from the menu. Enter the
name of the directory and press Enter, then double click the new directory
to open it. If you install AShop without adding a subdirectory it will
become the default content your visitors see on your website.
Select the file ashoptest.php and the folder ioncube in the left area.
Then right click and select Upload on the menu. After a few seconds the
right area should contain those two items as well.
3
Page 4
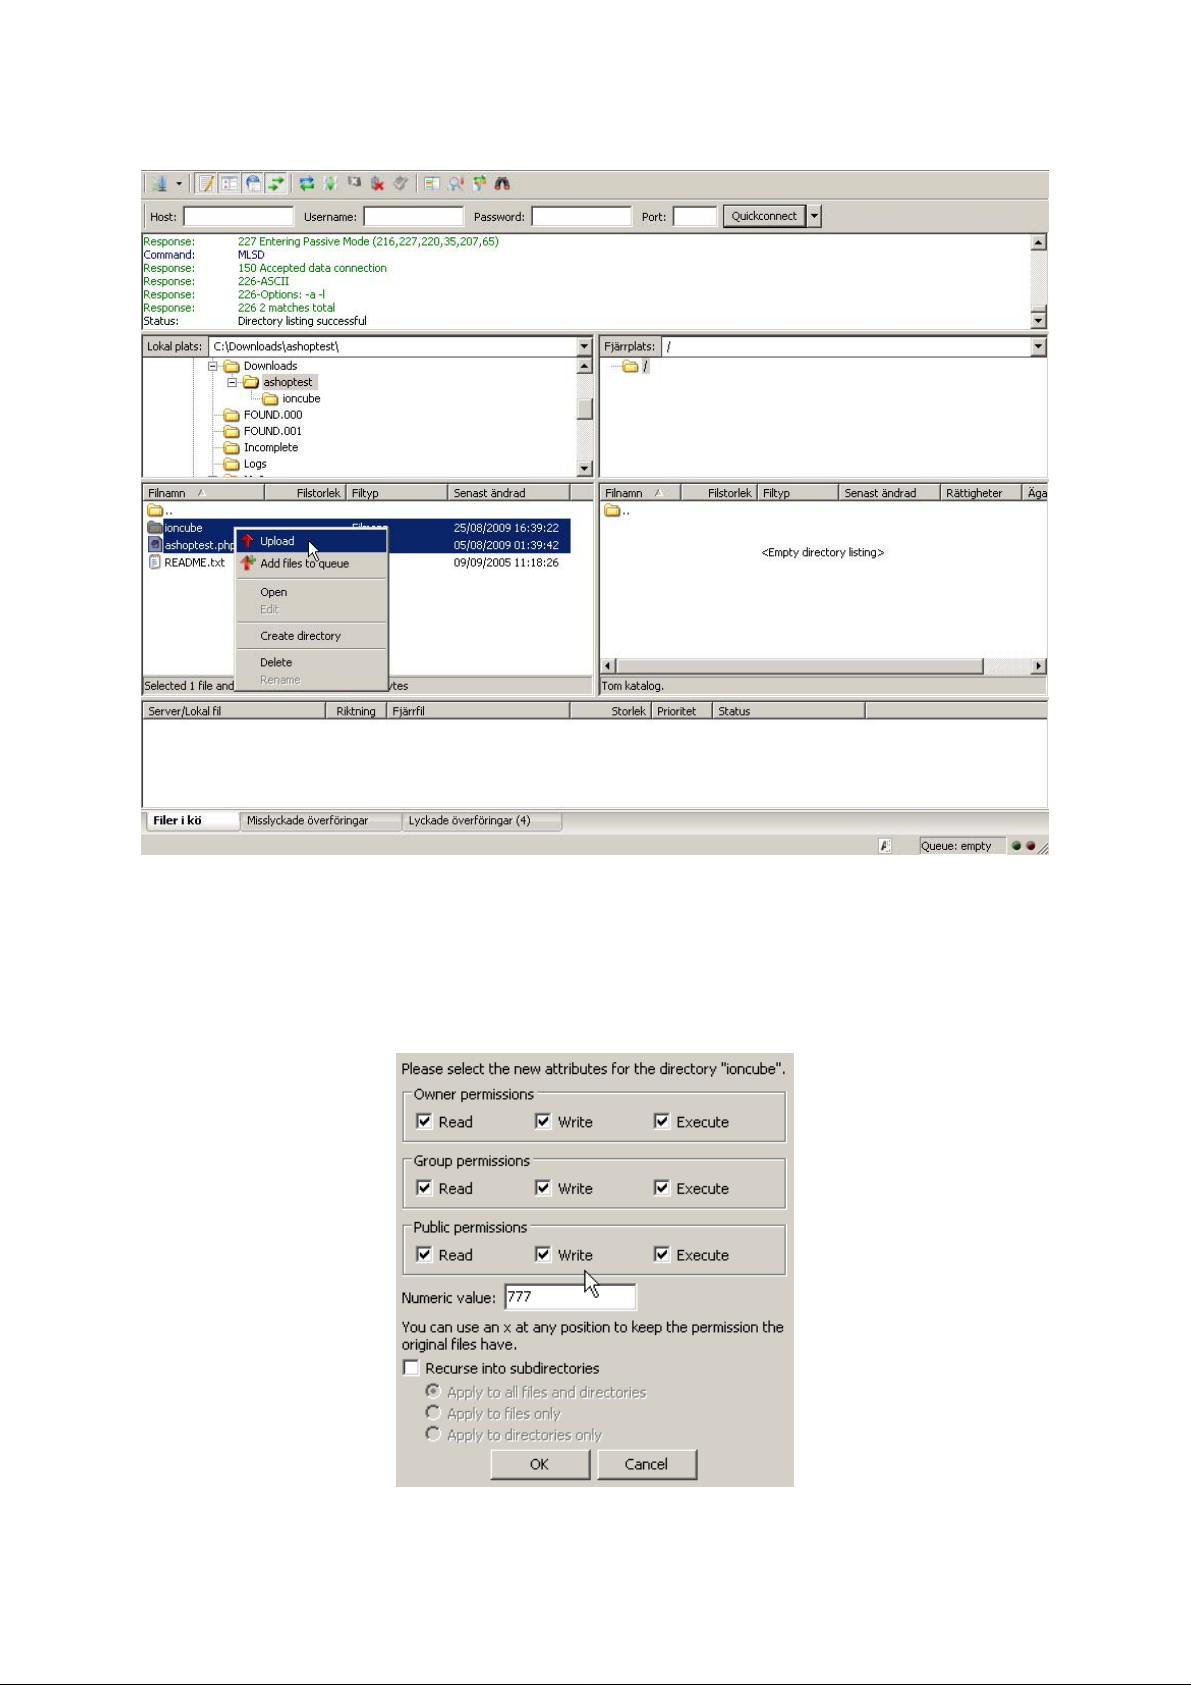
Uploading files in Filezilla
Right click the ioncube folder in the right area and select File
permissions. Make sure all the checkboxes are checked in the window
that opens and that the Numeric value box contains 777. Click Ok to
apply the changes.
Setting file permissions
4
Page 5

The system requirements check is now installed and can be used. Open
your favorite web browser, such as Firefox or Internet Explorer. Enter the
URL to where the ashoptest.php script is located on your site. For
example, if your domain is mycompanyname.com and you put the script
in a subdirectory called ashop you should enter the URL:
http://www.mycompanyname.com/ashop/ashoptest.php
The page will list all the system requirements and let you know if they are
met:
AShop Compatibility report
Note: If your hosting provider offers the ability to create your own php.ini
configuration file you can most likely get around any failed tests by
tweaking your PHP settings.
5
Page 6
Installation
You can download the full AShop V software at:
http://www.ashopsoftware.com/dlcounter
When it is downloaded, unpack the zip file using a software like Winzip
(Windows) or Stuffit (Mac). Make sure you remember where you
unpacked it on your hard drive.
To install AShop on your website you will need to prepare a MySQL
database for your site. This is usually done through a hosting control
panel. The steps to create a database will be described using the most
common one: cPanel. It is similar though not exactly the same in other
control panels.
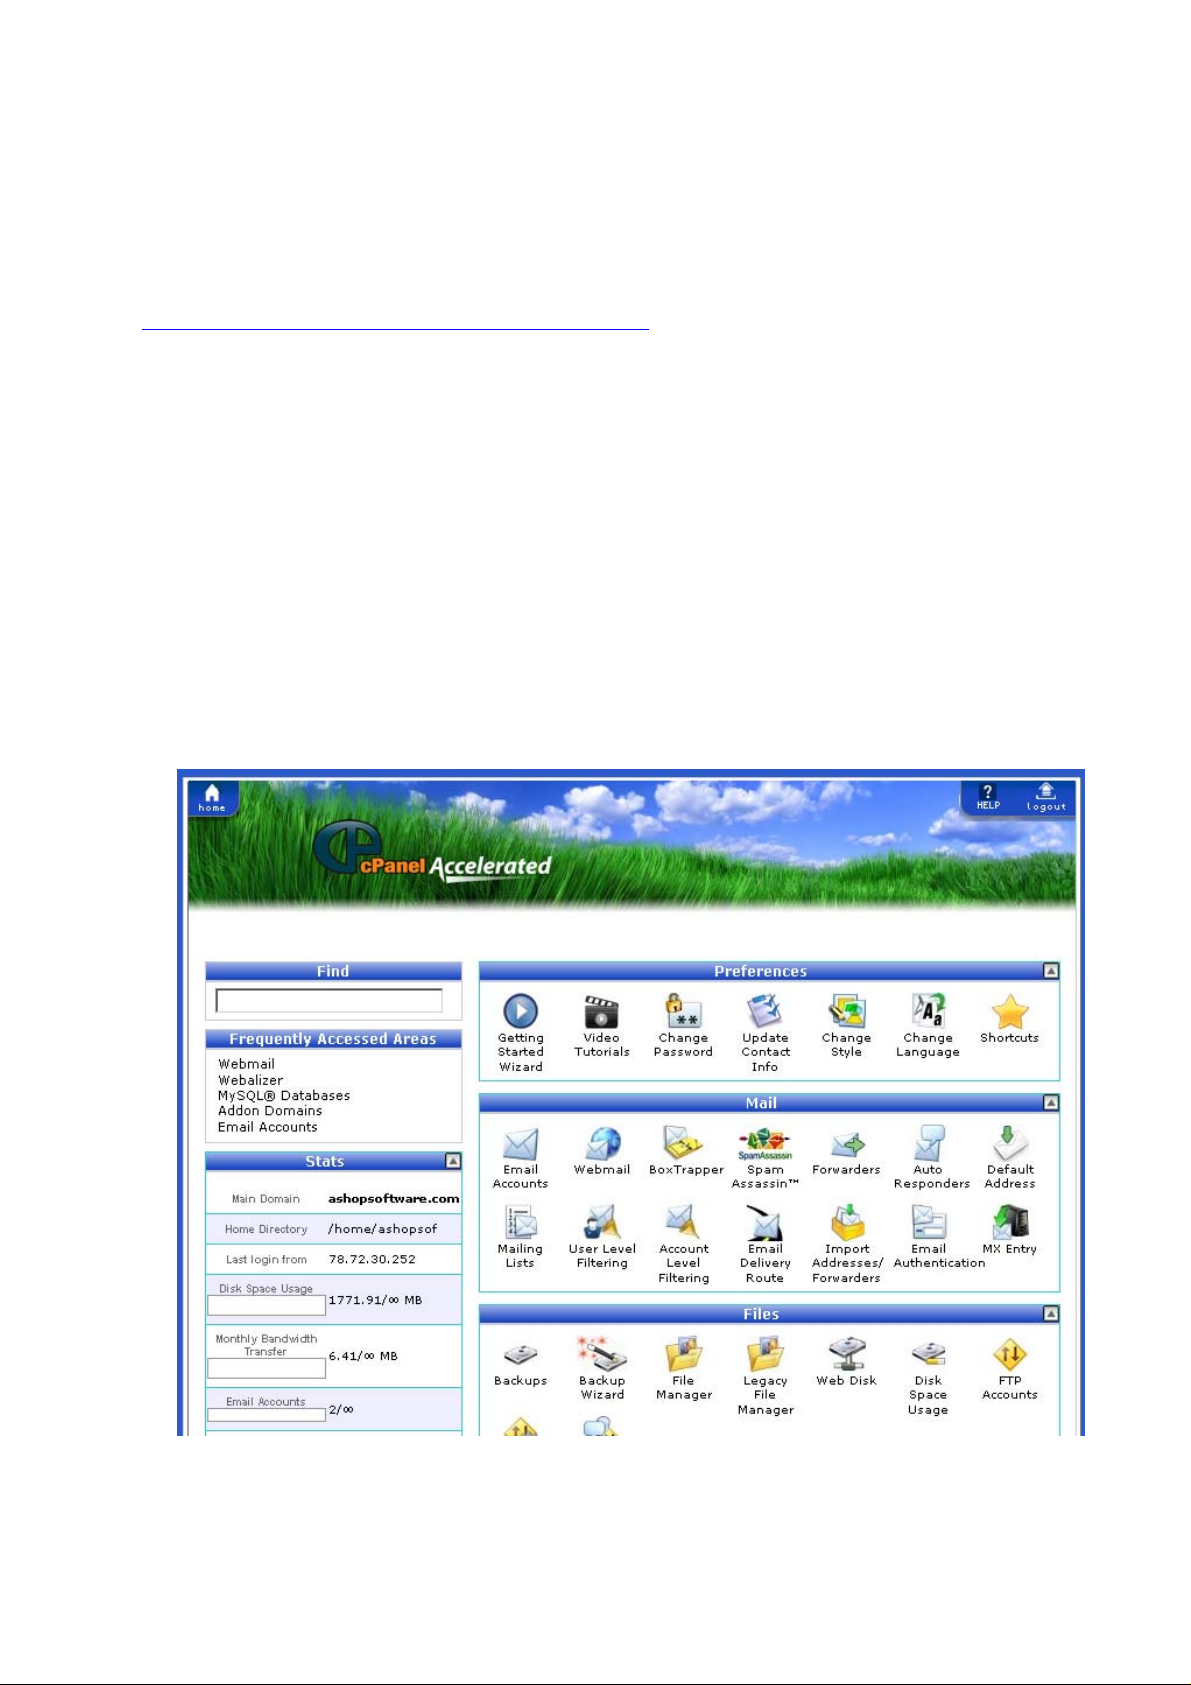
1. Login to the control panel for your site, which you should have got
access to from your hosting provider. It should look something like
this, though the colors and graphics may differ:
The popular cPanel hosting control panel
6
Page 7

2. Scroll down to the section labeled Databases and click MySQL
Databases.
3. Enter a name for your new database in the box labeled “New
Database”, for example: “ashop”.
4. When you click the button Create Database the new database will be
created on the server. A prefix consisting of your hosting account
username followed by an underscore will usually be added to the
name, for example: mycompany_ashop. Take note of this name.
5. Scroll down to the section Add new user and enter a username
into the box labeled “Username”, for example: “ashop”. Enter a
password into the box “Password” and confirm it by entering the
same password into the box “Password (again)”.
6. Once again a prefix will be added, this time to the username, which
will end up something like this: mycompany_ashop. Take note of
both this username and the password you entered.
7. Now you need to assign this user to the database to give the user
permission to access or change the data it will contain. Scroll down
to the section Add User To Database. Select the user in the first
7
Page 8

drop down list and the database in the second. Click Add.
8. On the next page you will get to assign the exact permissions this
user should have on the database. You will want to give the user all
permissions so you should check the checkbox labeled: ALL
PRIVILEGES. Then click Make Changes to apply the changes.
Now your database is ready to be used with your AShop. To make sure
the AShop scripts know how to connect to the database you will need
to add the database name, username, password and database server
to the AShop configuration file.
Locate the folder on your hard drive where you previously unpacked
AShop and open the folder named “admin”. In that folder you should
find a file named “config.inc.php” which you need to open in a text
editor such as Windows Notepad or TextEdit (Mac).
Find the line that starts with $databasename and change the text
within the quotation marks: “ashop” to the name of your database.
On the line that starts with $databaseuser you should change the text
“user” to the username you assigned to your database and on the line
that starts with $databasepasswd you should change the text
“password” to the password for your database user.
8
Page 9

Editing config.inc.php in Windows Notepad
The $databaseserver parameter should usually be left unchanged:
“localhost” but in some cases the hosting provider uses a dedicated
server for the databases and then you will need to enter the correct
host name of the database server here. Check with your hosting
provider what the host name is if you don’t already know it.
Finally, save the file. Now your AShop files are ready to be uploaded to
your website.
Start up your ftp client software again, for example Filezilla which we
described in the first part of this guide. Connect to your website.
Navigate to the folder where you unpacked all the AShop files in the
left area of the Filezilla window. Navigate to the publicly available folder
of your website in the right area, for example: public_html, www or
httpdocs. If you previously created a subdirectory where you you’re
your AShop to be installed, you should navigate to that subdirectory
rather than just to the public root folder.
Select all the files and folders in the left area, right click and select
Upload on the menu to start transferring all the AShop files to your
website, including the modified config.inc.php you previously made.
This may take a few minutes to complete since there are a lot of files
to transfer.
9
Page 10
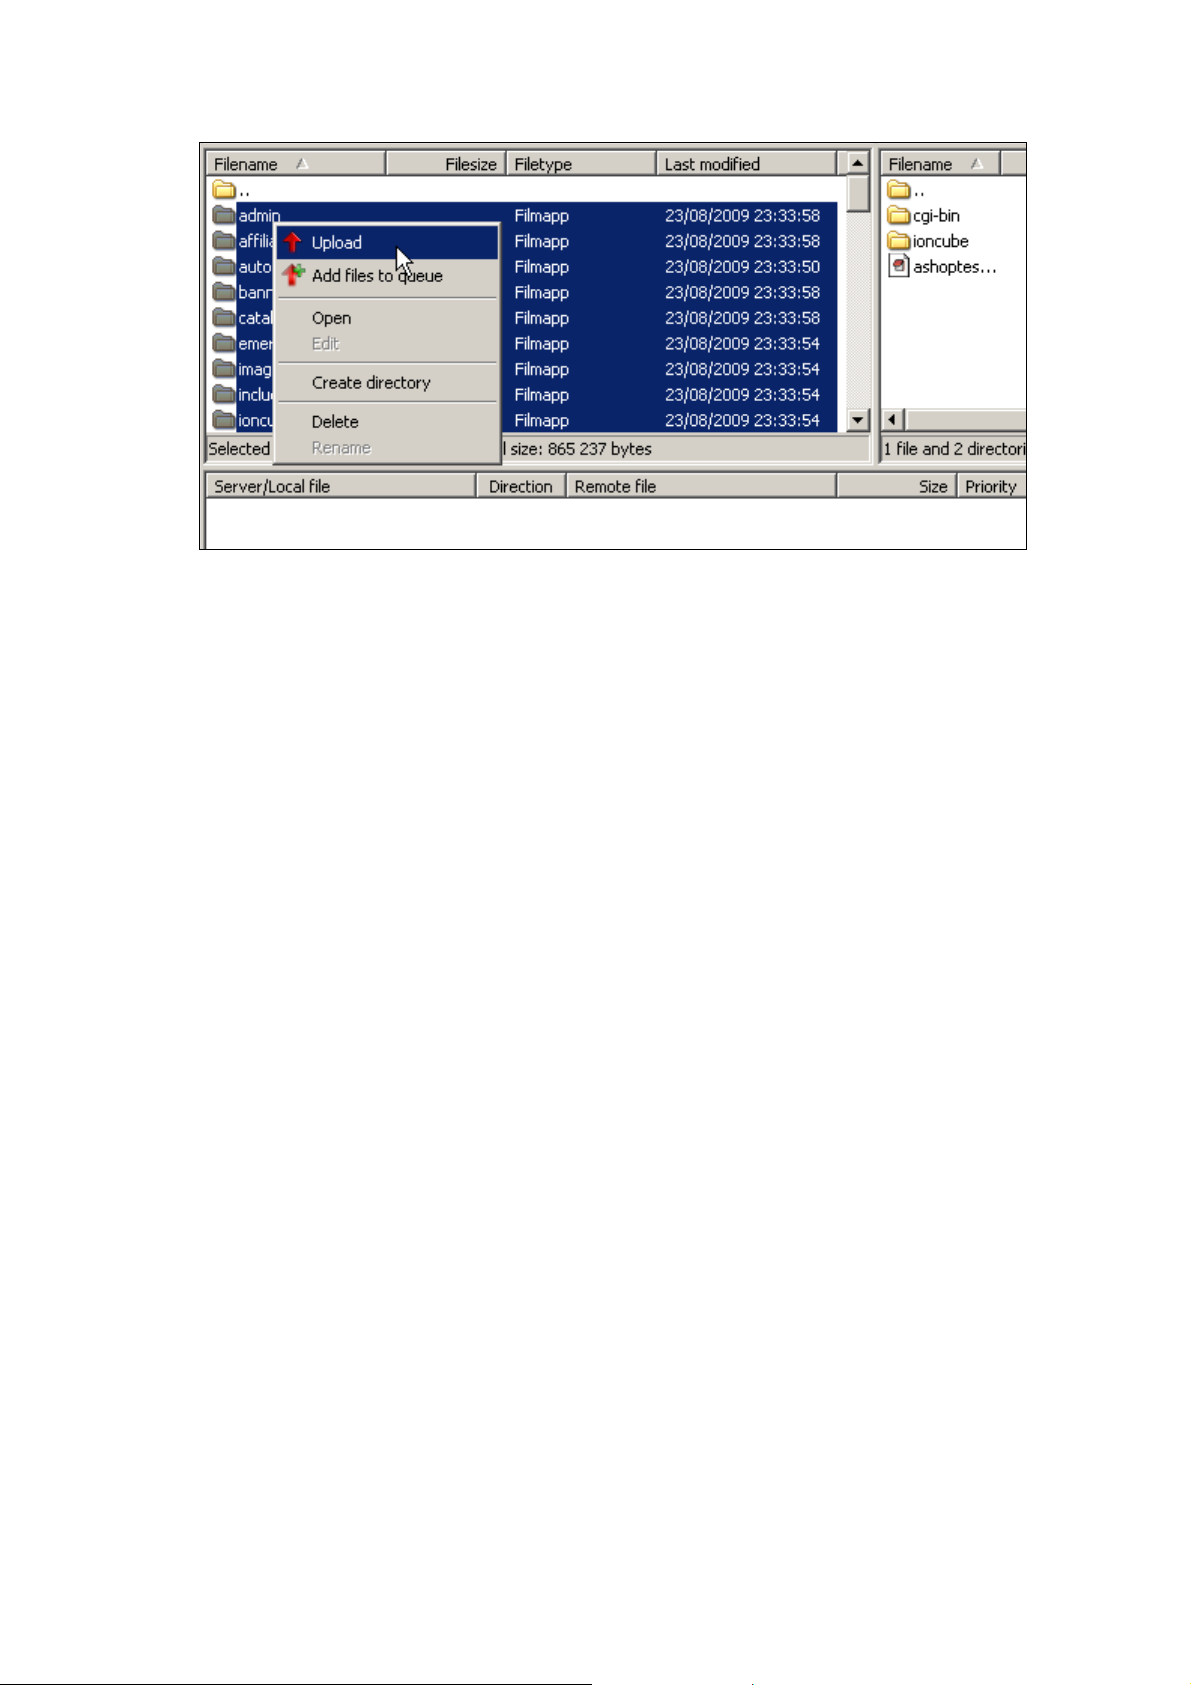
Upload all AShop files with Filezilla or another ftp client.
When the files are all uploaded to your site you should set full
permissions on the following files and folders by right clicking on them
in the right hand area of the Filezilla window and selecting File
permissions in the menu. Check all checkboxes or enter “777” in the
field labeled Numerical value.
• admin/receipts
• banners
• catalog
• “invoices” in the folder emerchant (not emerchant itself)
• “mail” in the folder emerchant
• images
• images/logo.gif
• “files” in the folder members (not members itself)
• previews
• prodimg
• products
• updates
Now you should open a web browser and enter the URL to your AShop in
the address line, followed by: /install.php, for example:
http://www.mycompanyname.com/ashop/install.php then press Enter to
start the AShop installation guide which will register your copy of the
software and set up the database tables.
To complete the installation guide you will need to have an AShop license
key, either a free 30 day trial key or a full key. If you haven’t already got
a license key you can get one by clicking one of the links on the first page
of the installation guide.
10
Page 11

The AShop installation guide.
Start the installation guide by clicking the button and fill out the form with
your name, email and AShop license key:
Register your AShop.
When you click the Register button your AShop will be activated, if the
license key is valid, and your AShop database tables will be created.
11
Page 12

Configuration
When the installation guide is completed you will be redirected to the login
for your AShop administration panel. The administrator username is:
ashopadmin but you will not need to enter the username at this stage. It
is only required if you have activated the Shopping Mall feature of AShop.
The default password is ashopadmin
Logging in to the AShop administration panel.
When you want to login to your administration panel again at a later time
you will find it at the URL where you installed AShop plus “/admin”, for
example: http://www.mycompanyname.com/ashop/admin
The first thing you should do when you have logged in to your
administration panel is to set the basic configuration options for your
shopping cart. Click the Configuration item in the left side menu. Then
click Shop Parameters in the top menu.
12
Page 13
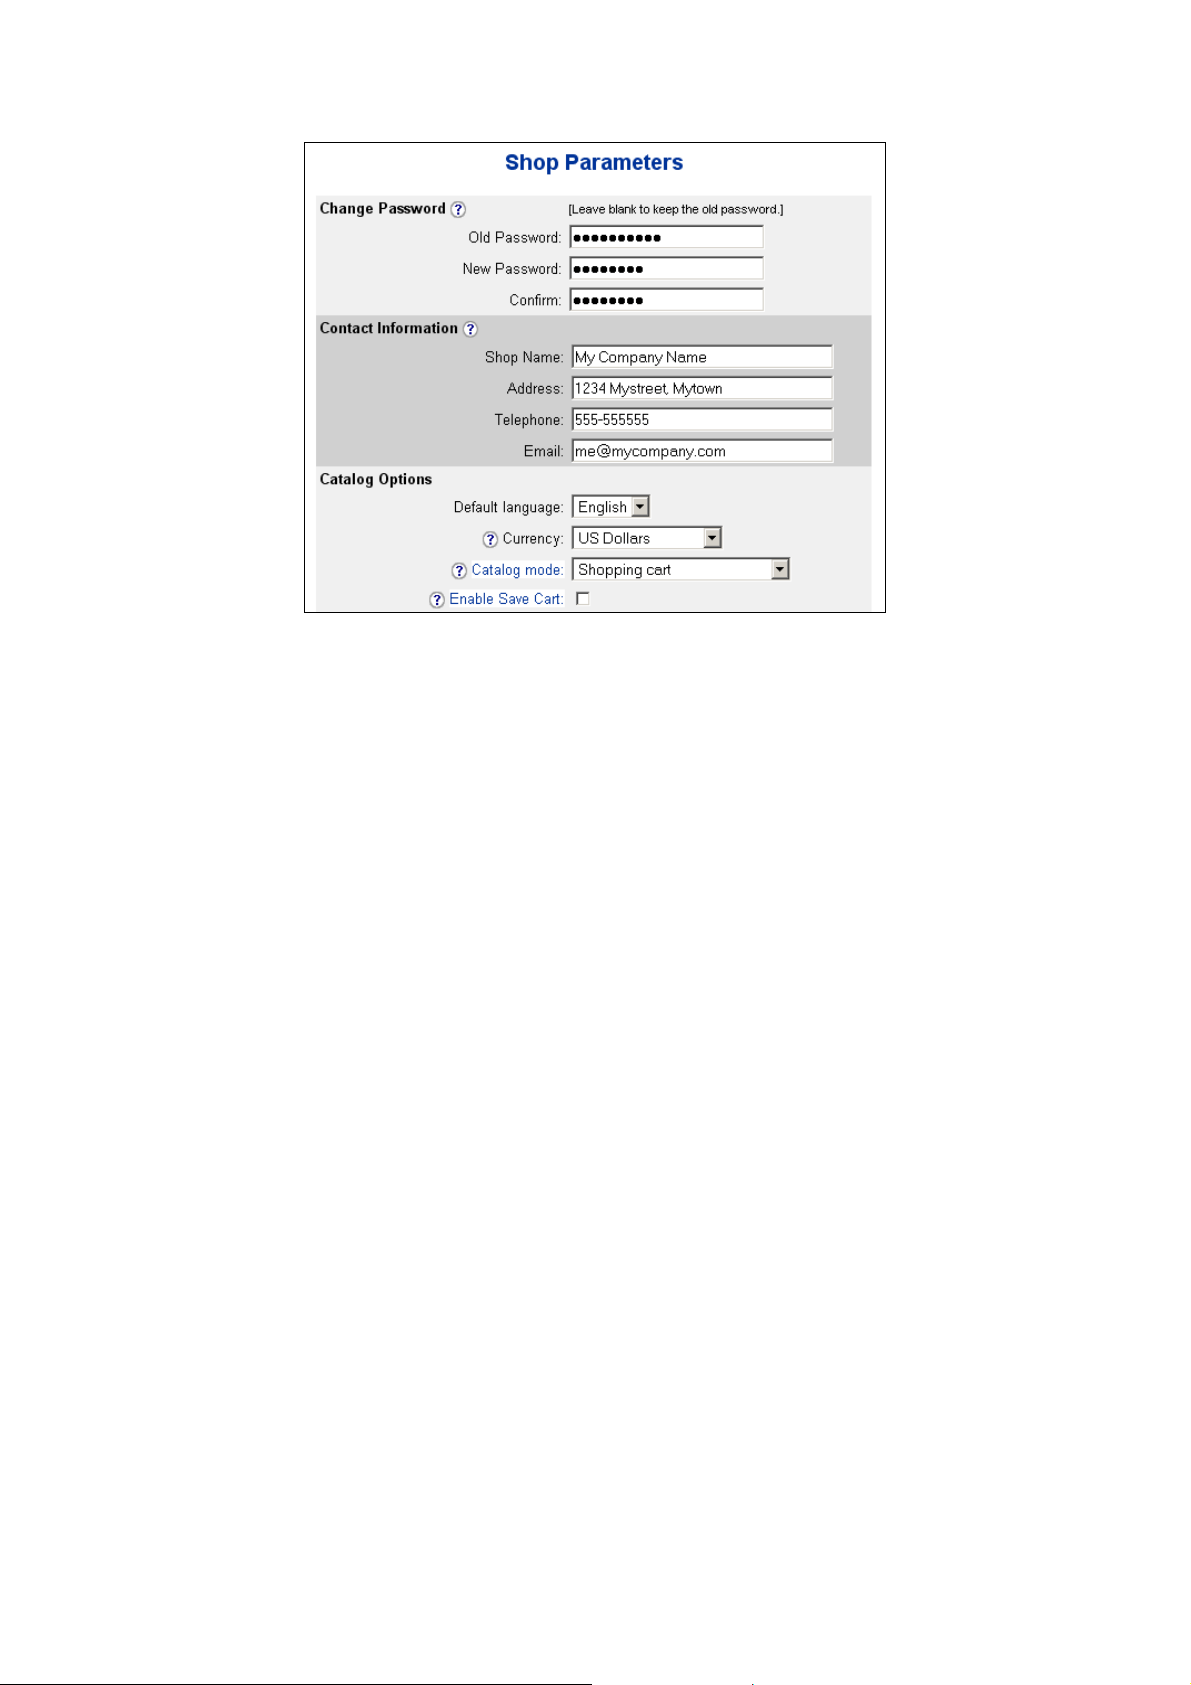
You should start by changing your administration panel password to make
sure no one else can access this area. Enter the current password in the
box labeled “Old Password” and type in the new password in both “New
Password” and “Confirm”.
Next you should change the default contact information to the name,
email and address of your business to make sure your AShop email
notices get to the right address and that your customers will know how to
contact you. Enter new values in the boxes in the “Contact Information”
section.
This page is also where you set the currency and default language of your
shop and where you configure several other features such as the
wholesale catalog and the shopping mall.
Click the Submit button at the bottom of the page to save your changes.
The next thing you should do is to make sure your customers can pay
you. This is done by clicking Configuration in the left menu and then
Payment in the top menu.
A sample payment option has been created for you. You can keep it and
just change it to the payment settings you wish to use or you can delete it
and create a new payment option instead.
13
Page 14

Payment configuration.
Once you have configured your payment option(s) you will need to add
products to your product catalog which your customers can buy from your
website. Click Edit Catalog in the left menu.
Managing the product catalog.
In the left area of the page, just right of the menu, you will find your
product categories. This is also where you manage the three standard
content pages: the first page, about page and terms page, add new
14
Page 15

categories by clicking the New category button and edit existing
categories through the various options below the category names: Edit,
Remove, Move up…
You can have an unlimited number of product categories and two levels of
subcategories. AShop should have added three example categories for you
to help you get started: Category 1, Category 2 and Category 3. You can
either edit these and change them to what you want to use or remove
them and add new ones instead.
You will need at least one product category to be able to add products to
your catalog.
Note: If your product categories are empty they will not show up in the
catalog when your customers visit your site. AShop will only show
categories that contain at least one item.
If you click on a category you will see a list of the products belonging to
that category to the right of the category list. AShop will have added a few
example products for you which you can modify or delete to add new ones
instead.
To add a new product first click the category it should be stored in, then
click the New product button at the top of the page.
15
Page 16

Adding a product to the catalog.
On the first page of the New product-guide you will give the product a
name, a price and a description. You will also find a number of other
settings for the product which may vary depending on the configuration of
your AShop. Setting the Sales Tax option to Yes will make your AShop
charge a sales tax on the product. The Affiliate Commission Level settings
are what you will pay your affiliate for helping you sell this product. The
only required fields on this page are the name, price and description.
Clicking the Submit button at the bottom of the page will open the next
step of the guide. This is where you add files to your product. There are
several types of files that you can add: product images, downloadable
products files, previews such as streaming mp3s or demo versions of
software, and lists of unlock keys for software.
16
Page 17

Managing product files.
You can upload several product images in jpg or gif format. The top image
will be shown as the main thumbnail in the product listing while the other
images will be shown in a gallery window that the customer can open by
clicking a link.
You can also upload several product files, for example multiple mp3 files if
you are selling a whole music album or both a software distribution file
and the documentation for the software in pdf format. You can sell and
deliver any type of file with your AShop.
Click the Finish button when you have uploaded the files for your
product. You can always return to this page to change or add more files.
The next and final step in the New product-guide is where you select if a
shipping fee should be added to the product price and how this fee should
be calculated. The available shipping options depend on the settings on
the page Configuration->Shipping.
Shipping calculation options.
17
Page 18

For example, you can select Flat rate to set a fixed shipping fee that will
always be added to the price when a customer buys the product or you
can select Zip Zone to define different rates depending on the customer’s
zip code.
When you select one of the options in the box Shipping Calculation
Method, a new set of fields will be shown to configure the method you
selected. If you leave the calculation method box at the default “None”
there will not be any shipping charges on this product.
Note: You can use shipping calculation even if you have added
downloadable product files, for example to provide a CD copy of a
software product that the customer also is allowed to download instantly.
Click Submit when you have completed the shipping calculation
configuration to save the settings and finish the New product-guide. You
will now be returned to the product category you initially selected and
there will be a product listing of the new product you just added. All the
options you have just configured plus several more can be changed at any
time by clicking the various buttons in the product box.
A new product listing with buttons to edit the product.
You can repeat these steps to add any number of additional products to
the category or to another category. To find out more about some of the
more advanced options for your products you should read the manual
which you can get access to by clicking Online Help in the left menu.
18
Page 19
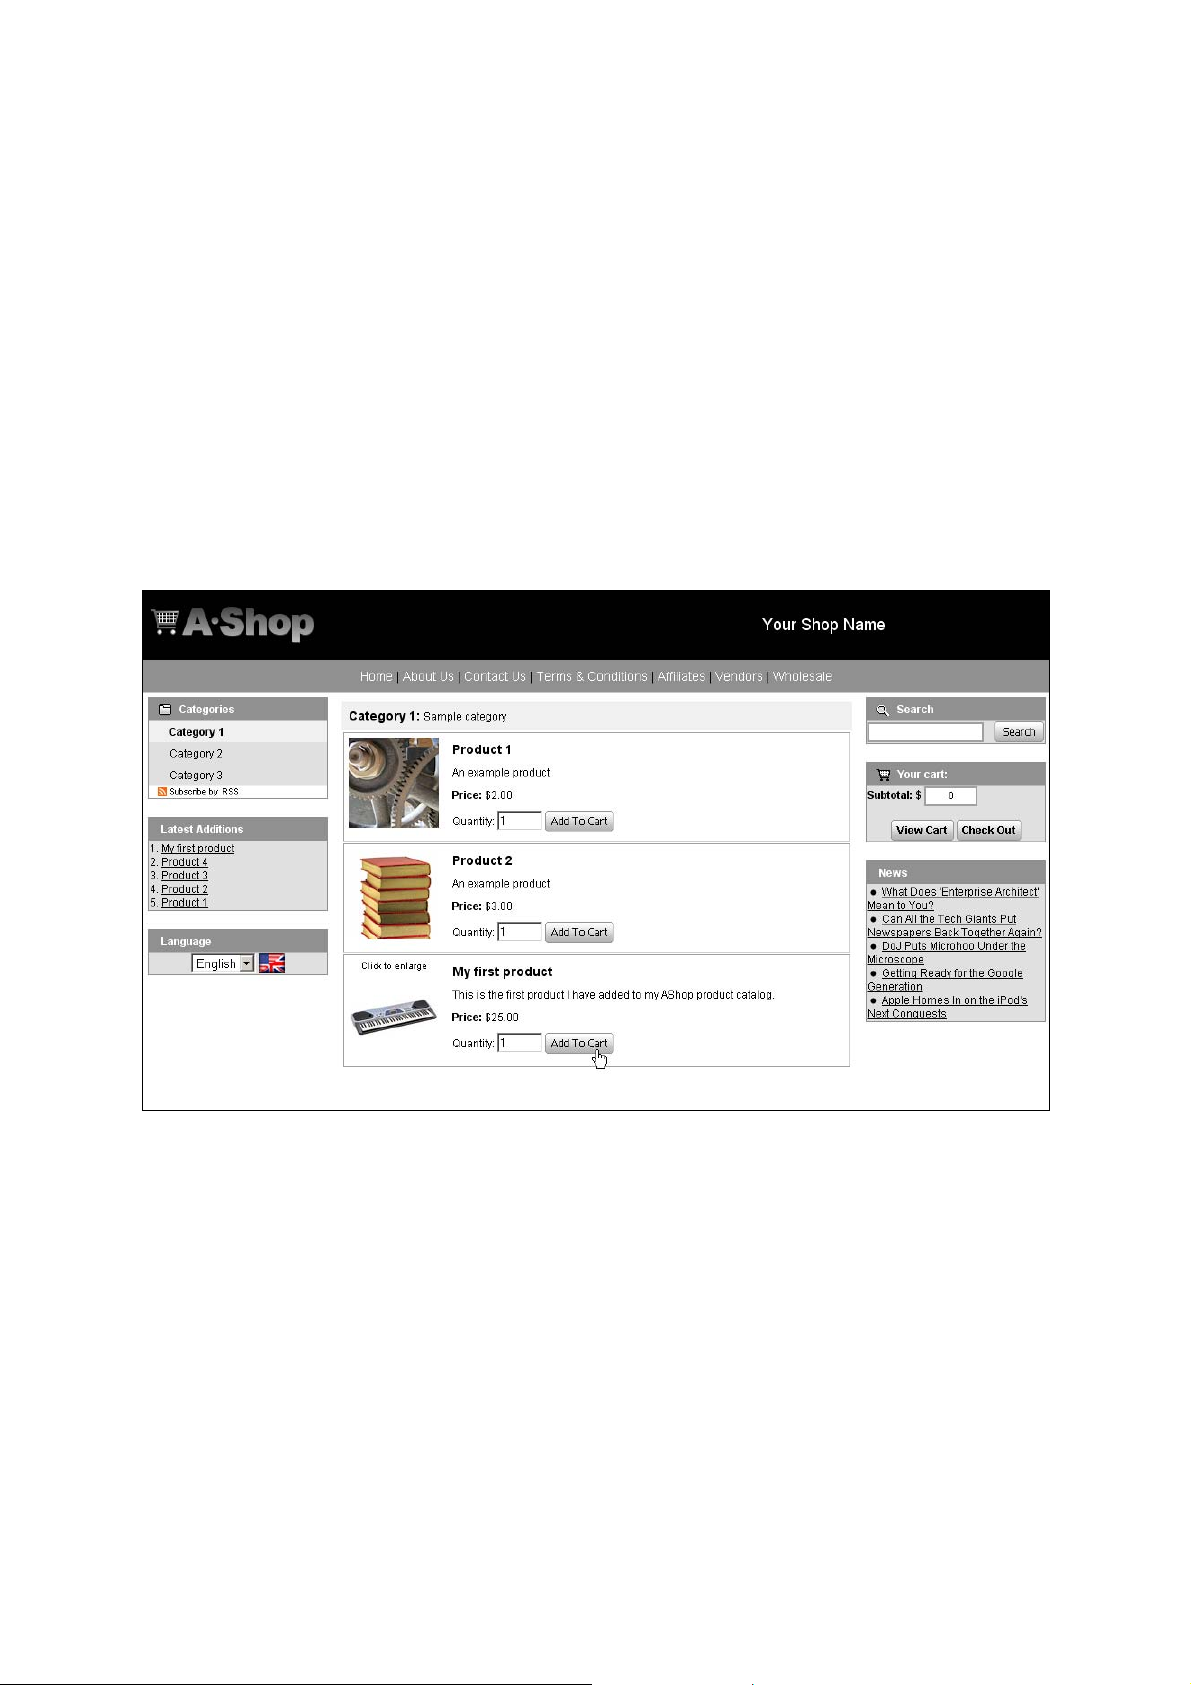
View the catalog
Your product catalog, which is where your customers will be able to buy
your products, can be access by opening the page index.php on the URL
where you installed your AShop, for example:
http://www.mycompanyname.com/ashop/index.php
or just:
http://www.mycompanyname.com/ashop
if the web server is configured to use index.php as the default home page.
You can also open the product catalog directly from your AShop
administration panel by clicking View Catalog in the left menu.
This is how the product catalog will look by default:
The AShop product catalog.
The look and layout can be changed by modifying the AShop templates
but this will be described in a separate guide.
Note: A simplified version of the catalog is available by using
catalogue.php instead of index.php. You can make this the default instead
by removing the index.php file.
Your customers can add the products to their shopping cart by clicking
Add To Cart. They can buy the products currently in their cart by clicking
Check Out, which will take them to the payment option you previously
configured.
19
 Loading...