

Page 1

User Manual
Ashley-Edison International Ltd Page 1
Model M2 Thermal Camera
User Manual
Page 2

User Manual
Ashley-Edison International Ltd Page 2
The Quality Management System of Ashley-Edison International Ltd. Is
approved to ISO9001:2000 for the design and manufacture, stockholding, inhouse repair and site servicing of non contact temperature measuring
instrumentation.
Ashley-Edison International Ltd. reserves the right to make
changes and improvements on any of the products described in
this manual without prior notice.
Model M2 Thermal Camera complies with current European directives
relating to electromagnetic compatibility and safety. (EMC directive
89/336/EEC; Low voltage directive 73/23/EEC)
Copyright
Ashley-Edison International Ltd, 2007. All rights reserved worldwide. No parts of
the products may be reproduced, transmitted, transcribed or translated into any
language or computer language in any form or by any means, electronic,
magnetic, optical, manual or otherwise, without the prior written permission of
Ashley-Edison International Ltd.
This manual must not, in whole or part, be copied, photocopied, reproduced,
translated or transmitted to any electronic medium or machine readable form
without prior consent, in writing, from Ashley-Edison International Ltd.
Page 3

User Manual
Ashley-Edison International Ltd Page 3
Table of Contents
Introduction ................................................................................................................ 4
Precautions ................................................................................................................ 5
Maintenance............................................................................................................... 6
Calibration and Repair Philosophy ............................................................................. 6
Technical Support ...................................................................................................... 6
Feedback to Us .......................................................................................................... 7
System overview ........................................................................................................ 8
Customer Benefits...................................................................................................... 9
System Configuration ................................................................................................. 9
Technical Specifications........................................................................................... 10
Features ................................................................................................................... 12
Parts Description...................................................................................................... 14
Quick Start Guide..................................................................................................... 15
Quick Reference Table............................................................................................. 16
Introduction to Buttons ............................................................................................. 17
Button Functions ...................................................................................................... 18
Using the Camera In Detail ...................................................................................... 19
Battery Charging ...................................................................................................... 40
Troubleshooting ....................................................................................................... 42
Emssivity .................................................................................................................. 43
Typical Emissivity Values………………………………………………………………….45
Page 4

User Manual
Ashley-Edison International Ltd Page 4
Introduction
This publication provides the necessary information required to safely operate the Model
M2 Thermal Camera.
It is important to fully check all equipment with which you have been supplied.
The equipment should be used, maintained and serviced by suitably trained personnel,
capable of carefully following the procedures and guidelines given in this User Manual
All User Manuals and leaflets should be read thoroughly before proceeding with operation
of the equipment.
It is also advisable that all User Manuals and Instruction Leaflets supplied are kept
readily available, for reference when the equipment is in general use.
Page 5

User Manual
Ashley-Edison International Ltd Page 5
Precautions
The following precautions must be adhered to at all times and must be
considered in addition to any advised precautions issued at the relevant
worksite or work area.
• Do not direct the Model M2 Thermal Camera at very high intensity
radiation sources such as the sun, carbon dioxide lasers or arc
welders etc.
• Always replace the lens cap when the unit is not in operation.
• Do never point the Model M2 Thermal Camera at high-temperature
object when switching on.
• Wait for 10 seconds or longer to restart the camera after turning it off.
• Keep the Model M2 Thermal Camera steady when operating on it.
• The Model M2 Thermal Camera shall work between -20℃ and +50℃.
• When the Model M2 Thermal Camera is not in use or is to be
transported, ensure that the unit and accessories are stored in the
protective carry case.
• The Model M2 Thermal Camera incorporates precision optical
equipment and static-sensitive electronics which should be protected
from shock and vibration at all times.
• Do not jam the air vent on the Model M2 Thermal Camera body.
• Do not attempt to open the camera body, as this action will void the
warranty.
The Model M2 Thermal Camera utilizes a Lithium Ion (Li-Ion) rechargeable
battery pack. The following safety precautions must be adhered to at all times
to ensure the safe use of this equipment.
• Do not disassemble or attempt to open the battery under any
circumstances
• Do not expose the battery to fire or high temperatures.
• Do not short circuit the battery.
• Do keep the battery off moisture or water.
• Charging of the battery should only be carried out using the
recommended or supplied charging device.
Page 6

User Manual
Ashley-Edison International Ltd Page 6
Maintenance
To ensure that the Model M2 Thermal Camera is kept in good working
condition and remains fully operational, the following guidelines should be
adhered to at all times.
Non-optical surfaces
The non-optical surfaces of the camera can be cleaned when required, with
a soft cloth dampened with water and a mild detergent.
Optical surfaces
The optical surfaces of the camera lens should only be cleaned when visibly
dirty. Care should be taken to avoid touching the exposed lens surface, as
skin acid left behind from fingerprints can be damaging to coatings and lens
substrates. Use only a proprietary lens cleaning tissue.
Calibration and Repair Philosophy
To ensure the accuracy and reliability of the Model M2 Thermal Camera, it
is highly recommended that the instrument be calibrated at 12 monthly intervals
Contact Ashley-Edison to arrange for the instrument to be returned to
Ashley-Edison calibration centre for a calibration check, or in the unlikely
event of a component or system failure, for repair
Caution The Model M2 IR Thermal Camera does not incorporate any user
serviceable parts. Never attempt to disassemble or modify the camera.
Opening the unit invalidates the warranty
Technical Support
Technical support for your Ashley-Edison Thermal Imaging System can be
obtained by either contacting the address / telephone number on the cover
of this User Manual or by Email to the following address:
Page 7

User Manual
Ashley-Edison International Ltd Page 7
Feedback to Us
We have tested and verified the information in this manual to the best of our
abilities. Yet as we are committed to continuous development and progress,
you might find features of the product have been changed since the time of
printing. You are appreciated to let us know about any error you find, and
your suggestions for further editions by either contacting the
address/telephone number on the cover of this User Manual, or by Email to the
following address: [email protected]
Page 8

User Manual
Ashley-Edison International Ltd Page 8
System overview
Model M2 Thermal Camera leads another breakthrough in today’s Infrared
Thermal Imaging industry.
Smallest, lightest and versatile, Model M2 sets a new baseline for the most
cost-effective IR thermal cameras in the world. Featured finger-tip controls,
stunning imaging performance, precise full-screen temperature
measurement, efficient image processing and plug-and-play USB
connectivity, it opens large new markets to the benefit of infrared technology.
Performing a way none IR system can and priced at the lowest level in the
market, its application is limited only by your imagination.
Model M2 Thermal Camera is the only IR camera that offers all the possibilities
of a high range camera at an unanticipated affordable price, enabling high-
performance thermal imaging where never possible before.
Page 9

User Manual
Ashley-Edison International Ltd Page 9
Customer Benefits
As an ultra-portable IR camera with big-camera power, the Model M2 Thermal
Camera provides outstanding thermal imaging of the highest quality and
presents a range of benefits to the customers, which can be seen below:
• High performance at bottommost price
• Ultra-compact, robust & easiest to use
• Accurate radiometric temperature measurement
• Advanced on-board image processing
• Integrated alarm, hot-spot tracing & laser locating
• Digital image storage with voice recording
• Professional analysis & reporting software
• Versatile fast USB connectivity
• License free
System Configuration
Please ensure that the following items have been correctly supplied:
• Model M2 Thermal Camera with laser locator
• 13mm IR lens
• 2.2’’ TFT & 1.2’’ CSTN color LCD
• Two rechargeable Li-ion batteries
• Battery charger
• USB extension cable
• Audio/video cable
• Post-analysis software IrAnalyser
• User manual
• Leather sheathe
• Soft carry bag
• Packing case
Page 10

User Manual
Ashley-Edison International Ltd Page 10
Technical Specifications
Image Performance
Detector Type: Focal plane array uncooled microbolometer
UFPA (120 x 120 pixels)
Spectral Range: 8-14µm
Field of View/ Focus: 18.9° x 18.9°
Thermal Sensitivity: <120mk @30°C
Image Frequency: 50 Hz PAL/60 Hz NTSC, non-interlaced
Electronic Zoom: × 2
Image Presentation
External Display: 2.2” TFT & 1.2” CSTN high resolution color LCD
Display Color: 256 level, 5 palettes
Video Output: PAL/NTSC, composite video
Measurement
Temperature Range: -20°C-+250°C
Accuracy: ±2oC or ± 2%of reading
Measurement Modes:
Auto hot-spot trace, spot, area, line profile,
isotherm, auto alarm
Emissivity Correction: Emissivity variable from 0.01 to 1.00 (in 0.01
increment)
Measurement Features: Automatic correction based on user input for
reflected ambient temperature, distance, relative
humidity, atmospheric transmission and external
optics
Image Storage
Type: Built-in Flash memory
Capacity: 100 images
Voice Annotation: Variant for different files, up to 30 seconds per file
System Status Indication
LCD Display: Display of battery status, indication of power
Sound Alarm Automatic alarm for power shortage
Laser Locator
Classification: Class 2
Type: Semiconductor AlGalnp Diode Laser;
1mW/635nm (red)
Battery System
Type: Li-ion battery, rechargeable, field replaceable
Operating time: Over 2 hours continuous operation
Charging System:
In camera via USB interface from AC adapter 96 – 250 VAC) or
in external battery charger
Power consumption < 3W
Page 11

User Manual
Ashley-Edison International Ltd Page 11
Environmental Specification
Operating Temperature -20°C-+60°C
Storage Temperature -20°C-+60°C
Humidity Operating and storing 10% to 95%, non- condensing
Encapsulation IP54
Shock Operational: 25g, IEC 68-2-29
Vibration Operational: 2g, IEC 68-2-6
Interfaces
USB1.1 Image, measurement, and voice transfer to PC
Physical Characteristics
Size 120mm x 60mm x 30mm (Standard Model)
Weight 265 gms (including battery)
Page 12

User Manual
Ashley-Edison International Ltd Page 12
Features
Image
• All the images are displayed on LCD in Black/ White and multiple 256-
level colors.
• Live image can be frozen on camera and captured in flash memory
onboard.
• Live image can be 2× zoomed in when there is no menu on the screen.
• Saved image can be transferred to PC via USB extension cable.
Freeze and Save
• Live image can be frozen on camera.
• Frozen image can be captured in flash memory onboard.
• Onboard data of live image can be frozen on camera and captured in flash
memory.
• Up to 100 images can be saved and up to 30-second voice annotation
can be saved for each Image.
• Voice annotation and thermal image can be captured in flash memory.
• Frozen or saved image can be processed on board.
Replay
• Saved images can be replayed on camera and in PC.
• Voice annotation and saved image can be simultaneously replayed on
camera and in PC.
• Replayed image on camera can be processed onboard.
• Saved images can be transferred to PC via USB extension cable for post
processing with analysis software.
Temperature Measurement
• Automatic trace for hot spot in the screen.
• Automatic indication of temperature for the center of the screen.
• Measurement of any spot within the screen.
• Measurement of movable spot.
• Measurement of movable area, showing max, min or mean temperature of
the area.
• Measurement of any lines: temperature profiles also generated.
• Isotherm measurement: display spots within a defined temperature range
in the same color.
• Automatic non-uniformity calibration ensures temperature measurement
stable and accurate.
Page 13

User Manual
Ashley-Edison International Ltd Page 13
Menu Setup
• Set up temperature measurement parameters and camera functions.
• Automatic measurement correction based on user input for emissivity,
distance, relative humidity, atmospheric transmission and external optics.
Page 14
User Manual
Ashley-Edison International Ltd Page 14
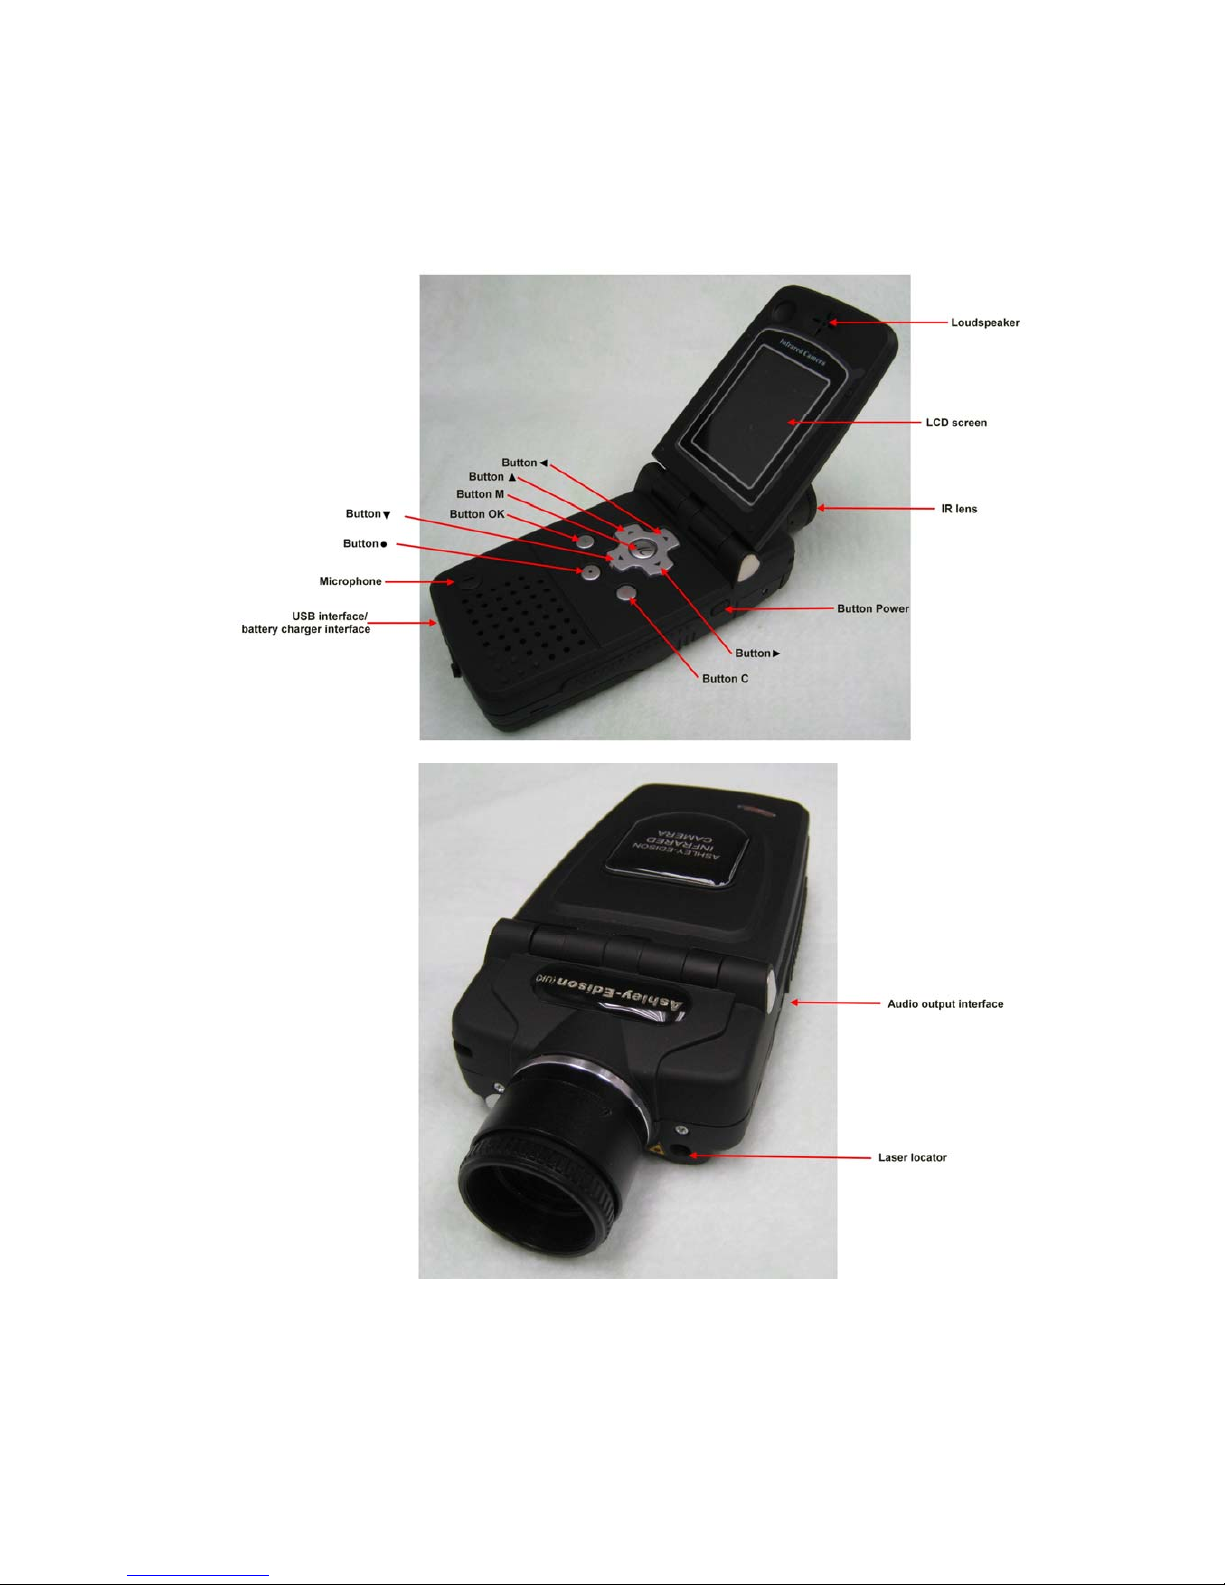
Parts Description
Page 15

User Manual
Ashley-Edison International Ltd Page 15
Quick Start Guide
• Ensure that the battery is fully charged.
• Power on the Model M2 thermal camera.
• Open the top half of the Model M2 thermal camera.
• Wait for 15 seconds and uncover lens cap.
• Non Uniformity Correction (NUC) is performed automatically after switching
on.
• Aim the Model M2 Thermal Camera at the object.
• Rotate the aperture and adjust the focus to get clear image.
• Press Button “•” for three seconds to switch between Auto and Manual
mode.
• Press Button “•” and release it instantly and then adjust brightness,
contrast and palette if necessary.
• Press Button “OK” to freeze the live image.
• Press Button “OK” again to store the frozen image.
• Press Button “C” to resume the live image.
Page 16

User Manual
Ashley-Edison International Ltd Page 16
Quick Reference Table
ABBREVIATION SIGNIFICANCE
On/ Off Button Power
M Button Menu
∧
Button Up-direction
v Button Down-direction
< Button Left-direction
> Button Right-direction
OK Button Confirm
C Button Cancel
• Button •
Page 17

User Manual
Ashley-Edison International Ltd Page 17
Introduction to Buttons
BUTTON FUNCTION
On/Off Power On/Off
M
To enter menus and its sub menus
To select one sub menu or option under menu
To confirm parameter setup
∧
Button Up-direction
To toggle between sub menus under menu
To turn on or turn off laser locator when there is no menu on live image
v
Button Down-direction
To toggle between sub menus under menu
To 2× zoom in the live thermal image
<
Button Left-direction
To return to the parent menu
To change value of parameters
>
Button Right-direction
To enter sub menus under menu
To change value of parameters
To perform background modification when pressed simultaneously with “C”
Ok
To select one sub menu or option under menu
To freeze and store live image when menu does not appear on screen.
To record voice annotation, replay voice annotation after recording and
bring up the recording menu when re-recording
To replay a selected image after preview
C
To cancel one sub menu or option under menu
To exit menu
To perform non-uniformity calibration when there is no menu on live
image
•
When menu does not appear on screen, keep it depressed for three
seconds to switch between Auto and Manual mode
When menu does not appear on screen, press it for an instant and then
release it to bring up the temperature measurement setup menu
To stop recording of voice annotation
To save voice annotation together with an image after recording or
replaying the recording
To delete image when previewing saved images
Page 18
User Manual
Ashley-Edison International Ltd Page 18
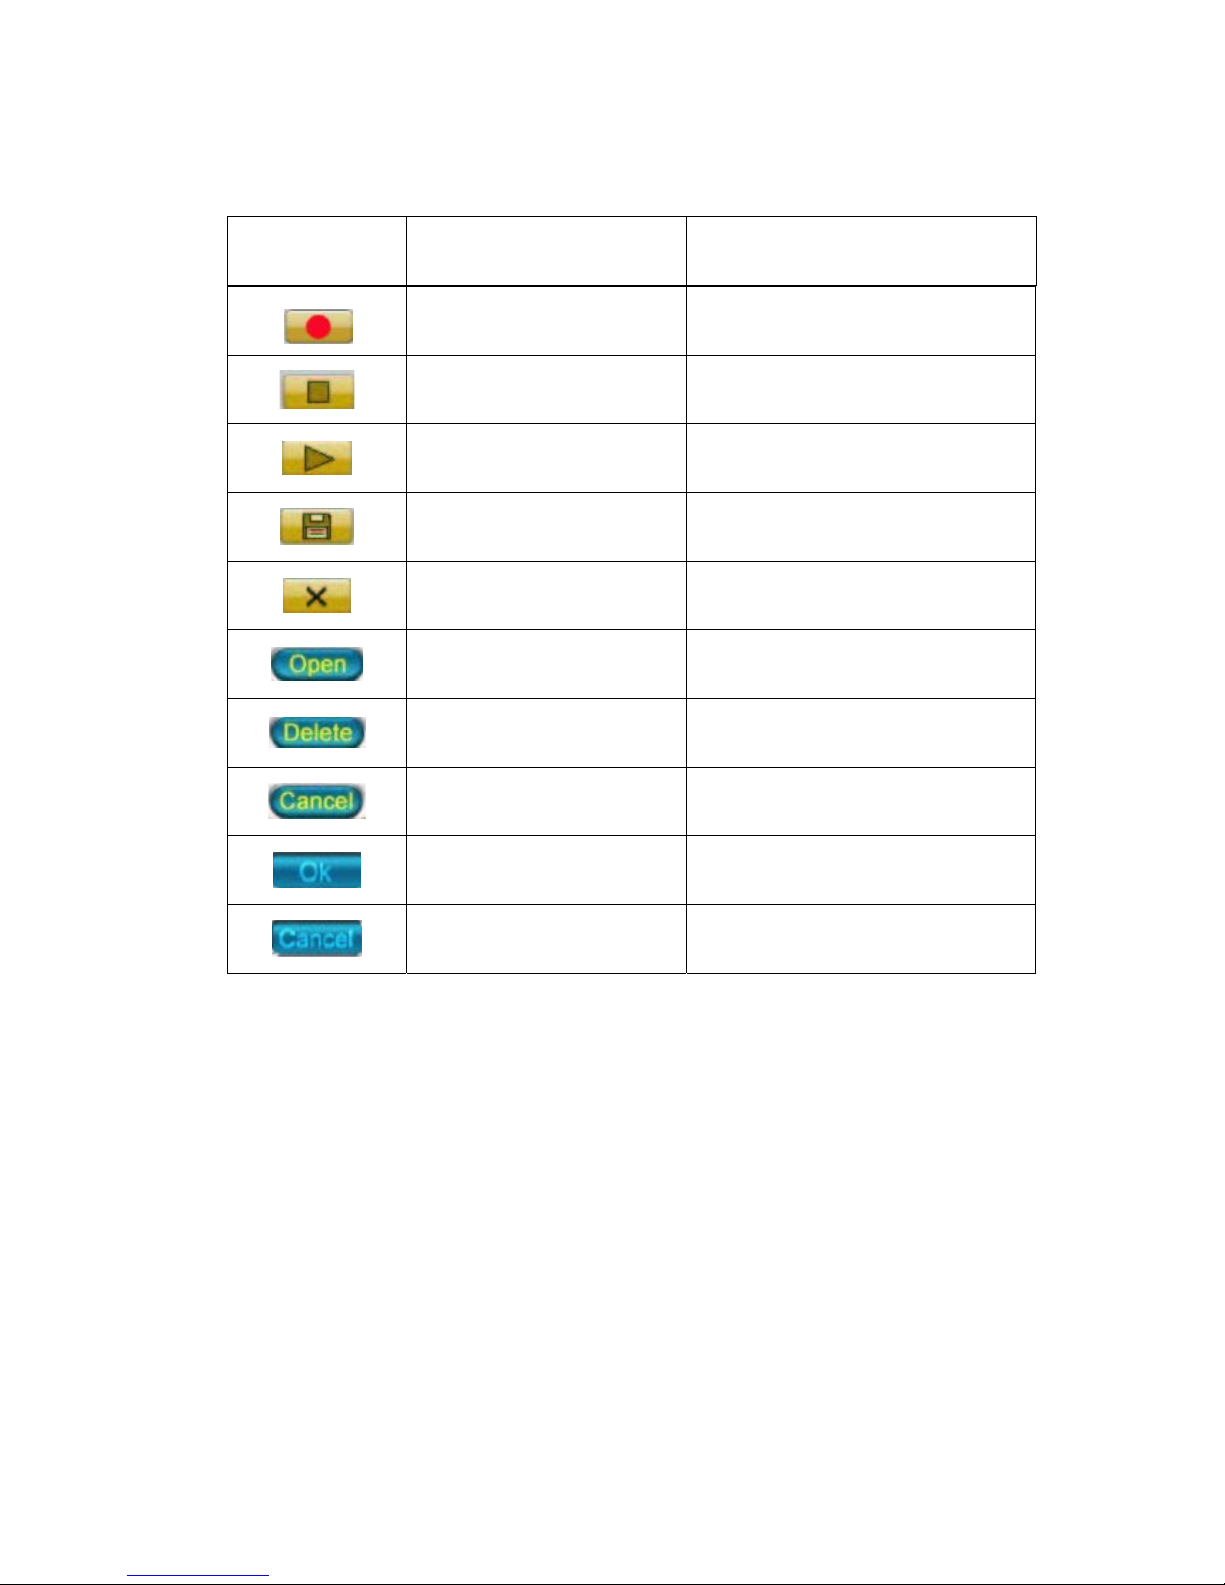
Button Functions
Buttons in
dialog box
Corresponding buttons
on camera body
Function
Button OK
To start recording of voice
annotation
Button •
To stop recording of voice
annotation
Button OK To playback recorded voice annotat
Button •
To save recorded voice annotation
with an image
Button C
To cancel recording of voice
annotation
Button OK
To display a saved image and
data in full screen
Button •
To delete any or all of the saved
images
Button C
To cancel an operation and return
to the file list or image gallery
Button OK To confirm deletion of a file
Button C To cancel deletion of a file
Page 19

User Manual
Ashley-Edison International Ltd Page 19
Using the Camera In Detail
Powering on the camera
• Switch on the camera by keeping Button “Power” depressed till the two
indicator lights on the top half of the camera shine.
• Open the top half of the camera.
• A welcome picture will appear on the inner LCD screen.
• When the welcome picture disappears, the power on test result of the
system including the hardware and software version No of the camera will
display on the upper half of the screen. Meanwhile, a blue loading bar
appears at the bottom of the inner LCD screen to indicate the camera
initialization progress. After 100% loading, a flash image below appears in
the inner LCD screen.
Basic Temperature Measurement
• For basic temperature measurement first ensure that a suitable
temperature range is set and that the image is in focus, two methods are
then available, dynamic real time temperature measurement and static
temperature measurement.
Dynamic Real Time Temperature Measurement
• Palette lies at the bottom of the screen, with its upper and lower limits
displayed at the two ends.
• Two temperatures are present just above the palette. The first one indicates
the lowest temperature, and the second indicates the highest scene
temperature. There are two arrows on the palette, which indicate the specific
color corresponding to the lowest and highest temperature respectively.
• The center temperature is displayed in top of the screen.
Page 20

User Manual
Ashley-Edison International Ltd Page 20
Setting the temperature range
• There are two modes available, Auto and Manual.
• To switch between one mode and another keep Button “•” depressed
for three seconds, the current mode is displayed temporarily on the
screen after the button is released.
• Within Auto or Manual mode the setup parameters menu can be brought
up, this is achieved by pressing Button “•” for an instant in either mode.
The item which can be modified will be highlighted.
• Press “∧ ” and “ V ” to change value when the upper or lower limits of the
palette is highlighted, to shift between different palettes from 1 to 5 when
palette is highlighted and to shift between Auto Mode and Manual Mode
when highlighted.
• Press “>” to shift between each item in turns counter-clockwise.
• Press “<” to shift between each item in turns clockwise.
• In Auto Mode, if you highlight the upper or lower limits of the palette
and press “∧” and “V” to change its value, the mode will change to
Manual Mode automatically.
• Press either OK or C to confirm the modification.
Static Temperature Measurement
• Keep the camera steady when you have the image in focus, press
Button “OK” to freeze the live image. The word “Frozen” will appear on
the screen to indicate the current status of the image.
• Press any key except OK to cancel this indication if necessary.
• Press Button “∧”, “V”, “<” and “>” to move the center cursor.
• The value in top of the screen shows the temp of the moving cursor.
• Imaging performance varies from different temperature range and palette.
• Setting the temperature range is the same as in dynamic real time
temperature measurement.
Page 21

User Manual
Ashley-Edison International Ltd Page 21
Main Menu Introduction
• This section covers all the main menu options and their sub menus. The
main menu is brought up on the screen by pressing Button “Menu”.
• The menus can be navigated by pressing Button “∧”, “∨”, “<”and “>”,
the highlighted option is confirmed by pressing Button “Menu” or “OK”.
• Setup Analysis: Allows for the camera functions to be setup.
• Setup Target: Allows for temperature measurement parameters to be set
up.
• Setup Time: Allows for the date and time to be set.
• Setup Default: Resume the factory configured value of all the parameters.
• File Browse: To preview and open saved images.
• File Delete All: To delete all the saved images.
• Analysis Spot: Allows spot measurement to take place on saved or
frozen images.
• Analysis Area: Allows rectangular area measurement to take place on
saved or frozen images, displaying maximum, minimum or mean
temperature.
• Analysis Line: Allows line profile measurement to take place on saved
or frozen images.
• Analysis Isotherm: Allows for an isotherm to be placed on live, saved
or frozen images.
• To exit the menu system at any time and return to the image press Button
“C”.
Page 22

User Manual
Ashley-Edison International Ltd Page 22
Laser Locator
• To turn on the laser locator option, press Button “M” to bring up the main
menu, press Button “∧”, “∨”, “<” and “>” to highlight the “Setup
Analysis” option, select by pressing Button “Menu” or “OK”.
• Under the heading named “Laser”, you can toggle between “on” and “off”
by pressing Button “<” and “>”. The selection “on” is confirmed by
pressing Button “Menu” or “OK”.
•
• When there is no menu on live image, press Button “A” to turn the laser on
or off.
• To turn off the laser locator option, press Button “M” to bring up the main
menu, press Button “∧”, “V”, “<” and “>” to highlight the “Setup
Analysis” option, select by pressing Button “Menu” or “OK”.
• Under the heading named “Laser”, you can toggle between “on” and “off
by pressing
” ∧” Button “<” and “>”. Press Button “Menu” or “OK” to confirm your
selection.
Page 23

User Manual
Ashley-Edison International Ltd Page 23
Warning:
• Pls never point the laser at eyes so as to avoid any hurt.
Pausing Live Images and Saving Images
• To store an image, press Button “OK” to freeze the live image. Pressing
Button “OK” again will store the infrared image into built-in flash
memory.
• The frozen image can be defined as the mean of 1, 4, 8, or 16 image
frames, which is designed to reduce or eliminate noise so as to ensure
better image quality.
• The image storage begins when “S” appears on the screen. When the
image is saved, indication like “Saved as IMAGE006” will appear on the
screen temporarily and then comes to the live image capturing status.
• If voice annotation is required with the image, make sure that the “Voice
Annotat” is toggled “ON” before trying to save the image. To do this, press
button “M” to bring up the main menu, press Button “∧”, “ V ”, “< ” and
“>” to highlight the “Setup Analysis” option, select by pressing Button
“Menu” or “OK”.
• Under the heading named “Voice Annotat”, you can toggle between “on ”
and “off by Button “< ” and “>”. The selection “on” is confirmed by pressing
Button “Menu” or “OK”
• Then when you repeat the steps to save an image the option to record
the voice is present.
• Press Button “OK” to begin recording, with time of the recording counted
automatically. Press Button “•” to stop recording. Pressing Button “C” will
cancel recording.
Page 24

User Manual
Ashley-Edison International Ltd Page 24
• Buttons in the dialog box above change to be the ones below
• Press Button “OK” to playback recording. Pressing Button “C” will
cancel recording. The recording can be repeated until a satisfactory
recording has been made.
• Pressing Button “•” will confirm the recording and save both the image and
recording, with the indication of “” appearing momentarily on the screen.
Indication like “Saved as IMAGE006” will appear on the screen temporarily
when finished.
• To turn off the voice annotation option, press Button “M” to bring up the
main menu, press Button “∧”, “ V ”, “< ” and “>” to highlight the “Setup
Analysis” option, select by pressing Button “Menu” or “OK”.
• Under the heading named “Voice Annotat”, you can toggle between “on”
and “off by pressing Button “<” and “>”. The selection “off is confirmed by
pressing Button “Menu” or “OK”.
Note:
• Recording will automatically stop when it reaches 30 seconds.
Non Uniformity Calibration (NUC)
• Non Uniformity Calibration allows the automatic adjustment of the camera
detector to ensure normalization and sharpness of the screen image.
• Non Uniformity Calibration can be performed on live image.
• To perform a Non Uniformity Calibration (NUC), keep Button “C” depressed
for two seconds.
• Then the live image pauses temporarily, whilst a shutter is placed in
front of the detector.
• If the image quality is still not satisfying, keep “>” depressed and then
press C to modify the background. There will be “Calibrating…” displayed
on the screen when modification starts and “Finished” when
accomplished.
• This process takes only a couple of seconds, however for best results,
please ensure that camera is pointed at an even object with temperature
similar to the ambient.
Page 25
User Manual
Ashley-Edison International Ltd Page 25
Note: It is advisable not to modify the background too frequently. The default
setting has reserved a group of accurate data which is approved by many
tests. Better quality image can also be achieved by going back to default
setting.
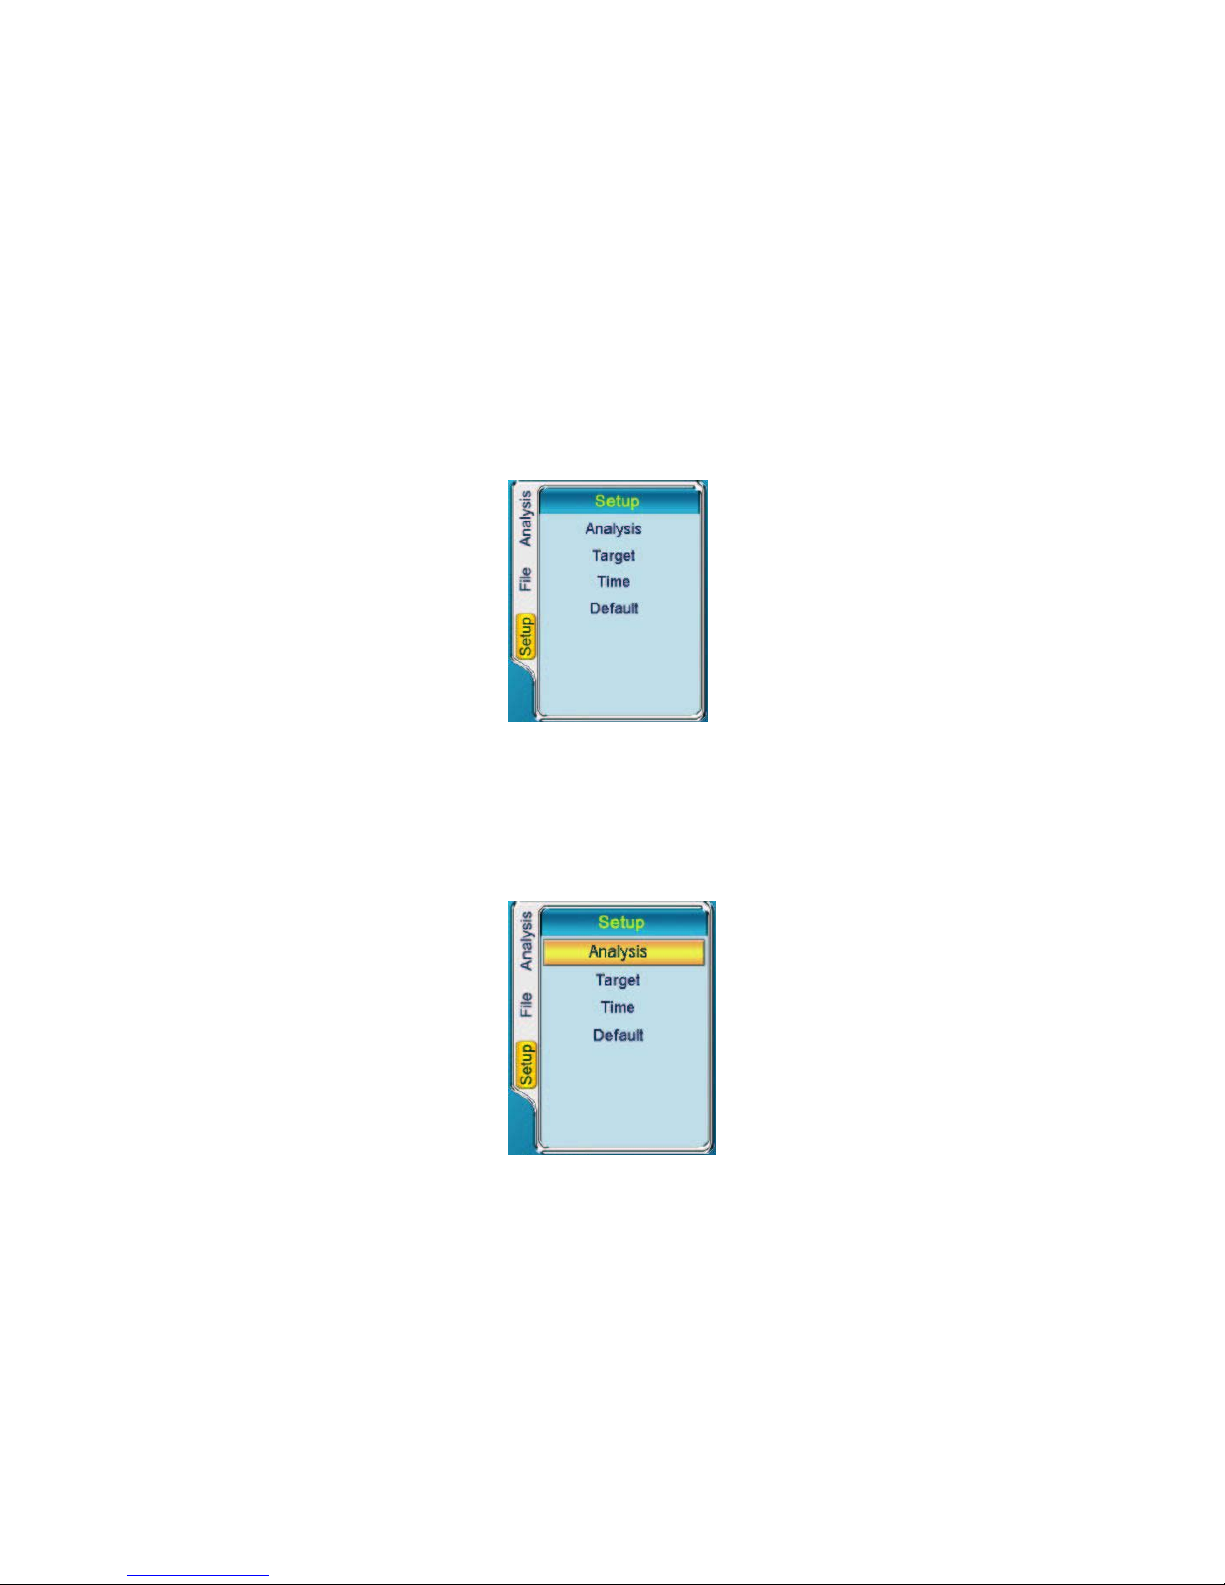
Menu Setup
• Press Button “Menu” to bring up the main menu. Press Button “∧” and “V”
to highlight the menu “Setup”
• Four sub menus are available: Analysis, Target, Time and default.
Sub Menu Analysis
• Press Button “Menu” or “>” to enter the option “Setup”.
Press Button “∨” to highlight “Analysis”
• Press Button “>” to go to the Analysis option, select by pressing
Button “Menu” or “OK”.
• Press Button “∧” and “∨” to switch between each option.
Page 26

User Manual
Ashley-Edison International Ltd Page 26
• Press Button “<” and “>” to alter the setting of highlighted option.
Options below are available :
Iso Color, Area, Menu Trans, Date Bkgrd, Laser, Audio Alarm, Voice
Annotat, Temp Unit, Mean and Video Out.
Iso Color : 3 colors black, white and green are available for the
isotherm.
Area : To make the rectangular area to display the Maximum,
Mean or Minimum temperature under area analysis.
Menu Trans : 5 grades of transparency are available for the menu display.
Data Bkgrd : To turn on or off the data background. If Data Bkgrd is set
as “on”, the data on the image will be highlighted by a
black background so that the data is easy to be recognized.
Laser : To turn on or off the laser locator when viewing live image.
Audio Alarm : To turn on or off the audio alarm for temperature exceeding
the preset value.
Voice Annotat : To enable or disable voice annotation when saving live
images.
Temp Unit: : To switch between Celsius and Fahrenheit.
Mean : To define the frozen image as mean of different frames.
Video Out : To turn on or off the video output.
• Press Button “Menu” or “OK” to confirm the parameter setting and exit
“Setup Analysis” menu.
• Press Button “C’ to cancel the parameter setting and exit “Setup Analysis”
menu. Press “C” again to exit main menu.
Page 27
User Manual
Ashley-Edison International Ltd Page 27
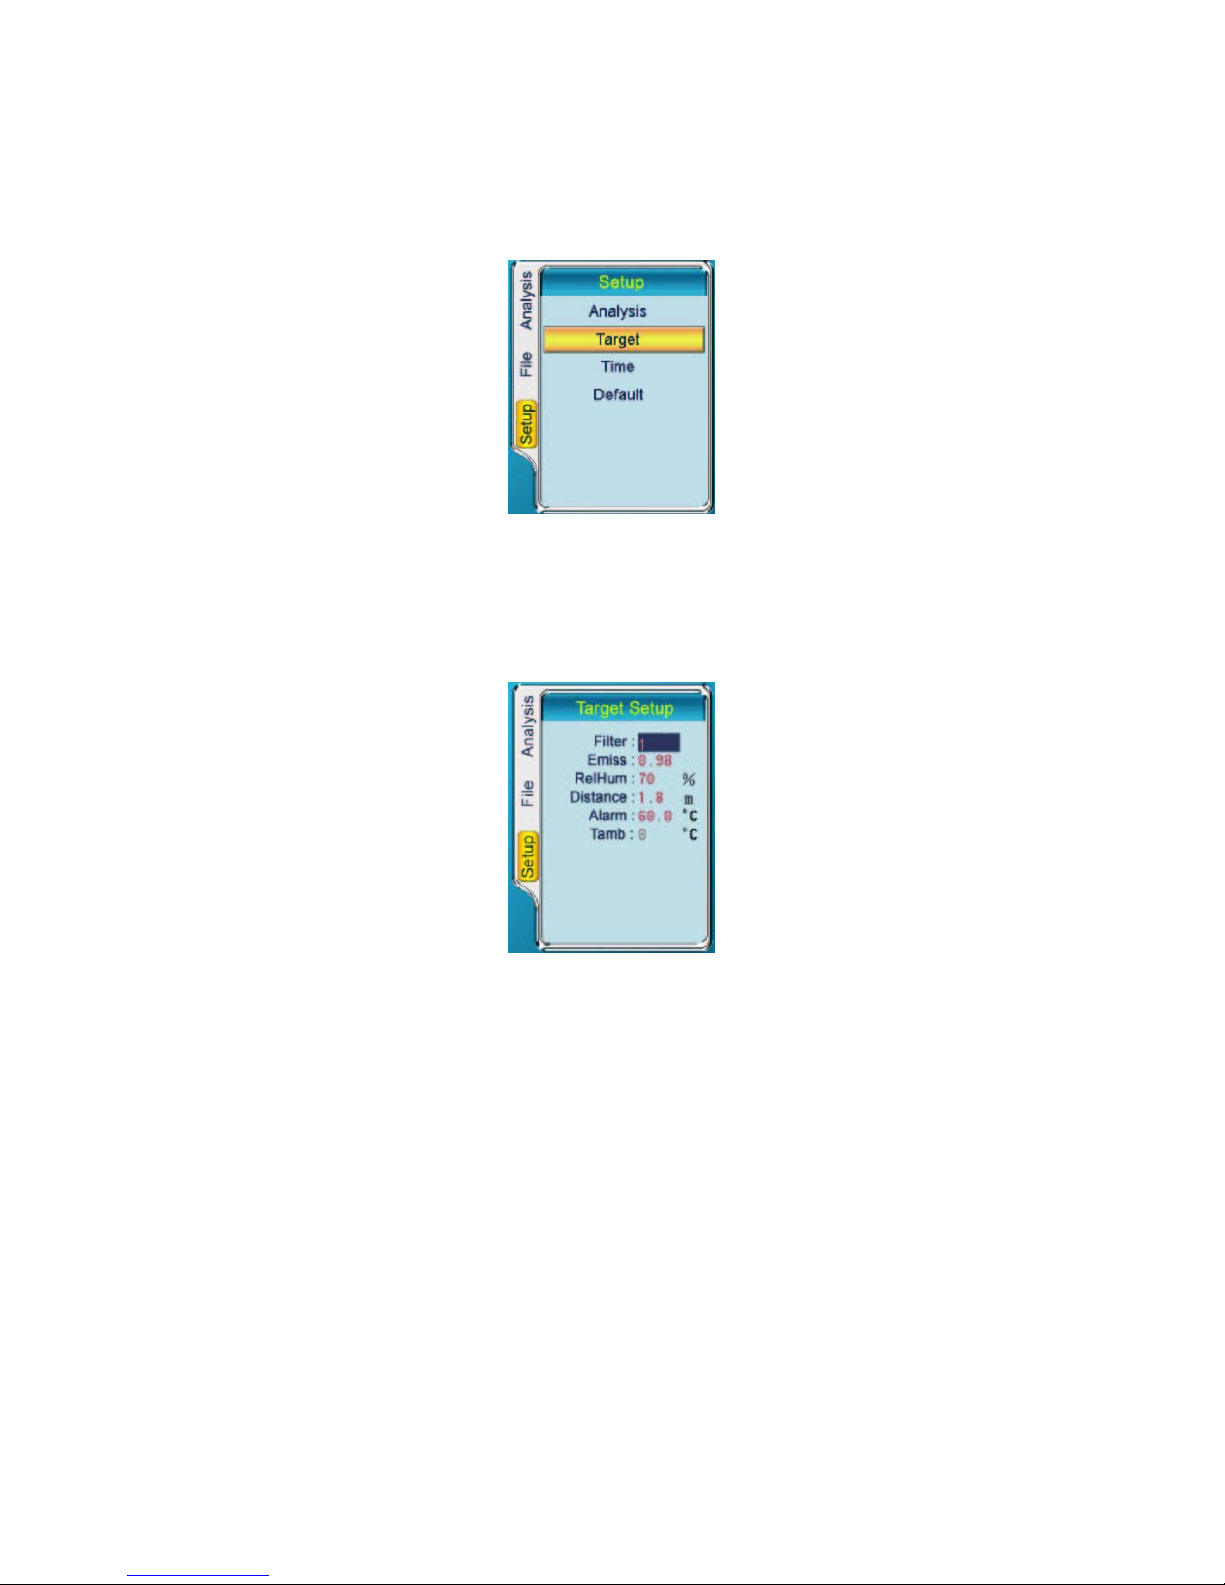
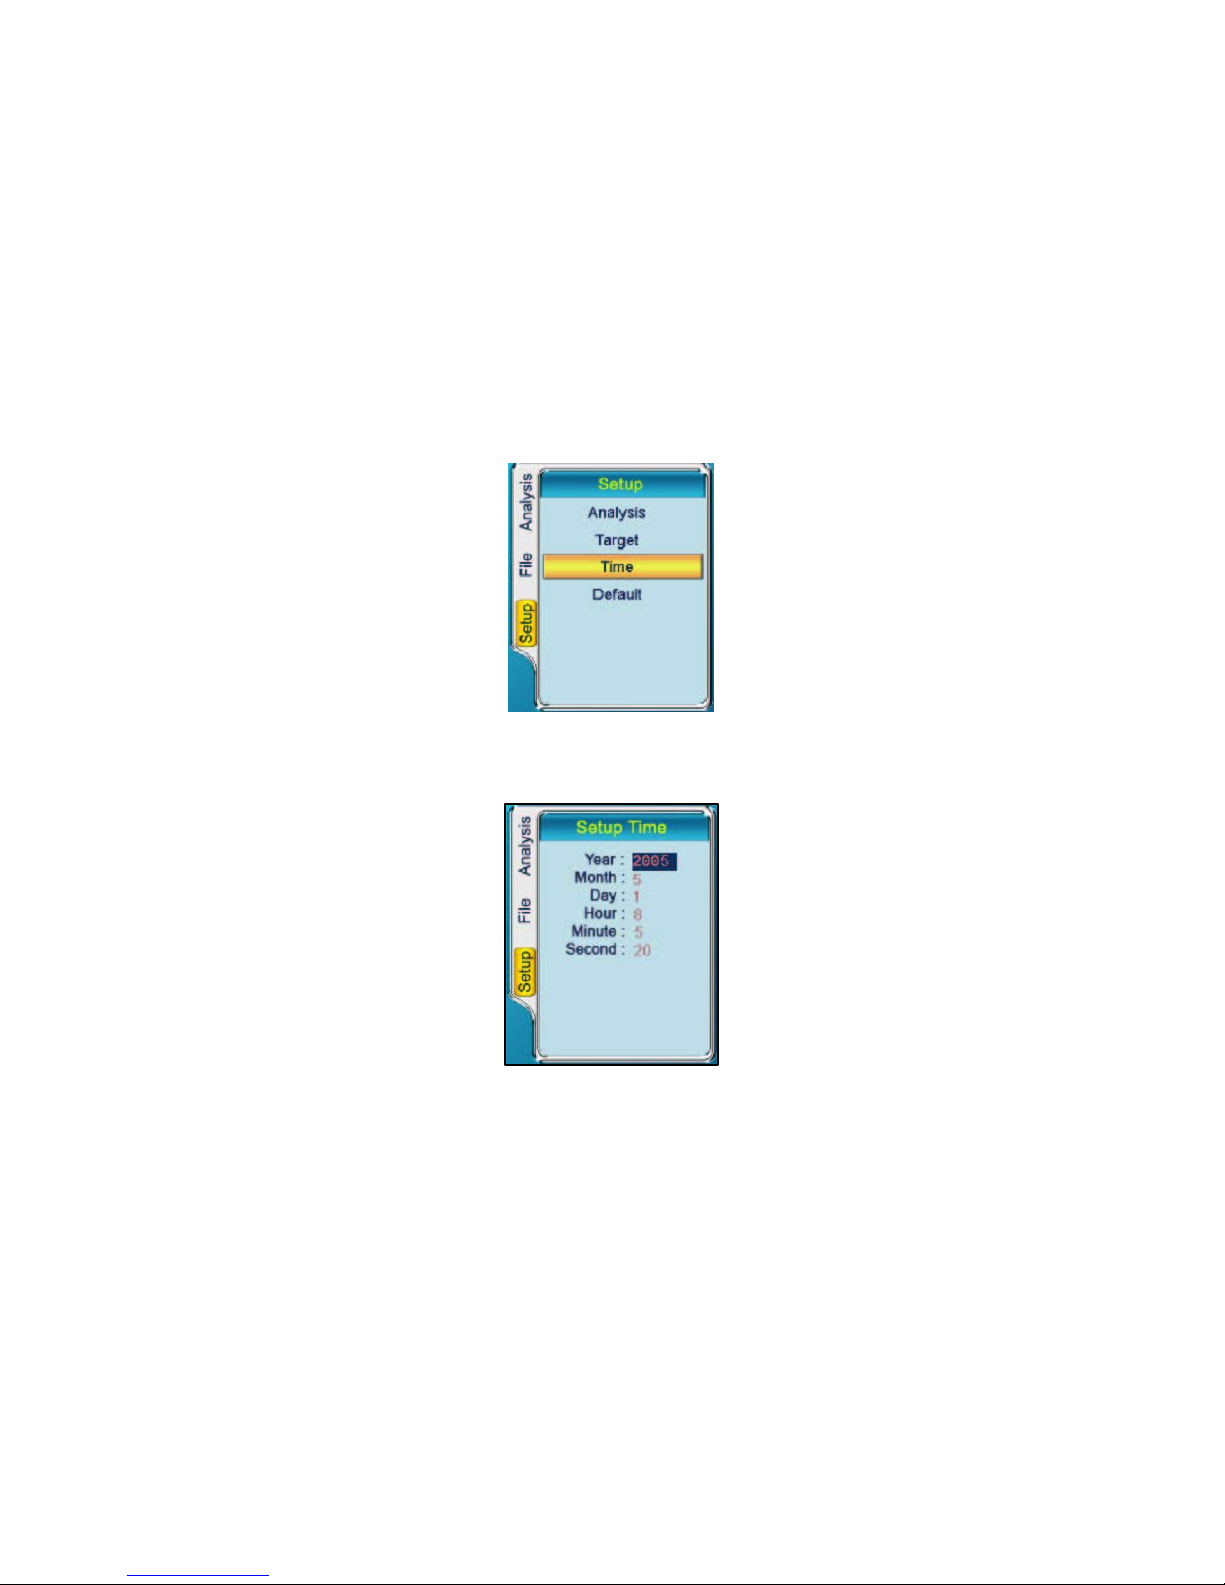
Sub Menu Target
• Press Button “Menu” or “>” to enter the option “Setup”.
Press Button “∨” to highlight “Target”.
• Press Button “Menu” or “OK” to enter the “Target Setup” option.
• The setup parameters menu will then appear. Press “∧”and“∨” to move
between each setting, press Button “<”and “>” to alter the values.
Filter : Set up temperature range. Filter 1 is for standard and filter 2
is for telephoto lens.
Emissivity : Set emissivity value between 0.01 and 1.00.
Relative Humidity: Set humidity percentage value between
1 and 100.
Distance : Set distance parameter from target.
Alarm : Set scene temperature alarm threshold for audible alarm.
Tamb : Show the ambient temperature automatically measured by
the camera.
Page 28
User Manual
Ashley-Edison International Ltd Page 28
Note: Altering Tamb value is unavailable.
• Press Button “Menu” or “OK” to confirm the change and exit the “Target
Setup” menu.
• Press Button “C” to exit the “Target Setup” menu.
• Press Button “C” again to return to the live image.
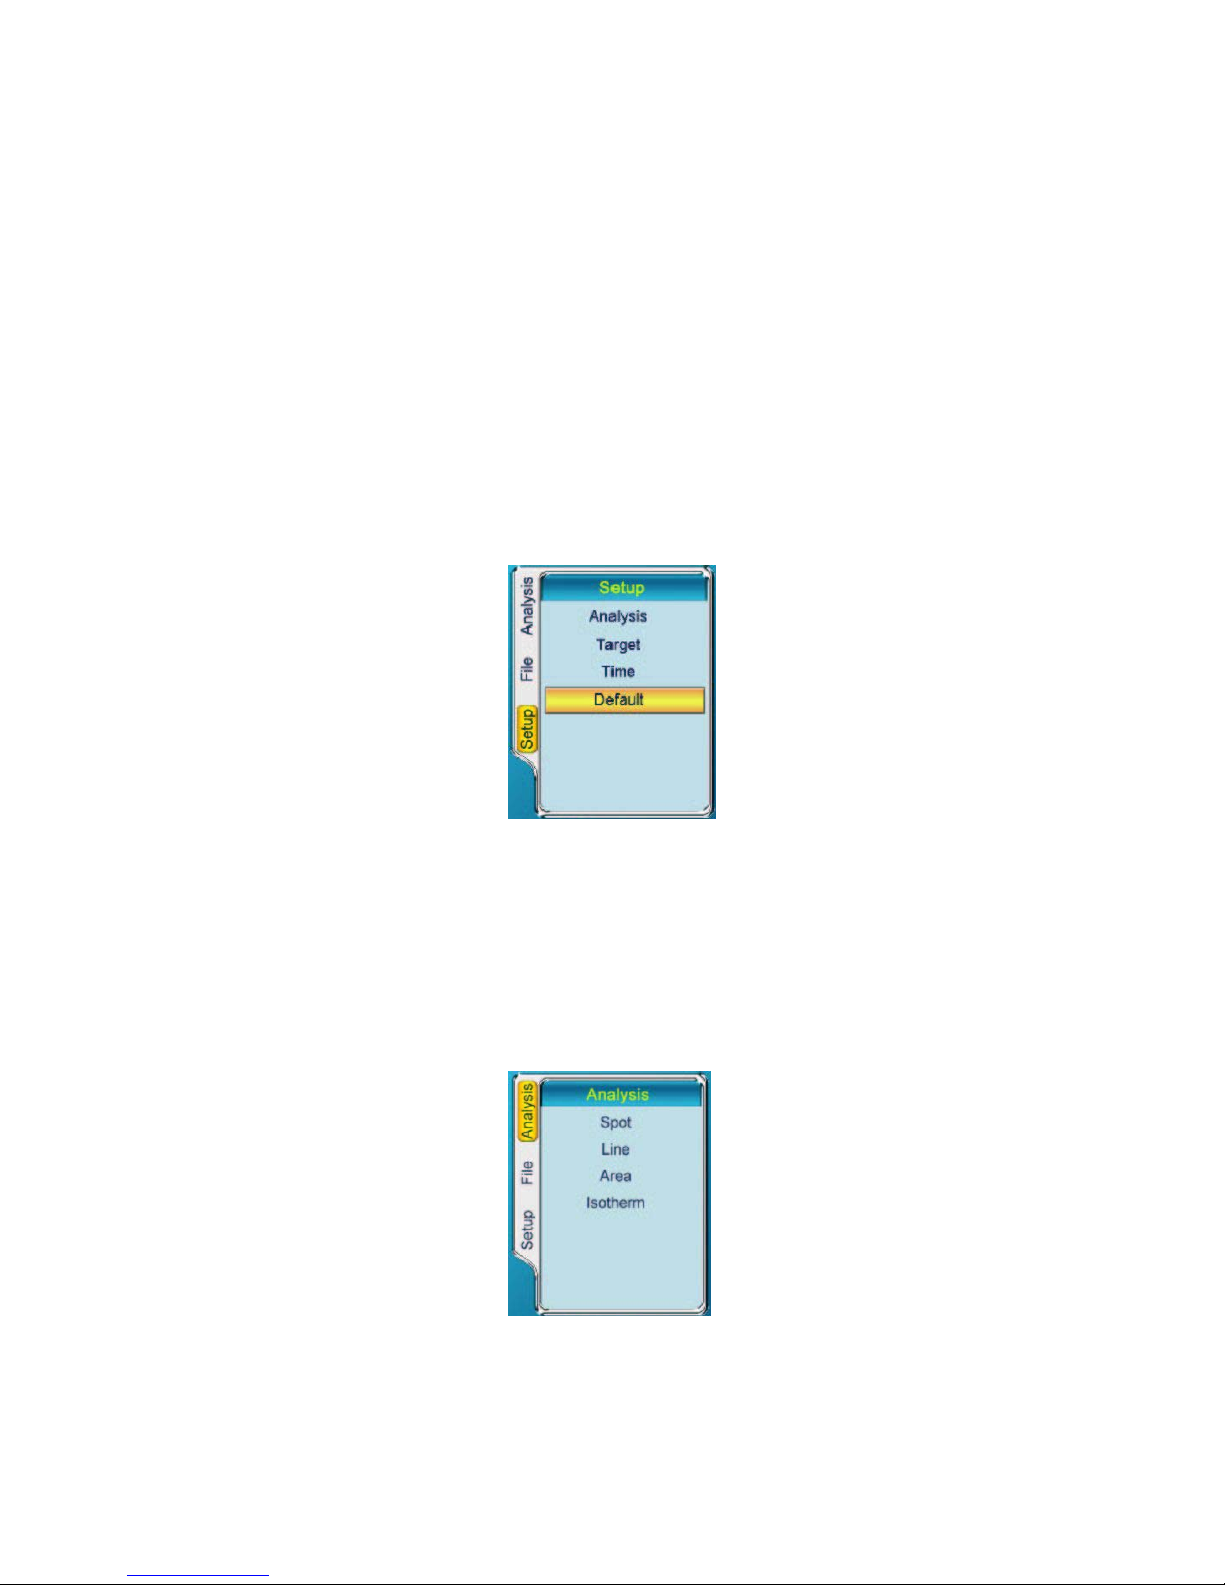
Sub Menu Time
• Press Button “Menu” or “>” to enter the option “Setup”.
Press Button “∨” to highlight “Time”.
• Press Button “Menu” or “OK” to enter the “Time Setup” option.
• The setup parameters menu will then appear. Press “∧” and “ V” to
move between each setting, press Button “<” and “>” to alter the values.
• Press Button “Menu” or “OK” to confirm the change and exit the “Target
Setup” menu.
• Press Button “C” to exit the “Target Setup” menu.
• Press Button “C” again to return to the live image.
Page 29
User Manual
Ashley-Edison International Ltd Page 29
Note:
• Time refreshes in real time when the camera is working.
Resetting the parameters under the menu above interrupts
refreshing. After setup, time goes on to refresh on time.
• Resetting time is essential when it takes more than half an hour to
replace the battery.
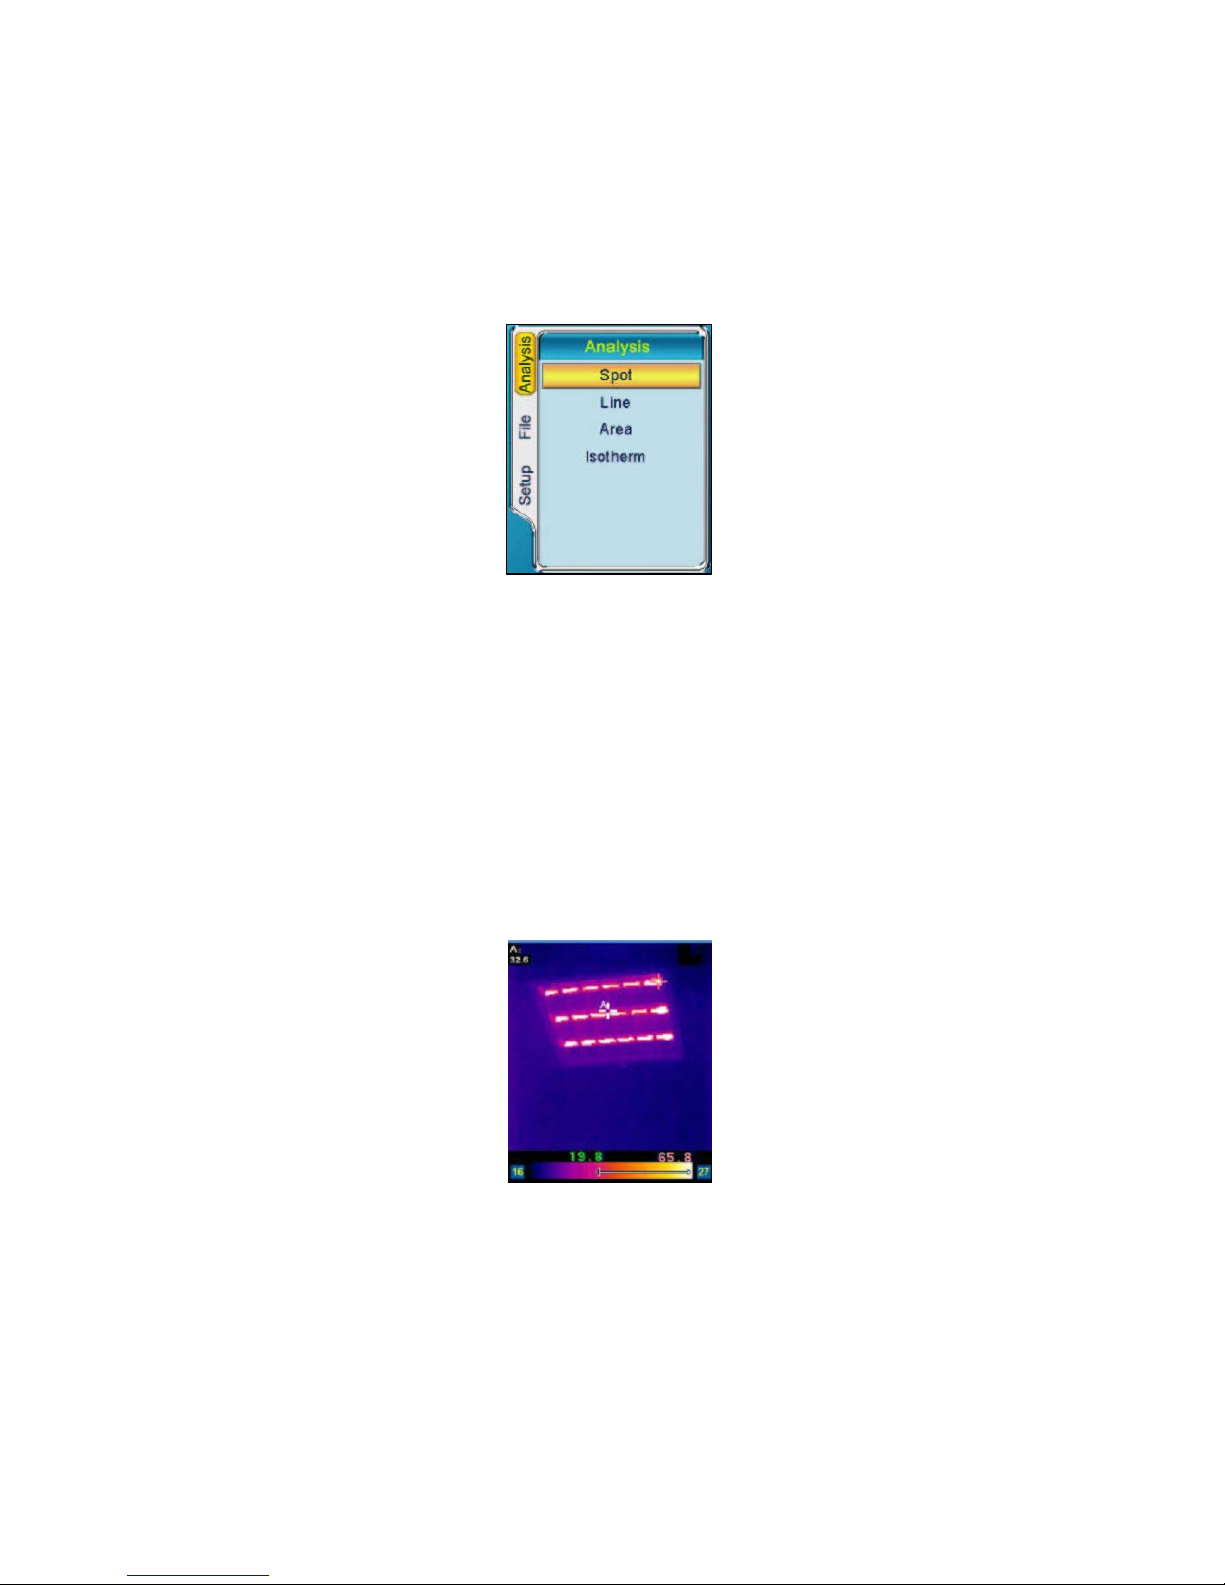
Sub Menu Default
• Camera setup parameters remain the same after re-powering on the
camera. But they can be resumed to be the factory configured ones.
• Press Button “Menu” or “>” to enter the option “Setup”. Press Button “∨”
to highlight “ Default ”:
• Press Button “Menu” or “OK”. Then a NUC is performed automatically.
• After NUC, all the parameters become the factory configured ones.
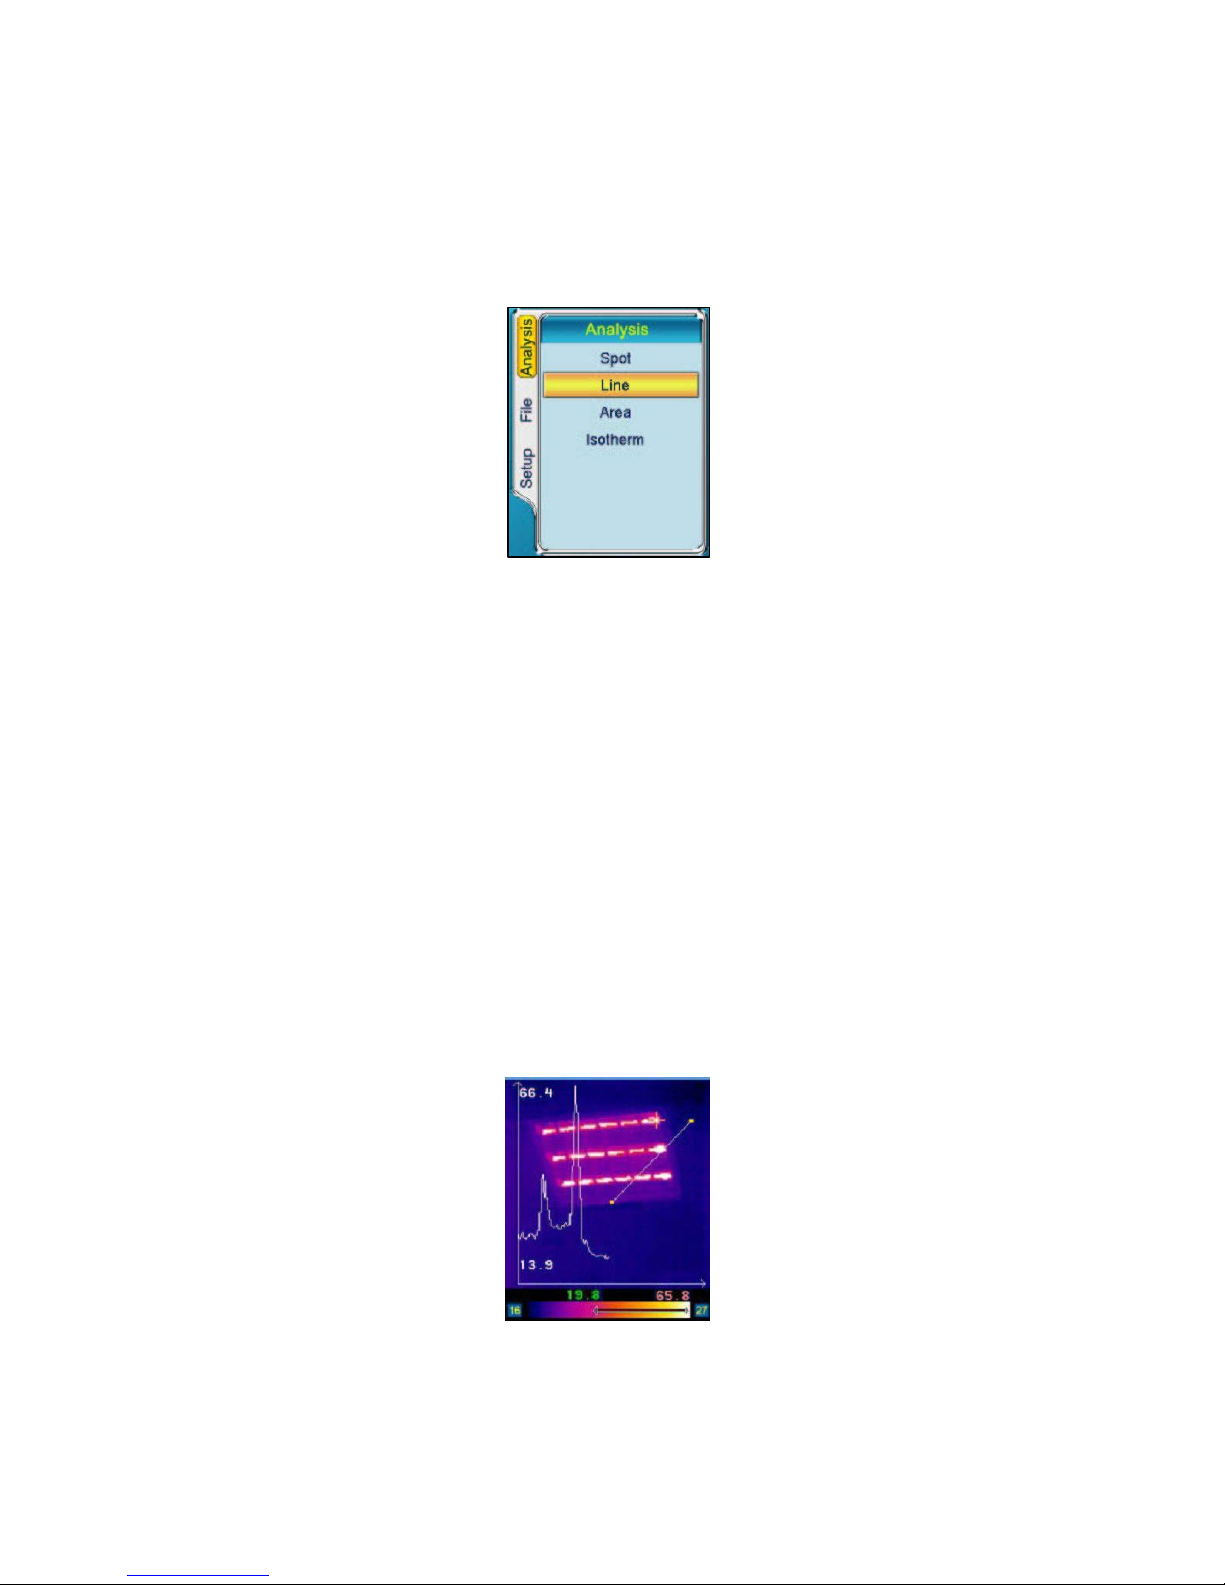
Menu Analysis
• Press Button “Menu” to bring up the main menu. Press Button “∧” and
“∨” to highlight the menu “Analysis”:
• Four sub menus Spot, Line, Area and Isotherm are available.
Page 30
User Manual
Ashley-Edison International Ltd Page 30
Sub Menu Spot
• Spot analysis is merely available on frozen / saved images.
• Press Button “Menu” or “>” to enter the option “Analysis”.
Press Button “∨” to highlight “Spot”, select by pressing Button “Menu” or
Button “OK”.
• A spot is shown on the screen, which is marked as A, the temperature
of the single spot will be shown at the top of the screen; the one without
any mark indicates the point with maximum temperature on the screen,
with its figure shown on the right corner above the palette.
• Press Button “∧”, “∨”, “<“ and “>” to move the cursor to the required
position, with the spot temperature shown at the top screen. The spot is
moving with acceleration.
• Press Button “C” to exit and return to the frozen/ saved image.
Page 31
User Manual
Ashley-Edison International Ltd Page 31
Sub Menu Line
• Line analysis is merely available on frozen / saved images.
• Press Button “Menu” or “>” to enter the option “Analysis”.
• Press Button “∨” to highlight “Line”, select by pressing Button “Menu” or
Button “OK”.
• The first point of the line can be moved to the correct location by
pressing
Button “∧”, “∨”, “<” and “>”. Confirm the starting point by pressing
Button M.
• To move the second point of the line, pressing Button “∧”, “∨”, “<” and
“>” in the same manner as previously described.
• This can be repeated until the line is in the correct position.
• Press Button “Menu” to confirm the location and the profile will be shown
on the image, displaying the minimum and maximum temperature of the
line.
• Press Button “C” to exit the analysis of this line.
• Repeat the above procedure to analyze new lines.
• Press Button “C” again to exit and return to the frozen/ saved image.
Page 32
User Manual
Ashley-Edison International Ltd Page 32
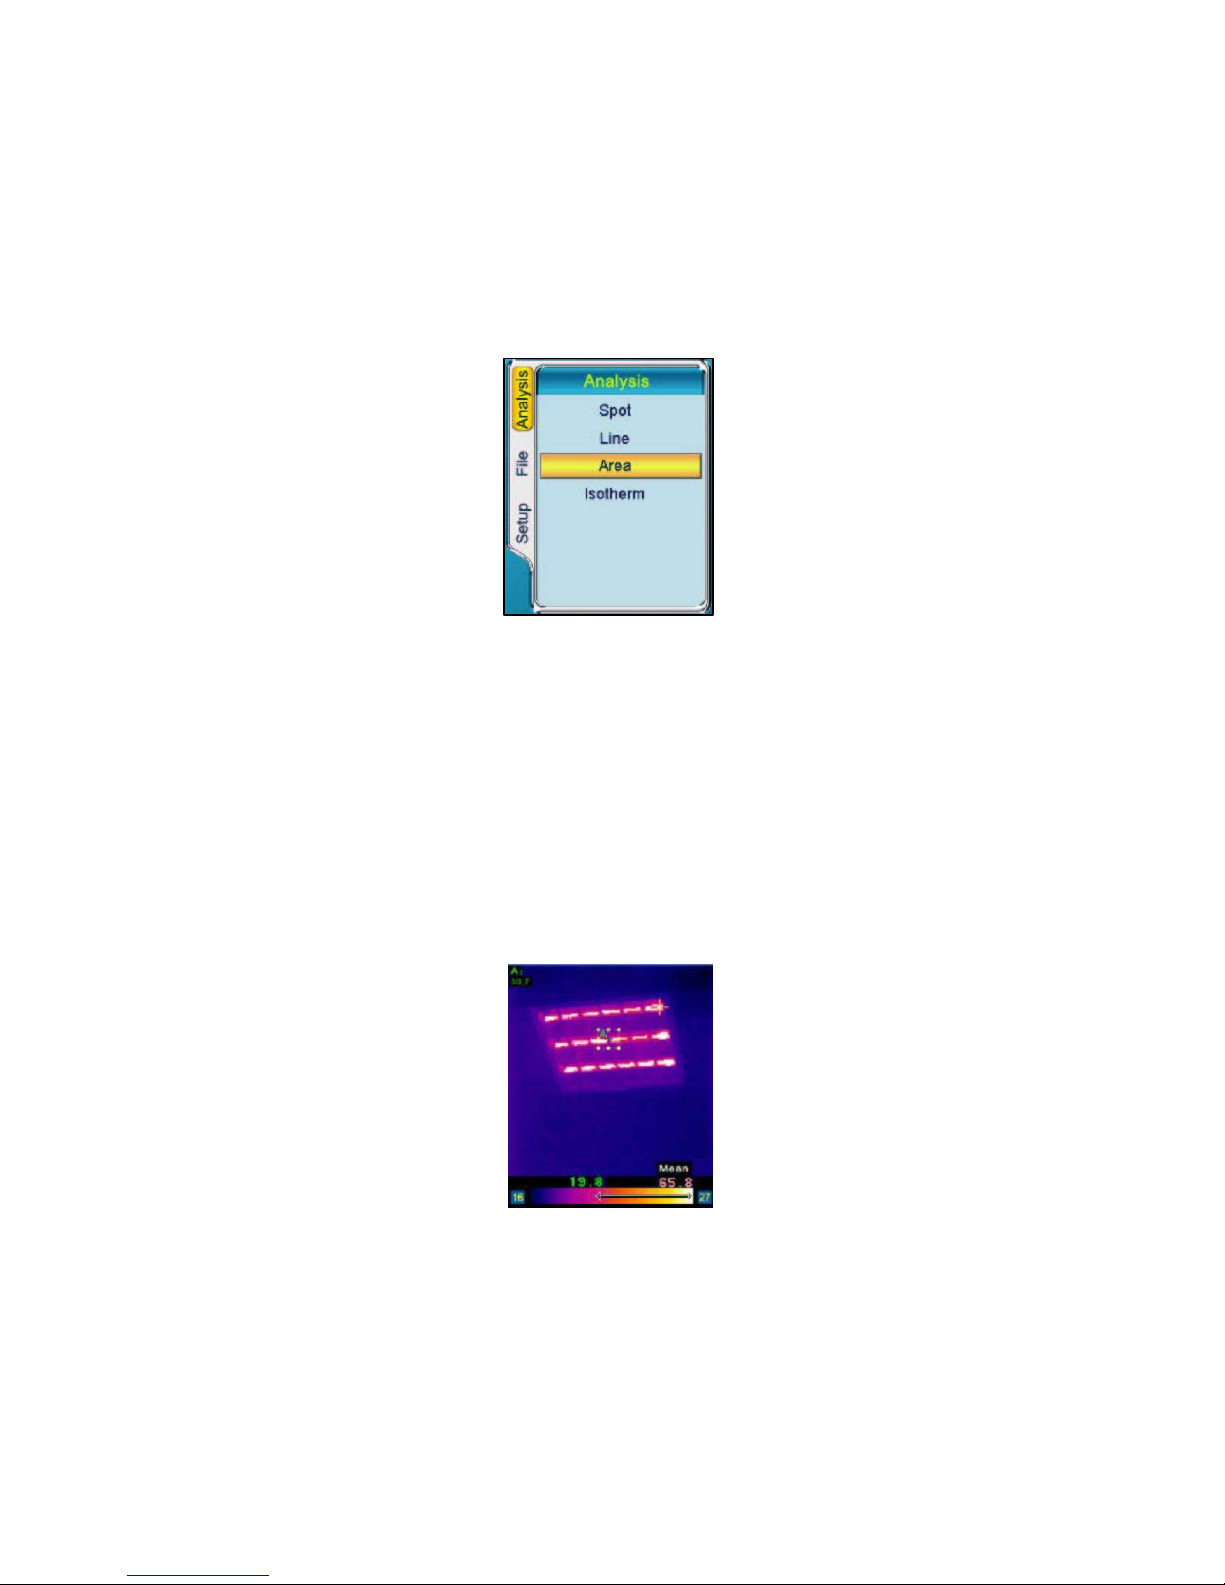
Sub Menu Area
• Area analysis is merely available on frozen / saved images.
• Press Button “Menu” or “>” to enter the option “Analysis”. Press
Button “∨” to highlight “Area”, select by pressing Button “Menu” or Button
“OK”.
• Area A will appear. Temperature of the area will be shown at the top of the
screen as well as the temperature measurement type, Minimum, Mean or
Maximum.
• Move the rectangular area. Press Button “∧”, “∨”, “<” and “>” to move
area A to the correct position.
• Change size of the rectangular area. Press Button • to enter the mode of
adjusting area size. Press Button “∧” and “>” to enlarge the area and
Button “∨” and “<” to shrink it. Press Button • to confirm the new size.
Page 33

User Manual
Ashley-Edison International Ltd Page 33
• Rectangular area can be set to display the Maximum, Mean or Minimum
temperature. Press Button “M” to bring up the main menu. Press Button
“V“
to highlight the Setup option, and then select “Analysis” by pressing Button
“M” or “OK”.
• Under the heading named “Area”, you can toggle between “Min”, “Mean” and
“Max” by pressing Button “<”and “>”, confirm by pressing Button “M” or
Button “OK”.
• Press “C” to exit and return to the frozen/ saved image.
Note:
• Pressing Button • can switch between the two modes: changing area
location and adjusting area size. Under each mode, pressing Button •
will switch to the other.
• The original size of rectangle area is the mean size for all the time.
Page 34
User Manual
Ashley-Edison International Ltd Page 34
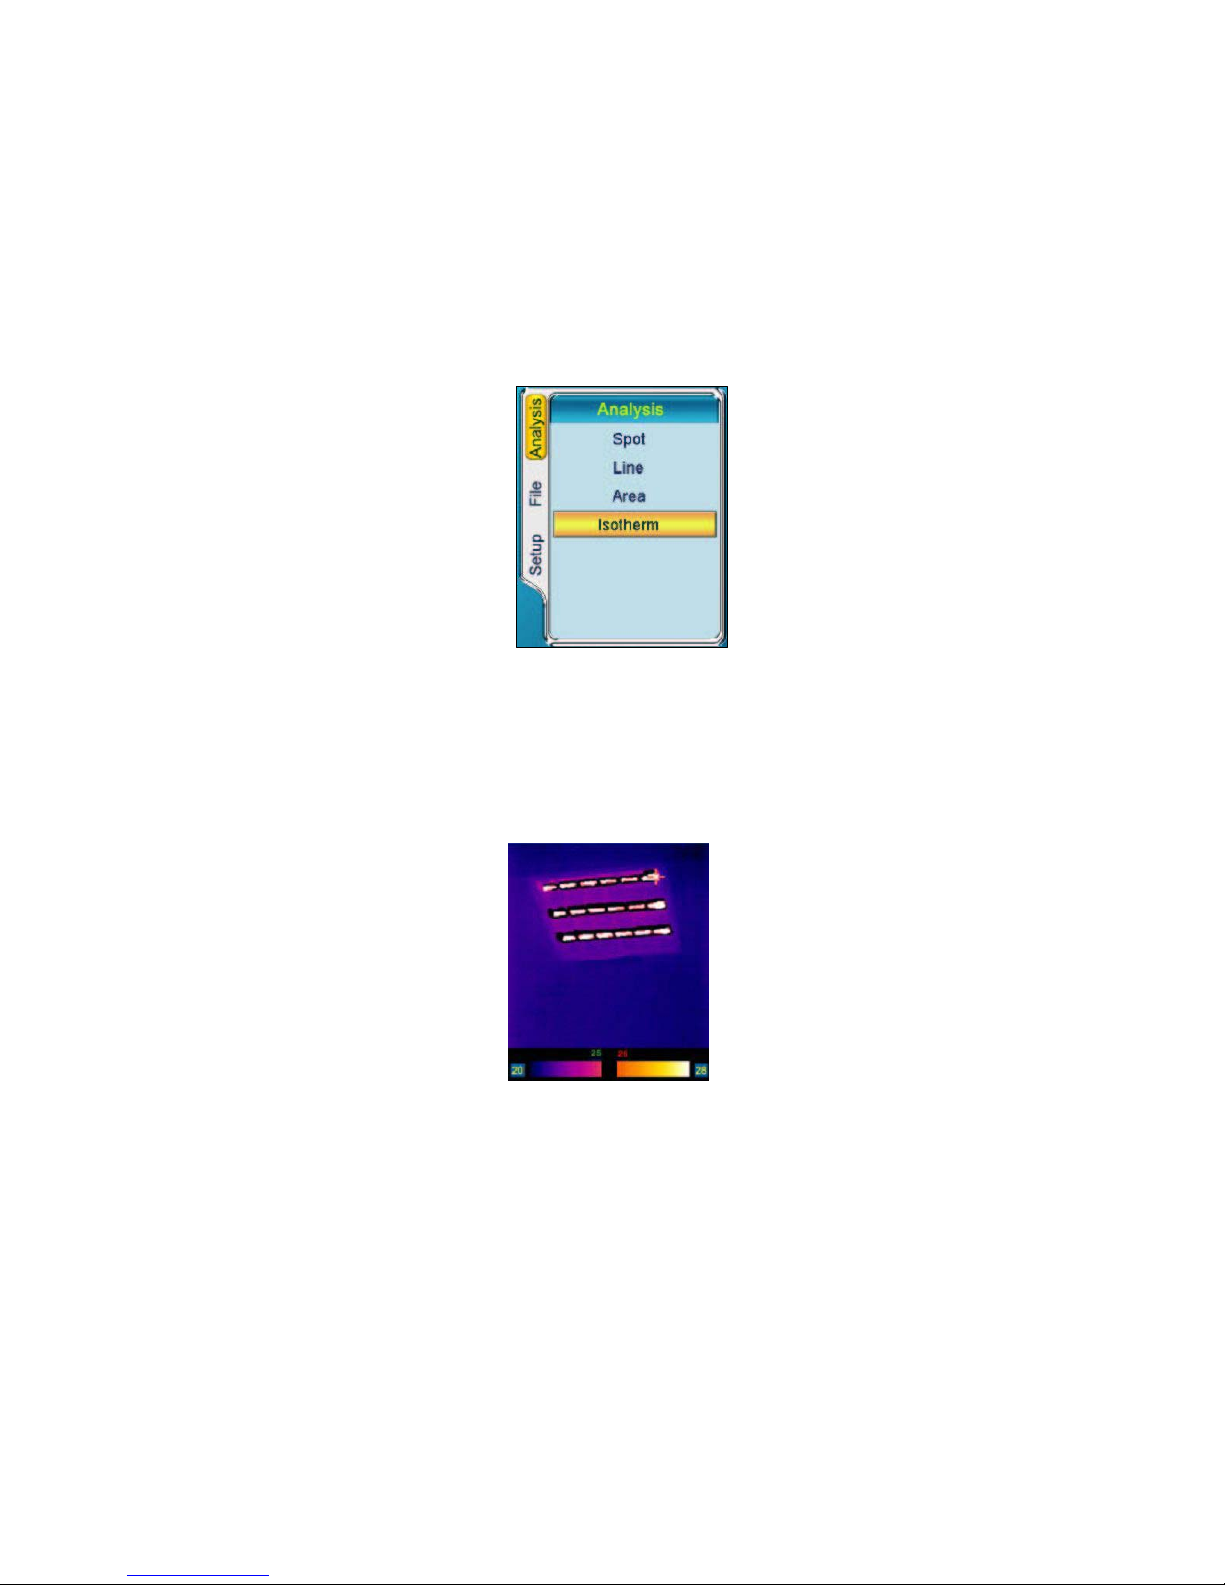
Sub Menu Isotherm
• Isotherm can be performed on live, frozen and saved images.
• Press Button “Menu” or “>” to enter the option “Analysis”.
Press Button “∨” to highlight “Isotherm”, select by pressing Button “Menu”
or Button “OK”.
• Press Button “∧” and “∨”to set the maximum temperature of the isotherm
band, Press Button “<” and “>” to set the minimum temperature of the
isotherm band.
• Press Button “C” to exit and return to the frozen/ saved image.
Page 35
User Manual
Ashley-Edison International Ltd Page 35
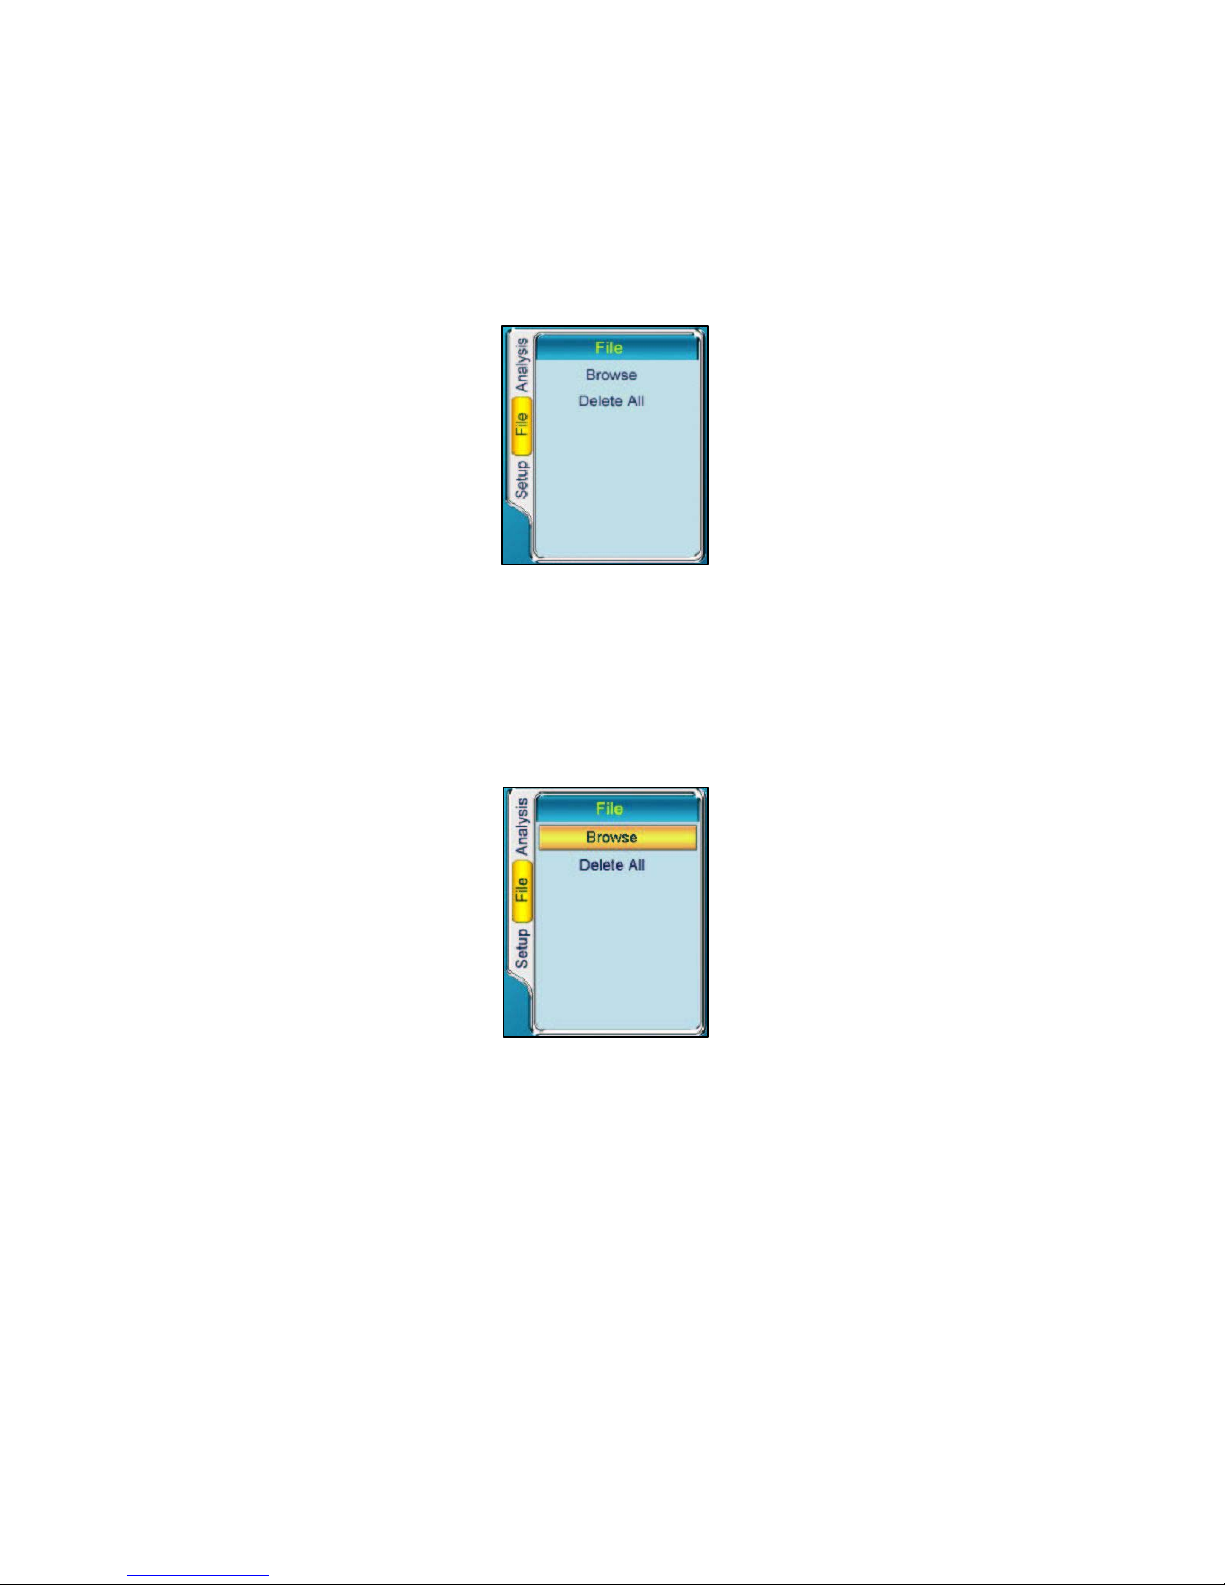
Menu File
• Press Button “Menu” to bring up the main menu. Press Button “∧” and “∨”
to highlight the menu “File”.
• Two sub menus Browse and Delete All are available.
Sub Menu Browse
• Press Button “Menu” or “>” to enter the option “File”. Press Button “∨” to
Highlight. “Browse”, select by pressing Button “Menu” or Button “OK”.
Page 36
User Manual
Ashley-Edison International Ltd Page 36
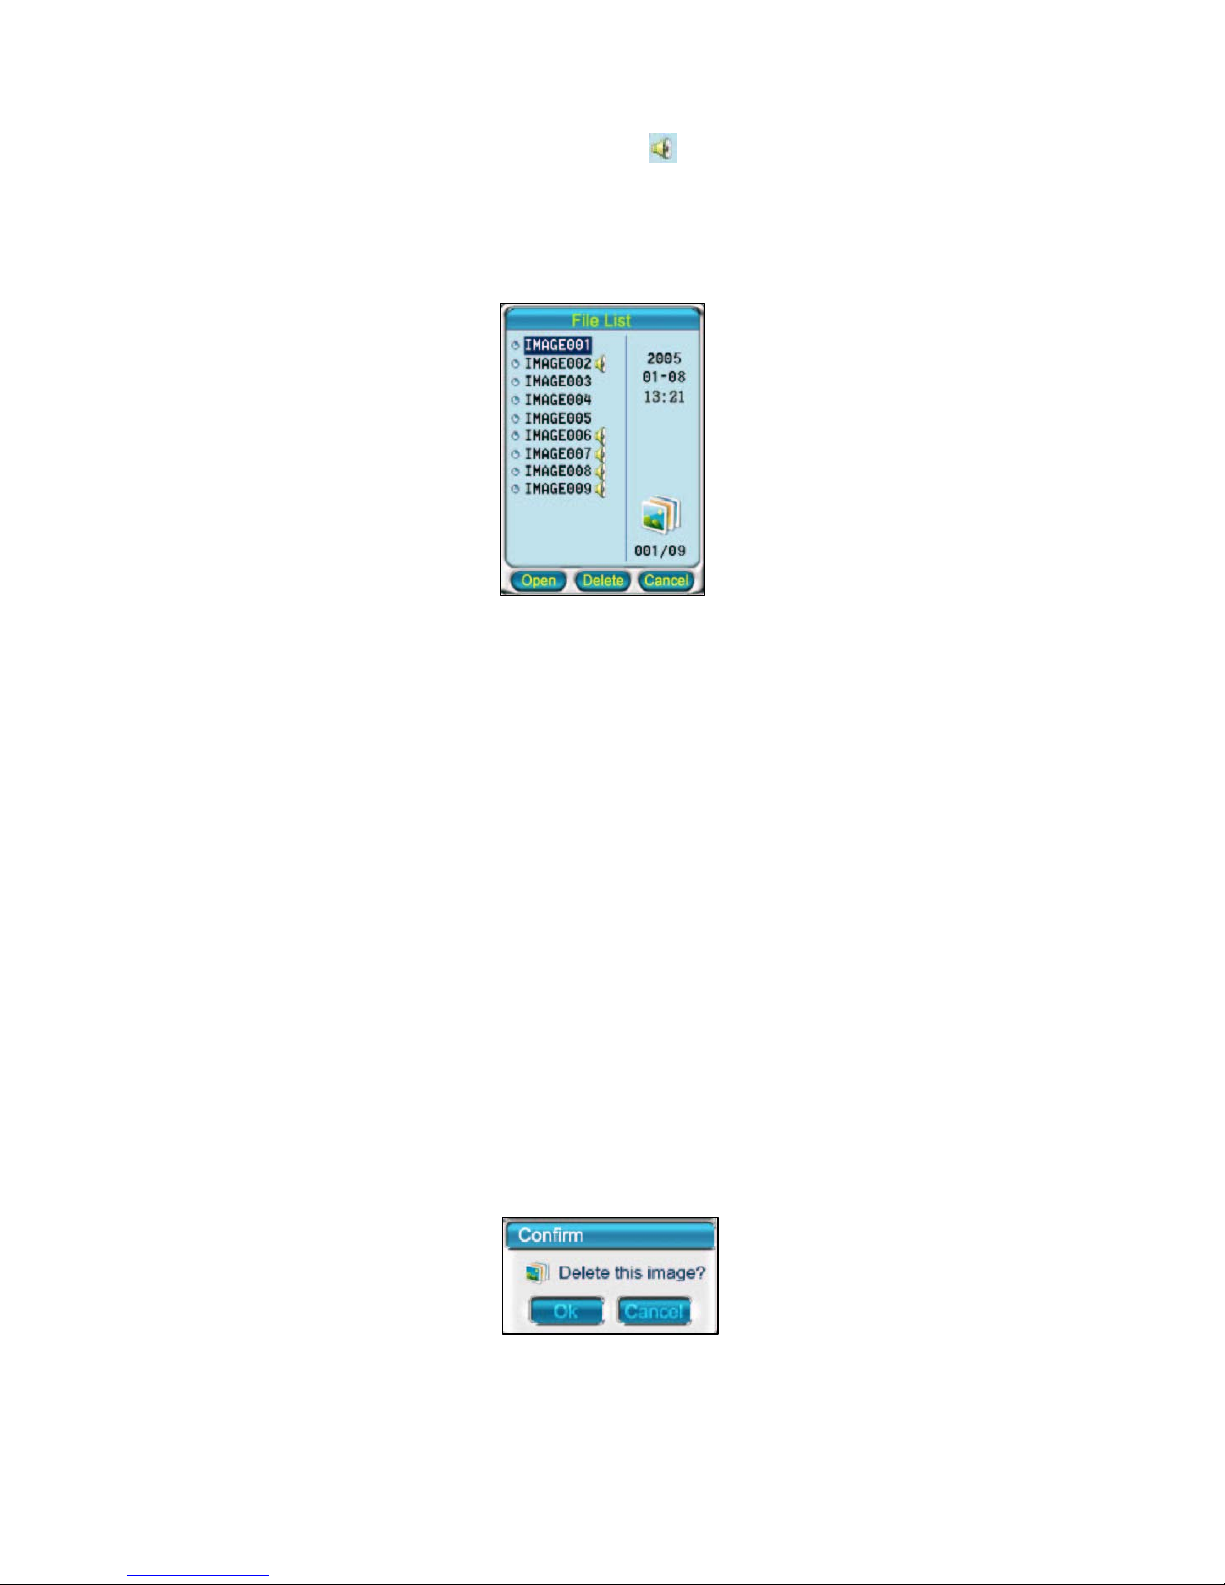
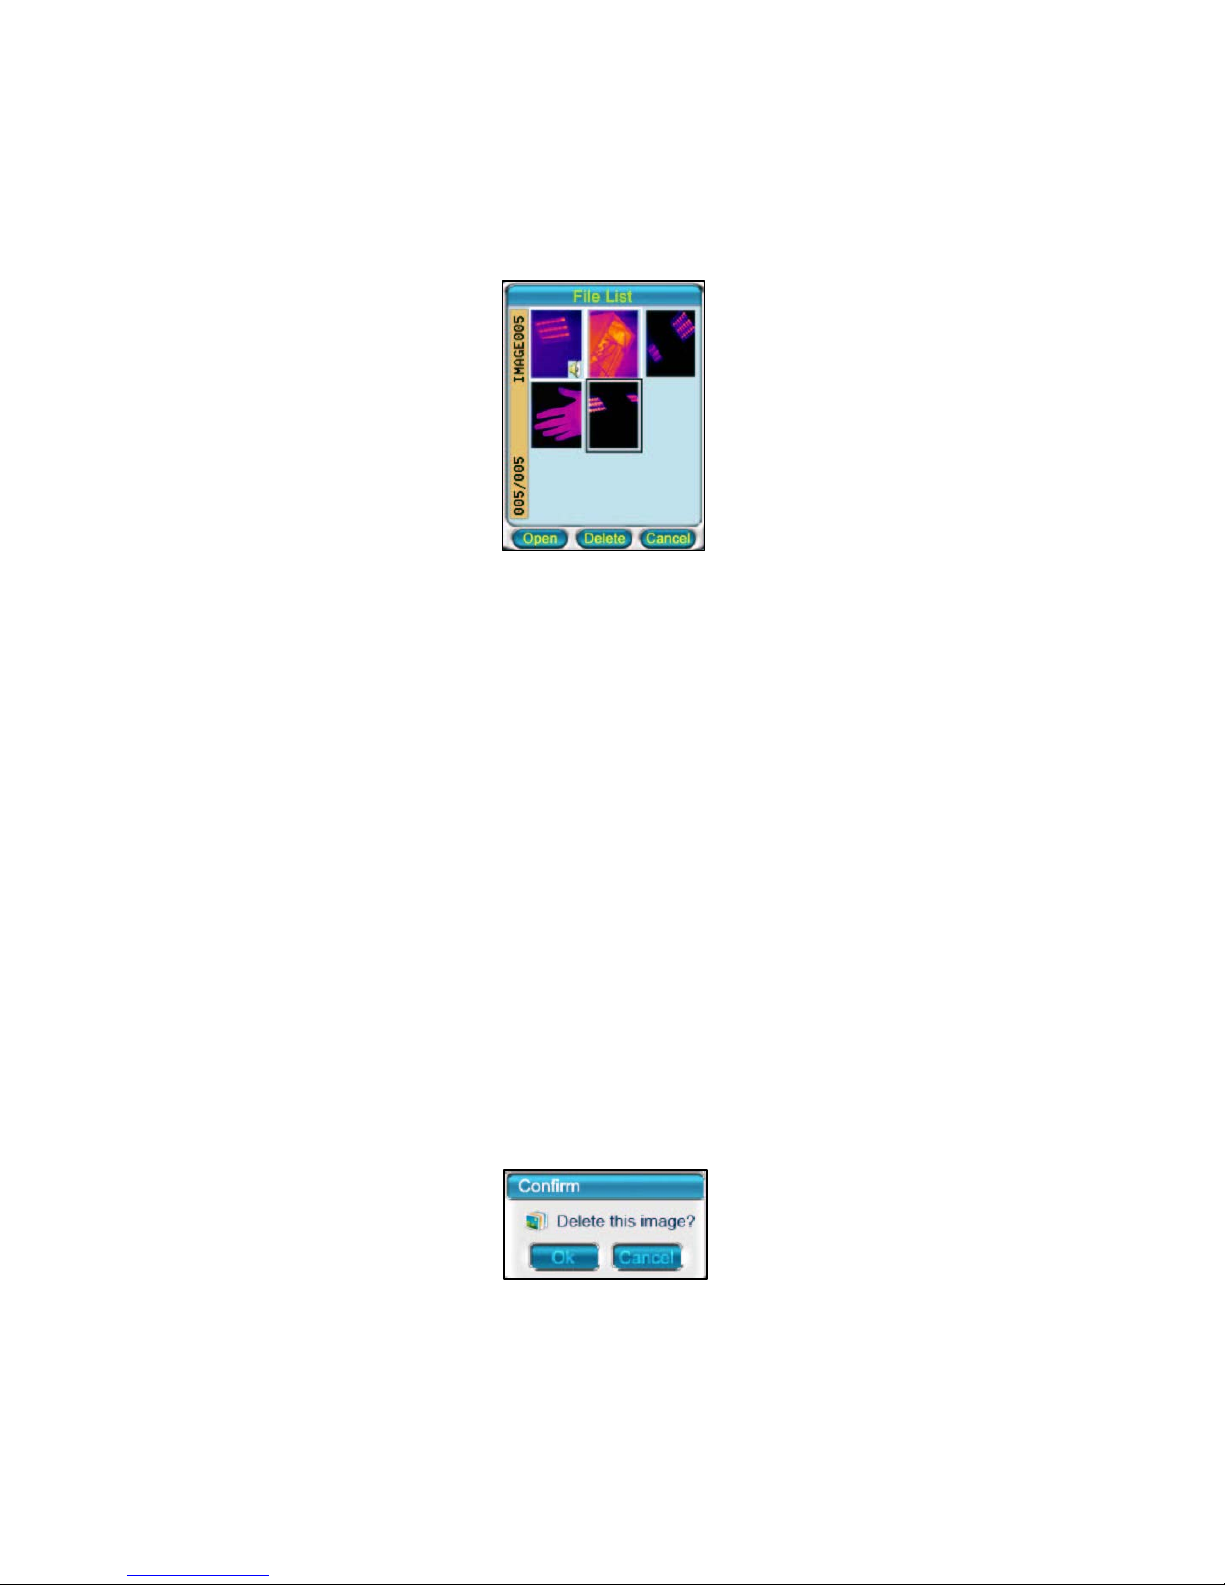
• The list of saved images appears. Icon “ " indicates the file contains voice
annotation. Numbers at the right bottom of the list shows which file is
highlighted, and number at the right top shows specific time at which the
highlighted file was taken.
• Now you can open or delete the highlighted file. Or you can open or
delete it after viewing its thumbnail image.
Opening and Deleting Images under File List
• If the file number is known, Press Button “∧” and “V” to locate it.
• Pressing Button “OK” will display the full saved image and data on the
screen.
• If voice annotation has been recorded it will play back automatically
when a saved image is opened.
• Repeat above operations to open other thermal images.
• To exit and return to the file list, press Button “C”.
• To delete a file, press Button “∧” and “V” to move on to the target file.
• Pressing Button • will open the dialog box below. Press Button “OK” to
confirm undertaking deletion, then the file will be deleted.
Press Button “C” to cancel deletion.
• Press Button “C” to return to the file list
Page 37
User Manual
Ashley-Edison International Ltd Page 37
Opening and Deleting Images from Thumbnail Image Gallery
• When the file list shows on the screen, press Button “M” to switch to the
thumbnail image gallery.
• Number on the left bottom of the screen shows which file is highlighted,
name of the highlighted file shows on the left top. For a file with voice
annotation saved, Icon shows at the right bottom of its thumbnail image.
• Press Button “<”, “>”, “∧” and “V” to move on the file to be opened. Then
a black frame will surround it.• Pressing Button “OK” will display the full
saved image and data on the screen.
• If voice annotation has been recorded it will play back automatically
when a saved image is opened.
• Repeat above operations to open other thermal images.• To exit and
return to the image gallery, press Button “C”.
• To delete a file, press Button “∧” and “V” to move on to the target file.
Then a black frame will surround it.
• Pressing Button • will open the dialog box below. Press Button “OK” to
confirm undertaking deletion, then the file will be deleted.
• Press Button “C” to cancel deletion.
• Press Button “C” to return to the image gallery.
Page 38
User Manual
Ashley-Edison International Ltd Page 38
Sub Menu Delete All
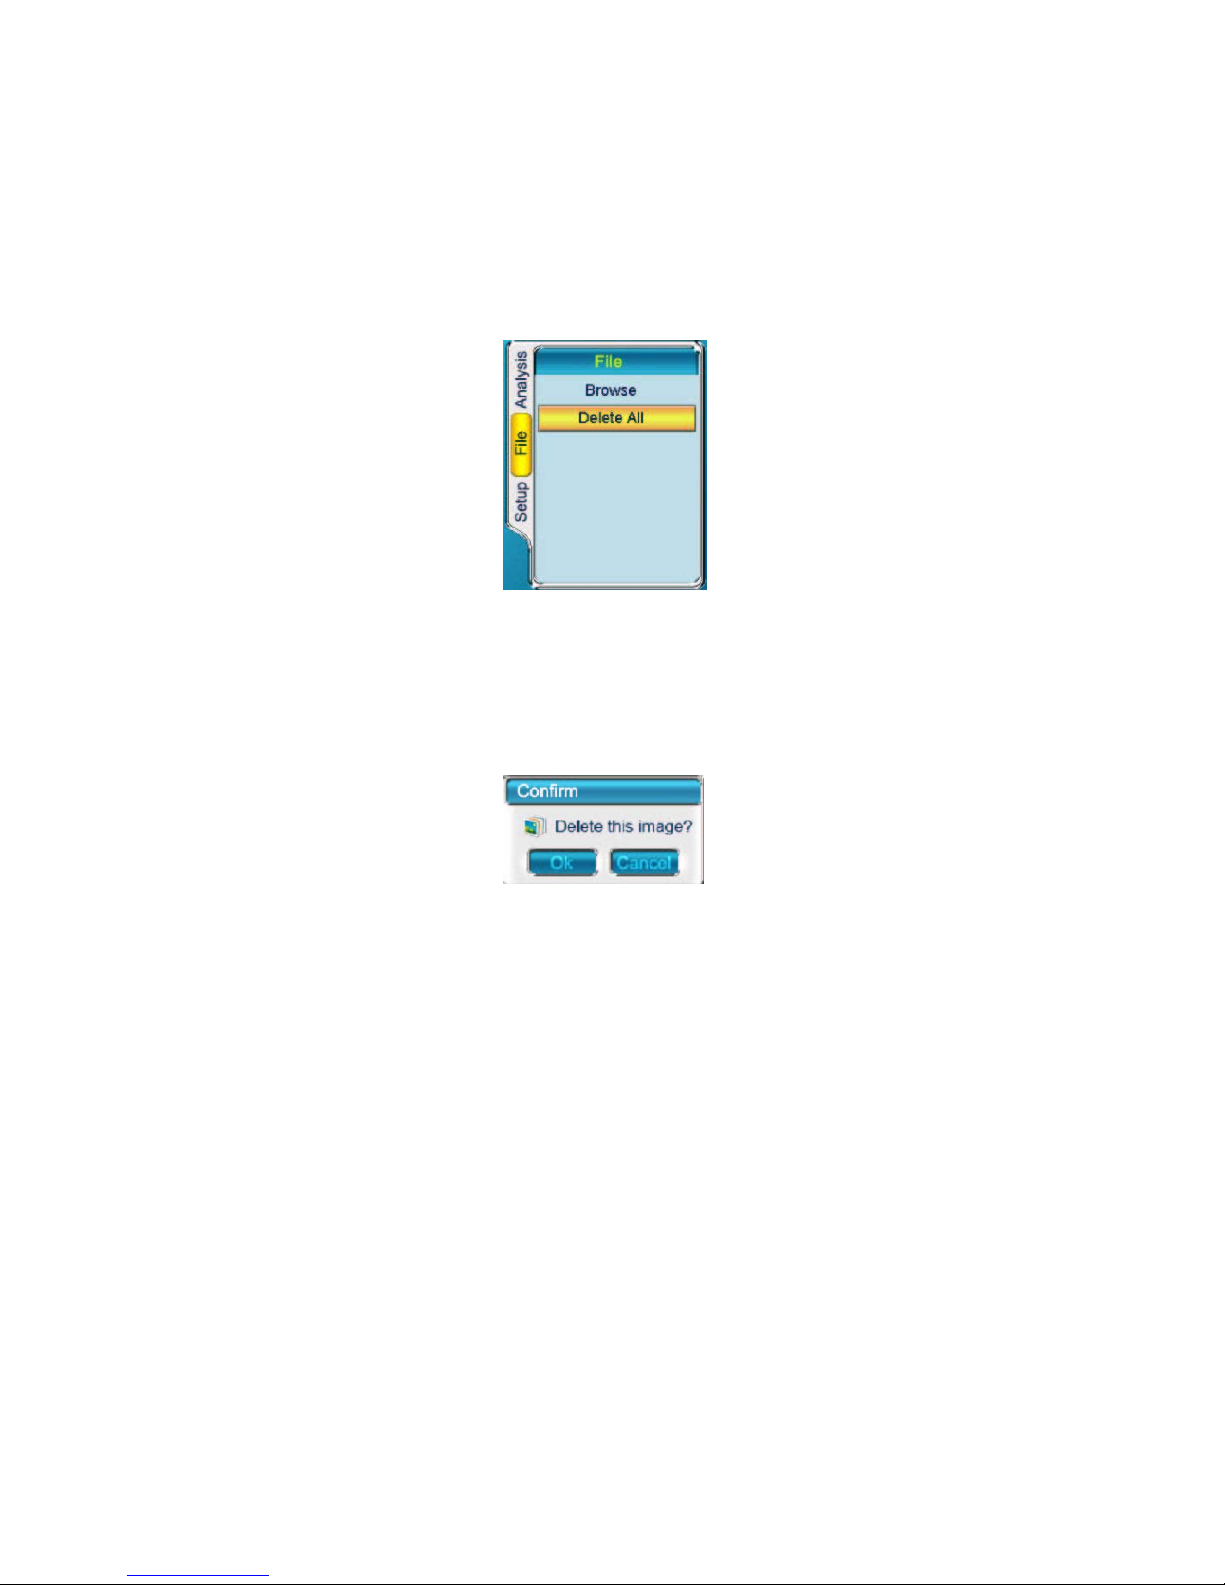
• All the files saved in the built-in flash memory can be deleted using this
command.
• Press Button “M” or “>” to enter the option “File”. Press Button “∨” to
highlight “Delete All”, select by pressing Button “M” or Button “OK”.
• Pressing “M” or Button “OK” will open the dialog box below.
Press Button “OK” to confirm undertaking deletion of all the saved files,
then the files will be deleted. Press Button “C” to cancel deletion.
• Pressing Button “C” will exit sub menu File.
Transferring Files from the Camera to your PC
• Before transferring files to your PC, ensure the Operating System of your PC
is Microsoft® Windows 2000 or higher, USB driver and software IrAnalyser®
are properly installed.
• When there is no menu on live image, correctly connect the USB interfaces
of the camera and your PC with the USB extension cable.
Prompt “USB Mode!” will appear on the live image.
• Run software IrAnalyser®. Go to sub menu M4 Device under menu File and
use the Device Manager command to get images from the camera.
Page 39

User Manual
Ashley-Edison International Ltd Page 39
Operation Instruction for Video Output
Composite video output (PAL or NTSC mode) option is available in this Model
M2 camera. With this option you can view the live image captured by the
camera on a monitor or a recording device.
Before trying to use this option, ensure that the Model M2 camera is switched
off.
• Properly connect the camera to the monitor (or recording device) with the
video cable supplied together with the camera
• Power on the monitor
• Power on the camera
• Enter the submenu Analysis under menu Setup, choose option Video
Output and set its value to be ON
• Press button M or Ok to save the setup and return to the live image
For PAL mode, live image is available in both the LCD screen of the camera
and the monitor (or recording device); For NTSC mode, live image is only
available in the monitor (or recording device).
• When viewing the live image, you can still use the buttons to control the
camera.
• After viewing the live image, power off the camera, monitor (or recording
device) and disconnect the cable
Note:
• It is required to power off the camera before connecting it to a monitor or a
recording device
• Before setting Analysis-> Setup-> Video output to be ON, the live image on
the monitor (or recording device) is not correct, because the video signals
have not been actually output yet
Power Alarm
• There is indication of power status at the right top of the outer screen of the
camera.
• When there is insufficient power, sound alarm will automatically turn on every
five minutes; there will be also a prompt as “ ” on the right top of the
screen to indicate the power insufficient.
Page 40

User Manual
Ashley-Edison International Ltd Page 40
Battery Charging
Two methods are available to charge the battery.
• Charging in an external battery charger.
• Charging in the imbedded battery charger.
Charging in an external battery charger
• Insert the battery into the battery charger.
• Connect the charger plug to a wall outlet (96-250VAC).
• The charge lamp (orange) will light and charging will begin.
• When the charge lamp changes to be green, normal charge is completed.
• If there is something wrong during charging, the charge lamp will change to
be red.
• Once the battery is fully charged it can be used with the camera
• The approximate charge time is 300 minutes for normal charge and 360
minutes for full charge.
Charging in the imbedded battery charger
• Connect the 5VDC plug of AC adapter (96-250VAC) to the converter
supplied with the AC adapter.
• Insert the USB plug of the converter into the USB interface of the camera
• Connect the AC adapter plug to a wall outlet (96-250VAC).
The charging will begin and the white indicator light under the outer screen of
the camera will blink.
• When the white indicator light shines steady, the battery is fully charged.
• The approximate charge time is 360 minutes for normal charge and 420
minutes for full charge.
Note:
• When charging the battery in the imbedded battery charger, Button
Power is unavailable.
• Charging time may vary from the battery condition or the environment
temperature.
• It is normal that battery and the charger get heated during charging
process.
Page 41

User Manual
Ashley-Edison International Ltd Page 41
Additional Information
• The battery shall be charged in temperature between 0°C and +45°C.
• Never dispose the battery to fire or try to heat the battery.
• Do insert the battery with the terminals connected to correct polarity.
• Do not short circuit the battery by directly connecting the metal terminals.
• Ensure that no metal objects touch the battery terminals.
• Do not direct the battery at bright sunshine or put the battery in an over-heated
environment.
• Always remove the battery from the equipment or charger when it is not in use.
Store the battery in a cool, dry place.
• All rechargeable batteries gradually lose their charge over time when they are
left in storage. If the battery is to be left in storage or for a period of non-use, a
'top-off charge should be carried out prior to use.
• Do stop using the battery when it heats abnormally or emit peculiar smell or
distorts.
• If liquid in the battery splashed into your eyes, please wash your eyes with fresh
water flush immediately and consult a doctor.
Page 42

User Manual
Ashley-Edison International Ltd Page 42
Troubleshooting
The camera does not turn
on
Battery improperly installed. Remove battery and
install correctly.
Battery contacts are dirty. Clean battery contacts. Battery
charge is low. Recharge battery or replace with fully
charged item.
Battery performance is poor Battery may be defective. Replace battery.
Image is blurry
The target is not in focus. Adjust focus.
Brightness and contrast are inappropriate.
Adjust brightness and contrast
Image contrast is low or
there is no image
Temperature set points Tmin and Tmax are
inappropriate. Change the lower set point and upper
set point to values that are more consistent with
target temperatures in the room.
Emissivity setting is incorrect. This affects the
temperature range set points. Check and amend the
emissivity setting.
The lens cap is on. Remove lens cap.
Condensation on camera lens. Place camera in a
dry area at room temperature until condensation
evaporates.
Non-uniformity appears in the image. Perform a
non-uniformity calibration.
Temperature measurement
is inaccurate
Emissivity setting is incorrect. Check and amend the
emissivity setting.
Temperature set points are inappropriate for this
temperature measurement. Select Tmin and Tmax
settings that are closer to the target temperature
being measured.
Condensation on camera lens. Place camera in a
dry area at room temperature until condensation
evaporates.
Page 43

User Manual
Ashley-Edison International Ltd Page 43
Emssivity
What is Emissivity?
The standard of radiation is "blackbody" radiation which exists in any enclosure
whose walls are at a uniform temperature. The shape of the enclosure and the wall
material have no effect on this radiation, it being a function of temperature alone.
A small hole in such an enclosure only affects this radiation level very slightly. The
area of the hole should not exceed 5% of the area of the walls of the enclosure,
when the radiation passing through the hole is within about one part in a thousand
of the blackbody radiation level defined by the wall temperature. Such a device is
fairly easy to build and forms the source on which all thermometers are
calibrated.
A surface always emits less radiation than would a black body at the same
temperature by a factor called the "emissivity" of the surface.
Emissivity = Radiation emitted by surface___
Radiation emitted by black body
How Do We Deal With Emissivity?
If we ignore the emissivity altogether and infer a temperature from the thermometer
output, we shall get a temperature lower than the true temperature by an amount
depending on the value of emissivity and the characteristics of the thermometer.
This temperature is known as the "apparent" or "brightness" temperature of the
surface. If the emissivity is constant, this temperature rises and falls in exactly the
same way as the true temperature and this may be sufficient for some purposes.
More often the true surface temperature is required. We have:
Actual output = E x output when viewing blackbody To obtain the true surface
temperature we must divide the actual output by the emissivity value E before we
convert to temperature.
Page 44

User Manual
Ashley-Edison International Ltd Page 44
This is done by setting the emissivity control to the appropriate value. It is therefore
necessary to know the value of the emissivity. There is a vast amount of data
available, unfortunately much of it is confusing because substantially different
values are quoted. This is because emissivity depends upon:
a) The basic material
b) Surface condition - roughness and oxidation
c) Temperature
d) Angle of view
e) Wavelength
For materials with smooth, clean (unoxidised) surfaces, emissivities are usually
in the range 0.05 to 0.50 and are usually very wavelength dependent, being
higher at shorter wavelengths. The appropriate settings for the Model M2 IR
Thermal Cameras are given in the following tables. It must be remembered that
these are only guideline figures. They can be substantially increased if the surface
is rough or even slightly oxidised.
The values quoted for oxidised metals assume that the metal is heavily oxidised.
Thin oxide layers will give an emissivity value between this and the value for an
unoxidised surface
The values quoted for oxidised metals assume that the metal is heavily oxidised.
Thin oxide layers will give an emissivity value between this and the value for an
unoxidised surface
If a more precise emissivity value is needed or more information is required on
how to obtain the emissivity value of a specific material, please contact us:
Page 45

User Manual
Ashley-Edison International Ltd Page 45
Typical Emissivity Values
Typical Emissivity Values
Refractories Miscellaneous
Alumina 0.40 Asphalt 0.90
Red Brick 0.93
Carbon >0.90
Alloys
Soot 0.95
Brass 0.10 Cement & Concrete 0.90
Oxidized
0.61 Cloth 0.85
Metals
Aluminium 0.05
Oxidized
0.30
Chromium 0.15
Cobalt 0.18
Gold 0.02
Iron & Steel 0.18
Oxidized
0.85
Lead 0.16
Oxidized
0.63
Magnesium 0.12
Nickel 0.15
Platinum 0.10
Silver 0.03
Tin 0.09
Titanium 0.30
Tungsten 0.13
Zinc 0.05
Oxidized
0.11
 Loading...