

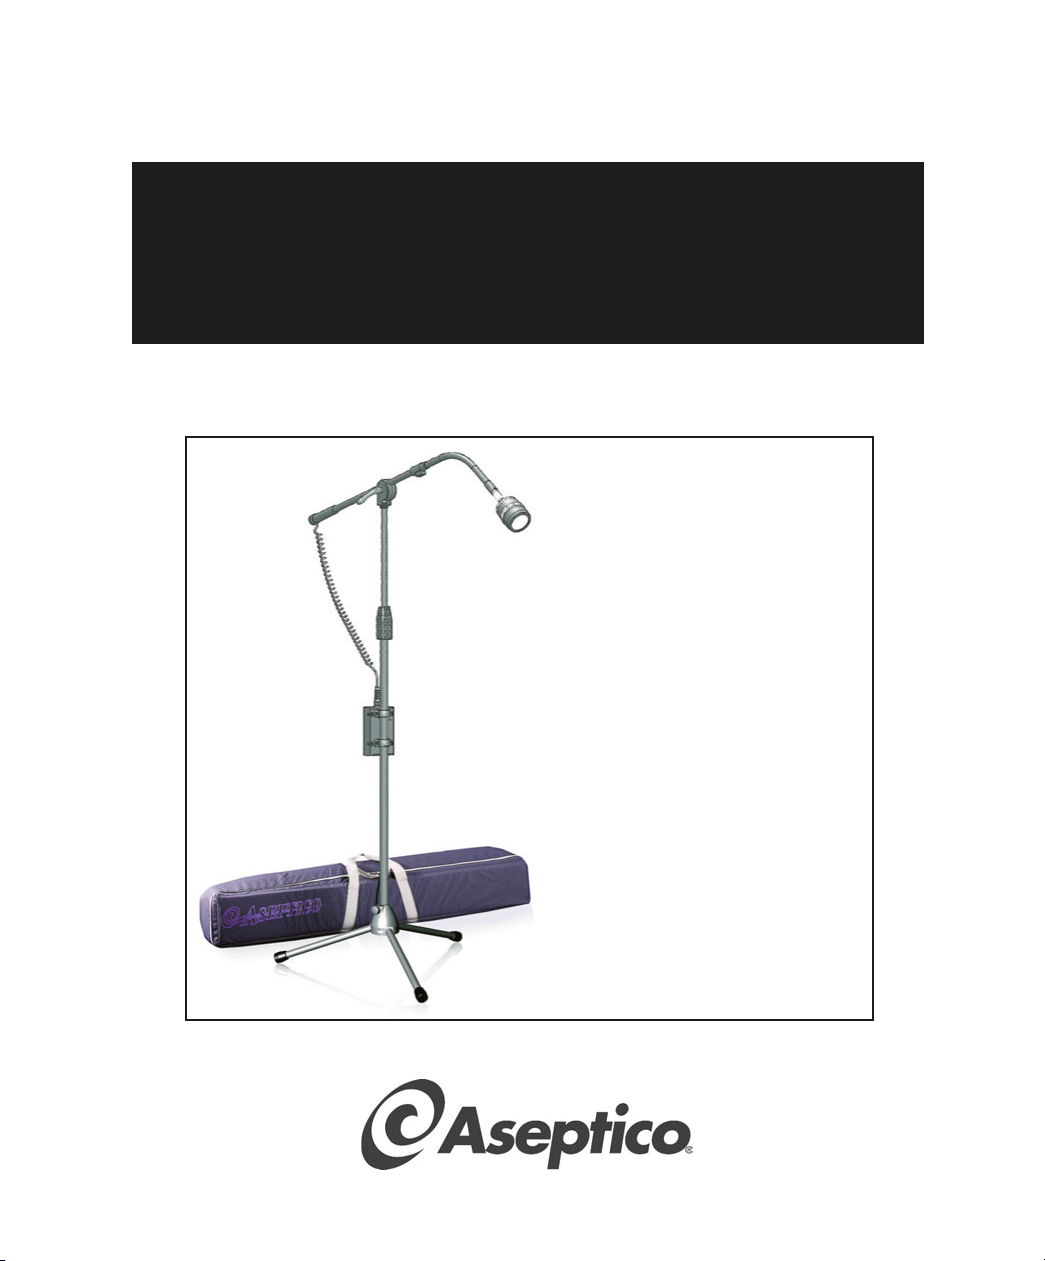
Aseptico ALU-40LED User Manual
OPERATION AND MAINTENANCE
INSTRUCTION MANUAL
ALU-40LED
ALU-40LED
PORTABLE
PORTABLE
DENTAL LAMP
DENTAL LAMP

TABLE OF CONTENTS:
Introduction . . . . . . . . . . . . . . . . . . . . . . . . . .1
Package Contents . . . . . . . . . . . . . . . . . . . . .1
Safety Precautions . . . . . . . . . . . . . . . . . . . .2
Setup . . . . . . . . . . . . . . . . . . . . . . . . . . . . .3-4
Operation . . . . . . . . . . . . . . . . . . . . . . . . . . . .5
Maintenance . . . . . . . . . . . . . . . . . . . . . . . 6-7
Parts Lists & Diagrams:
• Figure-9 Lamp Stand Boom . . . . . . . . . .8
• Figure-10 Lamp Stand & Pwr Supply .10
• Figure-11 Lamp Head . . . . . . . . . . . . .12
Troubleshooting . . . . . . . . . . . . . . . . . . . . . .14
Specifications . . . . . . . . . . . . . . . . . . . . . . . .15
Symbol Definitions . . . . . . . . . . . . . . . . . . .16
Warranty . . . . . . . . . . . . . . . . . . . . . . . . . . .17
P.O. Box 1548 • Woodinville, WA 98072
8333 216
International (425) 487-3157 • Toll Free (800) 426-5913
INFORMATION CONCERNING THE ACCURACY AND
PRECISION OF THIS PRODUCT MAY BE OBTAINED
UPON REQUEST BY CONTACTING ASEPTICO AT THE
ADDRESS SHOWN ON THIS PAGE.
th
Street S.E. Woodinville, WA 98072
www.aseptico.com • info@aseptico.com
CONFORMS TO UL STD 60601-1;
CERTIFIED TO CSA STD C22.2 NO. 601.1
To prevent injury to people and damage to
property, please heed relevant warnings and
remarks. They are marked as follows:
WARNING: Serious injury or death
may result if ignored.
CAUTION: Damage to property or
the environment may
result if ignored.
NOTE: Important additional
information and hints.
i.

Your new Aseptico ALU-40LED Lamp is one of the finest operating lights available to
the dental and medical professions. The ALU-40LED uses an LED light source which
provides brilliant white light, reduced power consumption, and longer operating life.
The universal voltage input Lamp operates from 100VAC to 240VAC, 50 and 60Hz,
and it provides an auxillary DC input that allows 12V and 24V battery operation in the
field. The ALU-40LED features a compact lamp head with adjustable intensity and
spotlight aperature controls, flexible gooseneck, telescoping tripod stand and padded
carrying case.
Congratulations!
This System is engineered to provide many years of reliable service. Please read the
instructions provided in this manual to receive the best and longest service from your
Aseptico equipment.
Separate manuals may be provided to cover the operation and maintenance of
other accessories for your unit.
PACKAGE CONTENTS:
• Portable Dental Lamp Assembly, PN: 120369
• Color Filter, PN: 461974 (For use with light-activated composites.)
• Two 0.160A Spare Fuses, PN: 830046
• One Each 110V Power Cord, PN: 840107, and 220V Adapter, PN: 840115
• Soft Padded Carrying Case, PN: 410084
• Operation and Maintenance Manual, PN: 420841
• Setup Guide, PN: 420884
PURCHASED SEPARATELY:
• DC Battery-Power Clip Assembly (Optional), PN: AA-40DC-BC
• 12Vdc Automobile Power Adapter Assembly (Optional), PN: AA-40DC-LP
• Color Filter 5-Pack (Optional), PN: AA-40FK
• Lens Replacement Kit (Optional), PN: AA-40LK, Includes:
- Fresnel Lens, PN: 461935
- Color Filter, PN: 461974
- Lens Cover, PN: 461936
- Torx Key, PN: 490140 (For removing Fresnel Lens)
- Three (3) Torx Screws, PN: 510727 (For mounting Fresnel Lens)
1
To prevent injury to people and damage to property, please heed relevant warnings and
remarks. They are marked as follows:
WARNING: Serious injury or death may result if ignored.
CAUTION: Damage to property or the environment may result if ignored.
NOTE: Important additional information and hints.
SAFETY PRECAUTIONS:
Aseptico accepts no liability for direct or consequential injury or damage resulting from improper
use, arising in particular through the non-observance of the operating instructions, or improper
preparation and maintenance of this product.
CAUTION: Use for intended purposes only. Failure to observe the operating instructions may
result in the patient or user suffering serious injury or the product being damaged,
possibly beyond repair. Before using this product, make sure that you have studied
and understood the operating instructions.
CAUTION: Use of other Lamp filters or accessories from third-party manufacturers is the sole
responsibility of the user.
CAUTION: All repairs to the LED Assembly, Boom Arm, and Power Supply are to be performed
by authorized Aseptico service personnel only.
WARNING: Do not install where there is a risk of an explosion. The ALU-40LED is not intended
for operation in the presence of flammable anesthetics or gases.
CAUTION: Connect AC power supply mains cable to a properly grounded outlet only.
CAUTION: The ALU-40LED Lamp is sensitive to shock and may be damaged if dropped or
impacted against a hard surface.
WARNING: Do not disassemble or alter the Lamp's LED, Boom Arm, or Power Supply
subassemblies.
CAUTION: It is recommended to always have the patient wear darkened eyewear during
dental procedures. Avoid looking directly into the LED when Lamp is turned on.
CAUTION: If the Lens Cover and/or acrylic Fresnel Lens on the Lamp Head needs to be
cleaned, use reagent-grade isopropyl alcohol, professional lens cleaning solution, or
de-ionized water with a small amount of dish soap - do not use other solvents as
they might adversely react with the Lens materials.
2
SETTING UP THE UNIT:
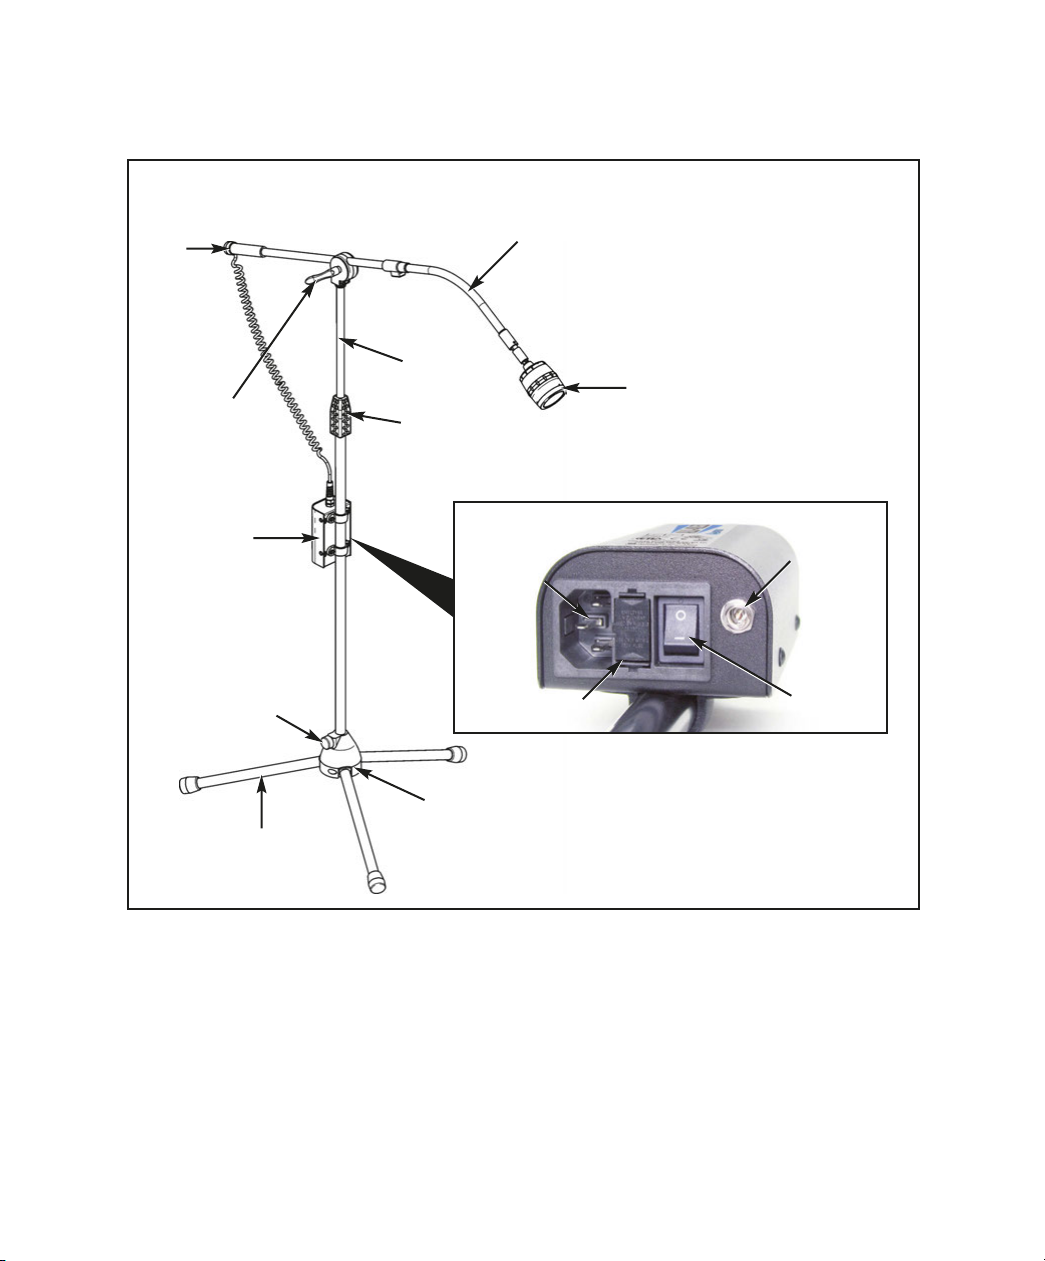
Fig. 1 - System Components
LAMP
BOOM
BOOM
ADJUSTMENT
HANDLE
POWER
SUPPLY
PEDESTAL
ADJUSMENT KNOB
FOLDING
LEGS
FLEXIBLE GOOSENECK
TELESCOPING
CENTER POST
CENTER POST
HEIGHT
ADJUSTMENT
HANDGRIP
LAMP HEAD
w/ADJUSTABLE
CONTROLS
Fig. 2 - Power Supply - Bottom View
AC POWER
CONNECTOR
FUSE
COMPARTMENT
PEDESTAL
DC POWER
CONNECTOR
ON/OFF
SWITCH
1. Remove the ALU-40LED Lamp from its
carrying case. Unfold the tripod legs to a
horizontal position. Loosen the pedestal
adjustment knob and slide the legs to the
bottom of the post (see Figure 1). Secure
legs in place by firmly tightening the
knob. Set Lamp Assembly on a stable,
level floor surface.
2. Loosen the handgrip on the center post
(see Figure 1) and raise the post to the
desired height. Tighten the handgrip to
secure post in place. Loosen the boom
adjustment handle and extend boom to
desired length and/or pivot the lamp head
to the desired operating position. Tighten
handle to secure the boom in place.
3
SETTING UP THE UNIT
3. Attach power cord to receptacle on
bottom of power supply housing (see
Figure 2, page 3) and plug cord into a
grounded electrical outlet. NOTE:
ALU-40LED Lamp features auto-sensing,
global voltage compatibility for 100VAC,
115VAC, 230VAC, and 240VAC at 50Hz
and 60Hz. The fuses provided are correct
for these line voltages. NOTE:
style 110V power cord and 220V adapter
are shipped with the unit. Power plug
adapters for the specific country of usage
may need to be purchased separately.
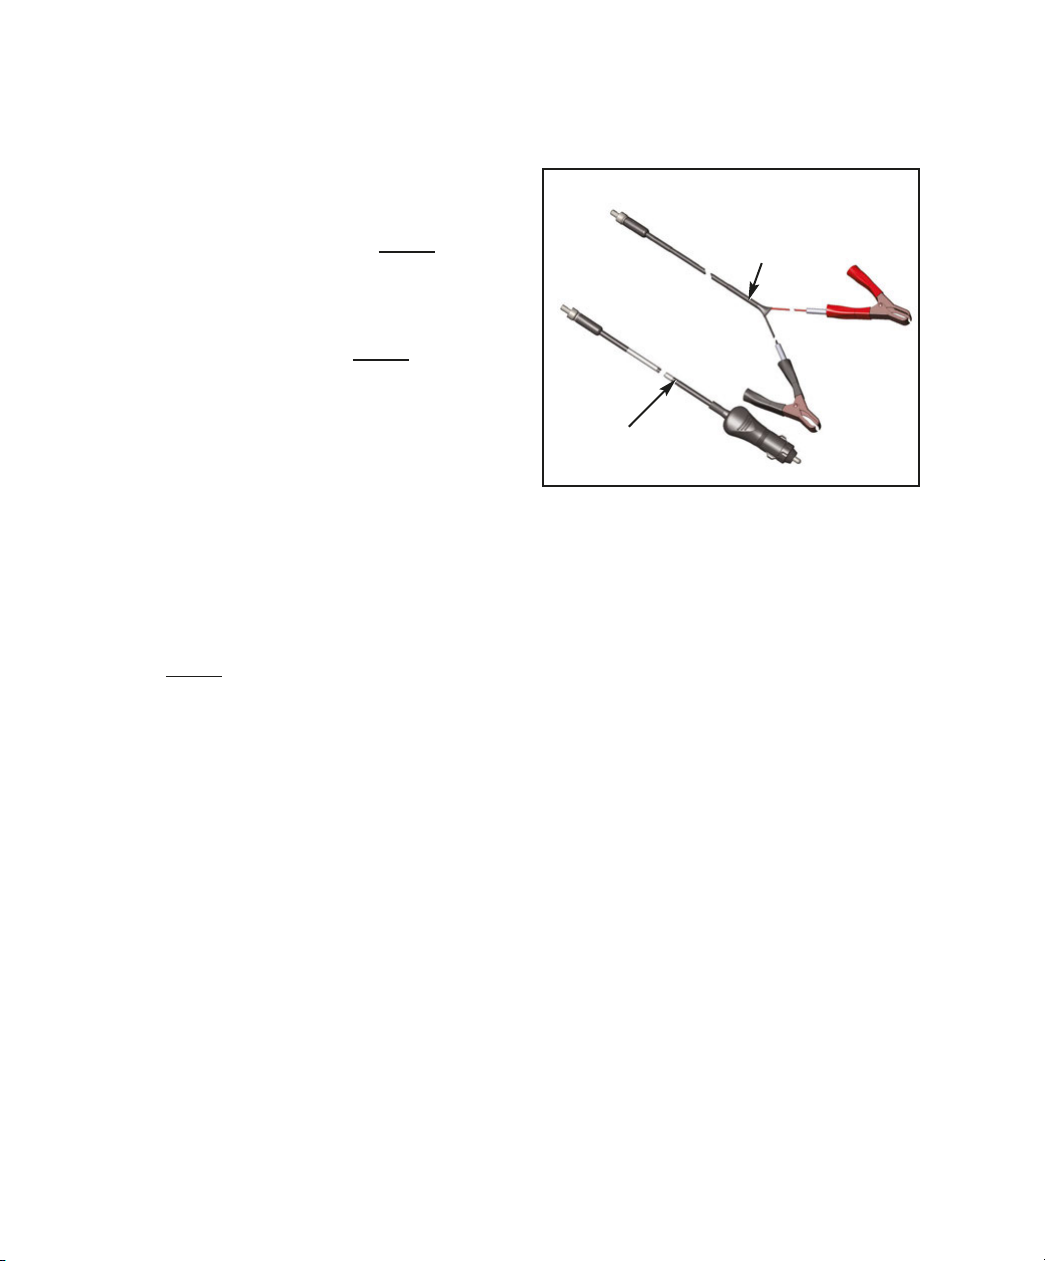
Optional DC Power:
If the power source is 12VDC or 24VDC,
use the optional DC Battery Clip or
Adapter Assemblies (see Figure 3) to
connect to the DC source. Insert the
Assemblies' Power Plugs into the DC
Power Jack located on the bottom of the
power supply housing (see Figure 2, page
3).
NOTE:
When attaching the optional DC
Battery Clips to the battery, connect the
red cable clamp to the positive (+)
terminal, and the black clamp to the
negative (-) terminal.
A USA
- Cont'd
The
Fig. 3 - Optional DC Power Accessories
DC BATTERY CLIP
ASSEMBLY
(Optional)
DC POWER PLUG
ASSEMBLY
(Optional)
4
 Loading...