

Aseptico ADU-08SXE User Manual
SEALANT
Express
OPERATION INSTRUCTIONS
ADU-08SXE
DESCRIPTION:
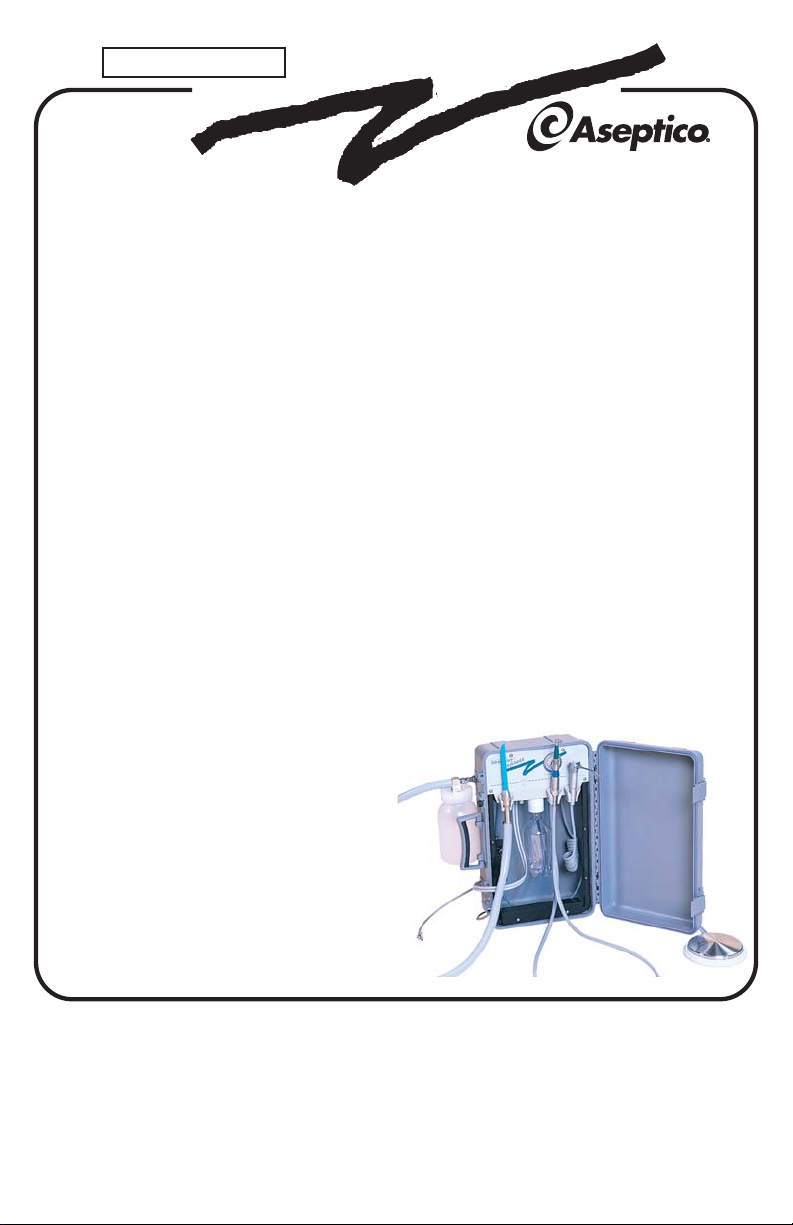
Aseptico quality make a winning combination with the ADU-08SXE Sealant
Express Delivery System. The ADU-08SXE is secured in a rugged injection
molded case and features an air/water syringe, high volume vacuum system,
self contained water system, a filter/dryer, and a single handpiece control.
Please read the instructions provided below to receive the best and longest
service from your Aseptico equipment.
Performance, portability, and value combined with
SET-UP: The ADU-08SXE unit may be set-up independently or clamped to
a table or counter top.
1. Unpack the ADU-08SXE unit, and set on a table top.
2. Open the unit case and remove the Quick Grip bar clamp.
3. Position the unit close to the edge of the table top. Expand Quick Grip
bar clamp, position over bottom edge of unit case and under the edge of
the table, then ratchet trigger to compress and secure unit to table.
4. Fill plastic water bottle with clean water and screw into top mount beneath
the unit control.
5. Remove Air Vacuum System Assembly from case and insert male quick
disconnect into air receptacle on the side of
the case. Hang hose end in holder on the
front of the unit.
6. Place handpiece hose and air/water
syringe into the proper holder on
the front of the unit. Place the disc
foot control in a comfortable position
on the floor.
7. Extend 1/4" grey air supply line with
quick disconnect and plug into the
AA-74 compressor, or a clean
50-100 PSI compressed air supply.
P.O. Box 1548 • Woodinville, WA 98072
8333 216th Street SE • Woodinville, WA 98072
(425) 487-3157 (800) 426-5913
www.aseptico.com • info@aseptico.com
P/N: 420555 • Rev. G • ECO 13997 • 11/2016
Aseptico, Inc.
Printed in U.S.A.

UNIT OPERATION:
TA-90D Air/Water Syringe-
Depress the right button for air operation,
and the left button for water operation. Depressing both buttons will create a
mist. The syringe features quick-change autoclavable tips: To remove a tip,
press on the locking collar surrounding the tip socket and pull the used tip
straight out of the socket. To insert a new tip, press locking collar and push tip
into socket as far as it will go. Release collar and gently tug on tip before
using to ensure that tip is securely locked into socket.
Syringe Tip Sterilization:
1) Remove contaminated syringe tip.
2) Remove all visible signs of contamination
before autoclaving.
3) Autoclave tip at 132° C (270° F) for ten
minutes.
4) Sterilize between each patient use.
NOTE: Since only the tips can be autoclaved, it is
recommended that the air/water syringe be bagged
with a disposable, single-use plastic sleeve
between each patient use.
AA-21SX Air Vacuum System
-
When the unit is connected to a
SYRINGE TIP REMOVALSYRINGE TIP REMOVAL
DEPRESS
DEPRESS
LOCKING COLLAR
LOCKING
COLLAR
compressed air source, and the vacuum bottle assembly is attached to the
air receptacle on the side of the unit case, the Air Vacuum System should be
fully functional. Insert a standard disposable vacuum tip into the hose end.
Depress button on hose end to activate vacuum. Observe waste bottle while
in use and dispose of waste when bottle is approximately 3/4 full.
ON/OFF
BUTTON
INSERT DISPOSABLE
VACUUM TIP
Avoid waste flow-back during use by keeping the ON/OFF button depressed
prior to entering the oral cavity and until the hose end has been removed
from the patients mouth. Clean the entire hose assembly and waste bottle
after each use by evacuating a cleaner/disinfectant through the system and
thoroughly scrubbing entire assembly. CAUTION: Use only NON-foaming
cleansers in the vaccum lines.
Handpiece Control-
The ADU-08SXE unit includes one manual handpiece control with water coolant and pressure gauge. Attach any 4-hole
Midwest style highspeed, lowspeed, or air sonic scaler to the control tubing
and place in the holder on the front of the unit. Depress the disc foot control
for handpiece operation. For water coolant, switch the ‘Water Coolant’ toggle
to the . Water coolant will activate with handpiece operation.
HighSpeed
‘ON’
position
Handpiece
Attach
Depress
Foot Control
LowSpeed
Air Scaler
 Loading...